

Page 1
Gigabit Business IP Phone
ZIP 45G / ZIP 45GW
ZIP 45G
WWW.ZULTYS.COM
Quick Start Guide
Page 2
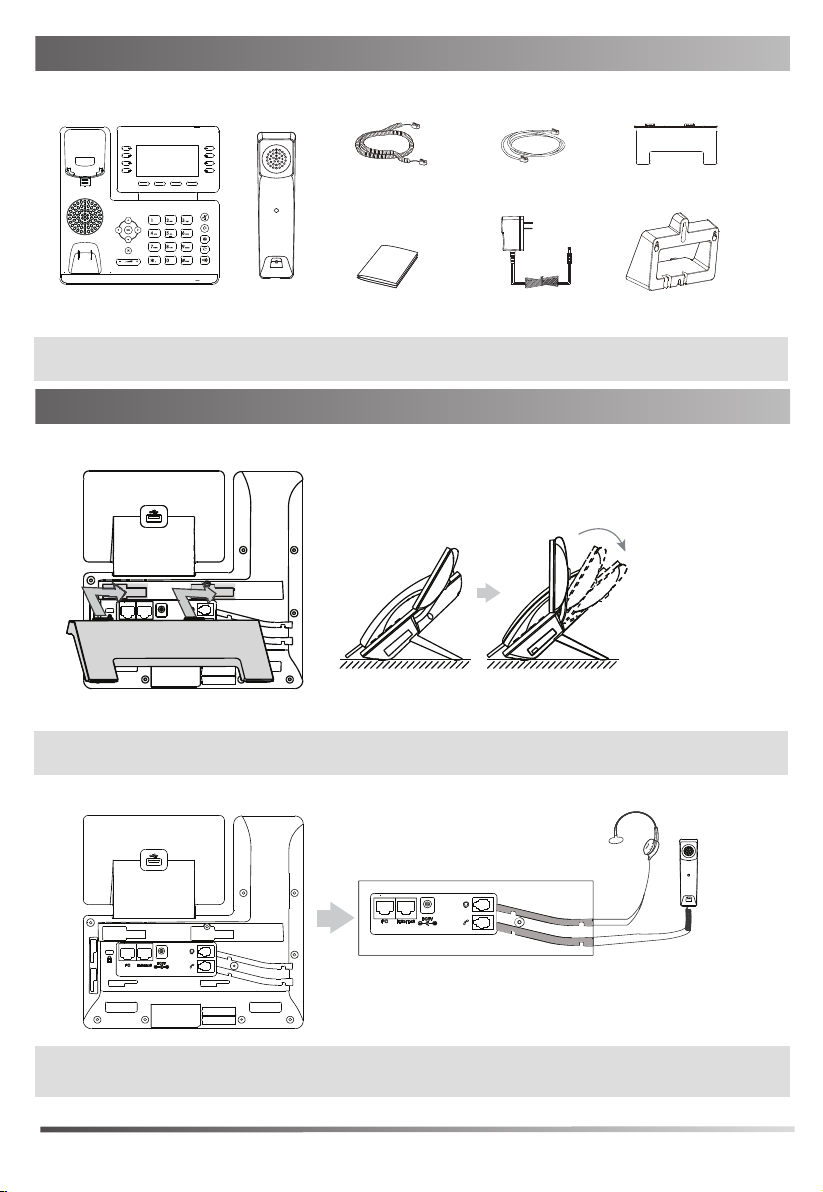
Packaging Contents
The following items are included in your package. If you find anything missing, contact your system
administrator.
Handset Cord
IP Phone
Note: We recommend that you use the accessories provided or approved by ZULTYS. The use of unapproved
third-party accessories may result in reduced performance or damage.
Handset
Quick Start Guide
Ethernet Cable
(Optional) (Optional)
Stand
Wall Mount BracketPower Adapter
Assembling the Phone
1. Attach the stand and adjust the angle of the screen
Note: The phone may also be wall mounted using the optional ZIP 45G/GW wall mount bracket. Refer to wall
mount installation guide for additional information.
2. Connect the handset and optional headset, as shown below:
Note: Electronic Hook Switch (EHS) functionality is supported with compatible wireless headsets when used
with the optional Zultys Wireless Headset Adapter connected via the USB port.
2
Page 3

3. Optional: Connect USB devices if supplied
IEEE 802.3af compliant
Note: Optional USB devices include the Zultys Bluetooth USB dongle, Wi-Fi USB dongle, ZIP 450M Expansion
Module and Wireless Headset Adapter. The ZIP 45GW has integrated Wi-Fi & Bluetooth support.
4. Connect to network and power:
If connecting to a wired network, the phone may be powered via Power over Ethernet (PoE) or an optional AC
adapter. Your system administrator will advise you which method to use.
A
AC Power Option
B
PoE ( Power over
Ethernet ) Option
PC
PC Connection
(Optional)
Power Adapter
(DC 5V)
PC Connection
(Optional)
PC
PoE Switch
5. Connecting to a wireless network:
The ZIP 45G supports wireless networks via the optional Zultys Wi-Fi USB dongle. The ZIP 45GW has integrated
Wi-Fi (2.4GHz & 5GHz) support. To connect a wireless network, select Menu>Settings>Basic Settings>Wi-Fi
and step through the on screen options. Check with your system administrator for wireless network details.
If connecting to a wireless network, the phone must be powered by the optional AC adapter.
Note: The IP phone should be used with a ZULTYS original power adapter (5V/1.2A) only. The use of a third
party power adapter may cause damage to the phone. If connecting a PC to the phone, it is
recommend that the Ethernet cable provided by ZULTYS is used. If inline power (PoE) is provided,
a power adapter is not required. Make sure the switch is PoE-compliant per the IEEE 802.3af standard.
Startup
After the IP phone is connected to the network and supplied
with power, it automatically begins a process of initializing
on the network and downloading it’s configuration information.
Contact your system administrator if the phone fails to register
with the IP phone system.
Welcome
Initializing... Please wait
3
Page 4

Basic Call Features
Placing a Call
Using the handset:
1. Pick up the handset.
2. Enter the number, and then press the Send soft key or .
--Alternatively-- Enter the number and then lift the handset to initiate the call.
Using the speakerphone:
1. With the handset on-hook, enter the number.
2. Then press or the
Using the headset:
1. With the headset connected, press
2. Enter the number, and then press the Send soft key or .
Note: During a call, you can alternate between the headset, hands-free speakerphone and handset modes by
pressing the HEADSET key, the Speakerphone key or by picking up the handset.
Answering a Call
Using the handset:
Pick up the handset.
Using the speakerphone:
or the Answer soft key.
Press
Using the headset:
Press
or the Answer soft key if headset mode is active.
Note: You can reject an incoming call by pressing the Reject soft key.
Ending a Call
Using the handset:
Hang up the handset or press the End Call soft key.
Using the speakerphone:
Press or the End Call soft key.
Using the headset:
Press the
End Call soft key.
Redial
Press
to enter the Placed Calls list, press or to select the desired entry, and then press
or the Send soft key.
Press twice when the phone is idle to dial out the last dialed number.
Send soft key.
to activate the headset mode.
Call Mute and Un-mute
Press to mute the microphone during a call.
Press again to un-mute the call.
Call Hold and Resume
To place a call on hold:
Press the Hold soft key during an active call.
To resume the call, do one of the following:
If there is only one call on hold, press the Resume soft key.
4
Page 5

If there is more than one call on hold, press or to select the desired call, and then press the
Resume soft key.
Call Transfer
You can transfer a call in the following ways:
Blind Transfer
1. Press the Transfer soft key during an active call. The call is placed on hold.
2. Enter the number you want to transfer to.
3. Press the B Transfer soft key.
Semi-Attended Transfer
1. Press the Transfer soft key during an active call. The call is placed on hold.
2. Enter the number you want to transfer to, and then press the Send soft key or .
3. Press the Transfer soft key when you hear the ring-back tone.
Attended Transfer
1. Press the Transfer soft key during an active call. The call is placed on hold.
2. Enter the number you want to transfer to, and then press the Send soft key or .
3. Press the Transfer soft key when ready to complete the transfer or to cancel transfer.
Call Forward
To enable call forward:
1. Press the Menu soft key when the phone is idle, and then select Features->Call Forward.
2. Select the desired forward type:
Always Forward----Incoming calls are forwarded unconditionally.
Busy Forward----Incoming calls are forwarded when the phone is busy.
No Answer Forward----Incoming calls are forwarded if not answered after a period of time.
3. Enter the number you want to forward to. For
ring time to wait before forwarding from the After Ring Time field.
4. Press the Save soft key to accept the change.
Note: Advanced ‘Call Handling Rules’ may be configured from the ZAC/MXIE unified communications client app.
Call Conference
1. Press the Conference soft key during an active call. The call is placed on hold.
2. Enter the number of the second party, and then press the Send soft key or .
3. Press the Conference soft key again when the second party answers. All parties are now joined in the
conference.
4. Press the End Call soft key to disconnect all parties.
Note: You can split the conference call into two individual calls by pressing the Split soft key.
Speed Dial
To configure a speed dial key:
1. Press the Menu soft key when the phone is idle, and then select Features->DSS Keys.
2. Select the desired DSS key, and then press the Enter soft key.
3. Select SpeedDial from the Type field, select the desired line from the Account ID field, enter a label in the
Label field and then enter the number in the Value field.
4. Press the Save soft key to accept the change.
To use the speed dial key:
Press the speed dial key to dial out the preset number.
No Answer Forward, press or to select the desired
X
5
Page 6

Voice Message
Message waiting indicator on the idle screen indicates that one or more voice messages are waiting at the
message center. The power indicator LED slowly flashes red.
To listen to voice messages:
1. Press or the Connect soft key.
2. Follow the voice prompts to listen to your voice messages.
Customizing Your Phone
Call History
1. Press the key when the phone is idle, press or to scroll through the list.
2. Select an entry from the list, you can do the following:
Press the Send soft key to call the entry.
Press the Delete soft key to delete the entry from the list.
If you press the Option soft key, you can also do the following:
Select Detail to view detailed information about the entry.
Select Add to Contacts to add the entry to the local directory.
Select Add to Blacklist to add the entry to the blacklist.
Select Delete All to delete all entries from the list.
Note: Call History may also be viewed by pressing the Directory soft key, then select the History menu item.
Contact Directory
To add a contact:
1. Press the Directory soft key when the phone is idle, select Local Directory and then All Contacts.
2. Press the Add soft key to add a contact.
3. Enter a unique contact name in the Name field and contact numbers in the corresponding fields.
4. Press the Save soft key to accept the change.
To edit a contact:
1. Press the Directory soft key when the phone is idle, select Local Directory and then All Contacts.
2. Press or to select the desired contact, press the Option soft key and then select Detail from the
prompt list.
3. Edit the contact information.
4. Press the Save soft key to accept the change.
To delete a contact:
1. Press the Directory soft key when the phone is idle, select Local Directory and then All Contacts.
2. Press or to select the desired contact, press the Option soft key and then select Delete from the
prompt list.
3. Press the OK soft key when the LCD screen prompts “Delete selected item?”.
Note: You can add contacts from call history. For more information, refer to Call History above.
Volume Adjustment
Press during a call to adjust the receiver volume of the handset/speakerphone/headset.
Press when the phone is idle or ringing to adjust the ringer volume.
Press to adjust the media volume in the corresponding screen.
6
Page 7

My Details
Name
Extension
DID
ZAC/MXIE Login Credentials
Login Name
(case sensitive)
Password
Host/URL
Assigned Phone ID
Support Contact
Phone
Email
Notes
7
Page 8

FCC Statement
This device complies with part 15 of the FCC Rules. Operation is subject to the following two
conditions: (1) This device may not cause harmful interference, and (2) this device must accept any
interference received, including interference that may cause undesired operation.
This equipment has been tested and found to comply with the limits for a Class B digital device,
pursuant to part 15 of the FCC Rules. These limits are designed to provide reasonable protection
against harmful interference in a residential installation. This equipment generates, uses and can
radiate radio frequency energy and, if not installed and used in accordance with the instructions, may
cause harmful interference to radio communications. However, there is no guarantee that interference
will not occur in a particular installation. If this equipment does cause harmful interference to radio or
television reception, which can be determined by turning the equipment off and on, the user is
encouraged to try to correct the interference by one or more of the following measures:
• Reorient or relocate the receiving antenna.
• Increase the separation between the equipment and receiver.
• Connect the equipment into an outlet on a circuit different from that
to which the receiver is connected.
• Consult the dealer or an experienced radio/TV technician for help.
IC Statement
This device complies with Industry Canada’s license-exempt RSSs. Operation is subject to the following
two conditions:
(1) this device may not cause interference; and
(2) this device must accept any interference, including interference that may cause undesired operation
of the device. CAN ICES-3(B)
Le présent appareil est conforme aux CNR d’Industrie Canada applicables aux appareils radio exempts
de licence. L’exploitation est autorisée aux deux conditions suivantes:
(1) l’appareil ne doit pas produire de brouillage;
(2) l’utilisateur de l’appareil doit accepter tout brouillage radioélectrique subi, même si le brouillage est
susceptible d’en compromettre le
Radiation Exposure Statement
This equipment complies with FCC and IC radiation exposure limits set forth for an uncontrolled
environment. This equipment should be installed and operated with minimum distance 20cm between
the radiator and your body.
Cet émetteur ne doit pas être Co-placé ou ne fonctionnant en même temps qu'aucune autre antenne
ou émetteur. Cet équipement devrait être installé et actionné avec une distance minimum de 20
centimètres entre le radiateur et votre corps.
About Zultys
Zultys is the global provider of a true all-in-one unified communications solution. Innovative, reliable
and scalable, Zultys IP phone systems integrate voice, video, data and mobility in a single premise
based appliance or in the cloud - to optimize collaboration for businesses of all sizes.
Zultys delivers a powerful, feature-rich communications system that is easy-to-use, deploy and
maintain. Zultys is headquartered in Silicon Valley with offices around the world.
Zultys, Inc.
785 Lucerne Drive, Sunnyvale
California, 94085, USA
Copyright © 2017 Zultys, Inc.
WWW.ZULTYS.COM
All rights reserved
96-35451- 02
 Loading...