

Page 1
2
1
-
+
+
-
Operating instructions
Card-System 1 and 2
Cashier system
Page 2
Thank you for choosing to buy one of our products. Your appliance is made to
high standards and is easy to use. Nevertheless, please take the time to read
these operating instructions in order to familiarise yourself with the appliance
and get the best use out of it.
Please follow the safety precautions.
Modifications
Text, diagrams and data correspond to the technical standard of the appliance
at the time these operating instructions went to press. The right to make technical modifications for the purpose of the further development of the appliance
is reserved.
Validity
The product family (model number) corresponds to the first alphanumerics on
the identification plate. These operating instructions apply to:
Model Type Product range
Card-System 1 CS 1 81A
Card-System 2 CS 2 82A
Variations depending on the model are noted in the text.
© V-ZUG Ltd, CH-6301 Zug, 2017
2
Page 3

Contents
1 Safety precautions 5
1.1 Symbols used........................................................................................................ 5
1.2 General safety precautions ................................................................................. 6
2 Instructions for use 7
2.1 Before using for the first time ............................................................................. 7
2.2 Correct use............................................................................................................. 7
2.3 Children in the household ................................................................................... 7
2.4 Note on use ........................................................................................................... 8
3 Disposal 9
4 Your appliance 10
4.1 Appliance description ........................................................................................10
4.2 Selecting the appliance and programme displays.......................................10
4.3 Basic position ......................................................................................................11
4.4 Standby.................................................................................................................11
4.5 Appliance design ................................................................................................11
4.6 User cards............................................................................................................12
4.7 Special cards.......................................................................................................12
5 Operation 13
5.1 Using the cards ...................................................................................................13
5.2 Current balance...................................................................................................14
5.3 Checking credits on user cards.......................................................................14
5.4 Adding a payment amount on a single machine..........................................14
5.5 Adding a payment amount on a double machine........................................15
5.6 Debiting the user card, single machine..........................................................15
5.7 Returning credit to the user card, single machine .......................................16
5.8 Debiting the user card for appliance 1, double machine ...........................17
5.9 Returning credit to the user card for appliance 1, double machine.........18
5.10 Using the charge card .......................................................................................19
5.11 Settings with the charge card...........................................................................20
5.12 Using the totaliser card......................................................................................21
6 Calculation 22
6.1 Preface to the calculation..................................................................................22
6.2 Individual calculations........................................................................................23
7 Settings 24
7.1 Parameters ...........................................................................................................24
3
Page 4

7.2 Key to parameters ..............................................................................................25
8 Care and maintenance 28
8.1 Cleaning the exterior ..........................................................................................28
9 Spare parts 29
10 Technical data 30
10.1 Dimensions ..........................................................................................................30
10.2 Electrical connections ........................................................................................30
11 Index 31
12 Notes 33
13 Service & Support 35
4
Page 5
1 Safety precautions
1.1 Symbols used
Denotes important safety precautions.
Failure to observe said precautions can result in injury or in damage
to the appliance or fittings!
Information and precautions that should be observed.
Information on disposal
Information about the operating instructions
▸ Indicates step-by-step instructions.
– Describes how the appliance reacts to the steps taken.
▪ Indicates a list.
5
Page 6

1 Safety precautions
1.2 General safety precautions
▪ Read the operating instructions before using the appliance for
the first time!
▪ This appliance can be used by children aged 8 and above
and by persons with reduced physical, sensory or mental capabilities, or lack of experience and/or knowledge, provided
they are supervised or have been instructed on the safe use
of the appliance and have understood the hazards involved.
Children shall not play with the appliance. Cleaning and user
maintenance shall not be undertaken by children without supervision.
▪ If an appliance is not equipped with a mains cable and a plug
or other means for disconnecting from the mains with a contact opening on each pole complying with the conditions of
overvoltage category III for full isolation, an isolating device
must be incorporated into the permanently installed electrical
installation in accordance with the installation regulations.
▪ If the mains cable of this appliance is damaged, it must be re-
placed by the manufacturer or its Customer Services or a similarly qualified person in order to avoid hazard.
6
Page 7

2 Instructions for use
2.1 Before using for the first time
▪ The appliance must be installed and connected to the electricity supply in
accordance with the separate installation instructions. Have a qualified fitter/
electrician carry out the necessary work.
▪ Dispose of the packaging material in accordance with local regulations.
▪ Make the required user settings.
2.2 Correct use
▪ The appliance is designed for collecting the costs of operating a washing
machine or tumble dryer. No liability is assumed for any damage caused by
improper or incorrect use.
▪ Any repairs, modifications or manipulations to the appliance, especially any
electrically live parts, may only be carried out by the manufacturer, its Customer Services or a similarly qualified person. Repairs carried out incorrectly could cause serious injury or damage to the appliance and fittings as
well as affect the functioning of the appliance. If the appliance is not working properly or in the case of a repair order, follow the instructions given in
the 'Repair service' section. Please contact our Customer Services if necessary.
▪ Keep these operating instructions in a safe place for future reference. If you
sell the appliance or pass it on to a third party, please ensure these operating instructions accompany the appliance. In this way, the new owner can
inform themselves about how to use the appliance correctly and take the
relevant safety precautions.
2.3 Children in the household
▪ Packaging material (e.g. plastic, polystyrene) can be dangerous for children.
Danger of suffocation! Keep packaging material away from children.
▪ The appliance is designed for use by adults who are familiar with these op-
erating instructions. Children are often unable to recognise the danger of
electrical appliances. Ensure proper supervision and do not allow children
to play with the appliance.
7
Page 8

2 Instructions for use
2.4 Note on use
▪ If the appliance is visibly damaged, do not use it. Contact our Customer
Services.
▪ Do not spray the appliance with water. Do not use a steam cleaner.
▪ If the mains cable of the appliance is damaged, it must be replaced by Cus-
tomer Services to avoid any danger.
8
Page 9

3 Disposal
Packaging
▪ All packaging materials (cardboard, plastic film (PE) and polystyrene (EPS))
are marked and should, if possible, be collected for recycling and disposed
of in an environmentally friendly way.
Disconnection
▪ Disconnect the appliance from the mains. With a fixed appliance, this is to
be carried out by a qualified electrician!
Safety
▪ Disable the appliance to prevent accidents caused by improper use, espe-
cially through children playing.
▪ Pull the plug out of the mains socket or have the appliance disconnected
from the mains by an electrician. Then cut the mains cable off flush with the
appliance.
Disposal
▪ The old appliance should not be discarded as worthless rubbish. If dis-
posed of correctly, the raw materials can be recovered for recycling.
▪ The symbol on the identification plate warns that the appliance may not
be disposed of in normal household waste.
▪ The appliance must be disposed of in accordance with local regulations on
waste disposal. For more information on the handling, disposal and recycling of the product, please contact the local authorities, the local recycling
facilities for household waste or the retailer from whom you purchased the
appliance.
9
Page 10
4 Your appliance
4.1 Appliance description
The cashier system controls the power supply to the appliance connected
based on the amount debited from the user card. The length of time that electricity is consumed is then measured and debited.
Any remaining balances that are not credited back, are stored in the appliance. Remaining balances can be credited back at any time. Up to 60 remaining balances from different user cards can be stored. Any remaining balances
will be credited the next time the same user card is used.
For separate parts of a programme such as spinning, rinsing, draining, etc.,
just hold the user card to the card reader and select the relevant appliance for
the cashier system to activate the power supply. Parts of programmes will normally be charged at 10 rappen.
The appliance does not always debit the same amount of money for
the same wash or drying programmes, as the length of time that electricity is used depends on various factors (load, amount and temperature of water, voltage, etc.).
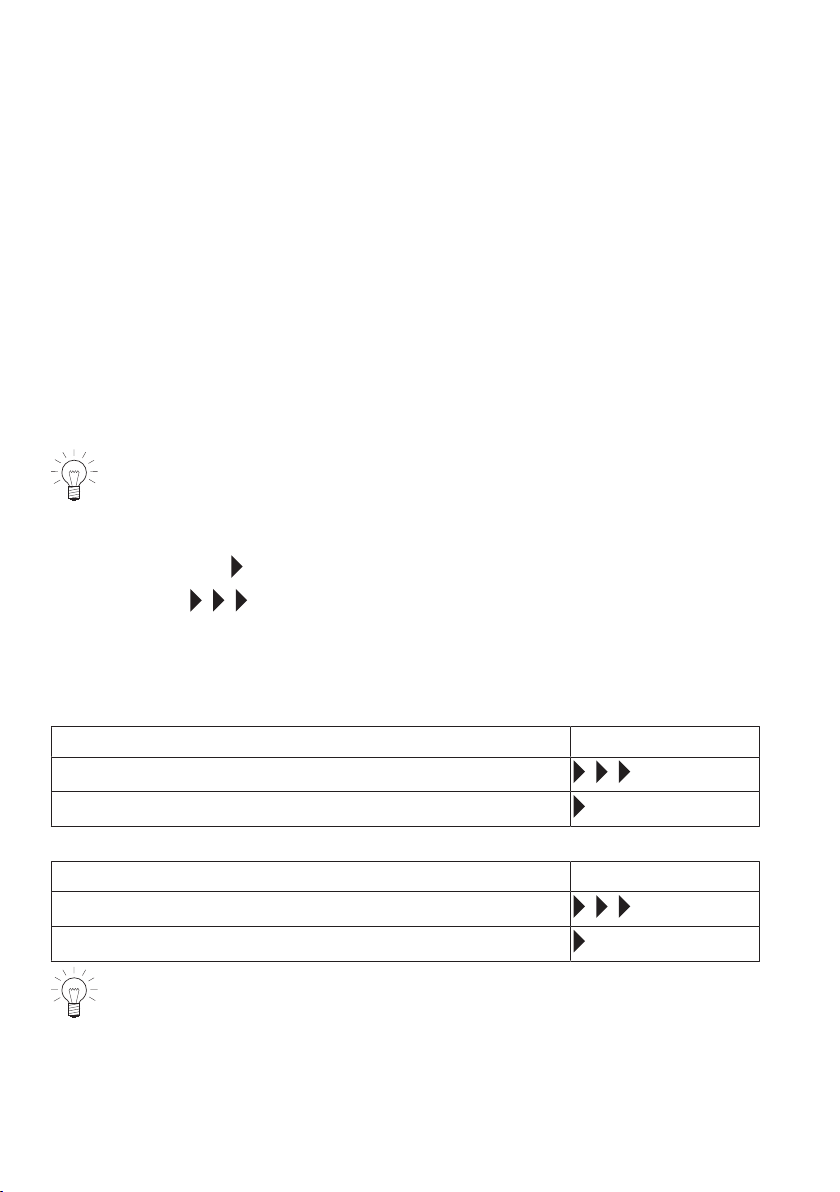
– A stationary indicates that no electricity is being used.
– Moving indicate that electricity is being consumed and will be
debited against the credited amount.
4.2 Selecting the appliance and programme displays
Only applies to double machines
Select appliance 1 LED illuminates
Appliance 1 debiting (moving arrows)
Appliance 1 selected, not consuming power
Select appliance 2 LED illuminates
Appliance 2 debiting (moving arrows)
Appliance 2 selected, not consuming power
The operating status is not shown during debiting, returning credit,
loading, etc.
10
Page 11
4 Your appliance
-
+
+
-
4
5
1
2
3
+
-
2
1
5
6
1
2
3
4
1
2
4.3 Basic position
Single and double machine
The backlight turns off when no text is displayed.
4.4 Standby
Single and double machine
The backlight is turned off. The machine switches to standby mode 10
seconds after the last action is completed. Power consumption is reduced to a
minimum by turning off unused features.
The automatic control feature is enabled using the buttons. The *RFID
reader is turned on.
*RFID = radio frequency identification.
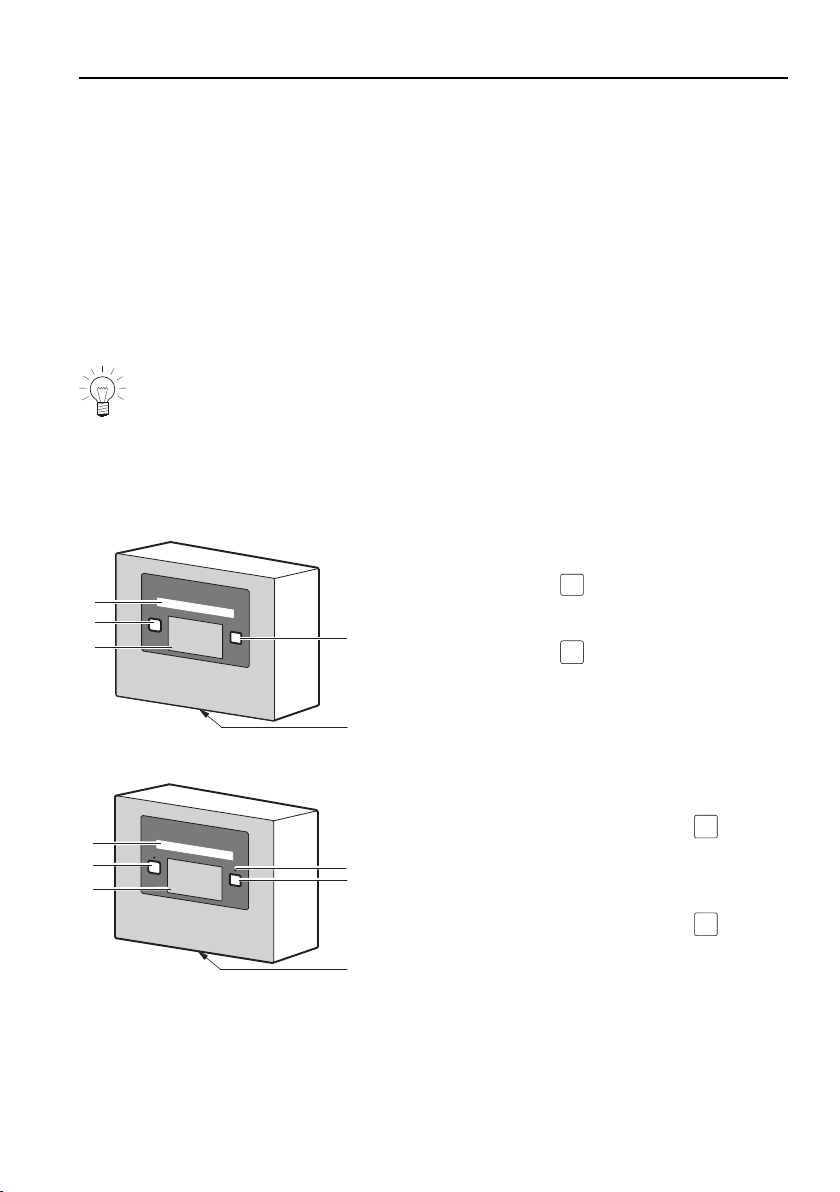
4.5 Appliance design
Model 81A, operation for one appliance
1 Plain text display
2 Settings button
3 Card reader
4 Settings button
5 Identification plate (underside of appli-
ance)
Model 82A, operation for two appliances in parallel
1 Plain text display
2 Selection button for appliance
3 Card reader
4 Indicator light
5 Selection button for appliance
6 Identification plate (underside of appli-
ance)
11
Page 12
4 Your appliance
CARD-SYSTEM
Card Nr.
Objekt
Name
Nom
Nome
CARD-SYSTEM
Objekt
LC
CARD-SYSTEM
Objekt
TC
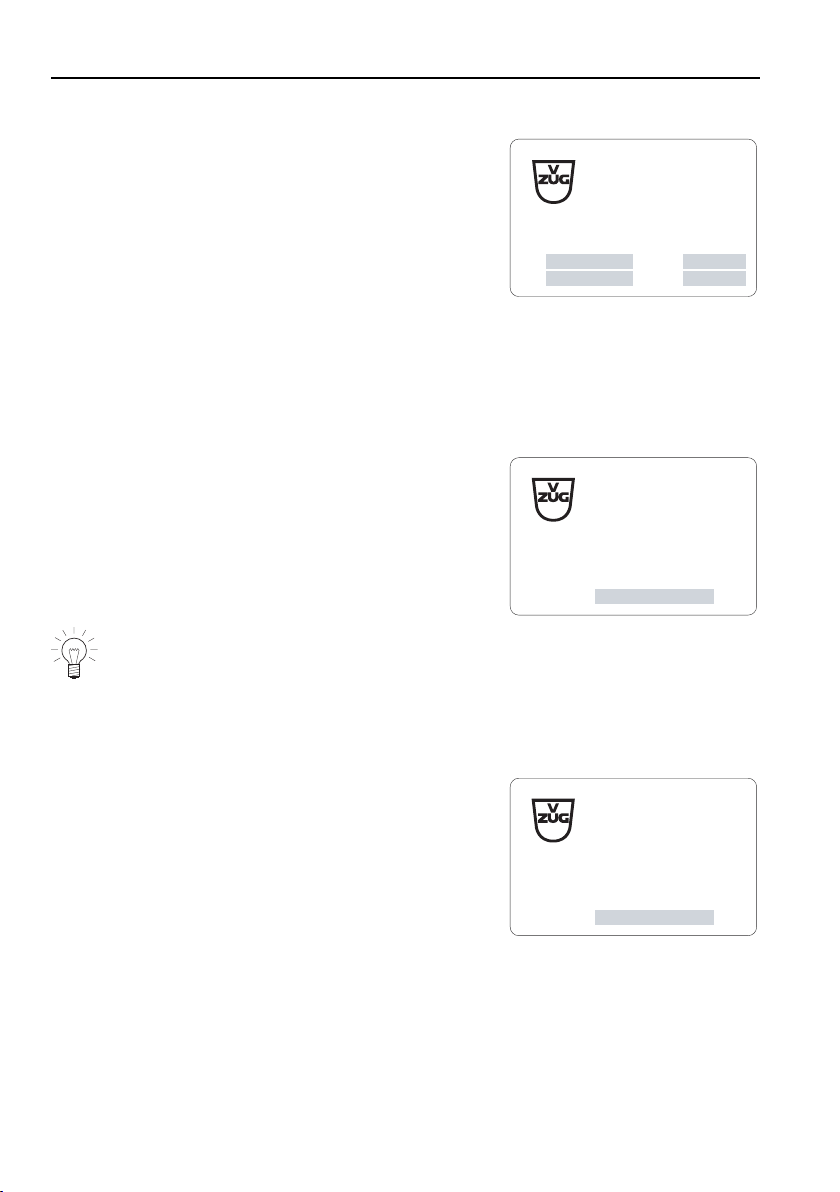
4.6 User cards
▪ The user card saves individual credit and can
be charged as often as required. It activates
the power supply to the washing machine and
tumble dryer.
4.7 Special cards
The cards described below are to be used by those who are responsible for
the appliance (property manager, owner, caretaker).
Charge card
The charge card is for the following 4 functions:
▪ Charging user cards
▪ Setting the tariff
▪ Setting the charge amount
▪ Setting the language
When a new charge card comes into contact with a cashier system for
the first time it is encoded and can then only be used with this particular appliance. In the settings mode, the charge card can be used with
any appliance.
Totaliser card
The totaliser card is for the following 2 functions:
▪ Scanning the total amount charged
▪ Resetting the total to zero.
12
Page 13
5 Operation
CARD-SYSTEM
Card Nr.
Objekt
Name
Nom
Nome
1
2
1
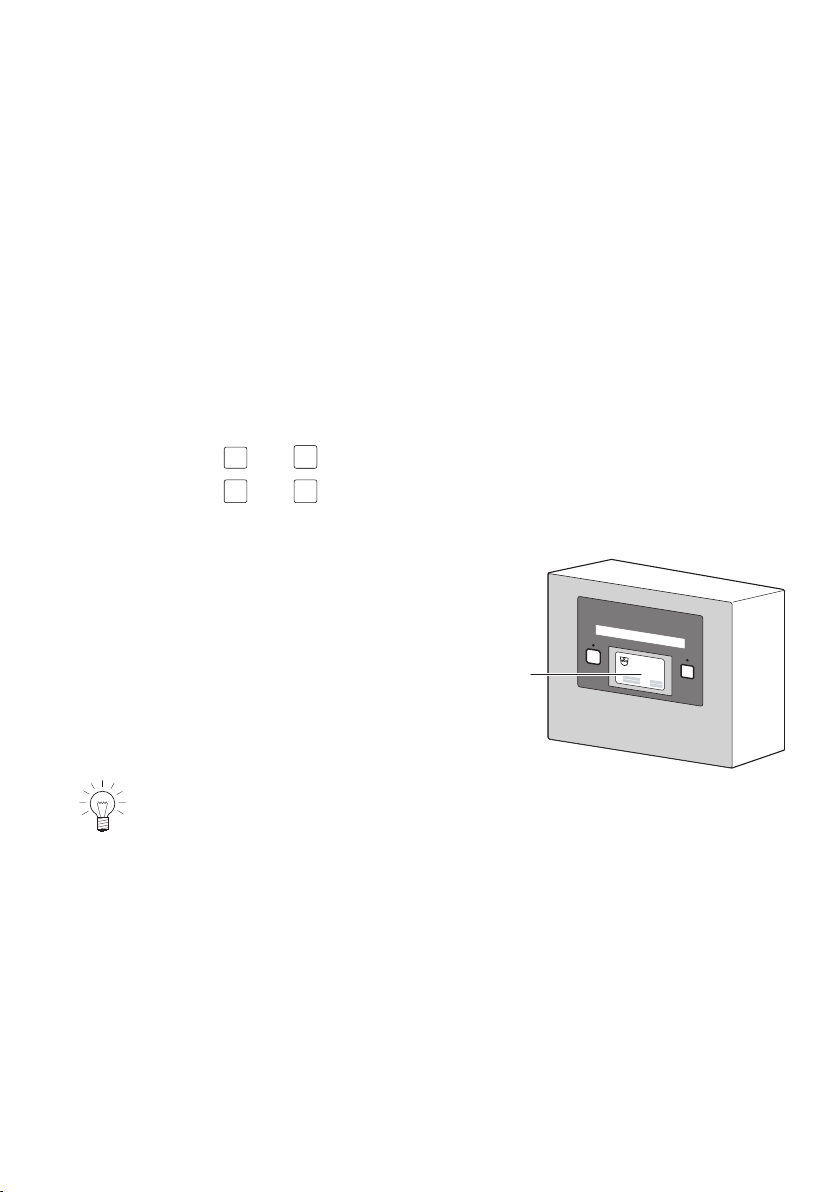
5.1 Using the cards
The user and special cards are basically used in the same way. The charge
and control cards are for identification purposes only and can be removed
after activating the corresponding mode:
– parameter settings for language, tariff and amount charged
– charge mode or
– totaliser display
.
General note
The appliance has two buttons:
– labelled + and - on the single machine.
– labelled 1 and 2 on the double machine.
RFID (radio frequency identification) cards
▸ Press a button.
▸ Hold an RFID card
– user card
– charge card or
– totaliser card
briefly to the card reader 1. Detailed
operating instructions can be found in
the following pages of this section.
A buzzer sounds for 0.3 seconds to indicate an action has been completed.
Each mode ends automatically after the predetermined time-out expires.
13
Page 14
5 Operation
Balance xxx.xx
Balance xxx.xx
Please select appliance
Credit xxx.xx
Remove card
New credit amount xxx.xx
Remove card
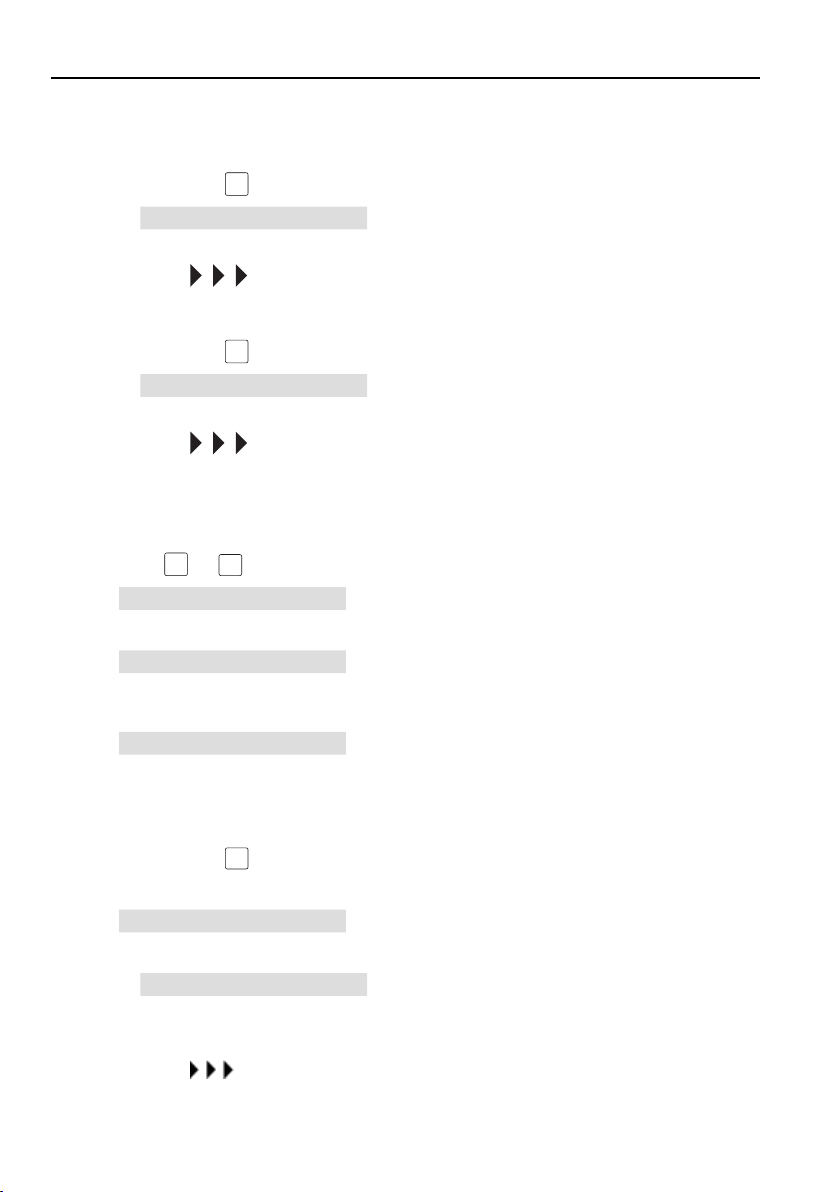
5.2 Current balance
Appliance 1
▸ Briefly press the 1 button.
– ...
minated.
– Moving appear after 10 seconds.
appears in the display and the LED is illu-
Appliance 2
▸ Briefly press the 2 button.
– ...
minated.
– Moving appear after 10 seconds.
appears in the display and the LED is illu-
5.3 Checking credits on user cards
Appliance 1
▸ Press the 1 or + button.
–
▸ Hold the user card briefly to the card reader.
–
This display goes out after 3 seconds. If the card has not yet
been removed from the card reader:
–
▸ Remove the card from the card reader.
appears in the display.
appears in the display.
appears in the display.
5.4 Adding a payment amount on a single machine
▸ Briefly press the + button.
▸ Hold the user card to the card reader.
–
▸ If the card has not yet been removed from the card reader:
– …
minated.
▸ Remove the card from the card reader.
– Moving appear in the display.
14
appears in the display.
appears in the display and the LED is illu-
Page 15
5.5 Adding a payment amount on a double machine
New credit amount xxx.xx
Tarif Gerät 1 xx.xx/xxx
Tarif Gerät 2 xx.xx/xxx
Remove card
Please select appliance
Please insert card
New credit amount xxx.xx
Tariff appliance 1 xx.xx/xxx
Remove card
▸ Briefly press the 1 or 2 button.
▸ Hold the user card to the card reader.
5 Operation
–
–
appears in the display.
or
appears in the
display and the LED is illuminated.
▸ If the card has not yet been removed from the card reader:
– …
appears in the display and the LED is illu-
minated.
▸ Remove the card from the card reader.
– Moving appear in the display.
5.6 Debiting the user card, single machine
▸ Press the + or - button to switch the appliance to the operating mode
from the standby mode.
–
▸ Press the + button.
–
▸ Hold the user card to the card reader.
– The amount is debited.
– A buzzer sounds briefly to confirm.
–
The appliance continues after 3 seconds. If the card has not yet been removed from the card reader:
appears in the display.
appears in the display.
appears in the display.
–
The appliance continues after 3 seconds. If the card has not yet been removed from the card reader:
–
▸ Remove the card from the card reader.
– A stationary appears.
▸ Start the washing machine or tumble dryer.
– Moving appear.
appears in the display.
appears in the display.
15
Page 16

5 Operation
Return credit
Please insert card
New credit amount xxx.xx
Remove card
5.7 Returning credit to the user card, single machine
▸ Hold down the + button.
– After 3 seconds,
appears in the display.
▸ Release the button after 3 seconds.
–
appears after 1 second.
▸ Hold the user card to the card reader.
– The amount is credited back to the user card.
– A buzzer sounds briefly to confirm.
–
appears in the display.
The appliance continues after 3 seconds. If the card has not yet been removed from the card reader:
–
appears in the display.
▸ Remove the card from the card reader.
16
Page 17
5 Operation
Please select appliance
Please insert card
New credit amount xxx.xx
Tariff appliance 1 xx.xx/xxx
Remove card
5.8 Debiting the user card for appliance 1, double machine
▸ Briefly press the 1 button.
– ...
appears in the display and the LEDs are il-
luminated.
▸ Briefly press the 1 button.
– ...
appears in the display and the LED is illu-
minated.
▸ Hold the user card to the card reader.
– The amount is debited.
– A buzzer sounds briefly to confirm.
–
appears in the display.
The appliance continues after 3 seconds. If the card has not yet been removed from the card reader:
– …
appears in the display and the LED is illu-
minated.
The appliance continues after 3 seconds. If the card has not yet been removed from the card reader:
– …
appears in the display and the LED is illu-
minated.
▸ Remove the card from the card reader.
– A stationary appears in the display.
▸ Start the washing machine or tumble dryer.
– Moving appear in the display.
Debiting the user card for appliance 2, double machine
To debit the user card for appliance 2 briefly press the 2 button instead of the 1 button. Then proceed as with appliance 1.
17
Page 18
5 Operation
Return credit
Please insert card
New credit amount xxx.xx
Remove card
5.9 Returning credit to the user card for appliance 1, double machine
▸ Hold down the 1 button.
▸ After 3 seconds,
▸ Release the button.
– After a second,
minated.
▸ Hold the user card to the card reader.
– The amount is credited back to the user card.
– A buzzer sounds briefly to confirm.
– ...
minated.
The appliance continues after 3 seconds. If the card has not yet been removed from the card reader:
– …
minated.
▸ Remove the card from the card reader.
appears in the display and the LED is illu-
appears in the display and the LED is illu-
appears in the display.
appears and the LED is illu-
Returning credit to the user card for appliance 2, double machine
To debit the user card for appliance 2 press down the 2 button instead of the 1 button. Then proceed as with appliance 1.
18
Page 19
5.10 Using the charge card
Please select appliance
Please insert card
Save charge code
Press button 1 to save data
Charge
Please insert card to charge
New credit amount xxx.xx
Remove card
Card already charged
End
Charging the user card
▸ Briefly press the 1 button.
5 Operation
– ...
appears in the display and the LEDs are il-
luminated.
▸ Briefly press the 1 button again.
–
appears in the display.
▸ Hold the charge card to the card reader.
The charge authorisation code on the card is checked.
– If the charge code on the charge card is 0, then
appears in the display.
The appliance continues after 3 seconds.
–
appears in the display.
▸ Press the 1 button to confirm.
–
appears in the display.
– then
▸ Hold the user card to the card reader.
–
appears in the display.
– A buzzer sounds briefly to confirm.
The appliance continues after 3 seconds. If the card has not yet been removed from the card reader:
–
appears in the display.
If the credit on the user card is the same as or greater than the
amount charged,
appears in the display.
If no other user cards are charged, the display goes out after about 10
seconds.
–
appears in the display.
19
Page 20
5 Operation
Please select appliance
Return credit
Setting
Please charge card
Tariff appliance 1 x.xx
Tariff appliance 2 x.xx
xxxx xxxxx
End
Please select appliance
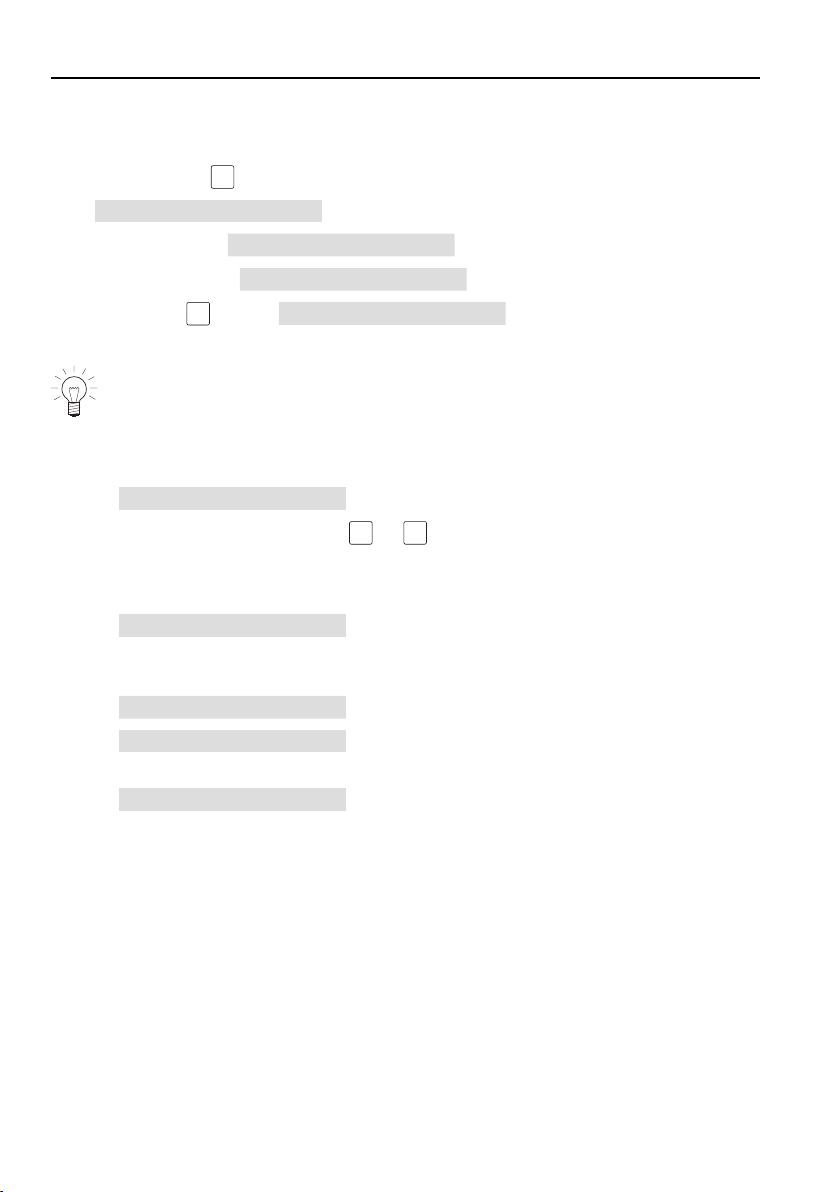
5.11 Settings with the charge card
The procedure described below is explained on the basis of model 82A.
▸ Hold down the 1 button.
▸ ...
▸ After 3 seconds,
▸ After 10 seconds,
appears in the display and the LEDs flash.
appears in the display.
appears in the display.
▸ Release the 1 button
▸ Hold the charge card to the card reader.
The charge authorisation code on the card is not checked.
▸ Remove the charge card.
–
appears in the display.
▸ To change the tariff, press the 1 or 2 button.
– The text in the display changes after about 5 seconds.
– The setting is saved.
–
appears in the display.
The other settings (amount charged and language) can be changed in exactly
the same way.
–
–
appears in the display.
appears in the display.
The appliance continues after 3 seconds. The next setting can be made.
–
20
appears in the display.
Page 21
5 Operation
Please select appliance
Total charged xxxx.xx
Press button 1 to delete total
Total charged 0.00
Remove card
End
Please select appliance
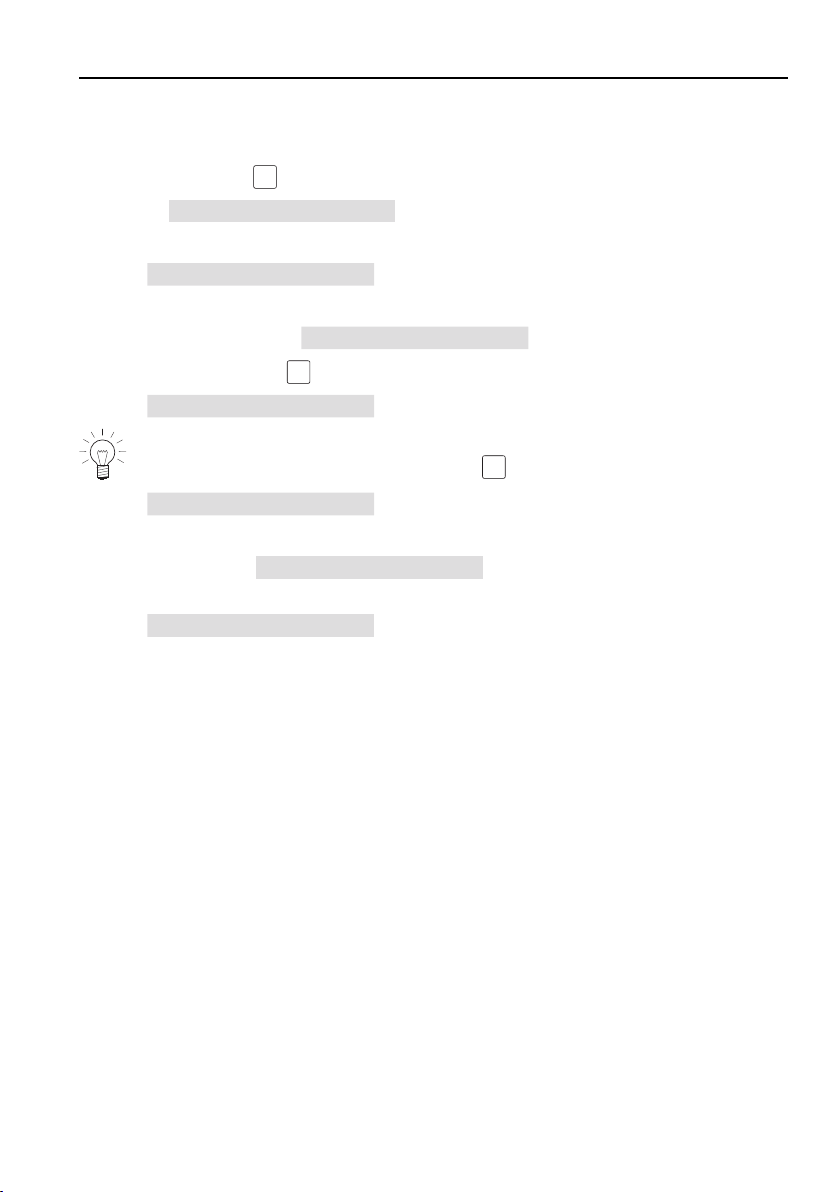
5.12 Using the totaliser card
The procedure described below is explained on the basis of model 82A.
▸ Briefly press the 1 button.
– ...
appears in the display and the LEDs flash.
– Hold the totaliser card to the card reader.
–
appears in the display.
▸ Hold the totaliser card to the card reader while the card is checked.
– After 3 seconds,
appears in the display.
▸ To delete, press the 1 button.
–
appears in the display.
If the total charged is not to be deleted, remove the totaliser card from
the card reader without pressing the 1 button.
–
appears in the display.
▸ Remove the totaliser card from the card reader.
▸ After 3 seconds,
appears in the display.
The appliance continues after 3 seconds.
–
appears in the display.
– The above procedure can be carried out again.
21
Page 22
6 Calculation
6.1 Preface to the calculation
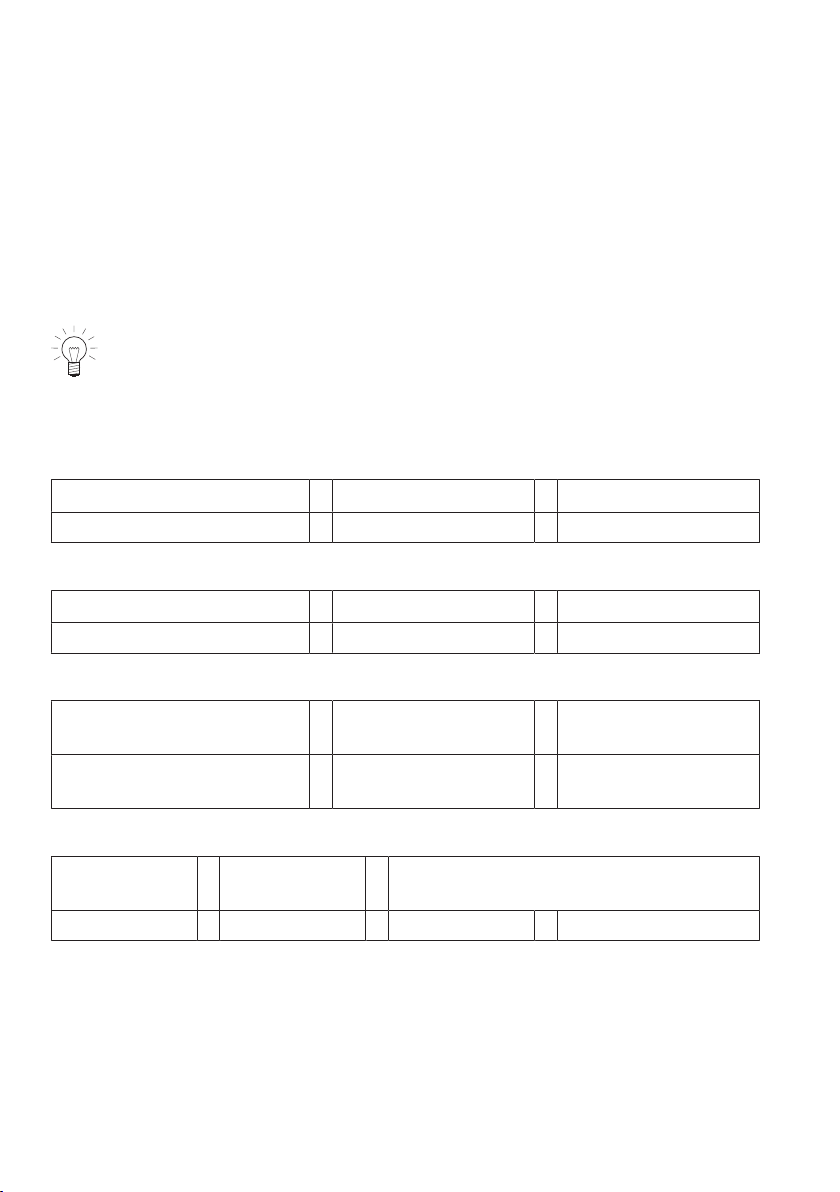
The costs which are calculated for the appliance are based on the operating
costs of the washing machine or tumble dryer connected. The operating costs
comprise the costs of the electricity and water consumed as well as of any
service subscription.
Example calculation for a washing machine with an 8 kg load capacity
The values indicated below are average values. These can vary
greatly (depending on local electricity and water rates as well as subscription costs).
Basis: Coloureds 60 °C without a pre-wash
Electricity costs
Electricity consumption Electricity tariff Electricity costs
1.3kWh × CHF/kWh 0.25 = CHF 0.32
Water costs (incl. waste water)
Water consumption Water rate Water costs
65litres = 0.065m
Cost of annual service agreement (per year with 5 to 12 parties)
Service agreement (WM *
CS)
CHF 249.00 + 89.00 = CHF
338.00
3
× CHF/m3 4.60 = CHF 0.30
No. wash cycles Service agreement
÷ 600 = CHF 0.56
costs
Total operating costs per programme (duration 70 mins.) CHF 1.18
Operating
costs
CHF 1.18 × 60mins. ÷ 70mins. = CHF/hr 1.00
In the absence of any individual components of the calculation, we recommend a sum of CHF 1.00 per hour for washing and CHF 1.20 per hour for drying.
22
Per hour Programme duration
Page 23
6 Calculation
6.2 Individual calculations
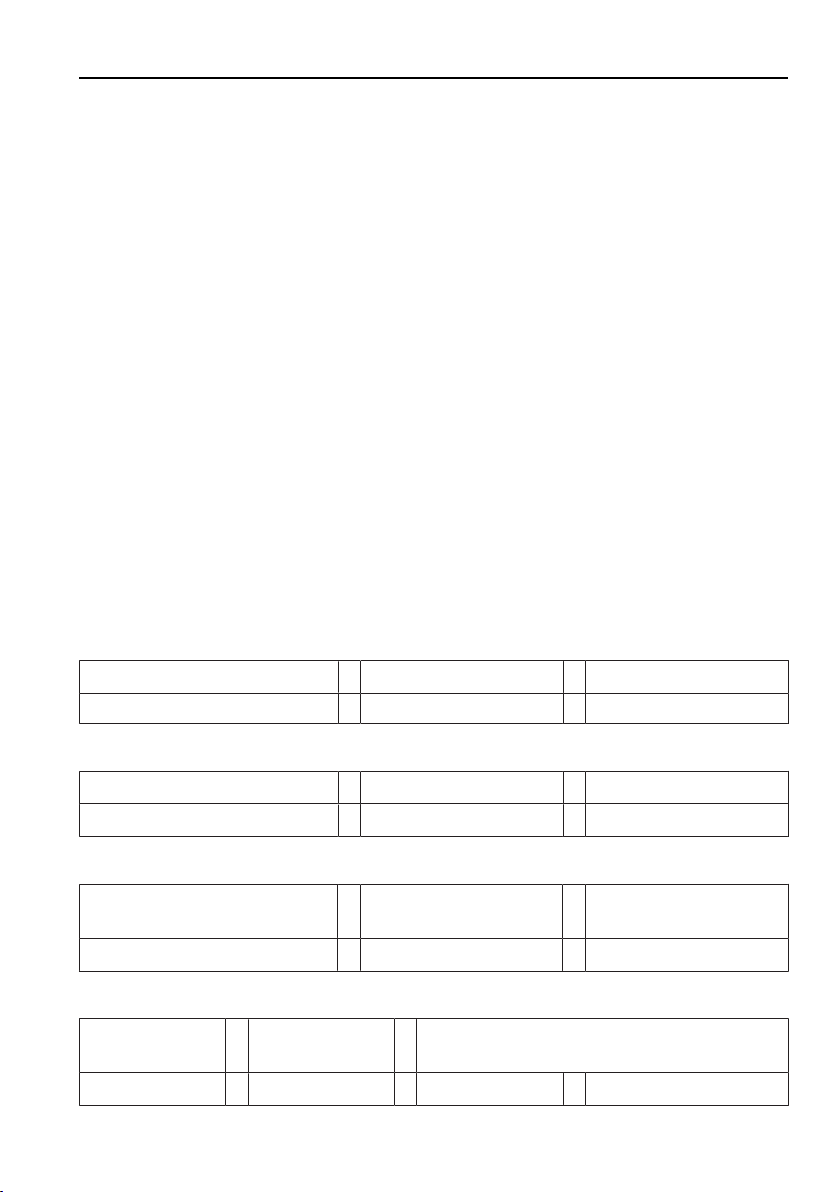
You will need the following details:
Electricity consumption*
Water consumption* (1m³ = 1000
.............. kWh
................. m³
litres)
Programme duration*
Electricity tariff per kWh (incl. peak
......... h .........
CHF ............. Ask local electricity sup-
and low tariffs)
Water rate per m³ (incl. waste wa-
CHF ............. Ask local electricity sup-
ter)
Annual service costs CHF CHF ............. See service agreement
Number of wash cycles per year
......................
* The calculation should be based on the example of the most frequently used
programme and carried out separately for each appliance. Ideally, select the
main programme «Coloureds 60°C» without a pre-wash for the washing machine and the «Standard dry» programme for the tumble dryer.
From the operating instructions
From the operating instructions
From the operating instructions
plier
plier
Approx. 150–200 per
year and household
Electricity costs
Electricity consumption Electricity tariff Electricity costs
kWh…… × CHF/kWh .......... = CHF..........
Water costs (incl. waste water)
Water consumption Water rate Water costs
…….m
3
× CHF/m3…… = CHF .............
Subscription costs (per year with 5 to 12 parties)
Service subscription (WM *
CS)
CHF…… + …… = CHF …… ÷
No. wash cycles Subscription costs
costs
……
= CHF ......
Total operating costs per programme (duration 70 mins.) CHF 1.18
Operating
Per hour Programme duration
costs
CHF ............. × 60mins. ÷
…….mins.
= CHF/hr ……
23
Page 24
7 Settings
P–01 1050
P–02 60
P–03 1.00
P–04 210
P–05 60
P–06 1.20
P–07 180
P–08 20
P–09 1xxxx
P–10 0
P–11 300
P–12 300
P–13 200
P–14 200
P–15 2
P–16 2
P–17 D
P–18 1
P–19 1
P–20 1
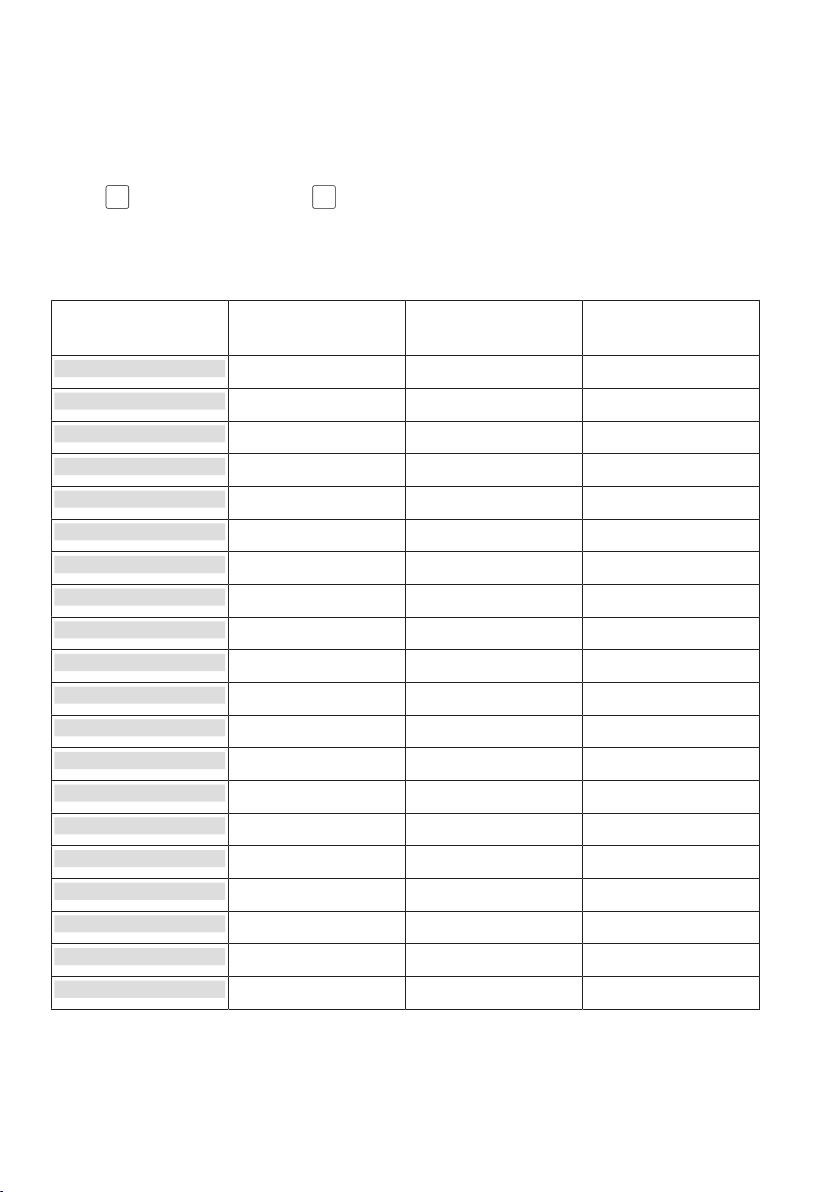
The different parameters are explained below. The factory setting is intended
for operating a washing machine in the case of model 81A and a washing ma-
chine 1 and a tumble dryer 2 in the case of model 82A.
7.1 Parameters
The parameters are set at the factory as follows:
Parameters with
factory settings
Unit Setting range Your setting
1000 to 19900
mins. 1 to 500
CHF. 0.10 to 10.00
mins. 1 to 600
mins. 1 to 500
CHF. 0.10 to 10.00
mins. 1 to 600
CHF. 0.00 to 90.00
1000 to 19900
0 to 19000
secs. 10 to 3600
secs. 10 to 3600
mA 0 to 1000
mA 0 to 1000
secs. 1 to 10
secs. 1 to 10
D/F/I/R/E
0 or 1
0 or 1
0 or 1
24
Page 25
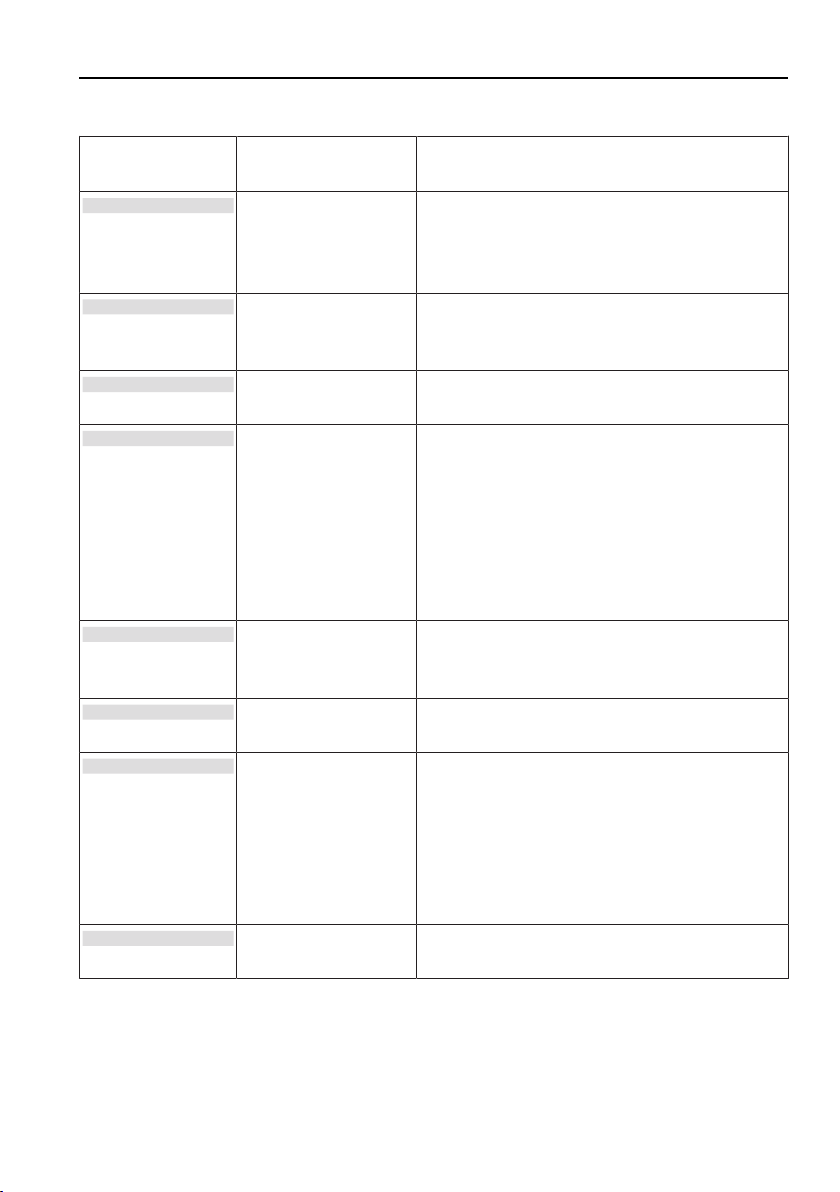
7.2 Key to parameters
P–01 1050
P–02 60
P–03 1.00
P–04 210
P–05 60
P–06 1.20
P–07 180
P–08 20
7 Settings
Parameters with
factory settings
Function Description
Laundry room no. Access code for the appliance. Can
vary from laundry room to laundry room.
The access code is transferred to the
user card the first time it is charged.
Time unit for appli-
ance 1
Defines the length of time (e.g. 60
mins.) during which the tariff in P-03 is
valid.
Tariff for appliance1Amount for (e.g. 60 mins.) washing/dry-
ing according to time defined in P-02.
Longest pro-
gramme duration
for appliance 1
The appliance calculates the amount to
be debited as follows: P-03 ÷ P-02 ×
P-04. In order that the amount debited
suffices for all programmes, the appli-
ance must be set for the programme
with the longest duration for the washing
machine or tumble dryer + 30 % re-
serve.
Time unit for appli-
ance 2
Defines the length of time (e.g. 60
mins.) during which the tariff in P-06 is
valid.
Tariff for appliance2Amount for (e.g. 60 mins.) washing/dry-
ing according to time defined in P-05.
Longest pro-
gramme duration
for appliance 2
The appliance calculates the amount to
be debited as follows: P-06 ÷ P-05 ×
P-07. In order that the amount debited
suffices for all programmes, the appli-
ance must be set for the programme
with the longest duration for the washing
machine or tumble dryer + 30% reserve.
Amount charged Amount transferred to the user card
while charging.
25
Page 26
7 Settings
P–09 1xxxx
P–10 0
P–11 300
P–12 300
P–13 200
P–14 200
P–15 2
P–16 2
P–17 D
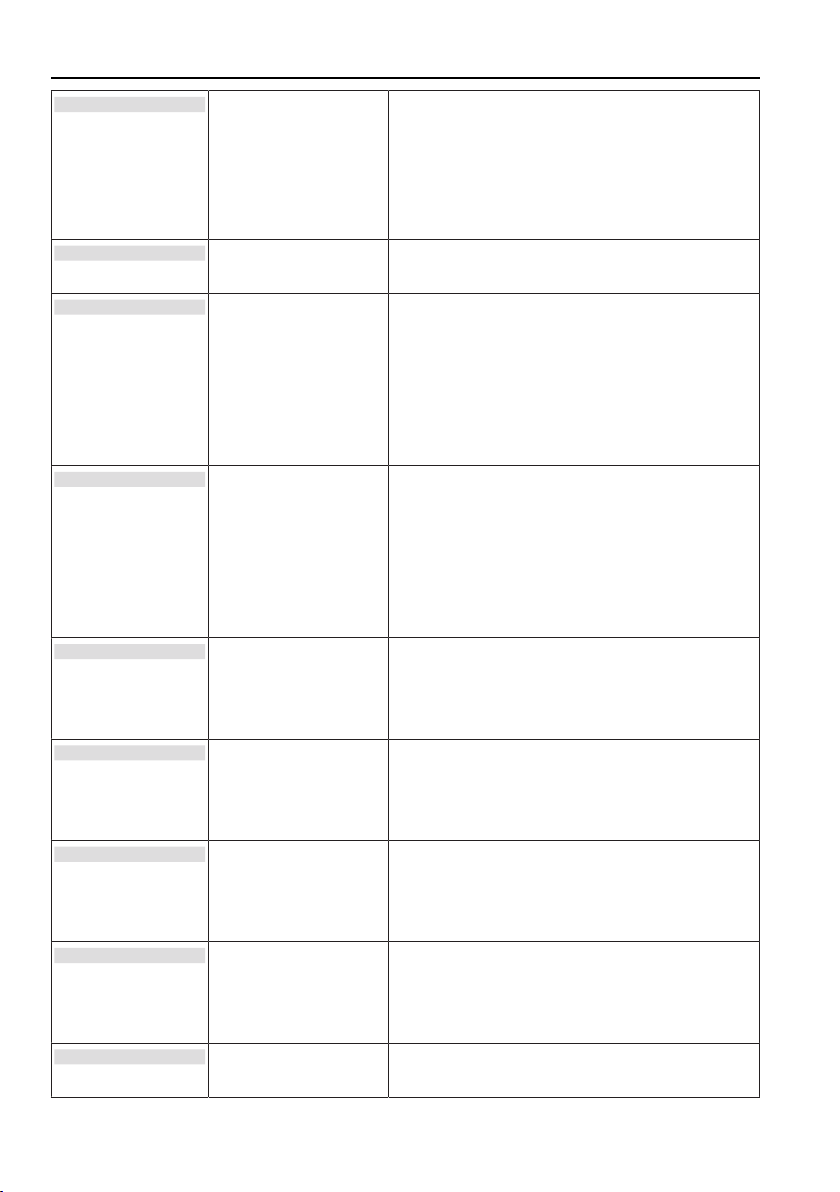
Charge access
code error
Access code for the charge card. Each
cashier system has a separate code.
The code is transferred the first time the
charge card is used. If required, the
same entry code can be set for all cash-
ier systems.
Number of cards
charged
Shut-off delay time
for appliance 1
Shows total number of times cards were
charged (can be reset).
Depending on the washing machine or
tumble dryer connected, there are
pauses during a programme sequence
(gaps in the power being supplied). As
soon as there is a gap that is greater
than the set shut-off delay time (end of
programme), debiting stops.
Shut-off delay time
for appliance 2
Depending on the washing machine or
tumble dryer connected, there are
pauses during a programme sequence
(gaps in the power being supplied). As
soon as there is a gap that is greater
than the set shut-off delay time (end of
programme), debiting stops.
Current response
threshold for appli-
ance 1
Changing the current response
threshold determines the level of power
consumption from which the debiting
begins.
Current response
threshold for appli-
ance 2
Changing the current response
threshold determines the level of power
consumption from which the debiting
begins.
Switch-on delay
time for appliance
1
For the appliance to start debiting, the
power being consumed must lie above
the current response threshold for the
duration of the time set.
Switch-on delay
time for appliance
2
For the appliance to start debiting, the
power being consumed must lie above
the current response threshold for the
duration of the time set.
Language setting For changing the language of the plain
text display.
26
Page 27
7 Settings
P–18 1
P–19 1
P–20 1
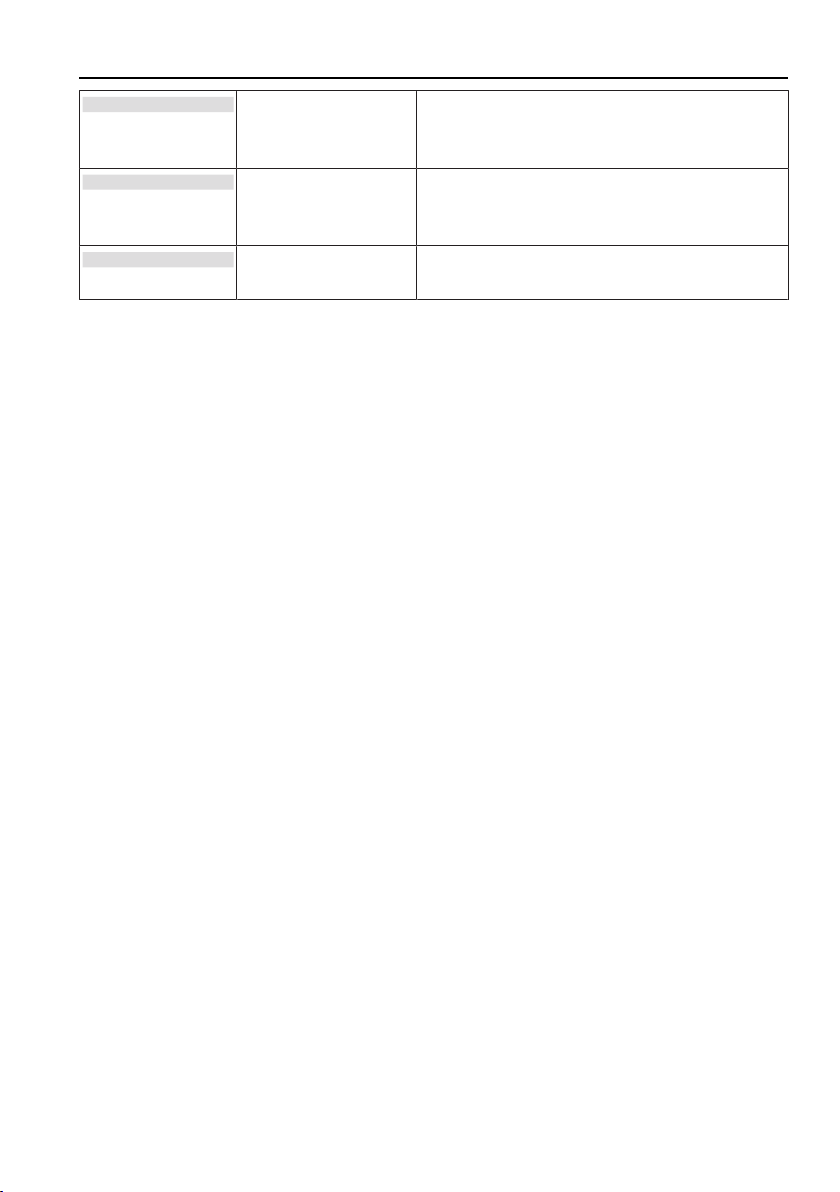
Acoustic signal To activate the acoustic signal in the
case of an error message 0=Off/1 =
On
Acoustic signal To activate the acoustic signal as con-
firmation that an action has been com-
pleted 0 = Off/1 = On
Loading payment
amount
To activate simple loading of the pay-
ment amount 0=Off/1 = On
27
Page 28

8 Care and maintenance
8.1 Cleaning the exterior
▪ Do not use abrasive, caustic cleaning agents or stainless steel cleaner.
▪ Do not use abrasive scouring pads, wire wool, etc., as such products will
damage the surface.
▸ Remove any soiling or excess cleaning solution immediately.
▸ Clean the surface with a soft cloth dampened with water and a little deter-
gent – for metal surfaces rub in the direction of the polish lines. Then wipe
dry with a soft cloth.
28
Page 29
9 Spare parts
CARD-SYSTEM
Card Nr.
Objekt
Name
Nom
Nome
CARD-SYSTEM
Objekt
LC
CARD-SYSTEM
Objekt
TC
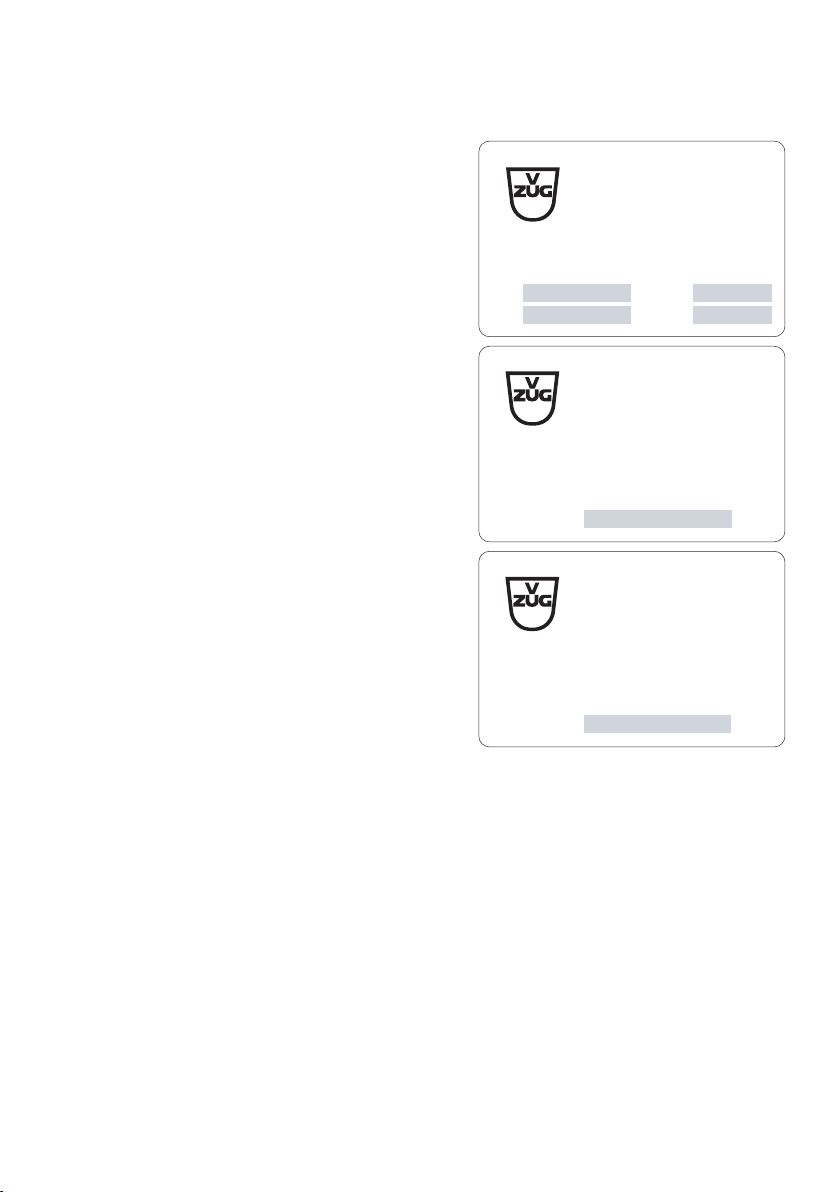
User card
Charge card
Totaliser card
29
Page 30

10 Technical data
10.1 Dimensions
Model 81A Model 82A
Width: 25cm 25cm
Height: 22.5cm 22.5cm
Depth: 10.5cm 10.5cm
Weight: 2.6kg 2.8kg
10.2 Electrical connections
Model 81A Model 82A
Voltage: 400 V 3N~ 2 × 400 V 3N~
Fuse: Max. 16 A Max. 16 A
Own consumption: < 6 VA < 9 VA
SWITCHING CAPA-
CITY
400 V 10 A/
230 V 16 A
400 V 10 A/
230 V 16 A
30
Page 31

11 Index
A
Appliance description .................................. 10
Appliance design .......................................... 11
B
Basic position ................................................ 11
C
Calculation ..................................................... 22
Care and maintenance ................................ 28
Checking credits on user cards................. 14
Cleaning the exterior.................................... 28
Current balance............................................. 14
D
Debiting the user card
Single machine .................................. 15
Debiting the user card for appliance 1
Double machine ................................ 17
Debiting the user card for appliance 2
Double machine ................................ 17
Dimensions .................................................... 30
Disconnection.................................................. 9
Disposal............................................................ 9
E
Electrical connections.................................. 30
G
General note on the calculation................. 22
I
Individual calculations.................................. 23
Instructions for use ......................................... 7
K
Key to parameters ........................................ 25
M
Model number ................................................. 2
N
Notes............................................................... 33
O
Operation........................................................ 13
P
Packaging ........................................................ 9
Parameters..................................................... 24
Product family.................................................. 2
Q
Queries ........................................................... 35
R
Returning credit to the user card
Single machine .................................. 16
Returning credit to the user card for ap-
pliance 1
Double machine ................................ 18
Returning credit to the user card for ap-
pliance 2
Double machine ................................ 18
S
Safety ................................................................ 9
Before using for the first time ............7
Children in the household ..................7
Correct use............................................7
Note on use...........................................8
Safety precautions
General...................................................6
Selecting the appliance and programme dis-
plays ......................................................... 10
Service & Support......................................... 35
Service agreement........................................ 35
Settings ........................................................... 24
Settings with the charge card..................... 20
Spare parts .................................................... 29
Standby........................................................... 11
Symbols............................................................ 5
T
Technical data ............................................... 30
Type................................................................... 2
U
User cards...................................................... 12
Using the cards............................................. 13
Using the charge card ................................. 19
Using the totaliser card ............................... 21
31
Page 32

V
Validity............................................................... 2
Y
Your appliance .............................................. 10
32
Page 33

12 Notes
33
Page 34

34
Page 35

13 Service & Support
The «Troubleshooting» section provides valuable tips for dealing with minor operating faults. This saves you the time, effort and potential cost of having to call out
a service technician.
Information on the V-ZUG warranty can be found at www.vzug.com →Service →Warranty information. Please read this information carefully.
Please register your V-ZUG appliance immediately:
▪ online via www.vzug.com →Service →Warranty registration, or
▪ using the enclosed registration card.
This will allow you to take advantage of the best possible support in the event of a fault in
the appliance during the guarantee period. You will require the serial number (FN) and appliance designation to complete the registration process. This information can be found on
the identification plate for your appliance.
My appliance information:
FN:
___________________
Always have this appliance information to hand when you contact V-ZUG. Thank you.
Your repair order
Call the free service number 0800 850 850 to contact your nearest
V-ZUG service centre. You can arrange an onsite visit by us by phone if you wish.
Appliance:
_____________________
General queries, accessories and service agreement
V-ZUG will be happy to help you with any general administrative or technical queries, to
accept your orders for accessories and spare parts and to inform you about our progressive service agreements. You can contact us by calling Tel. + 41 58 767 67 67 or by going
to our website at www.vzug.com.
35
Page 36
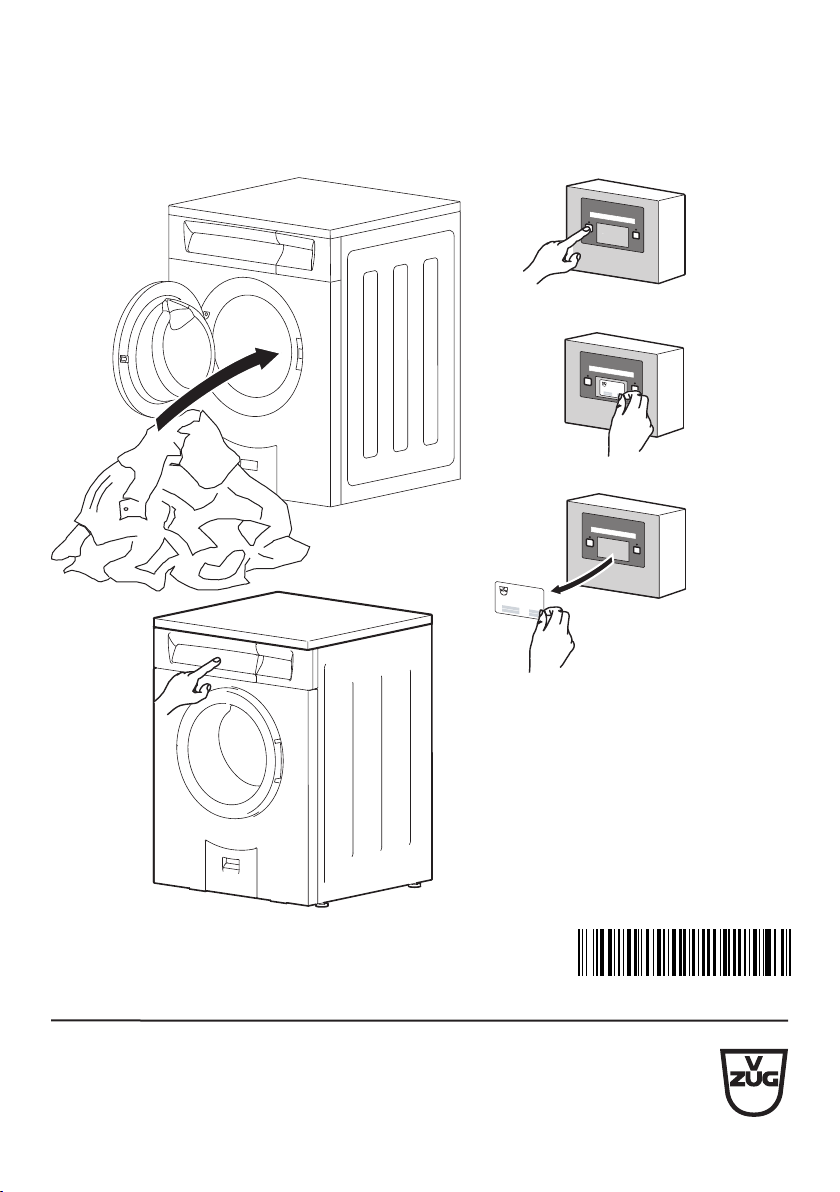
14 Quick start guide
2
1
2
1
1.
2.
3.
4.
5.
CARD-SYSTEM
Card N
r
.
Objekt
Name
Nom
Nome
2
1
CARD-SYSTEM
Card Nr.
Objekt
Name
Nom
Nome
Please first read the safety precautions in the operating instructions!
V-ZUG Ltd, Industriestrasse 66, CH-6301 Zug
Tel. +41 58 767 67 67, Fax +41 58 767 61 61
[email protected], www.vzug.com
Service Centre: Tel. 0800 850 850
J81A013-R04
 Loading...