

Page 1

Z852
User Manual
1
Page 2

About This Manual
Thank you for choosing this ZTE mobile device. In order to keep
your device in its best condition, please read this manual and
keep it for future reference.
Copyright
Copyright © 2017 ZTE CORPORATION
All rights reserved.
No part of this publication may be quoted, reproduced, translated
or used in any form or by any means, electronic or mechanical,
including photocopying and microfilm, without the prior written
permission of ZTE Corporation.
Notice
ZTE Corporation reserves the right to make modifications on print
errors or update specifications in this guide without prior notice.
This manual has been designed with the utmost care to ensure
the accuracy of its content. However, all statements, information
and recommendations contained therein do not constitute a
warranty of any kind, either expressed or implied. Please refer to
For Your Safety to be sure to use your phone properly and safely.
We offer self-service for our smart terminal device users. Please
visit the ZTE official website (at www.zteusa.com) for more
information on self-service and supported product models.
Information on the website takes precedence.
Disclaimer
ZTE Corporation expressly disclaims any liability for faults and
2
Page 3

damages caused by unauthorized modifications of the software.
Images and screenshots used in this manual may differ from the
actual product. Content in this manual may differ from the actual
product or software.
Trademarks
ZTE and the ZTE logos are trademarks of ZTE Corporation.
Google and Android are trademarks of Google, Inc.
The Bluetooth® trademark and logos are owned by the Bluetooth
SIG, Inc. and any use of such trademarks by ZTE Corporation is
under license.
microSDXC Logo is a trademark of SD-3C, LLC.
Qualcomm® Snapdragon™ processors are products of
Qualcomm Technologies, Inc.
Qualcomm and Snapdragon are trademarks of Qualcomm
Incorporated, registered in the United States and other countries.
Used with permission.
Other trademarks and trade names are the property of their
respective owners.
Version No.: R1.0
Edition Time: May 15, 2017
3
Page 4

Contents
Getting Started ....................................................... 10
Getting to Know Your Phone ............................................ 10
Knowing the Keys ............................................................ 12
Installing the nano-SIM Card, the microSDXC™ Card and
the Battery ....................................................................... 13
Charging the Battery ........................................................ 15
Extending the Battery Life ................................................ 17
Powering On/Off .............................................................. 17
Setting Up for the First Time ............................................ 18
Locking/Unlocking the Screen and Keys .......................... 18
Using the Touch Screen ................................................... 19
Getting to Know the Home Screen ................................... 22
Personalizing.......................................................... 25
Changing the System Language ...................................... 25
Setting the Date and Time................................................ 25
Changing Ringtone and Notification Sound ...................... 26
Turning On/Off System Sounds ........................................ 26
Adjusting Volume ............................................................. 26
Switching to Silent or Vibration Mode ............................... 27
Using Do Not Disturb Mode ............................................. 28
Applying New Wallpapers ................................................ 29
Setting the Theme ........................................................... 30
Setting the Home Screen Transition Effect ....................... 30
4
Page 5

Changing Screen Brightness ............................................ 30
Protecting Your Phone With Screen Locks ........................ 31
Protecting Your Phone With Encryption ............................ 32
Protecting Your Phone With Screen Pinning ..................... 33
Knowing the Basics ............................................... 35
Monitoring the Phone Status ............................................ 35
Managing Notifications ..................................................... 36
Managing Shortcuts and Widgets ..................................... 39
Organizing With Folders ................................................... 40
Rearranging the Primary Shortcuts ................................... 41
Entering Text .................................................................... 41
Editing Text ...................................................................... 51
Opening and Switching Apps ............................................ 52
Using Two Apps in Split-Screen Mode .............................. 53
Uninstalling or Disabling an App ....................................... 54
Connecting to Networks and Devices .................. 55
Connecting to Mobile Networks ........................................ 55
Connecting to Wi-Fi .......................................................... 57
Using Wi-Fi Direct® .......................................................... 60
Connecting to Bluetooth Devices ...................................... 61
Connecting to Your Computer via USB ............................. 64
Using the microSDXC Card as Portable or Phone Storage65
Sharing Your Mobile Data Connection .............................. 69
Connecting to Virtual Private Networks ............................. 71
5
Page 6

Phone Calls ............................................................ 74
Placing and Ending Calls ................................................. 74
Answering or Rejecting Calls ........................................... 75
Working With the Call History ........................................... 76
Calling Your Contacts ....................................................... 78
Checking Voicemail ......................................................... 78
Using Options During a Call ............................................. 79
Managing Multi-party Calls ............................................... 80
Adjusting Your Call Settings ............................................. 81
Contacts .................................................................. 88
Checking Contact Details ................................................. 88
Adding a New Contact ..................................................... 88
Setting Up Your Own Profile ............................................. 89
Importing, Exporting, and Sharing Contacts ..................... 89
Working With Favorite Contacts ....................................... 91
Working With Groups ....................................................... 92
Searching for a Contact ................................................... 94
Editing Contacts............................................................... 94
Web Accounts ........................................................ 96
Adding or Removing Accounts ......................................... 96
Configuring Account Sync ................................................ 97
Email ....................................................................... 99
Setting Up the First Email Account ................................... 99
Checking Your Emails ...................................................... 99
6
Page 7

Writing and Sending an Email ........................................ 100
Responding to an Email ................................................. 100
Adding and Editing Email Accounts ................................ 102
Changing General Email Settings ................................... 103
Messaging ............................................................ 104
Opening the Messaging Screen ..................................... 104
Sending a Message ....................................................... 104
Replying to a Message ................................................... 105
Forwarding a Message ................................................... 106
Deleting Messages or Threads ....................................... 106
Changing Message Settings ........................................... 107
Calendar ............................................................... 108
Viewing Your Calendars and Events ............................... 108
Creating an Event .......................................................... 109
Editing, Deleting or Sharing an Event ............................. 110
Changing Calendar Settings ........................................... 110
Web Browser ........................................................ 111
Opening the Browser ..................................................... 111
Setting the Homepage .................................................... 111
Using Multiple Browser Tabs .......................................... 112
Downloading Files .......................................................... 112
Changing Browser Settings ............................................ 112
Camera ................................................................. 114
Capturing a Photo .......................................................... 114
7
Page 8

Recording a Video ......................................................... 116
Using Manual Camera Mode ......................................... 117
Using Other Camera Modes .......................................... 118
Customizing Camera/Camcorder Settings ...................... 118
Gallery ................................................................... 121
Opening Gallery ............................................................. 121
Working With Albums ..................................................... 121
Working With Pictures .................................................... 123
Retouching Your Pictures ............................................... 124
Making a GIF Picture or a Collage ................................. 125
Playing Videos ............................................................... 127
Music ..................................................................... 128
Viewing Your Music Library ............................................ 128
Playing Music ................................................................ 129
Managing Playlists ......................................................... 131
Video Player ......................................................... 132
Opening the Video Library ............................................. 132
Playing and Controlling Videos ...................................... 132
Managing Video Files .................................................... 133
FM Radio ............................................................... 135
Scanning and Saving Channels ..................................... 135
Listening to FM Radio .................................................... 135
Editing a Saved Channel ............................................... 136
Other Options and Settings ............................................ 136
8
Page 9

Sound Recorder ................................................... 138
Recording a Voice Memo ............................................... 138
Playing a Voice Memo .................................................... 138
More Apps ............................................................ 140
Backup & Restore .......................................................... 140
Calculator ...................................................................... 140
Clock ............................................................................. 140
Downloads ..................................................................... 142
File Manager .................................................................. 142
Google Apps .................................................................. 143
Settings ................................................................ 145
Wireless and Networks ................................................... 145
Device ........................................................................... 148
Personal ........................................................................ 153
System........................................................................... 158
Upgrading the Phone Software .......................... 160
Troubleshooting ................................................... 161
9
Page 10
Auxiliary
Getting Started
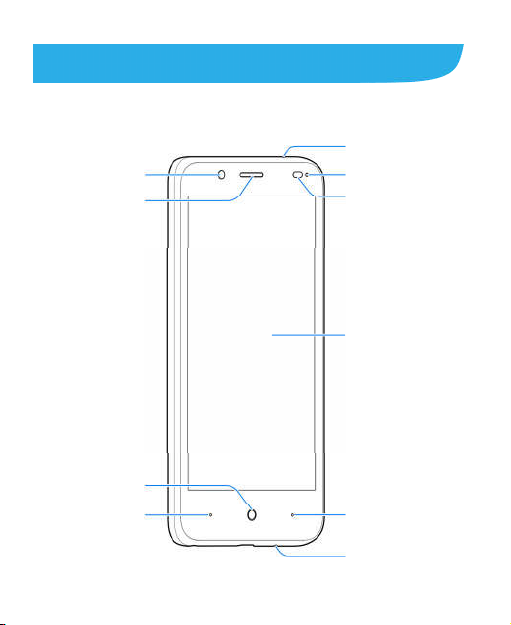
Getting to Know Your Phone
10
Front camera
Earpiece
Home key
Back key
microphone
Indicator light
Proximity & light
sensor
Touch screen
Recent apps key
Main
microphone
Page 11

Volume
Charging/
ort
3.5mm Headset
j
up/down key
Power key
micro-USB p
Flash
Speaker
11
Back camera
Back cover
ack
Page 12

Key
Function
h to return to the home screen from any
Knowing the Keys
Press and hold to turn on or off airplane
Power key
Home key
Back key Touch to go to the previous screen.
Recent apps
key
Volume key
NOTE:
The positions of the Back key and the Recent apps key are
interchangeable through Settings > Navigation key.
mode, power off or restart the phone.
Press to turn off or on the screen display.
Touc
application or screen.
Touch and hold to use Google Search.
Touch to see recently used apps.
Press or hold either end of the key to turn the
volume up or down.
12
Page 13

Installing the nano-SIM Card, the
microSDXC™ Card and the Battery
The nano-SIM card can be installed or removed while the phone
is turned on. Power off your phone before removing or replacing
the battery.
The microSDXC card (not included) can be installed or removed
while the phone is turned on. You need to unmount the
microSDXC card before removing it. See Using the microSDXC
Card as Portable or Phone Storage.
WARNING!
To avoid damage to the phone, do not use any other kind of SIM
cards, or any non-standard nano-SIM card cut from a SIM card.
You can get a standard nano-SIM card from your service
provider.
1. Insert your fingernail into the slot at the bottom left of the back
cover and lift it up gently.
13
Page 14

microSDXC
SIM
card
2. Hold the nano-SIM card or the microSDXC card with the cut
corner oriented as shown and slip it into the card holder.
card
nano-
14
Page 15

3. Insert the battery by aligning the metal contacts on the battery
with the metal contacts in the battery compartment. Gently
push down on the battery until it clicks into place.
4. Align the back cover with the back of the phone and press the
cover back into place. Ensure that all the tabs are secure and
there are no gaps around the cover.
Charging the Battery
Your phone’s battery should have enough power for the phone to
turn on, find a signal, and make a few calls. You should fully
charge the battery as soon as possible.
WARNING!
Use only ZTE-approved chargers and USB cables. The use of
15
Page 16

unapproved accessories could damage your phone or cause the
battery to explode.
1. Connect the adaptor to the charging jack. Ensure that the
adaptor is inserted with the correct orientation. Do not force
the connector into the charging jack.
2. Connect the charger to a standard AC power outlet. If the
phone is on, you’ll see a charging icon, such as or ,
appear on the status bar.
3. Disconnect the charger when the battery is fully charged.
NOTE:
16
Page 17

If the battery is extremely low, you may be unable to power on
the phone even when it is being charged. In this case, try again
after charging the phone for at least 20 minutes. Contact the
customer service if you still cannot power on the phone after
prolonged charging.
Extending the Battery Life
Active applications, screen brightness levels, Bluetooth and Wi-Fi
usage and GPS functionality can drain your battery. You can
follow the helpful tips below to conserve your battery power:
Use the Battery saver feature in Settings.
Reduce the screen backlight time.
Lower the screen brightness.
Turn Wi-Fi, Bluetooth and auto-sync off when not in use.
Disable the GPS function when not in use. Most applications
using this function will periodically query the GPS satellites
for your current location, and each query drains your battery.
Powering On/Off
Press and hold the Power key to turn on your phone.
To power off, press and hold the Power key to open the
options menu and touch Power off.
NOTE:
17
Page 18

If the phone freezes or takes too long to respond, you can press
and hold the Power key for about 10 seconds to restart the
phone.
Setting Up for the First Time
When you first power on your phone after you purchase it or
reset it to factory settings (see Backup and Reset), you need to
do some settings before using it.
Select the language and then follow the prompts to set up your
phone.
Locking/Unlocking the Screen and
Keys
Your phone allows you to quickly lock the screen and keys (put
the phone to sleep mode) when not in use and to turn the screen
back on and unlock it when you need it.
To lock the screen and keys:
To quickly turn the screen off and lock the keys, press the Power
key.
NOTE:
To save battery power, the phone automatically turns off the
screen after some time of inactivity. You will still be able to
receive messages and calls while the phone screen is off.
To unlock the screen and keys:
18
Page 19

1. Press the Power key to turn the screen on.
2. Touch and hold the blank area on the screen.
- or -
Touch and hold to make a call, or touch and hold
take a selfie photo or video with the front camera.
- or -
Double-tap a notification to open the related app.
NOTE:
If you have set an unlock pattern, a PIN or a password for your
phone (see Protecting Your Phone With Screen Locks), you’ll
need to draw the pattern or enter the PIN/password to unlock your
screen.
Using the Touch Screen
Your phone’s touch screen enables you to control actions
through a variety of touch gestures.
Touch
When you want to type using the onscreen keyboard, select
items on the screen such as the application and settings
icons, or press the onscreen buttons, simply touch them with
your finger.
19
Page 20

Touch and Hold
To open the available options for an item (for example, a
message or link in a web page), touch and hold the item.
Swipe or Slide
To swipe or slide means to quickly drag your finger vertically
or horizontally across the screen.
20
Page 21

Drag
To drag, press and hold your finger with some pressure
before you start to move your finger. While dragging, do not
release your finger until you have reached the target position.
Pinch
In some apps (such as Maps, web browser, and Gallery), you
can zoom in and out by placing two fingers on the screen at
once and pinching them together (to zoom out) or spreading
21
Page 22

them apart (to zoom in).
Rotate the screen
For most screens, you can automatically change the screen
orientation from portrait to landscape by turning the phone
sideways.
NOTE:
The auto-rotate feature needs to be enabled for the screen
orientation to automatically change. Touch the Home ke y >
> Settings > Display > When device is rotated and
select Rotate the contents of the screen.
You can also access the screen rotation control by sliding
down the status bar twice and touching Auto-rotate/Portrait.
Getting to Know the Home Screen
The home screen is the starting point for your phone’s
applications, functions, and menus. You can customize your
home screen by adding shortcuts, folders, widgets, and more.
22
Page 23

Status bar
Widget
Google Search
Folder
Shortcut
Primary shortcuts
Extended Home Screen Panels
Your home screen is extendable, providing more space for
shortcuts, widgets, and more. Simply swipe left or right on the
home screen to see the extended panels. You can add or remove
home screen panels, or adjust their order.
To add a new home screen panel:
1. Touch and hold a blank area of the home screen.
2. Touch Widgets or Themes.
3. Slide the home screen thumbnails left and touch .
23
Page 24

To delete a home screen panel:
1. Touch and hold an empty area of the home screen and touch
Home. You can slide left or right to view the home screen
thumbnails.
2. Touch on the top right corner of a thumbnail.
3. Touch OK. The items on the panel will also be removed.
NOTE:
When there are only two home screen panels, you cannot delete
any of them.
To adjust the order of a home screen panel:
1. Touch and hold an empty area of the home screen and touch
Home. You can slide left or right to view the home screen
thumbnails.
2. Touch and hold a thumbnail and drag it left or right to the
place you need.
NOTE:
Touch at the bottom of a home screen thumbnail to set it as
the main home screen.
24
Page 25

Personalizing
Changing the System Language
1. Touch the Home key > > Settings > Language &
input > Languages. The first language in the list is the
default system language.
2. Touch Add a language to add another language to the list.
3. To change the system language, touch and hold next to
the language you want and drag it to the top of the list.
NOTE:
To remove languages from the list, touch > Remove and
select the languages you want to delete.
Setting the Date and Time
1. Touch the Home key > > Settings > Date & time.
2. Set the date, time, time zone, and time format.
To adjust the date and time automatically, turn on
Automatic date & time.
To adjust the date and time manually, turn off Automatic
date & time and touch Set date / Set time to change the
date and time.
To adjust the time zone automatically, turn on Automatic
time zone.
25
Page 26

To adjust the time zone manually, turn off Automatic
time zone and touch Select time zone to set the correct
time zone.
To adjust the time format, touch Use 24-hour format.
Changing Ringtone and Notification
Sound
You can customize the default incoming call ringtone and the
default notification sound.
1. Touch the Home key > > Settings > Sound.
2. Touch Phone ringtone or Default notification ringtone.
3. Select the ringtone you want to use.
4. Touch OK.
Turning On/Off System Sounds
1. Touch the Home key > > Settings > Sound > Other
sounds.
2. Touch the switch beside each option to turn it on or off.
Adjusting Volume
1. Touch the Home key > > Settings > Sound.
2. Drag the sliders below Media volume, Alarm volume, Ring
volume and Notification volume to adjust the volume for
each type of audio.
26
Page 27

NOTE:
You can adjust the media volume when a media application is in
use by pressing the Volume key. If no media application is active,
press the Volume key to adjust ringtone volume (or the earpiece
volume during a call) or touch to adjust other types of
volume.
Switching to Silent or Vibration Mode
You can set the phone to silent or vibration mode by using one of
the following methods.
Press the Volume key when no media application is active to
show the volume management window. Drag the slider to the
left or keep pressing the Volume down key to switch the
phone to vibration mode. Press the key again in vibration
mode to switch the phone to silent mode.
Swipe down from the top of the screen to open the notification
panel and drag the panel downwards. Slide left and then
touch Sound or Vibrate to switch the phone to vibration or
silent mode.
Touch the Home key > > Settings > Sound >
Notification mode and select Vibrate or Mute to switch to
vibration or silent mode.
NOTE:
To restore normal sound settings, press or hold the Volume up
key.
27
Page 28

Using Do Not Disturb Mode
You can limit interruptions with Do not disturb mode. This mode
silences your phone so that it doesn’t make sounds or vibrate
when you don’t want it to.
To turn on Do not disturb mode:
1. Touch the Home key > > Settings > Sound > Do not
disturb.
2. Touch Do not disturb and select Always or Scheduled.
3. Set the detailed settings.
If you have selected Scheduled, set the days and
start/end time during which Do not disturb mode should
apply.
Touch Disturb rules to determine whether you allow
exceptions.
- Priority only: Disturbance set as priority interruptions
are allowed.
- Alarms only: Only alarms sound or vibration is
allowed.
- Total silence: Forbid all disturbance.
If you have allowed priority interruptions, customize the
types of allowed sounds or vibration in the Priority
interruptions section.
NOTE:
To turn off Do not disturb mode quickly, press either end of the
Volume key and then touch END NOW.
28
Page 29

To set exceptions for Do not disturb mode:
You can set reminders, certain calls and messages as exceptions
when Do not disturb mode is on and Priority only is selected as
the disturb rule, so these ringtones, sounds and vibration are not
turned off.
1. Touch the Home key > > Settings > Sound > Do not
disturb.
2. Touch the switches next to the items you want to allow. Touch
Messages or Calls and set who can alert you of their
messages or calls.
NOTE:
To set exceptions based on apps, touch the Home key > >
Settings > Notifications. Select an app and switch on Override
Do Not Disturb.
Applying New Wallpapers
You can set the wallpaper for the home screen or lock screen.
1. Touch the Home key > > Settings > Display >
Wallpaper.
2. Touch Gallery, Live Wallpapers, Photos, or Wallpapers
and select an image or an animation. Some cropping may be
needed for Gallery and Photos images.
3. If necessary, touch Set wallpaper.
4. If prompted, select to set the image as the lock screen
wallpaper, the home screen wallpaper or both.
NOTE:
29
Page 30

In addition, you can touch and hold an empty place on the home
screen, touch Wallpapers and then touch Lock screen or Home
screen. Then select a built-in image, a live wallpaper, or an
image from your Gallery.
Setting the Theme
1. Touch and hold an empty place on the home screen and
touch Themes.
2. Select a theme you like.
Setting the Home Screen Transition
Effect
1. Touch and hold an empty place on the home screen and
touch Home.
2. Pick an effect and the phone will demonstrate how it works.
Touch other effects until you find the favourite one.
Changing Screen Brightness
1. Touch the Home key > > Settings > Display >
Brightness level.
2. Drag the slider to manually adjust the screen brightness.
NOTE:
Your phone can automatically adjust the screen brightness for
available light. Touch Adaptive brightness in the Display
settings screen to turn the feature on or off.
30
Page 31

Protecting Your Phone With Screen
Locks
You can protect your phone by creating a screen lock. When it is
enabled, you need to touch and hold on the screen, draw a
pattern or enter a numeric PIN or password to unlock the phone’s
screen and keys.
1. Touch the Home key > > Settings > Security > Screen
lock.
2. Touch None, Long press, Pattern, PIN or Password.
Touch None to disable the screen lock.
Touch Long press to enable screen lock and allow
unlocking with a ‘touch and hold' gesture. You can unlock
the screen by touching and holding on the blank area of
the screen.
Touch Pattern to draw and redraw a pattern that you
must draw to unlock the screen.
Touch PIN or Password to set a numeric PIN or a
password that you must enter to unlock the screen.
3. For Pattern, PIN, or Password lock, select how you want
notifications and their contents to show when the phone is
locked. Then touch DONE.
NOTE:
Remember the pattern, PIN or password you set. Otherwise, you
will have to upgrade the phone software to use the phone. See
Upgrading the Phone Software.
31
Page 32

Protecting Your Phone With Encryption
You can encrypt all the data on your phone: your accounts,
application data, music and other media, downloaded information,
and so on. If you do, you must draw an unlock pattern, enter a
numeric PIN or a password each time you power on your phone.
WARNING!
Encryption is irreversible. The only way to revert to an
unencrypted phone is to perform a factory data reset, which
erases all your data.
Encryption provides additional protection in case your phone is
stolen, and may be required or recommended in some
organizations. Consult your system administrator before turning it
on. In many cases the pattern, PIN or password you set for
encryption is controlled by the system administrator.
Before turning on encryption, prepare as follows:
●
Set a screen lock pattern, PIN or password.
●
Charge the battery.
●
Keep the phone connected to the charger.
Schedule an hour or more for the encryption process: you
●
must not interrupt it or you will lose some or all of your data.
When you're ready to turn on encryption:
1. Touch the Home key > > Settings > Security > Encrypt
phone.
2. Read the information about encryption carefully.
The ENCRYPT PHONE button is dimmed if your battery is
32
Page 33

not charged or your phone's not plugged in.
If you change your mind about encrypting your phone, touch
the Back
If you interrupt the encryption process, you will lose data.
3. Touch ENCRYPT PHONE.
4. Draw your screen lock pattern or enter your PIN or password.
5. Touch ENCRYPT PHONE again.
The encryption process starts. Encryption can take an hour or
more, during which time your phone may restart several times.
When encryption is completed, you're prompted to draw the
unlock pattern, or enter your PIN or password.
Subsequently you must draw your unlock pattern, or enter your
PIN or password each time you power on your phone in order to
decrypt it.
key.
WARNING!
Protecting Your Phone With Screen
Pinning
You can use the screen pinning feature to keep an app in view,
so others cannot switch to other apps or access your personal
information.
Turn On Screen Pinning
1. Touch the Home key > > Settings > Security > Screen
pinning.
33
Page 34

2. Touch the On/Off switch.
3. If you want to ask for the unlock pattern, PIN or password
before unpinning the screen, switch on Ask for unlock
pattern / PIN / password before unpinning when the
screen lock has been set.
Pin a Screen
1. Ensure that screen pinning is turned on.
2. Open the app you want to keep in view.
3. Touch the Recent apps key.
4. If there are many app tabs, swipe up to find on the
front-most tab.
5. Touch .
Unpin the Screen
To unpin the screen and return to normal use, touch and hold the
Back key.
If you have asked for the unlock pattern, PIN or password before
unpinning the screen, touch and hold on the lock screen and
draw the pattern or enter the PIN/password.
34
Page 35
Vibration
Alarm set
Knowing the Basics
Monitoring the Phone Status
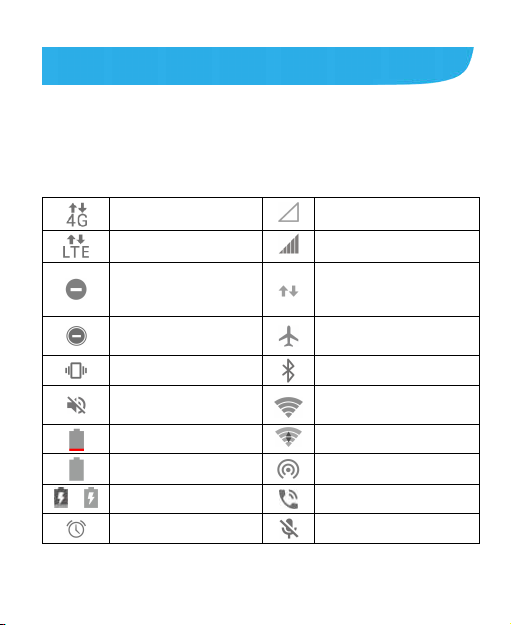
The status bar at the top of the home screen provides phone and
service status icons on the right side. Below are some of the
icons you may see.
4G/3G connected
LTE connected
Do not disturb mode on
(Alarms only or Priority
only)
Do not disturb mode on
(Total silence)
Silent mode
Battery low
Battery full
Battery charging
/
mode
No signal
Signal strength
Mobile data in use
Airplane mode
Bluetooth on
Connected to a Wi-Fi®
network
Wi-Fi in use
Mobile hotspot on
Speaker on
Phone microphone off
35
Page 36
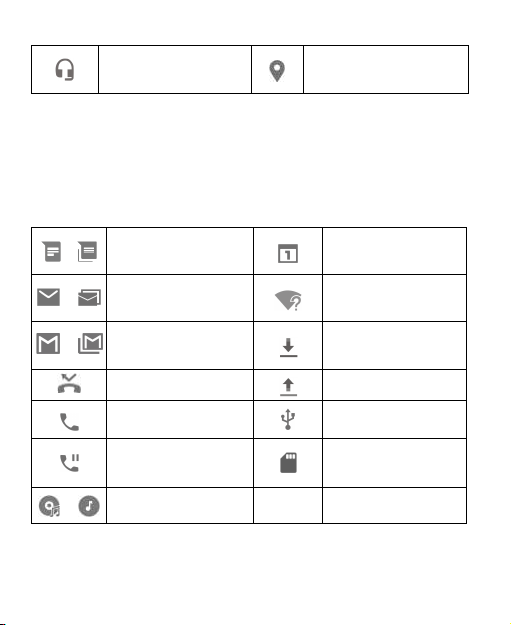
Wired headset
connected
GPS on
Managing Notifications
Notification Icons
The status bar at the top of the home screen provides notification
icons on the left. Below are some of the icons you may see.
New SMS or MMS
/
messages
New message(s) from
/
the Email app
New message(s) from
/
the Gmail™ app
Missed call
Call in progress
Call on hold
Song playing
/
36
Upcoming event
New Wi-Fi network
detected
Downloading data
Sending data
USB connected
microSDXC card
mounted
Page 37

Open/Close the Notification Panel
Notifications report the arrival of new messages, calendar
events, and alarms, as well as ongoing events, such as when
you are playing music. You can open the notification panel to
view the details of notifications.
To open the notification panel, swipe your finger down on the
home screen or from the top of the screen.
To close the notification panel, swipe your finger up on the
screen or touch the Back key.
Respond to or Remove a Notification
In the notification panel, you can respond to a notification or
remove the notifications. The notification panel also supports
expandable notifications that let you perform additional actions
right from the notification itself.
To respond to a notification, just touch it.
Slide down with one finger to expand certain notifications.
You can also swipe two fingers vertically or pinch-zoom to
expand or collapse certain notifications, or touch / to
expand or collapse certain notifications and bundled
notifications.
To remove a notification, swipe it left or right.
To remove all non-persistent notifications, touch CLEAR ALL
below all the notifications.
To manage notifications you have received, touch and hold a
notification, or slide it left or right a small amount and touch
37
Page 38

, and then choose to silence or block the application, or
touch MORE SETTINGS to customize more notification
settings. See Notifications.
NOTE:
If you block notifications for an app, you may miss its important
alerts and updates. The notifications of some apps cannot be
blocked.
Use Quick Settings
The Quick Settings make it convenient to view or change the
most common settings for your phone.
Open the notification panel and you can find a few Quick Settings
on the top. To open the Quick Settings panel and find all setting
tiles, drag the notification panel downwards, or swipe down from
the top of the screen with two fingers.
NOTE:
You can swipe left or right on the Quick Settings panel to find all
setting tiles.
To turn on or off settings quickly:
1. Swipe down from the top of the screen with two fingers to
open the Quick Settings panel.
2. To turn on or off a setting, touch its tile. Touch and hold
certain tiles to access more setting options. For example,
touch and hold the Wi-Fi tile to open Wi-Fi settings.
To customise the Quick Settings panel:
You can add, remove or rearrange the tiles on the Quick Settings
38
Page 39

panel.
1. Open the Quick Settings panel.
2. Touch at the top and do one of the following.
Touch and hold a tile and drag it to the position you want.
Touch and hold a tile and drag it to the section below to
hide it.
In the Drag to add tiles section, drag a tile up to show it
in the Quick Settings panel.
NOTE:
On the Quick Settings panel, touch at the top to get to the
Settings menu.
Managing Shortcuts and Widgets
Add Shortcuts and Widgets
1. Touch the Home key > .
- or -
To add widgets, touch and hold an empty area of the home
screen and select Widgets.
2. Slide to browse the available applications or widgets.
3. Touch and hold a widget or an application icon and drag it to
a home screen panel.
NOTE:
While holding the item, you can drag it to the right edge of the
screen to create a new home screen panel and put the item on it.
39
Page 40

Move Shortcuts or Widgets
1. Touch and hold a shortcut or widget on the home screen.
2. Drag it to the place you need.
Remove Shortcuts or Widgets
1. Touch and hold a shortcut or widget on the home screen.
2. Drag it to (Remove) to remove it.
Adjust Widget Size
1. Touch and hold a widget on the home screen and then
release it.
2. An outline appears around the widget. Drag the outline to
resize the widget.
NOTE:
Not all widgets can be resized.
Organizing With Folders
You can create folders on the home screen and add several
shortcuts to a folder.
You can move or remove folders the same way as moving or
removing shortcuts.
1. Touch and hold a shortcut on the home screen until
(Folder) appears.
2. Drag the shortcut to (Folder) and release it. A new folder
will be created and the shortcut is added into the folder.
40
Page 41
3. To add more shortcuts into the folder, touch and hold each
shortcut and drag it over the folder before releasing it.
NOTE:
Touch the folder and then touch the name field to rename the
folder.
Rearranging the Primary Shortcuts
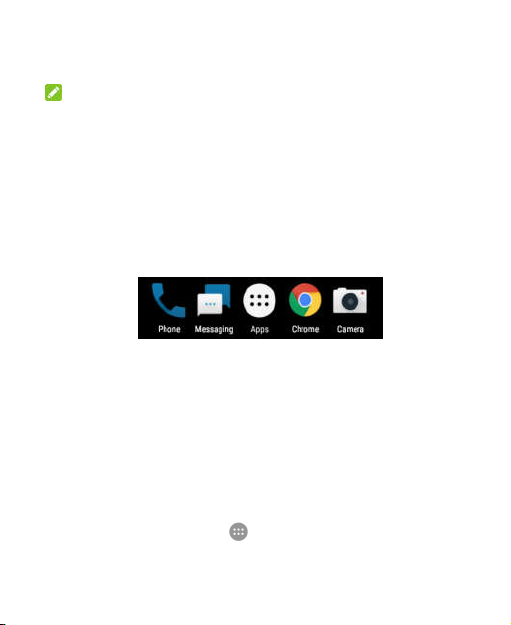
The home screen includes a customizable primary shortcuts area
at the bottom visible from all home screens. You can keep at
most four items in the primary shortcuts area. Drag shortcuts or
folders in or out of the area to rearrange it.
Entering Text
You can enter text using the onscreen keyboard. Some apps
open it automatically. In others, you open it by touching where
you want to type. Touch the Back key to hide the onscreen
keyboard. You can also enter text by speaking with the Google
voice typing feature.
Enable or Disable Input Methods
1. Touch the Home key > > Settings > Languages &
input > Virtual keyboard.
41
Page 42

2. Touch Manage keyboards.
3. Slide the switches beside the input methods to enable or
disable them.
Change Input Methods
1. When you use the onscreen keyboard to enter text, open the
notification panel and touch (Change keyboard).
2. Select the input method you need.
NOTE:
The icon appears only when more than one keyboard input
method is installed and enabled.
Google Keyboard
The Google Keyboard provides a layout similar to a desktop
computer keyboard. When screen auto-rotation is enabled, turn
the phone sideways and the keyboard will change from portrait to
landscape. The landscape keyboard is not supported in all
applications.
42
Page 43
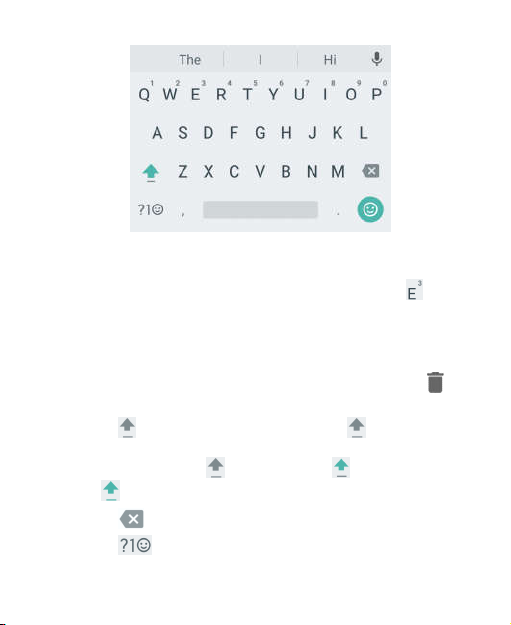
Touch the alphabetic keys to enter letters. Touch and hold
some specific keys to enter associated accented letters or
numbers. For example, to enter É, touch and hold and
the available accented letters and number 3 appear. Then
slide to choose É.
As you enter a word, candidates appear above the keyboard.
Touch to select the correct one; drag a suggestion to to
remove it.
Touch to use uppercase. Double-tap to lock
uppercase. This key also changes to indicate the current
case you are using: for lowercase, for uppercase,
and when locked in uppercase.
Touch to delete the text before the cursor.
Touch to select numbers and symbols. You can then
43
Page 44

touch to find more or touch to enter miniature
icons.
Touch to enter miniature icons, such as expressions,
horoscopes, and animals.
Touch to use Google voice typing.
Touch and hold to change the input language or set up
the Google Keyboard.
Touch and hold and then slide right to resize the
keyboard for one-hand input.
Gesture Typing
The Google Keyboard supports the gesture typing feature. You
use this feature to input a word by sliding through the letters.
To enable and use gesture typing:
1. Touch and hold on the Google Keyboard and then touch
Google Keyboard settings.
2. Touch Gesture typing and then touch Enable gesture
typing if this feature is turned off.
3. Move your finger from letter to letter on the keyboard to trace
a word without lifting the finger until you reach the end of the
word.
44
Page 45
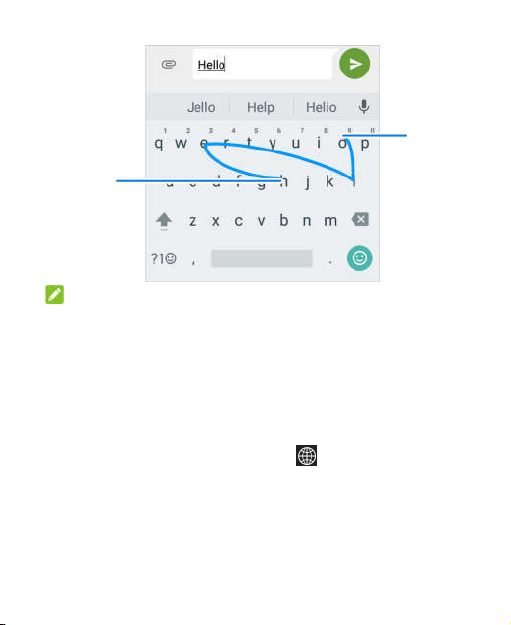
End of
the word
Start of
the word
NOTES:
Touch when you want to. If you want to enter a single letter,
go ahead and touch.
Lift your finger at the end of the word. A space is added
automatically when you begin to input the next word.
TouchPal Keyboard
The TouchPal keyboard offers three layouts including FULL,
PHONEPAD, and T+. You can touch to select a language
and layout.
You can also use Curve® and Wave™ to speed up text input by
moving your finger from letter to letter or word from word without
lifting the finger.
45
Page 46
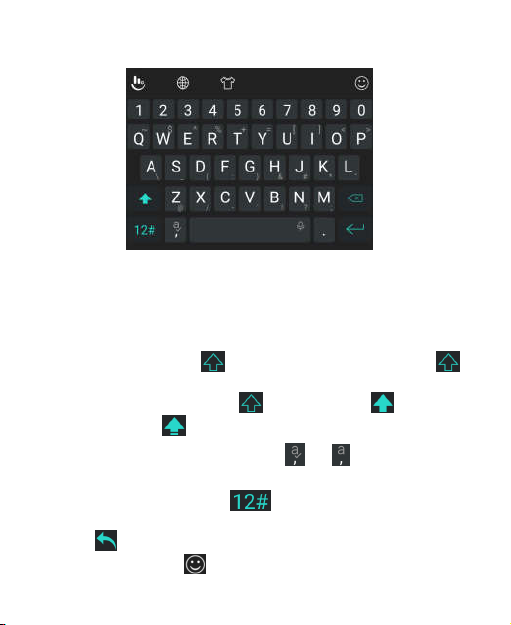
The Full Layout
The FULL layout offers an input experience similar to a computer
keyboard.
The alphabetic keys: Touch the keys to enter letters. Touch
and hold a key and slide if necessary to choose more
characters.
The shift key: Touch to use uppercase. Double-tap
to lock uppercase. This key also changes to indicate the
current case you are using: for lowercase, for
uppercase, and when locked in uppercase.
Word prediction: Touch and hold or and touch the
prediction switch to turn off or on prediction.
Pre-defined texts: Touch to enter digits, symbols, and
other texts. You can touch the arrow keys to turn pages, or
touch to go back to the alphabetic keys. Slide up on the
space key or touch to enter Emoji and emoticons.
46
Page 47
The delete key: Touch to delete text before the cursor.
You can also slide left on the key to delete a whole word.
More options: Touch to access additional functions of
TouchPal, use voice input, edit text, change keyboard themes,
and more.
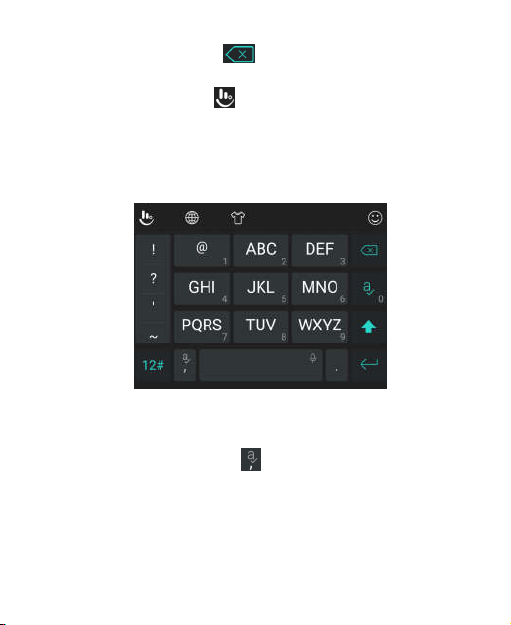
The PHONEPAD Layout
This layout is similar to a phonepad.
Touch an alphabetic key repeatedly until the desired letter
appears. You can also touch and hold the key and slide left or
right to choose the letter or number you need.
If word prediction is enabled ( ), just touch the keys once and
choose the right word.
47
Page 48
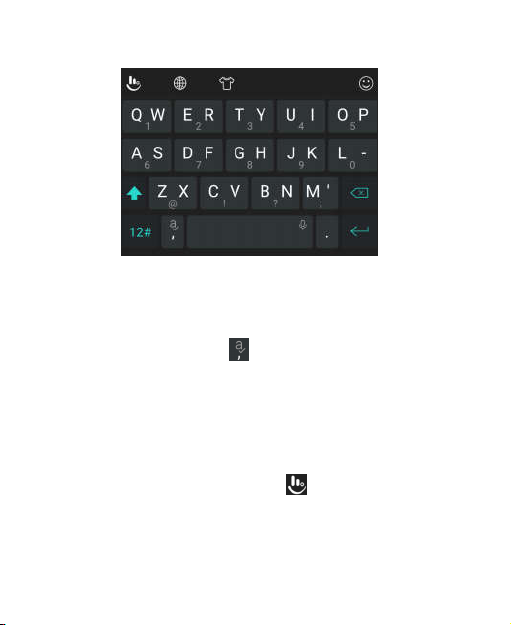
The T+ Layout
Touch to enter the left letter on the key. Double-tap or flick right to
enter the right letter/symbol on the key. You can also touch and
hold a key and slide left or right to choose more letters and
symbols.
If word prediction is enabled ( ), just touch the keys once and
choose the right word.
Curve - Word Gesture
Curve allows you to enter text by moving your finger on the
screen from letter to letter to enter each word.
To enable and use Curve:
1. On the TouchPal keyboard, touch > Settings > Smart
input and check Curve® - Word gesture.
2. Touch the Back key to return to the text field. Open the
TouchPal keyboard and switch to the FULL layout.
48
Page 49
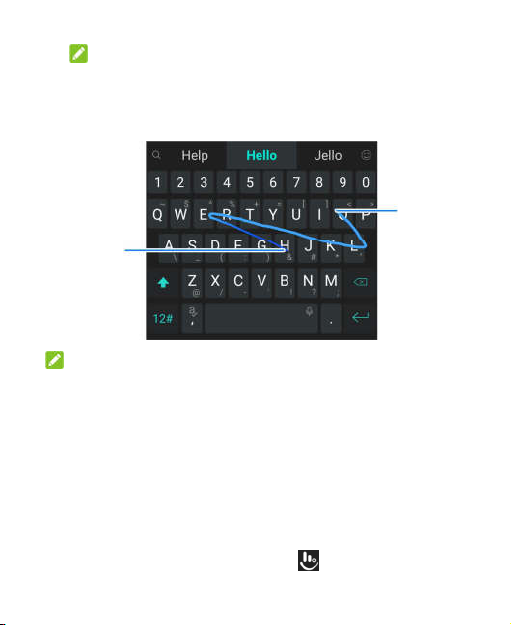
Start of
the word
NOTE:
Curve is only available in the FULL layout.
3. Move your finger from letter to letter on the keyboard to trace
a word without lifting until you reach the end of the word.
NOTES:
Touch when you want to. If you want to enter a single letter, go
ahead and touch the key.
Lift your finger at the end of the word. A space is added
automatically when you begin to trace the next word.
Wave - Sentence Gesture
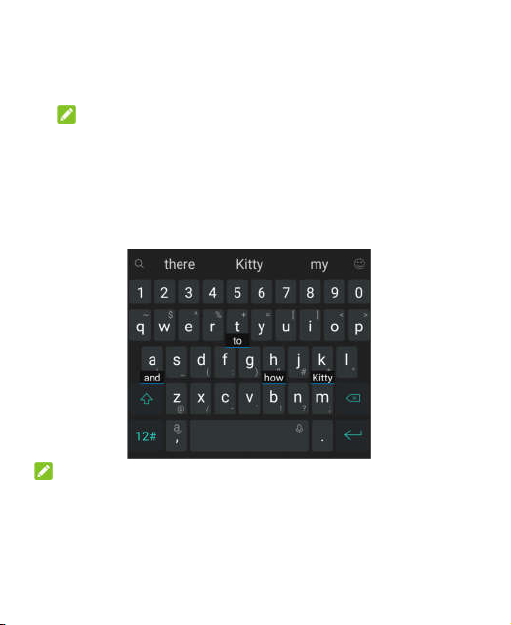
Wave allows you to enter words by dragging candidate words to
the space key.
To enable and use Wave:
1. On the TouchPal keyboard, touch > Settings > Smart
49
End of
the word
Page 50
input and check Wave™ - Sentence gesture.
2. Touch the Back key to return to the text field. Open the
TouchPal keyboard and switch to the FULL layout.
NOTE:
Wave is only available in the FULL layout.
3. Touch or use Curve to enter the first word. As the first word
appears on the text field, candidate words appear on the
keyboard for you to choose from as the following word.
4. Drag the correct candidate word to the space key to add the
word to the text field.
NOTE:
If no candidate word is correct or displayed, you can go on
entering the words normally.
50
Page 51

Google Voice Typing
Google voice typing uses the Google voice recognition service to
convert speech to text.
1. Touch to access the voice typing feature when you are
using the Google Keyboard.
Or flick down the status bar when entering text and touch
Change keyboard, and then select Google voice typing.
2. When you see the microphone image, speak what you want
to type.
3. You can continue entering text to keep it or to delete it.
NOTE:
Say "comma," "period," "question mark," "exclamation mark," or
"exclamation point" to enter punctuation.
Input Method Settings
Choose the input method settings by touching > Settings >
Languages & input > Virtual keyboard from the home screen.
You can set the current input method and choose the settings for
input methods.
Editing Text
Move the insertion point: Touch where you want to type.
The cursor blinks in the new position, and a tab appears
below it. Drag the tab to move the cursor.
51
Page 52

Select text: Touch and hold or double-tap within the text.
The nearest word highlights, with a tab at each end of the
selection. Drag the tabs to change the s election.
Cut or copy: Select the text you want to manipulate. Then
touch CUT or COPY to cut or copy the text to the clipboard.
Replace text with the clipboard text: Select the text you
want to replace. Then touch PASTE.
Insert clipboard text to the text field: Touch the tab below
the cursor and then select PASTE.
Opening and Switching Apps
Open an App
1. Touch the Home key > .
2. Slide up or down on the screen and touch an app to open it.
NOTE:
Drag the slider on the right side of the screen to the initial letter of
the app you need, or touch the search box at the top to search for
apps.
Switch Between Recently Opened Apps
1. Touch the Recent apps key. The apps you’ve used recently
are displayed in a series of tabs. Slide up and down to see all
the tabs.
2. Touch a tab to open that app.
52
Page 53

NOTE:
You can swipe a tab sideways or touch X on the tab to remove it
from the screen. Touch Clear all to remove all tabs.
NOTE:
Double-tap the Recent apps key to quickly switch between two
most recently opened apps.
Using Two Apps in Split-Screen Mode
You can work with two apps at the same time in split-screen
mode.
NOTE:
Some apps may not support split-screen mode.
1. Open the first app you want to use and then touch and hold
the Recent apps key. The screen is divided into two.
-orTouch the Recent apps key to view your recently used apps,
touch and hold the tab of the app you want to use and drag it
to the Drag here to use split screen area.
2. You can do one of the following.
If the app you need is in the recent apps list, touch it to set
it as the second app.
Touch the Home key to find the app you need and open it
as the second app.
To turn off split-screen mode, touch and hold the Recent apps
key, or drag the handle on the screen to the edge of the
53
Page 54

screen.
Uninstalling or Disabling an App
1. Touch the Home key > to open the application list
screen.
2. Touch and hold an application icon and drag the icon to
(Uninstall) or (Disable) at the top of the screen.
3. Touch OK to uninstall or disable the app.
NOTES:
Not all apps cannot be uninstalled or disabled.
To find the disabled applications, touch the Home key > >
Settings > Apps and touch > Disabled. You can then
touch an application and touch ENABLE to restore it.
54
Page 55

Connecting to Networks and
Devices
Connecting to Mobile Networks
Control Mobile Data Use
To enable or disable data access:
1. Touch the Home key > > Settings > Mobile networks >
Mobile Data.
2. Touch the Mobile Data switch to enable or disable mobile
data use.
To get data services when roaming:
1. Touch the Home key > > Settings > Mobile networks >
International Data Roaming.
2. Touch the Mobile Data switch if it is turned off.
NOTE:
Data roaming may incur significant roaming charges.
Select Preferred Network Type
1. Touch the Home key > > Settings > Mobile networks >
Preferred network type.
2. Touch the type of network you prefer to connect to.
55
Page 56

Set Access Point Names
To connect to the Internet you can use the default Access Point
Names (APN). And if you want to add a new APN, please contact
the service provider to get the necessary information.
1. Touch the Home key > > Settings > Mobile networks >
Access Point Names.
2. Touch .
3. Touch each item to enter the information you get from your
service provider.
4. Touch > Save to complete.
NOTE:
To set the APN to default settings, touch > Reset to default.
Select Network Operator
1. Touch the Home key > > Settings > Mobile networks >
Network operators.
2. Touch Search networks to search for all available networks
and select one to register manually. You can also touch
Choose automatically to select preferred network
automatically.
Disable 2G Service
1. Touch the Home key > > Settings > Mobile networks.
2. Touch the Disable 2G switch to turn it on.
56
Page 57

CAUTION:
If 2G service is disabled, some apps and functions may not work
in areas with limited coverage.
Connecting to Wi-Fi
Wi-Fi is a wireless networking technology that can provide
Internet access at distances of up to 300 feet, depending on the
Wi-Fi router and your surroundings.
Turn Wi-Fi On and Connect to a Wi-Fi
Network
1. Touch the Home key > > Settings > Wi-Fi.
2. Slide the Wi-Fi switch to the On position to turn on Wi-Fi.
3. Touch a network name to connect to it.
4. If the network is secured, enter the password and touch
CONNECT.
NOTE:
Your phone automatically connects to previously used Wi-Fi
networks when they are in range.
Get Notified of Open Networks
1. Touch the Home key > > Settings > Wi-Fi.
2. Slide the Wi-Fi switch to the On position.
3. Touch .
4. Slide the Network notification switch.
57
Page 58

When Wi-Fi is on, you receive notifications in the status bar when
your phone detects an open Wi-Fi network. Switch off this option
to turn off notifications.
Add a Wi-Fi Network
You can add a Wi-Fi network if the network does not broadcast
its name (SSID), or to add a Wi-Fi network when you are out of
range.
To connect to a secured network, you first need to get the
security details from the network's administrator.
1. Touch the Home key > > Settings > Wi-Fi.
2. Slide the Wi-Fi switch to the On position.
3. At the bottom of the available Wi-Fi networks, touch Add
network.
4. Enter the network SSID (name). If necessary, enter security
or other network configuration details.
5. Touch SAVE.
Connect to a WPS Network
Wi-Fi Protected Setup (WPS) is a feature that makes it easy to
add your phone to the access points which support WPS.
You can use one of the following methods to connect your phone
to a wireless network using WPS.
Method one: WPS button (Recommended)
1. Touch the Home key > > Settings > Wi-Fi.
58
Page 59

2. Slide the Wi-Fi switch to the On position.
3. Touch > Advanced > WPS Push Button.
4. Press the WPS button on the access point and the access
point will recognize your phone and add it to the network.
Method two: PIN number
1. Touch the Home key > > Settings > Wi-Fi.
2. Slide the Wi-Fi switch to the On position.
3. Touch > Advanced > WPS Pin Entry.
4. The WPS PIN number displays on the screen. Enter the PIN
number into the access point's setup page.
After entering the PIN number, your phone automatically finds
the access point and configures the connection.
NOTE:
For detailed information about the WPS feature of the access
point, please refer to its user documents.
Forget a Wi-Fi Network
You can make your phone forget about the details of a Wi-Fi
network that you added - for example, if you don’t want the phone
to connect to it automatically or if it is a network that you no
longer use.
1. Touch the Home key > > Settings > Wi-Fi.
2. Slide the Wi-Fi switch to the On position.
3. Touch and touch Saved networks.
59
Page 60

4. Touch the Wi-Fi network name and then touch FORGET.
Adjust Advanced Wi-Fi Settings
1. Touch the Home key > > Settings > Wi-Fi.
2. Touch to adjust the following settings.
Network notification: Get notifications in the status bar
when Wi-Fi is on and an open network is available.
Keep Wi-Fi on during sleep: Set whether to keep Wi-Fi
on in sleep mode.
MAC address: Check the MAC address.
IP address: Check the phone’s IP address.
- or -
Touch > Advanced to adjust the following settings.
Install certificates: Install certificates needed for
connecting to certain Wi-Fi networks.
Wi-Fi Direct: Use the Wi-Fi Direct feature. See Using
Wi-Fi Direct®.
WPS Push Button: Connect to a WPS network via the
push button method.
WPS Pin Entry: Connect to a WPS network via the
phone PIN method.
Using Wi-Fi Direct®
Wi-Fi Direct allows Wi-Fi devices to share files and data directly
60
Page 61

by connecting to each other without the need for wireless access
points (hotspots). Your phone supports Wi-Fi Direct, but you may
need to install third-party applications to share data through Wi-Fi
Direct.
To connect via Wi-Fi Direct:
1. Touch the Home key > > Settings > Wi-Fi.
2. If Wi-Fi is off, slide the Wi-Fi switch to the On position.
3. Touch > Advanced > Wi-Fi Direct. Your phone will search
for other devices enabled with Wi-Fi Direct connections.
4. Touch a device name below Peer devices to connect with it.
The other device will receive a connection prompt and need
to accept the request for connection. Both devices may need
to enter a common PIN.
5. Once connected the device is displayed as “Connected” in
the Peer devices list.
Connecting to Bluetooth Devices
Bluetooth is a short-range wireless communication technology.
Phones or other devices with Bluetooth capabilities can
exchange information wirelessly within a distance of about 30
feet. The Bluetooth devices must be paired before the
communication is performed.
Turn Bluetooth On/Off
1. Touch the Home key > > Settings > Bluetooth.
2. Slide the Bluetooth switch to the On or Off position.
61
Page 62

When Bluetooth is on, the icon appears in the status bar.
Change the Device Name
1. Touch the Home key > > Settings > Bluetooth.
2. Slide the Bluetooth switch to the On position if Bluetooth is
off.
3. Touch > Rename this device.
4. Edit the name and touch RENAME.
Pair With Another Bluetooth Device
1. Touch the Home key > > Settings > Bluetooth.
2. Slide the Bluetooth switch to the On position if Bluetooth is
off.
Your phone automatically scans for and displays the IDs of
all available Bluetooth devices in range. You could touch
> Refresh if you want to scan again.
3. Touch the device you want to pair with.
4. Confirm that the Bluetooth passkeys are the same between
the two devices and touch PAIR. Alternately, enter a
Bluetooth passkey and touch PAIR.
Pairing is successfully completed when the other device
accepts the connection or the same passkey is entered.
NOTE:
The Bluetooth passkey may be fixed for certain devices, such as
headsets and hands-free car kits. You can try entering 0000 or
62
Page 63

1234 (the most common passkeys), or refer to the documents for
that device.
Forget (Unpair With) a Bluetooth Device
You can make your phone forget its pairing connection with
another Bluetooth device. To connect to the device again, you
need to search it and enter or confirm a passkey again.
1. Touch the Home key > > Settings > Bluetooth and
ensure that Bluetooth is turned on.
2. In the list of paired devices, touch the icon beside the
Bluetooth device you want to forget.
3. Touch FORGET.
Send Data via Bluetooth
1. Open the appropriate application and select the file or item
you want to share.
2. Select the option for sharing via Bluetooth. The method may
vary by application and data type.
3. Touch a Bluetooth device the phone has paired with or wait
for it to search for new devices and touch one of them.
Receive Data via Bluetooth
1. Turn Bluetooth on before trying to receive data via Bluetooth.
2. Touch ACCEPT to start receiving the data. If necessary, flick
down the status bar, and touch ACCEPT on the Bluetooth
sharing notification.
Depending on your storage setting and whether a microSDXC
63
Page 64

card is installed, received files are stored automatically in a
dedicated folder (Bluetooth, for instance). You can access them
with the File Manager app.
Connecting to Your Computer via USB
You can connect your phone to a computer with a USB cable and
transfer music, pictures, and other files in both directions. Your
phone stores these files in the phone storage or on a removable
microSDXC card.
Connect Your Phone to a Computer via USB
1. Connect your phone to the PC with a USB cable.
2. Open the notification panel and touch (USB for ...).
3. Choose one of the following options:
Charge only: Charge your phone via USB.
Install driver: Install the driver needed for some USB
connection modes (such as MTP). You only need to install
the driver on the same PC once.
NOTE:
You can also install the driver on PC by running the
executable file in the new CD-ROM drive.
Media device (MTP): Transfer files on Windows® or
Mac®.
NOTE:
For Windows XP, please install the drivers and Media
64
Page 65

Player 11 (or later version) when you use Media device
(MTP) for the first time.
Camera (PTP): Transfer photos using camera software.
NOTE:
To make your phone connect to the computer automatically using
the selected connection type, check Don’t ask me again.
Disconnect Your Phone From the Computer
To disconnect the phone from the computer, simply unplug the
USB cable when you’re finished.
Using the microSDXC Card as Portable
or Phone Storage
You can use your microSDXC card as portable storage when
there's already content such as your media and other files so that
you don't lose them.
If your microSDXC card is new or doesn't have content you want
to keep, you can also set it up as an extension of the phone
storage, and this requires formatting that prevents the
microSDXC card from working with other devices.
CAUTION:
As part of the phone storage, the microSDXC card may have
data on it that is necessary for some apps to function normally.
Therefore, do not remove or replace the card randomly.
65
Page 66

Set Up the microSDXC Card as Portable
Storage
When you install a microSDXC card that has not been used on
your phone before, the phone will mount the card as portable
storage by default.
You can also open the notification panel and touch the
microSDXC card name, select Use as portable storage and
then touch NEXT > DONE.
To remove the microSDXC card from your phone:
If you need to remove the microSDXC card used as portable
storage while the phone is on, you must unmount it first.
1. Touch the Home key > > Settings > Storage.
2. Touch next to the card name in the Portable storage
section.
3. When the screen prompts the card is safely ejected, you can
now remove it from the phone.
To erase and format the microSDXC card:
1. Touch the Home key > > Settings > Storage.
2. Touch the card name in the Portable storage section.
3. Touch Format.
4. Touch ERASE & FORMAT.
CAUTION:
The formatting procedure erases all the data on the microSDXC
card, after which the files CANNOT be retrieved.
66
Page 67

Set Up the microSDXC Card as Phone
Storage
If your microSDXC card is new or doesn't have content you want
to keep, you can format the card and use it as part of the phone
storage. If you move the microSDXC card to another device, it’ll
be formatted before it can be used.
1. Touch the Home key > > Settings > Storage.
2. Touch the card name in the Portable storage section.
3. Touch Format as internal.
4. Touch ERASE & FORMAT.
CAUTION:
The formatting procedure erases all the data on the
microSDXC card, after which the files CANNOT be retrieved.
5. The phone will prompt you to move your photos, files and
other data from the internal storage to the microSDXC card.
Select Move now or Move later and touch NEXT. Follow the
onscreen instructions to continue.
To move data between the internal storage and the
microSDXC card:
With the microSDXC card as part of the phone storage, you can
move your photos, files and other data between the internal
storage and the card any time.
1. Touch the Home key > > Settings > Storage.
2. Touch Phone or the microSDXC card name.
3. Touch Migrate data.
67
Page 68

4. Touch MOVE.
NOTE:
Whenever you move data between the internal storage and the
microSDXC card, the destination is used to save new apps and
personal data (such as photos and videos) and only the
destination is accessible from a computer.
To remove the microSDXC card from your phone:
If you need to remove the microSDXC card used as phone
storage while the phone is on, you must unmount it first.
1. Touch the Home key > > Settings > Storage.
2. Touch your card name below Phone.
3. Touch Remove SD card.
NOTE:
Before ejecting the card, ensure that you have moved data
and apps to the internal storage.
4. Touch EJECT.
5. When the screen prompts the card is safely ejected, you can
now remove it from the phone.
To reformat the microSDXC card as portable storage:
If you no longer want to use your microSDXC card as phone
storage, you can reformat the card as portable storage.
NOTE:
Before the formatting, ensure that you have moved data and
apps to the internal storage.
1. Touch the Home key > > Settings > Storage.
68
Page 69

2. Touch your card name below Phone.
3. Touch Format as portable.
4. Touch FORMAT.
CAUTION:
The formatting procedure erases all the data on the microSDXC
card, after which the files CANNOT be retrieved.
Sharing Your Mobile Data Connection
You can share your phone’s data capabilities through USB
tethering or by activating the Wi-Fi hotspot feature to create a
mobile hotspot.
Share Your Mobile Data Connection via USB
You can access the Internet on your computer via the USB
tethering feature of your phone. The feature needs data
connection on a mobile network and may result in data charges.
NOTE:
You cannot transfer files between your phone and your computer
when the phone is USB tethered.
1. Connect your phone to your computer with a USB cable.
2. Touch the Home key > > Settings > More.
3. Switch on USB tethering. A new network connection will be
created on your computer.
NOTE:
To stop sharing your data connection, switch off USB tethering
69
Page 70

or disconnect the USB cable.
Share Your Mobile Data Connection as a
Mobile Hotspot
You can share your phone’s data connection with other devices
by turning your phone into a portable Wi-Fi hotspot. The feature
needs data connection on a mobile network and may result in
data charges.
NOTE:
When the mobile hotspot feature is enabled, you cannot use your
phone’s Wi-Fi capability to access the Internet. You still remain
connected to the Internet via your mobile data network.
1. Touch the Home key > > Settings > Mobile Hotspot.
2. Slide the switch to the On position.
After a moment, the phone starts broadcasting its Wi-Fi
network name (SSID).
3. On another device, locate your phone via Wi-Fi and connect
with it to start using the phone’s mobile data.
NOTE:
To stop sharing your data connection, slide the switch to the Off
position.
Set Your Mobile Hotspot
You can change the name of your phone's Wi-Fi network (SSID),
secure your mobile hotspot, and set other options.
1. Touch the Home key > > Settings.
70
Page 71

2. Touch Mobile hotspot and set the following options.
Configure:
-
Network name: Enter or edit a network name (SSID)
that other devices see when scanning for Wi-Fi
networks.
-
Channel: To avoid interference with other Wi-Fi
networks, try using a different channel.
-
Security: Choose a security option, Open (not
recommended) or WPA2 PSK (other users can
access your mobile hotspot only if they enter the
correct password). When you select WPA2 PSK,
touch the Password field to edit the security
password.
-
Show password: Display or hide the security
password.
-
Broadcast network name (SSID): Broadcast or hide
your network name. If the broadcast is disabled, other
users need to get your network name to find the
mobile hotspot.
Manage users: Block or unblock users, or set the
maximum number of devices that can connect to the
hotspot simultaneously.
Sleep policy: Set hotspot sleep policy and notification.
Connecting to Virtual Private Networks
Virtual private networks (VPNs) allow you to connect to the
resources inside a secured local network. VPNs are commonly
71
Page 72

deployed by corporations, schools, and other institutions to let
people access local network resources when not on campus, or
when connected to a wireless network.
Depending on the type of VPN you are using, you may be
required to enter your login credentials or install security
certificates before you can connect to your VPN. You can get this
information from your network administrator.
Add a VPN
1. Touch the Home key > > Settings > More > VPN.
2. Touch at the top right corner and fill in the information
provided by your network administrator.
3. Touch SAVE.
The VPN is added to the list on the VPN screen.
NOTE:
You must set a lock screen pattern, PIN or password before
using VPN.
Connect to a VPN
1. Touch the Home key > > Settings > More > VPN.
2. Touch the VPN that you want to connect to.
3. When prompted, enter any requested credentials, and then
touch CONNECT.
Modify a VPN
1. Touch the Home key > > Settings > More > VPN.
72
Page 73

2. Touch beside the VPN that you want to modify.
3. Edit the VPN settings and then touch SAVE.
73
Page 74
Phone Calls
You can place calls from the Phone app, the Contacts app, or
other apps or widgets that display contact information. Wherever
you see a phone number, you can usually touch it to dial.
Placing and Ending Calls
Place a Call by Dialing
1. Touch the Home key > > Phone.
2. Touch and enter the phone number or the contact name
with the dialpad. Touch to delete incorrect digits.
NOTE:
As you enter the phone number or the contact name, your
phone searches for matching information in your contacts. If
you see the number and contact you want to call, touch it to
place the call immediately.
3. Touch below the keypad to dial.
You can also touch the search box at the top of the Phone app
screen and enter the phone number or contact name you want to
call. Touch the matching contact or Call [number] to place the
call.
NOTE:
To make an international call, touch and hold the 0 key to enter
the plus (+) symbol. Next, enter the country code, followed by the
city/area code and then the phone number.
74
Page 75
NOTE:
To redial the last call you made, just touch when the
phone number field is empty to enter the number automatically.
End a Call
During a call, touch on the screen.
Answering or Rejecting Calls
When you receive a phone call, the incoming call screen opens,
displaying the caller ID or the information about the caller that
you've entered in the Contacts app. You can answer or reject the
call, or reject it with a text message.
Answer a Call
When you receive a phone call, drag to to answer the
call.
- or If the screen is unlocked, touch Answer to answer the call.
NOTE:
To silence the ringer before answering the call, you can press the
Volume key, the Power key, the Home key, the Back key, or the
Recent apps key.
Reject a Call
When you receive a phone call, you can:
75
Page 76
Drag to to reject the call.
- or -
Touch at the bottom to reject the call and select a preset text
message or edit one to send to the caller.
- or -
If the screen is unlocked, touch Dismiss to reject the call, or
touch Message to reject the call and select a preset text
message or edit one to send to the caller.
NOTE:
To edit the preset text response from within the Phone app, touch
in the top search field and select Settings > Quick responses.
Working With the Call History
The call history is a list of all the calls you've placed, received, or
missed. It provides a convenient way to redial a number, return a
call, or add a number to your contacts.
To open the call history, you can touch the Home key > >
Phone > (in the top search field) > Call History.
Place a Call From the Call History
1. Open the call history.
2. Touch beside a listing to call back.
NOTE:
You can touch (missed call), (outgoing call), or
(incoming call) to filter the records by call type.
76
Page 77

Add a Number From Call History as a Contact
1. Open the call history.
2. Touch the contact icon in front of a number.
3. Touch on the contact information tab.
4. To add the number to an existing contact, touch a contact in
the list. To add a new contact, touch Create new contact.
Take Other Actions on a Call History Entry
Open the call history, touch a listing and then touch Call details
to view more call information.
Touch to delete the entry.
Touch to call the number.
Touch Block number > BLOCK and you will no longer
receive calls or messages from the number.
NOTE:
To find all blocked numbers, touch the Home key > >
Phone > > Settings > Call blocking.
Touch Copy number to copy the number to the clipboard.
Touch Edit number before call to edit the number in the
dialler before calling it.
Touch the contact icon in front of the entry to open the contact
information tab from the bottom. You can send a message,
call back, edit the contact, add the contact to favorites, or add
the number to contacts.
NOTE:
77
Page 78
Touch > Clear call history in the call history screen to select
and delete the history records.
Calling Your Contacts
1. Touch the Home key > > Phone. Your favorite contacts
and frequently called contacts are displayed in the
FAVORITES tab.
2. Touch a contact to place the call, or touch the CONTACTS
tab and then touch beside a contact to make a call.
Checking Voicemail
If you have set the phone to divert calls to voicemail, callers can
leave voicemail messages when they cannot reach you. Here’s
how to check the messages they left.
1. Touch the Home key > > Phone > .
2. Touch and hold the 1 key in the dialer. If prompted, enter your
voicemail password.
3. Follow the voice prompts to listen to and manage your
voicemail messages.
NOTE:
See Set Voicemail for how to set your voicemail service. For
detailed information, please contact the service provider.
78
Page 79
Using Options During a Call
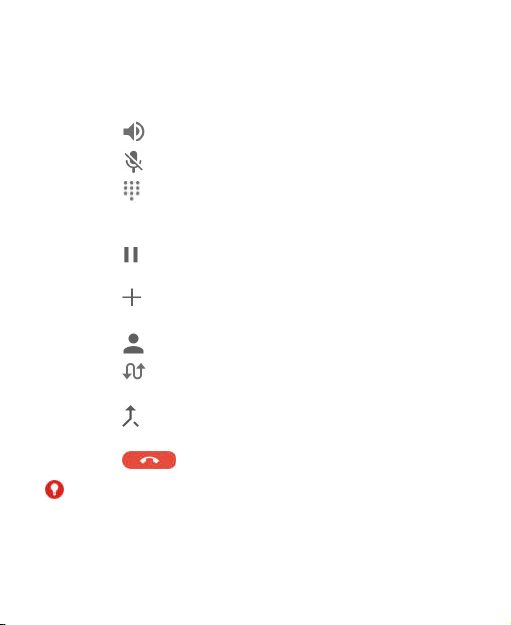
During a call, you will see a number of onscreen options. Touch
an option to select it.
Touch to turn on or off the speaker.
Touch to mute or unmute your microphone.
Touch to switch to the keypad when you need to enter a
code (for example, the PIN for your voicemail or bank
account) during the call.
Touch to put the call on hold when this option is
available.
Touch to make another call separately from the first call,
which is put on hold.
Touch to open the Contacts app.
Touch to put the caller you are speaking to on hold, and
switch to the other call that has been put on hold.
Touch to merge the separate calls into a single
conference call.
Touch to end the current call.
WARNING!
Because of higher volume levels, do not place the phone near
your ear during speakerphone use.
79
Page 80
Managing Multi-party Calls
When the call waiting and three-way call features are available,
you can switch between two calls or set up a conference call.
NOTE:
The call waiting and three-way call features need network
support and may result in additional charges. Please contact your
service provider for more information.
Switch Between Current Calls
When you’re on a call and another call comes in, your phone
screen informs you and displays the caller ID.
To respond to an incoming call while you’re on a call:
Touch Hold current and answer to answer the call. (This
puts the first caller on hold and answers the second call.)
Touch End current and answer to answer the second call
and end the first one.
Touch to reject the second call.
Touch to reject the second call and select a preset
text message or edit one to send to the caller.
To switch between two calls:
Touch to switch back to the other call.
Set Up a Conference Call
With this feature, you can talk to two people at the same time.
80
Page 81

1. Place the first call.
2. Once you have established the connection, touch and dial
the second number. (This puts the first caller on hold.)
3. When you’re connected to the second party, touch .
If one of the people you called hangs up during your call, you and
the remaining caller stay connected. If you initiated the call and
are the first to hang up, all callers are disconnected.
To end the conference call, touch .
Adjusting Your Call Settings
The call settings menu lets you configure a number of settings for
the phone application.
Set Contact Display Options
You can set the order of the contacts displayed in the
CONTACTS tab of the Phone app.
1. Touch the Home key > > Phone > > Settings >
Display options.
2. Touch Sort by or Name format to set the order of the
contacts and the format of the contact names.
Set Sound and Vibration
Set the sound and vibration for incoming calls as well as dialpad
sounds.
1. Touch the Home key > > Phone > > Settings >
81
Page 82

Sounds and vibration.
2. Touch the following options you want to configure.
Touch Phone ringtone to select the ringtone for incoming
call notification.
Check Also vibrate for calls to enable vibration for
incoming call notification.
Check Dialpad tones to play sounds when you touch the
dialpad keys.
Set Options for Answering and Ending Calls
When enabled, these options allow you to end a call by pressing
the Power key or allow the phone to vibrate when a call is
answered.
1. Touch the Home key > > Phone > > Settings >
Answer and end calls.
2. Check or uncheck Power button ends call or Vibrate when
call is answered.
Set Speed Dials
You can touch and hold the 1 ~ 9 keys from the dialer to call the
corresponding speed dial number.
The number key 1 is reserved to speed dial your voicemail.
To assign a speed dial key:
1. Touch the Home key > > Phone > > Settings >
Speed dial.
2. Touch a speed dial key.
82
Page 83

3. Enter a phone number or select one from the contact list.
4. Touch OK.
Edit Quick Response to Rejected Callers
1. Touch the Home key > > Phone > > Settings > Quick
responses.
2. Touch a text message to edit it.
Set Voicemail
1. Touch the Home key > > Phone > > Settings > Call
settings.
2. Touch Voicemail to configure voicemail settings.
Touch Service to select the voicemail service provider.
Your carrier is the default.
Touch Setup > Voicemail number to view or edit the
voicemail number.
Touch Sound to select the notification sound for new
voicemails.
Check Vibrate to enable vibration for notification.
Use Fixed Dialing Numbers
Fixed Dialing Numbers (FDN) allows you to restrict outgoing calls
to a limited set of phone numbers.
1. Touch the Home key > > Phone > > Settings > Call
settings.
2. Touch Fixed Dialing Numbers and the following options are
83
Page 84

available.
Enable FDN: Input the PIN2 code to enable the FDN
feature.
Change PIN2: Change the PIN2 code for FDN access.
FDN list: Manage the FDN list.
NOTE:
The PIN2 code is provided by your carrier. Entering an incorrect
PIN2 code more times than allowed can get your nano-SIM card
locked. Contact the service provider for assistance.
Forward Incoming Calls
Call forwarding feature allows you to forward your incoming calls
to another phone number.
1. Touch the Home key > > Phone > > Settings > Call
settings > Call forwarding.
2. Touch an available option to enable it.
Set Call Waiting
This option allows you to get notified of incoming calls during a
call.
1. Touch the Home key > > Phone > > Settings > Call
settings > Call waiting.
2. Choose to activate or deactivate it.
Display or Hide Caller ID
1. Touch the Home key > > Phone > > Settings > Call
84
Page 85
settings > Additional settings.
2. Touch Caller ID to choose whether your number is displayed
when someone receives your outgoing call.
NOTE:
Please contact the service provider to check whether the caller
ID feature is available.
Set Call Blocking
You can add numbers to the blocked numbers list to filter out
calls and messages from these numbers.
1. Touch the Home key > > Phone > > Settings > Call
blocking.
2. Touch ADD A NUMBER.
3. Enter the phone number or select one from the contacts.
4. Touch BLOCK.
NOTE:
To unblock a number, touch on its right and touch
UNBLOCK.
Set TTY Mode
Your phone is a TTY compatible device. A TTY device can allow
people who have hearing or speech disabilities to communicate
by telephone. Simply connect the TTY device to the phone’s
headset jack.
Select a TTY mode for your phone to work with a TTY device, or
turn TTY off.
85
Page 86

1. Touch the Home key > > Phone > > Settings >
Accessibility > TTY mode.
2. Select one of the following options. Consult your
teletypewriter manufacturer’s manual if necessary.
TTY Off: Users who can hear and talk can disable TTY
support.
TTY Full: Users who cannot talk or hear may use this
mode to send and receive text messages through TTY
device.
TTY HCO: Users who can hear, but cannot talk, may use
this mode to listen to conversation of the other party, and
respond via text messages.
TTY VCO: Users who can talk, but cannot hear, may use
this mode to talk through the phone and receive
responses via text messages.
Set Hearing Aids
Your phone supports the Hearing Aid Compatibility (HAC)
function. When you turn on the hearing aid compatibility and use
a hearing aid with a telecoil to answer the phone, it will help you
hear more clearly during the phone call.
1. Touch the Home key > > Phone > > Settings >
Accessibility.
2. Check Hearing aids to turn on hearing aid compatibility.
CAUTION:
Do not turn on the Hearing aids option unless you use a hearing
86
Page 87

aid with a telecoil. Using this setting without a hearing aid or with
a hearing aid without a telecoil may be harmful to your hearing.
Enable VoLTE
You can use LTE services to improve call quality.
1. Touch the Home key > > Settings > More.
2. Touch Enhanced LTE Services to turn the feature on or off.
87
Page 88

Contacts
You can add contacts on your phone and synchronize them with
the contacts in your Google account or other accounts that
support contact syncing.
To see your contacts, touch the Home key > > Contacts.
From there, you can touch the tabs on the top of the screen to
quickly switch to favorite contacts and contact groups.
Checking Contact Details
1. Touch the Home key > > Contacts and touch the
CONTACTS tab to access your contact list.
2. Scroll through the list to view all your contacts.
3. Touch a contact to view its details.
NOTE:
If you have a lot of contacts stored, you'll see a slider on the right
side of the screen. Drag the slider to the initial letter you need.
Adding a New Contact
1. Touch the Home key > > Contacts.
2. Touch to add a new contact.
3. Enter the contact name, phone numbers or email
addresses. If you have added a sync account, touch
Saving to to choose where the contact will be saved.
88
Page 89

4. If necessary, touch More Fields to add other information
including phone ringtone and notification ringtone.
5. Touch to save the contact.
Setting Up Your Own Profile
You can create your own name card in your phone.
1. Touch the Home key > > Contacts and touch the
CONTACTS tab.
2. Touch Set up my profile.
If a profile has already been set up, touch the existing
profile below ME and touch .
3. Edit your profile information.
4. Touch .
Importing, Exporting, and Sharing
Contacts
You can import/export contacts from/to the nano-SIM card, the
phone storage or the microSDXC card. This is especially useful
when you need to transfer contacts between different devices.
You can also quickly share contacts using Messaging, Email,
Bluetooth, Google Drive, Gmail, etc.
89
Page 90

Import Contacts From the Phone Storage or
the microSDXC Card
1. Touch the Home key > > Contacts.
2. Touch > Import/Export > Import from storage.
3. Select the vCard file(s) in the microSDXC card or the phone
storage and touch OK.
Import Contacts From the nano-SIM Card
1. Touch the Home key > > Contacts.
2. Touch > Import/Export > Import from SIM card.
3. Check the contacts you need and then touch .
Export Contacts to the Phone Storage or the
microSDXC Card
1. Touch the Home key > > Contacts.
2. Touch > Import/Export > Export to storage.
3. The phone will prompt you with the name of the vCard file and
the directory in which the file will be saved. Touch OK to
create the file.
Export Contacts to the nano-SIM Card
1. Touch the Home key > > Contacts.
90
Page 91

2. Touch > Import/Export > Export to SIM card.
3. Check the contacts you need and then touch .
Share Contacts
1. Touch the Home key > > Contacts and touch the
CONTACTS tab.
2. Touch > Multi-select.
3. Touch the contacts you want to share and then touch .
4. Choose how to share the contacts. Options depend on the
applications and services installed.
Working With Favorite Contacts
In the favorite contacts tab, you can find your favorite contacts
and frequently contacted contacts.
Add a Contact to Favorites
You can add the contacts you use frequently to FAVORITES so
that you can find them quickly.
1. Touch the Home key > > Contacts and touch the
CONTACTS tab.
2. Touch a contact and then touch at the top.
91
Page 92

Remove a Contact From Favorites
1. Touch the Home key > > Contacts and touch the
FAVORITES tab.
2. Touch a favorite contact and then touch at the top.
Working With Groups
View Your Contact Groups
1. Touch the Home key > > Contacts and touch the
GROUPS tab.
2. Scroll through the list to view the preset groups and any
groups you have created.
3. Touch a group to view its members.
NOTE:
To send a message or an email to all or some of the group
members, you can touch > Send group message / Send
group email after you open the group.
Set Up a New Group
1. Touch the Home key > > Contacts and touch the
GROUPS tab.
2. Touch to create a new group.
3. If you have added contact accounts other than the phone,
92
Page 93

select an account for the new group.
4. Touch the Group’s name field and enter the group name.
5. Touch Add member and select the contacts you wish to be
the group members.
6. If necessary, touch the field below RINGTONE and
NOTIFICATION RINGTONE to select the ringtone for
incoming calls and notifications from the group members.
7. Touch to save the group.
Delete a Group
1. Touch the Home key > > Contacts and touch the
GROUPS tab.
2. Touch a group and then touch > Delete group.
3. Touch OK to disband the group. The contacts in the group
will not be deleted.
Edit a Group
1. Touch the Home key > > Contacts and touch the
GROUPS tab.
2. Touch a group and then touch > Edit group.
3. Touch the group name to edit it, or touch the field below
MEMBER, RINGTONE or NOTIFICATION RINGTONE to
add more members or change the ringtone.
4. Touch .
93
Page 94

NOTE:
To remove group members, touch a group and touch >
Multi-select to choose members. Then touch > OK.
Searching for a Contact
1. Touch the Home key > > Contacts.
2. Touch at the top of the screen.
3. Input the contact name or any information the contact has to
search for it. The contacts matched will be listed.
Editing Contacts
Edit Contact Details
1. Touch the Home key > > Contacts.
2. Touch a contact you need to edit and then touch .
3. Edit the contact and touch .
Join Duplicate Contacts
As your phone synchronizes with multiple online accounts, you
may see duplicate entries for the same contact. You can merge
all the separate information of a contact into one entry in the
contacts list.
94
Page 95

1. Touch the Home key > > Contacts.
2. Touch and hold a contact to select it.
3. Touch the duplicate contacts to select them.
4. Touch and touch LINK.
Separate Contact Information
If contact information from different sources was joined in error,
you can separate the information back into individual contacts on
your phone.
1. Touch the Home key > > Contacts.
2. Touch a joint contact you want to separate.
3. Touch and touch > Unlink.
4. Touch UNLINK to confirm.
95
Page 96

Web Accounts
Adding or Removing Accounts
You can add multiple Google accounts and Microsoft Exchange
ActiveSync® accounts. You may also add other kinds of
accounts depending on the apps installed on your phone.
Add an Account
1. Touch the Home key > > Settings > Accounts > Add
account.
2. Touch the type of account you want to add.
3. Follow the onscreen steps to enter the information about the
account. Most accounts require a username and password,
but the details may vary. You may also need to obtain some
information from IT support or your system administrator.
When the account is successfully added, it is displayed in the
Accounts menu.
Remove an Account
Removing an account will delete it and all information
associated with it from your phone, such as emails and
contacts.
1. Touch the Home key > > Settings > Accounts.
2. Touch the account category and then touch the account.
96
Page 97

3. Touch > Remove account > REMOVE ACCOUNT.
Configuring Account Sync
Configure Auto Sync Setting
1. Touch the Home key > > Settings > Accounts.
2. Touch and check or uncheck Auto-sync data.
When automatic sync is turned on, changes you make
to information on your phone or on the web are
automatically synced with each other.
When automatic sync is turned off, you need to sync
manually to collect emails, updates, or other recent
information.
Sync Manually
1. Touch the Home key > > Settings > Accounts.
2. Touch the account category and then the account you want
to sync.
3. Touch > Sync now. Or touch the types of information you
want to sync.
97
Page 98

Change an Account’s Sync Settings
1. Touch the Home key > > Settings > Accounts.
2. Touch the account category and then the account. The
Sync screen appears, showing a list of information the
account can sync.
3. When auto-sync is enabled, switch on or off the items as
you need. The types of information that are switched on will
be kept in auto-sync. When auto-sync is disabled, touch a
listing to sync that type of information between the phone
and the web.
98
Page 99

Email
Touch in the home screen and select Email. Use it to
receive and send emails from your webmail or other accounts,
using POP3 or IMAP, or access your Exchange ActiveSync
account for your corporate email needs.
Setting Up the First Email Account
1. Touch the Home key > > Email.
2. Select an email server, and enter the email address and
password.
3. Touch NEXT to let the phone retrieve the network parameters
automatically.
NOTE:
Touch MANUAL SETUP if you want to enter these details
manually or when automatic setup fails.
4. Follow the on-screen instructions to finish the setup.
Your phone will show the inbox of the email account and start to
download email messages.
Checking Your Emails
Your phone can automatically check for new emails at the
interval you set when setting up the account.
You can also check new emails manually by dragging down on
99
Page 100
the message list.
Writing and Sending an Email
1. Open your email Inbox and touch .
NOTE:
If you have more than one email account added on the
phone, touch the sender line to select the account you want
to use for sending the message.
2. Enter a contact name or email address in the To field.
Separate each recipient with a comma. You can also touch
to select recipients from your contacts.
NOTE:
To send a carbon copy or blind carbon copy to other
recipients, touch beside the To field to open the Cc/Bcc
field and enter the contact names or email addresses.
3. Enter the email subject and compose the email text.
4. Touch to add audio files, images, videos and other
types of files as attachments.
5. Touch at the top right of the screen to send the
message.
Responding to an Email
You can reply to or forward a message that you receive. You
can also delete messages and manage them in other ways.
100
 Loading...