

Page 1

1
Sharing New Technology With You
ZTE CORPORATION
WP805
CDMA Wireless Fixed Phone
User Manual
Page 2

Sharing New Technology With You
2
Copyright © 2005 by ZTE Corporation
All rights reserved.
No part of this publication may be excerpted, reproduced, translated
or utilized in any form or by any means, electronic or mechanical, including
photocopying and microfilm, without the prior written permission of ZTE
Corporation.
Edition: 1st edition, Jan., 2005
Page 3

3
Sharing New Technology With You
Contents
1 General Information ........................................................ 6
1.1 Preface ......................................................................................... 6
1.2 Safety Precautions ....................................................................... 6
1.3 Cleaning and Maintenance ........................................................... 6
2 Getting Started ............................................................... 8
2.1 Checking the Package ................................................................. 8
2.2 Technical Specifications ............................................................... 8
2.3 Key Definition ............................................................................... 9
2.4 Display Icons .............................................................................. 10
2.5 Installation .................................................................................. 10
2.6 Power supply .............................................................................. 12
2.7 Connecting to the Network ......................................................... 13
3 Basic Operations .......................................................... 14
3.1Making a Call ............................................................................... 14
3.1.1 Making a Domestic Call ................................................... 14
3.1.2 Dialing PSTN’s Extensions .............................................. 14
3.1.3 Making IDD ...................................................................... 14
3.1.4 Dialing a Number in the List ............................................ 15
3.2 Answering the Call ...................................................................... 15
3.3 Ending the call ............................................................................ 15
3.4 Redialing ..................................................................................... 16
3.5 Billing Information ....................................................................... 16
3.6 Call Menu ................................................................................... 16
3.7 Making a Three-way Call ............................................................ 16
4 Function Menu .............................................................. 18
4.1 Usage of the Function Menu ...................................................... 18
4.2 Structure of the Function Menu .................................................. 18
4.3 NAMES ....................................................................................... 21
4.3.1 Searching ......................................................................... 22
4.3.2 Adding New Name ........................................................... 22
4.3.3 Editing Names ................................................................. 23
Page 4

Sharing New Technology With You
4
4.3.4 Deleting Names ............................................................... 23
4.3.5 Checking Used Space ..................................................... 23
4.3.6 Sorting Name Cards ........................................................ 23
4.3.7 Sending Messages .......................................................... 24
4.3.8 Add to speed .................................................................... 24
4.3.9 Sending Name Card ........................................................ 24
4.3.10 Setting the Default Number ........................................... 24
4.4 Messages ................................................................................... 24
4.4.1 New Messages ................................................................ 25
4.4.2 Writing Messages ............................................................ 25
4.4.3 Viewing Received and Saved Messages ........................ 25
4.4.4 Msg setting....................................................................... 26
4.5 Calls ............................................................................................ 27
4.5.1 Viewing Calls List ............................................................. 27
4.5.2 Clear Logs ........................................................................ 27
4.6 Profile .......................................................................................... 28
4.6.1 Selected Profile ................................................................ 28
4.6.2 Edit Profile ....................................................................... 28
4.7 Organizer .................................................................................... 28
4.7.1 Alarm Clock ...................................................................... 29
4.7.2 Calculator ......................................................................... 30
4.7.3 Personal Finance ............................................................. 31
4.7.4 Notepad ........................................................................... 34
4.7.5 Schedule .......................................................................... 36
4.7.6 World Clock...................................................................... 38
4.8 Diverts ......................................................................................... 39
4.9 Settings ....................................................................................... 40
4.9.1 Phone Settings ................................................................ 40
4.9.2 Display Settings ............................................................... 40
4.9.3 Call Setting ...................................................................... 40
4.9.4 Security Setting ................................................................ 41
4.9.5 Reset Settings ................................................................. 42
4.9.6 Manager Set .................................................................... 42
Page 5

5
Sharing New Technology With You
5 Text Input ...................................................................... 43
5.1 Overview ..................................................................................... 43
5.2 Keyboard Definition .................................................................... 43
5.3 Notes on Input Methods ............................................................. 43
5.3.1 English and Number Input ............................................... 43
5.3.2 Entering Set Idioms ......................................................... 44
6 Data Network Access Function ................................... 45
6.1 WIN98 Configuration for Internet Access ................................... 45
6.2 WIN2000 Configuration for Internet Access ............................... 49
6.3 WIN XP Configuration for Internet Access ................................. 54
6.4 Usage of the USB-serial cable ................................................... 61
7 Fax ................................................................................. 62
7.1 Summary .................................................................................... 62
7.2 Installation .................................................................................. 62
7.2.1 System Requirement ....................................................... 62
7.2.2 Set the WP805 phone ...................................................... 62
7.2.3 WINFAX Installation ......................................................... 74
7.3 How to use WINFAX ................................................................... 76
7.4 Notice .......................................................................................... 81
8 Troubleshooting ............................................................. 83
Page 6

Sharing New Technology With You
6
General Information
1
1.1 Preface
Thank you for using WP805 CDMA wireless fixed phone. To
guarantee your phone always in its best condition, please read this manual
carefully.
Besides its basic call function, the WP805 provides many practical
functions including telephone number grouping, clock and calculator, which
bring great convenience and fun to your work and daily life. With its rich
functions applied in business, the WP805 phone will be your right-hand
assistant.
1.2 Safety Precautions
Keep the phone from water or damp areas. Water or other liquid
will cause overheating, electrical leakage and failure of the phone.
Do not disassemble the phone by yourself.
Put the phone in a safe and stable place.
Do not touch the antenna while calling.
Keep the phone from heat radiation and dust.
Unplug the external power adapter or take out the battery before
you put the phone out of use for a long period of time.
Use the external power adapter approved by the phone manufac-
turer.
Do not unplug the connector of the serial port cable from the phone
when the power is on.
Try to use the phone at least 20 cm away from ordinary fixed telep-
hone, TV sets, radio and other automated office equipment so as to
avoid electromagnetic interference.
Keep the phone away from explosive or inflammable articles.
1.3 Cleaning and Maintenance
The phone is not water-resistant, so do not use it in high humidity
places such as the bathroom.
Page 7

7
Sharing New Technology With You
General Information
1
Wipe and clean the phone with soft and dry cloth.
Do not wipe the phone with the solution of alcohol, dilution agent or
benzene, etc.
Use the phone within a temperature range of -10°C~55°C and a
humidity range of 25%~85%.
Page 8

Sharing New Technology With You
8
2.1 Checking the Package
Please check all the parts shown below and make sure no piece is
missing or broken. ( The appearance of the parts in your package may be
different from those in the manual.)
Main Unit (1) Handset (1) Handset Cord (1) Antenna (1)
Serial port cable (1) External power adapter (1) User Manual (1)
Certificate of quality (1) USB serial cable (1) USB Driver CD (1)
(optional) (optional)
2.2 Technical Specifications
Air interface protocol: IS-2000SR1, downward compatible with
IS-95A/B.
Frequency range: Tx: 824~849MHz
Rx: 869~894MHz
LCD: large dot matrix LCD/outgoing number/ talk time/ clock/CID/
RSSI signal intensity/ battery level/ short message indication
External interfaces: a. External power socket (DC)
b. DATA interface (DB-9)
c. Antenna connector TNC (F)
Getting Started
2
Page 9
9
Sharing New Technology With You
Power supply: 100V-240V, 50Hz (AC)
Voice decoding: 13K QCELP/ 8K EVRC
Dimensions (W×H×D): 180 mm×207 mm×70 mm
2.3 Key Definition
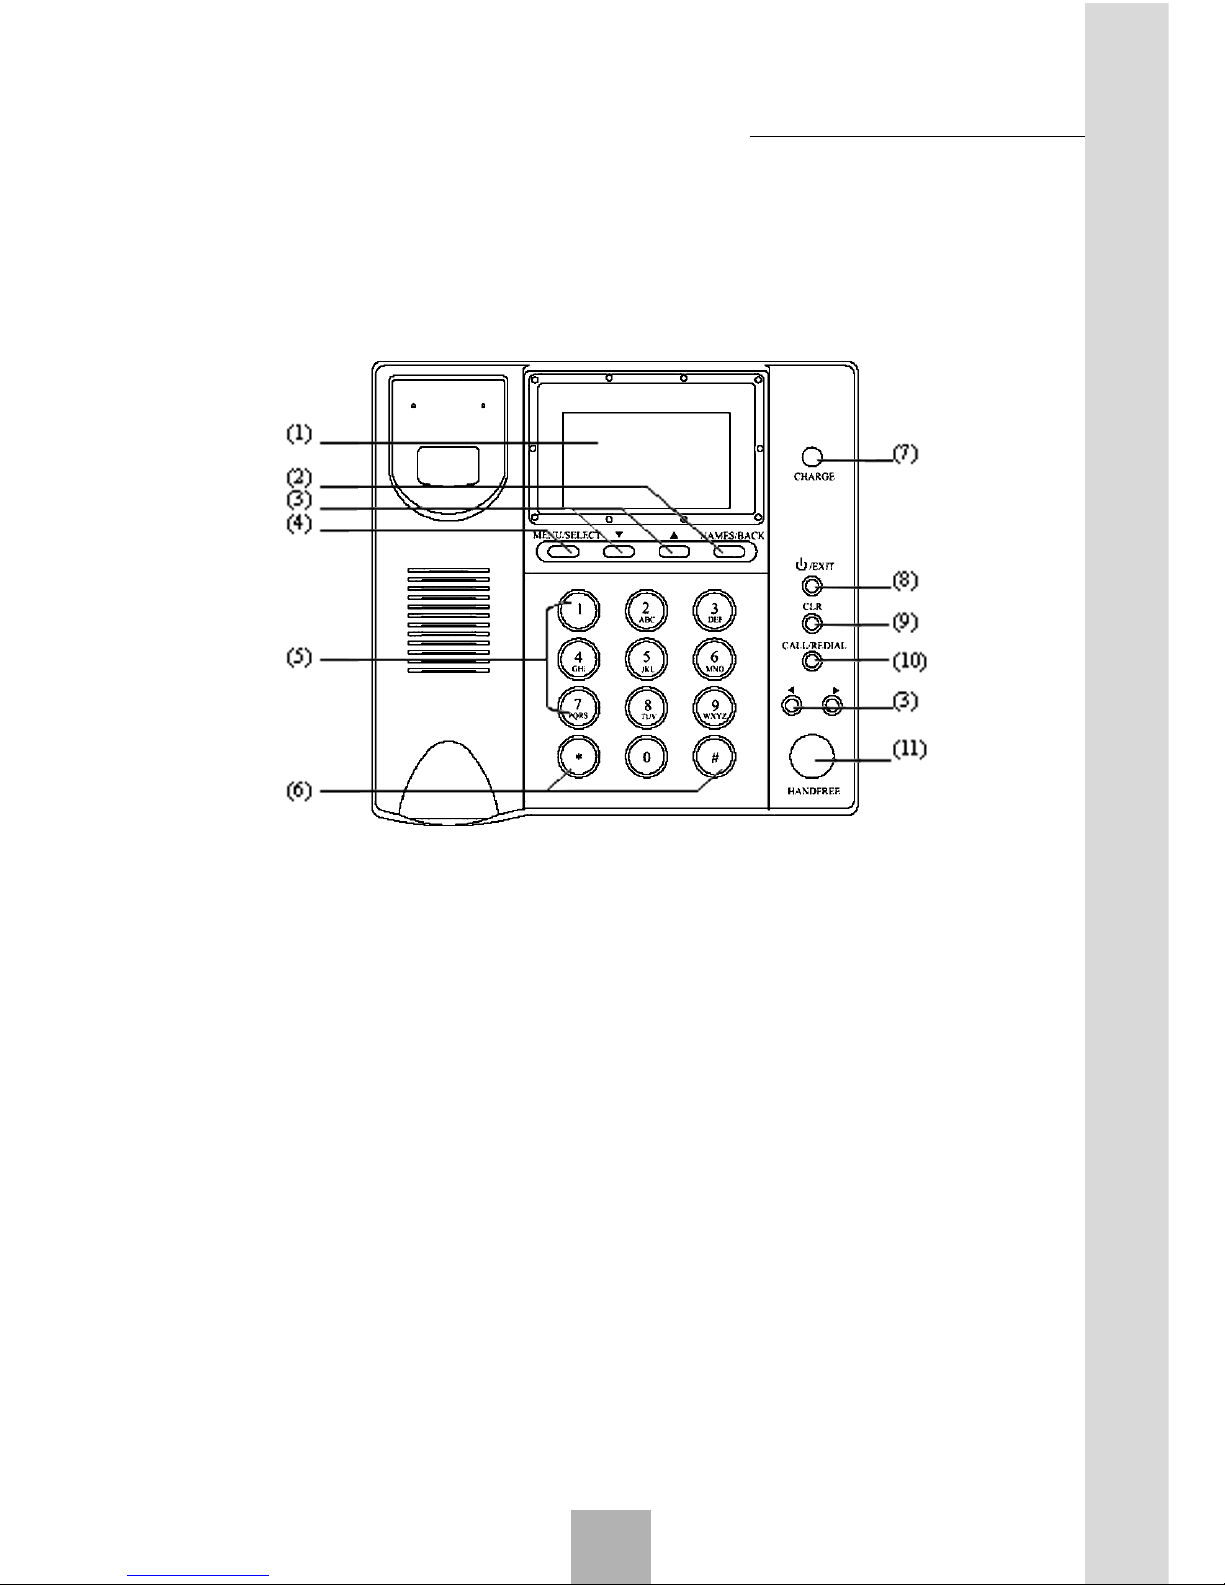
(1) LCD
(2) NAMES/BACK (Right Soft Key):
To access the phone book and execute functions as shown in the lower
right corner of the LCD.
(3) Up/Down/Left/Right key (Scroll keys):
To move the cursor when entering letters and to scroll through menu
options and displays, can be set as hotkeys.
(4) MENU/SELECT (Left Soft Key):
To access the main menus and execute functions as shown in the
lower left corner of the LCD.
(5) 0~9 number keys:
To enter numbers and characters.
(6) * key and # key:
They have different functions in different modes or function menus.
Please refer to corresponding sections.
(7) CHARGE LED:
Getting Started
2
Page 10

Sharing New Technology With You
10
It glows red when you charge the battery, and turns green when the
battery is fully charged.
(8) key:
Switch on/off the phone; hang up; display calendar in the standby mode,
return to the idle state from menu.
(9) CLR key:
Lets you clear your last entry.
(10) CALL/REDIAL key:
To make a call or redial the last number called after you pick up the
handset or press HANDFREE key.
(11) HANDFREE:
Hand-free key.
Hint:
The shape of the key shown in this manual may be different from
your phone.
In this manual, the expression “press a key-press” stands for press-
ing a key shortly, while “hold the key-press” for pressing a key for
2~3 seconds.
2.4 Display Icons
The icons listed below may appear on your phone’s LCD.
Signal indicator. More bars indicates stronger signal.
Indicates that you have received a new message. If the icon blinks,
it indicates that the message box is full.
The Alarm is set.
You have set “divert all calls”.
Battery level indicator. More black bars indicate higher level.
The ring is off.
Bar all incoming calls.
Bar list or bar all except list.
2.5 Installation
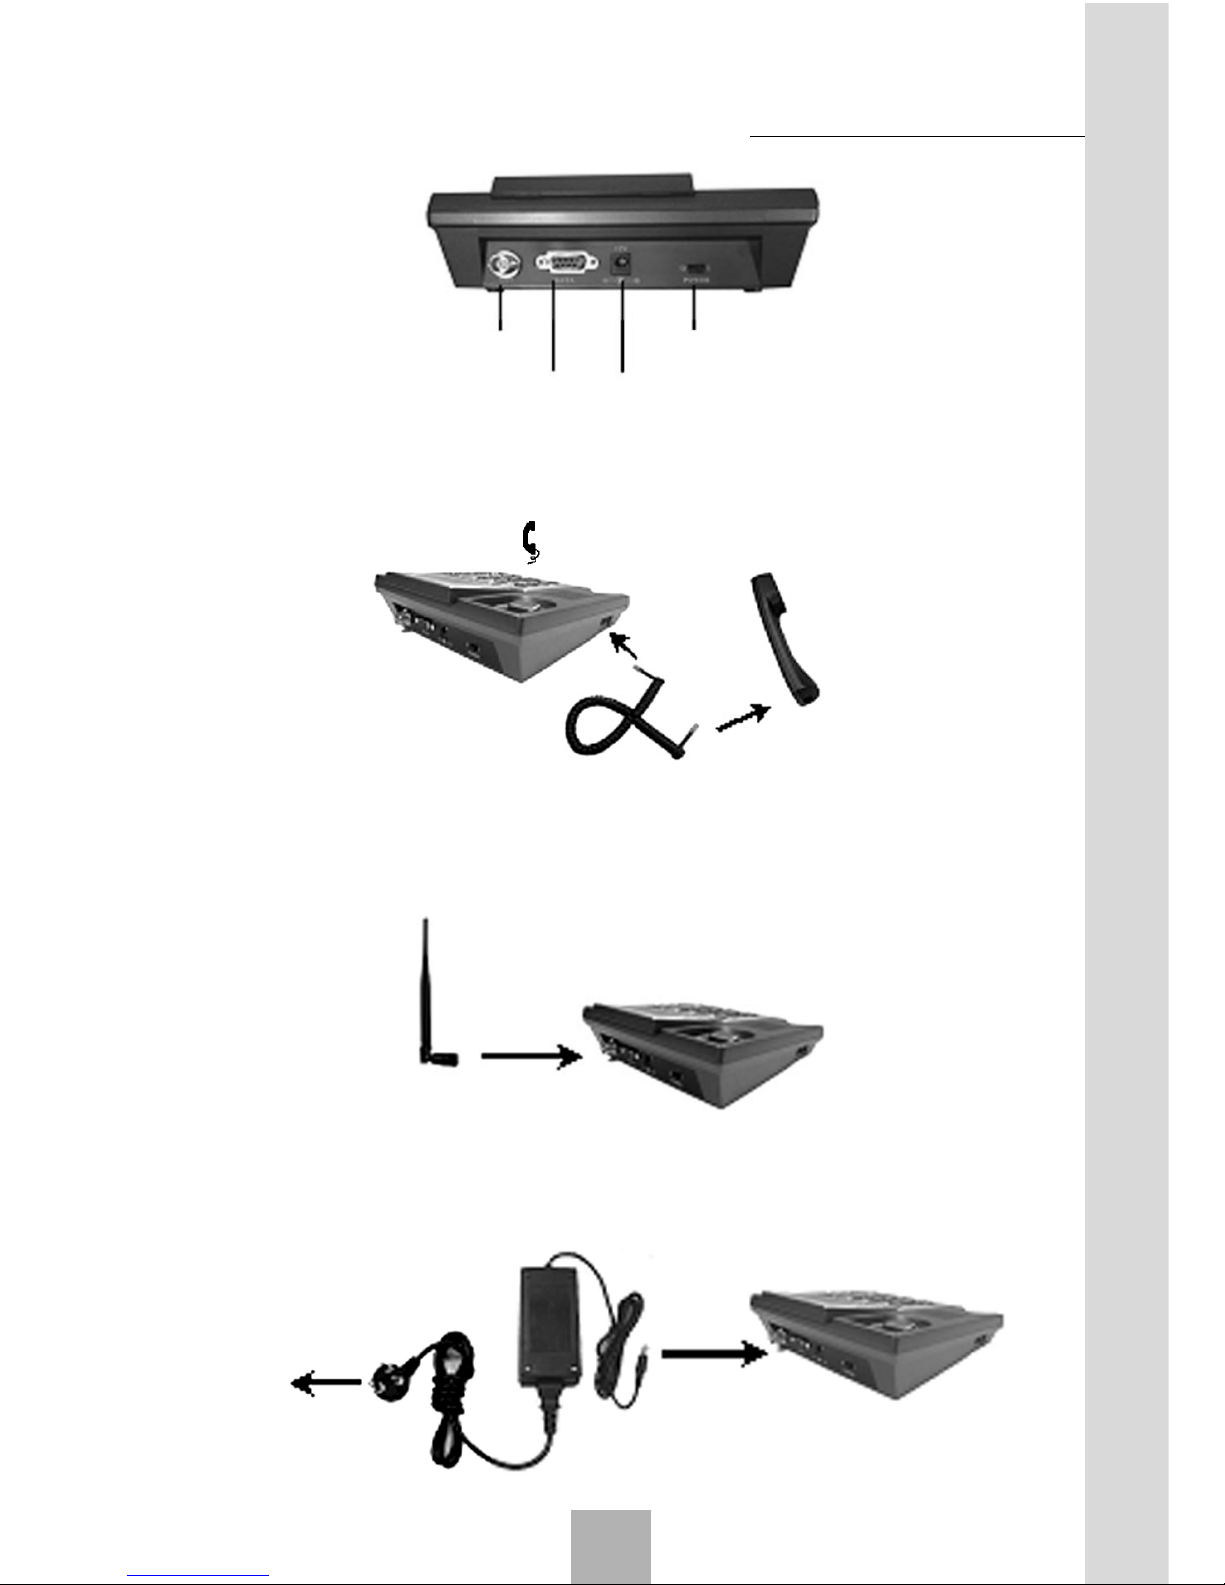
Back sight of WP805:
Getting Started
2
Page 11
11
Sharing New Technology With You
Antenna connector Power switch
Data interface External power socket
1. Handset:
Connect the main unit and the handset with the handset cord, plug the
cord into the handset socket on the left side of the main unit.
2. Antenna:
Install the antenna to the antenna connector. Hold the plastic stick of
the antenna and turn the metal screw clock-wise. Do not turn the an-
tenna directly.
3. Adapter
Plug the AC/DC adapter into an appropriate wall outlet.
Good grounding may guarantee your terminal in a reliable service
status.
AC
Plug
Getting Started
2
Page 12
Sharing New Technology With You
12
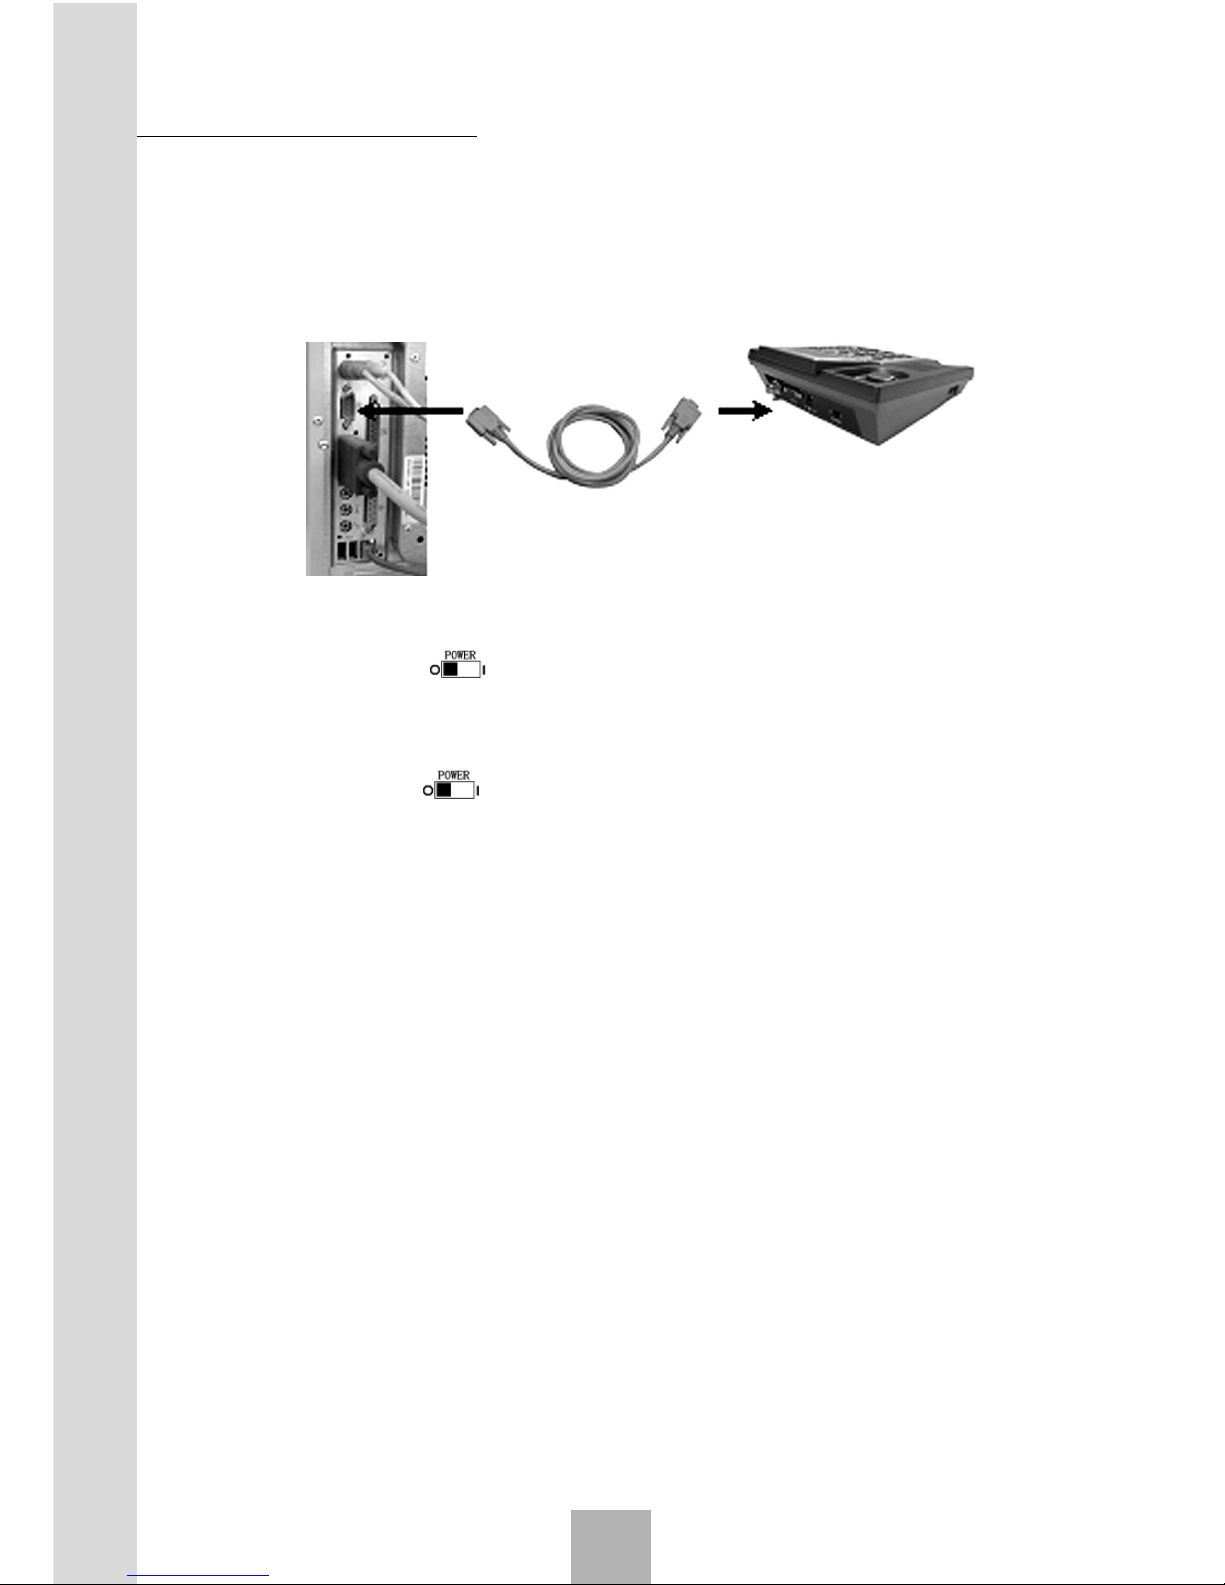
4. Computer
Use the serial port cable or USB serial cable for connecting the data
interface at the back of the phone with COM1 or COM2 of the computer for
data service. Turn off the switch then stick in or pull out serial port line.
5. Power on:
Turn the switch beside the external power socket on the back
side of the phone to “O”, and then get started after self-test.
6. Power off:
Turn the switch to “I”, then pull out the adapter from the socket.
2.6 Power supply
There are two ways of power supply:
1. Use the external power adapter.
2. Use the built-in spare battery of the phone.
When using the phone, please connect it with the external power
adapter.
With external power supply, the phone will automatically check electricity quantity of the battery and charge the built-in battery.
Use the built-in spare battery of the phone in case of power failure or
when there is no available power socket nearby.
If the electricity of the built-in battery will be used up, please connect
the external power adapter for charging in time. The screen will prompt
and the buzzer will beep.
Battery status LED: While charging, the LED indicates red. If the
battery is full, the LED changes to green color.
Battery indicates: Standby time 22 hours + Talk time 2 hours in
Getting Started
2
Page 13
13
Sharing New Technology With You
power supply of the built-in spare battery (depending on the network
condition).
2.7 Connecting to the Network
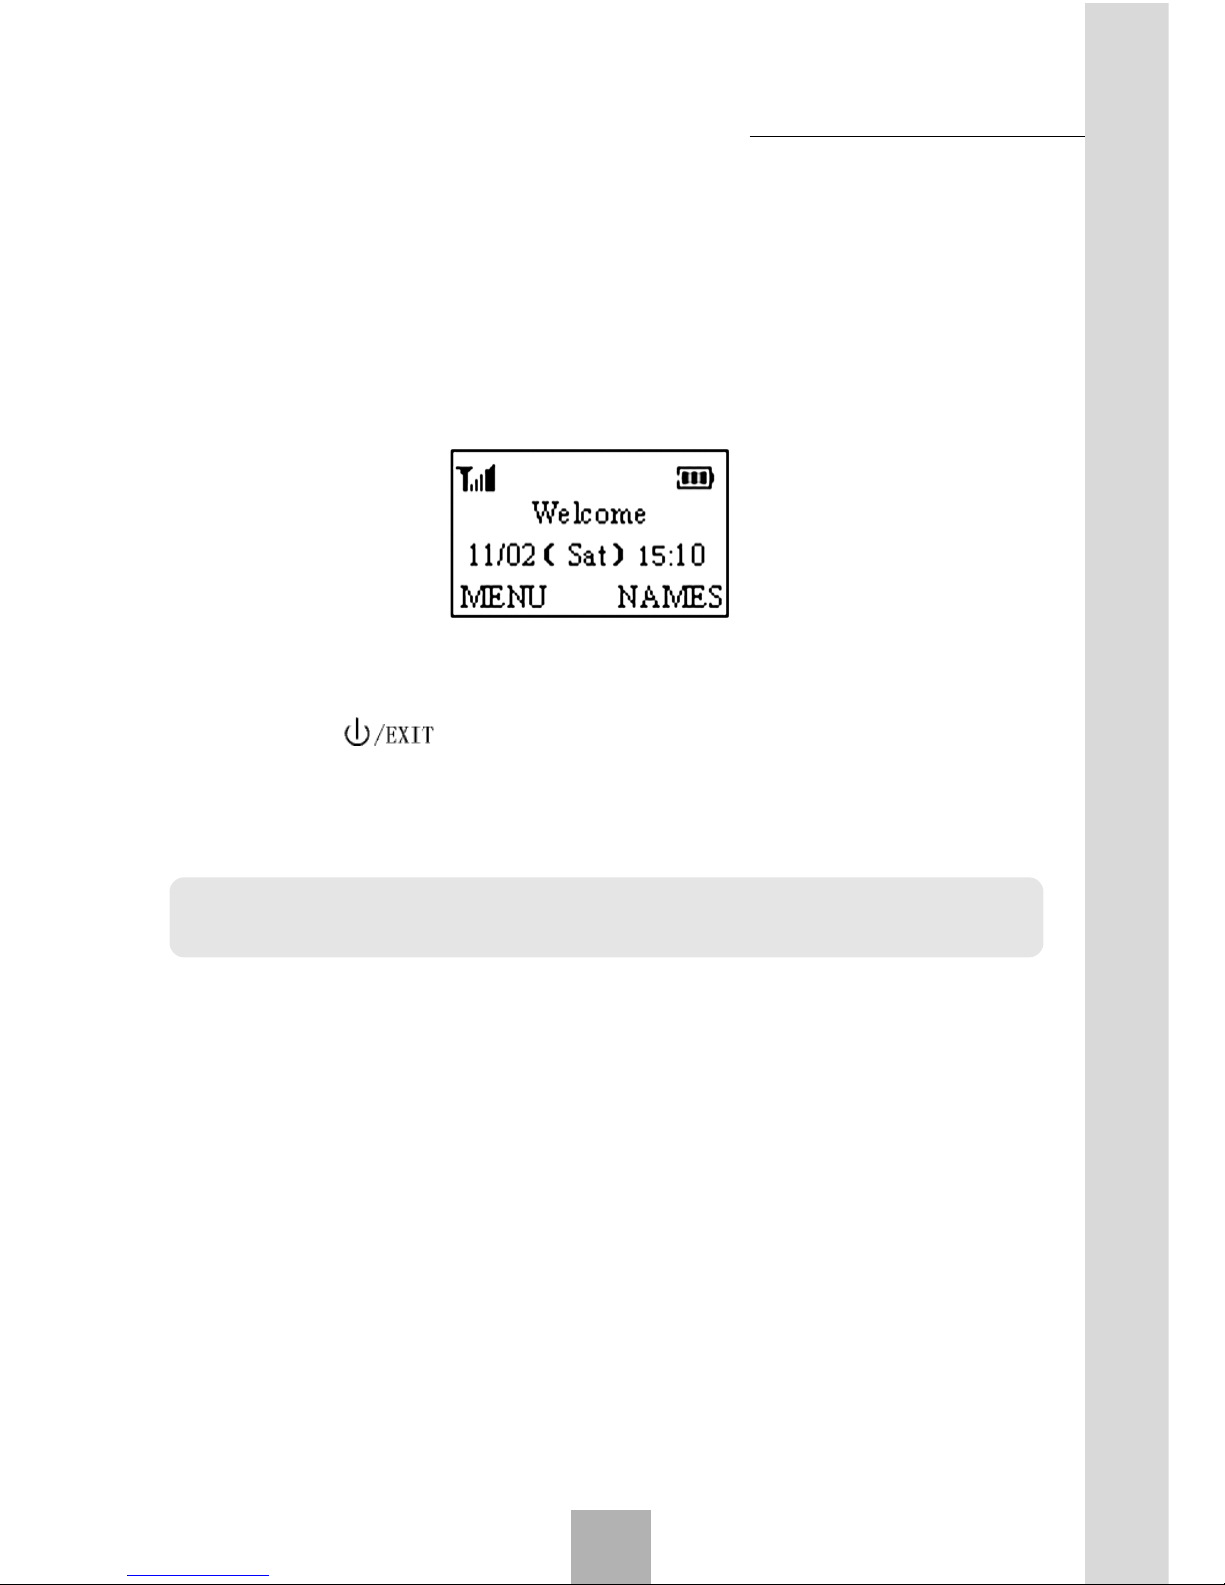
When the connection is set, the name of the network service provider
will be displayed at the center of the screen. The display will not be the
same as below with different service providers.
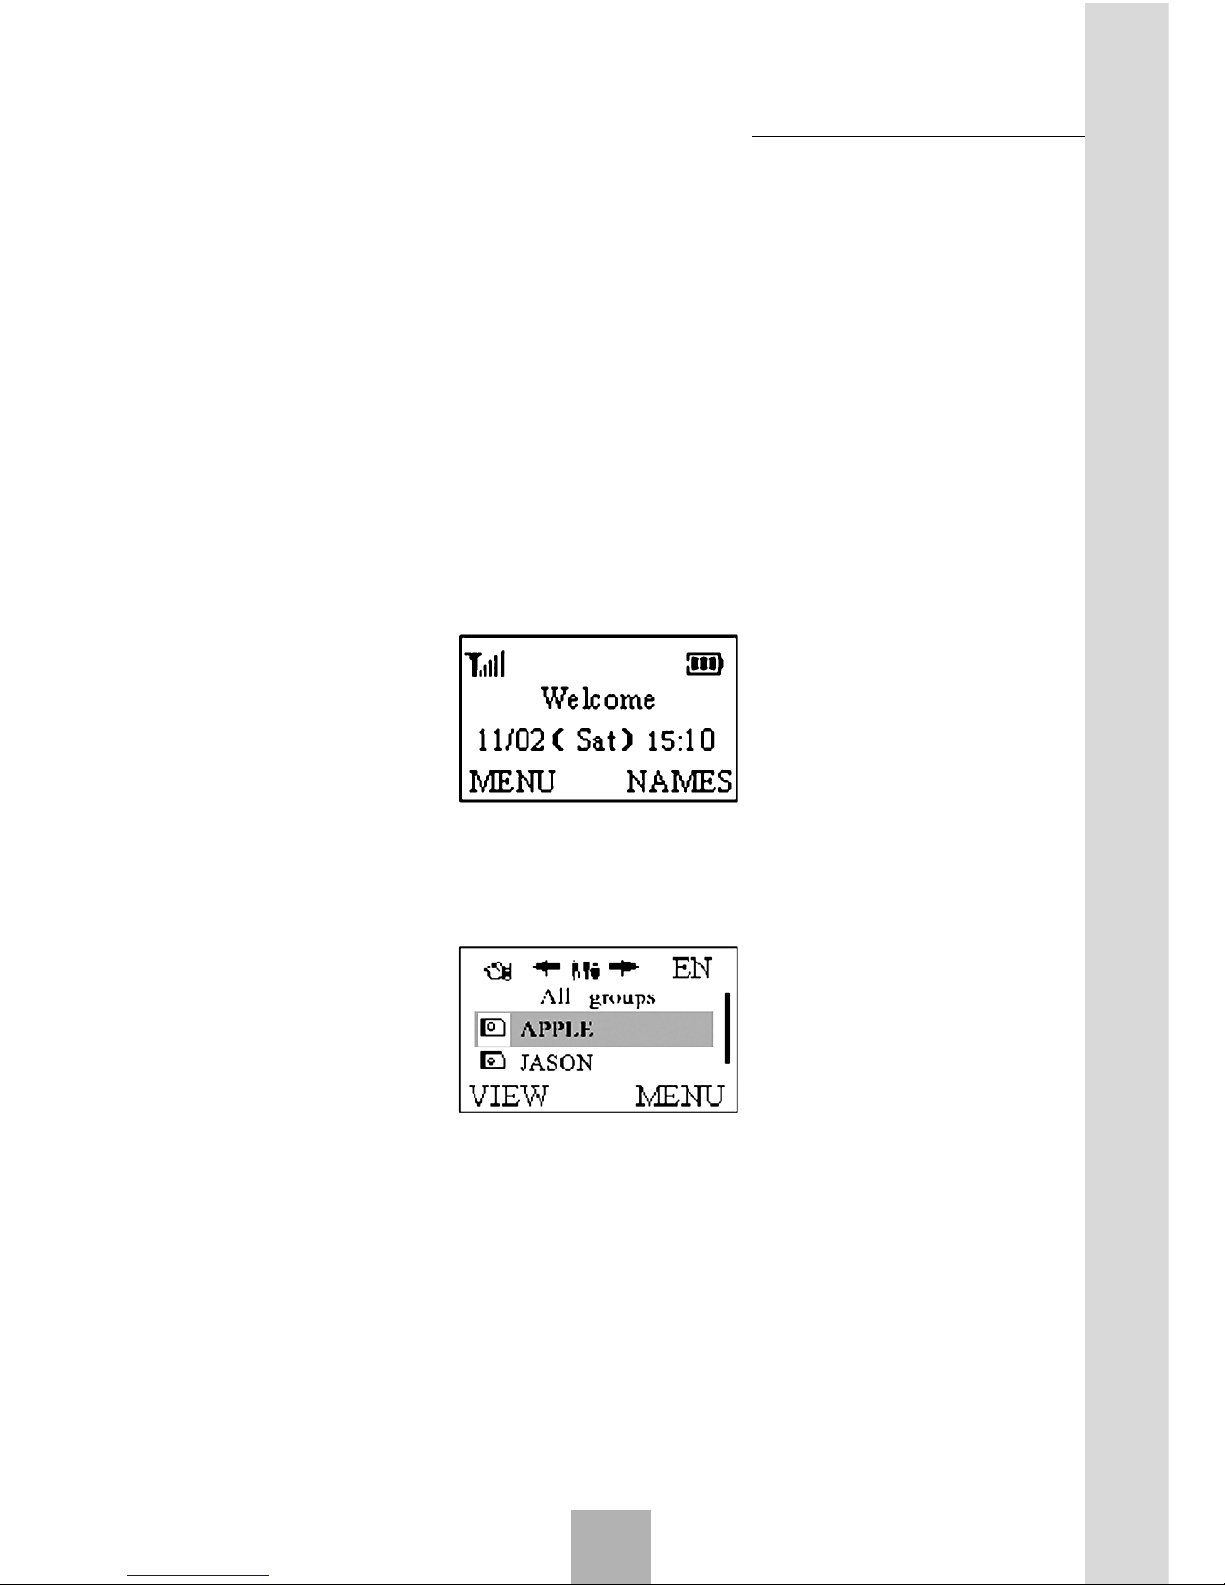
Now your phone is in the standby mode. Besides receiving and sending calls, you can do the following things:
Press to display the calendar.
Press Right Soft key to enter the names.
Press Left Soft key to enter the function menu. Please refer to
Chapter 4.
Note: If “EMERGENCY CALLS ONLY” is shown on your screen, you can
only send emergency calls relating to the strength of the signal.
Getting Started
2
Page 14

Sharing New Technology With You
14
3.1 Making a Call
3.1.1 Making a Domestic Call
Method: (After you pick up the handset or press HANDFREE key)
Area code (when making a long distance call) telephone
number CALL/REDIAL key
You can clear the last number by press “CLR” key. Call status will be
displayed when the network is connected, and there will be a prompt if the
put-through tone is set as on. Please refer to paragraph 4.9.3 “Call setting”,
get the information of put-through tone.
If the call is over, hang up or hook on the receiver, and then press
key to return to the idle state.
3.1.2 Dialing PSTN’s Extensions
Method 1: (After you pick up the handset or press HANDFREE key)
Dial the exchange number and then the extension.
Method 2: Add pause character “P” (holding # key to enter “p”) between exchange number and extension number, and then your phone will
dial the extension automatically.
Area code Exchange number P Extension number CALL/REDIAL key
An example of using pause character “P”:
8880000 P 6666 P 8888.
After the first part of this number is replied, 6666 will be automatically
dialed and the second pause character will generate a delay of 5 seconds
before 8888 is sent. (The first P indicates the pending put-through, and the
latter P stands for the 5-second delay.)
3.1.3 Making IDD
Method: (After you pick up the handset or press HANDFREE key)
+ Country code Complete telephone number CALL/RE-
DIAL key.
Before you make an international distance call, hold the * key until
your screen displays the prefix symbol “+” of an international call.
Basic Operations
3
Page 15

15
Sharing New Technology With You
After the prefix is inputted, enter the code of the country you want to
dial and the complete telephone number. Country codes follow the conventions (Get rid of “0” before the area code when you make a call). For
example, +862164008090.
3.1.4 Dialing a Number in the List
Generally, all calls you have made or received are saved in a list of the
phone, and the last made or received call is saved at the top of the list
(please refer to Section 4.5 “Call Log”. All numbers are grouped as dialed
calls, received calls and missed calls. Your phone lists all the numbers so
that you can view all the call logs. You can check the list by the following
operations:
View All calls by CALL/REDIAL key.
View Received calls by Down key.
View Missed calls by Up key.
All the numbers in the list can be directly dialed by press HANDFREE
key CALL/REDIAL key OK Left Soft key. When there is a list
of phone numbers, you can press Select key to view the details and then
Save key to save the number to the phonebook; SMS key to send mes-
sages to the number, key to exit.
Note: Up/Down key can be customized in Phone settings--Fast
key Setting.
3.2 Answering the Call
When the phone rings, LCD will display the incoming number. Pick up
the receiver to answer the call, and timing will start for the call.
Note: To display the incoming number requires the network to support.
3.3 Ending the call
Put down the handset when you answer the call by picking up the
handset.
Press HANDFREE key when you answer the call by pressing
HANDFREE key.
Basic Operations
3
Page 16

Sharing New Technology With You
16
Press key to return to the original state after ending call.
3.4 Redialing
Press CALL/REDIAL key to redial the last number called after you
pick up the handset or press HANDFREE key.
3.5 Billing Information
The phone adopts pulse-charging mode and the charging unit is “unit”.
When the call is over, the billing information will displayed. For example,
the message means: when a call is connected, 2unit will be displayed;
since then, 2units will be added per 10 seconds. If you dial a free number,
the phone will display 0unit. For example, if call duration is 15 seconds,
4units will be displayed. If call duration is 20 seconds, 6units will be
displayed.
Note: This function requires the network to support.
3.6 Call Menu
In put-through mode, you can enter the call menu by pressing Menu.
The operation methods are the same as those in the function menu; please
refer to Section 4.1 “Usage of Function Menu”.
You can do the following operations in Call menu:
Hold /Retrieve
Keep the current session or resume the held call.
Mute
Not send local voice.
DTMF off/on
Enable or disable sending DTMF tone.
Menu
Enter the organizer menu.
Note: This Call menu only appears in the session process, which supports Three-way Call.
3.7 Making a Three-way Call
The phone supports the Three-way call. When two parties are talking,
Basic Operations
3
Page 17

17
Sharing New Technology With You
one of which can dial the number of the third party without hanging up the
current session.
When the session is ongoing, the receiver/caller enters the number of
a third party and the current call will not be affected. If the receiver/caller
presses CALL/REDIAL key at this moment, the current session will be
hung on, and the receiver/caller will not hear the former call temporarily.
Press CALL/REDIAL key again and the call will resume. The user can
hear the ring-back tone from the third party before he answers. When the
third party answers, the three persons can talk at the same time. If the user
presses CALL/REDIAL key, the third party will be hung up and it becomes an ordinary call between two persons again.
Note: The network service provider should support the Three-way call
function. When the calls are switched, the hung-on party should not hang
up or it will stop the original two-way call.
Basic Operations
3
Page 18

Sharing New Technology With You
18
4.1 Usage of the Function Menu
1. Basic operation
In original state, press MENU/SELECT key to enter function main
menu. Press Up/Down key to select menu item. Enter the next menu
item by press Select key, Go back to previous menu by press Back soft
key .
In this manual, press Menu Calls, means press MENU/SELECT
key and then select Calls options.
2. Scrolling function:
Enter the function main menu by pressing Left Soft Key in the standby
mode. Enter the call menu interface by pressing Left Soft Key in the
session mode, and use Up/Down key to scroll and select.
3. Shortcuts select function:
If Menu Code is set as on, its shortcut number will be shown in the
upper right corner of the screen. Press Menu in the standby mode and
enter the shortcut number in the function options. (Note: some menus
may have no such shortcut select function.)
4. Quit the menu:
In most conditions you can press Right Soft key to quit a certain
menu or press key to return.
4.2 Structure of the Function Menu
The default structure of the Function menu is as follows:
1 Messages
1-1 Create Msg
1-2 Received Msg
1-3 Sent Msg
1-4 Msg Settings
1-4-1 Status Rept
1-4-2 Callback No.
1-4-3 Set idiom
1-4-4 Set poem
1-4-5 Priority
Function Menu
4
Page 19

19
Sharing New Technology With You
1-4-6 Msg Period
2 Calls
2-1 All calls
2-2 Missed calls
2-3 Received calls
2-4 Dialed calls
2-5 Clear logs
2-6 Last call
2-6-1 Time
2-6-2 Cost
2-7 All call info
2-7-1 Time
2-7-2 Cost
2-7-3 Clear logs
3 Profile
3-1 Selected Profile
3-2 Edit Profile
3-2-1 Normal
3-2-1-1 Ringtone type
3-2-1-2 Ringtone Vol
3-2-1-3 Speaker Vol
3-2-1-4 Key tones
3-2-1-5 Warn tone
3-2-1-6 Message alert
3-2-2 Outdoor (sub menu same as 3-2-1)
3-2-3 Silent (sub menu same as 3-2-1)
4 Organizer
4-1 Alarm clock
4-1-1 Set alarm
4-1-2 List alarms
4-1-3 Define restday
4-1-4 Clear all
4-2 Calculator
Function Menu
4
Page 20

Sharing New Technology With You
20
4-3 Personal finance
4-4 Notepad
4-5 Schedule
4-6 World clock
5 Diverts
5-1 All Calls
5-1-1 On
5-1-2 Off
5-1-3 By service
5-2 When busy (sub menu same as 5-1)
5-3 No answer (sub menu same as 5-1)
5-4 When hide (sub menu same as 5-1)
6 Settings
6-1 Phone Settings
6-1-1 Menu code
6-1-2 Fastkey Setting
6-2 Display Settings
6-2-1 Backlight
6-2-2 Owner name
6-2-3 Greetings
6-3 Call Settings
6-3-1 Minutemind
6-3-2 Conn mind
6-3-3 Network number
6-3-4 IP Setting
6-3-4-1 Status
6-3-4-2 Number
6-3-5 DDD settings
6-3-5-1 Status
6-3-5-2 Number
6-4 Security
6-4-1 SMS password
6-4-1-1 SMS
Function Menu
4
Page 21
21
Sharing New Technology With You
6-4-2 Handset lock
6-4-2-1 Password
6-4-3 Handset call bar
6-4-3-1 Bar Incoming
6-4-3-2 Bar Outgoing
6-5 Reset settings
6-6 Manager set
6-6-1 Hide IP
6-6-2 Clean admin data
4.3 NAMES
Enter the NAMES in the standby mode by pressing Right Soft key.
It shows List empty when there is no record in the NAMES, and you
can add records by pressing Left Soft key. Saved records will be listed
in the record list. The records will be listed in alphabetical order of initials of
the names.
View records by pressing Up/Down key.
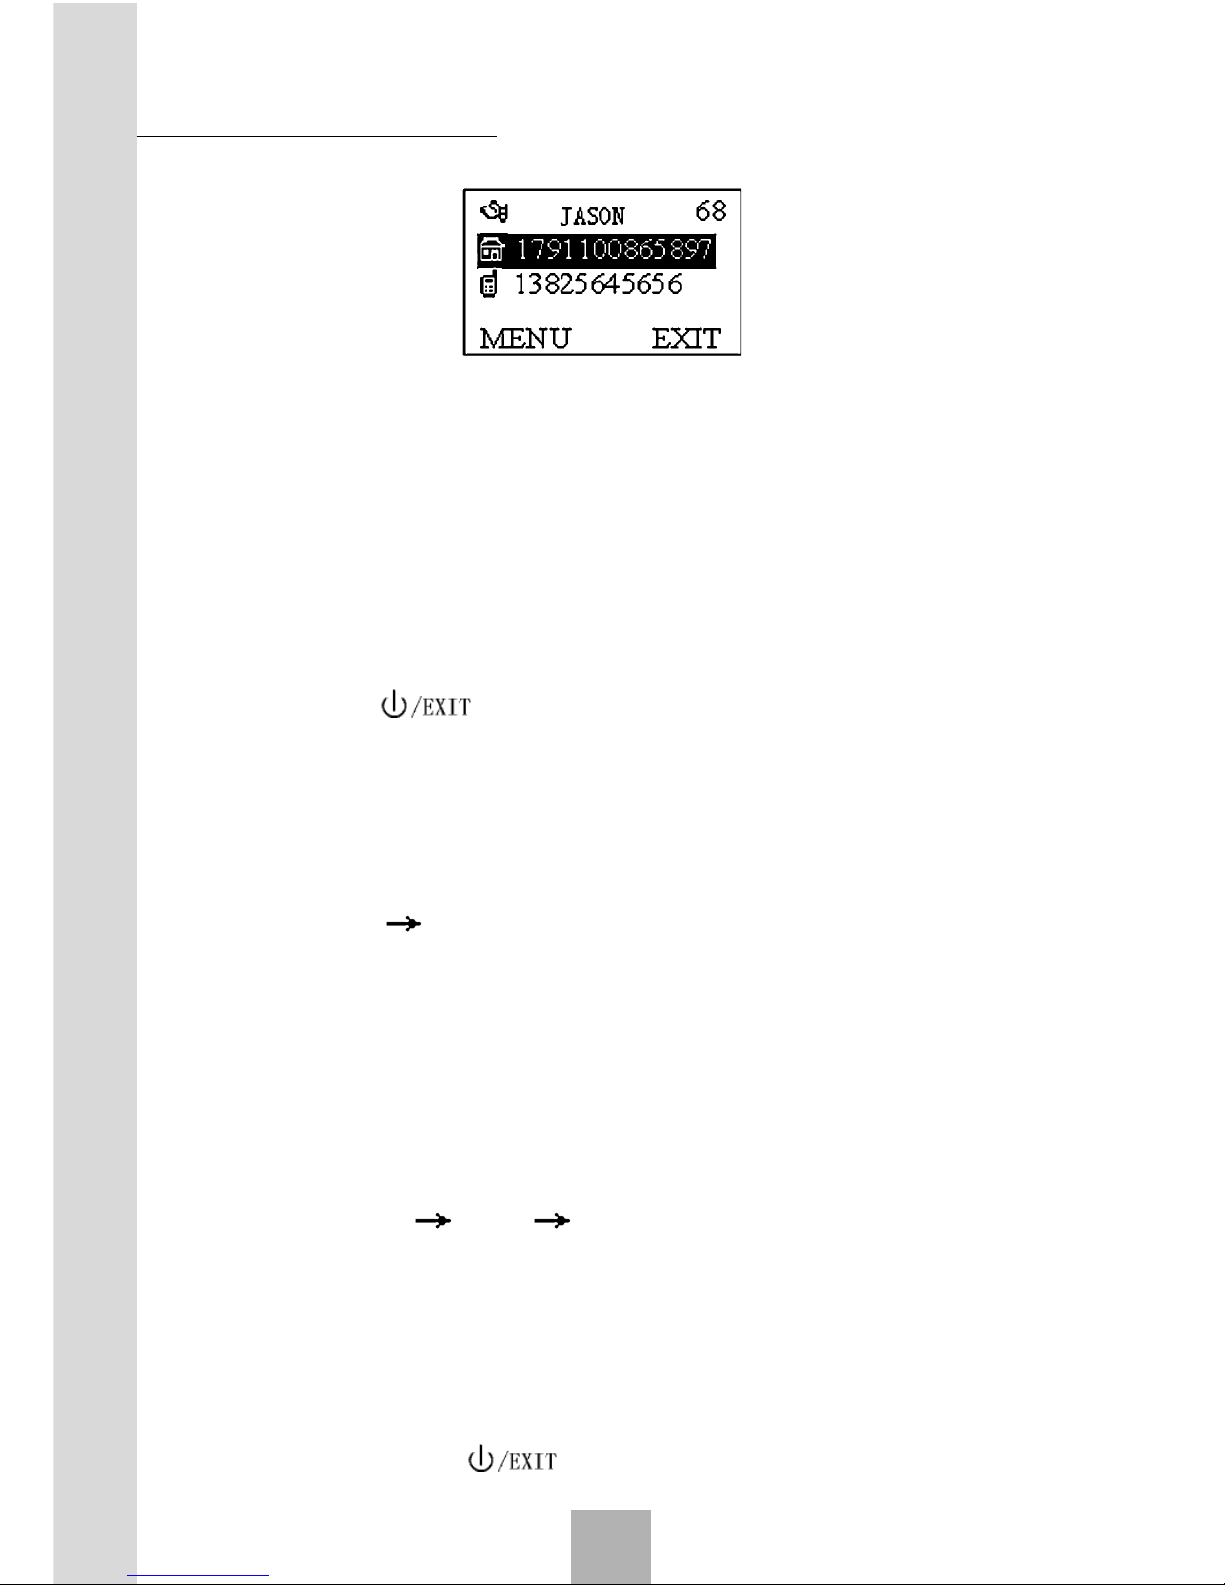
In this screen quick-search can be done by entering letters, and the
letters you enter can be shown in the upper right corner. For example,
if you want to search the name “JASON”, you can enter “J”, then
the cursor will move to the names that begin with “J”. If there is no
such record in the NAMES, it will stop at the most appropriate record.
Press Left/Right key to switch between groups, and all records
can be seen in the default status.
You can view details of the NAMES by pressing View.
Function Menu
4
Page 22
Sharing New Technology With You
22
One name can match three numbers and one E-mail address when
saved in the phone. Numbers can be any of the following five types:
Mobile, Home, Office, Fax, Pager
Shown in the upper right corner are the serial numbers of the Names.
- Press Menu to enter the detailed menu of Names.
- Press CALL/REDIAL key after you pick up the handset and
you can dial the first of the numbers corresponding to the current
name.
- Press key to return to the list interface.
If the number is longer than one line, there will be an arrow at the
bottom of the screen. Press Left/Right key to view the whole number.
4.3.1 Searching
1. Press Names, enter name menu.
2. Press Menu Search, enter the name or first letter of name you
want to search, and then press OK.
Or
Enter the serial number of the phone numbers you want to search
directly in home screen. For example: Enter “25#”, the phone number saved
in the 25th place will be displayed.
4.3.2 Adding New Name
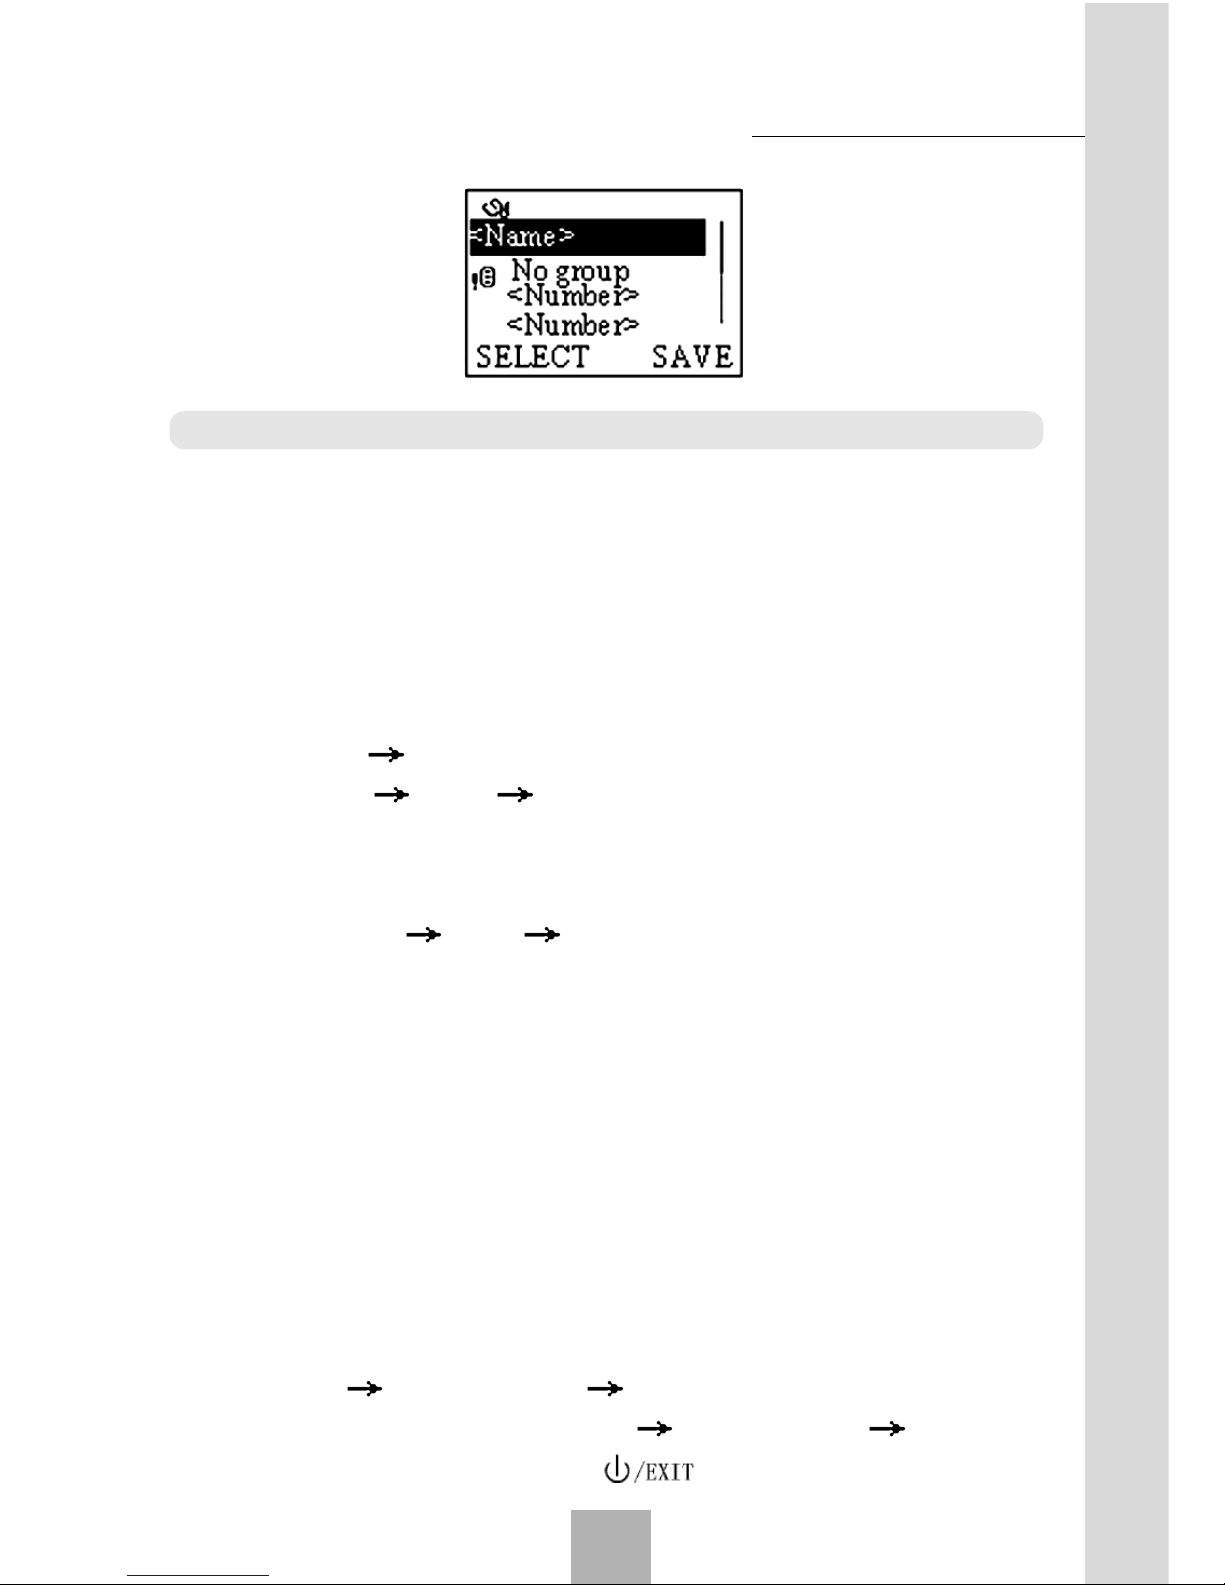
Press Names Menu Add new name. If it is in the status of
viewing all records, you can save the new name into the phone memory.
To save the name to the phone, as shown in the following figure, the
user can choose the input options. But the user must enter at least the
name and one phone number. After entering the name, choose the group;
and after entering the phone number, choose the number type. Press Save
to save the changes or key to abort the changes.
Function Menu
4
Page 23
23
Sharing New Technology With You
Note: Please refer to Chapter 5 for text input.
4.3.3 Editing Names
Press Names, select one name, press Menu to choose Edit and
then edit the present names including the name, the phone number and
the group.
4.3.4 Deleting Names
1. Press Names, select one name.
2. Press Menu Delete, delete the present selected Name.
3. Press View Menu Delete number to delete the present
number.
4.3.5 Checking Used Space
Press Names Menu Used Space, and you can view the to-
tal number of saved entries and the maximum number of entries to be
saved in the phone.
4.3.6 Sorting Name Cards
Name cards are sorted as follow:
Family, Friends, Colleague, Schoolmate, Society, VIP.
The Name cards unsorted by the user are grouped as Unsorted
Records.
After you enter Names menu, you can:
Switch between groups: Press Left/Right key.
Set ringing tones to distinguish calls from different groups: Press
Menu Group Setting Tone, choose the ring tone.
Rename the group: Press Menu Group Setting Rename.
Exit the current menu, press key.
Function Menu
4
Page 24

Sharing New Technology With You
24
Move the record to other groups (except “all records group”): select
one record from one group(except “all group”), press Menu Add
to group.
4.3.7 Sending Messages
After entering the Names screen, select one name, there are two
methods to send messages:
1. Press Menu Send message, the message will be sent to the
default number (the first number) matching the name.
2. Press View, select one number of the name, Press Menu Send
message, messages can be sent to the selected number.
4.3.8 Add to speed
Press Names, select one from the list , then press View and Menu
in turn, then select Add to speed to append the current number into
speed number list. In the standby mode, one can hold the serial number of
the current number for 2~3 seconds to make a call directly. Numbers can
be deleted by pressing the Delete right soft key in this list.
4.3.9 Sending Name Card
Press Names View Menu, select Send name card, the
current Name card (excluding E-mail address) will be sent out as a message.
If you select Send to one, you can enter the number or choose the
number from names.
If you select Send to many, you can only choose the number from
names.
4.3.10 Setting the Default Number
The first of the numbers matching each name is set as a default number.
You can change it. Press names View, select one number, then press
Menu Set as default , the current number can be assigned to a
name as the first number.
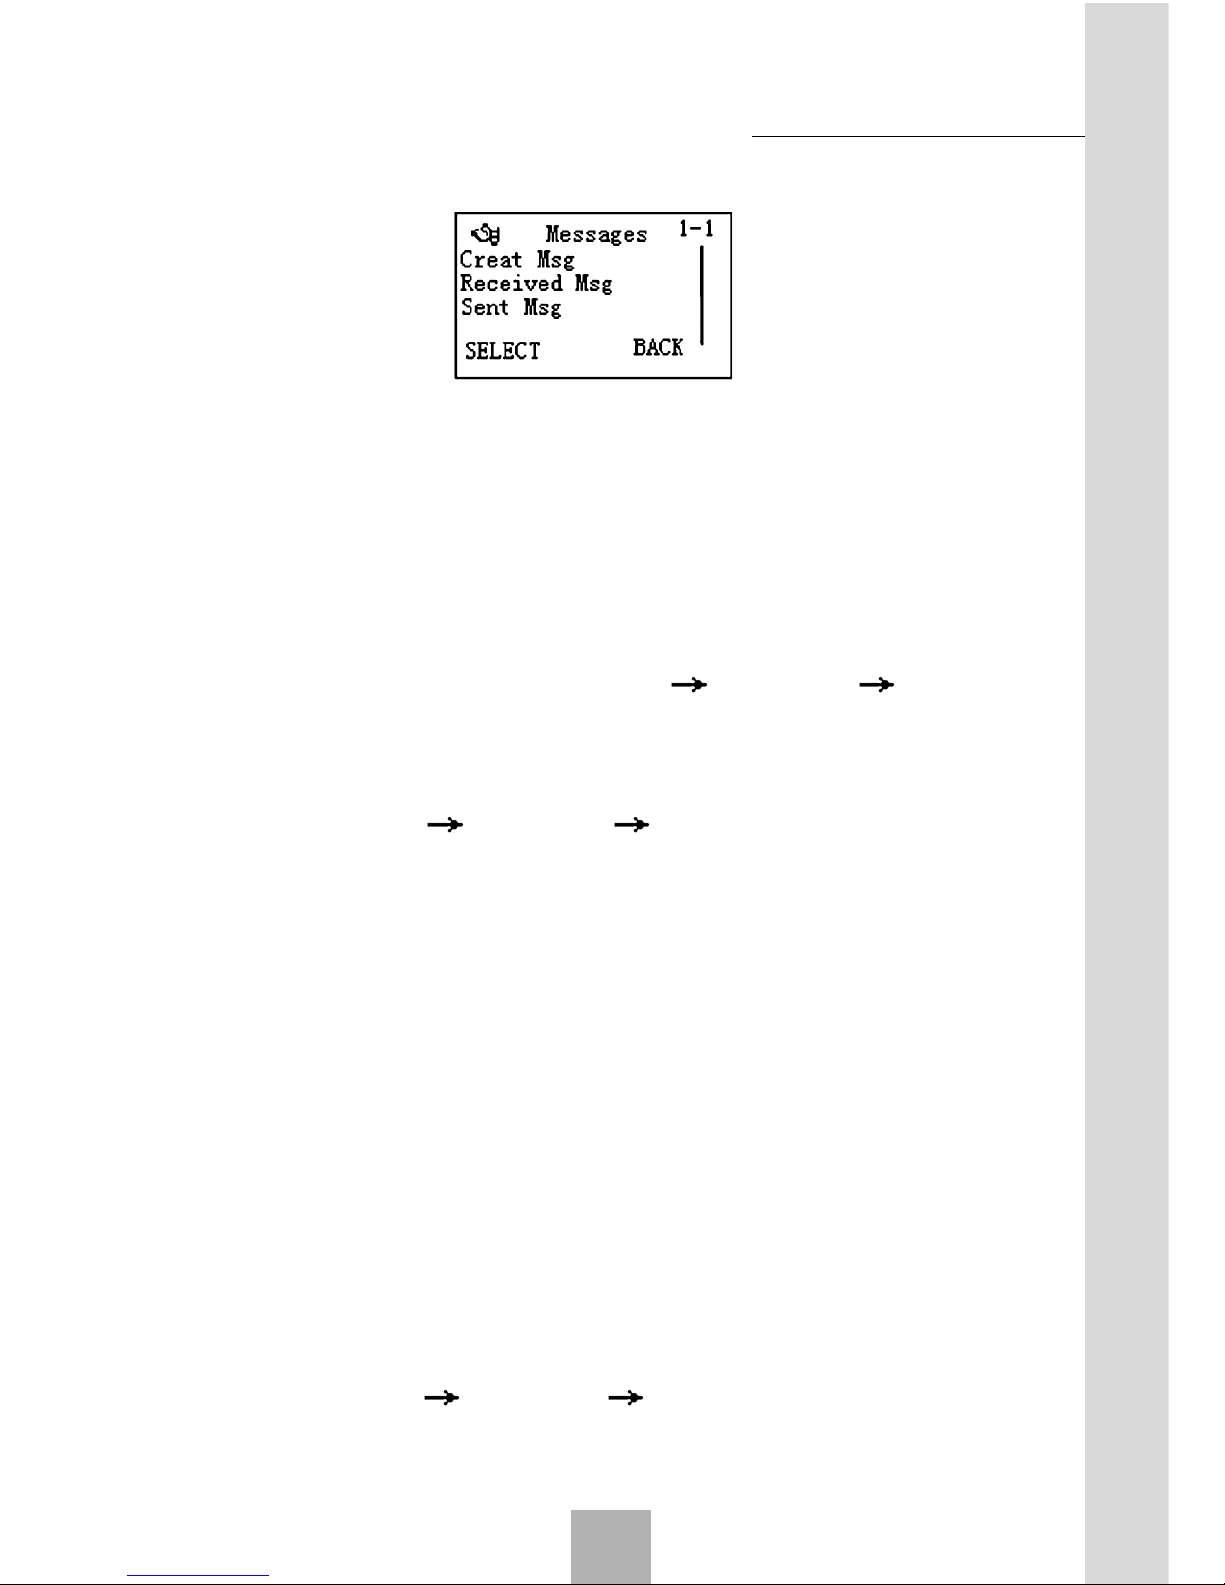
4.4 Messages
Your phone can save 40 short messages. The maximum length of each
Function Menu
4
Page 25
25
Sharing New Technology With You
message will be 160 characters in English.
4.4.1 New Messages
When receiving a new message, your phone will give an alert tone (if
the Sound is set as on). The new message icon will appear on the screen.
If not immediately read, the message will be saved to the phone
automatically. If the memory is full, a flashing message icon will appear at
the top of the screen, prompting you to delete old messages as soon as
possible.
To read new messages, select Menu messages Received
Msg.
4.4.2 Writing Messages
Select Menu messages Create Message, enter mes-
sage texts.
Press OK and scroll to Send to one or Send to many.
- When choosing Send to One, you can press Number keys
to enter the phone number or use Right Soft key to choose
the number from the Names.
- When choosing Send to many, your phone will automatically
navigate to the name list; you can only choose one name from
the list and continue to choose other names after confirming.
If Set Callback No. option is set ON in the Msg Settings item
of Messages Menu, after you enter the destination number, press
OK, the phone will prompt you to enter the call-back number, and
then press OK again to send the message.
4.4.3 Viewing Received and Saved Messages
Select Menu messages Received Msg to view received
messages. Select Sent Msg to view those messages saved but
not sent .
Function Menu
4
Page 26

Sharing New Technology With You
26
In the message list, choose Read to view the message. At this
time press Options to do the following operations:
- Edit: Edit current message
- Delete: Delete current message
- Voice Call: Call back by voice
- Extract Nos: Extract numbers from the text of the current message and display them in a list. Choosing one number will bring
you to the dialing window.
The Voice Call option will not appear when you read messages from
Sent Msg, and Send option will not appear when you read messages
from Received Msg.
Delete all: Delete all the received and saved messages.
If a name card message is received, a prompt message will appear
after choosing Read. You can save the name card message to the
phone book after confirmation.
4.4.4 Msg setting
You have to make necessary settings before using SMS service. Select Menu messages Message Settings.
Status Rept: If the Status Rept option is enabled, when the
message reaches the SMS center, the SMS center will inform you
in the form of a Status Report message.
Note: This function needs the network to support.
Callback No.: This submenu is used to set whether to enter the
callback number when sending a message. Callback number is the
number you want the message receiver to reply to. If you set the
callback number, the receiver will see this number in the end of the
message.
Note: This function needs the recipient’s phone to support callback number identification.
Set Idiom: When editing a message, Set Idiom screen can be
brought out by double pressing * key. In this screen, phrases can
be edited, changed or directly sent out.
Function Menu
4
Page 27

27
Sharing New Technology With You
Set Poems: You can save up to 10 poems in your phone and
bring out the poems by triple pressing * key while editing the short
message. In this menu, poems can be edited, changed or directly
sent out.
Priority: Press Change to set the priority of sending messages.
There are three options: Norm, Inte, or Urge.
Msg Period: During Msg Period, SMS center will repeatedly send
the short message until it is received. Press Change to set the
Msg Period as: 1 day,1 week, or 1month.
Note: This function needs the network to support.
4.5 Calls
4.5.1 Viewing Calls List
Your phone saves the latest 20 missed calls, 10 received calls and 10
dialed calls, and you can view all of them from the menu.
Press Menu Calls to enter.
Choose All Calls to view the list of all calls.
Choose Missed Calls to view the list of missed calls.
Choose Received Calls to view the list of received calls.
Choose Dialed Calls to view the list of dialed calls.
In the calls list screen:
- Press Select to view the detail of this call.
- Press Select SMS to send a message to this number
- Press CALL/REDIAL key to dial this number directly after you
pick up the handset or press HANDFREE key.
Last call: Enter Last call submenu, choose Time to view the
last call duration and choose Cost to view the last call charge.
All call info: Your phone allows you to view the accumulated call
duration and accumulated call charge.
4.5.2 Clear Logs
Select Menu Calls Clear Logs, press OK to clear all logs, or
press Cancel to exit.
Function Menu
4
Page 28
Sharing New Technology With You
28
4.6 Profile
You can choose different profiles in different occasions, or you can
customize the profiles according to your own needs.
4.6.1 Selected Profile
Press Menu Profile Select profile, then press Change to
change the current profile. There are 3 options: Normal, Outdoor and
Silent. These options have been preset by the manufacturer.
4.6.2 Edit Profile
In the 3 profiles mentioned above, the following items can be set, se-
lect Menu Profile Edit profile, select one profile.
Ringtone Type: 20 tones available.
Ringtone Vol: The volume of ringer. Press up/ down or left/
right key to adjust.
Speaker Vol: The volume of the receiver. Press up/ down or
left/ right key to adjust.
Key Tones: Press change left soft key to change the volume
of the key tone to Low or High.
Warn Tone: Enable or disable the warning tone.
Message Alert: Set Alert Tone types when receiving new mes-
sages.
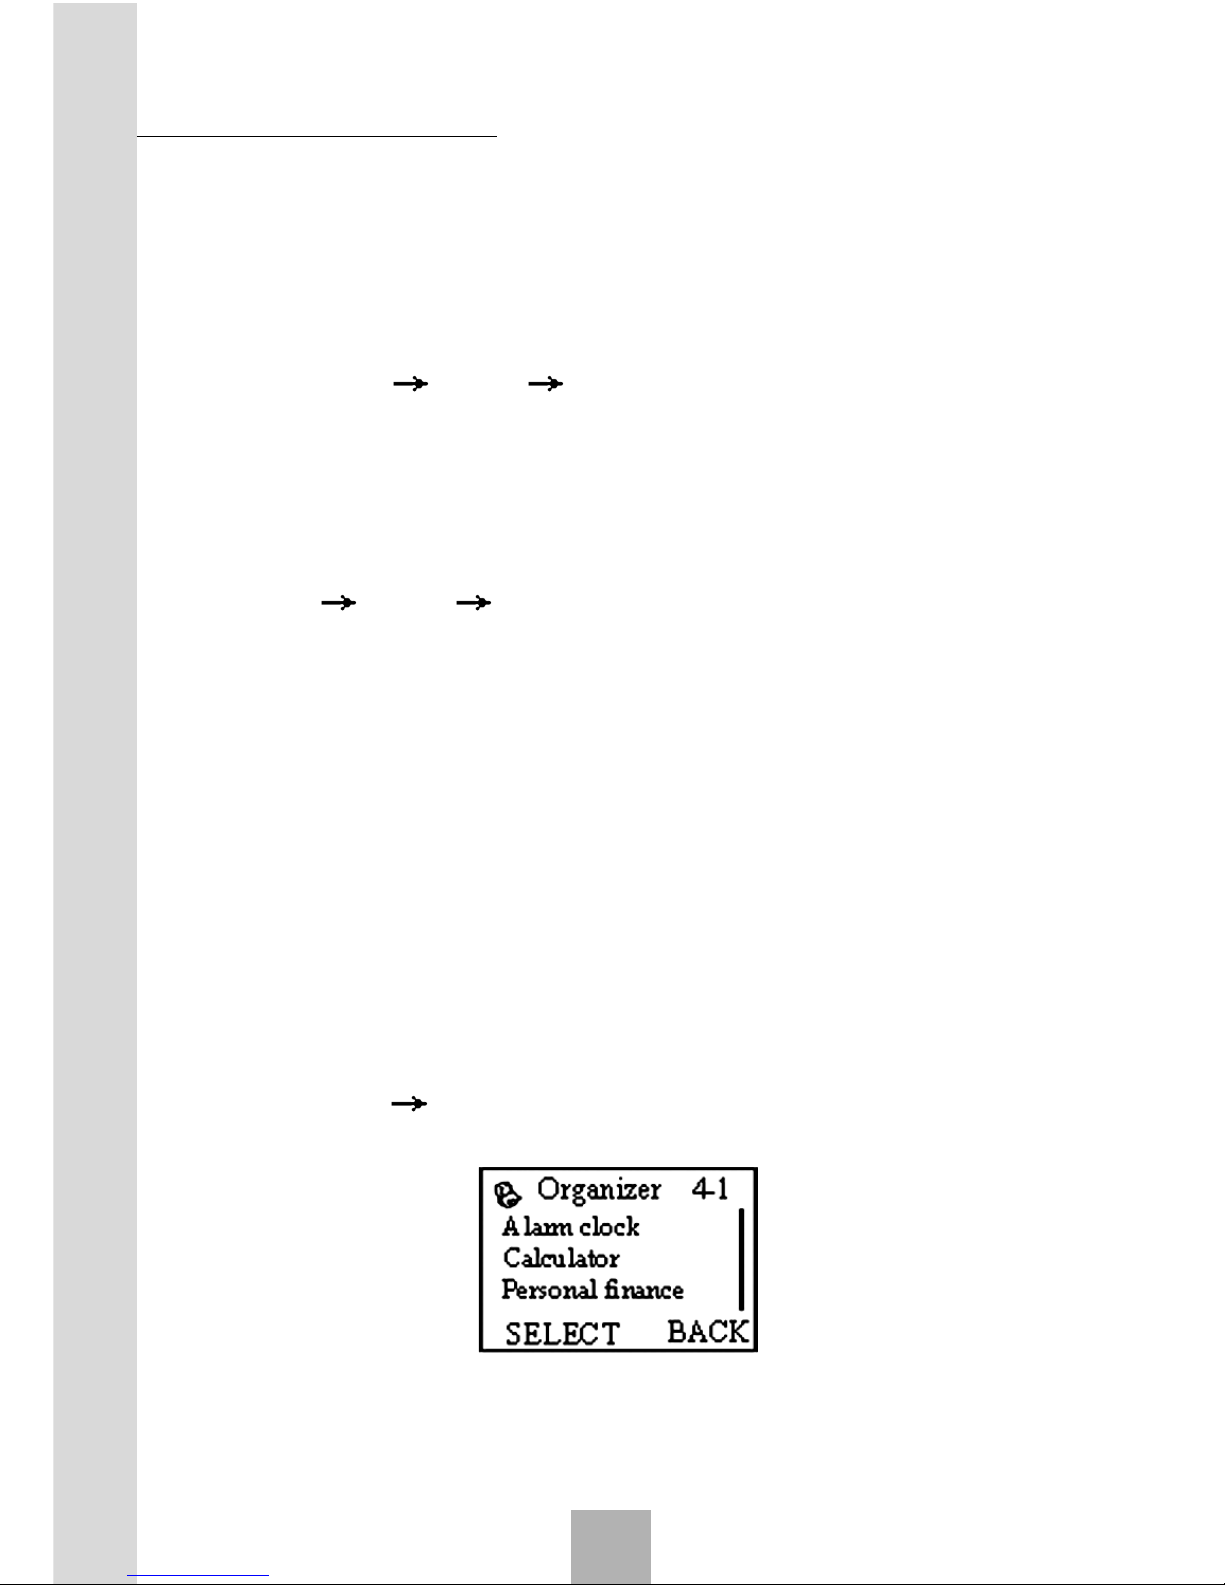
4.7 Organizer
Press Menu Organizer to enter organizer menu. The phone pro-
vide 6 functions:
1.Alarm Clock: Providing power-off/ordinary alarm clock service.
2.Calculator: Simple operations such as sum, subtraction, multipli-
cation and division.
Function Menu
4
Page 29

29
Sharing New Technology With You
3. Personal Finance:
- Small account book: Recording lots of accounts for the user to
consult and make statistics.
4. Notepad: Recording lots of necessary data.
5. Schedule: For planning journeys or errands.
6. World Clock: Keeping track of local and world time.
4.7.1 Alarm Clock
Your phone can have a maximum of 5 alarm clocks (excluding the
Schedule alarm clock).
1. Set alarm:
Press Menu Organizer Alarm Clock Set alarm, and
set the following options according to the instructions below:
Type: The clock can be set as Single alarm, Daily alarm,
Weekly alarm, and Workday alarm according to your prefer-
ence.
Date: It is set as the current day by default. This setting is not
necessary if Daily alarm or Workday alarm is set.
Time: If Normal is set, the clock Date/Time must be set later
than the current date/time, or you will be informed of an invalid date/
time entry.
Clock Message: Setting the text message that appears on the
idle screen when the alarm sounds. Default is void.
Automatic Power-Off/Normal: Press select left soft key and
then select one from two options:
Automatic Power-off When alarm time arrives, power off the phone
automatically without ringing.
Normal: Ringing normally when the alarm time arrives.
Ring Tone: Setting the alarm clock ringing tone.
Press OK to save alarm clock settings when completed. Or you can
press “exit” right soft key or key to exit after setting part of the
items and the phone will prompt you to save. If you choose to save your
settings, the rest items will use default values. If you are informed of invalid
Function Menu
4
Page 30
Sharing New Technology With You
30
alarm clock setting, press Exit to exit setting of the alarm clock. If the
alarm clock is properly set, a small corresponding icon will appear on the
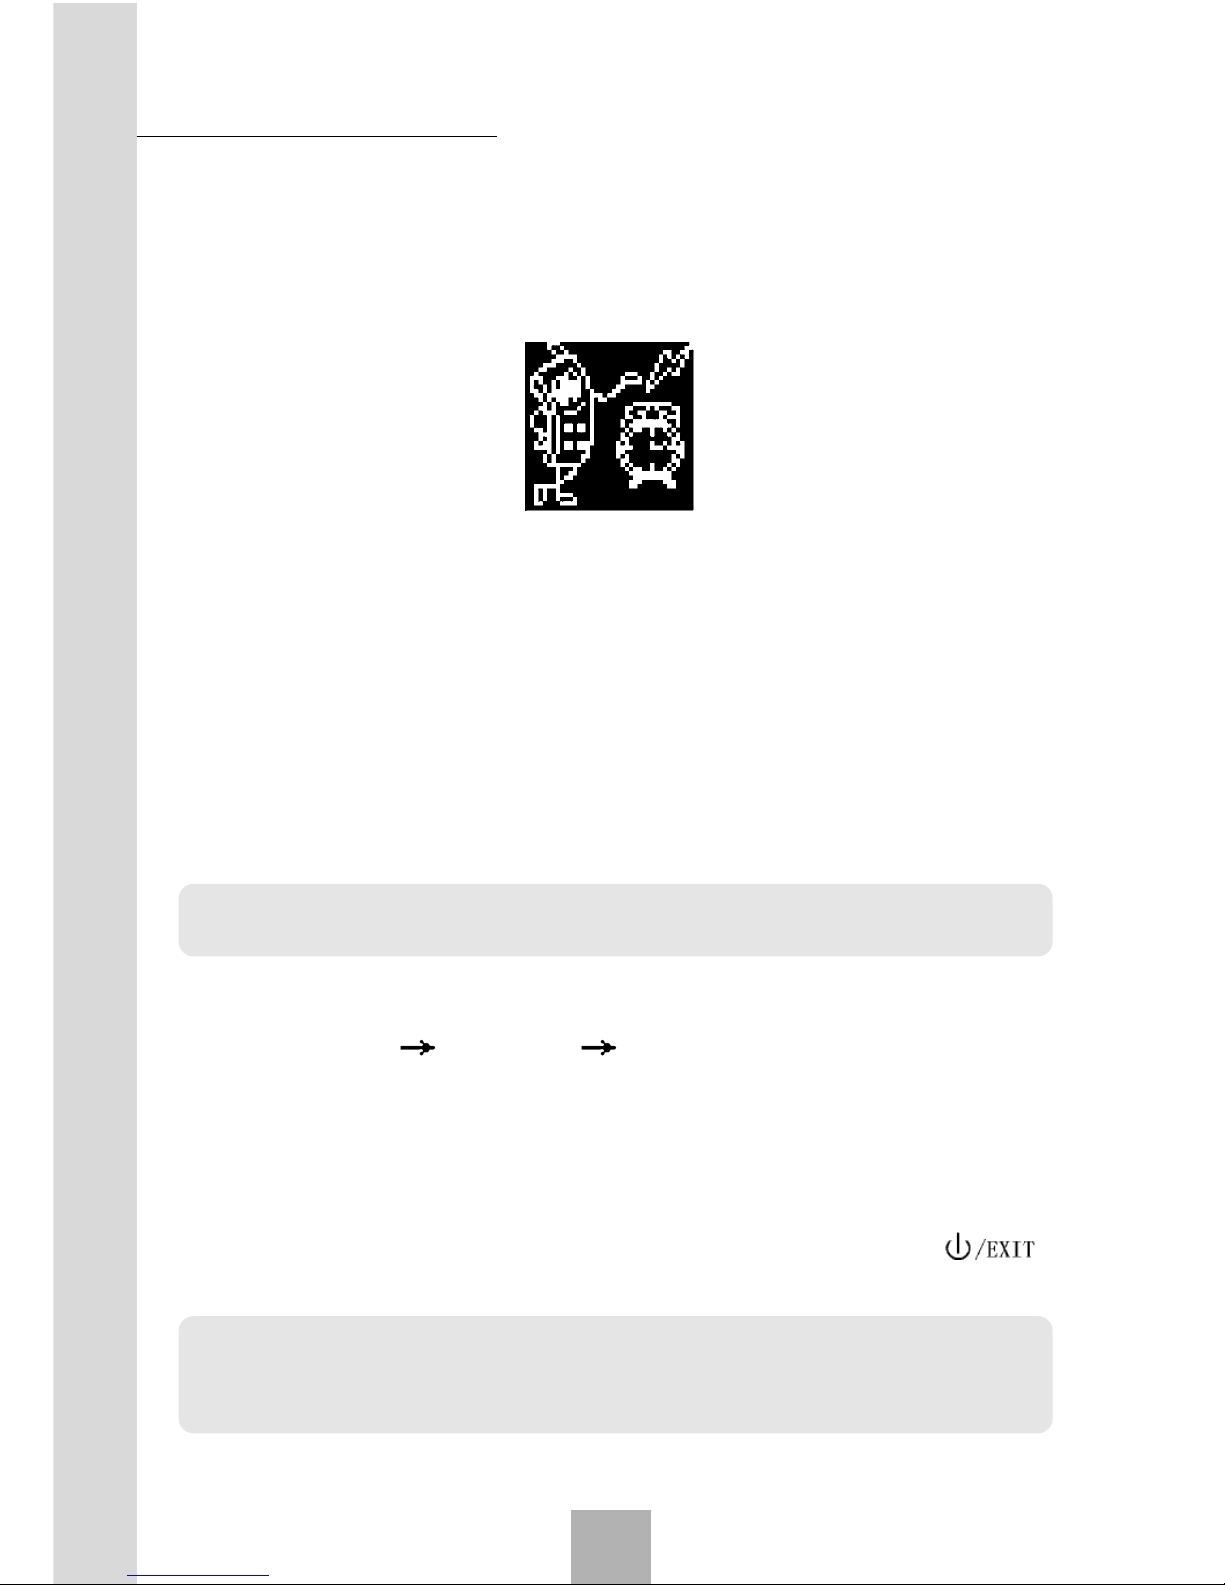
screen in the standby mode.
When Alarm time is coming, your phone will ring and the icon will display.
2.View List Alarms:
Select List Alarms, use Up/Down Key to view the set alarm clocks,
press Select to enter the setting screen, then press View/Edit to view
and edit settings of the alarm clock, press Delete to delete the settings, or
press Disable to disable the alarm clock.
3. Define rest day:
Select Define rest day to set or change rest day.
4. Clear All:
Select Clear All to clear all alarm clock settings.
Note: Scheduled alarm clock setting can only be viewed/edited or de-
leted in Schedule Menu.
4.7.2 Calculator
Select Menu Organizer Calculator.
Press 0~9 number keys to enter the numbers to be calculated,
and press # key to enter the decimal point.
Press left soft key or * key as many times as necessary to
switch between +, -, × and ÷.
Press CLR key to clear the last entry and results. Press
key to exit the Calculator. Press Equal to get results.
Note: This calculator is not perfect in precision and may cause rounding
errors. The maximum length is 9-digit. When the operational data and results exceed 9 digits, an overflow message will be shown.
Function Menu
4
Page 31
31
Sharing New Technology With You
4.7.3 Personal Finance
Account Book
The account book can restore 30 records of financial accounts, dated
from 2000 to 2050 AD.
4.7.3.1 Account Book screen:
Press Menu Organizer Personal Finance.
Access Account Book, and the Account Book View screen
will show if there are saved data.
Access Account Book, and the Add screen will show if there is
no data.
4.7.3.2 Account Book View screen:
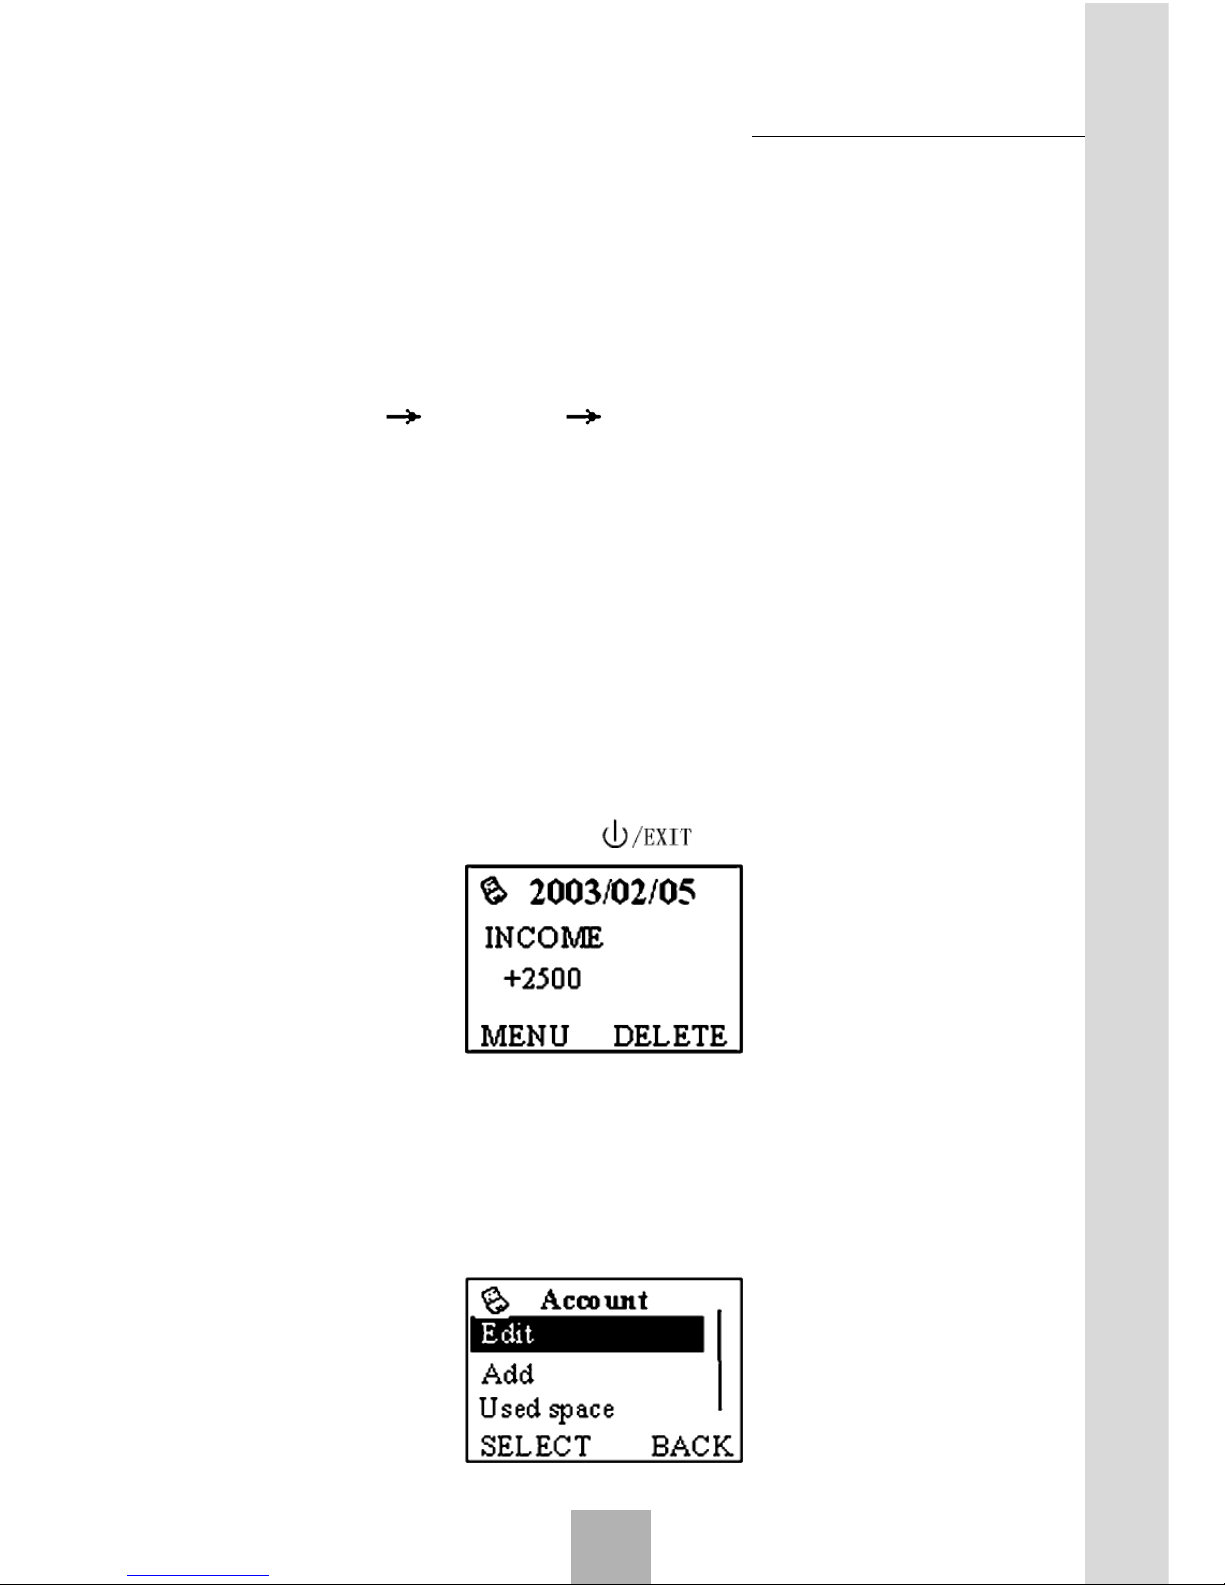
As shown in the figure, the View screen respectively shows the date,
name (at most 5 digits) and sum, with “+” representing saving and “-” representing expenditure. Press Up/Down key to view each account, and
press Menu to enter the menu interface. Press Delete to pop up a dialog
box, and press OK to return. Press key to exit.
4.7.3.3 Menu screen:
There are five options in the Menu screen: Edit, Add, Used Space,
Account and Clear all. Press Up/Down key to choose from the
options. Press Select to enter the next screen. Press Back to return to
the previous screen (Account Book View screen).
Function Menu
4
Page 32
Sharing New Technology With You
32
Note: If the memory is full, no Add option is available.
1.Edit
Choose Edit from the menu to enter the Edit screen.
Press Up/Down key to move the cursor, and the cursor will switch
between date, name and sum. Press Save to confirm the viewed/edited contents, and press key to abort the changes.
When the cursor is on the date, press Number keys or Calendar
to enter the date. Press Left/Right key to move the cursor. If the entered date is improper, Left Soft Key has no definition.
When the input cursor is on the name, press Number keys to enter
the contents, and press # key to switch between the input methods. Press
Left/Right key to move the cursor. Press CLR key to clear the last
entry.
When the cursor is on the sum, press Number keys to enter numbers.
Press # key to enter decimal point, with two digits reserved behind the
decimal point. Press * key to switch between “+” and “-”. Press Left/
Right key to move the cursor. Press CLR key to clear the last entry.
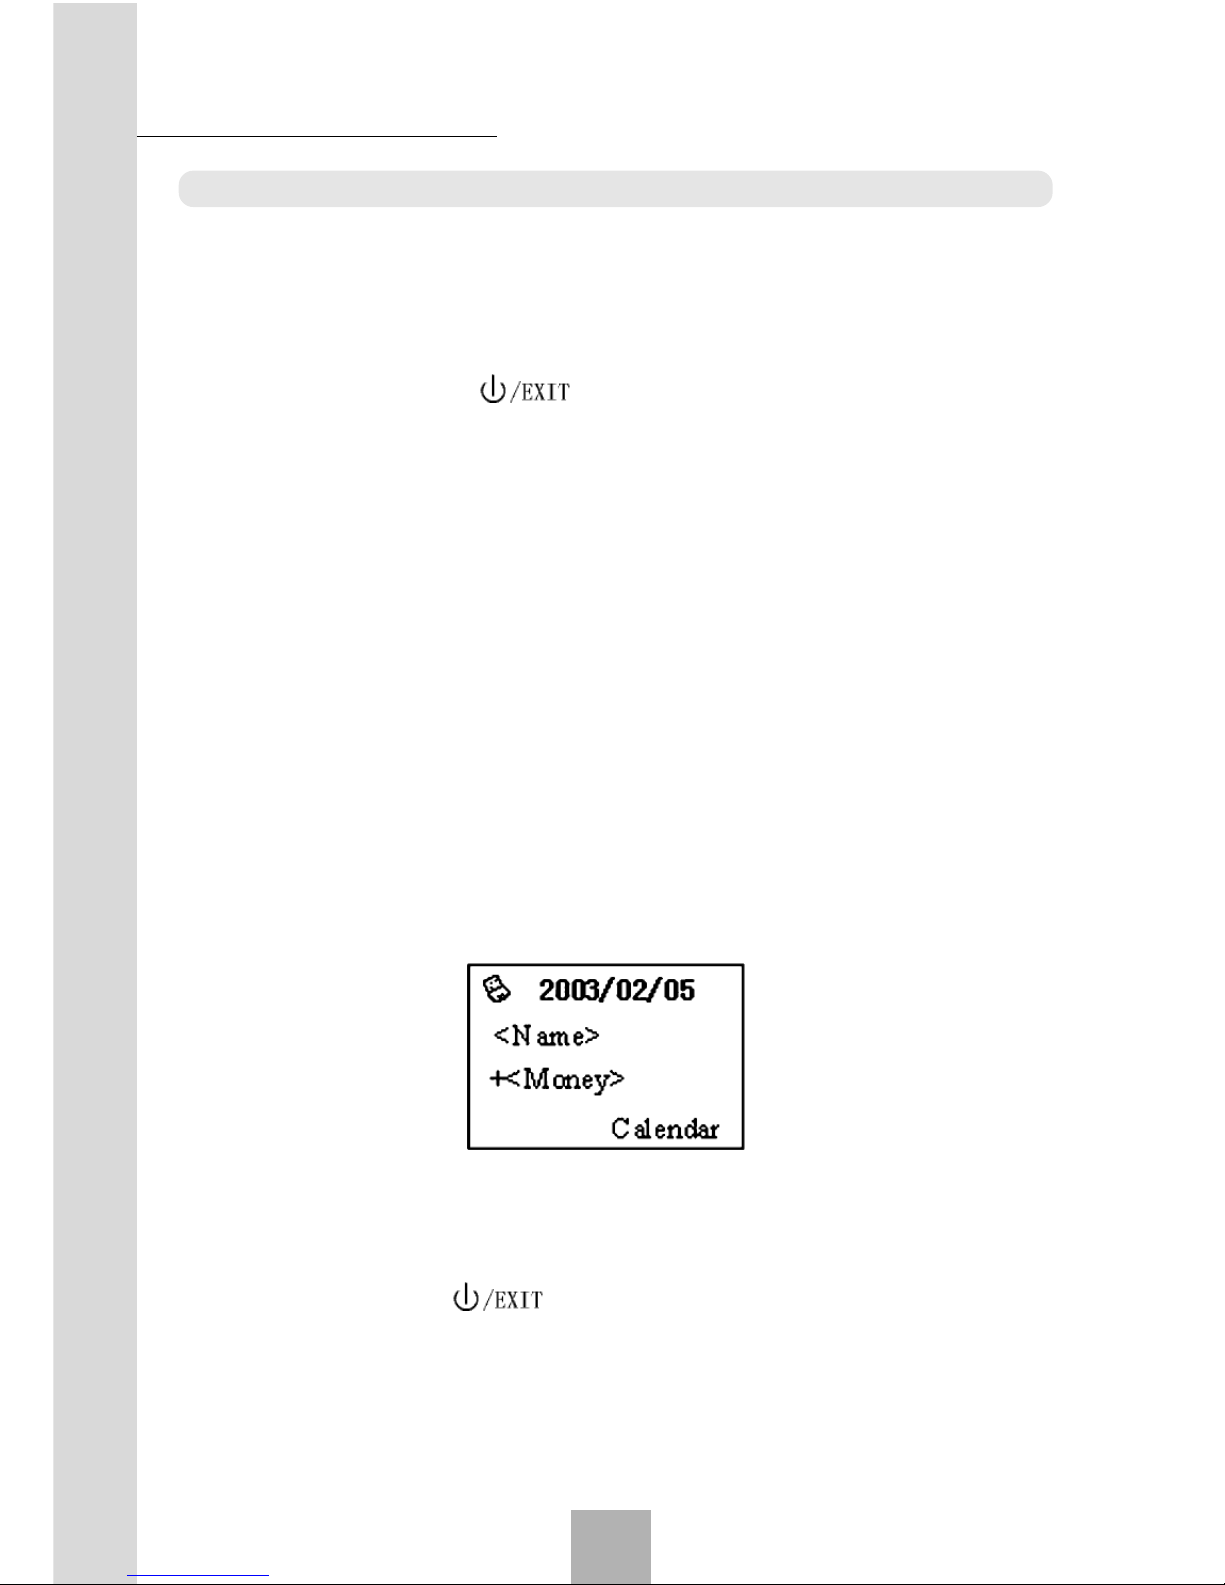
2. Add
Choose Add from the menu to enter the Add screen. Directly enter the
Add screen shown as below if there is no record saved.
The start date is the present date. Press Up/Down key to move the
cursor up and down, and the cursor will switch between Date, Name and
Money. Press Save to confirm adding and change to the Account View
screen. Press Exit or key to abort adding, and a prompt box will
pop up; press OK to exit Account Book.
For entering characters, please refer to operations in Edit.
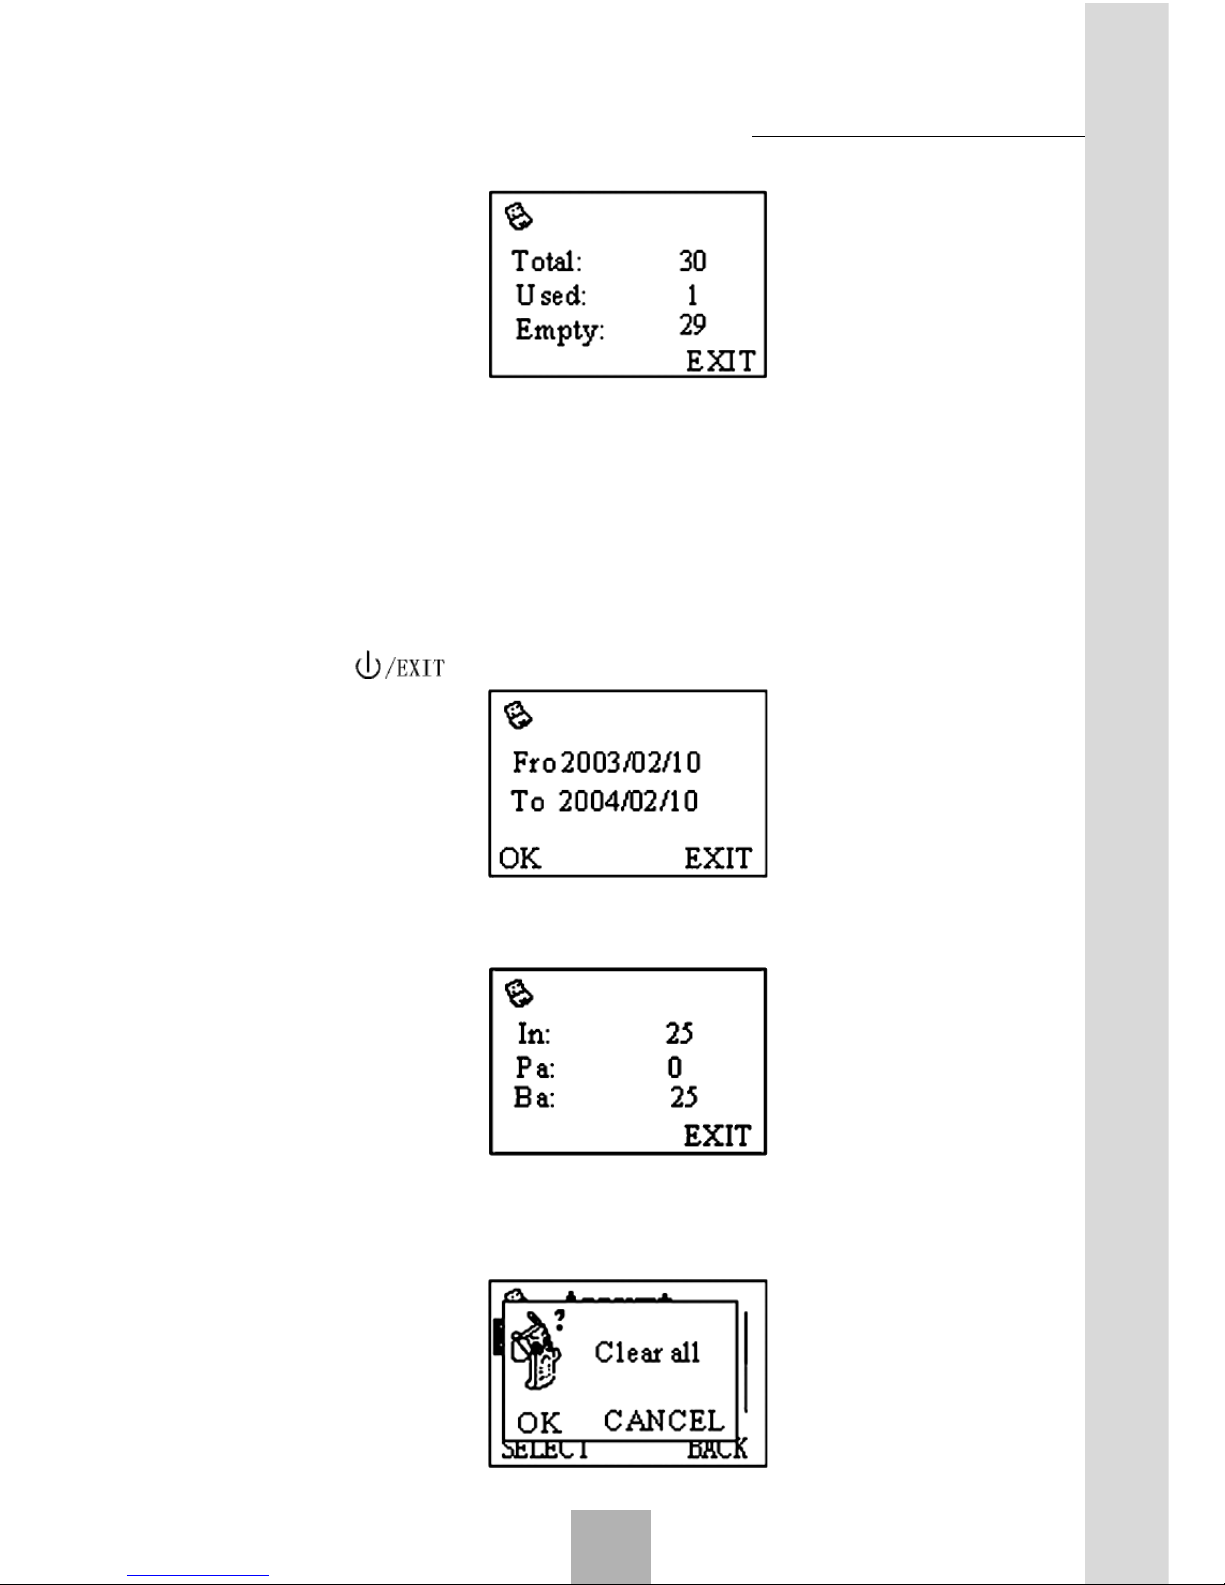
3. Used Space:
Choose Used Space from the menu to show the total available space
Function Menu
4
Page 33
33
Sharing New Technology With You
and used space.
4. Account
Account range setting: Choose Account from the menu to
enter the account date input screen. Both the start and end dates are the
present date. Use Up/down or Left/Right key to move the cursor. Press
Number keys to enter the date, and if the entered date is improper
(including the case when the start date is later than the end date), Left
Soft key has no definition. Press Ok to enter the Statistics View screen.
Press Exit or key to abort statistics.
Account View: The screen shows the total saved sum of currency,
total sum of expenditure, and balance. Press Exit to return.
5. Clear All screen
Choose Clear All in the menu to enter Clear All dialog, and press
OK to clear all records, or press Cancel to return.
Function Menu
4
Page 34
Sharing New Technology With You
34
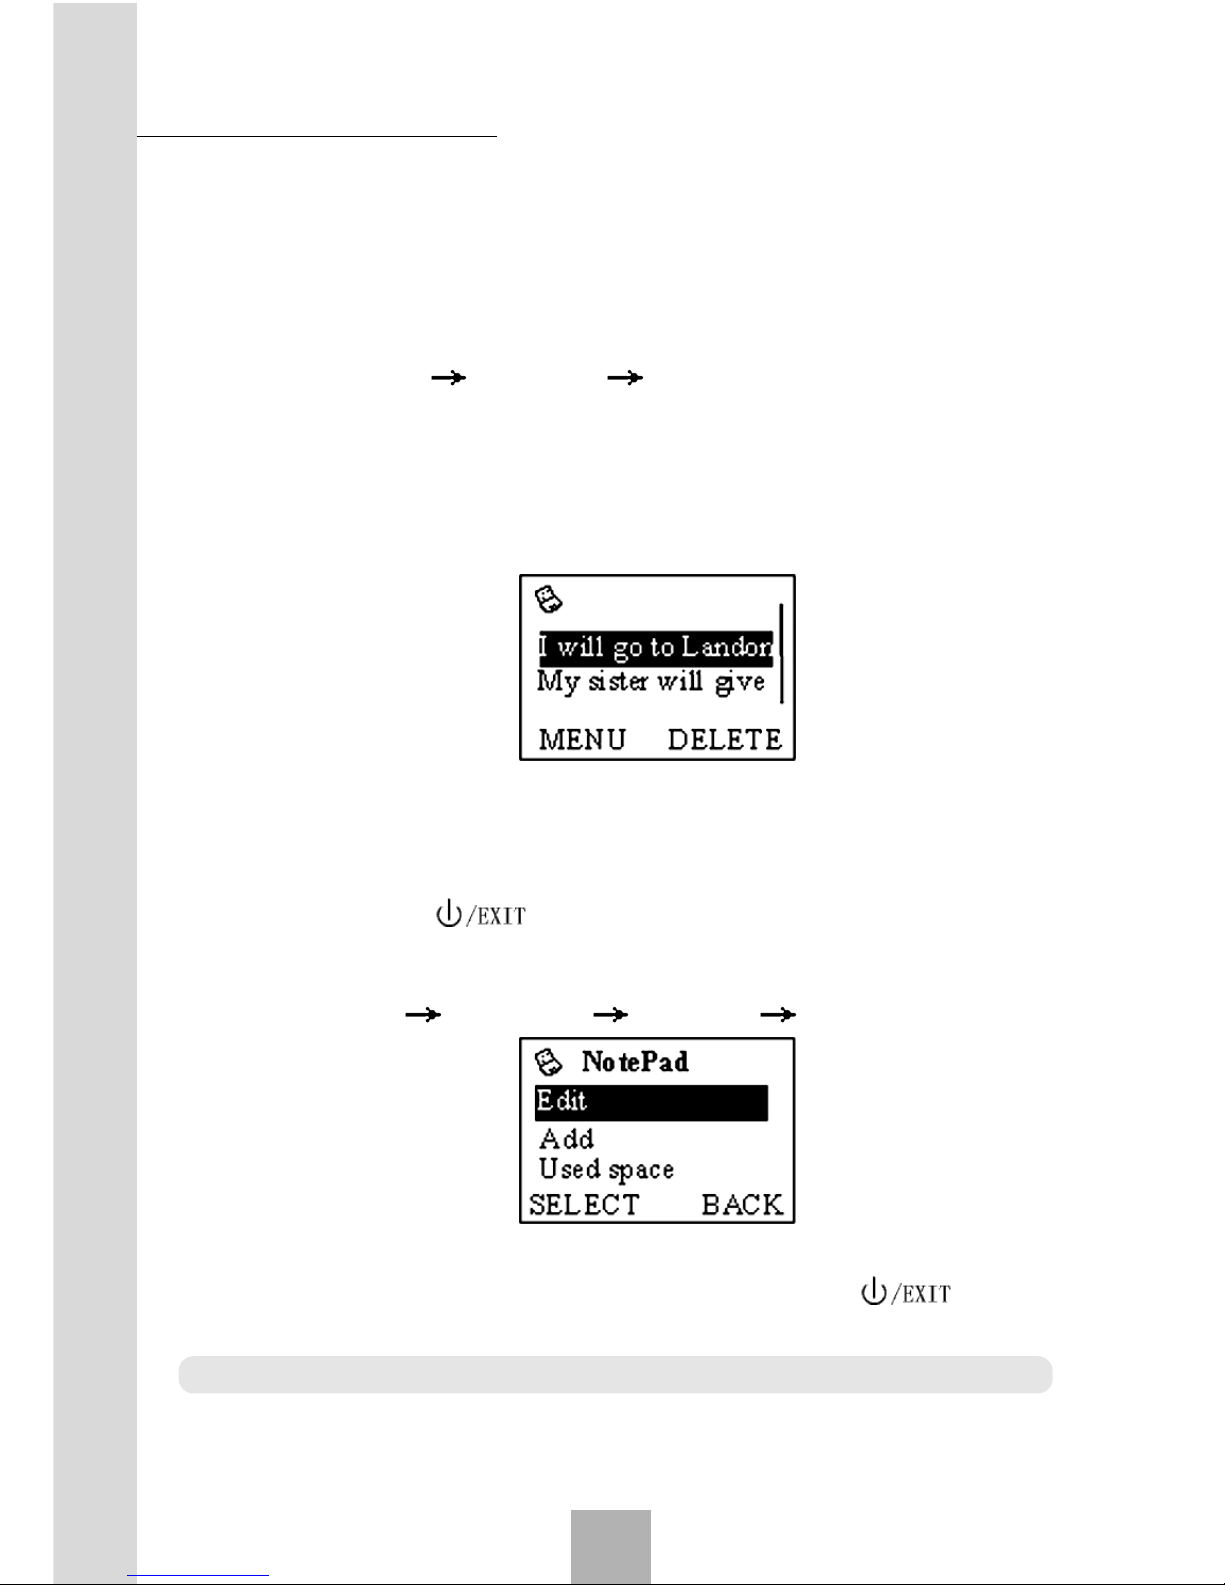
4.7.4 Notepad
It can record up to 30 events with the length of 30 characters, for the
user to consult at any time.
4.7.4.1 Notepad screen
Press Menu organizer notepad, press Menu soft key,
the list screen will appear first if there are events recorded.
Enter Notepad, and directly enter the Add screen if there are no
events recorded.
4.7.4.2 List screen
The list will only show the first line of record for each event. Press Up/
Down key to choose the event, press Menu to enter the Menu screen,
press Delete to pop up a dialog box, and press OK to delete it and return
to Notepad. Press key to exit Notepad.
4.7.4.3 Menu screen
Press Menu organizer notepad Menu to enter the
Notepad-Menu screen.
This screen lists four options: Edit, Add, Used Space, and Clear
All. Press Up/Down key to choose an option, and press key to
exit.
Note: If the memory is full, no Add option is available.
1. Edit screen
Choose Edit in the notepad menu to enter the screen. Press Up/
Function Menu
4
Page 35
35
Sharing New Technology With You
Down key to view the contents, and press Exit or key to return.
Press Number keys to enter contents; press # key to switch between the input methods; press Scroll key to move the cursor; and press
CLR key to clear entered characters. Press Save to confirm the changes
and return. Press Exit or key to abort the changes and return.
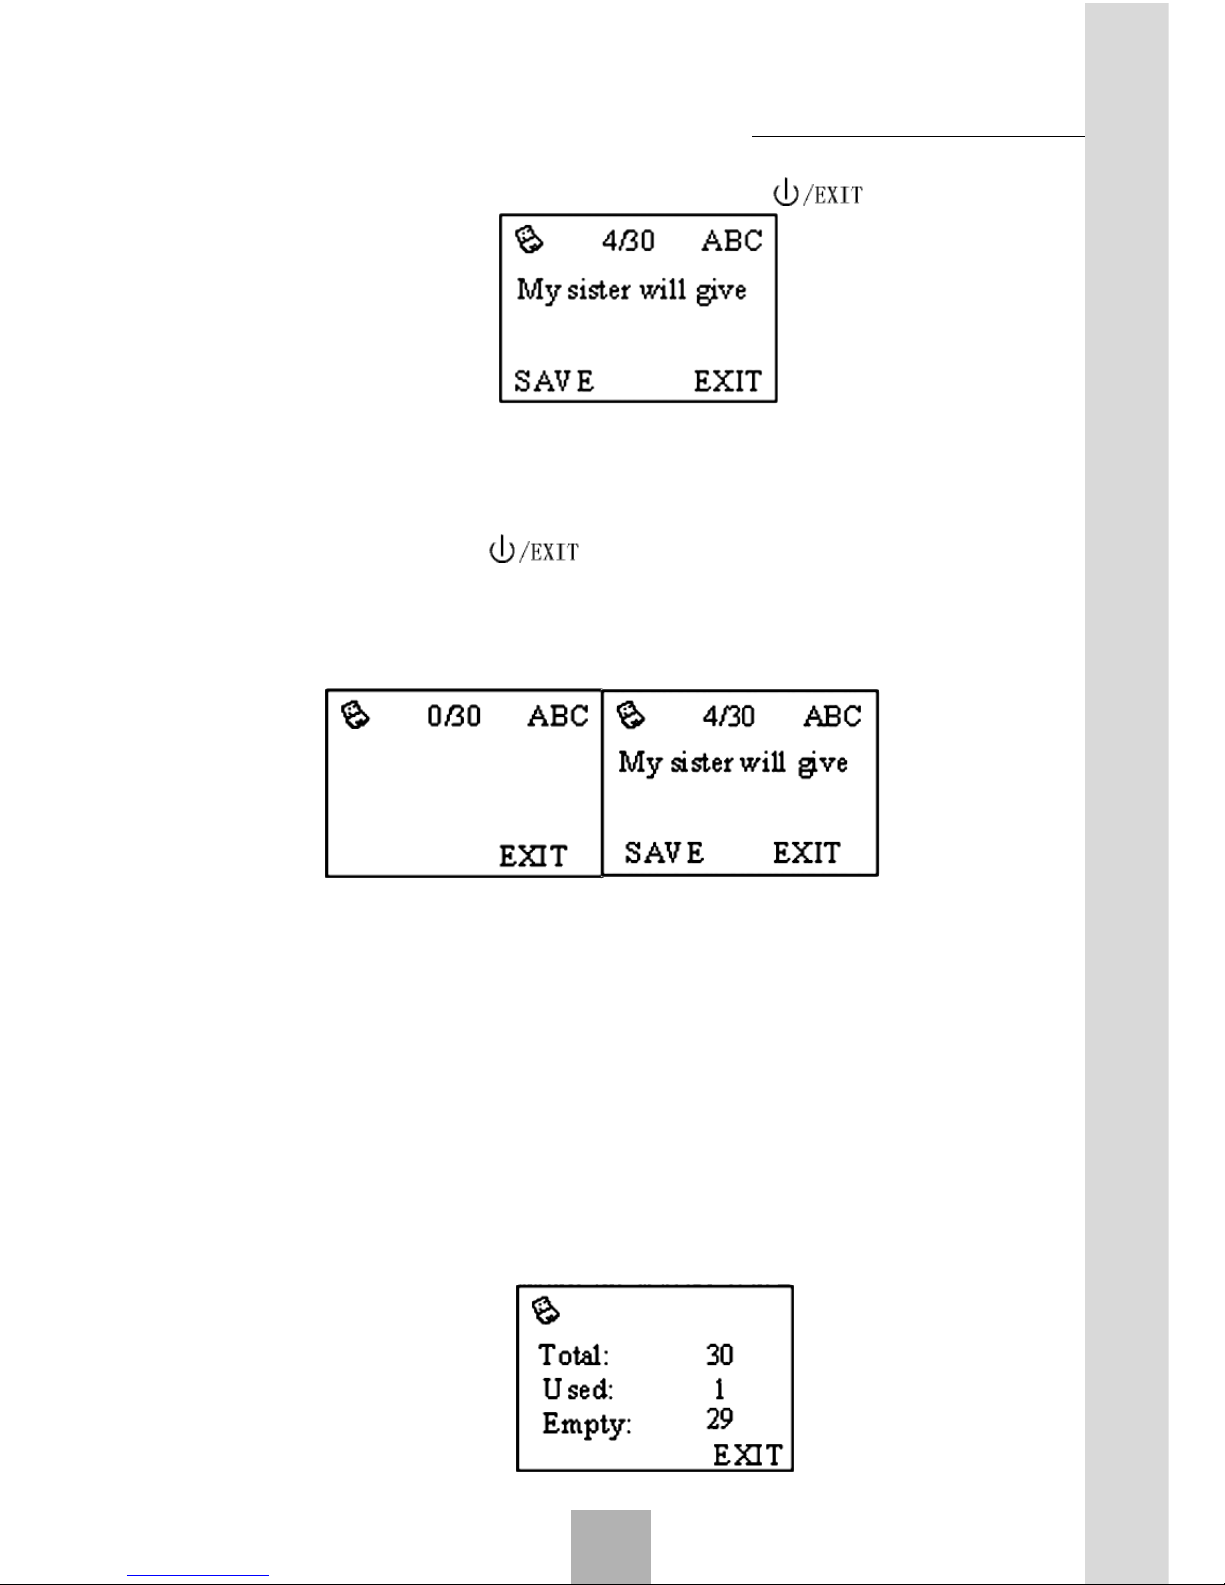
2. Add screen
Choose Add in the notepad menu to enter the Add screen, and directly enter the Add screen if there is no event recorded.
Press Number keys to enter contents. Two numbers, respectively
representing the entered characters and the total characters that can be
entered, will show right at the upper part of the screen. Press # key to
switch between the input methods. Press Up/Down key to move the
cursor, and press CLR key to clear the entered characters. Press Save
to confirm the added contents and return. Press Exit to abort adding, and
return to the List screen if the Add screen is navigated from it, or exit
Notepad if the Add screen is navigated automatically.
3. Used Space:
Choose Used Space from the notepad menu to show the total available space and used space.
Function Menu
4
Page 36
Sharing New Technology With You
36
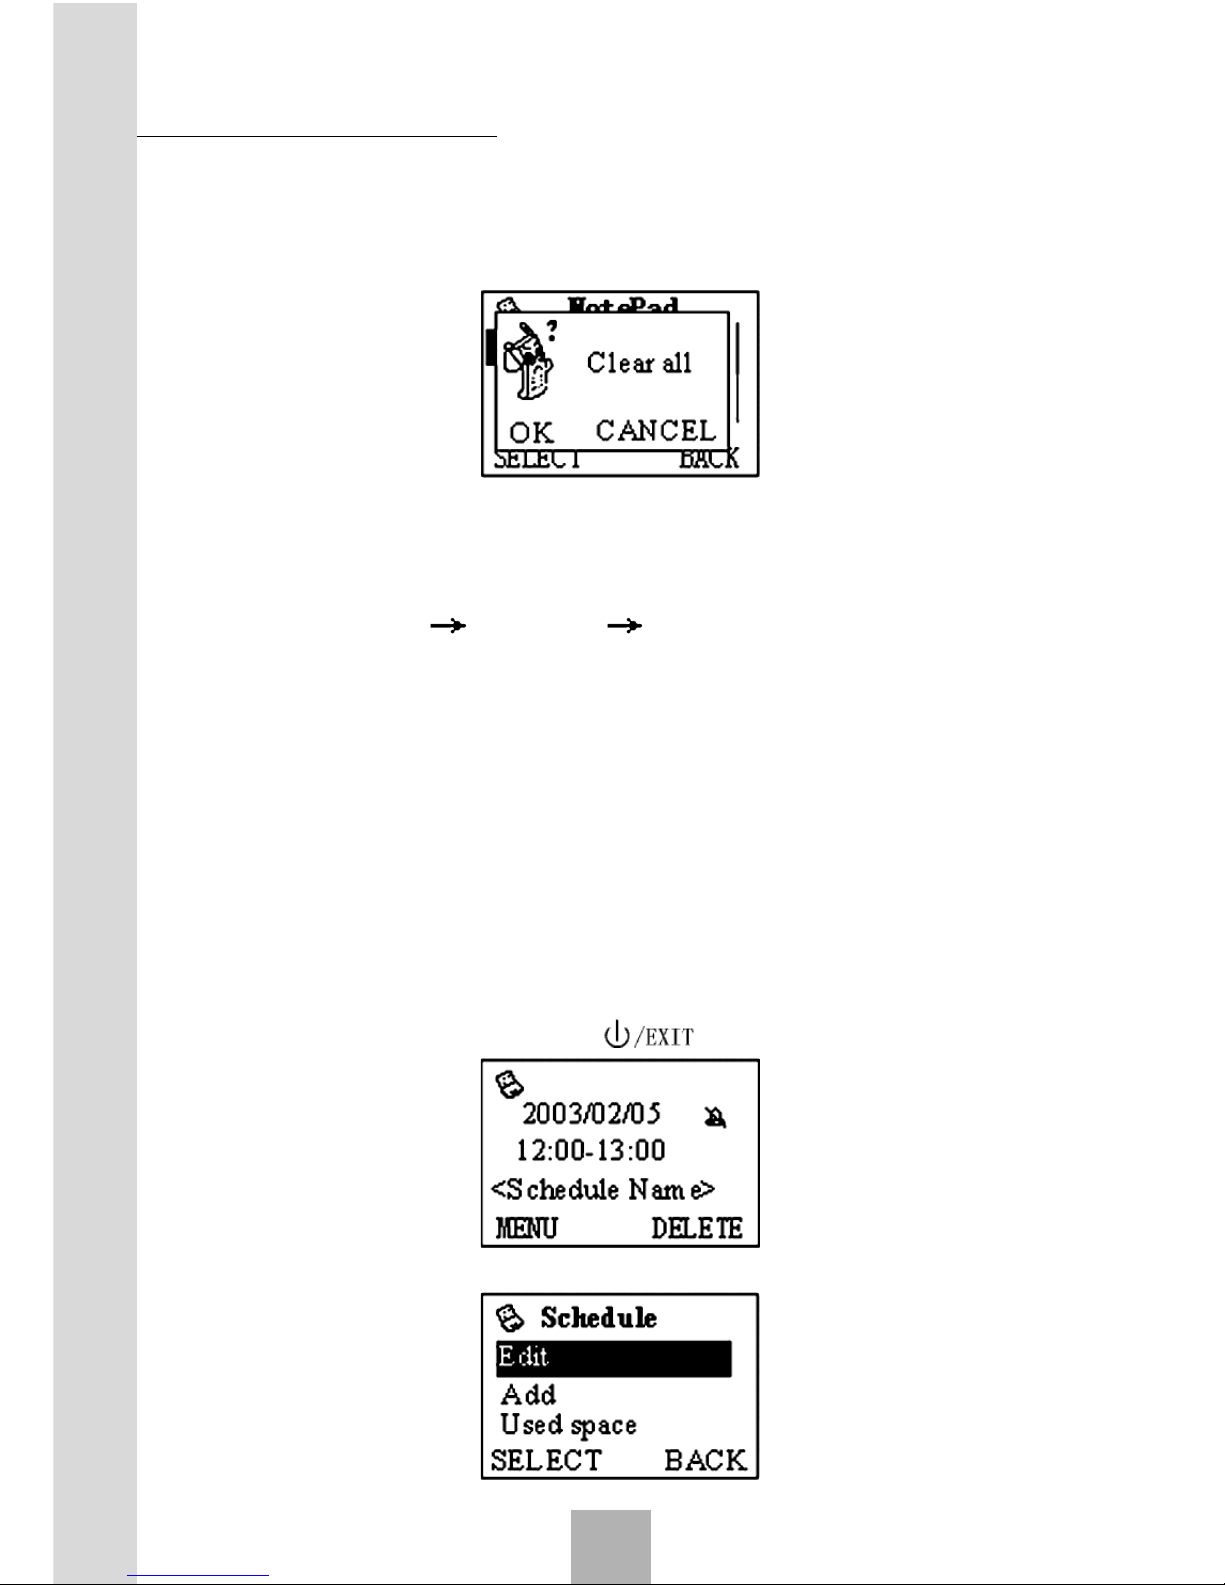
4. Clear All screen
Choose Clear All in the menu to enter the prompt screen, press OK
to delete all records, or press Cancel to abort deletion and return.
4.7.5 Schedule
The user can schedule 30 entries, dated from 2000 to 2050 AD.
4.7.5.1 Schedule screen
Press Menu organizer Schedule, if scheduled info is
saved, Schedule View screen will appear.
Enter Schedule, and if no scheduled info is saved, Add screen
will appear.
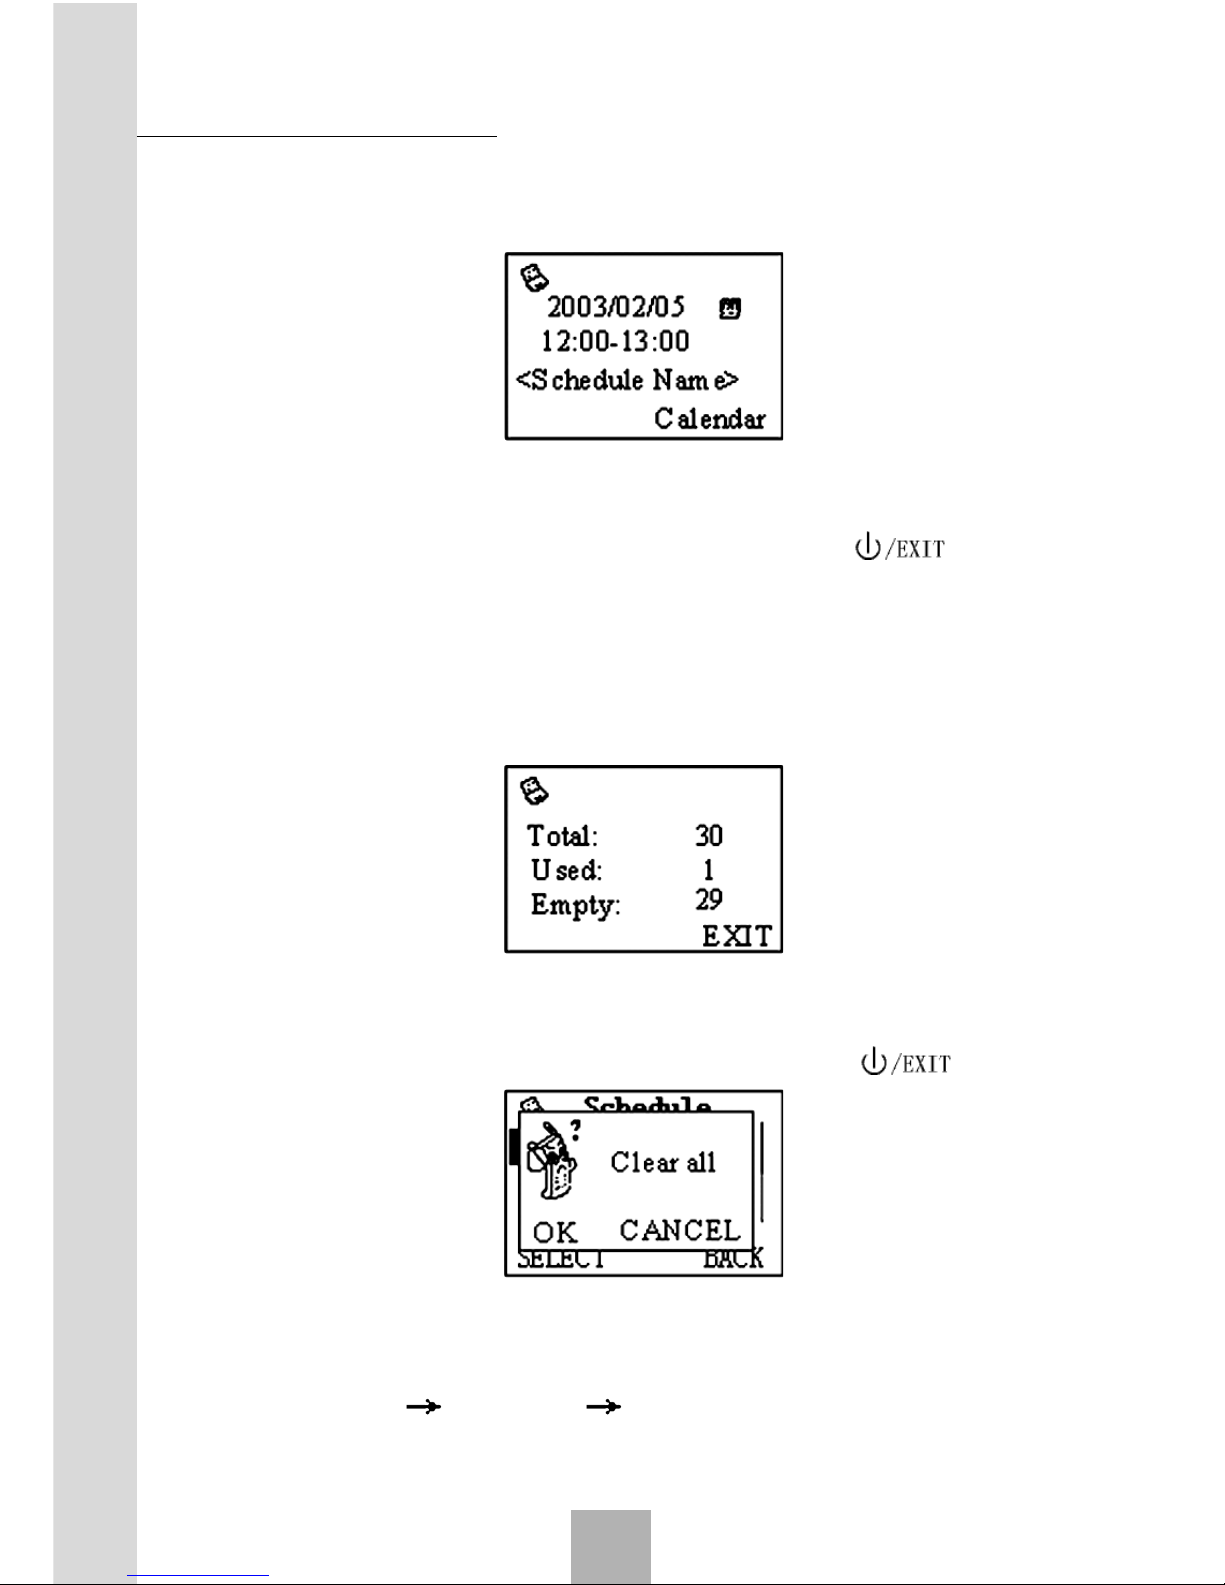
4.7.5.2 Schedule View screen
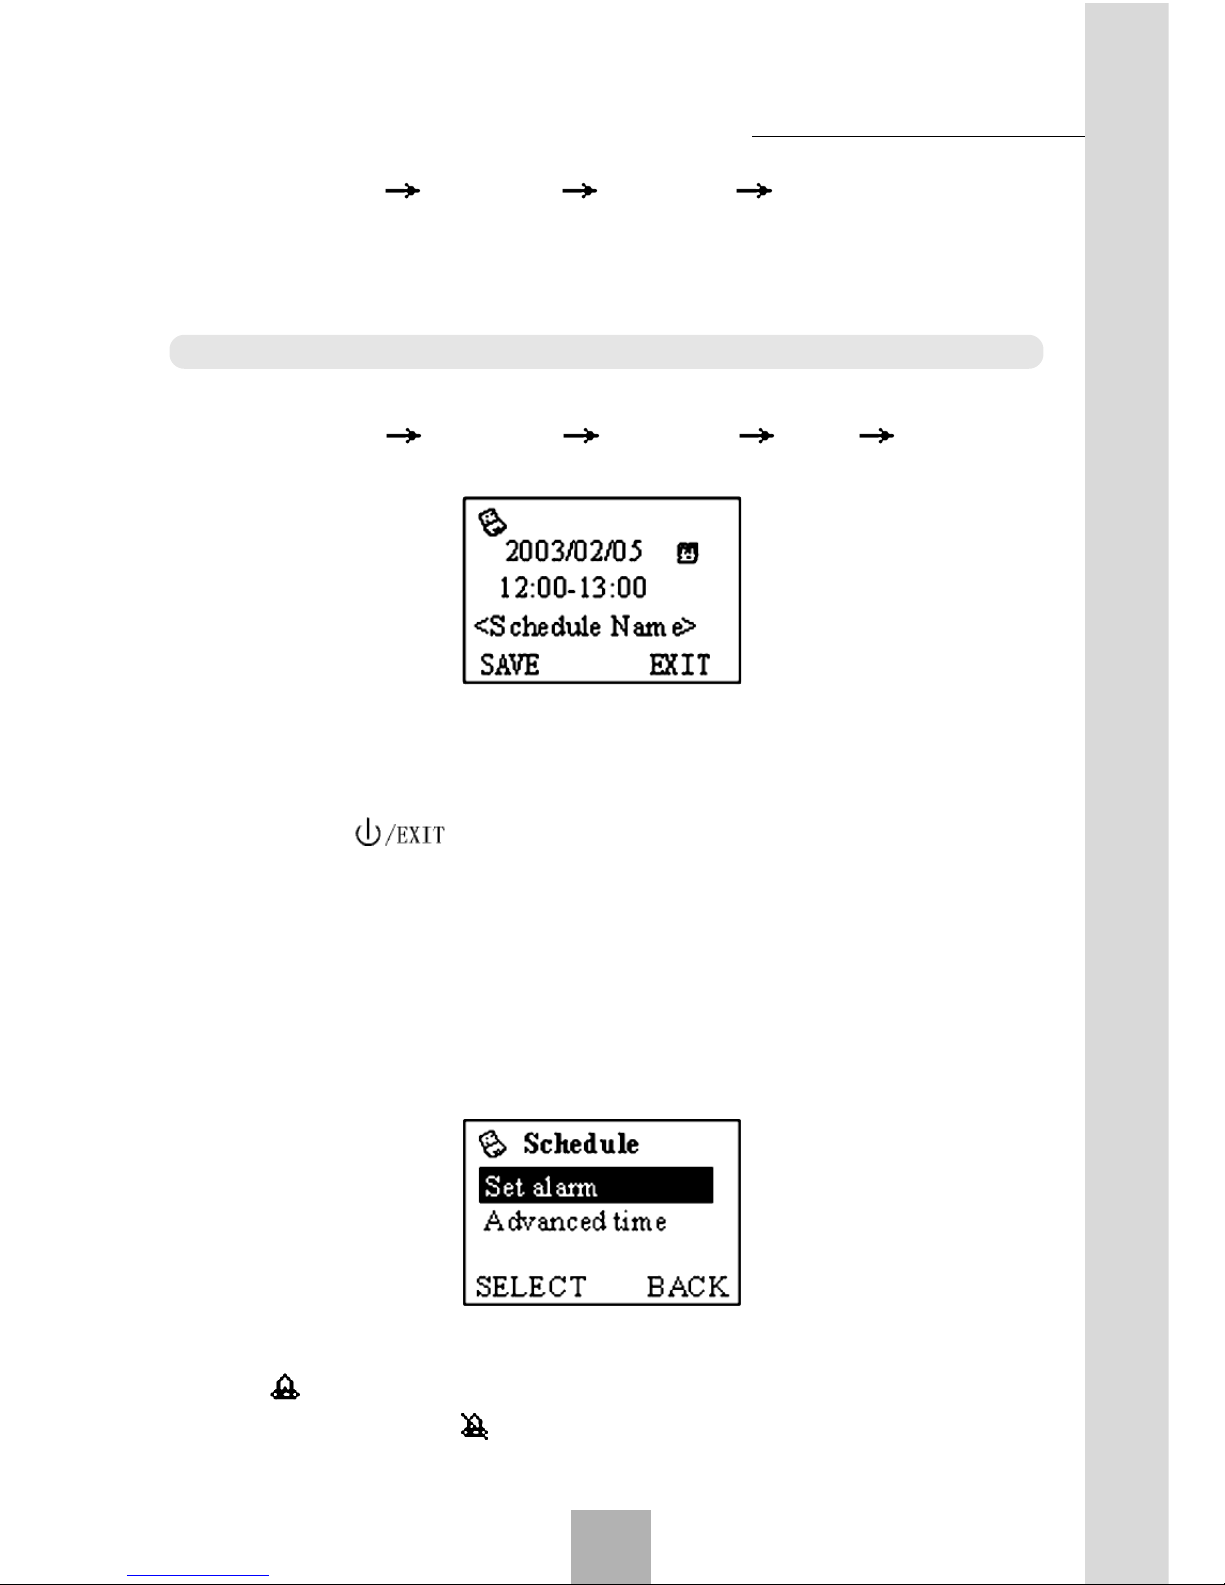
View screen will show date, alarm clock tag, start/end time and
entry (maximum 2 lines). Start date is the present date. Both start time and
end time refer to the time of the present day. The cursor will stop at the
date entry. Use Up/Down key to view different entries. Press Menu to
view Menu screen, press Delete to pop up the confirmation screen, press
OK to confirm and return, or press key to exit Schedule.
4.7.5.3 Menu screen
Function Menu
4
Page 37
37
Sharing New Technology With You
Press Menu organizer Schedule Menu. The schedule
menu screen lists four options: Edit, Add, Used Space, and Clear
all. Press Up/Down key to select an option, and press Back to return
to the previous screen.
Note: If the memory is full, then no Add option is available.
1. Add screen
Press Menu organizer Schedule Menu Add to enter Add screen. The start date is the present date.
Press Up/Down key to move the cursor up and down, and the cursor will switch between date, alarm, start time, end time, and
content. Press Save to confirm adding and return to the previous screen.
Press Exit or key to abort adding.
When the input cursor is on the content, press Number keys to en-
ter contents. Press # key to switch between the input methods. Press
Left/Right keys to move the cursor. Press Number keys to enter the
date and time. If the entered date and time are improper, move the cursor
to the date and time again, and then enter the right value.
When the input cursor is on the alarm clock tag, press Menu to enter
the Set Alarm screen.
Press Set Alarm to set the alarm clock and return, the icon at this
time is . Press Menu, then change Set Alarm to Cancel Alarm,
the icon at this time is . Press Advanced time to set the time for
alarming.
Function Menu
4
Page 38
Sharing New Technology With You
38
2. Edit screen
Choose Edit in the menu to enter Edit screen.
Press Up/Down key to move the cursor, and the cursor will switch
between date, alarm, start time, end time and content. Press
Save to confirm the changes and return. Press Exit or key to
abort the changes and return.
For entering characters, please refer to operations in Add screen.
3. Used Space:
Choose Used Space from the notepad menu to show the total available space and used space.
4. Clear All screen
Press Clear All in the menu to enter Clear All screen. Press OK to
clear all records and exits Schedule. Press CANCEL or key to
abort deletion and return.
4.7.6 World Clock
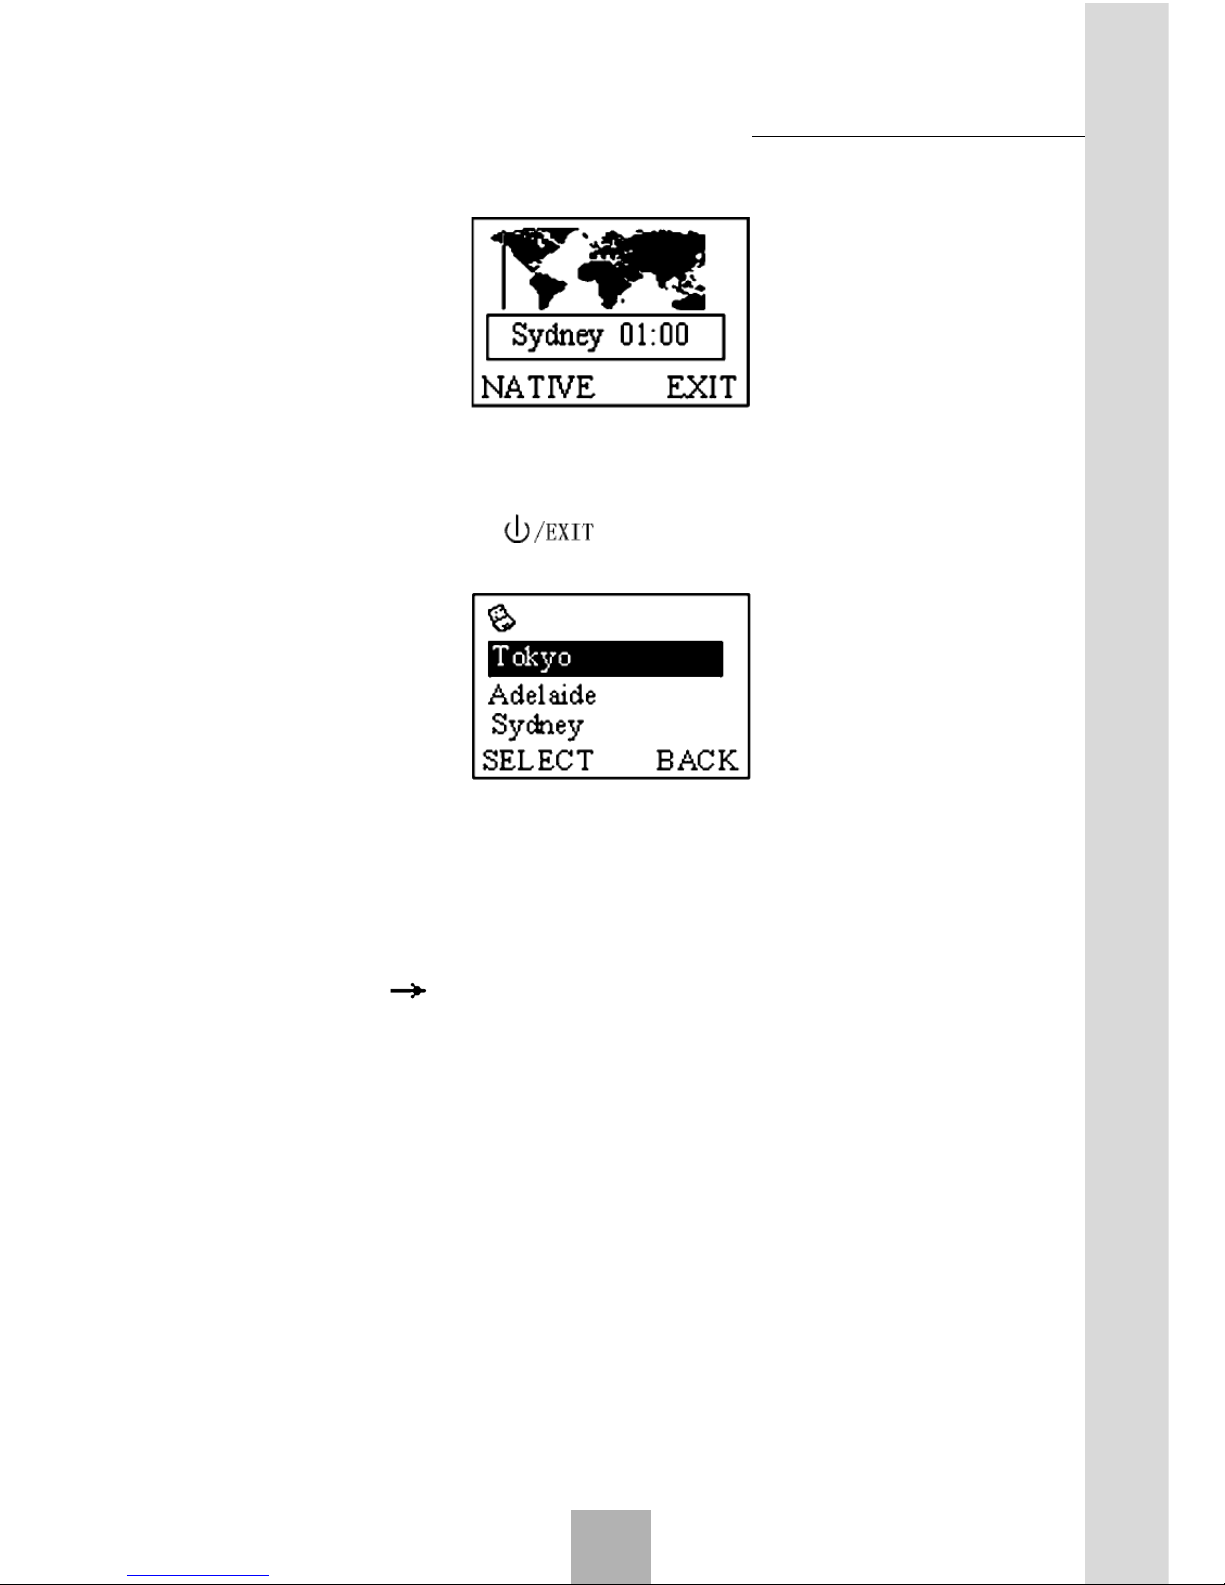
4.7.6.1 Navigation View
Select Menu organizer World Clock to enter Navigation
screen of World Time. Use Scroll key to select the specific international
Function Menu
4
Page 39
39
Sharing New Technology With You
city time. Press NATIVE to enter Native screen. Press Exit to exit World
Clock.
4.7.6.2 Native Screen
The default item of local city is set as Delhi. Press Up/Down key to
select others. Press Exit or key to return to the Navigation screen
of World Time. Press Select to save local city settings and return.
4.8 Diverts
Call divert service allows you to transfer the incoming call of a specific
service to an appointed number. Please contact your network service provider to enable this service.
Select Menu Diverts, One can set call transfer to another preset
number in different cases:
All Calls Transfer all calls.
When Busy Transfer when the user’s line is busy.
No Answer Transfer when there is no answer.
When Hide Including call transfer when there is no answer and
the call transfer when line is busy, but with higher priority when
transferred to the designated number.
After choosing one of the above four options, the followings can be
chosen:
On Only registered services are functional.
Off Delete this transfer service.
Function Menu
4
Page 40

Sharing New Technology With You
40
By Service Set conditions and types of additional services.
Choose By Service then Voice calls, Transfer only voice calls.
4.9 Settings
4.9.1 Phone Settings
Press Menu Settings Phone Settings to enter the submenu
Phone Settings, you have the following options:
Menu Code Choose to enable/disable the function of displaying
the menu code.
Fastkey Setting Set the shortcut menu contents corresponding
to Up/Down/Left/Right key and CLR key in the standby mode.
4.9.2 Display Settings
Press Menu Settings Display Settings to choose options
as follows:
Backlight: Press Change to enable or disable the backlight. Or
choose save mode, which disables backlight from 8:00 to 17:00
except at spare time.
Owner Name: View or edit the owner’s name and display it be-
low the network name.
Greetings: View or edit Greetings at start-up.
4.9.3 Call Setting
Press Menu Settings Call Settings to enter Call Settings
submenu and you have the following options:
Minutemind: Press Change to enter Minute Reminder screen.
You can choose to remind you 5S(second) or 15S(second) ahead
of every minute when you are talking, or choose Off.
Conn mind: If you choose On, you can hear put-through prompt
tone while making calls.
Network Number (set by operator): Set the number of the
network management center. So your phone can run some manager command by professionals.
IP Setting (set by operator): If an IP number has been set, IP
Function Menu
4
Page 41

41
Sharing New Technology With You
function will be enabled in Phonebook or Call Log, i.e. IP number
will be automatically added before the number of the call you are
going to make.
DDD Setting (set by operator): Set the local area code (inc-
luding “0”).
Note: IP Setting, DDD Setting, and Network Number should be
set by the network service provider via NMS. Please don’t set it by yourself,
otherwise, the phone usage may be affected.
4.9.4 Security Setting
Configure security settings to avoid illegal use of your phone. Press
Menu Settings Security Setting.
Note: The Default phone password is 1234.
SMS password
Select SMS Choose On to avoid unauthorized viewing of your short
messages. Choose Off to disable it.
Note: The default password for short messages is 5678.
Handset Lock
Choose On to enable password protection, so you will be prompted to
enter the password on the next start-up. Choose Off to disable password
protection.
If the phone password is enabled, emergency calls can be made.
Handset Call Bar
Enter the submenu Handset Call Bar
- Bar Incoming:
Press Select, and then choose Bar All to ban all incoming
calls. Choose List to ban all numbers in the blacklist. Choose
All Except List to ban the calls not included in the list. Choose
Cancel All to cancel all restrictions.
- Bar Outgoing:
Press Select, and then choose Bar All to ban all outgoing
calls except emergency calls. Choose List to ban all numbers in
the ban-list. Choose Cancel All to cancel all restrictions.
Function Menu
4
Page 42

Sharing New Technology With You
42
4.9.5 Reset Settings
Press Menu Settings Reset Settings, the phone will prompt
whether to reset the parameters of the phone to factory settings. Choose
OK to set, choose cancel to abort.
4.9.6 Manager Set
Press Menu Settings Manager Set, the phone will prompt
to enter your password. Please contact your network service provider to
get the manager password.
Hide IP: set the phone whether to display IP number when the IP number is dialing. Press change to set on or off.
Clean admin data: Press select, it will prompt that the admin data
was cleaned out.
Function Menu
4
Page 43

43
Sharing New Technology With You
5.1 Overview
Your phone provides the following input methods: English input (letters
and numbers), commonly used symbols and idioms input.
5.2 Keyboard Definition
The commonly used keyboard is defined as follows. For keyboard definitions in the specific input mode, please refer to Section 5.3 “Notes on
Input Methods”.
Left Soft key usually means OK or Select, and Right Soft
key usually means Exit or Back.
Scroll key is usually used for up/down movement and page up/
down.
# key switches between the input methods.
Number keys (0~9) represent letters and numbers.
* key Press * key to enter symbols, double-press * key to enter
Set Idioms, and triple press * key to enter Set Poems.
5.3 Notes on Input Methods
5.3.1 English and Number Input
The keyboard definition for entering English and numbers is as follows:
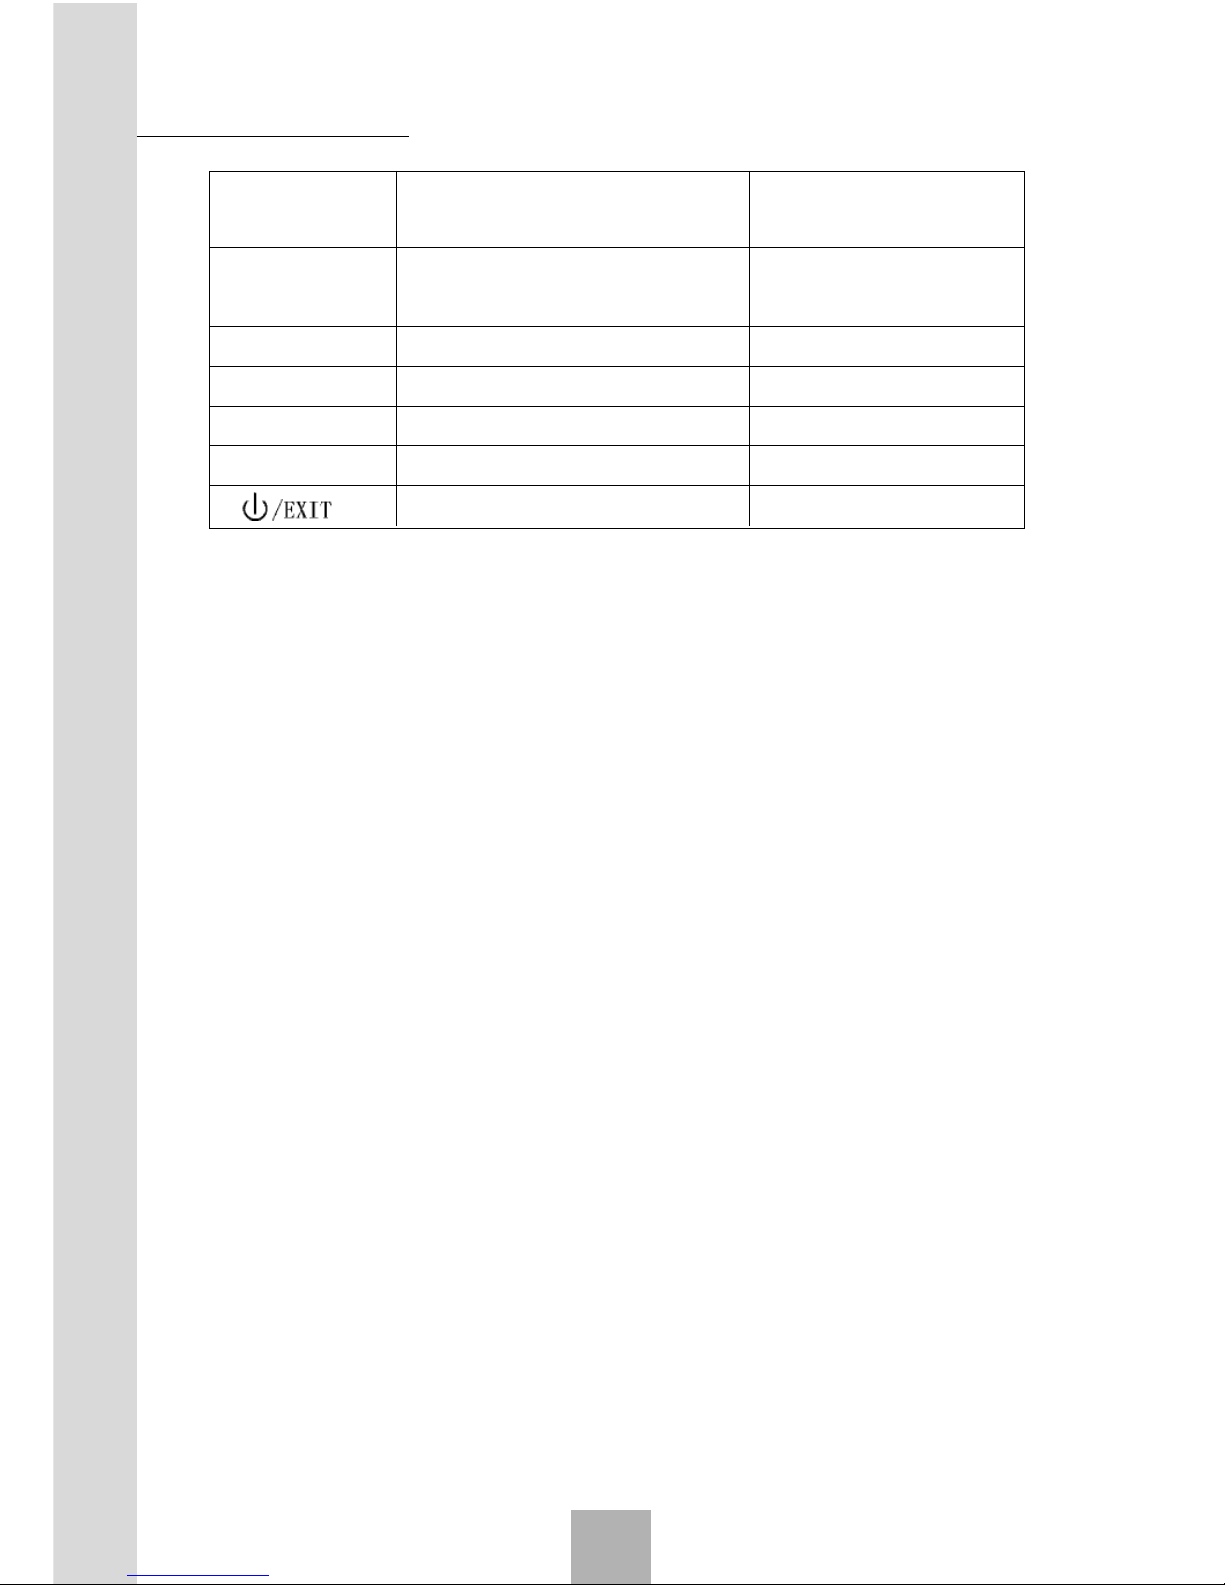
Key Corresponding character Notes
or function
1 - . , : ; ? / _ @ & ! etc. Entering the common
English punctuations
2 ABCabc2
3 DEFdef3
4 GHIghi4
5 JKLjkl5
6 MNOmno6
7 PQRSpqrs7
8 TUVtuv8
9 WXYZwxyz9
0 Space0
Text Input
5
Page 44
Sharing New Technology With You
44
* Switch between symbols,
idioms and poems.
# Switch between the input
methods
Up key Scroll up
Down key Scroll down
Left Soft Key OK
CLR key Clear
key Exit
The general procedure of entering English is as follows:
Each key corresponds to multiple English letters. Repeatedly press
the key rapidly until the desired letter appears. When the cursor
moves, enter the next letter.
Use # key to switch between the input methods.
In the uppercase or lowercase mode, press 0 key to enter a space.
Use CLR key to clear errors.
5.3.2 Entering Set Idioms
In entering short messages, the phone provides some commonly used
idioms for convenience. The general procedure for entering idioms is as
follows:
Double-press * key to enter Set Idioms.
Use Up/Down key to view the idioms list.
Press Select to choose the idiom.
10 commonly used set idioms are provided.
Text Input
5
Page 45
45
Sharing New Technology With You
You can surf the Internet freely in wireless condition. Connect the computer with WP805 phone by series port line. After finishing the right
configuration, you can access Internet by “Dial-Up Networking” in computer.
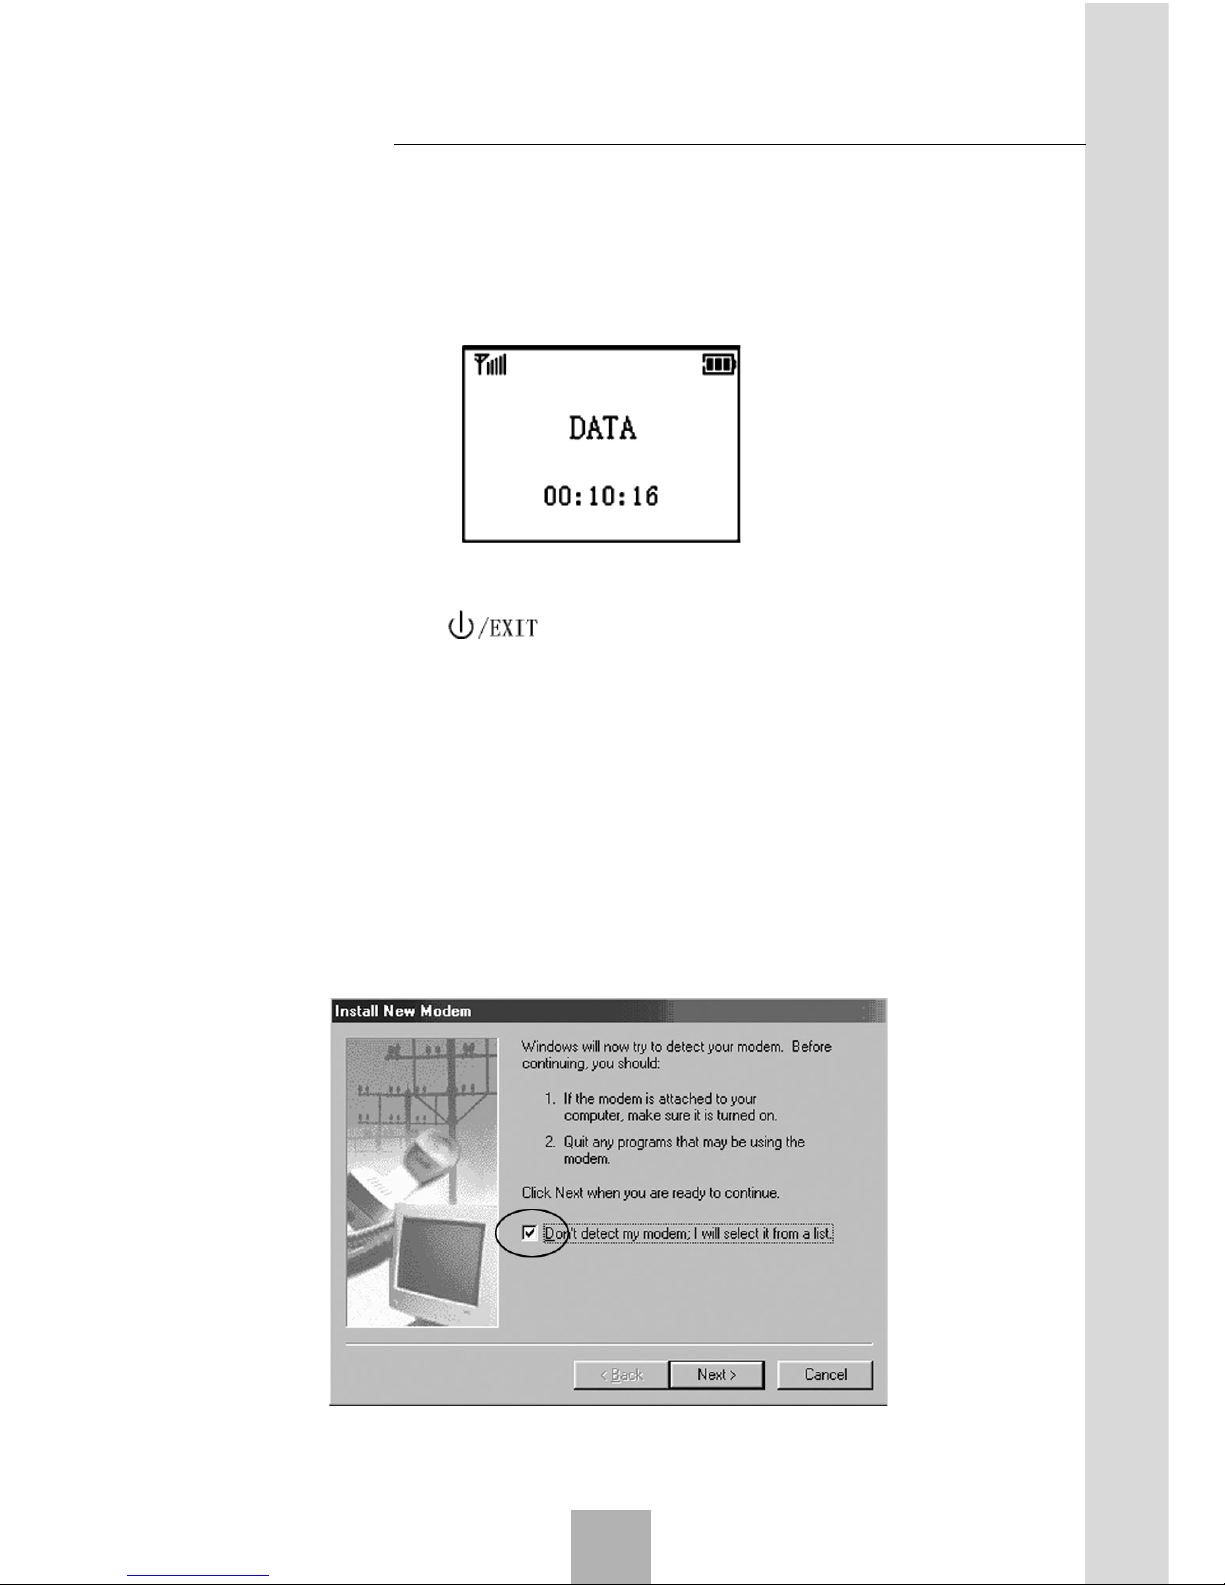
The phone will display as follows after the data link is set up successfully.
If you want to exit the Internet, you can disconnect the connecting on
the computer or press key to restart the phone.
When the phone is connected to the Internet, you cannot make a call.
When a call is coming, you can answer it and the network will interrupt at
the same time. When you end the call, the network will restore automatically.
6.1 WIN98 Configuration for Internet Access
1. Create a standard 28,800 bps Modem on the PC. Select “Control
Panel -> Modems”, and then click “Add”.
2. Click “Next”, and select “Don’t detect my modem; I will select it from
a list”.
Data Network Access Function
6
Page 46
Sharing New Technology With You
46
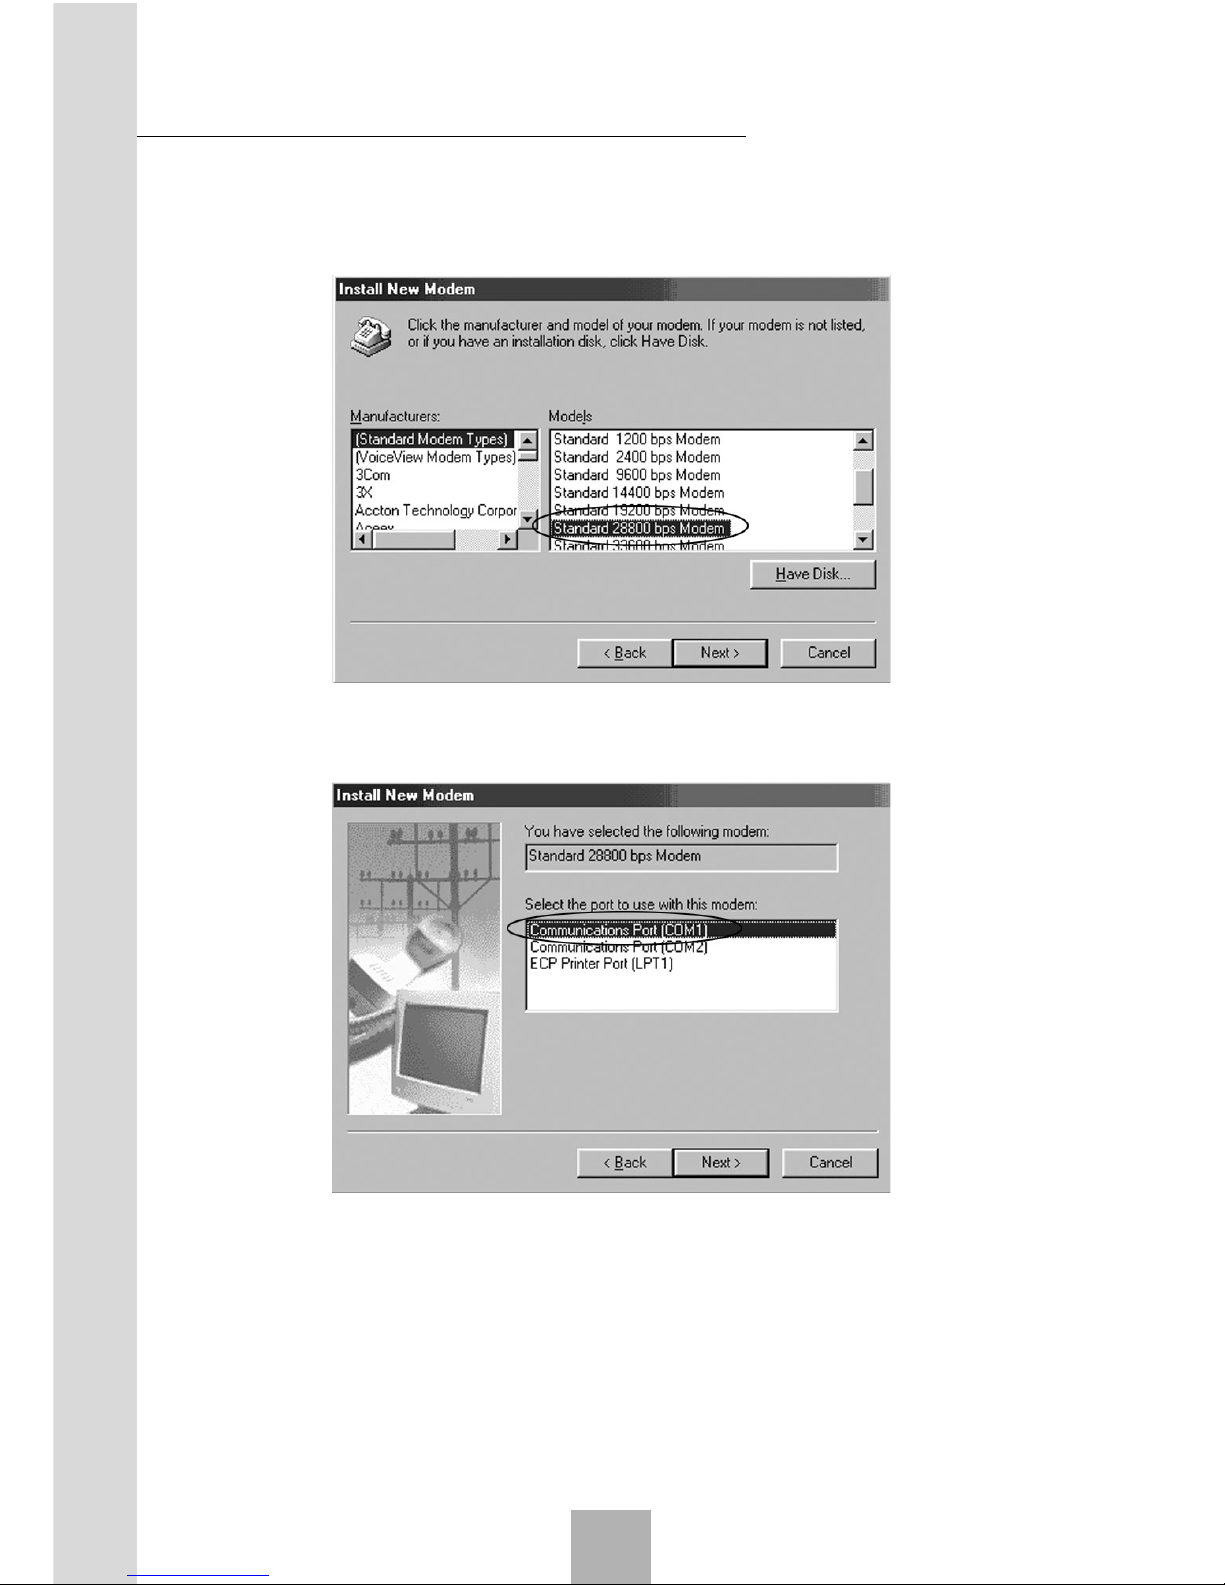
3. Select “Standard Modem Type” as the Manufacturers and “Standard
28800bps Modem” as the Models.
4. Select the Communication Port, e.g., COM1.
5. Click “Next” to finish.
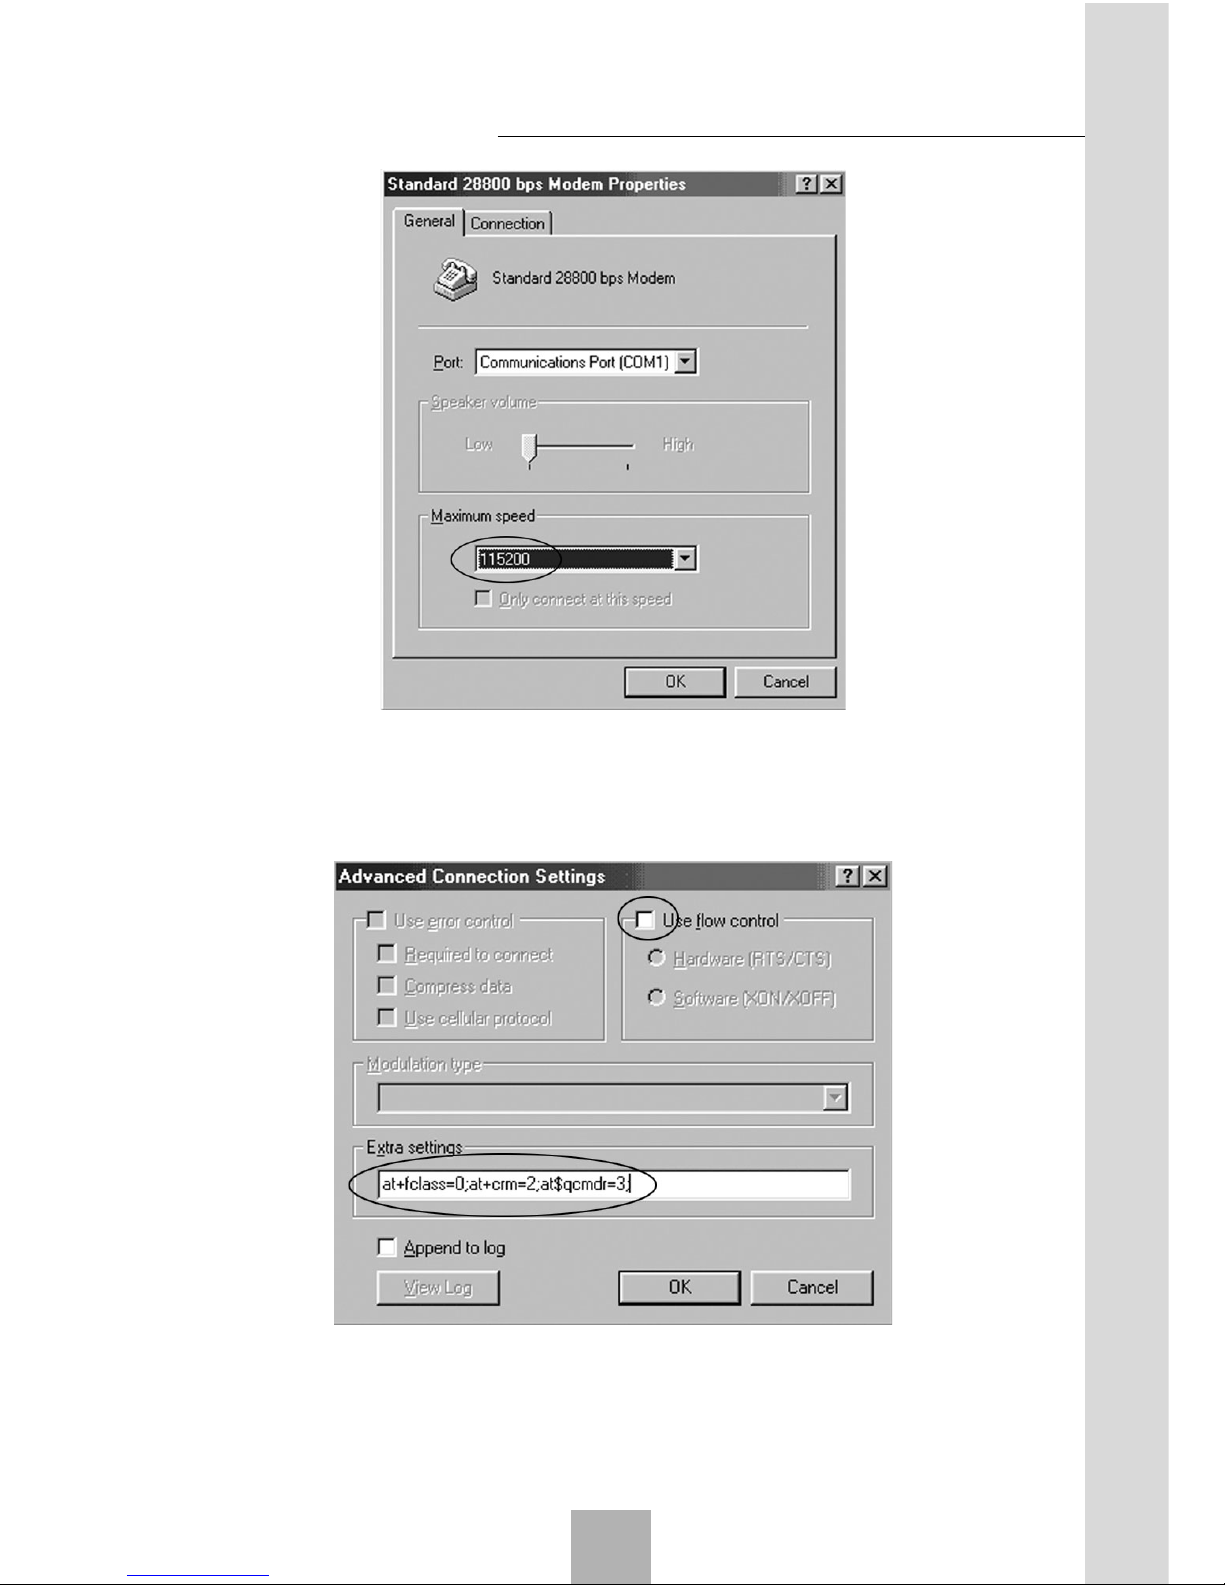
6. Select the newly created Modem in “Modems”, as shown in the interface,
select “Properties”, and then select “Maximum speed” as “115200” in
the “General” tab.
Data Network Access Function
6
Page 47
47
Sharing New Technology With You
7. Click “Advanced” in the “Connection” tab, Add at+fclass=0;at+crm=
2;at$qcmdr=3 to the Extra setting; and cancel “Use flow control”.
The Modem is set after Step 7.
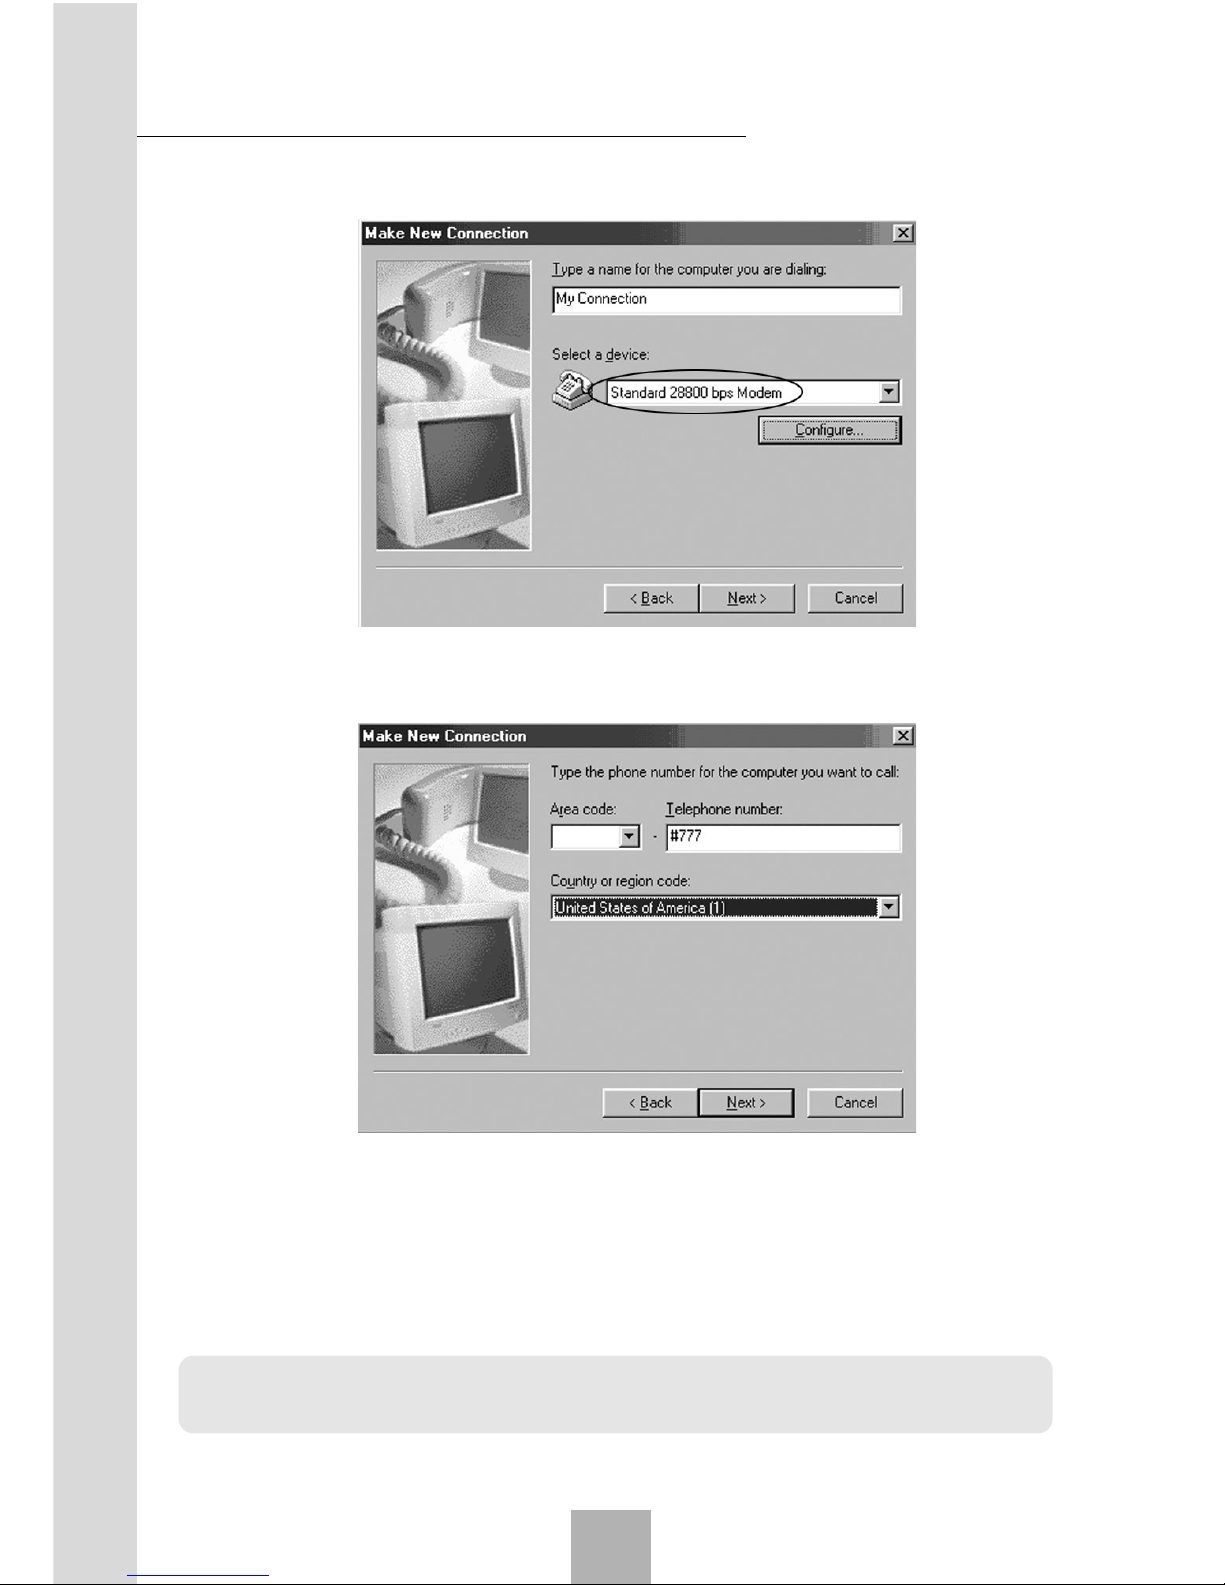
8. Create the dial-up network. Enter “Dial-Up Networking”, and doubleclick “New Connection”. Fill in the connection name, and select the newly
Data Network Access Function
6
Page 48
Sharing New Technology With You
48
created Modem as the device.
9. Click “Next”, and fill in the area code and number. The settings vary
with the areas.
10.Click “Next” to finish.
11. Double-click the newly created connection in the dial-up network.
12.Enter the user name and password, and then click “Connect” for dial-up
access.
13.Open the web page in IE for network access with successful dial-up.
Note: Local service provider should provide the user name and password,
no calling permitted when surfing the Internet.
Data Network Access Function
6
Page 49
49
Sharing New Technology With You
6.2 WIN2000 Configuration for Internet Access
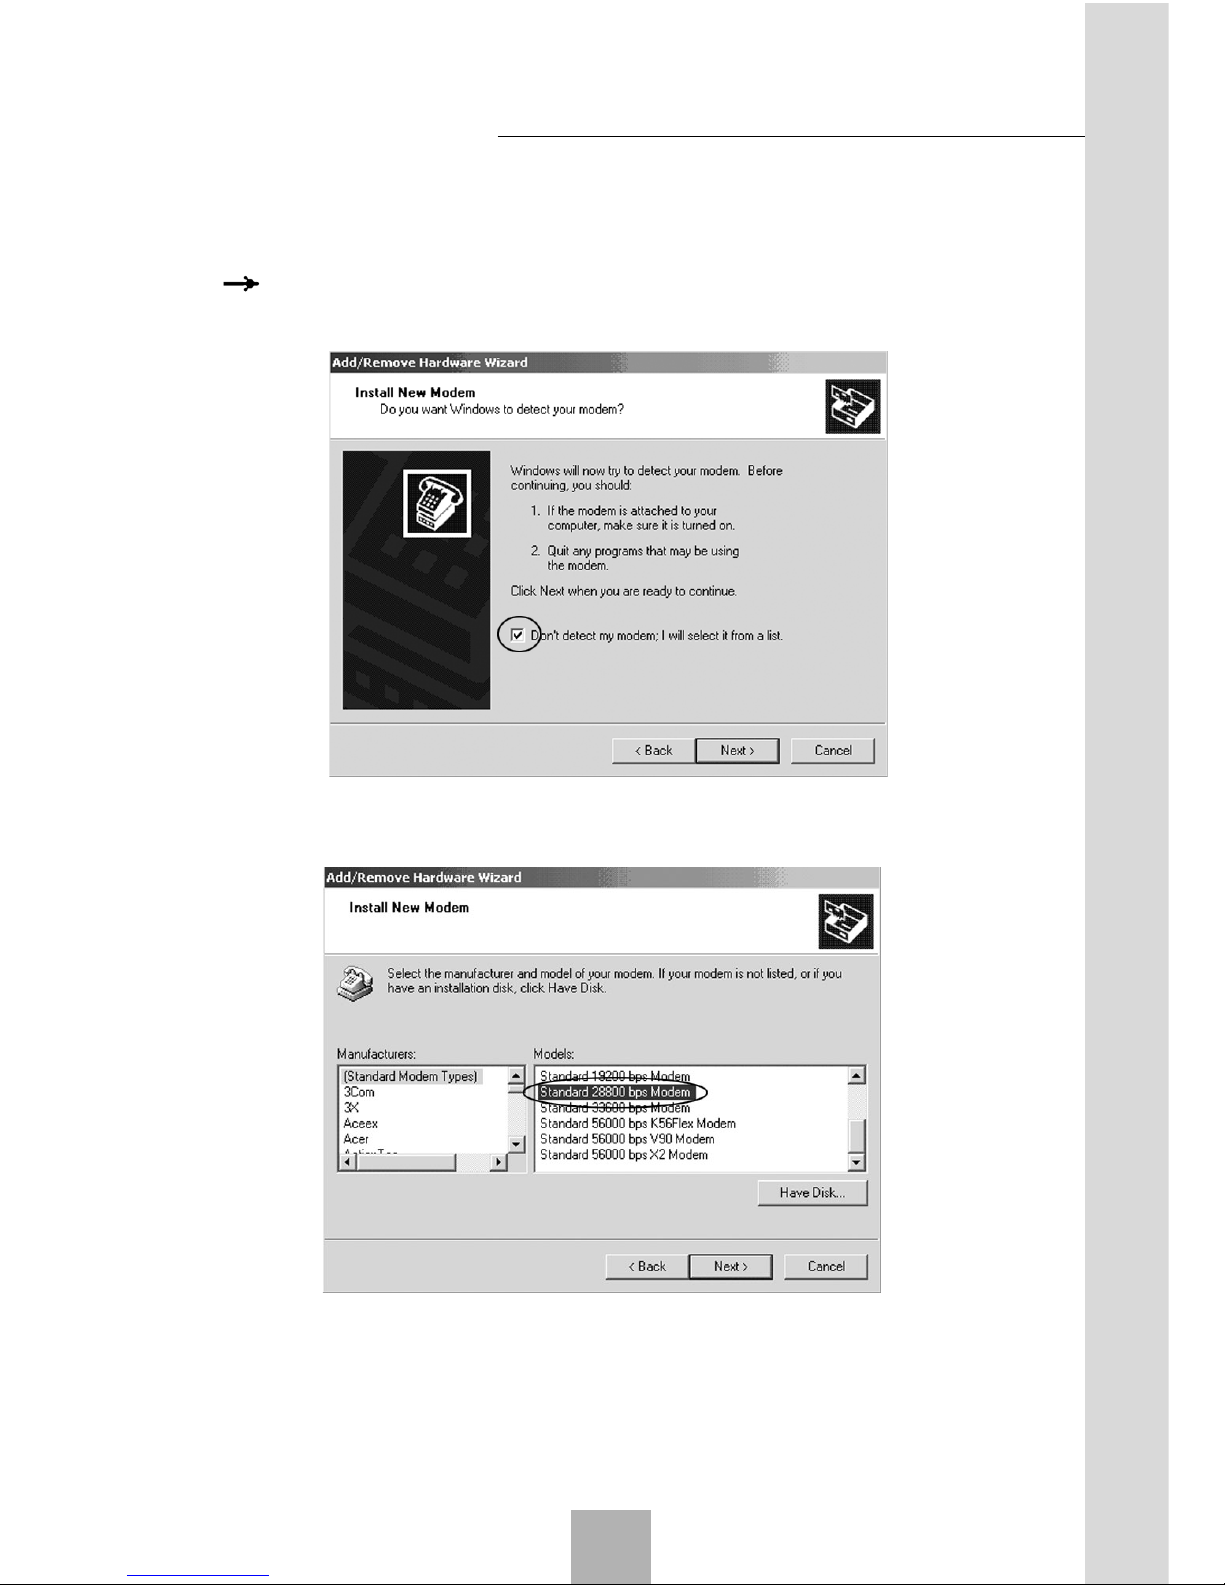
1. Create a standard 28,800 bps Modem on the PC. Select “Control Panel
Phone and Modem Options”, and then click “Add”.
2. Click “Next” and select “Don’t detect my modem; I will select it from a
list”.
3. Select “Standard Modem Type” as the Manufacturers and select “Stan-
dard 28800 bps Modem” as the Models.
4. Select the Communication Port, e.g., COM1.
5. Click “Next” to finish.
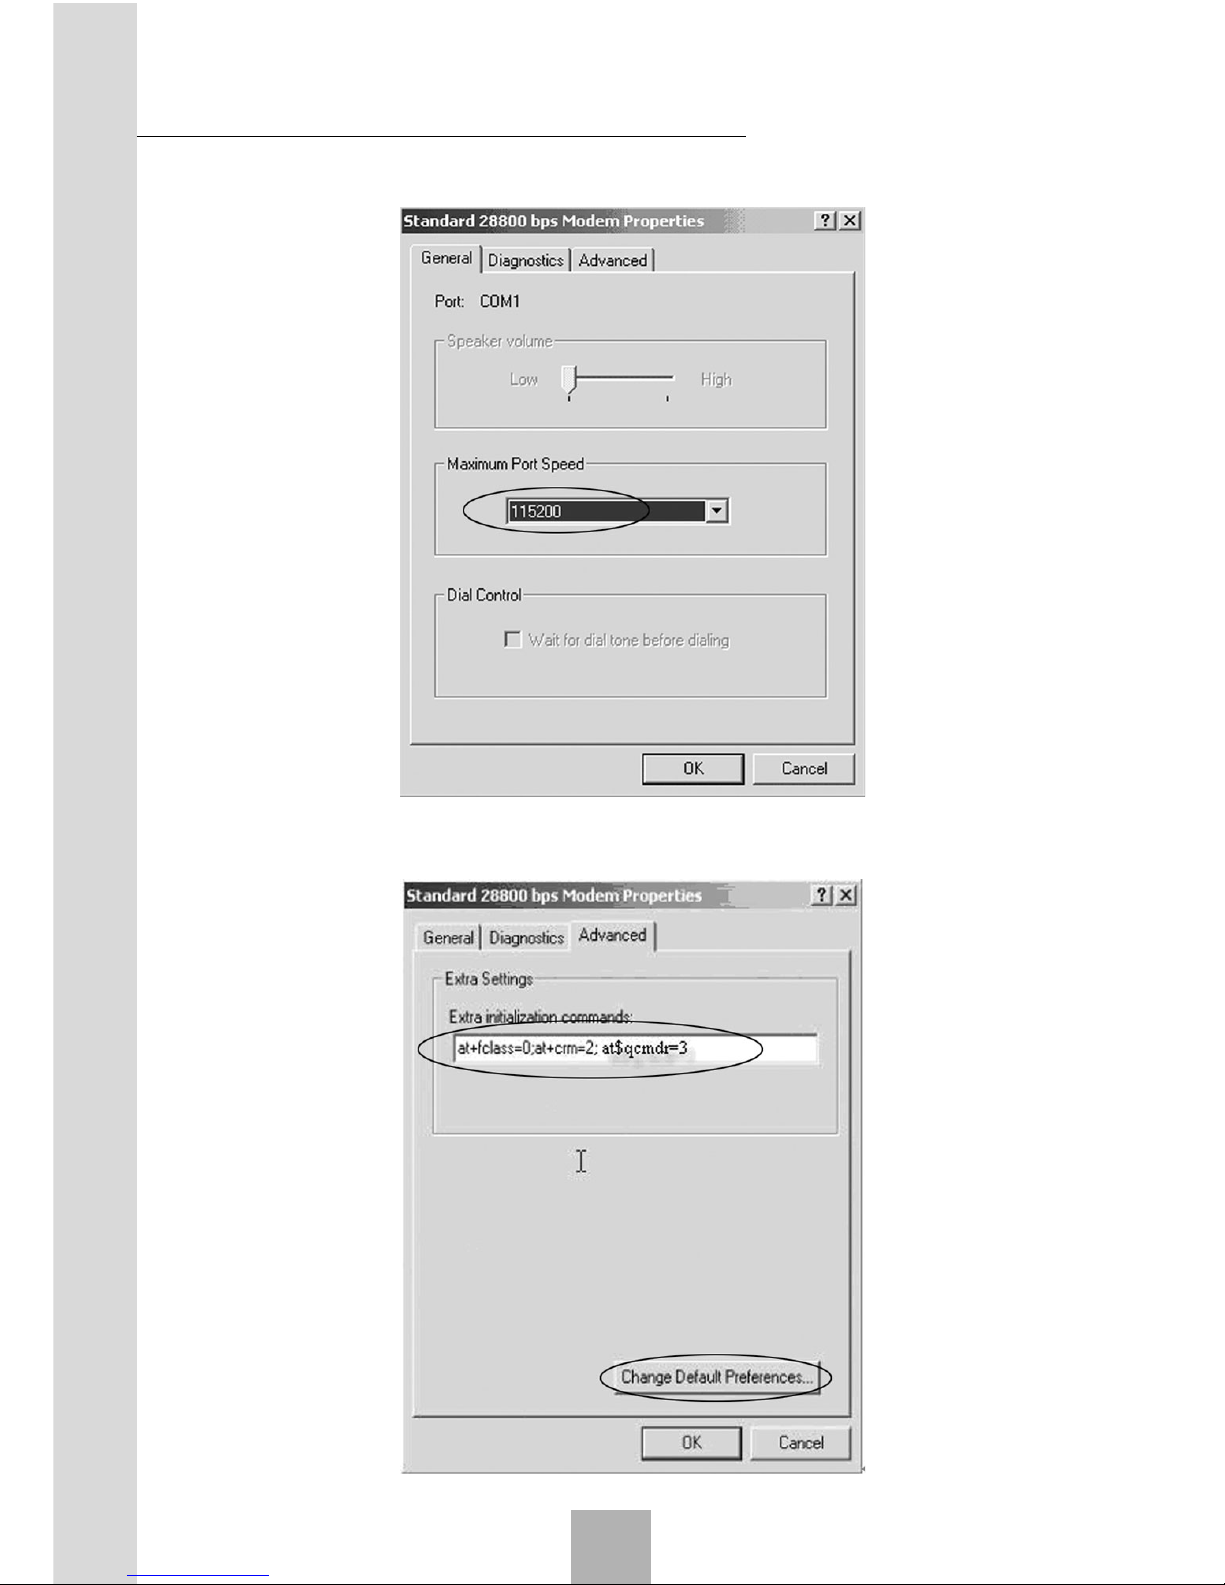
6. Select the newly created Modem in “Phone and Modem Options”, as
shown in the interface, select “Properties”, and then select “Maximum
Data Network Access Function
6
Page 50
Sharing New Technology With You
50
Port Speed” as “115200” in the “General” tab.
7. The setting in “Advanced” is as follows:
Add at+fclass=0;at+crm=2;at$qcmdr=3 to the Extra setting.
Data Network Access Function
6
Page 51
51
Sharing New Technology With You
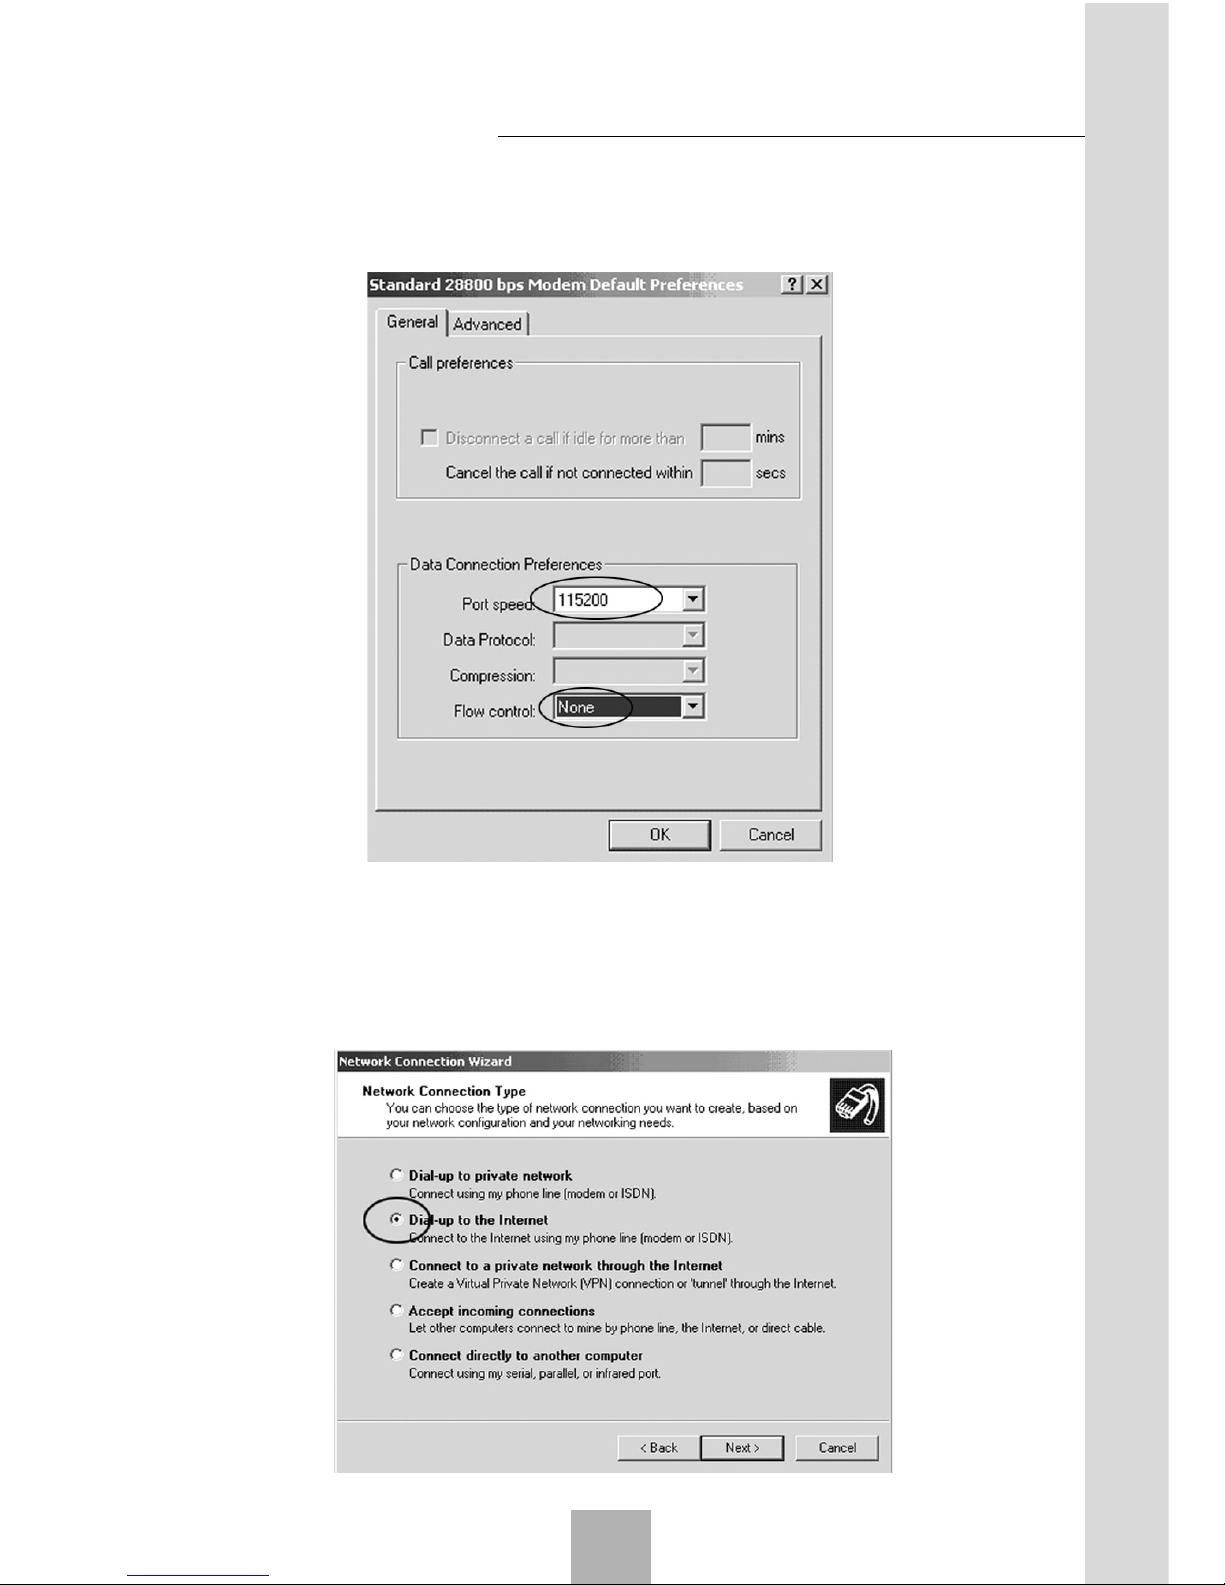
8. Click “Change Default Preferences”, select “Port speed” as “115200”,
select “Flow control” as “None”, as shown in the following interface:
9. Click “OK” to complete the Modem setting.
10.Create the dial-up network. Enter “Network and Dial-Up Connection”,
and double-click “New Connection”.
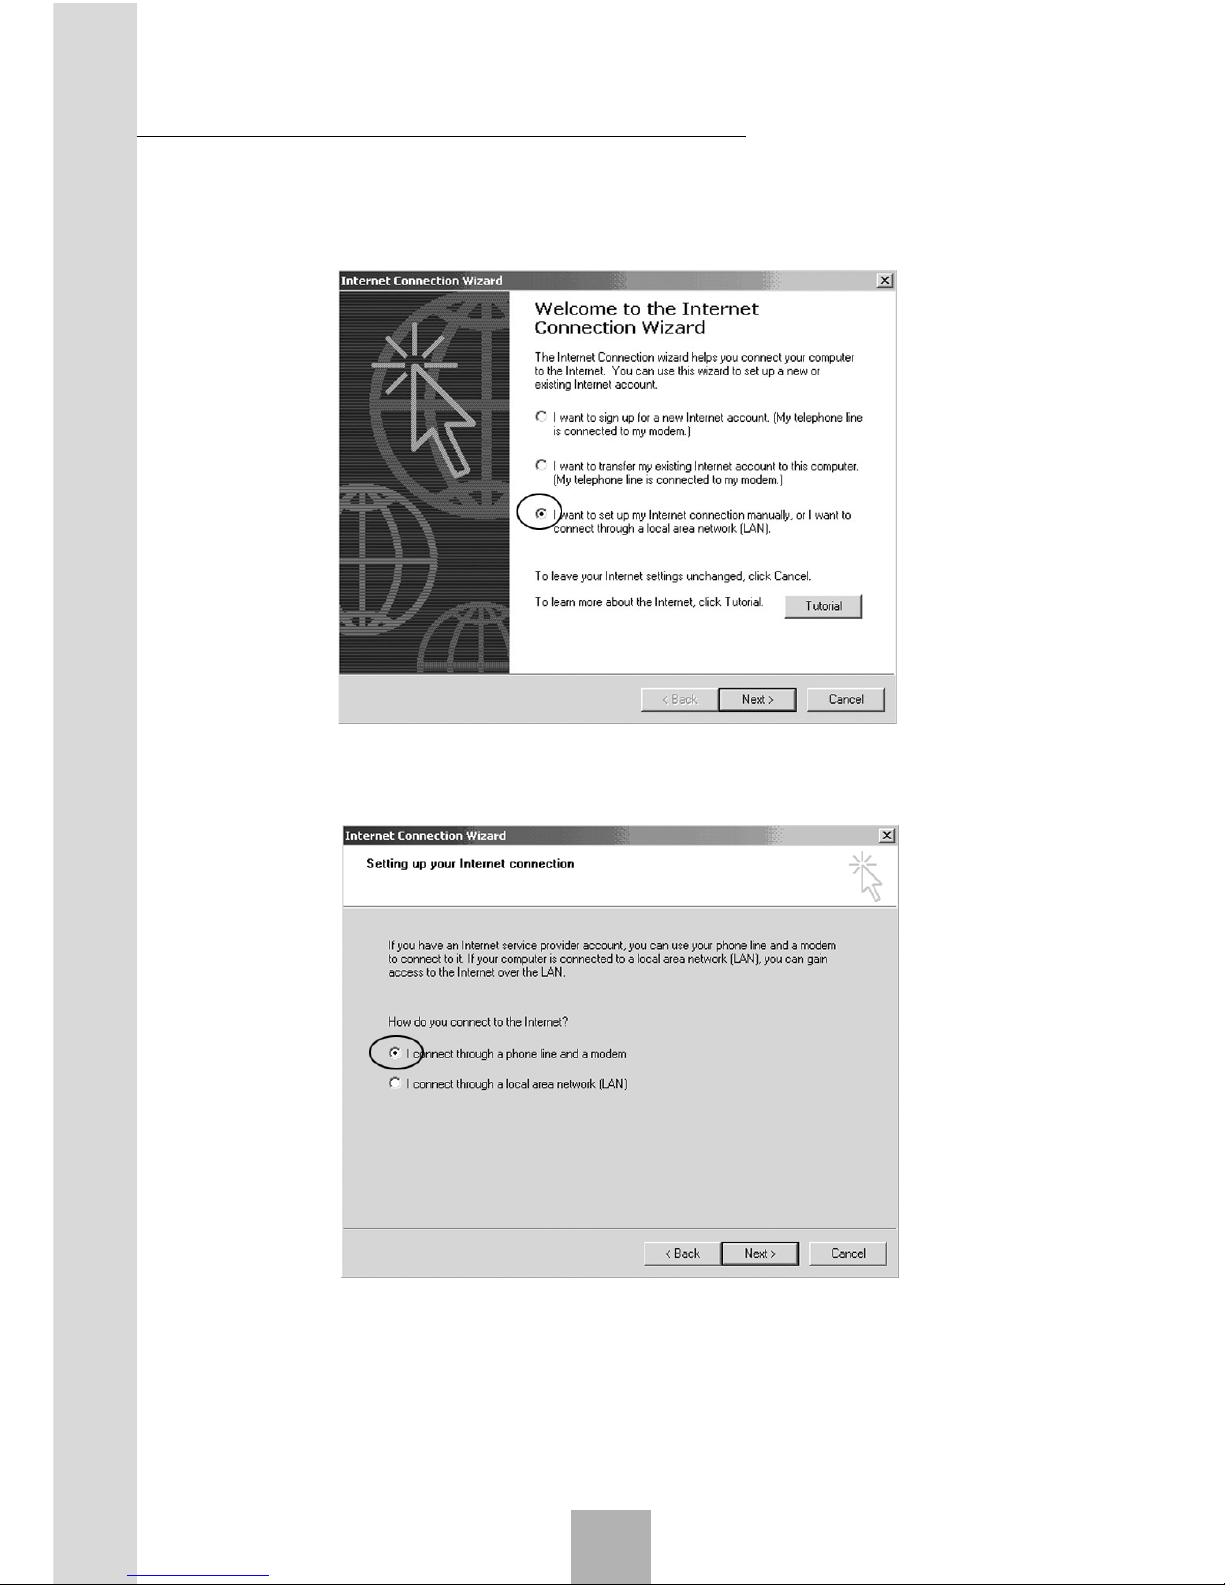
11. Click “Next”, and select “Dial-up to the Internet”.
Data Network Access Function
6
Page 52
Sharing New Technology With You
52
12.Click “Next”, and select “I want to set my Internet connection manually,
or I want to connect through a local area network ”.
13.Click “Next”, and select “I connect through a phone line and a modem”.
14.Click “Next”, and select the newly created Modem.
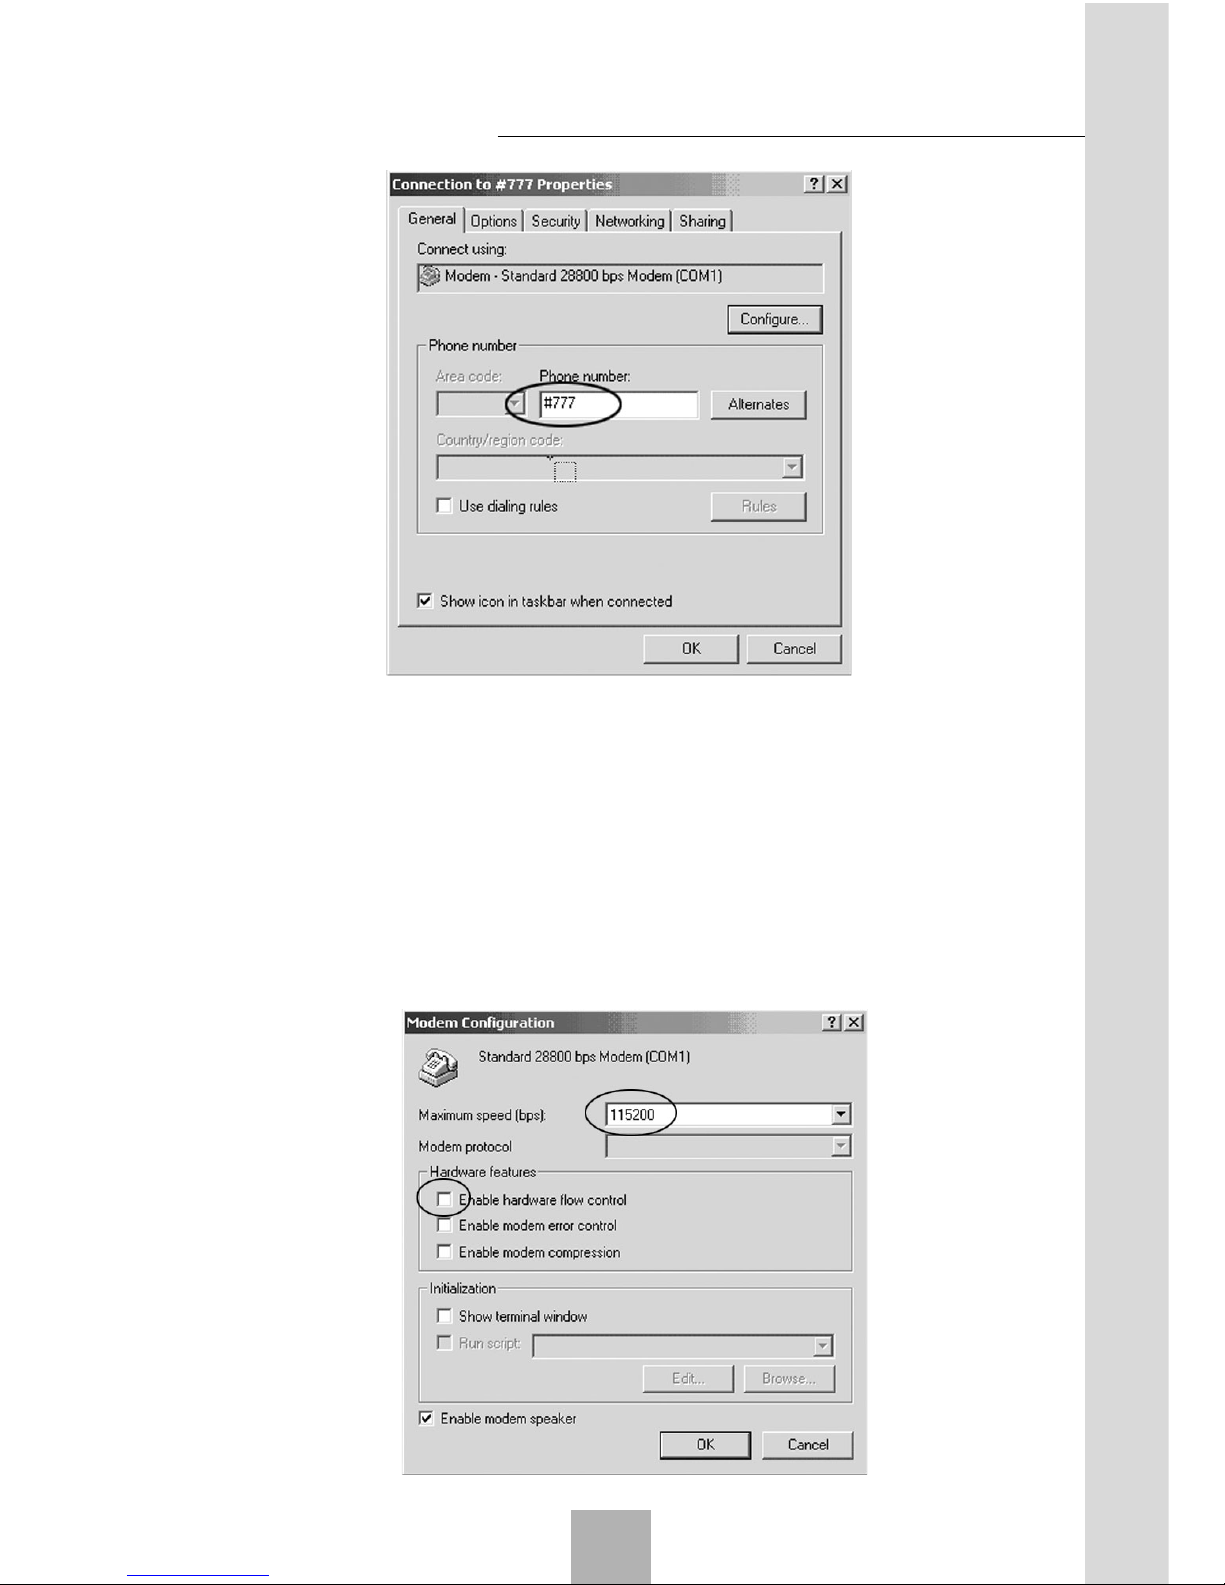
15.Click “Next”, fill in the phone number, which vary with the areas, e.g.,
“#777”.
Data Network Access Function
6
Page 53
53
Sharing New Technology With You
16.Fill in the user name and password.
17.Click “Next”, and enter the connection name.
18.Click “Next”, and select “Do not create Internet account”.
19.Click “Next” to finish.
20.Select the newly created connection in “Network and Dial-up Connection”, and right click to select “Properties”, cancel use dialing rules.
21.Click “Configure”, and select the speed as 115200, and cancel “Enable
hardware flow control”.
22.Click “OK”.
Data Network Access Function
6
Page 54
Sharing New Technology With You
54
23. Double-click the newly created connection, and enter the user name
and password for connection.
24. Open the web page in IE for Internet access with successful dial-up.
Note: Local service provider should provide the user name and password,
no calling permitted when surfing the Internet.
6.3 WIN XP Configuration for Internet Access
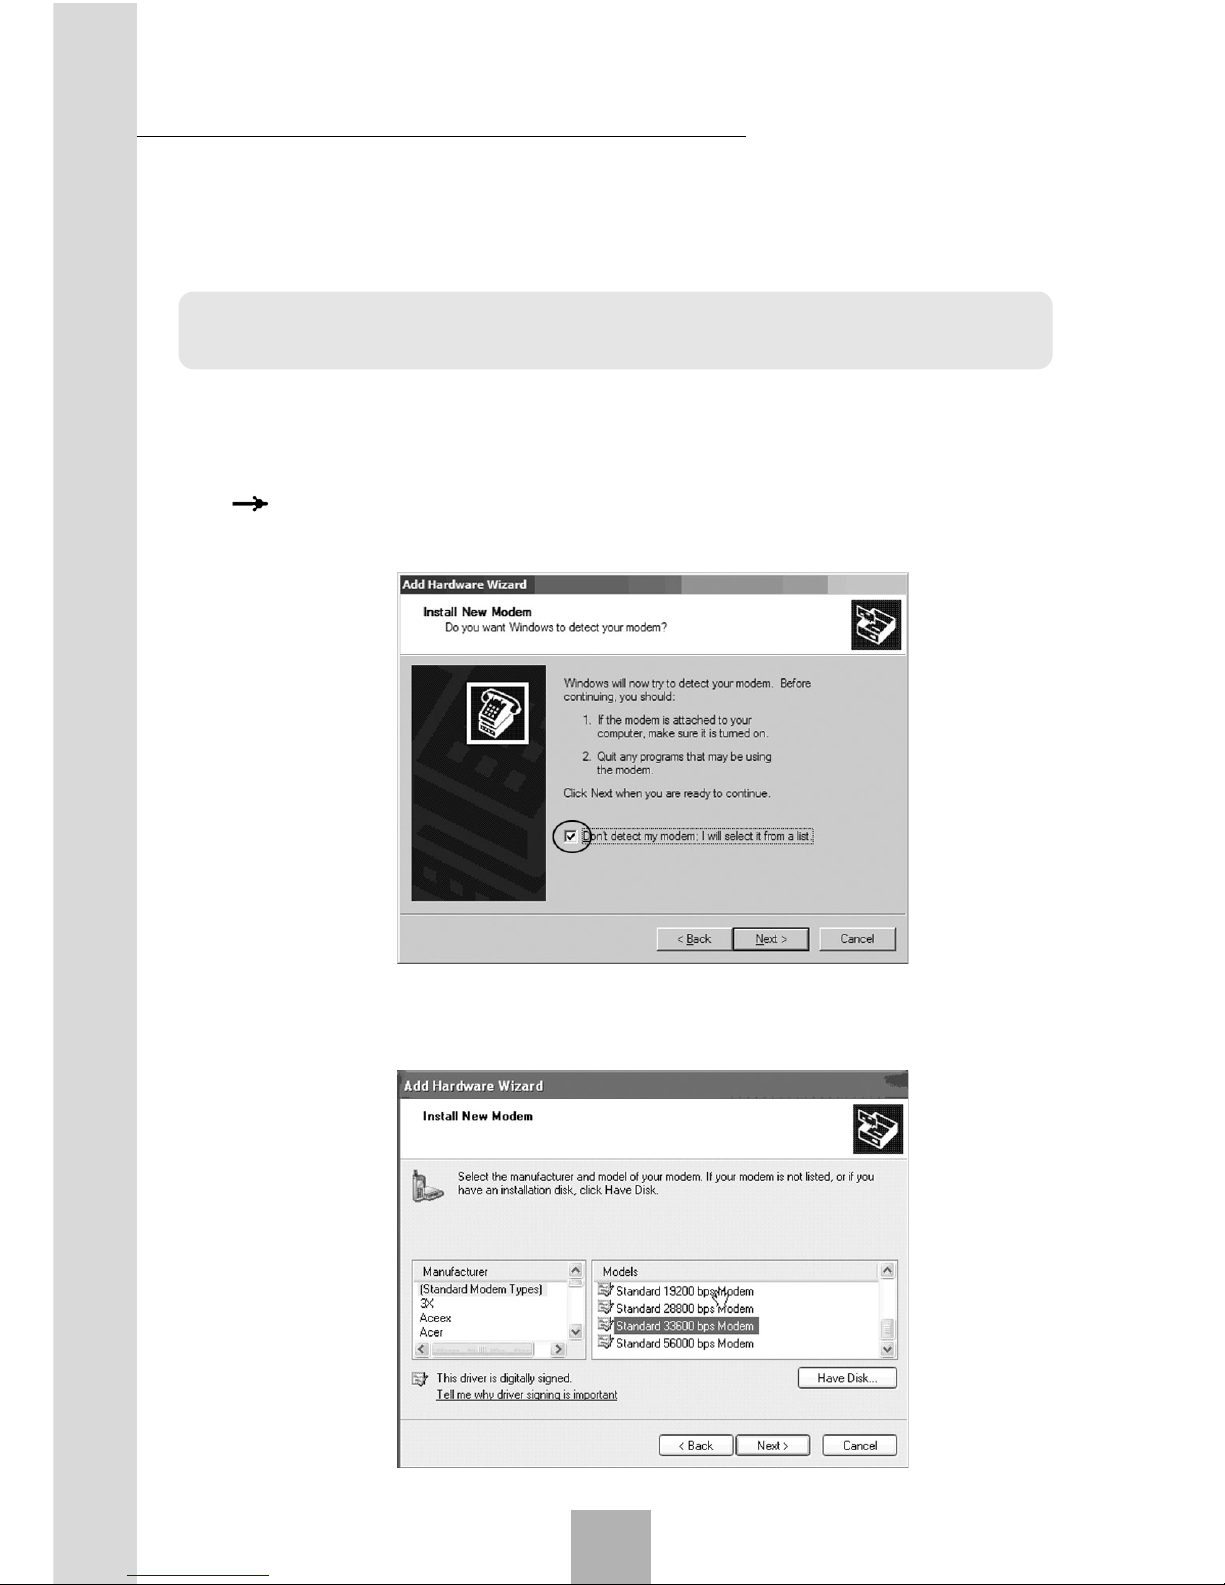
1. Create a standard 33,600 bps Modem on the PC. Select “Control Panel
Phone and Modem Options”, and then click “Add”.
2. Click “Next” and select “Don’t detect my modem; I will select it from a
list”.
3. Select “Standard Modem Type” as the Manufacturer and select “Standard 33600 bps Modem” as the Model.
Data Network Access Function
6
Page 55
55
Sharing New Technology With You
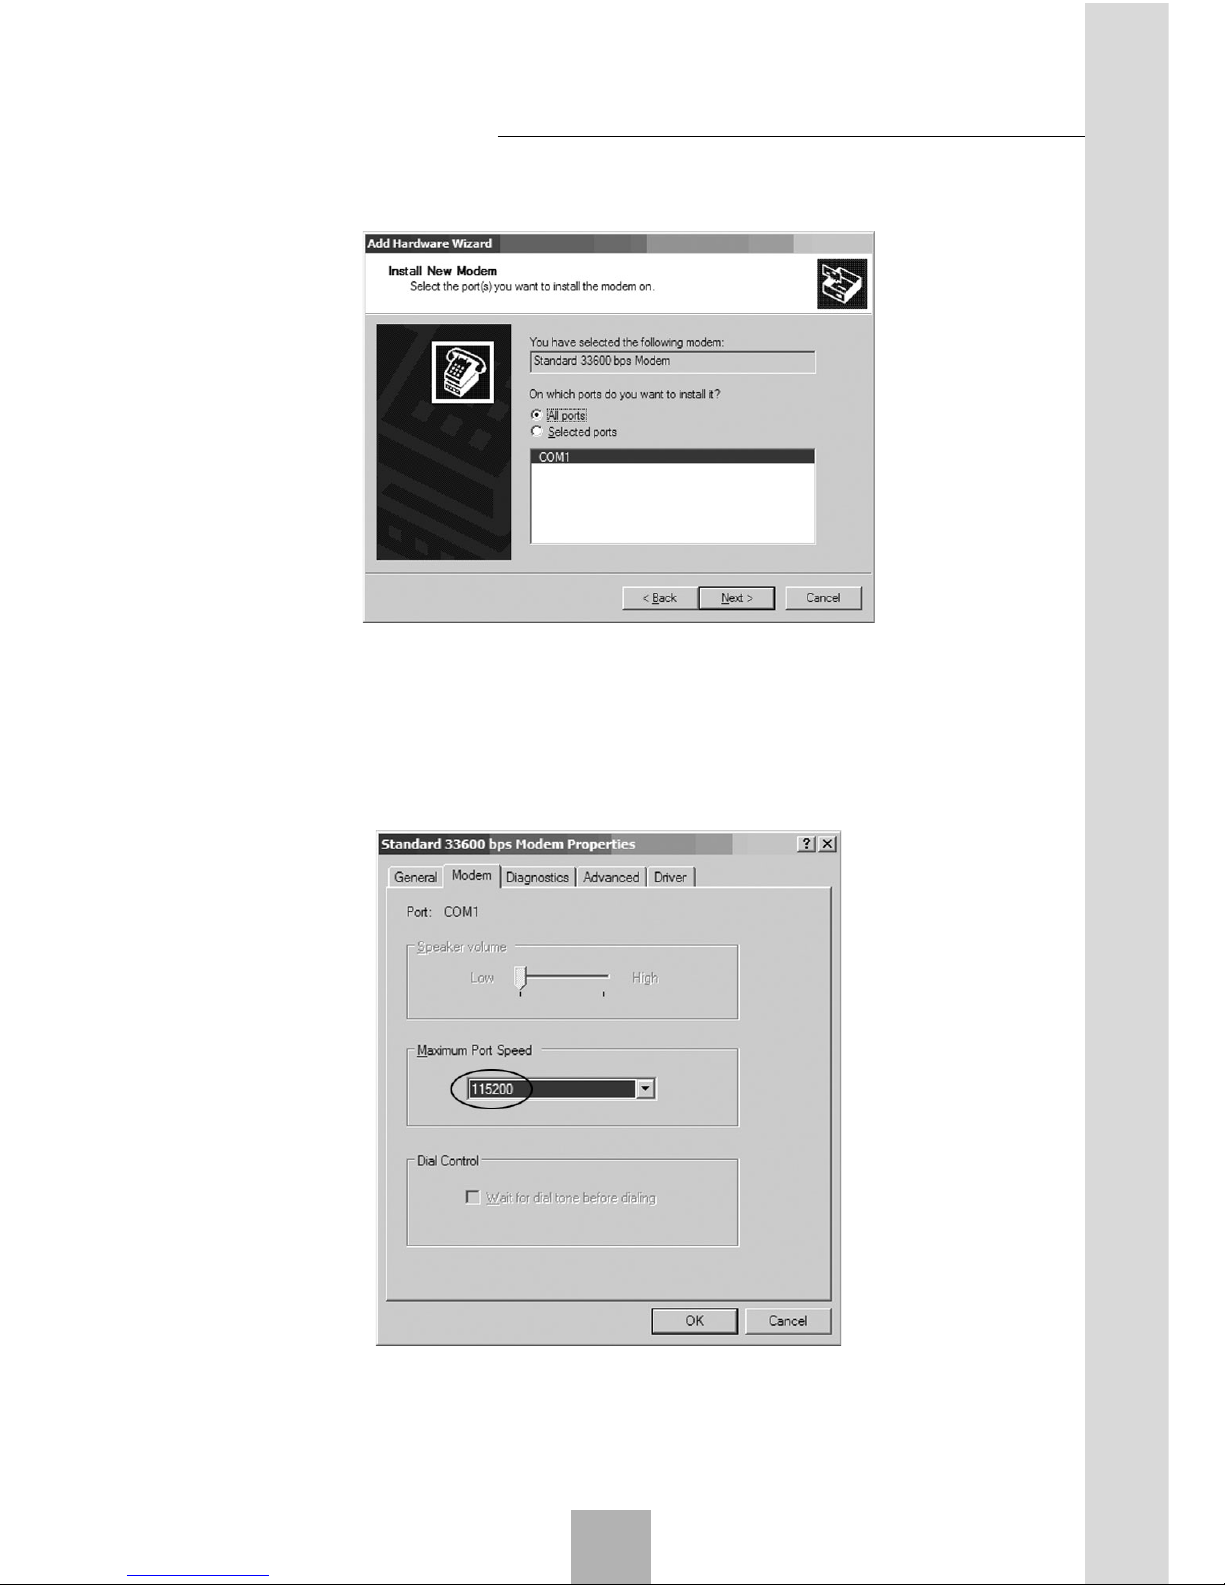
4. Click “Next”, Select the serial port, e.g., COM1.
5. Click “Next” to finish.
6. Select the newly created Modem in “Phone and Modem Options”, select “Properties”, and then select “Maximum port speed” as “115200” in
the “Modem” tab.
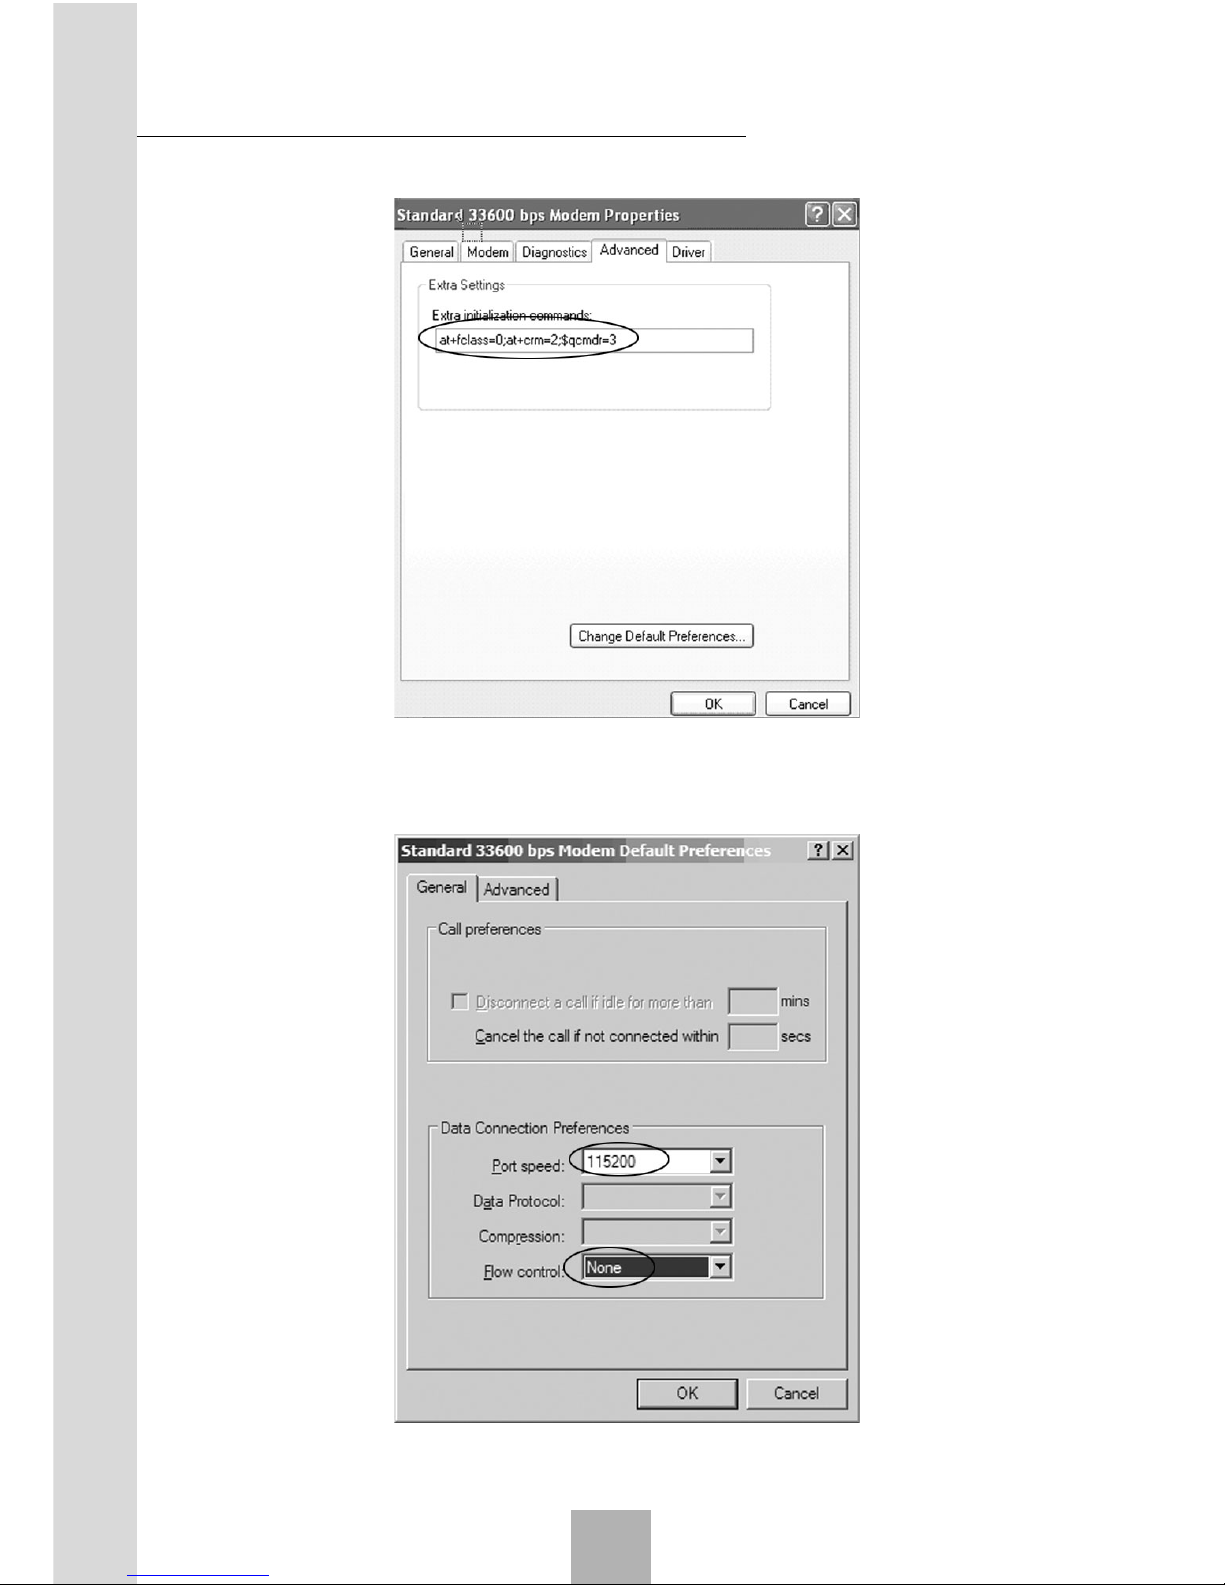
7. The setting in “Advanced” is as follows:
Add at+fclass=0;at+crm=2;at$qcmdr=3; to the Extra setting.
Data Network Access Function
6
Page 56
Sharing New Technology With You
56
8. Click “Change Default Preferences”, select “Flow control” as “None”.
Data Network Access Function
6
Page 57
57
Sharing New Technology With You
9. Click “OK” to complete the Modem setting.
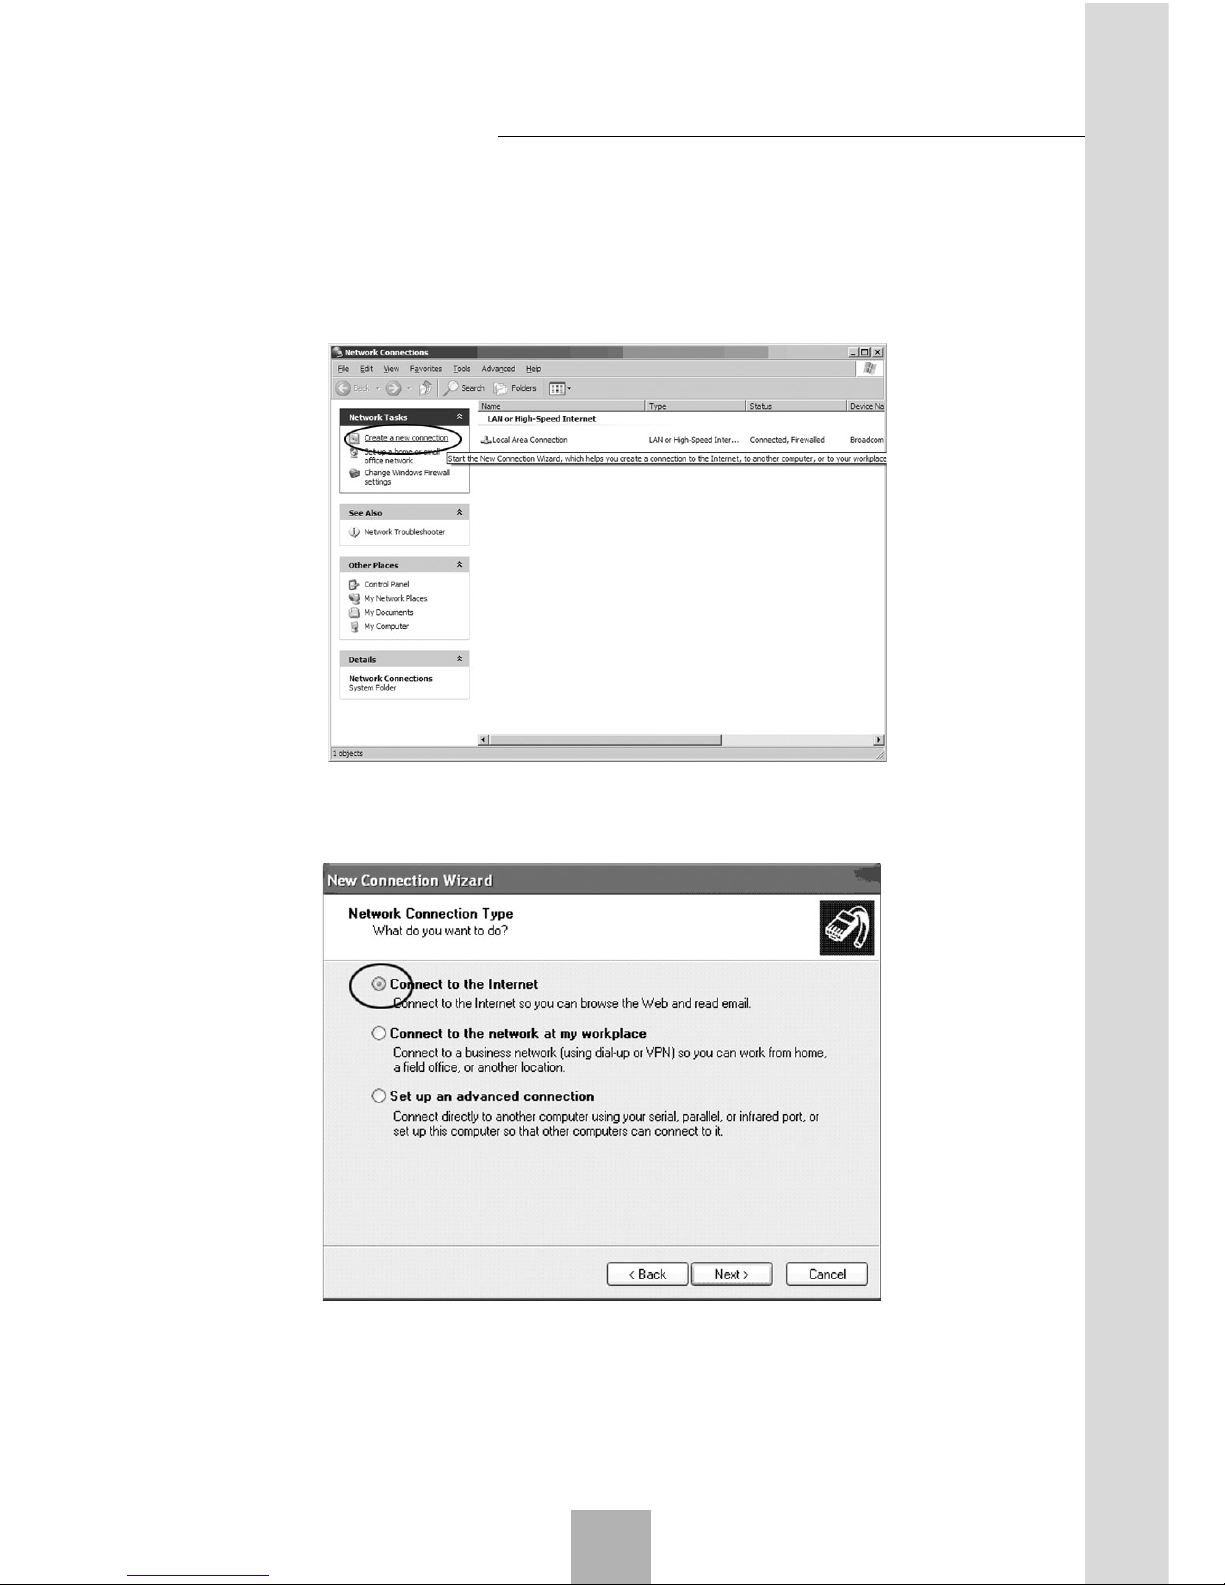
10.Create the dial-up network. Enter “Network Connections”, and doubleclick “Create a New Connection”.
11. Click “Next”, and select “Connect to the Internet”.
Data Network Access Function
6
Page 58
Sharing New Technology With You
58
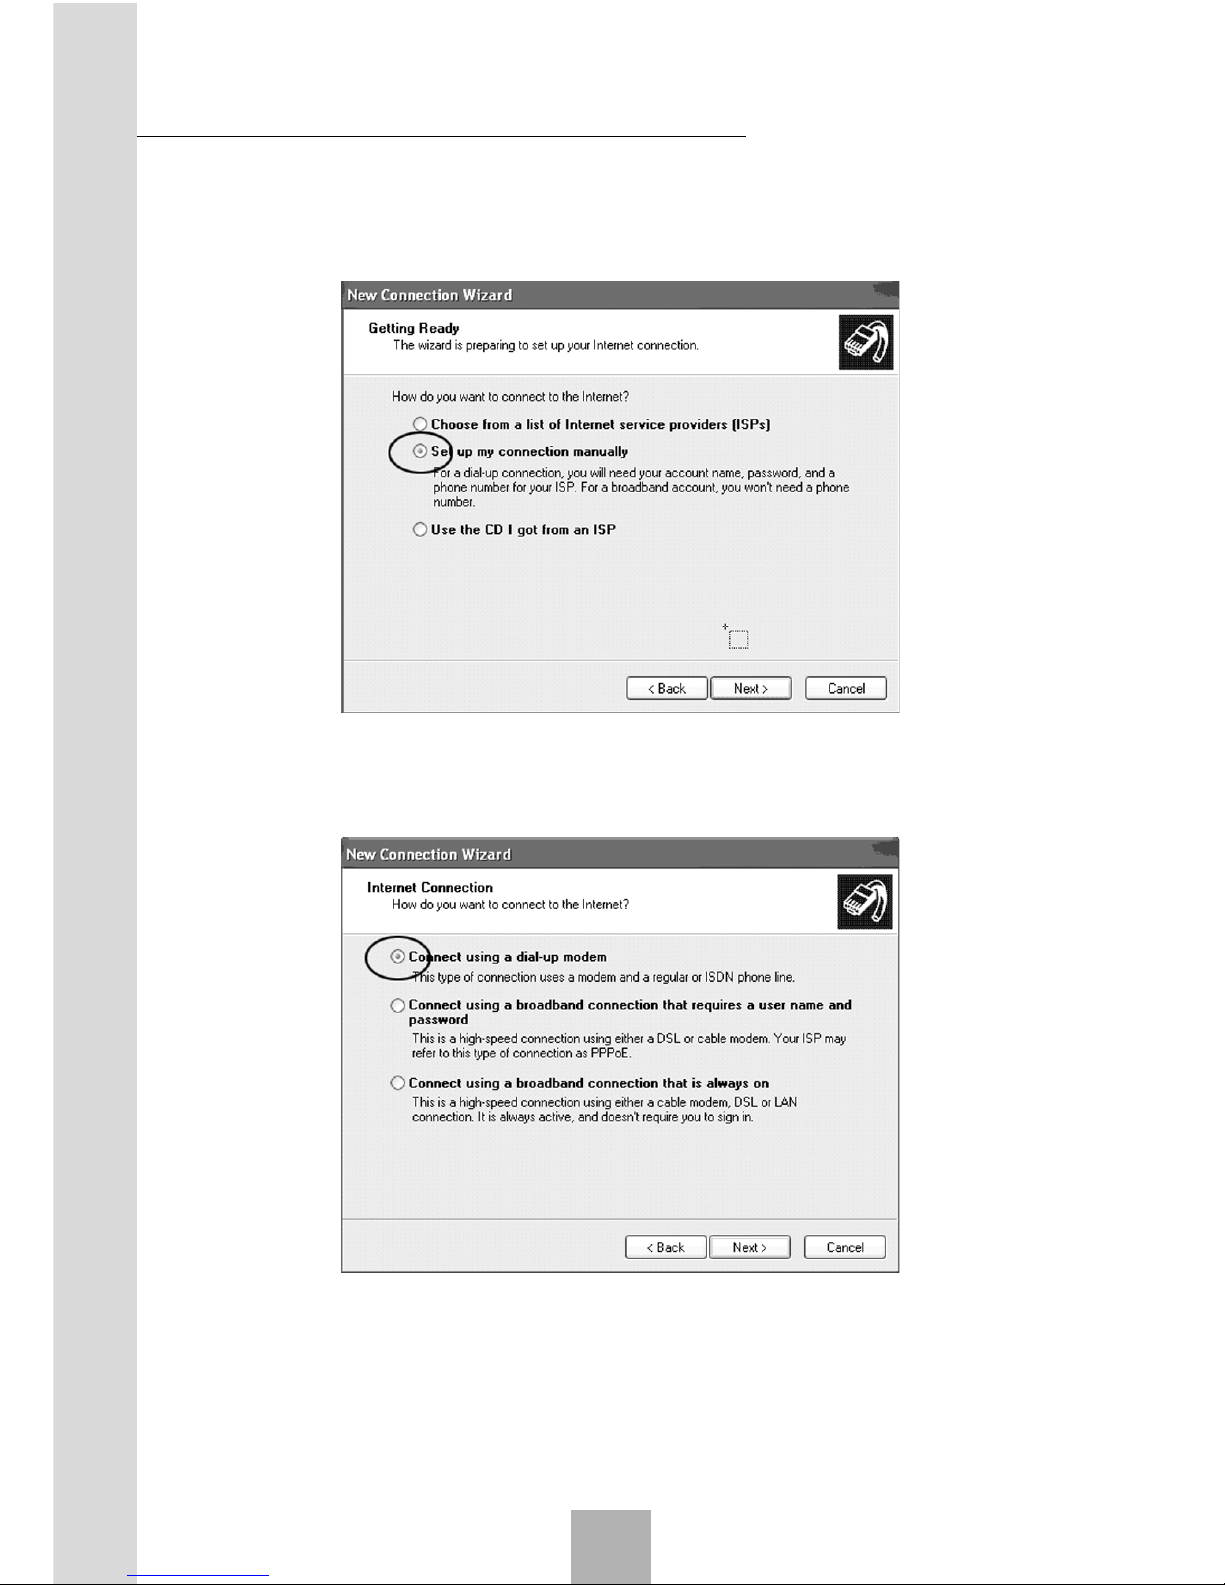
12.Click “Next”, and select “Set up my connection manually”.
13.Click “Next”, and select “Connect using a dial-up modem”.
14.Click “Next”, and select the newly created Modem.
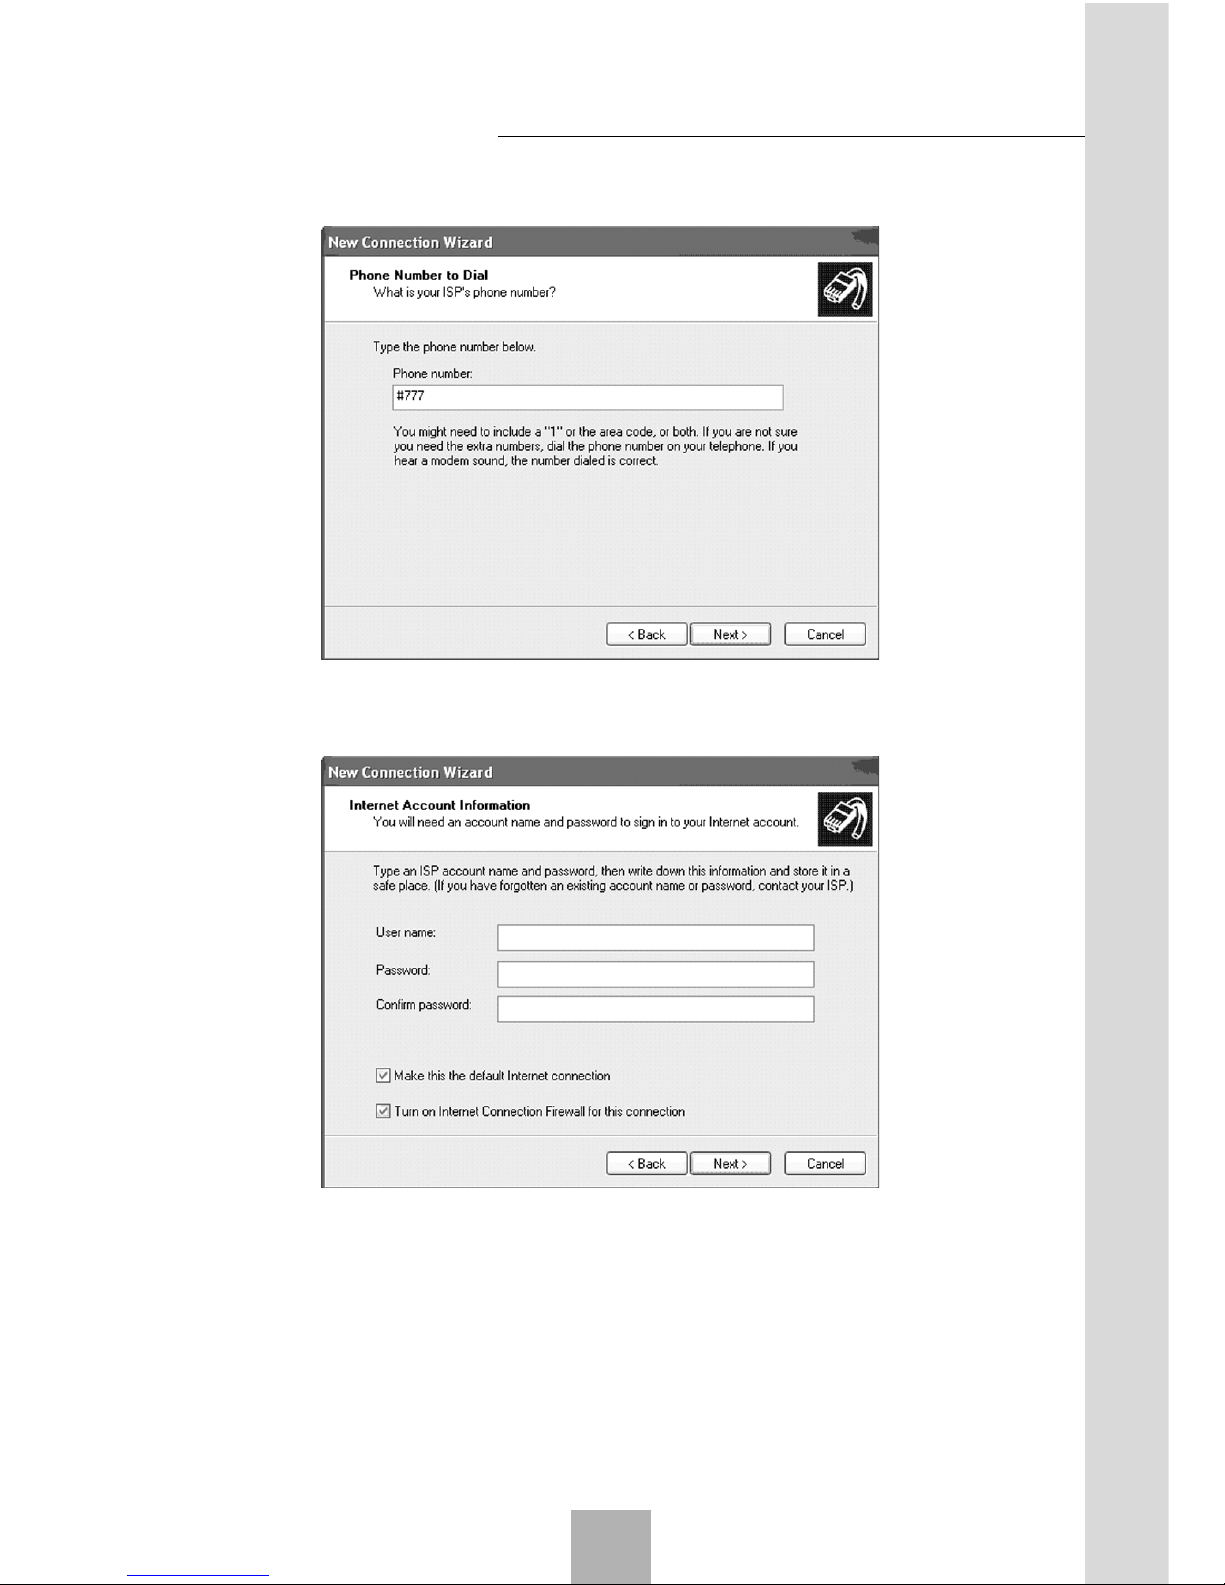
15.Click “Next” and fill in the Phone number, which vary with the areas.
Data Network Access Function
6
Page 59
59
Sharing New Technology With You
16.Fill in the user name and password.
17.Click “Next”, and enter the connection name.
18.Click “Next”, and select “Do not create Internet account”.
19.Click “Next” to finish.
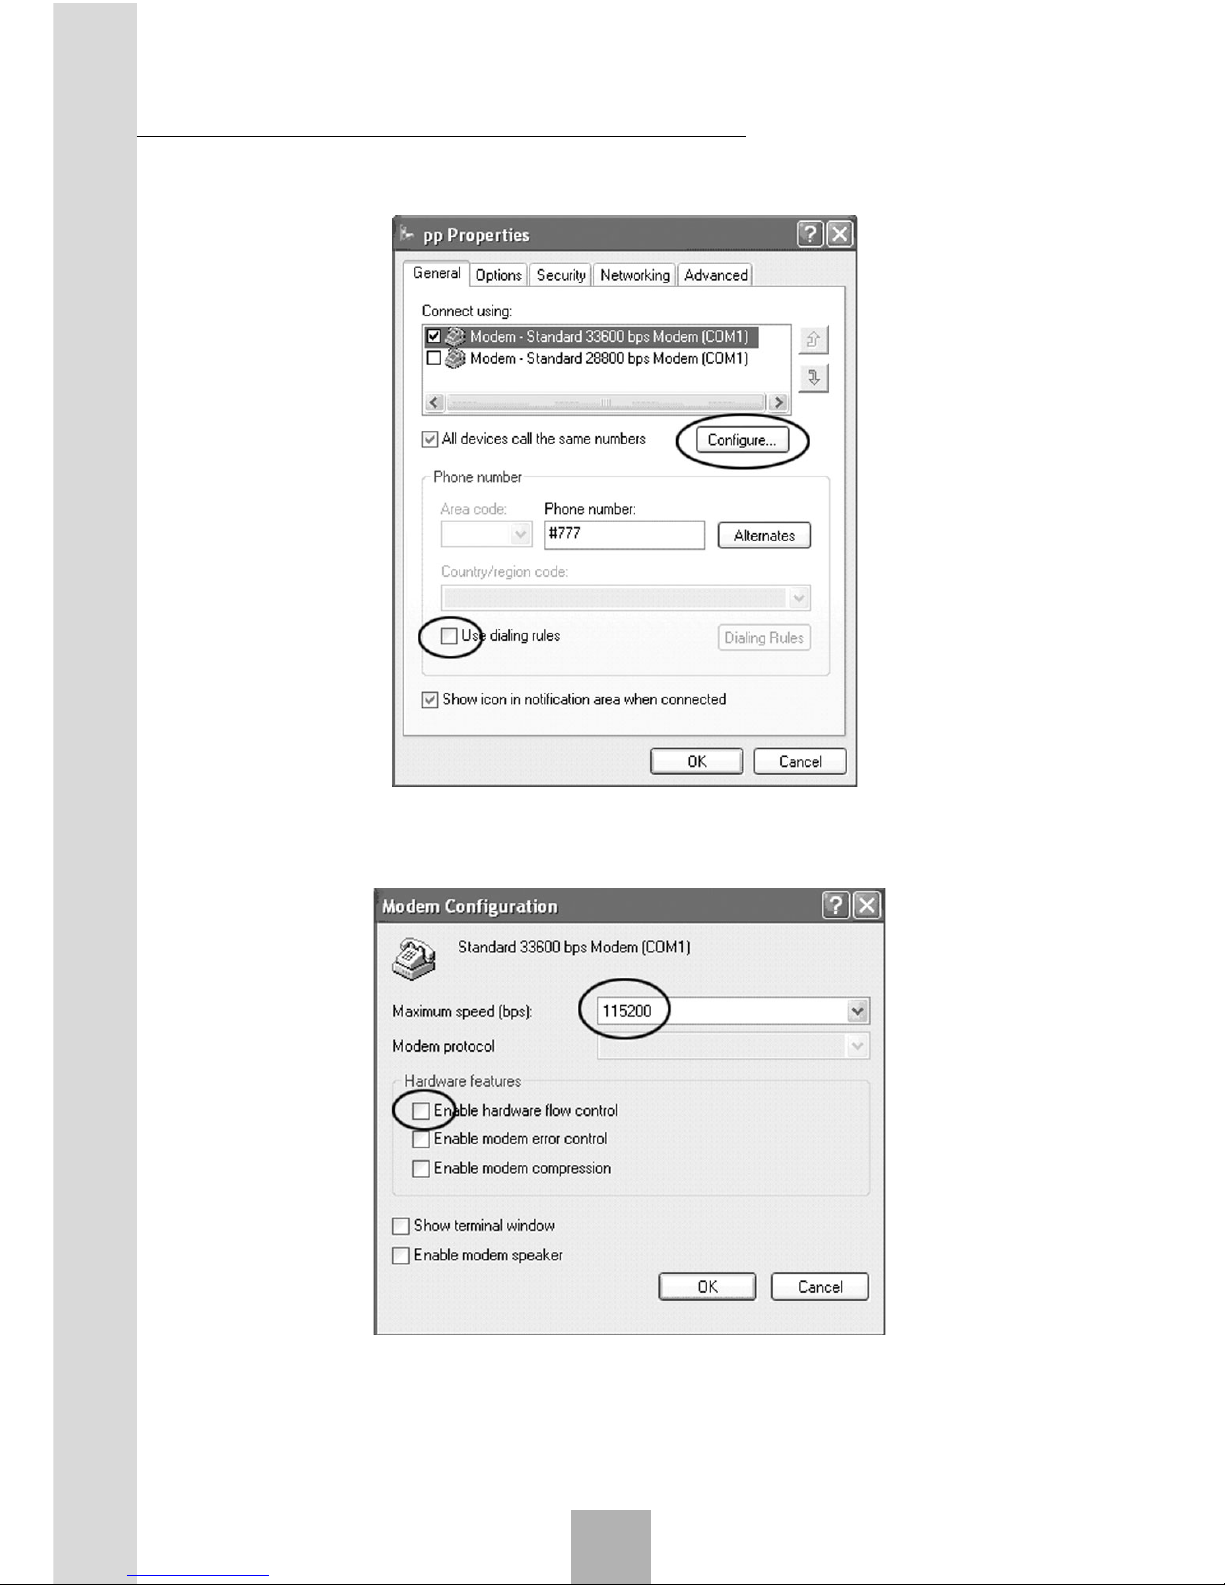
20.Select the newly created connection in “Network Connections”, and right
Data Network Access Function
6
Page 60
Sharing New Technology With You
60
click “Properties”. Cancel “Use dialing rules”.
21.Click “Configure”, and select the speed as 115200, and cancel “Enable
hardware flow control”.
22.Click “OK”.
23.Double-click the newly created connection, and enter the user name
and password for connection.
Data Network Access Function
6
Page 61

61
Sharing New Technology With You
24.Open the web page in IE for Internet access with successful dial-up.
Note: Local service provider should provide the user name and password,
no calling permitted when surfing the Internet.
6.4 Usage of the USB-serial cable
The following steps indicate how to use the USB-serial cable to con-
nect the phone with a computer:
1. Turn off your Phone. Plug the DB9 connector of the USB-Serial cable
into your phone, and then turn on your phone.
2. Turn on your computer and plug the USB connector of the USB-Serial
cable into the USB port.
3. Install the driver of the USB-Serial cable.
Insert the driver CD into the CD-ROM and open “USB 1.1 TO RS232
CABLE” folder. Select the appropriate OS version, i.e. “win2k”, enter the
folder and open the file “USB To RS232 Cable for Windows 2000 User’s
Manual”. Read the file carefully and install the USB-serial port.
4. Complete the configuration setting according to paragraphs 6.1~6.3.
Note that Modem port value is USB to Serial Port (COM3).
5. If you want to remove the USB-Serial cable driver program, unplug the
USB-Serial cable from your PC. Run D:\ USB 1.1 TO RS232 CABLE \
Win2000\Drv remover.exe from the driver CD, and then reboot
the PC. Here, “D:\” is the prompt of CD-ROM, which may differ from
your computer.
Data Network Access Function
6
Page 62
Sharing New Technology With You
62
7.1 Summary
When your phone is connected to the computer with serial port cable,
its wireless fax service is thus available with the help of WINFAX software.
The remote terminal can be set as follows:
Remote PC + WP805 phone or wireless access box
Remote electrograph + WP805 phone
Remote electrograph + ordinary phone (PSTN)
7.2 Installation
7.2.1 System Requirement
OS: WIN98 / WIN2000 / WINXP
Memory: 64M or above
Hard disk space: 500M or above
CPU frequency: 500M Hz or above
Support RS232 interface 1 or 2 / USB interface
Application software: WINFAX (Please purchase it by yourself.)
7.2.2 Set the WP805 phone
7.2.2.1 Win2000 system
Port setting:
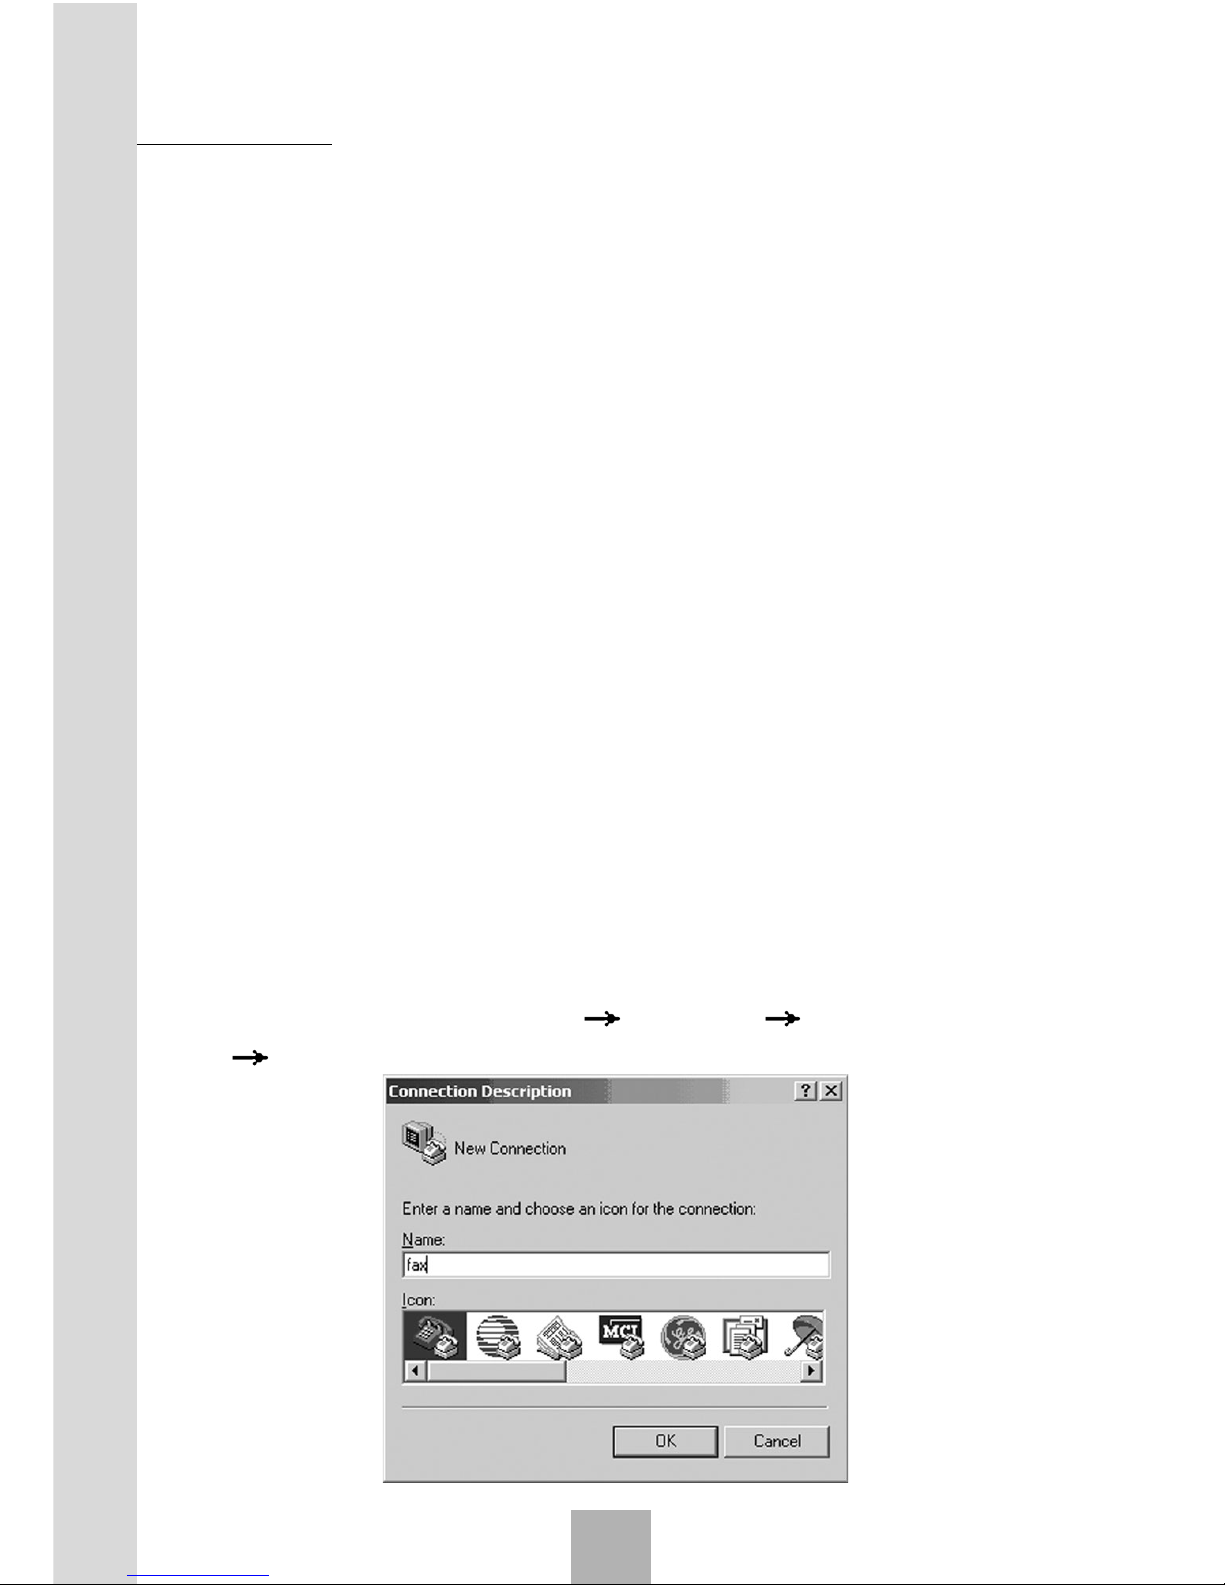
1. Connecting the phone and the computer via serial port and create a
new connect. Select programs accessories communications
hyper terminal, create new connection.
Fax
7
Page 63
63
Sharing New Technology With You
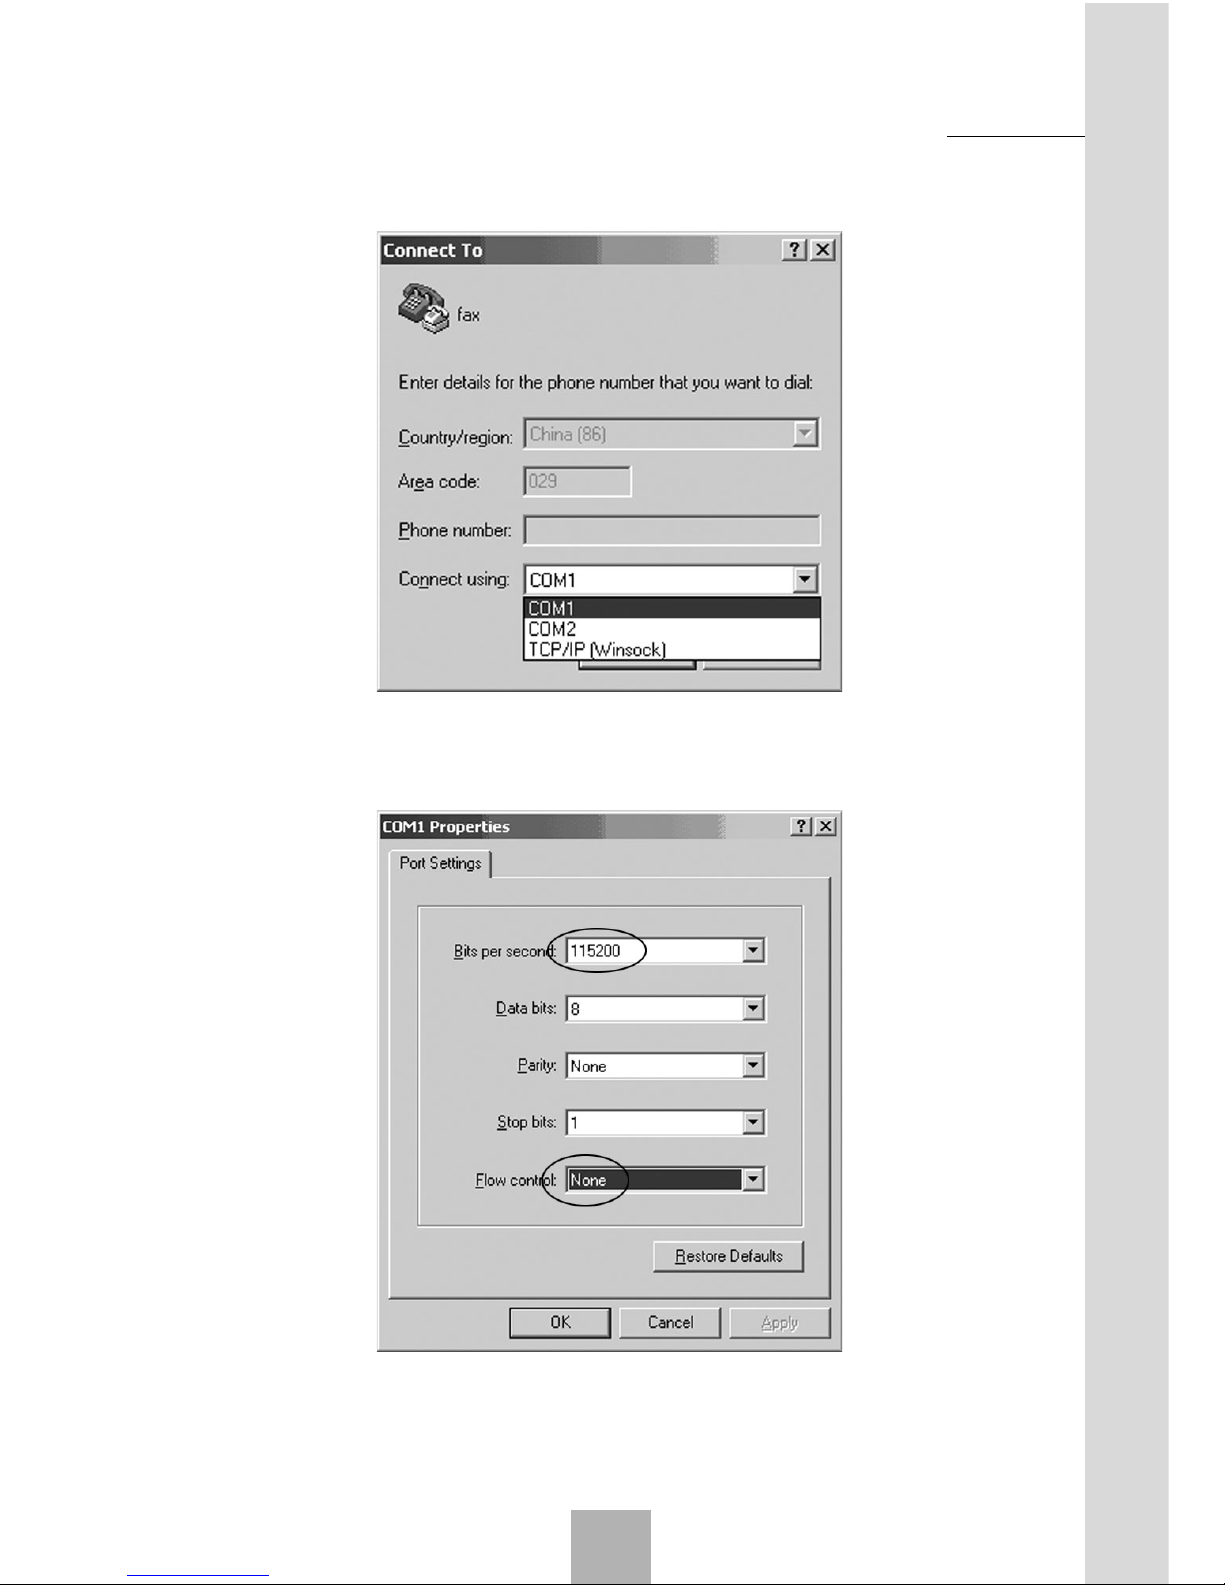
2. Click “OK”, then select correct communication port, i.e.COM1.
3. Set port properties, select “Bits per second” as “115200”, select “Flow
control” as “none”.
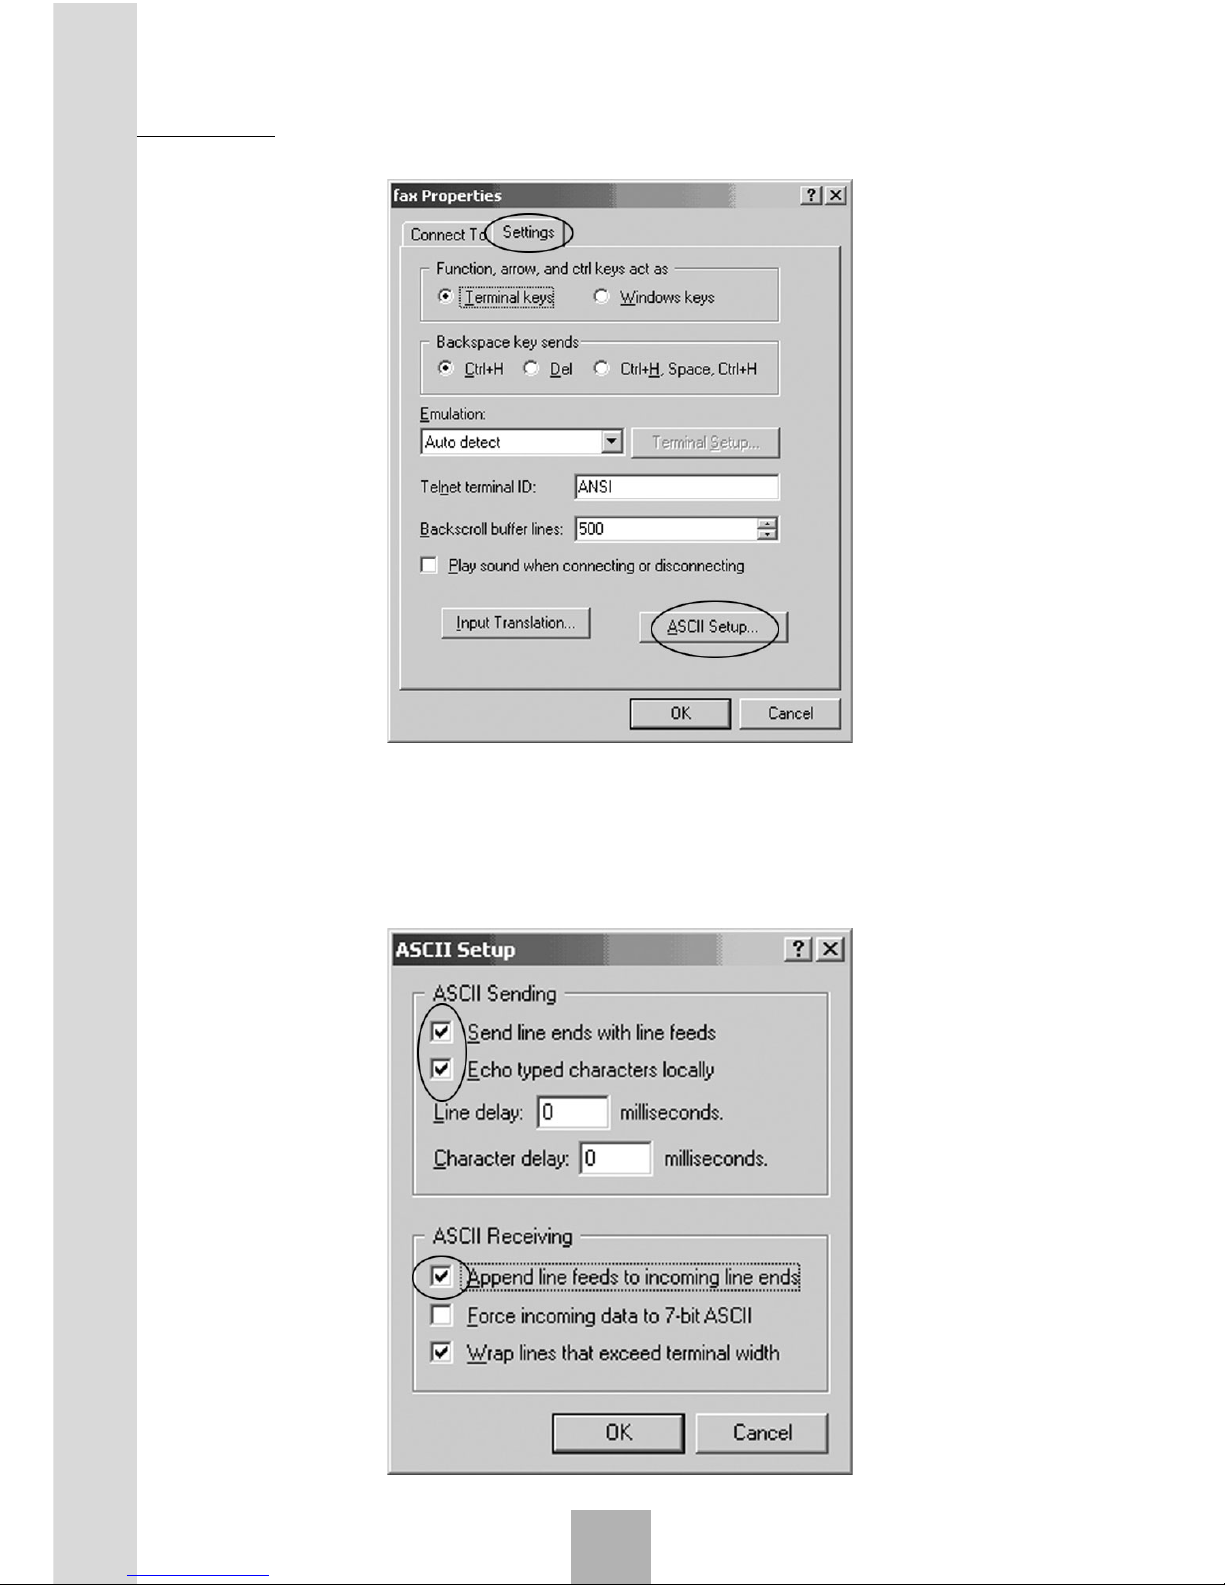
4. Click “OK”, select connect properties, click “Setting” and then click “ASCII
Setup”.
Fax
7
Page 64
Sharing New Technology With You
64
5. In “ASCII Sending” column, select “Send line ends with line feeds” and
“Echo typed characters locally”. In “ASCII Receiving” column, select
“Append line feeds to incoming line ends” and “Wrap lines that exceed
terminal width”.
Fax
7
Page 65
65
Sharing New Technology With You
6. Click “OK” to finish the setting.
7. Test whether the phone is connected correctly. Sent “AT” on hyper
terminal, it will return “OK”. Sent “AT+IPR=19200” again and set serial
port speed as 19200 bps, it will return “OK”. Otherwise, the phone cannot communicate with computer.
Modem Setting:
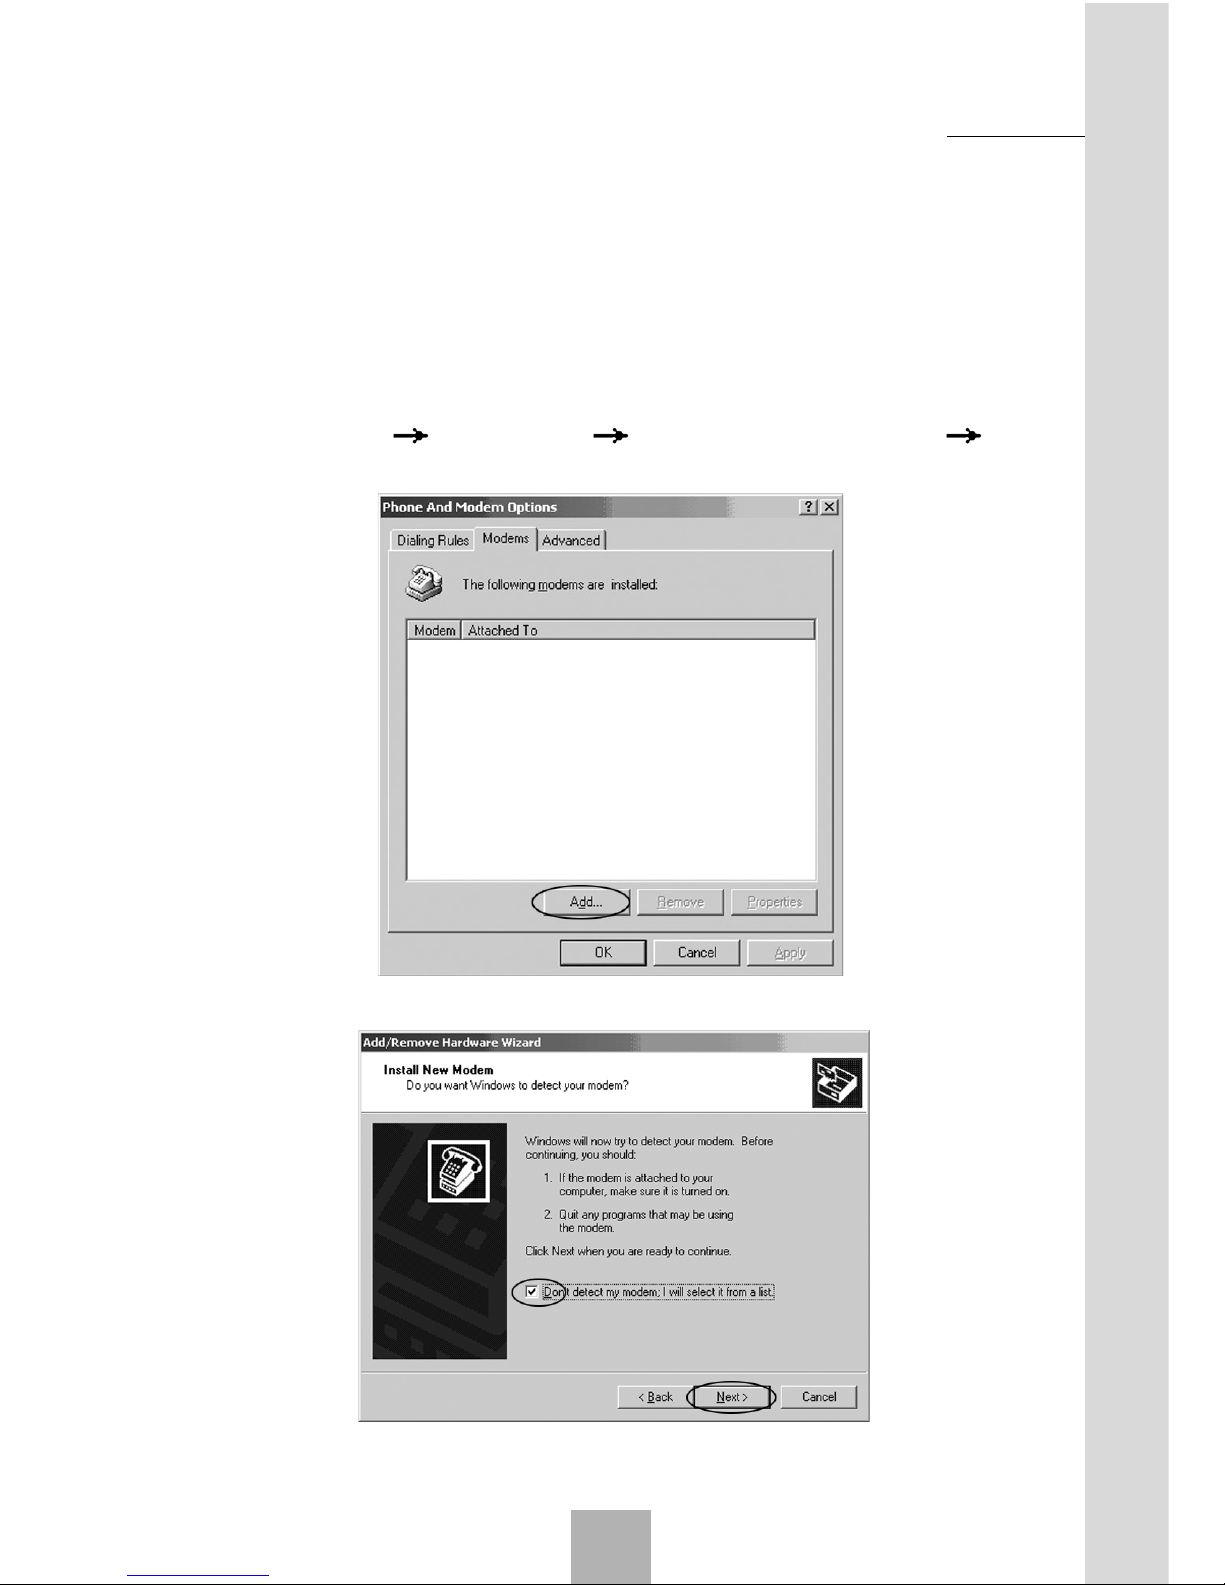
1. Select “Setting Control Panel Phone and modem options Modems”, and then click “Add”.
2. Click “Next”, and select “Don’t detect my modem; I will select it from a
list”.
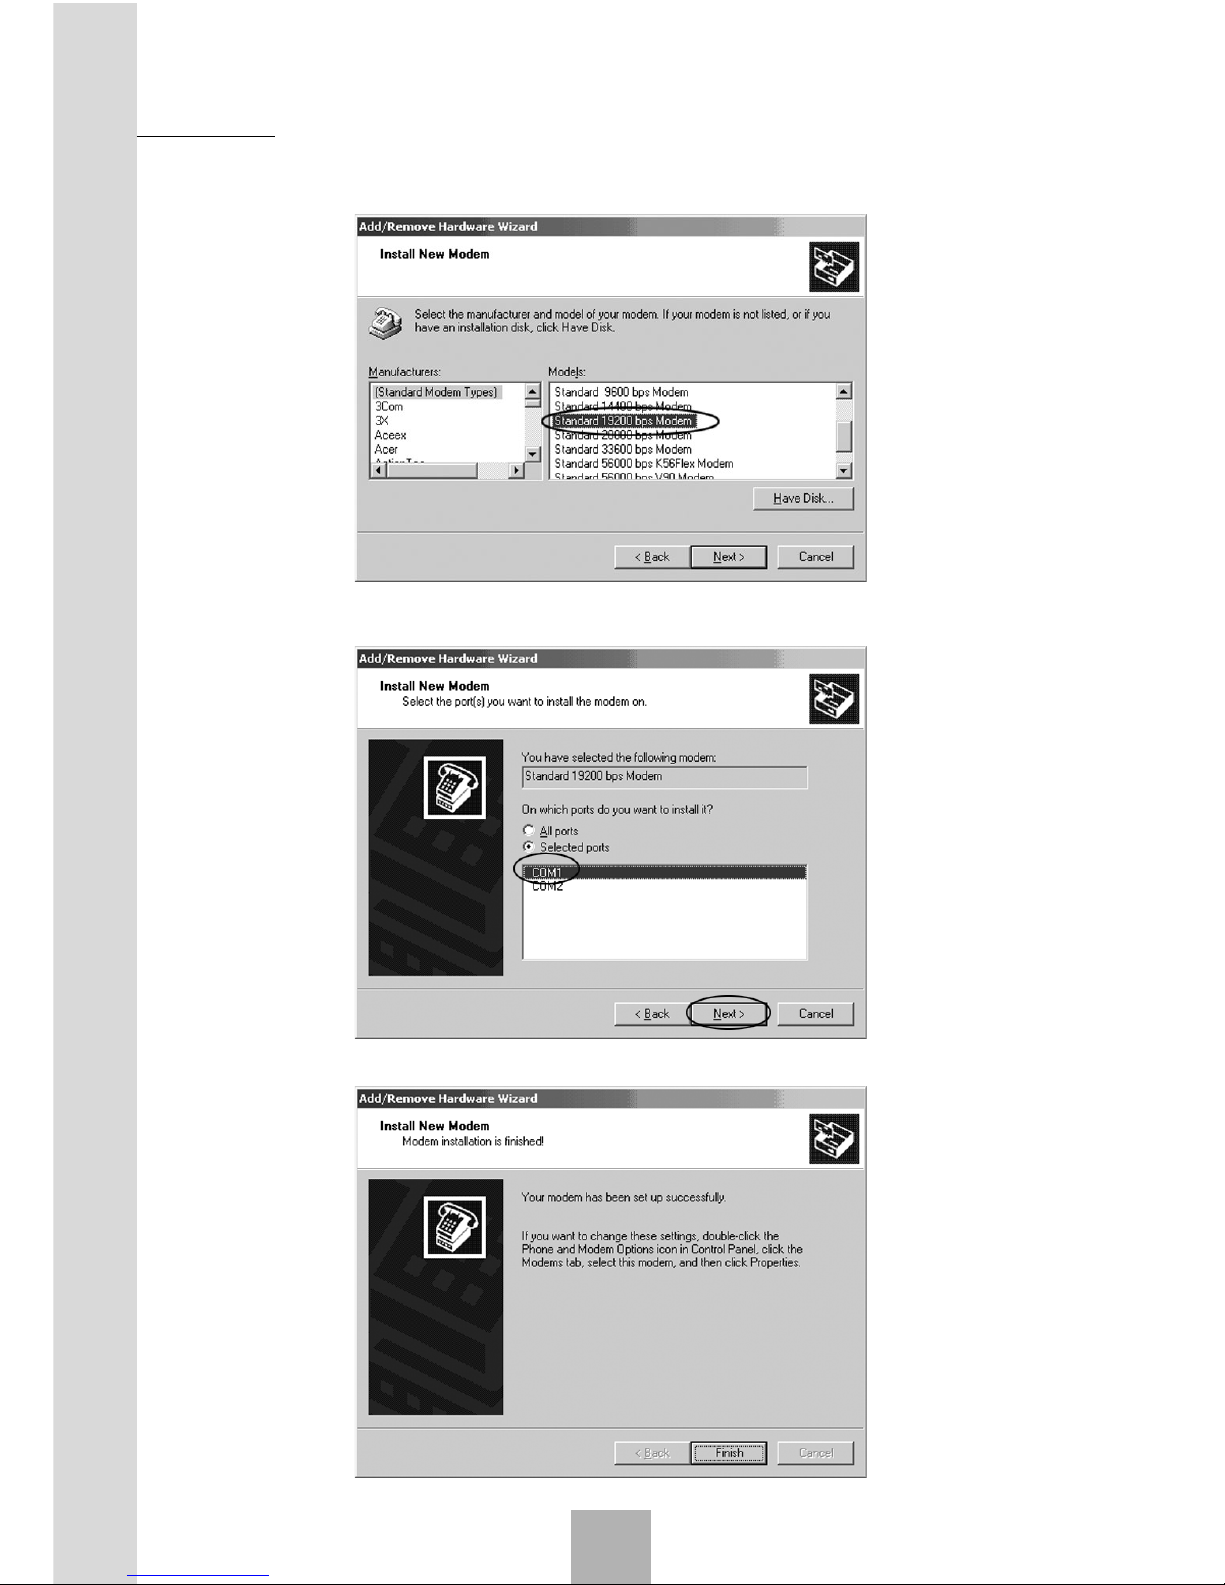
3. Click “Next”, select “Standard Modem Types” as the Manufacturers and
Fax
7
Page 66
Sharing New Technology With You
66
“Standard 19200bps Modem” as the Models.
4. Click “Next”, select the Communication Port, i.e., COM1.
5. Click “Next” to finish.
Fax
7
Page 67
67
Sharing New Technology With You
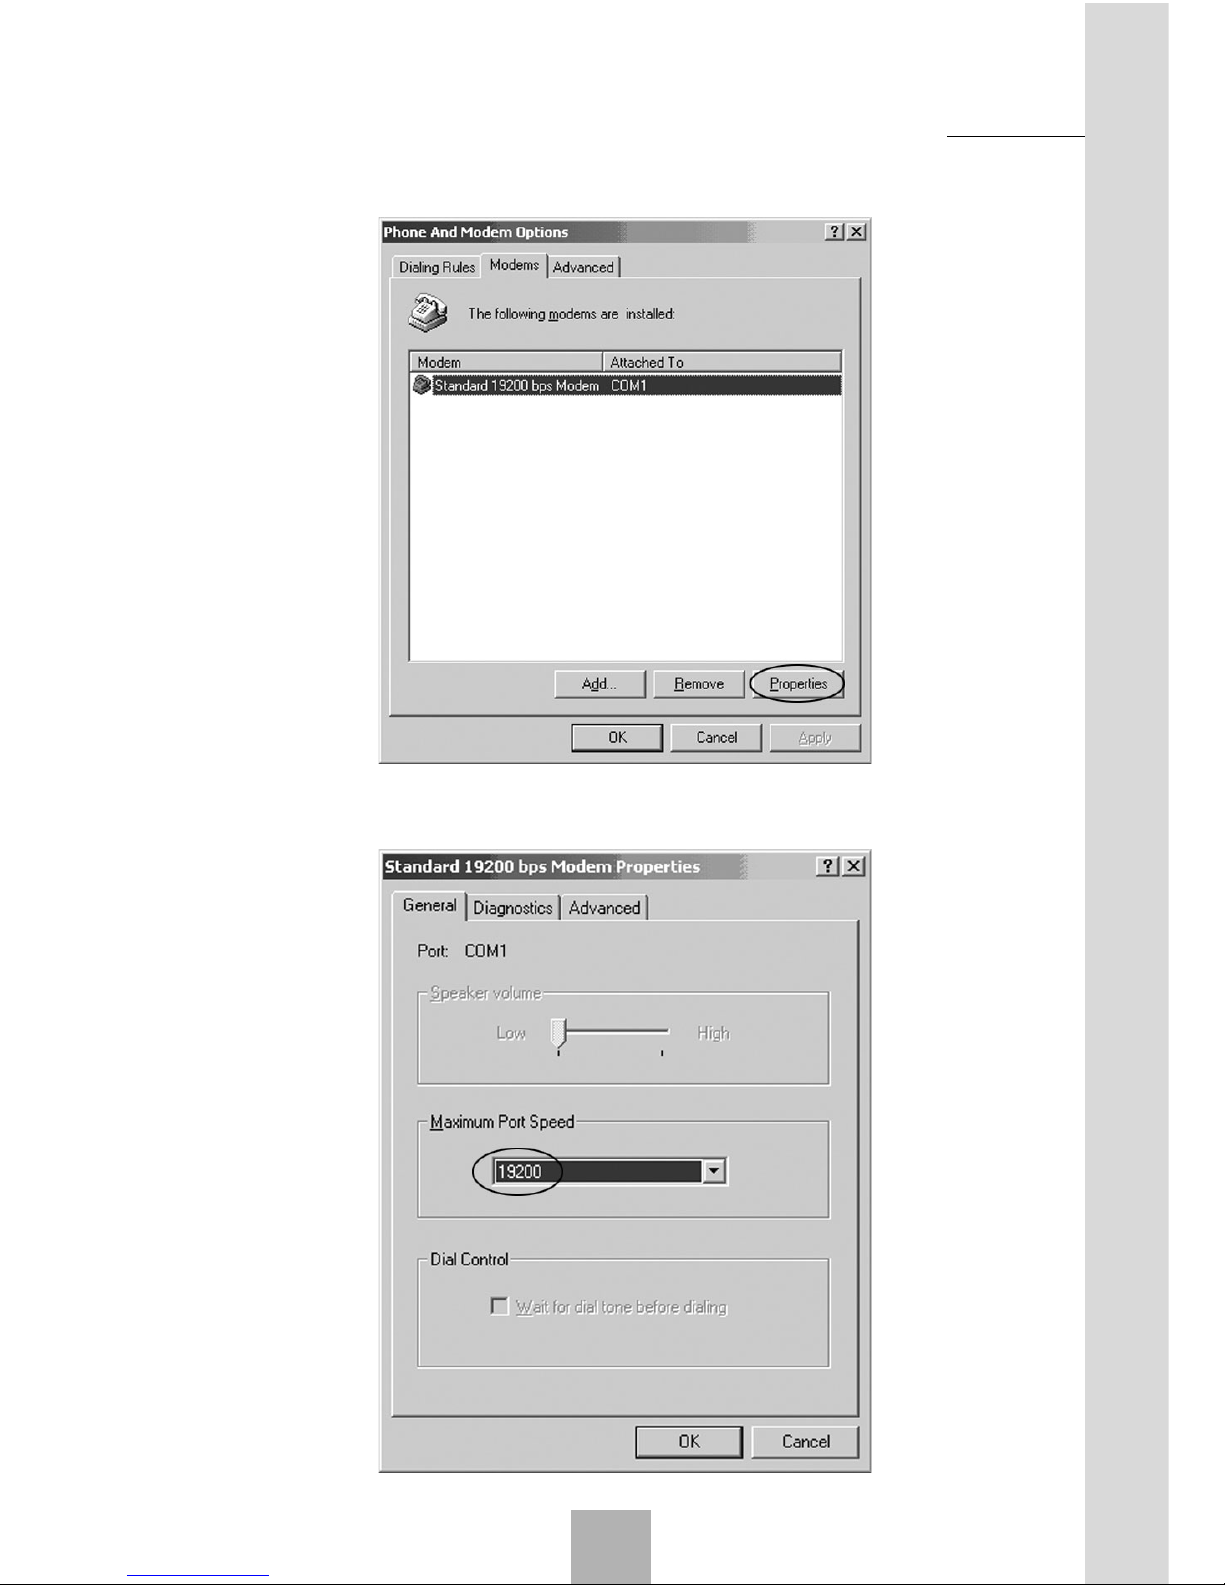
6. Select the newly created Modem in “Modems”, click “Properties”.
7. Select the “Maximum Port Speed” as “19200” in the “General” tab.
Fax
7
Page 68
Sharing New Technology With You
68
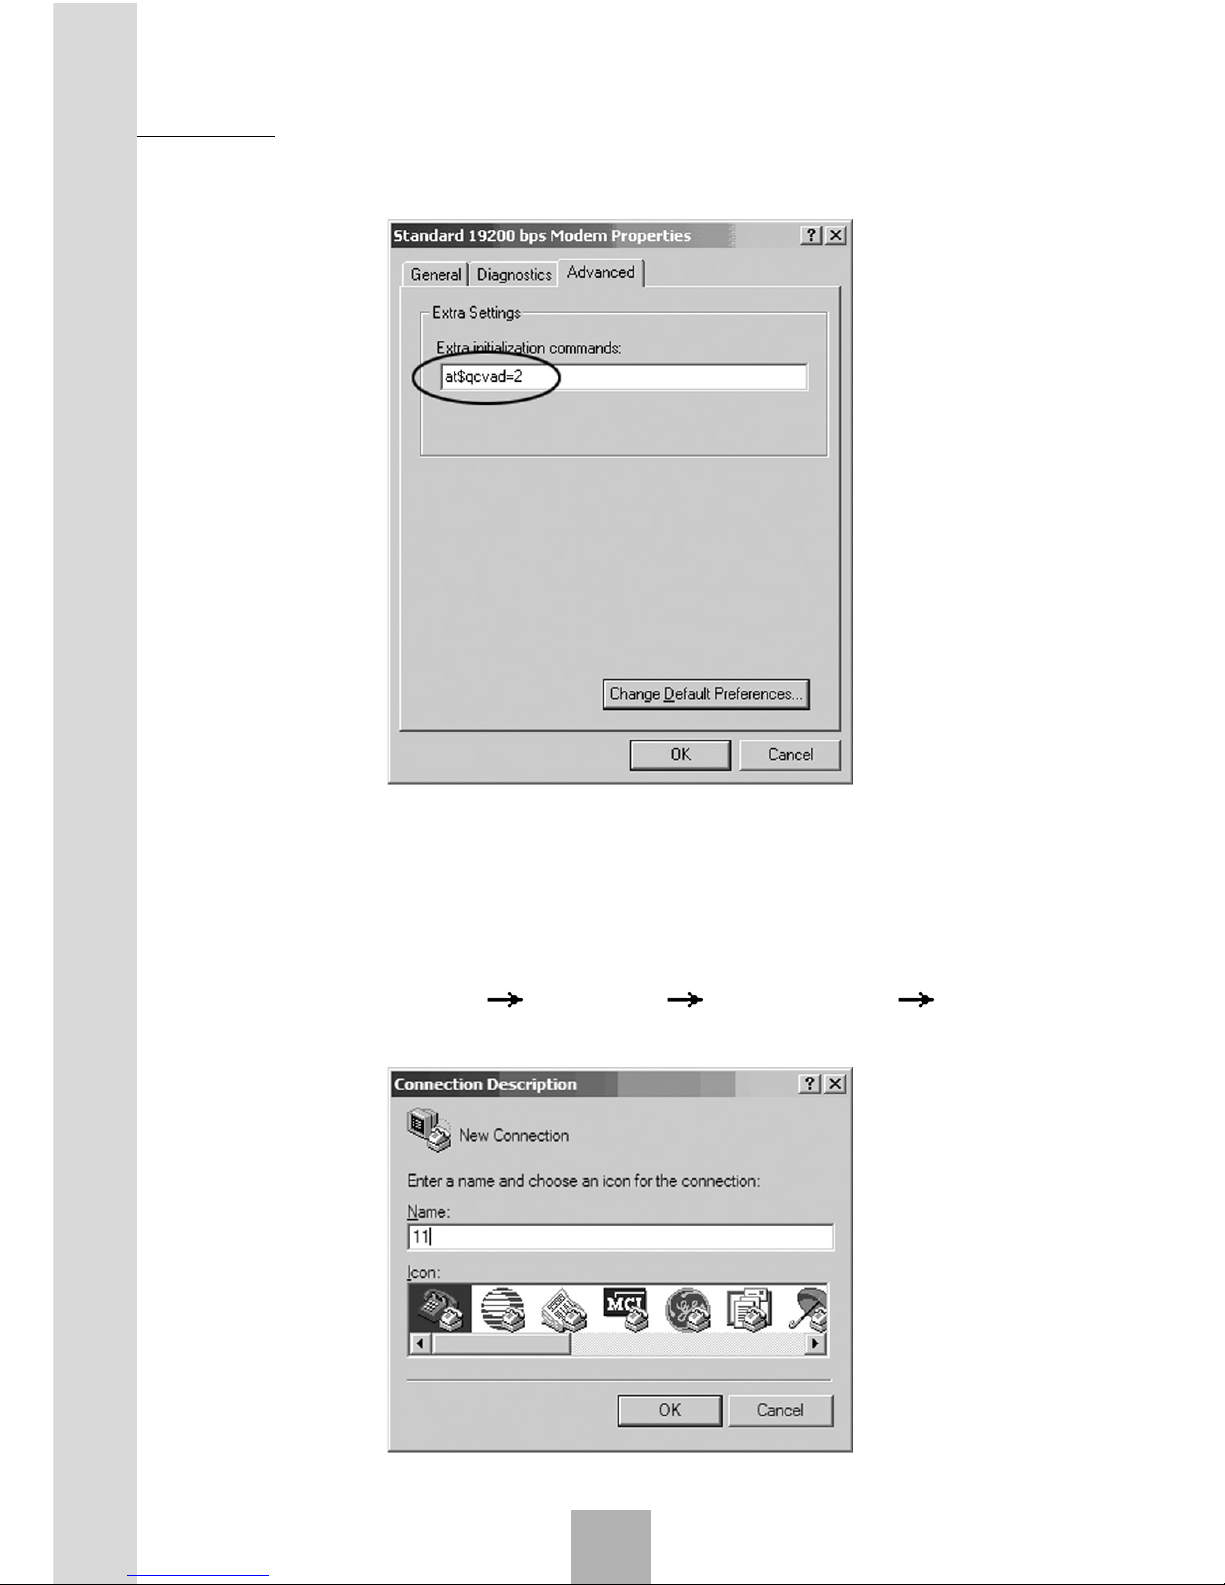
8. Click “Advanced” tab, add “AT$QCVAD=2” to the Extra settings.
9. Click “OK” to finish.
7.2.2.2 WINXP system
Port setting:
1. Connect the phone and the computer via serial port, create a new connect. Select programs accessories communications hyper
terminal, create new connection.
Fax
7
Page 69
69
Sharing New Technology With You
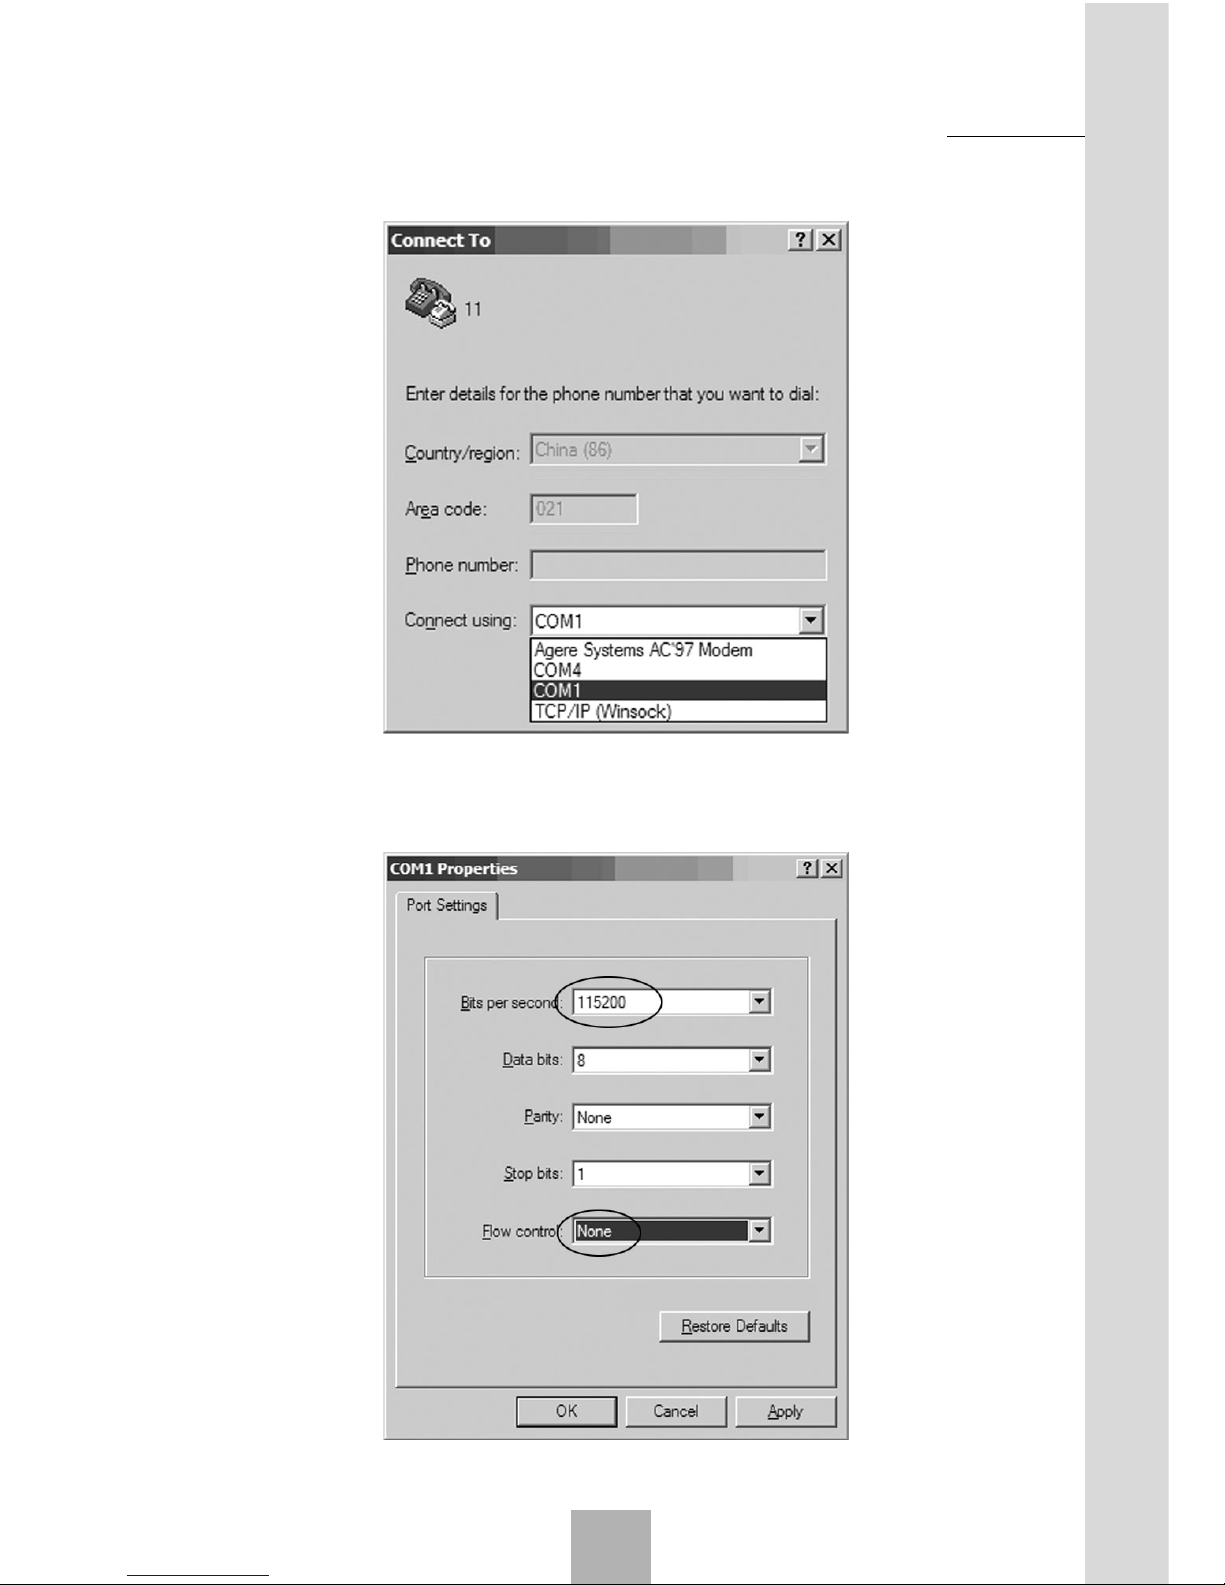
Select correct communication port, i.e., COM1.
2. Set port properties, set “Bits per second” as “115200”, set “Flow control” as “none”.
Fax
7
Page 70
Sharing New Technology With You
70
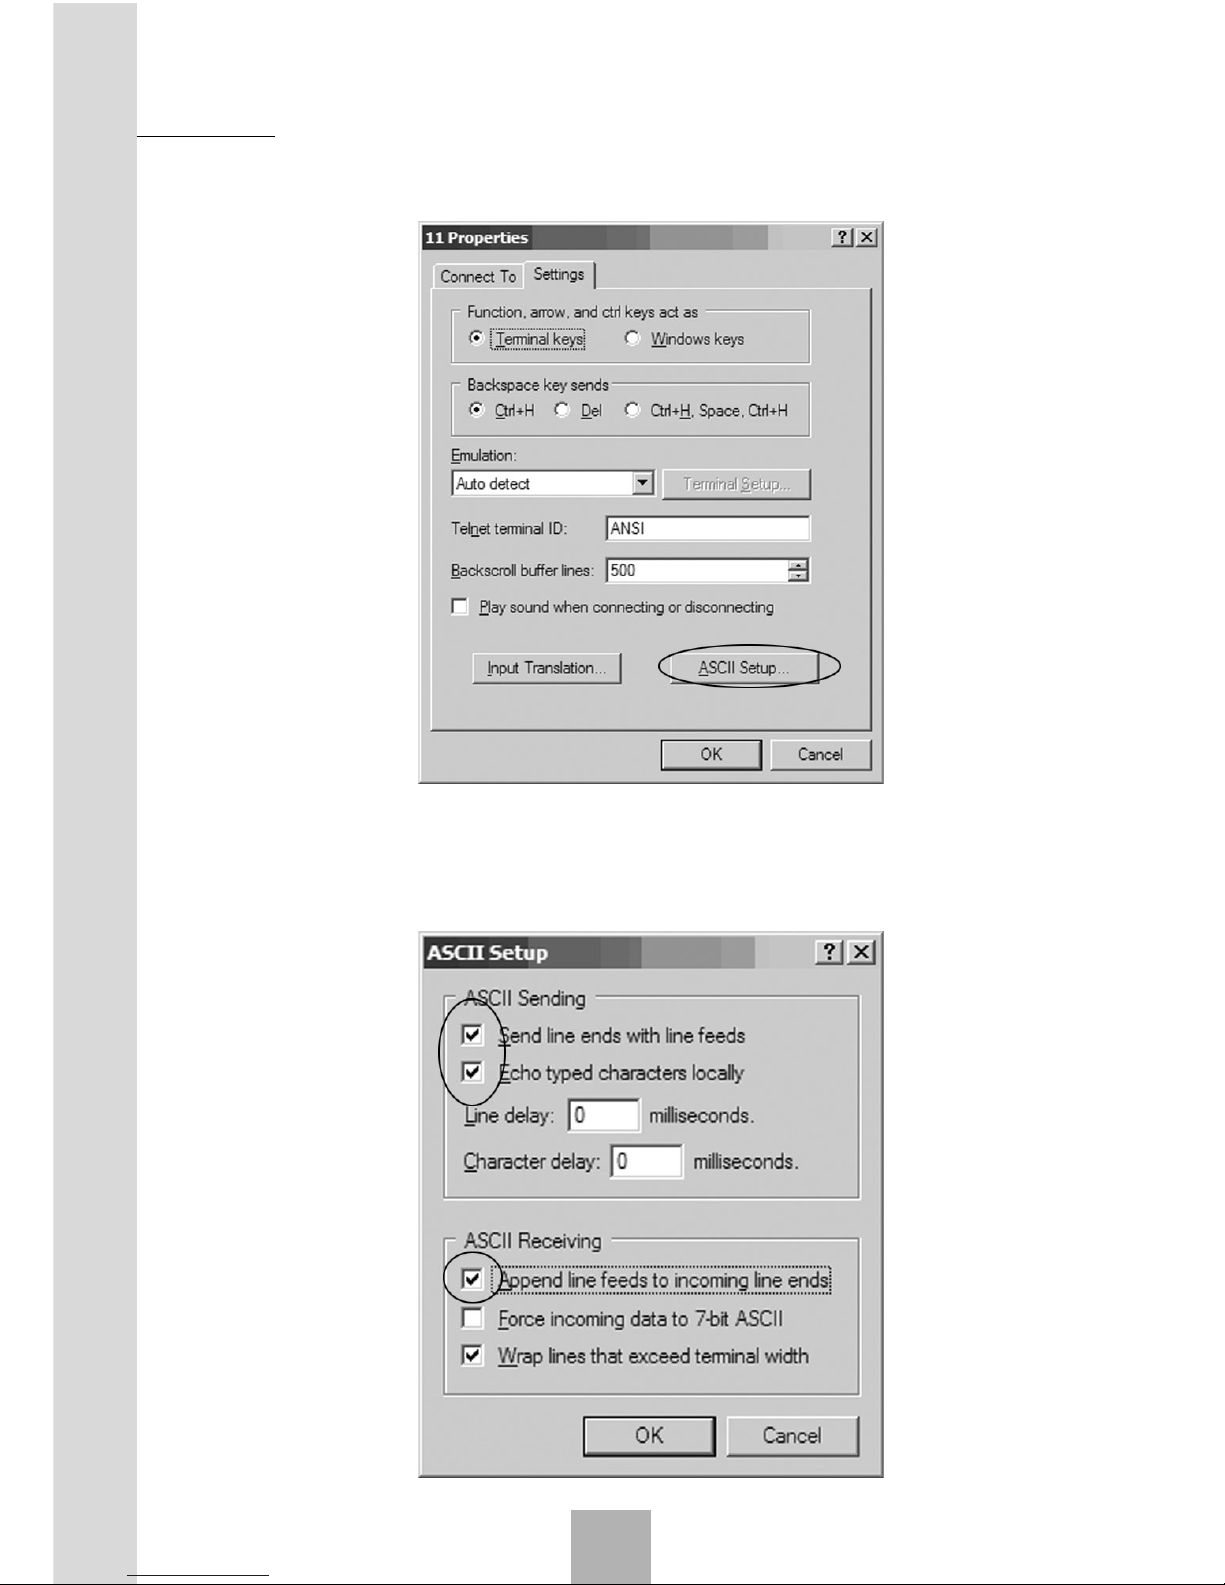
3. Click “OK”, select connect properties, click “Setting” and then click “ASCII
Setup”.
4. In “ASCII Sending” column, select “Send line ends with line feeds” and
Echo typed characters locally”. In “ASCII Receiving” column, select “Append line feeds to incoming line ends” and “Wrap lines that exceed
terminal width”.
Fax
7
Page 71
71
Sharing New Technology With You
5. Click “OK” to finish the setting.
6. Test whether the phone is connected correctly. Sent “AT” on hyper terminal, it will return “OK”. Then send “AT+IPR=19200”, set the serial port
speed as 19200 bps, it will return “OK”. Otherwise, the phone cannot
communicate with computer.
Modem Setting:
1. Select “Control Panel Phone and modem options Modems”, click
“Add”, click “Next”, and then select “Don’t detect my modem; I will select it from a list”.
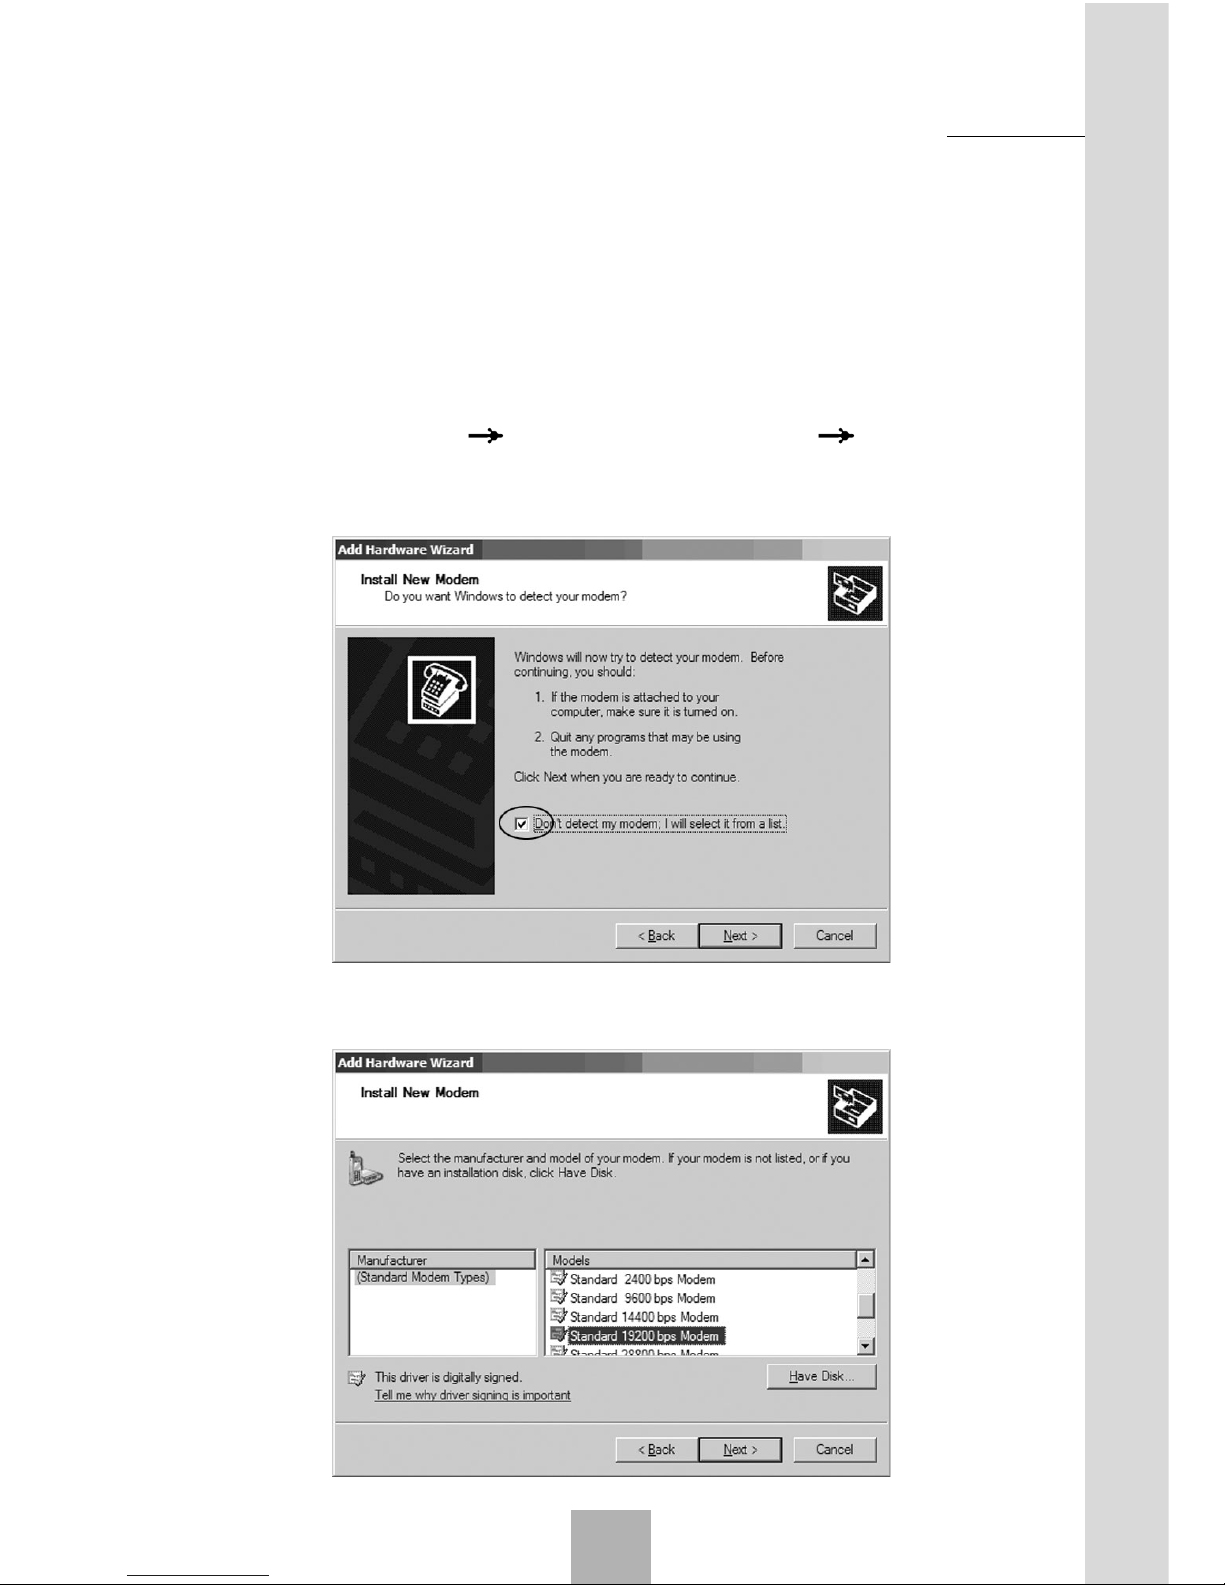
2. Click “Next”, select “Standard Modem Type” as the Manufacturer and
“Standard 19200bps Modem” as the Models.
Fax
7
Page 72
Sharing New Technology With You
72
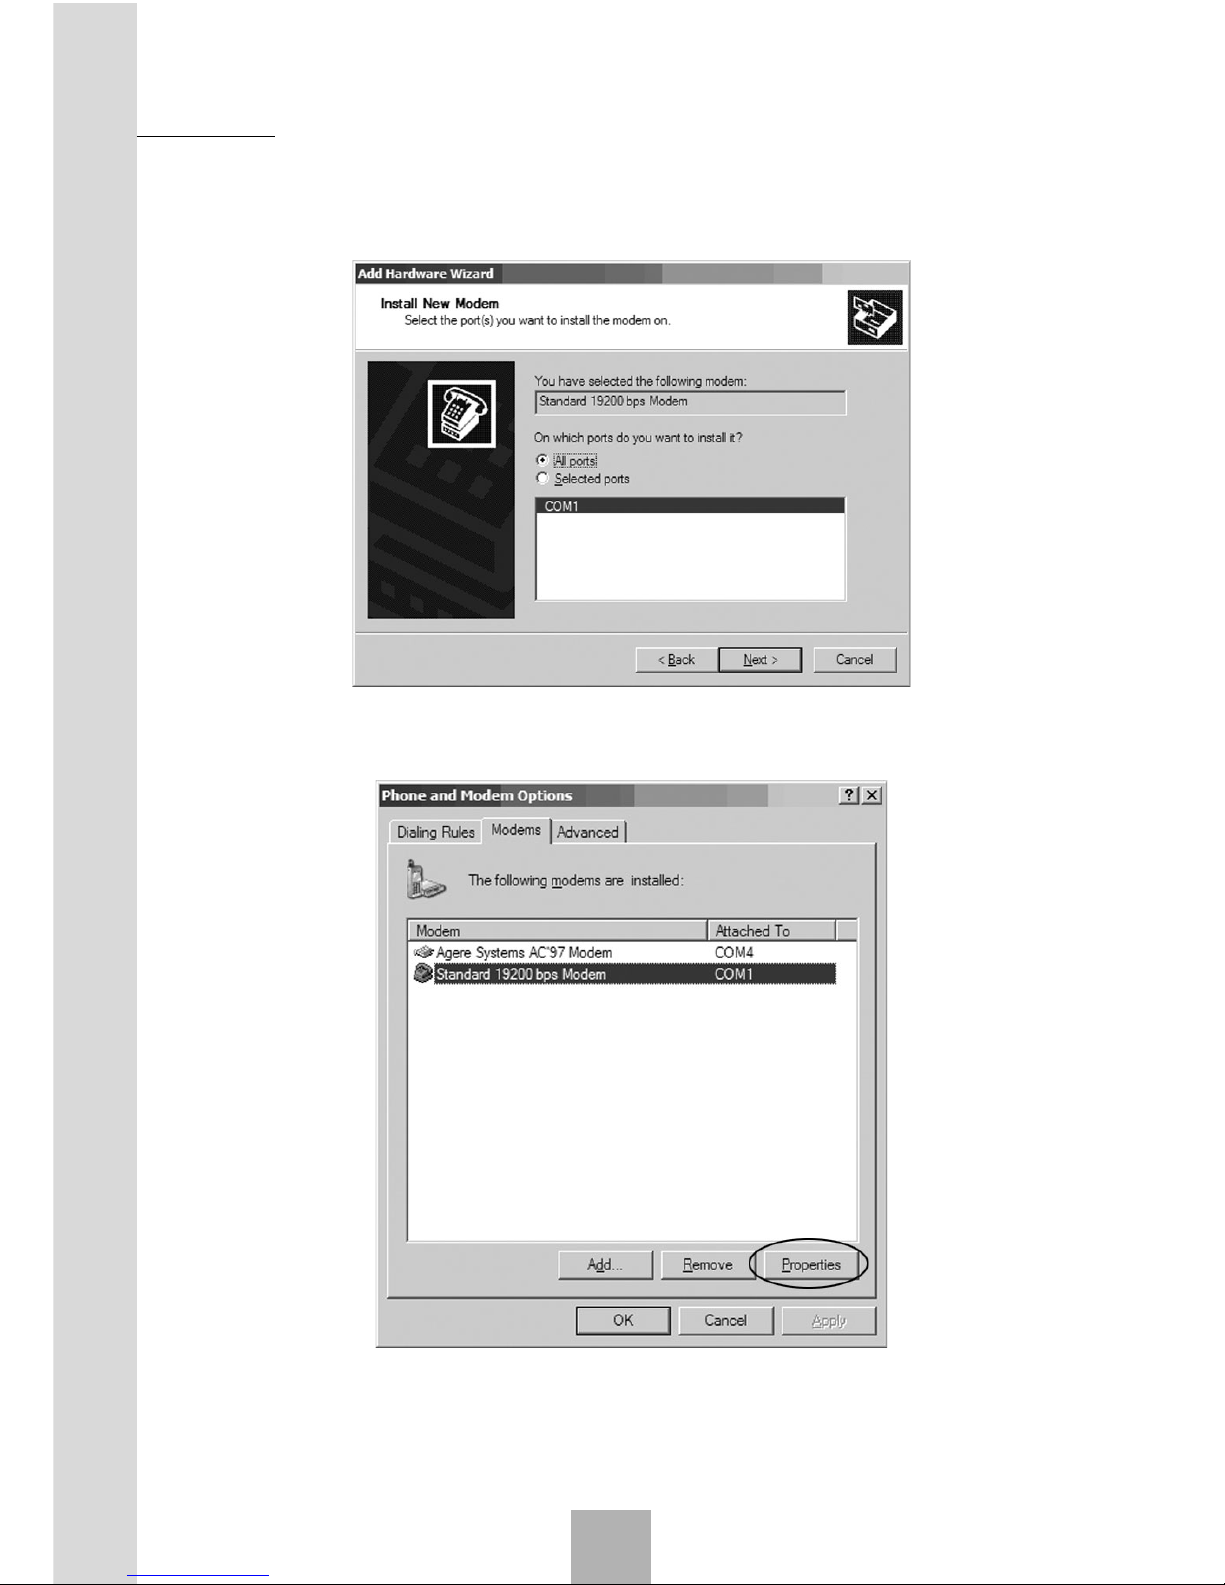
Click “Next”, select the Communication Port, i.e., COM1. Click “Next” to
finish.
3. Select the newly created Modem in “Modems”, click “Properties”.
4. Select the “Maximum Port Speed” as “19200” in the “Modem” tab.
Fax
7
Page 73
73
Sharing New Technology With You
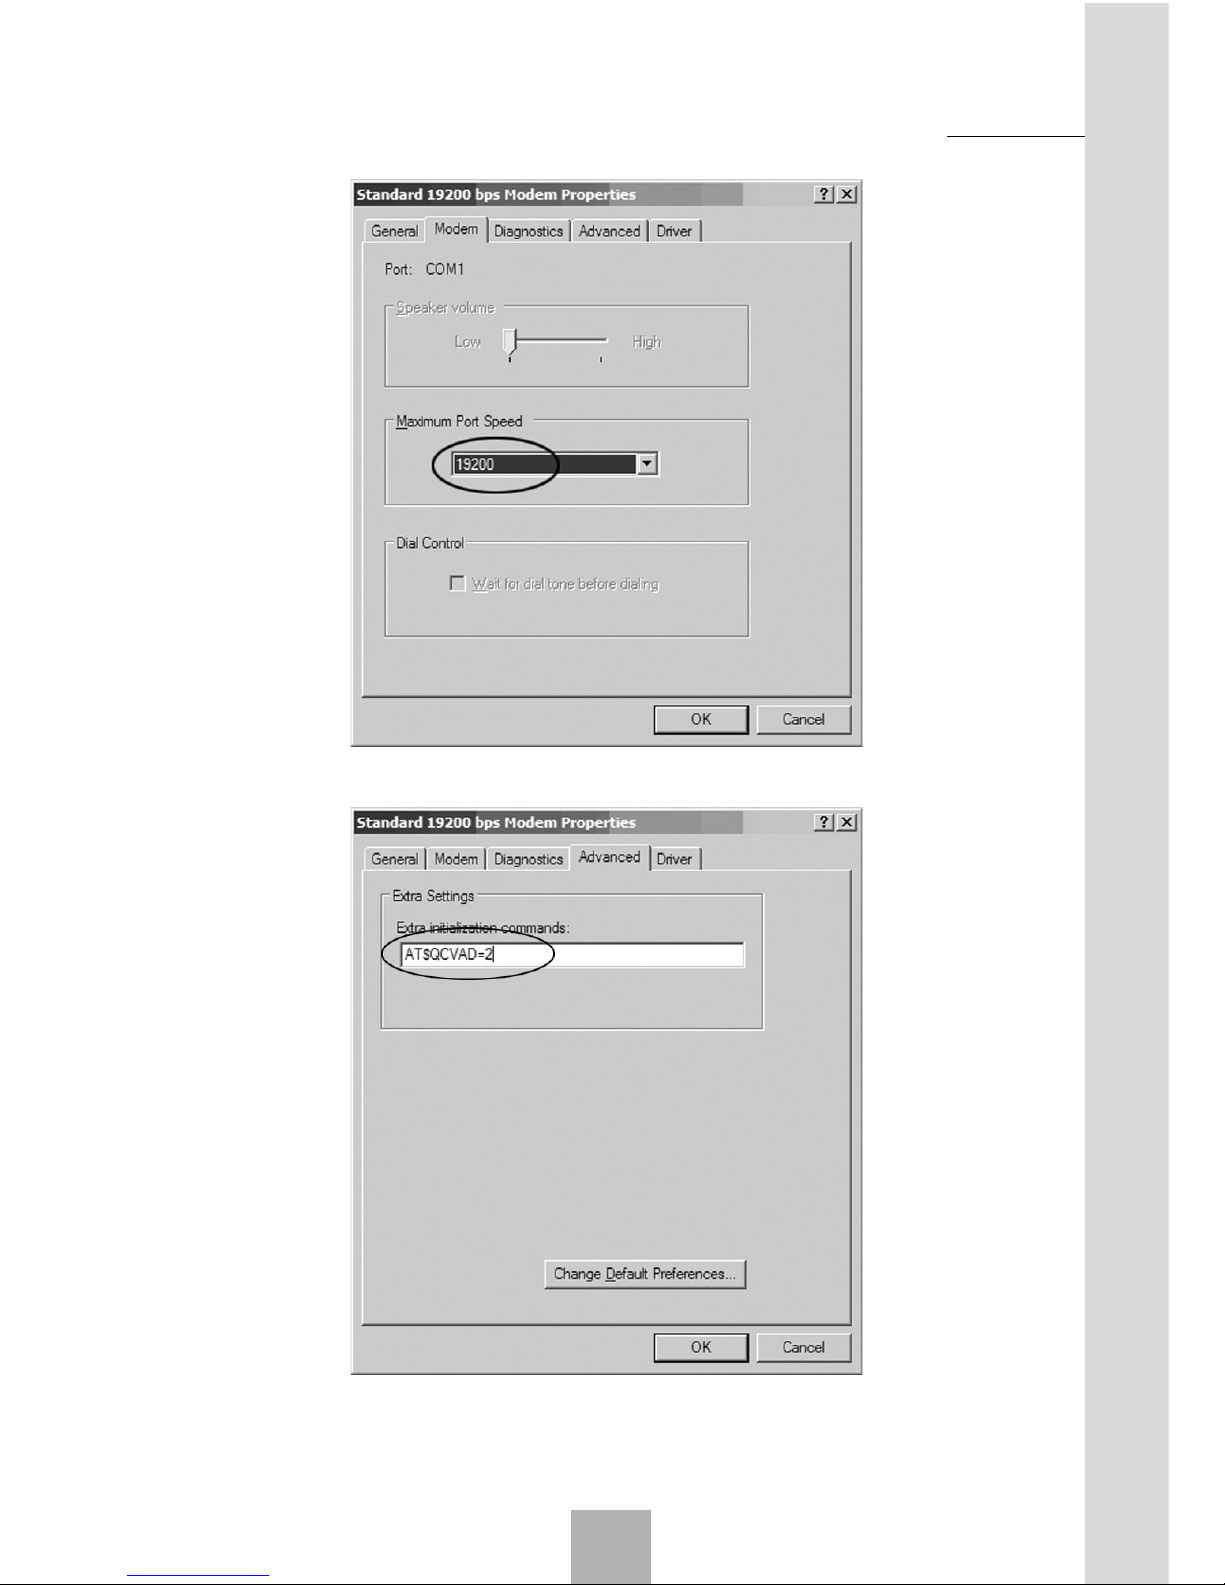
5. Click “Advanced” tab, add “AT$QCVAD=2” to the Extra Settings.
6. Click “OK” to finish.
Fax
7
Page 74
Sharing New Technology With You
74
7.2.3 WINFAX Installation
1. Connect the phone with serial port, make sure it is correctly connected
by the hyper terminal.
2. Software installation: please purchase the software by yourself.
Installation:
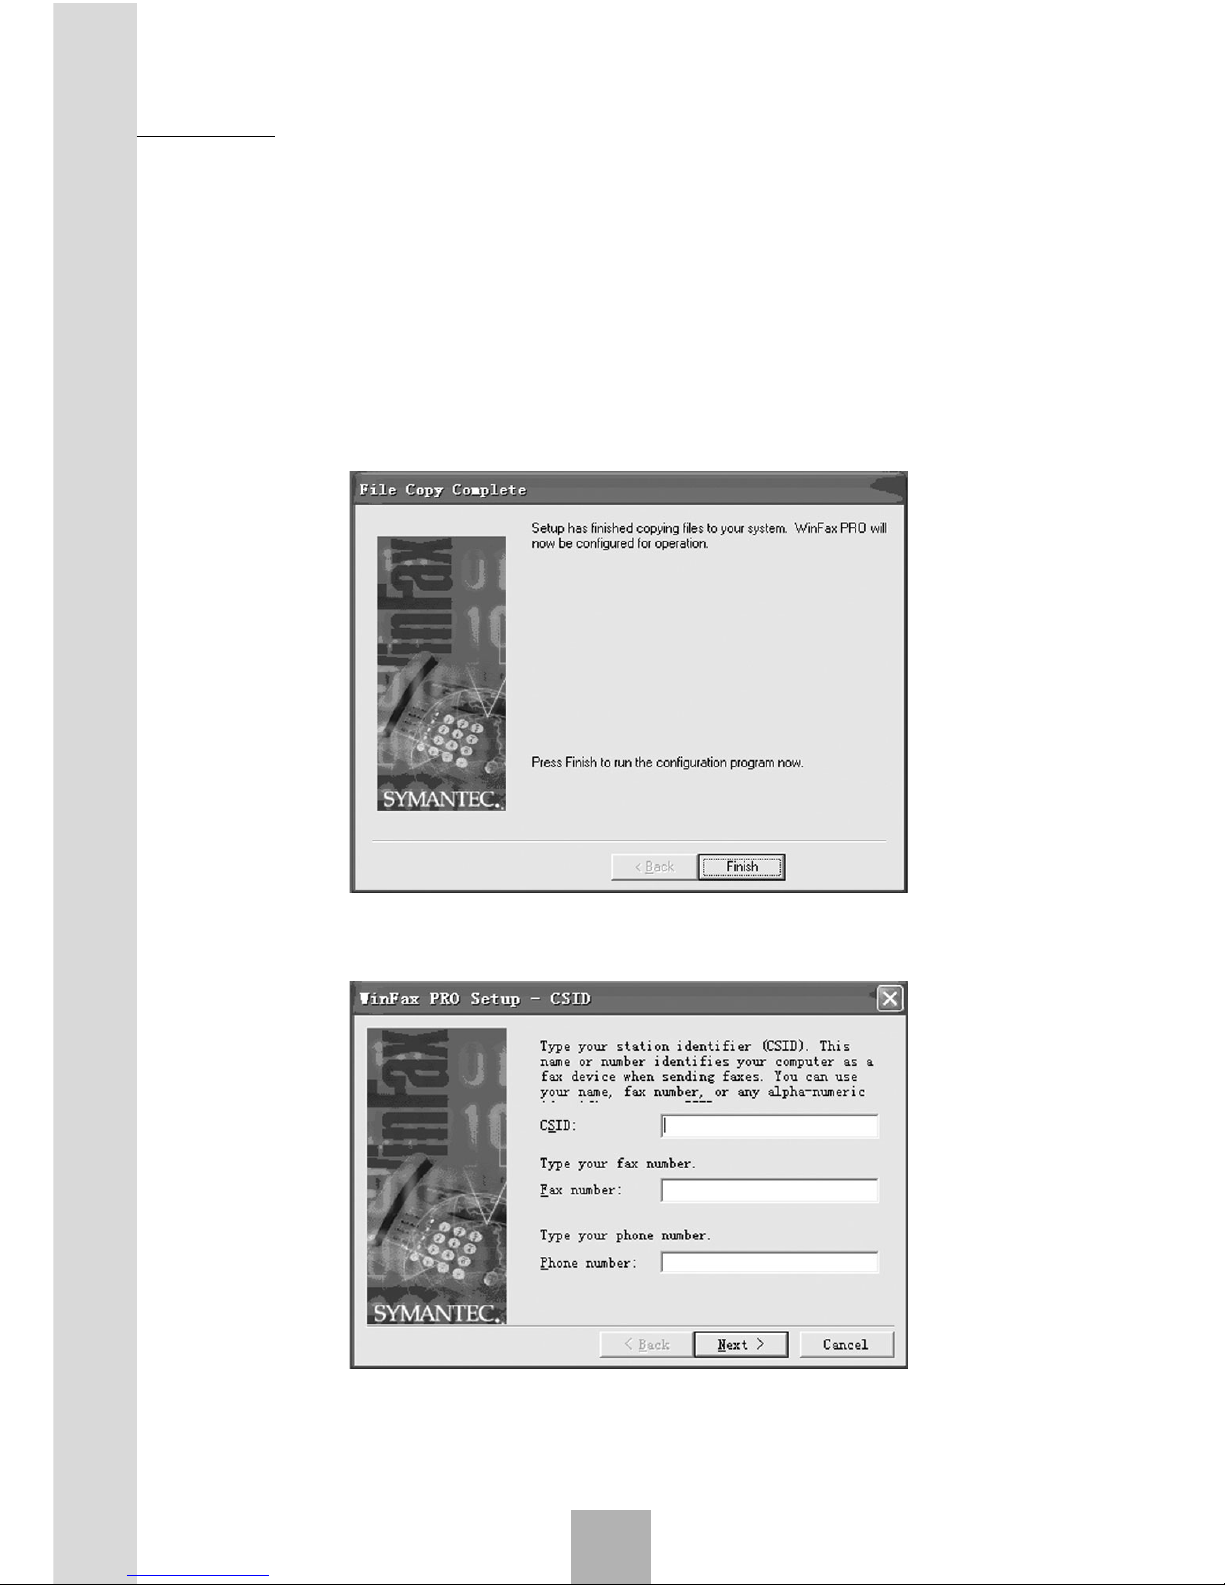
Unzip the software, run “Setup”, click “Next” or “Ok” until the following interface appeared.
3. Click “Finish”.
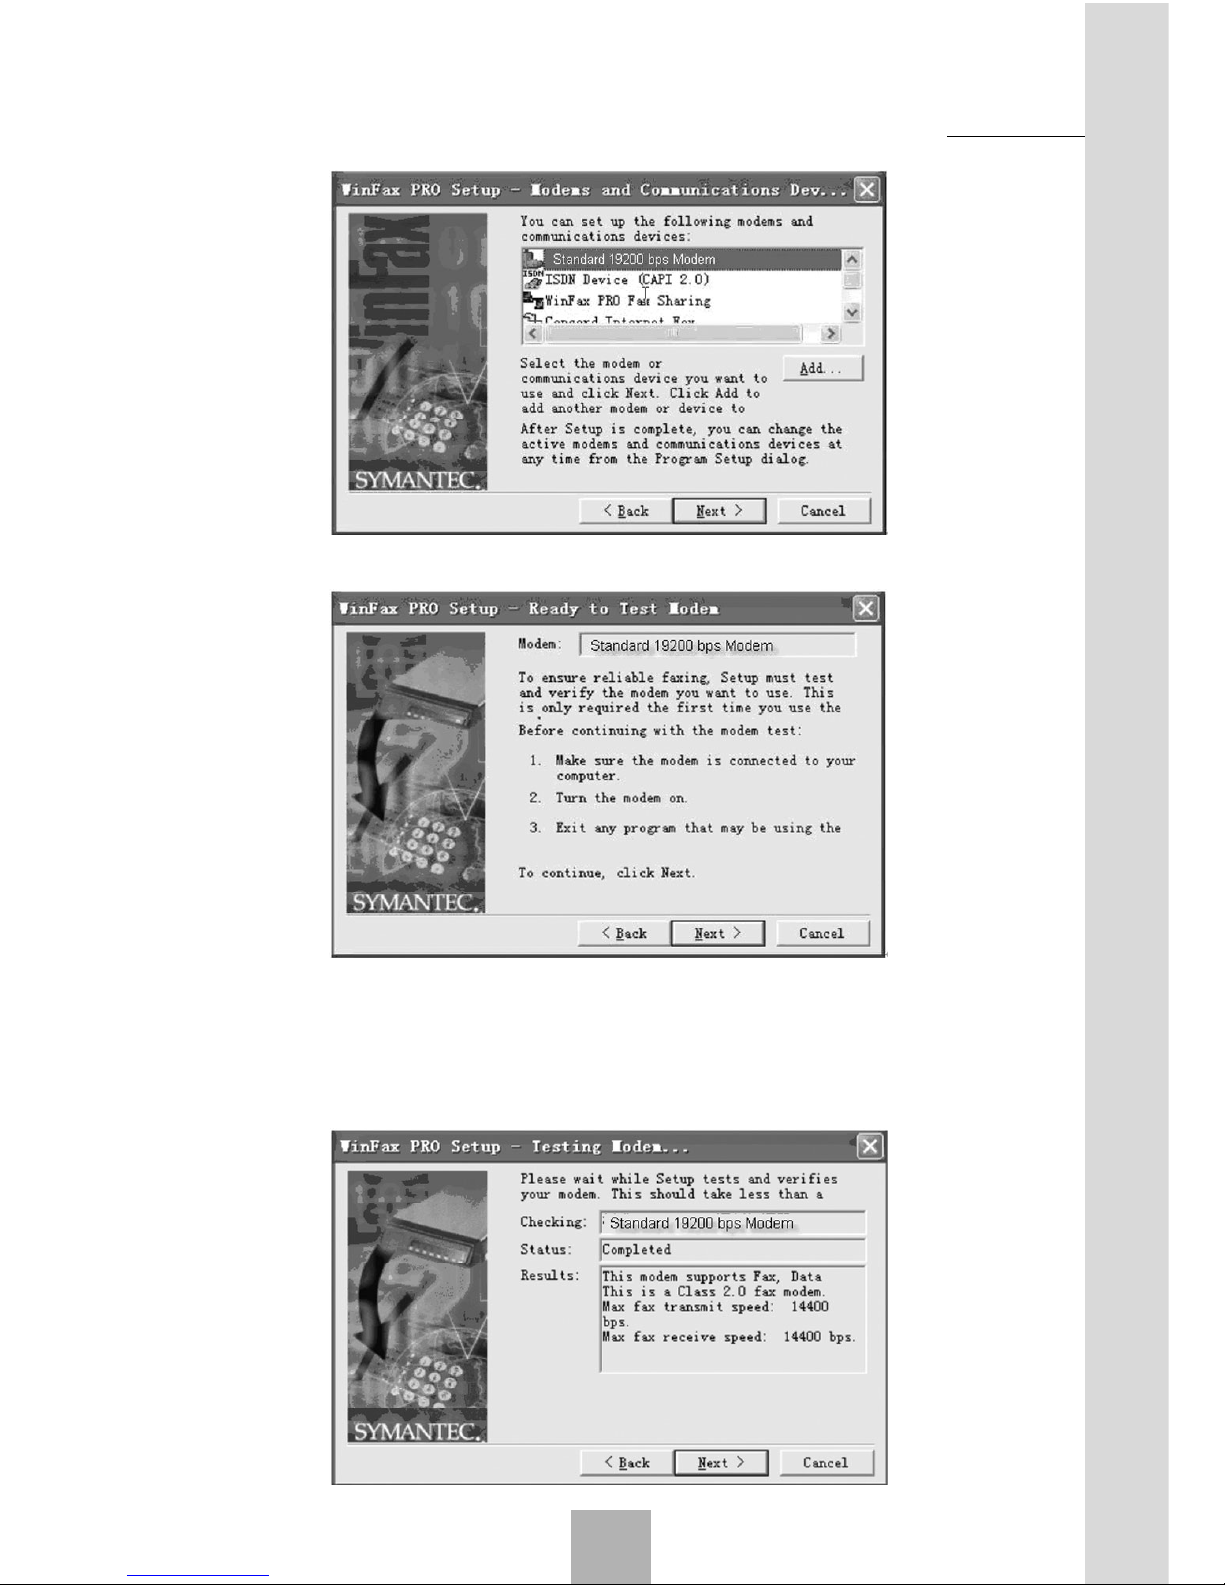
4. Click “Next”, then select “Standard 19200 bps Modem”.
Fax
7
Page 75
75
Sharing New Technology With You
Fax
7
5. Click “Next”.
6. Click “Next”.
WINFAX will communicate with MODEM (wireless fixed phone) to test
whether the MODEM supports fax service. If the modem is detected, the
following page will be displayed:
Page 76
Sharing New Technology With You
76
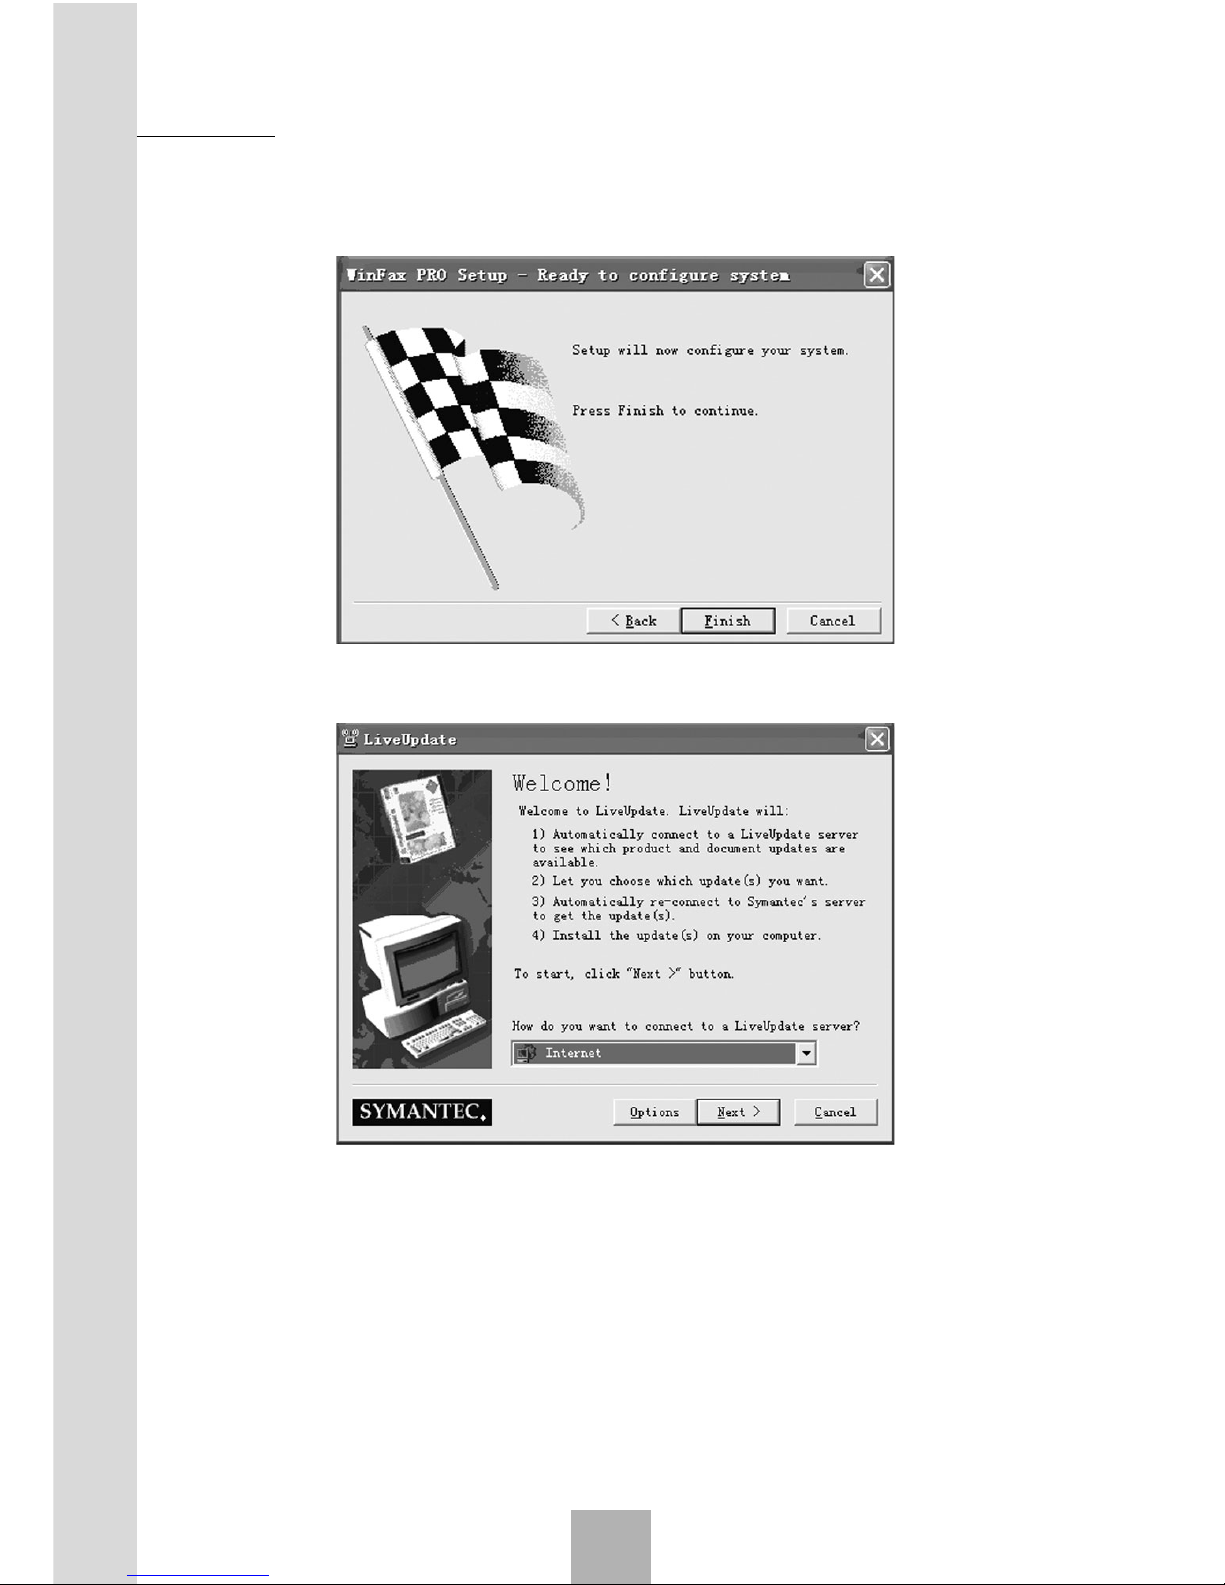
7. Click “Next” to select the default options, repeatedly click “Next” until it
displays as follows:
8. Click “Finish” to select the default options until it displays as follows:
9. Click “Cancel”, it will display “Install finished”.
7.3 How to use WINFAX
1. Connect phone to computer via serial port, and then test whether the
connection is correct. Send ATE1 and AT then press “enter” key on
hyper terminal, if it returns “OK”, send “AT+IPR=19200”. Make sure it
returns OK, otherwise WINFAX cannot communicate with the phone.
2. Set WINFAX
Fax
7
Page 77
77
Sharing New Technology With You
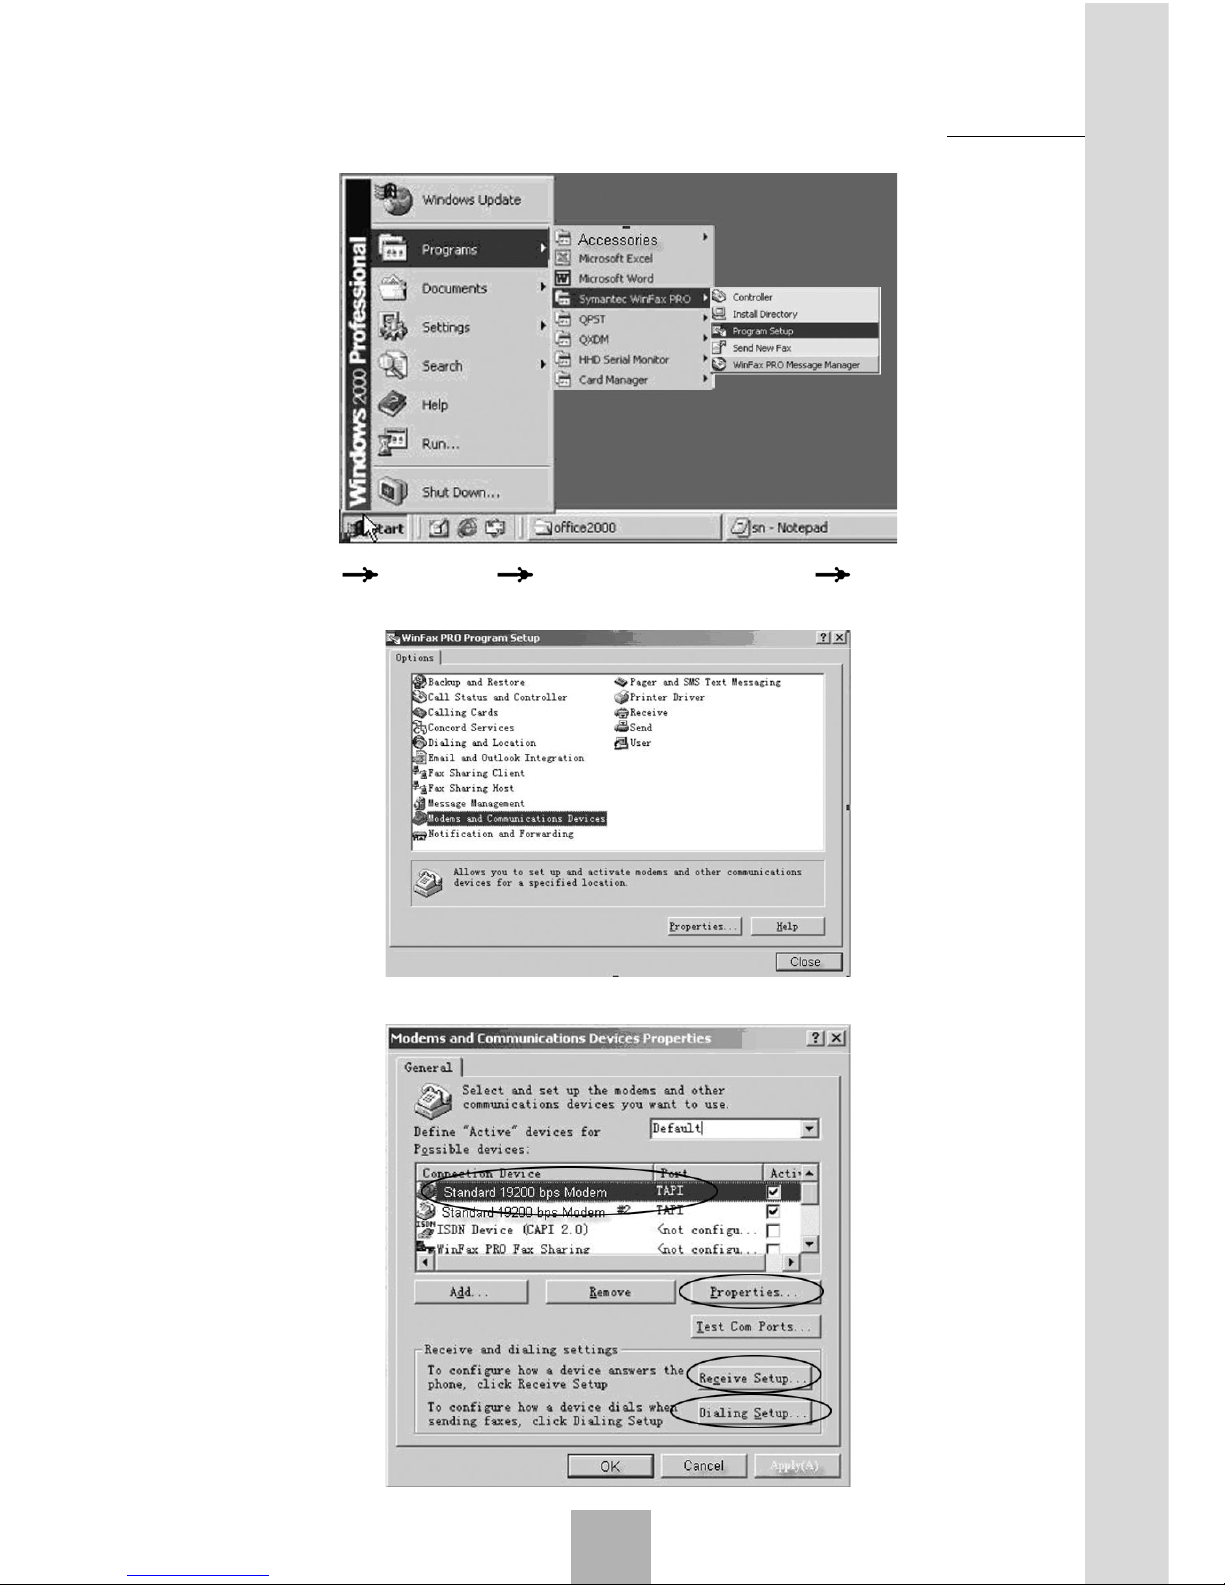
Click Start Programs Symantec WinFax PRO Program Setup
in your computer, It will display as follows:
3. Double-click “Modems and Communications Devices” to select:
Fax
7
Page 78
Sharing New Technology With You
78
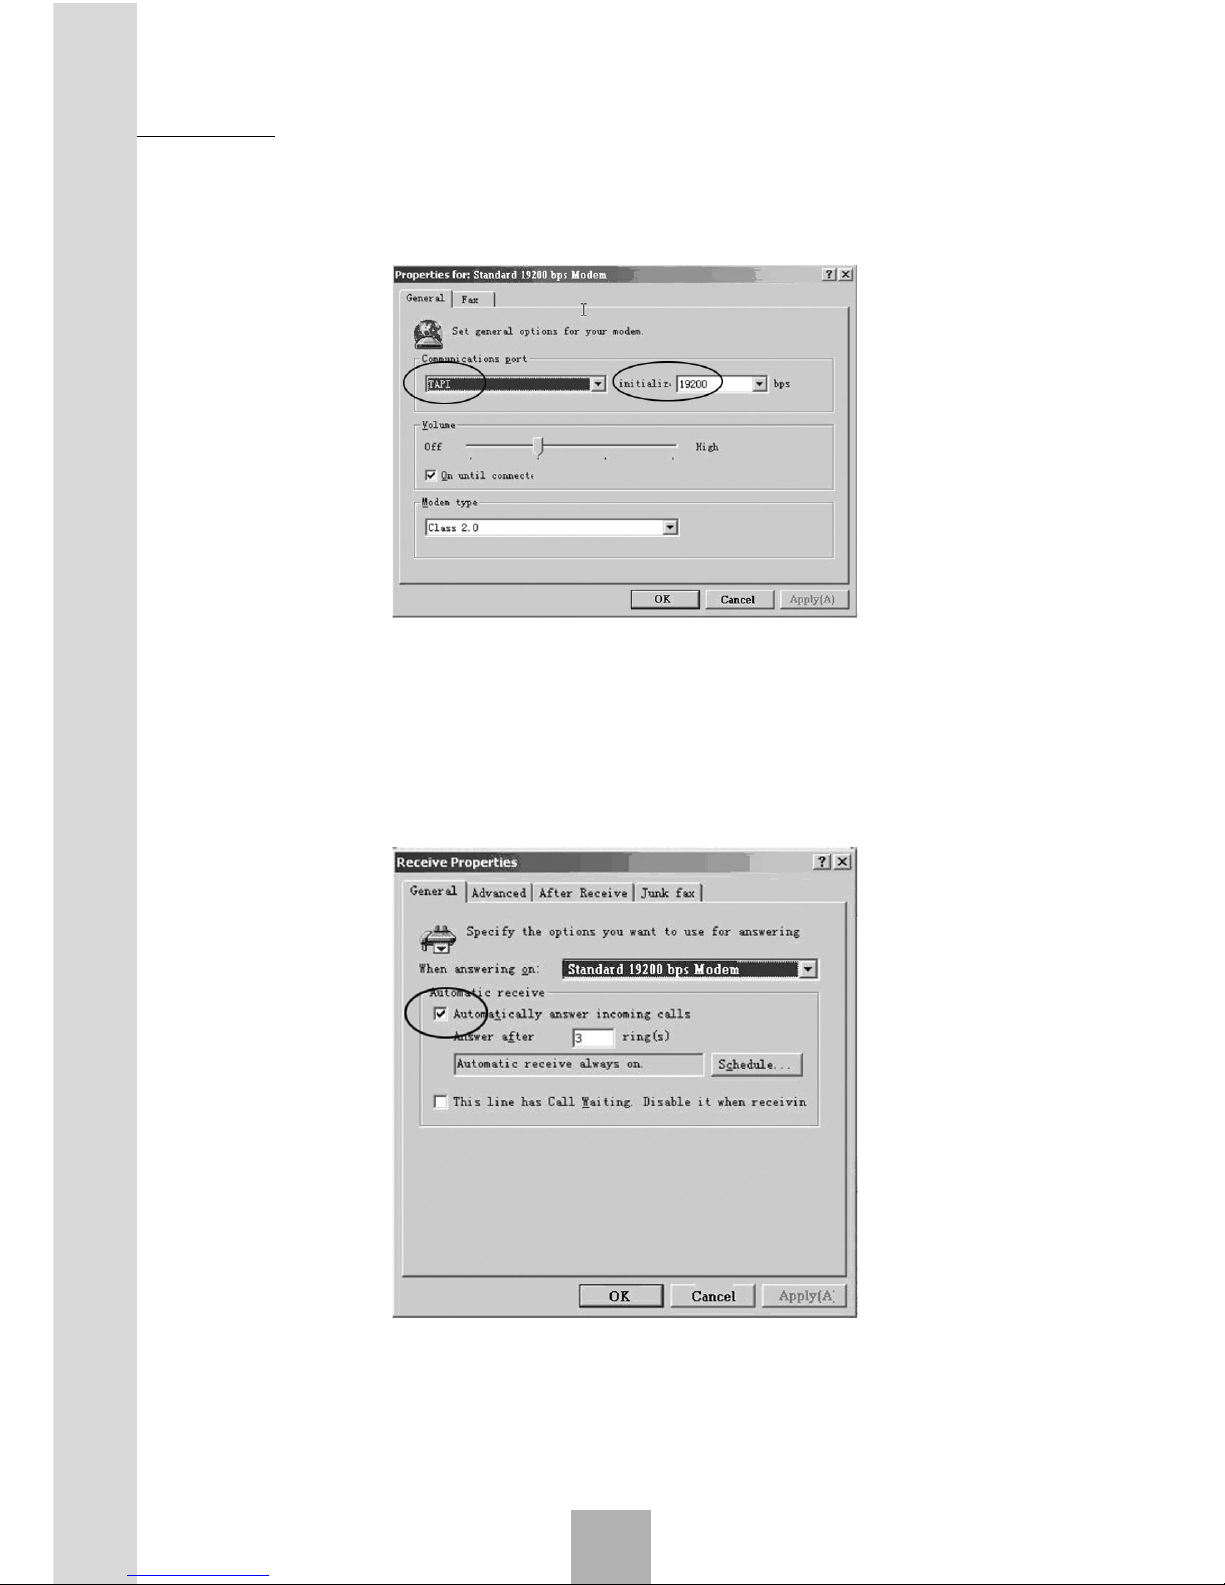
4. If the port for “Standard 19200 bps Modem” is COM1 or COM2, click
“Properties…”:
5. Select “Communications port” as “TAPI”, “initialize” as “19200” bps, click
“OK”.
6. Return to the interface of step 3 “modems and communications devices properties”, select “ Receive setup…” in “General” sheet, select “Automatically answer incoming calls”:
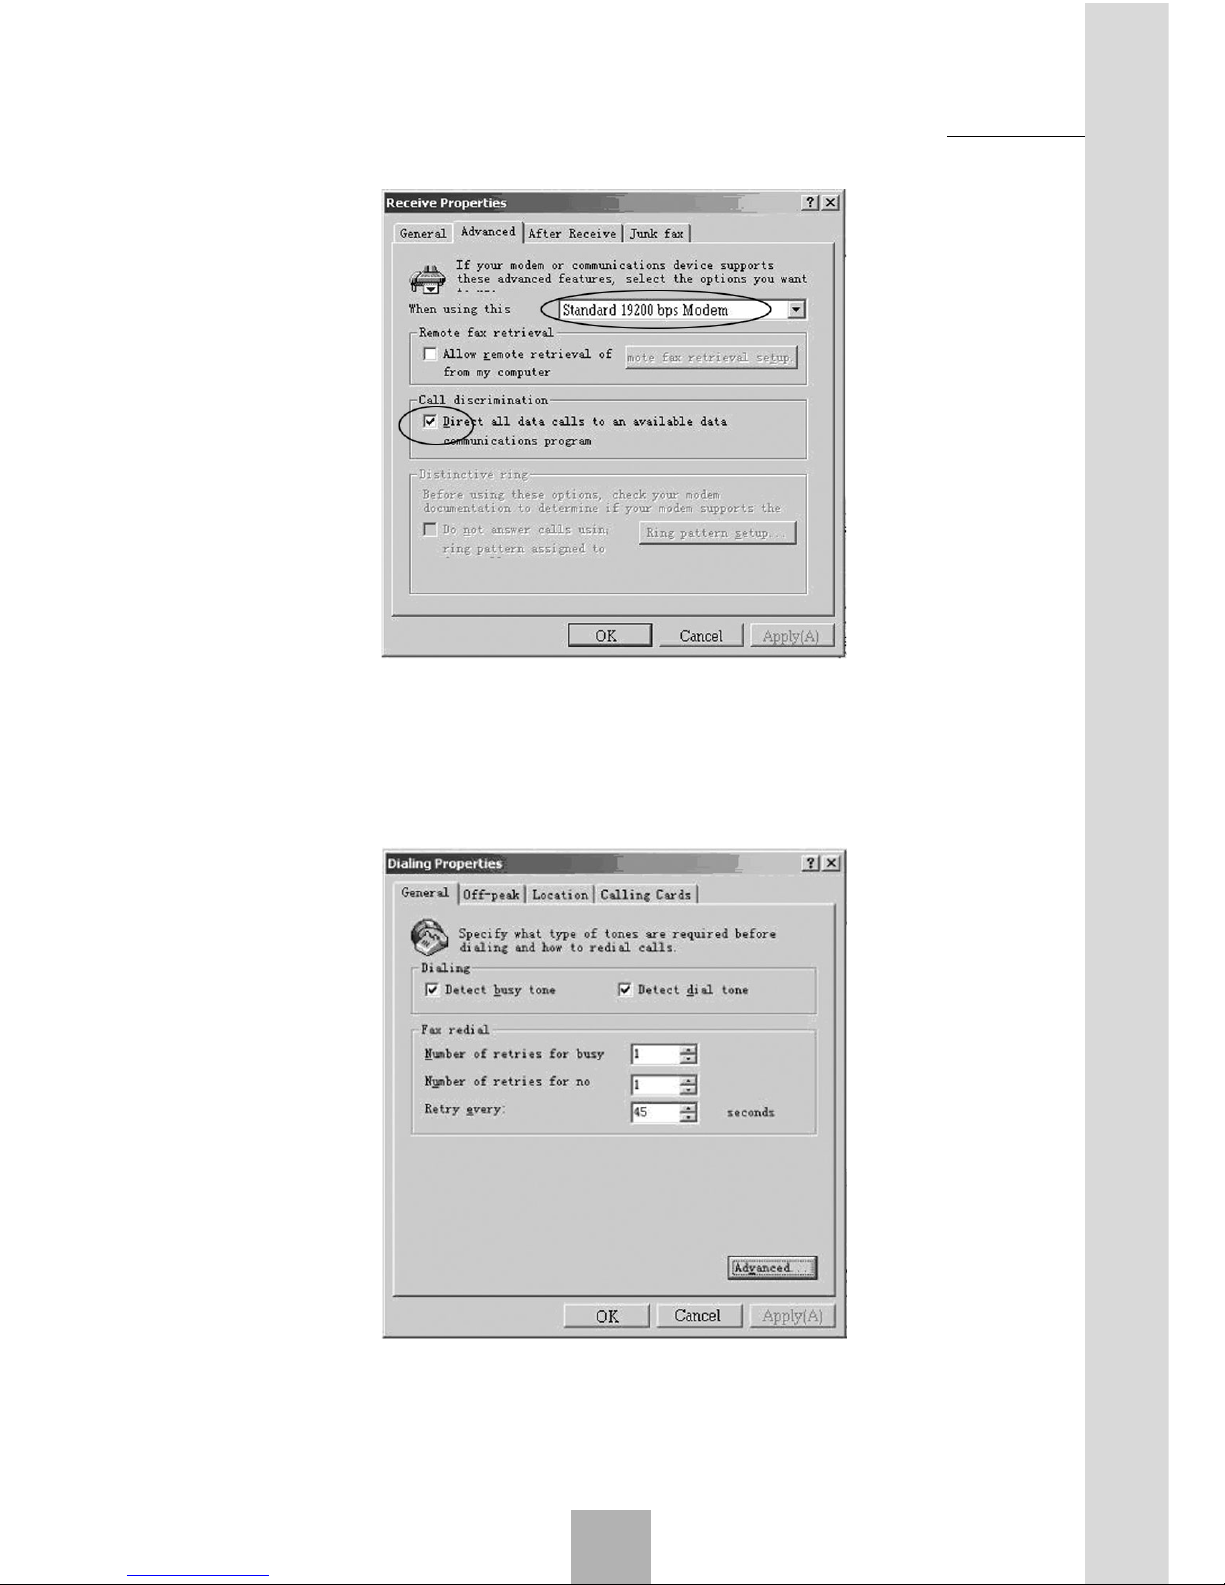
7. In “Advanced” sheet, select modem type, and select “Direct all data
calls to an available data communications program”.
Fax
7
Page 79
79
Sharing New Technology With You
8. Return to the interface of step 3: modems and communications devices
properties, select “Dailing Properties…”, set retry times and interval
after fax failed. It is suggested that retry times are the same as the
pages to be sent, and the interval is set as 20~30 seconds.
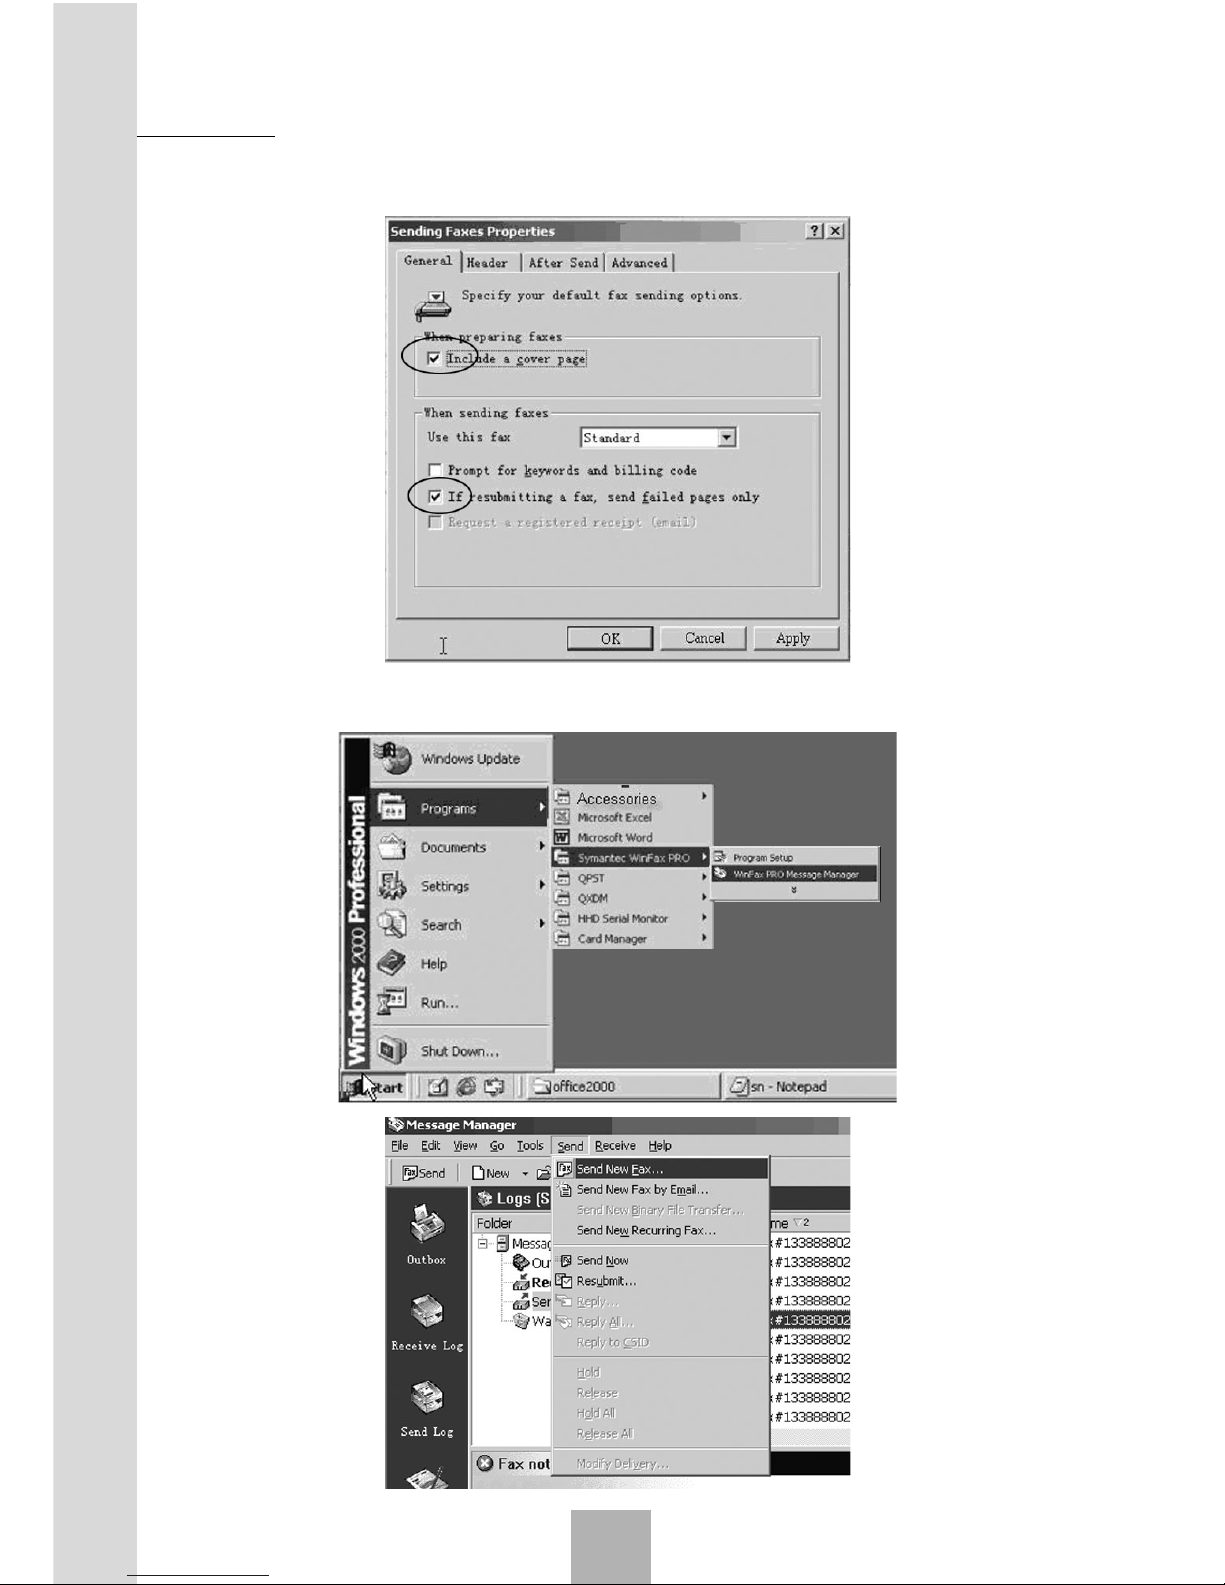
9. Return to the interface of step 2: WINFAX PRO program setup, select
“Send”. Then select “Include a cover page” and “If resubmitting a fax,
Fax
7
Page 80
Sharing New Technology With You
80
send failed page only”. Setting is completed.
10.Begin to send: run the program, select “Send”, then “Send New Fax”.
Fax
7
Page 81
81
Sharing New Technology With You
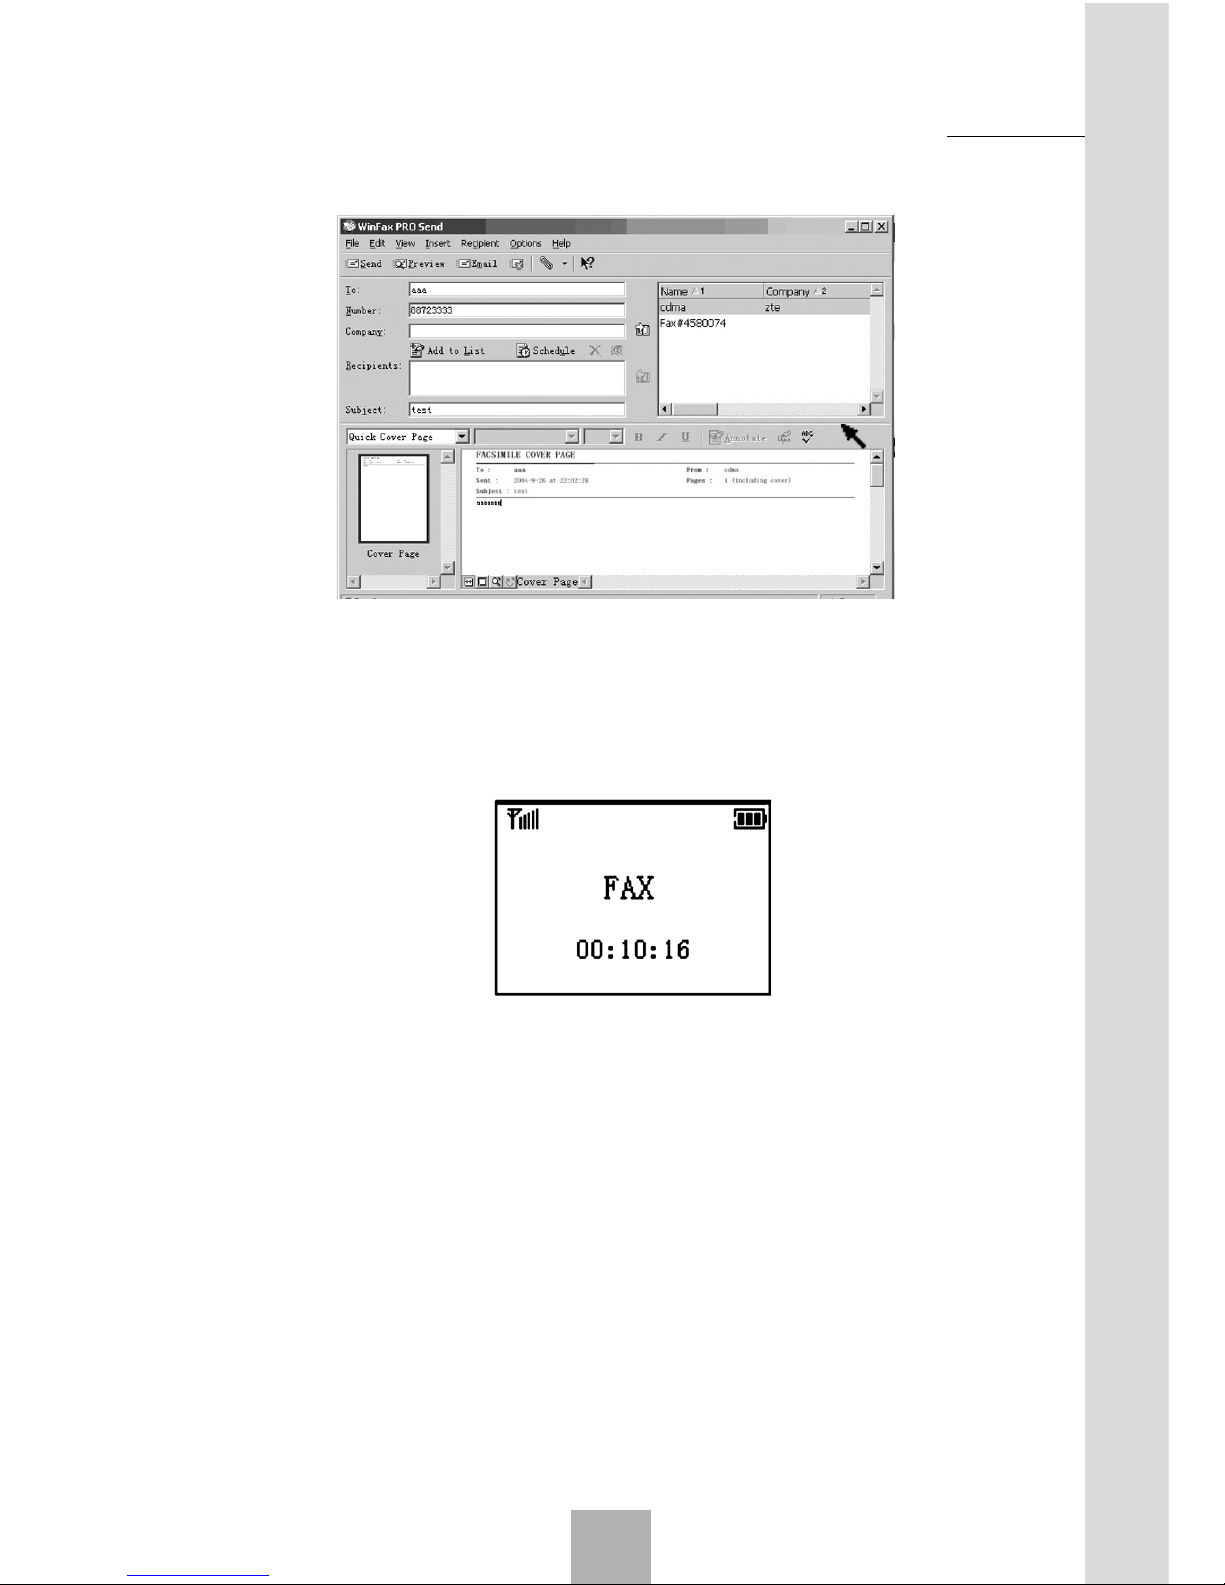
11. Start a new fax, set receiver and number.
This is the cover page. If the text is too long to be fixed in the cover
page, please save the fax as a word file, click “Insert”, select “Files…”,
and select the word file to insert. It will display a dialog box, select “yes”,
and then click “send” after inserting the file.
12.If the fax link is built, the phone will display:
If you want to end the fax while sending or receiving, you can discon-
nect it by WINFAX, or hang up the remote phone.
7.4 Notice
1. It is suggested to use serial port line to connect computer and the phone.
2. The default serial speed of WP805 is 115200 bps; you have to set the
serial speed to 19200 bps with hyper terminal.
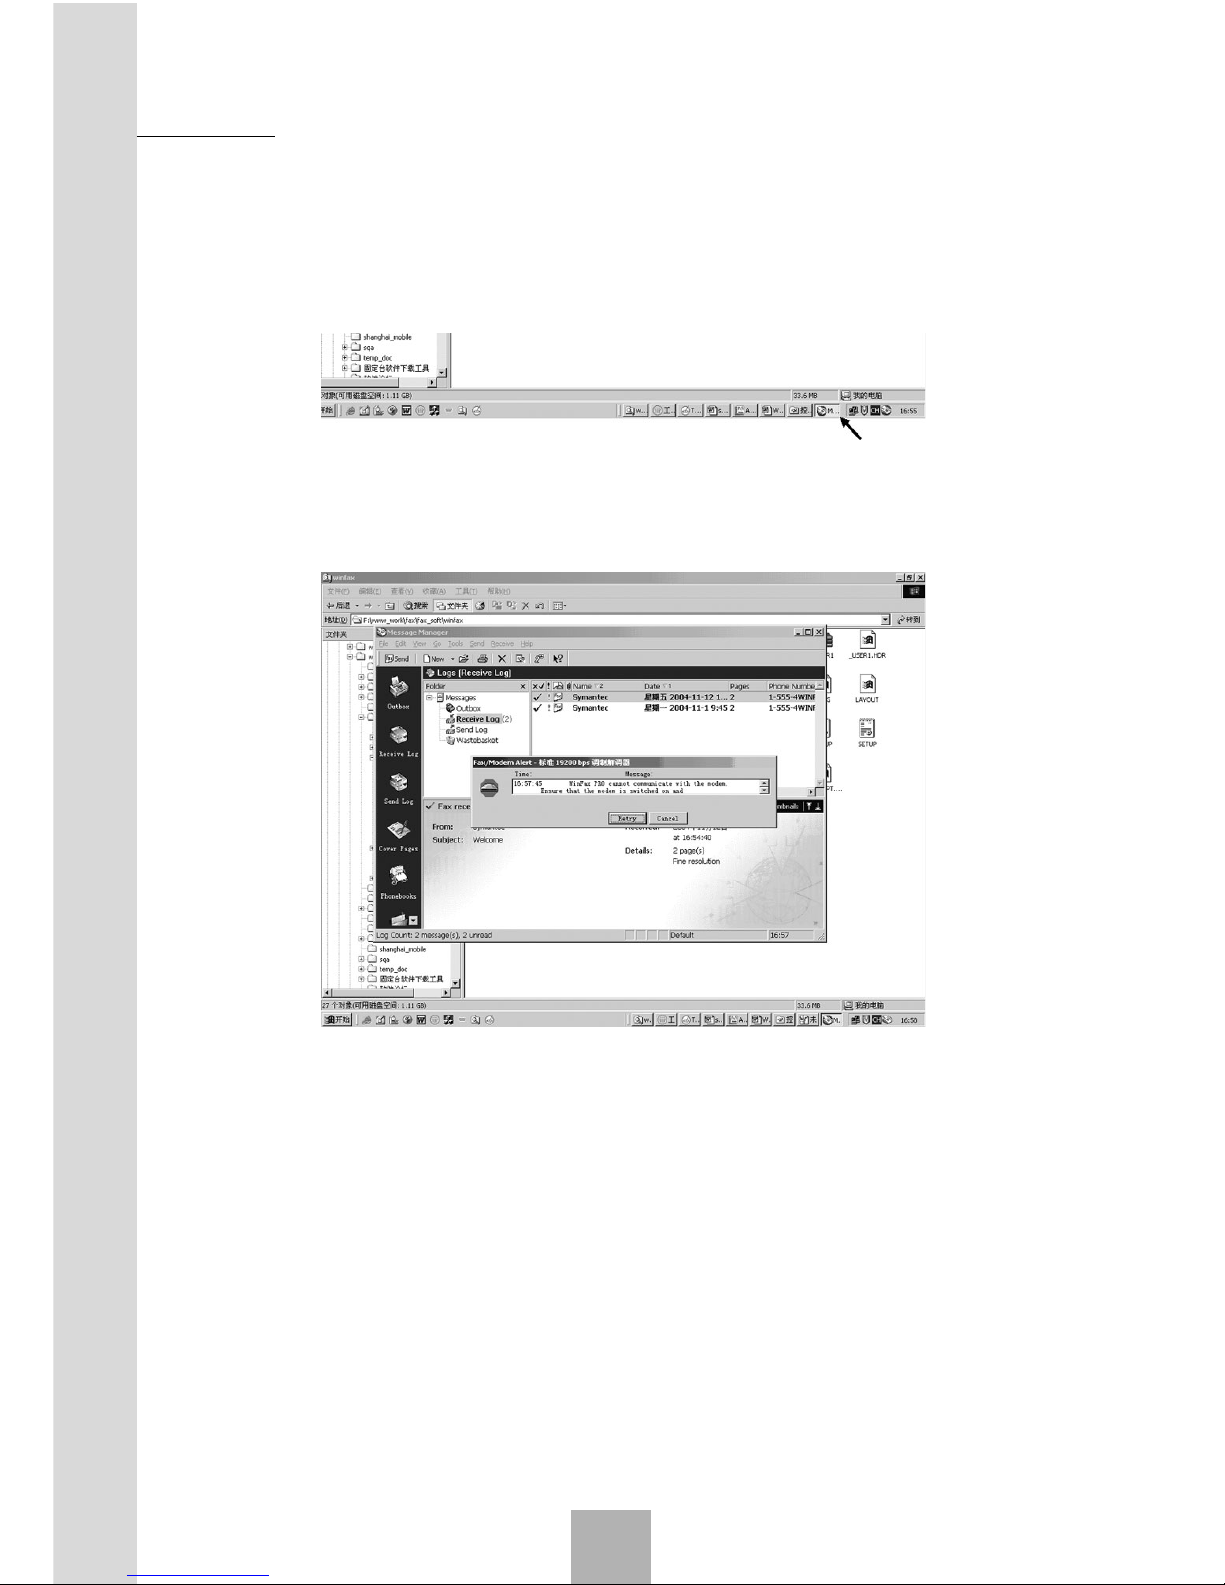
3. After the software is installed, the communication program of this software will test MODEM automatically. If you have not turned on the
WP805 and PC in the right order, it will make a mistake. So you must
run the windows task manager first, and then delete WINFAX MODEM…application.
Fax
7
Page 82
Sharing New Technology With You
82
4. Turn on the WP805, run WINFAX software to start the communicate
program. If the link is built successfully, a yellow printer icon will display
in the lower right corner of the PC screen. The color around the icon is
blue.
If the color around the icon is not blue, it means your PC is communicating with WP805. If you have waited for a long time, a dialog box will
pop up to prompt communication failed.
Now, you should turn off WP805 and exit WINFAX (right click the yellow
printer icon or delete from the windows task manager), then turn on WP805
again, run WINFAX software.
Fax
7
Page 83

83
Sharing New Technology With You
Fault Solution
No dialing tone after off-hook Hook on, and then hook off or press
HANDFREE key
No response in the key sys- Power on and then off once
tem interface (after several
attempts)
Incorrect display of system Check whether the antenna is conntime ected correctly and whether the sys-
tem signal is too weak
No display in the system int- Check whether the battery has elecerface after disconnecting tricity, or check whether the battery
the external power source is damaged, or power on the phone
again
No display in the system int- Check whether the power source is
erface after power-on well connected, or check whether
the battery has electricity, and then
connect the power source or battery
reliably
Display of “Not in the qualif- The phone currently is not in the seied service area” rvice area qualified by the network
service provider via NMS. Please
contact the network service provider.
No response or incorrect re- There may be problems with the nesponse of the system after twork, please make another attempt;
pressing CALL/REDIAL or you must have set an incorrect IP
key when making a call number, local area number or NMC
number, etc., by yourself. Please co-
ntact the network service provider.
Unable to send the number Check whether you have hooked off
after pressing CALL/RED- (Note: Be sure to hook off before
IAL key sending the number when making a
call.)
Troubleshooting
8
Page 84
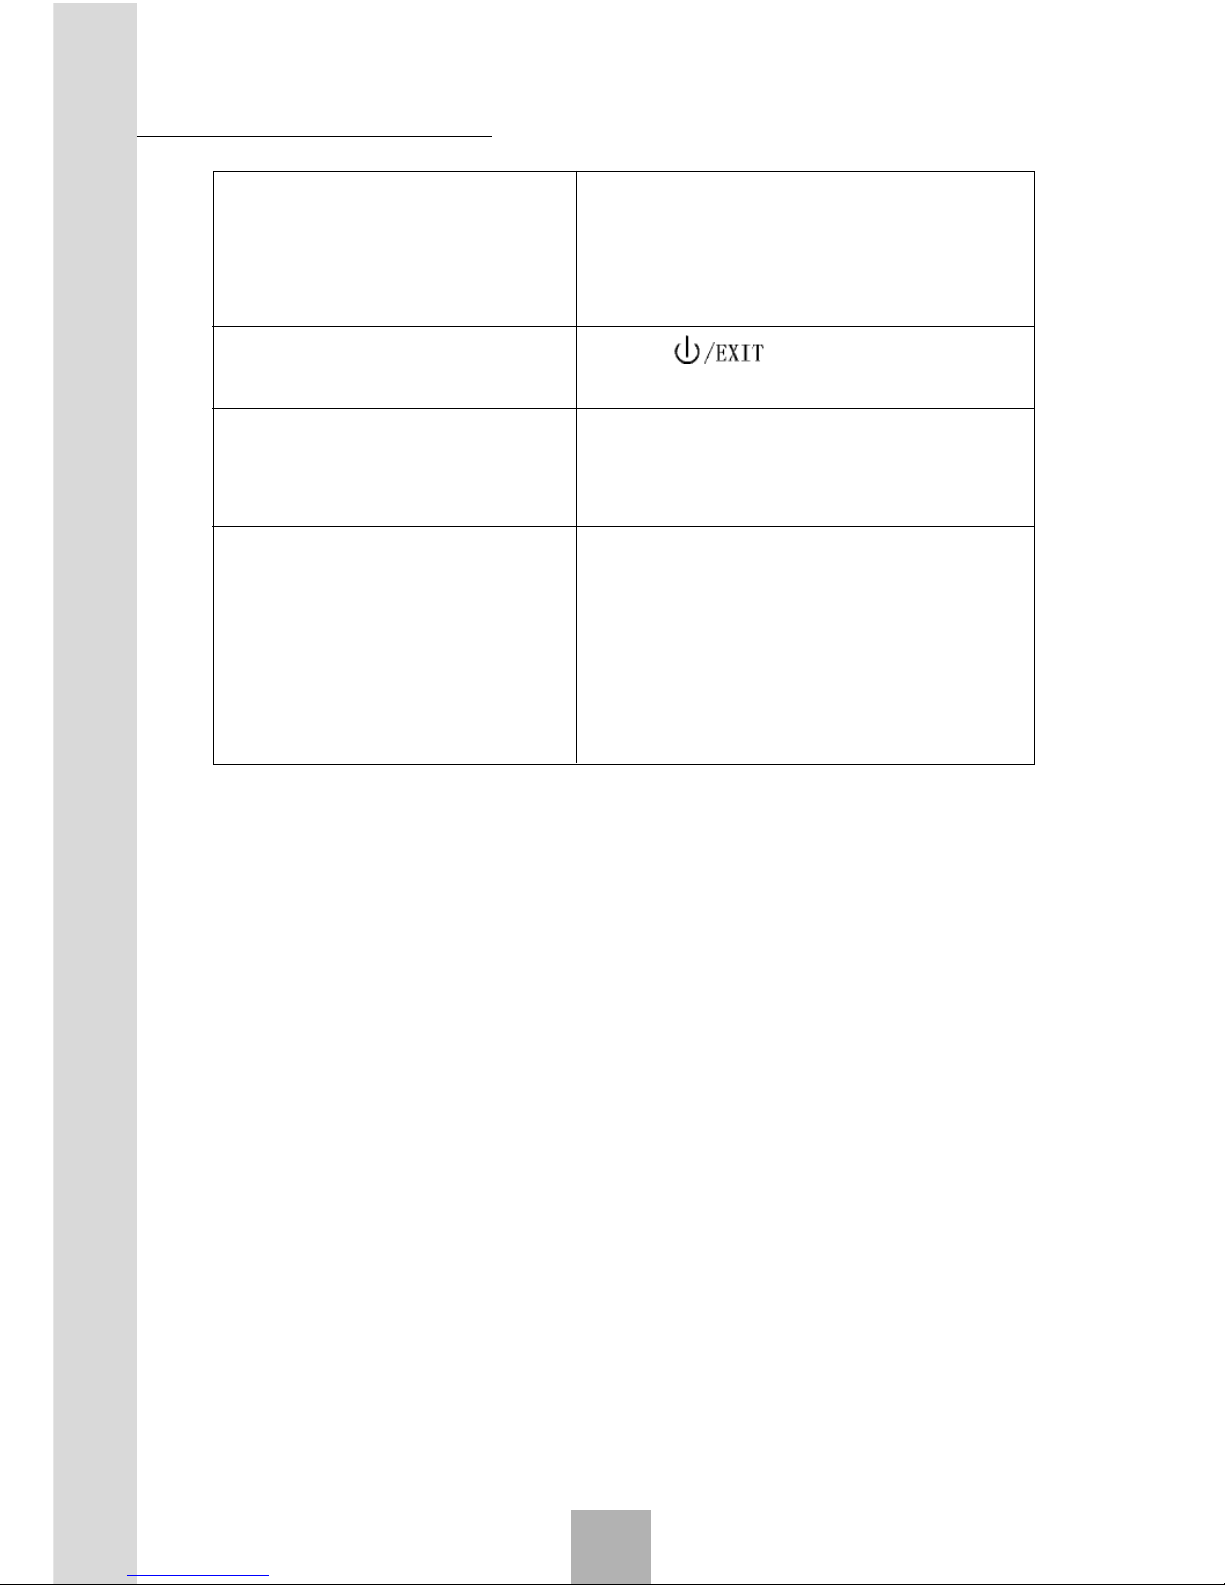
Sharing New Technology With You
84
The system stops sending Hook on, and then hook off to make
dialing tone and returns to a call
the main interface 20 seconds after hook-off
No response of key press Press key to return to the
after you end making a call. idle state
The hyper terminal do not Restart the computer
return “OK” when connecting to the Internet
Other abnormalities First refer to the User Manual, and
then check whether the parts such
as power source and antenna are
correctly connected. If there are no
such problems, power off and then
power on the phone again.
Troubleshooting
8
 Loading...