

Page 1

1
ZTE WP623
GSM Wireless Phone
User Manual
Page 2

2
Copyright © 2008 by ZTE Corporation
All rights reserved.
No part of this publication may be excerpted, reproduced, translated
or utilized in any form or by any means, electronic or mechanical,
including photocopying and microfilm, without the prior written
permission of ZTE Corporation.
The manual is published by ZTE Corporation. We reserve the right
to make modifications on print errors or update specifications without
prior notice.
Edition: 1
st
edition, Jan. 2008
Page 3

3
Contents
1 General Information..............................................................6
1.1 Welcome...................................................................................... 6
1.2 Security........................................................................................ 6
1.3 For Your Safety ........................................................................... 6
1.4 Cleaning and Maintenance.......................................................... 9
1.5 Limit Warranty ............................................................................. 9
1.6 Limitation of Liability .................................................................... 9
2 Getting Started.................................................................... 11
2.1 Configuration ............................................................................. 11
2.2 Technical Specifications............................................................ 11
2.3 Key Instruction........................................................................... 13
2.4 LCD Screen Description ............................................................ 14
2.5 Installation ................................................................................. 14
2.5.1 Receiver............................................................................. 14
2.5.2 Antenna.............................................................................. 15
2.5.3 Adapter .............................................................................. 15
2.5.4 Power Supply..................................................................... 15
2.6 Switching Power ........................................................................ 15
2.6.1 Power-on ........................................................................... 15
2.6.2 Power-off............................................................................ 16
2.7 About SIM Card ......................................................................... 16
2.7.1 SIM Card............................................................................ 16
2.7.2 Usage of SIM Card ............................................................ 16
2.8 Connecting to Network .............................................................. 16
2.8.1 PIN Code and Phone Lock Code....................................... 16
2.8.2 Connecting the Network .................................................... 17
3 Basic Operations ................................................................18
3.1 Making a Call............................................................................. 18
3.1.1 Making a Domestic Call ..................................................... 18
3.1.2 Making an International Call .............................................. 18
3.1.3 Dialing a Number in the List............................................... 19
3.1.4 Hand-free........................................................................... 19
3.1.5 Redialing............................................................................ 19
3.2 Answering a Call........................................................................ 20
3.3 Call Information ......................................................................... 20
3.4 During a Call.............................................................................. 20
3.5 Menu Functions ......................................................................... 20
4 Messages ............................................................................22
Page 4

4
4.1 New Message............................................................................ 22
4.2 Creating Message ..................................................................... 22
4.3 Inbox.......................................................................................... 23
4.4 Outbox ....................................................................................... 23
4.5 Preformatted Message .............................................................. 23
4.6 Message Settings ...................................................................... 23
5 Phone Menus ......................................................................25
5.1 Viewing Calls ............................................................................. 25
5.2 Calls Duration ............................................................................ 25
5.3 Diverting Calls ........................................................................... 26
5.4 Calls Firewall ............................................................................. 26
6 Settings ...............................................................................28
6.1 Phone Settings .......................................................................... 28
6.1.1 Language........................................................................... 28
6.1.2 Own Number...................................................................... 28
6.1.3 Fastkey Settings ................................................................ 28
6.2 Display Settings......................................................................... 28
6.3 Audio Settings ........................................................................... 29
6.4 Clock Settings............................................................................ 29
6.5 Call Settings .............................................................................. 29
6.5.1 Minute Minder .................................................................... 29
6.5.2 Call Waiting........................................................................ 29
6.6 Network Settings ....................................................................... 30
6.7 Security Settings........................................................................ 30
6.8 Factory Settings......................................................................... 31
7 Toolkit..................................................................................32
7.1 Set Alarm................................................................................... 32
7.1.1 Normal Alarm..................................................................... 32
7.1.2 Daily Alarm......................................................................... 32
7.2 Show Alarm ............................................................................... 32
8 Contacts in Names..............................................................33
8.1 About Names............................................................................. 33
8.2 Adding New Name..................................................................... 33
8.3 Viewing all Names ..................................................................... 34
8.4 Searching Names ...................................................................... 34
8.5 Editing Names ........................................................................... 35
8.6 Deleting Names ......................................................................... 35
8.7 Setting Names ........................................................................... 35
8.8 Batch Operation......................................................................... 35
9 Text Input.............................................................................37
Page 5

5
9.1 Multitap Input ............................................................................. 38
9.2 Numbers Input ........................................................................... 38
9.3 eZiText Input.............................................................................. 38
9.4 Symbols Input............................................................................ 38
10 Troubleshooting................................................................39
Page 6

6
1 General Information
1.1 Welcome
Thank you for choosing ZTE WP623 GSM Wireless Phone (hereinafter
referred to as "phone"). To guarantee your phone always works in its
best condition, please read this manual carefully and keep it for future
use.
The pictures, symbols and contents in this manual are just for your
reference. They might not be completely identical with your phone.
Please subject to the material object. ZTE operates a policy of
continuous development, and reserves the right to update the technical
specifications in this manual at any time without prior notice.
1.2 Security
If your phone is lost or stolen, please report to your service
provider or agencies of banning the use of your lost SIM card and
phone.
To prevent your phone from illegal use, please take the security
measures as follows:
¾ Set PIN code of the SIM card.
¾ Set password of the phone.
¾ Set Incoming Call Bar.
1.3 For Your Safety
To t he Ow ner
Some electronic devices are susceptible to electromagnetic
interference sent by phone if inadequately shielded. Please use
phone at least 20 cm or as far away as you can from TV set, radio
and other automated office equipment so as to avoid
electromagnetic interference.
Operating phone may interfere with medical devices like hearing
aides and pacemakers, or other medical devices in hospital.
Consult a physician or the manufacturer of the medical device
before using phone.
The phone with external antenna has been tested for compliance
with FCC RF Exposure (SAR) limits and is complied with FCC RF
exposure compliance requirements.
Be aware of the usage limitation when using phone at places such
as oil warehouses, or chemical factories, where there are
Page 7

7
explosive gases or explosive products being processed, because
even if your phone is in idle state, it still transmits radio frequency
(RF) energy. Therefore, power off your phone if required.
Do not touch the antenna while calling. Otherwise it will affect the
quality of calling and waste battery energy. The damaged antenna
will cause slight burn while touching your skin.
Keep phone out of the reach of small children. Phone may cause
injury if used as a toy.
Do not put other things on the terminal to avoid overlaying radiator.
Keep the antenna free from obstructions and position the antenna
straight up. This will ensure best call quality.
The phone complies with part 15 of the FCC Rules. Operation is
subject to the following two conditions:
(1) The phone may not cause harmful interference, and (2) the
phone must accept any interference received, including interference
that may cause undesired operation.
Phone Use
Please use original accessories or accessories that are authorized
by the manufacturer. Using any unauthorized accessories may
affect your phone’s performance, and violate related national
regulations about telecom terminals, or even endanger your body.
As your phone can produce electromagnetic field, do not place it
near magnetic items such as computer disks.
Do not expose your phone to direct sunlight or store it in hot areas.
High temperatures can shorten the life of electronic devices.
Prevent liquid from leaking into your phone.
Do not use your phone during thunderstorm.
Unplug the external power adapter or remove battery when your
phone is not in use, esp. for a long period of time.
It is highly recommended to charge the battery before initial use.
The battery might have been discharged during storage and
delivery.
Do not unplug the connector of the data cable from phone, and not
install or remove battery, when the power is on.
Keep phone power on and in service area when make emergency
call. Enter emergency call number in status of standby (press
MENU/SELECT key and then enter Phone lock code to Unlock
the phone in Emergency mode when Phone Lock is ON), and then
Page 8

8
press CALL/REDIAL key
to send.
Do not attempt to disassemble the phone by yourself. Non-expert
handling of the devices may damage them.
Do not attempt to disassemble the mobile phone and battery by
yourself. Changes and modifications made to the phone without
the approval of manufacturer could void your authority to operate
this phone.
Battery Using
The battery and the phone are separately deposited in the
package and packed in well condition. Please make use of the
battery carefully following the instructions.
Do not short-circuit the battery, as this can cause excessive heat
and fire.
Do not store battery in hot areas or dispose of it in a fire to avoid
explosion.
Never use any charger or battery damaged or worn out.
Return the wear-out battery to the provider or put it in the
appointed recycle place. Do not put it in familial rubbish.
Warning: If the battery is broken, keep away from content. If it
taints your skin, wash your skin with abundant fresh water and ask
doctor for help if necessary.
Safety and General Using in Vehicles
Before making or answering a call, you should pay attention to
the local laws about using wireless phones and take them into
account in practical use.
Safety airbag, brake, speed control system and oil eject system
shouldn’t be affected by wireless transmitting. If you do meet
problems above, please contact your automobile provider.
Please power off your phone when refueling your automobile, and
so do the place where duplex wireless equipments are banned.
Don’t put your phone together with flammable or explosive items,
inner spark may cause fire.
In Aircraft
Follow the restrictions in aircraft. Wireless devices can cause
interference in aircraft.
Please power off your phone before taking off till landing. In order
to protect airplane’s communication system from interference, it is
never allowed to use phone when it is in flight. Using phone before
Page 9

9
the plane taking off should get aircrew’s permission according to
safety regulations.
1.4 Cleaning and Maintenance
The phone is non-waterproof, please keep it dry and store in
shady and cool place.
If you want to clean your phone, please use clean fabric that is a
bit wet or anti-static. Do not use harsh chemical cleaning solvents
or strong detergents to clean your phone, such as alcohol, dilution
agent and benzene. Power-off your phone before you clean it.
Use phone within a temperature range of -10 ℃ ~ + 55℃ and a
humidity Less than 95%.
1.5 Limit Warranty
The warranty does not apply to defects or errors in the product caused
by:
(a) Reasonable abrasion.
(b) Misuse including mishandling, physical damage,
improper installation, unauthorized disassembly of the product.
(c) Water or any other liquid damage.
(d) Any unauthorized repair or modification.
(e) Power surges, lightning damage, fire, flood or other
events outside ZTE’s reasonable control.
(f) Use of the product with any unauthorized third party
products such as generic chargers.
(g) Any other cause beyond the range of normal usage
for Products.
End User shall have no right to reject, return, or receive a refund for any
Product from ZTE under the above-mentioned situations.
This warranty is end user’s sole remedy and ZTE’s sole liability for
defective or nonconforming items, and is in lieu of all other warranties,
expressed, implied or statutory, including but not limited to the implied
warranties of merchantability and fitness for a particular purpose,
unless otherwise required under the mandatory provisions of the law.
1.6 Limitation of Liability
ZTE shall not be liable for any loss of profits or indirect, special,
incidental or consequential damages resulting from or arising out of or
in connection with using this product, whether or not ZTE had been
Page 10

10
advised, knew or should have known the possibility of such damages.
Page 11

11
2 Getting Started
2.1 Configuration
Parts Quantity
Phone set 1
Handset (Receiver) 1
Ni-MH battery 1
External power adapter 1
Antenna 1
Phone Receiver Cord 1
2.2 Technical Specifications
Phone set
Type WP623
Dimensions (Length×Width×Thickness)
200mm×170mm×77mm
Weight About 870g (Battery Included)
Battery
Continuous
standby time
Above 72h (Subject to Network)
Continuous
talk time
Above 3h (Subject to Network)
Frequency Range:
GSM850 869-894MHz
PCS1900 1930-1990MHz
Page 12

12
z External Interface:
(1) Antenna connector ANT
(2) Data interface DATA (used for programming the phone;
not used for GPRS)
(3) External power socket
(4) Battery switch BATT
z Power Supply:100V-240V( AC) 50/60Hz
Please refer to the real objects for other relative parameters about the
battery and charger.
Page 13

13
2.3 Key Instruction
Key Description
MENU/SELECT
key
Enter main Menu, select or confirm options
in Menu and left bottom submenu on the
display.
In condition of character input, confirm the
character chosen.
CLR/BACK key
Enter right bottom submenu on the display.
Press CLR key to erase character while
editing or dialing. Hold CLR key to erase all
the characters.
Press BACK key to cancel operating, exit to
previous pop-up window interface.
MESSAGE key Press MESSAGE key to enter Messages
menu.
EXT PWR
Indicator
Lights on when external power supply
connected.
Up/Down key
(Scrolling key)
Up/Down key used as selection key up and
down for selecting the commands and items
shown on screen display.
Or default functions in standby mode are set
in Settings.
Move the cursor when inputting letters.
Scroll the cursor in menu option and display
Left/Right key
(Scrolling key)
Left/Right key used as selection key to
scroll cursor left and right for selecting the
commands and items shown on screen
display.
Or default functions in standby mode are set
in Settings.
Move the cursor when inputting letters.
Scroll the cursor in menu option and display.
EXIT key End an active call or reject calls.
Page 14
14
Key Description
Power on/power off.
Exit from any window interface to standby
mode
CALL/REDIAL
key
Send telephone number or redial.
In standby mode, press CALL/REDIAL key
to enter to view all recent calls list.
HANDFREE key Hand free call.
0~9 Number
key
Use the number keys to enter numbers and
characters.
Make a direct phone and Speed Dial.
# key, * key Differs in different mode, option or function
menu.
Note:
◆ Keys in this manual may shape different from actual ones on your
phone.
◆ “Press the key” in manual means pressing certain key once, “Hold
the key” means pressing key for 2 or 3 seconds.
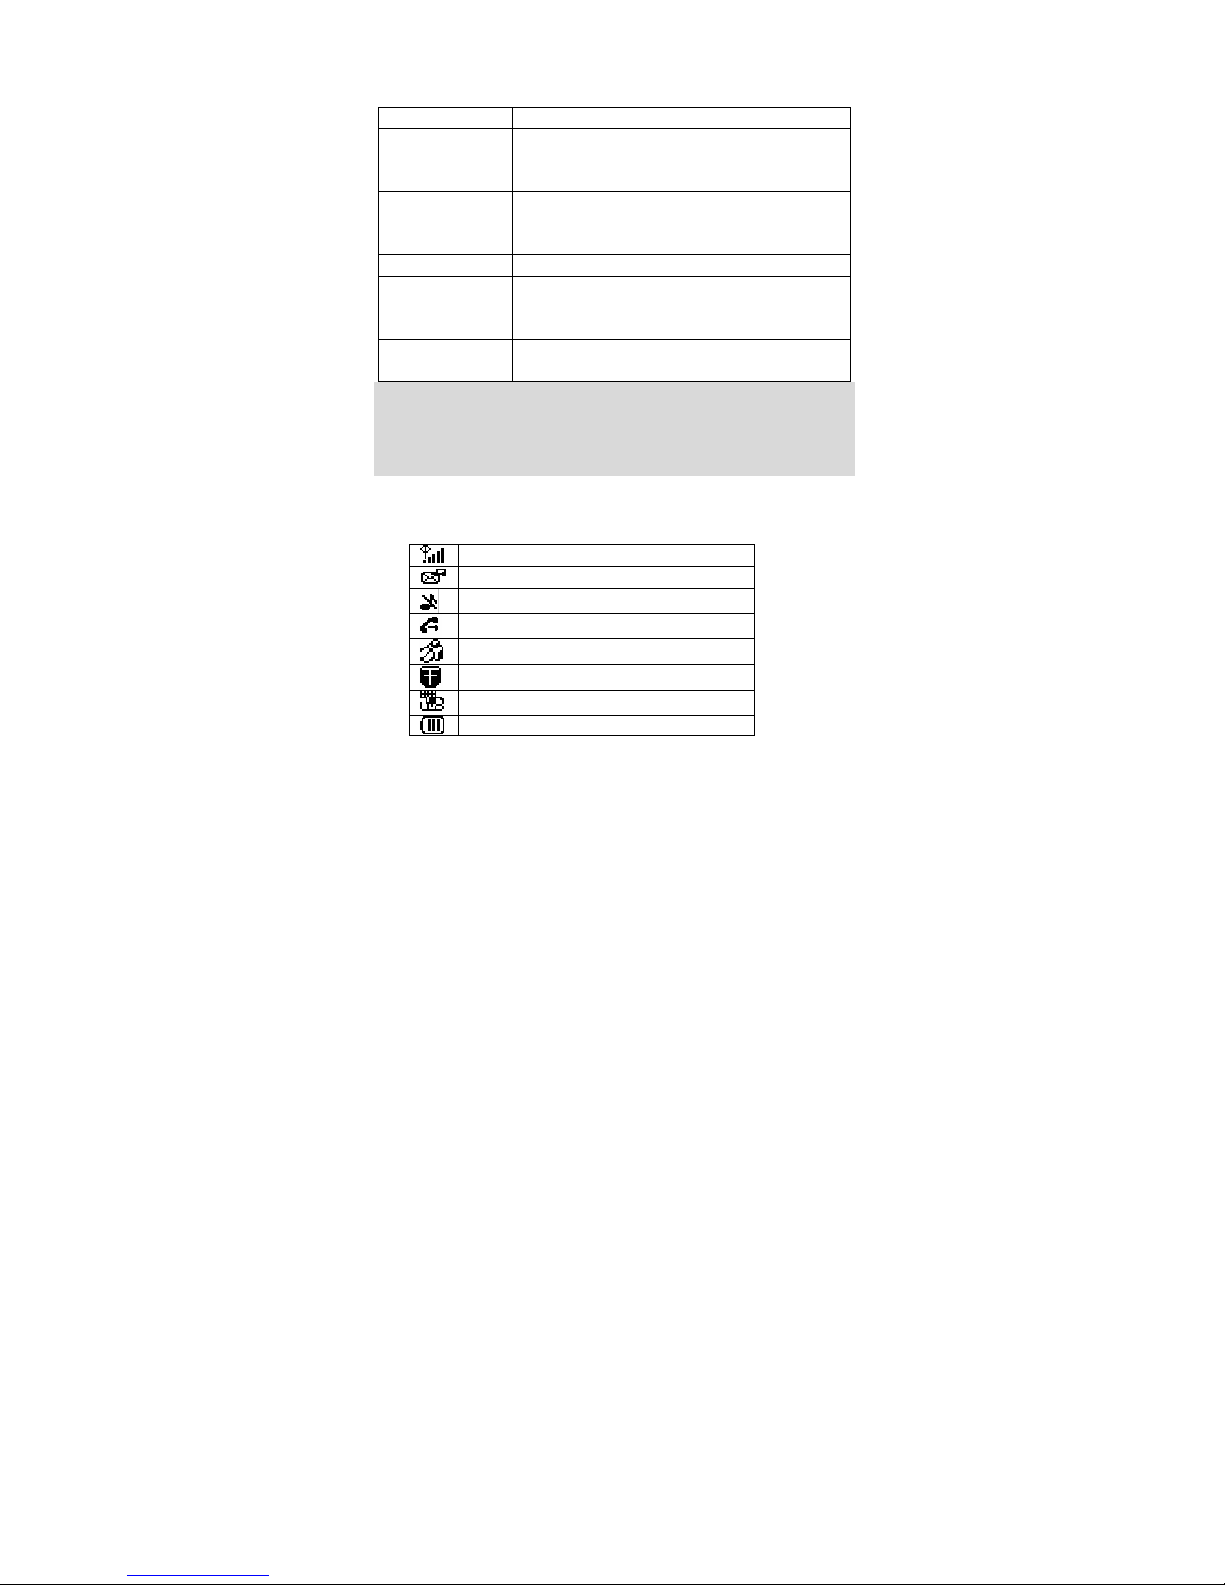
2.4 LCD Screen Description
These icons may appear on screen display of your phone.
Signal strength
New Message (flop when memory if full
)
Mute
Call Forwarding
Bar Blacklist
Bar All
Friend Only
Battery Indicator
2.5 Installation
2.5.1 Receiver
Connect phone set and receiver with the receiver cord.
Page 15

15
2.5.2 Antenna
Install antenna to antenna connector
ANT. Hold the plastic stick of the
antenna and rotate the metal screw cap in clockwise direction to fix it up.
Do not rotate antenna directly.
2.5.3 Adapter
Connect the lead from the external power adapter to socket at rear back
of phone set and connect adapter to an external AC socket.
Good ground may guarantee phone’s reliable performance.
2.5.4 Power Supply
There are two ways of power supply:
1. External power supply
2. Rechargeable battery supply
As usual, suggest make use of external power supply. When power
down or unavailable power supply nearby, you can use battery for
backup.
With external power supply connection and switch BATT to “∣”, phone
can automatically detect battery’s current capability and charge the
battery accordingly. At that time, external power adapter becomes hot. It
is normal.
Note: When the battery is in low-voltage, the phone may not work
normally:
- In state of standby, ZTE WP623 alerts.
- During a call, alert may interrupt your call.
- ZTE WP623 turns off automatically when in extreme low-voltage.
2.6 Switching Power
Switch ZTE WP623 “BATT” at rear back of phone to “∣” to power on
battery, and to “O” to power off battery supply.
2.6.1 Power-on
In state of power-off, press and hold button
key, LCD screen
lights with a sound. The phone will check whether SIM card inserted
well or not. And then follow the prompt indication on the display:
Enter PIN ——Key in PIN code of SIM card if it is set.
Page 16

16
Enter Lock Code——Key in Phone Lock Code of the phone if it is set.
Search——Search appropriate network connected.
2.6.2 Power-off
In state of power-on, press and hold button
key, LCD screen
closes with a sound.
Note:
When abnormal power blackout causes abnormal phone restart, please
disconnect and connect again external power adapter, and then switch
on/off ZTE WP623.
Please switch BATT at rear back of phone to “O” to power off battery
supply, or remove battery if phone won’t be in use for a long time.
2.7 About SIM Card
2.7.1 SIM Card
Please insert a valid SIM (Subscriber Identity Module) card into phone
set before using.
Please do not touch the metal surface of the SIM card, otherwise
information in the card may be lost or damaged. Keep the card away
from electricity and magnetism.
Warning: Please power off phone before removing the SIM card.
Inserting or removing the SIM card is forbidden when connects to
external power supply.
2.7.2 Usage of SIM Card
z Power off phone, disconnect external power supply and open the
bottom cover of the SIM card.
z Slide the SIM card into the SIM slot. Make sure that the metal
connector is facing downwards. And the beveled corner matches with
the SIM slot. Close the SIM card holder back to fix the SIM card and
press the cover back.
Note:If you cannot use phone normally after you insert the SIM card,
please check whether the SIM card is inserted correctly or the SIM card
is valid (Please consult with the network carrier). Do not power on/off
phone continuously for 3 times, otherwise the SIM card may be injured.
2.8 Connecting to Network
2.8.1 PIN Code and Phone Lock Code
Setting PIN code (personal identification number) and phone lock code
Page 17

17
are to avoid the illegal usage of SIM card and phone.
To Enter PIN code of SIM card and Enter lock code to Unlock the
phone, and then press MENU/SELECT key to confirm to start using the
phone. If inputting wrong PIN three times continuously, SIM card will be
locked by network.
Note:The network provider offers you PIN code (four to eight digits).
You should change PIN code as soon as possible for security.
To set PIN code and Phone lock code, see “6.7 Security Settings”.
2.8.2 Connecting the Network
After powering on and inputting PIN code and Phone lock code, the
phone automatically searches the network available and in state of
standby.
Besides making and answering calls, you can do also:
◆ Press MESSAGE key to enter Messages menu.
◆ Press MENU/SELECT key to enter main Menu.
Press CLR/BACK key to enter Names list.
Note: If “Emergency Mode” appears on the screen, then you can only
send emergency calls.
(Fri)
Menu Names
8:08
03/31/2006
Page 18

18
3 Basic Operations
3.1 Making a Call
In standby mode, signal strength icon is displayed on upper left corner
of screen. And then, you can make or answer calls.
1. Power-on ZTE WP623.
2. To either make or answer a call, you can pick up the receiver or
press HANDFREE key, or key in number directly and press
CALL/REDIAL key to dial.
3. Make a call or answer a call as steps detailed in the following.
Note: When SIGNAL indicator turns off and there is no dial tone while
picking up the phone receiver, maybe RF signal is weak or antenna is
not screwed on and fixed not well. Change the position of the terminal
or check the antenna installation.
3.1.1 Making a Domestic Call
Press Number key to key in phone number, and add area code when
making a long distance call (no need to add area code when dialing
local number in some area). Press CALL/REDIAL key to send a call.
Press
key to end the call and conversation.
3.1.2 Making an International Call
Enter the country code, area code (without the leading “0”) and the
complete telephone number you want to dial, press CALL/REDIAL
key
to call out.
Country code + Area code + Telephone number
0086 755 26770000
(Fri)
Menu Names
8:08
03/31/2006
Page 19

19
3.1.3 Dialing a Number in the List
All calls you recently dialed, received or missed are saved in your
phone. All numbers are grouped as Missed Calls, Incoming Calls and
Outgoing Calls. When the list is full, the oldest numbers will be
overwritten automatically when new record is coming.
You can check the list as follows:
In standby mode, press CALL/REDIAL key to enter all recent
calls.
Or press MENU/SELECT key→ Phone Menus→ Calls to
view All Calls, Missed Calls, Received Calls or Dialled
Calls.
Press Up/Down key and MENU/SELECT key to select
record listed and confirm options.
All the numbers listed can be directly dialed by
CALL/REDIAL key. Or press MENU/SELECT key to select
Options to Send Message to the number, view the number’s
information in Detail, or Save the number in Names, or Add
to Blacklist.
3.1.4 Hand-free
z Hand-free
ZTE WP623 supports hand-free function. Press HANDFREE
key to activate. The dial tone make user easy to recognize
whether phone is in status of hand-free or not.
z Receiver and Hand-free Conversion
ZTE WP623 supports hand-free converts to receiver speaking
(hand-free speaking is off while receiver is picked up). ZTE
WP623 also supports receiver to hand-free speaking (to convert
to hand-free speaking while picking up receiver, press
HANDFREE key and hook-on receiver afterwards).
3.1.5 Redialing
ZTE WP623 supports saving dialed phone numbers. When pick up
receiver or press HANDFREE key, press CALL/REDIAL key to display
dialed numbers on the screen, use Up/Down key to select one dialed
phone number, and then press CALL/REDIAL key to dial this number
directly.
Note: When abnormal power down causes abnormal phone restart, the
Page 20

20
last one dialed will not be saved.
3.2 Answering a Call
When the phone rings, press CALL/REDIAL key directly, or pick up the
receiver, or press HANDFREE key to answer.
Usually, originating
caller’s number displays in the screen. If the number is listed in the
contacts already, the corresponding name will be shown. Hang on
receiver to end call. Make sure to exit hand-free mode to guarantee
next call to come in
.
Note: Originating caller’s information display needs network support.
Pulling away and inserting power supply adapter is forbidden during
conversation.
3.3 Call Information
After ending a call, the phone indicates the call duration.
Press
key or wait for 4 seconds to exit automatically.
3.4 During a Call
During a call, you can press MENU/SELECT key to select and confirm
Options in the Menu.
Answer: Answer the incoming call.
Busy: Send busy tone to the dialer when you are busy in call.
Volum e: Press Up/Down or Left/Right key to adjust the volume
of the phone.
Hold/Retrieve/ Swap/ End: Hold the current call; Reactive the
call on hold; Swap between two calls; End the current call and
answer the incoming call in waiting.
Mute: Mute your local voice for the moment.
Note: Some options of submenu only appear under certain
circumstances. E.g. Swap appears as while as one call in conversation,
another is on hold.
3.5 Menu Functions
Main menu function:
1. In standby mode, press MENU/SELECT key to enter main Menu.
Scroll with Up/Down key through the menu and select functions.
2. If the menu contains submenus and further submenus, select
options and submenu you want according to the prompt on the
screen.
Page 21

21
3. Press MENU/SELECT key to confirm or CLR/BACK key to return
to the previous menu level. Press
key to exit to standby
mode.
Bottom menu function:
If options are displayed on the bottom of the screen, press
MENU/SELECT key and then Up/Down key to select. Press
MENU/SELECT key or CLR/BACK key to set or exit.
The functions of phone are mainly grouped in the main Menu: Short
Messages, Phone Menus, Settings, Toolkit. Please refer to the text
hereinafter in this manual in detail.
Page 22

22
4 Messages
This is an introduction to knowing how to send, receive, erase short
messages in your phone.
Press MENU/SELECT key→ Short Messages, or press MESSAGE
key directly to enter Short Messages menu.
Short Messages submenu: New Msg, Inbox, Outbox, and Msg
Settings.
Note: The function introduced hereinafter may differ with different
service your area offers. Please consult with your service provider for
more detailed information.
4.1 New Message
On receipt of a new message, the phone prompts “Received Message”
on the screen. Press Read to view. New message is automatically
saved in phone. If the memory space is full, the new message cannot
be saved. The memory spaces differ with SIM card and phone.
Select Inbox to Read the new message.
Press any of the Scrolling key (Up/Down or Left/Right key) to enter
Inbox in standby mode and Read the message, if set as default key.
4.2 Creating Message
Please confirm message center number is already set before writing
and sending a message.
1. Select New Msg in Short Messages menu.
2. Input Info context of message or select Idiom to choose text in
Templates, select Clear to erase character. See “9.Text Input”
to read more instructions for writing text and character.
3. Select Options to Send to One, Send to Many, or to Save the
message in Outbox.
4. Key in receiver’s phone number or select in Names list.
5. Select OK to send the message, or select Clear to erase the
number. Success information of sending message prompts on
the display.
Page 23

23
Note:Short Message center in some cities and areas do not support
short message exceeding 198 English characters.
4.3 Inbox
Select Inbox and press MENU/SELECT key to Read short message
received.
Text Reply: Reply message to sender.
Delete: Erase the message.
Forward: Forward message to other recipients.
Voice Reply: Call the sender directly.
Extract No.: Extract and list all the number(s) in the message.
Choose one to Save the number or Send Message to the
number.
4.4 Outbox
Select Outbox and press MENU/SELECT key to Read short messages
stored.
Delete: Erase the message.
Forward: Forward message to other recipients..
Extract No.: Extract and list all the number(s) in the message.
Choose one to Save the number or Send Message to the
number.
4.5 Preformatted Message
ZTE WP623 has a group of some common built-in phrases and
sentences, such as, “Please call me immediately”, “Please wait, I am on
the way.” etc.
1. Press MENU/SELECT key to enter Menu.
2. Select Short Messages→ Msg Settings→ Te mpl ate s.
3. Scroll to the message you want to edit.
4. To send message preformatted in Templates, see “4.2 Creating
Message” in detail.
Note: Hold “*” key directly to view all the preformatted message
Templates while writing message, and then edit and send the message.
4.6 Message Settings
Before using message functions, please make necessary short
message settings.
Access Msg Settings submenu:
Page 24

24
Tem plate s: Some built-in phrases and sentences in phone.
Write, edit and send templates, see “4.5 Preformatted
Message”.
Msg Centre: Input Message Centre number (contact network
service provider to get), press Save to finish setting.
Msg Validity: Set validity period as 1 Hour, 2 Hours, 6 Hours,
1 Day, 2 Days, 1Week, 1 Month or 6 Months within which the
message is repeatedly sent by short message center till it is
sent successfully.
Status Report: Select “On” to let network send Status Report
message to inform your sending message successfully or not.
Used Space: View the number of saved messages and
maximum number of messages saved in phone and SIM card
(differ with phone and SIM card).
Page 25

25
5 Phone Menus
Phone Menus includes Calls, Diverts, Firewall, etc.
5.1 Viewing Calls
Information of All Calls, Missed Calls, Received Calls and Dialled
Calls including the name, phone number, conversation time and Call
Duration are saved in Calls.
1. Select Menu→ Phone Menus→ Calls.
2. And then:
Select All Calls to view all calls.
Select Missed Calls to view all calls missed.
Select Received Calls to view all calls received.
Select Dialled Calls to view all calls dialed.
3. Select call number listed in, and press CALL/REDIAL key to
directly dial.
4. Or select one entry of the records and press MENU/SELECT
key to select Options.
- Send Message:Send message to this number.
- Detail:Indicate number, caller, conversation time and duration.
- Save:Save the number in SIM card; Or save in Phone and group
in No Group, Family, Friend, Colleague, Schoolmate, Society,
VIP.
- Add to Blacklist:Add this number to the Blacklist.
If the SIM Card does not support the function of incoming call Indication,
you can only see part of the above-mentioned options.
5.2 Calls Duration
1. Select Menu→ Phone Menus→ Calls.
2. Select Call Duration to view call time of Last
Call, accumulated time in All Calls Info, or Reset the time
duration of last call and all calls to be zero.
Page 26

26
5.3 Diverting Calls
Use Diverts to forward an incoming call to a preset designated phone
number. After setting of call forwarding, phone will automatically dial
network to set the function in active.
Note: This function needs network support. Please consult with network
service provider to get corresponding service application.
Setting Calls Divert
You can set divert type under different circumstances.
1. Select Menu→ Phone Menus→ Diverts.
2. Set types of divert, press MENU/SELECT key.
Divert Always (Divert unconditionally): Divert in all conditions.
When Busy (Divert when busy): When the phone is busy,
divert.
No Reply (Divert when no answer): When there is no answer,
divert.
Unreachable: (Divert when unreachable): When the call can
not reach the recipient, divert.
3. Select “On” to activate your setting or “Off” to cancel your
setting; Select Status Check to see whether Divert is activated;
4. Select one type to forward service selected to preset designated
phone number in By Service as follows
All Services: Divert all services, such as, voice call and short
message, etc.
Voice Calls: Divert voice call.
Data: Divert data only.
Fax: Divert fax only.
Messages: Divert short message only.
All Except Msgs: Divert all except for short message.
Cancel All Divert
1. Select Menu→ Phone Menus→ Diverts.
2. Set type of divert as Cancel All to cancel all calls’ divert setting,
and then press
MENU/SELECT key to confirm.
5.4 Calls Firewall
You can set Incoming Calls Bar in Firewall submenu including Friend
List, Black List, Current Settings.
Friend List
All the contacts will be list by the letter of the name. If there is no contact
Page 27

27
in the list, “List Empty” will be displayed.
1. Key in phone number to Add New prefix directly, or select from
Names.
2. Select Clear prefix list to delete all contacts in Friend List.
3. Or scroll to one contact listed and select Options:
Add: Add another new contact prefix.
Edit: Edit this contact prefix.
Delete: Delete this contact prefix.
Black List
All the contacts will be list by the letter of the name. If there is no contact
in the list, “List Empty” will be displayed.
1. Key in phone number to Add New prefix directly, or select from
Names.
2. Select Clear prefix list to delete all contacts in Black List.
3. Or scroll to one contact listed and select Options:
Add: Add another new contact prefix.
Edit: Edit this contact prefix.
Delete: Delete this contact prefix.
Current Settings
You can set barring applications as follows:
Bar Blacklist: Only bar numbers listed in Black List.
Friend Only: Only numbers listed in Friend List are not
blocked.
Bar All: Bar all incoming calls.
Cancel All: Cancel barring setting.
Page 28

28
6 Settings
Press and select MENU/SELCET key→ Settings to enter Settings
menu.
The phone has different functions in Settings to meet your requirement.
They are: Phone Settings, Display Settings, Audio, Clock Settings,
Call Settings, Network Settings, Security Settings, and Factory
Settings.
6.1 Phone Settings
6.1.1 Language
Set the displayed language as English available.
6.1.2 Own Number
Save, edit and list the number information of your phone.
1. Select Menu→Settings→Phone Settings→Own Number.
2. Press MENU/SELECT key to Select:
Edit Number: Edit number information of your own phone.
Add Number: Add and save another number’s information of
your own phone.
Delete Number: Delete number information of your own
phone.
3. View your own phone number in list.
6.1.3 Fastkey Settings
1. Select Menu→Settings→Phone Settings→ Fastkey Settings.
2. Set Up/Down, Left/Right key as the default Fastkey of empty,
Missed Calls, Received Calls, Dialled Calls, New Msg or
Inbox as what you like.
6.2 Display Settings
1. Select Menu→Settings→Display Settings.
2. Select “On” to active Backlight or turn “OFF” backlighting.
Page 29

29
6.3 Audio Settings
1. Select Menu→Settings→Audio.
2. You can adjust the tone and volume in submenu in the following,
and press MENU/SELECT key to confirm.
Volum e:Press Up/Down key or Left/Right key to adjust the
volume.
Ringing Volume: Set the volume of the ring tone.
Speaker Vol ume: Set the volume of the speaker.
Handfree Volume: Set the volume of hand-free.
Tone or Alert:
Ringing Tone: Select type of ring tone.
Key Tone: Select “On” or “Off” to utter sound or not when
press keys.
Warn Tone: Set the phone alert “On” or “Off”.
Missed Alert: Select “On” or “Off” to prompt alert or not
when there is call missed.
Message Alert: Select type of tone to prompt when there is
message.
Power on/off Ring: Select “On” or “Off” to ring or not when
power on/off the phone.
6.4 Clock Settings
Date & Time: Press Up/Down key or Left/Right key to move
between year/month/date and time to set date with a term from
Jan. 1
st
, 2005 to Dec. 31st, 2055, and time from 00:00 to 23:59.
And then press Menu/Select key to confirm.
Date Format: Select date format as Y:M:D , D:M:Y, M:D:Y.
6.5 Call Settings
6.5.1 Minute Minder
If there is an incoming call in conversation, set the phone to remind 5
Seconds or 15 Seconds before every minute or “Off” reminding.
6.5.2 Call Waiting
During a call, use Call Waiting to answer the waiting call, meanwhile
putting the first call on hold. These calls can be shifted while you have
calls in conversation.
Page 30

30
Note: This function needs network support. Please consult with network
service provider to get corresponding service application.
On:Register and activate Call Waiting function.
Off:Cancel Call Waiting function.
Status:Check whether Call Waiting is activated or not.
Select “On” to activate the Call waiting function. The network will notify
you of an incoming call while you have a call in progress. You can press
CALL/REDIAL key
to get through the waiting call and select option to
swap one call to another.
6.6 Network Settings
1. Select Menu→Settings→Network Settings.
2. Select option to search for the network.
Automatic: The phone searches for the network
automatically.
Manual: Search for the network in manual way.
6.7 Security Settings
Introduction to phone’s security options preventing others to avoid
illegal use or acquire your phone’s personal information.
Note: Please input right Phone Lock Code to enter Security Settings.
The default code is “1234”. Please change it to your own password as
soon as possible.
SIM Password: PIN code of SIM card prevents others to avoid
illegal use or acquire your SIM card. Select “On” or “Off” to
activate PIN code or not. Select “Change PIN” to change PIN
code.
Note: Three consecutive inputting wrong PIN code can cause lock of
SIM card. To unblock, you need PUK. PIN code and PUK code may be
offered together with the SIM card. If not, please contact with network
operator. Please change it to your own password as soon as possible.
Phone Lock: Select “On” or “Off” to activate phone lock or not.
Or enter new Phone Lock Code set by your own to Change
Code.
Network Call Bar: Set any of call bar(s) in the following to
promote security, please contact to the service provider for details.
The service provider will offer you a 4-digit Network Code to
activate Network Call Bar.
1. Select Menu→Settings→Security Settings→Network Call
Page 31

31
Bar.
2. Set types of bar, press MENU/SELECT key.
International Calls: Bar international call(s).
All Except Home: Bar all calls except for home number.
Incoming Calls: Bar incoming call(s).
Incoming If Abroad: Bar incoming call(s) overseas.
Outgoing Calls: Bar sending call(s).
Cancel All: Cancel barring call(s) setting.
3. Select any of above mentioned bars (except for Cancel All), and
then scroll to set barring options:
- All Services: Bar all services, such as incoming call, voice call,
and message, etc.
- Voice Calls: Bar voice call only.
- Data: Bar data only.
- Fax: Bar fax only.
- Messages: Bar message only.
- All except Msgs: Bar all services except for message.
4. After setting bar and service type, you can do as follows:
On:Activate bar after registration.
Off: Cancel setting of bar.
Status: Check whether bar is activated or not.
Cancel All: Cancel barring call(s) setting.
Note: Set or cancel network call bar acquires network code offered by
the service provider. Three consecutive inputting wrong codes can
cause locking of barring service. To unlock, please contact with network
provider.
6.8 Factory Settings
Your phone offers factory default phone setting. You may modify some
options when you use phone. You can also Phone Reset some modified
options to the origin.
Page 32

32
7 Toolkit
Select MENU→Toolkit to enter Toolkit menu. The phone offers Alarm
Clock in Toolkit.
7.1 Set Alarm
Set Alarm Clock at a certain time.
7.1.1 Normal Alarm
Set alarm alert at a normal time. The phone clock only alarms once.
1. Select Menu→Toolk it →Set Alarm →Normal Alarm.
2. Press Left/Right key and Up/Down key to select Date and Time,
and then press Number key to key in number.
3. Press MENU/SELECT key to confirm Date and Time, and then
select the Alert Tone in list.
7.1.2 Daily Alarm
Set alarm alert at a fixed time. The phone clock alarms at this time
everyday.
1. Select Menu→Toolk it →Set Alarm →Daily Alarm.
2. Press Left/Right key to select the Time, and then press
Number key to key in number.
3. Press MENU/SELECT key to confirm the Time, and then select
the Alert Tone in list.
7.2 Show Alarm
If Alarm Clock is already set, only Show Alarm is shown on the screen.
1. Select Menu→Toolk it →Show Alarm.
2. The alarm information is shown on the screen.
3. Select Options to Edit, Disable or Delete the Alarm
Clock settings.
Page 33

33
8 Contacts in Names
Press CLR/BACK key in standby mode or any submenu to enter
Names. You can save, search, view and edit contacts information in
Names.
If there is no contact in the list, “List empty” will be displayed. All the
contacts will be list by the letter of the name.
8.1 About Names
All the contacts in Names are grouped in No Group, Family, Friend,
Colleague, Schoolmate, Society, and VIP.
1. Press CLR/BACK key →Names.
2. Press * key to view contact and all Group list one by one. If there
is no contact in the list, “List empty” will be displayed.
3. Scroll Up/Down key to view contact and select one.
Press CALL/REDIAL key to call out.
4. Press MENU/SELECT key to select Options:
Search: Search other contact.
Edit: Edit this contact.
Delete: Erase this contact.
Add New Name: Add a new contact.
Settings: Set contact in Names.
Batch Operation: Copy, move, or delete contact in phone’s
memory or SIM card.
8.2 Adding New Name
1. Press CLR/BACK key →Names.
2. Press MENU/SELECT key to select names’ group, to Add New
Name in the preset place by Settings:
SIM Card: Add contact in SIM card as default.
Phone: Add contact in Phone’s memory as default.
If save contact in SIM card, it needs:
Input Number of new contact.
Input Name of new contact.
If save contact in Phone’s memory, it needs:
Input Number and Name of new contact.
Input Group of new contact.
3. Press MENU/SELECT key to confirm or CLR/BACK key to
cancel.
Page 34

34
8.3 Viewing all Names
Information of all contacts including the name, phone number, group
are displayed.
1. Press CLR/BACK key →Names.
2. Scroll Up/Down key to view contact and select one. Press
CALL/REDIAL key to call out.
3. Or select one entry of the records and press Right key to view
the information of the contact including the name, phone number,
group. And then press Left/Right key to view different contact.
4. And press MENU/SELECT key to select Options.
Send Message:Send message to this number..
Edit: Edit this contact
Delete: Erase this contact.
Add to Speed: Set available speed dial digit number (0-9) for
the phone number selected.
Copy to SIM: Copy this contact to SIM card., when saved in
phone.
Move to SIM: Move this contact into SIM card, when saved in
phone.
Copy to MS: Copy this contact to phone’s memory, when
saved in SIM card.
Move to MS: Move this contact into phone’s memory, when
saved in SIM card.
Add to Blacklist:Add this number to the Blacklist.
Add to Friendlist:Add this number to the Friendlist.
8.4 Searching Names
In Names
1. Press CLR/BACK key →Names.
2. Press MENU/SELECT key to select Search in Options.
3. Input part or full letter of contact’s name. Press MENU/SELECT
key to Search, press # key to switch Text Input.
Searching Input Mode
Input Mode while searching includes Eng, ABC, abc, 123. Press # key
to change input mode.
Quick Searching
IN Names list, press directly digit key to find contact contain or near the
letters on the digit key.
Page 35

35
8.5 Editing Names
1. Press CLR/BACK key →Names.
2. Press MENU/SELECT key to select Edit in Options.
3. Edit information of the contact selected including
Number, Name, Group, etc. Press MENU/SELECT key to
confirm, press # key to switch Text Input.
8.6 Deleting Names
1. Press CLR/BACK key →Names.
2. Press MENU/SELECT key to select Delete in Options.
3. Delete information of the contact selected.
Press MENU/SELECT key to confirm.
8.7 Setting Names
1. Press CLR/BACK key →Names.
2. Press MENU/SELECT key to select Settings in Options.
3. Set contact group and tone:
Ringing Tone: Set Ringing Tone for different group of No
Group, Family, Friend, Colleague, Schoolmate, Society or
VIP.
Save No. to: Save the number in SIM Card, Choice or
Phone memory.
Used Space: View the space used and maximum memory
space in phone and SIM card (differ with phone and SIM card).
Speed Dial List: Check the number information of speed dial
list. In standby status, hold directly digit (0-9) to call speed-dial
number preset already.
8.8 Batch Operation
1. Press CLR/BACK key →Names.
2. Press MENU/SELECT key to select Batch Operation
in Options.
3. Set contact group and tone:
Copy SIM to mem.: Copy all the contact information in SIM
card to Phone’s memory.
Copy mem. to SIM: Copy all the contact information in Phone’s
memory to SIM card.
Move mem. to SIM: Move all the contact information in Phone’s
memory to SIM card.
Page 36

36
Move SIM to mem.: Move all the contact information in SIM
card to Phone’s memory.
Delete All In SIM: Delete all of records in SIM card.
Delete All In Phone: Delete all of records in Phone’s memory.
Page 37

37
9 Text Input
Your phone offers text input modes: Multitap Input (ABC/abc), Numbers
Input (123), eZiText Input (Eng), and Symbol Input (Symbols). Input
mode includes capital letter and lowercase mode.
You can key in letters, digits, characters and symbols when writing text
or editing contact record information in Names or Messages etc.,
following the common instruction in hereinafter table.
Operation Method
Input Letters Multitap Input—“ABC” or “abc”, press
corresponding letter key till the letter
appears.
Input Words eZiText Input—“Eng”, press any key once
to key in any word.
Input Digits Numbers Input—“123”, press digit key
once.
Input Symbol Symbols Input —press * key and press
Left/Right key and Up/Down key to select
corresponding symbol.
ABC/abc Input — press “1” key till the
symbol (common symbols) appears.
Input Space Press “0”key, except for being in numbers
mode.
Erase Character Press CLR/BACK key.
Erase all the
characters
Hold CLR/BACK key till all the characters
to be erased.
Move cursor left or
right
Press Left/Right key.
Change input mode Press # key to change text input mode.
Capitalization Press # key to “ABC” and “abc” input
mode to switch between capitalization and
lowercase.
Page 38

38
9.1 Multitap Input
Select Multitap Input (ABC/abc) — Each key stands for multiple letters.
Press key till your letter appears. When the cursor moves, enter the
next letter. “ABC” and “abc” stand for letters in capitalization and
lowercase.
9.2 Numbers Input
Select Numbers Input (123) — Press the corresponding key once to
input the number. In Numbers input mode, you can not enter space.
9.3 eZiText Input
Select eZiText Input (Eng) — Predictive word input is based on a
built-in dictionary.
One letter asks for pressing only once.
Press the digit key corresponding to the letters once till the word
appears on the screen.
If the word displayed is not the word you want, press Left/Right key
and Up/Down key to look for another matching word. Then press
MENU/SELECT key to confirm.
9.4 Symbols Input
- Press “1” key to input till the symbol appears. Most common
punctuation marks and special characters are available.
Or press
* key to select symbols:
- Press Left/Right key and Up/Down key to select to enter
corresponding symbol.
Page 39

39
10 Troubleshooting
If your phone appears following phenomenon in the process of
application, please read following relative information at first. If the
problems still can not be solved, please contact with the distributor or
service provider.
Problem Check Point
When switching on the
phone, it prompts “Enter
PIN”.
Please input your PIN Code which
offered with SIM card together. If you
have changed PIN code, please input
new PIN Code. You can also set PIN
code deactivated, see “6.7 Security
Settings”.
When switching on the
phone, it prompts “Insert
SIM card”.
Please check whether valid SIM card
is inserted or not.
When switching on the
phone, it prompts
“Emergency Only”.
“Enter lock code” you set already to
Unlock the phone, see “6.7 Security
Settings”.
No ring tone prompt for a
incoming call.
Check volume setting of ring tone,
see “6.3 Audio Settings”.
No display on screen when
disconnect external power
supply.
Check whether the battery switch is
turn to “|”, whether the battery has
electricity, or it is damaged; or power
on the phone again.
Press CALL/REDIAL key,
but no number is sent.
Check whether you have set
Network Call Bar, see “6.7 Security
Settings”.
Certain call cannot be
received.
Check whether the number is
restricted to come, see “5.4 Calls
Firewall”.
Cannot send short Please check the network condition,
Page 40

40
Problem Check Point
message. or message centre setting, see “4.6
Message Settings”.
Other abnormal
phenomenon.
Please first refer to user manual, then
check whether the power is
connected correctly or not, if there
are no problems, please power off
and re-start the phone again.
 Loading...