

Page 1
Page 2
Page 3

Copyright Statement
Copyright © 2005 by ZTE Corporation
The copyright of this User Manual belongs to ZTE Corporation and under
the protection of Copyright Law of the People’s Republic of China and other
relative laws.
No part of this publication may be excerpted,reproduced, translated or
utilized in any form or by any means (electronic or mechanical,including
photocopying and microfilm) without prior written permission from ZTE
Corporation. Any violation behavior will be punished.
The information in the document is subject to change without notice. At the
same time we reserve the right to revise or recall the User Manual.
If there is anything unclear in this manual, please contact us or our agent or
seller.
1
st
version, March, 2005
Page 4

Contents
1 Function Introduction................................................................................. 1
2 Safety Precaution .......................................................................................4
2.1 During operation ................................................................................. 4
2.2 Use environment ................................................................................. 4
2.3 Battery & Adapter ............................................................................... 5
3 Checking the parts...................................................................................... 5
4 Instruction Icons in User Manual............................................................... 7
5 FWP Installation......................................................................................... 7
5.1 Installing antenna ................................................................................7
5.1.1 Installing Indoor Antenna............................................................. 7
5.1.2 Installing Outdoor Antenna .......................................................... 8
5.1.3 Connection between outdoor antenna and FWP......................... 10
5.1.4 Lightening arrest measures......................................................... 10
5.2 Installing the FWP............................................................................. 12
5.3 Service Status Check......................................................................... 17
6 Getting to know your FWP ...................................................................... 18
6.1 Main parts ......................................................................................... 18
6.2 Keys ..................................................................................................19
6.3 Display icons..................................................................................... 21
7 Calling function........................................................................................23
7.1 Make a call........................................................................................23
7.2 Receive a call .................................................................................... 24
7.3 Redial ................................................................................................ 25
7.4 Pause ................................................................................................. 25
7.5 Emergency Call.................................................................................26
8 Optional Function..................................................................................... 27
Page 5

8.1 Three-way Calling.............................................................................27
8.2 Call Forwarding ................................................................................27
8.3 Call Waiting.......................................................................................28
8.4 Call Setting........................................................................................ 28
8.4.1 Hot Line ..................................................................................... 28
8.4.2 Call Restrict................................................................................29
8.4.3 Originate Mode .......................................................................... 31
8.4.4 Ring Tone ...................................................................................32
8.4.5 Auto Hyphen .............................................................................. 32
9 Short Message.......................................................................................... 33
9.1 Create New........................................................................................ 34
9.2 Receive and Send Message. .............................................................. 35
9.2.1 View Inbox ................................................................................. 35
9.2.2 View Outbox ..............................................................................37
9.2.3 Voice Message............................................................................ 39
9.2.4 SMS Setting ............................................................................... 40
10 Message Saving......................................................................................42
10.1 Phonebook....................................................................................... 42
10.1.1 View book ................................................................................42
10.1.2 Search book.............................................................................. 45
10.1.3 Add entry.................................................................................. 47
10.1.4 Speed Dial ................................................................................ 48
10.2 Call History ..................................................................................... 50
10.2.1 Incoming Call........................................................................... 51
10.2.2 Outgoing Call ........................................................................... 51
10.2.3 Missed Call............................................................................... 52
10.2.4 Call Time.................................................................................. 52
11 Setting . ............................................................................................... .53
Page 6

11.1 Greeting........................................................................................... 53
11.2 Phone Number.................................................................................54
11.3 Alarm ...............................................................................................54
11.4 Backlight ......................................................................................... 56
11.5 Volume............................................................................................. 56
11.6 Font ................................................................................................. 57
12 Data service............................................................................................ 58
13 Input method .......................................................................................... 58
13.1 English Input ................................................................................... 59
13.1.1 English Letter Input..................................................................59
13.1.2 English word input ...................................................................59
13.2 Number Input .................................................................................. 60
13.3 Punctuation mark input ................................................................... 60
14 Power supply.......................................................................................... 61
15 FAQ ...................................................................................................62
16 Specifications .......................................................................................63
17 Legal Statement...................................................................................... 64
Page 7
ZTE WP560/960 User Manual
1 Function Introduction
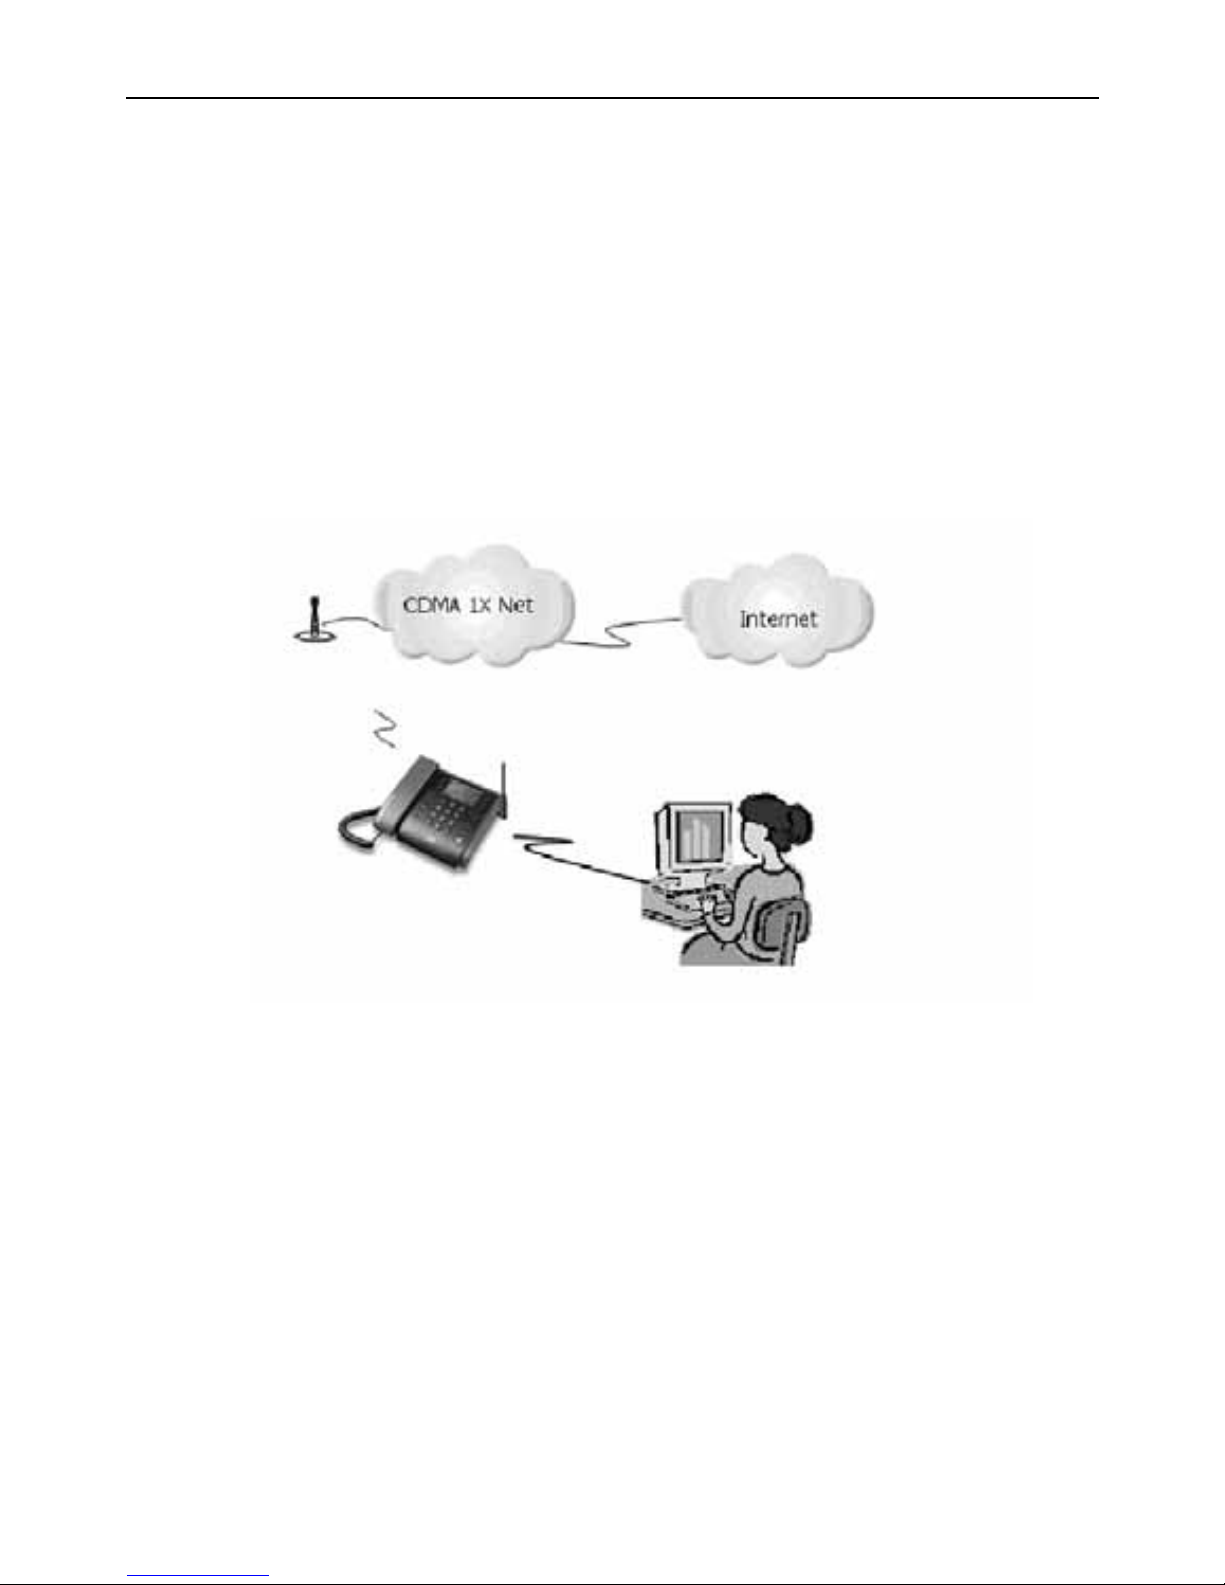
Thank you for choosing WP560/960 Fixed Wireless Phone (FWP) of ZTE
Corporation. To keep your FWP under the best condition, please read this manual
carefully before use, and
please keep this manual well in case of future use.
1
Page 8
ZTE WP560/960 User Manual
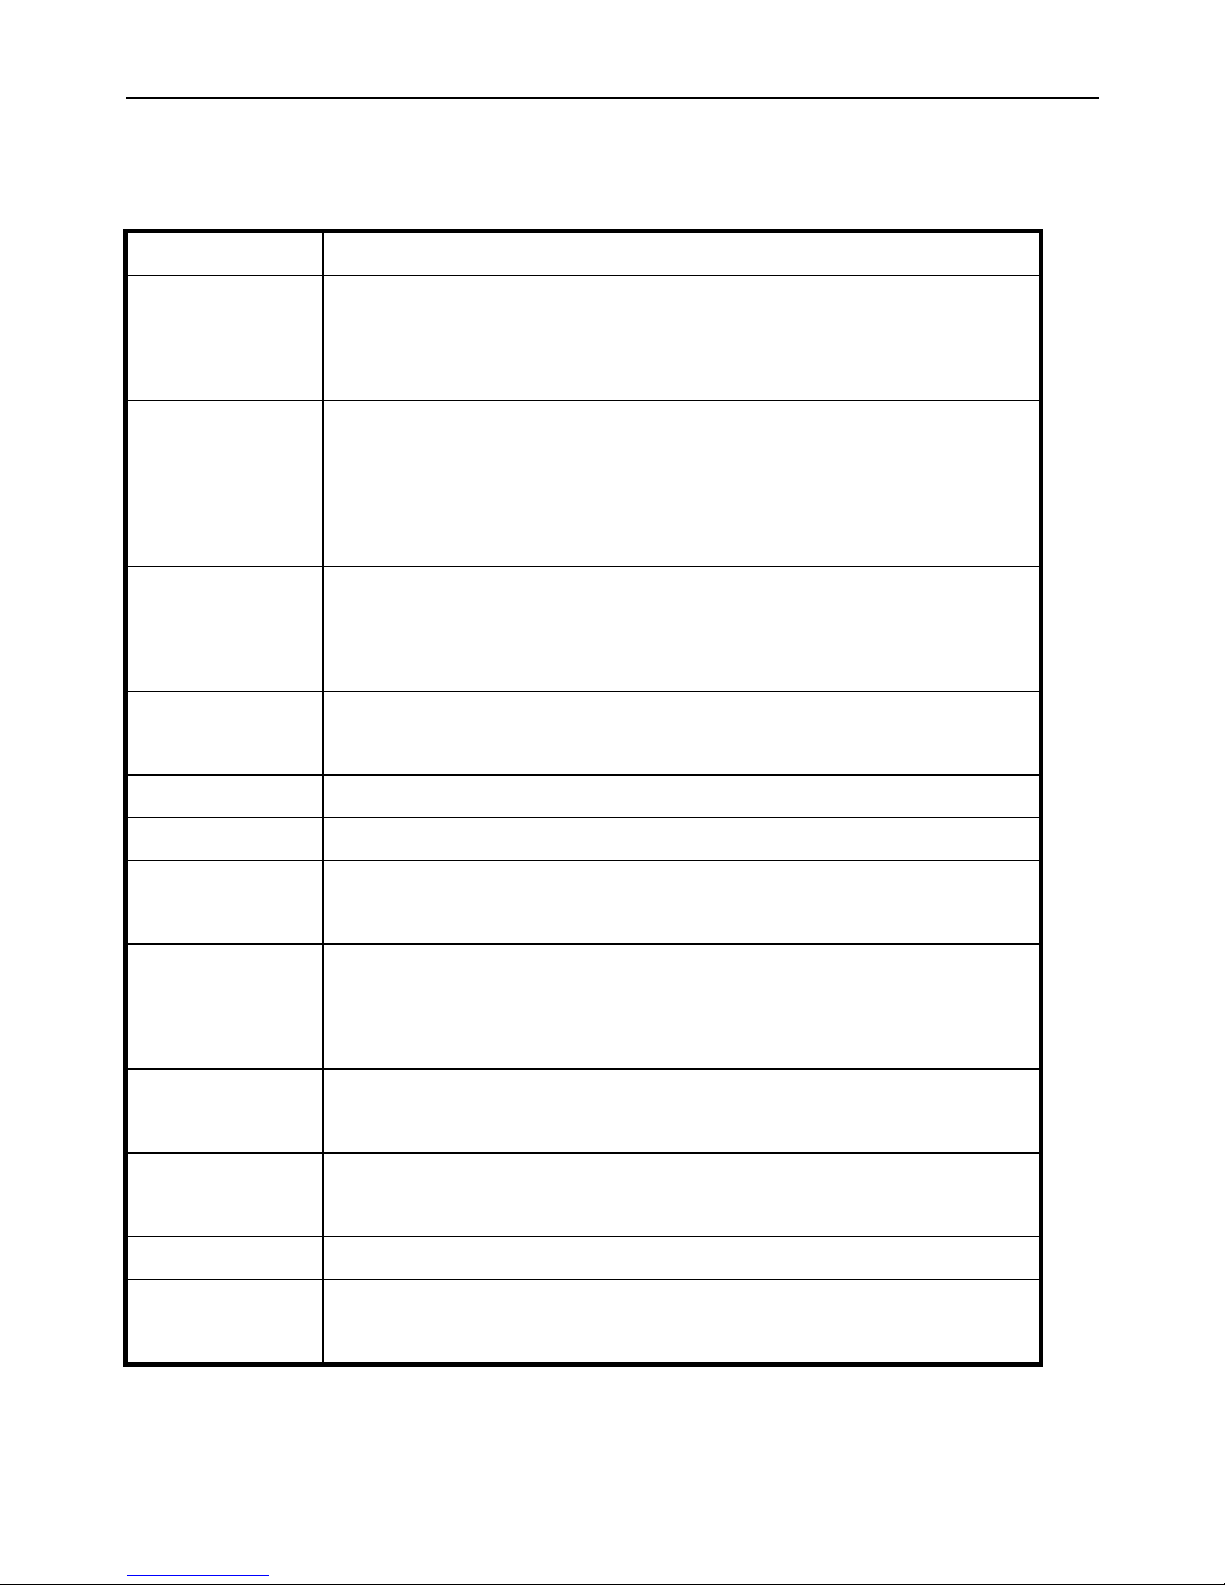
WP560/960 series of CDMA FWP have the following functions:
Voice service
Function Description
Making a call After applying to the local telecom operator for relevant voice
services, you can use the FWP to make local, domestic
long-distance, international and IP calls
Receiving a
call
You can use the FWP to receive incoming calls. If your FWP
supports incoming call display and you have applied to the local
telecom operator for incoming call display service, the incoming
call number will be displayed on the FWP after a ringing
Emergency call Once the FWP can search out the local CDMA digital network,
you can dial out the local emergency call numbers preset in the
FWP to seek for help in case of emergency
Handfree talk
/preset dialing
You can make or receive a call without picking up the handset.
Redial Redial the last outgoing number
Call Delay Insert dial delay during dialing.
Call
forwarding
This function forwards an incoming call to another telephone
you specify no matter the FWP is powered off or not.
Call
waiting
If there is a second incoming call when a call is in progress, you
can choose to receive or reject the second call. If you choose to
receive it, you can switch between the two calls.
Three-way
calling
This function allows three parties to have a talk simultaneously.
You have to apply to the local telecom operator for this service.
Call Restrict You can restrict a user to make or receive calls ( including
domestic and international long-distance calls) via setting
No-interfere Reject the incoming calls from the system side.
Hotline mode Via setting, you can only make preset hotline calls by pressing
<RD/CALL> key.
2
Page 9
ZTE WP560/960 User Manual
Data service
Function Description
Internet access
services
You can enjoy internet access services including
CDMA 2000 1X high-speed wireless file
transmission, email receiving/sending and homepage
exploration, etc. Dormancy function is also supported
PC fax You can use a PC to receive or send a fax.
Asynchronous
data
This service can enable you to realize low-rate
(9.6/14.4Kbps) file transmission and internet access
services.
Advanced function
Function Description
SMS
Send/receive messages, view new messages, delete
messages, write new messages. The Inbox can save
50 messages, the Outbox can save 10 messages (with
UIM-card)
Voice email Voice email based on message notification.
Phonebook Can store 100 addresses (with UIM-card),20 groups
for speed dial (with UIM-card), supporting grouping
function
Call record 50 Incoming call records;20 dialed call records, time record
Ring Tone 15 ring tones available for choice
Alarm 4 alarms and 9 ringings available for choice
Others Adjustable volume, 4 fonts available, ZI English input
method
3
Page 10

ZTE WP560/960 User Manual
2 Safety Precaution
2.1 During operation
1) The FWP may interfere with heart pacemaker, hearing aid and other
electronic medical devices, please follow the instructions given by your
equipment suppliers or consult your doctor during operation.
2) Do not disassemble the FWP.
3) If you clean the surface of the FWP, use only a dry, soft cloth with cleanser
containing no alcohol, benzene or acetone.
4) Don’t drop the FWP or have it hit by strong impact.
5) Please make sure that your terminal is powered off when you connect the
antenna to it; do not try to pull out the antenna after it's connected to your
terminal.
6) Use only the original antenna. Do not use the antenna for any other purpose.
2.2 Use environment
1) The product can only be installed indoors.
2) The phone’s working temperature is -10℃ ~ 55℃, don’t use it outside this
temperature range. When the environment temperature is too high or too low,
problems may occur.
3) Keep the product from dust, furnace or gas stove.
4) Don’t put it under humid environment to avoid being affected with damp,
otherwise the circuit board may be eroded and you may lose the data.
5) Keep the phone away from magnetic field and static electricity.
4
Page 11

ZTE WP560/960 User Manual
2.3 Battery & Adapter
1) Use only the original AC/DC power adapter. Don’t use the adapter for other
purposes.
2) The adapter must be used within the specified AC voltage range.
3) The phone will give an alert when the power is insufficient. To ensure normal
communication, charge or use the backup battery during low power (ensuring
the battery’s power is sufficient).
4) When the FWP do not work normally because of low battery power, please
turn off the power switch until the power is supplied by the adapter.
5) When the FWP is not connected with the power adapter and its power is only
supplied by battery, please charge the battery in time in case of low power to
avoid battery damage due to over-discharge.
6) Take out the battery if you won’t use the product for a long time.
7) Don’t use the power adapter if the power cable is damaged.
8) Dispose of the used battery in the way of environment protection.
3 Checking the parts
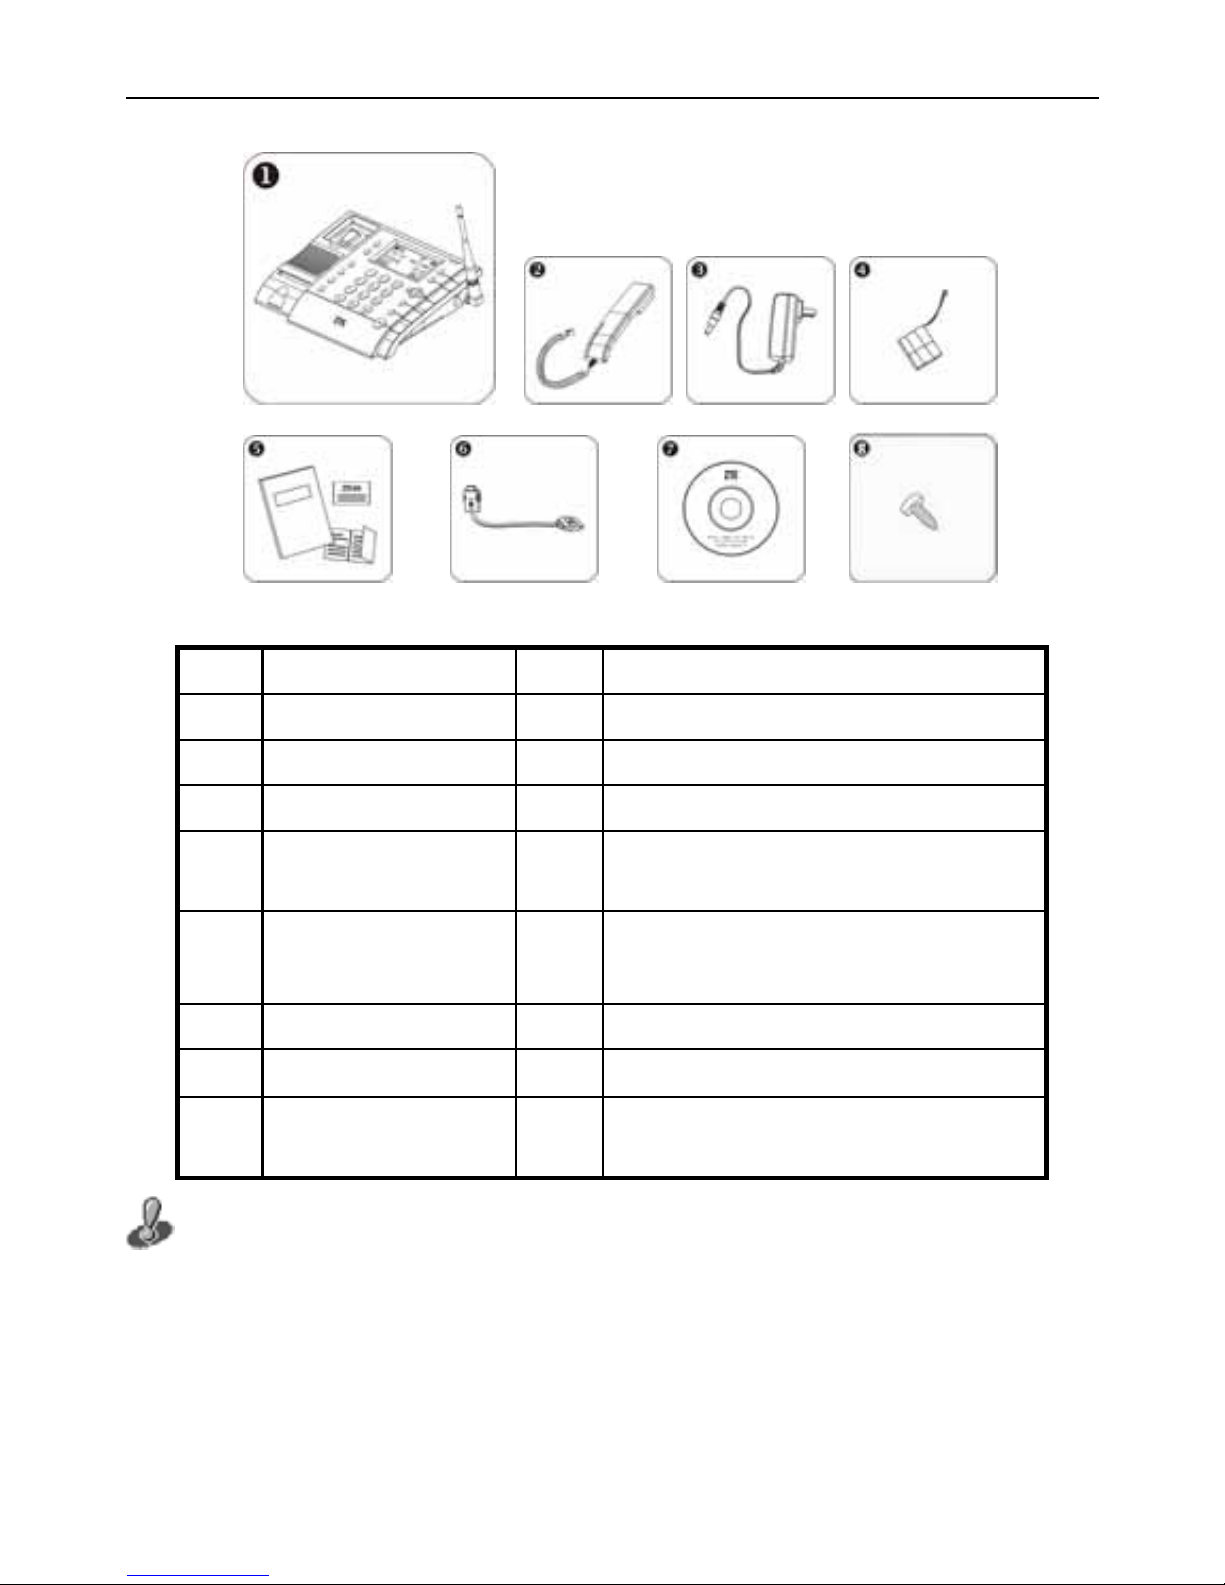
Once you have unpacked your FWP, make sure you have all the parts shown
below. If any piece is missing or broken, please call your customer service.
The product has 8 parts:
5
Page 12
ZTE WP560/960 User Manual
No. Name Q'ty Remark
1 FWP Host 1 Including an antenna.
2 Handset 1
3 AC/DC Adapter 1
4
Ni-MH Rechargeable
Battery
1
5 Prints 3
User Manual, Warranty Card an
d
Certificate of Qualification
6 USB cable 1 Optional
7 Software Disk 1 Optional
8 Screw 1
For fixing the battery cover
Include the plastic package
To protect your own right, please carefully fill in Warranty Card so as to get
warranty right. If you don’t fill in Warranty Card or dismantle the FWP yourself, you
may lose the warranty right.
6
Page 13
ZTE WP560/960 User Manual
4 Instruction Icons in User Manual
Attentions or cautions Function overview
Operation guide Operation skill
5 FWP Installation
5.1 Installing antenna
You can choose to install indoor or outdoor antenna, this chapter will tell you
how to install an antenna.
Make sure to switch off your FWP, disconnect the power adapter and battery
before installing the antenna. Please do not pull the antenna out after it is installed. Do
not frequently revolve the antenna or circumrotate it by 360 degrees, for that will
affect signal reception capability and lifespan of the FWP.
5.1.1 Installing Indoor Antenna
Operation guide
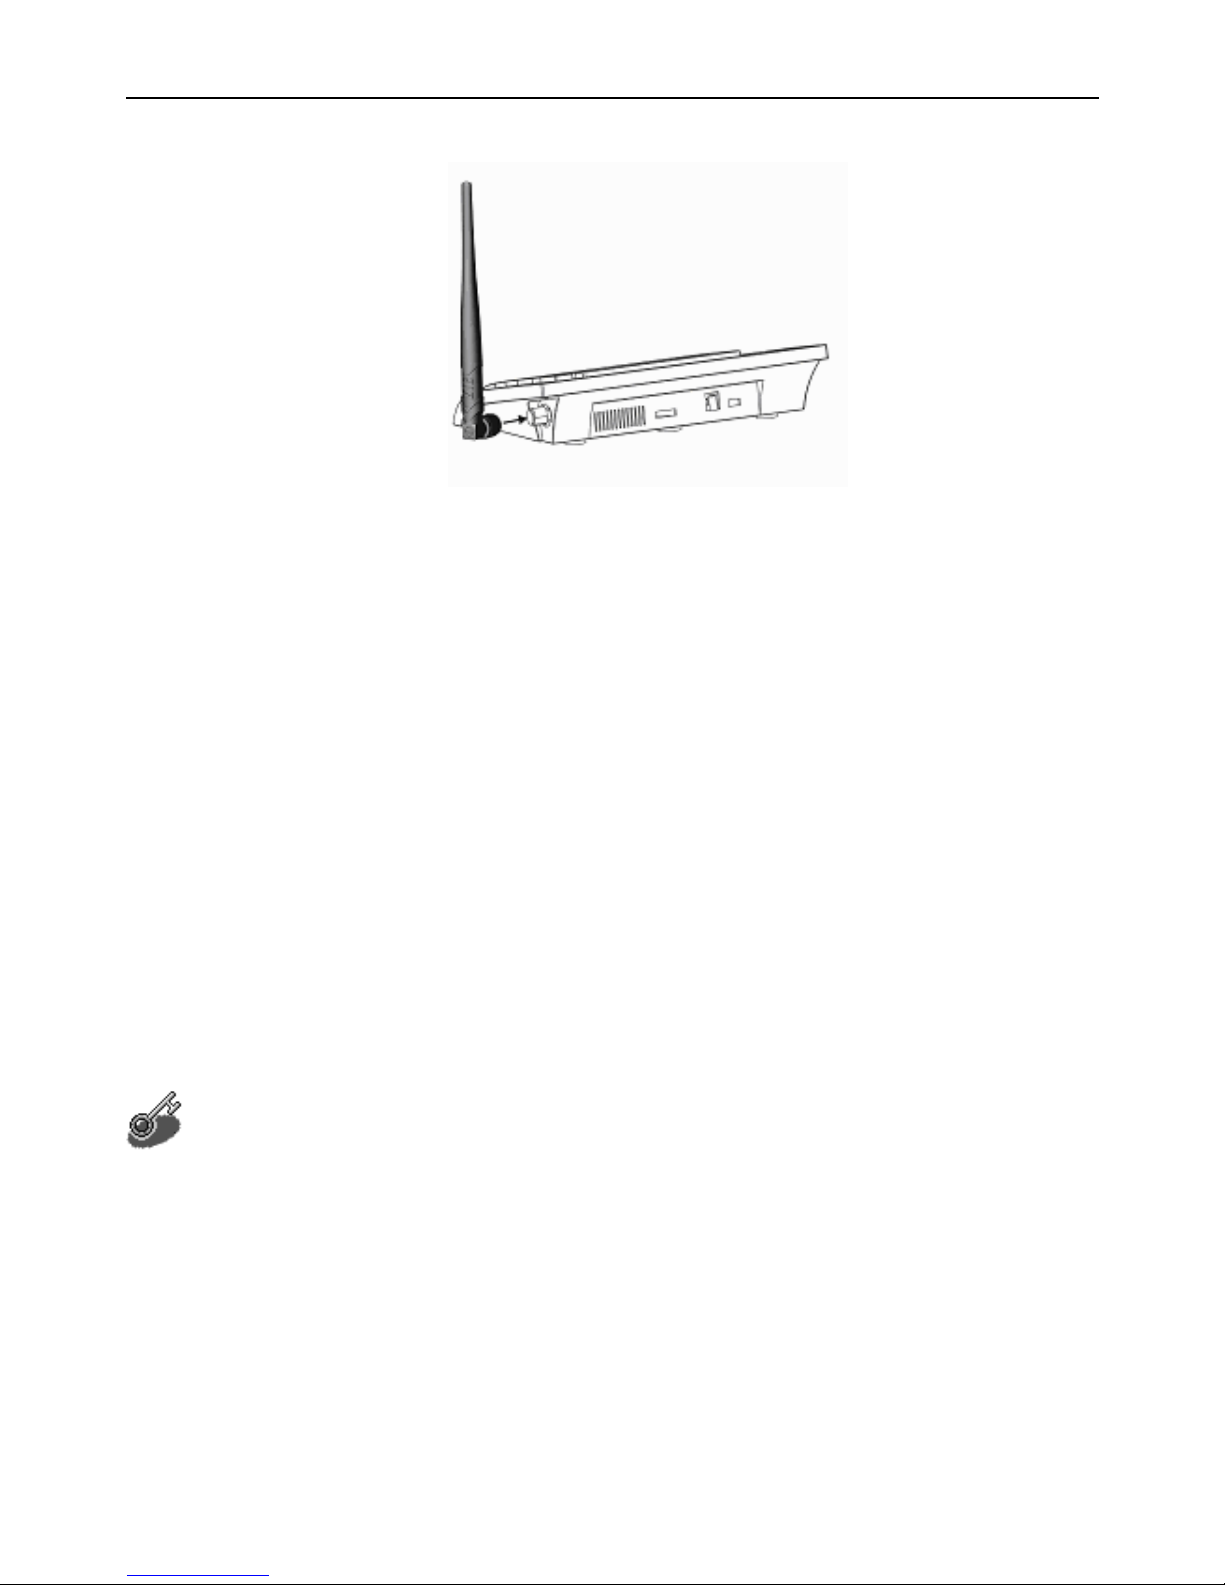
When your FWP is near to the BTS, the signal is good, the indoor antenna
will be ok for you to get a good conversation quality. Please insert the indoor
antenna to the antenna port on your FWP and screw it to make sure it’s well
connected.
7
Page 14
ZTE WP560/960 User Manual
5.1.2 Installing Outdoor Antenna
Outdoor antenna has a better signal receiving ability than indoor antenna.
When your FWP is far away from the BTS and the signal is weak, you could use
an outdoor antenna to get a better conversation quality. If you are already using an
outdoor antenna, we will not provide extra indoor antennas.
We provide two kinds of outdoor antennas: omni antenna and directional
antenna. The omni antenna is easy to install, you don’t have to consider about
direction and position during installation. The directional antenna has a better
signal receiving ability, but its installation is more complicated than the omni
antenna. The following is the instructions for installing outdoor antenna.
Operation guide
1) Installing omni outdoor antennas
You should install the omni outdoor antennas perpendicular to the ground.
Please follow the instructions given in the manual contained in the box. The
antenna must be fixed with a non-metal pole.
8
Page 15

ZTE WP560/960 User Manual
2) Installing directional outdoor antennas
Choosing a good location for the directional outdoor antenna
Directional outdoor antennas should be installed perpendicular to the ground
in a higher place, e.g., roof, top of a building and hilltop, etc. In general, the
higher the installation position is, the stronger the signal receiving ability is.
If there are very high buildings or hill-like barriers between the directional
outdoor antenna and BTS, you’d better install the antenna at least 50 meters
away from the building or barrier. If possible, you should install the antenna
directly over the barrier. At the same time, to prevent signal interruption,
you’d better install the outdoor antenna as far as possible from the TV
antenna.
Installing the directional outdoor antenna.
Please perform this operation according to the instruction manual contained
in the box. The antenna must be fixed with a non-metal pole.
The direction of the directional outdoor antenna.
If a directional antenna is already installed, then its direction is critical to its
signal receiving ability. If you live in a flat zone, please direct your antenna
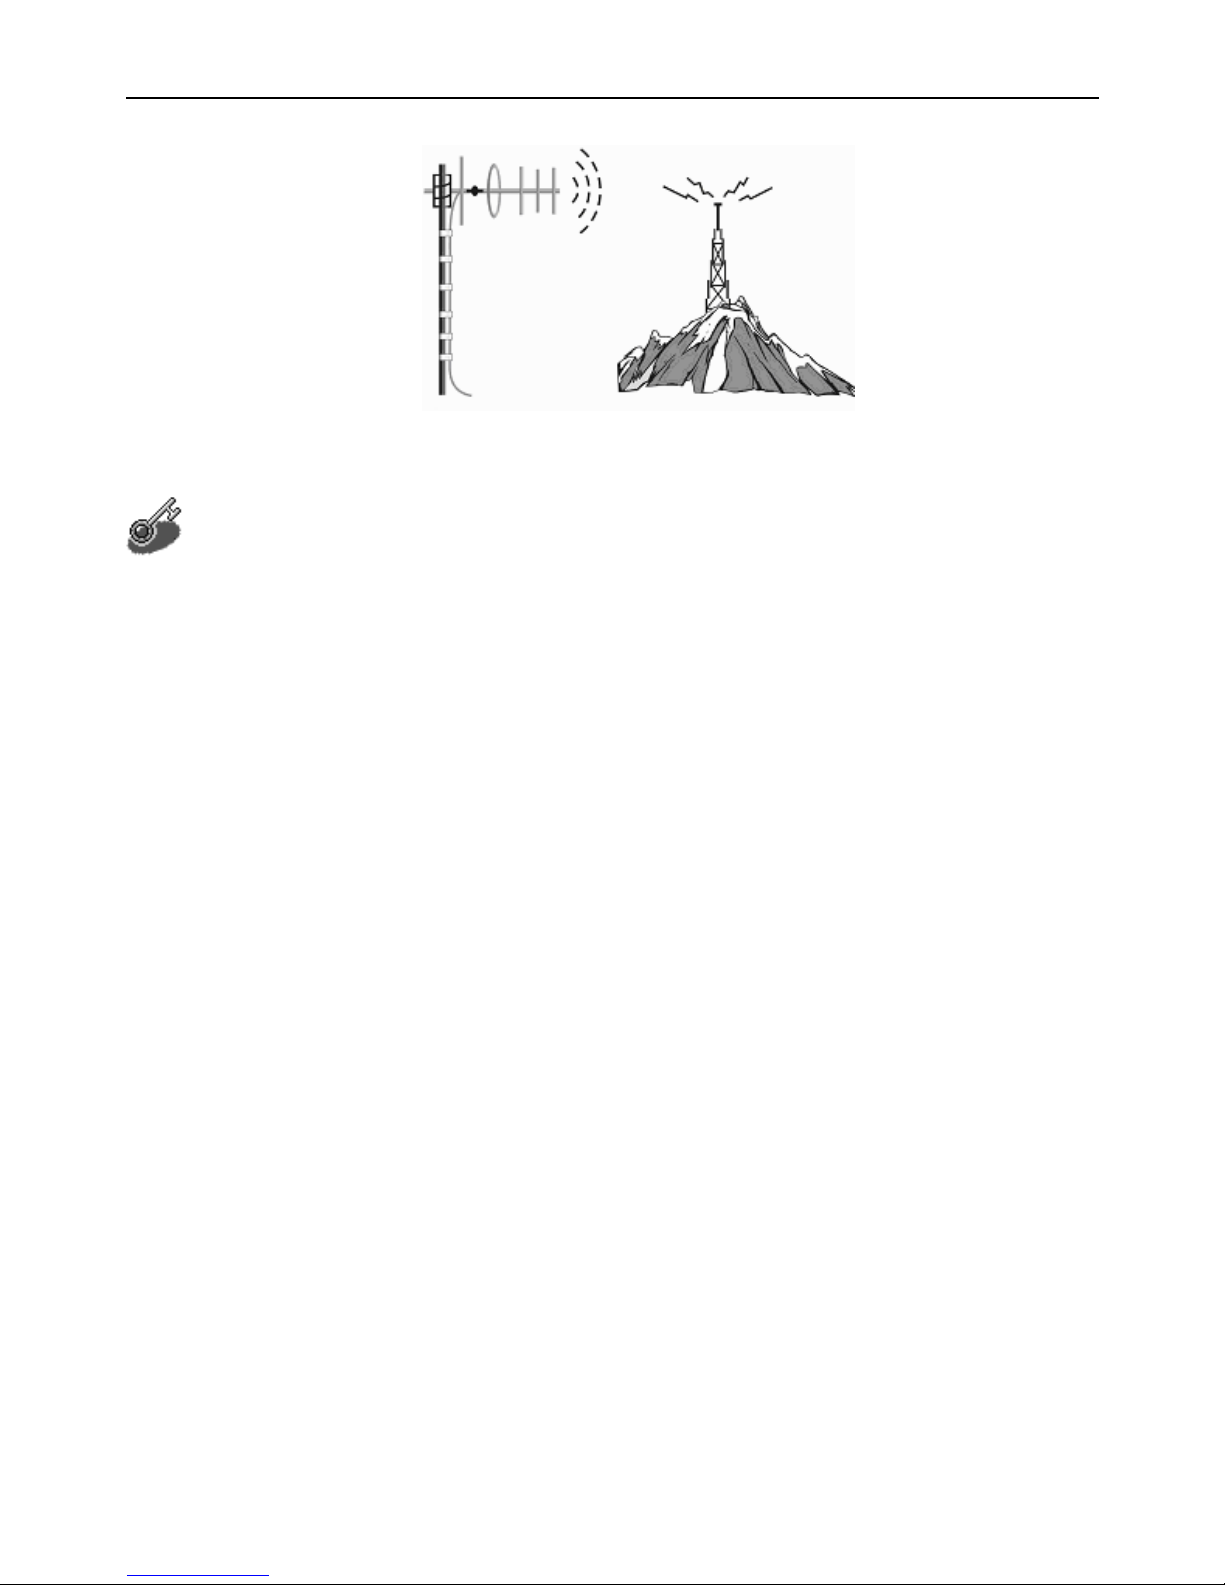
towards the BTS. If you live in a hilly area, please rotate your antenna until it
receives the strongest signal. As follows:
9
Page 16
ZTE WP560/960 User Manual
5.1.3 Connection between outdoor antenna and FWP
Operation guide
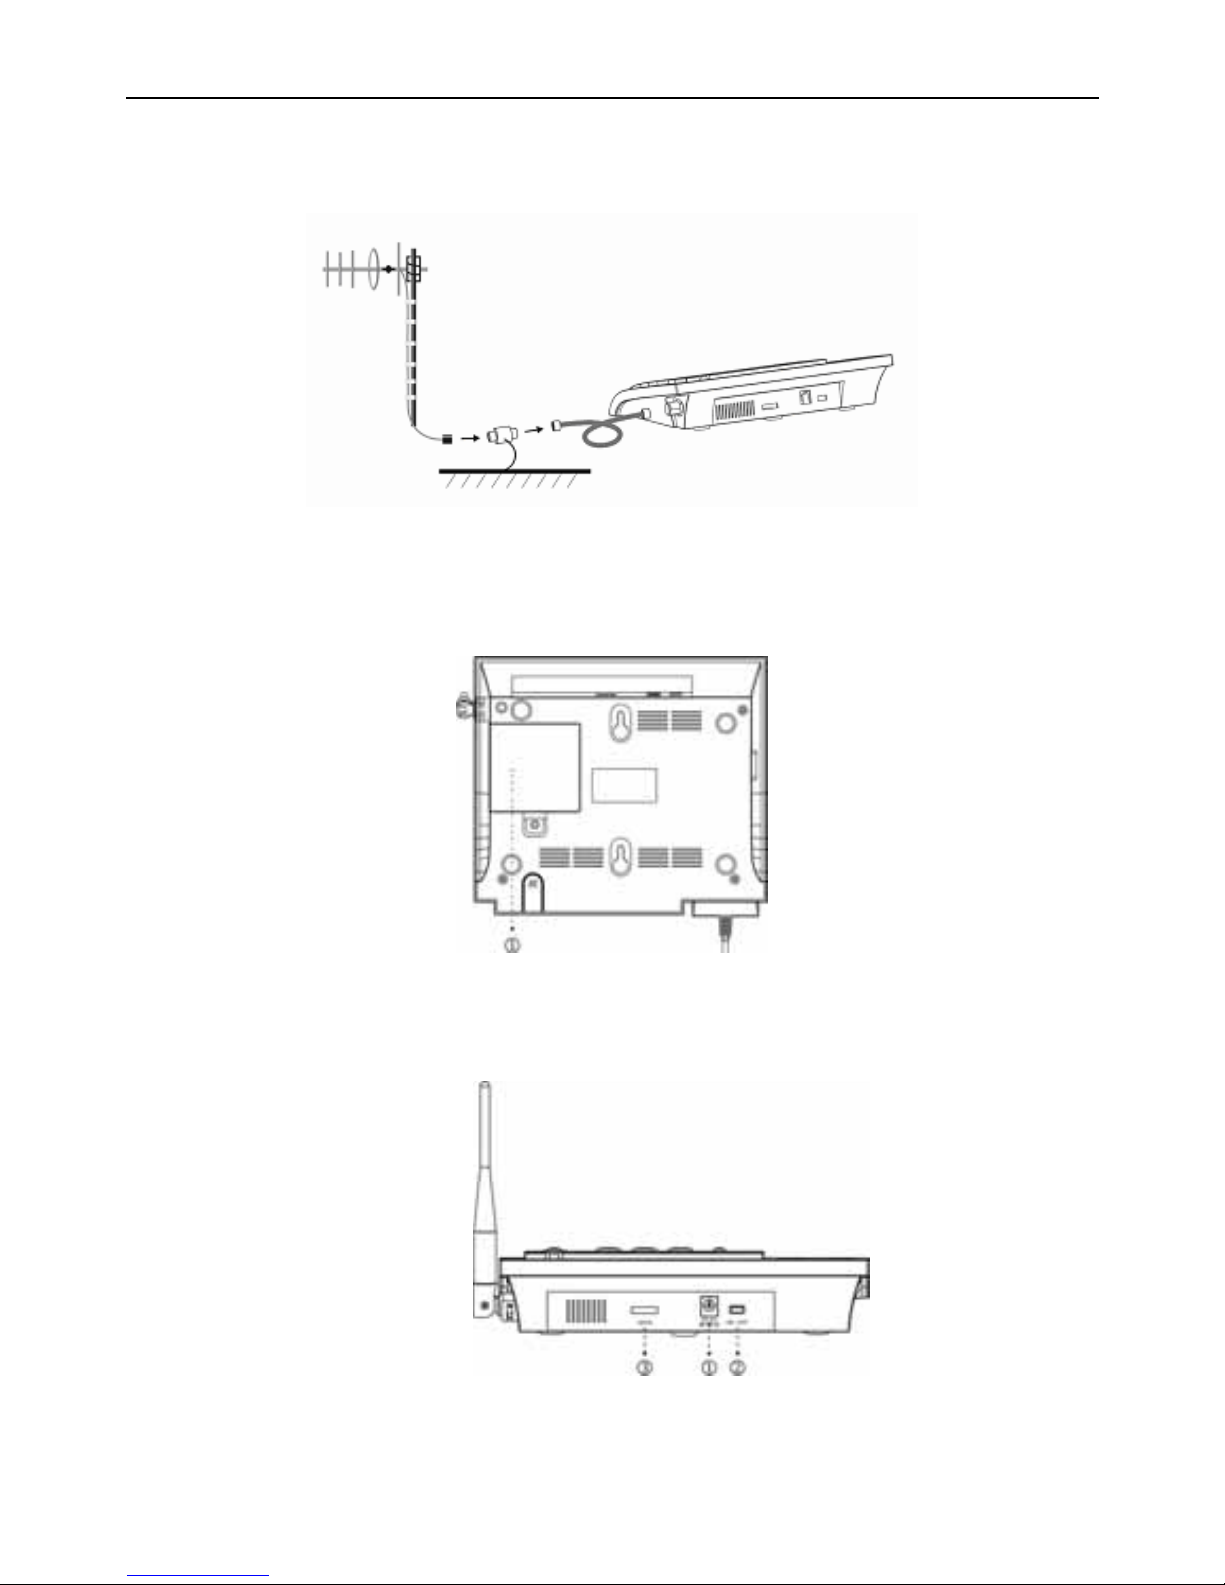
After the outdoor antenna is well installed, please connect the feeder line to
the outdoor antenna, tie it to a backstop and then place it down. After going
through a lightening arrester, connect the feeder line to your FWP, screw it tight
and make sure the connection is reliable. At the same time do not try to hang
heavy things on the cable line or drag/distort the cable. The feeder cable we
provide is about 15 meters long, don’t try to add power cable to lengthen it. If the
length is not enough, please contact us.
5.1.4 Lightening arrest measures
Because the outdoor antenna is normally installed at higher outdoor places,
you should consider lightning protection. We will provide you with detailed
lightening protection suggestions, please choose and buy the lightening rod and
arrester as suggested. Our company shall not be responsible if any accident
happens because of misoperations by users without following the instructions
(without installing lightening conductor as suggested) .
10
Page 17
ZTE WP560/960 User Manual
Please do not make calls on a lightening day if you have installed an outdoor
antenna.
Operation guide
1)
Lightning rod
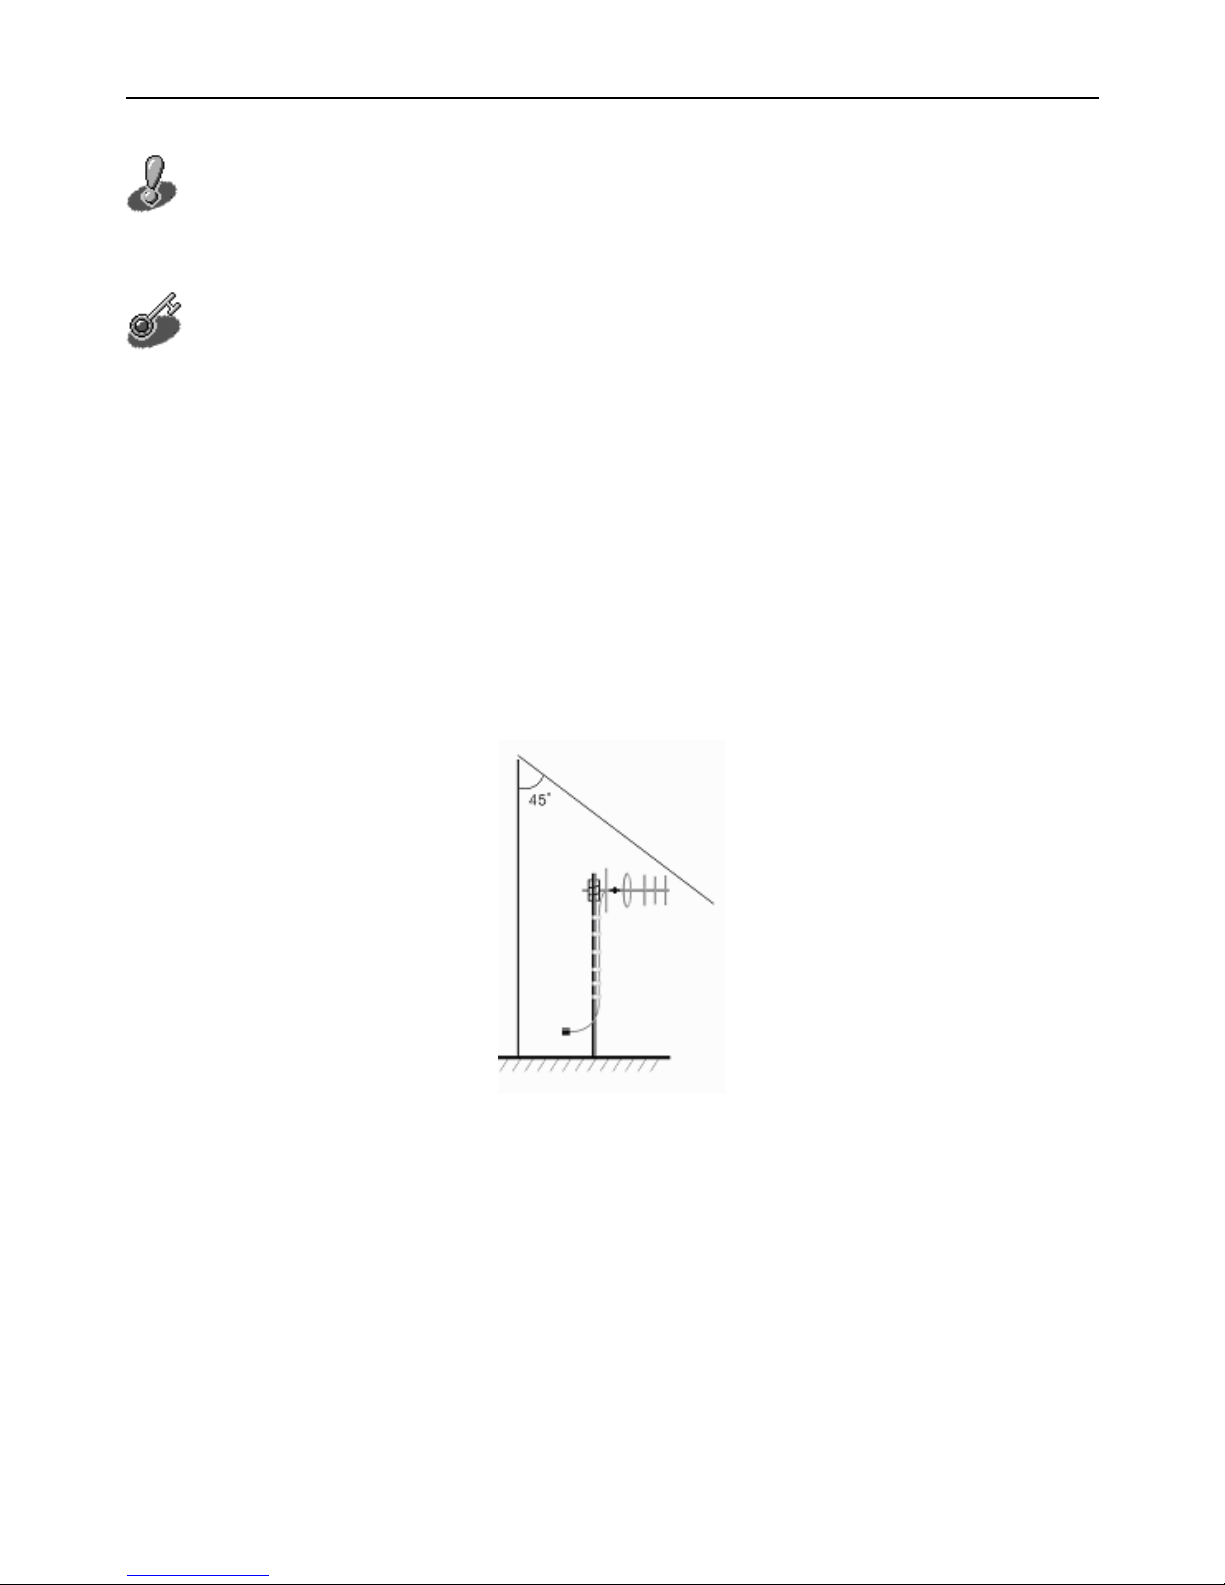
Please install the lightning rod near your outdoor antenna, the lightning rod
should be higher than your outdoor antenna, well grounded, and have a grounding
resistance less than 10ohm. Furthermore, the angle between the top of the rod and
the outmost point of the antenna shall not exceed 45 degree, and the horizontal
distance between the rod and the antenna shall not be shorter than 3 meters. See
below:
2) Lightening arrester
Please connect 2 meters of feeder cable to the antenna port on your FWP
before installing the lightning arrester. Connect the arrester to the outdoor antenna
through a 15-meter long feeder cable. In the middle of the lightening arrester is a
ground point, which is to be connected to a grounding line chosen according to
11
Page 18
ZTE WP560/960 User Manual
lightning arrest suggestions. Make sure that the line is well grounded.
5.2 Installing the FWP
Bottom View
① Battery cover
Back View
12
Page 19
ZTE WP560/960 User Manual
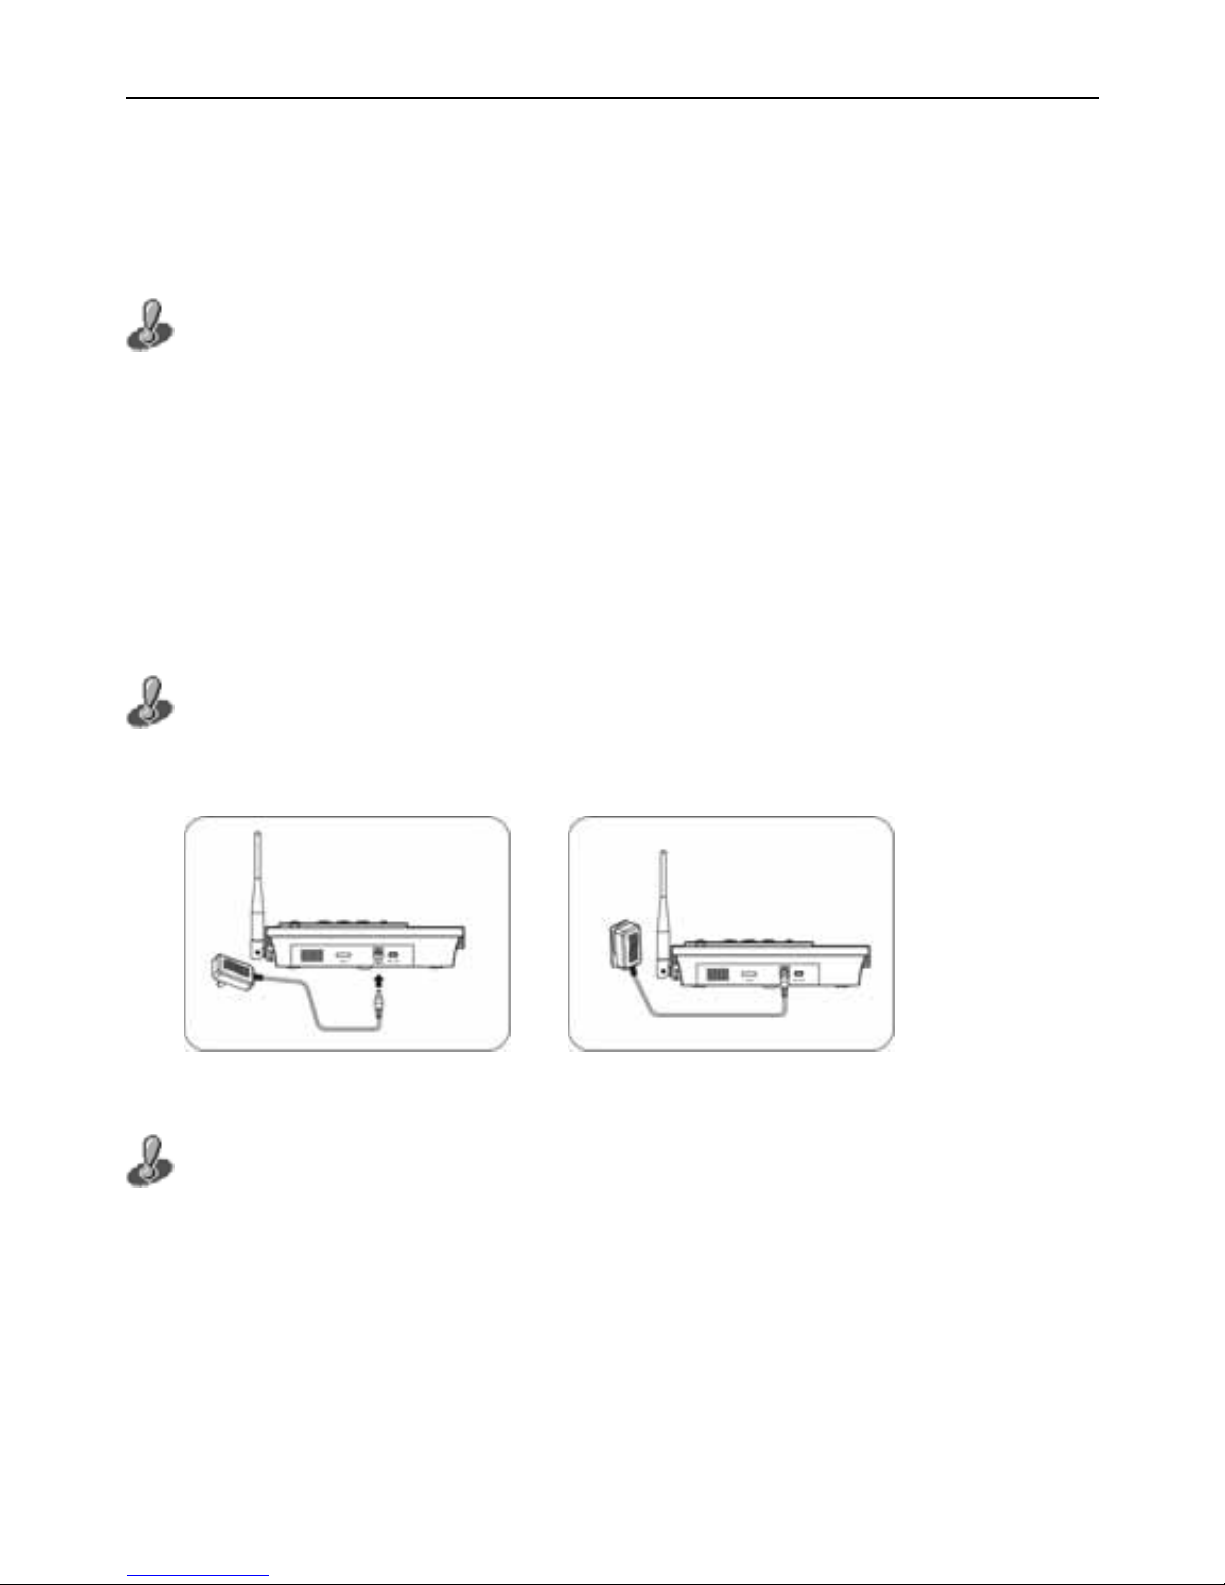
① Power Interface (DC 6V)
② Power Switch
③ USB Interface/ Serial Port Interface
Power on the FWP: move the power switch (see the picture above) to “ON”, the
FWP will give a “du” alert and enter into idle mode. Power off the FWP: move the
power switch (see the picture above) to “OFF”.
Installing the power adapter
The power for the FWP can be fed from the direct current output from the
power adapter which is connected to the indirect current power source.
Please connect the adapter with FWP’s power interface before connecting it with
external AC main supply.
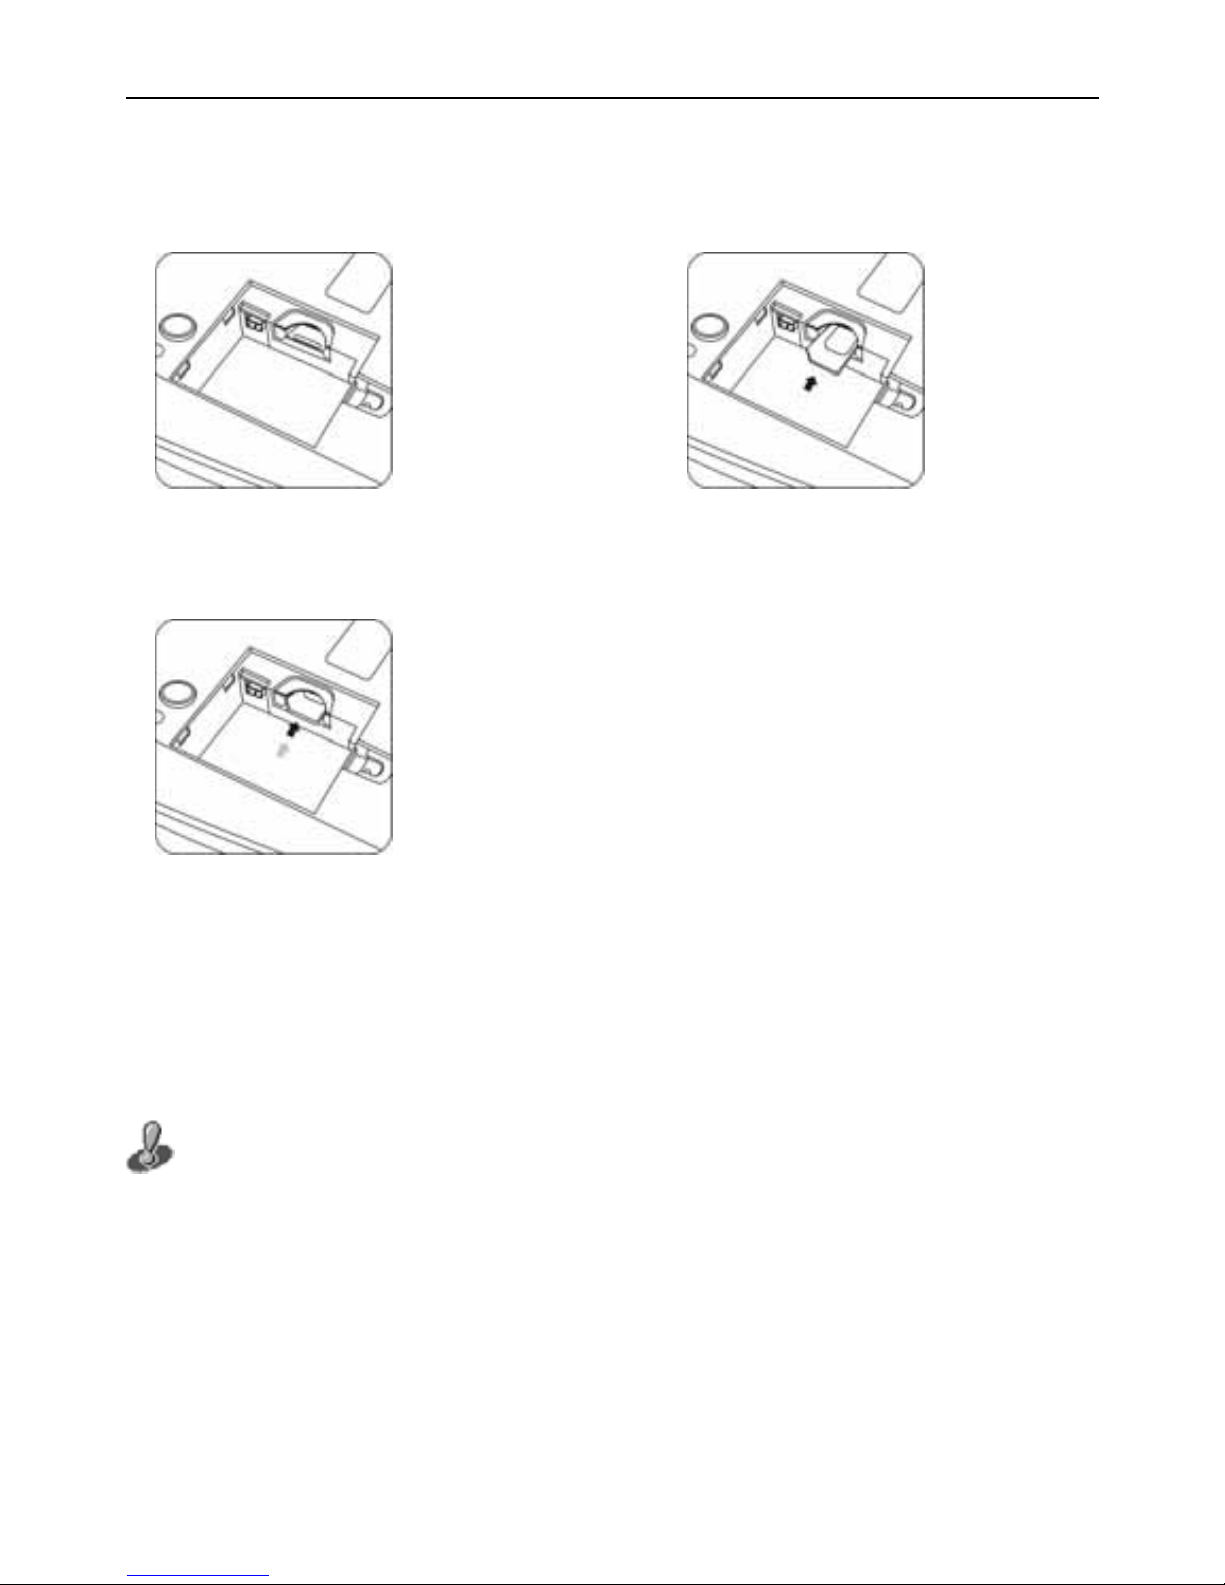
Installing UIM card
If your FWP is without UIM card, you have to install UIM-card before use. When
you are installing UIM card, make sure your FWP’s power switch is in “OFF” state
and the external power supply is disconnected.
Please install the UIM-card first before installing the battery。
13
Page 20
ZTE WP560/960 User Manual
1. Remove the battery cover 2. Install UIM card (pay attention to
UIM card’s cut corner position)
3. Follow the arrow to push the
UIM-card into the card holder
Installing Battery
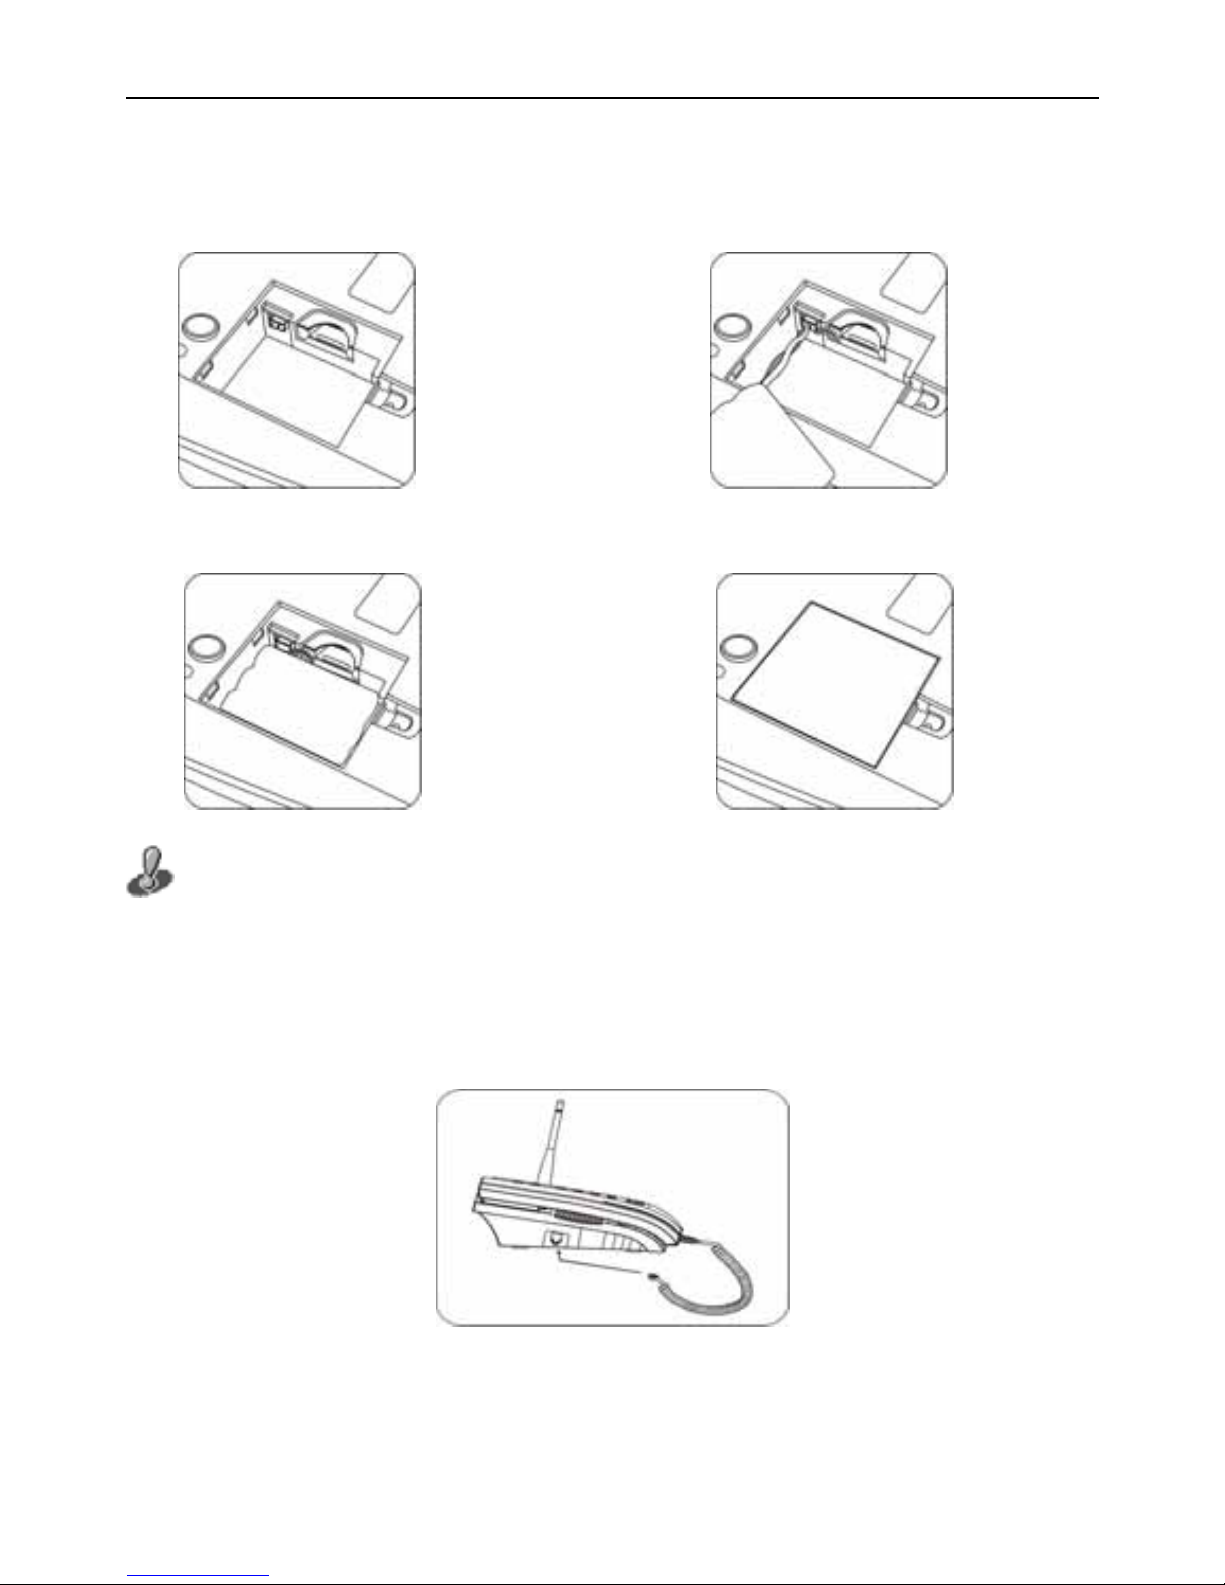
The FWP is equipped with a rechargeable built-in battery which can supply
power to the FWP when the power adapter is not available. When the power
adapter is supplying power to the FWP, it is also charging the battery.
When you are installing built-in battery, make sure your FWP’s power
switch is in “OFF” state and the external power supply is disconnected.
14
Page 21
ZTE WP560/960 User Manual
1. Remove the battery cover 2. Install battery (pay attention to
polarity)
3. After battery installation 4. Install battery cover
For the first time use, please charge the Ni-MH battery fo r over 16 hours
non-stop.
Attaching the handset
15
Page 22
ZTE WP560/960 User Manual
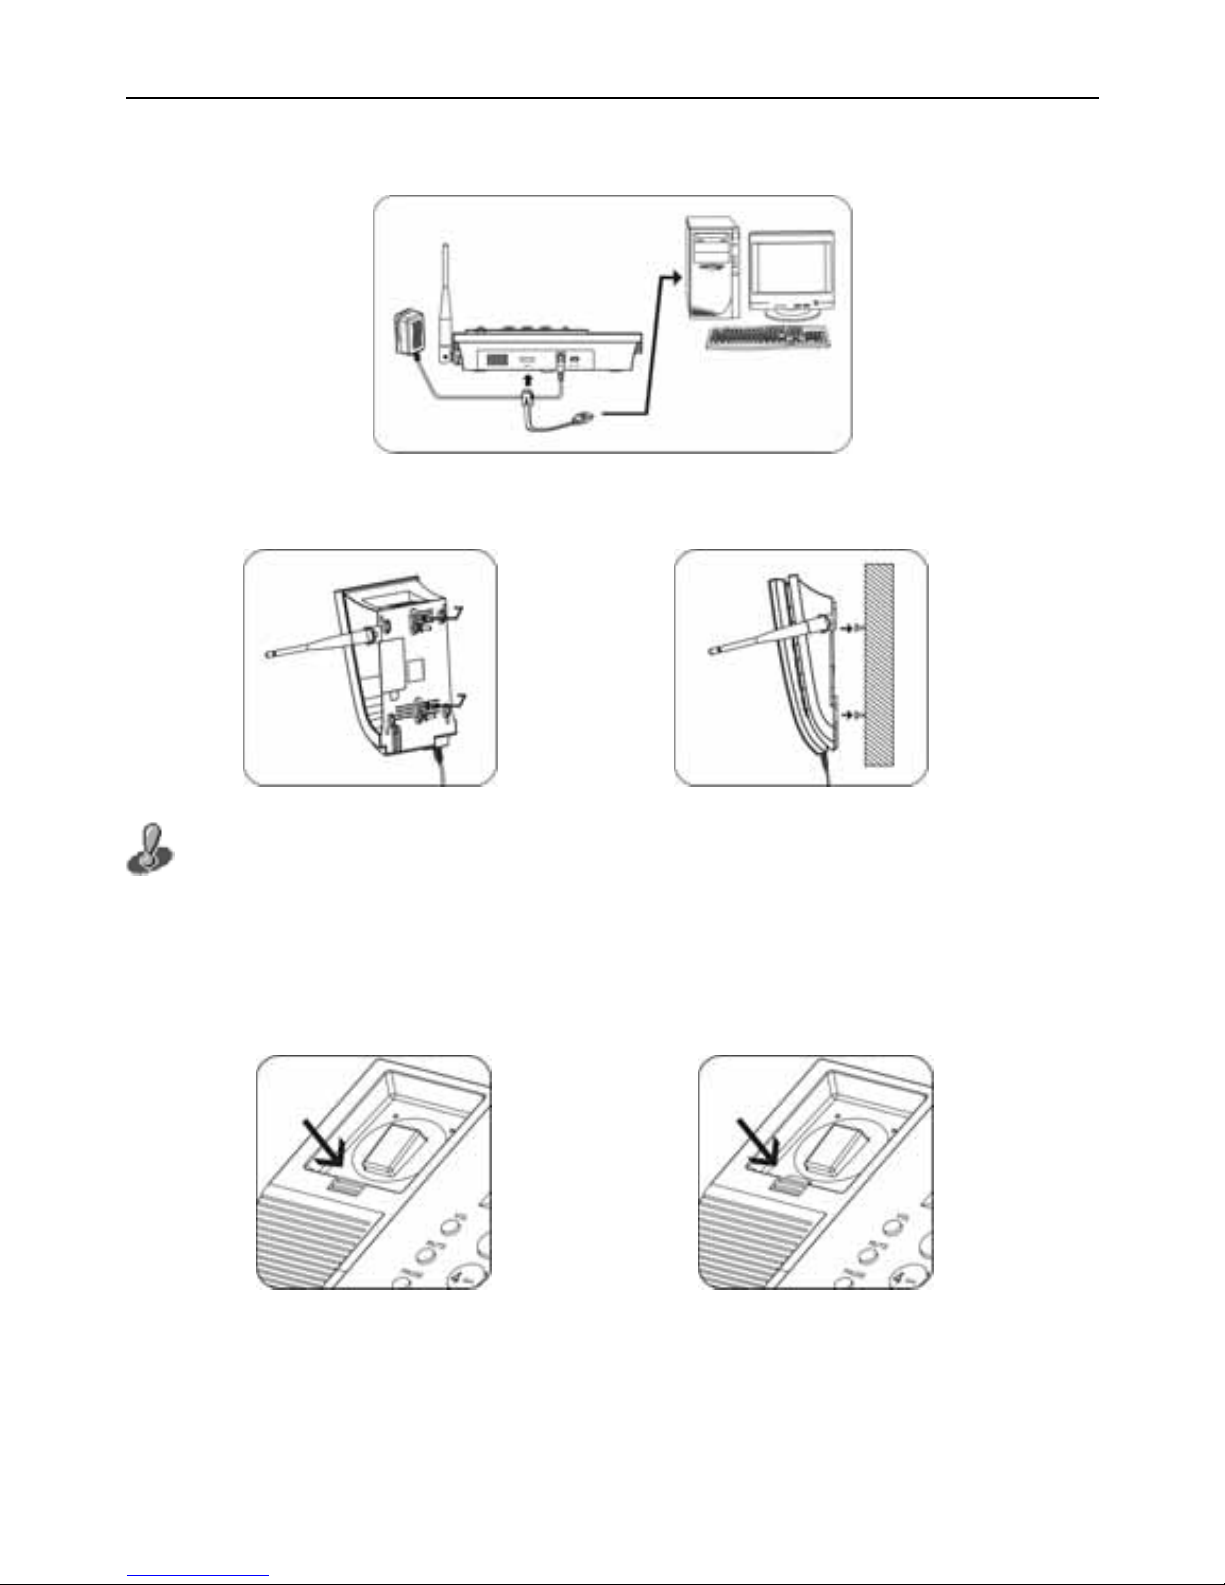
Connecting the FWP to a computer
Wall-Mount Installation
When in mount installation, plug out the anti-slip clip of handset as
shown in Fig. 1, and then reverse it and plug it back as shown in Fig. 2 to
avoid the slip of handset in mounting position.
Fig. 1 Fig. 2
16
Page 23

ZTE WP560/960 User Manual
5.3 Service Status Check
Display in service area: Turn on the FWP power, when the power cable is
connected properly, the FWP’s LCD window will light up and LOGO will be
displayed. The FWP will start to search for local CDMA digital network signals.
Once the network is found and the service is available, as shown in Fig. 1, you can
make a call.
Display in area with no service: When there is no service in your area, “No
Service!” will be displayed on the FWP. If the FWP still tries to search for local
CDMA digital network signal when there is no network, as shown in Fig. 2, in this
case please contact the local customer service.
Fig. 1 Fig. 2
17
Page 24
ZTE WP560/960 User Manual
6 Getting to know your FWP
6.1 Main parts
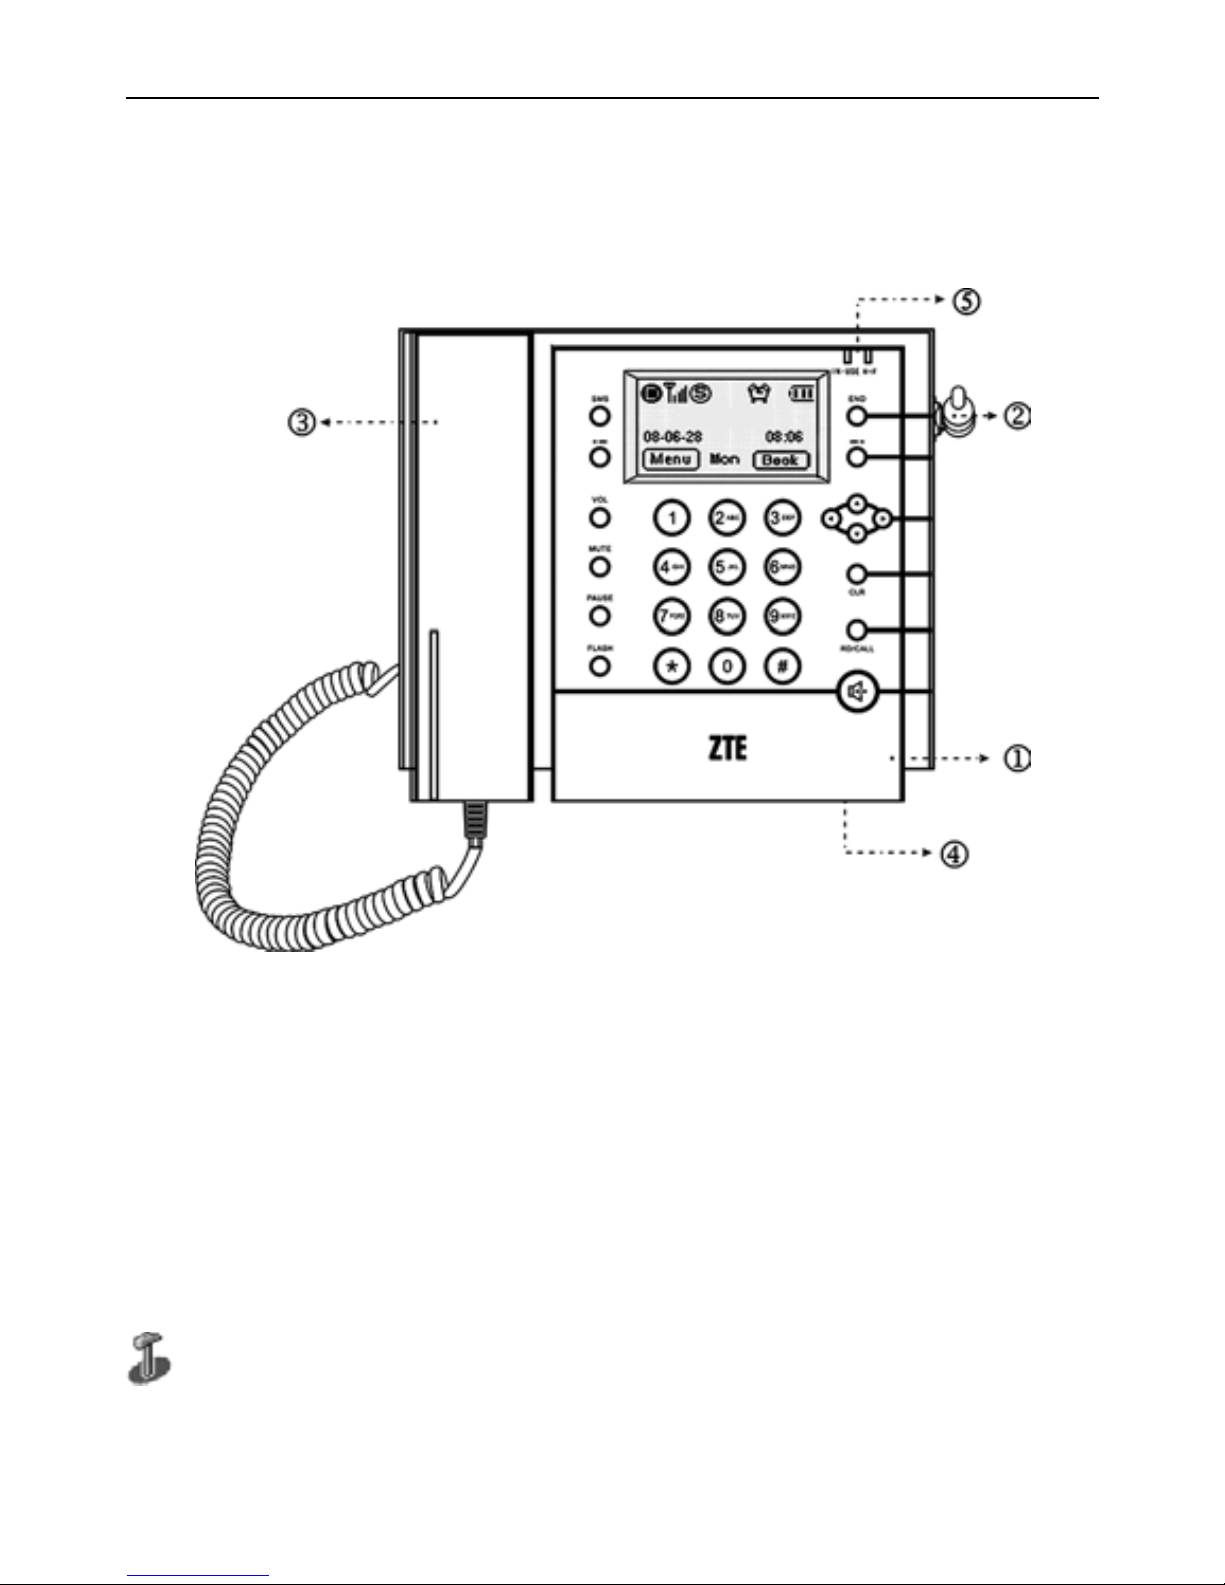
① FWP phone
② Antenna
③ Handset
④ Microphone (for handfree calling)
⑤ LED lights
IN-USE: the light will keep on once the handset is picked up and turn off once
18
Page 25
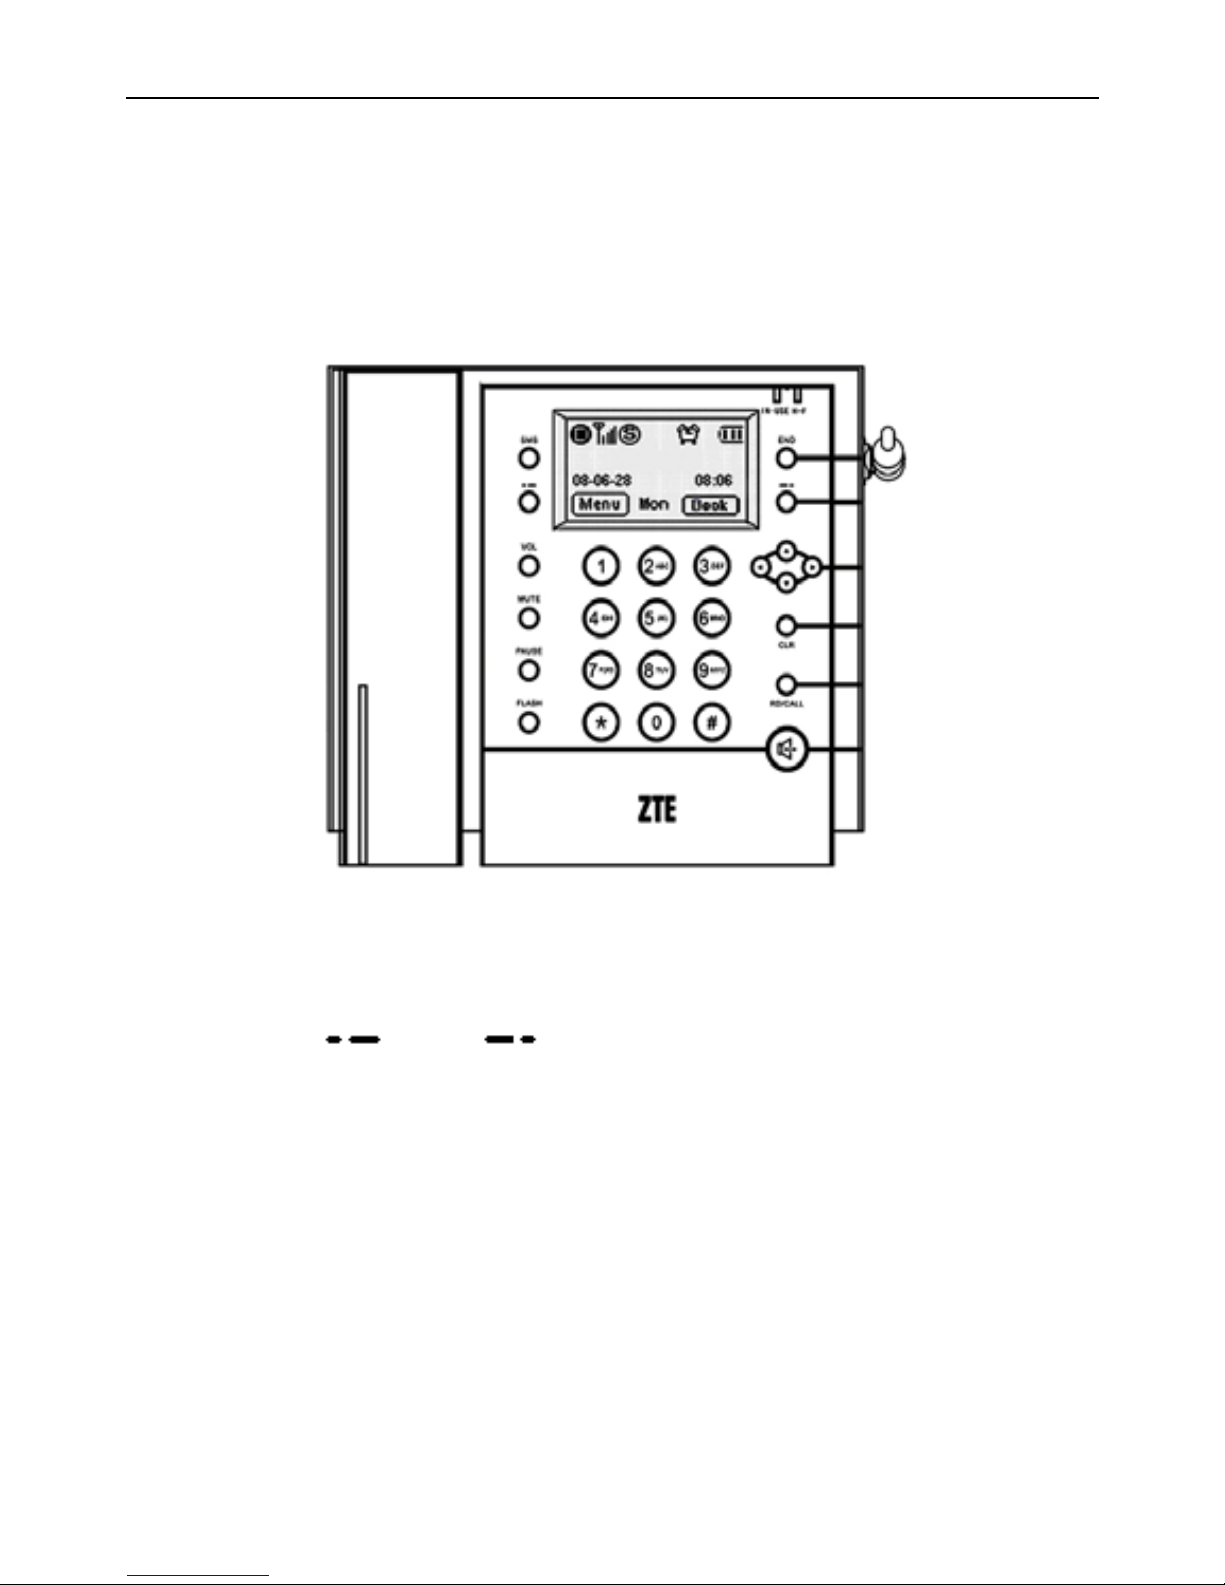
ZTE WP560/960 User Manual
the handset is put back. H.F: the light will keep on after pressing the handfree key
for off-hook, and turn off after pressing the handfree key again for on-hook.
6.2 Keys
1)
<SMS>
Press this key to enter into SMS menu
2)
Soft keys(left : right: )
There are Left Soft key and Right Soft key. Pressing the Left Soft or Right Soft
key will execute the function of the left or right icon on the bottom of the LCD
window.
3)
<VOL>
Press this key to adjust the volumes of receiver and speaker in idle or talk mode.
4)
<MUTE>
19
Page 26

ZTE WP560/960 User Manual
Press this key to prevent the other person from hearing your voice but keep
connection during talk.
You can also press this key to mute the ring tone of the FWP when there is an
incoming call and at the same time you can receive the call as normal. The FWP
will quit mute state when the other person hangs up or you receive the call.
5)
<PAUSE>
When you dial, press
<PAUSE> key to enter timed-pause character “P”. One “P”
means a 3-second delay. Several Ps can be input. This function is mainly
intended for users to dial the extension number or make IP or international calls.
6)
<FLASH>
When in conversation, you can press this key to set up a Three-Way Calling or
switch between Call-Waiting.
7)
<END>
This is to reject an incoming call; return to main menu ; hang up the phone.
8) Direction keys (
, ,◄, ►)
They are used to move the cursor and the scroll bar and menu selection. Except
under some special interfaces, e.g., address selecting and revising, the functions
of ◄ and ►are the same as those of the Left and Right Soft keys
9)
<RD/CALL>
Call or Redial or call back the phone numbers currently displayed in the FWP.
Dial out the hotline phone numbers when you have set the hotline function.
Look over the records of the outgoing calls.
20
Page 27

ZTE WP560/960 User Manual
10) <CLR>
Press this key to delete the character before the cursor or return to the upper
menu.
11)
Handfree key. Press this key to enter Handfree state.
12) 0-9 number and letter keys,*,#
To input numbers and characters. When allowed, “*” can be used to switch to
punctuation mark input mode. Under all the list interfaces, you can press * or #
to turn over or turn down the page.
Press<CLR>, you can return the upper menu., if “Back”is displayed on the right
below corner of the LCD window, then you can press the Right Soft key to return to
the upper menu. Press
<END>, you can directly return to the main menu. In the
editing status, you can delete one character pressing
<CLR> once and clear all by
pressing it and hold.
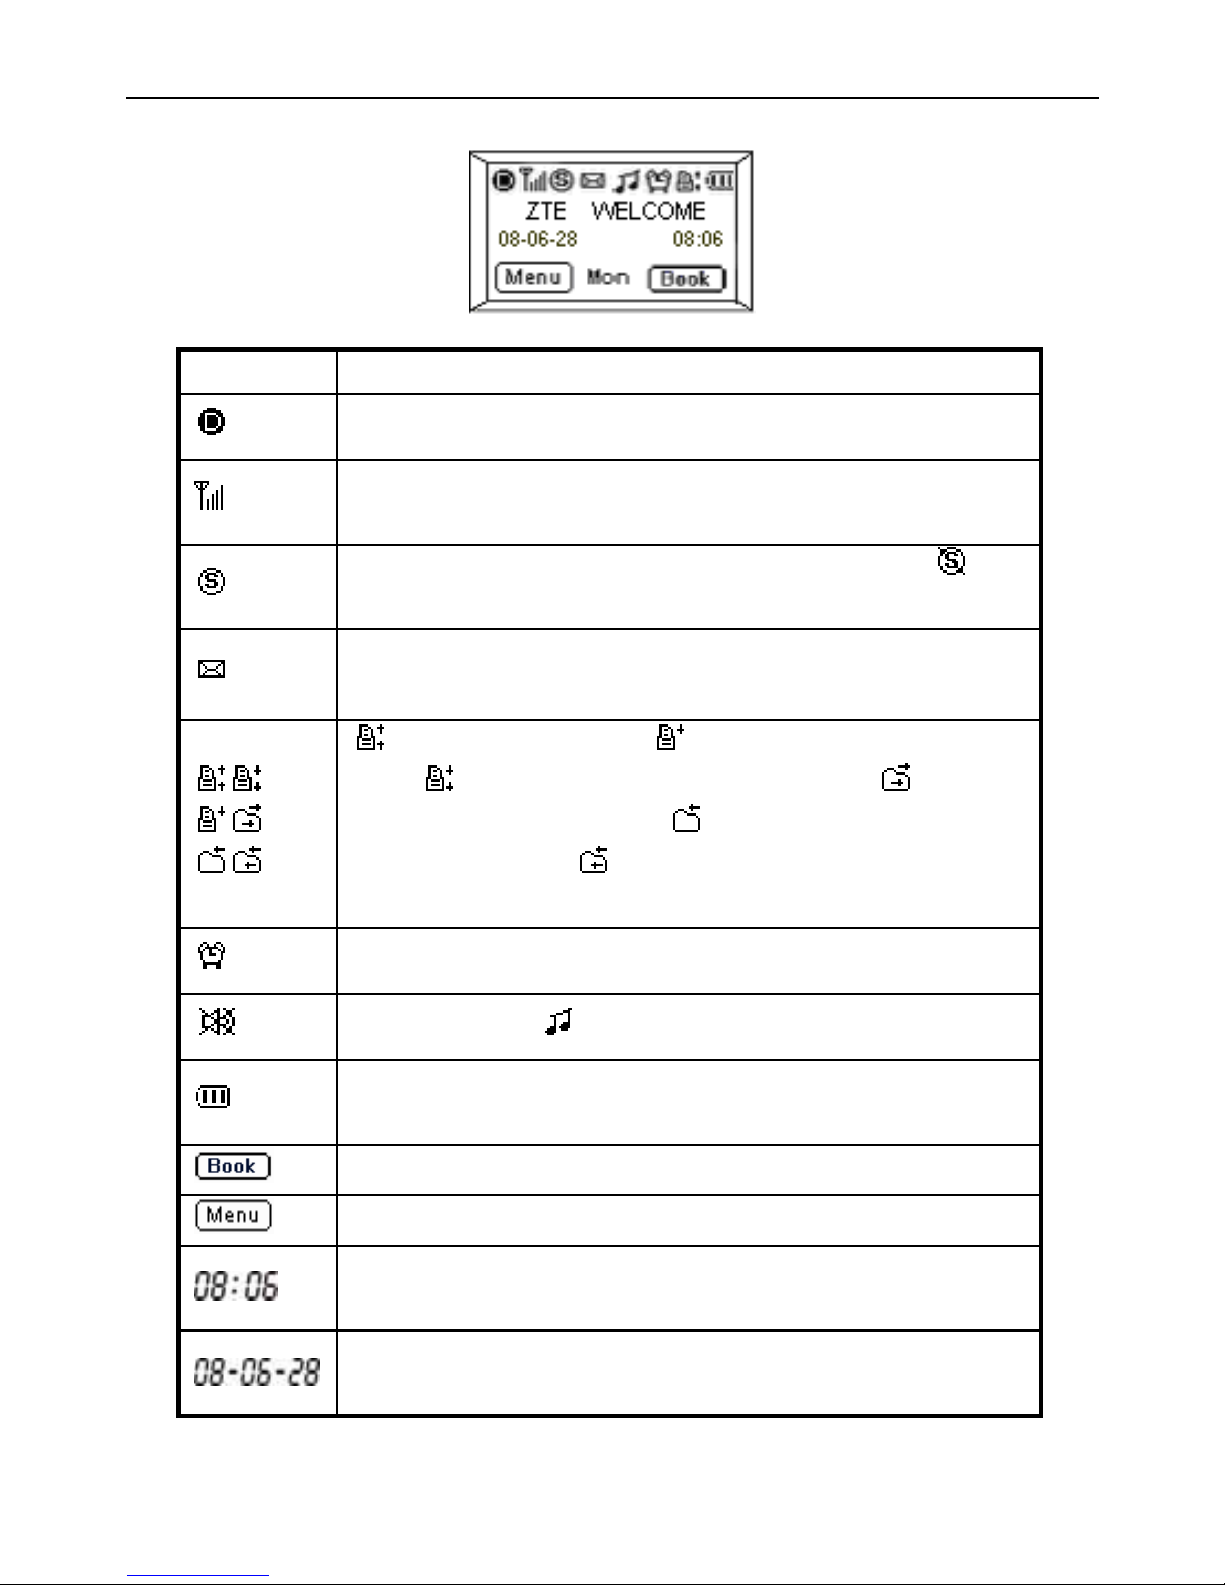
6.3 Display icons
The fist line of the LCD window displays the format of mobile network,
signal strength, network service, short message alert, ringing/mute, alarm, data
service and battery/external power supply. The second line displays greetings, the
third line displays date and time, the fourth shows the functions of left and right
soft keys and week.
21
Page 28
ZTE WP560/960 User Manual
Icon Description
Stands for CDMA digital format
Indicates the strength of current signal, the more bars, the
stronger the signal is
Stands for network service is currently available.
will
appear when there is no network service
flickers to indicate there is new messages. If the Inbox is full, it
will not flicker
Indicates sending fax, indicates receiving fax once
only,
indicates receiving fax all along, indicates
asynchronous data sending,
indicates asynchronous data
receiving only once,
indicates asynchronous data receiving
all along
Indicates that you have set your Alarm function
Stands for mute; stands for ringing
Indicates the level of battery power, the more bars, the more
power
The function of the right soft key in idle mode
The function of the left soft key in idle mode
Indicates current time, the numbers from left to right represent
hour and minute in turn
Indicates the current date, the number from left to right
represent year and month and day in turn
22
Page 29
ZTE WP560/960 User Manual
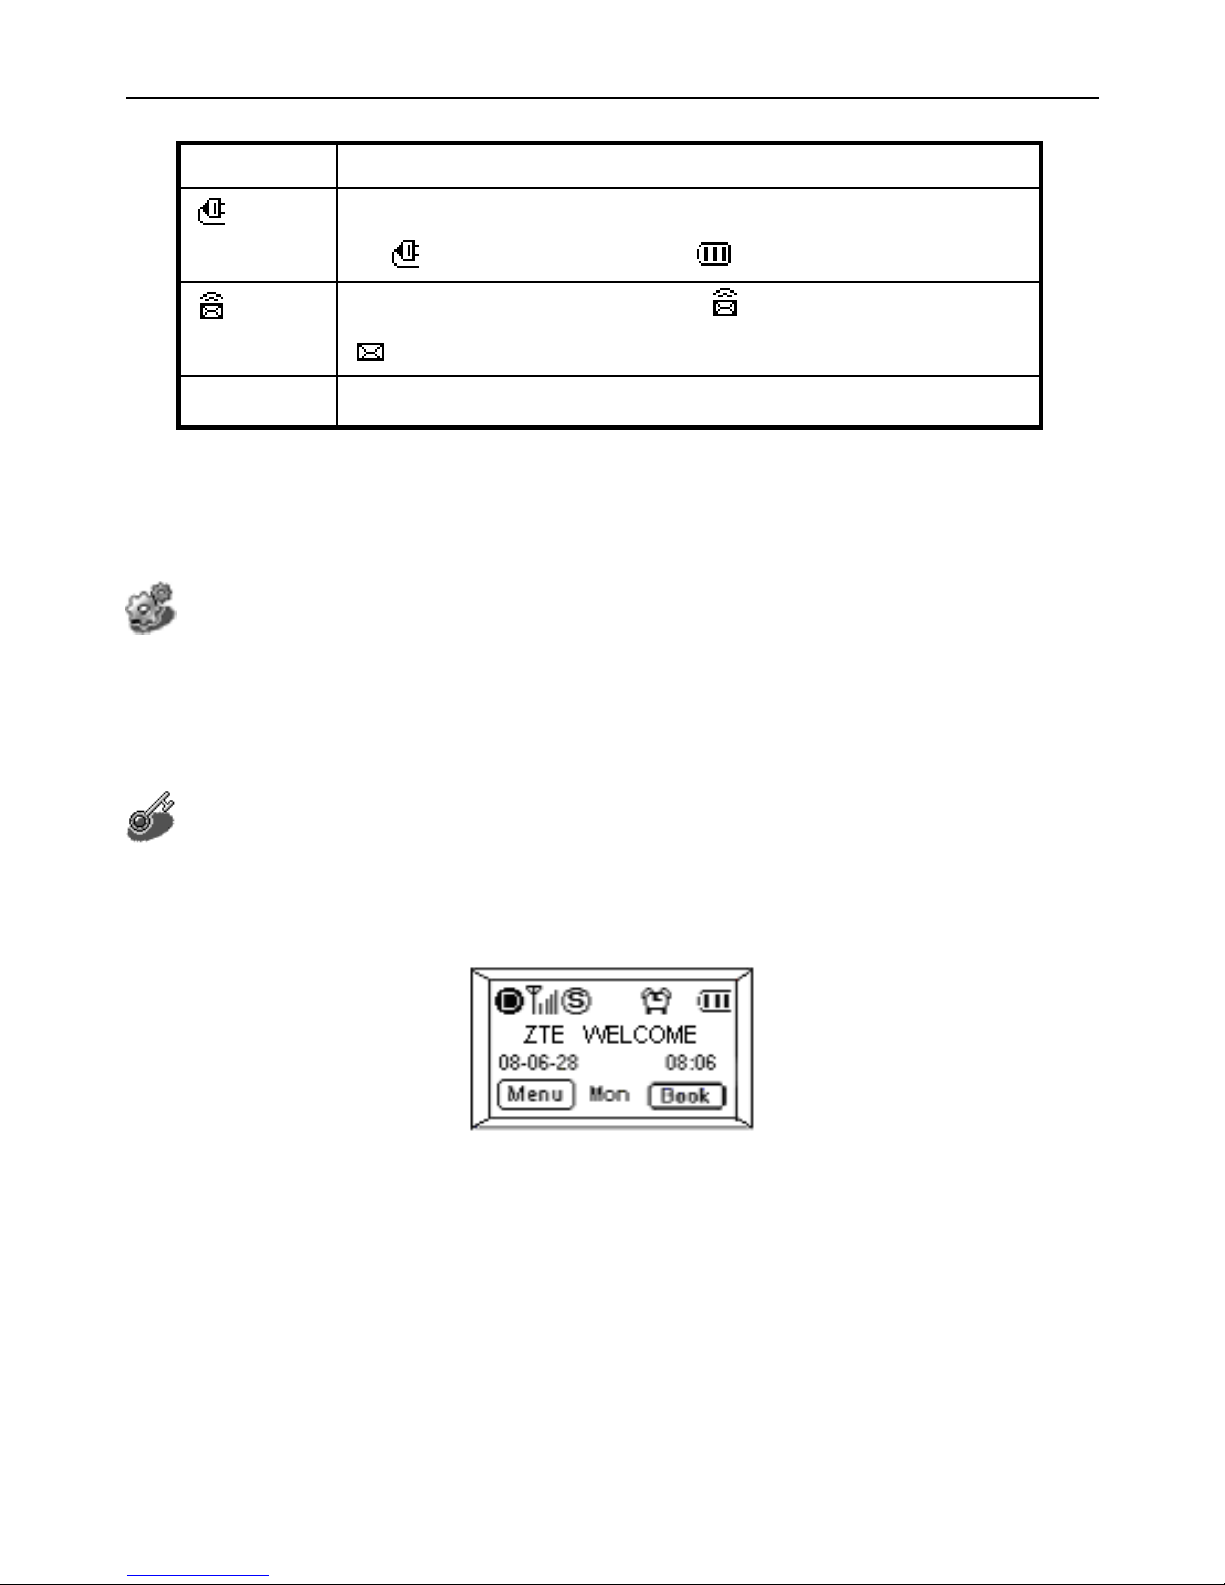
Icon Description
When you use your FWP only with the power adapter, the icon
of
will replace the icon of on the LCD
When there is a new voice mail,
will appear on the place of
Mon Indicates the current week
7 Calling function
7.1 Make a call
Function overview
If you have applied to the local telecom operator for relevant voice services,
you can use the FWP to make local, distance, international and IP calls.
Operation Guide
1) First make sure your FWP is powered on and enters the idle mode, as shown
below
2) Using handset
Pick up the handset in idle mode;
A dialing tone is heard, dial the desired number;
Press <RD/CALL>key or wait for several seconds, the call will be made
automatically;
23
Page 30

ZTE WP560/960 User Manual
Hang up the handset to end the call.
3) Handfree talk
Press handfree key in idle mode;
A dialing tone is heard, dial the desired number;
Press <RD/CALL>key or wait for several seconds, the call will be made
automatically;
Press handfree key again to end the call.
4) Preset dial
Dial the desired number directly in idle mode;
Press <RD/CALL>key to make the call;
Press <END> key to end the call.
7.2 Receive a call
Function overview
When you receive an incoming call, your FWP will ring and the incoming
number will be displayed in the LCD window if you have applied to your local
telecom operator for incoming call display service.
Operation guide
1) Using handset
When there is an incoming call, pick up the handset;
Talk time displayed on the LCD;
Hang up the handset to end the call.
2) Handfree receiving
24
Page 31

ZTE WP560/960 User Manual
When there is an incoming call, press the handfree key;
Talk time displayed on the LCD;
Press handfree key again to end the call.
7.3 Redial
Function Overview
This function is for redialing the last called number.
Operation Guide
1) Using handset
Pick up the handset in idle mode, then a dialing tone is heard;
Press<RD/CALL> key twice continuously to dial out the last called number;
Hang up the handset to end the call.
2)
Handfree redial
Press handfree key in idle mode, the a dialing tone is heard;
Press <RD/CALL> key twice continuously to dial out the last called number;
Press handfree key again to end the call.
If you activate Hot Line mode(not activate the call restriction), you can
only dial out the preset hot line calls (excluding emergency calls) by pressing
the
< RD/CALL> key.
7.4 Pause
Function overview
Add timed pause during dialing.
25
Page 32

ZTE WP560/960 User Manual
Operation guide
1) Add timed pause during dialing
When you are dialing, Press
<PAUSE> key to input timed pause character “P”
for delay in dialing. One “P” is 3-second delay.
2) If you dial a phone number with extension number, (e.g., the phone number is
123456, the extension number is 12) you input 123456PP12, your phone will
dial 123456 first, then after 6 seconds, it will dial 12. In this way, you can dial
the extension number directly.
7.5 Emergency Call
Function overview
In case of emergencies, only if the FWP can search out the local CDMA
digital network signal, can you dial out the emergency call numbers preset in the
FWP to seek for help.
Operation skill
1) When the Emergency call is over, your FWP will enter the Emergency state, and the
LCD will display:
EmergentCallOnly END to exit
2) You can press <END> key to exit Emergency state
3) During the Emergency state, you can only dial out the emergency call numbers, your
FWP will not respond to any other call numbers.
26
Page 33

ZTE WP560/960 User Manual
4) During the Emergency state, the volume of your key tone will be enhanced
Emergency calls are allowed even if Call Restrict is activated. Different countries
have different emergency call numbers, so the emergency call numbers preset in the
FWP won’t be effective in all countries. Please consult your local operator for details
when purchasing this product.
8 Optional Function
8.1 Three-way Calling
Function overview
This function allows a conservation involving three parties. Please contact
your local telecom operator to apply for this function and consult them for the
operations.
8.2 Call Forwarding
Function overview
This function enables you to forward your incoming calls to another
specified phone no matter your phone is turned off or not. You can still receive
calls while Call Forwarding is activated.
Please contact your local telecom operator to apply for this function and
consult them for the operations.
27
Page 34

ZTE WP560/960 User Manual
8.3 Call Waiting
Function overview
When there is a second incoming call when a call is in progress, you can
choose to receive or reject the second call. If you choose to receive it, you can
switch between the two calls.
Apply to your local telecom operator first to activate this function and
consult them for the operations.
8.4 Call Setting
Five submenus are available, including
① Hot Line ② Call Restrict ③
Originate Mode④Ring Tone⑤Auto Hyphen
8.4.1 Hot Line
Function overview
If you activate Hot Line mode, meanwhile not activate call restriction , you
can only dial out the preset hot line calls (excluding emergency calls) by pressing
the
< RD/CALL> key.
Operation guide
1) In idle mode, press Left Soft key and then press digital key <2>, you will enter
the menu of Call Setting.
28
Page 35
ZTE WP560/960 User Manual
2) Press digital key <1> to select【Hot Line】menu,
You will enter the interface on the right:
① Setting
② Edit
3) Select Setting, two Hot Line modes will appear: On and Off. You can choose
to activate this function or not.
4) Press the Left Soft key to return to the upper menu.
5) Select Edit you will enter the editing interface of
hotline number on the right:
Hotline:
OK Back
6) Press the Left Soft key to confirm the number and when you return to the idle
mode. The second line of the LCD window will appear :
-Hotline Mode-
8.4.2 Call Restrict
Function overview
Call Restrict includes five submenus:
① Origination ② Nation Wide ③
International④Incoming Call⑤Specified If Origination is activated, you cannot
make any calls (excluding emergency and hotline calls);If Nation Wide is
activated, you cannot make domestic distance calls;If International is activated,
you cannot make international distance calls;If Incoming Call is activated, you
cannot receive any calls;If Specified is activated, you cannot make specified calls.
29
Page 36

ZTE WP560/960 User Manual
Operation guide
1) In idle mode, press Left Soft key and then press digital key <2>, you will
enter the menu of Call Setting.
2) Press digital key <2> to select 【Call Restrict】, and then its submenus are
displayed.
3) Move the scroll bar to select the type of restriction you desires among the
submenus:
① Origination
② Nation Wide
③ International
④ Incoming Call
⑤ Specified
Press the Left Soft key to enter the activation interface of the restriction type
you selected.
4) Move the scroll bar to select On or Off option for the restriction type, and
then press the Left Soft key to confirm the option selection and return to the
upper menu.
Specified Restriction:
Operation guide
1) In idle mode, press Left Soft key and then Press digital key <2>, you will
enter the menu of Call Setting.
2) Press digital key <2> to select 【Call Restrict】, and then its submenus are
30
Page 37
ZTE WP560/960 User Manual
displayed.
3) Press digital key <5> to choose【Specified】, you
will enter the interface on the right:
① Setting
② Edit
4) Select Setting, you can activate or deactivate this
type of restriction by selecting On or Off.
5) Press the Left Soft key to return to the upper menu.
6) Select Edit ,you will enter the editing interface of
Specified number on the right:
Specified:
OK Back
7) Press the Left Soft key to confirm the input numbers and return to the upper
menu.
Emergency calls are still available after the setting of call restriction.
8.4.3 Originate Mode
Function overview
This function is intended to make it convenient for you to choose the way of
originating calls according to your own liking. Three options are available for
your choice.
Operation guide
1) In idle mode, press Left Soft key and then press digital key <2> to enter the
menu of Call Setting.
31
Page 38

ZTE WP560/960 User Manual
2) Press digital key <3> to select 【Originate Mode】 and enter its submenu,
three options are displayed:
①Sent Press (calls can be dialed out after pressing <RD/CALL>)
②After 3’S(the call will be automatically dialed out 3 seconds after the
number is input.)
③After 6’S(the call will be automatically dialed out 6 seconds after the
number is input.)
3) Select the desired originating mode and return to the upper menu.
8.4.4 Ring Tone
Function overview
15 types of ringings are available for your choice.
Operation guide
1) In idle mode, press Left Soft key and then press digital key <2> to enter
Call Setting.
2) press digital key <4> to enter the interface of Ring Type
3) Scroll to a ringing, and the system will play it.
4) Press the Left Soft key to select the desired ringing and return to the upper
menu.
8.4.5 Auto Hyphen
Function overview
By this function, you can set the input numbers with or without hyphen
according to your own habit.
32
Page 39

ZTE WP560/960 User Manual
Operation guide
1) In idle mode, press the Left Soft key and then press digital key <2> to enter
Call Setting menu.
2) press digital key <5> to enter the setting menu of Auto Hyphen
3) Move the scroll bar to select between ON and OFF options.
9 Short Message
Function overview
The contents of short message are mainly texts and digits. Owing to its
convenience in use and cost effectiveness, SMS is popular with users, especially
when you cannot make or receive calls if the traffic channel for voice service is
busy. SMS can bring you much convenience. In addition, short messages can be
saved in the FWP for you to view them, which can replace the function of voice
recorder when the call is not answered.
Submenus for Short Message include ①Create New②View Inbox③View
Outbox④Voice Message ⑤SMS Setting
Operation guide
You can enter Short Message via the following two ways.
1) In idle mode, press the Soft Left key and then press digital key <4>.
2) Press <SMS> key
Information including new message, old message, voice message and current
saving capacity, etc are displayed. After several seconds, the display disappears
33
Page 40
ZTE WP560/960 User Manual
and is replaced by submenus.If there isn’t any message, your system will not
display above information.
9.1 Create New
Function overview
Under this menu you can write new message. 160 English characters are
allowed for one message.
Operation guide
1) In Short Message interface, press digital key <1> to
select Create New, you will enter the interface on
the right:
How are you!
OK 160 Word
2) After inputting the message, press the Left Soft key
for confirmation. And then input the number of the
message receiver via the number keys, See the
right picture:
Or you can press the Right Soft key to enter “BOOK” to get the number
directly
SMS DestAddr:
26260000
OK Book
3) Press the Left Soft key, and three options as shown below will appear:
①Send;②Save;③Send & Save.
You can press the corresponding number key or press ▲ or ▼ to move the
scroll bar to make your selection.
34
Page 41
ZTE WP560/960 User Manual
9.2 Receive and Send Message.
9.2.1 View Inbox
Function overview
When a new message is received, the FWP will give an alert with four
continuous “di” sounds. At the same time, the reception of a new message is
displayed on the LCD window together with the information of the sender. The
icon
for new message will flicker on the standby picture. You can enter View
Inbox which have the following three options: ①New Msg②Old Msg③Clear
Inbox
Operation guide- New Msg
1) Under the View Inbox interface, Press digital key <1> to view 【New Msg】.
2) The content viewing interface is as the right
picture:
3/15 9:57AM
87654321
Delete Next
3)
You can press the Left Soft key to delete this message or
press the Right Soft key to view the next message.
4) The viewed message, if not deleted, will be saved into Old Msg of Inbox.
Operation guide-Old Msg
1) Under the View Inbox interface, Press digital key <2> to select to view 【Old
Msg】.
35
Page 42
ZTE WP560/960 User Manual
*26260000
*12345678
*87654321
Menu 1/3 View
2) The list of old messages is shown as the right
picture:
3) You can scroll to the desired message by pressing ▲ and ▼.
4) At this time ,you can get the Call Back phone number by pressing
<RD/CALL>
key, if pressing the key again, you will dial out the number. If the message
sender hasn’t set the Call Back number, the system will give you the alert :No
Call Back phone number received。
5) Under the above list interface, click the Left Soft key, three options will
appear:①Reply;②Forward;③Delete.
6) Under the above list interface, click the Right Soft
key to enter content viewing interface on the right:
*Urgent*
........
3/15 9:59AM
12345678
Menu Back
7) Under the above content viewing interface, you can press
<RD/CALL> key to
get the Call Back number. Press the key again, you can dial out the number. If
the Call Back number is not set, you can get the phone number of the
message sender. Press
<RD/CALL> key again, you can make a call to that
number.
Call back#
.........
12345678
Save Back
8) The interface of getting the Call Back number is
shown as the right picture:
9) You can press the Left Sofy key to save the number
into Phonebook. Here are two options:
36
Page 43
ZTE WP560/960 User Manual
① New entry (save as a new record)
② Existing (save to an existing record)
Operation guide-Clear Inbox
1) Under the View Inbox interface, Press digital key <3> to enter【Clear Inbox】,
which has three options:① Clear Old Msg ② Clear New Msg ③ Clear All
2) Click the corresponding number key or press ▲ or ▼ to scroll to the desired
option, you will perform the corresponding operation
When the messages reach to the maximum capacity, the still icon will
appear on the LCD window. Under the New Msg viewing interface, the function of
<RD/CALL> key is the same as that in【Old Msg】.
9.2.2 View Outbox
Function overview
The Outbox saves the edited messages. You can press digital key <3> under
the SMS interface to enter 【View Outbox】which has four options:①Sent Msg;
②Unsent Msg;③Temp Msg;④Clear Outbox.
Operation guide- Sent Msg
1) Under the interface of 【View Outbox】,press digital
key
<1> to enter Sent Msg, the list of phone numbers
26260000
87654321
12345678
Menu 1/3 View
37
Page 44

ZTE WP560/960 User Manual
to which you have sent messages is displayed as the right picture:
2) You can scroll to select the number for viewing. You can click the Right Soft
key to enter View or click the Left Soft key, three options can be seen:①
Send;②Edit;③Delete.
Operation guide-Unsent Msg
You can send the messages later by this function.
1)
Save your editing message(refer to 9.1).
2)
Later when needed ,press digital key <2> Under the interface of 【View
Outbox】to enter the Unsent Msg .
3) The next steps are referred to the operations in Sent Msg.
Operation guide-Temp Msg
This function enables to you save the message under editing any time when
there is an incoming call. Later you can continue editing the message.
1)
Press digital key <3>under the interface of 【View Outbox】to enter Temp
Msg.
2) The next steps are referred to the operations in Sent Msg.
Operation guide-Clear Outbox
1) Press digital key <4> under the interface of 【View Outbox】to enter Clear
Outbox which has four options:
①Clear Sent;②Clear Unsent;③Clear Temp;④Clear All.
38
Page 45

ZTE WP560/960 User Manual
2) You can click the corresponding number key or move the scroll bar by
pressing ▲ or ▼ to have the desired operation.
In all the listing interfaces, the names matching with those in Phonebook will be
listed.
9.2.3 Voice Message
Function overview
Voice Message is a service similar to Voice Recorder. You can forward the
incoming call to the Voice Message. You can get the voice messages through the
FWP saved in the server of the operator at any time and any place. When your
Voice Message receives a new message, your FWP will get an alert in time.
When there is a new voice message, the icon
will flicker on the LCD
window, and at the same time, when you press
<SMS> key to enter SMS menu,
“New VM:01” is displayed together with other information. After several
seconds, the display disappears and you can press digital key<4> to enter【Voice
Message】to see the notice of it.
Operation guide- Activate Vo ice Message
1) First you shall consult the local operator on how to activate the local Voice
Message and get the center code
2) Activate Call Forwarding in your FWP and set the destination number to be
the number of Voice Message. You shall consult the local operator on how to
39
Page 46

ZTE WP560/960 User Manual
activate the function of Call Forwarding.
3) The number of Voice Message is provided by the operator. Users can edit in
the editing interface of VM center code (refer to 9.2.4).
The function of Voice Message must be activated by the operator. If it is not
activated, voice messages cannot be received even if the number is set. Before using
this service, please confirm Call Forwarding and Message Receiving have been
enabled for your FWP
Please consult the local operator on how to leave/read a voice message and
consult them for the parameters of Voice Message (such as capacity, time for
recording, etc.)
9.2.4 SMS Setting
Function overview
Submenus for SMS Setting include ①Alert Type②Priority③Lifetime④
Delivery ACK⑤Center code ⑥Call Back#.
Press digital key<5>under SMS interface, you can enter 【SMS Setting
】.
Operation guide
1) Alert Type
Two types of alert are available:
Bell: when a new message is received, the FWP will give an alert in 4
continuous “di” sounds. At the same time, the LCD window will lighten up to
display the information of the message sender.
40
Page 47

ZTE WP560/960 User Manual
Lamp: when a new message is received, the FWP will just lighten up to show
the information of the message sender.
You can move the scroll bar via the directional keys to select the alert type.
2) Priority
Three levels of priority are available:
Normal
Urgent
Emergency
You can scroll to and select the desired level by moving the direction keys.
3) Lifetime
Lifetime indicates the time period that the system saves your message when
you fail to turn on the FWP in time when a new message is received.
The system has set 6 types of Lifetime:
1 Hour
2 Hours
12 Hours
1 Day
2 Days
3 Days
You can press the directional keys to scroll to the desired one and select it.
4) Delivery ACK
This is the acknowledgement made by the system for if the receiver has got
the message. You can activate or deactivate this function by choosing
Yes or
No via the direction keys.
5) Center code
41
Page 48

ZTE WP560/960 User Manual
One of the necessary steps of using the service of Voice Message is to input
the code of the voice message center.
6) Call Back#
If you want the message receiver to reply to another number, you need to
input the number here.
10 Message Saving
10.1 Phonebook
Function overview
Submenus for Phonebooks include ①View book②Search book③Add entry
④Speed dial.
Operation guide
You can enter Phonebook by the following 2 ways:
1) In idle mode press the Left Soft key and then digital key<3>.
2) Press the Right Soft key.
10.1.1 View book
Function overview
In Phonebook,
Press digital key<1> to enter View book.
When there is no list in your phonebook, the following submenus are
included in View book:
All entry Ungrouped (New group).
Operation guide- All entry
42
Page 49
ZTE WP560/960 User Manual
1) If no number is input in the Phonebook, only“ (New entry)”is displayed.
2) You can have the following operations:
Press the Left Soft key, you can add new entry, for which the detailed operation is
referred to Add entry in 10.1.3.
Press the Right Soft key, and then you can have the following operations:
① Add entry:please refer to
Add entry in 10.1.3 for details.
② Search book:please refer to
Search book in 10.1.2 for details.
③ Delete entry
After the above operations, the new entry will automatically be classified
into Ungrouped.
Operation guide- Ungrouped
If you haven’t input any number, the operations are the same as above.
Operation guide- New group
If you haven’t set any new group, (New gr oup) will appear on the third
line of the LCD window. And then you can choose to click the Left Soft key.
………………
< Music 01 >
Edit Save
1) You will enter the interface of adding new group,
see the right picture:
2) Click the Left Soft key again, you will enter the
interface of editing New group, see the right
picture:
_
OK 9 Word
43
Page 50
ZTE WP560/960 User Manual
< Music 01 >
Edit Save
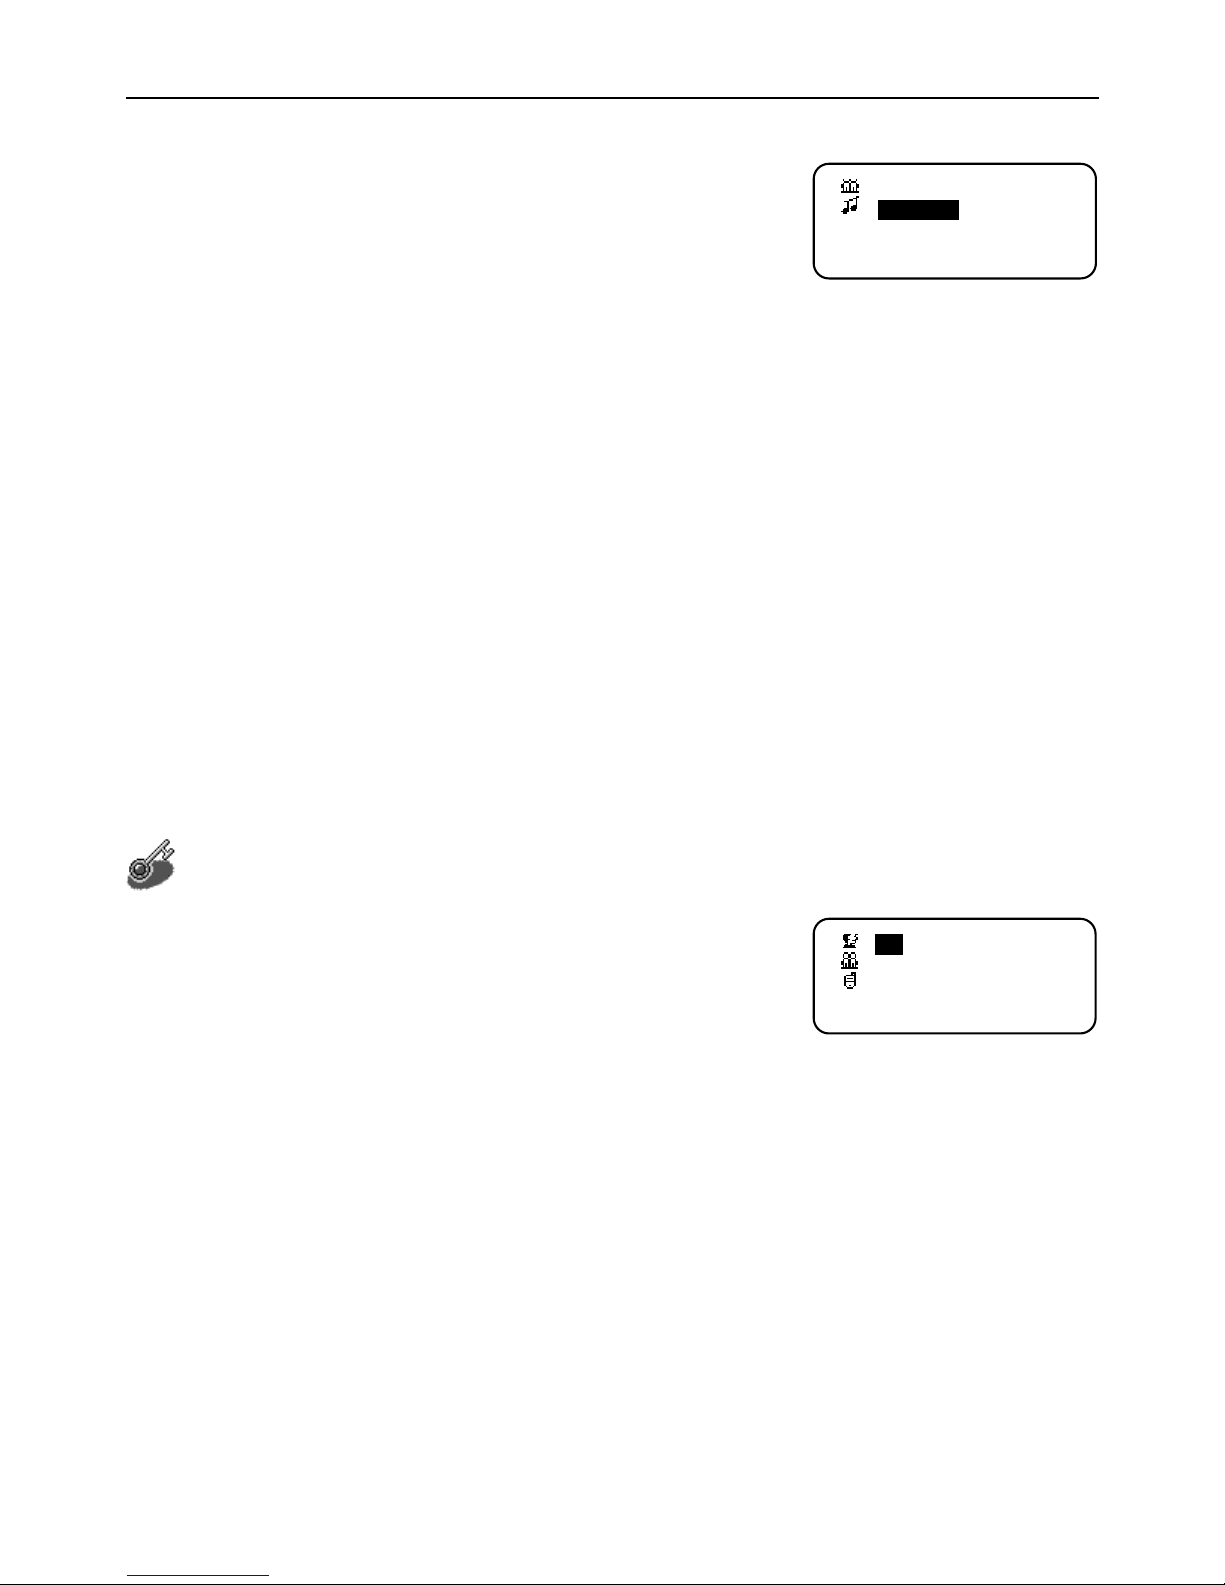
3) Input the name of new group, and press the Left
Softkey to confirm the input and return to the
previous display. Move to the next line, see the
right picture:
4) You can press the Left Soft key or the ◄► key to select the music. Finally
please press the Right Soft key to save this operation.
Or you can choose to click the Right Soft key
1) The following options will appear: ① Add group;② Modify group;③
Delete group.
2) You can click the corresponding number key or move the scroll bar to have
the desired operation.
Operation guide- viewing the content of existing records
1) While viewing the content of existing record, see
the right picture:
2) You can press the Left Soft key to edit the record.
Or you can press the Right Soft key, the following three options will appear:
①Save tel to;②Delete entry; ③Back.
joe
<Friends>
13525010000
Edit Menu
3) When you choose Save tel to ,two options will appear:①New entry;②
Existing.
4) You can click the corresponding number key or move the scroll bar to have
desired operation.
44
Page 51
ZTE WP560/960 User Manual
All the records within the group will be deleted if a group is deleted. Only the
self-established group can be deleted. “All entry” and “Ungrouped” belong to fixed
classification.
10.1.2 Search book
Function overview
You can search by name, number and group.
Operation guide
………………
< All entry >
Edit Start
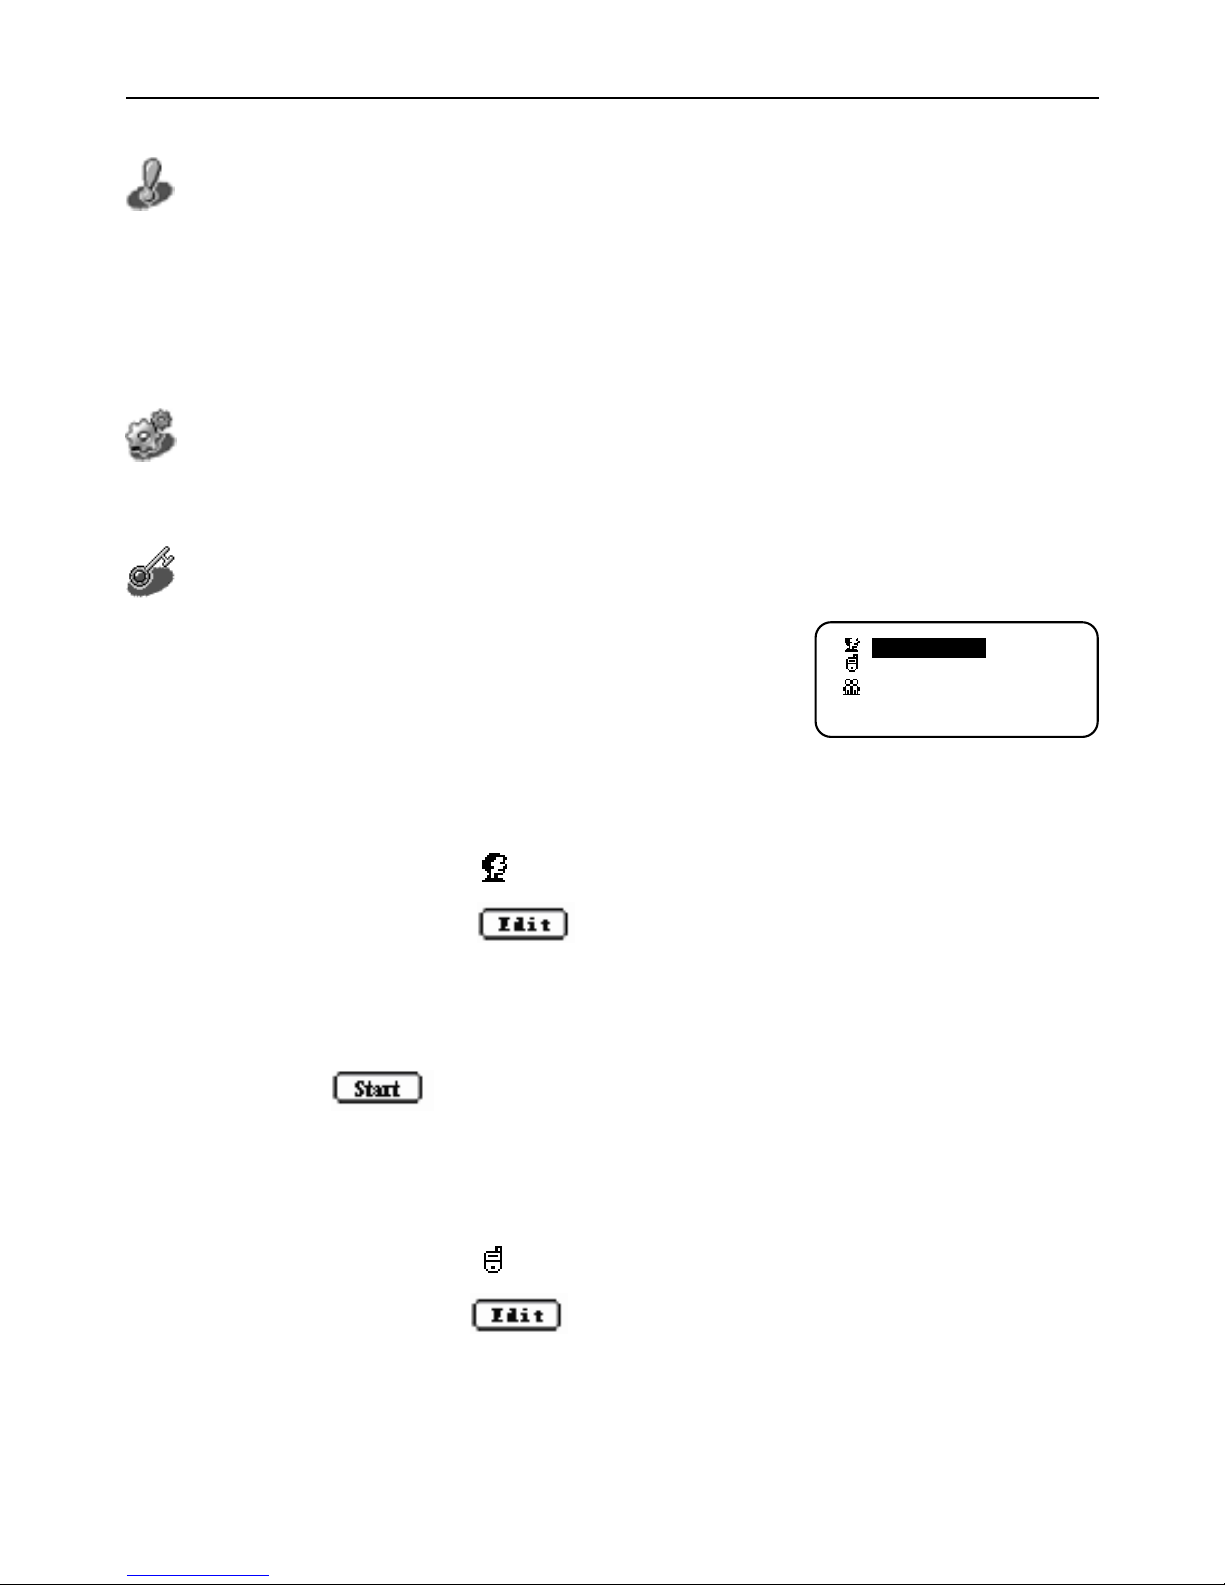
In Phonebook press digital key <2> to enter Search
book, see the right picture, You can operate as
follows:
1) Search by name
Move the scroll bar to
via ▲ and ▼, and click the Left Soft key to
activate the function of
. Now you can input the name for inquiry.
Press the Left Soft key to confirm the input and return to the previous
interface. Now you need only to click the Right Soft key to activate the
function of
to start searching the information of the name you
specified.
2) Search by number
Move the scroll bar to
via ▲ and ▼, and click the Left Soft key to
activate the function of
. Now you can input the number for inquiry.
Press the Left Soft key to confirm the input and return to the previous
45
Page 52
ZTE WP560/960 User Manual
interface. Now you need only to click the Right Soft key to activate the
function of
to start searching the information of the number you
specified.
3) Search by group
Move the scroll bar to
via ▲ and ▼, and click the Left Soft key to
activate the function of
or click ◄ and ► to select different group.
Press the Left Soft key to confirm the selected group, and then click the Right
Soft key to activate the function of
to start searching the
information of the group.
Rules for searching:
1) If the name domain is empty but the number domain is not, then all the records
containing the specified characters in the number domain will be searched in the
specified group.
2) If the number domain is empty but the name domain is not, then all the records
containing the specified characters in the name domain will be searched in the
specified group.
3) If neither the name domain or the number domain is empty, then all the records
containing the specified characters in both the name and the number domain will
be searched in the specified group.
4) If both the name domain and the number domain are empty, then all the records
of the specified group will be listed.
46
Page 53
ZTE WP560/960 User Manual
10.1.3 Add entry
Function overview
You can add new contacts via the submenu Add entry of Phonebook.
Operation guide
1) In idle mode, press the Right Soft key to enter Phonebook.
2) Press digital key <3> to select Add entry.
3) And Edit entry appears. Move the scroll bar by pressing ▲or▼ to select one
from different icon shown below which stands for different items:
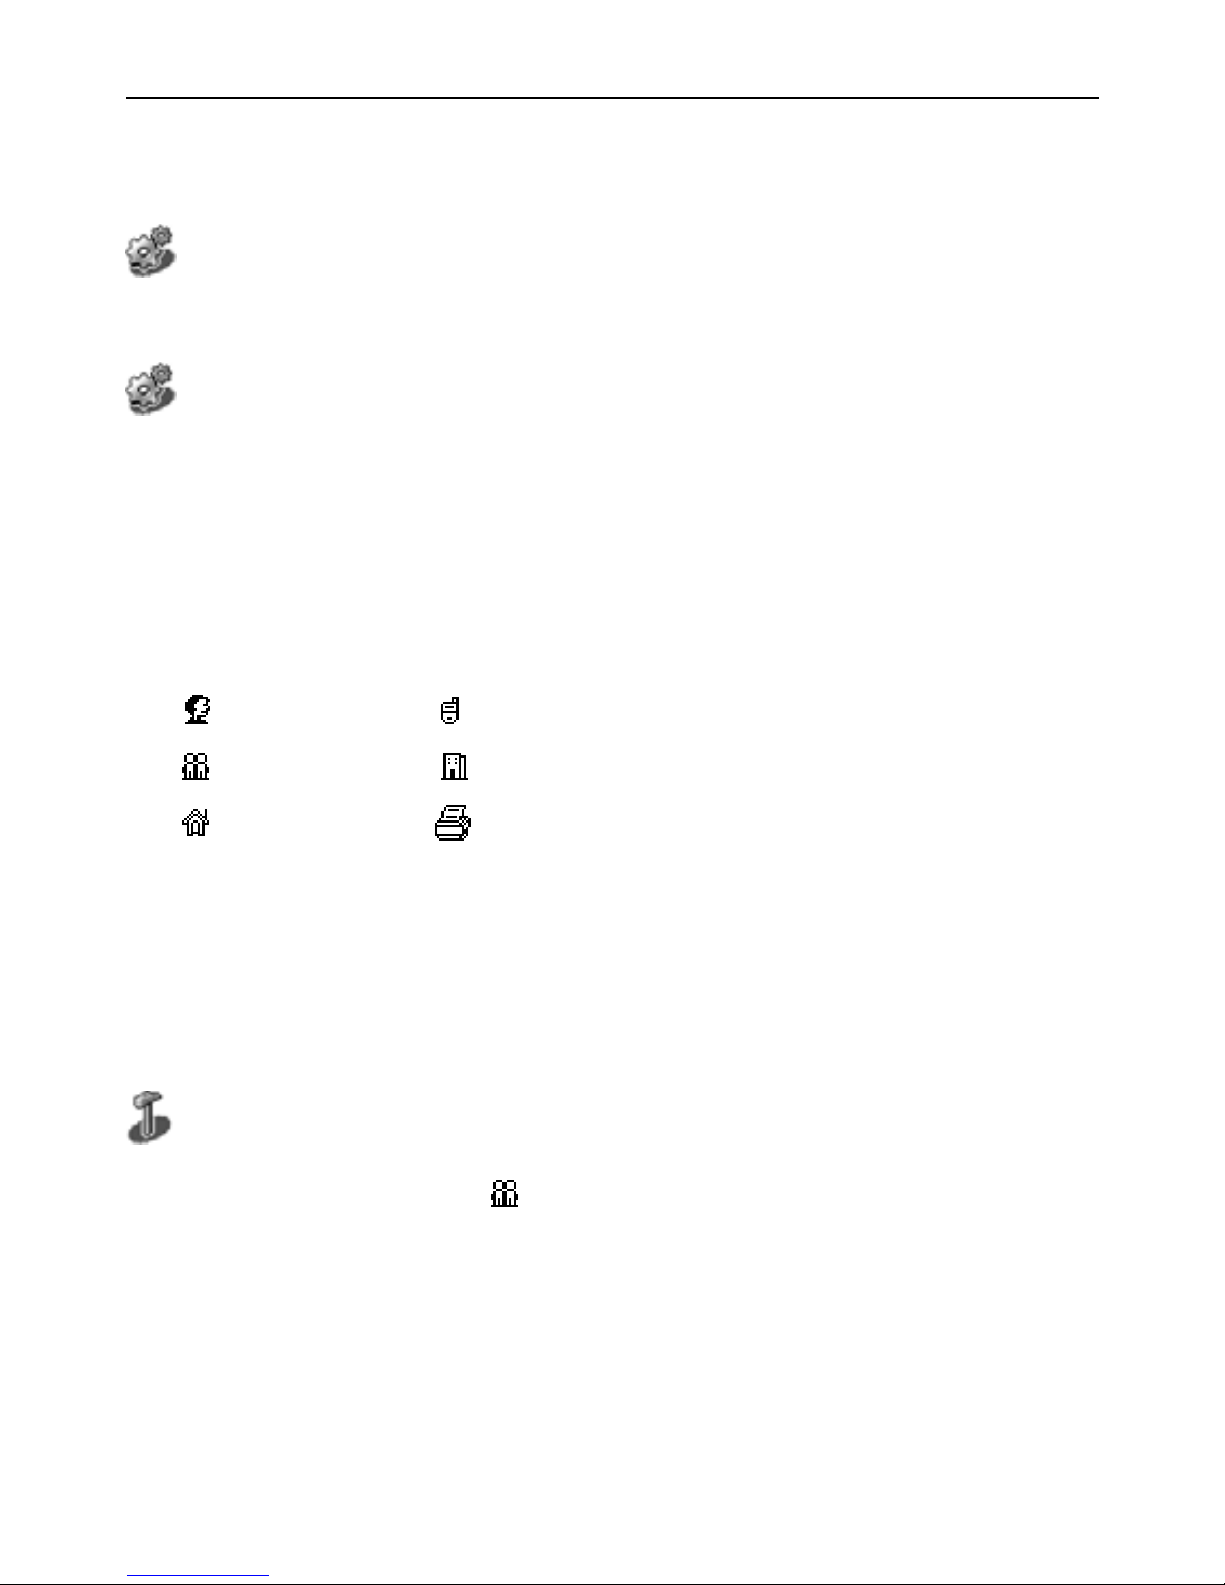
:Name :Mobile phone
:Group :Office phone
:Family phone :Fax
4) After selecting the item by moving the scroll bar, you can press the Left Soft
key to enter the editing interface of the selected item.
5) After editing, press the Left Soft key to confirm it and return to Edit entry
6) Press the Right Soft key to save the setting.
Operation skill
1) When it comes to the icon , You can press the Left Soft key or the ◄► key
to select existing groups.
2)
If you input the number in idle mode, you can press the Left Soft key to save
the number directly. There are two options: save to New entry and save to
47
Page 54
ZTE WP560/960 User Manual
Existing
10.1.4 Speed Dial
Function overview
This function enables you to manage, add, edit, view and delete speed dial
numbers. You can make calls or send messages in the viewing interface or from
the list of speed dial numbers. The FWP supports speed dial by inputting the
address into the interface in idle mode.
Operation guide-Add new record
(New entry)
Add 0 Back
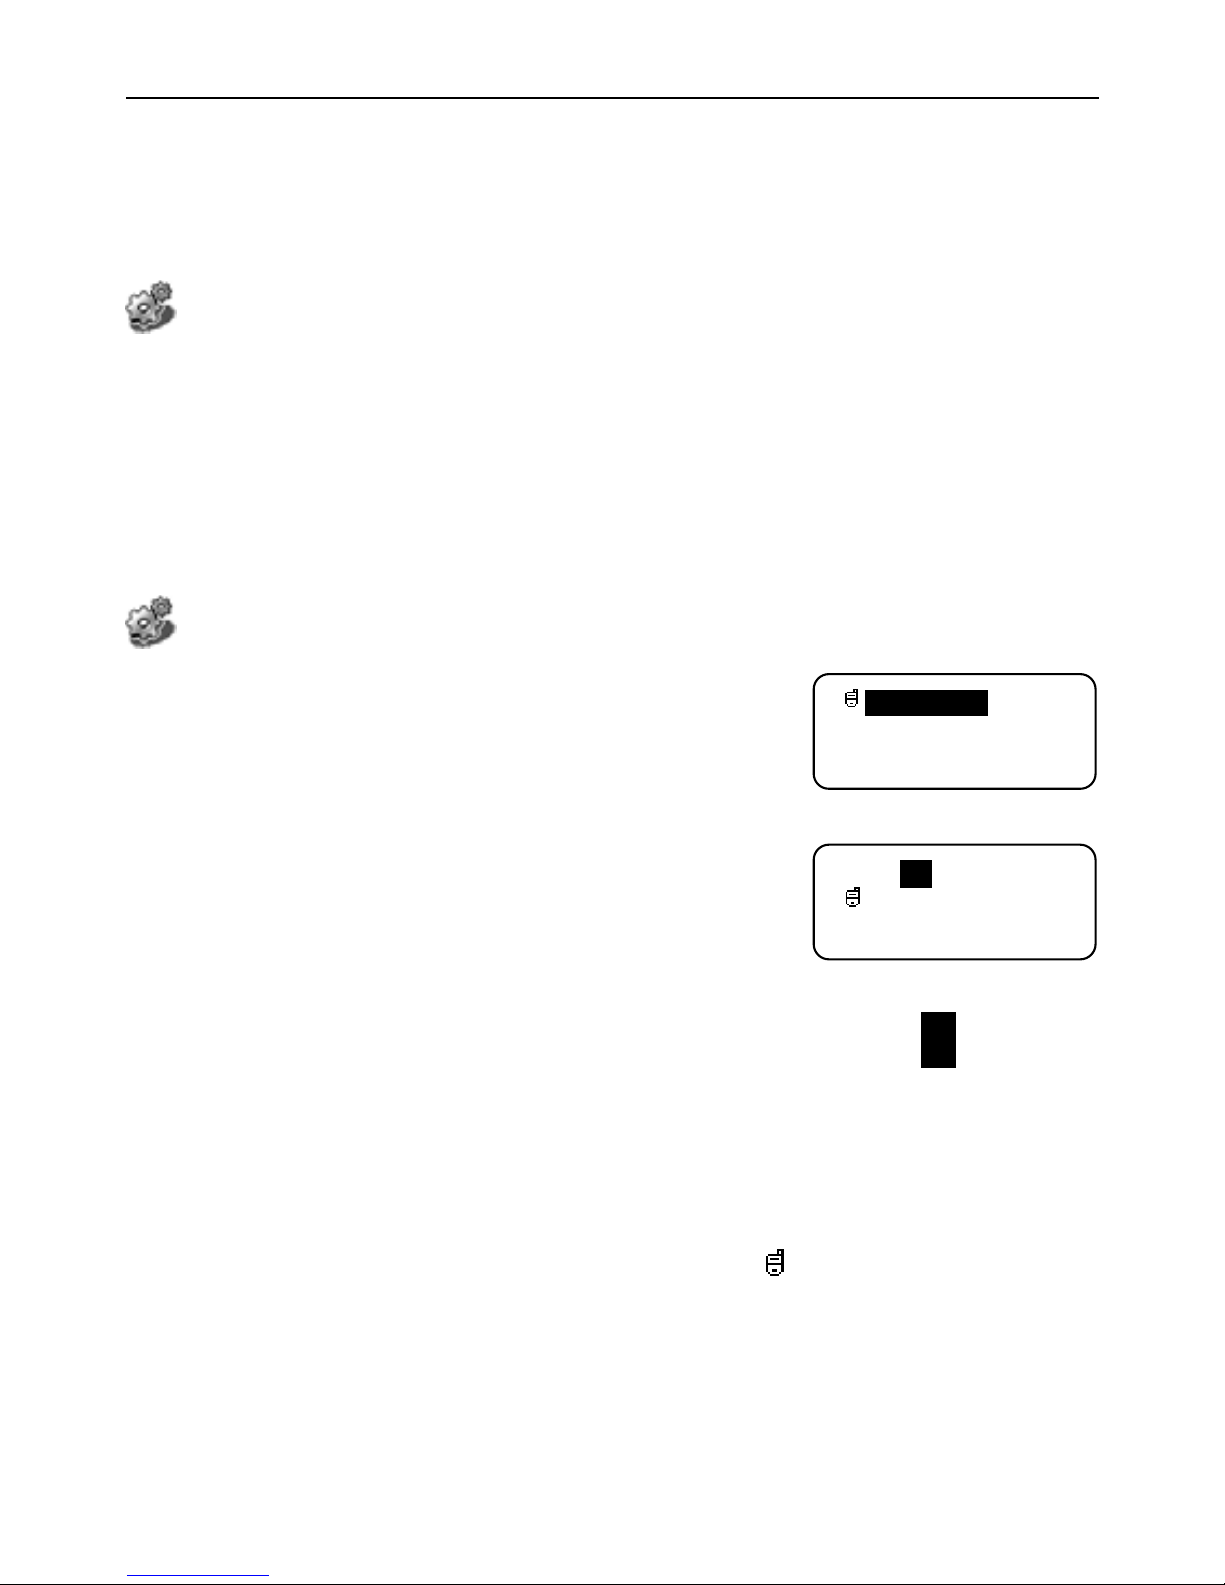
1) In Phonebook, press digital key <4> to enter
Speed Dial, see the right picture:
EDIT< 001 >
Menu Back
2) Click the Left Soft key to add new speed dial
record, see the right picture:
3) Address editing
Click ▲or▼ to move the scroll bar to address editing 【EDIT<001>】, and then
you can click
◄ or ► to select one from the addresses ranging from 001 to
020
4) Number editing
Click ▲or▼ to move the scroll bar to the icon , Click the Left Soft key,
three options will appear:①Edit;②Phone Book;③Save.
Click digital key
<1> to enter the editing interface of the specified address
48
Page 55
ZTE WP560/960 User Manual
Click digital key <2> to enter Phone Book and select the number of the
specified address.
After editing ,return back and click digital key <3> to save the setting.
Operation guide- viewing existing record
001 81512345
002 26260000
Menu 2/2 Back
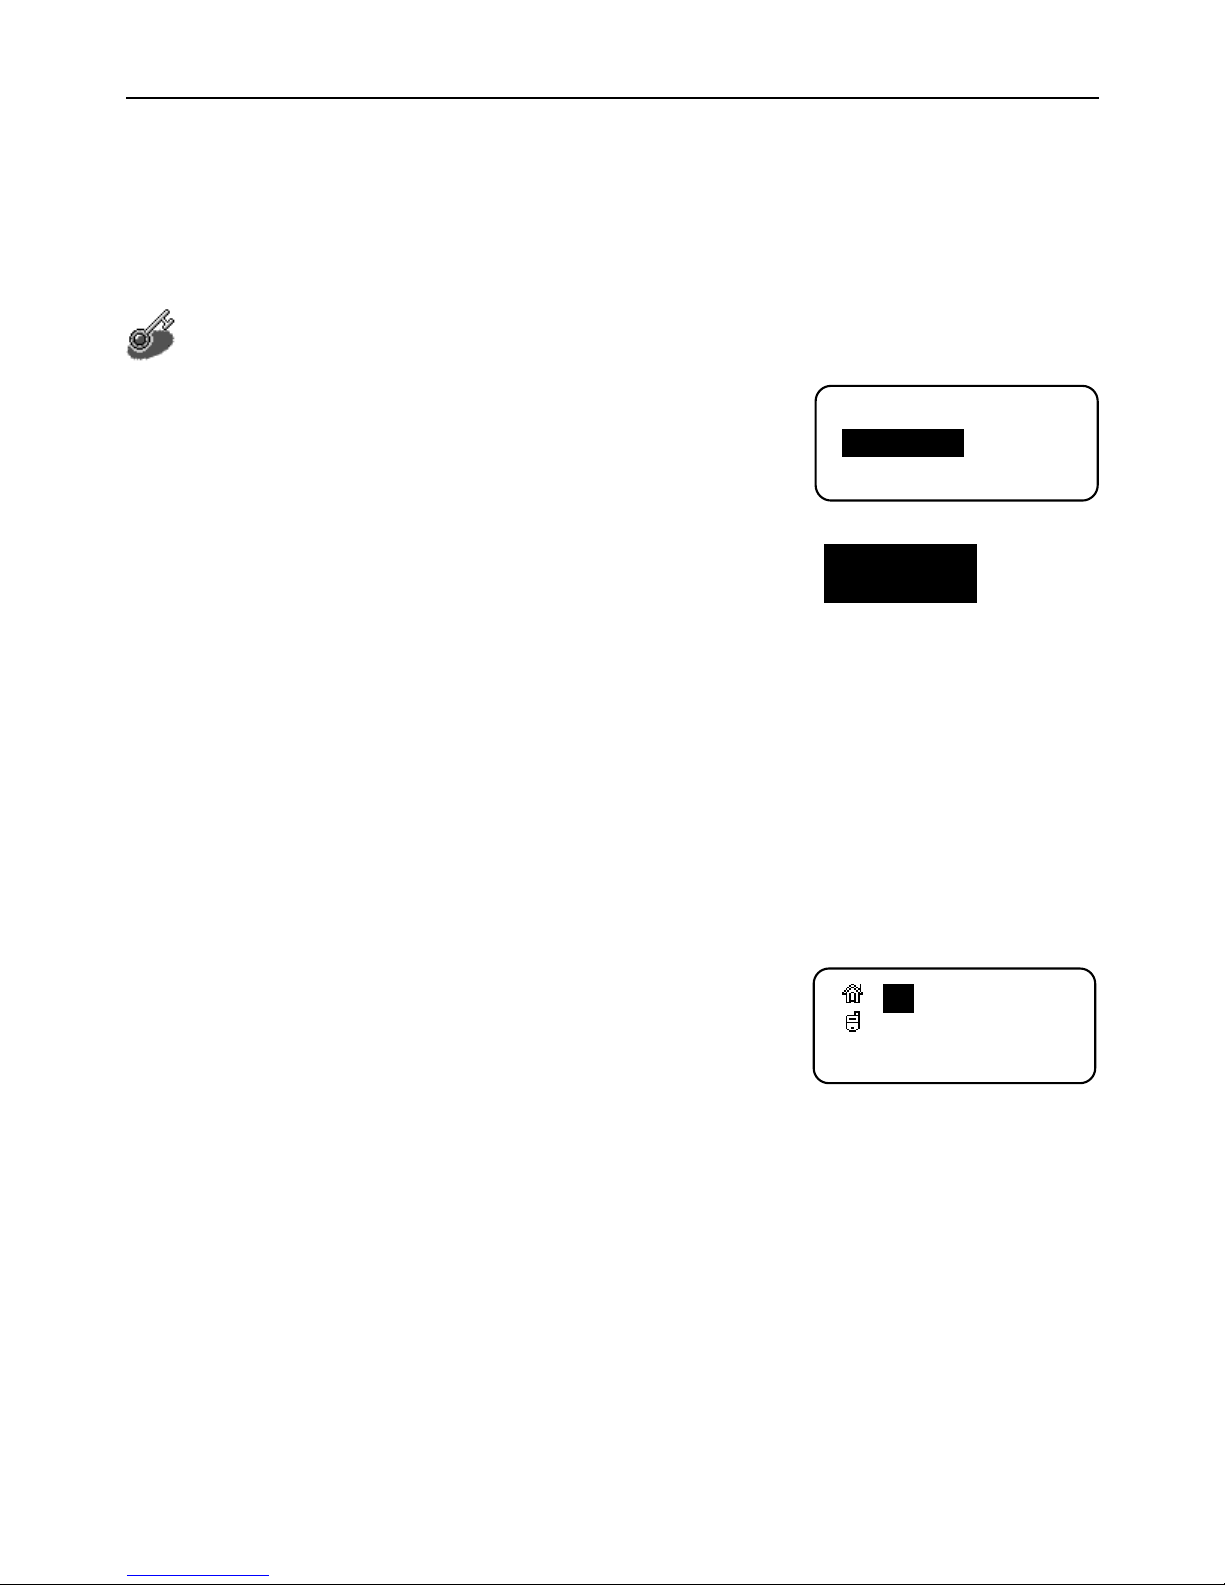
1) When you enter Speed Dial again, the interface is
as the right picture:
2) The list of numbers for speed dial is displayed, e.g., 【002 26260000】, here the
first three numbers 002 is the address for the phone number 2626000. If the phone
number is too long, you can press
digital key <0> so that the address won’t
displayed but only the phone number is displayed.
3) Then you can click the Right Soft key to return to the upper menu or click the
Left Soft key to have the following operation:①New entry;②View Mode;③
Delete. You can add new entry of speed dial or delete the current entry.
4) The interface of View Mode is as the right picture:
You can view the speed dial records under different addresses via pressing ◄
or ►. You can press the Right Soft key to return to the upper menu or press
the Left Soft key to enter the next submenu which has three options:① Edit
Mode② New entry ③ Delete.
< 001 >
26260000
Menu Back
49
Page 56

ZTE WP560/960 User Manual
Function overview- having speed dial in idle mode
In idle mode, two ways of speed dial are available.,
Operation guide
1)
In idle mode, input the correct address and press <RD/CALL>, if the address is
recorded, the system shall start dialing; if not recorded, There will be an alert
of No Record!!!
2) In idle mode, input the correct address and hold the last key of the input for a
few seconds. If the address is recorded, the system shall start dialing; if not
recorded, There will be an alert of No Record!!!
Under the number list interface and the view interface of speed dialing, you can
send messages by pressing <SMS> key or call by pressing <RD/CALL>key to the
number of the record directly.
10.2 Call History
Function overview
Submenus for Call History includes ①Incoming Call②Outgoing Call③
Missed Call
④Call Time.
In idle mode, just press the Left Soft key and then digital key<1>, you can
enter the menu of Call History.
50
Page 57

ZTE WP560/960 User Manual
10.2.1 Incoming Call
Operation guide
1) Press digital key<1> in Call History or press ▲ in idle mode to view the
incoming calls.
2) The list of incoming calls will be displayed, among which you can select the
desired number.
3) Press the Left Soft key to enter the view interface, the information related to
the incoming calls will be displayed.
10.2.2 Outgoing Call
Operation guide
1) In Call History, press digital key<2>to enter the submenus of Outgoing Call
2) The list of outgoing calls will be displayed, you can select the desired number
for view.
3) Press the Left Soft key to enter the view interface, the information related to
the dialed number will be displayed.
When in idle mode , you can press <RD/CALL> key to look over the outgoing call
records; press again, you will dial out the selected number.
51
Page 58

ZTE WP560/960 User Manual
10.2.3 Missed Call
Operation guide
1)
In Call History, press digital key<3> to view Missed Call, or you can view
Missed Call directly by pressing ▼ in idle mode.
2) The missed calls will be displayed, and you can move the scroll bar to the
desired number.
3) Press the Left Soft key to enter the interface of View, and the information
relative to the missed call will be displayed.
After entering the viewing interface of Incoming Call, Outgoing Call or Missed
Call, you can click the Left Soft key to directly save the number into Phonebook.
After entering the viewing interface or the list of Incoming Call, Outgoing Call or
Missed Call, you can press
<RD/CALL> key to call the number directly or press
<SMS> to send messages to the number .
10.2.4 Call Time
Function overview
Submenus for Call Time includes ①Last Call②Incoming Call③ Outgoing
Call④All Calls.
Operation guide
1) In Call History, press digital key <4> to enter the submenu of Call Time
52
Page 59

ZTE WP560/960 User Manual
2) Scroll to the submenu to be viewed or press the corresponding number key to
select the submenu.
3) The total talk time and the number of calls for the selected submenu will be
displayed
the call time here may vary from your actual call time , so you can refer to it but
not depend on it.
11.Setting
Function overview
Submenus for Setting includes ① Greeting ②Phone Number ③ Alarm ④
Backlight⑤Vo l u m e ⑥Font.
In idle mode, you can press the Left Soft key and then digital key <6>
to
enter Setting menu.
11.1 Greeting
Function overview
This function enables you set the greetings displayed on the second line of
LCD window in idle mode.
Operation guide
1)
In Setting, press digital key <1> to enter the editing interface of
Greeting ,The greeting words shall be no longer than 16 ASCII characters.
53
Page 60
ZTE WP560/960 User Manual
2)
After editing, press the Left Soft key for confirmation. The new greetings will
be displayed after the FWP returns to the idle mode.
11.2 Phone Number
Function overview
You can set the number of your FWP for your convenience in operation.
Operation guide
1) In Setting, press digital key <2> to enter editing interface of your phone
number.
2) After editing, press the Left Soft key for confirmation.
1 1.3 Alarm
Function overview
At most you can set four alarms
Operation guide
1) In Setting, press digital key <3> to enter Alarm’s setting menu.
2) Scroll to the alarm to be set.
3) Press the Left Soft key to confirm your choice. And then 3 lines of texts
shown below are displayed on the LCD window:
2005-02-23 11:43
Method < Once >
Bell < Sound 1 >
54
Page 61

ZTE WP560/960 User Manual
4) The line that the scroll bar is on is the alarm time you are editing. You can
press ◄ or ► to move the cursor to the number you want to revise, at this
time the number will flicker, and you can input the desired alarm time by
pressing the number keys.
5) Scroll to the next line by pressing ▼, and then you can press ◄ or ► to select
an alarming method from three options: <Never>, <Once> and <Daily>
6) Press▼ again to scroll to the third line, and then you can press ◄ or ► to
select an alarming bell from nine groups of sound
7) To confirm the setting, press the Left Soft key; to cancel the setting, press the
Right Soft key.
8) When one or more alarms are effectively set, the icon
will appear on the
LCD window when the FWP returns to idle mode.
9) When it comes to the alarming time, there will be time display on the screen
together with the preset ringing. You can press the Right Soft key to exit the
alarm, or the alarm ringing will last 3 minutes before returning to idle mode.
The date and time of the FWP is obtained from the local CDMA digital network.
If the system time cannot be obtained from the network, the preset alarm will become
ineffective.
55
Page 62

ZTE WP560/960 User Manual
11.4 Backlight
Function overview
This function enables you to choose the time interval from the last time when
you trigger on the backlight on the LCD window to the time when the backlight
turns off. The time interval may affect standby time and talk time supported by the
battery.
Operation guide
1)
In Setting Menu, press digital key <4> to enter Backlight’s setting menu.
2) three options including 5 Seconds、10 Seconds、Never are displayed. You can
click the direction keys to move the scroll bar and select your desired time
length.
3) After setting, press the Left Soft key for confirmation
1 1.5 Volume
Function overview
The volumes of income call ringing, keytone and other system sounds (e.g.
volume of alarm or new message alert) can be adjusted. The volume is divided
into five scales ranging from
Silent、Low、Middle、High、Super.
Operation guide
Please refer to the following steps for adjusting volume:
56
Page 63

ZTE WP560/960 User Manual
1)
Under the menu of Setting, press digital key <5> to enter the setting menu
of Volume.
2) three options are available:
① Ringer
② Key Tone
③ Alert Tone
Select the desired option and enter it for adjustment. Each option has five
scales of volumes
3) Press or to select the appropriate volume, and then press the Left
Soft key for confirmation.
Function overview
You can press
<VOL> key to adjust the volumes of the receiver and the
microphone. There are four levels of volume including
Low、Middle、High、Super.
Operation guide
1) When press
<VOL> again after pressing the handfree key, you can adjust the
volume of dialing tone and the volume of microhphone during handfree talk.
2) After picking up the handset or during talk, you can press
<VOL> to adjust the
volume of the receiver.
11.6 Font
Function overview
Four types of font are available for display: Italic, Old, Normal and Bold
57
Page 64
ZTE WP560/960 User Manual
Operation guide
Please refer to the following steps:
1) In Setting, press digital key <6> to enter Font Setting
2) Press or to select your desirable font.
3) Press the Left Soft key for confirmation and return to the upper menu.
12 Data service
Please refer to Data Service User Instruction in USB installation disk.
13 Input method
Number
Keys
English
Letter
Digital
keys
English Letter
1 6 M m o
2
3
4
A b c
D e f
G h i
7
8
9
P q r s
T u v
W x y z
5 J k l 0 Space
*# - , @’ ( ) _ ! ? * # % ” : + < > = etc
Function Overview
Four input methods are available, including English word input, upper case
English letter input, lower case English letter input and digital input. 26 English
letters are laid out on 2-9 number keys. The English word input method adopts the
intelligent input method of ZI Company, making input faster and more convenient.
58
Page 65

ZTE WP560/960 User Manual
Under upper or lower case English letter input mode, the English letters can be
input by clicking the 26-English-letter keys once or more times. The details are
referred to the following operation guide.
13.1 English Input
13.1.1 English Letter Input
Operation guide
1) Press Right soft key to select uppercase letter (ABC) or lowercase letter ( abc)
input in editing state.
2) Click a key to input the first letter on the key.
3) Double click the key to input the second letter on the key.
4) Click the key three times to input the third letter on the key.
5) E.g.: to input “c”,you must click 2 three times.
6) During keying, wait a few seconds until the cursor moves right, then click the
key for the second or third time.
7) Or quickly click the key for the second or third time, and then the second or
third letter is input.
13.1.2 English word input
Operation guide
1) In editing state, press Right Soft key to switch to Word input.
2) Input the first few letters in turn until the desired English word appears.
59
Page 66

ZTE WP560/960 User Manual
3)
Take “ tomorrow” as an example, press 8, 6, 6 and 6 in turn.
4) And then press to select “ tomorrow” into the editing area.
13.2 Number Input
Operation guide
1) Press Right Soft key to move to number input method in editing state.
2) Press the desired number key in turn.
3) In editing, * and # stand for themselves.
Press <CLR> key, one character before the cursor will be deleted. Press <CLR> key
and hold, all the characters will be cleared.
13.3 Punctuation mark input
Operation guide
1) Press * in non-digital editing state, the first screen of punctuation marks
appear.
2) Press
to get the punctuation marks one by one.
3) Press ▲ to input the selected punctuation mark into the editing area.
Note:
1) Press
to get the the other punctuation marks.
2) Press number keys to input the corresponding punctuation marks
During editing, the 4th line in the LCD window will display the number of
characters currently editable.
60
Page 67

ZTE WP560/960 User Manual
14 Power supply
Function overview
1) The power supply of the FWP has two types: power adapter (DC 6V) and
backup battery.
2) Rechargeable battery has several statuses including low power, no power,
under charging and full.
3) Battery charging has two types: charging during power-on and charging
during power-off. When the charging starts, the FWP will give a “du” alert.
After the charging is completed, disconnect the power supply and disconnect
the FWT from the charger.
4) To ensure your correct use of the power supply of the FWT, please read
carefully the contents in “ Installing Battery”, “installing power adapter” and
“ Battery & Power Adapter” in “ Safety Precautions”.
61
Page 68
ZTE WP560/960 User Manual
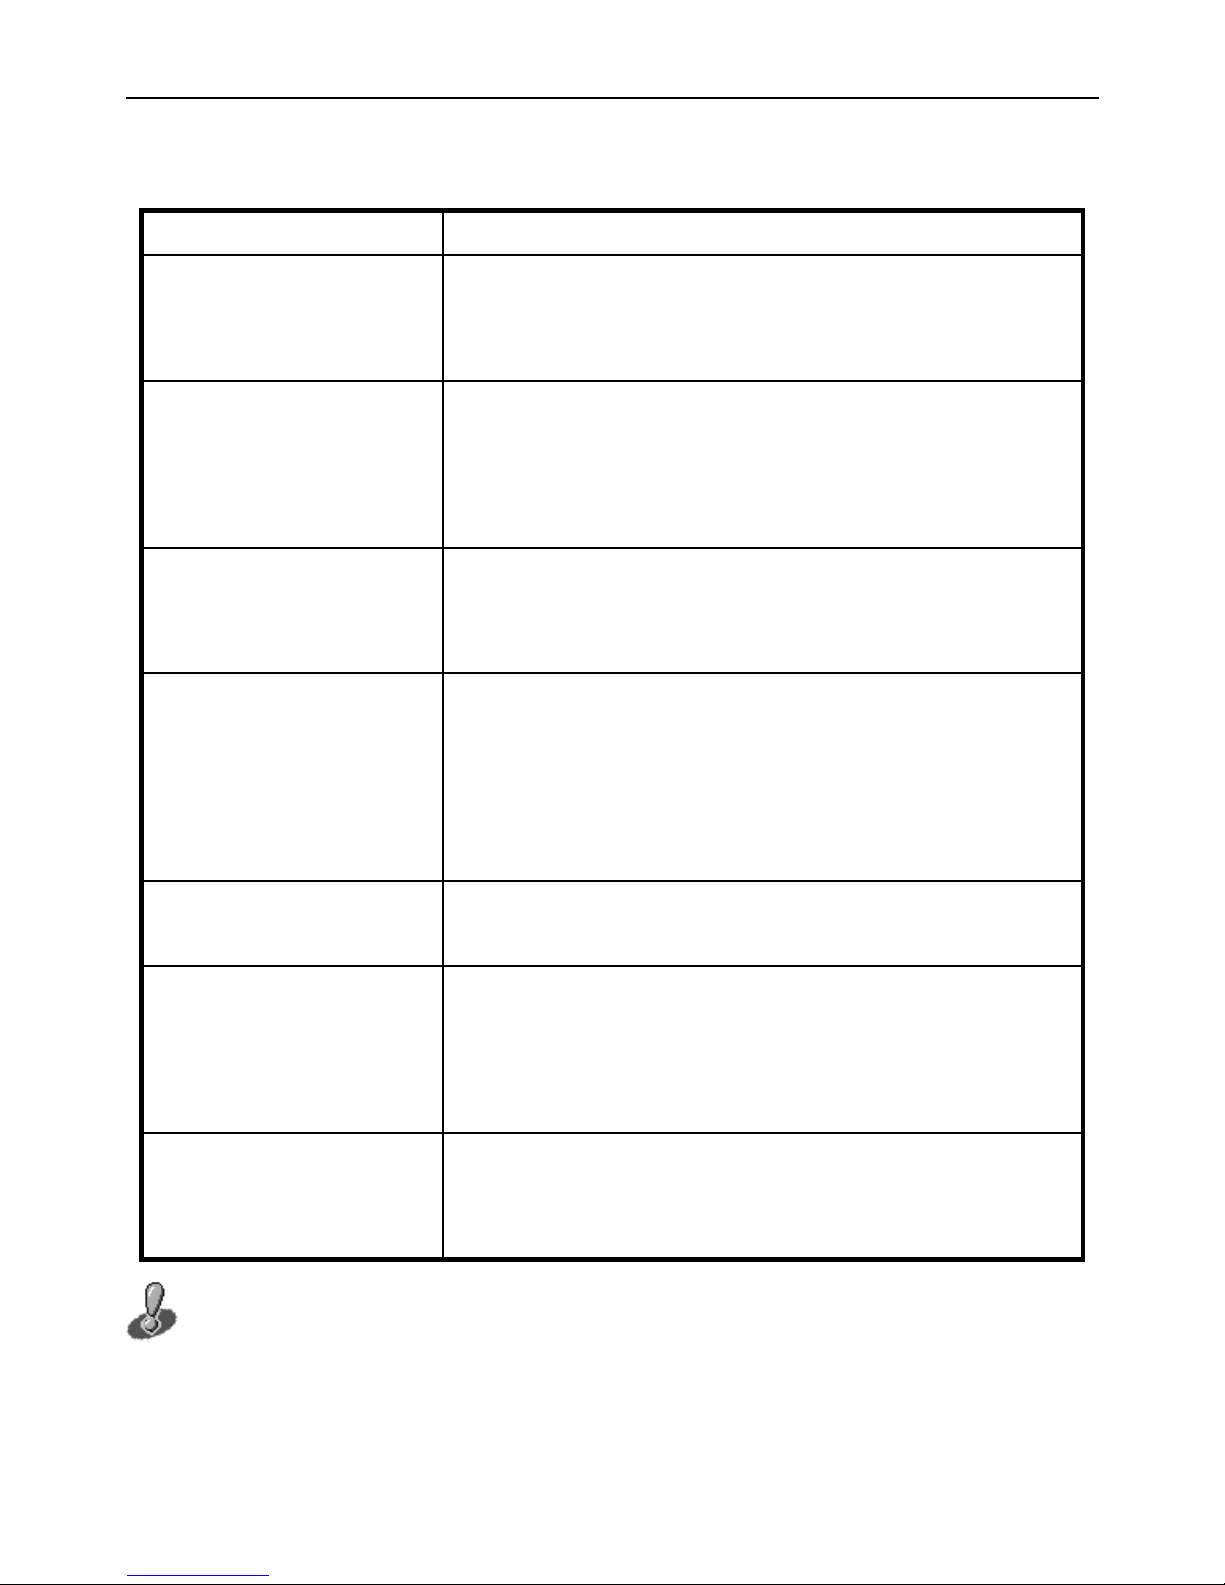
15 FAQ
Problems Solutions
No display on LCD after
the FWP is powered on
Check the status of power switch, quality and connection
of adapter and battery, otherwise change power adapter
or battery.
No display on LCD after
the FWP is powered on
when its power is
supplied by battery.
Check if the battery is correctly installed, if the battery
socket and plug are well connected, if the battery’s
connection is broken or has welding problem, otherwise
change the broken battery.
Can’t make long distance
calls
Check if the long distance setting of the FWP is enabled,
if enabled, please cancel this function according to the
User Manual
No indication of signal
strength
Change the antenna’s position; change the FWP’s place
when the network signal is weak; set the power switch to
“OFF” and then reset it to “ON” to check if the FWP
starts normally. If it can’t start normally, please contact
your seller.
No dialing tone after the
handset is picked up
Hang up and pick up the handset again; check the
connection between the phone and the handset.
Can’t have internet
access.
First check to see if USB data line is in good connection,
then operate according to the instructions in the disk.
Power off the FWP and power it on. If internet access
still fails, please contact your seller.
Other abnormalities First read the User Manual, check the connection of
power supply and antenna, if no abnormality is found,
power off the FWP and power it on again.
If the problems cannot be solved after the above handling, you may contact
62
Page 69
ZTE WP560/960 User Manual
customer service, or send emails to
[email protected]. We will reply to you as
fast as possible and provide you with good after-sales services.
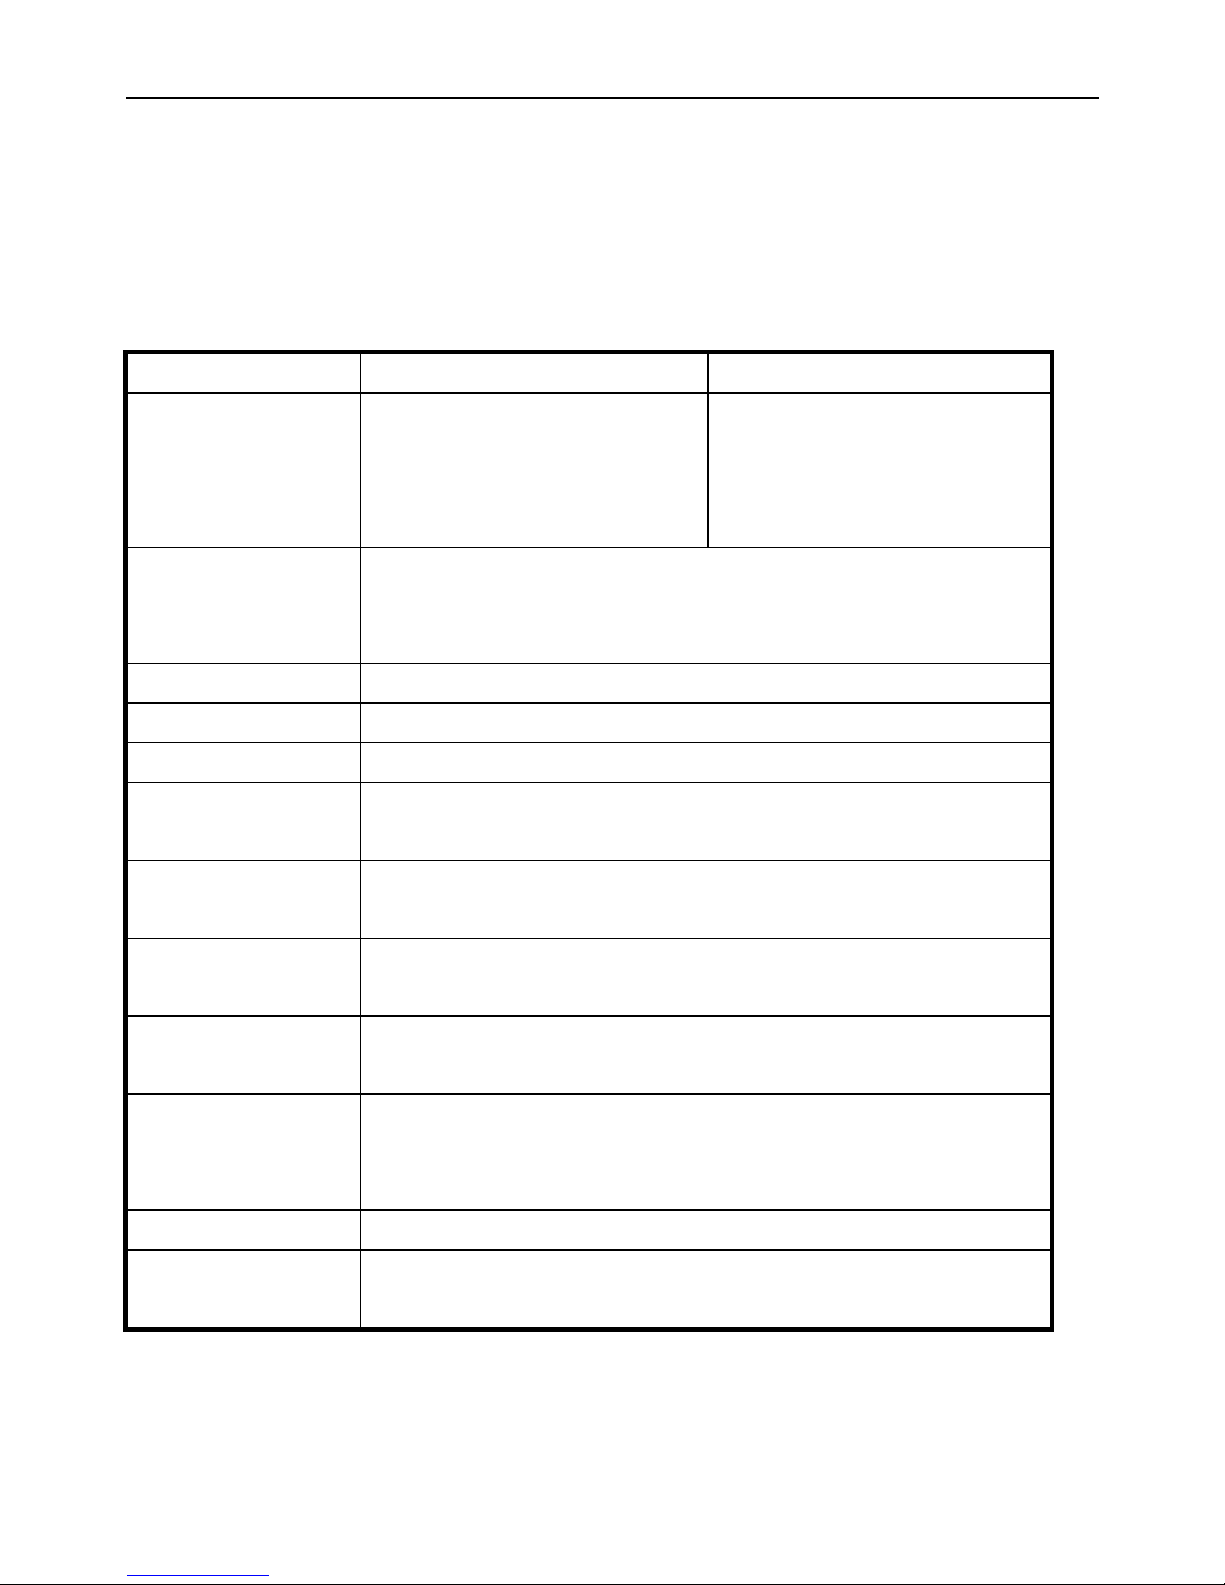
16 Specifications
Model WP560 WP960
Frequency Tx:
450~458MHz
Rx:
460~468MHz
Tx:
1850~1910MHz
Rx:
1930~990MHz
Max.
Transmitting
Power
CDMA Class III (200mW)
Air Interface IS-95A/B, IS-2000
Vocodec 13K QCELP & 8K EVRC
Max. Data Rate 153.6Kbps
Bandwidth of
Channel
1.25MHz
Operating
Temperature
-10 ℃ ~ +55℃
Range of
Humidity
≤95% RH
AC/DC
Power Adapter
AC input: 100~240V (47~63Hz)
DC output: 6V/1.5A
Backup Battery
Rechargeable Ni-MH battery: 3.6V/1800mAH,
Max. talk time: ≥2 hr.
Max. standby time: ≥48 hr.
Size (L * W *H) 200mm×174mm×59mm
Weight
About 650g
(including battery but excluding AC/DC power adapter)
63
Page 70

ZTE WP560/960 User Manual
17 Legal Statement
Users must follow User Manual in strict accordance during operations. If
things undescribed in User Manual occur, don’t handle them by yourself but
contact us or the local agent immediately. ZTE shall not be held responsible for
the loss due to user’s misoperations. The product’s specifications are subject to
change without notice.
64
Page 71
Page 72

版权声明
Copyright © 2005 by ZTE Corporation
本用户手册之版权属于中兴通讯股份有限公司所有,并依法受《中华人
民共和国著作权法》及有关法律的保护。
未经中兴通讯股份有限公司许可,任何人不得摘录、复制、发行、汇编
或者以各种方式(电子版、印刷品等)向公众传播本手册的任何内容。对于
有损版权人利益的行为,公司将依法追究侵权人的责任。
本公司保留在不预先通知的情况下,对此手册中描述的产品进行修改和
改进的权利;同时保留随时修订或收回本手册的权利。
本用户手册中如有文字不明之处,请您及时向本公司或者代理商、销售
商咨询。
2005 年 3 月第 1 版
Page 73

目 录
1 功能简介..................................................1
2 安全使用需知..............................................4
2.1 操作注意事项..........................................4
2.2 使用环境注意事项......................................4
2.3 电池和适配器使用注意事项..............................4
3 包装清单..................................................5
4 用户手册图标提示说明......................................6
5.无线固话安装说明 .........................................7
5.1 安装无线固话.........................................11
5.2 工作状态检测.........................................15
6.无线固话外观简介 ........................................16
6.1 主要外观部件.........................................16
6.2 按键介绍.............................................17
6.3 显示图标.............................................19
7 通话功能 ................................................20
7.1 拨打电话.............................................20
7.2 接听电话.............................................21
7.3 重拨.................................................22
7.4 拨号延时.............................................22
7.5 紧急呼叫.............................................23
8.可选功能 ................................................24
8.1 三方通话.............................................24
8.2 呼叫转移.............................................24
Page 74

8.3 呼叫等待.............................................24
8.4 呼叫设置.............................................24
8.4.1 热线模式.........................................25
8.4.2 呼叫限制.........................................25
8.4.3 起呼模式.........................................27
8.4.4 来电铃音.........................................28
8.4.5 连字符设置.......................................28
9.短信 ....................................................29
9.1 编辑新短信...........................................29
9.2 收发短信.............................................30
9.2.1 查看收件箱.......................................30
9.2.2 查看发件箱.......................................33
9.2.3 语音信箱 ........................................34
9.2.4 短信设置(SMS Setting) .........................35
10.信息存储 ...............................................37
10.1 电话本..............................................37
10.1.1 查看(View book).................................38
10.1.2 查找(Search book)...............................40
10.1.3 新增(Add entry).................................42
10.1.4 快速拨号(Speed dial)............................43
10.2 呼叫历史............................................45
10.2.1 已接来电........................................45
10.2.2 拨出电话........................................45
10.2.3 未接来电........................................46
10.2.4 通话时间........................................46
11.个人设置 ...............................................47
11.1 问候语..............................................47
Page 75

11.2 本机号码............................................48
11.3 闹钟................................................48
11.4 背景灯..............................................49
11.5 音量................................................50
11.6 字体................................................51
12.数据业务 ...............................................51
13.输入法 .................................................52
13.1 英文输入............................................52
13.1.1 英文字母输入....................................52
13.1.2 英文单词输入....................................53
13.2 数字输入............................................53
13.3 标点符号输入 .......................................53
14.电源 ...................................................54
15.常见故障解决 ...........................................55
16.规格说明 ...............................................56
17.法律声明 ...............................................57
Page 76
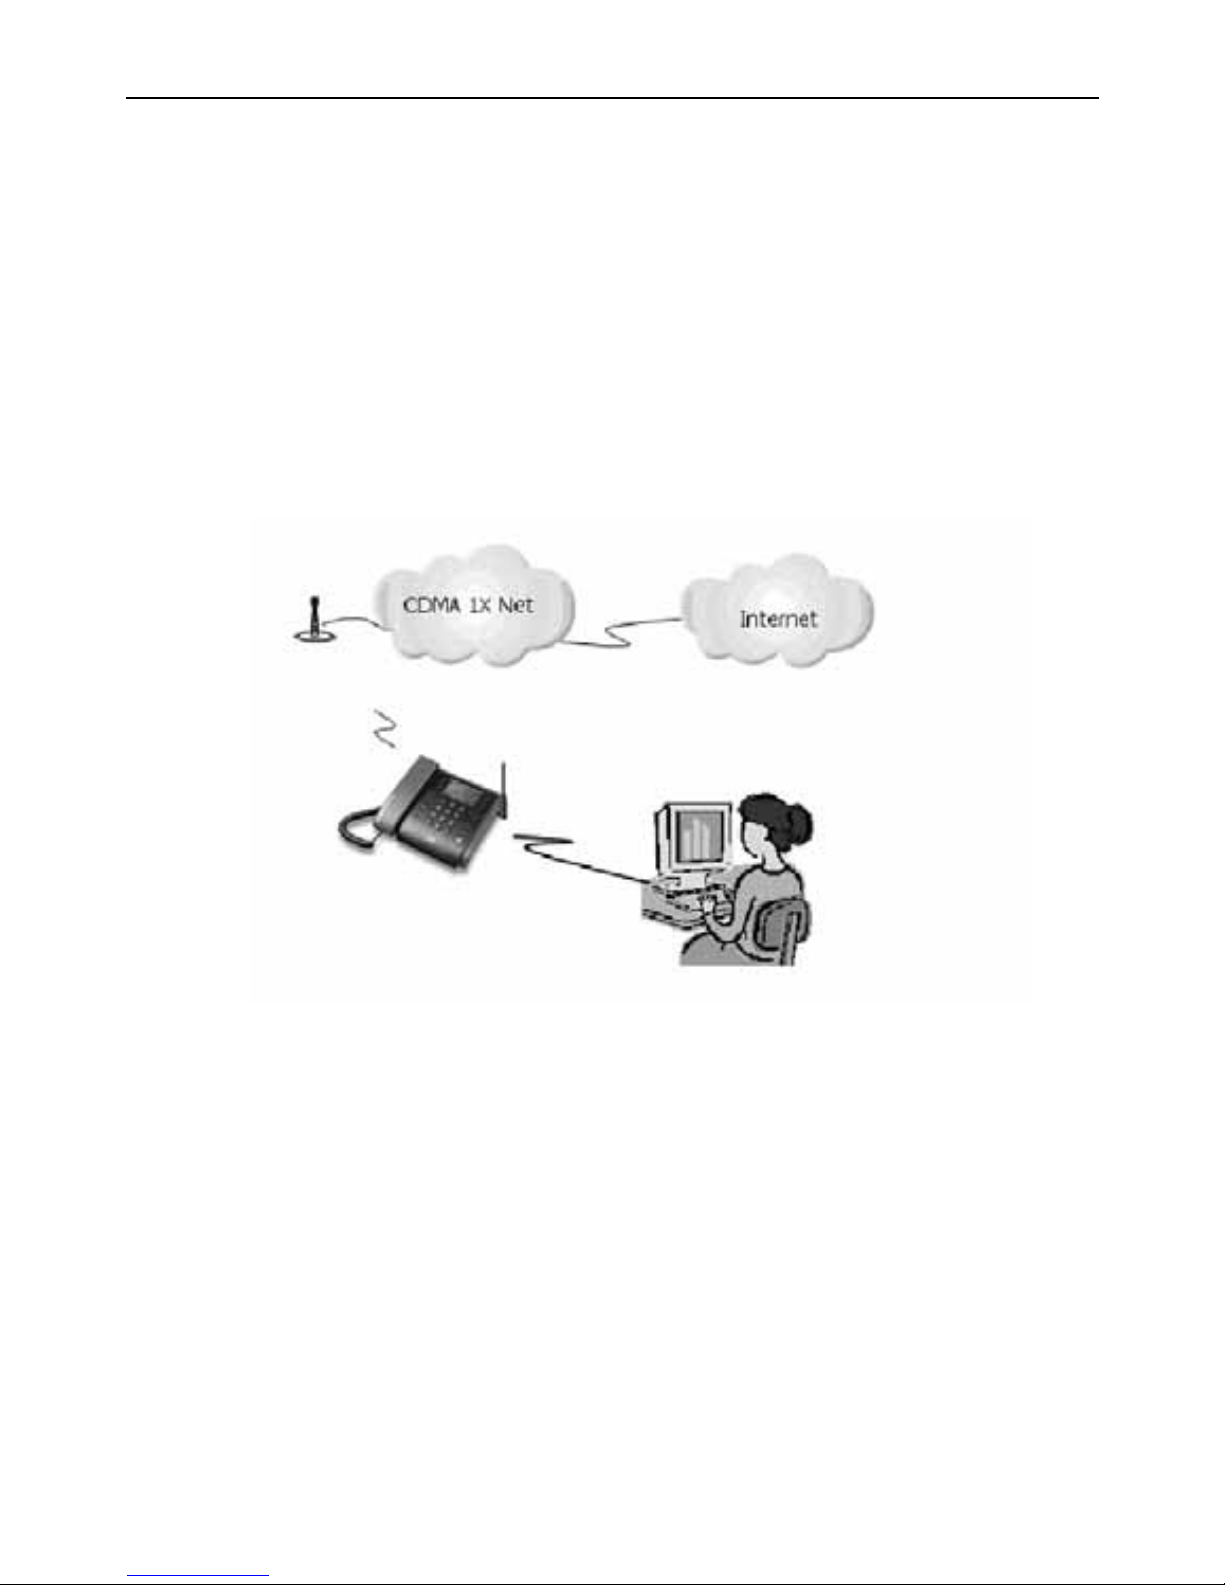
ZTE WP560/960用户手册
1 功能简介
感谢您选择中兴通讯股份有限公司的 WP560/960 系列 CDMA 无线固定
电话。为保证您的 WP560/960 系列无线固定电话工作在最佳状态,请在使用
前仔细阅读本用户手册,并妥善保存用户手册以备将来使用。
1
Page 77
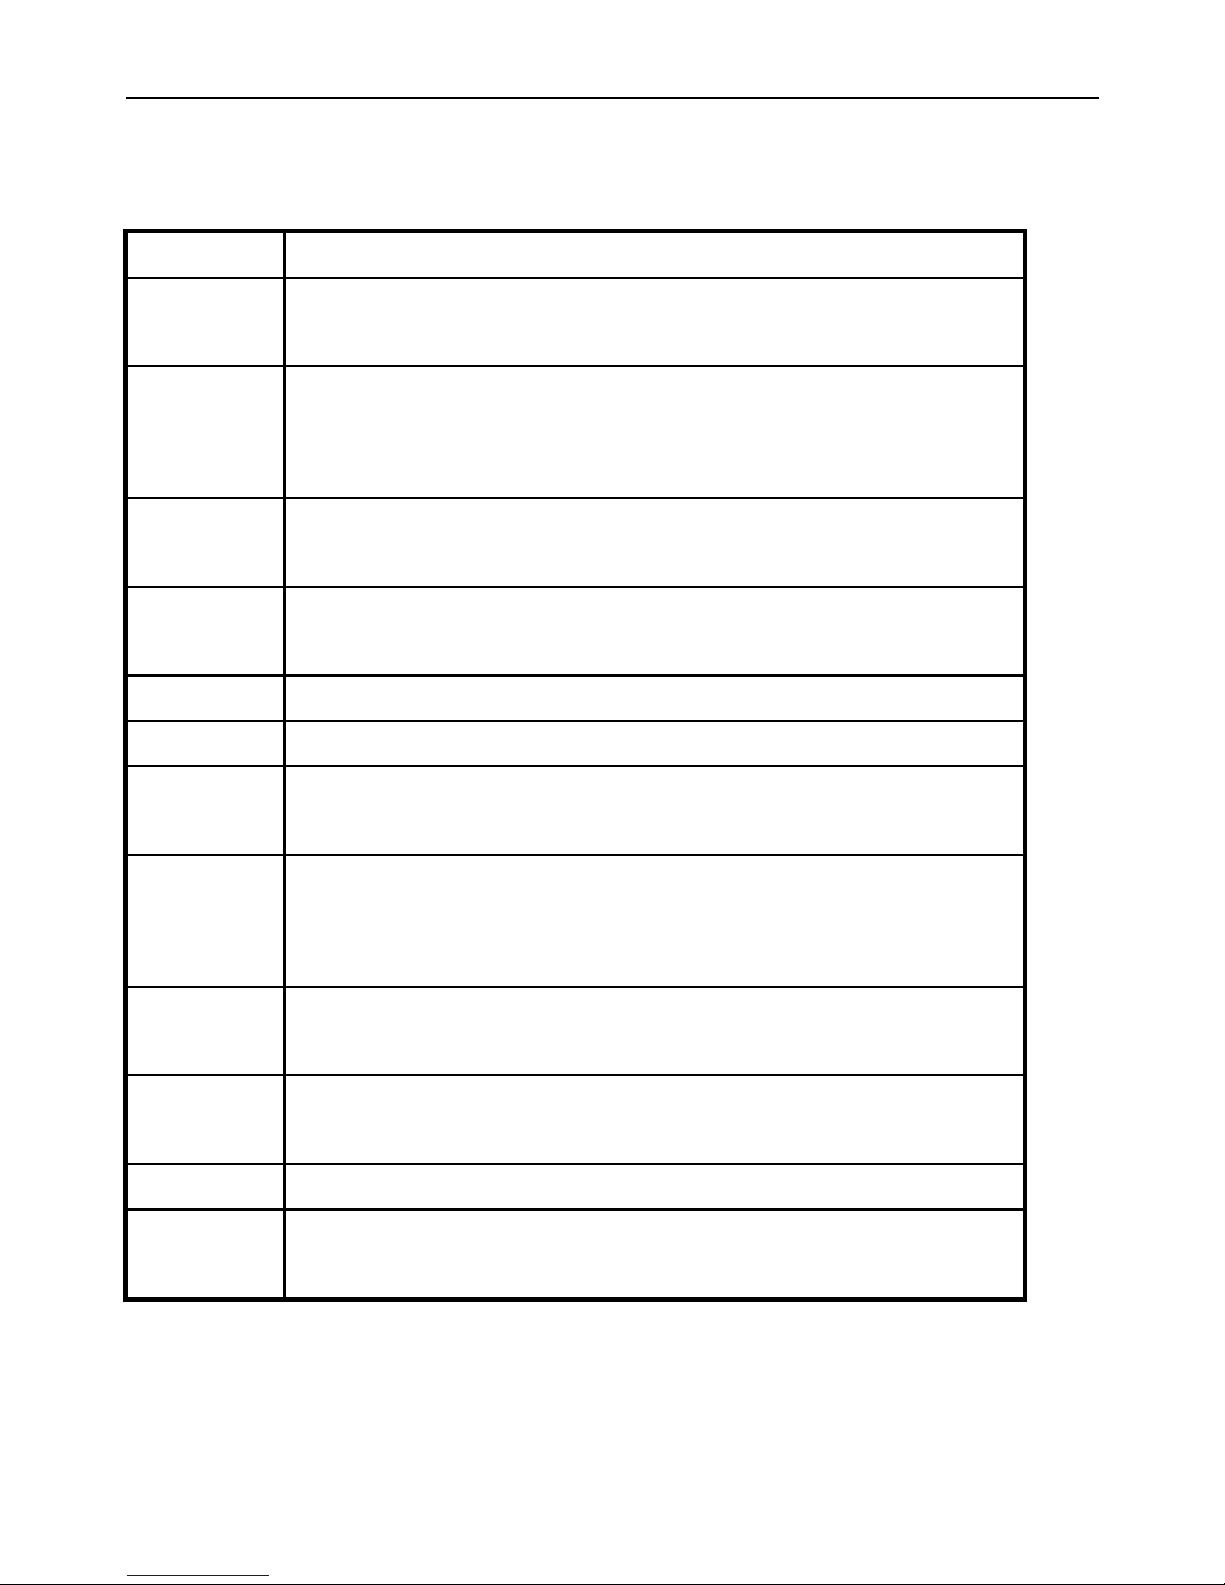
ZTE WP560/960用户手册
WP560/960 系列 CDMA 无线固话具有以下功能:
语音业务
功能 描述
拨打电话 只要您向当地的电信运营商开通了相关的语音业务,您就可以
利用本产品拨打本地电话、国内长途、国际长途及 IP 电话等。
接听电话
您可接听呼入电话。如果您向当地的电信运营商开通了来电显
示业务,并且所使用的固定电话机支持来电显示功能,那么响
铃时,固定电话上将会显示来电的号码。
紧急呼叫 只要固定电话能搜索到本地的 CDMA 数字网络,您可拨打在
电话中已设置的本地紧急电话号码以寻求紧急援助。
免提通话/
预拨号
您无需摘机即可拨打和接听电话。
重拨功能 重拨最后一次呼出的号码。
呼叫延时 在拨号中插入拨号延时。
呼叫转移 本功能是将来电转移到您指定的另一部话机上,不管您的话机
关机与否。
呼叫等待
当您正在通话时,如果又有一个新来电呼入,那么您可以选择
接听或拒听新来电。如果您选择接听新来电,那么您可以在两
个来电之间来回切换。
三方通话 本功能允许三方同时互相通话。本功能需要向当地的电信运营
商申请。
呼叫限制 通过设置,可以限制用户拨打或接听电话(包括国际或国内长
途)。
免打扰 从系统侧直接拒绝来电。
热线模式 通过设置,直接按<RD/CALL>键可以且仅可以呼出预先设置的
热线号码。
2
Page 78
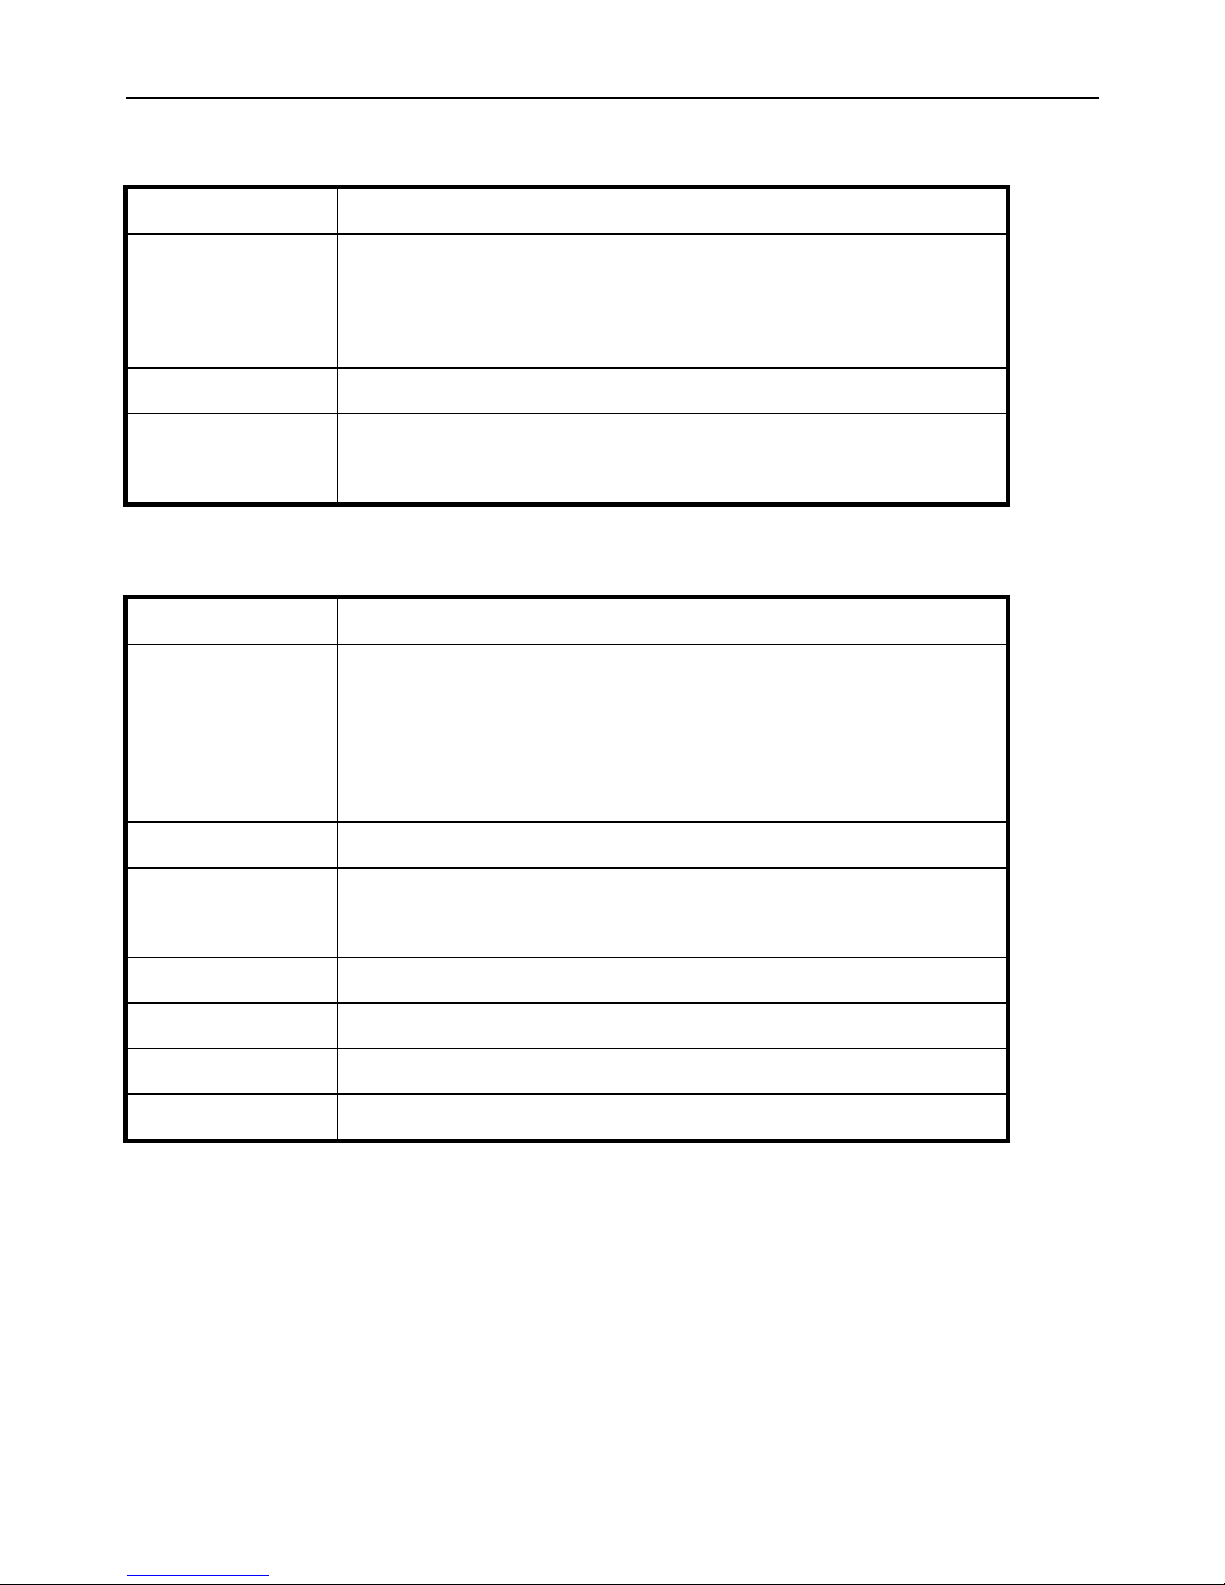
ZTE WP560/960用户手册
数据业务
功能 描述
上网服务 您可以享受 CDMA20001X 高速的无线文件传输、
收发电子邮件、网页浏览等 INTERNET 网络服务,
同时支持休眠功能。
PC 传真 您可以用 PC 机来收发传真。
异步数据 通过该业务,您可以实现低速率(9.6/14.4Kbps)的文件传
输、INTERNET 接入等服务。
高级功能
功能 描述
短信
收发短信、查看新短信、删除短信、编辑新短信等
功能;
收件箱可存储 50 条,发件箱可存储 10 条(机卡一
体)。
语音邮件 支持基于短信通知的语音邮件。
电话本 可存储 100 个地址(机卡一体),支持 20 组速拨(机
卡一体),支持群组分类。
通话记录 50 条来电记录、20 条去电记录,时间记录。
来电铃音 来电铃音 15 组可选。
闹钟 4 组闹钟,9 组铃声可选。
其他 音量可调、4 种字体可选、ZI 英文输入法。
3
Page 79

ZTE WP560/960用户手册
2 安全使用需知
2.1 操作注意事项
1) 本产品可能会影响心脏起搏器、听力助听器或其他电子医疗设备,请在
使用本产品时遵循设备提供商或您的医生的建议。
2) 请不要自行拆卸本产品外壳。
3) 当您清洁本产品时,请使用干燥、柔软的抹布,请使用不含酒精、笨及
丙酮的清洁剂。
4) 请避免本产品跌落或受到其他强烈冲击。
5) 安装天线时请确保您的固定台已经断电;请不要试图拔出天线。
6) 请只使用原配的天线,请勿将天线用于其他用途。
2.2 使用环境注意事项
1) 本产品只能安装在室内。
2) 本机的工作温度是-10 摄氏度到 55 摄氏度,请勿在此温度范围外使用。
当环境温度过高或过低时,可能会引起故障。
3) 请不要将本机置于多尘的环境下,远离火炉或煤气炉。
4) 请不要将本机置 于潮湿 的环境 下,避 免机器 进水或 受潮, 否则可 能腐蚀
电路板并造成资料丢失。
5) 请不要将本机靠近磁场、静电等环境。
2.3 电池和适配器使用注意事项
1) 请仅使用原配的 AC/DC 适配电源。请勿将该电源适配器用于其他用途。
2) AC/DC 适配电源应在规定的交流电压范围内使用。
3) 电量不足时,本产品会发出指示,为了确保您通讯正常, 请尽快 充电或
4
Page 80
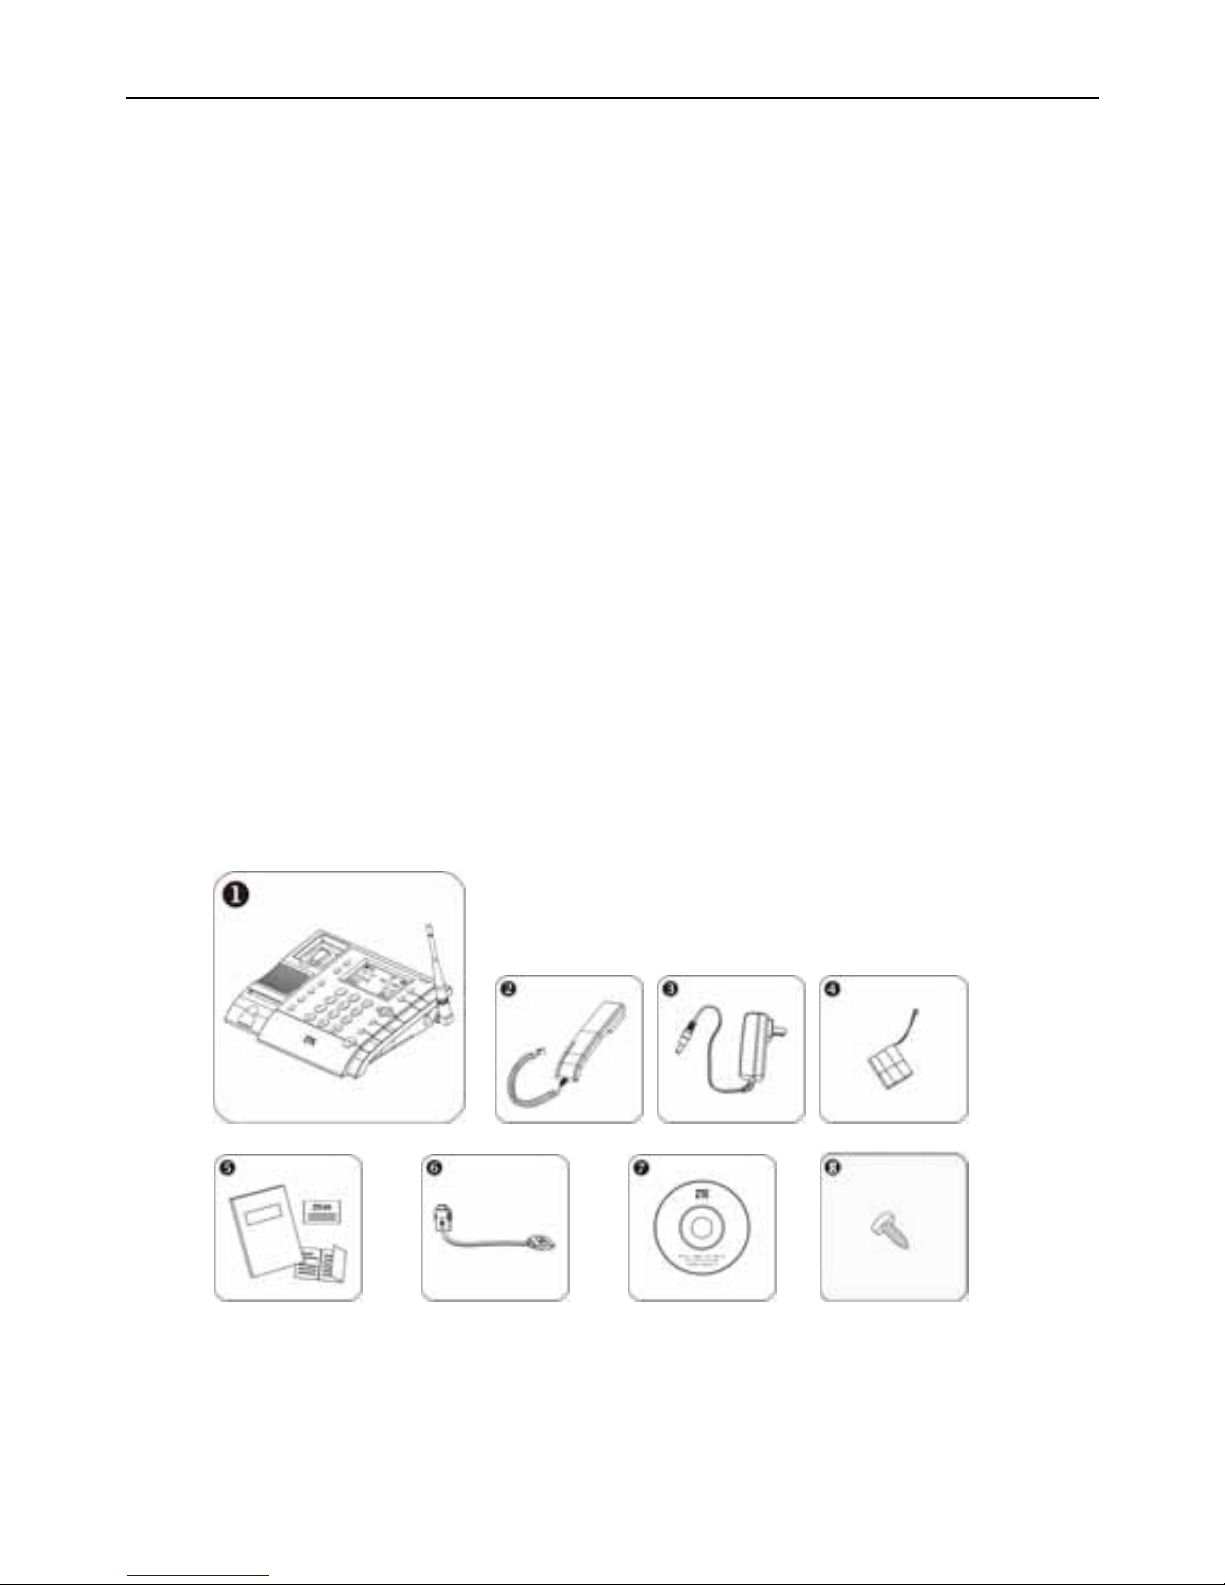
ZTE WP560/960用户手册
使用后备电池,并保证后备电池的电池电量充足。
4) 当电池电量不足,无线固话无法正常工作时,应把话机电源开关拨到 OFF
状态,直到使用电源适配器供电。
5) 当您的无线固话不使用电源适配器,而只用电池供电时, 请及时 给电池
充电,以免电池过放电。
6) 当您长期不需要使用本产品时,请及时将备用电池取出。
7) 当电源线已损坏时,请不要再使用电源适配器。
8) 请用环保的方式处理废弃的电池。
3.包装清单
当您拆开全新的本产品的包装时,请确保产品各部件齐全,如果您发现
产品部件不全或破损,请与我们的客户服务部联系。
本产品共有 8 个主要部件:
5
Page 81
ZTE WP560/960用户手册
序号 名称 数量 备注
1 无线固话主机 1 包括一根天线
2 手柄 1
3 电源适配器 1
4 镍氢可充电电池 1
5 印刷品 3
包括 1 本用户手册、一张保
修卡及一张合格证
6 USB 数据电缆 1 可选部件
7 软件光盘 1 可选部件
8 螺钉 1 用于固定电池盖,含包装袋
为维护您的权利,请您在购机时仔细填写“保修卡”以便获得保修权利,如果 您
没有填写“保修卡”或私自拆机,您将享受不到保修权利。
4.用户手册图标提示说明
功能简介
操作指导
操作技巧
注意事项或警告
6
Page 82
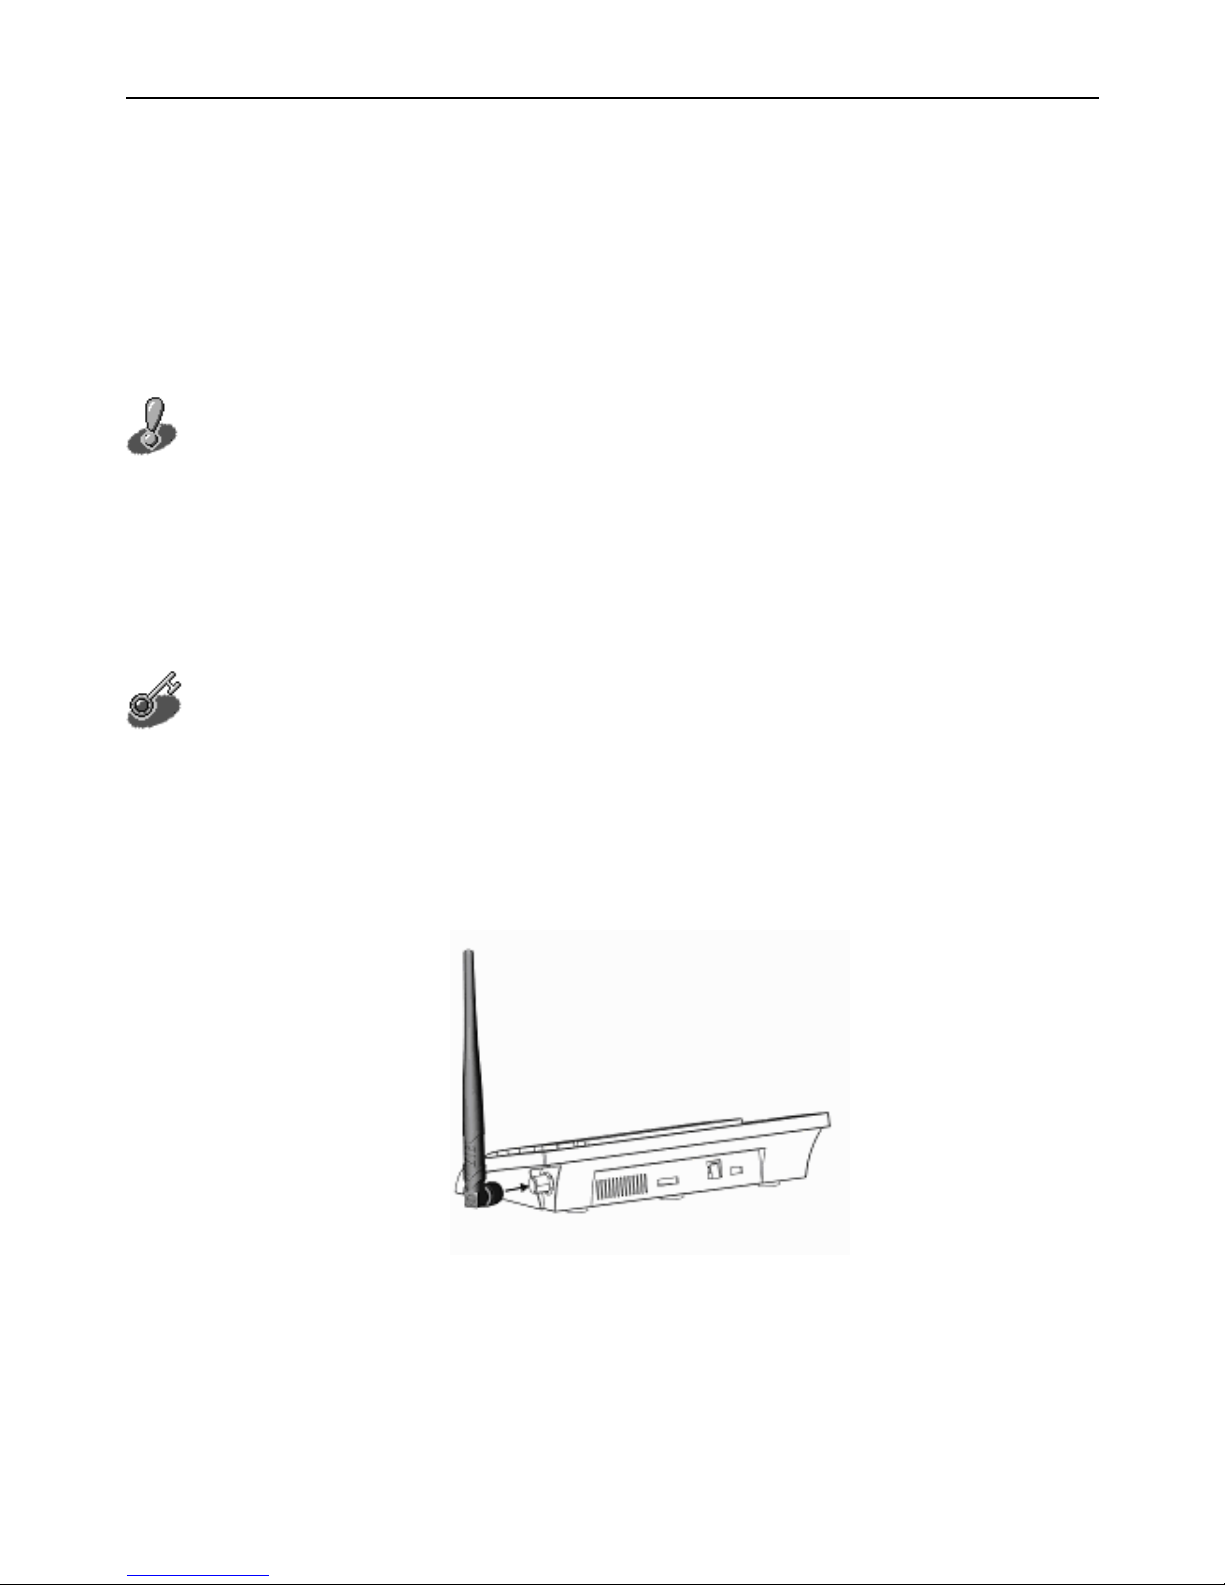
ZTE WP560/960用户手册
5.无线固话安装说明
5.1 天线安装
您的无线固话可以选择安装室内天线或者室外天线,本章将为您详细介
绍天线的安装。
安装天线前,请确认您的无线固话已关机,拔掉电源适配器以及电池。天线安装
后,请不要拔出天线。不要频繁扭转天线或者 360 度旋转天线,这样将对无线接入终
端的信号接收能力、使用寿命产生不良影响。
5.1.1 室内天线的安装
操作指导
当您的无线固话离基站较近,信号较强时,您只需要安装室内天线就可
以得到良好的通话质量。请您按照下图位置将室内天线插入无线固话天线接
口中,注意拧紧接头。
5.1.2 室外天线的安装
室外天线的信号接受能力强于室内天线。当您的无线固话离基站较远,
7
Page 83

ZTE WP560/960用户手册
信号较弱时,您可以选择使用室外天线以获得更好的语音效果。如果您已配
置了室外天线,我们将不再提供室内天线。
我们为您提供了两种室外天线,室外全向天线与室外定向天线。室外全
向天线安装简易,在安装过程中,您不需要考虑朝向、位置等因素。室外定
向天线拥有更好的信号接受能力,但是它的安装比室外全向天线复杂,下面
为您详细介绍室外天线的安装。
操作指导
1)
室外全向天线
室外全向天线需要垂直安装在室外。请您按照室外 全向天 线包装 盒中的
安装说明进行操作,用非金属物固定。
2) 室外定向天线
室外定向天线的选址:
室外定向天线需要在室外较高的地方垂直地面安装 ,例如 :房顶 ,建筑
物顶部,小山顶或者其他一些相对较高的地方。一 般来说 ,天线 安装位
置越高,接受信号能力就越强。如果在室外定向天 线与基 站之间 有高的
建筑或者小山等比天线高的障碍物挡在天线前边, 那么希 望您将 天线安
装在离障碍物至少 50 米远的地方。如果可能,可以直接将天线安装在该
障碍物上。同时,为防止干扰,请将室外定向天线 安装在 尽可能 远离电
视天线的地方。
室外定向天线的安装:
室外定向天线的安装,请您参照室外定向天线包装 盒中的 安装说 明进行
操作,用非金属杆固定。
8
Page 84
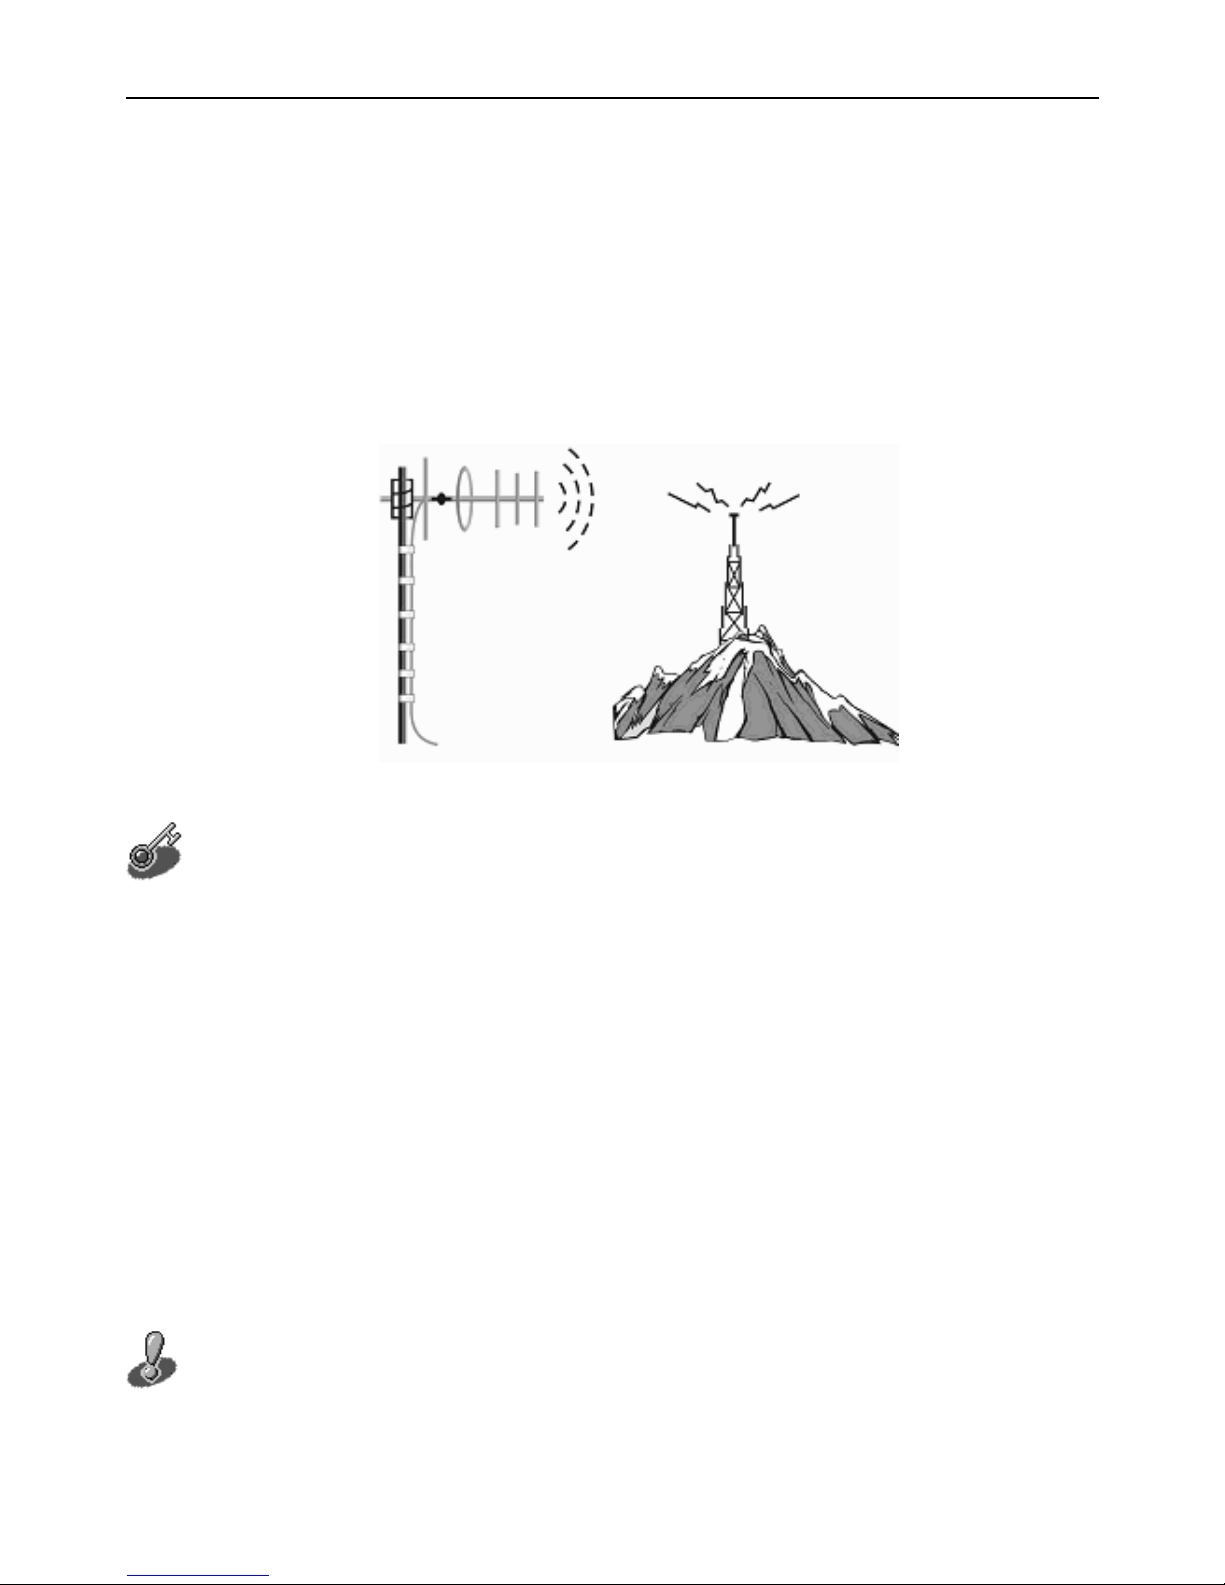
ZTE WP560/960用户手册
室外定向天线的朝向:
如果一个定向天线已经安装,那么决定它信号接受 能力强 弱的一 个重要
因素是它的朝向。如果您所在的地方为平地,请将 您所安 装的天 线面向
基站方向安装。如果您的住宅附近山或者建筑物较 多,请 旋转定 向天线
的朝向,直到无线固话达到最好的信号接受能力。如下图:
5.1.3 室外天线与无线固话的连接
操作指导
固定好室外天线后,请将馈线与室外天线连接,并固定于支撑物后垂下。
再将馈线经过避雷器后与无线固话连接、旋紧,确保连接可靠。同时,请不
要将重物悬挂在天线电缆上,用力拉扯,扭曲。我们提供的馈线长 15 米,请
不要用照明电线加长,如果长度不够,请与我们联系。
5.1.4 避雷措施
由于室外天线一般安装在室外较高的地方,您还需要考虑到避雷。我们
将为您提供详细的避雷建议,请您按照建议选配避雷针与避雷器。任何不正
当操作(没有按照建议安装避雷设施)产生的意外事故,本公司不负责任。
如果您安装了室外天线,请您在雷雨天气暂时不要打电话。
9
Page 85
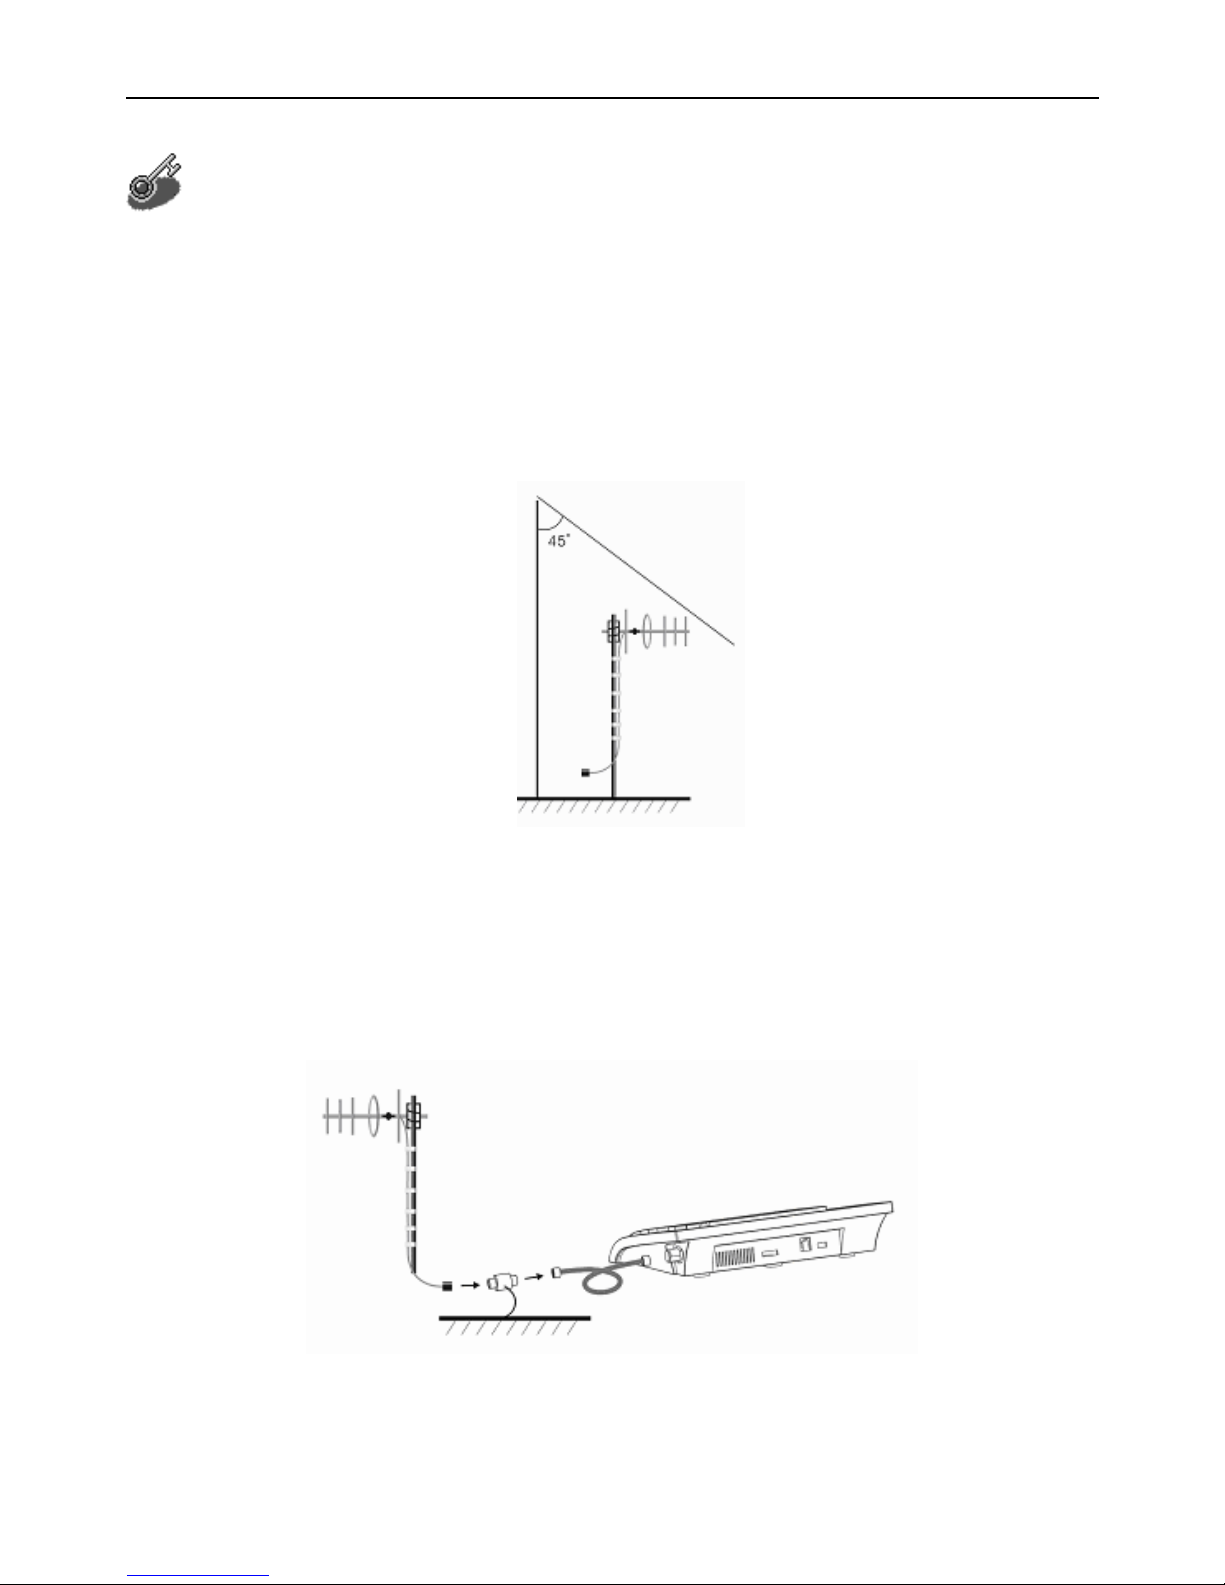
ZTE WP560/960用户手册
操作指导
1) 避雷针
请您在室外天线附近竖起避雷针,避雷针应比室外天线高,接地良好,
并且接地阻抗小于 10 欧姆。同时,避雷针顶端与室外天线最外边点的连线与
垂直线夹角应不大于 45 度,避雷针与室外天线的水平间距不低于 3 米。如下
图:
2) 避雷器
请您在无线固话天线接口处连接 2 米馈线,然后安装避雷器,避雷器的
另一端通过 15 米馈线接室外天线。在避雷器中间有安装接地线的位置,请您
按照避雷建议选择接地线,并确保将该线接地。
10
Page 86
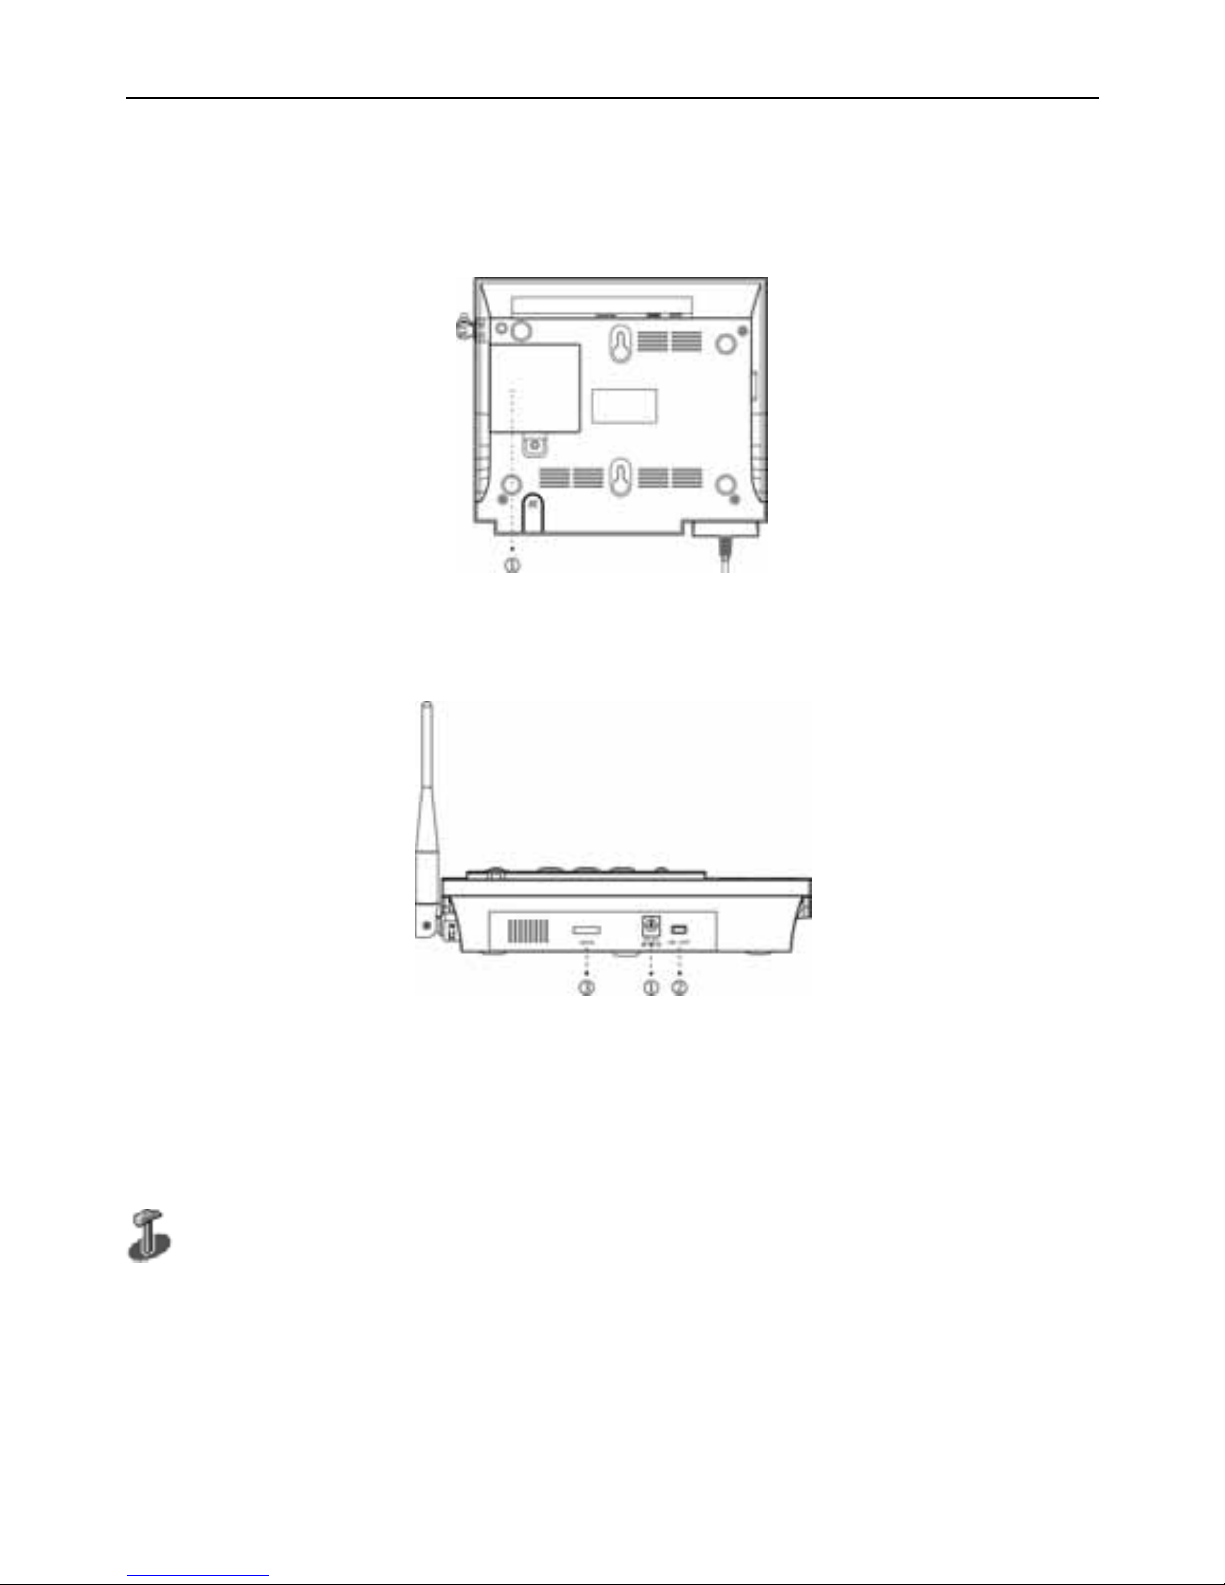
ZTE WP560/960用户手册
5.2 安装无线固话
底视图
① 电池盖
后视图
④ 电源插口 (DC 6V)
⑤ 电源开关
⑥ 数据 USB/串口接口
开机:将电源开关(见图)拨到 ON 档,这时话机发出“嘀~”的一声提示
音,进入待机画面;关机:将电源开关(见图)拨到 OFF 档。
11
Page 87
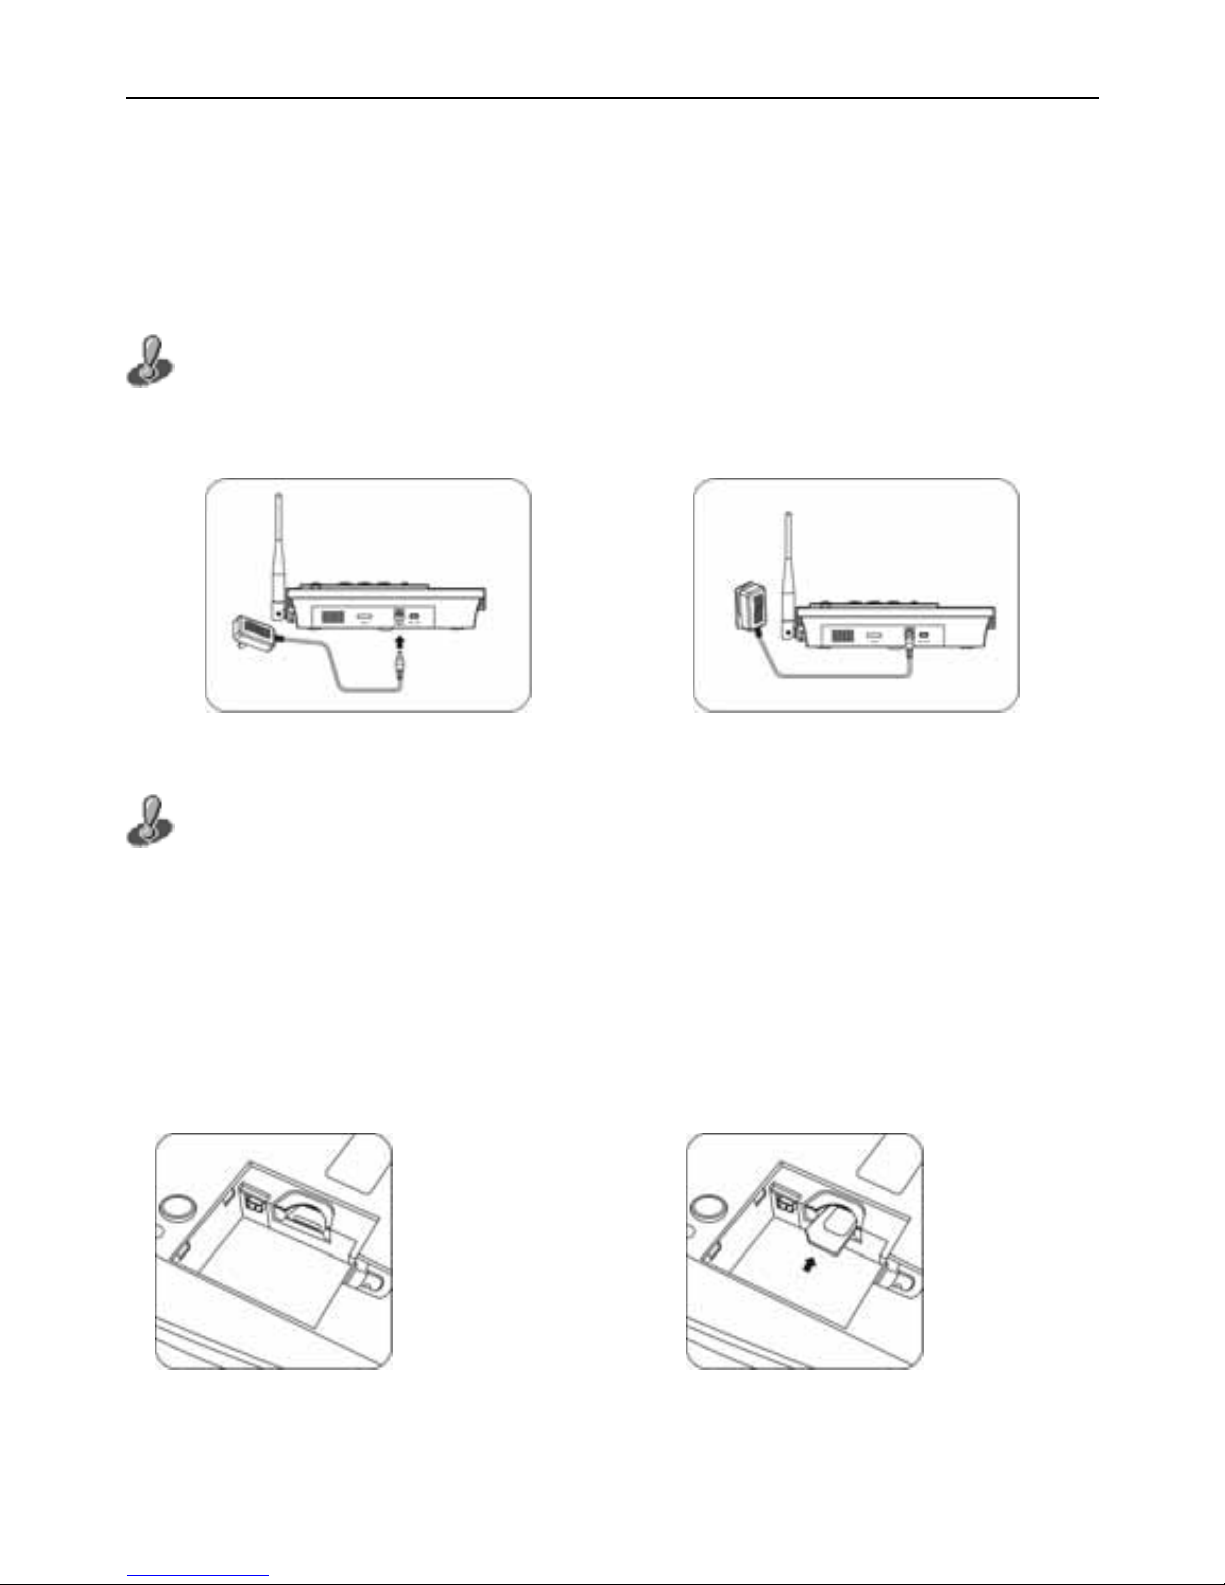
ZTE WP560/960用户手册
电源适配器安装
无线固话工作电源可来自电源适配器输出的直流电源,电源适配器连接
在外部交流电源上。
请先将电源适配器插入无线固话电源插孔,再将 电源适配器与外部交流电 源连
接。
UIM 卡安装
当您使用的是机卡分离的 WP560/960 时,需要在使用前安装 UIM 卡。当您安装 UIM
卡时,首先请确保无线固话的电源开关处于 “Off” 状态, 同时拔掉外部电源。
请在安装电池前安装 UIM 卡。
1.拆下电池盖 2. 安装 UIM 卡(注意
UIM 卡缺口位置 )
12
Page 88
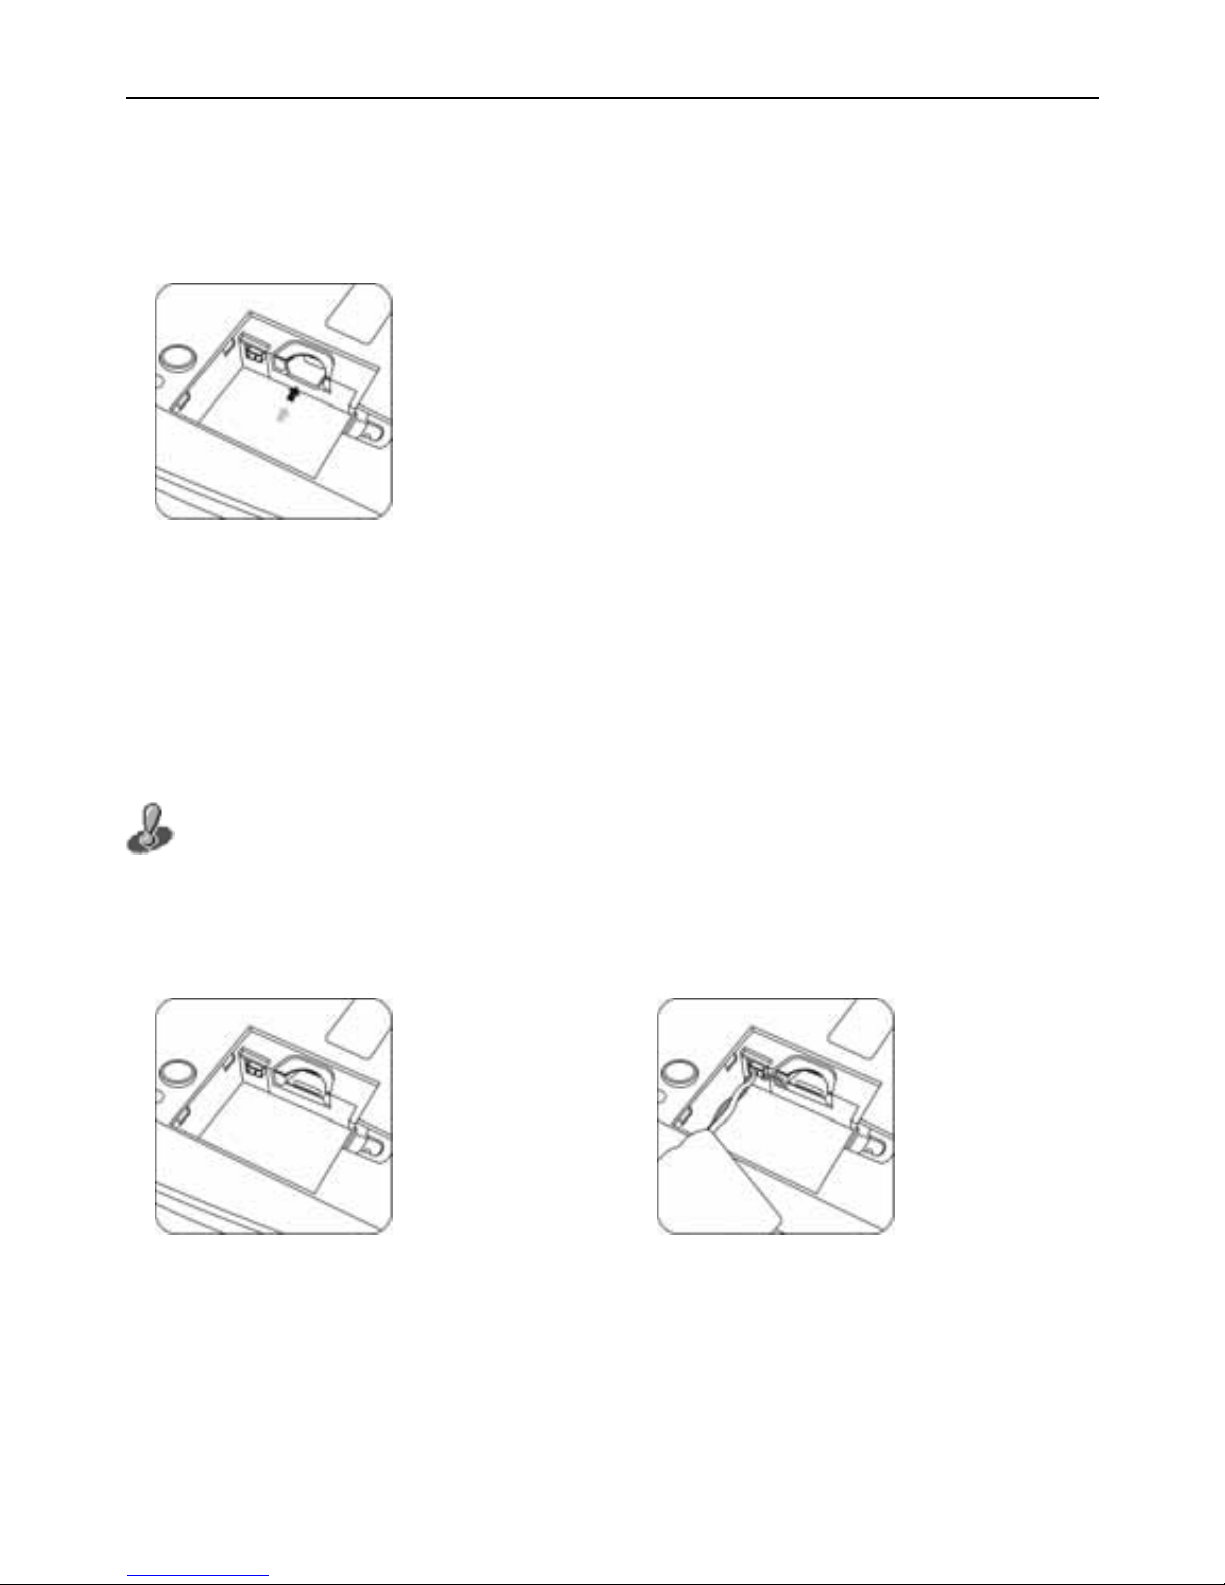
ZTE WP560/960用户手册
3.将 UIM 卡按照方向
推进卡座后示意图
电池安装
无线固话配备了一块可充电的内置备用电池,当没有电源适配器时,无
线固话可以依靠电池供电工作。当采用电源适配器给无线固话供电时,电源
适配器同时也在给电池充电。
当您安装电池时,首先请确保无线固话的电源开关处于 “Off” 状态, 同时拔掉
外部电源。在您第一次使用前,请给镍氢电池连续充电 16 小时。
1.拆下电池盖 2.安装电池(注意电池极性)
13
Page 89
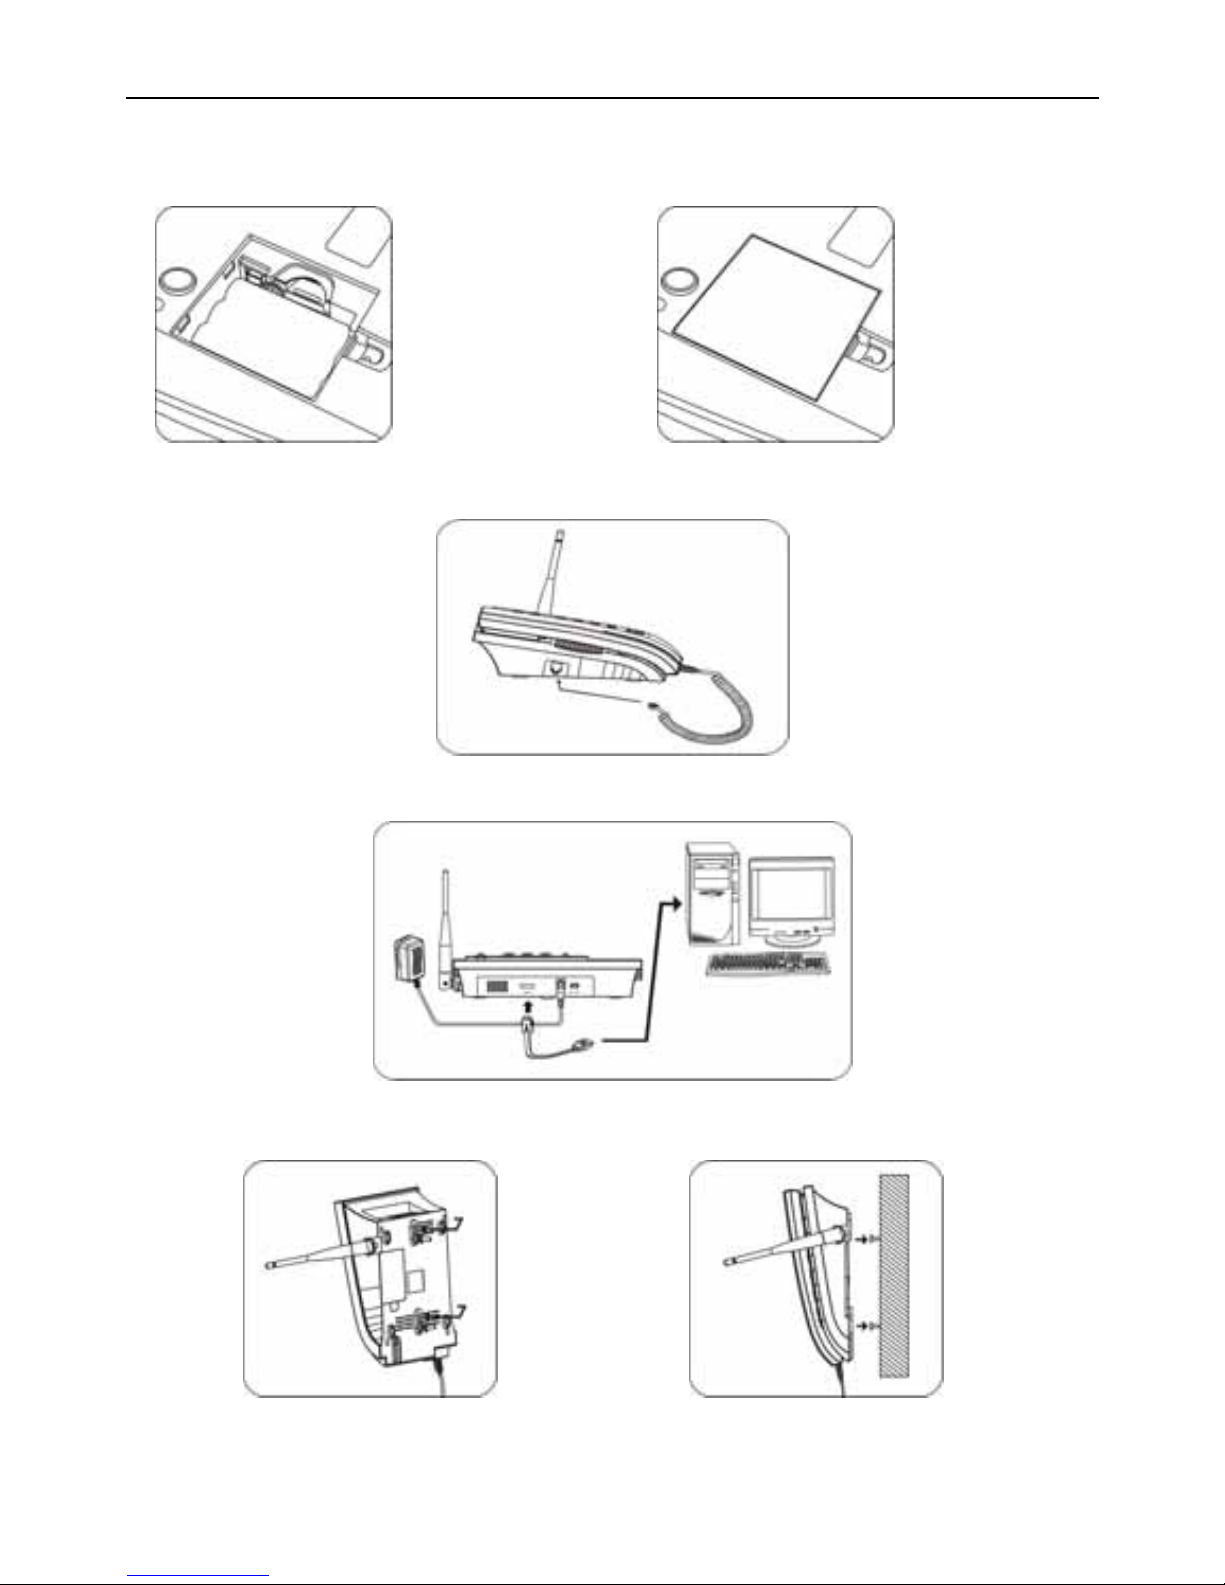
ZTE WP560/960用户手册
3.电池安装后示意 4.装上电池盖
话机手柄安装
连接无线固话和电脑
无线固话挂墙安装
14
Page 90
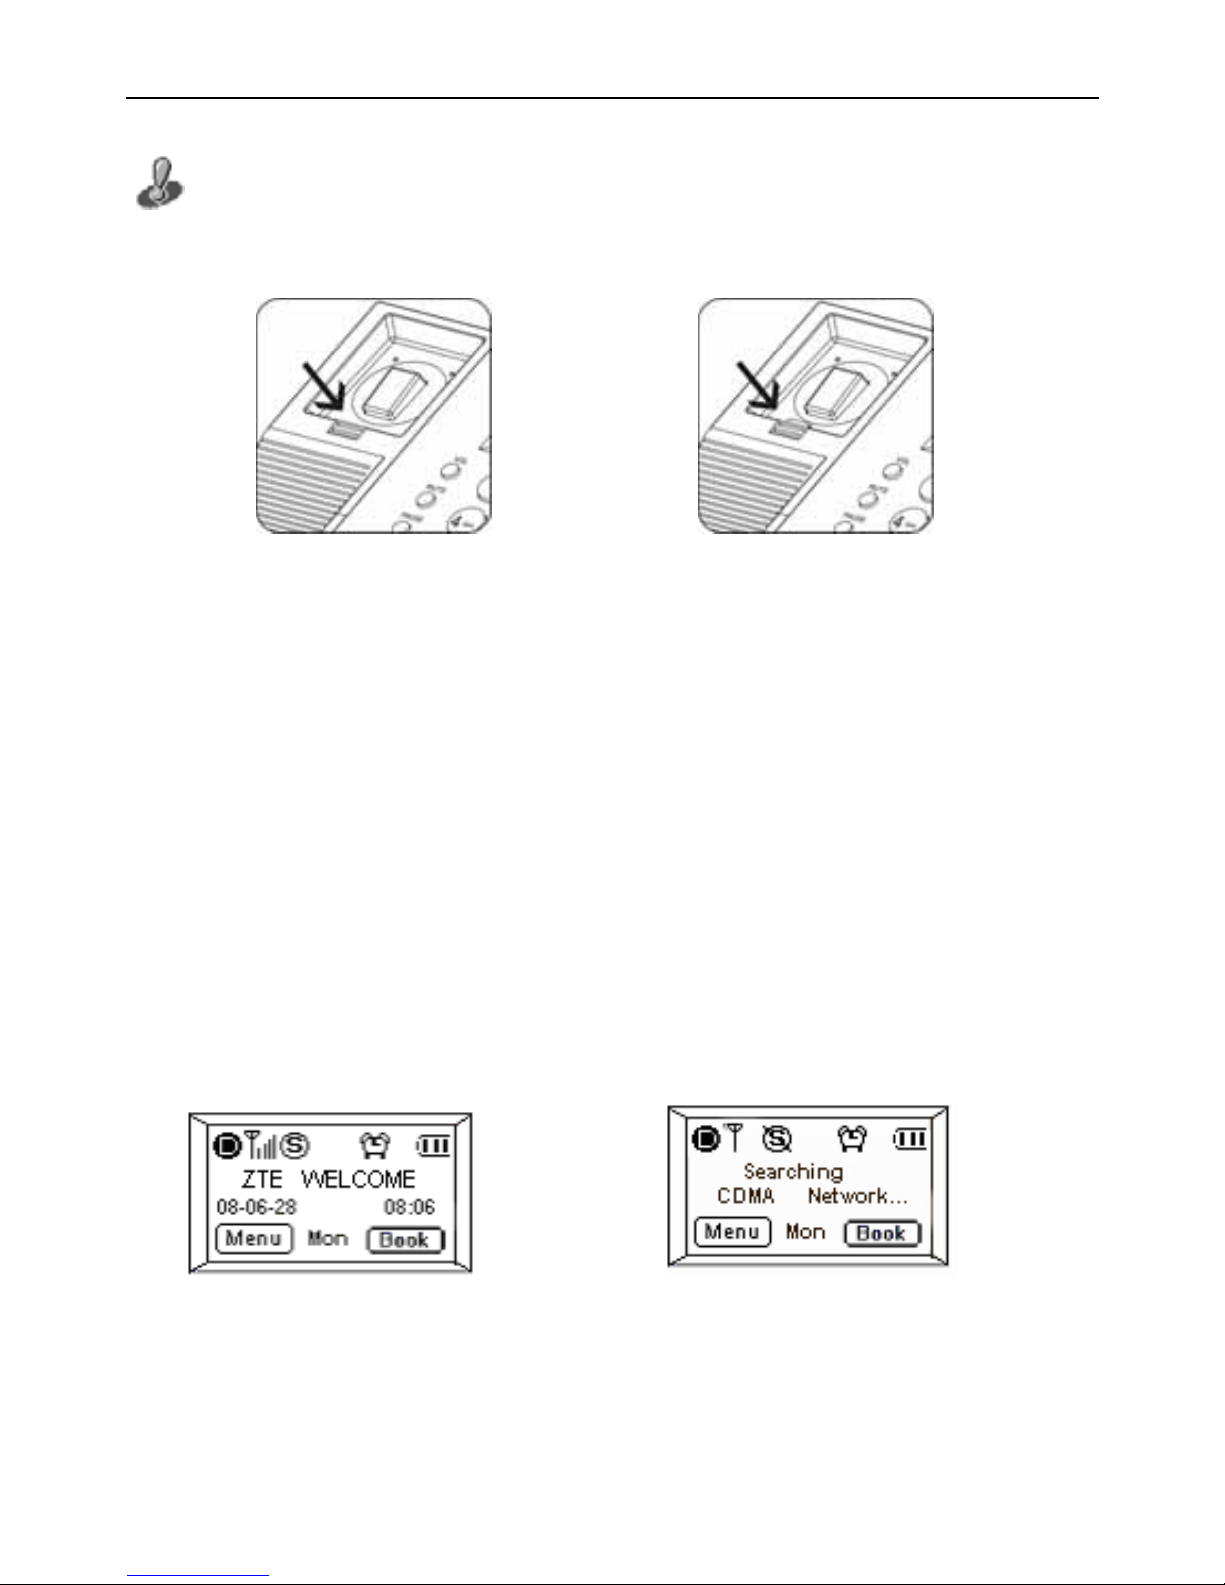
ZTE WP560/960用户手册
在挂墙安装时,请根据图1所示拔出手柄防滑扣,然后再根据图2所示反向将防
滑扣插回,以避免在挂墙使用状态下手柄滑脱。
图 1 图 2
5.3 工作状态检测
服务区显示:打开电源, 如果电源连接正确,无线固话 LCD 显示屏
将点亮,显示 LOGO 信息,然后无线固话开始搜索本地的 CDMA 数字网络
信号,当搜索到有网络且有服务时,如图 1 所示, 此时您就可以拨打或接听
电话了。
无服务区显示: 当您处于无服务区域时, 固定台将提示“No
Service!”;如果无网络时,还将试图搜索本地的 CDMA 数字网络信号,如图
2 所示,此时请与当地客户服务联系。
图 1 图 2
15
Page 91
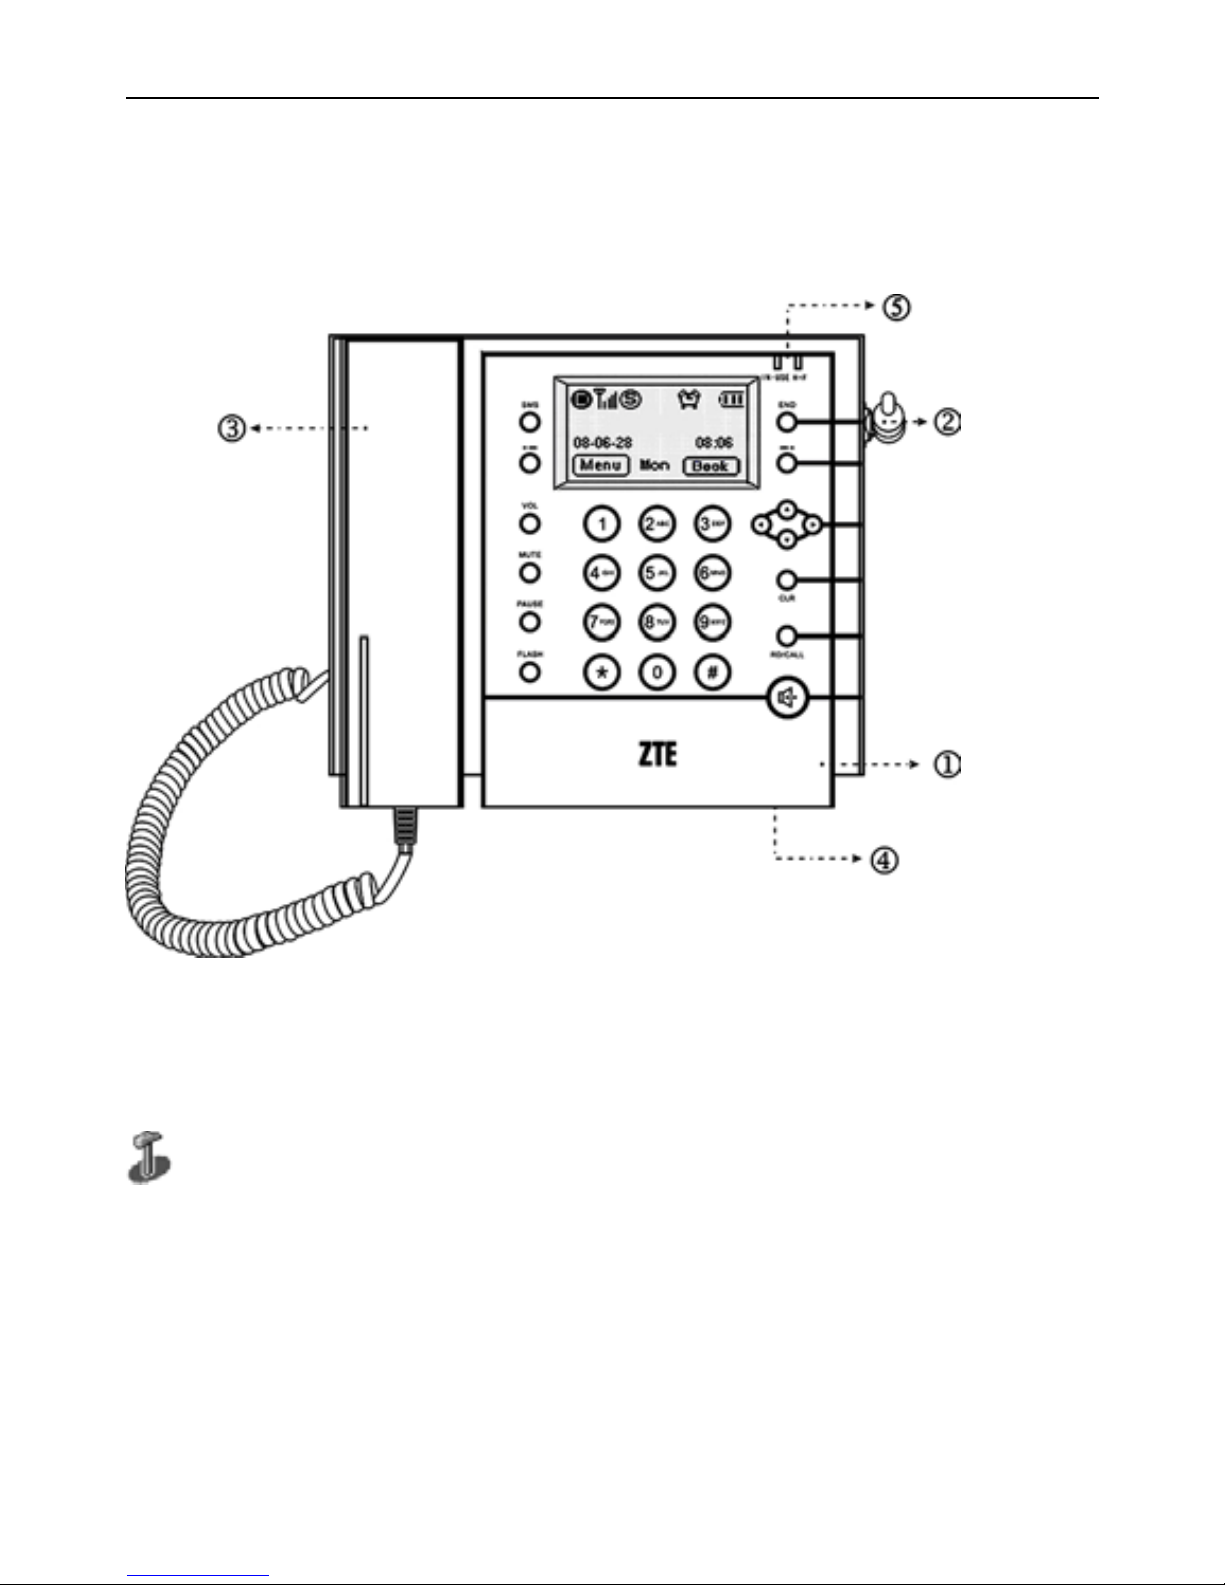
ZTE WP560/960用户手册
6.无线固话外观简介
6.1 主要外观部件
①主机;②天线;
③手柄;④免提麦克风;⑤LED 灯
手柄状态指示灯(IN-USE):提手柄摘机后长亮,放手柄挂机后长灭;免
提状态指示灯(H.F):按免提键摘机后长亮,按免提键挂机后长灭。
16
Page 92
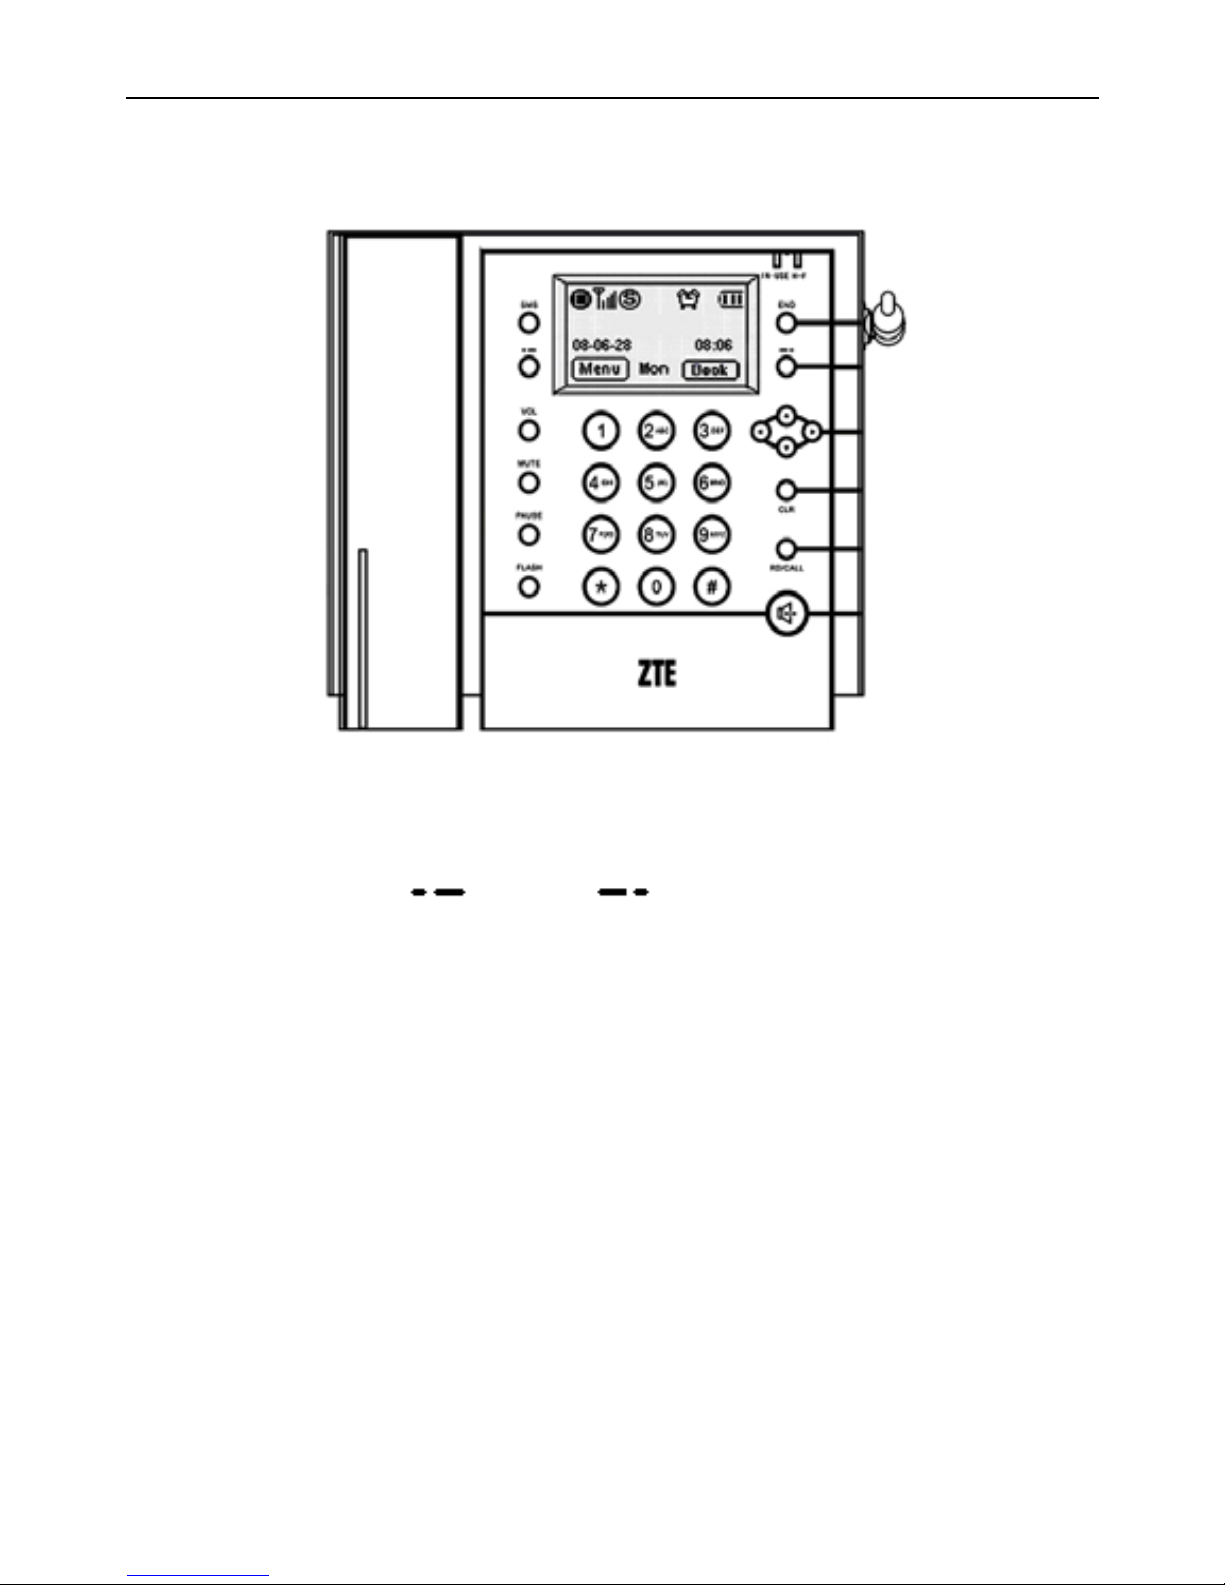
ZTE WP560/960用户手册
6.2 按键介绍
1)
<SMS>
按此键进入短信菜单。
2) 左右软键(
左软键: 右软键: )
有左右两个软键,按左右软键分别等同于显示屏左下 角和 右下角显 示的
功能软键。
3)
<VOL>
按此键可在待机或通话过程中调节听筒、喇叭音量。
4)
<MUTE>
在通话过程中使对方暂时听不到自己的声音,但保持通话连接。
在对方来电,振铃响起的过程按下可暂时使铃声静音 ,同 时可以正 常接
听电话,对方挂机或接听电话后恢复铃声正常设定;
5)
<PAUSE>
17
Page 93

ZTE WP560/960用户手册
在输入的电话号码中插入暂停“P”标识,每个“P”相当于 3S 延迟,
可多次重复输入多个“P”,主要用于用户一次拨通分机号码或用于 IP
电话或国际长途。
6)
<FLASH>
闪断键,通话过程中可按此键进行三方通话或切换呼叫等待。
7)
<END>
对方来电时,按此键拒接电话;菜单操作中直接退回到主菜单;挂机。
8)
, , ►,◄(方向键)
用于移动当前的光标位置、改变当前的菜单选项、垂直滚动条。除某些
界面下(如地址的选择和修改界面等),左右方向键的功能等同于左右
软键的功能。
9)
<RD/CALL>
开始呼叫当前显示的电话号码、回拨、重拨、热线呼 叫、 查看呼出 电话
记录。
10)
<CLR>
删除当前光标处的字符;返回上一级菜单。
11)
免提键:待机状态下, 按此键进入免提状态。
12)
0-9 ,*,# 数字/字母键
数字、字符的输入;其中*键在允许时可以切换至标点符号的输入模式。
在各记录列表界面,您可以按*键向上翻页,按#键向下翻页。
按键盘上 CLR 键可返回上一级菜单,如果在显示屏右下角的提示软键为 Back,则
按右软键可返回上一级菜单。按END 键直接返回主菜单,如果是在菜单的编辑屏中,
按一次 CLR 键可删除一个字符,长按可全部删除。
18
Page 94
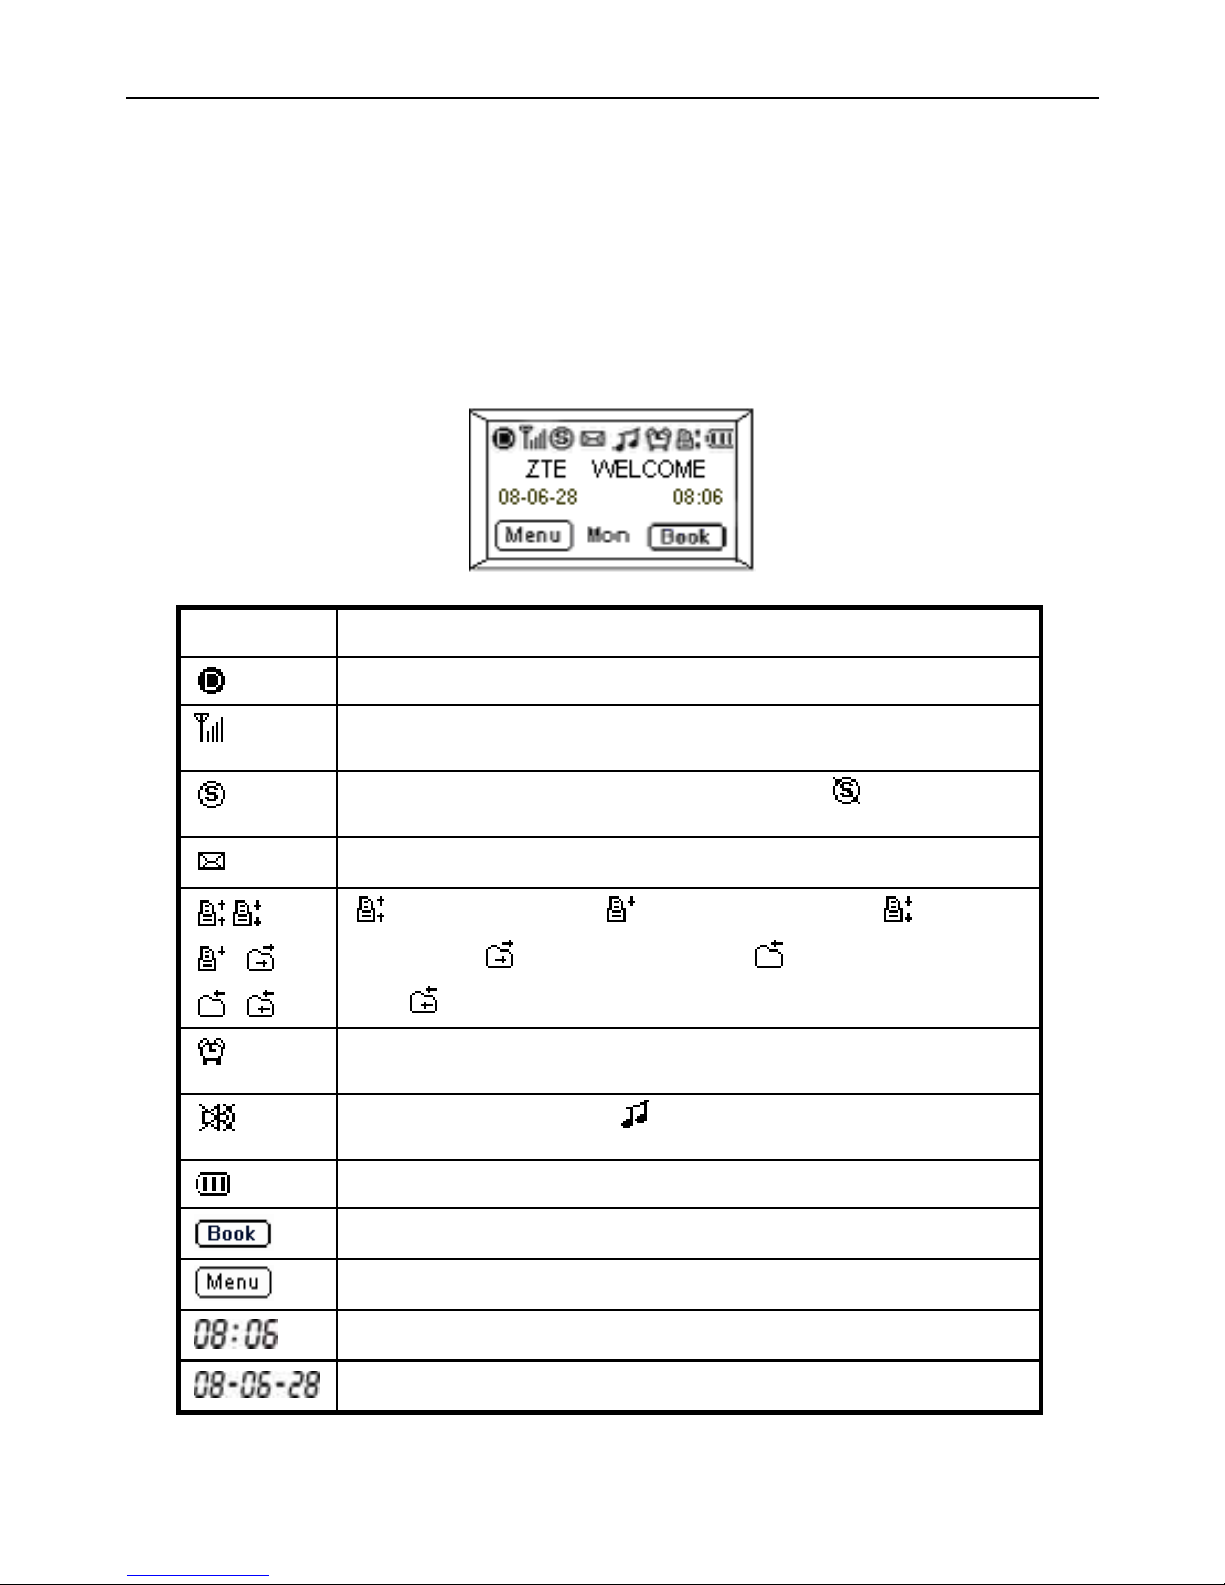
ZTE WP560/960用户手册
6.3 显示图标
LCD 显示屏上第一行显示的图标分别用来指示当前移动网络的制式、信
号强度、网络服务、短信提示、铃音/静音、闹钟、数据业务和电池/外接电源,
第二行显示问候语,第三行显示日期时间,第四行显示左右功能键和星期。
图标 描述
表示 CDMA 数字制式
指示当前接受信号强度;竖条越多,表明信号越强
指示当前网络有服务;网络无服务时显示
闪烁表示有未读短消息;不闪烁表示存储区满
指示 FAX 发送; 表示 fax 接收一次; 表示 fax
一直接收;
表示异步数据发送; 表示异步数据接收一
次;
表示异步数据一直接收
指示您已经设置了闹钟功能.
静音提示;铃音提示为
指示当前电池容量,竖条越多,表明电池容量越大
待机状态下的功能右键(右软键)
待机状态下的功能左键(左软键)
当前时间指示,从左到右依次为小时和分钟
当前日期指示,从左到右依次为年、月、日
19
Page 95
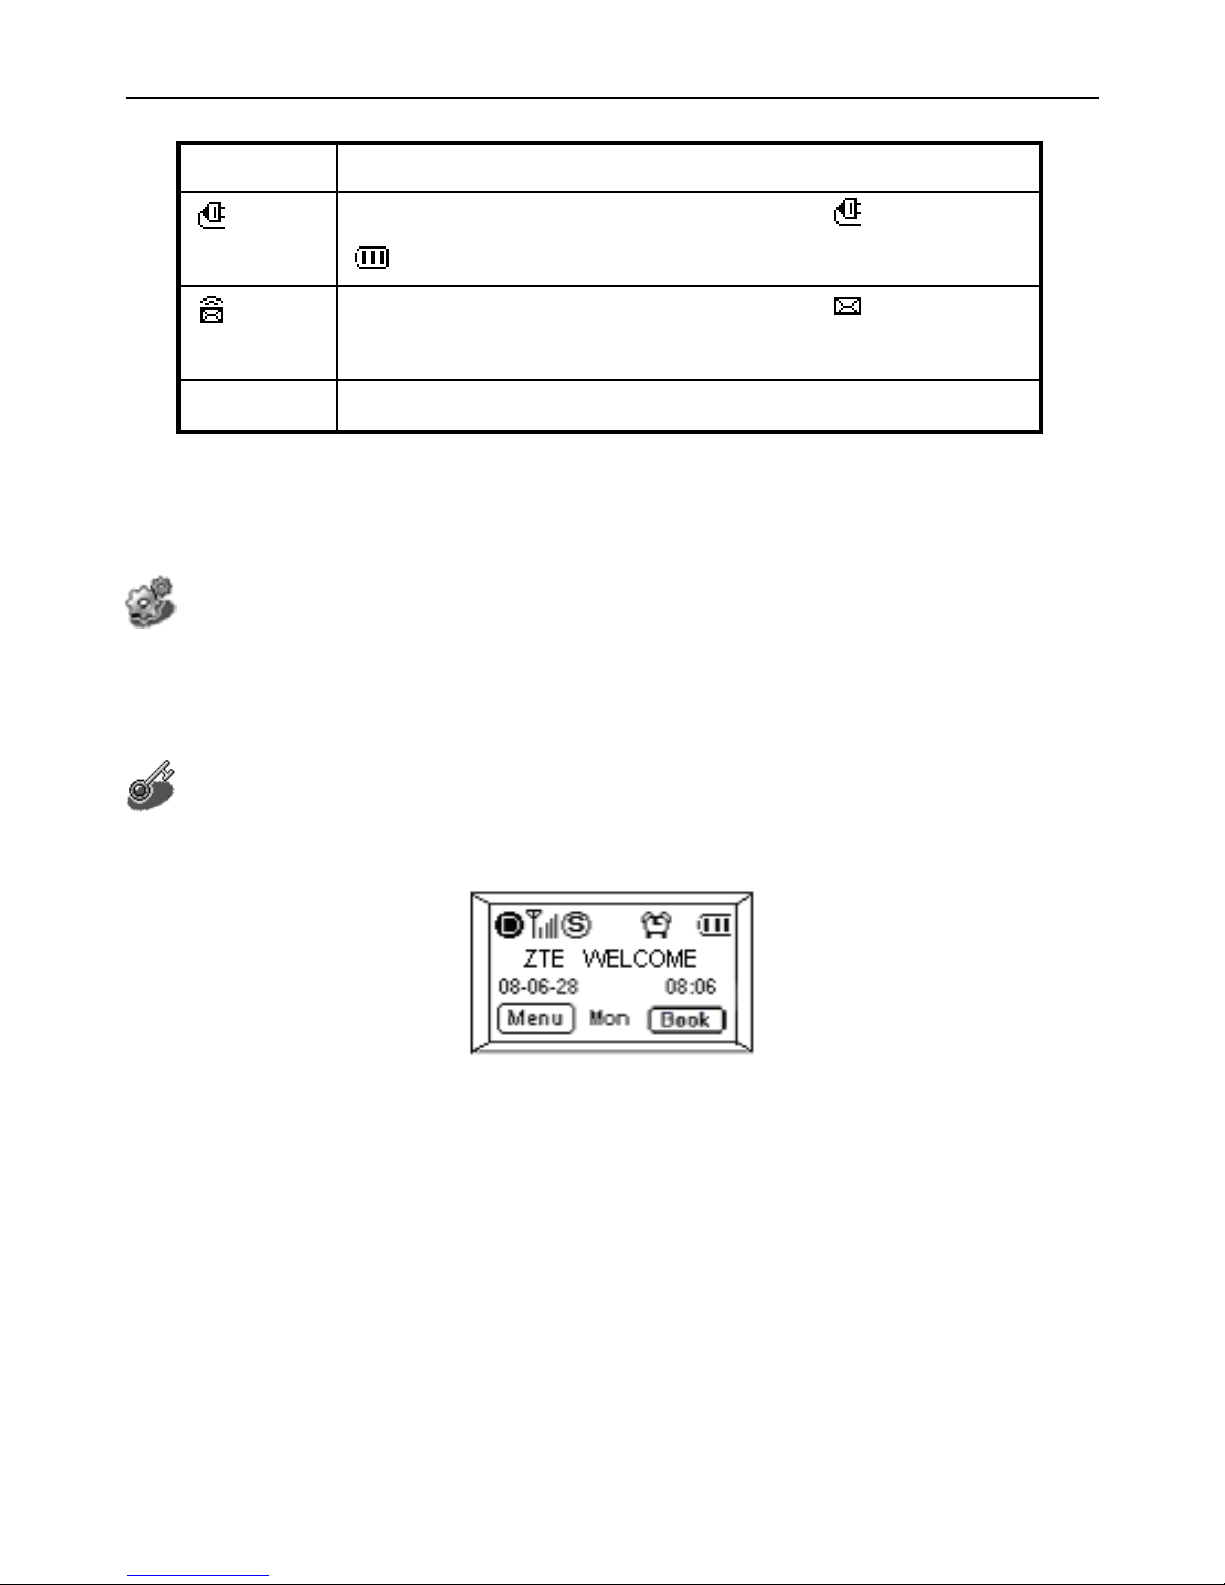
ZTE WP560/960用户手册
图标 描述
当您只通过电源适配器使用无线固话时,
图标将会取代
图标出现在 LCD 右上角
当您有新的语音信息时,此图标会出现在
图标出现的地
方
Mon
当前星期显示
7 通话功能
7.1 拨打电话
功能简介
只要您向当地的电信运营商开通了相关的语音业务,您就可以利用本产
品拨打本地电话、国内长途、国际长途及 IP 电话等。
操作指导
1) 首先确保您的无线固话开机并进入待机状态,如下图所示:
2) 手柄通话
待机状态提起手柄;
听拨号音,拨打所需号码;
按<RD/CALL>键或等待数秒自动呼出;
通话结束后手柄挂机。
3) 免提通话
20
Page 96

ZTE WP560/960用户手册
待机状态按免提键;
听拨号音拨打所需号码;
按<RD/CALL>键或等待数秒自动呼出;
通话结束后再次按免提键挂机。
4) 预拨号
待机状态直接拨打所需号码;
按<RD/CALL>键开始呼叫;
通话结束后,按<END>键挂机。
7.2 接听电话
功能简介
您可以接听呼入电话。如果您向当地的电信运营商开通了来电显示业务,
并且所使用的固定电话机支持来电显示功能,那么响铃时,固定电话上将会
显示来电的号码。
操作指导
1) 手柄接听
来电时提起手柄,LCD 屏显示通话时长;
通话结束后,手柄挂机。
2) 免提接听
来电时按免提键,LCD 屏显示通话时长;
通话结束后,再次按免提键挂机。
21
Page 97
ZTE WP560/960用户手册
7.3 重拨
功能简介
重拨最后一次呼出的号码。
操作指导
1) 手柄重拨
待机状态提起手柄,听拨号音;
连续按<RD/CALL>键两次,您将重拨最后一次呼出号码;
通话结束后,手柄挂机。
2) 免提重拨
待机状态按免提键,听拨号音;
连续按<RD/CALL>键两次,您将重拨最后一次呼出号码;
通话结束后,再次按免提键挂机。
如果您启用了热线模式(同时没有开启呼叫限制功 能),您拨打任何号码按
<RD/CALL>键呼出的都是你所设置的热线号码(不包括紧急号码)。
7.4 拨号延时
功能简介
在拨号中插入拨号延时。
操作指导
1) 拨号时插入拨号延时等待
当您拨号时, 按
<PAUSE> 键输入拨号延时字符 (P), 一个拨号延时字
22
Page 98

ZTE WP560/960用户手册
符相当于 3 秒钟延时。
2) 如果您要拨打一个分机 ,例如主机号码 123456, 分机号码是 12,您输入
123456PP12,无线固话将先拨出 123456,等待 6 秒钟后再拨出 12。这样
您就可以一次性直接拨通分机号码 12。
7.5 紧急呼叫
功能简介
当您处于紧急情况下时,只要固定电话能搜索到本地的 CDMA 数字网络
信号,您就可以拨打已设置在固定电话中的紧急呼叫号码,寻求紧急援助。
操作技巧
1)
紧急呼叫结束通话后,进入紧急呼叫状态,此时屏幕显示
EmergentCallOnly END to exit
2) 您可以按<END>键退出紧急呼叫状态。
3) 在紧急呼叫状态只能拨打紧急号码,对其他号码不响应。
4) 处于紧急呼叫状态时按键音量增大
即使设置了呼叫限制,也允许紧急号码的呼出。不同的国家有不同的紧急呼叫号
码,所以固定台的紧急呼叫号码不会在所有地区生效。详细情况请在购买本机时咨询
本地运营商。
23
Page 99

ZTE WP560/960用户手册
8.可选功能
8.1 三方通话
功能简介
本功能允许三方同时互相通话。如果您需要使用此 项功能 ,请首 先向当
地的电信运营商咨询并申请。
8.2 呼叫转移
功能简介
呼叫前转功能是将来电转移到您指定的另一部话机上,不管您的话机关
机与否。呼叫前转激活时,您仍然可以接听电话。
如果您需要使用此项功能,请首先向当地的电信运营商咨询并申请。
8.3 呼叫等待
功能简介
当您正在通话时,如果又有一个新来电呼入,那么您可以选择接听或拒
听新来电。如果您选择接听新来电,那么您可以在两个来电之间来回切换。
如果您需要使用此项功能,请首先向当地的电信运营商咨询并申请。
8.4 呼叫设置
呼叫设置包括:①热线模式(Hot Line)②呼叫限制(Call Restrict)③起呼模
式(Originate Mode)④来电铃音(Ring Tone)⑤连字符设置(Auto Hyphen)等子
菜单。
24
Page 100
ZTE WP560/960用户手册
8.4.1 热线模式
功能简介
如果您启用了热线模式,同时没有启动呼叫限制,那么您拨打任何号码
按
<RD/CALL>键呼出的都是你所设置的热线号码(不包括紧急号码)。
操作指导
1) 待机状态按左软键后,按数字键<2>,进入呼叫设置菜单。
2) 按数字键
<1>键选择菜单【Hot Line】(热线模式),有两个选项:
①Setting(设置);②Edit(编辑)。
3) 选择
Setting(设置)选项,您可以激活(On)或者关闭(Off)热线模式。
Hotline:
OK Back
4) 按左软键确认后返回上级菜单,选择
Edit(编辑)
选项,您将进入热线号码编辑界面,如右图所示:
5) 按左软键确认热线号码后返回到待机状态,LCD 屏第二行显示:
-Hotline Mode-
8.4.2 呼叫限制
功能简介
呼叫限制功能包括:①所有去电限制②国内长途限制③国际长途限制④
来电限制⑤特殊号码限制等子菜单。若所有去电限制设定, 该无线固话将不
25
 Loading...