

Page 1

V66
User Manual
1
Page 2

LEGAL INFORMATION
Copyright © 2011 ZTE CORPORATION.
All rights reserved.
No part of this publication may be excerpted, reproduced, translated or
utilized in any form or by any means, electronic or mechanical, including
photocopying and microfilm, without the prior written permission of ZTE
Corporation.
The manual is published by ZTE Corporation. We reserve the right to
make modifications on print errors or update specifications without prior
notice.
Google and the Google logo are trademarks of Google Inc.
Version No. : R1.0
Edition Time : Oct 2011
2
Page 3

Contents
Getting Started ........................................................................ 11
Overview ........................................................................................... 11
Key Definition .................................................................................... 13
Starting up......................................................................................... 13
How to slot your SIM/memory card ............................................. 13
How to charge your Tablet .......................................................... 16
Powering On/Off Your Device ........................................................... 17
How to power on/off your device ................................................. 17
How to switch your device to sleep mode ................................... 17
How to wake up your device from sleep mode............................ 18
Getting Around Your Device ............................................................. 18
Using Finger Gestures ................................................................ 18
Home Screen .............................................................................. 20
Applications and Settings Preview .............................................. 23
Contacts .................................................................................. 31
Starting to use Contacts ................................................................... 31
3
Page 4

Managing Contacts ........................................................................... 31
Importing/Exporting Contacts ...................................................... 31
Creating a Contact ...................................................................... 32
Searching for a Contact ............................................................... 33
Editing a Contact ......................................................................... 33
Deleting Contacts ........................................................................ 34
Synchronize Contacts ............................................................ 34
Entering Text ........................................................................... 35
Using the On-screen Keyboard ........................................................ 35
Input Options..................................................................................... 37
Touch Input Settings ......................................................................... 37
Using Email ............................................................................. 40
Creating an Email account .......................................................... 40
Composing and sending an Email ............................................... 41
Reply to or Forward an Email ...................................................... 42
Email Settings ............................................................................. 42
4
Page 5

Getting Connected .................................................................. 45
Connecting to the Internet ................................................................ 45
Ways of Connecting to the Internet ............................................. 45
CDMA/EvDo/LTE ........................................................................ 45
Wi-Fi ............................................................................................ 46
Virtual Private Networks (VPNs) ................................................. 48
Using the Device as a Modem .......................................................... 50
Enabling the Device as a Modem ................................................ 50
Disabling the Modem Function .................................................... 52
Using the Device as a Wi-Fi Hotspot ................................................ 52
Enabling the Wi-Fi Hotspot .......................................................... 53
Disabling the Wi-Fi Hotspot ......................................................... 53
Using Browser................................................................................... 54
Opening Browser ......................................................................... 54
Opening Web Pages ................................................................... 54
Browsing Options ........................................................................ 55
Using Bookmarks ........................................................................ 58
Browser Settings ......................................................................... 59
5
Page 6

Bluetooth
®
......................................................................................... 62
Turning on/off Bluetooth .............................................................. 62
Making your device visible .......................................................... 63
Change your device name .......................................................... 64
Pair with another Bluetooth device .............................................. 64
Experiencing Multimedia ....................................................... 66
Camera ............................................................................................. 66
Opening Camera ......................................................................... 66
Taking Pictures ............................................................................ 66
Camera Settings .......................................................................... 67
Camcorder ........................................................................................ 68
Opening Camcorder .................................................................... 68
Shooting Videos .......................................................................... 68
Video Settings ............................................................................. 69
Music ................................................................................................. 70
Opening Music ............................................................................ 70
Playing Music .............................................................................. 70
6
Page 7

Creating Playlists ......................................................................... 71
Managing Your Playlists .............................................................. 71
Gallery ............................................................................................... 72
Sound Recorder ................................................................................ 72
Opening Sound Recorder ................................................................. 72
Record Your Memo ..................................................................... 73
Google™ Applications ........................................................... 74
Signing In to Your Google Account ................................................... 74
Using Gmail ...................................................................................... 74
Open Gmail ................................................................................. 75
Creating and sending an gmail .................................................... 75
Using Google Calendar .................................................................... 75
Using Google Talk ............................................................................ 76
Opening Google Talk .................................................................. 76
Adding a new friend ..................................................................... 76
Viewing and accepting an invitation ............................................ 77
Starting a chat ............................................................................. 77
7
Page 8

Places ............................................................................................... 78
Navigation ......................................................................................... 79
Latitude ............................................................................................. 79
Settings ................................................................................... 81
Basic Settings ................................................................................... 81
Setting the Time and Date ........................................................... 81
Screen Settings ........................................................................... 82
Sound Settings ............................................................................ 83
Language Settings ...................................................................... 85
Mobile Network Services ............................................................. 86
Security Settings ............................................................................... 87
Protecting Your Tablet with a Screen Lock ................................. 87
Protecting Your UIM Card with a PIN .......................................... 90
Setting Up Credential Storage ..................................................... 91
Managing Memory ............................................................................ 92
Managing Your Memory Card ..................................................... 92
Managing Internal Storage .......................................................... 93
8
Page 9

Reset to factory settings .............................................................. 93
Application Settings .......................................................................... 93
Managing Applications ................................................................ 93
Removing an Application ............................................................. 94
Moving an Application to or from the Memory Card .................... 95
Other Settings ................................................................................... 96
Speech Synthesis Settings .......................................................... 96
Other Applications .................................................................. 97
Alarming ............................................................................................ 97
Set alarms ................................................................................... 97
Calculator .......................................................................................... 97
Specifications ......................................................................... 99
Health and Safety Information ............................................. 101
Distraction ....................................................................................... 101
Electrical Safety .............................................................................. 106
Explosive environments .................................................................. 110
9
Page 10

Vehicles Equipped with an Airbag ...................................... 110
Third Party Equipment ......................................................... 111
Efficient Use .......................................................................... 111
Radio Frequency (RF) Exposure ......................................... 112
FCC Compliance ................................................................... 114
10
Page 11
Getting Started
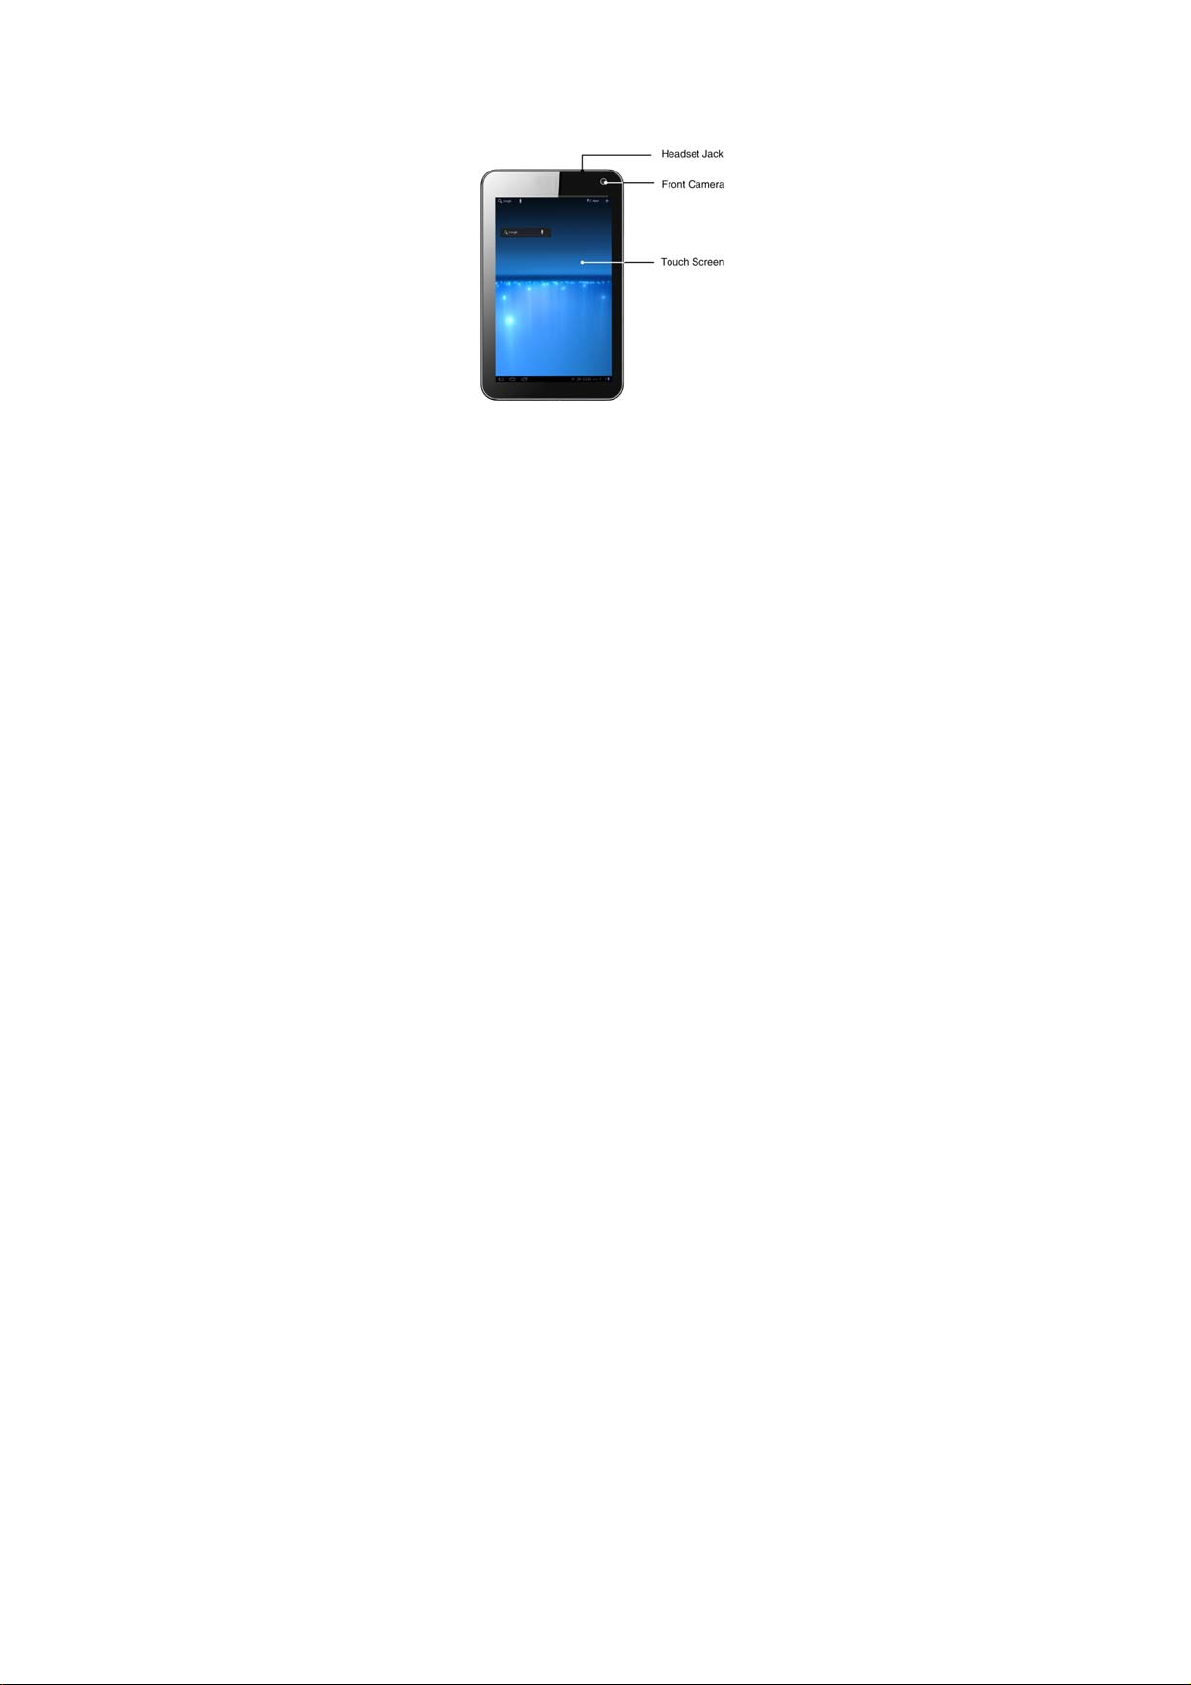
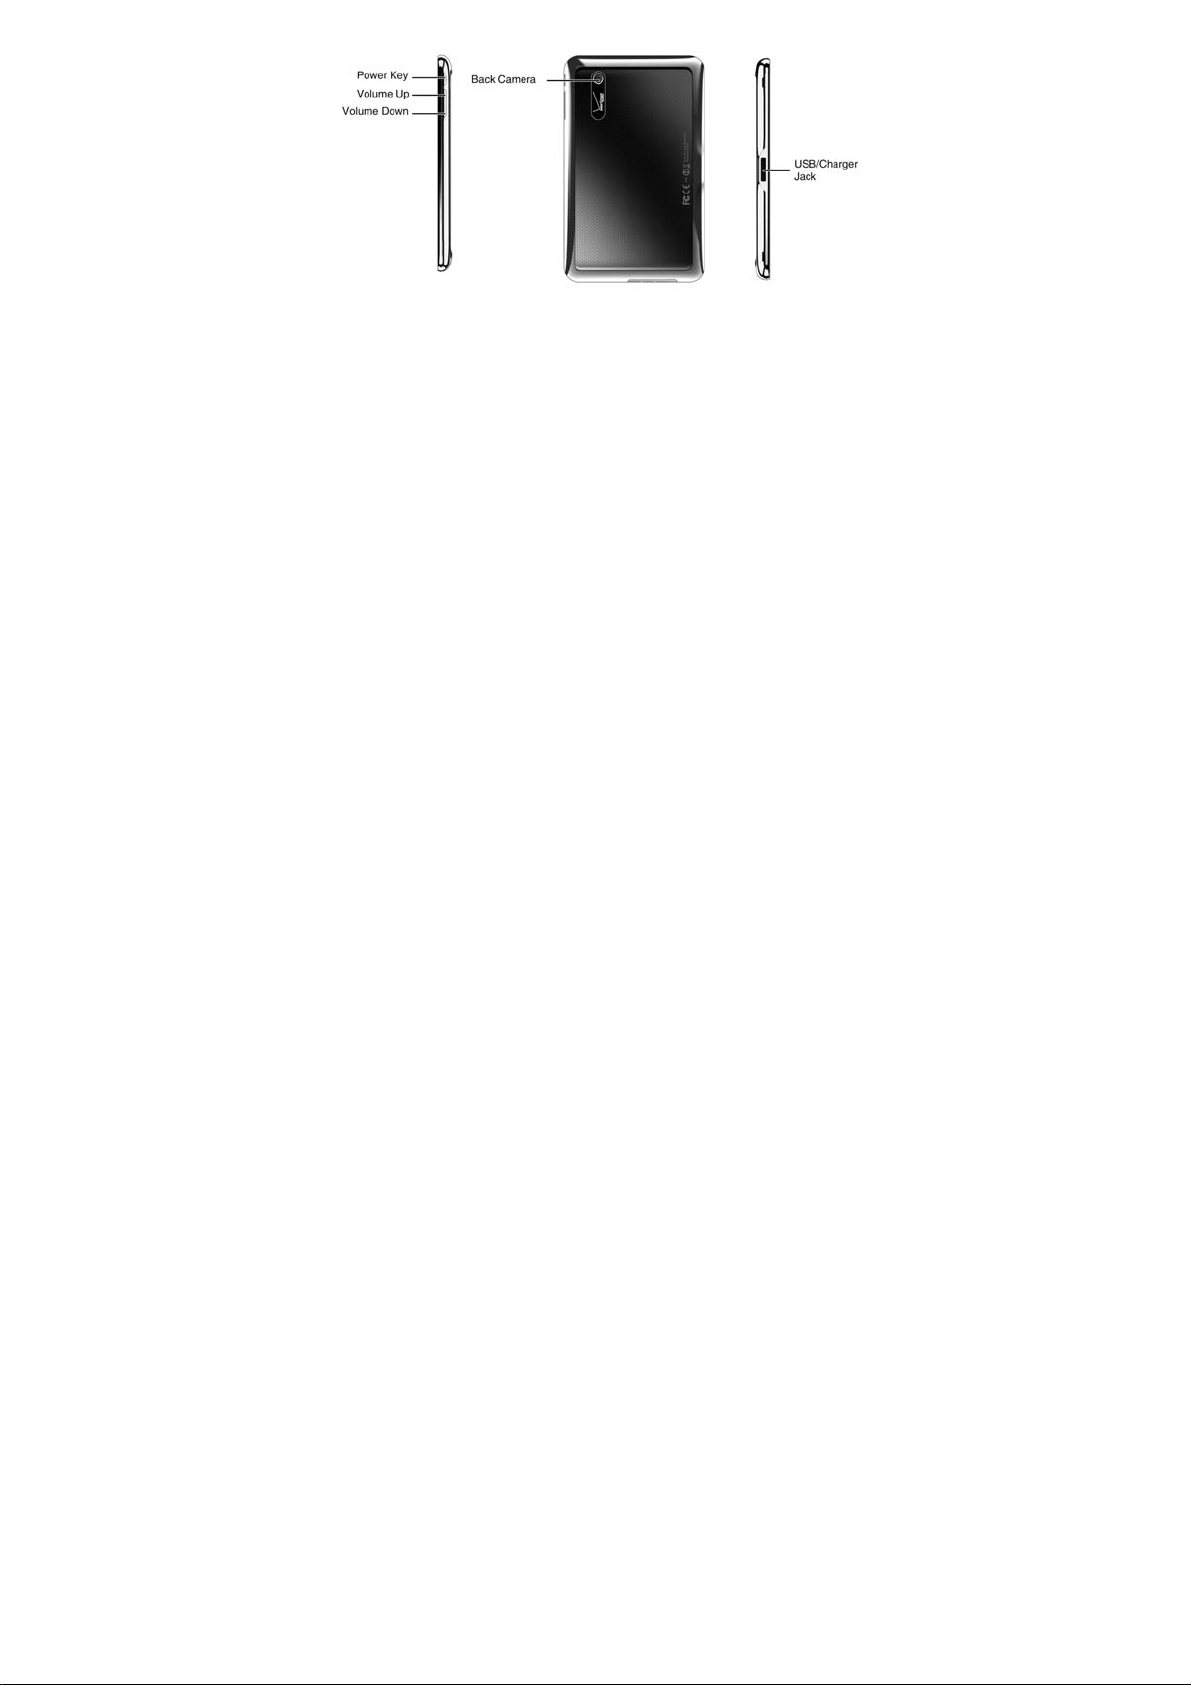
Overview
11
Page 12
12 13
Page 13

Key Definition
Key Function
Press and hold to power on your Tablet.
Power Key
Press to switch to sleep mode.
Press to wake up your Tablet.
Volume Keys
Use to control the volume Up or Down.
Starting up
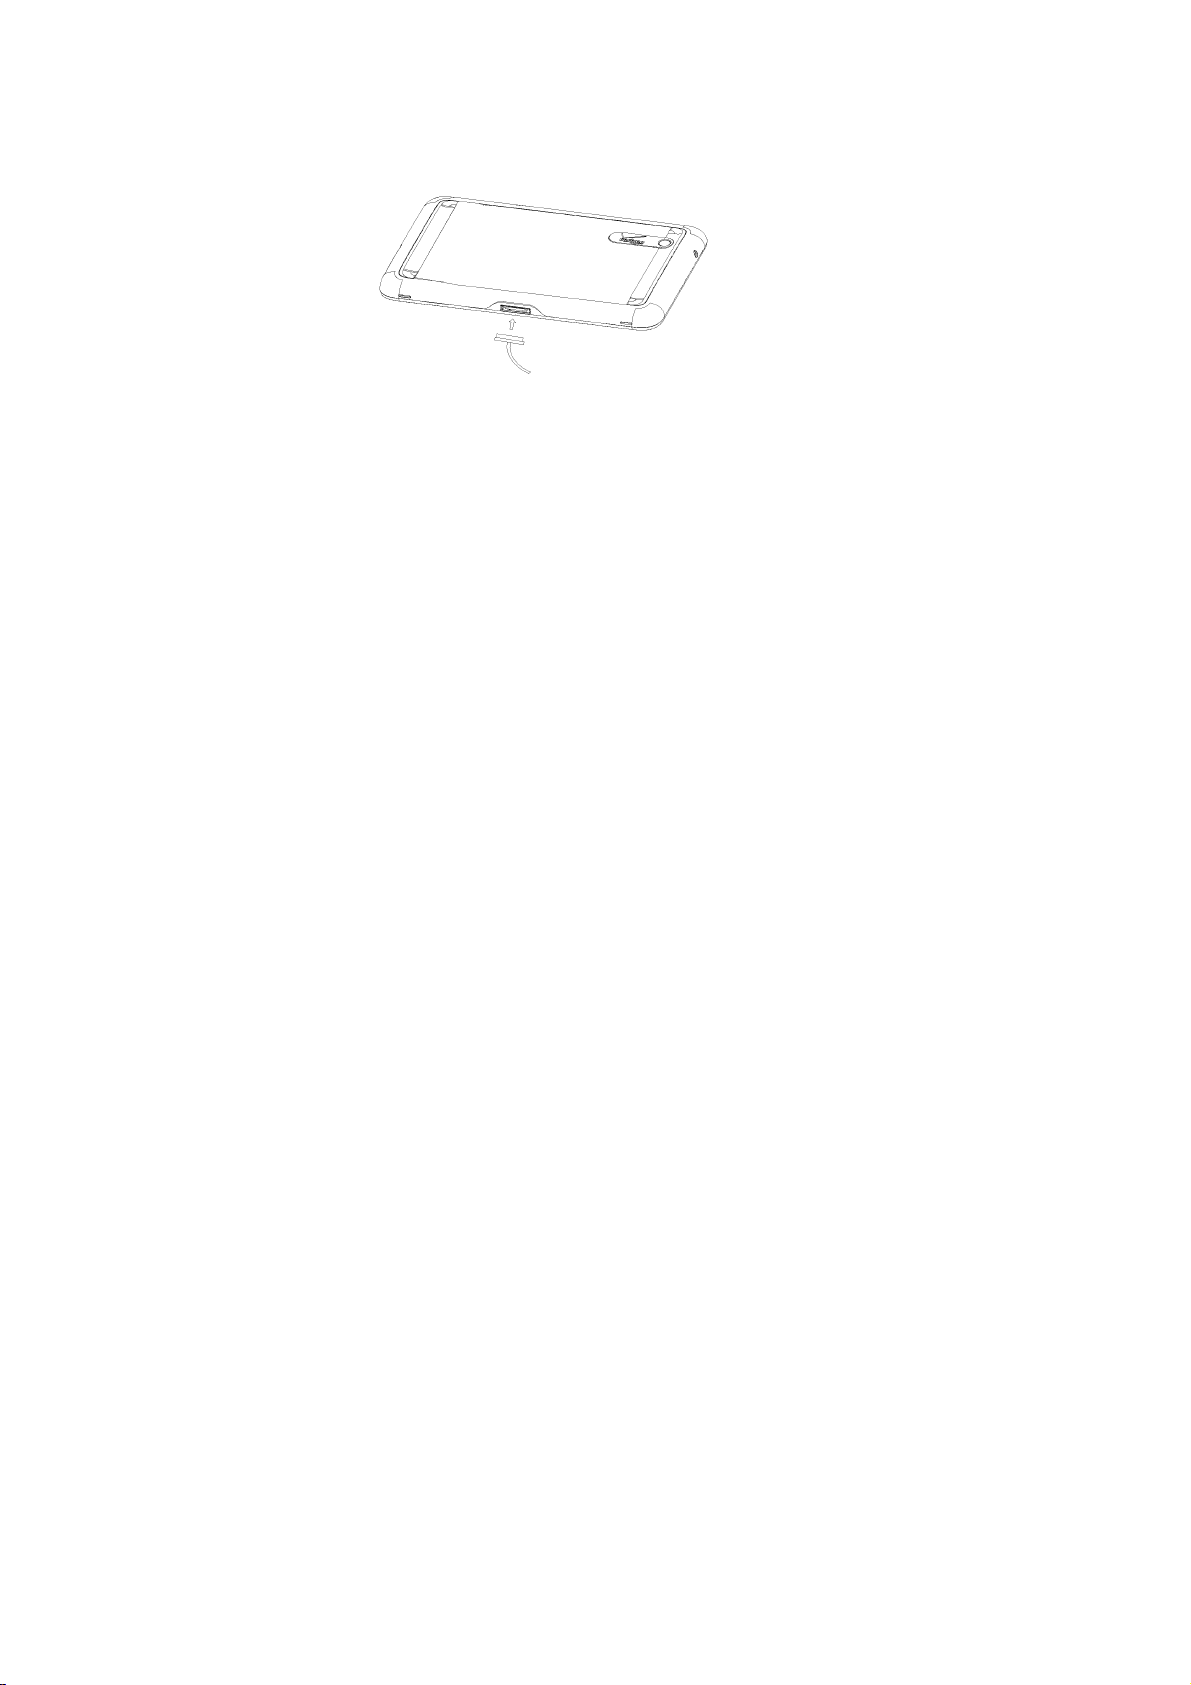
How to slot your SIM/memory card
Power off your device before installing or replacing the UIM card.
1. Open the cover of UIM slot, and insert your UIM card into the UIM slot.
Page 14

There is a diagram showing the correct orientation of the card printed
above the SIM slot.
2. Insert your memory card into the memory card slot. There is a
diagram showing the correct orientation of the card printed above the
memory card slot.
14
Page 15

Notes:
microSD logo (
) is a trade mark of SD Card Association.
15
Page 16
How to charge your Tablet
Your device comes with a wall adapter and a USB cable which connect
together to charge your device. To charge your device:
1. Connect the USB cable to the wall adapter. When connecting the logo
on the USB cable should face toward you.
2. Plug the USB cable into the device’s USB/Charger’s port.
3. Disconnect the charger when the battery is fully charged.
16
Page 17

Notes:
Use only the USB cable and wall adapter that came with your tablet when
charging your tablet.
Powering On/Off Your Device
How to power on/off your device
Make sure your UIM card is inserted and the battery is fully charged
before turning on your device.
1. Press and hold the Power Key to power on your device.
2. To switch it off, hold Power Key and tap OK.
How to switch your device to sleep mode
Press the Power Key.
Sleep Mode suspends your device to a low-power-consumption state while
the display is off to save battery power. Your device also goes into Sleep
17
Page 18

Mode automatically when you leave it idle after a certain period of time.
How to wake up your device from sleep mode
If your device is switched to sleep mode, you need to wake it up:
1. Press the Power Key to activate your screen display.
2. Press the lock icon
Notes:
If you have set an unlock pattern for your device (refer to Settings ->
Location & security -> Set up screen lock -> Pattern), you need to draw
the pattern to unlock your screen.
out of the circle.
Getting Around Your Device
Using Finger Gestures
You can use finger gestures to control your device. The controls on your
touch screen change dynamically depending on the tasks you are performing.
18
Page 19

1. Tap the buttons, icons, or applications to select items or to open
applications.
2. Hold a certain item to get available options.
3. Slide on the screen, you can scroll up/down. From Home Screen, you
can also slide left/right to browse the extended Home Screen.
4. Drag a certain item to move it or to do some other corresponding
operations.
5. In some apps (such as Maps, Browser, and Gallery), you can zoom in
and out by placing two fingers on the screen at once and pinching
them together (to zoom out) or spreading them apart (to zoom in).
Tips:
Besides using finger gestures to control your device, you can also switch
your device screens (such as text input screen, gallery screen, etc.) between
portrait or landscape mode by holding the device upright or sideways.
19
Page 20

Home Screen
You can add or remove home items in your Home Screen.
20
Page 21

How to extend the Home Screen
Beyond the screen width, the Home Screen extends to provide more
space for adding items. Slide your finger to the left or right to get the
extended Home Screen.
Customize the Home Screen Wallpaper
To change the wallpaper
1. Tap
2. Tap Wallpaper to open the wallpaper menu.
3. Select the wallpaper you want to use from Gallery, Live wallpapers,
4. Tap Save or Set wallpaper.
To add a Home Screen item
1. Tap
to open Customize home screen.
Or touch and hold on the home screen.
or Wallpapers.
open Customize home screen.
Or touch and hold on the home screen.
21
Page 22

2. Tap Widgets, Apps or More to select an item. And move the item to
Home Screen.
To remove a Home Screen item
1. Tap
2. Tap and hold the item you want to delete until the
appears on the screen.
3. Drag the item into
to return to Home Screen.
remove icon
.
22
Page 23

How to open the notifications and quick settings panel
From the Notifications and quick settings panel, you can get the
information of tablet status, app notification, and quick settings from the
Notification Panel.
To see a specific notification, touch the icon. To open a panel, touch the
digital clock.
Applications and Settings Preview
Programs Preview
Your Tablet has lots of functions. Tap
23
to get the following
Page 24

programs that are pre-installed on your device.
Applications Description
Books Enables you to view books.
Browser Enables you to browse the internet.
Calculator Enables you to perform the calculation.
Calendar
Camcorder
Camera
Clock Set alarms.
Contacts
Downloads Access useful applications and fun games to download.
Enables you to schedule appointments, including
meetings and other events.
Enables you to enter camcorder and shoot the
video clips you like.
Enables you to enter the camera screen directly and
use the camera features.
Enables you to manage the information of your
friends and colleagues.
24
Page 25

Applications Description
Email
Facebook Connect to facebook.
File Manager
Gallery
Gmail
Google Search Search for information online or on your deivce.
Latitude See your friends’ locations and share yours with them.
Maps
Enables you to enter the Email screen, where you
can setup Email, send or receive Emails.
Manage files on your microSD card and your
device.
Enables you to organize and manage your
multimedia files.
Enables you to access your Gmail account and
check your email on your mobile device.
Enables you to track your current location, view
real-time traffic situations, and receive detailed
directions to your destination.
25
Page 26

Applications Description
Market
Movie Studio Make movie.
Music
Navigation Enables you to use Google Maps Navigation.
Places
Settings Enables you to adjust the device settings.
Sound Recorder Enables you to record audio clips.
Talk
Enables you to access to useful applications and
fun games which you can download and install on
your device.
Enables you to browse your audio files and listen to
them in the Music player.
Enables you to find restaurants, ATMs, and other
places of interest near you.
Enables you to send and receive instant messages
and voice over internet protocol (VOIP), offered by
Google Inc.
26
Page 27

Applications Description
Videos Enable you to play videos.
Voice Search
YouTube
Settings Preview
You can adjust the device settings. Tap the
all the settings on your device.
Wireless &
networks
Sound
Enables you to search or dial by voice instead of
typing.
Enables you to watch YouTube videos and upload
your own.
Enables you to configure and manage your device’s
wireless connections, such as Wi-Fi, Bluetooth,
mobile networks, and Virtual Private Networks. You
can also enable the Airplane mode.
Enables you to set sound settings, such as
notification ringtone, and so on.
27
> Settings to view
Page 28

Screen
Location & security
Applications
Account & sync
Privacy
Storage
Language & input
Enables you to set display settings such as screen
brightness and so on.
Enables you to set the Lock screen, Encryption.
You can also select the sources to use when
determining locations from My Location.
Enables you to manage applications and installation
of new programs.
Enables you to manage your account and configure
general sync settings.
Enables you to configure privacy settings, such as
personal data.
Enables you to check the available memory of the
external card and the internal storage.
Enables you to set the locale (operating system
language and region), and text input options.
Enables you to configure the text-to-speech settings
28
Page 29

if you have installed a text-to-speech (voice data)
application.
Accessibility Enables you to manage accessibility options.
Date & time
About tablet
Enables you to set the date, time, time zone, and
date/time format. If the network supports, you can
also enable automatic time update.
Enables you to view the device status, battery level,
and legal information and you can make system
updates.
How to open recently used applications
1. Tap from any screen and the following recently used
applications interface appears.
29
Page 30

2. Tap the application you want to open.
30
Page 31

Contacts
Starting to use Contacts
You can add new contacts along with their information. Setting up
communication information for the contact will allow you to contact the
person quickly or browse the contact's information..
Tap the
Managing Contacts
Importing/Exporting Contacts
You can import/export contacts from/to you SIM card or microSD card.
Import/export contacts from/to SIM card
1. Tap
2. Select Import from SIM card.
> > Contacts to enter the Contacts Screen.
> Import/Export from the Contacts Screen.
31
Page 32

Your tablet will automatically read the contacts.
3. Select the contacts you want to import.
Tips:
If you want to impor all contacts, tap the > Select all.
4. Tap Done.
Import/export contacts from/to memory card
1. Tap the
2. Select to import or export contacts from/to storage.
If you want to import contacts from microSD card, you should have
vCard files saved in the microSD card. If there is more than one vCard
file, you need to select the vCard file.
3. Tap OK.
> Import/Export from the Contacts Screen.
Creating a Contact
1. Tap New from the Contacts Screen.
32
Page 33

2. Enter the name and phone numbers. You can also set the Group,
Email addresses, IM addresses, Postal addresses, Organizations etc.
if you select to create a phone contact.
3. Tap Done to save the contact.
Searching for a Contact
1. Tap Find contacts from the Contacts Screen.
2. Input the contact name you want to search for.
The contacts matched will be listed.
Editing a Contact
1. Select the contact you want to edit from the Contacts Screen.
2. Tap
3. Edit the contact and tap Done.
.
33
Page 34

Deleting Contacts
1. Tap > Delete contacts.
2. Select the contacts you want to delete.
3. Tap Done.
Synchronize Contacts
All your contacts from your email and social networking accounts are
automatically synched and backed up. When you change a contact for
one account, your tablet updates you other accounts.
34
Page 35

Entering Text
Using the On-screen Keyboard
Tap any text field to open the touch keypad. To close keypad keyboard,
tap Back
Android Keyboard is a keyboard layout similar to a desktop computer
keyboard. You can choose to use the landscape orientation of the
on-screen keyboard, by turning the Tablet sideways.
.
35
Page 36

Tips:
If you want to use the landscape keyboard, you need to select the
Auto-rotate screen check box in Settings > Screen.
Hold and select the text, tap Cut or Copy.
Hold location to paste, then touch Paste. You can paste the cut or
copied text.
36
Page 37

Input Options
To change input options, tap and you can select Input languages
or Android keyboard settings.
Input languages
Under Android keyboard, select Use system language. Or deselect
Use system language and select an active input method.
Android keyboard settings
General: Select Auto-capitalization, vibrate on keypress or sound on
keypress.
Text correction: Select Alw a ys show, Show on portrait mode or
always hide in Show correction suggestions.
Touch Input Settings
You can configure the touch input settings by tapping the >
> Settings > Language & input.
37
Page 38

Language settings
Select language
User dictionary
Voice input
Voice recognizer settings
Voice output
Text-to speech settings
Keyboard settings
Current input method: Enables vibration feedback as you touch on
the keyboard.
Input method selector: Enables the sound feedback as you touch on
the keyboard.
Configure input methods: Select the check box to capitalize the fist
letter of each sentence automatically.
Mouse an trackpad settings
38
Page 39

Pointer speed: Set the pointer speed.
39
Page 40

Using Email
Tap the > > Email. You can enter the Email Screen to setup
your Email account and exchange Emails.
Creating an Email account
1. Enter your Email address and password, then tap Manual setup or
Next when you enter the Email Screen for the first time.
2. Select the type of your account and tap Next.
3. Edit the incoming server settings and then tap Next.
Your device will check the incoming server settings and finish the
setup automatically. If you are notified that setup could not be finished,
you might need to correct some settings to finish it. If there is any
problem, please contact your mobile service provider and Email
service provider.
4. Edit the outgoing server settings and tap Next.
Your device will check the outgoing server settings and finish the
40
Page 41

setup automatically.
5. Set the Email checking frequency, select whether to use this account
by default or be notified when Email arrives, and then tap Next.
6. Give your account a name and set a name displayed on outgoing
message, and then tap Done.
Composing and sending an Email
After creating an Email account, you can compose and send Email
messages.
1. Tap the
2. Tap the To field and enter the recipient’s address.
When you enter the address, the matching addresses saved in your
Contacts will be displayed. You can tap the recipient from the list.
Tips:
You can also tap the
3. Enter the subject and the content of your Email.
from the Email Screen.
> Add Cc/Bcc to add recipients.
41
Page 42

4. Tap Send.
Reply to or Forward an Email
1. Open the Email you want to reply to or forward from Email Screen.
2. Enter your response in the text box at the bottom. To forward a text
message, tap and hold the message in the conversation, then touch
Forward message.
Email Settings
Tap the account you want to set from the Email Screen and tap the >
Account settings. You can get the Email settings.
General settings
Account name: Set your account name.
Your name: Set the name displayed on outgoing message.
Email address: View or edit the email address.
Use signature: Select to use signature.
42
Page 43

Signature: Edit your signature.
Email check frequency: Set the email checking frequency.
Power-saving mode: Enable the email synchronization time
intelligent adjustment.
Default account: Select the check box to send email from this
account by default.
Sync deleted message:
Notification settings
Email notifications: Select to be notified in status bar when Email
arrives.
Select ringtone: Select the ringtone for incoming Email notification.
Vibrate: Select to be notified by vibration with ringtones when Email
arrives.
Server settings
Incoming settings: Set the incoming server settings.
43
Page 44

Outgoing settings: Set the outgoing server settings.
44
Page 45

Getting Connected
Connecting to the Internet
Your device’s networking capabilities allow you to access the Internet or
your corporate network.
Ways of Connecting to the Internet
You can use the default connection settings to connect to the Internet
through your mobile network (CDMA/EvDo/LTE), or Wi-Fi.
CDMA/EvDo/LTE
Use CDMA/EvDo/LTE to connect to the Internet and to send and receive
Email messages on your Tablet. You will need a data plan to use your
wireless service provider’s CDMA/EvDo/LTE network. Check with your
wireless service provider for CDMA/EvDo/LTE rates.
45
Page 46

Wi-Fi
Wi-Fi provides wireless Internet access over distances of up to 300 feet
(100 meters).
Turn on Wi-Fi
1. Tap the > > Settings > Wireless & networks.
2. Select the Wi-Fi check box to turn Wi-Fi on.
Add a Wi-Fi network
1. Tap the > > Settings > Wireless & networks > Wi-Fi
settings.
The Wi-Fi network names and security settings (open network or
secured network) of detected Wi-Fi networks are displayed in the
Wi-Fi networks section.
2. Tap a network to connect.
If you select an open network, you will be automatically connected
to the network.
46
Page 47

If you select a secured network, you will need to input the wireless
password.
Check the Wi-Fi network status
You can check the Wi-Fi network status from the wireless controls.
Tap the
> > Settings > Wireless & networks > Wi-Fi
settings, then tap the wireless network that the device is currently
connected to.
47
Page 48

You can check the network status from the pop-up window.
Virtual Private Networks (VPNs)
Virtual private networks (VPNs) allow you to connect to the resources
inside a secured local network, from outside that network. VPNs are
commonly deployed by corporations, schools, and other institutions so
that their users can access local network resources when not on campus,
or when connected to a wireless network.
To configure VPN access from your tablet, you must obtain the details
from your network administrator.
Add a VPN
1. Tap the > > Wireless & networks > VPN settings.
2. Tap Add VPN.
3. Tap VPN type and input the content follow the instructions from your
network administrator to configure each component of the VPN
settings.
48
Page 49

ADD PPT VPN: Set up a connection to a VPN with Point-to Point
tunneling protocol.
ADD L2TP VPN: Set up a connection to a VPN with Layer 2
tunneling protocol.
Add L2TP/IPSec PSK VPN: Set up a connection to a VPN with
preshared key-based layer 2/IPsec tunneling protocol.
Add L2TP/IPSec CRT VPN: Set up a connection to a VPN with
Certificate-based Layer 2/IPSec tunneling protocol.
3. Touch the Menu button
in the top-right of the Application bar and
touch Save.
The VPN is added to the list on the VPN settings screen.
Connect to a VPN
1. Open the Settings application.
2. Touch Wireless & networks > VPN settings.
49
Page 50

The VPNs you’ve added are listed on the VPN settings screen.
3. Touch the VPN to which you want to connect.
4. In the dialog that opens, enter any requested credentials and touch
Connect.
When you’re connected to a VPN, you receive an ongoing notification
in the System bar, to the left of the time. If you are disconnected, you
receive a notification that you can use to return to the VPN settings
screen so that you can reconnect to it.
Using the Device as a Modem
You can access the Internet on your PC via your device as a modem.
Note the function may result in data charges from your device carrier.
Please contact them for detail.
Enabling the Device as a Modem
TIPS:
50
Page 51

The PC accesses the Internet via the device ’s mobile network.
Therefore, set u p the CDMA/EvDo/LTE connection correctl y bef ore
you try to use the device as a modem.
1. When you connect your device to your PC with the provided USB
cable for the first time, a window will pop up and prompt you to install
the driver.
2. Double click the executable file (.exe) in the window and follow the
prompt to finish the driver installation.
NOTES: If the window doesn’t pop up automatically for some reason,
please open the new CD-ROM drive on your PC manually and find
the executable file to run it.
3. Tap
Tethering & portab l e hot s po t and tick the USB tethering check box.
A new network connection will be created on your PC.
4. Go to Control Panel > Network on your PC to enable the new
network connection.
Now you can launch the Inter net bro wser on your PC a nd start
> > Settings > Wireless & ne tworks >
51
Page 52

surfing.
Disabling the Modem Function
Tap > > Settings > Wireless & networks > Tethering &
portable hotspot and clear the USB tethering check box.
You can also just pull out the USB cable.
Using the Device as a Wi-Fi Hotspot
You can use th e device as a p ortable WLAN r outer, providing Wi-Fi
connection for o ne or multiple PC or other devices. The fu nction nee d
data connection on a mobile network and may result in data charges.
TIPS:
The PC accesses the Internet via the device ’s mobile network.
Therefore, set u p the CDMA/EvDo/LTE connection correctl y bef ore
you try to use the device as a Wi-Fi hotspot.
When the po rtable Wi-Fi hotsp ot function is enabled, you ca nnot
access the internet with any application on y our device via its Wi-Fi
52
Page 53

connection.
Enabling the Wi-Fi Hotspot
5. Tap > > Settings > Wireless & networks > Tethering
& portable hotspot and tick the Portable Wi-Fi hotspot check box.
6. Tap Portable Wi-Fi hotspot settings > Configure Wi-Fi hotspot.
7. Change the name of the hotspot and its security setting, if necessary.
The default hotspot is set as an open one. You can tap Open and
choose WPA2 PSK or WPA PSK to set up a password. The
password must have at least 8 characters.
8. Tap Save. Now you can find the hotspot on other devices and
connect to it.
Disabling the Wi-Fi Hotspot
Tap > > Settings > Wireless & networks > Tethering &
portable hotspot and clear the Portable Wi-Fi hotspot check box.
53
Page 54

Using Browser
You can use your Browser to browse most of the websites. Your device will
automatically create an CDMA/EvDo/LTE connection for you while browsing
web pages.
Opening Browser
Tap the > > Browser to start this function.
Opening Web Pages
In Browser, you can open web pages through the following ways.
1. Tap the address bar to enter the website you want to browse, and tap
.
2. Tap the
3. Select an item from History tab of bookmarks screen.
to enter bookmarks screen and select an item to open.
54
Page 55

Browsing Options
When browsing web pages, you can do some operations.
1. Tap the
2. Tap the
window.
3. Tap the
browser window to prevent the browser from storing information about
your browsing session.
4. Tap the
search result.
5. Tap the
Gmail, or Facebook.
6. Tap the
7. Tap the
to refresh the page.
> New tab to open a new tab in the same browser
> New incognito tab to open a new blank tab in the
> Find on page to enter the search item to view the
> Share page to send the page by Bluetooth, Email,
> Save page to save the page.
> Page info to view the page information.
55
Page 56

8. Tap the
information.
9. Tap the
10. Rotate your device sideways to view the landscape Browser Screen if
you select the Auto-rotate screen check box in Screen settings by
tapping
> Downloads to view and manage the download
> Settings to set the browser.
> > Settings > Display.
Open a new browser window
1. Tap the or > New tab to open a new browser window in
browser.
2. Tap the address bar to enter the website you want to browse.
Switch between different browser tab
You can open several web pages in the same window to multiply your
web surfing fun. Touch
touch its tab. Touch
to open a new tab. To see a web page, just
on the tab to close it.
56
Page 57

Open links in web pages
1. Open a web page that contains a link.
2. Tap a link to open the page.
You can also hold on the link to open the shortcut menu:
Open: Open the web page.
Open in new tab: Open the web page in a new tab.
Save link: Download the linked web page to your LIGHT.
Copy link URL: Copy the link to the clipboard.
Select text: Select text to copy, share, find web search or select all.
Download applications from web pages
1. Open a web page that contains an application link.
2. Tap the link or hold on the link and select Save link to download the
application to your Tablet.
57
Page 58

Using Bookmarks
You can save your frequently-used pages as bookmarks on your Tablet.
Add a new bookmark
1. Open a web page.
2. Tap the
3. Enter a name of the bookmark and tap OK.
Edit a bookmark
1. Open a Browser window.
2. Tap the
3. Select an item you want to edit and hold on it until the shortcut menu
pops up.
4. Select Edit bookmark.
5. Edit the label or address, and then tap OK to save it.
.
.
58
Page 59

Delete a bookmark
1. Open a Browser window.
2. Tap the
3. Select an item you want to delete and hold on it until the shortcut
menu pops up.
4. Select Delete bookmark and tap OK to confirm the deletion.
.
Browser Settings
You can set the Browser text size, home page etc. by tapping the >
Settings from a browser window.
General
Set homepage: Select to edit the home page web site.
Sync with Google Chrome: Share bookmarks & other data between
Android browser and Google Chrome.
Form auto-fill: fill out web forms in a single click.
59
Page 60

Auto-fill data: Enter and save data for auto-filling web from fields.
Privacy & security
Show security warnings: Select to show warnings if there is a
problem with a site’s security.
Clear history: Clear the browser navigation history.
Accept cache: Allow tablet to save and read cache data.
Clear cache: Delete all the cached page contents.
Accept cookies: Select to allow sites to save and read cookies.
Clear all cookie data: Clear the browser cookies.
Remember form data: Select to remember the data you type in
forms for later use.
Clear form data: Clear the saved form data.
Enable location: Select to allow sites to request access to your location.
Clear location access: Select to clear access for all websites.
60
Page 61

Remember passwords: Select to save usernames and passwords
for web sites.
Clear passwords: Clear the saved passwords.
Advanced settings
Set search engine: Select a search engine.
Open in background: Select to open new windows behind the
current one.
Enable JavaScript: Select to enable JavaScript.
Enable plug-ins: Select to enable plug-ins.
Website settings: Advanced settings for individual websites.
Text size: Adjust the browser text size.
Default zoom: Set the browser default zoom.
Open pages in overview: Select to show overview of newly opened
pages.
Labs
61
Page 62

Quick controls: Swipe thumb from left or right edge to access quick
controls and hide application and URL bars.
Most-visited homepage: Your homepage displays your most-visited
webpages.
Google Instant: Use Google Instant when you use Google Search.
Bluetooth®
Bluetooth is a short-range wireless communication technology. Wireless
devices with Bluetooth capabilities can exchange information within a
distance of about 10 meters without any physical connection. The
Bluetooth devices must be paired before the communication is
performed.
Turning on/off Bluetooth
1. Tap the > > Settings > Wireless & networks.
2. Select the Bluetooth check box to turn Bluetooth on.
62
Page 63

icon will be displayed in the status bar. If you want to turn
The
Bluetooth off, clear the Bluetooth check box.
Notes:
By default, Bluetooth is turned off. If you turn it on, and then turn off your
device, Bluetooth is also turned off. When you turn on your device again,
Bluetooth turns on automatically.
Making your device visible
Other devices with Bluetooth capabilities can detect your device,
establish a partnership, or use a Bluetooth service.
1. Tap the
Bluetooth settings.
2. Select the Bluetooth check box if needed.
3. Select the Discoverable check box to make your device visible.
4. Select the Discoverable timeout to set how long device will be
discoverable.
> > Settings > Wireless & networks >
63
Page 64

Change your device name
1. Tap the > > Settings > Wireless & networks >
Bluetooth settings.
2. Select the Bluetooth check box if needed.
3. Tap Device name.
4. Enter the name and tap OK.
Pair with another Bluetooth device
You can pair your device with another device that has Bluetooth
capabilities. Once you do this, the two devices must have Bluetooth
turned on but do not need to be visible for you to exchange information
between them.
1. Tap the
Bluetooth settings.
2. Tap Find nearby devices.
Your Tablet will display all reachable Bluetooth devices in the Found
> > Settings > Wireless & networks >
64
Page 65

devices section.
3. Tap the device you want to pair with.
4. If necessary, type your PIN to pair and tap OK.
Tips: The same PIN should be entered on the other device.
65
Page 66

Experiencing Multimedia
Camera
Your Tablet comes with a 3.2–megapixel camera that lets you capture
sharp pictures.
Opening Camera
Tap the > > Camera to open the camera.
Notes:
You can switch from the camera to the camcorder quickly. Drag the
Tap
Taking Pictures
Aim the camera at the subject and then tap to take the shot.
sw itch up.
to change to front camera or back camera.
66
Page 67

After you take the photo, tap the picture at the bottom of left corner
(portrait mode) of your Camera Screen to open the gallery. Tap the photo
to open it.
Tap
Tap
Tap
Tap
to start a slideshow.
to send the photo in a messaging, transfer it using Bluetooth
wireless, or post it online.
to delete the photo.
to see details, rotate, crop or set as a contact photo or
wallpaper.
Camera Settings
Tap to adjust the camera settings, like focus mode, exposure,
picture size and so on.
to select color effect.
Tap
Tap
Tap
to adjust the white balance.
/ to zoom in or zoom out the image.
67
Page 68

Camcorder
Camcorder enables you to shoot video clips.
Opening Camcorder
Tap the > > Camcorder to open the camcorder.
Notes:
You can switch from the camcorder to the camera quickly:
Drag the sw itch down.
Shooting Videos
1. Tap to start shooting.
2. Tap
After you take the video, tap the video at the bottom of left corner (portrait
mode) of your Camera Screen to open the gallery. Tap the photo to open
it.
to stop shooting.
68
Page 69

Tap
Tap
Tap
Tap
to start a slideshow.
to send the photo in a messaging, transfer it using Bluetooth
wireless, or post it online.
to delete the photo.
to see details.
Video Settings
Tap to adjust the camera settings, like video quality, video duration,
and so on.
to set video quality.
Tap
to select color effect.
Tap
to adjust the white balance.
Tap
Tap
to zoom in or zoom out the image.
69
Page 70

Music
You can play digital audio files in Music.
Opening Music
You need to copy the audio files you want to play to your memory card or
your device first.
1. Tap the
2. Select a file to open.
Playing Music
1. Tap the list heading to see your music grouped your way-like by
Artist, by Albums, or Songs.
2. Tap a song from the list to start playing.
Notes:
Press the Volume Keys to adjust the volume.
> > Music to open Music Screen.
70
Page 71

Creating Playlists
You can create some playlists to organize your music files.
1. Select a music file you want to add to a new playlist.
2. Tap the file and select Add to playlist.
3. Tap New and enter the playlist name and tap Save.
The playlist is created and the file you selected is added to the playlist.
Managing Your Playlists
1. Tap Playlists from the Music Screen to view all playlists.
2. Tap and hold the Playlist and a shortcut menu pops up.
i. Tap Play to play the playlist.
ii. Tap Delete to delete the playlist.
ⅲ. Tap Rename to rename the playlist.
Add songs to your playlist
71
Page 72

1. Open the folder where the song you want to add to a playlist is.
2. Tap and hold it and select Add to playlist.
3. Select a playlist from the list.
Gallery
Gallery helps you view pictures and play back videos. For pictures, you
can also do some basic editing tasks. For instance, set them as your
wallpaper or contact icon, and share with your friends.
Sound Recorder
Sound Recorder enables you to record your voice memos that you can
set as ringtone.
Opening Sound Recorder
Tap the > > Sound Recorder to open the sound recorder.
72
Page 73

Record Your Memo
1. Get the microphone near to your mouth.
1. Tap
2. Tap
3. Tap
4. Tap Save record to save the voice recording, or tap Discard to
Notes:
You can find your recordings in
recordings.
to start recording.
to stop recording.
to play back the voice recording.
discard the recording.
> > Music > Playlist > My
73
Page 74

Google™ Applications
Signing In to Your Google Account
Signing in to your Google Account enables you to synchronize Gmail,
Calendar, web album, and contacts between your device and the web.
1. Tap a Google application, such as Talk.
2. Read the instructions and tap Next.
3. Tap Sign in if you have a Google account. Enter your user name and
password, and then tap Sign in.
Tap Create if you do not have a Google account.
Using Gmail
Gmail is Google’s web-based email service. Gmail is configured when
you sign in to your Google account. Depending on your synchronization
settings, Gmail on your device is automatically synchronized with your
74
Page 75

Gmail account on the web.
Open Gmail
Tap the > > Gmail.
Creating and sending an gmail
1. In the Inbox, press the Menu Key and then tap Compose.
2. Enter the message recipient’s email address in the To field. If you are
sending the email to several recipients, separate the email addresses
with a comma. You can add as many message recipients as you
want.
3. Enter the email subject, and then compose your email.
4. After composing your email, tap the Send.
Using Google Calendar
Tap the > > Calendar to use Google Calendar, Google’s
75
Page 76

time management application. You can use the calendar to schedule
appointments, including meetings and other events. Your appointments
will be displayed on the screen as are scheduled. All your appointments
are synchronised to your Google account, which enables you to share
your schedule, get your entire calendar on the go, and receive Email
reminder for your upcoming events.
Using Google Talk
Google Talk is Google’s instant messaging program, which enables you
to communicate with other people that also use Google Talk.
Opening Google Talk
Tap the > > Talk.
Adding a new friend
You can only add people who have a Google account.
76
Page 77

1. In the Friends list, press the
2. Enter the Google Talk instant messaging ID or Google email address
of the friend you want to add.
> Invite a friend to chat.
Viewing and accepting an invitation
1. In the Friends list, press the > Invite a friend to chat.
All chat invitations you have sent or received are listed on the pending
invitations screen.
2. Tap a received pending invitation, and then tap Accept or Decline.
Starting a chat
1. Tap a friend in the Friends list.
2. Chat with your friend by entering text using the on-screen keyboard.
3. After entering your message, tap
.
77
Page 78

Places
Google Places helps you find all kinds of businesses near you.
1. Tap the
satellites.
2. Tap the
Your location, when found, is displayed at the bottom of the screen.
3. Select a business category and the information of that type of
business near you will be displayed.
You can also use the Find places search box on the top to find the
business you need.
Note: Tap Add to add new business categories.
4. Tap a result you are interested in and check out the details and
reviews about that place. You can also see the place on Google Maps,
find out how to get there, or give that business a call.
> > Settings > Location & security > Use GPS
> > Places. Wait while you are being located.
78
Page 79

Navigation
You can use Google Navigation to get turn-by-turn driving directions,
both spoken and displayed on your screen.
1. Tap the
GPS satellites.
2. Tap the
located.
Your location, when found, is displayed at the bottom of the screen.
> > Settings > Location & security > Use
> > Navigation. Wait while you are being
Latitude
Google’s Latitude service is a social tool for sharing your location
information with selected friends.
If you join Google Latitude, you can view your friends’ locations on your
maps and share your location and other information with them.
79
Page 80

1. Tap the
2. After signing in to your Google account, tap the Menu Key > Join
Latitude to enable Latitude service.
Each time you launch Maps application, your location will be determined
using GPS and your Latitude status will be updated. You can tap the
Menu Key > Latitude in Maps or
status as well as that of your selected friends.
In Latitude, tap the Menu Key to refresh the friends’ status, see them on
Maps, add new friends, or change privacy settings.
> > Latitude.
> > Latitude to see your
80
Page 81

Settings
Basic Settings
Setting the Time and Date
1. Tap the > > Settings > Date & time.
2. Clear the Automatic check box if you want to set time and date by
yourself.
3. Configure the time and date settings:
– Tap Automatic date & time to use network-provided time.
– Tap Automatic time zone to use network-provided time zone.
– Tap Set date to adjust the date, and tap Set to save it.
– Tap Set time to adjust the time, and tap Set to save it.
– Tap Select time zone and tap the area where you are.
81
Page 82

– Tap the check box behind Use 24–hour format to change the time
format.
– Tap Select date format and select the type you like.
Screen Settings
By tapping the > > Settings > Screen, you can configure
the display settings, such as brightness, auto-rotate screen, animation,
and screen timeout.
Adjust the screen brightness
1. Tap Brightness.
2. Adjust the brightness and tap OK.
Adjust the delay before the screen turns off
1. Tap Timeout.
2. Select the time from the list.
82
Page 83

Switch the screen orientation automatically
You can select to switch your screen orientation to landscape or portrait
mode automatically when rotating your LIGHT.
Select the Auto-rotate screen check box.
Show animation when opening/closing windows
You can select to show an animation when opening or closing windows.
1. Tap Animation.
2. Select the animation type you’d like to use.
If you want to disable this function, select No animations.
Sound Settings
By tapping the > > Settings > Sound, you can configure the
sound settings, such as ringtones and notifications.
Set the default notification ringtone
1. Select Notification ringtone in Notifications section.
83
Page 84

2. Scroll the ringtone list and select one to set as the default notification
ringtone.
3. Tap OK to save.
Adjust the ringtone, media and alarm volume
If you want to set the ringer volume, make sure your device is not in silent
mode.
1. Tap Volume in the General section.
2. Adjust the volume and tap OK to save.
Tips:
You can adjust the volume quickly by pressing the Volume Keys from
any screen.
Enable the haptic feedback
You can get the vibration feedback while pressing the soft keys and on
certain UI interfaces if you have enabled haptic feedback.
1. Tap the
> > Settings > Sound.
84
Page 85

2. Select the Haptic feedback check box.
Enable the screen selection tones
You can set your device to play sound while making a selection by
touching the screen.
Select the Audible selection check box in the Feedback section.
Enable the screen lock sounds
You can set your device to play sound when locking and unlocking the
screen.
Select the Screen lock sound check box in the Feedback section.
Language Settings
You can change the system language of your device.
Change the language of your operating system
1. Tap the > > Settings > Language & input > Select
language.
85
Page 86

2. Select a language from the locale list to set it as the system language.
Mobile Network Services
The CDMA and EvDo services are supported by your device. You can
configure the network settings according to your device service.
Enable data roaming
1. Tap the > > > Settings > Wireless & networks >
Mobile networks.
2. Select the Data roaming check box to enable data roaming.
Switch the network mode
1. Tap the > > Settings > Wireless & networks > Mobile
networks > Network Mode.
2. Select your preferred network mode to switch the network mode.
86
Page 87

Security Settings
You can protect your device and SIM/UIM card from unauthorized use.
Protecting Your Tablet with a Screen Lock
Set the screen unlock pattern
You can protect your Tablet from unauthorized use by creating a
personal screen unlock pattern.
1. Tap the
Configure lock screen.
2. Tap Pattern.
3. Read the instructions and tap Next.
4. Draw your own pattern and tap Continue.
> > Settings > Location & security >
87
Page 88

5. Draw the pattern again and tap Confirm.
Lock the screen
Press the Power Key to lock the screen.
88
Page 89

Unlock the screen with a pattern
1. Press the Power Key.
2. Draw the pattern you set to unlock the screen.
If you make a mistake, your device will ask you to try again.
89
Page 90

Protecting Your UIM Card with a PIN
You can set the PIN password to prevent others from using the SIM
function. The initial PIN code is provided by your service operator.
1. Tap the
SIM card lock.
2. Select the Lock SIM card check box.
3. Enter the PIN code and tap OK.
Change SIM PIN
Before changing SIM PIN, you need to enable it.
1. Tap the
SIM card lock.
2. Tap Change SIM PIN.
3. Enter the old PIN code and tap OK.
4. Enter a new PIN code and tap OK.
5. Re-enter the new PIN code and tap OK.
> > Settings > Location & security > Set up
> > Settings > Location & security > Set up
90
Page 91

Setting Up Credential Storage
You can select to allow applications to access secure certificates and
other credentials.
Enable secure credentials
1. Tap the > > Settings > Location & security.
2. Tap Set password to create a password.
Tips:
You can also install encrypted certificates from microSD card by
tapping Install from storage.
Delete credentials
1. Tap the > > Settings > Location & security.
2. Tap Clear credentials to clear credentials.
91
Page 92

Managing Memory
Managing Your Memory Card
View the space information
Tap the > > Settings > storage.
You can view the Total space/Available space information in the SD
card section.
Unmount your memory card
1. Tap the > > Settings > storage.
2. Tap Unmount shared storage.
Erase the data of your memory card
1. Tap the > > Settings > storage.
2. Tap Erase USB storage.
3. Tap Erase USB storage to confirm.
92
Page 93

Managing Internal Storage
View the device space information
1. Tap the > > Settings > storage.
2. Scroll down to view the Available in the Internal storage section.
Reset to factory settings
1. Tap the > > Settings > Privacy.
2. Tap Factory data reset.
3. Tap Reset tablet.
4. Tap Erase everything.
Application Settings
Managing Applications
You can view and manage the applications installed in your device.
93
Page 94

View the applications installed in your device
Tap the > > Settings > Applications > Manage
applications.
Your tablet will show you the applications in a list.
Allow the installation of non-Market applications
1. Tap the > > Settings > Applications.
2. Select the Unknown sources check box.
Install an application
You can install an application from the Android Market by selecting the
item you want to download and tap Install.
Removing an Application
1. Tap > > Settings > Applications > Manage
applications.
2. Select the application you want to delete.
94
Page 95

3. Tap Uninstall and OK to confirm.
TIPS: Market applications can also be removed by going to the Downloads
page in Market, selecting the unwanted application, and tapping
Uninstall.
Moving an Application to or from the Memory Card
You can move the applications downloaded or installed on your device to
the memory card when the device memory is full. You can also move
applications to your device if the memory card is getting full.
NOTE: Not all applications can be move to your device or memory card.
1. Tap
applications.
2. Tap the application you want to move on the Downloaded tab.
3. Tap Move to tablet or Move to SD card.
> > Settings > Applications > Manage
95
Page 96

Other Settings
Speech Synthesis Settings
You can set the text-to-speech options by tapping the > >
Settings > Language & input > Voice output > Text-to-speech
settings. Before you use this function, you should install the voice data.
96
Page 97

Other Applications
Alarming
Set alarms
1. Tap the > > Clock.
2. Tap the Alarm set and tap
alarm details.
3. Tap one alarm and select the Turn alarm on check box to enable
alarm. You can edit the alarm items such as Time, Repeat, Ringtone,
vibrate, and Label.
Calculator
Open Calculator
to create a new alarm, then enter
97
Page 98

Tap the
Your calculator has basic and advanced views.
> > Calculator.
98
Page 99

Specifications
Dimension
Weight Approx. 400g (with battery)
Bearer CDMA/EvDo/LT E support
Main Display dimension,
resolution, color space
Sensor Type CMOS
Back Camera
Front Camera
Still Image Capture
Resolution
Sensor Type CMOS
Still Image Capture 2M Pixels
Approx.
194mm×120mm×11.5mm
7inch, 1280*800, 260K
5M Pixels
99
Page 100

Resolution
Total internal memory 1GB RAM + 16GB ROM
Removable memory card Support microSD card
Maximum Capacity of memory card 32GB
Capacity 4000mAh
Battery
Standby time
Approx. 350h (subject to
network status)
WAP browser version Support webkit
100
 Loading...