

Page 1

1
Telecom New Zealand R7
HSDPA Multi band 3G Mobile Phone
User Guide
Page 2

2
PC Software Requirements
JoinME PC Software supports Microsoft Vista, Windows 2000 with Service Pack 4
or Windows XP with Service Pack 2 & 3 only.
JoinME MAC has limited functionality and supports MAC OSX 10.4 and above.
Warnings and Safety Notices
Please read all the safety notices before using this device.
Do not use the phone at a refuelling point. Do not use near fuel or chemicals.
Do not transport or store flammable gas, liquid or explosives in the same
compartment of your vehicle as your mobile phone and accessories.
Copyright © 2009 ZTE Corporation All rights reserved.
1st Edition March 2009
No part of this publication may be excerpted, reproduced, translated or utilized
in any form or by any means, electronic or mechanical, including photocopying
and microfilm, without the prior written permission of ZTE Corporation.
ZTE Corporation operates a policy of continuous development. ZTE Corporation
reserves the right to make changes and improvements to any of the products
described in this document without prior notice.
Limitation of Liability
ZTE shall not be liable for any loss of profits or indirect, special, incidental or
consequential damages resulting from or arising out of or in connection with
using this product, whether or not ZTE had been advised, knew or should have
known the possibility of such damages. Refer to the enclosed warranty card.
Page 3

3
Contents
Environmental Information ...................................................................................... 8
1 Welcome .......................................................................................... 9
1.1 How to use the manual .......................................................................... 10
1.2 RF Safety Information .......................................................................... 11
1.3 Handset Overview ................................................................................ 12
1.4 Keypad Functions.................................................................................. 14
1.5 Information Bar Icons ........................................................................... 15
1.6 Menu Quick Reference Guide .................................................................. 16
2 Getting Started.............................................................................. 18
2.1 How do I remove the battery cover? ...................................................... 18
2.2 How do I insert the USIM Card? ............................................................. 18
2.3 How do I insert the battery? ................................................................. 20
2.4 How do I switch the phone On or Off? ................................................... 21
2.5 How do I set the time and date? ........................................................... 21
2.6 How do I connect the charger? .............................................................. 22
2.7 Tips about charging and battery life ....................................................... 22
3 Basic Operation ............................................................................. 23
3.1 How do I make a voice call? ................................................................... 23
3.2 How do I answer an incoming call? ......................................................... 23
3.3 How do I send a Text Message (SMS)? .................................................... 23
3.4 How do I navigate the Menu? ................................................................ 24
4 Contacts......................................................................................... 25
4.1 How do I enter my Contacts? ................................................................ 25
4.2 How do I copy all Contacts from a USIM card? ........................................ 25
Page 4

4
4.3 How do I search my Contacts? ............................................................... 26
4.4 How do I add a Contact from a received call number? .............................. 26
4.5 How do I add a Contact from a received SMS? ......................................... 26
4.6 How do I set a dedicated ringtone or image to a Contact? ....................... 27
4.7 How do I set Speed Dial numbers? ......................................................... 27
4.8 How do I make a call using Speed Dial? .................................................. 28
4.9 How do I update an existing Contact? .................................................... 28
4.10 Advanced Contact Options .................................................................... 29
5 Calls ............................................................................................................................ 30
5.1 How do I make a Voice Call? .................................................................. 30
5.2 How do I make a Call from my Contacts? ................................................ 30
5.3 How do I view and make a Call from my Call History? .............................. 30
5.4 How do I activate Speakerphone? .......................................................... 31
5.5 Call options during an active Voice Call ................................................... 31
5.6 Hints and Tips for Calls .......................................................................... 31
5.7 How do I answer a Call? ........................................................................ 32
5.8 How do I make a Video Call? .................................................................. 32
5.9 Call options during an active Video Call ................................................... 33
5.10 How do I answer a Video Call? ............................................................... 33
5.11 How do I make Emergency Calls? ........................................................... 34
5.12 Videophone Settings ............................................................................. 35
5.13 Call Divert ............................................................................................ 35
5.14 Call Waiting ......................................................................................... 35
5.15 Call Barring ........................................................................................... 36
5.16 Send my number ................................................................................... 36
5.17 Missed Calls Alert .................................................................................. 37
5.18 Call Options when Connected to a Bluetooth device ................................ 37
6 Messages and Emails.................................................................... 38
Page 5

5
6.1 How do I send a Text Message (SMS)? .................................................... 38
6.2 How do I view a received Text Message (SMS)? ...................................... 39
6.3 How do I use Predictive Text? ............................................................... 39
6.4 How do I add words to the My Words Dictionary? ................................... 40
6.5 Special Characters and SMS Message Length ........................................... 41
6.6 How do I send a Multimedia Message (MMS)? .......................................... 41
6.7 How do I receive a Multimedia Message (MMS)? ...................................... 42
6.8 MMS and SMS Advanced Settings ........................................................... 42
6.9 WAP Push Messages ............................................................................. 43
6.10 How do I send an Email? ........................................................................ 43
6.11 How do I receive an Email? .................................................................... 44
6.12 How do I set up automatic Email Retrieval? ........................................... 45
6.13 Pushmail Settings ................................................................................. 45
7 How to Personalise the Phone ..................................................... 46
7.1 Change the Profiles ............................................................................... 46
7.2 Change the Shortcut Keys (Arrow keys) ................................................. 47
7.3 Change the Background Screen (Wallpaper) ............................................ 47
7.4 Change the default Ringtones ................................................................ 48
7.5 Enable Vibrate Mode ............................................................................. 48
7.6 Engage the Meeting Profile with a single key press ................................. 48
7.7 Switch the Keytones off ....................................................................... 49
7.8 Set Spoken Key Sounds ......................................................................... 49
7.9 Change the Display Backlighting ............................................................ 49
7.10 Change the Screen Brightness ................................................................ 49
7.11 Add a Greeting and Owner name ............................................................ 49
7.12 Set the Keypad backlighting .................................................................. 50
7.13 What is the PIN Code? .......................................................................... 50
7.14 What is the Handset Code? ................................................................... 51
Page 6

6
7.15 Additional notes on PIN Codes ............................................................... 51
8 File Manager and External Memory............................................. 52
8.1 File Manager ......................................................................................... 52
8.2 Installing Additional Memory - Micro SD card .......................................... 53
8.3 Access the T-Flash card (Micro SD) using File Manager ............................. 54
8.4 File Manager and T-Flash Options Table .................................................. 54
9 Alarms and Appointments ............................................................ 55
9.1 Set Alarms ........................................................................................... 55
9.2 Set Appointments using the Calendar ..................................................... 56
10 Imaging - Pictures and Videos..................................................... 58
10.1 How to use the Camera ......................................................................... 58
10.2 How to use the Video Camera ................................................................ 59
10.3 Viewing pictures and videos ................................................................... 60
11 Music ............................................................................................................................ 61
11.1 FM Radio .............................................................................................. 61
11.2 Browse and play music files from File Manager ....................................... 62
11.3 Create a new Playlist ............................................................................ 62
12 Connectivity .................................................................................. 64
12.1 Use JoinME to connect the phone to a computer ...................................... 64
12.2 Installing JoinME .................................................................................. 65
12.3 Use JoinME to copy photos to your computer .......................................... 66
12.4 Use JoinME to transfer music from a computer ........................................ 68
12.5 Enter Contacts using JoinME .................................................................. 70
12.6 Copy Contacts from the phone to the computer (back-up) ....................... 71
12.7 Import Contacts from Microsoft Outlook ................................................ 72
Page 7

7
12.8 Export Contacts to Outlook ................................................................... 73
12.9 Import Calendar events from Microsoft Outlook ..................................... 74
12.10 Use JoinME to connect to the Internet ................................................... 75
12.11 Connect to a Bluetooth Device ............................................................... 76
12.12 Dial Up Networking using USB or Bluetooth ............................................ 79
12.13 PC Connection ....................................................................................... 81
12.14 Synchronize with a network server (SyncML) .......................................... 81
13 Other Facilities.............................................................................. 82
13.1 Browser ............................................................................................... 82
13.2 Stopwatch ............................................................................................ 83
13.3 Calculator ............................................................................................. 83
13.4 World Time ........................................................................................... 83
13.5 Currency Conversion .............................................................................. 84
13.6 GPS ...................................................................................................... 84
13.7 Games and Applications ........................................................................ 85
13.8 Voice Recorder ...................................................................................... 85
13.9 Slide Show ............................................................................................ 85
13.10 Streaming URL ...................................................................................... 86
13.11 Access Point Settings ........................................................................... 86
13.12 Restore default settings ....................................................................... 86
13.13 Download Location ............................................................................... 86
13.14 Connections .......................................................................................... 87
13.15 Network Settings .................................................................................. 87
13.16 CTM ...................................................................................................... 87
13.17 T-Mode for hearing aid support .............................................................. 88
14 Technical, Support and Warranty Information ........................... 90
14.1 Troubleshooting and FAQ’s .................................................................... 90
Page 8

8
14.2 Error Messages ...................................................................................... 93
14.3 Support Information ............................................................................. 93
14.4 Warranty Information .......................................................................... 94
14.5 Technical Parameters ............................................................................ 95
15 General Safety and Maintenance Information ........................... 96
Environmental Information
The R7 handset is made using the latest manufacturing techniques and
environmental standards to reduce waste and hazards to the environment.
However at the end of life of the equipment the manufacturer recommends
that you return the handset and accessories to the nearest re-cycling depot.
Valuable materials such as gold, silver, and copper can be recovered from the
handset. Any toxic materials will be prevented from entering the environment
and the waste materials will be recycled.
Page 9
9
1 Welcome
Congratulations on choosing the Telecom New Zealand R7 handset. Please take
a few minutes to read the user guide to help you get the most from your new
mobile.
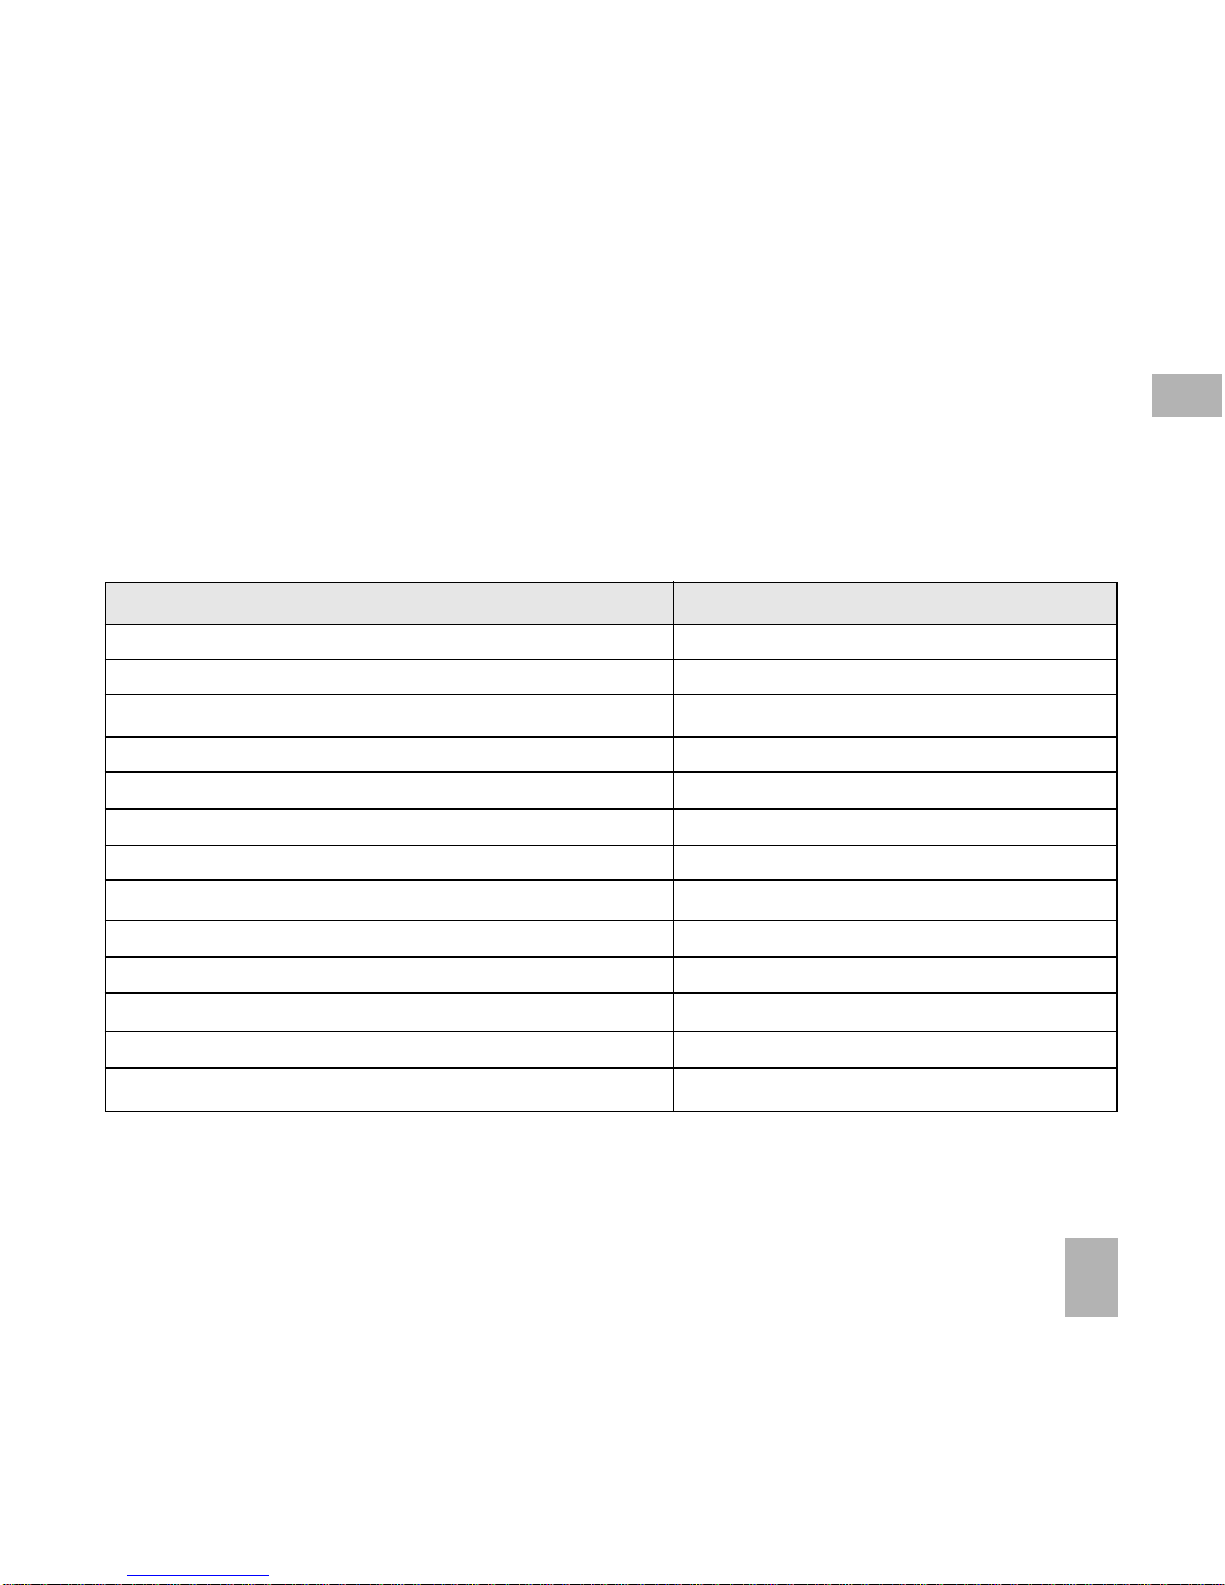
Operation Quick Reference
Handset overview, keypad and information bar Section 1 – Introduction
Making a call Section 2 – Getting Started
Quick introduction to key features, Calls & SMS Section 3 – Basic Operation
Store a list of contact names & phone numbers Section 4 – Contacts
View calls received, dialled and missed Section 5 – Calls
Text messages – sending and receiving Section 6 – Messages and Emails
Personalise your phone e.g. ringtone, screen Section 7 – Personalise…
Managing handset files and content Section 8 – File Manager
Setting alarms and reminders Section 9 – Alarms and Appointments
Using the camera – take photos, record videos Section 10 – Imaging
Using the FM radio and MP3 Player Section 11 – Music
Connecting to a PC to copy pictures & music Section 12 – Connectivity
Calculator, Stopwatch and more… Section 13 – Other Facilities
1
Page 10
10
1.1 How to use the manual
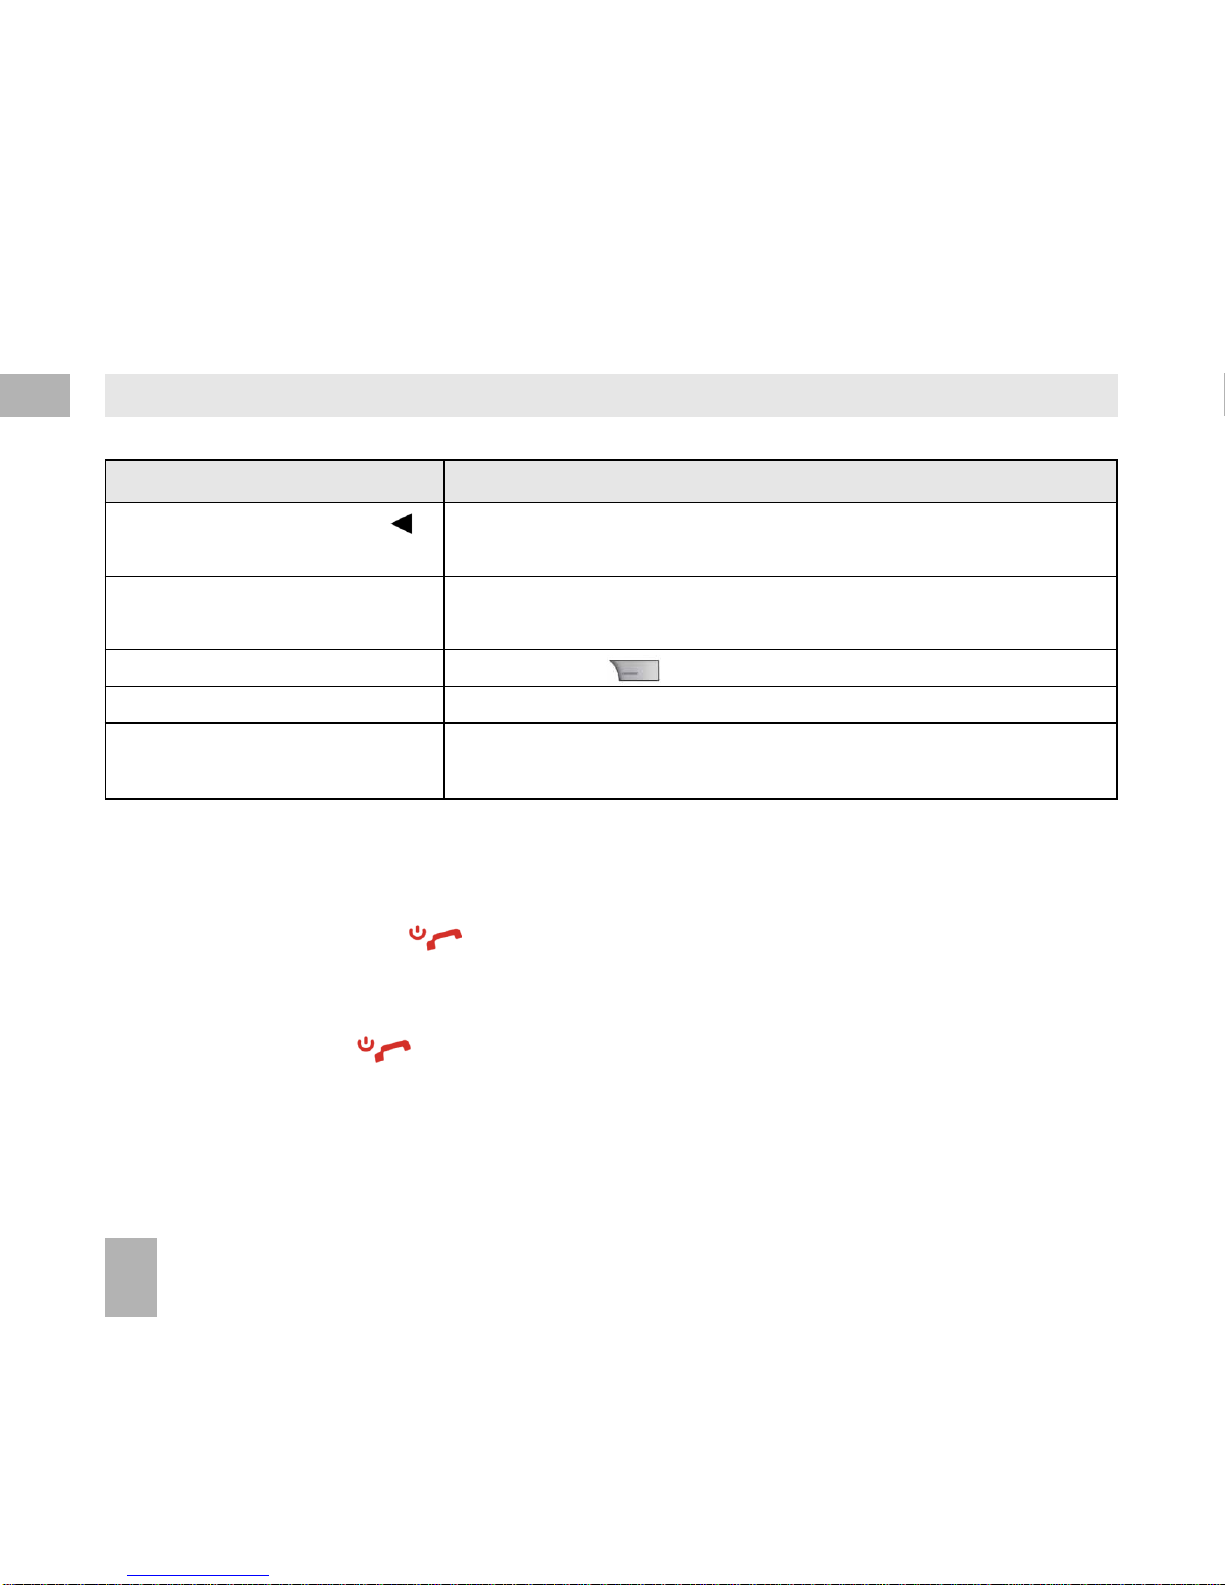
The following instructional format is used in the manual:
Instruction Description
Press the Left Arrow Press the left directional key on the four way
navigation controller
Press OK Press the OK key in the centre of the four way
navigation controller
Press the Right Soft Key Press the key just below the screen
Long press Press and hold the key for 2 seconds
Menu > Tools Go to the Main Menu (press OK) select Tools
and press OK to open
• The functions for the OK and Soft keys change depending on where you are
in the menu. The functions are described at the bottom of the handset
display.
• The End or Exit key is used to exit the menus, End a Call and switch the
phone On or Off. From within a sub-menu the Exit key goes to the main
menu
• Long press the key to switch the handset On and Off.
• The C key is used to step back in menus and to clear text in text modes. In
text edit mode press once for backspace, press and hold to clear all the text.
• Menu and setting choices on the handset are shown in bold text in the manual.
Quickly find the answer by checking the front Contents or the back Index.
1
Page 11

11
1.2 RF Safety Information
The handset has an internal antenna located at the top of the phone. For optimum
performance with minimum power consumption do not cover the antenna area
with your hand. Hold the handset between thumb and finger in the middle of the
device. Covering the antenna affects call quality, may cause the handset to
operate at higher power level than needed, and may shorten talk and idle
times.
Radio Frequency Energy
The handset is a low-power radio transmitter and receiver. When switched on it
intermittently transmits radio frequency (RF) energy (radio waves). The transmit
power level is optimized for best performance and automatically reduces when
there is good quality reception. Maximum power is only used at the edge of
network coverage so under most circumstances the power output is very low.
Under poor network conditions the phone will transmit at a higher power, may
get hot and will have a significantly shorter battery life.
Declaration of Conformity
We declare under our sole responsibility that the product(s) detailed in this
manual, and in combination with our accessories, conform with the essential
requirements of The Radio Communications Standard (Electro-magnetic
Radiation Human Exposure) 2003 and the Australian Communications and Media
Authority Section 376 of the Telecommunications Act 1997.
1
Page 12
12
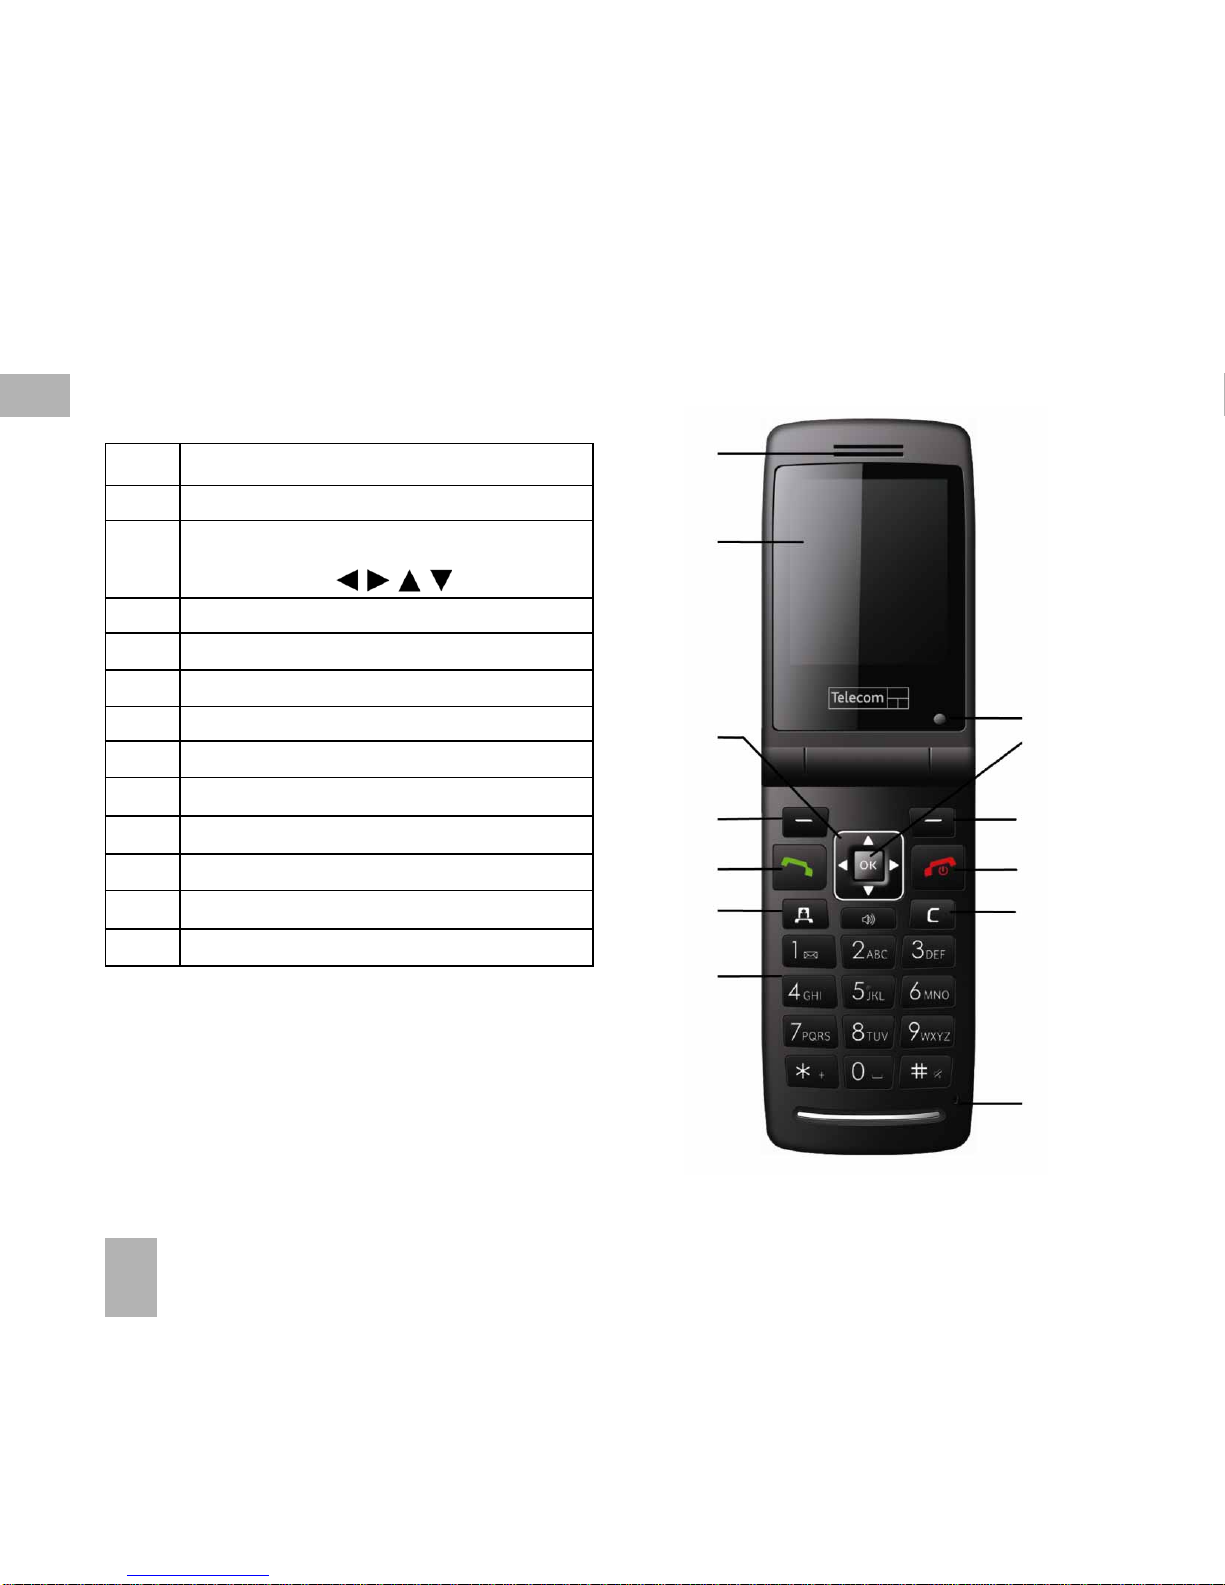
1.3 Handset Overview
1. Speaker
2. Display
3. Four way navigation controller
-Arrow Keys(
)
4. Left Soft Key (LSK)
5. Call Key, show Call History
6. Video Call Key
7. Keypad
8. Microphone
9. Clear Key *
10. End / Exit / Power Key
11. Right Soft Key (RSK)
12. OK Key
13. Camera for Video Calling
1
13
2
3
4
5
6
7
12
11
10
9
8
* The C key is used to step back in menus
and to clear text in text modes. In text edit
mode press once for backspace, press and
hold to clear all the text.
1
Page 13
13
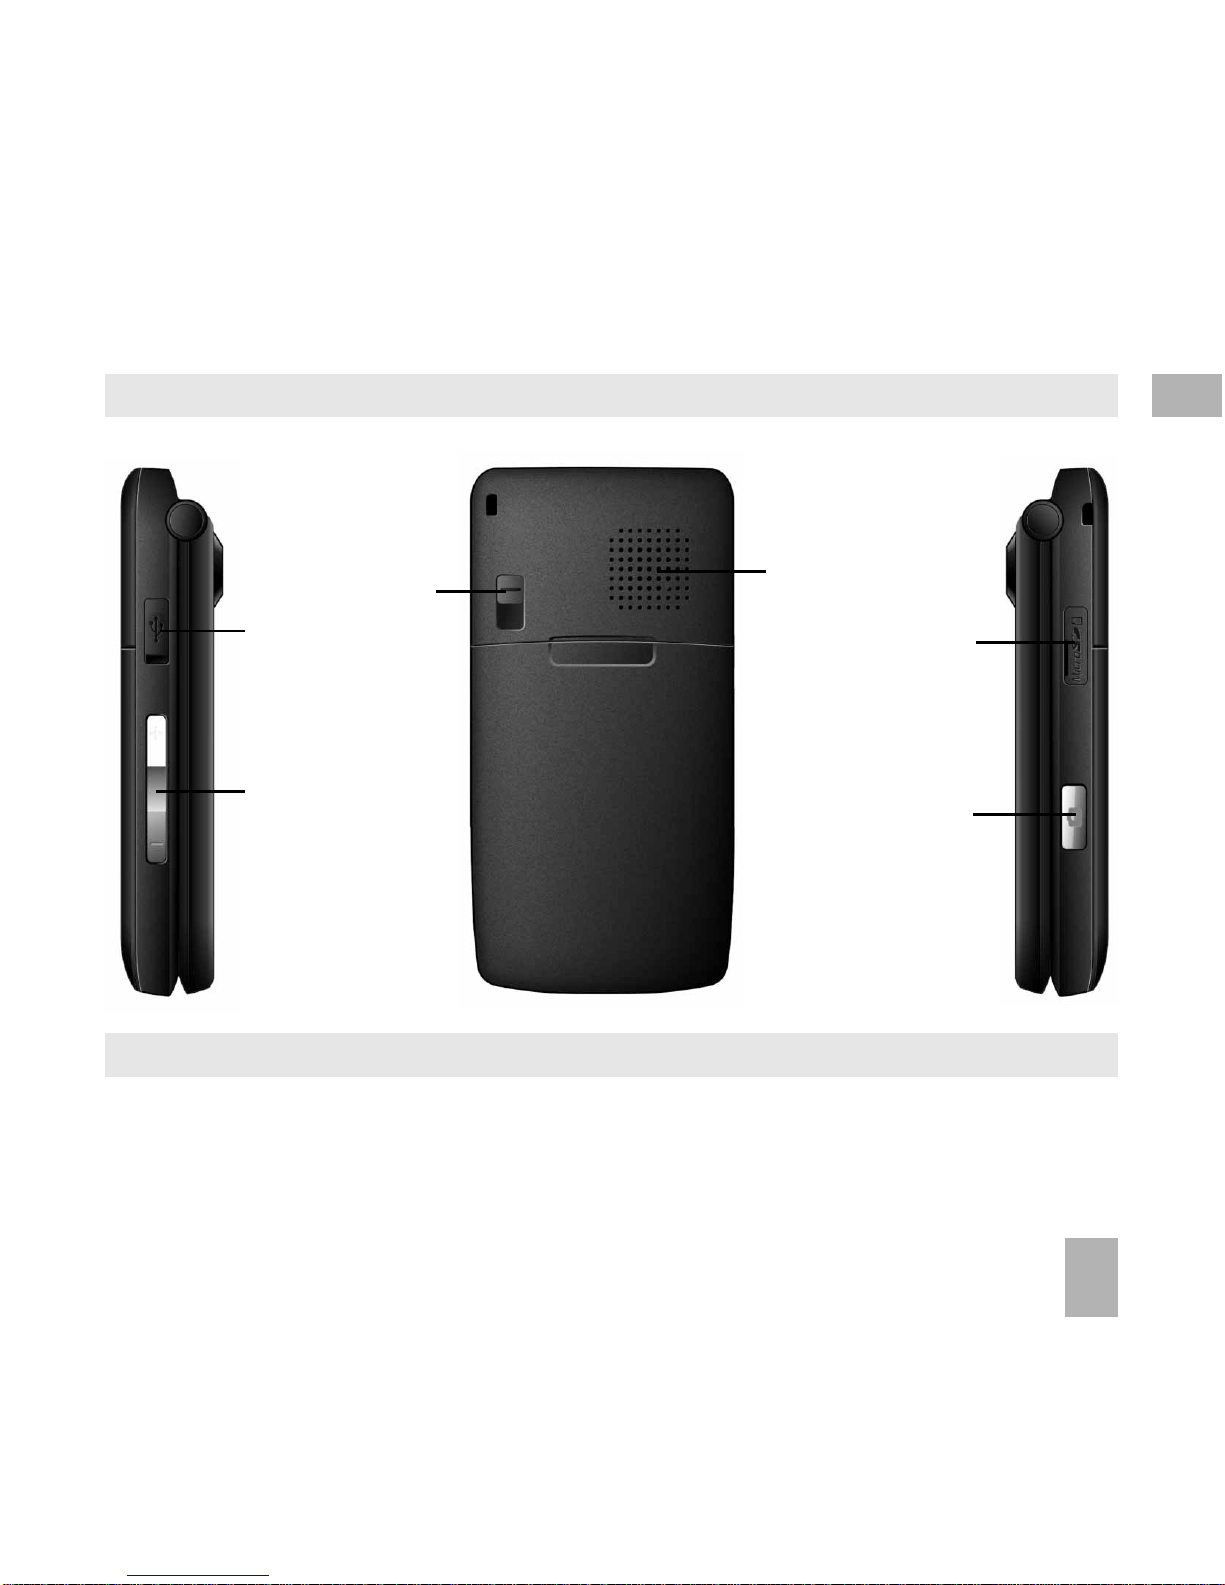
Handset Overview
Charger, USB and
Headset port
Volume keys
Speaker
External
Antenna port
Micro SD Port
Camera key
Left Rear Right
1
Page 14
14
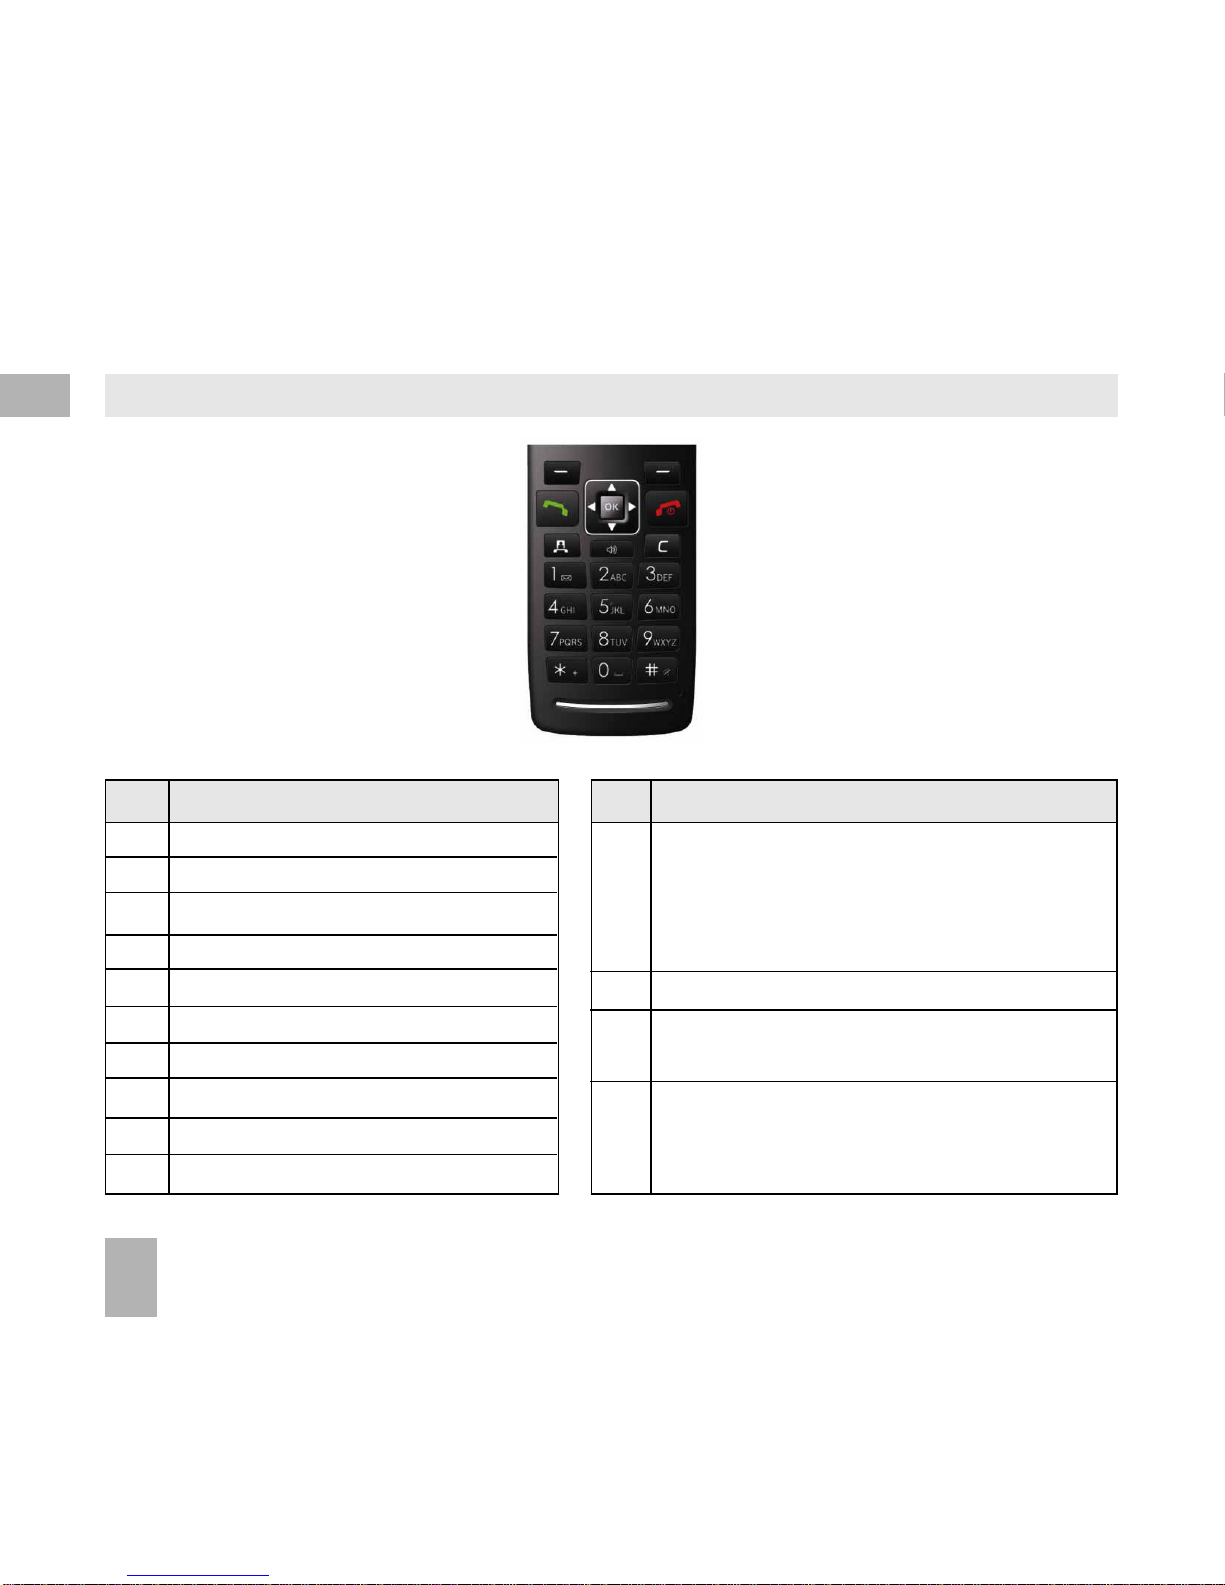
1.4 Keypad Functions
Key Corresponding Functions
1 1, punctuation marks, voicemail
2 2, abc, ABC
3 3, def, DEF
4 4, ghi, GHI
5 5, jkl, JKL
6 6, mno, MNO
7 7, pqrs, PQRS
8 8, tuv, TUV
9 9, wxyz, WXYZ
0 0, Space
Key Corresponding Functions
*
#
Call
End
Special characters in text modes
Press twice for the international prefix
‘+’
Press three times for ‘Pause’
Toggle text mode. Long press for Meeting Mode
Open All Calls list
Call a dialled or selected number
End a call.
Exit a menu
Long press to power ON / OFF
1
Page 15
15
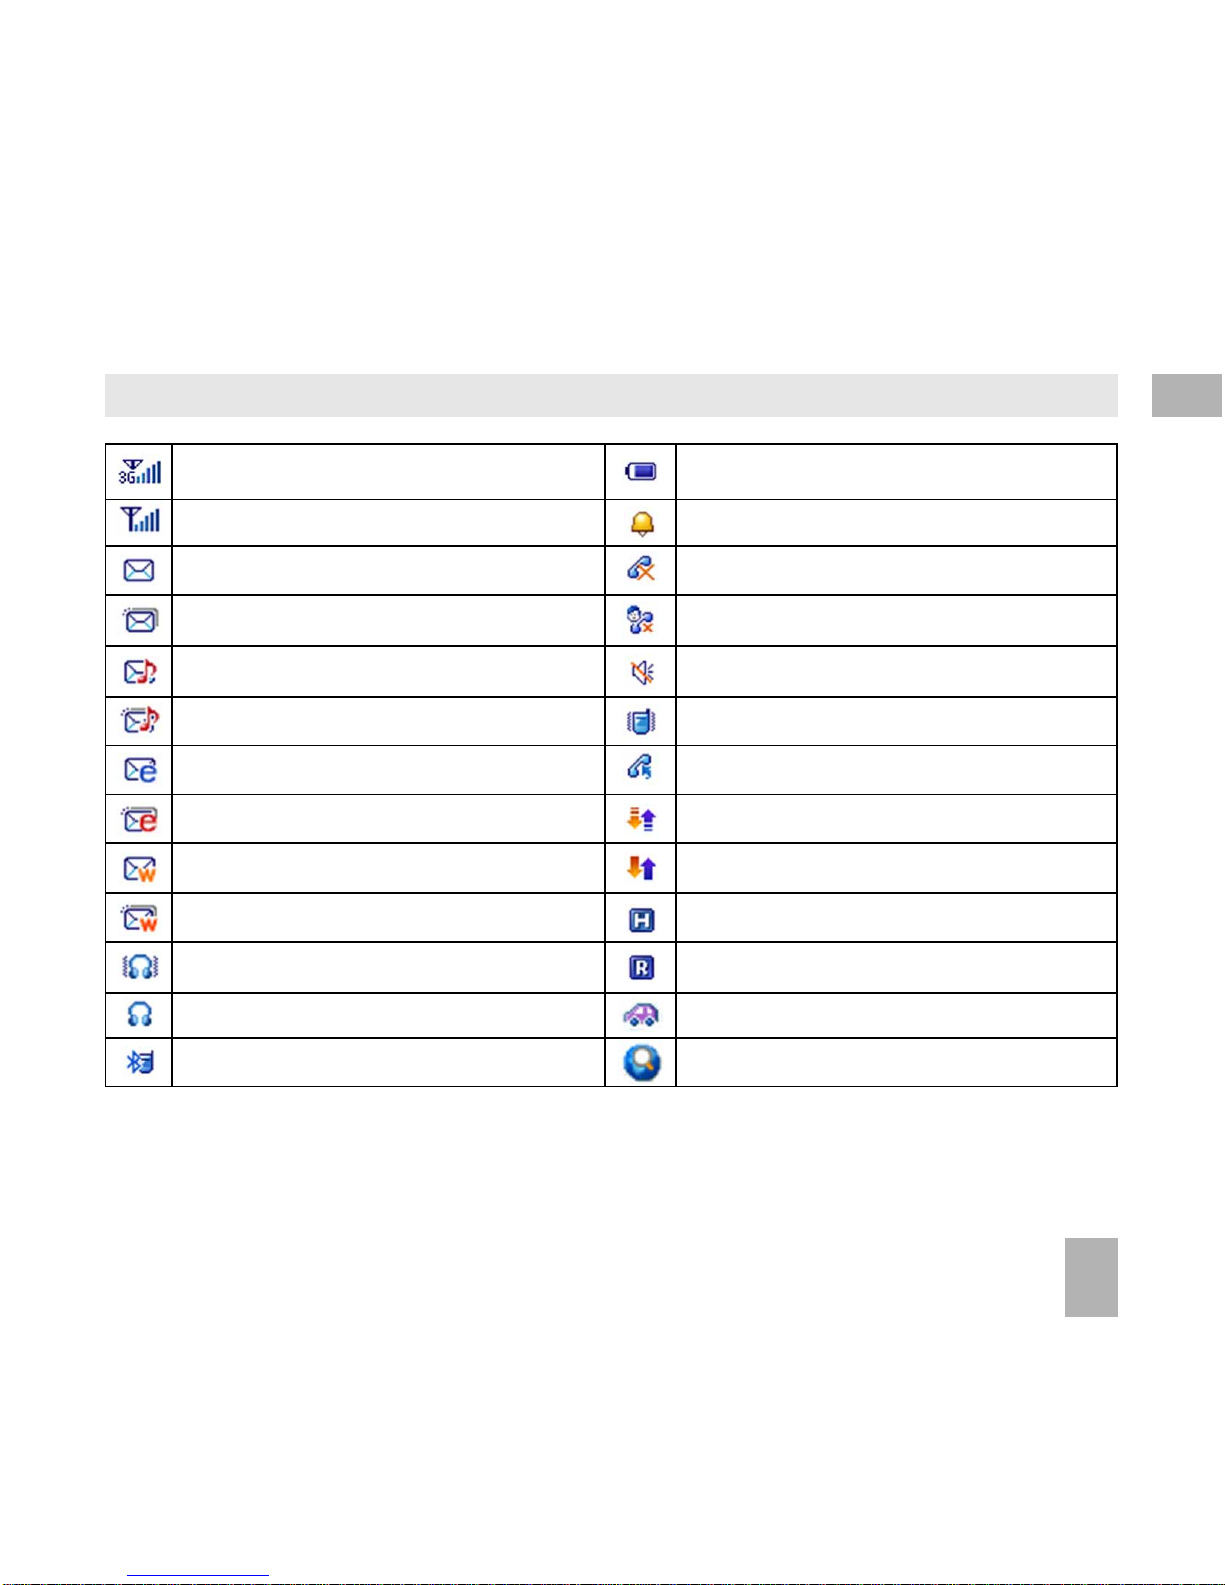
1.5 Information Bar Icons
3G Signal Strength
GSM Signal Strength
New SMS (Text Message)
SMS or MMS Memory is Full
New MMS (Multimedia Message)
MMS Memory is Full
New E-mail
E-mail Memory is Full
New Wap Push Message
Wap Push Memory is Full
Headset and Vibrate Mode
Headset Mode
Bluetooth is ON
Battery Level Indicator
Alarm is set
Missed Call
Missed Video Call
Silent Mode
Vibrate mode enabled
Call Forward is Active
PDP Data Available
PDP Data Connected
High speed data, HSDPA
Roaming
Car kit attached
A-GPS is ON
1
Page 16
16
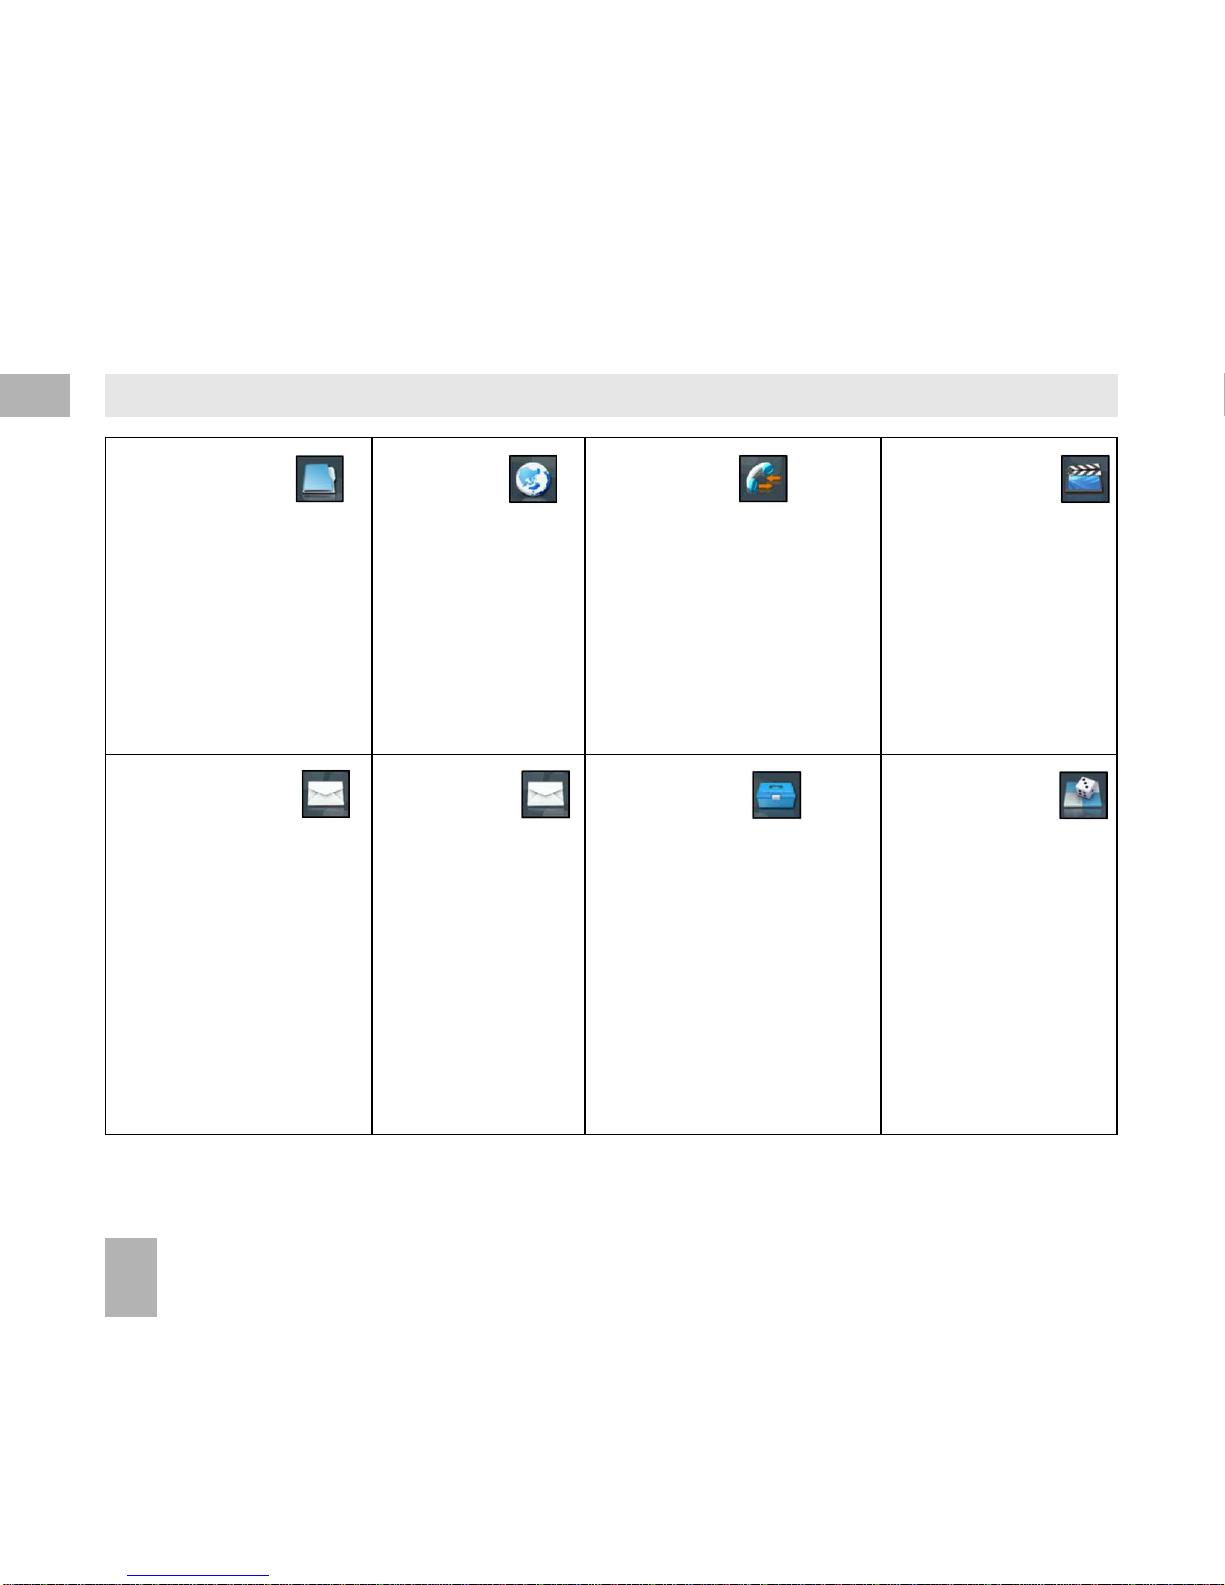
1.6 Menu Quick Reference Guide
File Manager
Photos
Audios
Videos
Others
Tab >
TFlash
Multimedia
1Camera
2Video camera
3FM radio
4Media player
5Playlist
6Slide show
7Streaming URL
8Voice recorder
Calls
A. Call log
1All calls
2Missed calls
3Received calls
4Dialled calls
B. > Calls Info.
1Call duration
Browser
1Home
2New Link
3Bookmarks
4History
5Saved Page
6Settings
7Version
Messages
1New Message
2Inbox (0/0)
3Outbox (0)
4Drafts (0)
5Sent (0)
6User folders
7(U)SIM Inbox (0/
0)
8Settings
9Memory info.
Tools
1Alarm
2Bluetooth
3Calendar
4Stopwatch
5Calculator
6World Time
7Syncml
8CurrencyConversion
9GPS
Messages
> E-mail
1New Email
2Inbox (0/0)
3Outbox (0)
4Drafts (0)
5Sent (0)
6User folders
7Settings
8Memory info.
Games and
Apps
Download
Applications
1
Page 17
17
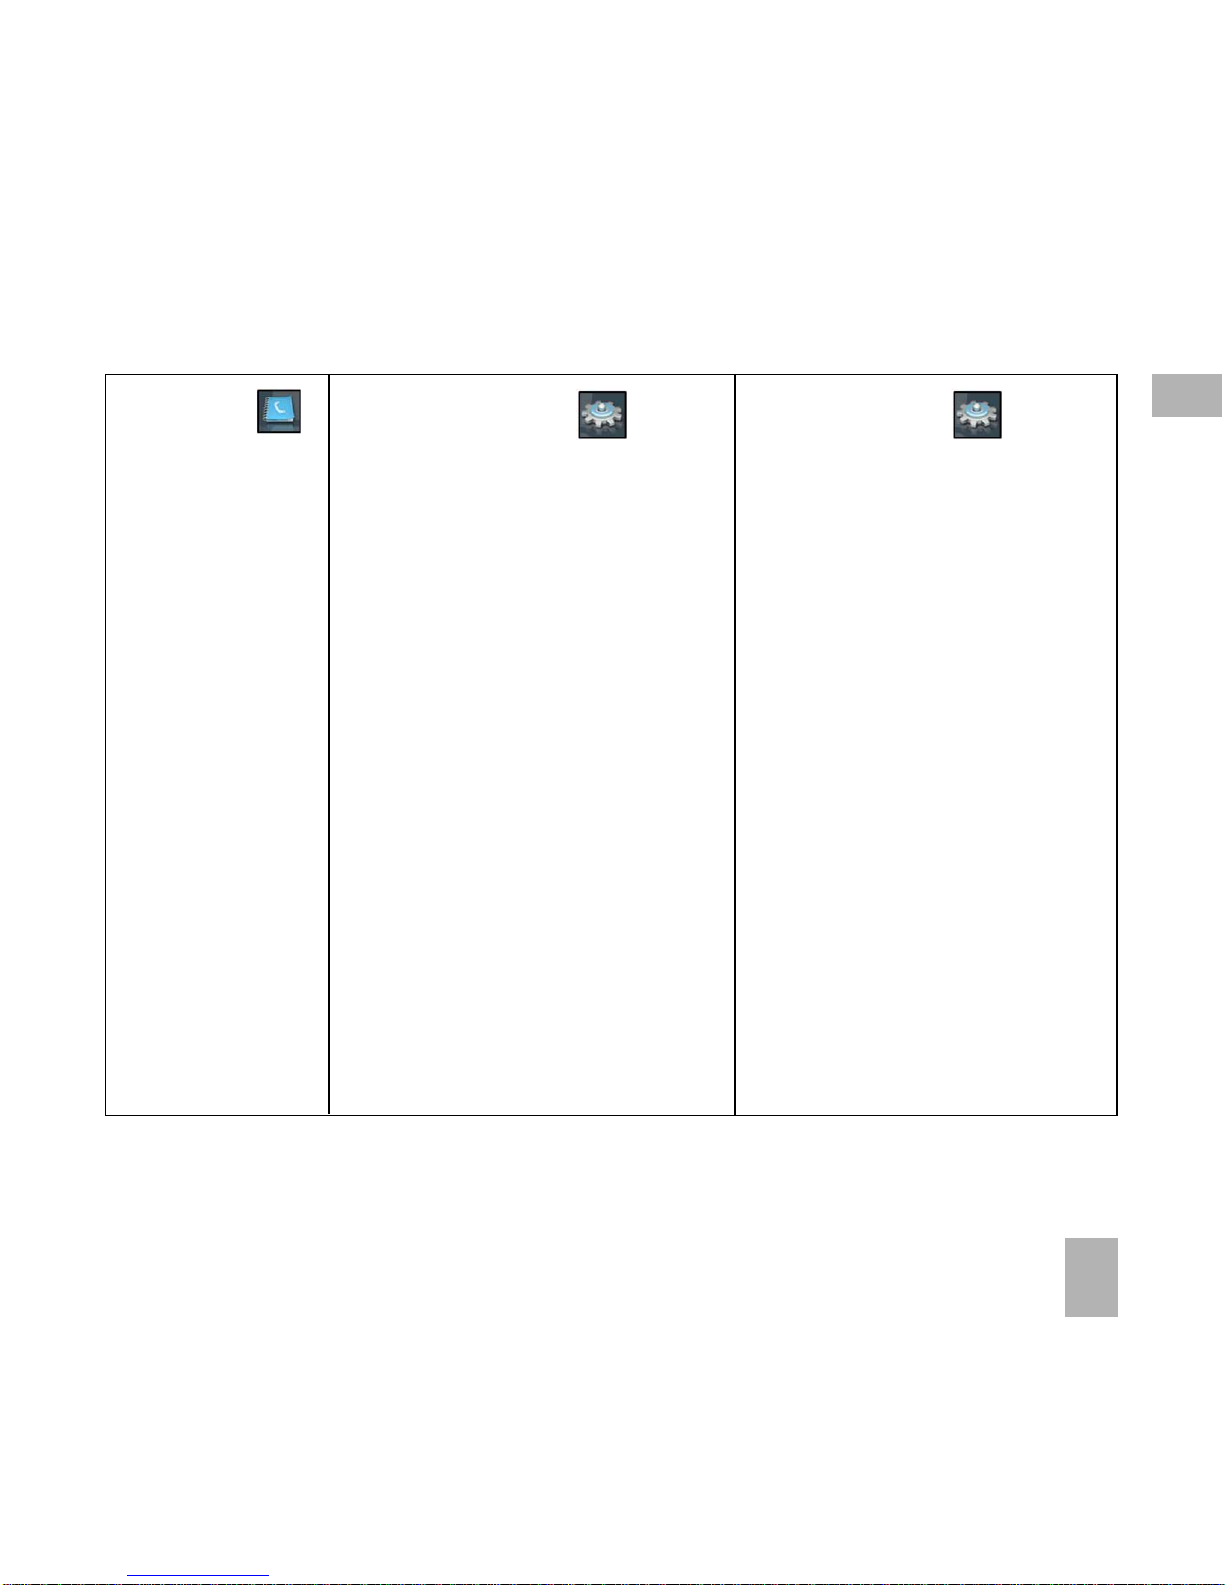
Contacts
All
> (U)SIM
> Family
> Friends
> Work
> VIP
> Unclassified
A. > Profiles
1 General
2 Meeting
3 Outdoor
4 Silent
5 Carkit
B. > Security
1 Activate security codes
2 Change security codes
3 Fixed dial numbers
4 FDN list
C. > Call
1 Videophone settings
2 Call divert
3 Call waiting
4 Call barring
5 Send my number
6 Open flip to answer
7 Any key to answer
Settings
A. Screen
1 Wallpaper
2 Display Backlighting
3 Set brightness
4 Keypad Backlighting
5 Owner name
6 Greeting
B. > Handset
1 Language
2 Time and Date
3 Network settings
4 Own phone number
5 Shortcut keys
6 Connections
7 Access point settings
8 Restore default settings
9 Network time
10Download location
11PC Connection
12CTM
13T-mode
14Missed calls alert
1
Page 18
18
2 Getting Started
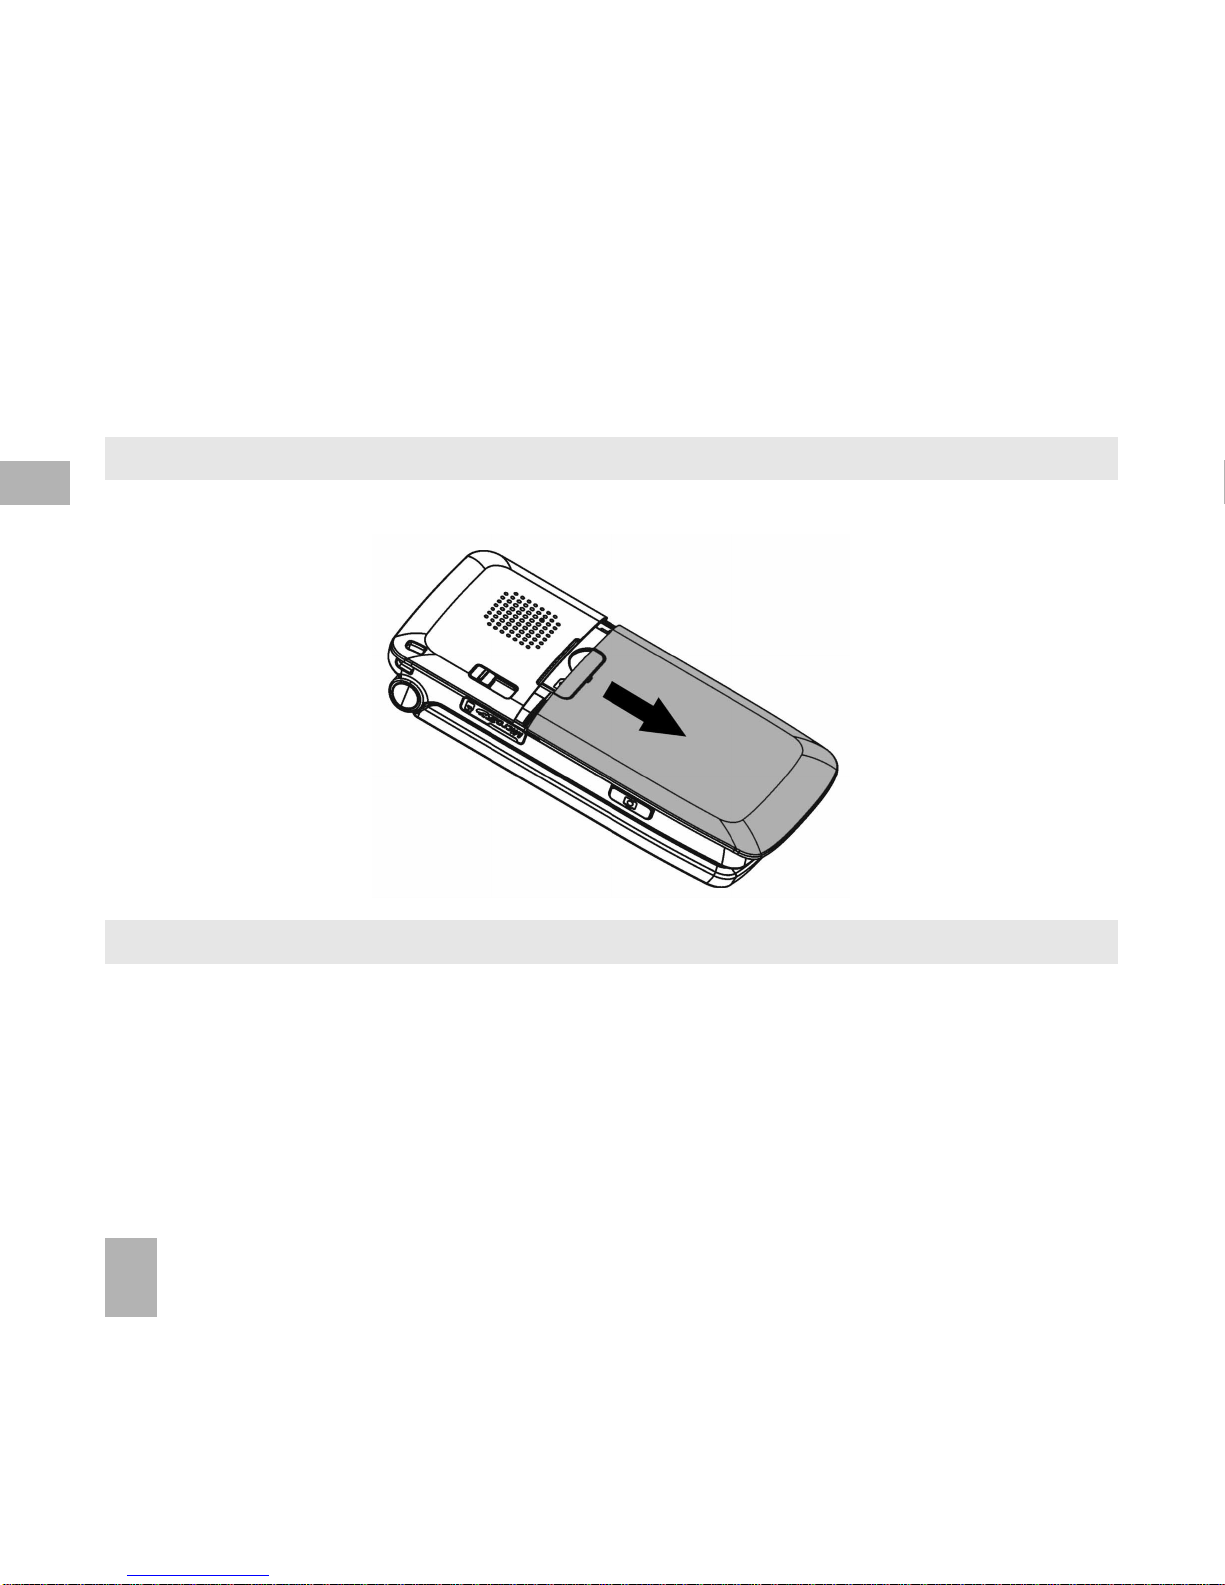
2.1 How do I remove the battery cover?
Push down gently on the thumb tab and slide the cover down then lift off.
2.2 How do I insert the USIM Card?
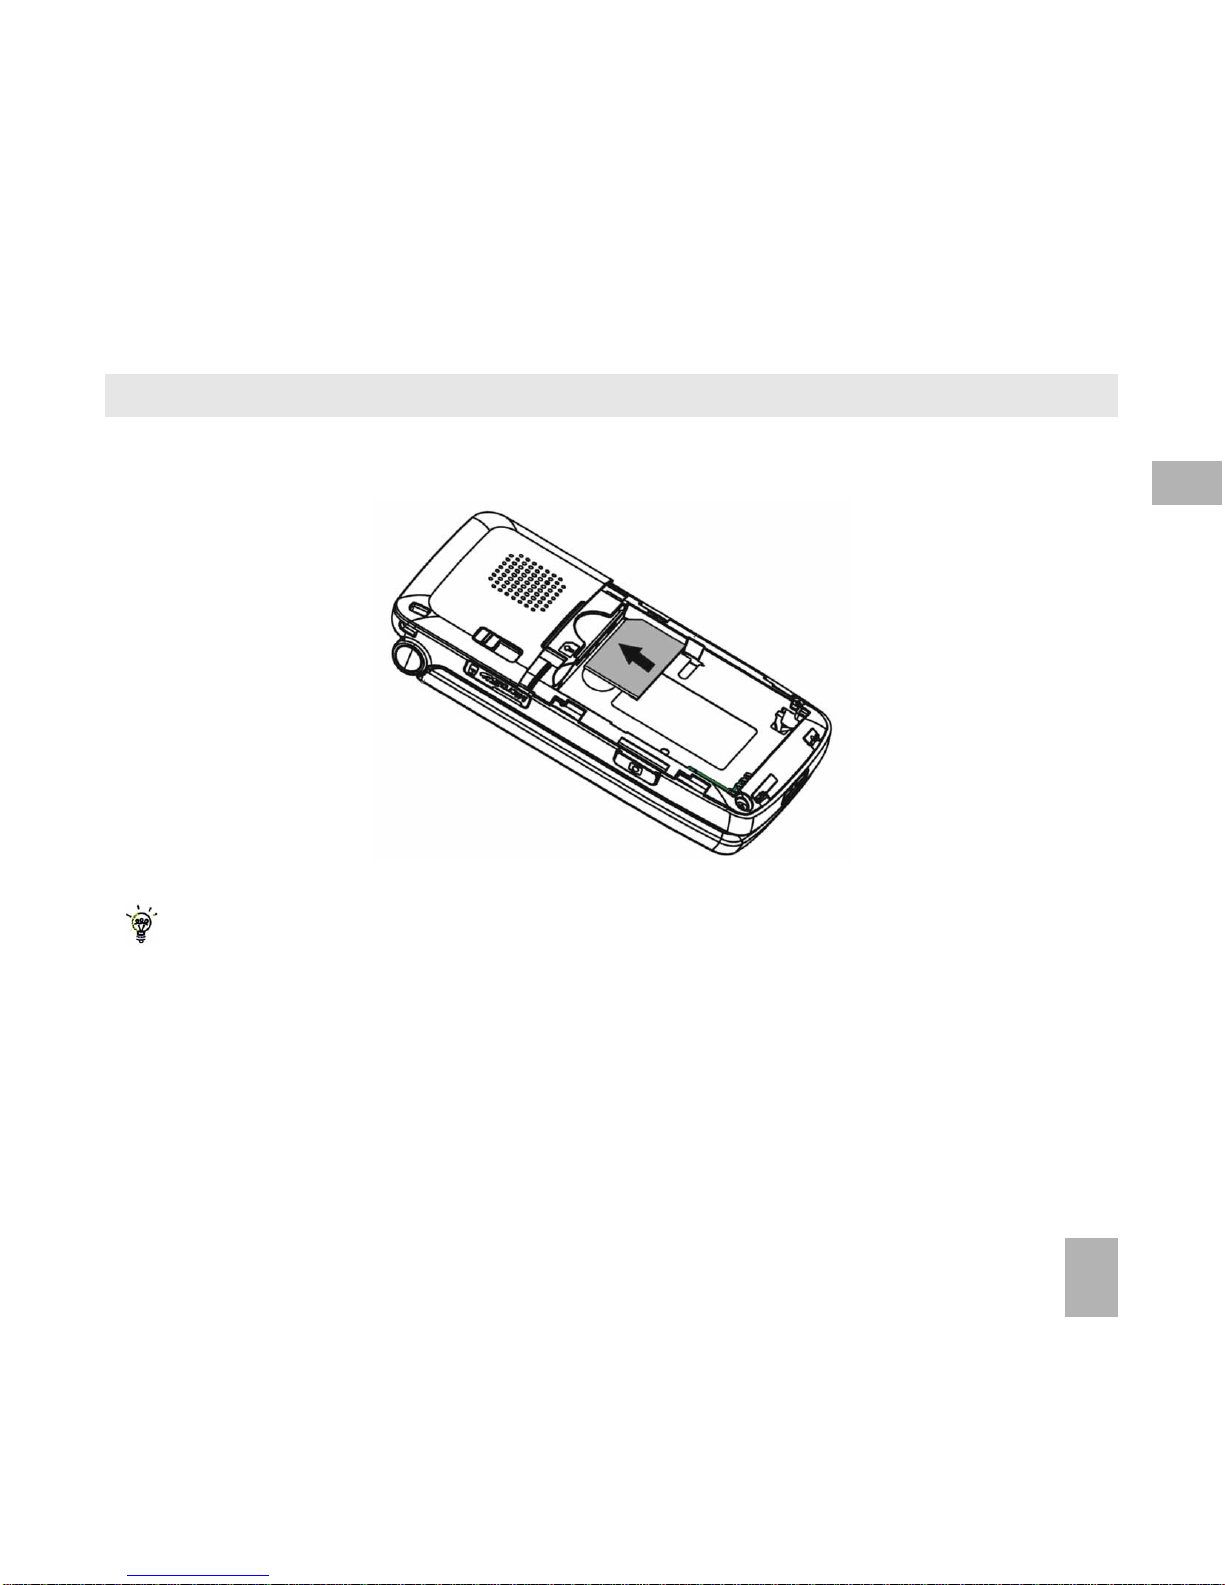
The USIM card (UMTS Subscriber Interface Module) is the small plastic smartcard with gold contacts. It holds personal information such as names and phone
numbers. It can be moved between different phones if required. The USIM card
must be inserted before using the handset.
Insert the USIM card with the gold contacts facing down and the bevelled edge
on the right hand side as shown. Carefully slide it into the carrier.
2
Page 19
19
How do I insert the USIM Card?
There is a diagram showing the USIM card orientation embossed onto the
case of the handset next to the USIM slot.
Always handle your USIM card with care to avoid damage. If your USIM
card is faulty please contact your service provider.
If your handset displays:
“No (U)SIM detected” check the USIM is inserted correctly.
“Enter PUK code” please contact your Service Provider.
“Enter Unlock code” please contact your Service Provider.
2
Page 20
20
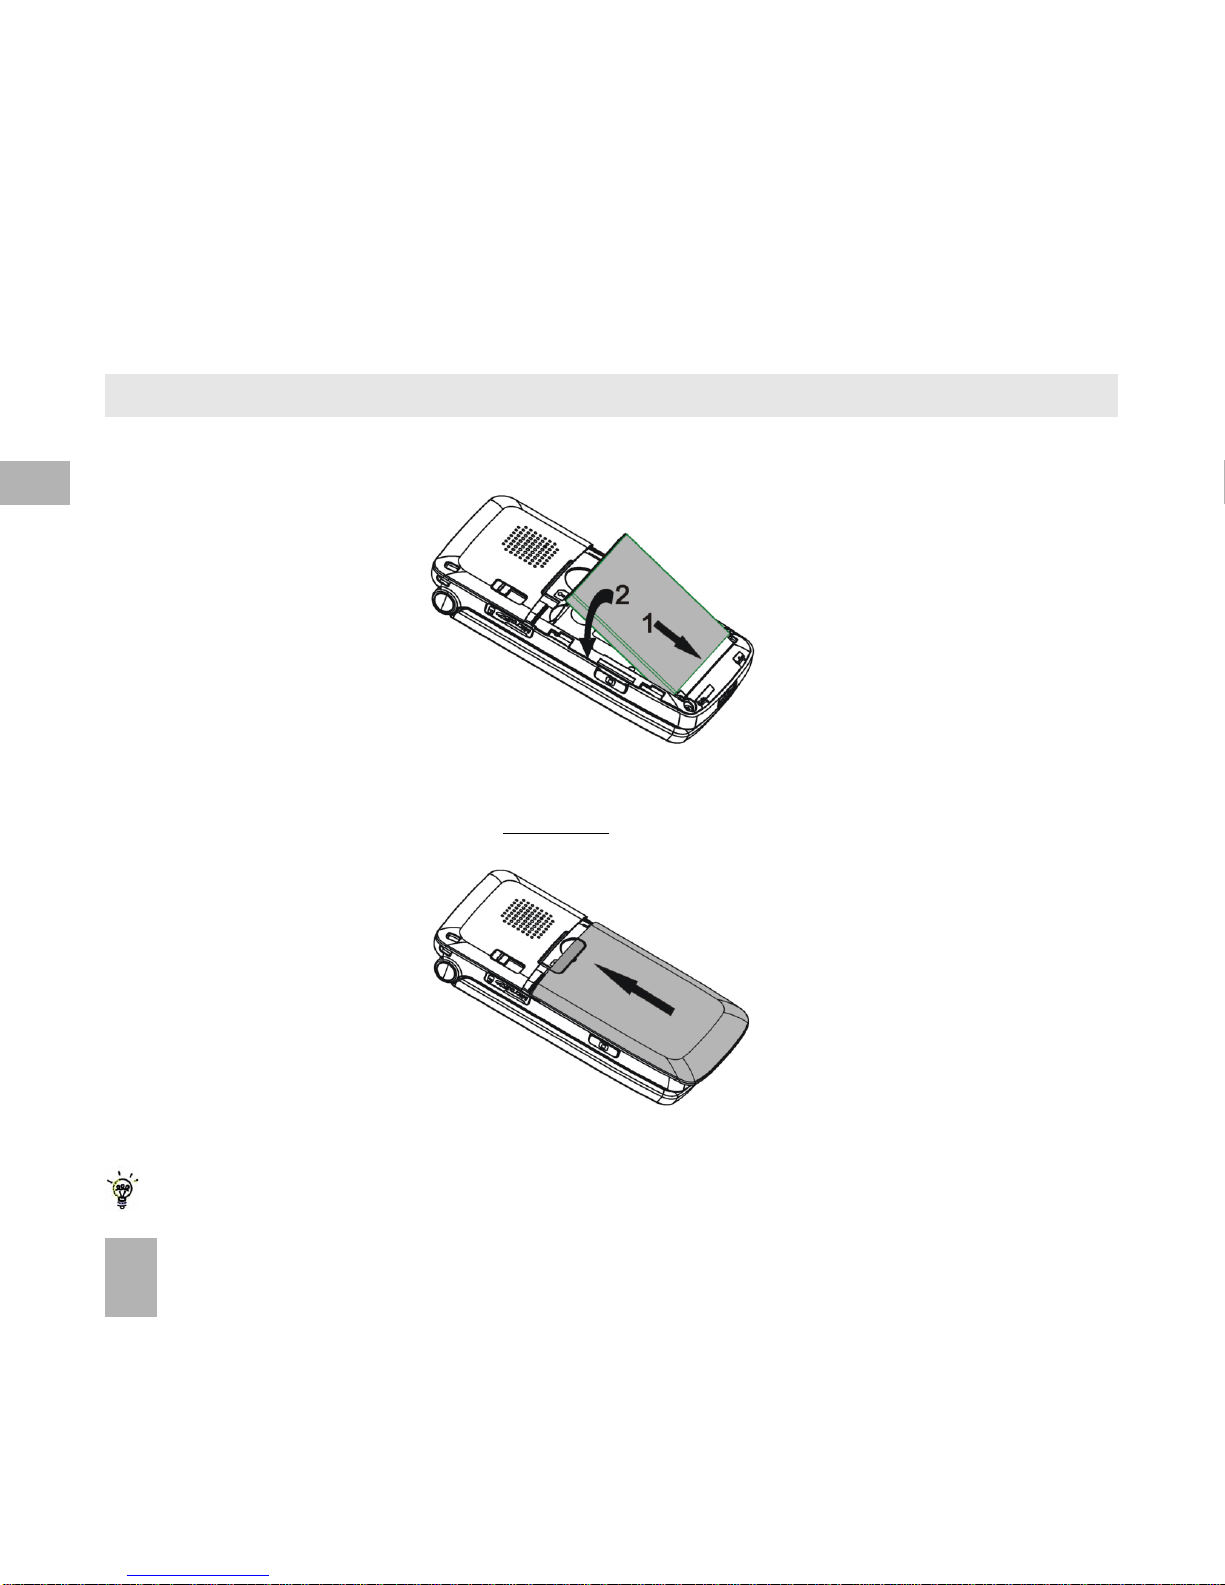
Slide the cover up gently
Locate the cover into the grooves horizontally and slide up gently.
2.3 How do I insert the battery?
Insert the battery as shown with the contacts located against the gold
springs. The battery will only fit one way.
Close the case by locating the plastic cover horizontally into the grooves and
sliding the cover up to close it. DO NOT force the cover down by pressing on it.
2
Page 21
21
2.4 How do I switch the phone On or Off?
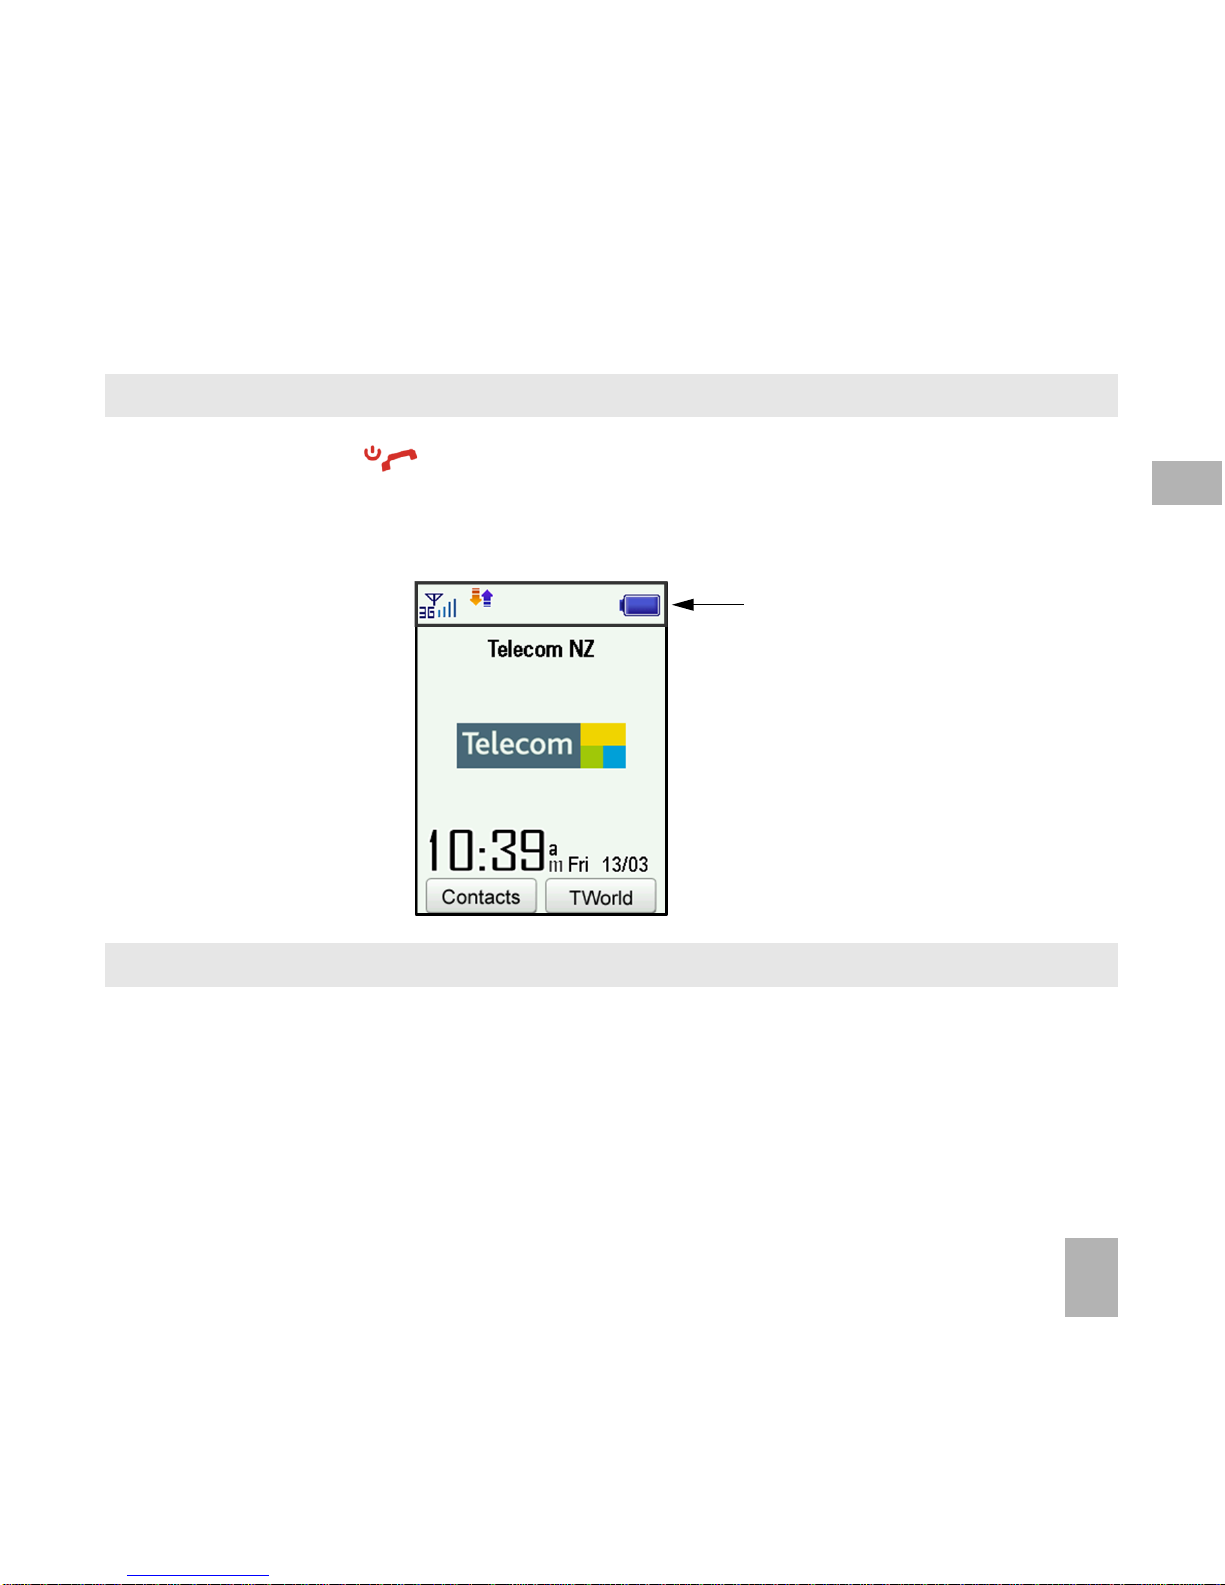
Press and hold the key for two seconds to switch the phone ON or OFF.
The start up screen below is referred to throughout the manual as the Idle
Screen:
2.5 How do I set the time and date?
The time and date is set automatically from the network. It takes a few seconds
to update when the phone is first switched on. Select 12 or 24 hr format in the
Network Time menu. To manually set the time it is necessary to switch Network
Time off:
Menu > Settings > Handset > Network Time > State Off then set the time and
date manually: Menu > Settings > Handset > Time and date.
The Idle Screen
The Information bar
2
Page 22

22
2.6 How do I connect the charger?
Charge before initial use. The charger lead only fits one way. The plug is marked
with an arrow. Always insert the charger lead carefully with the arrow facing the
top of the phone.
Do NOT use excessive force which may damage the USB socket.
Physical damage to the USB port is NOT covered by warranty.
The phone can also be charged by connecting it to a computer using the
USB lead supplied. If the phone is off after charging long press the End
Key to switch it back on.
2.7 Tips about charging and battery life
• Only use the AC charger and USB lead supplied.
• Insert the charger lead carefully with the arrow facing the top of the phone.
• Normal charge time is 2-3 hours. Do not charge for more than 24hrs.
• When not using the phone for long periods remove the battery.
• Charge the battery between 0°C~50°C. Charge promptly when flat.
• With poor network conditions (less than 2 bars) battery life is reduced.
• To increase battery life turn off Bluetooth when not in use and limit multimedia
functions
• After charging in the OFF state turn the phone ON by long pressing
• Battery life will be improved after a few charge / discharge cycles.
2
Page 23
23
3 Basic Operation
3.1 How do I make a voice call?
• Enter the number on the keypad and press the key to make the call
• Press OK to activate Handsfree (speakerphone) mode
• Press the key to end the call.
3.2 How do I answer an incoming call?
• Press or OK to answer the call, OK will activate Handsfree mode
• Press or Reject to end the call
If Voicemail is active pressing Reject will forward the call to Voicemail.
3.3 How do I send a Text Message (SMS)?
• Press the Left Arrow for Messages
• Press OK for New Message. Press OK for Text Message
• Enter the phone number directly or press OK to select from Contacts
• Select the Contact then press OK for Done. The Contact number will be
displayed, press OK
• Press the Down Arrow twice to move the cursor into the text field
• Type the message using the letter keys on the keypad (see Chapter 6)
• Press the OK to send the message.
3
Page 24
24
3.4 How do I navigate the Menu?
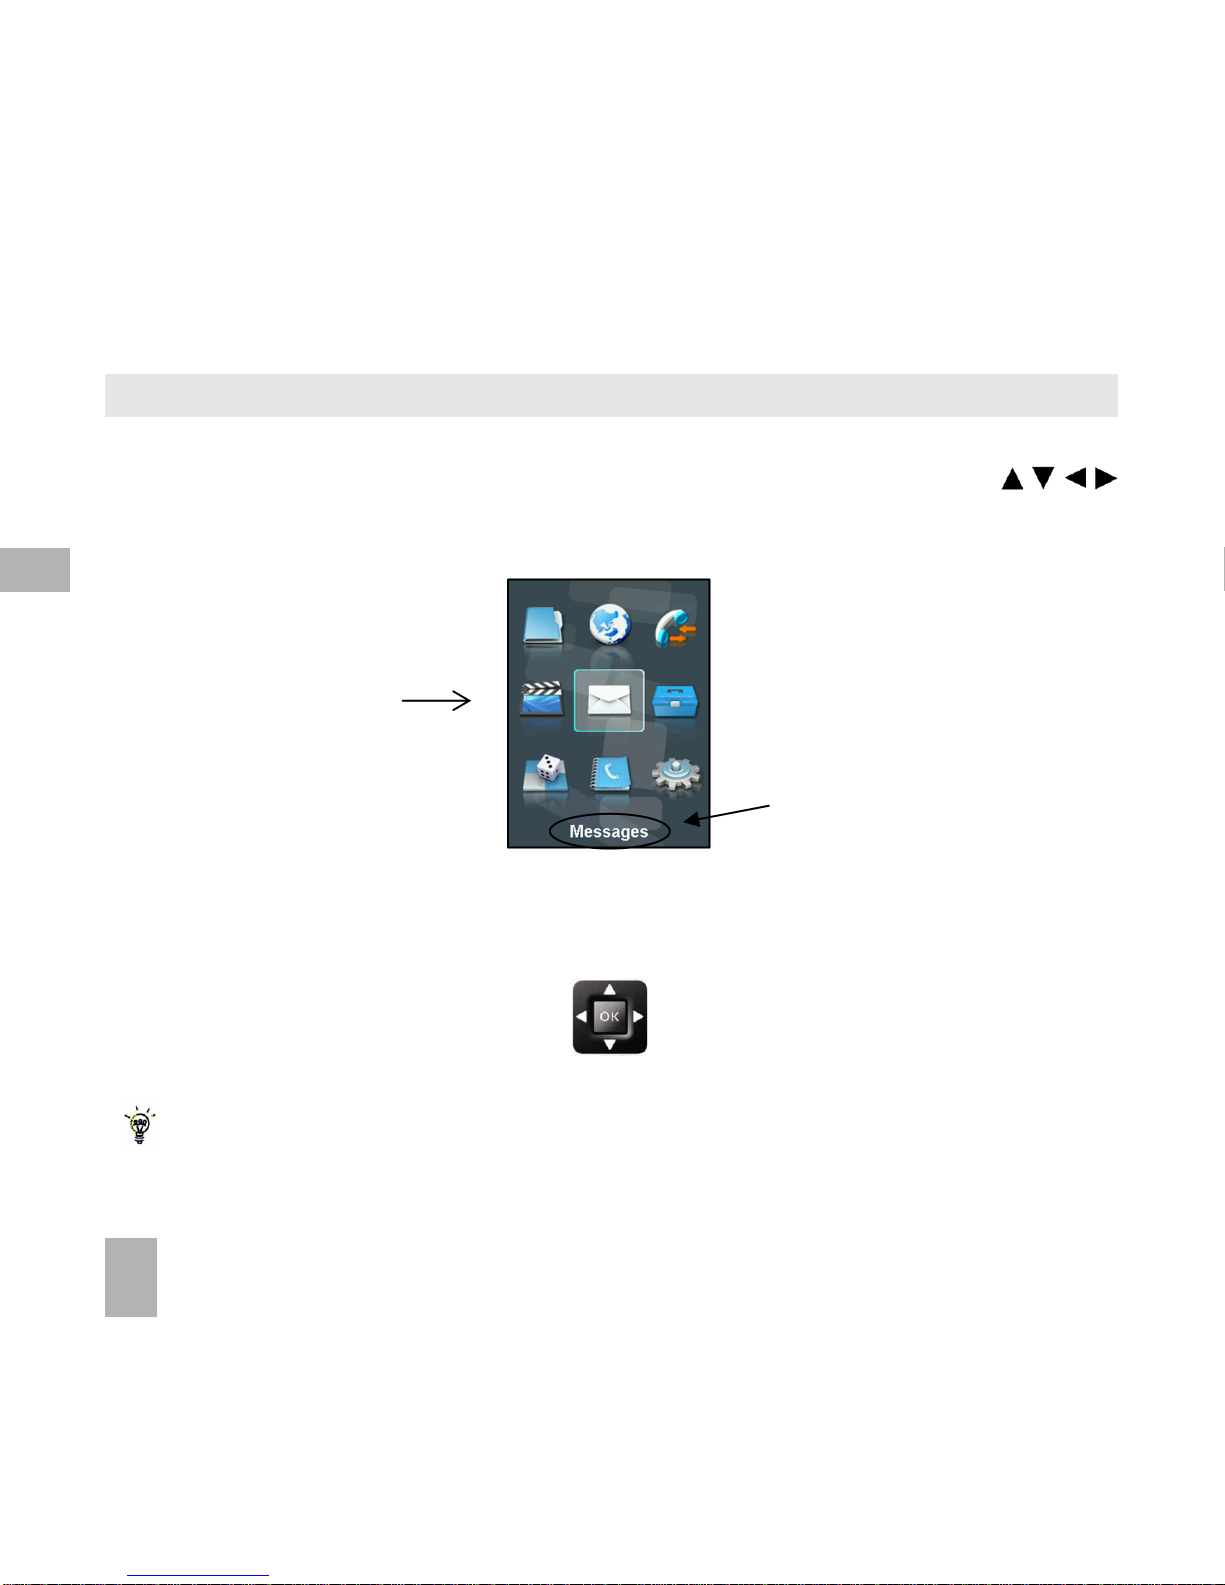
The Menu is a grid of icons that are used to access key features on the phone.
From the Idle Screen press OK to access the Menu. Use the Arrow Keys
to move the cursor or press the corresponding number key as shown on the grid
below. Eg Menu > 5 = Messages
Shortcuts
From the idle screen the Arrow Keys launch the default Shortcuts as shown:
Shortcuts: Menu > Settings > tab right to Handset > Shortcut keys
From sleep mode (dark screen) press the key once to wake up the handset,
press the key again to perform the required function.
TWorld
Messages File Manager
Calls
Icon description
OK
3
Page 25

25
4 Contacts
4.1 How do I enter my Contacts?
• From the Idle Screen enter the phone number, press the Left Soft Key to
Save.
• Press OK to create a New Contact or press the Down Arrow to Update
existing contact
• Using the keypad, enter a name for the new Contact or modify an existing
contact
• Press OK to Save. The default save location is the USIM card. Change if
required.
4.2 How do I copy all Contacts from a USIM card?
All USIM Contacts are automatically read by the handset.
To copy Contacts into the handset memory follow the steps below:
• Insert the USIM card where the contacts are stored. Switch the phone on
• From the idle screen press the Left Soft Key for Contacts
• Press the Right Arrow once for USIM to show the list of Contacts on the
USIM card
• Press the Left Soft Key for Options then use the arrow keys to select, Copy >
Copy all > OK > Yes to confirm.
4
Page 26

26
4.3 How do I search my Contacts?
From the idle screen press the Left Soft Key for Contacts. To find the Contact
‘John’ press the 5 key once for ‘J’. All names starting with ‘J’ will be displayed.
Refine the search by entering more letters that can occur anywhere in the name.
Eg. ‘Jn’ will find ‘John’ and ‘Julian’ but not ‘James’ whereas ‘Ja’ will find Julian
and James but not John.
4.4 How do I add a Contact from a received call number?
After receiving a call you can add the caller’s number to the Contacts list:
• Press the key to display All Calls. The last call received will be at the top
of the list
• Press the Left Soft Key > Options > Save > New Contact or Update to modify
a contact > OK
• Enter or modify the contact details and press OK to Save.
4.5 How do I add a Contact from a received SMS?
Menu > Messages > Inbox
• Select the required message and press OK to View
• Press Options > Use highlight object to save the number
• Choose New Contact to create a new contact from the received SMS number.
4
Page 27

27
4.6 How do I set a dedicated ringtone or image to a Contact?
The contact must be stored on the handset in order to set a dedicated ring or
image.
Menu > Contacts (Shortcut = Left Soft Key)
• Use the arrow keys to find the required contact (must be stored on
the handset)
• Press OK to View > Edit > Options > Add ring and photo. Select the
required feature
• Press Add then navigate to the folder where the Ringtone or Picture is
stored.
• Press OK to Save your choices when complete
4.7 How do I set Speed Dial numbers?
Having Speed Dials set makes it quicker to call selected contacts.
Menu > Contacts > Select the Contact > Options > Scroll down > Speed
Dial > Setup
• Assign the chosen contact to the next available number
• Speed dial 1 is preset for Voicemail and cannot be changed
• Press OK to Setup the speed dial or press OK Key again to cancel
• Press the key to exit when finished.
4
Page 28

28
4.8 How do I make a call using Speed Dial?
• From the Idle screen press and hold the required number key to call that
Contact
• E.g. A long press on the 1 key will automatically dial the Voicemail service.
4.9 How do I update an existing Contact?
• Edit the existing contact: Menu > Contacts > View > Edit.
• Press Save when finished
• Contacts are normally stored in the default Group, Unclassified.
• You can move contacts into other Groups: Family, Friends, Work, and VIP.
• Regardless of Group, all contacts on the handset are displayed under All
• Refine the search by entering a subsequent letter that can occur anywhere
in the name. Eg. ‘Jn’ will find ‘John’ and ‘Julian’ but not ‘James’
4
Page 29
29
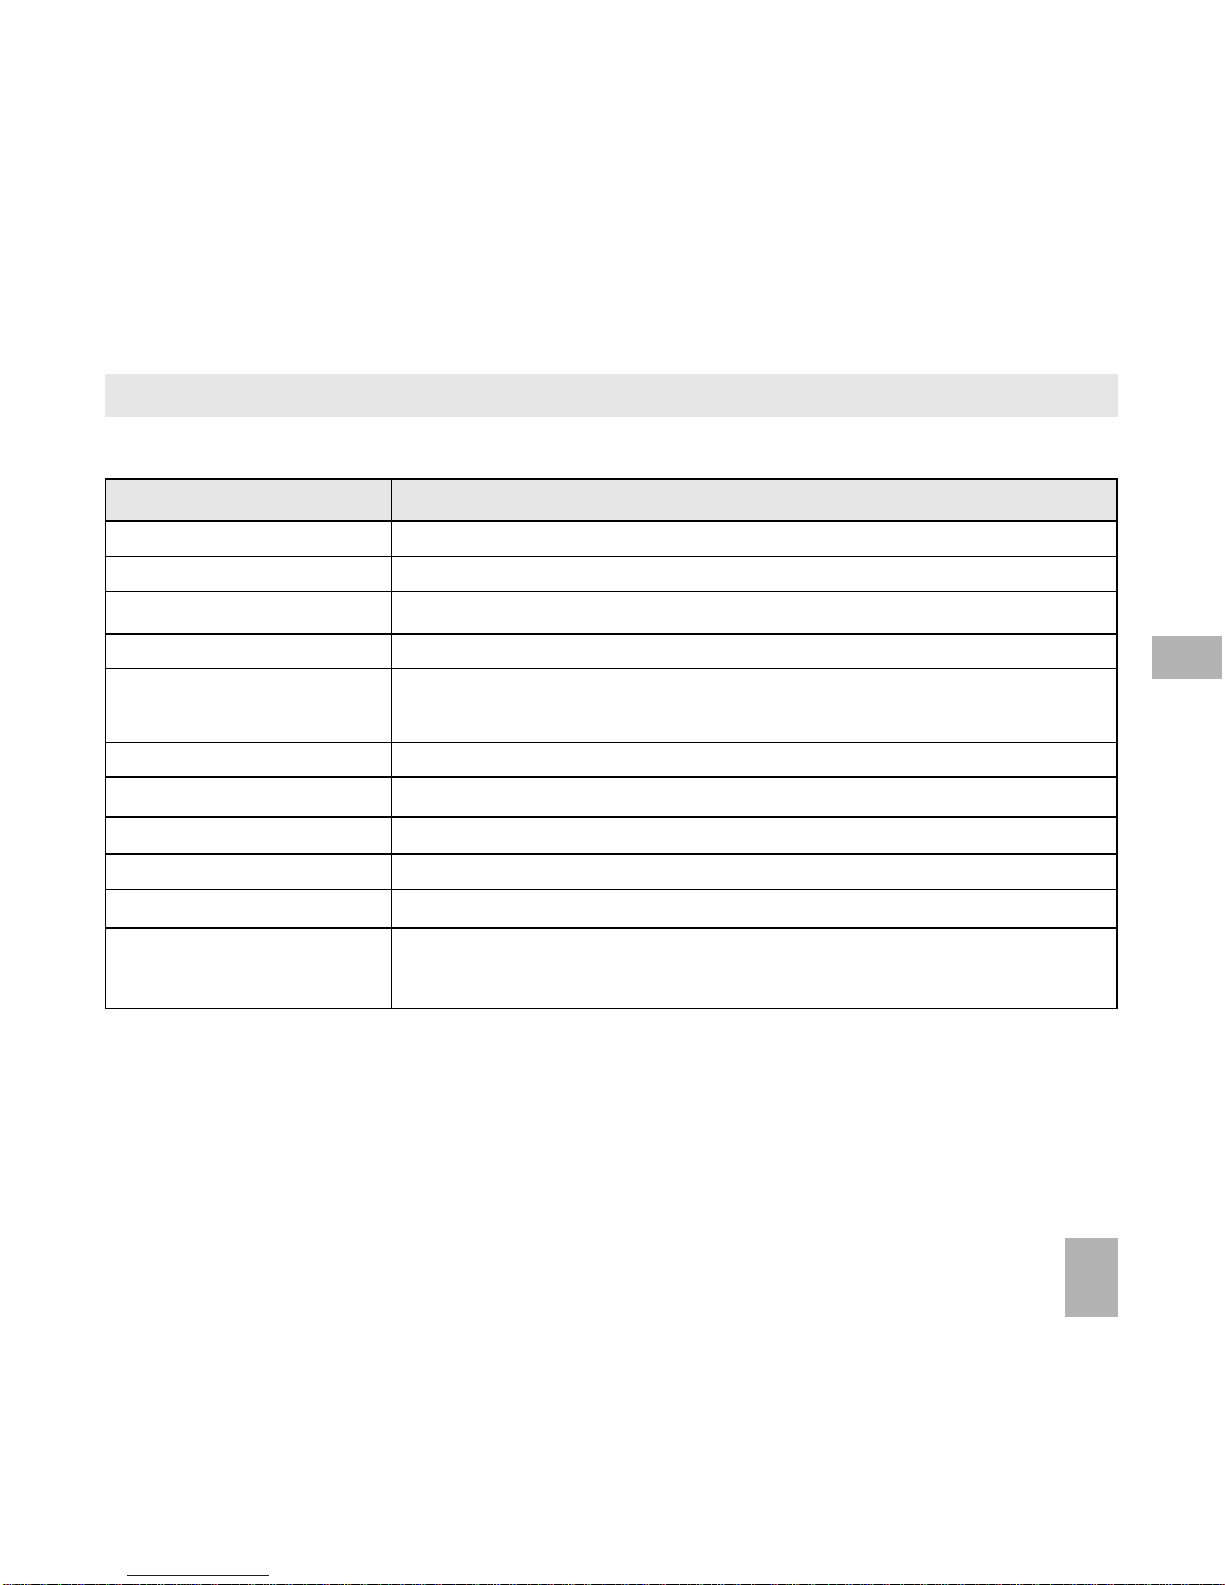
Option Description or subsequent options
Call Make a Voice Call or Video Call to the selected contact
Send Send an SMS, MMS or E-mail to the selected contact
New Contact Create a new contact
Edit Contact Edit the selected contact
Delete Delete contact, Delete all (Phone), Delete all (USIM),
Delete all (Both)
Copy Copy to phone, Copy all
Send Bus. Card Send a business card via SMS, MMS, E-mail or Bluetooth
Default Memory Default save location for contacts, USIM card or Phone
Service dial number Preset Voicemail message bank numbers
Speed dial Assign a speed dial to the selected contact
Manage Contact Set Group parameters (eg Ringtone and photo), Speed
dial info and check the memory status
4.10 Advanced Contact Options
Menu > Contacts > Options
4
Page 30
30
5 Calls
5.1 How do I make a Voice Call?
• Enter the number on the keypad and press the key to make a voice
call.
• Press OK to activate Handsfree or Speakerphone (Loudsp.)
• Press the key to end the call.
5.2 How do I make a Call from my Contacts?
• Press the Left Soft Key for the Contacts menu.
• Use the Arrow Keys to scroll to the chosen contact.
• Search Contacts using the letter keys – eg. press ‘J’ to find John
• Press the key to make the call.
• Press the key to end the call.
5.3 How do I view and make a Call from my Call History?
• Press to bring up All Calls. Press again for Last Number Redial
• Use the Arrow Keys to choose a number from the All calls list
• Press the key to make the call.
• Press the key to end the call.
5
Page 31
31
5.4 How do I activate Speakerphone?
Handsfree or Speakerphone is activated by pressing OK during a call
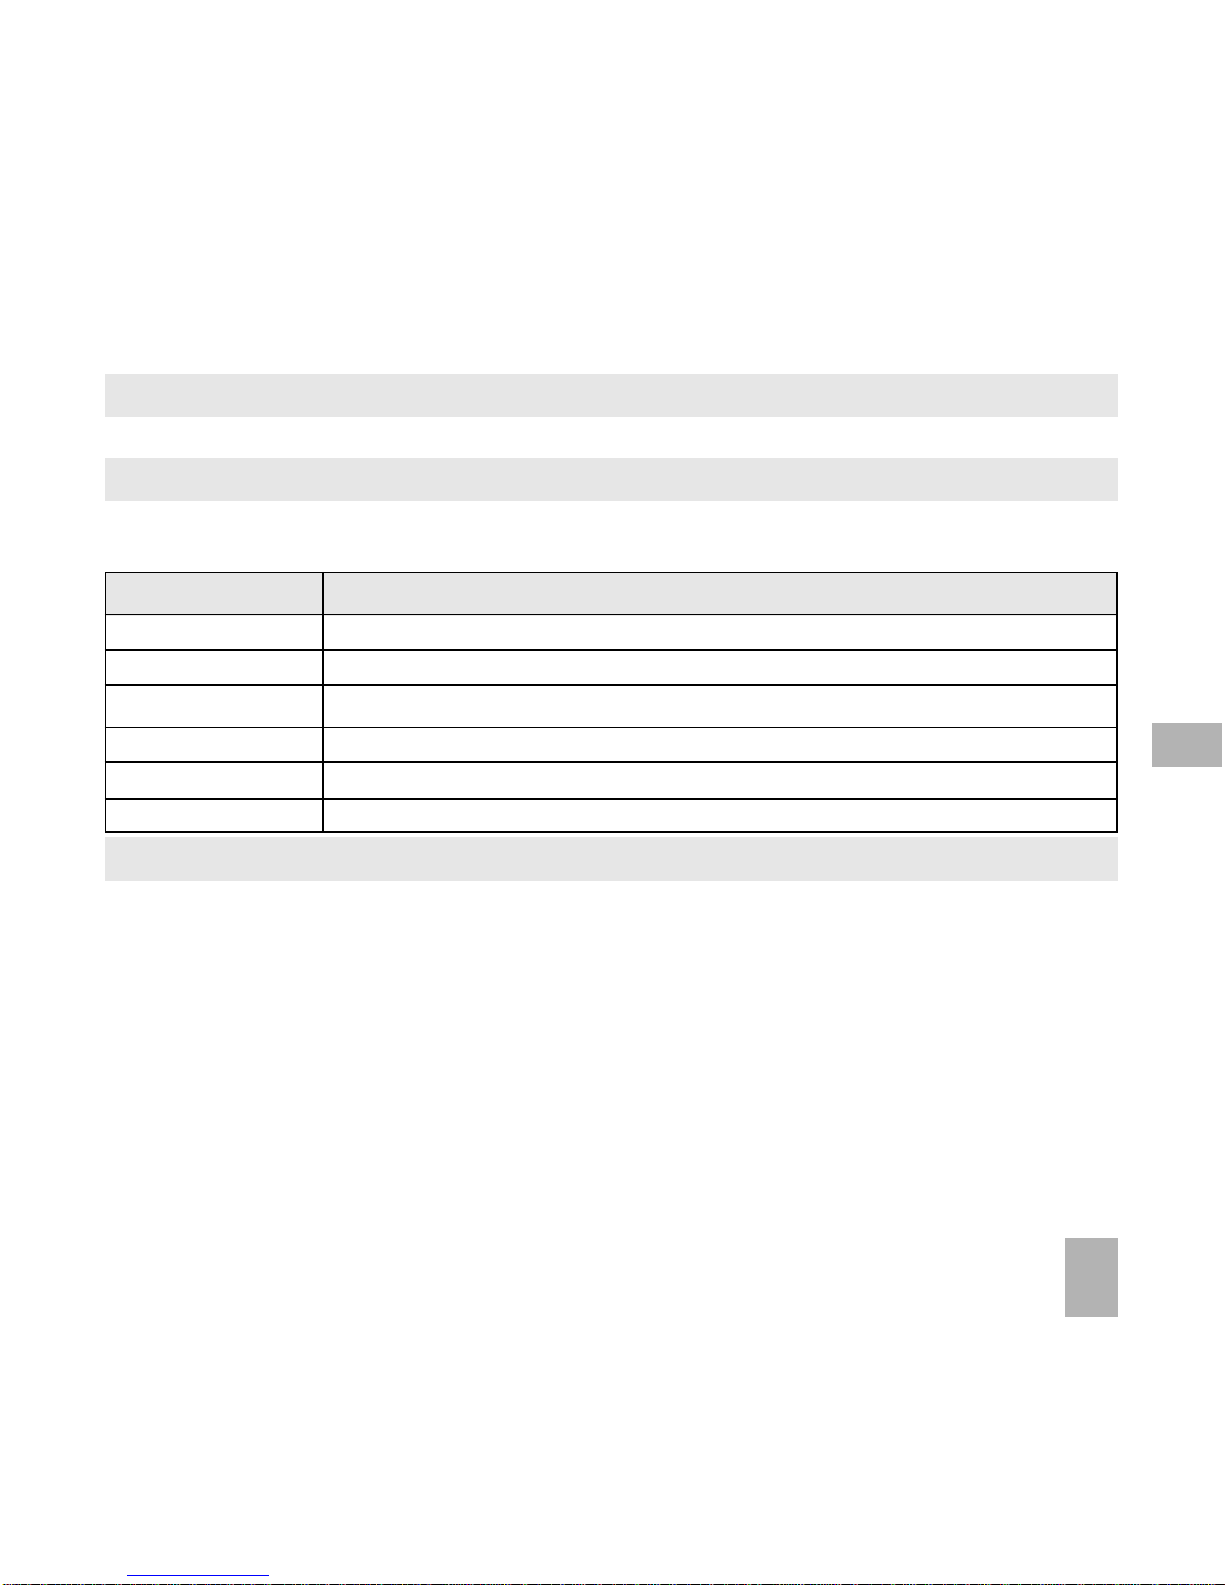
5.5 Call options during an active Voice Call
Press the Left Soft Key for Options during a voice call. Use the End key to return
to the call menu
Hold: Puts the current call on hold
End call: End the call
Record: Record the current call. The file is saved to My Audios
DTMF Off/On: Enable or disable sending DTMF tones. Default is ON
Message: Switch to SMS interface during a call
Contacts: Switch to Contacts interface during a call
Browser: Launch the web browser
5.6 Hints and Tips for Calls
• Press star twice for the International Prefix ‘+’, three times for a ‘Pause’
• To call a number from a message highlight the number then press
• The microphone is near the # key. Be careful not to block it with your hands
• During a call change the volume using the side Volume keys
• Set Open flip to answer or Any key to answer in Settings > Call menu
• The number of rings before the phone diverts to Voicemail is set by your
Service Provider. Contact your Service Provider to change this setting.
• To enable international roaming please contact your Service Provider.
5
Page 32

32
5.7 How do I answer a Call?
When you receive an incoming call:
• The phone will light up, the call alert will sound and the phone will vibrate
depending on the current profile setting.
• You will receive an incoming call notification displayed on the screen
• Press or OK to initiate Speakerphone (Loudsp.) to answer the call.
• Press to Reject the call.
• Press Silence to mute the incoming ring if required. This feature is useful to
silence the incoming ring without answering the call. The other party hears ring
tone until the call ends.
• You can set Open Flip to Answer and Any Key to Answer from Menu >
Settings > Call
5.8 How do I make a Video Call?
3G coverage is required to make and receive video calls.
• Enter the phone number using the keypad or from Contacts as described.
• Press to make a video call.
• Press to end the call.
If the call is not successful you will be asked if you want to try a voice call.
5
Page 33
33
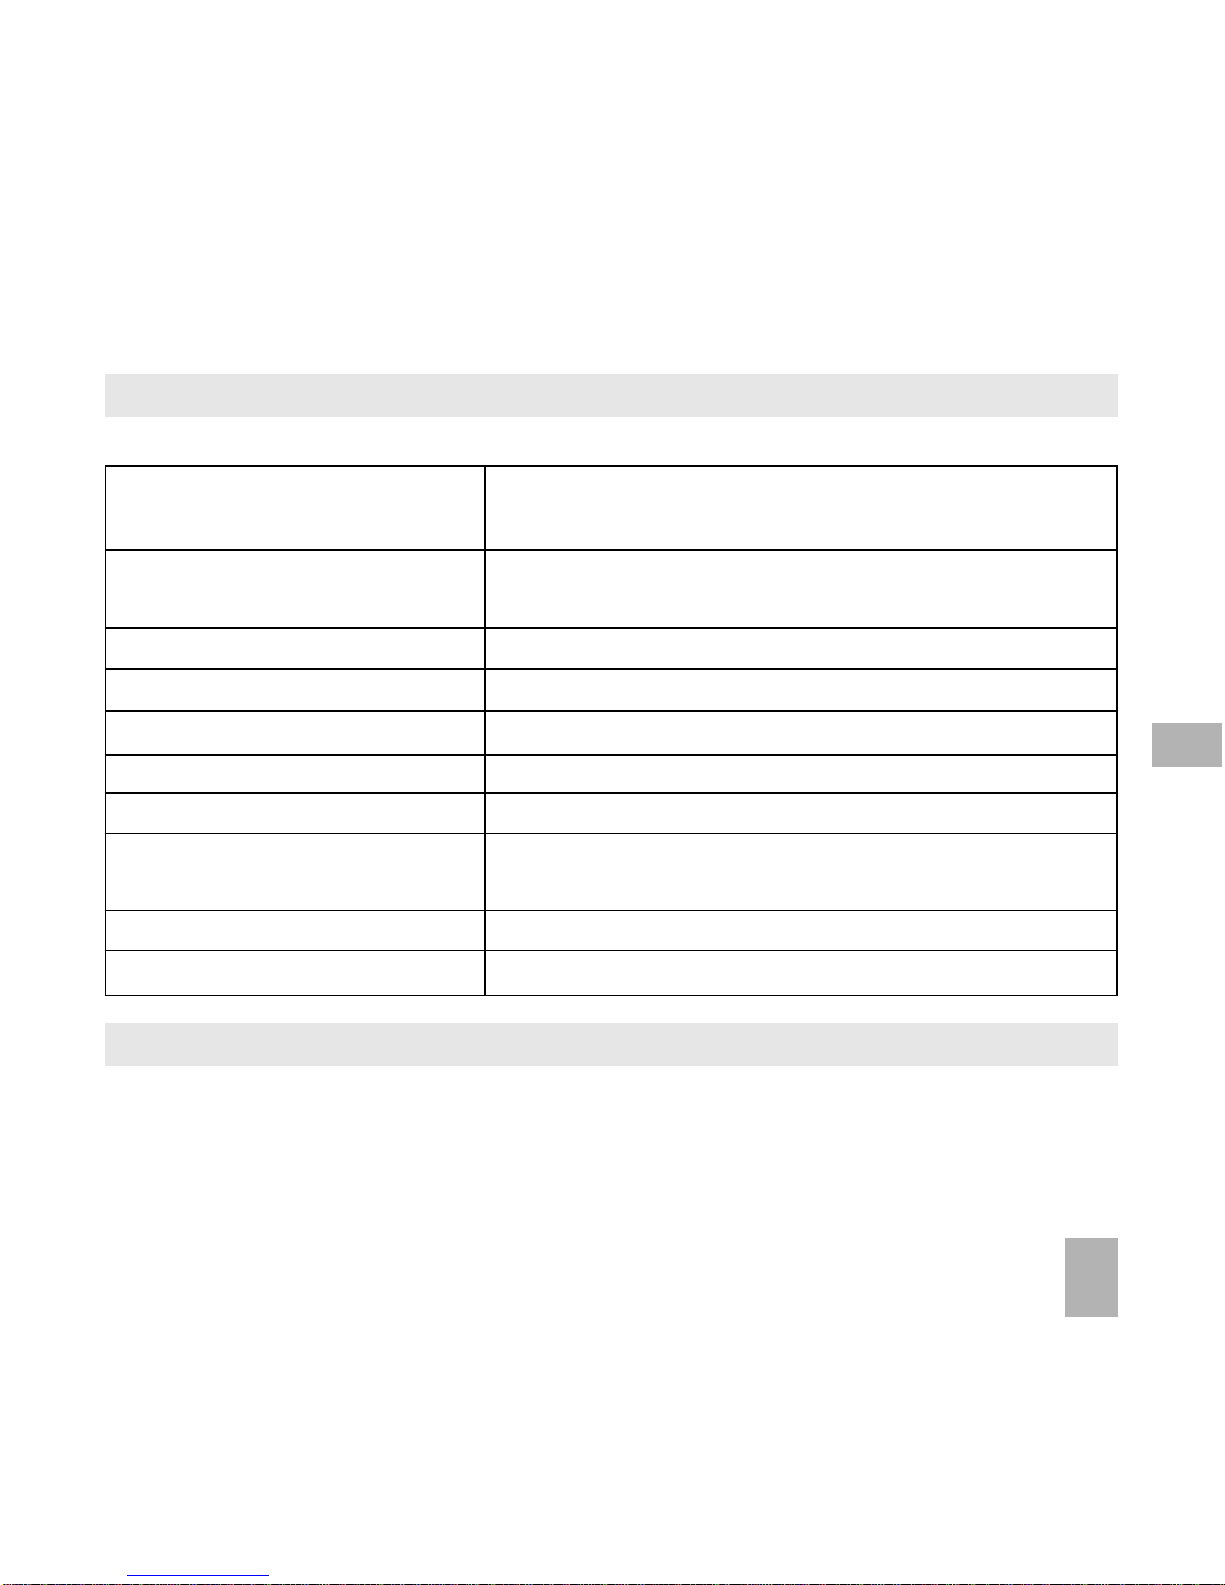
Hold / Cancel hold Send a still picture instead of your own image
and the voice is muted
Start recording video Record video from the other party
(i.e. incoming video)
Block / Send my picture Block / Send your own image to the other party
Use back / front camera Select the back/front camera
Brightness Adjust the brightness
Zoom Change the magnification of your own image
Own picture off / on Hide or show your own picture on the local screen
Exchange PIP Swap the Picture in Picture display the other way
round
New text message Send SMS during a video call
Contacts Switch to Contacts interface
5.10 How do I answer a Video Call?
3G coverage is required to make and receive video calls. If a video call is received
when browsing or using multimedia functions, the browser, media player or FM
radio will be suspended.
5.9 Call options during an active Video Call
Press the Left Soft Key for the following Options during a video call:
5
Page 34

34
When receiving an incoming Video call:
• The phone will ring, vibrate and illuminate depending on the current profile
setting,
• Press the Video call key to accept the video call,
• Press the End key to end the video call.
5.11 How do I make Emergency Calls?
To make an emergency call during normal use
• Ensure that the handset is switched on and in service.
• Press the key repeatedly to return to the Idle Screen.
• Enter the emergency number using the keypad, (eg 111).
• Press the key to call the number. Follow instructions received and do
not end the call until told to do so.
• Emergency calls can also be made without a USIM Card
• Enter the emergency number and press or OK to make the call.
• Advise the operator which emergency service you require
• Give your position and remain stationary to get the best coverage
• Due to the nature of the cellular system the connection of emergency calls
cannot be guaranteed
• Never rely solely on any wireless device for essential communications ie.
medical emergencies
• The Emergency Number 112 is used internationally.
5
Page 35
35
Advanced Call Settings
5.12 Videophone Settings
Menu > Settings > tab right to Call > Videophone settings
All the fields are preset. Contact your Service Provider for more details.
5.13 Call Divert
Menu > Settings > tab right to Call > Call divert
This service enables incoming calls to be diverted to another number. Choose
the Call divert function required from the menu list. Select the function to
Activate, Deactivate or Check status.
5.14 Call Waiting
Menu > Settings > tab right to Call > Call Waiting
This feature allows an incoming call to be answered while already on a call.
Answering the incoming call will automatically place the first call on hold. The
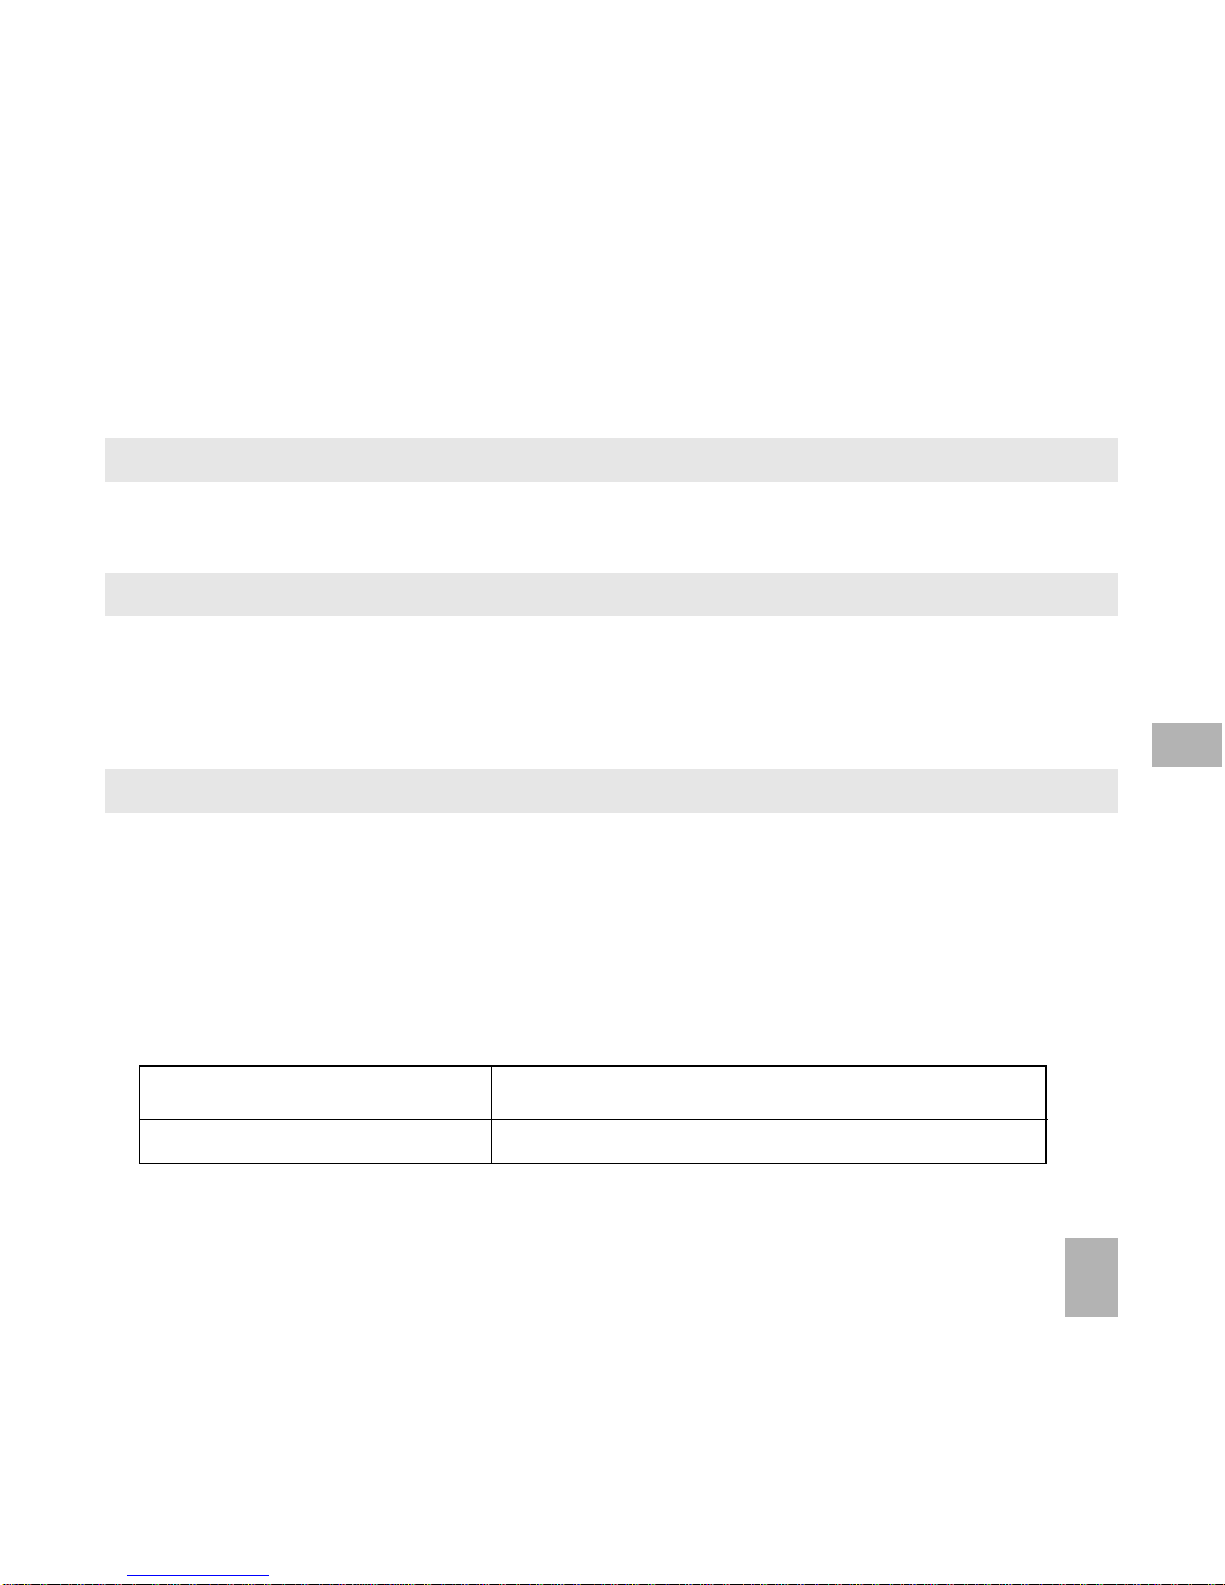
handset displays a table showing the Active call and call on Hold. Pressing
Options allows the switching between the ‘Active’ and ‘Hold’ calls.
Press Options to switch calls between Hold and Active:
03991234xx Active Press Options > Hold to switch calls
03996543xx Hold Press Options > Active to switch calls
5
Page 36
36
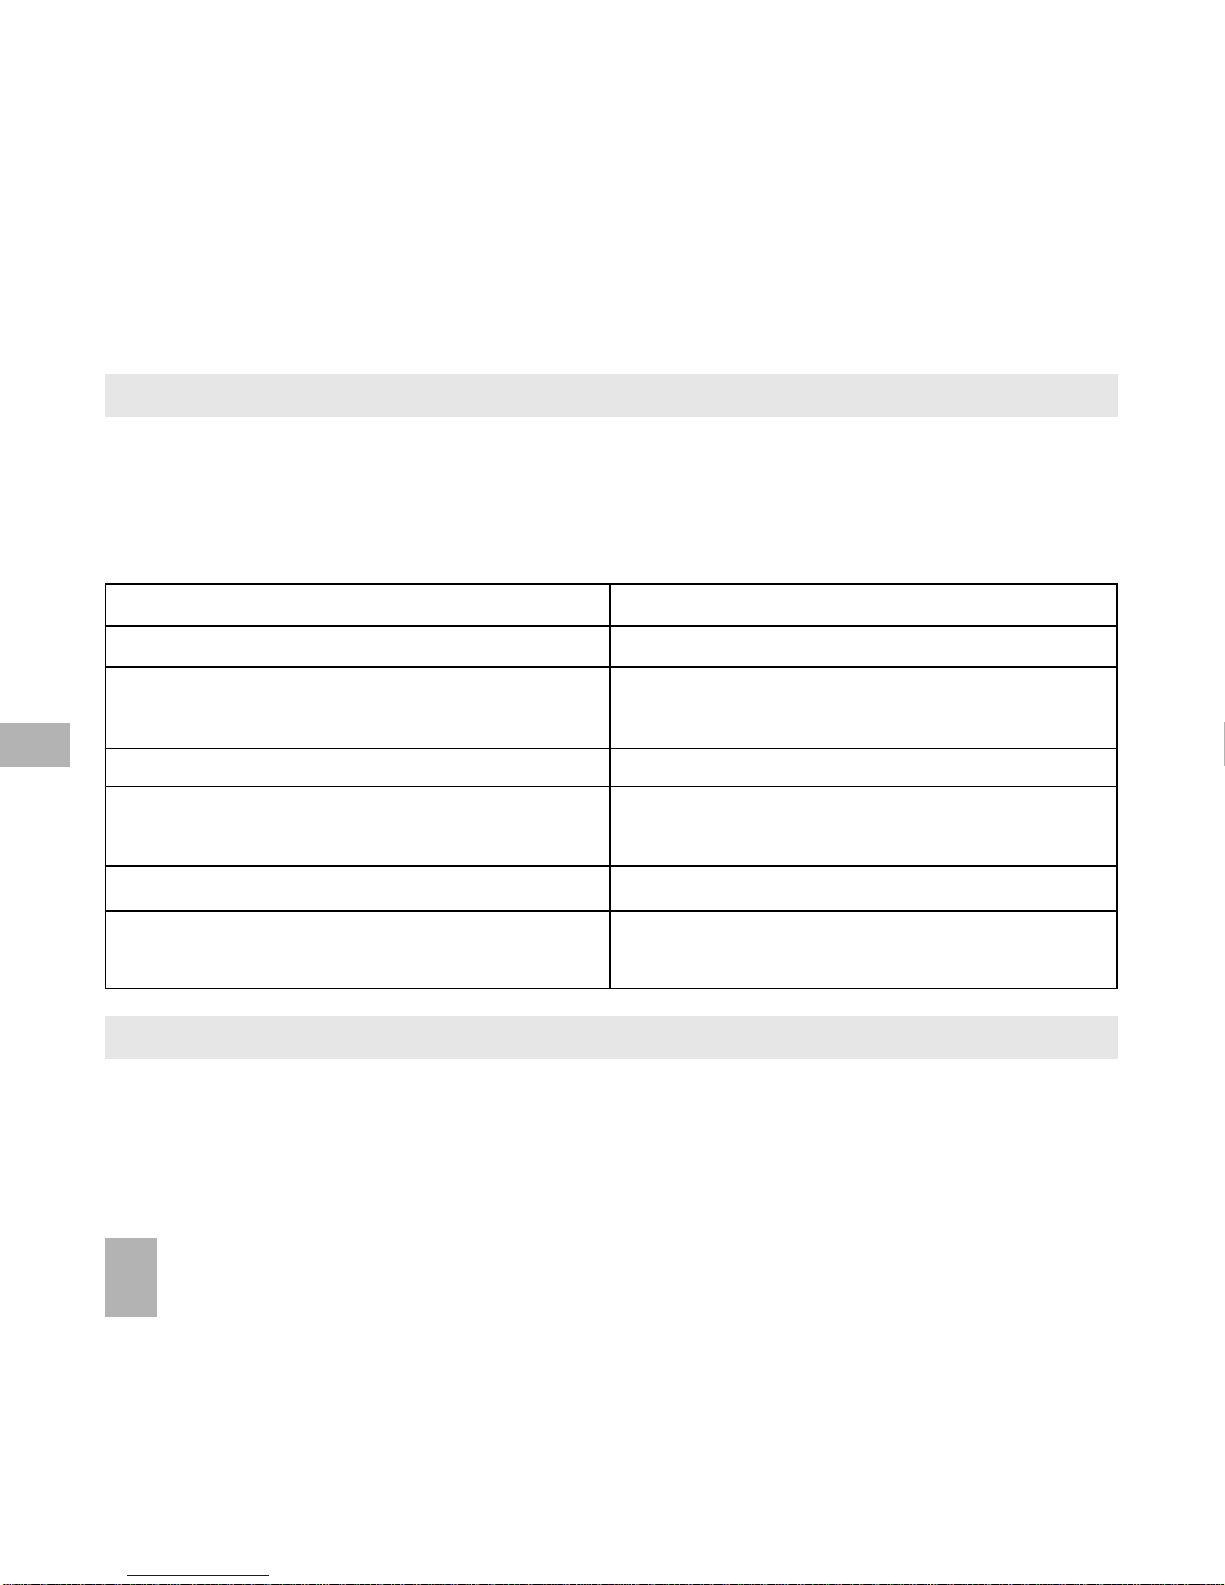
Bar all outgoing calls Calls cannot be made
Bar outgoing calls international International calls cannot be made
Outgoing International Calls Restricts international calls except to
except for calls to the home country your home country
Bar all incoming calls Calls cannot be received
Bar incoming calls when roaming Calls cannot be received when you
are overseas
Cancel all call barring Cancels all barring settings
Change password Set password to activate or erase
call barring
5.16 Send my number
Menu > Settings > tab right to Call > Send my number
Send or hide your number when making calls. Switch it on or off. The default
set by the network is On.
5.15 Call Barring
Menu > Settings > tab right to Call > Call barring
Call barring is a network feature. The barring password is provided by your
service provider. The service needs to be enabled on your account. To obtain
your PIN number contact your Service Provider.
5
Page 37

37
5.17 Missed Calls Alert
Menu > Settings > tab right to Handset > Missed calls alert
After missing a call, the missed call icon will be displayed on the
information bar.
When the Missed calls alert is set the reminder tones will sound at your
specified interval for 5 times or until the on screen message is acknowledged.
After a missed call press the green call key to display All Calls.
Press the green call key again to dial the last number.
5.18 Call Options when Connected to a Bluetooth device
If the handset is connected to a Bluetooth accessory such as a car kit or a
wireless headset then an incoming call is forwarded to the Bluetooth device.
Press the Call key on the Bluetooth device to answer the call. When idle press
the call key on the Bluetooth device to initiate Last Number Redial on the handset.
The handset does not support Contacts over Bluetooth. See Section 12.12 for
more details
An active call can be switched between the Bluetooth device and the
handset by pressing:
Options > Switch to Handset / Switch to Bluetooth.
5
Page 38

38
6 Messages and Emails
6.1 How do I send a Text Message (SMS)?
Left Arrow > New Message > Text Message or
Menu > Messages > New Message > Text Message
• Press the OK Key to select from Contacts (Cont.) or enter the number
manually.
• Scroll to the chosen contact and press OK twice (once to select and once to
confirm)
• Press the Down Arrow twice (once to add contacts, once to enter the
text area)
• The default text mode is Predictive Text indicated by the En symbol
• Enter text by pressing the corresponding keys once for each required letter
eg. 43556 for ‘hello’. The system updates the display to show the most
probable entry. See Section 6.3 for more details.
• Select the desired word from the available list and press OK to confirm or
choose Spell Word? to add a new word to the My Words dictionary.
• Press Options for the My Words dictionary
• Press the # key to toggle between En, 123, ABC and abc text modes.
• When completed press the OK Key to Send the message.
• You can send an SMS, MMS or Email to up to 10 recipients
6
Page 39
39
6.2 How do I view a received Text Message (SMS)?
• The envelope icon will appear on the information bar to indicate a received
message. The message alert tone and vibrate activate depending on the
current profile setting. Press OK to View the message.
• Navigate to the Inbox (Menu > Messages > Inbox > OK to Select) to view all
received messages. Scroll to the desired message and press OK to View.
6.3 How do I use Predictive Text?
Predictive text allows words to be entered more efficiently using a single keypress
for each letter, as opposed to multiple keypresses in multi-tap text mode.
Compare how to write the word ‘the’:
Traditional multi-tap text mode (ABC, abc) Predictive Text Mode (En)
Press 8 (tuv) once to select ‘t’ Press 8 once for ‘t’
Press 4 (ghi) twice to select ‘h’ Press 4 once for ‘h’
Press 3 (def) twice to select ‘e’ Press 3 once for ‘e’
• The default text mode is predictive text indicated by En in the top right of the
display
• Press the # key to toggle between different modes En, abc, ABC, 123
• It is not possible to disable predictive text mode or to change the initial mode
• Predictive text uses a dictionary to generate words from the sequence of
letters
• When a word is highlighted use the # key for capitals: dave > # > Dave > #
> DAVE
6
Page 40

40
• Select the desired word from the available list using the keys and press
OK to confirm or choose Spell Word? to save to My Words. Unknown words
default to Spell Word?
• If the next letter is on the same key, wait until the cursor appears or press the
Right arrow to move the cursor on
• To insert a space press the 0 key. To delete letters press the C key
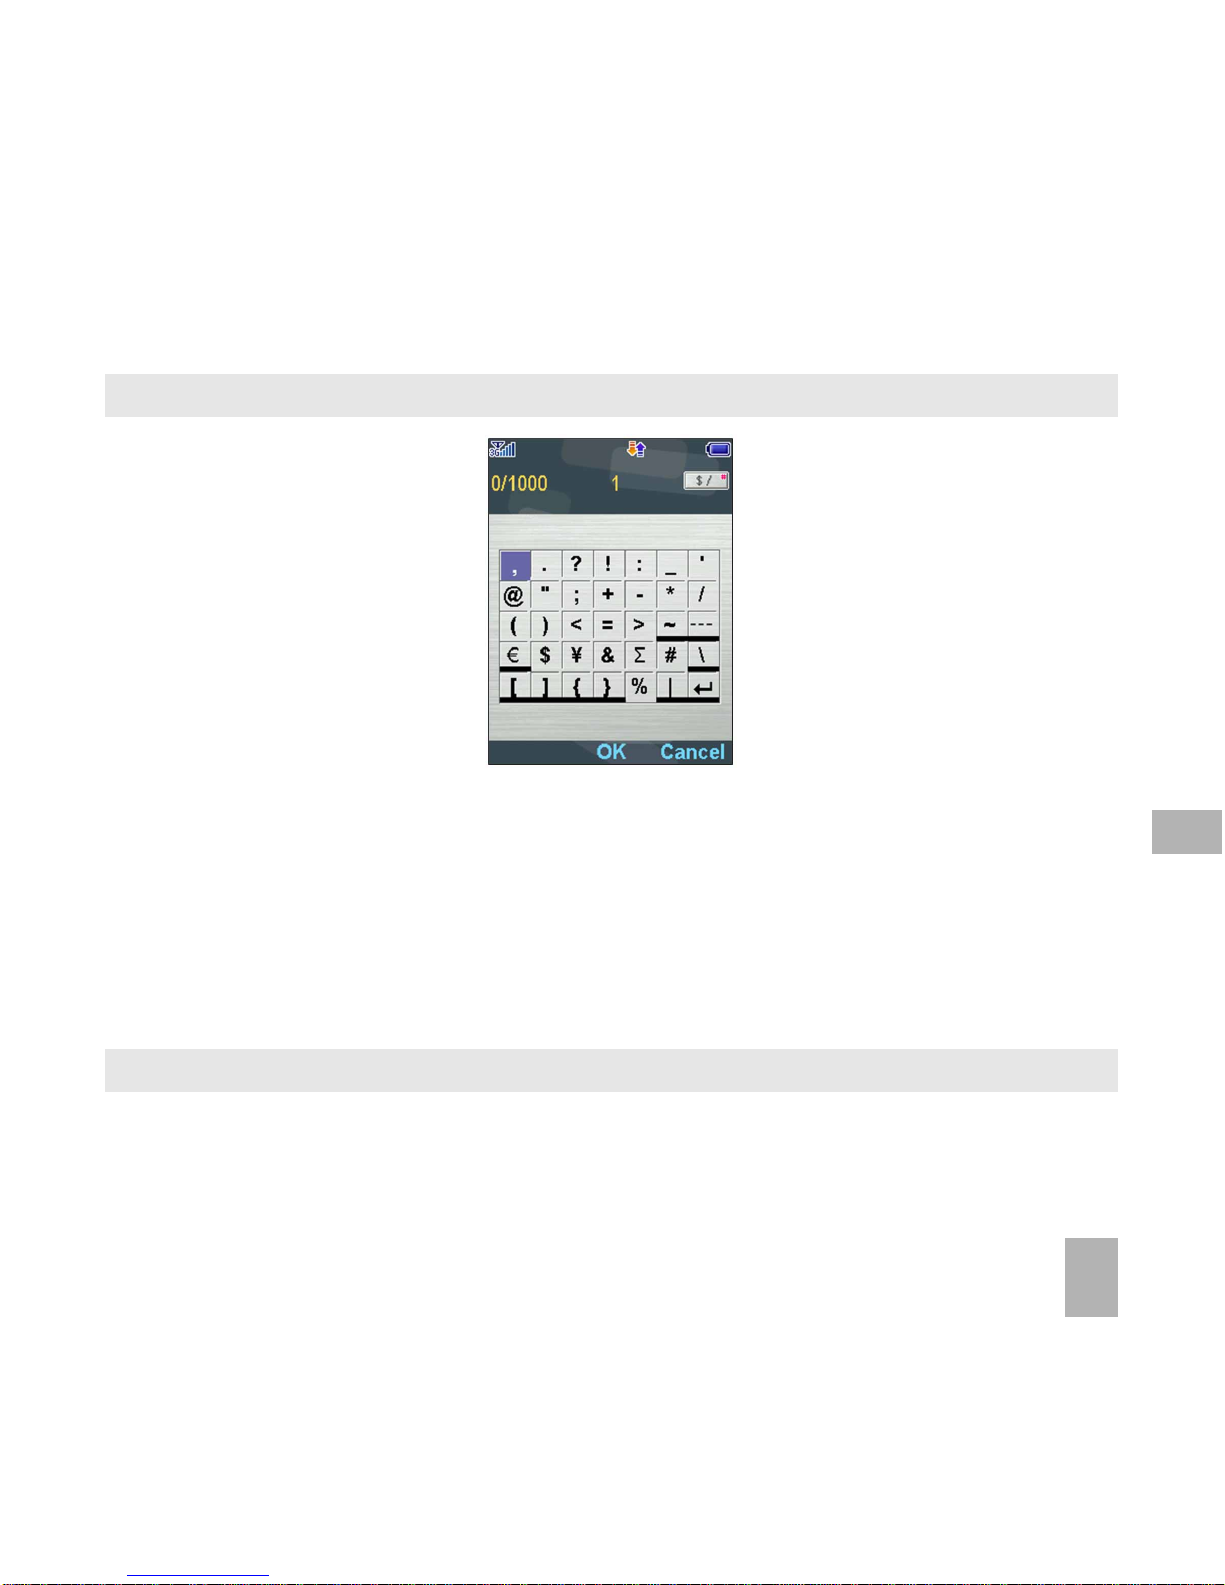
• Press the 1 key for common punctuation marks. Press the * key for special
characters.
• ABC, abc are multi-tap modes. Press the key once for the first letter, twice for
the second letter etc
• In text input screens (eg SMS, MMS and E-Mail) you can add your own words to
the built-in Dictionary which is called My Words.
• Press the Options key to access My Words to Add new words to the available
lists
6.4 How do I add words to the My Words Dictionary?
• From predictive text mode enter words directly by choosing Spell Word?
• From the text entry screen press the Options key and select My Words
• The first time you use My Words press OK to Add a new word
• Type the new word using the ABC or abc modes then press OK to Save it
• In My Words you can press the Options key to Edit, Delete or Delete all
words.
6
Page 41
41
6.5 Special Characters and SMS Message Length
The underlined characters in the above chart are Unicode Characters. This
means that they are not part of the standard SMS character set and they
require 2 SMS characters to transmit them. Normal SMS message length is
160 characters. If exceeded, the message will be sent by two SMS’. When the
underlined characters are used the message length is limited to 70
characters. When 70 characters are exceeded the message is sent by two
SMS’.
6.6 How do I send a Multimedia Message (MMS)?
Use a Multimedia Message to send pictures, music or video files to your
friends. It is also possible to send an mms directly to an email address.
6
Page 42

42
Menu > Messages > New Message > Multimedia Message
• Enter the phone number, email address or press OK for Contacts
• Press the down arrow and enter text in the title field
• Press the down arrow to enter the text area
• Press OK to Insert an Image, Audio or Video file
• Browse the folders to select the required file. Press OK
• When finished press the Right Soft Key to Send
Each ‘page’ can only contain one image, one audio, and one video file.
To add more than one file of the same type, select Options to add a new
page.
6.7 How do I receive a Multimedia Message (MMS)?
Menu > Messages > Inbox
• When receiving an MMS you get a standard message alert. Press OK to
View.
• Press Retrieve to download the message attachment.
• When the attachment has downloaded press the Options to Save
6.8 MMS and SMS Advanced Settings
Menu > Messages > Settings > Text Msg. Settings
The message centre number is stored on your USIM card supplied by your
service provider. The MMS and SMS advanced settings are preset by your
Service Provider.
6
Page 43

43
6.9 WAP Push Messages
Menu > Messages > Settings > Mul. Msg Settings > Push Messages
WAP push message is a formatted SMS that displays a message to the user,
giving the option of connecting directly to a particular URL via the mobile
phone’s WAP browser.
• WAP Push Messages are indicated by the icon on the main display.
• Use the Browser to view Push Messages. Set Reject to disable Push
Messages
6.10 How do I send an Email?
Before sending or receiving Emails you need to configure your personal
details.
Menu > Messages > tab right to Email > Settings > Mailbox Settings >
Options > Edit
• The default Email client is configured for your service provider
• Add your username, password and email address
• The username should be the full address: [email protected]
• It is possible to Add other providers under Mailbox Settings
• Configure the POP Server details, SSL settings, IP Address etc. by reference
to the other provider.
• You can send an SMS, MMS or Email to up to 10 recipients
6
Page 44

44
Sending an Email
Menu > Messages > tab right to Email > New E-mail
• Enter the sender’s address e.g. [email protected]
• Press the down arrow to access the Copy Field
• Press the down arrow to access the Subject Field
• Press the down arrow to enter the Text Field
• Press OK to Insert attachments if required
• Browse to the appropriate folder to add the attachment
• When you are finished press the Right Soft Key to Send.
6.11 How do I receive an Email?
Configure the Email Client with your settings to enable receiving Emails.
Menu > Messages > tab right to Email > Settings > Mailbox Settings > Options
> Edit
• The default Email client is configured for your service provider
• Add your username, password and email address
• The username should be the full address: [email protected]
• It is possible to Add other providers under Mailbox Settings
• Configure the POP Server details, SSL settings, IP Address etc. by reference
to the other provider.
• Menu > Messages > tab right to Email > Inbox > Options > Retrieve
• New Email messages will be delivered to the handset
• You can send an SMS, MMS or Email to up to 10 recipients
6
Page 45

45
6.12 How do I set up automatic Email Retrieval?
Menu > Messages > tab right to Email > Settings > Automatic Retrieval
Set your required polling time interval to check the server for new Email
messages.
6.13 Pushmail Settings
Menu > Messages > tab right to E-mail > Settings > Pushmail Settings >
Receive Pushmail
Pushmail provides an automatic email retrieval service that is Always On. New
emails arriving on your server are ‘pushed’ to your handset. This feature
depends on network support and it is not provided automatically by a POP3
server.
6
Page 46
46
7 How to Personalise the Phone
There are many ways to customise the handset such as changing the profiles,
wallpaper, ringtones, setting up shortcuts etc.
7.1 Change the Profiles
Menu > Settings > tab right to Profiles > Edit the required Profile
Profiles are used to control the preferred ringing mode, keys tones etc.
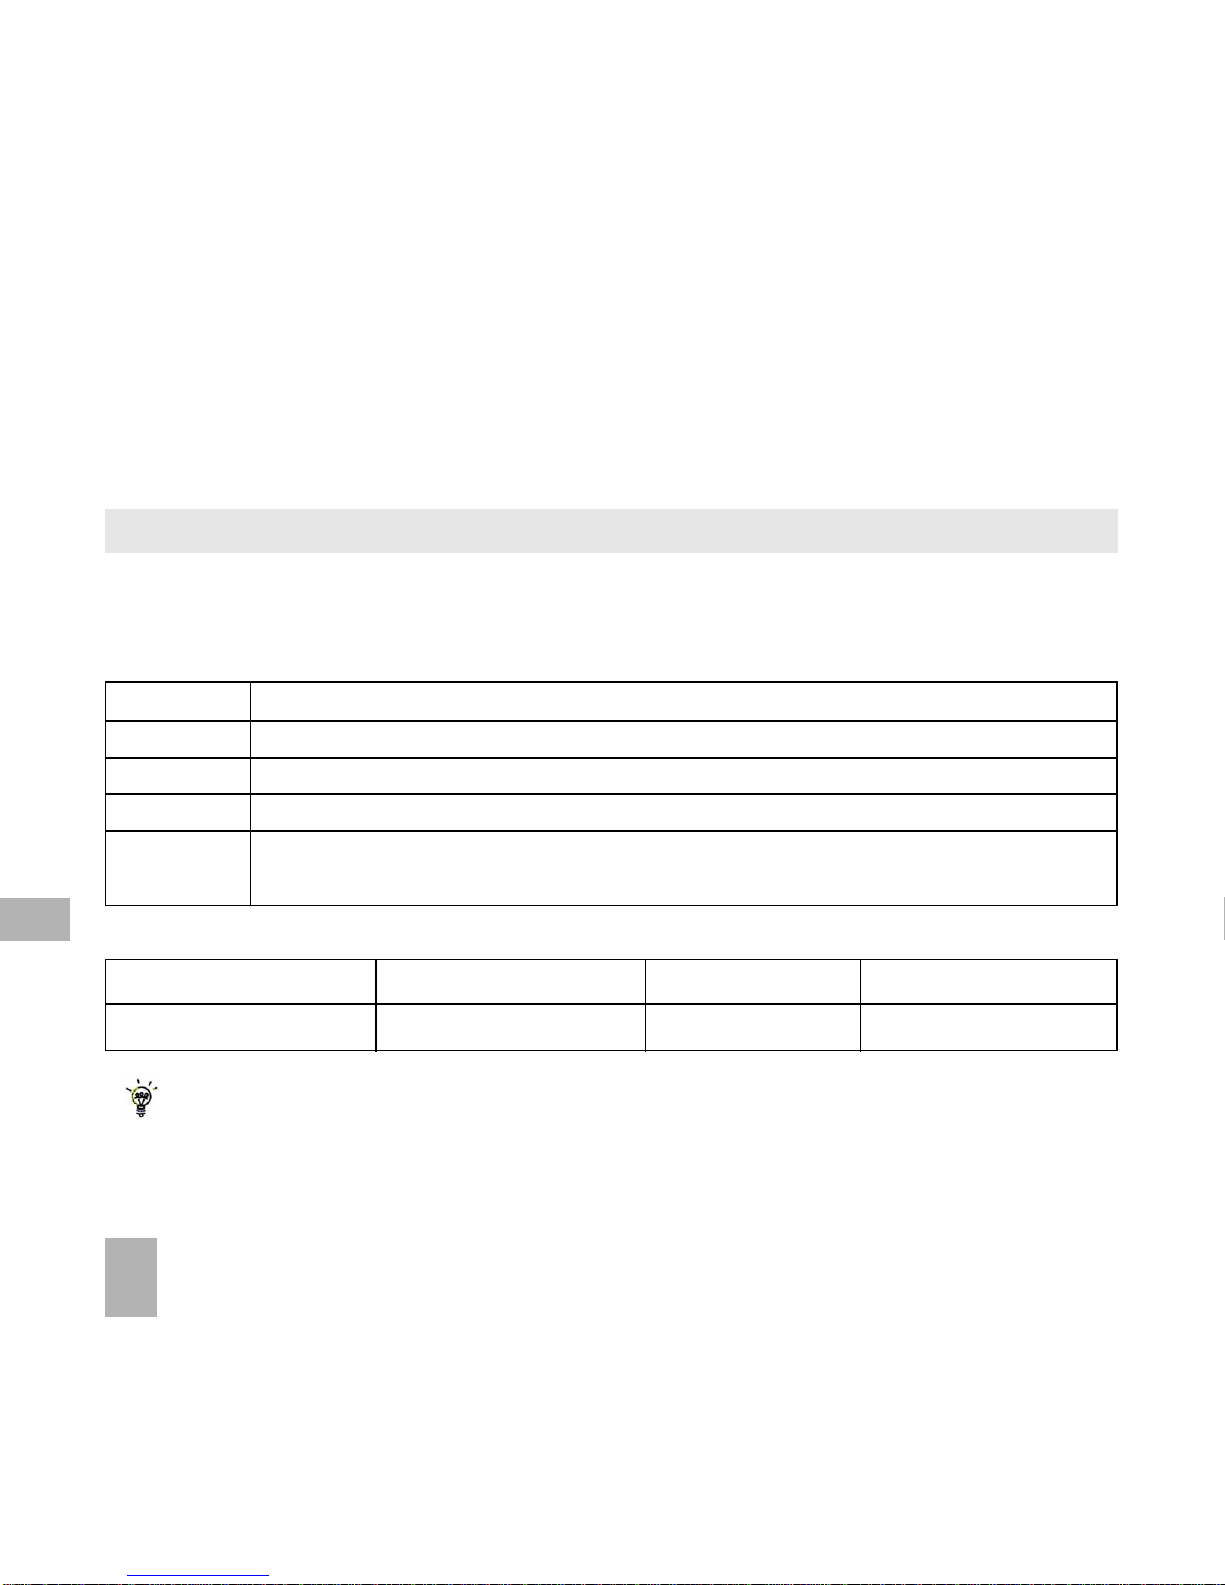
The pre-defined profiles are:
General Keytones ON, Ringing ON, Vibrate OFF
Meeting Keytones OFF, Ringing OFF, Vibrate ON
Outdoor Keytones ON, Ringing ON, Vibrate ON
Silent Keytones OFF, Ringing OFF, Vibrate OFF
Car Kit Keytones OFF, Ringing ON, Vibrate OFF, Auto answer,
Backlighting Always on
The following profile settings can be customised using Edit
Voicecall ringtone Ring volume Message tone Warning Tone
Videocall ringtone Ring type (vibrate) Keytones Earpiece volume
*From the idle screen long press the # key to engage Meeting Mode
The Car Kit profile is only available when installed in a car kit.
7
Page 47
47
File Manager
Calendar Messages
Contacts
7.2 Change the Shortcut Keys (Arrow keys)
The four arrow keys ( ) can be customised to launch preferred
features quickly from the idle screen.
Menu > Settings > tab right to Handset > Shortcut Keys > OK
• Set each key in turn to your preferred setting
• Scroll to the chosen feature and press OK to assign the shortcut key.
Example Alternative Shortcut Setting:
7.3 Change the Background Screen (Wallpaper)
Menu > Settings > Wallpaper
• Browse to the required folder eg Photos > My Pictures
• Choose the required picture and press Set to confirm
See Connectivity to import pictures
See Imaging to take photos on the camera
7
Page 48

48
7.4 Change the default Ringtones
Menu > Settings > tab right to Profiles > Edit
• Edit the current profile to change the default Ringtones for all incoming calls
• Press OK to Modify the Voicecall ringtone (scroll down to select Videocall
ringtone)
• Browse to Audios, Ring to see the available built in tones.
• See Connectivity to import your own music files.
7.5 Enable Vibrate Mode
Menu > Settings > tab right to Profiles > Edit
• Edit the current profile to enable the Vibrate function
• Scroll down to Ringing Type and press OK to Modify
• Select the required mode and press OK to confirm.
• The vibrate icon will be displayed on the Information Bar
7.6 Engage the Meeting Profile with a single key press
• Mute the handset and switch it to vibrate mode by long pressing the # key
from the Idle Screen:
• Press and hold the # key to engage and disengage Meeting Mode
• The vibrate icon and mute symbol will be displayed on the
Information Bar
7
Page 49

49
7.7 Switch the Keytones off
Menu > Settings > tab right to Profiles > Edit
• Scroll down to Keytones and switch them off.
7.8 Set Spoken Key Sounds
Menu > Settings > tab right to Profiles > Edit
• Scroll down to Keypad sound and select your preferred language
7.9 Change the Display Backlighting
Menu > Settings > Display backlighting
• Screen full-light is the main screen lighting. After the set time the screen
goes to half light
• Screen half-light, the screen is partially lit for the specified time
7.10 Change the Screen Brightness
Menu > Settings > Set Brightness
• Use the Up and Down keys to set the desired brightness level
7.11 Add a Greeting and Owner name
Menu > Settings > Owner name
Menu > Settings > Greeting
• The Owner name is permanently displayed on the idle screen
• The Greeting is displayed during the start up sequence
7
Page 50
50
7.12 Set the Keypad backlighting
Menu > Settings > Keypad backlighting
Duration 30 secs The keys remain illuminated for 30 seconds after the last
key press
Always On The keypad backlighting is enabled for the Duration
Customise The keypad is only illuminated between the times set
Keypad backlighting is unnecessary during the day so a customised
setting will improve battery life
7.13 What is the PIN Code?
Menu > Settings > tab right to Security > Activate Security Codes > Pin Code
• The PIN code is stored on the USIM card and protects your account against
unwanted use
• Select On or Off and enter the PIN number to confirm. The original PIN
number is provided by your service provider but can be changed if required
• To change the PIN Code select Change Security Codes
• If you forget the PIN code it can be supplied by your service provider.
7
Page 51

51
7.14 What is the Handset Code?
Menu > Settings > tab right to Security > Activate Security Codes > Handset
Code
• The Handset Code is stored on the handset and protects against unwanted
use. If the handset is lost or stolen it cannot be switched on without the
handset lock code. This provides a greater level of protection than the PIN
code which protects the USIM card only. The default code is 0000
• Select On or Off and enter the Handset code, 0000.
• To change the Handset Code select Change Security Codes and enter a new
code of your choice
• It is important to remember this code as it cannot be reset once it is lost or
forgotten
7.15 Additional notes on PIN Codes
• The PIN and PUK Codes are provided by your Service Provider
• If you enter the PIN number incorrectly three times the phone will be PUK
locked
• Contact your service provider to get the PIN Unlocking Key (PUK code)
• PIN2 Code is an additional PIN on the USIM card and is not generally supported.
7
Page 52
52
8 File Manager and External Memory
All user files and downloaded content are stored in the File Manager.
8.1 File Manager
Menu > File Manager
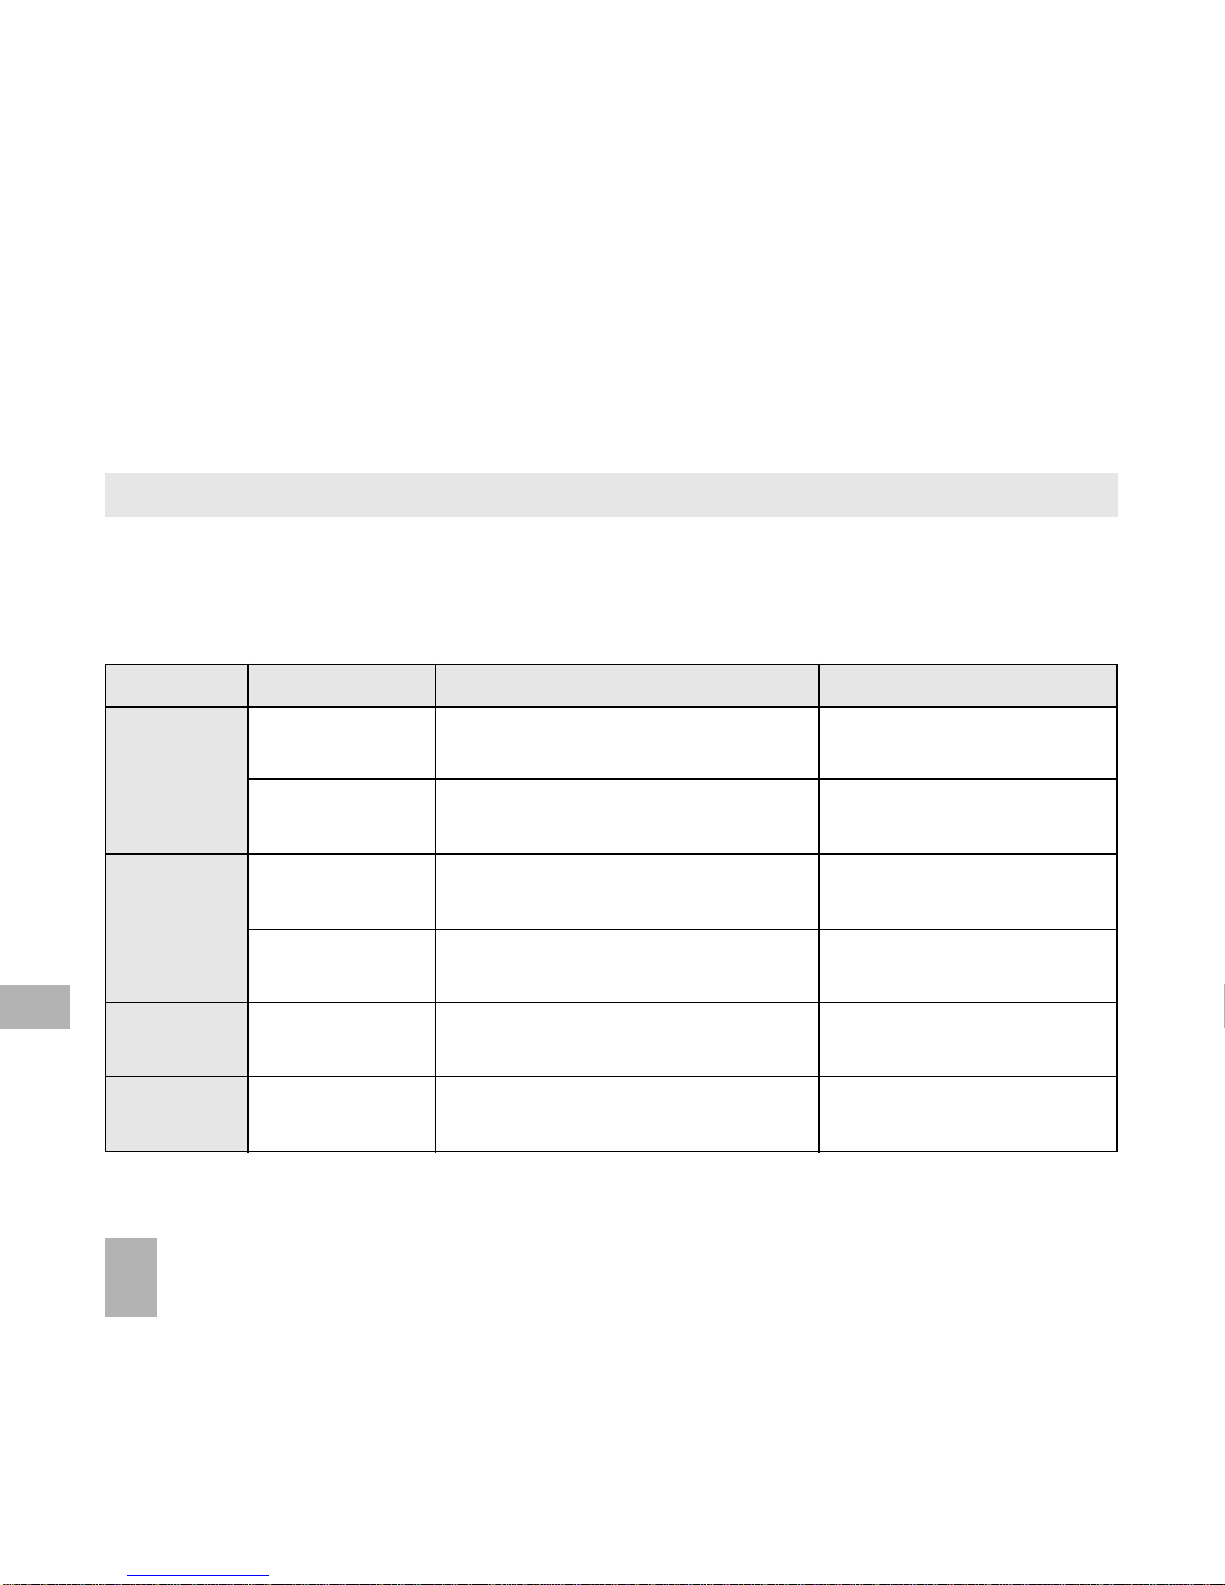
The file manager is separated into four folders, Photos, Audios, Videos and
Others as shown:
Folder Contents Description Supported Formats
Photos
Audios
Videos
Others
BMP, JPG, GIF
BMP, JPG, GIF
MP3, WAV, MID,
WMA, AMR, MMF
MP3, WAV, MID,
WMA, AMR, MMF
MP4, 3GP
Java MIDP 2.0
Wallpapers
My Pictures
Ring
My Audios
My Videos
Background screens for the
handset
Default directory for handset pictures
Pre-loaded handset Ring
Tones
Storage for your own Audio files (MP3 etc)
Default directory for handset videos
Downloaded Internet files,
JAVA apps etc.
8
Page 53
53
8.2 Installing Additional Memory - Micro SD card
Handset memory can be increased by inserting a Micro SD (HC) card up to 4GB.
Micro SD cards up to 2GB are supported (FAT 16 format)
Micro SD HC (high capacity) cards up to 4GB are supported (FAT 32 format).
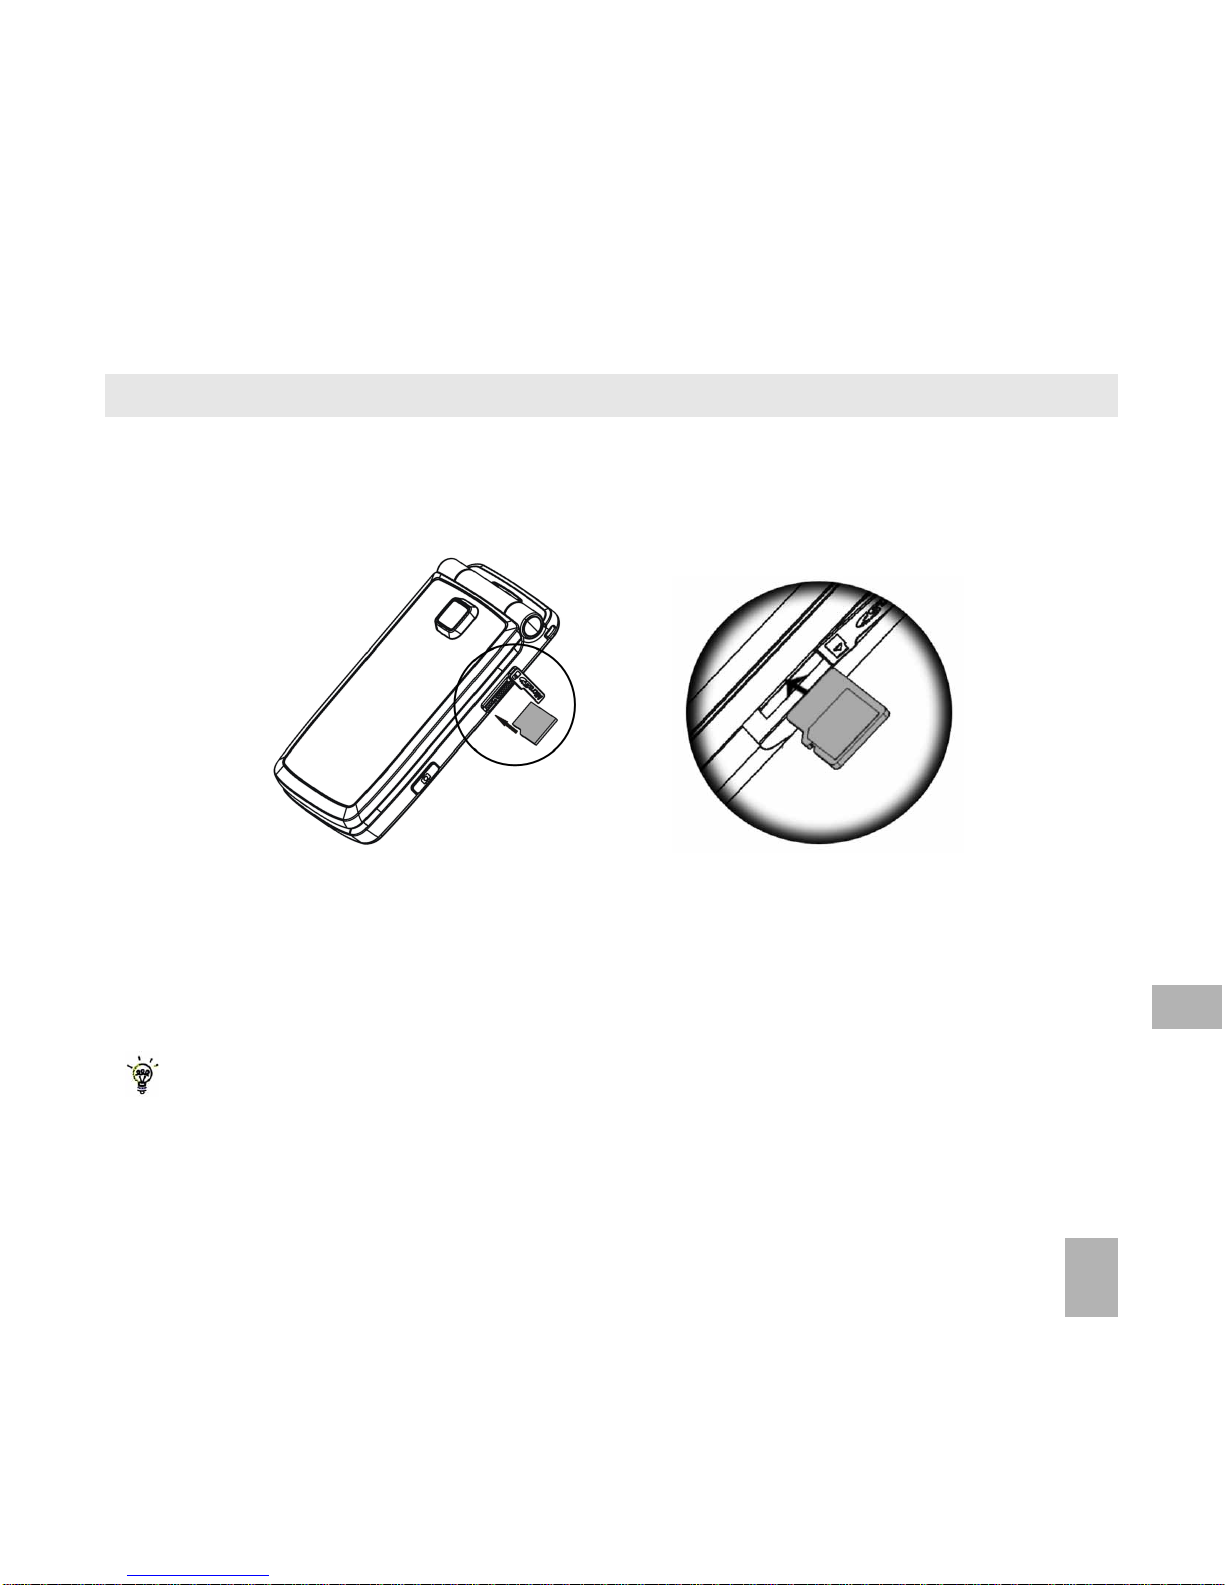
• Open the MicroSD port cover on the right hand side of the phone
• Carefully insert the Micro SD card as shown above
• Close the side port cover
• The external memory is accessed via the File Manager application as described
below.
With the Micro SD card inserted the default storage location (for photos
etc) is the External Memory. You can set this under Menu > Settings > tab
right to Handset > Download Location
Always handle memory cards with care and avoid static discharge
8
Page 54
54
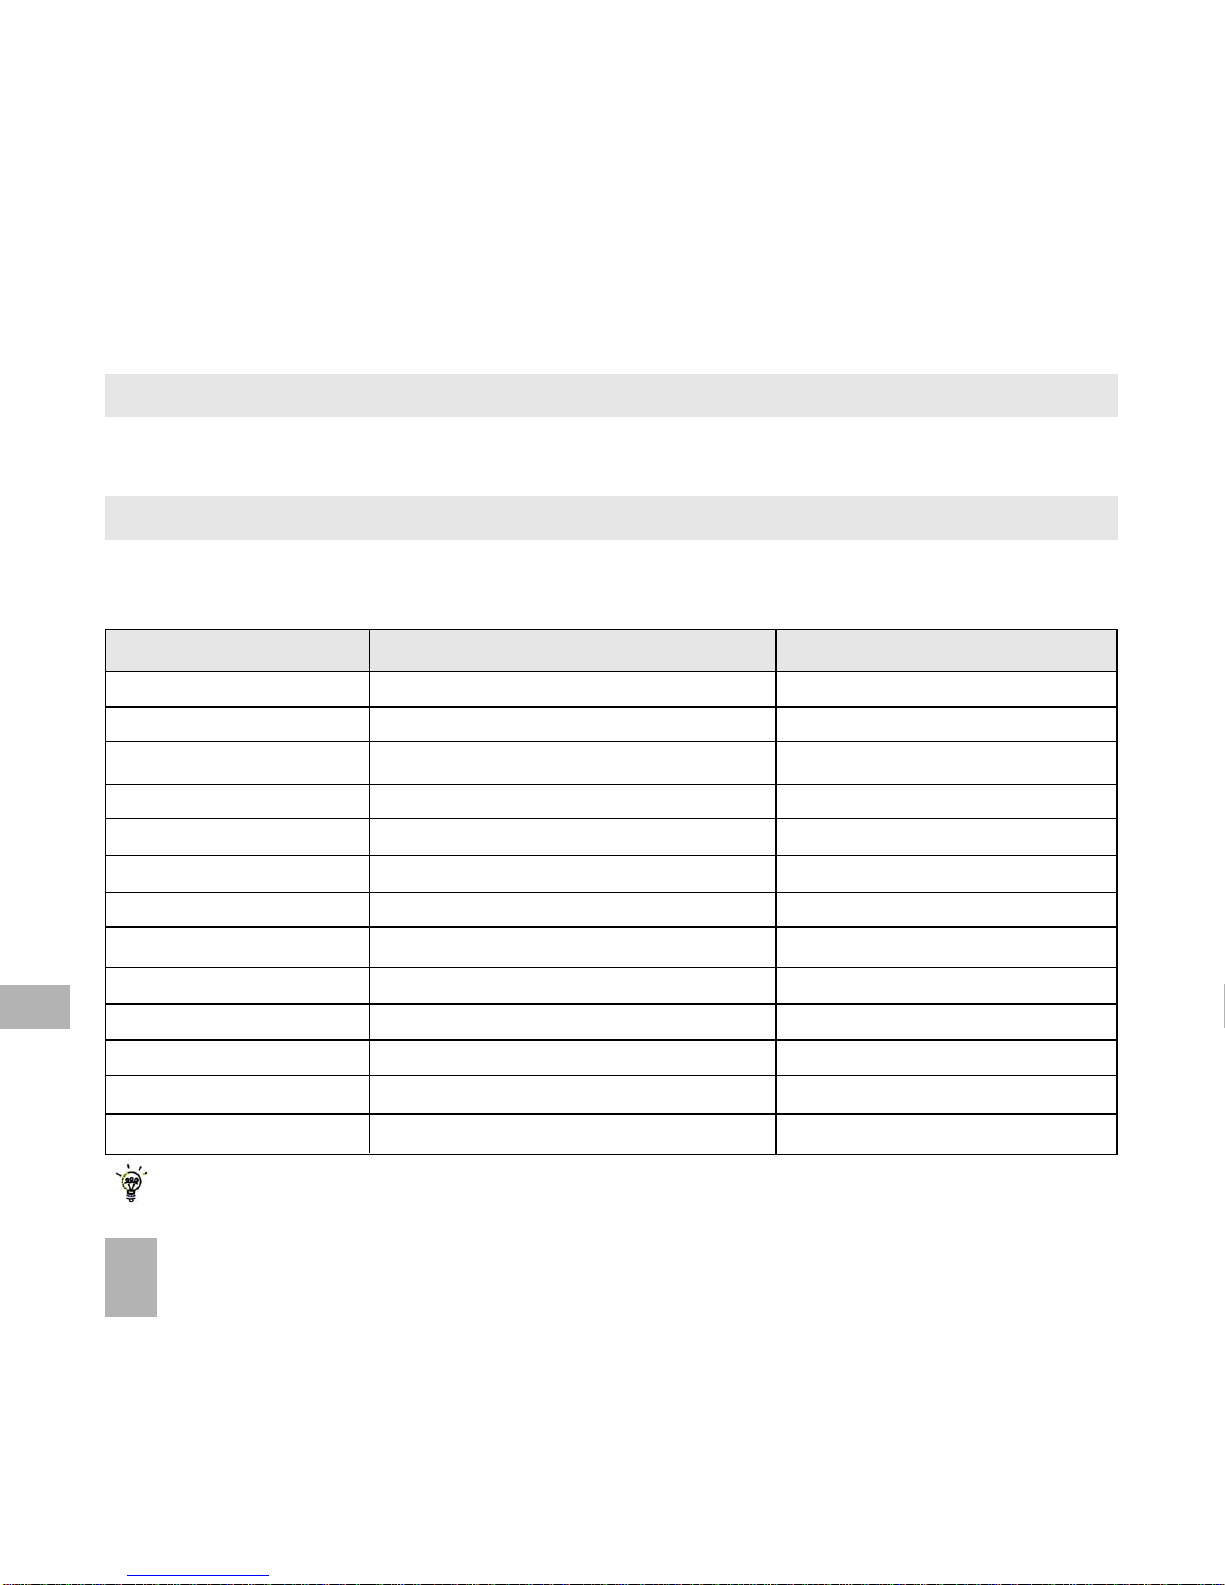
Press the Options to Mark files to perform the function to multiple files.
Folder Options File Options Mark Options
Search Mark Mark all files
New folder Send Unmark all
Delete Set as ringtone / wallpaper Add to playlist / slide
Delete all Add to playlist / slide Move to
Rename Move to Copy to
Folder information Copy to Delete
Space information Rename Delete all
Delete Play marked files
Delete all Space information
Mark all files New folder
File information
Space information
New folder
8.3 Access the T-Flash card (Micro SD) using File Manager
Menu > File Manager > tab right to T-Flash Card
• All the folders and files that are stored on the card are displayed
8.4 File Manager and T-Flash Options Table
Depending on your location within File Manager, there are different Options
(Left soft key) available as shown in the table below:
8
Page 55

55
9 Alarms and Appointments
9.1 Set Alarms
Menu > Tools > Alarm > Add
Configure the alarm as required using the Alarm Setup Screen:
• Daily Alarm goes off every day
• Workday Alarm goes off Mon – Fri only (Rest days can be set under Options)
• Weekly Alarm will go off at the same time each week
• Once Alarm will only go off once
• Snooze can be set to be Off, 5, 10, 15 or 30 minute intervals
• Snooze will repeat for six times or until you Stop the alarm by pressing OK
• The Alarm Tone is preset by the Ringfile Press Edit to change if required
• If the Alarm time has passed it cannot be saved
• If the phone is off the Alarm will automatically switch on the handset.
Alarm Summary Table
Alarm type Daily, Workday, Weekly, Once
Alarm date Available with Weekly and Once
Alarm time Set as required
Snooze Off, 5, 10, 15, 30 minutes
Ringtone On / Off
Ringfile Alarm.mid, press Edit to change
Status Enable / Disable
Alarm remark Optional
9
Page 56

56
9.2 Set Appointments using the Calendar
Menu > Tools > Calendar > Add
• Add a Meeting, Memo or Reminder. The memo function does not include an
alarm
• Use the Meeting function to set repeat events such as Weekly Meetings and
Anniversaries
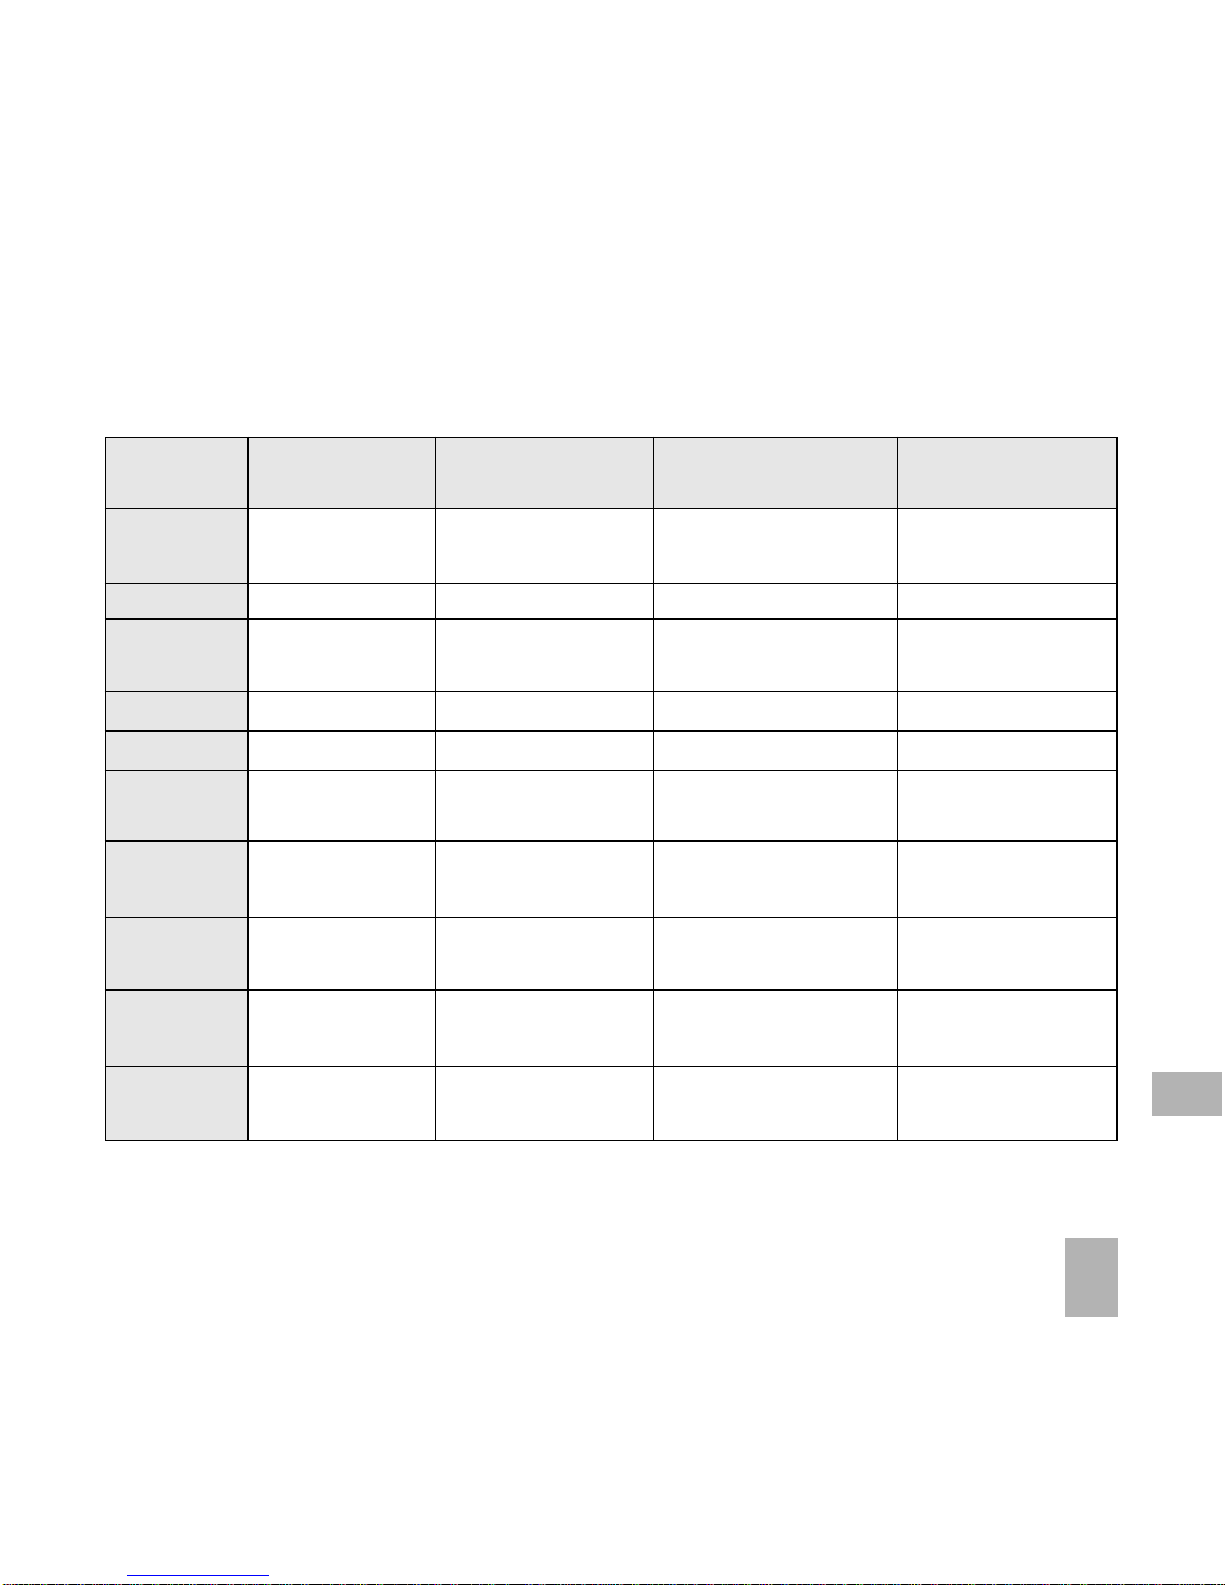
• Follow the prompts on screen to configure the event, see the examples in the
table below
• Events are shown by a highlighted box on the event day
• Use Options to see the Week view and to change default behaviour under
Settings
• If the Alarm time has passed or is after the event time you cannot save the
appointment
• If the phone is switched off the Alarm will automatically switch on the handset.
• Remember to scroll to the bottom of the handset display to see all the available
options.
9
Page 57
57
Examples of different uses for the Calendar > Meeting function
Subject
Location
Start
time
End time
Start date
Alarm
set
Alarm
time
Alarm
date
Repeat
set
Repeat
until
Repeat
Meeting
Weekly Team
Office
10.00am
11.00am
29/9/2008
On
09.45am
29/9/2008
Weekly
29/9/2012
Daily
Reminder
Check mail
10.00am
10.00am
28/9/08
On
09.45am
28/9/08
Daily
28/10/08
Meeting with
alarm
Appointment
Dentist
11.00am
01.00pm
30/10/2008
On
10.00am
30/10/2008
Not repeated
N/A
Anniversary
John’s
Birthday
08.00am
08.00am
29/03/2009
On
08.00am
29/3/09
Yearly
29/03/2030
9
Page 58

58
10 Imaging - Pictures and Videos
10.1 How to use the Camera
Menu > Multimedia > Camera
Shortcuts: Press and hold the side camera key to activate the camera.
The camera key activates the shutter and if pressed again will Save the
image.
From Still mode press ? to change to Video mode as
shown by the icon in the top right hand corner.
• Use the Up and Down arrows to control the zoom*
• Press the Options button to:
Change the Photo Size
Change the Photo Quality
Change the Brightness
Change the Contrast
Apply an Effect (Normal, B&W or Sepia)
Change the Shutter sound
Save to – Handset memory or External Memory (SD card if fitted)
Use the front / back camera
Switch to Video Camera
* Zoom is not available on 1200 x 1600 as the screen is at maximum resolution.
Menu > Multimedia > Camera > Options > Photo Size to increase the size
10
Page 59
59
10.2 How to use the Video Camera
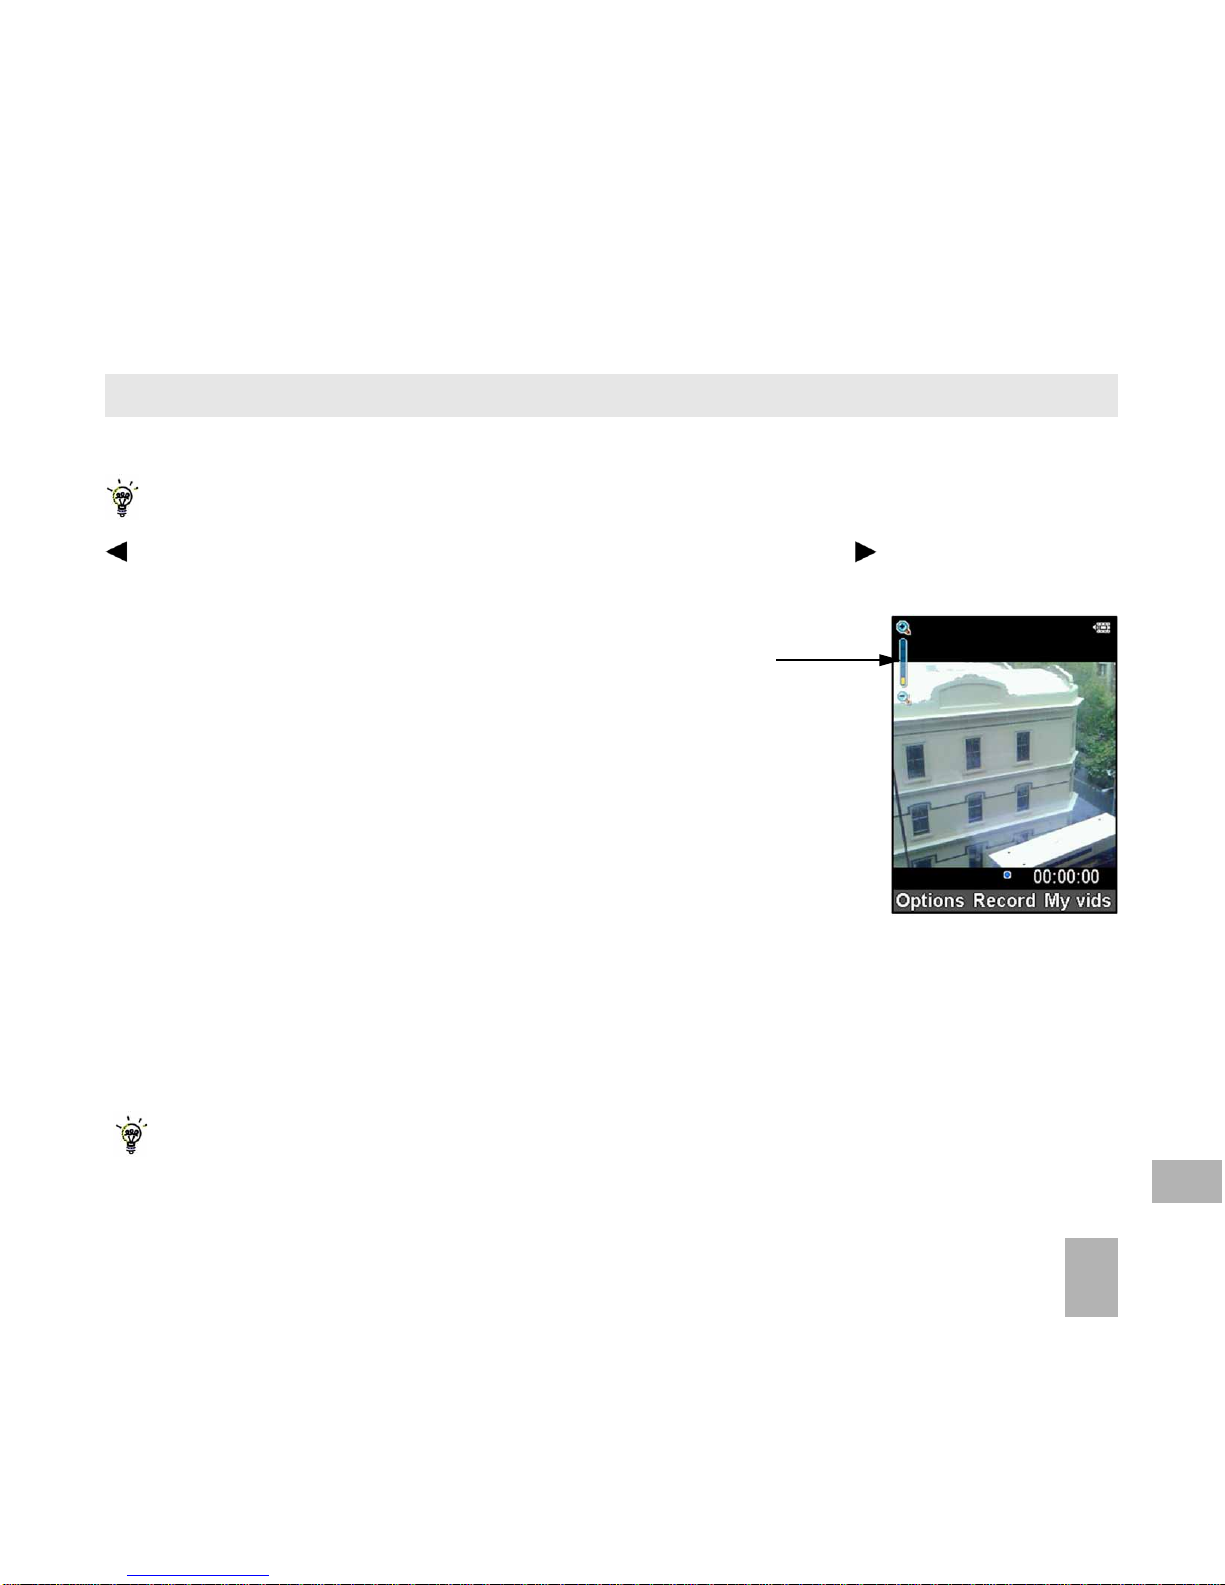
Menu > Multimedia > Video Camera
Shortcut: Press and hold the side camera key to activate the camera, press
to switch to video mode. From Video mode press the to change to Still
mode as shown by the icon in the top right hand corner.
• Use the Up and Down arrows to control the zoom
• Press the Options button to change the following:
Video size default is 15 seconds. Change if required.
Video Quality
Brightness
Contrast
Effect (Normal, B&W or Sepia)
Video sound
Video format, MP4 or 3GP
Save to – Handset memory or External memory (SD card if fitted)
Use the front / back camera
Switch to Camera
Press My Vids to view your saved video files
When viewing a video press Full Screen to view in Landscape.
10
Page 60
60
10.3 Viewing pictures and videos
1. View the file directly from file manager
Menu > File Manager > Photos > My Pictures or
Menu > File Manager > Videos > My Videos
Scroll down the list to your chosen picture, Press Open to view the image.
2. Create a slide show to view pictures in sequence
Menu > Multimedia > Slide Show > Add > Photos > My Pictures
Select your required photos using Options > Mark and then Save
Press Start to automatically view the pictures sequentially.
3. View My Pics or My Vids from Camera mode
Menu > Multimedia > Camera > My Pics
Menu > Multimedia > Video Camera > My Vids
Press the Right Soft Key to select My Pics or My Vids to view your photos.
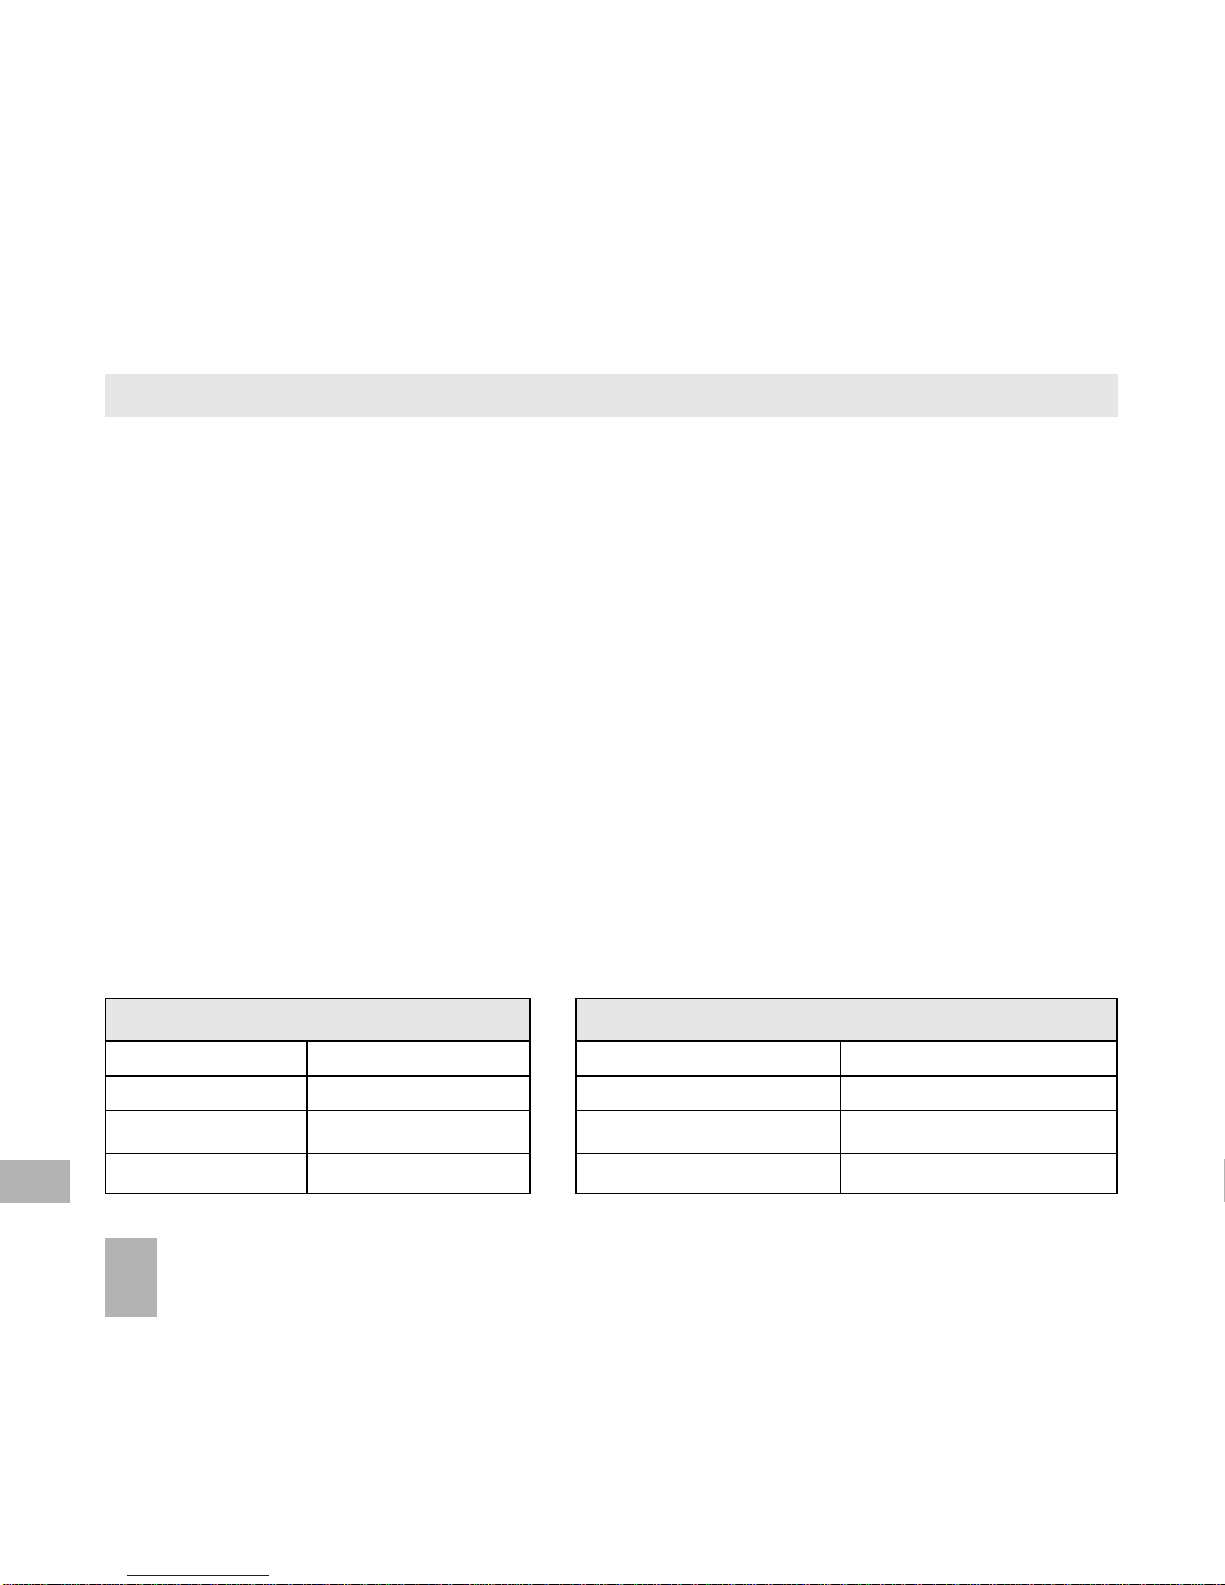
Additional features when viewing Pictures and Videos
Still Pictures Videos
Full Screen Right Soft Key Full Screen Right Soft Key
Zoom in / out Up / Down Volume up / down Up and Down Arrows
Rotate image 1,3 keys Brightness 2,8
Move image 2,4,6,8
10
Page 61

61
11 Music
To import music files onto the handset see the following sections:
• Import music files from your computer using JoinME (See Connectivity)
• Import music files from your computer or other device using Bluetooth (See
Connectivity)
• Download music files from the internet (ask your service provider for
assistance if required)
11.1 FM Radio
Menu > Multimedia > FM Radio
• Insert the personal hands free kit (PHF). The headset acts as the antenna
for the FM radio.
• Tune the required station using the keys or Options > Auto Search or
Set Channel
• Auto Search scans automatically for channels.
• Use Set Channel to enter the frequency using the keypad and * key to
access the decimal point
• Remember to Save the new channel.
• Press Options > Rename to personalize the channel name eg ABC
• If an incoming call is received, the radio will be suspended while you answer
the call.
11
Page 62
62
11.2 Browse and play music files from File Manager
Menu > File manager > Audios > My Audios
• Press Open to play the desired music file.
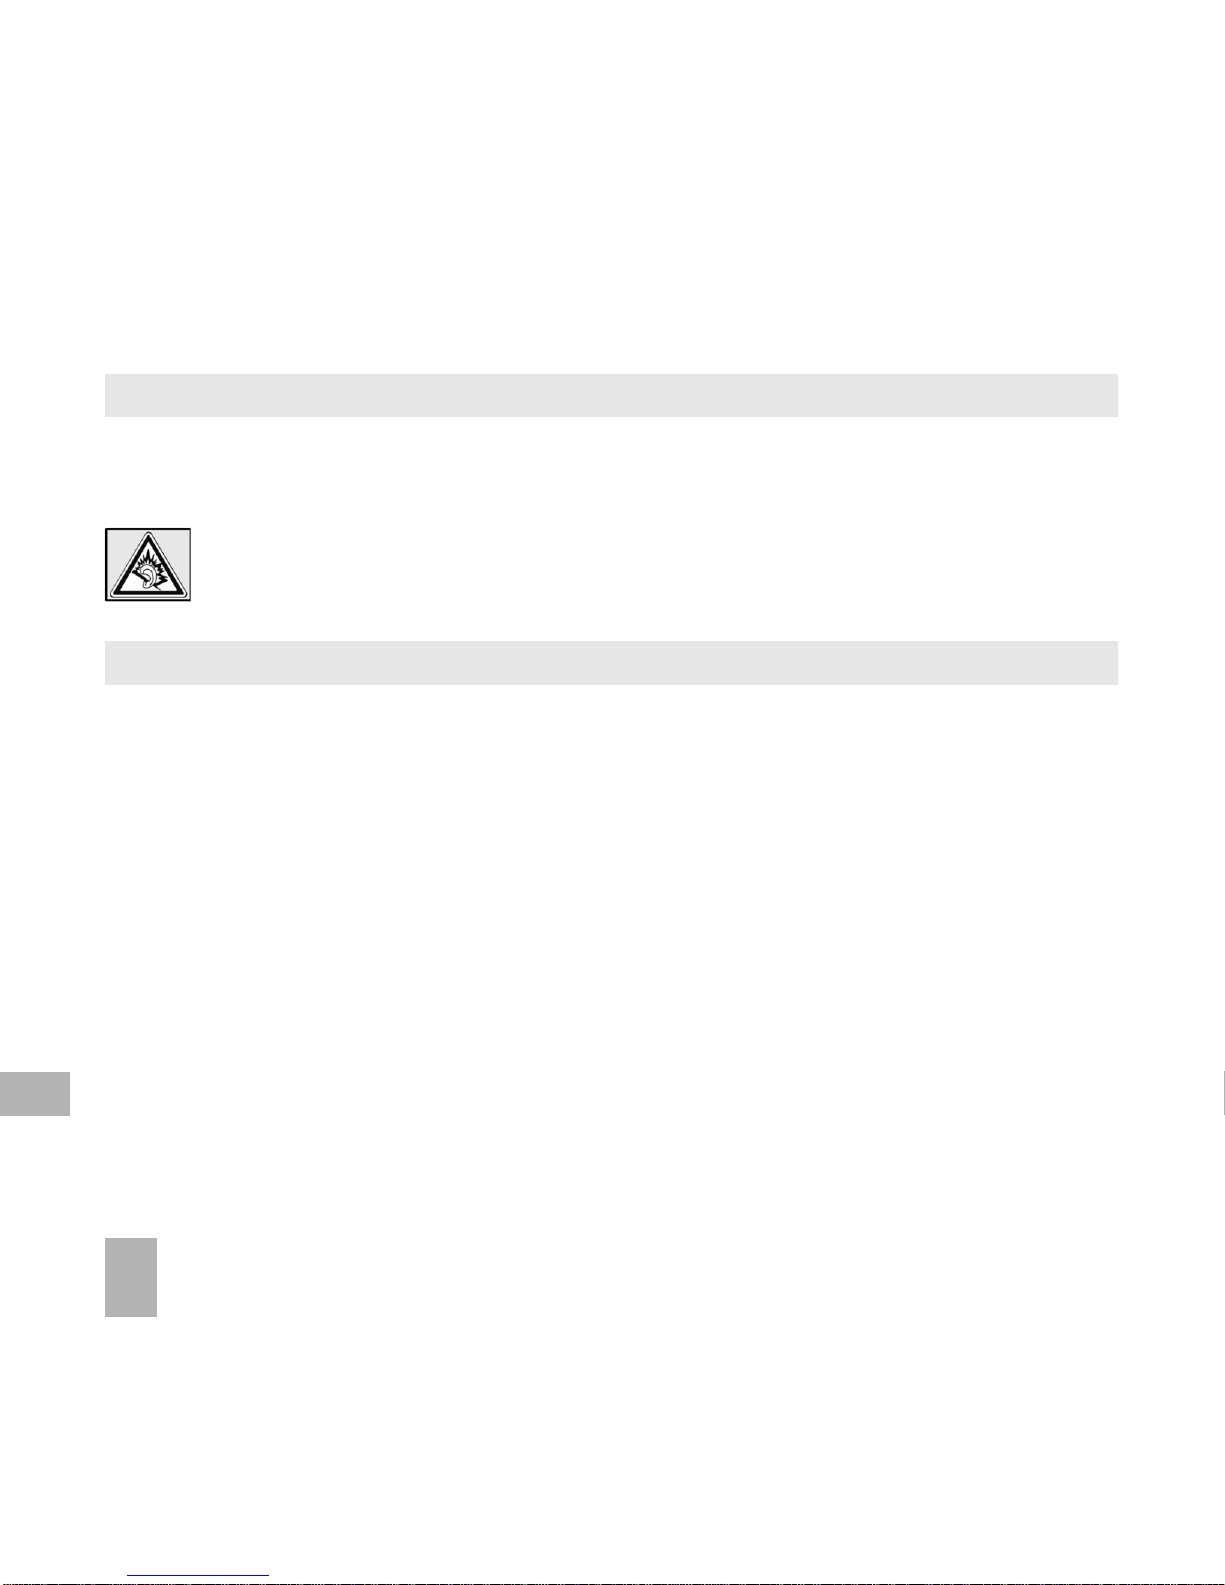
Warning – At high volumes, prolonged listening to audio devices can
damage hearing.
11.3 Create a new Playlist
Method 1: Create a Playlist from File Manager
Menu > File Manager > Audios > My Audios
• Scroll through the files and press Options > Mark (or Mark all files) to
select files then Press OK
• Press Options > Add to Playlist > OK (for existing Playlist) or Add / New (to
create a playlist)
• The selected song or songs will be added to an existing or new playlist
• Menu > Multimedia > Playlist > Scroll to select, OK to Play
11
Page 63

63
Method 2: Create a playlist in Multimedia
Menu > Multimedia > Playlist > Add > Playlist name > OK > Audios > My
Audios
• Scroll through the tracks and press Options > Mark to add the selected files to
the playlist
• Press OK to save the Playlist, Press OK again to begin playing it
• Once a Playlist has been saved press Options > Edit to add or delete tracks
and press Options to rename, delete etc. After editing a Playlist, you need to
save it.
• Press Options to set the Repeat Setting; no repeat, all repeat or shuffle
• Use the side volume keys to adjust the volume
• Use keys to select tracks from your playlist
• Press the keys to skip tracks
• Press and hold the keys to forward or rewind through tracks
It is possible to create up to six different playlists.
11
Page 64

64
12 Connectivity
12.1 Use JoinME to connect the phone to a computer
JoinME is a computer program that enables the transfer of music and picture
files between your PC and your handset. It is also used to manage contacts,
messages and calendar functions and to connect to the internet. The MAC version
has limited functionality and all the installation details and examples below are
for the PC version.
Compatibility
• The software is compatible with Windows* XP Service Pack 2 & 3, Windows*
2000 SP 4 Windows Vista*, MAC OS 10.4 and 10.5 (and above), but cannot
be guaranteed to run on these systems. 64 bit drivers are provided.
• It is not compatible with Windows* ME, 98, 95
• The software may not run in all PC environments, or with other software.
• Multi-boot systems are not supported.
• The software should be installed and run under the Administrator login.
Installation
• Please follow the installation steps carefully.
• If the installation fails please see the ReadMe file on the CD or consult our
web site for more help at www.zte.co.nz
*Windows, Vista, XP, 2000 & ME are trademarks of Microsoft Corporation.
12
Page 65

65
12.2 Installing JoinME
Please install the JoinME CD before connecting the phone to the computer.
• Insert the CD provided into the computer
• The CD will auto-start after a few seconds
• If auto run does not start then run Setup.exe from the CD
• The installation shield will launch and guide you through the installation
• Please follow the prompts to install the software
• When the installation is complete plug the handset into the computer using
the USB lead supplied
• The USB lead is unique and should not be used for other devices (It is not
the same as digital camera leads)
• When the handset is plugged in the computer will automatically install the
drivers. If this fails consult our website for more help or access Windows
Device Manager to update the drivers. See www.zte.co.nz for instructions
Note
If the phone is connected to the computer before installing the CD then the
drivers will not be installed correctly.
• Unplug the phone, un-install then re-install JoinME
• See www.zte.co.nz for more assistance
12
Page 66

66
12.3 Use JoinME to copy photos to your computer
Transfer photos from the handset to your computer using JoinME:
• Make sure the phone is switched on and connected to the computer and
JoinME has been installed.
• The PC Connection on the handset needs to be set to USB
Menu > Settings > tab right to Handset > PC Connection > USB
• Connect the phone to the computer using the USB lead supplied
• Double-click the JoinME icon on the desktop.
• Select the phone type and press Connect.
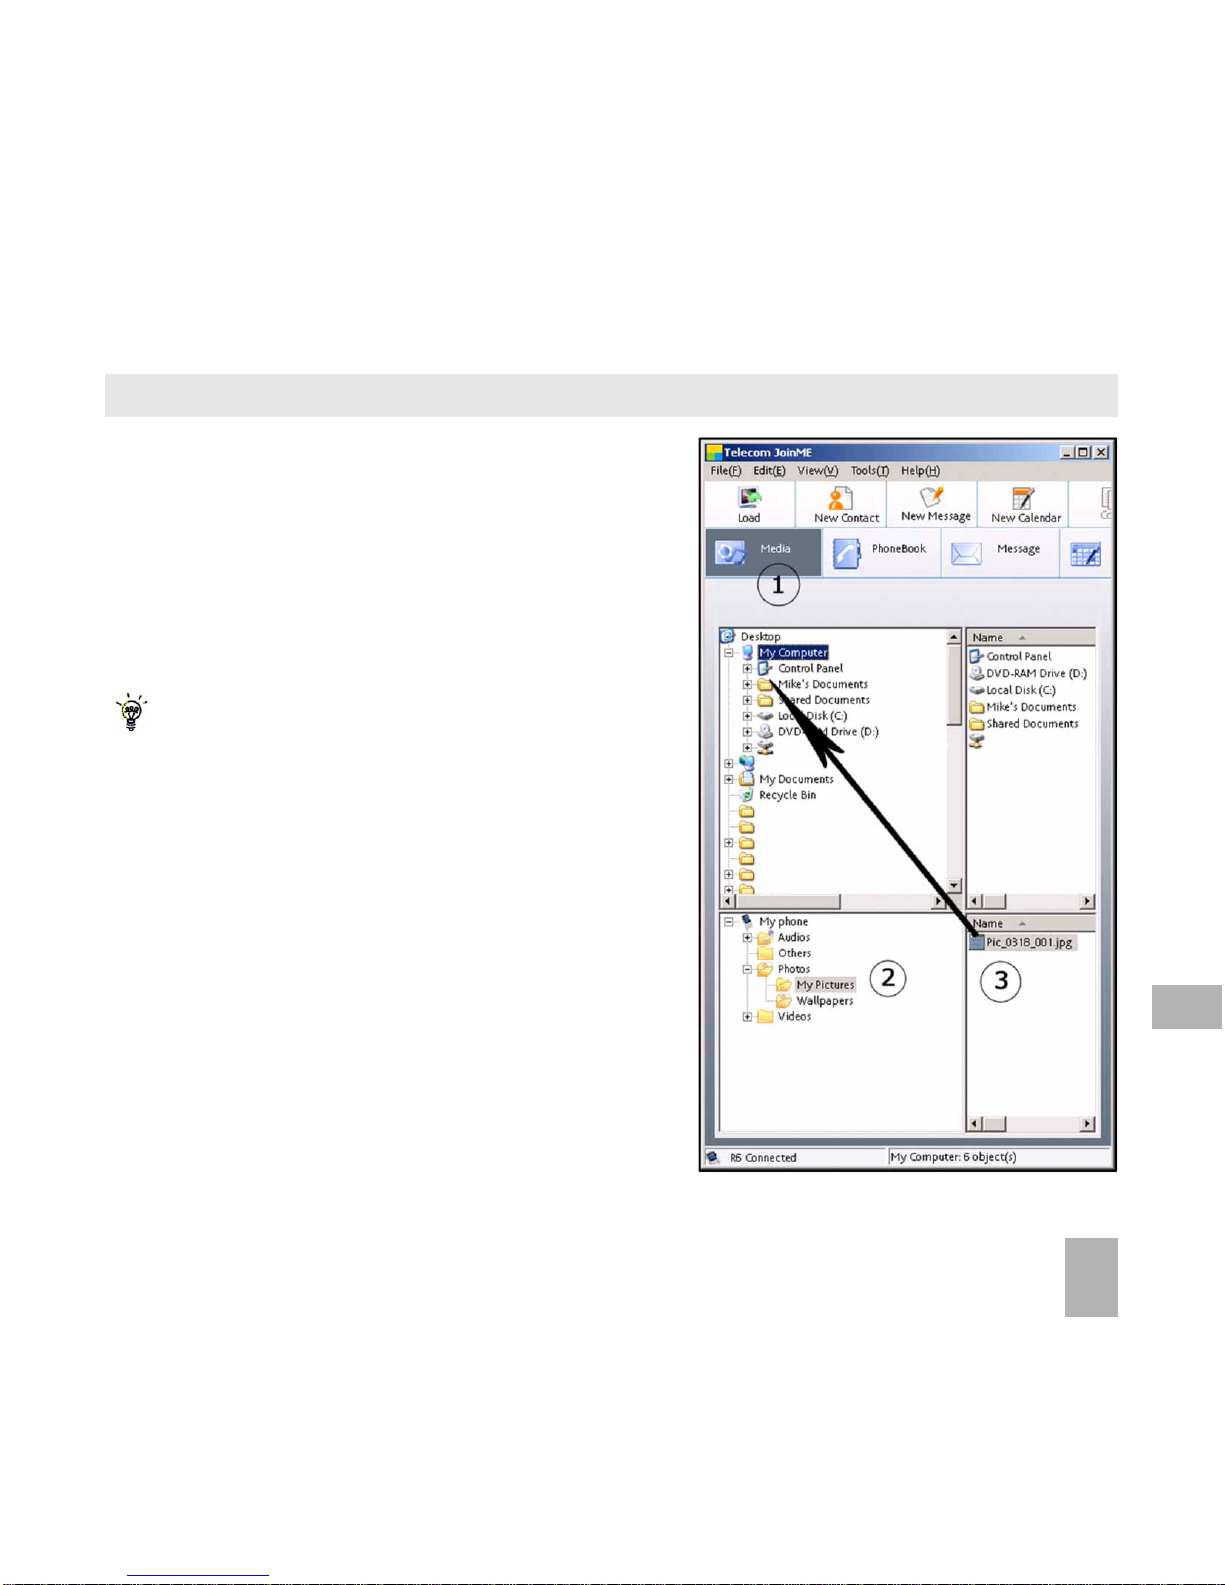
• Select the Media button as shown on the next page
• Double click on My Phone in the bottom left hand corner
• Double click on Photos to expand the folder structure
• Double click on My Pictures to see the picture files on the right hand side.
• Drag* the required file from the file list and Drop* it into the required
destination folder on the PC.
• The file will be copied to the destination folder (eg Desktop)
• Files can only be transferred into Folders.
• The default picture size is small when viewed on the computer. See 10.1
* Drag and Drop is a method of copying files. Click on the file, hold down the
left mouse button, move the mouse pointer to the required destination and
release the left mouse button to Drop the file to that location. Alternatively
right click on the file and use Copy and Paste from the menu.
12
Page 67
67
1.Select the Media button
2.Select My Pictures folder on My Phone
3.Drag the picture from My Pictures
to a folder on the PC
4.Alternatively right click on the file and
use Copy and Paste from the menu
Files can only be copied into
Folders
Notes on transferring files
DRM protected files, default ringtones and
wallpapers cannot be copied or sent to
other devices.
The handset does not support the transfer
of Contacts via Bluetooth.
Copy files (eg Photos) from phone to computer using JoinME
12
Page 68

68
12.4 Use JoinME to transfer music from a computer
Music files can be transferred onto the phone using JoinME.
• Make sure the phone is switched on and connected to the computer, and
JoinME has been installed.
• The PC Connection on the handset needs to be set to USB
Menu > Settings > tab right to Handset > PC Connection > USB
• Double click the JoinME icon on the desktop.
• Select the phone type and press Connect.
• Select the Media tab as shown in the picture on the next page.
• Double click My Phone in the bottom left hand corner.
• Double click Audios to open up the Audios folder.
• Locate the music files on the computer by browsing through the Windows file
structure in JoinME.
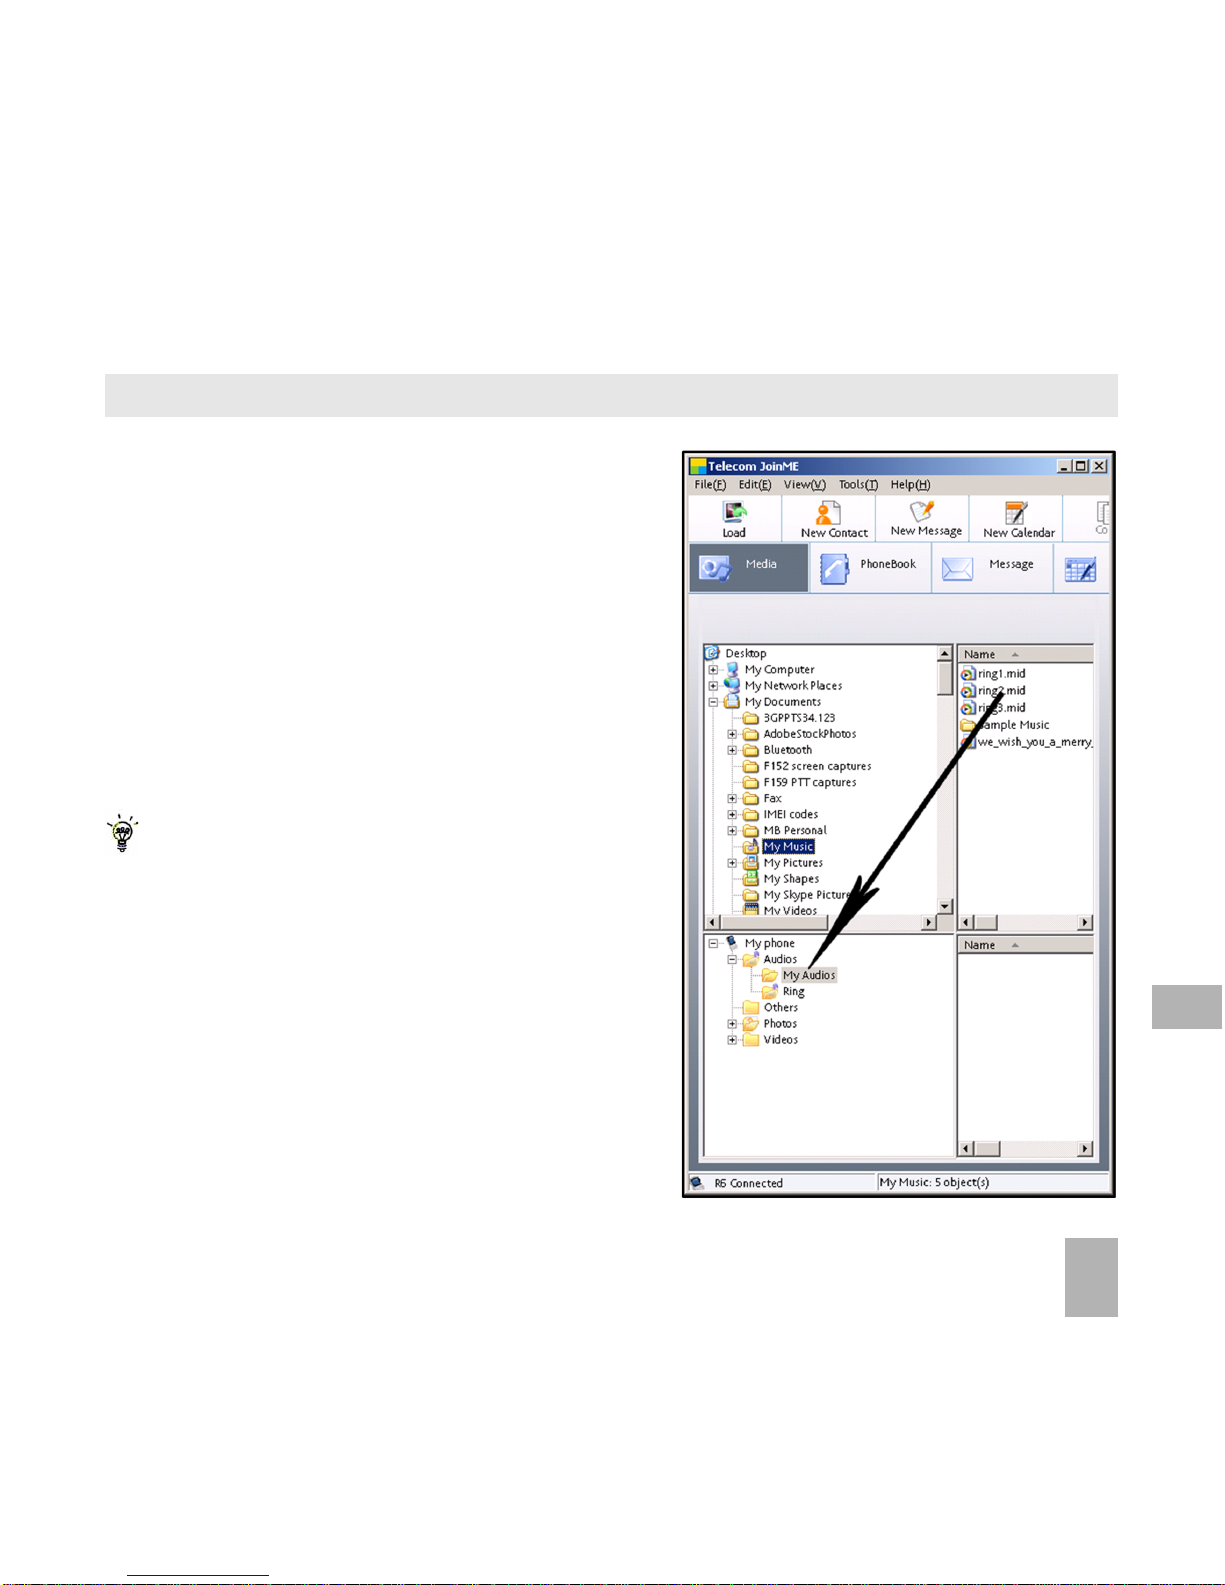
• Drag the required file from the top half (computer) and drop it into My Audios
on the phone.
• The file is copied to the destination folder (as shown below). Files can only be
copied into Folders.
• Alternatively Right Click on the file, choose Copy, then go to the destination
folder and Paste.
• Note: DRM protected files that you have downloaded cannot be copied or sent
to other devices.
MP3, WAV, WMA and MIDI Files are supported but MP3 is preferable due to
smaller file size.
12
Page 69
69
Select the Media button
Use drag and drop to copy the
selected file from the computer to
the My Audios folder on the handset.
Alternatively select the file, right click
to Copy the file, select the destination
folder (on the handset) and choose Paste.
Copy files(eg Music) from computer to handset using JoinME
Files can only be transferred into
user folders on the handset. Eg.
Transfer music files into My Audios,
pictures into My Pictures and java
games and applications into the
Others folder. All other folders are
write protected.
12
Page 70
70
12.5 Enter Contacts using JoinME
Use JoinME to enter new contacts into the phone.
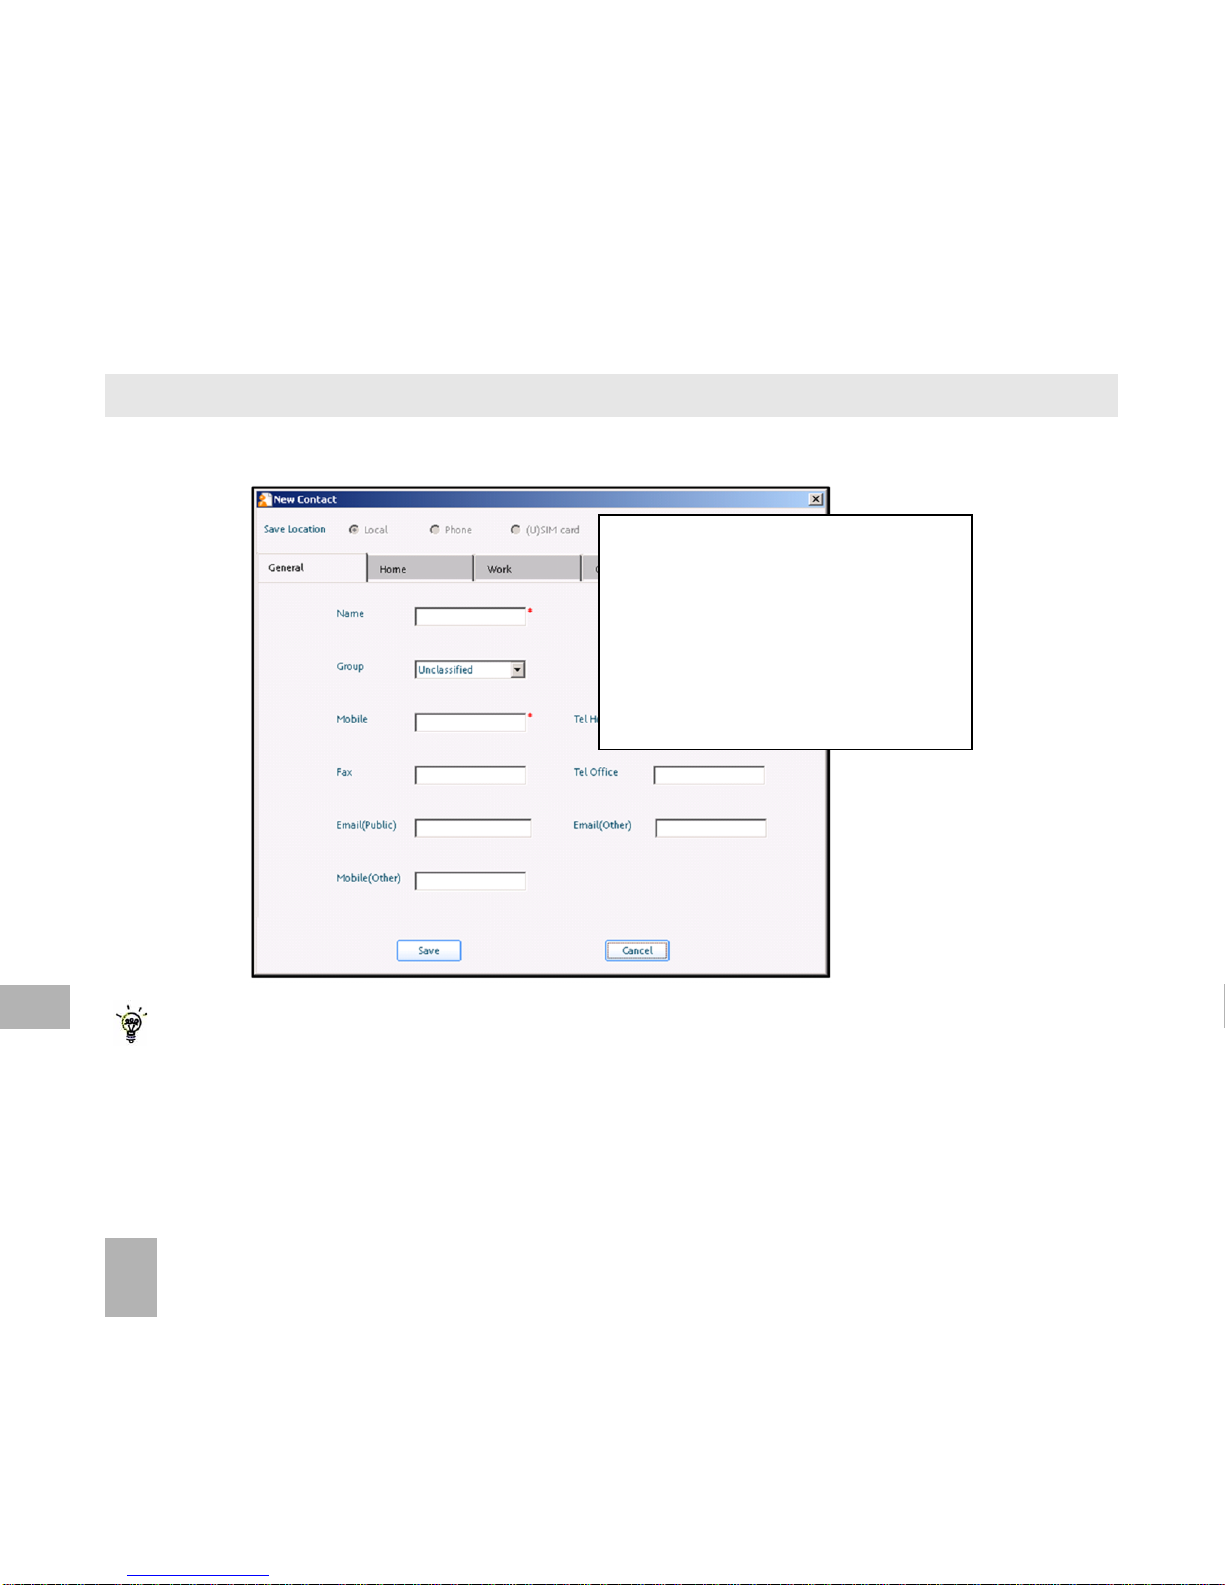
The save position ‘Local’ refers to the computer. Remember to change
this if you want to save contacts directly to the handset or use the copy
function to copy contacts from Local to Phone.
There is less storage available on the USIM card so some of the fields
are greyed out.
On the phonebook tab enter
contacts directly using the PC.
Select “New Contact” then complete the required fields.
Select the Save Position;
Local, Phone, (U)SIM or All.
12
Page 71
71
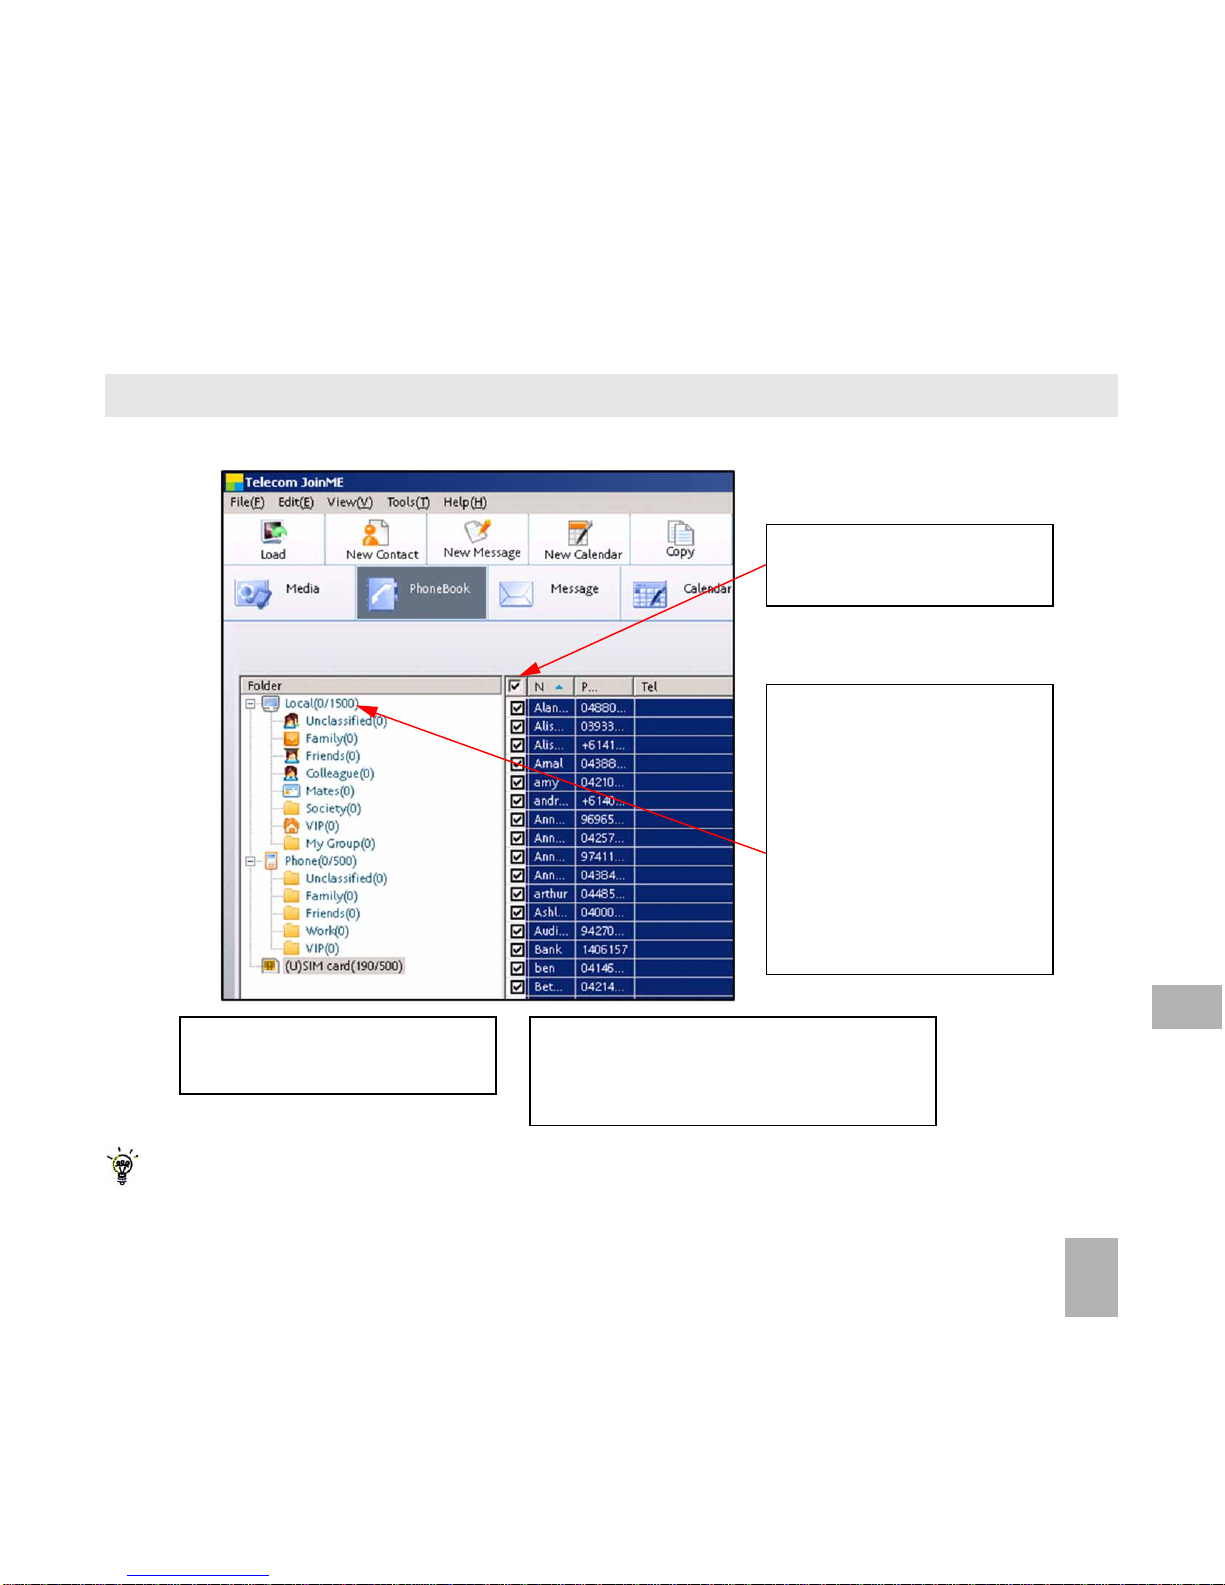
Copy one or all of the contacts from Local to Phone using the same method
12.6 Copy Contacts from the phone to the computer (back-up)
2. ‘Select all’ by checking
the box at the top of the list
3. Drag and drop the complete list to Local.
This will copy all the USIM
contacts to the PC (Local)
You can also select an individual contact to copy it in
either direction.
1. Select USIM to copy contacts from the USIM to the PC
You can also right click on the
Contacts grid and Import from
Outlook. See 12.7 below…
12
Page 72
72
12.7 Import Contacts from Microsoft Outlook
• Launch Microsoft Outlook and have JoinME running.
• Make sure you are on the Contacts tab in JoinME, see image in 12.6 above.
• Right click anywhere on the Contacts grid and select Import From Outlook.
• Only contacts in the root folder (Contacts) of Outlook will be copied
• The following fields are imported from Outlook to JoinME as below:
Outlook JoinME
Full Name Name
Mobile Telephone Number Mobile
Home Telephone Number Tel Home
Home Fax Fax
Business Telephone Number Tel Office
Other Telephone Number Mobile(Other)
Home Address Home Address
Business Address Business Address
Company Name Company
Department Department
Job Tile Job Tile
Business Fax Business Fax
Email Address Email(Public)
Email Address 2 Email(Other)
12
Page 73
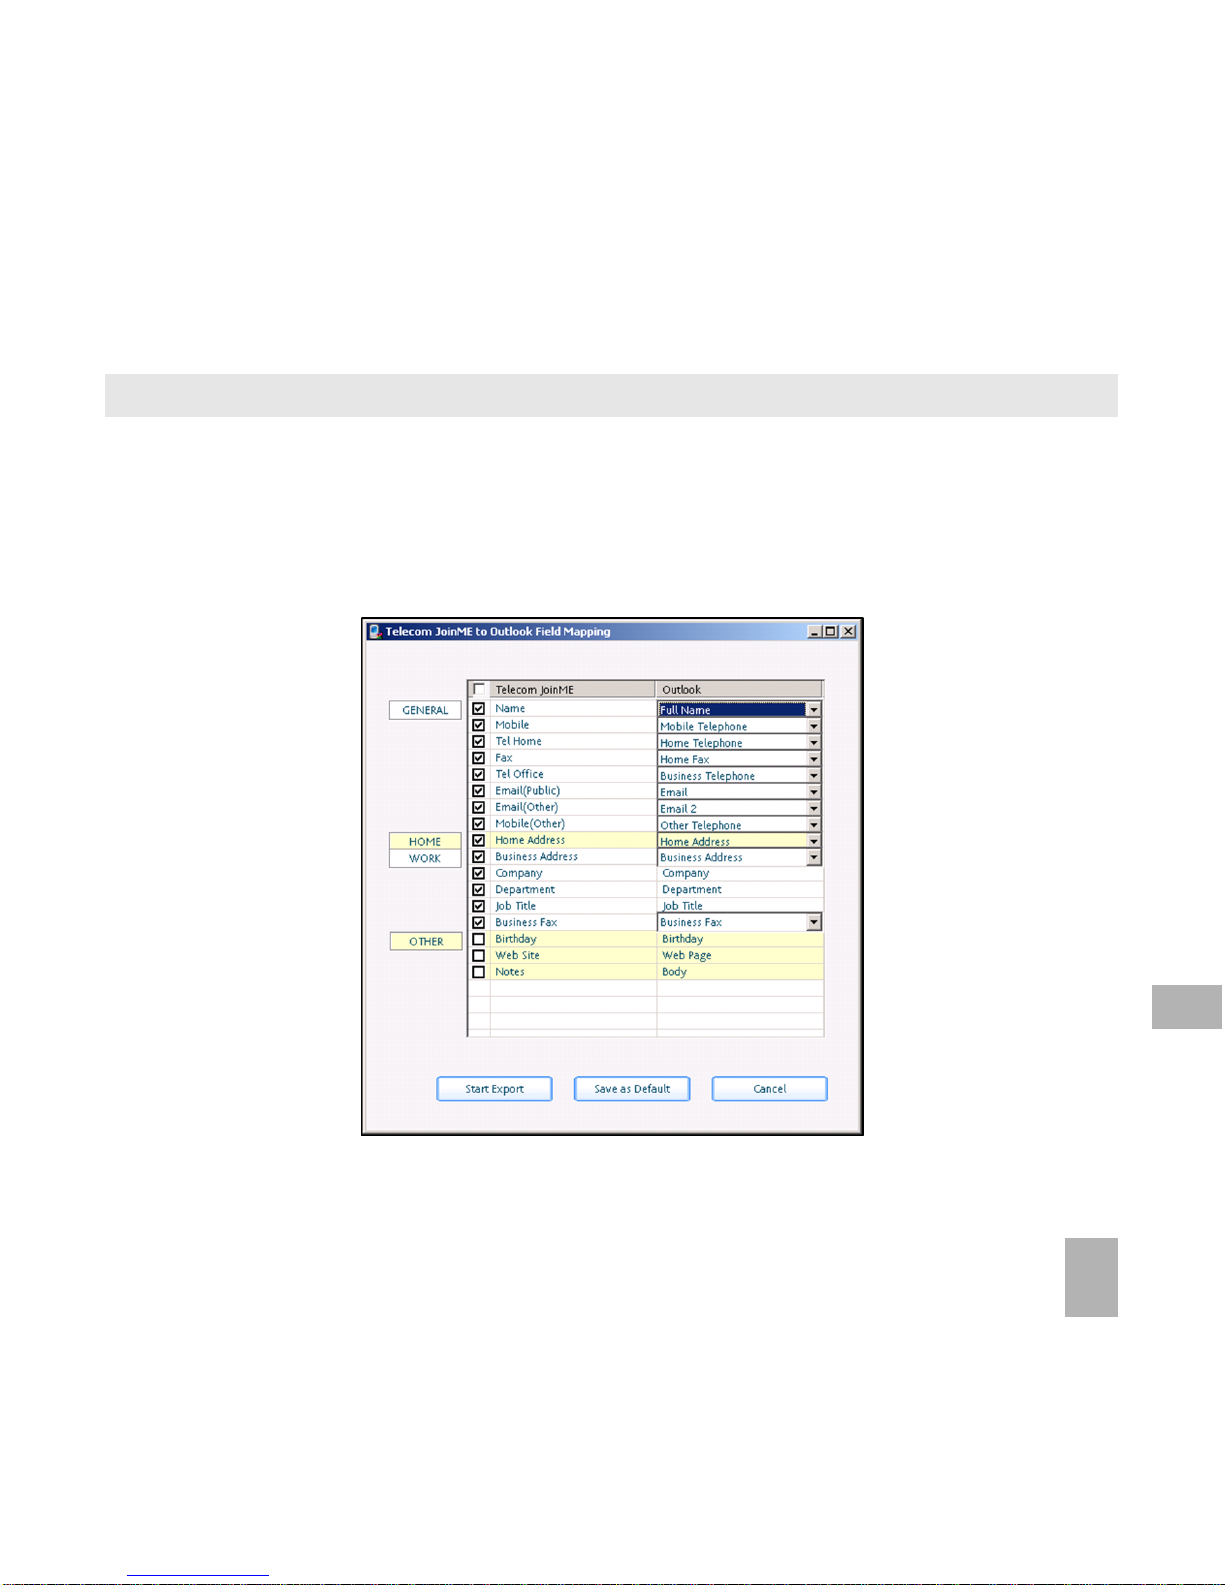
73
12.8 Export Contacts to Outlook
• Launch Microsoft Outlook, have JoinME running and connected to the handset.
• Make sure you are on the Contacts tab in JoinME, see image in 12.6 above.
• Select the number you want to export.
• Right click any selected contacts and select Export to Outlook
• Set the required fields to map from JoinMe to Outlook in the table below
• Press Start Export to export the Contacts
12
Page 74

74
Use JoinME to send an SMS
• Select the Message tab
• Click the New Message button to draft an SMS
• The new message window will appear
• Click the magnifying glass to select a contact from Local, Phone or (U)SIM
card
• Tick the box for the chosen Contact, press the right arrow to choose.
• Multiple contacts can be chosen. Click OK to continue
• Type your message in the text entry field and press Send when complete.
SMS Messages sent from JoinME are stored on your computer in the Local
folder of the Message tab.
12.9 Import Calendar events from Microsoft Outlook
• Launch Microsoft Outlook and have JoinME running.
• Note, at the end of the import process Outlook can shut down. Please save
any information beforehand.
• Make sure you are on the Calendar tab in JoinME
• Right click anywhere on the Calendar grid and select Import Calendar From
Outlook.
• All calendar entries are copied into JoinME
• Select the required entries, or select All
• Copy the imported entries from Local to phone
12
Page 75
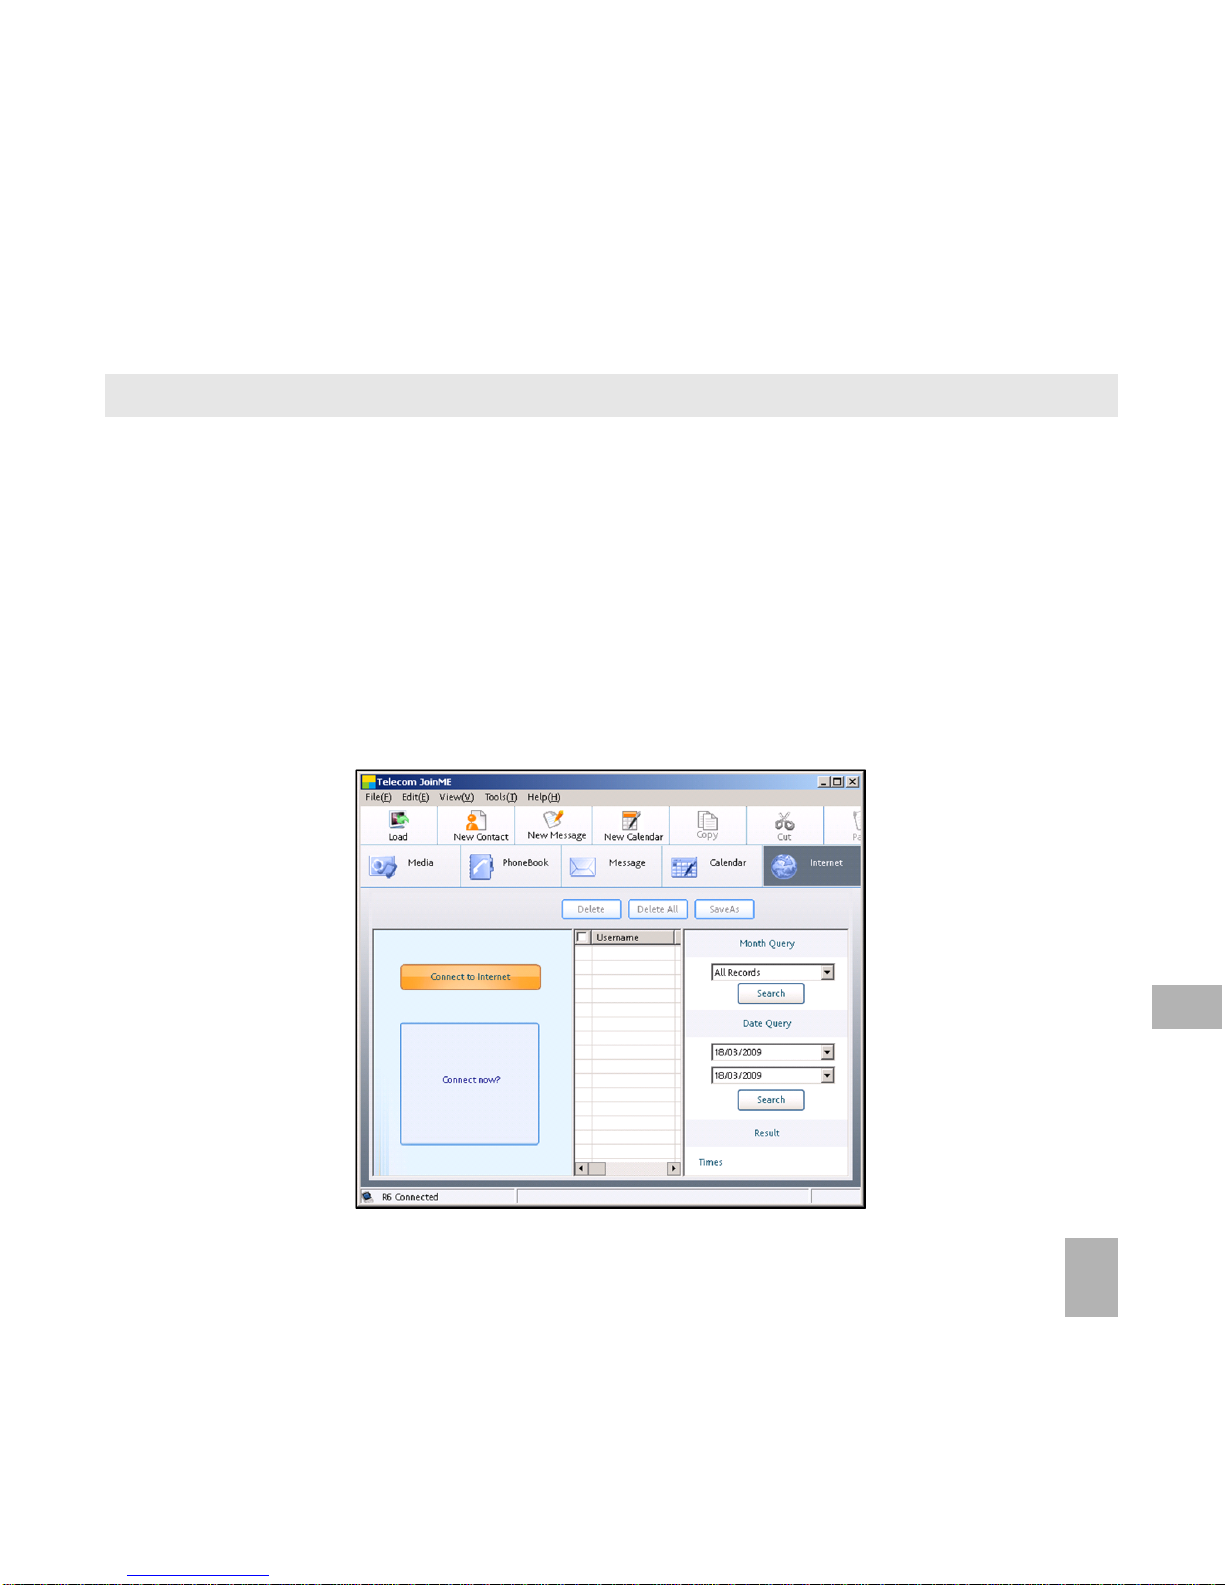
75
12.10Use JoinME to connect to the Internet
You can use the phone as a modem to connect a computer to the internet.
• Make sure the phone is switched on and connected to the computer and
JoinME has been installed.
• The PC Connection on the handset must be set to USB
Menu > Settings > tab right to Handset > PC Connection > USB
• Double click the JoinME icon on the desktop.
• Select the Internet tab as shown below
• Press Connect to Internet go online
• The default APN for Dial Up Networking is preconfigured
12
Page 76

76
12.11Connect to a Bluetooth Device
Bluetooth is used as a wireless connection for headsets, hands free car kits and
computers. Not all applications or devices are supported. Bluetooth is an open
forum and manufacturers choose which functions to implement.
The handset supports Bluetooth 1.2 with Handsfree, Headset, FTP and DUN
profiles.
Consult the other device for compatibility, connection issues and to find the
pairing password.
Please follow the process carefully. Connecting to a Bluetooth device first time
around requires authentication where both devices share a password.
When the devices are paired and connected the process is more automatic.
Connect to a Bluetooth Device
Menu > Tools > Bluetooth > Bluetooth Manager
• Press the Left or Right Arrow Key to switch Bluetooth on.
• Go down to Visible then press the Left or Right Arrow Key to select Show. The
phone name can be customised if required. Press OK to confirm.
• Go to My Devices and press OK. Press Search to look for Bluetooth devices
nearby.
• The chosen device must be switched on and in pairing mode.
• Devices are shown in the device list. Select the device, press OK to Connect.
• Enter the pass code, usually 0000 or 1234. Consult the product user guide for
more information.
• If you are connecting to a PC or another mobile enter the same password
12
Page 77

77
when requested on that device.
• Once the password has been shared and accepted by both devices they are
paired.
Send files from the handset to another device
Menu > File Manager
• Browse through the folders to the chosen file
• Press the Left Soft Key for Options
• Choose Send then select Bluetooth and press the OK Key
• If no devices are shown press Search
• Select the required device to send the file to
• Enter a pass code and use the same pass code on the other device (eg
0000).
Receive files from another device
• When another device sends you a file press Yes to authorise the connection
• Press Yes to accept the file
Notes on Transferring Files
• DRM protected files, default ringtones and wallpapers cannot be copied or
sent to other devices.
• The handset does not support the transfer of Contacts via Bluetooth.
12
Page 78

78
Connect to a Bluetooth Car Kit or Personal Headset
Follow the manufacturer’s instructions carefully to enable Pairing Mode on the
other device.
It is not possible to connect the phone to the other device unless Pairing
Mode is enabled.
Select the required device, share a pass code and press Connect.
Menu > Tools > Bluetooth > Bluetooth Manager > Turn On, Show > OK
• Make sure Bluetooth is On and in Show mode and the other device is in
Pairing Mode
• On the handset go to Bluetooth: Menu > Tools > Bluetooth > My Devices
• Press the Right Soft Key to Search
• From the list of available devices select the required device and press OK to
Connect
• Enter the pass code specified in the user guide of the far end device (eg 0000
or 1234)
• When the devices are paired the handset will report the device has been added
• In My Devices go to the new device and press OK to Connect
• The devices are now Connected
• When connected, incoming calls are sent to the Bluetooth device automatically.
Press the call button to answer.
• During a call press Options > Switch to Handset to return the call to the
handset
12
Page 79

79
12.12 Dial Up Networking using USB or Bluetooth
Dial Up Networking (DUN) is a method to connect your PC or MAC to the
internet using the handset as a modem.
1.Dial up Networking over USB using the Windows Wizard
Make sure JoinME is installed, the handset is on and connected to the PC
using the USB lead supplied.
Example for Windows XP
On the PC go Start > Accessories > Communications > New Connection
Wizard and follow the prompts:
Connect to the internet > Set up my connection manually > Connect using a
dial up modem
Select the ZTE USB Modem and uncheck any other modems
The ISP Name can be any name you like eg. R6 Handset
Set the Phone number to *99# > The Username and Password must be
blank > ‘Make this the default Internet connection’ can be unchecked
(optional) > ‘Add a shortcut to this connection to my Desktop’ can be checked
(optional) > Finish
Press Dial to test the connection.
The PC will open an internet connection using the handset as a high speed
modem.
12
Page 80

80
2. Dial Up Networking over Bluetooth
Bluetooth can be considered as a wireless replacement for the USB connection
and is compatible with any DUN enabled Bluetooth device. Use Bluetooth to
connect the handset to a PC or MAC and use Dial Up Networking to create an
internet connection.
a) Both devices must have Bluetooth ON
Handset: Menu > Tools > Bluetooth > Bluetooth Manager > Turn On, Show >
OK
PC or MAC: Enable Bluetooth using the appropriate hardware or software settings
b) Set the handset PC Connection to Bluetooth
Menu > Settings > Handset > PC Connection > Bluetooth
c) Create a New Connection on the PC or MAC
Launch the Bluetooth manager software on your PC or MAC. This varies depending
on your platform, hardware and software. Create a new connection and enter the
same password, when prompted, on each device. Select the R6 Handset, the
Dial Number is *99# and the Username and Password is blank.
When the Bluetooth manager opens a connection to the handset, accept the
incoming connection by pressing Yes when prompted.
The PC or MAC can now connect to the internet via the handset.
12
Page 81

81
The features described are dependant on external suppliers’ hardware and
software and vary between platforms and components. Consult your system
supplier for more information.
12.13 PC Connection
Menu > Settings > Handset > PC Connection > Bluetooth
PC Connection specifies how the handset initiates data connections to the PC.
It can be set to be via Bluetooth or via the USB cable. JoinME requires the
USB connector, other transfers can operate via Bluetooth if supported by your
system.
If PC Connection > Bluetooth is selected then JoinME will not connect to the
handset. Restore the PC Connection to USB to re-enable JoinME.
12.14 Synchronize with a network server (SyncML)
Use SyncML to enhance your Personal Information Management by
synchronizing Contacts and Calendar information on the handset with those
on a network server.
Menu > Tools > SyncML
• Complete the Sync settings before synchronizing the contacts and calendar
• Select to use Two-way fast sync or Two-way slow sync
• Use Query log to view the SyncML info
• SyncML requires network support and may require an additional subscription
• Contact your Service Provider for more details.
12
Page 82
82
13 Other Facilities
13.1 Browser
Menu > Browser
Home the home page is set by your Service Provider
New Link enter a web address manually using the keypad
Bookmark Link to a previously saved page
History Display pages visited
Saved Page View a local copy of a previously saved page
Settings Display browser settings (see below)
Version Display current browser version
Menu > Browser> Settings
Connection settings Sets the APN, preset by your service provider
Advanced settings Customise the browser display modes, sound, cache,
cookies
Clear cache Clears all cache data
Clear Cookies Deletes all cookie information
Clear autofill list Deletes all input history items
Certificate List the root and CA certificates on the handset
13
Page 83

83
13.2 Stopwatch
Menu > Tools > Stopwatch
• Press OK Key to Start timing.
• Press OK to Stop timing. The screen will display the event time.
• Press OK to continue timing.
• Press Right Soft Key to reset.
13.3 Calculator
Menu > Tools > Calculator
• Press 0~9 keys to enter numbers, Decimal to enter the decimal point.
• Press for +, –, ×, ÷
• Press the End key to clear last digit and results.
• Press OK to show the result
13.4 World Time
Menu > Tools > World Time
• The world time function provides time information on major cities worldwide.
• Scroll to the desired city by using the Left / Right keys.
• Select the required city then press the OK Key to save the selected city as
the local time zone.
• Note changing time zones changes the current time setting.
13
Page 84

84
13.5 Currency Conversion
Menu > Tools > Currency Conversion
• The exchange rate can be set and is stays after closing the application
• Use the arrows to highlight the required field to enter your local or
foreign value
• Press Decimal to use a decimal point
13.6 GPS
Menu > Tools > GPS
• Stand alone GPS is a limited service pre-installed in the handset, that in good
conditions will provide a decimal location position.
• Full functionality requires additional applications to be installed or supplied by
third parties. Please contact Telecom for more information.
• The GPS receiver requires signals from at least three satellites and can take
several minutes to acquire.
• Reception is reduced in city areas, best reception is achieved with a clear view
of the whole sky.
• The signal strength may be reduced in a vehicle, indoors or in overcast
weather conditions.
• The antenna is in the top of the phone. Avoid blocking it with your hands
• It is not recommended to use stand alone GPS for critical applications.
• To switch GPS On or Off go to Tools > GPS Status. Perform a search under
GPS Location. Results will be dependant on the above conditions.
13
Page 85

85
13.7 Games and Applications
Menu > Games and Apps
• Download the latest games from your service provider or other specialist
websites
• The handset supports Java Midlet 2.0
• Use JoinME to copy other games from your computer (see Connectivity)
• Games and applications are saved into the Others folder
• Select Open to install the game.
13.8 Voice Recorder
Menu > Multimedia > Voice Recorder
• Press OK to Start recording the voice memo
• Press OK to Pause / Continue (Contin.) recording
• Press the Right Soft Key to Stop recording
• Press OK to Save. The file will be saved to My Audios
• Press Right Soft Key to Discard the voice memo
• Press Left Soft Key to Send the memo via MMS, Email or Bluetooth
• Press Options to define the length of your recording (1, 5, 10 or 30mins).
13.9 Slide Show
Menu > Multimedia > Slide Show
• Add pictures by pressing Add or Options > New Slide
• Browse to My Pictures and Mark the pictures you want. Press OK to finish,
Play to play.
• Use Options to Edit, create New slide, Rename, Delete, Delete all, and View
13
Page 86

86
the image info.
13.10Streaming URL
Menu > Multimedia > Streaming URL
Streaming URL are links to audio or video streaming content over the internet.
The content is only available while connected to the server and depends on your
network provider.
13.11Access Point Settings
Menu > Settings > tab right to Handset > Access point settings
Access Point Settings (also called APN) are pre-defined by your service provider
and enable the handset to connect to the internet via WAP and to send multi
media messages (MMS). When using an alternate carrier, Add a new Connection
setting as defined by your service provider.
13.12Restore default settings
Menu > Settings > tab right to Handset > Restore Default Settings
If the handset is not working as normal, restore the handset to default settings.
The default Handset Lock Code is 0000. User content will not be erased.
13.13Download Location
Menu > Settings > tab right to Handset > Download Location
When a Micro SD card is installed the default save location (for photos etc)
changes to the External Memory. This refers to the Micro SD card.
13
Page 87

87
13.14Connections
Menu > Settings > tab right to Handset > Connections
Connections are pre-defined by your service provider and enable the handset
to connect to the internet via WAP and to send multi media messages (MMS).
When using an alternate carrier, Add a new Connection setting as defined by
your service provider.
13.15Network Settings
Menu > Settings > tab right to Handset > Network Settings
Preferred mode: Lock the handset to GSM or UMTS (3G) Networks
Preferred Band: Lock the handset to certain bands, U = UMTS, G = GSM
Preferred selection: Choose which network to register with.
Manual Network Selection overrides Preferred Mode and Band settings.
The handset will stay on the chosen network and related band. Eg. If you
choose a GSM Network, the Preferred Mode will switch to GSM and remain in
GSM-only mode. Further searches performed by Preferred Selection > Manual
mode will only detect networks from the GSM band. To return to normal mode
set Preferred Mode and Preferred band to Automatic.
13.16CTM
Menu > Settings > tab right to Handset > CTM
CTM (Cellular Text Telephone Modem) is a text based communications protocol
to offer support to hearing and speech impaired people. Hearing or speech
13
Page 88
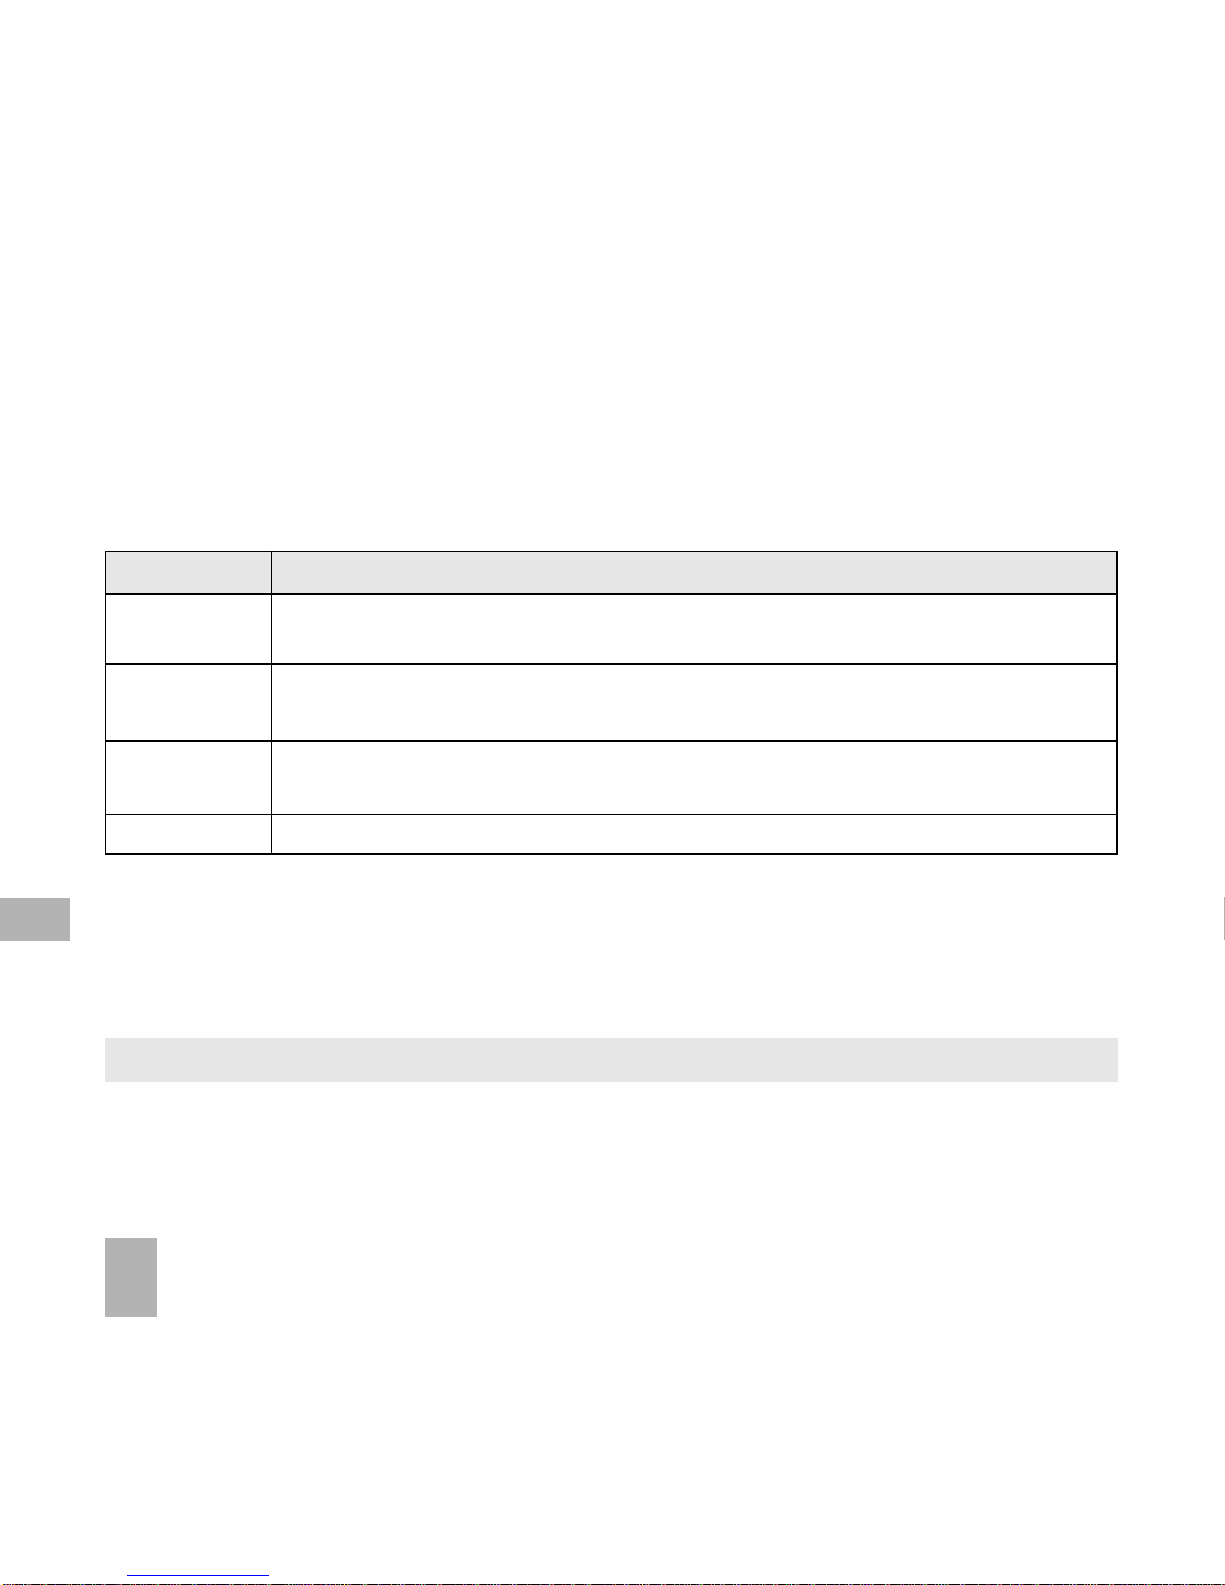
88
impaired persons can communicate using a teletype (TTY) terminal connected
to the mobile phone via a CTM Modem. The TTY signals are sent alongside
speech so it is possible to configure the system to enable speaking and hearing
as well as typing or receiving text to the TTY device. See below for the options
available:
CTM Mode Description
Full Text entered on the terminal is sent to the other party.
Received text from the other party is displayed on the terminal.
Talk & Received text is displayed on the terminal, Voice is relayed
Read to the other party.
Write & Text entered on the terminal is sent to the other party
Hear with incoming speech heard from the other party.
Off All CTM is disabled, use the phone as normal.
TIPS
If you are using a TTY device make sure the baud rate is set to 45.45 bps
If you are using a terminal with a CTM modem built in then select CTM Off on
the handset.
13.17T-Mode for hearing aid support
Menu > Settings > tab right to Handset > T-Mode
T-Mode can be set to improve the performance of the handset with hearing
aides. The audio output is optimised for Telecoil coupling.
13
Page 89

89
• Set your hearing aid to T-mode if available and enable T-mode on your handset
• To stop whistling feedback turn up your phones volume and hold it a bit
further away from your hearing aid
• A Telecoil can provide more clarity in a wide range of environments
• If you are using a cochlear implant, turning the sensitivity / volume down on
the speech processor and turning the volume up on the mobile phone tends
to lower low to medium background noises
• If you are using a Telecoil set T-mode On. Menu > Settings > Handset > T-
mode On
13
Page 90
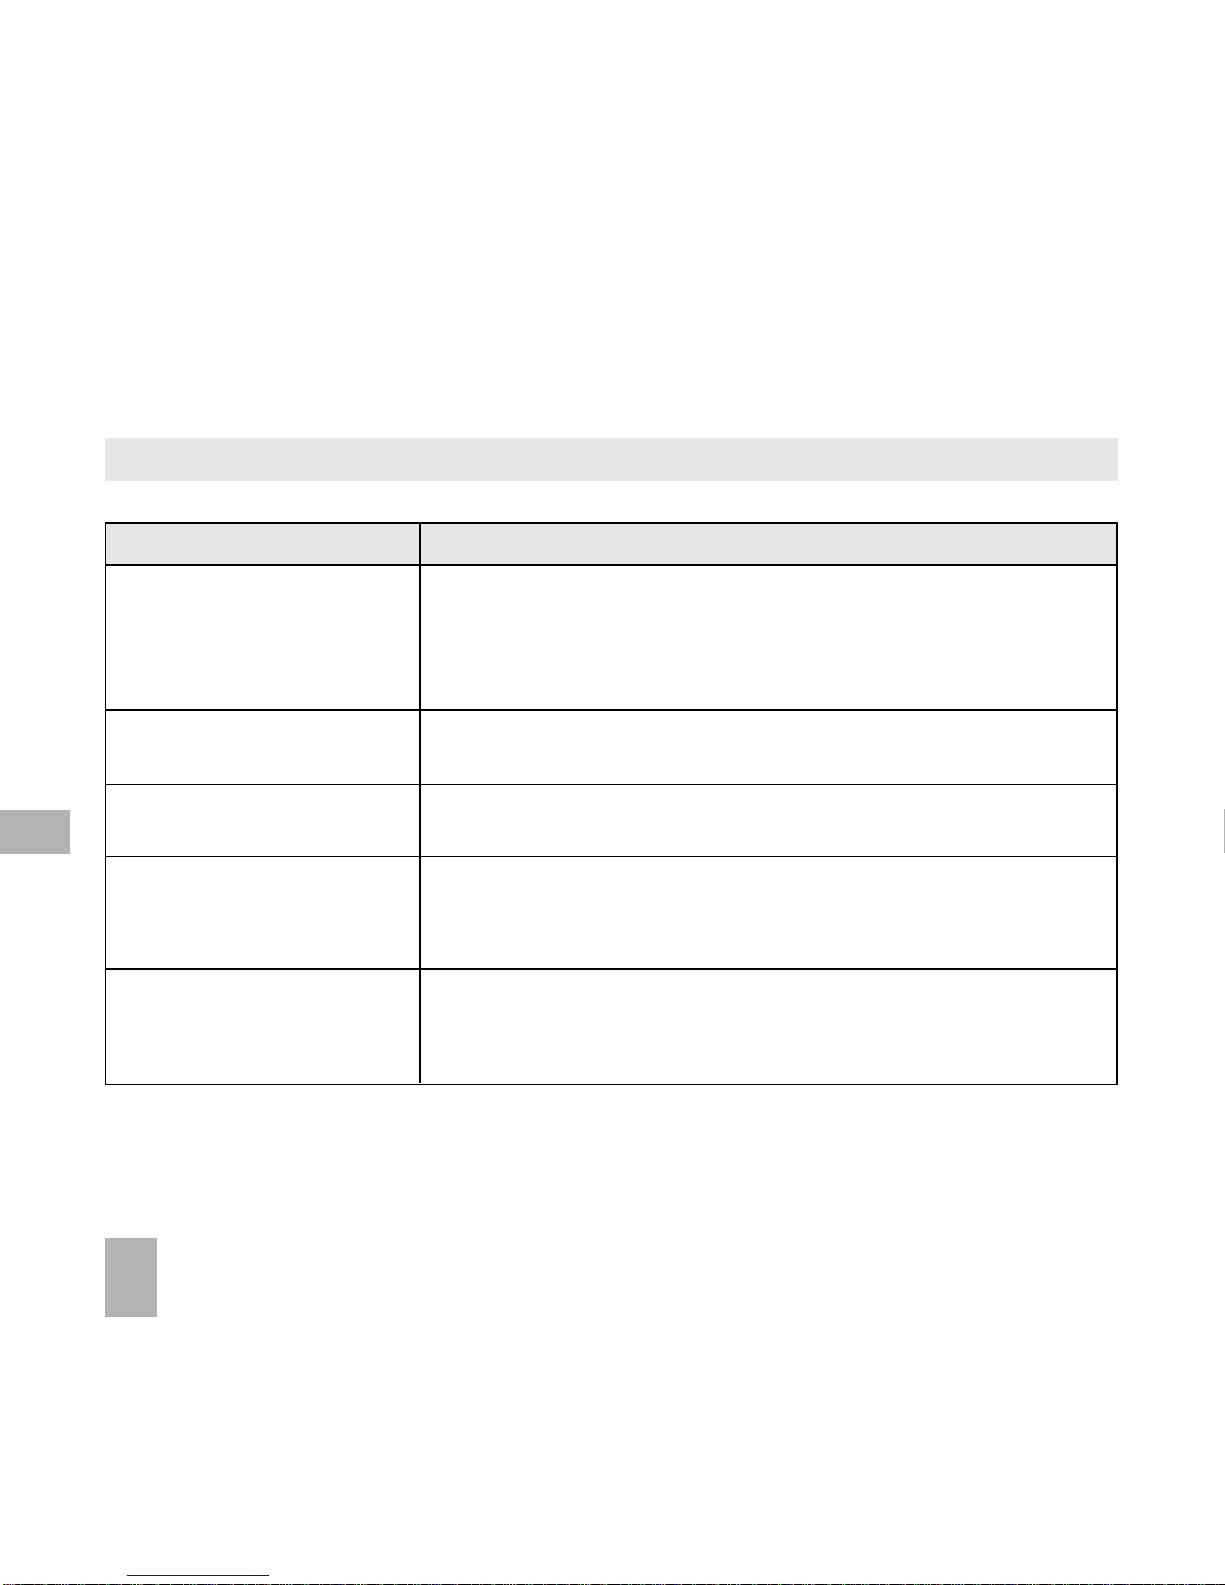
90
14 Technical, Support and Warranty Information
14.1 Troubleshooting and FAQ’s
Please check the manual thoroughly before contacting your service provider
Symptom
No incoming ring
or alarm tone
(No) keytones when
pressing keys
How do I extend the
incoming ring time?
A phone number
cannot be dialled
Short messages
cannot be sent or
received
Solution
Check the ring tone and ring volume settings under Profiles
Check the handset is not muted (Long press the
# key)
Check the key tone settings in the current profile.
See 7.1 Change the Profiles
This is not a handset setting. Please contact your
Service Provider to extend the ringing time.
Check for network coverage
Check whether any call restrictions are set. See
Call Barring
See Text Message Settings and check the SMS
centre number is correct. Contact your service
provider for more details.
14
Page 91
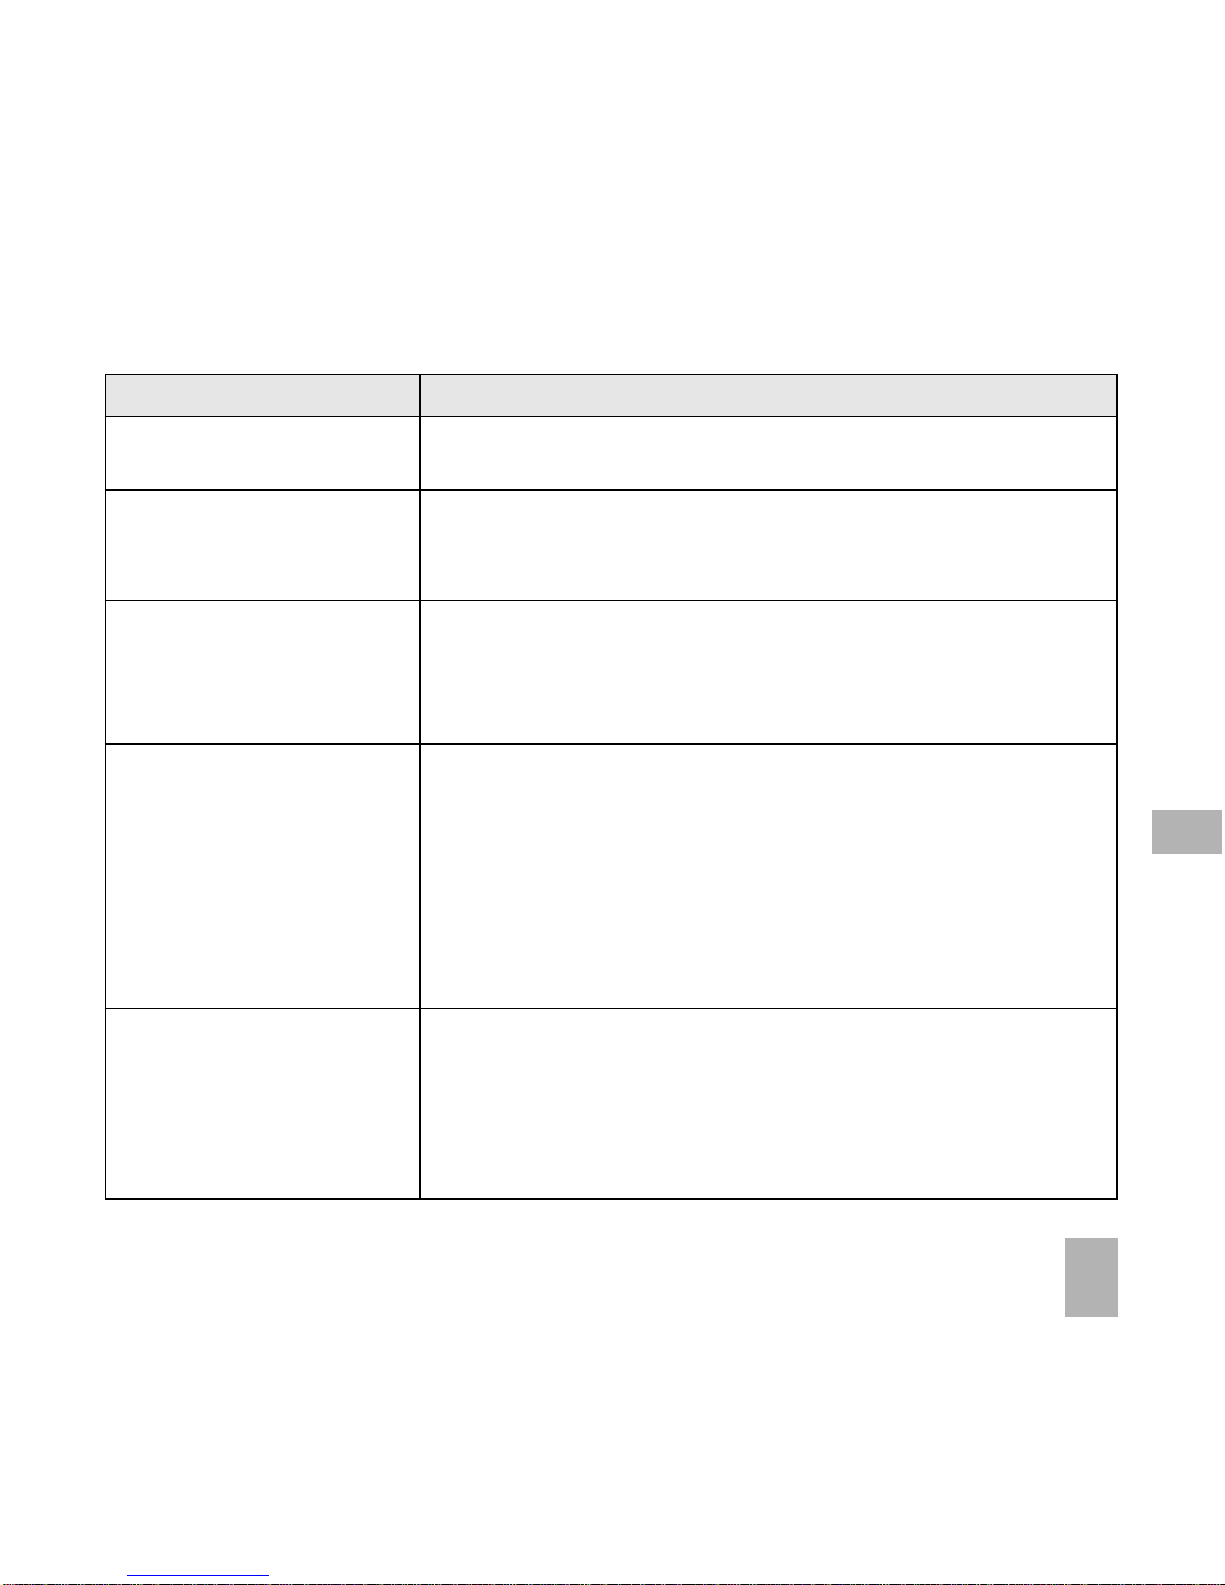
91
Symptom
MMS messages cannot
be sent or received
How do I switch off
Predictive Text?
I cannot connect to
JoinME
My phone is slow to
respond, handset
storage problems
The battery
discharges quickly
Solution
Your subscription does not include data services.
Check with your service provider.
The # key is used to toggle between different
modes.
See Chapter 6 for details.
Check: Menu > Settings > tab right to Handset >
PC Connection > USB
Uninstall and re-install the CD software
See FAQ’s at www.zte.co.nz for more assistance
Restart your phone every day to refresh the
memory
Delete or archive old SMS messages and other
content
Restore default settings:
Menu > Settings > tab right to Handset > Restore
Default > 0000 > Yes
Possible network coverage issue. Check the signal
strength. With only 1 or 2 bars, the battery has to
work harder to maintain network contact. Limit multimedia and Bluetooth usage to save power. The
battery may be worn out and needs to be replaced.
14
Page 92
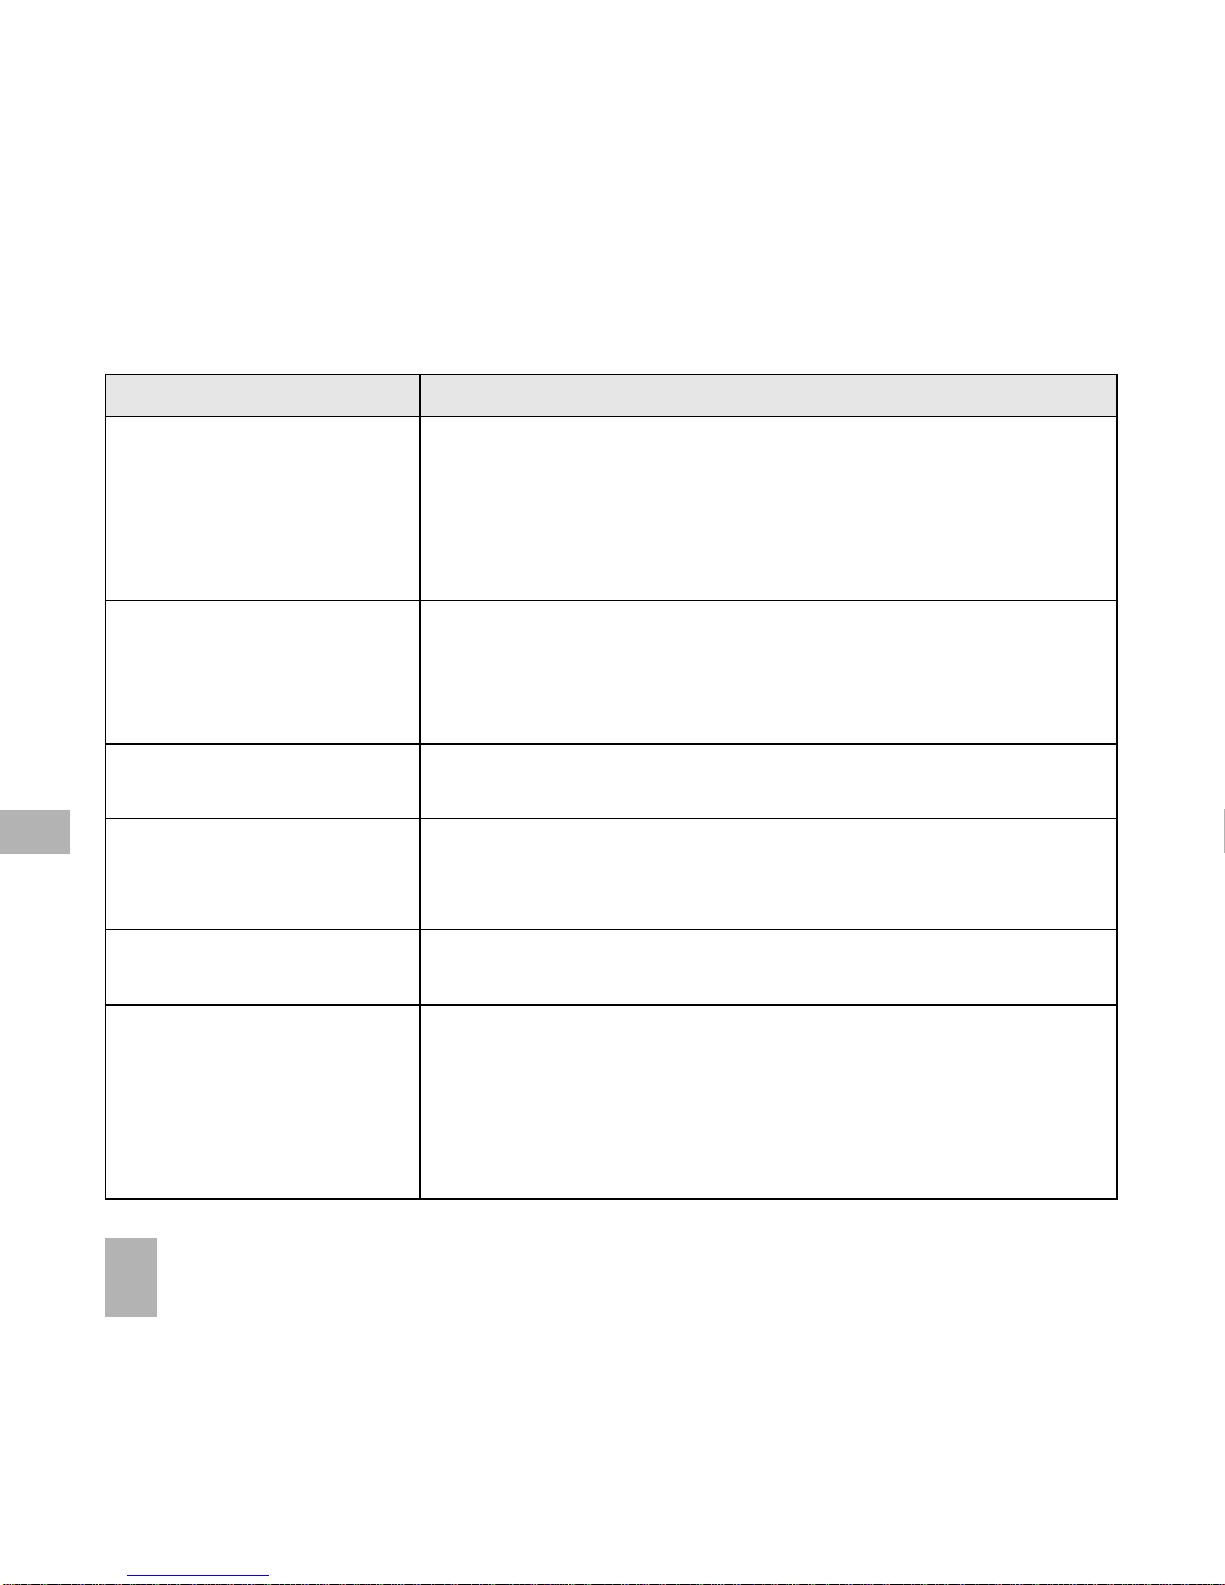
92
Symptom
I cannot charge the
phone
How do I enter text in
an SMS?
How do I change the
Ringtone?
The handset switches
off after charging.
The handset switches
on automatically
My phone is not able
to connect to other
Bluetooth devices
Solution
Confirm the charger is properly inserted.
Remove the battery, clean the contacts and check
it is inserted correctly. The battery may be worn out
and needs to be replaced.
Tip: Charge the phone using the supplied USB cable.
From the phone number field press the down arrow
twice to move into the text area. Use predictive
text or abc mode to manually type words. See
chapter 6 for details.
Edit the current profile and select a new tune from
the Audios directory. See chapter 7 for details.
The handset is charging in the off state. Press and
hold the Red key to switch the handset ON or charge
it in the ON state
An alarm or calendar event will switch the handset
on automatically.
Turn Bluetooth on. Set visibility to Show. Possible
compatibility issues. Manufacturers incorporate
different Bluetooth profiles. Not all functionality is
supported. For file transfer use alternative methods
such as Email or MMS.
14
Page 93
93
14.2 Error Messages
14.3 Support Information
• For Warranty Service directions please consult the ZTE website at http://www.
zte.co.nz
• All calls for PIN number enquiries, Network problems, Web Access, Account
and Billing Information, USIM card registration and general enquiries should
be directed to your Service Provider.
Message Solution
No (U)SIM detected Check a valid USIM card is inserted
See 2.2 How do I insert the USIM Card?
Enter PIN code Enter the correct PIN code supplied by your
service provider
Enter PUK code Contact your service provider to get the PUK
code
Enter 16 digit unlock code Please contact your service provider
Enter handset lock code The default handset lock code is 0000
14
Page 94

94
14.4 Warranty Information
The warranty does not apply to defects or errors caused by:
(a) Reasonable abrasion.
(b) Misuse including mishandling, physical damage, improper installation,
unauthorized disassembly of the product.
(c) Water, exposure to solvents or any other liquid damage.
(d) Any unauthorized repair or modification.
(e) Power surges, lightning damage, fire, flood or other events outside ZTE’s
reasonable control.
(f) Use of the product with any unauthorized third party products such as
generic chargers.
(g) Any other cause beyond the range of normal usage for products.
The End User shall have no right to reject, return, or receive a refund for any
product under the above-mentioned situations. Consult the warranty card for
full information
14
Page 95
95
14.5 Technical Parameters
Network 3G WCDMA 850, 1900, 2100 MHz with HSDPA 7.2Mbps
Compatibility GSM 850, 900, 1800, 1900 MHz with EDGE 236Kpbs
Dimensions Approx 103mm x 51mm x 17.3mm (LxWxH)
Weight Approx 108g (Including standard battery)
Features MP4 video, MP3 audio, Video Phone, USB, MIDP 2.0
JAVA, 225MHz Processor, 2.4” 262K colour LCD display
320 x 240 pixels, MMS, E-mail, Calendar,
Speakerphone, Voice Recorder, Bluetooth 1.2 Stereo,
Supports 4GB Micro-SDHC, CTM, FM Radio, T-Coil support
Battery 900mA hours, Lithium ion (Li-ion)
Idle time* Up to 200 hours
Talk time* 180 minutes on GSM network, 180 minutes on WCDMA
network, Video call >70 minutes
Charge time Approximately 3 hours
Battery Life Approximately 400 charge cycles
Supported Files JPG, BMP, GIF, MP3, WAV, MID, WMA, MMF, AMR, MP4,
3GP
Camera 3MPixel (Back Camera) / 0.3MPixel (Front Camera)
*The phone’s talk and idle time are based on ideal working environments. The
use of extended applications and network conditions can reduce battery life.
14
Page 96

96
• Handle the handset with care. Do
not drop or throw the handset
down roughly.
• Do not immerse in any liquid. The
handset contains a liquid detection
sticker and the warranty will be
voided by any liquid damage.
• Do not place the handset near
computer disks, credit cards, and
other magnetic media. The
information contained on disks or
cards may be erased or damaged.
• Do not leave the handset or
battery in direct sunlight or near
other heat sources where
temperatures could exceed 45°C.
• Keep the handset, battery, charger
and other accessories away from
children.
• In the unlikely event of a battery
leak avoid contact with your eyes
15 General Safety and Maintenance Information
The handset contains delicate electronic circuitry, magnets and battery systems.
You should treat it with care and pay attention to the following points:
or skin. Flush with water and
consult a doctor.
• Observe and obey warning signs
at petrol stations, airports and
hospitals.
• The operation of some medical
electronic devices, such as hearing
aids and pacemakers, may be
affected by the handset.
• Take care not to allow metal
objects such as coins or keys to
come into contact with the battery
terminals.
• Do not dispose of batteries in a
fire.
• Do not throw batteries into
household rubbish, return them to
a recycling point.
• Do not connect the handset to any
other chargers or cigarette lighter
chargers.
15
Page 97

97
• Only use the supplied charger.
• Be careful not to pierce the battery
with sharp objects and do not use
damaged batteries.
• Do not open or modify the battery.
• Stop using the battery if abnormal
heat, odour, discolouration,
deformation, or abnormal
condition is detected during use,
charge, or storage.
• Do not put the battery in your
mouth.
• Only use original replacement
batteries.
• Do not attempt to dismantle the
handset or any of its accessories.
• Do not place the handset close to
the edge of a table in case it
moves when set on vibrate mode.
• Do not put the handset into a
microwave oven, dryer, or highpressure container.
• Don’t use the handset
immediately after a sudden
temperature change eg. from an
air conditioned environment to
high temperature and humidity
outside. In such cases there could
be condensing moisture inside the
handset which can cause internal
damage. Switch off and leave for
30 minutes before use.
• Do not use the handset while
driving or operating other
machinery.
• Do not use the handset where
blasting is in progress.
• Switch the phone off when
boarding aircraft.
• Do not leave the handset at the
bottom of a bag where it may be
damaged by sharp objects.
• At high volume, prolonged
listening to audio devices can
cause hearing loss.
• Do not leave the handset
discharged or disconnected for a
long time, otherwise your personal
data may be lost.
15
Page 98

98
• Remember to make backup
copies of all important data on the
handset.
• Take care when the phone is in
your pocket. Sitting down may
damage the handset.
• It is normal for the handset to
become warm while the battery is
being charged.
• Under poor network conditions
battery life is considerably
reduced.
• When the battery is thrown away
cover the terminals with insulating
tape.
• Emergency service coverage is
dependant on network availability
and battery status.
• It is good practice to switch off the
handset regularly.
• Do not expose the handset to oils
or solvents.
• If you have an alarm set the
handset will switch on at the
prescribed time.
15
Page 99

99
Index
Access Point Settings 86
Advanced Call Settings 35
Answer a Call 23, 32
Appointments 55
Background Screen 47
Backlight Duration 49
Battery 20, 22
Bluetooth 76, 77
Bluetooth Car Kit 78
Calculator 83
Calendar 56
Call Divert 35
Call History 30
Call options 31, 33
Camera 58
CD 65
Change PIN Numbers 51
Charger 21
Charging 22
Contacts 25, 26, 28
Copy photos 67
CTM Set 87, 88
Dial Up Networking 79
Dictionary 40
Download Location 53, 86
DTMF 31
E-Mail 43
Emergency Calls 34
En 38
Environmental 8
Error messages 93
FAQ’s 90
File Manager 52
FM radio 61
Handsfree 31
Java Games 85
Join Me 64, 65
Key Tones 49
Last Number Redial 30
Main Menu 24
Make a Call 23
Make a Voice Call 30
Make Videos 59
Meeting Mode 48
Microsoft Outlook 72
MP3 Player 61
Multimedia Message 41
Music Player 61
Page 100

100
My Words 40
Network Settings 87
PC 65, 68
PIN Codes 51
Playlist 62
Predictive Text 39
Preferred mode 87
Preferred selection 87
Profiles 46
Push Messages 43
Receive a Text Message 39
Restore default settings 86
RF Energy 11
RF Safety Information 11
Ringtone 48
Safety Information 96
Screen Brightness 49
Send a Text Message 23, 38
Send my number 36
Set Alarms 55
Set the Time 21
Shortcut 47
Silent Mode 48
SIM card 18
Slide Show 85
SMS Message Length 41
Snooze 55
Speakerphone 31
Speed Dial 27
Spoken Key Sounds 49
Stopwatch 83
Streaming URL 81
SyncML 81
Take Pictures 58
Technical Parameters 95
Troubleshooting 90
USB 22
Using T-Flash cards 53
Vibrate Mode 48
Video Call 32
Voice Recorder 85
Wallpaper 47
WAP 43
Warranty 94
World Time 83
 Loading...