

Page 1

MC8010CA Smart Hub
User Manual
Page 2

Page 3

LEGAL INFORMATION
Copyright © 2021 ZTE CORPORATION.
All rights reserved.
No part of this publication may be excerpted, reproduced, translated or
utilized in any form or by any means, electronic or mechanical, including
photocopying and microfilm, without the prior written permission of ZTE
Corporation.
ZTE Corporation reserves the right to make modifications on print errors or
update specifications in this manual without prior notice. This manual has
been designed with the utmost care to ensure the accuracy of its content.
However, all statements, information and recommendations contained
therein do not constitute a warranty of any kind, either expressed or
implied.
Page 4

Page 5

Contents
Getting Started ................................................................. 1
Introduction ............................................................................................... 1
Indicator Lights .......................................................................................... 2
Best Placement in the Home ..................................................................... 2
Powering On/Off Your Device ................................................................... 3
Getting to Know the Work Modes .............................................................. 4
Connecting to the Smart Hub ......................................... 5
Configuring Your PC (Verifying IP Address and DNS) .............................. 5
Connecting via Wi-Fi ................................................................................. 7
Using the Wi-Fi Protected Setup (WPS) ................................................... 8
Connecting via a Network Cable ............................................................... 9
Accessing the 5G CPE Web Page ............................................................ 9
Connecting to the Internet ............................................ 11
Connecting to the Cellular Network ......................................................... 11
Connecting to the Public Network (WAN) ............................................... 12
Connecting to Existing Wi-Fi Networks ................................................... 13
Configuring the Work Modes ................................................................... 13
Navigating the 5G CPE Web Page ................................ 1 5
Phonebook and Text Messaging .................................. 1 7
Managing the Phonebook ....................................................................... 17
Managing Text Messages ....................................................................... 18
Managing Data Usage .................................................... 20
Access Controls ............................................................. 21
Limiting Wi-Fi Access With Parental Controls ......................................... 21
Limiting Wi-Fi Access With the White/Black Lists ................................... 21
Managing Settings ......................................................... 23
Cellular Settings ...................................................................................... 23
1
Page 6

Cable WAN Settings ............................................................................... 24
Wi-Fi Settings .......................................................................................... 24
Advanced Settings .................................................................................. 28
For Your Safety .............................................................. 29
Safety Precautions .................................................................................. 29
Cleaning and Maintenance ..................................................................... 30
Limited Warranty ..................................................................................... 30
Limitation of Liability ................................................................................ 31
Radio Frequency (RF) Exposure ............................................................. 31
FCC Compliance ..................................................................................... 32
IC Notice ................................................................................................. 33
Troubleshooting ............................................................. 34
2
Page 7
Getting Started
Introduction
ZTE MC8010CA Smart Hub is a 5G wireless router, working on the 5G, 4G,
3G networks and compatible with WAN. You can connect your devices to it
via network cables or Wi-Fi
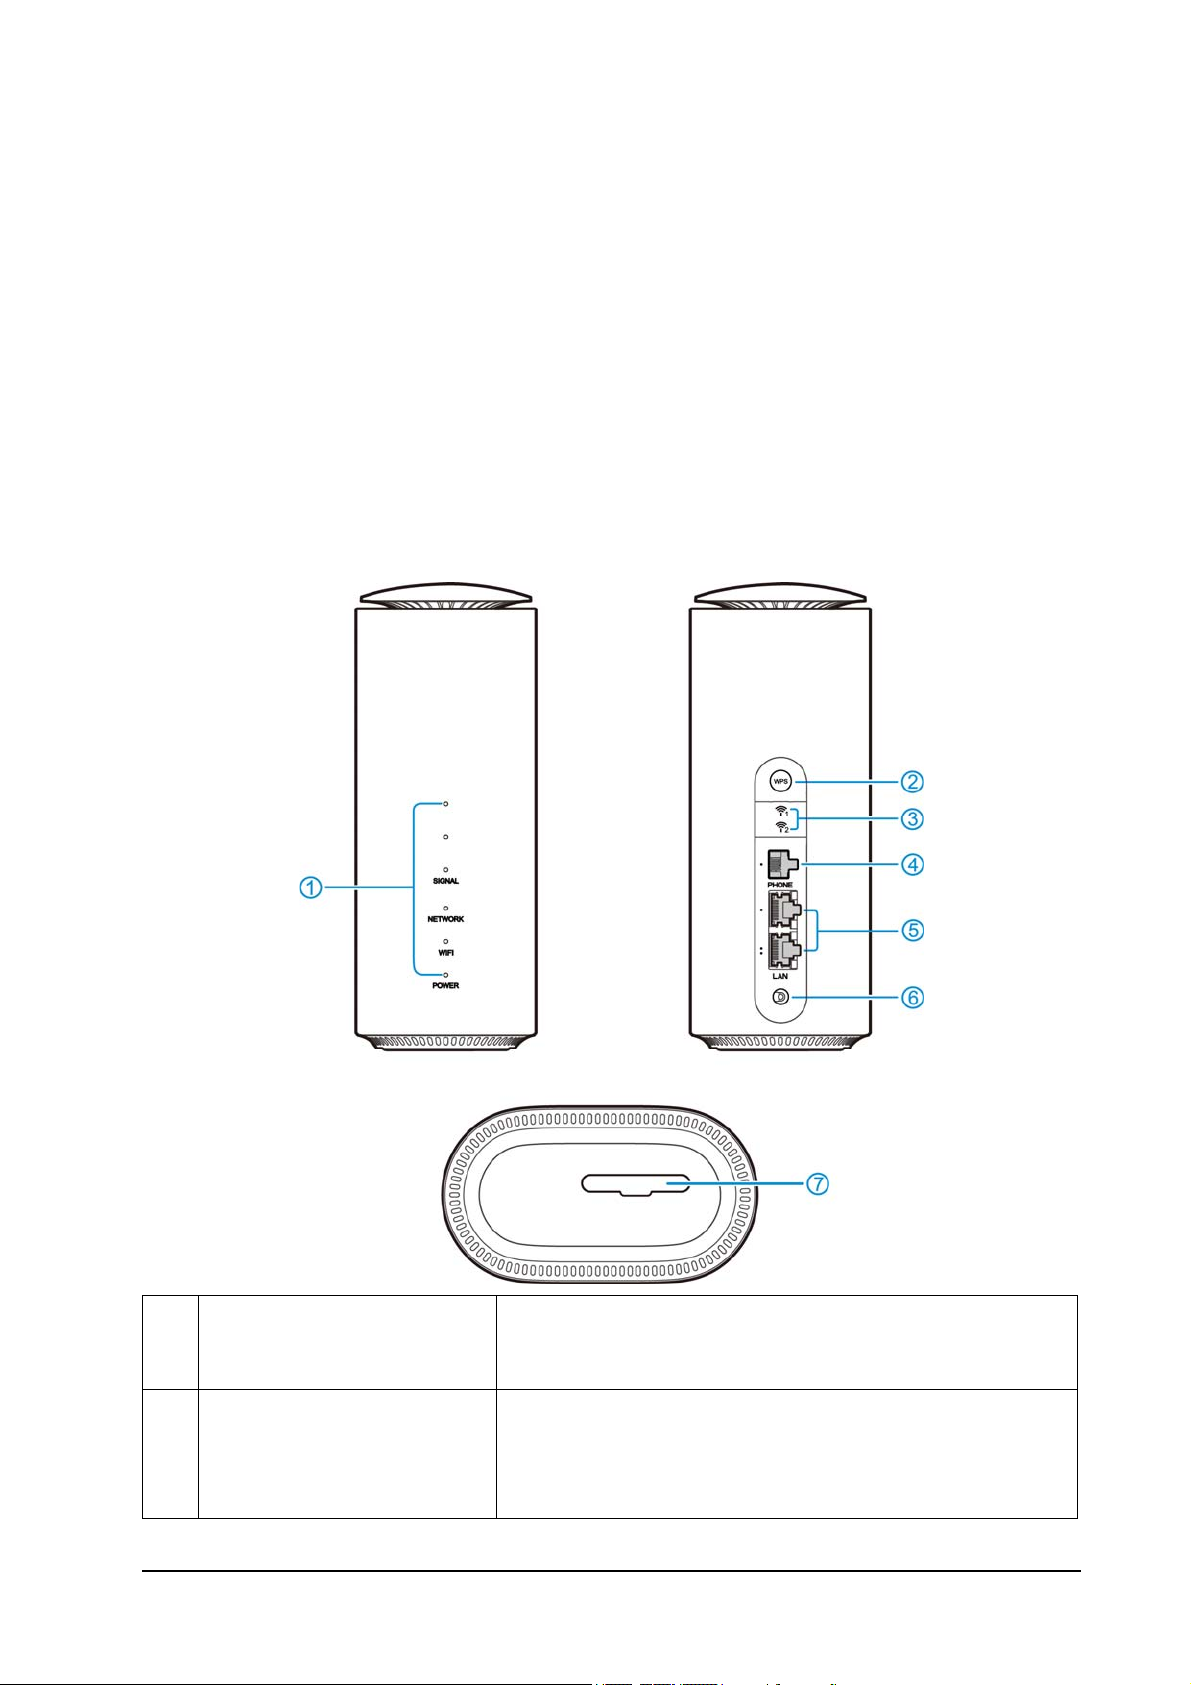
The following figure shows the appearance of the device. It is only for your
reference. The actual device may be different.
®
for data service.
1 Indicator lights
2 WPS button
Show the status of the device, including signal,
network, Wi-Fi, and power.
• Press to activate the WPS function.
• Press and hold for 10 seconds to power off.
1
Page 8
• Press and hold for about 3 seconds to power on.
3 External antenna ports* Connect to external antennas for better signal.
4 PHONE port
5 LAN ports Connect to WAN (public network) or clients.
6 Power port Connect to the power adapter.
nano-SIM card slot and
7
reset hole
The phone port is disabled. Please do not use this
port to make voice calls or call 911.
• Insert your nano-SIM card.
• Press and hold the reset hole for about
3 seconds to restore your device to the factory
settings.
* External antenna is not included. You may need to purchase separately.
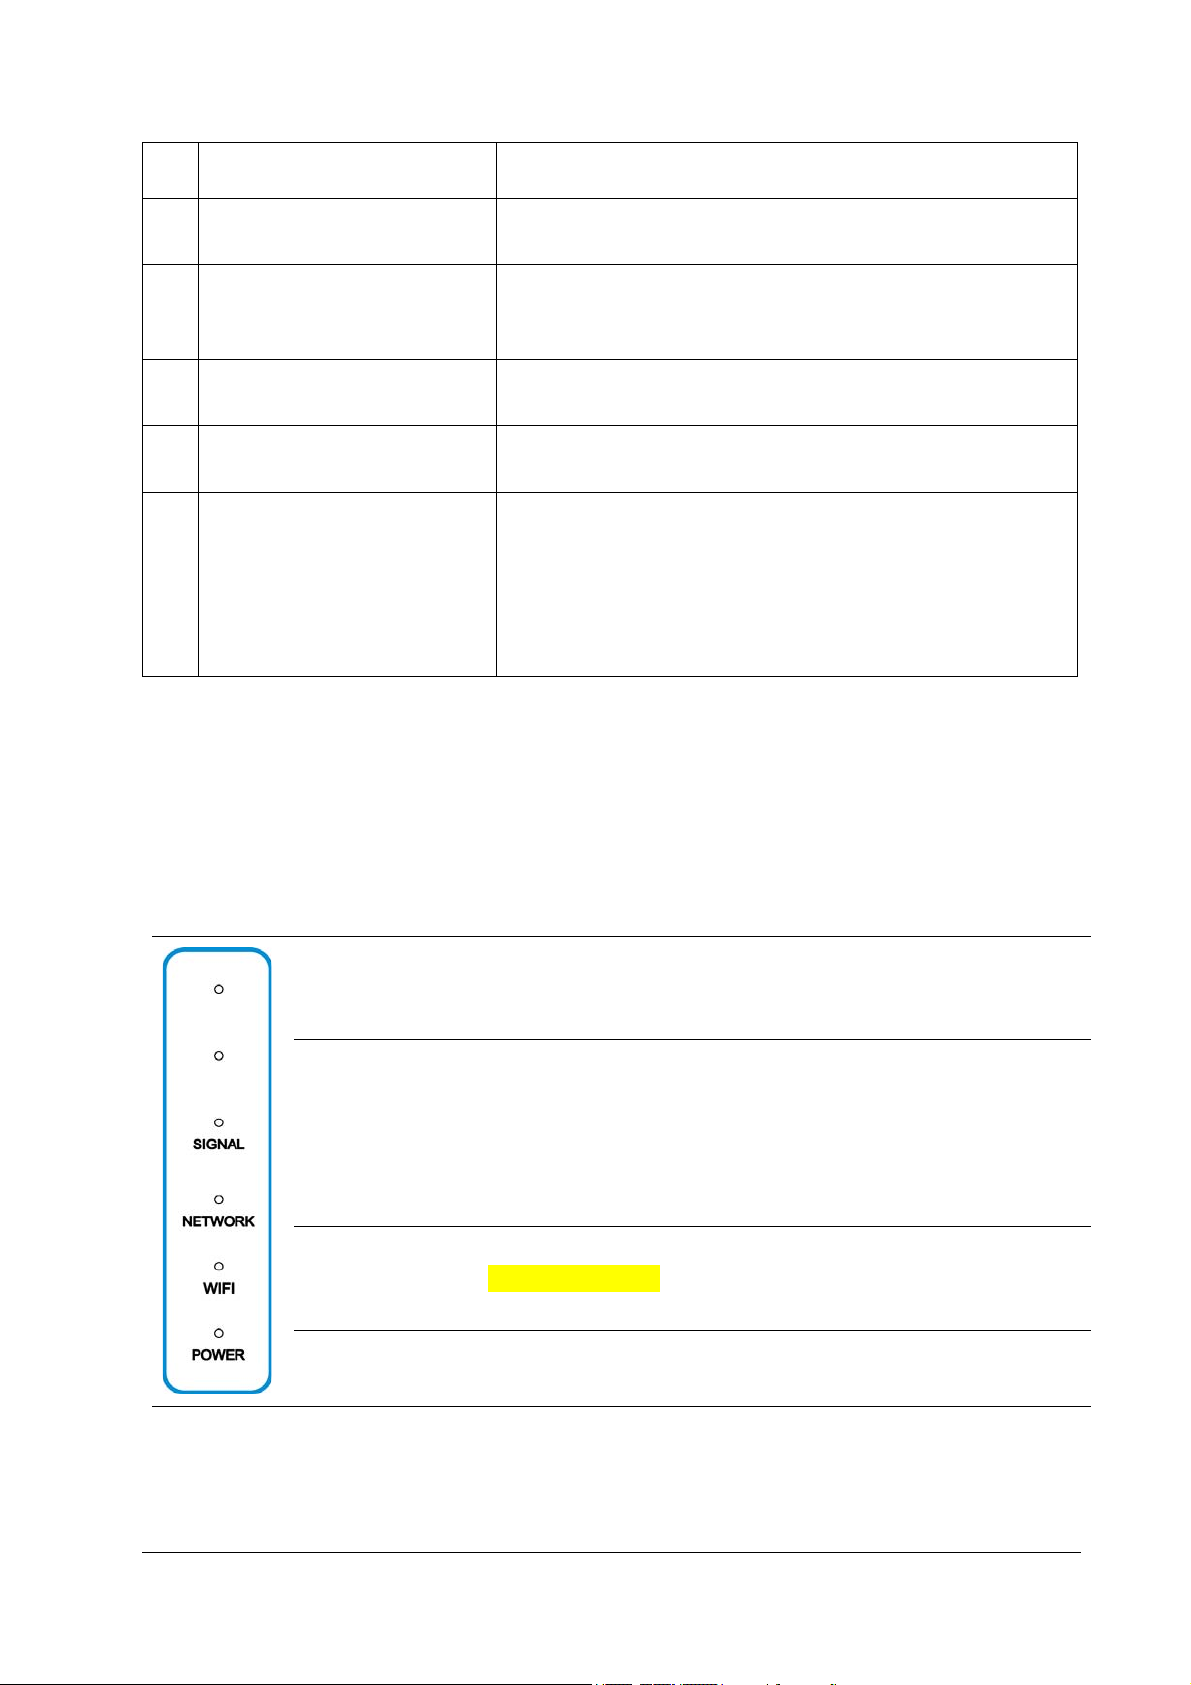
Indicator Lights
When the Smart Hub is powered on, the following indicators may light up
on the front of the device. Here is what they mean.
SIGNAL
(Three lights)
NETWORK
WIFI
POWER
On: Three lights show the signal strength. More lights
on means better signal.
Off: There is no signal or no nano-SIM card inserted.
Red solid: The Smart Hub is powered on but not
registered to the mobile network.
Blue solid: The Smart Hub is registered or connected
to the 3G/4G mobile network.
White solid: The Smart Hub is registered or
connected to the 5G network.
White solid: Wi-Fi works normally.
White blinking: WPS is activated.
Off: Wi-Fi is off.
On: The Smart Hub is powered on.
Off: The Smart Hub is powered off.
Best Placement in the Home
For best connection from the Smart Hub to the cellular network:
2
Page 9

• Place your Smart Hub in a central location close to a window where
there is also a power source. Concrete walls, metal doors can reduce
cellular signal from the tower. Placement in basements should be
avoided.
• Signal strength: You can check the cellular signal strength by checking
the signal indicators on the Smart Hub or after logging into the 5G CPE
web page (see Accessing the 5G CPE Web Page). If you do not have
full network signal bars, try setting up the Smart Hub in another location
of your home.
For best Wi-Fi connection between the Smart Hub and the clients:
• Minimize interference by trying to keep the following items no closer
than 2~3 metres from your Smart Hub: Cordless telephone base
stations, microwaves, baby monitors, Bluetooth devices, wireless
speaker systems.
• Avoid congestion since adding additional devices to your Wi-Fi network
may reduce the speed for all devices on that network.
• Make sure you have a good Wi-Fi signal on your client devices.
Powering On/Off Your Device
Connect the AC adapter/power cable from the Smart Hub to a wall power
outlet. The device will turn on automatically.
3
Page 10
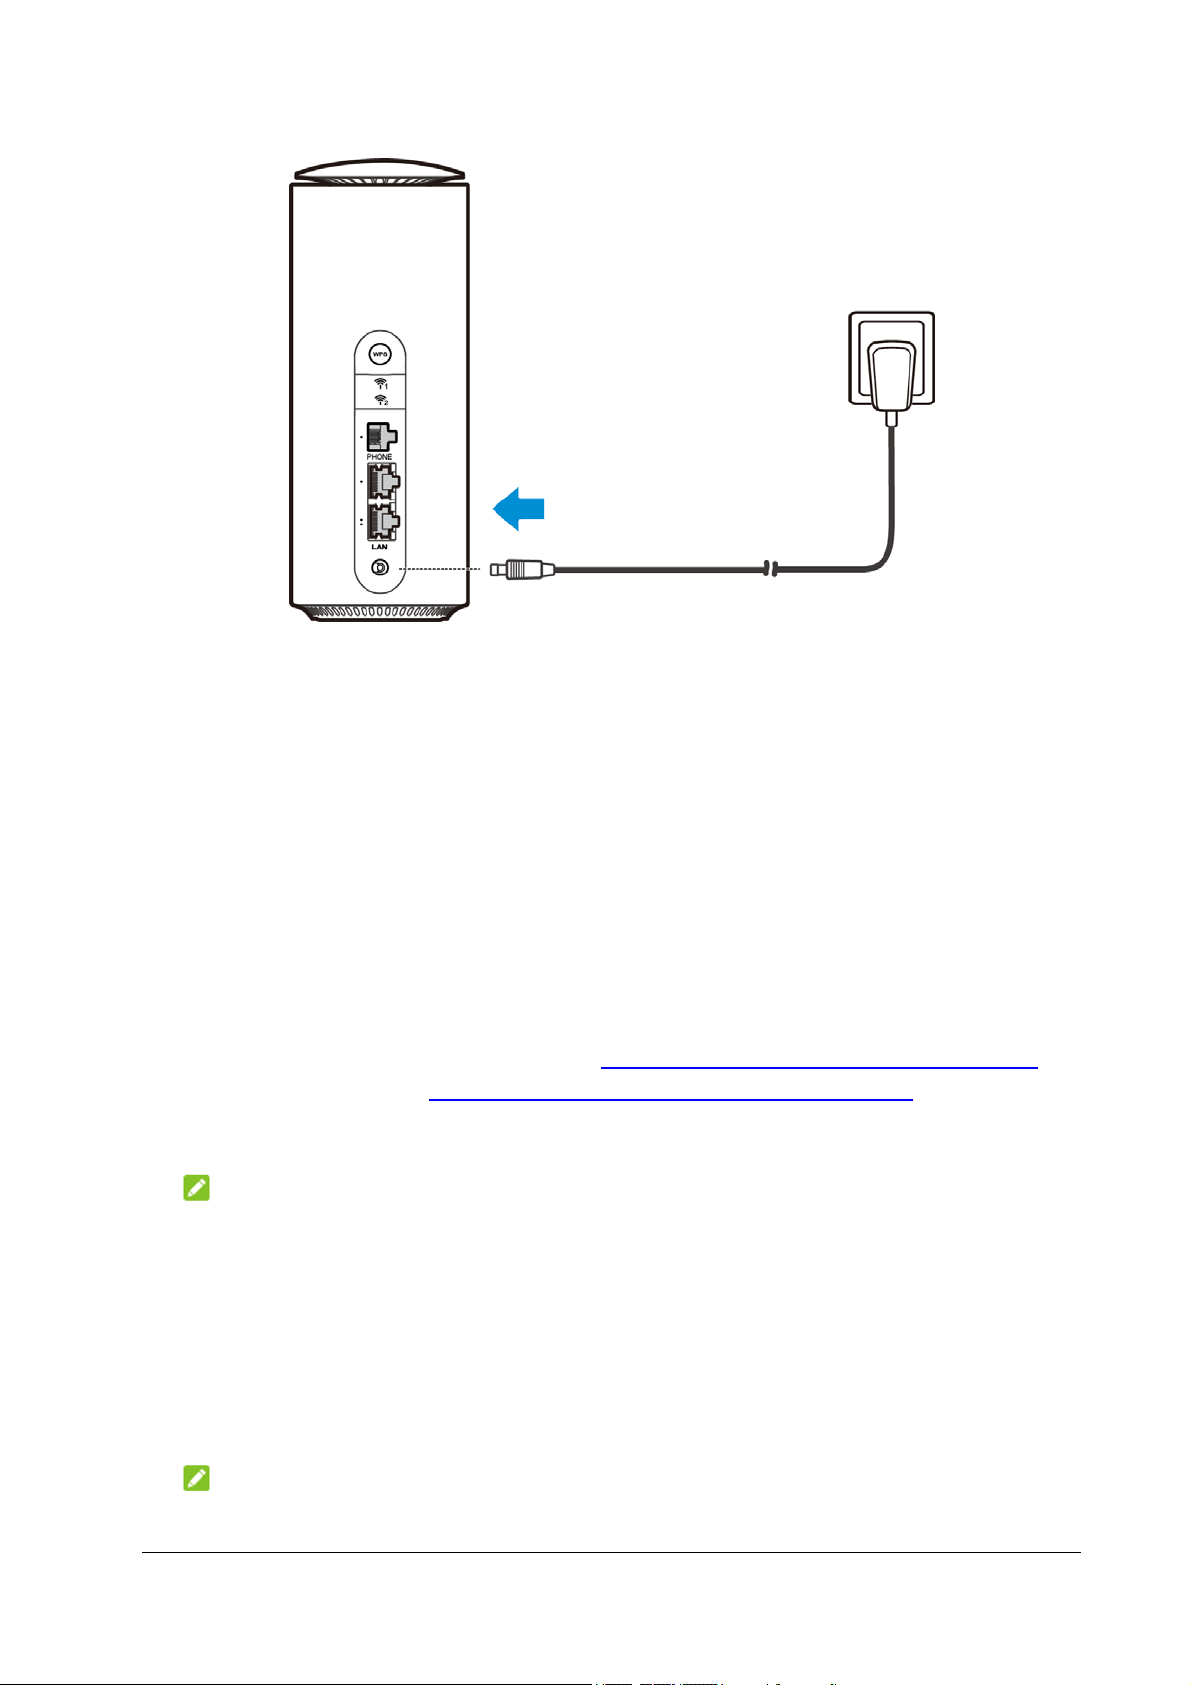
To power off without disconnecting the cable or the adapter, press and hold
the WPS button for 10 seconds. You can then press and hold the button for
about 3 seconds to power on again.
Getting to Know the Work Modes
You must set the correct work mode for the Smart Hub in order for it to
connect correctly under different scenarios. The Smart Hub offers 4 work
modes that you can choose from in the 5G CPE web page after it is
disconnected from the Internet.
• Wireless broadband mode: Connect the Smart Hub to the Internet via
the installed nano-SIM card (see Connecting to the Cellular Network) or
Internet Wi-Fi (see Connecting to Existing Wi-Fi Networks). Clients can
connect to the Smart Hub with a LAN cable or through Wi-Fi to access
the Internet and visit the 5G CPE web page.
NOTE:
Unplug LAN cables from both LAN ports of the Smart Hub before using
this mode.
• Cable broadband mode: Connect the Smart Hub to the public network
(WAN) via a LAN cable. Clients can connect to the Smart Hub with a LAN
cable or through Wi-Fi to access the Internet and visit the 5G CPE web
page. You cannot access the Internet via the cellular network even when
a valid nano-SIM card is installed.
NOTE:
When switching to Cable broadband mode in the 5G CPE web page,
4
Page 11

you need to select the LAN port for the WAN connection. The other LAN
port is free for a client to connect.
NOTE:
In Cable broadband mode, you cannot use the nano-SIM card to connect
to the Internet.
• Bridge mode: Connect the Smart Hub to the Internet via the installed
nano-SIM card (see Connecting to the Cellular Network) and then use
the Smart Hub as a WAN port that another router or a client can connect
to with a LAN cable. The client/router can obtain the IP address from the
WAN DHCP host and connect to the Internet directly.
NOTE:
When switching to Bridge mode in the 5G CPE web page, you need to
select the LAN port that the router is connected to.
NOTE:
In Bridge mode, you cannot connect to the Smart Hub through Wi-Fi or
the remaining LAN port to access the Internet. Connect to the remaining
LAN port to access the 5G CPE web page for device configuration.
• Auto mode: The Smart Hub will determine work mode by its status of
connection.
Connecting to the Smart Hub
You have two options to connect to the Smart Hub from your client devices,
via Wi-Fi or a LAN cable. Once you are connected, test your connection by
opening the 5G CPE web page.
If you use a computer, set it to obtain an IP address automatically.
Configuring Your PC (Verifying IP Address and DNS)
The following steps and figures reflect configuration for the Internet Protocol
for your connections with a Windows
1. Right-click Network and select Properties.
®
7 operating system.
5
Page 12
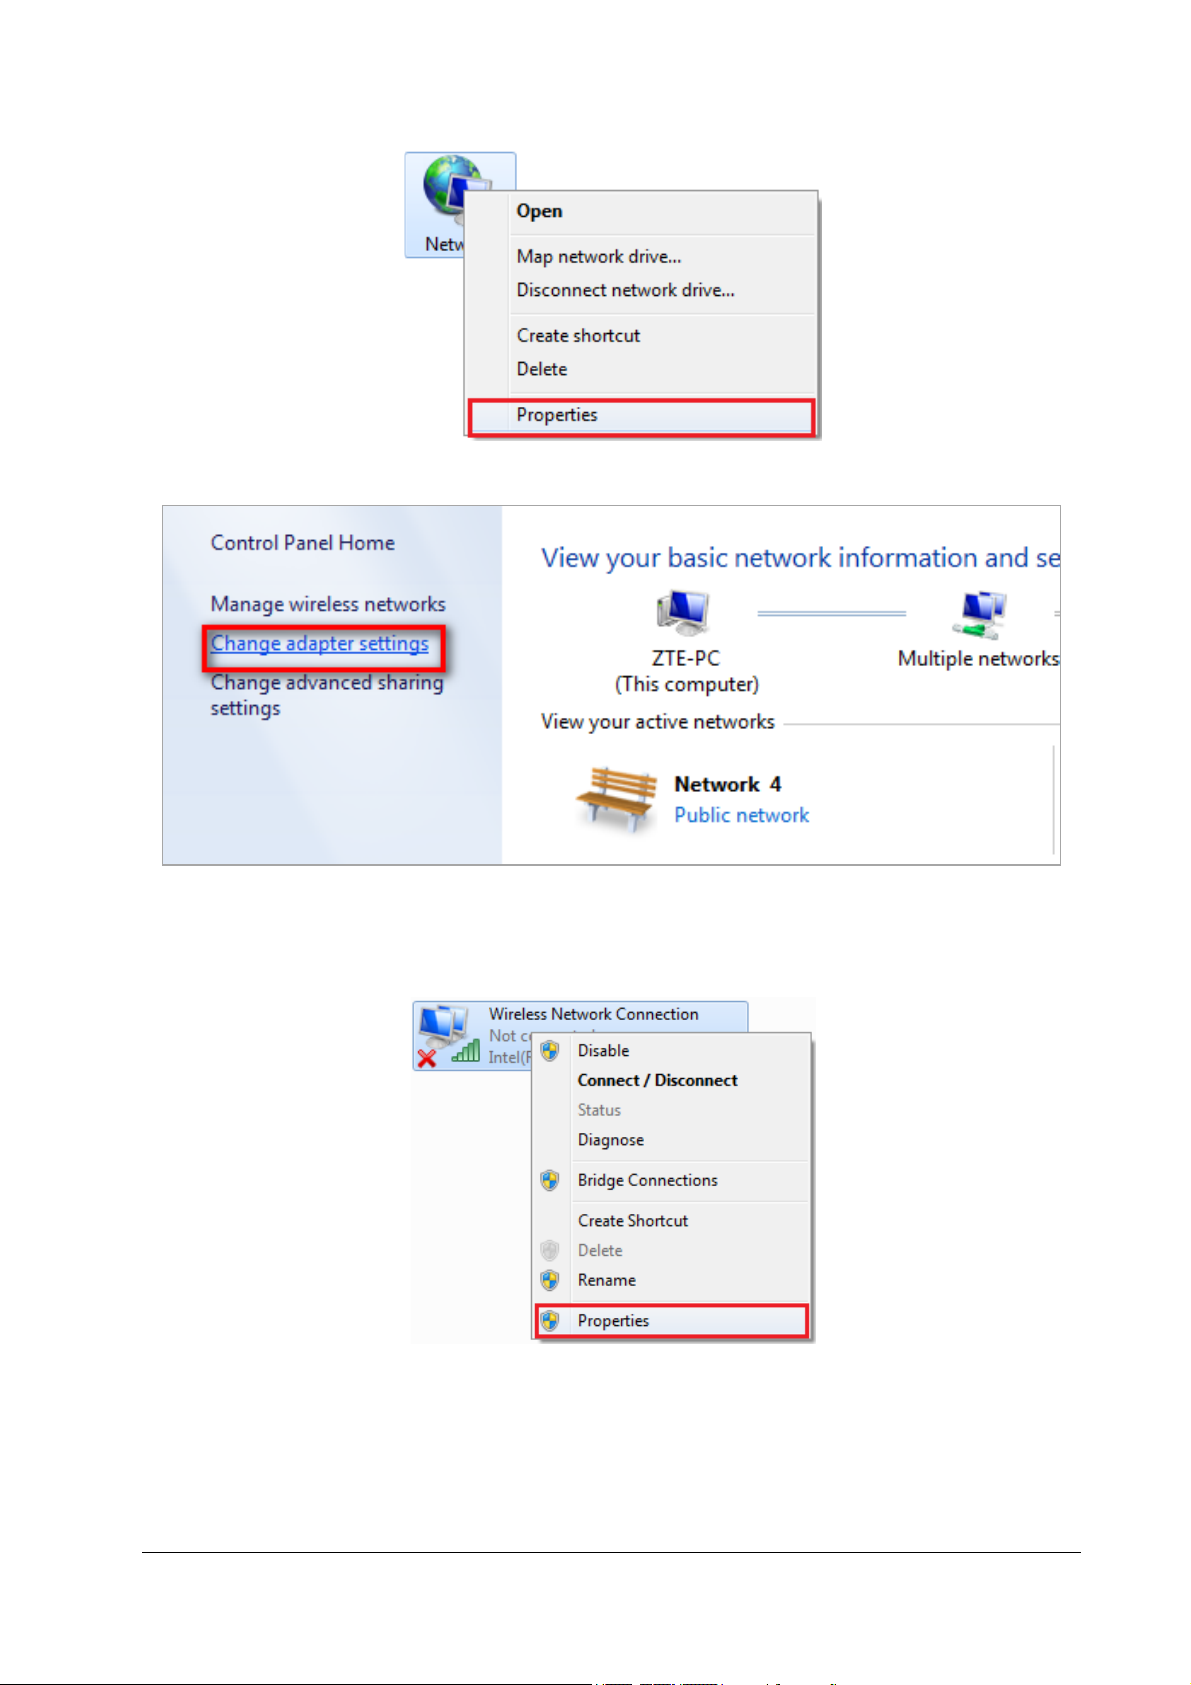
2. Select Change adapter settings.
3. Right-click Wireless Network Connection (if you connect to the Smart
Hub via Wi-Fi) or Local Area Connection (if you connect to the Smart
Hub via LAN), and then select Properties.
4. Select Internet Protocol Version 4 (TCP/IPv4), and then click
Properties.
5. Select Obtain an IP address automatically and Obtain DNS server
address automatically, and then click OK to finish the configuration.
6
Page 13

Connecting via Wi-Fi
1. Find the default Wi-Fi name (SSID) and password on the sticker at the
base of the Smart Hub.
2. On your Wi-Fi enabled devices, turn Wi-Fi on and view the list of
available Wi-Fi networks.
3. Choose the SSID from the sticker, enter the password, and select
connect.
7
Page 14

Using the Wi-Fi Protected Setup (WPS)
If a client supports WPS, you don’t have to input the password manually on
the client to connect with the Smart Hub via Wi-Fi. You have two options to
use WPS.
Option 1: WPS button
1. Press the WPS button. The Smart Hub will keep WPS on for 2 minutes.
2. Enable the WPS function on the client to respond to the WPS
authentication process.
3. Follow the system prompts on your client to finish the connection.
NOTE:
This method cannot get the client connected to the guest Wi-Fi. Use option 2
to connect to the guest SSID using WPS.
Option 2: 5G CPE web page
1. Visit the 5G CPE web page (see Accessing the 5G CPE Web Page).
2. Select Set Wi-Fi > WPS.
3. Select the main SSID for the Wi-Fi connection.
NOTE:
If the Guest SSID is enabled, you can also use it for WPS.
4. Select the WPS authentication method.
PIN: On the client, generate a PIN for WPS and enter here.
PBC: Start the Push Button Configuration (PBC).
5. Click Apply.
8
Page 15

6. Follow the system prompts on your device to finish the setup.
Connecting via a Network Cable
Connect one of the LAN ports on the Smart Hub and the LAN port on your
computer with a LAN cable.
Accessing the 5G CPE Web Page
Visit the 5G CPE web page to configure the Smart Hub settings, such as
work mode, passwords, Wi-Fi SSID.
1. View the sticker at the base of the Smart Hub to get the default URL to
the web page and password.
2. Launch the Internet browser from a device connected to the Smart Hub
and enter the URL in the address bar to load the log in page as below.
9
Page 16
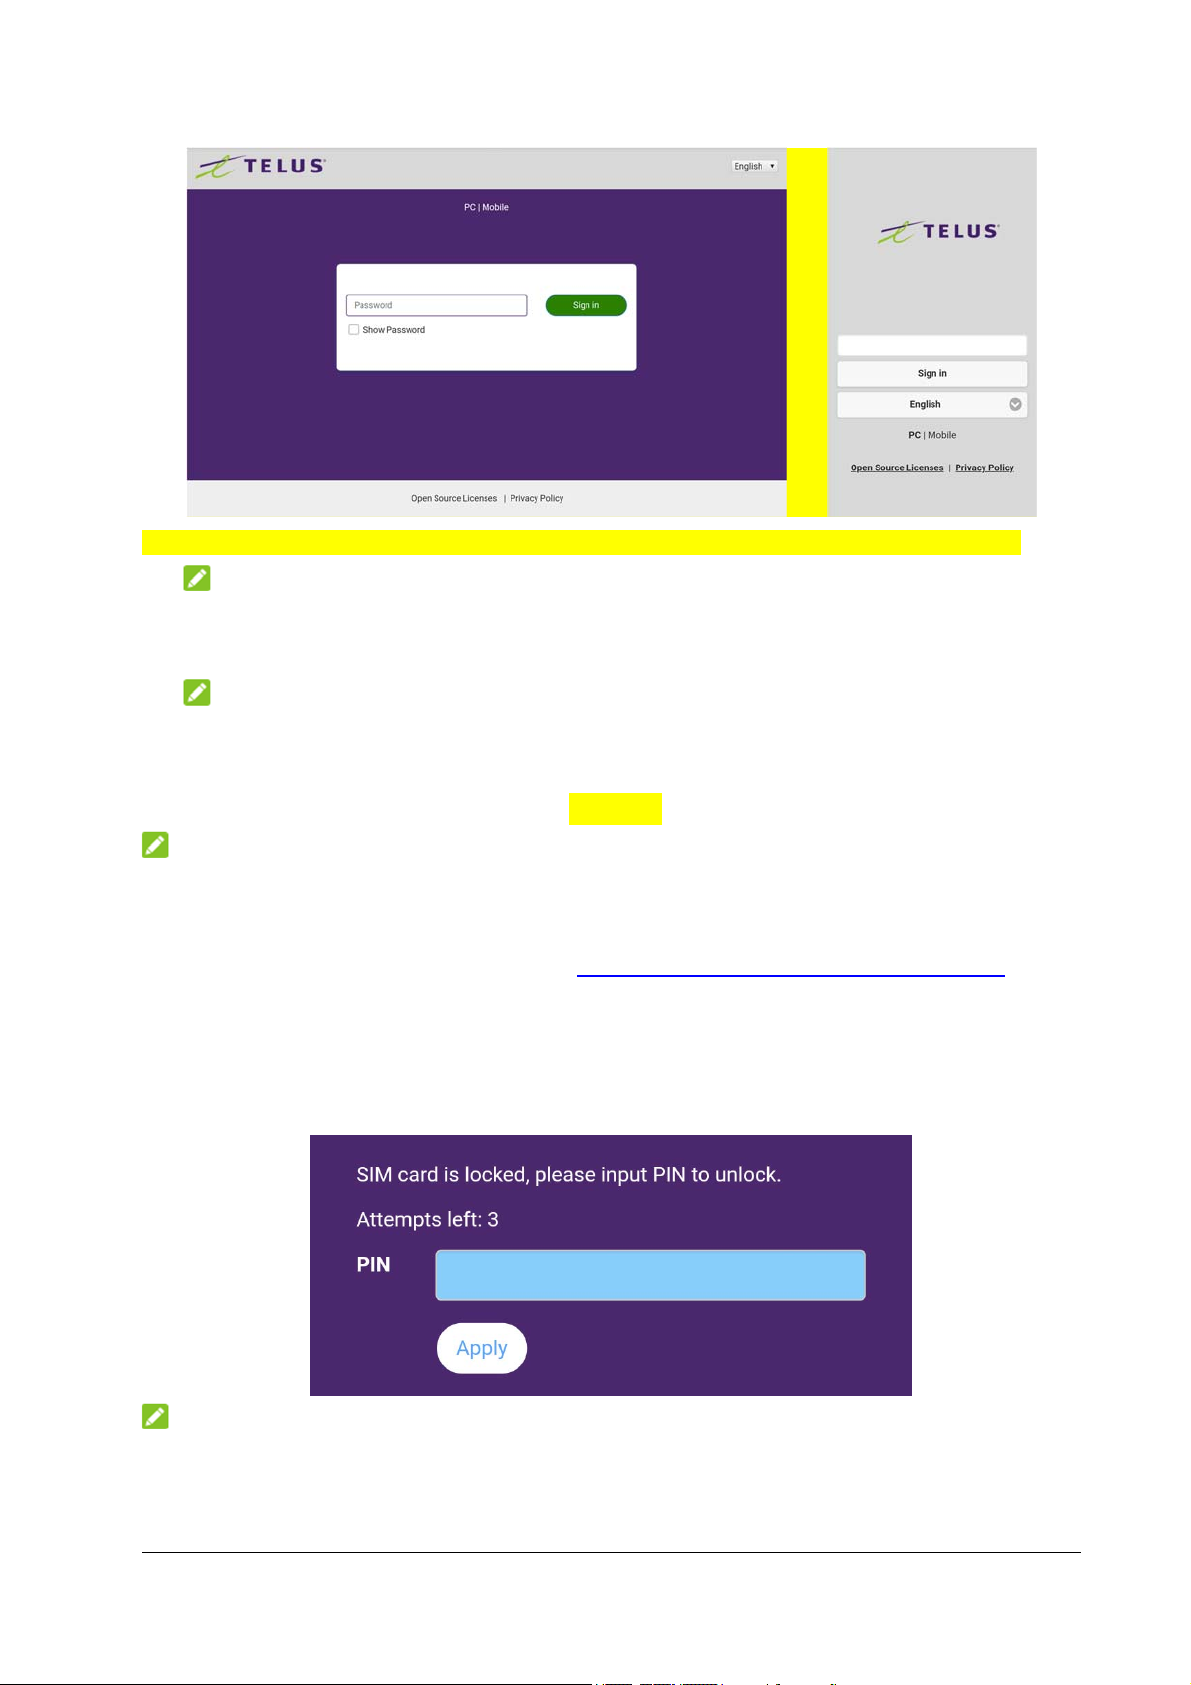
On computers On mobile devices
NOTE:
Select PC or Mobile to switch between computer interface and mobile
device interface.
NOTE:
It is recommended that you use Internet Explorer
®
, Firefox®, Safari®, or
Google™ Chrome™.
3. Enter the password and select Sign in.
NOTE:
As soon as you sign in to the 5G CPE web page, follow the prompts to
change the default password. You can also click Change sign-in
password on the home page (see Navigating the 5G CPE Web Page) to
do so.
If the PIN code of your nano-SIM card is enabled, every time the Smart Hub
restarts you will need to input the code and click Apply in order to connect
to the Internet via the nano-SIM card.
NOTE:
The nano-SIM card will be locked if you enter the wrong PIN code three
consecutive times. Please contact your SIM card provider to get a PIN
Unlock Key (PUK) to unlock the card.
10
Page 17

Connecting to the Internet
Connecting to the Cellular Network
To access the Internet through the cellular network from the Smart Hub,
you need to install a valid nano-SIM card first.
1. Turn the Smart Hub to get access to the base. Open the slot cover.
2. Insert the nano-SIM card as shown.
11
Page 18
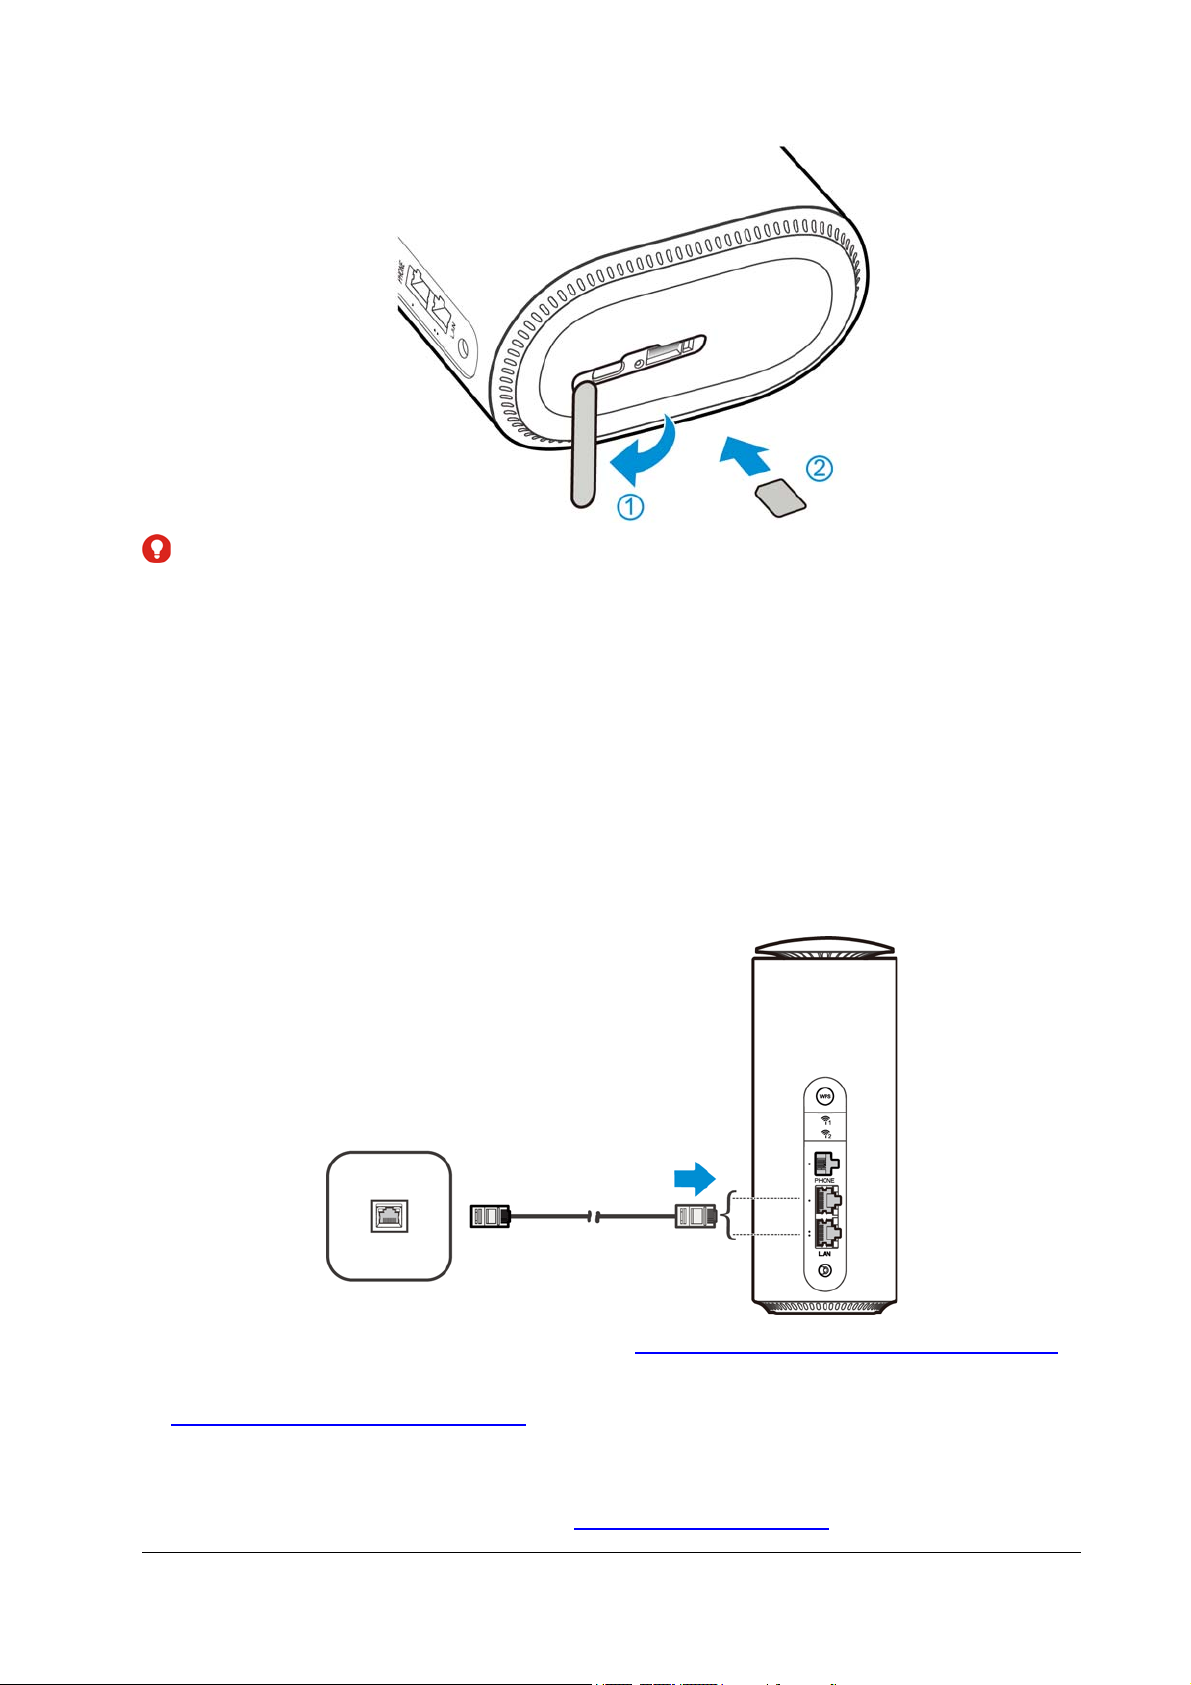
WARNING!
To avoid damage to the Smart Hub, do not use any other kind of SIM cards,
or any non-standard nano-SIM card cut from a SIM card. You can get a
standard nano-SIM card from your service provider.
Connecting to the Public Network (WAN)
Your device supports Cable broadband mode and you can use this mode to
access the Internet.
1. Connect either of the two LAN ports and the broadband service network
port with a network cable.
2. Log in to the 5G CPE web page (see Accessing the 5G CPE Web Page).
3. Change the operation mode to Cable broadband mode or Auto (see
Configuring the Work Modes).
4. Go to the 5G CPE home page and select Set internet to choose the
connection mode and enter the detailed parameters given by your
service provider. Please refer to Cable WAN Settings for details.
12
Page 19

5. Select Connect or Apply.
Connecting to Existing Wi-Fi Networks
Your Smart Hub supports the Internet Wi-Fi function and you can use this
function to extend your existing Wi-Fi network.
NOTE:
Internet Wi-Fi is not available in Bridge mode.
1. Log in to the 5G CPE web page.
2. Select Set Wi-Fi.
3. If Wi-Fi is disabled, select Enable.
4. Select Internet Wi-Fi > Enable > Apply. The Wi-Fi of the Smart Hub will
restart.
5. In the Wi-Fi settings screen, connect to the Wi-Fi network you want. The
following two methods are for your reference.
Select Scan to search for Wi-Fi hotspots. Select a Wi-Fi hotspot
listed and click Connect. Enter a password and click Yes.
Select Add Network, enter the Wi-Fi hotspot information in the Add
Wi-Fi hotspot area, and click Apply.
After the device is connected to the Wi-Fi hotspot successfully, you can
access the Internet.
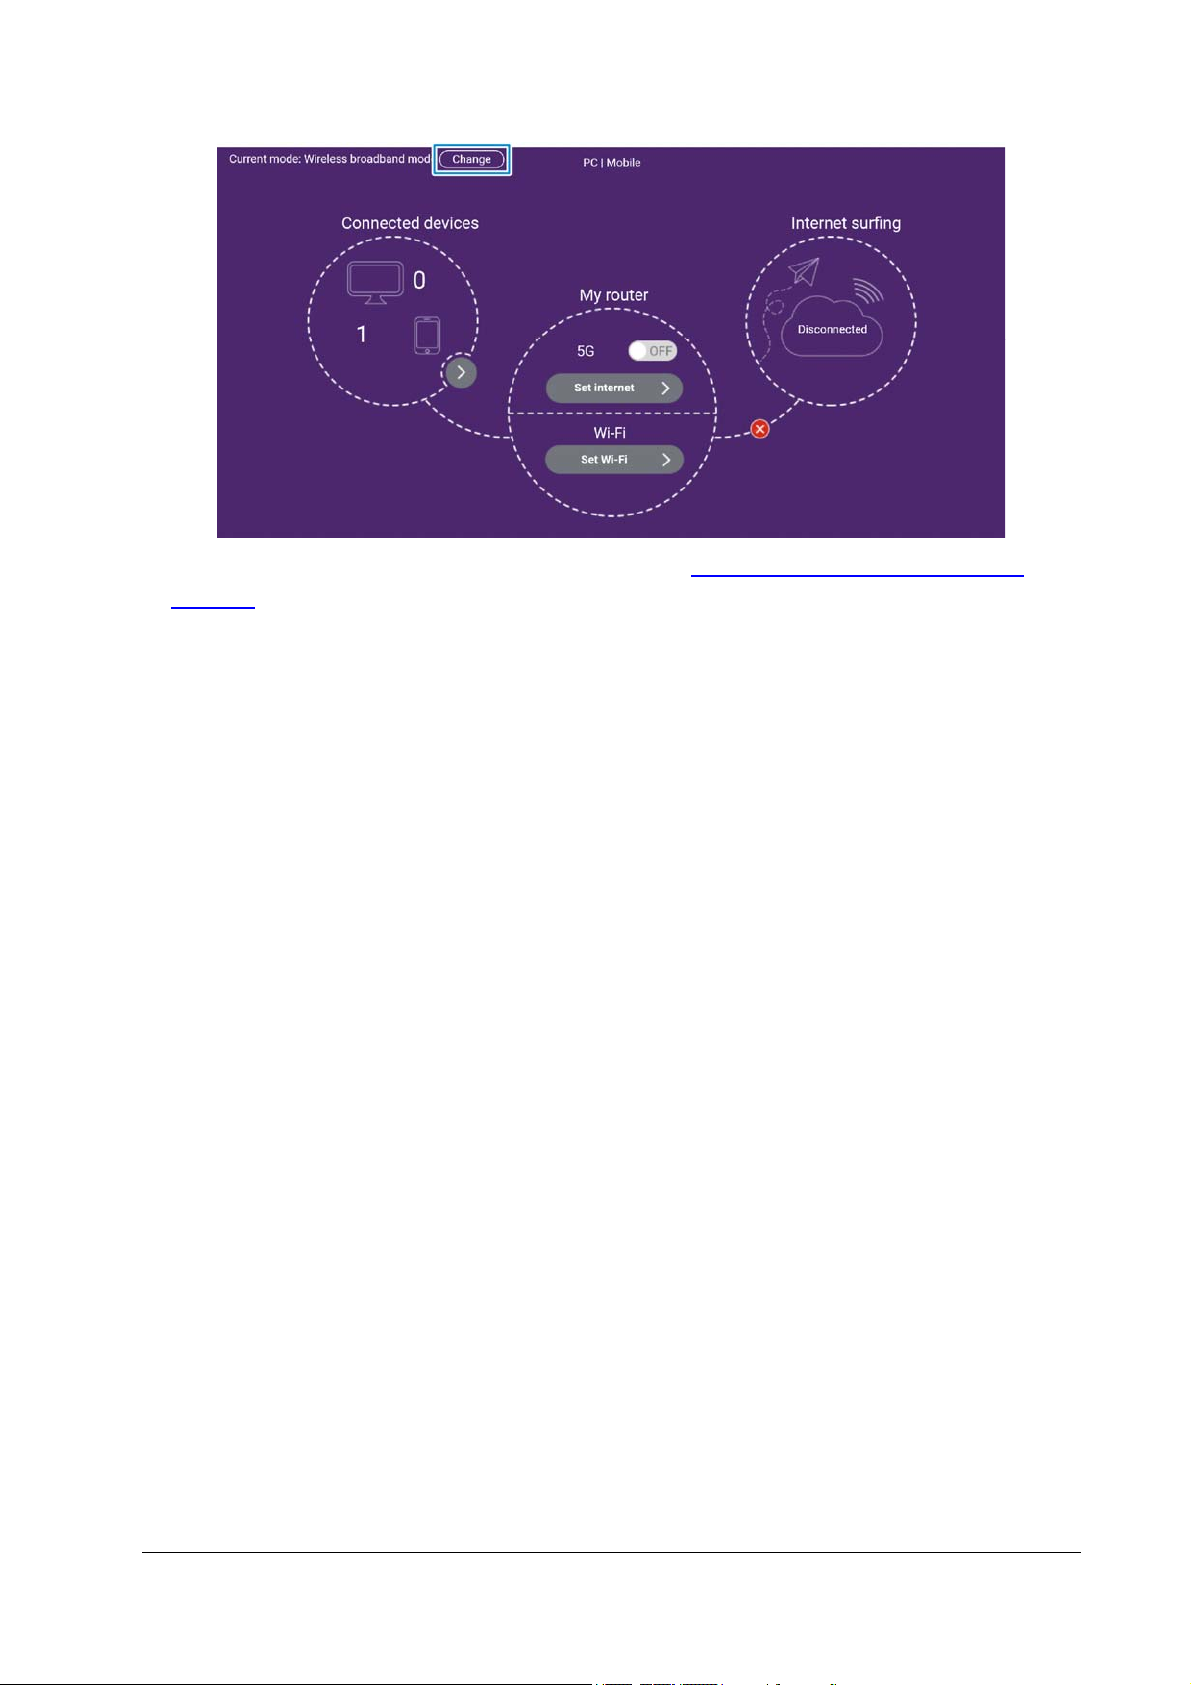
Configuring the Work Modes
1. Log in to the 5G CPE web page.
2. Select the Change button behind the current mode.
NOTE:
If the button is dimmed, disconnect the Smart Hub from the Internet first
by clicking the Internet switch on the center of the web page (in wireless
broadband mode) or by clicking Set internet > Disconnect (in cable
broadband mode).
13
Page 20
3. Select the operation mode you need (see Getting to Know the Work
Modes). If prompted, select the correct LAN port for WAN or router.
4. Select Apply and wait for the Smart Hub to restart.
14
Page 21
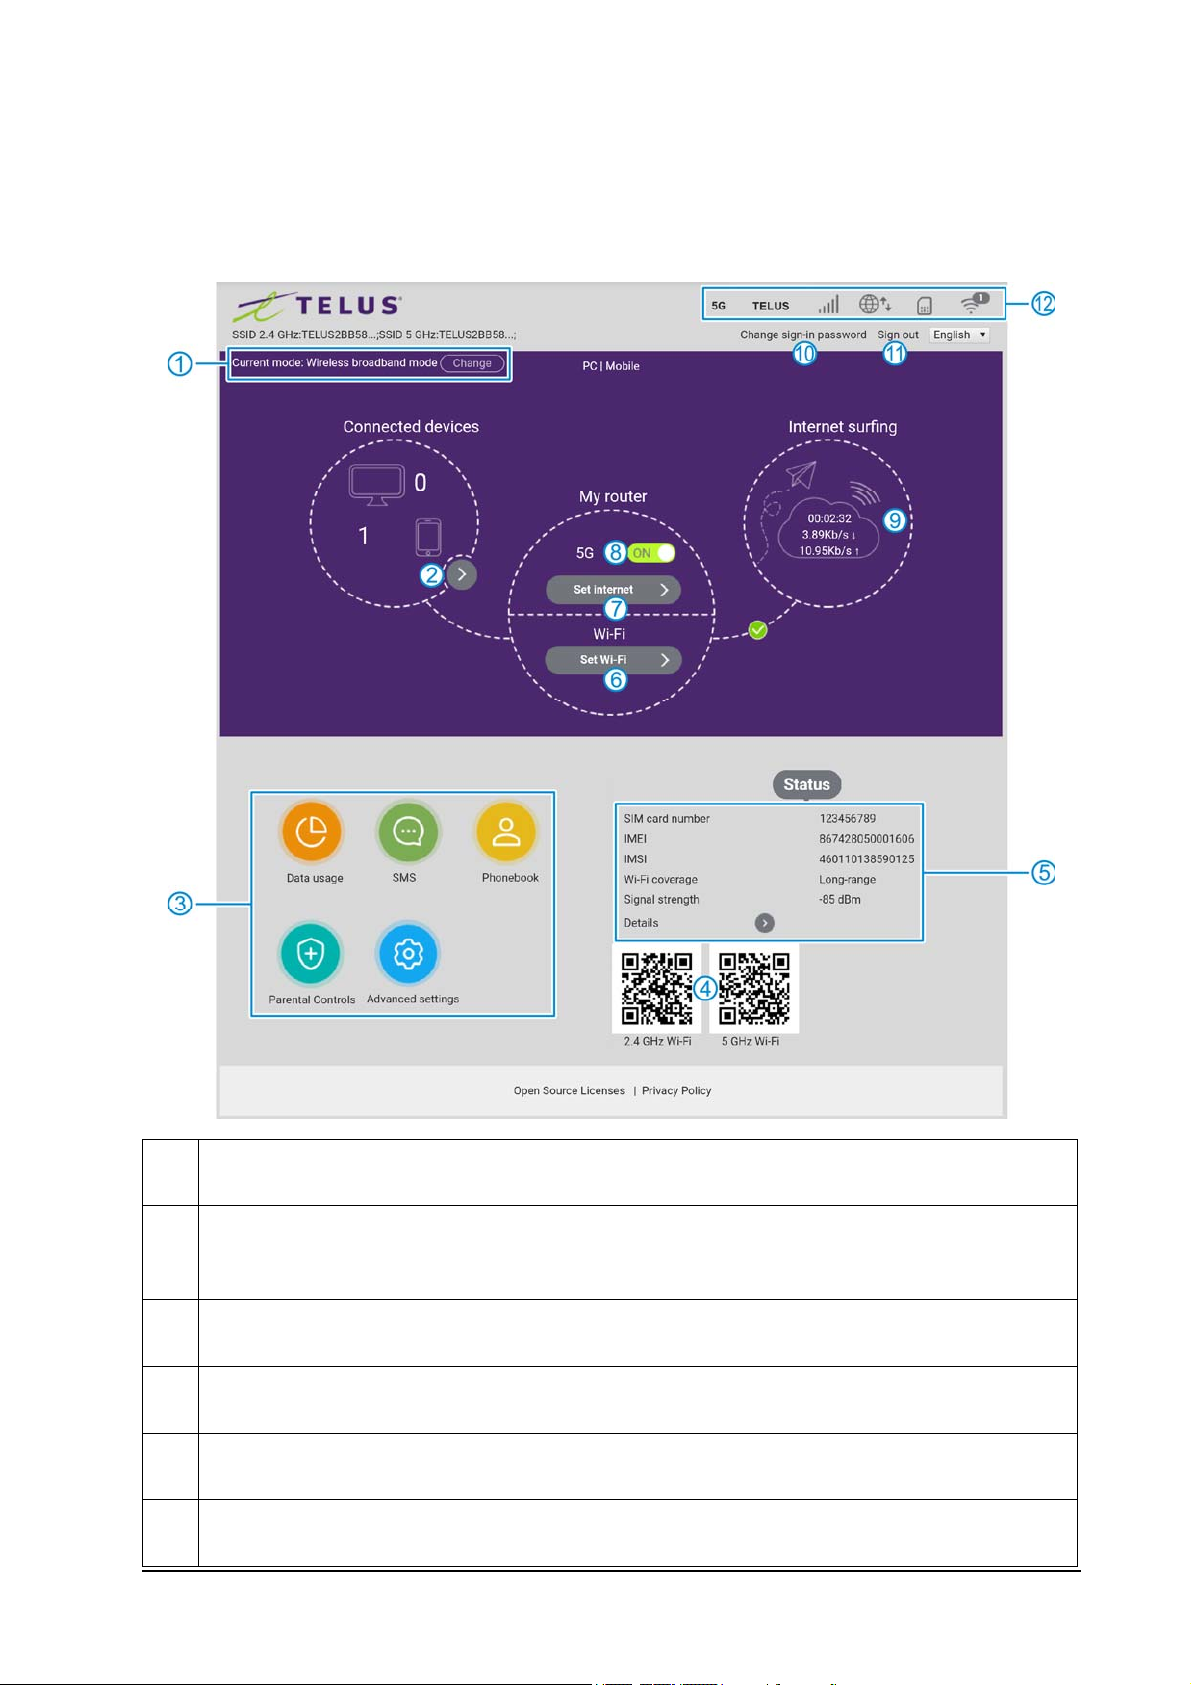
Navigating the 5G CPE Web Page
The 5G CPE home page looks like the following.
1 View and change work mode.
View connected clients and manage the list of blocked devices or allowed
2
devices.
3 Access more features and settings.
4 Scan QR codes with your clients to connect to the Smart Hub via Wi-Fi.
5 Check device status.
6 Manage Wi-Fi settings.
15
Page 22
7 Manage Internet connection settings.
8 Turn on/off cellular data connection.
9 View the Internet connection speed and time.
10 Change the login password to the 5G CPE web page.
11 Sign out of the 5G CPE web page.
12 View the status of the Smart Hub.
NOTE:
In most 5G CPE web pages, you can click to return to the previous
page or click to get more information on the current page.
16
Page 23

Phonebook and Text Messaging
This function allows you to keep a phonebook on the Smart Hub or the
nano-SIM card and send and receive text messages via the nano-SIM card.
NOTE:
Because this function needs cellular network connection, you cannot use it
in cable broadband mode.
Managing the Phonebook
Click Phonebook on the 5G CPE home page to view, add, or delete
contacts. You can also select some contacts to send a text message.
To view contact details:
On the Phonebook page, click a contact in the list to view details. If a
contact is saved to the device storage, details in addition to the name,
mobile number, and group are not displayed in the contact list.
To add a new contact:
1. Click New.
2. Select the storage location and enter the contact name and mobile
number.
NOTE:
For contacts saved to the device storage, you can save more information
such as home/office number, email, and group.
3. Click Save.
To delete a contact or contacts:
1. On the Phonebook page, click the checkboxes on the left of the contacts
you want to delete.
2. Click Delete > Yes.
To edit a contact:
1. On the Phonebook page, click a contact in the list to view details.
2. Click Edit and change the contact information.
3. Click Save.
17
Page 24
To send a text message:
1. On the Phonebook page, click the checkboxes on the left of the contacts
you want to send the message to.
NOTE:
You can add 5 recipients at most for one message.
2. Click Send SMS above the contact list.
3. Enter the message text and click Send.
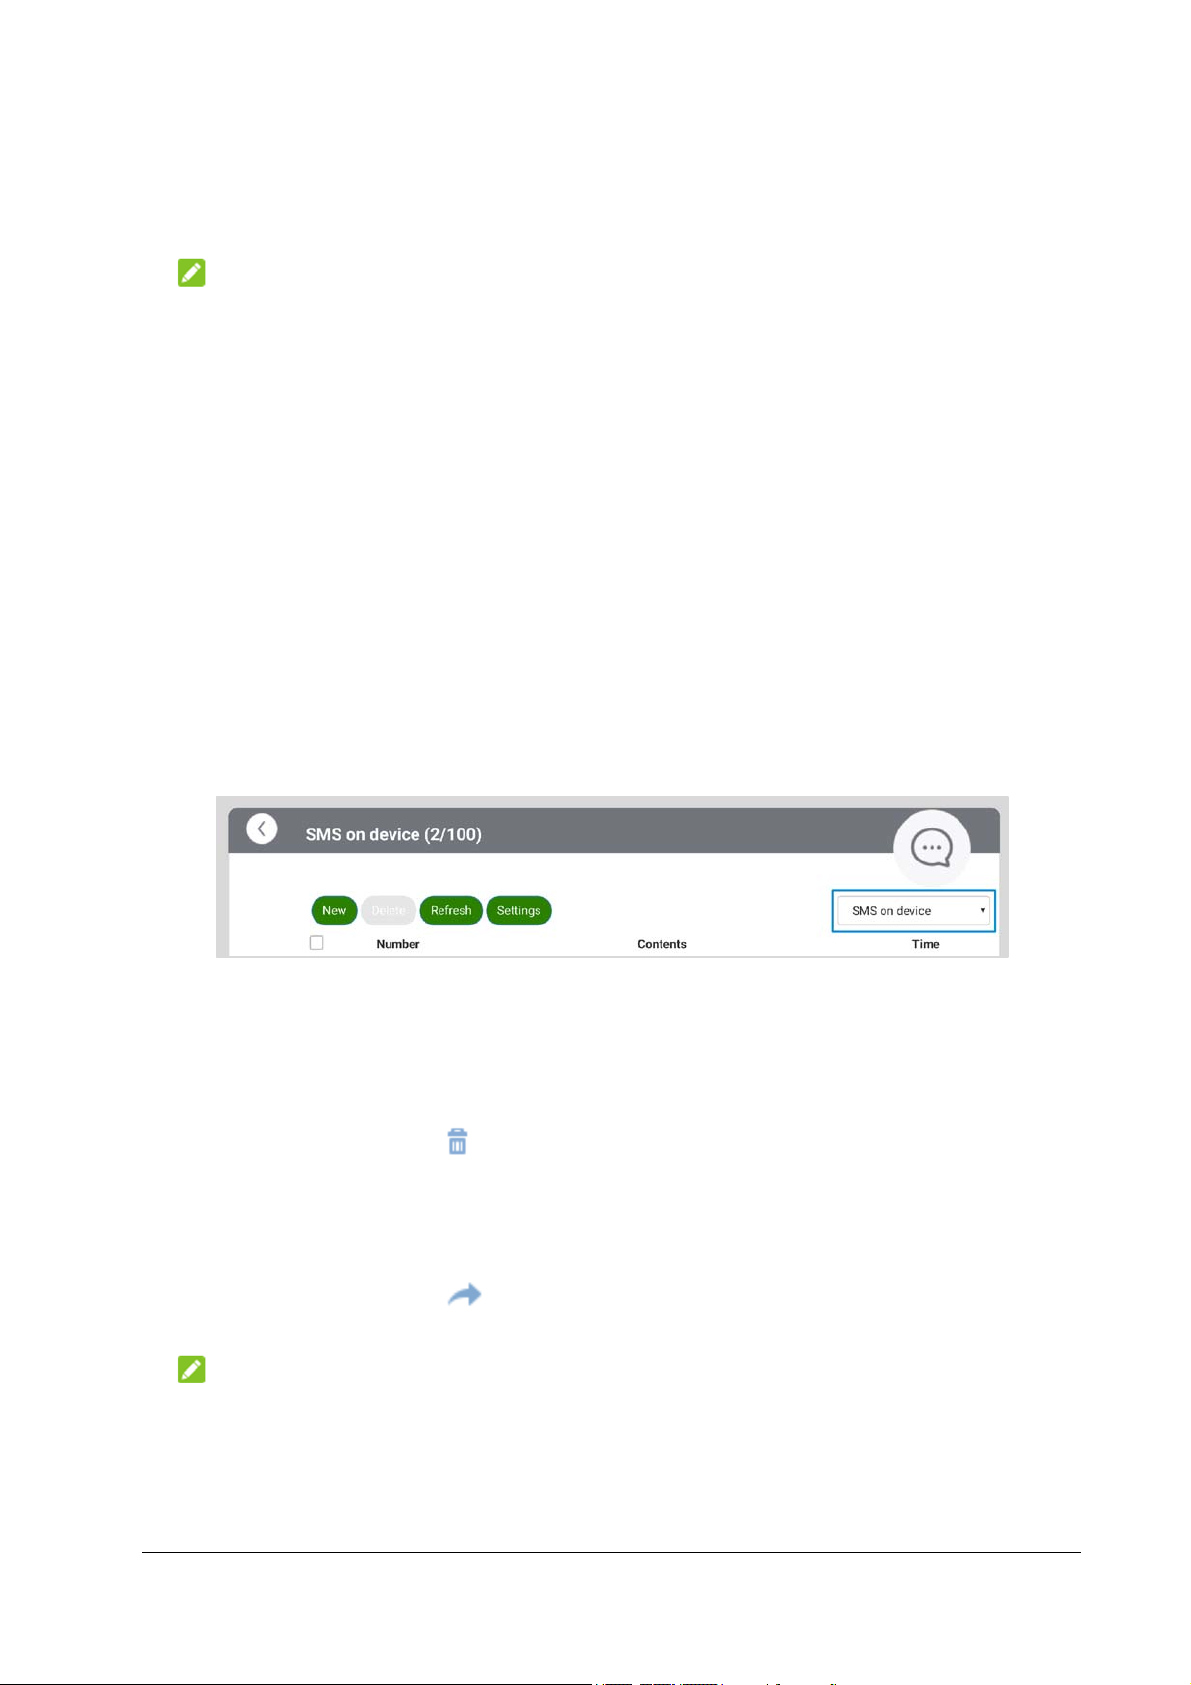
Managing Text Messages
Click SMS on the 5G CPE home page to view sent and received messages
in dialogue format, delete or forward messages, or configure message
settings.
To check your messages:
Click the menu on the top right of the message list and select SMS on
device or SMS on SIM card to view messages stored on the device or the
nano-SIM card.
Click a listing to view the dialogue you’ve had with a certain
number/contact.
To delete a message:
1. Click a listing in the message list.
2. In the dialogue, click below the message you want to delete.
3. Click Yes.
To forward a message:
1. Click a listing in the message list.
2. In the dialogue, click below the message you want to forward.
3. Click the recipient box to enter contacts or recipient numbers.
NOTE:
You can add 5 recipients at most for one message.
4. If necessary, click the message box to edit the message text.
5. Click Send.
18
Page 25

To configure message settings:
1. Click Settings above the message list.
2. Set validity and delivery report, or check the SMS center number.
Validity: Set the valid period for outgoing messages.
SMS Center Number: Display the SMS center number. Please
contact your carrier for more information.
Delivery report: Request delivery reports for outgoing messages
delivered to the recipients.
3. Click Apply to save the settings.
19
Page 26

Managing Data Usage
When the Smart Hub is connected to the Internet via cellular (that is the
Smart Hub is in Bridge mode or Wireless broadband mode), you can check
and manage mobile data use and get data warnings.
1. Click Data usage on the 5G CPE home page.
2. Select Enable to the right of Data management to use the feature.
3. Set the following available options.
Clear data: When enabled, the Smart Hub will reset the used data
to zero at the date of every month you set in Clear date.
Data plan type: Select the data plan type. You need to set the total
amount of your data plan and the warning level (in percentage).
4. Click Apply.
NOTES:
• When the used data or time reaches your specified percentage, you can
get a warning message on the 5G CPE web page.
• If the amount of used data/time differs from the carrier’s accounting, you
can manually calibrate the number in the Data usage or Used time box.
• The data usage is measured by your Smart Hub, and your carrier’s data
accounting may differ.
20
Page 27

Access Controls
You can limit devices’ access to the Smart Hub and the Internet via Wi-Fi
by setting up parental controls, white list, or black list.
Limiting Wi-Fi Access With Parental Controls
The Parental Controls feature allows parents to manage the kids’ access
time to the Smart Hub and the Internet via Wi-Fi.
1. Click Parental Controls on the 5G CPE home page.
2. Below the Current connected devices, click Add to mark the device as a
kid’s device. It will display in the Kids Devices list on the page.
NOTE:
If necessary, you can click next to the device name (host name) to
change it (e.g. Claire’s laptop).
3. Click Manage next to the kid’s device.
4. Enter the time period and days for restriction and click Save. You can
click Add new to add up to 10 restrictions for every kid’s device.
Limiting Wi-Fi Access With the White/Black Lists
Every Wi-Fi device has a unique MAC address, which the Smart Hub can
identify. You can set a white list (Allowlist) or black list (Blocklist) on the
Smart Hub to control Wi-Fi connection to it by filtering the MAC addresses.
1. Click the arrow on the Connected devices circle.
21
Page 28

2. Select Blocklist or Allowlist for Wi-Fi MAC filtering and click Apply.
With Blocklist turned on, devices in the Blocklist cannot connect to
the Smart Hub over Wi-Fi.
With the Allowlist turned on, only devices in the Allowlist can
connect to the Smart Hub over Wi-Fi.
3. Manage the Blocklist or the Allowlist.
When Blocklist is turned on, in the list of wireless access device,
click Block next to the device you want to block. The device will be
moved to the Blocklist. If you know the MAC address of the device,
you can also click Add new to manually add the device to the
Blocklist.
When Allowlist is turned on, you need to click Add new to enter the
MAC addresses for every allowed device.
Click Remove to remove devices from the Blocklist or Allowlist.
22
Page 29

Managing Settings
Cellular Settings
When the Smart Hub is connected to the Internet via cellular (that is the
Smart Hub is in Bridge mode or Wireless broadband mode), you can
manage options for your mobile network.
1. On the 5G CPE home page, turn off the mobile data switch and
click Yes.
2. Click Set internet.
3. Click Connection mode, Network selection, or APN settings to
configure the settings.
Connection mode: Choose to connect to the mobile network
automatically or manually every time the Smart Hub restarts. If you
are connecting to a roaming network, you need to select the check
box to connect to the Internet.
NOTE:
Data roaming may incur significant roaming charges.
Network selection: Select the preferred types of network you wish
to connect to.
APN settings: Set the Access Point Name (APN). To add a new
APN, select Manual for Mode and click Add new. Enter the
parameters and click Apply to save. To change your APN, click the
Profile box and choose a profile and click Set as default.
23
Page 30

Cable WAN Settings
When the Smart Hub is connected to the public network through a WAN
port in Auto or Cable broadband mode (see Connecting to the Public
Network (WAN)), you need to set the parameters given by your service
provider.
1. Go to the 5G CPE home page and select Set internet.
2. Click the Connection mode box to select PPPoE, Static IP, or Dynamic
IP and set the relevant parameters.
PPPoE: For this connection mode, you need to enter the username
and password given by the service provider. Select Auto or Manual
for dial-up, depending on whether you want the Smart Hub to
connect to the network automatically every time it restarts.
Static IP: For this connection mode, enter the IP address, subnet
mask, default gateway, primary DNS, and secondary DNS given by
your service provider.
Dynamic IP: Obtain dynamic IP address to access the Internet.
3. Click Connect or Apply.
Wi-Fi Settings
Click Set Wi-Fi on the 5G CPE home page to configure Wi-Fi settings.
Click the Enable/Disable to the right of Wi-Fi and click Apply to turn on or
off Wi-Fi for your Smart Hub.
When Wi-Fi is enabled, click Main SSID, Guest SSID, WPS, Advanced
settings, and Internet Wi-Fi to set each group of functions.
24
Page 31

NOTE:
Guest SSID and Internet Wi-Fi are two mutually exclusive features. Disable
one if you want to use the other.
Managing Main SSID Settings
You can configure the basic settings for the Smart Hub Wi-Fi on the 2.4
GHz and the 5 GHz bands. Click Apply to save the settings.
• Network name (SSID): Set the Service Set Identifier (SSID) for the 2.4
GHz bands or the 5 GHz bands.
• Broadcast network name (SSID): Only when you check this option can
new Wi-Fi clients find the network. If you want new clients to connect,
you must enter the SSID and password manually.
• Isolate all wireless devices: When you check this option, clients
connected to the Wi-Fi network cannot discover and communicate with
each other via the network.
• Security mode: Set the security mode for authentication and
encryption.
Mode Description
Authentication and encryption won’t be performed.
There are risks that private information will be
OPEN
intercepted or unauthorized individuals will use the
network.
WPA2(AES)PSK
A more secure version of WPA with implementation
of the 802.11i standard.
WPA-PSK/
Apply both the WPA-PSK and WPA2-PSK schemes.
WPA2-PSK
• Password: Set the Wi-Fi password when the security mode is not
OPEN.
NOTE:
Check the Show password box to view the password.
• Sync basic settings to 5 GHz: Sync the basic settings for 2.4 GHz Wi-
25
Page 32

Fi to 5 GHz. The SSID for 5 GHz Wi-Fi will be the SSID for 2.4 GHz WiFi with a “_5G” suffix.
NOTE:
Scan the QR codes to connect to the 2.4 GHz or 5 GHz Wi-Fi.
Managing Guest SSID Settings
You can enable a guest SSID on the 2.4 GHz bands for temporary users to
connect with limited time for access and restriction to the 5G CPE web
pages.
Click the Enable/Disable to the right of Guest SSID and click Apply to turn
on or off the guest Wi-Fi. The Wi-Fi of the Smart Hub will restart. Then
configure the following options and click Apply.
NOTE:
Disable Internet Wi-Fi before you enable Guest SSID.
• Allow Guest SSID to access admin page: Allow or forbid users
connected to the guest SSID to access the 5G CPE web pages.
• Network name (SSID): Set the network name for the guest SSID.
• Broadcast network name (SSID): Only when you check this option can
new Wi-Fi clients find the network. If you want new clients to connect,
you must enter the SSID and password manually.
• Isolate all wireless devices: When you check this option, clients
connected to the guest Wi-Fi network cannot discover and communicate
with each other via the network.
• Security mode: Set the security mode for authentication and
encryption.
• Password: Set the Wi-Fi password when the security mode is not
OPEN.
NOTE:
Check the Show password box to view the password.
• Time limits for network access: Select the upper time limit for all
26
Page 33

clients connected to the guest SSID.
NOTE:
Scan the QR codes to connect to the guest Wi-Fi.
Managing WPS Settings
Select the SSID and the authentication method for Wi-Fi Protected Setup
(WPS). Click Apply to start the WPS process for the Smart Hub. See Using
the Wi-Fi Protected Setup (WPS) for details.
Managing Advanced Wi-Fi Settings
Set the following options for Wi-Fi.
• Country/Region code: Select the country in which your device is
located.
• Max connections: Set the maximum number of clients that can connect
to the Smart Hub (regardless of bands and SSIDs) simultaneously.
• Network mode: Select the WLAN protocol. The recommended mode
depends on the Wi-Fi band. When using the 2.4 GHz band, select
802.11 b/g/n. When using the 5 GHz band, select 802.11 a/n/ac.
• Channel Bandwidth: Select a bandwidth option if necessary (not
recommended without prior experience).
• Channel: Select the channel (frequency) for your Wi-Fi networks. The
recommended option is Auto, which will select the channel with the least
potential interference.
• Wi-Fi coverage: Set the coverage of the Wi-Fi network. Larger range
will consume more power.
Managing Internet Wi-Fi
You can use this function to extend your existing Wi-Fi network. See
Connecting to Existing Wi-Fi Networks for details.
27
Page 34

NOTE:
Disable Guest SSID before you enable Internet Wi-Fi.
Advanced Settings
Click Advanced settings on the 5G CPE home page to configure the
following options for your Smart Hub. Click Apply to save your settings.
• Night mode: You can turn on or off indicator lights or set Wi-Fi sleep
schedule.
NOTE:
Turning off indicator lights will not affect network connections. When the
Smart Hub enters sleep mode, Wi-Fi will be turned off.
• Router: Set IP address, subnet mask, DHCP server parameters, MTU,
MSS, and MAC-IP binding.
• Firewall: Set port filtering, port forwarding, URL filtering, UPnP, DMZ,
and system security settings.
• Update: Check for system update or set auto-check (including auto-
check while roaming) options.
• Others: Reset or restart the Smart Hub, set Simple Network Time
Protocol (SNTP) for time synchronization and Daylight Saving Time,
check network status, use diagnosis and network tools, set periodic
restart options, and set L2TP and PPTP VPN parameters.
28
Page 35

For Your Safety
Safety Precautions
• Some electronic devices may be susceptible to electromagnetic
interference. Locate the device away from TV set, radio, and other
electronic equipment to avoid electromagnetic interference.
• The device may interfere with medical devices like hearing aids and
pacemakers. Consult a physician or the manufacturer of the medical
device before using it.
• Please keep yourself at least 20 centimeters away from your device.
• Do not use your device in dangerous environments such as oil terminals
or chemical factories where there are explosive gases or explosive
products being processed.
• Please use original accessories or accessories that are authorized by
ZTE. Unauthorized accessories may affect the device performance,
damage the device or cause danger to you.
• Do not attempt to dismantle the device. There are no user-serviceable
parts.
• Do not allow the device or accessories to come into contact with liquid
or moisture at any time. Do not immerse the device in any liquid.
• Do not place objects on top of the device. This may lead to overheating
of the device.
• The device must be placed in a well-ventilated environment for use.
• Do not expose the device to direct sunlight or store it in hot areas. High
temperature can shorten the life of electronic devices.
29
Page 36

• Do not allow children to play with the device or power adapter.
• The device is for indoor use only. Do not use the device outside.
• For pluggable equipment, the socket-outlet shall be installed near the
equipment and shall be easily accessible.
Cleaning and Maintenance
• Use an antistatic cloth to clean the device. Do not use chemical or
abrasive cleanser as these could damage the plastic case. Turn off your
device before you clean it.
• Use the device within the temperature range of -20°C ~ +55°C, and the
storage temperature range is -40°C ~ +70°C. The humidity range is
5%~95%.
• Do not use your device during a thunderstorm. Remove the mains
power pack from the wall socket.
Limited Warranty
• This warranty does not apply to defects or errors in the Product caused
by:
i. Reasonable abrasion.
ii. End User’s failure to follow ZTE’s installation, operation or
maintenance instructions or procedures.
iii. End User’s mishandling, misuse, negligence, or improper installation,
disassembly, storage, servicing or operation of the Product.
iv. Modifications or repairs not made by ZTE or a ZTE-certified individual.
v. Power failures, surges, fire, flood, accidents, actions of third parties or
other events outside ZTE’s reasonable control.
30
Page 37

vi. Usage of third-party products, or usage in conjunction with third-party
products provided that such defects are due to the combined usage.
vii. Any other cause beyond the range of normal usage intended for the
Product.
• End User shall have no right to reject or return the Product, or receive a
refund for the Product from ZTE under the above-mentioned situations.
• This warranty is End User’s sole remedy and ZTE’s sole liability for
defective or nonconforming items, and is in lieu of all other warranties,
expressed, implied or statutory, including but not limited to the implied
warranties of merchantability and fitness for a particular purpose, unless
otherwise required under the mandatory provisions of the law.
Limitation of Liability
ZTE shall not be liable for any loss of profits or indirect, special, incidental
or consequential damages resulting from or arising out of or in connection
with using of this product, whether or not ZTE had been advised, knew or
should have known of the possibility of such damages, including, but not
limited to lost profits, interruption of business, cost of capital, cost of
substitute facilities or product, or any downtime cost.
Radio Frequency (RF) Exposure
Your device contains a transmitter and a receiver. When it is ON, it receives
and transmits RF energy. When you communicate with your device, the
system handling your connection controls the power level at which your
device transmits.
Important safety information regarding radiofrequency radiation (RF)
exposure. To ensure compliance with RF exposure guidelines the device
must be used with a separation from the body. Failure to observe these
instructions could result in your RF exposure exceeding the relevant
guideline limits.
The transmitter is using external antenna that operate at 20cm or more
from nearby persons.
31
Page 38

The FCC grant can be found under the Display Grant section
of http://www.fcc.gov/oet/fccid after searching on FCC ID: SRQ-
MC8010CA.
FCC Compliance
This device complies with part 15 of the FCC Rules. Operation is subject to
the following two conditions: (1) This device may not cause harmful
interference, and (2) this device must accept any interference received,
including interference that may cause undesired operation.
CAUTION:
Changes or modifications not expressly approved by the manufacturer
could void the user’s authority to operate the equipment.
This equipment has been tested and found to comply with the limits for a
Class B digital device, pursuant to part 15 of the FCC Rules. These limits
are designed to provide reasonable protection against harmful interference
in a residential installation. This equipment generates, uses, and can
radiate radio frequency energy and, if not installed and used in accordance
with the instructions, may cause harmful interference to radio
communications. However, there is no guarantee that interference will not
occur in a particular installation. If this equipment does cause harmful
interference to radio or television reception, which can be determined by
turning the equipment off and on, the user is encouraged to try to correct
the interference by one or more of the following measures:
• Reorient or relocate the receiving antenna.
• Increase the separation between the equipment and receiver.
• Connect the equipment into an outlet on a circuit different from that to
which the receiver is connected.
• Consult the dealer or an experienced radio/TV technician for help.
32
Page 39

IC Notice
This radio transmitter (identify the device by certification number, or model
number if Category II) has been approved by Industry Canada to operate
with the antenna types listed below with the maximum permissible gain and
required antenna impedance for each antenna type indicated. Antenna
types not included in this list, having a gain greater than the maximum gain
indicated for that type, are strictly prohibited for use with this device.
Immediately following the above notice, the manufacturer shall provide a list
of all antenna types approved for use with the transmitter, indicating the
maximum permission antenna gain (in dBi) and required impedance for
each.
This device complies with Industry Canada license-exempt RSS
standard(s). Operation is subject to the following two conditions:
(1) this device may not cause interference, and
(2) this device must accept any interference, including interference that may
cause undesired operation of the device.
This Class B digital apparatus complies with Canadian ICES-003.
IC: 5200E-MC8010CA
IC Radiation Exposure Statement
This device complies with IC radiation exposure limits set forth for an
uncontrolled environment. In order to avoid the possibility of exceeding the
IC radio frequency exposure limits, human proximity to the antenna shall
not be less than 20cm (8 inches) during normal operation.
Cet appareil est conforme aux limites d'exposition aux rayonnements de la
CNR-102 definies pour unenvironnement non controle Afin d'eviter la
possibilite de depasser les limites d'exposition auxfrequences radio de la
CNR-102, la proximite humaine a l'antenne ne doit pas etre inferieure a 20
cm (8 pouces) pendant le fonctionnement norma.
33
Page 40
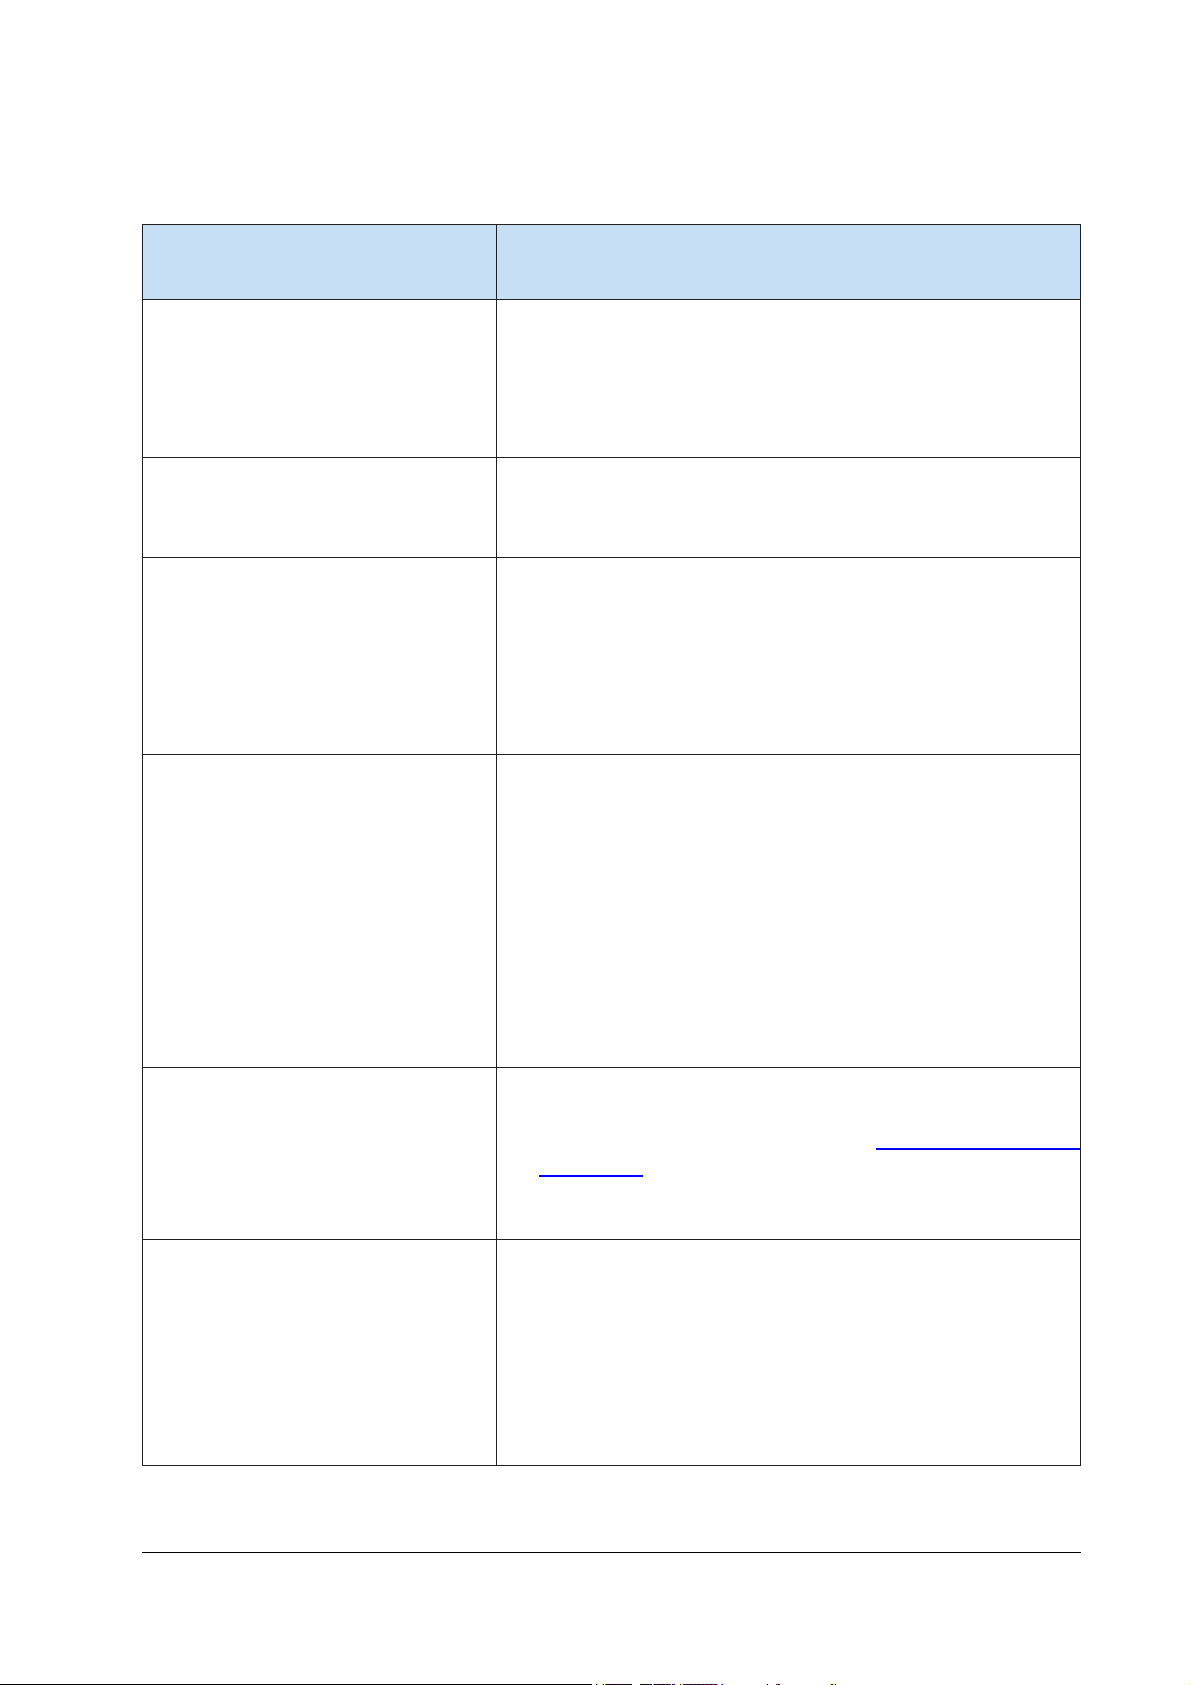
Troubleshooting
Problem
I cannot access the Internet at
all.
The download or upload speed
is very slow.
I cannot visit the 5G CPE web
page.
Suggested Solution
• Please check your configuration settings.
• Please wait 1~2 minutes for the router to initialize.
•
The speed is dependent on signal strength. Check
your signal strength and network type.
• Enter the correct IP address. You can check the
label on the device to get the default address.
• Only use one network adapter in your PC.
• Do not use any proxy server.
• Make sure the Wi-Fi function is active.
I cannot establish the Wi-Fi
connection between my device
and the client.
The signal indicator does not
light.
Problems with the passwords.
• Refresh network list and select the correct SSID.
• Check the IP address to make sure your client can
obtain an IP address automatically in the Internet
protocol (TCP/IP) properties.
• Type the correct network key (Wi-Fi password)
when you connect to the device.
• This indicates poor reception. Try moving the
device to another location. See Best Placement in
the Home.
• If you can still connect to the Internet, you may
• For the default Wi-Fi password and the default
password to the 5G CPE web page, please check
the label on the device.
• If you changed the passwords and forgot them,
you need to restore the device to the factory
default settings.
34
 Loading...