


Grand X Max+
ZTE Grand™ X Max+
User Guide

1CONTENTS
Contents
Getting started ..................................................7
Phone setup ...................................................7
Extending the battery life ........................................9
Powering your phone on/off. . . . . . . . . . . . . . . . . . . . . . . . . . . . . . . . . . . . . . 9
Getting around ...............................................11
Get to know your phone ........................................12
Key functions .................................................13
Phone calls ....................................................24
How to make calls .............................................24
Using speed dial .............................................. 25
How to receive calls. . . . . . . . . . . . . . . . . . . . . . . . . . . . . . . . . . . . . . . . . . . . 26
Adjusting your call settings ...................................... 29
Contacts ....................................................... 31
Importing and exporting contacts ................................31
Sharing contact information ....................................32
Creating a contact ............................................32
Adding a contact to Favorites ...................................33
Searching for a contact ........................................33
Joining contacts ..............................................33
Separating contact information .................................. 34
Creating a new group ......................................... 34
Some of the contents in this manual may differ from your phone depending on
the software of the phone. Actual color may vary.
Your phone is designed to make it easy for you to access a wide variety of
content. For your protection, we want you to be aware that some applications
that you enable may involve the location of your phone being shared. For
applications available through Cricket, we offer privacy controls that let you
decide how an application may use the location of your phone and other
phones on your account. However, the Cricket privacy tools do not apply
to applications available outside of Cricket. Please review the terms and
conditions and the associated privacy policy for each location-based service
to learn how location information will be used and protected. In addition, your
Cricket phone may be used to access the internet and to download, and/
or purchase goods, applications, and services from Cricket or elsewhere from
third parties. Cricket provides tools for you to control access to the Internet
and certain Internet content. These controls may not be available for certain
devices which bypass Cricket controls.
© 2015 Cricket Wireless LLC. All rights reserved. Cricket and the Cricket logo are
trademarks under license to Cricket Wireless LLC.
© 2015 ZTE CORPORATION. All rights reserved. No part of this publication may
be excerpted, reproduced, translated or utilized in any form or by any means,
electronic or mechanical, including photocopying and microlm, without
the prior written permission of ZTE Corporation. The manual is published by
ZTE Corporation. We reserve the right to make modications on print errors or
update specications without prior notice.
microSDHC logo is a trademark of SD-3C, LLC. Manufactured under license
from Dolby Laboratories. Dolby, Dolby Audio and the double - D symbol are
trademarks of Dolby Laboratories. Qualcomm and Snapdragon are trademarks
of Qualcomm Incorporated, registered in the United States and other countries.
Used with permission. Other marks are the property of their respective owners.

2 CONTENTS
3CONTENTS
Entering text ....................................................35
Google keyboard ............................................. 35
Gesture typing ................................................37
Google Voice typing ...........................................38
Choosing touch input settings ...................................38
Messaging .....................................................39
Message box ................................................. 39
Opening the messaging screen ................................. 39
Sending a message ...........................................39
Replying to a message .........................................40
Forwarding a message .........................................40
Changing message settings .................................... 41
Email .......................................................... 43
Creating an email account .....................................43
Receiving email ............................................... 43
Composing and sending an email ...............................44
Replying to or forwarding an email ...............................44
Deleting an email ............................................. 45
Email settings ................................................. 45
Connecting to the Internet. . . . . . . . . . . . . . . . . . . . . . . . . . . . . . . . . . . . . . . . 46
Adding a new mobile data connection ...........................46
Turning on Wi-Fi® ..............................................46
Connecting to a Wi-Fi network ................................... 47
Adding a Wi-Fi network .........................................47
Checking the Wi-Fi network status ................................48
Connecting to a WPS network ...................................48
Browsing the Internet ............................................ 49
Opening a web page .......................................... 49
Browsing options ..............................................49
Opening another browser window ...............................50
Using bookmarks .............................................. 50
Changing browser settings ......................................51
Using Wi-Fi Direct® ...............................................52
Connecting to another device via Wi-Fi Direct ......................52
Sending data via Wi-Fi Direct .................................... 52
Receiving data via Wi-Fi Direct ................................... 52
Bluetooth® .....................................................53
Turning Bluetooth on/off ........................................ 53
Changing the device name ..................................... 53
Pairing with another Bluetooth device .............................53
Unpairing from a Bluetooth device ...............................54
Sending data via Bluetooth ..................................... 54
Receiving data via Bluetooth ....................................55
Entertainment ..................................................56
Capturing a photo ............................................56
Recording a video .............................................60
Camcorder options ............................................60
Playing your music ............................................61

5CONTENTS
4 CONTENTS
Viewing your music library ......................................61
Setting a song as the default ringtone ............................61
Playing music ................................................. 62
Creating playlists ..............................................62
Managing playlists ............................................63
Adding a song to a playlist .....................................63
Using your gallery .............................................63
Retouching your pictures .......................................65
Playing videos ................................................ 66
Making memorable memos .....................................66
Recording a voice memo .......................................66
Playing a voice memo .........................................67
Google™ applications ...........................................68
Gmail™ ...................................................... 68
Google Calendar™ ............................................69
Google Chrome™ .............................................69
Google Maps™ ...............................................69
Google Search ............................................... 72
Google Music™ ...............................................73
Google Play™ Store ............................................76
Applications. . . . . . . . . . . . . . . . . . . . . . . . . . . . . . . . . . . . . . . . . . . . . . . . . . . . 77
Backup & Restore .............................................77
Calculator ...................................................77
Clock .......................................................77
Downloads ................................................... 78
Drive ........................................................78
File Manager .................................................79
Mi-Moment ...................................................79
WPS® Ofce ..................................................79
Amazon Kindle™ ..............................................80
AskMD® ...................................................... 80
Deezer ...................................................... 80
Evernote® ....................................................80
Task Manager ................................................ 81
YouTube™ .................................................... 81
Phone settings .................................................. 82
General settings .............................................. 82
Wireless & networks ............................................85
Device ...................................................... 86
Personal .....................................................88
Accounts ....................................................89
System ......................................................90
Upgrading the phone software ....................................91
Troubleshooting .................................................92
For your safety ..................................................95
General safety ................................................95
FCC regulations ...............................................96
RF exposure information (SAR) ...................................97
6 CONTENTS
7GETTING STARTED
Getting started
Phone setup
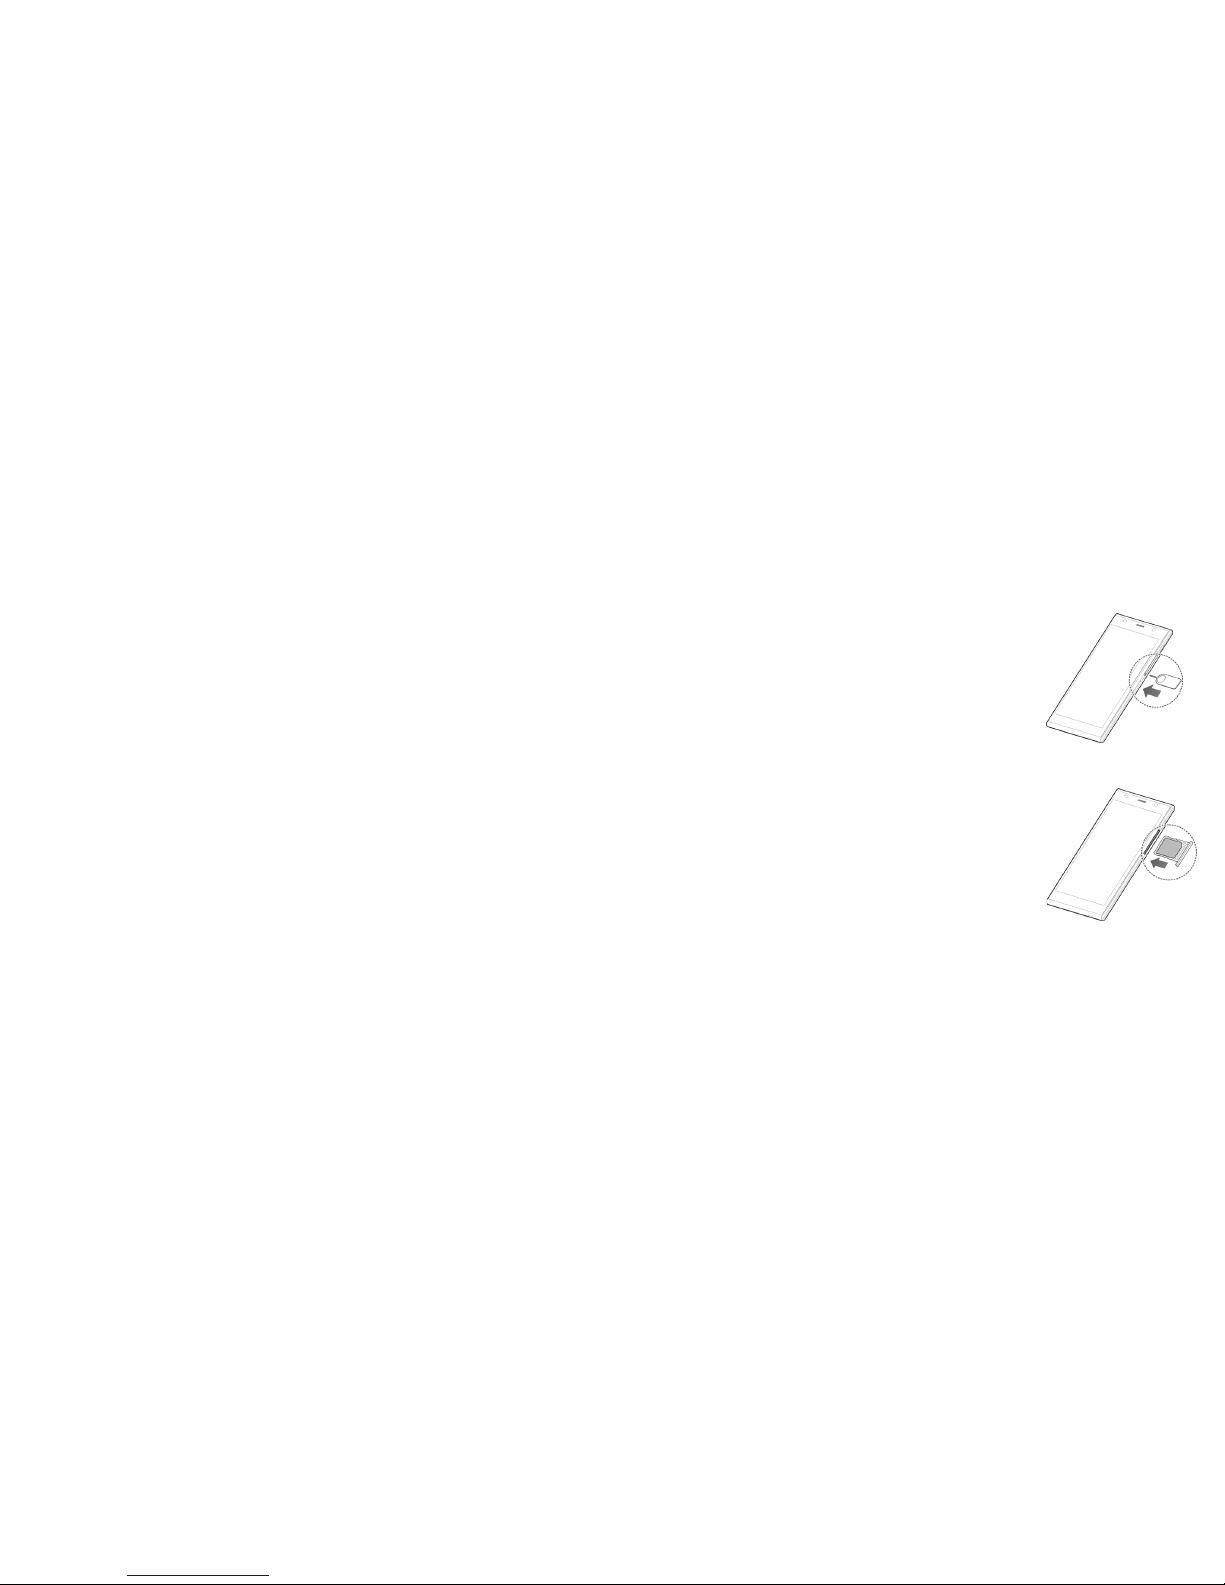
Installing the micro-SIM card
1. Insert the tray eject tool or the end of a small paper
clip into the hole beside the micro-SIM card tray.
2. Pull out the micro-SIM card tray and place the
micro-SIM card (contacts facing down) on the
tray as shown. Then carefully replace the tray.
Warning! Turn off your phone before installing
or removing the micro-SIM card.
Note: To avoid damage to the phone, do not use
any other kind of SIM card or any non-standard
micro-SIM card cut from a SIM card. You can get a
standard micro-SIM card from your service provider.
Hearing Aid Compatibility (HAC) .................................98
CTIA ....................................................... 100
Distraction ..................................................101
Product handling .............................................101
Electrical safety ..............................................104
Interference .................................................105
Explosive environments ........................................ 106
Specications ................................................. 108
Warranty ......................................................109
Limited warranty .............................................110
How to get warranty service .................................... 111
Other warranty programs ......................................111
Notes ......................................................... 112
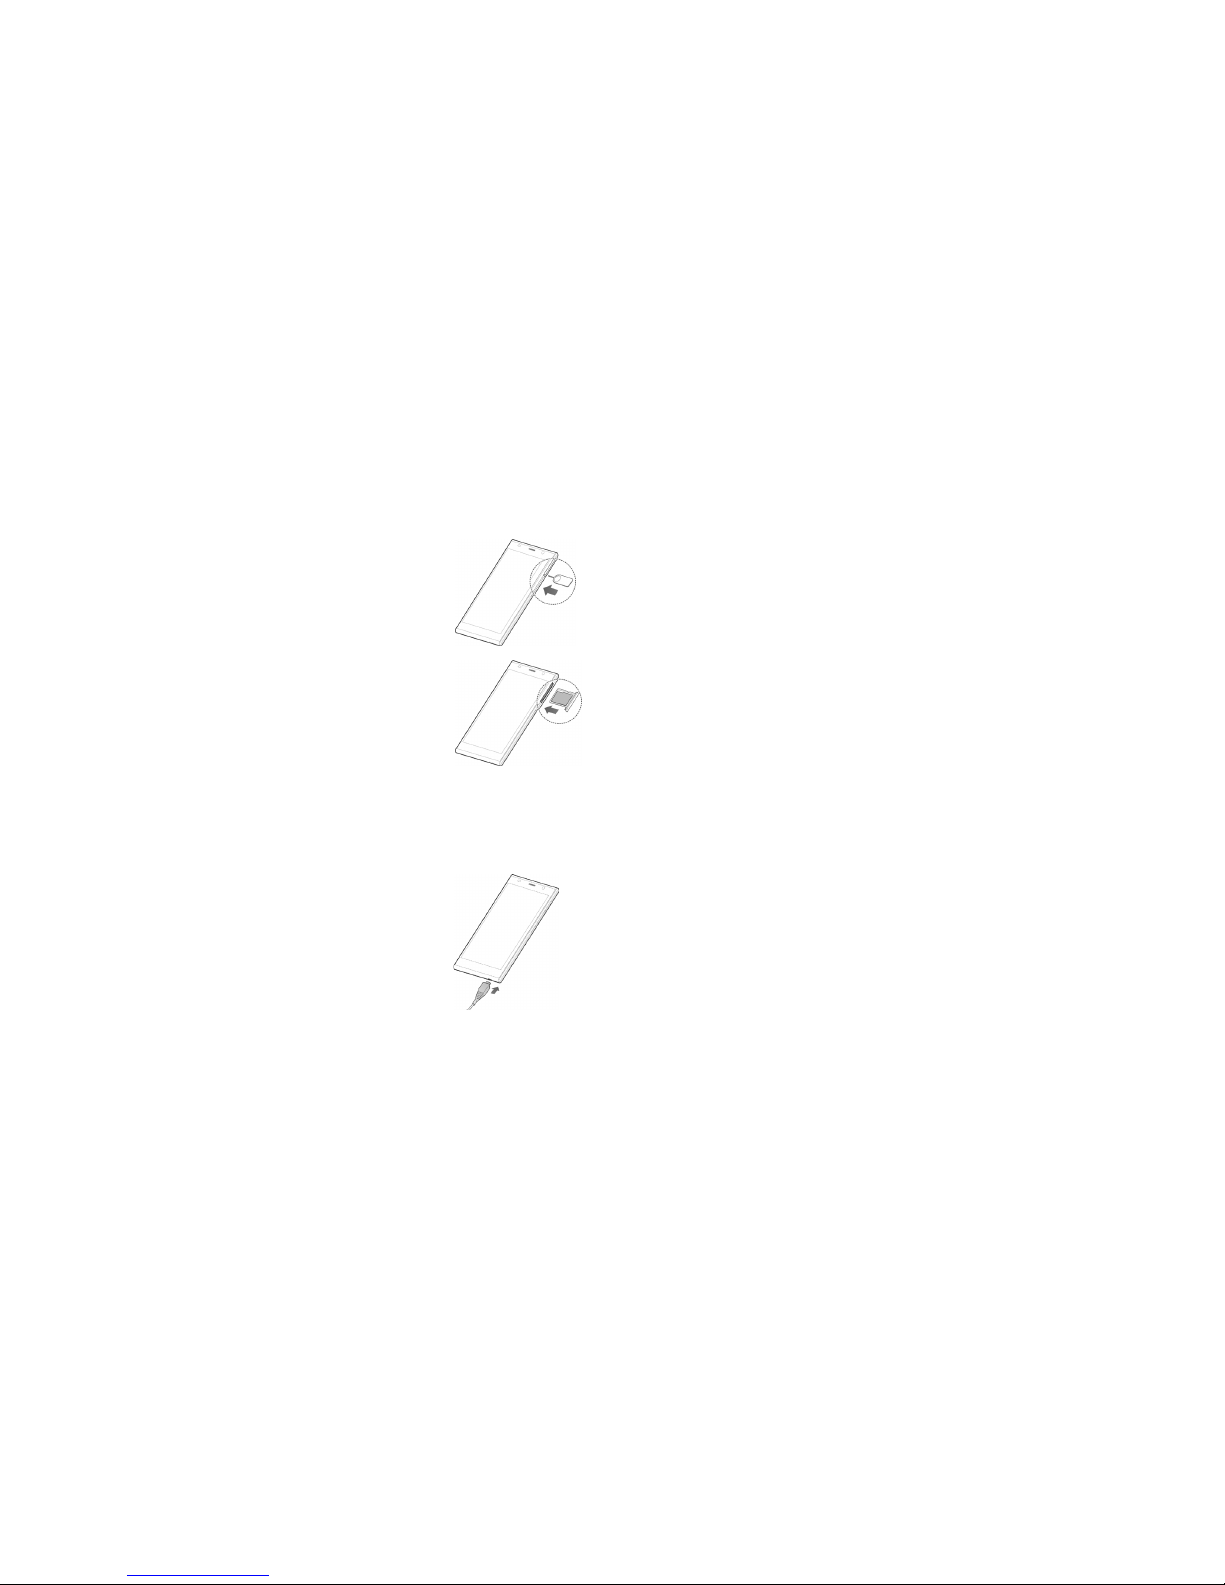
Installing the microSDHC™ Card (not included)
The microSDHC card can be installed and removed
while the phone is turned on. Unmount the microSDHC
card before removing or replacing it.
1. Insert the tray eject tool or the end of a small paper
clip into the hole beside the microSDHC card tray
(the upper one).
2. Pull out the microSDHC card tray and place the
microSDHC card (contacts facing down) on the tray
as shown. Then carefully replace the tray.
Note: Some applications may require a microSDHC card
to work normally or may store certain data on it. Therefore,
it is recommended that you keep a microSDHC card
installed and not remove or replace it randomly.
Charging the battery
Your phone’s battery should have enough power for the phone to turn on,
nd a signal, and make a few calls. You should fully charge the battery as
soon as possible.
If the battery is low, there will be a pop-up message on
the screen. As you charge your phone, the screen will
tell you the exact battery level each time you wake up
your phone.
If the battery is extremely low, you may be unable to
power on the phone even when it is being charged. In
this case, try again after charging the phone for at least
10 minutes. Contact customer service if you still cannot
power on the phone after prolonged charging.
9GETTING STARTED
8 GETTING STARTED
1. Insert the charger’s connector into the charging port. Be sure to insert
the connector in the correct orientation. Do not force the connector into
the port.
2. Plug the charger into a standard AC wall outlet.
3. When the battery is fully charged, unplug the charger and disconnect it
from the phone.
Warning! Use only ZTE-approved chargers and cables. The use of unapproved
accessories could damage your phone or cause the battery to explode.
Caution: Do not change the built-in rechargeable battery in your phone by
yourself. The battery can only be changed by ZTE or a ZTE authorized service
provider.
Extending the battery life
Active applications, screen brightness levels, Bluetooth and Wi-Fi usage and
GPS functionality can drain your battery. You can follow the helpful tips below
to conserve your battery power:
• Reduce the screen backlight time.
• Lower the screen brightness.
• Turn auto-sync, Wi-Fi, and Bluetooth off when not in use.
• Disable the GPS function when not in use. Most applications using this
function will periodically query the GPS satellites for your current location;
each query drains your battery.
Powering your phone on/off
Make sure the micro-SIM card is in your phone and the battery is charged.
• Press and hold the Power key to power on your phone.

10 GETTING STARTED
11GETTING STARTED
• To power it off, press and hold the Power key to open the options menu.
Tap Power off > OK.
Setting up your phone for the rst time
When you rst power on your phone after you purchase it or reset it to factory
settings (see Phone settings – Personal – Backup & reset), you need to set up
your phone settings before using it.
1. Select the language you want to use by scrolling up or down the
language options and then tap .
2. Select a Wi-Fi network or tap SKIP > SKIP ANYWAY.
3. If you have a Google account or Gmail, enter it to sign into your account,
or tap Or create a new account; follow the prompts. You can also tap
SKIP > SKIP, enter your name, and tap NEXT if you would like to set up an
account later.
4. Follow the prompts to personalize your device with setup options for
backup and restore, Google location services, screen lock selection,
and more.
Switching to Sleep Mode
To save battery power, Sleep Mode suspends your phone in a low-powerconsumption state while the display is off. Your phone also goes into Sleep
Mode by itself when the display is automatically turned off after a certain
period of time, which you can set by tapping Apps > Settings > Display >
Sleep from the home screen.
Press the Power key to switch to Sleep Mode.
Waking up your phone
1. Press the Power key to activate your screen display.
2. Press and hold any blank area of the screen to unlock the screen and keys.
Or, press and hold an application shortcut (Phone or Sele) at the bottom
of the screen to unlock the screen and open the application quickly.
Note: If you have set an unlock pattern, PIN, or password for your phone
(see Phone settings – Personal – Security), you’ll need to draw the pattern or
enter the PIN/password to unlock your screen.
Getting around
Touch control
Your phone’s touch screen lets you control actions through a variety of
touch gestures.
• Tap: Tap the buttons, icons, or applications to select items or to open
applications.
• Press and hold: To open the available options for an item (such as a
message or link in a web page), press and hold the item.
• Swipe or slide: To swipe or slide means to quickly drag your nger vertically
or horizontally across the screen.
• Drag: To drag, press and hold your nger with some pressure before you
start to move your nger. While dragging, do not release your nger until
you have reached the target position.
• Pinch: In some apps (such as Maps, Browser, and Gallery), you can zoom in
and out by placing two ngers on the screen and pinching them together
(to zoom out) or spreading them apart (to zoom in).
• Rotate the screen: For most screens, you can automatically change
the screen orientation from portrait to landscape by turning the phone
sideways.
12
13
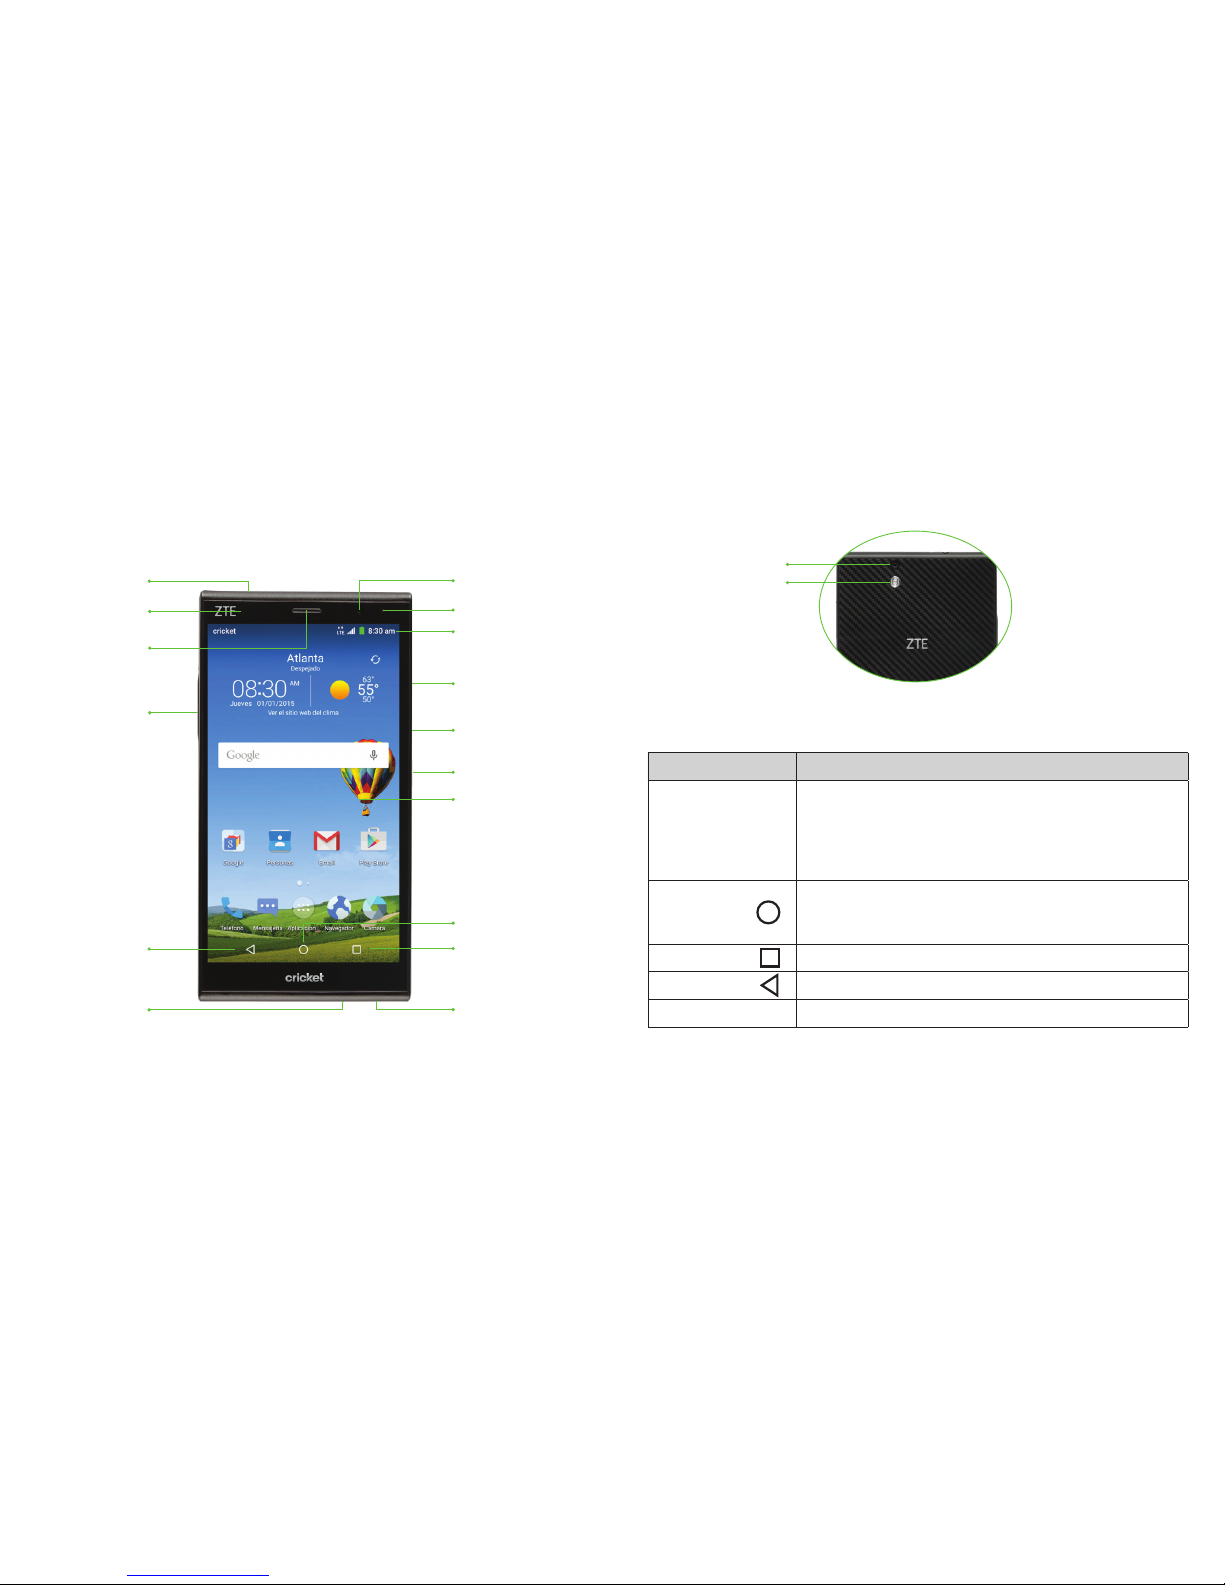
Get to know your phone
Key functions
Key Function
Power key
Press and hold to turn phone on/off, restart the phone,
or to set to Airplane mode.
Press to switch your phone to Sleep Mode.
Press to wake up your phone.
Home key
Tap to return to the main home screen from any
application or screen.
Drag to Google to use Google Search.
Recent apps Tap to see recently used applications.
Back key Tap to go to the previous screen.
Volume key Adjust the volume of the phone.
GETTING STARTED
Headset port
Proximity and
light sensor
Earpiece
Back key
Microphone
Status and
notication bar
microSDHC™
card slot
micro-SIM
card slot
Camera lens
Indicator light
Touch
screen
Power key
Recent
apps key
Charging/
data port
Home key
GETTING STARTED
Flash
Camera lens
Back
Volume key
14
15
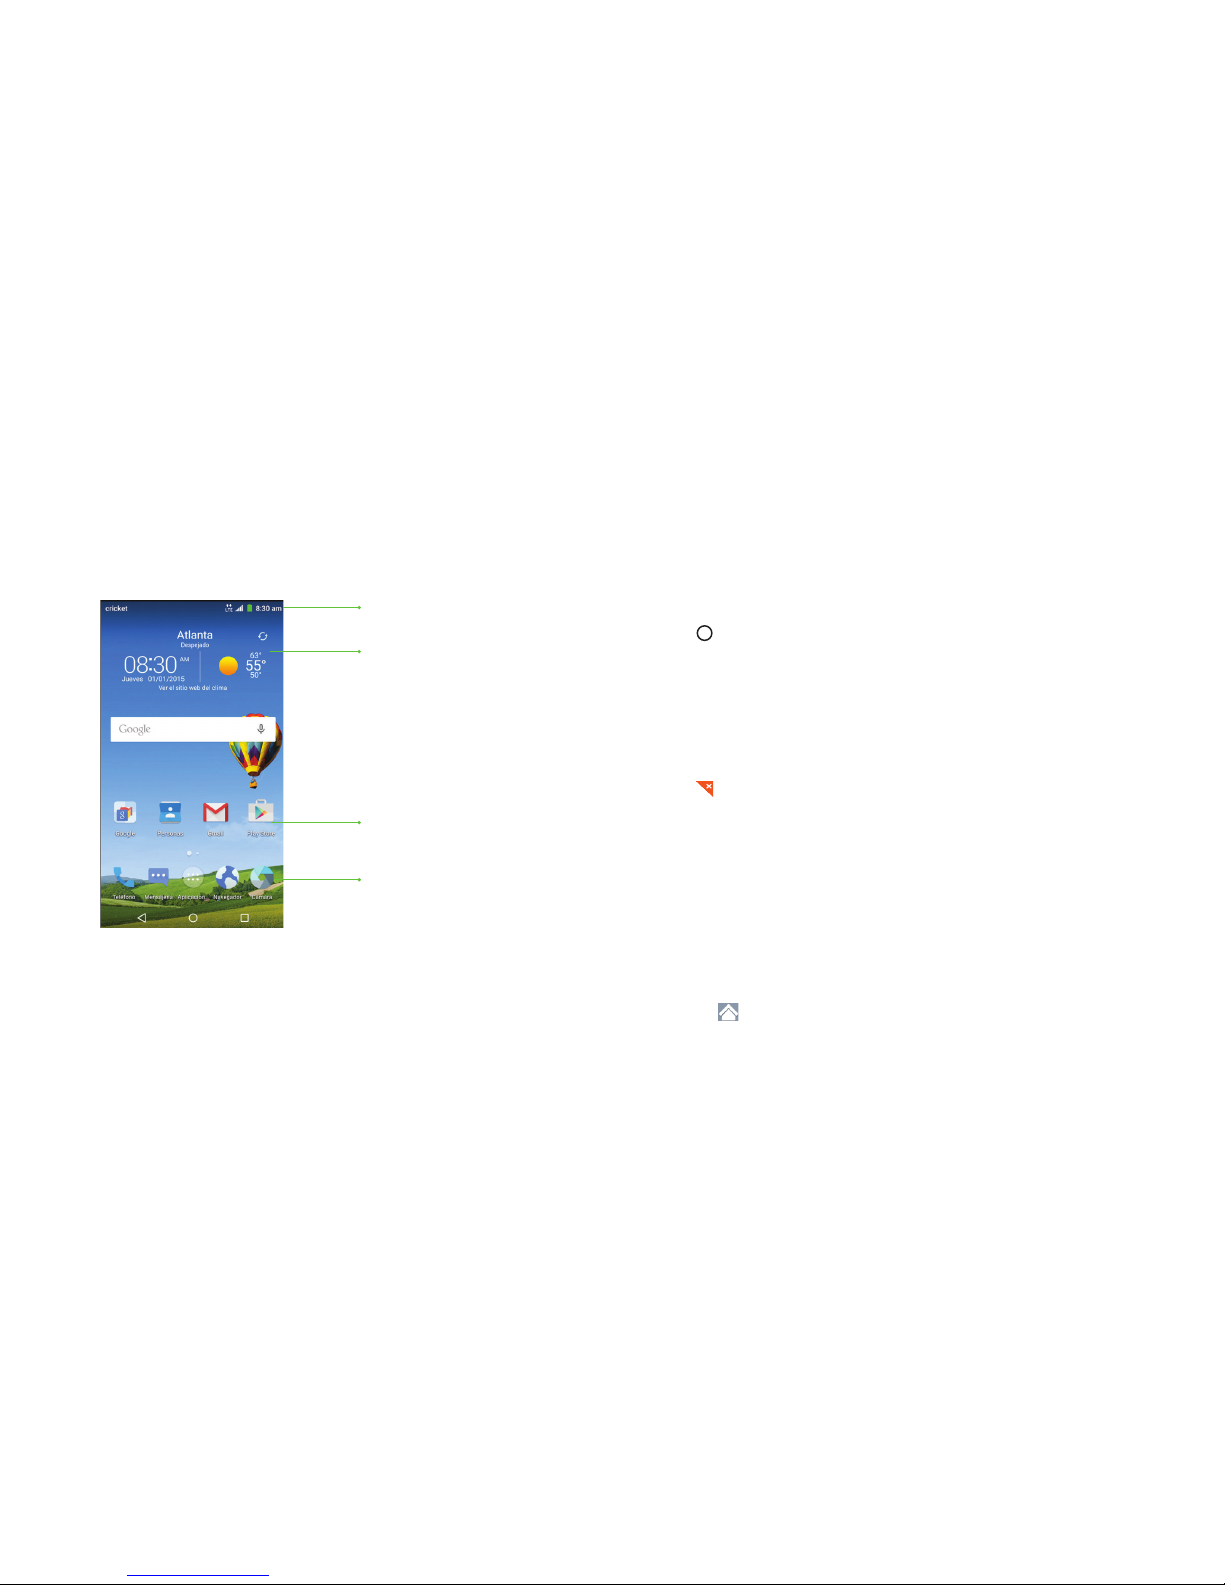
Home screens
You can customize your home screens. Set your own wallpaper, add the
widgets or application shortcuts you need, or remove them as you like.
Navigating your home screens
Your phone comes with 2 home screens, giving you more space to add more
items. Simply swipe your nger to the left or right to see each home screen.
Extended home screen
The home screen extends beyond the screen width, giving you lot more
space to add more stuff. Simply swipe your nger to the left or right to see
the extended home screen panels.
To add a new home screen panel:
1. Tap > Apps, or press and hold an empty area of the home screen and
select Widgets.
2. Press and hold an application icon or a widget and drag it to the right
edge of the screen to create a new home screen panel and put the icon
or widget on it.
To delete a home screen panel:
1. Press and hold an empty area of the home screen and slide left or right
to view the home screen thumbnails.
2. Tap on the top right corner of a thumbnail.
3. Tap OK. The items on the panel will also be removed.
Notes:
• A home screen panel cannot be left empty. If the icon, widget, or folder is
the only item on the current home screen panel, the panel will be deleted
as you remove the item.
• When there are only two home screen panels, you cannot delete them.
To adjust the order of a home screen panel:
1. Press and hold an empty area of the home screen and slide left or right
to view the home screen thumbnails.
2. Press and hold a thumbnail and drag it left or right to the place you need.
Note: Tap at the bottom of a home screen thumbnail to set it as the main
home screen.
Shortcuts
Status and
notication bar
Favorite shortcuts
Widget
GETTING STARTEDGETTING STARTED

16
17
Choosing your wallpaper
1. Press and hold a blank part of the home screen and tap Wallpapers.
2. Tap GALLERY or LIVE WALLPAPER and choose the image or animation
you want to use as the wallpaper. You can also tap a default image as
the wallpaper.
Adding widgets to your home screen
1. Press and hold a blank part of the home screen and tap Widgets.
2. Press and hold the icon of the item you wish to add and then drag it to a
home screen thumbnail above.
Adding apps to your home screen
1. From the home screen, tap Apps.
2. Press and hold an app icon you wish to add and then drag it to a
home screen.
Adjusting widget size
1. Press and hold a widget on the home screen and then release it.
2.
An outline appears around the widget. Drag the outline to resize the widget.
Note: Not all widgets can be resized.
Removing items from your home screen
1. Press and hold the item you want to delete until Delete appears on
the screen.
2.
Drag the item to Delete and release your nger when the item turns red.
Organizing icons with a folder
1. On a home screen, press and hold an app icon and drag it to Folder.
2 . You can add more apps to the folder by pressing and holding an
icon and dragging it to the folder.
3. Tap the folder to open it and access items in the folder.
4. To name the folder, open it and tap folder.
5. Enter a name and tap .
Setting the theme
1. Press and hold an empty place on the home screen and tap Themes.
3. Tap a theme to select it.
Setting the home screen transition effect
1. Press and hold an empty place on the home screen and tap Effects.
2. Tap to select a transition effect.
Application list screen
From the home screen, tap Apps to access all the applications on the
phone. You can uninstall or disable the applications, hide the application
icons, or organize them into folders.
Uninstalling or disabling an application
1. From the home screen, tap Apps.
2. Press and hold an application icon and drag it to at the top of the
screen to disable the application.
3. Tap OK.
Note: To nd the disabled applications, from the home screen tap Apps >
Settings > Apps > DISABLED. Tap an application and tap ENABLE to enable
it. Not all applications can be uninstalled or disabled.
GETTING STARTEDGETTING STARTED
18
19
GETTING STARTEDGETTING STARTED
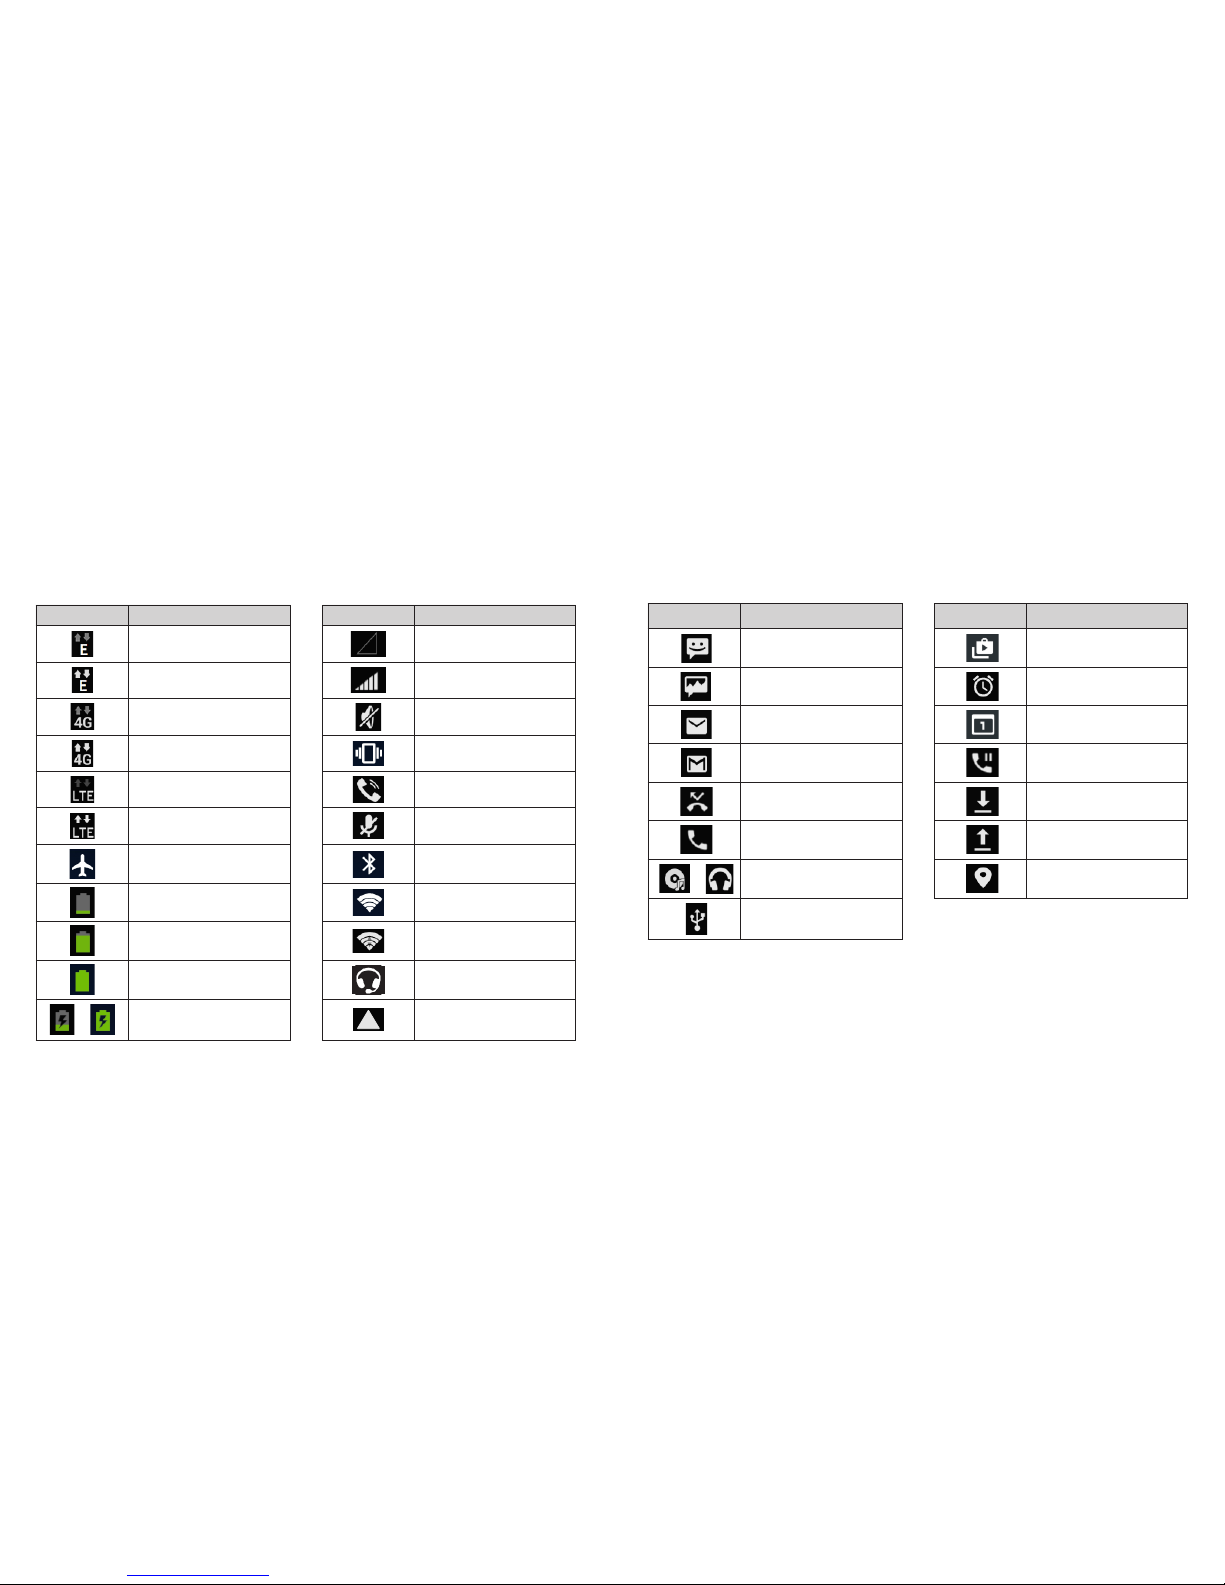
Status and notication icons
Your phone will tell you exactly what’s going on by showing you simple icons.
Here’s what they mean.
Indicators and icons
Indicator What it means Indicator What it means
EDGE connected No signal
EDGE data in use Signal strength
WCDMA data
connected
Ringer off
WCDMA data in use Vibrate mode
LTE connected Speaker on
LTE data in use
Phone
microphone off
Airplane mode Bluetooth on
Battery low
Connected to a
Wi-Fi network
Battery partially
drained
Wi-Fi in use
Battery full
Wired headset
connected
/
Battery charging
micro SDHD card
removed
Indicator What it means Indicator What it means
New SMS
Updates available
New MMS
Alarm set
New email
Upcoming event
New Gmail message
Call on hold
Missed call
Downloading data
Call in progress
Sending data
/
Song is playing
GPS on
USB connected
!
20
21
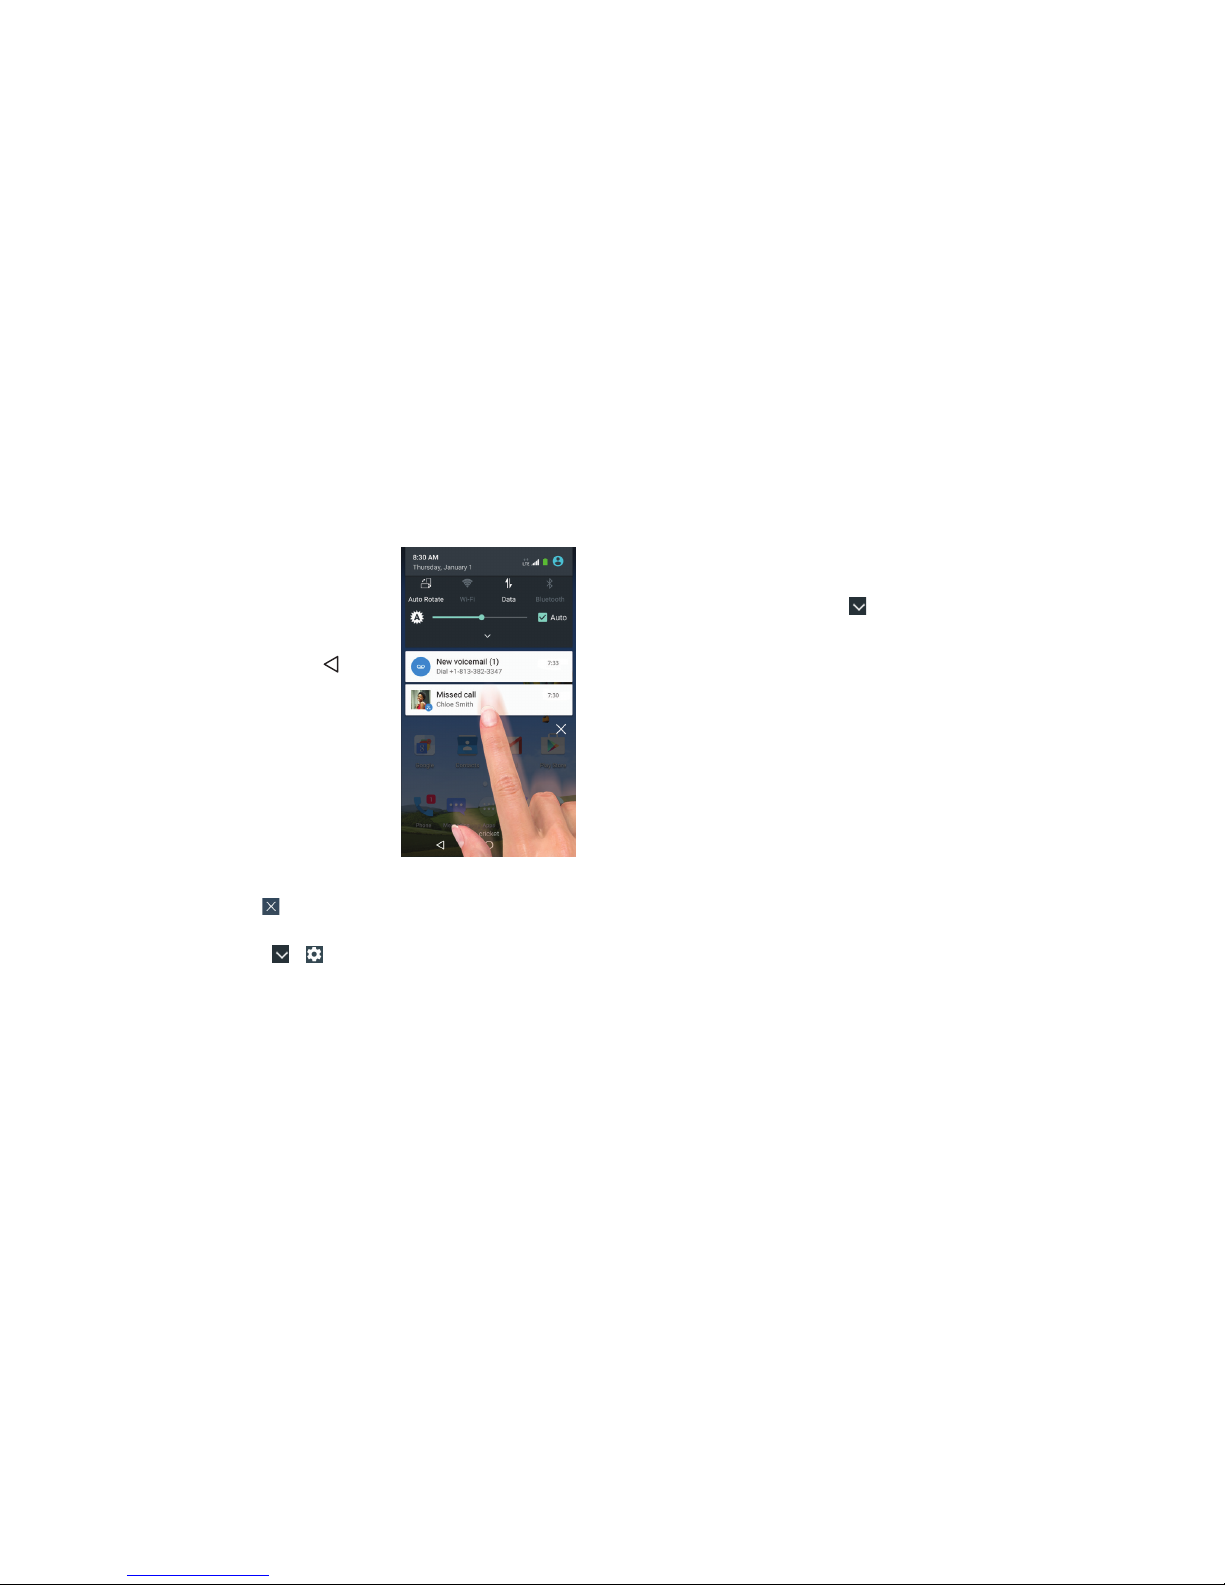
Using the Notications panel
The Notications panel provides quick access
to alerts including new messages, emails, and
software updates.
• To open the Notications panel, swipe your nger
down from the top of the screen.
• To close the Notications panel, swipe your nger
up from the bottom of the screen or tap .
Respond to or remove a notication
You can respond to or remove notications in
the Notications panel. The panel also supports
expandable notications that let you perform
additional actions.
• To respond to a notication, tap it.
• To expand a notication, slide down with one
nger. You can also swipe two ngers vertically
or pinch/zoom to expand or collapse certain
notications.
• To remove a notication, swipe it left or right.
• To remove all notications, tap in the bottom corner.
Tip: In the Notications panel, tap > at the top to get to the
Settings menu quickly.
Using Quick Settings
The Quick Settings above the Notications panel make it convenient to view
or change the most common settings for your phone.
Open the Notications panel and you can nd the following Quick Settings
on the top of the screen. Tap to view all setting options.
• Sync: Tap to turn the auto-sync feature on or off. When auto-sync is on,
changes you make to account information on the web or on your phone
are automatically synced.
• Sound: Tap to turn the silent mode with vibration on or off.
• Vibrate: Tap to turn on or off vibration.
• PowerSaver: Tap to turn on or off power saving mode.
• GPS: Tap to turn GPS on or off.
• Airplane: Tap to turn airplane mode on or off. Enabling airplane
mode turns off voice and data transmission.
• Flashlight: Tap to turn on or off the ashlight.
• Hotspot: Tap to allow your phone to be used as an Internet access
point via Wi-Fi.
• Auto Rotate: Tap to turn the auto-rotate feature on or off.
• Wi-Fi: Tap to turn Wi-Fi on or off.
• Data: Tap to enable or disable data access over the mobile network.
• Bluetooth: Tap to turn Bluetooth on or off.
• Brightness: Uncheck Auto and drag the brightness slider to adjust
the screen brightness.
GETTING STARTEDGETTING STARTED

22
23
Protecting your phone with a screen unlock pattern
You can protect your phone by creating a screen lock. When enabled, you
need to press and hold certain icon, draw a pattern or enter a numeric PIN
or password to unlock the phone’s screen and keys.
1. From the home screen, tap Apps > Settings > Security.
2. Tap Screen lock.
3. Tap Long press, Pattern, PIN, or Password.
• Tap Long press to enable screen lock and allow unlock with a “press and
hold” gesture. You can unlock the screen by tapping and holding on a
blank area of the screen.
• Tap Pattern to create a pattern you must draw to unlock the screen.
• Tap PIN or Password to set a numeric PIN or a password that you must
enter to unlock your screen.
If you make a mistake ve times, your phone will allow you to try again in
30 seconds.
Protecting your phone with encryption
You can encrypt all the data on your phone: Google Accounts, application
data, music and other media, downloaded information, and so on. If you do,
you must enter a numeric PIN or password each time you power on
your phone.
Warning! Encryption is irreversible. The only way to revert to an unencrypted
phone is to perform a factory data reset, which erases all your data.
Encryption provides additional protection in case your phone is stolen, and
may be required or recommended in some organizations. Consult your
system administrator before turning it on. In many cases the PIN or password
you set for encryption is controlled by the system administrator.
Before turning on encryption, prepare as follows:
• Set a lock screen PIN or password.
• Charge the battery.
• Keep the phone connected to the charger.
• Schedule an hour or more for the encryption process: you must not
interrupt it or you will lose some or all of your data.
When you’re ready to turn on encryption:
1. From the home screen, tap Apps > Settings > Security > Encrypt phone.
2. Read the information about encryption carefully.
The ENCRYPT PHONE button is dimmed if your battery’s not charged
or your phone’s not plugged in.
If you change your mind about encrypting your phone, tap .
Warning! If you interrupt the encryption process, you will lose data.
3. Tap ENCRYPT PHONE.
4. Enter your lock screen PIN or password and tap NEXT.
5. Tap ENCRYPT PHONE again.
The encryption process starts and displays its progress. Encryption can take
an hour or more, during which time your phone may restart several times.
When encryption is completed, you’re prompted to enter your PIN or
password.
Subsequently, you must enter your PIN or password each time you power
on your phone to decrypt it.
GETTING STARTEDGETTING STARTED
24
25
Phone calls
How to make calls
There are many ways to make a call with your phone, and they’re all easy to do.
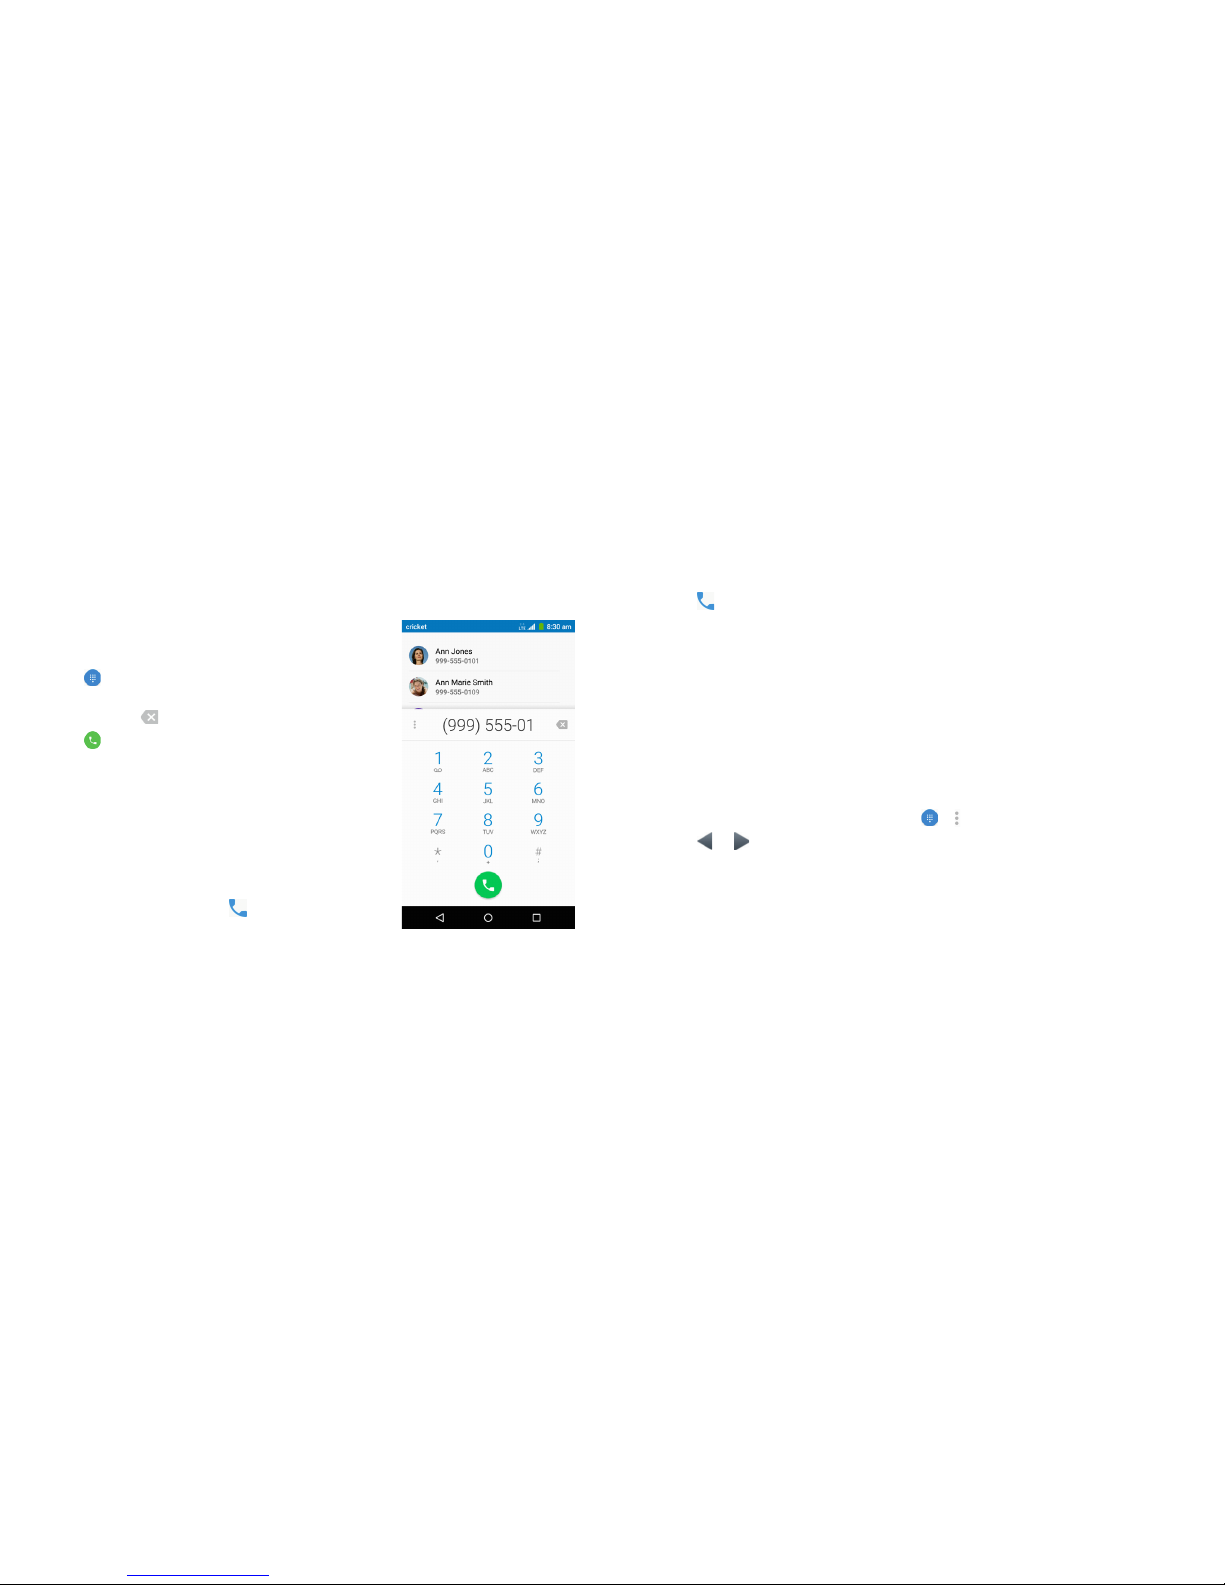
Calling from the dialer
1. From the home screen, tap Phone.
2. Tap to open the dialer.
3. Enter the phone number with the on-screen
keypad. Tap to delete incorrect digits.
4. Tap to place the call.
Tip: To make an international call, press and hold
the 0 key to enter the plus (+) symbol. Next, enter
the country code, followed by the city/area code,
and then the phone number.
Calling from your contacts
1. From the home screen, tap Contacts.
2. Swipe your nger up or down to scroll through
the contacts list and tap next to the
contact you want to call.
Tip: You can search for a contact by tapping the
search eld above the contacts list.
PHONE CALLS
Calling from your call history
1. From the home screen, tap Phone > RECENT CALLS > View full call history.
2. Tap ALL, MISSED, OUTGOING or INCOMING to view your call history.
3. Tap next to the number or contact you want to call.
Calling from a text message
If a text message contains a phone number that you want to call, you
can make the call while viewing the text message.
1. From the home screen, tap Messaging.
2. Tap the conversation and then tap the phone number in a message
you want to call.
3. Tap Call.
Use one-hand operation
1. From the home screen, tap Phone > > > One-hand operation on.
2. Tap or to change the dial pad’s position.
Using speed dial
Press and hold the 1–9 key from the dialer to call the corresponding speed
dial number.
The 1 key is reserved for your voicemail.
PHONE CALLS

26
27PHONE CALLS
Assigning a speed dial key
1. From the home screen, tap Apps > Settings > Call settings > Speed dial.
2. Tap and then input a phone number. Or, tap to select a contact
from the contact list.
3. Tap OK.
How to receive calls
Answering a call
When you receive a phone call, slide down to answer the call.
Note: To silence the ringer before answering the call, press either end of the
Volume key.
Rejecting a call
When you receive a phone call, slide up to reject the call.
You can also slide up to reject the call and select a preset text message
or edit one to send to the caller.
Tip: To edit the preset text response from the home screen, tap Phone > >
Settings > General settings > Quick responses.
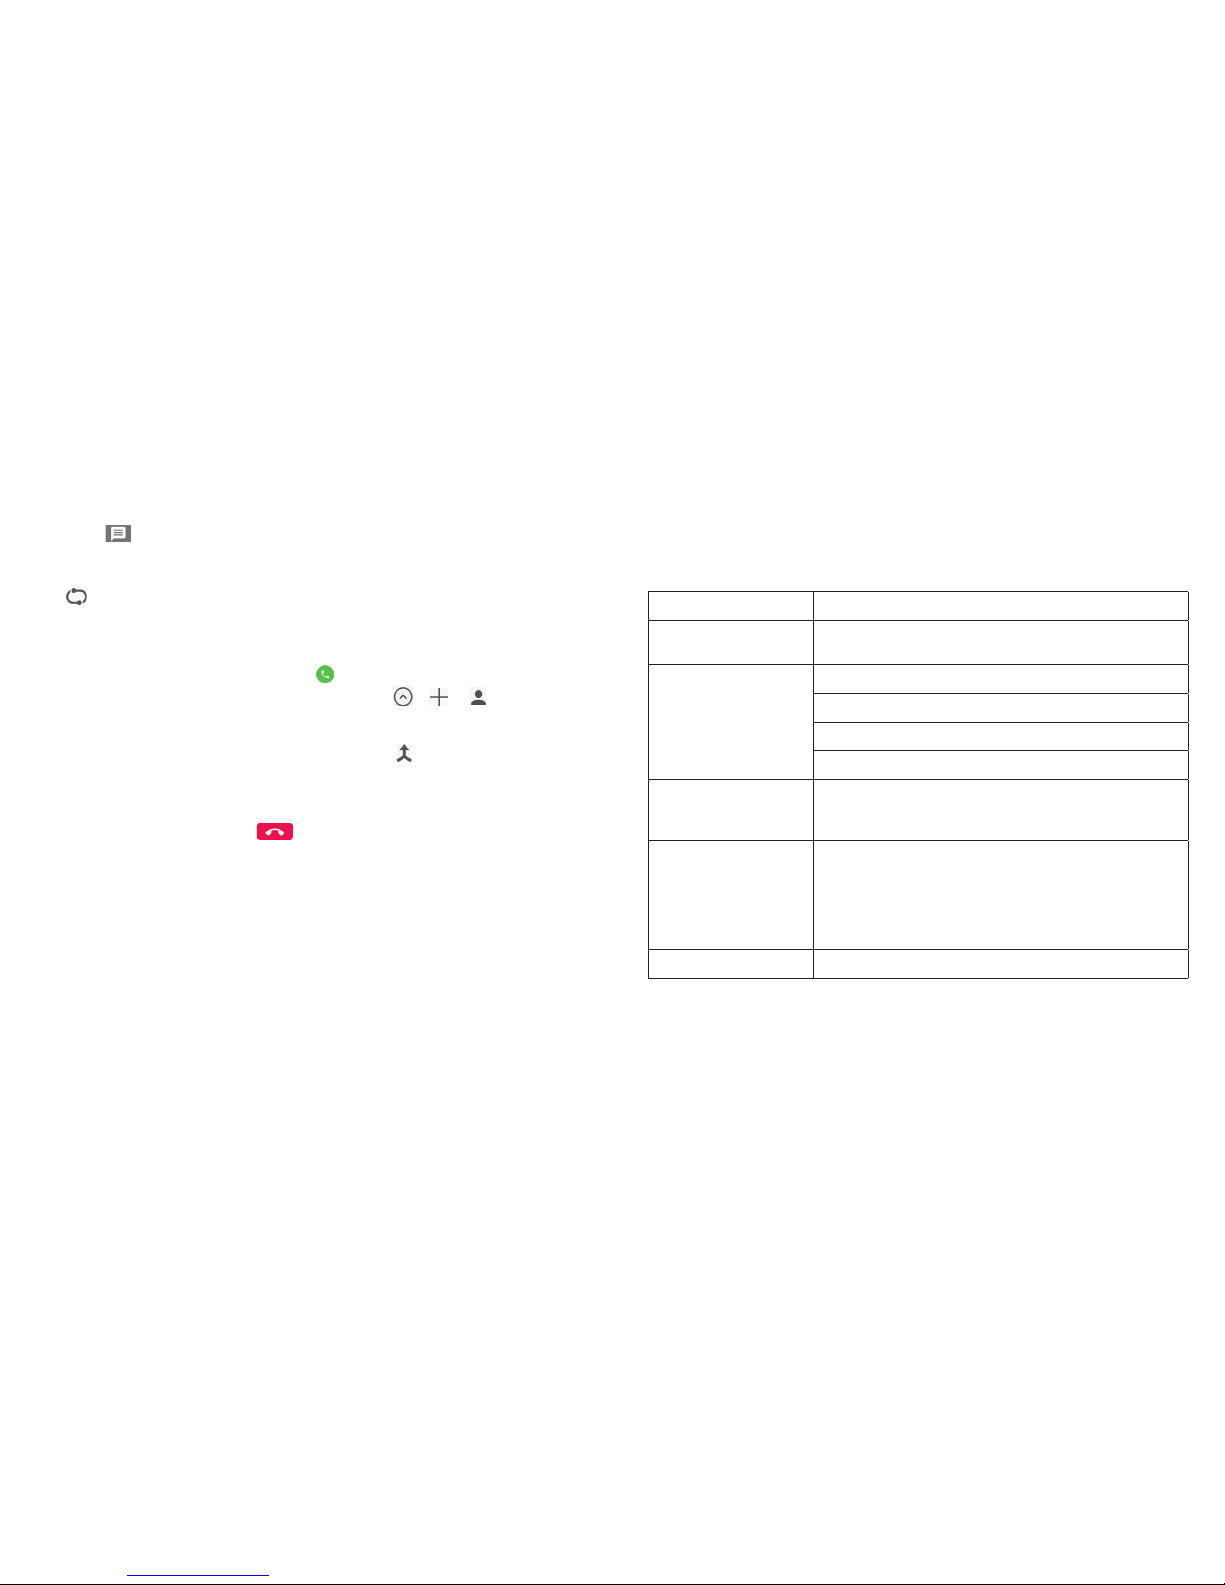
Using options during a call
During a call, you will see a number of on-screen options. Tap an option to
select it.
• Tap to view all call options.
• Tap to switch to the dialer (to enter a code, for example).
• Tap to mute or unmute your microphone.
• Tap to turn the speaker on or off.
• Tap to put the call on hold.
• Tap to make another call separately from the rst call, which is put
on hold.
• Tap to open the Messaging app.
• Tap to open the Contacts app.
• Tap to switch between two calls.
• Tap to merge separate calls into a single conference call.
• Tap to end the current call.
Warning! Because of higher volume levels, do not place the phone near your
ear during speakerphone use.
Managing multi-party calls
When call waiting and three-way call features are available, you can switch
between two calls or set up a conference call.
Note: Call waiting and three-way call features require network support and
may result in additional charges. Please contact your service provider for
more information.
Switching between current calls
When you’re on a call, your phone screen informs you that another call is
coming in and displays the caller ID.
To respond to an incoming call while you’re on a call:
Tap to answer the call. This puts the rst caller on hold and
answers the second call. Tap to answer the second call and
end the rst call. Tap to reject the second call.
PHONE CALLS
28
29
Note: Tap to reject the second call and select a preset text message
or edit one to send to the caller.
To switch between two calls:
Tap on the screen.
Setting up a conference call
With this feature, you can talk to two people at the same time.
1. In the dialer, enter a number and tap .
2. Once you have established the connection, tap > or and dial
the second number. This puts the rst caller on hold and dials the second
number.
3. When you’re connected to the second party, tap .
If one of the people you called hangs up during your call, you and the
remaining caller stay connected. If you initiated the call and are the rst
to hang up, all callers are disconnected.
To end the conference call, tap .
Adjusting your call settings
From the home screen, tap Apps > Settings > Call settings to congure
the call options.
Vibrate pattern Select the vibration pattern for incoming calls.
Vibrate when call
is answered
Check this option to enable vibration when the
call is answered.
Voicemail
Service: Select voicemail service provider.
Setup: Edit the voicemail number.
Sound: Set the notication sound for new voicemails.
Vibrate: Set the condition for vibration.
Fixed Dialing
Numbers
Restrict outgoing calls to a xed set of numbers.
To do this you must know your micro-SIM card’s
PIN2 code.
TTY mode
Your phone is a TTY compatible device. A TTY device
can allow people who have hearing or speech
disabilities to communicate by telephone. Simply
connect the TTY device to the phone’s headset jack.
Select a TTY mode for your phone to work with a TTY
device, or turn TTY off.
Hearing aids Check this option to turn on hearing aid compatibility.
PHONE CALLS
PHONE CALLS

Speed dial Set speed dialing keys.
DTMF tones
Set the length of dual-tone multi-frequency signal
tones.
Call ended
operation tips
Check this box to show call, send message, and
save options when a call is ended.
Call forwarding
Forward your incoming calls to a different number,
and choose when to forward: Always forward,
When busy, When unanswered, or When
unreachable.
Additional settings
Caller ID: Choose whether people you call can see
your number.
Call waiting: See new incoming calls while you’re
on another call.
30 PHONE CALLS
31CONTACTS
Contacts
You can add contacts on your phone and synchronize them with
the contacts in your Google account or other accounts that support
contact syncing.
To see your contacts, tap Contacts on the home screen. From there, you
can tap the tabs on the top to quickly switch to GROUPS, or FAVORITES.
Importing and exporting contacts
You can import/export contacts from/to your SIM card, phone storage, or
microSDHC card. This is especially useful when you need to transfer contacts
between different devices. You can also quickly share your contacts using
Bluetooth, Email, Messaging, etc.
Importing contacts from the micro-SIM card
1. From the home screen, tap Contacts.
2. Tap > Import/Export > Manage SIM card contacts.
3. If you have added contact accounts other than the phone, select
an account in which to save the contacts.
4. Tap > Import SIM Contacts.
5. Check the contacts you want to import and tap .
Importing contacts from a microSDHC card or phone
storage
1. From the Contacts screen, tap > Import/Export > Import from storage.
2. If you have added contact accounts other than the phone, select an
account in which to save the contacts.

32
33
3. Select the vCard les in the microSDHC card or the phone storage.
Note: If the microSDHC card is not installed in the phone, you can import
vCard le(s) in the phone storage.
Exporting contacts to the micro-SIM card
1. From the Contacts screen, tap > Import/Export > Export to SIM card.
2. Check the contacts you want to export and then tap .
Exporting contacts to the microSDHC card or phone storage
1. From the Contacts screen, tap > Import/Export > Export to storage.
2. The phone will prompt you with the name of the vCard le and the
directory in which the le will be saved. Tap OK to create the le.
Note: If the microSDHC card is not installed in the phone, you can export
vCard le(s) into the phone storage.
Sharing contact information
1. From the Contacts screen, tap > Import/Export > Share visible contacts.
2. Choose how to share the contacts. Options depend on the applications
and services installed.
Creating a contact
1. From the Contacts screen, tap to add a new contact.
2. Tap the account eld near the top of the screen to choose where to save
the contact. If a sync account is selected, the contacts will be synced
automatically with your account online.
CONTACTS
3. Enter the contact name, phone numbers, email addresses,
and other information.
4. Tap to save the contact.
Adding a contact to Favorites
You can add the contacts you use frequently to Favorites so that you can
nd them quickly.
1. From the Contacts screen, tap the contact you want to add to Favorites.
2. Tap .
Searching for a contact
1. Tap above the contacts list.
2. Enter the contact name you want to search for. Matching contacts will
be listed.
Joining contacts
As your phone synchronizes with multiple online accounts, you may see
duplicate entries for the same contact. You can merge all the separate
information of a contact into one entry in the Contacts list.
1. From the home screen, tap Contacts.
2. Tap a contact to display the contact’s details.
3. Tap > > Join.
4. Tap the contact whose information you want to join with the rst entry.
The information from the second contact is added to the rst, and the second
contact is no longer displayed in the contacts list.
You can repeat these steps to join another contact to the main contact.
CONTACTS
 Loading...