

Page 1

BOOST B795
3G MOBILE PHONE
USER MANUAL
Copyright © 2014. All rights reserved.
No part of this publication may be excerpted, reproduced, translated or utilised in
any form or by any means, electronic or mechanical, including photocopying and
microfilm, without the prior written permission of ZTE Corporation.
The manual is published by ZTE Corporation. We reserve the right to make
modifications on print errors or update specifications without prior notice.
Version 1.0 April 2014
Page 2

2
WHAT’S INSIDE
A QUICK LOOK AROUND YOUR DEVICE2
GETTING STARTED .............................. 4
PHONE CALLS ................................... 20
CONTACTS ........................................ 26
MESSAGES ........................................ 26
GETTING CONNECTED ...................... 43
CONNECT TO A COMPUTER ............. 46
USING THE BROWSER ...................... 47
BLUETOOTH ...................................... 48
USING MULTIMEDIA FUNCTIONS ..... 53
PLAY VIDEOS .....................................57
GALLERY ............................................57
SOUND RECORDER............................57
SECURITY ..........................................62
UPDATING YOUR DEVICE ..................64
TECHNICAL SPECIFICATIONS: ............64
TROUBLESHOOTING .........................66
WARRANTY INFORMATION ...............70
SAFETY ..............................................71
Page 3

3
A QUICK LOOK AROUND YOUR DEVICE
Page 4

4
GETTING STARTED
INSERT YOUR SIM CARD
1. Open the back cover using the thumb notch in the bottom left
corner:
Page 5

5
2. Insert your SIM card carefully into the SIM slot as shown:
3. The handset memory can be expanded using a microSD(HC) cardup
to 32GB.
4. The battery will only fit one way, just check the gold pads on the
battery line up with the gold springs in the phone.
5. Replace the battery cover and press to click into place.
Page 6

6
SWITCH YOUR DEVICE ON OR OFF
• Press and hold the Power Key to turn on your phone.
• To turn it off, press and hold the Power Key to
open the options menu.
• Touch Power off and then touch OK.
CHARGE THE BATTERY
• Ensure the plug has the correct orientation.
• Insert the charger lead carefully.
• Do not force the connector into the charger jack.
• Connect the charger to a standard AC wall outlet.
• Disconnect the charger when the battery is fully
charged.
• If the phone is on, the charging icon / is shown on the status bar.
• A pop-up message on screen warns you when the battery is low.
• As you charge your phone, the lock screen displays the battery level.
• It is better to keep your battery topped up than to let it fully discharge.
SHOW BATTERY % LEVEL ON THE NOTIFICATIONS BAR
Page 7

7
Go to Settings > Battery > Enable the Battery Percentage check box to
display the current charge level on the Notifications bar.
Important Notes for Charging:
Only use the AC charger and USB lead supplied.
Insert the charger lead carefully.
Check the plug and socket are aligned correctly.
Do NOT use excessive force which may damage the USB port.
Be careful to avoid tripping on the lead whilst it is plugged in.
Physical damage to the USB port is NOT covered by warranty.
Normal charge time is 3-4 hours.
Do not leave on charge for more than 24hrs.
To maximise battery life limit multimedia functions.
Charge the battery between 0°C~45°C. Charge the battery
promptly when flat.
With poor network conditions (less than 2 bars) battery life is
reduced.
When not using the phone for long periods remove the
battery.
Page 8

8
TIPS TO MAXIMISE BATTERY LIFE
• After 2-3 charge / discharge cycles the battery life will improve. From
then on use top up charging to recharge frequently and always charge
promptly when flat.
• To avoid the battery entering a deep discharged state charge the
battery promptly when flat.
• If the battery is deeply discharged it can take 30 minutes to start
charging. Leave it on charge to recover the battery.
• Keep your handset and battery cool. High temperatures degrade the
battery more quickly.
• Normal charge time is 3-4 hours. Do not charge more than 24hrs.
• When not using the phone for long periods charge to approx 40% and
remove the battery.
• With low network signal conditions battery life is reduced.
• Turn off Bluetooth and Wi-Fi when not in use, and set the screen
brightness to automatic to maximise battery life.
Page 9

9
GOOGLE ACTIVATION WIZARD: CREATE OR LOG IN TO A GOOGLE ACCOUNT
We recommend you log in or create a new Google account to enable
on line services.
Follow the on screen wizard to create or log in to an existing Google
account.
TIP
If you set a lock code on your device and then forget the pattern or PIN
number it can be reset using your Google Account. After entering the
PIN, Pattern or Password incorrectly a number of times, the device will
ask you to enter your Google Account details to unlock your device.
Page 10

10
WAKE UP FROM SLEEP MODE
• Press the Power key to activate the
display.
• Drag the padlock icon right to unlock.
SWITCH YOUR HANDSET TO SLEEP MODE
Press the Power key to activate sleep
mode.
Sleep Mode activates automatically with
the timeout set from Options > Settings >
Display > Screen timeout.
TIP
If you set an unlock pattern, PIN or password you need to enter it to
unlock the screen. If you forget your pattern or PIN use your Google
Account password to reset the phone. This will only work if you
register a Google account with this handset.
Page 11

11
Keys and Icons Function
Power Key
Hold down to power on your phone.
Press to switch to sleep mode. Press to wake up.
Hold down for Silent mode, Flight mode or Power off.
Back
Press to go to the previous screen.
Press to exit applications.
Home
Press to return to the Home Screen from any screen.
Hold down to access Google Search
Options
Press to get the options on the current screen.
Hold down to see the recently used applications.
Volume Keys Use to control the volume Up and Down
Phone icon – Open the dialer for Calls
Contacts – Open your Phonebook for all your Contacts
Apps – Open the Applications menu
Messages – go to the Messages app, for SMS and MMS
Page 12

12
THE HOME SCREEN
Slide the Home Screen left or right to view
additional pages.
Long press on the screen to add Shortcuts,
Widgets, Wallpapers etc.
OPTIONS
Press the Options Key for
ADD OR REMOVE ICONS, EXAMPLE: ADD THE CLOCK TO THE HOME SCREEN
Wallpaper, set background image for the Homescreen or Lock screen
Manage Apps, view Downloaded, Running and All apps
System settings, sortcut to device Settings
Page 13

13
• Press to go to Apps then long press any icon to add it to the
desktop.
• Hold the icon to move and release to place it on the home screen.
• Drag and drop the item in the trash to delete it.
• Eg: Select
> Long Press Clock to add this to your desktop:
THE NOTIFICATIONS AND CONTROL PANEL
The Notifications Panel at the top of the Home Screen shows useful
device and status information. Use the Control panel to quickly enable
Wi-Fi, Bluetooth, change Profiles etc.
Pull down the bar at the top of the display to view the Notifications
and Control panels:
Page 14

14
PHONE STATUS AND NOTIFIC ATION ICONS
Data connected
Signal strength
Data in use
Flight mode
Battery is very low
No signal
Battery is low
Speaker is muted
Battery is full
Microphone is muted
Battery is charging
Vibrate mode enabled
Speaker mode is on
FM Radio
Bluetooth is on
USB connected
GPS is on
Connected to a Wi-Fi network
Alarm is set
Headset connected
Page 15

15
NOTIFICATION ICONS
New Email
New instant message
New SMS/MMS
Upcoming event
New voicemail
Song is playing
Missed call
Downloading data
Call in progress
Content downloaded
Call on hold
Uploading data
Call forwarding on
More notifications
Problem with SMS/MMS delivery
TIP
You can also open the Notifications panel from the home screen by
tapping Options > Notifications.
Page 16

16
APPLICATIONS AND SETTINGS
Tap to access Applications. Flick the screen left or right to scroll
through in alphabetical order.
You can install additional applications by going to Play Store
INSTALL APPLICATIONS FROM GOOGLE PLAY STORE
Tap Play Store from the Home Screen to download and install
applications from the Google. Select the item and tap Install.
• You need a Google account to access Play Store
• Follow the wizard to sign in to an existing account or to create a new
account.
UNINSTALL APPLICATIONS
• From the Home screen tap Options > Manage applications
• Select the application to remove
• Tap Uninstall, tap OK to confirm.
Page 17

17
MULTI-TASKING
Run multiple applications simultaneously. Press the Home key from
any application to launch, open or view something else. The original
application will be suspended until you return to it.
TIPS
If you are finished with an application use the Back key to exit the
application. If you leave applications running in the background the
system memory will be depleted and the device will be slow to
respond. Return to the app and close it, or from the Home screen press
Options > Manage Apps > Running and select tasks to close them
down.
OPEN RECENTLY USED APPLICATIONS
Press and hold the Options Key from any screen to view
recently used applications.
Page 18

18
Tap Options > System Settings from the Home Screen:
SETTINGS MENU
Wi-Fi Connect to Wi-Fi devices and Networks
Bluetooth Connect to Bluetooth devices and Networks
Data usage View your data usage, and control Mobile Data
More… Flight mode, Tethering and portable hotspot, VPN,
Mobile networks
Sound Sound levels, ringtones, notifications, vibrate.
Display Brightness, screen timeout, orientation etc.
Storage
Check memory status. Mount or unmount the SD card
Battery See what has been consuming your battery power.
See how long the phone has been running.
Apps Manage applications, set Quick Launch shortcuts,
see running services and battery usage.
Page 19

19
SETTINGS MENU
Location Configure Location modes and services
Security Set screen locks, enable SIM PIN etc
Language &
input
Set the language and keyboard options.
Backup & reset Backup your data on Google servers, and perform a
factory reset to remove your default account.
Account Add and remove accounts.
Date & time Set the date, time, time zone, and formats. Enable
automatic time update.
Schedule power
on & off
Set a scheduled power on and off time.
Accessibility Download a screen reader application and make
other Accessibility settings
About phone System updates, Status, Build information.
Page 20

20
PHONE CALLS
MAKE A CALL FROM THE DIALER
• Unlock the phone and press the Call Key
• Tap numbers on the dial pad or select from Call Logs, Contacts, or
Favourites using the tabs at the bottom of the screen.
• Tap the call key to make the call.
• Press End to end the call.
TIP You can make a call from any place you see the phone icon
MAKE A CALL FROM CONTACTS
• Tap from the Home Screen. Contacts are displayed in
alphabetical order.
• Slide up or down to scroll through your Contacts list.
• Tap to select the Contact then tap to call.
TIP Tap to search for a Contact.
Page 21

21
MAKE A CALL FROM CALL LOGS
• Unlock the phone and press the Call Key
• Tap the Clock icon to view your Call logs.
• Scroll and tap the required number to start the call, tap the arrow
button to view the call details if required
MAKE A CALL FROM A TEXT MESSAGE
• Unlock the phone and press for messages. Tap the thread that
contains the phone number to call.
• Tap the number then tap
• Press End to end the call.
TURN THE SPEAKER ON/OFF (HANDSFREE)
Tap Speaker during a call. The speakerphone icon is displayed.
Page 22

22
MUTE A CALL
During a call tap Mute to mute your microphone.
The mute icon is displayed.
MAKE A CONFERENCE CALL
A conference call can be made between yourself and two or more
other parties.
• Call the first number.
• While you are connected, tap Add call.
• Call the second number.
• While you are connected to the second number, tap Merge
• To add the third party, tap Add call.
• Dial the number, and when connected, tap Merge
Page 23
23
MAKING AN INTERNATIONAL CALL
• Press the Call Key on the home screen to open the dialer.
• Hold down the 0 key to enter the ‘+’ symbol for International Dialling
• Enter the full phone number.
• Tap to make the call.
• Press End to end the call.
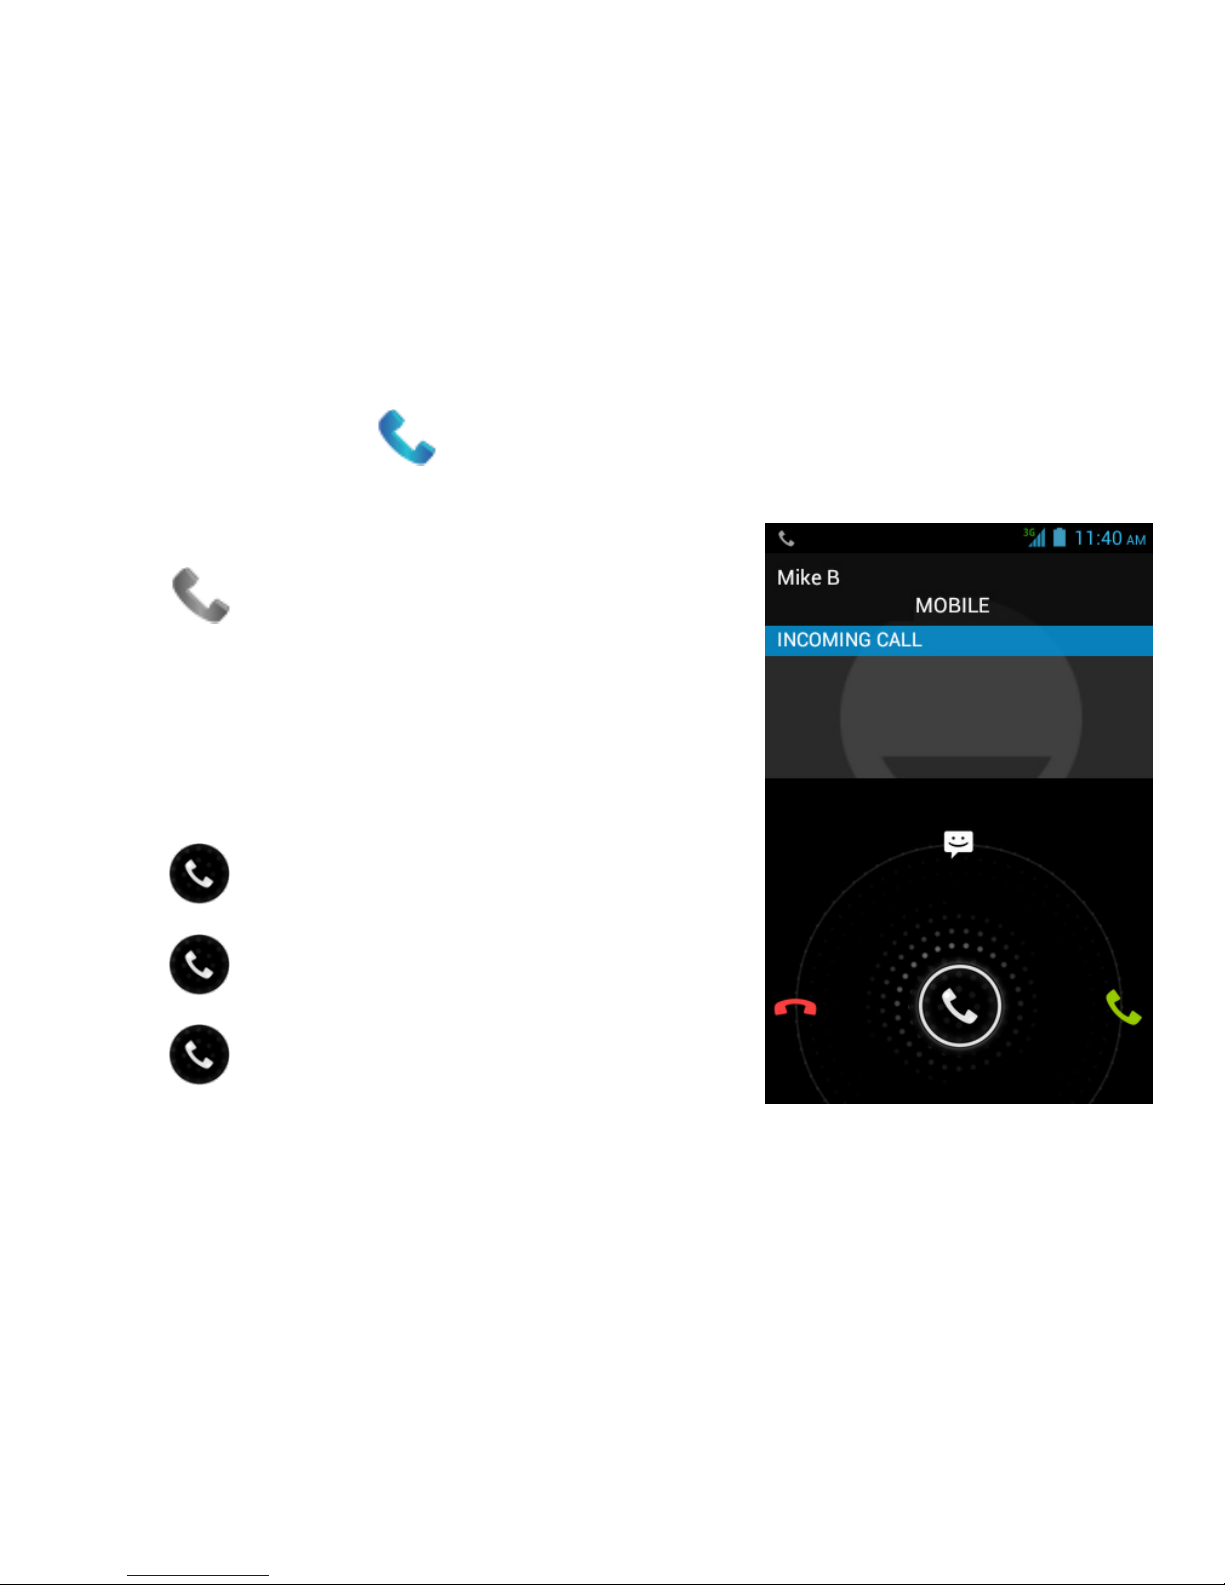
ANSWER AN INCOMING CALL
An incoming call presents three options:
Drag right to answer the call
Drag left to reject the call.
Drag to Messages to send an SMS.
The default return SMS can be set at Dialler > Settings > Other settings >
Quick responses.
Page 24
24
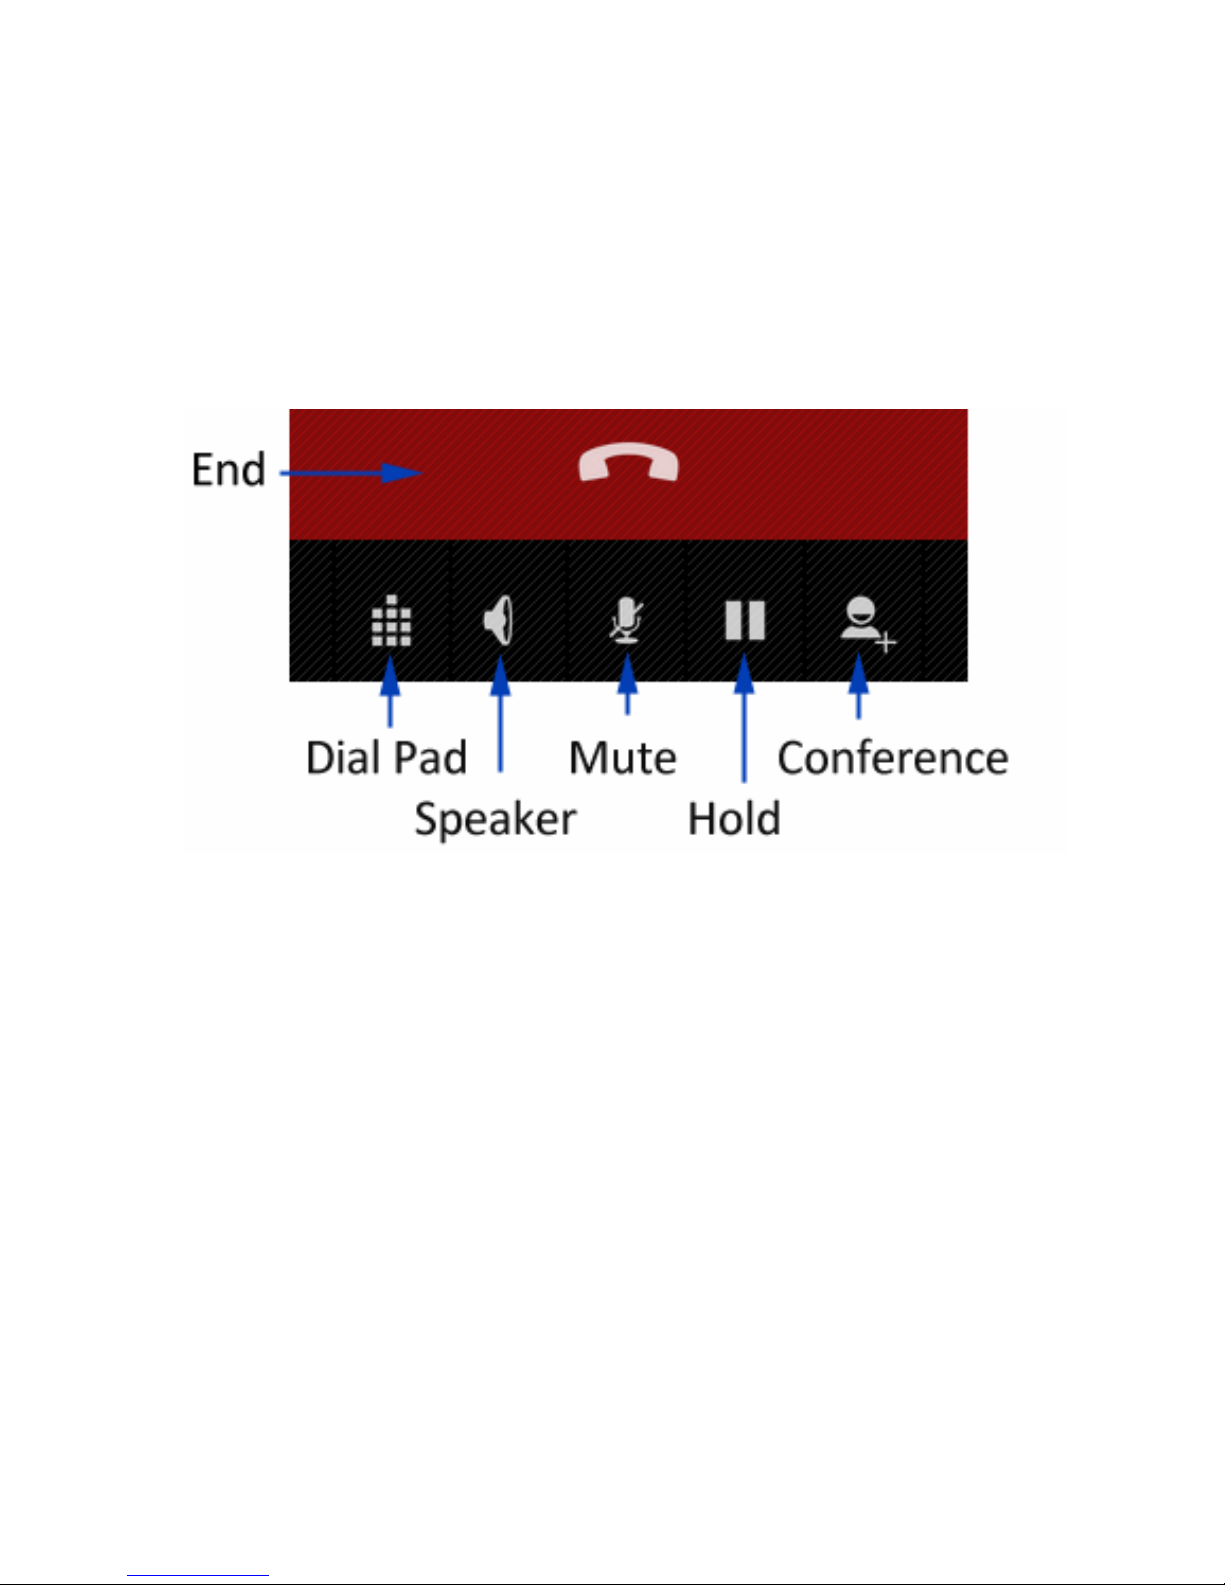
FUNCTIONS DURING A CALL
During a call when you move the handset away from your ear the
screen lights up. Use the buttons for the features described:
Dial Pad – enter DTMF tones
Speaker – Use Handsfree, Speaker mode
Mute – Mute the microphone
Hold – Place the caller on Hold
Conference – Dial in another party, the first call is put on hold.
Page 25

25
INSERT A PAUSE OR WAIT SYMBOL INTO A PHONE NUMBER
• Enter the phone number on the Dial pad.
• Press Options > Add 2-sec pause to add a Pause
• Press Options > Add Wait to wait for the next key press.
CALL SETTINGS
From within the Dialler, press Options > Settings > Call settings:
Voice Call
Configure Voice Mail, IP calling, Call forwarding,
Call barring, Additional > Caller ID, Call Waiting
Internet call Configure internet based (SIP) accounts
Other settings
Fixed dialling numbers*
Minute reminder
Quick responses
TTY mode
* Requires network support
Page 26
26
CONTACTS
Add contacts to your phone and synchronise them with your Google
account or other accounts that support contact syncing.
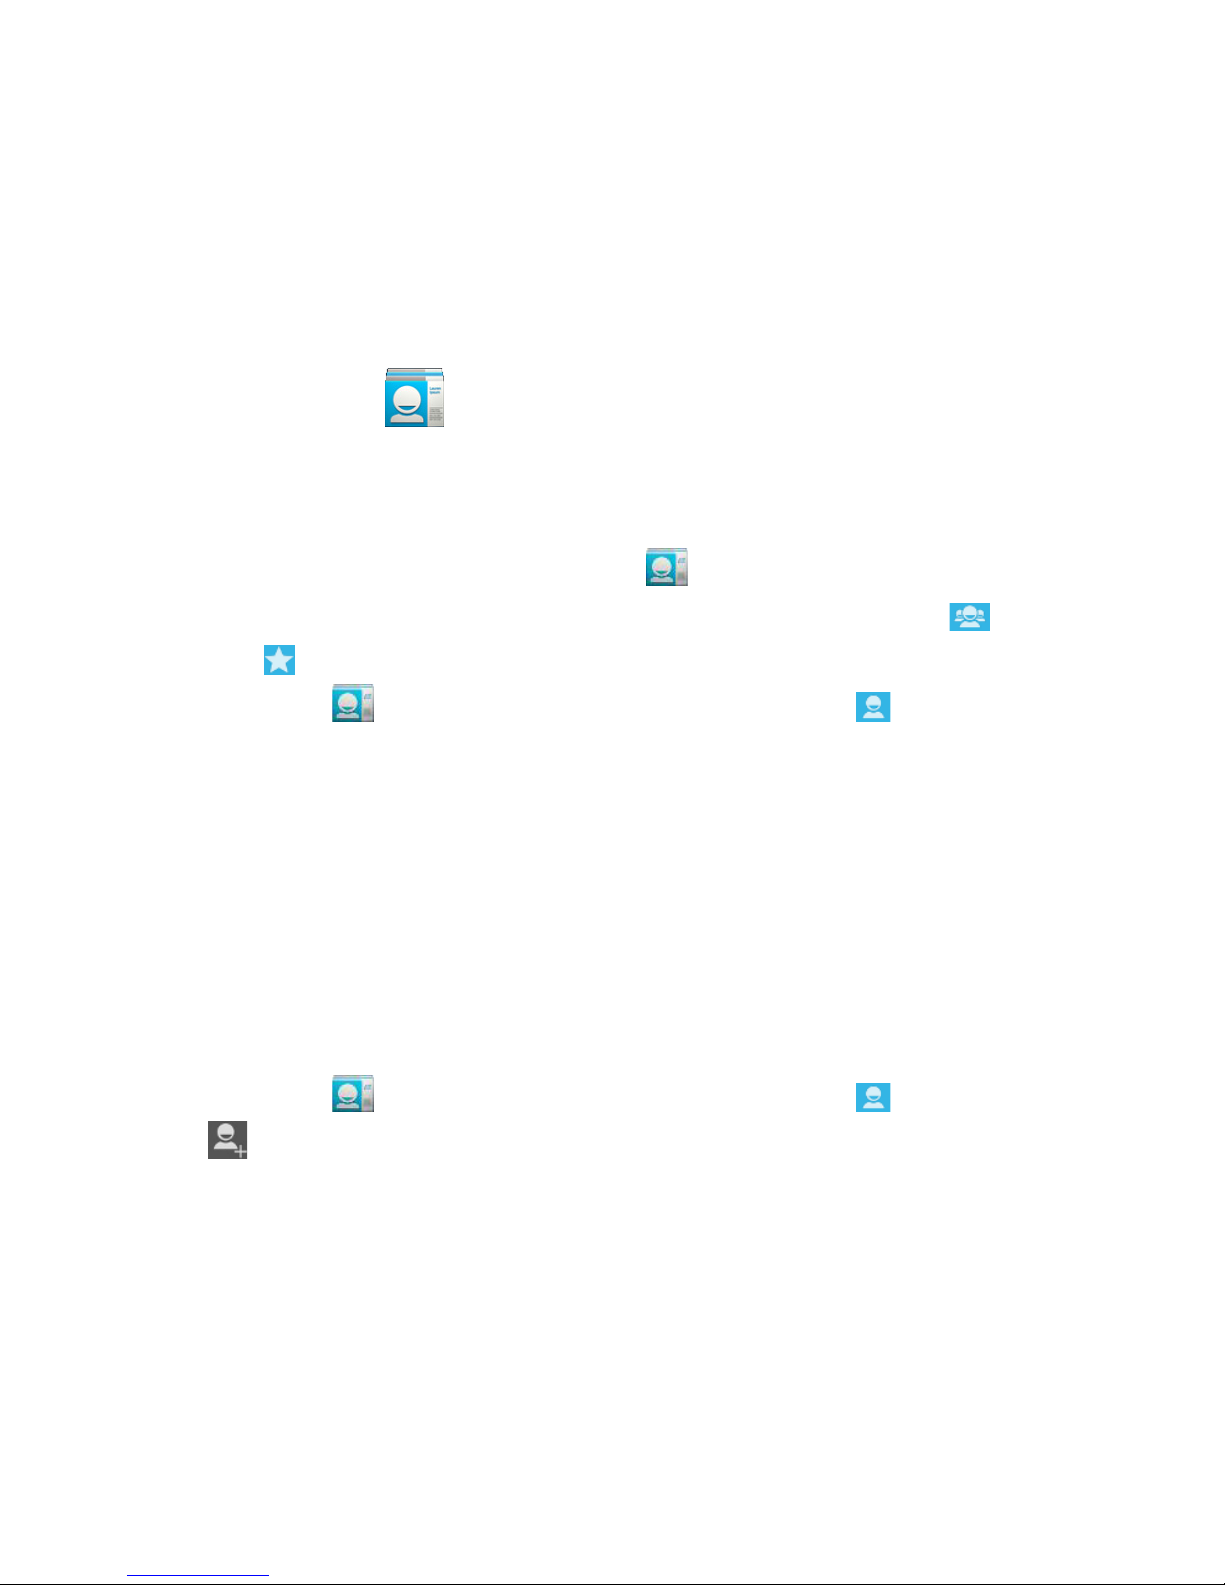
To see your contacts, touch Home > . From there, touch the tabs on
the top of the screen to quickly switch to contact groups or
favourites .
• Touch Home > and touch the all contacts tab to access your
contact list.
• Scroll through the list to view all your contacts.
• Touch a contact to view its details.
TIP: If you have a lot of contacts stored, you'll see a slider when you
touch the right side of the screen. To go directly to a letter, press and
hold the slider and drag it to a letter.
Adding a New Contact
• Touch Home > and touch the all contacts tab .
• Touch to add a new contact.
• Touch the account field on the top of the screen to choose where to
Page 27

27
save the contact. If a sync account is selected, the contacts will be
synced automatically with your account online.
• Enter the contact name, phone numbers, email addresses, and other
information.
• Touch DONE to save the contact.
Setting Up Your Own Profile
You can create your own name card in your phone.
• Touch Home > and touch the all contacts tab .
• Scroll to the top of the screen and touch Set up my profile.
• Edit your profile information and touch DONE.
Import, Export, and Share Contacts
You can import/export contacts from/to your SIM or microSD card.
This is useful when transferring contacts between different devices.
Import your SIM card Contacts to add more features such as dedicated
Ringtone, Photos etc.
Page 28

28
Import Contacts From the SIM Card
• Touch Home > > Options
• Touch Import/export > Import from SIM card.
• (If you have an account, Select the save account)
• Touch to select the contacts to import and then touch .
Import Contacts From the microSD Card
• Touch Home > > Options
• Touch Import/export > Import from SD card.
• Select an account to save the contacts.
• Select the vCard file(s) in the microSD card and touch OK.
Export Contacts to the SIM Card
• Touch Home > > Options
• Touch Import/export > Export to SIM card.
• Touch to select the contacts and then touch .
Page 29

29
Export Contacts to the microSD Card
• Touch Home > > Options
• Touch Import/export > Export to SD card.
• The phone will prompt you with the name of the vCard file. Touch OK
to create the file in the microSD card.
Share Contacts
• Touch Home > , touch the all contacts tab .
• Touch Options > Select item(s).
• Touch to select the contacts you want to share and then touch .
• Choose to share the contacts via Bluetooth, Email, Gmail, Messaging.
Add a Contact to Favourites
You can add the contacts used frequently to Favourites, so you can find
them quickly.
• Touch Home > and touch the all contacts tab .
• Touch a contact and then touch to add to favourites.
Page 30

30
Remove a Contact From Favourites
• Touch Home > > touch the favourites tab .
• Touch a favourite contact and then touch .
Using Groups
• Touch Home > and touch the contact groups tab .
• Touch to create a new group.
• Touch the account field on the top of the screen to choose an account
for the group.
• Enter the group name and touch DONE.
Add Members to a Group
• Touch Home > and touch the contact groups tab .
• Touch a group and then touch .
• Touch to select the contacts to add as group members.
• Touch .
Page 31

31
Delete a Group
• Touch Home > > touch the contact groups tab .
• Touch a group and then touch Options > Disband group.
• Touch OK to disband the group. The contacts in the group will not be
deleted.
Edit a Group
• Touch Home > > touch the contact groups tab .
• Touch a group and then touch Options.
• Touch Rename group to edit the group name. Or touch Select item(s)
to select the members you don’t need and remove them.
Searching for a Contact
• Touch Home > .
• Touch on the bottom of the screen.
• Input the contact name to search. The contacts matched will be listed.
Edit Contact Details
• Touch Home > .
Page 32

32
• Touch a contact to edit and then touch Options > Edit.
• Edit the contact and touch DONE when finished
Set a Ringtone for a Contact
• Touch Home > .
• Touch a contact to set a ringtone and then touch Options > Set
ringtone (Contact must be saved on the phone)
• Select a ringtone and touch OK.
Delete a Contact
• Touch Home > .
• Touch a contact to delete and touch Options > Delete.
• Touch OK to confirm.
To delete several contacts:
• Touch Options > Select item(s) in the all contacts screen.
• Touch to select the contacts to remove and then touch .
• Touch OK to confirm.
Page 33

33
Join Contacts
Your phone can synchronise with multiple accounts containing your
contact information (such as Google, Microsoft Exchange ActiveSync,
Facebook and Twitter). When you synchronise your phone with those
accounts, each account adds a separate contact entry in the Contacts
list.
The Join and Separate feature is only
available in the menu after
synchronising multiple contact sources. If you are only using SIM or
Phone Contacts this option is not available.
You can merge all the separate information of multiple accounts into
one record in the Contacts list.
• Touch Home > .
• Touch a contact to set as the prime contact. This is the contact you will
see in the list after the joining.
• Touch Options > Join. The phone will list the suggested contacts to join.
• Touch the contact whose information you want to join with the first
contact.
The information from the second contact is added to the first contact,
Page 34

34
and the second contact is no longer displayed in the Contacts list.
Separate Contact Information
If contact information from different sources was joined in error, you
can separate the information back into individual contacts on your
phone.
• Touch Home > .
• Touch a contact you want to separate, to view its details.
• Touch Options > Edit > Options > Separate.
• Touch OK to confirm.
The contact information is separated into individual contacts in the list
of contacts.
Page 35

35
MESSAGES
SMS AND MMS MESSAGES
From the Home screen tap the messages icon to access SMS and
MMS messages.
Unread message(s) display the (SMS) and (MMS) icons.
Open new messages from the Notifications Panel or the Messaging
Screen. Tap the message to read it.
COMPOSING AN SMS
• If the Messages app opens into an existing thread press the Back key to
return to the SMS main menu.
• Tap the messages icon > Compose new message.
• Tap the To field to enter the recipient’s number. You can also enter
letters to display matching Contacts and select a recipient from the list
or tap the Contacts icon to see your Contacts list.
• Tap the Type to compose field to type your message.
• Tap Send when done.
Page 36
36
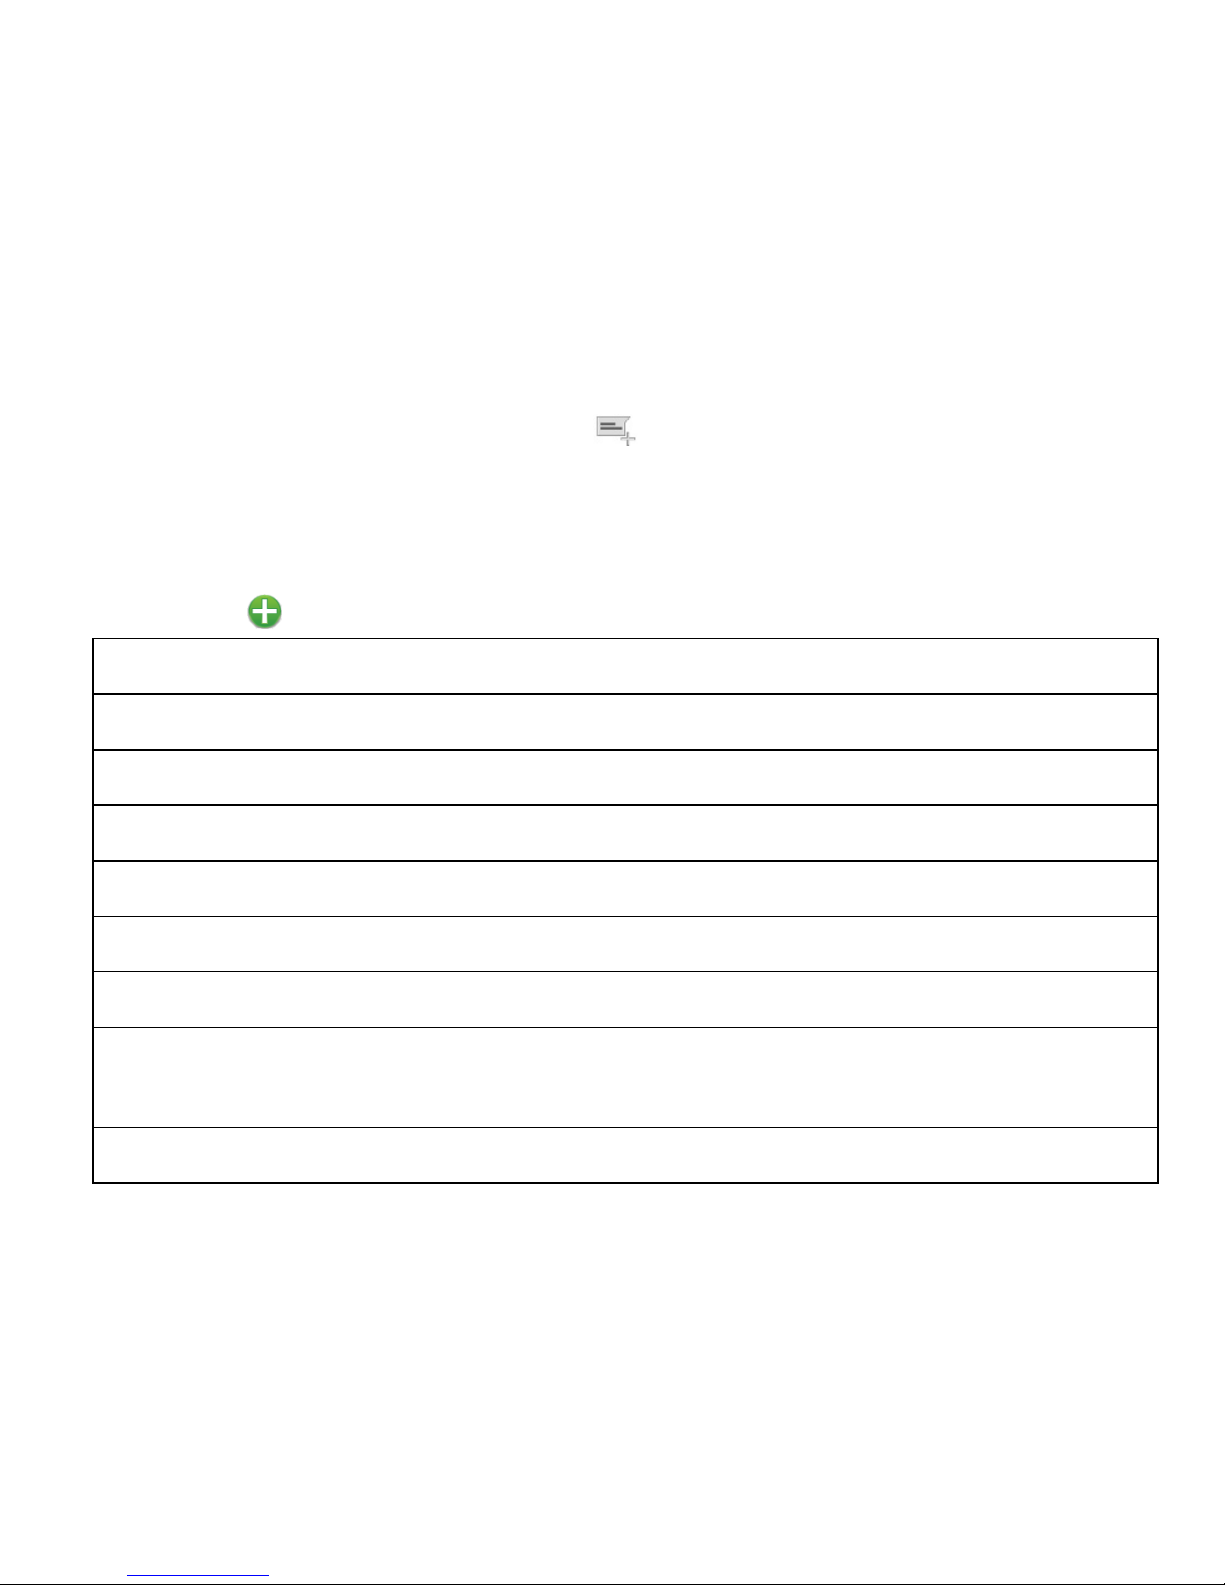
SEND A MULTIMEDIA MESSAGE
• On the Messaging screen, touch at the bottom to create a new
message.
• Enter the recipient and the text of the message, as you do when
sending a text message.
• Touch the icon to add an attachment:
Capture picture Take a photo and add to your message.
Capture video
Shoot a video clip and add to your message.
Record audio Record an audio file and add to your message.
Contact Select a contact to add as an attachment.
Pictures Select a picture to add to your message.
Videos
Select a video clip to attach to your message.
Audio Select an audio file to add to your message.
Calendar Add a Calendar event such as an appointment or
meeting (VCS).
Slideshow Add a series of pictures
Page 37

37
Touch to Send.
TIPS: The maximum MMS size is 2MB. Large images are automatically
re-sized but video files may be too large to send. Send large Video files
by email instead or share using Social Media.
FORWARDING A MESSAGE
Long press the individual message to get further options such as
Forward, Delete, View message details etc.
MANAGING MESSAGES AND MESSAGES THREADS
SMS and MMS messages sent and received are grouped into message
threads in the Messaging screen. Message threads show you the
history of messages from the specific contact. Threads are sorted by
received time, with the latest one at the bottom.
Page 38

38
REPLY TO A MESSAGE
• Tap the message (or thread) you want to reply to from the Messaging
Screen.
• Tap Type to compose and enter the contents of your message.
• Tap Send when done.
ACCESS DRAFT MESSAGES
Draft messages are automatically saved when you exit the message
application without having sent the message. If you have any messages
in Draft status they are marked in red with Draft
DELETE A MESSAGE (THREAD)
• Tap Options > Delete threads from the Messaging Screen.
• Select the messages or threads you want to delete.
• Tap OK.
• To delete an individual message (not a thread) tap and hold the
message and select Delete from the available options.
You can also delete a message by opening it from the Messaging
Page 39

39
Screen and tapping Options > Delete messages.
MESSAGE SETTINGS
Tap Messages > Options > Settings to configure message settings such
as Fonot size, Storage settings, SMS Settings, MMS Settings,
Notifications settings and Signature settings.
MULTIPLE SMS MESSAGE CHARGING:
A standard SMS message can contain up to 160 characters. If you
exceed this length the message will be sent as more than 1 SMS. You
will be charged for multiple SMS messages depending on the length.
Page 40

40
SET YOUR EMAIL ACCOUNT
Create an Email account to receive Emails on your phone.
• Tap Apps > Email to set up your email account
• Enter your Email address and Password
• Follow the prompts. You may need to refer to your email service
provider to complete the settings.
• Set your required options choosing from the Account options screen.
You can also use web based email accounts or download specific email
clients for your email provider.
COMPOSE AN EMAIL
• Tap Apps > Email > Options > Compose
• Tap the To field and enter the recipient’s address. Tap Options > Add
Cc/Bc to add more recipients if required.
• When you enter the address, the matching addresses saved in your
Contacts will be displayed. You can tap the recipient from the list.
• Enter the subject and the content of your Email.
Page 41

41
• Tap Send.
RE P LY, REPLY TO ALL, FORWARD AN EMAIL
• Tap Apps > Email to see your Inbox.
• Press and hold the email
• Select from Open, Delete, Forward, Reply all, Reply, Mark as unread.
• Enter the contents / recipients of your Email. Tap Send.
EMAIL SETTINGS
Tap Apps > Email > Options > Accounts > Long press the account >
Account settings
ACCOUNT SETTINGS
• Account name: Set your account name.
• Your name: Set the name displayed on the outgoing message.
• Signature: Edit your signature.
• Inbox check frequency: Set the email checking frequency.
Page 42

42
• Default account: Send email from this account by default.
NOTIFICATION SETTINGS
• Email notifications: Status bar notification for new Email
• Select ringtone: Incoming Email notification
• Vibrate: Enable vibrate with ringtones when Email arrives.
SERVER SETTINGS
• Incoming settings: Set the incoming server settings.
• Outgoing settings: Set the outgoing server settings.
Page 43

43
GETTING CONNECTED
CONNECT TO THE INTERNET
You can access the internet through the mobile network or via Wi-Fi.
When logged on to a Wi-Fi connection, all data will be sent via your
Wi-Fi network.
To disable mobile network data slide down from the top of the
handset screen to open the quick settings panel, then switch off data
connectivity using the Data conn. button.
WI-FI
Wi-Fi provides wireless Internet access over distances of up to 50
meters.
• Tap Home > Options > Settings > Wireless & networks.
• Select the Wi-Fi check box to turn Wi-Fi on.
CONNECT TO A WI-FI NETWORK
• Tap Home > Options > Settings > Wireless & networks > Wi-Fi settings
Page 44

44
• The available Wi-Fi network names and security settings (open or
secured) are displayed.
• Tap a network to connect.
• An open network will automatically connect,
• If you select a secured network you need to enter a password.
CHECK THE WI-FI NETWORK STATUS
• Check the wi-fi icon in the status bar.
• Tap Home > Options > Settings > Wireless & networks > Wi-Fi settings,
tap the current wireless network to view the network status.
• Set Wi-Fi always on Home > Options > Settings > Wireless & networks >
Wi-Fi settings > Options > Advanced > Wi-Fi sleep policy.
SET UP A WI-FI HOTSPOT
A Wi-Fi hotspot shares your network internet connection with other
devices nearby. For example, if you are travelling you can connect your
laptop wirelessly to your handset to use the internet.
Options > Settings > Wireless & networks > Tethering & portable
hotspot > Portable Wi-Fi hotspot
Page 45

45
Select Configure Wi-Fi hotspot and add a password to your device.
USING USB MODEM TETHERING
Use USB tethering to connect a computer to the internet using your
device network connection.
Plug your handset to a computer using the
USB lead supplied.
Options > Settings > Wireless & networks > Tethering & portable
hotspot > USB tethering.
Page 46

46
CONNECT TO A COMPUTER
Connecting to a computer enables you to transfer music, pictures and
other files to and from your handset. There are various ways to do this.
1. Connect using a USB lead. Select Built-in CDROM to install handset
drivers for Windows PC’s
2. Select MTP on the handset to browse the handset folders on your
PC.
3 Use Google Drive to share files in the cloud
4. Connect via Bluetooth to share files with other devices.
See the full User Guide available on line at www.zte.com.au for more
details.
MAC users need to download the File Transfer app from Android onto
your MAC device.
Select Built-in CDROM to install handset drivers for Windows PC’s
Page 47
47
USING THE BROWSER
You can use your Browser to visit most websites.
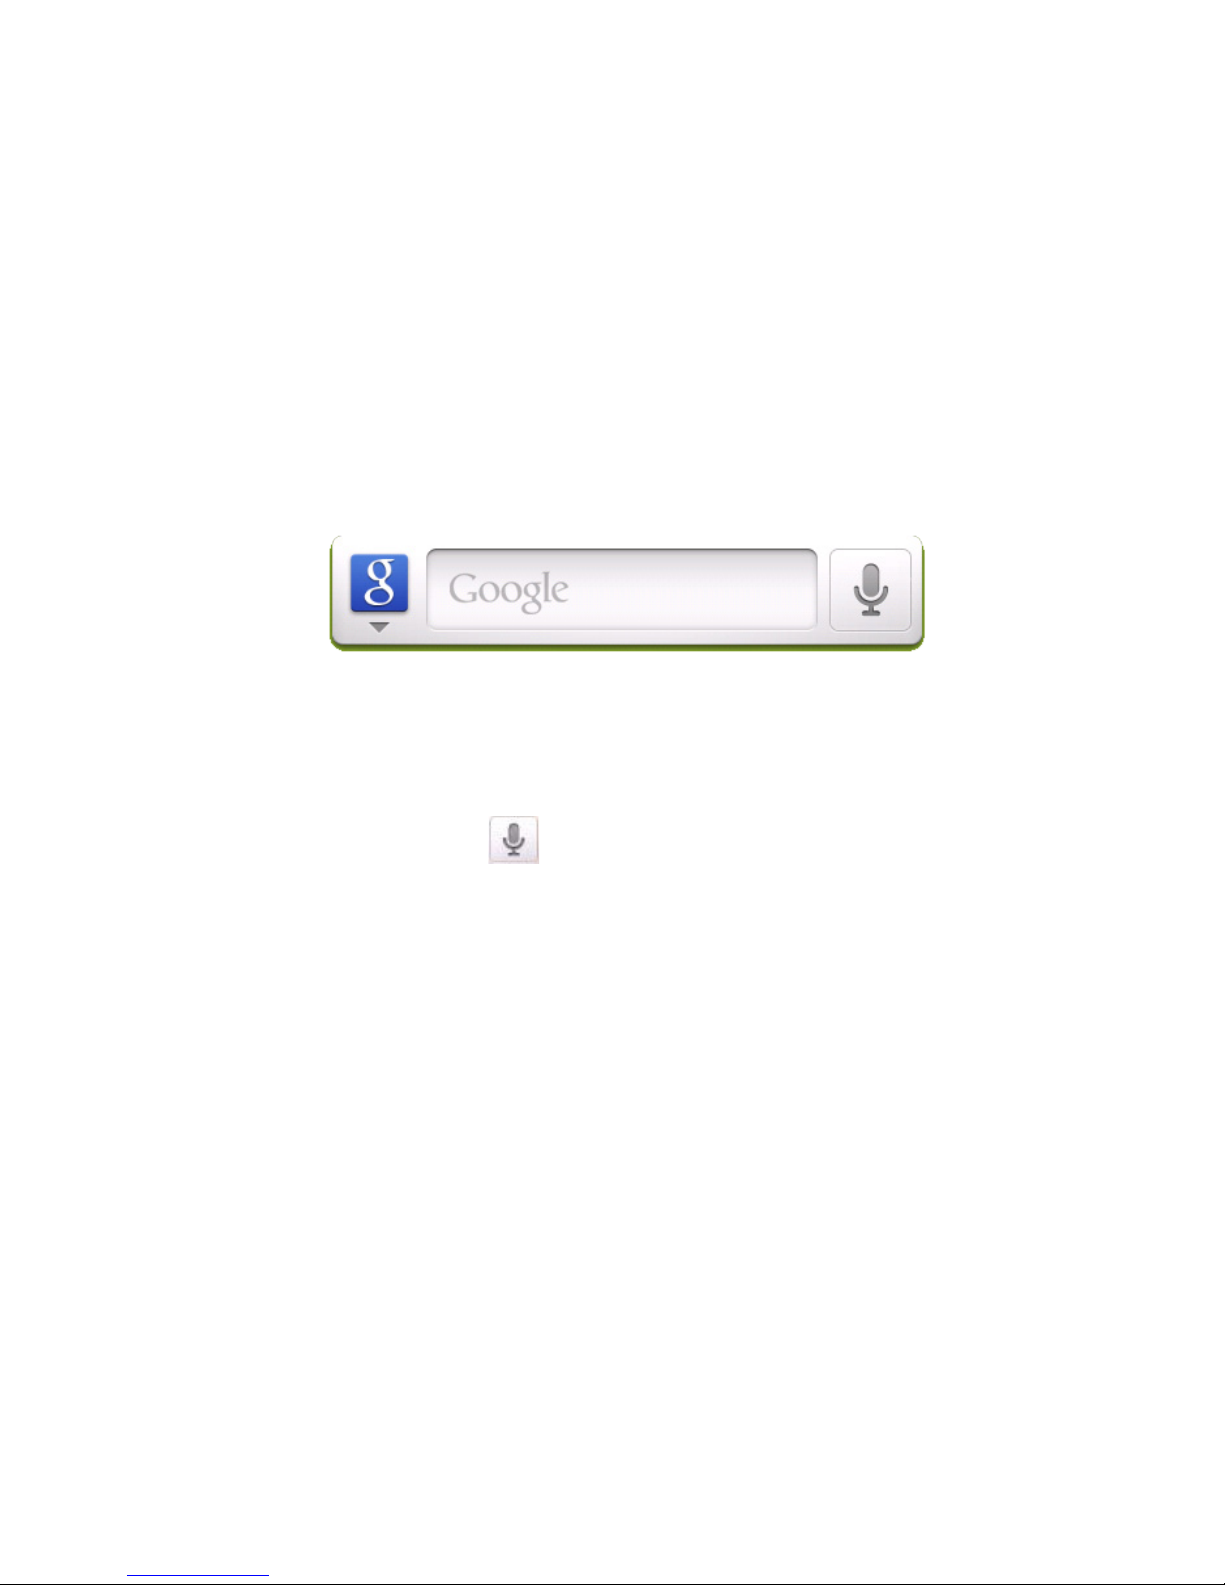
• Tap the Google Search box on the Home Screen.
• Enter your search request using the keypad.
• Press the arrow when done.
• Tap the microphone icon to use speech recognition. Speak your
request clearly into the handset microphone.
• From the Home Screen tap on the Chrome icon to launch Chrome
Page 48

48
BLUETOOTH
Bluetooth enabled devices can exchange information within a distance
of about 10 meters without any physical connection. The Bluetooth
devices must be paired to share information.
TURNING BLUETOOTH ON OR OFF
• Switch Bluetooth on or off from the quick settings panel or
• Tap Options > Settings > Wireless & networks.
• Tap the Bluetooth check box to turn Bluetooth on.
• The icon is displayed in the status bar. To turn Bluetooth off, clear
the Bluetooth check box.
MAKE YOUR DEVICE VISIBLE TO OTHER DEVICES
• Tap Options > Settings > Wireless & networks > Bluetooth settings.
• Select the Bluetooth check box to turn on.
• Select the Discoverable check box to make your device visible to other
devices.
Page 49

49
CHANGE YOUR DEVICE NAME
• Tap Options > Settings > Wireless & networks > Bluetooth settings.
• Select the Bluetooth check box to turn on.
• Tap Device name.
• Enter the name and tap OK.
PAIR WITH ANOTHER BLUETOOTH DEVICE
• Both devices must have Bluetooth turned on.
• Tap Options > Settings > Wireless & networks > Bluetooth settings.
• Tap Scan for devices to display available devices in your vicinity.
• Tap the device to pair with and enter your PIN if required. The same
PIN should be used on both devices.
• File transfer (OPP) is set to Always ask.
Page 50
50
USING THE BROWSER
Use the Google Search bar on the Home Screen or use Google Chrome.
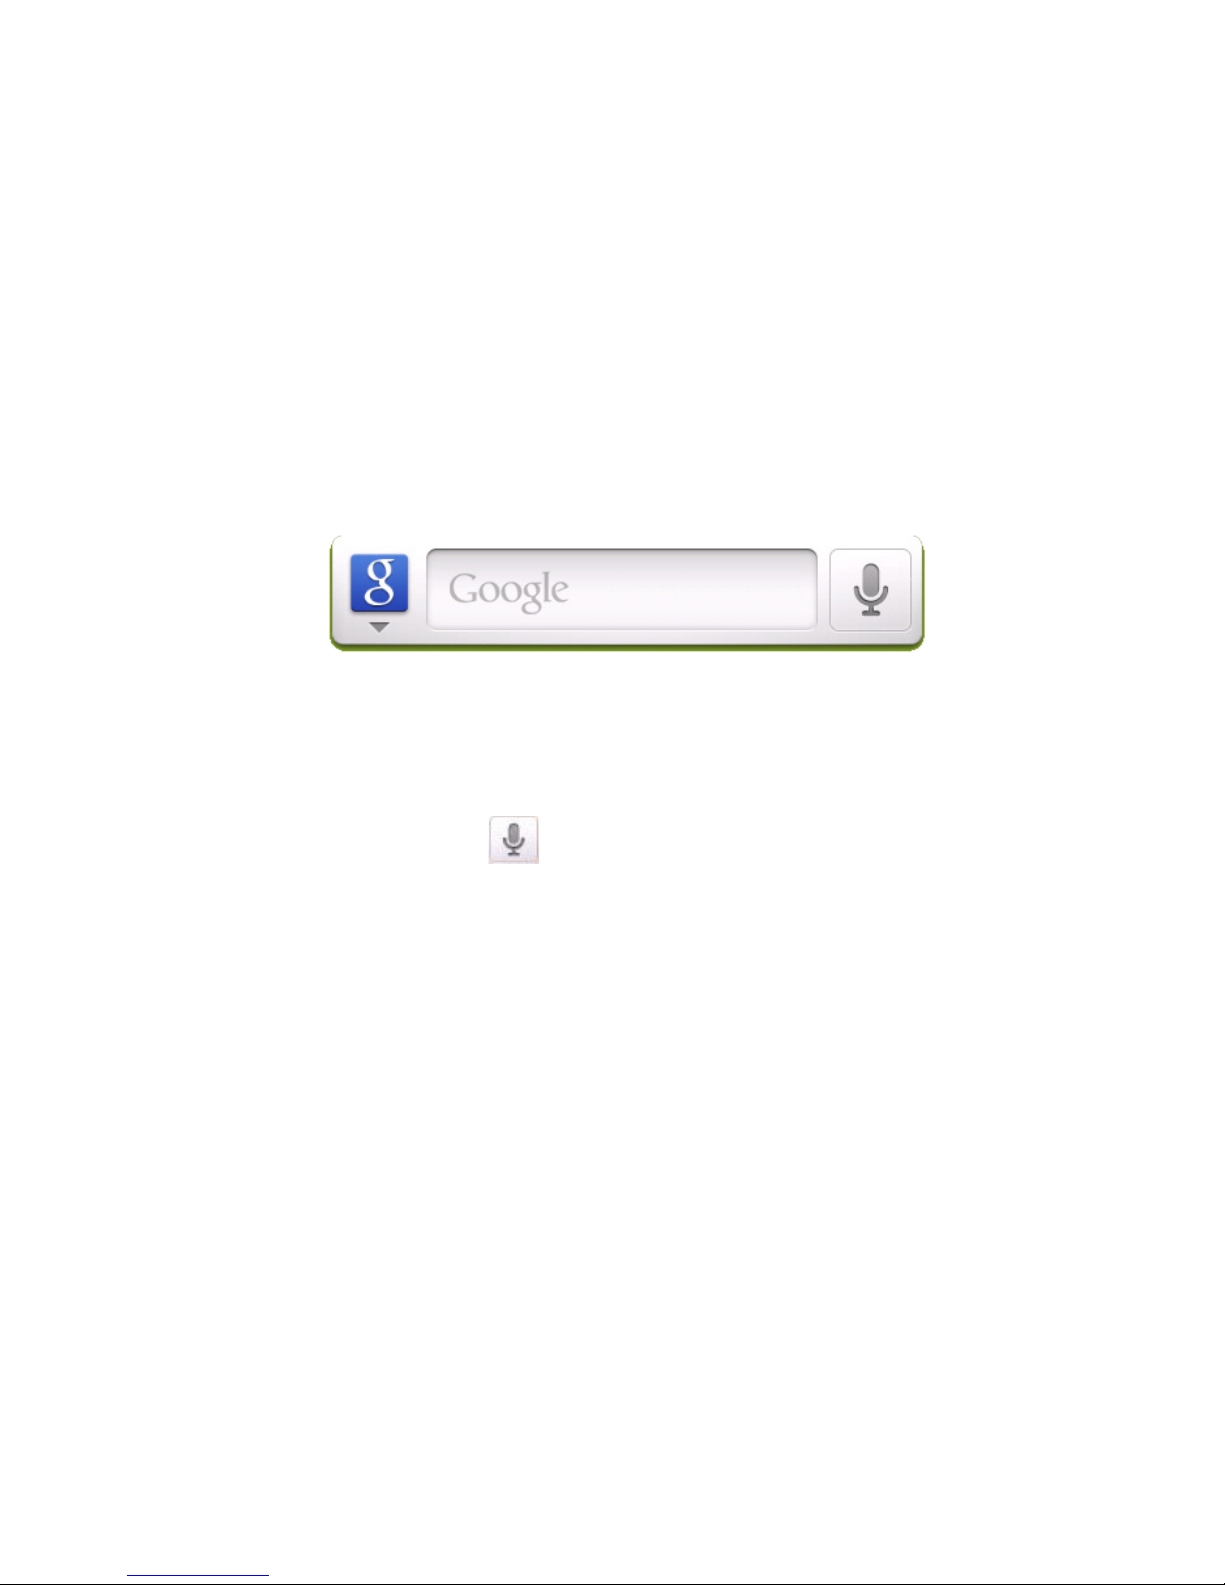
• Tap the Google Search box on the Home Screen.
• Enter your search request using the keypad.
• Press the arrow when done.
• Tap the microphone icon to use speech recognition. Speak your
request clearly into the handset microphone.
The first time you open Chrome you are guided through how to use by
on screen instructions and demos. Type the search in the top bar. Press
Options for new Tabs, Incognito browsing, Bookmarks and other
Settings options.
Page 51

51
BLUETOOTH
Bluetooth enabled devices can exchange information within a distance
of about 10 meters without any physical connection. The Bluetooth
devices must be paired to share information.
TURNING BLUETOOTH ON OR OFF
• Switch Bluetooth on or off from the quick settings panel or
• Tap Options > Settings > Wireless & networks.
• Tap the Bluetooth check box to turn Bluetooth on.
• The icon is displayed in the status bar. To turn Bluetooth off, clear
the Bluetooth check box.
MAKE YOUR DEVICE VISIBLE TO OTHER DEVICES
• Tap Options > Settings > Wireless & networks > Bluetooth settings.
• Select the Bluetooth check box to turn on.
• Select the Discoverable check box to make your device visible to other
devices.
Page 52

52
CHANGE YOUR DEVICE NAME
• Tap Options > Settings > Wireless & networks > Bluetooth settings.
• Select the Bluetooth check box to turn on.
• Tap Device name.
• Enter the name and tap OK.
PAIR WITH ANOTHER BLUETOOTH DEVICE
• Both devices must have Bluetooth turned on.
• Tap Options > Settings > Wireless & networks > Bluetooth settings.
• Tap Scan for devices to display available devices in your vicinity.
• Tap the device to pair with and enter your PIN if required. The same
PIN should be used on both devices.
• File transfer (OPP) is set to Always ask.
Page 53

53
USING MULTIMEDIA FUNCTIONS
TAKING PICTURES
Line up your shot and tap the shutter button to take the picture.
• Tap the thumnail in the bottom corner of your screen to view the
picture.
• Tap the Settings button to review the camera settings
VIDEO RECORDER
• Select the Video camera switch from the main camera window
• Tap the shutter button to start shooting.
• Long press, or press and hold the shutter to pause
• Tap the shutter button to stop shooting
• Tap the icon in the right corner to view the last video clip.
• Tap the Settings button to review the video settings
Page 54

54
FM RADIO
To use the FM radio you must insert
the headphones for the antenna.
OPEN THE FM RADIO
• Insert the headphones
• Tap Home > Options > FM Radio
• Touch the arrow controls to scan for available channels
• Press the star to add to favourites
• Press Options to view your Channel list where you can long rpess on
the channel to rename or delete it.
• Press the Power symbol to close the radio, otherwise it will continue to
run in the background.
Page 55

55
MUSIC
You need to have audio files stored on your memory card. Use
downloads, Bluetooth or PC Connectivity to save files onto your
memory card.
• Tap Home > Apps > Music
• Select from Songs, Playlists, Folders, Albums, Artists or Genre
• To play continuous tracks, select Songs > Options > Play All
• To play an album select Album then click the first track
CREATING PLAYLISTS
• Select a music file to add to a new playlist.
• Tap and hold on the file until a shortcut menu pops up.
• Tap Add to playlist.
• Tap New.
• Enter the playlist name and tap Save.
• The playlist is created and the selected file is added to the playlist.
Page 56

56
MANAGING YOUR PLAYLISTS
• Tap Playlist from the Music Screen to view all playlists.
• Hold on the playlist you want to play or edit until a shortcut menu pops
up.
• Tap Play to play the playlist.
• Tap Delete to delete the playlist.
• Tap Rename to edit the playlist name.
SETTING A SONG AS RINGTONE
• Open the folder where the song you want to set as ringtone is.
• Hold on the song until a shortcut menu pops up.
• Select Use as ringtone.
TIPs
You can also set a song as a ringtone when you are playing it by
tapping Options > Use as ringtone.
The play controls are also available on the Control panel
Page 57

57
PLAY VIDEOS
• Tap Home > Apps > Gallery, or Video Player
• Touch and Slide on the left of the screen to adjust the Brightness. Slide
on the right to adjust the Volume, Slide on the bottom of the screen to
use FW, RW and tap to Pasue and Resume.
GALLERY
Use Gallery to view pictures and play back videos. You can also set
pictures as wallpaper, contact icons and share them with your friends.
SOUND RECORDER
Sound Recorder enables you to record voice memos that you can also
set as a ringtone.
Tap Home > Apps > Sound Recorder.
Page 58

58
GOOGLE APPLICATIONS
SIGN IN OR CREATE YOUR GOOGLE ACCOUNT
Sign in to your Google Account to synchronise Gmail, Calendar, and
Contacts between your phone and the web.
• Tap a Google application, such as Talk or Market.
• Follow the instructions in the wizard and tap Next.
• Tap Sign in if you have a Google account.
Enter your user name and password, and then tap Sign in.
• Tap Create if you do not have a Google account.
USING GMAIL
Gmail is Google’s web-based email service. Gmail is configured when
you sign in to your Google account. Depending on your synchronisation
settings, Gmail on your phone is automatically synchronised with your
Gmail account on the web.
Tap Apps > Gmail to open.
Page 59

59
CREATE AND SEND AN EMAIL
• In the Inbox, press Menu and then tap Compose.
• Enter email address in the To field. If you are sending an email to
several recipients, separate the email addresses with a comma. You
can add as many message recipients as you want.
• Enter the email subject, and then compose your email.
• After composing your email, tap Send.
USING GOOGLE CALENDAR
Tap Home > Apps > Calendar to use Google Calendar. You can use
the calendar to schedule appointments, meetings and other events.
Your appointments are displayed on the screen as they are scheduled.
All appointments are synchronised to your Google account, which
enables you to share your schedule, get your entire calendar on the go,
and receive Email reminders for your upcoming events.
Page 60

60
USING GOOGLE TALK
Google Talk is an instant messaging program to communicate with
other Google Talk users.
OPEN GOOGLE TALK
Tap Home > Apps > Talk.
ADD A NEW FRIEND
You can only add people who have a Google Account.
• In the Friends list, press Options > Add friend.
• Enter the Google Talk instant messaging ID or Google email address of
the friend you want to add.
Page 61

61
VIEW AND ACCEPT AN INVITATION
• In the Friends list, press Options > More > Invites.
• All chat invitations you have sent or received are listed on the pending
invitations screen.
• Tap a pending invitation, and then tap Accept or Cancel.
CHANGE YOUR ONLINE STATUS
• Tap the online status icon to update your status.
• Tap the status message box and enter your status message using the
onscreen keyboard.
STAR T A CHAT
• Tap a friend from your Friends list and enter text on the on-screen
keyboard.
• After entering your message, tap Send.
Page 62

62
SECURITY
SET A SCREEN UNLOCK PATTERN, PIN, OR PASSWORD
Protect your phone from unauthorised use by creating a personal
unlock pattern, PIN or password. Use a pattern, PIN or password you
can easily remember.
• Tap Home > Options > Settings > Security > Set up screen lock
• Choose from Pattern, PIN or Password.
• Example for Pattern:
• Watch the demo and tap Next
• Draw a pattern of your choice, tap Continue
• Draw the pattern again and tap Confirm.
• We recommend you register a Google account before setting your
unlock pattern, PIN or Password. After five incorrect entries press
Forgot Pattern to enter your Google account password to reset the
screen lock.
Page 63

63
UNLOCK THE SCREEN WITH A PATTERN
• Press Power Key.
• Draw your pattern to unlock the screen. If you make a mistake you can
try again up to five times.
If you forget the unlock pattern then after five attempts you can enter
your Google account details to unlock your device.
SET A SIM CARD PIN LOCK
• Set a PIN code on your SIM card to prevent others from using your
account.
• The initial PIN code is provided by your service operator.
• Tap Options > Settings > Security > Set up SIM card lock.
• Select Lock SIM card. Enter the PIN and tap OK.
CHANGE SIM PIN
Before changing the SIM PIN, you need to enable it.
Page 64

64
UPDATING YOUR DEVICE
Your phone can download and install Software updates.
Options > Settings > About phone > System updates
The software update service checks an online server to see if any
updates are available for your phone. If an update is available you can
choose whether to download and install the update.
Downloading via Wi-Fi is highly recommended. Data usage charges will
apply if downloading via mobile networks such as the Telstra Next G
®
network. International roaming data charges will apply for customers
downloading the upgrade on a mobile network whilst travelling
outside of Australia.
A firmware update will require a restart of your device.
Page 65

65
TECHNICAL SPECIFICATIONS:
Size and Weight 121 × 62.1 × 11.5 mm. 120g with battery
Networks 3G UMTS 850, 2100 MHz. HSPA+ 21Mbps data
2G GSM 900, 1800, 1900 MHz
Display TFT 3.5”, 320 x 480, Capacitive touch
Back camera 2.0M Pixels
Memory card Supports microSD(HC) memory up to 32GB
Battery
Capacity 1200mAh Li-ion
Charge Time 3-4 hrs with AC Charger
Standby time 200 hours (subject to network)
Voice talk time 3 hours (subject to network)
Connectivity Bluetooth 3.0 Wi-fi 802.11b/g/n
Supported file types jpg, gif, png, amr, mid, mp3, mp4, 3gpp, h263
Audio
3.5mm headset jack
Page 66
66
TROUBLESHOOTING
PLEASE CHECK THE MANUAL THOROUGHLY BEFORE CONTACTING YOUR
SERVICE PROVIDER.
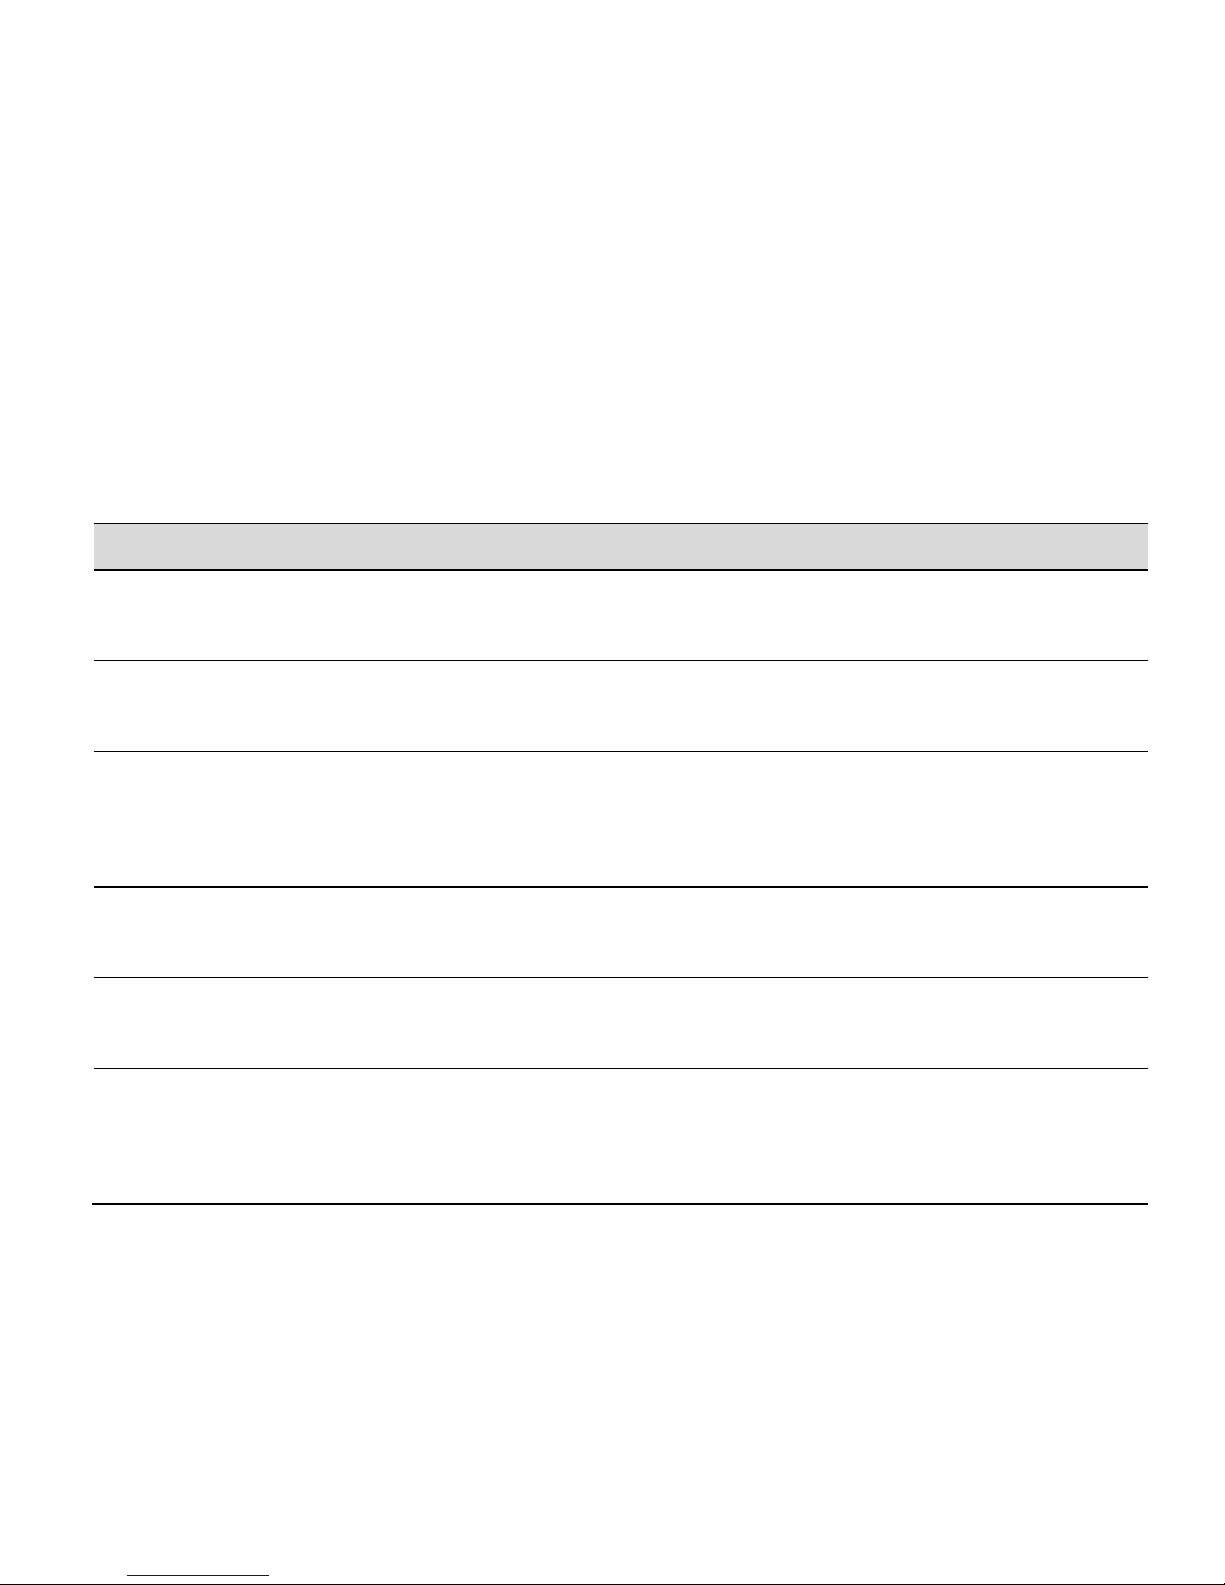
Symptom Solution
How do I check the
software version?
Menu > Settings > About phone > Build
number
How do I reset to
factory defaults?
Menu > Settings > Backup & reset > Factory
data reset
How do I check the
SMS service centre
number?
Menu > Messages > Options > Settings >Text
Message (SMS)
How do I configure
the MMS Settings?
Menu > Messages > Options >
Settings >Multimedia Message (MMS)
How do I configure
Email settings?
Apps > Email, or Menu > Settings > Accounts
How do I copy
Contacts to or
from my SIM card?
Contacts > Options > Import/Export > Follow
the directions on screen
Page 67
67
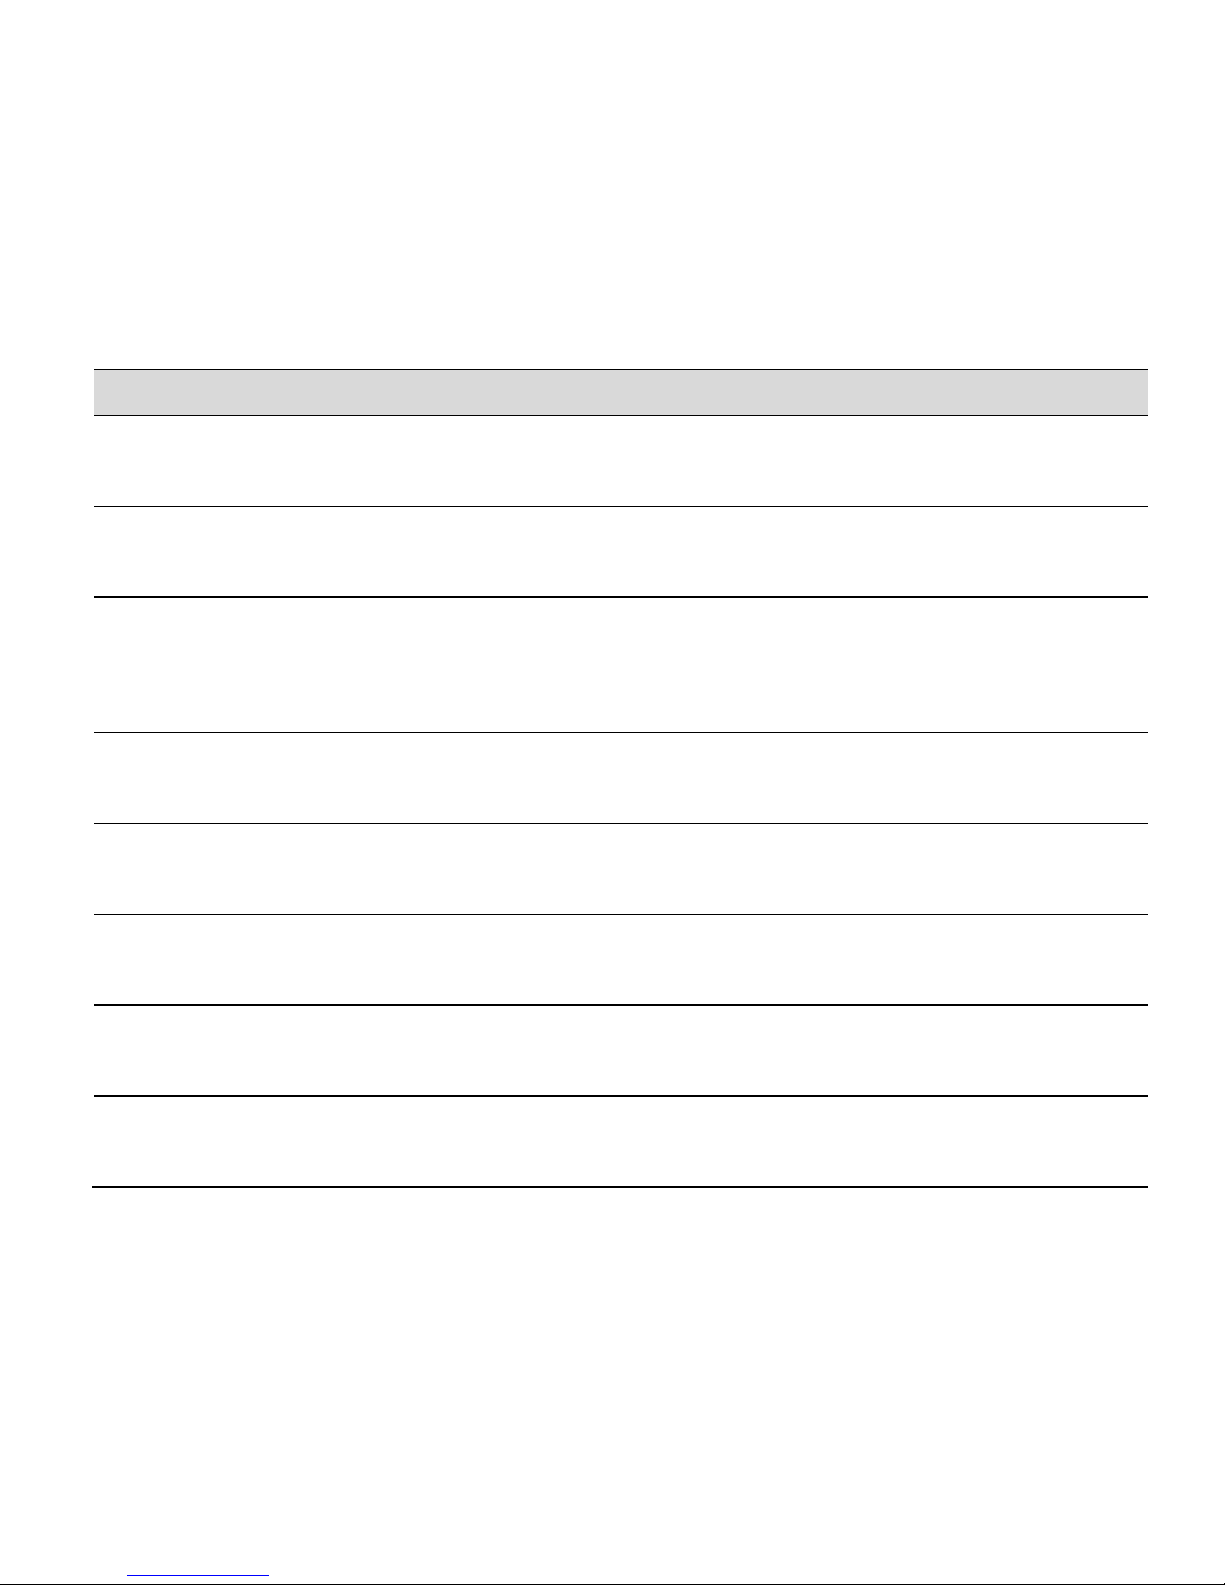
Symptom Solution
How do I select
Network mode?
Menu > Settings > More > Mobile Networks >
Network mode
How do I manually
select a carrier?
Menu > Settings > More > Mobile Networks >
Network operators
How do I enable
USB tethering?
Menu > Settings > More > Tethering and
Portable hotspot. Connect as CDROM to install
drivers
How do I configure
APN’s
Menu > Settings > More > Mobile Networks >
Access Point Names > New APN
How do I enable
Flight Mode?
Long press on the power key > Flight Mode
How do I clear my
Browser?
Browser > Options > Settings > Privacy > Clear
Browsing Data
How do I check
Call forwarding etc
Calls > Options > Settings > Voice call > Call
forwarding
How do I check for
Software Updates?
Menu > System updates
Page 68
68
Symptom Solution
How do I get more
technical support?
Visit zte.com.au or call 1300 789 475 during
office house AEST.
How do I change
the Ringtone?
Menu > Settings > Sound > Phone Ringtone
The battery
discharges quickly
Possible network coverage issue. Check the
signal level. With only 1 or 2 bars, the battery
has to work harder to maintain network
contact. Limit multi-media to save power. The
battery may be worn out.
The handset
switches on by
itself.
An alarm or calendar event switches the
handset on automatically.
No incoming ring
or alarm tone
Hold the power key to check the phone is not
in silent mode.
Check the ringtone and ring volume settings.
Page 69
69
Symptom Solution
I cannot charge
the phone
Confirm the charger is properly inserted.
Remove the battery, clean the contacts and
check it is inserted correctly. The battery may
be worn out.
Tip: Charge the phone using the supplied USB
cable.
The handset
switches off after
charging.
The handset is charging in the off state. Press
and hold the Red key to switch the handset
ON.
I cannot connect
to other Bluetooth
devices
Turn Bluetooth on. Set visibility to Show. Make
sure the pass-code is correct. Possible
compatibility issues. Not all functionality is
supported between different Bluetooth
devices and standards.
Page 70

70
WARRANTY INFORMATION
The warranty does not apply to defects or errors caused by:
(a) Normal wear and tear, mishandling, physical damage, improper
installation.
(b) Water, exposure to solvents or any other liquid damage.
(c) Any unauthorised disassembly, repair or modification.
(d) Power surges, lightning, fire, flood or other natural events.
(e) Use of the product with unauthorised third party products such as
generic chargers.
(f) Any other cause beyond the range of normal usage for products.
The End User shall have no right to reject, return, or receive a refund
for any product under the above-mentioned situations. The End User’s
statutory rights are not excluded by these terms and conditions.
Note: Consult the warranty card for full information.
Page 71

71
SAFETY
GENERAL STATEMENT ON RF ENERGY
The phone is a low-power radio transmitter and receiver. When switched on it
intermittently transmits radio frequency (RF) energy (radio waves). The
transmit power level is optimised for best performance and automatically
reduces when there is good quality reception. Maximum power is only used at
the edge of network coverage so under most circumstances the power output
is very low. Under poor network conditions the phone transmits at a higher
power, may get hot and have a shorter battery life.
SPECIFIC ABSORPTION RATE (SAR)
The phone is designed not to exceed the limits for exposure to radio waves
recommended by the ICNIRP. The limits include safety margins designed to
assure the protection of all persons, regardless of age and health.
The guidelines measure the Specific Absorption Rate, or SAR. The SAR limit for
mobile devices is 2W/Kg and the highest SAR value for this device is 0.906W/Kg.
Page 72
72
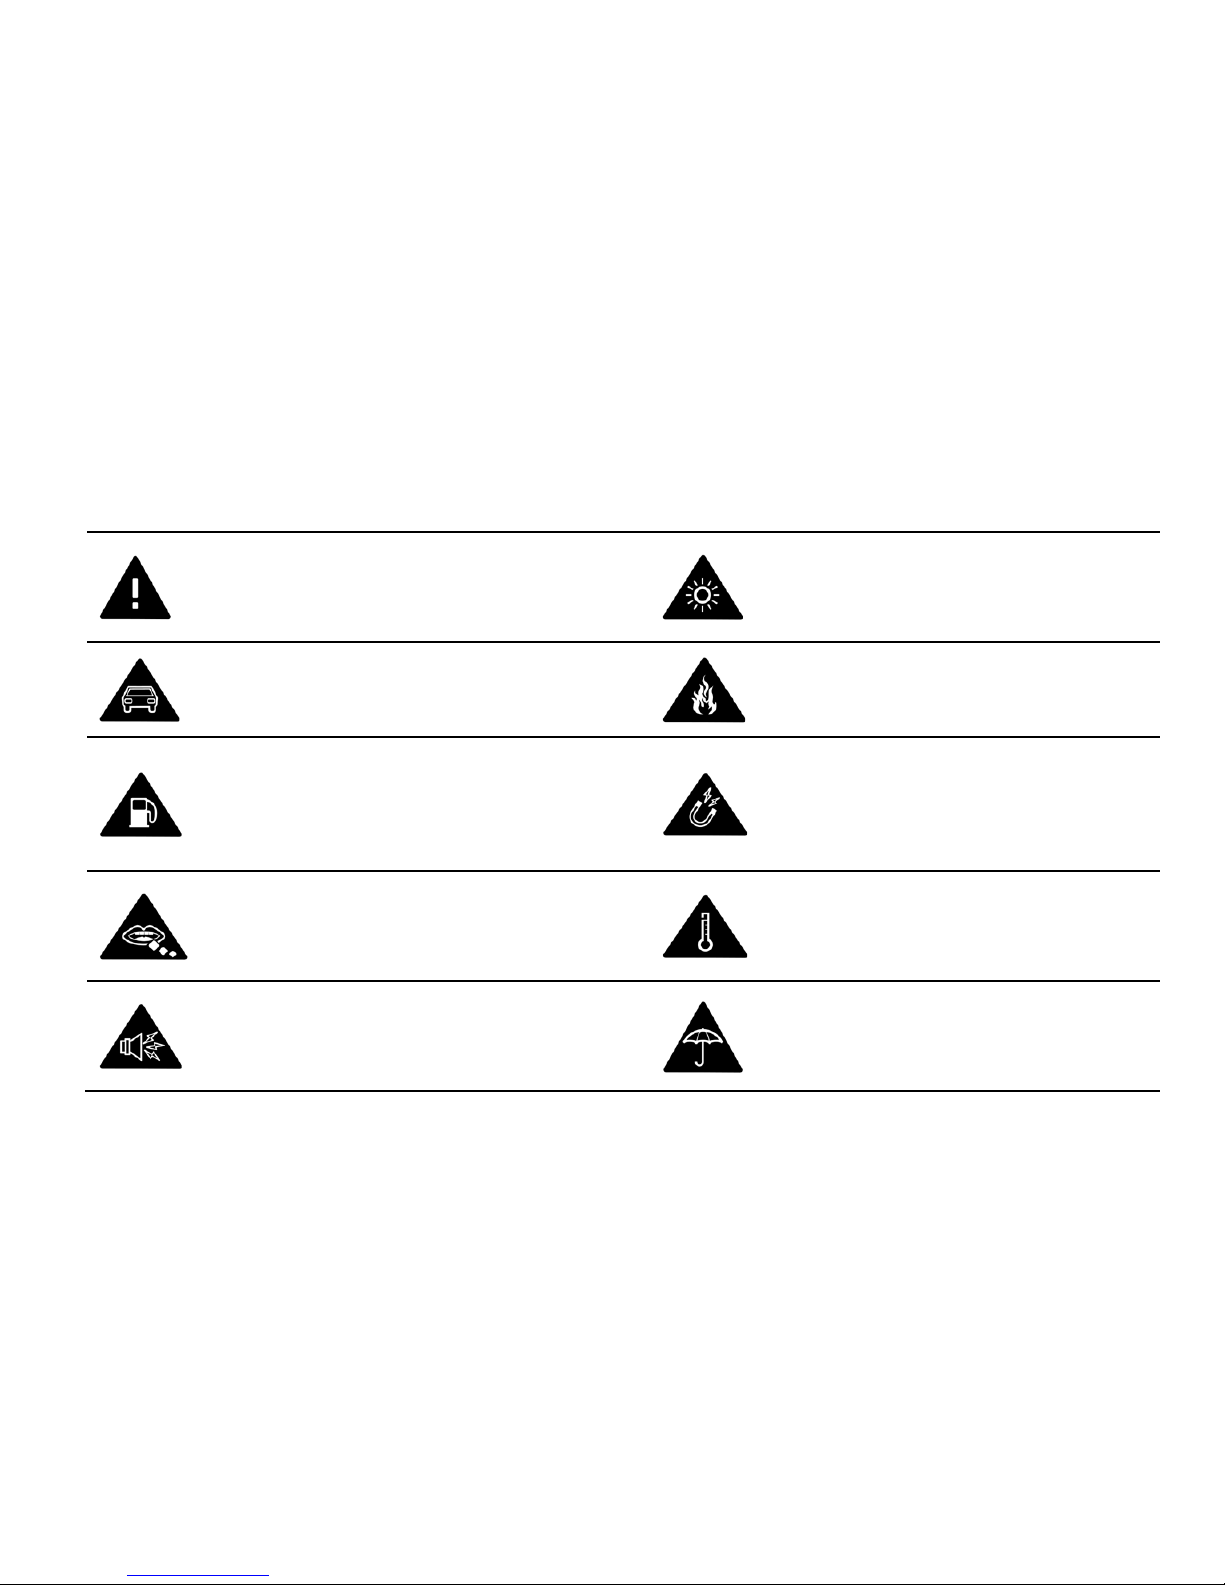
PRODUCT SAFETY INFORMATION
Please read all instructions
before use
This device may produce
bright or flashing lights
Do not use while driving
Do not dispose of in fire
Do not use while re-fuelling
Avoid contact with
magnetic media
Small parts may be a choking
hazard
Avoid Extreme
Temperatures
This device may produce loud
sounds
Avoid any contact with
liquid, keep it dry
Page 73
73
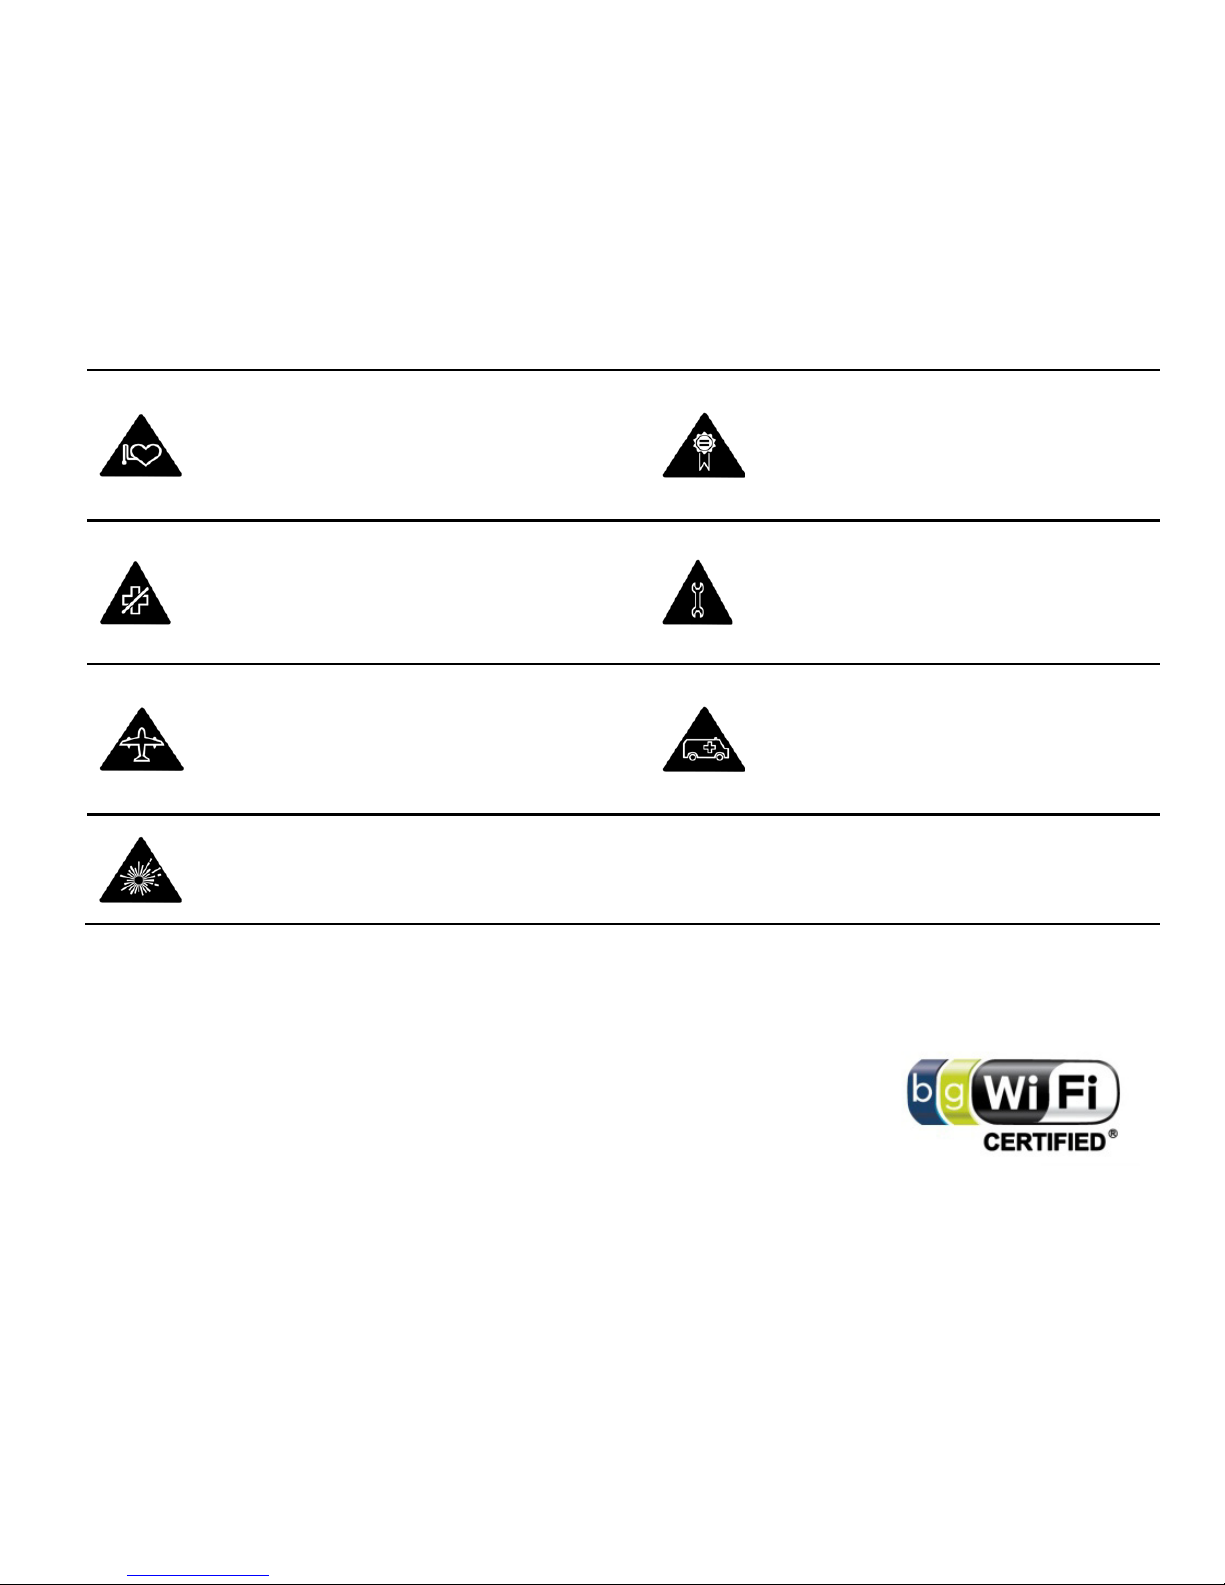
Keep away from pacemakers
and other personal medical
devices
Only use approved
accessories
Obey warning signs in hospitals
and medical facilities
Do not attempt to
disassemble
Switch off when flying
Do not rely on this device
for emergency
communications
Switch off in explosive
environments
This device is certified by the Wi-Fi Alliance.
microSD™ is a trademark of SD Card Association
 Loading...