

Page 1

1
ZTE Blade Vec/
Blade Vec Pro
User Manual
Page 2

2
About This Manual
Thank you for choosing this ZTE mobile de vice. In order to keep
your device in its best condition, please read this manual and
keep it for future reference.
Copyright
Copyright © 201 4 ZTE CO RPORATION
All rights reserve d.
No part of this public ation may b e quoted, re produc ed,
translated or used in any form or by any means, electronic or
mech an ic al , inc l udi ng p hot oc op yi ng an d mic rof i lm, wit ho ut the
prior written permission of ZTE Corporation.
Notice
ZTE Corporation re serves the rig ht to mak e modifi cations on pr in t
errors or update specifications in this guide without prior notice.
This manual has been d esigned with the utmost c are to e nsure
the a ccura cy of i ts conte nt. Ho wever, al l statements, i nformation
and recommendations contained therein do not consti tute a
warranty of any kind, either expressed or implied. Please refer to
For Your Safe ty
to be sure to u se your pho ne properly a nd safely.
We offer self-ser vice for our s mar t terminal de vi ce user s. Pleas e
visit the ZTE official website (at www.ztedevice.com
) for more
information on self-service and supported product models.
Information on the website takes precedence.
Page 3

3
Disclaimer
ZTE Corporation expressly discla ims any liability for faults and
damages caused by unauthorized modifications of the software.
Images and screenshots used in this manual may differ from the
actual product. Content in this manual ma y d iff er from t he actual
product or software.
Trademarks
ZTE and the ZTE lo gos are tra demarks of ZTE Corporation.
Google and Android are tradem arks of Google, Inc.
The Bluetooth
®
trademark and logos are owned by the Bluetooth
SI G, Inc. and any use of such trademarks by ZTE Corporation is
under license.
microSDHC Logo is a trad emark of SD-3C, LLC.
Other trademarks and trade name s are the proper ty of their
respective owners.
Versi on No.: R1.0
Edition Tim e : August 1, 2014
Page 4

4
Contents
Getting Started ....................................................... 12
Getting to Know Your Phon e ............................................ 12
Knowing the Keys ............................................................ 14
Instal ling the micro-SIM Car ds ......................................... 14
Installing the microSDHC™ Card (Not Included) .............. 18
Charging the Battery ........................................................ 19
Extending the Batter y Life ................................................ 21
Powering On/Off .............................................................. 21
Restarting the Phone ....................................................... 22
Setti n g Up for the Fi rst Time ............................................ 22
Locking/Unlocking the Screen and Keys .......................... 22
Using th e Touch Screen ................................................... 23
Get tin g t o Kno w the Hom e Scre en ................................... 27
Personalizing.......................................................... 29
Changing the System Language ...................................... 29
Setting the Date and Time................................................ 29
Changing Ringtone and No tificatio n Sound ...................... 30
Turning On/Off System Sounds ........................................ 30
Adjusting Volume ............................................................. 30
Switching to Silent/Meeting Mode .................................... 31
Applying New Wallp aper s ................................................ 32
Changing Screen Brightness ........................................... 32
Protecting Your Phone With Screen Lock s ....................... 33
Page 5

5
Protecting Your Phone With Encryption ............................ 34
Knowing the Basics ............................................... 36
Mo nitor ing the Ph one Status ............................................ 36
Ma naging Not ific atio ns ..................................................... 37
Managing Shortcuts and Widgets ..................................... 40
Organizing With Folders ................................................... 41
Rearranging the Primary Shortcuts ................................... 43
Entering Text .................................................................... 43
Editing Text ...................................................................... 51
Opening and Switching App s ............................................ 52
Connecting to Networks and Devices .................. 53
Connecting to Mobile N etworks ........................................ 53
Connecting to Wi-Fi
®
........................................................ 56
Using Wi-F i D irect
®
.......................................................... 60
Connecting to Bluetoo th
®
Devices .................................... 61
Connecting to Your Computer via USB ............................. 64
Sharing Your Mobile Data Connec tio n .............................. 67
Sharing Windows PC Internet via USB Cable ................... 71
Con necting t o Virtual Privat e N etworks ............................. 72
Phone Calls ............................................................ 74
Placing and Ending Calls ................................................. 74
Answering or Rejecting Calls ............................................ 75
Working With the Call History ........................................... 76
Calling Your Contacts ....................................................... 77
Page 6

6
Checking Voicemail ......................................................... 78
Using Options During a Call ............................................. 78
Managing Multi-party Cal ls ............................................... 79
Adjusting Yo ur Call Settings ............................................. 80
People ..................................................................... 86
Checki n g Contact Detai ls ................................................. 86
Adding a New Contact ..................................................... 86
Setting Up Your Own Profile ............................................. 87
Importing, Exporting, and Sharing Contacts ..................... 87
Working With Favorite Contac ts ....................................... 89
Working With Groups ....................................................... 89
Searching for a Contact ................................................... 91
Editing Contacts............................................................... 91
Accounts ................................................................. 94
Adding or Rem oving Accounts ......................................... 94
Configuring Accoun t Sync ................................................ 95
Email ....................................................................... 97
Set tin g U p t he First Email Account ................................... 97
Checking Your Emails ...................................................... 97
Responding to an Email ................................................... 98
Writing an d Send ing an Email .......................................... 99
Adding and Editing Email Accounts ................................ 100
Changing General Email Settings .................................. 101
Gmail™ .................................................................. 102
Page 7

7
Opening Your Gmail Inbox.............................................. 102
Switching Accoun ts ........................................................ 102
Writing and Sending a Message ..................................... 103
Replying to or Forwarding a Message ............................ 103
Working With Received Attachments .............................. 104
Working With Labels ...................................................... 104
Changing Gmail Settings ................................................ 106
Messaging ............................................................ 107
Opening the Messaging Sc reen ..................................... 107
Sending a Message ....................................................... 107
Replying to a Message ................................................... 108
Forwarding a Message ................................................... 109
Copying a Message ....................................................... 109
Changing Message Set tings ........................................... 110
Calendar ............................................................... 111
Viewing Your Calendars and E vents ............................... 111
Creating an Event .......................................................... 112
Editin g or Deleting an Event ........................................... 113
Changing Calendar Settings ........................................... 113
Google+™ ............................................................. 114
Get tin g Started Wit h Goog le+ ......................................... 114
Signing out of Google+ ................................................... 115
Browser ................................................................ 117
Opening the Browser ..................................................... 117
Page 8

8
Using Multiple Browser Tabs .......................................... 118
Downloading Files ......................................................... 119
Changing Browse r Settings ............................................ 119
Maps ...................................................................... 120
Activa t ing L ocat ion Servic es .......................................... 120
Getting Your Location .................................................... 120
Searching for a Location ................................................ 121
Getting Directions to Your Destination ............................ 121
Searching for Local Places ............................................ 122
Google Search ...................................................... 124
Searching With Text ....................................................... 124
Searching by Speaking .................................................. 124
Changing Search Settings ............................................. 125
Camera .................................................................. 126
Capturing a Photo or a Video ......................................... 126
Customizing Camera Settings ........................................ 128
Gallery ................................................................... 131
Opening Gallery ............................................................. 131
Working With Albums ..................................................... 131
Working With Pictures .................................................... 132
Retouching Your Pictures ............................................... 133
Playin g Videos ............................................................... 134
Music ..................................................................... 135
Page 9

9
Copying Music Files to Your Phone ................................ 135
Viewing Your Music Library ............................................ 136
Set tin g a Song as the D efau lt R ingtone .......................... 137
Playing Music ................................................................. 137
Managing Playlists ......................................................... 139
Play Music ............................................................ 140
Playing Your Music ......................................................... 140
Managing Playlists ......................................................... 142
Video Player ......................................................... 144
Playing and Controlling Videos ....................................... 144
Managing Video Files ..................................................... 144
FM Radio .............................................................. 146
Scanning and Saving Channels ...................................... 146
Listening to FM Radio .................................................... 146
Recording Radio Programs ............................................ 147
Editing a Saved Channel ................................................ 147
Sound Recorder ................................................... 149
Recording a Voice Memo ............................................... 149
Playin g a Voice M em o .................................................... 149
More App s ............................................................ 151
Backup and Restore ....................................................... 151
Calculator ...................................................................... 151
Chrome™ ...................................................................... 151
Page 10

10
Clock ............................................................................. 152
Downloads..................................................................... 153
Drive .............................................................................. 153
Family Mode .................................................................. 154
File Manager ................................................................. 155
NotePad ........................................................................ 156
System Upda te s ............................................................ 156
ToDo .............................................................................. 156
Google Play™ Store ............................................ 157
Browsing and Searching for Apps .................................. 157
Downloading and Installing Apps .................................... 157
Creating a Google W allet™ Account .............................. 158
Managing Your Downloads ............................................ 159
Settings ................................................................. 160
W ireless and N etworks .................................................. 160
Device ........................................................................... 163
Personal ........................................................................ 167
Accounts ....................................................................... 171
System .......................................................................... 172
Upgrading the Phone Software ........................... 174
Troubleshooting ................................................... 175
For Your Safety .................................................... 180
General Safety............................................................... 180
Page 11

11
Radio Frequency (RF) Exposure .................................... 181
Distraction ...................................................................... 183
Product Handling ........................................................... 183
Elect rica l Safety ............................................................. 187
Radio Frequency Interference ........................................ 188
Exp losive Envir onmen ts ................................................. 190
E-W aste Management .................................................... 191
ZTE Mobile Phone Registration ...................................... 192
Page 12

12
Getting Started
Getting to Know Your Phone
Earpiece
Proximity & Light
Sensor
Volume Key
Power Key
Main Micro ph one
Touch Screen
Front Camera
Indicator Light
Page 13

13
Auxiliary
Microphone
micro-SIM
Card Tray 2
micro-SIM
Card Tray 1
microSDHC
Card Tray
Speaker
Charging/
micro-USB Jack
Headset Jack
Back Camera
Flash
Page 14

14
Knowing the Keys
Key
Function
Power Key
• Press and hold to turn on or off the airplane
mode, enable or disable sound or vibration,
restart, or power off.
• Press to turn off or on the screen display.
Volume Key Press or hold either end of the key to turn the
volume up or down.
(Home)
•
Touch to retur n to the home screen f rom any
application or screen.
• Touch and slide upwards to open Google
Search.
(Back)
Touch to go to the previous screen.
(Recent
Apps)
Touch to see recently used applications.
Installing the micro-SIM Cards
Your phone has two micro-SIM card sl ots. You ca n inst all one or
both micro-SIM cards into the slots. The micro-SIM cards can be
installed or removed while the phone is turned on.
WARNING!
To avoid damage to the phone, do not use any other kind of SIM
Page 15

15
cards, or any non-standard micro-SIM card cut from a SIM card.
You can get a standard micro-SIM card from your service
provider.
NOTE:
Your phone is designed for simultaneous use of t wo micr o-SIM
ca rds in t he standb y m ode. Howev er, the m icro -SIM cards
cannot be used simultaneou sly for calls or the Internet. If one
micro-SIM card is used in a voice call, the other micro-SIM card
is not available.
Thi s sit ua tion is caused by the function of the phone and is
independent of the network. Such design can significantly redu ce
the power consumption of the phone in the standby mode.
1. Insert the tip of the tray eject tool into the holes on the
micro-SIM card trays 1 and 2.
micro-SIM card tray 1
Page 16

16
2. Pull out the micro-SIM card trays and place the micro-SIM
cards on the trays, as shown. Then carefully install the trays
back.
NOTE:
The micro-SI M card tr a y 1 suppor ts WCDMA/G SM micro-SIM
cards, while tray 2 supports GSM micro-SIM cards.
micro-SIM card tray 2
Page 17

17
WCDMA/GSM card
GSM card
Page 18

18
Installing the microSDHC™ Card (Not
Included)
A microSDHC card can be installed or removed while the phone
is turned on. Y ou need to unmount the microSDHC card
before
rem ovin g it.
1. In se rt the tip of the tray eject tool into the hole on the
microSDHC ca r d tra y.
2. Pull out the tray and place the card on the tray, as sh own.
Then carefully install the tray back.
Page 19

19
NOTE:
Some applications may requi re a microSDHC card to work
normally or may store certai n data on it. The refor e, it is
recommended tha t you keep a mi croSDHC card inst alled and
not remove or r eplace it r andomly.
Charging the Battery
Your phone’s battery should have enough power for the phone to
turn on, find a signal, and make a few calls. You should fully
ch arge the bat tery as soo n as pos sibl e.
If the battery is low, there will be a pop-up message on the
screen. As you charge your phone, the screen will t ell you the
exact battery level each time you wake up your phone.
Page 20

20
WARNING!
Use on l y ZTE-approved chargers and cables. The use of
unapproved accessori es could damage your phone or cause the
battery to explode.
CAUTION:
Do not remove or change the built-in rech argeable battery in you r
phone by yourself. The battery can only be changed by ZTE or
ZTE authorised service provider.
1. Connect the adapter to the charging jack. Ensure tha t th e
adapter is inserted in the corr ec t direction. Do not force the
connector into the charging jack.
2. Connect the charger t o a s tandard AC w all outlet. If the phone
is o n, you’ll see a charging icon, suc h as
or , appear on
th e s tat us b ar.
3. Disconnec t the charger when the battery is fully charged.
Page 21

21
NOTE:
If the battery is extremely low, you may be unable to power on
the phone even when it is being charged. In thi s ca se, try again
after charging the phone for at least 10 minutes. Contact our
customer service on 1300 789 475 if you still cannot power on
the phone after prolonged charging.
Extending the Battery Life
Active applications, screen brightness levels, Bluetooth and Wi-Fi
usage and GPS func tion ality can drain your battery. You can
follow the helpful tips below to conserve your battery power:
• Reduce the screen backlight time.
• Lower the screen brightness.
• Turn Wi-Fi, Bluetooth and auto-sync off when not in use.
• Disable the GPS function when not in use. Mo s t applications
using this function will periodically query the GPS satellites
for your current location; each query drain s your ba ttery .
Powering On/Off
• Press and hold the Power Key to turn on your phone.
• To turn it off, press and hold the Power Key to open the
options menu. Touch Power off and then touch OK.
Page 22

22
Restarting the Phone
If the screen freezes or takes too long to respond, try pressing
and holding the Power Key for about 10 secon ds to restart the
phone.
Setting Up for the First Time
When you first power on your phone after you purchase it or
reset it to f act o r y sett i n gs (se e Settings – Personal – Backup &
Reset), y ou nee d to do s ome set tings before using it.
Flick the language field to selec t the langua ge and touch
.
Then follow the prompts to set up Wi-Fi, Google Account, Google
location and other options.
Locking/Unlocki ng the Screen and
Keys
Your phone allows you to quickly lock the screen and keys (put
the phone to sleep mode) when not in use and to turn the screen
back on and unlock it when you need it.
To lock the screen and keys:
To quickl y turn the scre en off and lock the keys, press the Power
Key.
NOTE:
To save battery pow er, the phone au to ma tically turns of f the
screen after a certain period of time when you leave it idle. You
Page 23

23
will still be able to receive messages and calls while the phone
scree n is off.
To unlock the screen and keys:
1. Press the Power Key to turn the screen on.
2. Touch and hol d
.
-orYou can slide
upwards to use Google Search or slide lef t
fr om the right edge of the screen to use the c amera.
NOTE:
If you have set a voice lock, an unlock pattern, a PIN or passw ord
for your phone (see Personalizing – Protec ting Your Phone With
Sc reen Loc ks ), y ou’ll nee d to speak the voice comman d, draw
the pattern, or enter the PIN/password to unlock your phone.
Using th e Touch Screen
Your phone’s touch screen enables you to control actions
through a variety of touc h gestures.
• Touch
When you want to type using the onscreen keyboard, select
items on the screen such as the application and settings
icons, or press the onscreen buttons, simply touch them with
your finger.
Page 24

24
• Touch and Hold
To open the available options for an ite m (for example, a
messag e or lin k in a Web page), touch and hold the item .
• Swipe or Slide
To swipe or slide means to quickly drag your finger vertically
or horizontally across the screen.
Page 25

25
• Drag
To drag, press and hold your finger with some pressure
before you star t to move your finge r. While dragging, do not
release your finger until you have reached the target position.
• Pinch
In some apps (such as Maps, Browser, and Gallery), you can
zoom in and out by placing two fingers on the screen at once
and pinching them together (to zoom out) or spreading them
apart (to zoom in).
Page 26

26
• Rotate the screen
For most screens, you can autom ati cally chang e the screen
orientation from portrait to landscape by turning the phone
sideways.
NOTE:
The Auto-ro tate screen check box needs to be selected for
the screen orientation to automatically change. Touch
>
> Settings > Display > Auto-rotate screen.
You can also access the screen rot a t ion con trol by sliding
Page 27

27
down the status bar and touch > AUTO ROTATION.
Getting to Know the Home Screen
The home screen is the starting point for your phone’s
applications, function s , and menu s . You can custo mize your
home screen by adding shor t cu ts, fol ders, widgets, and more.
Status bar
Primary
shortcuts
Shortcut
Folder
Google Search
Page 28

28
Extended Home Screen Panels
Your home screen is extendable, pr oviding m ore space for
shortcuts, widgets, and more. Drag an icon over to the right to
create a new page on the right hand side. Then swipe left or right
on the home screen to see the extended panels.
Page 29

29
Personalizing
Changing the System Language
1. Touch > > Setti ngs > Langua ge & input >
Language.
2. Select the language you need.
Settin g the Date and Time
1. Touch > > Settings > Dat e & t i me.
2. Set the date, time, time zone, and date/ti me for mat.
To adjust the date and time automatically, touch
Automatic date & time and select Use
network-provided time or Use GPS-provided time.
To adjust the date and time manually, uncheck
Automatic date & time. The n touc h Set date / Set time
to change the date and time.
To a djust the t ime zone automatically, chec k Automatic
time zone.
To adjust the time zone manually, uncheck Automatic
time zone and touch Sele c t time zo ne to set the co rre ct
time zone.
To a djust the f ormat of tim e and da t e, touch Use 24-hour
format or Choose date form a t.
Page 30

30
Changing Ringtone and Notification
Sound
You can custo miz e the default ringtone f or in co mi ng calls and the
default notification sound.
1. Touch
> > Settings > Audio profiles >
(General).
2. Touch Phone ringtone or Default notification sound.
3. Select the ringtone yo u want to use and touch OK.
NOTE:
See People – Editing Cont acts – Set a Ringtone for a Contact
for
h ow to assign a special ringtone to an individ ual co nt act.
Turning On/Off System Sounds
1. Touch > > Settings > Audio profiles >
(General).
2. Check or unche c k Dial pad touch tones, Touch sounds,
Screen lock sound, or Vibr ate on touch.
NOTE:
All system sounds are disabled in Silent or Meeting mode, even
if t he opt ions above are checked.
Adjusting Volume
1. Touch > > Settings > Audio profiles >
Page 31
31
(General) > Volumes.
2. Drag the slide rs to adjust the volume for each type of audio.
3. Touch OK to save.
NOTE:
You can adjust the media volume when a media application is in
use by press ing th e Volume Key. If no media application is
active , p ress th e Volume Key to adjust ringtone volume (or the
earpiece volume during a call).
Swi tchin g to Silent/Meeting Mode
You can set the phone to silent or meetin g mode by using one of
the following methods.
• Press and hold the Power Key and then touch to enable
silent mode, touch
to enable meeting mode, or touch
to enable general mode.
• Keep pressing the Volume Down Key w hen no media
applic ation is activ e. Whe n the
icon appears on the
stat us bar, the phone is in meeting mode. When the
icon
appears on the status bar, the phone is in silent mode.
• Open the Quick Settings and touc h AUDIO PROFILES to
select Silent or Meeting. See Use Quick Settings
.
• Touch > > Settings > Audio profiles , and check
Silent or Meeting.
Page 32

32
Applying New Wallpapers
You can set the wallpaper for the home screen and lock screen.
1. Touch and hold a blank area of the home screen.
2. Touch WALLPAPERS.
3. Slide the preview images at the bottom to sel ect the
wall paper you like. Some images a re animated. You c an also
touch Pick image or Video Wallpaper to see other choices.
4. Touch Set wallpaper.
Changing Screen Bright ness
1. Touch > > Settings > Display > Brightness.
2. Touch AUTO to tur n on or off automatic brightness
adjustment. You can also drag the slider to turn off
auto-adjustmen t and chang e the s cr een brigh tne s s manually .
NOTE:
You can turn on or off automatic adjustment wit hou t going to the
Settings menu. Just swipe down the status bar at the top of the
screen, t ouch
and touch the BRIGHTNESS button. See Use
Quick Settings for more information.
Page 33

33
Protecti ng Your Phone With Screen
Locks
You can protect your phone by creating a screen lock. When it is
enabled, you need to touch and hold certain icon, speak a voice
command, draw a pattern or enter a numeric PIN or password to
unlock the phone’s screen and keys .
1. Touch
> > Settings > Security > S cree n lock.
2. Touch Long Press, Voice Unlock, Pattern, PIN or
Password.
Touch Long Press to enable screen lock and allow
unlock with a ‘touch and hold’ gesture. You can unloc k th e
screen by touching and holding
on the screen.
Touch Voice Unloc k t o let the pho ne record your voice
commands. You can unlock the screen or open a few
applications by speaking your unlock command or wake
up command. You also need to set a pattern or PIN in
case the phone cannot recognize your voice.
Touch Pattern to create a pattern you m ust draw to
unlock the screen.
Touch PIN or Password to set a numeric PIN or a
password that you must enter to unlock your screen.
NOTE:
If you forg et your PIN, pattern or password you can log in using
your Google Account. Press FORGOT PATTERN to sign in to
the Google account. You need an active Internet connection.
Page 34

34
If you have not set a Google Account then power the device off.
With the device switched off, hold the Volume Up key and press
the power key at the same time. Wait until you see an Android
logo, then press the power k ey to access the Android Recovery
Menu. Select ‘wipe data / factory reset’ and follow the prompts to
reset yo ur device.
Protecting Your Phone With Encryption
You can encrypt all the data on your phone: Google accounts,
application da ta, music and other media, downloaded information,
and so on. If you do, you must enter a numeric PIN or a
password each time you power on your phone.
WARNING!
Encryption is irreversible. The only way to revert to an
unencrypted phone is to perform a factory data reset, which
erases all your data.
Encryption provides additional protection in case your phone is
stolen, and may be required or recom mended in some
organizations. C onsult your sy stem administrator b efore turning it
on. In many cases the PIN or password you set for encryption is
controlled by the system administrator.
Before turning on encryption, prepare as follows:
● Set a lock screen PIN or password.
● Charge the battery.
● Keep the phone connected to the ch arger.
● Schedule an hour or more for the encryption process: you
Page 35

35
must not interru pt it or y ou will lose some or all of your data.
When you're ready to turn on encryption:
1. Touch
> > Settings > Security > Encrypt phone .
2. Read the inform ation about encryption carefully .
The Encrypt phone but ton is dimm ed if y our bat tery is not
charged or your phone's not plugged in.
If you change your mind about encrypting your phone, touch
.
WARNING!
If y ou interrupt t he enc rypt ion proces s, you will l ose data.
3. Touch Encrypt phone.
4. Enter your lock screen PIN or password and touch Next.
5. Touch Encrypt phone again.
The encryption proce ss starts . En cry ption can ta ke an hour or
more, during which time your phone may restart several times.
When encryption is completed, you're prompted to enter your
PIN or password.
Subsequently, you mus t enter your PIN or pa ssword each t im e
you power on your phone in order to decrypt it.
Page 36
36
Knowing the Basics
Monitoring the Phone Status
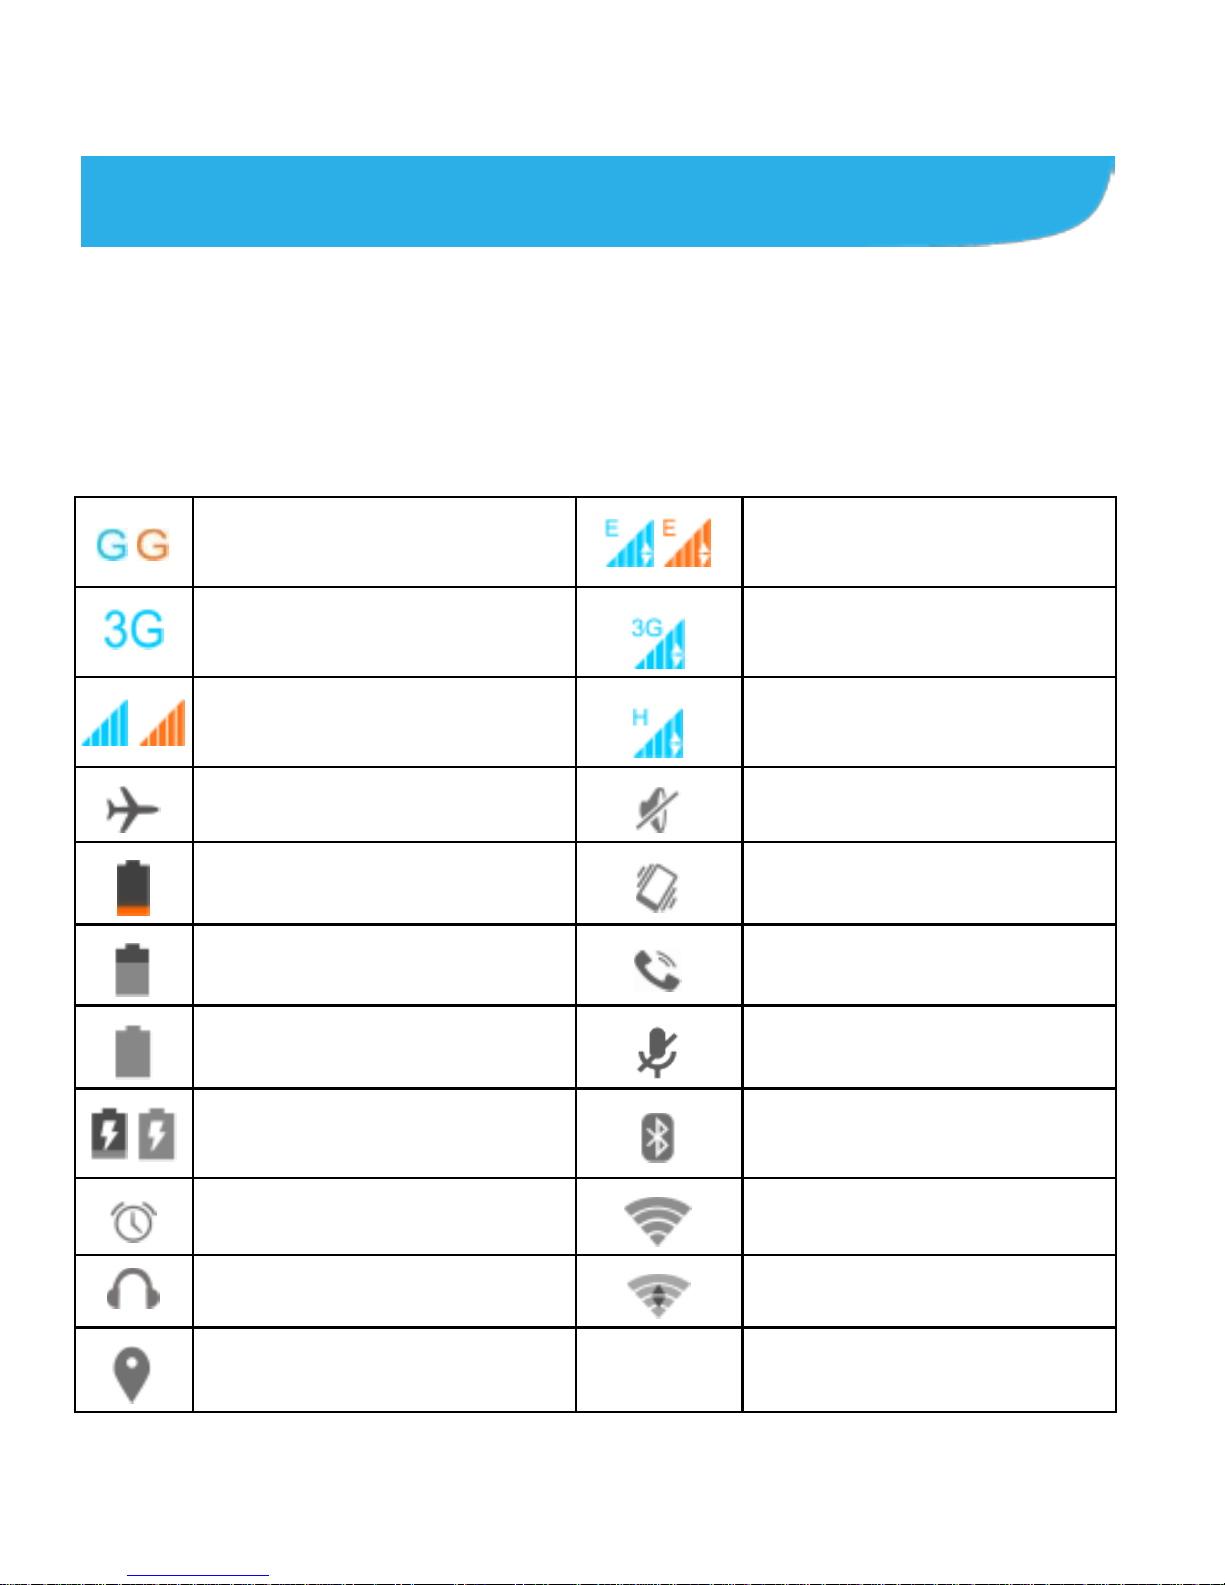
The status bar at the top of the home screen provides phone and
service status icons on the right side. Below are some of the
icons you may see.
/
GSM network connected
/
EDGE mobile data
3G network connected
3G mobi le data
/
Signal str en gth
HSPA mobile data
Airplane mode
Ringer off
Battery low
Vibrate mode
Batter y partiall y dr ain ed
Speaker on
Battery full
Phone microphone off
/
Battery charging
Bluetooth on
Alarm set
Connect ed to Wi-Fi®
Wired headset in use
Wi-Fi in use
GPS on
Page 37
37
NOTE:
You can set the color of signal for each micro-SIM card. See
Connecting to Networks and Devices – Managing the micro-SIM
Cards.
Managing Notifications
Notification Icons
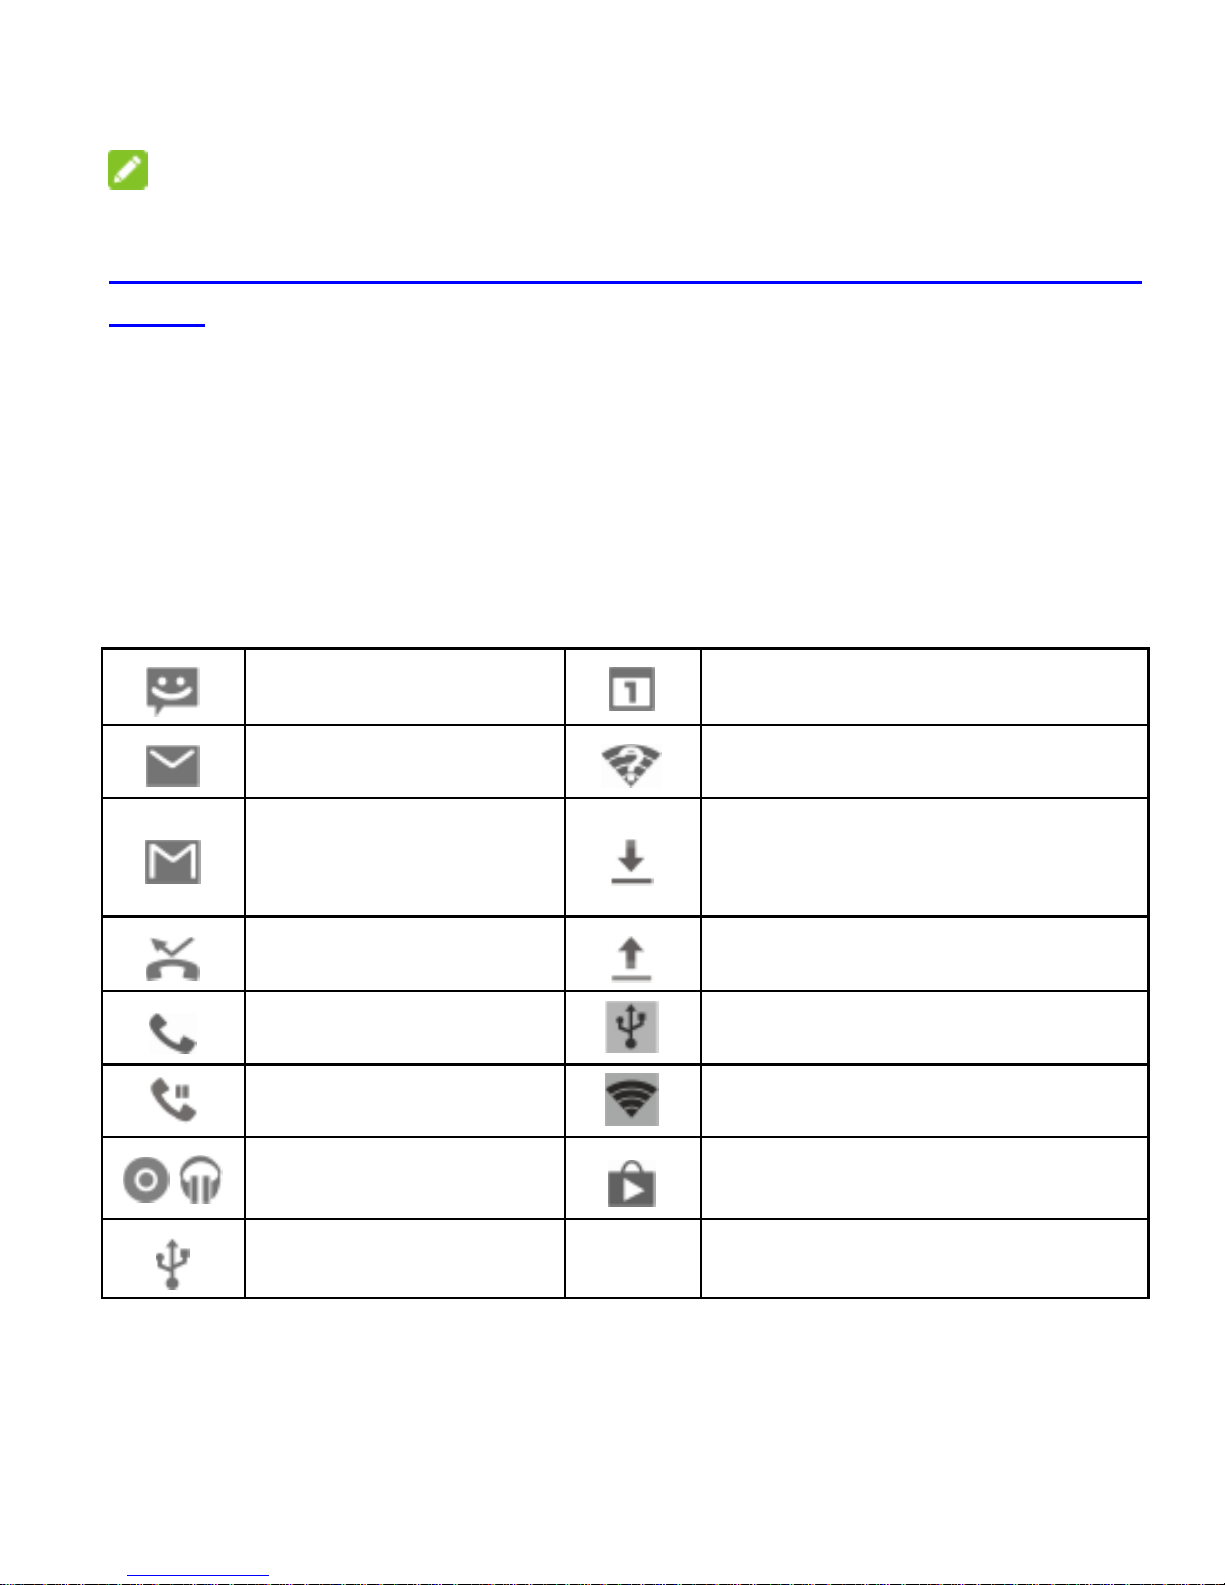
The status bar at the top of the home screen provides notification
icons o n t he left. Below are some of the icons you may see .
New SMS/MMS
Upcoming event
New Email
New Wi-Fi network detected
New Gmail™
message
Downloading data
Missed call
Sending da ta
Call in progress
USB tethering on
Call on hold
Portable Wi-Fi hotspot on
/
Song playi ng
Updates av ai lable
USB connected
Page 38

38
Open/Close the Notification Pa n el
Noti fi c at ions r eport the arrival of new messages, calendar
events, and alarms, as well as ongoin g ev ents , suc h as when
you are playing music. You can o pen the n otifi c ation pan el to
view the details of notifications.
• To open the notification panel, swipe your finger down fr om
the top of the screen.
• To close the notification panel, swipe your finger up from the
bottom of the screen or touch
.
Respond to or Remove a Notification
In the no tificat ion panel, you can respond to a notif ication o r
remove the notifications. The not ific ation panel also supports
expandable notificatio ns tha t let you perf orm additional actions
right from the notification itself.
• To respond to a notification, just touch it.
• Slide down with one finger to expand certain notifications.
You can also sw ipe tw o fingers vertically or pinch-zoom to
expand or collapse certain notifications.
• To r emove a notific atio n, swipe it left or right.
• To r emove all n otif ications, touch in the top right corner.
• Touch and hold a notif ication and then touch App info to
identify the application that created it. To t urn off notifications
fr om that appl icat ion if need ed, uncheck Show notific a ti ons
Page 39

39
in the App info screen.
• Most apps that s end notif ications, such as Gmail and
Calendar, have notification settings that you can adjust.
NOTE:
If y ou tur n of f notifications f or an app, yo u m ay miss its importan t
alerts and updates. The notifications of some apps cannot be
turned off.
Use Quick Settin g s
The Quick Settings in the notification panel make it convenient to
view or change the most commo n setting s for you r phon e.
Open the notification panel and touch
to find the following
Quick Sett i n gs.
• OWNER: Touch the contact icon to open your profile in the
People app.
• BATTERY: Display the current battery status. Touch to open
the Battery menu in Settings.
• SETTINGS: Touch to open the Settings app.
• WI-FI: Touch to turn on o r off Wi -Fi.
• BLUETOOTH: Touch to turn on or o ff Bluetooth.
• LOCATION / LOCATI O N OFF: To uch t o t urn on or off
loca ti on services.
• AIRPLANE MODE: Touch to turn on or off airplane mode.
Page 40

40
• DATA CONNECTIO N: Touch to turn on o r off data se rvic e
over mobile networks.
• DATA USAGE: To uch t o o pen the Data usage menu in
Settings.
• AUDIO PROFILES: Touch to select the audio profile you
need.
• BRIGHTNESS: Touch to turn on or off automatic brightness
adjustment, or change the brightness manually.
• AUTO ROTATIO N: Touch to turn on or off the auto-rotate
screen feature.
• CAST SCREEN: Touch to open the Cast screen menu in
Settings > Display.
Managing Shortcuts and Widgets
Add Shortcuts and Widgets
1. Touch > .
- or -
To add widgets, touch and hold an empty area of the home
screen and select WIDGETS.
2. Slide left or right to browse the available applications or
widgets.
3. Touch and hold a widget or an application icon and drag it to
the home screen.
NOTE:
Page 41

41
While holding the item, you can drag it to the right edge of the
scree n t o c reat e a new home scree n pane l and put the item on it.
Move Shortcuts or Widgets
1. Touch and hol d a shortcut or widget on the home screen.
2. Drag it to the place you need.
Remove Shortcuts or Widgets
1. Touch and hol d a shortcut or widget on the home screen.
2. Drag it to
to remove it.
NOTE:
No empty home screen panel is allow ed to ex ist. If the shortcut or
widget is the only item on the current home screen panel, the
panel will be deleted as y ou remove the item.
Adjust Widget Size
1. Touch and hol d a widget on the ho m e screen and then
release it.
2. An outline appears around the widget. Drag the outline to
resize the w idget.
NOTE:
Not all widgets can be resized.
Organizing With Folders
You can create folders on the home screen and add several
Page 42

42
shortcuts to a folder.
You can move or remove folders the same way as moving or
remov ing sho rt cu ts.
Create a Folder
1. Touch and hold a shortcut on the home screen and drag it
over another shortcut.
2. Release y our fing er and a new folder w ill be created with both
shortcuts adde d into it.
Rename a Folder
1. Touch a folder to open it.
2. Touch the folder nam e fiel d below t he shortcut icons and
enter a new name.
Add Shortcuts to a Folder
1. Touch and hold a shortcut and then drag it onto a folder icon.
2. Release the shor t cut and it will be added into the folder.
Remove Shor tcuts From a Folder
1. Touch a folder to open it.
2. Touc h and hold the shortcut y ou want to rem ove an d then
drag it to the home screen.
3. Release the shor tcu t and it w ill be removed from the folder.
Page 43
43
Rearranging the Pri mary Shortcu ts
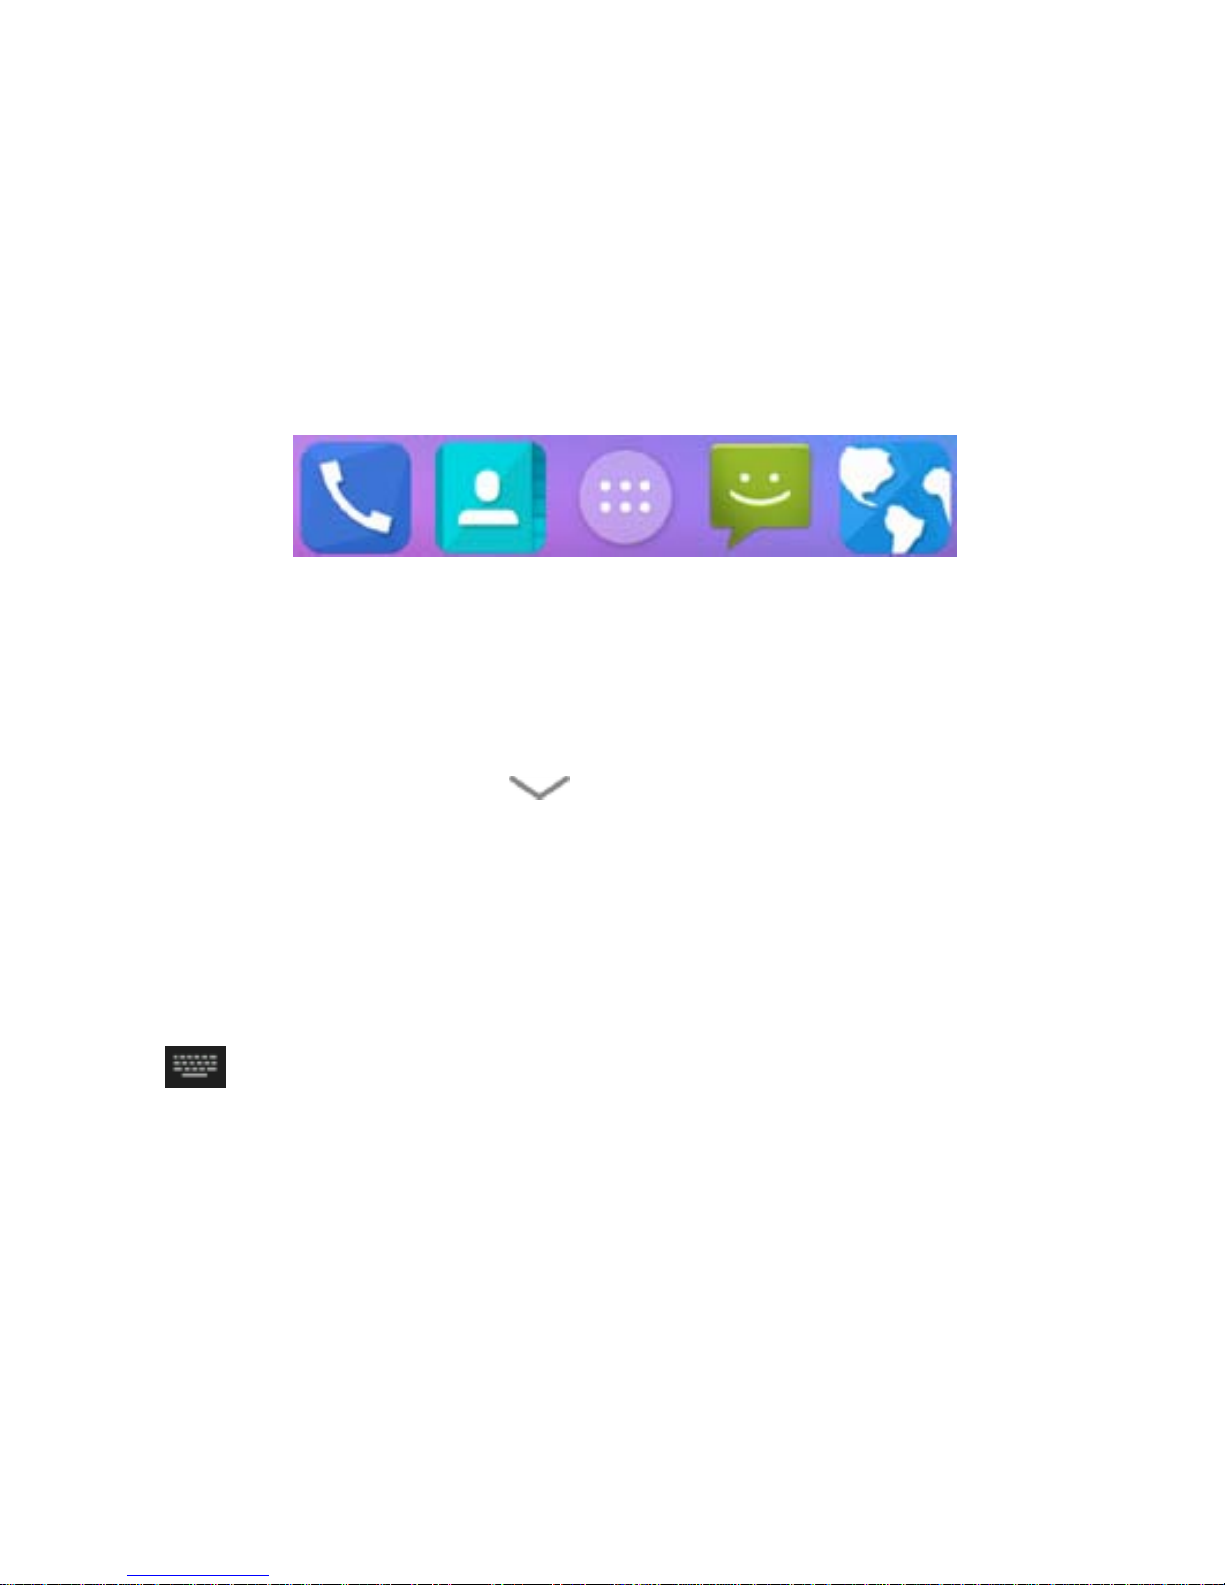
The home screen includes a customizable primary shortcuts area
at the bo t tom visible from all home screens. You can keep at
mos t fo u r ite ms in the primary short cut s a rea. D rag sho rtcu ts or
folders in or out of t he area to rearrange the area.
Entering Text
You can enter text using the on scree n keyboa rd. Som e apps
open it automatically. In others, you open it by touching where
you want to type. Touch
to hide the onscreen keyboard .
You can also enter text by speaking with the Google voice typing
feature.
Change Input Methods
1. When you use the onscree n keyb oard to enter text, the icon
appears on the status bar.
2. Open the notificatio n panel and tou c h Choose input
method.
3. Select the input method you need.
Page 44
44
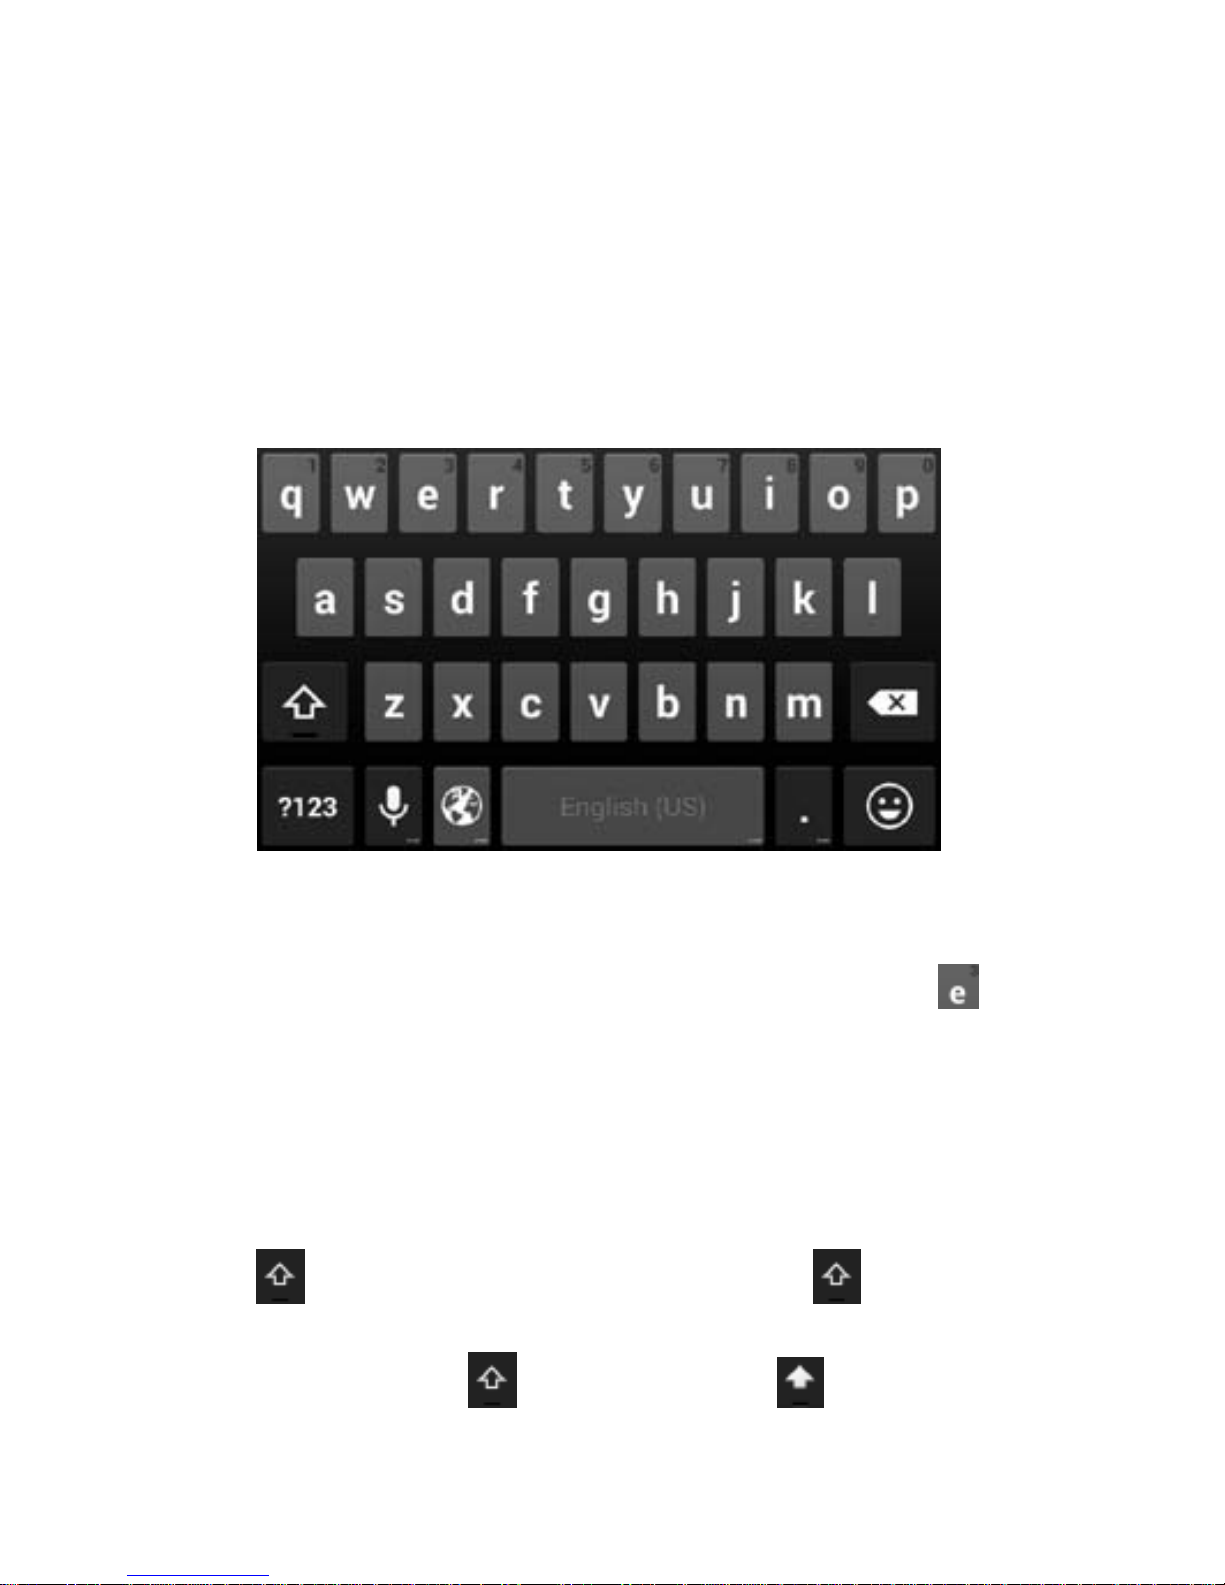
Android Keyboard
The Android Keyboard provides a layout similar to a desktop
computer keyboard . When scree n auto -rotation is enabled, turn
the phone sideways and the keyboard will change from po rtrait t o
landscape. The landscape keyb oard is n ot su pp orte d in a ll
applications.
• Touch the alphabetic keys to enter letters. Touch and hold
some specific ke ys to enter a ssocia ted accente d let te rs or
numbers. For example, to enter è, touch and hold
and the
av ailable accented l et ters and number 3 appear. Then slide
to choos e è.
• As you enter a word, candidates appear above the keyboard.
Touch to select the correct one; touch and hold to see more
possible options.
• Touch
to use uppercase. Double-tap to lock
uppercase. This key also changes to indicate the current
case you are using:
for lowerc ase, f or upp ercase,
Page 45

45
and when locked in uppercase.
• Touch
to delete the text before the cursor.
• Touch
to select numbers and symbols. You can then
touch
to find more.
• Touch
to enter miniature icons, such as expressions,
horoscopes, and animal s .
• Touch
to use Google’s netw orked voice input.
• Touch and hold
to change the input languages or set up
the Android keyboard.
• Touch
to toggle between activated input languages.
TouchPal X Keyboard
TouchPal X Keyboard offers three layouts: T26, T12 and T+. You
can touch
to select a layout or an input language.
You can also use Curve
®
to speed up text input by replacing th e
key tapping operation with a tracing gesture where you move
your finger from letter to letter without lifting the finger until you
reach the end of the word.
Page 46
46
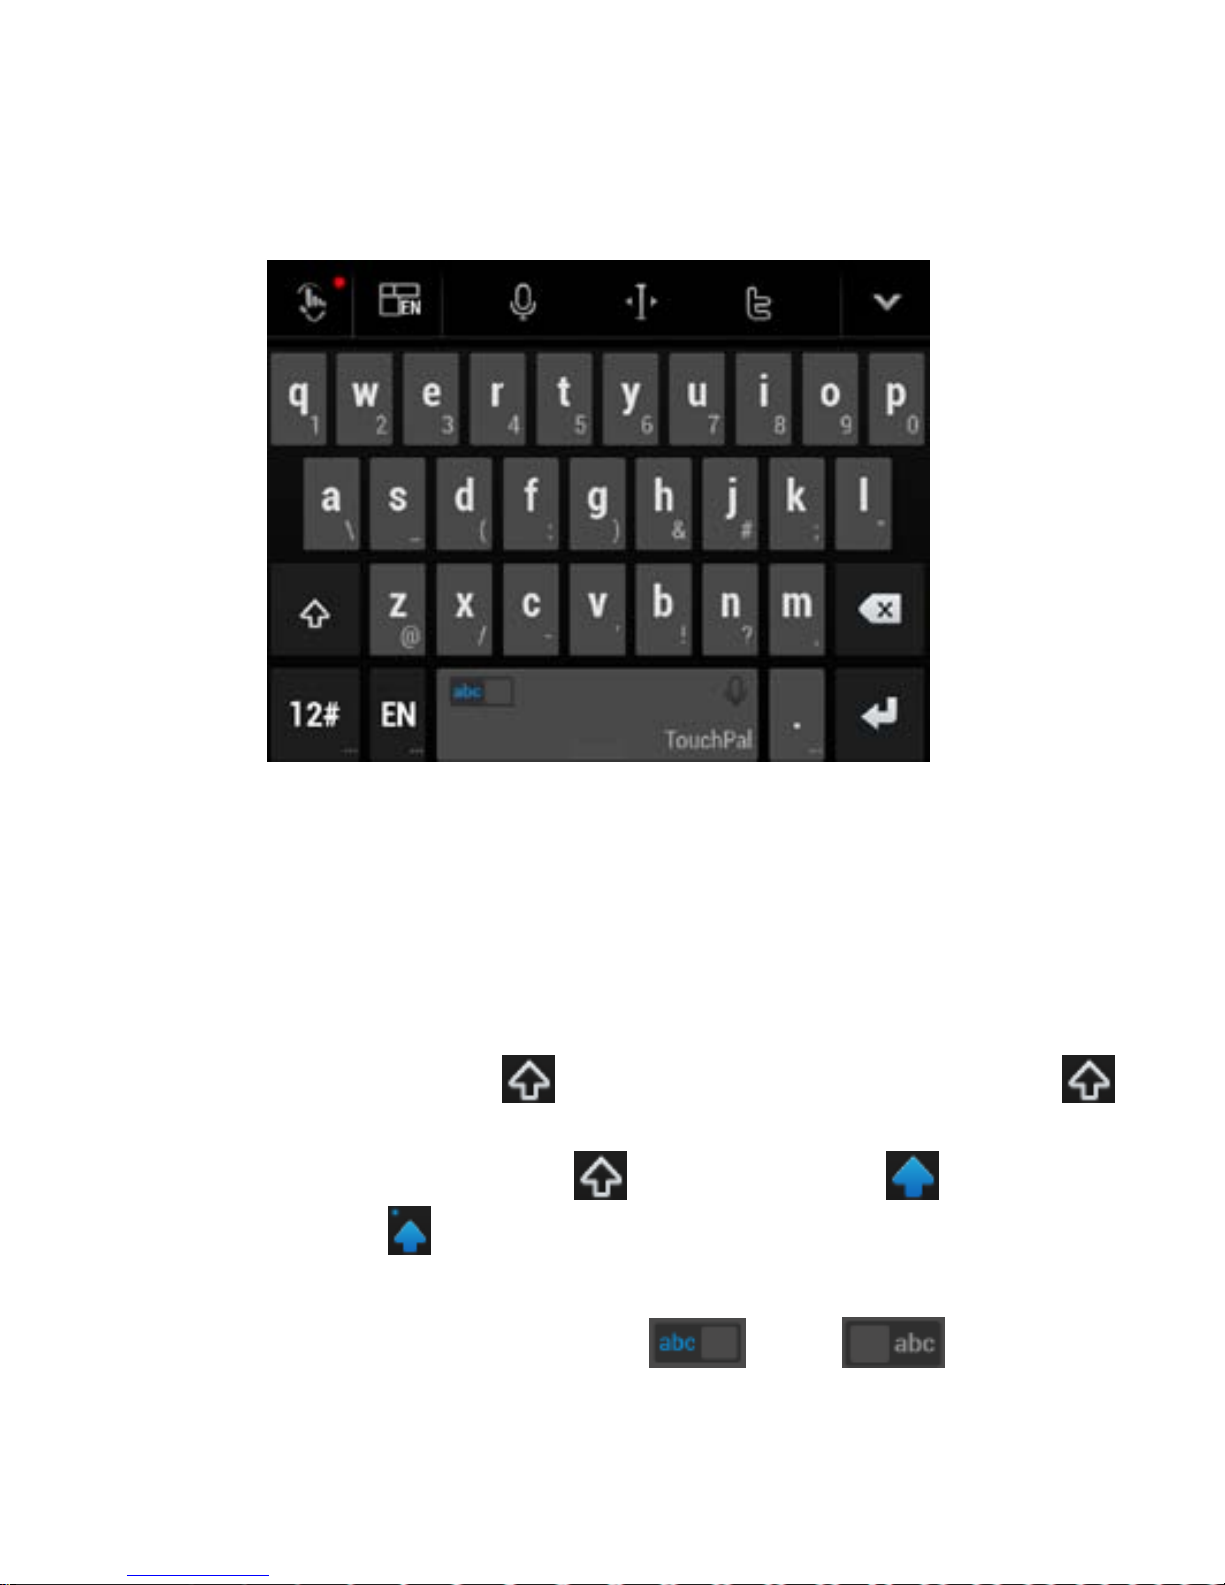
The T26 Layout
The T 26 lay out of fers an input ex perience s imilar to a computer
keyboard.
• The alphabetic keys: Touch the keys to enter letters. Touch a
key and slide down to enter the number or symbol on the key.
You can also touch and hold a key and slide to choo se more
characters.
• The capital key: Touch
to use uppercase. Double-tap
to lock uppercase. This key also changes to indicate the
current case you are us ing:
for lowercase, for
uppercase, and
whe n locked in uppercase.
• Word prediction: Slide left or right on the space key to turn on
or off prediction, as indicated by
and .
Page 47

47
• Languages: Touch and hold to select input language.
• Pre-defined texts: Touch
to ent er digi t s and symbols.
You can touch 1/2 or 2/2 to turn pages, or touch
to go
back to the alphabetic keys. Touch and hold
to ent er
Emoji and emoticons.
• The delete key: Touch
to delete text before the cursor.
You can also slide left on the key to delet e an en tire word.
• Voice input: Touch
and speak through the microphone.
• Edit text: Touch
to open text editing options. You can
move the cursor, select, cut, copy, paste, or delete text.
• Mo re opt ions: T ouch to access the quick settings of
TouchPal keyboard, change the keyboard theme, and more.
• Close the keyboard: Touch
. You can touch the text field
again to show t he keyboard.
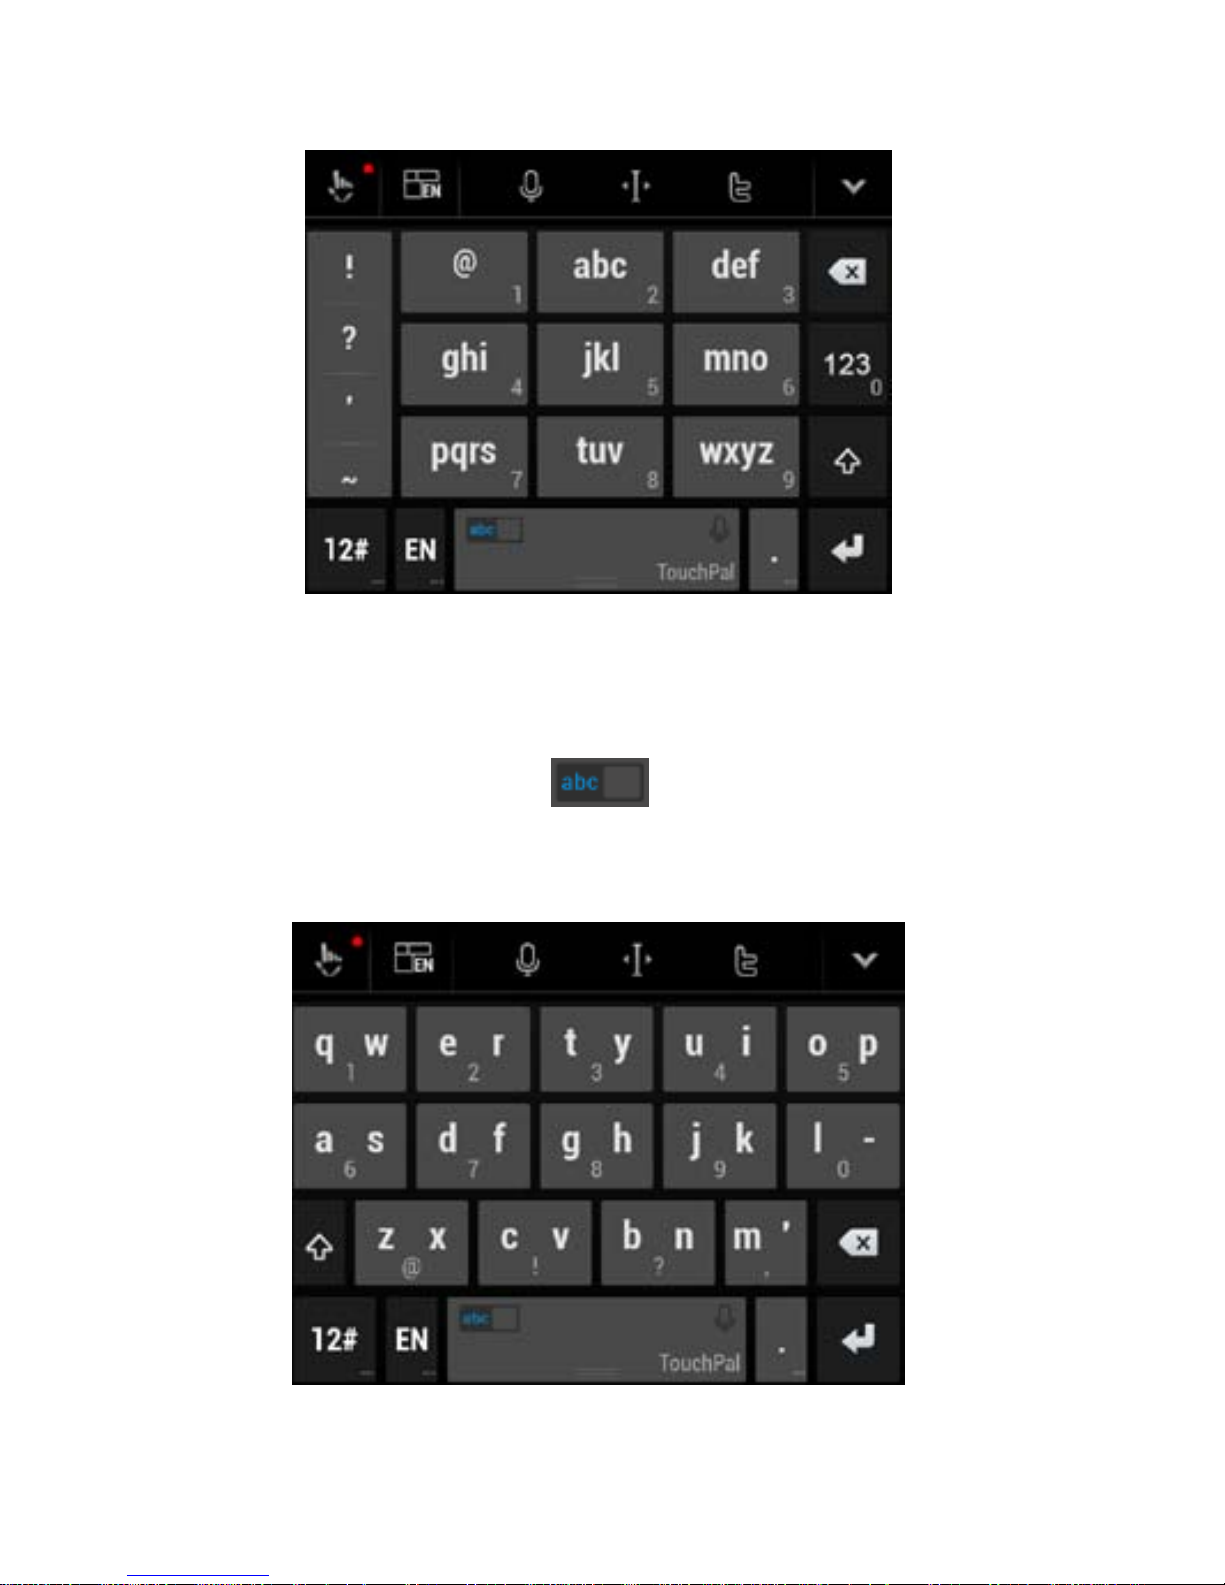
The T12 Layout
The layout is similar to a phone pad in T12 mode.
Page 48
48
Touch an alphabetic key repeatedly until the desired letter
appears. You can also touch and hold the key and slide left or
right to choose the letter or number you need.
If word prediction is enabled (
), jus t touch th e key s once
and choose the right w ord.
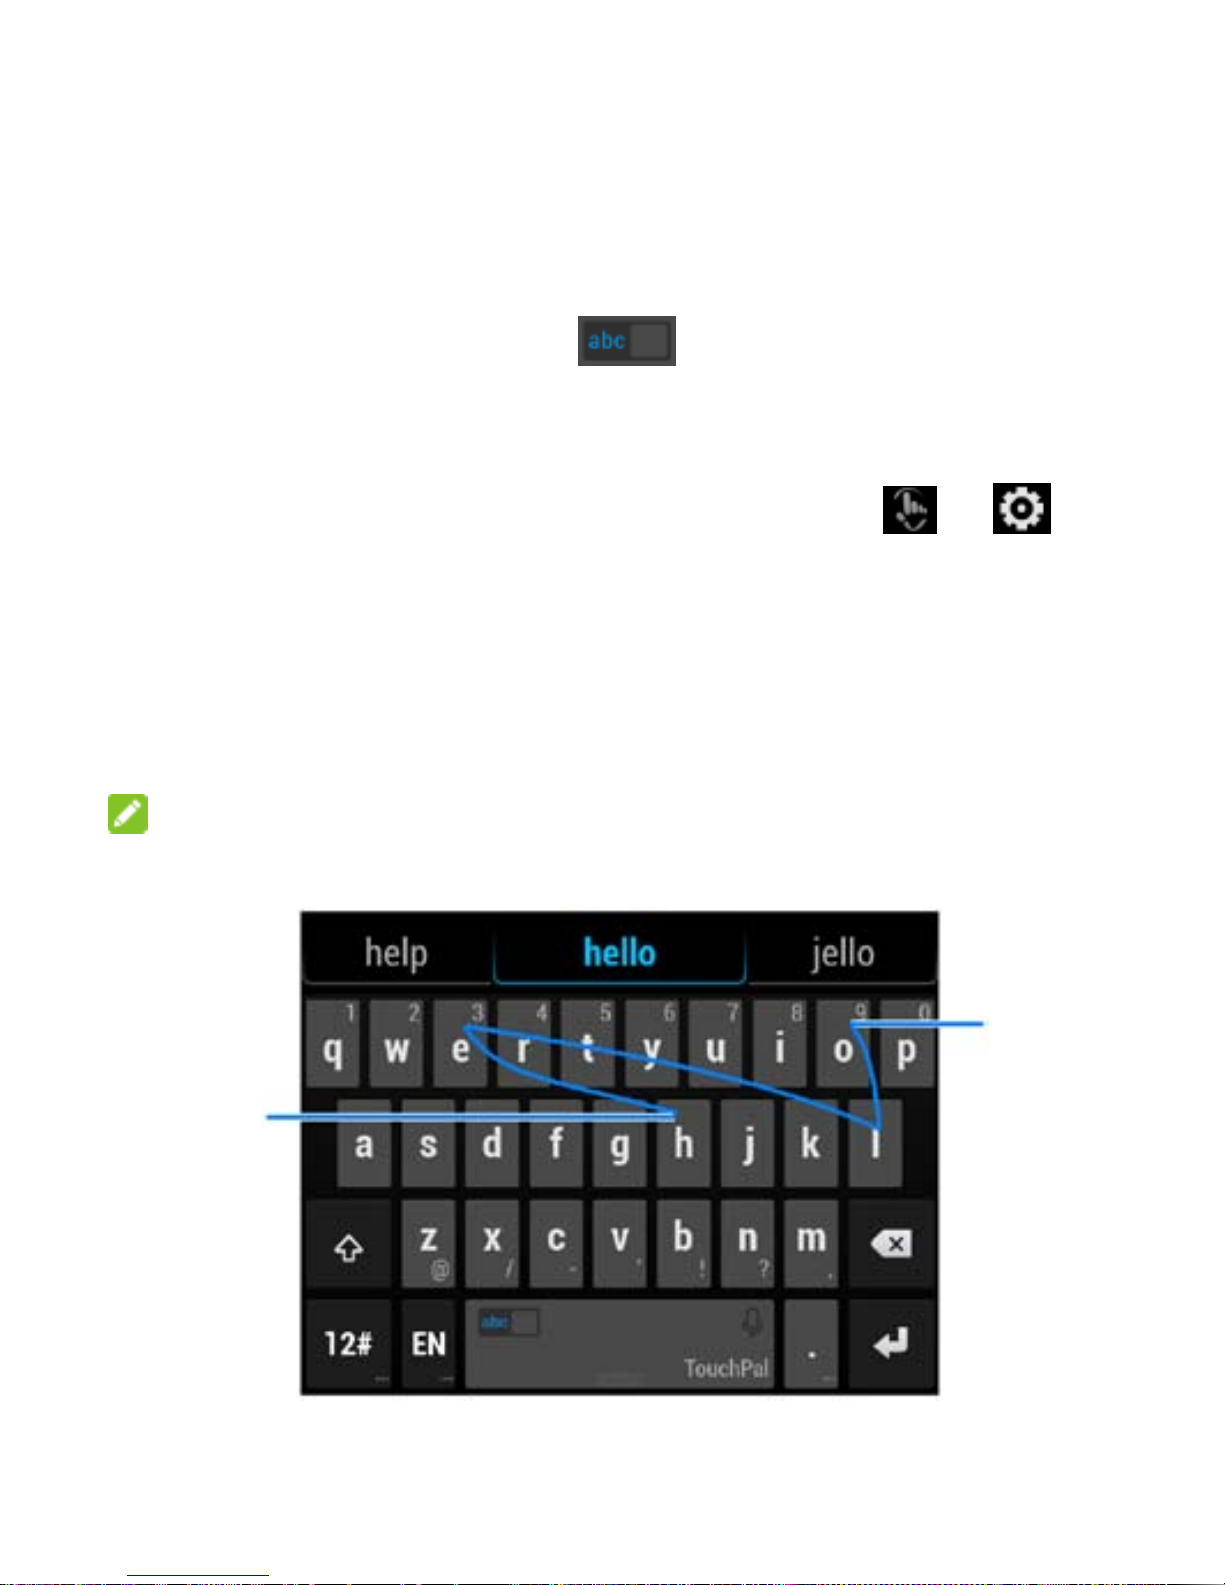
The T+ Layout
Page 49
49
Touch to enter the left letter on the key; Double-tap or flick right to
enter the right letter/symbol on the key. You can also touch and
hold a key and slide left or right to choose more letter s and
symbols.
If word prediction is enabled (
), just touch the keys and
choose the right word.
To enable and use Curv e :
1. In the TouchPal X keyboard screen, touch
> and
check Curve
®
- Word gesture .
2. If prom pted, tou ch OK to switch to the T26 layout.
3. Mo ve your finger fro m letter to letter on the keyboard to
trace a word without lifting the finger until you reach the end
of the word.
NOTE:
Curve is only available in the T26 layout.
End of
the word
Start of
the word
Page 50

50
NOTES:
• Touch when you want to. If you want to enter a single letter, go
ahead and touch.
• Lift your finger at the end of the word. A space is added
automatically when you begin to trace the next word.
Google Voice Typing
Google Voice typing uses the Google voi ce r ecognition service t o
convert speech to text. You must have a data connection on a
mobile or Wi-Fi network to use it .
1. Flick down the status bar when entering text and touch
Choose input method, and then select Google voice
typing.
Or touch
to access the voi ce typ i n g feature whe n you are
using the Android Keyboard.
2. When you see the microphone image, speak what you want
to type.
3. You can continue entering text to keep it or to delete it.
NOTE:
Say "comma," "period," "question mark," "exclamation mark," or
"exclamation point" to enter punctuation.
Input Method Settings
Choose the input method settings by touching > Set tin g s >
Language & input from the home screen.
In the KE Y BO A R D & I NP U T ME T HO DS section, you can set
Page 51
51
the default input method and choose the settings for input
methods.
Editing Te x t
• Move the insertion point: Touch where you want to type.
The cursor bli nks in t he ne w pos it ion , an d a tab a pp ears
below it. Drag the tab to move the cursor.
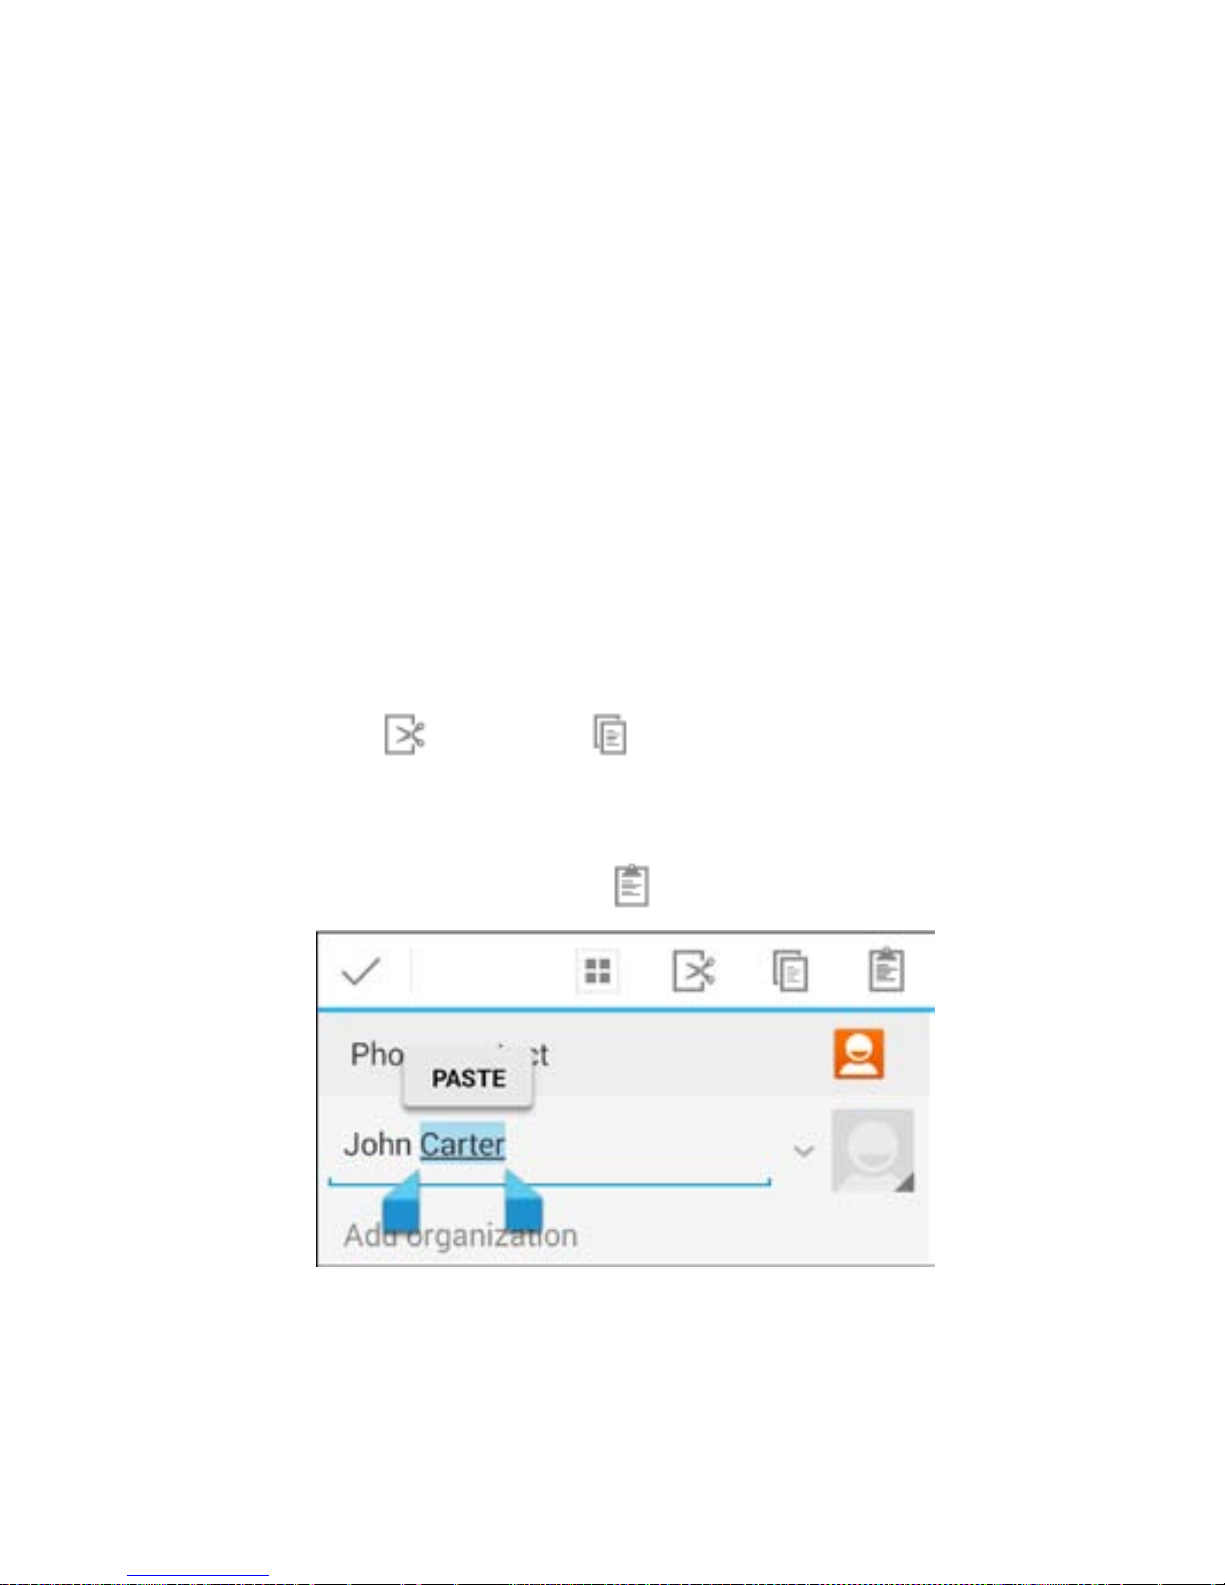
• Select text: Touch and hold or double-tap within the text.
The nearest word highlights, with a tab at each end of the
sel ec tion. Dr a g the tabs to c hange the select ion.
• Cut or copy: Select the text you wa nt t o manipulate. Then
touch the Cut
or Copy button to cut or copy th e text to
the clipboard.
• Replac e text with t he clipboard text: Select the text you
want to re place. T hen tou c h
or PASTE.
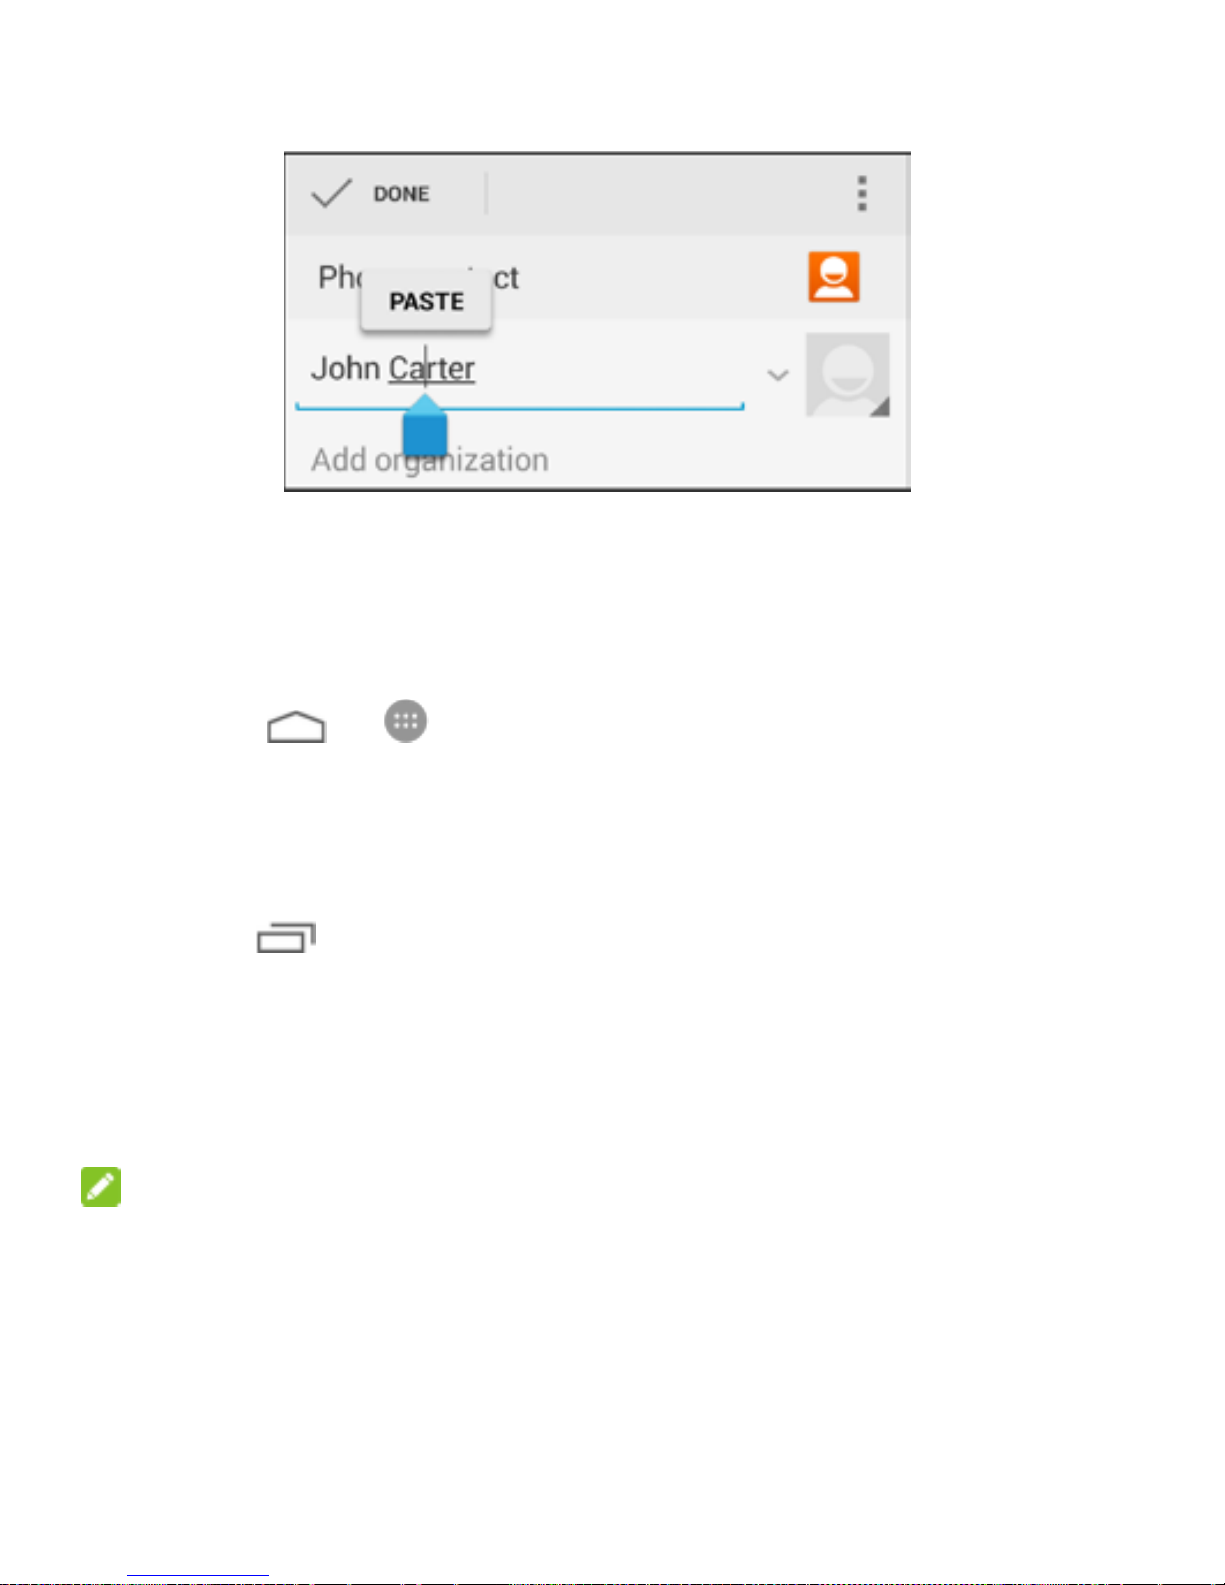
• Insert text from t h e clipboard: Move cursor to the inserti on
point and then touch and hold the tab below t he cursor.
Release the finger and tou ch PASTE.
Page 52
52
Opening and Switching Apps
Open an A pp
1. Touch > .
2. Slide left or right on the screen and touch an app to open it.
Switch Between Recently Opened A pps
1. Touch .
A list of the names and thumbnails of apps you’ve used
recently opens. If you’ve been using more apps recently than
can fit on the screen, you can scroll the lis t up and down.
2. Touch a thumbnail to open that app.
NOTE:
You can swipe a thumbnail sideways to remove it from the list.
Page 53

53
Connecting to Networks and
Devices
Connecting to Mobile Networks
Managing the micro-SIM Cards
You can turn on or off the micro-SIM cards, choose the default
card for voice calls, messaging , and data, or set roaming
restrictions for each card.
To tur n on or off a car d:
1. Touch
> > Settings > SIM management.
2. Touch the Network name related to the SIM card
NOTE:
Touc h each micro-SIM card name to set its SIM name, phone
number, background color of its signa l icon in the status bar and
display numbers.
To set t he default card:
1. Touch
> > Settings > SIM management.
2. Touch Voice call, Messaging, or Data connection and
select a card as the default. You can also turn off data
connection for both cards.
NOTE:
You can change the default micro-SIM card for voice call or
messaging while using the Phone app or the Messaging app.
Page 54

54
Just flick down the status bar and selec t the micro-SIM card
above the notifications.
To set roaming restrictions:
1. Touch
> > Settings > SIM management >
Roaming.
2. Touch Data r o aming and check the card allowed for data
roaming.
- or Touch Show roaming reminder to set when roaming
warnings should appea r.
Select Network Operator
1. Touch > > Settings > More > Mobile networks >
Networ k opera t ors .
2. If both micro-SIM cards are in stalled , to uch the one you need.
3. Touch Select manually > OK to se arch f or al l avai labl e
networks. Then touch a network in the net wor k list to register
manually.
- or Touch Choose automatically to select preferred network
automatically.
Control Mobile Da ta Use
1. Touch > > Settings > More > Mobile net w orks.
2. Touch Data conne c ti on and select the micro-SIM card for
data se rvice, or to uch Off to turn off mobile data.
Page 55

55
Select Preferred Network Mode
You can select the permitted network mode for the WCDMA
(UMTS) micro-SIM card.
1. Touch
> > Settings > More > Mobile networks >
Preferred network type.
2. Touch the WCDMA ( UMTS) micro-SIM card name and then
touch the network mode you would prefer the phone to
connect with.
Set Access Point Names
To connect to the Internet you can use the default Access Point
Names (APN). And if you want to add a new APN, please contact
the service provider to get the necessary information.
1. Touch
> > Settings > More > Mobile networks >
Access Point Names.
2. If both micro-SIM cards are installed, select the card the new
APN is associated with.
3. Touch
> New APN.
4. Touch each it em to enter t he inf ormat ion yo u get f rom your
se rvic e prov ider .
5. Touch
> Save to co mp l ete.
NOTE:
To set the APN to default settings, touch
> Reset to default.
Page 56

56
Connect ing to Wi-Fi®
Wi-Fi is a wireless networking technology that can provide
Internet access at distances of up to 100 mete rs , depending on
the Wi-Fi router and your surroundings.
Turn Wi-Fi On and Connect to a Wi-Fi
Network
1. Touch > > Settings > Wi-Fi.
2. Slide the Wi-Fi switch to the ON position to turn on Wi-Fi.
3. Touch a network name to connect to it .
4. If the network is secured, enter the password and touch
Connect.
NOTE:
Your phone automatica l ly con nec ts to pr ev io us l y used W i-Fi
networks when they are in range.
NOTE:
To connect to a Wi-Fi router that supports WPS, touch
on
the phone’s Wi-Fi menu and press the WPS button on your
router.
Get Notified of Open Networks
1. Touch > > Settings > Wi-Fi.
2. Slide the Wi-Fi switch to the ON position.
3. Touch
> Advanced.
Page 57

57
4. Check Network notification.
When Wi-Fi is on, y ou rece ive notifications in the status
bar when your phone detects an open Wi-Fi network.
Uncheck the option to turn off notifications.
Add a Wi-Fi Network
You can add a Wi-Fi network if the network does not broadcast
it s name (SSID), or t o add a Wi -Fi network when you are out of
range.
To connect to a secured network, you first need to get the
security details from the network's administrator.
1. Touch
> > Settings > Wi-Fi.
2. Slide the Wi-Fi switch to the ON position.
3. Touch
.
4. Enter t h e network SSID ( n ame) . If n ece ssary, en te r secur ity
or other net wor k co nfig uration d etai ls.
5. Touch Save.
Forget a Wi-Fi Network
You can make your phone forget about the detail s of a Wi-Fi
network that you add ed - for exa mple, if you don’ t w ant the phon e
to connec t to i t autom aticall y or if it is a network t hat you no
longer use.
1. Touch
> > Settings > Wi-Fi.
2. Slide the Wi-Fi switch to the ON position.
Page 58

58
3. Touch the Wi-Fi network name and then tou ch Forget.
Connect to a WPS N etwork
Wi-Fi Protected Setup (WPS) is a fea ture t hat ma k es it easy to
add your phone to the access point s w hich support WPS.
You can use one of the following methods to connect your phon e
to a wireless network using WPS.
Method one: WPS but t on (Rec omme nde d)
1. Touch
> > Settings > Wi-Fi.
2. Slide the Wi-Fi switch to the ON position.
3. Touch
.
4. Press the WPS button on the wireless router and the
access point will recognize your phone a nd add it to the
network.
Method two: PIN number
1. Touch
> > Settings > Wi-Fi.
2. Slide the Wi-Fi switch to the ON position.
3. Touch
> WPS Pin Entry.
4. The WPS PIN number displays on the screen. Enter the
PIN number i nto the acce s s point's setup p age.
After entering the PIN number, your phone automatically finds
the access point and configures the connection.
NOTE:
For detailed information about the WPS feature of the access
point, please refer to its user documents.
Page 59

59
Adjust Advanced Wi-Fi Settings
1. Touch > > Settings > Wi-Fi.
2. Touch
> Advanced to adjust th e f ollowing s ett ings.
Networ k notif ic a ti on: Get n otificat ions i n the status bar
when Wi-Fi is o n and an open n etwork is av ailable.
Keep Wi-Fi on during sleep: Set whether to keep Wi-Fi
on in sleep mode.
Scanning always avai lable: Allow Google location
services and other apps to scan for networks even when
Wi-Fi is t urned off.
Install certificates: Install certi ficates needed for
connecting to certain Wi-Fi networks.
Wi-Fi optimization: Minimize battery usage when Wi-Fi
is on.
Passpoint: Automatically connect to passpoint-enabled
Wi-Fi hotspots without manual authentication. Contact
your mobile service provider to confirm whether this is
available.
MAC address: Check the MAC address.
IPv4 address: Check the phone’s IPv4 address.
Page 60

60
Using W i-Fi Direct®
Wi-Fi Direct allows Wi-Fi devices to connect to each other
without the need for wireless acce s s points (hotspo t s) .
Connect to Another Device via Wi-Fi Direct
1. Touch > > Settings > Wi-Fi.
2. If Wi-Fi is off, slide the Wi-Fi swi tch to the ON position.
3. Touch
> Wi-Fi Direct. Your phone will search for other
devices enabled with Wi-Fi direct connections.
4. Touch a dev ice name under PEER DEVICES to connect with
it.
The other device will receive a connection prompt and need
to accept the request for conne c tion. Both devices may need
to e nter a c ommon PIN.
5. Once connected the device is displayed as “Connected” in
the PEER D EVIC ES list.
Send Data via Wi-Fi Direct
1. Open the appropriate application and select the file or item
you want to share.
2. Select the option for sharing via Wi-Fi Direct. The method
may vary by application and data type.
3. Touch a device the phone has connected with or wait for it to
search for new devices and tou ch on e of them.
Page 61

61
Receive Data via Wi-Fi Direct
When an attempt to transfer data via Wi-Fi Direct is received, you
can see a notification in the status bar. Open the notification
panel, touch the notification and select Accept to st art receiving
th e data.
Received files are stored automatically in a dedicated folder
(WiFiShare, for instance). You can a cces s them w ith the File
Manager app.
Connecting to Bluetooth® Devices
Bluetooth® is a short-range wireless communication technology.
Phones or other devices with Bluetooth capabilities can ex chan ge
information wirelessly within a distance of about 10 me ters. The
Bluetooth devices must be paired before the co m muni cation is
performed.
Turn Bluetooth On/Off
1. Touch > > Settings > Bluetooth.
2. Slide the Bluetooth switch to the ON or OFF position.
When Bluetooth is on, the
icon will appear in the stat us bar.
Make Your Pho n e Visible
In order to work with other phone s or devices that have Bluetooth,
you need to make your phone ‘visibl e’ to the m.
Page 62

62
1. Touch > > Settings > Bluetooth.
2. Slide the Bluetooth switch to the ON position if Blueto oth is
off.
3. Touch your devi ce nam e on the top of the screen to ma ke
your phone visible or invisible.
NOTE:
Touch
> Visi bility timeout to set the Bluetooth visibility
timeo ut of your pho ne.
Change the Device Name
1. Touch > > Settings > Bluetooth.
2. Slide the Bluetooth switch to the ON position if Bluetooth is
off.
3. Touch
> Rena me phone .
4. Edit the name and touch Rename.
Pair With Another Bluetooth Device
1. Touch > > Settings > Bluetooth.
2. Slide the Bluetooth switch to the ON position if Bluetooth is
off.
Your phone automatically scans for and display s the IDs of
all ava ilab le Blu etooth devices in ra nge. You could touch
SE ARC H FOR DEVI C ES if you want t o scan aga in.
3. Touch the device you want to pair with.
Page 63

63
4. Confirm that the Bluetooth passkeys are the sa me between
th e two devic es and touch Pair. Alternately, enter a
Blueto oth passkey and t ouch Pair.
Pairing is successfully completed when the other device
accepts the connection or the sa me pass key is entered.
NOTE:
The Bluetooth passkey may be fixed for certain devices, such as
headsets and hands-free car kit. You can try entering 0000 or
1234 (the most common passkeys), or refe r to the docum ents for
that device.
Unpair From a Bluetooth Device
You can make your phone forge t its pairing conn ec tio n with
another Blue tooth device. T o connect t o t he device again, yo u
may need to enter or confirm a passkey again.
1. Touch
> > Settings > Bluetooth and ensure that
Bluetooth is turned on.
2. In the list of pair ed dev ices, touch the icon
beside the
Blueto oth devic e you want to unpair from.
3. Touch Unpair.
Send Data via Bluetooth
1. Open the appropriate application and select the file or item
you want to share.
2. Select the option for sharing via Blue too th . The metho d may
vary by application and data type.
Page 64

64
3. Touch a Bluetooth device the phone has paired with or wait
for it to search for new devices and touch one of them.
Receive Data via Bluetooth
1. Turn Bluetooth on before trying to receive data via Bluetooth.
NOTE:
If the phone has not been paired with the sending devi ce, you
may need to touch Bluetooth > [your phone’s name] in
Settings to keep the phone detectable through Bluetooth.
2. Flick down the status bar and touch
.
3. Touch Accept to start receiving the data.
Depending on your storage setting and whether a microSDHC
ca rd is installed, received files are stored automatically in a
dedicated folder (Bluetooth, for instan ce ) in the phone storage or
microSDHC. You can access them with the File Manager app.
Connecting to Your Computer via USB
You can c onnect your ph one to a computer with a USB cable and
tr ansfer mus ic, p ic tur es , and othe r files in bot h dir ec tio ns . Your
phone sto r es the se files in the phone sto rage or on a removable
microSDHC card. For mor e information , s ee Storage
.
If y ou are using USB tethering, you must turn that off before you
can use USB to transfer files between your phone and computer.
Page 65

65
Connect Your Phone to a Computer via USB
1. Connect your phone to the PC with a USB cable.
2. Open the notification panel and tou ch
.
3. Choose one of the following options:
USB storage : Transfer files between PC and the phone
storage or microSDHC card on your phone.
NOTE:
After se lecting US B storage, you need to open the
notificat ion p anel and touch USB connected > Turn on
USB storage to turn on the USB mass storage mode .
Media device (MTP): Transfer media files on Windows
®
or Mac
®
.
NOTE:
For Windows XP, please install the drivers and Media
Player 11 (or later version) wh en you use Media device
(MTP) for the first time.
Camera (PTP): Trans fer phot os using camera software .
Charge only: Charge your phone vi a USB.
Built-in CD -ROM: Install the driver needed for some USB
connection modes (such as MTP). You only need to ins tall
th e driver on t he sam e PC once.
NOTE:
You can also install the driver on PC by running the
executable file in the new CD-ROM drive.
Page 66

66
NOTE:
You cannot access the internal storage of your phone on the
computer. S ee Storage
for details.
Connect With Windows Media® Player
You can sync music on your phone and the computer installed
with Windows Media Player.
1. Connect the phone with your computer via USB and choose
Media device (MTP).
2. Open Windows Media Player and sy nchronize music files.
Disconnect Your Phone From the Computer
To disconnect the phone from the computer, simply unplug the
USB cable when you’re finished .
If the connection is USB storage, fl ick down th e notification
panel and touch Turn off USB storage > Turn off USB stor a ge
before unplugging the cable .
Remove the microSDHC Card From Your
Phone
If you need to remove the microSDHC card whil e the phon e is on,
you must unmount it first.
1. Touch
> > Settings > Storage.
2. Scroll down and touch Unmount SD card > OK.
Page 67

67
3. When the Unmount SD card menu changes to Mount SD
card, you can now safely remove the microSDHC card from
the phone.
NOTE:
If you unmount the microSDHC card, some apps that you are
using will stop and may be unavailable until you remount the
microSDHC card.
Erase the microSDHC Card
1. Touch > > Settings > Storage.
2. Scroll down and touch Erase SD c ar d > Erase SD card >
Erase everything.
CAUTION:
The formatting procedure erases all the data on the microSDHC
ca rd, af ter which t he fil es CA N NO T be ret rieved.
Sharing Your Mobile Data Connection
You can share your phone’s data capabili tie s t hroug h tethering or
by activating the mobile hotspot feature to create a portable Wi-Fi
hotspot.
Share Your Mobile Data Connection via USB
You can access the Internet on your co mputer via the USB
tethering feature of your phone. The feature needs data
connection on a mobile network and may result in data charges.
Page 68

68
NOTE:
You cannot transfer files between the phone and the PC when
the phone is USB tethered.
1. Connect your phone to your computer with a USB cable.
2. Touch
> > Settings > More > Tetheri ng &
portable hotspot.
3. Touch Hotspot & tethering settings to select IPv4 or IPv4 &
IPv6 for tethering if needed.
4. Check USB tethering. A new network connection will be
cr eated on your com puter .
NOTE:
To stop sharing your data connection, unche ck USB tethering or
disconnect the U SB cable.
Share Your Mobile Data Connection via
Bluetooth
If your computer can obtain an Internet connection via Bluetooth,
you can configure your phone to sha re its mobile data con nection
with your computer.
1. Pair your phone with your computer via Bluetooth.
2. Configure your computer to obtain its network connection via
Bluetooth. For more information, please see your co mputer' s
documentation.
3. Touch
> > Settings > More > Tetheri ng &
portable hotspot.
Page 69

69
4. Touch Hotspot & tethering settings to se le ct IPv4 or IPv4 &
IPv6 for tethering if needed.
5. Check Bluetooth tethering. Your computer is now sharing
your phone's data connection.
NOTE:
To stop sharing your data connection, uncheck Bluetooth
tethering.
Share Your Mobile Data Connection as a
Wi-Fi Hotspot
You can share your phone’s data connection with other devices
by turn ing yo ur pho ne int o a portable W i-Fi hotspot. The fea tu r e
needs data connection on a mobile network and may result in
data charges.
NOTE:
When the portable Wi-Fi hotspot feature is enabled, you cannot
use your phone’s applications to access the Internet via its Wi-Fi
connection. You still remain co nne cted to the Internet via your
mobile data network.
1. Touch
> > Settings > More > Tetheri ng &
portable hotspot.
2. Touch Hotspot & tethering settings to select IPv4 or IPv4 &
IPv6 for the hotspot if needed.
3. Slide the Wi-Fi hots pot switch to the ON position to turn the
fe ature on.
After a moment, the phone starts broadcasting its Wi-Fi
network name (SSID).
Page 70

70
4. On another device, locate your phone via Wi-Fi and connect
with it to start using the phone’s mobile data.
Or, if th e device supports Wi-Fi Protected Setu p, touch the
W PS icon on th e device, and then touch Wi-Fi hotspot >
WPS connect and sel ect Pus h button on your phone. You
can also select PIN from cl ie nt and enter the PIN pro vided
by that device.
NOTE:
To stop sharing your data connection, slid e the Wi-Fi hotspot
switch to the OFF position.
Set Your Wi-Fi Hotspot
You can change the name of your phone's Wi-Fi network (SSID),
secure y our portable Wi-Fi h ot spot, and set other options.
1. Touch
> > Settings > More > Tetheri ng &
portable hotspot.
2. Touch Wi-Fi hotspot and set the following option s as follow s.
Keep Wi-Fi hotspot on: Choose to turn the Wi-Fi hotspot
off automatically when it is idle for certain time or to keep
it always on.
Set up Wi-Fi hotspot:
- Network SSID: Enter or edit a network SSID (name) that
other devices see when scanning for Wi-Fi networ ks.
- Security: Choose a security option: None (not
recommended) or WPA2 PSK (other user s can acces s
you r mobi le hotspot onl y if they enter the correc t
Page 71

71
password). When you select WPA2 PSK, touch the
Password field to edit the security password.
- Password: Edi t the se cu r ity password.
- Reset OOB: Re set the network SS ID, se cu r ity a n d
password to default settings.
- Maximum connections: Set the maximum number of
devices that can connect to the hotspot simultaneously.
Wi-Fi hotspot optimizati on: Minimize the battery usage
when the hots pot is on.
WPS connect: Set Push butt on or PIN from client as
the Wi-Fi protected se tup mo de and t ouch Connect.
Bandwidt h usage : Check the Wi-Fi hotspot real-time
data speed, time of duration and total of used data. You
can check Enable bandwidth throt tl ing to set the data
speed limit.
CONNECTED USE RS: Check the connected users or
block them .
BLOCKED USERS : Check the blocked users or unblock
them.
Sharin g Windows PC Internet via USB
Cable
You can connect your phone to the Inter net thro ugh your
W indows P C ’s Internet connection via a USB cable.
Page 72

72
1. Connect your phone to a Wind ows PC via a USB cabl e.
2. Touch
> > Settings > More > USB Internet.
3. Select your PC system version and touch Next.
4. Follow the onscreen instructions to set the Internet
connection sharing options on your PC.
5. Touch Done.
NOTE:
To stop the sharing, unche ck USB Internet in the Wireless &
networks screen.
Connecting to Virtual Private Networks
Virtual private networks (VPNs) allow you to connect to the
resources inside a secure d loca l networ k. VPNs are commonly
deployed by corporations, schools, and other institutions to let
people access local network resources when not on campus, or
when connected to a wireles s network.
Depending on the type of VPN you are using, you may be
required to enter your login credentials or install security
certificates be fore y ou can conn ect to your VPN. You can get this
information from your networ k administrator.
Add a VPN
1. Touch > > Settings > More > VPN.
2. Touch
and fill in the information provided by your
network administrator.
Page 73

73
3. Touch Save.
The VPN is added to the list on the VPN scree n.
NOTE:
You must set a lock screen pattern, PIN or password before
using VPN.
Connect to a VPN
1. Touch > > Settings > More > VPN.
2. Touch the VPN that you want to connect to.
3. When prompted, enter any requested credentials, and then
touch Connect.
Modify a VPN
1. Touch > > Settings > More > VPN.
2. Touch and hold the VPN that you want to modify.
3. Touch Edit profile and edit the VPN settings you want.
4. Touch Save.
Page 74
74
Phone Calls
You can place calls fro m the Phone app, the Peopl e app, or othe r
apps or widgets that display contact information. Wherever you
se e a phon e numb er, yo u c an usu ally touch it t o dial .
Placing and Ending Calls
Place a Call by Dialing
1. Touch > .
2. Touch
and enter the phone number or the contact name
with the dialpad. The phone will display matching information
from your cont ac t l is t.
To make an international call , touch and hold the 0 key to
enter the plus (+) symbol. Next, ent er the country code,
followed by the city/area code and then the phone number.
3. Touch the matching contact to call th e contact or to uch
to call t he numb er.
You can also touch
> IP d ia l to place an IP call to the number
you have entered. See Set Prefix Num ber for IP C alls
.
NOTE:
You can also touch the search box at the top of t he Phone app
screen and enter the phone nu mbe r or conta c t na me you w ant to
call . Touch the matching contact or Call [number] to place the
call.
Page 75
75
NOTE:
To redial the last call you made, just touch
> > >
and touch again.
End a Call
During a call, touch on the screen.
Answering or Rejectin g Calls
When you receive a phone call, the incoming call s cree n open s ,
displaying the caller ID or the in form ation abou t the call er that
you've entered in the People app. You can answer or reject the
call, or reject it with a text message.
Answer a Call
When you receive a phone call, drag over to a nswer
th e c all.
NOTE:
To silence the ringer before answering the call, press the either
end of the Volume Key.
Reject a Call
When you receive a phone call, drag over t o reje ct th e
call.
You can also drag
over to reject the ca ll and select a
preset text message or edit one to send to the caller.
Page 76
76
NOTE:
To edit the preset text re spo nse from within the Phone app, touch
> Se tt ings > Other Sett ings > Qui ck respon ses.
Working With the Call History
The call history is a list of all the calls you've placed, received, or
missed. It provides a convenient way to redial a number, return a
call, or add a number to your contacts.
To open the call history, you can touch
> > .
Place a Call From the Call History
1. Open the call history.
2. Touch a number for more information about the call, or
touch
beside it to call back.
NOTE:
You can touch
at the top of the screen or / /
above the list to filter the records by micro-SIM cards or call type
(incoming, outgoing, and mis sed) .
Add a Number Fr om Call Histo ry as a Contact
1. Open the call history.
2. Touch a number to view more call information.
3. Touch
.
Page 77

77
4. To add the num ber to an exis tin g contact, tou ch a contact in
the list. To add a new c ontact, touch CREATE NEW
CONTACT.
Take Other Actions on a Call History Entry
1. Open the call history.
2. Touch a number to view more call information. While
viewing the call details, you can:
Touch Call [number] to make a call.
Touch IP Call [number] to make an IP call.
Touch > Edit num ber bef ore call to edit the number
in the dialer before calling it.
Touch to send a message.
If the number belongs to a conta c t yo u have, touch to
view contact details.
Touch to delete the call log entry.
Callin g Your Conta cts
1. Touch > . Your favorite contacts and frequently
called contacts are displayed .
2. Touch a conta ct to place the call, or touch All cont a cts to
view all your contacts with phone numbers and select one to
make the call .
Page 78
78
Checking Voi cemail
If you have set the phone to divert calls to voicem ail, callers can
leave voicemail messages when t hey cannot reach you. Here’s
how to check the message s they lef t .
1. Touch
> > .
2. Touch and hold
on the dialpad. If prompted, enter y our
voicemail password.
3. Follow the voice promp t s to listen to and manage your
voicemail messages.
NOTE:
See Set Voicemail
for how to set your vo icema i l service. For
detailed information, please con tac t the ser vice provider.
Using Opt i ons D ur ing a Call
During a call, you will see a number of onscreen options. Touch
an option to select it.
• Touch to switch to the keypad when you need to enter a
code (for example, the PIN for your voicemail or bank account)
during the call.
• Touch / to turn on or off the speaker.
• Touch to mute or unmute your microphone.
• Touch to put the call on hold.
Page 79
79
•
Touch for more call options. You can make another call
separate from the first call, merge calls into a conference call,
record the phone call, or hang up.
• Touch to put the caller you are spe aking to on hold, and
switch to the other call that has been put on hold.
WARNING!
Because of higher volume levels , do not place the phone near
your ear during speakerph one use .
Managing Multi-party Calls
When the call waiting and three-way call features are available,
you can switch between two calls or set up a conference call.
NOTE:
The call waiting and three-way c all features need network
support and may result i n additional charges. Please contact your
service provider for more information.
Switch Between Current Calls
W hen you’ re on a call and another call comes in, your phone
screen informs you and displays the caller ID.
To respond to an inc omi ng call whi le you’re on a call:
Drag
over to answer the call. (This puts the first caller
on hold and answers the second call.)
NOTE:
You can also touch
> Hangup activ e , a ns wer waiting to end
Page 80

80
the first call and answer the second call.
To switch betw een two c all s :
Touch
on th e s cree n.
Set Up a Conference Call
With this feature, you can talk to two people at the same time.
1. On the dialpad, enter a number and touch
.
2. O nce you have establi shed the connectio n, tou c h
> Add
call and dial the second number. (This puts the first caller
on hold.)
3. When you’re connected to the second party, touch
>
Merge calls.
If one of th e people you c alled hangs up during y our call, you and
the remaining caller stay connected. If you initiated the call and
are the first to hang up, all callers are disconnected.
To end the conference call, touch
.
Adjusting Your Call Settings
Set Voicemail
1. Touch > > > Settings > Vo ice Call > Voicemail.
2. Select a micro-SIM car d if nece ssary.
3. Touch Service to select the voicemail service provider.
4. Touch Setup > Voicemail number to edit the voicemail
number if necessary.
Page 81

81
Forward Incoming Calls
Call forwarding feature allows you to forward your incoming calls
to another phone number.
1. Touch
> > > Settings > Voice Call > Call
forwarding.
2. Select a micro-SIM car d if nece ss ary.
3. Touch an available option ( Always forward, Forward when
busy, Forward when unanswered, or Forward when
unreachable) to enable it .
Bar Certain Calls
Call barring feature allow s you to forbid certain types of calls from
your phone.
1. Touch
> > > Setti ngs > Voice Call > Call
barring.
2. Select a micro-SIM car d if nece ssary.
3. Set the restriction of specific typ es of cal ls fr om you r phon e.
Set Caller ID and Call Waiting
1. Touch > > > Settings > Voice Call > Additional
settings.
2. Select a micro-SIM car d if nece ssary.
3. Touch Caller ID to choose w hether y our nu mber is di splayed
when someone receives your outgoing call. Or check Call
Page 82

82
waiting to get notified of in c oming cal ls during a c all .
NOTE:
Please contact the service provider to check whether the caller
ID and call waiting features are a vailable.
Internet Call Settings
To add an Interne t call ing account:
1. Touch
> > > Settings > Internet Call and check
Use Internet calling.
2. Touch Accounts > ADD ACCOUNT.
3. Follow the instructions from your Internet calling service
provider to configure the settings for your account.
4. Touch SAVE.
To configure your phone to receive Internet calls:
By default, your phone is configured to make Internet calls, but
not to receive them. Configure your phone to receive Internet
calls once you have added an interne t acc ount to your phone.
1. Touch
> > > Settings > Inter net Cal l >
Accounts.
2. Check Receive incoming calls. Checking this setting will
reduce your battery life between charges.
Use Fixed Dialing Numbers
Fixed Dialing N u mbe rs (F D N) allow s you to restrict outgoing calls
to a limited set of phone numbers.
Page 83

83
1. Touch > > > Settings > Other Settings > Fixed
Diali ng Num ber s.
2. Select a micro-SIM car d if nece ss ary.
3. The following options are available:
Enable FDN: Input the PIN2 code to enable the FDN
feature.
Change PI N2: Change the PIN2 code for FDN access.
FDN list: Man age the FDN list.
NOTE:
The PIN2 code is provided by your carrier. Entering an incorrect
PIN2 c ode more times than allowed can get your micro-SIM card
locked. Cont act the service provider for assi s tance.
Enable Minute Reminder
You can set the phone to ring a reminding tone when your phone
ca ll rea ches t he 50th second of every minute.
1. Touch
> > > Settings > Other Settings.
2. Check Minute remi nde r.
Suppress Background Noise
The phone can reduce background noise during phone calls.
1. Touch
> > > Settings > Other Settings.
2. Check Noise Reduc ti on.
Page 84

84
Edit Quick Response to Rejected Callers
1. Touch > > > Settings > Other Settings > Qui ck
responses.
2. Touch a text message to edit it.
3. Touch OK to save the new message .
Set TTY Mode
Your phone is a TTY compatible device. A TTY device can allow
people who have hear ing or speech disabilities to communicate
by telephone. Simply connect the TTY device to the phone’ s
headset jack.
Select a TTY mode for y our phone to work with a TTY de vice, or
turn TTY off.
1. Touch
> > > Settings > Other Settings > TTY
mode.
2. Select one of the following options. Consult your
teletypew riter manufacture r’s manual if necessary.
TTY Off: Users who can hear and talk can disable TTY
support.
TTY Full: Users who c an not talk or hear may use this
mode to send and receive text mes s ages thro ugh TTY
device.
TTY HCO: Users who can hear, but cannot talk, may use
this mode to listen to conversation of the other party, and
respond via text message s.
TTY VCO: Users w ho can tal k, b ut c anno t he ar, may use
Page 85

85
this mode to talk through the phone and re cei ve
responses via text messages.
Enable Internationa l Dialing Assist
You can enable or disable the international dialing assist.
1. Touch
> > > Settings > Other Settings.
2. Check International dialing assist to enable it.
Set Speed Dials
You can touch and hold the 1 ~ 9 keys from the dialpad to call the
corresponding speed dial number.
The number key 1 is reserved to speed dial your voicemail.
To assign a spee d dial ke y:
1. Touch
> > > > Speed Dial.
2. Touch a speed dial key .
3. Select one from the contact l is t.
Page 86
86
People
You can add contacts on your phone and synchronize them with
the contacts in your Google account or other accounts that
supp o rt con tact syncin g.
To se e your con tacts, touc h
> . From t here, y ou can
touch the tabs on the top of the screen to quickly switch to the
contact groups
or favorite contacts .
Checking Contact Details
1. Touch > and touch the all contac ts tab to
access yo ur contacts list.
2. Scroll through the list to view all your contacts.
3. Touch a co nta ct to view its de tails.
NOTE:
If you have a lot of contacts stored, you'll see a slider whe n you
touch the right side of the screen. To go directly to a letter, touch
and hold the slider and drag it to a letter.
Adding a New Contact
1. Touch > and touch the all contacts tab .
2. Touch
to add a new contact.
Page 87

87
3. Touch the account to choose where to sa ve the co nt act. If a
web account is selected, the contacts will be synced
automatically wit h your account online.
4. Enter the contact name, phone numbers, email addresses,
and ot he r inf o rmat i on .
5. Touch DONE to save the co ntact.
Setting Up Your Own Profile
You can create your own name card in your phone.
1. Touch
> and touch the all contacts tab .
2. Touch Set up my profile .
If a profile has already been set up, touch the listing under
ME and touch
> Edi t.
3. Edit your profile information and touch DONE.
Importing, Exporting, and Sharing
Contacts
You can import/expor t contac ts fro m/ to your micro-SIM card, the
phone storage, the microSDHC card or your online accounts.
This is especially useful when you need to transfer contacts
between different devices. You can also quickly share your
co ntac t s usin g Bluetooth, email, messages, etc.
Page 88

88
Import or Expo rt Cont acts
1. Touch > .
2. Touch
> Import/export.
3. Select the source of the contact data and touch Next.
4. Select the destinatio n of the imported/export ed contacts and
touch Next.
5. If necessary, select the contacts you want to import or export
and touch OK.
Share Contacts
1. Touch > and touch the all contacts tab .
2. Depending on your need, share multiple contact s in t he list
or share one contact.
To share multiple c ontac ts i n t he contact list, t ouch >
Sha re visible con tacts and check the conta c ts you want
to share. Then touch OK.
To share one contact, touch it to open the detail screen
and touch
> S h are.
3. Choose how to share the c ontacts. Options depend on
applications installed.
Page 89

89
Working With Favorite Contacts
In the favorite co ntacts tab, you can find your favorite
contacts and frequently conta cted conta cts.
Add a Contact to Favorites
You can add the contacts you use frequently to favorites so that
you c an fin d them quickly.
NOTE:
Contacts on the micro-SIM cards cannot be added to favorites.
1. Touch
> and touch the all contacts tab .
2. Touch a contact and then touch
next to the contact
name.
Remove a Contact From Favorites
1. Touch > and touch the favo r ite conta cts tab .
2. Touch a favorite contact and then touch
next to the
co ntac t name.
Wor k ing With Gr oups
View Your Contact Groups
1. Touch > and touch the conta c t groups tab .
Page 90

90
2. Scroll through the list to view the groups.
3. Touc h a grou p to view its m embers.
NOTE:
To send a message or an email to the group members, you can
touch
> Send group mes s a ge / Send group E-mail after y o u
open the group.
Set Up a New Group
1. Touch > and touch the conta c t groups tab .
2. Touch
to create a new group.
3. Touch to choose an account for the new group.
4. Touch the Group’ s nam e field and enter the group name.
5. Add contacts to the group.
Touch the Type person’s name field to enter the name of
the contact you want to add to the group. As matching
entries appear below the field, touch the one you need.
Touch and check the contacts you want to add to the
group. Then touch OK.
6. Touch DONE.
Delete a Group
1. Touch > and touch the conta c t groups tab .
Page 91

91
2. Touch a group and then touch > Delete.
3. Touch OK to disband the group. The contact s in the group
will not be deleted.
Edit a Gro u p
1. Touch > and touch the conta c t groups tab .
2. Touch a group and then touch
> Edit.
3. Touch the group name line to edit the group name or touch
/ to add/remove members.
4. Touch DONE.
Searchin g for a Contact
1. Touch > .
2. Touch
on the bottom of the screen.
3. Input th e contact name or any information the contact has
to searc h for it. T he contact s m at ched wil l be listed.
Editing Contacts
Edit Contact Details
1. Touch > .
Page 92
92
2. Touch a contact you need to edit and then touch > Edit.
3. Edit the contact and touch DONE.
Set a Ringtone for a Contact
Assign a special ringtone to a contact, so you know who is
calling when you hear the ringtone.
1. Touch
> .
2. Touch a contact you want to set a ringtone for an d the n
touch
> Set ringtone.
NOTE:
The contact must be saved on the phone, not the
micro-SIM cards.
3. S elec t a ring tone you like and touch OK.
Join Contacts
As your phone synchronizes with multiple online accounts, you
may see duplica te entri es fo r the same co ntact. You can merge
all the separate information of a contact into one entry in the
contact s list.
1. Touch
> .
2. Touch a contact entry to display the contact’s details.
3. Touch
> Edit > > Join.
Page 93

93
4. Touch the c ont act whose information you want to join with the
first entry.
5. Touch DONE.
The information from the second con tact is added to the first
contact, and the second contact is no longer displayed in the
contact s list.
You can repeat these steps to join anoth er conta c t to the main
contact.
Separate Contact Information
If contact information from dif ferent s ourc es was joined in error,
you can separate the information back into individual contacts on
your phone.
1. Touch
> .
2. Touch a contact entry you have merged and want to
separate.
3. Touch
> Edit > > Separate.
4. Touch OK to confirm.
Page 94

94
Accounts
Adding or Remov ing Account s
You can add multiple Google accounts and Microsoft Exchange
ActiveSync
®
accounts. You may als o add ot her kinds of
accounts, depending on the apps installed on your phone.
Add an Ac cou nt
1. Touch > > Settings > Add account.
2. Touch the type of account you want to add.
3. Follow the onscreen steps to enter th e information about the
account. Most accou nt s requ ire a use rname and pas sword ,
but the details may vary. You may also need to obtai n s ome
information from IT su ppor t or your system administrator.
W hen the account is s uc cess fully add ed, it is displayed in th e
ACCOUNTS section in the Settings menu.
Remove an A ccount
Removing an account will delete it and all information
associated with it from your phone, such as emails and
contacts.
1. Touch
> > Settings.
2. Touch the account category in the ACCOUNTS sect ion an d
then touch the account.
Page 95

95
3. Touch > Rem ove acc ount > Remove account .
Configur ing Ac count Sy nc
Configure Auto Sync Setting
1. Touch > > Settings > Data usage.
2. Touch
and check or uncheck Auto-sync data.
When aut omatic sync is turned on, change s you mak e
to information on your phone or on the web are
automatically synced with each other.
When auto sync is turned off, you need to sync manually
to collect emails, updates, or other recent information.
Sync Manually
1. Touch > > Settings.
2. In the ACCOUNTS section, touch the account category and
then the account you w ant to sync.
3. Touch
> Sync now. Or touch the types of information you
wa n t to sync.
Page 96

96
Change an Account’s Sync Settin g s
1. Touch > > Settings.
2. In the ACCOUNTS section, touch the account category and
then the account. The Sync screen appears, showing a list
of information the accoun t can syn c.
3. When auto-sync is enable d, check or u nc heck i tem s as you
need. Checked types of informa tio n on the phone and the
web will be kept in auto-sync.
Page 97

97
Email
Touch in the home screen and select Email. Use it to
receive and send emails from your webmail or other accounts,
using POP 3 or IMAP, o r acce ss yo ur Exch a n ge Active S ync
account for your corporate email needs.
Setting Up the Fi rst Email Account
1. When y ou open Email for th e fir st time, en te r your email
address and passw ord.
2. Touch Next to let th e phone retriev e t he network par am eters
automatically.
NOTE:
You can also enter these details ma nually by tou ching
Manual setup or whe n automatic s etup f ails .
3. Follow the on-screen in struc tions to finish the setup.
Your phone will show the inbox of the email ac coun t and s ta rt to
download email messages.
Checking Your Emails
Your phone can automatically check for new em ai ls at the
interval you set when setting up the account.
You can also check new emails manually by touching
>
Refresh in any of the email ac count’s boxes. Touch Load more
Page 98

98
at the bo t tom of t he email list to down loa d earlier messages.
Responding to an Email
You can reply to or forw ard a message that you receive. You
can also delete messages and manage them in other ways.
Reply to or Forward an Email
1. Open the email you want to reply to or forw ard from the Inbox.
2. Do the following as you need:
To reply to the sender, touch .
To reply to the sender and all recipients of the original
email, touch
> Repl y all.
To f orward the email to someone else, touch >
Forward.
3. Edit your mes sage and tou ch
.
Mark an Email as Unread
You can return a read email to the unread state - for example, to
remind your self to read it ag ain later. You can also mark a batch
of emai ls as unr ead.
• While reading a message, touch .
• While in a message list (for instance, the inbox) , touc h the
sender images in front of the messages and then to uch
.
Page 99

99
Delete an Email
You can delete an email from it s fold er. You can also delete a
bat ch of em ails.
• While reading a message, touch .
• While in a message list (for instance, the inbox), touch the
sender images in front of the messages and then touch
.
Writing and Sending an Email
1. Open your email inbox and tou c h .
NOTE:
If you have more than one email account added on the
phone, touch the sender line to select the account you want
to use for sending the message.
2. Enter a contact name or email address in the ‘To’ field.
Separat e each recipient with a comm a.
NOTE:
Touch
> Add Cc/Bcc to send a carbon copy or blind
carbon copy to other recipients.
3. Enter the email subject and compose the email text.
4. Touch
> Attach file to add audio fil es, i mages, video s and
other types of files as attachments.
5. Touch at the top right of the screen to send the
message.
Page 100

100
Adding and Editing Email Accounts
Add an Email Account
After setting up your first email account (see Email – Setting Up
th e F irst Email Acco unt), you c an add mo re email accounts and
manage them separately .
1. Open Email to get t he inbox screen.
2. Touch
> Settings and touch ADD ACCOUNT at the top
right of the screen.
3. Follow the p rompts to set up the account as you did with the
first one.
Edit an Email A ccoun t
You can change a number of settings for an account, including
how of ten y ou check for email, how you’re notified of new mails,
your email signature, and details about the servers the account
us es to send and r eceive mails.
1. Open Email to get t he inbox screen.
2. Touch
> Settings and touch the account whose settings
you want to change.
3. Make the changes you want and touch
whe n you
finish.
 Loading...