

Page 1

ZTE Blade S6
Quick Start Guide
1
Page 2

2
Page 3

LEGAL INFORMATION
Copyright © 2015 ZTE CORPORATION.
All rights reserved.
No part of this publication may be quoted, re-
produced, translated or used in any form or by
any means, electronic or mechanical, including
photocopying and microfilm, without the prior
written permission of ZTE Corporation.
Notice
ZTE Corporation reserves the right to make
modications on print errors or update speci-
cations in this guide without prior notice.
We offer self-service for our smart terminal de-
vice users. Please visit the ZTE ofcial website
(at www.ztedevice.com) for more information
on self-service and supported product models.
Information on the website takes precedence.
Disclaimer
ZTE Corporation expressly disclaims any liabil-
ity for faults and damages caused by unauthor-
ized modications of the software.
Images and screenshots used in this guide may
differ from the actual product. Content in this
guide may differ from the actual product or soft-
ware.
Trademarks
ZTE and the ZTE logos are trademarks of ZTE
Corporation.
Google and Android are trademarks of Google,
Inc.
3
Page 4

The Bluetooth® trademark and logos are owned
by the Bluetooth SIG, Inc. and any use of such
trademarks by ZTE Corporation is under li-
cense.
microSDHC Logo is a trademark of SD-
3C, LLC.
Qualcomm® Snapdragon™ processors are
products of Qualcomm Technologies, Inc.
Qualcomm and Snapdragon are trademarks
of Qualcomm Incorporated, registered in the
United States and other countries. Used with
permission.
License Notice and Trademark Acknowledg-
ment Required for Licensed Products.
Manufactured under license from Dolby Labo-
ratories. Dolby, Dolby Audio, and the double-D
symbol are trademarks of Dolby Laboratories.
Other trademarks and trade names are the
property of their respective owners.
Version No.: R1.0
Edition Time : February 10, 2015
Manual No. : 079584507263
4
Page 5
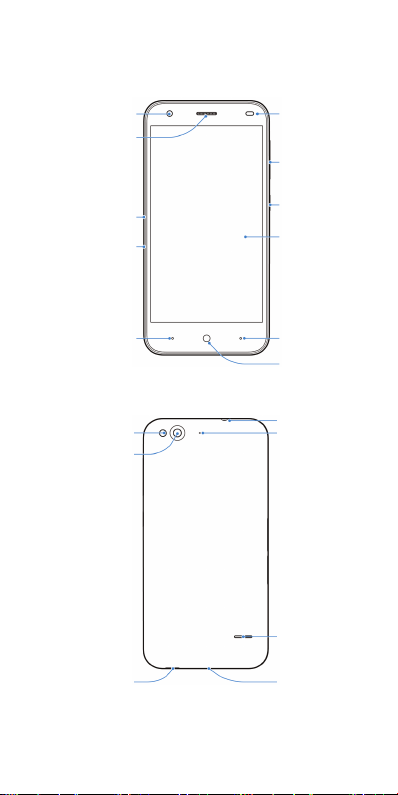
Getting to Know Your Phone
Front Camera
Earpiece
nano-SIM
Card Tray
microSDHC
Card Tray
Menu Key
Flash
Back Camera
Charging/ micro-
USB Jack
Proximity &
Light Sensor
Volume Key
Power Key
Touch Screen
Back Key
Home Key
Headset Jack
Auxiliary
Microphone
Speaker
Main
Microphone
5
Page 6
Key Function
• Press and hold to turn
on or off airplane mode,
enable no interruptions
mode, priority interruptions
Power Key
Home Key
Back Key
Menu Key
Volume Key
NOTE:
You can exchange the positions of the Back
Key and the Menu Key. Touch Settings > Cus-
tom bottom key from the home screen and
select one case.
only mode, silent mode
with vibration, disable
silent mode, power off or
reboot the phone.
• Press to turn off or on the
screen display.
• Touch to return to the
home screen.
• Touch and hold to open
Google Search.
Touch to go to the previous
screen.
• Touch to view the options
for the current screen.
• Touch and hold to see
recently used applications.
Press or hold either end of the
key to turn the volume up or
down.
6
Page 7
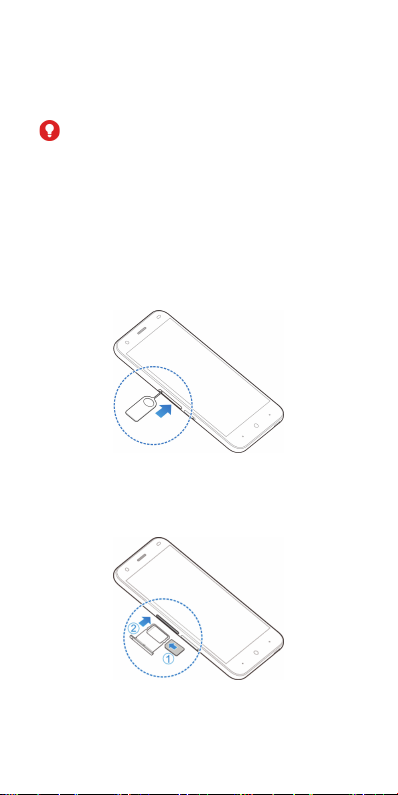
Installing the nano-SIM Card
Power off your phone before installing or re-
moving the nano-SIM card.
WARNING!
To avoid damage to the phone, do not use any
other kind of SIM cards, or any non-standard
nano-SIM card cut from a SIM card. You can
get a standard nano-SIM card from your service
provider.
1. Insert the tip of the tray eject tool into the
hole on the nano-SIM card tray.
2. Pull out the nano-SIM card tray and place
the nano-SIM cards on the tray, as shown.
Then carefully install the tray back.
7
Page 8
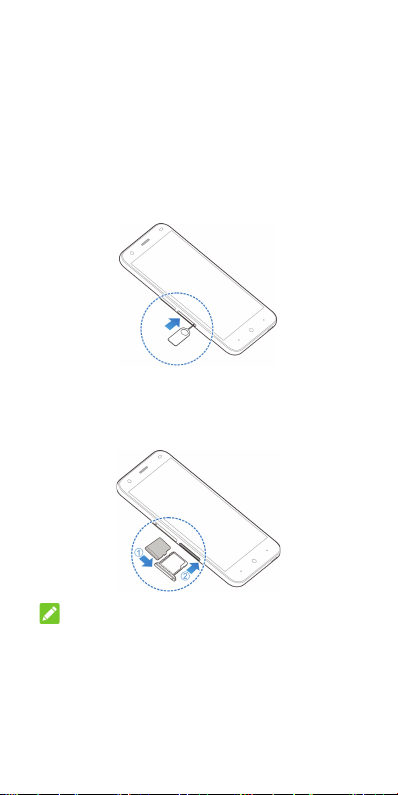
Installing the microSDHC™ Card
(Not Included)
A microSDHC card can be installed or removed
while the phone is turned on. You need to un-
mount the microSDHC card before removing it.
1. Insert the tip of the tray eject tool into the
hole on the microSDHC card tray.
2. Pull out the tray and place the card on the
tray, as shown. Then carefully install the tray
back.
NOTE:
Some applications may require a microSDHC
card to work normally or may store certain data
on it. Therefore, it is recommended that you
keep a microSDHC card installed and not re-
move or replace it randomly.
8
Page 9
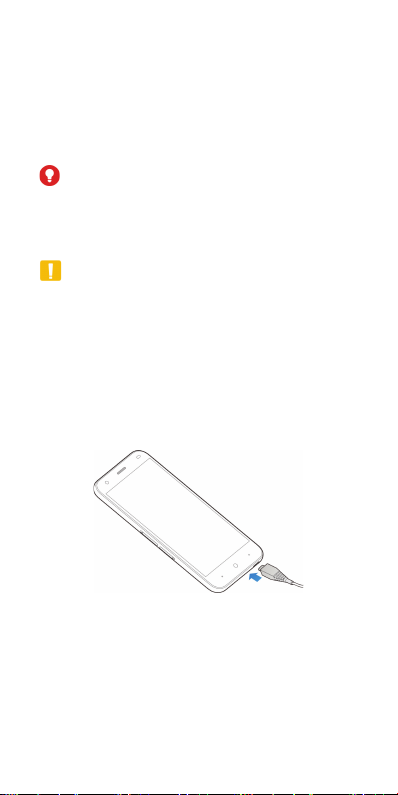
Charging the Battery
Your phone’s battery should have enough pow-
er for the phone to turn on, nd a signal, and
make a few calls. You should fully charge the
battery as soon as possible.
WARNING!
Use only ZTE-approved chargers and cables.
The use of unapproved accessories could dam-
age your phone or cause the battery to explode.
CAUTION:
Do not remove or change the built-in recharge-
able battery in your phone by yourself. The
battery can only be changed by ZTE or ZTE
authorised service provider.
1. Connect the adapter to the charging jack.
Ensure that the adapter is inserted in the
correct direction.
2. Connect the charger to a standard AC power
outlet.
3. Disconnect the charger when the battery is
fully charged.
9
Page 10

NOTE: If the battery is extremely low, you
may be unable to power on the phone even
when it is being charged. In this case, try again
after charging the phone for at least 20 minutes.
Contact the customer service if you still cannot
power on the phone after prolonged charging.
Powering On/Off Your Phone
Ensure that the battery is charged.
• Press and hold the Power Key to turn on
your phone.
• To turn it off, press and hold the Power Key
to open the options menu. Touch Power off
and then touch OK.
You can also press and hold the Power Key for
about 10 seconds to turn off your phone.
Waking Up Your Phone
Your phone automatically goes into sleep mode
when it is not in use for some time. The display
is turned off to save power and the keys are
locked to prevent accidental operations.
You can wake up your phone by turning on the
display and unlocking the keys.
1. Press the Power Key to turn the screen on.
2. Swipe up to unlock.
NOTE: If you have set an unlock pattern, a
PIN or a password for your phone, you’ll need
to draw the pattern, or enter the PIN/password
to unlock your phone.
10
Page 11
Using the Touch Screen
Your phone’s touch screen enables you to con-
trol actions through a variety of touch gestures.
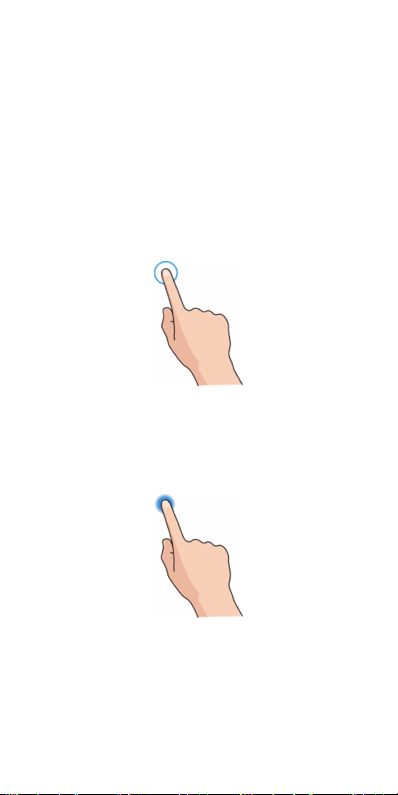
• Touch
When you want to type using the onscreen
keyboard, select items on the screen such
as the application and settings icons, or
press the onscreen buttons, simply touch
them with your nger.
• Touch and Hold
To open the available options for an item (for
example, a message or link in a web page),
touch and hold the item.
• Swipe or Slide
To swipe or slide means to quickly drag your
nger vertically or horizontally across the
screen.
11
Page 12
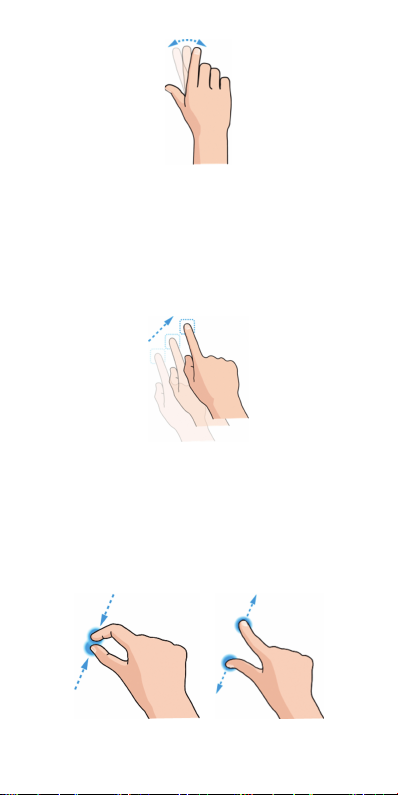
• Drag
To drag, press and hold your nger with
some pressure before you start to move
your nger. While dragging, do not release
your nger until you have reached the target
position.
• Pinch
In some apps (such as Maps, Browser, and
Gallery), you can zoom in and out by placing
two ngers on the screen at once and pinch-
ing them together (to zoom out) or spread-
ing them apart (to zoom in).
12
Page 13
• Rotate the screen
For most screens, you can automatically
change the screen orientation from portrait
to landscape by turning the phone sideways.
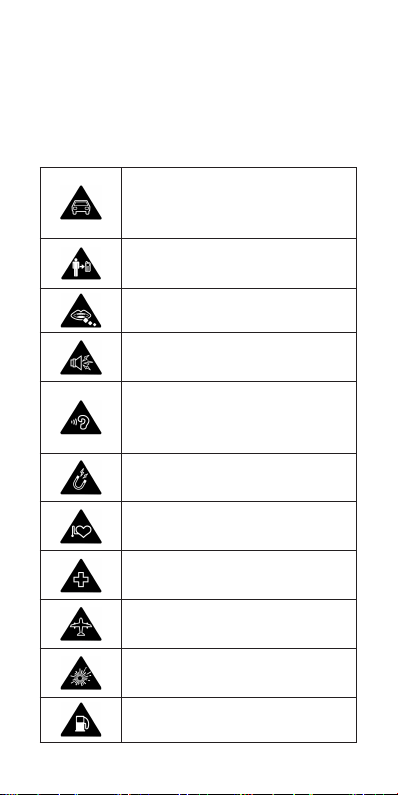
Product Safety Information
Don’t make or receive phone
calls while driving. Never text
while driving.
For body-worn operations, main-
tain a separation of 15 mm.
Small parts may cause choking.
Your phone can produce a loud
sound.
To prevent possible hearing dam-
age, do not listen at high volume
levels for long periods.
Avoid contact with anything mag-
netic.
Keep away from pacemakers and
other electronic medical devices.
Turn off when asked to in hospi-
tals and medical facilities.
Turn off when told to on aircraft
and at airport.
Turn off when near explosive
materials or liquids.
Don’t use at gas stations.
13
Page 14
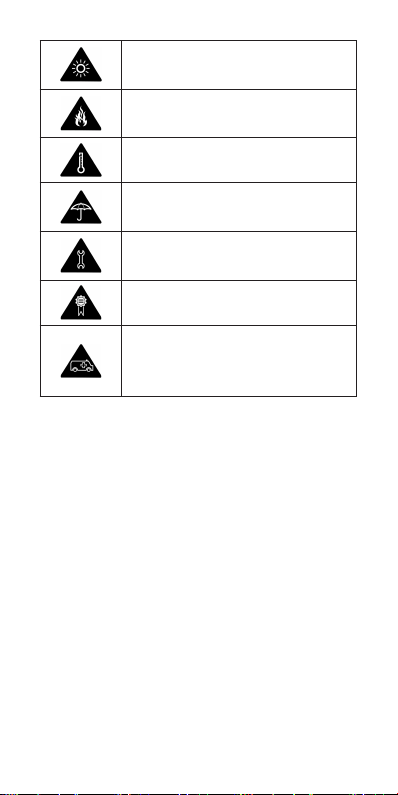
Your phone may produce a bright
or ashing light.
Don’t dispose of your phone in
re.
Avoid extreme temperatures.
Avoid contact with liquids. Keep
your phone dry.
Do not attempt to disassemble
your phone.
Only use approved accessories.
Don’t rely on your phone as a
primary device for emergency
communications.
Radio Frequency (RF) Exposure
General Statement on RF Energy
Your phone contains a transmitter and a re-
ceiver. When it is ON, it receives and transmits
RF energy. When you communicate with your
phone, the system handling your call controls
the power level at which your phone transmits.
Body Worn Operation
Important safety information regarding radio
frequency radiation (RF) exposure:
To ensure compliance with RF exposure guide-
lines the phone must be used with a minimum
of 15 mm separation from the body.
14
Page 15

Failure to observe these instructions could re-
sult in your RF exposure exceeding the relevant
guideline limits.
Limiting Exposure to Radio Frequency
(RF) Fields
For individuals concerned about limiting their
exposure to RF elds, the World Health Organi-
zation (WHO) provides the following advice:
Precautionary measures: Present scientific
information does not indicate the need for
any special precautions for the use of mobile
phones. If individuals are concerned, they might
choose to limit their own or their children’s RF
exposure by limiting the length of calls, or us-
ing ‘hands-free’ devices to keep mobile phones
away from the head and body.
Further information on this subject can be ob-
tained from the WHO home page http://www.
who.int/peh-emf (WHO Fact sheet 193: June
2000).
Regulatory Information
The following approvals and notices apply in
specic regions as noted.
Please find the section Declaration of RoHS
Compliance and CE DOC in the end of this
manual.
15
Page 16

Distraction
Driving
Full attention must be given to driving at all
times in order to reduce the risk of an accident.
Using a phone while driving (even with a hands
free kit) can cause distraction and lead to an
accident. You must comply with local laws and
regulations restricting the use of wireless de-
vices while driving.
Operating Machinery
Full attention must be given to operating ma-
chinery in order to reduce the risk of an acci-
dent.
Product Handling
General Statement on Handling and
Use
You alone are responsible for how you use your
phone and any consequences of its use.
You must always turn off your phone wherever
the use of a phone is prohibited. Use of your
phone is subject to safety measures designed
to protect users and their environment.
• Always treat your phone and its accessories
with care and keep it in a clean and dust-
free place.
• Keep the screen and camera lens clean.
Unclean screen or camera lens may slow
down the phone's reaction to your opera-
tions or lower image quality.
16
Page 17

• Clean the device and its accessories with
a soft material such as cleaning cloth for
eyeglass lenses. Do not use alcohol or other
corrosive substances for cleaning or allow
them to get inside.
• Do not expose your phone or its accessories
to open ames or lit tobacco products.
• Do not expose your phone or its accessories
to liquid, moisture or high humidity.
• Do not drop, throw or try to bend your phone
or its accessories.
• Do not paint your phone or its accessories.
• Do not attempt to disassemble your phone
or its accessories. Only authorized person-
nel can do so.
• Do not expose or use your phone or its ac-
cessories in a environment with or that can
reach extreme temperatures, minimum - [5]
and maximum + [50] degrees Celsius.
• Do not place your phone inside or near heat-
ing equipments or high pressure containers,
such as water heaters, microwave ovens, or
hot cooking utensils. Otherwise, your phone
may be damaged.
• Please check local regulations for disposal
of electronic products.
• Do not carry your phone in your back pocket
as it could break when you sit down.
17
Page 18

Small Children
Do not leave your phone and its accessories
within the reach of small children or allow them
to play with it.
They could hurt themselves or others, or could
accidentally damage the phone.
Your phone contains small parts with sharp
edges that may cause an injury or may become
detached and create a choking hazard.
Demagnetization
To avoid the risk of demagnetization, do not al-
low electronic devices or magnetic media to be
close to your phone for a long time.
Electrostatic Discharge (ESD)
Do not touch the nano-SIM card’s metal con-
nectors.
Antenna
Do not touch the antenna unnecessarily.
Normal Use Position
When placing or receiving a phone call, hold
your phone to your ear, with the bottom towards
your mouth.
Air Bags
Do not place a phone in the area over an air
bag or in the air bag deployment area as an air-
bag inates with great force and serious injury
could result.
Store the phone safely before driving your ve-
hicle.
18
Page 19

Seizures/Blackouts
The phone can produce a bright or flashing
light. A small percentage of people may be sus-
ceptible to blackouts or seizures (even if they
have never had one before) when exposed to
flashing lights or light patterns such as when
playing games or watching video. If you have
experienced seizures or blackouts or have a
family history of such occurrences, please con-
sult a physician.
Repetitive Strain Injuries
To minimize the risk of Repetitive Strain Injury
(RSI) when texting or playing games with your
phone:
• Do not grip the phone too tightly.
• Press the buttons lightly.
• Use the special features which are designed
to minimize the times of pressing buttons,
such as Message Templates and Predictive
Text.
• Take many breaks to stretch and relax.
Emergency Calls
This phone, like any wireless phone, operates
using radio signals, which cannot guarantee
connection in all conditions. Therefore, you
must never rely solely on any wireless phone
for emergency communications.
19
Page 20

Loud Noise
This phone is capable of producing loud noises,
which may damage your hearing. Turn down
the volume before using headphones, Bluetooth
stereo headsets or other audio devices.
Phone Heating
Your phone may become warm during charging
and during normal use.
Electrical Safety
Accessories
Use only approved accessories.
Do not connect with incompatible products or
accessories.
Take care not to touch or allow metal objects,
such as coins or key rings, to contact or short-
circuit in the battery terminals.
Never puncture the surface of the battery with
sharp objects.
Connection to a Car
Seek professional advice when connecting a
phone interface to the vehicle electrical system.
Faulty and Damaged Products
Do not attempt to disassemble the phone or its
accessories.
Only qualied personnel can service or repair
the phone or its accessories.
If your phone (or its accessories) has been sub-
merged in water, punctured, or subjected to a
severe fall, do not use it until you have taken it
to be checked at an authorized service center.
20
Page 21

Radio Frequency Interference
General Statement on Interference
Care must be taken when using the phone in
close proximity to personal medical devices,
such as pacemakers and hearing aids.
Pacemakers
Pacemaker manufacturers recommend that a
minimum separation of 15 cm be maintained
between a mobile phone and a pacemaker to
avoid potential interference with the pacemaker.
To achieve this, use the phone on the opposite
ear to your pacemaker and do not carry it in a
breast pocket.
Hearing Aids
People with hearing aids or other cochlear im-
plants may experience interfering noises when
using wireless devices or when one is nearby.
The level of interference will depend on the type
of hearing device and the distance from the
interference source. Increasing the separation
between them may reduce the interference. You
may also consult your hearing aid manufacturer
to discuss alternatives.
Medical Devices
Please consult your doctor and the device
manufacturer to determine if operation of your
phone may interfere with the operation of your
medical device.
21
Page 22

Hospitals
Turn off your wireless device when requested
to do so in hospitals, clinics or health care facili-
ties. These requests are designed to prevent
possible interference with sensitive medical
equipment.
Aircraft
Turn off your wireless device whenever you are
instructed to do so by airport or airline staff.
Consult the airline staff about the use of wire-
less devices onboard the aircraft. If your device
offers a ‘ight mode’, this must be enabled prior
to boarding an aircraft.
Interference in Cars
Please note that because of possible interfer-
ence with electronic equipment, some vehicle
manufacturers forbid the use of mobile phones
in their vehicles unless a hands-free kit with an
external antenna is included in the installation.
Explosive Environments
Gas Stations and Explosive Atmo-
spheres
In locations with potentially explosive atmo-
spheres, obey all posted signs to turn off wire-
less devices such as your phone or other radio
equipment.
22
Page 23

Areas with potentially explosive atmospheres
include fueling areas, below decks on boats,
fuel or chemical transfer or storage facilities,
and areas where the air contains chemicals or
particles, such as grain, dust, or metal powders.
Blasting Caps and Areas
Power off your mobile phone or wireless device
when in a blasting area or in areas posted pow-
er off “two-way radios” or “electronic devices” to
avoid interfering with blasting operations.
Declaration of RoHS Compliance
To minimize the environmental impacts and
take more responsibilities to the earth we live
on, this document shall serve as a formal dec-
laration that the Blade S6 manufactured by ZTE
CORPORATION is in compliance with the Di-
rective 2011/65/EU of the European Parliament
- RoHS (Restriction of Hazardous Substances)
with respect to the following substances:
1. Lead (Pb)
2. Mercury (Hg)
3. Cadmium (Cd)
4. Hexavalent Chromium (Cr (VI))
5. Polybrominated biphenyls (PBBs)
6. Polybrominated diphenyl ethers (PBDEs)
The Blade S6 manufactured by ZTE COR-
PORATION, meets the requirements of EU
2011/65/EU.
23
Page 24

Disposal of Your Old Appliance
1. When this crossed-out
wheeled bin symbol is
attached to a product,
it means the product is
covered by the European
Directive 2012/19/EU.
2. All electrical and elec-
tronic products should be
disposed of separately from
the municipal waste stream
via designated collection
facilities appointed by the
government or the local
authorities.
3. The correct disposal of
your old appliance will help
prevent potential negative
consequences for the envi-
ronment and human health.
For this product’s recycling information based
on WEEE directive, please send an e-mail to
weee@zte.com.cn
24
Page 25

EC DECLARATION OF CONFOR-
MITY
It is hereby declared that following designated
product:
Product Type: LTE/WCDMA/GSM(GPRS)
Multi-Mode Digital Mobile Phone
Model No: Blade S6
Product Description: LTE/WCDMA/
GSM(GPRS) Multi-Mode Digital Mobile
Phone
Complies with the essential protection require-
ments of Directives on Radio and Telecommu-
nication Terminal Equipment (Directive 1999/5/
EC), Restriction of the Certain Hazardous Sub-
stances in electrical and electronic equipment
(Directive 2011/65/EU), Eco-design Require-
ments for Energy-Related Products (Directive
2009/125/EC) and their amendments.
This declaration applies to all specimens manu-
factured identical to the samples submitted for
testing/evaluation.
Assessment of compliance of the product with
the requirements relating to Directive 1999/5/EC
was performed by PHOENIX TESTLAB GmbH
(Notified Body No.0700) and assessment of
compliance of the product with the requirements
relating to Directive 2011/65/EU was performed
25
Page 26

by Intertek Testing Services Ltd., Shanghai LAB
and Directive 2009/125/EC was performed by
Shenzhen Huatongwei International Inspection
Co.,Ltd. The assessments were based on the
following regulations and standards:
Requirement Standard
EN 62209-1:2006 ,
EN 62209-2:2010
EN 50360:2001/A1:2012
EN 50566:2013/AC:2014
Health and
safety
EMC
Radio
Spectrum
RoHS IEC 62321:2013
ErP (EC) No 278/2009
EN 62479:2010
EN 62311:2008
EN 60950-1:2006+A11:2009
+A1:2010+A12:2011
EN50332-1-2000;
EN50332-2-2003
EN 301 489-1 V1.9.2:2011
EN 301 489-7 V1.3.1: 2005
EN 301 489-3 V1.6.1;2012
EN 301489-17 V V2.2.1
:2012
EN 301 489-24V1.5.1:2010
EN 301 511 V9.0.2
EN 301 908-1/-2/-13 V6.2.1
EN 300328 V1.8.1
EN 301893 V1.7.1
EN 300 440-1 V1.6.1;
EN 300 440-2 V1.4.1;
26
Page 27

This declaration is the responsibility of the
manufacturer:
ZTE Corporation
ZTE Plaza, Keji Road South, Hi-Tech, In-
dustrial Park, Nanshan District, Shenzhen,
Guangdong, 518057, P.R.China
Authorised person signing for the company:
Yao cuifeng Quality Director Of ZTE
Corporation
Name in block letters & position in the com-
pany
Shenzhen, 24 January 2015
Place & date Legally valid signature
27
Page 28

:ןרציה תוירחאב הניה וז הרהצה
ZTE Corporation
ZTE Plaza, Keji Road South, Hi-Tech,
Industrial Park, Nanshan District, Shenzhen,
Guangdong, 518057, P.R.China
:הרבחה םשב םותחל רשואש גיצנ
ZTE דיגאת לש תוכיא להנמ Yao cuifeng
הרבחב דיקפת סופדב םש
24.01.15 ,ן'גנש
הפקת המיתח םוקמו ךיראת
17
Page 29

EN 62209-1:2006 , EN 62209-
2:2010
EN 50360:2001/A1:2012
EN 50566:2013/AC:2014
EN 62479:2010
EN 62311:2008
EN 60950-1:2006+A11:2009+A1:2
010+A12:2011
EN50332-1-2000; EN50332-2-
2003
EN 301 489-1 V1.9.2:2011
EN 301 489-7 V1.3.1: 2005
EN 301 489-3 V1.6.1;2012
EN 301489-17 V V2.2.1 :2012
EN 301 489-24V1.5.1:2010
EN 301 511 V9.0.2
EN301 908-1/-2/-13 V6.2.1
EN 300328 V1.8.1
EN 301893 V1.7.1
EN 300 440-1 V1.6.1; EN 300 440-
;2 V1.4.1
הקידבטרדנטס
תואירב
תוחיטבו
EMC
וידר
RoHSIEC 62321:2013
ErPEC( No 278/2009(
16
Page 30

)EC( תיפוריאה הייליהקה לש תומיאת תרהצה
:ןלהל טרופמש רצומה יכ תאזב רהצומ
ילטיגיד דיינ ןופלט :רצומה גוס
)LTE/WCDMA/GSM)GPRS :רואית
Blade S6 :םגד 'סמ
דויצ תייחנה לש תוינורקעה הנגהה תושירדב דמוע
EC Directive 1999/5/( היצקינומוקלט יפוסמו וידר
דויצב םינכוסמה םימיוסמ םירמוח לש הלבגה ,)EC
תושירד ,)Directive 2011/65/EU( ינורטקלאו ילמשח
Directive( םירצומל תורושקה היגרנאל יגולוקא בוציע
.םהלש םינוקיתהו )2009/125/EC
תוהזש תורצוימה תודיחיה לכל הפקת וז הרהצה
.הכרעה \ הקידבל וחלשנש תואמגודל
תוהזש תורצוימה תודיחיה לכל הפקת וז הרהצה
לע הכרעה .הכרעה \ הקידבל וחלשנש תואמגודל
/1999/5 תיחנהל תועגונה תושירדב רצומה לש ותדימע
PHOENIX TESTLAB GmbH ידי לע העצוב EC
ותדימע לע הכרעהו ))Notied Body No.0700
EU/65/2011 הארוהל תועגונה תושירדב רצומה לש
הארוה ..Intertek Testing Services Ltd י"ע ועצוב
ידי לע העצוב EC/125/2009
Shenzhen Huatongwei International Inspection
םינקתהו תונקתה לע וססבתה תוכרעהה .Co.,Ltd
:םיאבה
15
Page 31

הללוסל תוחיטב תוארוה
.ץוציפל םורגל הלולע היוגש הפלחה !הנכס תוריהז •
ןרציה ידי לע הרשואש הללוסב קרו ךא ףילחהל שי
.הז םגדב שומישל
םירזיבאבו םינעטמב ,תוללוסב קר שמתשהל שי •
שומיש .הז םגדב שומישל ןרציה ידי לע ורשואש
רושיא לכ תגופתל םורגל לולע םירחא םירזיבאב
שומיש דחוימב .ןכוסמ תויהל לולעו ,תוירחא וא
םורגל לולע םירשואמ םניאש תוללוסבו םינעטמב
.רחא עגפמ וא הליזנ ,ץוציפ ,הפירשל
הובג םוחל הללוסה זראמ וא הללוסה תא ףושחל ןיא •
.'דכו שא ,שמש רוא ןוגכ
ינקתמב אלא הפשאל הללוסה תא ךילשהל ןיא •
.ךכל םידעוימה רוזחמ
:ןאוביה יטרפ
מ"עב תירלולס תרושקת םוקורוי :םש
ביבא לת 4 תשוחנה 'חר :תבותכ
511795247 :פ.ח
*3131 \ 03-7699000 :ןופלט
05779433936 :סקפ
14
Page 32

ןעטמב שומישל תוחיטב תוארוה
.תוחל וא םימ תרידח ענמ •
:ןוגכ תוינוציק תורוטרפמטמ ןעטמה תא קחרה •
.שמשל חותפה םוקמ וא ,םח רונת ,רוטאידר
םירגיסו תוירגיס ,םיקלוד תורנמ ןעטמה תא קחרה •
.'וכו היולג הבהל ,םיקולד
תוצמוח ללוכ םילזונ תזתה וא םימצע תליפנ ענמ •
.ןעטמה לע ןהשלכ
חתמה תמר תא קפסמה עקשל קר ןעטמה תא רבח •
.ןעטמה לע תניוצמה
תא קתנת לא ,ילמשחה לבכל קזנ תנכס ןיטקהל ידכ •
עקשהמ ןעטמה
ותוא ךושמו ןעטמה תא זוחא .לבכה תכישמ י"ע
.עקשהמ
וא וילע וכרדיש הנכס ןיאש ךכ בתונמ לבכהש אדו •
.וב ולשכייש
עקתה וא ליתפה תא ףילחהל ןיא םלועל !הרהזא •
.םיירוקמ אל םיפילחתב
םאתמב שמתשה ,עקשל םיאתמ וניא עקתה םא
.ןרציה תצלמה יפל םיאתמ
.שמתשמה תולמשחתהל םורגל לולע יוקל רוביח
ךילומ תוניקת אדוול שי ךיראמ לבכ םע שומישב •
.לבכבש הקראה
ףושחה םוקמב אלו דבלב םינפ שומישל דעוימ •
.'וכו םשג ,שמשל
ילועפת בצמב קותינ ןקתה תא קזחתלו דיפקהל שי •
.שומישל ןכומ
13
Page 33

12
Page 34

הרירג •
התאש ינפל ךלש עבצאה תא קזחהו ץחל ,רורגל ידכ
עבצאה תא ררחשת לא ,הרירגה ןמזב .התוא זיזמ
יוצרה םוקימל תעגהש ינפל
הטיבצ •
תיירלג ,ןפדפד ,תופמ ומכ( תויצקילפאהמ קלחב
י"ע הנטקה וא הלדגה עצבל ךתורשפאב )תונומת
לע הטיבצ עצבלו דחיב ךסמה לע תועבצא 2 םוקימ
תבחרה ,הנטקהל ליבות תועבצאה תדמצה .ךסמה
הלדגהל ליבות תועבצאה
ךסמ בוביס •
ןוויכל רישכמה תא בבוסל לכות ,םיכסמה בורב
ךסמה תגוצת תא תונשל ידכ יכנא וא יקפוא
11
Page 35

קזחהו עג •
טקייבוא\םושיי לש תומיוסמ תויורשפא גיצהל ידכ
קזחהו עג )'וכו טנרטניא תבותכ ,העדוה ןוגכ( םיוסמ
ךסמב
קלחה וא ךושמ •
יבג לע עבצאה תכישמ התועמשמ הכישמ וא הקלחה
יכנא וא יקפוא ןוויכב ךסמה
10
Page 36

יוביכו הלעפה
.הנועט הללוסה יכ אדוו
ליעפהל ידכ יוביכהו הלעפהה שקמ תא קזחהו ץחל •
.ןופלטה תא
שקמ לע הכורא הציחל ץחל ,ןופלטה תא תובכל ידכ •
ךסמב "יוביכ" תורשפאב רחבו יוביכהו הלעפהה
.ךסמב הלועפה תא רשאל שי ןכמ רחאל .הגוצתה
שקמ לע תוינש 10-כ לש תכשוממ הציחל ,ןכ ומכ
.ןופלטה יוביכל ליבות יוביכהו הלעפהה
ןופלטה תא רעה
היה אלש המ ןמז רחאל הניש בצמל סנכיי ךלש ןופלטה
אל תוציחל עונמלו הללוסב ךוסחל ידכ תאז .שומישב
.תוינוצר
יוביכהו הלעפהה שקמ לע הרצק הציחל ץחל .1
הלעמ יפלכ לוענמה ןמיס תא קלחה .2
:הרעה
תעכ הניזהל שקבתת ,אמסיס תליענ תרדגה םא
עגמ ךסמב שומיש
וב שמתשהל ךל רשפאמ ךלש ןופלטה לש עגמה ךסמ
.תונוש תועונתבו תורוצב
עגמ •
סנכיהל ,תדלקמב דילקהל ןיינועמ התא םא
– אוהש שקמ לכ לע ץוחלל וא תמיוסמ היצקילפאל
ךסמב עג טושפ
9
Page 37

הללוסה תניעט
,קלדיי ןופלטהש ידכ תקפסמ הללוס תמצועב ךרוצ שי
הללוסה תא ןועטל שי .תוחיש עצבל לכויו תשרל רבחתי
.ןתינה עגרב האולמב
:הרהזא
.ZTE תיבמ םילבכו םינעטמב קרו ךא שמתשהל שי
קזנ םורגל םילולע םירשואמ אל םירזיבאב שומיש
.ךרישכמל
:ךבל תמושתל
תוחוכב תינבומה הללוסה תא ףילחהל וא ריסהל ןיא
הדבעמ וא ZTE תדבעמל תונפל שי ,ךכ ךרוצל .ךמצע
.ZTE י"ע תישרומ
לש USB-ה תסינכל ןעטמה תאיצי תא רבחל שי .1
.ןוכנה ןוויכב לבכה תא רבחמ ךניה יכ אדוו .ןופלטה
.ריקה עקשל ןעטמה תא רבחל שי .2
.הניעטה םויסב למשחהמ ןעטמה תא קתנל שי .3
:הרעה
לכות אלש ןכתיי ,תיטירק הרוצב הכומנ הללוסה םא
.למשחל רבוחמ וניהו הדימב וליפא ןופלטה תא ליעפהל
םא .בוש תוסנלו תוקד 20-כ ןיתמהל שי ,הזכש הרקמב
תורישל תונפל שי ,קלדנ אל ןיידע ןופלטה ןכמ רחאל
.תוחוקלה
8
Page 38

אל( MicroSD ןורכיז סיטרכ תסנכה
)לולכ
ןמזב עצבתהל הלוכי MicroSD ןורכיז סיטרכ תסנכה
"הניעט לוטיב" עצבל ץלמומ .לעפומ וא יובכ ןופלטהש
.ןורכיזה סיטרכ תרסה ינפל
MicroSD-ה תריגמ תא אצוהו ץחל ,טחמה תרזעב .1
.הצוחה
התוא לחשהו הריגמב ןורכיזה סיטרכ תא םקמ .2
.המינפ הרזחב
:הרעה
קלח ,ךרישכמל ןורכיז סיטרכ תסנכהו הדימב
אל ץלמומ .םינותנ תרימשל וב ושמתשי תויצקילפאהמ
םיתיעל ןורכיזה סיטרכ תא סינכהלו איצוהל וא ףילחהל
.תיארקא הרוצבו תובורק
7
Page 39

NanoSIM-ה סיטרכ תסנכה
סיטרכ לש האצוה וא הסנכה ינפל ןופלטה תא תובכל שי
.NanoSIM-ה
סינכהל ןיא ,ןופלטל קזנמ ענמיהל ידכ :הרעה
סיטרכ לבקל ידכ .NanoSIM גוסמ םניאש SIM יסיטרכ
.ךלש ירלולסה ליעפמל תונפל שי NanoSIM גוסמ
NanoSIM-ה תריגמ תא אצוהו ץחל ,טחמה תרזעב .1
.הצוחה
רויאב ראותמש יפכ NanoSIM-ה סיטרכ תא םקמ .2
.המינפ הרזח ותוא לחשהו
6
Page 40

הלעפה שקמ
,הסיט בצמ תובכל וא ליעפהל ידכ קזחהו ץחל •
בצמ ,טטר בצמ ,תופידע בצמ ,טקש בצמ ליעפהל
תא תובכל ןכ ומכו ןופלטל לוחתא עוציב ,עמש
.ןופלטה
.הניש בצמל ןופלטה תא סינכהל ידכ הרצק הציחל •
.ןופלטה תא ררועל ידכ הרצק הציחל •
תיב שקמ
וא היצקילפא לכמ תיבה ךסמל הרזח רוזחל ידכ עג •
.ךסמ
.Google שופיח ךסמ תא חותפל ידכ קזחה •
הרזח שקמ
.םדוקה ךסמל רוזחל ידכ ץחל •
תויורשפא שקמ
ךסמה רובע תופסונה תויורשפאה תא גיצהל ידכ עג •
.יחכונה
תונורחאה תויצקילפאה תא גיצהל ידכ קזחהו עג •
.הנורחאל שומישב ויהש
עמש תמצוע ישקמ
,עמשה תמצוע תא ריבגהל ידכ ןוילעה שקמב הציחל •
.ךימנהל ידכ ןותחת שקמ
:הרעה
שקמו הרזחה שקמ םוקימ ןיב ףילחהל תנמ לע
ישקמ תמאתה >- תורדגהל סנכיהל שי .תויורשפאה
טווינ
5
Page 41

ךרישכמ תא רכה
תימדק המלצמ
הינזוא
תריגמ
Nano-SIM
תריגמ
MicroSD
תויורשפא שקמ
שאלפ
תירוחא המלצמ
USB \ ןעטמ תסינכ
הברק ןשייח
הרואתו
תמצוע ישקמ
עמש
הלעפה שקמ
יוביכו
עגמ ךסמ
הרזח שקמ
תיב שקמ
תוינזוא תסינכ
ןופורקימ
לוקמר
ישאר ןופורקימ
4
Page 42

יטפשמ עדימ
ZTE דיגאת © 2015 םירצוי תויוכז
.תורומש תויוכזה לכ
הרוצ לכב שמתשהל וא םגרתל ,לפכשל ,טטצל ןיא
םוליצ תוברל ,ינכמ וא ינורטקלא ,יעצמא לכבו תרחא
הבותכ המכסה אלל הז ךסממ קלח םושב ,םליפורקימו
.ZTE דיגאת לש שארמ
סופד תואיגש ינוקית עצבל תוכזה לע רמוש ZTE דיגאת
.תמדקומ העדוה אלל ךירדמב םיטרפמה תא ןכדעל וא
ימשרה רתאב וניתוחוקלל םיפסונ םיתוריש םיעיצמ ונא
ימגד טוריפו םיתורישה לע ףסונ עדימל ,ZTE לש
םיכמתנה םירצומה
www.zte.com.cn תבותכב
.רתאב עיפומ ןכדועמה עדימה
www.ztedevices.com רתאב ורקב אנא ,ףסונ עדימל
.אלמה הלעפהה ךירדמ תא ודירוהו
תולעבב םושר ןמיס וניה MicroSDHC
SD-3C, LLC
תיבמ םירצומ םניה Qualcomm Snapdragon ידבעמ
.Qualcomm Technologies, Inc
םימושר םינמיס םניה Snapdragon -ו Qualcomm
.Qualcomm Incorporated תולעבב
3
Page 43

2
Page 44

ZTE Blade S6
ריהמ הלעפה ךירדמ
1.2 הרודהמ
1
 Loading...