

Page 1
121
Page 2

Page 3

ZTE Blade L3
WCDMA/GSM Mobile Phone
Quick Start Guide ....................................... 2
ZTE Blade L3
Téléphone portable WCDMA/GSM
Guide de démarrage rapide...................... 22
ZTE Blade L3
WCDMA-/GSM-Mobiltelefon
Kurzanleitung............................................ 43
ZTE Blade L3
WCDMA/GSM Cep Telefonu
Hızlı Başlangıç Kılavuzu ........................... 65
ZTE Blade L3
Teléfono móvil WCDMA/GSM
Guía de inicio rápido................................. 86
ZTE Blade L3
WCDMA-/GSM-mobiele telefoon
Snelstartgids ........................................... 108
ZTE Blade L3
Telefono cellulare WCDMA/GSM
Guida rapida ........................................... 129
ZTE Blade L3
Telemóvel WCDMA/GSM
Manual de Início Rápido ......................... 150
ZTE Blade L3
Κινητό Τηλέφωνο WCDMA/GSM
Οδηγός Γρήγορης Εκκίνησης ................. 171
Page 4

ZTE Blade L3
WCDMA/GSM Mobile Phone
Quick Start Guide
2
Page 5

LEGAL INFORMATION
Copyright © 2015 ZTE CORPORATION.
All rights reserved.
No part of this publication may be quoted,
reproduced, translated or used in any form
or by any means, electronic or mechanical,
including photocopying and microlm,
without the prior written permission of ZTE
Corporation.
Notice
ZTE Corporation reserves the right to make
modications on print errors or update
specications in this guide without prior
notice.
We offer self-service for our smart terminal
device users. Please visit the ZTE ofcial
website (at www.ztedevice.com) for more
information on self-service and supported
product models. Information on the website
takes precedence.
Visit http://www.ztedevice.com to download
the user manual. Just click Support >
Manuals from the home page and then
select your location, product type, and name
to search for related support information.
Disclaimer
ZTE Corporation expressly disclaims any
liability for faults and damages caused by
unauthorized modications of the software.
Images and screenshots used in this guide
3
Page 6

may differ from the actual product. Content
in this guide may differ from the actual
product or software.
Trademarks
ZTE and the ZTE logos are trademarks of
ZTE Corporation.
Google and Android are trademarks of
Google, Inc.
The Bluetooth® trademark and logos are
owned by the Bluetooth SIG, Inc. and any
use of such trademarks by ZTE Corporation
is under license.
microSDHC Logo is a trademark of
SD-3C, LLC.
Manufactured under license from Dolby
Laboratories. Dolby and the double-D
symbol are trademarks of Dolby
Laboratories.
Other trademarks and trade names are the
property of their respective owners.
Version No. : R1.0
Edition Time : 2015.02
4
Page 7

Getting to Know Your Phone
Earpiece
Indicator
Camera
Volume Key
Touch Screen
Charging/ USB Jack
5
Power Key
Home Key
Menu KeyBack Key
Headset Jack
SpeakerFlash
Camera
Back Cover
Page 8

Key Function
• Press and hold to power
Power Key
Home Key
Back Key
Menu Key
Volume Key
NOTE:
You can exchange the positions of the Back
Key and the Menu Key. Touch Settings >
Hard Key from the home screen and select
one case.
on, or power off.
• Press to turn off or on
the screen display.
Touch to return to the home
screen.
Touch to go to the previous
screen.
Touch to view the options
for the current screen.
Press or hold either end of
the key to turn the volume
up or down.
6
Page 9
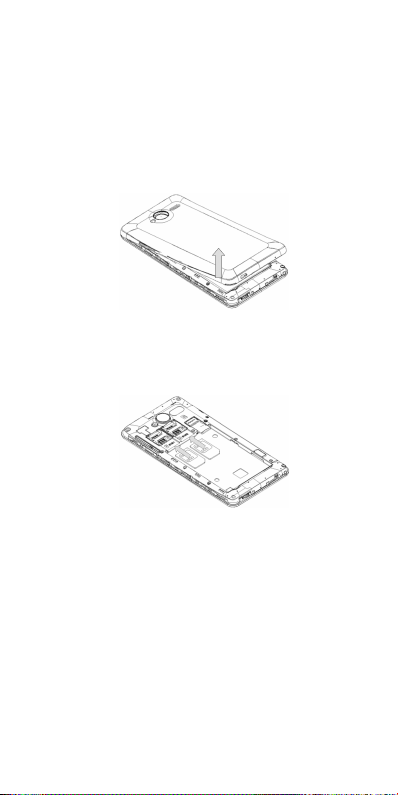
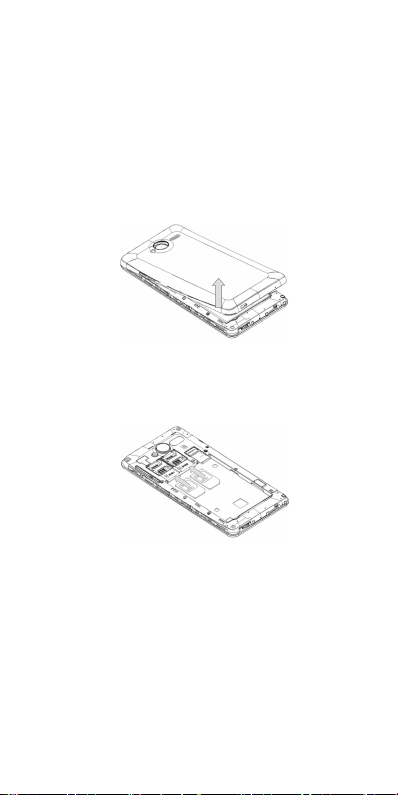
Installing the micro-SIM Card
Power off your phone before installing or
removing the micro-SIM card.
1. Insert your ngernail into the slot at
the right of the back cover and lift it up
gently.
2. Hold the micro-SIM card with the cut
corner oriented as shown and slip it into
the card holder.
3. Align the back cover with the back of
the phone and press the cover back into
place. Ensure that all the tabs are secure
and there are no gaps around the cover.
7
Page 10

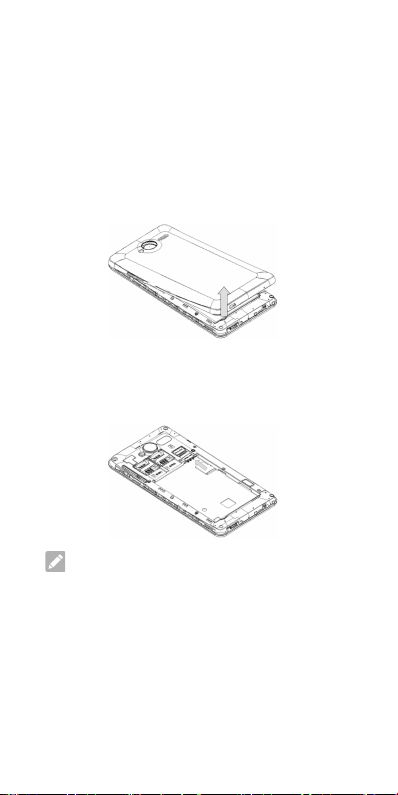
Installing the microSDHC™
Card (Not Included)
A microSDHC card can be installed or
removed while the phone is turned on.
You need to unmount the microSDHC card
before removing it.
1. Remove the back cover.
2. Hold your microSDHC card with the
metal contacts facing down and slide it
in.
NOTE:
Some applications may require a
microSDHC card to work normally or may
store certain data on it. Therefore, it is
recommended that you keep a microSDHC
card installed and not remove or replace it
randomly.
3. Replace the back cover.
8
Page 11

Installing the battery
Align the connectors on the phone and
the battery and slide the battery into the
compartment. Then gently press the battery
down until it is secured.
Charging the Battery
Your phone’s battery should have enough
power for the phone to turn on, nd a signal,
and make a few calls. You should fully
charge the battery as soon as possible.
WARNING!
Use only ZTE-approved chargers and
cables. The use of unapproved accessories
could damage your phone or cause the
battery to explode.
CAUTION:
Do not remove or change the built-in
rechargeable battery in your phone by
yourself. The battery can only be changed
by ZTE or ZTE authorised service provider.
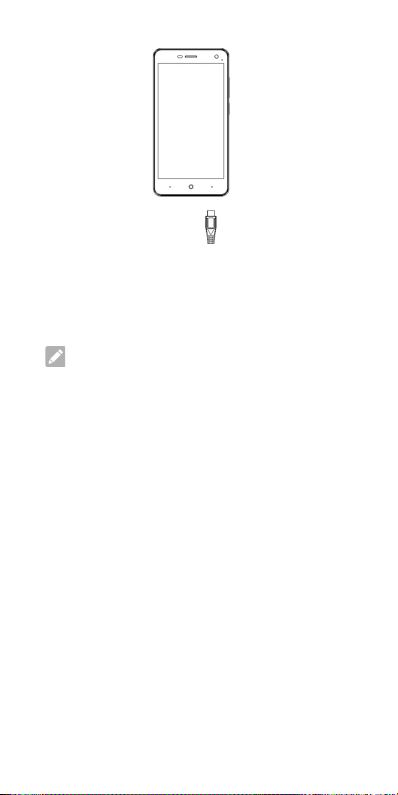
1. Connect the adapter to the charging
jack. Ensure that the adapter is inserted
in the correct direction.
9
Page 12
2. Connect the charger to a standard AC
power outlet.
3. Disconnect the charger when the battery
is fully charged.
NOTE:
If the battery is extremely low, you may be
unable to power on the phone even when it
is being charged. In this case, try again after
charging the phone for at least 20 minutes.
Contact the customer service if you still
cannot power on the phone after prolonged
charging.
Powering On/Off Your Phone
Make sure the battery is charged before
powering on.
• Press and hold the Power Key to turn
on your phone.
• To turn it off, press and hold the Power
Key to open the options menu. Touch
Power off .
10
Page 13

Restarting Your Phone
If the screen freezes or takes too long to
respond, try pressing and holding the Power
Key for about 10 seconds to restart the
phone.
Waking Up Your Phone
Your phone automatically goes into sleep
mode when it is not in use for some time.
The display is turned off to save power and
the keys are locked to prevent accidental
operations.
You can wake up your phone by turning on
the display and unlocking the keys.
1. Press the Power Key to turn the screen
on.
2. Touch and hold any blank area of the
screen.
NOTE:
If you have set an unlock pattern, a PIN or
a password for your phone, you’ll need to
draw the pattern, or enter the PIN/password
to unlock your phone.
11
Page 14
Using the Touch Screen
Your phone’s touch screen enables you to
control actions through a variety of touch
gestures.
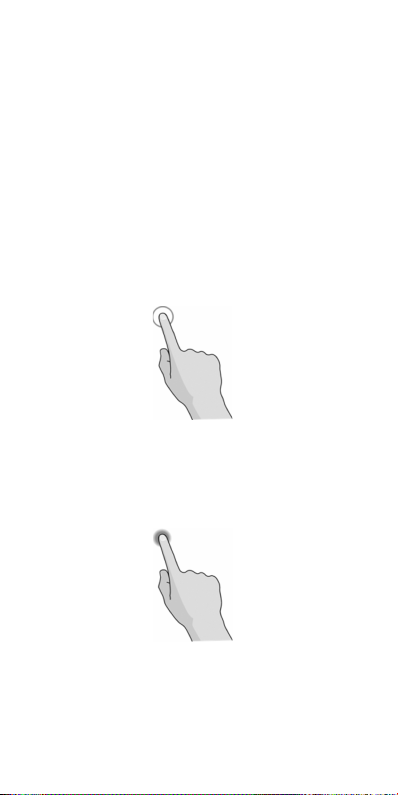
• Touch
When you want to type using the
onscreen keyboard, select items on
the screen such as the application and
settings icons, or press the onscreen
buttons, simply touch them with your
nger.
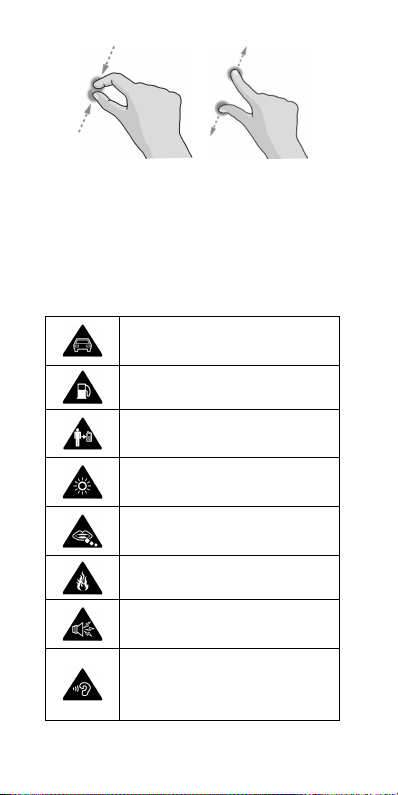
• Touch and Hold
To open the available options for an item
(for example, a message or link in a web
page), touch and hold the item.
12
Page 15
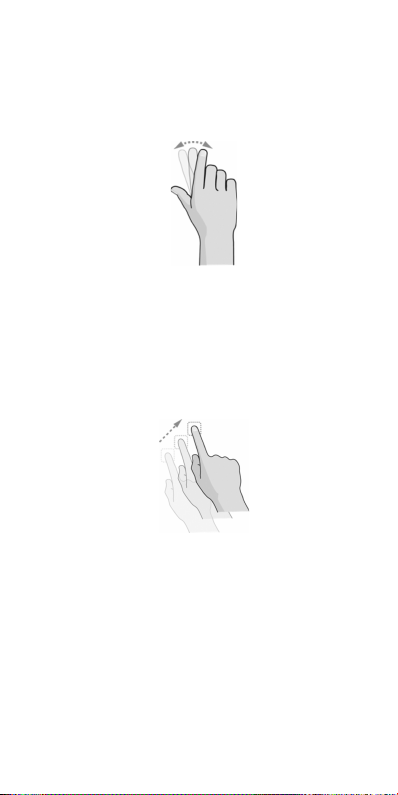
• Swipe or Slide
To swipe or slide means to quickly drag
your nger vertically or horizontally
across the screen.
• Drag
To drag, press and hold your nger
with some pressure before you start to
move your nger. While dragging, do
not release your nger until you have
reached the target position.
• Pinch
In some apps (such as Maps, Browser,
and Gallery), you can zoom in and out
by placing two ngers on the screen at
once and pinching them together (to
zoom out) or spreading them apart (to
zoom in).
13
Page 16
• Rotate the screen
For most screens, you can automatically
change the screen orientation from
portrait to landscape by turning the
phone sideways.
Product Safety Information
Do not use hand-held while
driving
Do not use while re-fuelling
For body-worn operation
maintain a separation of 15 mm
This device may produce a
bright or ashing light
Small parts may cause a
choking hazard
Do not dispose of it in a re
This device may produce a
loud sound
To prevent possible hearing
damage, do not listen at high
volume levels for long periods.
14
Page 17
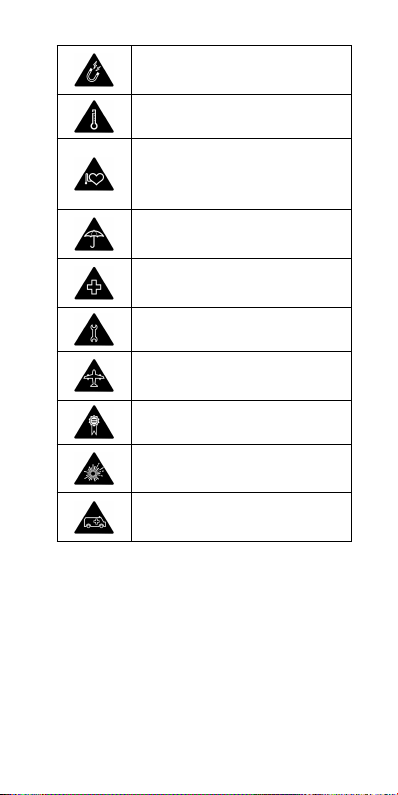
Avoid contact with magnetic
media
Avoid Extreme Temperatures
Keep away from pacemakers
and other personal medical
devices
Avoid any contact with liquid,
keep it dry
Switch off when instructed in
hospitals and medical facilities
Do not attempt to disassemble
Switch off when instructed in
aircrafts and airports
Only use approved accessories
Switch off in explosive
environments
Do not rely on this device for
emergency communications
15
Page 18

Declaration of RoHS
Compliance
To minimize the environmental impacts
and take more responsibilities to the earth
we live on, this document shall serve as a
formal declaration that the ZTE Blade L3
manufactured by ZTE CORPORATION is in
compliance with the Directive 2011/65/EU of
the European Parliament - RoHS (Restriction
of Hazardous Substances) with respect to
the following substances:
1. Lead (Pb)
2. Mercury (Hg)
3. Cadmium (Cd)
4. Hexavalent Chromium (Cr (VI))
5. Polybrominated biphenyls (PBBs)
6. Polybrominated diphenyl ethers (PBDEs)
The ZTE Blade L3 manufactured by ZTE
CORPORATION, meets the requirements of
EU 2011/65/EU.
Specic Absorption Rate (SAR)
Your mobile device is a radio transmitter
and receiver. It is designed not to exceed
the limits for exposure to radio waves
recommended by international guidelines.
16
Page 19

These guidelines were developed by the
independent scientic organization ICNIRP
and include safety margins designed
to assure the protection of all persons,
regardless of age and health.
The guidelines use a unit of measurement
known as Specic Absorption Rate, or
SAR. The SAR limit for mobile devices is
2 W/kg and the highest SAR value for this
device when tested at the head was 0.482
W/Kg*, and when tested at the body was
1.29W/Kg*. As mobile devices offer a range
of functions, they can be used in other
positions, such as on the body as described
in this user guide**.
As SAR is measured utilizing the device’s
highest transmitting power, the actual SAR
of this device while operating is typically
below that indicated above. This is due to
automatic changes to the power level of the
device to ensure it only uses the minimum
power required to communicate with the
network.
* The tests are carried out in accordance
with EN 50566, EN 62479, EN 62209-1, EN
62209-2, EN 50360.
** Please see body worn operation.
17
Page 20
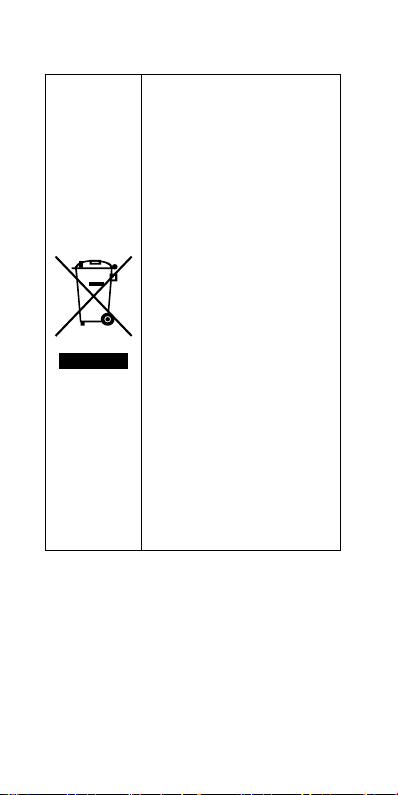
Disposal of Your Old Appliance
1. When this crossed-out
wheeled bin symbol is
attached to a product,
it means the product is
covered by the European
Directive 2012/19/EU.
2. All electrical and
electronic products
should be disposed
of separately from the
municipal waste stream
via designated collection
facilities appointed by
the government or the
local authorities.
3. The correct disposal of
your old appliance will
help prevent potential
negative consequences
for the environment and
human health.
For this product’s recycling information
based on WEEE directive, please send an
e-mail to weee@zte.com.cn
18
Page 21

EC DECLARATION OF
CONFORMITY
It is hereby declared that following
designated product:
Produc Type: WCDMA/GSM(GPRS)
Dual-Mode Digital Mobile phone
Model No: ZTE Blade L3/Blade L3
Complies with the essential protection
requirements of Directives on Radio and
Telecommunication Terminal Equipment
(Directive 1999/5/EC), Restriction of the
Certain Hazardous Substances in electrical
and electronic equipment (Directive 2011/65/
EU), Eco-design Requirements for EnergyRelated Products (Directive 2009/125/EC)
and their amendments.
This declaration applies to all specimens
manufactured identical to the samples
submitted for testing/evaluation.
Assessment of compliance of the product
with the requirements relating to Directive
1999/5/EC was performed by PHOENIX
TESTLAB GmbH (Notied Body No.0979)
and assessment of compliance of the
product with the requirements relating to
Directive 2011/65/EU was performed by
19
Page 22
Intertek Testing Services Ltd., Shanghai
Lab, Directive 2009/125/EC was performed
by ZTE Corporation Reliability Testing
Centre. The assessments were based on
the following regulations and standards:
Requirement Standard
EN 60950-1:2006+A11:200
9+A1:2010+A12:2011
EN 50566:2013
EN 62479:2010
EN 62209-1:2006 ;
EN62209-2:2010;
Health and
safety
EMC
EN 50360:2001/A1:2012
EN 301 489-1 V1.9.2:2011
EN 301 489-3 V1.6.1: 2012
EN 301 489-7 V1.3.1: 2005
EN 301489-17
V2.2.1(2012-09)
EN 301489-24 V1.5.1
(2010-10)
EN 301 511 V9.0.2 : 2003
EN 300 328 V1.8.1
EN 301 908-1 V6.2.1
EN 301 908-2V6.2.1
EN 300 440-1 V1.6.1;
EN300440-2 V1.4.1
20
Page 23
EN 60950-1:2006+A11:200
9+A1:2010+A12:2011
Radio
Spectrum
RoHS IEC 62321:2013
ErP (EC) No 278/2009
Authorised person signing for the company:
Yao cuifeng Quality Director Of ZTE
Corporation
Name in block letters & position in the
company
Shenzhen, 5nd JAN 2015
Place & date Legally valid signature
EN 50566:2013
EN 62479:2010
EN 62209-1:2006 ;
EN62209-2:2010;
EN 50360:2001/A1:2012
21
Page 24

ZTE Blade L3
Téléphone portable
WCDMA/GSM
Guide de démarrage rapide
22
Page 25

MENTIONS LEGALES
Copyright © 2015 ZTE CORPORATION.
Tous droits réservés.
Aucune partie de ce guide ne peut être
extraite, reproduite, traduite ou utilisée
sous quelque forme ou par quelque moyen
que ce soit, électronique ou mécanique, y
compris par photocopie ou microlm, sans
l'accord préalable écrit de ZTE Corporation.
Avis
ZTE Corporation se réserve le droit
d'apporter des corrections aux erreurs
d'impression ou de mettre les spécications
à jour sans avis préalable.
Nous offrons un service d'assistance
autonome aux utilisateurs de nos terminaux.
Consultez le site ofciel de ZTE (à l'adresse
www.ztedevice.com) pour en savoir plus sur
ce service et sur les modèles de produits
pris en charge. Les informations disponibles
sur le site Web sont prioritaires.
Rendez-vous sur le site http://www.
ztedevice.com pour télécharger le guide
de l'utilisateur. A partir de la page d'accueil,
cliquez sur Support > Manuals (Manuels),
puis sélectionnez votre emplacement,
le type de produit et le nom du produit
pour obtenir les informations d'assistance
correspondantes.
23
Page 26

Limitation de responsabilité
ZTE Corporation décline toute responsabilité
en cas de problème ou dommage résultant
d'une modication non autorisée du logiciel.
Les images et captures d'écran utilisées
dans ce guide peuvent ne pas correspondre
au produit réel. Le contenu du guide peut ne
pas s'appliquer exactement au produit ou au
logiciel réel.
Marques commerciales
ZTE et les logos ZTE sont des marques
commerciales de ZTE Corporation.
Google et Android sont des marques
commerciales de Google, Inc.
La marque commerciale et les logos
Bluetooth® sont la propriété de Bluetooth
SIG, Inc. et sont utilisés sous licence par
ZTE Corporation.
Le logo microSDHC est une marque
commerciale de SD-3C, LLC.
Fabriqué sous licence Dolby Laboratories.
Dolby et le symbole du double « D » sont
des marques commerciales déposées de
Dolby Laboratories.
Toutes les autres marques commerciales
et noms commerciaux sont la propriété de
leurs détenteurs respectifs.
N° de version : R1.0
Date d'édition : 2015.02
24
Page 27
Découvrez votre téléphone
Ecouteur
Voyant
Ecran
tactile
Touche
Retour
Appareil photo
Touche de
volume
Touche
Marche-Arrêt
Touche Accueil
Touche Menu
Prise casque
Haut-parleurFlash
Appareil photo
Cache
arrière
Prise chargeur/USB
25
Page 28
Touche Fonction
• Appuyez longuement
sur cette touche pour
allumer ou éteindre le
Touche
Marche-Arrêt
Touche
Accueil
Touche
Retour
Touche Menu
Touche de
volume
REMARQUE:
Vous pouvez échanger les positions des
touches Retour et Menu. Sur l'écran
d'Accueil, appuyez sur Paramètres >
Touche non-programmable et cochez une
case.
téléphone.
• Appuyez sur cette
touche pour activer ou
désactiver l'afchage
de l'écran.
Appuyez sur cette touche
pour aller à l'écran
d'accueil.
Appuyez sur cette touche
pour revenir à l'écran
précédent.
Appuyez sur cette touche
pour obtenir les options de
l'écran actuel.
Appuyez sur ou
maintenez appuyée une
des extrémités de cette
touche pour augmenter ou
diminuer le volume.
26
Page 29
Installation de la carte microSIM
Eteignez votre téléphone avant d'installer ou
d'enlever la carte micro-SIM.
1. Insérez votre ongle dans la fente située
à gauche du cache arrière et soulevez-le
délicatement.
2. Tenez la carte micro-SIM en orientant
la face biseautée comme illustré, puis
faites-la glisser dans le support de carte.
3. Alignez le cache arrière avec l'arrière
du téléphone et appuyez sur le cache
pour le remettre en place. Assurez-vous
que le cache est correctement en place
et qu'il ne reste pas d'espace entre le
téléphone et le cache.
27
Page 30
Installation de la carte
microSDHC™ (non incluse)
La carte microSDHC peut être installée ou
retirée même si le téléphone est allumé.
Vous devez désactiver la carte microSDHC
avant de la retirer.
1. Retirez le cache arrière.
2. Insérez votre carte microSDHC, contacts
métalliques vers le bas, et faites-la
glisser dans son logement.
REMARQUE:
Certaines applications peuvent nécessiter
une carte microSDHC pour fonctionner
normalement ou pour stocker des données.
Il est donc recommandé de conserver une
carte microSDHC installée et de ne pas la
retirer ou la remplacer de façon impromptue.
3. Remettez le cache arrière en place.
28
Page 31

Installation de la batterie
Alignez les connecteurs du téléphone et de
la batterie, puis faites glisser cette dernière
dans le compartiment. Puis, poussez
délicatement la batterie jusqu'à ce qu'elle
soit xée.
Chargement de la batterie
Votre téléphone devrait disposer de
sufsamment de batterie pour s'allumer,
trouver un signal, et effectuer quelques
appels. Il vous est conseillé de charger
complètement la batterie dès que possible.
AVERTISSEMENT !
Utilisez exclusivement des chargeurs et
câbles approuvés par ZTE. L'utilisation
d'accessoires non autorisés peut
endommager votre téléphone, voire
provoquer l'explosion de la batterie.
ATTENTION :
Ne tentez pas de retirer ou de remplacer
vous-même la batterie rechargeable
intégrée. La batterie doit uniquement être
changée par ZTE ou par un prestataire
agréé par ZTE.
29
Page 32

1. Connectez l'adaptateur à la prise de
charge. Assurez-vous que l'adaptateur
est inséré dans le bon sens.
2. Branchez le chargeur sur une prise
murale standard.
3. Lorsque la batterie est complètement
chargée, débranchez le chargeur.
REMARQUE:
Si le niveau de charge de la batterie
est extrêmement faible, il peut s'avérer
impossible d'allumer le téléphone, même
si la charge est en cours. Dans ce cas,
réessayez d'allumer le téléphone après
l'avoir chargé pendant au moins 20 minutes.
Si le téléphone ne s'allume toujours pas
après une longue période de charge,
contactez le service d'assistance clientèle.
30
Page 33

Mise sous tension / hors
tension de votre téléphone
Vériez que la batterie est chargée avant
d'allumer votre téléphone.
• Appuyez longuement sur la touche
Marche-Arrêt pour allumer le téléphone.
• Pour l'arrêter, appuyez longuement sur
la touche Marche-Arrêt pour ouvrir le
menu d'options. Appuyez sur Eteindre.
Redémarrage de votre téléphone
Si l'écran se bloque ou met longtemps à
réagir, appuyez sur la touche Marche/
Arrêt pendant environ 10 secondes an de
redémarrer le téléphone.
Sortie de veille de votre téléphone
Votre téléphone passe automatiquement
en veille lorsqu'il reste inutilisé durant
une période dénie. L'écran s'éteint pour
économiser la batterie et le clavier est
verrouillé pour empêcher toute utilisation
inintentionnelle.
Pour sortir votre appareil de veille, activez
l'écran ou débloquez le clavier.
1. Appuyez sur la touche Marche-Arrêt
pour verrouiller l'écran.
2. Appuyez longuement sur n'importe
quelle zone vierge de l'écran.
31
Page 34

REMARQUE:
Si vous avez déni un schéma de
déverrouillage, un code PIN ou un mot de
passe pour protéger votre téléphone, vous
devrez dessiner ce schéma ou saisir le code
PIN/mot de passe pour déverrouiller votre
téléphone.
Utilisation de l'écran tactile
L'écran tactile du téléphone vous permet de
contrôler les actions de diverses façons.
• Appuyer
Pour saisir des données sur votre clavier
tactile, sélectionner des éléments (icônes
des applications ou des paramètres par
exemple) ou appuyer sur un bouton à
l'écran, il vous suft de les toucher du
doigt.
• Appuyer longuement
Pour ouvrir les options disponibles
pour un élément (un message, un lien
dans une page Web, etc.), appuyez
longuement sur l'élément souhaité.
32
Page 35

• Glisser
Par glisser, on entend déplacer
rapidement un doigt horizontalement ou
verticalement sur l'écran.
• Déplacer
Pour déplacer un élément, maintenez
votre doigt fermement appuyé sur ce
dernier, puis déplacez votre doigt. Ne
relâchez pas votre doigt avant d'être
arrivé à l'emplacement cible.
33
Page 36

• Pincer
Dans certaines applications (cartes,
navigateur, photos), vous pouvez zoomer
et dézoomer en plaçant deux doigts sur
l'écran. Rapprochez-les pour zoomer,
écartez-les pour dézoomer.
• Pivoter l'afchage
Pour la plupart des écrans, il suft
de pivoter le téléphone pour changer
automatiquement l'orientation de l'écran.
Informations de sécurité
relatives au produit
Ne pas utiliser le combiné
lorsque vous êtes au volant
Ne pas utiliser dans les
stations essence
Pour une utilisation proche du
corps, conserver un espace de
15 mm
Ce dispositif peut émettre une
lumière vive ou clignotante
Les petites pièces présentent
un risque d'étouffement
34
Page 37

Ne pas jeter au feu
Ce dispositif peut produire un
son puissant
Pour protéger votre audition,
ne vous exposez pas à des
volumes élevés durant des
périodes prolongées.
Eviter tout contact avec
un support de stockage
magnétique
Eviter les températures
extrêmes
Maintenir à distance des
stimulateurs cardiaques et de
tout autre matériel médical
personnel
Eviter tout contact avec les
liquides, maintenir au sec
Eteindre le combiné dans les
hôpitaux et les établissements
médicaux si le règlement le
stipule
Ne pas tenter de démonter
l'appareil
Eteindre le combiné dans les
avions et les aéroports si le
règlement le stipule
35
Page 38

Utiliser uniquement des
accessoires approuvés
Eteindre dans les
environnements explosifs
Ne pas dépendre de
ce dispositif pour les
communications d'urgence
Déclaration de conformité
RoHS
Pour réduire l'impact environnemental et
faire preuve d'une plus grande responsabilité
envers notre environnement, ce document
constitue une déclaration formelle que le
téléphone ZTE Blade L3 fabriquépar ZTE
CORPORATION est conforme à la directive
2011/65/UE du Parlement européen
(directive RoHS concernant la restriction
des substances dangereuses) en rapport
avec les substances suivantes :
1. Plomb (Pb)
2. Mercure (Hg)
3. Cadmium (Cd)
4. Chrome hexavalent (Cr (VI))
5. Polybromobiphényle (PBB)
6. Polybromodiphényléthers (PBDE)
Le téléphone ZTE Blade L3 fabriqué par
ZTE CORPORATION est conforme à la
directive européenne 2011/65/UE.
36
Page 39

Débit d'absorption spécique
(DAS)
Votre appareil mobile est un émetteur-
récepteur d'ondes radio Il est conçu pour
ne pas dépasser les limites d'exposition
aux ondes radio recommandées par les
directives internationales. Ces directives
ont été mises au point par un organisme
scientique indépendant, l'ICNIRP. Elles
précisent notamment des marges de
sécurité destinées à assurer la protection de
toutes les personnes, indépendamment de
leur âge et de leur condition physique.
Ces directives utilisent une unité de mesure
appelée débit d'absorption spécique (DAS).
La limite DAS pour les appareils mobiles
est xée à 2 W/kg. En phase de test, la
valeur DAS la plus élevée qui a été relevée
pour cet appareil près de la tête est 0.482
W/Kg*et 1.29 W/Kg* près du corps. Dans
la mesure où les appareils mobiles offrent
de nombreuses fonctions, ils peuvent être
utilisés dans d'autres positions, notamment
près du corps comme décrit dans ce guide
de l'utilisateur**.
Le débit d'absorption spécique étant évalué
à l'aide de la puissance de transmission
la plus élevée du téléphone, le débit réel
de ce téléphone en fonctionnement est
généralement inférieur à la mesure indiquée
37
Page 40

ci-dessus. Cela est dû aux changements
automatiques du niveau de puissance
du téléphone, qui permettent de n'utiliser
que la puissance minimale requise pour
communiquer avec le réseau.
* Les tests sont réalisés conformément aux
normes EN 50566, EN 62479, EN 62209-1,
EN 62209-2, EN 50360.
** Reportez-vous à la section consacrée à
l'utilisation près du corps.
38
Page 41

Mise au rebut de votre ancien
appareil
1. Lorsque le symbole
représentant une
poubelle barrée est
apposé sur un produit,
cela signie que ce
produit entre dans le
champ d'application de
la directive européenne
2012/19/UE.
2. Tous les produits
électriques et
électroniques doivent
être mis au rebut suivant
un autre circuit que
le circuit standard de
ramassage des ordures,
via les sites de collecte
prévus à cet effet par les
autorités publiques ou
locales.
3. La mise au rebut de
votre ancien appareil
suivant le circuit
approprié permettra de
prévenir d'éventuelles
conséquences néfastes
pour l'environnement et
la santé humaine.
Pour obtenir les informations de recyclage
relatives à ce produit, conformément à
la directive WEEE, envoyez une-mail à
l'adresse weee@zte.com.cn
39
Page 42

DECLARATION DE
CONFORMITE CE
Il est déclaré dans la présente que le produit
mentionné ci-après :
Type de produit : Téléphone portable
numérique WCDMA/GSM(GPRS)
Référence :ZTE Blade L3/Blade L3
Est conforme aux principales exigences
de protection des directives relatives aux
équipements radio et de télécommunications
(directive 1999/5/CE), à la limitation
de l'utilisation de certaines substances
dangereuses dans les équipements
électriques et électroniques (directive
2011/65/UE), aux exigences en matière
d'écoconception applicables aux produits
liés à l'énergie (directive 2009/125/CE) et
aux modications apportées à celles-ci.
La présente déclaration s'applique à tous
les exemplaires fabriqués et identiques
aux spécimens fournis aux ns de test/
d'évaluation.
L'évaluation de la conformité du produit aux
exigences de la directive 1999/5/CE a été
réalisée par PHOENIX T ESTLAB GmbH
(Organisme notié n° 0979), l'évaluation de
40
Page 43

la conformité du produit aux exigences de
la directive 2011/65/UE a été réalisée par
Intertek Testing Services Ltd., Shanghai Lab,
et l'évaluation de la conformité du produit
aux exigences de la directive 2009/125/CE
a été réalisée par le centre de test de ZTE
Corporation (ZTE Corporation Reliability
Testing Center). Ces évaluations s'appuient
sur les réglementations et normes suivantes:
Exigence Norme
EN 60950-1:2006+A11:2009+
A1:2010+A12:2011
EN 50566:2013
EN 62479:2010
EN 62209-1:2006 ;
EN62209-2:2010;
Santé et
sécurité
EMC
EN 50360:2001/A1:2012
EN 301 489-1 V1.9.2:2011
EN 301 489-3 V1.6.1: 2012
EN 301 489-7 V1.3.1: 2005
EN 301489-17
V2.2.1(2012-09)
EN 301489-24 V1.5.1
(2010-10)
EN 301 511 V9.0.2 : 2003
EN 300 328 V1.8.1
EN 301 908-1 V6.2.1
EN 301 908-2V6.2.1
EN 300 440-1 V1.6.1;
EN300440-2 V1.4.1
41
Page 44

EN 60950-1:2006+A11:2009+
A1:2010+A12:2011
Portée
radio
RoHS IEC 62321:2013
ErP (EC) No 278/2009
Personne autorisée à signer pour la société:
Yao cuifeng Directeur Qualité de ZTE
Corporation
Nom en caractères d'imprimerie et
fonction dans la société
Shenzhen, 5 janvier 2015
Lieu et date Signature valable en
droit
EN 50566:2013
EN 62479:2010
EN 62209-1:2006 ;
EN62209-2:2010;
EN 50360:2001/A1:2012
42
Page 45

ZTE Blade L3
WCDMA-/GSM-Mobiltelefon
Kurzanleitung
43
Page 46

RECHTLICHE HINWEISE
Copyright © 2015 ZTE CORPORATION.
Alle Rechte vorbehalten.
Teile dieses Benutzerhandbuchs dürfen
ohne die vorherige schriftliche Zustimmung
der ZTE Corporation in keiner Form zitiert,
vervielfältigt, übersetzt oder in irgendeiner
Form und unter Verwendung beliebiger
Mittel, ob elektronisch oder mechanisch,
inklusive der Erstellung von Fotokopien und
Mikrolmen, verwendet werden.
Hinweis
Die ZTE Corporation behält sich das Recht
vor, ohne Vorankündigung Druckfehler zu
korrigieren bzw. Spezikationen in diesem
Handbuch zu aktualisieren.
Für Anwender, die sich mit unseren Geräten
auskennen, bieten wir auch die Möglichkeit
zur selbständigen Fehlerbehebung an. Auf
unserer ofziellen Website (www.ztedevice.
com) nden Sie weitere Informationen zur
selbstständigen Fehlerbehebung und die
hierfür unterstützten Modelle. Vorrangig
gelten die Informationen auf der Website.
Gehen Sie auf http://www.ztedevice.com,
um das Benutzerhandbuch herunterzuladen.
Klicken Sie auf der Startseite einfach
auf Support > Manuals, und wählen Sie
anschließend Ihren Standort, Produkttyp
und -namen aus, um nach den jeweiligen
Supportinformationen zu suchen.
44
Page 47

Haftungsausschluss
Die ZTE Corporation übernimmt keine
Haftung für Fehler und Schäden, die durch
nicht autorisierte Veränderungen an der
Software verursacht wurden.
Die in diesem Handbuch verwendeten Bilder
und Screenshots können vom tatsächlichen
Produkt abweichen. Inhalte in diesem
Handbuch können vom tatsächlichen
Produkt oder der Software abweichen.
Marken
ZTE und die ZTE-Logos sind Marken der
ZTE Corporation.
Google und Android sind Marken von
Google, Inc.
Die Bluetooth® Marke und ihre Logos sind
Eigentum der Bluetooth SIG, Inc. und jede
Nutzung dieser Marken vonseiten der ZTE
Corporation ist lizenziert.g
Das microSDHC-Logo ist eine Marke
von SD-3C, LLC.
Hergestellt unter Lizenz von Dolby
Laboratories. Dolby und das Doppel-D
Symbol sind eingetragene Marken von
Dolby Laboratories.
Sonstige Marken und Markennamen sind
Eigentum ihrer jeweiligen Inhaber.
Versionsnr.: R1.0
Bearbeitung: 2015.02
45
Page 48

Erstes Kennenlernen Ihres
Telefons
Hörer
Leuchtanzeige
Touchscreen
Zurück-
Taste
Kamera
Lautstärke-
Taste
Ein/AusTaste
Starttaste
Menü-Taste
HeadsetAnschluss
LautsprecherBlitz
Kamera
Hintere
Abdeckung
Laden/USB-Anschluss
46
Page 49

Taste Funktion
• Halten Sie diese Taste
gedrückt, um das Gerät
Ein/AusTaste
Starttaste
ZurückTaste
Menü-Taste
Lautstärke-
Taste
HINWEIS:
Sie können die Position der Zurück-Taste
und der Menü-Taste austauschen. Berühren
Sie die Tasten Einstellungen > Physische
Taste auf der Startseite und wählen Sie
einen Fall aus.
ein- oder auszuschalten.
• Mit dieser Taste schalten
Sie das Display aus und
ein.
Drücken Sie diese
Taste, um zur Startseite
zurückzukehren.
Drücken Sie diese Taste, um
zum vorherigen Bildschirm
zurückzukehren.
Drücken Sie diese Taste, um
Optionen für den aktuellen
Bildschirm anzuzeigen.
Drücken Sie den jeweiligen
Bereich dieser Taste (oder
halten Sie ihn gedrückt), um
die Lautstärke zu erhöhen
oder zu reduzieren.
47
Page 50

Einsetzen der Micro-SIM-Karte
Schalten Sie Ihr Telefon vor dem Einsetzen
oder Entfernen der Micro-SIM-Karte aus.
1. Fahren Sie mit Ihrem Fingernagel in den
Schlitz an der hinteren Abdeckung rechts
und heben Sie sie vorsichtig an.
2. Halten Sie die SIM-Karte so, dass ihre
abgeschrägte Ecke wie dargestellt
ausgerichtet ist, und schieben Sie die
Karte in den Kartenhalter.
3. Richten Sie die hintere Abdeckung an
der Rückseite des Telefons aus und
drücken Sie sie vorsichtig wieder auf.
Achten Sie darauf, dass alle Verschlüsse
einrasten und um die Abdeckung herum
kein Spalt vorhanden ist.
48
Page 51

Einlegen einer microSDHC™
-Karte (nicht im Lieferumfang
enthalten)
Die microSDHC-Karte kann eingelegt oder
entfernt werden, während sich das Telefon
im Betrieb bendet. Vor dem Entfernen
müssen Sie die microSDHC-Karte jedoch
deinstallieren.
1. Nehmen Sie die hintere Abdeckung ab.
2. Halten Sie die microSDHC-Karte so,
dass die Metallkontakte nach unten
zeigen, und setzen Sie die Karte ein.
HINWEIS:
Bei einigen Apps ist möglicherweise eine
microSDHC-Karte erforderlich, um die
App ordnungsgemäß ausführen und/oder
App-Daten auf der Karte speichern zu
können. Aus diesem Grund wird empfohlen,
49
Page 52

eine microSDHC-Karte einzusetzen und
diese nicht grundlos zu entfernen oder zu
ersetzen.
3. Bringen Sie die hintere Abdeckung
wieder an.
Einsetzen des Akkus
Richten Sie die Kontakte des Telefons und
des Akkus aneinander aus, und schieben
Sie den Akku in das Fach ein. Drücken
Sie den Akku dann leicht herunter, bis er
einrastet.
Laden des Akkus
Achten Sie darauf, dass noch genügend
Restladung auf dem Akku vorhanden ist,
um das Telefon einzuschalten, ein Signal
zu suchen und einige Anrufe zu tätigen. Der
Akku sollte so bald wie möglich vollständig
aufgeladen werden.
WARNUNG!
Verwenden Sie nur von ZTE zugelassene
Ladegeräte und Kabel. Die Verwendung
nicht zugelassenen Zubehörs kann Schäden
am Telefon sowie eine Explosion des Akkus
verursachen.
50
Page 53

ACHTUNG:
Den eingebauten Akku nicht selbst
wechseln. Der Akkuwechsel kann nur von
ZTE oder einem durch ZTE autorisierten
Serviceanbieter vorgenommen werden.
1. Stecken Sie den Stecker des Ladegeräts
in die entsprechende Buchse am Telefon.
Stellen Sie sicher, dass der Stecker mit
der richtigen Ausrichtung in die Buchse
gesteckt wird.
2. Schließen Sie das Ladegerät an eine
Standardsteckdose mit Wechselstrom
an.
3. Ziehen Sie den Stecker des Ladegeräts,
sobald der Akku vollständig geladen ist.
51
Page 54

HINWEIS:
Bei sehr geringer Ladung kann es
vorkommen, dass Sie das Handy selbst
während des Ladevorgangs nicht
einschalten können. Versuchen Sie es in
diesem Fall mindestens 20 Minuten nach
dem Ladevorgang erneut. Wenden Sie
sich an den Kundendienst, wenn Sie auch
nach längerer Ladezeit das Handy nicht
einschalten können.
Ein- und Ausschalten des
Handys
Stellen Sie vor dem Einschalten sicher, dass
der Akku geladen ist.
• Drücken und halten Sie die Ein/Aus-
Taste, um das Telefon einzuschalten.
• Um das Telefon wieder auszuschalten,
drücken und halten Sie die Ein/Aus-
Taste, um das Menü „Optionen“ zu
öffnen. Drücken Sie Ausschalten .
Neustart des Telefons
Wenn das Display einfriert oder über
längere Zeit nicht mehr reagiert, halten Sie
die Ein/Aus-Taste ca. 10 Sekunden lang
gedrückt, um das Telefon neuzustarten.
„Wecken“ Ihres Handys
Ihr Telefon wechselt automatisch in den
Standby-Modus, wenn es längere Zeit nicht
52
Page 55

verwendet wird. Dabei wird das Display
abgeschaltet, um Strom zu sparen, und die
Tasten werden gesperrt, um unbeabsichtigte
Eingaben zu verhindern.
Sie können das Telefon wieder aktivieren,
indem Sie das Display einschalten und die
Tastensperre aufheben.
1. Drücken Sie die Ein/Aus-Taste, um das
Display einzuschalten.
2. Halten Sie einen beliebigen leeren
Bereich auf dem Bildschirm gedrückt.
HINWEIS:
Wenn Sie ein Entsperrmuster bzw. eine PIN
oder ein Kennwort für Ihr Handy festgelegt
haben, müssen Sie das Entsperrmuster
zeichnen bzw. die PIN oder das Passwort
eingeben, um Ihr Telefon zu entsperren.
Verwenden des Touchscreens
Mit dem Touchscreen Ihres Telefons können
Sie mithilfe verschiedener Handgesten
Eingaben machen.
• Berühren
Wenn Sie mithilfe der Bildschirmtastatur
etwas schreiben, auf dem Bildschirm
Symbole für Anwendungen und
Einstellungen auswählen oder auf eine
Schaltäche klicken wollen, tippen Sie
einfach nur mit Ihrem Finger darauf.
53
Page 56

• Tippen und Halten
Um alle verfügbaren Optionen für ein
Element (zum Beispiel eine Nachricht
oder ein Link auf einer Website)
anzuzeigen, tippen Sie mit Ihrem Finger
auf das Element und halten Sie ihn
darauf.
• Wischen oder Ziehen
Wischen oder Ziehen bedeutet,
den Finger schnell senkrecht oder
waagerecht über den Bildschirm zu
ziehen.
54
Page 57

• Ziehen
Um zu ziehen, drücken Sie mit Ihrem
Finger auf den Bildschirm und bewegen
Sie Ihren Finger dann über den
Bildschirm. Bleiben Sie beim Ziehen mit
dem Finger auf dem Bildschirm, bis Sie
die gewünschte Position erreicht haben.
• Auseinanderziehen und
Zusammenziehen
Bei einigen Apps (wie zum Beispiel „
Maps“, „Browser“ und „Galerie“)
können Sie hinein- und herauszoomen,
indem Sie den Bildschirm mit zwei
Fingern gleichzeitig berühren und
sie dann auseinanderziehen (um
hineinzuzoomen) oder zusammenziehen
(um herauszuzoomen).
55
Page 58

• Drehen des Displays
Bei den meisten Displays können Sie
die Bildschirmausrichtung automatisch
von Hochformat zu Querformat ändern,
indem Sie das Telefon zur Seite drehen.
Produktsicherheitsinformationen
Mobilteil nicht am Steuer
verwenden.
Nicht während des Tankens
verwenden.
Bei Betrieb am Körper einen
Abstand von 15 mm einhalten.
Dieses Gerät kann grelles oder
aufblitzendes Licht erzeugen.
Kleinteile können bei
Verschlucken zum Ersticken
führen.
Nicht im Feuer entsorgen.
Dieses Gerät kann laute Töne
erzeugen.
Zur Vermeidung von
Gehörschäden nicht über
längere Zeiträume Musik bei
hoher Lautstärke hören.
56
Page 59

Kontakt mit Magnetfeldern
vermeiden.
Extreme Temperaturen
vermeiden.
Von Herzschrittmachern und
anderen medizinischen Geräten
fernhalten.
Kontakt mit Flüssigkeit
vermeiden, trocken halten.
In Krankenhäusern und
medizinischen Einrichtungen
auf Anweisung ausschalten.
Das Gerät nicht zerlegen.
In Flugzeugen und auf
Flughäfen auf Anweisung
ausschalten.
Nur zugelassenes Zubehör
verwenden.
In explosionsgefährdeten
Umgebungen ausschalten.
Verlassen Sie sich bei Notrufen
nicht allein auf dieses Gerät.
57
Page 60

Einhalten der RoHS-Richtlinie
Zum Zweck der größtmöglichen
Einschränkung negativer Einüsse auf die
Umwelt und als Zeichen der Bereitschaft,
mehr Verantwortung für die Erde zu
übernehmen, soll dieses Dokument als
formelle Erklärung dienen, dass das
ZTE Blade L3, hergestellt von der ZTE
CORPORATION, die Richtlinie 2011/65/
EU des europäischen Parlaments –
RoHS (Einschränkung der Verwendung
gefährlicher Stoffe) – im Hinblick auf die
folgenden Stoffe erfüllt:
1. Blei (Pb)
2. Quecksilber (Hg)
3. Cadmium (Cd)
4. Sechswertiges Chrom (Cr (VI))
5. Polybromierte Biphenyle (PBBs)
6. Polybromierte Diphenylether (PBDEs)
Das ZTE Blade L3, hergestellt von der ZTE
CORPORATION, erfüllt die Anforderungen
der Richtlinie EU 2011/65/EU.
58
Page 61

Spezische Absorptionsrate
(SAR)
Dieses Handy ist ein Funksender
und -empfänger. Es ist so konzipiert,
dass die in internationalen Richtlinien
empfohlenen Grenzwerte für die Belastung
durch Funkwellen nicht überschritten
werden. Diese Richtlinien wurden von
der unabhängigen wissenschaftlichen
Organisation ICNIRP erarbeitet und
enthalten Sicherheitsgrenzwerte, die
dem Schutz aller Personen dienen
sollen, unabhängig von deren Alter und
Gesundheitszustand.
Grundlage für diese Richtlinien ist die als „
spezische Absorptionsrate“ oder „SAR“
bekannte Maßeinheit. Der SAR-Grenzwert
für mobile Geräte liegt bei 2 W/kg, und der
höchste SAR-Wert für dieses Gerät lag
im Test am Kopf bei 0,482 W/kg* und am
Körper bei 1,29W/kg*. Da mobile Geräte
eine Reihe von Funktionen anbieten,
können sie in anderen Positionen, z. B. (wie
in diesem Benutzerhandbuch beschrieben)
am Körper verwendet werden.**
59
Page 62

Für die Ermittlung des SAR-Werts wird
die höchste Sendeleistung des Geräts
verwendet. Deshalb liegt der tatsächliche
SAR-Wert dieses Geräts während des
Betriebs normalerweise darunter. Dies
ist darauf zurückzuführen, dass der
Leistungspegel des Geräts automatisch
angepasst wird, sodass immer nur die für
eine Verbindungsherstellung zum Netz
benötigte Sendeleistung erbracht wird.
* Die Test werden gemäßEN 50566, EN
62479, EN 62209-1, EN 62209-2, EN 50360
durchgeführt.
** Siehe Betrieb bei Tragen am Körper.
60
Page 63

Entsorgung von Altgeräten
1. Wenn dieses Symbol
eines durchkreuzten
Mülleimers an einem
Produkt angebracht ist,
bedeutet dies, dass das
Produkt die europäische
Richtlinie 2012/19/EU
erfüllt.
2. Alle elektrischen und
elektronischen Produkte
müssen gesondert vom
kommunalen Abfall bei
dafür vorgesehenen
Sammelstellen
entsorgt werden, die
auf Veranlassung der
Regierung oder der
Ortsbehörde eingerichtet
wurden.
3. Die ordnungsgemäße
Entsorgung von
Altgeräten trägt dazu
bei, potenziell negative
Konsequenzen für
Umwelt und Gesundheit
zu verhindern.
Bitte senden Sie für auf der WEEE-Richtlinie
basierende Recycling-Informationen für das
vorliegende Produkt eine E-Mail an weee@
zte.com.cn
61
Page 64

EU-KONFORMITÄTSERKLÄRUNG
Für das nachstehend ausgezeichnete
Produkt wird Folgendes erklärt:
Produkttyp: WCDMA/GSM(GPRS)
Digitales Mobiltelefon
Modell-Nr.: ZTE Blade L3/Blade L3
Erfüllt die grundlegenden
Schutzanforderungen der
Richtlinie für Funkanlagen und
Telekommunikationsendeinrichtungen
(Richtlinie 1999/5/EG), der Richtlinie
zur Beschränkung der Verwendung
bestimmter gefährlicher Stoffe in Elektround Elektronikgeräten (Richtlinie 2011/65/
EU), der Richtlinie zu Anforderungen
an die umweltgerechte Gestaltung
energieverbrauchsrelevanter Produkte
(Richtlinie 2009/125/EG) sowie deren
Nachträge.
Diese Erklärung gilt für sämtliche
Exemplare, die in ihrer Herstellungsweise
mit dem zu Test- und Bewertungszwecken
eingereichten Musterexemplar identisch
sind.
Die Beurteilung der Richtlinienerfüllung des
Produkts im Hinblick auf die Anforderungen
der Richtlinie 1999/5/EG erfolgte durch
62
Page 65

PHOENIX TESTLAB GmbH (Benannte
Stelle Nr.0979), die Beurteilung der
Richtlinienerfüllung des Produkts im Hinblick
auf die Anforderungen der Richtlinie
2011/65/EU wurde vom Labor Schanghai der
Intertek Testing Services Ltd. und – für die
Richtlinie 2009/125/EG – vom Zentrum für
Zuverlässigkeitstests der ZTE Corporation
durchgeführt. Die Beurteilungen wurden auf
Grundlage folgender Bestimmungen und
Standards durchgeführt:
Anforderung Standard
EN 60950-1:2006+A11:200
9+A1:2010+A12:2011
EN 50566:2013
EN 62479:2010
EN 62209-1:2006 ;
EN62209-2:2010;
Gesundheit
und Sicherheit
EN 50360:2001/A1:2012
EN 301 489-1 V1.9.2:2011
EN 301 489-3 V1.6.1: 2012
EN 301 489-7 V1.3.1: 2005
EN 301489-17
V2.2.1(2012-09)
EN 301489-24 V1.5.1
(2010-10)
63
Page 66

EN 301 511 V9.0.2 : 2003
EN 300 328 V1.8.1
EMC
Netz
RoHS IEC 62321:2013
ErP (EC) No 278/2009
Autorisierter Unterzeichner im Namen der
Firma:
Yao cuifeng Quality Director der ZTE
Corporation
Name in Druckbuchstaben und Position
in der Firma
Shenzhen, 5. Januar 2015
Ort und Datum Rechtsgültige
Unterschrift
EN 301 908-1 V6.2.1
EN 301 908-2V6.2.1
EN 300 440-1 V1.6.1;
EN300440-2 V1.4.1
EN 60950-1:2006+A11:200
9+A1:2010+A12:2011
EN 50566:2013
EN 62479:2010
EN 62209-1:2006 ;
EN62209-2:2010;
EN 50360:2001/A1:2012
64
Page 67

ZTE Blade L3
WCDMA/GSM Cep Telefonu
Hızlı Başlangıç Kılavuzu
65
Page 68

YASAL BİLGİLER
Telif Hakkı © 2015 ZTE CORPORATION.
Tüm hakları saklıdır.
Bu yayının hiçbir bölümü ZTE Corporation'ın
önceden yazılı izni olmadan fotokopi ve
mikrolm dahil elektronik veya mekanik
olarak hiçbir şekilde ve hiçbir maksatla
alıntılanamaz, çoğaltılamaz, çevrilemez
veya kullanılamaz.
Bildirim
ZTE Corporation önceden haber
vermeksizin bu kılavuzdaki baskı hatalarını
düzeltme veya teknik özellikleri güncelleme
hakkını saklı tutar.
Akıllı terminal aygıtı kullanıcılarımız için self
servis sunuyoruz. Self servis ve desteklenen
ürün modelleri hakkında daha fazla bilgi
edinmek için lütfen resmi ZTE web sitesini
(www.ztedevice.com) ziyaret edin. Web
sitesindeki bilgiler önceliklidir.
Kullanıcı kılavuzunu indirmek için http://
www.ztedevice.com adresini ziyaret edin.
Ana sayfada Destek > Kılavuzlar öğesine
tıklayın ve ilgili destek bilgilerini aramak için
konumunuzu, ürün tipini ve adını seçin.
66
Page 69

Feragatname
ZTE Corporation, yazılım üzerinde yapılan
izinsiz değişikliklerden kaynaklanan
arızaların ve zararların sorumluluğunu açık
olarak reddeder.
Bu kılavuzda kullanılan görüntüler ile ekran
görüntüleri gerçek üründen farklı olabilir.
Bu kılavuzdaki içerik gerçek ürün veya
yazılımdan farklı olabilir.
Ticari Markalar
ZTE ve ZTE logoları, ZTE Corporation'ın
ticari markalarıdır.
Google ve Android; Google, Inc.'nin ticari
markalarıdır.
Bluetooth® ticari markası ve logoları
Bluetooth SIG, Inc. mülkiyetindedir ve bu
ticari markalar ZTE Corporation tarafından
lisans altında kullanılmaktadır.
microSDHC Logosu bir SD-3C, LLC
ticari markasıdır.
Dolby Laboratories lisansı altında üretilmiştir.
Dolby ve çift D simgesi Dolby Laboratories'in
ticari markalarıdır.
Diğer ticari markalar ve ticari isimler ilgili
sahiplerinin malıdır.
Sürüm No. : R1.0
Basım Tarihi : 2015.02
67
Page 70

Telefonunuzu Tanıyın
Gösterge
Dokunmatik
Ekran
Geri Tuşu
Kulaklık
Kamera
Ses Tuşu
Açma/Kapatma
Tuşu
Ana Ekran
Tuşu
Menü Tuşu
Kulaklık Jakı
HoparlörFlaş
Kamera
Arka Kapak
Şarj Etme/USB Jakı
68
Page 71

Tuş İşlev
Açma/
Kapatma
Tuşu
Ana Ekran
Tuşu
Geri Tuşu
Menü Tuşu
Ses Tuşu
NOT:
Geri Tuşu ile Menü Tuşu'nun konumlarını
birbiriyle değiştirebilirsiniz. Ana ekrandan
Ayarlar > Sert Tuş'a dokunun ve birini
seçin.
• Açmak veya kapatmak
için basıp basılı tutun.
• Ekranı açmak ya da
kapatmak için basın.
Ana ekranına dönmek için
dokunun.
Önceki ekrana dönmek için
dokunun.
Geçerli ekranın
seçeneklerini görmek için
dokunun.
Sesi yükseltmek veya
alçaltmak için tuşun
herhangi bir ucuna basın
veya ucu basılı tutun.
69
Page 72

micro-SIM Kartın Takılması
micro-SIM kartı takmadan veya çıkarmadan
önce telefonunuzu kapatın.
1. Tırnağınızı arka kapağın sağındaki
yarığa sokun ve hafçe kaldırın.
2. micro-SIM kartı, kesik köşenin yönü
gösterildiği gibi olacak şekilde tutun ve
kaydırarak kart tutucusuna yerleştirin.
3. Arka kapağı telefonun arkasıyla hizalayın
ve kapağı bastırarak yerine oturtun. Tüm
tırnakların takılı olduğundan ve kapağın
kenarlarında boşluk olmadığından emin
olun.
70
Page 73

microSDHC™ Kartı Takma
(Kart Dahil Değildir)
microSDHC kartı, telefon açıkken takılabilir
veya çıkarılabilir. microSDHC kartını
telefondan çıkarmadan önce yerinden
sökmeniz gerekir.
1. Arka kapağı çıkarın.
2. microSDHC kartınızı metal temas
noktaları aşağı bakacak şekilde tutun ve
kaydırarak yerine yerleştirin.
NOT:
Bazı uygulamalar normal çalışmak için
microSDHC karta ihtiyaç duyabilir veya
belirli verileri bu karta depolayabilir.
Dolayısıyla, bir microSDHC kartı takılı
tutmanız ve kartı rastgele çıkarmamanız ya
da değiştirmemeniz önerilir.
3. Arka kapağı yerine takın.
71
Page 74

Pilin takılması
Telefondaki konektörler ile pili hizalayın ve
pili yuvasına kaydırarak yerleştirin. Son
pili, yerine oturuncaya kadar aşağı doğru
zorlamadan bastırın.
Pilin Şarj Edilmesi
Telefonunuzun açılması, sinyal bulması
ve çağrı yapması için telefonunuzdaki
pilde yeterli güç olması gerekir. Pili en kısa
zamanda tamamen doldurmalısınız.
UYARI!
Yalnızca ZTE onaylı şarj cihazlarını
ve kabloları kullanın. Onaylanmamış
aksesuarların kullanılması telefonunuza
hasar verebilir ya da pilinizin patlamasına
neden olabilir.
DİKKAT:
Telefonunuzdaki dahili şarj edilebilir pili
kendi başınıza çıkarmayı veya değiştirmeyi
denemeyin. Pil yalnızca ZTE ya da ZTE
tarafından yetkilendirilmiş bir hizmet
sağlayıcısı tarafından değiştirilebilir.
72
Page 75

1. Adaptörü şarj cihazı jakına takın.
Adaptörün doğru yönde takıldığından
emin olun.
2. Şarj cihazını standart bir AC prize takın.
3. Pil tamamen şarj olduğunda şarj cihazını
çıkarın.
NOT:
Pil çok düşük seviyedeyse, şarj ediliyor olsa
bile telefonu açamayabilirsiniz. Bu durumda
telefonu, en az 20 dakika şarj edildikten
sonra açmayı deneyin. Telefon uzun süre
şarj edildiği halde hala açılmıyorsa müşteri
hizmetlerine başvurun.
Telefonunuzu Açma/Kapatma
Telefonu açmadan önce pilin şarj edilmiş
olduğundan emin olun.
• Telefonunuzu açmak için Açma/
Kapatma Tuşuna basılı tutun.
73
Page 76

• Telefonunuzu kapatmak için Açma/
Kapatma Tuşuna basılı tutarak
seçenekler menüsünü açın. Telefonu
Kapat seçeneğine dokunun.
Telefonunuzu Yeniden Başlatma
Ekran donduysa ya da yanıt vermesi uzun
sürüyorsa telefonu yeniden başlatmak için
Açma/Kapatma Tuşunu yaklaşık 10 saniye
basılı tutun.
Telefonunuzu Uyandırma
Telefonunuz belirli bir süre kullanılmadığında
otomatik olarak uyku moduna geçer. Güç
tasarrufu için ekran kapatılır ve tuşlar
yanlışlıkla basmaya karşı kilitlenir.
Telefonunuzu, ekranı açıp tuş kilidini devre
dışı bırakarak uyandırabilirsiniz.
1. Ekranı açmak için Açma/Kapatma
Tuşuna basın.
2. Ekranın boş herhangi bir yerine ve basılı
tutun.
NOT:
Telefonunuz için bir kilit açma şekli, bir PIN
kodu ya da bir parola belirlediyseniz, telefon
kilidini açmak için şekli çizmeniz ya da PIN
kodunu/parolayı girmeniz gerekir.
74
Page 77

Dokunmatik Ekranı Kullanma
Telefonunuzun dokunmatik ekranı, farklı
dokunma hareketleriyle işlevleri kontrol
etmenizi sağlar.
• Dokunma
Ekran klavyesini kullanarak yazı
yazmak, ekrandaki uygulama ve ayar
simgeleri gibi öğeleri seçmek veya
ekran düğmelerine basmak istediğinizde
parmağınızla dokunmanız yeterlidir.
• Dokunma ve Basılı Tutma
Bir öğenin geçerli seçeneklerini (örneğin
bir mesaj ya da web sayfasındaki bir
bağlantı) açmak için öğeye dokunun ve
basılı tutun.
75
Page 78

• Kaydırma
Kaydırmak, parmağınızı ekran boyunca
yatay veya dikey olarak hızla kaydırmak
anlamına gelir.
• Sürükleme
Sürüklemek için parmağınızı hareket
ettirmeden önce dokunun ve hafçe
basılı tutun. Sürükleme sırasında, hedef
konuma ulaşıncaya dek parmağınızı
ekrandan kaldırmayın.
76
Page 79

• İki Parmakla Dokunma
Bazı uygulamalarda (ör. Maps
(Haritalar), Browser (Tarayıcı) ve Gallery
(Galeri)) görüntüyü yakınlaştırmak
veya uzaklaştırmak için ekrana iki
parmağınızla aynı anda dokunup
parmaklarınızı birleştirin (görüntü
uzaklaştırılır) veya ayırın (görüntü
yakınlaştırılır).
• Ekranı döndürme
Çoğu ekranda telefonu yan çevirerek
ekran yönünü dikey konumdan yatay
konuma otomatik değiştirebilirsiniz.
Ürün Güvenlik Bilgileri
Araç sürerken aygıtı elde
kullanmayın
Benzin alırken kullanmayın
Vücuda takılı olarak çalıştırırken
15 mm'lik mesafeyi koruyun
Bu aygıt parlak veya yanıp
sönen bir ışık üretebilir
77
Page 80

Küçük parçalar boğulma
tehlikesine neden olabilir
Ateşe atmayın
Bu aygıt yüksek şiddette ses
üretebilir
İşitme duyunuzun zarar
görmemesi için uzun süre
yüksek ses seviyelerinde
dinlemeyin.
Manyetik ortamlarla temas
etmesini engelleyin
Aşırı Sıcaklıklardan Koruyun
Kalp pilleri ve diğer kişisel tıbbi
aygıtlardan uzakta tutun
Sıvılarla temas etmesini
engelleyin ve kuru tutun
Hastanelerde ve tıbbi tesislerde
aygıtınızı kapatmanız
istendiğinde kapatın
Parçalarına ayırmayı
denemeyin
Uçaklarda ve havaalanlarında
aygıtınızı kapatmanız
istendiğinde kapatın
78
Page 81

Yalnızca onaylanmış
aksesuarları kullanın
Patlama tehlikesi bulunan
ortamlarda kapatın
Acil durumlarda iletişim için bu
aygıta güvenmeyin
RoHS Uyumluluğu Beyanı
Bu belge, çevreye verilen zararın azaltılması
ve yaşadığımız dünyaya karşı daha fazla
sorumluluk üstlenmek amacıyla, aşağıdaki
maddelerle ilgili olarak ZTE CORPORATION
tarafından üretilen ZTE Blade L3 ürününün
Avrupa Parlamentosu'nun 2011/65/
EU Sayılı RoHS (Tehlikeli Maddelerin
Sınırlandırılması) Yönetmeliğiyle uyumlu
olduğunu ifade eden resmi bir beyandır:
1. Kurşun (Pb)
2. Cıva (Hg)
3. Kadmiyum (Cd)
4. Heksavalent Krom (Cr (VI))
5. Polibromine bifeniller (PBB’ler)
6. Polibromine difenil eterler (PBDE’ler)
ZTE CORPORATION tarafından üretilen
ZTE Blade L3 ürünü AB'nin 2011/65/EU
gereksinimleriyle uyumludur.
79
Page 82

Özgül Emilim Oranı (SAR)
Mobil cihazınız bir radyo alıcısı ve
vericisidir. Uluslararası yönergelerin
önerdiği radyo dalgalarına maruz kalma
sınırlarını (radyo frekansı elektromanyetik
alanları) aşmayacak şekilde tasarlanmıştır.
Söz konusu yönergeler bağımsız bir
bilimsel kuruluş olan ICNIRP tarafından
geliştirilmiştir ve tüm kişilere yaş ya da sağlık
durumlarından bağımsız olarak koruma
sağlayacak güvenlik sınırlarını içermektedir.
Bu yönergeler Özgül Emilim Oranı veya
SAR olarak bilinen bir ölçü birimini
kullanırlar. Mobil cihazlar için SAR sınırı
2 W/kg'dır ve bu cihazın en yüksek SAR
değeri başta test edildiğinde 0,482 W/kg*,
bedende test edildiğinde 1,29 W/kg*
olarak ölçülmüştür. Mobil cihazlar çeşitli
fonksiyonlar sunduğundan, bu kullanım
kılavuzunda anlatıldığı gibi vücudun üzeri
gibi başka konumlarda da kullanılabilir**.
80
Page 83

SAR değeri cihazın en yüksek iletim
gücü kullanılarak ölçüldüğü için cihazın
çalışırkenki SAR değeri genelde yukarıda
belirtilen değerin altındadır. Bunun nedeni
cihazın şebeke ile iletişime geçmede sadece
gerekli olan asgari gücü kullandığından emin
olmak için güç seviyesinde yapılan otomatik
değişikliklerdir.
* Testler EN 50566, EN 62479, EN 62209-1,
EN 62209-2, EN 50360 şartlarına uygun
olarak gerçekleştirilmiştir.
** Lütfen vücuda takılı olarak çalıştırmaya
bakın.
81
Page 84

Eski Cihazınızın Bertaraf
Edilmesi
1. Bir ürün üzerinde,
üstünde çarpı işareti
bulunan tekerlekli
çöp bidonu sembolü
bulunması, bu ürünün
2012/19/EU sayılı
Avrupa Yönergesi
kapsamında olduğu
anlamına gelir.
2. Tüm elektrikli ve
elektronik ürünler evsel
atıklardan ayrı olarak,
hükümet veya yerel
yetkililer tarafından
belirlenmiş toplama
tesisleri aracılığıyla
bertaraf edilmelidir.
3. Eski cihazınızın
doğru şekilde bertaraf
edilmesi çevreye
ve insan sağlığına
yapacağı olumsuz
etkilerin önlenmesine
yardımcı olacaktır.
Ürünün WEEE yönergesini temel alan geri
dönüşüm bilgileri için lütfen şu adrese bir
e-posta gönderin: weee@zte.com.cn
82
Page 85

AT UYUMLULUK BEYANI
İşbu belgede aşağıdaki ürünün özelliklerinin
aşağıdaki gibi olduğu beyan edilir:
Ürün Tipi: WCDMA/GSM(GPRS) Dijital
cep telefonu Telefon
Model No: ZTE Blade L3/Blade L3
Telsiz ve Telekomünikasyon Terminal
Ekipmanları (1999/5/EC Yönetmeliği),
elektrikli ve elektronik ekipmanlarda Belirli
Tehlikeli Maddelerin Sınırlandırılması
(2011/65/EU Yönetmeliği), Enerji ile İlgili
Ürünlerin Çevreye Duyarlı Tasarımına İlişkin
Gereklilikler (2009/125/EC Yönetmeliği)
Yönetmeliklerinin asli gereklilikleri ve
bunlara yönelik değişiklikler ile uyumludur.
Bu beyan, test/değerlendirme için gönderilen
numunelerle aynı şekilde üretilen tüm
örneklerde de geçerlidir.
Ürünün 1999/5/EC Yönetmeliği uyumluluk
değerlendirmesi PHOENIX TESTLAB
GmbH (Onaylanmış Kuruluş No. 0979)
tarafından, ürünün 2011/65/EU Yönetmeliği
uyumluluk değerlendirmesi Intertek Testing
Services Ltd., Shanghai Lab tarafından
ve ürünün 2009/125/EC Yönetmeliği
uyumluluk değerlendirmesi ZTE Corporation
Güvenilirlik Test Merkezi tarafından
83
Page 86

yürütülmüştür. Değerlendirmeler, aşağıdaki
düzenlemeler ve standartları esas almıştır:
Gereklilik Standart
EN 60950-1:2006+A11:2009+
A1:2010+A12:2011
EN 50566:2013
EN 62479:2010
EN 62209-1:2006 ;
EN62209-2:2010;
Sağlık ve
Güvenlik
EMC
Radyo
Spektrumu
EN 50360:2001/A1:2012
EN 301 489-1 V1.9.2:2011
EN 301 489-3 V1.6.1: 2012
EN 301 489-7 V1.3.1: 2005
EN 301489-17
V2.2.1(2012-09)
EN 301489-24 V1.5.1
(2010-10)
EN 301 511 V9.0.2 : 2003
EN 300 328 V1.8.1
EN 301 908-1 V6.2.1
EN 301 908-2V6.2.1
EN 300 440-1 V1.6.1;
EN300440-2 V1.4.1
EN 60950-1:2006+A11:2009+
A1:2010+A12:2011
EN 50566:2013
EN 62479:2010
EN 62209-1:2006 ;
EN62209-2:2010;
EN 50360:2001/A1:2012
84
Page 87

RoHS IEC 62321:2013
ErP (EC) No 278/2009
Şirket adına imzaya yetkili kişi:
Yao cuifeng ZTE Corporation Kalite
Müdürü
Büyük harerle isim ve şirketteki
pozisyonu
Shenzhen, 5 Ocak 2015
Yer ve tarih Yasal olarak geçerli
imza
85
Page 88

ZTE Blade L3
Teléfono móvil
WCDMA/GSM
Guía de inicio rápido
86
Page 89

INFORMACIÓN LEGAL
Copyright © 2015 ZTE CORPORATION.
Todos los derechos reservados.
No se podrá citar, reproducir, traducir ni
utilizar de modo alguno ni mediante ningún
medio, electrónico o mec ánico, incluido
mediante fotocopias y microfilms, ninguna
parte de esta publicación sin permiso previo
por escrito de ZTE Corporation.
Aviso
ZTE C orpo rat ion se r eserva el d erecho
a efect u a r modifi c a c i ones de er r ores
de impr e sión o de e specif icacio nes d e
actua liz aciones en esta guía s in p revio
aviso.
Ofrecemos autoservicio para los usuarios
de nue s tros dispo sitiv o s de term i nales
inteligentes. Visite el sitio web oficial de
ZTE Españ a (en la pág ina www.zte.es)
para obtener más información acerca del
autoservicio y de los modelos de productos
compatibles. La información disponible en el
sitio web tendrá prioridad.
Visite www.zte.es para descargar el manual
del usuario. Tan solo tiene que hacer clic en
Soporte > Descargas en la página de inicio
y, a continuación, seleccionar su Compañía
y modelo para buscar la información de
asistencia relacionada.
Exención de responsabilidad
ZTE Co r por a t i on re c h aza de man e r a
e x pr es a cu al qu ie r re sp on sa bi li da d
87
Page 90

relacionada con fallos y daños ocasionados
po r modifi c a ciones n o autor i z adas d e l
software.
Es posible que las imágenes y capturas
de pantalla utilizadas en esta guía varíen
respecto al producto real. Es posible que
el contenido de esta guía varíe respecto al
producto o el software real.
Marcas comerciales
ZTE y los logotipos de ZTE son marcas
comerciales de ZTE Corporation. Google y
Android son marcas comerciales de Google,
Inc. La marca comercial y los logot ipos
de Bluetooth® son propiedad de Bluetooth
SIG, Inc. y cualquier uso de dichas marcas
comerciales por parte de ZTE Corporation
se efectúa con licencia.
El logotipo de microSDHC es una
marca comercial de
SD-3C , LLC. Fabr icado c on l icencia de
Dolby Laboratories. Dolby y el símbolo de la
doble D son marcas comerciales de Dolby
Laboratories.
El resto de marcas comerciales y nombres
c o me rc ia le s so n p r op ie d ad de su s
respectivos propietarios.
Número de versión: R1.0
Fecha de edición: 2015.02
88
Page 91

Conozca su teléfono
Indicador
Pantalla
táctil
Tecla
Atrás
Auricular
Cámara
frontal
Tecla
Volumen
Tecla de
encendido
Tecla de inicio
Tecla de menú
Conector para
auriculares
AltavozFlash
Cámara
trasera
Cubierta
trasera
Puerto USB
89
Page 92

Tecla Función
• Manténgala pulsada
para encender y
Tecla de
encendido
Tecla de inicio
Tecla Atrás
Tecla de menú
Tecla Volumen
apagar el dispositivo.
• Púlsela cambiar el
teléfono al modo
de suspensión o
activarlo.
• Púlsela para regresar
a la pantalla de inicio
desde cualquier
aplicación o pantalla
• Manténgala pulsada
para iniciar la
búsqueda de Google.
Púlsela para ir a la
pantalla anterior.
• Pulse esta tecla para
obtener las opciones
de la pantalla actual.
• Mantenga pulsada
esta tecla para ver las
aplicaciones utilizadas
recientemente.
Manténgala pulsada para
subir o bajar el volumen.
90
Page 93

NOTA:
Puede intercambiar las posiciones de la
te c la A trás y la tec l a Menú . Desd e la
pantalla de inicio ir a Ajustes > Teclado y
seleccione una opción.
Instalación de tarjeta SIM
Ap ague el telé fono ante s de inst alar la
tarjeta SIM.
1. In s erte l a uña e n la r a nura q u e hay
a la derecha de la cubierta traser a y
levántela suavemente.
2. Coloque la tarjeta SIM con la esquina
cortada orientada en la dirección que se
muestra e insértela en la ranura.
91
Page 94

Instalación de la tarjeta
microSD
Ap ague el telé fono ante s de inst alar la
tarjeta microSD.
1. Retire la cubierta trasera.
2. Coloq u e la ta r j e t a mic r o S D con la
esquina cortada orientada en la dirección
que se muestra e insértela en la ranura.
NO TA : Es p o si b le q u e al g u na s
aplicaciones requieran una tarjeta microSD
para funcionar correctamente o para poder
almacenar determinados datos en ella. Por
lo tanto, es recomendable que mantenga
una tarjeta microSD instalada y que no la
extraiga ni la sustituya aleatoriamente.
92
Page 95

Instalación de la batería
Ali n e e l o s c o nec t o re s del tel é f ono y
la ba t er í a e in se rt e la ba te r ía en el
compartimento. A continuación, presione
suavemente la batería hacia abajo hasta
que quede ja.
Carga de la batería
La p rimera v e z que ut i l ice el t e l éfono,
deberá cargar la batería de la siguiente
forma:
1. Co n e c t e e l ad a ptador a la toma d e
carga. Asegúrese de haber insertado el
adaptador en la dirección correcta.
93
Page 96

2. Co n ecte e l carg a dor a u na tom a de
corriente de CA estándar.
3. Desconect e el ca r g ador cuando la
batería esté completamente cargada.
ADVERTENCIA
Ut i lice s o lamente carga d o res y c ables
aprobados por ZTE. El uso de accesorios
no aprobados podría dañar el teléfono o
provocar que la batería explote.
NOTA:
• Si la ba t e r ía se ha de s cargad o en
exceso, el icono de carga se visualizará
con retraso.
• S i l a c a r g a d e l a b a t e r í a e s
extremadamente baja, es posible que
no pueda encender el teléfono aunque
se esté cargando. En tal caso, inténtelo
de nuevo después de haber cargado el
teléfono al menos durante 20 minutos.
Póngase en contacto c on el servicio
de atención al cliente si tras una carga
prolongada del teléfono aún no puede
encenderlo.
94
Page 97

Encendido/Apagado del
teléfono
Asegúrese de que la batería está cargada
antes de encender el teléfono.
• Mantenga pulsada la Tecla de
encendido para encender el teléfono.
• Para apagarlo, mantenga pulsada la
Tecla de encendido para abrir el menú
de opciones. Pulse Apagar.
Reinicio del teléfono
Si la pantalla queda inmovilizada o tarda
de m as ia do en re s po nd er, pr ue be a
mantener pulsada la tecla de encendido
du r a n t e 1 0 segundos para re i n i c i a r el
teléfono.
Activación del teléfono
El teléfono pasa automáticamente al modo
de suspensión cuando no se utiliza durante
un período deter min ado. La pantall a se
apaga para a horrar batería y l as tecl as
se bl o q u e an pa r a evita r o perac i o n es
involuntarias.
P u ed e vo l ve r a a c ti va r e l te l é fo no
encendiendo la pantalla y desbloqueando
las teclas.
1. Pulse la te c l a de ence n d i d o para
activar la pantalla.
2. Des l i ce el de d o ha c i a ar r iba para
desbloquear la pantalla.
95
Page 98

NOTA:
Si ha establecido un patrón de desbloqueo,
un PIN o una contraseña para el teléfono,
deberá dibujar el patrón o introducir el PIN o
la contraseña para desbloquear la pantalla.
Uso de la pantalla táctil
La pantalla táctil del teléfono le permite
controlar las acciones a través de una gran
variedad de gestos táctiles.
• Pulse
Cu a n d o desee es c r i b ir median t e e l
te c l ad o qu e ap a re c e en pa n ta l la ,
seleccionar elementos en pantalla como
aplicaciones o i c o n o s d e a j u s t e s o
seleccionar botones en pantalla, tan solo
tendrá que pulsarlos con el dedo.
96
Page 99

• Mantener pulsado
Si desea abrir las opciones disponibles
par a u n e l e m e n t o ( p o r e j e m p l o , un
me nsaje o u n enl ace e n una pág ina
web), mantenga pulsado el elemento.
• Pasar el dedo o deslizarlo
Pa s ar el d edo o d e slizar l o sign i f ica
ar r a st r a r r á pi d a me n te el de do en
orientación vertical u horizontal por la
pantalla.
• Arrastrar
Para arrastr ar, m ant enga pulsado e l
dedo sobre un elemento, ejerciendo algo
de presión antes de comenzar a mover
el dedo. Durante el arrastre, no levante
el dedo hasta que haya alcanzado la
posición deseada.
97
Page 100

• Pellizcar
En algunas aplicaciones (como Mapas,
Navegador y Galería), puede acercar y
alejar la imagen con el zoom si coloca
dos dedos sobre la pantalla al mismo
tiempo y pellizca para juntarlos (alejar
la imagen) o para separarlos (acercar la
imagen).
• Girar la pantalla
Para la mayoría de las pantallas, es
posib le camb iar automát ica mente la
orientación de la pantalla, de Retrato
(vertical) a Paisaje (horizontal), si gira el
teléfono lateralmente.
98
 Loading...