

Page 1

Page 2

LEGAL INFORMATION
Copyright © 2011 ZTE CORPORATION.
All rights reserved.
No part of this publication may be quoted,
reproduced, translated or used in any form or by
any means, electronic or mechanical, including
photocopying and microfilm, without the prior
written permission of ZTE Corporation.
ZTE Corporation reserves the right to make
modifications on print errors or update specifications
in this guide without prior notice.
Version No. : R1.0
Edition Time : 2011.9.27
Manual No. : 079584503379
1
Page 3

Contents
Welcome ················································· 6
Your AdamantTM.......................................................6
Phone Overview.......................................................7
Getting Started····································· 11
Installing the Battery...............................................11
Removing the Battery.............................................12
Charging the Battery ..............................................12
Installing the SIM Card........................................... 13
Removing the SIM Card......................................... 14
Installing the microSD Card....................................14
Removing the microSD Card..................................15
Powering On/Off Your Phone................................. 15
Activating Your Phone............................................16
Idle Mode ............................................................... 16
Main Display Icons................................................. 17
Menu Outline..........................................................22
Basic Operation···································· 32
Menu Navigation .................................................... 32
Locking/Unlocking Your Phone ..............................33
Locking/Unlocking the Keypad ...............................33
Choosing the Network Mode..................................34
Set-up Wizard ........................................................34
Easy Set-up ...........................................................35
Entering Text..........................................................36
Calling··················································· 38
Making a Call ......................................................... 38
Answering a Call .................................................... 39
Three-Way Call ...................................................... 40
Speed Dialing.........................................................40
2
Page 4

Wait/Pause.............................................................42
Caller ID .................................................................43
In-Call Options........................................................43
Turn Vibration Mode on or off.................................44
Recent Calls...........................................................44
Contacts ··············································· 45
Adding a New Contact............................................45
Editing a Contact....................................................45
Updating a Contact.................................................46
Changing the Default Number ................................46
Finding a Contact ...................................................47
Managing Contacts.................................................47
Grouping Contacts..................................................50
Backup Assistant....................................................52
In Case of Emergency............................................52
My Name Card .......................................................54
Messaging ············································ 56
Using the Message Key..........................................56
Creating and Sending a Text Message...................57
Creating and Sending a Picture Message...............58
Creating and Sending a Voice Message.................60
Message Folders....................................................61
Erasing Messages..................................................65
Backing Up/Restoring Messages............................66
Voicemail................................................................67
Emergency Alerts ...................................................67
Mobile IM................................................................68
Mobile Email...........................................................68
Messaging Settings ................................................69
Mobile Web ··········································· 71
Opening Web Pages ..............................................71
3
Page 5

Opening a New Browser Tab ................................. 72
Setting a Speed Dial ..............................................72
Adding Favorites .................................................... 73
Browser Settings.................................................... 73
Exiting the Browser ................................................ 74
Media Center ········································ 75
Apps.......................................................................75
Bing Search ...........................................................77
My Music................................................................77
My Sounds .............................................................81
My Ringtones .........................................................82
Taking a Picture ..................................................... 83
Viewing and Managing My Pictures........................84
Online Album..........................................................86
Bluetooth®············································· 87
Turning Bluetooth On or Off ................................... 87
Pairing With a Bluetooth Device............................. 87
Bluetooth Settings.................................................. 89
Tools ····················································· 90
Voice Commands................................................... 90
Calculator............................................................... 95
Tip Calculator......................................................... 95
Calendar ................................................................96
Alarm Clock............................................................97
Stop Watch ............................................................98
World Clock............................................................98
Notepad .................................................................99
USB Mass Storage.................................................99
Settings ··············································101
My Verizon...........................................................101
4
Page 6

Master Volume .....................................................101
Keyguard Settings ................................................101
Sound Settings .....................................................102
Display Settings....................................................105
Phone Settings .....................................................110
Call Settings .........................................................121
Memory ................................................................125
Phone Info............................................................129
SIM Info................................................................129
Software Updating via PC ················· 130
For Your Safety ·································· 131
General Care........................................................131
Aircraft Safety.......................................................134
Hospital Safety .....................................................135
General Guidelines...............................................135
Road Safety..........................................................136
Vehicles Equipped With an Airbag........................137
Third Party Equipment..........................................138
Efficient Use .........................................................138
Radio Frequency (RF) Energy..............................138
Emergency Services.............................................140
FCC Compliance ..................................................140
Using Your Phone With a Hearing Aid Device ......142
Turning on the HAC Setting..................................143
Copyright Notice...................................................144
Consumer Limited Warranty·············· 145
5
Page 7

Welcome
Your AdamantTM
Thank you for choosing AdamantTM for your mobile phone.
TM
Adamant
so you can make calls and send messages or emails
while traveling or roaming.
To guarantee this mobile phone is always in its best
condition, please read this manual carefully and keep it
for future reference. To ensure your safety, read the
section: For Your Safety thoroughly before using this
phone for the first time.
Note: The pictures and icons presented in this manual
are meant for illustrative purposes only and may not
accurately represent the actual pictures and icons found
on the phone. Your phone contains the most up to date
information.
can works in both CDMA and GSM networks,
6
Page 8

Phone Overview
7
Page 9

8
Page 10

1. Earpiece: Allows you to hear the caller.
2. LCD Screen: Displays all the information needed to
operate your phone.
3. Left Soft Key: Press to display the Messaging menu
or access the function listed above the key.
4. Send Key: Press to make or receive a call. From idle
mode, press to access the All Calls list.
5. Speakerphone Key: Press to activate or deactivate
the speakerphone.
6. Music Key: Press to display the My Music menu
from idle mode.
7. Voicemail Key: Press and hold to dial your voicemail
from idle mode.
8. Vibration Mode Key: Press and hold to turn
vibration mode on or off from idle mode.
9. Lock Key: Press and hold to lock the keypad from
idle mode.
10. Message Key: Press to open a new text message
from idle mode. For more information, see “Using the
Message Key” on page 56.
11. Center Select Key: Allows you to access the menu
screen. It also allows you to accept choices when
navigating through a menu.
12. CLR Key: Press to delete characters or press and
hold to delete entire words during text entry mode.
Press to return to the previous menu or screen.
13. End/Power Key: Press to end calls or close
applications. Press and hold to power your phone on
or off.
9
Page 11

14. Right Soft Key: Press to display the Contacts List or
access the function listed above the key.
15. Directional Key: Allows you to scroll through phone
menu options and provides a shortcut to phone
functions from idle mode.
16. Accessory/Charger Port: Connects the phone to
the wall adapter, or other compatible accessories.
17. Camera Key: Press and hold to access the camera
screen from idle mode.
18. Wrist Strap Eyelet: Attach a strap (not included).
19. Flash Lamp: The flash lamp for picture taking.
20. External Speaker: Allows you to listen to music,
sounds or ringtones.
21. Camera Lens: The lens of your built-in camera.
22. Headset Jack: Plug in an optional headset for
convenient and hands-free conversations or music
playback.
23. Volume Keys: Allows you to adjust the master
volume or the earpiece volume during a call.
24. Voice Commands Key: Press to launch Voice
Commands from idle mode.
10
Page 12

Getting Started
Installing the Battery
1. Remove the battery cover by pressing downward and
sliding it off.
2. Align the battery contacts with the phone terminal
and press until you hear the “click”.
3. Align the battery cover over the battery compartment
and slide it upward until it clicks into place.
11
Page 13

Removing the Battery
1. Turn the phone off. Press downward on the battery
cover and slide the battery cover downward to
remove it.
2. Remove the battery from the battery compartment by
lifting the battery up using the fingertip cutout.
Charging the Battery
Your device comes with a wall adapter and a USB cable
which connect together to charge your phone. To charge
your phone:
1. Connect the USB cable into the wall adapter. When
connecting the logo on the USB cable should face
toward you.
2. Plug the USB cable (as shown below) into the phone’s
Accessory/Charger Port.
12
Page 14

Warning: Please use only an approved charging
accessory to charge your device. Improper handling of the
charging port, as well as the use of an incompatible
charger, may cause damage to your device and void the
warranty.
When not using the battery for a long time, remove it from
the phone and store in a cool dry place.
Installing the SIM Card
Your phone comes with a SIM card pre-installed which
along with a global feature on your account, enables you
to make calls and access email in GSM networks while
traveling or roaming.
Make sure the phone is turned off and the charger is
disconnected before inserting or removing the SIM card.
1. Remove the battery cover and remove the battery, as
previously instructed.
2. Hold the SIM card so that the metal contacts on the
SIM card face down and the cutoff corner of the SIM
Card points toward the bottom-right corner of your
phone.
13
Page 15

3. Slide the SIM card into the SIM card holder until it
stops.
4. Align the battery contacts with the phone terminal
and press until you hear the “click”.
5. Align the battery cover over the battery compartment
and slide it upward until it clicks into place.
CAUTION: Do not bend, scratch, or unnecessarily touch
the SIM card’s metal surface. It may damage the
information stored in it.
Removing the SIM Card
1. Remove the battery cover and remove the battery, as
previously instructed.
2. Slide the SIM card out of the SIM card holder.
Installing the microSD Card
Your phone supports a microSD card up to 16GB. You
can store music, pictures, and other files on the microSD
card.
The microSD logo
Association.
is a trademark of the SD Card
14
Page 16

1. Remove the battery cover, as previously instructed.
2. Position the microSD card with the metal contacts
facing down and slide it into place until it is fully
inserted and locked in place.
3. Replace the battery cover, as previously instructed.
Removing the microSD Card
1. Remove the battery cover, as previously instructed.
2. Gently pull the exposed border of the microSD card to
release it. Then gently pull it out to remove it.
Powering On/Off Your Phone
It’s important to fully charge the battery before turning
on your phone.
• To power on the phone, press and hold the
End/Power Key until the LCD screen lights up.
Note: If the phone lock code has been activated, you
need to enter the code to unlock the phone. The default
lock code is the last 4 digits of your phone number.
If the SIM card is inserted in your phone and the SIM
PIN is enabled, you also need to enter the PIN code
when powering on the phone. The default PIN code is
1111. See “SIM Security” on page 117 for more
information.
15
Page 17

• To power off the phone, press and hold the
End/Power Key until the display turns off.
Activating Your Phone
Please contact your service provider for more
information.
Idle Mode
The start screen indicates that your device is in Idle Mode.
Take the following start screen in CDMA mode for
example.
1
6
5
2
1. Signal strength: The strength of the signal received
by the device is indicated by the number of bars
displayed.
2. Message: Press the Left Soft Key to select this option.
3. MENU: Press the Center Select Key to select this
option.
4. Contacts: Press the Right Soft Key to select this
option.
3
16
4
Page 18

5. Location: Location information sharing mode.
6. Battery strength: Four bars indicate a fully charged
battery.
Note: The start screen may vary if you change the default
display settings.
Main Display Icons
Top Display Icons
Digital: Digital service is available. More bars
indicate a stronger signal.
1X: CDMA 1X service is available. More bars
indicate a stronger signal.
GSM Mode: GSM service is available. More
bars indicate a stronger signal.
EDGE Mode: EDGE service is available. More
bars indicate a stronger signal.
Airplane Mode: Airplane Mode is on.
Roaming: The phone is outside the home
service area and roaming.
Femtocell: Femtocell service is available.
SSL: Data communication is encrypted by the
Secure Socket Layer (SSL) encryption.
Voice Privacy: The Voice Privacy feature is
active.
17
Page 19
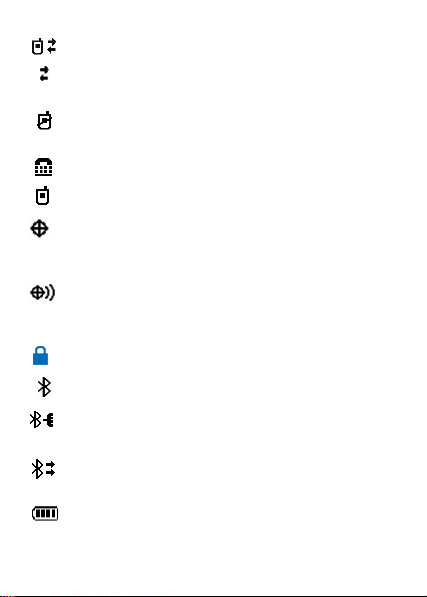
Data Call: Data call is in progress.
Dormant: Data call is in the dormant state. No
data is being transmitted or received.
No Service: Your phone is outside the service
area.
TTY: TTY mode is active.
Voice Call: A voice call is in progress.
E911: Global Positioning Service (GPS)
location feature for 911 is enabled (for
emergency calls only).
Location On: Global Positioning Service
(GPS) location feature is enabled (for location
and emergency calls).
Keypad Lock: The keypad is locked.
Bluetooth On: Bluetooth is turned on.
Bluetooth Connected: Your phone is paired
with a Bluetooth headset.
Bluetooth Active: Your phone is exchanging
data wit h another Bluetooth device.
Battery Level: Indicates the battery level. More
bars indicate stronger battery power.
18
Page 20
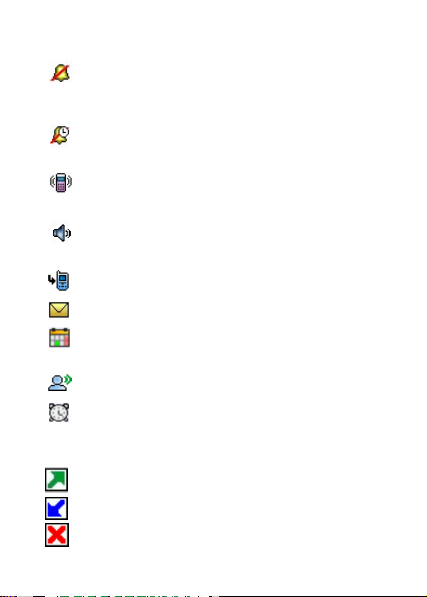
Bottom Display Icons
All Sounds Off: All sounds are silenced including
incoming call ringtone, message alert, alarm
sound and other alert sounds.
Alarm Only: Your phone only rings for the alarm
sounds.
Vibrate On: Your phone vibrates for calls and
alerts.
Speakerphone: The speakerphone mode is
active.
Missed Calls: You have missed calls.
Message: You have a new message.
Calendar Appointment: You have an active
calendar event.
Voicemail: You have new voicemail messages.
Alarm On: An alarm is set.
Other Icons
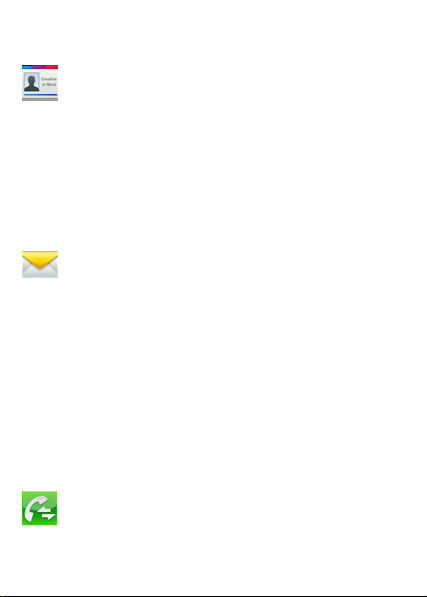
Dialed Call
Received Call
Missed Call
19
Page 21

Mobile 1
Mobile 2
Home
Business
Personal Email
Business Email
Groups
Picture
Ringtone
Fax
Speed Dial
Voice Dial
New/Unread Message
Opened/Read Message
Message Delivered
Incomplete Delivery
Sent Message, Delivery Failed
Message Locked
20
Page 22
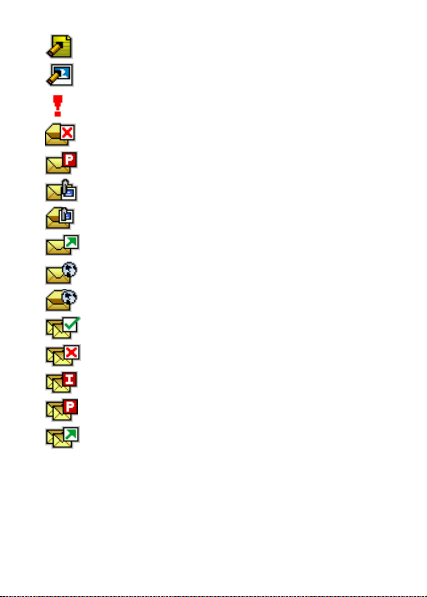
Text Message Draft
Multimedia Message Draft
Priority
Corrupt Message
Pending Message Send
Unread MMS
Read MMS
Sent Message
Unread WAP PUSH
Read WAP PUSH
Multiple Message Delivered
Multiple Message Failed
Multiple Message Incomplete
Multiple Message Pending
Multiple Message Sent
21
Page 23
Menu Outline
Contacts
1. New Contact
2. Contact List
3. Backup Assistant
4. Groups
5. Speed Dials
6. In Case of Emergency
7. My Name Card
Messaging
1. New Message
1. TXT Message
2. Picture Message
3. Voice Message
2. Messages
3. Drafts
4. Voicemail
5. Emergency Alerts
6. Mobile IM
7. Mobile Email
Recent Calls
1. Missed
22
Page 24

2. Received
3. Dialed
4. All
5. View Timers
Mobile Web
Media Center
1. Apps
2. Search
3. Mobile Web
4. Music & Tones
1. My Ringtones
2. My Music
1. All Songs
2. Playlists
3. Artists
4. Genres
5. Albums
6. Manage My Music
1. Erase
2. Lock
3. Unlock
4. Move To Memory Card
5. Move To Phone
23
Page 25
7. Music Settings
1. Repeat
2. Shuffle
3. Music Only Mode
3. My Sounds
1. Record New
5. Pictures
1. My Pictures
2. Take Picture
3. Online Album
Mobile Email
Apps
My Pictures
Settings & Tools
1. My Verizon
2. Master Volume
3. Tools
1. Voice Commands
2. Calculator
3. Tip Calculator
4. Calendar
24
Page 26

5. Alarm Clock
6. Stop Watch
7. World Clock
8. Notepad
9. USB Mass Storage
4. Bluetooth Menu
1. Add New Device
5. Keyguard Settings
1. Auto Lock
2. Unlock Options
6. Sounds Settings
1. Easy Set-up
2. Call Sounds
1. Call Ringtone
2. Call Vibrate
3. Caller ID Readout
3. Alert Sounds
1. TXT Message
1. Tone
2. Vibrate
3. Reminder
2. Multimedia Message
1. Tone
2. Vibrate
3. Reminder
25
Page 27

3. Voicemail
1. Tone
2. Vibrate
3. Reminder
4. Emergency Tone
5. Missed Call
1. Tone
2. Vibrate
3. Reminder
4. Keypad Volume
5. Digit Dial Readout
6. Service Alerts
1. ERI
2. Minute Beep
3. Call Connect
4. Software Update
7. Power On/Off
1. Power On
2. Power Off
7. Display Settings
1. Easy Set-up
2. Banner
1. Personal Banner
2. ERI Banner
3. Backlight
26
Page 28

1. Display
2. Keypad
4. Wallpaper
1. My Pictures
2. Fun Animations
5. Display Themes
6. Main Menu Settings
1. Menu Layout
2. Replace Menu Items
3. Position Menu Items
4. Reset Menu Settings
1. Menu Layout
2. Menu Items
3. Item Positions
4. All
7. Dial Fonts
8. Menu Font Type
9. Menu Font Size
10. Clock Format
8. Phone Settings
1. Airplane Mode
2. Set Shortcuts
1. Set My Shortcuts
1. Shortcut 1
2. Shortcut 2
27
Page 29

3. Shortcut 3
4. Shortcut 4
2. Set Directional Keys
1. UP Directional Key
2. LEFT Directional Key
3. DOWN Directional Key
3. Voice Commands Settings
1. Confirmation
2. Sensitivity
3. Adaptation
1. Adapt Voice
4. Prompts
1. Mode
2. Audio playback
3. Timeout
5. About
4. Language
5. Location
6. Current Country
7. Phone Security
1. Edit Codes
1. Phone Only
2. Calls & Services
2. Restrictions
1. Location Setting
28
Page 30

3. Phone Lock Setting
4. Lock Phone Now
5. Restore Phone
8. SIM Security
1. PIN Code
1. PIN Lock
2. Edit PIN Code
2. SIM Lock
9. Network Mode
10. Global Data Settings
11. System Select
1. CDMA Settings
2. GSM Settings
12. NAM Select
13. Time & Date*
1. Time Setting
2. Date Setting
9. Call Settings
1. Answer Options
2. Auto Retry
3. TTY Mode
4. One Touch Dial
5. Voice Privacy
6. DTMF Tones
7. Assisted Dialing
29
Page 31

8. Hearing Aid Mode
10. Memory
1. Save Options
1. Pictures
2. Sounds
2. Phone Memory
1. Memory Usage
2. My Pictures
3. My Ringtones
4. My Music
5. My Sounds
6. My Contacts
7. Move All To Card
3. Card Memory
1. Card Memory Usage
2. My Pictures
3. My Music
4. My Sounds
5. My Contacts
6. Move All To Phone
7. Format
4. Card Lock
11. Phone Info
1. My Number
1. CDMA Number
30
Page 32

2. GSM Number
2. SW/HW Version
3. Icon Glossary
4. Software Update
1. Status
2. Check New
5. Operating System
12. SIM Info
13. Set-up Wizard
*Note: The phone menu may change according to the
current network mode, or whether the microSD card or
SIM card is inserted. The ‘Time & Date’ menu is only
available when your phone is set to GSM or Global mode.
31
Page 33

Basic Operation
Menu Navigation
Your phone can be customized via the menu. Each
function can be accessed by scrolling with the Directional
Key or by pressing the number that corresponds with the
menu item.
1. Press the Center Select Key to unlock the phone.
To access the menu, press the Center Select Key
[MENU].
2. To scroll through the menu, press the Directional
Key up, down, left or right, or press the number that
corresponds to the desired menu item.
3. To return to the previous page, press the CLR Key.
To exit the current menu and return to idle mode,
press the End/Power Key.
4. To access the Messages menu, press the Left
Soft Ke y [Message]. To access the Contact List, press
the Right Soft Key [Contacts].
In this manual, the steps needed to access a function or
menu, are shown in a straightforward condensed form.
For example, press the Center Select Key [MENU] >
Settings & Tools > Tools > Calendar.
Note: This manual assumes that the menu layout is set to
Grid and the display theme is set to Neon, which are the
default settings.
32
Page 34

Locking/Unlocking Your Phone
To keep your phone from unauthorized use, you can lock
the phone. The use of your phone is restricted once the
phone is locked. You can still make emergency calls
when the phone is locked.
Locking Your Phone
1. Press the Center Select Key to unlock the keypad.
Press the Center Select Key [MENU] > Settings &
Tools > Phone Settings > Phone Security.
2. Enter the phone lock code and press the Center
Select Key [OK]. The default lock code is the last 4
digits of your phone number.
3. Select Lock Phone Now and press the Center
Select Key [OK].
Tip: You can choose to make the phone locked
automatically when you power it on. For detailed
information, see “Phone Lock Setting” on page 115.
Unlocking Your Phone
1. Press the Right Soft Key [Unlock] from idle mode.
2. Enter the phone lock code and press the Center
Select Key [OK].
Locking/Unlocking the Keypad
• To lock the keypad, press and hold the Lock Key
from idle mode.
33
Page 35

• To unlock the keypad, you can press the Center
Select Key, or press the Left or Right Soft Key and
Center Select Key sequentially depending on the
current unlock options.
Note: To change the unlock options, press the Center
Select Key [MENU] > Settings & Tools > Keyguard
Settings > Unlock Options, select Press Once or
Press Twice, and press the Center Select Key [SET].
Tip: You can choose to make the keypad locked
automatically. Just press the Center Select Key [MENU]
> Settings & Tools > Keyguard Settings > Auto lock,
select On, and press the Center Select Key [SET].
Choosing the Network Mode
Your phone can work in both CDMA and GSM networks.
You can use your phone in Global Mode while traveling
abroad. You must insert a SIM card into your phone to
enable GSM Mode and Global Mode. The SIM card is
pre-installed in your phone. For more information,
please contact your service provider.
1. Press the Center Select Key to unlock the phone.
Press the Center Select Key [MENU] > Settings &
Tools > Phone Settings > Network Mode.
2. Select CDMA Mode, GSM Mode or Global Mode,
and press the Center Select Key [SET].
Set-up Wizard
Set-up Wizard will guide you to set the most commonly
used setting options. You can set your phone quickly
and easily.
34
Page 36

1. Press the Center Select Key to unlock the phone.
Press the Center Select Key [MENU] > Settings &
Tools > Set-up Wizard.
2. Follow the prompts on the screen, and press the
Center Select Key [SET] to set each option or
press the Right Soft Key [Skip] to skip setting the
option.
Note: Press the CLR Key to go to the previous options
and change the settings. Press the Left Soft Key [Preview]
or [Play] to view or play the option before setting it.
Easy Set-up
Easy Set-up will guide you to set the common sound or
display setting options.
1. Press the Center Select Key to unlock the phone.
Press the Center Select Key [MENU] > Settings &
Tools > Sounds Settings/Display Settings > Easy
Set-up.
2. Follow the prompts on the screen, and press the
Center Select Key [SET] to set each sound or
display option or press the Right Soft Key [Skip] to
skip setting the option.
Note: Press the CLR Key to go to the previous options
and change the settings. Press the Left Soft Key [Preview]
or [Play] to view or play the option before setting it.
35
Page 37

Entering Text
Your phone has a QWERTY keypad – a compact version
of a standard computer keyboard. Here’s how it works.
• For lowercase letters, simply press the keys as
normal.
• To enter a single uppercase letter, press
then press the corresponding key.
• To enter all uppercase, press twice and then
type. To change back to lowercase, press
again.
• To type a number or symbol (found at the upper left
or right of the key), press
corresponding keys. Press
numbers or symbols. To change back to normal type,
press
again.
and then press the
twice to enter all
and
36
Page 38

• Press the Left Soft Key to change the input mode:
predictive text, alphabetic and numeric. You can also
press and hold
• To open the symbols, press
Soft Key and select Symbols. Use the Directional
Key and the Center Select Key to enter a symbol.
You can press the Left/Right Soft Key [Prev/Next]
to view more symbols.
• To open the smileys, press
Soft Key and select Smileys. Use the Directional
Key and the Center Select Key to enter a smiley.
• To add a quick text, press the Left Soft Key and
select Quick Text, choose an entry and press the
Center Select Key [OK].
• To move the cursor, use the Directional Key.
• To delete the character before the cursor, press
or the CLR Key. In predictive text input mode, hold
or the CLR Key to delete the entire word before
the cursor. In alphabetic input mode, hold
CLR Key to delete all characters before the cursor.
• To start a new line, press
• To enter a space, press
to switch the input modes.
or press the Left
or press the Left
or the
.
.
37
Page 39

Calling
Making a Call
Using the Keypad
1. Press the Center Select Key to unlock the phone.
Enter the phone number including the full area code
if needed. Delete wrong digits by pressing the CLR
Key or
2. Press the Send Key.
Note: To make an emergency call, enter the emergency
number and press the Send Key. If possible, remain
stationary and keep the line connected.
Using the Contacts
1. Press the Center Select Key to unlock the phone.
Press the Center Select Key [MENU] > Contacts >
Contact List.
2. Select a contact you want to call. If the contact has
multiple numbers, you can open the contact and
select a phone number.
3. Press the Send Key.
Note: Selecting a contact and then pressing the Send
Key will dial the default number of the contact
automatically.
.
38
Page 40

Using the Call History
1. Press the Center Select Key to unlock the phone.
Press the Center Select Key [MENU] > Recent
Calls.
2. Navigate through the menu and press the Center
Select Key to view Missed, Received, Dialed or All
Calls.
3. Select a number or contact you want to call and
press the Send Key.
Shortcut: Press the Send Key in idle mode to view the
All Calls history.
Making an International Call
1. Press the Center Select Key to unlock the phone.
Press
for international calls.
2. Enter the country code, area code, and phone number.
3. Press the Send Key.
on the keypad to display the ‘+’ required
Answering a Call
When there is an incoming call, press the Send Key to
answer the call.
If you don’t want to answer, just press the End/Power
Key or Right Soft Key [Ignore].
Note: You can change the default call answering options
by pressing the Center Select Key [MENU] > Settings &
Tools > Call Settings > Answer Options.
39
Page 41

Answering a call-waiting call:
1. When you receive a call while on a call, press the
Send Key to place the first call on hold and answer the
new call.
2. Press the Send Key again to return to the first call.
Note: Call waiting requires network support and may result
in additional charges.
Three-Way Call
Your phone has a three-way calling feature, which enables
you to have conference calls with two parties. You can
activate this function by following the procedure below:
1. Press the Center Select Key to unlock the phone.
Enter the phone number you wish to call and then
press the Send Key.
2. Once you have established the connection, enter the
second phone number you wish to call and then press
the Send Key.
3. When you’re connected to the second party, press
the Send Key again to begin your 3-Way call.
Note: If one of the people you called hangs up during
your call, you and the remaining caller stay connected. If
you initiated the call and are the first to hang up, all three
calls are disconnected.
Speed Dialing
This feature is ideal for frequently dialed numbers and
allows contact entries to be dialed via the keypad with
only one, two, or three key presses.
40
Page 42

One-Touch Dialing:
1-9: Press and hold the number you wish to connect to for
more than 1 second.
1: Speed Dial entry 1 (Voicemail) is already assigned.
Two-Touch Dialing:
10-99: Press the first digit then press and hold the second
digit of the number to dial.
95, 96, 97, 98 and 99: Speed Dial entries 95(#Warranty
Center), 96(#DATA), 97(#BAL), 98(#MIN) and 99(#PMT)
are already assigned to Verizon Wireless Account
Information.
Three-Touch Dialing:
100-999: Press the first and second digits, then press and
hold the third digit of the number to dial.
411: Speed Dial entry 411 (Directory Assistance) is already
assigned.
Assigning a Speed Dial
1. Press the Center Select Key to unlock the phone.
Press the Center Select Key [MENU] > Contacts >
Speed Dials.
2. Select a speed dial entry, or enter the speed dial digits
in the Go To field, then press the Center Select Key
[SET].
3. Select a contact in the contact list and press the
Center Select Key. If the contact has multiple phone
numbers, you need to choose a number.
4. Select Yes and press the Center Select Key [OK].
41
Page 43

Removing a Speed Dial
1. Press the Center Select Key to unlock the phone.
Press the Center Select Key [MENU] > Contacts >
Speed Dials.
2. Select a speed dial entry, or enter the speed dial digits
in the Go To field.
3. Press the Right Soft Key [Remove].
4. Select Yes and press the Center Select Key [OK].
Wait/Pause
Pauses are used for automated systems (i.e., voicemail
or calling cards). The numbers entered after the pause
will automatically be dialed after the pause. This feature
is useful for dialing into systems that require a code.
Wait (W)
The phone stops dialing until you press the Send Key to
dial the next number.
1. Press the Center Select Key to unlock the phone.
Enter the phone number.
2. Press the Right Soft Key [Options].
3. Select Add Wait and press the Center Select Key
[OK].
4. Enter additional number(s).
5. Press the Send Key to dial.
42
Page 44

2-Sec Pause (P)
The phone waits 2 seconds before sending the next string
of digits automatically.
1. Press the Center Select Key to unlock the phone.
Enter the phone number.
2. Press the Right Soft Key [Options].
3. Select Add 2-Sec Pause and press the Center Select
Key [OK].
4. Enter additional number(s) (pin number or credit card
number).
5. Press the Send Key to dial.
Caller ID
Caller ID displays the name and phone number of the
person calling. If the caller’s identity is not stored in your
Contact List, only the phone number appears on the
screen.
In-Call Options
The following features and options are available during a
call.
• To adjust the volume, press the Volume Keys up or
down to increase or decrease the call volume.
• To mute or unmute your voice, press the Left Soft
Key [Mute/Unmute].
• To activate or deactivate the speakerphone, press
the Speakerphone Key.
• Press the Right Soft Key [Options] for more
options.
43
Page 45

¾ New TXT Message: Create a new text
message.
¾ Contact List: View the contact list.
¾ Recent Calls: View the call history.
¾ Bluetooth Menu: Open the Bluetooth menu.
¾ Main Menu: Open the main menu.
¾ Notepad: Open the notepad.
¾ Voice Privacy: Turn the voice privacy
feature on or off.
Turn Vibration Mode on or off
The vibration mode mutes tones and makes the phone
vibrate for an incoming call or message.
To enable or disable vibration mode, press and hold the
Vibration Mode Key on the keypad in idle mode.
Recent Calls
Press the Center Select Key to unlock the phone, then
press the Center Select Key [MENU] > Recent Calls to
view call history.
• Missed: View the calls you did not answer.
• Received: View the calls you answered.
• Dialed: View the calls made from your phone.
• All: View missed, received and dialed calls.
• View Timers: View the information of Last Call, All
Calls, Received Calls, Dialed Calls, Roaming
Calls, Transmit Data, Received Data, Total Data,
Last Reset, Lifetime Calls and Lifetime Data
Counter.
44
Page 46

Contacts
Adding a New Contact
1. Press the Center Select Key to unlock the phone.
Press the Center Select Key [MENU] > Contacts >
New Contact.
2. Enter the contact information you need (Name,
Mobile 1, Home, Business, Mobile 2, Fax,
Personal Email, Business Email, IM Screen Name,
Picture, Ringtone, Message Tone, Group, Home
Address, Work Address or Notes) and press the
Center Select Key [SAVE].
3. When your SIM card is inserted in the phone, you’ll
see the prompt “SAVE A COPY OF THE CONTACT
INTO THE SIM CARD”.
4. Select Yes or No and press the Center Select Key
[OK].
Editing a Contact
1. Press the Center Select Key to unlock the phone.
Press the Right Soft Key [Contacts] in idle mode
or press the Center Select Key [MENU] > Contacts
> Contact List.
2. Select a contact and press the Left Soft Key [Edit].
3. Edit or add the contact information and press the
Center Select Key [SAVE].
45
Page 47

Updating a Contact
1. Press the Center Select Key to unlock the phone.
Enter the phone number you want to save in idle
mode.
2. Press the Left Soft Key [Save].
3. Select Update Existing and press the Center Select
Key [OK].
4. Select the contact you would like to update and press
the Center Select Key [OK].
5. Select the desired number type and press the Center
Select Key [OK] to update the contact.
Changing the Default Number
1. Press the Center Select Key to unlock the phone.
Press the Right Soft Key [Contacts] in idle mode.
2. Select a contact and press the Left Soft Key [Edi t].
3. Highlight the number you would like to set as the
default and press the Right Soft Key [Options].
4. Select Set As Default and press the Center Select
Key [OK].
5. Select Yes and press the Center Select Key [OK].
6. Press the Center Select Key [SAVE] to update the
contact's information.
46
Page 48

Finding a Contact
1. Press the Center Select Key to unlock the phone.
Press the Right Soft Key [Contacts] in idle mode to
view the contact list.
2. Enter the contact name in the Go To field and the
contacts matching the name will be displayed.
Managing Contacts
Filtering Contacts
When your SIM card is inserted into the phone, you can
choose to view the phone contacts only, SIM contacts
only or all contacts.
1. Press the Center Select Key to unlock the phone.
Press the Right Soft Key [Contacts] in idle mode.
2. Select a contact and press the Right Soft Key
[Options].
3. Select Filter Contacts and press the Center Select
Key [OK].
4. Select All, Only Phone, or Only SIM Card and press
the Center Select Key [OK].
Deleting Contacts
1. Press the Center Select Key to unlock the phone.
Press the Right Soft Key [Contacts] in idle mode.
2. Press the Right Soft Key [Options], select Manage
Contacts > Erase and press the Center Select Key
[OK].
47
Page 49

3. Press the Center Select Key [MARK] to mark the
contacts, or press the Right Soft Key [Mark All] to
mark all contacts and then press the Left Soft Key
[Done].
4. Select Yes and press the Center Select Key [OK] to
confirm.
Note: You can also select a contact in the contact list,
press the Right Soft Key [Options] > Erase, select Yes
and press the Center Select Key [OK] to delete it.
Locking/Unlocking Contacts
You can lock or unlock the phone contacts in the contact
list and the locked contacts cannot be deleted. The SIM
contacts cannot be locked.
1. Press the Center Select Key to unlock the phone.
Press the Right Soft Key [Contacts] in idle mode.
2. Press the Right Soft Key [Options], select Manage
Contacts > Lock/Unlock and press the Center
Select Key [OK].
3. Press the Center Select Key [MARK] to mark the
contacts you want to lock or unlock, or press the
Right Soft Key [Mark All] to mark all contacts and
then press the Left Soft Key [Done].
Moving/Copying Contacts Between Your
Phone and SIM Card
You can move or copy contacts from or to the SIM card
when your SIM card is inserted into the phone.
48
Page 50

1. Press the Center Select Key to unlock the phone.
Press the Right Soft Key [Contacts] in idle mode.
2. Select a phone or SIM contact and press the Right
Soft Key [Options].
3. Select Move & Copy > Move to SIM Card/Copy to
SIM Card and press the Center Select Key [OK] to
move or copy the phone contact to your SIM card.
Select Move & Copy > Move to Phone/Copy to
Phone and press the Center Select Key [OK] to
move or copy the SIM contact to your phone.
Copying Contacts to the microSD Card
You can copy contacts to a microSD card when it is
inserted into the phone. The contact files are saved in
synched\contact on the microSD card.
1. Press the Center Select Key to unlock the phone.
Press the Right Soft Key [Contacts] in idle mode.
2. Press the Right Soft Key [Options], select Manage
Contacts > Copy To Memory Card and press the
Center Select Key [OK].
3. Press the Center Select Key [MARK] to mark the
contacts, or press the Right Soft Key [Mark All] to
mark all contacts and then press the Left Soft Key
[Done].
4. Select Yes and press the Center Select Key [OK].
Note: You can also copy or move the contacts in the
microSD card to your phone. See “Card Memory” on page
127 for detailed information.
49
Page 51

Sending Contacts via Bluetooth
You can send the contacts (vCards) to the Bluetooth
devices that support vCards.
1. Press the Center Select Key to unlock the phone.
Press the Right Soft Key [Contacts] in idle mode.
2. Select a contact and press the Right Soft Key
[Options].
3. Select Send via Bluetooth and press the Center
Select Key [OK].
4. Press the Center Select Key [MARK] to mark more
contacts, or press the Right Soft Key [Mark All] to
mark all contacts and then press the Left Soft Key
[Done].
5. Follow the on-screen prompts and pair with a new
Bluetooth device or select a previously-paired
Bluetooth device to send the vCards. For more
information about Bluetooth pairing, see “Bluetooth”
on page 87.
Note: Not all Bluetooth devices can receive vCards. Not
all contact information is contained in a vCard.
Grouping Contacts
It’s easier to manage your contacts by grouping them.
You can add, rename, delete the groups or send a
message to all contacts in a group.
50
Page 52

Adding Contacts to a Group
1. Press the Center Select Key to unlock the phone.
Press the Center Select Key [MENU] > Contacts >
Groups.
2. Select a group and press the Right Soft Key
[Options].
3. Select Add or Edit and press the Center Select Key
[OK].
4. Press the Center Select Key [MARK] to mark your
desired contacts and press the Left Soft Key
[Done].
Adding a New Group
1. Press the Center Select Key to unlock the phone.
Press the Center Select Key [MENU] > Contacts >
Groups.
2. Press the Left Soft Key [New].
3. Enter the new group name and press the Center
Select Key [SAVE].
Sending a Message to Group Members
1. Press the Center Select Key to unlock the phone.
Press the Center Select Key [MENU] > Contacts >
Groups.
2. Select a group you want to send a message to and
press the Right Soft Key [Options].
51
Page 53

3. Select New TXT Message, New Picture Message
or New Voice Message and press the Center Select
Key [OK].
4. Write the message and press the Center Select Key
[SEND].
Backup Assistant
Backup Assistant is a wireless service that saves a copy
of your phone’s address book to a secure web site.
Login to your web account and get full access to your
address book. You can view, print, add, delete, and edit
your contacts online.
If you lose, damage, or upgrade your phone, Backup
Assistant will restore your address book to a new or
replacement phone. For more information, please
contact the service provider.
1. Press the Center Select Key to unlock the phone.
Press the Center Select Key [MENU] > Contacts >
Backup Assistant.
2. Follow the on-screen prompts to continue.
In Case of Emergency
This feature allows you to set up 3 emergency contacts
and enter the personal information, which may be helpful
in case of emergency.
Adding an ICE Contact
1. Press the Center Select Key to unlock the phone.
Press the Center Select Key [MENU] > Contacts >
In Case of Emergency.
52
Page 54

2. Select Contact 1, Contact 2 or Contact 3 and press
the Center Select Key [ADD].
3. Select an option in the ADD CONTACT screen and
press the Center Select Key [OK].
• From Contacts: Choose a contact from the
contact list and press the Center Select Key
[OK].
• New Contact: Create a new contact, and then
press the Center Select Key [SAVE].
4. The contact name will be displayed in place of
Contact 1, Contact 2 or Contact 3.
Re-assigning/Unassigning an ICE Contact
1. Press the Center Select Key to unlock the phone.
Press the Center Select Key [MENU] > Contacts >
In Case of Emergency.
2. Select a contact to re-assign or unassign and press
the Right Soft Key [Options], then choose an option.
z Re-assign: Choose another contact in the
contact list or create a new contact for the
assignment.
z Unassign: Delete the contact from the ICE
contact list.
Adding Personal Information
1. Press the Center Select Key to unlock the phone.
Press the Center Select Key [MENU] > Contacts >
In Case of Emergency.
53
Page 55

2. Select Personal Info and press the Center Select
Key [VIEW].
3. Select Note 1, Note 2 or Note 3 and press the
Center Select Key [ADD].
4. Enter the information and press the Center Select
Key [SAVE].
5. The information you entered now appears in place of
Note 1, Note 2 or Note 3.
Erasing Personal Information
1. Press the Center Select Key to unlock the phone.
Press the Center Select Key [MENU] > Contacts >
In Case of Emergency.
2. Select Personal Info and press the Center Select
Key [VIEW].
3. Select a desired note and press the Right Soft Key
[Erase]. Select Yes and press the Center Select
Key [OK] to delete the note.
My Name Card
My Name Card is your personal contact, which you can
send as a vCard via a message or Bluetooth.
Editing My Name Card
1. Press the Center Select Key to unlock the phone.
Press the Center Select Key [MENU] > Contacts >
My Name Card.
2. Press the Center Select Key [EDIT].
54
Page 56

3. Enter your contact information and press the Center
Select Key [SAVE].
Sending My Name Card via Message
1. Press the Center Select Key to unlock the phone.
Press the Center Select Key [MENU] > Contacts >
My Name Card.
2. Press the Right Soft Key [Options], then select
Send via TXT/Picture/Voice Message and press
the Center Select Key [OK].
3. Create a text, picture or voice message with My
Name Card as an attachment, and then press the
Center Select Key [SEND].
Sending My Name Card via Bluetooth
You can send My Name Card to Bluetooth devices that
support vCards.
1. Press the Center Select Key to unlock the phone.
Press the Center Select Key [MENU] > Contacts >
My Name Card.
2. Press the Right Soft Key [Options], then select
Send via Bluetooth and press the Center Select
Key.
3. Follow the on-screen prompts and pair with a new
Bluetooth device or select a previously-paired
Bluetooth device to send My Name Card. For more
information about Bluetooth pairing, see “Bluetooth”
on page 87.
55
Page 57

Messaging
Your phone is able to send text, picture and voice
messages. To access Messaging, press the Center Select
Key [MENU] > Messaging.
Shortcut: To quickly access the message box, press the
Center Select Key to unlock the phone, then press the
Left Soft Key [Message] in idle mode.
Using the Message Key
You can press the Message Key on the keypad to
create a new message.
• From idle mode, press the Message Key to create a
new text message.
• From the Contact List, press the Message Key to
create a new text message addressed to the
highlighted contact’s default number.
• From Recent Calls, press the Message Key to
create a new text message addressed to the
highlighted phone number or contact.
• From My Pictures, press the Message Key to create
a new picture message with the highlighted picture
as an attachment.
• From My Sounds, press the Message Key to create
a new picture message with the highlighted sound as
an attachment.
56
Page 58

Creating and Sending a Text Message
1. Press the Center Select Key to unlock the phone.
Press the Center Select Key [MENU] > Messaging
> New Message > TXT Message.
2. In the To field, enter the phone number or email
address and press the Center Select Key [OK]. Or
press the Right Soft Key [Add] to access the
following options:
• From Contacts: Add the recipients from the
contact list.
• Recent Calls: Add the recipients from the recent
calls list.
• Groups: Add the recipients from the group list.
• To Contacts: Add the phone number you
entered to a new contact, or update an existing
contact with it.
3. Enter the message in the Text field. Press the Right
Soft Key [Options] to access the following options:
• Insert Quick Text: Insert already written
sentences to the message.
• Save As Draft: Save the current message in the
Drafts folder.
• Add: Add Graphic, Animation, Sound, Name
Card or Insert Contact Number/Email to the
message.
• Format Text: Change the Alignment, Font Size,
Font Style, Text Color or Background Color.
57
Page 59

• Priority Level: Set the priority level of the message
to High or Normal.
• Cancel Message: Cancel the message, with the
option to save it in the Drafts folder.
4. Press the Center Select Key [SEND] or press the
Send Key to send the message.
Creating and Sending a Picture
Message
1. Press the Center Select Key to unlock the phone.
Press the Center Select Key [MENU] > Messaging
> New Message > Picture Message.
2. In the To field, enter the phone number or email
address and press the Center Select Key [OK]. Or
press the Right Soft Key [Add] to access the
following options:
• From Contacts: Add the recipients from the
contact list.
• Recent Calls: Add the recipients from the recent
calls list.
• Groups: Add the recipients from the group list.
• To Contacts: Add the phone number you
entered to a new contact, or update an existing
contact with it.
• To Online Album: Send the message to the
Online Album.
3. Enter the message in the Text field.
58
Page 60

4. Select the Picture field and press the Left Soft Key
[My Pics]. Select a picture and press the Center
Select Key [OK] to add the picture.
5. Select the Sound field and press the Left Soft Key
[Sounds]. Select a sound or record a new sound,
and then press the Center Select Key [OK] to add
the sound file.
6. Select the Name Card field and press the Left Soft
Key [Add]. Select My Name Card or From
Contacts to add the name cards.
7. Select the Subject field and enter the subject.
8. Press the Right Soft Key [Options] to access the
following options:
• Preview: View the message before sending.
• Save As Draft: Save the current message in the
Drafts folder.
• Insert Quick Text: Insert already written
sentences in the Text or Subject fields.
• Add Slide: Add a slide to the message.
• Priority Level: Set the priority level of the
message to High or Normal.
• Insert Contact Number/Email: Add the contact
number or Email address in the Text field.
• Remove Picture: Remove the added picture in the
Picture field.
• Remove Sound: Remove the added sound in the
Sound field.
59
Page 61

• Remove Name Card: Remove the added name
card in the Name Card field.
• Remove Slide: Remove the added slide.
• Cancel Message: Cancel the message, with the
option to save it in the Drafts folder.
9. Press the Center Select Key [SEND] or press the
Send Key to send the message.
Creating and Sending a Voice Message
1. Press the Center Select Key to unlock the phone.
Press the Center Select Key [MENU] > Messaging
> New Message > Voice Message.
2. Press the Center Select Key [OK] to start recording
a voice memo. Press the Center Select Key [STOP]
to stop recording and insert the voice memo to the
message.
3. In the To field, enter the phone number or email
address and press the Center Select Key [OK]. Or
press the Right Soft Key [Add] for more options.
4. You can select the Voice field and press the Left
Soft Key [Record] to re-record the voice memo.
5. Select the Text field to enter your message.
6. Select the Name Card field and press the Left Soft
Key [Add]. Select My Name Card or From
Contacts to add the name cards.
7. Select the Subject field and enter the subject.
8. Press the Right Soft Key [Options] to access the
following options:
60
Page 62

• Review: Review the message before sending.
• Save As Draft: Save the current message in the
Drafts folder.
• Insert Quick Text: Insert already written
sentences in the Text or Subject fields.
• Insert Contact Number/Email: Add the contact
number or Email address in the Text field.
• Priority Level: Set the priority level to High or
Normal.
• Remove Recording: Remove the voice memo in
the Voice field.
• Remove Name Card: Remove the added name
card in the Name Card field.
• Cancel Message: Cancel the message, with the
option to save it in the Drafts folder.
9. Press the Center Select Key [SEND] or press the
Send Key to send the message.
Message Folders
Inbox
When the Inbox View is set to Time, the received
messages are saved in the Inbox, and the sent
messages are saved in the Sent folder. You can view the
messages sorted by time.
1. Press the Center Select Key to unlock the phone.
Press the Center Select Key [MENU] > Messaging
> Inbox.
61
Page 63

2. Select a message and press the Right Soft Key
[Options] to access the following options.
• Reply: Reply to the message.
• Reply w. Copy: Reply with a copy of the original
message included.
• Forward: Forward the message.
• Extract Addresses: Extract all phone numbers,
email addresses or URLs in the message.
• Add To Contacts: Save the number of the
sender to the contact list or add it to an existing
contact.
• Message Info: View details of the message.
• Manage Inbox: Mark the desired messages in
the Inbox to erase them, lock/unlock them or
mark them as read/unread.
• Sort By Sender/Sort By Time: List the
messages in the Inbox by sender or by time.
• Sort By Size: List the messages in the Inbox by
size.
3. Press the Left Soft Key [Erase] to delete the
highlighted message or press the Center Select Key
[OPEN] to view it.
Note: You can set the Inbox View by Time or by Contact.
See “Messaging - Messaging Settings”.
62
Page 64

Messages
The default Inbox View is set to Contact. The received
and sent messages are saved in the combined
Messages folder. You can view the messages grouped
by a contact or phone number.
1. Press the Center Select Key to unlock the phone.
Press the Center Select Key [MENU] > Messaging
> Messages.
2. Select a contact or phone number and press the
Right Soft Key [Options] to access the following
options.
• Erase: Delete all messages grouped by the
highlighted contact or phone number.
• Add To Contacts: Save the contact number to
the contact list or add it to an existing contact.
• Manage Messages: Mark the desired messages
in the Messages folder to erase them,
lock/unlock them or mark them as read/unread.
• Sort Alphabetically/Sort By Time: List the
message threads in alphabetical order or by time.
• Messaging Menu: Go back to the Messaging
menu.
3. To reply to the highlighted contact or phone number,
press the Left Soft Key [Reply]. You can send a text,
picture or voice message.
4. To view a message thread, select the contact or
phone number and press the Center Select Key
[OPEN]. Enter your message in the text box and
press the Center Select Key [SEND] to reply.
63
Page 65

Sent
When the Inbox View is set to Time, the sent messages
are saved in the Sent folder. You can view the messages
sorted by time.
1. Press the Center Select Key to unlock the phone.
Press the Center Select Key [MENU] > Messaging
> Sent.
2. Select a message and press the Right Soft Key
[Options] to access the following options.
• Forward: Forward the message.
• Resend: Send the message again. You can also
add new recipients.
• Add To Contacts: Save the number of the
recipient(s) to the contact list or add it to an
existing contact.
• Manage Sent: Mark the desired messages in the
Sent folder to erase them or lock/unlock them.
• Message Info: View details of the message.
3. Press the Left Soft Key [Erase] to delete the
highlighted message or press the Center Select Key
[OPEN] to view it.
Drafts
The Drafts folder contains unfinished text messages,
picture messages and voice messages. In this folder you
can complete and send your messages.
64
Page 66

1. Press the Center Select Key to unlock the phone.
Press the Center Select Key [MENU] > Messaging
> Drafts.
2. Select a message and press the Right Soft Key
[Options] to access the following options.
• Send: Send the draft message.
• Add To Contacts: Save the number of the
recipient(s) to the contact list or add it to an
existing contact.
• Manage Drafts: Mark the desired messages in
the Drafts folder to erase them or lock/unlock
them.
3. Press the Left Soft Key [Erase] to delete the
highlighted message or press the Center Select Key
[EDIT] to edit the message.
Erasing Messages
You can delete all messages in the Inbox, Sent or Drafts
folders. The locked messages cannot be erased.
1. Press the Center Select Key to unlock the phone.
Press the Center Select Key [MENU] > Messaging
and press the Right Soft Key [Options] for the
following options.
• Erase Inbox: Erase all messages or only read
messages in the Inbox.
• Erase Sent: Erase all messages in the Sent
folder.
• Erase Drafts: Erase all messages in the Drafts
folder.
65
Page 67

• Erase All: Erase all messages or all except
unread messages in all message folders.
2. Select the desired option and press the Center
Select Key [OK] to confirm.
Note: When the Inbox View is set to Contact (default
setting), you can erase all Sent/Received messages in
the Messages folder.
Backing Up/Restoring Messages
When a microSD card is inserted in your phone, you can
copy all your messages to the card, or restore the
messages in the card to your phone.
Backing Up Messages
1. Press the Center Select Key to unlock the phone.
Press the Center Select Key [MENU] > Messaging
and press the Right Soft Key [Options].
2. Select Backup & Restore > Backup and press the
Center Select Key [OK]. If you have locked the
microSD card, you need to exit the card lock.
3. You may edit the backup file name and then press
the Center Select Key [OK].
Restoring Messages
1. Press the Center Select Key to unlock the phone.
Press the Center Select Key [MENU] > Messaging
and press the Right Soft Key [Options].
66
Page 68

2. Select Backup & Restore > Restore and press the
Center Select Key [OK].
3. Select a backup file and press the Left Soft Key
[Restore]. After the restoring, you can check the
message folders to view the restored messages.
Voicemail
All unanswered calls to your phone can be transferred to
voicemail, even if your phone is powered off. It’s
recommended to set up your voicemail and personal
greeting as soon as you activate your phone. For more
information, contact your service provider.
1. Press the Center Select Key to unlock the phone.
To dial your voicemail directly, enter your voicemail
number (the default number is *86) in idle mode and
press the Send Key. Or press the Center Select
Key [MENU] > Messaging > Voicemail and press
the Center Select Key [CALL] to dial.
2. Follow the prompts to enter your password and listen
to your messages.
Shortcut: In idle mode, press and hold 1 to dial your
voicemail.
Emergency Alerts
You can open the emergency alerts box to view the
emergency alerts, such as presidential, extreme, severe
and AMBER alerts.
1. Press the Center Select Key to unlock the phone.
Press the Center Select Key [MENU] > Messaging
> Emergency Alerts.
67
Page 69

2. Select an emergency alert and press the Center
Select Key [OK] to view it.
Note: You can enable or disable extreme/severe/AMBER
alerts by selecting Emergency Alerts > Receive Alerts
in Messaging Settings.
Mobile IM
Mobile IM allows you to send and receive instant
messages on your phone.
1. Press the Center Select Key to unlock the phone.
Press the Center Select Key [MENU] > Messaging
> Mobile IM. When you launch Mobile IM for the first
time, you’ll be prompted to accept the terms and
conditions.
2. Select either AIM, Windows Live, or Yahoo! and
press the Center Select Key.
3. Enter the user ID and password to sign in and use
the IM application.
Mobile Email
1. Press the Center Select Key to unlock the phone.
Press the Center Select Key [MENU] > Messaging
> Mobile Email or press the Center Select Key
[MENU] > Mobile Email. When you launch Mobile
Email for the first time, you’ll be prompted to accept
the terms of services.
2. Follow the on-screen prompts and functions.
68
Page 70

Messaging Settings
1. Press the Center Select Key to unlock the phone.
Press the Center Select Key [MENU] > Messaging
and then press the Left Soft Key [Settings].
2. Select one of the following options and press the
Center Select Key [OK].
• Inbox View: Set the Inbox View. If the Inbox
View by Time is set, the received and sent
messages are separated in the Inbox and Sent
folders. If the Inbox View by Contact (default
setting) is set, the received and sent messages
are saved in the combined Messages folder.
• Entry Mode: Choose one as the default text
entry modes.
• Auto Save Sent: Set the default save mode for
the messages you send. Choose On to save all
sent messages in the Sent folder. Choose Off to
discard all sent messages. Choose Prompt to
have the prompt after a message is sent.
• Auto Erase Inbox: Choose On to erase the
oldest read message automatically from the
Inbox when the Inbox is full and a new message
arrives. Choose Off to disable this feature and
you can delete the messages manually when the
Inbox is full.
• Messaging Font Size: Set the message font
size to Normal or Large.
• TXT Auto View: Choose On to display text
messages automatically when they arrive.
Choose Off to disable this feature and have the
phone prompt you.
69
Page 71

• Multimedia Auto Receive: Choose On to
download the picture/voice messages
automatically. Choose Off to have the phone
prompt you to download the picture/voice
messages.
• Quick Text: Create or edit the quick text which
you can add to a message. Press the Center
Select Key [EDIT] to edit a quick text. Press the
Left Soft Key [Erase] to delete one entry.
Select Options > New/Move to add a new quick
text or move a saved one.
• Emergency Alerts: Choose to receive extreme,
severe and AMBER alerts, and set the alert
reminder and vibration.
• Voicemail #: Enter a new voicemail number or
edit the voicemail number. The default number is
*86.
• Callback #: Add a default callback number so
that the recipient can call back or reply. Choose
On and enter the callback number, then press
the Center Select Key [OK].
• Signature: Choose Custom to add a signature
that can be inserted at the end of a text, picture
or voice message. Choose None to disable the
signature.
• Delivery Receipt: Choose On to be notified
when the message you send is delivered. The
icon for the sent message changes. Choose Off
to disable notification.
70
Page 72

Mobile Web
The Opera Mini web browser is preinstalled in your phone,
which allows you to access the Internet with ease. This
browser compresses the data of the web pages you visit
and speeds up the browsing experience while saving your
data airtime.
Press the Center Select Key to unlock the phone, then
press the Center Select Key [MENU] > Mobile Web or
Center Select Key [MENU] > Media Center > Mobile
Web to launch the browser.
Opening Web Pages
In the browser, you can open a web page in the following
ways.
• Use the Directional Key to highlight the address bar
on the top of screen and press the Center Select
Key [Edit] to enter the website address you want to
browse, and then press the Center Select Key [Go].
• Use the Directional Key to highlight the search bar
below the address bar and press the Center Select
Key [Edit] to enter the information you want to
search, and then press the Center Select Key
[Search].
• Use the Directional Key to select a preset website
thumbnail and press the Center Select Key [Open].
• Press the Left Soft Key [Menu] and highlight
and then press the Center Select Key [Favorites].
Select a website and press the Center Select Key
[Open].
71
Page 73

Opening a New Browser Tab
The Opera Mini browser supports multi-tab browsing. You
can open a different web page in each tab.
1. Use the Directional Key to highlight
upper right of the browser screen and press the
Center Select Key [Tabs] to view the tabs.
2. Select
[OK].
3. Press the Center Select Key [Edit] to enter the
website address, and then press the Center Select
Key [Go].
Note: To close a tab, select the tab you want to close and
press the Right Soft Key [Close].
and press the Center Select Key
on the
Setting a Speed Dial
The website thumbnails in the main screen of the browser
are for speed dial, which enables quick access of certain
web pages.
1. Use the Directional Key to highlight an unassigned
speed dial
Center Select Key [Add].
2. Enter the website address and press the Center
Select Key [Add].
You can also select an assigned speed dial and press the
Right Soft Key [Options] > Clear/Edit to delete or edit
the website address.
in the browser screen and press the
72
Page 74

Adding Favorites
You can add a web page in Favorites, so that you can
open it easily next time.
1. Press the Left Soft Key [Menu] in the browser
screen and highlight
Select Key [Favorites].
2. Highlight
[Add].
3. Edit the website Title and Address, and choose a
Folder for the website.
4. Press the Left Soft Key [Add].
Add and press the Center Select Key
and then press the Center
Browser Settings
1. Press the Left Soft Key [Menu] in the browser
screen and highlight
Select Key [More].
2. Select Settings and press the Center Select Key.
You can set the following options.
• Display Mode: Set the display mode as Page
View, Detail View or Mobile View.
• Security: Enable/disable Cookies or Remember
Password feature, and view the certificate details.
• Manage Memory: Clear Cookies, History,
Passwords or all data.
• Restore Defaults: Restore defaults for Display
Mode, Security settings, Font Size or all browser
settings.
and then press the Center
73
Page 75

• Information: View the web page and browser
information.
• Font Size: Change the size of the text in a web
page to Small, Medium, or Large.
Exiting the Browser
1. Press the Left Soft Key [Menu] in the browser
screen and then press the Right Soft Key [Exit].
2. Select Yes and press the Center Select Key [Select]
to exit the browser.
74
Page 76

Media Center
Apps
Apps is Verizon’s mobile storefront which allows you to
download all kinds of applications and games. You can
search, purchase, and use applications from your phone
in Apps.
Shopping Applications
1. Press the Center Select Key to unlock the phone.
Press the Center Select Key [MENU] > Apps or
press the Center Select Key [MENU] > Media
Center > Apps.
2. Highlight SHOP APPS and press the Center Select
Key [OK].
3. Follow the on-screen prompts to continue.
Note: Charges may occur according to your data plan.
Searching for an Application
You can search the entire catalog of available
applications for your desired application.
1. Press the Center Select Key to unlock the phone.
Press the Center Select Key [MENU] > Apps or
press the Center Select Key [MENU] > Media
Center > Apps.
2. Highlight SHOP APPS and press the Left Soft Key
[Search].
75
Page 77

3. Enter the keywords and press the Center Select
Key [Search].
Application Folder
Application folders allow you to organize the applications
you purchased into your own categories. You can move
any of your applications into a folder.
To create an application folder:
1. Press the Center Select Key to unlock the phone.
Press the Center Select Key [MENU] > Apps or
press the Center Select Key [MENU] > Media
Center > Apps.
2. Select Add Folder and press the Center Select Key
[OK].
3. Use the Directional Keys to select a folder icon and
press the Center Select Key [Select] to confirm.
4. Highlight the Name field and enter the folder name,
then press the Right Soft Key [Save].
5. Press the Left Soft Key [Yes] to save.
To add an application into a folder:
1. Highlight an application in Apps and press the Right
Soft Key [Options] > Add to Folder.
2. Select a folder and press the Center Select Key
[Select].
76
Page 78

To remove an application from a folder:
1. Open a folder and select the application you want to
remove from the folder.
2. Press the Right Soft Key [Options] > Remove from
Folder.
Bing Search
TM
Bing
Search allows you to get free maps, local business
listings, nearby services and other information right on
your phone when you need them.
1. Press the Center Select Key to unlock the phone.
Press the Center Select Key [MENU] > Media
Center > Search to access Bing Search. Follow the
on-screen prompts to continue. You’ll be prompted to
accept the terms of services for the first time.
2. Enter your search information and press the Center
Select Key.
My Music
You can use My Music to play and manage music files
stored on your phone and microSD card. Press the
Center Select Key to unlock the phone. Press the Center
Select Key [MENU] > Media Center > Music & Tones >
My Music to access My Music.
IMPORTANT: To play music files on the microSD card,
please store your music files in synched\music on the
microSD card. The phone will load the music files in this
directory.
77
Page 79

Playing Music
1. Press the Center Select Key to unlock the phone.
Press the Music Key in idle mode to access My
Music. The phone will check your phone memory and
the microSD card (if inserted) for music files.
2. Select All Songs, Artists, Genres, Albums or
Playlists and press the Center Select Key [OK] to
view the songs or playlists.
3. Choose a song or playlist and press the Center
Select Key [PLAY].
4. In the music player, you can:
• Press the Center Select Key to pause or
continue the playing.
• Press the Directional Key left or right to skip to
the previous or next song.
• Press and hold the Directional Key left or right to
rewind or fast forward.
• Press the Directional Key up or down to display
the current playlist.
• Press the Volume Keys to adjust the volume. Or
press the Left Soft Key [Mute/Unmute] to mute
or unmute the playing.
• Press the Right Soft Key [Options] for more
options:
¾ Exit Player: Stop the playing and close the
music player.
¾ Music Only Mode: Turning this option on
will disable all wireless communications.
78
Page 80

¾ Song Info: View detailed song information.
¾ Home Screen: Return to idle mode and the
music is still playing.
¾ Repeat: Set the repeat mode (Repeat All,
Repeat One or Off).
¾ Shuffle: Turn on or off the shuffle.
• Press the End/Power Key to go back to idle
mode and the music will continue playing in the
background. You can check the playing
information on the screen.
Tip: When the music is playing in the background, press
the Music Key in idle mode to open the player, or press
the End/Power Key in idle mode to stop the playing.
Creating a Playlist
1. Press the Center Select Key to unlock the phone.
Press the Music Key in idle mode. Select Playlists
and press the Center Select Key [OK].
2. Select Yes and press the Center Select Key [OK] if
there’re no playlists available. Or press the Right
Soft Key [Options] and select Create New then
press the Center Select Key [OK] if you have
created a playlist.
3. Mark your desired songs and press the Left Soft
Key [Done].
4. Edit the playlist name and press the Center Select
Key [SAVE].
79
Page 81

Adding Songs to a Playlist
1. Press the Center Select Key to unlock the phone.
Press the Music Key in idle mode. Select Playlists
and press the Center Select Key [OK].
2. Select a playlist and press the Left Soft Key [View].
3. Press the Right Soft Key [Options] and select Add
Songs then press the Center Select Key [OK].
4. Mark the songs you want to add and press the Left
Soft Key [Done].
Managing My Music
1. Press the Center Select Key to unlock the phone.
Press the Music Key in idle mode. Select Manage
My Music and press the Center Select Key [OK].
2. The following options are available:
• Erase: Mark the songs and press the Left Soft
Key [Done] to delete them. The locked songs
cannot be deleted.
• Lock/Unlock: Mark the songs and press the Left
Soft Key [Done] to lock or unlock them. Only
the songs in the phone memory can be locked.
• Move To Memory Card/Move To Phone: Mark
the songs and press the Left Soft Key [Done] to
move them to the microSD card or phone
memory. The locked songs cannot be moved.
Note: Please insert the microSD card before moving the
songs. The songs moved to the microSD card are saved
in synched\music.
80
Page 82

My Sounds
In My Sounds, you can play and use the sound files
stored on your phone and microSD card.
IMPORTANT: To use the sound files on the microSD card,
please store them in synched\sounds on the microSD
card. The phone will load the sound files in this directory.
Recording a New Sound
1. Press the Center Select Key to unlock the phone.
Press the Center Select Key [MENU] > Media
Center > Music & Tones > My Sounds.
2. Select Record New and press the Center Select
Key [OK].
3. Press the Center Select Key [OK] to start recording
and press the Center Select Key [STOP] to stop
recording.
Playing and Using a Sound
1. Press the Center Select Key to unlock the phone.
Press the Center Select Key [MENU] > Media
Center > Music & Tones > My Sounds.
2. Select a sound and press the Center Select Key
[PLAY] to play it.
3. Press the Left Soft Key [Set As] to set as default
Ringtone, Contact ID or Alert Sounds (for All
Messages, TXT Message, Mul timedia Message
or Voicemail) by pressing the Center Select Key
[OK].
81
Page 83

4. Press the Right Soft Key [Options] for more
options:
• Send: Send the sound.
• Rename: Rename the sound. (Not available for
preloaded sounds.)
• Move To Memory Card/Move To Phone: Move
the sound to the microSD card or phone memory.
The locked sound cannot be moved. (Not
available for preloaded sounds.)
• Lock/Unlock: Lock or unlock the sound. Only the
sounds in the phone memory can be locked.
(Not available for preloaded sounds.)
• Erase: Delete the sound. The locked sounds
cannot be deleted. (Not available for preloaded
sounds.)
• Erase All: Delete all sounds in the microSD card
or phone. (Not available for preloaded sounds.)
• File Info: View detailed sound information.
Note: Please insert the microSD card before moving the
sounds. The sounds moved to the microSD card are
saved in synched\sounds.
My Ringtones
You can play and use the ringtones.
1. Press the Center Select Key to unlock the phone.
Press the Center Select Key [MENU] > Media
Center > Music & Tones > My Ringtones.
82
Page 84

2. Select a ringtone and press the Center Select Key
[PLAY] to play it.
3. Press the Left Soft Key [Set As] to set a preloaded
ringtone as default Ringtone, Contact ID or Alert
Sounds (for All Messages, TXT Message,
Multimedia Message or Voicemail) by pressing the
Center Select Key [OK].
Taking a Picture
1. Press the Center Select Key to unlock the phone.
Press the Center Select Key [MENU] > Media
Center > Pictures > Take Picture.
Shortcut: Press and hold the Camera Key in idle
mode to turn on the camera.
2. Press the Directional Key up or down to adjust the
brightness. Press the Directional Key left or right to
zoom out or in (except for the 1600X1200 resolution
setting).
3. Press the Right Soft Key [Options] to access the
camera options. Then select an option and press the
Directional Key up or down to set each option.
• Flash Lamp: Choose the flash mode from Auto
Flash, Only This Shot, Off and On.
• White Balance: Choose from Auto, Darkness,
Fluorescent, Tungsten, Cloudy and Sunny. You
can select Darkness to take better pictures in
low light levels.
• Color Effects: Choose from Normal, Negative,
Black & White and Antique.
83
Page 85

• Self Timer: Choose from Off, 10 Seconds, 5
Seconds and 3 Seconds.
• Shutter Sound: Choose from Shutter, Ready! 1
2 3, Say “Cheez” and Silent.
• Resolution: Choose from 1600x1200, 1280x960,
800x600, 640x480 and 320x240.
• Save Option: Choose Phone to save the new
pictures in the phone or choose Card to save
them in the microSD card.
4. Press the Center Select Key [TAKE] or press the
Camera Key to take a picture.
5. Press the Left Soft Key [Save] to save the picture in
My Pictures or press the Right Soft Key [Erase] to
delete it. You can also press the Center Select Key
[SEND] to send it via a picture message.
Warning: Keep a safe distance when using the
flash. Do not point the flash toward people or
animals’ eyes.
Viewing and Managing My Pictures
In My Pictures, you can view and manage all taken or
downloaded pictures, and the pictures stored on your
phone and microSD card.
IMPORTANT: To view the pictures on the microSD card,
please store them in synched\pics on the microSD card.
The phone will load the pictures in this directory.
84
Page 86

1. Press the Center Select Key to unlock the phone.
Press the Center Select Key [MENU] > My
Pictures.
2. Select a picture and press the Center Select Key
[VIEW] to view it.
3. Select a picture and press the Left Soft Key [Erase]
to delete it. The preloaded and locked pictures
cannot be deleted.
4. Select a picture and press the Right Soft Key
[Options] for more options:
• Send: Send the picture. Not all pictures can be
sent.
• Set As: Set the picture as Wallpaper or a
Picture ID.
• Take Picture: Open the camera to take new
pictures.
• Manage Pictures: Manage the pictures stored
on your phone and microSD card. (Not available
for preloaded pictures.)
¾ Erase: Mark the pictures and delete them.
The locked pictures cannot be deleted.
¾ Lock/Unlock: Mark the pictures and
lock/unlock them. Only the pictures in the
phone memory can be locked.
¾ Move To Phone/Move To Memory Card:
Mark the pictures and move them to the
phone memory or microSD card. The
locked pictures cannot be moved.
85
Page 87

• Rename: Rename the picture. (Not available for
preloaded pictures.)
• File Info: View detailed picture information.
Note: Please insert the microSD card before moving the
pictures. The pictures moved to the microSD card are
saved in synched\pics.
Online Album
1. Press the Center Select Key to unlock the phone.
Press the Center Select Key [MENU] > Media
Center > Pictures > Online Album.
2. The browser launches and the Online Album sign-on
screen appears.
3. Follow the on-screen prompts.
86
Page 88

Bluetooth®
Your phone is capable of connecting to a variety of
Bluetooth wireless accessories. It allows you to transfer
data between Bluetooth devices, talk with a Bluetooth
wireless earphone, etc. The approximate range for
Bluetooth wireless technology is up to 30 feet (10
meters).
This device is compliant with Bluetooth specifications,
supporting the following profiles: Headset, Handsfree,
Stereo, Phonebook Access and Object Push for vCard
and vCalendar.
Turning Bluetooth On or Off
1. Press the Center Select Key to unlock the phone.
Press the Center Select Key [MENU] > Settings &
Tools > Bluetooth Menu.
2. Press the Left Soft Key [Turn On/Turn Off] to turn
Bluetooth on or off.
Pairing With a Bluetooth Device
To pair with another Bluetooth device, you need to turn
the Bluetooth of both devices on and enable the other
device’s Bluetooth discoverable mode.
1. Press the Center Select Key to unlock the phone.
Press the Center Select Key [MENU] > Settings &
Tools > Bluetooth Menu > Add New Device.
87
Page 89

2. The phone will prompt you to place the device you
are connecting to in discoverable mode. Press the
Center Select Key [OK] to continue.
3. A list of visible Bluetooth devices in range will be
shown. Select the Bluetooth device to be paired to
and press the Center Select Key [PAIR].
4. The phone will prompt you for the passkey (if
matching codes are not found). Enter the passkey
and press the Center Select Key [SET].
5. Select Always Ask or Always Connect and press
the Center Select Key [OK] to set the incoming
security for the device.
6. Once paired, you will see the device in the Bluetooth
menu.
7. Select a paired device and press the Right Soft Key
[Options] to access the following options.
• Remove Device: Remove the paired device from
the list.
• Remove All Devices: Remove all paired
devices.
• Rename Device: Rename the paired device.
• Incoming Security: Set the incoming security
(Always Ask or Always connect) for the paired
device.
• Service Discovery: View the Bluetooth services
supported by the paired device.
• Device Info: View the information of the paired
device.
88
Page 90

• Send Name Card Via Bluetooth: Send contact
information (vCard) to the paired device.
• Send V-calendar Via Bluetooth: Send calendar
events (vCalendar) to the paired device.
• Send Pictures Via Bluetooth: Send pictures in
My Pictures to the paired device.
• Send Sounds Via Bluetooth: Send sounds in
My Sounds to the paired device.
Bluetooth Settings
In the Bluetooth menu, highlight Add New Device and
press the Right Soft Key [Options] to access the
following options.
• My Phone Name: Edit your phone name which
appears on other Bluetooth devices when your
phone is located.
• Discovery Mode: Select On to allow other
Bluetooth devices to find your phone, or select Off
to disable the discovery mode.
Note: After selecting On, other users have three
minutes to see your accessibility, after which the
discovery mode will automatically turn off.
• Supported Profiles: View the profiles that your
phone can support. Highlight a profile and press the
Center Select Key [VIEW] to view the description.
89
Page 91

Tools
Voice Commands
Voice Commands is advanced voice recognition software
that can be used to activate a wide variety of functions on
your phone.
1. Press the Center Select Key to unlock the phone.
Press the Center Select Key [MENU] > Settings &
Tools > Tools > Voice Commands.
Shortcut: Press the Voice Commands Key in idle
mode to access Voice Commands.
2. The phone displays the Voice Commands menu and
prompts you to say the following name of the command
you want to use. To complete your task, simply follow
the voice prompts.
• Call <Name or #>
To make a call, say “Call” and the command
system will prompt you for the name or phone
number. You can state the name and number
type of the contact (for example, “Call John
Work ”) to dial the contact’s phone number
directly.
When using the Call command, speak clearly
and say the name exactly as it is entered in our
contact list.
90
Page 92

• Send <MSG Type >
To create a message, say “Send” and the
command system will prompt you for the type of
message. After choosing the message type,
you will be prompted for the contact name,
number or group. You can say a full-sentence
command, which states the message type and
the name or number of the contact (for example,
“Send Text Message to Bob Smith”), and the
voice command system will automatically start a
text message. If the name has more than one
number, the system will prompt you for the
number type.
When using the Send command, speak clearly
and say the name, number, or group exactly as it
is entered in your contact list.
• Go To <Menu >
To access a menu within the phone, say “Go to”
command. For example, “Go to Calendar”. If no
menu option is stated, a list of options will be
provided.
• Check <Item>
Say “Check” and the command system allows you
to check out device information including Status,
Voicemail, Messages, Missed Calls, Time,
Signal Strength, Battery, Volume, Balance,
Minutes, Payment and My Number.
91
Page 93

• Contact <Name>
Say “Contact” and the command system allows
you to access information for a contact. For
example, stating “Contact Bob Smith” will
display all the detaile d information of that contact.
You will also be prompted to call, modify or er ase
the contact, or create a new contact.
When using the Contact command, speak
clearly and say the name exactly as it is entered
in your contact list.
• Search
The “Search” command starts an application that
allows you to search for information over the
Internet. Enter your search text and press the
Center Select Key.
• Redial
To make a call to the last number that you dialed,
say “Redial”.
• Play <Playlist>
To open the music player and play all your
songs, say “Play All Songs”. To play an
individual playlist, say “Play” followed by the
playlist name.
• My Verizon
The “My Verizon” command allows you to
access the detailed information about your
Verizon Wireless account.
92
Page 94

• Help
The “Help” command allows you to view a general
guideline about using Voice Commands.
Note: If you are frequently prompted to repeat a
command, press the Right Soft Key [Settings] >
Adaptation, and adapt the system to your voice.
Setting Voice Commands
1. Press the Center Select Key to unlock the phone.
Press the Voice Commands Key in idle mode to
access Voice Commands.
2. Press the Right Soft Key [Settings] to access the
following options.
• Confirmation: Choose if the Command System
prompts you with a list of potential matches.
Select Automatic, Always Confirm or Never
Confirm and press the Center Select Key
[OK].
• Sensitivity: Control how the system filters for
matches. Select one of the following options and
press the Center Select Key [OK]:
¾ Most Sensitive: The voice commands
system will increase the sensitivity and
displays more potential matches. If you are
frequently asked to try again, select Most
Sensitive.
¾ Recommended: The voice commands
system will control the sensitivity
automatically.
93
Page 95

¾ Least Sensitive: The voice commands
system will decrease the sensitivity to filter
out more potential matches.
• Adaptation: Adaptation is the process of
optimizing the voice recognition software to
your voice. Adaptation requires recording your
voice, which is then used to customize the voice
recognition system.
1. Select Adapt Voice and press the Center
Select Key [OK].
2. Press the Center Select Key [OK] to begin.
Adaptation will take a few minutes, and you
should be in a quiet environment.
3. Follow the on-screen prompts to complete
the adaptation.
• Prompts: Select settings for the voice
commands prompts.
¾ Mode: Select the level of audio guidance
provided by the system from Prompts,
Readout + Alerts, Readout, or Tones
Only.
¾ Audio playback: Choose whether the audio
is played through the Speakerphone or
Earpiece.
¾ Timeout: Control how long the system
listens for your command before timing out.
Choose 5 seconds or 10 seconds.
• About: View the information about Voice
Commands.
94
Page 96

Calculator
Your phone has a basic calculator for addition,
subtraction, multiplication and division.
Press the Center Select Key to unlock the phone. Press
the Center Select Key [MENU] > Settings & Tools >
Tools > Calculator and use the keypad to operate.
• Press the Directional Key to select a mathematical
function (add, subtract, multiply or divide).
• Press the Center Select Key to perform the
calculation.
• Press the * Key to insert a decimal point.
• Press the # Key to change the sign.
• Press the Left Soft Key [Clear] to clear the inputs
and result.
• Press the Right Soft Key [Operators] to insert ( , ),
or Exponent.
Tip Calculator
1. Press the Center Select Key to unlock the phone.
Press the Center Select Key [MENU] > Settings &
Tools > Tools > Tip Calculator.
2. Enter the Total bill amount, adjust the Tip
percentage, and set the Split for the number of
people paying.
3. The calculator automatically displays the tip and
the share of the bill for each person.
95
Page 97

Calendar
You can use the function to arrange and remind you of
your upcoming events.
Shortcut: In idle mode, press the Directional Key right to
access the My Shortcuts menu, select Calendar and
press the Center Select Key [OK].
Adding a New Event
1. Press the Center Select Key to unlock the phone.
Press the Center Select Key [MENU] > Settings &
Tools > Tools > Calendar.
2. Press the Directional Key to highlight a date.
3. Press the Left Soft Key [Add] to add a new event.
4. Enter the subject, scroll down and press the Left Soft
Key [Set] to set other event settings including Start
Time, End Time, Start Date, End Date, Recurrence,
Alert Time, Reminder, Alert Tone and Vibrate.
5. Press the Center Select Key [SAVE].
Viewing an Event
1. Press the Center Select Key to unlock the phone.
Press the Center Select Key [MENU] > Settings &
Tools > Tools > Calender.
2. Press the Directional Key to highlight a scheduled
day.
3. Press the Center Select Key [VIEW] to view the
event of the highlighted day.
96
Page 98

4. Press the Center Select Key [VIEW] again to see
detailed information about the event.
Calendar Options
From the calendar view, press the Right Soft Key
[Options] to access the calendar options.
• Weekly View/Monthly View: Choose to display the
calendar in weekly view or monthly view.
• Go To Date: Specify a date to view.
• Erase All: Delete all events.
• Erase All Old: Delete all past events.
• Search: Enter the subject in the Go To field to search
for the matched events.
Alarm Clock
Shortcut: In idle mode, press the Directional Key right to
access the My Shortcuts menu, select Alarm Clock and
press the Center Select Key [OK].
Adding a New Alarm
1. Press the Center Select Key to unlock the phone.
Press the Center Select Key [MENU] > Settings &
Tools > Tools > Alarm Clock.
2. Select an alarm entry and press the Center Select
Key [OK].
97
Page 99

3. From the Turn On/Off field press the Left Soft Key
[Set] to turn the alarm On or Off. Scroll down to adjust
the remaining settings, including Set Time, Repeat
and Ringtone.
4. Press the Center Select Key [SAVE].
Alarm Options
From the Alarm Clock menu, highlight an existing alarm
and press the Right Soft Key [Options] to access the
following options.
• Turn Off/On: Turn off or turn on the alarm.
• Reset: Delete the alarm.
• Reset All: Delete all alarms.
Stop Watch
1. Press the Center Select Key to unlock the phone.
Press the Center Select Key [MENU] > Settings &
Tools > Tools > Stop Watch.
2. Press the Center Select Key [START] to start
timing.
3. Press the Left Soft Key [Lap] to record lap times.
4. Press the Center Select Key [STOP] to stop timing.
5. Press the Right Soft Key [Reset] to clear the
records.
World Clock
View the local time and the time of other cities around the
world.
98
Page 100

1. Press the Center Select Key to unlock the phone.
Press the Center Select Key [MENU] > Settings &
Tools > Tools > World Clock.
2. Press the Directional Key left or right to display
different cities and time zones.
Note: Press the Left Soft Key [DST] to enable or disable
daylight savings time. Press the Right Soft Key [Cities]
to open the city list and set a desired city as the local city
by pressing the Center Select Key [OK].
Notepad
You can create, edit or erase notes on your phone.
1. Press the Center Select Key to unlock the phone.
Press the Center Select Key [MENU] > Settings &
Tools > Tools > Notepad.
2. Press the Left Soft Key [Add] to add a new note.
3. Enter the note and press the Center Select Key
[SAVE] to save it.
4. Highlight a note in the notepad list and press the Right
Soft Key [Options] > Erase/Erase All to delete the
highlighted note or all notes.
5. Select Yes and press the Center Select Key [OK].
USB Mass Storage
You can use the USB mass storage feature to transfer
data between the microSD card and PC.
1. Insert the microSD card into your phone.
2. Connect your phone to the PC with a USB cable.
99
 Loading...