

Page 1
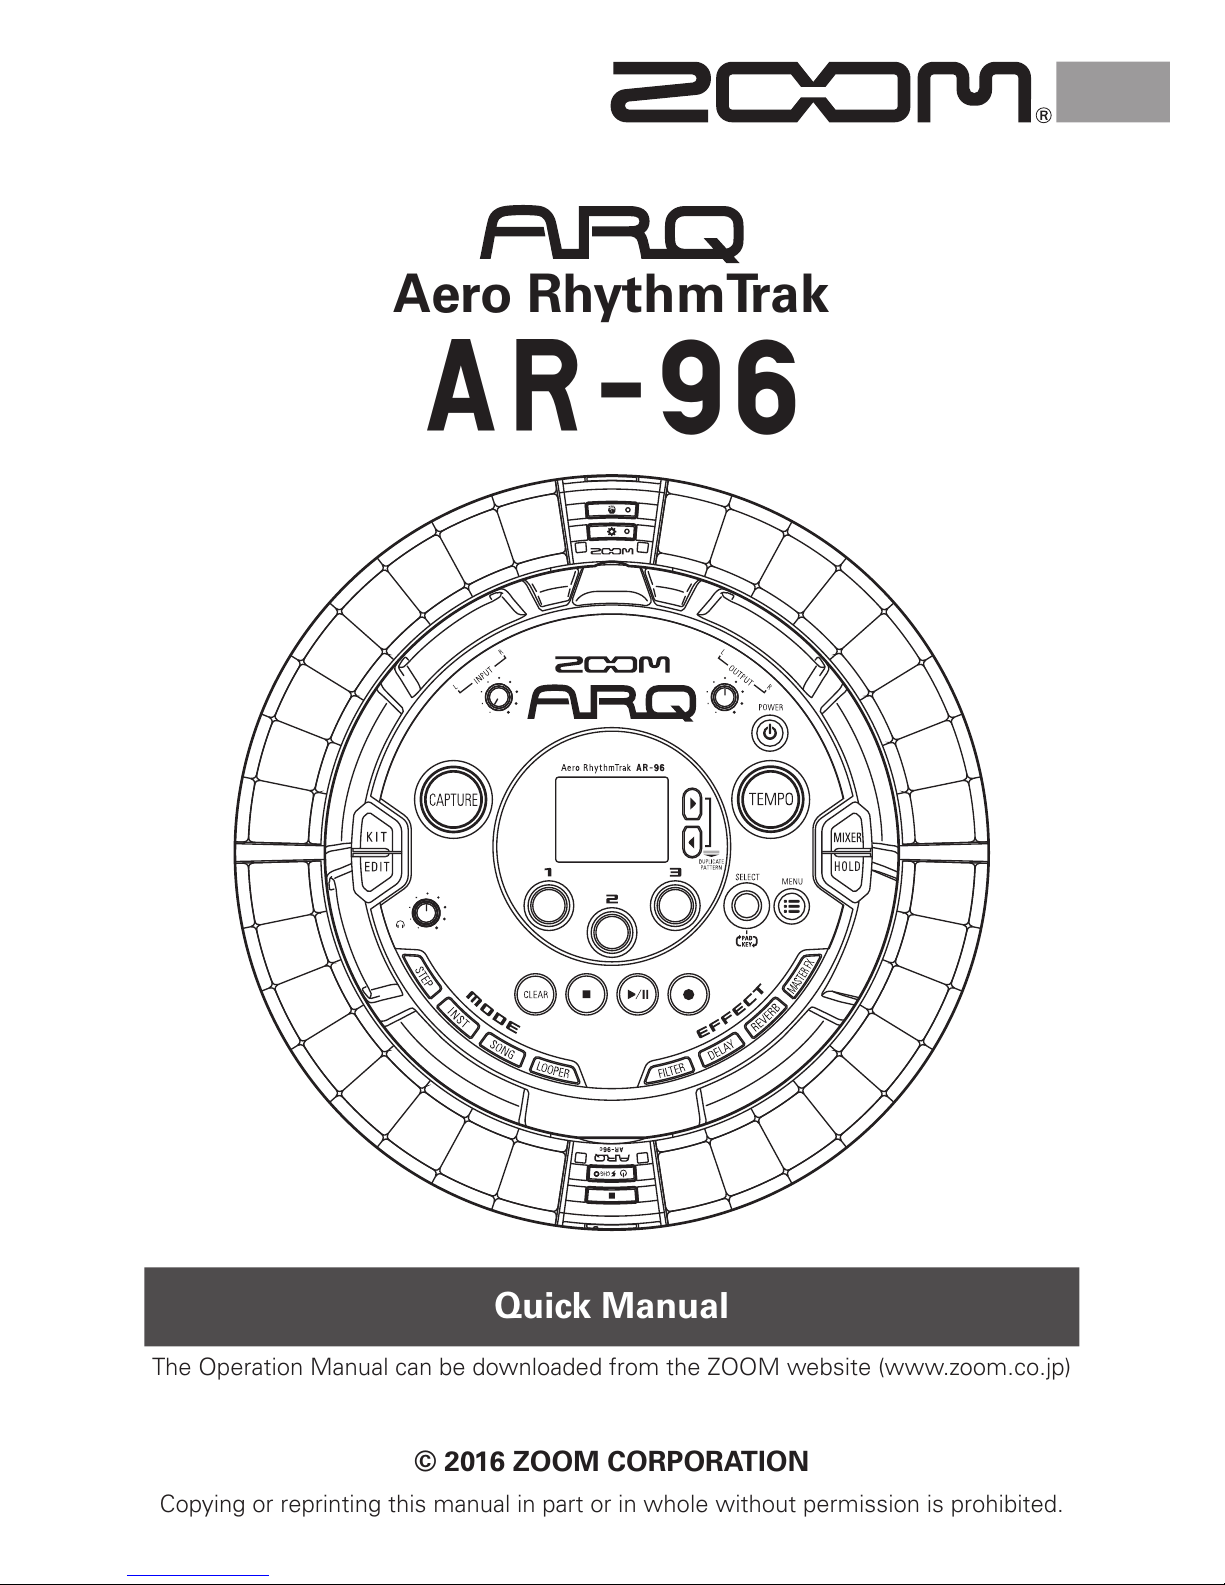
Aero RhythmTrak
A
Quick Manual
© 2016 ZOOM CORPORATION
Copying or reprinting this manual in part or in whole without permission is prohibited.
The Operation Manual can be downloaded from the ZOOM website (www.zoom.co.jp)
Page 2
Usage and Safety Precautions .......................3
Introduction ...................................................6
Explanation of terms ......................................7
Overview
Names of parts ..............................................8
Using the A ....................................... 11
Ring Controller overview ..............................12
Connecting other devices ............................14
Switching modes .........................................15
Instrument overview .....................................16
Preparations
Turning the power on and o .......................17
Loading an SD card ..................................... 19
INST mode
INST mode overview ....................................20
Operation procedure ....................................21
STEP mode
STEP mode overview ...................................23
Operation procedure ....................................25
SONG mode
SONG mode overview .................................26
Operation procedure ....................................27
Capturing audio (recording)
Capture overview .........................................28
Operation procedure ....................................29
LOOPER mode
LOOPER mode overview .............................30
Operation procedure ....................................31
Other functions
Editing sounds .............................................32
Eects .........................................................32
Mixer ...........................................................32
Troubleshooting ...........................................33
Specications ..............................................34
Contents
Page 3
3
Safety Precautions
In this Quick Manual, symbols are used to highlight
warnings and cautions that you must read to prevent
accidents. The meanings of these symbols are as
follows.
Something that could cause serious
injury or death
Something that could cause injury or
damage to the equipment
Other symbols used
An action that is mandatory
An action that is prohibited
Warning
Operation using an AC adapter
Never use any AC adapter other than a ZOOM AD-
14. The use of other than the specied type could
damage the unit and pose a safety hazard.
Connect the AC adapter only to an AC outlet that
supplies the rated voltage required by the adapter.
Operation using the rechargeable battery
Always use a ZOOM BT-04 rechargeable battery.
Carefully study warning indications on batteries
before use.
Always keep the battery cover closed during use.
Alterations
Do not open the case or modify the product.
Caution
Product handling
Do not drop, bump or apply excessive force to the
unit.
Be careful not to allow foreign objects or liquids to
enter the unit.
Operating environment
Do not use in extremely high or low temperatures.
Do not use near heaters, stoves and other heat
sources.
Do not use in very high humidity or where it could
be splashed by water.
Do not use in places with frequent vibrations.
Do not use in places with much dust or sand.
AC adapter handling
When disconnecting the power plug from an out-
let, always pull on the plug itself.
Disconnect the power plug from the outlet when
the unit will not be used for a long time and when-
ever there is lightning.
Connection cables and input/output jacks
Always turn the power OFF for all equipment be-
fore connecting any cables.
Always disconnect all connection cables and the
AC adapter before moving the unit.
Volume
Do not use at a loud volume for a long time.
Usage Precautions
Interference with other electrical equipment
In consideration of safety, the
A
has been de-
signed to minimize its emission of electromagnetic
waves and to suppress interference from external
electromagnetic waves. However, equipment that is
very susceptible to interference or that emits power-
ful electromagnetic waves could result in interference
if placed nearby. If this occurs, place the
A
and
the other device farther apart.
With any type of electronic device that uses digital
control, including the
A
, electromagnetic inter-
ference could cause malfunction, corrupt or destroy
data and result in other unexpected trouble. Always
use caution.
Cleaning
Use a soft cloth to clean the exterior of the unit if it
becomes dirty. If necessary, use a damp cloth that
has been wrung out well to wipe it.
If the Ring Controller surface becomes dirty, wipe it
with a soft damp cloth that does not shed bers.
Never use abrasive cleansers, wax or solvents such
as alcohol, benzene or paint thinner.
Breakdown and malfunction
If the unit becomes broken or malfunctions, imme-
diately disconnect the AC adapter, turn the power
off and disconnect other cables. Contact the store
where you bought the unit or ZOOM service with the
following information: product model, serial number
and specic symptoms of breakdown or malfunction,
along with your name, address and telephone num-
ber.
Usage and Safety Precautions
Page 4
4
Copyrights
• Windows
®
, Windows® 10, Windows® 8 and Win-
dows
®
7 are trademarks or registered trademarks of
Microsoft
®
Corporation.
• Mac, Mac OS, iPad and iOS are trademarks or reg-
istered trademarks of Apple Inc.
• Intel and Intel Core are trademarks or registered
trademarks of Intel Corporation or its subsidiaries
in the US and other countries.
• The SD, SDHC and SDXC logos are trademarks.
• Bluetooth and the Bluetooth logo are registered
trademarks of Bluetooth SIG, Inc. and are used un-
der license by ZOOM CORPORATION.
• MIDI is a registered trademark of the Association of
Musical Electronics Industry (AMEI).
• Other product names, registered trademarks and
company names in this document are the property
of their respective companies.
Note: All trademarks and registered trademarks in this doc-
ument are for identification purposes only and are not
intended to infringe on the copyrights of their respective
owners.
Recording from copyrighted sources, including CDs, records,
tapes, live performances, video works and broadcasts, without
permission of the copyright holder for any purpose other than
personal use is prohibited by law.
ZOOM CORPORATION will not assume any responsibility re-
lated to infringements of copyrights.
For optimal performance
The
A
uses Bluetooth LE wireless communica-
tion for communication between the Ring Controller
and the Base Station. Communication at up to 10
meters is possible in an unobstructed indoor space.
If interference from electromagnetic waves or other
causes prevent good communication, try the follow-
ing.
• Bring the Ring Controller and the Base Station clos-
er together.
• Move any obstacles between the Ring Controller
and the Base Station.
• Stop unnecessary 2.4GHz transmissions or move
interfering devices (including the following) further
away.
• WiFi access points
• Smartphones and other devices that use WiFi
• Microwave ovens
• Audio monitors, lighting controllers and other de-
vices that communicate at 2.4GHz
Warnings and requests regarding safe
battery use
Carefully read the following warnings in order to
avoid serious injuries, burns, res and other problems
caused by leaking, heat generation, combustion, rup-
ture or accidental swallowing.
DANGER
Do not charge the lithium-ion battery (BT-04) in any
way other than using the
A
and an AD-14.
Danger of explosion if battery is incorrectly re-
placed. Replace only with the same or equivalent
type.
Do not disassemble the battery, put it in fire, or
heat it in a microwave or conventional oven.
Do not leave the battery near a re, in strong sun-
light, inside a vehicle that has become hot or in
similar conditions. Do not recharge in conditions
like these.
Do not carry or store the battery with coins, hair-
pins or other metal objects.
Do not allow the battery to be wet by any liquid,
including water, seawater, milk, soft drinks or
soapy water. Do not charge or use a battery that is
wet.
Warning
Do not hit the battery with a hammer or other ob-
ject. Do not step on it or drop it. Do not otherwise
impact or apply force to the battery.
Do not use the battery if it becomes deformed or
damaged.
Do not remove or damage the outer seal. Never
use a battery that has had all or part of its outer
seal removed or a battery that has been torn.
Recycling request
Please recycle batteries to help con-
serve resources. When discarding used
batteries, always cover their terminals
and follow all laws and regulations that
are applicable to the location.
Usage and Safety Precautions (continued)
Page 5
5
FCC regulation warning (for U.S.A.)
This equipment has been tested and found to
comply with the limits for a Class B digital device,
pursuant to Part 15 of the FCC Rules. These
limits are designed to provide reasonable protec-
tion against harmful interference in a residential
installation. This equipment generates, uses, and
can radiate radio frequency energy and, if not in-
stalled and used in accordance with the instruc-
tions, may cause harmful interference to radio
communications. However, there is no guarantee
that interference will not occur in a particular in-
stallation. If this equipment does cause harmful
interference to radio or television reception, which
can be determined by turning the equipment o
and on, the user is encouraged to try to correct
the interference by one or more of the following
measures:
• Reorient or relocate the receiving antenna.
• Increase the separation between the equip-
ment and receiver.
• Connect the equipment into an outlet on a
circuit different from that to which the re-
ceiver is connected.
• Consult the dealer or an experienced radio/
TV technician for help.
Disposal of Old Electrical & Electronic Equip-
ment (Applicable in European countries with
separate collection systems)
Prod ucts and batteries that
ha ve b een marke d with the
symbol of a crossed-out
wheeled waste bin must not
be disposed of with household
waste.
Old electrical/electronic equip-
ment and batteries should be
recycled at facilities that are
able to process them and their
byproducts.
Contact the local government
for information about nearby
recycling facilities. Conducting
recycling and waste disposal
properly helps conserve re-
sources and prevents harmful impacts on human
health and the environment.
The contents of this document and the specications of
the product could be changed without notice.
Declaration of Conformity
For EU Countries
For U.S.A. and CANADA
This devi ce compli es with par t 15 of the F CC
Rules and Industr y Canada license-exempt RSS
standard(s). Operation is subject to the following
two conditions:
(1) This device may not cause harmful interference,
and (2) this device must accept any interference
received, including interference that may cause
undesired operation.
This equipment complies with FCC/IC radiation
exposure lim its set forth for a n uncont rolled
environment and meets the FCC radio frequency
(RF) Exposure Guidelines and RSS-102 of the
IC r adi o frequen cy (RF) Exp osure ru les. This
equipment has very low levels of RF energy that
are deemed to comply without testing of specific
absorption ratio (SAR).
For CANADA
Le présent appareil est conforme aux CNR
d’Industrie Canada applicables aux appareils
radio exempts de licence. L’exploitation est
autorisée aux deux conditions suivantes : (1)
l’appareil ne doit pas produire de brouillage, et
(2) l’utilisateur de l’appareil doit accepter tout
br ouillag e rad ioélect rique subi, mê me si le
brouillage est susceptible d’en compromettre le
fonctionnement.
Ce t équi pement est con forme aux lim ites
d’exposition aux rayonnements énoncées pour un
environnement non contrôlé et respecte les règles
d’exposition aux fréquences radioélectriques
(R F) CNR-102 de l’IC. Ce t équ ipement émet
une énergie RF très faible qui est considérée
conforme sans évaluation du débit d’absorption
spécifique (DAS).
Label is located at the bottom of the unit.
Usage and Safety Precautions (continued)
Page 6
6
Thank you very much for purchasing a ZOOM
Aero RhythmTrak
A
. The
A
has the
following features.
● Loop-shaped controller
The loop-shaped Ring Controller makes input-
ting loop sequences intuitive.
● Ring Controller with 3 rows of 32
pads and 5 rows of 32 LEDs
During step input, you can use the 3 rows of
pads to input 3 instruments at the same time.
In addition, the multicolor LEDs allow you to
see the input status of up to ve instruments
at a glance.
Furthermore, each pad row can be used sep-
arately for real-time input, allowing diverse
performance options.
● Ring Controller can be removed from
Base Station
The Ring Controller can be removed from the
Base Station to perform with it in hand. You
can now realize entertaining performances in
ways that are not possible with conventional
rhythm machines.
●
Accele ro m eter b uilt i nto th e Ring
Controller
You can control eect parameters by tilting the
Ring Controller. Enjoy a new feeling of con-
trolling sound with your body.
● Automatic detection of the grip area
The grip area setting function can prevent
misoperation when holding the Ring Controller
during performances.
The position can be set easily when holding it
in the most comfortable position.
● The Ring Controller and Base Station
connect with Bluetooth LE
The Ring Controller and Base Station connect
wirelessly using Bluetooth LE. Power con-
sumption is low, so use for long periods of
time is possible.
In addition, the Ring Controller can be inde-
pendently connected to Mac computers and
iOS devices to be used as a multifunction MIDI
controller.
● Built-in sound sources can be edited
in various ways
The sounds included in the
A
have
various setting parameters that increase their
tonal ranges.
Each of the sound parameters can be set
easily on an icon-based editor screen.
In addition, each kit can use the sounds of up
to 33 instruments (16 simultaneous voices),
allowing the creation of rich musical pieces.
● More than 400 PCM sound sources
and 70 synthesizer oscillator types
built-in
From the rich selection of sound sources, you
will be able to nd sounds that t your image
of the music you want to make.
The sounds are organized by categories so
you can nd them quickly.
● Various creation modes
Create music using different modes for dif-
ferent purposes. Build patterns one step at a
time in STEP mode. Perform patterns in INST
mode. Arrange patterns you have made into
complete pieces of music in SONG mode.
Assign captured audio to pads and perform
with them in LOOPER mode.
●
Use up to ve eects simultaneously
You ca n u se a n i ns er t e ff ec t o n i nd iv id ual in -
struments, as well as global lter, delay, reverb
and master effects at the same time. This
vastly increases sound design possibilities.
● Inputs for electronic instruments and
audio devices
You can perform while listening to the input
from a connected device and capture input
sounds to use as loops.
● Loading of audio les possible
You can use a computer to save WAV les on
an SD card and load them for use as loops. (An
SD card (not included) is required.)
● Headphone output independent from
other outputs
The second stereo output allows you to output
a metronome just to the headphones, for
example.
Introduction
Page 7
7
Pattern
This is a short musical part of several bars.
The
A
has preset patterns that cover a
variety of musical genres.
Song
This is a combination of multiple patterns that
form a single musical piece.
Step
These are the smallest parts of patterns. Input
sounds in steps when inputting a sequence.
Sequence
A sequence combines the data for the various
scales and tones used for the sounds in the
melodies and rhythms in the patterns.
Kit
This is a set of sounds, which can include
drum sets, percussion instruments, basses
and synthesizers, for example. By changing
the kit, you can easily use sounds that suit
dierent musical genres and applications. The
A
has preset kits organized by genre.
Explanation of terms
Page 8
8
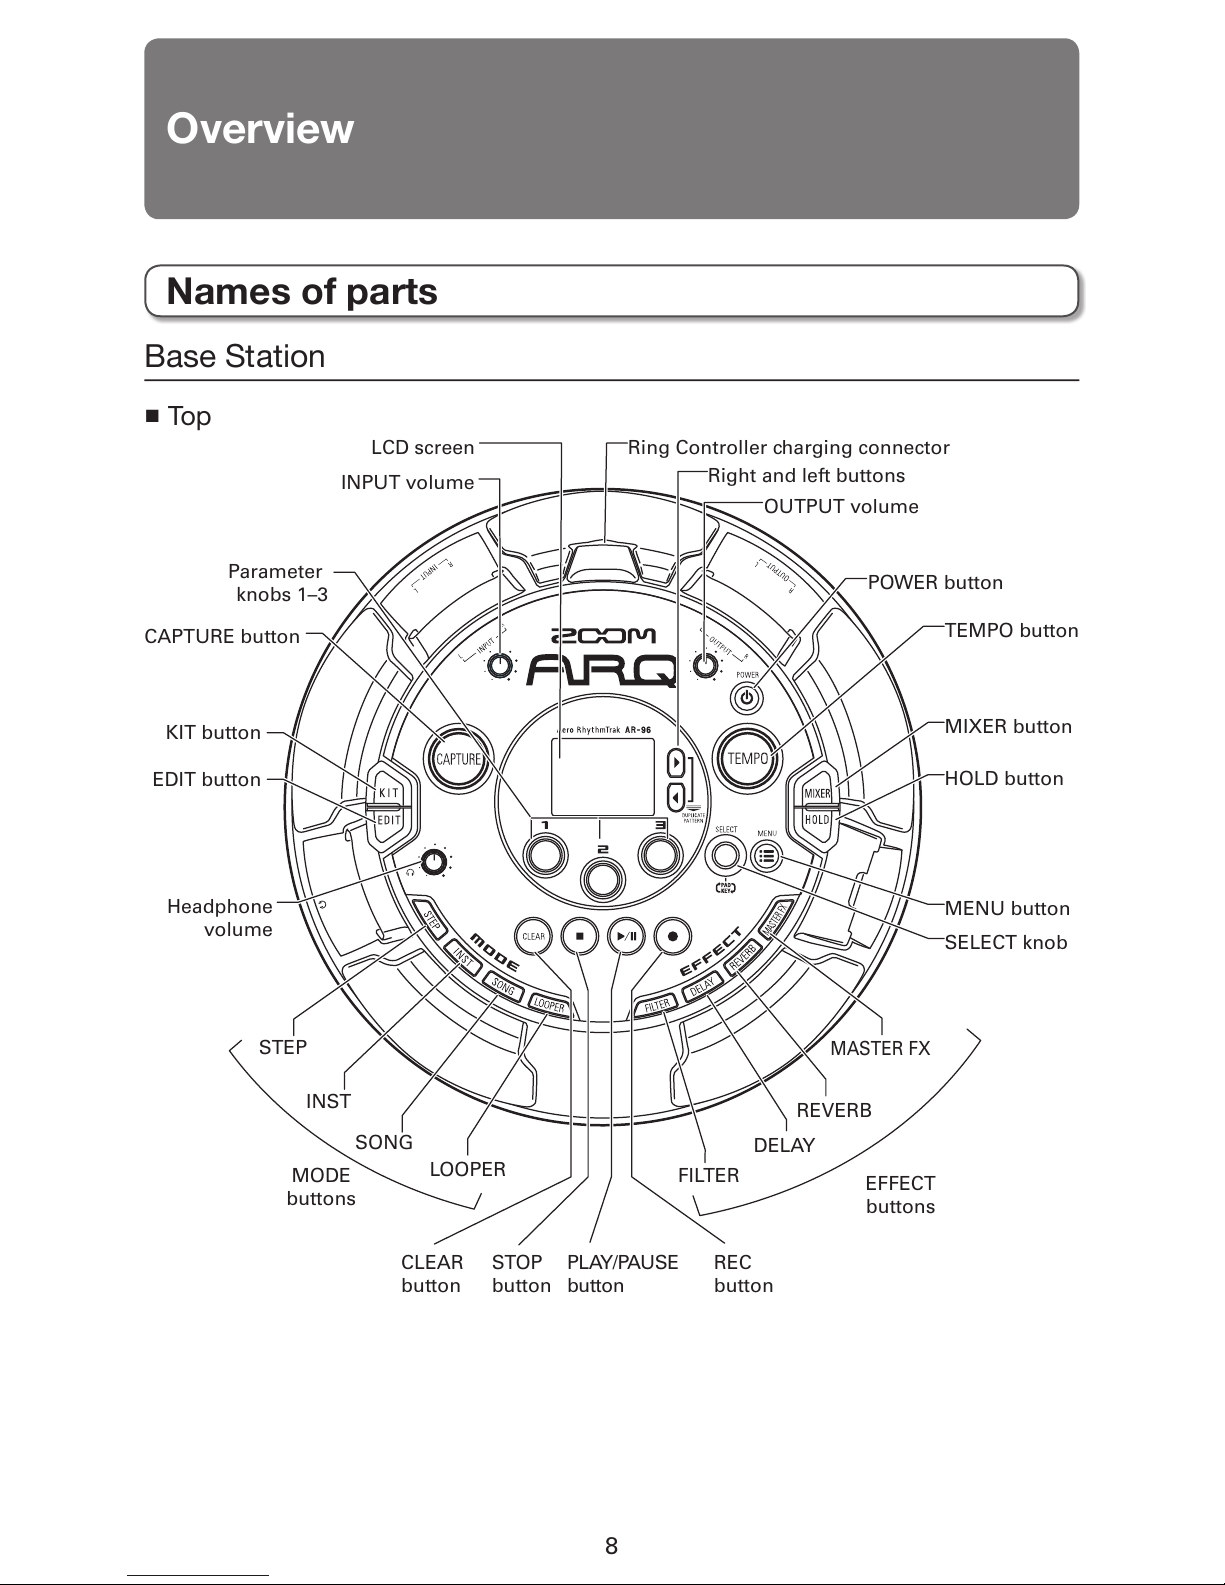
Base Station
■
Top
Overview
TEMPO button
MIXER button
HOLD button
MENU button
SELECT knob
KIT button
EDIT button
CAPTURE button
Ring Controller charging connectorLCD screen
Right and left buttons
INPUT volume
Parameter
knobs 1–3
OUTPUT volume
POWER button
Headphone
volume
STEP
MODE
buttons
INST
SONG
LOOPER
CLEAR
button
STOP
button
PLAY/PAUSE
button
REC
button
MASTER FX
EFFECT
buttons
REVERB
DELAY
FILTER
Names of parts
Page 9
9
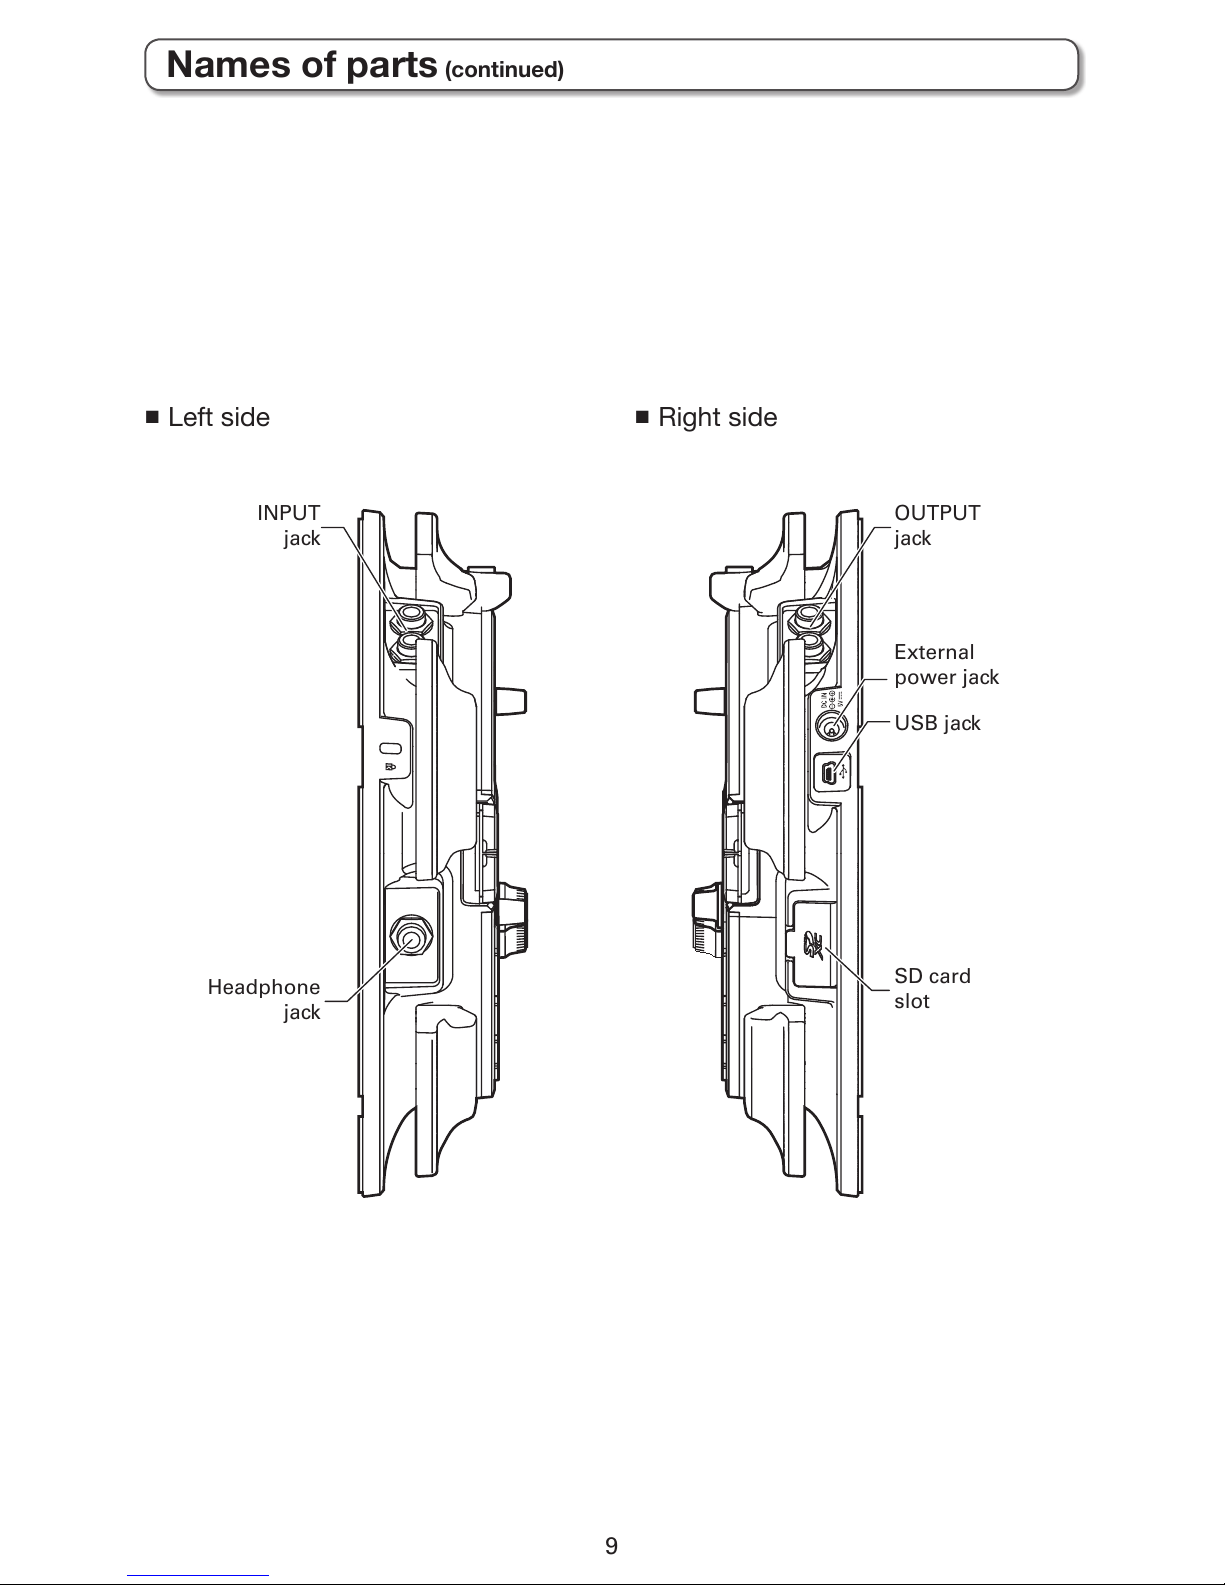
INPUT
jack
Headphone
jack
SD card
slot
USB jack
External
power jack
OUTPUT
jack
■
Left side
■
Right side
Names of parts (continued)
Page 10
10
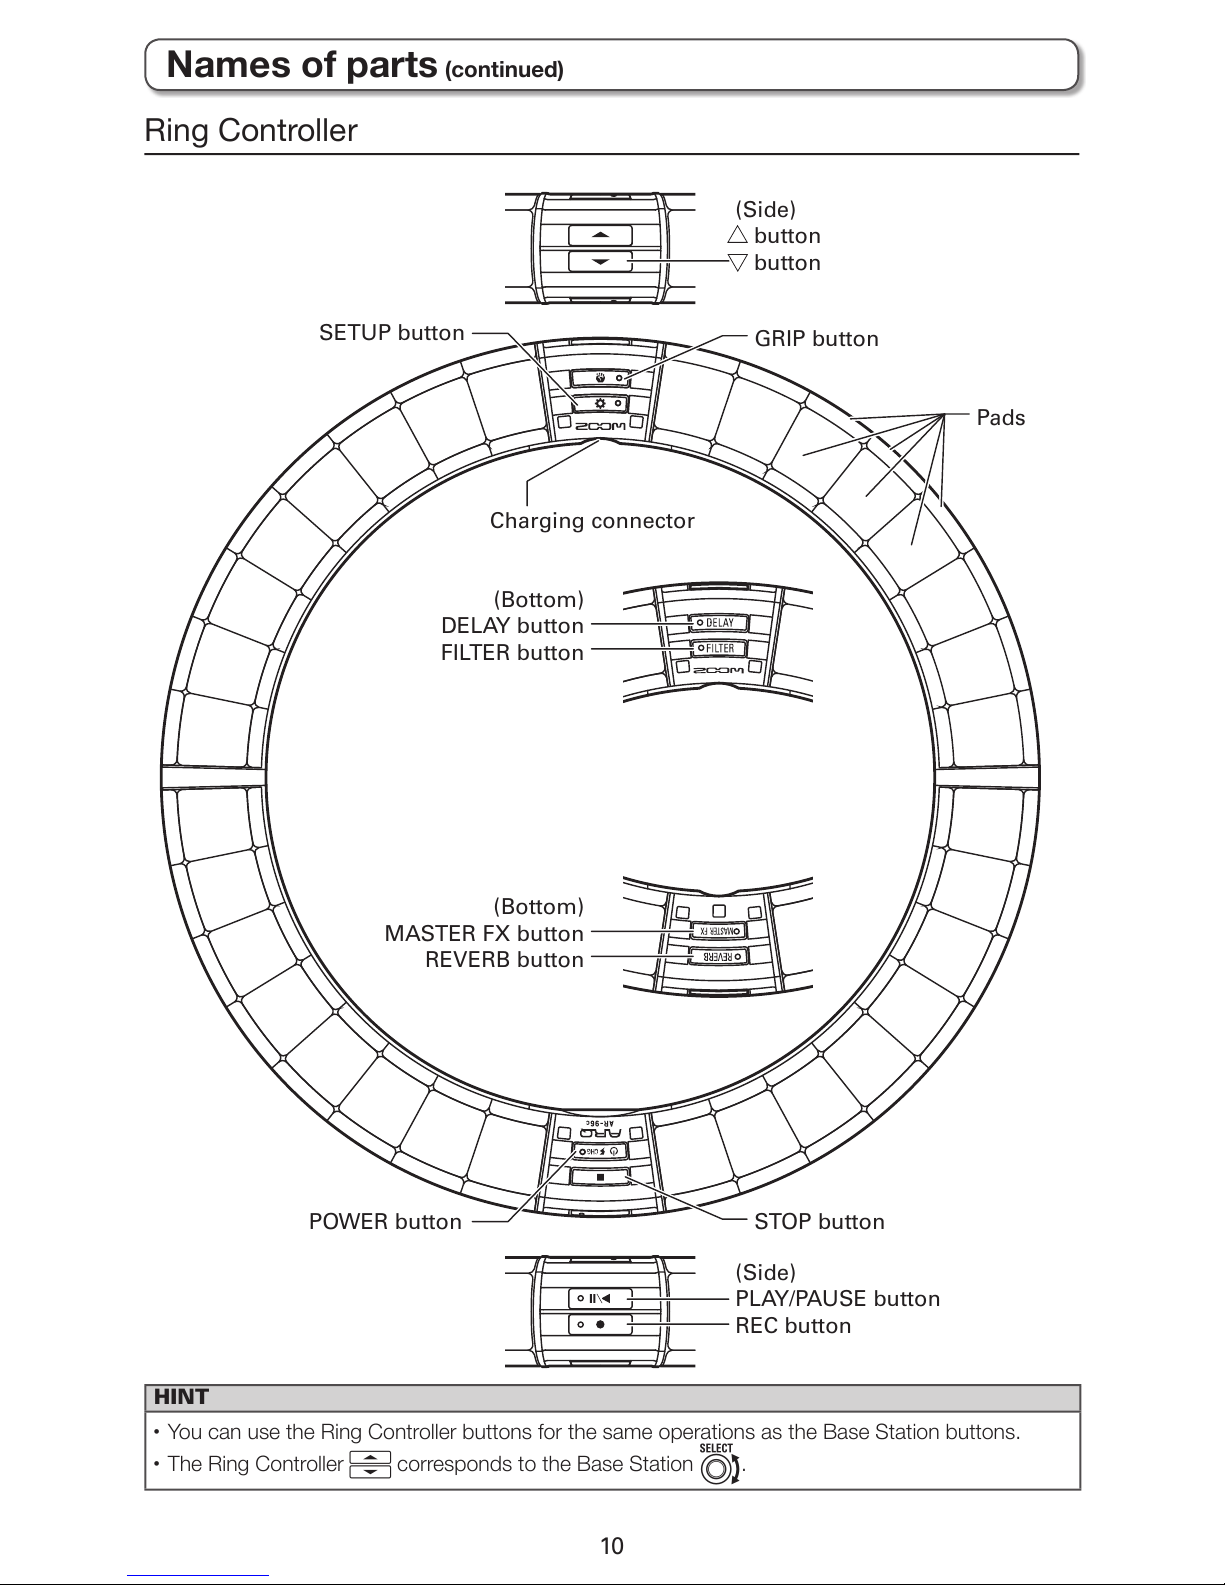
Ring Controller
SETUP button
Charging connector
GRIP button
POWER button STOP button
Pads
(Side)
PLAY/PAUSE button
REC button
(Bottom)
DELAY button
FILTER button
(Bottom)
MASTER FX button
REVERB button
(Side)
button
button
HINT
• You can use the Ring Controller buttons for the same operations as the Base Station buttons.
• The Ring Controller U corresponds to the Base Station e.
Names of parts (continued)
Page 11
11
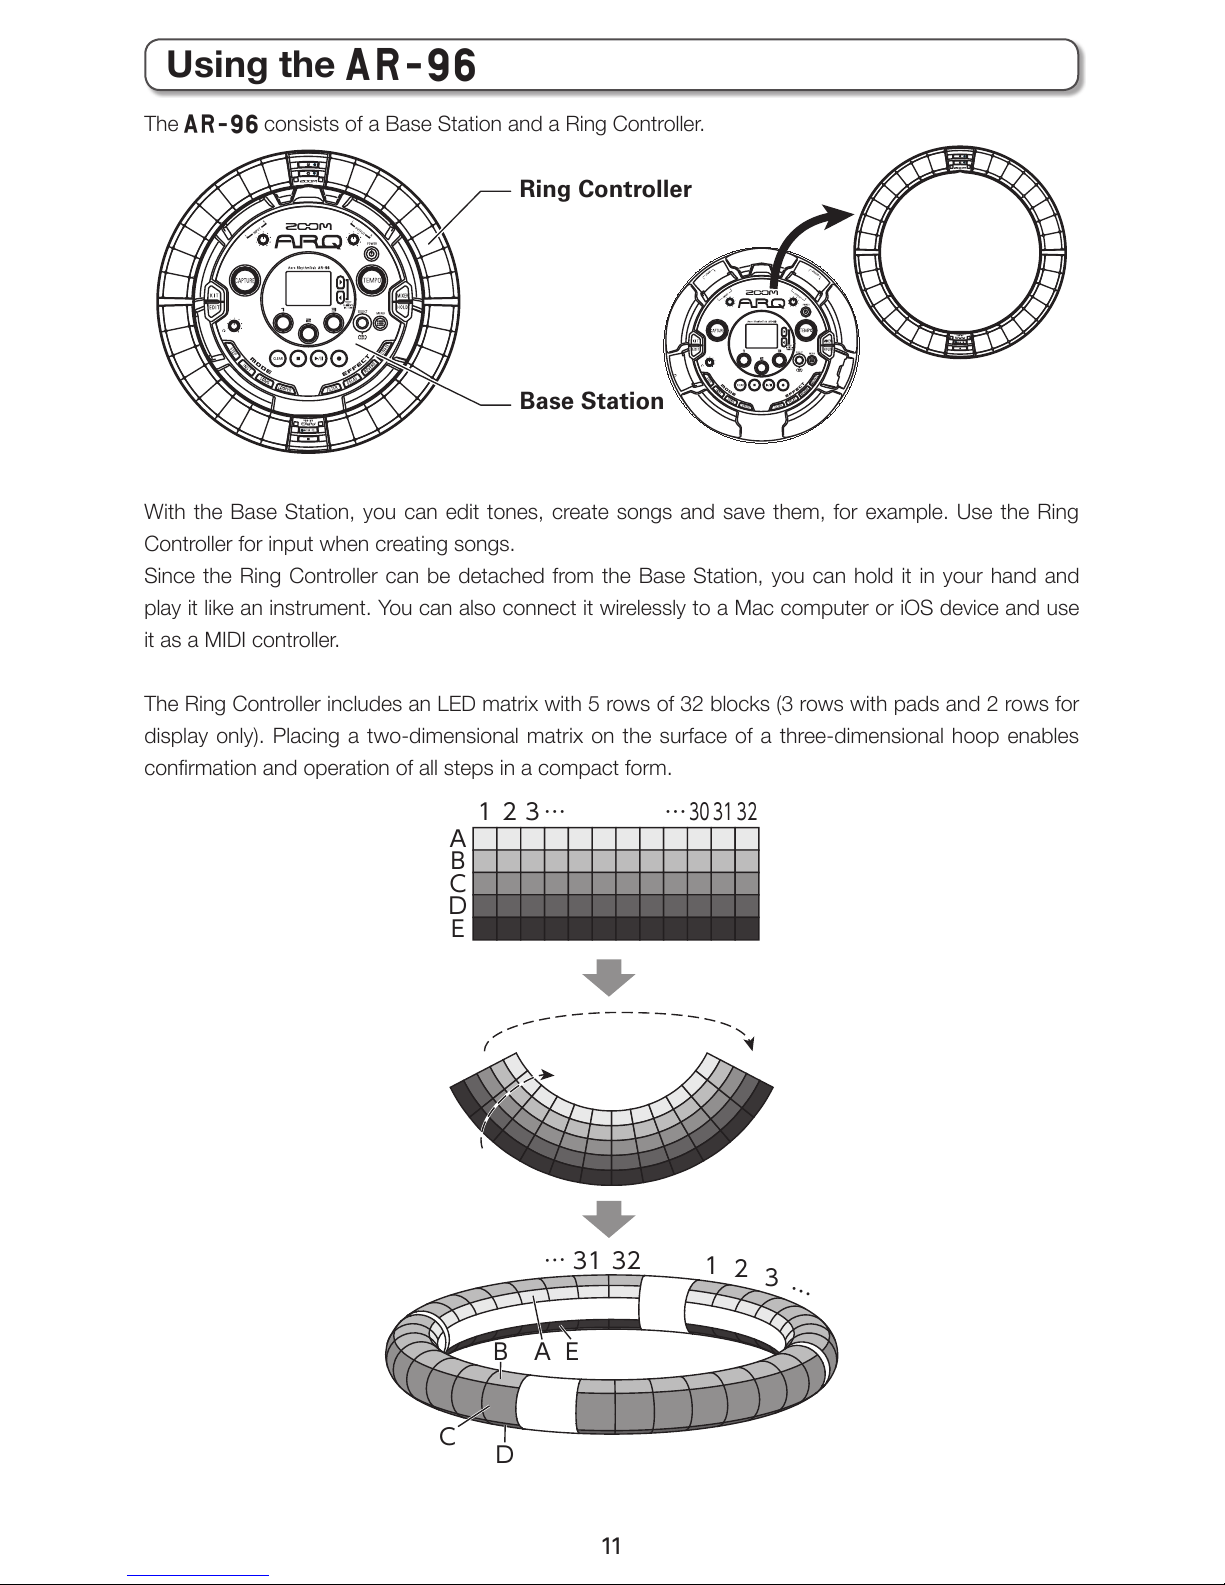
The A consists of a Base Station and a Ring Controller.
Ring Controller
Base Station
With the Base Station, you can edit tones, create songs and save them, for example. Use the Ring
Controller for input when creating songs.
Since the Ring Controller can be detached from the Base Station, you can hold it in your hand and
play it like an instrument. You can also connect it wirelessly to a Mac computer or iOS device and use
it as a MIDI controller.
The Ring Controller includes an LED matrix with 5 rows of 32 blocks (3 rows with pads and 2 rows for
display only). Placing a two-dimensional matrix on the surface of a three-dimensional hoop enables
conrmation and operation of all steps in a compact form.
1
A
B
C
D
E
A
32
2313
30 31 32
…
…
…
…
1
2
3
E
B
C
D
Using the A
Page 12
12
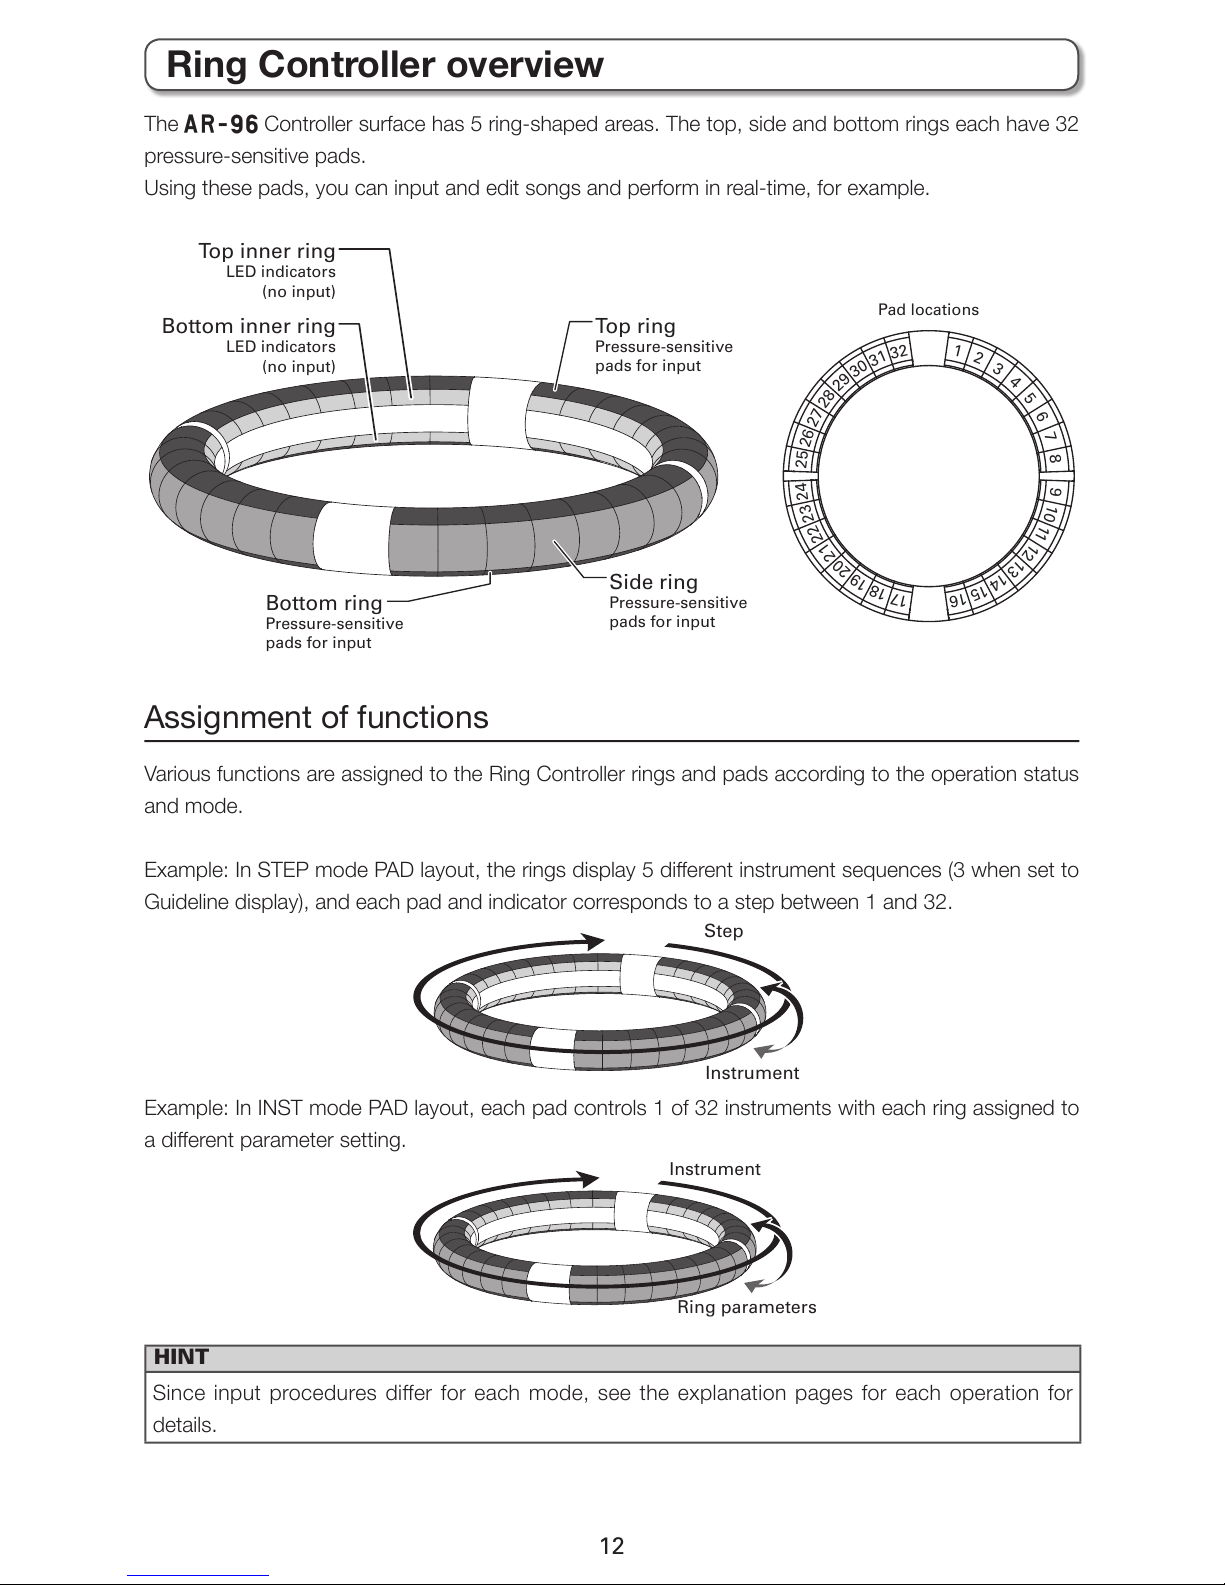
The A Controller surface has 5 ring-shaped areas. The top, side and bottom rings each have 32
pressure-sensitive pads.
Using these pads, you can input and edit songs and perform in real-time, for example.
Top ring
Pressure-sensitive
pads for input
Pad locations
1
2
3
4
5
6
7
8
9
10
11
12
13
14
15
16
17
18
19
20
21
22
23
24
25
26
27
28
29
30
31
32
Bottom inner ring
LED indicators
(no input)
Top inner ring
LED indicators
(no input)
Bottom ring
Pressure-sensitive
pads for input
Side ring
Pressure-sensitive
pads for input
Assignment of functions
Various functions are assigned to the Ring Controller rings and pads according to the operation status
and mode.
Example: In STEP mode PAD layout, the rings display 5 dierent instrument sequences (3 when set to
Guideline display), and each pad and indicator corresponds to a step between 1 and 32.
Step
Instrument
Example: In INST mode PAD layout, each pad controls 1 of 32 instruments with each ring assigned to
a dierent parameter setting.
Instrument
Ring parameters
HINT
Since input procedures differ for each mode, see the explanation pages for each operation for
details.
Ring Controller overview
Page 13
13
Grip area
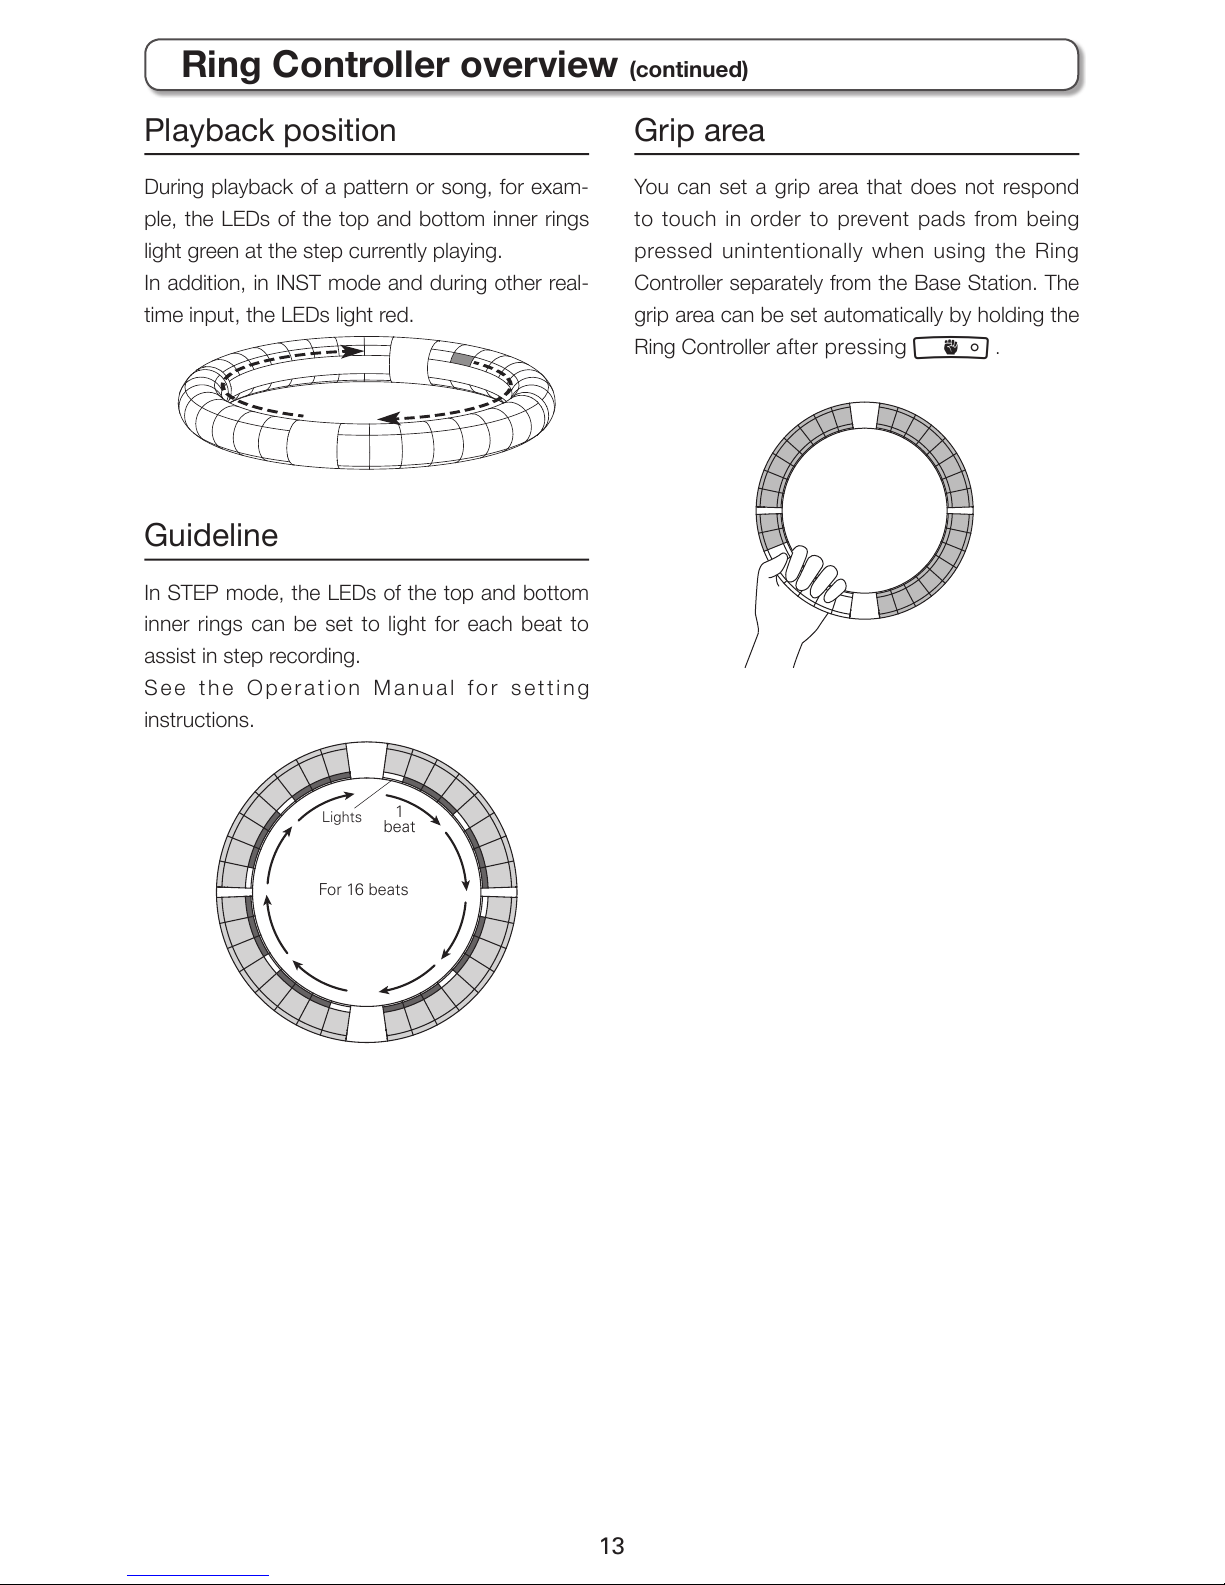
You can set a grip area that does not respond
to touch in order to prevent pads from being
pressed unintentionally when using the Ring
Controller separately from the Base Station. The
grip area can be set automatically by holding the
Ring Controller after pressing g .
Playback position
During playback of a pattern or song, for exam-
ple, the LEDs of the top and bottom inner rings
light green at the step currently playing.
In addition, in INST mode and during other real-
time input, the LEDs light red.
Guideline
In STEP mode, the LEDs of the top and bottom
inner rings can be set to light for each beat to
assist in step recording.
S e e th e O p e r a t i o n Ma n u a l fo r se tt in g
instructions.
1
beat
Lights
For 16 beats
Ring Controller overview (continued)
Page 14
14
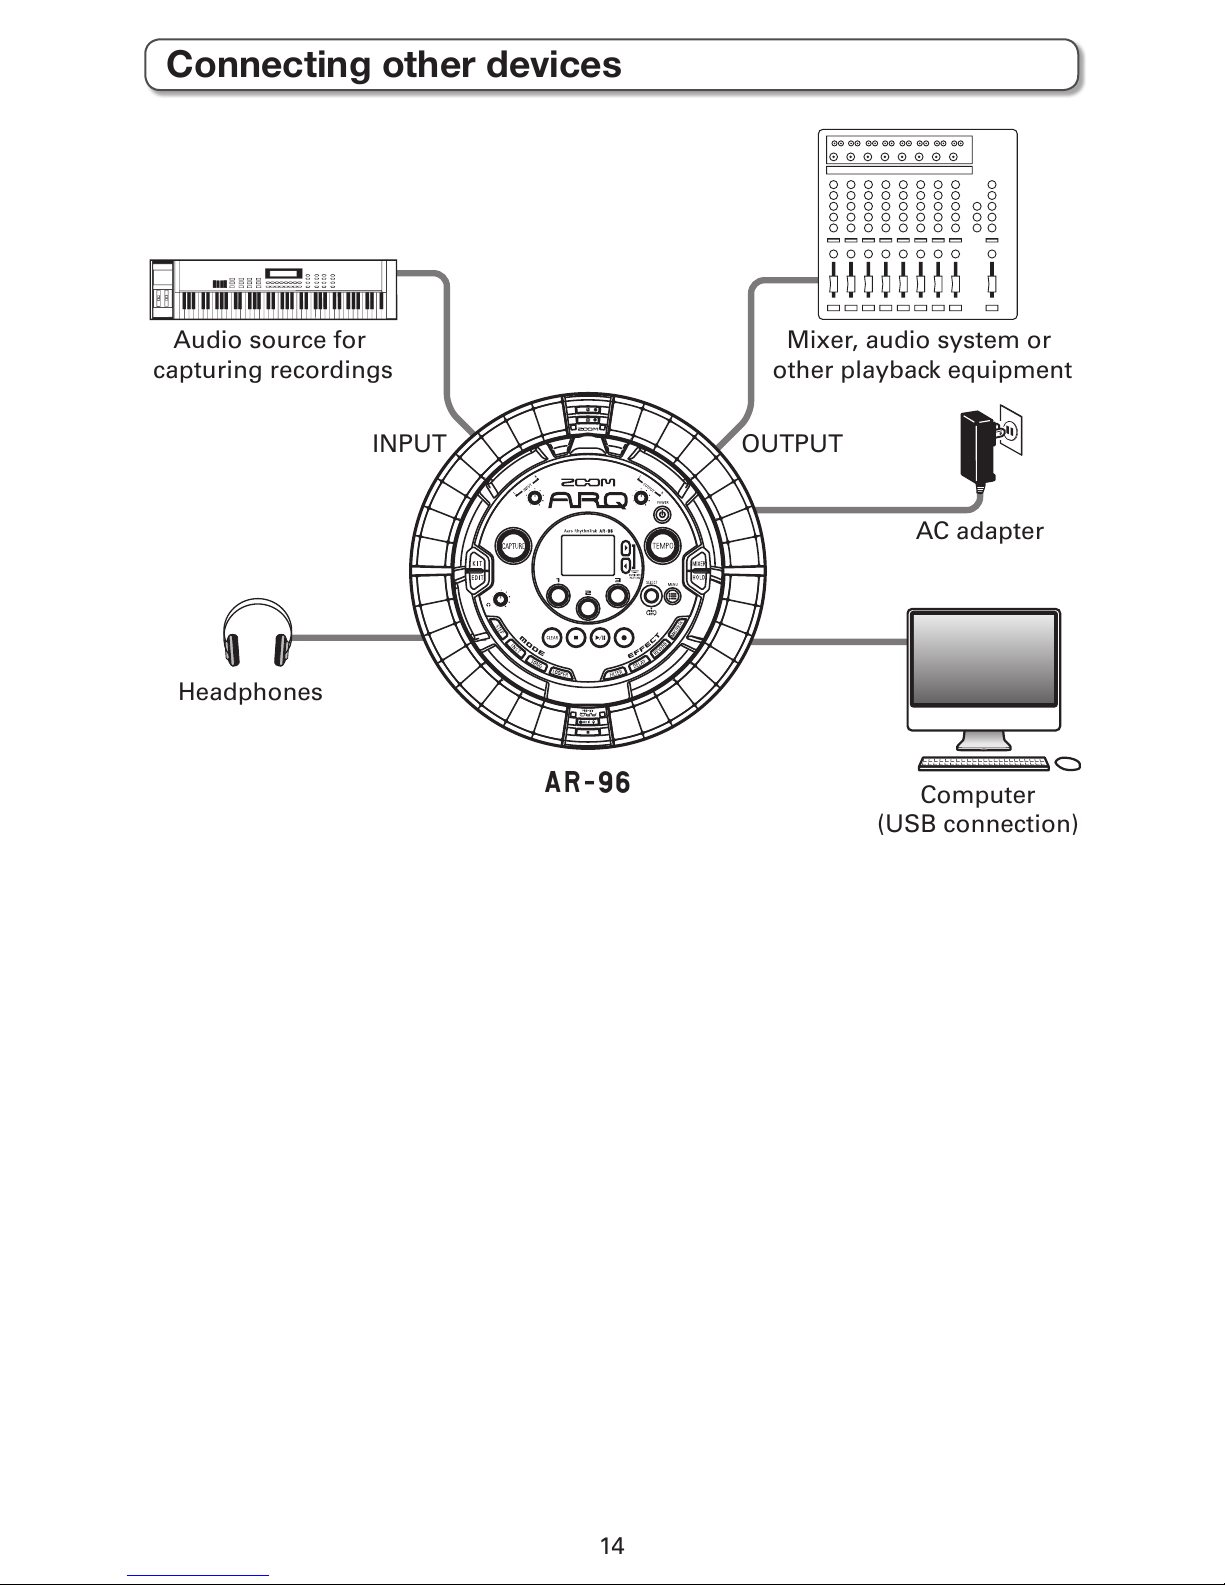
INPUT
Audio source for
capturing recordings
Headphones
AC adapter
OUTPUT
Mixer, audio system or
other playback equipment
Computer
(USB connection)
A
Connecting other devices
Page 15
15
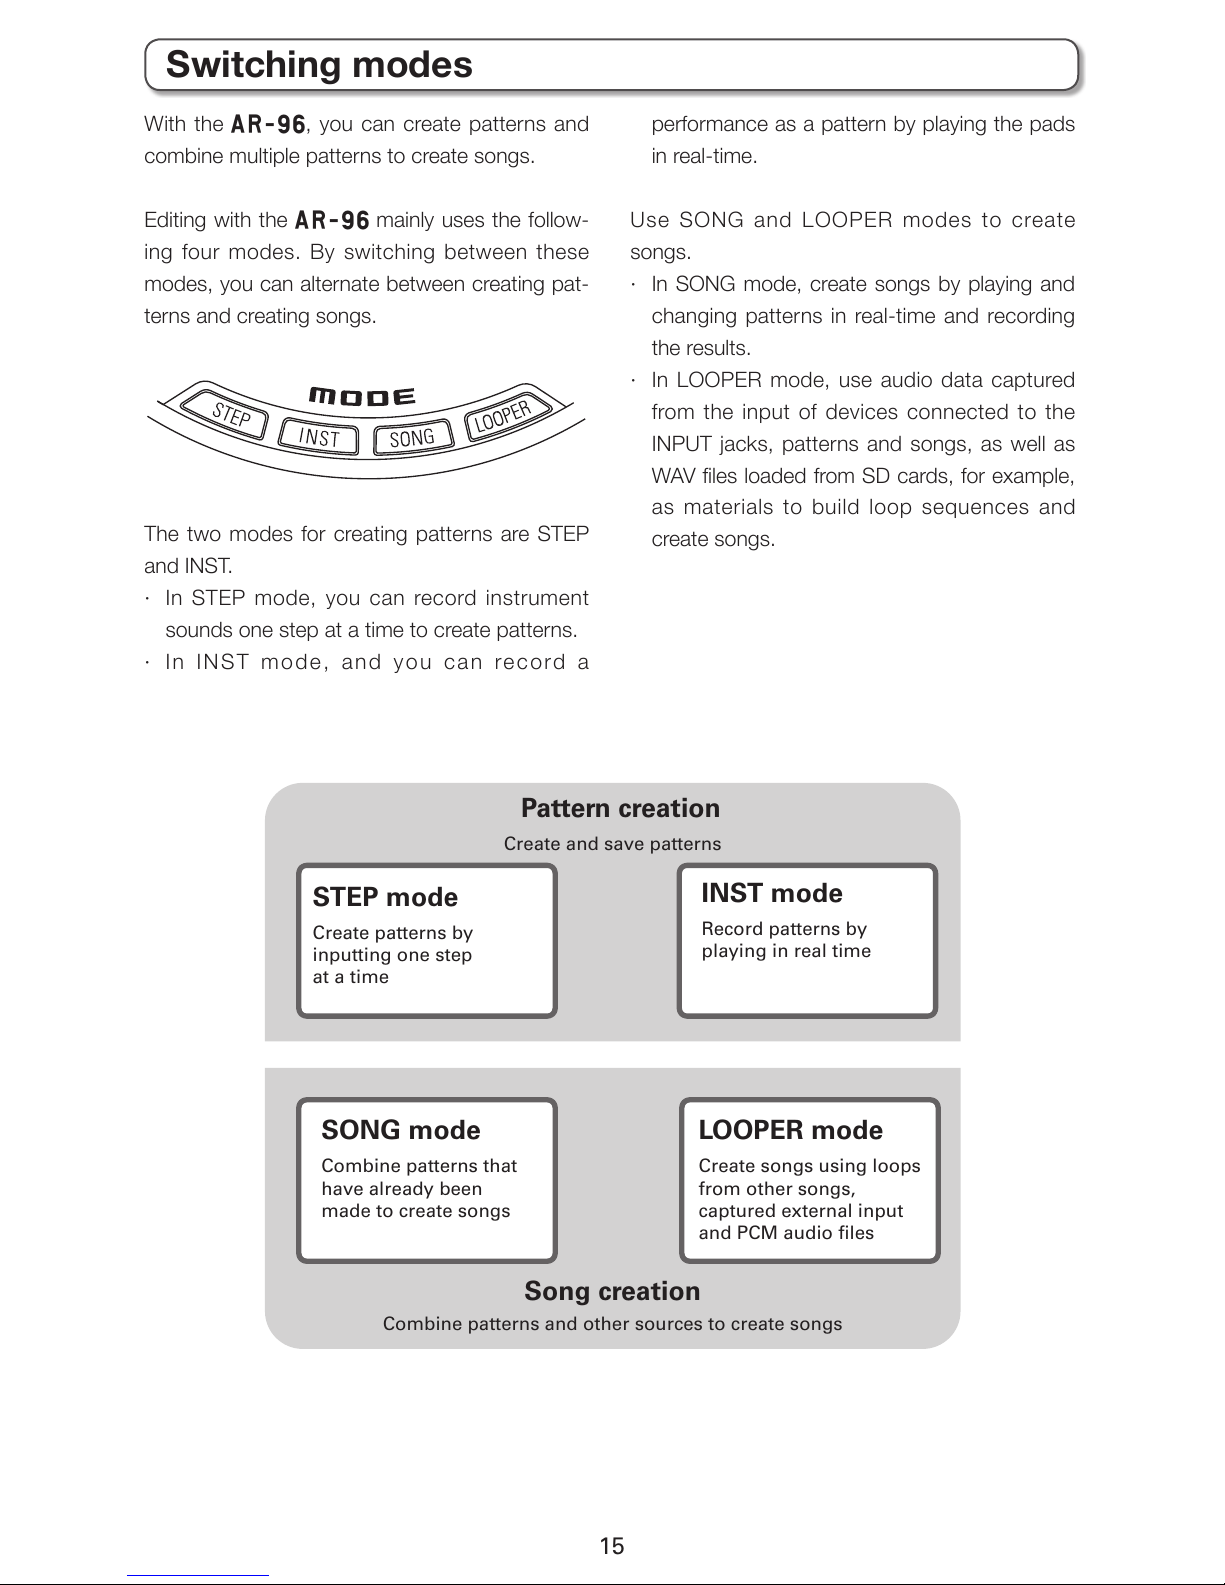
With the A, you can create patterns and
combine multiple patterns to create songs.
Editing with the A mainly uses the follow-
ing four modes. By switching between these
modes, you can alternate between creating pat-
terns and creating songs.
The two modes for creating patterns are STEP
and INST.
· In STEP mode, you can record instrument
sounds one step at a time to create patterns.
· I n IN S T mo de , an d yo u ca n rec ord a
performance as a pattern by playing the pads
in real-time.
Use SONG and LOOPER modes to create
songs.
· In SONG mode, create songs by playing and
changing patterns in real-time and recording
the results.
· In LOOPER mode, use audio data captured
from the input of devices connected to the
INPUT jacks, patterns and songs, as well as
WAV les loaded from SD cards, for example,
as materials to build loop sequences and
create songs.
Pattern creation
Create and save patterns
Song creation
Combine patterns and other sources to create songs
STEP mode
Create patterns by
inputting one step
at a time
INST mode
Record patterns by
playing in real time
SONG mode
Combine patterns that
have already been
made to create songs
LOOPER mode
Create songs using loops
from other songs,
captured external input
and PCM audio files
Switching modes
Page 16
16
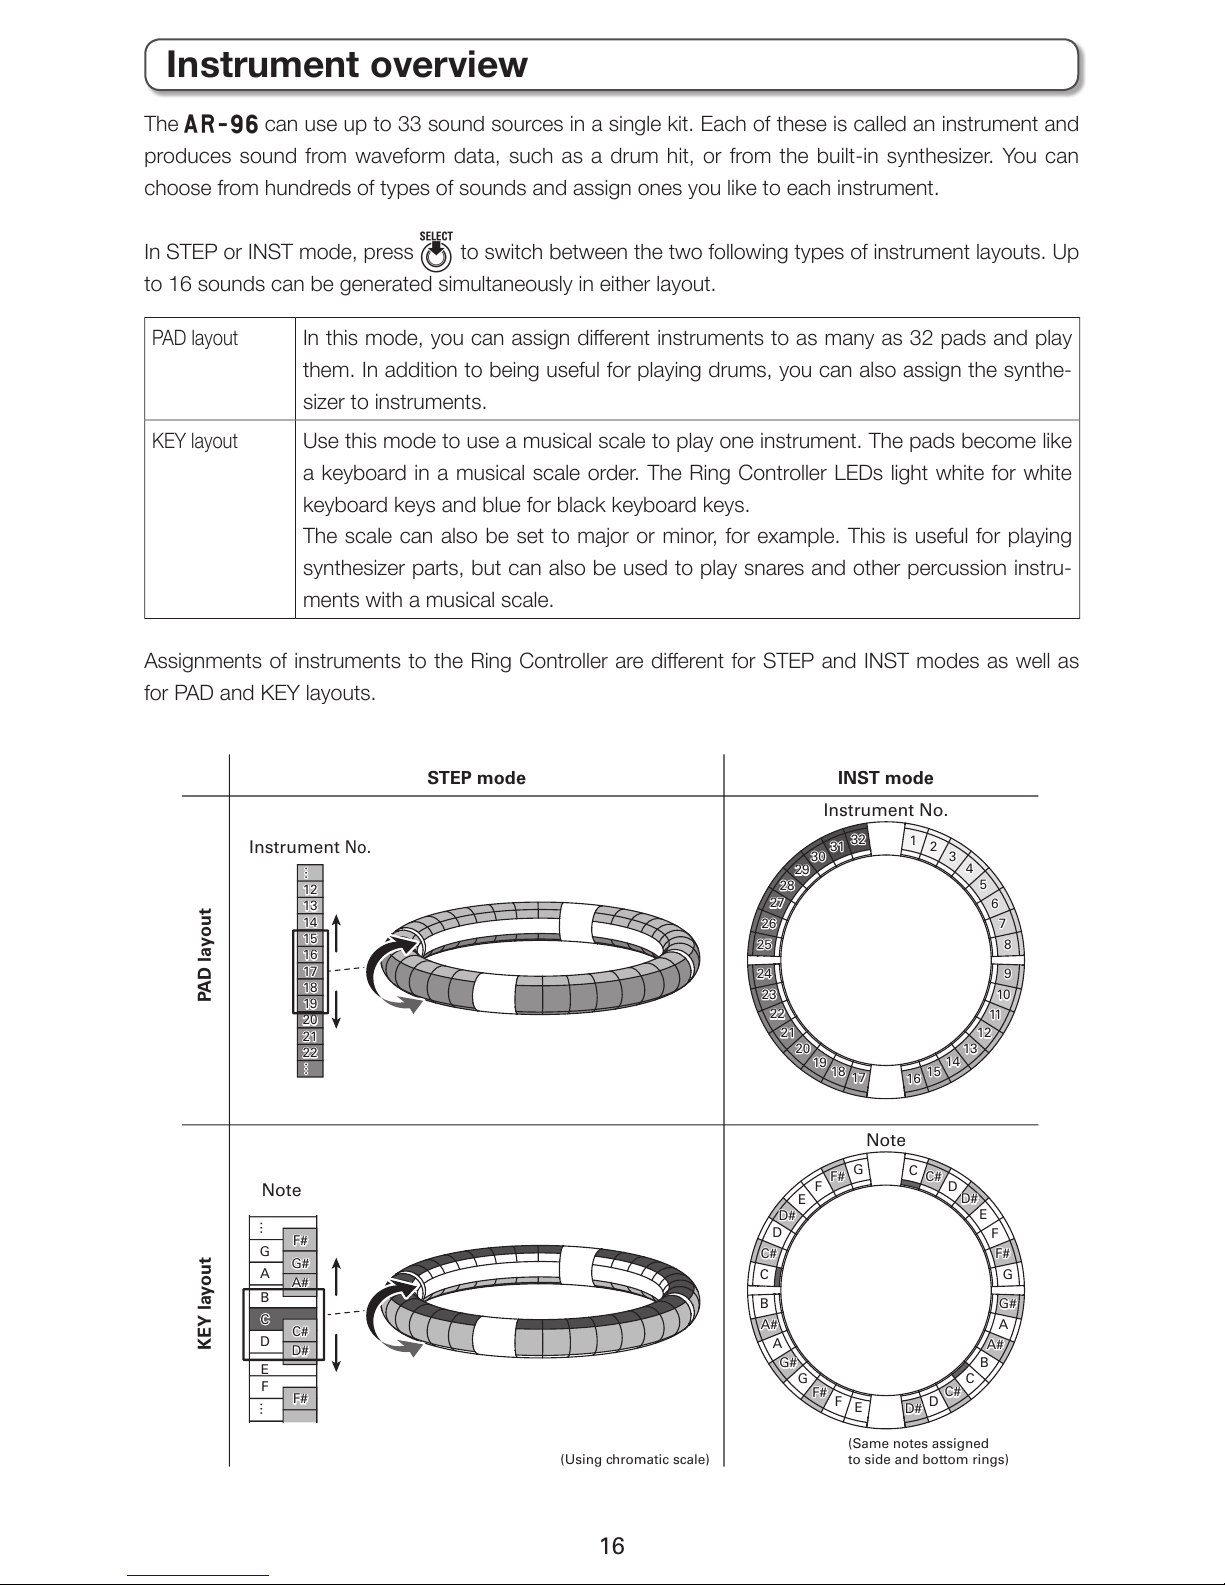
The A can use up to 33 sound sources in a single kit. Each of these is called an instrument and
produces sound from waveform data, such as a drum hit, or from the built-in synthesizer. You can
choose from hundreds of types of sounds and assign ones you like to each instrument.
In STEP or INST mode, press E to switch between the two following types of instrument layouts. Up
to 16 sounds can be generated simultaneously in either layout.
PAD layout
In this mode, you can assign dierent instruments to as many as 32 pads and play
them. In addition to being useful for playing drums, you can also assign the synthe-
sizer to instruments.
KEY layout
Use this mode to use a musical scale to play one instrument. The pads become like
a keyboard in a musical scale order. The Ring Controller LEDs light white for white
keyboard keys and blue for black keyboard keys.
The scale can also be set to major or minor, for example. This is useful for playing
synthesizer parts, but can also be used to play snares and other percussion instru-
ments with a musical scale.
Assignments of instruments to the Ring Controller are dierent for STEP and INST modes as well as
for PAD and KEY layouts.
Instrument No.
Instrument
No.
INST modeSTEP mode
PAD layoutKEY layout
1
2
3
4
5
6
7
8
9
10
11
12
13
14
15
16
17
18
19
20
21
22
23
24
25
26
27
28
29
30
31
32
Note
C
C#
D
D#
E
F
F#
G
G#
A
A#
B
C
C#
D
D#
E
F
F#
G
G#
A
A#
B
C
C#
D
D#
E
F
F#
G
… …
12
13
14
15
16
17
18
19
20
21
22
Note
(Using chromatic scale)
(Same notes assigned
to side and bottom rings)
… …
C
D
E
F
C#
D#
F#
G
A
B
F#
G#
A#
Instrument overview
Page 17
17
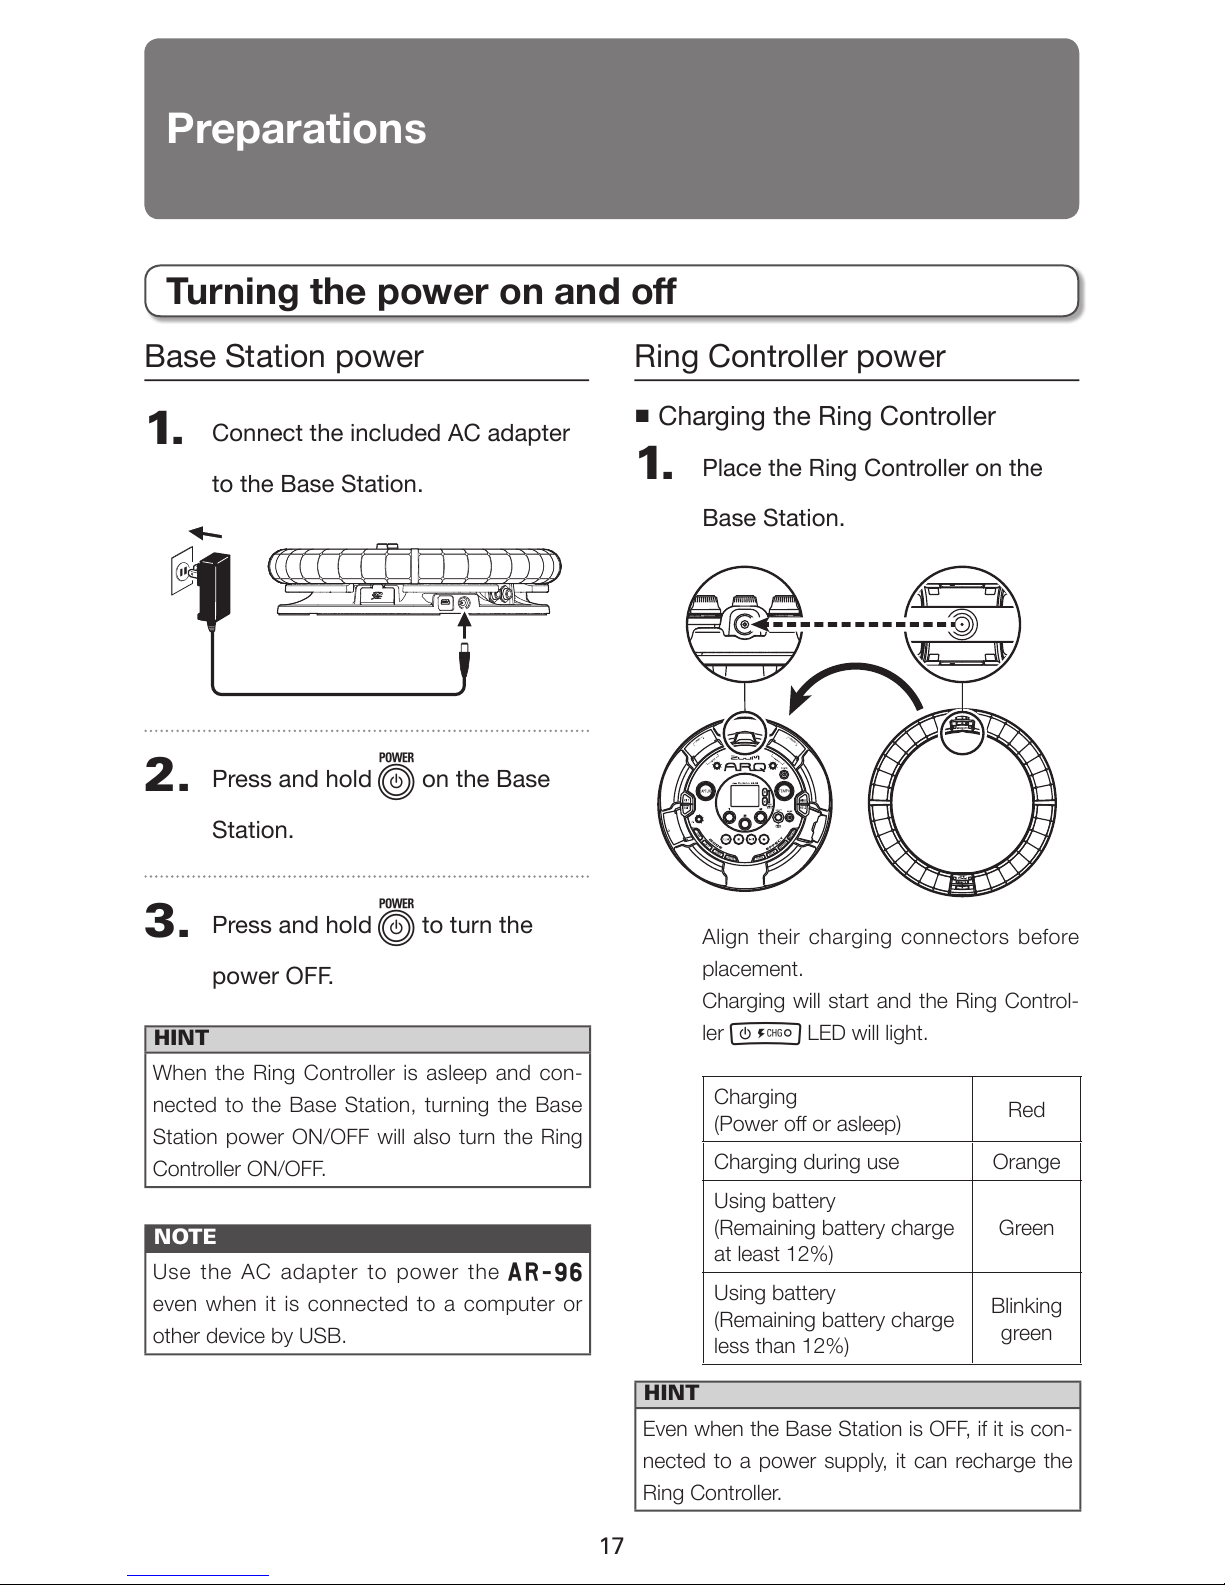
Base Station power
1.
Connect the included AC adapter
to the Base Station.
2.
Press and hold p on the Base
Station.
3.
Press and hold p to turn the
power OFF.
HINT
When the Ring Controller is asleep and con-
nected to the Base Station, turning the Base
Station power ON/OFF will also turn the Ring
Controller ON/OFF.
NOTE
Use the AC adapter to power the A
even when it is connected to a computer or
other device by USB.
Ring Controller power
■
Charging the Ring Controller
1.
Place the Ring Controller on the
Base Station.
Align their charging connectors before
placement.
Charging will start and the Ring Control-
ler p LED will light.
Charging
(Power o or asleep)
Red
Charging during use Orange
Using battery
(Remaining battery charge
at least 12%)
Green
Using battery
(Remaining battery charge
less than 12%)
Blinking
green
HINT
Even when the Base Station is OFF, if it is con-
nected to a power supply, it can recharge the
Ring Controller.
Preparations
Turning the power on and o
Page 18
18
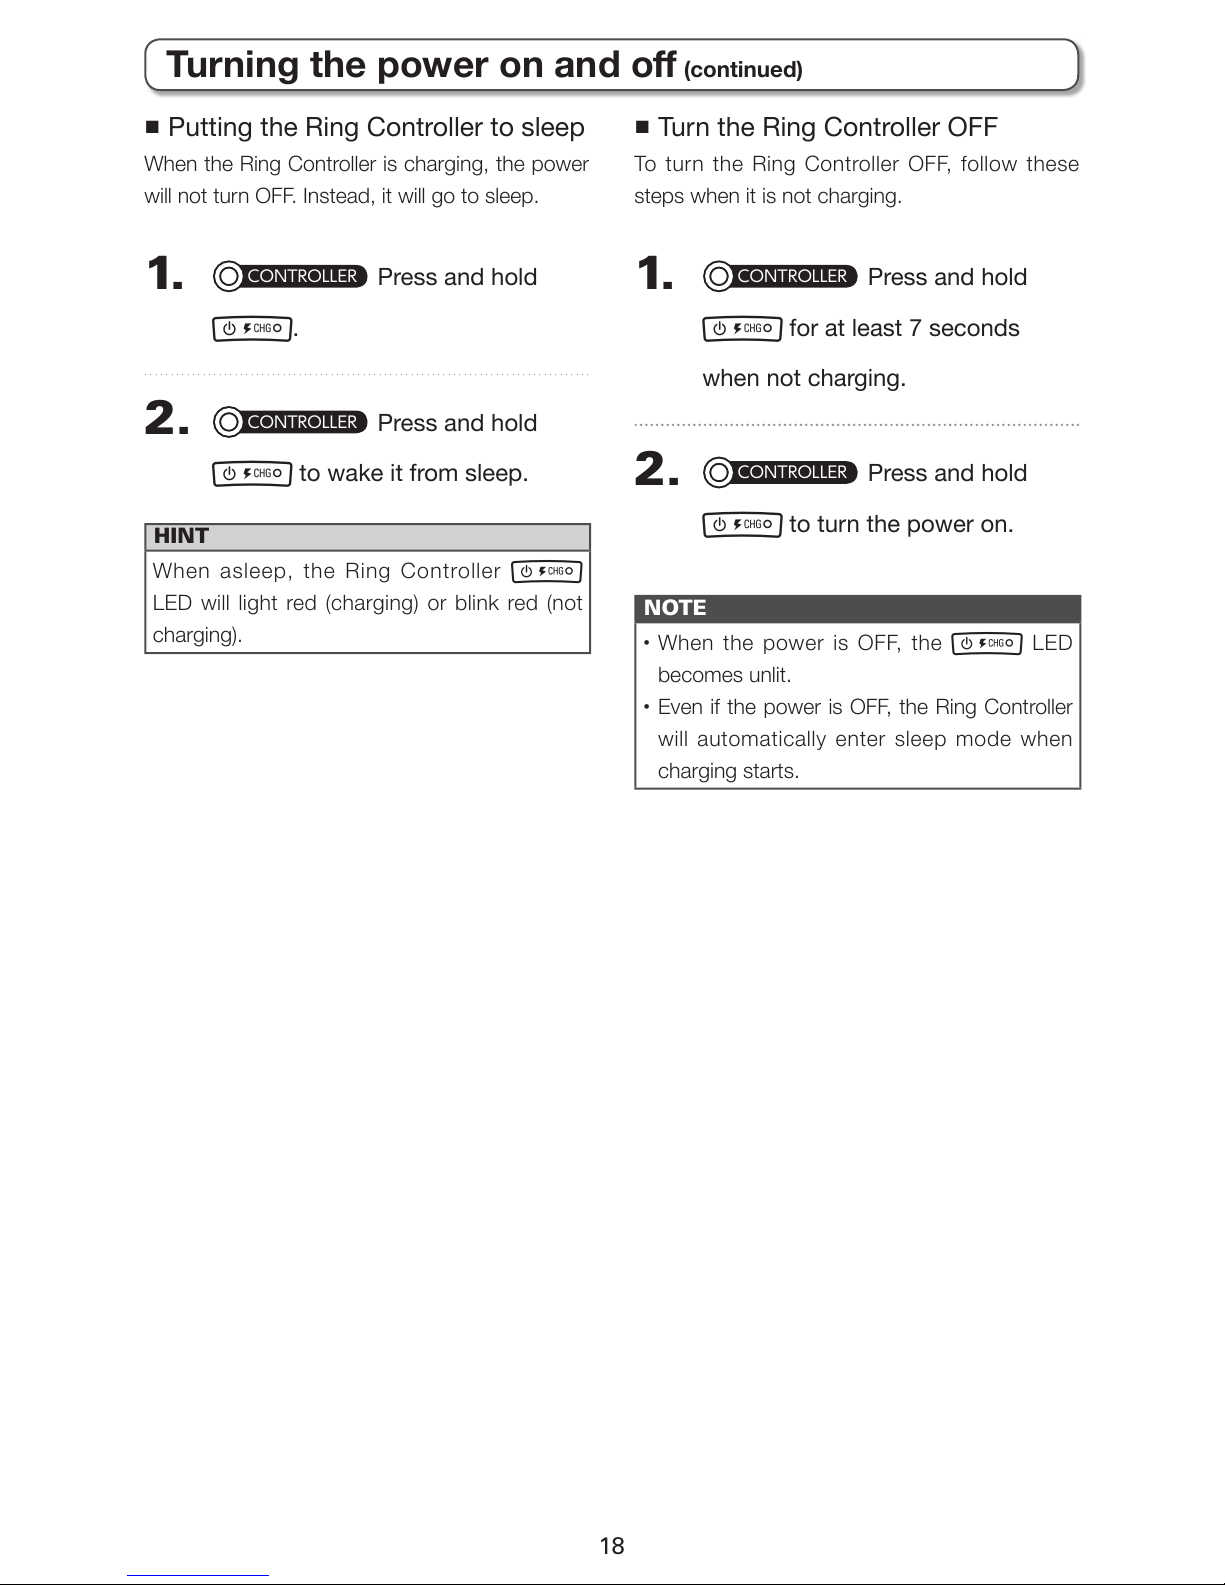
■
Putting the Ring Controller to sleep
When the Ring Controller is charging, the power
will not turn OFF. Instead, it will go to sleep.
1.
CONTROLLER
Press and hold
p
.
2.
CONTROLLER
Press and hold
p
to wake it from sleep.
HINT
When asleep, the Ring Controller p
LED will light red (charging) or blink red (not
charging).
■
Turn the Ring Controller OFF
To turn the Ring Controller OFF, follow these
steps when it is not charging.
1.
CONTROLLER
Press and hold
p
for at least 7 seconds
when not charging.
2.
CONTROLLER
Press and hold
p
to turn the power on.
NOTE
• When the power is OFF, the p LED
becomes unlit.
• Even if the power is OFF, the Ring Controller
will automatically enter sleep mode when
charging starts.
Turning the power on and o (continued)
Page 19
19
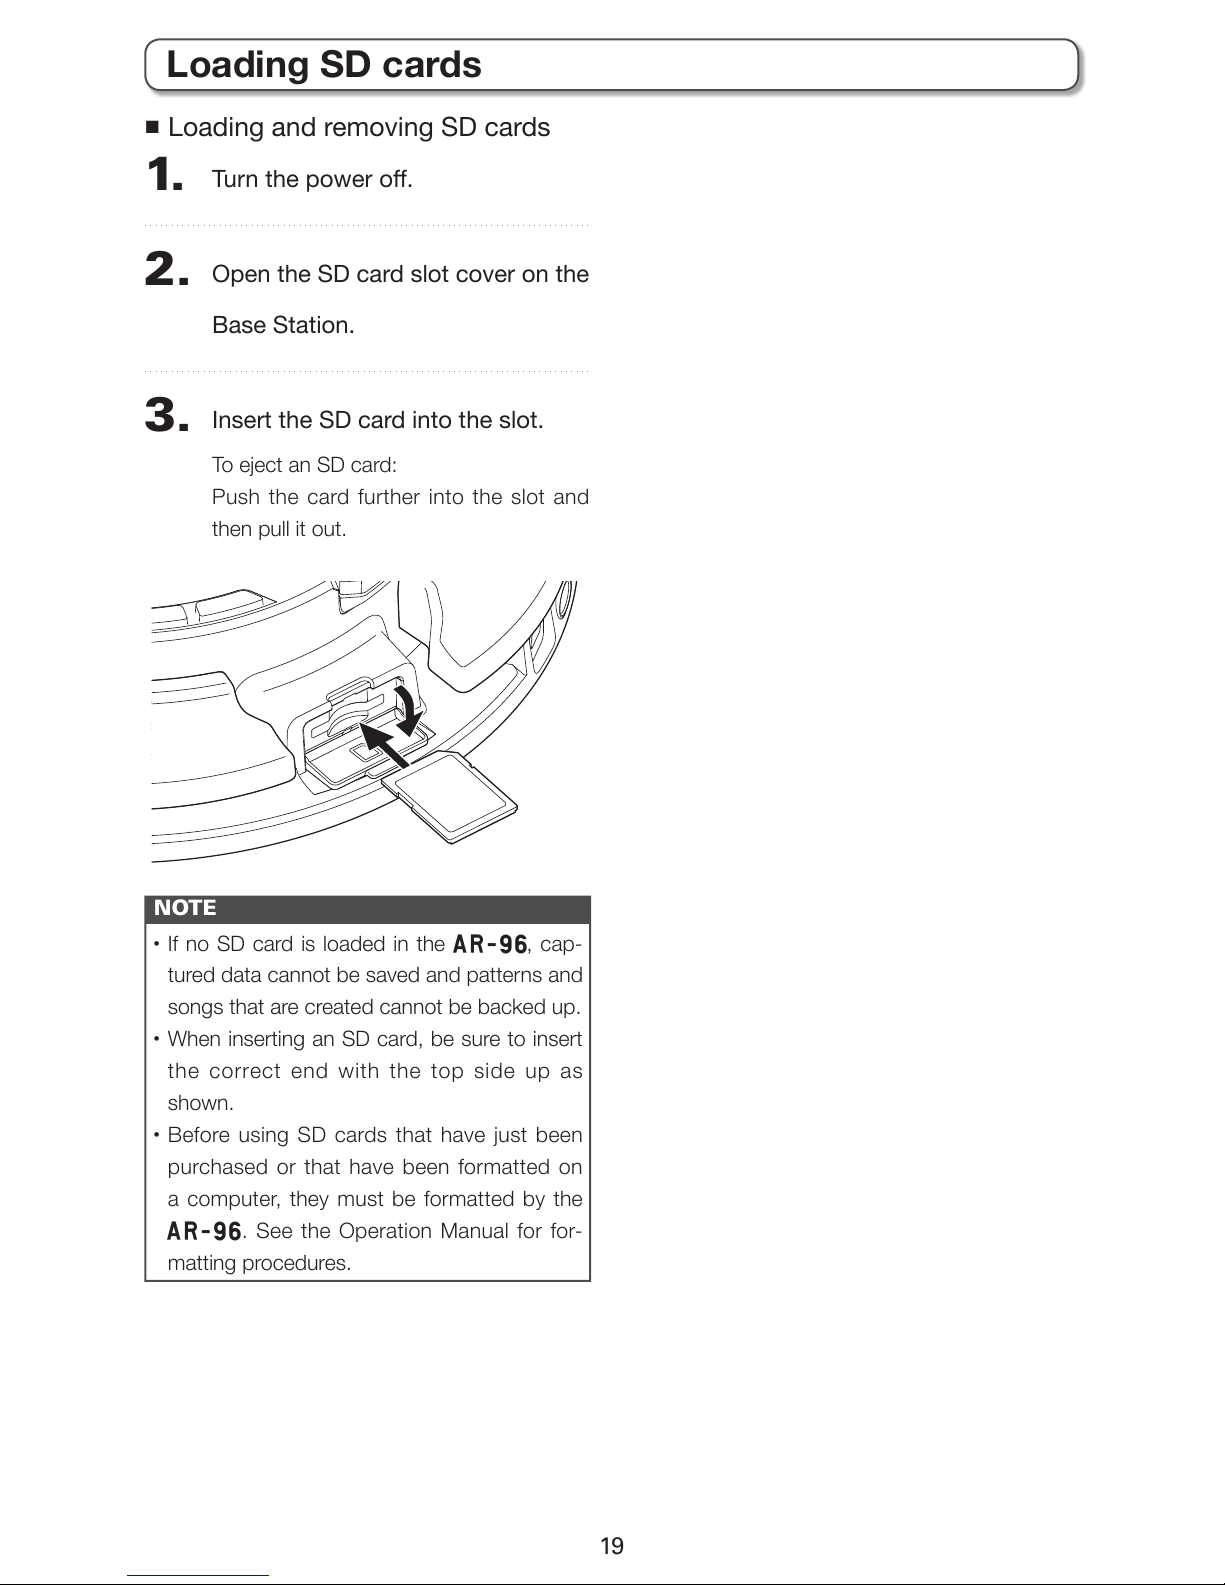
■
Loading and removing SD cards
1.
Turn the power o.
2.
Open the SD card slot cover on the
Base Station.
3.
Insert the SD card into the slot.
To eject an SD card:
Push the card further into the slot and
then pull it out.
NOTE
• If no SD card is loaded in the A, cap-
tured data cannot be saved and patterns and
songs that are created cannot be backed up.
• When inserting an SD card, be sure to insert
the correct end with the top side up as
shown.
• Before using SD cards that have just been
purchased or that have been formatted on
a computer, they must be formatted by the
A. See the Operation Manual for for-
matting procedures.
Loading SD cards
Page 20
20
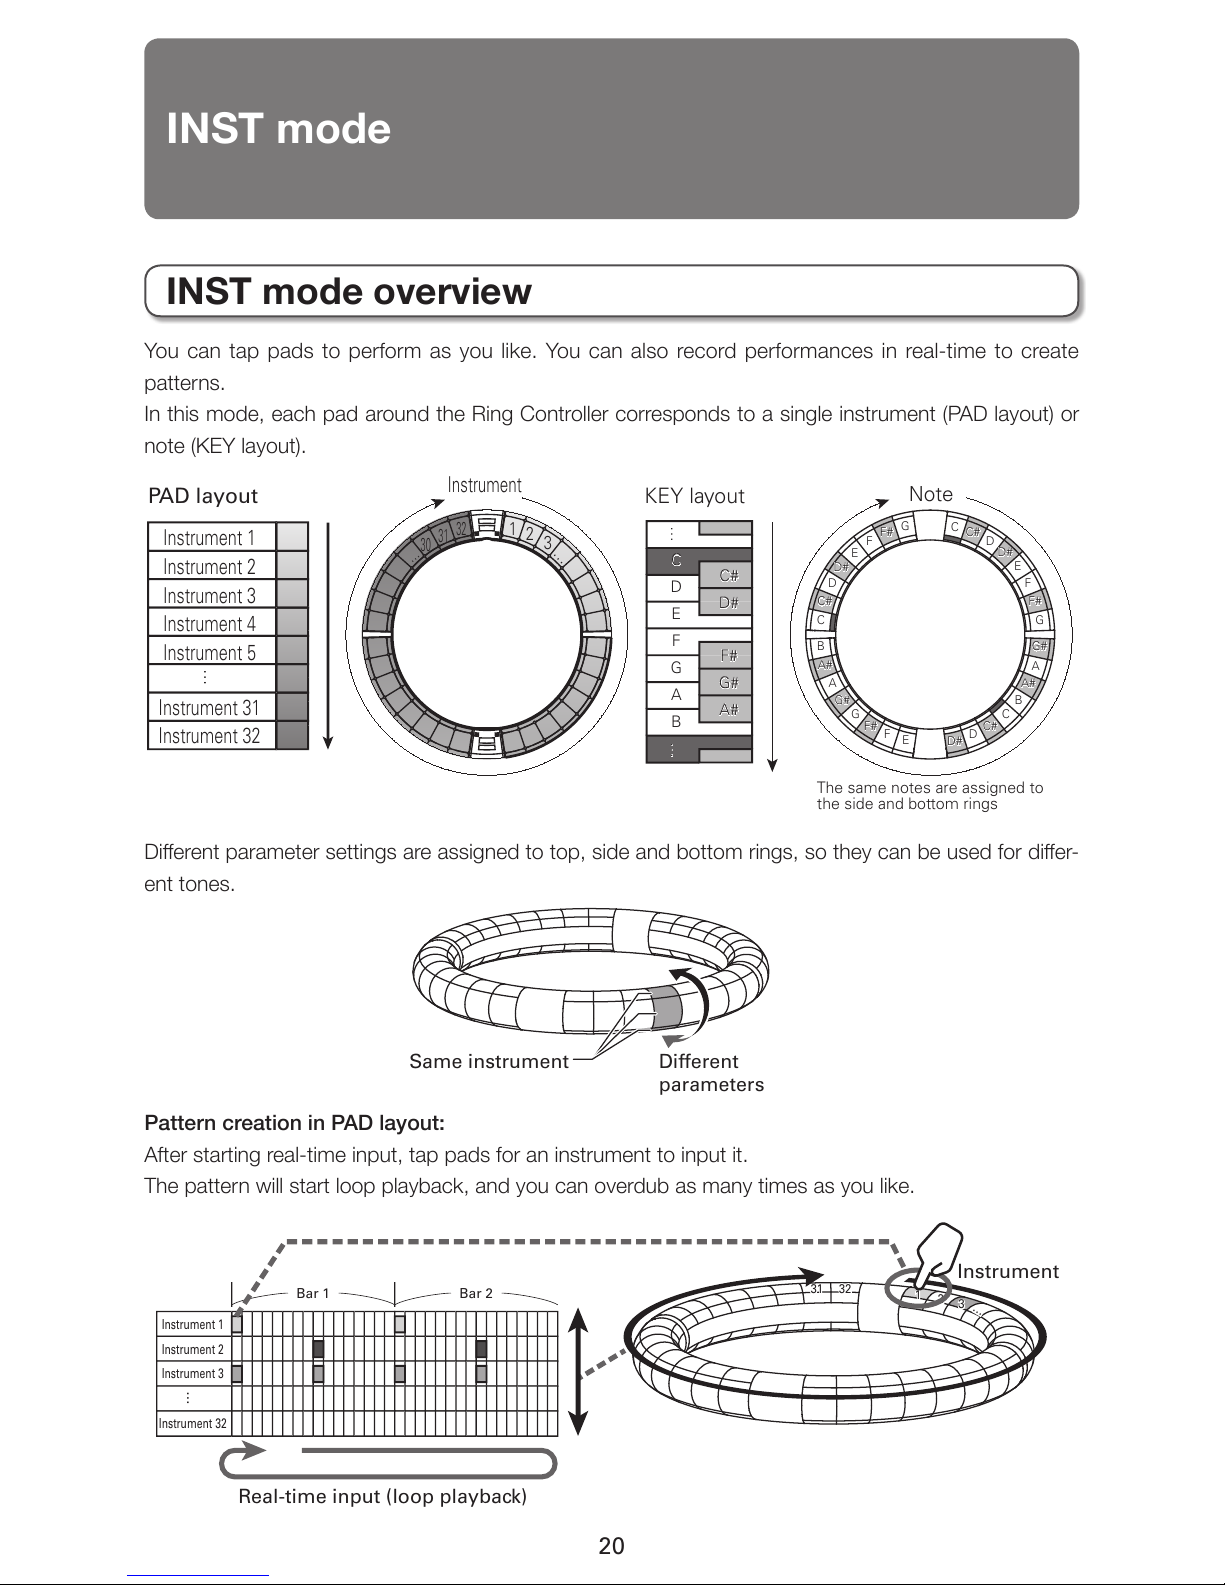
You can tap pads to perform as you like. You can also record performances in real-time to create
patterns.
In this mode, each pad around the Ring Controller corresponds to a single instrument (PAD layout) or
note (KEY layout).
1
2
3
…
…
30
31
32
Instrument 1
Instrument 2
Instrument 3
Instrument 4
Instrument 5
…
Instrument 31
Instrument 32
Instrument
Note
PAD layout KEY layout
The same notes are assigned to
the side and bottom rings
C
C#
D
D#
E
F
F#
G
G#
A
A#
B
C
C#
D
D#
E
F
F#
G
G#
A
A#
B
C
C#
D
D#
E
F
F#
G
… …
C
D
E
F
G
A
B
C#
D#
F#
G#
A#
Dierent parameter settings are assigned to top, side and bottom rings, so they can be used for dier-
ent tones.
Same instrument
Different
parameters
Pattern creation in PAD layout:
After starting real-time input, tap pads for an instrument to input it.
The pattern will start loop playback, and you can overdub as many times as you like.
Instrument 1
1
31
2
32
3
…
Bar 1 Bar 2
Instrument 2
Instrument 3
…
Instrument
Real-time input (loop playback)
Instrument 32
INST mode
INST mode overview
Page 21
21
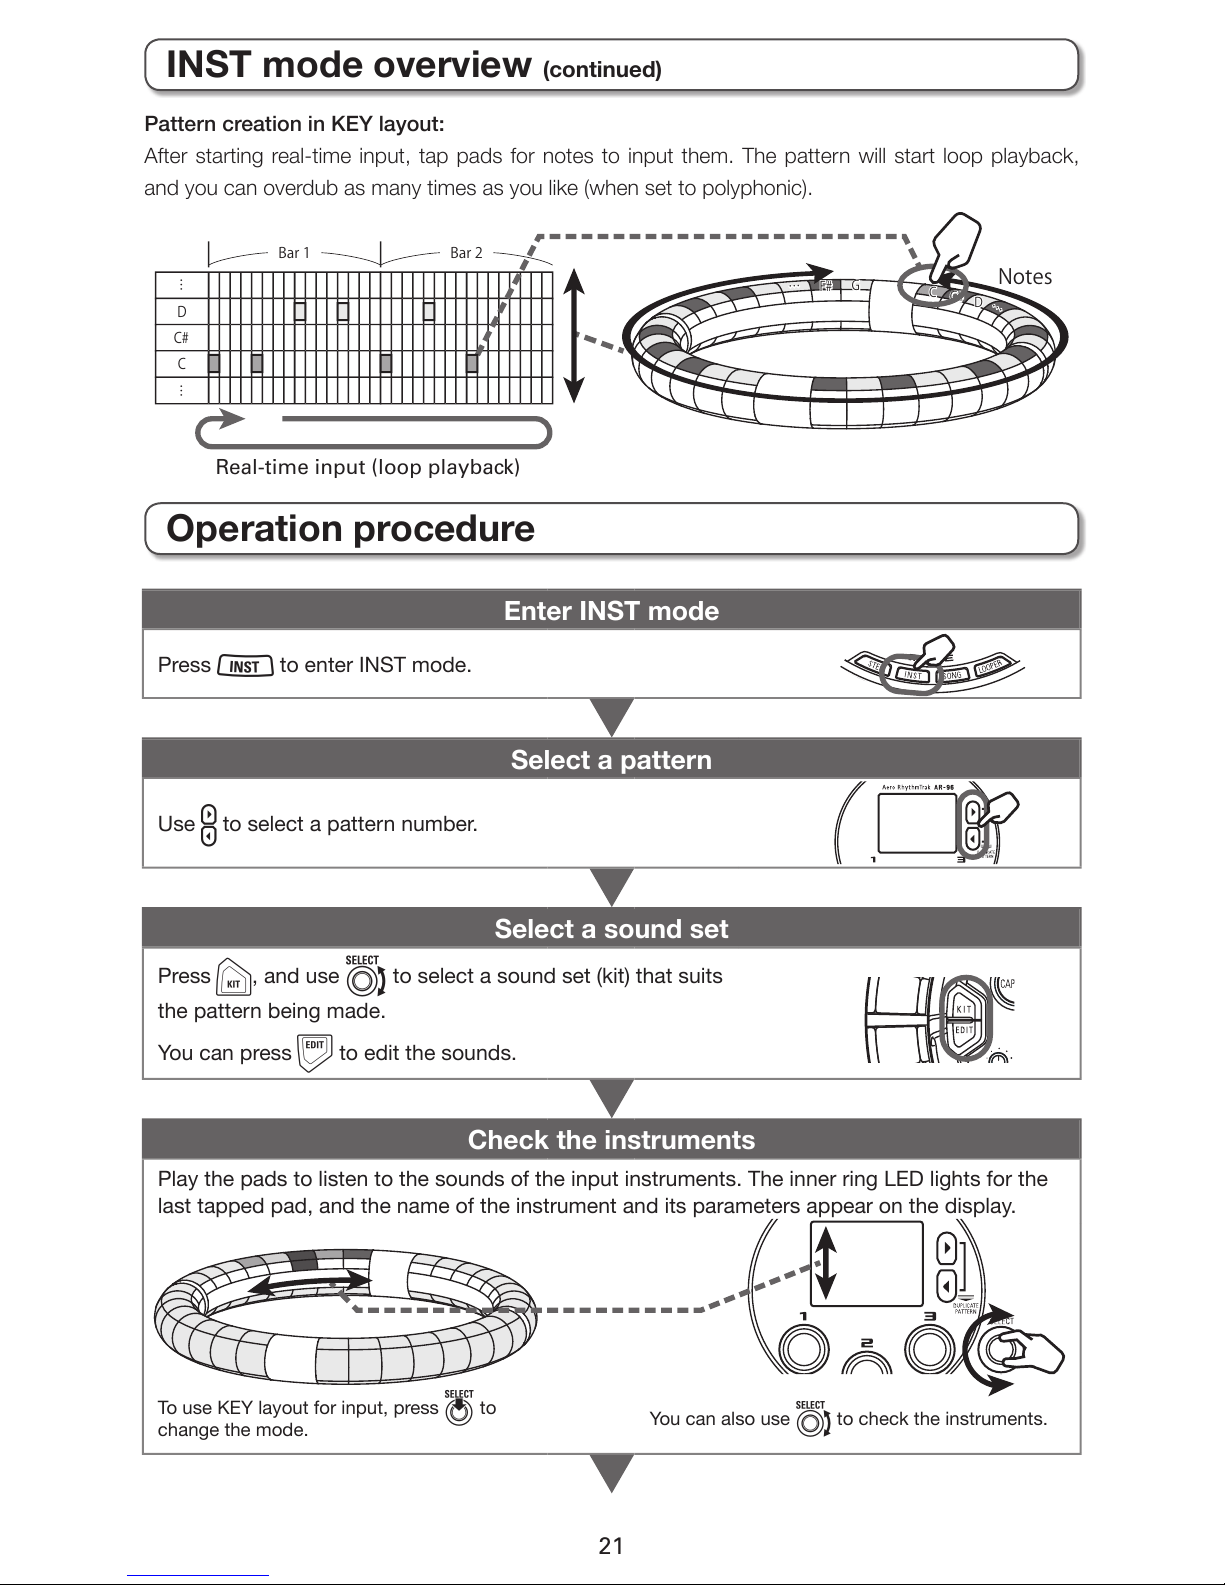
Pattern creation in KEY layout:
After starting real-time input, tap pads for notes to input them. The pattern will start loop playback,
and you can overdub as many times as you like (when set to polyphonic).
D
C
F#
C#
G
D
…
…
Bar1 Bar2
C#
C
Notes
Real-time input (loop playback)
……
Operation procedure
Enter INST mode
Press X to enter INST mode.
Select a pattern
Use u to select a pattern number.
Select a sound set
Press K, and use e to select a sound set (kit) that suits
the pattern being made.
You can press D to edit the sounds.
Check the instruments
Play the pads to listen to the sounds of the input instruments. The inner ring LED lights for the
last tapped pad, and the name of the instrument and its parameters appear on the display.
To use KEY layout for input, press E to
change the mode.
You can also use e to check the instruments.
INST mode overview (continued)
Page 22
22
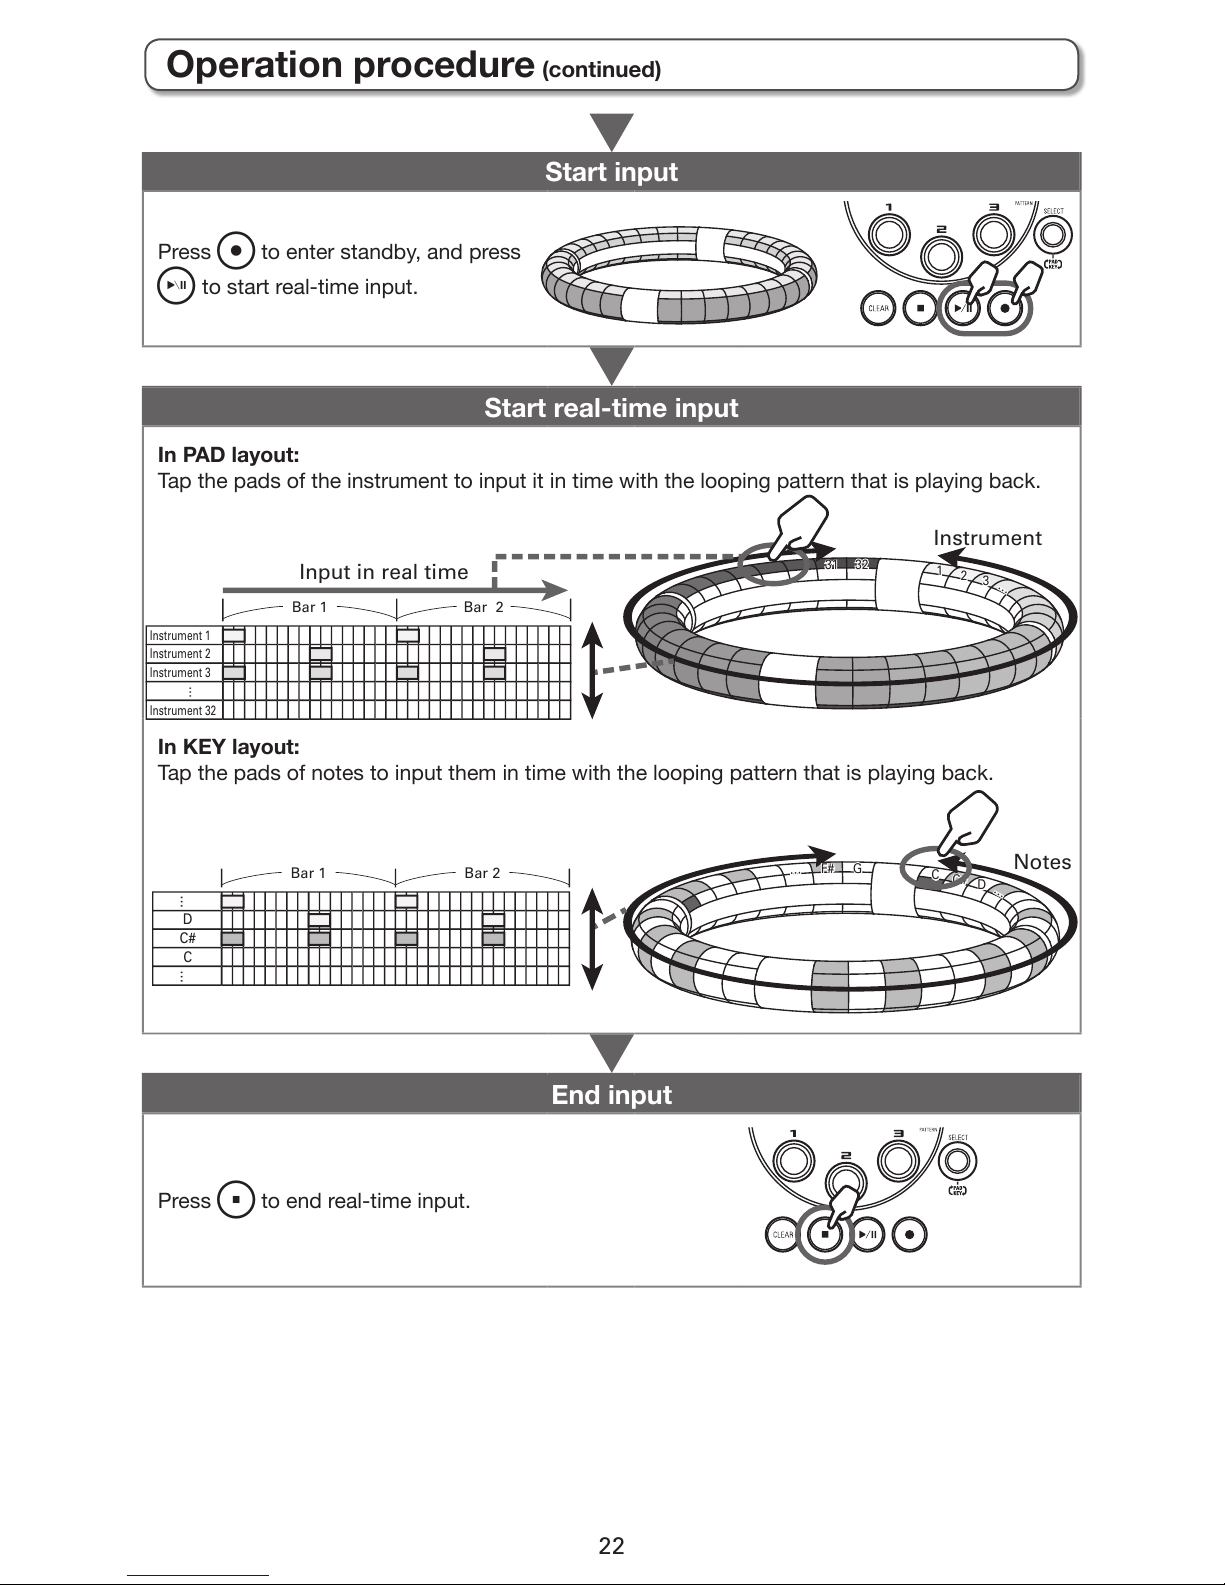
Start input
Press R to enter standby, and press
P to start real-time input.
Start real-time input
In PAD layout:
Tap the pads of the instrument to input it in time with the looping pattern that is playing back.
In KEY layout:
Tap the pads of notes to input them in time with the looping pattern that is playing back.
End input
Press S to end real-time input.
1
31
2
32
3
…
Bar 1 Bar 2
Instrument
Input in real time
Instrument 32
Instrument 1
Instrument 2
Instrument 3
…
D
C
F#
C#
G
D
…
…
Bar 1 Bar 2
C#
C
Notes
……
Operation procedure (continued)
Page 23
23
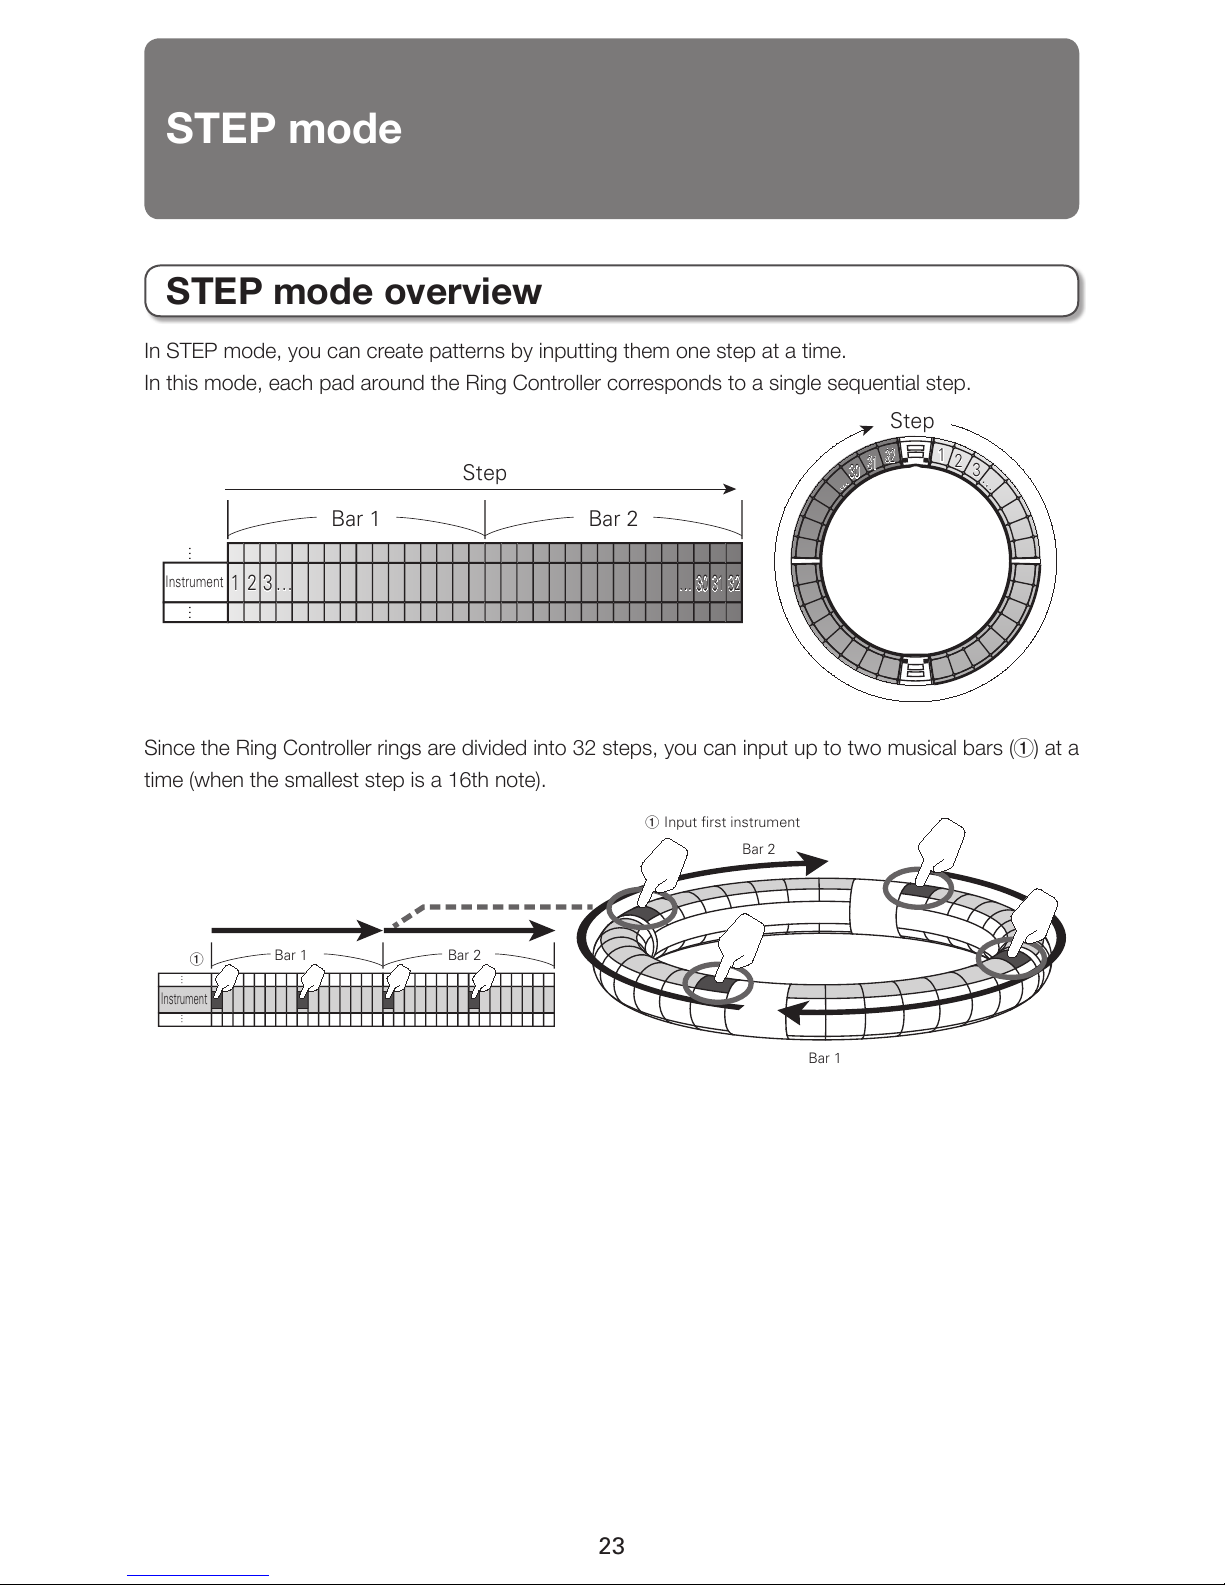
In STEP mode, you can create patterns by inputting them one step at a time.
In this mode, each pad around the Ring Controller corresponds to a single sequential step.
Instrument
Step
Step
Bar 1 Bar 2
1
2
3
…
1 2 3 …
……3030313132
32
……
Since the Ring Controller rings are divided into 32 steps, you can input up to two musical bars (1) at a
time (when the smallest step is a 16th note).
…
Bar 1
1
1 Input first instrument
Bar 1
Bar 2
Bar 2
Instrument
…
STEP mode
STEP mode overview
Page 24
24
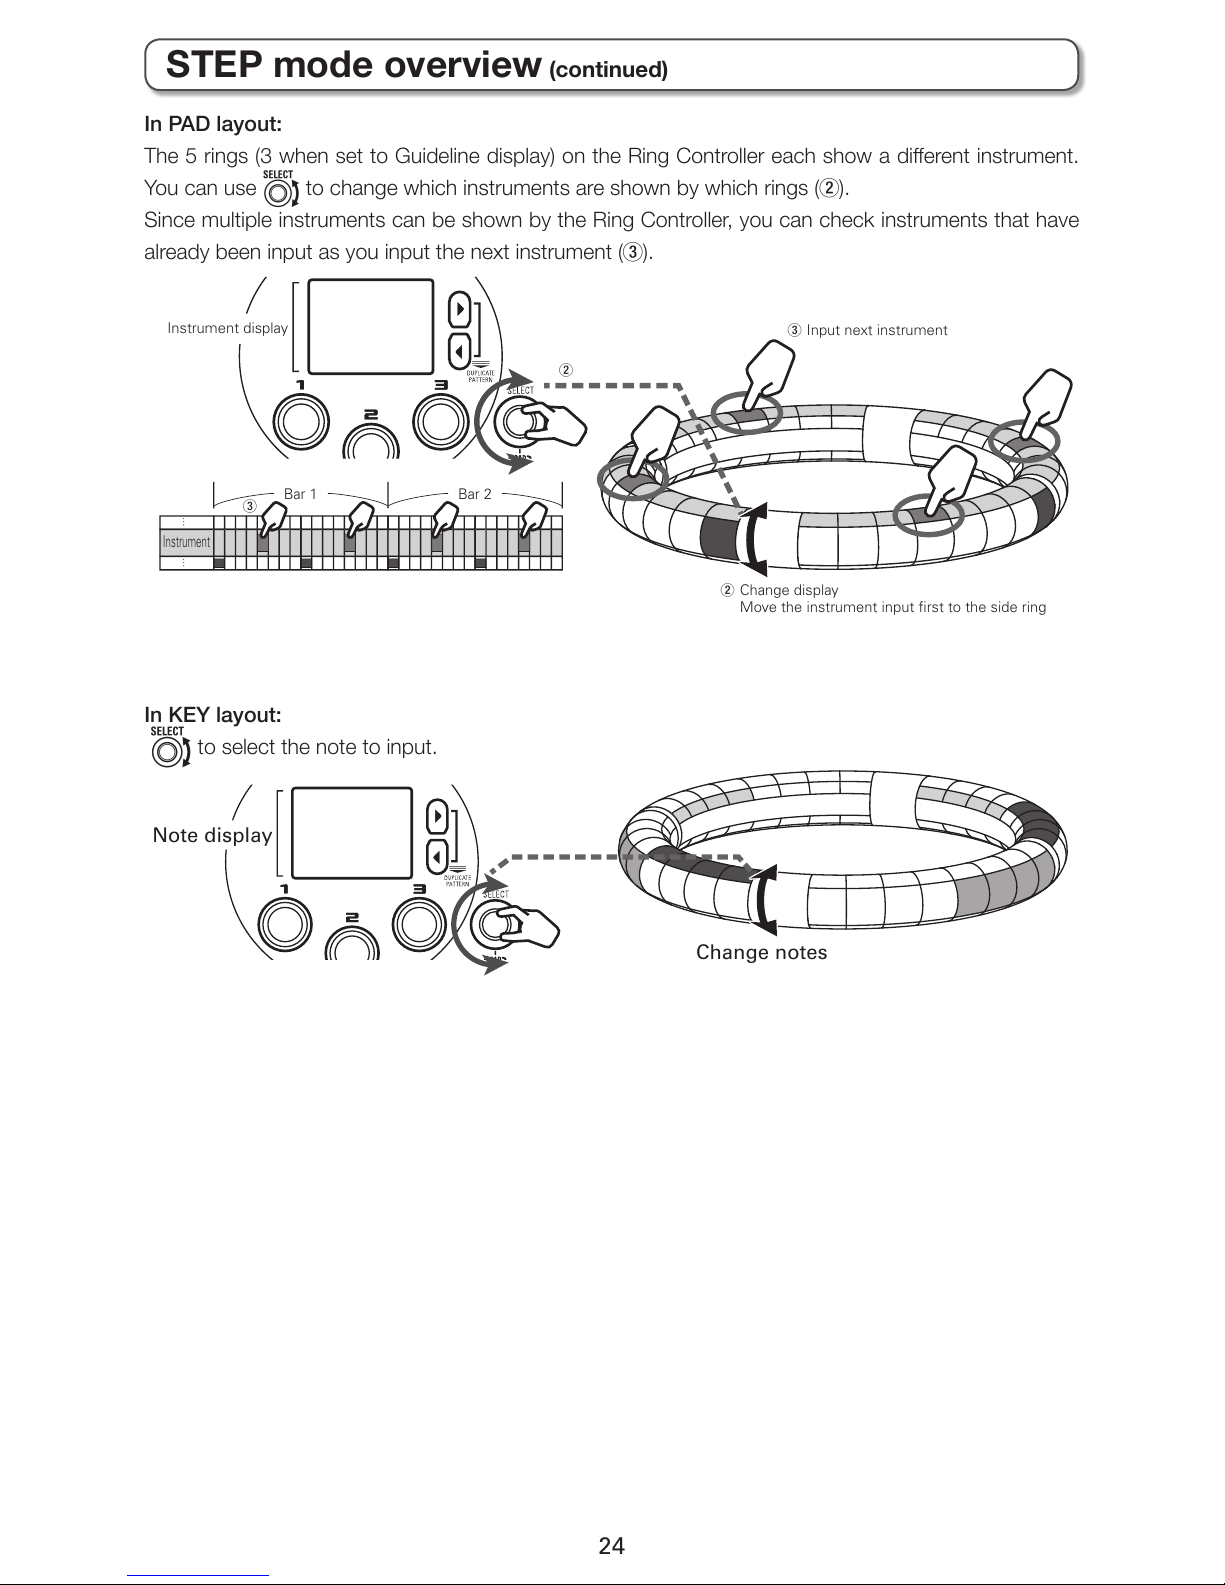
In PAD layout:
The 5 rings (3 when set to Guideline display) on the Ring Controller each show a dierent instrument.
You can use e to change which instruments are shown by which rings (2).
Since multiple instruments can be shown by the Ring Controller, you can check instruments that have
already been input as you input the next instrument (3).
Bar 1
3
2 Change display
Move the instrument input first to the side ring
3 Input next instrument
Bar 2
…
Instrument
…
2
Instrument display
In KEY layout:
e to select the note to input.
Change notes
Note display
STEP mode overview (continued)
Page 25
25
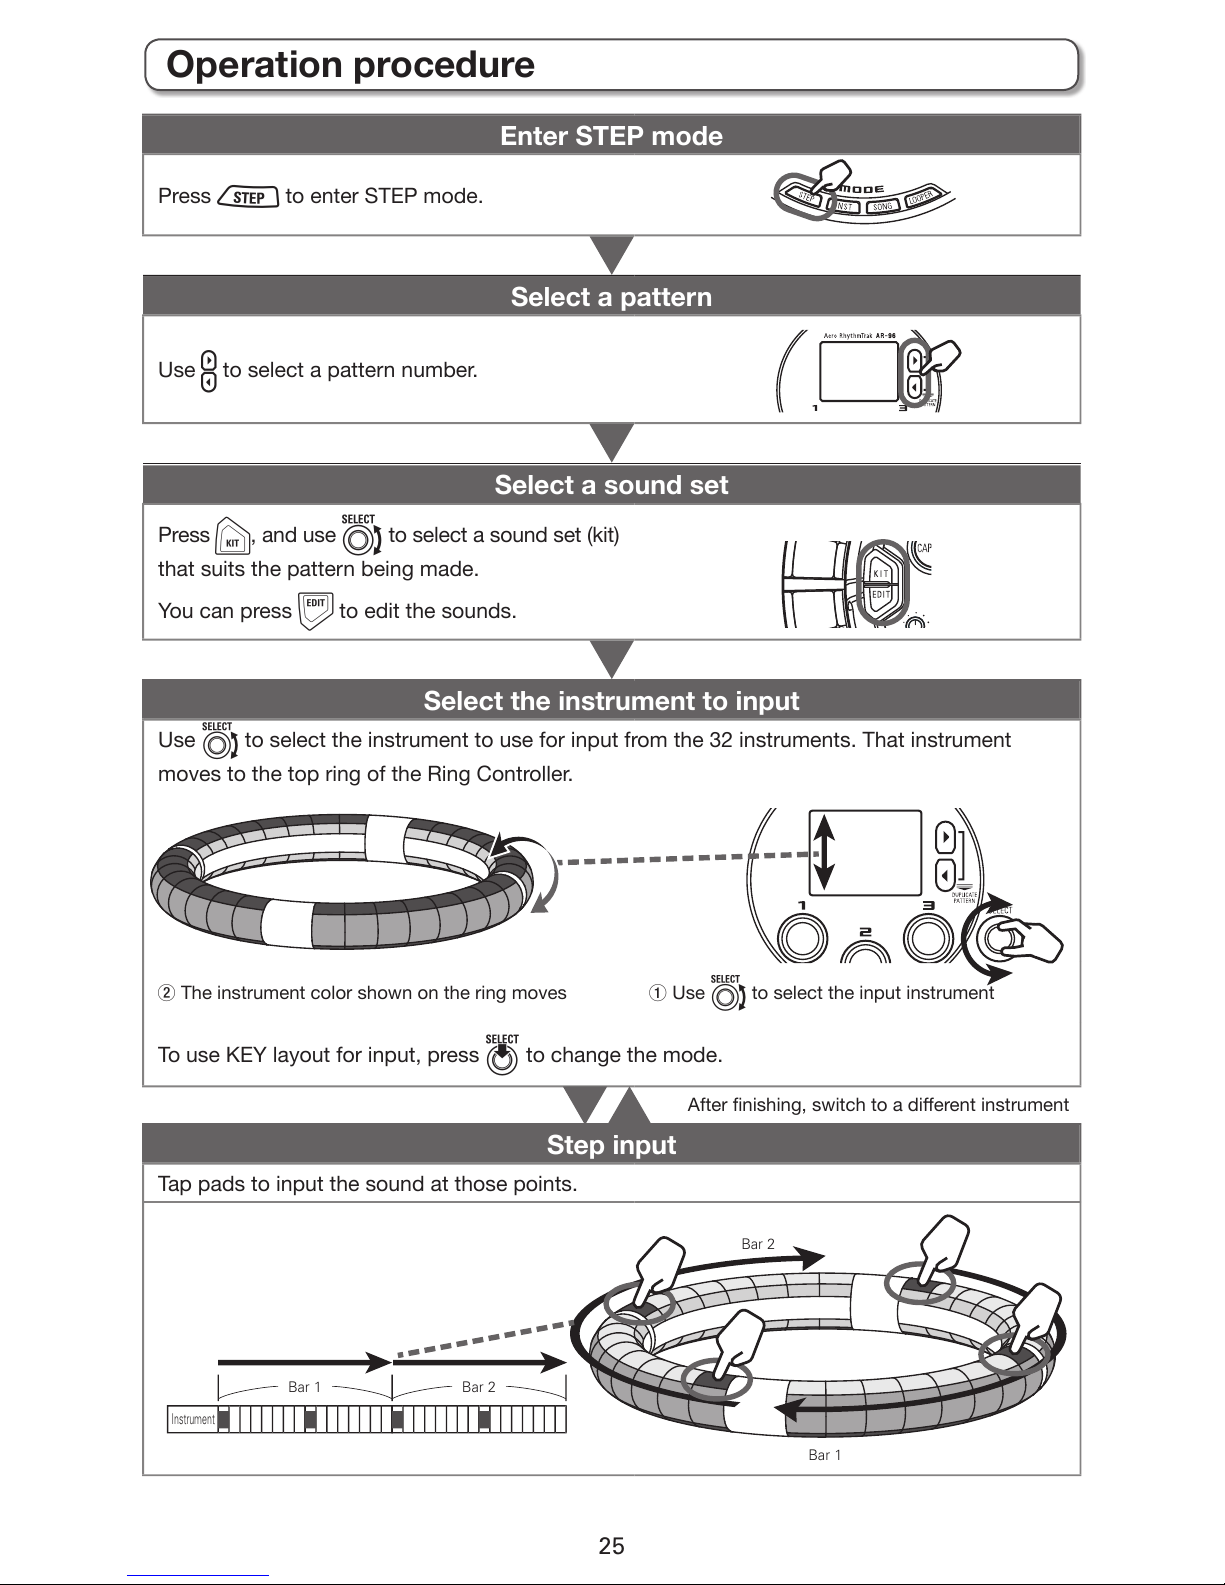
Enter STEP mode
Press W to enter STEP mode.
Select a pattern
Use u to select a pattern number.
Select a sound set
Press K, and use e to select a sound set (kit)
that suits the pattern being made.
You can press D to edit the sounds.
Select the instrument to input
Use e to select the instrument to use for input from the 32 instruments. That instrument
moves to the top ring of the Ring Controller.
2 The instrument color shown on the ring moves 1 Use e to select the input instrument
To use KEY layout for input, press E to change the mode.
Step input
Tap pads to input the sound at those points.
Instrument
Bar 1
Bar 1
Bar 2
Bar 2
After nishing, switch to a dierent instrument
Operation procedure
Page 26
26
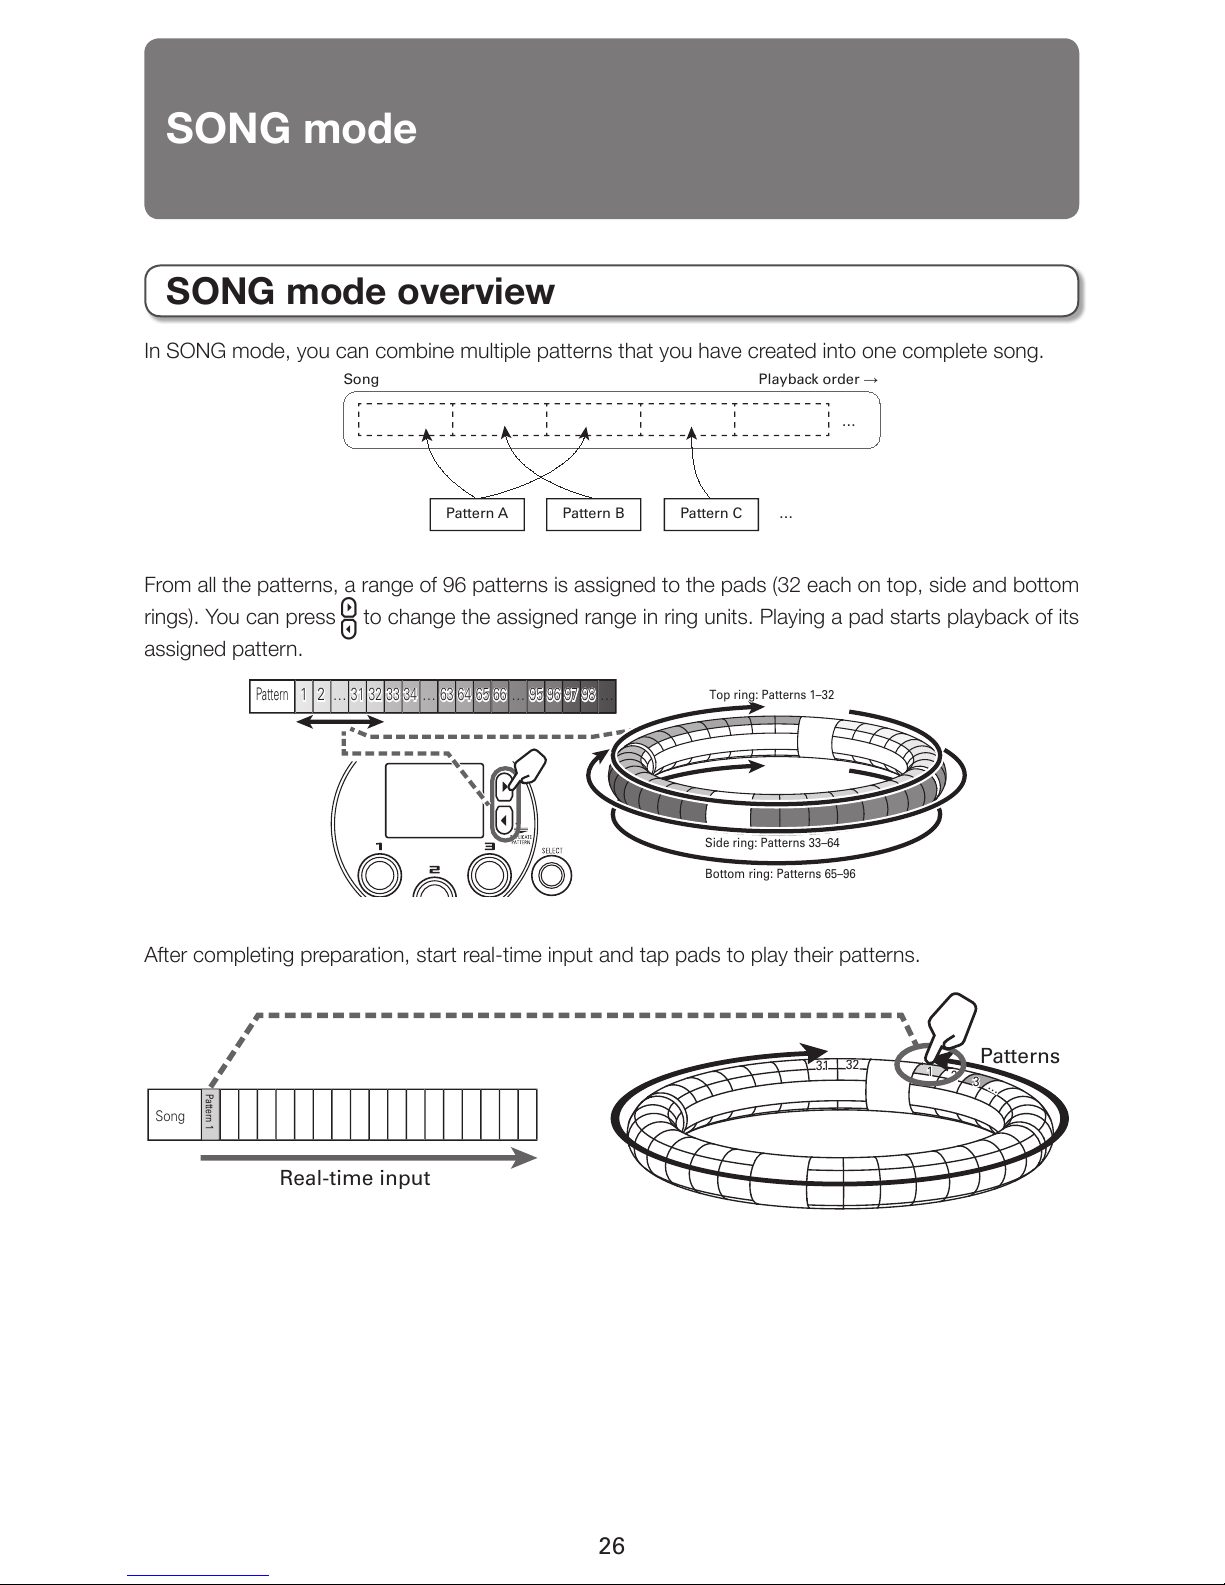
In SONG mode, you can combine multiple patterns that you have created into one complete song.
Playback order →
…
Song
Pattern A Pattern B Pattern C …
From all the patterns, a range of 96 patterns is assigned to the pads (32 each on top, side and bottom
rings). You can press u to change the assigned range in ring units. Playing a pad starts playback of its
assigned pattern.
65 66
…
97 98
…
95 96
Pattern
1 2 …
31 32 33 34…63 64
Top ring: Patterns 1–32
Side ring: Patterns 33–64
Bottom ring: Patterns 65–96
After completing preparation, start real-time input and tap pads to play their patterns.
Song
1
31
2
32
3
…
Patterns
Real-time input
Pattern 1
SONG mode
SONG mode overview
Page 27
27
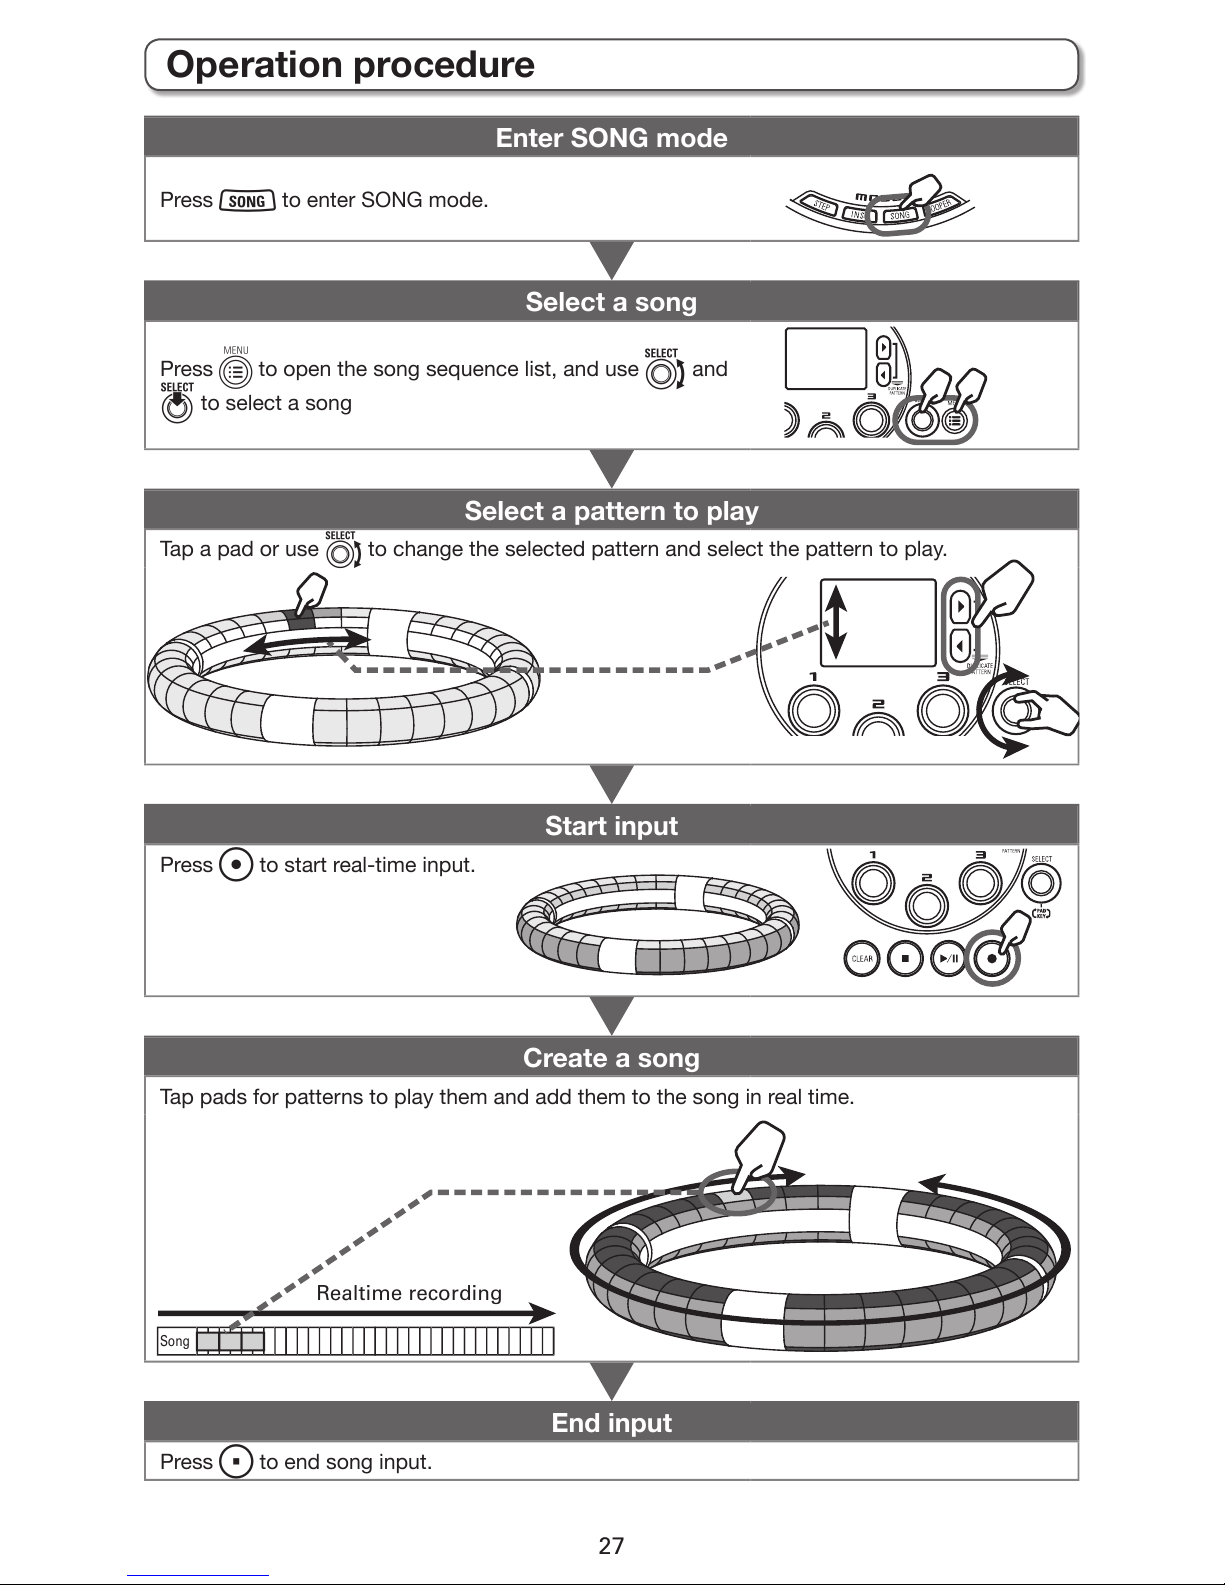
Enter SONG mode
Press Y to enter SONG mode.
Select a song
Press M to open the song sequence list, and use e and
E to select a song
Select a pattern to play
Tap a pad or use e to change the selected pattern and select the pattern to play.
Start input
Press R to start real-time input.
Create a song
Tap pads for patterns to play them and add them to the song in real time.
End input
Press S to end song input.
Song
Realtime recording
Operation procedure
Page 28
28
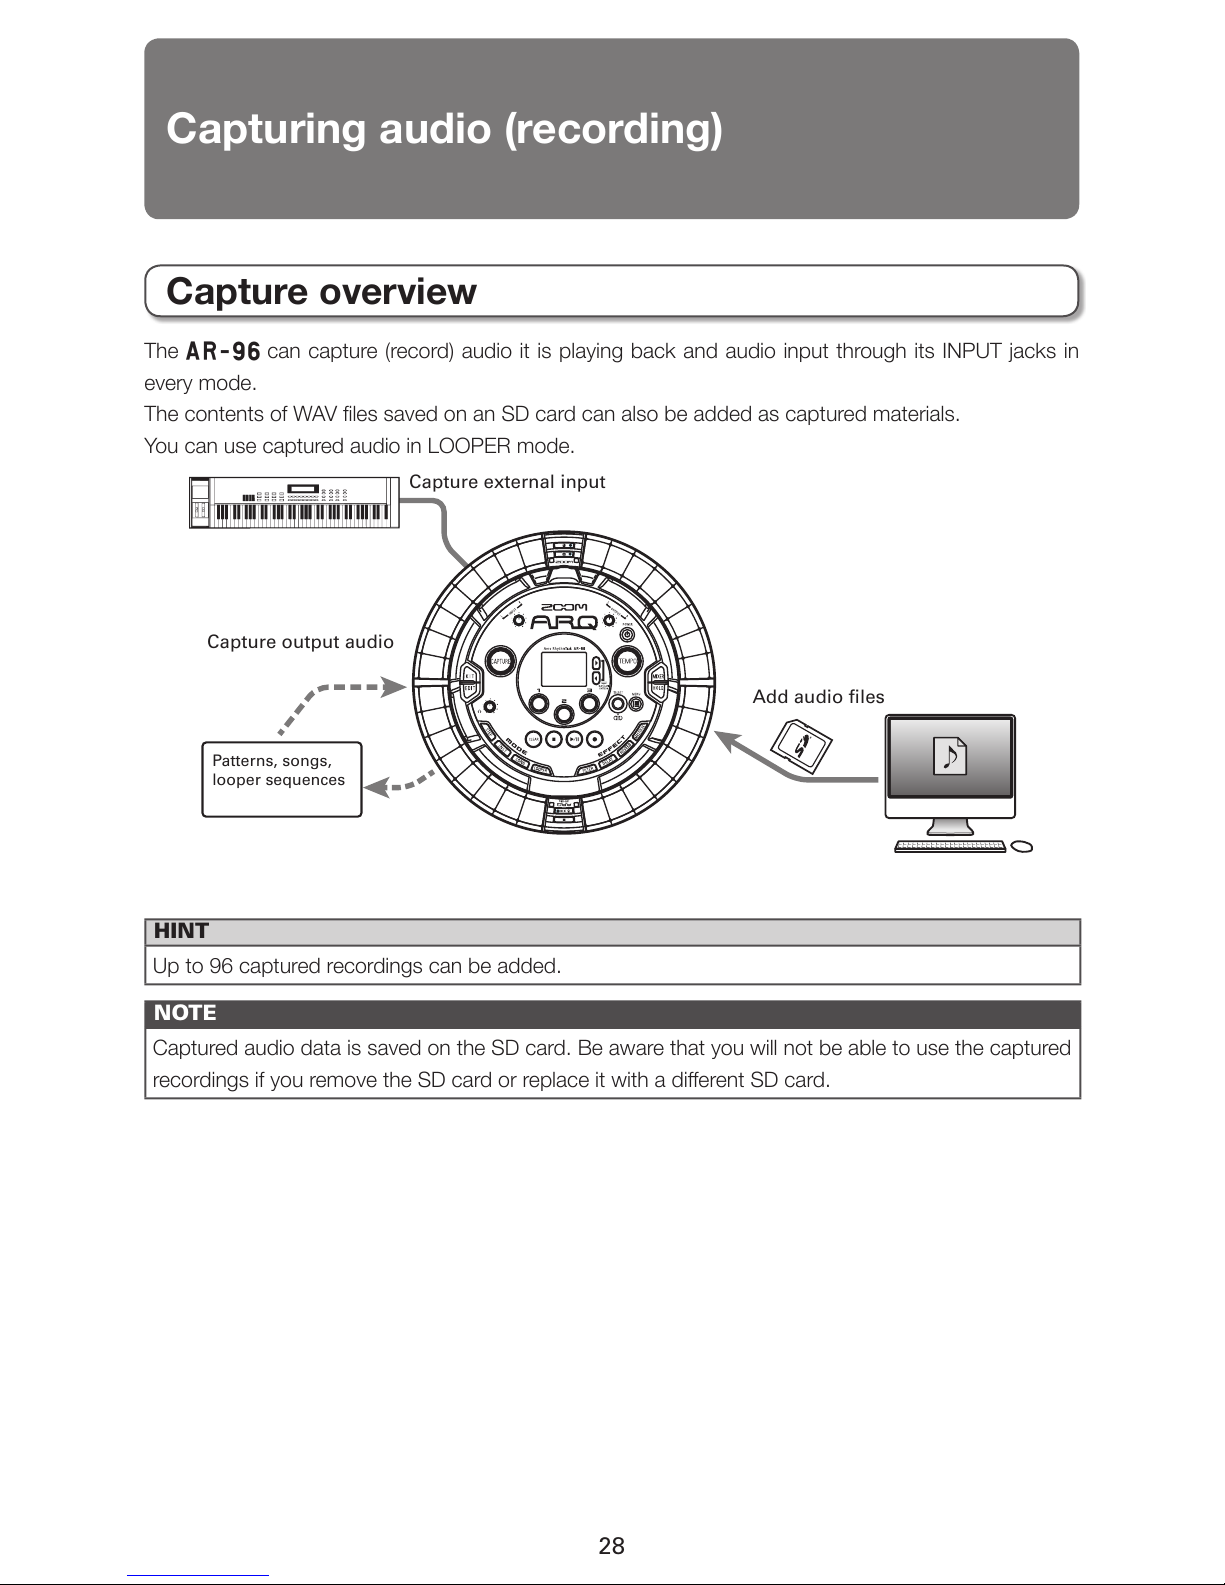
The A can capture (record) audio it is playing back and audio input through its INPUT jacks in
every mode.
The contents of WAV les saved on an SD card can also be added as captured materials.
You can use captured audio in LOOPER mode.
Capture external input
Capture output audio
Add audio files
Patterns, songs,
looper sequences
HINT
Up to 96 captured recordings can be added.
NOTE
Captured audio data is saved on the SD card. Be aware that you will not be able to use the captured
recordings if you remove the SD card or replace it with a dierent SD card.
Capturing audio (recording)
Capture overview
Page 29
29
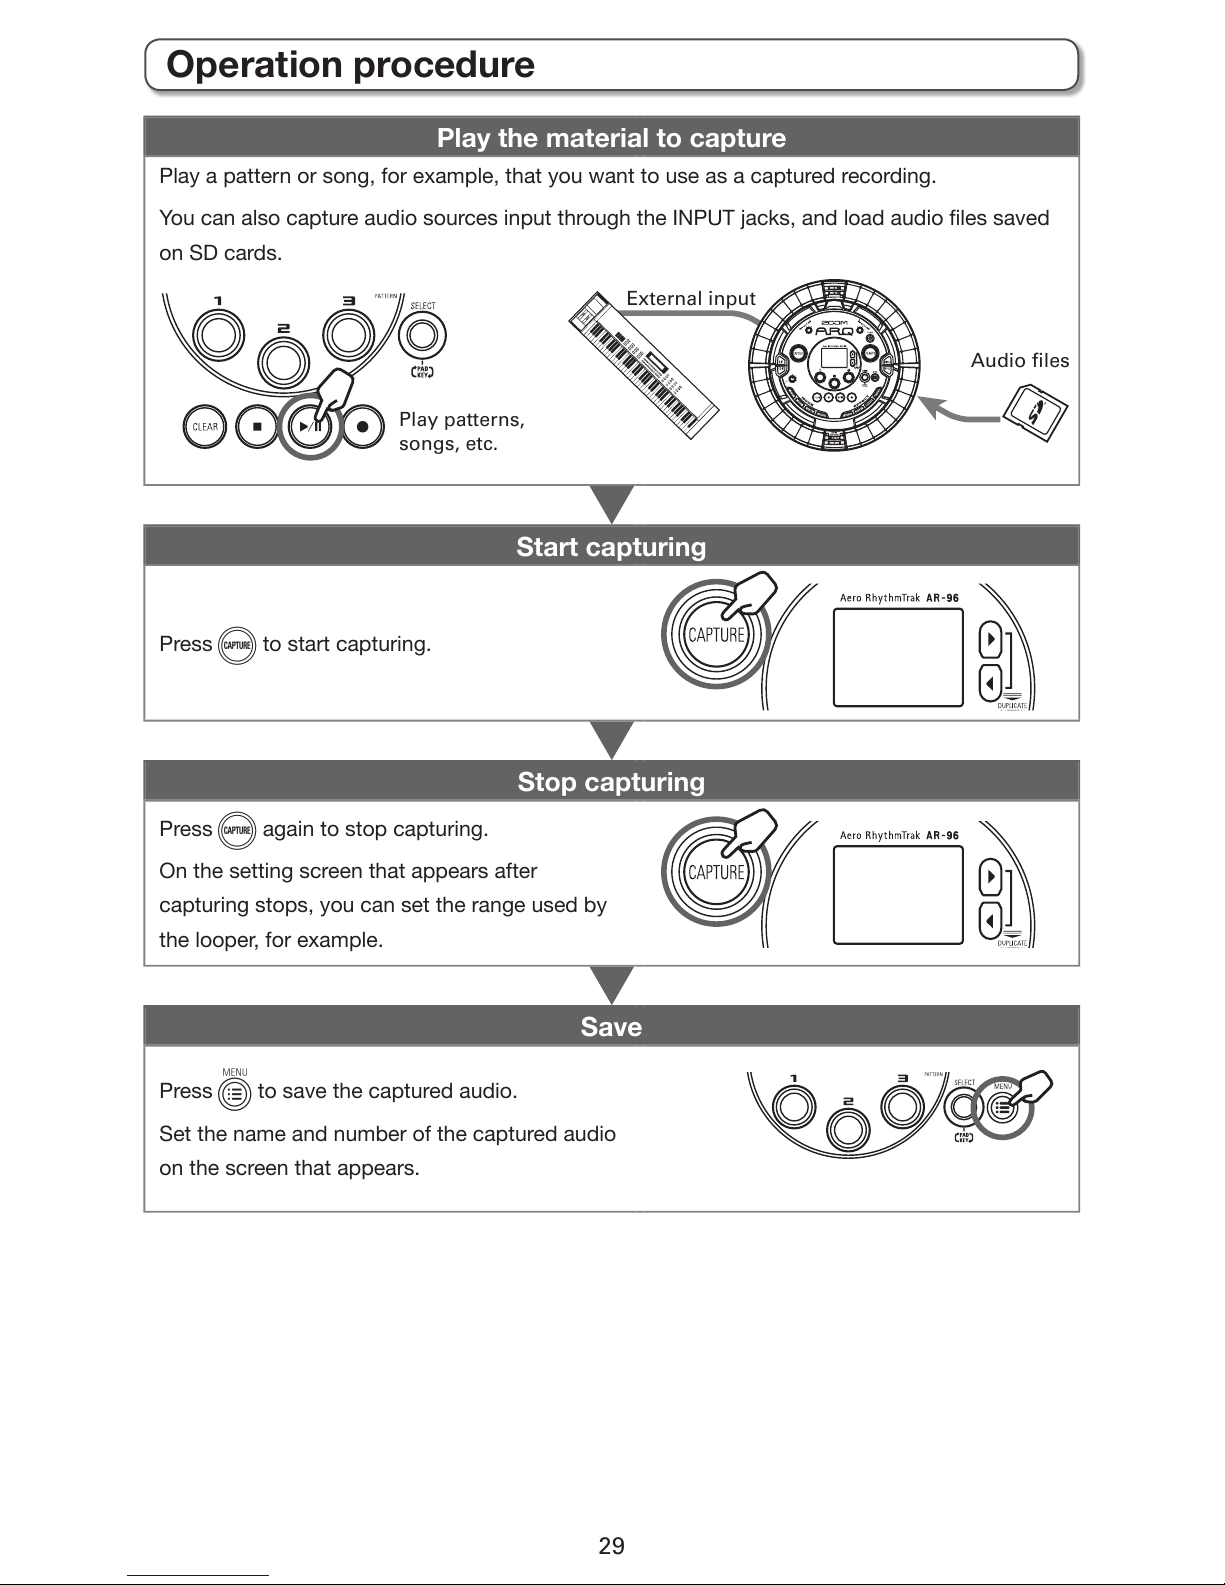
Play the material to capture
Play a pattern or song, for example, that you want to use as a captured recording.
You can also capture audio sources input through the INPUT jacks, and load audio les saved
on SD cards.
Start capturing
Press c to start capturing.
Stop capturing
Press c again to stop capturing.
On the setting screen that appears after
capturing stops, you can set the range used by
the looper, for example.
Save
Press M to save the captured audio.
Set the name and number of the captured audio
on the screen that appears.
External input
Audio files
Play patterns,
songs, etc.
Operation procedure
Page 30
30
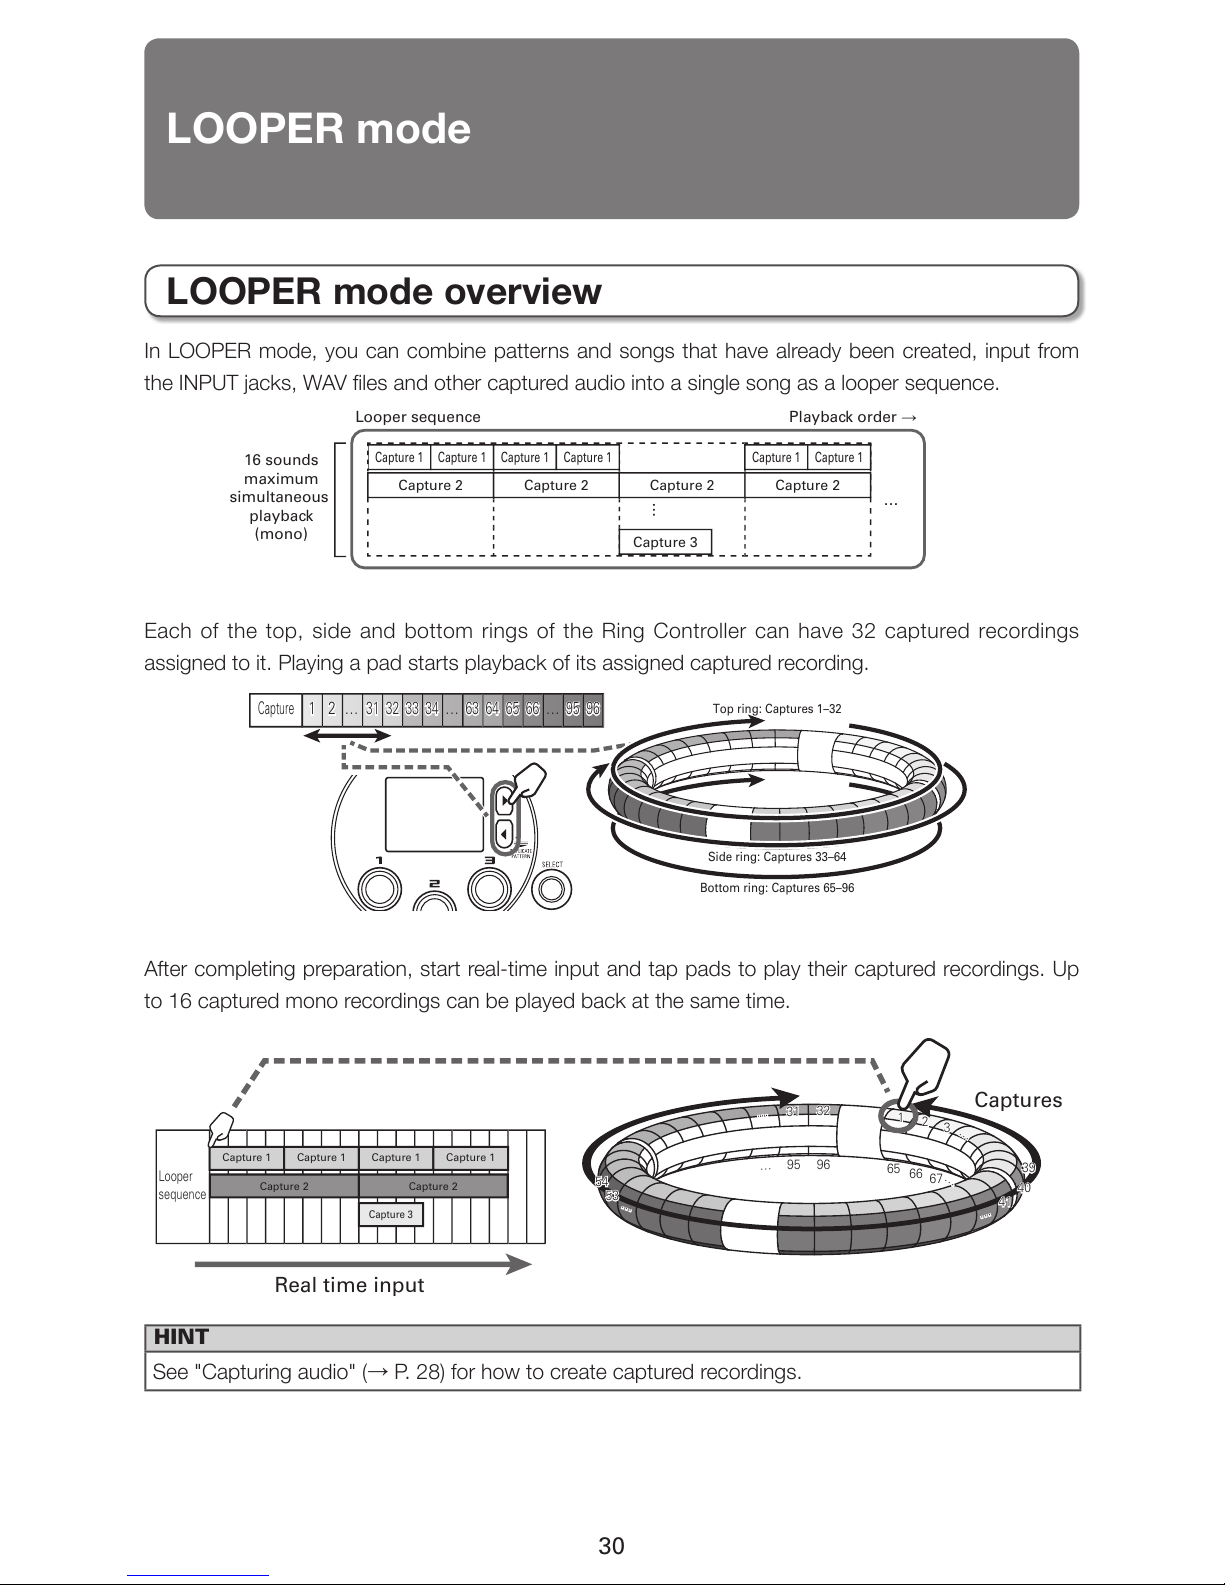
In LOOPER mode, you can combine patterns and songs that have already been created, input from
the INPUT jacks, WAV les and other captured audio into a single song as a looper sequence.
…
Playback order →Looper sequence
16 sounds
maximum
simultaneous
playback
(mono)
Capture 1 Capture 1 Capture 1 Capture 1 Capture 1 Capture 1
Capture 3
Capture 2 Capture 2 Capture 2 Capture 2
…
Each of the top, side and bottom rings of the Ring Controller can have 32 captured recordings
assigned to it. Playing a pad starts playback of its assigned captured recording.
65 66…95 96
Capture
1 2 …
31 32 33 34…63 64
Top ring: Captures 1–32
Side ring: Captures 33–64
Bottom ring: Captures 65–96
After completing preparation, start real-time input and tap pads to play their captured recordings. Up
to 16 captured mono recordings can be played back at the same time.
Looper
sequence
1
31
2
32
95
…
53
54
…
96
3
…
65
39
40
41
66
67
…
…
…
Captures
Real time input
Capture 1 Capture 1
Capture 2 Capture 2
Capture 3
Capture 1 Capture 1
HINT
See "Capturing audio" (→ P. 28) for how to create captured recordings.
LOOPER mode
LOOPER mode overview
Page 31
31
t
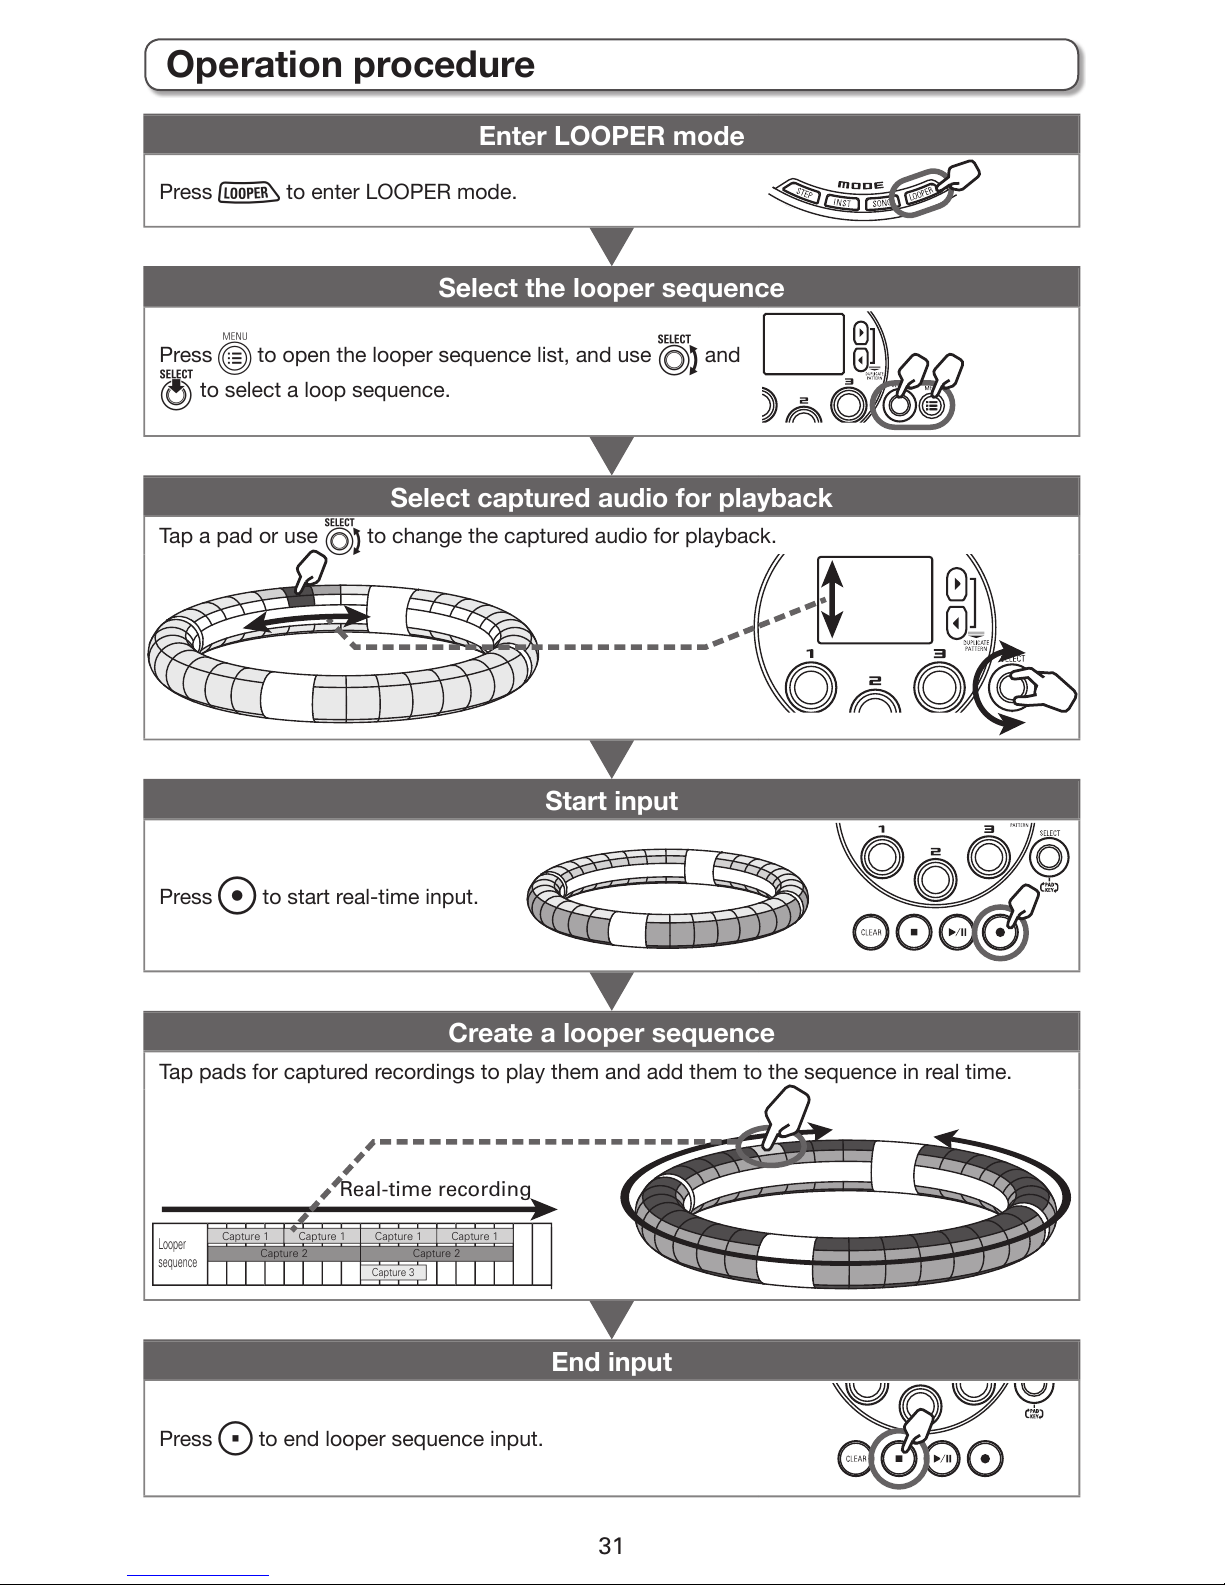
Enter LOOPER mode
Press Z to enter LOOPER mode.
Select the looper sequence
Press M to open the looper sequence list, and use e and
E to select a loop sequence.
Select captured audio for playback
Tap a pad or use e to change the captured audio for playback.
Start input
Press R to start real-time input.
Create a looper sequence
Tap pads for captured recordings to play them and add them to the sequence in real time.
End input
Press S to end looper sequence input.
Looper
sequence
Capture 1 Capture 1
Capture 2 Capture 2
Capture 3
Capture 1 Capture 1
Real-time recording
Operation procedure
Page 32
32
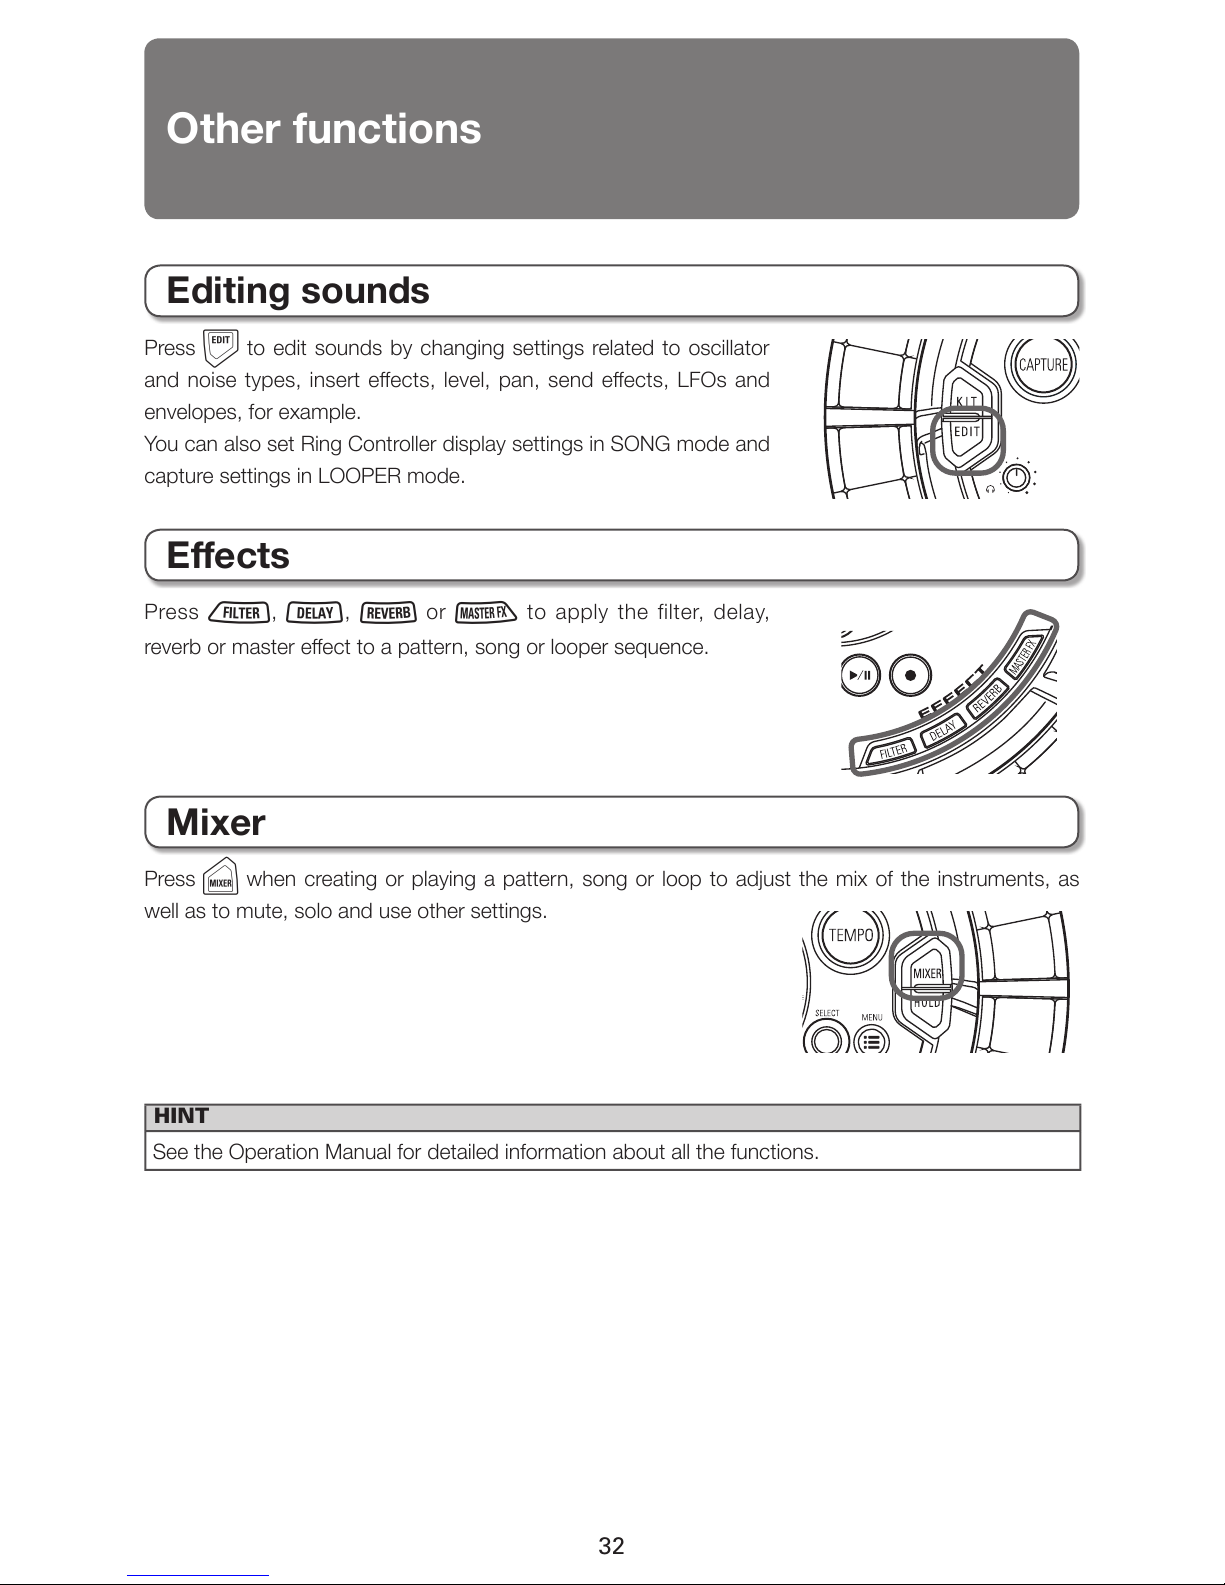
Editing sounds
Press D to edit sounds by changing settings related to oscillator
and noise types, insert eects, level, pan, send eects, LFOs and
envelopes, for example.
You can also set Ring Controller display settings in SONG mode and
capture settings in LOOPER mode.
Eects
Press w, x, y or z to apply the filter, delay,
reverb or master eect to a pattern, song or looper sequence.
Mixer
Press m when creating or playing a pattern, song or loop to adjust the mix of the instruments, as
well as to mute, solo and use other settings.
HINT
See the Operation Manual for detailed information about all the functions.
Other functions
Page 33
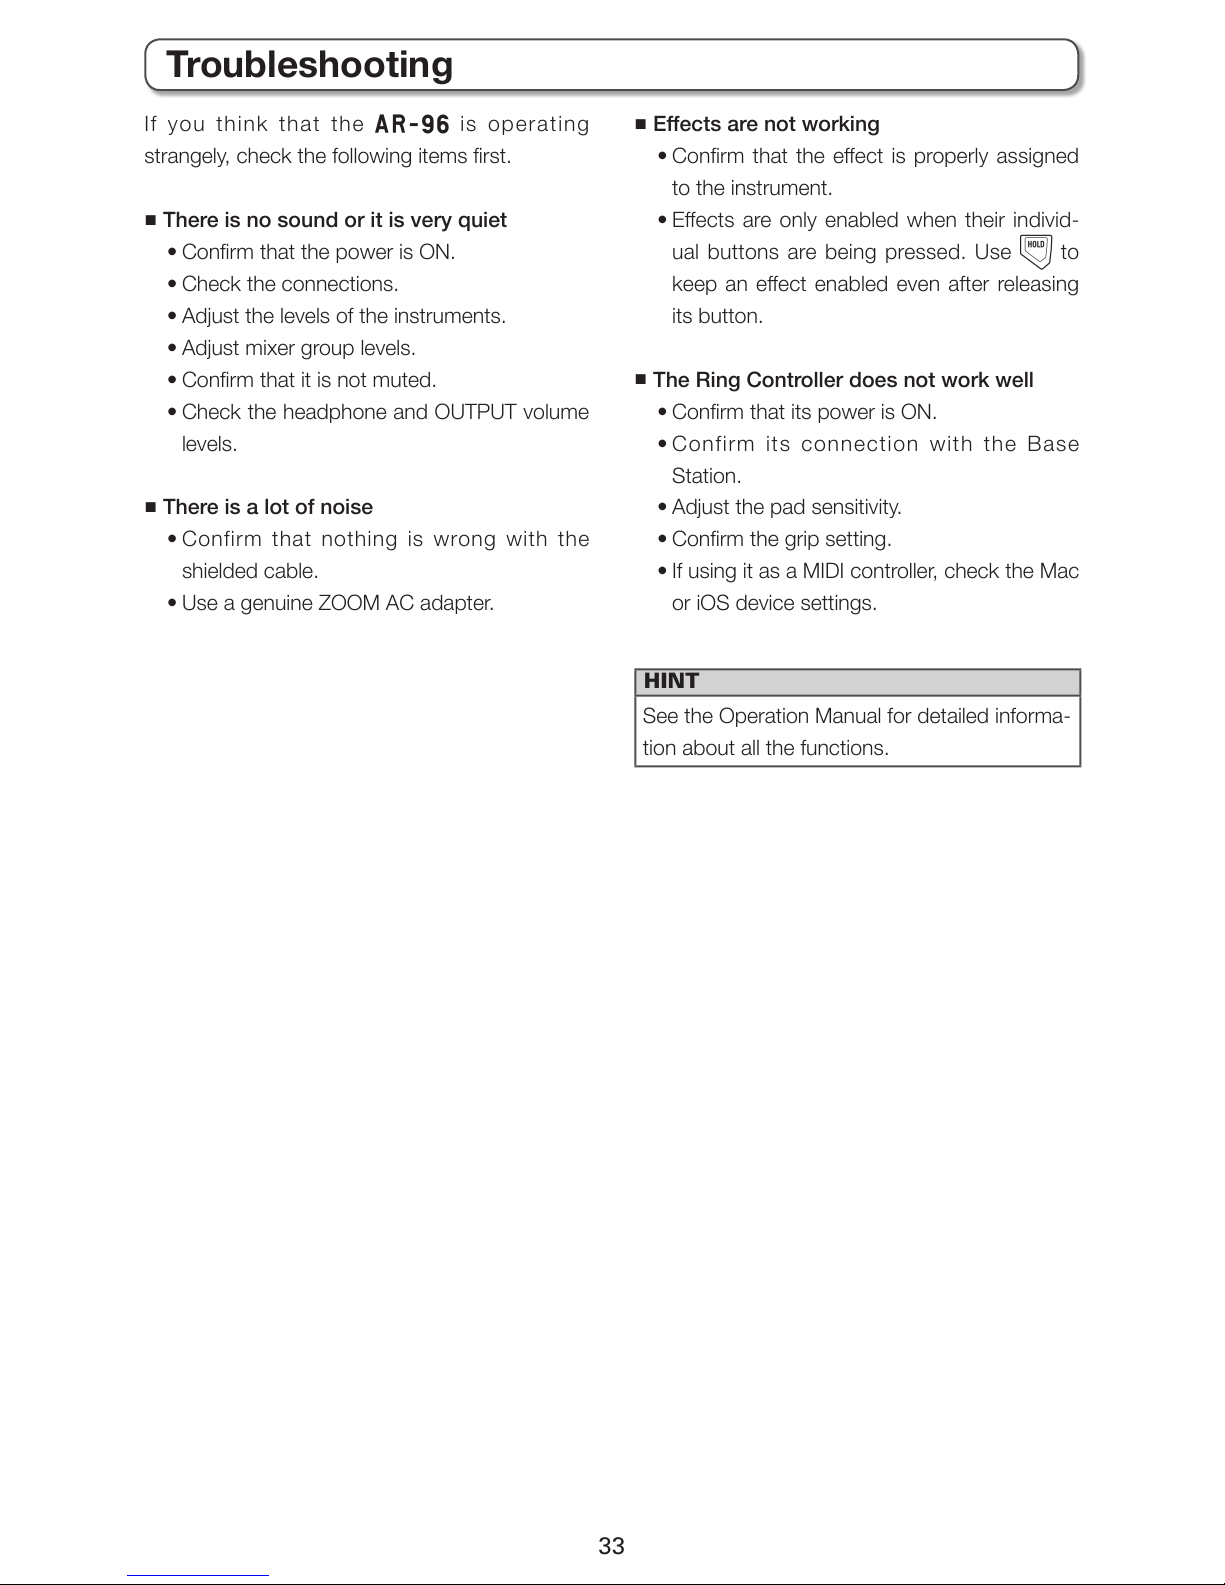
33
■
Eects are not working
• Conrm that the eect is properly assigned
to the instrument.
• Eects are only enabled when their individ-
ual buttons are being pressed. Use
H
to
keep an eect enabled even after releasing
its button.
■
The Ring Controller does not work well
• Conrm that its power is ON.
• C o n fir m it s con n e cti o n w i th the Base
Station.
• Adjust the pad sensitivity.
• Conrm the grip setting.
• If using it as a MIDI controller, check the Mac
or iOS device settings.
HINT
See the Operation Manual for detailed informa-
tion about all the functions.
If you think that the A is op e ra t in g
strangely, check the following items rst.
■
There is no sound or it is very quiet
• Conrm that the power is ON.
• Check the connections.
• Adjust the levels of the instruments.
• Adjust mixer group levels.
• Conrm that it is not muted.
• Check the headphone and OUTPUT volume
levels.
■
There is a lot of noise
• Confirm that nothing is wrong with the
shielded cable.
• Use a genuine ZOOM AC adapter.
Troubleshooting
Page 34
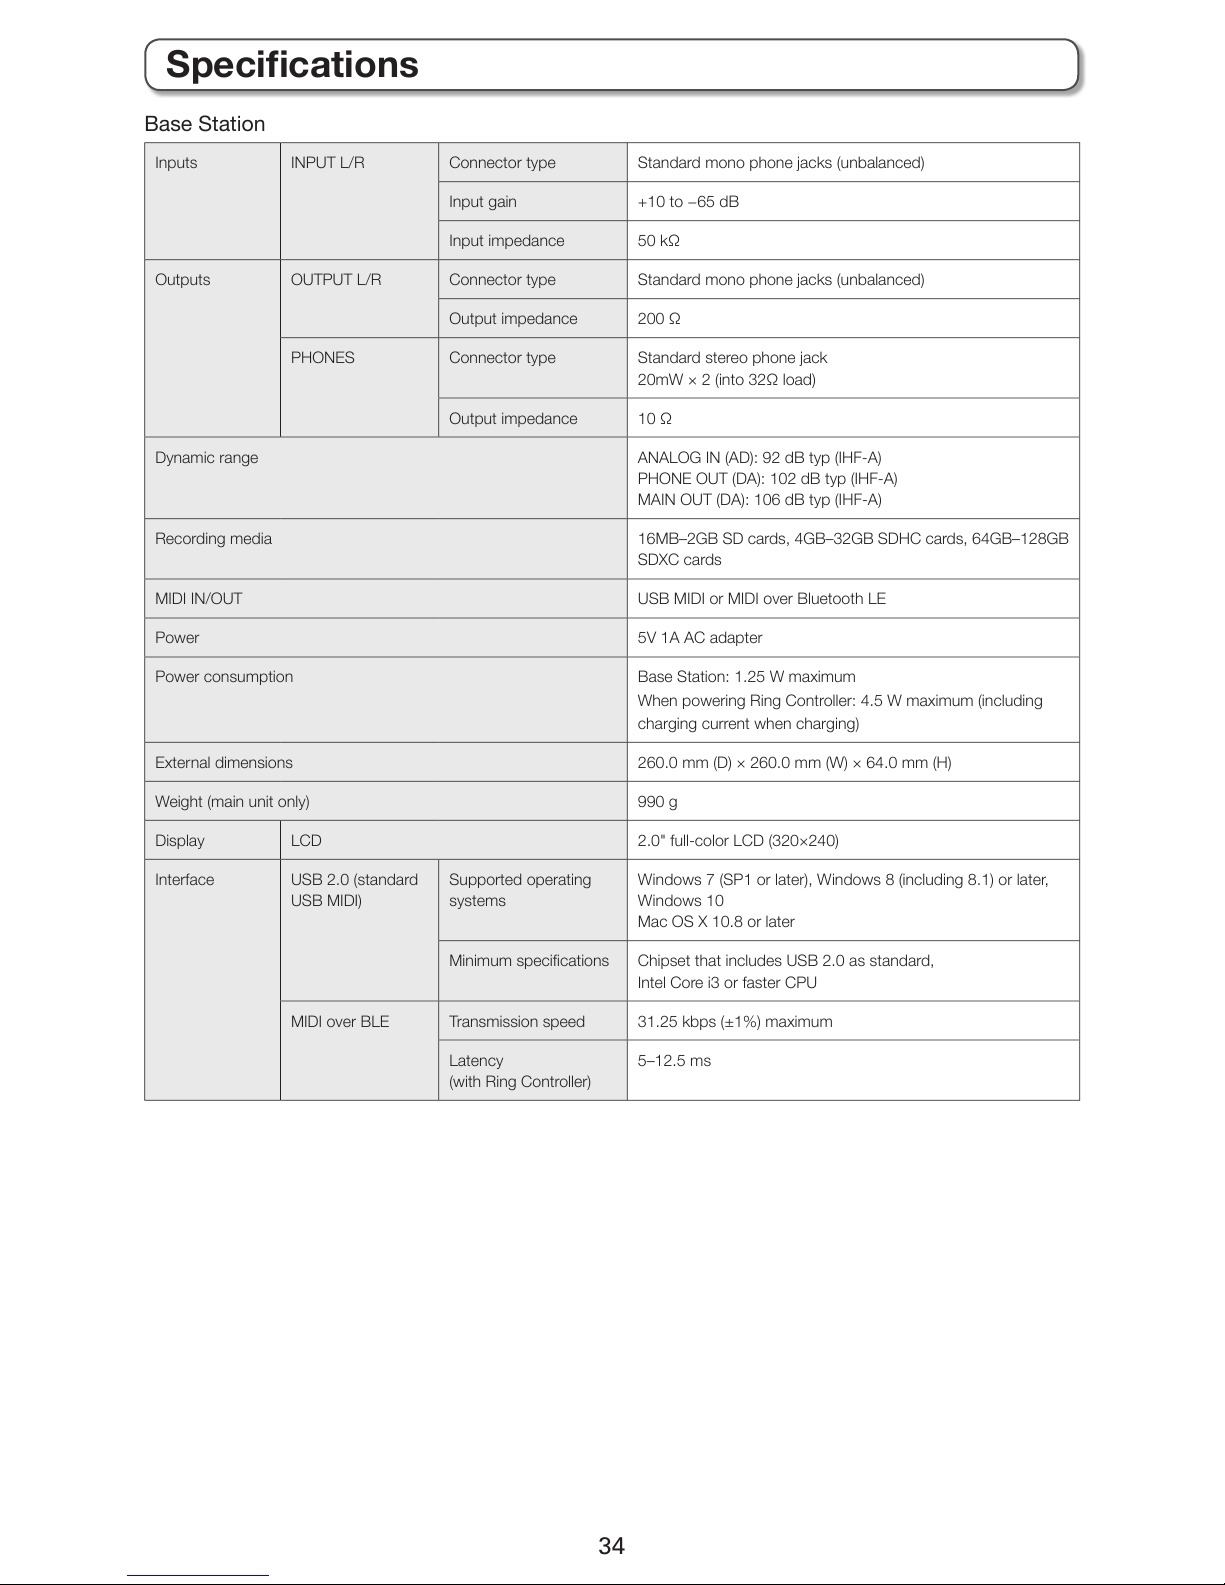
34
Base Station
Inputs INPUT L/R Connector type Standard mono phone jacks (unbalanced)
Input gain +10 to −65 dB
Input impedance 50 kΩ
Outputs OUTPUT L/R Connector type Standard mono phone jacks (unbalanced)
Output impedance 200 Ω
PHONES Connector type Standard stereo phone jack
20mW × 2 (into 32Ω load)
Output impedance 10 Ω
Dynamic range ANALOG IN (AD): 92 dB typ (IHF-A)
PHONE OUT (DA): 102 dB typ (IHF-A)
MAIN OUT (DA): 106 dB typ (IHF-A)
Recording media 16MB–2GB SD cards, 4GB–32GB SDHC cards, 64GB–128GB
SDXC cards
MIDI IN/OUT USB MIDI or MIDI over Bluetooth LE
Power 5V 1A AC adapter
Power consumption Base Station: 1.25 W maximum
When powering Ring Controller: 4.5 W maximum (including
charging current when charging)
External dimensions 260.0 mm (D) × 260.0 mm (W) × 64.0 mm (H)
Weight (main unit only) 990 g
Display LCD 2.0" full-color LCD (320×240)
Interface USB 2.0 (standard
USB MIDI)
Supported operating
systems
Windows 7 (SP1 or later), Windows 8 (including 8.1) or later,
Windows 10
Mac OS X 10.8 or later
Minimum specications Chipset that includes USB 2.0 as standard,
Intel Core i3 or faster CPU
MIDI over BLE Transmission speed 31.25 kbps (±1%) maximum
Latency
(with Ring Controller)
5–12.5 ms
Specications
Page 35
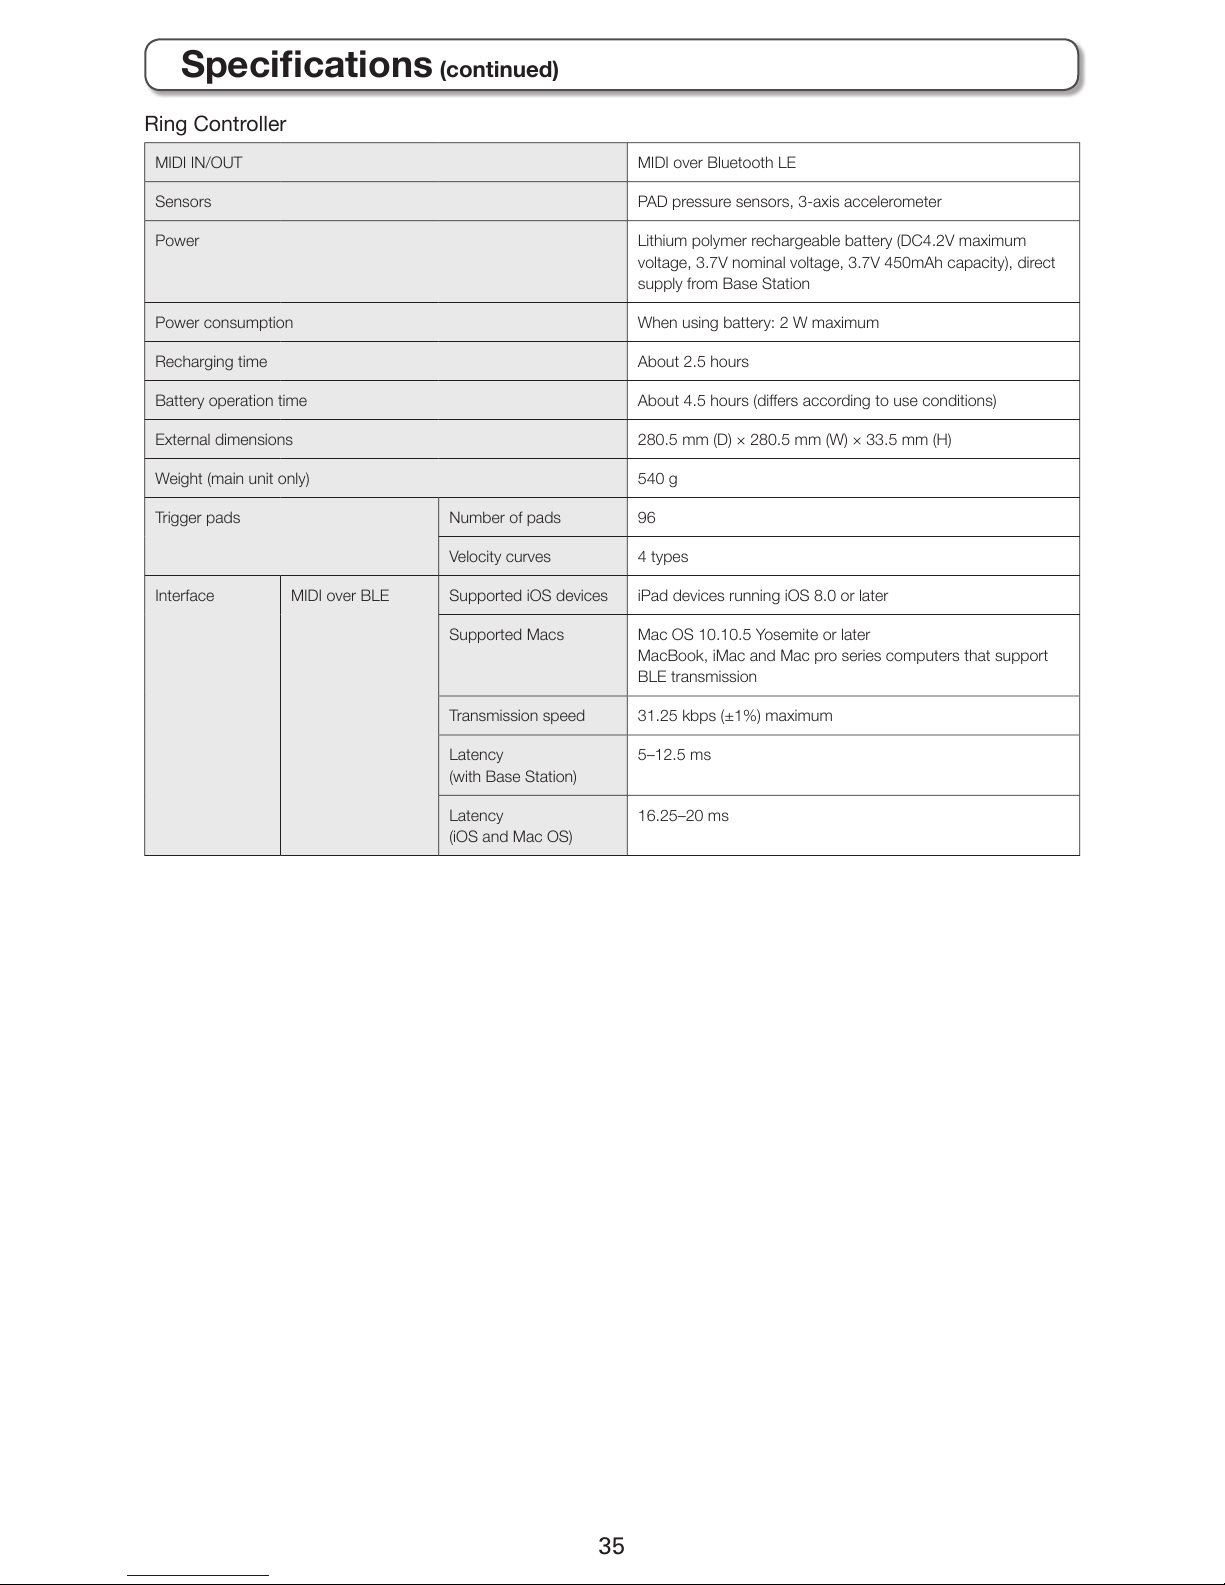
35
Ring Controller
MIDI IN/OUT MIDI over Bluetooth LE
Sensors PAD pressure sensors, 3-axis accelerometer
Power Lithium polymer rechargeable battery (DC4.2V maximum
voltage, 3.7V nominal voltage, 3.7V 450mAh capacity), direct
supply from Base Station
Power consumption When using battery: 2 W maximum
Recharging time About 2.5 hours
Battery operation time About 4.5 hours (diers according to use conditions)
External dimensions 280.5 mm (D) × 280.5 mm (W) × 33.5 mm (H)
Weight (main unit only) 540 g
Trigger pads Number of pads 96
Velocity curves 4 types
Interface MIDI over BLE Supported iOS devices iPad devices running iOS 8.0 or later
Supported Macs Mac OS 10.10.5 Yosemite or later
MacBook, iMac and Mac pro series computers that support
BLE transmission
Transmission speed 31.25 kbps (±1%) maximum
Latency
(with Base Station)
5–12.5 ms
Latency
(iOS and Mac OS)
16.25–20 ms
Specications (continued)
Page 36

Z2I-2711-03
ZOOM CORPORATION
4-4-3 Kandasurugadai, Chiyoda-ku, Tokyo 101-0062 Japan
http://www.zoom.co.jp
 Loading...