

Page 1

QUICK
START
and
REFERENCE GUIDE
for
USB
Faxmodems
Page 2

NOTICE
This document contains proprietary information protected by copyright, and this manual
and all the accompanying hardware, software, and documentation are copyrighted. All
rights are reserved. No part of this document may be photocopied or reproduced by
mechanical, electronic, or other means in any form.
The manufacturer does not warrant that the hardware will work properly in all environments and applications, and makes no warranty or representation, either expressed or
implied, with respect to the quality, performance, merchantability, or fitness for a particular purpose of the software or documentation. The manufacturer reserves the right to
make changes to the hardware, software, and documentation without obligation to notify
any person or organization of the revision or change.
All brand and product names are the trademarks of their respective owners.
© Copyright 1999
All rights reserved.
Page 3

Contents
INTRODUCTION................................................................................4
WHAT YOU NEED TO USE YOUR FAXMODEM.....................................4
SYSTEM REQUIREMENTS.....................................................................5
CHAPTER 1: SETTING UP YOUR USB FAXMODEM................6
INSTALLING THE DRIVERS...................................................................6
CONNECTING THE FAXMODEM TO YOUR COMPUTER..........................7
Summary of the Indicator Lights..................................................10
COMPLETING THE INSTALLATION......................................................10
INSTALLING THE SOFTWARE..............................................................11
CHAPTER 2: USING THE FAXMODEM......................................12
ACCESSING THE INTERNET................................................................12
SETTING UP THE FAX AND COMMUNICATIONS SOFTWARE................12
Tips for Selecting Setup Options..................................................13
INITIALIZATION STRINGS...................................................................13
MAKING THE MOST OF THE FAX AND VOICE FEATURES....................14
USING VIDEO ....................................................................................15
CHAPTER 3: SOLVING COMMON PROBLEMS.......................16
GENERAL TROUBLESHOOTING ..........................................................16
DIAL TROUBLESHOOTING..................................................................17
ON-LINE TROUBLESHOOTING............................................................18
APPENDIX A: REMOVING A PC’S INTERNAL MODEM .......20
APPENDIX B: REGULATORY INFORMATION........................21
FCC PART 15 EMISSIONS STATEMENT..............................................21
FCC PART 68 TELECOMMUNICATIONS STATEMENT .........................21
IMPORTANT INFORMATION......................................................24
Page 4

Introduction
Welcome to the world of USB faxmodems. A faxmodem
equipped with a Universal Serial Bus, or USB, means convenience, ease of installation, and high performance.
You can install your USB modem quickly, without bothering with a separate power supply or having to worry
about your computer’s internal settings, as you might with
other types of external or internal modems.
Your USB faxmodem supports both the V.90 ITU Standard
and K56flex, the most widely used pre-standard 56K technology. This way, your faxmodem automatically selects the
fastest compatible connection speed. You’ll find this feature particularly valuable if you frequently access different
sites.
This Quick Start and Reference Guide provides easy,
step-by-step installation instructions for your new USB
faxmodem.
What You Need to Use Your Faxmodem
Make sure that you have received the following items
in addition to this manual:
• USB faxmodem
• Phone cord
• USB cable
• Zoom Link™ CD-ROM disc containing installation and
communications software.
You also need the following:
• A telephone jack to plug the modem into, so the mo-
dem can dial out or receive calls
• An available USB port on your computer
4 Quick Start and Reference Guide
Page 5

If you want to use the modem as a telephone answering
machine, you’ll also need:
• A soundcard, microphone, and speakers or an ear-
phone (PC models)
• A microphone and speakers if not provided with your
computer (Macintosh models).
System Requirements
PC:
• IBM PC-compatible Pentium® 133 or faster (or
equivalent), with 16 megabytes of RAM equipped with
either a USB port or a PCI USB card
• Windows® 98 operating system
Macintosh:
• iMac™, USB-equipped Power Mac™ G3, or USB-
equipped PCI-based Power Mac
• Mac OS 8.5 or above
Introduction 5
Page 6

Chapter 1: Setting Up Your USB Faxmodem
A computer has many devices inside it, or attached to it,
such as the mouse or the video card. These devices are
controlled by software called drivers. The USB faxmodem
also requires drivers. These drivers reside on the Zoom
Link CD, and are installable in a few simple steps.
Installing the Drivers
REMEMBER
IMPORTANT
Note: If you have a PC and are replacing an existing in-
ternal modem, turn to Appendix A: Removing a
PC’s Internal Modem (page 20) to decide whether
to keep or remove it.
If you have a PC:
Follow the instructions on the Zoom Link CD. An in-
1
stallation interface will display.
Click on the Install Drivers button.
2
Once your driver files are installed, a Setup Complete
3
dialog box will appear. Click Finish.
If you have a Macintosh:
Insert the Zoom Link CD.
1
A folder will appear with flags representing different
2
countries; double-click on the country you want.
You must install the modem drivers be-
fore you install the USB faxmodem.
Double-click on Zoom Installer and follow the
3
prompts.
6 Quick Start and Reference Guide
Page 7

For both the Macintosh and the PC, the installation interface also provides for uninstalling the drivers, if you ever
need to.
One final note: Don’t install any of the other software on
the Zoom Link CD at this time.
Connecting the Faxmodem to Your Computer
Find the serial number of your faxmodem on the bot-
1
tom of the case, just under the bar code. Write the
number in the Important Information table on the last
page of this manual.
You do not have to shut down your computer. Connect
2
the cable. Plug the cable’s square end into the USB
jack on the back of the faxmodem. Plug the other,
rectangular end into the USB connector on your computer.
Your computer will display a message that it has de-
3
tected new software and is installing it.
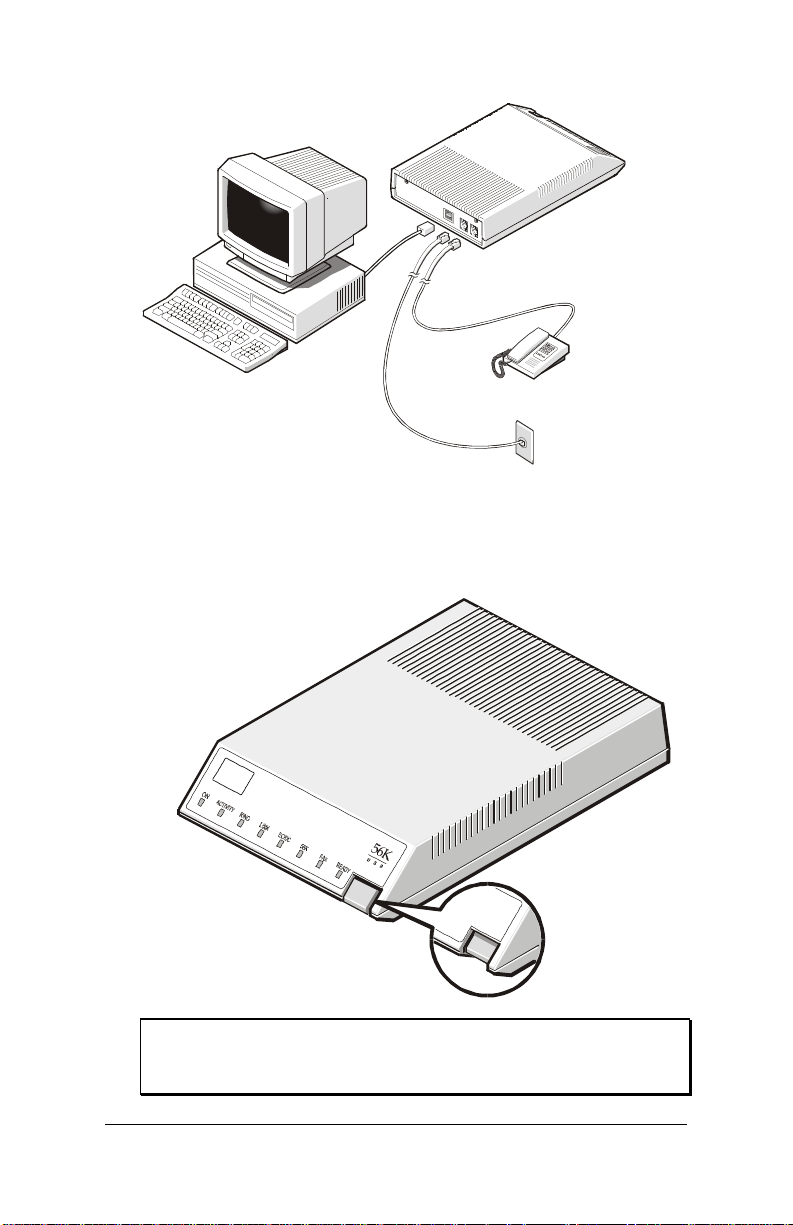
Connect the telephone cord. Plug one end of the cord
4
into the PHONE LINE jack on the back of the faxmodem. Plug the other end into the wall jack just as you
would a standard telephone. You may also connect
your regular telephone to the back of the faxmodem, in
the jack labeled PHONE. See the following illustration.
The faxmodem works with or without a telephone connected to it.
Chapter 1: Setting Up Your USB Faxmodem 7
Page 8
TELEPHONE
TELEPHONE
MODEM (ENLARGED
TO SHOW DETAIL)
COMPUTER
LINE
Turn the faxmodem on by pushing in the power button
5
on the front, shown in the following illustration.
Note: Although the faxmodem has an on/off switch,
we recommend that you leave it on whenever
your computer is on; it draws minimal power.
8 Quick Start and Reference Guide
Page 9

The modem will perform a brief self-test. Then the
6
READY light should go on to show that the faxmodem
is ready for use.
Note: If the computer goes into power-save mode
(also referred to as “going to sleep”), the modem’s READY light will go off. The light will go
on automatically whenever the faxmodem is in
use.
The USB faxmodem has a set of eight indicator lights on
the front. A chart explaining what the lights mean is on
the following page. This chart is also reproduced in condensed form on the bottom of the faxmodem.
Chapter 1: Setting Up Your USB Faxmodem 9
Page 10

Summary of the Indicator Lights
Light Description
OH (Off Hook) Lights when the faxmodem is off hook.
ACTIVITY
RING
LINK
EC/DC (Error Correc-
tion/Data Compression)*
56K
FAX
READY
*Error Correction/Data Compression filters out line noise, repeats transmissions automatically if an error occurs, and automatically compresses data when it’s sent and decompresses it when it is received.
Flashes whenever data or commands are transmitted from the serial port of your computer (or
other device) to the faxmodem, or vice-versa. At
high speeds the light may appear to be continuously on.
Blinks on and off when detecting incoming ring.
Lights when the Data Carrier Detect (DCD) signal
from the faxmodem to the computer is on.
Lights when using V.42 or MNP 4 error correction
and V.42bis or MNP 5 data compression.
Lights when communicating in V.90 or K56flex™
mode.
Lights when a fax connection has been made to
another faxmodem or to a fax machine.
Lights when the faxmodem is turned on; is unlit
when the computer is in power-save mode.
Completing the Installation
If you have a PC:
You can now verify the COM port setting of your modem
and perform a brief test. Follow these steps:
Open Control Panel in Windows and double-click on
1
the Modems icon.
Click on the entry for your new faxmodem and then
2
click on the Diagnostics tab.
Highlight the port next to the entry for your new fax-
3
modem and click on More info.
Clicking on More info also tests your faxmodem by querying it with AT commands. A list of responses means the
modem is properly connected.
10 Quick Start and Reference Guide
Page 11

If you have a Mac:
• Double-check that the USB faxmodem is selected un-
der Settings.
Installing the Software
Consult the Software Installation Guide that came with
your faxmodem to install a complete faxing and communications package that will help you get the most out of your
modem. Also explore the other software offerings on the
Zoom Link CD. The CD describes each program and offers
easy point-and-click installation.
That’s it! We hope you enjoy the use of your new USB
faxmodem.
Chapter 1: Setting Up Your USB Faxmodem 11
Page 12

Chapter 2: Using the Faxmodem
If you have installed the fax and communication software
that came with your faxmodem, you probably do not need
to read this chapter. The software sets itself up automatically and takes care of sending any necessary commands
to the faxmodem.
You may, however, want to read this chapter if you want
to learn some general facts about how software works with
your faxmodem or if you intend to use your new faxmodem
with other software.
This chapter explains how to get Internet access, and provides tips for setting up faxing and communications software, sending AT commands to the faxmodem, and using
a video camera.
Accessing the Internet
To access the Internet and the World Wide Web, use an
online service such as America Online (AOL) or CompuServe, or an Internet Service Provider (ISP). The best place
to start is your ZoomLink CD, which includes Internet
and online services for you to try.
Setting Up the Fax and Communications Software
Most software programs identify the modem automatically
and configure themselves for the correct operating settings.
Note: If you want to continue using software that had
been set up for a different modem, you may need to
reinstall the software or change its settings to run
with your new faxmodem. See the documentation
or help files of your existing software.
If you run into difficulty configuring or reconfiguring your
software, it may be helpful to read the following section,
Tips for Selecting Setup Options.
12 Quick Start and Reference Guide
Page 13

Tips for Selecting Setup Options
In setting up some older software programs, you may be
asked to enter certain information. Most programs have
default settings that are correct for use with this modem,
and there is no need to change them. Nevertheless, you
should be aware of the following items:
• If you are asked to select the “modem type” from a
menu, and you don’t see this modem listed by name
on the menu (for instance, Zoom External V.90 56K
USB Faxmodem), select the most descriptive name
such as V.90 modem, 56K modem, or generic Class
1 fax modem.
• If you have a PC, in the dialing directory set all entries
to the highest possible baud rate, if your software supports these speeds (do not go over 115,200). All communications between the computer and the modem
take place at this higher speed, independent of the
modem-to-modem speed.
• If your fax software gives you the option of selecting
Class 1 or Class 2 fax drivers, select Class 1.
Initialization Strings
An initialization string is a group of AT command settings
that the software sends to the faxmodem to initialize it.
Your software determines which commands should be included in the initialization string, based on the modem
you select during software installation.
Your software may send other AT commands to perform
actions such as dialing a phone number or answering a
call. This is transparent to you—the software does this in
the background without your having to be aware of it.
It is sometimes necessary, however, to add other AT commands to initialization strings. You can find a description
of AT commands on the World Wide Web at
www.modems.com. Click on Reference and then on AT
Command Sets.
Chapter 2: Using the Faxmodem 13
Page 14

Here are two of the more useful AT commands:
• If your software suggests an initialization string for
this modem, you should use it. If this modem is not
listed by your software and no initialization string is
suggested, use the following: AT &F. This command
returns the modem to the default factory settings.
• If your phone service includes Call Waiting, an in-
coming call can disrupt your modem connection. You
can temporarily suspend Call Waiting by pressing *70;
if so, include ATDT*70, in the dial prefix option
(including the comma, which inserts a brief pause to
allow the phone company to respond). If your software
does not have a dial prefix option, you need to insert
the code for each phone number in the dialing directory. If you need to dial a special code number, such as
9, to get an outside line, put the number (followed by a
comma) before the phone number.
Making the Most of the Fax and Voice Features
Your faxmodem includes software on the ZoomLink CD
that enables you to send, receive, and schedule faxes.
In addition, it includes software so that you can use your
computer and modem as a telephone answering machine
or voice mail system (with single or multiple mailboxes). If
you have a PC, the software will also let you set up faxback, sometimes called fax-on-demand, and issue fax
broadcasts.
If you use your faxmodem for receiving faxes and voice
mail, keep in mind the following:
• Your computer must be running, and the communica-
tions software must be active.
• If you want to connect to your online service or ISP,
you must exit the communication software first. While
you are on line, you cannot receive calls or faxes.
• Some computers have a power saving option that stops
the hard drive from spinning after a period of inactivity. If a call (voice or fax) comes in, it may fail to con-
14 Quick Start and Reference Guide
Page 15

nect while the hard drive restarts and activates the
software. If this happens, you should deactivate the
feature of your power saving option that stops the hard
drive. See your computer's documentation for details.
Using Video
Your faxmodem supports video applications through the
V.80 standard protocol so that it can be used for highquality modem-to-modem videoconferencing. The modem
is compatible with H.324 point-to-point and H.323 Internet video conferencing standards. To send videos, you
need a camera and video software. Zoom® Telephonics’
ZoomCam™ video camera devices add video recording and
transmission capabilities to your computer and work well
with your USB faxmodem.
Chapter 2: Using the Faxmodem 15
Page 16

Chapter 3: Solving Common Problems
Note: If your modem is not working, please read this
chapter and Chapter 2: Using the Faxmodem on
page 12 carefully.
For installation problems, refer to Chapter 1: Setting Up
Your USB Faxmodem on page 6.
This chapter covers three categories: general troubleshooting, dial troubleshooting, and on-line troubleshooting.
General Troubleshooting
Problem: The software cannot find the modem and the
modem does not respond to AT commands.
(The following solution applies to many
other problems as well.)
Solution: The most common problem with modems is
that the communications software is not configured for the same COM port as the modem or
that the USB faxmodem is not selected under
the software.
If you have a PC, check which COM port the
modem is using and make sure that the software’s COM port setting matches the modem’s
COM port setting. From the Windows Toolbar,
under Settings/Control
Panel/Modems/Diagnostics, click on the COM
Port for your modem, then click on More info.
If Windows displays the modem’s ATI responses, the modem is working.
If you have a Mac, make sure that the USB
faxmodem is selected under Settings in the
application software.
Problem: The modem speaker volume is too low or too
high.
16 Quick Start and Reference Guide
Page 17

Solution: Your modem has a small speaker on its board
that gives you audible feedback of dial tones
and remote connection signals (“handshaking”).
This is not the same as the speaker that you
may have connected to your computer’s soundcard.
If the software allows you to control the volume
of the on-board speaker, make sure the speaker
is enabled and set to a comfortable volume.
If the software does not have speaker settings,
add one of the AT commands listed below to
the initialization string:
L1 for low volume
L2 for medium volume
L3 for highest volume
M0 to turn the speaker off completely
M1 to turn the speaker back on
For example, if you want the volume low and
the software uses the initialization string AT
&F, change it to AT &F L1.
Dial Troubleshooting
Problem: The modem does not automatically dial a
call when you send a Dial command.
Solution: Make sure the modem speaker is turned on in
your software so that you can hear dialing
sounds. Also make sure that the phone line is
plugged in.
Make sure that you are dialing a valid phone
number, including any required dial prefixes.
If you are using tone dialing on a line that requires pulse dialing, the line may not be able to
accept tone-dialed calls. Select Pulse dialing in
your software or make sure software dialing
prefix is ATDP (for pulse dialing).
Make sure your communications software and
modem are configured for the same COM port.
Chapter 3: Solving Common Problems 17
Page 18

Make sure your modem has hung up from the
previous call. Select Hang Up in your software
or type ATH in terminal mode.
On-line Troubleshooting
Problem: Your modem disconnects while communicat-
ing with a remote system.
Solution: The remote system has hung up. You need to
reconnect.
The telephone line disrupted your call. If your
telephone service includes Call Waiting, turn it
off by including a special code in the dial prefix
(consult your phone company for details).
Someone may be picking up an extension connected to the line that your modem is using. If
the modem is sharing a telephone line with
other telephones, inform the other users when
you will be making a data call.
Line conditions may have deteriorated. Reconnect.
Problem: Your online service or Internet connection
seems slow, Web pages appear slowly, and
file downloads seem to take too long.
Check your connection speed. Each time you
dial in, your call may be routed over different
lines. Logging off and redialing can sometimes
give you a better connection. With V.90 or
K56flex sites you should be able to obtain
speeds between 42,000 and 52,000 bps.
If your ISP or online service provides more than
one number, try another one. Some are faster
than others.
Try different Web pages. Some very popular
pages have a lot of traffic and may be slow, especially in the evening.
18 Quick Start and Reference Guide
Page 19

Problem: Your modem does not make a connection.
Solution: If your modem places calls but never makes a
connection, make sure you are dialing the right
number.
The remote modem may be turned off.
Chapter 3: Solving Common Problems 19
Page 20

Appendix A: Removing a PC’s Internal Modem
If your PC does not already have an internal modem installed, or if you are replacing an external modem, you do
not need this section.
Note: Although you do not have to remove your internal
modem, we recommend that you do so. Removing
your old modem frees up resources for other internal devices you may want to install in the future.
Before you take out the modem, you must inform
1
Windows that you are going to remove it:
Follow these steps:
• Click on Start and point to Settings. Click on
Control Panel. When the Control Panel displays,
double-click on the Modems icon.
• Now click on the Remove button. Click OK to con-
firm that you are removing the modem.
Windows has now been informed of your intention to
remove the old modem.
Remove the old modem as follows:
2
• Shut down and turn off the computer.
• Remove any cables connected to the modem.
• Open the case of the computer.
• Remove the screw that attaches the modem
bracket to the computer.
• Pull the modem out of its slot.
• Replace the case of the computer.
You may now return to Chapter 1: Setting Up Your
USB Faxmodem on page 6 to continue with the installation.
20 Quick Start and Reference Guide
Page 21

Appendix B: Regulatory Information
FCC Part 15 Emissions Statement
This modem has been tested and found to comply with the limits for a
Class B digital device, pursuant to part 15 of the FCC Rules. These limits are designed to provide reasonable protection against harmful interference in a residential installation. This equipment generates, uses and
can radiate radio frequency and, if not installed and used in accordance
with the instructions, may cause harmful interference to radio communications.
However, there is no guarantee that interference will not occur in a particular installation. If this equipment does cause harmful interference to
radio or television reception, which can be determined by turning the
equipment off and on, the user is encouraged to try to correct the interference by one or more of the following measures:
• Reorient or relocate the receiving antenna.
• Increase the separation between the equipment and receiver.
• Connect the equipment into an outlet on a circuit different from that
to which the receiver is connected.
• Consult the dealer or an experienced radio/TV technician for help.
FCC Part 68 Telecommunications Statement
The Federal Communications Commission (FCC) has established rules
which permit this device to be directly connected to the telephone network. This device is registered with the Federal Communications Commission (FCC) for direct connection to the telephone line using a standardized RJ-11C telephone jack. This device complies with the Part 15,
Subpart B, and Part 68 requirements of the FCC rules.
The telephone company may make changes in its technical operations
and procedures; if such changes affect the compatibility or use of the
device, the telephone company is required to give adequate notice of the
changes.
If the telephone company requests information on what equipment is
connected to the line, inform them of:
1. The telephone number that this unit is connected to
2. The ringer equivalence number
3. The USOC jack required [RJ-11C]
4. The FCC Registration Number
Items (2) and (4) are indicated on the label on the bottom case of the
modem. The ringer equivalence number is used to determine how many
devices can be connected to your telephone line. In most cases, the sum
Page 22

of the RENs of all devices on any one line should not exceed five (5.0). If
too many devices are attached, they may not ring properly.
If this device should malfunction, it may also cause harm to the telephone network; should this occur, this device should be disconnected
from the network until the source of the problem can be determined and
repair has been made. If a device which harms the network is not removed, the telephone company may temporarily disconnect service.
In the event of equipment malfunction, all repairs should be performed
at an authorized repair facility. It is the responsibility of users requiring
service to report the need for service to such a facility. Service facilities
are listed on the product’s warranty flyer.
The Telephone Consumer Protection Act of 1991 makes it unlawful for
any person to use a computer or other electronic device to send any
message via telephone fax machine unless such message clearly contains in a margin at the top or bottom of each transmitted page, or on
the first page of the transmission, the date and time sent, the identification of the business, entity, or individual sending the message, and the
telephone number of the sending machine. In order to program this information into your fax machine, refer to your faxmodem software
22 Quick Start and Reference Guide
Page 23

Notes
Page 24

Important Information
In the event you need to call for technical support or customer service, you will
need the information below.
We recommend that you take a few moments to fill in the following information
for your future reference.
Faxmodem Model _______________________________
(located on the box)
Serial Number _______________________
(located on the bottom of the modem
under the bar code)
COM Port _______________________
Date of Purchase _______________________
Store or Dealer _______________________
1139-A 27575 ©1999
 Loading...