

Page 1

ZoomCam 100
Quick Start Guide
Page 2

The information in this document is subject to change without notice and does not represent a
commitment on the part of the vendor.
No warranty of representation, either expressed or implied, is made with respect to the quality,
accuracy or fitness for any particular purpose of this document. The manufacturer reserves the
right to make changes to the content of this document and/or the products associated with it at any
time without obligation to notify any person or organisation of such changes.
In no event will the manufacturer be liable for direct, indirect, special, incidental or consequential
damages arising out of the use or inability to use this product or documentation, even if advised of
the possibility of such damages.
©
2003 Copyright. All rights reserved
IBM, PC/AT and PS/2 are registered trademarks of International Business Machines Corporation.
Microsoft, Windows, and Windows NT are registered trademarks of Microsoft Corporation in the
United States of America and other countries.
Photo Express is the registered trademark of Ulead Systems, Inc in the United States of America
and other countries.
All other trademarks are trademarks of their respective holders.
Page 3
C
ongratulations on purchasing ZoomCam 100. This manual tells you how to
install and use the camera.
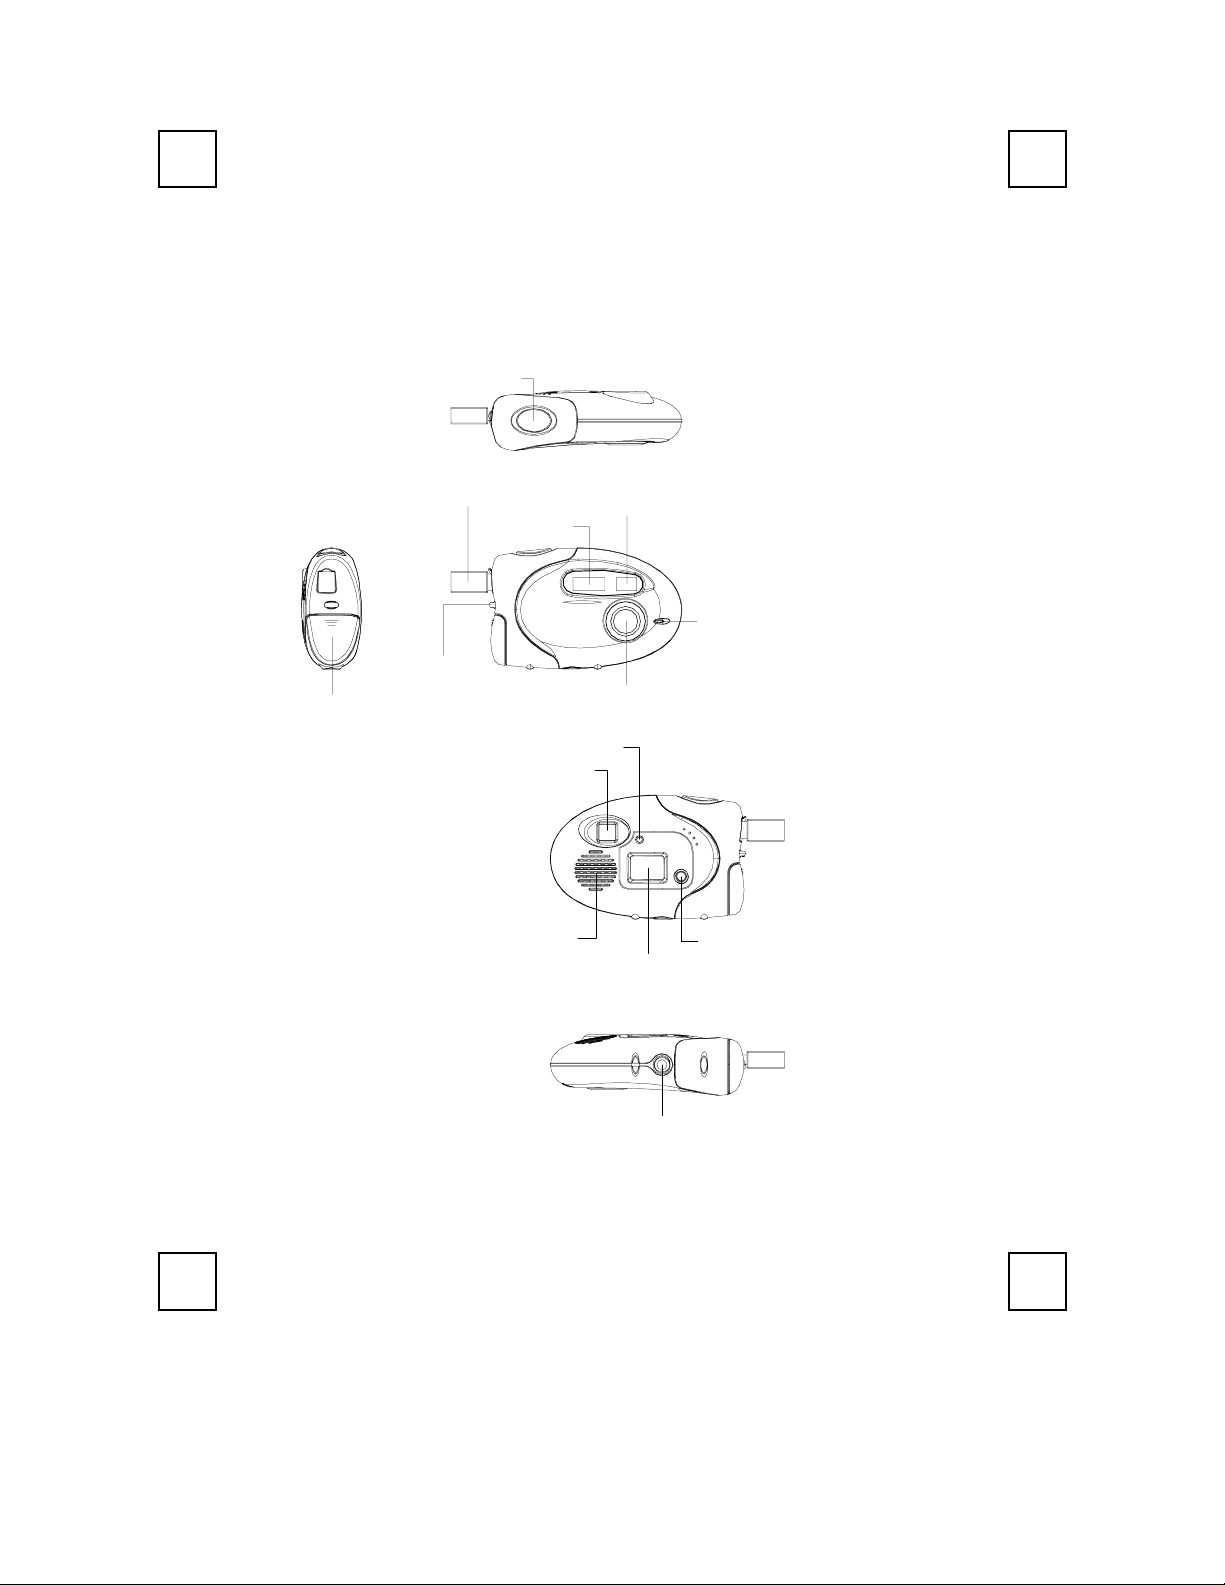
Getting to Know the Camera
Snapshot button
Battery compartment
USB connection
Strap holder
Flash light
Viewfinder
Flash light indicator
Viewfinder
Speaker
Timer light
Lens
Mode button
Display panel
Stand Receptacle
Page 4

Software Installation
Please note that you
camera to the USB port of your computer.
must
install the software
BEFORE
you connect the
Step 1: Install Ulead Photo Express
1. Insert the software CD into the CD-ROM drive of your computer.
2. Follow the on-screen instructions to install the software. The software will
install automatically.
Note: If the software does not setup automatically, go to the Taskbar and
click Start, then click on Run, select Browse and choose SETUP.EXE on
the software CD, then click OK to install.
3. The Ulead Photo Express software is loaded when you see the software
icon on the screen.
Important: For more information on how to use the software, please refer
to the folder named “Manual” on the CD.
Step 2 : Install Digital Camera Driver-CamMaestro
In order to use the camera and connect it to your PC, you
driver named CamMaestro
software in step 1.
1. Follow the on-screen instructions to install the software. The software will
install automatically.
Note: If the software does not setup automatically, go to the Taskbar and
click Start, then click on Run, select Browse and choose SETUP.EXE on
the software CD, then click OK to install.
AFTER
you have installed the Photo Express
must
install the
2. When the setup is finished, you must restart your computer before using
the camera. Shut down your PC using the appropriate procedure for your
operating system.
Page 5

Removing the Camera’s Software and Driver
You should only do this if you will no longer be using the Camera.
To Remove Camera Application Software:
Step 1: Click
Step 2: Move cursor to
Step 3: Click on
Step 4: Select
Step 5: Click
Start
menu (on the left-bottom taskbar).
Settings
Add/Remove Programs
Ulead Photo Express
Yes
to confirm you want to uninstall.
To Remove Camera Driver:
Step 1: Click
Step 2: Move cursor to
Step 3: Click on
Step 4: Select
Step 5: Click
Start
menu (on the left-bottom taskbar).
Settings
Add/Remove Programs
CamMaestro
Yes
to confirm you want to uninstall.
and click on the
in Start menu and select
in the Control Panel.
and click on the
in Start menu and select
in the Control Panel.
Remove
Remove
icon.
Control Panel
icon.
Control Panel
.
.
Page 6

Getting Started
Inserting or Replacing the Batteries
Make sure to power OFF the camera before you change the batteries.
Slide the compartment cover open and insert/replace the 2 AAA alkaline
batteries. After inserting/replacing the batteries, you can immediately use the
camera. Always make sure to download pictures before your batteries run out.
Loss of battery charge may result in loss of stored pictures.
Connect to PC
If you want the camera to work as a PC camera, or if you want to download
pictures to your PC, you simply use the included USB cable to connect the
camera to the USB port of your PC. This camera is compatible with
NetMeeting and other Windows based Video Conferencing applications.
Taking a Picture
The display should show a number, it should not be blank
or show a symbol. If the screen is blank, press the Mode
Mode Button
Snapshot Press Snapshot button once to take one image.
Button once to turn on the camera. If a symbol is
displayed, press the Mode Button until a number appears
on the display.
Page 7

Camera Display Panel
Here is a list of the icons that appear on the Camera Display Panel. The
Snapshot
and
Use the
symbol is displayed, press the
shut off the camera, you would press the
display OF on the LCD Screen. Pressing the
buttons can be used with the display to select an option.
Mode
button to click through the options. When the desired option
Snapshot
button to select it. For example, to
Mode
button one or more times to
Snapshot
button would shut off
the camera.
A number on the display that lets you know how many more pictures can be
00 to 99
OF
FA Flash strobe ON.
Fo Flash strobe Off
Ct
AI
taken with the current settings of resolution and compression. This number
is accurate unless you are in low resolution with compressed mode, where
24 means you have 24,124 or 224 pictures left.
Pressing the Snapshot button will turn the camera off when this is
displayed.
Continuous shot. As long as you hold the Snapshot button down, about one
picture per second, at the current resolution, will be stored until you run out
of memory.
Video recording, AVI file. As long as you hold the Snapshot button down, a
video will be recorded at about 15 frames per second until you run out of
memory.
Mode
St
CL Clear the last image you took.
CA Clear all pictures in the camera memory.
Lr
Hr
CP Compressed mode on.
NP Compressed mode off.
Self-shot. A picture will be taken automatically about 5 seconds after you
press Snapshot to give you time to be in the picture.
Low resolution QVGA. For Low resolution mode, you can take up to 82
images in non-compressed mode and up to 246 images in compressed
mode.
High resolution VGA. For High resolution, you can take up to 20 images in
non-compressed mode and up to 60 images in compressed mode.
Page 8

F5
Select 50Hz to reduce flicker caused by Fluorescent Lights if your local AC
power is 50 Hz.
F6
Lo
Select 60Hz to reduce flicker caused by Fluorescent Lights if your local AC
power is 60 Hz.
Battery Low. Please download your pictures from memory to your PC first,
and then change the batteries as soon as possible.
Page 9

Technical Support
Your first avenue of support should be through the organization that provided
you with your Zoom Camera. If you still desire to directly contact Zoom
Technical Support, please feel free to do so. For your records, and to facilitate
Technical Support from either your equipment supplier or Zoom, please write
down the following information when you receive your Zoom Camera.
Product Name
Product Model Number
Product Serial Number
The serial number for the camera is located on the back of the unit below the
barcode. Once you have located the serial number, please be sure to write it
down. This will greatly speed up your service and ensure that the service
representative is addressing the proper model of camera.
Contacting Zoom by E-mail
You can e-mail Zoom with any tech support questions you have and one of our
Technical Support Engineers will respond by e-mail within 2 business days.
Send your questions to:
When e-mailing Zoom, be sure to include the following:
•
Serial number(s)
•
Your full name and mailing address
•
A detailed description of your problem.
Contacting Zoom by Phone
In the U.S. Zoom Support phone lines are open Monday to Friday, 9:00 AM to
11:00 PM Eastern Time. Please call:
__________________________________________
__________________________________
__________________________________
www.zoom.com/techmail
(561) 997-9683
In the United Kingdom, Zoom Support phone lines are open Monday to Friday,
9:00 AM to 5:00 PM Greenwich Mean Time. Please call:
+44 (0)1276 704440
Return of Defective Units
Please contact your local distributor or reseller for factory-authorized repair or
replacement of your in-warranty defective product. If you are unable to reach
your distributor, you can contact Zoom Factory Customer Service in the United
States by calling:
Page 10

(617) 423-2564
Please note that the customer is responsible for any charges (including
brokerage or customs and duties) associated with shipping the defective unit to
Zoom for repair. During the first year Zoom will pay return shipping to the
customer by common carrier. After the first year the Customer may be required
to pay a nominal shipping and handling fee. Any applicable customs, duties
and brokerage charges to import the product are the responsibility of the
customer. Zoom encourages all customers to return defective units to their
respective reseller whenever possible.
Limited Warranty
Zoom Telephonics, Inc. (hereinafter “Zoom”) warrants this product against
defects in material and workmanship for a period two (2) years from the date of
the original end-user purchase. This warranty applies to the original end-user
purchaser. For all Zoom products other than software, Zoom will, solely at its
option, repair or replace this product with a functionally equivalent new or
factory-reconditioned product during the warranty period. The consumer will
deliver the product to Zoom. All transportation risks and costs in connection
with this warranty service are the responsibility of the consumer.
For Software Products supplied by Zoom
Zoom will replace software at no charge if there is a defect in materials or
workmanship for a period of 30 days from date of original retail purchase,
provided the defective software is returned to Zoom. Returned shipment will be
via U.S. Mail. Software products supplied by Zoom are sold “as is,” without
warranty, either expressed or implied, as to function, application,
merchantability, performance, and quality. Zoom is not responsible for
incidental or consequential damages resulting from the breach of any
expressed or implied warranty, including any costs of recovering,
reprogramming, or reproducing any programs or data stored or used with the
Zoom products, damage to property, and to the extent permitted by law,
damages for personal injury. This warranty is in lieu of all other warranties,
expressed or implied. We do not assume or authorize assumption for use of
any other warranty expressed or implied.
Some states and countries do not allow the exclusion or limitation of incidental
or consequential damages, so the above limitation or exclusions may not apply
to you. This warranty does not apply if the Zoom product has been damaged
by accident, abuse, lightning or other natural disasters, misuse or
misapplication, or if it has been modified without the written permission of
Zoom, or if any serial number has been removed or defaced. This warranty
shall not be applicable to the extent that any provisions of this warranty are
prohibited by any federal, state, or municipal law that cannot be preempted.
This warranty gives you specific legal rights, and you may also have other
rights that vary from state to state or country to country.
Page 11

CE Compliance Statement
Hereby Zoom declares that this modem is in compliance with the essential requirements and other
relevant provisions of Directive 1999/5/EC.
Zoom vakuuttaa täten että modeemi tyyppinen laite on direktiivin 1999/5/EY oleellisten
vaatimusten ja sitä koskevien direktiivin muiden ehtojen mukainen.
Hierbij verklaart Zoom dat het toestel modem in overeenstemming is met de essentiële eisen en de
andere relevante bepalingen van richtlijn 1999/5/EG
Bij deze verklaart Zoom dat deze modem voldoet aan de essentiële eisen en aan de overige relevante
bepalingen van Richtlijn 1999/5/EC.
Par la présente Zoom déclare que l'appareil modem est conforme aux exigences essentielles et aux
autres dispositions pertinentes de la directive 1999/5/CE
Par la présente, Zoom déclare que ce modem est conforme aux exigences essentielles et aux autres
dispositions de la directive 1999/5/CE qui lui sont applicables
Härmed intygar Zoom att denna modem står I överensstämmelse med de väsentliga egenskapskrav
och övriga relevanta bestämmelser som framgår av direktiv 1999/5/EG.
Undertegnede Zoom erklærer herved, at følgende udstyr modem overholder de væsentlige krav og
øvrige relevante krav i direktiv 1999/5/EF
Hiermit erklärt Zoom dass sich modem in Übereinstimmung mit den grundlegenden
Anforderungen und den anderen relevanten Vorschriften der Richtlinie 1999/5/EG befindet".
(BMWi)
Hiermit erklärt Zoom die Übereinstimmung des Gerätes modem mit den grundlegenden
Anforderungen und den anderen relevanten Festlegungen der Richtlinie 1999/5/EG. (Wien)
ΜΕ ΤΗΝ ΠΑΡΟΥSΑ ZOOM ΔΗΛOΝΕΙ ΟΤΙ ΜΟΝΤΕΜ SΥΜΜΟΡFOΝΕΤΑΙ ΠΡΟS ΤΙS
ΟΥSΙOΔΕΙS ΑΠΑΙΤΗSΕΙS ΚΑΙ ΤΙS ΛΟΙΠΕS SΧΕΤΙΚΕS ΔΙΑΤΑΞΕΙS ΤΗS ΟΔΗGΙΑS
1999/5/ΕΚ
Con la presente Zoom dichiara che questo modem è conforme ai requisiti essenziali ed alle altre
disposizioni pertinenti stabilite dalla direttiva 1999/5/CE.
Por medio de la presente Zoom declara que el módem cumple con los requisitos esenciales y
cualesquiera otras disposiciones aplicables o exigibles de la Directiva 1999/5/CE
Zoom declara que este modem está conforme com os requisitos essenciais e outras disposições da
Directiva 1999/5/CE.
Page 12

0113A 27278
©
2003
 Loading...