

Page 1
Animal Clippers ZTS 10 B 1
Animal Clippers
Operating instructions
KOMPERNASS GMBH
BURGSTRASSE 21 · D - 44867 BOCHUM
www.kompernass.com
ID-Nr.: ZTS 10 B1-01/11-V2
IAN:63807
Karvaleikkuri
Käyttöohje
Hårklippare för djur
Bruksanvisning
Trimmer til dyr
Betjeningsvejledning
Page 2

ZTS 10 B1
A
B
1
4
2
3
Page 3
Animal Clippers 2
Read the operating instructions carefully before using the device for the fi rst time and preserve this
booklet for later reference. Pass this manual on to whoever might acquire the device at a future date.
Karvaleikkuri 5
Lue käyttöohje ennen ensimmäistä käyttökertaa huolellisesti läpi ja pidä sitä lähettyvillä myös
myöhemmissä käytöissä. Jos myyt laitteen, anna ohje myös seuraavalle omistajalle.
Hårklippare för djur 8
Läs igenom bruksanvisningen noga innan du börjar använda apparaten och spara den för senare
bruk. Lämna över bruksanvisningen tillsammans med apparaten om du överlåter den till någon
annan person.
Trimmer til dyr 11
Læs betjeningsvejledningen igennem før første brug, og opbevar den til senere brug. Lad vejlednin-
gen følge med, hvis apparatet gives videre til andre.
- 1 -
Page 4
Animal Clippers
Intended use
These animal clippers are intended exclusively for
the cutting and trimming of animal hair in domestic
households. This appliance is not intended for use
in commercial/industrial applications. Usage other
than as described here is not permitted and may
cause damage or injury. For damage resulting from
misuse or improper handling, the use of force
or unauthorized modifi cation, no liability will be
assumed.
Safety instructions
To avoid the risk of accidents and
injuries:
• This appliance is not intended for use by
individuals (including children) with restricted
physical, physiological or intellectual abilities or
defi ciences in experience and/or knowledge
unless they are supervised by a person responsible for their safety or receive from this person
instruction in how the appliance is to be used.
• Children should be supervised to ensure that
they do not play with the appliance.
• Use only the original accessory parts for this
device.
• Check the cutting head for proper function
before using the appliance.
• Never use the appliance with a damaged or
broken trimming guide. The absence of teeth on
the trimming guide can lead to injury.
• Switch the appliance off before you put it down.
To avoid the risk of an electric shock:
• Connect the appliance only to correctly
installed and earthed mains sockets that are
easily accessible. Ensure that the rating of the
local power supply tallies completely with the
details given on the rating plate of the device.
• Ensure that the power cable does not become
damaged. Protect the power cable from sources
of heat and ensure that it cannot be damaged.
• To avoid risks, arrange for defective plugs and/
or cables to be replaced at once by qualifi ed
technicians or our Customer Service Department.
• Do not use the appliance in the close vicinity
of a bath/shower or a sink fi lled with water.
The proximity of moisture presents a danger,
even when the appliance is switched off .
• NEVER submerse the appliance in water or
other liquids.
• Should the appliance be dropped into water,
ABSOLUTELY disconnect the plug from the
mains socket before extracting the appliance.
• After use or when cleaning it, ALWAYS remove
the plug from the mains power socket. Do not
pull on the power cable directly, pull the plug.
• The appliance is suitable for use only in dry
areas.
• Attention! Keep the appliance dry.
• Do not use the unit while the animal is being
bathed or when the fur is wet.
Items supplied
Animal clippers with blade guard
6 Trimming guides
Cleaning brush
Blade oil
This operating manual
Technical Data
Power supply:
Power consumption: 10 W
Protection class: II /
Operating temperature: + 5 °C - + 40 °C
Storage temperature: 0 °C - + 40 °C
- 2 -
230 V~/50 Hz
Page 5
CE-
Conformity
This device complies, in regards to conformance with
the basic requirements and other relevent regulations,
with the EMC Directive 2004/108/EC, as well as the
Directive for Low Voltage Devices 2006/95/EC.
Description of the appliance
Appliance (Fig. A)
1 Cutting head
2 Suspension loop
3 On/Off switch
4 Adjusting lever
Trimming guides and accessories (Fig. B)
1/8“ (3 mm Cutting length)
1/4“ (6 mm Cutting length)
3/8“ (9 mm Cutting length)
1/2“ (13 mm Cutting length)
Trimming guide for side step cut (right)
Trimming guide for side step cut (left)
Blade cover
Cleaning brush
Blade oil
Operation
The fur to be cut must be dry and clean. Brush the
fur through to remove any knots.
•
Remove the blade guard from the cutting
.
head 1
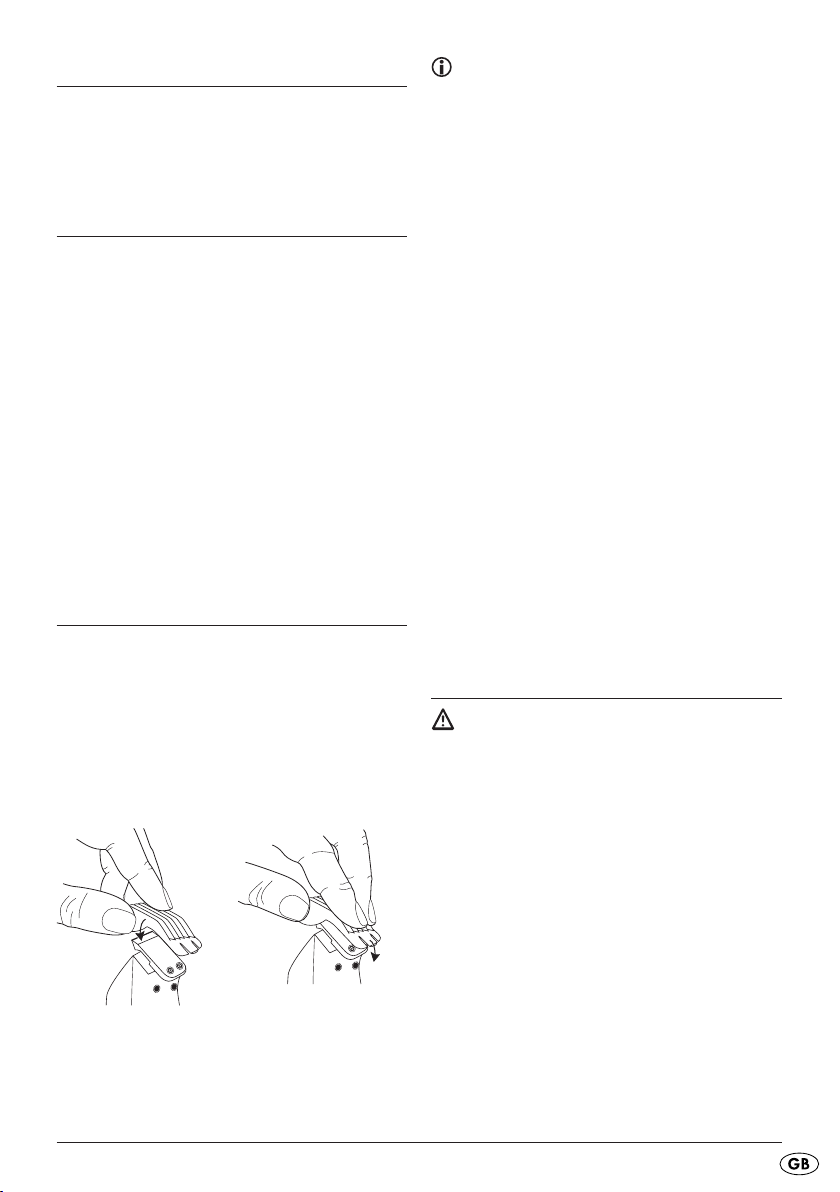
• Place the required trimming guide ( - )
with the prongs facing upwards on the cutting
head 1 and thereby press the fl ap of the trimming guide down fi rmly onto the lower metal
edge of the cutting head (see illustration).
Note:
It is recommended that you begin by trimming a
small area to test the individual trimming guides.
Start with a trimming guide for long fur and, if necessary, change to a shorter one. The trimming guides
allow an average cutting length from 3 -13 mm.
•
Switch the appliance on by sliding the On/Off
switch 3 to the position „ON“.
• Slowly run the appliance through the fur against
the direction of hair growth. Hold the appliance
so that the trimming guide is as fl at as possible
against the animal.
• Additionally, using the adjusting lever 4,
the cutting depth of the cutting head 1 can
be adjusted stepwise (approx. 2 mm) without
changing the trimming guide.
To do this, press the adjusting lever 4 backwards to increase the cutting length in steps.
Through this, the cutting length of the respective
attached trimming guide will also be increased
by up to 2 mm.
Press the adjusting lever 4 forwards to reduce
the cutting length or to bring the trimming guide
back into its original position.
• Through removal of the individual trimming
guide, i.e. using only the cutting head 1 itself,
you can cut clean contours.
• After use, switch the appliance off by sliding the
On/Off switch 3 to the position „OFF“.
Cleaning and Care
Risk of electric shock
Before cleaning, remove the plug from the mains
power socket.
NEVER submerse the appliance in water or other
liquids.
• Ensure that the trimming guide has properly
engaged and is secured before starting to cut/
trim the fur.
• Take the respective trimming guide, if fi tted, off .
•
Using exclusively the cleaning brush , remove
the hairs from the cutting head 1
head 1 may not be cleaned with water or
other liquids, except medical alcohol!
•
If in regular use, the cutting head 1 should be
oiled occasionally. For this, use the supplied
blade oil
• Remove excess oil with a dry cloth.
• Clean the housing with a soft, dry lint-free cloth.
• Store the appliance in a dry and dust free
location. When it is in storage, place the blade
guard on the cutting head 1.
- 3 -
.
. The cutting
Page 6

Disposal
Do not dispose of the device in your
normal domestic waste. This product is
subject to the provisions of European
Directive 2002/96/EC.
Dispose of the appliance over a registered waste
disposal fi rm or at your local community waste
disposal facility. Observe the currently applicable
regulations. In case of doubt, please
contact your waste disposal centre.
Dispose of all packaging materials in an
environmentally friendly manner.
Warranty and Service
You receive a 3-year warranty for this device as
of the purchase date. This appliance has been
manufactured with care and meticulously examined
before delivery.
Please retain your receipt as proof of purchase.
In the case of a warranty claim, please make contact by telephone with our service department.
Only in this way can a post-free despatch for your
goods be assured.
The warranty covers only claims for material and
manufacturing defects, not for transport damage,
worn parts or for damage to fragile components,
e.g. switches or batteries. This product is for private
use only and is not intended for commercial applications.
In the event of misuse and improper handling,
use of force and interference not carried out by
our authorized service branch, the warranty will
become void.
Your statutory rights are not restricted in any way
by this warranty.
The warranty period is not extended by repairs
eff ected under warranty. This applies also to
replaced and repaired parts. Damages or defects
discovered after purchase are to be reported
directly after unpacking, at the latest two days after
the purchase date. Repairs carried out after lapse
of the warranty period are subject to charge.
Service Great Britain
Tel.: 0871 5000 720
E-Mail: kompernass@lidl.gb
Service Ireland
Tel: 1890 930 034
(0,082 EUR/Min., (peak))
(0,064 EUR/Min., (off peak))
E-Mail: kompernass@lidl.ie
Importer
KOMPERNASS GMBH
BURGSTRASSE 21
44867 BOCHUM, GERMANY
www.kompernass.com
(£ 0.10 / minute)
- 4 -
Page 7

Karvaleikkuri
Määräystenmukainen käyttö
Karvaleikkuri on tarkoitettu ainoastaan eläinkarvojen
leikkaamiseen ja trimmaamiseen yksityistalouksissa.
Laitetta ei ole tarkoitettu käytettäväksi ammatti-/
teollisuusaloilla. Muu kuin tässä kuvattu käyttö ei ole
sallittua ja voi johtaa vaurioihin ja loukkaantumisiin.
Emme vastaa vahingoista, joiden syynä on virheellinen tai asiaton käsittely, voimankäyttö tai valtuuttamattomat muutokset.
Turvaohjeet
Onnettomuus- ja loukkaantumisvaa-
rojen välttämiseksi:
• Tätä laitetta ei ole tarkoitettu sellaisten henkilöiden (mukaan lukien lapset) käyttöön, joiden
rajoitetut, fyysiset, aistilliset tai henkiset kyvyt tai
kokemuksen ja/tai tiedon puute estävät käytön,
lukuun ottamatta tilanteita, joissa heitä valvoo
turvallisuudesta vastaava henkilö tai joissa he
ovat saaneet tältä ohjeita laitteen käytöstä.
• Lapsia on valvottava ja varmistettava, etteivät
he leiki laitteella.
• Käytä laitteessa vain alkuperäisiä lisäosia.
• Tarkista leikkuupään moitteeton toiminta ennen
laitteen käyttöä.
• Älä koskaan käytä laitetta, jos sen leikkuukampa
on viallinen tai särkynyt. Leikkuukamman piikkien
puuttuminen voi johtaa loukkaantumisiin.
• Kytke laite pois päältä, ennen kuin asetat sen
sivuun.
Näin vältät sähköiskun vaaran:
• Liitä laite ainoastaan määräysten mukaisesti
asennettuun ja maadoitettuun pistorasiaan.
Verkkojännitteen on vastattava laitteen tyyppikilven tietoja.
• Älä päästä verkkojohtoa vaurioitumaan. Pidä
se etäällä kuumista paikoista ja asettele se niin,
ettei se voi vaurioitua.
• Anna vaurioitunut verkkopistoke tai virtajohto
heti valtuutetun ammattihenkilöstön tai huoltopalvelun vaihdettavaksi vaarojen välttämiseksi.
• Älä käytä laitetta koskaan kylpyammeen/
suihkun tai vedellä täytetyn pesualtaan lähellä.
Veden läheisyys aiheuttaa aina vaaran, vaikka
laite olisi kytketty pois päältä.
• Älä koskaan upota laitetta veteen tai muihin
nesteisiin.
• Jos laite on pudonnut veteen, irrota verkkopistoke ehdottomasti pistorasiasta ennen laitteen
ottamista vedestä.
• Pistoke on irrotettava pistorasiasta jokaisen
käytön jälkeen tai puhdistuksen ajaksi. Älä vedä
liitosjohdosta.
• Laite soveltuu käytettäväksi ainoastaan kuivissa
tiloissa.
• Huomio! Pidä laite kuivana.
• Älä käytä laitetta, kun kylvetät kotieläintäsi tai
kun turkki on märkä.
Toimitettavat osat
Trimmauskone ja teränsuojus
6 leikkuukampaa
Puhdistusharja
Teräöljy
Tämä käyttöohje
Tekniset tiedot
Jännitelähde:
Tehontarve: 10 W
Suojausluokka: II /
Käyttölämpötila: + 5 °C ... + 40 °C
Varastointilämpötila: 0 °C ... + 40 °C
- 5 -
230 V~/50 Hz
Page 8

CE-
yhdenmukaisuus
Tämä laite vastaa EMC-direktiivin 2004/108/EC
ja pienjännitedirektiivin 2006/95/EC perustavia
vaatimuksia ja muita tärkeitä määräyksiä.
Laitteen kuvaus
Laite (Kuva A)
1 Leikkuupää
2 Ripustussilmukka
3 Virtakytkin
4 Säätövipu
Leikkuukammat ja tarvikkeet (Kuva B)
1/8“ (leikkauspituus 3 mm)
1/4“ (leikkauspituus 6 mm)
3/8“ (leikkauspituus 9 mm)
1/2“ (leikkauspituus 13 mm)
Sivuleikkuukampa (oikea)
Sivuleikkuukampa (vasen)
Teränsuojus
Puhdistusharja
Teräöljy
Ohje:
On suositeltavaa trimmata ensin pienempi alue
yksittäisten leikkuukampojen testaamiseksi. Aloita
pitkälle turkille tarkoitetulla leikkuukammalla ja
käytä tarvittaessa lyhyempää. Leikkuukammat
mahdollistavat 3 -13 mm leikkuupituuden.
•
Kytke laite päälle työntämällä
asentoon ”ON”.
• Kuljeta laitetta hitaasti karvan kasvusuuntaa
vasten turkin läpi. Pidä laitetta niin, että leikkuukampa on mahdollisimman matalana.
• Lisäksi leikkuupään 1 leikkauspituutta voidaan
säätää säätövivulla 4 portaittain (n. 2 mm)
leikkuukampaa vaihtamatta.
Paina tätä varten säätövipua 4 taaksepäin
lisätäksesi leikkuupituutta portaittain.
Myös kulloinkin asetetun kampaosan leikkuupituus lisääntyy tällöin jopa 2 mm.
Paina säätövipua 4 eteenpäin lyhentääksesi
leikkuupituutta jälleen tai saattaaksesi kampaosan jälleen lähtöasentoonsa.
• Kun irrotat leikkuukamman eli leikkaat pelkällä
leikkuupäällä 1, voit leikata selkeitä rajoja.
• Kytke laite käytön jälkeen pois päältä työntämällä
virtakytkin 3 asentoon „OFF“.
virtakytkin 3
Käyttö
Leikattavan turkin on oltava kuiva ja puhdas. Poista
mahdolliset takut harjaamalla turkki läpikotaisin.
•
Irrota teränsuojus leikkuupäästä 1
• Aseta kukin leikkuukampa ( - ) leikkuuteräl-
le 1 piikit ylöspäin ja paina tällöin leikkuukamman läppää voimakkaasti leikkuupään
alempaa metallireunaa vasten (katso kuva).
• Varmista, että leikkuukampa on lukittunut
paikoilleen oikein, ennen kuin aloitat karvojen
leikkuun/trimmauksen.
.
Puhdistus ja hoito
Sähköiskun vaara!
Irrota verkkopistoke pistorasiasta ennen jokaista
puhdistuskertaa.
Älä koskaan upota laitetta veteen tai muihin nesteisiin.
• Irrota vastaava leikkuukampa, mikäli asetettuna.
•
Poista karvajäämät leikkuu
taan puhdistusharjalla
ei saa puhdistaa vedellä tai muilla nesteillä,
lääkintäspriitä lukuun ottamatta!
•
Säännöllisessä käytössä leikkuupää 1 tulisi
öljytä silloin tällöin. Käytä siihen mukana tulevaa
teräöljyä
• Poista liiallinen öljy kuivalla liinalla.
• Puhdista kotelo kuivalla, nukkaamattomalla
liinalla.
• Säilytä laite kuivassa ja pölyttömässä paikassa.
Aseta säilytystä varten teränsuojus leikkuupäähän 1.
- 6 -
.
päästä 1 ainoas-
. Leikkuupäätä 1
Page 9

Hävittäminen
Älä missään tapauksessa heitä laitetta
tavallisen talousjätteen sekaan. Tämä
tuote on eurooppalaisen direktiivin
2002/96/EC alainen.
Hävitä laite hyväksytyn jätehuoltoyrityksen tai
kunnallisen jätehuollon kautta. Noudata voimassa
olevia määräyksiä. Ota epävarmoissa tapauksissa
yhteyttä jätelaitokseesi.
Hävitä kaikki pakkausmateriaalit ympäris-
töystävällisellä tavalla.
Takuu ja huolto
Laitteella on kolmen vuoden takuu alkaen ostopäivästä. Laite on valmistettu huolellisesti ja tarkistettu
tarkasti ennen toimitusta.
Säilytä ostokuitti todisteeksi ostosta. Ota takuutapauksessa puhelimitse yhteyttä lähimpään
huoltopisteeseen. Ainoastaan näin voidaan
taata tuotteesi lähettäminen huoltoon maksutta.
Takuu koskee ainoastaan materiaali- ja
valmistusvirheitä, ei kuitenkaan kuljetusvaurioita,
kuluvia osia tai herkästi vaurioituvien osien, esim.
kytkinten tai akkujen vaurioita. Tuote on tarkoitettu
ainoastaan yksityiseen käyttöön. Tuotetta ei siten
saa käyttää ammatillisiin tarkoituksiin. Väärä tai
asiaton käyttö, väkivallan käyttö ja muiden kuin
valtuutetun huoltopisteen suorittamat korjaukset
aiheuttavat takuun raukeamisen.
Tämä takuu ei rajoita kuluttajan lakisääteisiä
oikeuksia.
Takuukorjaus ei pidennä takuuaikaa. Tämä koskee
myös vaihdettuja ja korjattuja osia. Mahdolliset jo
ostettaessa olemassa olevat vahingot ja puutteet on
ilmoitettava välittömästi pakkauksen avaamisen jälkeen, viimeistään kuitenkin kahden päivän kuluessa
ostopäivästä. Takuuajan umpeutumisen jälkeiset
korjaukset ovat maksullisia.
Service Suomi
Tel.: 010309 3582
E-Mail: kompernass@lidl.fi
Maahantuoja
KOMPERNASS GMBH
BURGSTRASSE 21
44867 BOCHUM, GERMANY
www.kompernass.com
- 7 -
Page 10

Hårklippare för djur
Föreskriven användning
Den här pälstrimmern ska endast användas för att
klippa och trimma päls på djur i privata hushåll.
Den är inte avsedd för yrkesmässigt eller industriellt
bruk. Ingen annan form av användning än den som
beskrivs här är tillåten och innebär risk för skador
på person, djur och material. Tillverkaren ansvarar
inte för skador som är ett resultat av missbruk och
felaktig behandling, användande av våld eller för att
apparaten modifi erats av okvalifi cerade personer.
Säkerhetsanvisningar
För att undvika olyckor och skador :
• Den här apparaten ska inte användas av personer (inklusive barn) med begränsad fysisk,
sensorisk eller mental förmåga eller bristande
erfarenhet och kunskap om de inte först övervakats eller instruerats av någon ansvarig person.
• Håll uppsikt över barnen så att de inte leker
med apparaten.
• Använd bara originaltillbehör till apparaten.
• Kontrollera att skärhuvudet fungerar som det
ska innan du använder apparaten.
• Använd aldrig apparaten om kamtillsatsen
är defekt eller bruten. Om det fattas tänder i
kammen kan ditt husdjur skadas.
• Stäng av apparaten innan du lägger ifrån dig
den.
För att undvika elchocker:
• Anslut endast apparaten till ett godkänt och
lättåtkomligt eluttag. Nätspänningen måste
överensstämma med angivelserna på apparatens typskylt.
• Akta så att elkabeln inte skadas. Håll den på
avstånd från heta ytor och lägg den så att den
inte kan skadas på annat sätt.
• Låt genast auktoriserad fackpersonal eller vår
kundtjänst reparera skadade kablar och kontakter för att undvika olyckor.
• Använd inte apparaten i närheten av badkaret/
duschen eller över ett tvättställ fyllt med vatten.
Närhet till vatten utgör en risk, även när apparaten är avstängd.
• Doppa aldrig ner apparaten i vatten eller andra
vätskor.
• Om apparaten råkar fall i vatten måste du alltid
dra ut kontakten innan du tar upp den.
• Dra alltid ut kontakten när du använt apparaten
färdigt och innan du rengör den. Dra inte i
själva sladden.
• Den här apparaten ska bara användas i torra
utrymmen.
• AKTA! Håll apparaten torr.
• Använd inte apparaten på ett djur som nyss har
badat eller har våt päls.
Leveransens innehåll
Hårklippare för djur med klingskydd
6 kamtillsatser
Rengöringsborste
Saxolja
Denna bruksanvisning
Tekniska data
Spänningsförsörjning: 230 V~/50 Hz
Eff ektförbrukning: 10 W
Skyddsklass: II /
Drifttemperatur: + 5 °C - + 40 °C
Förvaringstemperatur: 0 °C - + 40 °C
- 8 -
Page 11

CE-
överensstämmelse
Den här apparaten uppfyller de grundläggande
kraven och övriga relevanta föreskrifter i EMCdirektiv 2004/108/EC samt lågspänningsdirektiv
2006/95/EC.
Beskrivning
Apparat (bild A)
1 Skärhuvud
2 Upphängningsögla
3 På/Av-knapp
4 Inställningsspak
Kamtillsatser och tillbehör (bild B)
1/8“ (3 mm snittlängd)
1/4“ (6 mm snittlängd)
3/8“ (9 mm snittlängd)
1/2“ (13 mm snittlängd)
Kam för nivåklippning på sidan (höger)
Kam för nivåklippning på sidan (vänster)
Klingskydd
Rengöringsborste
Saxolja
Observera:
Ett bra tips är att trimma ett litet område först för att
testa de olika kamtillsatserna. Börja med en kam
för lång päls och byt till en kam för kortare päls
om det behövs. Kammarna kan klippa 3 -13 mm
av pälsen.
•
Sätt på apparaten genom att fl ytta På/
Av-knappen 3
• För apparaten långsamt genom pälsen mot
hårens riktning. Håll apparaten så att kammen
ligger så platt mot pälsen som möjligt.
• Man kan också använda spaken 4 för att
anpassa skärhuvudets 1 snittlängd med ca
2 mm i taget, utan att byta kamtillsats.
Tryck då spaken 4 bakåt för att öka snittlängden stegvis.
Då ökas även snittlängd för den kam som monterats med upp till 2 mm.
Tryck spaken 4 framåt för att åter minska
snittlängden eller fl ytta tillbaka kammen till
utgångsläget.
• Om man tar av kamtillsatsen och bara använder
skärhuvudet 1 kan man klippa skarpa konturer.
• Stäng av apparaten när du är färdig genom att
fl ytta På/Av-knappen 3 till läge OFF.
till läge ON.
Användning
Den päls som ska klippas måste vara torr och ren.
Borsta igenom pälsen om det behövs, för att få
bort ev. tovor.
•
Ta av klingskyddet från skärhuvudet 1
• Sätt den kamtillsats ( - ) du vill ha med
tänderna uppåt på skärhuvudet 1 och tryck
samtidigt kraftigt ner fl iken på kamtillsatsen
över skärhuvudets undre metallkant (se bilden).
• Kontrollera att kamtillsatsen sitter ordentligt fast
innan du börjar klippa och trimma ditt husdjur.
.
Rengöring och skötsel
Risk för elchocker!
Dra alltid ut kontakten ur uttaget när du klippt färdigt.
Doppa aldrig ner apparaten i vatten eller andra
vätskor.
• Ta av den kam som ev. sitter på apparaten.
•
Använd ingenting annat än rengöringsborsten
för att ta bort rester av päls från skärhuvudet
Skärhuvudet 1
eller andra vätskor, med undantag av medicinsk
alkohol!
•
Om apparaten används regelbundet bör skärhuvudet 1 smörjas med olja ibland. Använd
då medföljande saxolja
• Torka bort överfl ödig olja med en torr trasa.
• Rengör höljet med en torr, luddfri trasa.
• Förvara apparaten på ett torrt och dammfritt
ställe. Sätt klingskyddet över skärhuvudet 1
när du ställer undan apparaten.
- 9 -
får inte rengöras med vatten
.
1.
Page 12

Kassering
Apparaten får absolut inte kastas
bland hushållssoporna. Produkten
faller under EU-direktiv 2002/96/EC.
Lämna in den till ett företag som har tillstånd att ta
hand om den här sortens avfall eller till en avfallsanläggning i din kommun. Följ gällande föreskrifter.
Kontakta din avfallsanläggning om du har några
frågor.
Lämna in allt förpackningsmaterial till
miljövänlig återvinning.
Garanti och service
För den här apparaten lämnar vi tre års garanti från
och med inköpsdatum. Den här apparaten har tillverkats med omsorg och genomgått en noggrann
kontroll innan leveransen.
Var god bevara kassakvittot som köpbevis. Vi ber
dig kontakta vår kundtjänst per telefon vid garantifall.
Bara då kan du skicka in produkten utan kostnad.
Garantin gäller bara för material- eller fabrikationsfel, den täcker inte transportskador, förslitningsdelar
eller skador på ömtåliga delar som t ex knappar
och batterier. Produkten är endast avsedd för privat
bruk och får inte användas yrkesmässigt.
Vid missbruk och felaktig behandling, användande
av våld och vid ingrepp som inte gjorts av vår auktoriserade servicefi lial upphör garantin att gälla.
Den lagstadgade garantin begränsas inte av
denna garanti.
Garantitiden förlängs inte för att man utnyttjat garantin. Det gäller även för utbytta eller reparerade
delar. Eventuella skador som existerar redan vid
köpet måste rapporteras så snart apparaten packats
upp, dock senast två dagar efter köpet.
När garantitiden är slut kostar det pengar att
reparera apparaten.
Service Sverige
Tel.: 0770 930739
E-Mail: kompernass@lidl.se
Service Suomi
Tel.: 010309 3582
E-Mail: kompernass@lidl.fi
Importör
KOMPERNASS GMBH
BURGSTRASSE 21
44867 BOCHUM, GERMANY
www.kompernass.com
- 10 -
Page 13

Trimmer til dyr
Anvendelsesområde
Trimmeren til dyr er udelukkende beregnet til klipning
og trimning af dyrehår i private husholdninger.
Trimmeren til dyr er ikke beregnet til anvendelse til
erhvervsmæssige/industrielle områder. Al anden
anvendelse end den, som er beskrevet her, kan
føre til skader og kvæstelser. Vi giver ikke garanti
for skader, som opstår på grund af misbrug eller
forkert behandling, anvendelse af vold eller uautoriseret ændring.
Sikkerhedsanvisninger
Sådan undgår du fare for uheld
og personskader:
• Denne trimmer til dyr må ikke benyttes af personer (inklusive børn) med begrænsede fysiske,
sensoriske eller psykiske evner eller med manglende erfaringer og/eller manglende viden,
medmindre en ansvarlig person holder opsyn
med dem og giver dem anvisninger til, hvordan
trimmeren til dyr skal benyttes.
• Børn skal være under opsyn, så det sikres, at
de ikke leger med trimmeren.
• Brug kun originale tilbehørsdele til denne trimmer.
• Kontrollér, at trimmehovedet fungerer korrekt,
før du bruger maskinen.
• Brug aldrig trimmeren, hvis kammen er defekt
eller knækket. Hvis der mangler tænder på
kammen, kan det føre til skader.
• Sluk for trimmeren, før du lægger den til side.
Undgå elektrisk stød:
• Slut kun trimmeren til en forskriftsmæssigt
installeret stikkontakt, som er nem at komme
til. Netspændingen skal stemme overens med
oplysningerne på trimmerens typeskilt.
• Sørg for, at el-ledningen ikke bliver beskadiget.
Hold den borte fra varme områder, og læg
den, så den ikke kan blive ødelagt.
• Lad omgående defekte stik eller kabler udskifte
af en autoriseret reparatør eller af kundeservice,
så farlige situationer undgås.
• Brug ikke trimmeren i nærheden af badekarret/
bruseren eller over en vask, der er fyldt med
vand. Selv om der er slukket for trimmeren, er
det farligt at opbevare den i nærheden af vand.
• Læg aldrig trimmeren ned i vand eller andre
væsker.
• Hvis trimmeren falder ned i vand, skal du altid
tage stikket ud af stikkontakten, før du tager den
op igen.
• Træk altid strømstikket ud af stikkontakten efter
brug eller ved rengøring. Træk ikke i ledningen.
• Trimmeren er kun egnet til anvendelse i tørre rum.
• OBS! Hold trimmeren tør.
• Brug ikke trimmeren, mens dyret bades, eller hvis
dets pels er våd.
Medfølger ved køb
Trimmer til dyr med klingebeskyttelse
6 kamme
Rengøringspensel
Klingeolie
Denne betjeningsvejledning
Tekniske data
Spændingsforsyning: 230 V~/50 Hz
Eff ektforbrug: 10 W
Beskyttelsesklasse: II /
Driftstemperatur: + 5 °C - + 40 °C
Opbevaringstemperatur: 0 °C - + 40 °C
- 11 -
Page 14

CE-
-overensstemmelse
Denne trimmer til dyr er i overensstemmelse med de
grundlæggende krav og øvrige relevante forskrifter
i EMC-direktivet 2004/108/EC samt lavspændingsdirektivet 2006/95/EC.
Beskrivelse af trimmeren til dyr
Trimmer til dyr (fi g. A)
1 Trimmehoved
2 Øsken
3 Tænd-/slukknap
4 Indstillingsarm
Kamme og tilbehør (fi g. B)
1/8“ (3 mm trimmelængde)
1/4“ (6 mm trimmelængde)
3/8“ (9 mm trimmelængde)
1/2“ (13 mm trimmelængde)
Kam til trinvis trimning på siden (højre)
Kam til trinvis trimning på siden (venstre)
Klingebeskyttelse
Rengøringspensel
Klingeolie
Bemærk:
Det anbefales først at trimme et lille stykke for at teste
de enkelte kamme. Begynd med en kam til lang
pels, og skift til en kortere ved behov. Kammene
giver mulighed for en trimmelængde på 3 -13 mm.
•
Tænd for trimmeren ved at stille
knappen 3 på position „ON“.
• Bevæg langsomt trimmeren gennem pelsen
imod hårets vækstretning. Hold trimmeren, så
kammen sidder så fl adt som muligt.
• Trimmehovedets trimmelængde 1 kan også
indstilles trinvist (ca. 2 mm) med indstillingsarmen
, uden at det er nødvendigt at skifte kam.
4
Stil indstillingsarmen 4 bagud for at øge trimmelængden trinvist.
Den anvendte kams trimmelængde øges derved
med op til 2 mm.
Stil indstillingsarmen 4 frem for at afkorte
trimmelængden igen eller for at stille kammen i
udgangsstillingen.
• Ved at tage kammen af, dvs. du bruger kun
selve trimmehovedet 1, kan du klippe helt rene
konturer.
• Sluk for trimmeren efter brug ved at stille tænd-/
slukknappen 3 på position „OFF“.
tænd-/sluk-
Betjening
Pelsen, der skal trimmes, skal være tør og ren.
Børst pelsen igennem, så eventuelt sammenfi ltret
hår fjernes.
•
Tag klingebeskyttelsen af trimmehovedet 1
• Sæt den ønskede kam ( - ) med takkerne
opad på trimmehovedet 1, og tryk kammen
godt fast på trimmehovedets nederste metalkant
(se billedet).
• Sørg for, at kammen er gået rigtigt i hak, før du
begyder at klippe/trimme dyrets hår.
Rengøring og vedligeholdelse
Fare for elektrisk stød!
Tag altid stikket ud af stikkontakten før rengøring.
Læg aldrig maskinen ned i vand eller andre
.
væsker!
• Tag kammen af, hvis der er sat én på.
•
Fjern hårresterne fra trimmehovedet 1
rengøringspenslen
ikke rengøres med vand eller andre væsker
bortset fra medicinsk alkohol!
•
Ved regelmæssig brug skal trimmehovedet 1
smøres med olie af og til. Brug hertil den medfølgende klingeolie
• Fjern den overfl ødige olie med en tør klud.
• Rengør kabinettet med en tør, trævlefri klud.
• Opbevar trimmeren på et tørt og støvfrit sted.
Sæt klingebeskyttelsen på trimmehovedet 1
ved opbevaring.
- 12 -
. Trimmehovedet 1
.
med
må
Page 15

Bortskaff else
Smid aldrig trimmeren til dyr ud sammen med det normale husholdningsaffald. Dette produkt er underkastet det
europæiske direktiv 2002/96/EC.
Bortskaf trimmeren til dyr via en godkendt bortskaff elsesvirksomhed eller via den kommunale
genbrugsplads. Overhold de gældende forskrifter.
Henvend dig i tvivlstilfælde til det lokale bortskaffelsessted.
Afl ever alle emballagematerialer på et
aff aldsdepot, så miljøet skånes.
Garanti og service
På dette apparat får du 3 års garanti fra købsdatoen. Grillvognen er produceret omhyggeligt
og inden levering afprøvet samvittighedsfuldt.
Opbevar kassebonen som bevis for købet.
Kontakt venligst din serviceafdeling telefonisk,
hvis du ønsker at gøre brug af garantien.
På denne måde kan gratis indsendelse af varen
garanteres.
Garantiydelsen gælder kun for materiale- eller
fabrikationsfejl, men ikke for transportskader,
sliddele eller skader på skrøbelige dele som
f.eks. kontakter eller batterier. Produktet er kun
beregnet til privat og ikke til erhvervsmæssigt brug.
Ved misbrug og uhensigtsmæssig behandling,
anvendelse af vold og ved indgreb, som ikke er
foretaget af vores autoriserede service-afdeling,
ophører garantien.
Dine juridiske rettigheder indskrænkes ikke ved
denne garanti.
Garantiperioden forlænges ikke af garantiydelsen.
Det gælder også for udskiftede og reparerede
dele. Skader og mangler, der eventuelt allerede
fi ndes ved køb, skal anmeldes straks efter udpakningen og senest to dage efter købsdatoen. Når
garantiperioden er udløbet, er alle reparationer
betalingspligtige.
Service Danmark
Tel.: 32 710005
E-Mail: kompernass@lidl.dk
Importør
KOMPERNASS GMBH
BURGSTRASSE 21
44867 BOCHUM, GERMANY
www.kompernass.com
- 13 -
 Loading...