

Page 1

TranzStor
8X
FIELD-READY
User Manual
Z Microsystems
Page 2

REGULATORY
WARNING
TO PREVENT FIRE OR SHOCK HAZARDS, DO NOT EXPOSE THIS UNIT TO R AIN OR
MOISTURE. ALSO, DO NOT USE THIS UNIT’S POLARIZED AS PLUG WITH AN EX TENSION
CORD RECEPTACLE OR OTHER OUTLETS UNLESS ALL THR EE PRONGS CAN BE FULLY
INSERTED
1. Use the power c able
supplied with the product
to help prevent interference with radio and television reception. The use
of cables and adapters
may cause interference
with electronic equipment
in the vicinity of this unit.
2. Changes or modifi cations not expressly
approved by Z Microsystems could void user’s
warranty.
TranzStor
8X
CAUTION
RISK OF ELECTRIC SHOCK - DO NOT OPEN
CAUTION: TO REDUCE THE RISK OF ELECTRIC SHOCK DO NOT REMOVE COVER (OR
BACK OF UNIT). NO USER SERVICEA BLE PARTS INSIDE . REFER SERVICING TO QUALIFIED PERSONNEL.
This symbol warns the user that insulated voltage within the unit may have suf fi cient
magnitude to cause electric shock. Therefore, it is dangerous to make any kind of
contact with any part inside this unit.
This symbol alerts the user that impor tant literature concerning the operation and
maintenance of this unit has been inc luded. Therefore it should be read carefully in
order to avoid any problems.
Doc # 27-00 30UM Rev 1.0 Issued 12 /04
2
Page 3

TABLE OF CONTENTS
SECTION PAGE
Introduction ........................................................................................................ 4
About This Manual ............................................................................................ 4
Safety Precautions ............................................................................................ 4
Product Description ........................................................................................... 5
Installation ......................................................................................................... 6
Shipment Contents ............................................................................................ 6
Required Tool .................................................................................................... 8
Preparations ...................................................................................................... 8
Installation Precautions ..................................................................................... 8
Rail Installation .................................................................................................. 9
8X RAID Installation .........................................................................................11
Cable Connections ...........................................................................................12
Operations ........................................................................................................ 13
Powering up TranzStor 8X ...............................................................................13
Establish Serial Co nnection .............................................................................13
Verify Channel Settings ...................................................................................14
Begin Quick Install Wizard ...............................................................................15
Add New Logical Drive .....................................................................................17
Status Indicators ............................................................................................. 20
TP7 Description ................................................................................................21
Inserting the TP7 ............................................................................................. 22
Removing the TP7 .......................................................................................... 23
Removing the Door ......................................................................................... 24
Replacing the Door ......................................................................................... 25
Maintenance ................................................................................................... 26
Cleaning the TranzStor 8X .............................................................................. 26
Replacing the Fan Assembly .......................................................................... 27
Troubleshooting ............................................................................................... 28
Confi guring the Channels After Reset ............................................................ 28
Drive Failures .................................................................................................. 34
Schematics for TranzStor 8X .......................................................................... 39
Appendix ..........................................................................................................41
Specifi cations ...................................................................................................41
Replacements ..................................................................................................42
Warranties ...................................................................................................... 43
Customer Support ........................................................................................... 49
Customer Feedback ........................................................................................ 50
Doc # 27-00 30UM Rev 1.0 Issued 12 /04
3
Page 4

INTRODUCTION
ABOUT MANUAL
This Manual is also available on the Z Microsystems website (ww w.zmicro.com). We
recommend you read this manual carefully and follow the instructions in the Installation
chapter for verifi cation of system functions and control settings.
SAFETY PRECAUTIONS
DANGER:
To avoid shock hazard:
Do not penetrate the 8X with any
•
screw longer than .18”. Damage will
occur.
Do not connect or disconnect the 8X
•
during an electrical storm.
e power cord plug must be connected
•
to a properly wired and grounded
power outlet.
Any equipment to which the 8X will
•
be attached must also be connected to
properly wired and grounded power
outlets.
Doc # 27-00 30UM Rev 1.0 Issued 12 /04
4
Page 5

INTRODUCTION
PRODUCT DESCRIPTION
From the TranzStor family of low-profi le, platform-independent network storage solutions comes the TranzStor 8X SC (SCSI Controller). Featuring an Ultra 160 (or Ultra 320)
SCSI to SCSI RAID controller and 8 hot-swappable TranzPak 7 hard drive modules. The
TranzStor 8X SC RAID array provides data intensive, mission critical applications with the
high-end availability, performance and fault-tolerance they require.
Packed in a tough, lightweight, compact aluminum enclosure, this fail proof hot-plug storage installs easily into any industry standard 7” (4U) RETMA rack or transit case slot. Designed specifi cally to work under extreme conditions, this ultra-rugged low-profi le modular
system utilizes hot-pluggable and removable TranzPak 7 hard drives to of fer portability in
complex deployed computing environments. Each TranzPak 7 drive holds up to 400 GB
of storage capacity and features an extruded aluminium body and a die cast cam locking
front panel, solid protection for your deployed media investment.
5
Doc # 27-00 30UM Rev 1.0 Issued 12 /04
Page 6
INSTALLATION
INSTALLATION
This portion of the Operations chapter is for quick reference only. For a more detailed
description of RAID confi gurations, see the Controller Manufacturer’s user manual.
Shipment Contents:
(8) Nut, Locking, 10-32, SS, 01-
8X Raid Enclosure (Power Sup-
a
plies and TP7s installed)
e
92151
(6) Screw, SEM, Phillips, 10-32
b
x 1.00”, SS,
01-92220
(4) Screw, Pkh, Phillips, 10 -32 x
c
0.375Lng, SS, 01-92087
(16) Washer, 10 Flat SS, 01-
d
91872
a
(4) Screw, 10-32 x 0.75 Pan Phil-
f
lips, 01-92112
(8) Screw, 10-32 x 0.50 Pan Phil-
g
lips SS ISEM,
01-91622
(8) Screw, 10-32 x 0.1875 Pan SS,
h
01-91827
h
e
f
d
d
g
b
c
Doc # 27-00 30UM Rev 1.0 Issued 12 /04
d
6
Page 7

INSTALLATION
Null Modem Cable (DB9F to DB9F)
i
j
IEC Power Cable
k
Rack Slides
l
SCSI LVD/SE External Terminators
(Quantities will vary depending on
RAID Controller Model)
i
Raid Controller Manual
m
n
Warranty & Service Plan
o
8X User Manual
p
Electronic Documentation
j
k
l
n
m
Doc # 27-00 30UM Rev 1.0 Issued 12 /04
p
o
7
Page 8

INSTALLATION
REQUIRED TOOLS
• Phillips Head Screwdriver
• 3/8” ratchet
PREPARATIONS
In preparation to install the 8X, take the
following precautionary steps:
Turn off the electrical power to the host
computer.
INSTALLATION
PRECAUTIONS
When mounting the 8X, there is a
maximum of .18” screw penetration on the
underside and side screw hole locations.
NOTE: For the fastest and easiest
installation of the 8X, follow
these steps in the sequence they
are presented.
Doc # 27-00 30UM Rev 1.0 Issued 12 /04
8
Page 9

INSTALLATION
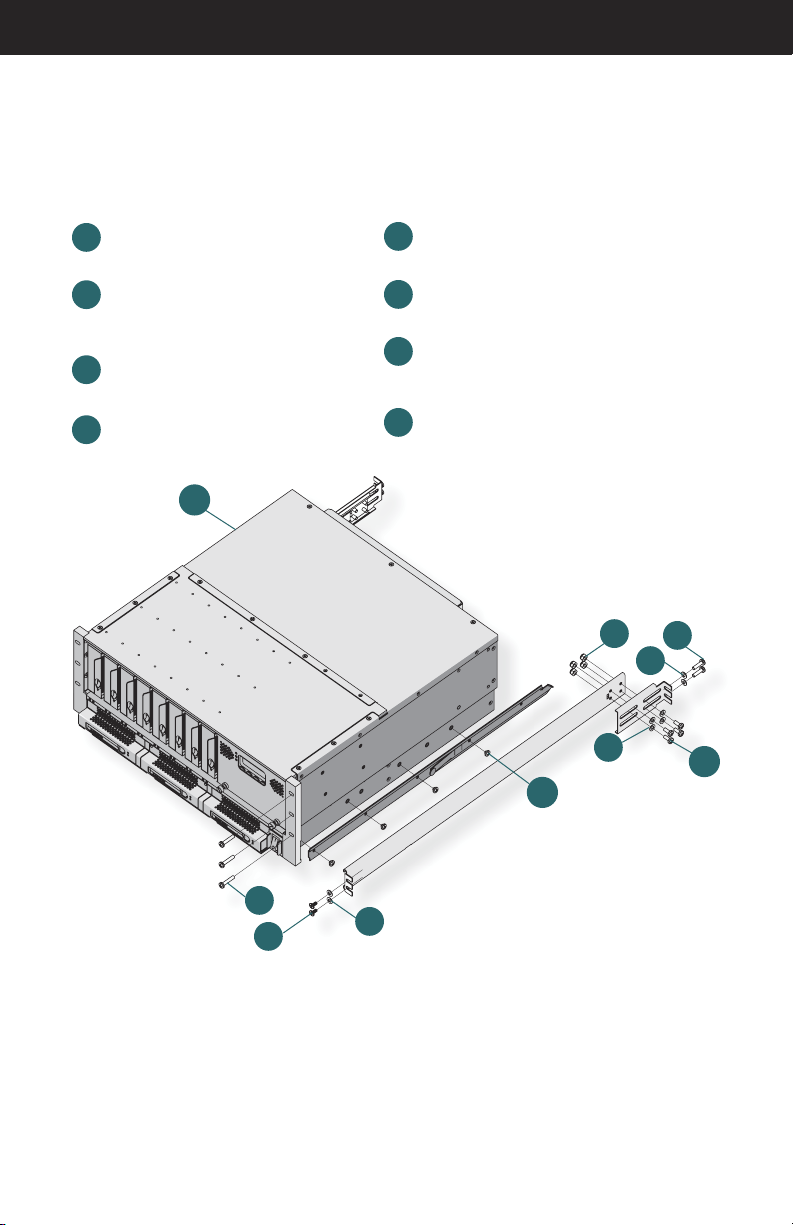
STEP 1: RAIL INSTALLATION
The 8X RAID will arrive with the slides unattached.
To attach the slides to the extension
brackets, use two panhead phillips screws
(part # 01-91622), two fl at washers (01-
91872), and two lock washers (01-92151).
Slide Extension Bracket
Outer Slide Member
Insert the screws through the slots of the
extension bracket and into the holes in
the outer slide member. Secure loosely
with fl at and lock washers. Do not tighten.
Repeat with the second slide assembly.
Secure the rear of the slide assembly to
the rear of the rack using two panhead
Phillips head screws (part #01-91622).
Doc # 27-00 30UM Rev 1.0 Issued 12 /04
Positioning the slide assembly on the
inside of the rack, secure the front of the
slide assembly to the front of the rack using
a fl at Phillips head screw (part #01-92087)
in the top position.
Tighten the slide assembly screws using
a Phillips screwdriver and 3 /8” ratchet.
Repeat rail installation for other side.
9
Page 10
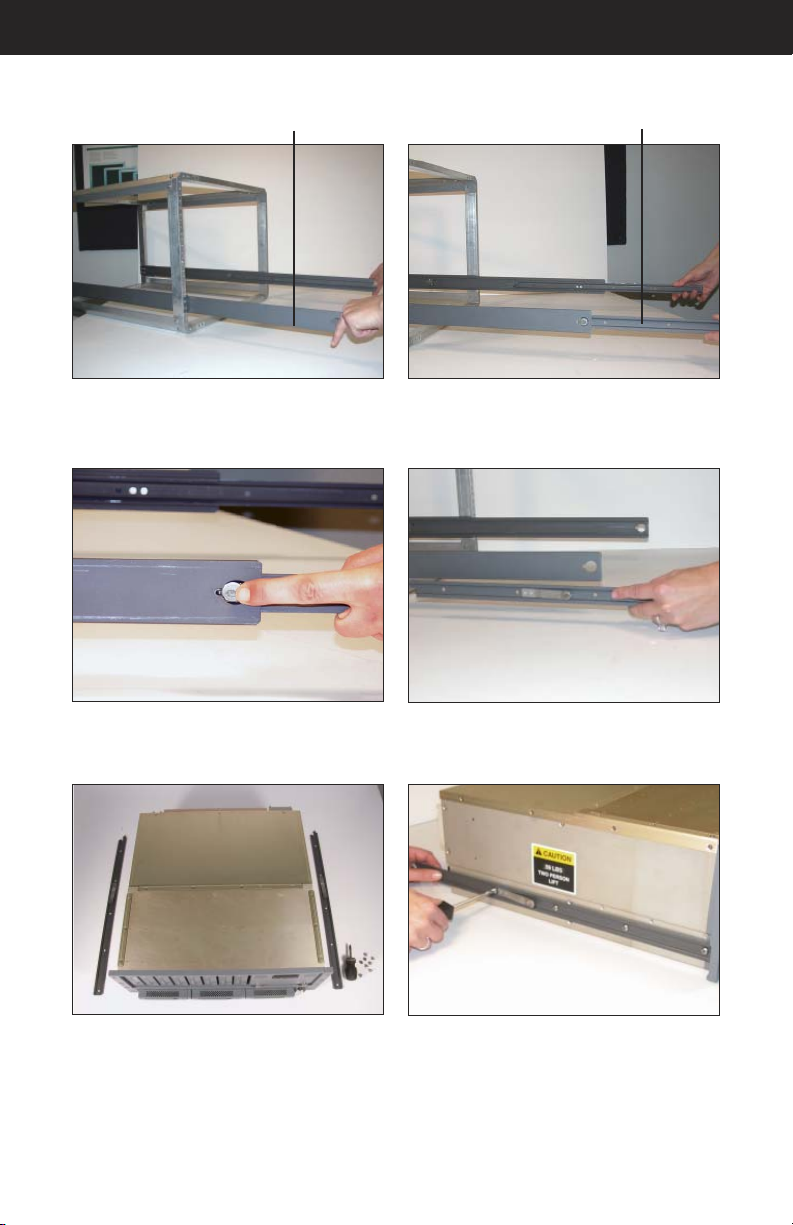
INSTALLATION
Middle Slide Member
Once both slide assemblies are installed
in the rack, extend the middle members of
the slide assemblies out of the rack.
Inner Slide Member
Extend the inner members of the slide assemblies out as far as they will go.
Press the slide locking tab on the outer
sides of the slides...
Lay the inner members along either side
of the 8X RAID, placing the pointed end of
the members toward the rear of the unit.
This is how the inner members will be attached to the 8X RAID.
Doc # 27-00 30UM Rev 1.0 Issued 12 /04
and remove the inner members of the slide
assemblies.
Attach the inner members to the sides of
the 8X RAID using 10-32 x 3/16” panhead
Phillips head screws (part# 01-91827).
10
Page 11

INSTALLATION
STEP 2: 8X RAID INSTALLATION
CAUTION: When attaching the inner
members of the slide assemblies
to the sides of the 8X RAID,
ensure screw penetration
does not exceed 3/16” length.
Damage may result if screw
length exceeds 3/16” length.
Use 10-32 x 3/16” screws only
(part# 01-91827).
Hold the 8X R AID up to the extended
rails with the rear of the 8X RAID to the
rear of the rack. Insert the inner member
(attached to the 8X RAID) into the middle
member of the slide.
Simultaneously press the slide locking tab
in and push the unit all the way back into
the rack.
Doc # 27-00 30UM Rev 1.0 Issued 12 /04
Slide the unit in until the slide action stops.
Secure the front of the 8X RAID to the rack
with three 8-32 x .75” panhead Phillips
screws on each side. See image above.
11
Page 12

INSTALLATION
STEP 3: CABLE CONNECTIONS
The picture below shows the rear of a TranzStor 8X RAID unit and the connection points
for these cables. TranzStor 8X confi gurations may vary.
1. Terminate externa l SCSI connectors
2. Connect SCSI Adapter to Host Computer’s SCSI adapter using a 68 pin external SCSI
cable.
3. Connect Serial CTRL A to the Host Computer’s COM 1 port using the modem cable.
4. Connect power cable.
Install LVD/SE Terminators
SCSI Adapter
Serial CTRL A AC Power Plug
Doc # 27-00 30UM Rev 1.0 Issued 12 /04
12
Page 13

OPERATIONS
STEP 4: POWER UP TRANZSTOR 8X
Before powering the TranzStor 8X, make sure all of the connections are tightened securely at the rear of the unit.
Then press the power switch on the front of the 8X.
Power Switch, Front
After turning on the power switch, the controller will beep. Watch the amber activity lights.
All of the drives’ activity LEDs will illuminate briefl y, and then extinguish.
STEP 5: ESTABLISH
SERIAL CONNECTION
From Accessories/Comunications/ select
Hyperterminal. Create description, select
COM Port and fi ll in Port Settings as
follows:
Bits per seconds: 38 400
•
Data bits: 8
•
Parity: None
•
Stop bits: 1
•
Flow control: None
•
13
Doc # 27-00 30UM Rev 1.0 Issued 12 /04
Page 14

OPERATIONS
STEP 6: VERIFY CHANNEL SETTINGS
If you’re not at the “Main Menu”, select “ PC Graphic (ANSI Mode)” and press “Enter”. This
will take you to the “Main Menu”.
Verify that your channel settings match the image below. If your channel settings do NOT
match, you can not continue with the Quick Guide set-up. Please refer to the troubleshooting section of this manual.
Doc # 27-00 30UM Rev 1.0 Issued 12 /04
14
Page 15

OPERATIONS
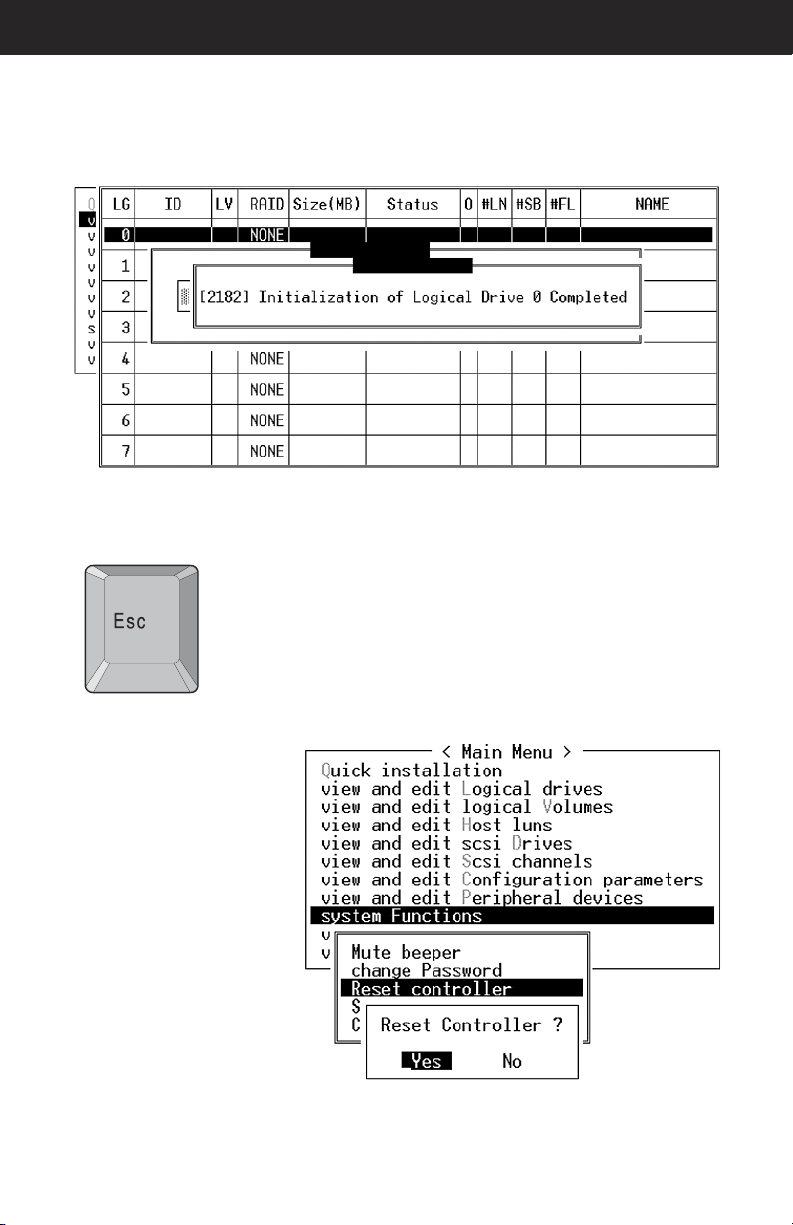
STEP 7: BEGIN QUICK INSTALL WIZARD
Create logical drive.
Select top option. See controller user manual for other R AID options.
Initialization will begin, and will continue for up to two hours, depending on the drive capacity (about 2 hours for a 146 GB drive).
15
Doc # 27-00 30UM Rev 1.0 Issued 12 /04
Page 16
OPERATIONS
Once the initialization is complete, the progress counter will disappear.
Press the “ESC” key.
Select “System Functions,”
then “Reset the Controller,”
and fi nally “Yes” to reset.
Doc # 27-00 30UM Rev 1.0 Issued 12 /04
16
Page 17

OPERATIONS
STEP 8: ADD NEW LOGICAL DRIVE
After the TranzStor 8X system reboots, rescan the SCSI bus on the host computer by
right-clicking on the SCSI controller in the device manager.
NOTE: e following screens are Win2K screens, and may appear diff erently with
diff erent operating systems.
Go to Administrative Tools>Computer Management>Disk Management. Click on “Disk
Management ” to start up Write Signature and Upgrade Wizard. Follow the steps in the
Wizard.
17
Doc # 27-00 30UM Rev 1.0 Issued 12 /04
Page 18

OPERATIONS
The host OS should fi nd a new disk with unallocated space and start up the Create
Volume Wizard automatically. If the Wizard doesn’t start up automaically, right-click on
unallocated disk and select “create volume”.
NOTE: If the Disk symbol is shown as “unallocated” (has a red negative symbol over
the drive symbol), there is no signature written to the drive. To do so, right
click on the disk, and write a signature for the drive in the window that
appears. Click “OK”. e red negative sign will be gone and the drive will
be useable.
The wizard will take
the user through
the remaining
options to create
a logical volume,
assign a new drive
letter and format
the partition with
your fi le system of
choice.
18
Doc # 27-00 30UM Rev 1.0 Issued 12 /04
Page 19

OPERATIONS
Once complete, the new drive can be found in the same fi le location as the fi rst available
drive under “My Computer”.
Doc # 27-00 30UM Rev 1.0 Issued 12 /04
19
Page 20

OPERATIONS
STATUS INDICATORS
The drives are numbered one through eight. Each drive has two dedicated status indicator
LEDs just below the drive. The following indicators apply to the drives only:
Green= When the drive is plugged into the
TranzStor 8X, the green light indicates the
drive has power.
Yellow= The yellow light comes on when
the drive is accessed by the controller,
indicating activity on the drive.
Power Activity
System Power Indicator
Drive Status Indicator
Alert Indicator
The System Power Indicator= illuminates when power to the system is detected.
The Drive Status Indicator= illuminates when a drive is active.
The Alert Indicator= illuminates when the system detects an error condition. See the controller manufacturer’s user manual to troubleshoot problems with the controller.
NOTE: For operation of the RAID
Controller, refer to the Infortrend
SR2500F User’s Manual.
20
Doc # 27-00 30UM Rev 1.0 Issued 12 /04
Page 21

OPERATIONS
TP7 DESCRIPTION
Red - SCSI Drive
Sliding Locking catch
Locking handle
High tensile extruded
aluminium alloy thermoconductive body
High tensile diecast aluminium alloy front panel
High tensile diecast aluminium alloy rear panel
Rear Connector
Doc # 27-00 30UM Rev 1.0 Issued 12 /04
21
Page 22

OPERATIONS
INSERTING THE TP7
With the handle in the open position, hold
the TranzPak 7 by the main body and
insert it partially into the docking bay. ( Be
sure that it is sliding on the black guides).
Check that the locking catch is aligned with
the locking indent in the slide rail and press
the handle towards body...
Using your thumb push the TranzPak 7
gently into the bay until you can feel it
touching off on the rear connector.
until it snaps the locking handle in place.
Check that all TranzPak 7 disk modules are
aligned across the face of the 8X.
Doc # 27-00 30UM Rev 1.0 Issued 12 /04
22
Page 23

OPERATIONS
REMOVING THE TP7
Slide the locking catch to the right to allow
locking handle to spring open.
Pull handle gently forward to eject the
TranzPak 7 off of the rear connector.
Locking handle springs open.
Continue to gently pull handle to slide
the TranzPak 7 forward. The TranzPak 7
should slide over the grounding contacts
until it is half way out.
Take the TranzPak 7 by the main body and
pull straight out.
Doc # 27-00 30UM Rev 1.0 Issued 12 /04
23
Page 24

OPERATIONS
REMOVING THE DOOR ON THE CONTROLLER
To remove the controller door, turn the
thumbscrews on the face of the door
counterclockwise.
The door will come loose.
NOTE: For information regarding
removal of the R AID
Controller, refer to the
Infortrend SR2700F User’s
Manual.
Doc # 27-00 30UM Rev 1.0 Issued 12 /04
The door can be removed by lifting it
down and off of the hinge.
24
Page 25

OPERATIONS
REPLACING THE DOOR ON THE CONTROLLER
To install the controller door, seat the
hinges up into the hinge slots at a 45
degree angle.
Rotate the bottom of the door down to
align the thumbscrews with the screw
holes.
Doc # 27-00 30UM Rev 1.0 Issued 12 /04
Simultaneously press and turn the
thumbscrews on the face of the door
clockwise. Tighten the thumbscrews.
25
Page 26

MAINTENANCE
MAINTAINING THE 8X
WARNING: Be sure to turn off
the power before you perform any
maintenance on the RAID.
CLEANING THE TRANZSTOR 8X
Unplug the 8X from the power outlet before cleaning.
To clean the surface of the 8X, lightly dampen a soft, clean cloth with water or mild detergent and wipe the surface of the 8X gently.
Doc # 27-00 30UM Rev 1.0 Issued 12 /04
26
Page 27

MAINTENANCE
REPLACING THE FAN ASSEMBLY
With your fi ngers, turn the two thumbscrews (locations shown above) counter
clockwise until the screws loosen.
Lift the fan assembly away from the TranzStor 8X chassis.
Rotate the fan assembly upward on the
hinge and then down.
To install the new fan assembly, place the
two hinges into the hinge slots (shown in
the next photo) at a 45 degree angle.
The image above shows a hinge being
inserted into the hinge slot.
Doc # 27-00 30UM Rev 1.0 Issued 12 /04
Seat the assembly down and secure it in
place by simultaneously pressing and turning the thumbscrews clockwise. Tighten
the thumbscrews.
27
Page 28

TROUBLESHOOTING
TROUBLESHOOTING
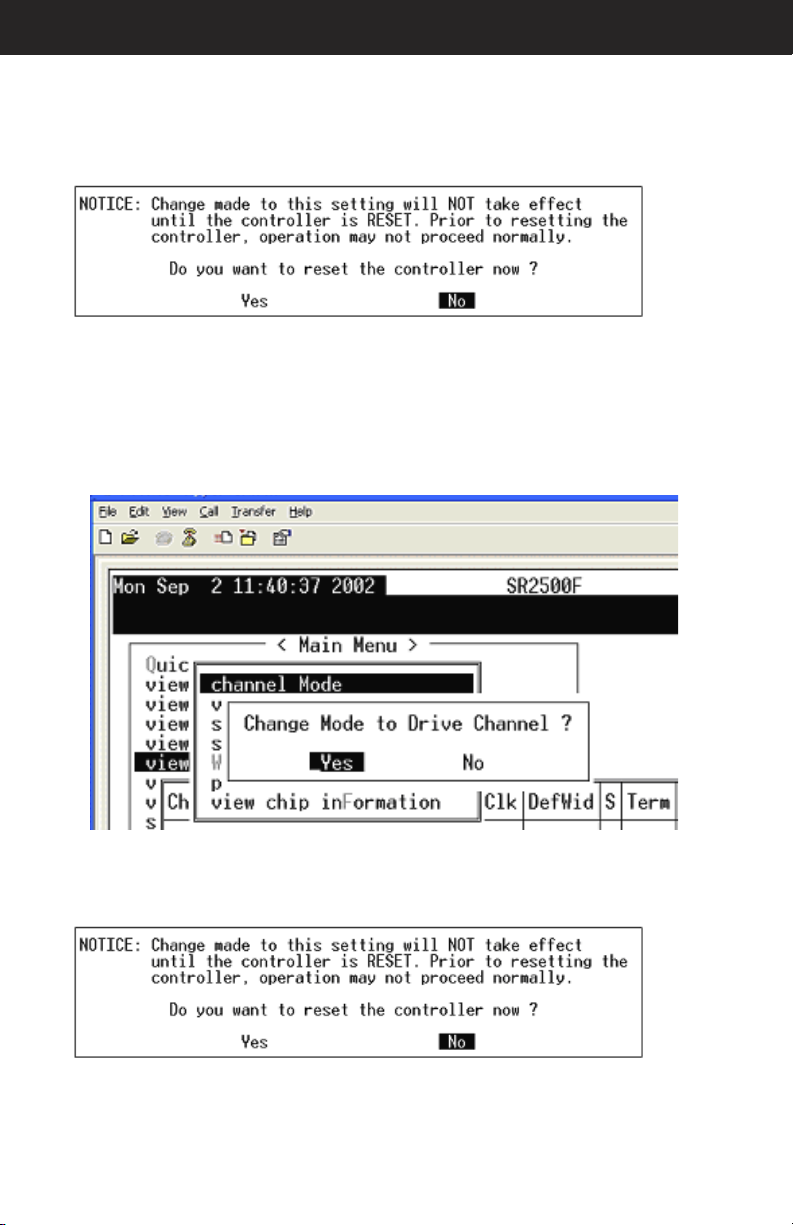
Confi guring the Channels After Accidental Reset
If the controller is reset accidentally to factor y default settings, follow these steps to
recover.
NOTE: Optimal setup for the RAID controller
is 0=Drive, 1=Drive, 2=Host,
3=Host. Only follow these steps if these
parameters are not already setup.
1. Select
“view and edit
channels”.
2. Now select “Chl 0” and then “channel Mode”, and then select “Yes”.
28
Doc # 27-00 30UM Rev 1.0 Issued 12 /04
Page 29
TROUBLESHOOTING
3. At this point you will be asked if you want to reset the controller. Select “No”.
4. Now select “Chl 1” and then “Channel Mode”, and then “Yes”.
5. At this point you will be asked if you want to reset the controller. Select “No”.
29
Doc # 27-00 30UM Rev 1.0 Issued 12 /04
Page 30

TROUBLESHOOTING
6. Now select “Chl 2” and then “Channel Mode”, and then “Yes”.
7. When asked to reset the controller select “No”.
30
Doc # 27-00 30UM Rev 1.0 Issued 12 /04
Page 31

TROUBLESHOOTING
8. Now select “Chl 2” and then “scsi Terminator”, and then “Yes”.
9. When asked to reset the controller select “No”.
31
Doc # 27-00 30UM Rev 1.0 Issued 12 /04
Page 32

TROUBLESHOOTING
10. Now select “Chl 3” and then “channel Mode”, and fi nally “Yes”.
11. When asked to reset the controller select “No”.
32
Doc # 27-00 30UM Rev 1.0 Issued 12 /04
Page 33

TROUBLESHOOTING
12. Now select “Chl 3” and then “scsi Terminator” and then “Yes”.
11. This time, when asked if you want to reset the controller, select “Yes”.
33
Doc # 27-00 30UM Rev 1.0 Issued 12 /04
Page 34

TROUBLESHOOTING
Drive Failures
With a functioning drive, the Attention and Busy LEDs fl ash while the controller is booting
(after the system is powered on). If no amber activity LED is fl ashing when the power is
turned on, please begin the following troubleshooting procedure.
1. If the drive(s) fails during the initial setup of the RAID, turn off power to the RAID and
reboot. Allow the system to come up again and verify that the drives show activity.
2. Ensure the drives are seated securely in the 8X. Remove the failed drive and re -install
it to ensure a good connection.
3. Ensure that the power indicators on the front of the 8X are green for the drive(s) that is
failing.
4. If the indicator shows a green light, ensure the drive terminations are secure at the rear
of the 8X.
5. If Steps 1- 4 do not restore activity to the drive, the “Auto Detect Drive Failure” function
should be enabled. Follow these steps:
A. Confi gure the global parameters for the spare drive. To do so, select “view and
edit Confi guration parameters”, and then “Drive-side Parameters”.
Doc # 27-00 30UM Rev 1.0 Issued 12 /04
34
Page 35

TROUBLESHOOTING
B. Now select “Auto-Assign Global Spare Drive”. When asked “Enable Auto-Assign
Global Spare?” select “Yes”.
C. Finally, select “Drive Predictable Failure Mode(SMART)” and then “Detect Only”.
When asked “Set Drive SMART Action Mode? ” select “Yes”.
35
Doc # 27-00 30UM Rev 1.0 Issued 12 /04
Page 36

TROUBLESHOOTING
D. Now select “Periodic Auto-Detect Failure Drive Swap Check Time”.
E. Select “5 seconds” from the drop -down menu.
36
Doc # 27-00 30UM Rev 1.0 Issued 12 /04
Page 37

TROUBLESHOOTING
F. When asked “Set Periodic Auto-Detect Failure Drive Swap Check Time?”, select “Yes”.
G. Press “Esc” once to return to the previous menu.
H. Now select “Controller Parameters” followed by “SDRAM ECC”.
37
Doc # 27-00 30UM Rev 1.0 Issued 12 /04
Page 38

TROUBLESHOOTING
I. When asked “Enable SDRAM ECC Functionality?” select “Yes”.
J. When asked “Do you want to reset the controller now?” select “Yes”.
9ES
If the drive is still failing after attempting these troubleshooting steps, call the Z Microsystems’ Customer Service Department for further assistance.
38
Doc # 27-00 30UM Rev 1.0 Issued 12 /04
.O
Page 39

SCHEMATICS
MECHANICAL OUTLINE FOR 8X
WARNING: There is a maximum of .18” screw penetration on the
underside and side screw hole locations. Only use screws provided.
Use of longer screws may result in damage to internal components.
Doc # 27-00 30UM Rev 1.0 Issued 12 /04
39
Page 40

SCHEMATICS
2.38
3
6
1.18
4.44
MECHANICAL OUTLINE FOR 8X
1.14
3.772.06
.2
18.19
17.64
Doc # 27-00 30UM Rev 1.0 Issued 12 /04
19.39
18.69
40
18.46
1.75
6.90
1.75
2.58
18.97
Page 41

APPENDIX
SPECIFICATIONS
General Display Specifications
Enclosure
Materials Aluminium 5052 H32, 6061 T6, A380
System Capabilities Eight Storage bays
Storage Capacity Up to 3200 GB (each drive ranges from 73 -400 GB)
Base Options Split-SCSI Bus
Dimension (H x W x D) 6.9” H, 18.97” W, 19.39” D
Net Weight 51 lbs. (with eight TP7 drives @ 2.5 lbs. each)
Power Requirements 90-264 VAC, 1.90A, 47-63 Hz
Environmental*
Operating Temp +5º to + 45º C
Non Operating Temp -20º to + 60º C
Operating Humidity 5% to 95% Non condensing
Non Op. Altitude -1,300 to 40,000 ft.
Operating Altitude -1,300 to 10,000 ft.
Fungus Non Nutrients / contaminants
Rliability
MTTR <20 minutes
Regulatory
Safety UL 1950 (used as a guideline)
EMI FCC Class A
Connectors Micro -D 68 pin SCSI Bus
Quality/Workmanship
MIL-HDBK-454
IPC / ISO 9001:2000 and applicable section of
* Units are designed and built to meet the following environmental levels.
41
Doc # 27-00 30UM Rev 1.0 Issued 12 /04
Page 42

APPENDIX
REPLACING PARTS
If the Z Microsystems Technical Support Engineer determines that the product needs to
be replaced, a Customer Ser vice Representative will issue a Return Material Authorization (RMA) number.
An RMA number is required to return a product to Z Microsystems, regardless of the
reason for the return.
The Z Microsystems Customer Service Department/ RMA Request Form will ask the customer to provide the following information:
You will be given an RMA number and will be asked to send the product to:
Z Microsystems
ATTN.: (RMA#) It is very important to reference the RMA#
5945 Pacifi c Center Dr., Suite 505
San Diego, CA 92121
• model number of the defective product
• serial number of the defective product
• problem with the defective product
• return “ship to” address
• the name and address of the company department to which we will send
the invoice (if product is out of warranty or is different from the “ship to”
address.
• phone number and e-mail address of contact
• purchase order number
Doc # 27-00 30UM Rev 1.0 Issued 12 /04
42
Page 43

APPENDIX
APPENDIX
WARRANTIES
Standard Warranty
-no charge-
Z Microsystems’ one-year Standard Warranty includes a 90-day AirSpare Ser vice Plan.
This means that if any standard Z Microsystems’ product fails within the fi rst 90 days after
shipping, the customer will receive a new replacement.
All non-standard* products are covered for one year under Z Microsystems’ Standard
Warranty that includes free parts and labor. However, the 90-day AirSpare Plan can be
purchased as an additional option for non-standard products.
1-90 days - Z AirSpare Service
• 91-365 days - Free Parts and Labor
• 9-5 EST telephone technical assistance
• Online technical help
• Email product updates
*a non-standard product is a prototype or a product specifi cally designed or engineered
per a customer’s specifi cation
To return a defective product a customer can call the Z Microsystems Customer Service Department at 1- 858 -657-1000, ext. 232, or fi ll out the RMA Request Form on our
website. Please see the section in this manual titled, “Replacements” for details on how to
replace a part.
43
Doc # 27-00 30UM Rev 1.0 Issued 12 /04
Page 44

APPENDIX
Z Extended Warranty
Z Microsystems’ Extended Warranty Plan provides one and t wo year extended warranty
options under which a Standard Warranty is extended from the end of the fi rst year of the
Standard Warranty period.
The One-Year Extended Warranty period will begin on the day the Standard Warranty
expires and the Two-Year Extended Warranty begins when the One-Year Extended Warranty expires.
1-90 days - Z AirSpare Service
91-365 days - Free Par ts and Labor
• 9-5 EST telephone technical assistance
• Online technical help
• Email product updates
2nd year - Free Parts and Labor
• 9-5 EST telephone technical assistance
• Online technical help
• Email product updates
3rd year - Free Parts and Labor
• 9-5 EST telephone technical assistance
• Online technical help
• Email product updates
Doc # 27-00 30UM Rev 1.0 Issued 12 /04
44
Page 45

APPENDIX
Z Preferred Warranty
Z Microsystems provides a Preferred Service Plan under which Z Microsystems will repair
or replace and return a defective product to the customer within one week of Z Microsystems’ receipt of the defective product.
1-90 days - Z AirSpare Service
91-365 days - Free Par ts and Labor
• 9-5 EST telephone technical assistance
• Online technical help
• Email product updates
• Guaranteed One Week Turnaround
2nd year - Free Parts and Labor
• 9-5 EST telephone technical assistance
• Online technical help
• Email product updates
• Guaranteed One Week Turnaround
3rd year - Free Parts and Labor
• 9-5 EST telephone technical assistance
• Online technical help
• Email product updates
• Guaranteed One Week Turnaround
Doc # 27-00 30UM Rev 1.0 Issued 12 /04
45
Page 46

APPENDIX
Z Airspare Warranty
Z Microsystems provides an AirSpare Service Plan that will replace a defective product,
within the fi rst year of the warranty period, with a new product the following business day.*
The AirSpare Service Plan does not cover special order items. A product may be deemed
a special order item at the discretion of the Customer Service Depar tment. Z Microsystems, at its discretion, may offer the AirSpare Service Plan to a customer who purchases
a special order item at the one-year rate.
*Z Microsystems cannot guarantee next day deliver y if contacted after 2:00 PM Pacifi c
Time. Calls on Fridays or before holidays will receive a new product the following business day.
1st Year - 24 hour replacement
• 9-5 EST telephone technical assistance
• Online technical help
• Email product updates
2nd Year - 24 hour replacement
• 9-5 EST telephone technical assistance
• Online technical help
• email product updates
Doc # 27-00 30UM Rev 1.0 Issued 12 /04
46
Page 47

APPENDIX
Z On-Site Service
Z Microsystems also provides on site service and consultation to customers who require Z
Microsystems’ technical exper tise.
Doc # 27-00 30UM Rev 1.0 Issued 12 /04
47
Page 48

APPENDIX
Disclaimer
Z Microsystems warrants that every product is free from defects in materials, workmanship and conforms to Z Microsystems’ stringent specifi cations.
Z Microsystems calculates the expiration of the warranty period from the date the product
is shipped. This means that the ship date on your invoice is your product ship date unless
Z Microsystems informs you otherwise. During the warranty period, Z Microsystems will
provide warranty service under the type of warranty purchased for the product.
Replacement parts will assume the remaining warranty of the parts they replace. If a
product does not function as warranted during the warranty period, Z Microsystems will
repair or replace the part (with a product that is as a minimum functionally equivalent)
without charge.
If the product is transferred to another user, the warranty service is available to that user
for the remainder of the warranty period.
Z Microsystems’ warranties are voided if the covered product is damaged due to an accident or abuse. The warranty is voided if the product is shipped in suffi cient packaging.
Under no circumstances is Z Microsystems liable for any of the following:
Some jurisdictions do not allow the exclusion or limitation of incidental or consequential
damages, so the above limitation or exclusion may not apply to you. This warranty gives
you specifi c legal rights and you may also have other rights that vary from jurisdiction to
jurisdiction.
Warranty does not take effect until full payment is received by Z Microsystems.
1. Third-par ty claims against you for losses or damages,
2. Loss of, or damage to, your records or data, or
3. Economic consequential damages (including lost profi ts or savings) or
incidental damages, even if Z Microsystems is informed of their possibility.
Doc # 27-00 30UM Rev 1.0 Issued 12 /04
48
Page 49

APPENDIX
CUSTOMER SUPPORT
NOTE: For image problems, run
AUTO SETUP again before
consulting this section. In most
cases, AUTO SETUP can fi x
the problems. See the Auto
Setup section for details.
NOTE: If possible, stay by the computer.
e Z Microsystems Technical
Support Representative may
wish to go through the problem
over the telephone.
If you are unable to correct the problem
yourself, contact:
NOTE: More help, late-breaking
news and details of the
latest accessories for these
products may be found on the
worldwide web at:
http://www.zmicro.com
49
Doc # 27-00 30UM Rev 1.0 Issued 12 /04
Z Microsystems at:
(858) 657-1000
Fax: ( 858) 657-1001
Website: www.zmicro.com
Before calling, please have available as
much of the following information as possible:
1. Model and serial number from the
label on the monitor
2. Purchase P.O.
3. Description of problem
4. Computer type and model
5. System configuration (hardware fitted, etc.)
6. System BIOS version number
7. Operating System and version
number
8. Display driver version number
9. Video Adapter Type
Page 50

APPENDIX
CUSTOMER FEEDBACK
We value feedback on our products, their per formance, problems found, and welcome all
constructive suggestions. Please send such productive information in writing to:
Customer Service
Z Microsystems
5945 Pacifi c Center Blvd., Suite 505
San Diego, CA 92121
or www.zmicro.com
Doc # 27-00 30UM Rev 1.0 Issued 12 /04
50
Page 51

Z Microsystems, Inc.
5945 Pacifi c Center Blvd., Suite 505
San Diego, CA 92121
Phone: (858) 657-1000
Fax: ( 858) 657-1001
Website: www.zmicro.com
Copyright 2005 Z Microsystems, Inc. All Rights Reserved
 Loading...