

Page 1

Installation Manual
INDUCTION COOKTOP
www.zlinekitchen.com
Page 2

ZLINE Kitchen and Bath provides Attainable Luxury, where the kitchen and bath of your dreams
is never out of reach. Through our unique designs and unparalleled quality, we’re dedicated to
providing you an elevated experience in the heart of your home. With an endless selection of
features and finishes, our inspiration is your reality.
Page 3

ZLINE is fueled by a passion for innovation; A relentless pursuit of bringing the
highest end luxury designs and professional features into everyone’s homes.
Because we continually strive to improve our products, we may change
specifications and designs without prior notice.
Scan the QR code to view the most up-to-date version of the Installation
Manual and User Manual.
WARNING: This product can expose you to chemicals including nickel, which is known to the
State of California to cause cancer. For more information, go to www.P65Warnings.ca.gov.
Page 4

TABLE OF CONTENTS
IMPORTANT SAFETY INSTRUCTIONS . . . . . . . . . . . . . . . . . . . 1
Electrical Safety . . . . . . . . . . . . . . . . . . . . . . . . . . . . . . . . . . 3
Cooking Safety . . . . . . . . . . . . . . . . . . . . . . . . . . . . . . . . . . 4
Environmental Safety . . . . . . . . . . . . . . . . . . . . . . . . . . . . . . . 5
BEFORE INSTALLATION . . . . . . . . . . . . . . . . . . . . . . . . . . . . . . . 6
Parts Provided . . . . . . . . . . . . . . . . . . . . . . . . . . . . . . . . . . . 6
Tools Needed . . . . . . . . . . . . . . . . . . . . . . . . . . . . . . . . . . . 6
Product Dimensions . . . . . . . . . . . . . . . . . . . . . . . . . . . . . . . . 7
Product Specifications . . . . . . . . . . . . . . . . . . . . . . . . . . . . . . . 8
Minimum Clearances . . . . . . . . . . . . . . . . . . . . . . . . . . . . . . . 9
INSTALLATION . . . . . . . . . . . . . . . . . . . . . . . . . . . . . . . . . . . . . 10
Installing The Heat Deflector . . . . . . . . . . . . . . . . . . . . . . . . . . 10
Room Ventilation . . . . . . . . . . . . . . . . . . . . . . . . . . . . . . . . 11
Power Sharing . . . . . . . . . . . . . . . . . . . . . . . . . . . . . . . . . . 13
Connecting The Cooktop To The Main Power Supply . . . . . . . . . . . . . 13
WARRANTY . . . . . . . . . . . . . . . . . . . . . . . . . . . . . . . . . . . . . . . . 15
Page 5

IMPORTANT SAFETY INSTRUCTIONS
GENERAL SAFETY
If the information in this manual is not followed exactly, a fire or explosion may
WARNING
• Before beginning installation, please read and follow these important instructions for the
safety of your home and the people living in it.
• The manufacturer will not be responsible for any damage to property or to persons
caused by incorrect installation, improper use of the appliance, or failure to heed the
warnings listed.
• Installation and service must be performed by a qualified installer and/or service provider.
• The installer should leave these instructions with the consumer who should retain for local
inspectors’ use and for future reference.
• This appliance has been designed for non-commercial, domestic use only.
• No combustible or flammable materials or products should be placed or stored on or
near this appliance at any time.
• Never use your appliance for warming or heating the room.
• Wear proper apparel. Loose-fitting or hanging garments should never be worn while
result causing property damage, personal injury, or death.
installing or operating the appliance.
• Do not repair or replace any part of the appliance unless specifically recommended
in this User Manual or in the Installation Manual provided with this appliance. All
installation and other servicing should be referred to a qualified technician.
• NEVER use water on grease fires — smother fire or flame or use dry chemicals or a
foam-type extinguisher.
The appliance and its accessible parts become hot during use. Do not store any
WARNING
• Do not touch hot surfaces. Use dry potholders or oven mitts to hold the handles of pots
and pans. Do not use a towel or other bulky cloth.
• Use only dry potholders – moist or damp potholders on hot surfaces may result in burns
from steam. Do not let potholders touch hot heating elements.
items on the cooking surface, as this increases fire danger.
General Safety
1
Page 6

IMPORTANT SAFETY INSTRUCTIONS
• Use only proper pan sizes. This appliance is equipped with one or more surface units
of different size. Use pots and pans with flat bottoms large enough to cover the entire
surface unit. Using undersized pans may expose a portion of the heating element to
direct contact and may result in burns or ignition of clothing.
• Never leave surface units unattended at high heat settings. Boil-overs may cause smoking
and greasy spillovers that may ignite.
• To reduce the risk of burns, ignition of flammable materials, and spillage due to
unintentional contact with pots and pans, handles should be positioned so they are
turned inward and do not extend over adjacent surface units.
• Do not cook on a broken cooktop, as cleaning solutions and spillovers may penetrate
the broken cooktop and create a risk of electric shock.
• Clean your cooktop with caution. If a wet sponge or cloth is used to wipe spills on a hot
cooking area, be careful to avoid steam burns. Some cleaners can produce noxious
fumes if applied to a hot surface.
• Do not use a steam cleaner or high-pressure cleaners to clean your cooktop. Do not use
scourers or harsh abrasive cleaning agents, as these can scratch the ceramic glass.
• Do not place metallic objects such as knives, forks, spoons, or lids on the cooktop surface
since they can get hot and increase risk of burns.
• DO NOT TOUCH SURFACE UNITS OR AREAS NEAR UNITS. Surface units may be hot
even though they are dark in color. Areas near surface units may become hot enough to
cause burns.
• During and after use, do not touch, or let clothing or other flammable materials contact
surface units or areas near units until they have had sufficient time to cool.
Light (Error Code) signals a component failure. If you see this error, disconnect
WARNING
the power supply and contact ZLINE at 1-614-777-5004, as the appliance
must be repaired by a qualified service provider.
2
• This appliance should be connected to a dedicated circuit that incorporates an isolating
switch providing full disconnection from the power supply.
• Connect only to a 3-wire, 240-volt power supply; the neutral conductor is not required
for operation of the appliance. The potential at the power supply electrical connections
shall be 150 volts-to-ground or less. Please ensure the cooktop is properly grounded.
General Safety
Page 7

IMPORTANT SAFETY INSTRUCTIONS
HOT SURFACE HAZARD
• During use, accessible parts of this appliance will become hot enough to
cause burns. Do not let your body, clothing, or any item other than suitable cookware
contact the ceramic glass until the surface is cool.
• Handles of saucepans and other cookware may be hot to touch. Check to make sure
handles do not overhang other cooking zones that are on.
• Keep handles and cookware out of reach of children.
• Failure to follow this advice could result in burns and scalds.
ELECTRICAL SAFETY
ELECTRICAL SHOCK HAZARD
• Do not cook on a broken or cracked cooktop. If the surface is broken or cracked, switch
the appliance off immediately from the main power circuit (wall switch) and contact
ZLINE at 1-614-777-5004.
• Switch the cooktop off at the wall before cleaning or maintenance.
• To reduce the risk of electric shock, do not mount the unit over a sink.
• No attempt should be made to operate the appliance during power failure.
• Failure to follow this advice may result in electrical shock or death.
If the cooktop surface is damaged or cracked in any way, switch off the
WARNING
CUTTING HAZARD
• Using a single-edge razor blade scraper at a 30° to 45° angle against the glass surface
is appropriate during cleaning to scrape off hard-to-clean residue.
appliance to avoid the possibility of electric shock.
• Please note that the razor-sharp blade of a cooktop scraper is exposed when the safety
cover is retracted. Use with extreme care, always store safely, and keep out of reach
of children.
• Failure to use caution could result in injury or cuts.
HEALTH HAZARD
This appliance complies with electromagnetic safety standards.
Electrical Safety
3
Page 8

IMPORTANT SAFETY INSTRUCTIONS
COOKING SAFETY
• Never use your appliance as a work station or storage surface. Certain substances such
as salt, sugar, or sand can scratch the glass ceramic surface.
• Never leave any objects or utensils on the appliance other than appropriately sized and
induction-safe cookware.
• After use, always turn off the cooking zones and the cooktop as described in the User
Manual (i.e. by using the touch controls as outlined in "Using Your Cooktop" on page 13).
• Children should not be left alone or unattended in the area where appliance is in use.
Children should also never be allowed to sit, stand, or climb on any part of the appliance,
as they could be seriously injured.
• Cleaning and user maintenance shall not be made by children without supervision.
• Do not store items of interest to children in cabinets above or adjacent to the appliance.
• Do not place or drop heavy objects on your cooktop.
• Do not stand on your cooktop.
• Do not use pans with jagged edges and do not drag pans or utensils across the glass
surface, as this can scratch the glass.
• If the power cord is damaged, it must be replaced by the manufacturer or a qualified service
agent. If the unit arrives with the power cord damaged, contact ZLINE at 1-614-777-5004.
• When the unit is on, do not touch outside the control panel, as the surface may contain
residual heat. It is important to be aware that the unit’s surface will remain hot for a short
period of time after use.
• The appliance is not intended to be operated by means of an external timer or separate
remote-control system.
• To prevent accidents and achieve optimal ventilation, allow for sufficient space around the
cooking area.
• This appliance is designed for built-in household use only. Do not use outdoors.
• Avoid preparing food in aluminum foil or plastic containers over the hot cooking zones.
4
• Do not allow pans to boil dry or empty.
• Always remove the covers on sealed or canned goods before heating to avoid explosion.
• If the cooktop is near a window, ensure that curtains and drapes do not blow over or
near the unit.
Cooking Safety
Page 9
IMPORTANT SAFETY INSTRUCTIONS
Unattended cooking on a cooktop with fat or oil can be dangerous and may
WARNING
APPROPRIATE
PRODUCT
result in a fire. NEVER try to extinguish a fire with water. Instead, immediately
disconnect the appliance from power and then cover flames with a lid or a
fire blanket.
ENVIRONMENTAL SAFETY
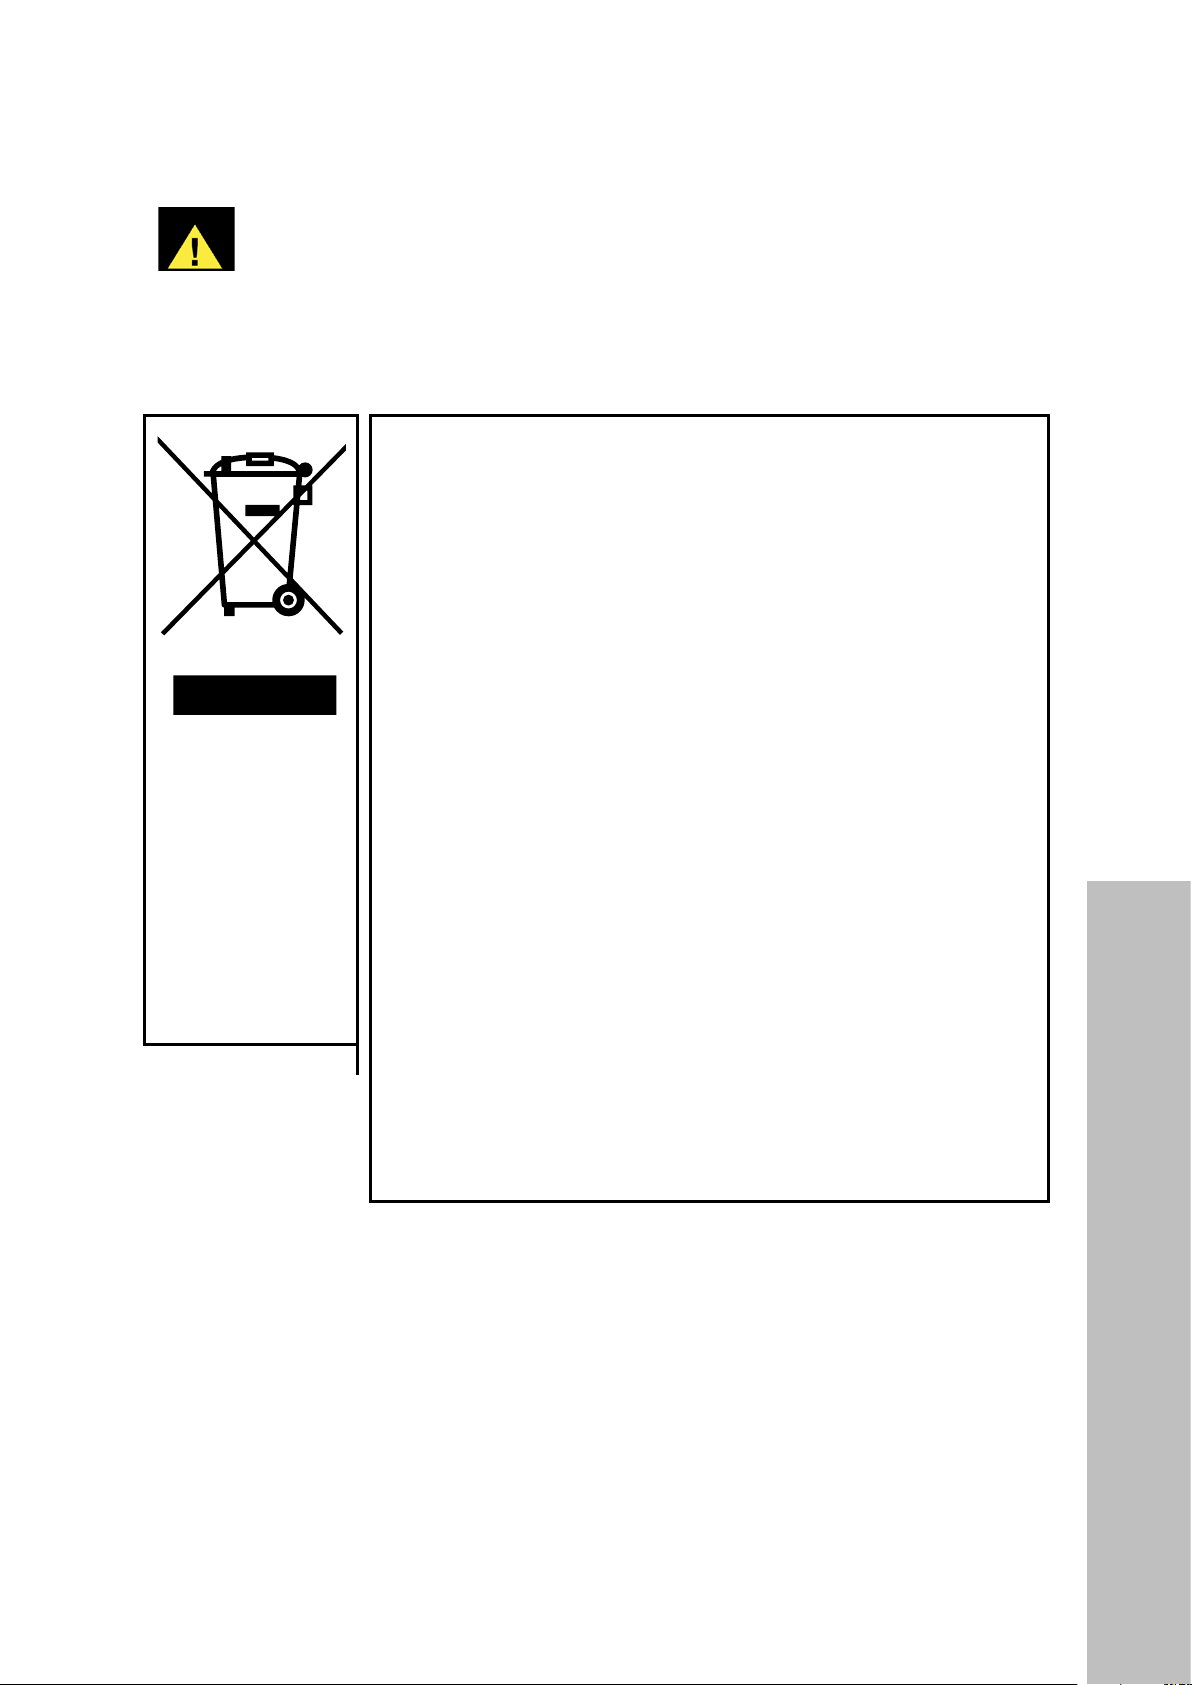
This appliance is labeled in compliance with European
directive 2012/19/EU for Waste Electrical and Electronic
Equipment (WEEE).
By ensuring that this appliance is disposed of correctly, you
will help prevent any possible damage to the environment and
to human health, which might otherwise be caused if it were
disposed of in the wrong way.
DISPOSAL:
Do not dispose
this product
as unsorted
municipal waste.
NOTE: All ZLINE Kitchen and Bath range and cooktop products carry a one-year parts
and service warranty. If you experience any issues with your product, contact ZLINE at
1-614-777-5004. The ZLINE customer service team is ready to work on resolving your
issues and assessing if service is required. All service repairs must only be conducted by an
industry professional with prior approval from the ZLINE customer service team.
The symbol on the product indicates that it may NOT be treated
as normal household waste. It should be taken to a collection
point for the recycling of electrical and electronic goods.
This appliance requires special waste disposal to ensure
environmental safety. For further information regarding the
treatment, recovery, and recycling of this product, please contact
your local government office, your household waste disposal
service, or the shop where you purchased it.
Environmental Safety
5
Page 10

BEFORE INSTALLATION
PARTS PROVIDED
• Heat deflector (1) — if necessary, see page 10
• Fixing brackets (4) — see page 14
• Phillips-head screws for fixing brackets (4) — see page 14
TOOLS NEEDED
• Phillips-head screwdriver or drill bit
BEFORE YOU INSTALL THE COOKTOP, PLEASE ENSURE:
• The cabinet surface is square and level and there is no structural interfere with space
requirements.
• The work surface is made of a heat-resistant material.
• If the cooktop is installed above an oven, the oven has a built-in cooling fan.
• The installation will comply with all clearance requirements and applicable standards
and regulations.
• A suitable isolating switch providing full disconnection from the main power supply is
incorporated in the permanent wiring, mounted, and positioned to comply with the local
wiring rules and regulations.
• The isolating switch must be of an approved type and provide a 1/8" (3 mm) air gap
contact separation in all poles (or in all active [phase] conductors if the local wiring rules
allow for this variation of the requirements).
• Consult local building authorities and by-laws if in doubt regarding installation.
• Use heat-resistant and easy-to-clean finishes (such as ceramic tiles) for the wall surfaces
surrounding the cooktop.
AFTER INSTALLING THE COOKTOP, PLEASE ENSURE:
• The power supply cable is not accessible through cupboard doors or drawers adjacent
to or below the cooktop.
• There is adequate flow of air from outside the cabinetry to the base of the cooktop.
• If the cooktop is installed above a drawer or cupboard space, a thermal protection
• The isolating switch is easily accessible by the customer and by professional service
BEFORE LOCATING THE FIXING BRACKETS
The unit should be placed on a stable, smooth surface (it's recommended to utilize the
packaging provided). Do not apply force onto the controls protruding from the cooktop.
Before Installation
6
See page 14 for details on installing the fixing brackets.
barrier is installed below the base of the cooktop.
technicians.
Page 11
BEFORE INSTALLATION
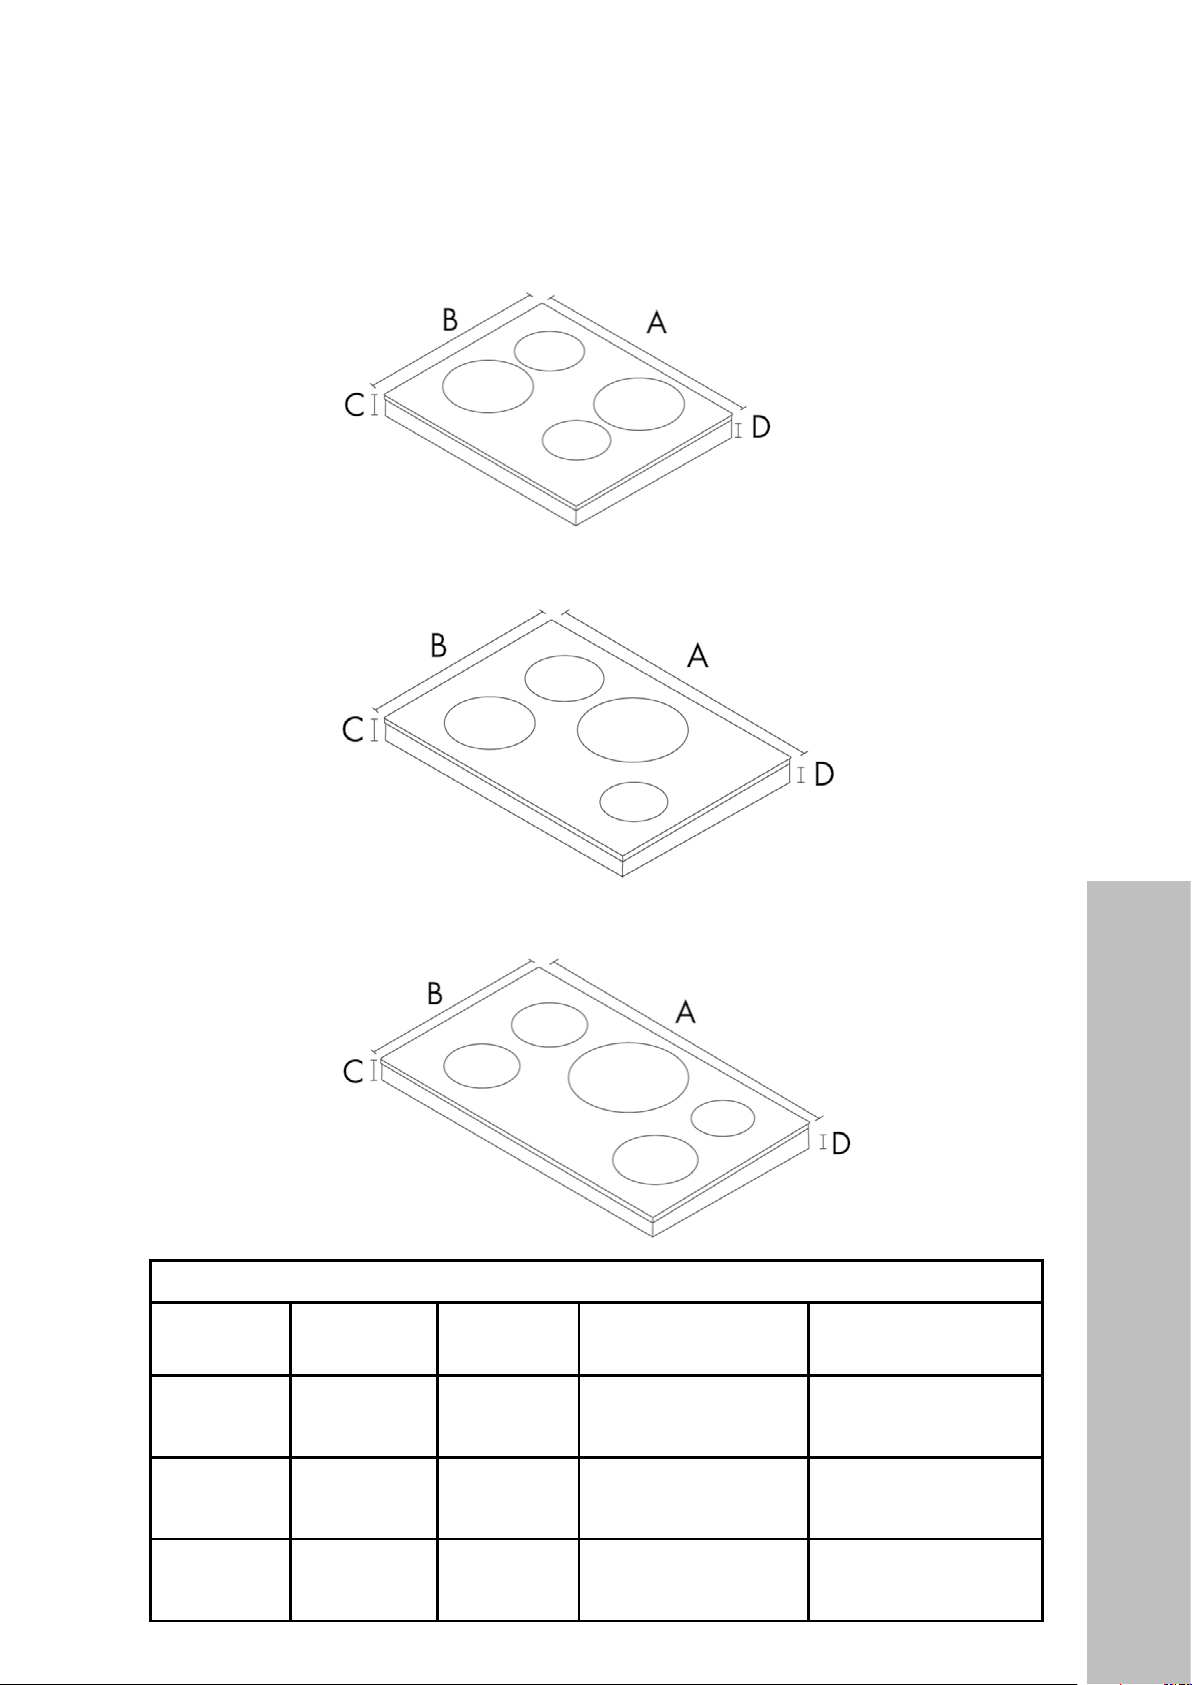
PRODUCT DIMENSIONS
RCIND24 SERIES
RCIND30 SERIES
RCIND36 SERIES
INDUCTION COOKTOP DIMENSIONS
MODEL A. WIDTH B. DEPTH
RCIND-24
SERIES
RCIND-30
23 1/2"
(597 mm)
30"
20 1/2"
(521 mm)
21 "
C. HEIGHT
(including glass top)
2 9/16"
(65 mm)
2 9/16"
D. HEIGHT
(without glass top)
2 5/16"
(59 mm)
2 5/16"
Product Dimensions
SERIES
RCIND-36
SERIES
(762 mm)
36"
(914 mm)
(533 mm)
21 "
(533 mm)
(65 mm)
2 9/16"
(65 mm)
(59 mm)
2 5/16"
(59 mm)
7
Page 12
BEFORE INSTALLATION
X
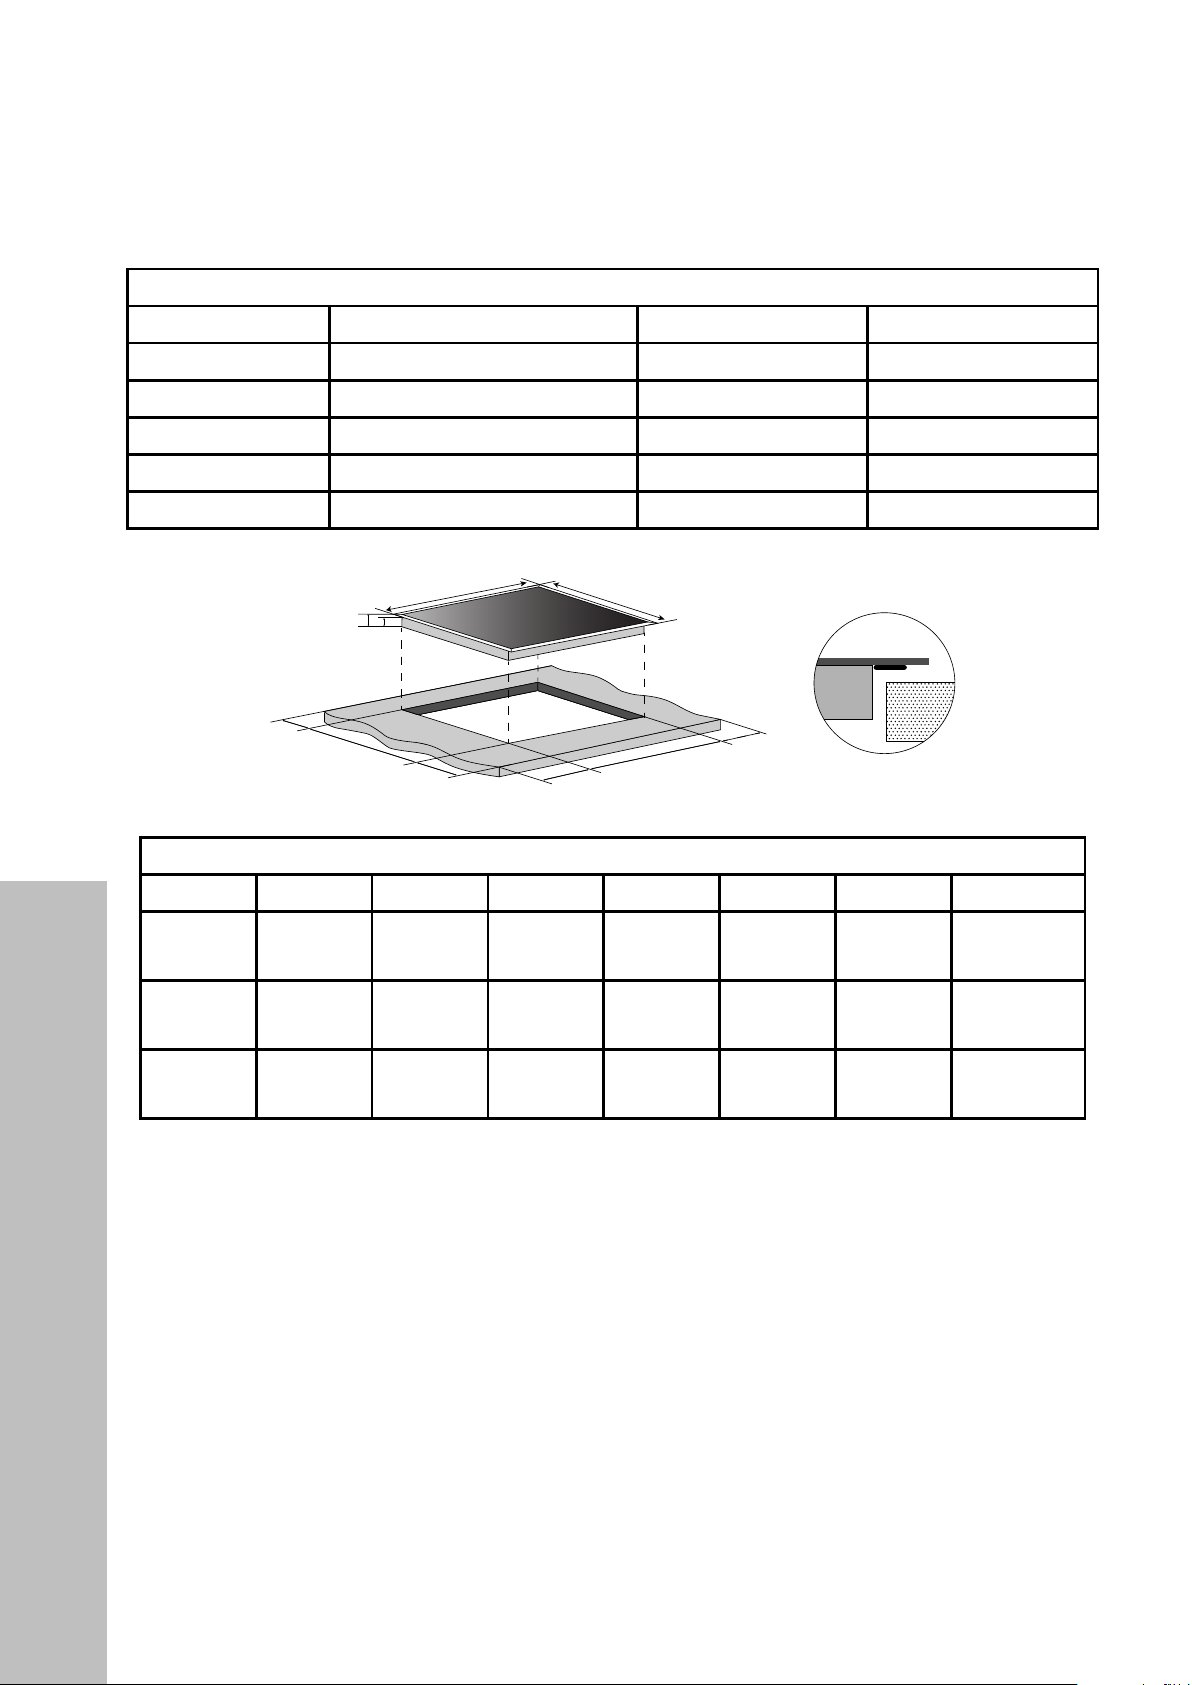
PRODUCT SPECIFICATIONS
INDUCTION COOKTOP SPECIFICATIONS
Model RCIND24 SERIES RCIND30 SERIES RCIND36 SERIES
Cooking zones 4 zones 4 zones 5 zones
Supply voltage 240VAC~, 60Hz 240VAC~, 60Hz 240VAC~, 60Hz
Amperage 30A 30A 40A
Recommended circuit 40A 40A 50A
Installed electric power 7200W 7200W 9300W
W
H
H1
X
MODEL W D H *H1 A B **X
RCIND-24
SERIES
RCIND-30
SERIES
RCIND-36
SERIES
23 1/2"
(597 mm)
(762 mm)
(914 mm)
30"
36"
B
X
PRODUCT AND CUTOUT DIMENSIONS
20 1/2"
(521 mm)
21 "
(533 mm)
21 "
(533 mm)
2 9/16"
(65 mm)
2 9/16"
(65 mm)
2 9/16"
(65 mm)
D
A
2 5/16"
(59 mm)
2 5/16"
(59 mm)
2 5/16"
(59 mm)
X
22 1/4"
(565 mm)
29"
(737 mm)
34"
(864 mm)
SEAL
19 9/16"
(497 mm)
19 9/16"
(497 mm)
19 9/16"
(497 mm)
2" (min)
(51 mm min)
2" (min)
(51 mm min)
2" (min)
(51 mm min)
NOTES:
• *H1: While the height of the cooktop recess without the glass top is 2 5/16" (59 mm), please
note a minimum 2" (51 mm) gap is required between the bottom of the cooktop and combustible
surfaces below (as outlined in the diagram on page 11). Considering this, the minimum
recommended cut-out depth is 4 5/16" (110 mm).
• **X: For the purpose of installation and use, a minimum of 2" (51 mm) space shall be preserved
around the entirety of the cutout hole.
• Recommended cutout width (A) and depth (B) allows for the cooktop’s recess to fit with minimal
distance on either side so the glass top may be firmly secured to the countertop.
• Be sure to carefully consider these critical dimensions before making an opening in the surface of
your countertop. Since kitchen layouts vary, ZLINE recommends consulting with a professional
Cutout Dimensions
installer to verify countertop dimensions before installing the appliance.
8
Page 13
BEFORE INSTALLATION
To eliminate risk of burns or fire by reaching overheated surface units, cabinet
storage space above the surface units should be avoided. If cabinet storage is to
WARNING
be provided, the risk can be reduced by installing a range hood that projects
horizontally a minimum of 5" (127 mm) beyond the bottom of the cabinets.
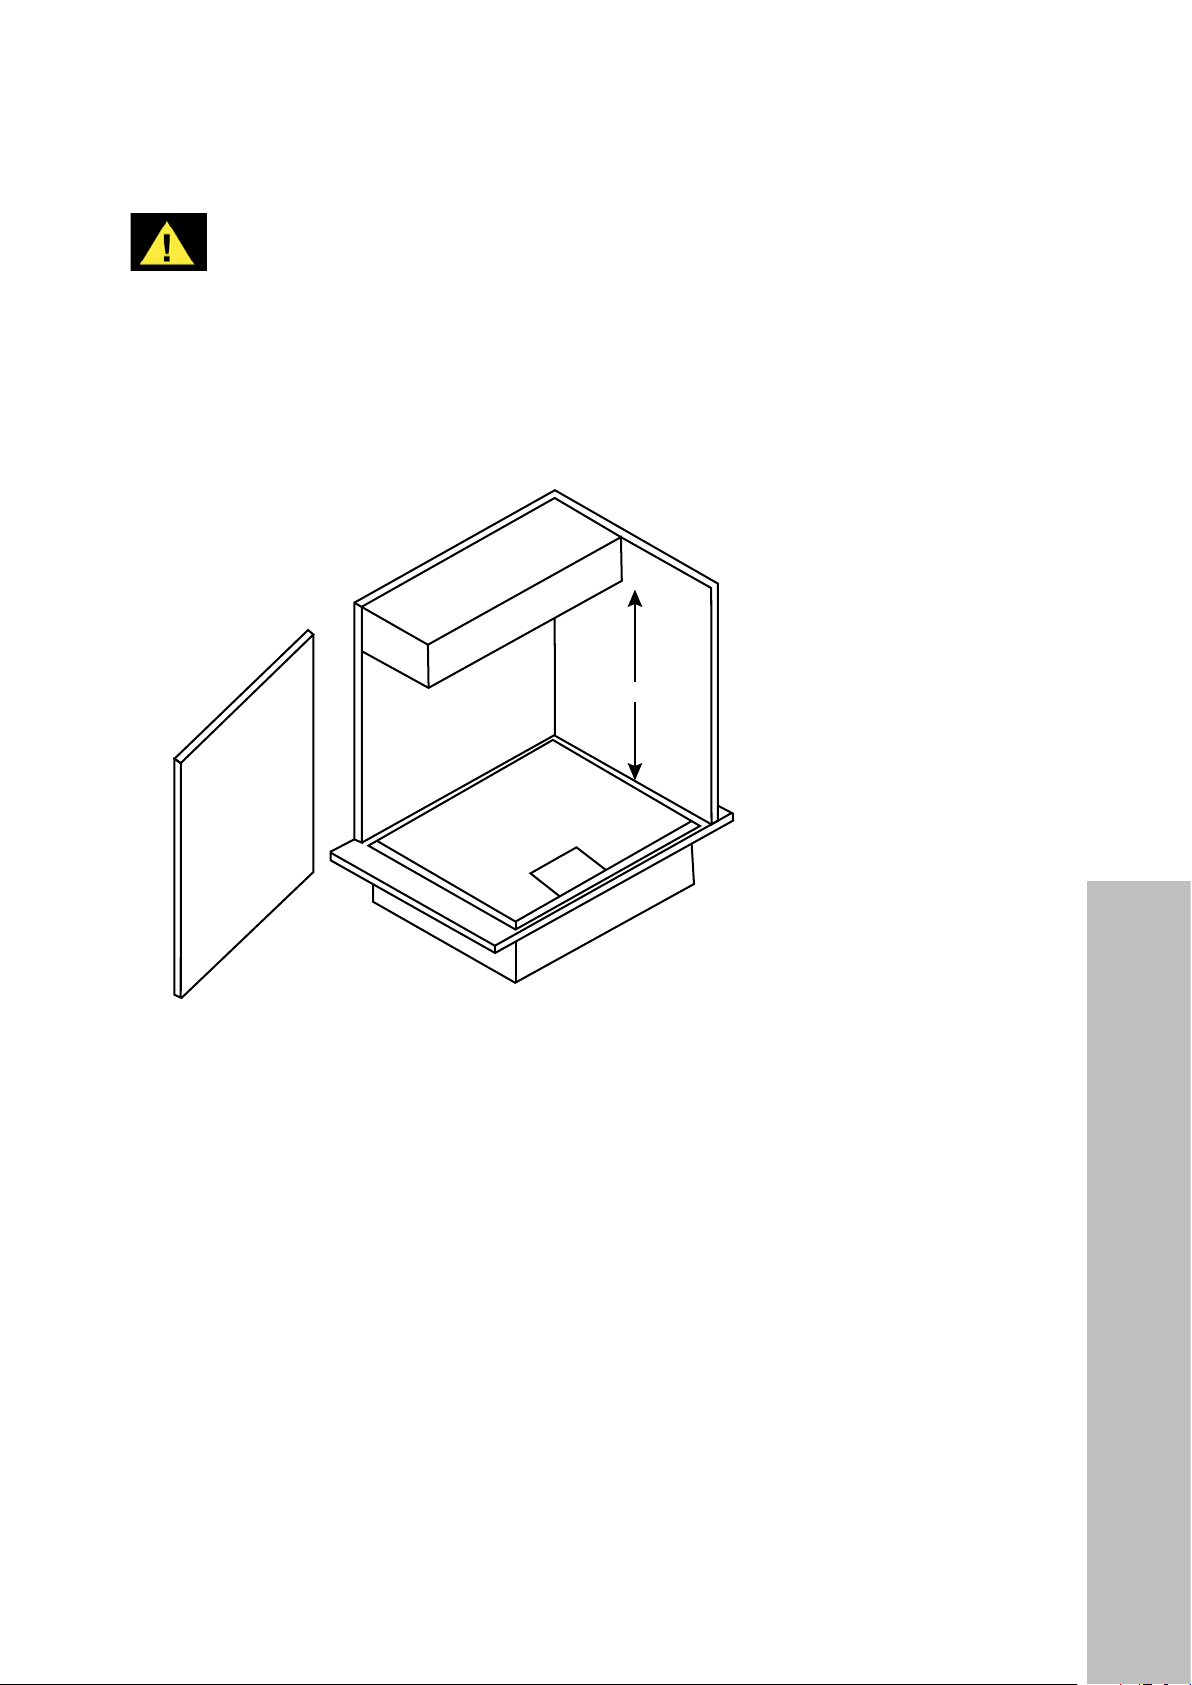
MINIMUM CLEARANCES
(GENERAL REQUIREMENT):
2
1
1. Building back wall
7
A
2. Top building cabinet
3. Control panel
4. Cooking surface
5. Building side wall
5
4
3
6
6. Base
7. Building side wall
A = 30" (762 mm) minimum clearance between the top of the cooking surface and the bottom
of a range hood or an unprotected wood or metal cabinet.
OR
A = 24" (610 mm) minimum when bottom of wood or metal cabinet is protected by not less
than 1/4" (6 mm) thick flame retardant millboard covered with not less than No. 28 MSG
sheet steel, 1/64" (0.4 mm) thick stainless steel, 1/32" (0.8 mm) thick aluminum, or 1/32"
(0.8 mm) thick copper.
Minimum Clearances
PREPARING FOR INSTALLATION
• Cut out the work surface according to the sizes shown in the diagram on page 8.
• Be sure the thickness of the work surface is at least 1 3/16" (30 mm). Please select heat-
resistant material to avoid deformation caused by the heat radiation from the cooktop.
• Ensure the table is capable of supporting the surface unit on the metal frame edge, as
outlined in the diagram on page 8.
9
Page 14
INSTALLATION
Instruction for windshield
,QVWUXFWLRQIRUZLQGVKLHOG
、
;
Instruction for windshield
8VHDVFUHZGULYHUWRORRVHQWKHOHIWDQGULJKWVFUHZVDWWKH
ERWWRPFDVLQJDVVKRZQDERYH
4
,QVWUXFWLRQIRUZLQGVKLHOG
;
windshield
Instruction for windshield
8VHDVFUHZGULYHUWRORRVHQWKHOHIWDQGULJKWVFUHZVDWWKH
4
WKHKROHVDWZLQGVFUHHQVKRXOGEHDOLJQHG
ZLQGVKLHOG
,QVWUXFWLRQIRUZLQGVKLHOG
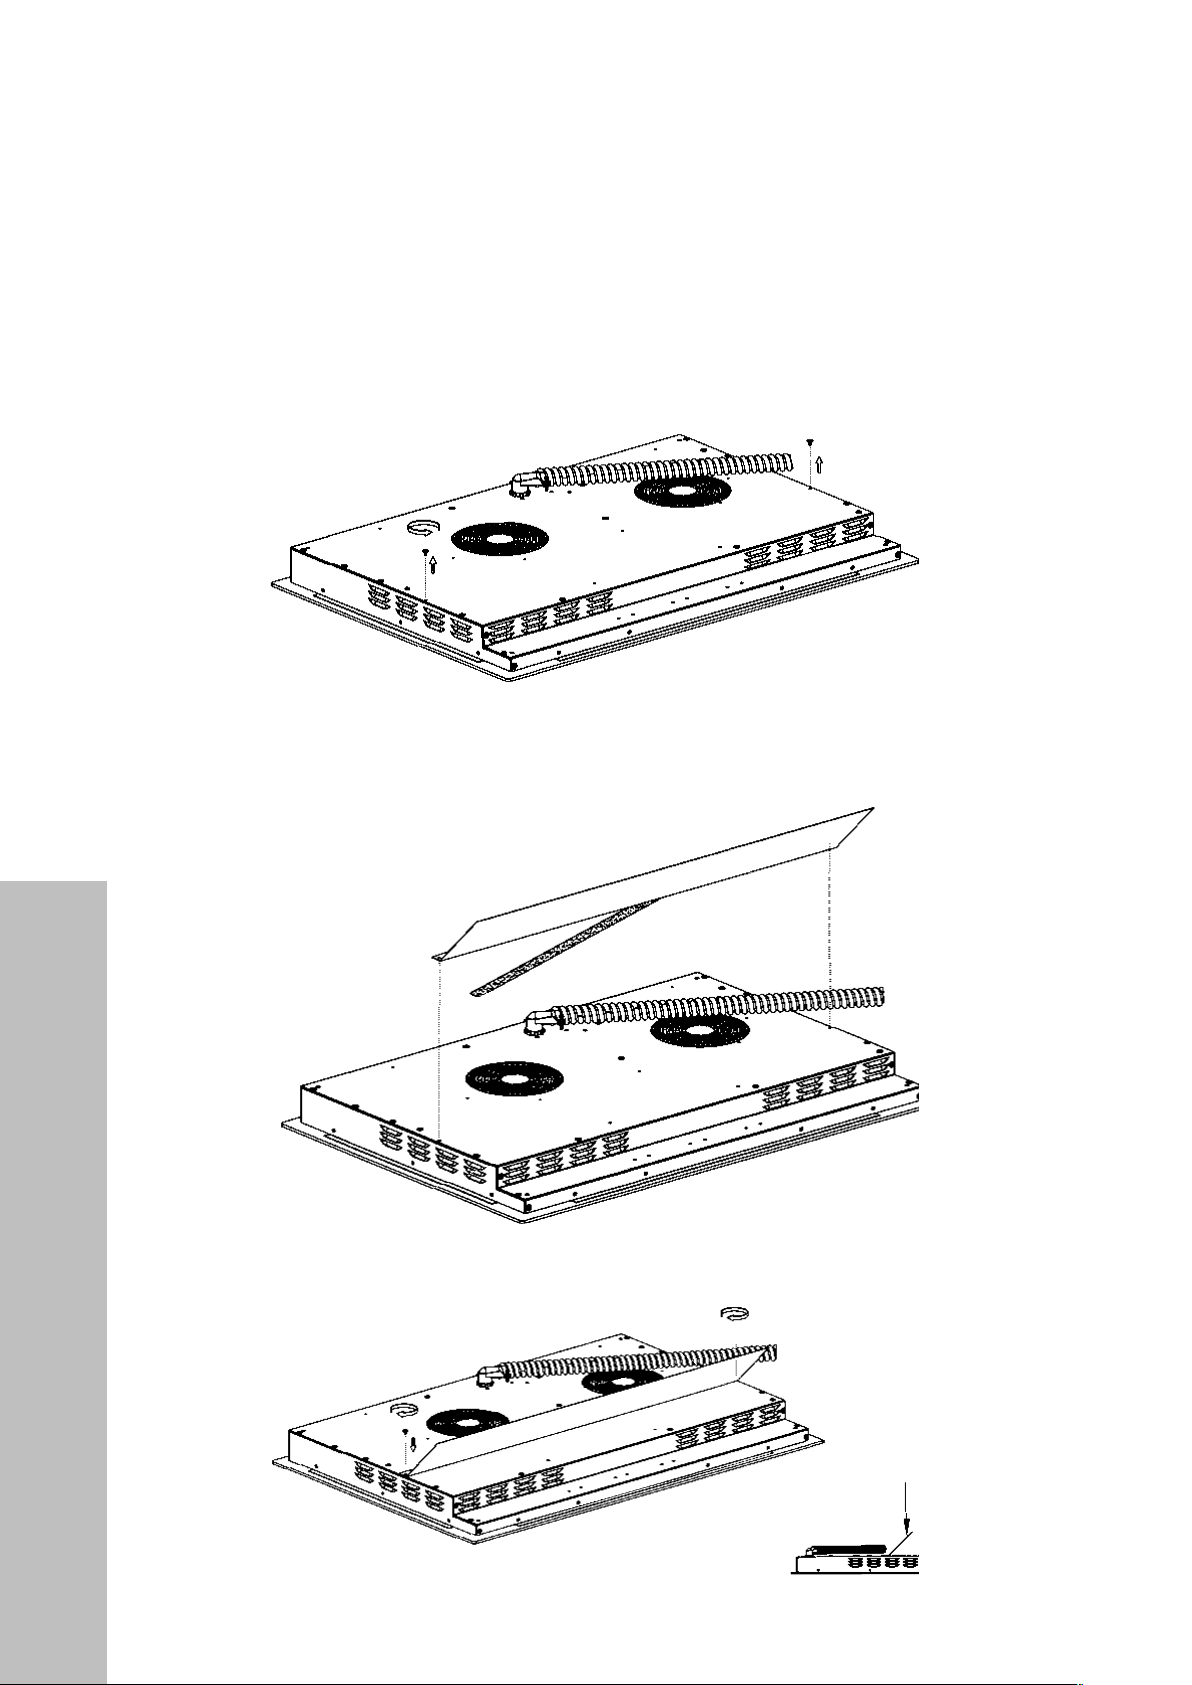
INSTALLING THE HEAT DEFLECTOR
NOTE: The heat deflector is only needed if the cooktop is installed less than 3" (76 mm) above
an oven or range, as it is designed to divert hot air between both units. To install:
1. Use a screwdriver to loosen the 2 screws from the bottom of the cooktop (as shown below):
2. Remove the 3M double-sided tape from the deflector and attach it to the bottom of the
cooktop; the holes on the deflector should be aligned with the screw holes.
3. Re-install the 2 screws to secure the deflector to the bottom of the cooktop.
Installing the Heat Deflector
10
$
deflector
Page 15
INSTALLATION
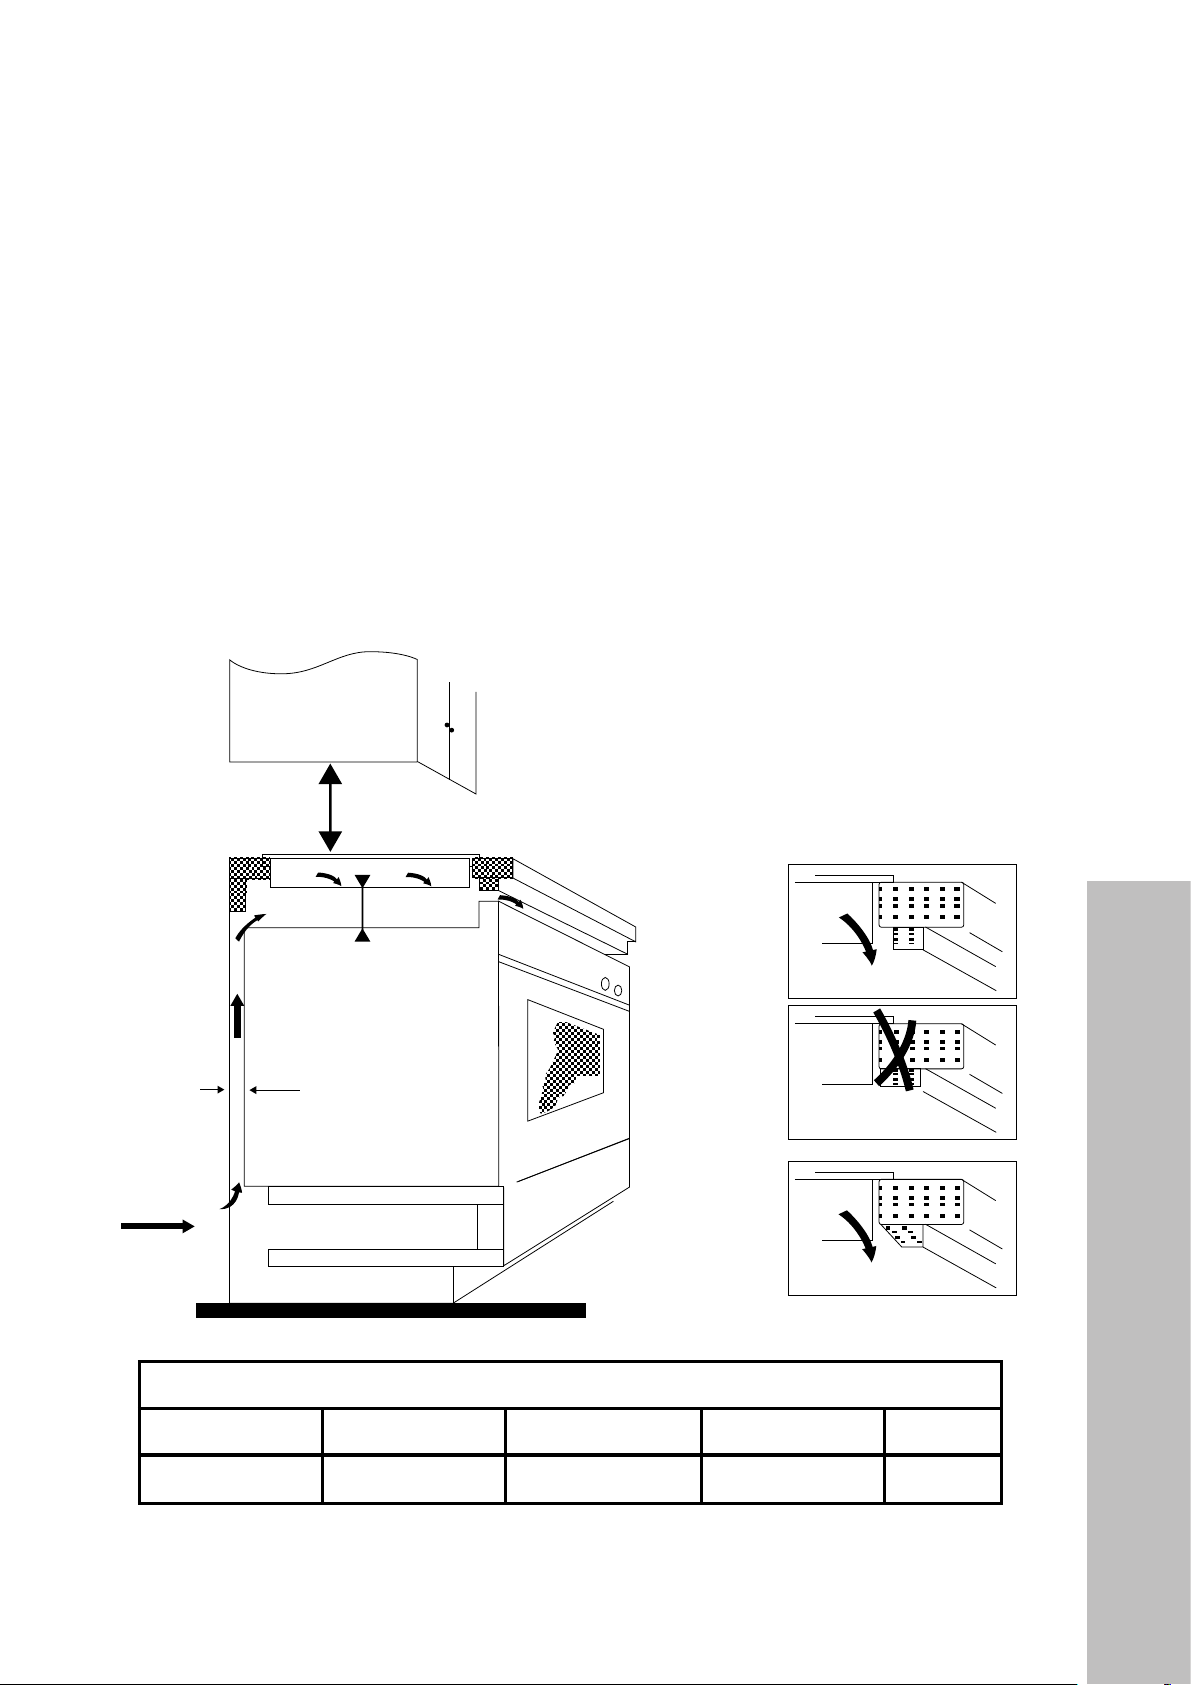
ROOM VENTILATION
• The use of this appliance generates heat and humidity in the room/kitchen where it is
installed. Proper ventilation in the room is needed.
• An exhaust fan / range hood may be used with the appliance; in each case it shall
be installed in conformity with the appropriate national and local standards. Exhaust
hood operation may affect other vented appliances; in each case it shall be installed in
conformity with the appropriate national and local standards
• Intensive and continuous use of the appliance may require additional ventilation, for
example by opening a window.
• Under all circumstances, make sure the cooktop is well ventilated and the air inlet and
outlet are not blocked. Ensure the cooktop is in proper work state, as shown below.
.
A
B
E
C
D
MINIMUM VENTILATION REQUIREMENTS
*A B C D E
30" (762 mm) 2" (51 mm) 13/16" (21 mm) Air intake Air exit
*A: Represents the minimum distance between top of cooktop and bottom of range hood
installed above the unit.
Ventilation Requirements
11
Page 16
INSTALLATION
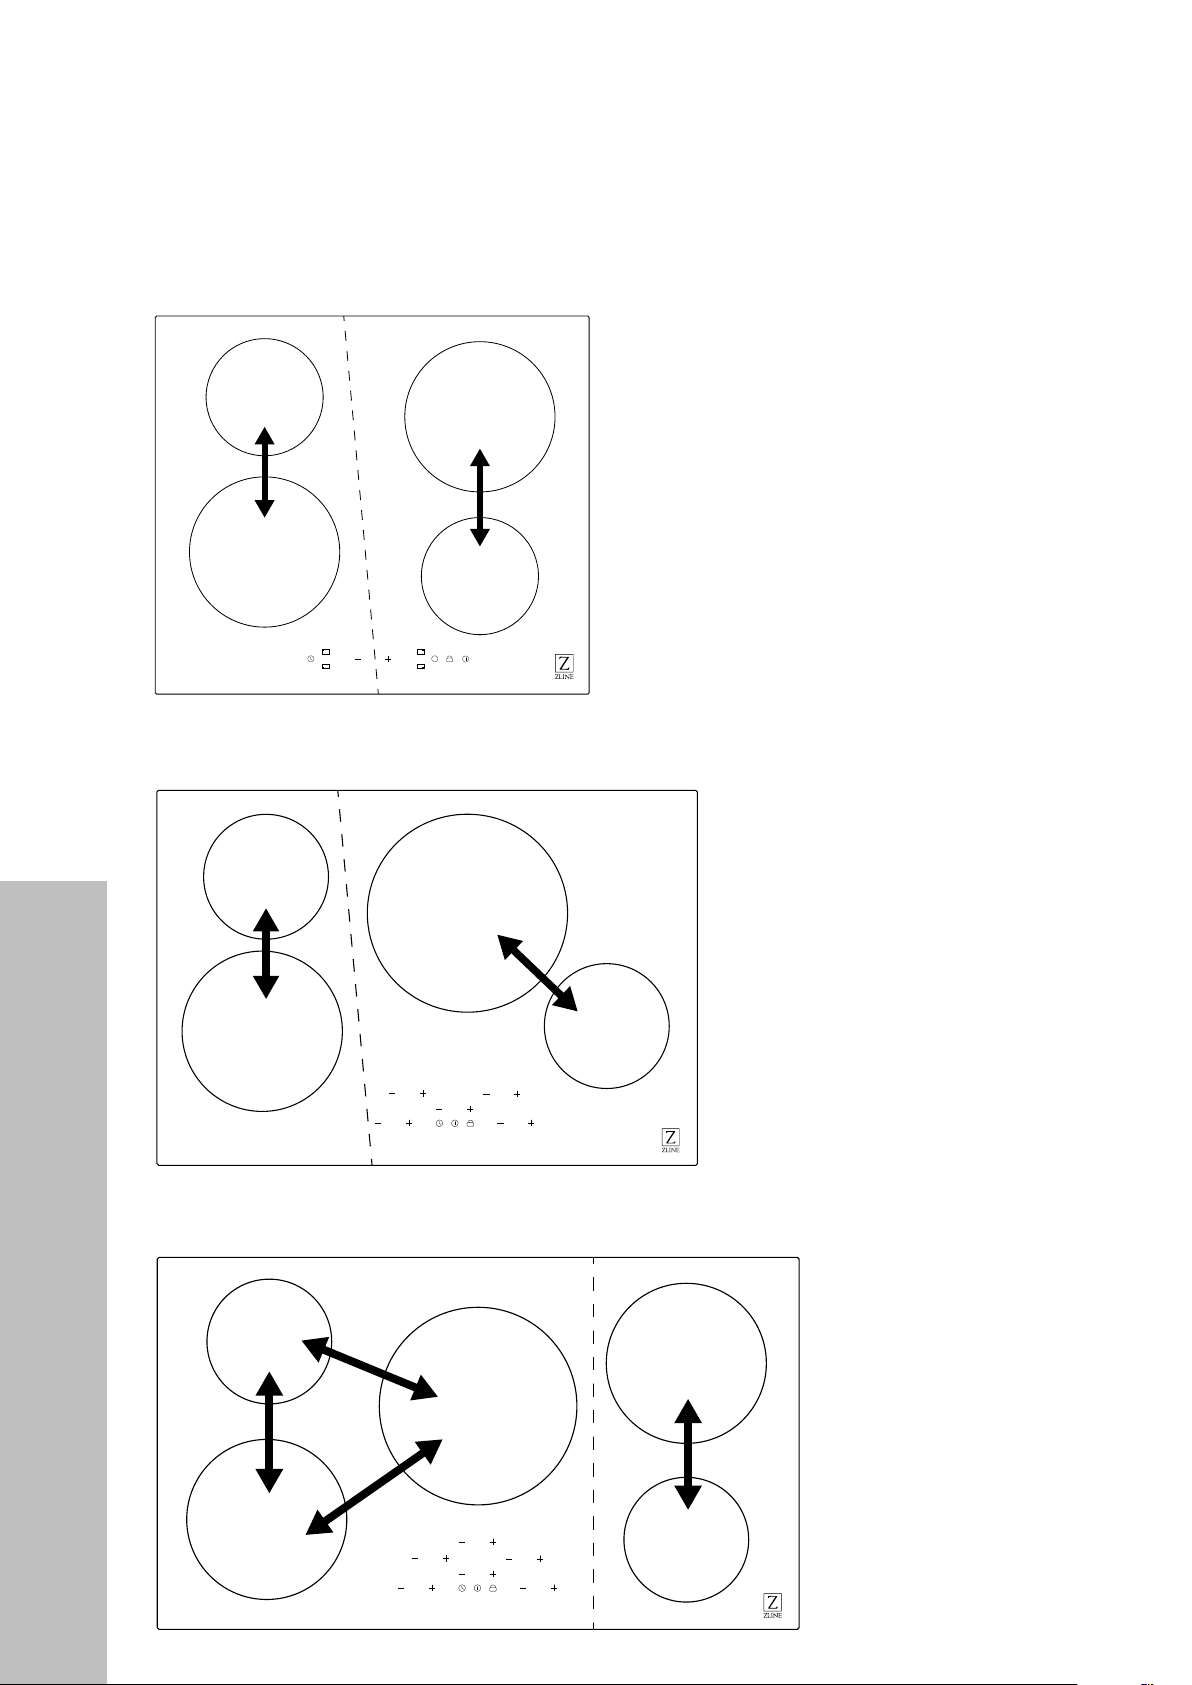
SURFACE BURNER LAYOUT AND POWER SHARING
RCIND24 SERIES
1200W
1500W
2300W
3000W
1800W
2100W
1200W
1500W
B
RCIND30 SERIES
1200W
1500W
1800W
2100W
RCIND36 SERIES
1200W
1500W
2300W
3700W
1200W
1500W
BOOST
BOOST
BOOST
BOOST
1800W
2300W
2100W
Power Sharing
12
1800W
2100W
BOOST
BOOST
3700W
BOOST
1200W
BOOST
BOOST
1500W
Page 17
INSTALLATION
POWER SHARING
• Power sharing happens when the total amount of watts is above the rated wattage, which
is 7200W for RCIND-24 and RCIND-30 and 9300W for RCIND-36. Max watts is the first
number in the diagrams on the previous page and "Boost" watts is the second number.
• Power levels 3 through 9 use the max watts on the burner being used. When using three burners
at once above power level 3 — and then adding a fourth on Boost — this will combine the total
being used above the rated wattage.
• Power sharing then activates, ensuring total watt usage stays at 7200W/9300W; to do so, the
appliance will drop the Boost level to 9 and show the change on the display panel.
• Power sharing tips: Select the power setting last for the cooking element you want to maintain
at the highest heat setting. When cooking two items at the same time, place one on an element
in one section (the left side, for example) and the other item in another section (right side).
ELECTRICAL CONNECTION
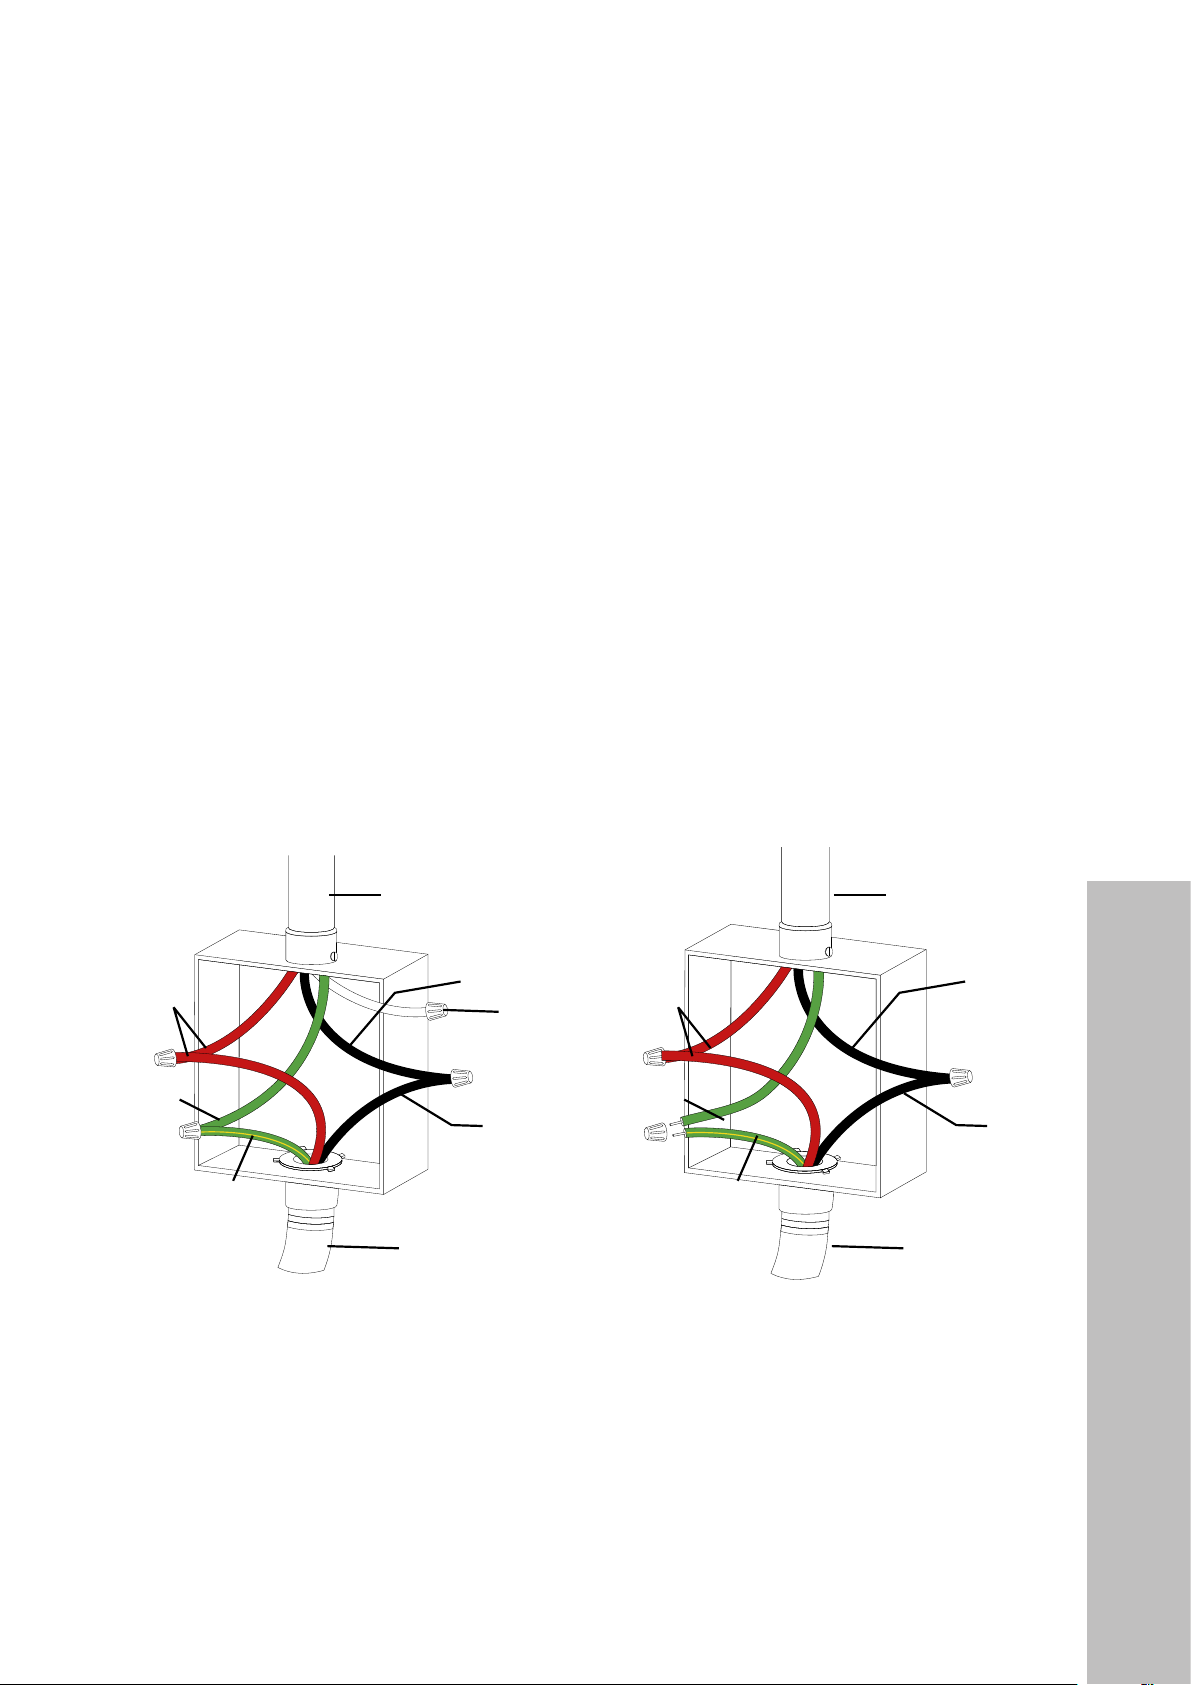
CONNECTING THE COOKTOP TO THE MAIN POWER SUPPLY
• The power supply should be connected in compliance with the relevant standard, or a singlepole circuit breaker. The method of connection is shown below.
Red wires
Green
ground wires
Yellow/Green
ground wires
Cable from home
power supply
Black
wires
White
wires
Black
wires
3-wire cable
from cooktop
Red wires
Green
ground wires
Yellow/Green
ground wires
Cable from home
power supply
Black
wires
Black
wires
3-wire cable
from cooktop
• If the cable is damaged or needs replacing, this should be done only by a qualified technician
Electrical Connection
using the proper tools, so as to avoid any accidents.
• If the appliance is being connected directly to the main power supply, an omnipolar circuit
breaker must be installed with a minimum gap of 1/8" (3 mm) between the contacts.
• The installer must ensure the correct electrical connection has been made and that it complies
with safety regulations.
• The cable must not be bent or compressed and can only replaced by a qualified technician.
• NOTE: If your home has a 4-wire system, under no circumstances should the neutral line be
connected to the ground, as it may result in injury and fire.
13
Page 18
INSTALLATION
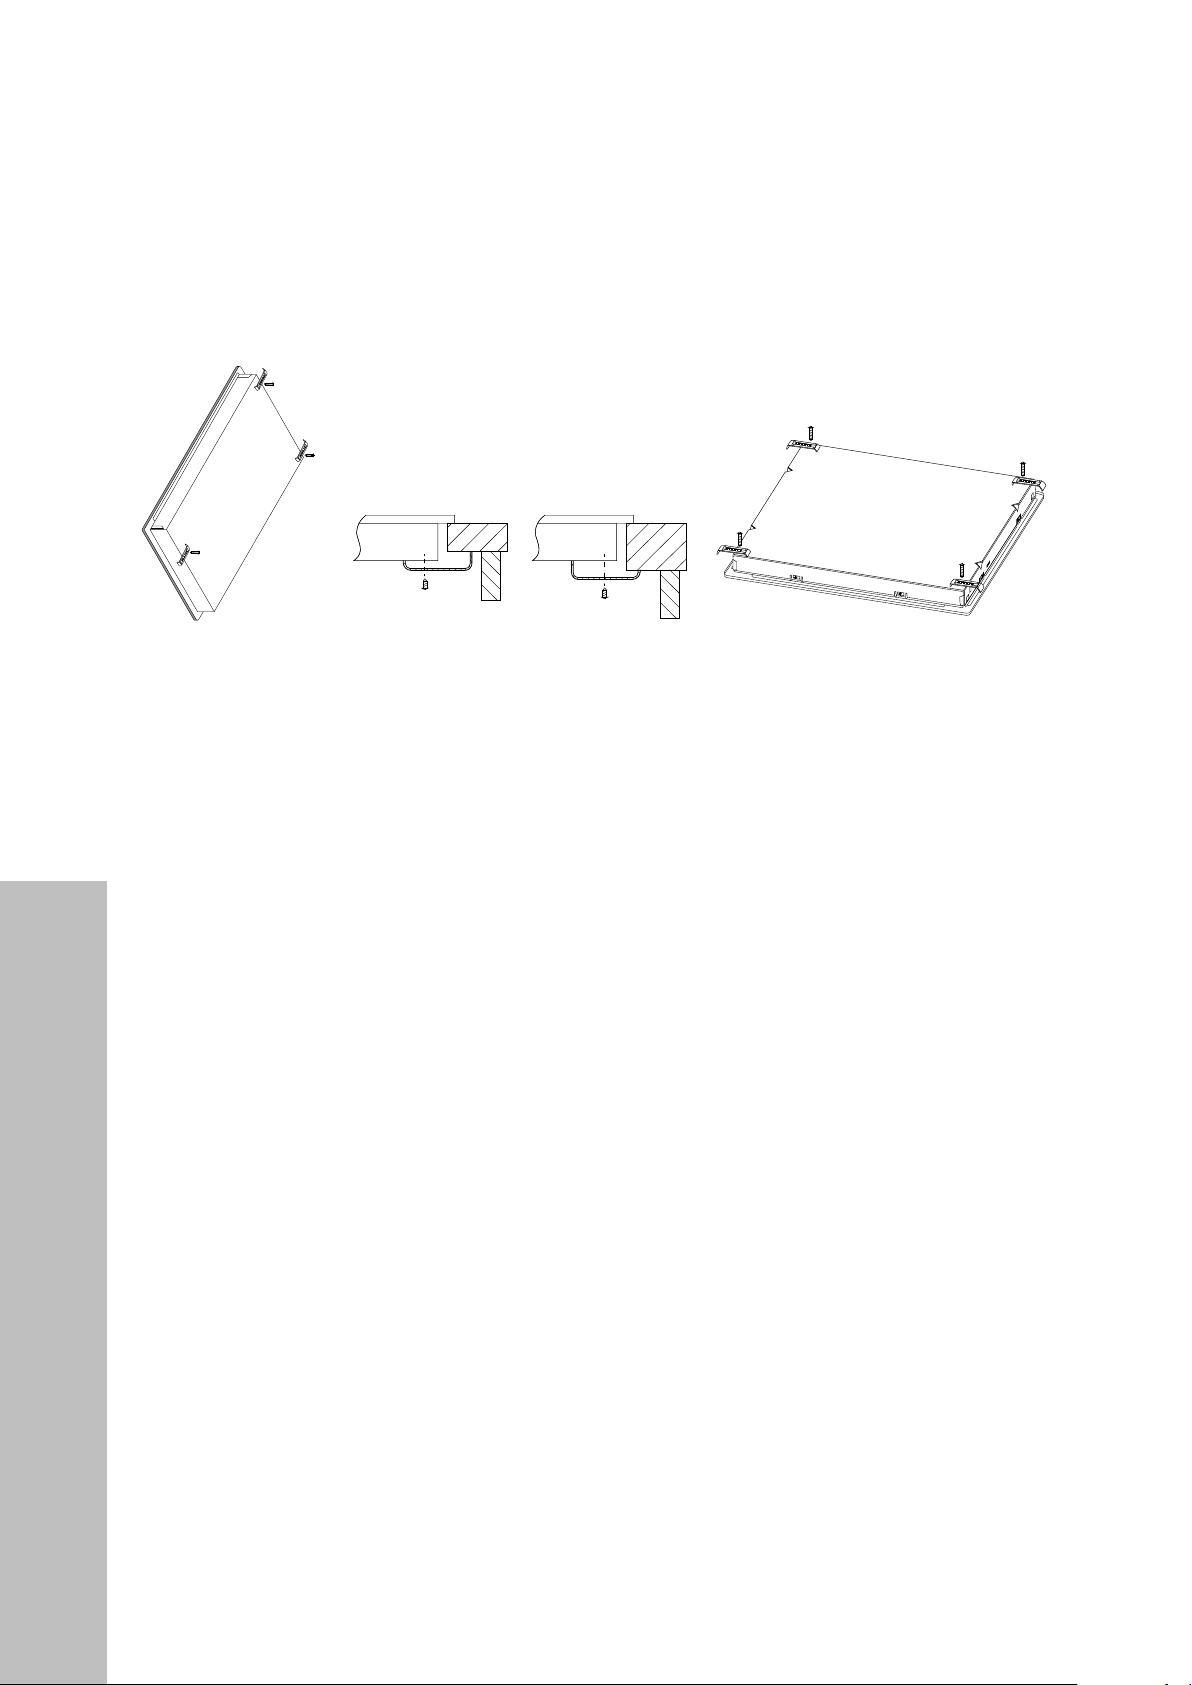
INSTALLING THE FIXING BRACKETS
Secure the cooktop to the cabinet surface by securing the 4 provided fixing brackets and
4 Phillips-head screws on the bottom of the cooktop (see images below) after installation.
Adjust bracket positions as needed to suit different surface thicknesses.
Cooktop
Bracket
Table
Cooktop
Bracket
Table
CAUTIONS
• The induction cooktop must be installed by qualified personnel or technicians. Never
conduct the operation by yourself.
• The cooktop shall not be mounted to cooling equipment, dishwashers, or rotary dryers.
• The cooktop shall be installed in a way so better heat radiation can be ensured to
enhance its reliability.
• The wall and inducted heating zone above the work surface must be able to withstand
heat. To avoid damage, the layers and adhesive must be resistant to heat.
• This cooktop can be connected only to a supply with system impedance no more than
0.427 ohms. Please consult a qualified electrician or your local utility authority to ensure
proper system impedance.
Securing The Cooktop
14
AFTER INSTALLING THE COOKTOP
1. Remove all stickers and items from the top of the cooktop surface.
2. Carefully clean the cooktop before use. Dry with a soft cloth. See "Care and Cleaning"
in the User Manual for reference.
3. Thoroughly read the Operation section of the User Manual before use.
4. Turn on the power to the cooktop.
5. Verify all function operation properly.
NOTE: If the cooktop does not work or you encounter connection problems, please check
that the circuit breaker has not tripped or the fuse has not blown. For more information,
please see "Troubleshooting" in the User Manual. If the problem cannot be resolved, call
ZLINE at 1-614-777-5004 for customer support.
Page 19

WARRANTY
COVERAGE
ZLINE Kitchen and Bath (“ZLINE”) induction cooktops have a one year parts and
service warranty.
ZLINE warranty periods begin from the original date of product delivery and solely cover the
original purchaser of the product, delivered new and in its original carton. The limited warranty
covers all parts and labor for necessary repairs if any part of the product, or the product itself,
proves to be defective in materials or workmanship. The product must be deemed serviceable
via troubleshooting with the ZLINE Customer Experience team. All service on ZLINE products
under warranty must be performed by ZLINE-approved and ZLINE-certified service providers
unless otherwise specified by ZLINE. Service will be provided during normal business hours.
Products must be unobstructed and accessible to the service provider at the time of service.
ZLINE’s liability is limited to the original purchase price of the product. Additional injuries,
losses, damages, or other inconveniences caused by product malfunction or defects in materials
are not covered under the terms of this warranty.
TERMS
ZLINE warranties apply only to the original purchaser of a ZLINE product installed for normal
residential use. This is defined as a single-family, residential dwelling in a non-commercial
setting. Any warranty claim stemming from installation, operation, or any other use within a
commercial setting is not covered under this limited warranty. Commercial settings include,
but are not limited to: schools, churches, hotels, restaurants, vacation rentals such as Airbnb,
daycare centers, private clubs, fire stations, common areas in multi-family dwellings, nursing
homes, food service locations, and institutional food service locations such as hospitals or
correctional facilities.
This warranty is non-transferable and will not under any circumstance be extended based on
the date of installation — the warranty period takes effect from the date of delivery and only
covers the original purchaser. The warranty applies only to products installed in the contiguous
United States and the District of Columbia. Failure to secure certified warranty service per
these terms will result in a forfeiture of the remaining warranty. Out-of-pocket payments will not
be reimbursed unless prior approval is received from ZLINE and/or ZLINE-certified service
contract partners. Unapproved out-of-pocket payments for service will not be reimbursed. All
warranty procedures must be followed to maintain warranty coverage.
Page 20

WARRANTY
If a product qualifies within the service window provided under these warranty terms, and ZLINE
is unable to repair the product or a defective part of the product after a reasonable number
of attempts, ZLINE reserves the right to offer to replace the defective part or the product or
provide the original purchaser a full refund of the purchase price of the product (not including
installation, removal, or other charges that were not included in the original purchase price).
The original purchaser of the product must provide the original proof of purchase, including the
purchase date, when filing a claim to obtain replacement parts, service, or refunds. Additionally,
the original purchaser of the product must provide the serial number of the product when filing
a claim to obtain replacement parts, service, or refunds.
This warranty shall not apply to any ZLINE product in which the original factory serial
number has been removed, altered, or cannot be readily determined for any reason. Further,
ZLINE is not responsible for damage resulting from, but not limited to: shipment, delivery, or
improper installation; negligence or improper maintenance, misuse, or abuse of the product;
unauthorized alteration, modification, or tampering with the product; accident, fire, floods,
pest infestations, pandemics, natural disasters, or any other unpreventable or unexplained
acts of nature, commonly referred to as “acts of God”; flare-up fires or damages caused
by improper electric supply, electrical line current, voltage, or power surges; and service
to correct installation not in accordance with the instructions contained in ZLINE’s product
manuals and/or with local government codes.
This warranty does not apply to aesthetic damage, scratches, or natural wear caused by normal
use; second-hand, open box products, or products purchased from an unauthorized retailer;
and damages or issues stemming from alteration or tampering with the cooktop, including, but
not limited to, painting any portion of the product’s interior or exterior and altering or otherwise
manipulating the power cord.
In the event service is dispatched, and it is discovered that the reported issue is not covered
under warranty based on the disclaimers above, the customer will be responsible for all service
fees. Failure to pay these fees will result in the forfeiture of remaining warranty coverage.
Information contained within ZLINE’s installation and user manuals, in addition to product
information included on ZLINE’s website and all related digital listings, do not cover every
possible condition and situation that may occur during the installation or operation of
ZLINE products.
Page 21

The rating tag shows the model and serial
number of your induction cooktop. The
product label and rating tag is located on
the underside of the product. Do not remove
permanently affixed labels, warnings, or
plates from the product. This will void the
warranty.
WARRANTY
ZLINE reserves the right to make changes at any time to its products when considered safe,
necessary, and useful. Always check the ZLINE website for the most up-to-date version of its
product manuals: www.zlinekitchen.com/pages/manuals.
Do not install or operate any ZLINE product if it has missing or broken parts or if it arrives
damaged due to shipping. If ZLINE products arrive damaged, contact ZLINE Customer
Experience at 1-614-777-5004 for help. Failure to report a damaged appliance prior to
installation or operation may void the warranty.
ZLINE disclaims responsibility for damage or injury caused by improper installation or use of
any of its products. ZLINE is under no obligation, by law or otherwise, to provide concessions,
including repairs, prorates, rebates, discounts, or replacements, once the warranty has expired.
SERIAL NUMBER LOCATION
Please write down the model number and serial number of your appliance. Both numbers are
located on the rating tag located on the underside of the product. Do not remove permanently
affixed labels, warnings, or plates from the product. This will void the warranty. You may also
consider attaching your receipt or proof of purchase to this manual.
Page 22

WARRANTY
SERVICE
For warranty service, please contact our Customer Service team at
1-614-777-5004 or visit www.zlinekitchen.com/contact to utilize our
online Customer Experience Portal.
Scan the QR code to view the most up-to-date version of our Installation
Manual and User Manual.
Need to purchase a part or accessory for your ZLINE product?
Visit www.zlineparts.com, ZLINE's official parts distribution partner.
Page 23

 Loading...