

Page 1

FaceKiosk Series User Manual
ersion: 2.4
V
Date: 11/26/2018
1 F16 Quick Start Guide
Page 2
Information provided in this manual may differ from actual technical specifications due to the
ibility for any disputes arising
out of any discrepancy between actual technical parameters and those described in this
Declaration
Thank you for choosing our product. Before using this product, read this manual carefully to use the
software properly. Proper use will result in good effect and fast verification.
None of the content of this document shall be copied or delivered in any forms or by any means
without the prior written consent of our company.
The product described in this manual may include the copyright software of the company and its
possible licensors. No one shall copy, distribute, modify, extract, decompile, disassemble, decrypt,
reverse engineer, rent, transfer, sublicense, or infringe the software copyright in any form, except that
such limitations are prohibited by applicable laws.
constant development of products. Our company claims no respons
document. The document is subject to change without prior notice.
Page 3

I
Contents
1. Note ....................................................................................................................................................................................................................................................... 1
1.1. Configurations ................................................................................................................................................................................................................. 1
1.2. Installation .......................................................................................................................................................................................................................... 1
1.2.1 Installation Environment ............................................................................................................................................................................ 1
1.2.2 Installation Procedure ................................................................................................................................................................................. 2
1.3. Precautions ........................................................................................................................................................................................................................ 4
1.4. Notes for Access Control Wiring .......................................................................................................................................................................... 4
1.4.1 Access Control Interface ............................................................................................................................................................................. 4
1.4.2 Connection with Lock .................................................................................................................................................................................. 5
1.4.3 Wiegand Output Connection ................................................................................................................................................................. 6
1.4.4 Recommended Identification Distance ........................................................................................................................................... 6
2. Check-in interface and Main Menu ................................................................................................................................................................................... 6
3. Employee Management ........................................................................................................................................................................................................... 9
4. Communication Settings ...................................................................................................................................................................................................... 11
4.1 Wi-Fi Settings .................................................................................................................................................................................................................. 11
4.2 Ethernet Settings ......................................................................................................................................................................................................... 11
4.3 Server Settings ............................................................................................................................................................................................................... 12
5. System Settings ........................................................................................................................................................................................................................... 13
5.1 Time and Date ................................................................................................................................................................................................................ 13
5.2 Face Parameters ................................................................................................................................................................................................
5.
3 Attendance Parameters ........................................................................................................................................................................................... 16
5.4 Stranger Photo Save Function ............................................................................................................................................................................ 17
5.5 Stranger Alarm Function ......................................................................................................................................................................................... 17
5.6 Blacklist Photo Save Function .............................................................................................................................................................................. 17
5.7 Blacklist Alarm Function .......................................................................................................................................................................................... 18
5.8 QR Code Setting ........................................................................................................................................................................................................... 18
6. Data Management .................................................................................................................................................................................................................... 19
6.1 Delete Data ...................................................................................................................................................................................................................... 19
6.2 Backup Data .................................................................................................................................................................................................................... 20
6.3 Restore Data .................................................................................................................................................................................................................... 20
............ 15
7. U Disk Management ................................................................................................................................................................................................................. 21
7.1 Uploading Data over a USB Drive ..................................................................................................................................................................... 21
7.2 Downloading Data over a USB Drive .............................................................................................................................................................. 22
8. Record Search ............................................................................................................................................................................................................................... 22
Page 4

II
8.1 Attendance Record and Photo Search .......................................................................................................................................................... 23
8.2 Meeting Information ................................................................................................................................................................................................. 24
8.3 Stranger Photo .............................................................................................................................................................................................................. 24
8.4 Blacklist Photo ................................................................................................................................................................................................................ 25
9. System Information .................................................................................................................................................................................................................. 26
10. Advertisement Setting ......................................................................................................................................................................................................... 26
11. Personal ......................................................................................................................................................................................................................................... 28
12. Access Control Management .......................................................................................................................................................................................... 30
12.1 Access Control Parameters ................................................................................................................................................................................. 30
12.2 Wiegand Output Setting ...................................................................................................................................................................................... 31
13. BioTime 7.0 Connection ...................................................................................................................................................................................................... 32
13.1 Adding a Device ........................................................................................................................................................................................................ 32
13.2 User Management ................................................................................................................................................................................................... 33
13.2.1 Adding a User .............................................................................................................................................................................................. 33
13.3 Attendance Management .................................................................................................................................................................................. 33
14. ZKBiosecurity Connection ................................................................................................................................................................................................. 34
14.1 Adding a Device ........................................................................................................................................................................................................ 34
14.2 User Management ................................................................................................................................................................................................... 35
14.2.1 Adding a User .............................................................................................................................................................................................. 35
14.2.2 Uploading a Photo ................................................................................................................................................................
.3 Importing User Information in Batches ...................................................................................................................................... 37
14.2
................... 36
14.2.4 Importing User Photos in Batches ................................................................................................................................................. 38
14.3 Adding Advertisement .......................................................................................................................................................................................... 39
14.3.1 Add Advertising Pictures ...................................................................................................................................................................... 39
14.3.2 Add AD Video............................................................................................................................................................................................... 40
14.3.3 Advertisement Settings ........................................................................................................................................................................ 40
14.4 Attendance Management .................................................................................................................................................................................. 42
14.5 Scan Code Registration ......................................................................................................................................................................................... 42
Page 5

1. Note
This user manual is applicable for 21.5-inch, 32-inch and 43-inch FaceKiosk series device. The content of this
manual includes the UI display of 43-inch FaceKiosk as an example to show some basic operations of the product.
1.1. Configurations
Product Name Model/Specifications Configuration
FaceKiosk Series
Main Board
CPU
Frequency
Memory
FaceKiosk-V43
FaceKiosk-V32
FaceKiosk-H32
FaceKiosk-H21
Rockchip RK3399
2.0 GHZ
4 GB DDR3
LCD brand
Power supply: 110–240 V AC
Screen ratio: 16:9 / 9:16
Power: 70 W
Standby power consumption: < 5 W
Output audio: 8 ohms, 5 W
Resolution: 1920 x 1080 / 1080 x 1920
Screen brightness: 300 cd/m
Technology: Dusting or Drawing
Operating system
Built-in storage
Network port
: New LED or LG LCD
2
RJ45 8-core standard port; Wi-Fi port
Android 7.1.2
32 GB
Note: Th
e specific configurations depend on the actual purchased product.
1.2. Installation
1.2.1 Installation Environment
Notes:
FaceKiosk Device adopts visible light face recognition technology, so it is not recommended to place it outside,
or in direct sunlight, or in window side, etc.
FaceKiosk Series User Manual 1
Page 6

FaceKiosk Device must be stationed at an indoor place with good lighting.
The camera is especially designed for face recognition. While placing the device, please do not point the
camera towards doors, windows, or other places with strong light, to avoid overexposure of the camera and
affecting the face verification effect.
Operating temperature –10°C to 50°C
Operating humidity
Storage humidity
10% – 98%
10% – 98%
1.2.2 Installation Procedure
Installation Procedure (Vertically):
The upper portion of the device and the base are separately packed. The installation procedure is as follows:
Step 1: Open the packing box of the device from the side. Take out the base and put it on the top of the base box
to avoid scratching. Place the packing box upside down, and take out the upper portion (put it on the side and avoid
bumping).
Step 2: Remove the protective film from the base and insert the base into the card slot on the upper portion of the
device.
Step 3: Open the packing box, take out the screws and wrench. Use screws to secure the base.
Step 4: Keeping the device upper part vertical, remove its protective film.
Step 5: Connect the power supply and turn on the switch at the rear of the machine.
Inst
The following tools are required for installation:
2 FaceKiosk Series User Manual
allation Procedure (Wall Hanging):
Page 7
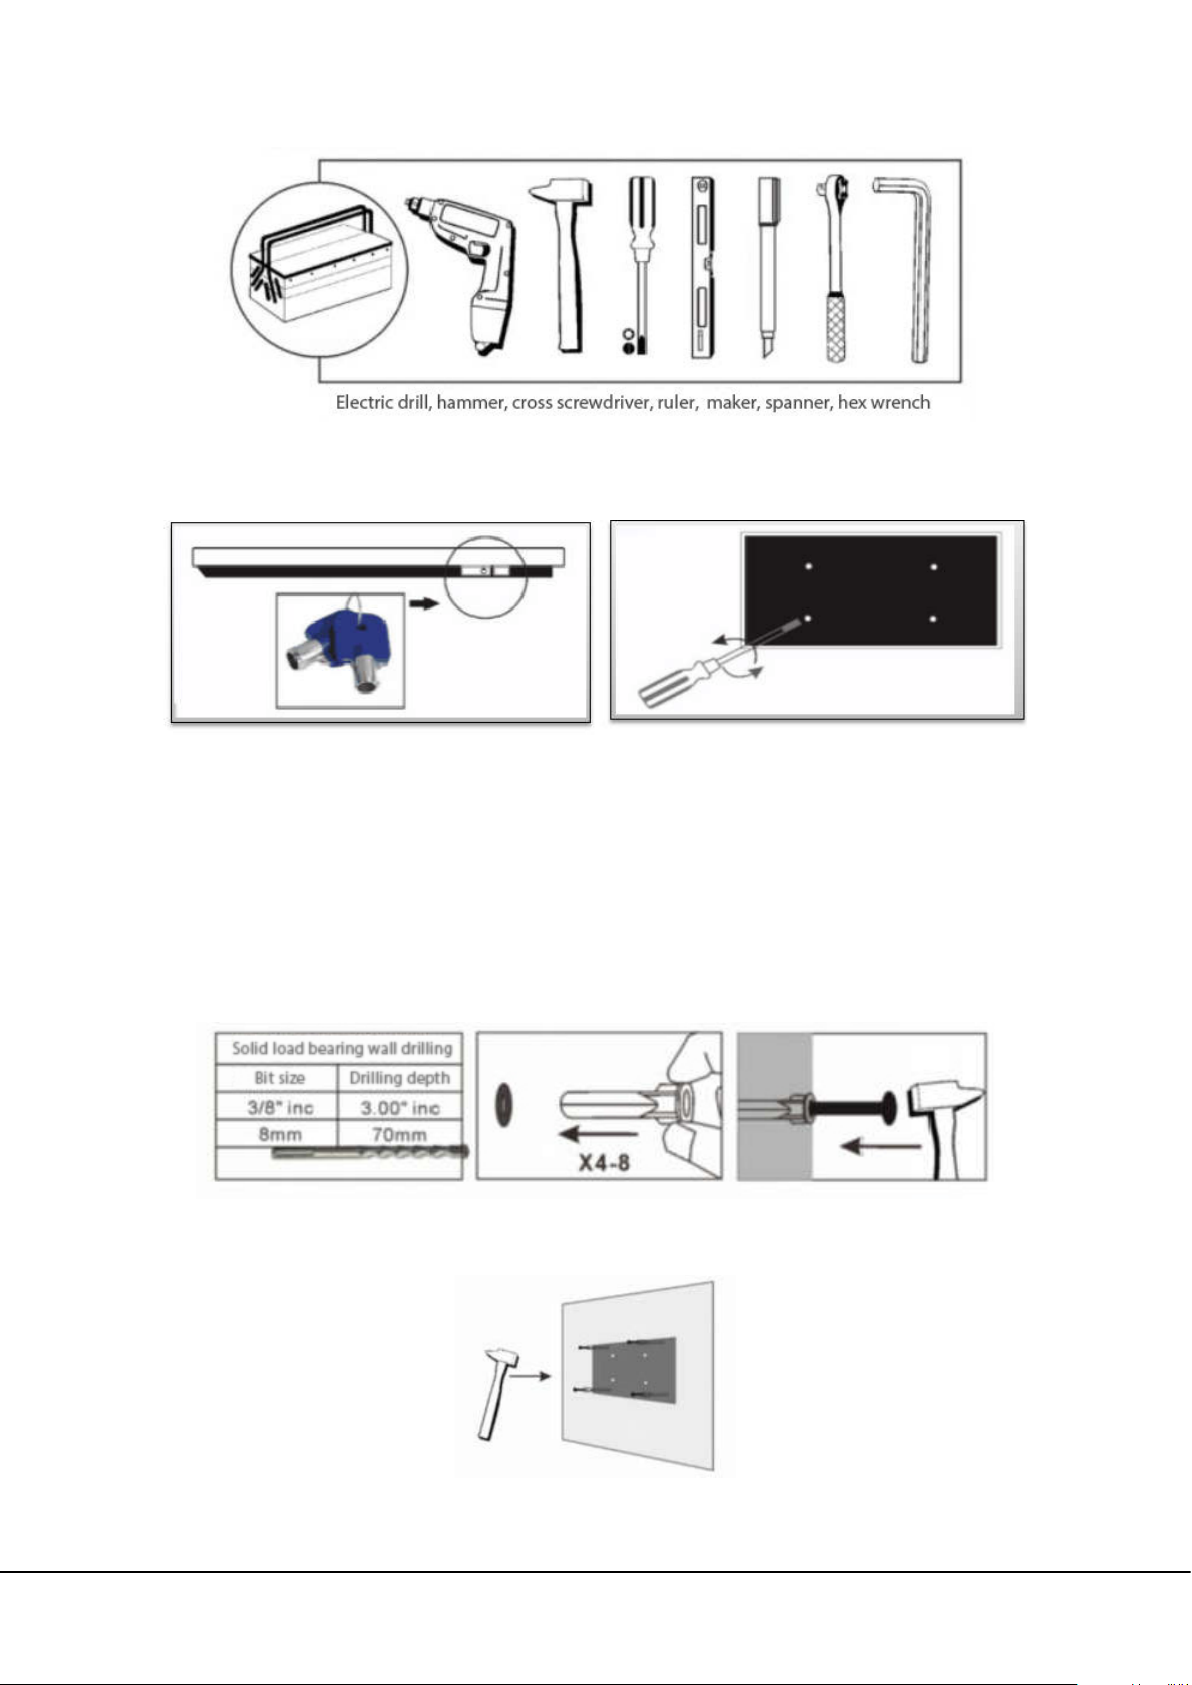
Step 1: Unlock the security lock with the key, then use the cross screwdriver to turn the wall-hook screws counter-
clockwise by 2-3 cm.
Step 2: Put a cushion on the FaceKiosk device screen to avoid scratchi
hanging plate towards the lock to remove the hanging plate.
Step 3: Attach the hanging plate on the wall horizontally. Mark the fixing holes with a marker where the screws need
to be fixed (Generally the device below 22-inch needs 4-6 screws, device above 42-inch needs 6-8 screws)
Step 4: Drill 6-8 fixing holes with a depth of 50mm by using a 6mm or 8mm drill on the marked holes. (The number
of holes depends on the weight of the device.)
Step 5: Hammer the micelle or explosive screws of accessories into the drilled holes, then lock the hanging board
with self-tapping or cap of screw tightly.
ng the glass surface. Then push the wall
Step 6: There are four hanging holes behind the FaceKiosk device. It’s easy to hang it from top to bottom aiming to
FaceKiosk Series User Manual 3
Page 8

the four hanging nails on the hanging board.
Note: Due to the weight factor, the FaceKiosk device above 26-inch should be installed with the help of two
people. After installation, make sure that it is fastened properly.
1.3. Precautions
1. This product can be used in an AC voltage range of 110–240 V. If the input voltage is less than 110 V or greater
than 240 V, the device will not start or it may get damaged.
2. Use a socket equipped with a ground cable. Use the power cable provided in the device package to ensure
proper operation of the device.
3. Keep children away from socket and follow electrical precautions.
4. Keep the device away from water, heat sources, high-voltage power transmission networks, and places with
vibration or prone to shocks, to avoid short circuits and instability of the device.
5. Non-professionals should not open the rear door in power-on situation because of the high pressure inside. Shut
down the device before opening the rear door.
6. Disconnect the power supply from the device if it will not be used for a longer period.
7. Avoid frequent switching on/off the device to avoid affecting the LCD service life. Start the device 3 minutes after
the shutdown.
8. If any kind of liquid enters into the device, disconnect the power supply immediately and contact a professional
for repair.
9. If the device emits odors, disconnect its power supply immediately and contact a professional for repair.
10. Set the display brightness and contrast lower than the maximum value, to extend the LCD service life.
Note: This product requires a 110–240 V input voltage and a total power of 70 W. This device has passed the safety
inspection and had obtained 3C certification.
1.4. Notes for Access Control Wiring
1.4.1 Access Control Interface
Access Control interface is divided into 5 rows: J5, J6, J7, J8, J9. Currently J8 and J5 interface are used, rest others are
reserved.
4 FaceKiosk Series User Manual
Page 9
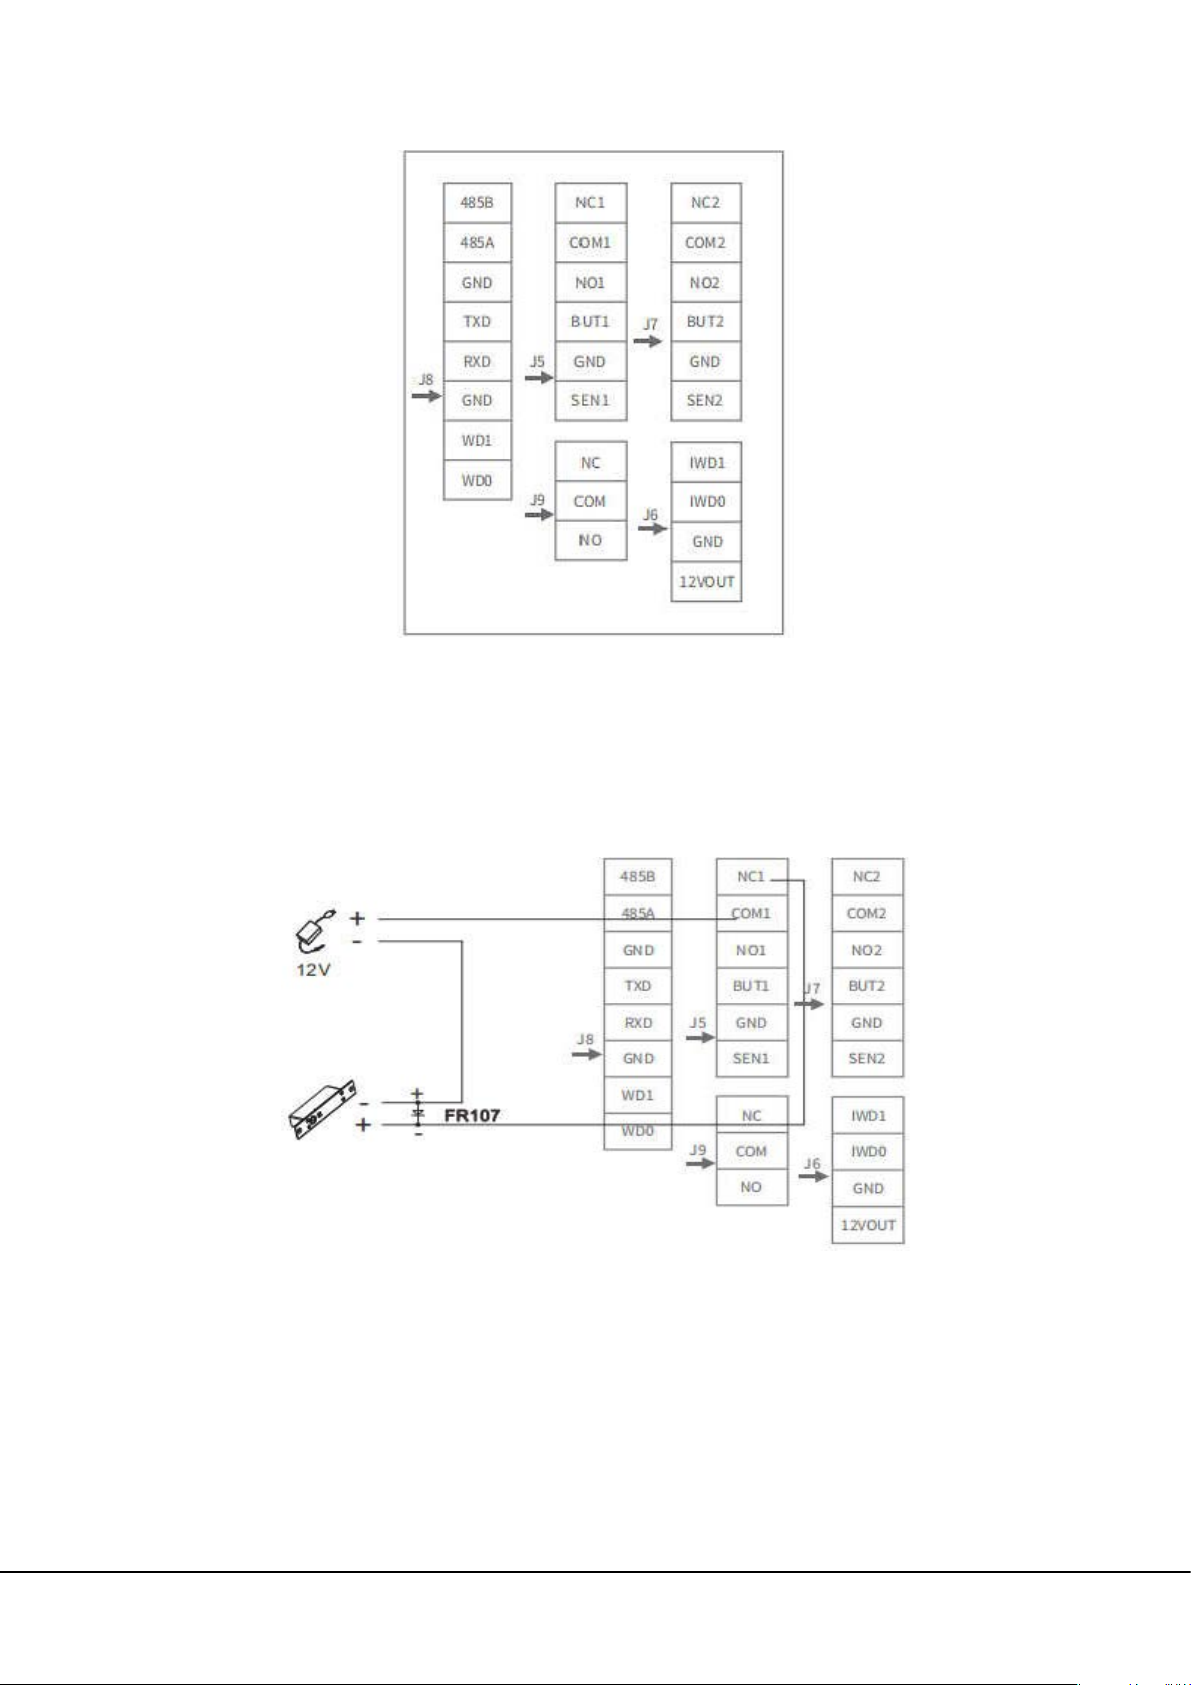
1.4.2 Connection with Lock
Connect the lock with 12V power, NC1 and COM1 into a loop, as follows:
Notes for wiring:
n order to avoid the influence of the self-induced electromotive force produced by the electric lock on the access
I
control system, a diode in parallel need to be connected on the electric lock, when the access controller is connected.
Select FR107 diode with a faster response speed. FR107 diode has positive (shown as “+ ” in the figure) and negative
(shown as “-” in the figure) poles. At the time of wiring, connect the “ +” of diode to the “-” of electric lock and the “-”
of diode to the “+ ” of electric lock. Keep the diode as close as possible to the electric lock.
FaceKiosk Series User Manual 5
Page 10

1.4.3 Wiegand Output Connection
When the FaceKiosk device needs to connected to the controller through Wiegand output, connect GND, WD1 and
WD0 of the controller's Wiegand input to the GND, WD1 and WD0 of J8 interface.
1.4.4 Recommended Identification Distance
The recommended identification distance is about 1m to 5 m from the face of the device. Recommended distance
is about 3 m, shown in the following figure.
2. Check-in interface and Main Menu
1. The check-in interface is divided into 4 areas: Title bar, Information bar, Monitoring screen and Check-in result.
6 FaceKiosk Series User Manual
Page 11

itle bar: It displays check-in title and main menu button.
T
Information bar: It displays weather, date, software connection status icon, should arrive, not arrive, actual arrive
and QR code. Click should arrive, not arrive and actually arrive to view the relevant statistics.
Monitoring screen: It displays the picture captured by the camera. After detecting any face, it captures the face
within the green box and pops up the verification result window after recognition.
Check-in result: It displays the relevant information about the personnel verification result.
2. On the initial screen, press to open the main menu, as shown in the following figure.
FaceKiosk Series User Manual 7
Page 12
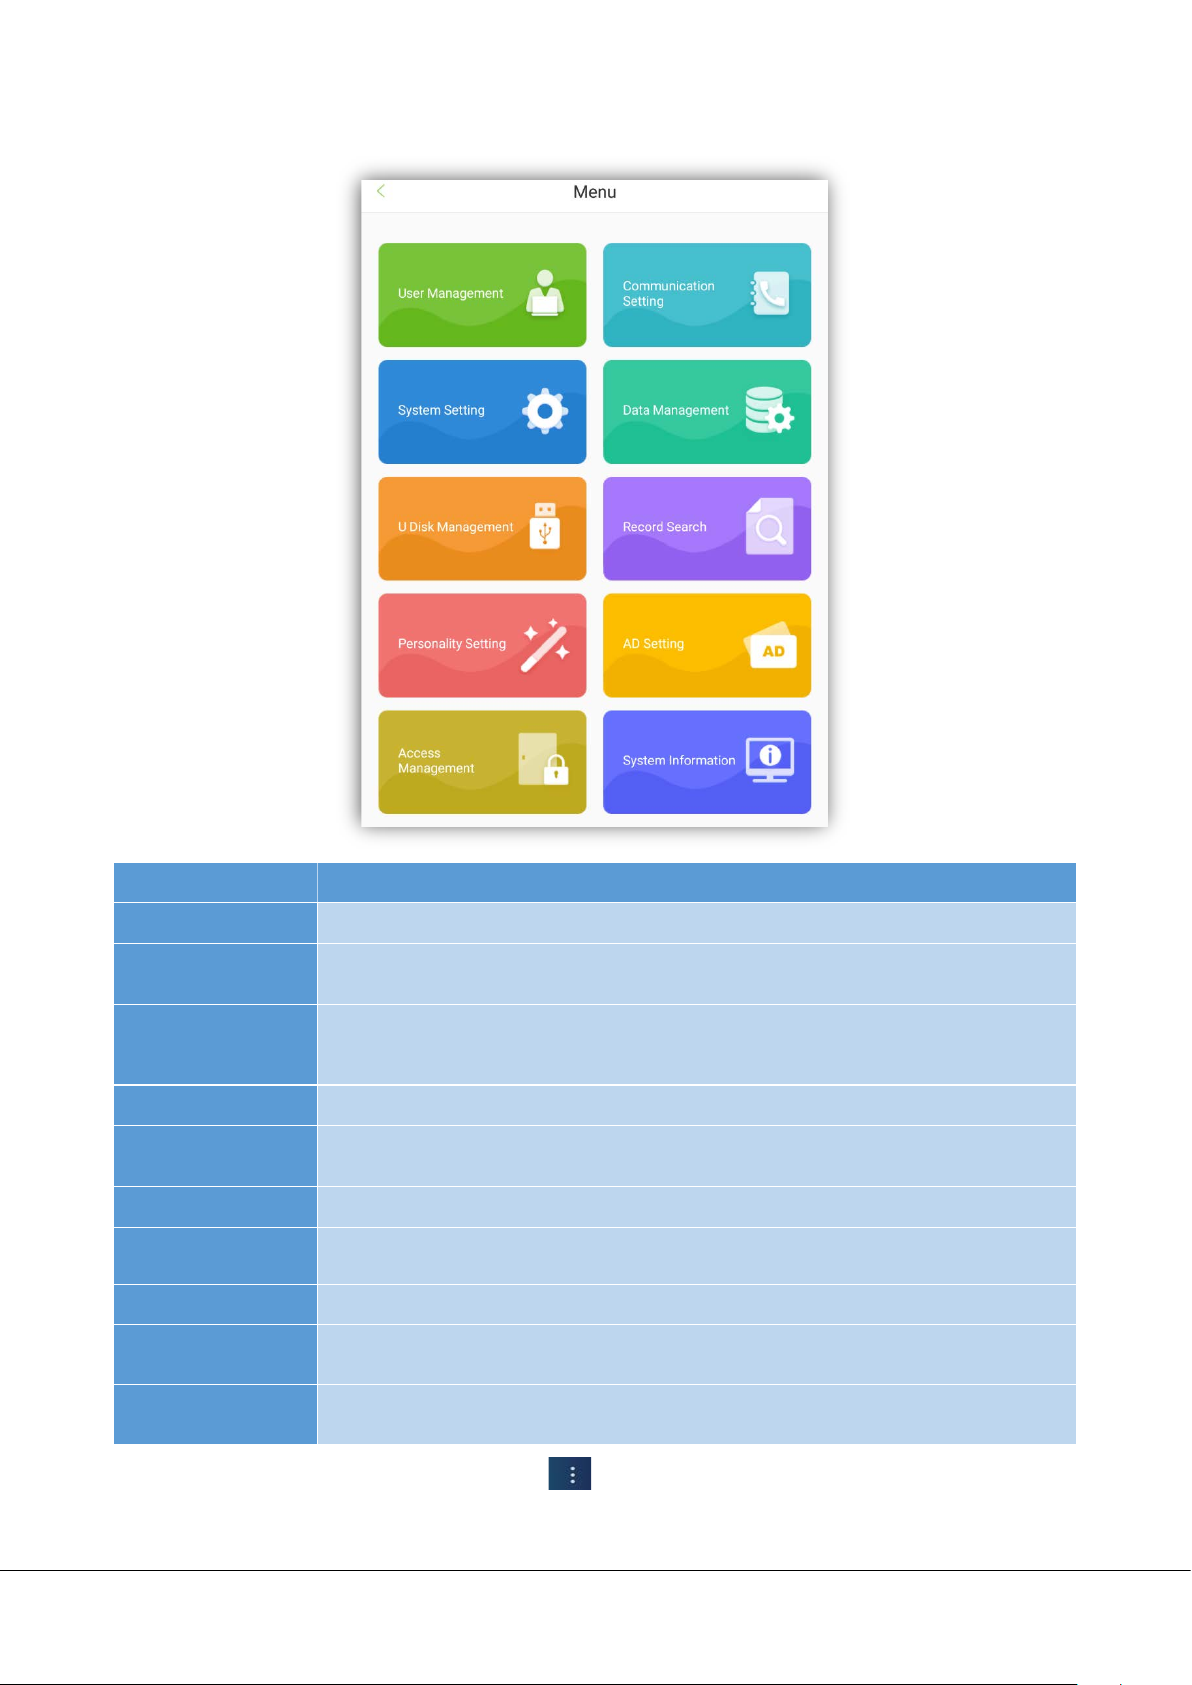
Menu Function
[User Management]
[Communication
Setting]
Adds, edits, views, searches, and deletes basic employee information.
Sets communication parameters such as the network, Wi-Fi, and PUSH.
Set relevant parameters of the system, include time & date, face parameters, attendance
[System Setting]
parameters, stranger alarm function, save stranger’s photo, blacklist alarm function, save
blacklist photo and QR code address setting.
[Data Management]
[U Disk
Management]
[Record Search]
[Personality Setting]
[AD Setting]
[Access Control
Management]
[System
Information]
Uploads or downloads data through a USB drive, and sets related parameters.
Checks the attendance record, meeting information, blacklist data, stranger photo, etc.
Sets voice broadcast, sleep time of device, display of status bar and special effects of VIP,
Views device information such as data capacity, device information, and firmware
Clears the device’s record data, backup and restore data.
etc.
Sets the advertisement playing, advertising frequency, etc.
Sets the access control parameters and Wiegand function.
information.
Note: If the device has no super administrator, press to access the menu. If the device has a super administrator,
then his/her verification is required to access the menu. For security purposes, you are advised to register as an
8 FaceKiosk Series User Manual
Page 13
administrator when using the device for the first time.
3. Employee Management
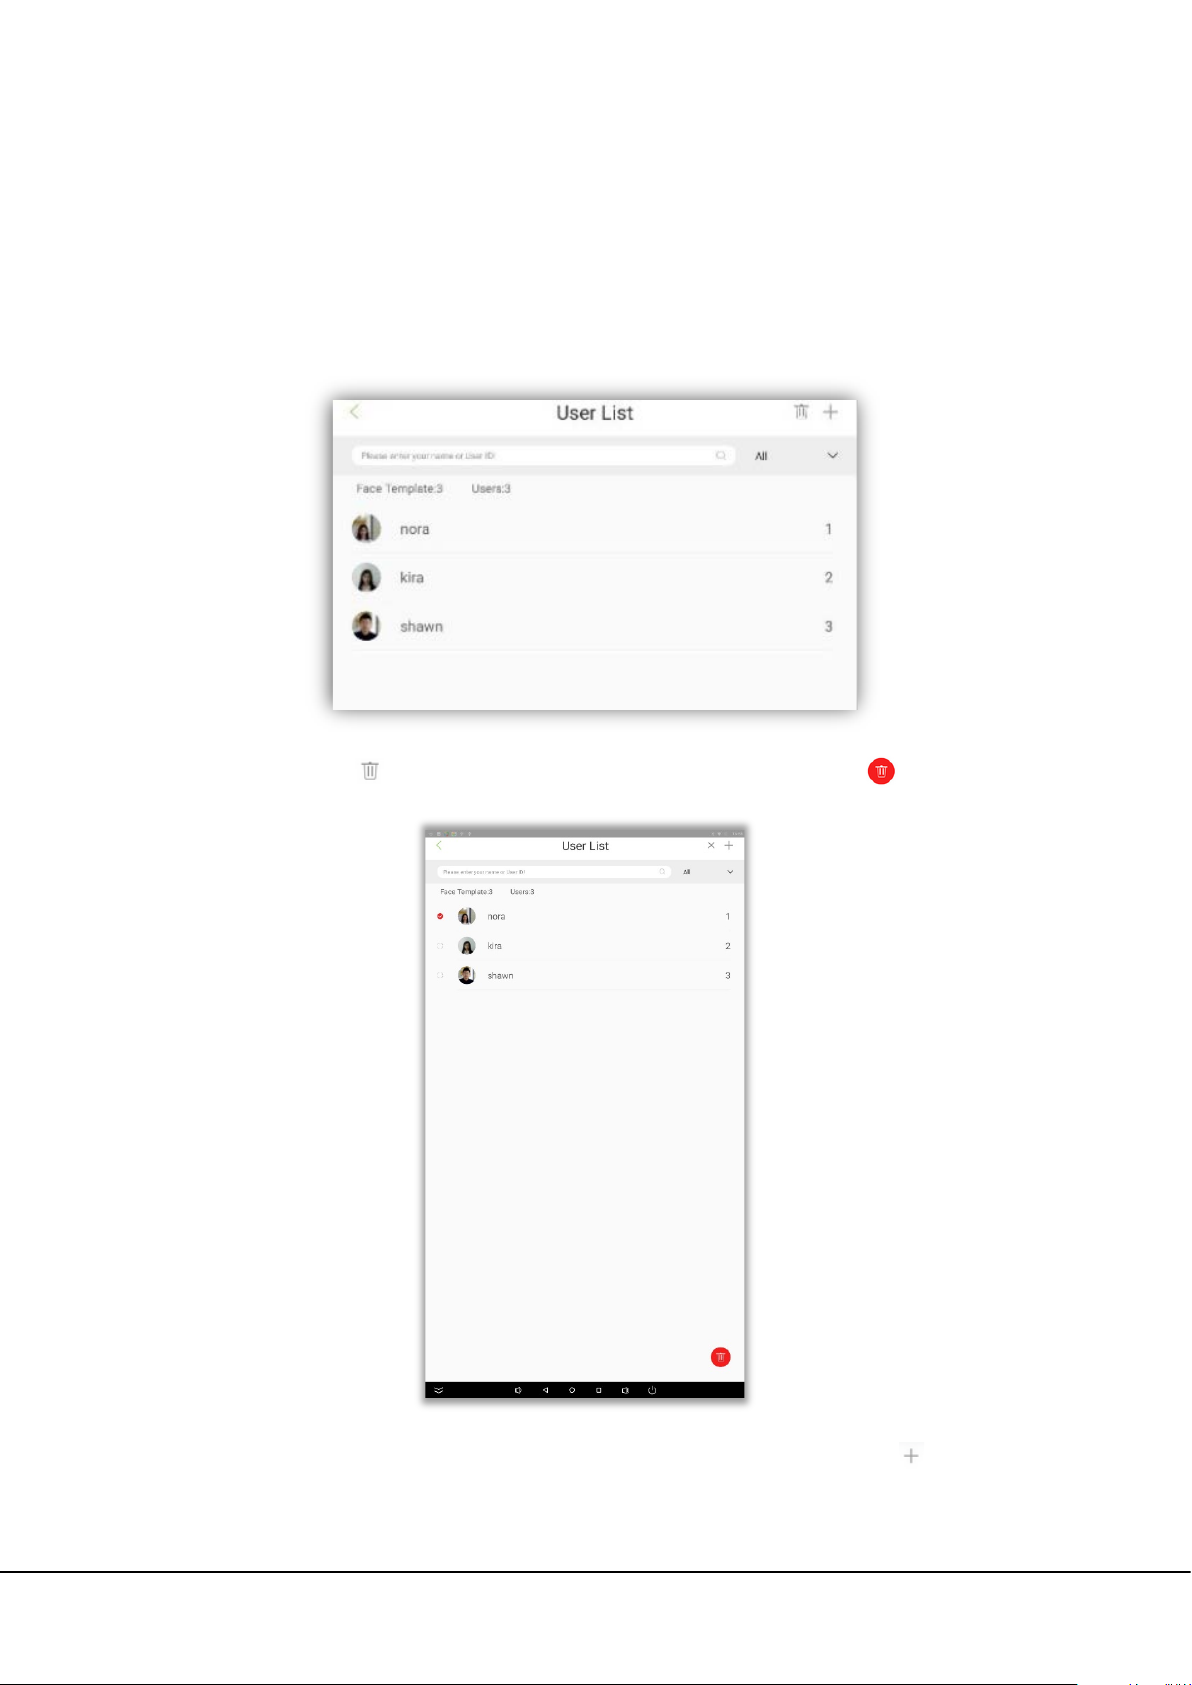
Click [User Mgt.] on the main menu screen. The personnel list screen is displayed, showing the basic information of
all personnel, including their names, employee IDs, and portraits, as shown in the following figure.
Del
ete an employee: Click in the upper right corner, select an employee, and click .
-+
Add an employee: Click < in the upper left corner to return to the employee list screen. Click in the upper right
corner to jump to the [New User] screen, as shown in the following figure.
FaceKiosk Series User Manual 9
Page 14
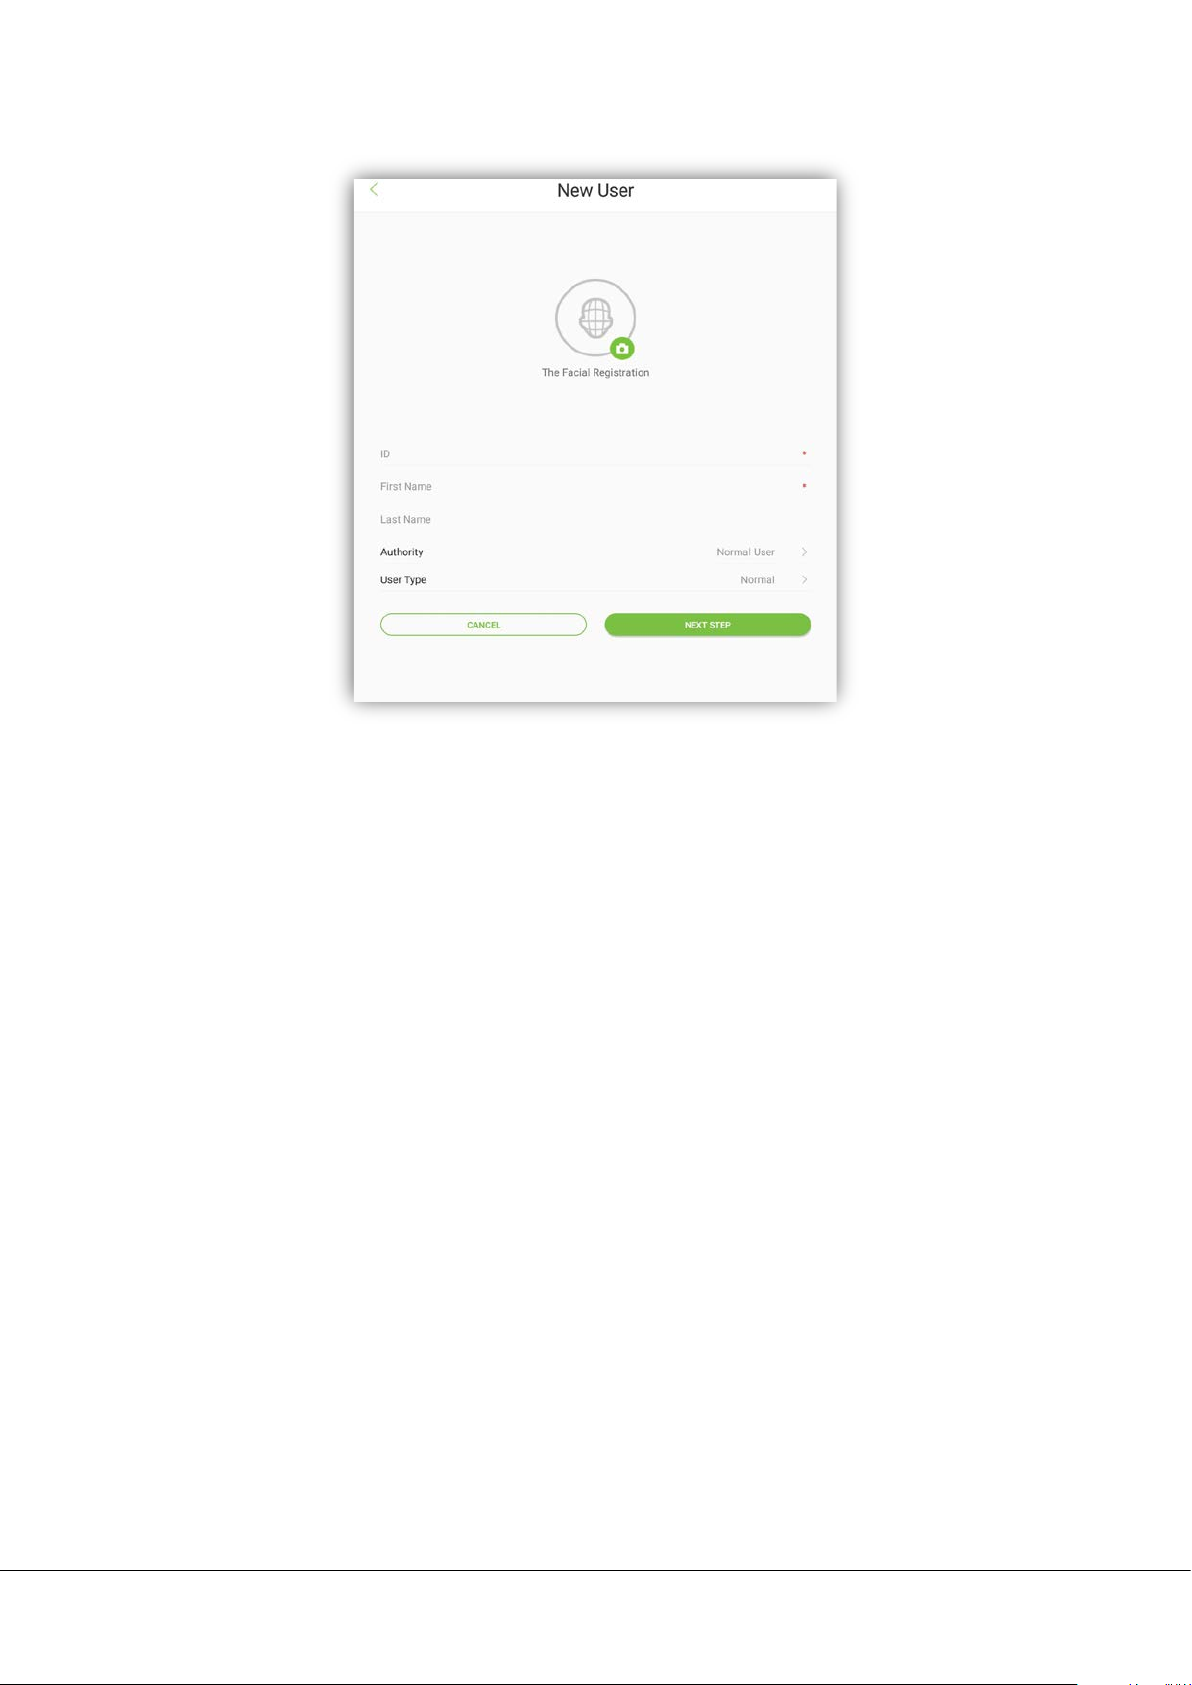
ield description:
F
[Authority]: It includes Normal user and Administrator. After setting an administrator, administrator verification is
required to access the main menu. Administrator can set up the admin password (6 digits).
[Identity Type]: It includes Normal, VIP and Blacklist. Normal type is for normal personnel attendance. The pop-up
windows effects after verification differs for VIP and Normal mode. The special effects can be set in [Personal].
If any personnel is set In blacklist, he/she cannot open the door by facial recognition. Blacklist photo capture and
blacklist alarm functions can be set in [System setting].
Register a facial template: Click [Next] to call the camera. Click [START FACE ENROLLMENT] and stand in the
monitoring area. When your face is identified, the registration is successful and your photo is saved.
10 FaceKiosk Series User Manual
Page 15
4. Communication Settings
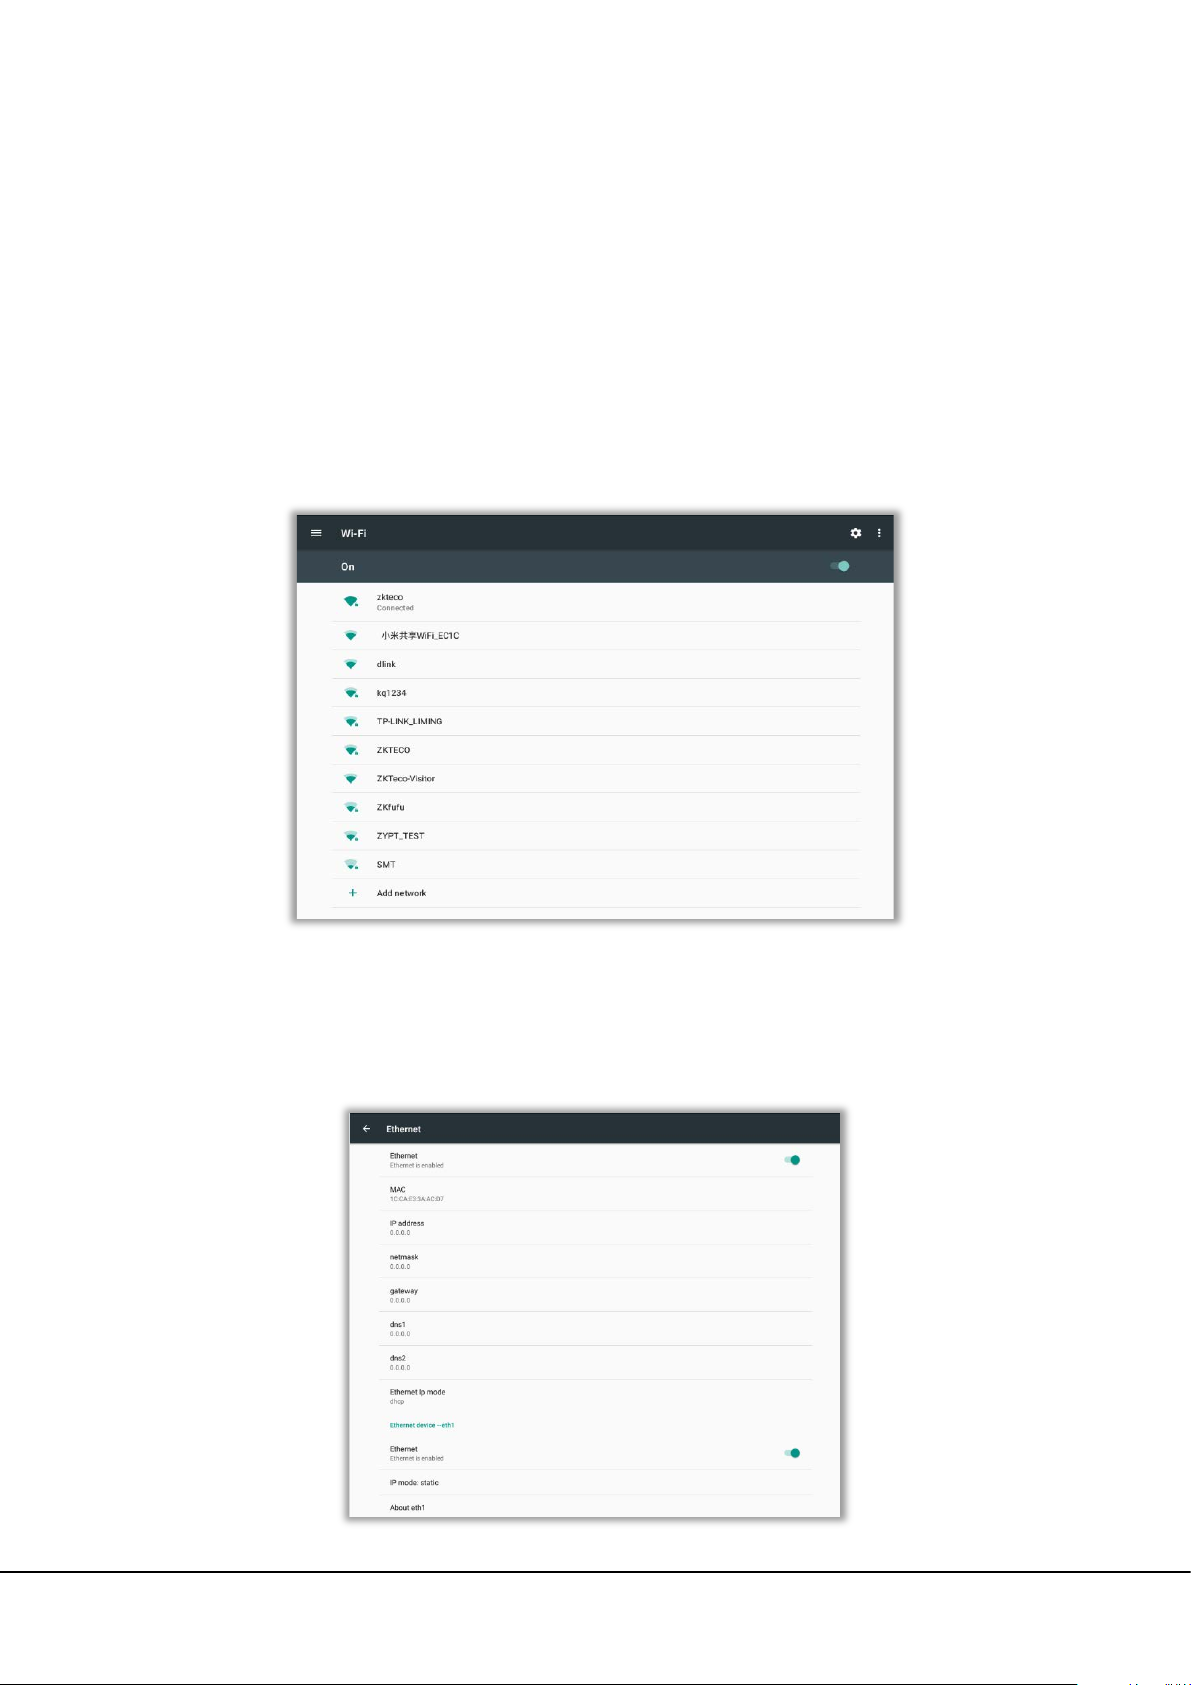
For the communication between device and the PC over a network, set communication parameters on the device.
Click [WI-FI setting] to connect to the Wi-Fi, or choose [Ethernet setting] to connect to the network by Ethernet.
4.1 Wi-Fi Settings
On the [Communication Setting] screen, click [WI-FI] to set WLAN parameters.
4.2 Ethernet Settings
On the [Communication Settings] screen, click [Ethernet Setting]. The [Ethernet Setting] screen is displayed.
FaceKiosk Series User Manual 11
Page 16

Menu Function
[Ethernet]
[IP address]
[netmask]
[gateway]
[DNS]
[DHCP]
[IP Mode]
Enables the Ethernet connection.
The default IP address is 192.168.1.201. Change it as required.
The default subnet mask is 255.255.255.0. Change it as required.
The default gateway address is 0.0.0.0. Change it as required.
The default address is 0.0.0.0. Change it as required.
Assigns dynamic IP addresses to network clients over a server.
Only choose static mode can edit the IP.
4.3 Server Settings
Set parameters for connecting to PUSH server. On the [Communication Settings] screen, click [Cloud Server Setting].
Menu Function
Please enter server type
Domain name server
Please enter server address
Please enter server port
12 FaceKiosk Series User Manual
Choose the software you want to connect:
BioTime, ZKBioSecurity.
Enable the domain name server.
Set the server IP address of software.
Set the server port of software.
Page 17
5. System Settings
Set system parameters based on your requirements.
On the main menu screen, click [System Setting].
5.1 Time and Date
On the main menu screen, click [Date & time].
FaceKiosk Series User Manual 13
Page 18
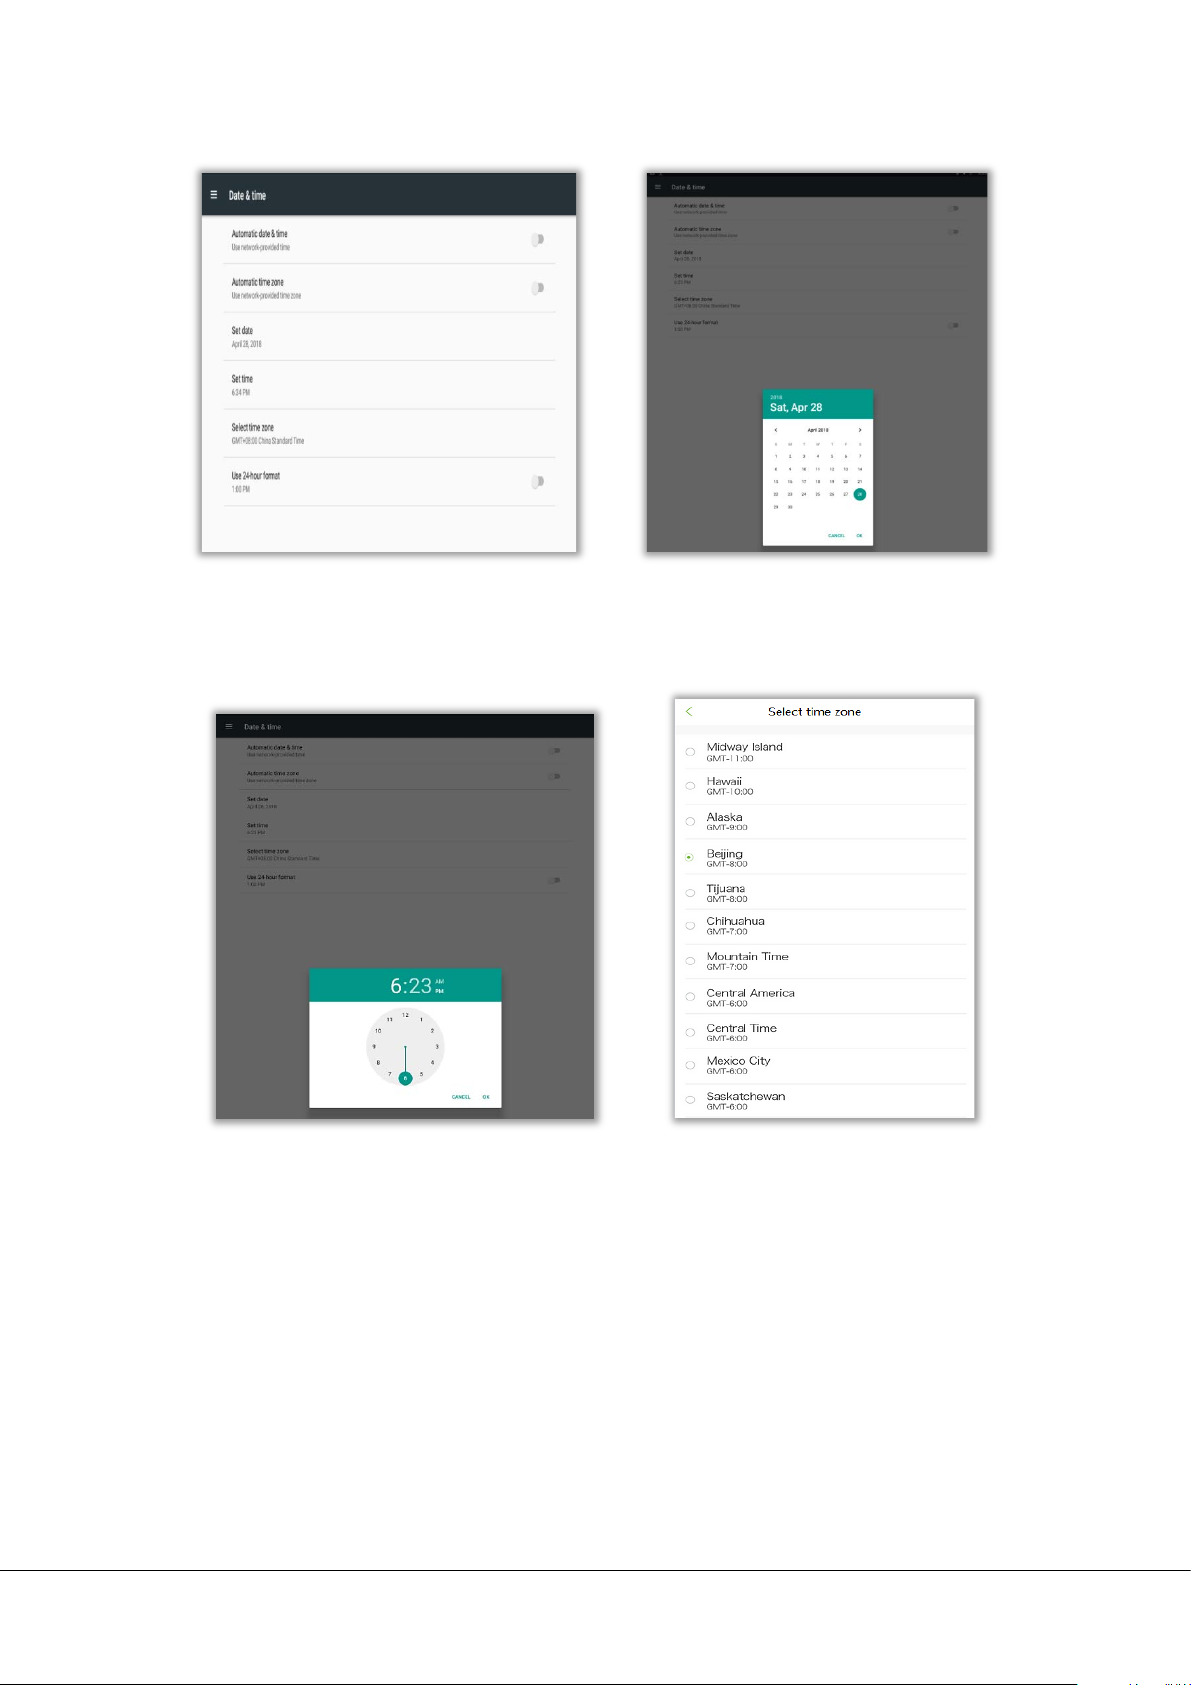
1.Click [Date & time
n the time and date screen, select [Set time]. 4.On the time and date screen, select [Select tim
3.O
]. 2.Sc
roll as required to set the year, month, and day,
and press the [OK] key.
e
14 FaceKiosk Series User Manual
z
one], and scroll downwards to set the hour,
minute, and second to select a time zone.
Page 19

5. Click [Use 24-hour format] to display the time in the 24-hour format.
5.2 Face Parameters
Click [Face parameters] on the system setting interface to enter the following interface:
F
ield Description:
[Face recognition threshold]: Sets the level of similarity between the registered face templates and the verified one
in device. The default value is 83, and it ranges from 83 to 95.
[Liveness detection threshold]: Lower value leads to higher accuracy with higher rejection rate. But recognition
speed will be influenced. The recommended value is 80, and it ranges from 30 to 80.
[Multiple recognition]: If selected, it will support the multiple recognition function. After enabling, 4-6 persons can
be recognized at the same time. It’s not recommended in access control scenes.
FaceKiosk Series User Manual 15
Page 20
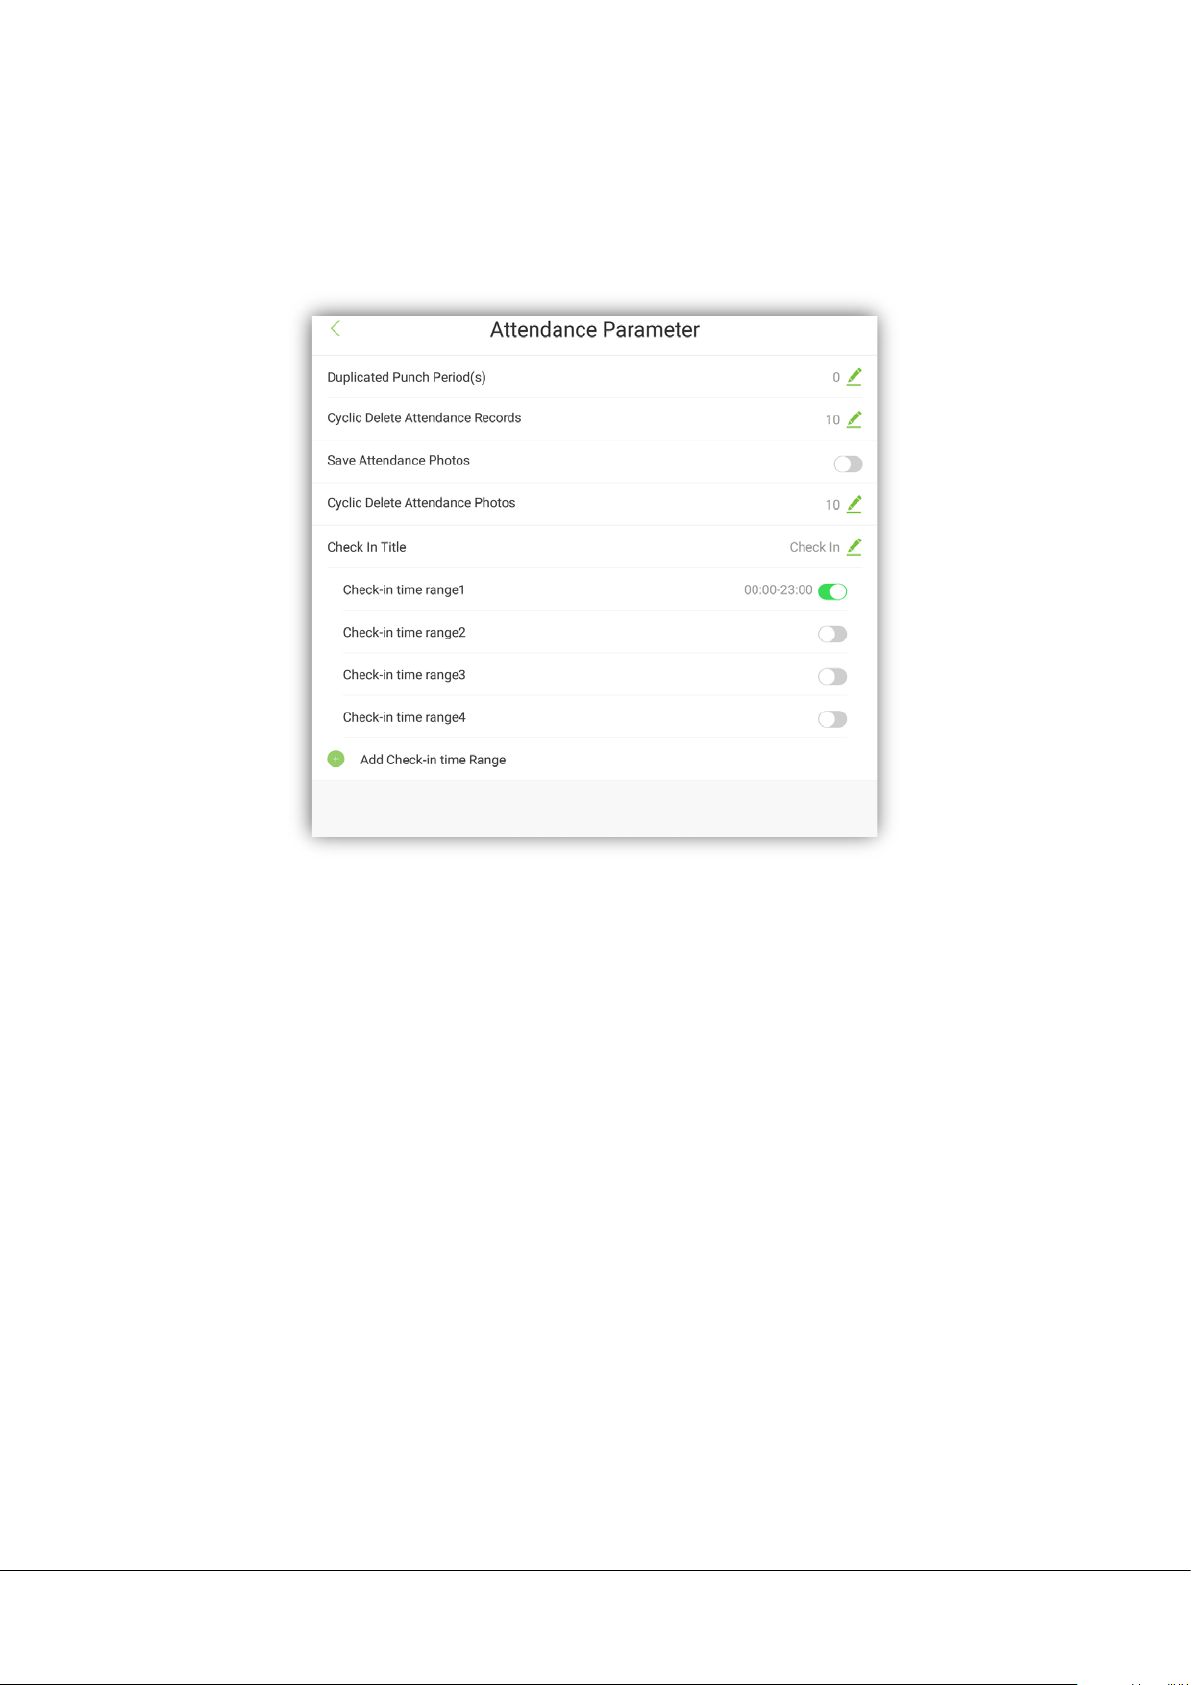
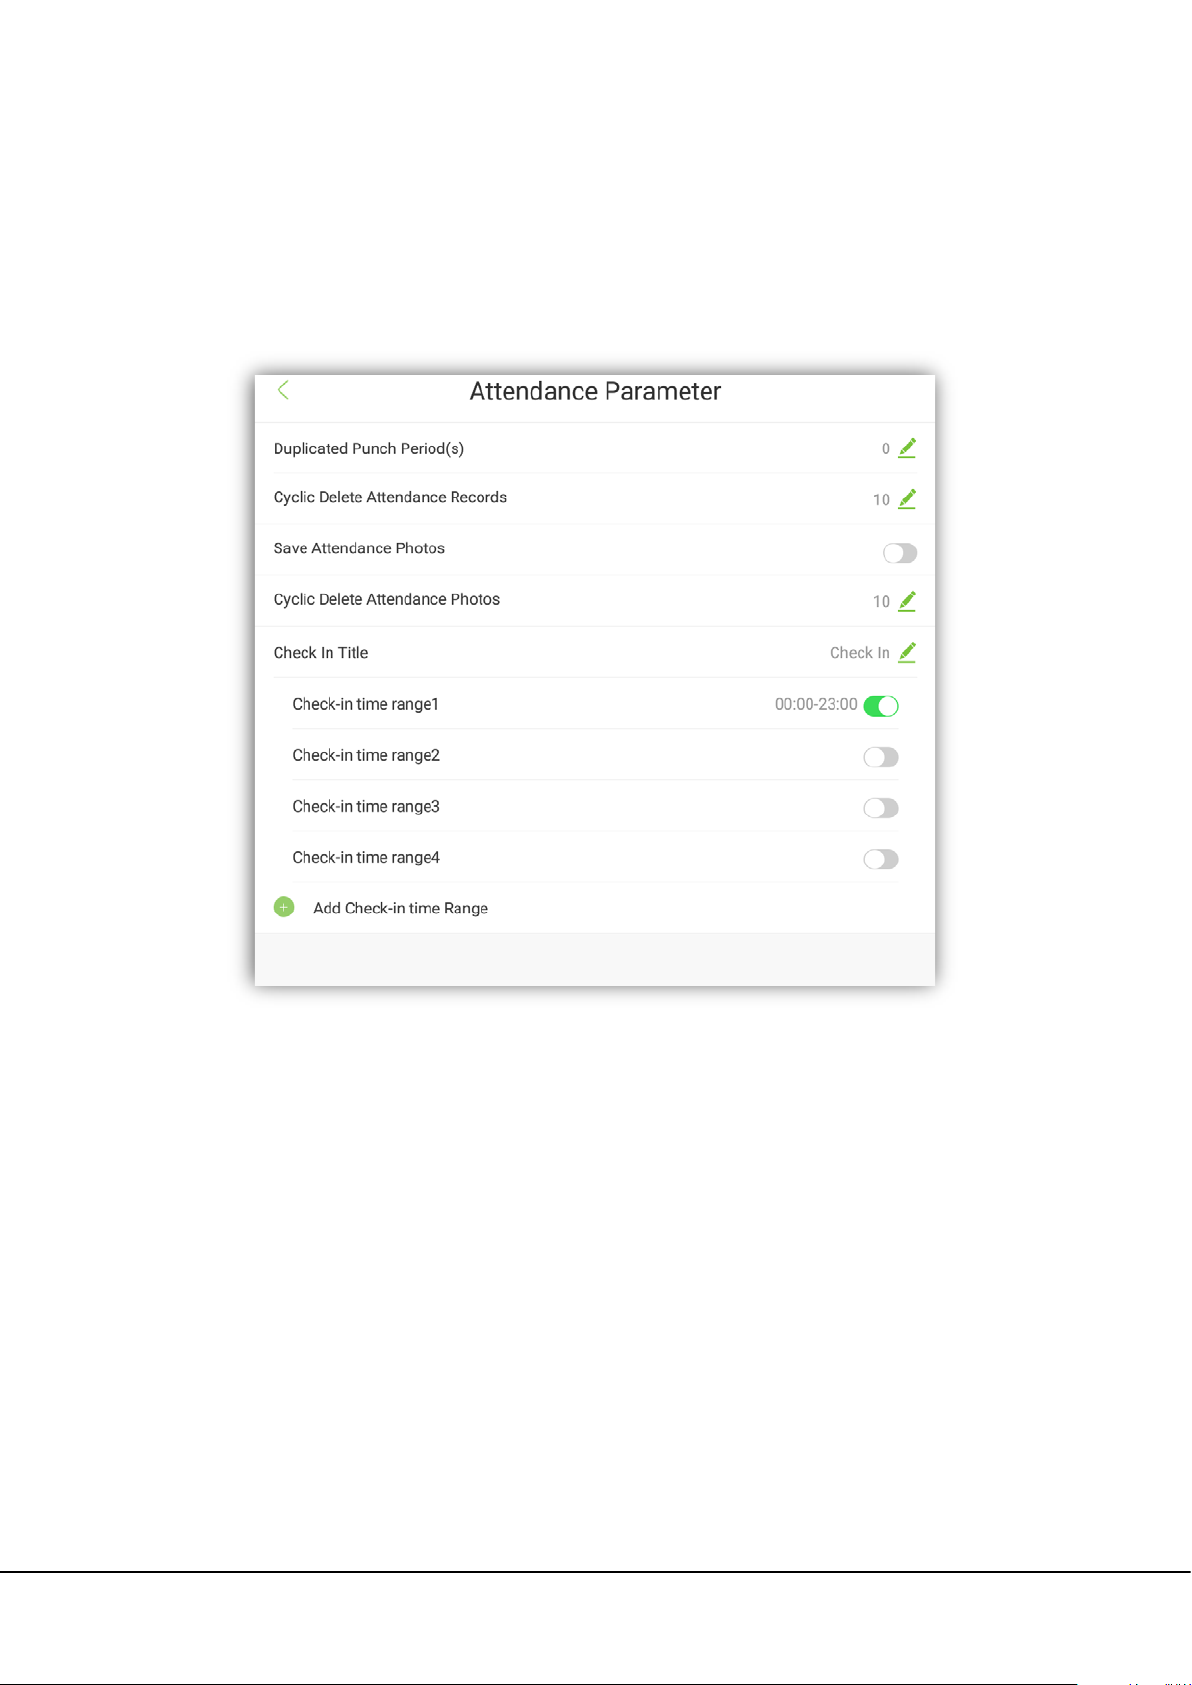
5.3 Attendance Parameters
The relevant attendance parameters can be self-defined. The interface is as follows:
Field Description:
[Duplicate check-in period]: User can set a time-period, in which, repeated attendance record of the same
employee will not be considered. (unit: second)
[Cyclic delete attendance record]: It indicates the duration up to which the attendance records will be saved. That
means, when attendance record reaches the maximum capacity, it deletes the earliest record in cycle. The maximum
capacity of attendance record is 10w. The range value is 0-9999. 0 means no deletion.
[Save attendance photo]: Set if you want to save the captured attendance photo after the face verification. The
default is disabled.
[Cyclic delete attendance photo]: When attendance photo reaches to the maximum capacity, it will delete the
earliest attendance photo in cycle. The maximum capacity of attendance photo is 1w. The range value is 0-9999. 0
means no deletion.
[Check-in title]: Set the display t
title will automatically switch. It is sent by the software.)
itle of FaceKiosk device. (Note: When the device uses BioTime software, meeting
[Check-in time range]: The face appearing in the monitoring area will not be identified if the device is not within
16 FaceKiosk Series User Manual
Page 21
the check-in time range. It has 4 check-in time ranges by default. Now it can add more 5 time-ranges.
5.4 Stranger Photo Save Function
In the system setting interface, click [Stranger photos save function] and select to enable. When it is enabled,
strangers face appearing in the monitor display interface will be recognized and captured as unregistered person.
Captured photo records can be viewed in [Record Search]. When it’s disabled, it will not recognize the strangers.
5.5 Stranger Alarm Function
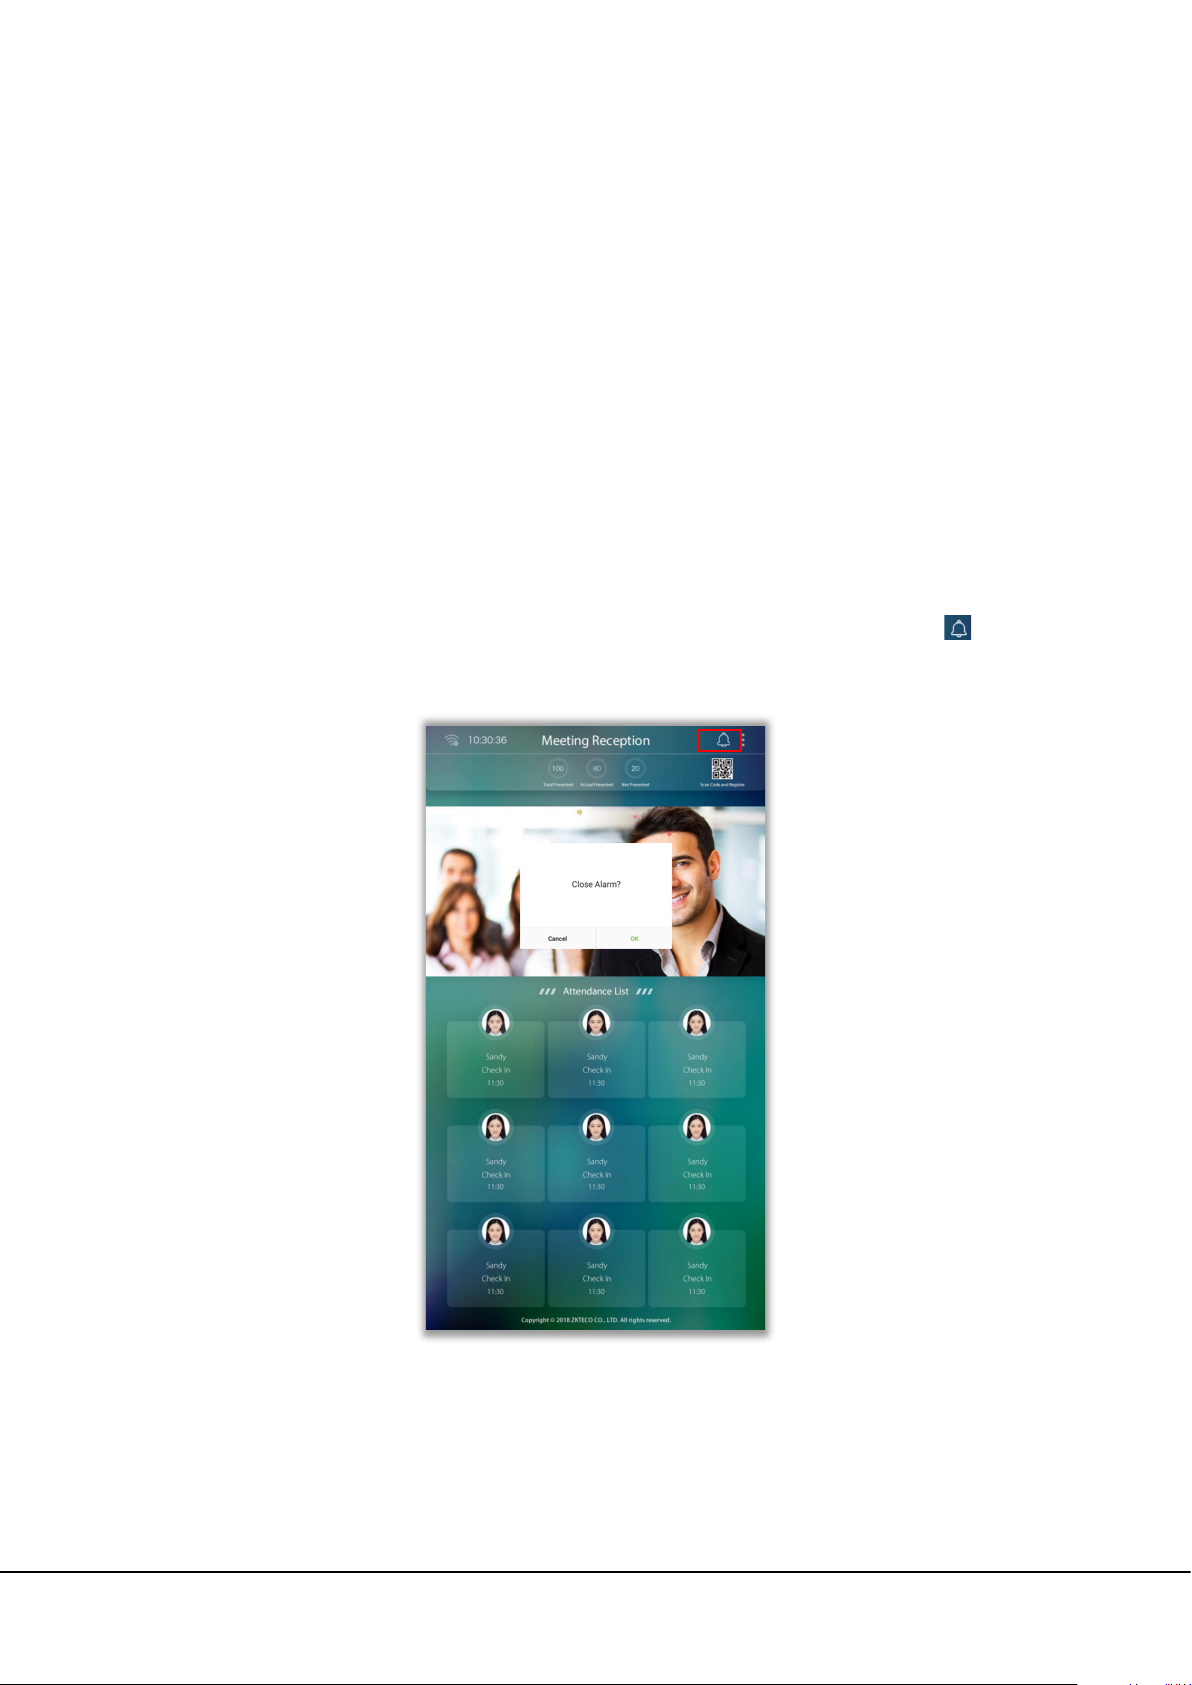
In the system setting interface, click [stranger alarm function] and select to enable. When it is enabled, the alarm bell
will sound for 10 seconds if stranger face appears in the monitoring display interface. Click on in the main
interface to turn off the alarm temporarily, as shown below:
5.6 Blacklist Photo Save Function
In the system setting interface, click [Blacklist photo save function] and select to enable. When it is enabled, person
FaceKiosk Series User Manual 17
Page 22

in blacklist will be captured if they appear in the monitor display interface. Captured photo records can be viewed in
[Record Search].
5.7 Blacklist Alarm Function
In the system setting interface, click [Blacklist alarm function] and select to enable. When it is enabled, the alarm bell
will sound for 10 seconds if person in blacklist appears in the monitoring display interface. Click on in the main
interface to turn off the alarm temporarily, as shown below:
5.8 QR Code Setting
Click [QR code address] in the system setting interface. User can set the URL address of the main interface QR code
to the background server. After setting, use phone to scan the QR code in main interface. Personnel registration
information interface can be displayed on the phone. If the firmware version is above 2.0, and the server address set
in the device is BioTime or ZKBioSecurity software, the QR code generated in the device check-in interface will
automatically obtain the device’s serial number information. When user scans the QR code to register, the device’s
serial number will be seen in the review interface on software.
18 FaceKiosk Series User Manual
Page 23
The format of QR code address is:
ZKBiosecurity3.0 software QR code address setting: http://server IP: port/app/v1/adreg
BioTime7.0 software QR code address setting: http://server IP: /facereg
6. Data Management
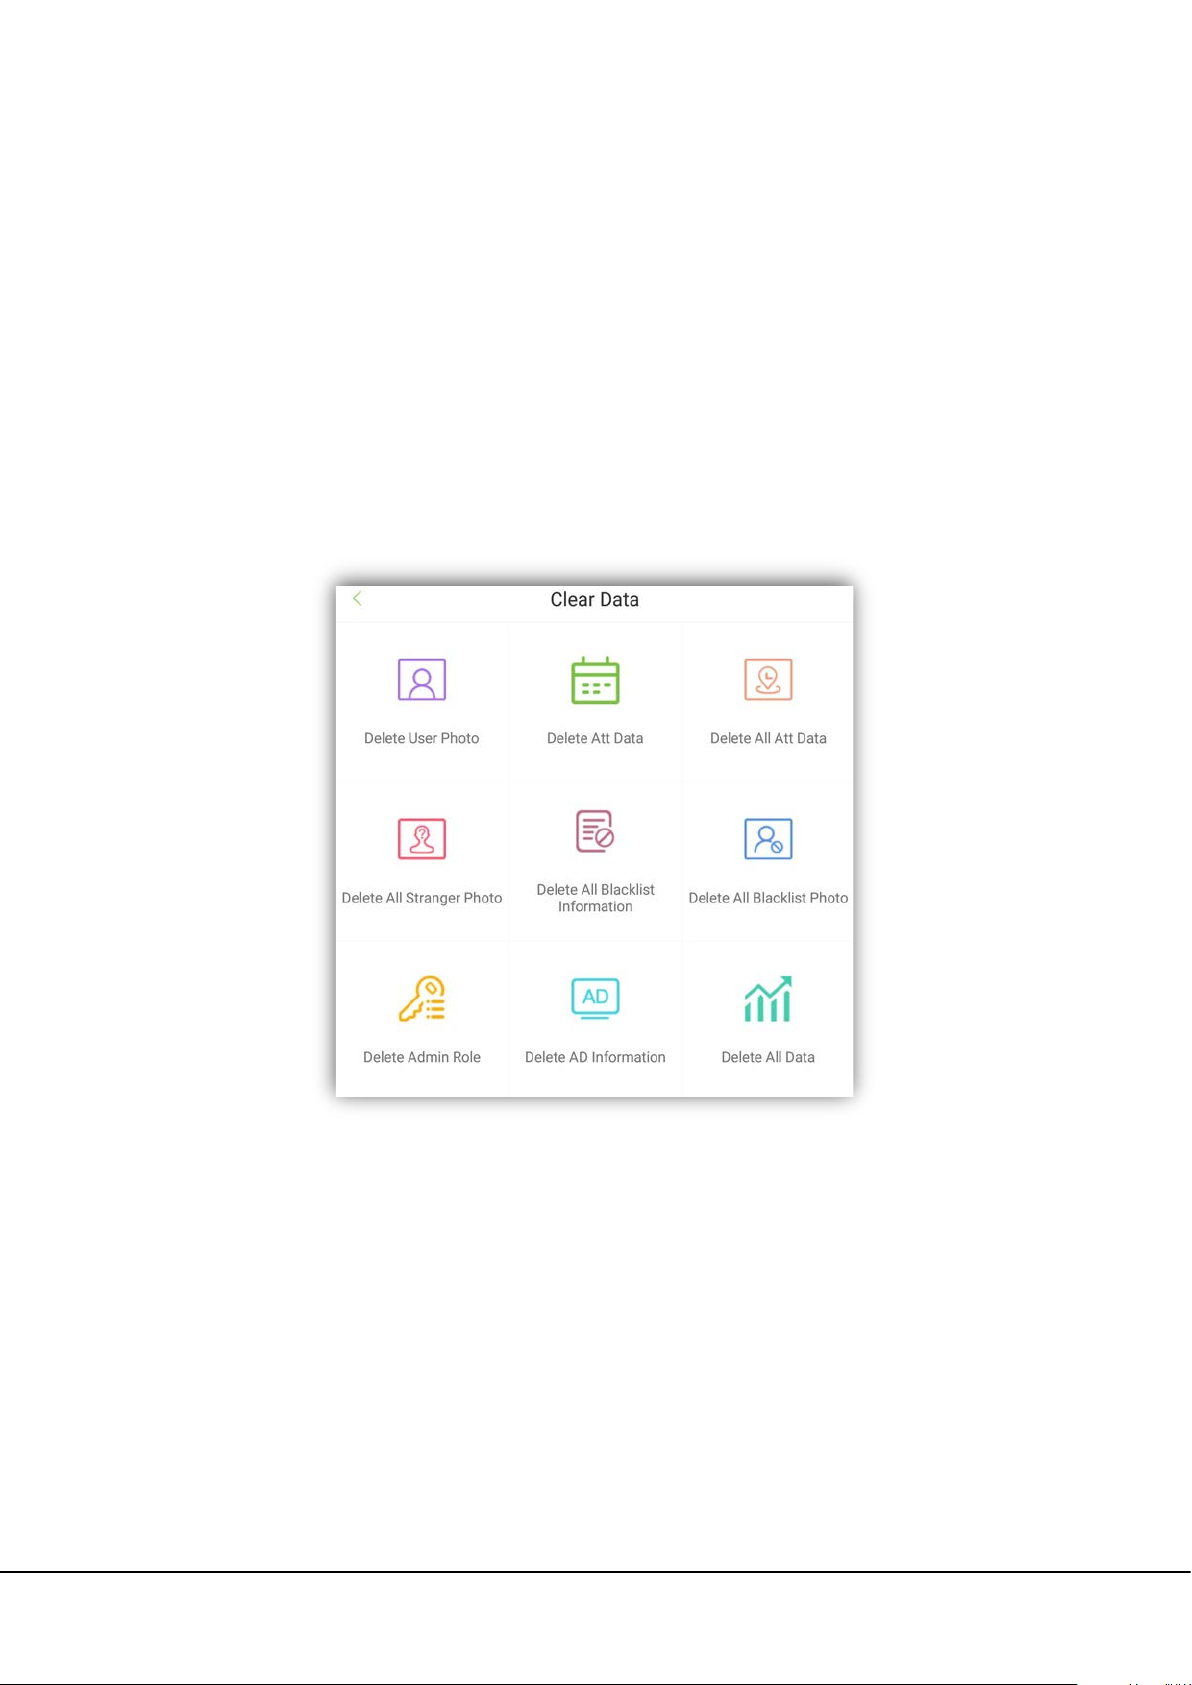
Click on [Data Management] in the main interface to perform delete, restore, and backup data operation.
6.1 Delete Data
Field Instruction:
[Delete attendance record]: Deletes all attendance record in device, or for a specific period.
[Delete user photo]: Deletes all user’s photo from the device.
[Delete advertisement information]: Deletes all or some specific advertisement pictures from the device.
[Delete all attendance photo]: Deletes all attendance photos from the device.
[Delete all blacklist information]: Deletes all blacklist record from the device.
[Delete blacklist photo]: Deletes all blacklist photos from the device.
[Delete stranger’s photo]: Deletes all stranger’s photo from device.
FaceKiosk Series User Manual 19
Page 24

[Delete administrator’s authority]: Deletes the authority of a specific administrator from the device.
[Delete all data]: Deletes all data from the device.
6.2 Backup Data
Click on [Backup & Restore] in the data management module. Click on [Backup data] interface, as shown below:
Menu Function
Backup
content
Backup path
After setting the details, click [Start backup] to backup the
content to the specific path of device or U-disk.
Backup all data in default, cannot be modified.
Choose within Local backup and U-disk backup.
Local backup: Backup to the specific path of the
device in default.
U-disk backup: Plug into the U-disk before operation.
6.3 Restore Data
Click on [Backup & Restore] in data management module. Click on [Restore data] as shown below:
Menu Function
Restore
content
Restore all data in default, cannot be modified.
20 FaceKiosk Series User Manual
Choose within Local restore and U-disk restore.
Restore path
After setting the details, click [Start restore] to restore the backup
Local restore: Restore the backup data from the
specific path.
U-disk restore: Plug into the U-disk before operation.
data in device or U-disk.
Page 25

7. U Disk Management
types are supported, including JPG, BMP, GIF, and PNG.
On the main menu screen, click on [U Disk Management]. The [U Disk Management] screen is displayed. Insert a USB
drive into the USB port on the device before uploading and downloading data over the USB drive.
7.1 Uploading Data over a USB Drive
On the [U Disk Management] screen, click on [USB Upload].
Menu Function
[Upload User data]
[Upload AD Photo]
[Upload AD Video]
Precautions
Uploads user information from the USB drive to the device.
1. Storage location for advertisement-related files.
2. Create a folder in the root directory of a USB drive and rename it as “ad”; then after, create
a new folder “picture” in folder “ad” for saving picture advertisements. Various picture
Create a folder “video” in folder “ad” for saving video advertisements.
The supported file formats include AVI, 3GP, WMV, FLV, MP4, MKV.
Select either advertising pictures or advertising videos on a device. For example, if
advertising pictures are added to a device, advertising videos cannot be added.
FaceKiosk Series User Manual 21
Page 26
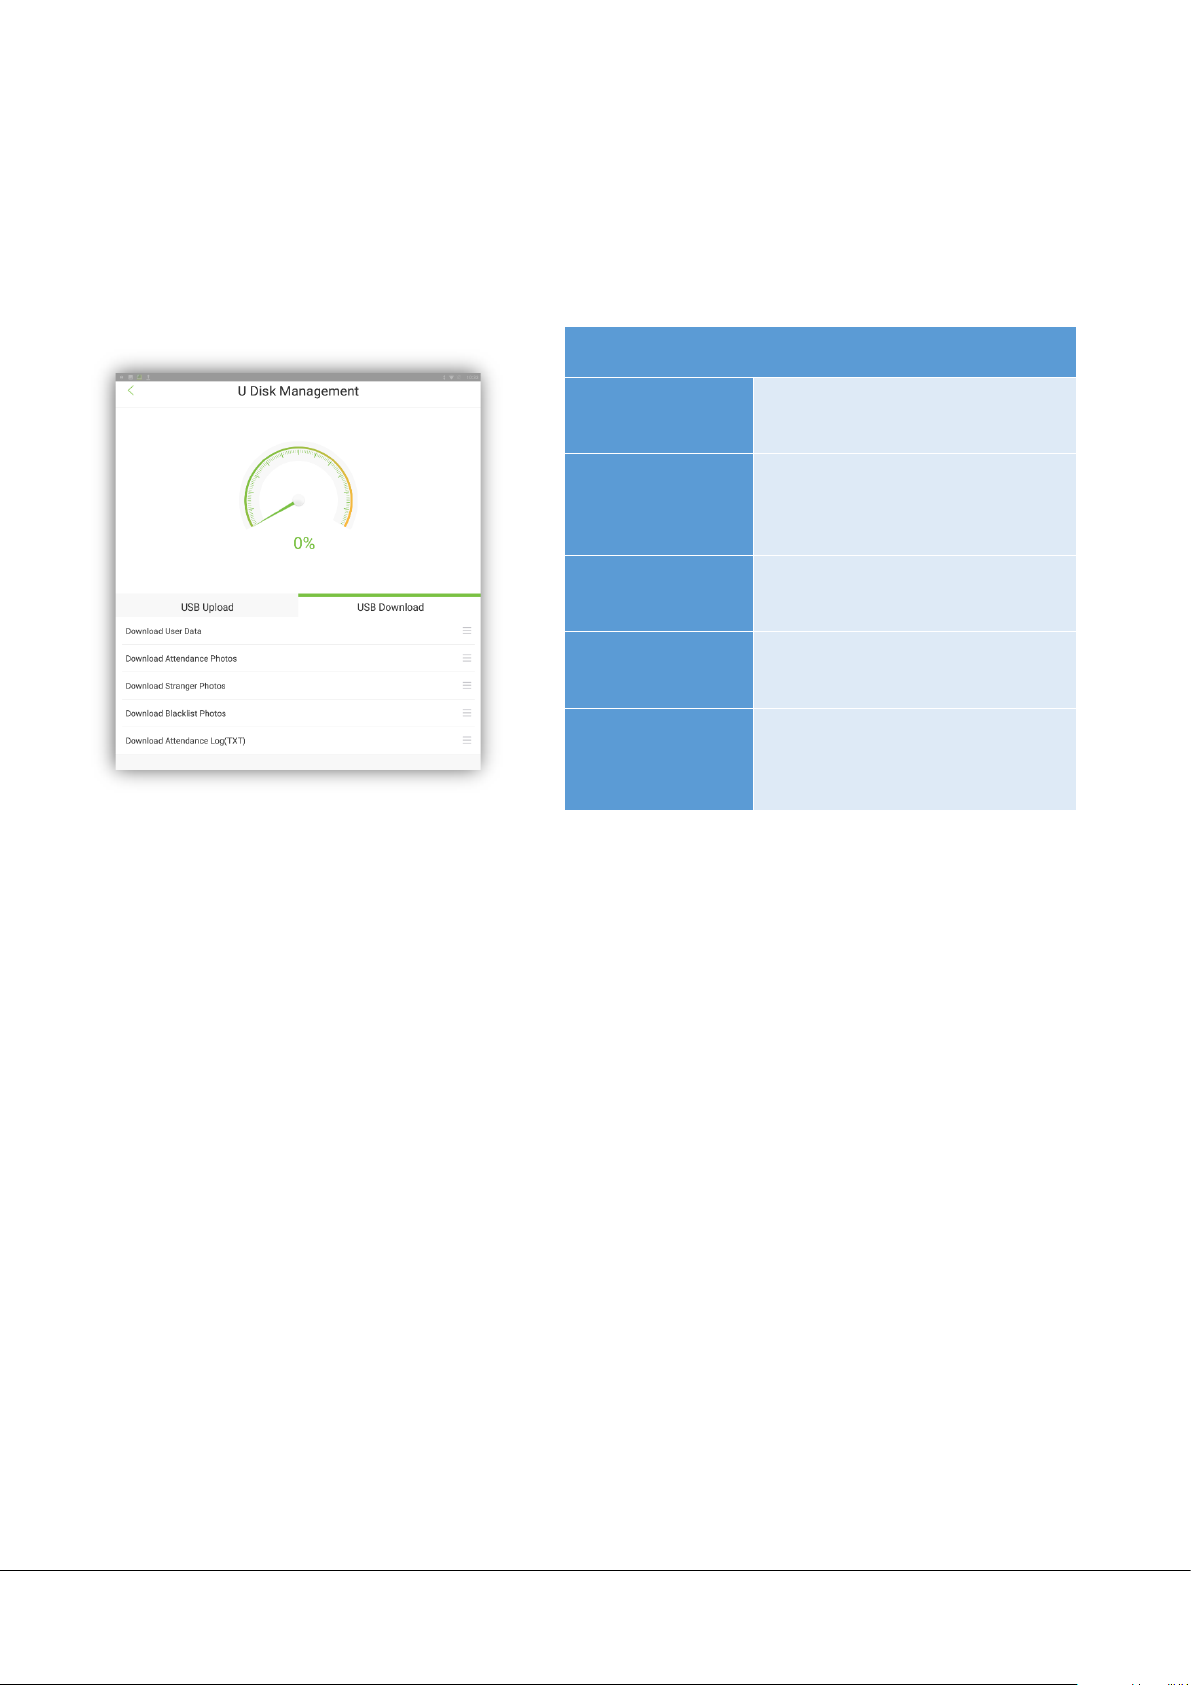
7.2 Downloading Data over a USB Drive
On the USB drive management screen, click on [USB Download]. You can import data from the device to other
devices over the USB drive for spare use.
Menu Function
[Download User
Data]
[Download
attendance
photo]
[Download
stranger’s photo]
[Download
blacklist photo]
[Download
attendance
record] (TXT)
Downloads user information from
the device to the USB drive.
Download all attendance photos or
for a specific time period.
Download all strangers’ photos in
device or for a specific time period.
Download all blacklist photos in
device or for a specific time period.
Download all attendance record in
device or for a specific time period.
Format: TXT.
8. Record Search
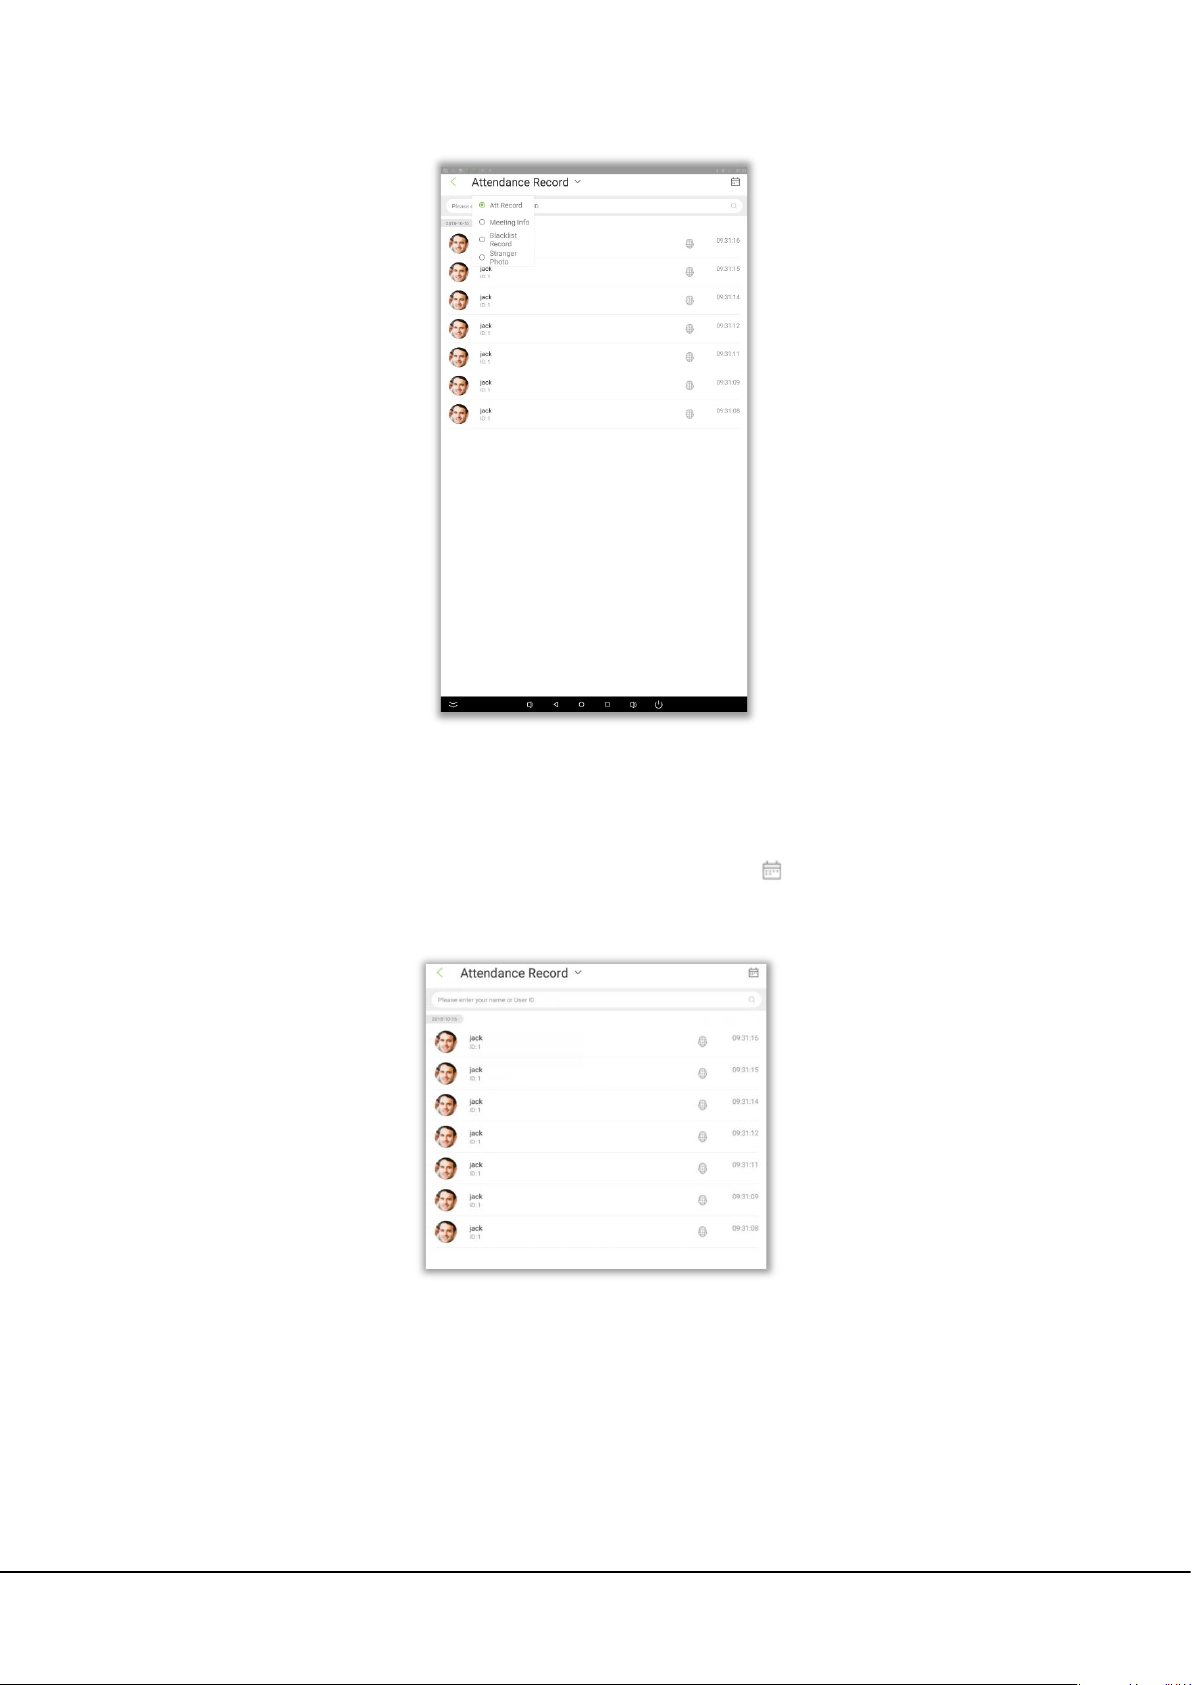
Click on [Record Search] module to enter below shown interface. Related record can be checked in FaceKiosk device.
22 FaceKiosk Series User Manual
Page 27
8.1 Attendance Record and Photo Search
Select [Attendance record] to view all attendance record in device. Click on to filter the records accordingly, as
shown below:
C
lick the head portrait of attendance record to enlarge the person photo. Display information include: Employee
name, Employee ID, Check-in time, Attendance photo, as shown below:
FaceKiosk Series User Manual 23
Page 28

ote: If attendance photo save function is disabled, then the user’s photo will be displayed.
N
Go to [System setting] [Attendance parameter] to set this function.
8.2 Meeting Information
Select [Meeting record], the interface displays the list of meeting information sent by BioTime software, which
includes meeting name, start and end time and number of participants. This function is only available for BioTime
software, as shown below:
8.3 Stranger Photo
Select [Stranger photo] to view or delete the stranger’s captured photo.
Go to [System setting] [Stranger photo save function] to enable this function.
24 FaceKiosk Series User Manual
Page 29

8.4 Blacklist Photo
Select [Blacklist photo] to view or delete the blacklist capture photo.
Go to [System setting] [Blacklist photo save function] to enable this function.
FaceKiosk Series User Manual 25
Page 30
9. System Information
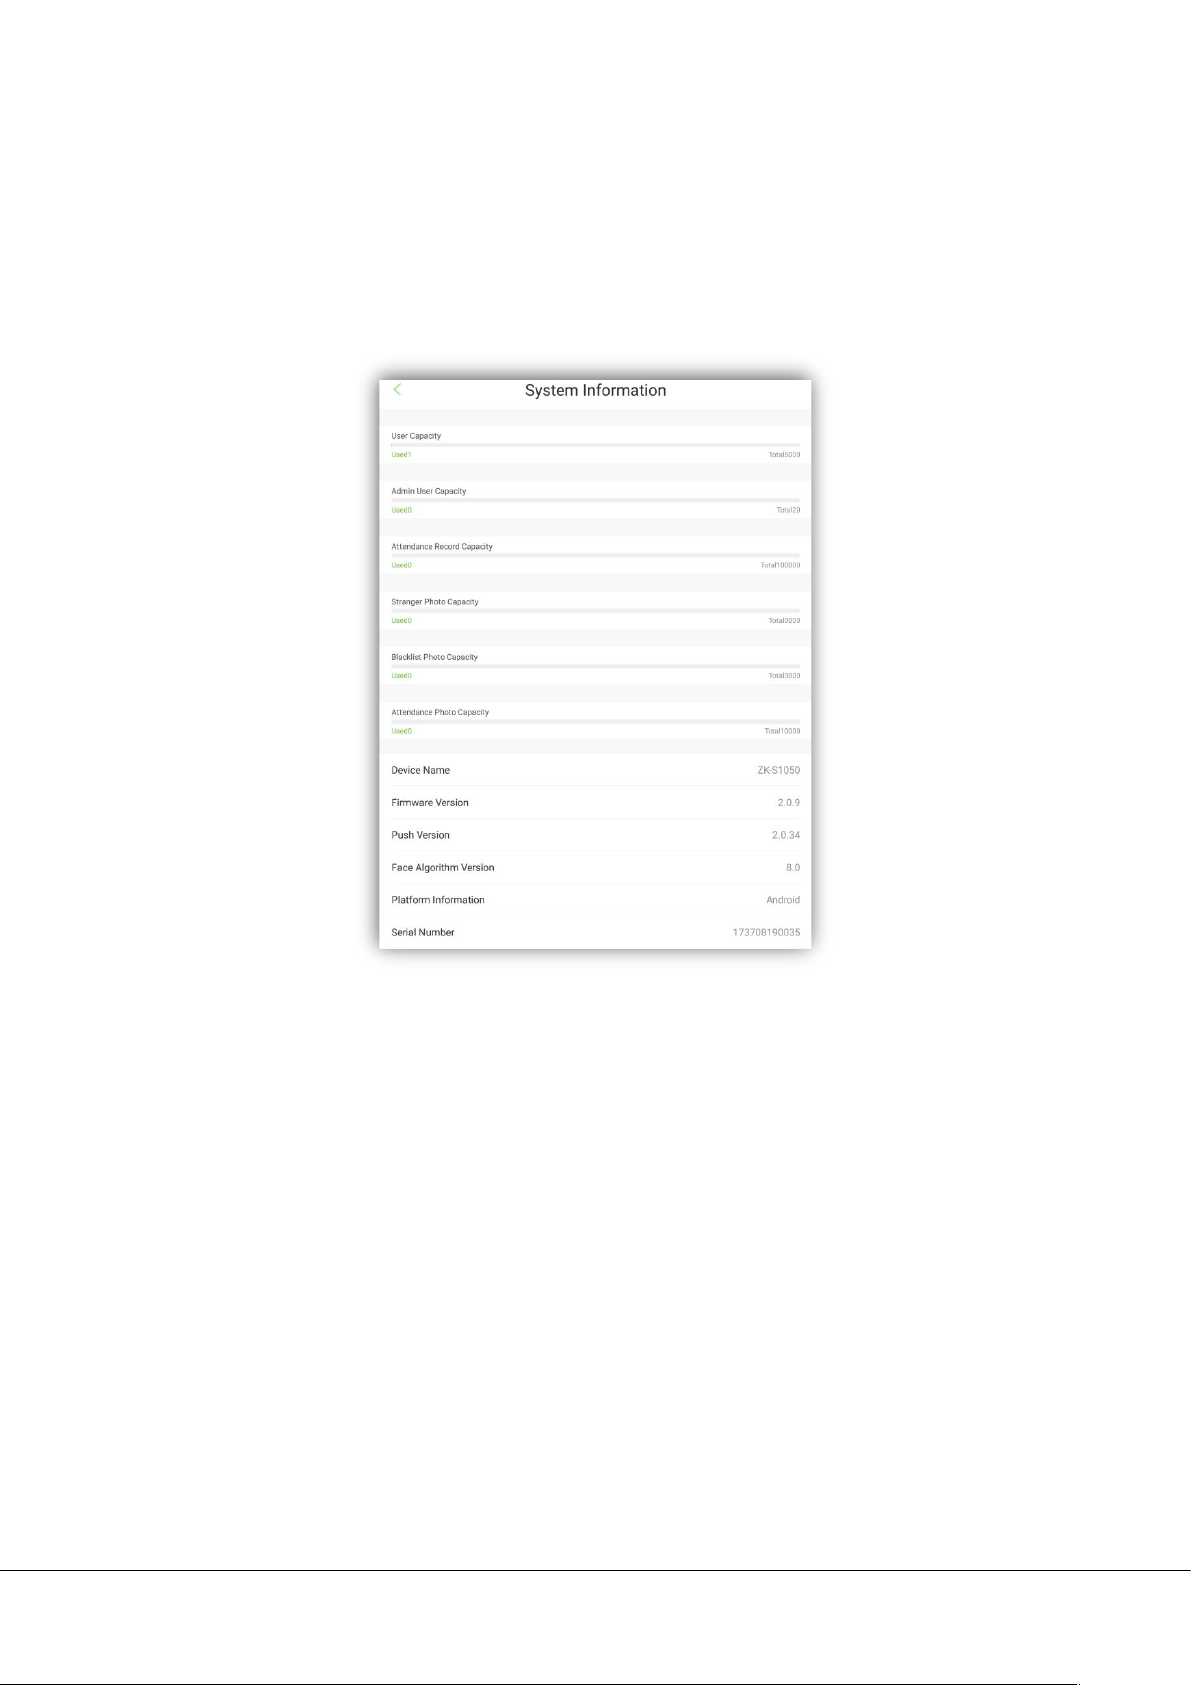
The [System Info] menu allows you to view the device storage and version information.
On the main menu screen, click on [System Info].
10. Advertisement Setting
On the [AD Setting] screen, click on [Turn on AD Player] to enable advertisement playing and setting the
advertisement photo/video switching time, as shown in the following figure.
26 FaceKiosk Series User Manual
Page 31
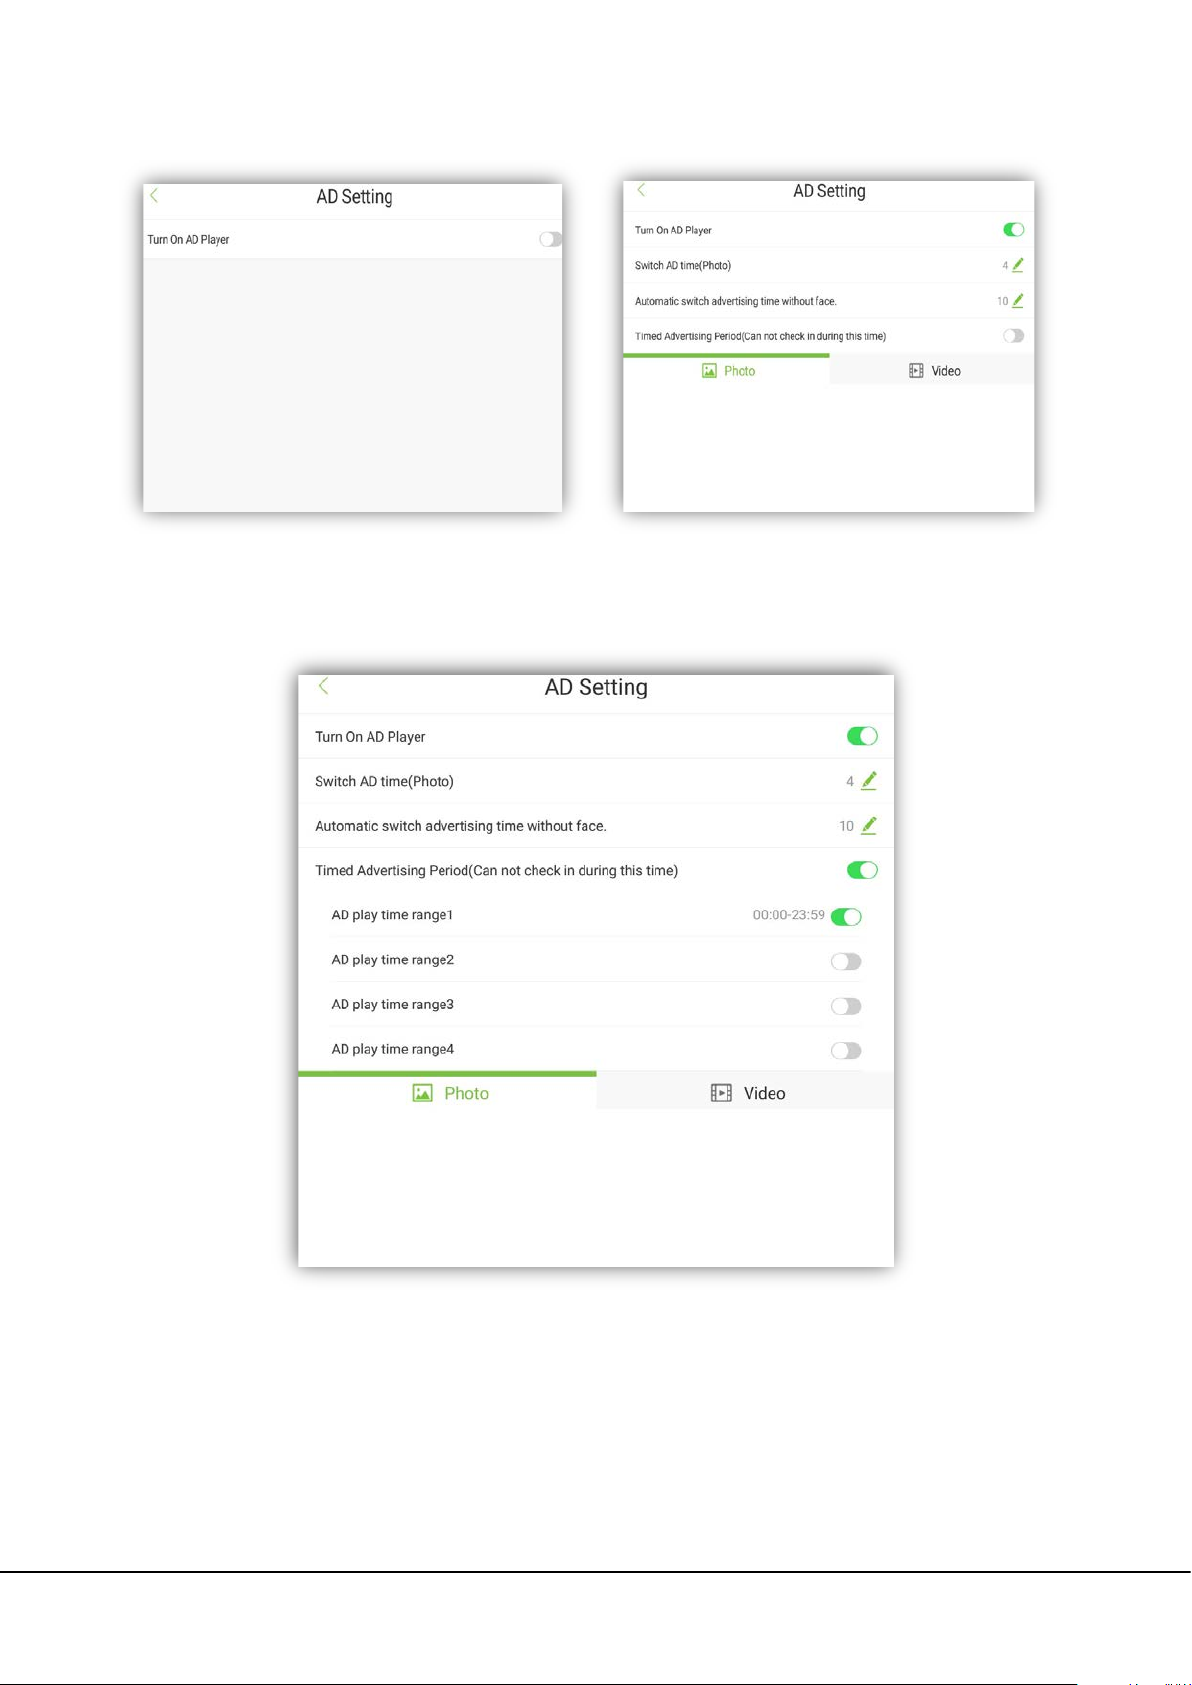
1.E
nable advertisement play. 2. Select pictures/videos.
(Note: Select either advertising pictures or videos.)
. Set the picture or video play time (unit: s).
3
Field Instruction:
Switch advertisement time: Use to set the frequency of change for advertisements.
Automatic switch advertising time without face: Use to set the time duration after which, advertisement
picture/video will be shown if no face is detected.
FaceKiosk Series User Manual 27
Page 32
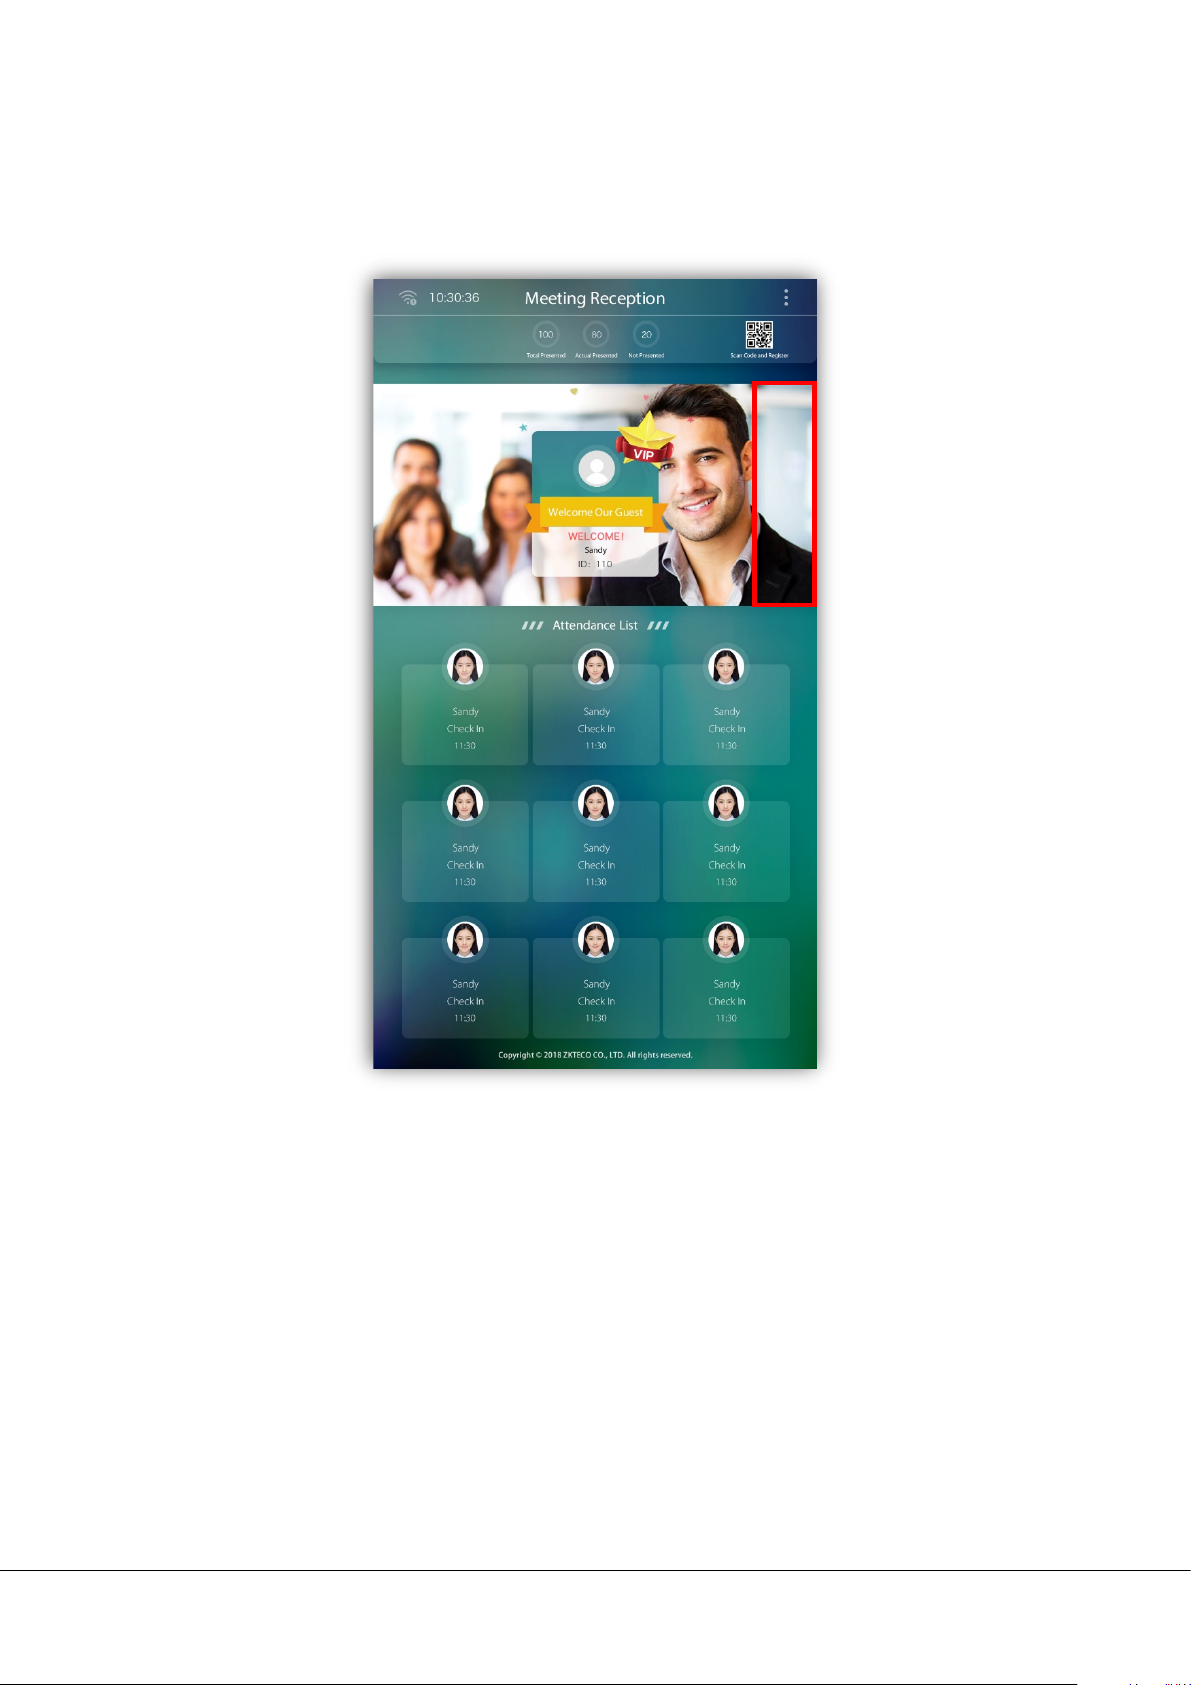
Manual sliding advertisement: Slide the advertisement to the left directly from the right part of face monitoring
interface to switch advertisement manually. The position is shown below:
Advertisement playing time: Use to set the time period for the advertisement playing time. If the advertisement time
period is repeated with the check-in time range and the check-in and check-out time of the meeting, it will switch
to the face check-in interface when someone is detected in the monitoring area and then switch back to
advertisement playing interface during no check-in period.
11. Personal
Click on [Personal] in the main menu. The main functions can be used to set voice broadcast content, sleep time of
device, status bar display, special effects setting of VIP, etc. As shown below:
28 FaceKiosk Series User Manual
Page 33
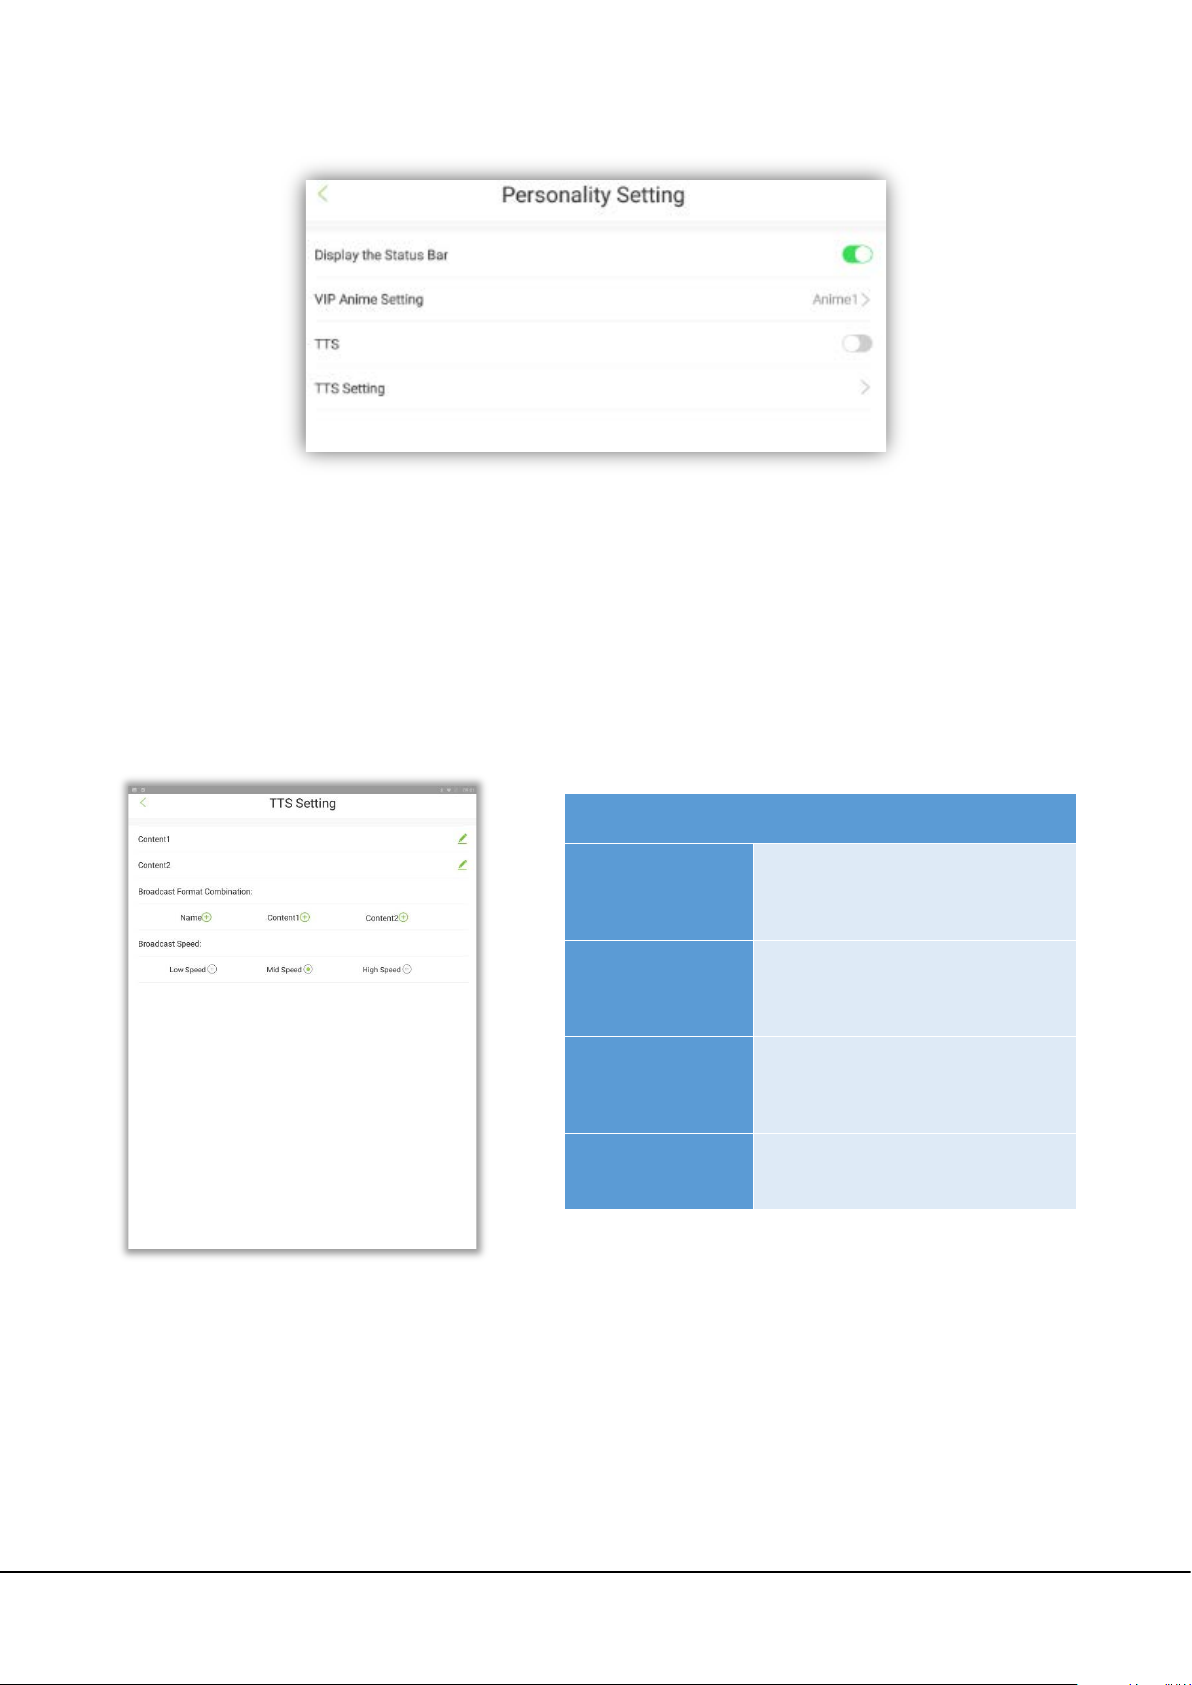
ield Instruction:
F
[Switch of status bar display]: Display or hide the guide bar of device.
[VIP special effects setting]: Use to set the special effects of VIP. User can choose from either of the four special
effects. The default setting is no special effect.
[Switch of voice broadcast]: It will turn on the voice broadcast function.
[Voice broadcast setting]: It will set the voice broadcast content, as shown below:
Menu Function
Support letters, numbers and
Custom content 1
Chinese character. A maximum of
Five characters can be entered.
Support letters, numbers and
Custom content 2
Chinese. 5 characters can be
entered at most.
Broadcast format
combination
Voice broadcast
speed
N
ote: Setting up more characters in this function will lead to a longer broadcast time. In multiple recognition
Set the voice broadcast content
format combination. The default is
to broadcast name only.
Choose low speed, medium speed
or high speed.
situation, it will influence the feedback result of successful recognition. Users can choose whether to turn on this
function or not according to the actual needs.
FaceKiosk Series User Manual 29
Page 34

12. Access Control Management
Click on [Access control management] in the main interface of the device. Related parameters of access control can
be set in this interface. As shown below:
12.1 Access Control Parameters
Click [Access control parameter] to set the related parameter, as shown below:
Field Instruction:
[Door Lock Delay (s)]: The time duration for which the lock will be kept unlocked by the device. (Valid value: 1~10
seconds)
[Door Sensor Delay (s)]: When the door is opened, the door sensor will be monitored after a time period; if the state
of the door sensor is inconsistent with that of the door sensor mode, the alarm will be triggered. This time period is
30 FaceKiosk Series User Manual
Page 35

the Door Sensor Delay (valid value: 1 to 99 seconds).
[Door Sensor Type]: There are three option:
No
means door sensor is not in use;
Normally Open
Normally Closed
[Door Alarm Delay (s)]: When the state of the door sensor is inconsistent with that of the door sensor type, alarm
will be triggered after a time period; this time period is the Door Alarm Delay (valid value: 1 to 99 seconds).
[Alarm]: Select the turn on the alarm function.
means the door is always opened in power-on condition;
means the door is always closed in power-on condition.
No, Normally Open
, and
Normally Closed
.
12.2 Wiegand Output Setting
Click on [Wiegand output setting] to set the related parameters, as shown below:
Field Instruction:
[Type]: Displays default User ID and it cannot be modified.
[Wiegand output bits]: The default is Wiegand34. Other options are Wiegand26, Wiegand26a, and Wiegand34a.
[Pulse Width (us)]: The default value is 100, the range is 20-400.
[Pulse Interval (us)]: The default is 1000, the range is 200-20000.
[Failed ID]: It is defined as the output value for failed user verification. The output format depends on the [Wiegand
Format] setting. It’s disabled by default; the range is 0 - 65535.
FaceKiosk Series User Manual 31
Page 36

[Site Code]: Used to customize the Wiegand format. It is almost similar to device ID, the only difference is that, it can
be set manually and repeated with different devices. It’s disabled by default; the range is 0 - 256.
13. BioTime 7.0 Connection
By allowing the device to communicate with the attendance module of the BioTime 7.0 software, you can add users
through software. In addition, you can also upload attendance records to this software for attendance calculation.
13.1 Adding a Device
There are two ways to add a device:
Add a device automatically.
Set a server IP address and port number on the device.
Add a device manually. The procedure is as follows:
1. On the function menu, go to [Device] [Add]. The following screen is displayed.
2. Set parameters and click [OK] to add the device. You can click [Cancel] to cancel the addition.
The parameters are described as follows:
[Device Name]: Attendance device name. You can enter up to 20 characters.
[Serial Number]: Serial number of the attendance device.
[IP Address]: IP address of the attendance device.
[Port No]: Port number of the attendance device. The default value is 4370.
[Area]: Areas divided on the device for data management.
32 FaceKiosk Series User Manual
Page 37
[Time Zone]: Attendance time divisions.
[Refresh Interval] (min): Frequency of sending a command request.
[Fixed Transmission Time]: Time of transmitting data. You can set 10 values, separated by a semicolon.
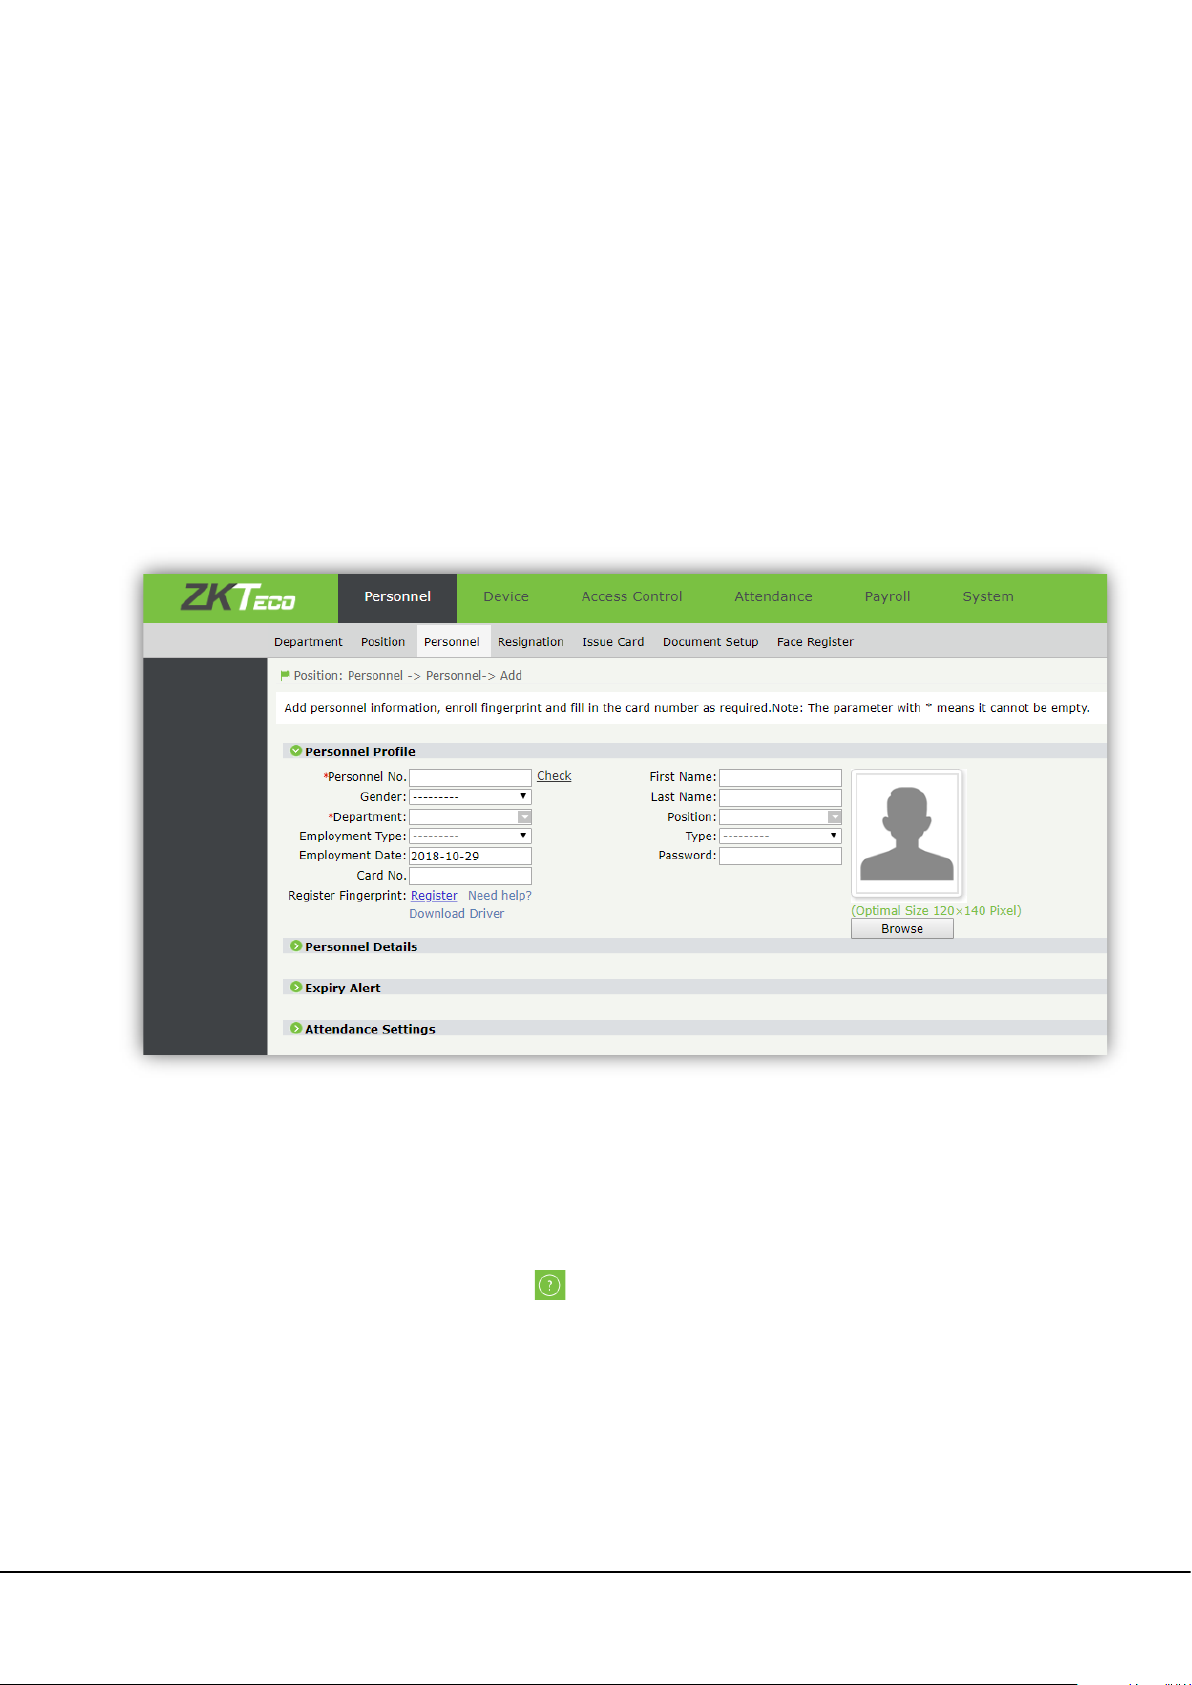
13.2 User Management
13.2.1 Adding a User
Go to [Personnel] [Add] to add a user.
13.3 Attendance Management
After attendance records are uploaded to the software, set the schedule to manage attendance statistics. For details
of the software, see the related user manual. Click on the home screen to refer the help menu.
FaceKiosk Series User Manual 33
Page 38
14. ZKBiosecurity Connection
By allowing device to communicate with the attendance module of the ZKBioSecurity software, you can use
functions such as adding users and delivering advertising pictures or videos. In addition, you can upload attendance
records to this software for attendance calculation.
14.1 Adding a Device
There are two ways to add a device:
Add a device automatically.
Set a server IP address and port number on the device and click to add the device.
Add a device manually. The procedure is as follows:
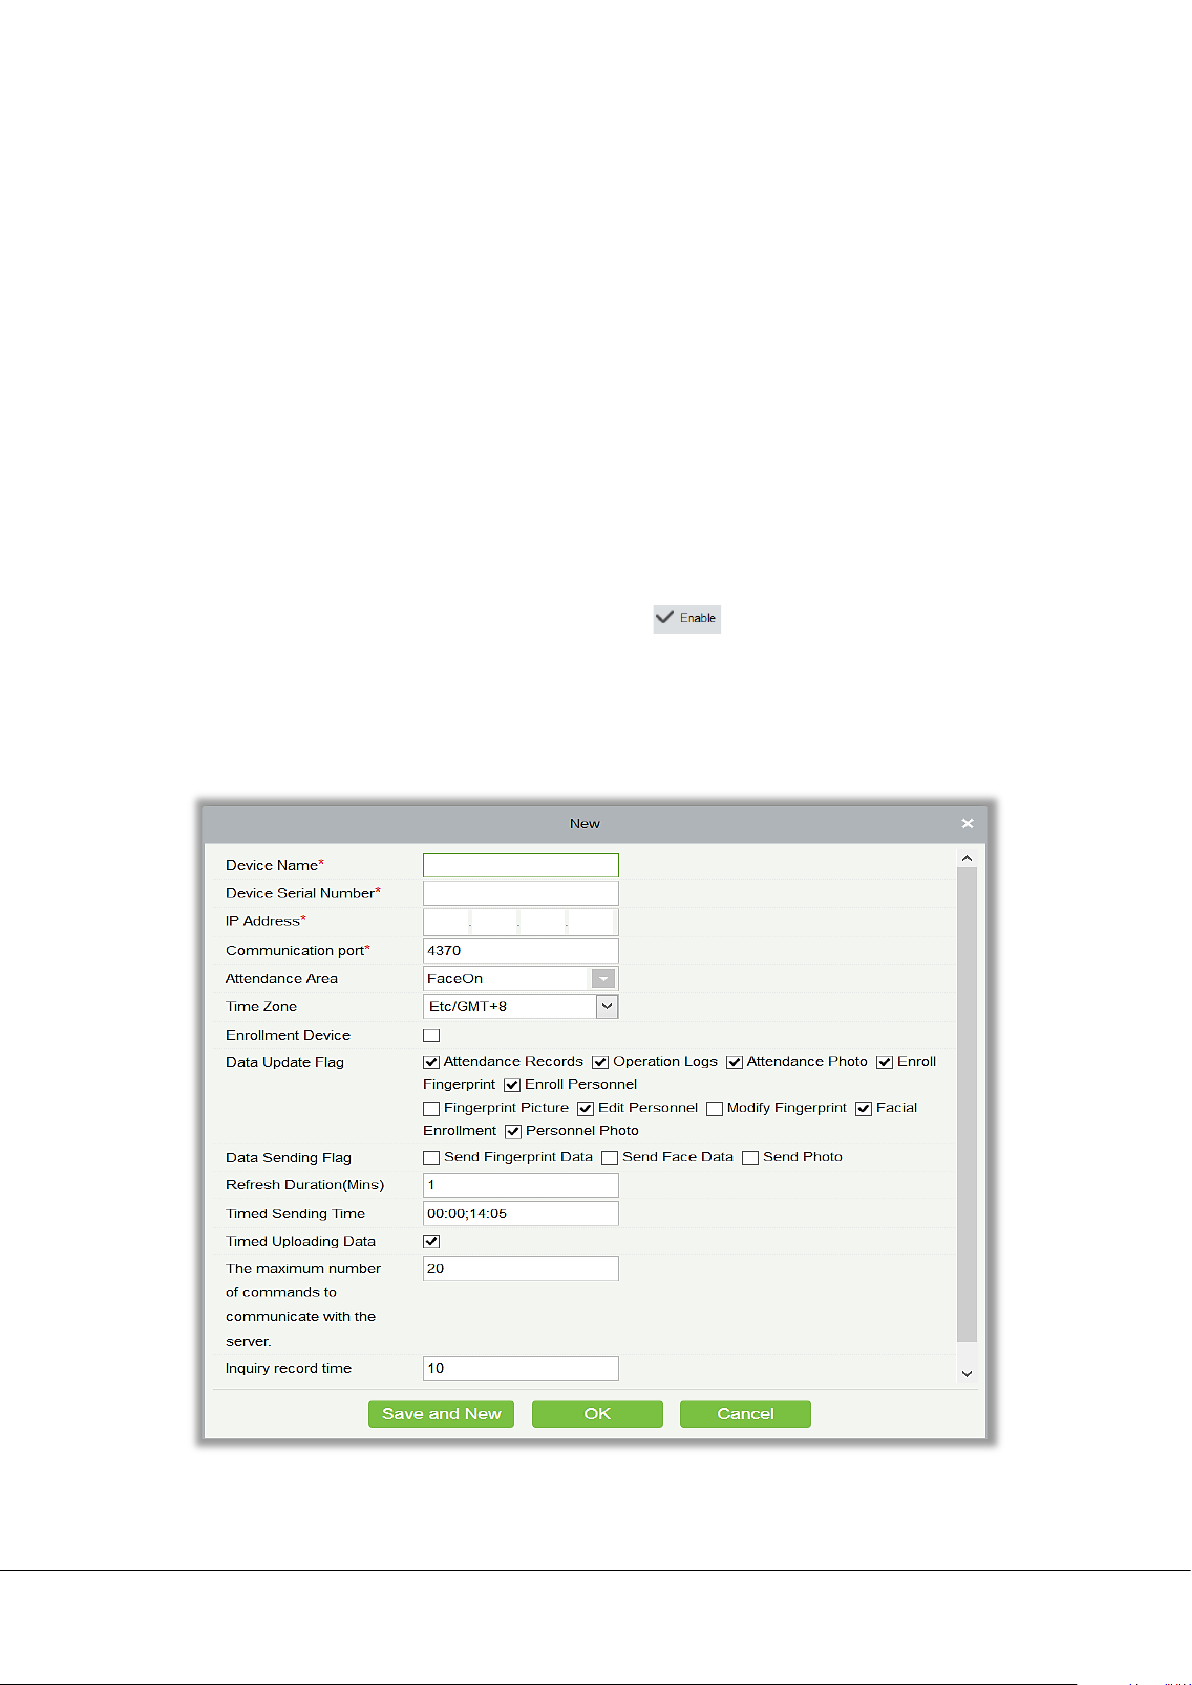
1. On the function menu, go to [Attendance] [Device] [New]. The following screen is displayed.
2. S
et parameters and click [OK] to add the device. You can click [Cancel] to cancel the addition.
34 FaceKiosk Series User Manual
Page 39
The parameters are described as follows:
[Device Name]: Attendance device name. Enter up to 20 characters.
[Device Serial Number]: Serial number of the attendance device.
[IP Address]: IP address of the attendance device.
[Communication port]: Port number of the attendance device. The default value is 4370.
[Attendance Area]: Areas divided on the device for data management.
[Time Zone]: Attendance time divisions.
[Enrollment Device]: If this option is not selected, the uploaded user data is not processed (except attendance
records); if this option is selected, the uploaded user data is processed.
[Data Update Flag]: Types of data to be actively uploaded (mainly software).
[Data Sending Flag]: Data to be delivered to the device (mainly device-supported functions)
[Refresh Duration] (min): Frequency of sending a command request.
[Timed Sending Time]: Time of transmitting data. You can set 10 values, separated by a semicolon.
[The maximum number of commands to communicate with the server]: Maximum number of commands at a
time.
[Inquiry record time] (s): Time interval for Searching device records.
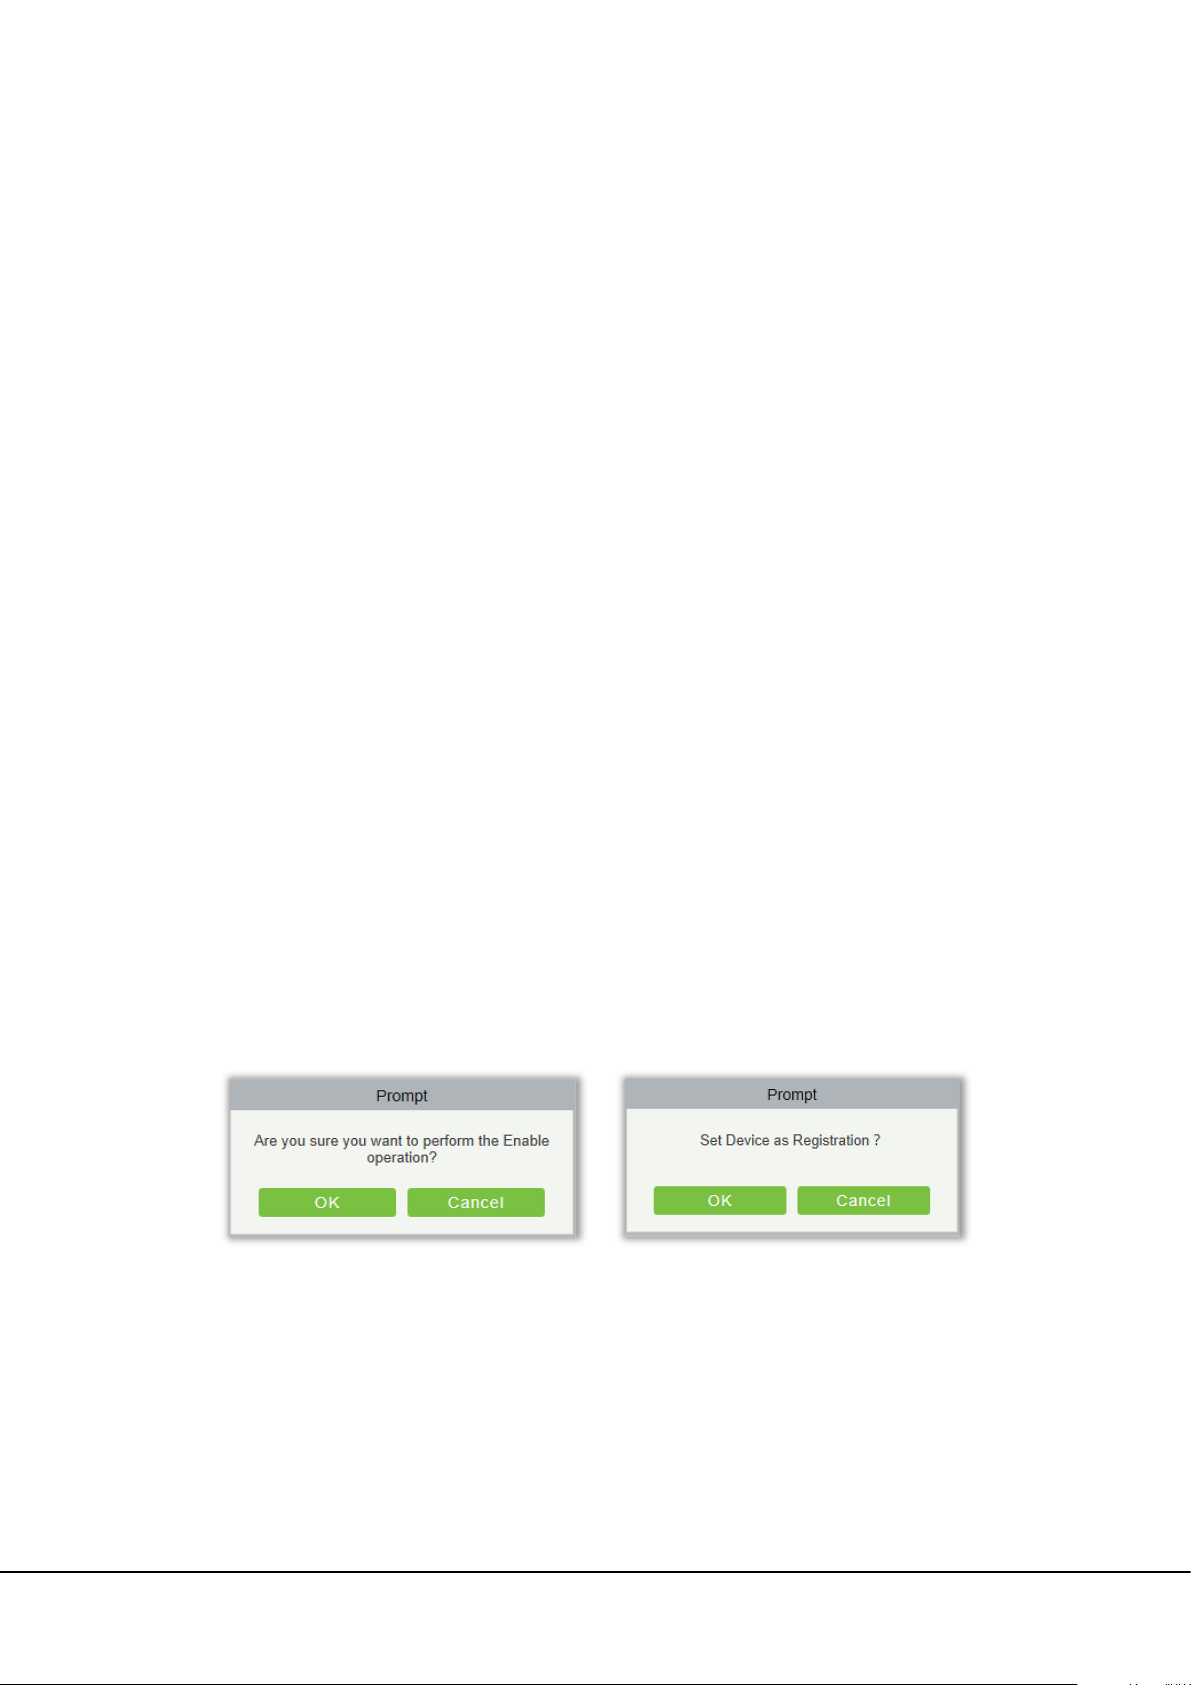
3. Enable the device.
If you enable the device, data is uploaded and delivered properly. (Currently, the function of setting the device as a
registration device is added.)
14.2 User Management
14.2.1 Adding a User
Go to [Personnel] [Person] [New] to add a user.
FaceKiosk Series User Manual 35
Page 40
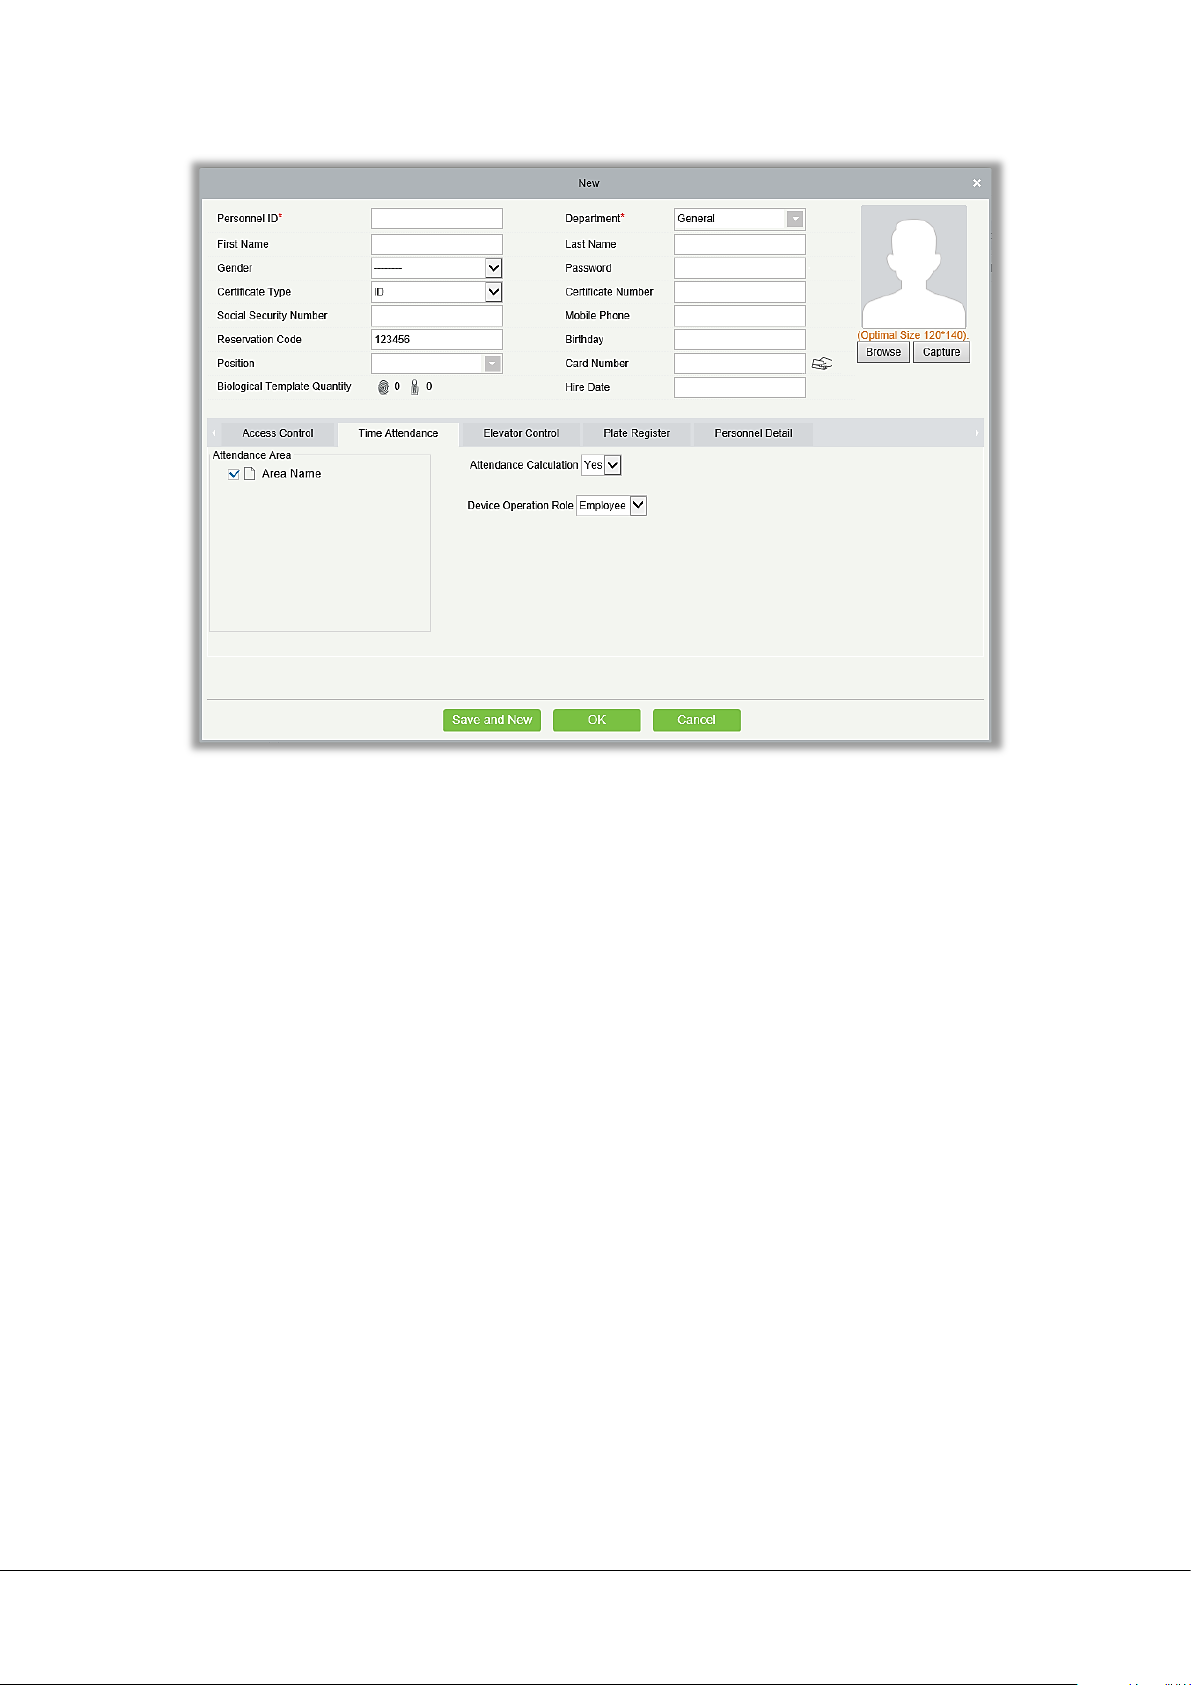
ecommended user photo requirements: Face in center, distinct face, no deformation of photo, no reflection.
R
640*480<pixel<1920*1080. Only jpg format is supported.
14.2.2 Uploading a Photo
To upload a photo, perform the following steps:
(1) Go to [Personnel] > [Person] and click [Personnel ID] or [Edit]. The user profile editing screen is displayed.
(2) Click [Browse] to select a photo and click [OK].
To capture a photo, perform the following steps:
(1) Connect to an external camera, or switch to the built-in camera of the device.
(2) Go to [Personnel] > [Person] and click [Personnel ID] or [Edit]. The user profile editing screen is displayed.
(3) Click [Capture]. The photo capturing screen is displayed. The browser allows you to select the camera. The screen
is as follows:
36 FaceKiosk Series User Manual
Page 41
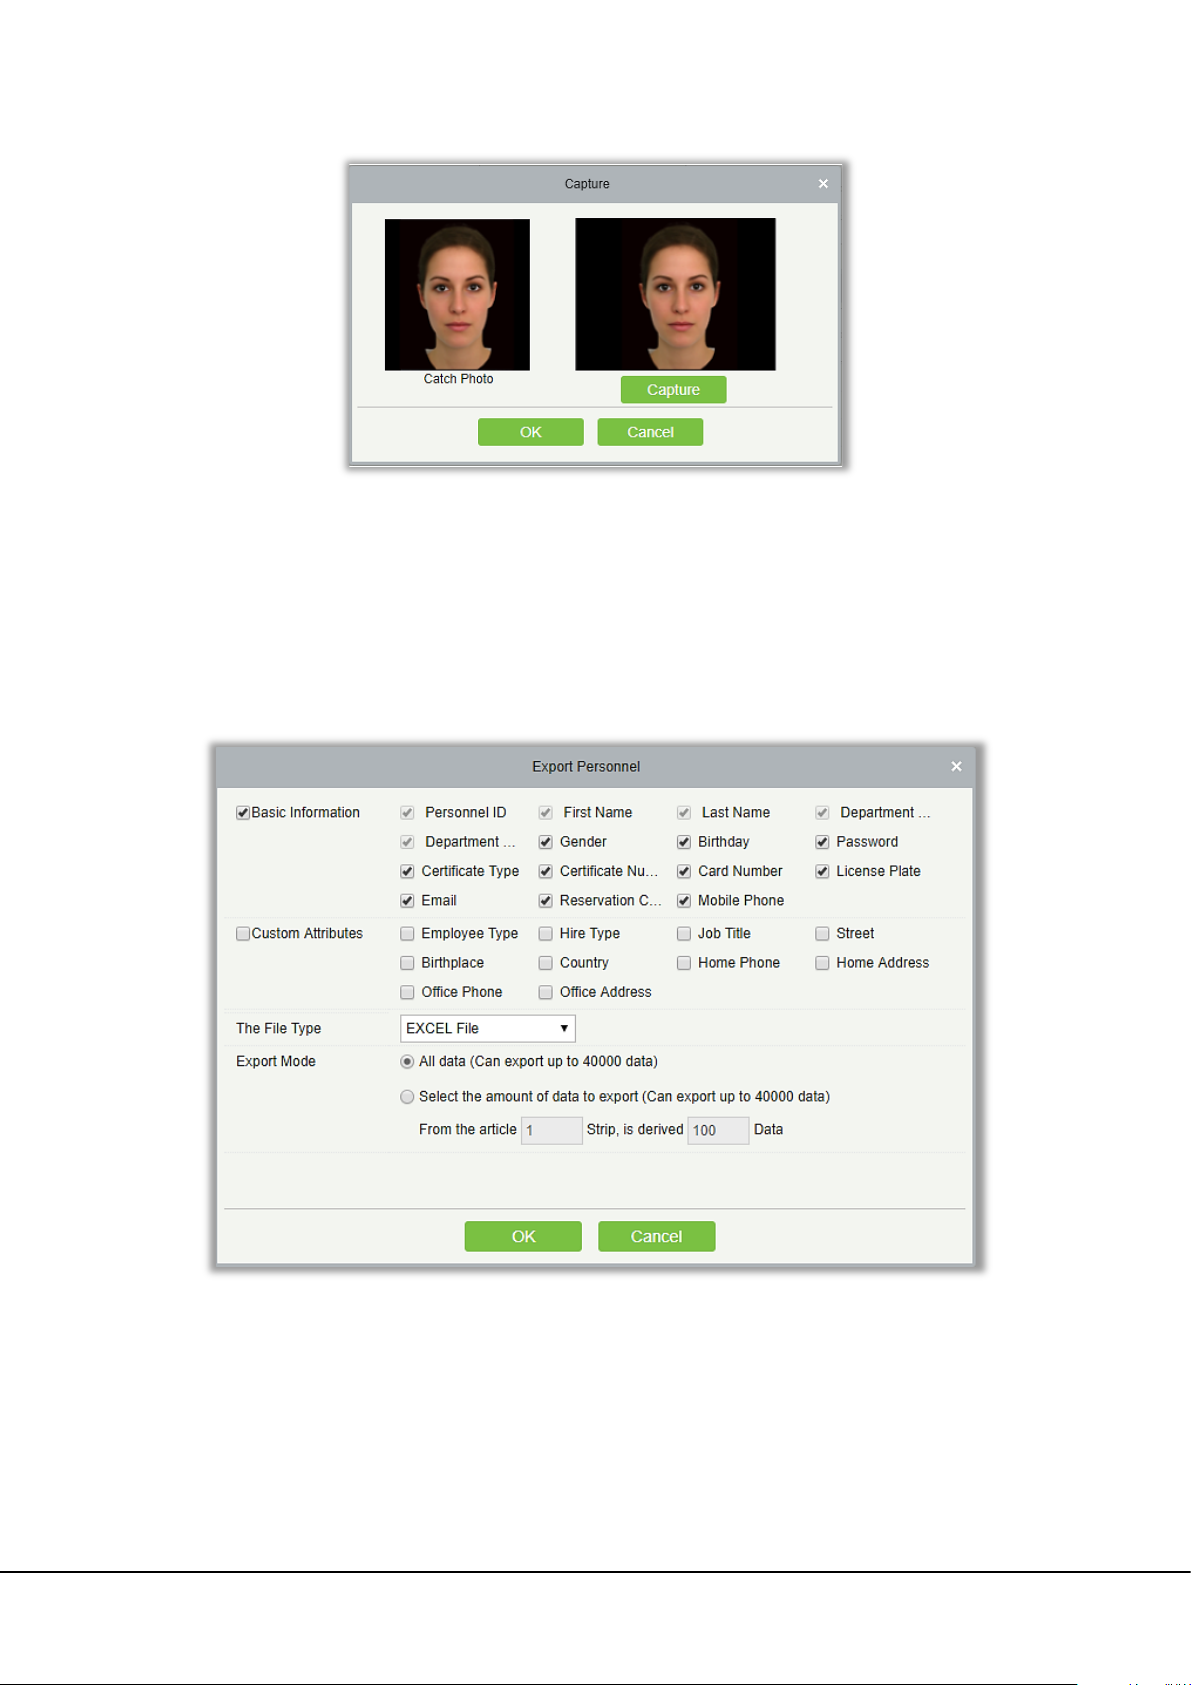
(4) Click on [Capture] to capture the photo and click [OK].
14.2.3 Importing User Information in Batches
1. Export the user information template, click [Export], select [Export Personnel], select user information fields, and
click [OK] to download the template.
ill in the template information.
2. F
3. Click on [Import] and select [Import Personnel]. The import screen is displayed.
FaceKiosk Series User Manual 37
Page 42
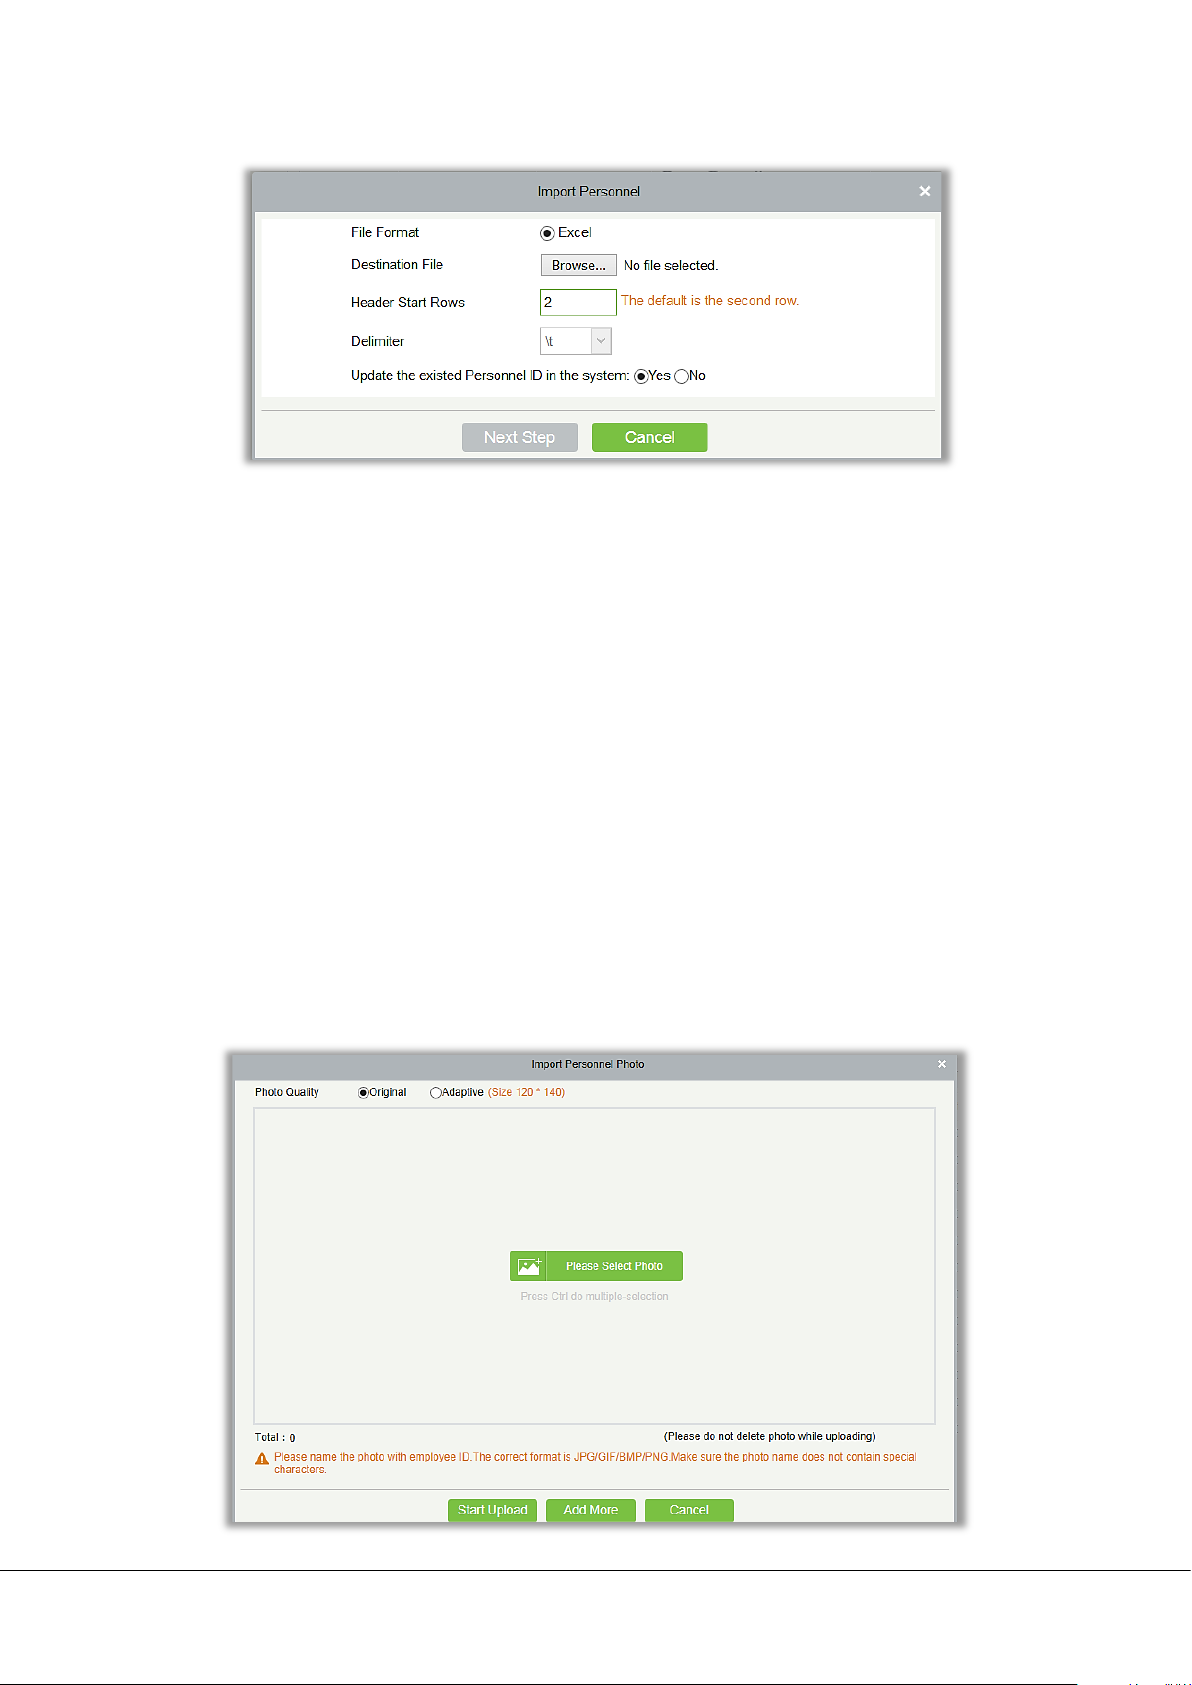
e parameters are described as follows:
Th
[File Format]: The imported file format is Excel.
[Destination File]: Click [Browse] to select a file to be imported.
[Header Start Rows]: Enter the first line of the data.
[Update the existed Personnel ID in the system]: If you select [Yes], the user information is updated; if you select
[No], the user information remains unchanged.
14.2.4 Importing User Photos in Batches
Recommended user photo requirements: Face in center, distinct face, no deformation of photo, no reflection.
640*480<pixel<1920*1080. Only jpg format is supported.
Click [Import] and select [Import User Photos] to enter the [Import Photos] interface.
38 FaceKiosk Series User Manual
Page 43
Note: Use the employee ID to name the photo. The supported format is JPG. The photo name must not contain
special characters.
Click on [Please Select Photo] and select multiple photos by pressing Ctrl. Click on [Start Upload] to import the photos.
14.3 Adding Advertisement
Note: You can either add pictures or videos as an advertising. That means, if any picture is already added as an
advertising picture to the device, then a video cannot be added.
14.3.1 Add Advertising Pictures
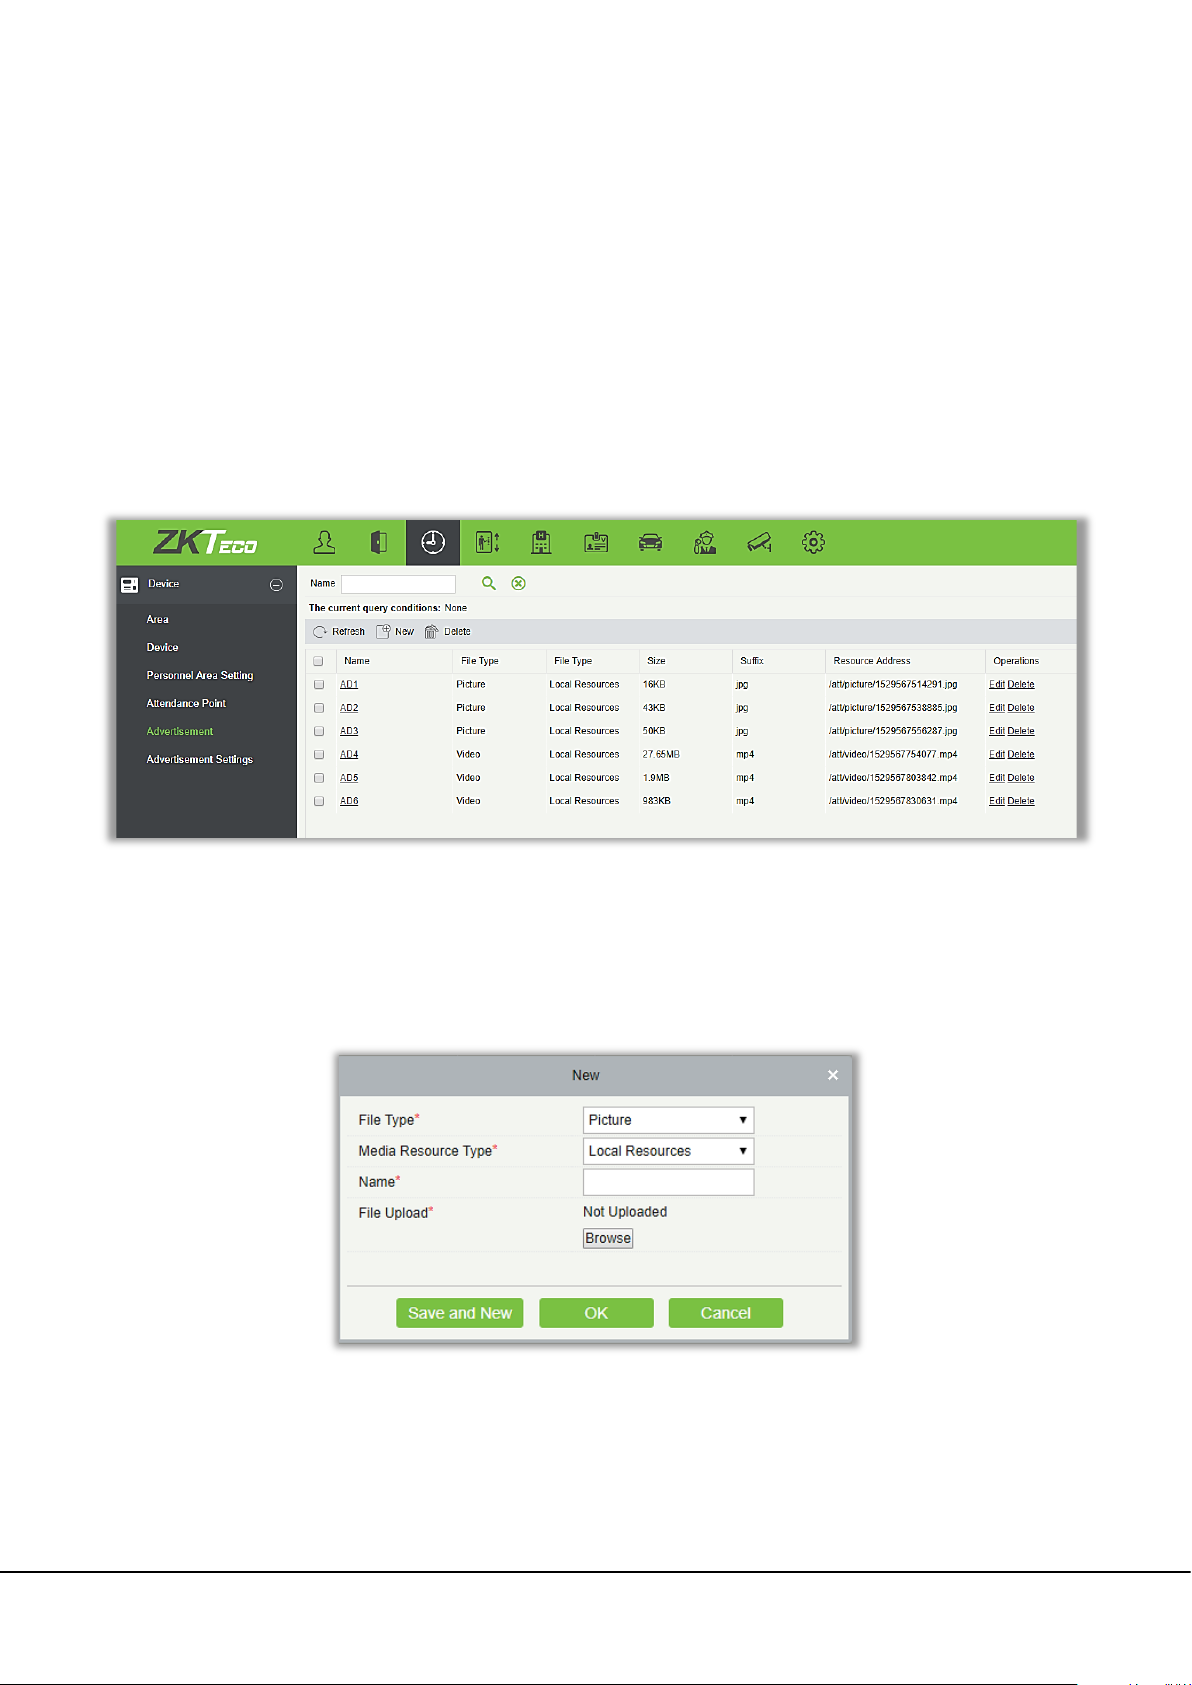
Click on [Attendance] [Device] [Advertisement], the interface is shown below:
[File Upload]: Click [Browse] and select the desired image file to upload. The size and suffix name will be displayed
automatically.
[Name]: Enter the image name of the advertisement. It shouldn’t be more than 10 characters.
FaceKiosk Series User Manual 39
Page 44

[Delete the Pictures]: Go back to the list of advertising images, select the images to be deleted, and click [Delete].
14.3.2 Add AD Video
Click [Attendance] [Device] [Advertisement], the interface is shown below:
[File Upload]: Click [Browse] to select the required video to be uploaded. Size, suffix name will be displayed
automatically.
[Name]: Enter the desired video name, it shouldn’t be more than 10 characters.
[Delete the Video]: After creation, go back to the list of advertising video, then select the video that needs to be
deleted, and click [Delete].
Note: if the advertisement video is too big (over 50MB), then it needs to be uploaded by USB disk. The video issued
by the software only supports MP4, WMV and AVI format, and the size is within 50 MB. Image supports JPG, BMP, GIF
and PNG format.
14.3.3 Advertisement Settings
40 FaceKiosk Series User Manual
Page 45

Add Advertisement
Click on the [Add Advertisement] button under the device to set the advertisement content of the device. The
content list is added from the [Advertisement] column.
D
elete advertisement
Select the required advertisement and click [Delete] to remove the advertisement content.
FaceKiosk Series User Manual 41
Page 46

14.4 Attendance Management
After attendance records are uploaded to the background software, set the schedule to manage attendance statistics.
For details of the background software, see the related user manual. Click on the home screen to obtain the help
system.
14.5 Scan Code Registration
1. Go to the main interface of the information screen device, then open [Scan] function in mobile phone and scan
the QR code, the registration interface will be displayed, enter the name and work number information, and
click upload avatar or take photo. Allow [Access to Mobile Phone Camera] to open the mobile phone camera
and capture photo. After capturing a photo, click registration to open the registration. (Note: Backgroun
s
etting is required for the default opening of the scanning registration function for the verification. You can
choose to close it.)
2. After background verification: The software background interface is shown. Click [Personnel]→[Personnel]→
[Temporary Personnel]
d
elect the desired personnel and the administrator. Click [Audit] to check and verify. Only after the successful approval,
S
face verification can be carried out through the device.
42 FaceKiosk Series User Manual
Page 47

ZK Building, Wuhe Road, Gangtou, Bantian, Buji Town,
Longgang District, Shenzhen China 518129
Tel: +86 755-89602345
Fax: +86 755-89602394
www.zkteco.com
© Copyright 2018. ZKTeco Inc. ZKTeco Logo is a registered trademark of ZKTeco or a related company. All other product and company names
mentioned are used for identification purposes only and may be the trademarks of their respective owners. All specifications are subject to
change without notice. All rights reserved.
FaceDepot Series User Manual 43
 Loading...