

Page 1
User Manual
For V150 Series Appliances
ONLINE VERSION: For the digital animation of
how to use your new Ziploc® Vacuum Sealer
System, please use your smart device to scan
the QR code found to the left.
1 http://ziplocvacuumsealer.com 1-888-723-5198
Do not attempt to service this product. Service should be performed by an authorized service
representative. A short power-supply cord is provided to reduce the risk resulting from
becoming entangled in or tripping over a longer cord. Extension cords are not prohibited from
being used when care is exercised in their use. When an extension cord is used the marked
electrical rating of the extension cord shall be no less than the marked electrical rating of the
appliance. The longer cord shall be arranged so that it does not drape over the counter-top or
tabletop where it is capable of being tripped over, snagged, or pulled on unintentionally,
especially by children.
IMPORTANT SAFEGUARDS
1. Read the instructions carefully.
2. Do not allow the appliance to be used as a toy.
3. This appliance should not be operated by children.
4. Do not operate the appliance with a damaged power cord or plug. Before each use,
inspect power cord and plug for signs of damage.
5. Do not use the appliance on a wet or hot surface, or near a heat source.
6. Always use the appliance on a level surface.
7. Do not immerse any part of the appliance, power cord or plug into water or other liquid.
8. To disconnect, unplug the power cord from the electrical outlet. Do not disconnect by
pulling on the cord. Always unplug the appliance before cleaning and when not in use.
9. Do not operate the appliance if it malfunctions or is damaged in anyway. If the cord or
the machine is damaged, it must be returned to our customer service department. See
warranty for more information.
10. Use the appliance only for its intended use.
11. Close supervision is required when this product is used near children.
12. The Appliance is not for commercial use. If sealing more than 20 bags or canisters
continuously, wait at least 20 minutes before resuming use of your appliance.
Read and fully understand all instructions and warnings prior to using this
machine. Your safety is most important! Failure to comply with procedures and
safeguards may result in serious injury.
This appliance has a polarized plug (one blade is wider than the other). To reduce the risk
of electrical shock, this plug is intended to fit into a polarized outlet only one way. If the plug
does not fit fully into the outlet, reverse the plug. If it still does not fit, contact a qualified
electrician to install the proper outlet. Do not attempt to modify the plug in any way. If the
plug fits loosely into the AC outlet or if the AC outlet feels warm, do not use the outlet.
POLARIZED PLUG
Welcome and thank you for purchasing this Ziploc® Brand Vacuum Sealer! With the new Ziploc®
Brand Vacuum Sealer, just close the lid firmly by pressing down on both sides, check to make sure
that the lid will not open. If the lid cannot be lifted, then you have successfully locked the lid in place,
press the vacuum seal button and let the vacuum sealer do the rest! The machine will continue to
vacuum out air and then seal the bag; once it’s done it even releases the bag automatically!
Your new Ziploc® Brand Vacuum Sealer System includes the following:
• V150 Series Food Sealer • Registration Card
• Starter Bags • Accessory Hose
WELCOME
This appliance is for HOUSEHOLD USE ONLY!
Page 2
http://ziplocvacuumsealer.com 1-888-723-5198 2
VACUUM SEALING GUIDELINES
Food Storage & Safety
IMPORTANT: Vacuum packaging is NOT a
substitute for refrigeration or freezing. Any
perishable foods that require refrigeration
must still be refrigerated or frozen after
vacuum packaging.
For best results in extending the life of foods, it is
important to vacuum package foods that are
fresh. Once food has begun to deteriorate,
vacuum packaging may only slow the
deterioration process. Vacuum sealing cannot
prevent the growth of mold. Other disease
causing microorganisms can still grow in low
oxygen environments and may require further
measures to be eliminated. Yeast - The
development of yeast can be slowed by
refrigeration and completely stopped by freezing
food at 0°F(-18°C).Yeast causes fermentation,
which gives food an identifiable smell. Bacteria -
Bacteria can grow rapidly in the “Danger Zone”,
the temperatures between 40ºF and 140ºF.
Pathogenic bacteria cause illness and do not
generally affect the taste, smell or appearance of
food. They are rare, but can be very dangerous.
IMPORTANT: There are basic rules to follow
when handling food: COOK, SEPARATE,
CLEAN and CHILL.
Cook– It is crucial to cook food to a safe internal
temperature to destroy bacteria that is present.
Bacteria is not just a surface condition but can be
found deep within the mixture of meats and other
foods. Separate - Foods that will be eaten
uncooked and foods that will be cooked before
eating MUST ALWAYS be kept separate. Cross
contamination can occur when raw foods (such
as meats or eggs) come in contact with foods
that will be eaten before or after cooking. Always
use your Ziploc® Brand Vacuum Sealer Bags to
ensure that juices won’t drip onto fresh produce
or other foods. Clean– Wash hands and work
surfaces frequently when cooking. Washing with
soap and water for at least 15 seconds, then dry
with a paper towel. Chill - Chilling food is very
important. To help preserve food safely, do not
allow food to stand at room temperature for 2
hours or more, set your refrigerator to 40oF(4oC)
or colder and your freezer to 0oF(-17oC).
Freezing at 0oF does not kill microorganisms, but
stops them from growing. For long-term storage,
always freeze perishable foods that have been
vacuum packaged and keep refrigerated after
thawing.
Food Preparation Hints and Tips for
Air-tight Vacuum Sealing
Cooking, Thawing and Reheating - Simmering
in a Ziploc® Brand Vacuum Sealer Bag helps
food retain its flavor and it helps with the clean up
as well. When reheating foods in the microwave
that have been stored in Ziploc® Brand Vacuum
Sealer Bags, puncture the bag to allow hot air to
escape. You can also reheat foods in Ziploc®
Brand Vacuum Sealer Bags by placing them in
water at a low simmer below 170oF (75oC).
IMPORTANT: Always thaw food in either
refrigerator or microwave - do not thaw
perishable foods at room temperature.
Preparation Hints for Meat and Fish:
Pre-freeze meat and fish for 1-2 hours before
vacuum packaging. This helps retain the juice
and shape, providing a better seal. If you can’t,
place a folded paper towel between the food and
top of the bag, but below seal area. Leave paper
towel in bag to absorb excess moisture and
juices during vacuum packaging process.
Preparation Hints for Cheeses:
Buy fresh and keep fresh, that’s our motto!
Vacuum package cheese after each use. If you
make your bag just a little longer than needed,
you can re-seal the bag after each use.
IMPORTANT: Due to the risk of anaerobic
bacteria, soft cheeses should never be
vacuumed packaged.
Preparation Guidelines for Vegetables:
Mom always said “eat your vegetables..”, we say
blanch them. Blanching is a process that should
be done before vacuum packaging. This process
stops the enzyme action that could lead to loss of
flavor, color and texture. To blanch vegetables,
place them in simmering water or in a microwave
until they are cooked, but still crisp. Blanching
times can range from 1 to 2 minutes for leafy
greens and peas; 3 to 4 minutes for snap peas,
sliced zucchini or broccoli; carrots about 5
minutes; and 7 to 11 minutes for corn on the cob.
After blanching, immerse vegetables in cold
water to stop the cooking process.
NOTE: All vegetables (including broccoli,
brussels sprouts, cabbage, cauliflower, kale,
turnips etc.) naturally emit gases, during
storage. Therefore, after blanching, it’s best
if they are stored in the freezer.
3 http://ziplocvacuumsealer.com 1-888-723-5198
More on Vegetables:
Vegetables are a great candidate for portion
control; when storing vegetables, try prefreezing them for 1 to 2 hours, then separate
them into meal portions within your Ziploc®
Brand Vacuum Sealer Bags. After they have
been vacuum packaged, return them to the
freezer.
IMPORTANT: Due to the risk of anaerobic
bacteria, fresh mushrooms, onions & garlic
should never be vacuum packaged.
Preparation Hints for Powdery Foods:
When vacuum packaging powdery items like
flour, it’s best to use their original packaging
inside of the Ziploc® Brand Vacuum Sealer
Bags. The fine powder could get sucked into
the machine and cause enough damage to
shorten the life of the sealer.
Preparation Hints for Liquids:
Before vacuum packaging liquids such as
soup stock, pre-freeze in a casserole dish, loaf
pan or ice cube tray until solid. Remove
frozen liquid from the pan and vacuum
package in a Ziploc® Brand Vacuum Sealer
Bag. Then store in the freezer. When ready to
use, simply cut the corner of the bag and place
with the cut corner up in either a microwave
dish or drop into water at a low simmer, below
170ºF (77ºC).
Preparation Guidelines for Healthy
Make-Ahead Meals:
Ziploc® Brand Vacuum Sealer Bags are very
effective in helping you plan and prepare
healthy make-ahead meals. Check out the
recipes contained on our website for additional
ideas.
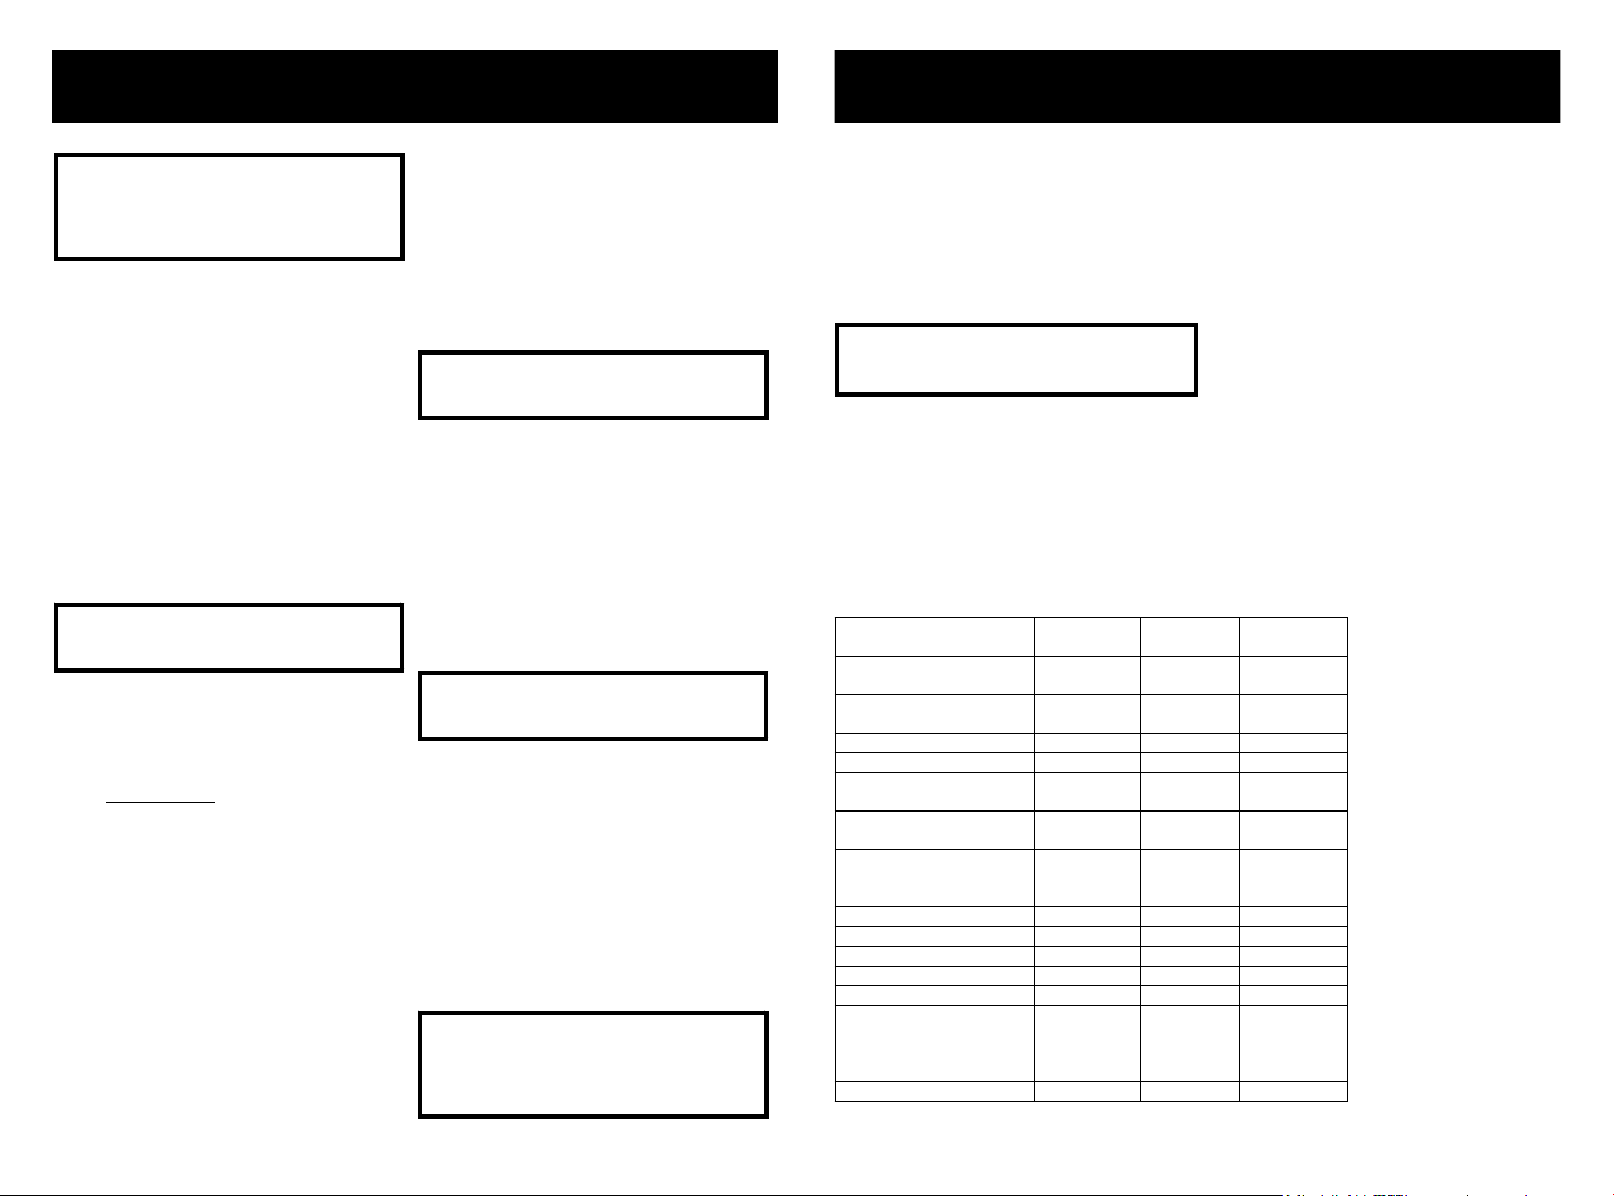
VACUUM SEALING GUIDELINES
Vacuum Food Storage Guide*
Food
Stored In
Normal
Shelf Life
Vacuum
Shelf Life
Large cuts of meat: beef,
poultry, lamb and pork
Freezer
6 months
2-3 years
Ground meat: beef,
poultry, lamb and pork
Freezer
4 months
1 year
Fish
Freezer
6 months
2 years
Coffee beans
Pantry
4 weeks
16 months
Coffee beans
Freezer
6-9
months
2-3 years
Berries: strawberries,
raspberries, blackberries
Refrigerator
1-3 days
1 week
Berries: cranberries,
huckleberries,
blueberries
Refrigerator
3-6 days
2 weeks
Cheese
Refrigerator
1-2 weeks
4-8 months
Cookies, crackers
Pantry
1-2 weeks
3-6 weeks
Flour, sugar, rice
Pantry
6 months
1-2 years
Lettuce
Refrigerator
3-6 days
2 weeks
Nuts
Pantry
6 months
2 years
Oils with no
preservatives, like
safflower, canola, corn
oil
Pantry
5-6
months
1-1.5 years
Wine
Refrigerator
1-3 weeks
2-4 months
Table adapted from Dr. G.K. York, Dept. of Food Science & Tech.,
University of California, Davis
* Only use information on this table
as a guideline! Actual storage
life may vary. Check all food for
spoilage before use.
FOOD STAYS
FRESHER LONGER
WHEN YOU
VACUUM SEAL!
Page 3

http://ziplocvacuumsealer.com 1-888-723-5198 4
(Note: some features may vary slightly
by model)
FEATURES OF YOUR ZIPLOC® BRAND
(NOTE: Ziploc® Brand storage
bags that are not designed for
vacuum storage should never be
used in your vacuum sealer!)
Vacuum & Seal Button
Press to vacuum packages and
seal food airtight. Appliance shuts
off automatically.
Cancel Button
Immediately halts the
current function.
Accessory Port
Allows vacuum packaging
with Canisters and
Accessories.
Pulse Button
Used when extreme control of
the vacuum process is needed
for delicate foods. Press the
button and the vacuum pump
turns ON, release the button
and it shuts OFF.
Seal Button
This button has three uses:
1. Press to create a seal when making
bags from a Ziploc® Brand Vacuum
Sealer Roll.
2. Press to immediately stop the
vacuum process and begin sealing
the bag, preventing delicate foods
from being crushed.
3. Press to create a seal on foil bags
(such as a potato chip bag) to keep
food sealed airtight.
Indicator light
After plugging the machine in, the light WILL NOT
come on, but the machine is ready for use.
Green Light indicates that the vacuum feature
is operating
Red Light indicates that the sealing feature is
operating.
5 http://ziplocvacuumsealer.com 1-888-723-5198
1. Pull enough bag material to hold item to be vacuum packaged, plus 2 inches. With a pair of
scissors or sharp knife, cut desired bag length from bag roll. Make sure to cut in a straight line.
Plug in power cord.
2. Open lid. Place one end of the cut bag onto the sealing strip. Don’t worry if you accidently
place any material onto the gasket area.
3. Close lid by pressing down firmly on both sides until a “click” is heard from
each side. Check to make sure the lid will not open. If the lid cannot open, you have
successfully locked the lid in place.
4. Now that the lid has been locked in place, press the ‘SEAL’ button to create a custom size bag.
The indicator light illuminates during the seal process.
5. The machine will briefly start the vacuum pump. Once completed, the lid will open by itself and
the indicator light will turn off. It is now safe to take out the newly created bag.
6. The custom size bag is now ready for vacuum sealing
HOW TO MAKE CUSTOM SIZE BAGS
NOTE: Make sure you give the appliance time to cool down. Wait at least 20 seconds
between seals. Under heavy usage, the appliance will shut off automatically to prevent
overheating. If it does, wait 20 minutes to allow the appliance to cool down. The appliance
is not for commercial use. If sealing more than 20 bags or canisters consecutively, wait at
least 20 minutes before resuming use of your appliance.
NOTE: The sealing st rip will NOT work proper ly u nless you loc k th e lid . Ensure
that the lid has been locked on both sides for proper sealing.
IMPORTANT: In the rare instance that the automatic bag release
mechanism does not function properly, simply press down on the lid
over the locked side to release the lid and the bag.
Page 4

http://ziplocvacuumsealer.com 1-888-723-5198 6
1. Place the item(s) to be sealed into the pre-cut or custom sized bag. Leave at least 2 inches
between the contents and the top of the bag to allow for bag contraction.
2. Open lid. Place one end of the bag into the vacuum channel.
3. Close lid by pressing down firmly on both sides until a “click” is heard from
each side. Check to make sure the lid will not open. If the lid cannot open, you have
successfully locked the lid in place.
4. To begin the vacuum process, press the Vacuum and Seal button. The unit will continue to
vacuum and then seal once the ar has been removed.
5. Once the indicator light has been turned off, the machine will automatically unlock and release
the bag.
NOTE: Canister might not be included, accessory hose may not fit all canisters lids.
HOW TO VACUUM SEAL WITH ZIPLOC®
BRAND VACUUM SEALER BAGS
HOW TO USE YOUR ZIPLOC® BRAND
VACUUM SEALER WITH A CANISTER
1. Clean and wipe the canister cover and canister base to make sure they are clean and dry.
2. Place food into the canister and leave at least one inch of space between the food and the
cover.
3. Place cover onto canister.
4. Insert one end of the accessory hose in to the accessory port on the appliance. Ensure that
the hose end is secure and in place.
5. Insert the opposite end of the accessory hose into the accessory port on the canister or
accessory adapter. Again, ensure that it is secure and in place.
6. Close lid by pressing down firmly on both sides until a “click” is heard from
each side.
7. To begin the vacuum process, press the Vacuum and Seal button. The unit will continue to
vacuum and then seal once the ar has been removed.
8. Once the indicator light has been turned off, it is safe to remove the accessory hose from the
canister and the machine.
7 http://ziplocvacuumsealer.com 1-888-723-5198
TROUBLESHOOTING
PROBLEM
SOLUTION
Nothing happens
when I press the
Vacuum and Seal
button.
Make sure the power cord is correctly plugged in to the electrical outlet.
Make sure the power cord is not damaged in any way.
Make sure the electrical outlet is working by plugging in another appliance. If it
is not working please check the circuit breakers or fuses in your home.
Make sure the bag is positioned correctly down in the vacuum channel.
Press down firmly on both sides of the lid to make sure that it is locked in place.
Wait 20 minutes to allow the appliance to cool off, then try using again.
Air is not
vacuumed from
the bag
Check that there are no gaps, folds, wrinkles or holes in the pre-sealed bag.
Check for loose, worn or cracked upper and lower sealing gaskets.
Foods with high liquid contents may prevent the bag from sealing properly. Cut
bag open and wipe top inside of bag and reseal.
Check to see if bag is properly inserted in to the Vacuum Channel.
Make sure you’ve placed the bag in the proper place. When making a bag from
a roll, make sure end of cut piece is on the Sealing Strip.
Bag Melts
The Sealing Strip may have been too hot during the sealing process. Allow the
unit to cool for 20 seconds between uses. If the bag continues to melt, allow
unit to cool with the lid in the upright position for 20 minutes before using.
Air has seeped
back in to the
vacuumed bag
Check the seal of the bag. There may be a hole or wrinkle that is allowing air to
re-enter the bag. Carefully cut the bag open and re-seal it, or use an entirely
new bag.
Make sure there is no moisture or liquid from the food present within the bag
seal. You may need to cut open the bag and re-seal it, or use an entirely new
bag. Partially freeze foods with excess liquids, prior to vacuum sealing.
Make sure there are no food items with sharp edges that may have punctured
the bag. If you find a puncture hole, seal the item in an entirely new bag.
Make sure no liquids were drawn to the sealing strip area.
Check for loose, worn or cracked upper and lower sealing gaskets.
Moisture of foods with high liquid content will prevent the bag from sealing
properly. Cut bag open and wipe top inside of bag and re-seal.
Bag will not seal
Check that there aren’t any gaps, folds, wrinkles or holes in pre-sealed edges.
Moisture of foods with high liquid content will prevent the bag from sealing
properly. Cut bag open and wipe top inside of bag and re-seal.
Make sure you’ve placed the bag in the proper place. When making a bag from
a roll, make sure end of cut piece is on the Sealing Strip.
Make sure you’ve given the appliance time to cool down. Wait 20 seconds
between seals.
Auto Bag Release
Mechanism does
not function
In the rare instance that the automatic bag release mechanism does not
function properly, simply press down on the lid over the unlocked side to
release the lid and the bag.
ACCESSORY ADAPTER
Accessory Adapter
Use your Ziploc® Brand Vacuum
Sealer System with a wide variety of
vacuum accessories with the new
Ziploc® Brand Accessory Adapter!
Simply attach your vacuum hose to
the Accessory Adapter and you are
ready to vacuum anything from
canisters to zippered vacuum bags
to wine bottles!
Page 5

http://ziplocvacuumsealer.com 1-888-723-5198 8
CARE AND CLEANING
1. Risk of Electric Shock: Always unplug the unit before cleaning.
2. DO NOT IMMERSE IN WATER!
3. Do not use abrasives to clean the unit.
4. Wipe the outer surfaces with a soft, damp cloth and mild soap.
5. To clean the inside of the unit, wipe away any food or liquid with a clean paper towel.
6. Dry all parts thoroughly before you plug the unit in and operate.
HELPFUL HINTS
1. Store Safely! Store your Ziploc® Brand Vacuum Sealer System with the lid unlocked to prevent
damage to the vacuum gaskets.
2. Take Your Vitamins With You When Traveling! When traveling, take your vitamins along
with you without the bulk of bottles! Simply use your Ziploc® Brand Vacuum Sealer System and
vacuum rolls to make pint sized vitamin pack bags to save on room and to keep all your
vitamins pre-packed in your daily dose.
3. Remember the TSA’s 3-1-1 rule for Carry-Ons when flying! When you travel, vacuum seal
your liquids in a 1 quart clear sided bag using your Ziploc® Brand Vacuum Sealer System and
quart size pre-cut vacuum bags and rolls.
4. Stay Dry Outside! On your trips to the beach, on a boat or simply camping, vacuum seal your
cell phone and important electronics and paper items to keep them dry! Use your Ziploc®
Brand Vacuum Sealer System and quart or gallon size pre-cut vacuum bags and rolls to
protect your important electronics and other items even when it is raining outside!
9 http://ziplocvacuumsealer.com 1-888-723-5198
Page 6

http://ziplocvacuumsealer.com 1-888-723-5198 10
SERVICE INSTRUCTIONS
1. Do not ATTEMPT to repair or adjust any electrical or mechanical functions on this unit. Doing
so will void the Warranty.
2. If you have any questions or comments regarding the unit’s operation or believe any repair is
necessary, please contact our Customer Service Department:
CTi Industries Corporation
22160 N. Pepper Road
Lake Barrington, IL. 60010
1 YEAR LIMITED WARRANTY
CTi Industries Corporation warrants that for a period of one year from the date of purchase, this
product will be free from defects in material and workmanship. CTi, at its option, will repair or
replace this product or any component of the product found to be defective during the warranty
period. Replacement will be made with a new or remanufactured product or component. If the
product is no longer available, replacement may be made with a similar product of equal or greater
value. This is your exclusive warranty. Do NOT attempt to repair or adjust any electrical or
mechanical functions on this product. Doing so will void this warranty.
This warranty is intended and valid solely for the original retail purchase, and is not transferable.
Keep the original sales receipt. Proof of purchase is required to obtain warranty performance. CTi
dealers, service centers, or retail stores selling CTi products do not have the right to alter, modify
or in any way change the terms and conditions of this warranty.
This warranty does not cover normal wear of parts or damage resulting from any of the following:
negligent use or misuse of the product, use on improper voltage or current, use contrary to the
operating instructions and disassembly repair or alteration by anyone other than CTi or authorized
CTi service center. Further, the warranty does not cover: damage to the unit caused by immersion
in water or liquid, or from dropping.
What are the limits on CTi’s liability?
Except to the extent prohibited or limited by applicable law, and except as expressly provided
herein, CTi DISCLAIMS ALL WARRANTIES, EXPRESS OR IMPLIED, INCLUDING WITHOUT
LIMITATION ANY WARRANTY OF MERCHANTABILITY OR FITNESS FOR A PARTICULAR
PURPOSE. Except to the extent prohibited or limited by applicable law, CTi shall not be liable or
responsible for loss, injury or damage of any kind arising from the purchase, use, misuse, or
inability to use the product, or the breach of any warranty provided herein, including without
limitation, incidental, exemplary, special or consequential damages, or loss of profits, and the sole
remedy of the purchaser of the product with respect to any breach of warranty shall be the remedy
specifically provided for herein.
How to Obtain Warranty Service:
In the U.S.A.
If you have any questions regarding this warranty or would like to obtain warranty service, please
call 1-888-723-5198 and a convenient service center address will be provided to you.
In Canada
If you have any questions regarding this warranty or would like to obtain warranty service, please
call 1-888-723-5198 and a convenient service center address will be provided to you.
Bags and Rolls: CTi makes no warranty, expressed or implied, written or oral, including that of
merchantability or fitness for any particular purpose with respect to bags and rolls.
 Loading...