


USER
MANUAL
Your ZINGO X200 warranty must be registered online
within 7 days of purchase.
To activate your warranty visit www.tevo.co.za,
click the “Outdoor” tab, then click the “ZINGO X200” icon, then click the “Register Your Warranty” link.
Fill in your details, enter the serial number (found near the charging port) and agree to the terms and conditions.

IMPORTANT
BATTERY CARE AND MAINTENANCE
1. Make sure that your ZINGO X200 is fully charged prior to initial use. The rst charge will take 14 hours. Wait for the full
14 hour charge period before unplugging.
2. Always charge your ZINGO X200 after every use.
3. DO NOT leave your ZINGO X200 charging for more than 10 hours.
4. Should you wish to store your ZINGO X200, charge it beforehand and make sure to charge once every 14 days.
This manual contains vital information regarding product care as well as best riding practices, riding conditions, and
precautionary measures. Read through this entire manual before riding, and make sure to heed all warnings, failure
to do so may result in your ZINGO X200 not being covered by warranty.
WARNINGS
The ZINGO X200 is not intended to be used on public roads where there are cars, buses, taxis or any other licensed motor
vehicles. Make sure to familiarize yourself with the trac rules and regulations in your area to determine where it is safe for you
to ride your scooter.
Riding the ZINGO X200 can result in serious injury or even death regardless of the ability of the rider, any factory fault, any
precautions taken or conditions in which they (the rider) were riding in. Make sure to check that all nuts and bolts are tightly
fastened before use, that your brakes are in proper working condition, and that you are both able and competent to handle
this scooter. Parents should be made aware that this scooter is not for children under the age of 10, and further still, that riders
above this age should show a suitable degree of awareness, skill and ability to handle a ride-on of this nature.
Do not exceed the weight limit of 70kg. The rider’s weight does not necessarily mean that their size is appropriate to maintain
control of the scooter.
RIDING CONDITIONS, METHOD AND APPROPRIATE APPAREL
Make sure to use protective gear in the form of elbow and knee pads as well as a helmet and appropriate footwear. Gloves and
goggles are recommended.
Riders will become accustomed to riding the ZINGO X200 over time. Accidents can occur when given to someone who has
never ridden a scooter before. Exercise caution when allowing a rst-time rider to get onto the ZINGO X200. The rider should
be instructed on how to ride the ZINGO X200 (see full details on “HOW TO RIDE YOUR ZINGO X200” below).
Use caution when riding, and make sure to always be aware of your surroundings so as to avoid any pedestrians, other riders,
animals or xed obstacles that may cause you, or you may cause, any injury. The ZINGO X200 is not designed to withstand any
extreme manoeuvres. Do not attempt to perform any tricks, wheelies, bunny hops or any other extreme manoeuvres on the
ZINGO X200. Evidence of such abuse will render your warranty void.
Assess riding conditions before making use of the ZINGO X200, and do not ride through any gravel, mud, water, sand or on any
o-road surface. Do not ride your ZINGO X200 in the rain, or through any adverse weather conditions. The electrical and drive
components could be damaged by riding through the aforementioned elements or surfaces and will render your warranty void.
HOW TO RIDE YOUR ZINGO X200
The ZINGO X200 has a variable speed accelerator (throttle) like that found on a motorcycle. You can control your speed
precisely by slowly opening the throttle. Opening the throttle further will result in increased speed. Do not snap the throttle
open suddenly as this will rapidly project the scooter forward. This may result in you losing control of the ZINGO X200 and can
result in damage to property or cause you serious injury.
Before turningthe ZINGO X200 on make sure that the scooter is aimed towards an open space with nothing in front of you.
Put one foot on the deck and hold the handlebars rmly. Familiarize yourself with the brakes before switching on your ZINGO
X200. Hold the accelerator rmly and slowly twist it open. As the scooter starts to move forward and you have enough speed
to balance, place your second foot onto the deck. Slowly open the throttle until you get to the required speed for the conditions in which you are riding, whilst maintaining a speed suitable for your ability. Build your speed up gradually as you become
familiar with the scooter. Practise using the brakes while you are going slowly. Avoid opening the throttle to its maximum until
you are well accustomed to the scooters handling and braking. Fully opening the throttle will result in your batteries
discharging rapidly, and your range will be adversely aected.
1.
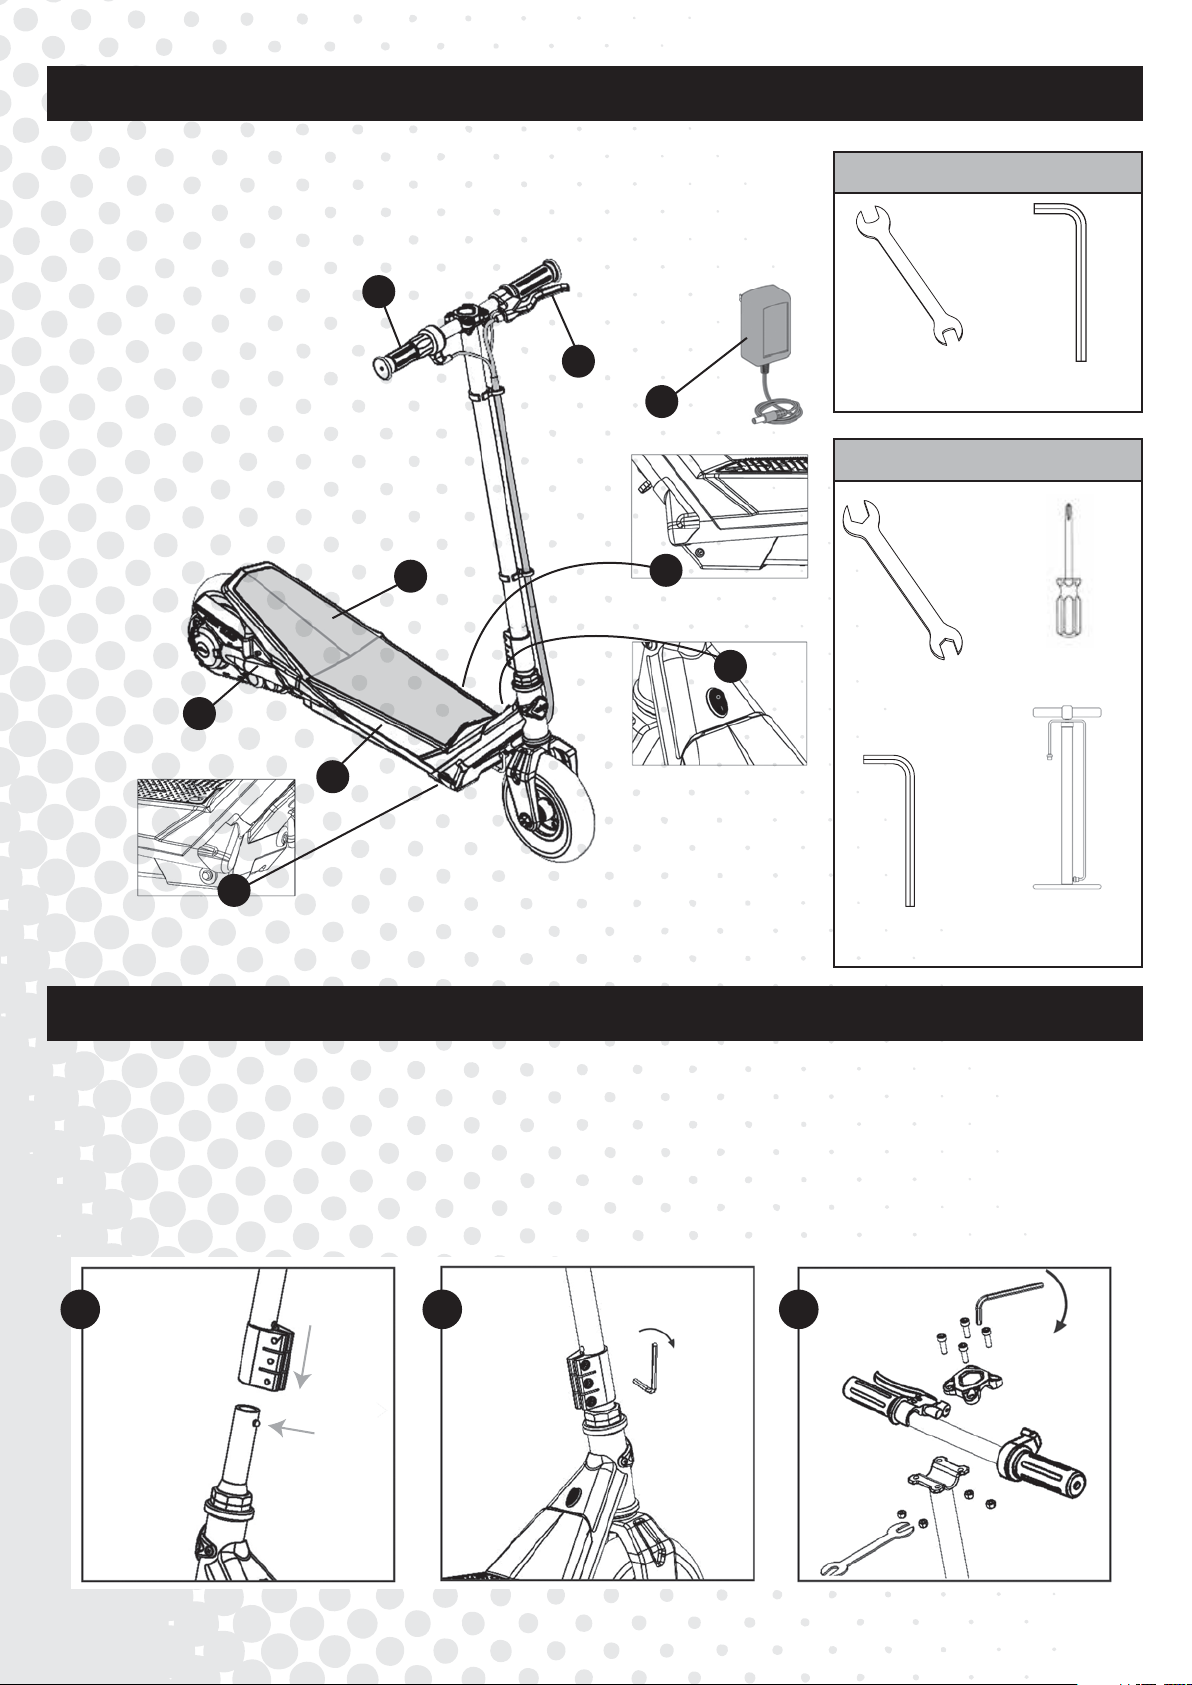
FAMILIARIZING YOURSELF WITH YOUR ZINGO X200
1. Throttle
2. Brake
3. Race-Ready
Rising Deck
4. 200W Motor
5. Rechargeable
24V Battery
6. Charger port
7. On/O switch
8. Charger
9. Reset Button
4
Tools included
1
2
8mm / 10mm spanner
5mm Allen Key
8
Tools required - not included
3
6
7
12mm / 13mm and
14mm spanners
Phillips Screwdriver
5
9
4mm Allen Key
Air pump with
pressure guage
for Schrader type valves
GETTING STARTED
Installing the T-Bar & Handlebar
1. Take the handlebar stem (A) and insert it into the top of the fork (B). Press the button (C) down until it clicks into place.
2. Tighten the Allen bolts on the head-clamp securely using the Allen key and spanner provided.
3. Place the handlebars (a) over the handlebar stem (b) and make sure that they’re correctly aligned. Now take the
handlebar bracket (c) and place it over the handlebar. Place the 4 bolts (d) in the top of the bracket holes and
screw on the 4 nuts (e) from below. Now tighten securely with the Allen key and spanner provided.
1 2 3
A
d
c
C
a
B
b
e
2.

CHARGING
To charge, plug the charger into the wall (1), and the charger into the charging port (2) located on the right hand side of the
ZINGO X200 just beneath the deck.
1 2
Prior to rst use your ZINGO X200 must be charged for 14 hours. Even if the green light comes on, disregard this and leave the
unit charging for the full 14 hours before unplugging.
After the rst charge, charge your ZINGO X200 until the green light appears (this means that your scooter is fully charged). The
ZINGO X200 may be left charging for up to 10 hours. Do not exceed this period as your batteries may suer irreparable
damage and this treatment will render your warranty void.
BATTERY CARE
1. For the rst charge your ZINGO X200 must be left to charge for 14 hours.
2. From there onwards charge your ZINGO X200 until the green light appears on the charger. Do not charge your
ZINGO X200 for a period longer than 10 hours, this may cause irreparable damage to your batteries and will not be
covered by warranty.
3. Do not allow your batteries to go into “deep discharge”. This occurs when a rider does not charge the unit immediately
after the batteries have been depleted. This will cause irreparable damage to your batteries and will not be covered by
warranty.
4. Make sure that you charge your ZINGO X200 prior to storing it. Make sure that you charge it at least once every 14 days.
Not charging the ZINGO X200 every 14 days may result in irreparable damage to your batteries which will not be
covered by warranty.
To increase the range on your batteries, be sure to charge your ZINGO X200 whenever the scooter is not in use. On
returning from a ride, charge your ZINGO X200 immediately. Consistent charging will build up the range of your batteries.
CHAIN CARE
Proper chain care will increase the life and improve the performance of your ZINGO X200.
1. Always keep the chain lubricated with a good chain spray (either motorcycle or bicycle-grade).
2. Make sure that the chain is tight with about 2-3mm of “play”.
3. It is recommended that you do not attempt to tighten the chain yourself, but rather visit a Service Centre for this
adjustment as this is a specialized operation.
4. Incorrectly aligning the rear wheel and/or over tightening the chain will cause damage to the scooter that will not be
covered by your warranty.
BEFORE RIDING
Make sure that your tyres are pumped up to the correct pressure before riding. The correct pressure for ZINGO X200 front tyre
is 2.5 BAR, and for the rear tyre it is 4.1 BAR. Check that the wheels spin freely and that the brakes are not catching at any point.
3.

ADJUSTING YOUR BRAKES
The ZINGO X200 has a rear wheel brake-pad system.
To tighten your brakes, loosen the lock nut (A) by turning it anti-clockwise until it spins freely. Now turn the tensioning bolt (B)
outwards until the brake is correctly adjusted. Finally, tighten the lock nut to lock the adjustment in place.
To loosen your brakes, loosen the lock nut (A). Turn the tensioning bolt (B) inward and the brake will loosen. Now tighten the
lock nut to lock the adjustment in place.
A
B
IMPORTANT: Please do not attempt to adjust the end of the brake cable that is located on the underside of the scooter. This is a
specialized operation that should only be done at your Service Centre.
RESET BUTTON
If your ZINGO X200 happens to suddenly stop working, press the RESET button located below the deck on the right-hand side
of the scooter. Should you experience further issues please contact your local Service Centre (see below for details).
Reset Button
SERVICE CENTRES
Our nationwide Service Centres carry spares and back-up parts for your ZINGO X200. For best long-term performance it is
highly recommended that you visit your nearest Service Centre to give your ZINGO X200 a service every 3 months. Please call
0861 77 88 88 or email info@tevo.co.za to get further information on your nearest Service Centre.
4.

TROUBLE SHOOTING
Problem
Scooter will not run. Take scooter and charger to Service
Performance, range or
run time of scooter has
decreased signicantly.
1. Ensure that your scooter is fully
charged. The rst charge should not be
longer than 14 hours and subsequent
charges should not be more than 10
hours.
2. Check all connectors.
If charging, make sure that the charger
is correctly connected to the charging
port, and that there is power to the
charger.
1. Scooter is overloaded. Keep to the
70kg weight limit.
2. Hill is too steep. Max range is
attained on at ground, avoid steep
hills.
3. Scooter was used in an o-road
environment. Use your scooter on hard,
dry surfaces free of any debris.
Solution
If solution doesn’t work
Centre.
Take scooter to Service Centre to
replace batteries.
4. Check that wheels are spinning freely
and brakes are not catching.
Brakes are not working. Take scooter to Service Centre.
Chain is noisy.
Chain is very loose. N/A
Chain falls o. N/ATake scooter to Service Centre.
Do not attempt to adjust the brake cable
on the underside of the scooter.
Apply chain oil.
Take scooter to Service Centre. A loose
chain is a good indication that it is time
for a professional service. (Do not
attempt to adjust the chain. Doing so
will void your warranty).
Take scooter to Service Centre.
CHARGING OF BATTERIES
Batteries are not
charging after use
(charger light stays
green and won’t go red).
Clean and check both ends of the
charger plug. Make sure they t
correctly and are not worn.
Take scooter and charger
to Service Centre.
1. Check that the wall plug is plugged
in correctly and that the power is on.
2. Check power cable for breakages.
5.
Replace Charger.Charger light not working.

BATTERY DISPOSAL
Please ensure that your sealed lead-acid batteries are disposed of in an environmentally friendly manner. Hazardous materials
such as lead, acid and plastic can cause harm to the environment. Do not expose batteries to re as they may leak or explode
and may injure those close by and/or cause damage to nearby surroundings. Consult your local authorities to understand how
to dispose of your batteries.
LIMITED WARRANTY
Remember to register your warranty online at www.tevo.co.za within 7 days of purchase.
To activate your warranty vist www.tevo.co.za, click the “Outdoor” tab, then click the “ZINGO X200” icon, then click the
“Register Your Warranty” link. Fill in your details, enter the serial number (found near the charging port) and agree to the terms
and conditions.
Please ensure that you retain your receipt as proof of purchase. You will not qualify for your warranty should you not have it.
The ZINGO X200 limited warranty covers manufacturing defects only for a period of one hundred and eighty (180) days from
the original date of purchase. This limited warranty does not cover normal wear and tear, tyres, tubes, body work or cables nor
any damage, failure or loss caused by improper assembly, maintenance, storage or use of the product.
This Limited Warranty will be void if the product is ever:
• used in a manner other than for recreation;
• tampered with in any way;
• modied in any way;
• rented.
The manufacturer is not liable for incidental or consequential loss or damage due directly or indirectly to the use or misuse of
this product.
Please note that your ZINGO X200 electric scooter will not be covered under warranty if you ride through any gravel, mud,
water, sand or on any o-road surface. The electrical and drive components could be damaged by riding through the
aforementioned elements or surfaces.
Never wash your ZINGO X200 with a hose, rather use a damp rag to wipe your electric ride-on clean, paying particular attention in ensuring that the motor and batteries are kept free of water and moisture.
Battery Usage
• For the rst charge, your ZINGO X200 should be charged for a period of 14 hours.
• From there onwards, your ZINGO X200 should be recharged for a period of no longer than 10 hours for each recharge.
Recharging your batteries for longer than 10 hours will soon result in the batteries no longer holding a charge and will not be
covered under warranty.
• If not being used, your ZINGO X200 must be charged frequently (at least once every two weeks) and not left standing for
lengthy periods of time. If left uncharged for a prolonged period the batteries will no longer produce the necessary charge
needed to run the product. Not charging your batteries at least once every 14 days will result in your batteries not being
covered under warranty.
6.

Manufactured for
and distributed by:
Tevo (Pty) Ltd
PO Box 25234, Gateway, 4321
Tel 0861 77 88 88
www.tevo.co.za
 Loading...