

Page 1

EN 118.511 S, EN 118.511 W, EN 118.511 B, EN 115.622 S,
EN 115.622 W, EN 115.622 B, EN 113.722 X, EN 113.722 A,
EN 115.622 I, EN 129.612 A, EN 129.612 X
USER MANUAL
РУКОВОДСТВО ПОЛЬЗОВАТЕЛЯ
Page 2

GB
Dear Customer,
Thank you for relying on this product.
We aim to allow you to optimally and efciently use this environment-friendly product produced in our modern facilities under precise
conditions with respect to sense of quality in total.
We advise you to read these operating manual thoroughly before using
the oven and keep it permanently so that the features of the built-in oven
you have purchased will stay the same as the rst day for a long time.
NOTE:
This Operating Manual is prepared for multiple models. Your appliance
may not feature some functions specied in the manual.
The product images are schematic.
This product has been produced in modern environment-friendly
facilities without adversely affecting nature.
Products marked with (*) are optional.
"Complies with AEEE Regulation"
2
Page 3

GB
CONTENTS
Important Warnings 4
Introducing The Appliance 6
Technical Specications 7
Installation Of Appliance 7
Important Warnings 13
Control Panel 14
Timer 16
Program Types 21
Cooking Recommendations 22
Cooking Table 22
Using The Oven 23
Replacing Oven Lamp 24
Cleaning Oven Glass 24
Cleaning And Mounting Oven Door 25
Maintenance And Cleaning 26
Steam Cleaning 26
Troubleshooting 27
Environmentally-Friendly Disposal 27
Package Information 27
3
Page 4

GB
IMPORTANT WARNINGS
1. WARNING: To avoid electric shock, ensure that the
appliance circuit is open before changing the lamp.
2. WARNING: All supply circuit connections must be
disconnected before accessing terminals.
3. WARNING: The accessible parts may be hot during use
of grid. Children must be kept away.
4. WARNING: Fire hazard; do not store materials on cook-
ing surface.
5. WARNING: If the surface is cracked, open the appli-
ance circuit to avoid risk of electric shock.
6. WARNING: Appliance and its accessible parts are hot
during operation.
7. Setting conditions of this appliance are specied
on the label.(Or on the data plate)
8. Accessible parts might be hot during use of grill.
Small children should be kept away.
9. WARNING: Appliance is intended for cooking only. It
should not be used for other purposes like heating a room.
10. There are additional protective tools avoiding
contact with oven doors. This part must be attached
when it's likely that there are children around.
11. Do not use steam cleaners to clean the appliance.
12. NEVER try to put out the re with water. Only
shut down the appliance circuit and then cover the
ame with a cover or a re blanket.
4
Page 5

GB
13. Hard and abrasive cleaners or hard metal scrap-
ers should not be used to clean the oven glass door,
as these can scratch the surface and cause breaking.
14. Ensure that door is fully closed after food is
placed.
15. Children under 8 years of age should be kept away,
if they cannot be monitored continuously.
16. Touching the heating elements should be avoided.
17. This appliance can be used by children over 8
years of age, people with physical, hearing or mental
challenges or people with lack of experience or knowledge; as long as control is ensured or information is
provided regarding the dangers.
18. The appliance hasn't been designed for opera-
tion with an external time or a separate remote control
system.
19.This device has been designed for domestic use.
20. Cleaning and user maintenance can't be made
by children without adult supervision.
21. Children must not play with the appliance. Clean-
ing and user maintenance shouldn't be made by children unless they are older than 8 years old and under
adult supervision.
22. Make sure that children at and under 8 can't reach
appliance and appliance cable.
23. Keep curtains, tissue paper or combustible (in-
ammable) materials away from appliance before
starting to use it. Do not place inammable or
combustible materials in or on the appliance.
5
Page 6

INTRODUCING THE APPLIANCE
1
2
3
4
5
6
1.Control Panel 4.In Tray Wire Grill
2.Deep Tray* 5.Standard Tray
3.Roast Chicken Skewer* 6.Oven door
GB
7
8
9
7. Lamp
8. In Tray Wire Grill
9. Standard Tray
6
Page 7

GB
TECHNICAL SPECIFICATIONS
SPECIFICATIONS 60 cm Built-In Oven
Lamp Power
Thermostat
Lower Heater
Upper Heater
Turbo Heater
Grill Heater Small Grill 1000W Big Grill 2000W
Supply Voltage 220V-240V 50/60 Hz
15W
40-240 / Max °C
1200W
1000W
1800W
Technical specications can be changed without prior notice to improve
product quality.
The values provided with the appliance or its accompanying documents
are laboratory readings in accordance with the respective standards.
These values may differ depending on the use and ambient conditions.
Figures in this guide are schematic and may not be exactly match your
product.
INSTALLATION OF APPLIANCE
Ensure that electrical installation is suitable for operationalising the
appliance. If not, call an electrician and plumber to make necessary
arrangements. Manufacturing rm can't be hold responsible for damages
to arise due to operations by unauthorized people and product warranty
becomes void.
WARNING: It is customer's responsibility to prepare the location the
product shall be placed on and also have power utility prepared.
WARNING: The rules about electrical local standards must be adhered to
during product installation.
WARNING: Check for any damage on the product before installing it.
Do not have product installed if it's damaged. Damaged products pose
danger for your safety.
7
Page 8

GB
Important Warnings for Installation:
Cooling fan shall take extra steam out
and prevent outer surfaces of appliance
from overheating during operation of
oven. This is a necessary condition for
better appliance operation and better
cooking.
Cooling fan shall continue operation
after cooking is nished. Fan shall
automatically stop after cooling is completed.
Figure 1
A clearance must be left behind the enclosure where you'll place the
appliance for efcient and good operation. This clearance shouldn't be
ignored as it's required for ventilation system of the appliance to operate.
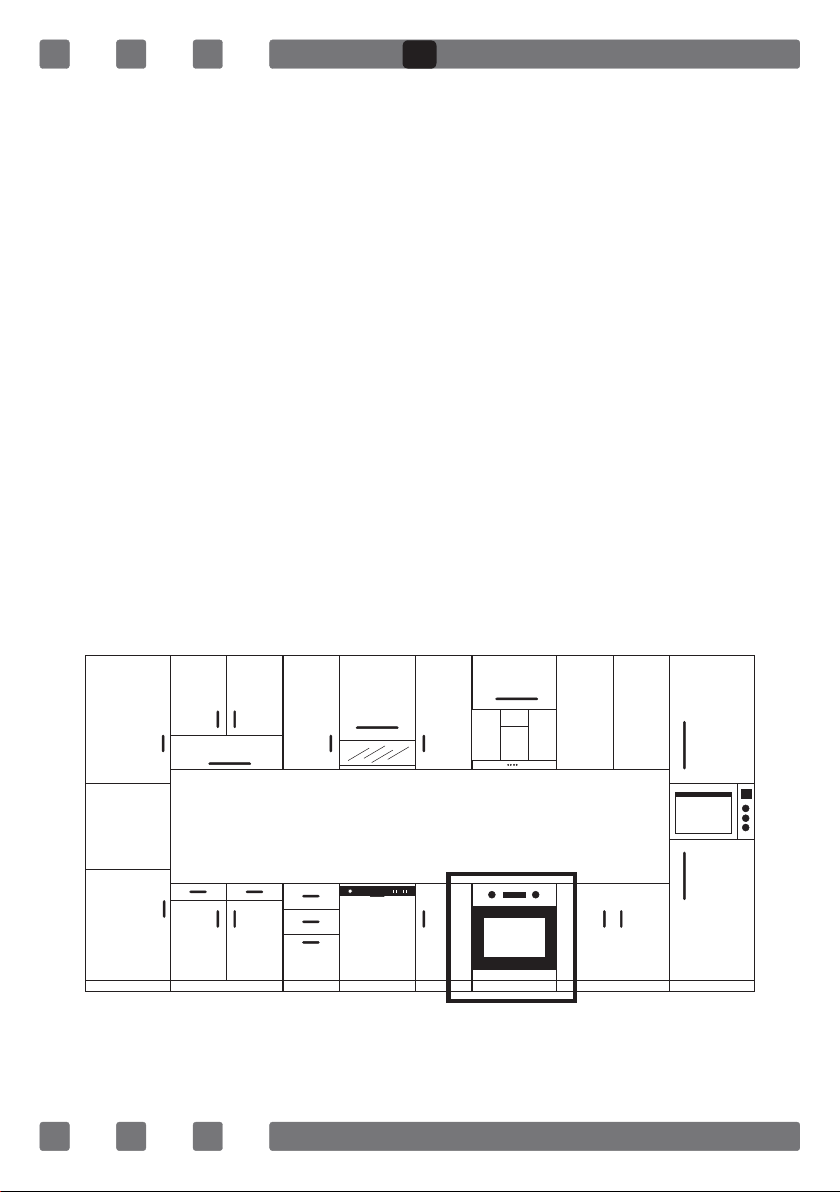
Right Place For Installation
Product has been designed to be mounted to worktops procured from
market. A safe distance must be left between the product and kitchen
walls or furniture. See the drawing provided on the next page for proper
distances. (values in mm).
• Used surfaces, synthetic laminates and adhesives must be heat resistant. (minimum 100°C).
• Kitchen cupboards must be level with product and secured.
• If there is a drawer below the oven, a rack must be placed between
oven and drawer.
WARNING: Do not install the product next to refrigerators or coolers. The
heat emitted by the product increases the energy consumption of cooling
devices.
WARNING: Do not use door and/or handle to carry or move the product.
8
Page 9

GB
60 cm Built-In Oven Installation and Mounting
Place of use for product must be located before starting installation.
Product mustn't be installed in places which are under the effect of
strong air ow.
Carry the product with minimum two people. Do not drag the product so
that oor isn't damaged.
Remove all transportation materials inside and outside the product.
Remove all materials and documents in the product.
Installation Under Counter
Cabin must match the dimensions provided in Figure 2.
A clearance must be provided at the rear part of the cabin as indicated
in the gure so that necessary ventilation can be achieved.
After mounting, the clearance between lower and upper part of the
counter is indicated in Figure 5 with "A". It's for ventilation and shouldn't
be covered.
Installation In An Elevated Cabinet
Cabin must match the dimensions provided in Figure 4.
The clearances with the dimensions indicated in the gure must be provided at the rear part of cabin, upper and lower sections so that necessary
ventilation can be achieved.
Installation Requirements
Product dimensions are provided in the Figure 3.
Furniture surfaces for mounting and mounting materials to be used
must have a minimum temperature resistance of 100 °C.
Mounting cabin must be secured and its floor must be plane for product
not to tilt over.
Cabin floor must have a minimum strength that would handle a load of
60 kg.
Placing and Securing the Oven
Place the oven into the cabin with two or more people.
Ensure that oven's frame and front edge of the furniture match
uniformly.
9
Page 10
GB
Supply cord mustn't be under the oven, squeeze in between oven and
furniture or bend.
Fix the oven to the furniture by using the screws provided with the
product. Screws must be mounted as shown in Figure 5 by passing them
through plastics attached to frame of the product. Screws mustn't be
overtightened. Otherwise, screw sockets might be worn.
Check that oven doesn't move after mounting. If oven isn't mounted in
accordance with instructions, there is a risk of tilt over during operation.
Electrical Connection
Mounting place of the product must have appropriate electrical installation.
Network voltage must be compatible with the values provided on type
label of product.
Product connection must be made in accordance with local and nation-
al electrical requirements.
Before starting the mounting disconnect network power. Do not connect
the product to network until its mounting is completed.
Mounting
Figure 2
10
Page 11
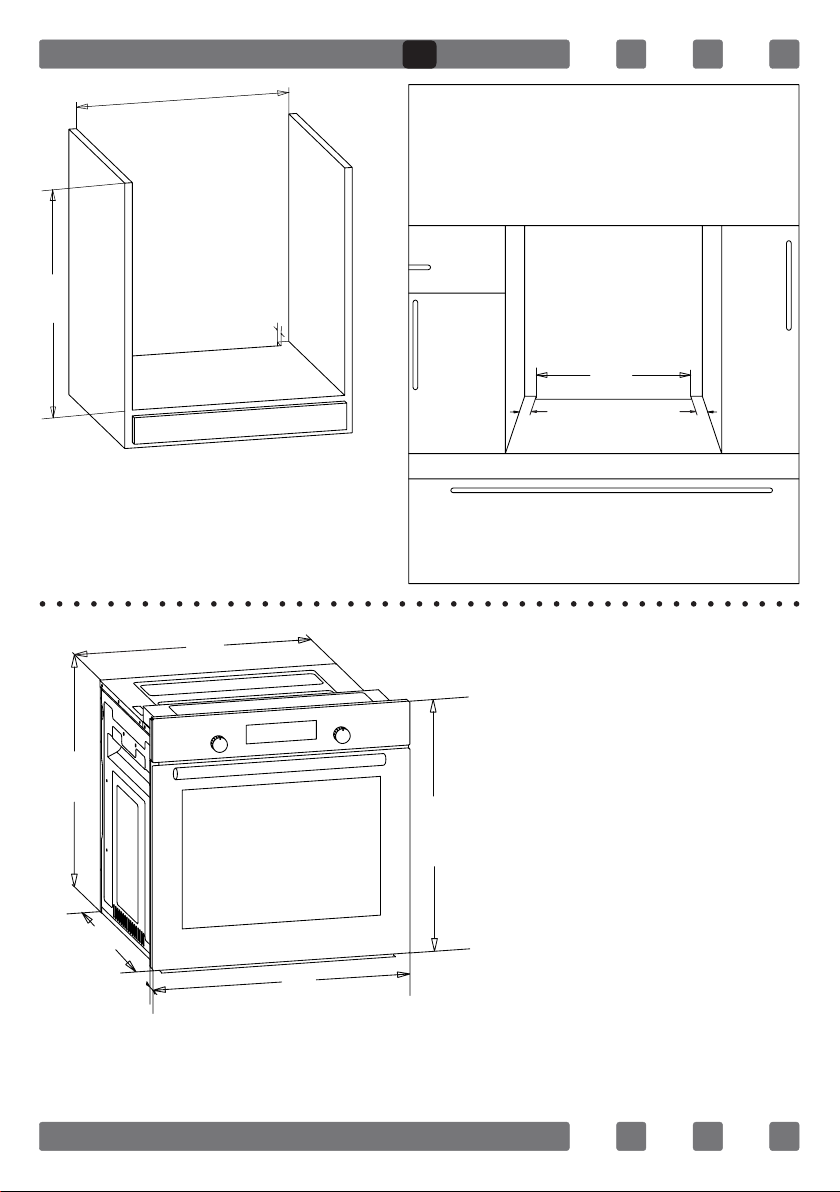
560
GB
600
545
555
35
500
30
595
30
565
22
595
Figure 3
11
Page 12
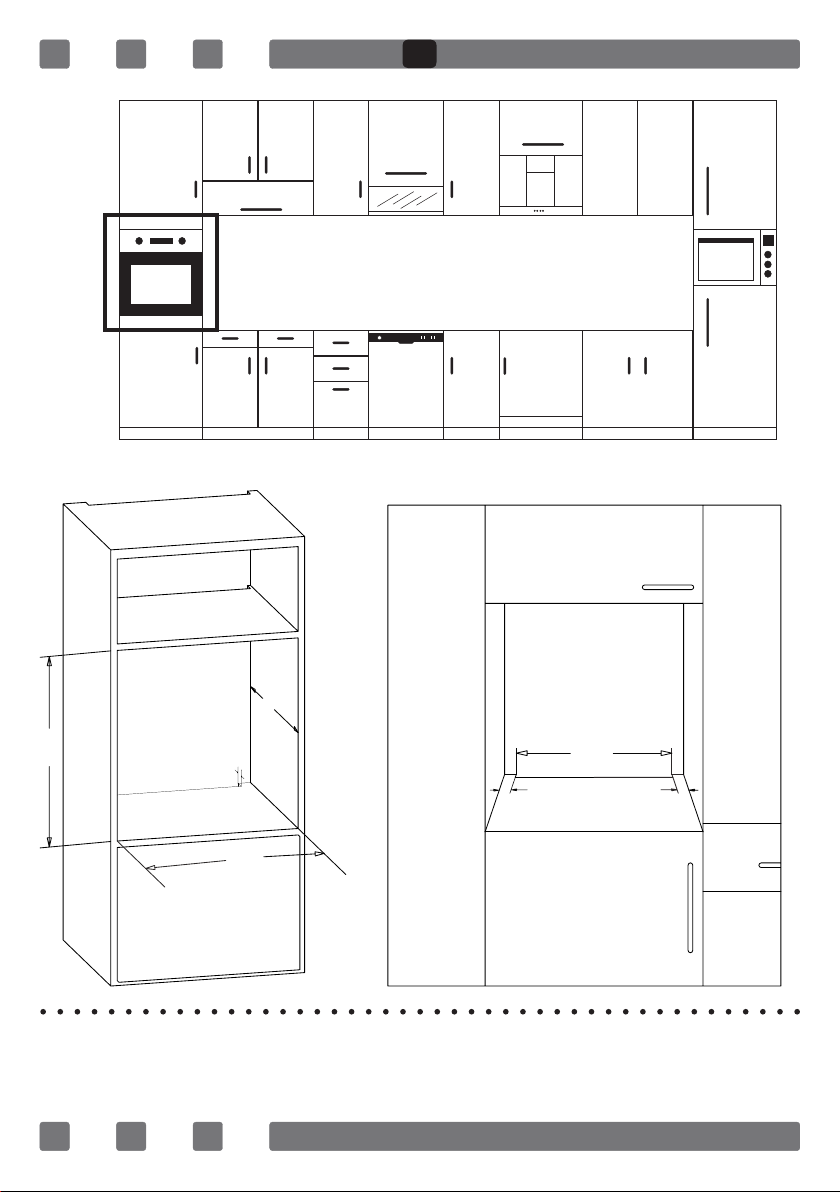
GB
Figure 4
590
550
35
560
500
30 30
12
Page 13
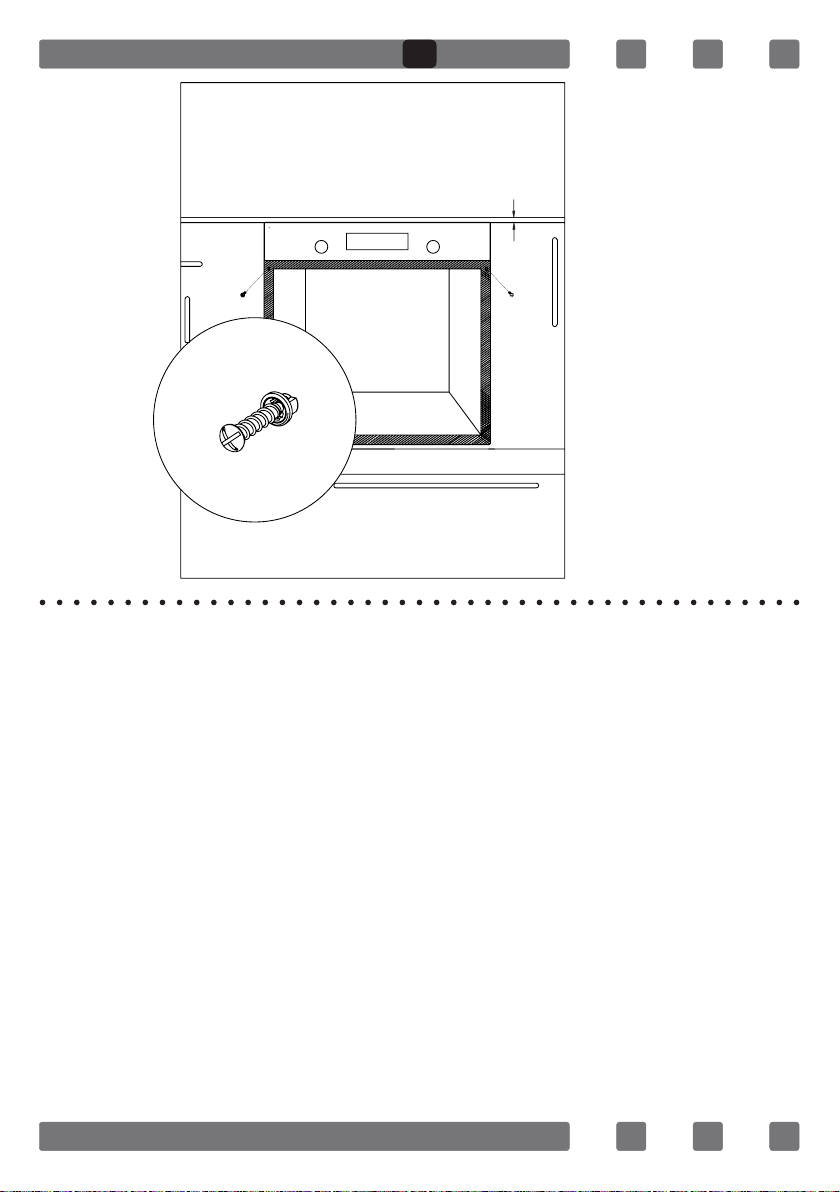
GB
A
Figure 5
IMPORTANT WARNINGS
Electrical Connection and Safety
This oven must be installed and connected to its place correctly
according to manufacturer instructions and by an authorized service.
Appliance must be installed in an oven enclosure providing high
ventilation.
Electrical connections of the appliance must be made only via sockets
having earth system furnished in compliance with rules. Contact an
authorized electrician if there is no socket complying with the earthed
system at where appliance will be placed. Manufacturing company is by
no means responsible for damage resulting from connection of
non-earthed sockets to appliance.
Plug of your oven must be earthed; ensure that socket for the plug
is earthed. Plug must be located in a place that can be accessed after
installation.
Your oven has been manufactured as 220-240 V 50/60 Hz. AC power
13
Page 14

GB
supply compliant and requires a 16 Amp fuse. If your power network
is different that these indicated values, refer to an electrician or your
authorized service.
When you need to replace the electrical fuse, please ensure that
electrical connection is made as follows:
• Phase (to live terminal) brown cable
• Blue cable to neutral terminal
• Yellow-green cable to earth terminal
Oven disconnecting switches must be in an accessible place for nal
user while oven is in its place.
Power supply cable (plug in cable) mustn't touch hot parts of the appliance.
If supply cord (plug in cable) is damaged, this cord must be replaced
by the importer or its service agent or an equally competent personnel to
prevent a hazardous situation.
CONTROL PANEL
C
40
70
max
240
80
120
220
180
EN 115
Digital Panel Visual
EN 118
Mechanical Panel Visual
Adjustment can be made only when button is popped for models with
pop-up button.
Make sure that button is popped by pressing on the
button as shown in the gure at left side.
Figure 6 *
You can make necessary adjustments by turning
right or left when button is popped enough.
Figure 7*
14
Page 15

Figure 8
GB
Thermostat Button: Helps to set cooking tempera-
ture of the food to be cooked in the oven. You can
set the desired temperature by turning the button
after placing the food into the oven. Check cooking
table related to cooking temperatures of different
foods.
*Mechanical Timer Button: Helps to set time for the
food to be cooked in the oven. Timer de-energizes
the heaters when set time expires and warns you
by ringing. See cooking table for cooking times.
Figure 9
EN 118
EN 115
Figure 10
Program Button: Helps to set with which heaters the
food placed in oven will be cooked. Heater program
types in this button and their functions are stated
below. Every model might not have all heater types
and thus program types of these heaters.
15
Page 16
GB
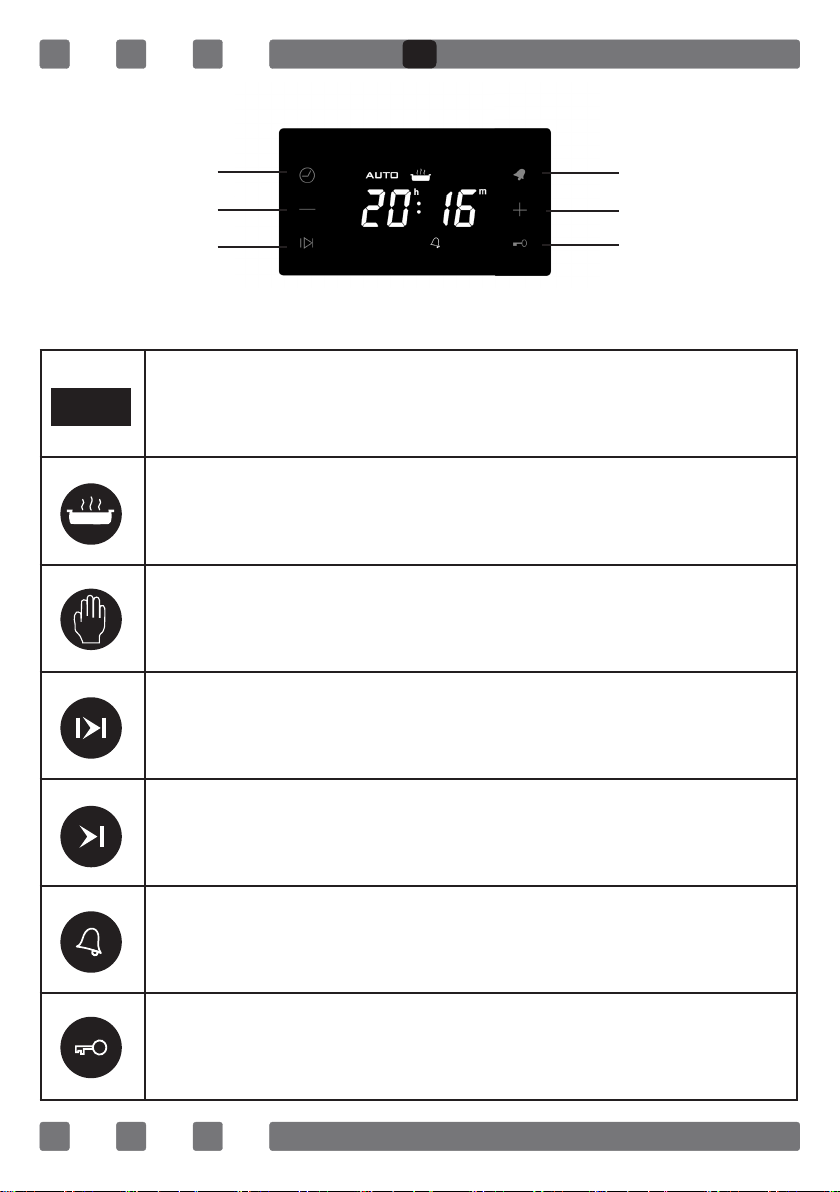
Time of Day
Adjustment Button
Minus Button
Automatic
Cooking Button
SCREEN SYMBOLS
Automatic cooking Status Indication
AU TO
• On: Full or Semi auto-cooking active
• Flashing: Auto cooking completed or power on condition
• Off: No auto cooking active
Oven Status Indication
• On: Timer relay is closed – cooking or ready for cooking
• Off: Timer relay is open – no cooking
Manual Cooking Status Indication
• On: Manual cooking
• Off: Auto cooking ( auto symbol is on)
Semi Automatic Cooking Adjustment Mode Indication
• Flashing: Cooking duration adjustment mode , adjustment possible
by + or – buttons
Minute Minder
Button
Plus Button
Child Lock Button
Full Automatic Cooking Adjustment Mode Indication
• Flashing = End of cooking Time adjustment mode, adjustment possible
by + or – buttons
Minute Minder Status Indication
• ON: Minute minder alarm active
• Flashing: Minute minder adjustment mode , adjustment possible by + or –
buttons OR current minute minder alarm completed
• OFF: Minute minder is not active
Child Lock Indication
• ON: Child Lock is active
• OFF: Child Lock is inactive
16
Page 17
GB
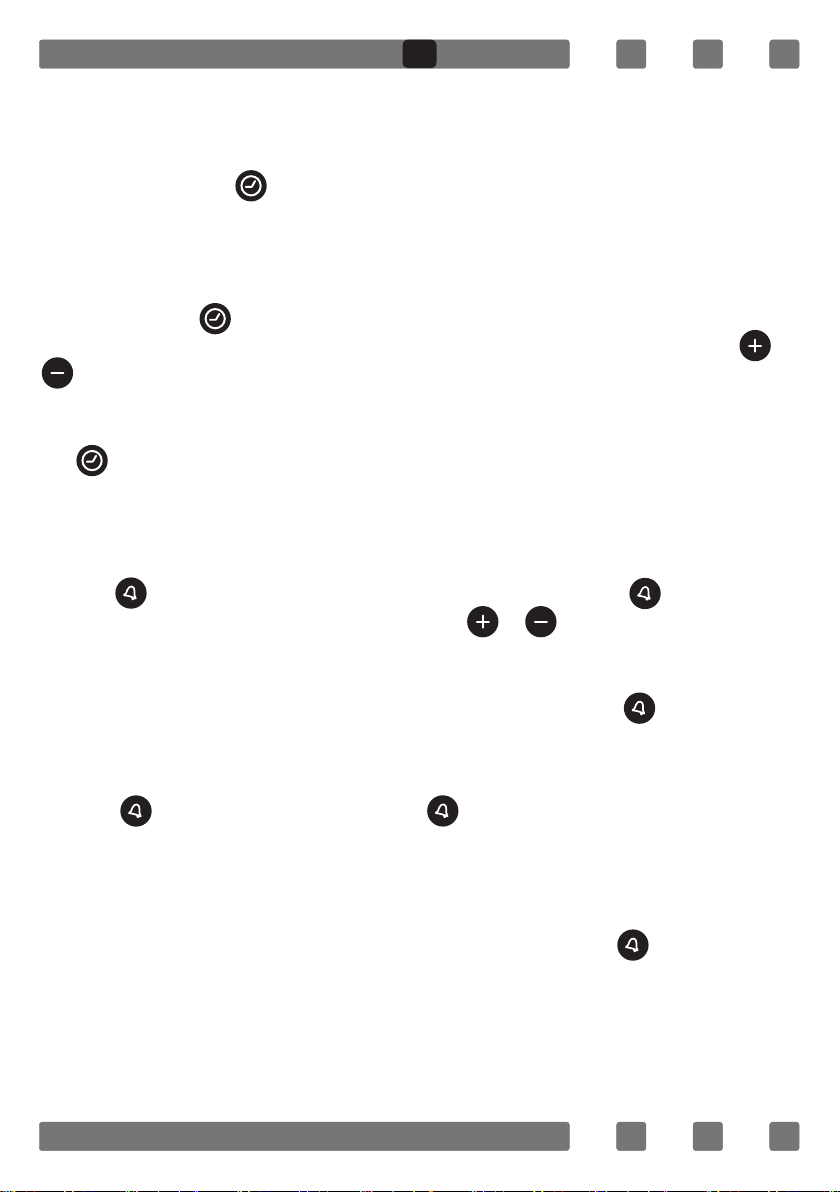
POWER ON
At power on, oven is inactive, time of day and AUTO symbols are
ashing. The indicated (ashing) time of day is not correct and has to
be adjusted. Press to activate the oven and proceed adjusting the
time of day as below.
TIME OF DAY ADJUSTMENT
Time of Day adjustment is only possible when no cooking program is in
progress. Press to enter the adjustment mode, the double dot symbol
in between hours and minutes digits will start to ash.Using either or
adjust the desired duration. The maximum adjustable duration is
23h 59 minutes. Adjustment mode will be abandoned within 5 seconds
after the last button press or can be terminated immediately by pressing
the .
SETTING THE MINUTE MINDER
With this function, you can adjust a duration in minutes . After the
adjusted time has been elapsed, an alarm sound will be produced.
Press to enter the minute minder adjustment mode, symbol will
start ashing on the screen. Using either or ,adjust the desired
duration . The maximum adjustable duration is 23h 59 minutes. Adjustment mode will be abandoned within 5 seconds after the last button
press or can be terminated immediately by pressing the button.
CANCELLING THE MINUTE MINDER
Any active minute minder function can be cancelled by pressing and
holding button for 3 seconds. The symbol on the screen, indicating the active minute minder function, will dissapear.
CANCELLING THE ALARM BUZZER SOUND
Once the adjusted minute minder duration is elapsed, the buzzer
alarm will start to sound , accompanied by the ashing symbol on the
screen. Any button press will stop the alarm sound and this indication.
If no button is pressed, the alarm sound will end automatically after 7
minutes, but the ashing symbol will go on.
17
Page 18
GB
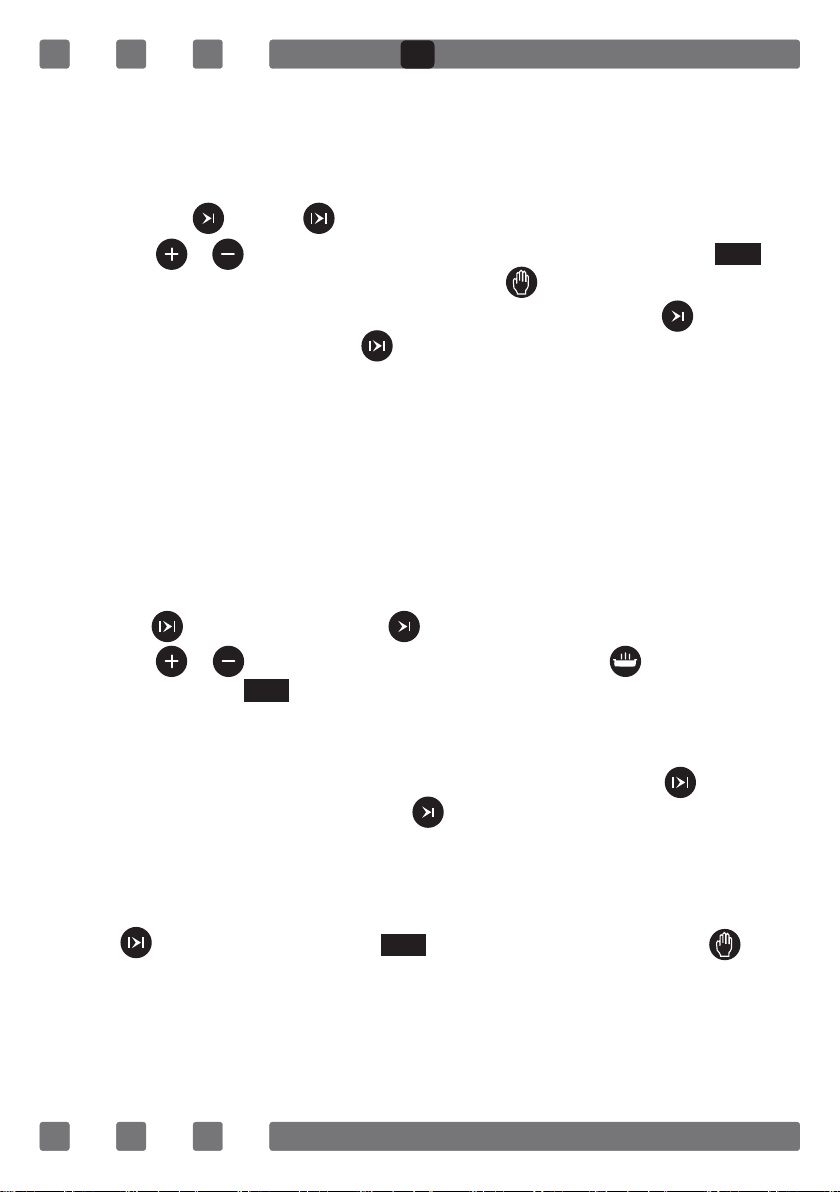
SEMI AUTOMATIC COOKING
This cooking program is intented to start cooking immediately for a
specied duration. After the oven is set to the desired function and
Temperature via the oven knobs:
1. Press the button, symbol will ash on the screen.
2. Using or buttons, adjust the desired cooking duration.
AU TO
symbol appears on the screen, whereas disappears.
3. After 5 seconds of the last button press or by pressing twice, the
adjustment is completed. symbol disappears , the display shows
the current time of day.
FULL AUTOMATIC COOKING
This cooking program is intented to perform a delayed cooking by
programming the time of day ,when the food should be ready. In other
words, the oven will start cooking not immediately but will automatically
calculate the time to start cooking.
1. Perform step 1 and 2 of the semi auto cooking as above
(cooking duration adjustment).
2. Press button once again, symbol will start to ash.
3. Using or , program the end of cooking time. symbol will
disappear but symbol will be still present on the screen. This
AU TO
indicates that an automatic cooking is programmed but cooking
has not started yet.
4. After 5 seconds of the last button press or by pressing , the
adjustment will be completed, symbol disappears from the
screen the display shows the current time of day.
MANUAL MODE
Any automatic cooking in progress , can be cancelled by pressing and
holding button for 3 seconds. symbol will disappear and will
AU TO
appear. In manual mode, the oven will be active depending on the
status of the oven knobs.
18
Page 19

GB20GB
AUTO COOKING END
After the automatic cooking has been completed, symbol will
AU TO
be ashing on the screen an the buzzer alarm will sound. Any button
press will stop the alarm sound but the ashing symbol will go on till
button is pressed. The buzzer alarm will sound for 7 minutes if not
stopped.
POWER INTERRUPTS
After any interrupt of mains power, your oven will be inactive after the
power is restored, for safety reasons. After power on, the time of day
digits and symbol will ash and the time of day has to be adjusted
AU TO
(see : power on).
Note: The ashing symbol indicates that the oven is inactive and
AU TO
you have to enter the manual mode.
CHILD LOCK
This function is intented to prevent any unauthorized modication of
the timer settings. When this function is active, any button press except
the button itself, will be inactive.
To activate this function , press and hold the button until appears on the screen, approximately for 3 seconds. To deactivate it, do
the same until the symbol disappears.
Note: Any alarm sound can be stopped by any button press, even the
child lock function is active.
PROGRAMMABLE OPTIONS
Alarm tone:
Whenever no adjustment mode is active, pressing and holding the
button will result in the currenly valid buzzer tone being produced. By
releasing and pressing the same button again, you may scroll through 3
available buzzer tones. The last heard buzzer tone will be automatically
recorded as the selected tone.
Note: Programmable options are nonvolatile and will be resident after any
power failure.
19
Page 20

Minute Hand (A)
Index (D)
Cooking Time (E)
Hour Hand (B)
- To set time of day: push and turn
- To set the cooking time: turn
CLOCK
To set the time of day, push and turn the shaft counterclockwise. Set
the hands ‘ A ’ et ‘ B ’ in the right position of time of day.
COOKING TIME
Immediate start of cooking and automatic stop of cooking.
Maximum duration : 180 minutes ( 3 hours ).
To set the cooking time, turn the shaft counterclockwise and set the
graduation of the disk ‘ E ’ in front of the index ‘ D ’ of the dial.
The end of cooking is indicated by a bell which stops automatically
after a few minutes, the disk E indicates ‘‘ O ’’ or ‘‘ ’’ (off position).
This bell can be stopped manually by turning the shaft counterclockwise
in order to put the ‘‘ O ’’ or ‘‘ ’’ of the disk ‘ E ’ in front of the index ‘ D ’.
MANUAL POSITION
The manual position ‘ I ’ or ‘‘ ’’ must be set manually to operate the AT.
To set the manual position, turn the shaft counterclockwise to position
the ‘ I ‘ or ‘‘ ’’ in front of the index ‘ D ’. ( off position ), turn the shaft
clockwise.
Page 21

GB
PROGRAM TYPES
Heating program types in your appliance and important explanations
of them are provided below for you can cook different foods appealing to
your taste.
Lower and Upper Heating
Elements
Lower Heating Element and Fan Turbo Heater and Fan
Grill and Roast Chicken
Upper Heating Element and Fan Grill and Fan
Multifunctional Cooking Grill
Lower Heating Element Upper Heating Element
Small Grill and Fan Steam Cleaning
Fan
Lower-Upper Heating Element
and Fan
Lower heating element: Select this program towards end of cooking time
if lower part of the food cooked will be roasted.
Upper heating element: Used for post heating or roasting very little pieces
of foods.
Lower and upper heating elements: A program that can be used for
cooking foods like cake, pizza, biscuit and cookie.
Lower heating element and fan: Use mostly for cooking foods like fruit
cake.
Lower and upper heating element and fan: The program suitable for
cooking foods like cakes, dried cakes, lasagne. Suitable for cooking
meat dishes, as well.
Grill: Grill cooker is used for grilling meat like foods such as steak,
sausage and sh. While grilling, tray should be placed in the lower rack
and water must be placed in it.
Turbo heater and fan: Suitable for baking and roasting. Keep heat setting
lower than “Lower and Upper Heater” program since heat is conveyed
immediately via air ow.
Grill and fan: Suitable for cooking meat type foods. Do not forget to
place a cooking tray in a lower rack inside the oven and a little water in
it while grilling.
21
Page 22

GB
Multi Functional Cooking: Suitable for baking and roasting. Lower and
upper heaters operate as well as quick transmission of heat via air ow.
Suitable for cooking requiring single tray and intense heat.
COOKING RECOMMENDATIONS
You can nd in the following table the information of food types which
we tested and identied their cooking values in our labs. Cooking times
can vary depending on the network voltage, quality of material to be
cooked, quantity and temperature. Dishes to cook by using these values
might not appeal to your taste. You can set various values for obtaining
different tastes and results appealing to your taste by making tests.
WARNING: Oven must be preheated for 7-10 minutes before placing the
food in it.
COOKING TABLE
Food
Cake Static / Static+Fan 170-180 2-3 35-45
Small Cake Static / Turbo+Fan 170-180 2 25-30
Pie Static / Static+Fan 180-200 2 35-45
Pastry Static 180-190 2 20-25
Cookie Static 170-180 2 20-25
Apple Pie Static / Turbo+Fan 180-190 1 50-70
Sponge cake Static 200/150* 2 20-25
Pizza Static Fan 180-200 3 20-30
Lasagne Static 180-200 2-3 25-40
Meringue Static 100 2 50
Grilled Chicken** Grill+Fan 200-220 3 25-35
Grilled Fish** Grill+Fan 200-220 3 25-35
Calf Steak** Grill+Fan Max 4 15-20
Grilled Meatball** Grill+Fan Max 4 20-25
Cooking
Function
Cooking
Temperature (°C)
Cooking
Rack
Cooking
Time (min.)
* Do not preheat. First half of cooking time is recommended to be at
200°C de while the other half at 150°C.
** Food must be turned after half of the cooking time.
22
Page 23

GB
USING THE OVEN
Initial Use of Oven
Here are the things you must do at rst use of your oven after making
its necessary connections as per instructions:
1. Remove labels or accessories attached inside the oven. If any, take
out the protective folio on front side of the appliance.
2. Remove dust and package residues by wiping inside of the oven with
a damp cloth. Inside of oven must be empty. Plug the cable of appliance
into the electrical socket.
3. Set the thermostat button to the highest temperature (240 Max. °C)
and run the oven for 30 minutes with its door closed. Meanwhile a
slight smoke and smell might occur and that's a normal situation.
4. Wipe inside of the oven with a slightly warm water with detergent
after it becomes cold and then dry with a clean cloth. Now you can use
your oven.
Normal Use of Oven
1. Adjust thermostat button and temperature at which you want to
cook the food to start cooking.
2. You can set cooking time to any desired time by using the button at
models with mechanical timer. Timer will de-energize heaters when time
expired and provide warning beep as ringing.
3. Timer turns the heaters off and provides audible signal when
cooking time expires in line with the information entered in the models
with digital timer.
4. Cooling system of the appliance will continue to operate after cooking
is completed. Do not cut the power of appliance in this situation which is
required for appliance to cool down. System will shut down after cooling
is completed.
23
Page 24

GB
REPLACING OVEN LAMP
WARNING: To avoid electric shock, ensure that the appliance circuit is
open before changing the lamp. (having circuit open means power is off)
First disconnect the power of appliance and en-
sure that appliance is cold.
Remove the glass protection by turning as
indicated in the gure on the left side. If you
have difculty in turning, then using plastic
gloves will help you in turning.
Figure 11
Then remove the lamp by turning, install the
new lamp with same specications. Lamp
specications must be as follows;
-220-240 V 50/60 Hz AC, -15 W, -Type E14
Reinstall glass protection, plug the power cable
of appliance into electrical socket and complete
Figure 12
replacement. Now you can use your oven.
CLEANING OVEN GLASS
Lift by pressing on plastic latches on left and right side as shown in
Figure 13 and pulling the prole toward yourself as in Figure 14. Glass
is released after prole is removed as shown in Figure 15. Remove the
released glass by pulling toward yourself carefully. Outer glass is xed
to oven door prole. You can perform glass cleaning easily after glasses
are released. You can mount glasses back by performing the operations
reversely after cleaning and maintenance are completed. Ensure that prole is seated properly in place.
Figure 13 Figure 14 Figure 15
24
Page 25

GB
CLEANING AND MOUNTING OVEN DOOR
Figure 16
Figure 17
Figure 16.1 Figure 16.2 Figure 17.1 Figure 17.2
Open the door fully
by pulling the oven
door toward yourself.
Then perform unlock
operation by pull-
ing the hinge lock
upwards with the
aid of screwdriver as
indicated in
Figure 16.1.
Set the hinge lock to
the widest angle as
in Figure 16.2. Adjust
both hinges connect-
ing oven door to the
oven to the same
position.
Later, close the
opened oven door so
that it will be in a
position to contact
with hinge lock as
in Figure 17.1.
For easier removal
of oven door, when
it comes close to
closed position, hold
the cover with two
hands as in Figure
17.2 and pull
upwards.
Reversely perform respectively what you did while opening door to
reinstall oven door back.
Soft Close Door:
The Soft-Closing Door gently, safely and silently closes. When the door
is pushed, the hinge automatically catches the door, causing it to move
smoothly through the nal few centimetres, so that it slowly and quietly
comes to a stop. Oven door opens slowly and prevents the crashing to
the ground.
25
Page 26

GB
MAINTENANCE AND CLEANING
1. Remove the power plug from electrical socket.
2. Do not clean inner parts, panel, trays and other parts of the
product with hard tools such as bristle brush, wire wool or knife. Do not
use abrasive, scratching materials or detergent.
3. Rinse after wiping the parts at inner parts of the product with soapy
cloth, then dry thoroughly with a soft cloth.
4. Clean glass surfaces with special glass cleaning material.
5. Do not clean your product with steam cleaners.
6. Never use combustibles like acid, thinner and gas while cleaning your
product.
7. Do not wash any part of the product in dishwasher.
8. "Use potassium stearate (soft soap) for dirt and stains.
You can perform cleaning with a soft textured cloth not to scratch
surfaces according to the gures below.
STEAM CLEANING*
It enables cleaning the soils softened
thanks to the steam to be generated
in the oven.
1.Remove all the accessories in the
oven.
2.Pour a half litre of water into the
tray and Place the tray at the bottom
of the boiler.
3. Set the switch to the steam cleaning
mode.
Figure 18
4.Set the thermostat to 70° C degrees
and operate the oven for 30 minutes.
5. After operating the oven for 30 minutes, open the oven door and
wipe the inner surfaces with a wet cloth.
6. Use dish-washing liquid, warm water and a soft cloth for stubborn
dirt, then dry off the area you have just cleaned with a dry cloth.
26
Page 27

GB
TROUBLESHOOTING
You can solve the problems you can face with your product by
checking the following points before calling the technical service.
If Oven Doesn't Work;
• Check if electrical cable of the oven is plugged.
• Safely check if there is power in the network.
• Check the fuses.
• Check if electrical cable of the oven is damaged.
ENVIRONMENTALLY-FRIENDLY DISPOSAL
Dispose of packaging in an environmentally-friendly
manner.
This appliance is labelled in accordance with European
Directive 2012/19/EU concerning used electrical and
electronic appliances (waste electrical and electronic
equipment - WEEE). The guideline determines the frame
work for the return and recycling of used appliances as
applicable throughout to the EU.
PACKAGE INFORMATION
Packaging materials of the product are manufactured from recyclable
materials in accordance with our National Environment Regulations.
Do not dispose of the packaging materials together with the domestic
or other wastes. Take them to the packaging material collection points
designated by the local authorities.
27
Page 28

RU
Уважаемый покупатель,
мы благодарим Вас за доверие, оказанное данному продукту.
Наша цель - обеспечить для Вас наиболее производительное
использование данного продукта, который был произведен в
соответствии с нашим пониманием качества, на современных
заводах, в чистой рабочей атмосфере и без вреда окружающей
среде.
Рекомендуем Вам внимательно изучить и сохранить для дальнейшего
пользования данное руководство по эксплуатации в целях обеспечения
наиболее долгого сохранения приобретенной Вами электрической
плитой своих первоначальных особенностей.
ПРИМЕЧАНИЕ:
Настоящее руководство по эксплуатации подготовлено для нескольких
моделей. Некоторые из характеристик, указанных в руководстве, могут
отсутствовать в Вашем приборе.
Рисунки прибора представлены в схематическом отображении.
Настоящий прибор был изготовлен без вреда для окружающей среды
на современных заводах.
Особенности, отмеченные знаком * являются выборочными.
"Соответствует требованиям Положения AEEE."
28
Page 29

RU
СОДЕРЖАНИЕ
Важные Примечания 29
Описание Прибора 32
Технические Характеристики 33
Установка Прибора 33
Важные Предупреждения 39
Панель Управления 40
Часов 42
Виды Программ 49
Рекомендации По Приготовлению 50
Таблица Приготовления 50
Эксплуатация 51
Замена Лампы 52
Чистка Стекла 52
Чистка И Установка Дверцы 53
Уход И Чистка 54
Пароочистка 54
Проблемы И Рекомендации По Их Устранению 55
Утилизация С Учетом Экологических Требований
Информация Об Упаковке 55
29
Page 30

RU
ВАЖНЫЕ ПРЕДУПРЕЖДЕНИЯ
1. ПРЕДУПРЕЖДЕНИЕ: Во избежание
поражения электрическим током, перед
заменой лампы убедитесь, что прибор
отключен от цепи питания.
2. ПРЕДУПРЕЖДЕНИЕ: Перед работой с
соединительными контактами необходимо
отключить все соединения цепи питания.
3. ПРЕДУПРЕЖДЕНИЕ: Во время
использования гриля, доступные места могут
нагреваться. Следует держать детей вне
досягаемости.
4. ПРЕДУПРЕЖДЕНИЕ: Опасность возгорания;
не храните вещи на поверхности для готовки.
5. ПРЕДУПРЕЖДЕНИЕ: В случае обнаружения
трещин на поверхности, отключите
цепь питания во избежание поражения
электрическим током.
6. ПРЕДУПРЕЖДЕНИЕ: Прибор и его
доступные части могут нагреваться во время
использования.
7. Условия для настройки настоящего прибора
указаны на этикетке. (Или на табличке с
техническими данными)
8. Доступные части прибора могут нагреваться
во время использования гриля. Маленьких детей
следует держать вдали от прибора.
30
Page 31

RU
9. ПРЕДУПРЕЖДЕНИЕ: Прибор предназначен
исключительно для приготовления пищи. Не
подлежит использованию для других целей,
таких как обогрев помещения.
10. Имеются дополнительные ограничители,
препятствующие контакту с дверцами печи.
Данные детали следует устанавливать в
случае возможности присутствия детей рядом
с прибором.
11. Не следует использовать паровые
генераторы для чистки прибора.
12. НИКОГДА не пытайтесь потушить пламя
водой. Сначала отключите питание прибора, а
затем потушите огонь при помощи крышки или
пожарного одеяла.
13. Не используйте жесткие и едкие чистящие
средства иди жесткие металлические щетки
для чистки стеклянной поверхности печи во
избежание появления царапин и трещин.
14. Убедитесь в том, что дверца плотно закрыта
после того, как поместили еду в печь.
15. Если за печью не ведется постоянное
наблюдение, следует держать детей младше 8-и
лет вдали от печи.
16. Следует вести себя осторожно во избежание
контакта с нагревательными элементами.
31
Page 32

RU
17. Настоящий прибор может использоваться
детьми старше 8-и лет, лицами с ограниченными
физическими, слуховыми или умственными
способностями или лицами с недостаточным
опытом и знаниями только в случае обеспечения
непрерывного наблюдения или предоставления
необходимой информации для безопасного
использования прибора и осознания возможных
рисков.
18. Прибор разработан таким образом, что он
может быть включен внешним таймером или
системой дистанционного управления.
19.Настоящий прибор предназначен для бытового
применения.
20. Чистка и пользовательский уход за прибором
не должны выполняться детьми без присмотра
ответственных лиц.
21. Следите за тем, чтобы дети не играли с
изделием. Чистка и пользовательский уход за
прибором не должны выполняться детьми без
присмотра лиц старше 8-и лет или взрослых.
22. Убедитесь, что прибор и кабель питания
расположены в месте, не доступном для детей
младше 8-и лет.
23. Перед использованием прибора,убедитесь,
что занавески, тюль, бумага и прочие
горючие (воспламеняющиеся) предметы
отдалены от прибора. Не располагайте
легковоспламеняющиеся или
горючие материалы внутри или на приборе.
32
Page 33

RU
ОПИСАНИЕ ПРИБОРА
1
2
3
4
5
6
1. Панель управления 4. Решетка на поднос
2. Глубокий поднос* 5. Стандартный поднос
3. Шампур для зажарки курицы 6. Крышка печи
7
8
9
7. Лампа
8. Решетка на поднос
9. Стандартный поднос
33
Page 34

RU
ТЕХНИЧЕСКИЕ ХАРАКТЕРИСТИКИ
ХАРАКТЕРИСТИКИ ВСТРАИВАЕМАЯ ПЕЧЬ 60 см
Мощность лампы 15Вт
Термостат 40-240 / Max °C
Нижний нагреватель 1200Вт
Верхний нагреватель 1000Вт
Турбо нагреватель 1800Вт
Нагреватель гриля Малая решетка 1000Вт Большая решетка 2000Вт
Напряжение 220-240B 50/60 Гц.
В прибор могут вноситься изменения без предварительного
предупреждения в целях улучшения его технических характеристик.
Значения, имеющиеся на обозначениях изделия, или декларируемые
на поставляемой вместе с изделием дополнительной печатной
документации, являются значениями, полученными в лабораторных
условиях в соответствии с установленными стандартами. Эти значения
могут изменяться в зависимости от способа использования изделия и
условий его эксплуатации.
Рисунки, представленные в руководстве, являются схематическими и
могут не отражать настоящий вид продукта.
УСТАНОВКА ПРИБОРА
В целях обеспечения работоспособности прибора убедитесь, что
электрическое оборудование соответствует требованиям. В случае
несоответствия, вызовите профессионального электрика или ремонтника
для выполнения соответствующих корректировок. Производитель не
несет ответственности за вред, причиненный в результате выполнения
операций не уполномоченными лицами, что ведет к прекращению
действия гарантии.
ПРЕДУПРЕЖДЕНИЕ: Покупатель несет ответственность за подготовку
места для расположения прибора и электрического оборудования.
ПРЕДУПРЕЖДЕНИЕ: Во время монтажа изделия следует соблюдать
правила, установленные местными стандартами в части электрических
работ.
ПРЕДУПРЕЖДЕНИЕ: Перед установкой прибора, проверьте его на
наличие каких либо повреждений. Не выполняйте установку если прибор
поврежден. Поврежденные приборы несут риск для Вашей безопасности.
34
Page 35

RU
Важные примечания по установке:
Во время работы печи, охлаждающий
вентилятор будет выводить лишний
пар наружу и предотвращать
чрезмерное нагревание внешних
поверхностей прибора. Это необходимо
для правильной работы прибора и
равномерного приготовления блюд.
После окончания процесса готовки,
вентилятор будет продолжать работать.
Вентилятор отключится автоматически,
когда охлаждение будет завершено.
Рис. 1
В задней части отсека для установки прибора необходимо предусмотреть
пространство для качественной и правильной работы прибора. Не следует
упускать это пространство, так как оно необходимо для исправной работы
системы вентиляции прибора.
Правильное место для монтажа
Дизайн изделия разработан в соответствии с доступными на рынке
столешницами. Между прибором и стенами кухни или мебелью следует
оставить безопасное расстояние. Для подходящих промежутков см.
диаграмму, представленную на следующей странице.
(значения указаны в мм).
• Используемые поверхности, синтетический ламинат и клеящие
материалы должны быть жароустойчивыми. (минимум 100°C).
• Кухонные шкафы должны находиться на одном уровне с прибором
и должны быть закреплены.
• Если под печью имеется выдвижной ящик, между печью и ящиком
следует установить панель.
ПРЕДУПРЕЖДЕНИЕ: Не устанавливайте прибор вблизи
холодильников или охлаждающих приборов. Жар, исходящий от прибора
может повысить энергопотребление охлаждающих приборов.
ПРЕДУПРЕЖДЕНИЕ: Не используйте дверцу или ручку дверцы для
передвижения прибора.
Сборка и установка встраиваемой печи 60 см
Перед началом установки следует определить место использования
прибора.
35
Page 36

RU
Не следует устанавливать прибор в местах с сильными потоками
воздуха.
Прибор следует передвигать минимум вдвоем. Не тащите прибор по
полу во избежание повреждения полового покрытия.
Удалите все перевозочные материалы снаружи и внутри прибора.
Выньте все материалы и документацию из прибора.
Установка под столешницу
Отсек должен соответствовать меркам, указанным на рисунке 2.
В задней части отсека следует обеспечить пространство как указано на
рисунке, в целях обеспечения необходимой проветриваемости.
Пространство между столешницей и верхней частью прибора, которое
должно оставаться после установки, отмечено буквой "А" на рисунке 5.
Это пространство необходимо для вентиляции и не должно закрываться.
Установка в шкаф
Отсек должен соответствовать меркам, указанным на рисунке 4.
В задней части отсека, в нижней верхней частях следует обеспечить
пространство как указано на рисунке, в целях обеспечения необходимой
проветриваемости.
Условия установки
Размеры прибора приведены на рисунке 3.
Поверхность мебели и монтажные материалы, используемые для
установки, должны обладать минимальной жароустойчивостью в 100°C.
Во избежание переворачивания прибора, отсек для установки должен
быть закреплен а основание должно быть плоским.
Основание отсека должно выдерживать минимальную нагрузку в 60 кг.
Установка и закрепление печи
Установите печь в отсек при помощи двух или более человек.
Убедитесь, что рамка прибора и передняя часть мебели выровнены.
Кабель питания не должен оставаться под печью, зажиматься между
печью и мебелью и сгибаться.
Закрепите печь к окружающей мебели при помощи болтов,
предоставленных вместе с прибором. Болты следует вкручивать
продев их в пластиковые крепежи, установленные на раме прибора, как
показано на рисунке 5. Болты не следует закручивать чрезмерно туго. В
противном случае резьба может повредиться.
36
Page 37

RU
После установки убедитесь, что печь не двигается. Если установка
печи выполнена не в соответствии с инструкциями, существует риск
опрокидывания во время использования.
Подключение к сети
Место подключения печи должно обладать подходящим электрическим
оборудованием.
Напряжение сети должно соответствовать значениям, указанным на
типовой этикетке прибора.
Сетевое соединение прибора должно выполняться в соответствии с
местными и национальными стандартами электричества.
Перед началом установки прибора отключите питание в сети. Не
подключайте прибор к сети до завершения процедуры установки.
Монтаж
Рис. 2
37
Page 38

560
RU
600
545
555
35
500
30
595
30
565
22
595
Рис. 3
38
Page 39

RU
Рис. 4
590
550
35
560
500
30 30
39
Page 40

RU
A
Рис. 5
ВАЖНЫЕ ПРЕДУПРЕЖДЕНИЯ
Электрическое соединение и Безопасность
Установка и соединения данной печи должны выполняться
уполномоченным сервисом и в соответствии с указаниями
производителя.
Прибор следует устанавливать в отсек для печи, обеспечивающий
хорошую вентилируемость.
Соединение прибора с электрической сетью следует выполнять только
через розетки с надлежащей системой заземления. Если в месте установки
прибора нет розеток с системой заземления, свяжитесь с уполномоченным
персоналом. Производитель ни в коем случае не несет ответственность
за вред, причиненный в
результате соединения прибора с не заземленной системой питания.
Вилка Вашей печи оснащена заземлением, убедитесь, что розетка
для подключения также заземлена. После установки прибора, розетка
должна располагаться в легко доступном месте.
40
Page 41

RU
Ваша печь изготовлена в соответствии с электропитанием 220-240
V 50/60 Hz. AC и требует установки предохранителя мощностью 16
Amp. Если Ваша сеть отличается от указанных значений, свяжитесь с
уполномоченным сервисом или профессиональным электриком.
В случае необходимости замены электрического предохранителя,
убедитесь, что электрическое соединение выполнено следующим
образом:
• Коричневый кабель в фазу (рабочий контакт)
• Синий кабель в нейтральный контакт
• Желто-зеленый кабель в контакт заземления
Разъединители цепи питания должны быть расположены в доступном
для пользователя месте.
Кабель питания (кабель с вилкой) не должен контактировать с
нагревающимися поверхностями прибора.
В случае повреждения кабеля питания (кабель с вилкой), он должен
быть заменен изготовителем или его сервисным агентством или
профессионалом в целях предотвращения возникновения опасных
ситуаций.
ПАНЕЛЬ УПРАВЛЕНИЯ
C
40
70
max
240
80
120
220
180
EN 115
В моделях с выдвигающимися реле настройка может осуществляться
только когда реле выдвинуто.
Изображение цифровой панели
EN 118
Изображение механической панели
Рис. 6 *
Рис. 7 *
Нажмите и отпустите реле, чтобы оно выдвинулось,
как показано на рисунке слева.
Когда реле выдвинуто вперед, можно
осуществлять необходимые настройки поворотами
влево или вправо.
41
Page 42

Рис. 8
Рис. 9
RU
Реле Термостата: Используется для установки
температуры приготовления пищи в печи. Послу
размещения блюда в печи, поверните реле и
установите желаемую температуру. См. таблицу
приготовления пищи, чтобы узнать температуру
приготовления различных продуктов.
*Механическое реле таймера: Используется
для установки времени приготовления пищи.
Когда установленное для приготовления время
истекает, таймер отключает нагревательные
элементы и издает характерный звон. Для времени
приготовления различных продуктов см. таблицу
приготовления.
EN 118
EN 115
Рис. 10
Реле программы готовки: Используется
для определения программы приготовления
продуктов, размещенных в печи. Виды программ,
расположенных на реле, и их функции описаны
далее. Не все модели могут быть оснащены всеми
видами нагревателей и соответствующими видами
программ.
42
Page 43

RU
ЭЛЕКТРОННОГО ПРОГРАММАТОРА ДЛЯ МОДЕЛЕЙ ДУХОВОК
ИНСТРУКЦИЯ ПО ИСПОЛЬЗОВАНИЮ
EN 115.622 S, EN 115.622 W, EN 115.622 B
ПАНЕЛЬ УПРАВЛЕНИЯ:
Кнопка «Настройка
времени»
Кнопка «МИНУС»
Кнопка
«Автоматические
режимы»
Кнопка «Будильник»
Кнопка «Плюс»
Кнопка
«Блокировка»
ОБЗОР:
Таймер с электронным управлением позволяет управлять временем приготовления пищи. Все, что
нужно сделать, - это настроить время приготовления и время готовности блюда. Также его можно
использовать в качестве будильника, который можно настроить таким образом,чтобы он подавал
звуковой сигнал после приготовления блюда.
SCREEN SYMBOLS
Функция автоматического приготовления
AU TO
• Горит - Автоматическое или полуавтоматическое приготовление включено
• Мигает - Автоматическое приготовление завершено или задаются данные для включения
• Не горит - Функция автоматического приготовления не включено
Символ работы духовки
• Горит –духовка работает или находится в режиме ожидания
Ручной режим приготовления
• Горит – включено ручное приготовление
Модуль настройки полуавтоматического приготовления
• Также регулировка может быть настроена клавишами + или –
Модуль настройки полуавтоматического приготовления
• Также регулировка может быть настроена клавишами + или –
Звуковой сигнал
• Горит - таймер активен
• Мигает – установка сигнала может быть настроена путем использования клавиш + или – ,
или же истекло время работы заданное для таймера
• Не горит - сигнал таймера не активен
Символ ключ
• Защита от детей
• Горит - Защита от детей активна
• Не горит - Защита от детей не активна
43
Page 44

RU
ФУНКЦИИ ЭЛЕКТРОННОГО ПРОГРАММАТОРА
После первого подключения прибора к электросети и в случае
отключения электроэнергии следует установить текущее время.
Установка текущего времени:
• После подключения прибора к электросети и в случае отключения
электроэнергии на дисплее будет мигать индикаторы 0:00 и .
• Нажмитена кнопку далее кнопками и установите точное
время суток,после того как выставлено время, нажмите на кнопку
Процесс установки времени завершен.
Если кнопку или удерживать, то значение будет меняться
быстрее (увеличиваться или уменьшаться соответственно).
Будильник:
Программатор оснащен функцией будильника,который оповещает,
что установленное время истекло и не отключает духовку.
Будильник можно использовать независимо от работы духовки.
Максимальное время функции составляет 23 часа 59 минут!
• Нажмите кнопку и кнопками и установите время
будильника. Максимальное время установки звукового сигнала –
23 часа 59 минут.
AU TO
• Через 5 секунд после установки начнется отсчет времени. На
дисплее отображается текущее время суток. С помощью кнопки
можно проверить оставшееся время и при необходимости его
изменить кнопками и .
• По истечении установленного времени раздастся звуковой
сигнал,который можно выключить нажатием на любую кнопку, или
через 7 минут сигнал выключится автоматически.
Отмена функции будильника:
• Для отмены функции будильника нажмите и удерживайте кнопку
в течение 3-х секунд, функциябудильника будет отключена, на
дисплее исчезнет символ
44
Page 45

RU
Выбор мелодии звукового сигнала:
Вы можете выбрать одну из трех мелодий звукового сигнала.
• Нажмите и удерживайте кнопку в течении3-х секунд:Вы
услышите текущий сигнал,отпустите и снова нажмите .
Прозвучит следующая мелодия. Программатор автоматически
сохраняет последнюю выбранную мелодию.
• Вы можете изменить мелодию в любое время.
Ручной режим :
Нажмите и удерживайте в течении 5 секунд кнопку . Отменятся
все установленные функции (индикатор погаснет если он горел).
Загорится индикатор ,это означает, что духовка находится в ручном
режиме.
Программированиевремени работы духовки:
Для программирования времени работы духовки сначала
включите духовку, выбрав режим нагрева и температуру. Затем
можно установить необходимую функцию. После завершения
приготовления выключите духовку, установив переключатели в
положение 0.
AU TO
Продолжительность приготовления:
Данная функция позволяет запрограммировать продолжительность
приготовления - время, как долго духовка будет работать.
Максимальное время функции составляет 10 часов.
• Нажмите кнопку : на дисплее появится 0:00,и будет мигать
индикатор . Кнопками и установите продолжительность
приготовления.Время устанавливается с шагом в 1 минуту.
Максимальное время функции составляет 10 часов.
• Через 5 секунд после установки начнется отсчет времени. На
дисплее отображается время суток. Нажатием на кнопку можно
проверить оставшееся время и при необходимости его изменить
кнопками и .
• По истечении установленного времени раздастся звуковой сигнал,
который можно выключить, нажав любую кнопку, или через семь
минут сигнал выключится автоматически.Индикатор погаснет,
45
Page 46

RU
индикатор мигает. Духовка автоматически выключится. После
нажатия на кнопку индикатор погаснет, духовка готова к
AU TO
AU TO
работе в ручном режиме.
Чтобы завершить приготовление, выключите духовку, установив
переключатели в положение 0.
Окончание приготовления:
Данная функция позволяет запрограммировать время отключения
духовки(окончание приготовления).
Окончание приготовления можно запрограммировать не больше чем на
10 часов с момента установки функции.
• Нажмите дважды кнопку . На дисплее появится время суток и
будет мигать индикатор .Кнопками и установите время
окончания приготовления (время должно быть больше, чем текущее
время суток). Загорится индикатор .
AU TO
• Через пять секунд после установки на дисплее отобразится время
суток. Нажав на кнопку один раз, можно проверить оставшееся
время.
• По истечении установленного времени раздастся звуковой сигнал,
который можно выключить, нажав любую кнопку, или через семь
минут сигнал выключится автоматически. Индикатор погаснет,
индикатор будет мигать. Духовка автоматически выключится.
После нажатия на кнопку индикатор погаснет, духовка
AU TO
AU TO
готова к работе в ручном режиме.
Чтобы завершить приготовление, выключите духовку, установив
переключатели в положение 0.
Отсрочка старта:
Данная функция позволяет запрограммировать время работы
духовки (продолжительность приготовления),и время отключения
духовки (окончание приготовления).Окончание приготовления можно
запрограммировать не больше чем 10 часов с момента установки
функции.
• Нажмите кнопку и кнопками и установите
продолжительность приготовления.
• Нажмите повторно кнопку ,на дисплее отобразится сумма
46
Page 47

RU
текущего времени суток и продолжительности приготовления.
Кнопками и время окончания приготовления.
• Индикатор погаснет,если время окончания приготовления
больше суммы текущего времени суток и продолжительности
приготовления. Духовка включится автоматически в определенное
время, и выключится в установленное время.
Пример:
Текущее время 15:00. Установлена продолжительность приготовления
1:30, а окончание - в 17:00. Значит, духовка начнет работу в 15:30. По
истечении установленного времени раздастся звуковой сигнал, который
можно выключить, нажав любую кнопку, или через семь минут сигнал
выключится автоматически. Индикатор погаснет, индикатор
будет мигать. Духовка автоматически выключится. После нажатия на
кнопку индикатор погаснет, духовка готова к работе в ручном режиме.
Чтобы завершить приготовление, выключите духовку, установив
переключатели в положение 0.
Чтобы войти в ручной режим настройки, нажмите и удерживайте в
течении 5 секунд кнопку Отменятся все установленные функции
(индикатор погаснет, если он горел). Загорится индикатор ,это
AU TO
означает, что духовка находится в ручном режиме.
AU TO
Защита от детей:
Эта функция блокирует возможность изменения времени работы
духовки в автоматическом режиме. Если включен режим блокировки,
все кнопки, кроме кнопки блокировки, неактивны. Нажмите и
удерживайте кнопку в течении 3-х секунд : на дисплее появится
индикация .
Для отключения функции нажмите и удерживайте кнопку в течении 3-х
секунд . На дисплее исчезнет индикация .
Примечание: При работающем режиме “защита от детей” можно
отключить сработавший звуковой сигнал, нажав на любую кнопку.
Режим блокировки при этом будет продолжать работать.
Инструкция для электронного программатора является неотъемлемой
частью инструкции для духовых шкафов. Продукт сертифицирован в
соответствии с действующим техническим регламентом.
Производитель на свое усмотрение и без дополнительных
уведомлений может менять комплектацию, внешний вид, страну
производства и технические характеристики модели.
47
Page 48

RU
Минутная стрелка (A)
Индикатор (D)
Время готовки (E)
- Для настройки времени нажмите и поверните по часовой стрелке.
- Для настройки времени готовки поверните по часовой стрелке.
АНАЛОГОВЫЙ ТАЙМЕР
Для настройки времени, отображенном на аналоговом таймере, сначала
нажмите на ручку рядом с часами и затем поверните ее против часовой стрелки.
Поворачивайте до тех пор, пока часы (A и B) покажут правильное время.
ВРЕМЯ ГОТОВКИ
Процесс готовки начинается как только время готовки настроено и заканчивается,
когда время заканчивается.
Максимальное время готовки, которое может быть настроено: 180 минут (3 часа)
Для настройки времени аналогового таймера, настройте уровень диска E
напротив D, поворачивая ручку по часовой стрелке без нажатия.
Когда настроенное вами время готовки закончится, раздастся звонок
таймера. Звонок раздастся в течение определенного количества времени и в
конце замолкнет автоматически. На этой стадии диск E покажет “O” или “ ”
(позиция ВЫКЛЮЧЕНО).
Звонок, обозначающий истечение времени готовки, также может быть
выключен вручную. Звонок замолкнет, если вы переключите диск E напротив D
на “O” или “ ” (позиция ВЫКЛЮЧЕНО), поворачивая ручку рядом с часами
против часовой стрелки.
РУЧНОЙ РЕЖИМ
Для запуска часов в ручном режиме вы должны переключить на “I” или “ ”.
Поворачивайте ручку рядом с часами против часовой стрелки до тех пор, пока
она не покажет “I” или “ ” символ стороны D для переключения часов в ручной
режим.
Если вы хотите вернуться на позицию выключено, поворачивайте ручку
по часовой стрелке до тех пор, пока он не покажет “O” или “ ” (позиция
ВЫКЛЮЧЕНО).
Часовая стрелка (B)
48
Page 49

RU
ВИДЫ ПРОГРАММ
Виды программ приготовления пищи и важные пояснения к ним
предоставлены ниже с целью предоставления Вам возможности
приготовления различных блюд на свой вкус.
Нижний и верхний
нагревательные элементы
Нижний нагревательный элемент
и вентилятор
Гриль и шампур для зажарки
курицы
Верхний нагревательный элемент
и вентилятор
Мульти-функциональное
приготовление
Нижний нагревательный элемент Верхний нагревательный элемент
Малая решетка и вентилятор Пароочистка
Вентилятор
Турбо нагреватель и вентилятор
Нижний и верхний нагревательные
элементы и вентилятор
Гриль и вентилятор
Гриль
Нижний нагревательный элемент: Выбирайте эту программу ближе к
концу времени готовки для обеспечения пропекания нижней части блюда.
Верхний нагревательный элемент: Используется для приготовления
или разогрева мелких продуктов.
Нижний и верхний нагревательный элемент: Программа,
используемая для приготовления таких продуктов, как кексы, пицца,
бисквиты, печенье.
Нижний нагревательный элемент и вентилятор: Используется для
приготовления фруктовых кексов и похожих продуктов.
Нижний и верхний нагревательные элементы и вентилятор:
Программа, подходящая для приготовления кексов, бисквитов, лазаньи и
подобных блюд. Также подходит для приготовления мясных блюд.
Решетка (гриль): Решетка используется для приготовления таких
продуктов, как бифштексы, сосиски и рыбы на гриле. Во время
приготовления пищи на гриле, под решетку следует установить поднос с
небольшим количеством воды.
Турбо нагреватель и вентилятор: Подходит для приготовления и
жарки пищи в печи. Устанавливайте температуру немного ниже, чем для
программы “Верхнего и нижнего нагревательного элемента”, так как жар
быстро распространяется при помощи потока воздуха.
Решетка и вентилятор: Подходит для приготовления мясных блюд.
Во время приготовления пищи на гриле, под решетку следует установить
поднос с небольшим количеством воды.
49
Page 50

RU
Мульти-функциональная готовка: Подходит для приготовления и
жарки пищи в печи. Помимо быстрого распространения жара посредством
потока воздуха, также работают и верхней и нижний нагревательные
элементы. Подходит для приготовления блюд на одном подносе, требующих
интенсивного нагрева.
РЕКОМЕНДАЦИИ ПО ПРИГОТОВЛЕНИЮ
Информация о различных продуктах, которые мы протестировали в наших
лабораториях и установили значения для их приготовления, приведена в
таблицах ниже. Время приготовления может меняться в зависимости от
напряжения сети, особенностей, количества и температуры продуктов.
Блюда, приготовленные с применением предоставленных значений,
могут не подойти Вам по вкусу. Вы можете определить новые значения
экспериментируя и находя более подходящие для Вас.
ПРЕДУПРЕЖДЕНИЕ: Перед размещением продуктов в печь, ее следует
предварительно нагреть в течение 7-10 минут.
ТАБЛИЦА ПРИГОТОВЛЕНИЯ
Блюда
Тор т Статический / Статический+Вентилятор 170-180 2-3 35-45
Небольшие Торты Статический / Турбо+Вентилятор 170-180 2 25-30
Пэтти Статический / Статический+Вентилятор 180-200 2 35-45
Тор т Статический 180-190 2 20-25
Печенье Статический 170-180 2 20-25
Яблочный Пирог Статический / Турбо+Вентилятор 180-190 1 50-70
Бисквит Статический 200/150* 2 20-25
Пицца Статический+Вентилятор 180-200 3 20-30
Лазанья Статический 180-200 2-3 25-40
Меренга Статический 100 2 50
Курица На Гриле** Гриль+Вентилятор 200-220 3 25-35
Жареная Рыба** Гриль+Вентилятор 200-220 3 25-35
Стейк Без Костей** Гриль+Вентилятор Max 4 15-20
Фрикаделька** Гриль+Вентилятор Max 4 20-25
Функция
Приготовления
Температура
(°C)
Полка
Время
(мин.)
* без предварительного нагрева Первая половина времени приготовления
при температуре 200°C, остальное время - 150°C.
** В середине продолжительности приготовления необходимо
перевернуть продукты.
50
Page 51

RU
ЭКСПЛУАТАЦИЯ
Первое использование
После выполнения необходимых соединений согласно инструкциям,
необходимо совершить следующие действия:
1. Выньте все этикетки и аксессуары, находящиеся внутри печи.
Удалите защитную пленку на внешней стороне прибора.
2. Протрите внутреннюю часть печи от пыли и частиц упаковки при
помощи влажной тряпки. Внутренность печи должна быть пустой.
Вставьте вилку устройства в розетку.
3. Установите реле термостата на максимальную температуру
(240 Max. °C) и дайте печи проработать с закрытой дверцей в течение 30
минут. При этом может появиться легкий дым и запах, это нормально.
4. После этой процедуры, дождитесь охлаждения печи, протрите
внутреннюю часть теплой мыльной водой и просушите при помощи
чистой сухой тряпки. Теперь Вы можете использовать свою печь.
Стандартная эксплуатация печи
1. Для начала приготовления, установите реле термостата в положение
желаемой температуры в соответствии с продуктами.
2. На моделях с механическим таймером, Вы можете установить
желаемое время готовки при помощи реле таймера. По истечении
установленного времени таймер отключает нагреватели и издает
характерный звонок.
3. На моделях с цифровым таймером, по истечении времени готовки в
соответствии с установленными данными, таймер отключает нагреватели
и издает характерный звонок.
4. После завершения процедуры готовки система охлаждения прибора
будет продолжать работать. Не отключайте питание прибора до полного
охлаждения прибора в таком режиме. После завершения охлаждения
система отключится автоматически.
51
Page 52

RU
ЗАМЕНА ЛАМПЫ
ПРЕДУПРЕЖДЕНИЕ: Во избежание поражения электрическим током,
перед заменой лампы убедитесь, что прибор отключен от цепи питания.
(Отключение от цепи питание означает отключение
от магистральной сети).
Сначала отключите питание прибора и убедитесь
в том, что он остыл.
Поверните и снимите стеклянный плафон как
показано на рисунке. В случае затруднения при
Рис. 11
Рис. 12
ЧИСТКА СТЕКЛА
Нажмите на пластиковые защелки по левой и правой стороне дверцы,
как показано на рисунке 13 и потяните планку на себя, как показано на
рисунке 14. Как показано на рисунке 15, после снятия профиля, стекло
остается свободным. Осторожно потяните на себя освобожденное
стекло. Внешнее стекло закреплено на профиле дверцы печи. После
снятия стекол, Вы можете с легкостью их очистить. После завершения
процедуры чистки и ухода, выполните процедуру в обратном порядке и
установите стекла на место. Убедитесь, что профиль плотно установлен
на свое место.
повороте плафона, используйте пластиковые
перчатки.
Затем, выкрутите старую и установите
новую лампу с такими же характеристиками.
Характеристики лампы должны быть
следующими:
-220-240 V 50/60 Hz AC, -15 W, -Type E14
Установите плафон на место, подключите кабель
питания к розетке и завершите процедуру замены
лампы. Теперь Вы можете использовать свою печь.
Рис. 13 Рис. 14 Рис. 15
52
Page 53

ЧИСТКА И УСТАНОВКА ДВЕРЦЫ
RU
Рис. 16
Рис. 17
Рис. 16.1 Рис. 16.2 Рис. 17.1 Рис. 17.2
Потяните дверцу печи
на себя и откройте ее
до предела. Затем,
потяните замок
петли при помощи
отвертки и выполните
процедуру открытия
замка, как показано на
рисунке 16.1.
Приведите замок
петли в максимально
открытое положение,
как показано на
рисунке 16.2
. Переведите обе
петли, соединяющие
дверцу с печью,
в одинаковое
положение.
Затем, прикройте
дверцу до того
момента как она будет
упираться в замок
петли, как показано
на рисунке 17.1.
Для снятия дверцы,
приведите ее в
практически закрытое
положение и потяните
ее вверх обеими
руками, как показано
на рисунке 17.2.
Для установки дверцы на место выполняйте действия, описанные для
снятия, в обратном порядке.
Плавное закрытие и открытие дверцы духового шкафа:
Дверца духового шкафа оснащена функцией плавного закрытия и
открытия. Специальное устройство в дверце позволяет снизить скорость
при открытии и закрытии дверцы, тем самым облегчит и обезопасит
эксплуатацию духового шкафа.
53
Page 54

RU
УХОД И ЧИСТКА
1- Отсоедините вилку питания от розетки.
2- Не используйте жесткие щетки, металлические щетки или ножи для
чистки внутренних частей, панели, подносов и прочих частей печи. Не
используйте абразивные, царапающие материалы или моющие средства.
3- Протрите части печи мыльной тканью и прополоскайте водой, а затем
тщательно обсушите мягкой тканью.
4- Очищайте стеклянные поверхности специальными средствами для
чистки стекол.
5- Не используйте парогенераторные очистители для чистки прибора.
6- Для чистки печи никогда не пользуйтесь кислотой, растворителем и
керосином и другими горючими веществами.
7- Не мойте какие-либо части печи в посудомоечной машине.
8- Для удаления грязи и пятен используйте стеарат калия
(нейтральное мыло).
Осуществляйте чистку мягкой тряпкой в соответствии с рисунками ниже
во избежание возникновения царапин.
ПАРООЧИСТКА*
Это дает возможность очистить
размягченные загрязнения благодаря
пару, образующемуся в печи.
1.Удалите все аксессуары из духовки.
2.Залейте пол литра воды в поднос
и Поместите лоток в нижней части
котла.
3.Установите переключатель на
режим очистки паром.
4.Установите термостат на 70 ° C
Рисунок 18
5.После работы печи в течение 30 минут откройте дверцы печи и
протрите внутреннюю поверхность влажной тряпкой.
6.Используйте жидкость для мытья посуды, теплую воду и мягкую тряпку
для стойких загрязнений, затем просушите очищенное пространство сухой
тряпкой.
градусов и включите печь в течение
30 минут.
54
Page 55

RU
ПРОБЛЕМЫ И РЕКОМЕНДАЦИИ ПО ИХ УСТРАНЕНИЮ
Перед тем, как вызвать технический сервис, попробуйте
воспользоваться следующими рекомендациями для устранения
проблем.
Если плита не работает;
• Проверьте, вставлена ли штепсельная вилка электрического шнура в
розетку.
• Проверьте безопасными способами наличие электричества в сети.
• Проверьте предохранители.
• Проверьте наличие повреждений электрического шнура.
УТИЛИЗАЦИЯ С УЧЕТОМ ЭКОЛОГИЧЕСКИХ ТРЕБОВАНИЙ
Утилизируйте упаковку с учетом требований по охране окружающей
среды.
Данное устройство маркировано в соответствии с требованиями
Директивы ЕС 2012/19/EU по утилизации использованных электрических
и электронных устройств (утилизация электрического и электронного
оборудования -WEEE). Здесь указаны требования по возврату и
переработке использованных устройств, применимые во всех странах
Европейского Союза.
ИНФОРМАЦИЯ ОБ УПАКОВКЕ
Упаковочные материалы холодильника изготовлены из материалов,
подлежащих вторичной переработке, в соответствии с местными
нормативами и правилами касательно защиты окружающей среды.
Не утилизируйте упаковочные материалы вместе с бытовыми или
другими отходами. Сдайте их на пункт сбора упаковочных материалов,
определенный местными властями.
55
Page 56

RU
Основной импортер товара Zigmund & Shtain в России:
ООО «Элеком» РФ, г. Москва, Очаковское шоссе дом 36,
помещение 8.
Тел.: +7 968 336 38 26
Email: elekom_ooo@mail.ru
Срок службы – 10 лет со дня покупки, при использовании в
строгом соответствии с настоящей инструкцией по эксплуатации и
применимыми техническими стандартами.
Веб-сайт; www.zigmundshtain.ru
Информацию об авторизованных сервисных центрах и условиях
гарантийного обслуживания Вы можете узнать на веб-сайте и в
гарантийном талоне.
Если в Вашем городе отсутствует авторизованный сервисный
центр, Вам следует обратиться в магазин, где Вы приобрели наш
товар, и он организует ремонт, или замену.
Страна происхождения – Турция
Настоящая информация является частью сопроводительной
технической документации, прилагаемой к товару. Изготовитель
постоянно работает над совершенствованием конструкции и
технических характеристик выпускаемой продукции, в том числе
над улучшением энергетической эффективности.
Изготовитель оставляет за собой право на внесение изменений
в конструкцию, оснащение и технические характеристики прибора
без предварительного уведомления. Ассортимент выпускаемой
продукции постоянно обновляется и расширяется, информация в
настоящем издании может периодически меняться.
По истечению срока службы техника не обслуживается, запчасти
не поставляются, авторизованный сервисный центр вправе
отказать в ремонте. Дальнейшая эксплуатация может повлечь
невозможность нормального использования товара.
Товар необходимо передать специализированным компаниям,
которые занимаются утилизацией данного вида продукции.
56
Page 57

Утилизация упаковки.
Упаковка изготовлена из экологически чистых материалов,
которые можно без ущерба для окружающей среды подвергать
переработке, складировать на специальных полигонах для
хран¬¬ения отходов и утилизировать. Упаковочные материалы
имеют соответствующую маркировку.
Отслужившее изделие нужно сделать непригодным для
использования. Для этого отсоедините прибор от электросети и
обрежьте присоединенный кабель, так как он может представлять
опасность для играющих детей.
Символ на изделии или его упаковке указывает, что оно не
подлежит утилизации в качестве бытовых отходов. Изделие
следует сдать в соответствующий пункт приема электронного и
электрооборудования для последующей утилизации. Соблюдая
правила утилизации изделия, вы поможете предотвратить
причинение ущерба окружающей среде и здоровью людей, который
возможен вследствие неподобающего обращения с подобными
отходами. За более подробной информацией об утилизации
изделия просьба обращаться к местным властям, в службу
по вывозу и утилизации отходов или в магазин, в котором вы
приобрели изделие.
Импортер: Общество с ограниченной ответственностью
«ЭЛЕКОМ». 119530,
Российская Федерация, город Москва, Очаковское шоссе, дом 36,
помещение 8., elekom_ooo@mail.ru.
Изготовитель: «Зигмунд энд Штайн ГмбХ» ГЕРМАНИЯ, Грассен
штр.5, 40213, Дюссельдорф.
Дата производства указана на упаковке.
www.zigmundshtain.ru
57
 Loading...