

Page 1
EN 152.911 W
EN 122.921 S
EN
OPERATING AND INSTALLATION
INSTRUCTIONS OF
BUILT-IN OVEN
Page 2
Dear Customer,
We take offering quality products that more than meet your
expectations as our goal, offering you products produced in
modern factories that have been carefully and extensively
tested for quality.
Your manual is prepared in order to help you to use your
appliance that is manufactured by the most recent technology,
with confidence and maximum efficiency.
Before use of your appliance, carefully read this guide that
includes the basic information for right and safe installation,
maintenance and use. Contact to the nearest Authorized
Service for mounting of your product.
Page 3

Contents
1- Presentation and size of product
2- Warnings
3- Preparation for installation and use
4- Using the oven
5- Cleaning and maintenance of your product
6- Service and Transport
ME 68
1
Page 4
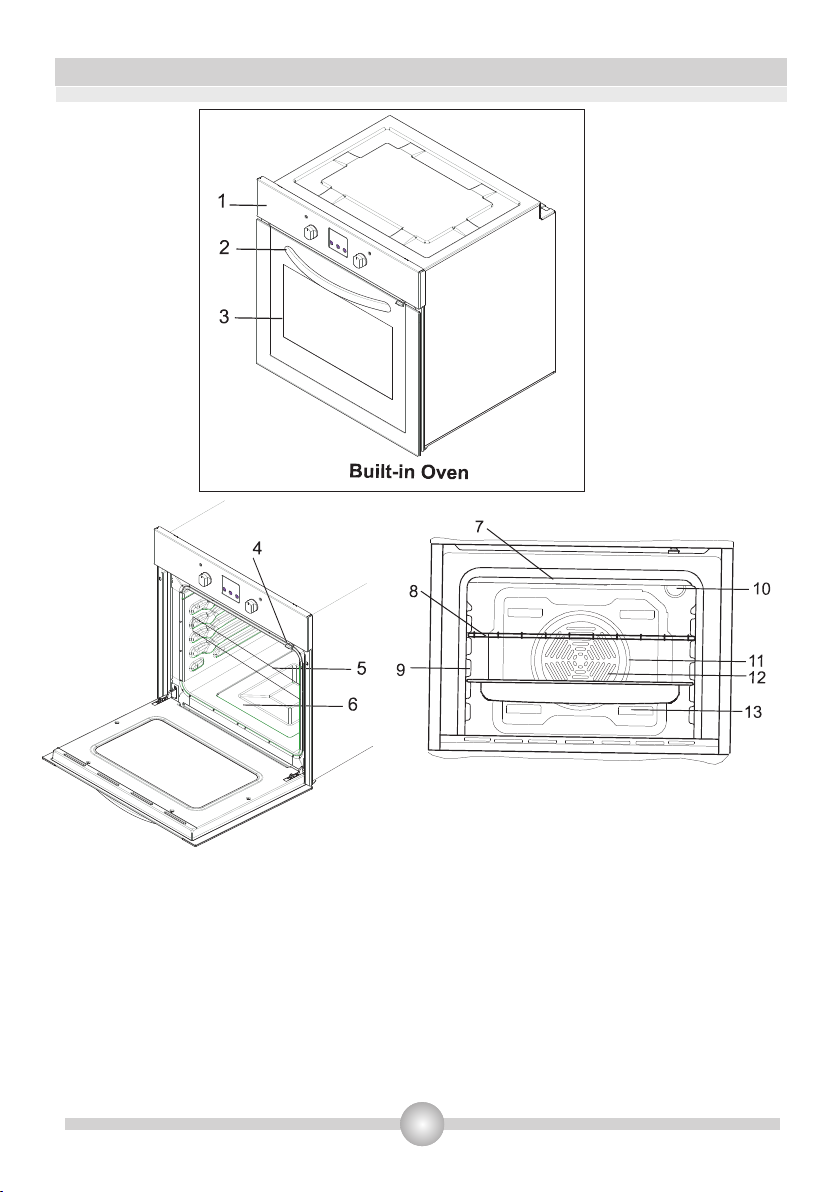
PART 1: PRESENTATION AND SIZE OF PRODUCT
LIST OF COMPONENTS :
1- Control panel
2- Handle
3- Oven Door
4- Child Lock
5- Tray
6- Lower Heating Element
7- Upper Heating Element
8- Wire Grill
9- Racks
10- Oven Light
11- Turbo Heating Element
12- Fan
13- Air Outlet Shutters
2
Page 5

PART 2: WARNINGS
READ THESE INSTRUCTIONS CAREFULLY AND COMPLETELY BEFORE USING YOUR
APPLIANCE, AND KEEP IT IN A CONVENIENT PLACE FOR REFERENCE WHEN NECESSARY.
THIS MANUAL IS PREPARED FOR MORE THAN ONE MODEL IN COMMON. YOUR APPLIANCE
MAY NOT HAVE SOME OF THE FEATURES THAT ARE EXPLAINED IN THIS MANUAL. PAY
ATTENTION TO THE EXPRESSIONS THAT HAVE FIGURES, WHILE YOU ARE READING THE
General Safety Warnings
OPERATING MANUAL.
- This appliance can be used by children aged
from 8 years and above and persons with
reduced physical, sensory or mental capabilities
or lack of experience and knowledge if they
have been given supervision or instruction
concerning use of the appliance in a safe way
and understand the hazards involved. Children
shall not play with the appliance. Cleaning and
user maintenance shall not be made by children
without supervision.
- WARNING: The appliance and its accessible
parts become hot during use. Care should be
taken to avoid touching heating elements.
Children less than 8 years of age shall be kept
away unless continuously supervised.
- WARNING: Danger of fire: do not store items
on the cooking surfaces.
- WARNING: If the surface is cracked, switch off
the appliance to avoid the possibility of electric
shock.
- The appliance is not intended to be operated
by means of an external timer or separate
remote-control system.
3
Page 6

- During use, the appliance becomes hot. Care
should be taken to avoid touching heating
elements inside the oven.
- During use, handles held for short periods in
normal use can get hot.
- Do not use harsh abrasive cleaners or sharp
metal scrapers to clean the oven door glass and
other surface since they can scratch the surface,
which may result in shattering of the glass or
damage to the surface.
- Do not use steam cleaners for cleaning the
appliance.
- WARNING: Ensure that the appliance is
switched off before replacing the lamp to avoid
the possibility of electric shock.
- CAUTION: Accessible parts may be hot when
the cooking or grilling is in use. Young children
should be kept away.
- Your appliance is produced in accordance with all applicable local and international
standards and regulations.
- Maintenance and repair work must be made only by authorized service technicians.
Installation and repair work that is carried out by unauthorized technicians may endanger
you. It is dangerous to alter or modify the specifications of the appliance in any way.
- Prior to installation, ensure that the local distribution conditions (nature of the gas and gas
pressure or electricity voltage and frequency) and the requirements of the appliance are
compatible. The requirements for this appliance are stated on the label.
- CAUTION: This appliance is designed only for cooking food and is intended for indoor
domestic household use only and should not be used for any other purpose or in any other
application, such as for non-domestic use or in a commercial environment or room heating.
- Do not try to lift or move the appliance by pulling the door handle.
- All possible security measures have been taken to ensure your safety. Since the glass may
break, you should be careful while cleaning to avoid scratching. Avoid hitting or knocking on
the glass with accessories.
4
Page 7

- Ensure that the supply cord is not wedged during the installation. If the supply cord is
damaged, it must be replaced by the manufacturer, its service agent or similarly qualified
persons in order to prevent a hazard.
- While the oven door is open, do not let children climb on the door or sit on it.
Installation Warnings
- Do not operate the appliance before it is fully installed.
- The appliance must be installed by an authorized technician and put into use. The producer
is not responsible for any damage that might be caused by defective placement and
installation by unauthorized people.
- When you unpack the appliance, make sure that it is not damaged during transportation. In
case of any defect; do not use the appliance and contact a qualified service agent
immediately. As the materials used for packaging (nylon, staplers, styrofoam...etc) may
cause harmful effects to children, they should be collected and removed immediately.
- Protect your appliance against atmospheric effects. Do not expose it to effects such as sun,
rain, snow etc.
- The surrounding materials of the appliance (cabinet) must be able to withstand a
temperature of min 100°C.
During usage
- When you first run your oven a certain smell will emanate from the insulation materials and
the heater elements. For this reason, before using your oven, run it empty at maximum
temperature for 45 minutes. At the same time you need to properly ventilate the environment
in which the product is installed.
- During usage, the outer and inner surfaces of the oven get hot. While opening the oven
door, step back to avoid the hot steam coming out of the oven. There may be a risk of burns.
- Do not put flammable or combustible materials, in or near the appliance when it is
operating.
- Always use oven gloves to remove and replace food in the oven.
- Do not leave the cooker while cooking with solid or liquid oils. They may catch fire on
condition of extreme heating. Never pour water on to flames that are caused by oil. Cover
the saucepan or frypan with its cover in order to choke the flame that has occured in this
case and turn the cooker off.
- If you will not use the appliance for a long time, plug it off. Keep the main control switch off.
Also when you do not use the appliance, keep the gas valve off.
- Make sure the appliance control knobs are always in the "0" (stop) position when it is not
used.
- The trays incline when pulled out. Be careful not to let hot liquid spill over.
- When the door or drawer of the oven is open, do not leave anything on it. You may
unbalance your appliance or break the cover.
- Do not put heavy things or flammable or ignitable goods (nylon, plastic bag, paper,
cloth...etc) into the drawer. This includes cookware with plastic accessories (e.g. handles).
- Do not hang towels, dishcloths or clothes from the appliance or its handles.
During cleaning and maintenance
- Always turn the appliance off before operations such as cleaning or maintenance. You can
do it after plugging the appliance off or turning the main switches off.
- Do not remove the control knobs to clean the control panel.
TO MAINTAIN THE EFFICIENCY AND SAFETY OF YOUR APPLIANCE, WE
RECOMMEND YOU ALWAYS USE ORIGINAL SPARE PARTS AND TO CALL ONLY OUR
AUTHORIZED SERVICE AGENTS IN CASE OF NEED.
5
Page 8
PART 3: PREPARATION FOR INSTALLATION AND USE
Manufactured with best quality parts and materials, this modern, functional and practical
oven will meet your needs in all respects. Make sure to read the manual to obtain successful
results and not to experience any problems in the future. The information given below contain
rules that are necessary for correct positioning and service operations. They should be read
without fail especially by the technician who will position the appliance.
CONTACT THE AUTHORIZED SERVICE FOR INSTALLATION OF YOUR OVEN!
3.1. CHOOSING A PLACE FOR THE OVEN
There are several points to pay attention to when choosing a place for your oven.
Make sure to take into account our recommendations below in order to prevent any
problems and dangerous situations, which might occur later!
When choosing a place for the oven, attention should be paid that there are no flammable
or combustible materials in the close vicinity, such as curtains, oil, cloth etc. which quickly
catch fire.
Furnitures surrounding the oven must be made of materials resistant to heat more than 50
C° of the room temperature.
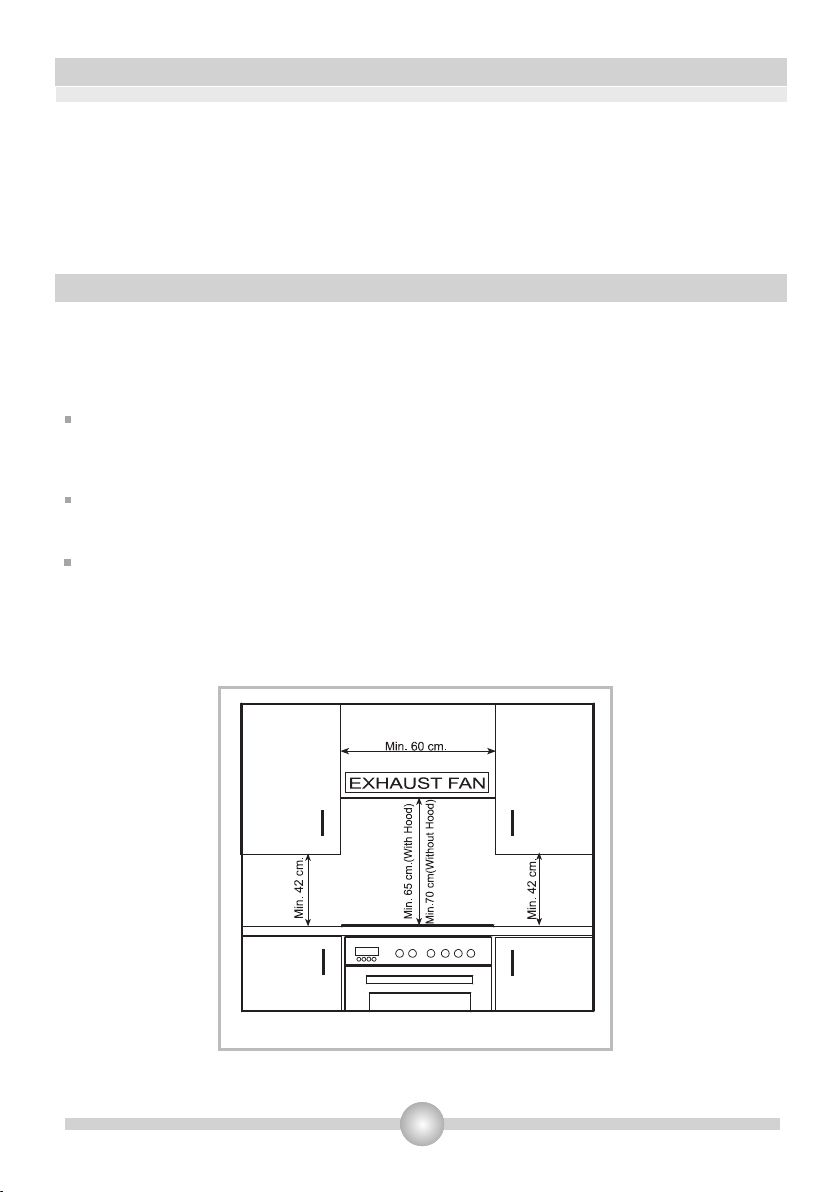
Required changes to wall cabinets and exhaust fans above the built-in combined product
as well as minimum heights from the oven board are shown in Figure 1. Accordingly, the
exhaust fan should be at a minimum height of 65 cm from the hob board. If there is no
exhaust fan the height should not be less than 70 cm.
Figure 1
6
Page 9

3.2. INSTALLATION OF BUILT_IN OVEN
Cabinet cut-out sizes
555mm
560mm
Product sizes
Distance between
countertop and
control panel
Min.25mm
1
575mm
Countertop
Control
panel
Built-in oven
595mm
B DETAIL
Min 25mm
You can use either cabinet 1
or cabinet 2 cut-out sizes
555mm
570mm
C
555mm
Mounting screws
Built-in hob
Distance between
countertop snd
top panel of built-in
oven
Min. 50mm
570mm
590mm
2
A
C DETAIL
Mounting
screw
B
580mm
560mm
595mm
600mm
20mm
Minimum 40mm(The wooden
part can be extended up
to cut-out depth)
Front
frame
A DETAIL
Wooden
part
Spacer
Insert the oven into cabinet by pushing it forward. Open the oven door and insert 2 screws in
the holes located on the oven frame. While the product frame touches the wooden surface of
cabinet, tighten the screws.
7
Page 10
The dimensions and material of the cabinet in which the oven will be installed must be
correct and resistant to increases in temperature. In a correct installation, contact with
electrical or insulated parts must be prevented. Insulating parts need to be fitted in a way to
ensure that they cannot be removed by using any kind of tool. Installing the appliance in the
close vicinity of a refrigerator or a deep-freezer is not recommended. Otherwise, the
performance of the above-mentioned appliances will be negatively affected due to
emanating heat. After removing your oven from its packaging, be sure that the oven is not
harmed. In case, you suspect of any damage to the appliance, do not use it; immediately
contact Authorized Service.
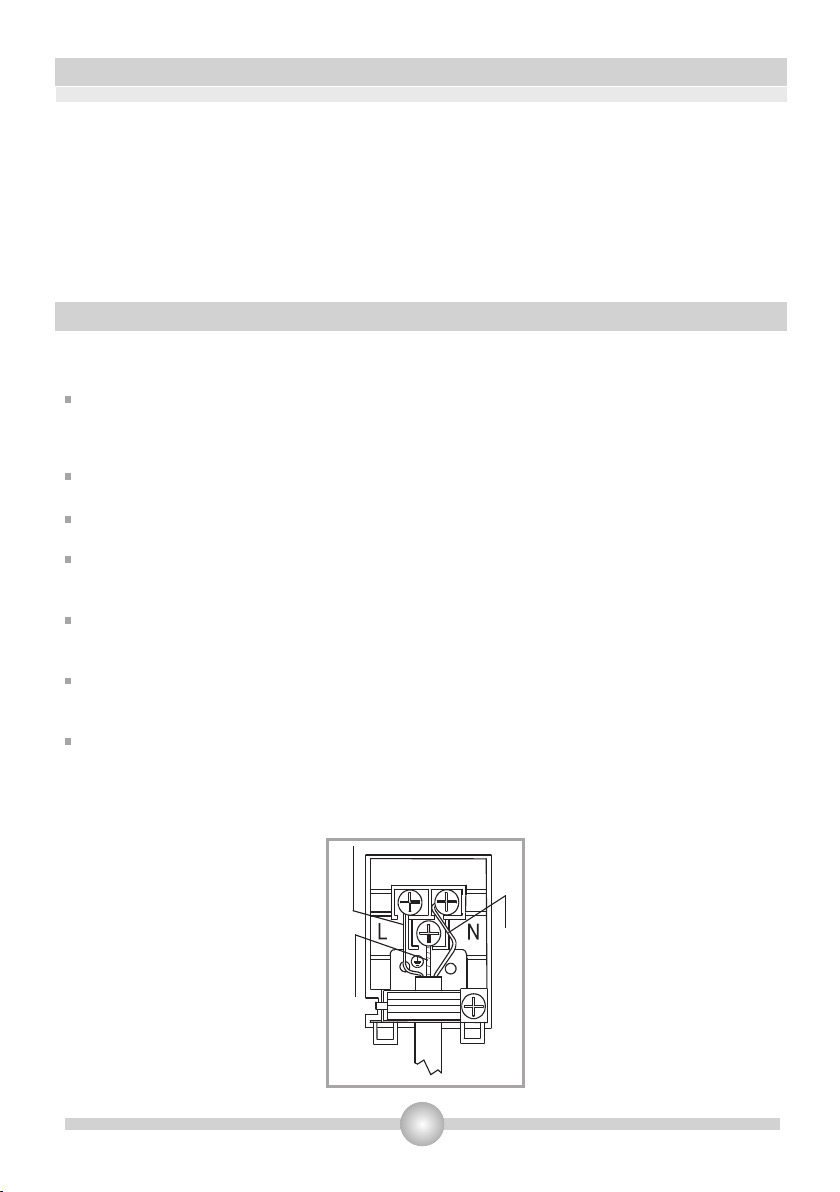
3.3. WIRING AND SAFETY OF BUILT_IN OVEN
The instructions given below must be followed without fail during wiring :
The earthing cable must be connected via the screw with the earthing mark. Supply cable
connection must be as shown in Figure 6. If there is no earthed outlet conforming to
regulations in the installation environment, call the Authorized Service immediately.
The earthed outlet must be in close vicinity of the appliance. Never use an extension cord.
The supply cable should not contact the product’s hot surface.
In case of any damage to the supply cable, make sure to call the Authorized Service. The
cable must be replaced by the Authorized Service.
Wiring of the appliance must be performed by the Authorized Service. H05VV-F type
supply cable must be used.
Faulty wiring may damage the appliance. Such a damage will not be covered under the
warranty.
The appliance is designed to connect to 220-240V~ electricity is different than the value
given above, call the Authorized Service immediately.
The Manufacturer Firm declares that its bears no responsibility whatsoever for any
kind of damage and loss arising from not complying with safety norms!
BROWN
BLUE
YELLOW+GREEN
Figure 6
8
Page 11
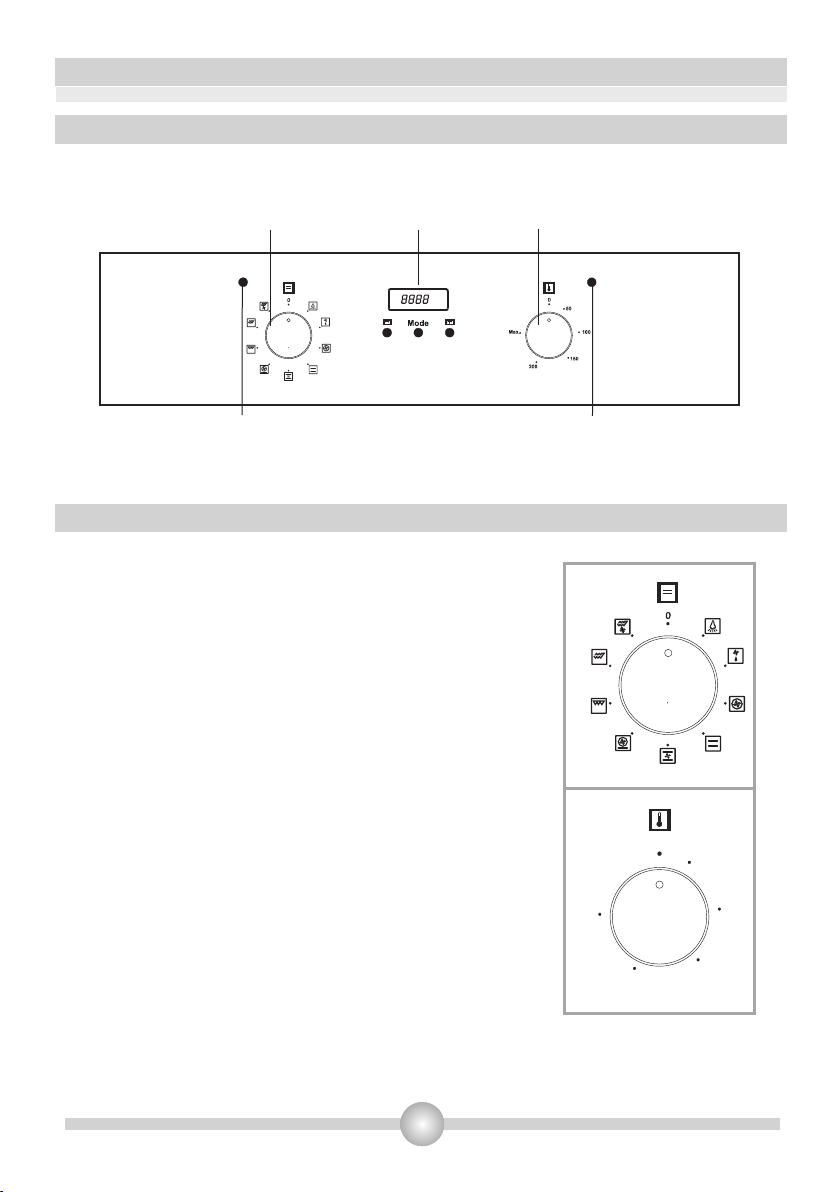
4.1 CONTROL PANEL
Built_in Oven
PART 4: USING THE OVEN
Oven Function
Control Knob
Oven Operation Light
'LMLWDO Timer
4.2. USING THE OVEN PART OF THE APPLIANCE
Oven Function Control Knob:
To select the desired cooking function, turn the knob
to the related symbol(Figure 11). the details of the
oven functions have been explained in Table 1 and
next part.
Oven Thermostat Knob:
After cooking function set, desired temperature can
be adjusted by oven thermostat knob (figure 12) and
oven start to operate (timer must be adjusted, if
available).
Thermostat signal light will be on or off according to
thermostat operation.
Oven Thermostat Knob
Oven Thermostat Light
0
Figure 11
50
Max
200
100
150
Figure 12
9
Page 12
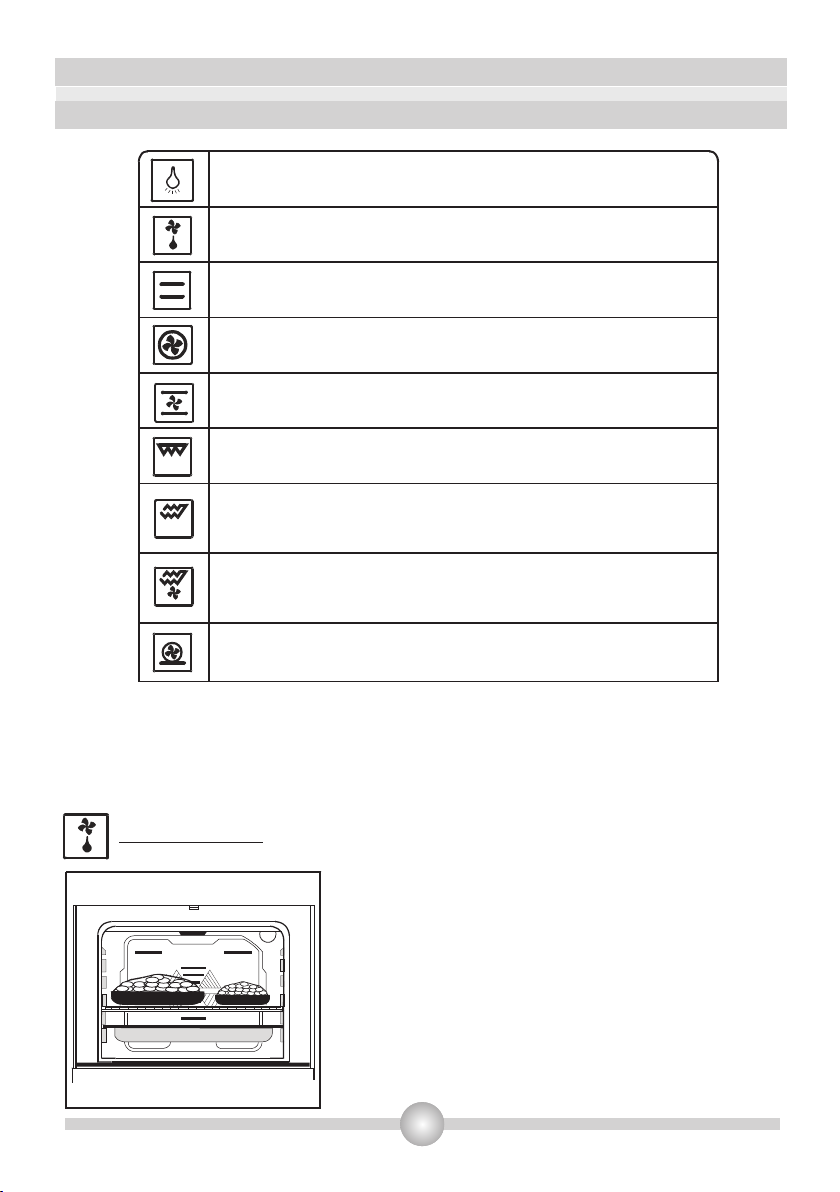
4.3. USING THE OVEN FUNCTION CONTROL BUTTON
Table 1
The oven light will be turned on.
The oven light, the red warning light and the fan will be turned
on. Performs the function of defrosting the frozen foods.
The oven’s thermostat and warning lights and the lower and
upper heating elements will be switched on.
The oven’s thermostat and warning lights, the fan and the
turbo heater will be switched on.
The oven’s thermostat and warning lights, the fan and the
lower and upper heating elements will be switched on.
The oven’s thermostat and warning lights, the grill heater
will be switched on.
The oven’s thermostat and warning lights, the upper heating
element, the grill heater will be switched on.
The oven’s thermostat and warning lights, the upper heating
element, the grill heater, the fan will be switched on.
The oven’s thermostat and warning lights, the lower
the fan,
heating element, the turbo heater, will be switched on.
Availability of the functions explained below vary depending on the product model.
Defrost Function :
You can start the defrost operation by putting the frozen
food into oven and bringing the knob to the indicated
mark. This function does not cook/bake the food; it only
helps defrost it within a short time. Put the food to be
defrosted on the wire rack that you will place on the third
rack support from the bottom (Figure 13). To collect the
water to accumulate due to the melting ice, insert an oven
tray into the lower rack.
Figure 13
10
Page 13
Lower-Upper Heating Element Function (Static Coking) :
In this type of cooking which is described as the traditional method, the heat emanating
evenly from the lower and upper resistors into the oven ensures even cooking of the lower
and upper side of the food that you are cooking. Adjust the thermostat knob of your oven to a
temperature recommended on the cooking table for the cooking operation you will perform. A
preheating of the oven for about 10 minutes is recommended. Leave a food to cook, which is
placed in a suitable container, for the recommended duration. This position is a preferred
function in making cakes, sponge cakes, pastry, baked pasta, lasagne, pizza.
After a cooking/baking, turn off the oven function control knob and the thermostat knob and
cancel the timer program if available. Take the cooked/bake food out of the oven, place it on a
safe place and ensure that the oven completely cools off by keeping the oven door open. As
the oven will be hot, stay away from the oven and keep your children away as well.
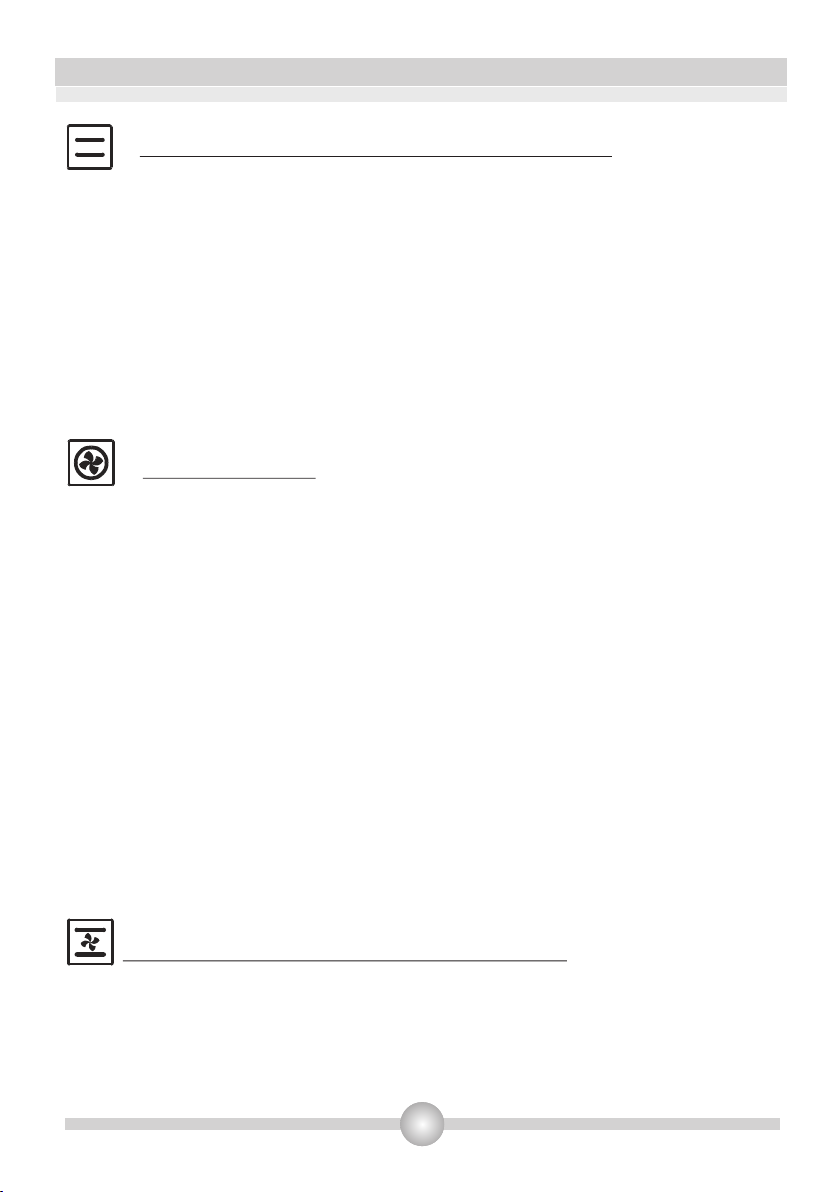
Turbo Fan Function :
The turbo fan function evenly disperses the heat in the oven. All foods on all racks will be
cooked evenly.
Adjust the thermostat knob to the desired degree. Turn the function knob so it will point to the
Turbo function symbol. After completing the preheating of 10 minutes, place the foods
into the oven, which need to be put into suitable containers. This function is suitable for
cooking multiple dishes.
If you are going to cook using two trays at the same time; while adjusting the cooking
temperature, select the temperature that is the lowest among the levels suitable for your
foods, as shown on the table. Cooking with two trays requires additional cooking time
compared to cooking with one tray. Usually, the foods on both trays do not finish at the same
time. Therefore, take the tray out of the oven, which you observed is finished and continue
the cooking operation for the other tray.
After the cooking/baking, turn off the oven function control knob and the thermostat knob
and cancel the timer program if available. Take the cooked/baked food out of the oven, place
it on a safe place and ensure that the oven completely cools off by keeping the oven door
open. As the oven will be hot, stay away from the oven and keep your children away as
well.
Fan and the Lower - Upper Heating Element Function:
This is the position where the air is coming from the lower and upper heating elements is
circulated into the oven by the fan motor and blade.
Adjust the thermostat knob of your oven to temperature recommended on the cooking
table for the cooking operation you will perform. Turn the oven knob so it will point to the
11
Page 14

symbol of this function, adjust the oven timer to the recommended time for cooking and
preheat the oven for about 10 minutes. The food placed in a suitable container is put into
the oven and the operation is started. This position is position where usually very good
results are obtained in baking pastry. All parts of the foods will be cooked evenly in this
position . Suitable for cooking with one tray.
After the cooking/baking, turn off the oven function control knob and the temperature
setting knob and cancel the timer program if available. Take the cooked/baked food
out of the oven, place it on a safe place and ensure that the oven completely cools off
by keeping the oven door open. As the oven will be hot, stay away from the oven and
keep your children away as well.
Grill Function :
This function is used for grills. For grills; put the foods on the grill, and the grill on the highest
rack. After placing the oven tray on the 2. Rack, You can start the grill operation. The tray
placed on the 2. Rack will ensure that the oil dropping from he foods will be collected. When
grilling, the oven door must be closed and the oven temperature should be adjusted to
190°C.
Turn your oven’s thermostat knob so it will point to this temperature value. After a preheating
period of 5 minutes, put your food into the oven.
After the cooking, turn off the oven function control knob and the thermostat knob and cancel
the timer program. Take the cooked/baked food out of the oven, place it on a safe place and
ensure that the oven completely cools off by keeping the oven door open. As the oven will
be hot, stay away from the oven and keep your children away as well.
Upper Heating Element, Grill Function :
This function is used for faster grills and for grills on a larger surface. For grills; put the foods
on the grill, and the grill on the highest rack. After placing the oven tray on the 2. Rack, you
can start the grill operation. 2, the tray placed on the 2. Rack will ensure that the oil dropping
from the foods will be collected. When grilling, the oven door must be closed and the
oven temperatureshould be adjusted to 190°C.
Turn your oven’s thermostat knob so it will point to this temperature value. After a preheating
period of 5 minutes, put your foods into the oven.
After the cooking, turn off the oven function control knob and the thermostat knob and cancel
the timer program if available. Take the cooked/baked food out of the oven, place it on a safe
place and ensure that the oven completely cools off by keeping the oven door open.
12
Page 15
As the oven will be hot, stay away from the oven and keep your children away as well.
Grill, Fan Function :
At this function; ensuring complete frying by working together, the fan, the grill and the upper
heating element perform the operation. It is also used for faster grills and for grills on a larger
surface. For grills; put the foods on the grill, and the grill on the highest rack. After placing the
oven tray on the 3. rack, you can start the grill operation. The tray placed on the 2. rack will
ensure that the oil dropping from the foods will be collected.When grilling, the oven door
must be closed and the oven temperature should be adjusted to 190°C.
Turn your oven’s thermostat knob so it will point to this temperature value. After a preheating
period of 5 minutes, put your foods into the oven.
After the cooking, turn off the oven function control knob and the thermostat knob and cancel
the timer program. Take the cooked/baked food out of the oven, place it on a safe place and
ensurethat the oven completely cools off by keeping the oven door open. As the oven will be
hot, stay away from the oven and keep your children away as well.
Turbo Fan and Lower Heating Element Function :
Turbo Fan and the Lower Heating Element Function is ideal for baking pizza. While the turbo
fan evenly disperses the heat of the oven, the lower heating element ensures the baking of
the pizza dough. Adjust your oven’s function knob so it will point to the symbol of this function.
After a preheating period of 10 minutes, put your foods into the oven. After cooking, turn off
the oven function control knob and the thermostat knob and cancel the timer program. Take
the cooked/baked food out of the oven, place it on a safe place and ensure that the oven
completely cools off by keeping the oven door open. As the oven will be hot, stay away
from the oven and keep your children away as well.
Turbo Fan an the Lower Heating Element Function is ideal for baking pizza. While the turbo
fan evenly disperses the heat of the oven, the lower heating element ensures the baking of
the pizza dough.
ENERGY SAVING
Oven door should not be opened often during cooking period.
13
Page 16

Time Adjustment :
4.4 USING TO DIJITAL TIMER
A
The time must be adjusted before starting to use the oven. Following
the power supply to the oven, the symbol (A) and the three “0” on the
screen will begin to flash. Press the (+) and (-) keys simultaneously.
MODE
-
+
Figure 18
The symbol will appear on the screen. Also, the dot in the middle
of the screen will begin to flash. Using the (+) and (-) keys, adjust the
day’s time while this dot is flashing. After the adjustment, it should be
expected that the dot will be lit continuously.
Following the power supply to the oven, when the symbol (A) and the three << 0 >>s on the
screen begin to flash, the oven cannot be operated using the control buttons. When the (+)
and (-) keys are pressed simultaneously for time adjustment, the symbol will appear on
the screen. When this symbol appears on the screen, you can manually operate the oven
part. As the adjusted time will be reset in the event of a power failure, time adjustment
operation willl have to performed again.
A
Audible Warning Time Adjustment :
The time
must be adjusted before starting to use the oven. Following
the power supply to the oven, the symbol (A) and the three “0” on the
MODE
-
Figure 19
screen will begin to flash. Press the (+) and (-) keys simultaneously.
+
The symbol will appear on the screen. Also, the dot in the middle
Page 17

of the screen will begin to flash. Using the (+) and (-) keys, adjust the day’s time while this dot
is flashing. After the adjustment, it should be expected that the dot will be lit continuously.
This function can be used to recieve audible warning at the completion of the adjusted time
period.
Press the MODE key in the middle. The symbol will flash on the screen. Also three “0”s will
appear. Adjust the desired time period for the warning by using (+) and (-) keys while the
symbol is flashing. Some time after the completion of the adjustment, the symbol will begin
to light continuously. When the symbol begins to light continuously, the audible warning
time adjustment is done.
The audible warning time can be set to a time between the time range of 0 and 23.59.
When the set time is up, the timer gives an audible warning and the symbol begins to flash
on the screen. Pressing any key will stop the audible warning and the symbol disappears
on the screen.
Audible Warning time adjustment is for warning purposes only. The oven will not be
activated at this function.
Semi - Automatic Time Adjustment According to Cooking Period :
This function is used to cook in the desired time range. The foods
A
-
du
MODE
r
+
Figure 20
to be cooked are put into the oven. The oven is adjusted to the
desired cooking function. The oven thermostat is adjusted to the
desired degree depending on the dish to be cooked. Keep
pressing on the MODE button until you see “stop” on the timer
screen. When you see “stop” on the timer screen, the symbol
(A) will begin to flash. Adjusted the cooking period for the food
you wish to cook, by using the (+) and (-) keys while the timer is in
this position. Some time after the adjustment operation is completed, the day’s time wil
appear on the screen and the symbols (A) and will begin to continuously light on the
screen. While doing this, the oven will also start to operate.
A cooking period between the time range of 0 and 10 hours can be set. At the completion
of the set duration, the timer wil stop the oven and give an audible warning. Also, the symbol
(A) will begin to flash on the screen. After bringing the oven button and oven thermostat
button to 0 position, pressing any button of the timer will end the audible warning. Also, the
timer wil be brought to manual use function.
Semi-Automatic Programming According to Finish Time:
This function is used to cook according to desired finishing time. The food to be cooked is put
into the oven. The oven is adjusted to the desired cooking function. The oven thermostat is
adusted to the desired degree depending on the dish to be cooked. Keep pressing on the
MODE button until you see “end” on the timer screen, the symbol (A) and the day’s time will
respectively begin to flash.
16
Page 18

Adjust the finishing time for the food you wish to cook, by using the
A
d
En
MODE
-
At the completion of the set duration, the timer will stop the oven and give audible warning.
Also the symbol (A) will begin to flash on the screen. After bringing the oven button and oven
thermostat button to 0 position, pressing any button of the timer will end the audible warning.
Also, the timer will be brought to manual use function.
Full- Automatic Programming :
This function is used to cook after a certain period of time, within a certain duration. The food
to be cooked is put into the oven. The oven is adjusted to the desired cooking function. The
oven thermostat is adjusted to the desired degree depending on the dish to be cooked.
First; keep pressing on the MODE button until you see “stop” on the timer screen. When you
see “stop” on the timer screen, the symbol (A) will begin to flash. Adjust the cooking period
for the food you wish to cook, by using the (+) and (-) keys while timer is in this position. Some
time after the adjustment operation is completed, the day’s time will appear on the screen
and the symbols (A) and will begin to continuously light on the screen ( Figure 20 ).
A coking period between the time range of 0 and 10 hours can be set.
Second; keep pressing on the MODE button until you see “end” on the timer screen. When
you see “end” on the timer screen, the symbol (A) and the day’s time will begin to flash, with
the addition of the cooking period. Adjust the finishing time for the food by using the (+) and () keys while the timer is in this position. Some time after the adjustment operation is
completed, the day’s time will appear on the screen and the symbol (A) will begin to
continuously light on the screen (Figure 21).
+
Figure 21
(+) and (-) keys while the timer is in this position. Some time after
the adjustment operation is completed, the day’s time will appear
on the screen and the symbols (A) and will begin to
continuously light on the screen. While doing this, the oven will
also start to operate.
You can set a time which can be up to 10 hours after the day’s
time.
You can set a time which can be up 23.59 hours after the time obtained br adding the
cooking periot the day’s time.
The oven will start operating at the time calculated by deducting the cooking period from the
set finishing time, and will stop at the set finishing time. The timer will give an audible warning
and the symbol (A) will begin to flash. After bringing the oven button and oven thermostat
button to 0 position, pressing any button of the timer will end the audible warning. Also, the
time will be brought to manual use function.
17
Page 19

min
min
min
min
1-2
1-2
1-2-3
1-2
1-2-3
1-2
4
2
2
4
1-2
1-2
3-4
4
1-2-3
1-2-3
1-2-3
15
2
1-4
1-4
Page 20

4.5. ACCESSORIES USED IN THE OVEN
It is recommended that you use the containers indicated on the table depending on the
food you will cook in your oven, you can also use glass containers, cake cutters, special
oven trays suitable for use in your oven, available in the market. Pay attention to the
information given by the manufacturer firm concerning this issue. If small sized
containers are used, place
this container on the inner grill wire so it will be precisely on the middle of the wire. The
information given below should be implemented for enamelled containers.
If the food to be cooked does not completely cover the oven tray, if the food is taken out
of the deep-freezer or if the tray is used to collect the dripping juices of the foods during
the grill operation; deformation might be observed on the tray due to high temperatures
forming during the cooking/frying operation. This is normal, physical state thay results
during the heat transfer. Do not leave a glass tray or container in a cold environment
immediately after cooking in them. Do not place them on cold and wet surfaces. Ensure
that they slowly cool off placing them on a dry piece of cloth. Otherwise, the glass tray or
container might break. If you are going to perform a grill operation in your oven, we
recommend that use use the grill on tray, supplied together with your product (if your
product includes this equipment). This way, splattering and dripping oils will not make the
oven interior dirty. If you are going to use the large wire grill, insert a tray into one of the
lower racks to avoid accumulation of the oils. To make cleaning easier, add some water
into it as well. In a grilling operation, use the 3. Or the 4.rack and ail the grill to prevent
the food to be grilled from sticking to the grill.
5. rack
4. rack
3. rack
2. rack
1. rack
Wire grid: Used for grills or placing
different containers other than the cooking
tray on it.
Figure 22
16
Page 21

Pan anti-tilting wire
Removal of wire shelf
To locate grid correctly in the cavity, put
it to any rack and push the grid up to the
end.
The pan anti-tilting wire must be placed
inside of the cavity.
Pull the wire shelf as
shown in the picture.
After releasing it from
clips, lift it up.
1
2
WARNING- Fit
the grid correctly
into any
correspondent
rack in the oven
cavity and push it
to the end.
17
19
Page 22

PART 5: CLEANING AND MAINTENANCE OF YOUR OVEN
5.1. CLEANING
Before starting to clean your oven, be sure that all control buttons are off and your appliance
is cooled off. Unplug the appliance.
Do not use cleaning materials containing particles that might scratch the enamelled and
painted parts of your oven. Use cream cleaners or liquid cleaners, which do not contain
particles. As they might harm the surfaces, do not use caustic creams, abrasive cleaning
powders, rough wire wool or hard tools. In the event the excess liquids spilling over your
oven should burn, it may cause a damage to the enamel. Immediately clean up the split
liquids. Do not use steam cleaners for cleaning the oven.
Cleaning the interior of the oven
Make sure to unplug the oven before starting to clean it. You will obtain best results if you
clean the oven interior while the oven is slightly warm. Wipe your oven with a soft piece of
cloth dampened with soap water after each use. Then wipe it again, this time with a wetted
cloth, and wipe it dry. A complete cleaning using dry and powder type cleaners. For product
with catalytic enamel frames, the rear and side walls of the inner frame do not require
cleaning. However; depending on usage, it is recommended that you replace them after a
certain period of time.
5.2. MAINTENANCE
Replacing the Oven Light
The change of oven lamp must be done by authorized technician. The rating of the bulb
should be 230V, 25Watt, Type E14,T300 before changing the lamp,the oven should be
plugged off and it should be cool.
The lamp design is specific for the use in household cooking appliances and it is not suitable
for household room illumination.
20
18
Page 23

PART 6: SERVICE AND TRANSPORT
6.1. REQUIREMENTS BEFORE CONTAINING TO SERVICE
If the oven does not operate :
The oven may be plugged off, there has been a black out. On models fitted with a timer, time
may not be regulated.
If the oven does not heat :
The heat may be not adjusted with oven’s heater control switch.
If the interior lighting lamp does not light :
The electricity must be controlled. It must be controlled whether the lamps are defective. If
they are defective, you can change them as following the guide.
Cooking (if lower-upper part does not cook equally) :
Control the shelf locations, cooking period and heat values according to the manual.
Except these, if you still have any problem with your product, please call to the
“Authorized Service”.
6.2. INFORMATION RELATED TO TRANSPORT
If you need any transport :
Keep the original case of product and carry it with its original case when need to be carried.
Follow the transport signs on case. Tape the cooker on upper parts, hats and heads and
saucepan carriers to the cooking panels.
Place a paper between the upper cover and cooking panel, cover the upper cover, than tape
to the side surfaces of oven.
Tape cardboard or paper onto the front cover on interior glass of oven as it will be suitable to
the trays, for the wire grill and trays in your oven not damage to the oven’s cover during
transport. Also tape the oven’s covers to the side walls.
If does not have the original case :
Take measure for external surfaces (glass and painted surfaces) of oven against possible
blows.
19
21
Page 24

The symbol on the product or on its packaging indicates that
this product may not be treated as household waste. Instead it shall
be handed over to the applicable collection point for the recycling
of electrical and electronic equipment. By ensuring this product is
disposed of correctly, you will help prevent potential negative
consequences for the environment and human health, which could
otherwise be caused by inappropriate waste handling of this
product. For more detailed information about recycling of this
product, please contact your local city office, your household
waste disposal service or the shop where you purchased the
product.
Page 25

EN 122.921 S
Zigmund & Shtain
Руководство по установке и эксплуатации
встраиваемого духового шкафа
EN 152.911 W
Page 26

1
Уважаемый потребитель!
Спасибо, что выбрали духовой шкаф Zigmund & Shtain. Надеемся, он оправдает Ваши ожидания и
станет прекрасным помощником на Вашей кухне. Для правильной и безопасной эксплуатации
прибора, пожалуйста, ознакомьтесь со всеми пунктами данной инструкции.
Просим Вас сохранять эту инструкцию на весь срок службы духового шкафа.
В начале инструкции Вы узнаете о некоторых важных условиях безопасной работы прибора.
Чтобы Ваш прибор длительное время находился в прекрасном состоянии, мы приводим
множество полезных советов по уходу и чистке.
Также эта инструкция даёт некоторые советы по экономии электроэнергии.
На случай, если когда-нибудь в процессе эксплуатации прибора возникнут неполадки, на
последних страницах этой инструкции Вы сможете найти советы, как самостоятельно устранить
мелкие неисправности.
Ваш новый прибор изготовлен из высококачественных материалов и полностью соответствует
всем стандартам ЕЭС.
Ваше мнение о нашем продукте очень важно для нас. Мы будем признательны, если Вы
пришлёте свои наблюдения по работе, качеству исполнения и удобству пользования купленного
Вами товара на адрес: info@zigmundshtain.ru.
Производитель оставляет за собой право вносить изменения в конструкцию с целью улучшения
характеристик продукции. Наша бытовая техника постоянно совершенствуется, улучшаются
характеристики приборов, обновляется дизайн, поэтому рисунки и обозначения в инструкции
могут незначительно отличаться от приобретённой Вами модели.
Желаем Вам приятного аппетита!
Изделие произведено в соответствии с европейскими стандартами и
сертифицировано СЕ, TŰV , ISO 9001,
Производитель оставляет за собой право вносить изменения в конструкцию
с целью улучшения характеристик продукции.
Page 27

1
Содержание
1: Внешний вид и габаритные размеры
2: Меры предосторожности
3: Подготовка к установке и использованию
4: Использование духового шкафа
5: Чистка и техническое обслуживание
духового шкафа
6: Сервис и транспортировка
ME 68
Page 28

1
ЧАСТЬ 1: Внешний вид и габаритные размеры
Основные узлы духового шкафа:
1- Панель управления
2- Ручка
3- Дверца
4- Защита от доступа детей
5- Противень
6- Нижний нагревающий элемент (за кожухом)
7- Верхний нагревающий элемент (за кожухом)
8- Гриль
9- Полка
10- Подсветка
11- Нагревающий элемент с надувом (за кожухом)
12- Вентилятор (за кожухом)
13- Заслонки воздуховодов
Page 29

Page 30

Page 31

Page 32

Page 33

1
ЧАСТЬ 3: Подготовка к установке и использованию
Разработанный с использованием деталей, прошедших строжайший контроль
качества, современный, функциональный и практичный духовой шкаф полностью
удовлетворит все ваши требования. Для достижения максимальной эффективности
и снижения вероятности столкновения с какими-либо проблемами в будущем,
внимательно изучите инструкцию. Приведѐнная ниже информация позволит вам
правильно выровнять духовой шкаф. Вы также можете найти описание служебных
операций. Данный раздел следует внимательно изучить, особенно лицам,
осуществляющим установку.
Для установки свяжитесь с авторизированным сервисным центром.
3.1 Выбор места для духового шкафа
При выборе места установки духового шкафа существуют определѐнные
нюансы. Для предотвращения проблем и опасных ситуаций в будущем,
примите во внимание следующее:
Вблизи духового шкафа не должно быть огнеопасных и горючих материалов,
таких как занавески, масло, тряпки и т.д., которые могут быстро
воспламениться.
Мебель, окружающая духовой шкаф, должна быть изготовлена из материалов,
способных выдерживать температуру на 50°С больше, нежели температура
окружающей среды.
Необходимые расстояния до подвесной кухонной мебели и вытяжки, а также
минимальные высоты от плиты показаны на рисунке 1. Соответственно,
вытяжка располагается на высоте минимум 65 см от плиты (конфорок). Если
вытяжки нет, расстояние до подвесной мебели не должна быть менее 70 см.
Page 34

1
3.2 Установка встроенного духового шкафа
Вставьте духовой шкаф в нишу, нажимая на переднюю часть. Откройте дверцу
шкафа и вставьте 2 болта в отверстия на раме. Состыкуйте раму шкафа и
деревянную поверхность ниши и затяните болты.
7
Page 35

1
Размер ниши должен соответствовать размерам духового шкафа, материалы
должны быть устойчивы к воздействию высоких температур. При правильной
установке исключён контакт шкафа с электрическим кабелем или изолированными
частями. Изолированные части монтируются таким образом, чтобы их демонтаж не
мог быть осуществлён какими-либо инструментами. Установка духового шкафа
вблизи холодильников или морозильных камер не рекомендуется. С другой
стороны, работа вышеупомянутой бытовой техники негативно сказывается на
излучении тепла. Снимите упаковку и проверьте духовой шкаф на наличие какихлибо повреждений. Если вы их обнаружили, ни в коем случае не используйте
изделие, немедленно свяжитесь с авторизованным сервисным центром.
3.3 Электрическая схема и безопасность встроенного духового
шкафа
При подключении проводов строго следуйте приведённым ниже инструкциям:
· Заземляющий провод присоединяется при помощи винта с соответствующей
маркировкой. Силовой кабель подключается, как показано на рисунке 2. Если у
вас нет заземляющего отвода (заземлённой розетки), немедленно свяжитесь с
авторизованным сервисным центром.
· Заземлённая розетка должна располагаться вблизи шкафа. Никогда не
используйте удлинитель.
· Силовой кабель не должен дотрагиваться до горячих поверхностей духового
шкафа.
· В случае повреждения силового кабеля свяжитесь с авторизованным
сервисным центром, который должен произвести замену.
· Подключение проводов должно осуществляться авторизованным сервисным
центром. Используйте кабель H05VV-F.
· Неправильное подключение проводов может повредить изделие. На подобные
случаи гарантия не распространяется.
· Духовой шкаф подключается к сети 220-240 В. Если значения тока не
попадают в данный диапазон, немедленно свяжитесь с авторизованным
сервисным центром.
Компания производитель не несёт ответственности за повреждения,
возникшие в результате несоблюдения норм безопасности.
8
Page 36

1
Часть 4: Использование духового шкафа
4.1. Использование функции шкафа
Функция духового
шкафаручка управления
цифровой таймер
Ручка термостата духовки
Свет работы духовки
Свет термостата духовки
Ручка выбора функций шкафа
Для выбора необходимого режима приготовления поверните
ручку к соответствующему символу (рис 11). Режимы
приготовления детально описаны в таблице 1 и следующей
части.
Ручка терморегулятора
После выбора режима приготовления, можно выставить
необходимую температуру (ручкой терморегулятора) (рис 12).
Далее шкаф начнѐт работу (если установлен таймер, то его
необходимо настроить).
9
Page 37

1
4.2. Использование клавиши выбора функции шкафа
Включение подсветки духового шкафа
Включение подсветки духового шкафа, красного индикатора и
вентилятора. Функция размораживания пищи.
Включение термостата, индикаторов и верхнего с нижним нагревающих
элементов.
Включение термостата и индикаторов, вентилятора и турбонагревателя.
Включение термостата и индикаторов, вентилятора, верхнего и нижнего
нагревательных элементов.
Включение термостата и индикаторов и гриля
Включение термостата и индикаторов, гриля, верхнего и нижнего
нагревательных элементов.
Включение термостата и индикаторов, вентилятора, гриля и верхнего
нагревающего элемента.
Включение термостата и индикаторов, вентилятора, нижнего
нагревающего элемента и турбонагревателя.
Таблица 1
Доступность функций, истолкованных ниже, отличается в зависимости от модели
изделия.
Функция размораживания
Вы можете начать процесс размораживания, поместив пищу
в шкаф и переключив кнопку в соответствующее положение.
Данная функция не приготавливает/выпекает продукты, она
просто производит размораживание в течение короткого
промежутка времени. Положите продукты на решѐтку,
решѐтку установите на третьи снизу салазки (рисунок 2).
Для сбора воды, образующейся при таянии льда, установите
ниже противень.
10
Page 38

1
Верхний-нижний нагревающие элементы (статичная выпечка)
Данный тип выпечки носит название традиционного, тепло испускается равномерно от
верхнего и нижнего нагревающих элементов, равномерно нагревая верхние и нижние слои
пищи. Выставьте температуру на термостате в соответствии с таблицей приготовления.
Рекомендуется предварительный разогрев духового шкафа в течение 10 минут. Поместите
пищу в подходящее блюдо и оставьте готовиться необходимое время. Данная функция
предпочтительна при приготовлении пирожных, бисквитов, мучных кондитерских
изделий, макарон, лазаньи, пиццы.
После окончания приготовления/ выпечки выключите духовой шкаф (ручкой управления),
термостат и таймер программы (если такая функция доступна). Достаньте
приготовленную пищу из шкафа, поместите в безопасное место, убедитесь, что шкаф
полностью остыл (дверцу держите открытой). Во время остывания шкафа не
подпускайте к нему детей и сами держитесь от него подальше.
Турбовентилятор
Турбовентилятор рассеивает тепло по духовому шкафу. Поэтому еда, расположенная на
разных противнях, готовится равномерно.
Установите на термостате необходимую температуру. Поверните ручку кнопку в
положение турбовентилятора, помеченное соответствующим значком. После
десятиминутного предварительного нагрева поместите пищу в подходящую посуду и
далее в духовой шкаф. Данная функция удобна при приготовлении пищи в нескольких
блюдах.
Если вы собираетесь готовить на двух противнях одновременно, выставьте наиболее
низкую и подходящую температуру для приготовления обоих блюд, пользуйтесь
таблицей. Обычно время окончания приготовления пищи на обоих противнях отличается.
Поэтому достаньте из шкафа противень с, как вам кажется, приготовленным блюдом и
продолжите приготовление оставшейся пищи (на другом противне).
После окончания приготовления/ выпечки выключите духовой шкаф (кнопкой
управления), термостат и таймер программы (если такая функция доступна). Достаньте
приготовленную пищу из шкафа, поместите в безопасное место, убедитесь, что шкаф
полностью остыл (дверцу держите открытой). Во время остывания шкафа не
подпускайте к нему детей и сами держитесь от него подальше.
Вентилятор и верхний-нижний нагревающие элементы
При использовании данной функции горячий воздух, нагретый верхним и нижним
элементами, циркулирует при помощи вентилятора (привода и крыльчатки).
Выставьте температуру на термостате в соответствии с таблицей приготовления.
Поверните ручку в положение, помеченное соответствующим значком, выставьте на
таймере время приготовления и проведите предварительный разогрев духового шкафа в
течение 10 минут.
11
Page 39

1
Поместите пищу в подходящее блюдо и далее в шкаф, начните приготовление. Данная
функция очень подходит для выпечки. Пища готовится равномерно. Режим удобен при
приготовлении на одном противне.
После окончания приготовления/ выпечки выключите духовой шкаф (ручкой управления),
термостат и таймер программы (если такая функция доступна). Достаньте
приготовленную пищу из шкафа, поместите в безопасное место, убедитесь, что шкаф
полностью остыл (дверцу держите открытой). Во время остывания шкафа не подпускайте
к нему детей и сами держитесь от него подальше.
Гриль
Для приготовления на гриле используется самый высокий противень. После размещения
противня на 2. салазках, вы можете начать приготовление на гриле. После размещения
убедитесь, что стекающий с пищи жир будет собираться в другой противень. При
приготовлении на гриле дверца должна быть закрыта, а температура шкафа
выставлена 190° С.
Поверните ручку термостата, чтобы та показывала температуру приготовления. После
предварительного нагрева в течение 5 минут, поместите пищу в духовой шкаф.
После окончания приготовления/ выпечки выключите духовой шкаф (кнопкой
управления), термостат и таймер программы (если такая функция доступна). Достаньте
приготовленную пищу из шкафа, поместите в безопасное место, убедитесь, что шкаф
полностью остыл (дверцу держите открытой). Во время остывания шкафа не
подпускайте к нему детей и сами держитесь от него подальше.
Верхний нагревающий элемент, гриль
Данная функция используется для уменьшения времени приготовления на гриле,
подходит для решѐтки и больших поверхностей. При приготовлении на гриле
поместите пищу на решѐтку, а решѐтку разместите на самых верхних салазках. После
размещения противня на 2-ой полке вы можете начинать приготовление. Противень на 2ой полке предназначен для сбора капель масла. При приготовлении на гриле дверца
шкафа должна быть закрыта, выставленная температура 190 С.
Поверните ручку термостата, чтобы та показывала температуру приготовления. После
предварительного нагрева в течение 5 минут, поместите пищу в духовой шкаф.
После окончания приготовления/ выпечки выключите духовой шкаф (кнопкой
управления), термостат и таймер программы (если такая функция доступна). Достаньте
приготовленную пищу из шкафа, поместите в безопасное место, убедитесь, что шкаф
полностью остыл (дверцу держите открытой). Во время остывания шкафа не
подпускайте к нему детей и сами держитесь от него подальше.
12
Page 40

1
Гриль и вентилятор
Данная функция применяется для полной обжарки пищи при одновременной работе гриля,
вентилятора и верхнего нагревающего элемента. Также используется для уменьшения
времени приготовления на гриле, подходит для решѐтки и больших поверхностей. . При
приготовлении на гриле поместите пищу на решѐтку, а решѐтку разместите на самых
верхних салазках. После размещения противня на 3-й полке вы можете начинать
приготовление. Противень на 2-ой полке предназначен для сбора капель масла. При
приготовлении на гриле дверца шкафа должна быть закрыта, выставленная
температура 190 С.
Поверните ручку термостата, чтобы та показывала температуру приготовления. После
предварительного нагрева в течение 5 минут, поместите пищу в духовой шкаф.
После окончания приготовления/ выпечки выключите духовой шкаф (кнопкой
управления), термостат и таймер программы (если такая функция доступна). Достаньте
приготовленную пищу из шкафа, поместите в безопасное место, убедитесь, что шкаф
полностью остыл (дверцу держите открытой). Во время остывания шкафа не
подпускайте к нему детей и сами держитесь от него подальше.
Турбовентилятор и нижний нагревающий элемент
Функция турбовентилятора и нижнего нагревающего элемента идеально подходит для
приготовления пищи. Пока турбовентилятор рассеивает по духовому шкафу тепло,
нижний нагревающий элемент готовит тесто для пиццы. Поверните ручку в положение,
помеченное соответствующим значком. После предварительного нагрева в течение 10
минут поместите пищу в духовой шкаф. После окончания приготовления/ выпечки
выключите духовой шкаф (кнопкой управления), термостат и таймер программы.
Достаньте приготовленную пищу из шкафа, поместите в безопасное место, убедитесь, что
шкаф полностью остыл (дверцу держите открытой). Во время остывания шкафа не
подпускайте к нему детей и сами держитесь от него подальше.
Функция турбовентилятора и нижнего нагревающего элемента идеально подходит для
приготовления пищи. Пока турбовентилятор рассеивает по духовому шкафу тепло,
нижний нагревающий элемент готовит тесто для пиццы.
Энергосбережение
Сократите количество жирной пищи и пищи с повышенным содержанием
жидкостей или время приготовления
Во время приготовления пищи как можно реже открывайте дверцу
13
Page 41

Page 42

Page 43

1
Блюда
ТУРБО
НИЖНИЙ-ВЕРХНИЙ
НИЖНИЙ-ВЕРХНИЙ
ВЕНТИЛЯТОР
ГРИЛЬ
Положение
термостата
(ºС)
Положение
противня
Время
приготовле
ния (мин.)
Положение
термостата
(ºС)
Положение
противня
Время
приготовле
ния (мин.)
Положение
термостата
(ºС)
Положение
противня
Время
приготовле
ния (мин.)
Положение
термостата
(ºС)
Положение
противня
Время
приготовле
ния (мин.)
Слоеные
пирожные
170-190
1-2-3
35-45
170-190
1-2
35-45
170-190
1-2
25-35
Торт
150-170
1-2-3
30-40
170-190
1-2
30-40
150-170
1-2-3
25-35 Печенье
150-170
1-2-3
25-35
170-190
1-2
30-40
150-170
1-2-3
25-35
Жареные
Фрикадель
-ки
200 4 10-15
Водянистые
продукты
175-200
2
40-50
175-200
2
40-50
175-200
2
40-50
Курица 200
1-2
45-60
200
1-2
45-60
200 4 50-60
Отбивная
котлета
200
3-4
15-25
Бифштекс
200 4 15-25
Двухслойный пирог
160-180
1-4
30-40
Двухслойные
пирожные
170-190
1-4
35-45
15
Page 44

1
4.7 Дополнительные принадлежности для духового шкафа
Рекомендуется использовать посуду, указанную в таблице, в зависимости от пищи,
которую собираетесь готовить. Вы можете также использовать стеклянную посуду,
корзиночки для пирожных, специальные противни. В данном контексте уделите
внимание рекомендациям производителя. При использовании малогабаритной
посуды поместите еѐ на середину решѐтки гриля. Рекомендации касаемо
эмалированной посуды приведены ниже.
Если приготовляемая пища полностью не распределяется по противню, если пища
вынута из морозильной камеры или если противень используется для сбора соков
во время приготовления на гриле, то возможно появление деформаций противня по
причине воздействия высоких температур. Это нормальное физическое состояние,
вызванное переносом тепла. Не помещайте стеклянные подносы или блюда в холод
сразу после приготовления в них пищи, не ставьте их на холодные и влажные
поверхности. Оставьте утварь медленно остывать, поставив на кусок ткани. В
противном случае стеклянный поднос или блюдо могут дать трещину. Если для
приготовления пищи вы собираетесь использовать гриль, то мы рекомендуем
использовать поддон, поставляемый вместе с пищей (если он входит в набор). При
приготовлении таким образом масло не разбрызгивается и не загрязняет духовой
шкаф. Если вы собираетесь использовать большой гриль, вставьте противень в
салазки ниже, чтобы избежать скопления масла. Для облегчения чистки в процессе
добавляйте воду. При использовании гриля используйте 3 или 4 салазки (полки),
смазывайте решѐтку маслом, чтобы пища не пригорала.
16
Page 45

1
Решѐтка
Предназначена для приготовления на гриле или размещения на
ней кухонной утвари. Для правильной установки в пазах
поместите решѐтку на любую полку и нажмите до конца.
Плоский поднос
Предназначен для выпечки кондитерских изделий, например
фруктового пирога и т.д. Для правильной установки в пазах
поместите решѐтку на любую полку и нажмите до конца
Глубокий поднос
Предназначен для тушения мяса. Для правильной установки в
пазах поместите решѐтку на любую полку и нажмите до конца.
Телескопические направляющие
Для правильного размещения подноса в
телескопических направляющих поставьте его
на опорные штифты (как показано на рисунке)
Принадлежности духового шкафа
Принадлежности к вашему духовому шкафу могут варьироваться в
зависимости от модели духового шкафа.
ПРЕДУПРЕЖДЕНИЕ:
Разместите реш¸тку на
соответствующем
уровне направляющих
по боковым стенкам
духовки и задвиньте е¸
до конца.
17
Page 46

1
ЧАСТЬ 5: Чистка и техническое обслуживание духового шкафа
5.1 Чистка
Перед чисткой обязательно убедитесь, что все управляющие клавиши находятся в
выключенном положении, а сам духовой шкаф остыл. Отсоедините вилку от
розетки.
Не используйте абразивные чистящие материалы, т.к. можете поцарапать
окрашенные и эмалированные части шкафа. Используйте жидкие чистящие
средства или средства в виде крема. Могут повредить поверхности духового шкафа
едкие вещества, абразивные чистящие порошки, тряпки из грубой шерсти и твѐрдые
инструменты. Излишки используемой жидкости сгорают, повреждая эмаль.
Немедленно удалите пролитые жидкости. Для чистки шкафа не используйте
пароочистители.
Чистка внутри духового шкафа
Перед чисткой обязательно убедитесь, что вилка отключена от розетки. Лучше
всего проводить очистку шкафа, когда он слегка тѐплый. Для чистки используйте
мягкую тряпочку, смоченную в мыльной воде. Протрите сухой тряпочкой.
Закончите чистку, используя сухие и порошкообразные чистящие средства. Если в
духовом шкафу рама покрыта каталитической эмалью, то задняя и боковые стенки
не нуждаются в чистке. Однако, в зависимости от условий использования,
рекомендуется их периодическая замена.
5.2 Техническое обслуживание
Замена подсветки
Мы рекомендуем производить замену подсветки авторизированному сервисному
центру. Отсоедините вилку от розетки и убедитесь, что духовой шкаф остыл.
Установите новую лампочку (тип Е14, температура 300 С, мощность 25 Вт, 230 В).
Лампочка предназначена для использования в бытовой технике и не подходит для
комнатного освещения.
18
Page 47

1
ЧАСТЬ 6: Сервис и транспортировка
6.1 Перед отправкой в сервисный центр
Если духовой шкаф не работает:
Шкаф может быть не подключен к розетке, а вы этого не заметили. На моделях с
таймером не произведена настройка времени.
Если шкаф не нагревается:
Не установлена температура нагревающего элемента
Если не горит внутренняя подсветка:
Проверьте подачу электричества, т.к. лампочки могут быть неисправны. Замените
неисправную лампочку согласно инструкции.
Приготовление (нижний и верхний нагревающие элементы не «готовят»
одинаково):
Проверьте расположение на противне, время приготовления и температуру в
соответствии с инструкцией.
Если все вышеперечисленное не помогло вам решить проблему, обращайтесь в
авторизированный сервисный центр.
6.2 Информация по транспортировке
Если необходимо произвести транспортировку:
Проводите транспортировку в оригинальной упаковке (сохраняйте упаковку). При
транспортировке соблюдайте указания значков, изображѐнных на упаковке.
Приклейте скотчем верхние части, крышки, противни к панелям.
Проложите бумагу между верхней крышкой и плитой, накройте сверху и
зафиксируйте скотчем (сверху и сбоку).
Приклейте скотчем бумагу или картон к передней части шкафа и задней части
стекла дверцы, зафиксируйте скотч на внутренней стороне стекла (чтобы гриль и
противни не повредили шкаф во время транспортировки). Также проклейте боковые
стенки.
Если у вас не сохранилась оригинальная упаковка:
Защитите внешние поверхности (стекло и окрашенные части) духового шкафа от
ударов.
19
Page 48

1
52120435 05/13
Данный символ на изделии или на его упаковке обозначает, что это изделие не
может быть переработано как обычные бытовые отходы. Его следует передать в
соответствующий сборочный пункт по переработке электрического и электронного
оборудования. Правильная ликвидация данного изделия поможет предотвратить
потенциально негативные воздействия на окружающую среду и здоровье людей,
которые иначе могут возникнуть при несоответствующем обращении с отходами
данного изделия. Для получения более детальной информации об утилизации
данного изделия свяжитесь с офисом компании в вашем городе, службой вывоза
бытовых отходов или с магазином, в котором вы покупали данное изделие.
 Loading...