


Zicplay MiniKey Colour with FM option MANUAL
Language
I.English……………………………………………….....3
II. French………………………………………………....24
III. German………………………………………………..46
IV. Spanish………………………………………………..67
V. Portuguese……………………………………………87
VI. Italian…………………………………………………109
VII. Dutch…………………………………………………131
2
|
|
Mnaual |
|
I. |
APPEARANCE LAYOUT.............................................................................................................. |
4 |
|
II. |
BASIC FUNCTION ....................................................................................................................... |
6 |
|
III. |
MUSIC MODE............................................................................................................................... |
7 |
|
A. |
BUTTON OPERATION ............................................................................................. |
7 |
|
B. |
INSTRUCTION ....................................................................................................... |
7 |
|
IV. VOICE RECORD .......................................................................................................................... |
9 |
||
A. |
BUTTON OPERATION ............................................................................................. |
9 |
|
B. |
INSTRUCTION ....................................................................................................... |
9 |
|
V. |
PLAY VOICE FILES.................................................................................................................... |
11 |
|
VI. FM MODE ................................................................................................................................... |
11 |
||
A. |
BUTTON OPERATION ........................................................................................... |
11 |
|
B. |
INSTRUCTION ..................................................................................................... |
11 |
|
VII. SYSTEM SETTING..................................................................................................................... |
13 |
||
A. |
ICON.................................................................................................................. |
13 |
|
B. |
INSTRUCTION ..................................................................................................... |
13 |
|
VIII. OTHER FUNCTION.................................................................................................................... |
16 |
||
A. USE DIFFERENT FOLDER (STOP TO USE SUB-MENU)................................................ |
16 |
||
B. |
FILES DELETE INDICATION ................................................................................... |
16 |
|
C. |
REPEAT OPERATION ............................................................................................ |
16 |
|
D. |
TEMPO RATE ADJUSTMENT .................................................................................. |
17 |
|
E. |
REPLAY FUNCTION .............................................................................................. |
17 |
|
IX. FLASH DISK .............................................................................................................................. |
19 |
||
A. |
CONNECT TO PC ................................................................................................ |
19 |
|
B. FLASH DISK FUNCTION/ DOWNLOAD MP3 FILES .................................................... |
19 |
||
C. TRANSFORM ACT FILES TO WAV FILES ................................................................ |
19 |
||
X. |
PRIVACY FUNCTION................................................................................................................. |
20 |
|
XI. TROUBLE SHOOTING............................................................................................................... |
23 |
||
XII. TECHNICAL SPECIFICATIONS................................................................................................. |
23 |
||
3

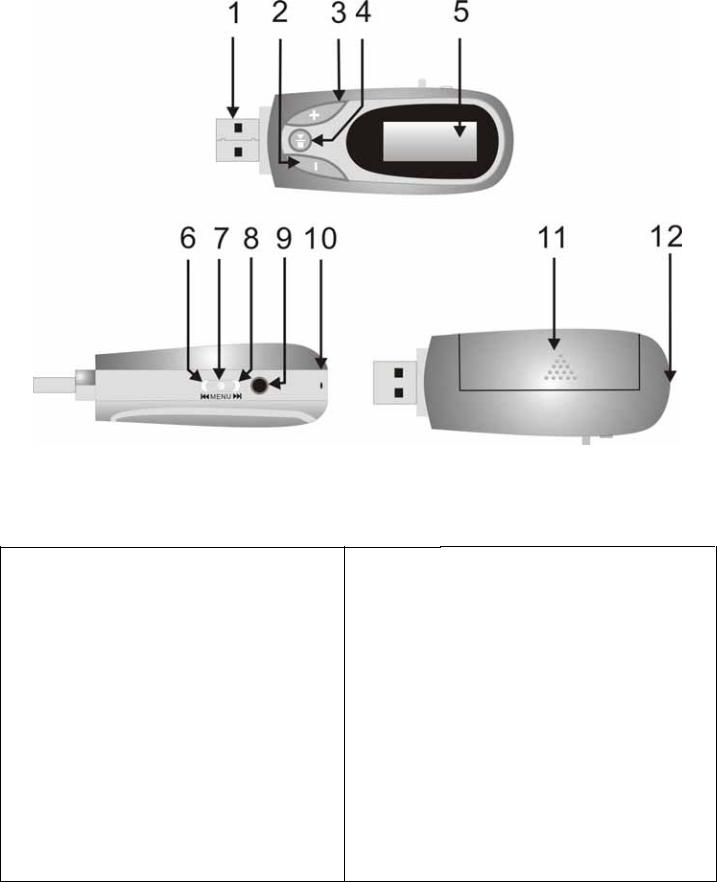
I. Appearance Layout
z Name of the parts
The UFD Picture
1.USB |
USB connection for |
7. Mode |
Select between different modes |
|||
Connector |
connecting to pc |
|
|
1.Music-play music |
||
|
|
|
|
|
2.Record-record via mic |
|
|
|
|
|
|
3.Voice-play record files |
|
|
|
|
|
|
4.Sys set-change settings of |
|
|
|
|
|
|
UFD |
|
2. |
VolKey |
Volume down |
8. |
FF |
Next Track/Fast Forward |
|
3. |
Vol+ Key |
Volume up |
9. |
Ear phone jack |
||
4. |
Play/Pause/Stop key |
10. MIC |
|
Build-in microphone |
||
5.LCD |
Show the Information on |
11. Battery cover |
||||
|
|
Screen |
12. Accessory hold Ring for neck Strap |
|||
6. |
Rew |
Previous Track/Fast |
|
|
|
|
|
|
Reward |
|
|
|
|
|
|
|
4 |
|
|
|
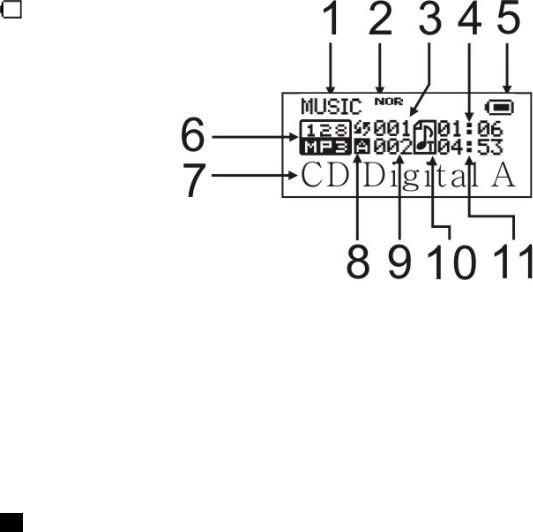
z Name of the LCD
The LCD Picture |
|
|
1. |
Working mode……MP3/Rec/Voice |
7. Title…………Folder/Mp3 File name |
2. EQ mode |
8. Repeat mode |
|
3. The order of songs |
9. The total of songs |
|
4. |
Play time |
12.Lyrics sign |
5. |
Battery Indicator |
11.Total time |
6. |
Bit rate/File Format |
|
z Battery
There are 9 levels of battery control
 When the battery storage is 1.5V, it will indicate full. If will slowly decrease according to the battery storage.
When the battery storage is nearly used up, it will indicate empty. Please reload the battery.
5

II. Basic Function
(a)Enter the Function Menu
Make use of key MODE to select the different functions. There is main function menu (long press key MODE when it is in stop status), sub menu when in play status (short-press key MODE to enter), and sub-menu when in stop status (short-press key MODE to enter).
(b)Preview operation
A. |
Press key or for music selection. |
B.When songs are playing, turn left/right of key MODE for fast forward or backward.
(c)Hold function (Key Lock)
A.Press key Mode go to submenu.
B. |
Rotate key to select Lock. |
C.Short press key Mode to enter, the LCD will display as shown “Hold”.
D.If you want to cancel the “Hold” function, press key Mode for 2~3 seconds until “Hold” is disappear.
(d)Enter different modes
You can enter different mode from the main function’s menu
z Main Menu: (Long press key MODE to enter)
z Music Mode:
z Record Mode:
z Voice Mode:
z FM Mode
z System Settings:
6

III.Music Mode
A.Button Operation
The backlight colors will change for every key press (when the backlight is not
0).
Music Mode 
Keys |
|
Press |
Stop Status |
Play Status |
Submenu of |
Submenu of |
|
play status |
stop status |
||||
|
|
|
|
|
||
Play |
|
Long |
Power off |
Power off |
Power off |
Power off |
|
Short |
Play |
Stop |
Exit menu |
Exit Menu |
|
|
|
|||||
|
|
Long |
Enter Menu |
Enter Menu |
Enter Menu |
Enter Menu |
Mode |
|
Short |
Enter the submenu of |
Enter the submenu |
Confirmation or |
Confirmation or |
|
|
stop status |
of play status |
enter |
enter |
|
|
|
|
||||
|
|
Rotate |
Next |
Next and Play |
Move the |
Move the |
|
|
submenu |
submenu |
|||
Next |
|
|
|
|
||
|
Hold |
Continue to Preview |
Fast forward |
Continue to |
Continue to |
|
|
|
|||||
|
|
forward |
move forward |
move forward |
||
|
|
|
|
|||
|
|
Rotate |
Previous |
Previous and Play |
Move the |
Move the |
|
|
submenu |
submenu |
|||
Last |
|
|
|
|
||
|
Hold |
Continue to Preview |
Fast backward |
Continue to |
Continue to |
|
|
|
|||||
|
|
Backward |
move backward |
move backward |
||
|
|
|
|
|||
Vol+ |
|
Short |
Increase Volume |
Increase Volume |
X |
X |
|
Hold |
Increase Volume |
Increase Volume |
X |
X |
|
|
|
continuously |
continuously |
|||
|
|
|
|
|
||
|
|
Short |
Decrease Volume |
Decrease Volume |
X |
X |
Vol- |
|
Hold |
Decrease Volume |
Decrease Volume |
X |
X |
|
|
continuously |
continuously |
|||
|
|
|
|
|
||
Note: |
Short: press the key for 1 second |
|
|
|||
|
|
Long: press the key for 3 seconds |
|
|
||
|
|
Hold: press and hold the key without releasing |
|
|
||
|
|
Rotate: to rotate or turn left/right of the key. |
|
|
||
B.Instruction
(a)Simple Operation
zWell connect the earphone to the earphone jack.
zMake sure the key HOLD is off.
zLong press key  and the player will enter to Music mode, then short
press  to start playing.
z Music selection: rotate key or to select the songs.
7
zVolume adjustment: Press key Vol+/Volto adjust the volume.
zCautions: The player will turn off automatically when it is not in play status.
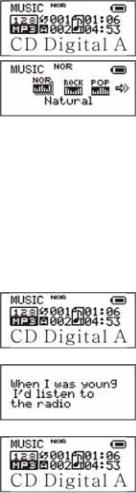
(b)Equalizer
zWhen music is play:
zShort press key MODE to enter the submenu of play status
z Rotate key to select Equalizer.
z Short press key Mode to enter, the LCD will display as shown below:
z Then rotate key for EQ selection: Natural, Rock, Pop, Classical, Soft, Jazz and DBB
(c)Lyrics’ Switch
This player supports *.LRC files. If there is lyrics file under the same folder of the MP3 with the same name; the player will play MP3 and lyrics synchrony.
If there is a lyric for the song, the LCD will display  icon instead of
  icon.
icon.
zIf there is a lyric, the LCD will display
zLong press key MODE to enter Lyric interface
zLyric will display:
zShort press key MODE will return title interface:
zManual lyrics reading: short press key VOL of lyric reading.
8

IV. Voice Record
A. Button Operation
Record Mode 
Keys |
Press |
Stop Status |
Record Status |
Make |
|
Play |
Long |
Power off |
Stop Record |
||
Short |
Start Record |
Pause Record |
sure |
||
|
|||||
Mode |
Long |
Enter Main Menu |
X |
that the |
|
Short |
Enter submenu |
X |
player |
||
|
|||||
|
|
|
|
has |
enough battery storage before you record. The player supports 99 files for each folder.
B.Instruction
(a)Record Mode
z Enter the main menu:
z Rotate |
to select Record: |
zShort press key MODE to enter:
zShort press key  to start record.
 The recorded voice will be saved in the root folder in the submenu of record stop status/main menu.
 If the LCD displays “Memory Full”, there is no memory storage for new records. Please delete some of the files for memory release.
 If the LCD displays “Folders full”, there is already 99 files in the folder. Please change another folder.
(b)Types of Record Format(The Record Type is selected Voice Record)
zEnter the stop record status interface:
zPress key MODE to enter the submenu of record mode:
z Press key |
/ |
to select Record Type: |
z Press key MODE to enter: |
||
z Press key |
/ |
for selection. |
 : Fine REC, wav format, good voice quality.
9
 : Long REC, act format, normal voice quality.
 : Fine VOR, wav format (voice record control, pause when with no voice).
  : Long VOR, act format.
zPress key MODE for confirmation
zPress key  to start record.
(c)Types of Record Format (The Record Type is selected WAV Music Record)
zEnter the stop record status interface:
zPress key MODE to enter the submenu of record mode:
z Press key / to select sub-functions:
9Track mode: You can use this function which can auto separate the record file.
9Record type: There are 32k, 64k, 128k, 192k bit rates can be selected.
(d)Types of Record Format (The Record Type is selected MP3 Record)
zEnter the stop record status interface:
zPress key MODE to enter the submenu of record mode:
z Press key / to select sub-functions:
9Track mode: You can use this function which can auto separate the record file.
9Record type: There are 32k, 64k, 128k, 192k bit rates can be selected.
10
V. Play Voice files
z Enter the main menu:
And the Key Operation is the same with Music Mode.
1. Rotate key |
to select RPL: |
|
||||
2. Short press key MODE to enter play voice |
||||||
|
|
interface: |
|
|||
3. |
Press key |
to start playing voice. |
|
|||
4. Voice selection: Rotate key or to select the voice. |
||||||
5. Volume Adjustment: Press key VOL+/- to adjust the volume. |
||||||
VI. FM Mode |
|
|
|
|||
A. Button Operation |
|
|||||
|
FM Mode |
|
|
|
||
Keys |
|
Press |
|
|
Stop Status |
Record Status |
Play |
|
Long |
|
|
Power Off |
Power Off |
|
Short |
|
|
Have saved channels Next |
EXIT |
|
|
|
|
|
No saved channel X |
||
|
|
|
|
|
|
|
Mode |
|
Long |
|
|
Enter Main Menu |
Enter Main Menu |
|
Short |
|
|
Enter submenu |
Confirmation or enter |
|
|
|
|
|
|||
|
|
Short |
|
Increase the frequency of 100KHz |
Move the submenu |
|
Next |
|
Long |
|
Increase the frequency of 100KHz |
Continue to move forward |
|
|
|
|
|
continuously |
||
|
|
|
|
|
|
|
|
|
Short |
|
Decrease the frequency of 100KHz |
Move the submenu |
|
Last |
|
Long |
|
Decrease the frequency of 100KHz |
Continue to move backward |
|
|
|
|
|
continuously |
||
|
|
|
|
|
|
|
Vol+ |
|
Short |
|
|
Increase Volume |
X |
|
Long |
|
|
Increase Volume continuously |
X |
|
|
|
|
|
|||
Vol- |
|
Short |
|
|
Decrease Volume |
X |
|
Long |
|
|
Decrease Volume continuously |
X |
|
|
|
|
|
|||
B.Instruction
(a)Enter to the Main Menu
(b) |
Rotate key to select FM |
(c)Short press key MODE to enter the FM
(d)Auto detect
Hold 2 second . The UFD will Increase /
Decrease the frequency of 100KHz continuously , and will stop in
11

searched station If you want stop search , rotate Key |
/ |
will stop |
search.
(e)Fine-tune
zrotate Key Decrease the frequency of 100KHz
zrotate Key Increase the frequency of 100KHz
(f)Save the searched radio channel
zShort press key MODE to enter the submenu of FM mode
zAnd short press key Mode one time to save the station
(g)Choose the saved radio channels
zShort press key Play can change radio channels which you saved.
(h)Volume Adjustment:
zPress key VOL+/- to adjust the volume.
Caution: You can choose `Normal Band` FM 87 - 108MHz and `Japan Band` FM 76 – 90MHz In the different countries(Press key Mode go to the FM submenu rotate key
/to choose
z If the radio channel is use by stereo , the LCD will show the sign“ ”.
”.
 “Normal Band” and “Japan Band” can saved twenty radio channels by it`s self.
12
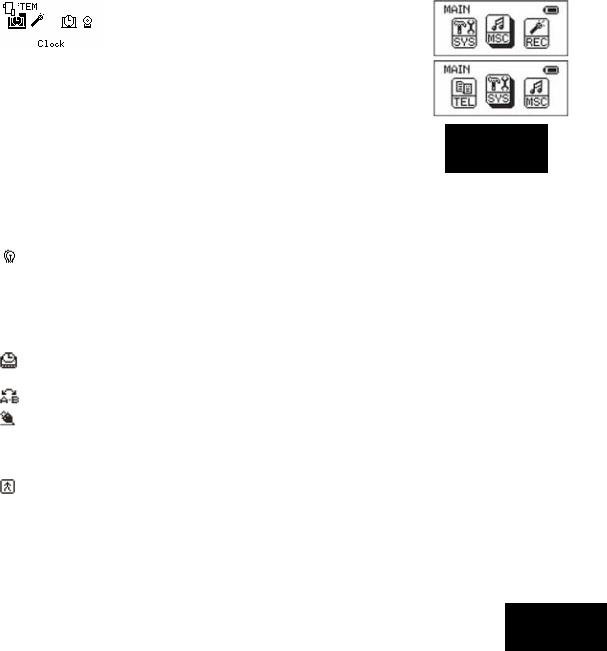
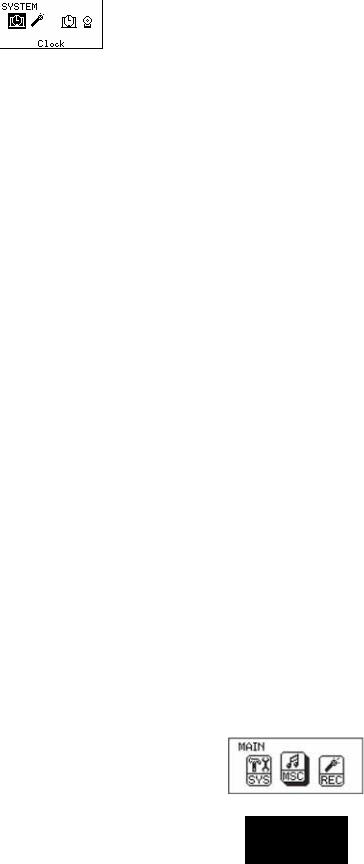
VII. System Setting
z Enter the main menu:
z Rotate key to select SYS:
z Short press key MODE to enter:
A. Icon
|
|
Clock |
Time and date for recorded voice |
|
|
|
|||
|
|
|
(Record type) |
Select the record type |
|
|
|||
|
|
|||
|
|
|
(Light Color) |
Select the light color |
|
|
Backlight |
Time for Backlight on when no any key press |
|
|
|
|||
|
|
|
(Brightness) |
Select the brightness |
|
|
|
||
|
|
|
Language |
Language selection |
|
|
|
||
|
Power off |
Auto power off when with no key press within the |
||
|
preset time |
|||
|
|
|
|
|
|
|
Replay mode |
Manual Replay/ Auto Replay |
|
|
Online Mode |
Normal Only/ Encrypted Only/Multi Drive |
||
|
|
|
Memory Info |
To view memory status |
|
|
|
||
|
|
Firmware version |
Display the firmware version |
|
|
|
|||
|
Exit |
Exit |
||
B. Instruction
z  Clock
Clock
9Enter the system interface and then select Record Time:
9Short press key MODE to enter:
9Rotate key VOL+ from year to start setting, the display year will flicks
9Rotate key VOL+ will increase the number (VOLwill decrese)
9Press key MODE when finish and exit.
z  (Record type)
9There are three kinds record type can be selected.
9Voice Record: Standard voice record, the file format is WAV (32K) or ACT (8K).
9WAV Music Record: Set the voice record file format is WAV, and you can select the bit rates at record submenu.
9MP3 Music Record: Set the voice record file format is MP3, and you
13

can select the bit rates at record submenu. z  Light color
9Enter the system interface and then select Light Color:
9Short press key MODE to enter:
9 |
Rotate key or to adjust. |
9 |
Press key MODE when finish and exit. |
z  (Backlight)
9Enter the system interface and then select “Backlight”:
9Short press key MODE to enter:
9 |
Rotate key or to adjust. |
||
9 |
Press key MODE when finish and exit. |
||
z |
|
(Brightness) |
|
|
|||
|
|||
9 |
Operation is the same as “Language”. |
||
z  Language
Make use of key or Language mode
z  Power off
9Enter the system interface and then rotate key MODE to select Power off.
9Press key MODE to enter. There will be 2 selections:
I. Off time: the player will automatically at a certain
time without any key is pressed in stop status.
II.Sleep time. The player will shut down automatically at a certain time without any key is pressed in any status.
z  Replay node
9Operation is the same as “Language”.
9Manual Replay: Replay by manually
9Auto Replay: Replay automatically.
z  Online Mode
9 Operation is as “Language”.
9 Some operating systems do not support 2 UFD, and so you can set it as “Normal Only/Encrypted Only”.
z  Memory Info
14

Display the total memory storage, and the percentage used up.
z  Firmware version
Display the firmware version.
z  Firmware upgrade
Use to upgrade the firmware; the firmware must be first transfer to the player for upgrade.
 Note: Short press key MODE after system are set and then press
  for exit.
15
VIII. Other Function
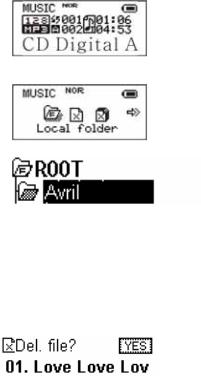
A. Use different folder (stop to use sub-menu)
User can separate different types of files into different folders (created from the PC) for convenient use. The player supports 9 submenus.
(a)Go to stop status (of any mode)
(b)Press key MODE to enter the submenu:
(c)Press key MODE to enter the folder interface:
(d) |
Rotate key or to select the folder you want: |
(e)Press key MODE to confirm.
Caution: The submenu of Music, Record and Voice mode are individually. That is, each mode has a different folder.
B. Files Delete indication
You can delete files in music or voice mode
(a)In stop status, press key MODE to enter the submenu
(b) |
Rotate key |
or |
to select Delete file/ Delete all. |
(c)Press key MODE to delete file.
(d) Rotate key or to select NO/YES.
(e)Then press key MODE for confirmation
Caution: “Delete all” will delete all the files in that mode. (Once files are deleted cannot be recovered)
C. Repeat operation
You can select different play mode in music or voice mode.
(a)Press key  to start playing music
(b)Press key MODE to enter and select “Repeat”.
(c)Then press key MODE again to enter. There are various selections, such as
z  Normal: play all songs for once.
z  Repeat One: repeat all songs for once.
z  Folder: playing the songs in the folder for once
z  Repeat folder: repeat playing the songs in the folder. z
  Repeat all: repeat playing all the songs
z  Random: shuffle playing.
16

z  Intro: play each song for 10 seconds only.
D. Tempo Rateadjustment
You can select different playing speed while playing music (MP3 only) without any change to the voice quality.
(a)Press key MODE while playing music
(b) |
Rotate key or to select “Tempo rate” |
(c)Press key MODE again to enter.
(d) |
Rotate key |
or |
to adjust the speed. |
Caution :Once you adjust the rate, all songs will be played as set.
E. Replay function
zA-B Repeater
(a)Press key MODE while playing music
(b) |
Rotate key or to select “Replay” |
(c)Press key MODE again to enter. The LCD will display  with “A” blinking.
(d) |
Rotate key |
to confirm the start point “A”. The LCD will display |
|
|
|
|
|
||||
|
with “B” blinking. |
|
|
||
(e) |
Rotate key |
to confirm the end point “B”. The LCD will display |
|
|
|
|
|
|
|||
|
stable and the player will play repeatedly from A to B |
|
|
||
You can rotate key
 You can press key VOL+/- to set the tempo rate in Replay mode.
|
z Follow Reading |
(f) |
In A-B repeater status, rotate key to enter follow reading function. |
(g)The LCD will display  instead of
  , and the player will start to record, the record time length as the length of A-B repeater.
(h)The player will play the original voice, the LCD will display  . You can
rotate key to enter compare reading.
 In this status, rotate key will return to A-B repeater status.
zCompare Reading
(a)In contrast reading, the LCD will display  and the player will play the original voice.
(b)When finished, the LCD will display  and the player will play the recorded follow reading voice.
(c)The player will repeat playing the original voice and the recorded voice continuously until key MODE is pressed.
17
 In this status, press key will return to follow reading mode.
 In the above 3 status, press key MODE will quit Replay mode. z Repeat times
9Operation is as “Backlight”.
9The numbers of times in repeating A-B repeat and then exit.
z Replay Gap
9Operation is as “Backlight”.
9This is to determine the time (in seconds) of pausing after playing each song.
18

IX. Flash Disk
This device does not need to install any driver system for Win ME/2000/XP, except for Win 98,
format or recovery. It also support Windows 2K or above, Mac OS 10.3, Linux Redhat 8.0 or above.
The player also support Suspend mode
A. Connect to PC
After connected to the PC, the player will display 3 different pictures according to its status:
(a)Waiting Mode
(b)Downloading files
(c)Uploading files
B.Flash Disk Function/ download MP3 files
Our product do not need to install any actuate system (except WIN98), you can immediately download any format of files by plug-in the USB hub to your PC.
(a)Once you switch on our product, the UFD would connect to the PC through the USB port. The system would detect a new hardware, follow the steps shown for installation. (WinMe/Win2000/XP can automatically finish installation). If the volume of the UFD is too large and cannot be connected to the USB port, you can use our extended USB line attached.
(b)After installation, the LCD would display USB MUSIC DISK and on
MY COMPUTER and FILE MANAGER would appear
REMOVABLE DISK.
(c)Drag or Copy the files you need to the Removable Disk to start
downloading. Downloaded MP3 files can put into the main menu while others in the submenu. You can make use “FILE SELECTION” to play the files which is in the submenu.
(d)While downloading, the LCD would display the animation as shown, you are required to wait until the animation disappeared and furthermore five seconds before you can plug out the UFD.
C.Transform ACT files to WAV files
You can make use of the attached software disk to transform WAV files.
19

(a)Run “Sound Converter” and then click “Open”.
(b)Select the act files for transform:
(c)Click “Transform” to start files transform to wav files
You can also transform WAV files to MP3 files.
X. Privacy Function
Most users will delete some files or secret files before lending it to friends, in order to protect your privacy. This is very inconvenient!
From now on, this player will provide you a function to protect your own privacy.
User can make use of the attached software in the CD to divide the drive memory as two (users can
see 2 flash disk in the computer, for Windows 2K user must install SP4). Add password for one of the disk, and store your secret files in that disk. In this way only password can enter.
(a)Connect the player to the PC.
(b)Run the attached software CD “MP3 Player Disk Tool”.
(c)Select “Divide and add password”; set a
20
desirable memory for needed. Then click “Set user and password”. Fill in the “new user”, “new password” and “repeat password (same as new password”). Then click “Start” to start disk divide.
(d)4. The window will display as show when finished, click “OK” and the window will re-start again
(e)You will see 2 flask disks on your computer
after it is restated. Click to the disk added password (the 2nd unit) and you will see 3 files; 2 of them are invisible and one of it is .exe file, the disk memory is about 300K.
21
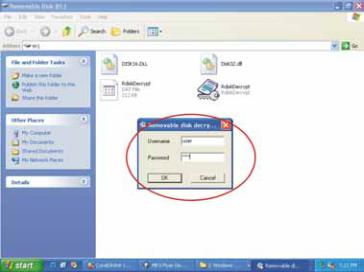
(f)Run “RdiskDecrypt.exe” and a window will pop up as shown below, type in your user name and password. If it is correct, the disk will be open.
(g)You must enter your use name and password to enter the disk every time.
 Caution: Disk memory divide or combine will delete all the files in the player.
 Caution: Never forget your user name and password, or else you cannot enter the disk. You must need to combine the disks to cancel password and this will delete all the files
22

XI. Trouble Shooting
No power |
z Is the battery install correctly |
|
z Make sure that it is turn on |
Unable to listen from the earphone |
z Make sure that the volume is not 0, and the |
|
earphone is well connected. |
|
z Make sure that the earphone is clean |
|
z Damaged MP3 will lead to various levels of |
|
noise or unable to be played. Make sure |
|
that the file is complete. |
LCD display wrong characters |
z Make sure that you select the right |
|
Language |
Unable to download music |
z Make sure that the USB connecting wire is |
|
not damage or it well connected. |
|
z Is the driver installed? |
|
z Make sure that there is enough memory |
|
storage left. |
XII. Technical Specifications
|
Dimensions |
27mm×81mm×26mm |
|
|
|
LCD |
|
2 colors display |
|
|
USB version |
USB2.0 |
|
|
|
Memory |
Flash memory:128M~1024M |
|
|
|
Battery |
|
One AAA alkaline battery |
|
|
|
Max. play time: 8 hrs. |
|
|
|
|
|
|
|
|
|
|
Sampling rate |
8KHz |
|
Record |
|
Record format |
WAV (32K bps), ACT (8K |
|
|
|
bps) |
|
|
|
|
|
|
|
|
|
Record time |
35hrs.(ACT, 128M Flash) |
|
|
|
Output |
10mW (32Ohm) |
|
|
|
||
|
|
|
MP3 frequency |
8K bps ~ 320K bps |
|
MP3, WMA, WMV, ASF |
|
WMA, WMV, ASF frequency |
5K BPS~384K BPS |
|
|
|
|
|
|
|
|
Input |
20Hz~20KHz |
|
|
|
Voice rate |
85dB |
|
File format |
MP1, MP2, MP3, WMA, ACT, |
WAV |
|
|
Language |
|
Simple Chinese, English, Traditional Chinese, Japanese, |
|
|
|
|
Korean, French, German, Italian, Dutch, Portuguese, |
|
|
|
|
Spanish |
|
|
Operating system |
Windows98/SE/ME/2K/XP |
|
|
|
|
|
23 |
|
|
Manuel |
|
I. ASPECT EXTÉRIEUR ........................................................................................... |
25 |
|
II. FONCTIONS DE BASE ......................................................................................... |
27 |
|
III. MODE MUSIQUE................................................................................................... |
28 |
|
A. FONCTIONNEMENT DES TOUCHES......................................................................... |
28 |
|
B. |
INSTRUCTION ..................................................................................................... |
28 |
IV. ENREGISTREMENT DE LA VOIX ........................................................................ |
30 |
|
A. FONCTIONNEMENT DES TOUCHES......................................................................... |
30 |
|
B. |
INSTRUCTIONS.................................................................................................... |
30 |
V. LECTURE DES FICHIERS DE VOIX .................................................................... |
32 |
|
VI. MODE FM .............................................................................................................. |
33 |
|
A. FONCTIONNEMENT DES TOUCHES......................................................................... |
33 |
|
B. |
INSTRUCTIONS.................................................................................................... |
33 |
VII. CONFIGURATION DU SYSTÈME......................................................................... |
35 |
|
A. |
ICONES .............................................................................................................. |
35 |
B. |
INSTRUCTIONS.................................................................................................... |
35 |
VIII.AUTRES FONCTIONS.......................................................................................... |
37 |
|
A. UTILISATION D’UN AUTRE DOSSIER (STOP POUR UTILISATION DU SOUS-MENU) ........... |
37 |
|
B. INDICATION DE SUPPRESSION DE FICHIERS ............................................................ |
38 |
|
C. |
FONCTIONNEMENT DU « REPEAT »....................................................................... |
38 |
D. |
REGLAGE DU TEMPO ........................................................................................... |
38 |
E. |
FONCTION « REPLAY » (RELIRE).......................................................................... |
39 |
IX. FLASH DISK.......................................................................................................... |
40 |
|
A. |
CONNEXION A UN PC .......................................................................................... |
40 |
B. FONCTION FLASH DISK / TELECHARGEMENT DE FICHIERS MP3............................... |
40 |
|
C. CONVERSION DE FICHIERS ACT EN FICHIERS WAV................................................ |
41 |
|
X. FONCTION DE CONFIDENTIALITÉ ..................................................................... |
42 |
|
XI. RÉSOLUTION DES PROBLÈMES ....................................................................... |
44 |
|
XII. SPÉCIFICATIONS TECHNIQUES......................................................................... |
45 |
|
24
XIII. Aspect extérieur
z Nom des pièces
L’UFD
1.Connecteur |
Connexion USB |
|
USB |
pour branchement |
|
|
|
vers PC |
2. |
Touche Vol- |
Baisser volume |
3. |
Touche Vol+ |
Relever volume |
4. |
Touche Lecture/Pause/Arrêt |
|
5. Afficheur à |
Afficher les |
|
cristaux liquides |
informations à |
|
|
|
l’écran |
6. Rew |
Piste |
|
|
|
précédente/Recul |
|
|
rapide |
7. Mode Sélectionner entre plusieurs modes
1.Music-lire la musique 2.Record-enregistrer à l’aide
du micro
3.Voice-lire les fichiers musicaux
4.Sys set-modifier les paramètres de l’UFD
8.FF Piste suivante/Avance rapide
9.Prise oreillette
10. MIC Micro intégré
11. Couvercle du compartiment à pile
12. |
Anneau pour la |
Porte-accessoire |
bandoulière |
25

z Nom de l’afficheur à cristaux liquides
cheur à cristaux liquides |
|
|
1.Mode de |
7. Titre…………Nom du |
|
fonctionnement……MP3/Rec/Voice |
dossier/fichier MP3 |
|
(MP3/enregistrer/voix) |
|
|
2. Mode EQ |
8. Mode « Repeat » |
|
3. |
Ordre des morceaux |
9. Total des morceaux |
4. Temps de lecture |
10.Indicateur |
|
5. |
Indicateur de pile |
11.Indicateur des paroles |
6. |
Débit en bits/ Format de fichier |
|
z Pile
Il existe 9 niveaux de contrôle de la pile :
 Lorsque la pile contient 1,5V, le niveau indique qu’elle est pleine. Il diminue ensuite progressivement en fonction de l’état de charge de la pile.
  Lorsque la charge de la pile est quasiment épuisée, le niveau indique qu’elle est vide et il faut la recharger.
26

XIV. Fonctions de base
(a)Entrez dans le menu « Function »
Utilisez la touche MODE pour sélectionner les différentes fonctions. Vous avez un menu principal (appuyez de manière prolongée sur la touche MODE lorsque l’appareil est à l’arrêt), ainsi qu’un sous-menu lorsque l’appareil est en lecture (appuyez brièvement sur la touche MODE pour y entrer) et un sous-menu lorsque l’appareil est à l’arrêt (appuyez brièvement sur la touche MODE pour y entrer).
(b)Aperçu du fonctionnement
A. |
Appuyez sur ou pour sélectionner un morceau. |
B.Pendant la lecture, tournez à droite/gauche de la touche MODE pour un recul/une avance rapide.
(c)Maintenir la fonction (Touche verrouillée)
A.Appuyer sur la touche Mode pour aller dans le sousmenu
B. |
Changer de touche pour choisir le bon verrouillage. |
C.Appuyer rapidement sur la touche Mode pour entrer, le LCD affichera comme indiqué "Maintenu".
D.SI vous voulez annuler la fonction "Maintenu", appuyer sur la touche Mode pendant 2-3 secondes jusqu'à ce que "Maintenu" est disparu.
(d)Mise en œuvre des différents modes
Vous pouvez entrer dans différents modes à partir du menu des fonctions principales
z Menu principal : (Appuyez de manière prolongée sur MODE pour y entrer)
z Mode musique :
z Mode enregistrement : z Mode voix :
zMode FM :
zParamètres système :
XV. Mode musique
A. Fonctionnement des touches
Les couleurs du rétro-éclairage changent chaque fois que vous appuyez sur une touche (lorsque le rétro-éclairage n’est pas à 0).
Mode musique 
Touche |
Appui |
A l’arrêt |
En lecture |
Sous-menu en |
Sous-menu à |
|
lecture |
l’arrêt |
|||||
|
|
|
|
|||
Play |
Long |
Mise hors tension |
Mise hors tension |
Mise hors tension |
Mise hors tension |
|
Bref |
Lecture |
Arrêt |
Quitter menu |
Quitter Menu |
||
|
||||||
|
Long |
Entrer dans le menu |
Entrer dans le menu |
Entrer dans le |
Entrer dans le |
|
|
menu |
menu |
||||
Mode |
|
|
|
|||
Bref |
Entrer dans le |
Entrer dans le |
Confirmer ou entrer |
Confirmer ou entrer |
||
|
||||||
|
sous-menu à l’arrêt |
sous-menu en lecture |
||||
|
|
|
|
|||
|
Rotation |
Suivant |
Suivant et lire |
Déplacer |
Déplacer |
|
|
sous-menu |
sous-menu |
||||
Next |
|
|
|
|||
Maintenez |
Continuer pour |
Avance rapide |
Continuer |
Continuer |
||
|
||||||
|
aperçu vers l’avant |
d’avancer |
d’avancer |
|||
|
|
|
||||
|
Rotation |
Précédent |
Précédent et lire |
Déplacer |
Déplacer |
|
|
sous-menu |
sous-menu |
||||
Last |
|
|
|
|||
|
|
|
|
|
||
Maintenez |
Continuer pour |
Recul rapide |
Continuer de |
Continuer de |
||
|
||||||
|
aperçu vers l’arrière |
reculer |
reculer |
|||
|
|
|
||||
|
Bref |
Augmenter volume |
Augmenter volume |
X |
X |
|
Vol+ |
Maintenez |
Augmenter volume |
Augmenter volume |
X |
X |
|
|
en continu |
en continu |
||||
|
|
|
|
|||
|
Bref |
Baisser volume |
Baisser volume |
X |
X |
|
Vol- |
Maintenez |
Baisser volume en |
Baisser volume en |
X |
X |
|
|
continu |
continu |
||||
|
|
|
|
Remarque :
Bref : appuyez la touche pendant 1 seconde
Long : appuyez la touche pendant 3 secondes
Maintenez : appuyez sur la touche et maintenez-la enfoncée
Rotation : tournez la touche vers la gauche/droite
B.Instruction
(a)Fonctionnement simple
zBranchez l’oreillette sur la prise prévue à cet effet.
zAssurez-vous que la touche HOLD est désactivée.
28

z Appuyez de manière prolongée sur la touche  . Le lecteur passe en mode musique. Ensuite, appuyez brièvement sur la touche
  pour démarrer la lecture.
z Sélection du morceau : tournez la touche ou pour sélectionner le morceau.
zRéglage du volume : appuyez sur la touche Vol+/Volpour régler le volume.
zAttention : le lecteur s’éteint automatiquement lorsqu’il n’est pas en
lecture.
(b)Egaliseur
zEn lecture de musique :
zAppuyez brièvement sur la touche MODE pour
entrer dans le sous-menu de lecture
z Tournez la touche pour sélectionner l’égaliseur. z Appuyez brièvement sur la touche Mode pour entrer.
L’afficheur apparaît comme indiqué ci-dessous :
z Ensuite, tournez la touche |
pour sélectionner l’EQ : Natural, Rock, Pop, |
Classical, Soft, Jazz ou DBB
(c)Bouton des paroles
Ce lecteur prend en charge les fichiers *.LRC. Si un fichier de paroles portant le même nom que le MP3 se trouve dans le même dossier que celui-ci, le lecteur lit le MP3 et les paroles en même temps.
Si vous avez les paroles du morceau, l’afficheur fait apparaître l’icône  au lieu de l’icône
  .
.
zSi vous avez les paroles, l’afficheur fait apparaître
zAppuyez de manière prolongée sur la touche MODE pour entrer dans l’interface des paroles
zLes paroles s’affichent :
zAppuyez brièvement sur la touche MODE pour retourner à l’interface du titre :
29

z Lecture manuelle des paroles : appuyez brièvement sur la touche VOL pour la lecture des paroles.
XVI. Enregistrement de la voix
A. Fonctionnement des touches
Mode enregistrement 
Touche |
Appui |
A l’arrêt |
En enregistrement |
|
Play |
Long |
Mise hors tension |
Arrêter l’enregistrement |
|
Bref |
Démarrer enregistrement |
Suspendre l’enregistrement |
||
|
||||
Mode |
Long |
Entrer dans le menu principal |
X |
|
Bref |
Entrer dans le sous-menu |
X |
||
|
||||
Stop |
Bref |
X |
Arrêter l’enregistrement |
|
Long |
Mise hors tension |
Mise hors tension |
||
|
Assurez-vous que la charge de la pile est suffisante avant d’entamer un enregistrement.
Le lecteur accepte 99 fichiers par dossier.
B.Instructions
(a)Mode enregistrement
z Entrez dans le menu principal :
z Tournez pour sélectionner « Record » :
zAppuyez brièvement sur la touche MODE pour entrer :
zAppuyez brièvement sur la touche  pour entamer l’enregistrement.
 La voix enregistrée est sauvegardée dans le dossier racine, dans le sous-menu enregistrement arrêt/menu principal.
 Si l’afficheur indique « Memory Full » (mémoire pleine), vous n’avez plus de mémoire pour de nouveaux enregistrements. Vous devez détruire des fichiers pour libérer de la mémoire.
 Si l’afficheur indique « Folders full » (dossiers pleins), vous avez déjà 99 fichiers dans le dossier. Vous devez passer à un autre dossier.
30
 Loading...