

Page 1
ILLUSION 500
OPERATING MANUAL
Page 2

Page 3
If a portable or temporary three phase
mains supply is used to power this
desk, we recommend that the desk
mains plug is removed before
connecting or disconnecting the
supply.
Serious damage will occur if the desk
is connected across two phases.
This equipment is designed for use as
a lighting control desk only, and is
unsuitable for any other purpose. It
should only be used by, or under the
supervision of, an appropriately
qualified or trained person.
Zero 88 Lighting Ltd. reserves the right
to make changes to the equipment
described in this manual without prior
notice. E & OE.
Federal Communications Commission
This equipment has been tested and
found to comply with the limits for a
Class A digital device, pursuant to part
15 of the FCC rules. These limits are
designed to provide reasonable
protection against harmful interference
when the equipment is operated in a
commercial environment. This
equipment generates, uses, and can
radiate radio frequency energy and, if
not installed and used in accordance
with the instruction manual, may cause
harmful interference to radio
communications. Operation of this
equipment in a residential area is likely
to cause harmful interference in which
case the user will be required to
correct the interference at his own
expense.
Issue 2 - December 2003
Manual Stock No. 73 - 741 - 00
Software Version ML 1.0
© Zero 88 Lighting Ltd. 2003
Zero 88 Lighting Ltd.
Usk House
Llantarnam Park
Cwmbran
Gwent NP44 3HD
United Kingdom
Tel: +44 (0)1633 838088 *
Fax: +44 (0)1633 867880
e-mail: sales@zero88.com
Web: www.zero88.com
* 24 hour answerphone
Illusion 500 Manual 73-741-00 Issue 2 i
ILLUSION 500
OPERATING MANUAL
Page 4

1. Introduction
This Manual 1-1
The Illusion 500 1-2
Front Panel Controls 1-4
The Monitor Screen 1-9
Mouse Interface 1-10
Remote Switches 1-10
2. Quickstart Tutorial
Introduction 2-1
Turning on the Desk 2-1
Desk Setup 2-1
Preparing to Plot 2-1
Setting Dimmer Channels 2-2
Setting Fixture Parameters 2-2
Recording Data 2-2
Playing Back the Memories 2-3
Playback Using Submasters 2-3
The Cueline Screen 2-4
3. Setup
Setup Options 3-1
Floppy Disk Functions 3-2
Illumination 3-5
Display Schemes 3-5
Desk Setup 3-6
Desk Defaults 3-6
Assign Channels 3-9
Assign Fixtures 3-11
Autopatch Out 3-15
Autopatch In (Optional) 3-16
Clear DMX Patch 3-16
Setup Auxiliary Buttons 3-17
Setup Remote Switches 3-18
Operating Mode 3-19
Exiting Desk Setup 3-19
4. Program Window
Introduction 4-1
Program Window Header 4-1
Brightness Section 4-2
Colour Section 4-3
Beamshape Section 4-4
Position Section 4-5
Palettes Section 4-6
Command Line Area 4-7
Using the Mouse in the PW 4-7
Programming Dimmer Channels 4-8
Using the Control Wheel 4-9
Using the Mouse 4-9
Programming Fixtures 4-10
Movement Effects 4-13
Wheel Editing Modes 4-16
Undoing and Redoing Edits 4-16
Closing the Program Window 4-16
Groups 4-17
Palettes 4-18
5. Memories
Introduction 5-1
Memories - Common Data 5-2
Memory Numbers 5-2
Memory Triggers 5-2
Memory Types 5-3
Transition Times 5-4
Memory Data in Full Mode 5-4
Memory Data in Partial Mode 5-4
The Memories Screen 5-5
Programming Memories 5-6
Saving Channel Data from the Program Window 5-11
Modifying Memory Data 5-14
Copying Memories 5-16
Inserting Memories 5-17
Previewing a Memory 5-17
Deleting a Memory 5-17
Transferring Memories onto Submasters 5-18
SMPTE and MIDI Time Modes 5-19
ii Illusion 500 Manual 73-741-00 Issue 2
Contents
Page 5

6. Submasters
Introduction 6-1
The Submaster Screen 6-2
Programming Submasters 6-4
Transferring Memories onto Submasters 6-6
Previewing a Submaster 6-7
Clearing a Submaster 6-7
Copying Submaster Data 6-8
Triggering Macros from Submasters 6-9
Playback using Submasters 6-10
Triggering Chase Memories 6-11
Submaster Flash Functions 6-12
7. Memory Stack
Introduction 7-1
Jumps, Loops and Macro Triggers 7-2
Programming Jumps 7-3
Programming Loops 7-4
Programming Macro Triggers 7-5
Playback X 7-6
8. Playback A/B
Introduction 8-1
Manual Load Operation 8-2
Auto Load Operation 8-2
Monitor Display 8-2
Clearing the A/B Masters 8-2
9. Cueline
Introduction 9-1
The Cueline Screen 9-2
Programming Cues 9-3
Editing Cues 9-4
Previewing Cues 9-5
Deleting Cues 9-5
Copying Cues 9-5
Transferring Cues onto Submasters 9-6
Zoom Buttons 9-6
Scroll Bar 9-6
Playback Buttons 9-6
10. Super User
Entering Super User 10-1
Clear Memories 10-2
Renumber Memories 10-2
Clear Submasters 10-2
Clear Auxiliary Controls 10-2
Clear Palettes 10-3
Clear Groups 10-3
Clear All 10-3
Reset Desk 10-3
Set Date and Time 10-3
Lock Desk Function 10-4
Exiting Super User Mode 10-4
11. Other Features
Introduction 11-1
DMX Output Screen 11-2
DMX Patch Screen 11-2
Auxiliary Outputs 11-3
Topset 11-4
Macros 11-5
Entering Channel Values 11-7
Entering Text using Front Panel Keys 11-8
Entering Real Times from Numeric Keypad 11-8
DMX In 11-8
Upgrading Software 11-8
12. Technical Specification
Introduction 12-1
Desk Power Supply 12-1
Audio Input 12-1
Remote Switches 12-2
DMX Output 12-2
MIDI (Optional) 12-2
SMPTE (Optional) 12-2
DMX Input (Optional) 12-2
Backup Data Storage 12-2
Mouse 12-2
Keyboard 12-2
Video Output 12-2
Desk Light 12-2
Illusion 500 Manual 73-741-00 Issue 2 iii
Contents
Page 6

iv Illusion 500 Manual 73-741-00 Issue 2
Contents
Page 7
Introduction
This Manual
This manual describes the operation of
the Illusion 500 lighting desk.
This chapter contains a general
overview of the desk followed by a
description of the front panel controls
and displays, details of the layout and
contents of the monitor screen, use of
mouse and remote switches.
The quick start tutorial chapter is
provided to help you get the desk up
and running quickly and lead you
through the basic functions on the desk
such as assigning and patching
dimmer channels and fixtures and
recording and playing back memory
and submaster data.
For detailed descriptions of each of the
major desk functions (setup,
memories, submasters, cueline etc.)
refer to the appropriate chapter(s) in
the manual.
The manual concludes with chapters
on the Super User functions, other
features and the technical specification
of the desk.
Conventions
Throughout this manual the following
conventions are used.
References to controls, buttons and
lights on the front panel appear in
capital letters, for example:
GRAND MASTER, GO, PAUSE.
Data entry via the numeric keypad and
associated keys is shown in bold type,
for example:
CHANNEL 1 @ 50 ENTER
Options and data fields which appear
on the monitor screen are shown in
italics, for example:
Floppy Disk, Illumination, Desk Setup.
The colours specified in this manual for
various items displayed on the monitor
screen refer to those defined in the
Normal display scheme.
If a diffferent display scheme is
selected, the colours displayed on the
monitor may be different to those
specified in this manual.
Illusion 500 Manual 73-741-00 Issue 2 1 - 1
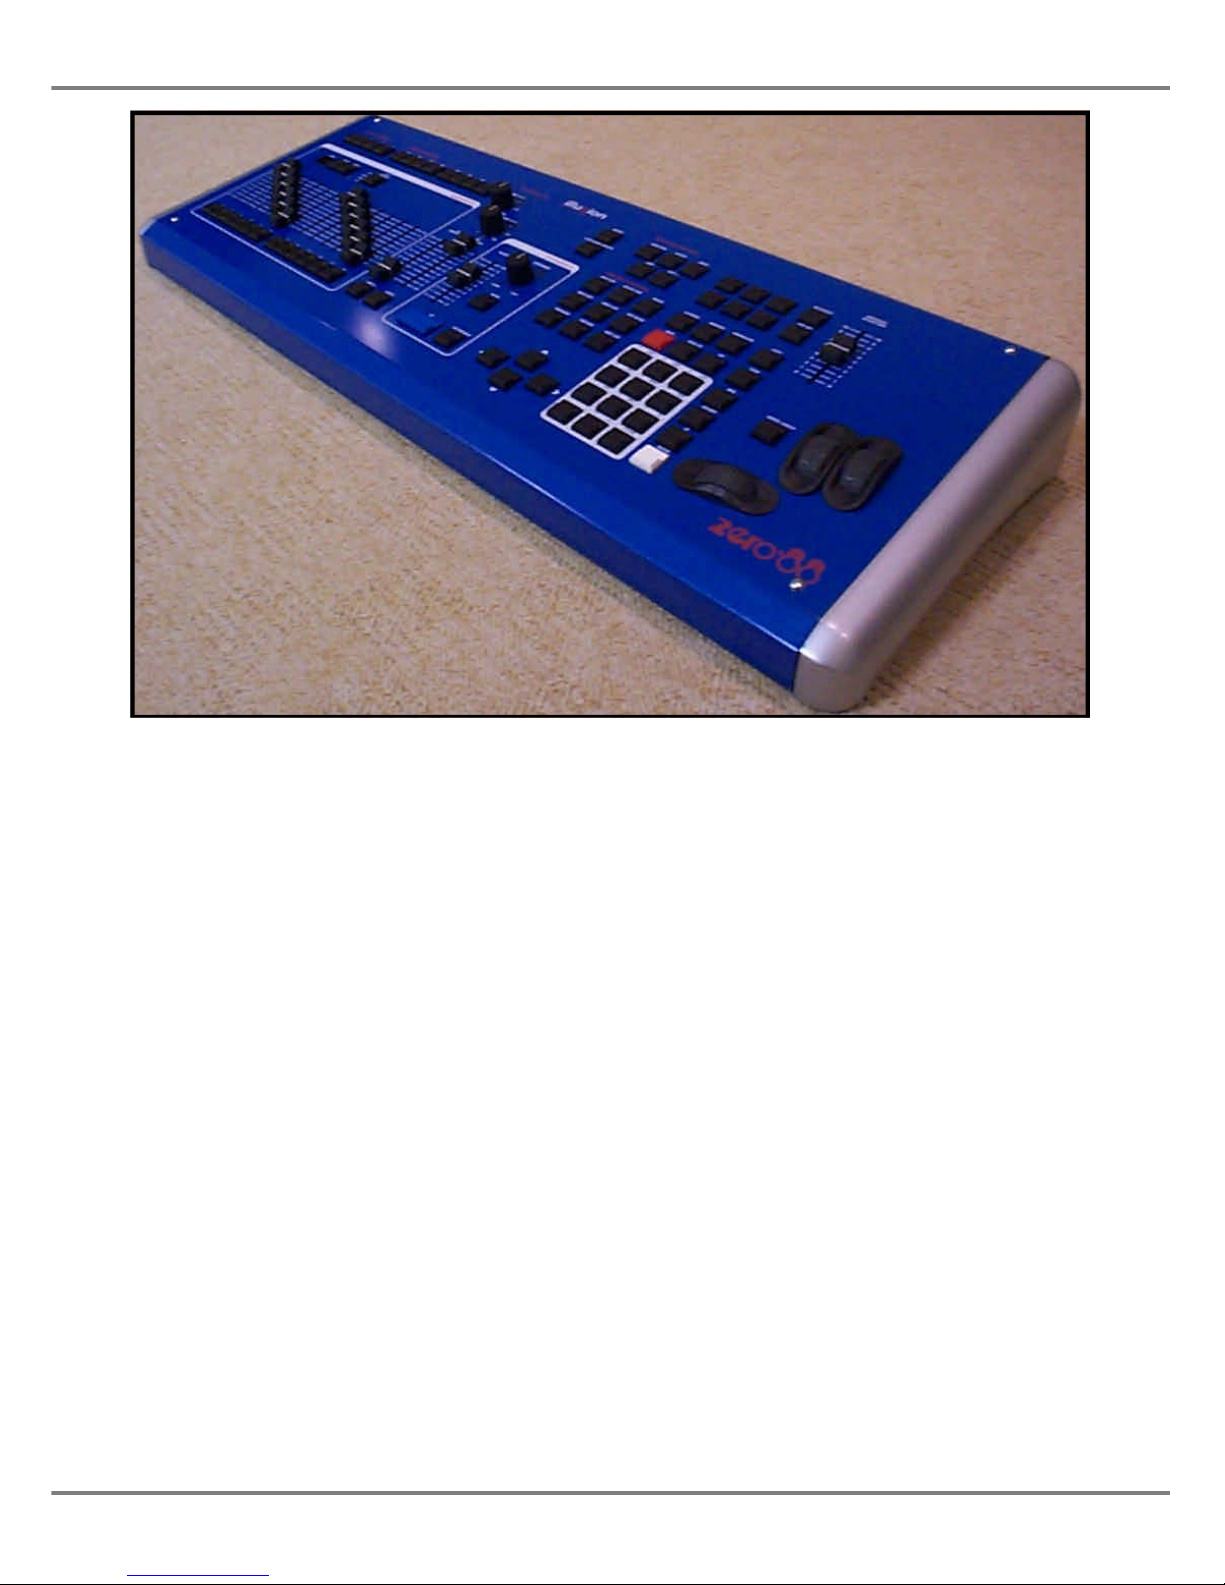
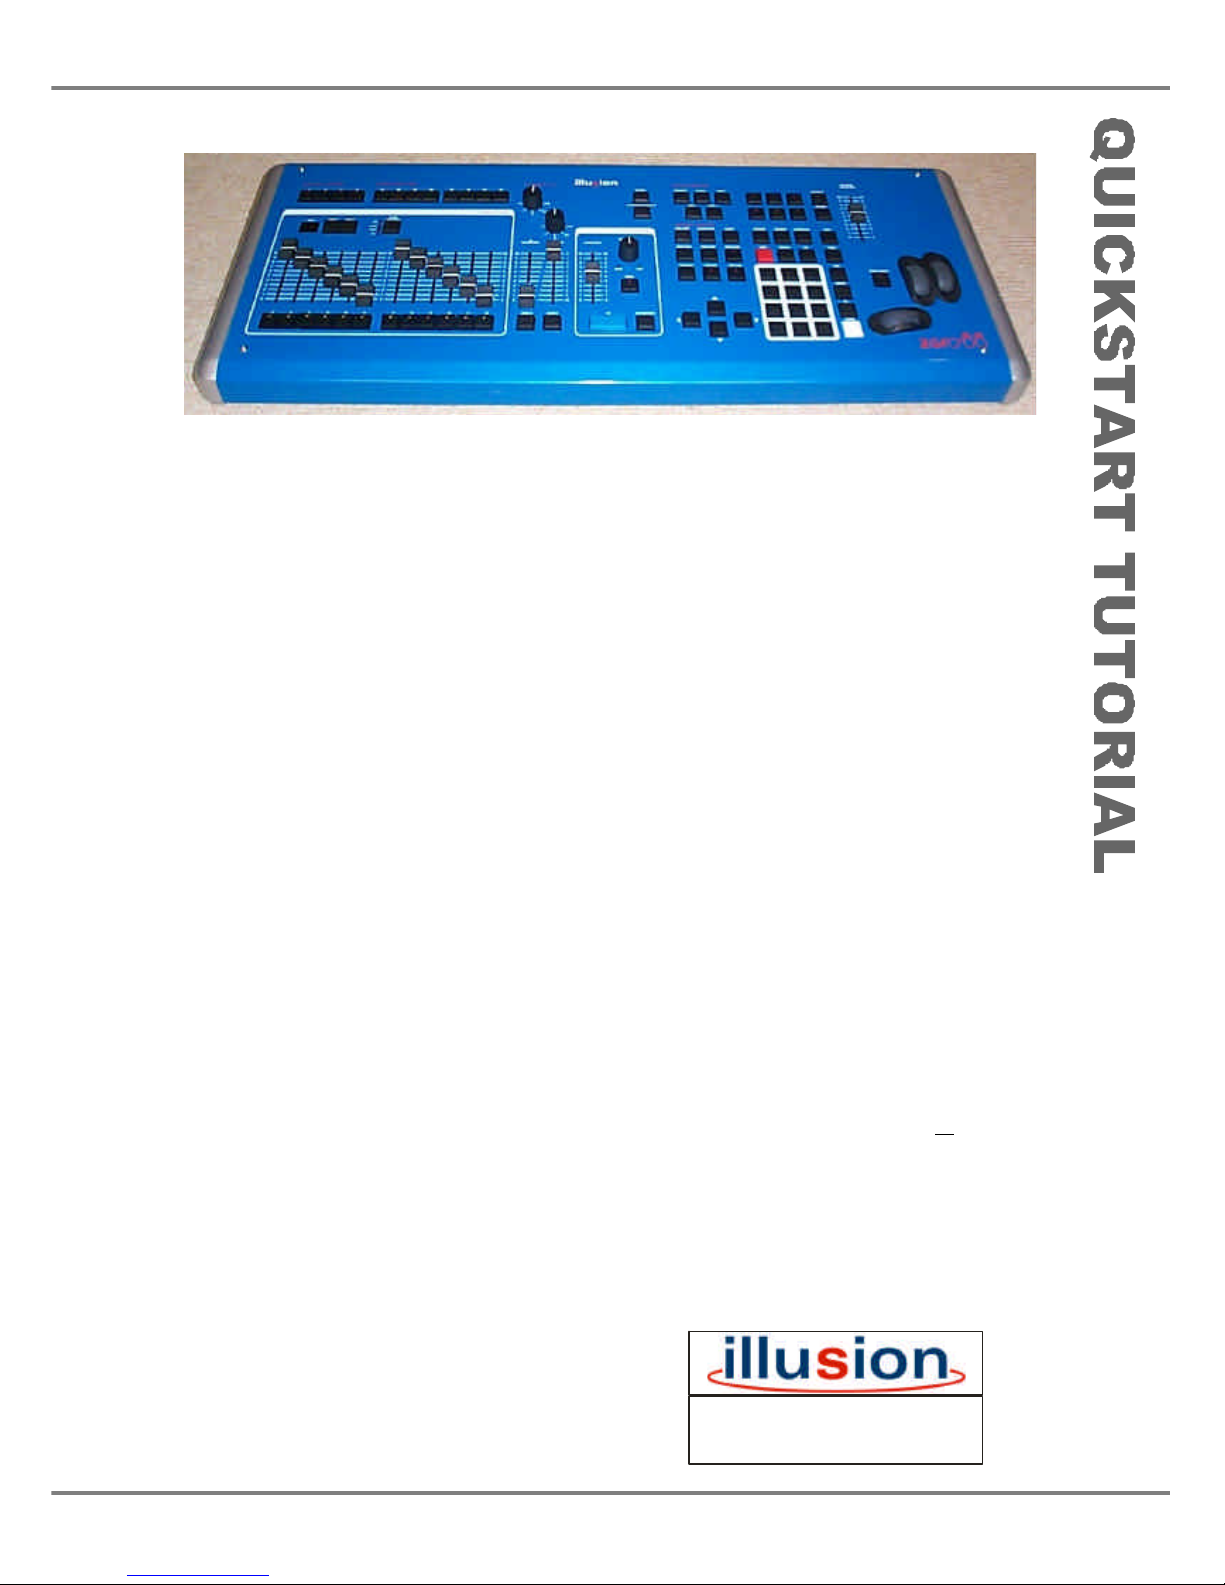
Figure 1 - 1: The Illusion 500 Lighting Desk
For news, views and latest software
visit our dedicated Illusion website at:
www.illusionsupport.com
Page 8

The Illusion 500
This section provides a summary of the
Illusion 500 lighting desk, highlighting
its main functions.
Graphical Interface
All setup, programming and playback
information is displayed graphically on
the monitor screen. Continuous
on-screen help text is provided at the
bottom of the screen.
Function keys on the front panel
enable quick and direct access to the
main setup, programming, playback
and information screens.
The mouse interface allows the user to
move quickly around the screens,
select items, choose options etc.
Control Channels
The Illusion 500 Lighting desk has 512
channels of control which can be
configured into the required number of
dimmer channels and fixtures.
The desk is therefore capable of
handling dimmer channels, scrollers
and intelligent moving light fixtures.
Dimmer Channels
Dimmer channels can be patched fully
or proportionally to the DMX channels .
Each channel may be patched to up to
10 different DMX addresses.
Dimmer Channels can be excluded
from memory data, if required. This
allows data for particular channels to
be loaded directly onto submasters
(eg. house lights, orchestra lights etc.)
A dimmer channel may be associated
with up to three other dimmer channels
or fixtures.
Dimmer channel data for memories
and submasters is programmed and
edited from the Program Window
(PW).
Fixtures
A Fixture is an object requiring one or
more DMX channels and can be a
scroller or moving mirror or moving
head intelligent lights (eg Goldenscan,
MAC 250).
Moving light fixtures typically contain a
number of parameters (intensity,
colour, gobo, pan, tilt etc.). These
parameters are defined in the Fixture
Type Data - see below.
Each assigned fixture can be named.
Fixtures can be patched to the DMX
channels (1-512). Each fixture may be
patched to up to 10 different DMX
addresses.
A fixture may be associated with up to
three other dimmer channels or
fixtures.
Fixture Parameter data for memories,
submasters and palettes is
programmed and edited from the
Program Window (PW).
Fixture Type Data
The Illusion 500 desk contains 20
Common Fixture Types which are
stored on the desk itself.
The desk also has special Scroller
Fixture Types. When assigning these
fixtures the user can specify the
number of frames in the scroller.
All other fixture types are assigned
from the fixture library file which is
stored on floppy disk.
The latest fixture library can be
downloaded from the Illusion Support
website.
Program Window (PW)
The Program Window (PW) is
displayed on the monitor and provides
the main user interface for setting up,
editing and previewing dimmer channel
and fixture parameter data.
Dimmer channel and fixture parameter
selection is achieved via the numeric
keypad and associated keys on the
front panel or the mouse.
Dimmer channel and fixture parameter
levels can be set using the control
wheel, numeric keypad, external
keyboard or mouse.
Groups
The Illusion 500 desk provides 20 user
programmable groups.
A Group is a number of selected
dimmer channels and/or fixtures.
Groups are programmed via the PW
and can then be used as a quick
method for selecting channels or
fixtures when programming memories,
submasters or palettes.
Palettes
The Illusion 500 desk provides up to
200 user programmable palettes for
each LTP attribute (Colour,
Beamshape and Position).
Palettes are programmed via the PW
and can then be referenced when
programming memories or
submasters.
Operating Modes
The Illusion 500 desk provides two
operating modes:
Partial Mode - The default mode of the
desk which includes full tracking and
partial programming of memories,
submasters and palettes using a
‘tagging’ method to identify the dimmer
channels and fixture parameters that
are programmed in the data.
Full Mode - In this mode, all dimmer
channels and fixture parameters are
automatically recorded into memories,
submasters and palettes.
1 - 2 Illusion 500 Manual 73-741-00 Issue 2
Introduction
Page 9

Memories
The Illusion 500 provides a number of
different memory types (scenes,
multi-part scenes, chases, sound to
light and ripplesound).
All memories have their own delay,
fade, transition and dwell times which
determine how the programmed
dimmer channels and fixture
parameters behave when the memory
is output.
Memories can be created, modified or
deleted from either the Memories or
Cueline screens.
Memory Stack
The Memory Stack is made up of all
the programmed memories in
increasing numerical order.
Jumps, loops and macro triggers can
be programmed into the Memory
Stack, if required.
Memories can be triggered by the GO
button, automatically or at a specified
time. They can also be triggered by
SMPTE or MIDI timecode (if optional
upgrade kit has been fitted).
Cueline
The Cueline screen provides an
alternative graphical representation of
the Memory Stack.
Playback X
Playback X provides a simple method
of playing back the memory stack
using the GO button. There are also
MASTER, PAUSE, OVERRIDE and
GO PREVIOUS controls.
Playback A/B
Playback A/B allows memories to be
loaded manually or automatically onto
the A and B MASTERS and then faded
in and out manually or timed.
Submasters
There are a total of 108 submasters,
divided into 9 pages of 12 which can
be loaded with channel data directly or
have a memory transferred onto them.
Each submaster has its own fade
times, trigger levels and modifiers
(where applicable).
The submasters can be used when
programming memories and for playing
back channel data and memories.
One page is always active, which is
indicated by the display on the front
panel. Page Overlay is provided to
allow submasters from different pages
to be output at the same time.
Auxiliary Buttons
There are 4 AUXILIARY CONTROL
buttons which can be programmed with
their own on/off values, fade up/down
times and actions.
The Auxiliary buttons can be patched
fully or proportionally to the DMX
output channels (1-512). Each auxiliary
may be patched to up to 10 different
DMX addresses.
Macros
The desk provides 10 macros which
can be programmed with a series of
button pushes.
Remote Switches
The desk provides a socket on the
back panel for the connection of up to
6 remote switches.
Each of the remote switches may be
assigned to certain front panel buttons
or macros.
Super User
The desk provides a number of Super
User functions for clearing memories,
submasters and other show data,
renumbering memories, resetting the
desk and locking the desk to prevent
unauthorised editing of show data.
Desk Output
The output from the desk is DMX only.
The data is output on DMX channels
1-512.
Peripherals
The desk has a floppy disk drive to
enable desk setup, show data and
fixture data to be saved and loaded.
Operating System software upgrades
are also performed via floppy disk.
Illusion 500 Manual 73-741-00 Issue 2 1 - 3
Introduction
Page 10
Front Panel Controls
This section provides a description of
the various controls and displays on
the front panel of the Illusion 500 desk.
The front panel controls have been
divided into the following sections:
•
SUBMASTER CONTROLS
•
PLAYBACK X CONTROLS
•
MEMORY CONTROLS
•
EFFECTS CONTROLS
•
PLAYBACK A/B CONTROLS
•
FIXTURE CONTROLS
•
OTHER CONTROLS
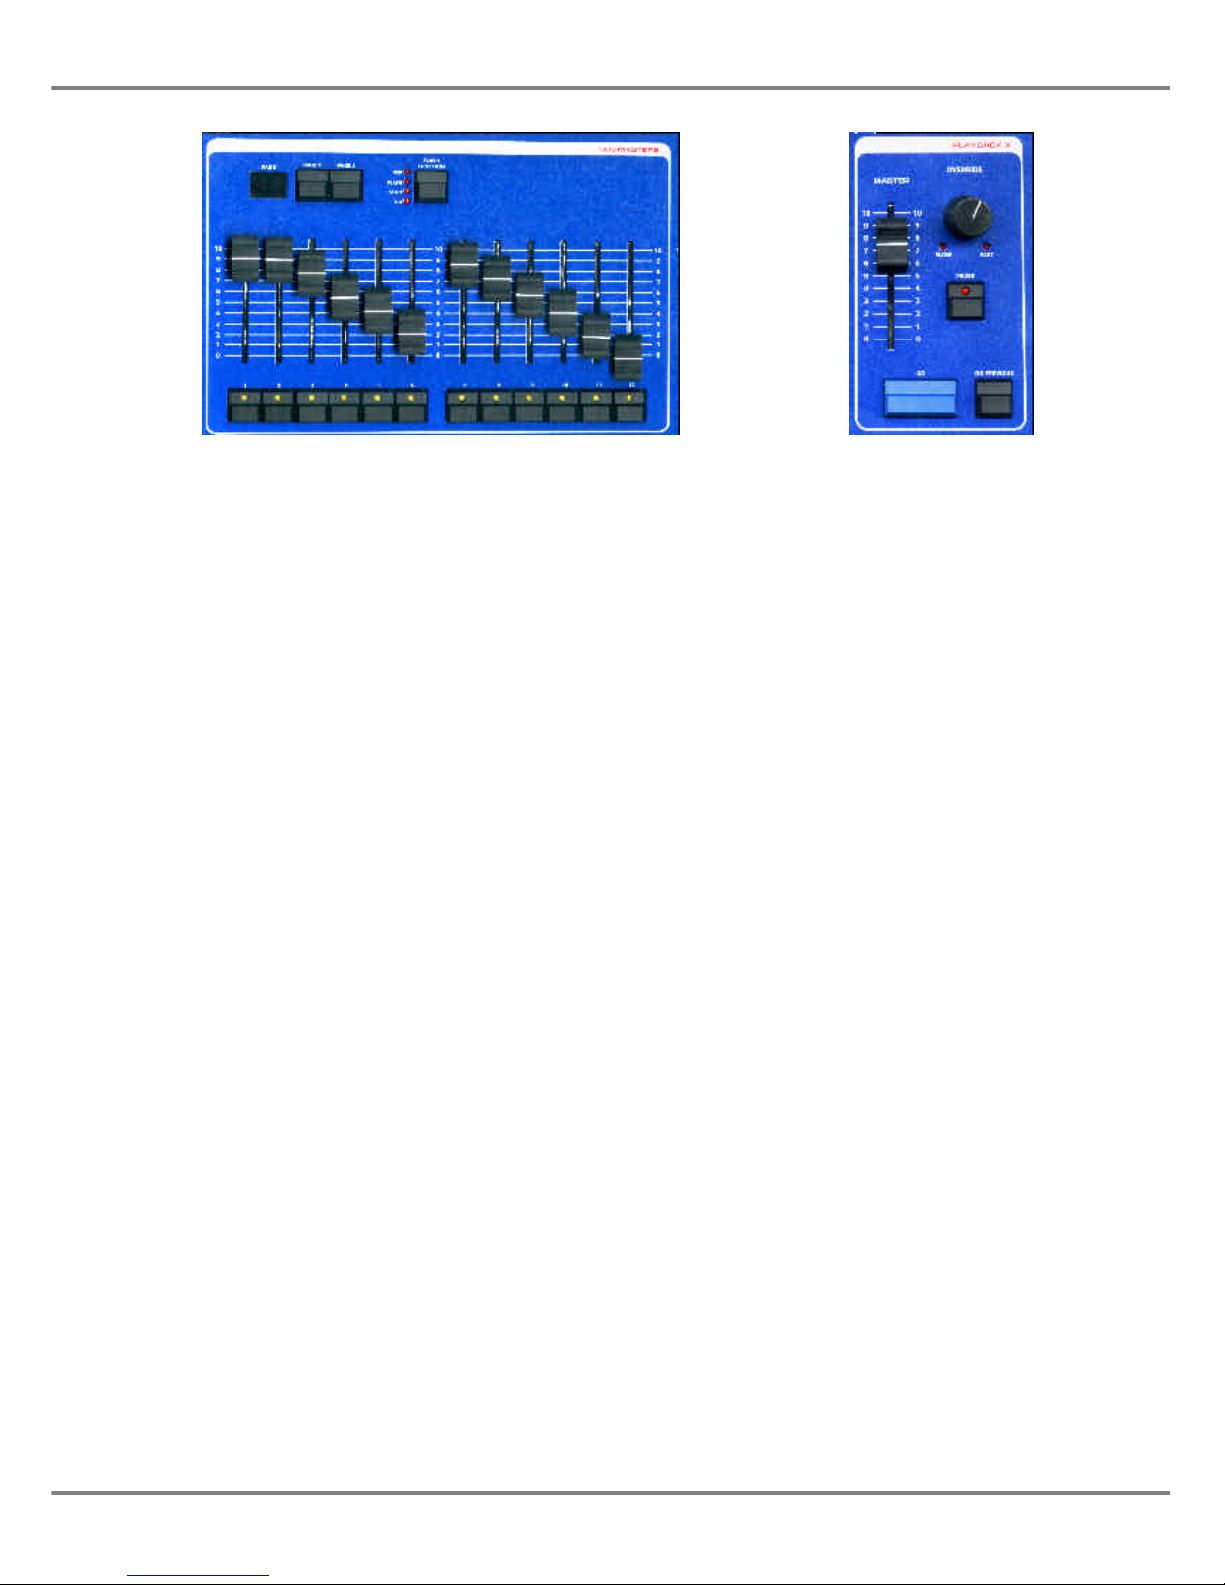
Submaster Controls
• SUBMASTER FADERS
The 12 SUBMASTER FADERS control
the output levels of the channel data or
memory data loaded onto them.
• SUBMASTER FLASH BUTTONS
The 12 SUBMASTER FLASH
BUTTONS are used to flash, solo or
‘Go’ the channel data or memory data
on the submaster. The action of these
buttons is determined by the FLASH
FUNCTION button.
The SUBMASTER FLASH BUTTONS
can also be used to start and stop a
chase, when applicable.
Each button has a yellow light in it
which is used to indicate page overlay.
• FLASH FUNCTION BUTTON
This button determines the function of
the SUBMASTER FLASH BUTTONS .
The accompanying red lights show the
function currently selected
(OFF, FLASH, SOLO or GO).
• SUBMASTER PAGE UP/DOWN
The submaster PAGE UP and PAGE
DOWN buttons are used to select the
current Submaster page (1 - 9) .
• SUBMASTER PAGE DISPLAY
The current submaster page is shown
on the seven segment PAGE Display.
Playback X Controls
• MASTER FADER
The MASTER fader is used to control
the maximum output level of the
programmed dimmer channels and
fixture brightness parameters in the
memories on the memory stack.
• GO BUTTON
This button initiates a dipless
crossfade between the memory
currently being output and the next
memory on the memory stack.
• GO PREVIOUS BUTTON
This button initiates a crossfade
between the memory currently being
output and the previously output
memory from the memory stack.
• PAUSE BUTTON
This button is used to halt progression
through the memory stack and will stop
a cross fade between memories if one
is in progress.
When the show is paused, the red light
in the PAUSE button flashes. When
the PAUSE button is pressed again,
the light in the PAUSE button goes off
and the show continues.
• OVERRIDE CONTROL
This control is used to slow down or
speed up progression through the
memory stack. When the control is
moved away from the central neutral
position the red SLOW or FAST light
flashes accordingly.
1 - 4 Illusion 500 Manual 73-741-00 Issue 2
Introduction
Figure 1 - 2 : Submaster Controls Figure 1 - 3: Playback X
Page 11
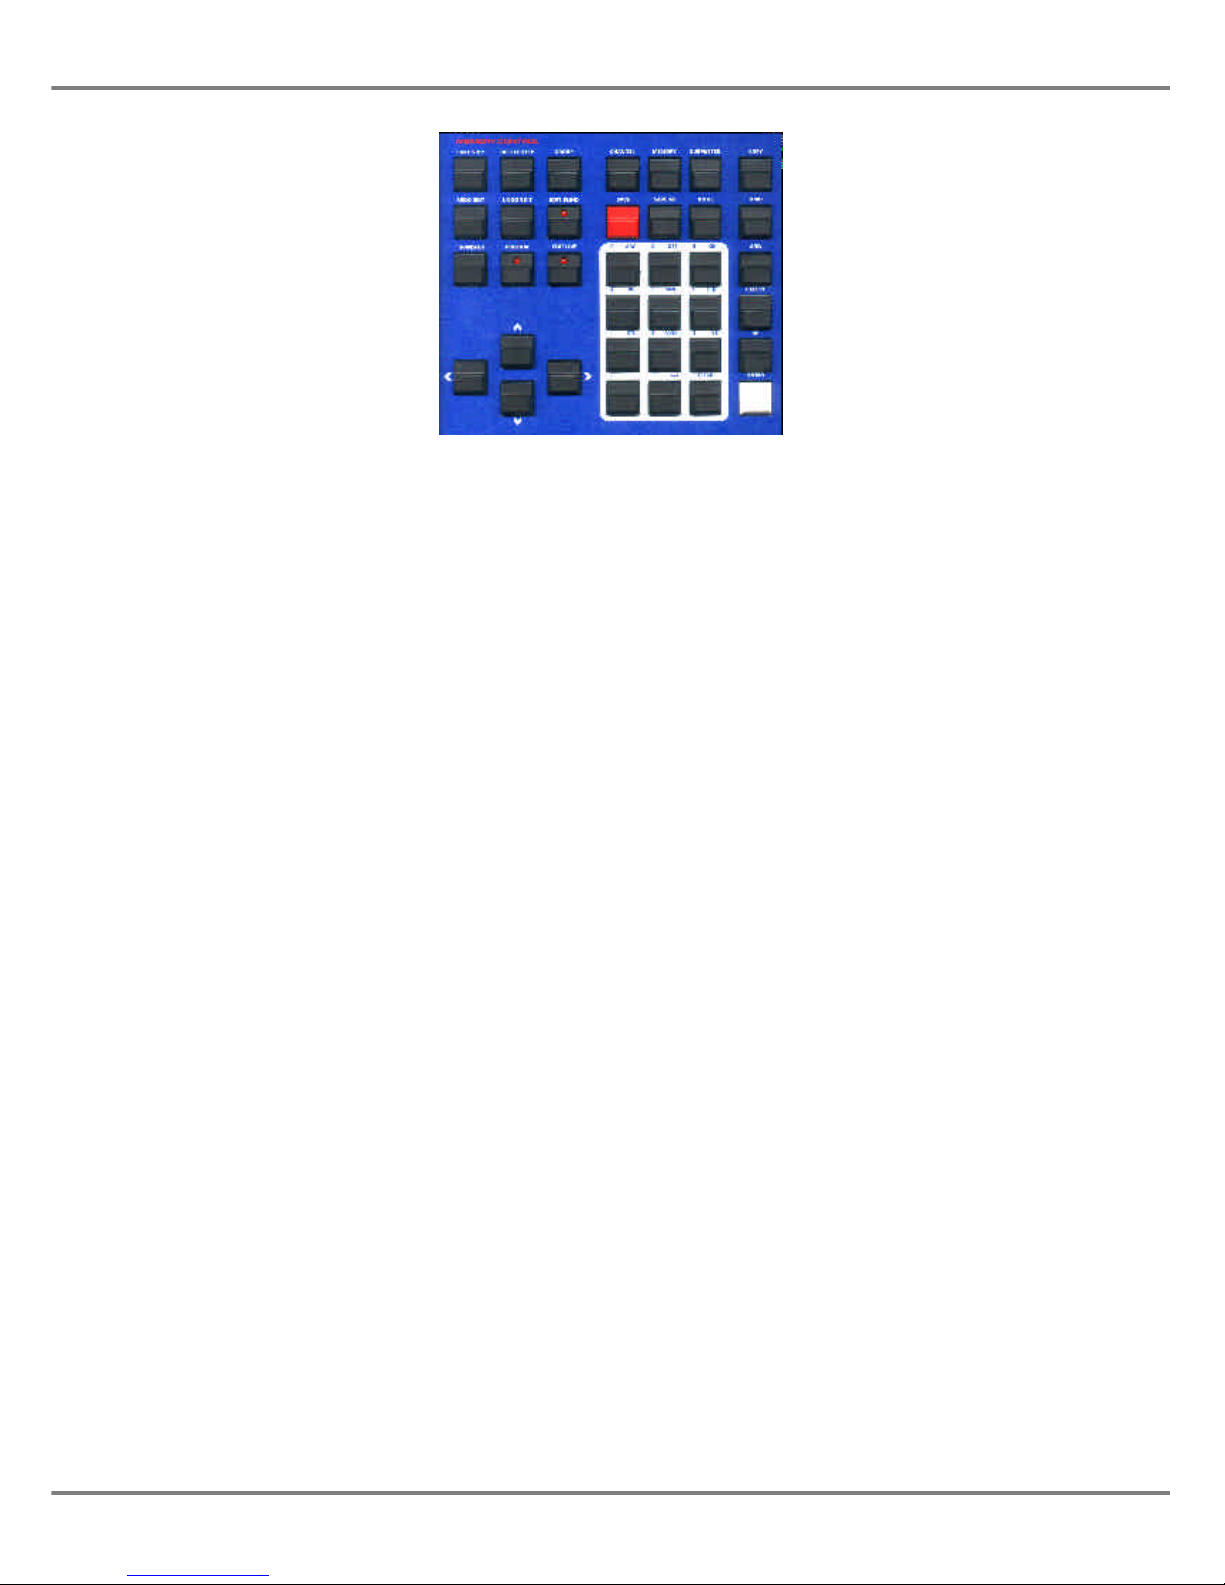
Memory Controls
•
TRANSFER BUTTON
This button is used to transfer a
memory onto a submaster. It is
applicable when the Memories,
Cueline or Submaster screen are
displayed on the monitor screen.
• PREVIEW BUTTON
This button allows the user to preview
the dimmer channel and fixture
parameter data for a selected memory
or submaster on the monitor screen.
While the data is being previewed, the
red light in the PREVIEW button is
illuminated.
• EDIT LIVE BUTTON
This button brings up the Program
Window allowing the user to edit live
the dimmer channel and fixture
parameter data for the selected
memory or submaster. While the data
is being edited live, the red light in the
EDIT LIVE button is illuminated.
• EDIT BLIND BUTTON
This button brings up the Program
Window allowing the user to edit blind
the dimmer channel and fixture
parameter data for the selected
memory or submaster. While the data
is being edited blind, the red light in the
EDIT BLIND button is illuminated.
•
UNDO EDIT BUTTON
This button allows the user to
systematically undo edits made to
channel data in the Program Window.
Each time the button is pressed the
last edit is undone.
• REDO EDIT BUTTON
This button undoes an UNDO EDIT,
that is it reverses the action of the
UNDO EDIT button.
•
SAVE STEP BUTTON
This button is used to save the current
step when programming a chase,
sound to light or ripplesound memory.
•
DELETE STEP BUTTON
This button is used to delete a step
from a chase memory.
• GROUP BUTTON
This button is used in conjunction with
the numeric keypad for programming
and using groups.
•
CURSOR BUTTONS
These four buttons are used to move
around the fields on the monitor
screen, and are equivalent to the
cursor keys on the external keyboard.
•
CHANNEL BUTTON
This button is used to open the
Program Window (PW) for
programming purposes. This button
can also be used in conjunction with
the numeric keypad to select dimmer
channel numbers, where applicable.
•
MEMORY BUTTON
This button is used in conjunction with
the numeric keypad to select a
memory number.
•
SUBMASTER BUTTON
This button is used in conjunction with
the numeric keypad to select a
submaster number.
•
COPY BUTTON
This button allows the user to copy
memory data or submaster data from
one location to another.
•
SAVE BUTTON
This button is used to save memory or
submaster data to the currently
selected memory or submaster.
•
SAVE AS BUTTON
This button is used to save dimmer
channel data and fixture parameter
data in the Program Window to a
specified memory, submaster, group or
palette, as required.
•
AND, THRU, EXCEPT, and ‘@’
Buttons
The AND, THRU, EXCEPT, and ‘@’
buttons are used in conjunction with
the numeric keypad to select
combinations of dimmer channels or
fixture parameters and set their values.
The ‘+’, ‘/’, ‘-’ and ‘*’ buttons on the
external keyboard can be used to
mimic the AND, THRU, EXCEPT and
‘@’ buttons on the front panel.
Illusion 500 Manual 73-741-00 Issue 2 1 - 5
Introduction
Figure 1 - 4 : Memory Controls and Numeric Keypad
Page 12
•
HOME BUTTON
The HOME button is used to set the
selected dimmer channels to the
‘home’ value (default = 100%).
The HOME button is also used as a
quick mehtod of setting fixture
parameters to their home or default
values.
•
NUMERIC KEYPAD
The numeric keypad consists of twelve
buttons labelled ‘0’ .. ‘9’, ‘.’ and
CLEAR. These buttons are used for
entering numeric data (channel or
fixture numbers, memory numbers,
submaster numbers, data levels etc.)
The buttons labelled ‘0’ - ‘9’ can also
be used to enter alphanumeric data
where applicable (see chapter 11).
The CLEAR button is used to deselect
selected channels or fixtures,
unprogram programmed channels or
clear memories or submasters.
• ENTER BUTTON
This button is used to confirm setup or
programming data.
The Enter or Carriage Return buttons
on the external keyboard can be used
to mimic the ENTER button on the
front panel.
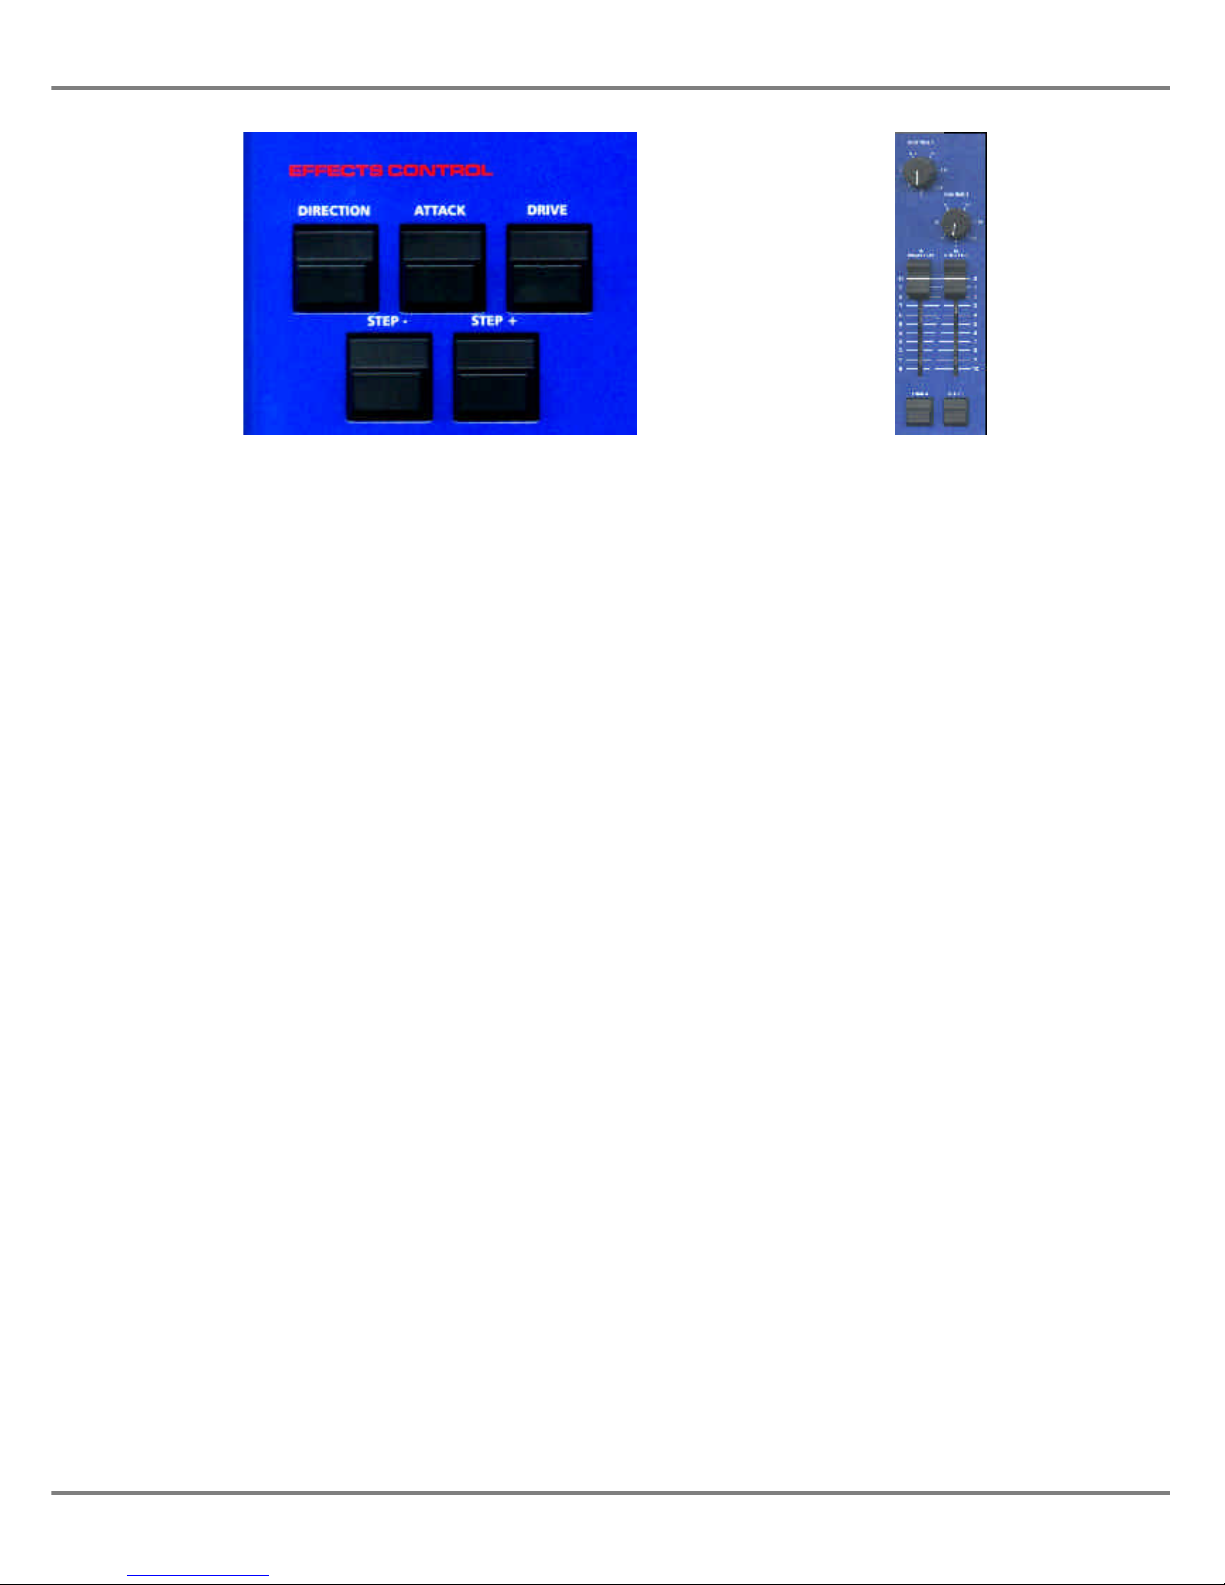
Effects Controls
• DIRECTION BUTTON
This button is used to select the
direction of a chase memory.
•
ATTACK BUTTON
This button is used to select the attack
of a chase, sound to light or
ripplesound memory.
• DRIVE BUTTON
This button is used to select the drive
of a chase memory.
•
STEP - AND STEP + BUTTONS
These buttons are used to select a
required step when programming or
editing a chase, sound to light or
ripplesound memory. These buttons
can also be used to manually step
through a chase being output.
Playback A/B Controls
• PLAYBACK A/B MASTER FADERS
The A MASTER and B MASTER
faders control the output levels of the
memories loaded onto them.
The B MASTER fader is reversed
(100% at the bottom) to facilitate
manual crossfades when moving the A
and B MASTER faders together.
• LOAD A AND LOAD B BUTTONS
The LOAD A and LOAD B buttons are
used to load a selected memory onto
the A MASTER and B MASTER faders
respectively.
• FADE TIME A AND FADE TIME B
The FADE TIME A and FADE TIME B
controls are used to set the fade times
for the A MASTER and B MASTER
faders respectively. The two times can
be set independently from 0 (manual)
to 180 seconds.
1 - 6 Illusion 500 Manual 73-741-00 Issue 2
Introduction
Figure 1 - 5 : Effects Controls Figure 1 - 6 : Playback A/B
Page 13
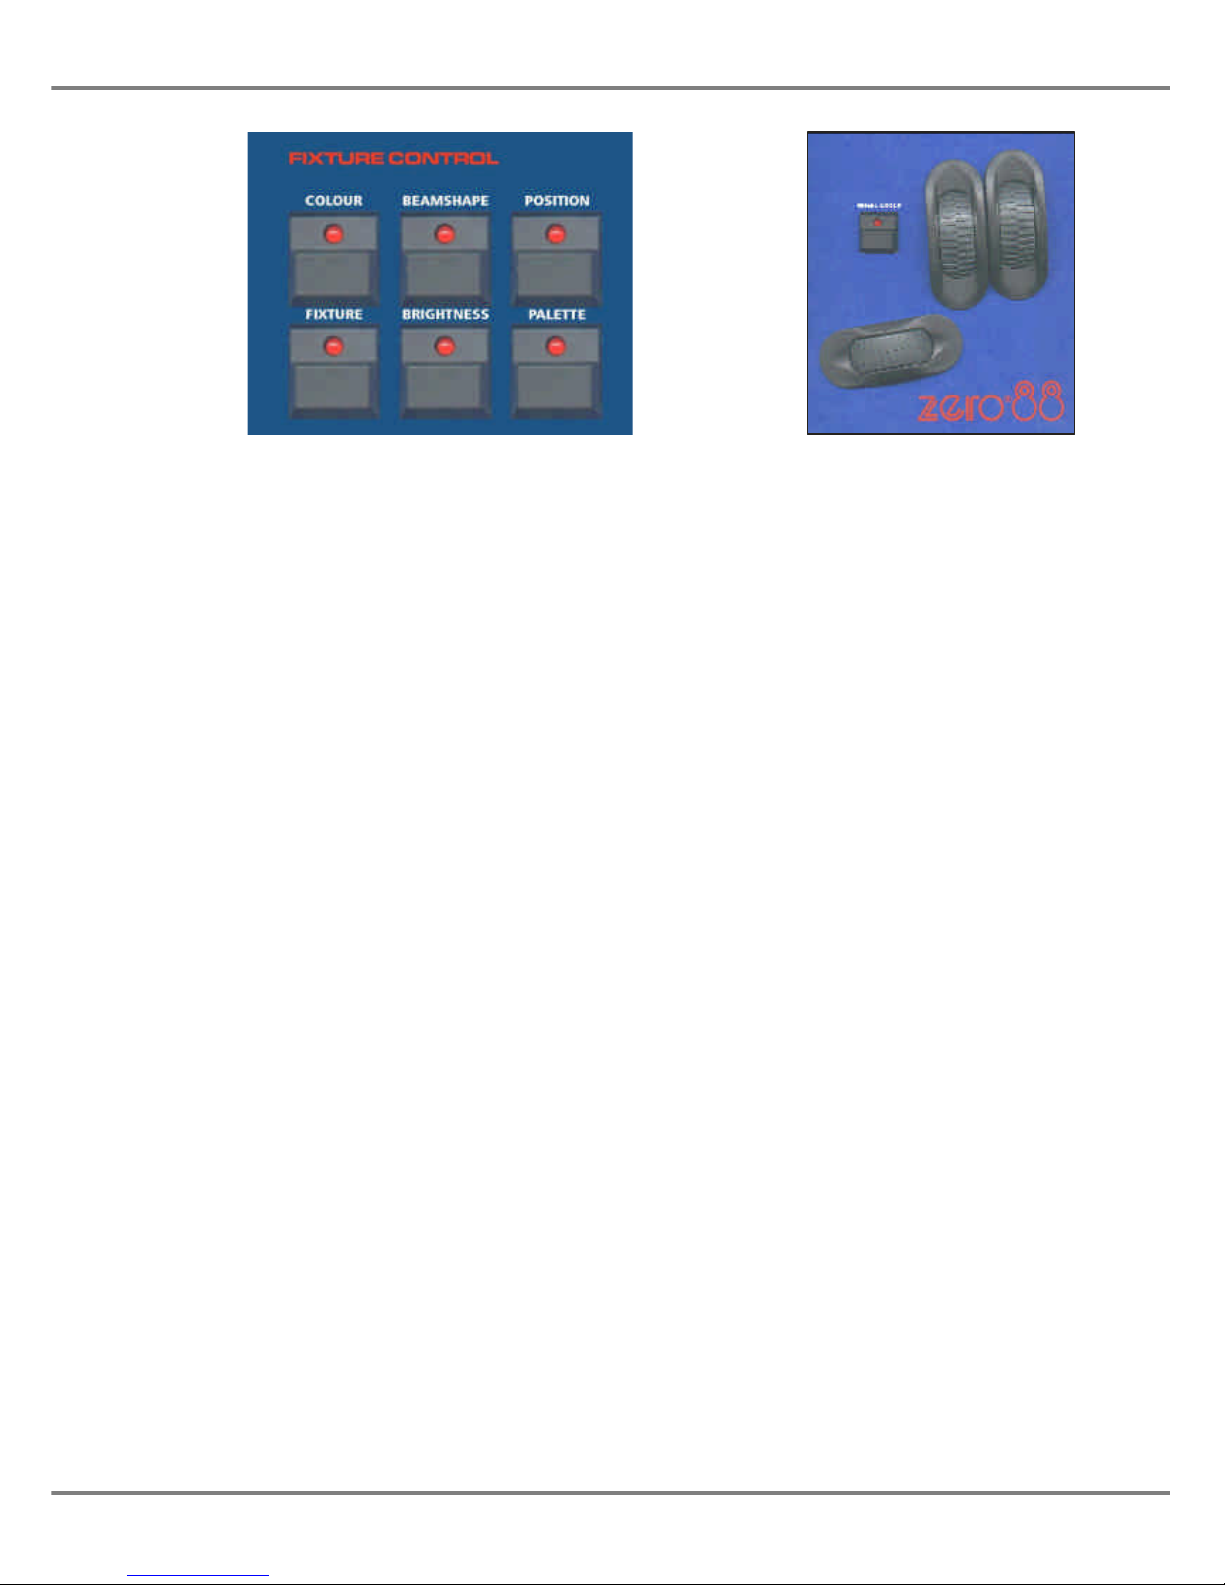
Fixture Controls
• FIXTURE BUTTON
The FIXTURE button is used to open
the Program Window (PW) from the
Memories, Submasters or Cueline
screens.
The FIXTURE button is also used in
conjunction with the numeric keypad to
select fixtures when the PW or other
appropriate window are displayed on
the monitor screen.
• ATTRIBUTE BUTTONS
The BRIGHTNESS, COLOUR,
BEAMSHAPE and POSITION buttons
are used to select an attribute for the
selected fixtures in the PW.
This then determines which fixture
parameters are assigned to the three
CONTROL WHEELS.
The attribute buttons are also used in
commands when setting fixture
parameters or saving data as palettes,
displaying LTP transition times on the
Memories and Submaster screens,
and displaying LTP data tracks on the
Cueline screen.
The selected attribute(s)are indicated
by the red lights in the buttons.
• PALETTE BUTTON
The PALETTE button is used in
conjunction with the attribute buttons in
the programming, assignment and
output of palettes.
• WHEEL GROUP BUTTON
When the parameters for the current
attribute of the selected fixture(s) are
contained in more than one wheel
group, the red light in the WHEEL
GROUP button is lit.
Pressing the button will cycle through
the groups of fixture parameters.
• CONTROL WHEELS
The three control wheels are used for
setting fixture parameter levels
(including movement effect
parameters).
The fixture parameters which are
assigned to the control wheels are
indicated in the Program Window.
When the Program Window is not open
the first finger wheel is used to adjust
various data levels as indicated on the
monitor screen.
Illusion 500 Manual 73-741-00 Issue 2 1 - 7
Introduction
Figure 1 - 7 : Fixture, Attribute and Palette Buttons Figure 1 - 8 : Control Wheels
Page 14

Other Controls
•
AUXILIARY CONTROL BUTTONS
These four buttons are used to activate
the auxiliary controls.
Each AUXILIARY CONTROL button
contains a red light which indicates the
state of the corresponding auxiliary
output (on, off or fading).
•
SCREEN FUNCTION BUTTONS
These buttons (labelled F1 - F8) are
used to access the main Setup (F1),
Memories (F2), Submasters (F3),
Cueline (F4), DMX Output (F5) and
DMX Patch (F6) screens.
They can also be used to select
specific functions as indicated on the
monitor display.
•
ASSOCIATED BUTTON
This button is used to switch between
selected dimmer channels or fixtures
and their associated dimmer channels
or fixtures in the Program Window.
• MACRO BUTTON
This button is used in conjunction with
other front panel buttons to define and
run macros.
•
BLACKOUT BUTTON
The BLACKOUT button controls the
desk outputs of the dimmer channels
and fixture brightness parameters from
all sources.
Pressing the BLACKOUT button
toggles between blackout being active
(all dimmers channels and fixture
brightness parameters zero) and
blackout not active (normal outputs).
The red light in the BLACKOUT button
flashes when blackout is active.
Fixture colour, beamshape and
position parameters are not affected by
the BLACKOUT button.
•
TOPSET BUTTON
This button brings up the Topset
screen on the monitor allowing the
user to adjust the Topset values of
dimmer channels and fixture
brightness parameters.
•
GRAND MASTER FADER
The GRAND MASTER fader is used to
control the final output values of all
dimmer channels and fixture
brightness parameters from the desk.
Fixture colour, beamshape and
position parameters are not affected by
the GRAND MASTER fader.
The GRAND MASTER fader level is
displayed in the Information Bar at the
bottom of the monitor screen.
NOTE
Function Keys on External Keyboard
The function keys F1 - F8 on the external
keyboard can be used to mimic the screen
selection buttons F1 - F8 on the front panel.
1 - 8 Illusion 500 Manual 73-741-00 Issue 2
Introduction
Figure 1 - 9: Auxiliary Control and Screen Function Buttons
Page 15
The Monitor Screen
The monitor screen display is divided
into a number of different sections
which are described below.
Screen Selection Buttons
The top section of the monitor screen
contains the main screen selection
buttons which are labelled F1 - F6.
The main screens are as follows:
• F1 - Setup
• F2 - Memories
• F3 - Submasters
• F4 - Cueline
•
F5 - DMX Output
•
F6 - DMX Patch
Clicking on one of these buttons, or
pressing the corresponding SCREEN
FUNCTION button, or function key on
the external keyboard, displays the
selected screen in the main data area
of the monitor screen.
Main Data Area
The centre section of the monitor
screen shows information which is
dependent on the currently selected
main screen (Setup, Memories etc.)
When the desk is in Super User Mode,
the Super User screen is displayed in
this centre section of the screen.
Channel Data Display (CDD)
The Channel Data Display (CDD)
shows the current output values of the
dimmer channels and fixture
brightness parameters.
The output values are displayed in
percentage (0-100) or DMX (0-255)
format which is determined in the Desk
Defaults section of Desk Setup.
An output value of zero is displayed as
“-” rather than “0”.
Output values of topsetted dimmer
channels or fixtures are displayed in
red text, rather than the normal black.
The initial size (height) of the CDD is
set up in Desk Setup; the height of the
CDD can be altered directly on the
monitor screen using the mouse.
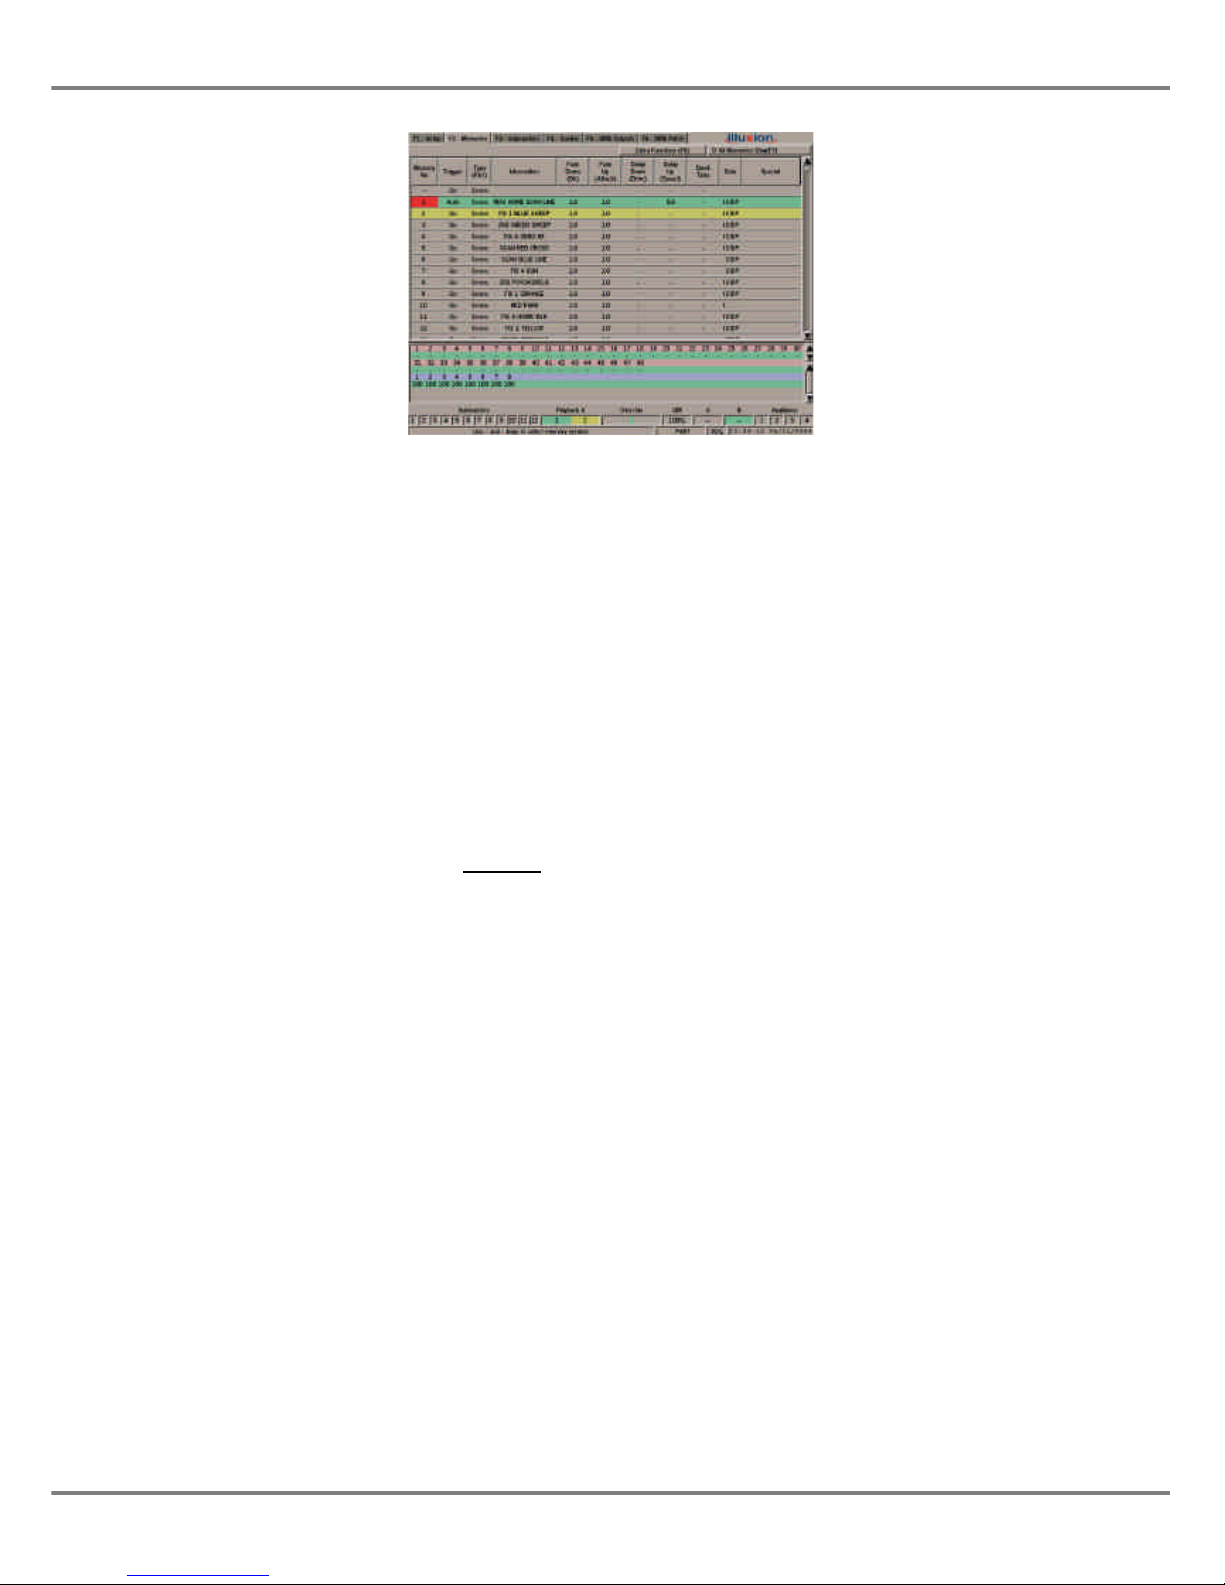
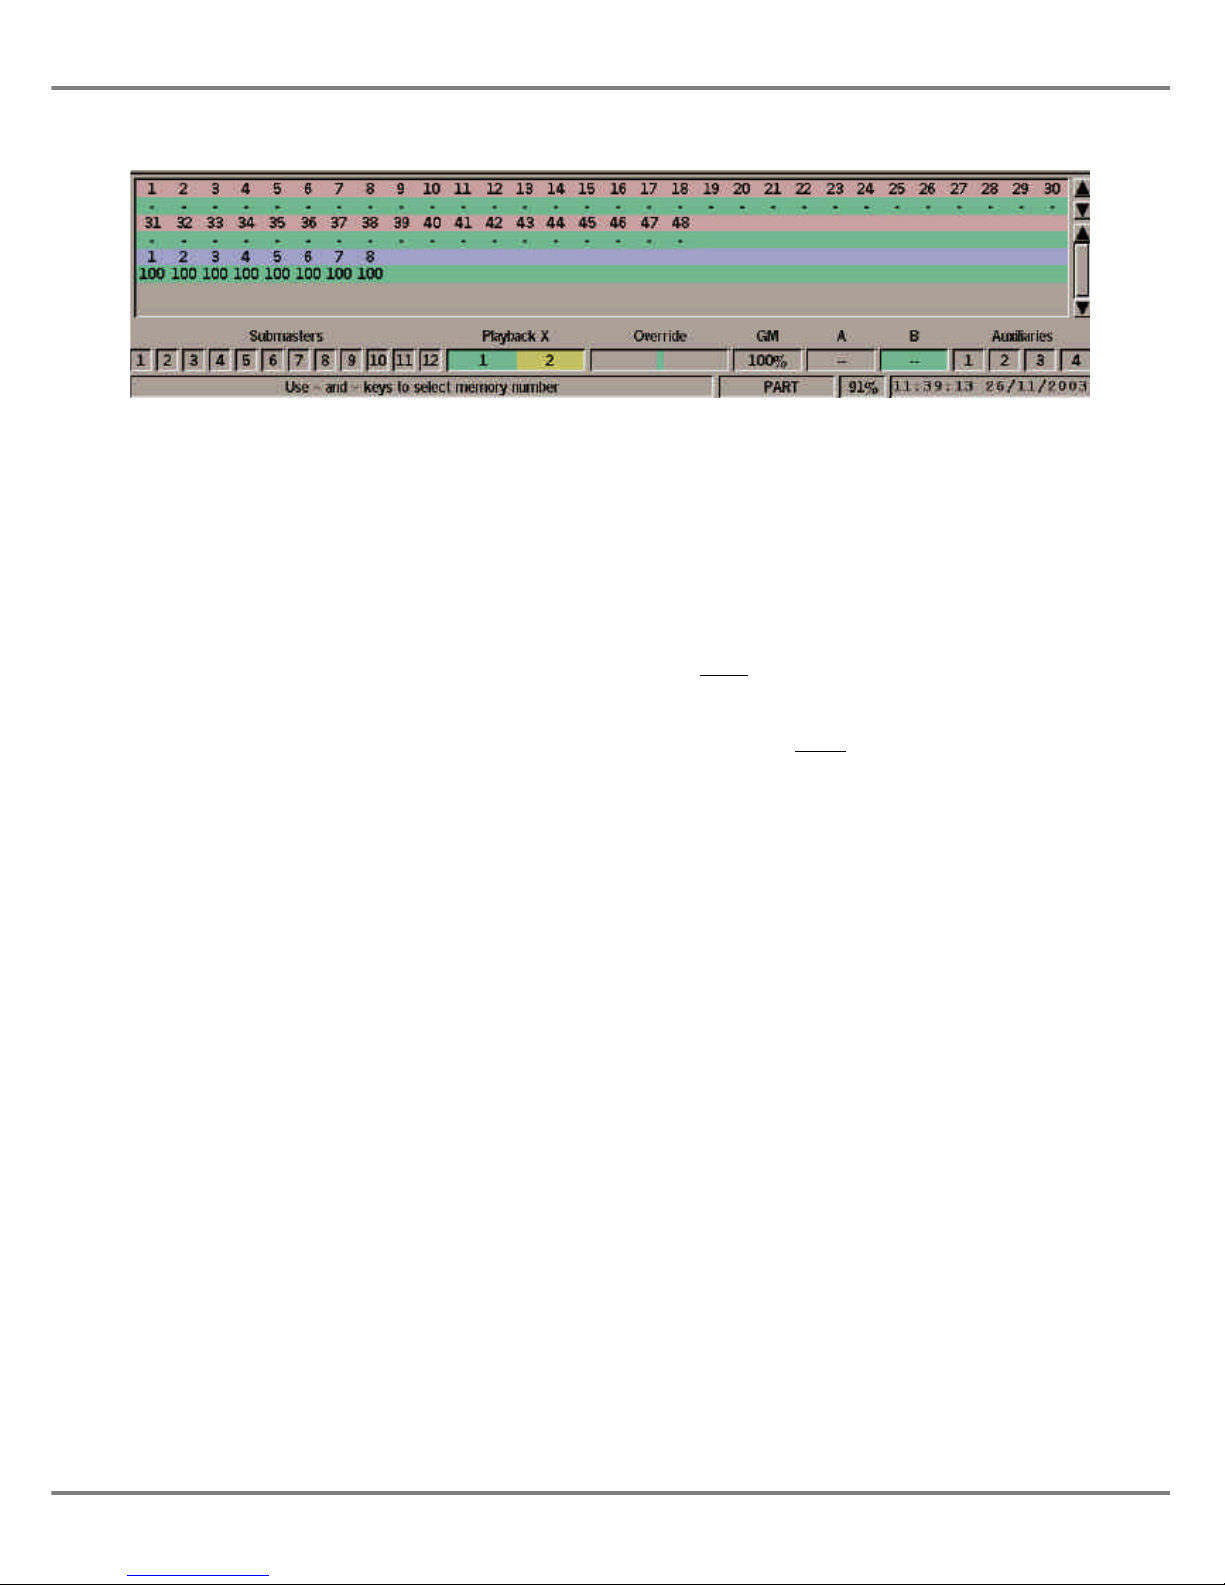
Fade Status Bar
The Fade Status Bar displays status
information on the Submasters,
Playback X, Override, Grand Master,
Playback A/B and Auxiliaries.
The Submasters are shown in grey
when zero, red when fading, and green
when above zero. When the submaster
is outputting data from a different page
(overlaid), the background is orange.
The Playback X area shows the
Current (green) and Next (yellow)
memories in the memory stack. When
a fade is taking place a red bar moves
across the whole area.
The Override field indicates the
position of the OVERRIDE control
(neutral = green, fast or slow = red).
If the optional upgrade kit is fitted, and
the desk is in SMPTE or MIDI Time
Mode, the Override field is replaced by
the Timecode field (see chapter 5).
The Grand Master (GM) field indicates
the position of the GRAND MASTER.
When Blackout is active a red flashing
“Blackout” is displayed in this field.
The Playback A/B fields indicate which
memories (if any) are loaded onto the
A MASTER and B MASTER faders.
The backgrounds are grey when the
master is at zero, red when fading, and
green when above zero.
The Auxiliaries are grey when off, red
when fading, and green when on.
Illusion 500 Manual 73-741-00 Issue 2 1 - 9
Introduction
Figure 1 - 10: Memories Screen on the Monitor
Page 16
Information Bar
The Information Bar contains operating
help text, desk mode, topset and lock
indicators, memory meter and clock.
The operating help text is context
sensitive and relates to the current
position of the cursor on the main
screen or popup window displayed.
The operating mode of the desk is
shown as “PART” (partial) or “FULL”.
When Topset has been adjusted for
any of the dimmer channels or fixture
brightness parameters, the text “TOP”
is displayed in the Information Bar.
When the desk is locked, a padlock
icon is displayed.
The Memory Meter shows the
percentage of memory blocks available
on the desk (see chapter 5).
The clock field shows the current time
and date. The time is in 24 hour format
and the date in dd/mm/yy format.
Mouse Interface
A mouse interface is available for use
on all the main monitor screens (Setup,
Memories, Submasters etc.) and
popup windows.
The mouse must be plugged in before
the desk is switched on.
Activating screen buttons and selecting
fields in data tables can be achieved
using the mouse pointer and left
mouse button.
On fields where several options are
available (eg. memory type) left
clicking in the field will scroll through
the available options.
Where appropriate, right clicking on a
selected item or window will bring up a
menu of options.
This allows certain functions, for
example, programming memories to be
done entirely using the mouse and
external keyboard, if preferred.
Remote Switches
The Remote Switches socket on the
back panel allows up to six remote
switches to be connected to the desk.
Each remote switch can be assigned to
a front panel button or a macro.
Remote switches can be assigned to
certain front panel buttons but they
cannot be assigned to any of the
faders or rotary controls.
For further details on setting up,
assigning, enabling and testing remote
switches see chapter 3 .
Pressing a remote switch which is
assigned to a front panel button will
have the same effect as pressing the
front panel button.
Pressing a remote switch which is
assigned to a macro will have the
same effect as running that macro.
NOTE
Selecting Soft Buttons from the Front
Panel
Where soft buttons are displayed on the
monitor (without a corresponding front panel
button), use the cursor keys to select the soft
button, and then press the ENTER key to
activate it.
1 - 10 Illusion 500 Manual 73-741-00 Issue 2
Introduction
Figure 1 - 11: CDD, Fade Status and Information Bars
Page 17
Quickstart Tutorial
Introduction
This chapter enables you to get the
desk up and running quickly and set
up, program and playback a simple
show.
It starts by covering how to turn the
desk on and set up the required
dimmer channels and fixtures
(assignment and DMX patching).
It then covers how to set up dimmer
channel and fixture data on the
outputs, save the data into memories
or submasters, and transfer memories
onto submasters.
It then continues with playing back the
memories using the Playback X
controls, and outputting data from
submasters.
Finally, it gives a summary of how
memories can also be edited and
played back from the Cueline screen.
Before starting a new lighting session it
may be necessary to clear an existing
show or reset the desk. If so, refer to
chapter 10 for details.
This tutorial assumes that a suitable
lighting rig has already been set up
with dimmers, luminaires, scrollers or
moving lights (as required) which are
controlled by a standard DMX signal.
Turning on the Desk
Connect the DMX output cable,
monitor, keyboard and mouse to the
desk.
Connect the power supply to the desk
and monitor and switch on at the
mains.
Desk Setup
The default setup for the desk is 120
dimmer channels patched 1:1 with the
DMX outputs.
If your lighting rig has a different
number of dimmer channels (more or
less) and intelligent moving light
fixtures or scrollers, then these need to
be assigned and patched to the DMX.
See the Desk Setup section in Chapter
three for full details.
Preparing to Plot
Ensure that Blackout is not active (red
light in the BLACKOUT button is off ).
Set the Playback X MASTER and
GRAND MASTER faders to full and all
the SUBMASTER faders to zero.
Press the SCREEN FUNCTION
BUTTON F2 to display the Memories
screen on the monitor.
Illusion 500 Manual 73-741-00 Issue 2 2 - 1
Figure 2 - 1: The Illusion 500 Lighting Desk
For news, views and latest software
visit our dedicated Illusion website at:
www.illusionsupport.com
Page 18
Setting Dimmer Channels
Press the CHANNEL button on the
front panel. The Program Window
(PW) is displayed on the monitor.
There are several methods of selecting
dimmer channels and setting their
levels as described below.
Using the numeric keypad and
associated keys to select channel(s)
and set their levels, for example:
1 @ 50 ENTER
5 THRU 10 @ 70 ENTER
23 AND 33 AND 44 @ 90 ENTER
Using the first finger wheel to
continually adjust the level(s) of the
selected channels:
1 <wheel>
5 THRU 10 <wheel>
The mouse can also be used to select
channels by left clicking on the channel
number in the PW (the selected
channels are shown in red).
Left clicking in the bar graph area will
set the level of the channel.
See Chapter 4 for full details of all the
commands and functions available.
Setting Fixture Parameters
Press the FIXTURE button on the front
panel. The Program Window (PW) is
displayed on the monitor.
There are several methods of selecting
fixtures and setting their parameters
levels as described below.
The simplest method is to select the
required fixture(s) and attribute
(Brightness, Colour, Beamshape or
Position) using the front panel keys
and then adjust the fixture parameters
using the control wheels.
If there are more than three
parameters for the selected fixture and
attribute, press the WHEEL GROUP
button to cycle through the groups.
Individual fixture parameters can also
be selected and set using the
command line, for example:
FIXTURE 1 COLOUR 2 @ 128 ENTER
FIXTURE 2 BEAMSHAPE 3 @ 0 ENTER
FIXTURE 3 POSITION 1 @ 255 ENTER
Fixtures and attributes can also be
selected with the mouse, and the level
can be set, providing the parameter
has a list of details displayed.
See Chapter 4 for full details of all the
commands and functions available.
Recording Data
The next two sections explain how to
save the dimmer channel data and
fixture parameter data in the PW into a
memory and directly onto a submaster.
Saving Data to a Memory
1. Set up a scene on the outputs as
described earlier.
2. Press the SAVE AS button on the
front panel. The Save As window
is displayed.
3. Enter the required memory
number in the field provided, add
a text description in the field
provided (optional) then select
ENTER or click on the OK button
in the window.
Saving Data to a Submaster
1. Set up a scene on the outputs as
described in previous sections.
2. Press the SAVE AS button on the
front panel. The Save As window
is displayed.
3. Select the Submaster option with
the cursor keys or the mouse.
4. Enter the submaster number, add
a text description in the field
provided (optional) then select
ENTER or click on the OK button
in the window.
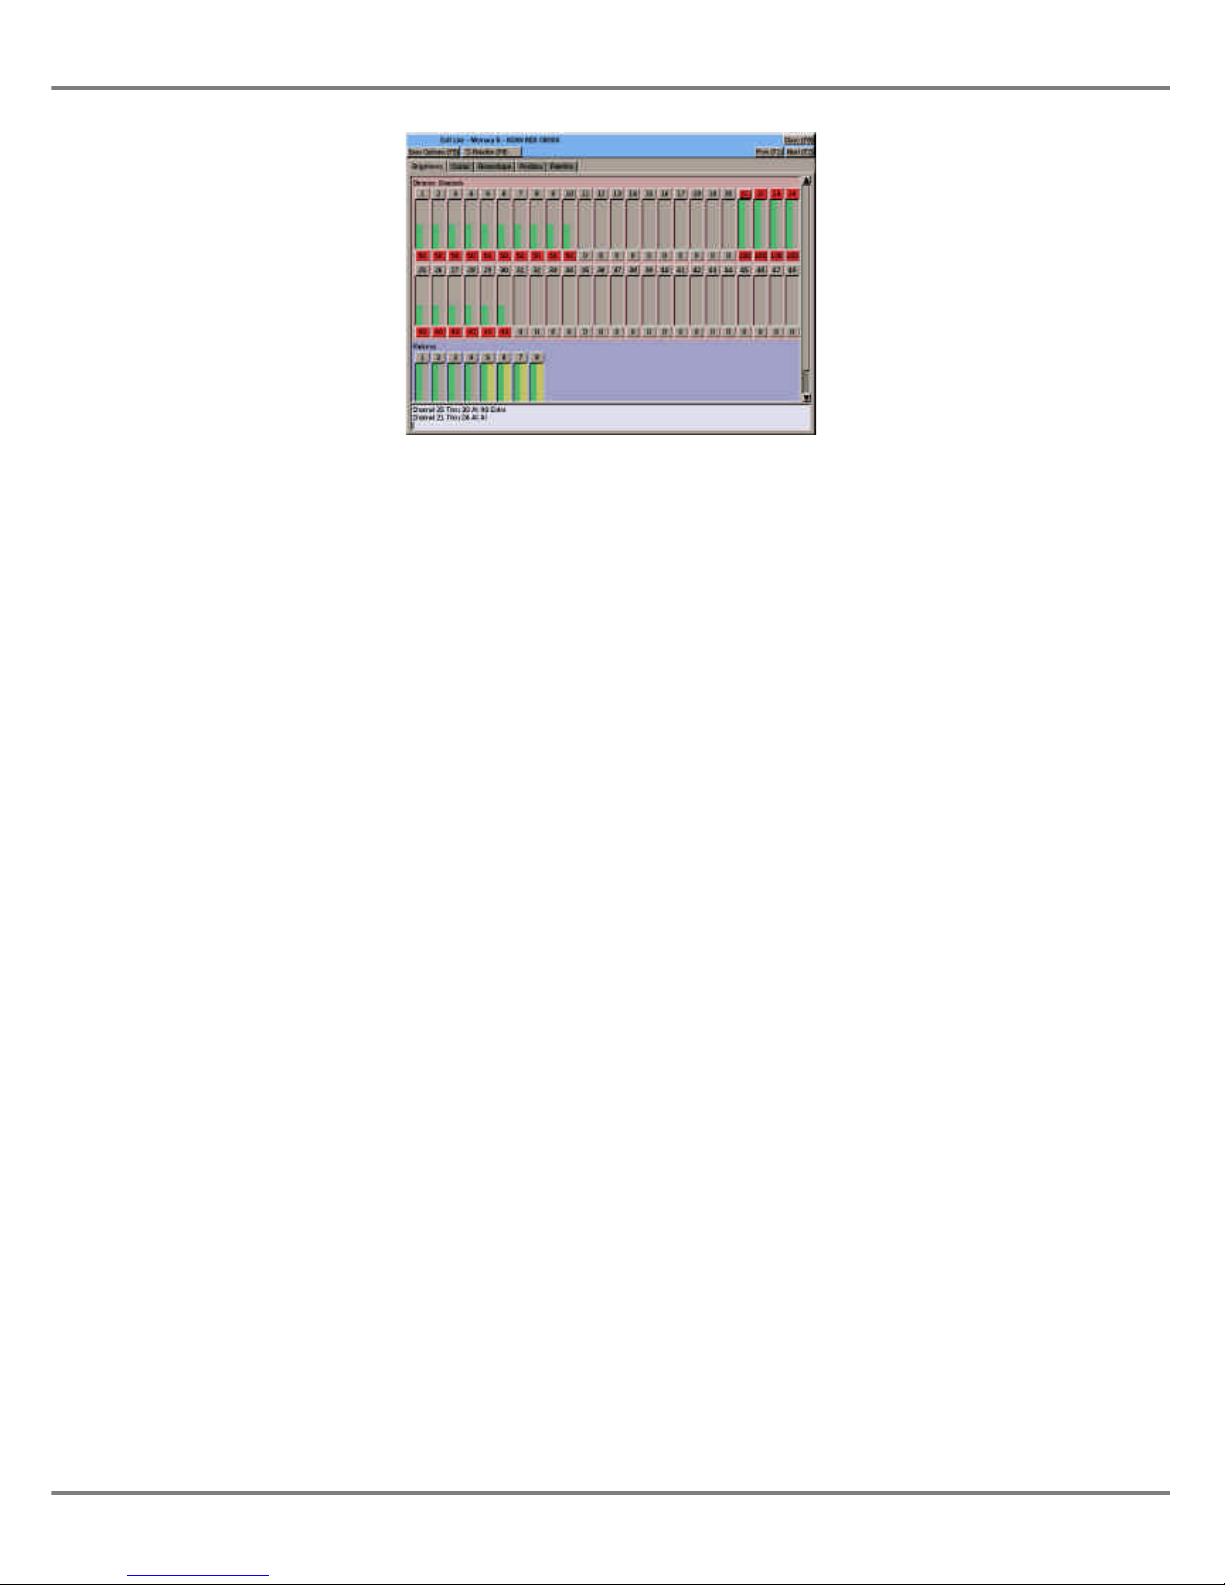
2 - 2 Illusion 500 Manual 73-741-00 Issue 2
Quickstart Tutorial
Figure 2 - 2 : Program Window - Brightness Section
Page 19

Playing Back the Memories
The programmed memories can be
played back in ascending numerical
order using the GO button.
Replaying the Memory Stack
1. If not already selected, press
SCREEN FUNCTION button F2
to display the Memories screen.
2. Set the Playback X MASTER and
the GRAND MASTER to full.
3. Select the first programmed
memory using the cursor keys or
the mouse. A yellow highlight bar
is displayed on the selected
memory.
4. Press the GO button. The outputs
fade from their current levels to
those programmed in the memory
according to the delay, fade and
transition times for that memory.
The highlight bar moves to the
next programmed memory.
5. To output the next programmed
memory, press the GO button.
6. Repeat step 5 until the end of the
memory stack is reached.
Pressing the GO button again will
then return to the first memory.
See Chapter 5 for more details on
delay, fade and transition times etc.
See Chapter 7 for details on other
memory stack functions.
Playback Using Submasters
The Submaster faders can be used to
playback loaded dimmer channel and
fixture data or transferred memories.
Outputting Submaster Data
The dimmer channel and fixture data
or the memory transferred onto a
submaster is output as follows:
1. Select the required submaster
page using the PAGE UP or
PAGE DOWN buttons as
appropriate.
2. Move the appropriate submaster
fader to the level required.
The dimmer channel and fixture
brightness levels programmed in
the submaster are determined by
the submaster fader level.
Any fixture colour, beamshape or
position data programmed on the
submaster will be triggered when
the submaster fader reaches its
LTP Trigger Point. The outputs
will snap or fade to their
programmed values depending on
the transitions defined for the
submaster.
The programmed data on submasters
can also be flashed, soloed, or output
over a period of time, using the
SUBMASTER FLASH buttons - see
Chapter 6 for full details.
Transferring a Memory from
the Memories Screen
1. Select a programmed memory,
using the cursor keys or mouse.
2. Press the TRANSFER button on
the front panel, or right click and
select the Transfer option from
the menu. The Transfer window is
displayed.
3. Enter the required submaster
number (as page and number) in
the field provided.
4. Adjust any of the other submaster
parameters, if required.
5. Select the OK button in the
Transfer Window to complete the
transfer operation.
Transferring a Memory from
the Submasters Screen.
1. Select a submaster, using the
cursor keys or mouse.
2. Press the TRANSFER button on
the front panel, or right click and
select the Transfer option from
the menu. The Transfer window is
displayed.
3. Enter the required memory
number in the field provided.
4. Adjust any of the other submaster
parameters, if required.
5. Select the OK button in the
Transfer Window to complete the
transfer operation.
Illusion 500 Manual 73-741-00 Issue 2 2 - 3
Quickstart Tutorial
Figure 2 - 3: Submaster Controls Figure 2 - 4: Playback X
Page 20
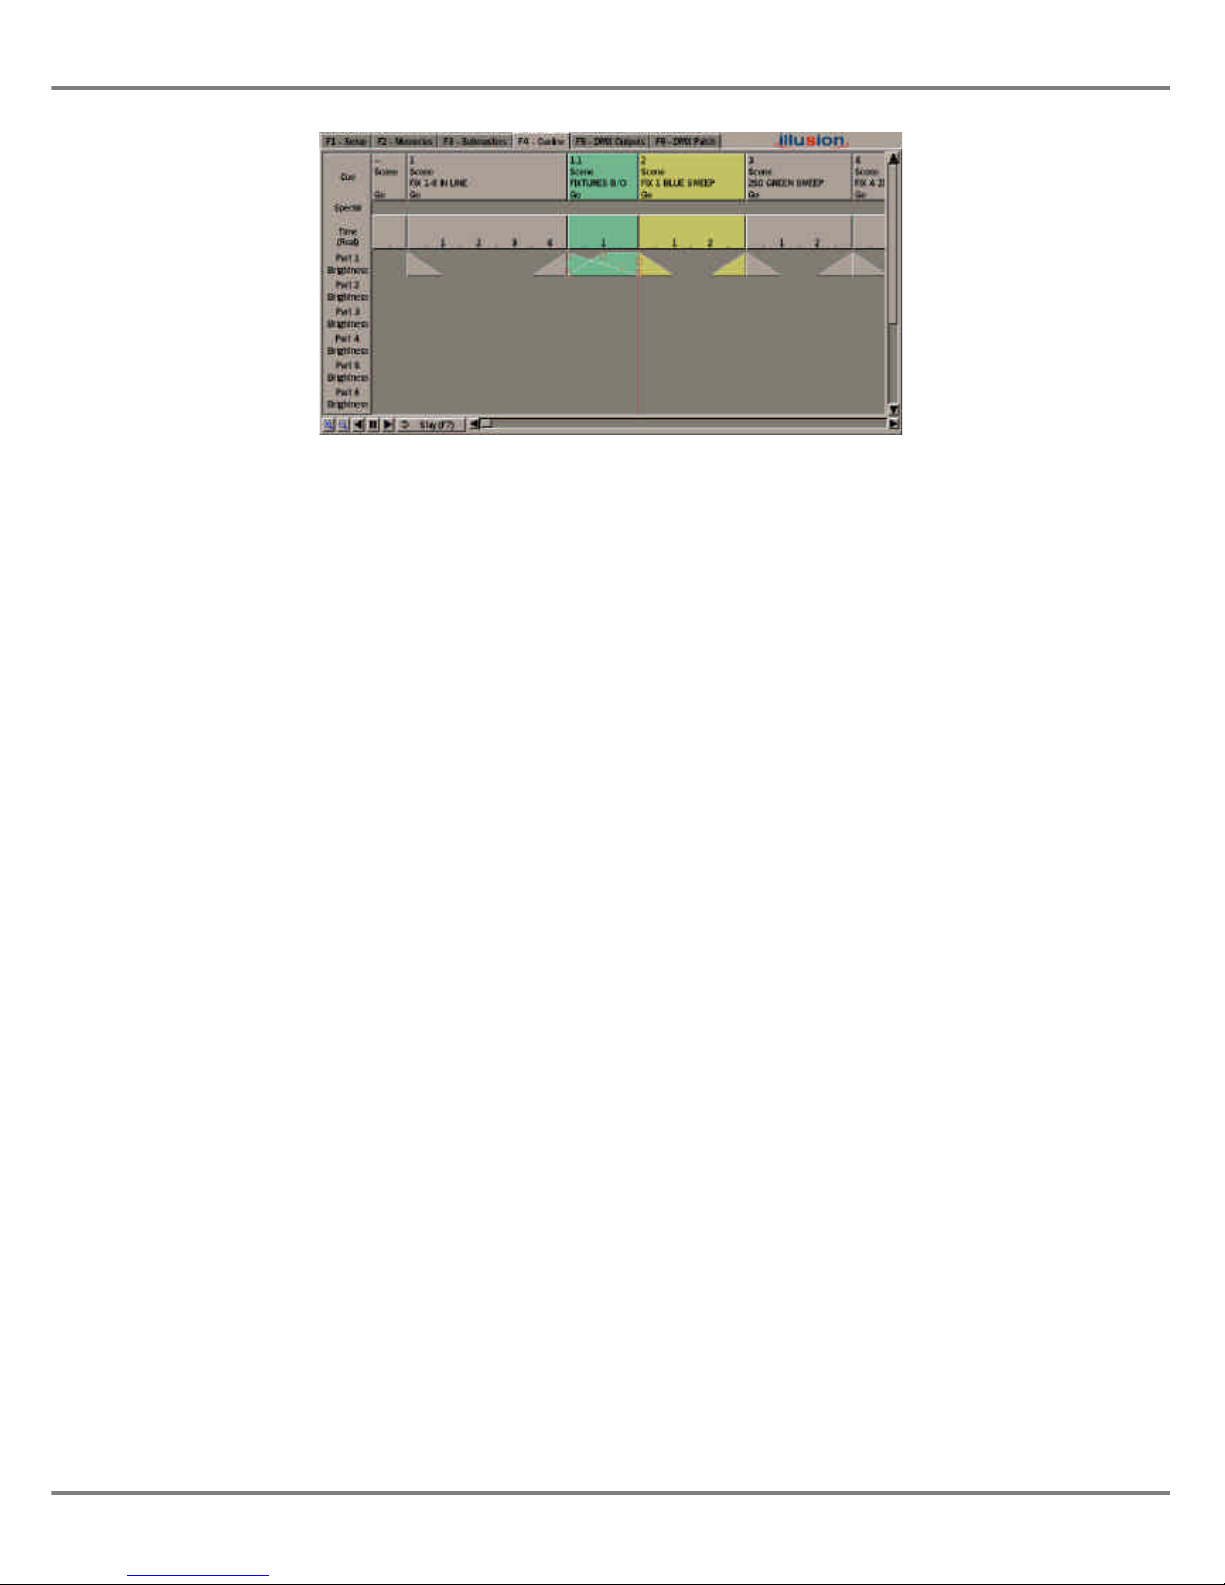
The Cueline Screen
The Cueline Screen is a graphical
representation of the Memory Stack,
and represents the same data as
displayed on the Memories screen.
Programming and editing memory data
and running the Memory Stack can be
done from the Cueline screen.
Any changes made to memory data or
the memory stack on the Cueline
screen are reflected in the Memories
screen and vice versa.
If the programmed memories contain
fixture Colour, Beamshape or Position
data, press the corresponding attribute
button on the front panel to display the
extra track(s) on the Cueline screen.
Full details of the layout and operation
of the Cueline screen are provided in
Chapter 9 of this manual.
Editing Fade Times etc.
The delay, fade, transition and dwell
times of a cue (memory) can be easily
adjusted from the Cueline screen.
1. Press the SCREEN FUNCTION
BUTTON F4 to display the
Cueline screen on the monitor.
2. Ensure that the screen is in Stay
mode, using F7, if necessary.
3. Select a cue (memory) using the
cursor keys or mouse. Various
handles, shown as red boxes, are
displayed in the data tracks.
4. To adjust the delay, fade,
transition or dwell time, left click
on the appropriate red box, hold
the mouse button down, and drag
the handle forwards or backwards
to the required time. Release the
mouse button.
Editing Dimmer Channel and
Fixture Data
The dimmer channel and fixture data
for a cue (memory) can be edited from
the Cueline screen.
1. Select the cue to be edited using
the cursor keys or mouse.
2. Position the mouse pointer on the
required data track. Right click
and select the Edit Live or Edit
Blind option from the menu. The
PW is displayed on the screen.
3. Adjust the dimmer channel or
fixture parameter levels, as
required. Press the SAVE button
to commit the changes to the
memory.
Running the Show
When the Cueline Screen is on
display, the Memory Stack can be
played back using the Playback X
controls on the front panel or the soft
buttons on the Cueline screen.
1. If not already selected, press
SCREEN FUNCTION button F4
to display the Cueline screen.
2. Set the Playback X MASTER and
the GRAND MASTER to full.
3. Select memory 1 using the cursor
keys or the mouse. A yellow
highlight column is displayed on
the memory. Use F7 to set the
display to Follow mode (if not
already selected).
4. Press the GO button. The outputs
will fade from their current levels
to those programmed in memory
1 using the delay, fade and
transition times for memory 1.
The highlight bar moves to the
next programmed memory
automatically.
The CUELINE (red vertical line)
moves across the screen showing
the progress of the fade.
5. To output the next programmed
memory, press the GO button.
6. Repeat step 5 until the end of the
memory stack is reached.
Pressing the GO button again will
then return to memory 1.
2 - 4 Illusion 500 Manual 73-741-00 Issue 2
Quickstart Tutorial
Figure 2 - 5 Cueline Screen
Page 21
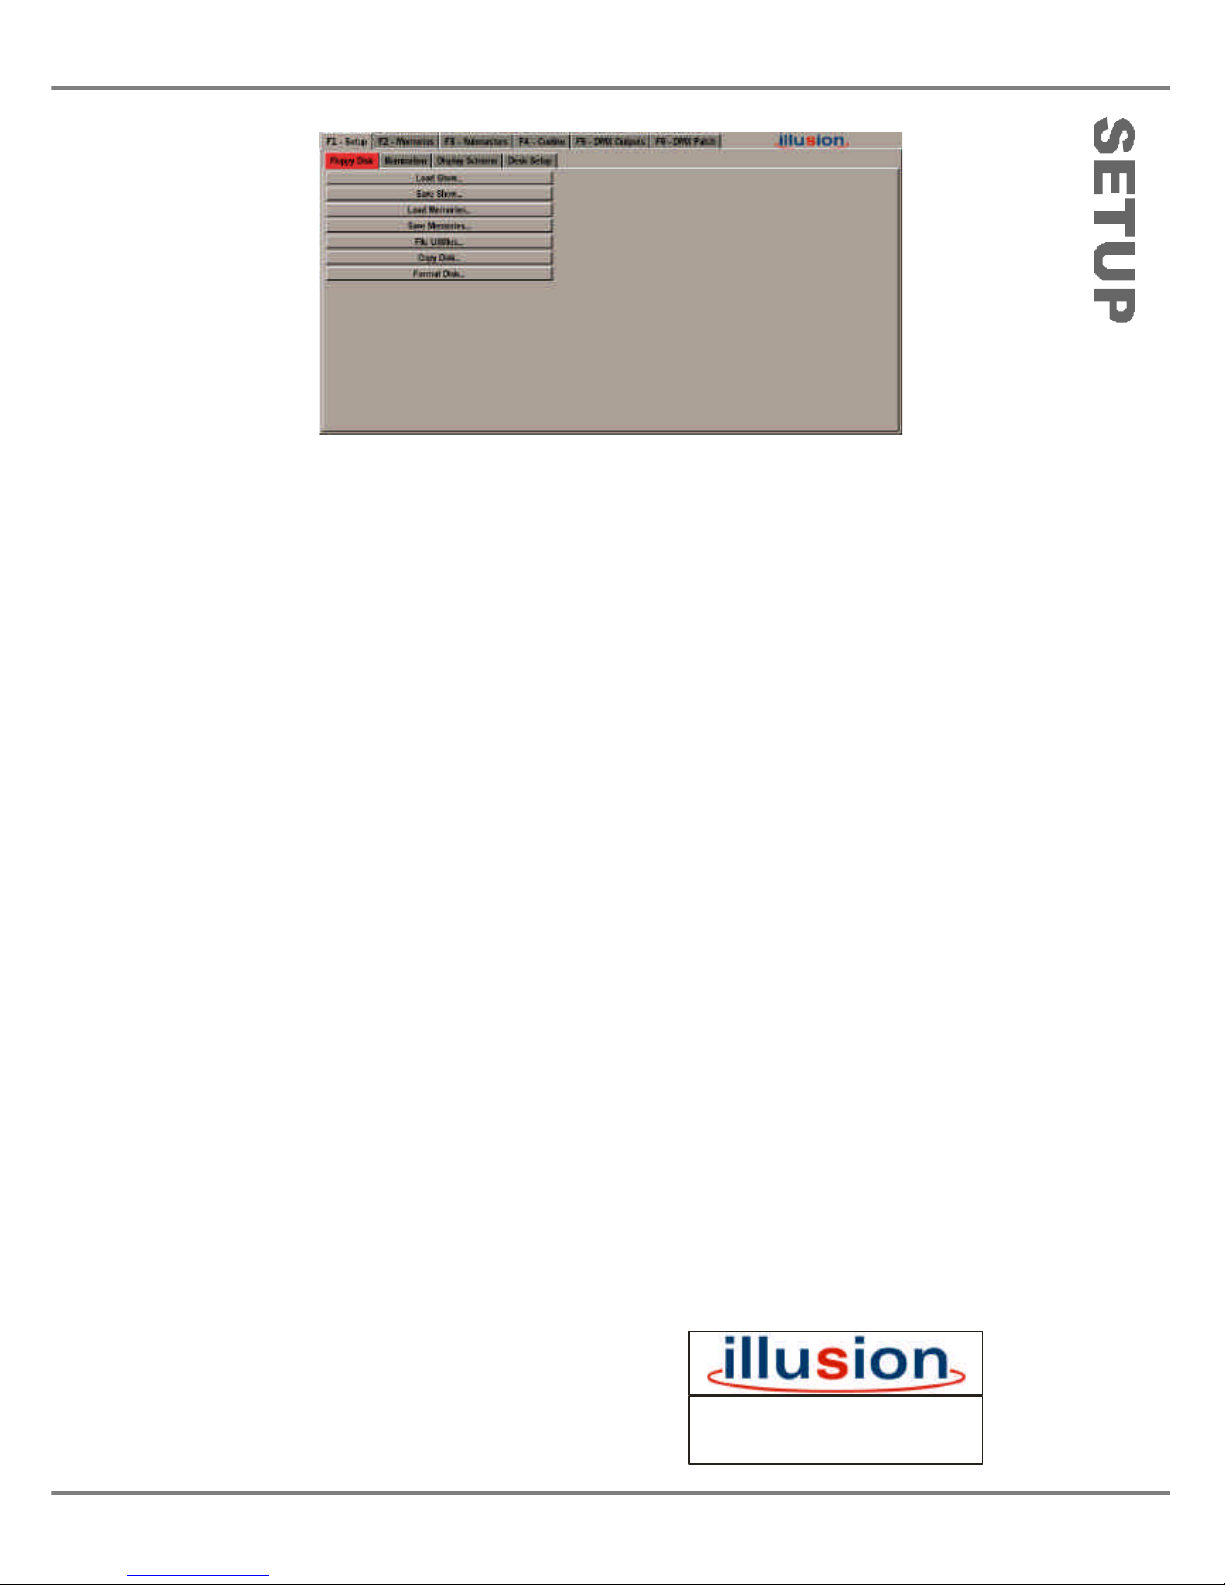
Setup
Setup Options
Press the SCREEN FUNCTION button
F1 or select the Setup screen selection
button using the mouse. The Setup
screen contains the following options:
• Floppy Disk
Used for loading and saving show data
and memory data to floppy disk, file
utilities, copying and formatting disks.
• Illumination
Used for setting up the desk lamp
brightness.
• Display Scheme
Used for setting the preferred display
scheme on the monitor.
• Desk Setup
Used for setting up the desk defaults,
assigning dimmer channels and
fixtures, DMX patching, and setting up
auxiliary controls and remote switches.
Illusion 500 Manual 73-741-00 Issue 2 3 - 1
Figure 3 - 1: Setup Screen
For news, views and latest software
visit our dedicated Illusion website at:
www.illusionsupport.com
Page 22
Floppy Disk Functions
The following sections describe the
various options available under the
Floppy Disk tab.
Loading and Saving Shows
When a show is loaded from floppy
disk, all existing show data on the desk
(setup, memories, submasters etc.) is
automatically cleared before the new
show data is loaded.
When loading or saving a show to
floppy disk the following options are
available:
Desk Setup Only
Desk Setup & Memories
Desk Setup & Submasters
Complete Show
To choose one of these options, use
the soft button in the Load Show or
Save Show window, or F4 on the front
panel or keyboard, before loading or
saving the show.
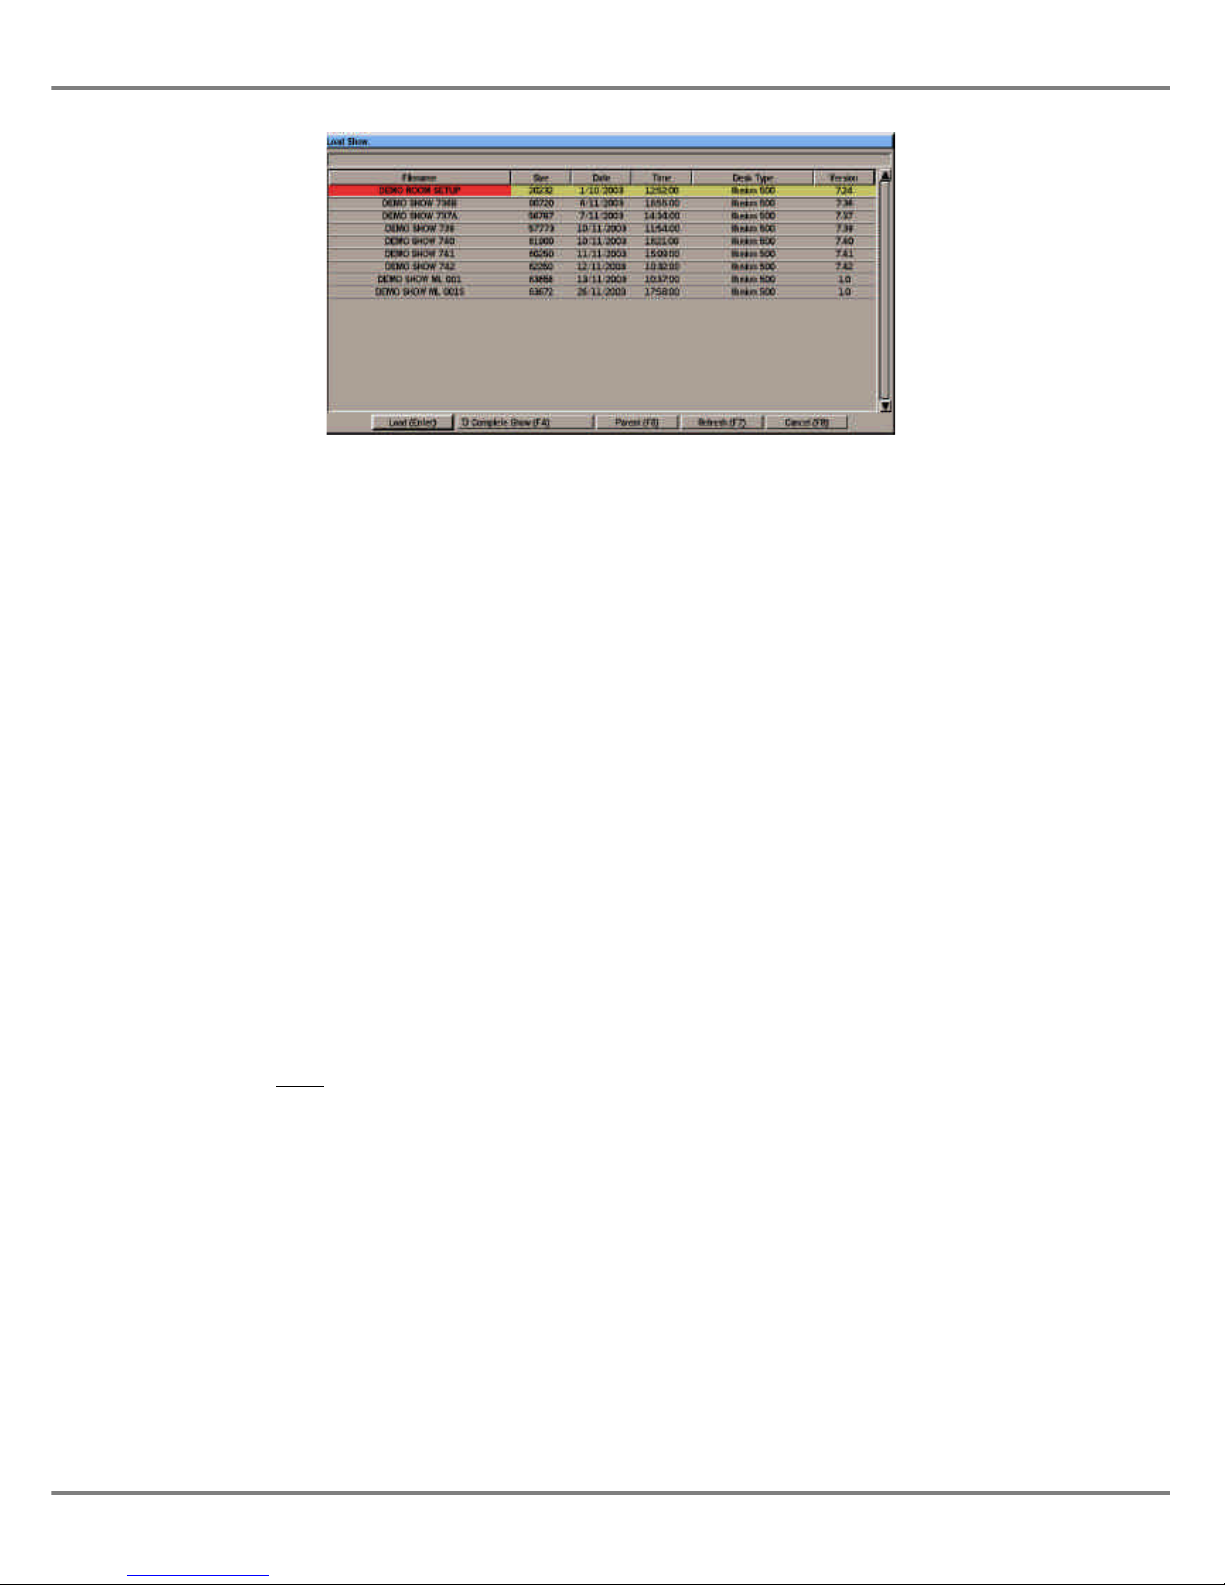
Load Show from Disk
1. Select Floppy Disk from the Setup
options.
2. Insert a floppy disk containing the
saved show into the disk drive.
3. Select Load Show, and press
ENTER. There is a slight delay
while the disk is being read.
4. The Load Show window is
displayed on the monitor screen,
and contains a list of showfiles
found in the top directory plus any
other directories.
5. Select the required load option
(using F4). Use the cursor keys or
the mouse to select the required
showfile from the disk, then press
ENTER, or click on the Load
button in the window.
6. A progress window is displayed
while the show is being loaded.
When the loading is complete,
click on the OK button to close the
window.
Save Show to Disk
1. Select Floppy Disk from the Setup
options.
2. Insert a DOS formatted 3.5” 1.44
MB floppy disk into the disk drive.
3. Select Save Show, and press
ENTER. There is a slight delay
while the disk is being read.
4. The Save Show window is
displayed. Select the required
save option (using F4). Select an
existing show and press ENTER,
or just press ENTER to move to
the Filename field.
5. Modify the filename, if required,
and then press ENTER to save
the show to disk.
6. If the file already exists in the
selected directory, a warning is
displayed. Select Overwrite to
overwrite the existing file, or
Cancel to abandon the operation.
7. A progress window is displayed
while the show is being saved.
When the operation is complete,
click on the OK button to close the
window.
NOTES
Load/Save Show Windows
Filenames are sorted alphabetically.
The selected show is indicated by a yellow
highlight bar.
3 - 2 Illusion 500 Manual 73-741-00 Issue 2
Setup
Figure 3 - 2: Load Show Window
Page 23
Loading and Saving
Memories
The Illusion desk provides the facility to
save and load individual memories to
floppy disk.
This makes it possible to maintain a
library of useful memories for a given
lighting installation, without having to
save the complete show each time.
Individual memories can be added into
a show being created on the desk. The
memory data is loaded into a specified
destination and the channel data is
treated according to the current setup
on the desk.
User confirmation is required before
overwriting existing programmed
memories on the desk.
Memories can be loaded from a normal
showfile or a file containing memory
data only.
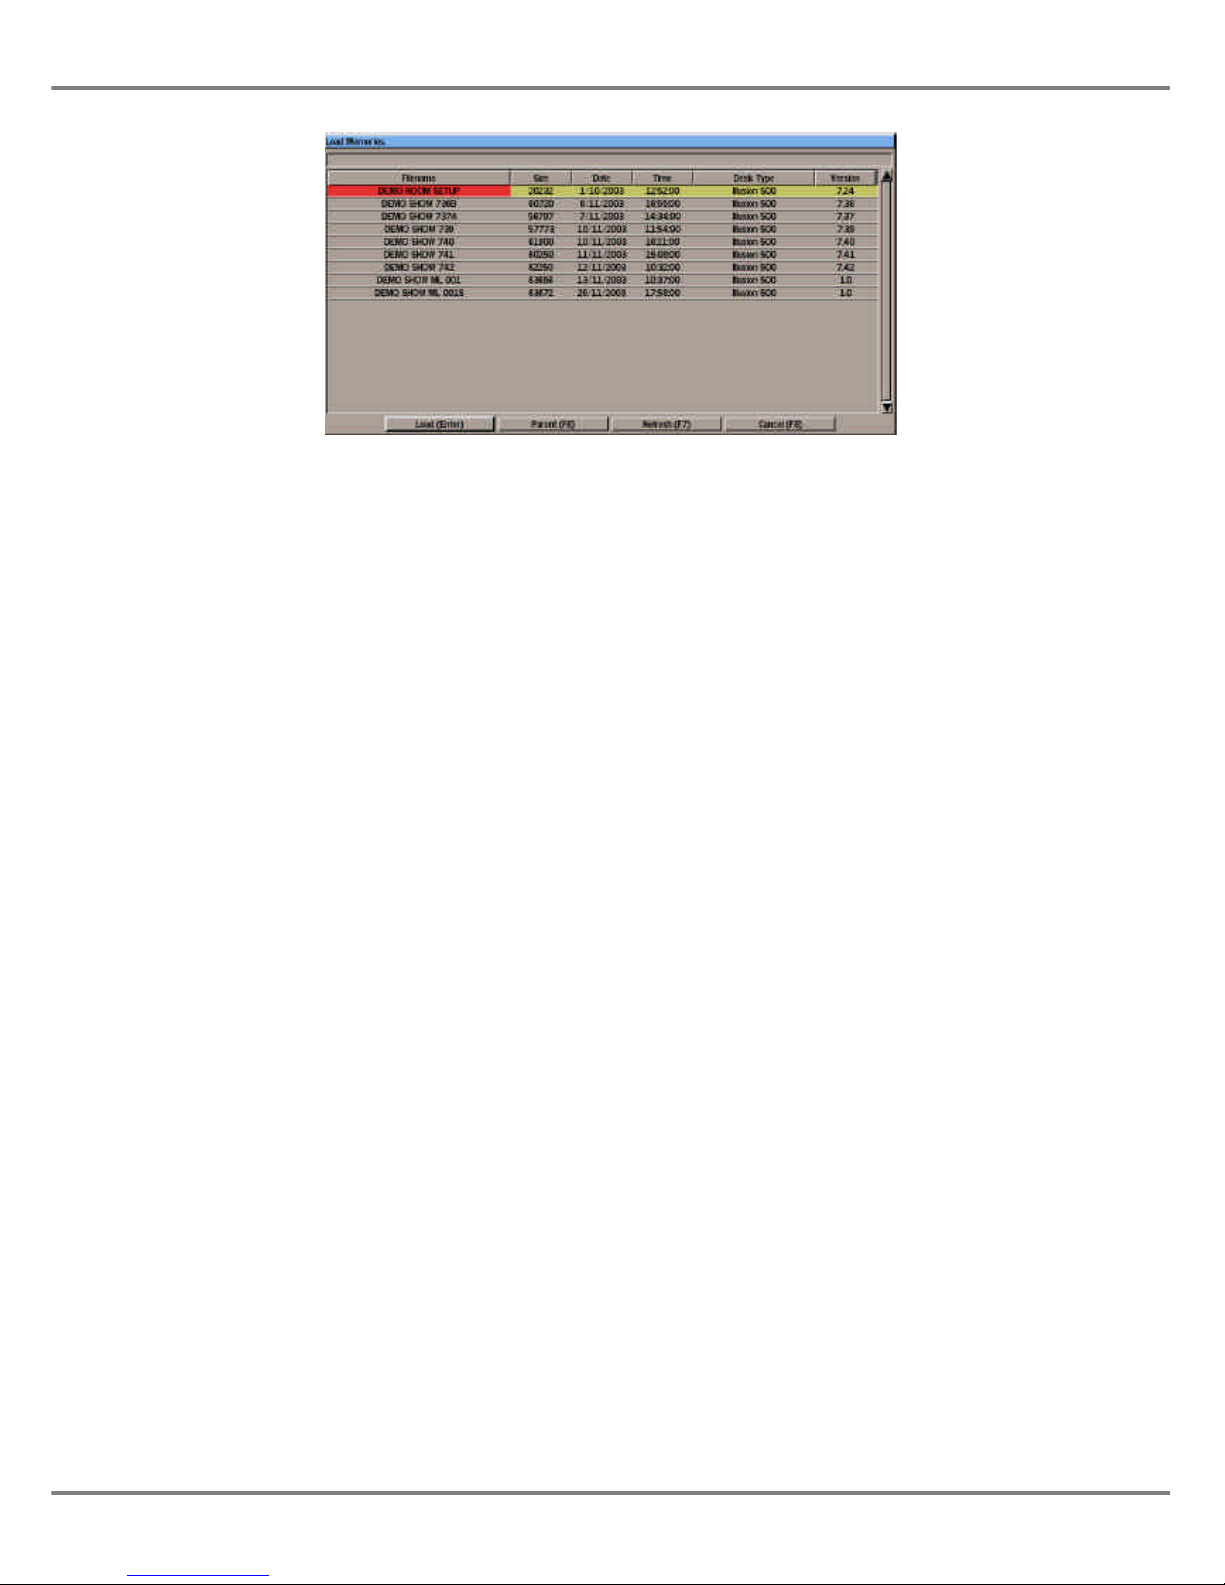
Loading Memories
1. Select Floppy Disk from the Setup
options. Insert a floppy disk
containing the memory data file
into the floppy disk drive.
2. Select Load Memories and press
ENTER. There is a slight delay
while the disk is being read. The
Load Memories Window is
displayed containing a list of files
and directories found on the disk.
3. Use the cursor keys or the mouse
to select the required file, then
press ENTER or click on the Load
button in the window. A popup
window is displayed. There is a
slight delay while the file is read.
4. Use the cursor keys or mouse to
select the required memory to be
loaded. Move to the Load As
Memory column and enter the
required destination memory
number.
5. Repeat step 4 for each memory to
be loaded.
6. Press F7 or click on the OK
button in the window. A popup
window is displayed showing
progress. When loading is
complete, press ENTER or click
on the OK button in the window.
Saving Memories
1. Select Floppy Disk from the Setup
options. Insert a DOS formatted
3.5” 1.44 Mb floppy disk into the
floppy disk drive.
2. Select Save Memories and press
ENTER. There is a slight delay
while the disk is being read. The
Save Memories Window is
displayed containing a list of files
and directories found on the disk.
3. Use the cursor keys or mouse to
select a file, then press ENTER to
move to the Filename field.
4. Modify the filename, if required
then click on the Save button in
the window or press ENTER. A
popup window is displayed
showing the programmed
memories in the desk.
5. Use the cursor keys or mouse to
select a memory to be saved.
Move to the Save This Memory
column and press ENTER to
change the text to Yes.
6. Repeat step 5 for each memory to
be saved.
7. Press F7 or click on the OK
button in the window. A popup
window is displayed showing
progress. When saving is
complete, press ENTER or click
on the OK button in the window.
Illusion 500 Manual 73-741-00 Issue 2 3 - 3
Setup
Figure 3 - 3 : Load Memories Window
Page 24
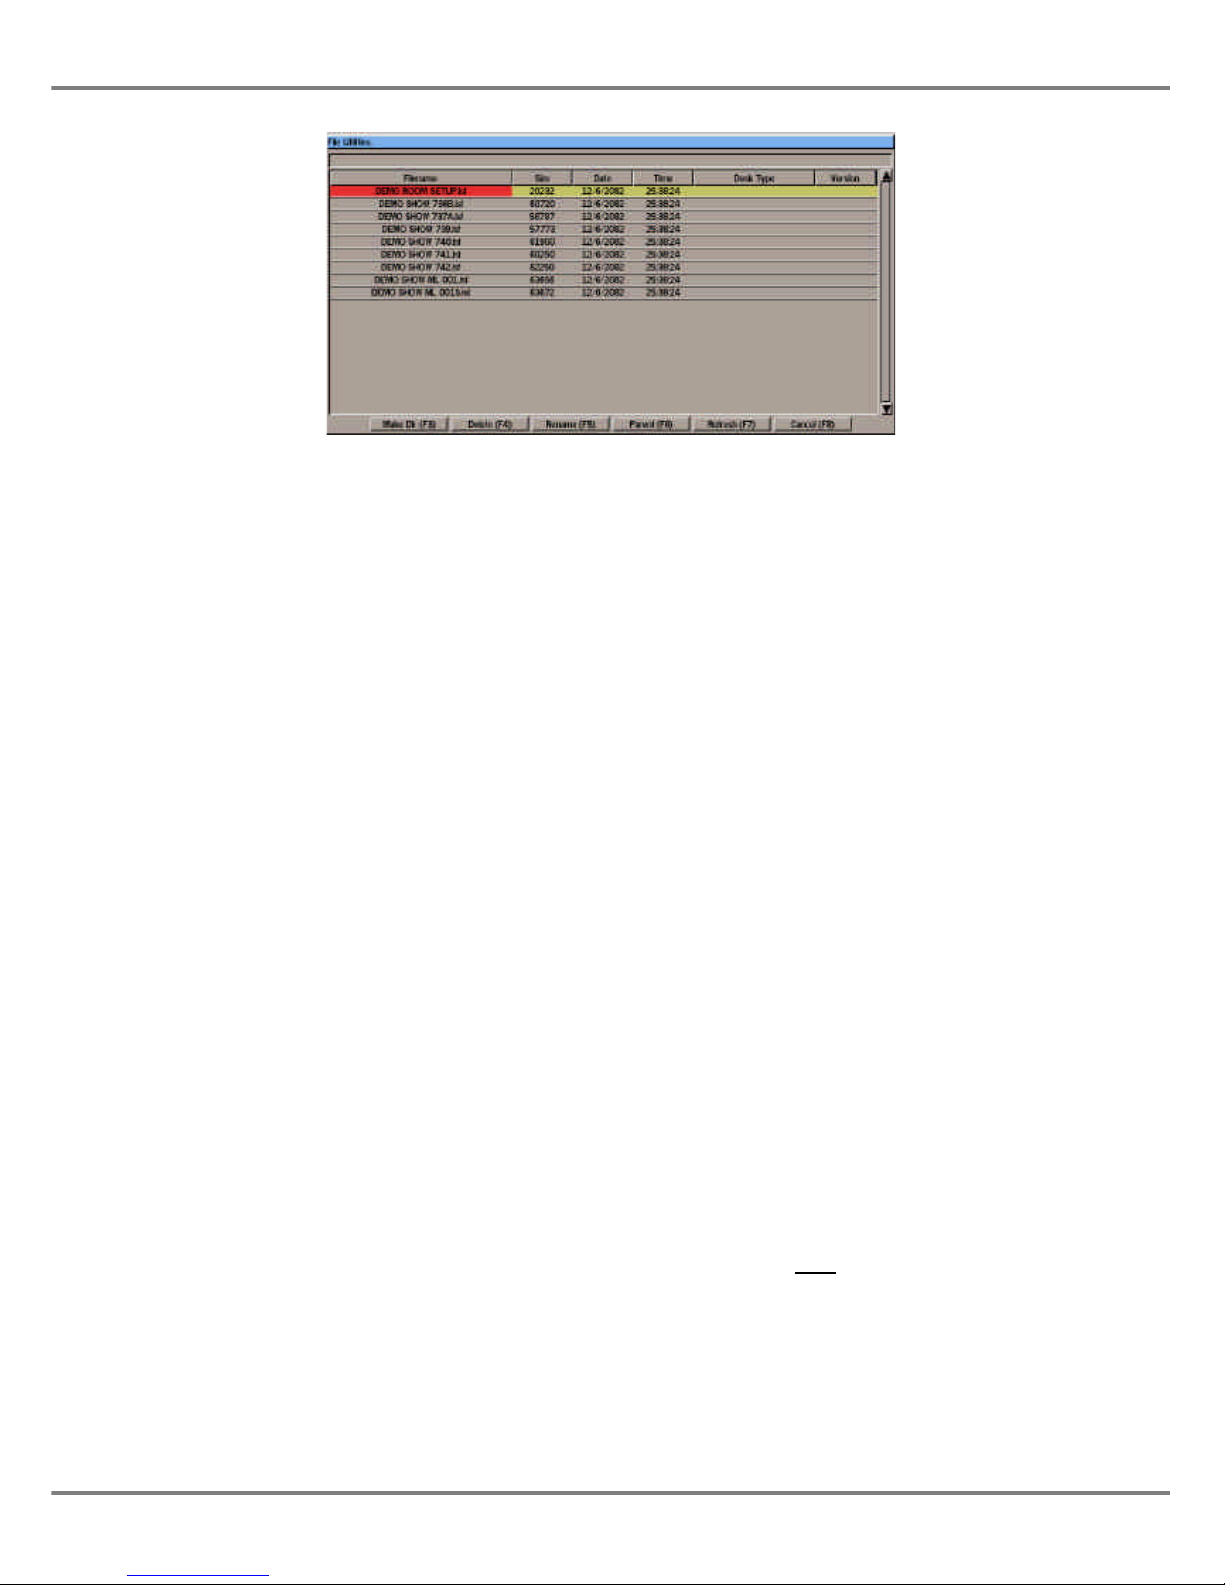
File Utilities
The Illusion desk provides basic file
utilities for creating directories, and
deleting and renaming directories and
files on the floppy disk.
1. Select Floppy Disk from the Setup
options.
2. Insert a floppy disk containing
data into the disk drive.
3. Select File Utilities, and press
ENTER. There is a slight delay
while the disk is being read.
4. The File Utilities window is
displayed on the monitor screen.
File Utilities Window
The File Utilities Window contains a list
of files found in the top directory plus
any other directories on the disk. The
currently selected directory or file is
highlighted.
Use the left and right cursor keys to
move up and down directories (if
applicable) and the up and down
cursor keys to move the highlight bar
up and down the list.
At the bottom of the File Utilities
window are several soft buttons. The
action of each of these buttons is
described in the following sections.
Make Directory (F3)
This option allows you to create a new
directory on the floppy disk.
1. Select the Make Dir button in the
File Utilities window. The Make
Directory window is displayed.
2. Enter the required name in the
Name field, then select the OK
button in the window.
Delete (F4)
This option allows you to delete a
directory or file on the floppy disk.
1. Use the cursor keys to select the
directory or file to be deleted.
2. Select the Delete button in the
File Utilities window. A
confirmation window is displayed.
3. Select the Delete button to
confirm.
Rename (F5)
This option allows you to rename a
directory or file on the floppy disk.
1. Use the cursor keys to select the
directory or file to be renamed.
2. Select the Rename button in the
File Utilities window. The Rename
window is displayed.
3. Enter the required name in the
Name field, then select the OK
button in the window.
Parent (F6)
Selecting this button takes you to the
parent directory of the one currently
displayed in the File Utilities window.
Refresh (F7)
Selecting this button reads the floppy
disk and displays the contents in the
File Utilities window.
This allows you to swap disks and read
the contents of the new disk without
having to close the window.
Cancel (F8)
Selecting this button closes the File
Utilities window.
NOTE
Setup - Floppy Disk Functions
To ensure that the Illusion floppy disk drive
functions correctly, remove the floppy disk
before turning the power off.
Failure to do this may result in the drive not
detecting the presence of a disk when the
desk is turned back on.
3 - 4 Illusion 500 Manual 73-741-00 Issue 2
Setup
Figure 3 - 4 : File Utilities Window
Page 25

Copy Disk
This function allows the contents of
one floppy disk to be copied to
another.
1. Select Floppy Disk from the Setup
options.
2. Select the Copy Disk option. A
confirmation window is displayed.
Select the Copy button in the
window to continue.
3. Follow the instructions displayed
in the window. It is necessary to
swap between the source and
destination disks several times in
order to copy the contents of the
source disk.
Format Disk
This function formats a floppy disk.
1. Insert the disk to be formatted into
the floppy disk drive.
2. Select Floppy Disk from the Setup
options.
3. Select the Format Disk option. A
confirmation window is displayed.
Select the Format button in the
window to continue.
4. The Format Disk window is
displayed showing the progress of
the operation.
Illumination
The Desk Lamp Brightness can be
adjusted as follows:
Select Illumination from the Setup
options. Move to the Desk Lamp
Brightness field, then adjust the
brightness using the wheel, or by
entering the required value directly.
Display Schemes
A number of monitor display schemes
are provided to suit different ambient
conditions.
Changing Display Scheme
1. Select Display Scheme from the
Setup options. The current display
scheme is indicated.
2. Move to the Select Scheme
button and use the < and > keys
or the mouse to select the
required scheme.
3. Select the Activate Scheme
button. The display scheme will
change to the selected scheme.
NOTES
Disk Errors
If any errors occur while accessing the floppy
disk, saving or loading show data or
memories, an error message is displayed on
the monitor screen.
Display Schemes
The colours referred to in this manual are for
the Normal Display Scheme. The colours may
vary in other display schemes.
Illusion 500 Manual 73-741-00 Issue 2 3 - 5
Setup
Figure 3 - 5 : Setup - Display Schemes
Page 26
Desk Setup
Select Desk Setup from the Setup
options. The Desk Setup Window is
displayed on the monitor screen and
contains the following options:
Desk Defaults
Assign Channels
Assign Fixtures
Autopatch Out
Autopatch In (if upgrade fitted)
Clear DMX Patch
Setup Auxiliary Buttons
Setup Remote Switches
Operating Mode
Desk Defaults
The Desk Defaults section allows the
desk to be set up to your own personal
preferences.
Select Desk Defaults from the Desk
Setup options. The following options
are displayed:
General
Memory
Submaster
Playback X
Playback A/B
Select the required option, then use
the cursor keys or mouse to move to
the field to be edited. Adjust the value
as required.
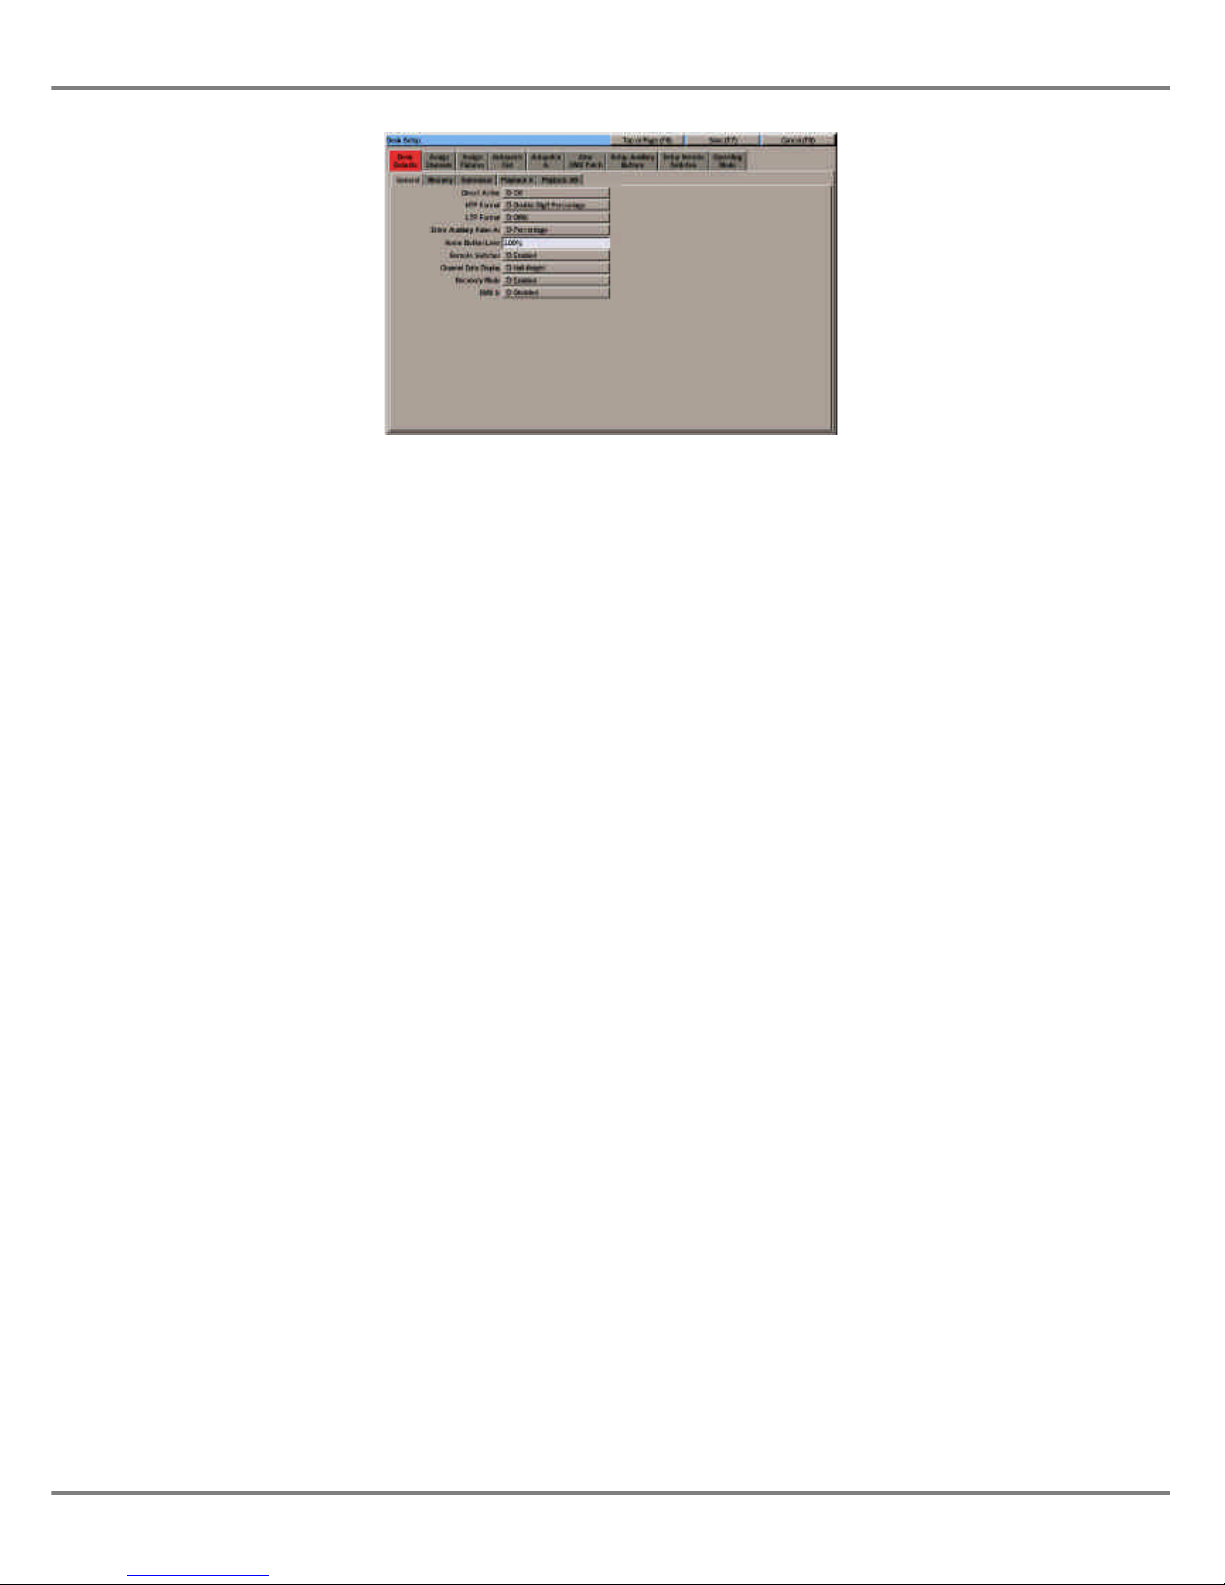
General Defaults
•
DIRECT ACTION
Defines the syntax for numeric entry of
channel and fixture data in the PW.
• HTP FORMAT
Defines the syntax for numeric entry of
dimmer channel and fixture brightness
data in the PW.
• LTP FORMAT
Defines the syntax for numeric entry of
fixture colour, beamshape and position
data in the PW.
• ENTER AUXILIARY VALUE AS
The format for entering auxiliary data.
(Percentage or DMX).
• HOME BUTTON LEVEL
The default value of the HOME button.
•
REMOTE SWITCHES
Enables or disables remote switches.
• CHANNEL DATA DISPLAY
Defines the height of the Channel Data
Display on the monitor screen.
• RECOVERY
Enables or disables recovery mode
(see Notes for further details).
• DMX IN
Enables or disables DMX In.
(This option is only displayed if an
upgrade kit is fitted to the desk).
3 - 6 Illusion 500 Manual 73-741-00 Issue 2
Setup
Figure 3 - 6: Desk Defaults - General
Page 27
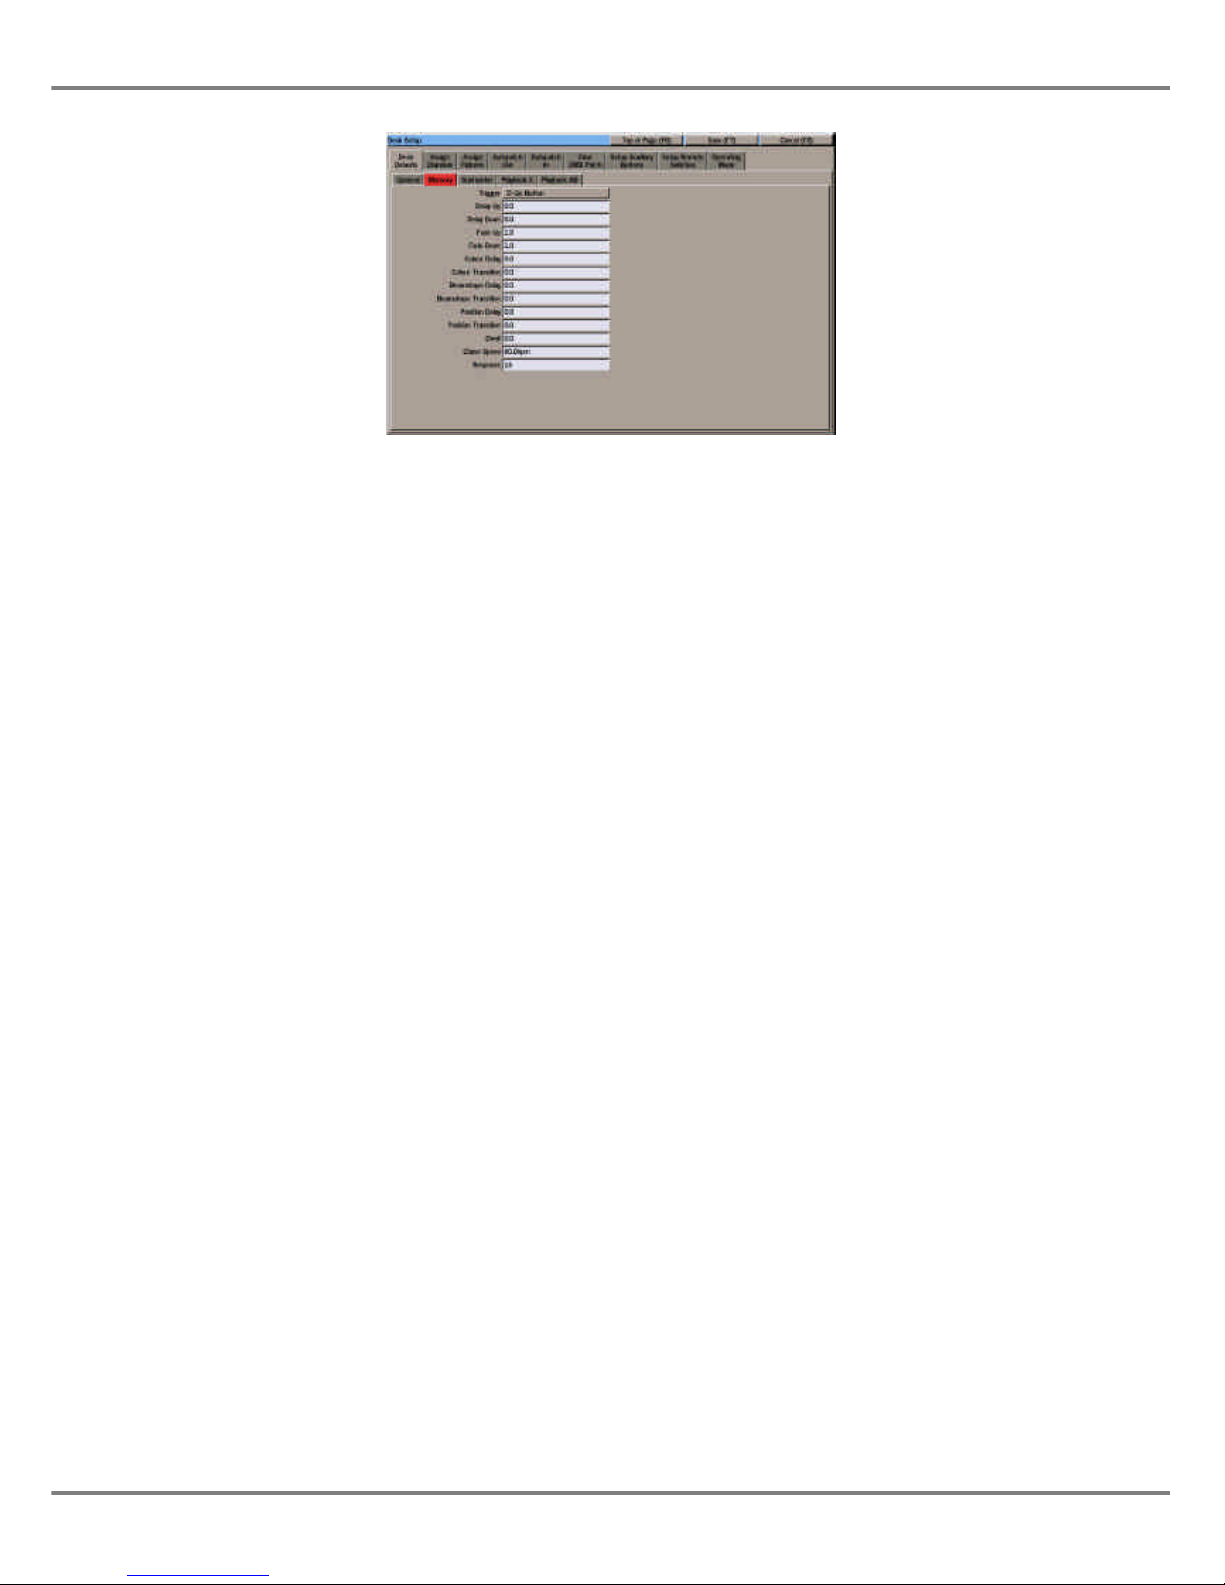
Memory Defaults
•
TRIGGER
The default memory trigger (GO
button, Automatic or At Time).
• DELAY UP
The delay before the dimmer channels
and fixture brightness parameters in
the next memory begin to fade in.
•
DELAY DOWN
The delay before the dimmer channels
and fixture brightness parameters in
the current memory begin to fade out.
•
FADE UP
The time for the dimmer channels and
fixture brightness parameters in the
next memory to fade up.
•
FADE DOWN
The time for the dimmer channels and
fixture brightness parameters in the
current memory to fade down.
•
COLOUR DELAY
The delay before the fixture colour
parameters in the next memory begin
to fade.
•
COLOUR TRANSITION
The time for the fixture colour
parameters in the next memory to fade
to their programmed values.
•
BEAMSHAPE DELAY
The delay before the fixture
beamshape parameters in the next
memory begin to fade.
•
BEAMSHAPE TRANSITION
The time for the fixture beamshape
parameters in the next memory to fade
to their programmed values.
•
POSITION DELAY
The delay before the fixture position
parameters in the next memory begin
to fade.
•
POSITION TRANSITION
The time for the fixture position
parameters in the next memory to fade
to their programmed values.
•
DWELL
The hold time from the end of the
transition to the end of the memory.
•
CHASE SPEED
The default chase speed (bpm)
• RESPONSE
The default response for sound to light
and ripplesound memories (1-16).
NOTES
Recovery Mode
The Recovery Mode determines how the desk
performs when switched off and back on,
either deliberately or accidently.
Recovery Disabled
The desk will come up showing the Memories
Screen, the highlight bar on memory zero.
There are no outputs (unless any submasters
containing data are raised).
Page 1 of the submasters is displayed with no
page overlays in operation.
Recovery Enabled
The desk will come up showing the screen
which was on display when the desk was
switched off.
The previous position in the Memory Stack is
reinstated, ie the current and next memory
are as before.
Any chase memories running are restarted
from step 1.
The submasters come up on the page that
they were on, complete with any overlays
that were in operation at the time.
Illusion 500 Manual 73-741-00 Issue 2 3 - 7
Setup
Figure 3 - 7: Desk Defaults - Memory
Page 28
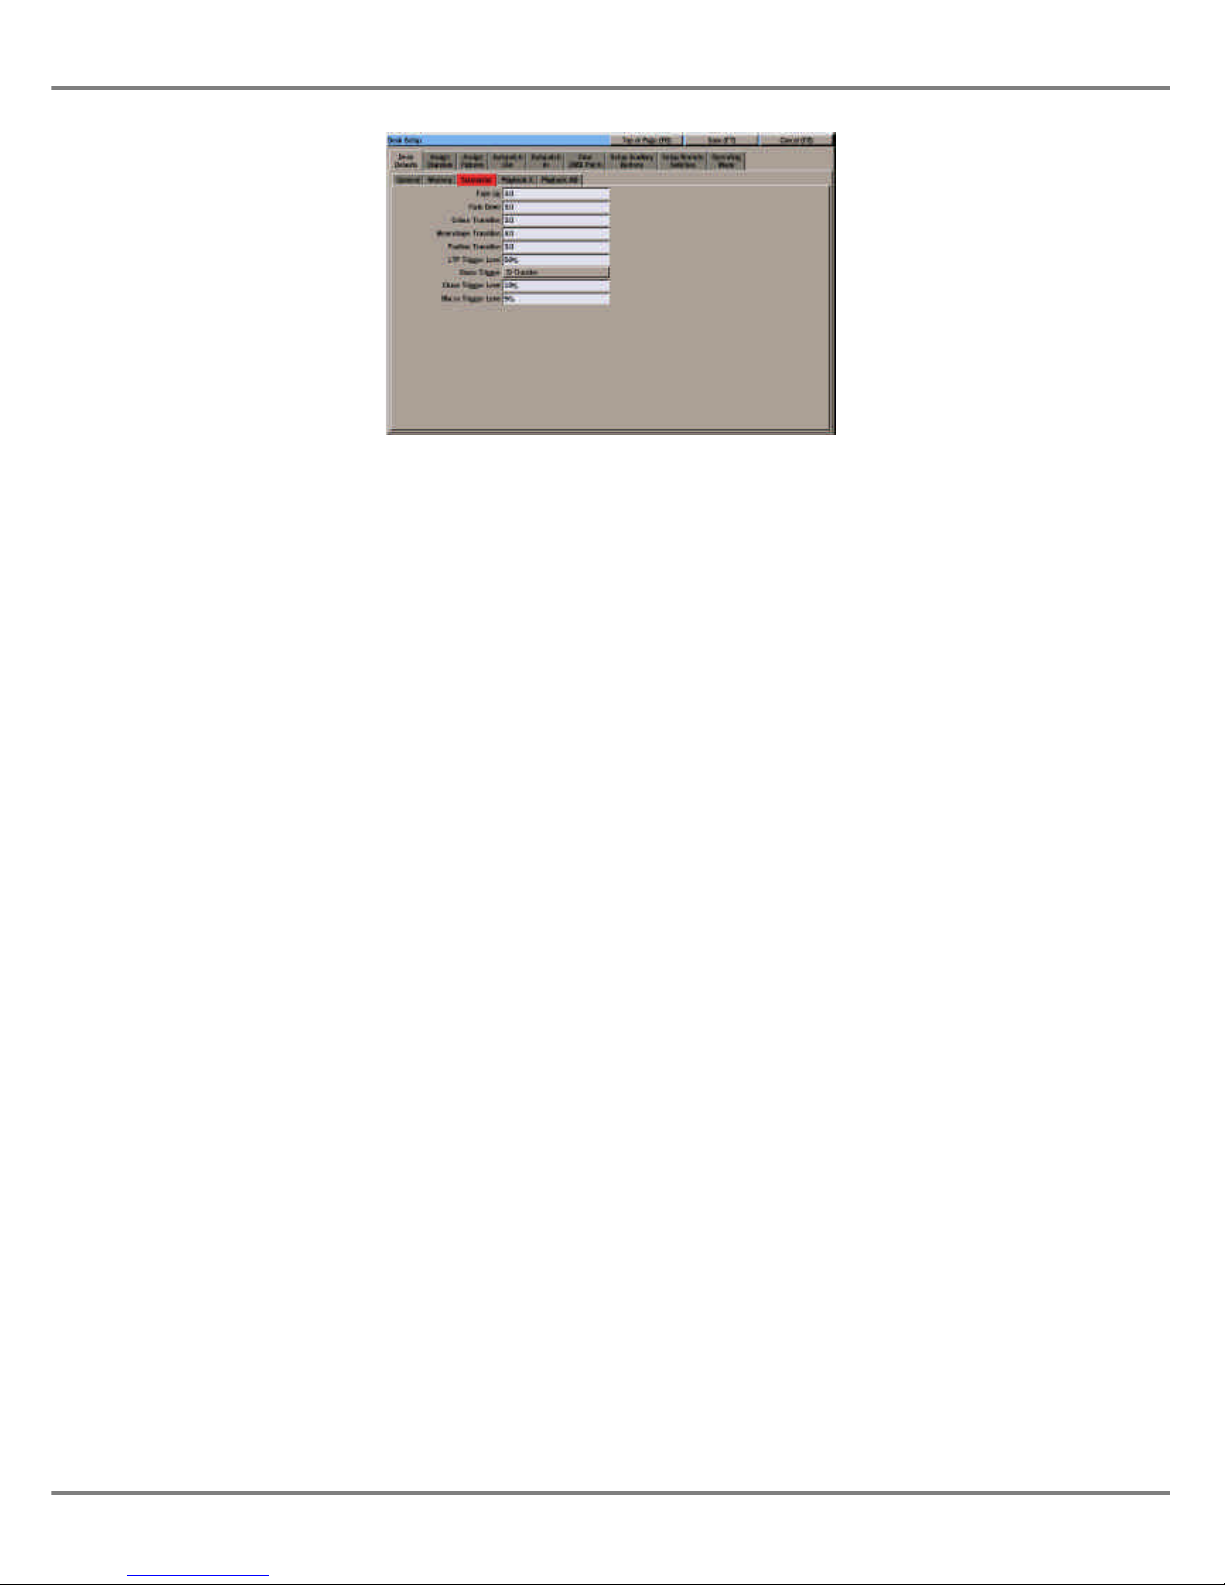
Submaster Defaults
•
FADE UP
The default time to fade up the dimmer
channel and fixture brightness data on
a submaster, when the fader is moved
through its full travel from zero to full.
• FADE DOWN
The default time to fade down the
dimmer channel and fixture brightness
data on a submaster, when the fader is
moved through its full travel from full to
zero.
•
COLOUR TRANSITION
The time taken for the fixture colour
parameters to reach their programmed
level after being triggered.
•
BEAMSHAPE TRANSITION
The time taken for the fixture
beamshape parameters to reach their
programmed level after being
triggered.
• POSITION TRANSITION
The time taken for the fixture position
parameters to reach their programmed
level after being triggered.
•
LTP TRIGGER LEVEL
The default value at which the fixture
colour, beamshape and position
parameters are triggered as the
submaster fader is raised.
• CHASE TRIGGER
The default chase trigger determines
how transferred chase memories are
triggered (started) on the submaster
(Transfer, Fader Level or Flash
Button).
•
CHASE TRIGGER LEVEL
The level of the submaster fader that
will trigger (start) the chase memory This parameter only applies if the
Chase Trigger is set to Fader Level.
• MACRO TRIGGER LEVEL
The level of the submaster fader that
will trigger the macro.
Playback X Defaults
•
TIME INPUT
Defines the time input mode for the
memory stack - Playback X (Real,
SMPTE or MIDI).
• TIME DISPLAY
Number of frames/sec (24,25 or 30)
when Time Input is set to SMPTE or
MIDI time.
Playback A/B Defaults
•
MODE
The operating mode of Playback A/B
(Manual or Auto Load).
•
A LTP TRIGGER LEVEL
The level at which the fixture colour,
beamshape and position parameters
are triggered when the A MASTER
fader is raised.
• B LTP TRIGGER LEVEL
The level at which the fixture colour,
beamshape and position parameters
are triggered when the B MASTER
fader is raised.
3 - 8 Illusion 500 Manual 73-741-00 Issue 2
Setup
Figure 3 - 8: Desk Defaults - Submaster
Page 29

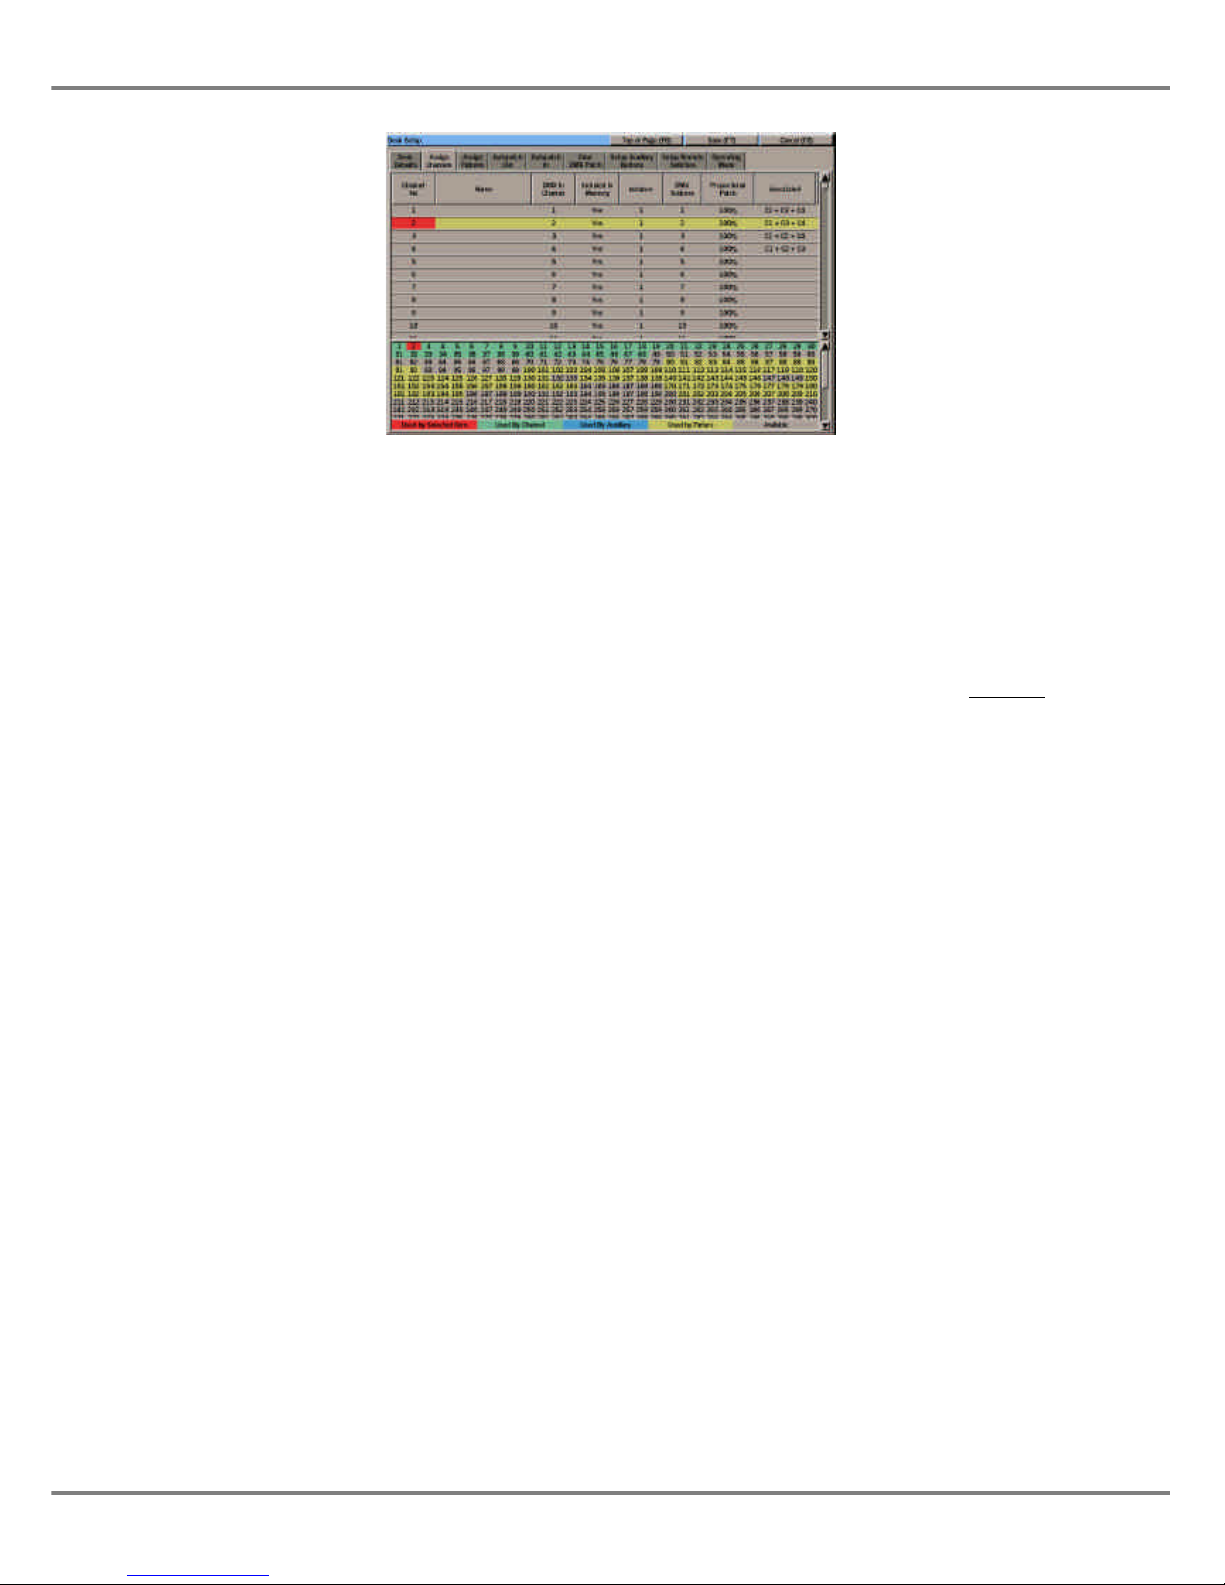
Assign Channels
This option allows you to define, set up
and patch each of the dimmer
channels on the desk. The dimmer
channel data is displayed on the
monitor screen as a table.
Defining the Channels
1. Select Assign Channels from the
Desk Setup options. The channel
table and colour-coded DMX map
are displayed.
2. Select a channel by scrolling up
or down using the cursor keys,
pressing the CHANNEL key
followed by the channel number
and then ENTER, or clicking on
the channel number field using
the mouse.
The highlight bar will move to the
selected channel.
Use the cursor keys to move to
each of the fields, as required.
3. The Name field. Enter a text
description of the channel
(optional).
4. The DMX In Channel field.
Enter the DMX In channel
address using the numeric
keypad or keyboard (optional).
5. The Included in Memory field.
Select Yes or No using the
ENTER key (see notes).
6. DMX Address and Proportional
Patch fields - see Patching
Channels.
7. Associated field - see Associating
Dimmer Channels and Fixtures.
Patching Channels (1)
1. Move to the DMX Address field of
the dimmer channel using the
cursor keys or mouse.
2. Enter the DMX address using the
numeric keypad or keyboard.
3. If the DMX address entered is
valid, the channel table and DMX
map are updated.
If the DMX address is already
used, a warning message is
displayed.
Patching Channels (2)
1. Select the channel to be patched
using the cursor keys or mouse.
2. Using the mouse, left click on the
required DMX address in the
colour-coded DMX map.
3. If the DMX address entered is
valid, the channel table and DMX
map are updated.
If the DMX address is already
used, a warning message is
displayed.
Proportional Patching
1. Select the channel to be patched
using the cursor keys or mouse.
2. Move to the Proportional Patch
field. Set the value as required.
Adding Duplicates
A duplicate is an additional instance of
a dimmer channel which is patched to
a different DMX output address.
Up to 9 duplicates may be added to
each dimmer channel. An extra line of
data is displayed on the screen for
each duplicate defined.
Duplicates are added automatically
when patching the desk channel using
either of the following methods:
1. By specifying additional DMX
address(es) separated by AND
when entering the address in the
DMX Address field
(eg 101 AND 102 AND 103)
2. Left clicking the mouse on
additional DMX addresses in the
DMX map.
Providing the DMX addresses are
valid, an extra line will be added for
each duplicate showing it patched to
the specified address.
NOTE - Excluded Channels
When channel data is saved to a memory,
the data for any excluded channels is stored
in the memory, but it is not output on the
DMX when the memory is output via
Playback X, Playback A/B or a submaster.
When channel data is loaded directly onto a
submaster, the data for the excluded
channels is output on the DMX when the
submaster is raised.
Illusion 500 Manual 73-741-00 Issue 2 3 - 9
Setup
Figure 3 - 9: Desk Setup - Assign Channels
Page 30
Unpatching Channels
There are two methods for unpatching
channels manually.
1. Move to the DMX Address field of
the required dimmer channel.
Enter a DMX address of 0 (zero)
or press the CLEAR button.
2. Using the mouse, left click on the
corresponding DMX address in
the DMX map.
In both cases the dimmer channel is
unpatched and the channel table and
DMX map are updated.
If a duplicate is unpatched, it is
removed from the channel table. Any
other instances are shuffled down
accordingly.
Unused Dimmer Channels
An ‘unused’ dimmer channel is defined
as one that is not displayed in the CDD
and PW or processed by the desk
software.
To make a dimmer channel unused:
Move to the DMX Address field, enter
‘999’ and press the ENTER key.
The DMX Address field shows ‘N/A’ to
indicate that the channel is not used.
Associating Channels
A dimmer channel may be associated
with up to three other dimmer channels
or fixtures.
For example, a scroller fixture may be
associated with its lamp, or up to four
separate dimmer channels may be
associated together.
Dimmer channels and fixtures are
associated with a dimmer channel by
entering information into the data table.
1. Select a dimmer channel to be
associated and move to the
Associated field.
2. To associate a dimmer channel:
simply enter the channel number
in the field.
To associate a fixture: press the
FIXTURE button followed by the
fixture number.
If more than one channel or
fixture is to be associated, enter
each channel number or fixture
number separated by a ‘+’ (AND).
If the data entered is valid the channel
table is updated accordingly.
If the data is invalid, eg. a channel or
fixture number entered is already in an
association, a warning message is
displayed.
To remove an association: enter 0
(zero) in the Associated field for a
channel which is in the association.
Find Channel Function
This function provides a quick method
for finding out which dimmer channel,
fixture or auxiliary is patched to a
particular DMX channel.
1. Using the mouse, right click on
the required DMX channel
number in the DMX map, and
select the Find Channel option.
If a dimmer channel is patched to the
DMX channel, the highlight bar will
automatically move to the dimmer
channel number in the channel table.
If a fixture or auxiliary is patched to the
selected DMX channel, a warning
message is displayed indicating what
is patched to that channel.
If nothing is patched to the selected
DMX channel, a warning message is
displayed indicating that nothing is
patched to that channel.
NOTE
Associated Channels and Fixtures
In the Assign Channels screen, dimmer
channel and fixture associations are shown in
the right hand column. Fixture numbers are
prefixed with ‘F’ and multiple associations
are indicated by ‘+’ between the channel or
fixture numbers.
Eg, if dimmer channel 1 was associated with
dimmer channels 2 and 3 and fixture 8, the
Associated column for channel 1 would read
2+3+F8.
3 - 10 Illusion 500 Manual 73-741-00 Issue 2
Setup
Figure 3 - 10 : Assign Channels Screen
Page 31

Assign Fixtures
This option allows you to assign and
patch fixtures onto the desk.
The fixture data is displayed on the
monitor screen as a table.
Below the fixture table is a colour
coded DMX map which shows where
the assigned fixtures (and dimmer
channels and auxiliaries) are patched
to the DMX outputs.
Initially no fixtures are assigned. It is
up to the user to assign the required
number and type of fixtures to match
those to be controlled in the rig.
A fixture type is defined by two fields:
Manufacturer and Type (eg Martin
MAC 250, Clay Paky Goldenscan)
Once a fixture has been assigned, it
can be patched to the DMX outputs.
Assigned fixtures can also be named,
patched to the DMX IN and associated
with dimmer channels or other fixtures
as required.
Assigning Common Fixtures
This section describes how to assign a
fixture to one of the 20 Common fixture
types permanently stored on the desk.
Select a fixture number, then move to
the Manufacturer/Type field using the
cursor keys or mouse.
Press the ENTER key. The Assign
Fixture Type Window is displayed on
the monitor screen, with the
Manufacturer field highlighted.
Use the left/right cursor keys to select
the required manufacturer (eg Martin).
Move the cursor down to the Type field
in the window, then use the left/right
cursor keys to select the required
fixture type (eg MAC 250).
Press the ENTER key or click on the
OK button in the window to complete
the assignment.
The Assign Fixture Type Window is
closed and the selected manufacturer
and fixture type are displayed in the
fixture table.
NOTE
Common Fixture Types
The default set of 20 Common Fixture Types
on the Illusion 500 desk are as follows:
Martin MAC 250 (Mode 4)
Martin MAC 300 (Mode 4)
Martin MAC 500 (Mode 4)
Martin MAC 600 (Mode 4)
Martin MAC 2000 Prof (16 bit mode)
Martin Roboscan Pro 518 (Mode 2)
Martin Roboscan 812 (Extended)
High End Studio Colour
High End Studio Colour 250
High End Studio Spot
High End Studio Spot 250
High End Cyberlight (Mode 2)
High End Technobeam (Full Mode)
High End Trackspot
Clay Paky Goldenscan HPE
Clay Paky Stage Scan
Clay Paky Stage Color 300 (16 bit)
Clay Paky Stage Color 1200 (16 bit)
Clay Paky Stage Light 300 (16 bit)
Clay Paky Stage Zoom 1200 (16 bit).
Illusion 500 Manual 73-741-00 Issue 2 3 - 11
Setup
Figure 3 - 11: Desk Setup - Assign Fixtures Screen
Page 32

Assigning Scroller Fixtures
This section describes how to assign a
fixture to a Scroller Fixture type stored
on the desk.
Select a fixture number, then move to
the Manufacturer/Type field using the
cursor keys or mouse.
Press the ENTER key. The Assign
Fixture Type Window is displayed on
the monitor screen, with the
Manufacturer field highlighted.
Use the left/right cursor keys to select
the manufacturer SCROLLER.
Move the cursor down to the Frames
field in the window, then use the
left/right cursor keys to select the
required number of frames (1 - 50).
Press the ENTER key or click on the
OK button in the window to complete
the assignment.
The Assign Fixture Type Window is
closed and SCROLLER and the
number of frames are displayed in the
Manufacturer and Type columns of the
fixture table respectively.
Assigning Fixture Types from
Files on Floppy Disk
This section describes how to assign a
fixture to one of the fixture types stored
on a floppy disk.
Ensure that a floppy disk containing
the required fixture file(s) is inserted
into the floppy disk drive.
Select a fixture number, then move to
the Manufacturer/Type field using the
cursor keys or mouse.
Press the ENTER key. The Assign
Fixture Type Window is displayed on
the monitor screen.
Select the From Disk button in the
window with the mouse or press the F7
key on the front panel or keyboard. A
window is displayed showing the
fixture file(s) found on the floppy disk.
Select the required fixture file and
press the ENTER key. The Assign
Fixture Type From Disk window is
displayed on the monitor screen.
Use the left/right cursor keys to select
the required manufacturer (eg Martin).
Move the cursor down to the Type field
in the window, then use the left/right
cursor keys to select the required
fixture type (eg MAC 1200).
Press the ENTER key or click on the
OK button in the window to complete
the assignment.
The Assign Fixture Type From Disk
window is closed and the selected
manufacturer and fixture type are
displayed in the fixture table.
Reassigning Fixtures
A fixture may be reassigned to a
different fixture type, by simply
assigning the new type as described in
the previous sections.
Warning
Reassigning a fixture will affect the
data in any programmed memories,
submasters and palettes. The
original fixture parameter data will
be removed and replaced by the
default values for each parameter in
the new fixture type, with the
exception of the brightness
parameters which are set to zero.
Unassigning Fixtures
Select a fixture number, then move to
the Manufacturer/Type field using the
cursor keys or mouse.
Press the ENTER key. The Assign
Fixture Type Window is displayed on
the monitor screen.
Use the left/right cursor keys to select
“Not Assigned”.
Press the ENTER key or click on the
OK button in the window to complete
the assignment.
The Assign Fixture Type window is
closed and the Manufacturer and Type
fields are cleared in the fixture table.
3 - 12 Illusion 500 Manual 73-741-00 Issue 2
Setup
Figure 3 - 12: Assign Fixture Type Window.
Page 33

Patching Fixtures (1)
1. Move to the DMX Address field of
the fixture using the cursor keys
or mouse.
2. Enter the DMX start address
using the numeric keypad on the
front panel or external keyboard.
3. If the DMX address entered is
valid, the fixture table and DMX
map are updated.
If the DMX address is already
used, a warning message is
displayed.
Patching Fixtures (2)
1. Select the fixture to be patched
using the cursor keys or mouse.
2. Using the mouse, left click on the
required DMX start address in the
colour-coded DMX map.
3. If the DMX address entered is
valid, the fixture table and DMX
map are updated.
If the DMX address is already
used, a warning message is
displayed.
Adding Duplicates
A duplicate is an additional instance of
a fixture which is patched to a different
DMX output address.
Up to 9 duplicates may be added to
each fixture. An extra line of data is
displayed on the screen for each
duplicate defined.
Duplicates are added automatically
when patching the fixture using either
of the following methods:
1. By specifying additional DMX
address(es) separated by AND
when entering the address in the
DMX Address field
(eg 1 AND 21 AND 41)
2. Left clicking the mouse on
additional DMX addresses in the
DMX map.
Providing the DMX addresses are
valid, an extra line will be added for
each duplicate showing it patched to
the specified address.
NOTES
Adding Duplicates
Use the AND key on the front panel or ‘+’
key on external keyboard to separate DMX
addresses when adding duplicates.
Unpatching Fixtures
There are two methods for unpatching
fixtures manually.
1. Move to the DMX Address field of
the required fixture. Enter a DMX
address of 0 (zero) or press the
CLEAR button.
2. Using the mouse, left click on the
corresponding DMX address in
the DMX map.
In both cases the fixture is unpatched
and the fixture table and colour coded
DMX map are updated.
If a duplicate is unpatched, it is
removed from the fixture table. Any
other instances are shuffled down
accordingly.
Illusion 500 Manual 73-741-00 Issue 2 3 - 13
Setup
Figure 3 - 13: Assign Fixtures Screen
Page 34

Associating Dimmer
Channels and Fixtures
A fixture may be associated with up to
three other dimmer channels or
fixtures.
For example, a scroller fixture may be
associated with its lamp, or up to four
separate fixtures may be associated
together.
Dimmer channels and fixtures are
associated with a fixture by entering
information into the fixture table.
1. Select a fixture to be associated
and move to the Associated field.
2. To associate a fixture: simply
enter the fixture number in the
Associated field.
To associate a dimmer channel:
press the CHANNEL button
followed by the channel number.
If more than one channel or
fixture is to be associated, enter
each channel number or fixture
number separated by a ‘+’ (AND).
If the data entered is valid the fixture
table is updated accordingly.
If the data is invalid, eg. a channel or
fixture number entered is already in an
association, a warning message is
displayed.
To remove an association: enter 0
(zero) in the Associated field.
Find Channel Function
This function provides a quick method
for finding out which dimmer channel,
fixture or auxiliary is patched to a
particular DMX channel.
1. Using the mouse, right click on
the required DMX channel
number in the DMX map, and
select the Find Channel option.
If a fixture is patched to the DMX
address, the highlight bar will
automatically move to the fixture
number in the channel table.
If a dimmer channel or auxiliary is
patched to the selected DMX channel,
a warning message is displayed,
indicating which channel or auxiliary is
patched to that DMX address.
If nothing is patched to the selected
DMX channel, a warning message is
displayed indicating that nothing is
patched to that channel.
NOTE
Associated Channels and Fixtures
In the Assign Fixtures screen, dimmer
channel and fixture associations are shown in
the Associated column. Dimmer Channel
numbers are prefixed with ‘C’ and multiple
associations are indicated by ‘+’ between
the channel or fixture numbers.
Eg, if fixture 1 was associated with fixtures 2
and 3 and dimmer channel 8, the Associated
column for channel 1 would read 2+3+C8.
3 - 14 Illusion 500 Manual 73-741-00 Issue 2
Setup
Figure 3 - 14 : Assign Fixtures Screen
Page 35

Autopatch Out
The Autopatch Out function allows
selected dimmer channels and fixtures
to be patched to the DMX outputs,
unpatched, or unassigned in a single
operation.
The Autopatch Out screen contains a
dimmer channel and fixture selection
area, a command line area and a
colour coded DMX map which shows
the current state of the DMX patch.
Autopatching Dimmer
Channels and Fixtures
1. Select Autopatch Out from the
Desk Setup options, then press
the down cursor key to enter the
Autopatch Out screen. The
command line changes to white.
2. Select the dimmer channels
and/or fixtures to be patched by
using the numeric keypad or the
mouse. The selected channels
and fixtures are displayed in red
in the selection area.
3. To patch the selected dimmer
channels and/or fixtures, press
the @ key followed by the
required DMX start address and
then ENTER (or using the mouse
click on the start address in the
DMX map on the screen).
The selected channels and
fixtures are patched and the DMX
map is updated to show where
they have been patched to.
Unpatching Dimmer
Channels and Fixtures
1. Select Autopatch Out from the
Desk Setup options, then press
the down cursor key to enter the
Autopatch screen. The command
line changes to white.
2. Select the dimmer channels
and/or fixtures using the numeric
keypad or mouse. The selected
channels and fixtures are
displayed in red.
3. Press the @ key followed by
CLEAR. The selected channels
and fixtures are unpatched and
the DMX map is updated.
Unassigning Dimmer
Channels and Fixtures
1. Select Autopatch Out from the
Desk Setup options, then press
the down cursor key to enter the
Autopatch screen. The command
line changes to white.
2. Select the dimmer channels
and/or fixtures using the numeric
keypad or mouse. The selected
channels and fixtures are
displayed in red.
3. Press the @ key followed by 999
and ENTER. The selected
channels and fixtures are
unassigned and the DMX map is
updated accordingly.
NOTES
Autopatch Out
If autopatching would overlap dimmer
channels, fixtures or auxiliaries already
patched, a warning message is displayed.
The user is given the option of unpatching
the overlapping channels or fixtures and
continuing with the autopatch, or cancelling
the autopatch operation.
If the selection to be autopatched includes
dimmer channels and fixtures, they will be
patched in the following order:
1. Dimmer channels.
2. Brightness parts of composite fixtures.
3. Other parts of composite fixtures.
4. Other (non-composite) fixtures.
Illusion 500 Manual 73-741-00 Issue 2 3 - 15
Setup
Figure 3 -15 : Autopatch Out Screen.
Page 36

Autopatch In (Optional)
If a DMX In upgrade kit has been fitted
to the desk, an Autopatch In function is
provided which allows selected dimmer
channels and fixture brightness
parameters to be patched to DMX
input channels in a single operation.
This option is indicated by the display
of the Autopatch In tab in the Desk
Setup options.
The Autopatch In function works in the
same way as the Autopatch Out
function, except that only dimmer
channels and fixture brightness
parameters can be patched to the
DMX In.
NOTES
Autopatch In
A DMX In channel may only be patched to
one dimmer channel or one fixture brightness
parameter.
Only the brightness parameter of selected
fixtures will be patched to the DMX In.
If any of the selected fixtures do not have a
brightness parameter, a warning message is
displayed.
If autopatching would overlap dimmer
channels or fixtures already patched, a
warning message is displayed.
The user is given the option of unpatching
the overlapping channels or fixtures and
continuing with the autopatch, or cancelling
the autopatch operation.
Clear DMX Patch
This option will allow the user to
unpatch the dimmer channels, fixtures
and auxiliaries which are patched to
the DMX outputs. It will also allow the
user to clear the DMX In patch (if
applicable).
Select the Clear DMX Patch tab from
the Desk Setup options.
The following options are displayed on
the screen:
Clear DMX Patch (Dimmer Channels)
Clear DMX Patch (Fixtures)
Clear DMX Patch (Auxiliaries)
Clear DMX In Patch
Clear All DMX Patches.
Use the mouse or cursor keys and
ENTER to select the required option.
A confirmation window is displayed.
Select the Clear button to confirm the
operation.
3 - 16 Illusion 500 Manual 73-741-00 Issue 2
Setup
Figure 3 -16 : Clear DMX Patch
Page 37

Setup Auxiliary Buttons
The desk provides 4 auxiliary buttons
which can be programmed and
patched to DMX channels.
They are normally used to control
smoke machines or other simple DMX
devices.
Note that an Auxiliary button cannot be
patched to the same DMX address as
a dimmer channel or fixture.
Programming Auxiliaries
1. Select Setup Auxiliary Buttons
from the Desk Setup options. The
auxiliary screen is displayed.
2. Select an auxiliary by scrolling up
or down using the cursor keys, or
use the mouse. The highlight bar
moves to the selected auxiliary.
3. Move to the Name field. Enter a
description using the front panel
or external keyboard (optional).
4. Move to the On Value field. Set to
the required value.
5. Move to the Off Value field. Set to
the required value.
6. Move to the On Time field. Set to
the required value.
7. Move to the Off Time field. Set to
the required value.
8. Move to the Action field. Select
the required action (Momentary or
Push On/Push Off).
Patching Auxiliaries (1)
1. Move to the DMX Address field of
the auxiliary to be patched using
the cursor keys or mouse.
2. Enter the DMX address using the
numeric keypad or keyboard.
3. If the DMX address entered is
valid, the auxiliary table and DMX
map are updated. If the DMX
address is already used, an error
message is displayed.
Patching Auxiliaries (2)
1. Select the auxiliary to be patched
using the cursor keys or mouse.
2. Using the mouse, left click on the
required DMX address in the
colour-coded DMX map.
3. If the DMX address entered is
valid, the auxiliary table and DMX
map are updated. If the DMX
address is already used, an error
message is displayed.
Proportional Patching
1. Select the auxiliary to be patched
using the cursor keys or mouse.
2. Move to the Proportional Patch
field. Set the value as required
(0-400%).
Adding Duplicates
A duplicate is an additional instance of
an auxiliary which is patched to a
different DMX address.
Up to 9 duplicates may be added to
each auxiliary. An extra line is
displayed on the screen for each
duplicate defined.
Duplicates are added automatically
when patching the auxiliary using
either of the following methods:
1. Specifying additional DMX
address(es) separated by AND
when entering the address in the
DMX Address field.
(eg. 101 AND 102 AND 103).
2. Left clicking with the mouse on
additional addresses in the DMX
map on the screen.
Providing that the DMX address is
valid, an extra line will be added for
each duplicate showing it patched to
the specified address.
Playback of Auxiliaries
The playback of auxiliary buttons,
including the effects of fade times and
button actions on the resulting outputs,
is described in Chapter 11.
Illusion 500 Manual 73-741-00 Issue 2 3 - 17
Setup
Figure 3 -17 : Setup Auxiliaries Screen
Page 38

Setup Remote Switches
The desk provides the facility for up to
6 remote switches to be connected to
the desk and assigned to front panel
buttons or macros.
The following front panel buttons may
be assigned to remote switches:
AUX CONTROLS 1 - 4,
DIRECTION, ATTACK, DRIVE,
STEP+, STEP-, BLACKOUT,
PAGE UP, PAGE DOWN,
FLASH FUNCTION,
FLASH BUTTONS,
GO, PAUSE, and GO PREVIOUS.
The default assignments for the
Remote Switches are as follows:
Remote Switch 1 - AUX CONTROL 1
Remote Switch 2 - AUX CONTROL 2
Remote Switch 3 - AUX CONTROL 3
Remote Switch 4 - AUX CONTROL 4
Remote Switch 5 - GO Button
Remote Switch 6 - Not Assigned
Assigning a Remote Switch
1. Select Setup Remote Switches
from the Desk Setup options. The
Remote Switch data is displayed
on the monitor screen.
2. Use the cursor keys to scroll up or
down the table, or use the mouse.
The highlight bar moves to the
selected switch.
3. Move to the right hand column of
the table using the cursor keys or
the mouse.
4. Use the ENTER key or left click
with the mouse to scroll through
the available options. Select the
option required.
Clearing Remote Switches
1. Select a remote switch as
described earlier. Press the
CLEAR button, or right click and
select the Clear option. A
confirmation window is displayed.
2. Click on the Clear button to
confirm the operation.
Testing Remote Switches
1. Press a remote switch connected
to the desk. The corresponding
line in the table changes to green
if the switch is working correctly.
2. Repeat for each remote switch to
be tested.
Note that when testing a remote switch
in Desk Setup, the front panel button or
macro which is assigned to the remote
switch is not actioned.
3 - 18 Illusion 500 Manual 73-741-00 Issue 2
Setup
Figure 3 -18 : Setup Remote Switches Screen
Page 39

Operating Mode
This option allows the user to set or
change the operating mode of the
desk.
The default operating mode of the desk
following a Desk Reset or software
upgrade is Partial.
Setting Operating Mode
1. Select Operating Mode from the
Desk Setup options.
2. Move to the Operating Mode
button. Use the cursor keys or
mouse to select Partial or Full as
required.
Exiting Desk Setup
The Desk Setup Window can only be
closed by either Saving or Cancelling
the Desk Setup.
To save Desk Setup - select the Save
button in the Desk Setup Window or
press F7 on the front panel or
keyboard.
To cancel Desk Setup - select the
Cancel button in the Desk Setup
Window or press F8 on the front panel
or keyboard.
NOTES
Desk Setup
While the Desk Setup Window is displayed
the screen function keys (F1 - F8) are
disabled. Therefore it is not possible to
display any of the other screens (Memories,
Submasters, Cueline etc.) until Desk Setup
has been exited in a controlled manner,
either by saving or cancelling.
Saving Desk Setup
Any changes made to the Desk Setup will
only take effect when the Desk Setup is
saved.
It is possible to continue running the show
while in Desk Setup, but the DMX outputs
will be halted momentarily if the Desk Setup
is saved.
Illusion 500 Manual 73-741-00 Issue 2 3 - 19
Setup
Figure 3 -19 : Operating Mode Screen
Page 40

3 - 20 Illusion 500 Manual 73-741-00 Issue 2
Setup
Page 41

Program Window
Introduction
The Program Window (PW) is
displayed on the monitor screen when
setting up, programming and editing
dimmer channel and fixture parameter
levels in memories, submasters,
groups and palettes.
The PW consists of a header, a user
selectable main section (Brightness,
Colour, Beamshape, Position or
Palettes) and a command line.
Program Window Header
The format and content of the PW
header depends on how the PW is
opened, as described below:
Opening the PW Directly
If the PW is opened directly from the
Memories, Submaster, Cueline, DMX
Output or DMX Patch screens using
any of the front panel buttons below,
the PW header contains the text Edit
Live - Channel Data and a soft button
labelled Close (F8).
Pressing the CHANNEL button - The
Brightness section of the PW is
displayed and the keyword Channel
appears in the command line.
Pressing the GROUP button - The
Brightness section of the PW is
displayed and the keyword Group
appears in the command line.
Pressing the FIXTURE button - The
Brightness section of the PW is
displayed and the keyword Fixture
appears in the command line.
Pressing the PALETTE button - The
Palette section of the PW is displayed
and the command line is clear.
Editing a Memory
If the PW is opened from the Memories
or Cueline screen using the EDIT LIVE
or EDIT BLIND buttons, the header
contains the text Edit Live or Edit Blind,
followed by the memory number,
information, plus the step number, step
name or part number, if applicable.
Editing a Submaster
If the PW is opened from the
Submasters screen using the EDIT
LIVE or EDIT BLIND buttons, the
header contains the text Edit Live or
Edit Blind, followed by the submaster
number and information.
Illusion 500 Manual 73-741-00 Issue 2 4 - 1
Figure 4 - 1: Program Window (Brightness Section)
For news, views and latest software
visit our dedicated Illusion website at:
www.illusionsupport.com
Page 42

Brightness Section
This main section is used to display
and adjust dimmer channel and fixture
brightness parameters.
The Dimmer Channel selection area
contains a bargraph and value for each
used (active) dimmer channel.
The Fixture selection area contains a
bargraph and value for each assigned
fixture.
Dimmer Channel Numbers
The dimmer channel numbers are
displayed in boxes above the
bargraphs.
The text colour of the background is
used to indicate whether the channel is
included or excluded from memory
data and whether it is selected.
Included & not selected - Grey
Included & selected - Red
Excluded & not selected - Dark Grey
Exluded & selected - Dark Red
Fixture Numbers
The fixture numbers are displayed in
boxes above the bargraphs.
The text colour of the background is
used to indicate whether the fixture is
selected or not:
Not selected - Grey
Selected - Red
Bar Graphs
Each assigned dimmer channel and
fixture brightness parameter is
represented by a bar graph.
Each bar graph is divided into two
halves. The left half shows the current
output level and is coloured green.
Editing live - the right half shows the
programmed level (yellow).
Editing blind - the right half shows the
current level (blue). When the level
matches the programmed level or
when the data is saved, the bar
changes from blue to yellow.
Numerical Value
The numerical value of the dimmer
channel or fixture brightness parameter
is displayed beneath the bar graphs.
The value is displayed as a percentage
or DMX value depending on the option
selected in Desk Setup.
Partial Mode - The background colour
indicates if the channel or fixture
parameter is tagged (programmed):
Untagged (unprogrammed) - Grey
Tagged (programmed) - Red.
Full Mode - The colour of the box
containing the numeric value indicates
if the channel or fixture parameter is
programmed, and also if the current
value is equal to the programmed
value, as follows:
Editing Live - Unprogrammed channels
and fixture parameters are grey.
Programmed channels and fixture
parameters are yellow when the
programmed value is equal to the
current value, otherwise green.
Editing Blind - Unprogrammed
channels and fixture parameters are
grey. Programmed channels and
fixture parameters are yellow when the
programmed value is equal to the
current value, otherwise blue.
Multi Part Scenes
Dimmer channels and fixture
parameters which are programmed in
other parts of the memory are
displayed in orange.
Topsetted Channels
If a dimmer channel or fixture
brightness parameter has been
topsetted, a red line is displayed
across the output bar graph at the
topset level.
4 - 2 Illusion 500 Manual 73-741-00 Issue 2
Program Window
Figure 4 - 2 : Program Window - Brightness Section
Page 43

Colour Section
The Colour section is used to display
and adjust fixture colour parameters
(eg Cyan, Magenta, Yellow, Colour
Wheels etc.).
The Colour section contains a soft
Wheel Group Button, fixture parameter
data and a Fixture Selection area.
Wheel Group Button
This soft button performs the same
function as the WHEEL GROUP button
on the front panel, ie is used to cycle
through the groups of parameters.
Fixture Parameter Data
This section of the window shows data
on the fixture colour parameters that
are currently assigned to the three
control wheels on the front panel.
The actual fixture parameters
displayed are determined by the fixture
type, attribute and wheel group
selected. The following information is
displayed for each fixture parameter:
Number - The number of the
parameter within the current attribute.
Name - The name of the fixture
parameter (eg Cyan, Yellow).
Value - The current numeric value of
the parameter. This is displayed as a
percentage or DMX value depending
on the option selected in Desk Setup.
Details - If the fixture parameter details
are defined in the fixture data file, this
section of the screen contains a list of
the details in increasing DMX value
order (eg Colour 1, Colour 2 etc..)
Fixture Selection Area
This section of the window contains a
soft button for each of the assigned
fixtures that has one or more colour
parameters.
Selected fixtures are shown in red,
unselected fixtures in grey.
The ‘Primary Fixture’ is highlighted.
Illusion 500 Manual 73-741-00 Issue 2 4 - 3
Program Window
Figure 4 - 3 : Program Window - Colour Section
Page 44

Beamshape Section
The Beamshape section is used to
display and adjust fixture beamshape
parameters (eg Gobo, Iris, Focus etc).
The Beamshape section contains a
soft Wheel Group Button, fixture
parameter data and a Fixture Selection
area.
Wheel Group Button
This soft button performs the same
function as the WHEEL GROUP button
on the front panel, ie is used to cycle
through the groups of parameters.
Fixture Parameter Data
This section of the window shows data
on the fixture beamshape parameters
that are currently assigned to the three
control wheels on the front panel.
The actual fixture parameters
displayed are determined by the fixture
type, attribute and wheel group
selected. The following information is
displayed for each fixture parameter:
Number - The number of the
parameter within the current attribute.
Name - The name of the fixture
parameter (eg Gobo, Iris, Focus).
Value - The current numeric value of
the parameter. This is displayed as a
percentage or DMX value depending
on the option selected in Desk Setup.
Details - If the fixture parameter details
are defined in the fixture data file, this
section of the screen contains a list of
the details in increasing DMX value
order (eg Gobo 1, Gobo 2 etc..)
Fixture Selection Area
This section of the window contains a
soft button for each of the assigned
fixtures that has one or more
beamshape parameters.
Selected fixtures are shown in red,
unselected fixtures in grey.
The ‘Primary Fixture’ is highlighted.
4 - 4 Illusion 500 Manual 73-741-00 Issue 2
Program Window
Figure 4 - 4 : Program Window - Beamshape Section
Page 45

Position Section
The Position section is used to display
and adjust fixture position parameters
(eg Pan, Tilt) and movement effect
parameters.
The Position section contains a soft
Wheel Group Button, fixture parameter
data and a Fixture Selection area.
Wheel Group Button
This soft button performs the same
function as the WHEEL GROUP button
on the front panel, ie is used to cycle
through the groups of parameters.
Fixture Parameter Data
This section of the window shows data
on the fixture position parameters or
movement effect parameters that are
currently assigned to the three control
wheels on the front panel.
The actual fixture or movement effect
parameters displayed are determined
by the fixture type, attribute and wheel
group selected.
The following information is displayed
for each fixture parameter:
Number - The number of the
parameter within the current attribute.
Name - The name of the fixture
parameter (eg Pan, Tilt, P/T Spd).
Value - The numeric value of the
parameter. This is displayed as a
percentage or DMX value depending
on the option selected in Desk Setup.
The Movement Effect parameters have
there own ranges - see later.
Details - If the fixture parameter details
are defined in the fixture data file, this
section of the screen contains a list of
the details in increasing DMX value.
Fixture Selection Area
This section of the window contains a
soft button for each of the assigned
fixtures that has one or more position
parameters.
Selected fixtures are shown in red,
unselected fixtures in grey.
The ‘Primary Fixture’ is highlighted.
NOTE
Movement Effect Parameters
For fixtures with pan and tilt, there are six
movement effect parameters (Effect, Size X,
Size Y, Offset, Rotation and Speed).
These parameters are displayed as two
groups of position parameters after the real
position parameters for the fixture.
Illusion 500 Manual 73-741-00 Issue 2 4 - 5
Program Window
Figure 4 - 5 : Program Window - Position Section
Page 46

Palettes Section
The Palettes section is used to display,
reference and output Colour,
Beamshape and Position palettes.
The Palettes section contains three
palette lists (Colour, Beamshape and
Position) and a Fixture Selection area.
Palette Lists
These three sections of the window
show data on the Colour, Beamshape
and Position palettes.
Each of the palette lists shows all the
programmed palettes for the attribute
in numerical order.
Each palette is identified by it’s number
and information text (eg 1 : White).
The selected palette, if applicable, is
highlighted with a red bar.
Fixture Selection Area
This section of the window contains a
soft button for each of the assigned
fixtures.
Selected fixtures are shown in red,
unselected fixtures in grey.
The ‘Primary Fixture’ is highlighted.
4 - 6 Illusion 500 Manual 73-741-00 Issue 2
Program Window
Figure 4 - 6 : Program Window - Palettes Section
Page 47

Command Line Area
The command line area displays the
commands entered from the front
panel keys, external keyboard or
mouse (eg channel or fixture selection,
level data etc).
When the ENTER button is pressed to
complete a command, a control wheel
is moved, the mouse is used to set a
level or the HOME button is pressed,
the text on the command line is
cleared.
Use the left arrow key to delete
command items already on the
command line.
Long commands will wrap around onto
the next line.
Invalid or unprogrammed memory,
submaster, group or palette numbers
in commands will be ignored.
Using the Mouse in the PW
The main sections of the Program
Window can be selected by clicking on
the required tab using the mouse.
Right clicking in the channel or fixture
selection area of the PW displays a
popup menu with the options Save,
Save As, Cancel, Undo and Redo.
Selecting any of these menu options
performs the same function as
pressing the corresponding key on the
front panel.
Channel Information
Right clicking on a dimmer channel
number in the Brightness section
opens a Channel Info window
containing all the information on the
dimmer channel (number, name, DMX
address etc.)
Fixture Information
Right clicking on a fixture number in
the PW opens a Fixture Info window
containing all the information on the
dimmer channel (number, name,
manufacturer, type, DMX address etc)
Illusion 500 Manual 73-741-00 Issue 2 4 - 7
Program Window
Figure 4 - 7: Channel Info and Fixture Info Windows
Page 48

Programming Dimmer
Channels
This section describes how to select
and program dimmer channels using
commands, the control wheels or the
mouse.
Selecting Dimmer Channels
Individual dimmer channels or
combinations of channels can be
selected using the numeric keypad and
associated buttons on the front panel.
Dimmer channels can also be selected
or deselected by left clicking on the
channel number in the PW.
The currently selected channels are
displayed on a red or dark red
background in the PW.
Previous and Next Buttons
Previous (F1) and Next (F2) buttons
are provided in the PW to allow quick
selection of the previous or next
dimmer channel.
Associated Channels
The ASSOCIATED button on the front
panel is used to deselect a selected
dimmer channel and select the next
channel in the association.
Selecting All Non-Zero
Dimmer Channels
If the command line is clear, pressing
ENTER ENTER will deselect all the
currently selected dimmer channels
and then select all non-zero dimmer
channels.
In live editing - all non-zero output
channels are selected
In blind editing - all non-zero
programmed channels are selected.
Deselecting Channels
The EXCEPT key can be used to
deselect a single channel:
EXCEPT CHANNEL 7
The EXCEPT and THRU keys can be
used to deselect a range of channels.
EXCEPT CHANNEL 7 THRU 10
Pressing the CLEAR key on the front
panel will deselect all currently
selected dimmer channels.
Tagging Dimmer Channels
When the desk is in Partial Mode,
various methods are provided for
tagging and untagging the dimmer
channels.
When a dimmer channel is untagged,
the background of the numerical value
field is grey, when tagged, the
background changes to red.
Automatic Tagging
When a dimmer channel level is
adjusted using a command, the control
wheel or the mouse, the channel is
automatically tagged:
Manual Tagging
To toggle the tag status of a single
dimmer channel, left click on the
channel value field in the PW or enter
the following command:
CHANNEL X BRIGHTNESS ENTER
The tag status of several dimmer
channels can be toggled in a single
command, for example:
CHANNEL 1 THRU 20 BRIGHTNESS
ENTER
4 - 8 Illusion 500 Manual 73-741-00 Issue 2
Program Window
Figure 4 - 8 : Program Window - Brightness Section
Page 49

Setting Dimmer Channel
Levels
There are several methods which can
be used to set the levels of dimmer
channels:
• Entering commands using the
numeric keypad and associated
buttons on the front panel.
•
The HOME button.
• The first finger control wheel.
• The mouse.
The new channel levels are displayed
in the PW when the command is
completed, the HOME key is pressed,
the wheel is moved or the mouse is
used to adjust the level(s).
The new dimmer channel levels are
output live on the DMX if the channel
data is being edited live.
If editing blind, the DMX outputs are
not affected.
The following sections give examples
on how to use the various controls to
select and set channel levels.
All examples in this chapter use the
default Double Digit Percentage entry
format.
For details of entering channel levels
using different formats, see chapter 11.
Setting a Single Channel
CHANNEL 1 @ 50 ENTER
sets dimmer channel 1 to 50%.
The AND Key
The AND key is used to select a
number of channels.
CHANNEL 1 AND 2 @ 50 ENTER
sets dimmer channels 1 and 2 to 50%.
The THRU Key
The THRU key is used to select a
range of dimmer channels. The
channel range can be specified in
either direction, for example:
CHANNEL 1 THRU 6 @ 50 ENTER
sets channels 1,2,3,4,5 and 6 to 50%.
CHANNEL 11 THRU 8 @ 75 ENTER
sets channels 8,9,10 and 11 to 75%.
The EXCEPT Key
The EXCEPT key is used to remove a
dimmer channel from the selection, for
example:
CHANNEL 1 THRU 6 EXCEPT 4 @ 70
ENTER
sets channels 1,2,3,5 and 6 to 70%.
The GROUP Key
The GROUP key is used to select a
pre-programmed group of dimmer
channels and/or fixtures - see section
on Groups later in this chapter.
The HOME Key
The HOME key is a quick method of
setting the selected dimmer channel(s)
to the ‘Home’ value which is defined in
Desk Setup, for example:
CHANNEL 1 HOME
CHANNEL 2 AND 3 HOME
CHANNEL 10 THRU 20 HOME
Setting Channels to Full
The @ key can be used as a quick
method of setting the selected
channel(s) to full, for example:
CHANNEL 1 @@
CHANNEL 5 AND 6 @@
CHANNEL 11 THRU 20 @@
Using the Control Wheel
The first finger control wheel can be
used to continually adjust the level(s)
of the selected dimmer channel(s).
The wheel movement will complete the
command.
If several dimmer channels are
selected, the resultant levels of the
dimmer channels is dependent on the
Wheel Edit Mode - see later for details.
Example commands using the wheel:
CHANNEL 1 <wheel>
CHANNEL 2 AND 3 <wheel>
CHANNEL 5 THRU 10 <wheel>
GROUP 1 <wheel>
Using the Mouse
The mouse can be used to adjust the
level of a dimmer channel by clicking in
the bar graph area.
If several dimmer channels are
selected, and the mouse is used to
adjust the level of one of the selected
channels, all the selected channels will
increase or decrease by the same
amount.
Illusion 500 Manual 73-741-00 Issue 2 4 - 9
Program Window
Page 50

Programming Fixtures
This section describes how to select
and program fixture parameters.
Fixture data is normally programmed
by selecting the fixture(s), selecting the
attribute and then adjusting the fixture
parameters using the control wheels.
It is also possible to select and adjust
fixture parameters using the numeric
keypad and associated keys via
commands, or by using the mouse.
Fixture Selection
Soft fixture selection buttons are
displayed in the main sections of the
PW to allow fixtures to be selected and
deselected using the mouse.
It is also possible to select fixtures
using the FIXTURE button, numeric
keypad and associated keys.
Any combination of fixtures may be
selected at the same time regardless
of their fixture type.
Selected fixtures are indicated in red,
unselected fixtures are displayed in
grey.
The first fixture, numerically, in the
selection is designated as the Primary
Fixture - see later for details.
Previous and Next Buttons
Previous (F1) and Next (F2) soft
buttons are provided to allow quick
selection of the previous or next fixture.
Associated Fixtures
The ASSOCIATED button on the front
panel is used to deselect a selected
fixture and select the next fixture in the
association.
Selecting Single Fixtures
Individual fixtures can be selected and
deselected as required using the
mouse or FIXTURE button and
numeric keypad.
Selecting Multiple Fixtures
Multiple fixtures can be selected in a
single command using the FIXTURE
key, numeric keypad and associated
keys, for example:
FIXTURE 2 AND 3
FIXTURE 5 THRU 10
FIXTURE 11 THRU 20 EXCEPT 14
The “Primary Fixture”
The “Primary Fixture” is indicated in
the fixture selection area by having a
thicker border round the fixture
selection button.
The fixture parameters displayed in the
PW relate to the “Primary Fixture”.
Fixture Tagging
When the desk is in Partial Mode,
various methods are provided for
tagging and untagging the fixture
parameters.
When a fixture parameter is untagged,
the background of the parameter
number, name and value fields are
grey, when the parameter is tagged,
the background fields change to red.
Automatic Tagging
When a fixture parameter level is
adjusted using a command, the control
wheel or the mouse, the parameter is
automatically tagged.
Manual Tagging
To toggle the tag status of a single
fixture parameter, left click on the
parameter value field (brightness), the
parameter number field (colour,
beamshape, position) or enter the
following command:
FIXTURE X <attribute> N ENTER
The tag status of all the fixture
parameters of a particular attribute can
be toggled by holding down the
attribute button on the front panel for
one second.
4 - 10 Illusion 500 Manual 73-741-00 Issue 2
Program Window
Figure 4 - 9 : Program Window - Colour Section
Page 51

Attribute Selection
Once a fixture (or fixtures) have been
selected, the attribute can be selected
using the attribute buttons on the front
panel (BRIGHTNESS, COLOUR,
BEAMSHAPE, POSITION), or by
clicking on the attribute tab in the PW.
The red lights in the attribute buttons
and the attribute tabs in the PW
indicate the selected attribute.
The corresponding fixture parameters
are assigned to the three CONTROL
WHEELS.
The fixture parameter names and
values are displayed in the PW.
Fixture Brightness values are
displayed as a percentage or DMX
value depending on the HTP Format
option in Desk Setup.
Fixture Colour, Beamshape and
Position values are displayed as a
percentage or DMX value depending
on the LTP Format option in Desk
Setup.
For 16 bit parameters (two DMX
channels), the parameter value is
displayed as two separate values; the
first representing the ‘coarse’ value,
the second the ‘fine’ value.
In Position - the Pan parameter is
always assigned to the thumb wheel;
the Tilt parameter is always assigned
to the first finger wheel.
Movement Effect parameters are
displayed in two separate wheel
groups after the real Position
parameters for the fixture.
Controlling Fixture
Parameters with the Wheels
When the fixture(s) and attribute have
been selected, the control wheels are
used to adjust the parameter levels.
If more than one fixture is selected, the
PW shows the fixture parameter data
for the “Primary Fixture” only.
If all the selected fixtures are of the
same fixture type moving the control
wheels will adjust the same
parameters on each of the selected
fixtures.
However, if the selected fixtures are of
different fixture types the following
rules apply:
The control wheels will control the
fixture parameters displayed on the
PW for the “Primary Fixture” (and any
other selected fixtures of the same
fixture type), and they will control the
corresponding parameters (where
applicable) for the selected fixtures of
different fixture types.
The corresponding parameter is
defined as being the parameter which
would appear on the same wheel in the
same wheel group for the currently
selected attribute.
It should be noted that with colour and
beamshape attributes particularly, the
corresponding parameters for different
fixture types could be totally different
functions on the fixtures themselves.
For example - Beamshape Group 1
wheel 1 may be a Gobo wheel on one
fixture but a shutter/strobe on another
fixture, focus on another etc.
When several fixtures are selected at
the same time, adjusting a fixture
parameter using a control wheel may
result in different parameter values
being set depending on the Wheel
Editing Mode selected - see later in
this chapter for further details.
Scroller Fixtures
Scroller fixtures have a single colour
parameter and can be programmed by
frame number or actual percentage or
DMX values using the numeric keypad
and associated keys, control wheel or
mouse.
Programming Scroller
Fixtures by Frame Number
Scroller fixtures can be set to a specific
frame number using the numeric
keypad and associated keys.
Select the required fixture(s), then
enter @ followed by the frame number
and ENTER. For example:
FIXTURE 1 @ FRAME 4 ENTER
This only works when all the selected
fixtures are scrollers. The keyword
FRAME is inserted automatically into
the command line after the @ to
indicate that the next number entered
will be taken as a frame number rather
than as an absolute value.
If the frame number entered is too high
for a scroller fixture then the scroller
will be set to its highest frame value.
Programming Scrollers by
Absolute Values
Scroller fixtures can be set to any
absolute value using the numeric
keypad and associated keys, control
wheel or mouse using the various
methods described below:
If the selected fixtures contain a
combination of scrollers and other
fixture types, the number entered after
the @ will be taken as a percentage or
DMX value (depending on the LTP
Format option selected in Desk Setup).
All the selected fixture parameters are
set to the specifed value.
Select the required scroller fixture(s)
and press the HOME button. The
selected scrollers are set to their home
values (frame 1).
Select the required scroller fixture(s)
and adjust the parameter level using
the control wheel or the mouse.
Illusion 500 Manual 73-741-00 Issue 2 4 - 11
Program Window
Page 52

Commands for Setting
Fixture Parameters
The following sections contain various
commands for setting and adjusting
fixture parameters using the numeric
keypad and associated keys on the
front panel of the desk.
Commands which include setting a
parameter to an absolute numeric
value are subject to the Direct Action,
HTP Format and LTP Format options
in Desk Setup.
Note that all the examples in the
following sections use the default entry
format (double digit percentage for
HTP and DMX values for LTP).
For details of entering parameter levels
using other formats, see chapter 11.
All other commands relating to fixture
data are actioned when the command
is completed with the ENTER key,
except where the command contains
an implicit Enter (eg HOME).
Brightness Parameters
Adjusting fixture brightness parameters
live temporarily overides the normal
HTP mixing.
Therefore it is possible to bring a
fixture brightness parameter level
down below its normal output value
generated from the various HTP
sources (playback X, playback A/B,
submasters and DMX In).
Since a fixture can only have a single
brightness parameter, the syntax for
setting brightness parameters is similar
to that for dimmer channels (see earlier
in this chapter).
To set the brightness parameter for a
fixture to a specific value (eg 50%):
FIXTURE 1 @ 50 ENTER
To set the brightness parameter for a
fixture to its ‘home value:
FIXTURE 2 BRIGHTNESS HOME
To set the brightness parameter for a
fixture to full (100%):
FIXTURE 3 @ @
Colour Parameters
In setting colour parameters for fixtures
(eg Cyan, Magenta, Yellow etc.) the
keyword COLOUR and the parameter
number are used to specify the actual
fixture parameter to be adjusted
The colour parameters for a fixture are
numbered in wheel group order.
The parameter number is displayed to
the left of the parameter name in the
Program Window.
The complete syntax for setting a
colour parameter is as follows:
FIXTURE X COLOUR Y @ Z ENTER
Example: Fixture 1 had three colour
parameters, Cyan (1), Magenta (2) and
Yellow (3):
FIXTURE 1 COLOUR 1 @ 0 ENTER
Sets the Cyan parameter to zero.
FIXTURE 1 COLOUR 2 @ 128
ENTER
Sets the Magenta parameter to 128.
FIXTURE 1 COLOUR 3 @ 255
ENTER
Sets the Yellow parameter to 255.
It is also possible to set several colour
parameters and/or fixtures at the same
time, for example:
FIXTURE 1 COLOUR 1 AND 2 @ 255
ENTER
FIXTURE 1 AND 2 COLOUR 3 @ 128
ENTER
FIXTURE 1 THRU 4 COLOUR 1 AND
2 @ 255 ENTER
4 - 12 Illusion 500 Manual 73-741-00 Issue 2
Program Window
Page 53

Beamshape Parameters
In setting beamshape parameters for
fixtures (eg Gobo, Focus, Iris etc.) the
keyword BEAMSHAPE and the
parameter number are used to specify
the actual fixture parameter to be
adjusted
The beamshape parameters for a
fixture are numbered in wheel group
order.
The parameter number is displayed to
the left of the parameter name in the
Program Window.
The complete syntax for setting a
beamshape parameter is as follows:
FIXTURE X BEAMSHAPE Y @ Z
ENTER
Example: Fixture 1 has three
beamshape parameters, Gobo (1),
Focus (2) and Iris (3):
FIXTURE 1 BEAMSHAPE 1 @ 0
ENTER
Sets the Gobo parameter to zero.
FIXTURE 1 BEAMSHAPE 2 @ 128
ENTER
Sets the Focus parameter to 128.
FIXTURE 1 BEAMSHAPE 3 @ 255
ENTER
Sets the Iris parameter to 255.
It is also possible to set several
beamshape parameters and/or fixtures
at the same time, for example:
FIXTURE 2 BEAMSHAPE 1 AND 2 @
255 ENTER
FIXTURE 3 AND 4 BEAMSHAPE 3 @
128 ENTER
FIXTURE 5 THRU 8 BEAMSHAPE 1
AND 2 @ 255 ENTER
Position Parameters
In setting position parameters for
fixtures (eg Pan, Tilt etc.) the keyword
POSITION and the parameter number
are used to specify the actual fixture
parameter to be adjusted
The position parameters for a fixture
are numbered in wheel group order.
The parameter number is displayed to
the left of the parameter name in the
Program Window.
The complete syntax for setting a
position parameter is as follows:
FIXTURE X POSITION Y @ Z ENTER
Example: Fixture 1 has three position
parameters, Pan (1), Tilt (2) and Mov
Spd(3):
FIXTURE 1 POSITION 1 @ 0 ENTER
Sets the Pan parameter to zero.
FIXTURE 1 POSITION 2 @ 128
ENTER
Sets the Tilt parameter to 128.
FIXTURE 1 POSITION 3 @ 255
ENTER
Sets the Mov Spd parameter to 255.
It is also possible to set several
position parameters and/or fixtures at
the same time, for example:
FIXTURE 2 POSITION 1 AND 2 @
255 ENTER
FIXTURE 3 AND 4 POSITION 3 @
128 ENTER
FIXTURE 5 THRU 8 POSITION 1 AND
2 @ 255 ENTER
Movement Effects
A movement effect can be added to
any fixture which has Pan and Tilt
parameters.
The six movement effect parameters
are displayed in two separate wheel
groups after the Position parameters of
the fixture (Pan, Tilt etc.):
Effect : None, Ellipse, Quad, Triangle
and Eight (default = None).
Size X: 0 - 100 (default = 0).
Size Y: 0 - 100 (default = 0).
Offset: 0 - 100 (default = 0).
Rotation: 0 - 359 degrees (default = 0)
Speed: -100 to +100 (default = 0)
By adjusting the Size X and Size Y
parameters, a wide range of shapes
and effects can be achieved.
Any effect can be rotated using the
Rotation parameter to produce
diagonal lines, diamonds etc.
The Offset parameter is used to
synchronise movement effects and to
set the start position within the effect.
The Speed parameter affects both the
speed and direction of the effect (-100
is full speed anti-clockwise; zero is
stopped, +100 is full speed clockwise)
Adding Movement Effects
Select the required fixture(s) and the
Position attribute. Set the Pan and Tilt
parameters to the ‘base position’ for
the effect.
Press the WHEEL GROUP button to
display the first three movement effect
parameters.
Select the Effect, Size X and Size Y
using the control wheels.
Press the WHEEL GROUP button
again to display the second three
movement effect parameters.
Select the Offset, Rotation and Speed
using the control wheels.
Illusion 500 Manual 73-741-00 Issue 2 4 - 13
Program Window
Page 54

Copying Fixture Parameter
Data from a Memory
This command allows the user to copy
programmed fixture data from a
memory into the Program Window.
For example, extract all the
programmed data for fixture 1 from
memory 23 and copy it into the
Program Window.
To copy all the programmed data for a
fixture from a programmed memory the
command syntax is as follows:
FIXTURE X @ MEMORY Y ENTER
To copy the programmed brightness,
colour, beamshape or position data
only for a fixture from a programmed
memory the commands are as follows:
FIXTURE X BRIGHTNESS @
MEMORY Y ENTER
FIXTURE X COLOUR @
MEMORY Y ENTER
FIXTURE X BEAMSHAPE @
MEMORY Y ENTER
FIXTURE X POSITION @
MEMORY Y ENTER
Note - if the memory specified is a
Chase, Sound to Light or Ripplesound
memory, the fixture data from the first
step only is copied.
Copying Fixture Parameter
Data from a Submaster
This command allows the user to copy
fixture data from a programmed
submaster into the Program Window.
If the specified submaster contains a
transferred memory, then the fixture
data for the memory will be used (see
previous section for details).
To copy all the programmed data for a
fixture from a programmed submaster
the command syntax is as follows:
FIXTURE X @ SUBMASTER P.S
ENTER
Where P is the page number and S is
the submaster number.
To copy the programmed brightness,
colour, beamshape or position data
only for a fixture from a programmed
submaster the commands are as
follows:
FIXTURE X BRIGHTNESS @
SUBMASTER P.S ENTER
FIXTURE X COLOUR @
SUBMASTER P.S ENTER
FIXTURE X BEAMSHAPE @
SUBMASTER P.S ENTER
FIXTURE X POSITION @
SUBMASTER P.S ENTER
Copying Fixture Parameter
Data from another Fixture
This command allows the user to copy
fixture data from another fixture.
To copy all the programmed parameter
data from another fixture the command
syntax is as follows:
FIXTURE X @ FIXTURE Y ENTER
To copy the brightness, colour,
beamshape or position data from
another fixture the commands are as
follows:
FIXTURE X BRIGHTNESS @
FIXTURE Y ENTER
FIXTURE X COLOUR @
FIXTURE Y ENTER
FIXTURE X BEAMSHAPE @
FIXTURE Y ENTER
FIXTURE X POSITION @
FIXTURE Y ENTER
4 - 14 Illusion 500 Manual 73-741-00 Issue 2
Program Window
Page 55

Adding Data from a Memory
This command provides the facility to
include the dimmer channel and fixture
parameter data from another
programmed memory into the PW.
The command is as follows:
MEMORY N @ X ENTER
Where N is the memory number and X
is a percentage.
The values of the programmed dimmer
channels and fixture brightness
parameters in memory N are multiplied
by X% and added into the data in the
PW on a HTP basis.
The values of the programmed fixture
colour, beamshape and position
parameters in memory n are copied
directly into the corresponding
parameters in the PW, replacing the
original data.
If the memory specified is a chase,
sound to light or ripplesound memory,
the dimmer channel and fixture
parameter data for the first step is
used.
If the memory specified is a multi part
scene, the programmed data from all
the programmed parts of the memory
are combined, and then added into the
PW as described above.
If the memory specified is invalid, or
unprogrammed, an error message is
displayed and the data in the PW is left
unaltered.
Adding Data from a
Submaster
This command provides the facility to
include dimmer channel and fixture
parameter data loaded onto a
submaster, or the memory data
transferred onto a submaster, into the
PW.
The command is as follows:
SUBMASTER P.S @ X ENTER
Where P is the page number, S is the
submaster number and X is a
percentage.
The values of the programmed dimmer
channels and fixture brightness
parameters in the submaster data or
transferred memory are multiplied by
X% and added into the data in the PW
on a HTP basis.
The values of the programmed fixture
colour, beamshape and position
parameters in the submaster data or
transferred memory are copied directly
into the corresponding channels in the
PW, replacing the original data.
If the memory transferred onto the
specified submaster is a chase, sound
to light or ripplesound memory, then
the data from the first step is used.
If the submaster specified is invalid, or
does not contain channel data or a
transferred memory, an error message
is displayed and the data in the PW is
left unaltered.
The Home Function
The Home function provides a quick
method of setting fixture parameters to
their home (default) values.
For a typical fixture this will be
brightness (intensity) to full, colour to
white, no gobos, no effects, shutter
open, pan and tilt to mid position.
The home (default) values for each
fixture parameter are defined in the
fixture personality data.
The Home function can be performed
at the fixture, attribute or parameter
level, as required.
Homing All Parameters
Select the fixture(s) and press the
HOME button. Examples:
FIXTURE 1 HOME
FIXTURE 2 AND 3 HOME
FIXTURE 5 THRU 8 HOME
Homing An Attribute
Select the fixture(s) and attribute
required and then press the HOME
button. Examples:
FIXTURE 1 BRIGHTNESS HOME
FIXTURE 2 COLOUR HOME
FIXTURE 3 BEAMSHAPE HOME
FIXTURE 4 POSITION HOME
Homing A Single Parameter
Select the fixture(s),attribute and
parameter number required and then
press the HOME button. Examples:
FIXTURE 2 COLOUR 1 HOME
FIXTURE 3 BEAMSHAPE 4 HOME
FIXTURE 4 POSITION 2 HOME
Illusion 500 Manual 73-741-00 Issue 2 4 - 15
Program Window
Page 56

Wheel Editing Modes
There is a soft button in the PW header
(equivalent to F6) which defines the
wheel editing mode for each attribute.
In Brightness - this determines how the
control wheel affects the levels of the
selected dimmer channels and/or
fixture brightness parameters.
In Colour, Beamshape and Position this determines how the control wheel
affects the levels of the fixture
parameter assigned to the wheel for
the selected fixtures.
Click on the soft button in the header
or press F6 on the front panel to cycle
through the wheel edit modes.
The action of each of the wheel editing
modes is as follows:
Absolute - All the selected channels or
fixture parameters go to the same
absolute value, regardless of their
original values.
Relative - All the selected channels or
fixture parameters increase or
decrease by the same amount, relative
to their original values.
Proportional - All the selected
channels or fixture parameters
increase or decrease by different
amounts, depending on their original
values.
Fan-First - All the selected channels or
fixture parameters increase or
decrease by different amounts; the first
channel or fixture value is locked.
Fan-Middle - All the selected channels
or fixture parameters increase or
decrease by different amounts; the
middle channel or fixture value is
locked.
Fan-Last - All the selected channels or
fixture parameters increase or
decrease by different amounts; the last
channel or fixture value is locked.
Undoing and Redoing Edits
The UNDO EDIT and REDO EDIT
buttons on the front panel and the
Undo and Redo menu options can be
used to undo and redo dimmer channel
and fixture parameter edits from the
Program Window.
Pressing the UNDO EDIT button or
selecting the Undo menu option will
undo the last channel or fixture
parameter edit made. The text “UNDO”
appears in the command line.
Pressing the UNDO EDIT button
several times will undo the edits one at
a time back as far as the last save or
the maximum edits (20).
Pressing the REDO EDIT button or
selecting the Redo menu option will
redo the last dimmer channel or fixture
parameter edit that was undone. The
text “REDO” appears in the command
line.
NOTES
Undo/Redo Edits
It is not possible to undo/redo channel or
fixture parameter edits across different steps
or parts of a memory, because in order to
move to a different step or part, any edits
must first be saved or lost.
Closing the Program Window
The Program Window is closed by
clicking on the Close (F8) button in the
header or by pressing F8 on the front
panel or keyboard.
If the PW was originally opened using
the CHANNEL, FIXTURE or GROUP
buttons, and dimmer channel or fixture
parameter levels have been adjusted,
these levels will remain on the outputs
when the PW is closed without saving.
These temporary edits to the output
levels will remain until the outputs are
altered via the Playback X, Playback
A/B or submasters.
4 - 16 Illusion 500 Manual 73-741-00 Issue 2
Program Window
Page 57

Groups
The Illusion 500 desk provides 20
user-programmable groups.
A Group is defined as a number of
selected dimmer channels and/or
fixtures.
Groups can be recorded (programmed)
via the Program Window and then
used when programming dimmer
channels and fixtures in memories,
submasters or palettes.
Programming a Group
Groups are programmed from the
Program Window as follows:
Select the required dimmer channels
and/or fixtures.
Press the SAVE AS button or right
click in the PW and select the Save As
option from the menu. The Save As
window is displayed on the screen.
Select the Group option by pressing
the GROUP button or clicking on the
Group tab in the window.
Enter the number of the group in the
Group Number field.
Enter the name of the group in the
Group Info field (optional).
Select the OK button in the window.
Using Groups in the PW
The GROUP command is used as a
quick method for selecting the dimmer
channels and/or fixtures programmed
in a group, and setting their values to a
particular level, for example:
GROUP 1 @ 50 ENTER
GROUP 2 @@
GROUP 3 HOME
GROUP 4 <wheel>
The dimmer channels and fixtures
programmed in the specified group are
shown as selected in the PW.
Previewing Groups
This function is available from the PW
and displays the programmed groups.
1. Ensure that the command line in
the PW is clear.
2. Press the PREVIEW button,
followed by the GROUP button.
A popup window is displayed
showing the number and
information text for each of the
programmed groups in the desk.
3. Press ENTER or click on the OK
button in the window to close the
popup and return to the PW.
NOTES
Recording Group Data
The minimum command required to save the
selected channels/fixtures into a group is:
SAVE AS GROUP N ENTER
Attempting to save as an already
programmed group results in a warning
message.
If no dimmer channels or fixtures are
selected an error message is displayed.
Illusion 500 Manual 73-741-00 Issue 2 4 - 17
Program Window
Figure 4 - 10: Save As .. Window (Group)
Page 58

Palettes
The Illusion 500 desk provides up to
200 palettes each for colour,
beamshape and position.
Palettes are recorded (programmed)
via the Program Window. They can
then be used when programming
memories or submasters.
Programming Palettes
Set up the fixture colour, beamshape
or position parameters to the required
output levels.
Press the SAVE AS button or right
click in the PW and select the Save As
option from the menu. The Save As
window is displayed on the screen.
Select the Colour Palette, Beamshape
Palette or Position Palette option by
pressing the corresponding attribute
button or by clicking on the appropriate
tab in the Save As window.
Enter the number of the palette in the
Palette Number field.
Enter the name of the palette in the
Palette Info field (optional).
Select the OK button in the window.
If the selected palette is
unprogrammed, the fixture parameter
data is saved into the palette.
If the selected palette is programmed a
warning message is displayed,
allowing the user to overwrite the
palette or cancel the operation.
Referencing Palettes
Once a palette has been programmed,
it can then be referenced when
programming memories or
submasters.
Fixtures can be set to reference a
programmed palette using any of the
following methods:
•
Select the Palettes section of the
PW and then select the palette with
the appropriate control wheel.
• Select the Palettes section of the
PW and then select the palette from
the palette list with the mouse.
• Enter a palette reference command
using the front panel keys, for
example:
FIXTURE X COLOUR PALETTE Y
ENTER
FIXTURE X BEAMSHAPE PALETTE
Y ENTER
FIXTURE X POSITION PALETTE Y
ENTER
If a fixture parameter has been set to
reference a palette, the PW will show
the palette reference number (eg P01)
next to the parameter name instead of
the normal percentage or DMX value.
Outputting Palettes
Palettes can also be used for quick
hands on operation of fixtures (eg
select fixtures 1-4 and turn them all to
red, make them strobe, move to centre
stage etc.)
The simplest way to achieve this is via
the Palettes section of the PW as
follows:
Open the PW by pressing the
PALETTE button on the front panel.
The Palettes section of the PW is
displayed.
Select the fixture(s) required using the
FIXTURE and numeric keys or the
mouse.
Select the required palette from the
palette lists using the corresponding
control wheel, or by clicking on the
required palette using the mouse.
4 - 18 Illusion 500 Manual 73-741-00 Issue 2
Program Window
Figure 4 - 11 : Save As .. Window (Colour Palette)
Page 59

Memories
Introduction
The Illusion 500 lighting desk provides
a number of different memory types:
•
Scene
• Multi-Part Scene
• Chase
• Sound to Light
•
Ripplesound
Memory Zero
Memory Zero is a special scene
memory which is displayed on the
Memories and Cueline screens as
memory number “—”.
It has a Go button trigger; delay, fade,
transition and dwell times set to zero;
all dimmer channels and fixture
brightness parameters are set to 0%;
all fixture colour, beamshape and
position parameters are set to their
default values.
Memory Zero can be selected,
previewed, output, copied or
transferred to a submaster, but it
cannot be edited or deleted.
Memory Storage Limits
The Illusion 500 desk has a maximum
capacity equivalent to 400 full scene
memories (all 512 channels used).
The different memory types and
palettes require different amounts of
memory:
A Scene uses one memory ‘block’. A
Multi-Part Scene uses one block per
part. A Chase uses one block per step.
Sound to Light and Ripplesound
memories use 4 blocks each. A colour,
beamshape and position palette
requires one memory block.
Therefore the total number of
memories that can be programmed is
determined by the size of the memory
block and the type of memories used.
Low Memory Warning
The Memory Meter in the Information
Bar shows the percentage of memory
blocks remaining.
When the number of memory blocks
available is getting low (10% left) the
Memory Meter turns red. When there
are no more blocks left, the Memory
Meter flashes red.
Illusion 500 Manual 73-741-00 Issue 2 5 - 1
Figure 5 - 1: Memories Screen
For news, views and latest software
visit our dedicated Illusion website at:
www.illusionsupport.com
Page 60

Memories - Common Data
The following data is common to all
memories regardless of their type, and
is displayed on the Memories screen:
• Memory Number (0 - 999.9)
• Trigger - Determines how the
memory is triggered (GO button,
Auto or At Time).
• Type - Scene, Multi-part Scene,
Chase, Sound to Light or
Ripplesound.
• Information - A text string used to
describe the memory (30 chars).
•
Delay Down - The time delay after
the memory has been triggered
before the HTP channels start to
fade down.
•
Fade Down - The time taken for the
HTP channels to fade down.
•
Delay Up - The time delay after the
memory has been triggered before
the HTP channels start to fade up.
•
Fade Up - The time taken for the
HTP channels to fade up.
•
Colour Delay - The time delay after
the memory has been triggered
before the fixture colour parameters
start to fade to their new levels.
•
Colour Transition - The time taken
for the fixture colour parameters to
fade to their new values.
•
Beamshape Delay - The time delay
after the memory has been triggered
before the fixture beamshape
parameters start to fade to their new
levels.
•
Beamshape Transition - The time
taken for the fixture beamshape
parameters to fade to their new
values.
• Position Delay - The time delay
after the memory has been triggered
before the fixture position
parameters start to fade to their new
levels.
•
Position Transition - The time
taken for the fixture position
parameters to fade to their new
values.
•
Dwell - The time that the memory
remains at its programmed levels.
Memory Numbers
Memory numbers can be whole
numbers (1, 2, 3 etc) or numbers with
a decimal point (1.1, 1.2, 1.3 etc).
This allows up to 9 memories to be
inserted between two whole number
memories. The range of available
memory numbers is 0.1 to 999.9.
Memory Triggers
The memory triggers available depend
on the Time Input option selected in
Desk Setup:
Real Time - Go, Automatic or At Time
triggers are available. If memory trigger
is set to At Time, the start time is
specified in the form hh:mm:ss
(hours, minutes and seconds).
SMPTE or MIDI Time - Automatic or
At Time triggers are available. If the
memory trigger is set to At Time, the
start time is specified in the form
hh:mm:ss:ff (hours, minutes, seconds
and frames).
5 - 2 Illusion 500 Manual 73-741-00 Issue 2
Memories
Figure 5 - 2 : Memories Screen (Detail)
Page 61

Memory Types
The Illusion 500 lighting desk provides
a number of different memory types:
• Scene
• Multi-Part Scene
• Chase
• Sound to Light
•
Ripplesound
All memories contain one or more sets
of Channel Data (ie a level for each
programmed dimmer channel and a
level or palette reference for each
programmed fixture parameter).
Scene Memory
A scene memory has all the common
data plus a single set of channel data.
Multi-Part Scene Memory
A Multi-Part Scene memory consists of
a memory number, type, information
and trigger and up to a maximum of 8
programmed parts.
Each programmed part has its own
information (optional), delay, fade,
transition and dwell times and a set of
channel data.
Chase Memory
A chase memory contains all the
common data plus a number of
programmed steps (maximum 99).
Each programmed step contains a set
of channel data.
It also has the following modifiers:
•
Direction - The order in which the
steps are output (forwards,
backwards or bounce).
• Attack - The transition of the
dimmer channels and fixture
brightness parameters between
steps (snap, slow attack, slow decay
or crossfade).
• Colour Action - The transition of
the fixture colour parameters
between steps (snap or fade).
• Beamshape Action - The
transition of the fixture beamshape
parameters between steps
(snap or fade).
•
Position Action - The transition of
the fixture position parameters
between steps (snap or fade).
• Drive - The method by which the
chase steps are triggered
(Auto, Vari, Bass or Manual).
• Speed - The basic speed of the
chase (1 - 600 bpm).
Sound to Light Memory
A sound to light memory consists of all
the common data plus four ‘steps’
(Lo, Lo-Mid, Hi-Mid and Hi).
Each ‘step’ contains a set of channel
data.
It also has the following modifiers:
•
Attack - Determines how the output
follows the sound input waveform
(snap, slow attack, slow decay or
crossfade).
• Speed - Determines how quickly the
outputs react to the changes in the
sound input waveform (1-16).
Ripplesound Memory
A ripplesound memory consists of all
the common data plus four ‘steps’
(Band 1, Band 2, Band 3, Band 4).
Each ‘step’ contains a set of channel
data.
It also has the following modifiers:
• Attack - Determines how the output
follows the sound input waveform
(snap, slow attack, slow decay or
crossfade).
• Speed - Determines how quickly the
outputs react to the changes in the
sound input waveform (1-16).
Illusion 500 Manual 73-741-00 Issue 2 5 - 3
Memories
Figure 5 - 3 : Memories Screen (Detail)
Page 62

Transition Times
The transition from the Current
memory to the Next memory on the
memory stack (Playback X) is
determined by the delay, fade and
transition times defined for the
incoming memory only.
This allows the user to choose how the
outputs of each attribute behave when
‘fading’ from one memory to the next.
Brightness Transitions
If a dimmer channel or fixture
brightness parameter goes from a low
value to a higher value, the transition is
defined by the Delay Up and Fade Up
parameters.
If a dimmer channel or fixture
brightness parameter goes from a high
value to a lower value, the transition is
defined by the Delay Down and Fade
Down parameters.
If a dimmer channel or fixture
brightness parameter is programmed
at the same levels in the Current and
Next memories, then it will remain at
that level throughout the transition.
Once the Brightness fade has
completed, the Dwell time determines
how long the memory is output for
before reaching the start (trigger) of the
next memory. This is only significant if
the trigger of the next memory is
automatic.
Colour Transitions
If a fixture colour parameter goes from
one value to a different value, the
transition is defined by the Colour
Delay and Colour Transition
parameters.
If a fixture colour parameter is
programmed at the same levels in the
Current and Next memories, then it will
remain at that level throughout the
transition.
Beamshape Transitions
If a fixture beamshape parameter goes
from one value to a different value, the
transition is defined by the Beamshape
Delay and Beamshape Transition
parameters.
If a fixture beamshape parameter is
programmed at the same levels in the
Current and Next memories, then it will
remain at that level throughout the
transition.
Position Transitions
If a fixture position parameter goes
from one value to a different value, the
transition is defined by the Position
Delay and Position Transition
parameters.
If a fixture position parameter is
programmed at the same levels in the
Current and Next memories, then it will
remain at that level throughout the
transition.
Memory Data in Full Mode
When a memory is recorded in Full
Mode all the active dimmer channels
and fixture parameters are recorded in
the memory. It is not necessary to
specifically set all the channels and
fixture parameters.
Any dimmer channels and fixture
parameters that are not set will be
recorded at their current output levels if
editing live, or their current
programmed levels if editing blind.
This applies to all memory types
except for multi-part scenes, where
only the programmed dimmer channels
and fixture parameters are recorded.
Memory Data in Partial Mode
In Partial Mode, the desk works by
only recording the ‘tagged’ dimmer
channels and fixture parameters.
Dimmer channels and fixture
parameters can be tagged manually or
automatically (see chapter 4).
Untagged dimmer channels and fixture
parameters are ‘tracked’ from previous
memories.
When a memory is edited, any
changes made to the dimmer channel
or fixture parameter data are ‘tracked’
through subsequent memories.
The desk also provides options for
tracking backwards, track forwards and
backwards and cue only options when
editing programmed memories.
5 - 4 Illusion 500 Manual 73-741-00 Issue 2
Memories
Figure 5 - 4 : Memories Screen (Detail)
Page 63

The Memories Screen
The Memories screen is used in the
programming, editing and playback of
memories from the Memory Stack.
To display the Memories screen press
the F2 key or click on the Memories
screen tab using the mouse.
Display Mode Button (F7)
The SCREEN FUNCTION key F7 is
used to toggle between the two display
modes described below.
All Memories/Stay - All programmed
and unprogrammed memories are
displayed on the screen. When running
the show using the GO button, the
screen does not follow the current and
next memories.
Programmed Memories/Follow Only the programmed memories are
displayed on the screen. When running
the show using the GO button, the
screen follows the Next memory.
Extra Functions Button (F8)
When this soft button is selected using
F8 or the mouse a drop down menu is
displayed containing the options Insert,
Jump To, Loops, Trigger Macro and
Cancel (F8). See later in this chapter
and Chapter 7 for further details.
Memory Data
The memory data is displayed in the
form of a table with the memory
numbers listed in increasing numerical
order down the screen.
Unprogrammed Memories
If displayed, have an asterisk (*) next
to their memory number.
Memory Triggers
Go, Auto or At Time is displayed in the
Trigger column. If the memory trigger
is At Time, the actual time is displayed
on the line below.
Transition Times
For the delay, fade, transition and
dwell times, a time of zero is displayed
as “-” on the Memories Screen.
To simplify the Memory Screen layout,
only the transition times for a single
attribute are shown at one time.
The Attribute buttons on the front panel
are used to switch between the
different attributes; the lights in the
buttons and the column headings in
the table change accordingly.
Chase Memories
The number of steps is displayed
under the memory type.
The chase modifiers are displayed on
a second line under the Fade and
Delay columns.
Sound to Light Memories
For Sound to Light and Ripplesound
memories the modifiers are displayed
on a second line under the fade and
Delay columns.
Multi-Part Scene Memories
The information and delay, fade,
transition and dwell times for each
programmed part of the memory are
displayed on separate lines below the
main memory data.
Data Column
The Data column is used to indicate
which attribute(s) are programmed in
the memory.
If at least one channel or parameter of
an attribute is programmed in the
memory, the attribute letter is
displayed as follows:
Brightness (I), Colour (C),
Beamshape (B), Position (P).
The information, delay times, fade
times and dwell time for each part are
displayed on a separate line below the
main memory data. Unprogrammed
parts are indicated by an asterisk (*)
next to the part number.
Jumps, Loops and Macro
Triggers
The Special column contains data
relating to jumps and loops in the
Memory Stack and macro triggers
(see chapter 7 for details).
Current and Next Memories
The Current memory is indicated on
the screen by a green highlight bar.
The Next memory is indicated on the
screen by a yellow highlight bar.
The currently selected field in the
memory data table is indicated by a
red cursor or box.
Illusion 500 Manual 73-741-00 Issue 2 5 - 5
Memories
Page 64

Programming Memories
The following sections deal with
programming the different memory
types described earlier in this chapter.
Any differences in options, display
formats etc. between Real Time and
SMPTE/MIDI Time formats are
described at the end of this chapter.
Selecting a Memory
1. If the Memories screen is not on
display, press the SCREEN
FUNCTION button F2.
2. Use the SCREEN FUNCTION
BUTTON F7 to select all
memories or programmed
memories, as required.
3. Select the required memory using
any of the following methods:
Use the up and down arrow keys
on the front panel.
Press the MEMORY button on the
front panel, followed by the
required memory number and
then ENTER.
Position the mouse pointer over
the required memory and press
the left mouse button.
4. In each case the yellow highlight
bar moves to the selected
memory number.
Programming a Scene
1. Select an unprogrammed
memory.
2. Move to the Trigger field - select
Go, Automatic or At Time as
required.
3. Move to the Type field and select
Scene (if not already selected).
4. Move to the Information field.
Enter a textual description of the
memory (optional).
5. Set up the delay, fade, transition
and dwell times by moving to the
corresponding fields and entering
the required times.
6. To program the channel data for
the memory, press the EDIT LIVE
or EDIT BLIND button on the front
panel, or right click and select the
Edit Live or Edit Blind option from
the menu. This opens the
Program Window (PW).
7. Set the dimmer channel and
fixture parameter levels to the
required values (see chapter 4).
8. Press the SAVE button on the
front panel, or right click in the
PW and select the Save option
from the menu.
9. Press the ENTER button or click
on the OK button in the popup
window.
NOTES
Selecting a Memory
When using the up/down cursor keys to scroll
through the memory list, moving down from
the last memory takes you back to the first,
moving up from the first takes you through
memory zero to the last memory in the list.
When selecting a memory number directly, if
the EDIT LIVE or EDIT BLIND button is
pressed instead of the ENTER button, the
highlight bar moves to the selected memory
and the Program Window is opened.
Editing Live or Blind
If the memory is edited live, the DMX
outputs change as the dimmer channel and
fixture parameter levels are adjusted. If the
memory is being edited blind, the DMX
outputs are not affected.
Timed Triggers
The time appears underneath the trigger,
and is displayed in hours, minutes and
seconds (eg 21:30:00 represents 9:30 pm).
Abandoning Channel Edits
Press the EDIT LIVE or EDIT BLIND button
on the front panel, or right click in the PW
and select the Cancel option.
Partial Mode
In Partial Mode the Save Window also
contains Tracking Options and a Save All
button - see later in chapter for details.
5 - 6 Illusion 500 Manual 73-741-00 Issue 2
Memories
Figure 5 - 5: Memories Screen
Page 65

Programming a Multi-Part
Scene Memory
Select an unprogrammed memory,
move to the Type field and select Multi.
The memory is displayed as nine lines
of data on the Memories Screen.
The first line contains the memory
number, type, information and trigger.
The next eight lines contain the part
number, information, transition and
dwell times for each of the eight parts
of the memory.
Programming the Memory
Information and Trigger
Move to the Information field on the
first line of memory data. Enter a
textual description of the memory.
Move to the Trigger field - select Go,
Auto or At Time.
If the trigger is At Time, enter the start
time under the trigger.
Programming Information
and Times for a Part
Move to the part of the memory to be
programmed.
Move to the Information field for the
part and enter a textual description.
Set up the delay, fade, transition and
dwell times for the part by moving to
the appropriate fields and entering the
required times, using the numeric
keypad or control wheel.
Programming the Channel
Data for a Part
Move to the part of the memory to be
programmed.
Press the EDIT LIVE or EDIT BLIND
button on the front panel, or right click
and select the Edit Live or Edit Blind
option from the menu. This opens the
Program Window (PW).
Set the dimmer channel and fixture
parameter levels to the required values
(see chapter 4 for details).
To save the channel data into the
currently selected part, press the
SAVE button on the front panel, or
right click in the PW and select the
Save option from the menu.
Repeat the above operations for each
part of the memory to be programmed.
Display of Multi-Part Scenes
in the Program Window
The PW contains a soft button (F7),
which toggles between the options
Show This Part and Show All Parts.
When Show This Part is selected - any
dimmer channels or fixture parameters
which are programmed in other parts
of the memory are indicated by an
orange background in the value box.
When Show All Parts is selected orange bar graphs for dimmer
channels and fixture brightness
parameters programmed in the other
parts are displayed in orange.
If editing live the dimmer channels and
fixture parameters programmed in the
other parts are output live on the DMX.
NOTES
Channel Data in Multi-Part Scenes
Only dimmer channels and fixture parameter
changed and marked as programmed are
recorded into each part of a multi part scene
memory.
A dimmer channel or fixture parameter may
be only be programmed in one part of a multi
part scene memory.
Attempting to program dimmer channels or
fixture parameters already programmed in
other parts of the memory will generate a
warning message.
Illusion 500 Manual 73-741-00 Issue 2 5 - 7
Memories
Figure 5 - 6 : Memories Screen showing Multi-Part Scene Memory
Page 66

Programming a Chase
Select an unprogrammed memory,
move to the Type field and select
Chase.
Programming the Memory
Information and Trigger
Move to the Information field. Enter a
textual description of the memory.
Move to the Trigger field - select Go,
Auto or At Time as required.
If the trigger is At Time, enter the start
time under the trigger.
Programming the Delay, Fade
Transition and Dwell Times
Set up the delay, fade, transition and
dwell times for the memory by moving
to the appropriate fields and entering
the required times, using the numeric
keypad or control wheel.
Programming the Chase
Modifiers
Move to the Direction field - select
Forwards (>), Backwards (<) or
Bounce (<>) as required.
Move to the Attack field - select snap,
slow attack, slow decay or crossfade
as required.
Move to the Drive field - select Auto,
Vari Bass or Manual as required.
Move to the Speed field - adjust the
speed as required.
Programming Chase Steps
To program the first step in the chase,
press the EDIT LIVE or EDIT BLIND
button on the front panel, or right click
and select the Edit Live or Edit Blind
option from the menu. This opens the
program Window. Step 1 is indicated
as unprogrammed (*).
Select the required build option via the
soft button in the PW header or F4
(see notes at end of this section).
Set the dimmer channel and fixture
parameter levels to the required values
(see chapter 4 for details).
Press the SAVE STEP button on the
front panel, or select the Save Step
button in the PW. The channel data is
saved into the step and a new step is
automatically added to the end of the
chase.
To program the next step of the chase,
set the dimmer channel and fixture
parameter levels to the required
values, then press SAVE STEP.
Repeat until all the steps in the chase
have been programmed.
On the last step of the chase press the
SAVE button on the front panel, or
right click in the CDW and select the
Save option from the menu, rather than
pressing SAVE STEP.
Adjusting Chase Modifiers
To see the effects of adjusting the
chase modifiers while previewing the
chase memory:
Select a programmed chase memory.
Press the PREVIEW button on the
front panel to open the Program
Window.
The changing channel levels can be
seen in the PW. The Modifiers section
of the PW is displayed showing the
current modifier values.
Adjust the Direction, Attack, Drive and
Speed modifiers using the front panel
buttons or by clicking on the screen
buttons in the PW with the mouse.
To save the new modifier values into
the memory press the SAVE button or
click on the Save button in the PW.
Press the PREVIEW button to close
the Program Window.
5 - 8 Illusion 500 Manual 73-741-00 Issue 2
Memories
Figure 5 - 7: Memories Screen showing Chases
Page 67

Inserting a Chase Step
1. Select a programmed chase
memory.
2. Press the EDIT LIVE or EDIT
BLIND button on the front panel,
or right click and select Edit Live
or Edit Blind from the menu. The
PW is opened showing Step 1.
3. Use the STEP + or STEP buttons to select a step.
4. Press the Insert Step button in the
PW, or F7 on the front panel. A
new step is inserted after the
selected step.
5. Set the dimmer channel and
fixture parameter levels to the
required values.
6. Select the Save Step button in the
PW or press the SAVE STEP
button on the front panel to save
the new step into the memory.
7. To insert more steps into the
chase repeat steps 3 - 6.
8. Press the SAVE button to save
the complete memory.
Deleting a Chase Step
1. Select a programmed chase
memory.
2. Press the EDIT LIVE or EDIT
BLIND button on the front panel,
or right click and select Edit Live
or Edit Blind from the menu. The
Program Window is opened and
shows Step 1.
3. Use the STEP + or STEP buttons to select the step to be
deleted.
4. Press the DELETE STEP button.
The selected step is deleted and
the Program Window shows the
previous step (except if step 1 is
deleted, in which case it shows
the new step 1).
5. Press the SAVE button to save
the modifed chase memory.
NOTES
Build and Non-Build Chases
Build Mode - when a new step is added, the
dimmer channel and fixture parameter data
remains as in the previous step.
Non-Build Mode - when a new step is
added, the dimmer channel and fixture
brightness parameter data is reset to zero.
Chase Modifiers
The Direction, Attack, Drive and Speed
modifiers can also be set using the
DIRECTION, ATTACK and DRIVE buttons
and control wheel on the front panel.
Chase Drive Modifier
Auto - progresses automatically at the chase
speed without any external input.
Vari - speeds up and slows down according
to the tempo of the sound input, with the
basic speed set by the chase speed modifier.
Bass - each step is triggered by a bass beat
of a sound input.
Manual - requires a STEP+ or STEPbutton press to move to next step.
Inserting and Deleting Steps
When a step is inserted or deleted, any
chase steps after the inserted or deleted step
are renumbered accordingly.
When a chase contains a single step, it
cannot be deleted using DELETE STEP. The
only way that the step can be deleted is to
delete the entire memory.
Illusion 500 Manual 73-741-00 Issue 2 5 - 9
Memories
Figure 5 - 8: Program Window - Editing a Chase Memory
Page 68

Programming a Sound to
Light Memory
Select an unprogrammed memory,
move to the Type field and select S/L.
Programming the Memory
Information and Trigger
Move to the Information field. Enter a
textual description of the memory.
Move to the Trigger field - select Go,
Auto or At Time as required.
If the trigger is At Time, enter the start
time under the trigger.
Programming the Delay, Fade
Transition and Dwell Times
Set up the delay, fade, transition and
dwell times for the memory by moving
to the appropriate fields and entering
the required times, using the numeric
keypad or control wheel.
Programming the Modifiers
Move to the Attack field - select snap,
slow attack, slow decay or crossfade
as required.
Move to the Speed field - adjust the
speed as required.
Programming the ‘Steps’
Press the EDIT LIVE or EDIT BLIND
button on the front panel, or right click
and select Edit Live or Edit Blind from
the menu. The Program Window is
opened showing the Lo Step.
Set the dimmer channel and fixture
parameter levels to the required
values.
Select the Save Step button in the PW
or press the SAVE STEP button on the
front panel to save the ‘step’ into the
memory.
To program the remaining steps
(Lo-Mid, Hi-Mid, and Hi) use the
STEP+ and STEP- buttons to select
the required step.
Set the dimmer channel and fixture
parameter levels to the required
values.
Select Save Step, to save the step into
the memory.
To save the complete memory data
into the currently selected memory,
press the SAVE button on the front
panel, or right click in the PW and
select the Save option from the menu.
Programming a Ripplesound
Memory
Programming a Ripplesound memory
is exactly the same as programming a
Sound to Light memory, except that
the four ‘steps’ are Band 1, Band 2,
Band 3 and Band 4 respectively.
Adjusting Modifiers
To see the effects of adjusting the
modifiers while previewing a sound to
light or ripplesound memory:
1. Ensure that a sound input is
connected to the desk.
2. Select a programmed sound to
light or ripplesound memory.
3. Press the PREVIEW button on
the front panel to open the
Program Window.
4. The changing channel levels can
be seen in the PW. The Modifiers
section of the PW is displayed
showing the modifier values.
5. Adjust the Attack and Speed
modifiers using the front panel
buttons and wheel or by clicking
on the screen buttons in the PW
with the mouse.
6. To save the new values into the
memory press the SAVE button or
click on the Save button.
7. Press the PREVIEW button to
close the PW.
NOTE
Fixture LTP Parameters
Sound to Light and Ripplesound memories are
only designed for use with HTP parameters.
Therefore if colour, beamshape or position
parameters are programmed, they will have
the same value in all four steps.
5 - 10 Illusion 500 Manual 73-741-00 Issue 2
Memories
Figure 5 - 9 : Program Window - Editing a Sound to Light Memory
Page 69

Saving Channel Data from the
Program Window
If the Program Window is opened
directly, or as a result of editing a
memory or submaster, the dimmer
channel and fixture parameter data can
be saved straight to a Scene memory,
directly onto a submaster, or the
relevant fixture data can be saved to a
Colour, Beamshape or Position palette.
Note that when editing a chase, sound
to light or ripplesound memory, the
dimmer channel and fixture parameter
data for the current step is saved into
the specified destination.
When editing live, various save options
are provided via the Save Options
button displayed in the PW header.
If a memory (or submaster) is
accidently overwritten with channel
data, this can be reversed using the
UNDO EDIT button.
These functions are described in the
following sections.
Saving Data to a Scene
Press the SAVE AS button on the front
panel, or right click in the PW and
select the Save As option from the
menu. The Save As window is
displayed on the screen.
Note that when the Save As.. Window
is opened, the next unprogrammed
memory number is automatically
displayed in the Memory Number field
as the default.
Select the Memory option by presssing
the MEMORY button or by clicking on
the Memory tab.
Enter the destination memory number
in the field provided.
Enter the name of the memory in the
Information field (optional).
Select the OK button in the window.
If the destination memory is
unprogrammed, the channel data is
saved into the memory.
If the destination memory is already
programmed, a warning message is
displayed. Select Overwrite or Cancel
as required.
Saving Data to a Submaster
Press the SAVE AS button on the front
panel, or right click in the PW and
select the Save As option from the
menu. The Save As window is
displayed.
Select the Submaster option by
pressing the SUBMASTER button or
clicking on the Submaster tab.
Enter the destination submaster
number (page and submaster number)
in the field provided.
Enter the name of the submaster in the
Information field (optional).
Select the OK button in the window
If the specified submaster is
unprogrammed, the channel data is
loaded onto the submaster.
If the specified submaster is already
programmed, a warning message is
displayed. Select overwrite or cancel
as required.
Illusion 500 Manual 73-741-00 Issue 2 5 - 11
Memories
Figure 5 - 10: Save As Window
Page 70

Saving Data to a Palette
Press the SAVE AS button on the front
panel, or right click in the PW and
select the Save As option from the
menu. The Save As window is
displayed.
Select the Colour Palette, Beamshape
Palette or Position Palette option by
pressing the COLOUR, BEAMSHAPE
or POSITION button or clicking on the
corresponding tab in the window.
Enter the destination palette number in
the field provided.
Enter the name of the palette in the
Information field (optional).
Select the OK button in the window
If the specified palette is
unprogrammed, the channel data is
programmed into the palette.
If the specified palette is already
programmed, a warning message is
displayed. Select overwrite or cancel
as required.
Save Options
When channel data is being edited live
in the PW, various save options are
available to the user.
Press F5 or click on the Save Options
button in the PW header to display a
menu of available options.
The actual save options available will
depend on the item being edited.
Save
This option performs the normal Save
operation and is equivalent to pressing
the SAVE button.
Save As
This option performs the normal Save
As operation and is equivalent to
pressing the SAVE AS button.
Update
This option is only available when
editing a memory or submaster.
Any dimmer channels or fixture
parameters which have been changed
are saved into the item being edited.
Any outputs which originate from the
submasters or Playback A/B are not
saved.
Update Step
This option is only available when
editing a chase, sound to light or
ripplesound memory.
Any dimmer channels or fixture
parameters which have been changed
are saved into the step being edited.
Any outputs originating from the
submasters or Playback A/B are not
saved.
5 - 12 Illusion 500 Manual 73-741-00 Issue 2
Memories
Figure 5 - 11: Program Window - Save Options Menu
Page 71

Save Excluding Submasters
This option is the same as Save
except a popup window is displayed
allowing the dimmer channel and
fixture brightness outputs from
individual submasters and/or Playback
A/B to be excluded.
Save As Excluding
Submasters
This option is the same as Save As
except a popup window is displayed
allowing the dimmer channel and
fixture brightness outputs from
individual submasters and Playback
A/B to be excluded.
Save Step Excluding
Submasters
This option is only available when
editing a chase, sound to light or
ripplesound memory.
The option is the same as the Save
Step function except a popup window
is displayed allowing the dimmer
channel and fixture brightness outputs
from individual submasters and
Playback A/B to be excluded.
Cancel (F8)
This option closes the Save Options
menu.
Save (As) Excluding
Submasters Window
This popup window is displayed when
the Save Excluding Submasters,
Save As Excluding Submasters or
Save Step Excluding Submasters
options are selected from the Save
Options menu (see earlier sections).
It allows the dimmer channel and
fixture brightness outputs resulting
from each of the submasters and
Playback A/B to be selectively included
or excluded in the channel data prior to
it being saved.
Use the cursor keys or mouse to select
the required submaster or Playback
A/B and select Include or Exclude as
required.
Select the Include All button to set all
the submasters and Playback fields to
Include.
Select the Exclude All button to set all
the submasters and Playback fields to
Exclude.
Select the OK button to confirm the
settings in the window and save the
channel data.
Select the Cancel button to cancel the
operation and close the window.
Undoing an Accidental Save
If channel data is accidently saved to a
memory (or submaster) it is possible to
reverse the save operation using the
UNDO EDIT button.
Press the UNDO EDIT button. The
Undo Save window is displayed.
Select the Undo Save Only button to
restore the channel data in the memory
or submaster to its previous values.
Select the Undo Save & Restore
Channel Data button to restore the
channel data in the memory or
submaster to its previous values and
open the PW as follows:
If previously editing live - the PW is
opened (as if the CHANNEL button
was pressed) and the channel data
which was saved is added into the
channel data in the PW and output live.
If previously editing blind - the PW is
opened in a special blind mode and the
channel data which was saved is
added into the channel data in the PW.
The channel data is not output live.
Select the Cancel button to cancel the
undo save operation.
Illusion 500 Manual 73-741-00 Issue 2 5 - 13
Memories
Figure 5 - 12: Save (As) Excluding Submasters Window
Page 72

Modifying Memory Data
If any memory data on the Memories
screen for a unprogrammed memory is
edited (eg trigger, name, fade times),
and an attempt is made to save the
memory, a warning message is
displayed saying that no channel data
has been programmed for the memory.
If any memory data on the Memories
screen for a programmed memory is
edited (eg trigger, name, fade times), a
modify flag (M) is displayed next to the
memory number.
To commit the edits to the memory,
press the SAVE button on the front
panel, or right click and select the Save
option from the menu. The edits are
saved and the modify flag is removed.
If memory data has been modified and
not saved, and an attempt is made to
change the memory number or to
display a different screen on the
monitor, a popup warning message is
displayed.
Select the Save Changes or Lose
Changes button in the popup window,
as required.
The popup window is closed and the
modify flag is removed.
Editing Memories Live
When a programmed memory is
selected and the EDIT LIVE button
pressed, the selected memory is faded
in and output live on the DMX.
The current memory on the Memory
Stack is temporarily removed from the
outputs (except when Tracking is
enabled, where it remains on the
outputs).
Any changes made to the channel data
are visible in the CDW and appear live
on the outputs.
Editing Memories Blind
When a programmed memory is
selected and the EDIT BLIND button is
pressed, the selected memory
becomes the next memory.
The current memory on the Memory
Stack and the DMX outputs remain
unaffected.
Any changes made to the channel data
are only visible in the CDW and do not
affect the DMX outputs.
Switching Edit Modes
When editing a memory live or blind,
pressing the ‘other’ Edit button on the
front panel will switch the edit mode.
The lights in the EDIT buttons, the data
in the PW and the DMX outputs will
change accordingly.
Editing and Tracking Options
This function is only applicable when
editing programmed memories in
Partial Mode. The desk software
monitors which dimmer channels and
fixture parameters have been changed
during the editing process.
When the channel data is saved back
into the same memory, the following
tracking options are provided:
Track Forwards: The changes made
in the edited memory are tracked
forwards through subsequent
memories until a programmed value is
encountered.
Track Backwards: The changes made
in the edited memory are tracked
backwards through previous memories
to the point where the dimmer channel
or fixture parameter was last
programmed. Memories after the
edited memory are not affected.
Track Forwards and Backwards: The
changes made in the edited memory
are tracked backwards through
previous memories to the point where
the dimmer channel or fixture
parameter was last programmed, and
tracked forwards through subsequent
memories until a new programmed
value is encountered.
Cue Only: The changes made in the
edited memory are only applied in that
memory. The outputs of previous and
subsequent memories are not affected.
5 - 14 Illusion 500 Manual 73-741-00 Issue 2
Memories
Figure 5 - 13: Save - Tracking Options Window
Page 73

Changing the Type of a
Programmed Memory
WARNING: Changing the type of a
programmed memory may have
serious consequences on the
memory data stored, and some
channel data may be lost.
The results of changing the memory
type are detailed below.
• Scene to Multi-Part Scene
The dimmer channel and fixture data
and transition times for the scene are
copied into part 1 of the multi-part
scene. Parts 2 - 8 are unprogrammed.
• Scene to Chase
The dimmer channel and fixture data
for the scene are copied into step 1 of
the chase memory.
• Scene to Sound to Light
The dimmer channel and fixture data
for the scene memory is copied into all
four ‘steps’ of the sound to light
memory.
•
Scene to Ripplesound
The dimmer channel and fixture data
for the scene memory is copied into all
four ‘steps’ of the sound to light
memory.
• Multi-Part Scene to Scene
The delay, fade, transition and dwell
times are set to the memory defaults.
The programmed dimmer channel and
fixture data in each programmed part is
combined into a single set of channel
data and copied into the scene.
• Multi-Part Scene to Chase
The multi-part scene memory is
converted into a scene, and then the
scene is converted into a chase.
• Multi-Part Scene to Sound to Light
The multi-part scene memory is
converted into a scene and then the
scene is converted into a sound to light
memory, as described above.
• Multi-Part Scene to Ripplesound
The multi-part scene memory is
converted into a scene and then the
scene is converted into a ripplesound,
as described above.
•
Chase to Scene
The dimmer channel and fixture data
for step 1 becomes the contents of the
scene memory. The data in all other
steps in the chase is lost.
• Chase to Multi-Part Scene
The chase memory is converted into a
scene, and then the scene is converted
into a multi-part scene, as described
above.
•
Chase to Sound to Light
The dimmer channel and fixture data
for the first 4 steps of the chase are
copied into the Lo, Lo-Mid, Hi-Mid and
Hi ‘steps’ respectively. All other steps
from the chase are lost.
•
Chase to Ripplesound
The dimmer channel and fixture data
for the first 4 steps of the chase are
copied into the Band 1, Band 2, Band 3
and Band 4 ‘steps’ respectively. All
other steps from the chase are lost.
•
Sound to Light to Scene
The dimmer channel and fixture data
from the Lo ‘step’ are copied into the
channel data for the scene. The data in
all other ‘steps’ from the sound to light
memory are lost.
•
Sound to Light to Multi-Part Scene
The sound to light memory is
converted into a scene, and then the
scene is converted into a multi-part
scene, as described above.
•
Sound to Light to Chase
The dimmer channel and fixture data
for the four ‘steps’ is copied into steps
1,2,3 and 4 of the chase. The memory
becomes a four step chase.
• Sound to Light to Ripplesound
The dimmer channel and fixture data
for the Lo, Lo-Mid, Hi-Mid and Hi
‘steps’ are copied into the Band 1,
Band 2, Band 3 and Band 4 ‘steps’
respectively.
•
Ripplesound to Scene
The dimmer channel and fixture data
from the Band 1 ‘step’ is copied into
the scene. All other ‘steps’ from the
ripplesound memory are lost.
• Ripplesound to Multi-Part Scene
The ripplesound memory is converted
into a scene, and then the scene is
converted into a multi-part scene, as
described above.
•
Ripplesound to Chase
The dimmer channel and fixture data
from Band 1, Band 2, Band 3 and
Band 4 ‘steps’ are copied into steps
1,2,3 and 4 respectively. The memory
becomes a four step chase.
•
Ripplesound to Sound to Light
The dimmer channel and fixture data
from Band 1, Band 2, Band 3 and
Band 4 ‘steps’ are copied into the Lo,
Lo-Mid, Hi-Mid and Hi ‘steps’
respectively.
Illusion 500 Manual 73-741-00 Issue 2 5 - 15
Memories
Page 74

Copying Memories
The copy function is used to copy a
complete memory from one location to
another.
The function performed (Copy To or
Copy From) is dependent on the
programmed status of the selected
memory as described in the following
sections.
If there is not sufficient memory
available to perform the copy operation
a warning message is displayed on the
monitor screen.
Copying to a Memory
1. Select an unprogrammed memory
2. Press the COPY button on the
front panel, or right click and
select the Copy option from the
menu. A window is displayed
requesting a memory number to
copy from.
3. Enter the source memory number
in the field provided and then
select the OK button in the
window.
If a valid source memory is
entered, the source memory is
copied into the currently selected
memory and the Copy window is
closed.
If the source memory number
specified is invalid, or the source
memory is unprogrammed, an
error message is displayed.
Copying from a Memory
1. Select a programmed memory.
2. Press the COPY button on the
front panel, or right click and
select the Copy option from the
menu. A window is displayed
requesting a memory number to
copy to.
3. Enter the destination memory
number in the field provided, then
select the OK button in the
window.
If the destination memory is
unprogrammed, the currently
selected memory is copied into
the destination memory and the
copy window is closed.
If the destination memory is
programmed, a warning message
is displayed. Select the Overwrite
button to overwrite the destination
memory, or the Cancel button to
cancel the operation.
5 - 16 Illusion 500 Manual 73-741-00 Issue 2
Memories
Figure 5 - 14: Copy Memory Window
Page 75

Inserting Memories
The desk provides the facility to insert
individually up to nine point memories
between two whole number memories.
Example: memories 3.1 ..3.9 may be
inserted between memories 3 and 4.
Select a whole number memory on the
Memories Screen.
Press the F8 button on the front panel
and select the Insert option from the
menu, or right click in the Memories
Screen and select the Insert option
from the menu.
The Insert Memory Window is
displayed. The default memory insert
number is displayed in the window.
Use the left and right cursor keys to
select a different memory insert
number, if required.
Select the OK button in the window.
The Insert Memory Window is closed
and the insert memory is displayed on
the Memories Screen.
Notes - Inserting Memories
The Memory Screen switches automatically
to showing all memories when the Insert
function is performed.
Memories cannot be inserted between a
whole number and the first insert (eg 3 and
3.1), two consecutive point memories (eg 4.2
and 4.3), or the last insert and the next
whole number (eg 5.9 and 6).
Previewing a Memory
Previewing a memory allows the
dimmer channel and fixture parameter
data for the memory to be examined
without affecting the outputs. When
previewing it is not possible to edit the
dimmer channel or fixture data.
Select a programmed memory. Press
the PREVIEW button, or right click and
select the Preview option from the
menu. The light in the PREVIEW
button is illuminated and the Program
Window is opened in preview mode.
To preview other memories in the
memory stack, use the left and right
arrow keys or click on the Previous or
Next buttons in the PW header.
To exit Preview mode, press the
PREVIEW button. The light in the
button goes out; the PW is closed.
Notes -Previewing Memories
Chase - The chase ‘runs’ at the programmed
modifiers (direction, attack, drive, speed).
Sound to Light or Ripplesound - the
memory ‘runs’, providing there is a sound
input connected to the desk.
Multi-Part Scenes - The whole memory or
individual parts may be previewed by
selecting the memory number or part number
prior to pressing the PREVIEW button.
Deleting a Memory
Select a programmed memory, then
press the CLEAR button on the front
panel, or right click and select the
Clear option from the menu.
A confirmation window is displayed,
with the following options:
OK, Preserve Data (F7), Cancel (F8)
Select the OK button to confirm
deletion of the memory.
Select the Preserve Data button to
confirm deletion of the memory but
preserve the programmed dimmer
channel and fixture parameter data in
later memories (Partial Mode only)
Select the Cancel button to cancel the
operation.
Notes - Deleting Memories
If a deleted memory had previously been
transferred to one or more submasters, the
relevant submaster(s) are also cleared.
If a deleted memory had previously been
loaded onto the Playback A or B master, the
relevant master is also cleared.
Illusion 500 Manual 73-741-00 Issue 1 5 - 17
Memories
Figure 5 - 15: Insert Memory Window
Page 76

Transferring Memories onto
Submasters
Most programmed memories can be
transferred onto submasters and then
output by raising the corresponding
submaster fader.
Transferring a Memory
1. Select a programmed memory.
2. Press the TRANSFER button on
the front panel, or right click in the
memories screen and select the
Transfer option from the menu.
The Transfer to Submaster
Window is displayed showing the
memory number, the submaster
number and its associated
parameters.
3. Enter the required submaster
page and number in the field
provided.
4. Adjust the other submaster
parameters (optional).
5. Select the OK button in the
window to complete the transfer
operation.
Notes - Transferring Memories to
Submasters
Multi-Part Scenes cannot be transferred onto
submasters. An error message is displayed if
this is attempted.
Confirmation has to be given before a
memory can be transferred onto a submaster
containing channel data.
Confirmation is not required when
transferring a memory onto a submaster
which already contains a memory.
When a memory is transferred onto a
submaster, its information text is
automatically copied into the information
field for the submaster.
If the ENTER button is pressed after entering
the memory number in the Transfer Window,
the OK button is actioned immediately.
Pressing the TRANSFER or F8 button will
perform the Cancel operation and close the
Transfer Window.
5 - 18 Illusion 500 Manual 73-741-00 Issue 2
Memories
Figure 5 - 16: Transfer to Submaster Window
Page 77

SMPTE and MIDI Time Modes
This section is only applicable if the
optional SMPTE/MIDI/DMX In upgrade
kit has been fitted to the desk.
It describes the differences in menu
options, display formats and operation
when the Time Input is set to SMPTE
Time or MIDI Time in Desk Setup
(see chapter 3 for details).
Memory Triggers
When Time Input is set to Real Time,
the memory triggers available are Go,
Automatic and At Time. If the Trigger is
set to At Time the start time is
displayed in the format hh:mm:ss.
When Time Input is set to SMPTE
Time or MIDI Time, the memory
triggers available are Automatic and
At Time only. If the Trigger is set to
At Time the start time is displayed in
the format hh:mm:ss:ff (ff = frames).
Transition Times
On the Memories screen, the transition
times (delay, fade, transition and dwell)
are displayed as follows:
When Time Input is set to Real Time,
the times are displayed in the format
mm:ss.t (minutes, seconds, tenths).
When Time Input is set to SMPTE or
MIDI Time, the times are displayed in
the format mm:ss.ff (minutes,
seconds, frames).
Programming Memories
When programming memories with an
At Time trigger in SMPTE or MIDI time
modes, the start time is specified and
displayed in hours, minutes, seconds
and frames (see earlier).
This start time is then fixed and can
only be adjusted by the user.
It is possible to specify a start time
which would overlap a previous
memory and to program memories in
non-chronological order although this
is not recommended practice.
A memory with an At Time trigger has
higher priority than memories with
other triggers, and will be triggered
when the incoming SMPTE or MIDI
timecode signal equals the start time.
Editing Memories
If the start time of a memory is
modified, the duration of a memory is
changed (by altering the delay, fade,
transition or dwell times), or memories
are added or removed from the
memory stack - all other memories with
At Time triggers will not be affected.
Jumps
Jumps can be programmed into the
memory stack in all Time Input modes
(see chapter 7 for details).
A memory which is jumped to will only
run immediately if its memory trigger is
set to Auto.
Loops
Loops can be programmed into the
memory stack in all Time Input modes
(see chapter 7 for details).
When the desk is in SMPTE or MIDI
mode - the first memory in a loop can
have an Automatic or At Time trigger.
The Loop Trigger is always Automatic.
SMPTE or MIDI Timecode
When the desk is in SMPTE Time or
MIDI Time mode, the timecode value
(whether generated internally or
externally) is displayed in the Fade
Status Bar on the monitor screen.
The Override field is replaced with the
Timecode field. The Timecode is
displayed in the format hh:mm:ss.ff
(hours, minutes, seconds, frames).
Illusion 500 Manual 73-741-00 Issue 2 5 - 19
Memories
Figure 5 - 17: Setting Time Input Mode in Desk Defaults
Page 78

Running SMPTE/MIDI Shows
When the desk is running in SMPTE or
MIDI time mode, there is an option
available to choose between an
Internal or External time source.
The Internal time source allows shows
which are programmed in SMPTE or
MIDI time modes to be tested when the
external SMPTE or MIDI time code
signal is not available.
The External time source is used when
a SMPTE or MIDI time code signal is
connected to the desk.
Selecting the Time Source
From the Memories screen - select the
Extra Functions button, then select the
Internal Timecode or External
Timecode option from the menu.
From the Cueline screen - select the
soft button displayed to the right of the
zoom buttons. This button toggles
between Internal and External.
Internal Time Source
When the time source is set to Internal,
the desk itself generates the required
SMPTE or MIDI timecode signal.
The GO, PAUSE and GO PREVIOUS
buttons on the front panel are used to
play, pause and reset the timecode to
zero respectively.
The OVERRIDE control on the front
panel is used to speed up or slow
down the timecode signal.
Three soft buttons are provided on the
Memories and Cueline screens to play,
pause and reset the timecode signal.
External Time Source
When the time source is set to
External, the show can only be run if a
suitable external SMPTE or MIDI
timecode signal is provided.
The GO, PAUSE and GO PREVIOUS
buttons and OVERRIDE control on the
front panel are disabled.
The Playback X MASTER fader works
as normal.
Changing Time Input Mode
If memories have been programmed
and the Time Input mode is changed in
Desk Setup the trigger data for the
memories will be modified as follows:
• Real Time to SMPTE or MIDI
Go triggers are changed to Automatic .
Automatic triggers stay the same.
At Time triggers remain the same with
the number of frames set to zero
(eg 12:34:56 changes to 12:34:56.00).
• SMPTE or MIDI to Real Time
Automatic triggers stay the same.
At Time triggers are rounded to the
nearest second (eg 23:12:39.23 is
rounded up to 23:12:40).
•
SMPTE to MIDI
No changes.
• MIDI to SMPTE
No changes.
5 - 20 Illusion 500 Manual 73-741-00 Issue 2
Memories
Figure 5 - 18: Fade Status Bar showing SMPTE/MIDI Timecode.
Page 79

Submasters
Introduction
The Illusion 500 lighting desk provides
9 pages of 12 submasters giving a total
of 108 submasters.
In this manual, the submasters are
referenced by page number and
submaster number (eg 1-1, 1-2, 1-3).
On the monitor screen the submasters
are shown as 1.1, 1.2, 1.3 etc.
The PAGE UP and PAGE DOWN
buttons on the front panel are used to
select the required submaster page.
The soft buttons on the Submaster
screen or the Page Up and Page Down
keys on an external keyboard can also
be used to select the submaster page.
There is always an active page which
is indicated by the seven segment
display on the front panel.
Each submaster may be loaded
directly with channel data or a
transferred memory.
Each submaster has its own up and
down fade times, LTP trigger points
and other parameters, depending on
the type of memory transferred.
Submasters can also be used to trigger
specified macros.
Illusion 500 Manual 73-741-00 Issue 2 6 - 1
Figure 6 - 1 : Submaster Controls
For news, views and latest software
visit our dedicated Illusion website at:
www.illusionsupport.com
Page 80

The Submaster Screen
The Submaster Screen is used in the
programming, editing and playback of
submasters.
Press the SCREEN FUNCTION key F3
or select the Submaster screen
selection tab using the mouse to
display the Submaster screen.
Display Mode Button (F7)
The SCREEN FUNCTION key F7 or
the soft button on the Submaster
screen is used to toggle between the
two display modes of All Submasters
and Active Submasters.
Extra Functions Button (F8)
The SCREEN FUNCTION key F8 or
the soft button on the Submaster
screen is used to display a drop down
menu for items in the Special column
of the Submaster screen.
Page Up/Down Buttons
The PAGE UP and PAGE DOWN
buttons or the soft buttons on the
Submaster Screen are used to change
the submaster page.
The current submaster page is
indicated by the seven segment
display on the front panel.
All Submasters Display
This display mode is used primarily
when ‘programming’ or editing the
submasters.
A table containing the data for one of
the nine pages of submasters is
displayed on the monitor screen.
The page number is indicated by the
seven segment display.
If the submaster page is changed
using either the front panel buttons or
the soft buttons on the Submaster
screen, the submasters shown on the
monitor screen change accordingly.
Both unprogrammed and programmed
submasters are shown in the table.
A yellow highlight bar is displayed on
the submaster which is currently
selected on the monitor screen.
Active Submasters Display
This display mode is used primarily
when ‘running’ the show and playing
back data on the submasters.
The table indicates which of the 108
submasters are currently active on the
12 physical submaster faders on the
front panel of the desk.
It also shows which memories or
channel data are loaded onto these
submasters, if any.
There is always an active page, which
is indicated by the seven segment
display on the front panel.
Where page overlay is in operation
(i.e. the output from a submaster is not
from the current page), the submaster
number field for the appropriate
submaster(s) is highlighted in orange.
Example - Set the submaster page to
page 1 and raise the first 4 submaster
faders to full. Change to page 2.
The submaster screen will show the
following submasters:
1.1, 1.2, 1.3, 1.4, 2.5, 2.6, 2.7, 2.8, 2.9,
2.10, 2.11, 2.12.
A yellow highlight bar is displayed on
the submaster which is currently
selected on the monitor screen.
6 - 2 Illusion 500 Manual 73-741-00 Issue 2
Submasters
Figure 6 - 2: Submaster Screen
Page 81

Submaster Data
The following information is displayed
on the Submaster screen for each
submaster in both display modes:
•
SUBMASTER NUMBER
Displayed as Page and Submaster
(eg 1-1, 1-2 ... 9-12). Unprogrammed
submasters have an asterisk (*) next to
the submaster number.
•
INFORMATION
A text string describes the data on the
submaster. When a memory is
transferred onto a submaster, its
information text is copied into this field.
• MEMORY NUMBER
This field shows the memory number if
a memory has been transferred onto
the submaster, “CD” if channel data is
loaded onto the submaster, or blank if
the submaster is not programmed.
•
FADE UP
The time taken to fade up the dimmer
channel data and fixture brightness
data as the submaster fader is moved
from zero to full.
•
FADE DOWN
The time taken to fade down the
dimmer channel data and fixture
brightness data as the submaster fader
is moved from full to zero.
•
COLOUR TRANSITION
The time taken for the fixture colour
parameters to fade to their
programmed values after the LTP
parameters have been triggered.
•
BEAMSHAPE TRANSITION
The time taken for the fixture
beamshape parameters to fade to their
programmed values after the LTP
parameters have been triggered.
•
POSITION TRANSITION
The time taken for the fixture position
parameters to fade to their
programmed values after the LTP
parameters have been triggered.
•
LTP TRIGGER LEVEL
The level at which the fixture colour,
beamshape and position parameters
are triggered when the submaster
fader is raised.
•
CHASE TRIGGER
The method of triggering the chase if a
chase memory is transferred onto the
submaster.
•
CHASE TRIGGER LEVEL
If a chase memory is transferred onto
the submaster and the Chase Trigger
is set to Fader Level, this field shows
the level at which the chase will be
triggered, ie start running.
•
SPECIAL
This field is used for extra functions
which can be associated with
submasters. Currently it is used for
Macro Triggers.
Modifiers
If a Chase, Sound to Light or
Ripplesound memory has been
transferred onto the submaster, a
second line of data is displayed
containing the following modifiers:
•
DIRECTION
Forwards, Backwards or Bounce
(Chases only).
•
ATTACK
Snap, Slow Attack, Slow Decay or
Crossfade.
•
COLOUR ACTION
Snap or Fade (Chases only).
• BEAMSHAPE ACTION
Snap or Fade (Chases only).
• POSITION ACTION
Snap or Fade (Chases only).
•
DRIVE
Auto, Vari, Bass or Manual
(Chases only).
•
SPEED
The Chase Speed or the Speed
(response) for a Sound to Light or
Ripplesound memory.
Illusion 500 Manual 73-741-00 Issue 2 6 - 3
Submasters
Figure 6 - 3: Submasters Screen
Page 82

Programming Submasters
The following sections describe how to
select submasters, load submasters
directly with channel data (dimmer
channel and fixture parameter data),
adjust the various submaster
parameters and transfer memories
onto submasters.
Selecting a Submaster
Press the SCREEN FUNCTION
BUTTON F3 to display the Submaster
screen on the monitor.
A submaster can be selected in a
number of different ways:
Using Front Panel Buttons: Use the
PAGE UP or PAGE DOWN button to
select the required page. Press one of
the SUBMASER FLASH buttons to
select the corresponding submaster.
Using the Cursor Keys: Use the up
and down cursor keys on the front
panel or external keyboard to scroll up
or down the submaster table.
Direct Submaster Selection: Press
the SUBMASTER button on the front
panel, enter the required submaster
number as page and submaster (eg
2.3) and then press the ENTER button.
Using the Mouse: Position the mouse
pointer over the required submaster
and press the left mouse button.
In each case the yellow highlight bar
moves onto the selected submaster.
Loading Channel Data (1)
A set of channel data (comprising
dimmer channels and/or fixture
parameters) may be loaded directly
onto a submaster as follows:
Select an unprogrammed submaster.
Press the EDIT LIVE or EDIT BLIND
button, or right click on the Submaster
screen and select Edit Live or Edit
Blind from the menu.
The Program Window (PW) is
displayed on the monitor screen.
Set the dimmer channel and fixture
parameter levels to the required values
(see chapter 4 for details).
Press the SAVE button on the front
panel, or right click in the PW and
select the Save option from the menu.
The channel data is saved onto the
submaster and the Program Window is
closed.
6 - 4 Illusion 500 Manual 73-741-00 Issue 2
Submasters
Figure 6 - 4: Submaster Screen
Page 83

Loading Channel Data (2)
An alternative method of loading
channel data directly onto a submaster
is as follows:
Open the Program Window directly
using the CHANNEL, FIXTURE or
GROUP button.
Set the dimmer channel and fixture
parameter levels to the required values
(see chapter 4 for details).
Press the SAVE AS button on the front
panel, or right click in the PW and
select the Save As option from the
menu. The Save As window is
displayed on the screen.
Select the Submaster option using the
SUBMASTER button, cursor keys or
the mouse.
Enter the destination submaster
number in the field provided.
Enter a name in the Submaster Info
field (optional).
Select the OK button in the window.
If the destination submaster is
unprogrammed, the channel data is
loaded onto the submaster, and the
popup window is closed.
If the specified submaster is already
programmed with channel data or a
transferred memory, a warning
message is displayed.
Submaster Parameters
When a submaster has been loaded
with channel data or a transferred
memory, the submaster parameters
(information, fade times etc.) can be
edited from the Submaster screen.
Select a submaster, then use the
cursor keys on the front panel or
keyboard to move around the fields, or
select the required field with the
mouse.
Adjust the value in the selected field as
required.
Edits to submaster parameters take
effect immediately. It is not necessary
to ‘save’ the changes as with memory
parameters on the Memories screen.
NOTES
Scrolling through the Submaster Table
In Active Submaster Display Mode, the cursor
keys will only scroll up and down the 12
submasters in the table. In All Submaster
Display Mode, the cursor keys will scroll up
and down the entire submaster table.
Selecting Submaster and Opening PW
If the EDIT LIVE, EDIT BLIND or PREVIEW
button is pressed, instead of the ENTER
button, the highlight bar moves to the
selected submaster and the Program Window
is opened ready for the user to edit or
preview the channel data (or memory).
Automatic Display Mode Switching
If the submaster screen is displaying active
submasters only, and a submaster number
not currently active is entered, the display
will switch automatically to All Submasters
Display Mode, before moving the highlight
bar to the selected submaster.
Submaster Parameters
The Submaster parameters (info, fade times,
trigger levels etc) can only be accessed and
edited after channel data or a memory has
been loaded onto the submaster.
Abandoning Channel Edits
To close the Program Window and abandon
any channel data edits press the EDIT LIVE
or EDIT BLIND button on the front panel, or
right click in the PW and select the Cancel
option from the menu.
Illusion 500 Manual 73-741-00 Issue 2 6 - 5
Submasters
Figure 6 - 5: Save As Window (Submaster)
Page 84

Transferring Memories onto
Submasters
Programmed memories can be
transferred onto submasters and then
output by raising the corresponding
submaster fader.
Transferring a Memory
1. Select a submaster.
2. Press the TRANSFER button on
the front panel, or right click and
select the Transfer option from
the menu. The Transfer to
Submaster Window is displayed.
3. Enter the required memory
number in the field provided,
adjust any of the other submaster
parameters, if required, then
select the OK button in the
Transfer Window.
If the submaster is
unprogrammed, the specified
memory is transferred onto the
submaster and the Transfer
Window is closed.
If the submaster has channel data
loaded onto it, a warning
message is displayed.
If the submaster already has a
memory on it, the new memory is
transferred onto the submaster,
replacing the original one.
Chase Memories on
Submasters
When a Chase memory has been
transferred onto a submaster, the
chase trigger, chase trigger level and
chase modifiers can all be set from the
Submaster screen, if required.
1. Select a submaster with a chase
memory transferred onto it.
2. Move to the Chase Trigger field.
Select the required trigger
(Transfer, Fader Level, Flash
Button). The different triggers are
covered later in this chapter
3. If the Chase Trigger is set to
Fader Level - Move to the Chase
Trigger Level field and set the
required level
4. Move to the Direction field, and
adjust as required.
5. Move to the Attack field, and
adjust as required.
6. Move to the Drive field, and adjust
as required.
7. Move to the Speed field, and
adjust as required.
Sound to Light Memories on
Submasters
When a Sound to Light or Ripplesound
memory has been transferred onto a
submaster, the modifiers can be set
from the Submaster screen.
1. Select a submaster which has a
sound to light or ripplesound
memory transferred onto it.
2. Move to the Attack field, and
adjust as required.
3. Move to the Speed field and
adjust the value as required.
NOTES
Transferring Memories
Multi-Part Scene memories cannot be
transferred onto submasters.
Adjusting Modifiers
The modifiers for a Chase, Sound to Light or
Ripplesound Memory transferred onto a
submaster can also be adjusted using the
DIRECTION, ATTACK and DRIVE buttons
and the control wheel on the front panel.
6 - 6 Illusion 500 Manual 73-741-00 Issue 2
Submasters
Figure 6 - 6 : Transfer to Submaster Window
Page 85

Editing Memories from the
Submaster Screen.
Once a memory has been transferred
onto a submaster, editing the channel
data for the memory can be initiated
from the Submaster screen, if required.
1. Select a submaster which has a
transferred memory.
2. Press the EDIT LIVE or EDIT
BLIND button on the front panel,
or right click and select the Edit
Live or Edit Blind option from the
menu. A warning message is
displayed.
3. To continue with editing the
memory select the OK button.
The Program Window is opened
showing the channel data for the
transferred memory.
Previewing a Submaster
Previewing a submaster allows the
channel data loaded onto the
submaster, or the channel data for a
memory transferred onto the
submaster to be examined, without
affecting the outputs.
When previewing a submaster the
channel data cannot be edited.
Select a programmed submaster, then
press the PREVIEW button on the front
panel, or right click and select the
Preview option from the menu.
The light in the PREVIEW button is
illuminated and the Program Window is
opened.
To preview other submasters, use the
left and right arrow keys or click on the
Previous or Next buttons in the PW.
To exit Preview mode, press the
PREVIEW button on the front panel.
The light in the PREVIEW button goes
out and the PW is closed.
Clearing a Submaster
Select a programmed submaster.
Press the CLEAR button on the front
panel, or right click in the Submaster
screen and select the Clear option
from the menu. A confirmation window
is displayed.
Select the OK button in the window to
confirm. The submaster is cleared.
NOTES
Previewing Memories on Submasters
When previewing a memory on a submaster,
the PW header shows the submaster number
followed by the transferred memory number
in parentheses.
If a Chase, Sound to Light or Ripplesound
memory on a submaster is previewed, it will
‘run’ according to the modifiers defined in the
Submaster screen.
Illusion 500 Manual 73-741-00 Issue 2 6 - 7
Submasters
Figure 6 - 7: Edit Submaster with Memory Warning
Page 86

Copying Submaster Data
The copy function can be used to copy
all the data associated with one
submaster to another submaster
(information text, fade times, trigger
levels, memory number etc).
The actual function performed (Copy
To or Copy From) is dependent on the
status of the selected submaster as
shown in the following sections:
Copying to a Submaster
1. Select an unprogrammed
submaster.
2. Press the COPY button on the
front panel, or right click and
select the Copy option from the
menu. The Copy Submaster
Window is displayed.
3. Enter a submaster number to
copy from in the field provided,
then select the OK button in the
Copy Submaster Window.
If a valid submaster is entered,
the data associated with the
source submaster is copied into
the destination submaster and the
Copy Submaster Window is
closed.
If an invalid or unprogrammed
submaster is specified an error
message is displayed.
Copying from a Submaster
1. Select a programmed submaster.
2. Press the COPY button on the
front panel, or right click and
select the Copy option from the
menu. The Copy Submaster
Window is displayed.
3. Enter the destination submaster
number in the field provided, then
select the OK button in the
window.
If the destination submaster is
unprogrammed, the submaster
data is copied and the Copy
Submaster Window closed.
If the destination submaster is
already programmed, a warning
message is displayed. Select the
Overwrite or Cancel button, as
required.
6 - 8 Illusion 500 Manual 73-741-00 Issue 2
Submasters
Figure 6 - 8: Copy Submaster Window
Page 87

Triggering Macros from
Submasters
The Illusion 500 desk provides the
facility to trigger macros from the
submasters.
The macro is triggered and runs when
the submaster fader level reaches the
macro trigger level.
Display of Macro Triggers
Macro Triggers are displayed in the
Special column of the Submaster
screen in the form Macro: n .
Programming or Editing a
Macro Trigger
1. Select a programmed submaster.
2. Press SCREEN FUNCTION key
F8 or click on the Extra Functions
button, then select the Trigger
Macro option.
The Edit Macro Trigger Window is
displayed.
3. Enter the required macro number
and macro trigger level in the
fields provided, then select the
OK button in the window.
If the data entered is valid the Edit
Macro Trigger Window is closed
and the macro trigger data
appears in the Special column for
the submaster. Otherwise an error
message is displayed.
Deleting a Macro Trigger
1. Select the submaster which has
the macro trigger.
2. Press SCREEN FUNCTION KEY
F8 or click on the Extra Functions
button, then select the Trigger
Macro option.
The Edit Macro Trigger Window is
displayed.
3. Select the Clear button in the
window. The window is closed
and the macro data is removed
from the submaster in the
Submaster screen.
Triggering the Macro
To trigger a macro on a submaster,
raise the submaster fader above the
macro trigger level programmed for the
submaster.
Pressing the corresponding submaster
flash button will also trigger the macro.
Illusion 500 Manual 73-741-00 Issue 2 6 - 9
Submasters
Figure 6 - 9: Edit Macro Trigger Window
Page 88

Playback using Submasters
The submasters are used to playback
channel data or memories which have
been loaded onto them.
The data on up to 12 submasters can
be output simultaneously.
The data from submasters on different
pages can be combined using the
Page Overlay feature (see later).
The channel data or memories on the
submasters are accessed using the
PAGE UP and PAGE DOWN buttons
and the SUBMASTER FADERS.
The current active submaster page is
indicated by the seven segment
display on the front panel.
Chase memories transferred onto
submasters can be triggered in several
different ways (Transfer, Fader Level
or Flash Button).
Chase memories which are triggered
by Fader Level or Flash Button can be
stopped and restarted.
Chase memories which are triggered
by Transfer are running permanently
on the submaster.
The SUBMASTER FLASH BUTTONS
are used to flash, solo or ‘Go’ the
channel data or memory data on the
submaster.
Outputting Submaster Data
Select the required page using the
PAGE UP and PAGE DOWN buttons,
then move the SUBMASTER FADER
to the level required.
HTP Channel Data
The output levels of the HTP channels
(ie the dimmer channels and fixture
brightness parameters) in the channel
data or transferred memory are
determined by the level of the
submaster fader.
The time taken to fade up/down the
HTP channel data is governed by the
Fade Up and Fade Down times
specified for the individual submaster
(shown on the Submaster screen).
If the Fade Up and Fade Down times
are zero, the fade is determined by the
speed at which the SUBMASTER
FADER is moved.
LTP Channel Data
The LTP channels (ie fixture colour,
beamshape or position parameters) in
the channel data or transferred
memory are triggered when the
submaster fader level reaches the LTP
trigger level.
Once triggered, the LTP channels will
fade to their programmed values
according to the Colour, Beamshape
and Position Transition times defined
for the submaster.
Submaster Page Overlay
It is possible to output the channel data
or memory data on several submasters
from different pages simultaneously,
provided that they are not controlled by
the same physical submaster fader.
For example - It is possible to output
data from submasters 1-1, 2-2, 3-3, 4-4
at the same time, but not from
submasters 1-1, 2-1 and 3-1 as they
are all controlled by the same fader.
If the submaster page is changed while
any of the submaster faders are up, or
any of the SUBMASTER FLASH
BUTTONS are being held down, the
fader or button remains on the original
page and the outputs for the previous
submaster are held.
The new channel data or memory
associated with the fader or button is
not output until the fader is returned to
zero, or the flash button is released.
While data being output is not from the
current page, the yellow light in the
corresponding SUBMASTER FLASH
BUTTON flashes. The light in the
SUBMASTER FLASH BUTTON stops
flashing when the correct page is
returned to, by using the PAGE UP or
PAGE DOWN buttons.
6 - 10 Illusion 500 Manual 73-741-00 Issue 2
Submasters
Figure 6 - 10: Submaster Controls
Page 89

Page Overlay Example
1. Memories 1, 2, 21 and 22 have
been programmed as scene
memories and transferred onto
submasters 1-1, 1-2, 2-1, and 2-2
respectively.
2. All the SUBMASTER FADERS
are set to zero and the GRAND
MASTER is set to full.
3. The PAGE UP or PAGE DOWN
buttons are used to select Page 1.
4. SUBMASTER FADER 1 is moved
to full. Memory 1 is output live.
5. The PAGE UP button is used to
change to Page 2. The light in
SUBMASTER FLASH BUTTON 1
flashes showing that the data
output from submaster 1 is not
from the current page. The
outputs do not change.
6. SUBMASTER FADER 2 is moved
to full. Memory 22 is output live.
7. SUBMASTER FADER 1 is moved
back to zero. Memory 1 is
removed from the output. The
light in SUBMASTER FLASH
BUTTON 1 stops flashing.
8. SUBMASTER FADER 1 is moved
to full. Memory 21 is output live.
9. The PAGE DOWN button is used
to change back to Page 1. The
lights in SUBMASTER FLASH
BUTTONS 1 and 2 will now flash
showing that the data output from
both submasters is not from the
current page. The outputs do not
change.
Triggering Chase Memories
When a chase memory is transferred
onto a submaster, it can be triggered
(ie made to run) in a number of ways
as defined by the Chase Trigger:
Transfer
The Chase memory transferred onto
the submaster runs continuously.
When the SUBMASTER FADER is
raised, it is not possible to predict
which step will appear on the outputs.
The chase cannot be stopped.
Fader Level
The Chase memory transferred onto
the submaster remains on step 1 while
the SUBMASTER FADER level is
below the Chase Trigger Level.
When the SUBMASTER FADER level
reaches the Chase Trigger Level the
chase starts running.
When the SUBMASTER FADER is
brought down below the Chase Trigger
Level the chase stops running.
When the fader level reaches zero the
chase returns to step 1.
Flash Button
When the SUBMASTER FADER is first
raised, the chase is not output until the
corresponding SUBMASTER FLASH
BUTTON is pressed.
When the SUBMASTER FLASH
BUTTON is pressed the chase is
output starting from step 1.
Subsequent presses of the
SUBMASTER FLASH BUTTON will
stop and start the chase.
The SUBMASTER FLASH BUTTON
essentially becomes a chase pause
button.
NOTES
Flash, Solo and Go Functions
When a submaster contains a chase memory
which is triggered by the Flash button, the
normal Flash, Solo and Go functions are
disabled for that submaster.
Illusion 500 Manual 73-741-00 Issue 2 6 - 11
Submasters
Figure 6 - 11 : Submasters Screen
Page 90

Submaster Flash Functions
The SUBMASTER FLASH BUTTONS
can be set to Flash, Solo or Go the
channel data or memory data on the
submasters.
The FLASH FUNCTION button is used
to select the required function.
The red lights next to the FLASH
FUNCTION button indicate the
selected function (OFF, FLASH,
SOLO, or GO).
Flash
1. Set the Flash Function to FLASH
using the FLASH FUNCTION
BUTTON.
2. Press a SUBMASTER FLASH
BUTTON.
The dimmer channels and fixture
brightness parameters in the
channel data or transferred
memory on the submaster are
flashed to their programmed
levels.
Any fixture colour, beamshape or
position parameters in the
channel data or transferred
memory on the submaster are
automatically triggered and output
at their programmed levels.
Solo
1. Set the Flash Function to SOLO
using the FLASH FUNCTION
BUTTON.
2. Press a SUBMASTER FLASH
BUTTON.
The dimmer channels and fixture
brightness parameters in the
channel data or transferred
memory on the submaster are
flashed to their programmed
levels.
All other dimmer channel and
fixture brightness data being
output on other submasters,
Playback X and Playback A/B is
reduced to zero, except for any
‘excluded’ channels being output
from submasters.
Any fixture colour, beamshape or
position parameters in the
channel data or transferred
memory on the submaster are
automatically triggered and output
at their programmed levels.
Go
The Submaster ‘Go’ function is
essentially a ‘timed flash’ and is
equivalent to raising the physical
SUBMASTER fader to full.
1. Set the Flash Function to GO
using the FLASH FUNCTION
BUTTON.
2. Press a SUBMASTER FLASH
BUTTON.
The dimmer channels and fixture
brightness parameters in the
channel data or transferred
memory on the submaster fade
up from their current level in the
appropriate time.
If the submaster fader level
passes the LTP Trigger level, any
fixture colour, beamshape or
position parameters will be
triggered and output.
3. Press the SUBMASTER FLASH
BUTTON again. The dimmer
channels and fixture brightness
parameters in the channel data or
transferred memory on the
submaster fade down to the level
of the submaster fader in the
appropriate time.
Notes - Submaster Fade Times
If the submaster has non-zero fade up and
fade down times, the ‘slugged’ value of the
submaster is used to trigger the chase and
not the physical position of the SUBMASTER
FADER.
6 - 12 Illusion 500 Manual 73-741-00 Issue 2
Submasters
Figure 6 - 12: Submaster Controls
Page 91

Memory Stack
Introduction
The Memory Stack is defined as the
list of programmed memories in
increasing numerical order.
The Memories and Cueline screens
are two representations of the same
Memory Stack.
Programming and editing memory data
is normally done from the Memories
screen, but it can also be done from
the Cueline screen, if preferred.
Any changes made to memory data on
the Memories screen are reflected on
the Cueline screen and vice versa.
Jumps, Loops and Macro Triggers can
be programmed into the Memory Stack
from either the Memories or Cueline
screens.
The Memory Stack is played back
using the Playback X controls, from
either the Memories screen or the
Cueline screen, as preferred.
Note - Memories and Cues
This chapter refers to memories and cues. A
cue on the Cueline screen is exactly the same
as a memory on the Memories screen.
Illusion 500 Manual 73-741-00 Issue 2 7 - 1
Figure 7 - 1: Memories Screen
For news, views and latest software
visit our dedicated Illusion website at:
www.illusionsupport.com
Page 92

Jumps, Loops and Macro
Triggers
Normally the Memory Stack is played
back by going through each of the
programmed memories in numerical
order, each memory being triggered
automatically or by a GO button press.
The Illusion 500 desk provides
additional functions allowing jumps,
loops and macro triggers to be
programmed into the Memory Stack.
Jumps
The Jump function provides the facility
to jump to a particular memory when
the current one is complete. Jumps
may be forwards or backwards in the
Memory Stack.
Loops
The Loop function provides the facility
to run through several memories a
specified number of times before
progressing onto the next memory in
the Memory Stack.
Macro Triggers
The Macro Trigger function provides
the facility to trigger a specified macro
when the memory is triggered from the
Memory Stack.
Display of Jumps and Loops
Memories Screen - the jump and loop
information is displayed in the Special
column.
A jump is shown as Jump To: n where
n is the memory number to jump to.
On the first memory in the loop the
Special column shows Loop x/y where
x indicates the current loop and y the
total number of loops.
On the last memory in the loop the
Special column shows Trigger: t where
t is either Go or Auto as programmed
in the loop.
All memories contained in a loop are
shown with a dark grey background in
the Special column.
Cueline Screen - the jump and loop
information is displayed in the Special
track.
A jump is shown as Jump To: n where
n is the cue number to jump to.
All the cues contained in a loop are
indicated by a grey bar in the Special
track.
The text in the left hand side of the
grey bar shows Loop x/y where x
indicates the current loop and y the
total number of loops.
The text in the right hand side of the
bar shows Trigger: t where t is either
Go or Auto as programmed in the loop.
Display of Macro Triggers
Memories Screen - a macro trigger is
displayed in the Special column as
Macro: n .
Cueline Screen - a macro trigger is
displayed in the Special track as
Macro: n .
Notes - Jumps, Loops & Macro Triggers
A memory in a loop can be jumped to, but it
is not possible to program a jump from a
memory inside a loop
A Loop must contain at least 2 memories.
The number of the last memory in a loop
must be greater than the number of the first
memory in the loop.
All the programmed memories between the
first and last memories in a loop are
automatically included in the loop. It is not
possible to specify overlapping loops.
It is not possible to jump from or start a loop
from memory zero.
A macro trigger cannot be programmed onto
a memory, if that memory has a jump, or is
the first or last memory in a loop.
A macro trigger can be attached to a memory
in the middle of a loop.
7 - 2 Illusion 500 Manual 73-741-00 Issue 2
Memory Stack
Figure 7 - 2 : Memories Screen showing Jump, Loop and Macro Trigger
Page 93

Programming Jumps
The following sections describe how to
program, edit and delete jumps from
the Memories or Cueline screens.
Programming a Jump from
the Memories Screen
1. Select the memory which is the
start of the jump.
2. Press SCREEN FUNCTION key
F8 and select the Jump To option
from the menu, or right click and
select the Jump To option. A
popup window is displayed.
3. Enter the memory number in the
field provided and then select the
OK button in the window.
If the memory number is valid the
popup window is closed and the
Jump data appears in the
Memories screen against the
memory which is being jumped
from. Otherwise an error message
is displayed.
Editing a Jump from the
Memories Screen
For example, change a jump to
memory 20 to jump to memory 25.
The procedure is the same as
Programming a Jump (see above).
Change the memory number to the
new one required, then select the OK
button in the window.
Deleting a Jump from the
Memories Screen
1. Select the memory which is the
start of the jump.
2. Press the SCREEN FUNCTION
key F8 and select the Jump To
option from the menu, or right
click and select the Jump To
option. A popup window is
displayed.
3. Select the Clear button in the
window. The popup window is
closed and the jump data is
removed from the Memories
screen.
Programming a Jump from
the Cueline Screen
1. Select the cue which is the start of
the jump.
2. Right click in the Cue Track and
select the Jump To option from
the menu. A popup window is
displayed.
3. Enter the cue number to jump to
in the field provided and select the
OK button in the window.
If the cue number is valid, the
popup window is closed and the
jump data is displayed in the
‘Loop’ Track on the Cueline
screen. Otherwise an error
message is displayed.
Editing a Jump from the
Cueline Screen
For example, change a jump to
memory 20 to jump to memory 25.
The procedure is the same as
Programming a Jump (see above).
Change the cue number to the new
one required, then select the OK
button in the window.
Deleting a Jump from the
Cueline Screen
1. Select the cue which is the start of
the jump.
2. Right click in the Cue Track and
select the Jump To option from
the menu. A popup window is
displayed.
3. Select the Clear button in the
window. The popup window is
closed, and the jump data is
removed from the Cueline screen.
Illusion 500 Manual 73-741-00 Issue 2 7 - 3
Memory Stack
Figure 7 - 3: Edit Jump To Window
Page 94

Programming Loops
The following sections describe how to
program, edit and delete loops from
the Memories or Cueline screens.
Programming a Loop from
the Memories Screen
1. Select the memory which is the
first memory in the loop.
2. Press SCREEN FUNCTION key
F8 and select the Loop option
from the menu, or right click and
select the Loop option. The Edit
Loop Window is displayed.
3. Enter the last memory number in
the loop, the number of loops and
select the loop trigger in the fields
provided. Then select the OK
button in the window.
If the data entered is valid the Edit
Loop Window is closed and the
loop data appears in the Special
column of the Memories screen
against the corresponding
memories. Otherwise an error
message is displayed.
Editing a Loop from the
Memories Screen
This is the same as Programming a
Loop except that the loop parameters
are already displayed in the Edit Loop
Window.
Change the loop parameters as
required, then select the OK button in
the window.
Deleting a Loop from the
Memories Screen
1. Select any memory in the loop.
2. Press SCREEN FUNCTION KEY
F8 and select the Loop option
from the menu, or right click and
select the Loop option. The Edit
Loop Window is displayed.
3. Select the Clear button in the
window. The window is closed
and the loop data is removed from
the corresponding memories in
the Memories screen.
Programming a Loop from
the Cueline Screen
1. Select the cue which is the start of
the loop.
2. Right click in the Cue Track and
select the Loop option from the
menu. The Edit Loop Window is
displayed.
3. Enter the last cue number in the
loop, the number of loops and the
loop trigger in the fields provided.
Then select the OK button in the
window.
If the data entered is valid, the
Edit Loop Window is closed and
the loop data is displayed in the
Special track on the Cueline
screen. Otherwise an error
message is displayed.
Editing a Loop from the
Cueline Screen
This is the same as Programming a
Loop except that the loop parameters
are already displayed in the Edit Loop
Window.
Change the loop parameters as
required, then select the OK button in
the window.
Deleting a Loop from the
Cueline Screen
1. Select any cue in the loop.
2. Right click in the Cue Track and
select the Loop option from the
menu. The Edit Loop Window is
displayed.
3. Select the Clear button in the Edit
Loop Window. The window is
closed and the loop data is
cleared from the Cueline screen.
7 - 4 Illusion 500 Manual 73-741-00 Issue 2
Memory Stack
Figure 7 - 4 : Edit Loop Window
Page 95

Programming Macro Triggers
The following sections describe how to
program, edit and delete macro
triggers from the Memories or Cueline
screens.
Programming a Macro
Trigger from the Memories
Screen
1. Select the memory which is to
trigger the macro.
2. Press SCREEN FUNCTION key
F8 and select the Trigger Macro
option from the menu, or right
click and select the Trigger Macro
option. The Edit Macro Trigger
Window is displayed.
3. Enter the required macro number
in the field provided, then select
the OK button in the window.
If the data entered is valid the Edit
Macro Trigger Window is closed
and the macro trigger data
appears in the Memories screen
against the corresponding
memory. Otherwise an error
message is displayed.
Editing a Macro Trigger from
the Memories Screen
This is the same as Programming a
macro trigger except that the macro
number is already displayed in the Edit
Macro Trigger Window.
Change the macro number as
required, then select the OK button in
the window.
Deleting a Macro Trigger from
the Memories Screen
1. Select the memory which has the
macro trigger.
2. Press SCREEN FUNCTION KEY
F8 and select the Trigger Macro
option from the menu, or right
click and select the Trigger Macro
option. The Edit Macro Trigger
Window is displayed.
3. Select the Clear button in the
window. The window is closed
and the macro data is removed
from the corresponding memory
in the Memories screen.
Programming a Macro
Trigger from the Cueline
Screen
1. Select the cue which is to have
the macro trigger.
2. Right click in the Cue Track and
select the Trigger Macro option
from the menu. The Edit Macro
Trigger Window is displayed.
3. Enter the macro number in the
field provided, then select the OK
button in the window.
If the data entered is valid, the
Edit Macro Trigger Window is
closed and the macro data is
displayed in the Special Track on
the Cueline screen. Otherwise an
error message is displayed.
Editing a Macro Trigger from
the Cueline Screen
This is the same as Programming a
Macro Trigger except that the macro
number is already displayed in the Edit
Macro Trigger Window.
Change the macro number as
required, then select the OK button in
the window.
Deleting a Macro Trigger from
the Cueline Screen
1. Select a cue which has the macro
trigger.
2. Right click in the Cue Track and
select the Trigger Macro option
from the menu. The Edit Macro
Trigger Window is displayed.
3. Select the Clear button in the Edit
Macro Trigger Window. The
window is closed and the macro
data is cleared from the Cueline
screen.
Illusion 500 Manual 73-741-00 Issue 2 7 - 5
Memory Stack
Figure 7 - 5: Edit Macro Trigger Window
Page 96

Playback X
The following sections describe how to
play back the Memory Stack when the
desk is in Real Time mode.
For details on running a show when
the desk is SMPTE or MIDI Time mode
see chapter 5.
The Playback X controls are used to
output the programmed memories from
the Memory Stack.
The Memory Stack can be run from the
Memories or Cueline screens using the
Playback X controls on the front panel,
or from the Cueline screen using the
soft buttons provided.
The memories can be output in
ascending numerical order simply by
using the GO button, or a particular
memory can be selected and then
output, as required.
Jumps, Loops and Macro Triggers may
also have been programmed into the
Memory Stack.
Memory Triggers
The various types of memory trigger
available in Real Time mode are
described below:
Go Button Trigger
If the trigger for the next memory is the
GO button, when the CUELINE
reaches the end of the dwell of the
previous memory it will wait there until
the GO button is pressed.
Automatic Trigger
If the trigger for the next memory is
Automatic, when the CUELINE
reaches the end of the dwell of the
previous memory it will jump to the
start of the memory and begin running
through it immediately.
At Time Trigger
If the trigger for the next memory is
At Time, the CUELINE will jump to the
start of the memory and begin running
through it when the time (as shown by
the clock in the Information Bar) equals
the start at time for the memory.
Jumps in the Memory Stack
When the CUELINE reaches the end
of the dwell time for a memory which
has a jump, it will jump to the start of
the specified memory.
If the trigger for this memory is
automatic, the CUELINE will continue
progressing through the memory. If the
trigger is the GO button, the CUELINE
will wait at the start of the memory until
the GO button is pressed.
Loops in the Memory Stack
If a loop is programmed in the Memory
Stack, when the CUELINE reaches the
end of the dwell time for the last
memory in the loop, it will jump back to
the start of the first memory in the loop.
If the Loop Trigger is automatic, the
CUELINE will begin progressing
through the first memory. If the Loop
Trigger is the GO button, the CUELINE
will wait at the start of the first memory
until the GO button is pressed.
Macro Triggers in the
Memory Stack
If a macro trigger is programmed in the
Memory Stack, the specified macro will
run when the memory is triggered via
the GO button, automatically or at a
specified time.
7 - 6 Illusion 500 Manual 73-741-00 Issue 2
Memory Stack
Figure 7 - 6: Playback X Controls
Page 97

Selecting the Next Memory
To select a memory from the Memories
screen - see chapter 5.
To select a memory from the Cueline
screen - see chapter 9.
Starting the Show
When playing back the Memory Stack
it is recommended that the Memories
or Cueline screen is displayed.
1. Set the Playback X MASTER and
GRAND MASTER faders to full
(100%). Set the OVERRIDE
control to its central position.
Ensure that Blackout is not active.
2. Select the first programmed
memory and press the GO button
on the front panel or select the Go
button on the Cueline screen.
The outputs will fade to the first
memory using the programmed
delay, fade and transition times.
If the Cueline screen is displayed,
the CUELINE (red vertical bar)
will be displayed at the start of the
first cue and then begin moving
across the screen.
3. As the CUELINE passes each
event in the memory track(s) the
DMX outputs are updated
accordingly.
The Go Button
To output the next memory (indicated
by the highlight bar on the Memories or
Cueline screen) press the GO button
on the front panel or select the GO
button on the Cueline screen.
This initiates a crossfade to the next
memory. The highlight bar moves
automatically to the next programmed
memory when the GO button is
pressed.
The outputs fade to the next memory
according to its programmed delay,
fade and transition times.
To prevent accidental multiple presses,
the GO button or a remote switch
assigned to the GO button does not
have the auto-repeat facility.
The Go Previous Button
The GO PREVIOUS function is used to
go from the Current memory to the
previously output memory using the
transition times for the current memory
in reverse.
Press the GO PREVIOUS button or
select the Go Previous button on the
Cueline screen.
This initiates a crossfade to the
previously output memory (see note).
The highlight bar moves automatically
to the next programmed memory when
the GO PREVIOUS button is pressed.
Note - Go Previous Function
The previously output memory is not
necessarily the one before the current one on
the memory stack.
Example - if the memories output so far have
been 1,2,3,4,5,10, and the current memory
is number 10; pressing the GO PREVIOUS
button will go back to memory 5, using the
transition times for memory 10 in reverse.
Illusion 500 Manual 73-741-00 Issue 2 7 - 7
Memory Stack
Figure 7 - 7: Memories Screen
Page 98

The Override Control
Progress through the Memory Stack
can be slowed down or speeded up
using the Playback X OVERRIDE
control on the front panel.
Turning the control anti-clockwise
slows down the progress, turning it
clockwise speeds it up.
An indication of the position of the
OVERRIDE control is displayed in the
Fade Status Bar at the bottom of the
monitor screen.
The Pause Button
Progress through the Memory Stack
can be halted at any point by pressing
the PAUSE button on the front panel or
selecting the Pause button on the
Cueline screen.
When progress is halted, the red light
in the PAUSE button flashes.
Progress through the Memory Stack is
restarted by pressing the PAUSE
button again. The red light in the
PAUSE button goes out.
End of the Show
When the CUELINE reaches the end
of the show (ie the end of the dwell
time for the last programmed memory
in the Memory Stack), it returns to the
start of the first programmed memory
in the memory stack.
If the trigger for the first memory is the
GO button, the CUELINE waits at the
start of the first memory until the GO
button is pressed.
If the trigger for the first memory is
automatic the Cueline will start running
through the first memory.
NOTES
Memories Screen Display Mode
When playing back the Memory Stack with
the Memories screen on display, it is
recommended that the Display Mode is set
to Programmed Memories/Follow. In this
mode only the programmed memories will be
displayed and the screen will follow the Next
memory as the show progresses.
The cursor keys, direct memory number entry
or mouse can be used to select the next
memory out of sequence, if required. This
may result in the currrent memory no longer
being visible on the monitor screen.
If an attempt is made to select a field other
than the memory number, edit or preview a
memory, the display mode will automatically
change to All Memories/Stay.
Selecting an Unprogrammed Memory
If an unprogrammed memory is selected and
then the GO button is pressed, an error
message will be displayed on the screen, and
the yellow highlight bar will move
automatically to the next programmed
memory in the Memory Stack.
Multi-Part Scenes
In Full Mode - unprogrammed channels in
the memory will fade to zero when the
memory is output.
In Partial Mode - unprogrammed channels in
the memory are unaffected when the
memory is output.
7 - 8 Illusion 500 Manual 73-741-00 Issue 2
Memory Stack
Figure 7 - 8: Playback X Controls
Page 99

Playback A/B
Introduction
The Playback A/B function allows any
of the programmed memories (except
multi-part scenes) to be loaded onto
the A and B MASTER faders.
The A MASTER and B MASTER
faders are then used to control the
outputs and crossfade between the
loaded memories.
The A and B fade times are controlled
independently by the FADE TIME A
and FADE TIME B controls.
Memories can be manually loaded
onto the A and B MASTERS, or loaded
automatically each time either of the
master faders reaches zero.
The Playback A/B Mode and the LTP
Trigger Levels for the A and B
MASTER faders are defined in Desk
Setup (see chapter 3 for details).
The Playback A/B section is
independent of the Playback X section
of the desk.
Illusion 500 Manual 73-741-00 Issue 2 8 - 1
Figure 8 - 1: Playback A/B Controls
For news, views and latest software
visit our dedicated Illusion website at:
www.illusionsupport.com
Page 100

Manual Load Operation
When Playback A/B is operating in
Manual Mode, memories can be
selected and loaded onto the A and B
MASTERS as and when required.
Loading the A Master
1. Set the A MASTER fader to zero.
Set the required fade time on the
FADE TIME A control.
2. Press the LOAD A button on the
front panel. The Load Playback A
window is displayed.
3. Enter the memory number in the
field provided and select the OK
button in the window.
4. To output the memory - raise the
A MASTER fader to full. The
dimmer channels and fixture
brightness parameters in the
loaded memory will fade up in the
indicated time.
The fixture colour, beamshape
and position parameters in the
loaded memory are triggered
when the A MASTER fader
reaches the LTP trigger level.
Loading the B Master
Loading and outputting a memory on
the B MASTER is the same as for the
A MASTER, except the B MASTER,
LOAD B and FADE TIME B controls
are used instead.
Auto Load Operation
When Playback A/B is set to Auto
Load, memories are loaded onto the A
and B MASTERS automatically when
the fader level reaches zero.
Loading A/B Automatically
1. Set the A MASTER to zero and
the B MASTER to full.
2. Load the A MASTER with a
memory as described earlier.
3. Move the A MASTER to full and
the B MASTER fader to zero. The
memory loaded onto A will be
output, and the next programmed
memory will be loaded onto the
B MASTER automatically.
4. Move the A MASTER back to
zero and the B MASTER to full.
The outputs will crossfade
between the two memories. The
next memory will be loaded onto
the A MASTER automatically.
Monitor Display
The Fade Status Bar at the bottom of
the monitor screen indicates the
memories currently loaded onto the
A MASTER and B MASTER faders.
Clearing the A/B Masters
To clear the A MASTER or B MASTER
(ie remove the memory loaded onto it)
load memory zero onto the fader.
Notes - Playback A/B
Fade Time A/B
If the FADE TIME A or FADE TIME B control
is set to zero, the fade time is determined by
the speed at which the corresponding Master
fader is moved.
Manual Loading of A/B
An attempt to load an unprogrammed or
multi-part scene memory onto the A or B
MASTER generates an error message.
If the A MASTER or B MASTER is not at zero
when a memory is loaded, the memory will
be output at the corresponding fader level.
Dipless Crossfades
Dipless crossfades can only be achieved
providing that the memories loaded onto the
A and B MASTERS are both scenes and the
two master faders are moved in tandem.
Auto Load
If there are multi-part scene memories in the
Memory Stack, these will be ignored when
automatically loading the A and B MASTERS.
Moving a single master fader (A MASTER or
B MASTER) up and down will fade the loaded
memory up and down, and then
automatically load the next programmed
memory when the fader is returned to zero.
8 - 2 Illusion 500 Manual 73-741-00 Issue 2
Playback A/B
Figure 8 - 2 : Load Playback A Window
 Loading...