

Page 1
This product must be earthed
Apparatets stikprop skal tilsluttes en stikkontakt med jord, som giver forbindelse til stikproppens jord.
Laite on liitettävä suojakoskettimilla varustettuun pistorasiaan
Apparatet må tilkoples jordet stikkontakt
Apparaten skall anslutas till jordat uttag
Lighting Controls –
FLX S lighting console
FLX S24 & FLX S48
User Manual
Version 1
Correct as per ZerOS Version 7.9.3
Zero 88 FLX S Lighting Console – User Manual Page 1 of 47
Page 2

Contents
Introduction ...................................................... 4
FLX S24 & FLX S48 ....................................................... 4
ZerOS (Operating Software) .......................................... 4
Phantom ZerOS (offline editor) .................................. 4
This manual .................................................................... 4
Getting started… ............................................................ 4
Turning the console on ............................................... 4
External Display.......................................................... 5
Using FLX S48 without an External Display ............... 5
Touch Scrolling ........................................................... 5
Front panel – FLX S24 ................................................... 6
Front panel – FLXS 48 ............................................... 6
Controlling Intensities ..................................... 8
Multi-Functional Faders (MFFs) ................................. 8
Encoder wheels .......................................................... 8
Commands ................................................................. 8
Groups .............................................................. 8
Groups window ........................................................... 8
Automatic groups ....................................................... 8
Recording groups ....................................................... 9
Using groups .............................................................. 9
Referencing intensities ............................................... 9
Naming groups ........................................................... 9
Updating groups ......................................................... 9
Deleting Groups.......................................................... 9
Controlling Attributes .................................... 10
Select a fixture(s)...................................................... 10
Choosing an attribute ............................................... 10
Encoder wheels ........................................................ 10
Central encoder button ............................................. 10
Palettes ........................................................... 11
Palette Windows ....................................................... 11
Automatic palettes .................................................... 11
Recording Palettes ................................................... 11
Using palettes ........................................................... 11
Referencing palettes ................................................ 11
Naming Palettes ....................................................... 11
Updating Palettes ..................................................... 12
Deleting Palettes ...................................................... 12
Colour ............................................................. 12
Palettes ..................................................................... 12
Picker (Colour Picker & Image Picker) ..................... 12
Multi-Touch on the picker ......................................... 13
Mood boards by Lee Filters ...................................... 13
Beam ............................................................... 13
Palettes ..................................................................... 13
Position ........................................................... 14
Palettes ..................................................................... 14
Pan/Tilt Grid .............................................................. 14
Multi-Touch on the P/T Grid ..................................... 14
Effects ............................................................. 14
Palettes .................................................................... 14
Speed, Size, Offset and Rotation Encoders ............ 15
Cues & Playbacks .......................................... 16
Playbacks ..................................................................... 16
Master Playback ....................................................... 16
Multi-Function fader window .................................... 16
Playback window ...................................................... 16
Naming playbacks .................................................... 16
Copying playbacks ................................................... 16
Deleting playbacks ................................................... 16
Advanced Playbacks ................................................ 17
Playback Settings ......................................................... 17
General ..................................................................... 17
Chase ....................................................................... 18
Raise and Lower ...................................................... 19
Move on Dark ........................................................... 19
Cues ............................................................................. 21
Recording cues ........................................................ 21
Record Window ........................................................ 21
Adjusting fade times ................................................. 22
Naming cues ............................................................ 22
Updating cues .......................................................... 22
Copying Cues ........................................................... 23
Deleting Cues ........................................................... 23
Cue Settings ................................................................. 24
Trigger (Go, Auto, Timecode etc) ............................. 24
Next cue ................................................................... 24
Don’t Move on Dark settings .................................... 24
Macros ...................................................................... 24
Playing back cues ........................................................ 24
Jumping to a cue (Go To cue) .................................. 25
Snapping to a cue (Ignoring fade times) .................. 25
Using the pause key ................................................. 25
Releasing playbacks ................................................ 25
Macros ............................................................ 25
Macro Window .............................................................. 25
Automatic fixture macros .............................................. 25
Ⓩ Key .............................................................. 26
Save Show ............................................................... 26
Lock Console ............................................................ 26
Calibrate (FLX S48 only) .......................................... 26
System Information .................................................. 26
Guidance .................................................................. 26
Encoder Wheels ....................................................... 26
Command syntax ..................................................... 26
Patching – introduction ................................. 28
Fixtures ..................................................................... 28
Parameters ............................................................... 28
Attributes .................................................................. 28
Zero 88 Fixture library .............................................. 28
Zero 88 FLX S Lighting Console – User Manual Page 2 of 47
Page 3

User fixture types...................................................... 28
DMX – introduction ....................................................... 29
DMX channels (and DMX start address) .................. 29
DMX universes ......................................................... 29
16 bit channels ......................................................... 29
Composite fixtures .................................................... 29
Setup ............................................................... 30
Fixture schedule ........................................................... 30
With a fixture’s home position of Pan and Tilt at 50%,
inverting or swapping these parameters won’t make a
instant visible change. Therefore, it’s recommended
that before editing these values, you select all the
fixtures and move them all to a different position.
Now, as you change the values within “Alignment”,
you’ll see the beams updating live. .......................... 30
Add fixtures ................................................................... 33
System Settings............................................................ 34
Desk Name ............................................................... 34
External Display Settings (FLX S48 only) ................ 34
Internal Display Settings ........................................... 34
Peripheral Settings (encoder wheel settings etc) ..... 34
Operational Settings ................................................. 34
Attribute Settings (Colour, Beamshape, Position) .... 35
Tracking Options ...................................................... 36
Inputs & Outputs ........................................................... 37
DMX Outputs ............................................................ 37
Defaults ........................................................................ 37
Default Times ........................................................... 38
Playback Defaults ..................................................... 38
Save Show ................................................................... 38
File Types ................................................................. 38
Phantom ZerOS........................................................ 39
Load File ....................................................................... 39
ZerOS Showfiles....................................................... 39
ASCII Showfiles ........................................................ 39
User Fixture Types ................................................... 40
Zero 88 Fixture Library ............................................. 40
Installing new software ............................................. 40
Clear Options................................................................ 40
Clearing specific areas of the console ..................... 40
Clear User Fixture Types ......................................... 40
Reset Desk / Factory Reset ..................................... 40
Remote (mobile apps) .................................................. 41
Art-Net .......................................................................... 41
Streaming ACN (sACN) ................................................ 42
Wings and ZeroWire ..................................................... 43
Network devices ........................................................... 43
Visualisation ................................................................. 44
Capture ..................................................................... 44
Light Converse ......................................................... 44
WYSIWYG ................................................................ 44
Networking Basics ........................................................ 45
Ethernet basics ......................................................... 45
IP Addresses ............................................................ 45
Subnet Masks ........................................................... 45
Switch vs Crossover ................................................. 45
DHCP ....................................................................... 45
Technical Information .................................... 46
Power supply ............................................................ 46
USB ports ..................................................................... 46
Ethernet ........................................................................ 46
Kensington Lock ........................................................... 46
DMX output .................................................................. 46
Video output ................................................................. 46
Troubleshooting............................................. 46
Fixtures not responding? .......................................... 46
External Touch Screen not responding? .................. 46
Remote App not connecting? ................................... 46
Console does not start correctly?............................. 46
Basic maintenance ........................................ 47
Cleaning the surface ................................................ 47
Cleaning the faders .................................................. 47
Transportation & storage .......................................... 47
Operating environments ........................................... 47
Reporting a problem ...................................... 47
Mechanical information ................................. 47
Dimensions ................................................................... 47
Weight .......................................................................... 47
Operating temperature range ....................................... 47
Humidity ....................................................................... 47
Zero 88 FLX S Lighting Console – User Manual Page 3 of 47
Page 4
Save – FLX S automatically saves you’re work
internally, indicated by a green icon. Press this
icon to save to an external USB drive.
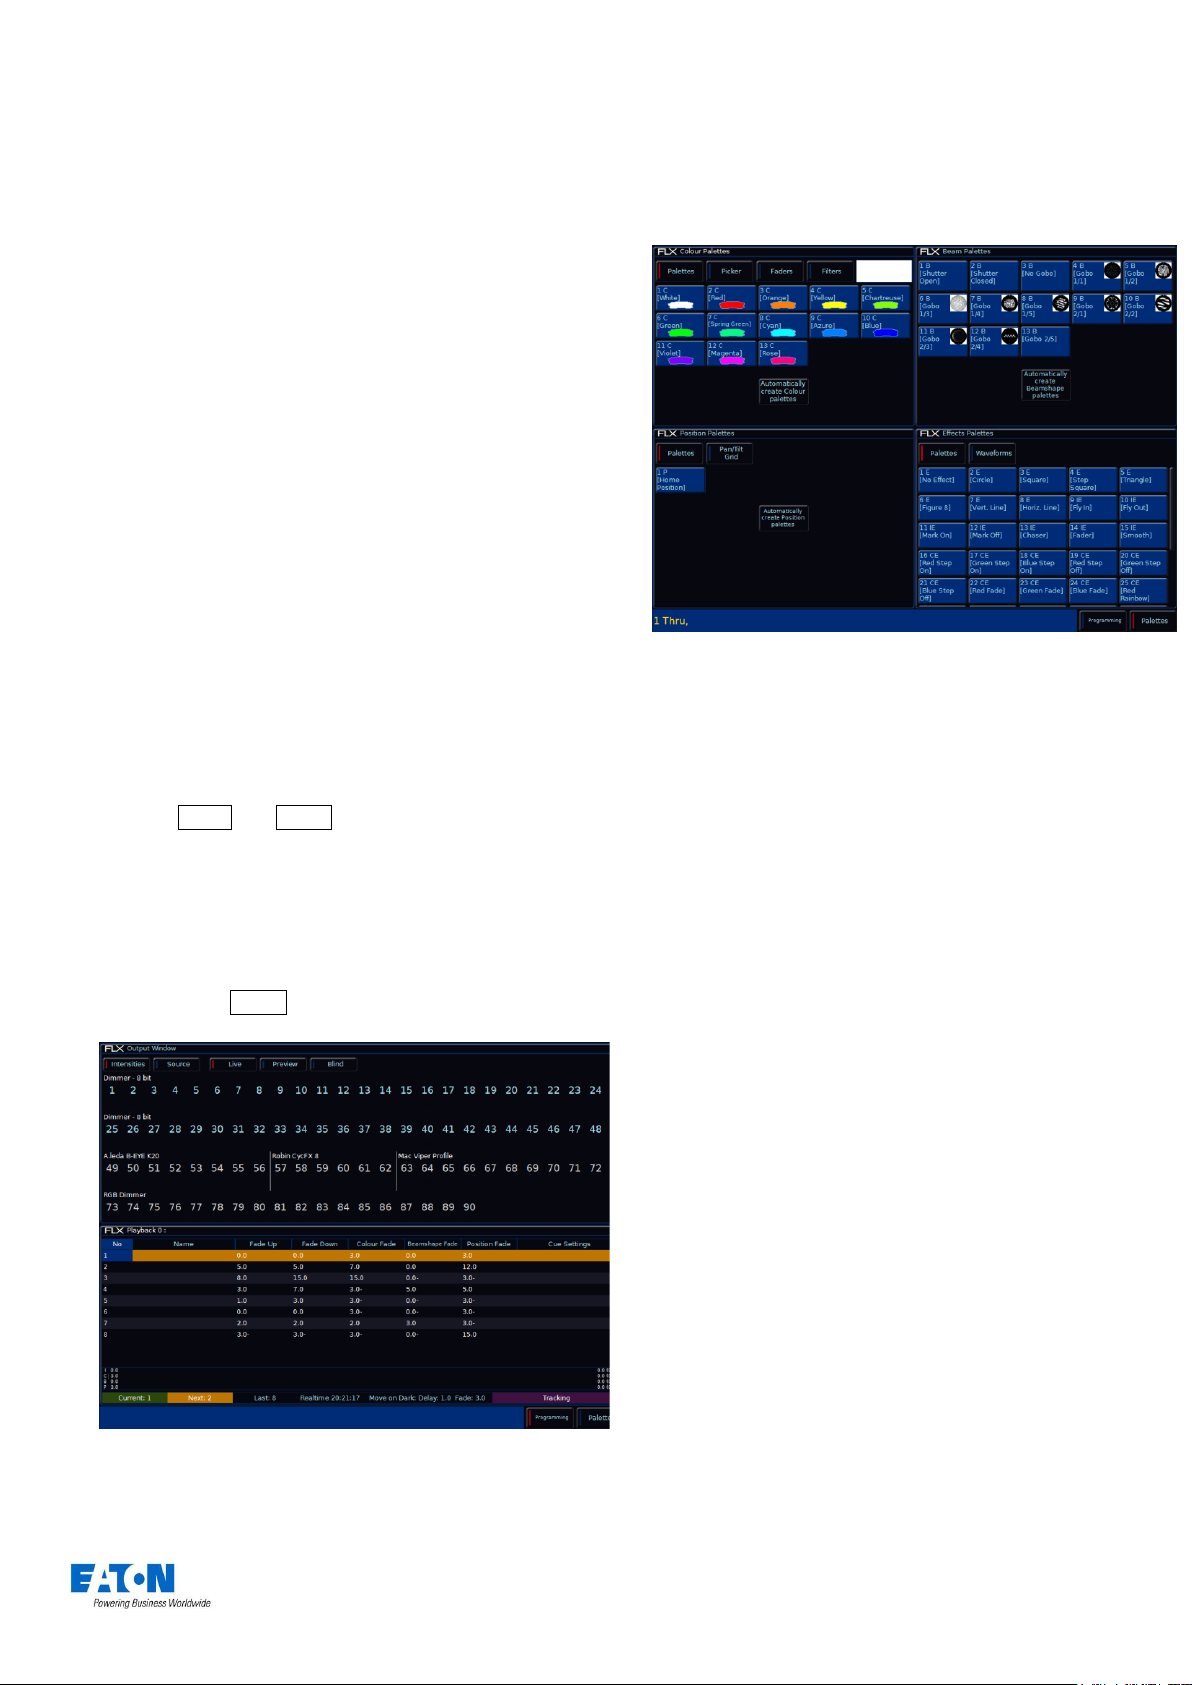
Output window – this window displays each
fixture and its current intensity as a percentage.
Cue list window – this window displays the list
of cues on a specific playback, ready to be
progressed by pressing the GO button.
Playback window – this window displays the
current functionality of the 24 or 48 faders on
the left hand side of the console.
Groups window – this window is used to select
fixtures that are often used together. Groups
can be automatically or manually created.
Introduction
FLX S24 & FLX S48
FLX S consoles are easy to learn and simple to use delivering all the features you need at an affordable price.
We sincerely hope that your new FLX S will bring you
years of trouble-free service. We take great care to build in
reliability and serviceability at every stage of our
development and production processes.
This manual
This manual describes the operation of the FLX S lighting
Console. For detailed information on each function, the
manual has been divided into chapters - one for each
major area of the console Throughout this manual the
following conventions are used:
References to physical front panel controls and buttons
appear within a solid border, for example:
Record , Update.
References to “soft buttons”, which appear on the monitor,
are displayed in italics, within a dotted border, as follows:
Next , Picker .
Experience is the best way of fully learning the console.
Through time you will develop your own operating style.
Getting started…
Turning the console on
After plugging in all the relevant cables to the rear of the
console (power, DMX and possibly USB devices or, on
FLX S48, a monitor), turn on the power supply and FLX S
will power up automatically.
ZerOS (Operating Software)
ZerOS is regularly updated to bring new features and to
keep your console stable and secure. Software updates
are free of charge and can be downloaded from
zero88.com/software. It is strongly recommended to
always be running the latest release of software.
Phantom ZerOS (offline editor)
Phantom ZerOS is free to download, and can emulate any
console which runs our ZerOS software, including FLX S.
Show files can be loaded, saved and transferred to “real”
consoles, useful to setup your show, or make slight
changes while you’re not at the console.
Phantom ZerOS can also be unlocked to output Art-Net or
sACN with the addition of the “Phantom ZerOS Unlock
Dongle”.
Phantom ZerOS can be downloaded from the Zero 88
website.
Navigating the touchscreen
Along the top of the touchscreen are five square buttons.
Additional buttons (e.g. colour, positon and effect controls)
will appear and disappear to the right of these depending
on the capabilities of the fixtures you’re controlling. The
currently selected button is highlighted in blue.
Zero 88 FLX S Lighting Console – User Manual Page 4 of 47
Page 5
RigSync
When FLX S is first plugged into a lighting rig, “RigSync”
will set it up automatically and continue working in the
background to ensure FLX S and your rig are always
synchronised and problem free. RigSync removes the
need to understand DMX (if your fixtures support “RDM”).
Guidance (help)
Available in multiple languages, “Guidance” steps you
through the key features of FLX S at your own pace, to
learn or refresh your skills. Guidance will be automatically
open on the bottom 3rd of the internal screen, and will
follow your progression through the console. If closed,
Guidance can be reopened by pressing Ⓩ and choosing
“Guidance” on the internal screen.
External Display
FLX S48 includes an optional external DVI-D monitor.
The optional external display can view one of two different
desktops – “Programming” or “Palettes”. Which one is
currently being viewed can be switched using the two
buttons in the bottom right corner of the external display (or
by pressing Shift and View together).
“Programming” desktop
The Programming desktop shows the Output Window in
the top half of the screen, and either the Playback
window or the Multi-Function Faders window in the
bottom half. Which one is being viewed can be switched
by tapping the View button.
“Palettes” desktop
The Palettes desktop shows the four attribute windows
(Colour, Beam, Position and Effects) in each corner.
”Palettes” desktop on the external display
Using FLX S48 without an External Display
FLX S48 can be used without the need of an external
display. The console will automatically detect that an
external monitor is not present and display these windows
on the internal display instead.
Touch Scrolling
All windows can be scrolled through using either touch or a
mouse by simply dragging over a window or list, rather
than having to use the scroll bars.
”Programming” desktop on the external display
Zero 88 FLX S Lighting Console – User Manual Page 5 of 47
Page 6
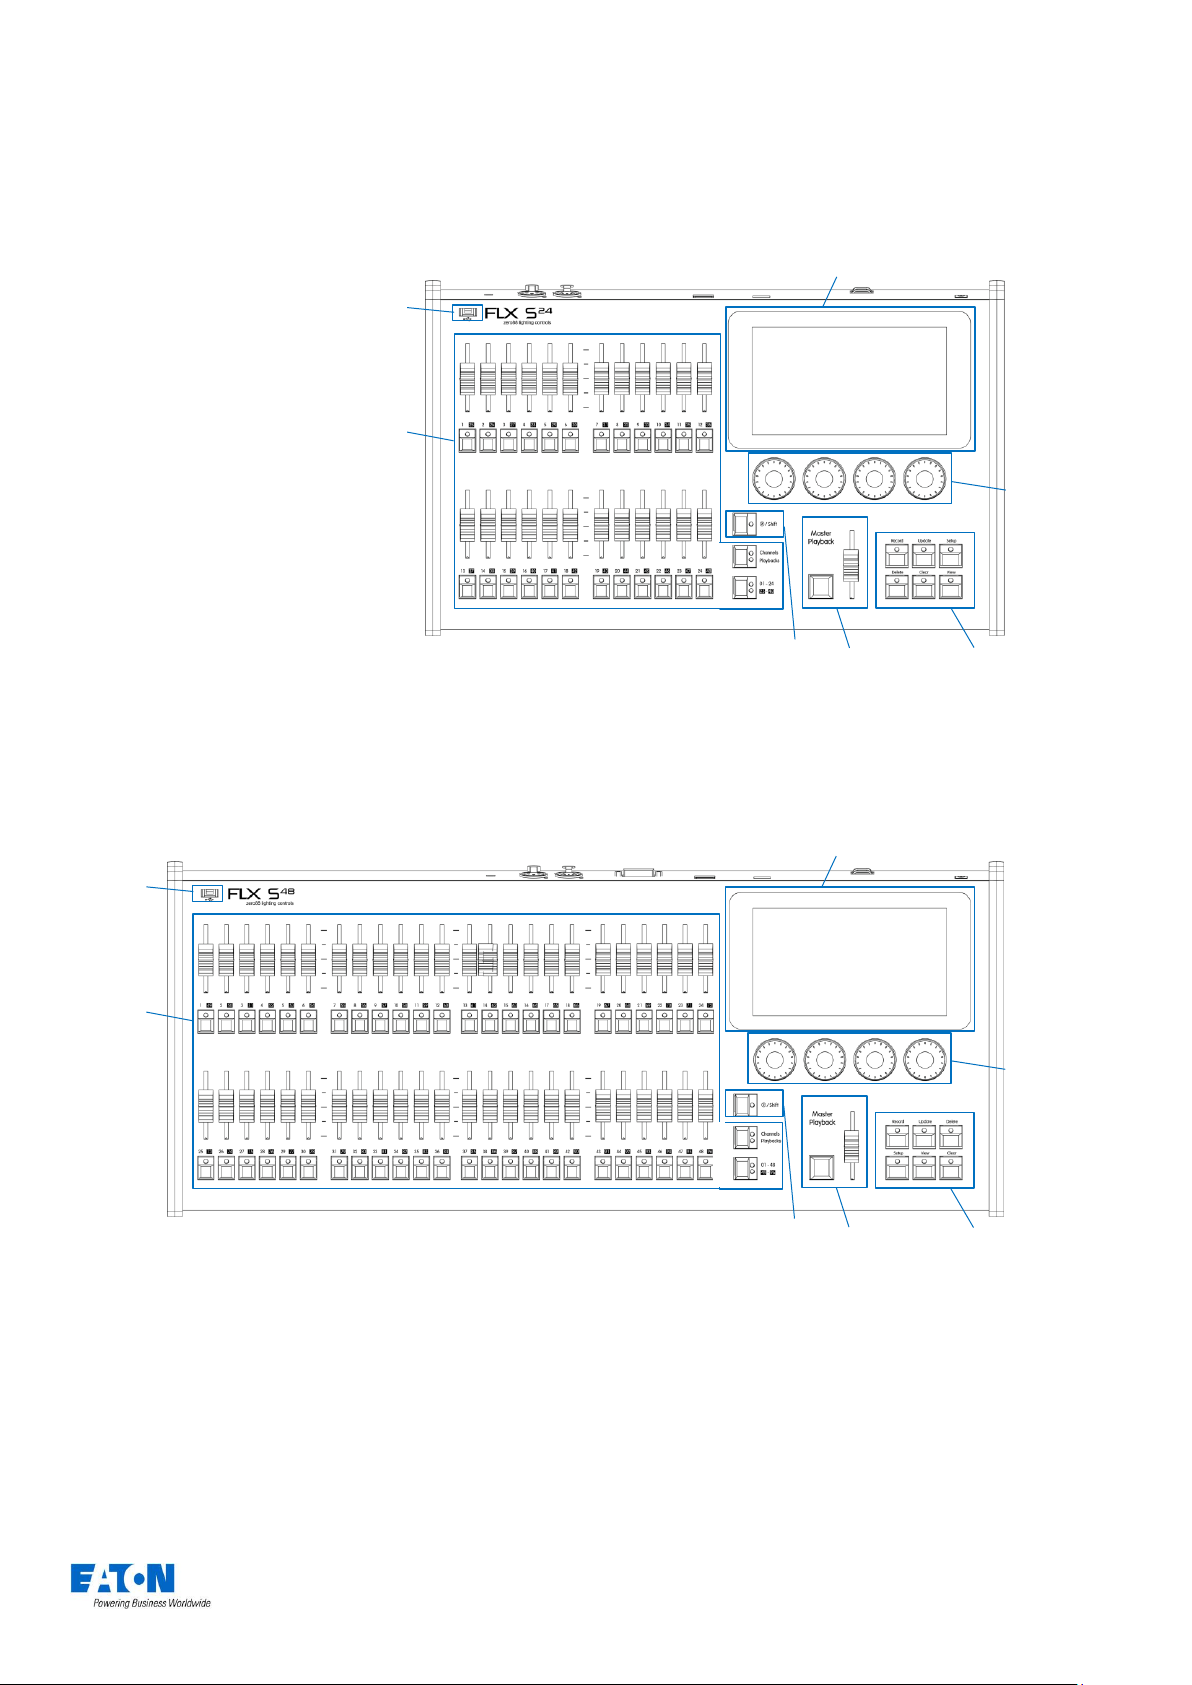
Master
Playback
Command &
Function Keys
“Z” / shift
Multi-Touch Monitor
USB
Multi-
Function
Faders
(MFFs)
Encoder
Wheels
Master
Playback
Command &
Function Keys
Ⓩ / shift
Multi-Touch Monitor
USB
Multi-
Function
Faders
(MFFs)
Encoder
Wheels
Front panel – FLXS 48
Front panel – FLX S24
Zero 88 FLX S Lighting Console – User Manual Page 6 of 47
Page 7
Multi-Function Faders (MFFs)
The FLX S lighting console is equipped with either 24 or 48
Multi-Function Faders. These can quickly and easily be
switched between their two functions (“Channels” and
“Playbacks”) by using the Fader Funct. button.
Channels
When set to “Channels”, the faders directly control
each light (or “fixture”) in the rig (this is often
referred to as “Channel per Fader”). Each fixture,
no matter what it is, will have a single “Channel
Number”, and so will take up a single channel
fader. FLX S consoles support double the number
of fixtures as there are faders. The Page button
can be used to switch the faders between fixtures
(see below).
Playbacks (or cues, stacks & submasters)
Lighting “states” (or “scenes”) can be prerecorded, ready to be recalled later. They are
called “cues”, and are recorded onto “playbacks”.
Each playback can store a single cue, or multiple
cues. FLX S consoles support double the number
of playbacks as there are faders, plus the “Master
Playback”. Traditionally, playbacks with a single
cue have often been referred to as “submasters”
whereas playbacks with multiple cues have often
been referred to as “cue stacks”. We simply call
them all playbacks.
Command keys & function keys
FLX S includes dedicated keys for commands Record ,
Update and Delete , and the functions Setup , View ,
and Clear . As well as performing functions themselves,
functionality of other buttons may be changed when
pressed at the same time.
Encoder wheels
Four encoder wheels are provided, and used for accurate
control of various settings. The settings currently being
controlled by the four encoders are displayed in the four
boxes along the bottom of the touch screen, just above the
encoders.
Ⓩ / Shift key
Ⓩ places a range of quick access settings & functions on
the internal display and encoder wheels. Holding Ⓩ acts
as “Shift”, changing the functionality of other buttons when
pressed simultaneously.
USB ports
Two USB 2.0 ports are provided - one on the rear, one on
the front panel. USB ports can be used for:
- Keyboard & Mouse (mouse on external monitor only)
- Touchscreen (DVI-D also required, FLX S48 only)
- External Storage Devices (such as Memory Sticks)
Page
The page button allows you to switch between
faders 1 – 24 and faders 25 – 48 on FLX S24, or
faders 1 – 48 and faders 49 – 96 on FLX S48.
Switching between “Channels” and “Playbacks”
will automatically change the page to the page you
had previously selected when in that function.
Master Playback
For many shows, especially theatrical, a single playback is
often used with a long list of pre-recorded cues. For these
situations, an additional “Master Playback” is provided with
a quieter “soft” Play / GO button and Level fader.
Zero 88 FLX S Lighting Console – User Manual Page 7 of 47
Page 8
Controlling Intensities
On FLX S, all intensities can be controlled in exactly the
same way – no matter if the fixture is a basic dimmer, an
LED, a moving light or any other type of fixture. There are
three possible ways to control an intensity:
Multi-Functional Faders (MFFs)
Ensure that the MFFs are in channel mode by pressing
the Fader Funct. button.
When set to “Channels”, the 24 (48) MFFs directly control
each light (or “fixture”) in the rig (this is often referred to as
“Channel per Fader”). Each fixture, no matter what it is, will
have a single “Channel Number”, and so will take up a
single channel fader. The Page button can be used to
switch between channels (two pages of 24 channels on the
FLX S24, and two pages of 48 channels on the FLX S48).
Grey outline boxes in the Output Window show which set
of channels are currently being controlled on the MFFs.
Channels can be adjusted by moving the appropriate
fader. If a channel already has a level, for example set
through commands, then you must ‘grab’ the level by
moving the fader up to the present value. Once that value
is grabbed, the fader gains control.
Encoder wheels
To change the intensity of a fixture via an encoder wheel,
first select the fixture(s) required. Channels are
automatically selected when channel faders are moved,
but can be changed using the buttons under the faders
(MFFs must be in “channel” mode).
When the channel is selected, the LED in the button under
the fader will turn on, and an orange box will be drawn
around the channel number in the Output Window. You
can select multiple channels on the faders at the same
time by pressing and holding the first button, and then
tapping the last button.
Groups
Groups are selections of fixtures that are used together
regularly (such as a colour wash, or all the moving lights
on a specific truss). A group can hold any number of
fixtures, and a fixture can be in many different groups. FLX
S24 can hold up to 48 groups of fixtures, and FLX S48 can
hold up to 96 groups. Groups can also store and recall
intensities of all the fixtures stored within that group.
Groups window
The Group window is displayed on the internal
display when the Group button is pressed.
Groups can be selected and deselected directly
within this window.
When groups are selected, they will be highlighted in the
Groups window. Selecting “All – Dimmers” will also
highlight “Odd – Dimmers”, “Even – Dimmers” etc, as by
selecting “All – Dimmers” you are selecting channels within
all these groups.
Automatic groups
The FLX S lighting console can automatically generate a
group for each type of fixture you have, plus ‘odd’, ‘even’,
“1st half” and “2nd half” groups for each different fixture
type.
To create the automatic groups, view the Groups window
(by pressing Group ) and choose “Automatically create
groups”.
All automatic groups automatically store the intensities of
those fixtures at 100%.
Once selected, press the Ⓩ key and then use the encoder
wheel marked on the internal monitor as “intensity” to
adjust the level. The output value is shown above the
corresponding encoder wheel and in the Output Window.
Commands
Pressing the Ⓩ button displays a number pad which can
be used to type commands. For more information, see the
chapter entitled “Z key”.
Zero 88 FLX S Lighting Console – User Manual Page 8 of 47
Groups window after “Automatically create groups” has been selected.
Page 9
Recording groups
You can create your own groups of fixtures, eg Blinders,
FOH movers, PARs on LX3 etc. Simply select the fixtures
that you wish to be in the group using either the channel
buttons or syntax, ensure you are viewing the groups
window, and then press Record followed by touching an
empty group This records whichever group you touch on
the touch screen.
If the selected fixtures have a tagged intensity value (red
value in the Output Window), this will also get stored within
the group. If there is no tagged intensity value, those
channels will get stored at 100%.
Groups window with various fixtures current selected highlighted in blue
Only fixtures that are currently selected will be recorded
into the group, even if other fixtures have intensity values.
As well as the selection and the intensities, groups record
the order the fixtures were selected in. This is useful when
offsetting effects across selections of fixtures.
When groups are recorded, they will be automatically given
a name, based on what’s been recorded into them. This
name can be easily changed (see “naming groups”).
Using groups
Using the built in touch screen, you can select and
deselect groups directly just by touching them.
Touching multiple groups will select all of those groups.
FLX S will keep adding to the selection until another
command is entered (like changing the intensity, or
selecting a palette). After that, those channels will remain
selected until you press on another group, which will start
the selection again. The previous channels being
deselected can be avoided by typing “and” first, and then
selecting another group.
Intensity Groups can be recalled by double-tapping a
group on the touch screen. This also selects the fixtures
within that group. If all fixtures are already at the Intensity
Group levels, double-tapping the group will turn the
intensities off (0%).
Referencing intensities
When a fixture is taken to its full intensity stored within a
group (using any of the previous methods), ZerOS
references the recorded value back to the group’s
intensity, so if the group is updated, the cues will
automatically be updated to the new intensity too.
Naming groups
Groups can be named by holding Setup and pressing the
Group on the touchscreen. An onscreen keyboard will
then be displayed to type the group’s name. Press OK to
confirm.
Updating groups
To update a group, make the new selection of fixtures, and
then press Update followed by touching the specific
group .This updates whichever group you touch on the
touch screen.
Updating a group will update the contents of that group,
but will not alter the name of the group.
Deleting Groups
To delete a group, press Delete followed by touching the
specific group .
The desk will ask you to confirm this action before the
command is executed. Once deleted, a group cannot be
recovered but can be recreated manually if required.
Zero 88 FLX S Lighting Console – User Manual Page 9 of 47
Page 10
Controlling Attributes
The intensity of all fixtures, no matter what they are, is
controlled in the same way – as described on the previous
pages. Controlling all other parameters is described below.
Select a fixture(s)
Fixtures are automatically selected when the channel
faders are moved. The selection can be changed by using
the buttons under the faders (MFFs must be in “channel”
mode for this to work) or by using the commands
described on the previous page (accessed via the Ⓩ
button, just press Enter after typing the last channel, in
place of typing @ …).
When the channel is selected, the LED in the button under
the fader will turn on, and an orange box will be drawn
around the channel number in the Output Window. You
can select multiple channels on the faders at the same
time by pressing and holding the first button, and then
tapping the last button.
Attribute Settings (Colour, Beamshape, Position)” on page 35 for more
information).
Central encoder button
On parameters with discrete values (such as colour wheel,
gobo, shutter, macro, control etc), these values can be
displayed on the internal touch screen by pressing the
central encoder button. For parameters involved in colour
mixing (Red, Green, Blue etc) the central button opens the
colour picker page. For parameters involved in position
(Pan and Tilt) the central button opens the position grid
page.
Choosing an attribute
Each fixture has its own set of parameters (eg Intensity,
Colour, Gobo, Pan, Tilt etc.), which are grouped together
into three attributes (Colour, Beam and Position).
Once a fixture, or group of fixtures, have been selected,
the relevant attributes will appear along the top of the
touchscreen, to the right of the five icons. Selecting one
will open that attribute’s window on the internal display,
and put the attribute’s parameters onto the four encoder
wheels ready to be controlled.
Encoder wheels
Parameters can be controlled directly by the four encoder
wheels. The parameters currently being controlled by the
encoders are displayed in the four boxes along the bottom
of the touch screen, just above the encoders.
Remember that each fixture will have a different range of
parameters available, depending on its feature set. Consult
the fixture’s operating manual for details. If the fixture has
more than four parameters in the attribute, pressing the
attribute tab again brings more controls onto the encoder
wheels.
Example of the display after the central encoder button has been pressed
on a “shutter” parameter. The highlighted value (in blue) shows the
currently active value.
The sensitivity, mode and behaviour of the encoder wheels
can be changed in Setup. (See “Peripheral Settings (encoder
wheel settings etc)” on page 34 and “
Zero 88 FLX S Lighting Console – User Manual Page 10 of 47
Page 11
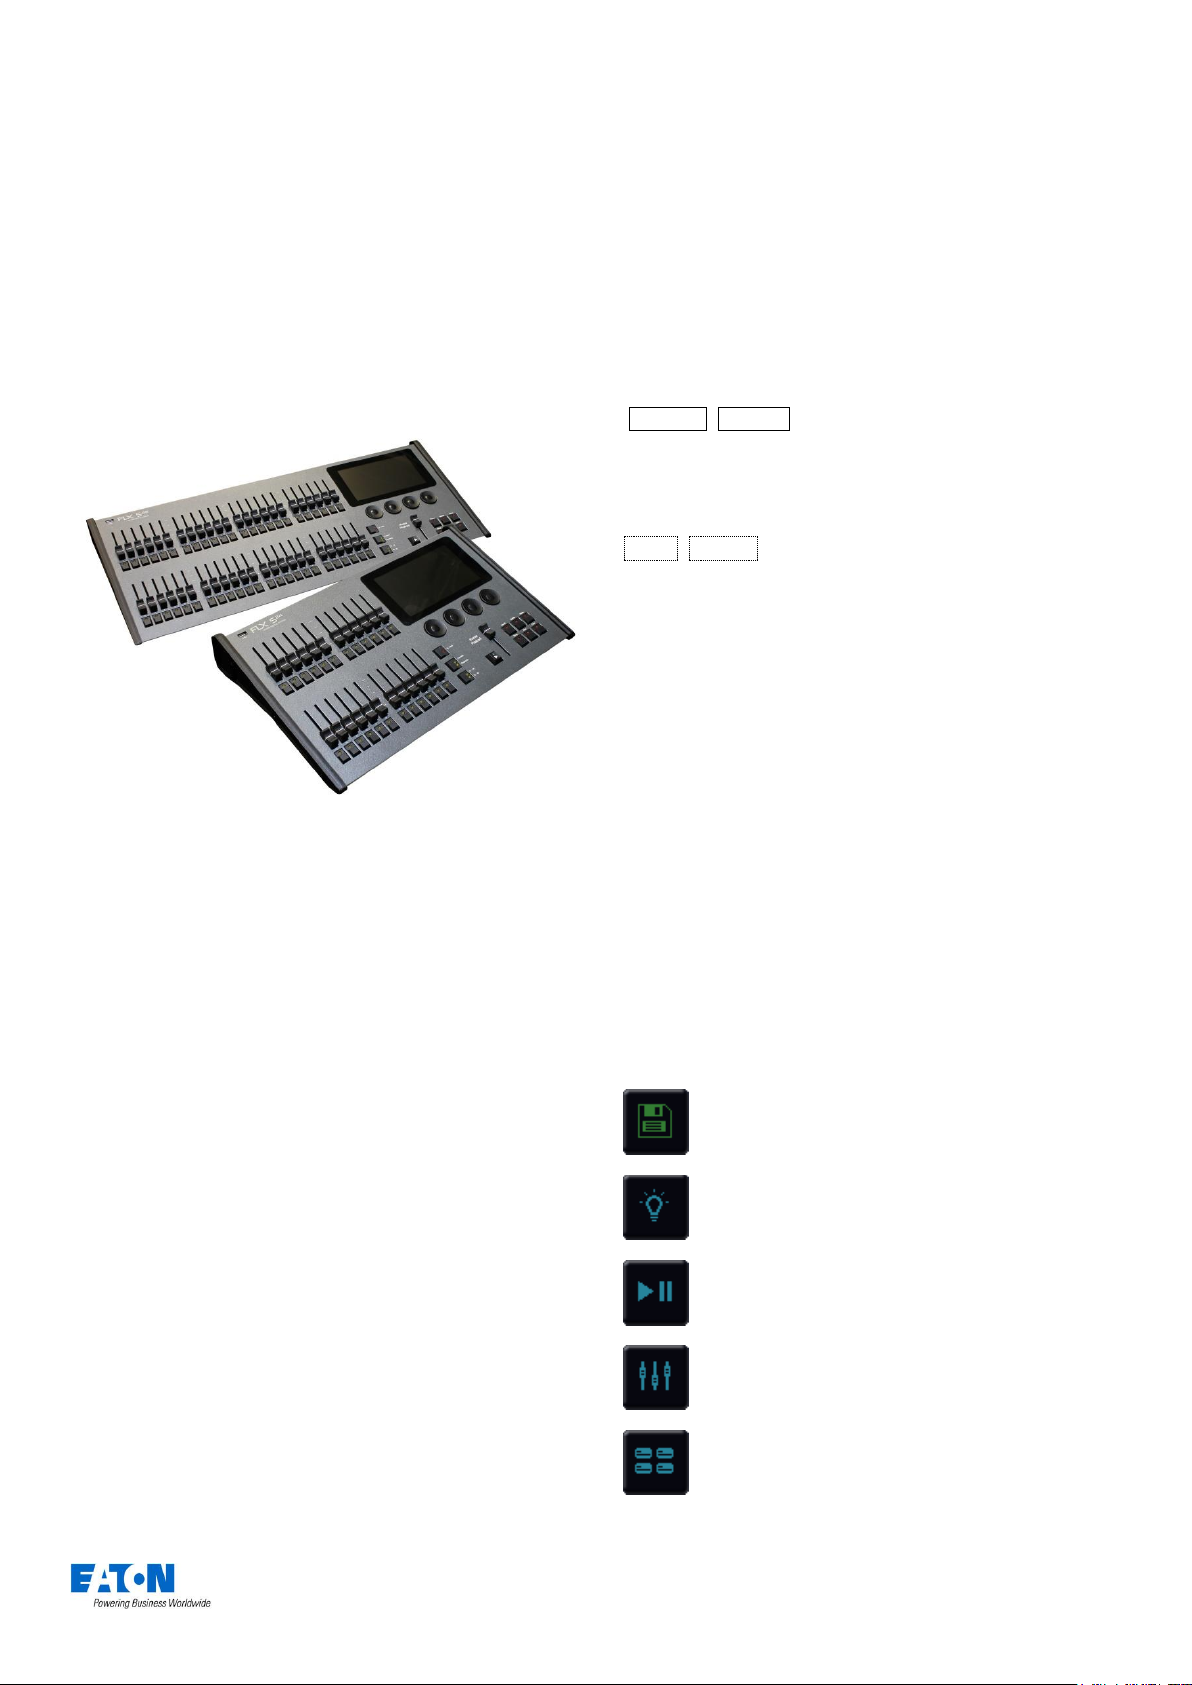
Palettes
Each attribute on the FLX S24 console has 48 palettes
(Colour, Beam, Position and Effect). Each attribute on the
FLX S48 console has 96 palettes.
A palette stores all the values of a fixture (or group of
fixtures) required to create a particular look on stage. For
example, a palette can be stored for the colour Red which
details the values required for each fixture to create a red
colour. Likewise a palette can be stored for a position on
the stage, with the relevant Pan & Tilt information for each
fixture in the rig.
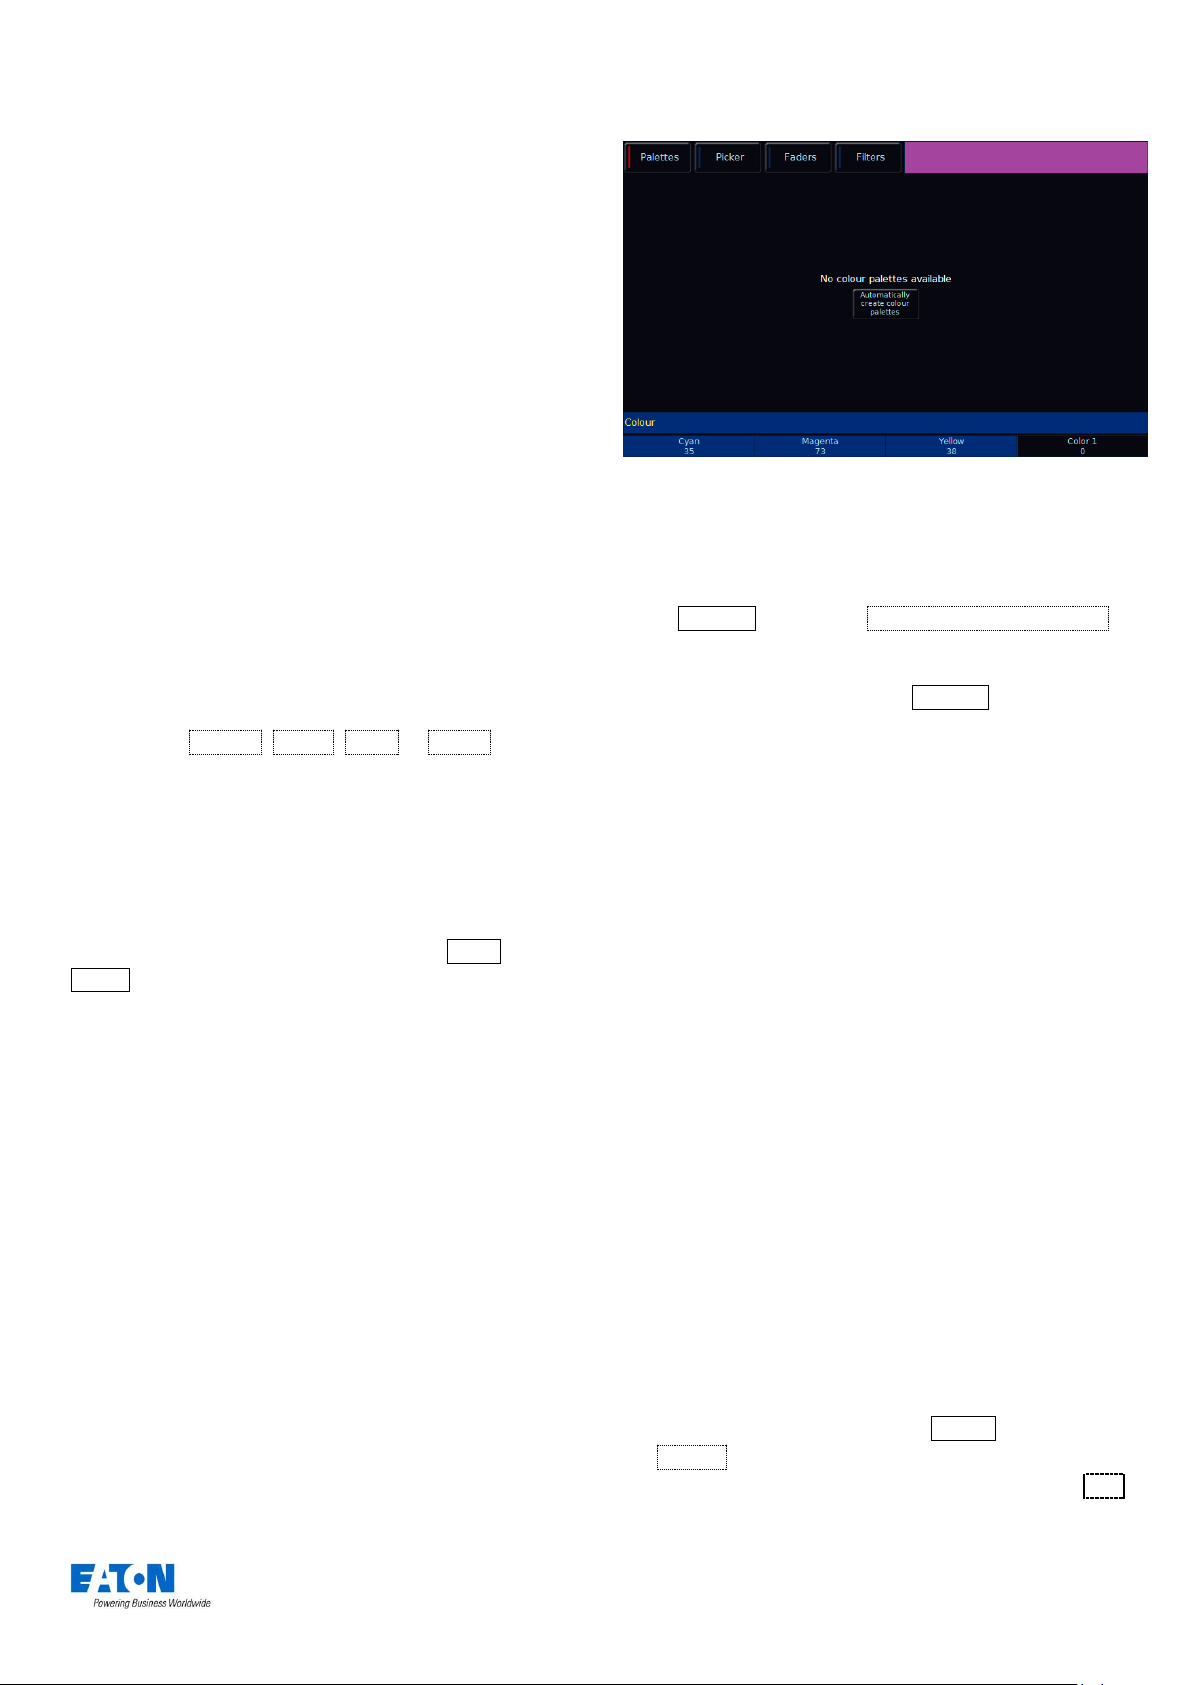
Palettes window without any palettes, offering to automatically create
some.
Palettes can quickly recall parameter settings that are used
regularly, such as a range of colours for LED fixtures, or a
range of positions for moving lights. FLX S can
automatically create palettes if required.
Palette Windows
Each set of palettes has its own palette window. This is
opened automatically when you press the appropriate
attribute tab (Position, Colour, Beam or Effects).
The palette window contains a soft button for each of the
48 or 96 palettes. Each soft button contains a palette
number and a name.
On FLX S48, palettes can also be displayed on the
external monitor by pressing “Palettes” in the bottom right
corner of the external monitor, or pressing Shift and
VIEW together.
Automatic palettes
FLX S can automatically create palettes for all of the
attributes, which can be a quicker method of controlling
parameters than via the encoders. If palettes are available
for your fixtures, an “Automatically create palettes” button
will be displayed.
Automatic palettes are created based on the fixtures you
have patched, so it’s recommended to fully patch your
console before choosing ”Automatically create palettes”.
Recording Palettes
To record a colour palette, set up the fixtures as required
(all red for example) and whilst viewing the colour window,
press Record followed by touching an empty palette .
This process is the same for other palettes, just view the
correct attribute before pressing Record .
Using palettes
When using palettes, only the selected fixtures will move to
the values stored within that palette. This means you can
have a single palette of everything red, but then only select
a small number of fixtures to actually go red.
To use a palette, first select a fixture or group of fixtures.
Then, simply choose a palette on the internal touchscreen
The fixture(s) will change to the colour they were in when
the palette was stored.
If any of the selected fixtures are not actually programmed
in the applied palette, but there are one or more fixtures of
the same type that are programmed, the fixture will use the
values programmed for the first fixture of the same type.
Referencing palettes
If you use palettes, and then record a cue, the console will
record the palette reference rather than the actual
parameter data. This means if you update the palette, all
the cues which used that palette will automatically be
updated. This is especially useful for touring shows when
using positions, to save updating each cue individually
when you move venue.
Naming Palettes
Palettes can be named by holding Setup and pressing
the Palette on the touchscreen. An onscreen keyboard will
then be displayed to type the palette’s name. Press OK to
confirm.
Zero 88 FLX S Lighting Console – User Manual Page 11 of 47
Page 12

Updating Palettes
To update a palette it is often easiest to activate the palette
first by selecting your fixtures and touching the palette.
Now, make the changes you want, and then press Update
followed by touching the relative palette .This updates
whichever palette you touched on the touch screen.
Updating a palette will update the contents of that palette,
but will not alter the name of the palette.
Deleting Palettes
To delete a palette, simply press Delete followed by
touching the relevant palette .
The desk will ask you to confirm this action before the
command is executed. Once deleted, a palette cannot be
recovered but can be recreated manually if required.
When deleting a palette, any references to the palette in
programmed cues will be replaced with “hard values”
before deleting it. This ensures cues are not changed.
Colour
Palettes
The desk provides the following standard colour palettes
for fixtures with CMY or RGB colour mixing: White, Red,
Orange, Yellow, Chartreuse, Green, Spring Green, Cyan,
Azure, Blue, Violet, Magenta and Rose.
In addition to the above, the desk generates an auto
palette for each colour available on every colour wheel in
the fixture. These palettes are labelled with the stock
colour names as supplied by the manufacturer. The desk
compares the RGB values specified for each colour on the
colour wheel of the fixture with the RGB values of the
standard colours listed above. The desk combines the auto
palette of the standard colours and the auto palette of the
colour wheel for those which are within a certain tolerance
of the standard colour.
“Colour Palettes” window after “Automatically create colour palettes” has
been selected with colour mixing fixtures patched.
Note: the following features will only work with Colour
Mixing fixtures (RGB or CMY).
Picker (Colour Picker & Image Picker)
The “Colour Picker” tab will also appear along the top,
which displays a colour picker (shown to the right),
allowing you to select a colour for use in colour mixing
(CMY/RGB) fixtures. Just touch the picker using the built in
touch screen, and the colour of the selected fixture will be
set to the colour pressed. Along the left of the Picker
screen will be 4 pre-loaded images that you can also pick
colours from.
The cross (“+”) symbol on the picker indicates the current
colour values for the selected fixture. If multiple fixtures are
selected, multiple “+” will be displayed.
Zero 88 FLX S Lighting Console – User Manual Page 12 of 47
Page 13
where the colours might be used, and gives a selection of
several colours that work well together for that mood.
Some moods have more than one selection of colours,
such as “Moonlight” which has “Realistic” & “Romantic”
selections.
“Colour Picker” screen
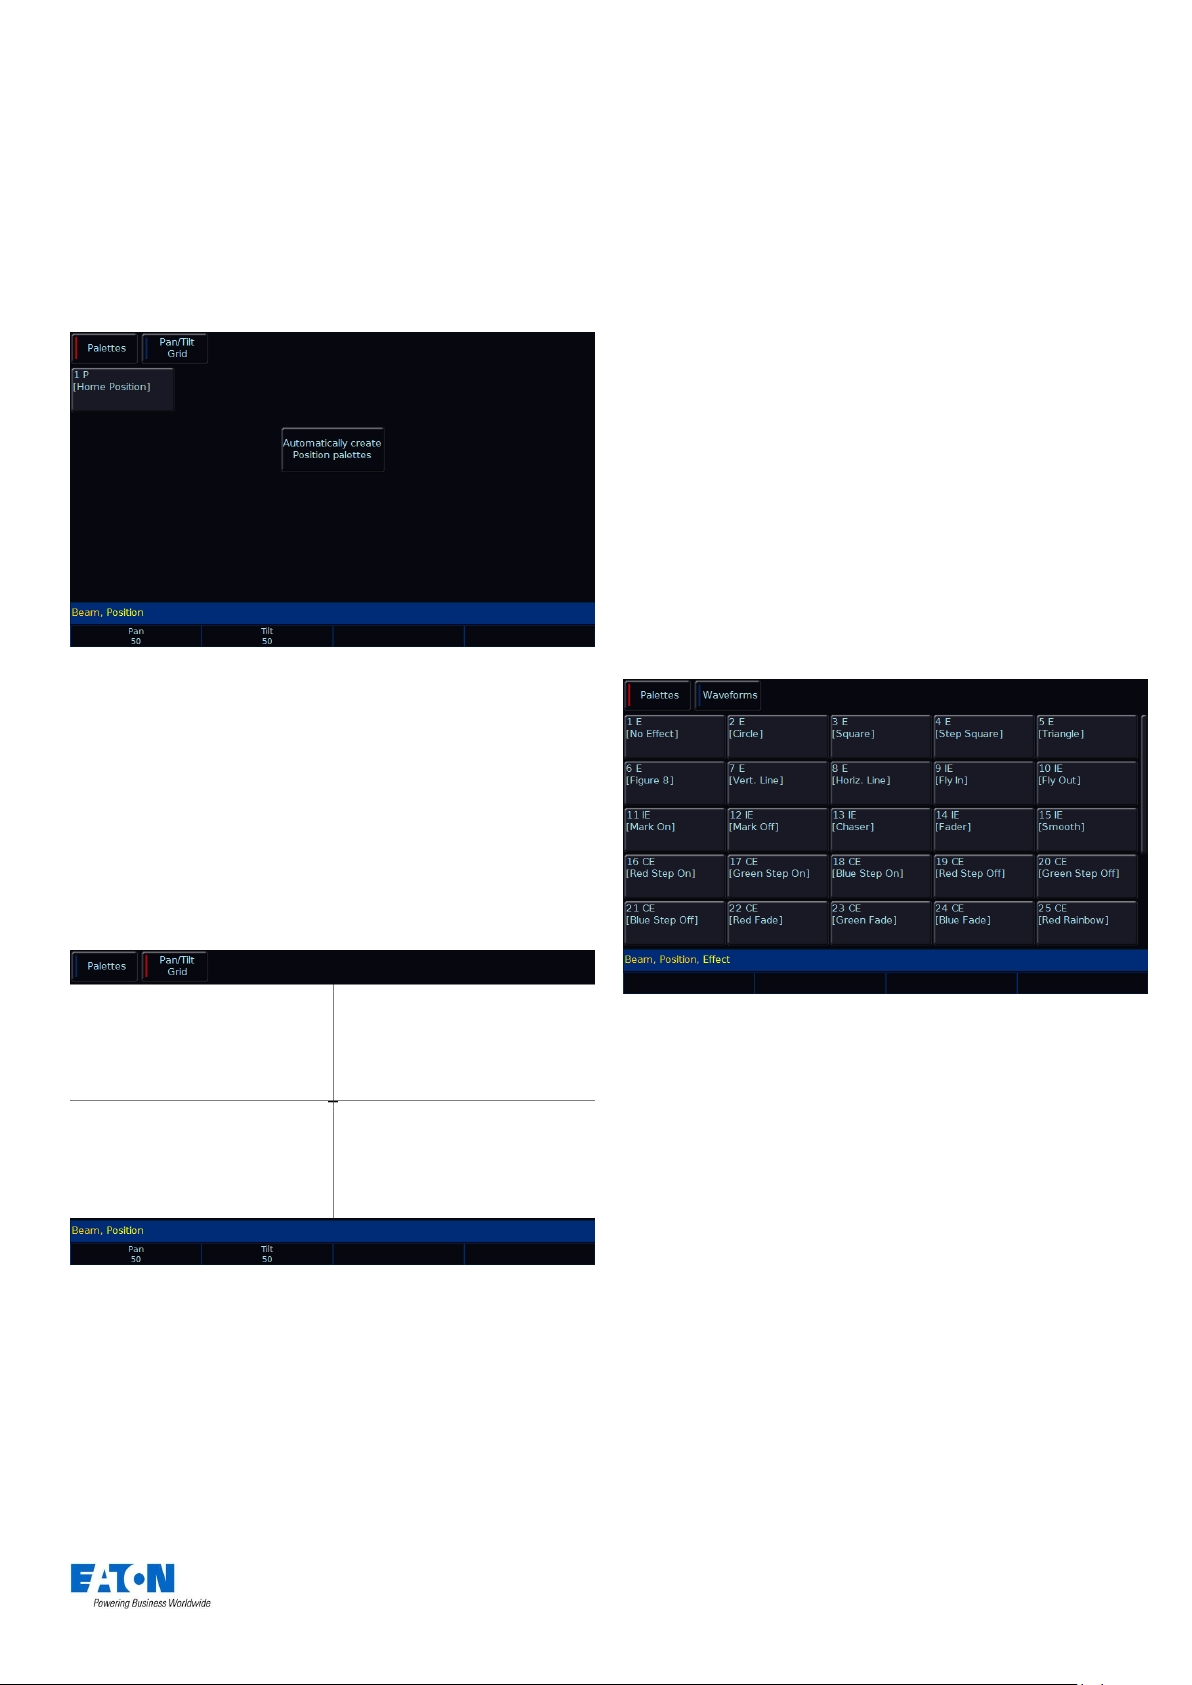
It’s possible to replace the colour picker with a photograph
or image, allowing you to select colours from that. This is
useful when wanting to use the colours of a companies’
logo, or wanting to recreate the colours from a particular
image you’ve photographed. Press the “+” symbol along
the left hand side of the picker to open the “Load file”
window which will display all the images on the external
USB drive.
“Mood boards by Lee Filters”
Beam
Palettes
The beam auto palettes generated by the desk are based
on the gobo wheel and shutter parameters of the fixtures in
the schedule. An auto palette is generated for each Gobo
present on each gobo wheel. “No Gobo” is an auto palette
that sends all the “Gobo” parameters to their default
values. Shutter will be given two auto palettes (Shutter
Open and Shutter Closed).
“Image Picker” screen with four images already loaded in
To remove an image from the Picker, just press the
Delete button and then press the image from the left hand
side. This creates space for a new image to be loaded.
Multi-Touch on the picker
Both the colour picker and the image picker are multitouch. This means you can select multiple fixtures and
“fan” them across the image by using two fingers. The first
selected fixture will be at your first finger, the last selected
fixture will be at your last finger, and all the ones inbetween will spread between these two points.
Mood boards by Lee Filters
Clicking the “Mood boards by Lee Filters” tab along the top
shows a window which collates colours together in
“moods”. Selecting a mood will give a brief description of
Zero 88 FLX S Lighting Console – User Manual Page 13 of 47
“Beam Palettes” window after “Automatically create beam palettes” has
been selected.
Page 14
Position
Palettes
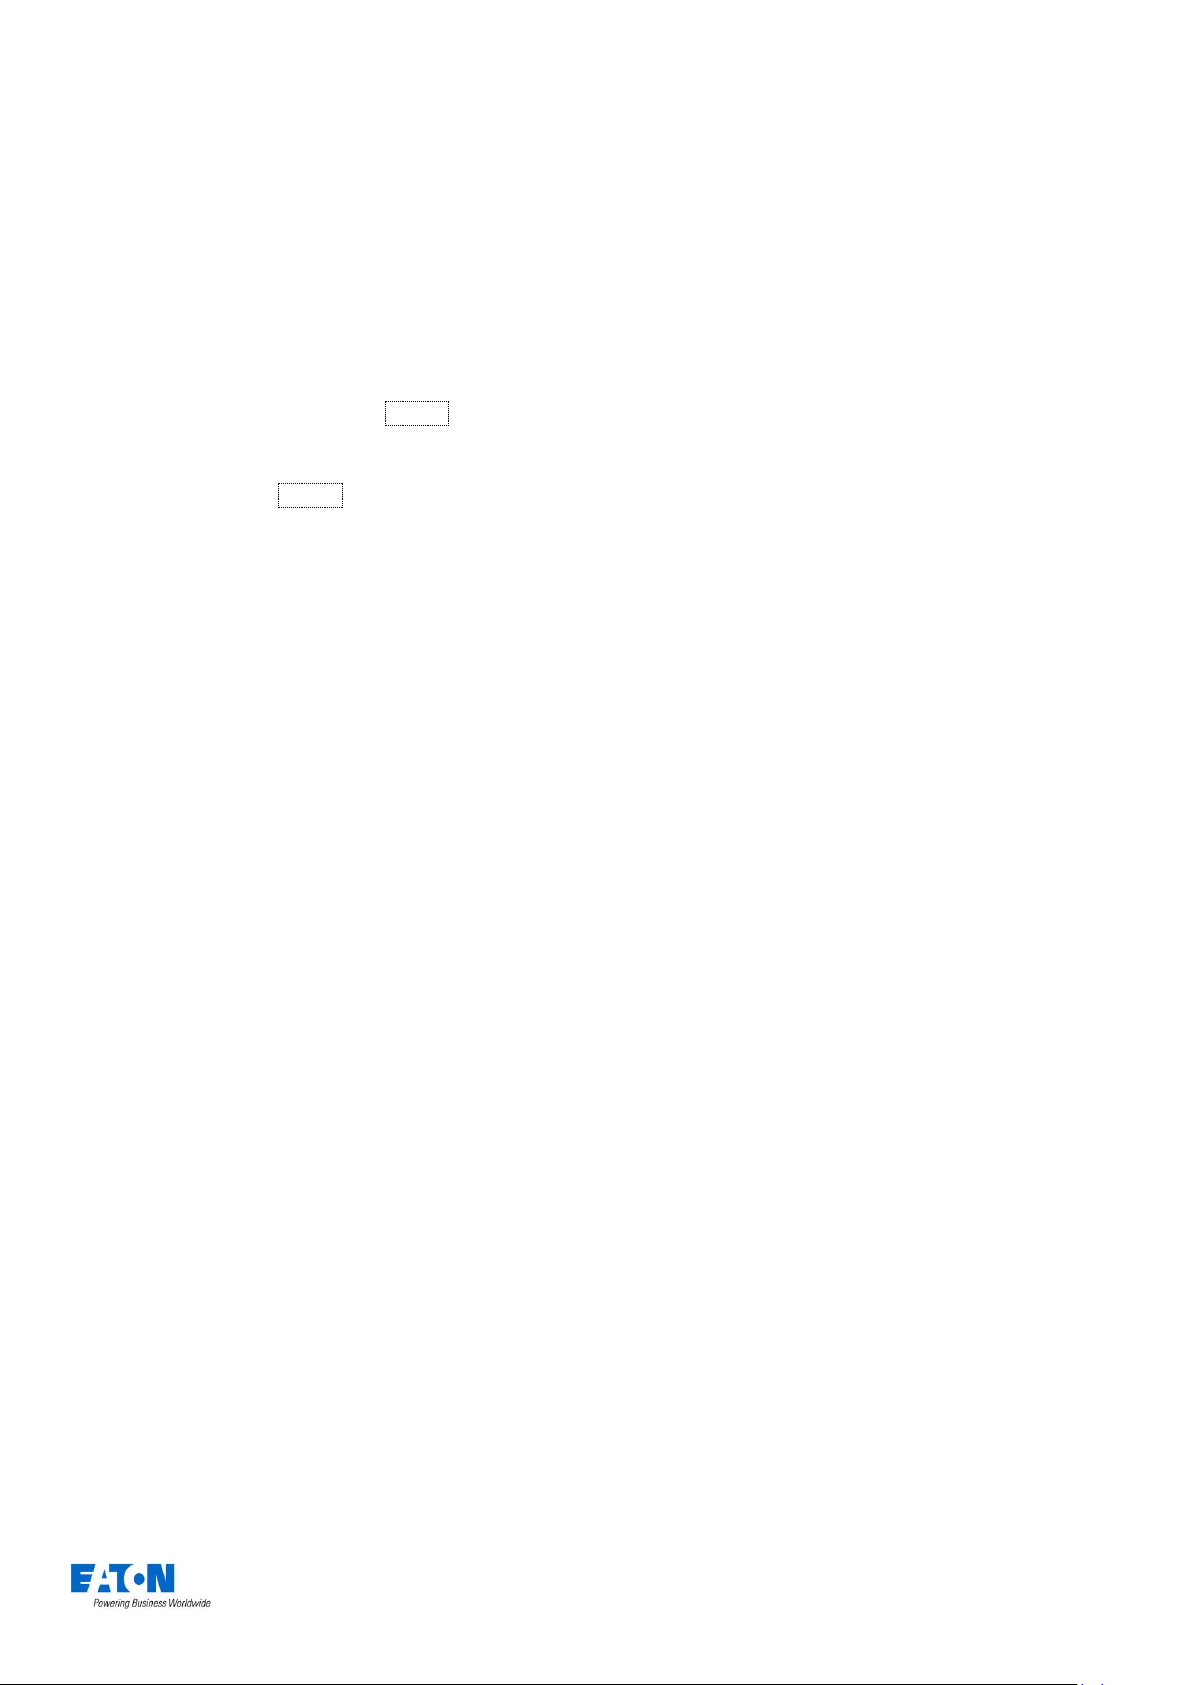
The desk generates a single Home Position palette which
sets the Pan and Tilt parameters to a value of 50%. (For
more information on palettes, see “Palette Windows” on page 11)
“Position Palettes” window after “Automatically create position palettes”
has been selected.
Pan/Tilt Grid
The Pan/Tilt grid gives you a touch method of controlling
Pan and Tilt. The horizontal axis is “pan” and the vertical
axis is “tilt”.
Effects
Effects are different than the other four attributes, in that
they do not directly control features and parameters of the
fixtures patched. Instead, effects are used to manipulate
parameters to create effects such as “Circle”, “Figure 8”
and “Rainbow”. This is achieved by applying various
mathematical functions (sine, cosine, ramp etc) to the
outputs of different fixture parameters and adjusting the
size, speed and offset values. Using this, a wide range of
movement and other effects can be generated quickly and
easily. Effects can affect any parameter, from any attribute,
and can also control multiple parameters from multiple
attributes.
Palettes
The desk generates a number of standard effects, as
shown below, by clicking the “Automatically create effect
palettes” button.
The “+” symbol indicates the current position values for the
selected fixture. If multiple fixtures are selected, multiple
“+” will be displayed.
“Pan / Tilt Grid” in the position window
Multi-Touch on the P/T Grid
The Pan / Tilt Grid allows for multi-touch. This means you
can select multiple fixtures, and “fan” them across the grid
by using two fingers. The first selected fixture will be at
your first finger, the last selected fixture will be at your last
finger, and all the ones in-between will spread between
these two points.
“Effect Palettes” window after “Automatically create effect palettes” has
been selected.
Each palette displays the effect Number, a set of content
flags indicating which attributes are programmed in the
effect palette (I = Intensity, C = Colour, B = Beamshape, P
= Position, E = Effects) and name, if defined.
(For more information on palettes, see “Palette Windows”
on page 11)
Zero 88 FLX S Lighting Console – User Manual Page 14 of 47
Page 15
Speed, Size, Offset and Rotation Encoders
When you press effect, the effect parameters are assigned
to the control wheels.
If you apply different effects to different parameters of the
fixtures (e.g. Rainbow and Circle) you can use the Speed
wheel to control the speed of all the effects in one go.
When multiple effect palettes are being used together (for
example, Circle, Chaser, and Rainbow, Each palette can
be adjusted separately by pressing Effect to cycle
through the displays on the encoders. The first press
displays the global Speed, Size, Offset and Rotation of the
overall effect. Pressing Effect again will then display
Speed, Size, Offset and Rotation for just the first effect.
Pressing “Effect” again will page to the second effect, and
so on. Once the last effect has been reached, pressing
“Effect” again will return to the global settings.
Rotation cannot be performed on a per parameter basis,
and can only be applied to the Pan and Tilt parameters
together. Therefore the Rotation parameter can be
adjusted via the control wheel, but is not displayed in the
Effects Window.
When applying one of the standard Intensity, Colour, Iris or
Focus effects, the base value of the parameter is
automatically changed to 50% to allow the effect to work
correctly. For these effects the size parameter is set to
100% as the default.
Apart from the effects specified above the default values of
the effect parameters for the standard effects are Speed =
25, Size = 20, Offset = 0, Rotation = 0.
Effect parameters are not automatically fanned across
fixtures. Should fanning of an effect parameter be required,
use the Offset buttons along the top of the Effect window.
Zero 88 FLX S Lighting Console – User Manual Page 15 of 47
Page 16

Cues & Playbacks
Lighting “states” (or “scenes”) can be pre-recorded, ready
to be recalled later. They are called “cues”, and are
recorded onto “playbacks”.
Playbacks
Each playback can store a single cue, or multiple cues.
The FLX S24 has 49 playbacks and the FLX S48 has 97.
Both can store a total of 10,000 cues.
Traditionally, playbacks with a single cue have often been
referred to as “submasters” whereas playbacks with
multiple cues have often been referred to as “cue stacks”.
This manual will simply call them playbacks.
The buttons below the faders are “Go” buttons when
several cues are recorded onto the Playbacks. If a single
cue is recorded on a Playback, the button acts as a “Flash”
function. This can be configured in the Playback Setup
window (see chapter entitled “Playback Settings”). .
Once you have set up a scene that you like, you can then
record that onto a cue. Cues can be recorded into any of
the playbacks, or the “Master Playback”. On FLX S48, if
you are using an external monitor when dealing with cues,
we suggest viewing the “Programmers” desktop. If you do
not have an external monitor, or are using the FLX S24,
the two windows discussed below (“MFF Window” and
“Playback Window” will appear on the internal monitor
when you press View . Pressing View again will switch
between the two windows. Alternatively you can use the
two icons on the top left of the screen:
When the MFF faders are set to channels, this window
displays the Channel’s number, name and current
intensity. Pressing one of the buttons selects / deselects
that channel.
When the MFF faders are set to Playbacks, this window
displays the Playback’s number, name, current intensity,
current & next cue and the playback raise (u) & lower (d)
time. By default, pressing one of the buttons will open the
Playback’s Settings window for quick access. However this
functionality can be changed in Setup > System Settings
to match the physical button of the playback (Flash, Solo,
Go, Tap Tempo etc), or alternatively to act as an on-screen
fader. This allows playbacks to be controlled on a touch
screen or tablet when viewing this window.
Playback window
The Playback window shows all the cues within a single
playback, with each cue being a different row. The
columns show the various fade times and settings for each
of those cues.
To change which playback you’re viewing, hold View and
tap the button of the playback you wish to view – this could
be any of the MFFs, or the Master Go button. This will now
display the cues in this playback in the Playback Window.
Naming playbacks
Playbacks that have cues recorded into them can be
named. Empty playbacks cannot be named. These names
appear in the Multi-Function Faders window. To name a
playback, hold the Setup button and then press the
playback you wish to name using the buttons under the
faders. This will open the Playback Settings window, which
includes an option to name the playback.
“Cue List” window and “Playback Window” icons.
Master Playback
For many shows, especially theatrical, a single playback is
often used with a long list of pre-recorded cues. For these
situations, an additional “Master Playback” is provided.
There’s nothing different about the Master Playback
compared to the other playbacks, apart from the quieter
► (play/go) button, a fader for convenience and the
playback doesn’t change function when
“Channels/Playbacks” is pressed.
Multi-Function fader window
The Multi-Function Fader window shows the current status
of the 24 or 48 built-in faders.
Zero 88 FLX S Lighting Console – User Manual Page 16 of 47
Copying playbacks
To copy one playback to another playback, press the Ⓩ
key to open the “Z Window”. In here, press the Copy
button to open the Copy Window. Now press Playback
and then type the number of the playback you wish to copy
in the “from” field, and the number of the playback you
wish to copy it to in the “to” field. Instead of pressing
Playback and typing the playback number, you can also
select the playback using the Playback button. This will
automatically move onto the next field.
Deleting playbacks
To delete a playback (and all the cues within that
playback), press the Delete button, and then select the
playback you wish to delete using the buttons under the
Page 17

faders. A popup will appear to confirm this action. Deleting
Playbacks cannot be undone.
Advanced Playbacks
Empty Playbacks can have advanced functions. Hold
Setup and press the button of a playback which is
currently empty. The options available are Grand Master ,
Global BPM , Programmer Time and Speed Override .
Playback Settings
The settings for an individual Playback are adjusted within
the Playback Setup window. To display this window, hold
down Setup and press the button below the playback
fader. Alternatively, in the Multi-Function Faders window,
press the playback you wish to change the settings of (this is
dependent on the selection option in Setup > System Settings > MFF
Window Playback button action .
The Playback Settings window is split into five sections General, Chase, Raise and Lower, Move on Dark and
Advanced. These are detailed below, and are accessed via
the five buttons along the top of the window (as shown
below). When you first enter the window, the “General” tab
will be selected unless the Playback is set as a chase, in
which case the “Chase” tab will be selected automatically.
75% on another active playback, it will output at 75%.
As that playback is pulled down, the intensity will
reduce to 50%, but stay at 50% as that becomes the
highest value for that fixture.
Latest takes precedence (or “Soft LTP”) –the intensity
of fixtures will match the latest command, rather than
the highest. If one active playback has a fixture at
100%, and another playback is at 50%, set to LTP, as
this fader is raised, the fixture will fade down to 50%, as
this is the “latest” command.
LTP Catch – This is an alternative version of LTP,
where control of a value will only happen when the
fader goes past the current value. This is useful to
“catch” values that are currently high, to bring them
back down to a lower intensity.
Inhibit – Inhibitive playbacks do not output the
programmed intensities of the current cue, but instead
act as a “proportional scale” for those channels. When
changing cues, these values change, allowing multiple
Inhibitor states to be stored onto a single playback.
Fader Function
The operation of the playback fader may be one of the
following options:
Playback Setup window – General tab
General
The “General” tab is split up into five parts, as shown
above and detailed below.
Intensity Mixing
This option determines how the programmed intensity
parameters are mixed. The following options are
available:
Highest takes precedence (HTP) – This default option
will output the highest value of all the playbacks – so if
an intensity is at 50% on one active playback, and at
HTP Master – Simply controls the maximum level of the
programmed HTP channels. Cues are triggered via the
GO key. This is the default option.
Manual Fader (2 Way) – Press the GO button to
activate the playback. The next cue in the playback is
automatically loaded when the fader reaches either end
of its travel (0% or 100%). Moving the fader creates a
dip-less cross-fade between the two cues. The fader
controls the HTP levels; the LTP channels are triggered
when the fader is moved from the end stop and then
fade according to the times in the incoming cue.
Manual Fader (1 Way) - Press the GO button to activate
the playback. The next cue in the cue stack is
automatically loaded when the fader reaches zero. The
fader controls the HTP levels; the LTP channels are
triggered when the fader is moved from zero and then
fade according to the times defined in the incoming cue.
This option is not available if the playback is a chase.
Fader Controls…
This allows you to force a parameter to follow the
movement of the fader for its crossfade, rather than
Zero 88 FLX S Lighting Console – User Manual Page 17 of 47
Page 18

triggering at specified level and fading automatically.
This is great for building playbacks which move fixtures
out into the audience – as the fader moves up, the
fixtures move up. Another application commonly used is
to create three playbacks – one for Red, one for Green
and one for Blue. To use this feature, simply select the
attributes required using the on-screen buttons.
Button Function
This offers Flash , Latch , Solo , Go (Fade) , Go
(Snap) , Pause and Tap Tempo functionality to each
of the playback buttons (“Tap Tempo” is only available if
the playback is set as a chase).
A secondary “shifted” option can be chosen whilst
holding down the Shift key on the console.
The default option changes dependant on the “status”
of the playback. However, once this setting has been
changed by the user it will not change again
automatically, even if the playback “status” changes.
For a playback with a single cue, the default is Flash
(shifted default: Solo). For a playback with multiple
cues, the default is GO (Fade) (shifted default: GO
(Snap)). For a playback which is set to a chase, the
default is Tap Tempo (shifted default: GO (Snap))
Stack Name
This allows you to name a Playback.
the button changes to Revert from Chase , and additional
options appear in the chase tab, split into six parts as
detailed below.
Chase Direction
This option determines which order the steps (cues) are
output when the chase is run:
Forward – The steps are output in increasing numerical
order (eg 1,2,3,4,5).
Backward – The steps are output in reverse order (eg
5,4,3,2,1).
Bounce – Alternates between forwards and backwards
(eg 1,2,3,4,5,4,3,2,1).
Random – The steps are output in a random order.
Intensity
Intensities in a chase can be set to “Cross Fade”,
“Ramp Up” or “Ramp Down”. “Ramp Up” will fade up
the intensity, and then snap it off, whereas “Ramp
Down” will snap on the intensity, and then fade it down.
Attribute fade percentages
Individual fade percentages can be set for each
attribute.
Assuming the chase speed is set to 12 Beats Per
Minute (meaning 1 step every 5 seconds), a fade
percentage of 20% means that attribute will fade for 1
seconds (20% of 5 seconds), and then remain on for
the other 4 seconds (80% of 5 seconds).
Playback Setup window – Chase tab
Chase
It is possible to convert a whole playback into a chase,
which makes the playback run automatically in sequence.
This is done by choosing Turn into Chase within the
“chase” tab of Playback Setup. Once converted to a chase,
Zero 88 FLX S Lighting Console – User Manual Page 18 of 47
A fade percentage of 0% is equivalent of a snap, and a
fade percentage of 100% is the equivalent of a cross
fade.
Chase Speed
The Speed option determines how fast the chase runs.
When the Speed is set to zero, the chase runs
according to the delay and fade times that are
programmed into each step (cue) in the chase.
When the Speed is set to any other value, the chase
runs at the corresponding number of beats per minute
(bpm). All the fade and delay times that are
programmed in the steps (cues) are ignored and the
transition between each step (cue) is determined by the
“Intensity” and “Attribute fade percentages” options
above.
Page 19

Please note: “Tap Tempo” functionality is available under “Button
Function” in the General Tap on any playback which is a chase.
Alternately, “Use Global BPM” can be selected. This
allows multiple chases to all use the same BPM. The
Global BPM speed can be controlled by pressing the Ⓩ
button and changing the “Global BPM” wheel, or by
holding Setup and pressing the Playback Button of an
empty playback, and selecting Global Tap Tempo .
The central encoder button or playback button will now
work as a Tap Tempo, and the encoder / fader will
speed up / slow down the Global BPM.
Shots
This option determines how many times the chase will
run after being triggered.
When Shots is set to zero, the chase runs continuously.
When Shots is set to a value between 1 and 255, the
chase runs the specified number of times and then
stops on the last step.
Trigger / Release Level
The level at which the playback is triggered or released,
in %. If set to 10%, the playback will not be triggered
until the physical fader is at 10%.
Raise Time
This time simulates a time the physical fader is raised
over. So setting it to 5 seconds, and pulling up the fader
instantly, will take 5 seconds to fade up the playback.
Lower Time
This time simulates a time the physical fader is lowered
over. So setting it to 5 seconds, and pulling down the
fader instantly, will instead take 5 seconds to fade down
the playback.
Note – If the Direction modifier is set to Random, then one “shot” is
defined as outputting N steps, where N is the total number of steps
(cues) in the cue stack.
Playback Setup window – Raise and Lower tab
Raise and Lower
The various options are described below:
Trigger on Raise
When the playback fader is raised, the first cue is
activated.
Release on Lower
When the playback fader is lowered, the stack is
released.
Playback Setup window – Move on Dark tab
Move on Dark
The various options are described below:
Move on Dark
When this function is enabled for the playback,
whenever a fixture goes black (ie it’s intensity falls to
zero, or the shutter is closed), ZerOS will look ahead in
the playback to see what values the colour, beam and
position parameters are next programmed at for that
fixture.
It will then output those values shortly after the fixture
has gone black (according to the delay and fade times
set in the window). When the fixture comes back on
again in a later cue, the colour, gobo, position etc. will
already be at their correct values and just the intensity
will fade up or the shutter open.
Move to First Cue
This option is used when there are no more cues later
in the playback for the fixture to Move on Dark to. If
enabled, when fixtures go dark for the last time in the
Zero 88 FLX S Lighting Console – User Manual Page 19 of 47
Page 20

playback, they will move to the first cue they are used
in. When disabled, they the fixtures go dark for the last
time in the playback, they will not move.
Fade Time
The time with which FLX S fades the attributes that
move on dark.
Delay Time
The time the FLX S waits after a fixture reaches
blackout before move on dark kicks in.
Don’t Move Colour / Beamshape / Position / Effect
This option allows you to disable a specific attribute
from moving in dark across the whole playback. By
default, only “Don’t Move Effect” should be enabled.
Playback Setup window – Advanced tab
Zero 88 FLX S Lighting Console – User Manual Page 20 of 47
Page 21

Cues
Recording cues
Once you have set up a look that you like, by selecting
fixtures and adjusting their parameters as described in the
previous chapters, you can then record that state into a
cue. To see the cues being recorded, it is recommended
that the Playback Window is displayed. To record a cue,
press Record and then press the Go of the Playback
you wish to record the Cue into (for example, the Master
Playback Go button).
Subsequent cues can then be set up and recorded using
the same method.
“Point Cues” can be recorded in between other cues. For
example, to add an extra cue between Cue 5 and Cue 6,
you could record a Cue 5.5. (See “Z key” for more info).
After recording a cue, one of three things will happen:
1) If in non-tracking mode (or in tracking mode with
“Smart tag” enabled) the cue is not played back and
the fixture parameters remain tagged and the
fixtures remain selected
2) If in tracking mode (and “Smart tag” is disabled) and
the playback fader is above the “trigger level”, the
cue will be played back and the fixture parameters
are automatically untagged, but the fixtures remain
selected.
3) If in tracking mode (and “Smart tag” is disabled) and
the playback fader is below the “trigger level”, FLX S
will ask you to raise the Playback fader. Once done,
FLX S will act as per Option 2 above.
Record Window
Record Window
When you press Record , the Record Window opens on
the external monitor of FLX S48. To open the Record
Window on the internal monitor of either console, press
and hold the Record button, rather than just tapping it.
You can change where and when the Record Window
opens by going into Setup , System Settings and
changing the Show Record & Update Window setting.
Within the Record Window are the following options:
Fade Times
Each cue can have a Fade Up, Fade Down,
Colour, Beam, Shape and Position fade time.
Within Setup > Defaults the default fade times
are defined, and can be adjusted if required prior
to programming cues. Cue 1 will always have a
default of 0 seconds, but can be altered once
recorded if desired.
Subsequent cues can then be set up and recorded in a
similar way.
As you become more experienced with the desk, you will
find the most efficient way of programming cues into cue
playbacks.
Please note: FLX S can be operated as a tracking console. This means
that if a parameter is programmed in one cue, it will track through all
subsequent cues until it is programmed to do something else. If you
program playbacks sequentially, you shouldn’t have to worry about
tracking, as long as you ensure that you tag any parameters you wish to
be recorded in the cue you are working on.
Zero 88 FLX S Lighting Console – User Manual Page 21 of 47
Fade times can be added when recording a cue, or
adjusted after the cue is recorded or when
updating a cue.
To add fade times when recording a cue, use the
encoder wheels. When you press Record during
the record process, “Up Fade”, “Up Delay”, “Down
Fade” and “Down Delay” will be shown on the
encoder wheels. Use the encoder wheels to
change these fade times, or press the middle
button on the encoder wheel to type in a fade time.
Snapshot
Snap Shot will store a value for every single
parameter of every single fixture in the cue,
ensuring that the lighting state you see is exactly
what is recorded, and that the cue can’t be altered
accidently in the future when other cues are
Page 22

updated / deleted / inserted (this is sometimes
called a “Block Cue” or “Blocked Cue”).
Alternatively, pressing Shift & Record together
will automatically record the cue as a Snap Shot.
Smart Tag
Smart Tag ensures the lighting state you see is
exactly what is recorded, but doesn’t “block” the
cue. Instead, only the values for the parameters
and fixtures which are different to the previous
lighting state are stored. Fixtures with intensity at
0% are not recorded when Smart Tag is active.
Tracking options & Cue Only
These options are only available if the console is in
Tracking mode (basic or advanced). More
information on this is in the SETUP section of the
manual.
In Tracking Mode, every cue programmed
behaves in a Tracking methodology. This means
that each cue only programs the changes between
two states – channels are told to fade up, fade
down, or if no instructions are programmed, the
channel will stay the same. This is a powerful
programming method as it allows advanced
manipulation of the cue stack and updates can be
filtered through entire sequences without having to
update each cue individually.
When updating a cue, there are four tracking
options available – Track Forward, Track
Backward, Track Both or Cue Only.
Cue Only forces the update only to affect the cue
you are
updating. This is useful when recording a cue out
of sequence, or when updating a cue, to ensure
the update you make doesn’t affect any
subsequent cues in the cue list.
Choosing Track Forwards allows the update to
follow through into the following cues. If you
choose to update with Track Forwards enabled,
remember to “undo” the change you made in one
scene when you move to the next – particularly if
the next cue is a blackout.
Non Tracking mode eliminates these choices
making programming simpler but restricts the
flexibility of your programming capabilities.
Fixture, Attribute & Parameter Filters
These options filter which values are and aren’t
stored into cue. First, “Fixtures” define which
fixtures are to be recorded. Tagged Fixtures will
store information for all fixtures with a value
“tagged” (value in the programmer) whereas
Select Fixtures will only store values for the
currently selected fixtures.
Secondly, “Parameters” define which parameters
of the above fixtures are recorded. Tagged
Parameters will store all the values which are
tagged, whereas All Parameters will store every
value for the chosen fixtures.
If Tagged Parameters is selected, this can be
filtered further using “Attributes”. Each attribute is
listed, and can be switched between Blue (no
parameters within this attribute will be recorded),
Red (only tagged parameters within this attribute
will be recorded) and Green (all parameters within
this attribute will be recorded).
These filters are only available if both Smart Tag
and Snapshot are disabled.
Remove
Selecting Remove will take the values out of the
defined cue, rather than adding them in. This is
useful if a parameter or fixture is accidently
recorded into a cue.
Adjusting fade times
Once a cue has been programmed, its times can be
adjusted in a similar format to a spreadsheet on a
computer, with each time being in a separate “cell”.
Choose the time you wish to change by touching it and
adjust the fade time on the encoders. Alternatively, click
the middle button of the encoder to type a specific fade
time.
Naming cues
Naming cues can be helpful in remembering what
changes, or when the cue happens. Double touch/click the
“Name” cell in the Playback Window and an onscreen
keyboard will be displayed to name the cue. Alternatively,
use an external keyboard to type a cue name.
Updating cues
In order to update a cue, the first thing to do is to ensure
that the cue is outputting (with a green bar) and you are
viewing the playback.
Zero 88 FLX S Lighting Console – User Manual Page 22 of 47
Page 23

Once the cue is outputting, make the changes required
(using the MFFs, encoder wheels or touchscreen). To
record the changes to the current cue, press Update and
then press the relevant GO/Play button for the cue you
wish to update (such as the Master Playback button).
The cue will inherit the new information and the update will
be complete.
When you press Update , fade times appear on the
encoders in the same way as when pressing Record ,
allowing you to make changes to the fade times during the
update process.
Copying Cues
To copy one cue to another cue, press the Ⓩ
key to open the “Z Window”. In here, press the Copy
button to open the Copy Window. Ensure Cue is selected
in the window (it will be by default) and then type the
number of the cue you wish to copy in the “from” field, and
the number of the cue you wish to copy it to in the “to” field.
To copy a cue to or from an alternative playback, press the
playback after typing the cue number. Doing this moves
onto the next field automatically. For example, to Copy
Cue 7 from Playback 15 to cue 25 in playback 18, type 7
in the “from” field followed by Playback button 15 , and
then type 25 in the “to” field, followed by Playback button
18 .
Deleting Cues
To delete a cue, press the Delete button, press Ⓩ , and
then type the cue number you wish to delete (for example
15 ), and then press the Playback button which contains
the cue you wish to delete (for example, the Master
Playback). To delete multiple cues, the “thru” button can be
used (for example 15 Thru 20 ).
To delete all cues within a playback, see “Deleting
playbacks” on page 16.
Deleting a cue cannot be undone.
Zero 88 FLX S Lighting Console – User Manual Page 23 of 47
Page 24

Cue Settings
Cue Setting can be changed via the “Cue Setup” window.
To open this, press Settings button of the cue required,
under the settings column of the Playback Window. The
Cue Setup window appears:
Cue Setup window
Trigger (Go, Auto, Timecode etc)
This option allows you to change what’s going to trigger
each individual cue. By default, this is “Go”, but the
following options are available:
GO
This option will only trigger the selected cue when
the Go button is pressed. This is the standard way a
cue is triggered, and is chosen by default.
Auto (with previous cue)
This will trigger the selected cue at the same time as
the previous cue. For example, when you press Go on
the previous cue, this cue will also be triggered and run
at the same time. When this option is selected, a “Wait
Time” field will appear just below the drop down. This
allows you to enter a wait time, for example 5 seconds.
This means the selected cue will be triggered 5
seconds after the previous cue is triggered, even if the
previous cue is still running as it’s fade time is longer
than 5 seconds.
Auto (after previous cue)
This option is similar to above, but it will trigger the
selected cue only once the previous cue’s fade time has
been completed. Again, when this option is selected, a
“Wait Time” option will appear under the drop down.
Next cue
“Next cue” is the cue number which automatically gets
selected after this cue is executed. This functionality is
very useful if a scene is “cut” from the show – you can tell
FLX S to skip the cues in that scene and jump straight to a
different cue. If this field is empty, FLX S will automatically
select cues sequentially.
Don’t Move on Dark settings
This option allows you to disable a specific attribute from
moving in dark during this specific cue. For example, you
may not want colour scrollers changing during a very quiet
scene, so during that scene “Don’t Move Colour” can be
selected. For more information about this, see “Move on Dark” on page
“19”.
Macros
Macros allow you to trigger (and release) other playbacks
automatically during this cue. For example, if you want a
chase on cue 20, you could create that chase on a
separate playback, and then trigger it from Cue 20 in your
Master Playback.
To do this, press the “Add” button next to either of the two
options. This will open a new window which displays all the
Playbacks. Select the Playback you wish to trigger. This
will add it into the previous window. You can repeat this to
trigger multiple playbacks at the same time. To remove a
playback you’ve added, simply select it in this window.
Once finished, select
the OK button.
Playing back cues
Before playing back the programmed cues, it’s suggested
to remove any unrecorded commands from the command
line by pressing the Clear button twice.
Raising the playback’s fader to full will automatically trigger
the first cue within the playback.
To output the next memory in the playback, simply press
the Go button. Each time you press it, the console will
continue down the list one cue at a time.
Within the Playback window, the green bar shows you the
currently active cue, while the yellow bar highlights the
next cue (which will become active if you press Go ).
You can change which cue is next by tapping a cue. The
cue will go yellow, and become active when Go is
pressed.
Once the end of the playback is reached, the first cue will
be selected as the next cue, resulting in a loop.
Cues that are currently running live can be sped up or
slowed down live by using “Speed Override”, accessible
under the Ⓩ key.
Zero 88 FLX S Lighting Console – User Manual Page 24 of 47
Page 25

Jumping to a cue (Go To cue)
To jump to a specific cue, simply scroll to in on the
touchscreen and touch it so it’s selected in yellow and then
press the Playback’s Go button.
Snapping to a cue (Ignoring fade times)
To snap to a cue (for example, during a programming
session when you want to alter a cue without having to
wait for the cue fade to complete), hold Shift whilst
pressing the Go button. This will snap to the cue, rather
than using the fade times. Doing this also won’t allow Auto
Triggers to work (useful to jump to a cue without
automatically moving onto the next cue). (If this doesn’t work,
settings within the Playback Setup window must have changed – see
page 17 for more information).
Using the pause key
If at any time you wish to pause a cue while it is running,
you can use the pause function. Pause is an option that
can be chosen within the Playback Setup window (see
page 17 or more info). Often, users will set Pause to be the
“shifted” function of the playback button, which can be set
as a default option so you don’t need to change every
playback – see page 38 for more info.
Macros
FLX S supports “Fixture Macros” which are used for fixture
settings such as “Lamp On” or “Reset”. Which Macros are
available depend on the fixtures patched.
Macro Window
The Macro window is displayed on the internal display
when the Macro tab is pressed along the top of the touch
screen. This will only be shown if Macros are available for
the currently selected fixtures. Macros can be selected
directly within this window.
Automatic fixture macros
The FLX S can generate a number of Fixture Macros
based upon the fixture types patched. To create the
automatic macros, view the Macros window (by pressing
Macro ) and choose Automatically create macros .
After the initial press of the Pause button, subsequent
“Pauses” will step backwards through the playback using
the current cue fade times.
To continue running the playback, press the Go key.
Releasing playbacks
Once you have finished playing back cues it is important to
release the playback. This stops the playback having any
further control over the channels. When you lower a fader,
the playback is automatically released, but you can also
manually do this by holding Clear and pressing
the Go button of the playback.
To release all the playbacks, hold Clear and press
the Fader Funct. button. This will release the MFFs (not
Playback 0). To release Playback 0, hold Clear and press
the Go button of the Master Playback.
Macros window after “Automatically create macros” has been selected.
Zero 88 FLX S Lighting Console – User Manual Page 25 of 47
Page 26

Ⓩ Key
The Ⓩ Key places a range of quick access settings &
functions on the internal display and encoder wheels. It
can be pressed at any time unless you are in Setup.
“Z” button
Save Show
This option quickly saves your show to USB. If the show
hasn’t yet been named, FLX S will ask for a name before
saving the showfile. If the show has a name, FLX S will
save a new copy of the showfile with the next sequential
number on the end automatically.
Lock Console
This option allows you to lock FLX S with a pin number, so
you can leave the console unattended safely. The default
Pin is 0000. It’s highly recommended that you change this
pin.
Calibrate (FLX S48 only)
This is a quick access to calibration (page 34).
Intensity
This encoder is available when fixtures are selected,
and can be used to alter the intensities of all the
selected fixtures. This intensity adjustment is relative,
which means that if a range of fixtures are selected with
different original values, the movement of the encoder
will be applied to each fixture individually (eg each
fixture will increase or decrease by a percentage from
its original value).
Speed Override
The Speed Override encoder is used to override the
current crossfades occurring on the Master Playback.
By default, the override fader is set to 50% to give
“normal” crossfades. Deviating the level above 50% will
increase the crossfade speed proportionally, and
reducing the level below 50% will slow down the fade
proportionally. 100% will snap the cue, and 0% will
pause the cue. Once the cue is complete, the encoder
will go back to 50%.
Global BPM
The Global BPM encoder is used to adjust the Global
BPM speed. The central button acts as a Tap Tempo,
and the encoder will speed up / slow down the current
Tap Tempo. Any chase can be set to use the “Global
BPM” opposed to its own individual BPM.
Programmer Time
The Programmer Time encoder is used to set the
internal fade time on FLX S. This fade time can then be
applied to anything in the programmer, ideal for
“busking” shows.
The encoder will allow you to set any value between 0.0
(snap) and 11:30.0. This time is displayed just above
the encoder on the touch screen.
System Information
This opens the System Information window, which contains
information, debugging options, licence details and a DMX
Outputs view.
Guidance
Available in multiple languages, “Guidance” steps you
through the key features of FLX S at your own pace, to
learn or refresh your skills. Guidance will be automatically
open on the bottom 3rd of the internal screen, and will
follow your progression through the console. If closed,
Guidance can be reopened here.
Encoder Wheels
On the encoder wheels are four additional options:
Zero 88 FLX S Lighting Console – User Manual Page 26 of 47
To enable the time crossfade function, press the middle
button of the encoder. Now, activating palettes,
changing intensities via syntax, clearing the
programmer, releasing playbacks etc will all take the
time set on the encoder, rather than happening
instantly.
Command syntax
Pressing the Ⓩ button displays a number pad which can
be used to type commands. To control the intensity of a
fixture(s) via the numeric keypad, commands must be
typed like this:
… Channel No(s). @ Intensity % Enter …
Page 27

Examples of valid commands are below:
… 1 @ 1 0 0 Enter …
This sets the intensity of channel 1 to 100%.
… 2 And 3 @ 7 5 Enter …
This sets the intensity of channels 2 and 3 to 75%.
… 5 Thru 1 0 @ 5 0 Enter …
This sets the intensity of channels 5 through to 10 to 50%.
… 5 Thru 1 0 Except 7 @ 6 5 Enter …
This sets the intensity of channels 5, 6, 8, 9 and 10 to 65%
… 3 Thru 9 Except 5 Except 6 @ 0 Enter …
This sets the intensity of channels 3, 4, 7, 8 and 9 to 0%. Note how
Except is used twice to exclude two different channels from the range.
… 1 Thru 3 And 7 Thru 9 @ 2 5 Enter …
This sets the intensity of channels 1, 2, 3, 7, 8, and 9 to 25%.
… 1 And 7 Thru 1 2 Except 9 @ 5 Enter …
This sets the intensity of channels 1, 7, 8, 10, 11 and 12 to 5%.
There are also some shortcuts available:
… 1 @ @ …
@@ is a shortcut which quickly sets the intensity to 100%.
… 1 @ . …
@ . (at dot) is a shortcut which quickly sets the intensity to 0%.
… Enter Enter @ . …
Enter Enter is a shortcut which quickly selects all the channels that
are currently on (above 0%). In this example, it then takes them to 0%
using the @. shortcut (resulting in a blackout).
Zero 88 FLX S Lighting Console – User Manual Page 27 of 47
Page 28

Patching – introduction
When FLX S is first plugged into a lighting rig, “RigSync”
will set it up automatically and continue working in the
background to ensure FLX S and your rig are always
synchronised and problem free. RigSync removes the
need to understand DMX (if your fixtures support “RDM”).
If your fixtures do not support RDM, the DMX Patch (or
“patching”) is a required process where ZerOS is told all
about the devices, known as “fixtures”, being used in your
lighting rig (see “Fixtures” on page 28). From this information,
ZerOS will be able to provide you the controls required onscreen (and on the fixture wheels) to control all the
functions, known as “parameters”, of these fixtures (see
“Parameters” on page 28).
Fixtures
Every device controlled by ZerOS is known as a “Fixture”,
and will be assigned a “Fixture Number”. Fixtures can be a
simple generic dimmer channel or a more complex device
such as a colour scroller, LED fixture, moving head, strobe
light, smoke machine or media server.
Parameters
A parameter is a function of a fixture. A fixture with ten
different functions has 10 different “parameters”. Dimmer
channels are simple fixtures with only one parameter - the
“intensity”. More complex devices (such as moving lights,
LEDs etc) are fixtures with multiple parameters (for
example “pan”, “tilt”, “red”, “green”, “blue”, “strobe” and/or
“focus”).
Some fixtures may contain multiple operating “modes”,
which can vary the amount of parameters that are
available. For example, some customers may want less
control than others, so they can choose a mode that has
less parameters. For more information on this, please
consult the fixture’s operating manual.
Zero 88 Fixture library
ZerOS includes the Zero 88 Fixture Library. This is a
library which contains information for around 6000 fixtures,
including how they work, what parameters they have, what
their default vales are etc. During the patching process,
you tell ZerOS the Make and Model of the fixtures being
used, and ZerOS finds those fixtures in the Zero 88 Fixture
Library to learn all about them. The Zero 88 fixture library
is regularly updated, and can be downloaded from
zero88.com/software/library.
User fixture types
If the fixture type you require is not in the library, you can
import it - see zero88.com/software/library for more info.
Here you can either request a “User Fixture Type”, or
create one yourself using the Fixture Tools utility which is
available on the above link, along with a guide to creating
User Fixture Types.
Once a User Fixture Type has been obtained or created, to
load it into console you save it onto USB, plug it into the
console, press Setup and then choose Load File .
A list of files found on the drive will then be displayed and
you can select the required file using the touch screen.
Once the file you want is highlighted, press
the OK button to load it into the desk.
All the fixture types contained in the selected fixture type
file will be loaded and added to the fixture library on the
desk. These now work in the same way as any of the
normal fixture types already present in the fixture library on
the desk, displayed in the correct place based on the
alphabetical sorting of manufacturer and fixture type.
Attributes
Parameters are grouped together into three attributes for
easy access and control. These attributes are called
“Colour”, “Beam”, and “Position”.
A fourth attribute, called “Effect”, manipulates parameters
to create effects such as “Circle”, “Ballyhoo” and
“Rainbow”.
Zero 88 FLX S Lighting Console – User Manual Page 28 of 47
Page 29

DMX – introduction
DMX is the primary method we use to control lighting
fixtures such as dimmers, moving lights, LEDs and smoke
machines etc. In fact, any device controllable via a DMX
signal can be assigned as a fixture within ZerOS.
The name “DMX” covers the cabling (“DMX cable”), which
connects your console to your lighting rig, and the data
signal running through those cables (“DMX signal”), which
lets your console and your lighting rig talk.
To understand DMX, you must understand “DMX
addresses” and “DMX universes”:
DMX channels (and DMX start address)
DMX can control up to 512 channels down a single cable.
Each parameter of each fixture requires one channel, so a
simple fixture may take up a single channel (for example, a
dimmer) and a more complex fixture may take up a large
range of channels (for example an LED or moving light).
So ZerOS knows which device to control, each fixture on
the cable must have a unique “DMX start address”
between “1” and “512”.
For example, if a fixture has 14 parameters, it will take up
14 DMX channels. If that fixture has a “DMX start address”
of 101, it will therefor take up channels 101 – 114. No other
fixture in the rig should be set to use these channels,
meaning the next fixture must be addressed 115 or above.
Depending on the fixture you are using, the DMX address
may be configured using DIP switches, on-screen menus
or remotely using various configuration tools. For
information on addressing your fixtures, please consult the
user manual of the fixtures.
A typical DMX addressing system may look like this:
001 – 096 – Dimmers 1 to 96
097 – 100 – Empty
101 – 114 – Fixture 1 (14 channels)
115 – 128 – Fixture 2 (14 channels)
129 – 142 – Fixture 3 (14 channels)
143 – 156 – Fixture 4 (14 channels)
DMX universes
The 512 DMX channels down a single cable is known as a
“DMX Universe”. Therefore, when more than 512 channels
are needed, a second DMX Universe is required to be
plugged into the console. The fixtures on this universe are
also addressed between channels 1 – 512, but on
“Universe 2” rather than “Universe 1”.
The FLX S lighting console supports one universe (512
channels) as standard, or can be upgraded to control up to
two “universes” (or up to 1024 DMX channels) when
upgraded. These two universes can be sent out over the
two DMX outputs (see “DMX Outputs” on page 37), or can be
distributed over an Ethernet network using either “Art-Net”
(page 41) or “Streaming ACN” (page 42).
16 bit channels
Each DMX channel (512 per universe) can be a value
between 0 and 255 (known as “8-bit”). This is sufficient for
the majority of parameters (for example, a gobo wheel may
only have 7 or 8 different gobos to select from, so 256
possible values is plenty) however in more advanced
control equipment, 256 values is not enough. In these
situations, two channels are linked together to create a
“16-bit” channel.
These channels are paired together internally and
processed as a single control channel. When output, the
second channel (sometimes called the “Fine Channel” or
the “LSB” – Least Significant Byte) is faded between 0 and
255, then returned to 0 as the first channel (sometimes
called the “Course Cannel” or the “MSB” - Most Significant
Byte) is increased by 1, then the pattern continues. This
process gives 65536 possible values for a channel instead
of the 256 possible using 8-bit control.
Composite fixtures
Certain fixture types are “composite fixtures” and have to
be patched twice, once for the intensity parameter, and
once for the remaining parameters. An example of this
would be the Varilite VL5, which has an external dimmer
channel in addition to the main control channels. Another
example would be a Lamp + 1 Channel Scroller fixture
which is used for patching colour scrollers. For these
fixtures, there are two DMX addresses displayed.
Zero 88 FLX S Lighting Console – User Manual Page 29 of 47
Page 30

Setup
To enter Setup, press the Setup key on the front panel.
Whilst within Setup, the LED in the Setup key will be lit.
Navigate through Setup using the column of options on the
left hand side of the screen. Each item in this list has a
section of the chapter below. To exit Setup, press the
Setup key again.
Fixture schedule
When you first enter Setup, you’ll be in the “Fixture
Schedule” screen, which displays all the fixtures currently
patched on your console.
Each fixture on the desk has its own fixture name and
number. The number is how it will be referred to during
programming and on-screen, and the name is used as a
description to ease identification. These two fields can be
changed by simply touching the appropriate cell.
It is recommended that you take some time thinking about
numbering your fixtures. It is useful to renumber your
fixtures to something logical and unique, as this will be how
each fixture will then be referenced during programming
and playback.
To renumber multiple fixtures at the same time, select the
fixtures as detailed earlier, and then select the column
header button which is labelled “Ch #”. This will open an
onscreen numberpad. When you edit this value, the
fixtures selected will be renumbered sequentially in the
order they were selected and shown – they won’t all be
given the same channel number. For example, display all
the LED units and enter 25. The LED units will be
renumbered 25, 26, 27 etc.
column header button which is labelled “Change all
Names”.
Fixture names and numbers being displayed in the Output
Window
Alignment (inverting and swapping pan & tilt)
If your fixtures have Pan and Tilt control, ZerOS is capable
of making adjustments to your fixtures to take into account
their rigging position.
Inverting Tilt can be particularly useful if you’ve rigged
Front of House fixtures the opposite way around to those
onstage, or you have some fixtures sat on the floor.
Inverting Pan can be particularly useful if you wish your rig
to be symmetrical, so the beams move into and away from
Centre Stage rather than all in the same direction.
Swapping Pan and Tilt can be particularly useful if a fixture
is rigged on its side. In this function, any values defined for
Pan will be output on the Tilt channel(s), and any values
defined for Tilt will be output on the Pan channel(s).
If a fixture number is not completely unique, ie another
fixture exists with the same fixture number, then a ‘*’ is
displayed after the fixture number.
The Fixture name defaults to the fixture type (eg “LED
Unit”) but they can be renamed by selecting the “Name”
cell in the normal way. For example, you may label them
“Stage Left LED Unit”, “Centre Stage LED unit” and “Stage
Right LED Unit”.
Fixture names are shown in the Output Window, as shown
below. When sequential names are identical, the name is
only displayed once per row. A vertical line splits up
fixtures with different names. Multiple names can be edited
at the same time by selecting the fixtures and selecting the
Zero 88 FLX S Lighting Console – User Manual Page 30 of 47
These settings can be changed by touching the relevant
cell using the touch screen. The invert column has the
options “none”, “invert pan”, “invert tilt” and “invert both”.
Swap has the options “swapped” or “not swapped”.
Multiple fixtures can be changed at the same time by selecting the
fixtures and selecting the appropriate column header
buttons which are labelled “Invert” or “Swap”.
With a fixture’s home position of Pan and Tilt at 50%,
inverting or swapping these parameters won’t make a
instant visible change. Therefore, it’s recommended
that before editing these values, you select all the
fixtures and move them all to a different position. Now,
as you change the values within “Alignment”, you’ll
see the beams updating live.
Page 31

Changing fixture type (fixture swapout)
This function allows you to change with fixture type from
the Zero 88 library you are using. It is useful if a mistake
has been made (wrong model or mode, for example) but
also allows for a complete swap-out of the physical fixtures
from one type to another, for example if there’s a fault and
you can’t get an identical replacement fixture. ZerOS will
attempt to clone the programmed data for the swapped
fixture(s) in Cues and Palettes as far as possible.
Touch the appropriate cell, or select all the fixtures to be
changed and touch the column header button labelled
Change all Profiles . A popup window will open with the
list of manufactures, fixture types and modes available.
Patch window
Select the required Universe by clicking on the Universe
button and selecting the universe from the drop down
menu. Enter the required DMX address in the Address field
provided or press the Next Address button to
automatically pick up the next available address in the
selected universe.
Replace fixture type popup window
If the new fixtures require more DMX channels per unit
than the previous fixture type, you will be required to add in
the new DMX start addresses. Parameters in the new
fixture type that were not present in the original fixture type
are left unprogrammed
DMX address (patch, repatch and unpatch)
The Address column allows you to add, change or remove
the DMX start address of each fixture. The DMX start
address of each fixture will be displayed in this column. If a
fixture does not currently have a DMX start address, the
cell will be left blank.
When you touch the cell, a Patch Fixture(s) popup window
is displayed on the monitor, with the current universe and
start address selected (if present), as shown below.
Press the OK button to complete the patching operation
or the Cancel button to cancel.
Alternatively, in this window you can press the Unpatch
button. A confirmation popup window will be displayed.
Select the Yes button to confirm the operation.
Unpatching a fixture removes that fixture’s information from
the DMX output, effectively disabling that fixture. However,
the information is not removed from the showfile, and the
fixture may still be manipulated, programmed and adjusted
on the desk, but no data will be output to it. Going back
into Edit Fixtures and adding back in the DMX start
address for that fixture will get it back up and running. This
is useful when touring, where one venue may have more
fixtures than another venue. (See “Error! Reference source not
found.” on page Error! Bookmark not defined. for information regarding
permanently deleting a fixture).
Add as additional address
Using this button instead of simply “OK”, it is possible to
patch a fixture to more than one DMX address in one or
more universes. These additional patch addresses are
known as duplicates.
When duplicates are patched, additional rows are added to
the Fixture Schedule table (one row per duplicate address)
as shown in the following example.
Zero 88 FLX S Lighting Console – User Manual Page 31 of 47
Page 32

Fixture 4 has an address of 4, but also has two duplicates
– ch 15 and 24
To change or remove a duplicate, select the Address cell
and choose “Unpatch”.
Multi-part fixtures
For multi-part fixtures (eg Lamp + Scroller) the different
parts of the fixture are displayed on separate rows in the
Edit Fixtures patch table.
The desk will ask you to confirm the deletion and then
remove the fixtures from the show file. This includes
modifying all cues, groups and palettes to remove all
references to this fixture. This action cannot be undone.
There is an additional column (“Part”) which shows the part
name of the multi-part fixture. Each row has its own DMX
start address button.
Patch screen within Edit Fixtures displaying multi-part fixtures
DMX In
Some ZerOS consoles support linking fixtures to the DMX
In, to control them remotely. The option is shown on FLX S
for showfile compatibility with other ZerOS consoles.
Deleting fixtures
Deleting fixtures is a permanent change to the show file
and should not be carried out without intention. There is no
undo function, so exercise caution when using this
function. To delete a fixture, select the fixtures using the
MFF buttons or “Patch Groups” along the bottom, and then
press the Delete button on the front panel.
Zero 88 FLX S Lighting Console – User Manual Page 32 of 47
Page 33

Add fixtures
To add fixtures, such as additional dimmers, LEDs, moving
lights, effect machines etc, you need to use the “Add
Fixtures” window, which is the second option within the
Setup window. Press Add Fixtures on the left hand side
of the display.
It may be useful to first collate all the information you need
into a spreadsheet (or more likely, scribbled onto the
lighting plan) before commencing the patch on ZerOS, as
incorrectly entered data can result in the rig being
unusable.
First, the window asks you to select the fixture’s
manufacturer, fixture and (if applicable) mode. Scroll down
through each column to select the required manufacturer
(eg Clay Paky), fixture type (eg “Alpha Beam 300”) and
mode. It is important that the mode set here matches the
mode set on the fixture - if in doubt, consult the fixture’s
operating manual for details.
Setting the DMX address
The Add Fixtures process is now complete and your
fixtures have been assigned. The fixtures should now have
moved to their “Home” positions.
You can repeat this process for every type of fixtures you
have.
The first option in the list of Manufactures is <Generic
Fixtures>. This contains generic profiles for fixtures such
as “RGB”, “RGBWA”, “Video 1ch” and “Dimmer + Scroller”.
Selecting a manufacture, fixture and mode
Once the manufacture, fixture and mode has been
selected, press the Next button to move on and select the
quantity, fixture number and DMX address. These will be
automatically pre-populated, so if you have not yet set a
DMX address on the fixtures themselves, the desk will
have already calculated a DMX address for you based on
the existing patch. It is important here to ensure that the
correct DMX universe is selected.
Multi-part fixtures
For multi-part fixtures (eg Lamp + Scroller) there are two
separate DMX addresses required, one for the lamp and
one for the scroller. When setting the DMX address, an
additional button will be shown called “Fixture Part”. Use
this to set a different address for each part of the fixture.
The fixture number is the number you will refer to the
fixture as within the desk software, and defines where that
fixture will be located on the faders. Enter the number and
press Finish .
Zero 88 FLX S Lighting Console – User Manual Page 33 of 47
Page 34

System Settings
System Settings within the Setup menu allows you to
change various settings that affect the ZerOS system, such
as monitor settings or switch between the various modes
available.
The “System Settings” window
Desk Name
The desk name is used to identify itself. For example,
when using the mobile apps, the name of every console on
the network will be displayed. By default, the desk name
will be “FLX S” followed by the serial number, but this can
be changed by selecting the cell, pressing Enter and
using an external keyboard to type a new name.
External Display Settings (FLX S48 only)
FLX S48 supports one external monitor, plugged into the
“DVI-D” connector on the rear of the console. This monitor
can also be touchscreen if desired, which also plug into
one of the USB connectors with a second cable.
FLX S48 will automatically detect if the external monitor is
present, and the best resolution to use for that monitor.
displayed in the same place you touch the monitor.
Press Enter to confirm and return to System Settings.
A number of external touchscreens are supported by FLX
S48. Although we will endeavour to add support for other
screens where possible, we make no guarantees about
this since the drivers may not be available in the correct
format for the desk operating system. If you want us to add
support for a different screen, then we may ask you to loan
us the screen (including the drivers CD that came with it)
for a short time for testing. Please contact Zero 88 for
details.
Internal Display Settings
The Internal Display Settings allow you to change the
touch screen brightness and the calibration of the internal
display.
The touchscreen brightness is a value between 0% and
100%. Recommended use is at 50% brightness. 0% will
not allow the backlight to go out completely, but instead to
a very dim level that can still be seen in most situations.
Peripheral Settings (encoder wheel settings etc)
Wheel Sensitivity can be changed under “Attribute
Settings” within each Attribute. “Wheel Sensitivity” allows
you to change the sensitivity of the four encoder wheels.
The setting is a value between 0% and 100%, with 100%
being the most sensitive. Recommended use is between
50% and 60%.
“Mouse Controls Pan/Tilt” allows you to control the Pan
and Tilt of a moving light by using an external USB device,
such as a mouse or trackball. When enabled, this device
will control the Pan and Tilt of any selected device when
the “Position” attribute button is selected on the front panel.
To manually change if a monitor is present or not, change
“Monitor” to “Enabled” or “Disabled” (by default, this is set
to “Auto Detect”). This will change what’s displayed on the internal
monitor – see “Using FLX S48 without an External Display” on page 5 for
more information.
If using a touchscreen, this monitor will need to be
calibrated before the touch functionality will work.
Click Calibrate under the External Display Settings. The
external monitor will now guide you through the calibration
process – press the orange cross in the upper left corner,
then the lower right corner, then the upper right corner.
This completes the calibration and ZerOS will ask you to
draw on the screen to check the calibration has worked
correctly. You should ensure that the line drawn is
Zero 88 FLX S Lighting Console – User Manual Page 34 of 47
“Always show Intensity on the first wheel” allows you to
lock the first wheel to an Intensity control. This means all
other options on the encoders will be shown on wheels two
to four only. Using Intensity on a wheel is advantageous
when you have multiple channels all at different levels, and
you want to increase or decrease their levels all together. If
you only plan to use this feature occasionally, leave this
option disabled, and use the Intensity Wheel that becomes
available when you press the “Z” button.
Operational Settings
“Channel Mix Mode” can be switched between “HTP”
(highest takes precedence) and “LTP” (latest takes
precedence).
Page 35

“HTP” means the channel faders will only affect a
channel if they are higher than anything else affecting
that channel (so, if a channel is programmed at 50% in
a cue, the channel fader will only affect that channel
when it’s above 50%).
“LTP” means the channel faders can “catch” the
intensity (by taking the fader above 50% in the above
example) and then pull it back down to 0% and keep
control of the channel.
“Show Record & Update Window” can be changed to
decide when these two windows should be shown during
programming.
“When held” means the windows will only be displayed
when the Record or Update buttons are held for
around half a second.
“On internal display” means the windows will be shown
on the internal display as soon as the Record or
Update buttons are pressed.
Attribute Settings (Colour, Beamshape, Position)
These options allow you to change various settings for
each attribute. The same windows can also be opened
outside of the Setup Window, by pressing Setup and the
attribute tab together.
For example, Setup + Colour together will open the
Attribute Settings for colour, as shown below.
The “Attribute Settings” window for the Colour attribute
“On external display” means the windows will be shown
on the external display (FLX S48) as soon as the
Record or Update buttons are pressed, but only on
the internal monitor if the buttons and pressed and held.
“On both displays” means the windows will appear on
both displays as soon as the Record or Update
buttons are pressed.
“MFF Window Playback button action” defines what
happens when you press a Playback Button in the MFF
window. By default this opens the Playback’s Setup
Window, but it can instead match the physical button
action (for example Flash or Tap Tempo), or set a Fader
Level.
“Auto Select Channel on Fader Movement” automatically
selects a channel when a channel fader is moved. This can
be disabled if you wish.
The options in each Attribute’s window are the same (apart
from colour, which has one extra option), but the setting for
each option can be changed per attribute independently.
“Wheel mode” allows you to change how the encoder
wheel will affect the selected fixtures. The options are
explained below. A secondary “shifted” option can be
chosen whilst holding down the Shift key on the
console, which allows you to select how the encoder
will work when you rotate it whilst holding Shift .
- “Absolute” will change all the selected fixtures to be
exactly the same value for that wheel’s parameter.
For example, if all the moving lights have different
gobos, changing the gobo wheel in absolute mode
will switch them all to the same gobo, and then alter
them all together.
- “Relative” will change all the selected fixtures
relative to the values they currently have. For
example, if lots of moving lights are all pointing
centre stage, they are all at different angles. Moving
them “relative” will move all their Pans and Tilts
together rather than snapping them all to the same
angle (which is what “absolute” would do).
- “Fan first” fans the change you make across all the
selected fixtures, so the first fixture’s parameter
doesn’t change, the last fixture’s parameter changes
as expected, and all the fixtures in-between will
scale between these two values.
Zero 88 FLX S Lighting Console – User Manual Page 35 of 47
Page 36

- “Fan Middle” will fan from the middle fixture, so the
middle fixture’s parameter doesn’t change, the first
half of the fixtures will change in one direction
(again, scaling as you move away from the middle
fixture), and the second half of the fixtures will
change in the other direction.
- “Fan Last” fans the change you make across all the
selected fixtures, so the last fixture’s parameter
doesn’t change, the first fixture’s parameter changes
as expected, and all the fixtures in-between will
scale between these two values.
- “Fan V” is similar to “Fan Middle”, but the second
half of the fixtures change in the same direction as
the first half, rather than the opposite direction.
“Wheel Behaviour” changes how responsive rotating
the encoder is.
- “Proportional” uses an exponential algorithm to
control attributes based on the speed of the encoder
wheel movement
- “Course” uses a linear algorithm to control attributes,
with a low sensitivity to make large changes quickly.
- “Fine” using a linear algorithm to control attributes,
with a high sensitivity to make very accurate
changes easily. Every “click” of the encoder wheel
will change the parameter by one DMX value.
“Basic” (default) means that cues are programmed with
exactly the lighting state seen on stage. The cue will
only contain the changes required from the previous
cue to make this lighting state, and uses the “Smart
Tag” rules.
“Advanced” means that cues are programmed to
contain only the changes you’ve programmed. This
means that if a parameter is programmed in one cue, it
will track through all subsequent cues until it is
programmed to do something else. If you program cue
stacks sequentially, you shouldn’t have to worry too
much about tracking.
“Keep Parameters Separate” allows you to decide if
moving one parameter within an attribute should
automatically tag all the other parameters within that
attribute too. By default, this is set to “No” for Colour
and Position, as all the values within those attributes
come together to create a single colour and single
position, whereas the default is “Yes” for Beamshape,
as often the parameters within Beamshape are
completely independent from each other.
“Colour Edit Mode” (within colour only) allows you to
switch between controlling fixtures using RGB (Red,
Green, Blue) or CMY (Cyan, Magenta, Yellow). ZerOS
will convert all fixtures to this colour mixing mode.
Tracking Options
This option defines the behaviour of the desk when
recording cues. There are three options available:
“Disabled” means that cues are programmed with a full
capture of the stage output to ensure what you see on
stage is exactly what is programmed, and exactly what
will be played back when you replay the cue.
Zero 88 FLX S Lighting Console – User Manual Page 36 of 47
Page 37

Inputs & Outputs
Inputs and Outputs within the Setup menu allows you to
manage the DMX Output of the FLX S. This screen does
not cover networking, which is covered in other areas
within Setup.
The “Inputs & Outputs” window
DMX Outputs
FLX S has two DMX Outputs on the rear of the console. By
default, these both output Universe 1, unless FLX S has
been upgraded to 2 universes. Each of the outputs can be
mapped to either of the DMX Universes. For example, on
smaller rigs you may choose both outputs to be the same
Universe 1 so it doesn’t matter which output you plug your
rig into. The default setting is “Automatic”, which means if
something is patched on Universe 1 it will be outputted on
DMX Output 1, and if something is patched on Universe 2,
it would be outputted on DMX Output 2 (if upgraded).
Defaults
Defaults within the Setup menu allows you to change the
default times and settings given when you program Cues.
Changing the default settings will never change Cues
which have already been programmed. Only future Cues
will be affected by a change in defaults.
The “Defaults” screen within Setup
Zero 88 FLX S Lighting Console – User Manual Page 37 of 47
Page 38

Default Times
These settings change the default times that cues are
recorded with. Both the default fade and default delay of
the Intensity, Colour, Beamshape and Position attributes
can be changed in this window.
Cue 1 of each playback is always recorded with a 0s fade
time by default. This can be changed during the recording
process on the encoders, or after the cue is recorded in the
Playback Window.
Playback Defaults
Clicking Playback Defaults… will open the Playback
Settings window, allowing you to change the default
settings that are applied to any new playbacks. Playbacks
are created when a cue is first recorded into that playback.
For more information about the options available, see “
Playback Settings” on page 17.
Save Show
The FLX S Lighting Console will save the show
automatically to its internal memory at regular intervals.
External copies of the show data can be saved to a USB
Storage Device.
It is highly recommended to save external backups
regularly – especially when leaving the console unattended
for any amount of time.
To save the show, press Setup and then choose
Save Show on the left hand side of the display. The
following popup window will be displayed:
The “Save Show” popup window
If you have more than one USB Storage Device
connected, first select the required device on the top
dropdown. If the device does not appear straight away,
wait a few seconds and then click Refresh .
Type the show name in the Filename box using the
onscreen keyboard and press Enter or OK . After a few
seconds the show will be saved. Press Setup to exit
Setup mode.
File Types
ZerOS is able to save shows in different file formats. Which
file type you choose depends on what you plan to do with
the showfile. Choosing the correct file type is crucial. Each
type is detailed below.
Zero 88 FLX S Lighting Console – User Manual Page 38 of 47
Page 39

ZerOS Showfile
This is the default option, and should be used in most
circumstances. These can be loaded back into the console
or loaded onto any other console running ZerOS (for
ultimate compatibility, it is suggested that both consoles
are running the same software version). When selecting
“ZerOS Showfile”, you are given the option to “Save
Complete Show”, “Save Setup Only” or “Save Setup &
Palettes”. It is recommended that you choose “Save
Complete Show”, which takes all of the available
information in the console, including setup options, patch,
cue and palette data and stores it into a single file. This file
can then be reloaded at a later date to return the console
to the same state as it was in when you saved it.
Comma Separated Values (.csv)
This saves the information into a text file that can be
imported into most spreadsheet applications to get a print
out of all the cues and the values of each fixture in each
cue. These values cannot be loaded back onto FLX S or
any other ZerOS console. When selecting “Comma
Separated Values (.csv) you are given the option to select
with Playback stack you wish to export (only one can be
chosen at a time), if you want the data displayed as
“Percentage”, “DMX Values “or “Details” (if present). You
can also choose if Palette References are included or not
(palette references will display the palette used to change
that value, rather than the value itself).
Phantom ZerOS
Phantom ZerOS requires a “Local Drive” to be defined
which emulates a USB storage device. This could be the
computer’s Desktop, “My Documents”, or an actual USB
device. To select a folder, choose “Settings” and then
choose “Browse”. Now, when you select “Save Show” in
Phantom ZerOS, this folder will be displayed.
Load File
The single “Load File” window can load several different
types of files:
ZerOS Showfiles
Any ZerOS Showfile can be loaded onto the FLX S from a
USB Storage Device. For ultimate compatibility, it is
suggested that both consoles are running the same
software version.
When loading a showfile, all information on the console will
be lost. Therefore, ensure you save your current show first
before loading another file.
To load a show, press Setup and then choose
Load File on the left hand side of the display. If you have
more than one USB Storage Device connected, select the
required device on the top dropdown. If the device does
not appear straight away, wait a few seconds and then
click Refresh .
A list of show files on the currently selected storage device
appears on the touch screen. Select the show file you wish
and press OK to load the show. The console will load the
show into its memory and you will automatically leave
Setup.
When loading a ZerOS Showfile, you are given three
options – “Load Complete Show”, “Load Setup Only” and
“Load Setup & Palettes”. Loading a complete show brings
the console back to the same settings that were defined
when the show was stored - Patch information, Cue
Information, Palettes, Groups, Desk Setup and Network
settings will all be restored.
ASCII Showfiles
ASCII showfiles are a generic file format that can be
shared between a range of consoles from a range of
manufactures. FLX S can load ASCII showfiles using the
same method as detailed above for ZerOS Showfiles.
The ASCII showfile specification has several limitations,
such as only supporting dimmer channels (not moving
lights etc) and a basic cue stack. However it is very useful,
especially when touring.
ZerOS supports “manufacture specific information” from
within ASCII files for certain consoles. This includes ETC
EOS/Ion consoles and Strand “Genius Pro” consoles. This
means moving lights, palettes, multiple playbacks and
various other settings are also supported via ASCII.
Zero 88 FLX S Lighting Console – User Manual Page 39 of 47
Page 40

User Fixture Types
User Fixture Types are files created when a required
fixture is not included within the Zero 88 Fixture Library.
These files are loaded into the console using the same
method as detailed within “ZerOS Showfiles”. Once
loaded, a confirmation will appear saying “x Fixture Types
loaded” (x being the number of fixtures included within the
single file). These will be loaded into the main library,
ready to be patched in the usual way. (See “User fixture types”
on page 28 for more information).
Zero 88 Fixture Library
The Zero 88 Fixture Library contains a library of thousands
of fixtures you may wish to use with FLX S. This library is
regularly updated, and can be downloaded free of charge
from the Zero 88 website. These files are loaded into the
console using the same method as detailed within “ZerOS
Showfiles”. Once loaded, the new library will not take effect
until the console has been restarted (which can be done
straight away, or at a more convenient time later). (See “Zero
88 Fixture library” on page 28 for more information).
Installing new software
ZerOS, the software running on FLX S, is regularly
updated as a free update from the Zero 88 website. This
software is loaded into the console using the same method
as detailed within “ZerOS Showfiles”. Once loaded, you will
be required to restart the console before you can continue.
The software installation process completely removes all
data on the console, including any current show files. If the
current show file is still required, please ensure that
backups are taken before proceeding with the update.
After completing the update you may re-load your show if
required.
Clear Options
Clear options allows you to clear certain areas of the
console, or reset the console back to factory settings.
The “Clear Options” section of Setup
Clearing specific areas of the console
Data stored on the console is separated into eight areas,
each of which can be cleared independently to each other.
Alternatively, “Clear All” will clear all eight sections in one
go. Selecting any of these options will offer confirmation
before clearing. Once confirmed, this action cannot be
undone. These eight areas are:
- Colour Palettes
- Beamshape Palettes
- Position Palettes
- Effect Palettes
- Macros
- Groups
- Playbacks
Clear User Fixture Types
A separate option, that is not included within “Clear All”, is
“Clear User Files”. This removes all User Fixture Types
from the internal library. Although this removes user fixture
types from the console, any fixtures being used within a
specific showfile are stored within that showfile itself. (See
“User fixture types” on page 28 for more information).
Reset Desk / Factory Reset
“Reset desk” will reset all settings and data on the console.
This cannot be undone. “Factory Reset” completely wipes
the console back to a fresh installation of ZerOS, requiring
the console to be restarted before you can continue.
Zero 88 FLX S Lighting Console – User Manual Page 40 of 47
Page 41

NOTE – FLX S should not be connected to the Internet
NOTE – FLX S should not be connected to the Internet
Remote (mobile apps)
This section of Setup enables access to the console from
the “Windows Remote Monitor” application (available as a
free download from the Zero 88 website) and the “ZerOS
Remote” and “ZerOS Monitor” mobile apps. These are
available free of charge from the iOS App Store and
Google Play respectively.
“ZerOS Remote” is designed to work as a "rigger's
remote" to wirelessly control fixtures etc, especially
during a focus session.
“ZerOS Monitor” is designed to work as a "remote
monitor", just like the physical touch screen monitor you
can plug into the back of the FLX S48. Whatever you
can do on that monitor, you can do with this app.
Whatever you can't do on that monitor, you can't do on
this app! Although this app can work on any screen, it's
not really designed for a smartphone sized screen.
To use these features, the console must be plugged into a
wireless network. To enable access to the console from
these apps, change “Remote” to “Enabled”.
Art-Net
Art-Net is a lighting protocol which sends DMX data over
Ethernet. The protocol allows for multiple DMX universes
to be sent over a single Ethernet cable. The FLX S console
can output up to 1 universes of DMX data via Art-Net, or 2
universes if upgraded.
For more in-depth information about Art-Net, please visit
the dedicated website at art-net.org.uk
Each Art-Net device needs an IP address starting with a
2.x.y.z or a 10.x.y.z. The same start number must match
on the desk itself. Each DMX universe must then be
allocated to a Port – Art-Net Ports numerate from 0-15, so
it is generally accepted that desk universe 1 will become
Art-Net universe 0, however this is user definable.
Art-Net enabled devices include Media Servers, Moving
Lights and also dedicated DMX output boxes such as the,
“EtherN.8”, “EtherN.2” and “1 Universe Ethernet Box” by
Eaton.
You’re wireless network should already include security
measures to ensure unauthorised access isn’t possible,
however you can also add a password on the console as
an additional layer of security by enabling “Security” (this
security is simply a password the remote will prompt you
for before connecting - ensure you change the password
from the default one).
If you enable “Use DHCP Address”, the console will
request an available IP address from the router. This will
only work if your router supports DHCP. Alternatively,
disable DHCP to display two more options – IP Address
and Subnet Mask.
At the bottom of the remote setup screen, a message
should appear - "Remote Active". If "Remote Not Active No DHCP Address" is displayed, ensure that DHCP is
enabled on the router and reboot the desk. Assuming
"Remote Active" is displayed and the mobile device is
connected to the wireless network, you should be able to
start the app on the device and the desk should be
detected. Press on the Desk name and click the connect
button.
The Art-Net options within Setup (when using Phantom ZerOS)
Zero 88 FLX S Lighting Console – User Manual Page 41 of 47
Page 42

NOTE – FLX S should not be connected to the Internet
Transmit Art-Net
This option enables or disables Art-Net transmission.
Transmit Mode
This allows you to switch between “Broadcast” and
“Unicast”. Visit the Art-Net website for more information
about this.
“Devices”
Art-Net is outputted in blocks of four Art-Net “ports”
(equivalent of DMX Universes). These blocks are called
“Devices”. For more, click Add Device at the bottom. A
Remove button will appear next to each device if you wish
to remove them.
Within each Device, there are the following options:
Name
This allows you to give each device an independent name
Network Switch
This can be switched between 2 or 10 (this is the first digit
of the IP address being used). Art-Net allows two separate
network IP ranges.
Streaming ACN (sACN)
Streaming ACN is another lighting protocol which sends
DMX data over Ethernet. The protocol allows for multiple
DMX universes to be sent over a single Ethernet cable.
The FLX S console can output 1 universe of DMX data via
sACN, or up to 2 universes upgraded. The protocol is
approved by ANSI and ESTA as the standard for DMX
over Ethernet and allows ZerOS to communicate with a
multitude of sACN enabled devices already available from
a range of manufactures.
Please note – on Phantom ZerOS, this option will change
to “IP Address” and will allow you to select any of the IP
addresses on your computer. To change these IP address
settings, use your computers settings within Control Panel.
Net
This is used for multiple Art-Net networks on a single
network. If you’re not sure, leave this as “0”.
Subnet
This is used for multiple Art-Net networks on a single
network. If you’re not sure, leave this as “0”.
Port 1 – 4
This allows each of the four device ports to be allocated a
separate Art-Net port, or be disabled. This port must be
matched with the Art-Net receiving device. The DMX
Universes can be linked to the Art-Net ports.
The Streaming ACN options within Setup (when using Phantom ZerOS)
Transmit sACN
This option enables or disables sACN transmission.
Please note – on Phantom ZerOS, this option will change
to “IP Address” and will allow you to select any of the IP
addresses on your computer. To change these IP address
settings, use your computers settings within Control Panel.
IP Address & Subnet Mask
These options are only displayed if “Use DHCP” is set to
“Disabled”, and allows you to define an IP Address and
Subnet Mask for streaming ACN.
UUID
Each DMX universe is offered as a separate “Configure”
button with configuration options for each universe. By
default all universes are disabled, so enable only the
universes you require in order to reduce the network
overhead.
Zero 88 FLX S Lighting Console – User Manual Page 42 of 47
Choose Configure to make changes to the sACN
universes. This will open the following window.
Page 43

The “Configure sACN Universe” options window
Mode
Each sACN universe can be either “Live” or “Preview”
output – the Preview output option although configurable is
not currently implemented in ZerOS.
sACN Universe
sACN allocates a universe number to each DMX universe,
which must be the same on the FLX S and the receiving
device (the DMX output node or fixture, etc).
Priority
Each universe can be defined a Priority level (0-200) –
sACN receptive devices will automatically listen for the
highest priority number received and respond to that
signal. In this way, multiple consoles can be running on a
network at the same time and can automatically take over
from one another .
Wings and ZeroWire
It is possible to use the Enttec Playback Wing as an
additional fader/playback wing for the ZerOS consoles.
Each key and fader can be assigned individually to allow a
truly configurable accessory, and multiple wings can be
supported simultaneously.
In the settings window, select and assign IP addresses as
required. Once the desk is at the correct IP address, you
should see the wing appear in a list below it. Press the
Configure key and a popup window will appear allowing
you to assign each of the keys and faders on the wing as
required. These settings will be stored as part of your show
file, so you can reuse the wing.
Zero Wire DMX is a legacy wireless DMX transmission
system from Zero 88. The system can be output directly
from the console and can then be routed via a Wireless
Access Point to Zero Wire DMX boxes which decode the
signal to DMX for linking to fixtures and dimmers, etc.
In the Zero Wire setup page there are a host of options,
which enable each DMX Universe on the desk to be routed
to an IP address with a unique Universe number (see
below). For more information, see the Zero Wire DMX user
manual, which can be found on the Zero 88 website.
Name
Each sACN universe can also have a unique name
associated with it, which can be entered using the
onscreen keyboard. This functionality allows you to identify
which universe is coming from which console on a larger
networked system.
The Wings and ZeroWire section of Setup
Network devices
Network devices allow you to configure the functionality of
external Art-Net devices on the network. The options
available depend on the devices present on the network.
For more in-depth information about Art-Net and Art-Net
devices, please visit the dedicated website at art-net.org.uk
Zero 88 FLX S Lighting Console – User Manual Page 43 of 47
Page 44

Visualisation
3rd Party visualisation packages allow you to preview your
lighting through a 3D emulator when you don’t have
access to the venue. Most accept Art-Net or streaming
ACN directly (see pages 41 and 42 respectively), but FLX
S also includes specific support for Capture, WYSIWYG
and Light Converse, detailed below.
Capture
Capture visualising software communicates with the desk
via a protocol known as CITP. This protocol allows for any
standard PC network between the desk and the visualising
PC. The console allows you to configure either a fixed IP
address or one allocated via DHCP. As long as the two
devices can see each other, the system should function
correctly.
For more information on Capture, please visit their website
at capturesweden.com
Light Converse
The Light Converse visualiser uses Art-Net to
communicate with the desk software. The rules of Art-Net
apply when configuring a Light Converse setup.
“Light Converse integration” requires a Zero 88 Light
Converse USB dongle. Once active, the system allows
bidirectional control of fixtures, selection and patching via
the Ethernet connection.
For more information on Light Converse, please visit their
website at lightconverse.net
WYSIWYG
Recent versions of WYSIWYG support Art-Net directly. For
older versions of WYSIWYG (Release 21 or greater) follow
these instructions:
WYSIWYG Installation
1. First install WYSIWYG Release 22 or greater,
following the standard procedure (if you’re using
Release 21, you’ll need the Zero 88 Consoles CFB
file)
2. Run the Zero 88 WYSIWYG Driver installation tool
3. Once the driver is installed, run the tool
4. Select the network interface you wish to connect
WYSIWYG with (the IP address is shown)
5. Choose OK
WYSIWYG Usage
1. Start WYSIWYG & load your show file
2. Patch your fixtures to Universes in WYSIWYG
3. In the LIVE tab, select LIVE, Device Manager
4. In Device Manager, select New and locate the Zero
88 console you are connecting to
5. Select the console and click Properties, then enter
the IP address of the desk in the Address. Select
each Port on the desk and Bind these to a Universe
on WYSIWYG.
6. In the Device Manager, click CONNECT and the
console should connect. You can now use
WYSIWYG to visualise your show.
7. When you have finished using it, click
DISCONNECT in the Device Manager.
For more information on WYSIWYG, please visit their
website at castlighting.com
Zero 88 FLX S Lighting Console – User Manual Page 44 of 47
Page 45

NOTE – FLX S should not be connected to the Internet
Networking Basics
Ethernet basics
The FLX S supports various Ethernet communication
protocols for sending DMX over a network, connecting to
visualisation tools / remote apps etc. and for creating a full
tracking backup system. Details of these options are found
on previous pages, and example system layouts are
shown on the following pages.
Unlike DMX, Ethernet operates in a different topology.
DMX is daisy chained (“line topology”) from fixture to
fixture, whereas Ethernet data is connected using a Star
topology.
IP Addresses
IP Addresses are a devices identity on an Ethernet
network. The address indicates where the device is located
and in combination with the Subnet Mask, indicates what
the desk can see, and vice-versa. The number is made up
from 4 blocks of data, between 0 and 255 – eg 192.168.0.1
Subnet Masks
The Subnet Mask indicates what a network device can see
on the network – the standard subnet mask for an Ethernet
network is 255.255.255.0, indicating that a device with an
IP address of 192.168.0.1 can see any device whose IP
starts with 192.168.0.x, but cannot see anything starting
192.168.1.x
Switch vs Crossover
There are two ways of making an Ethernet connection with
a ZerOS console.
Via a standard Ethernet Switch – the desk is connected to
one port on the switch, and other devices are connected to
another port
Via a crossover cable – the desk and connected device are
connected together directly via a crossed network cable.
This system is ideal for visualisation PCs as it negates the
need for an additional box in the middle, however this
system has its drawbacks – it is not possible to use DHCP
configuration, and it is not possible to connect more than
one device in this manner.
DHCP
DHCP is a protocol used by Ethernet enabled devices to
dynamically allocate an IP address to devices on the
network. In order to use this system, a DHCP host must
exist on the network. Some Ethernet Switches offer DHCP
capabilities, as do Wireless Routers. It is important that
you ensure that there is only ONE DHCP host on a
network – multiple DHCP hosts can cause malfunctioning
of the system.
Zero 88 FLX S Lighting Console – User Manual Page 45 of 47
Page 46

NOTE – FLX S should not be connected to the Internet
Technical Information
Power supply
FLX S is supplied with an external power supply, which is
connected to FLX S via a 2.1mm DC barrel connector
(center positive).
12V DC; MAX 1.25A, 15W
The approved Zero 88 power supply included with FLX S
should always be used. This power supply should be
earthed. Spaces / replacements can be ordered, listed
under “accessories” on the first page of this guide.
USB ports
Two USB 2.0 ports are provided - one on the rear, one on
the front panel. USB ports can be used for:
- Keyboard & Mouse (mouse on external monitor only)
- Touchscreen (DVI-D also required, FLX S48 only)
- External Storage Devices (such as Memory Sticks)
Ethernet
An Ethernet port (RJ45) is provided for connecting Apps to
FLX S over WiFi, or connecting FLX S to Ethernet based
lighting rigs. The Ethernet connection is designed to be
used within a dedicated, local lighting network, and not part
of a larger, building wide network.
Kensington Lock
A Kensington-style lock slot is provided on
FLX S for securing the console to an
operating location, using a standard laptop
lock cable.
DMX output
Two female Neutrik XLR are provided. 1 x 5 pin connector,
and 1 x 3pin connector. These both output Universe 1,
unless the FLX S console has been upgraded to 2
universes.
Video output
1 x DVI-D connector, on FLX S48 only
Troubleshooting
Fixtures not responding?
If your fixtures and dimmers are not responding to the
desk, check:
- Have you plugged the DMX cable into the back of the
console?
- If the fixtures do not support RDM, they must be added
(or “patched”) manually – see the manual for full details.
- If you have upgraded your FLX S, ensure the DMX
cable is plugged into the correct output
- Some fixtures require the lamp to be “lamped on”. If this
is required, a “Macros” tab will be displayed along to top
of the screen when the fixture is selected. Selecting
macros will display a “Lamp On” command.
External Touch Screen not responding?
On FLX S48, if the external touchscreen is not responding,
remember these points:
- External Touch Screens require both the USB and
DVI-D cables to be connected.
- External Touch Screen require calibration by going to
Setup > System Settings > Calibrate
Remote App not connecting?
If the remote apps are not connecting to the console,
check one of the following things:
- Is the Remote enabled in Setup > Remote?
- Is there a password set in Setup > Remote?
- Are you using a dedicated network, or plugging into a
much larger network? On larger networks, firewalls can
sometimes block the communications.
- Is the IP address of the console in the same range as
the IP address of your remote device? For simple
setups where nothing else is using the network apart
from the remote, we suggest either enabling DHCP on
both devices (which will set the IP address
automatically) or use the IP addresses 192.168.1.10 on
FLX S and 192.168.1.20 on your remote device.
Console does not start correctly?
In this situation, follow these steps:
- Remove all USB storage devices from the console
- Check internal monitor for any error messages or
warning information
- Hold Shift on a USB keyboard to get to diagnostic
mode. Perform a Backup Desk State and email this to
Zero 88 (see contact details on right).
- Hold Shift on a USB keyboard then “clear show data”
- If all else fails, reinstall the software as a last resort
Zero 88 FLX S Lighting Console – User Manual Page 46 of 47
Page 47

WARNING! - NO USER SERVICEABLE PARTS INSIDE
Basic maintenance
FLX S is designed to be relatively maintenance free,
however a few simple steps can prolong the life of your
hardware.
Cleaning the surface
Every month or so, gently wipe down the front panel with a
nonabrasive, non-corrosive surface cleaner applied with a
soft cloth.
Cleaning the faders
A can of compressed air can be used to clear our dust
from the fader tracks. Do NOT use an oil based lubricant
(such as WD-40) on faders as this will cause irreparable
damage to your FLX S.
Transportation & storage
Care should be taken when transporting FLX S. Flight
cases are available (listed under “accessories” on the first
page of this guide) for the transportation of FLX S – the
cardboard box which FLX S is supplied in is intended only
for one or two journeys, and should not be relied upon to
keep the console safe for prolonged use.
Operating environments
Always observe the operating environment information in
the main FLX S manual. If this environment is exceeded, it
is likely that damage will occur to your FLX S. To download
the full manual, please visit zero88.com
Reporting a problem
Before reporting a problem to Zero 88, please obtain as
many of the following pieces of information as possible:
- The console’s current software version
- A copy of the current showfile
- Details of what you were doing at the time, or which
playback / palette etc is affected.
- If the system has crashed, the console will offer you a
debug file the next time you turn it on.
Support requests can be submitted through our support
forum at zero88.com/forum or via email to
support@zero88.com
For more urgent requests, please contact Zero 88 by
telephone on +44 (0)1633 838088 – 24 hour answer
service available.
If you have reported a problem by email or on the forum,
please bear with us as our response may take a few days
if your problem is complex. It is also worth checking other
posts on the forum to see if the fault is already reported /
fixed before contacting Zero 88.
If you suspect that your problem is software related, please
always check that you are running the latest software
version. This can be found at zero88.com/software
Mechanical information
Dimensions
90mm (H) x 660mm (W) x 340mm (D)
Weight
7.5 kg
Operating temperature range
+5 to +40 °C
Humidity
5% to 95% non-condensing
Zero 88 FLX S Lighting Console – User Manual Page 47 of 47
 Loading...