

Page 1

PSM Training ECHO
User Guide
Page 2

PSM Training User Guide
Page 2 of 31
Ph: 1 (443) 569-3603 Fax: 1(443) 926-9402 Web: www.zephyranywhere.com
9700.0142 © Zephyr™ Technology 2014 2014-FEB-11
Contacts
Mail: Zephyr Technology Corp. 1 Annapolis St., Suite 200, Annapolis MD 21401
Email: support@zephyrtech.zendesk.com
Web: www.zephyranywhere.com
Phone: 443-569-3603
Fax: 443-926-9402
Version
Description
2012-05-14
Initial Release
2012-06-15
Updates for OmniSense 3.3.11
2012-07-06
Move configuration and firmware upgrade details to OmniSense Live Help file
2012-11-06
Add GPS Support, move log format descriptions to separate document
2013-01-22
Add repeater description
2013-03-21
Update repeater battery life
2013-07-03
Add BioModule configuration for GPS
2014-FEB-11
Minor corrections and edits
The information in this document is believed to be accurate in all respects at the time of publication but is subject to change without
notice. Zephyr™ Technology assumes no responsibility for errors or omissions, and disclaims responsibility for any consequences
resulting from the use of information included herein. Additionally, Zephyr™ Technology assumes no responsibility for the functioning
of undescribed features or parameters. Zephyr™ Technology does not assume any liability arising out of the application or use of
any product, and specifically disclaims any and all liability, including without limitation consequential or incidental damages.
Zephyr™ Technology products are not designed, intended or authorised for use in applications intended to support or sustain life, or
for any application in which the failure of the Zephyr™ Technology product could create a situation where personal injury or death
may occur. Should Buyer purchase or use Zephyr™ Technology products for any such unintended or unauthorised application,
Buyer shall indemnify and hold Zephyr™ Technology harmless against all claims and damages.
Page 3

PSM Training User Guide
Page 3 of 31
Ph: 1 (443) 569-3603 Fax: 1(443) 926-9402 Web: www.zephyranywhere.com
9700.0142 © Zephyr™ Technology 2014 2014-FEB-11
Contents
1. INTRODUCTION ................................................................................................................................... 5
1.1 System Description ............................................................................................................................ 5
1.2 System Diagrams .............................................................................................................................. 6
1.3 Hardware Component Options .......................................................................................................... 7
1.4 Software Installation .......................................................................................................................... 9
2. LIVE OPERATIONS ............................................................................................................................ 10
2.1 Radio Network Setup ....................................................................................................................... 10
2.2 Database Setup ............................................................................................................................... 10
2.3 Issue BioHarness ............................................................................................................................ 11
2.3.1 Strap Fitting ......................................................................................................................... 12
2.3.2 BioHarness LED Behaviour ................................................................................................. 13
2.3.3 Garment Type ...................................................................................................................... 14
2.4 Operational Startup ......................................................................................................................... 15
2.5 Live Screen Operation Checks ........................................................................................................ 16
2.6 Field Repeater Units ........................................................................................................................ 17
2.7 GPS Support.................................................................................................................................... 18
2.7.1 Configuring a BioHarness for use with a GPS .................................................................... 19
3. LOGGING ............................................................................................................................................ 22
3.1 Download Device Logs .................................................................................................................... 22
3.1.1 Download to OmniSense Database .................................................................................... 22
3.1.2 Download to External Files .................................................................................................. 22
3.2 Logging Formats .............................................................................................................................. 22
4. MAINTENANCE .................................................................................................................................. 23
4.1 BioHarness™ Module ...................................................................................................................... 23
4.2 Charging BioHarness Modules ........................................................................................................ 24
4.3 Strap ................................................................................................................................................ 25
5. BIOHARNESS CONFIGURATION ...................................................................................................... 26
6. FIRMWARE UPGRADES .................................................................................................................... 27
7. SPECIFICATIONS ............................................................................................................................... 28
7.1 BioHarness Module ......................................................................................................................... 28
8. TROUBLESHOOTING ........................................................................................................................ 29
8.1 Device Clock Synchronization ......................................................................................................... 29
8.2 Physiological Data Anomalies ......................................................................................................... 30
8.3 General Issues ................................................................................................................................ 30
8.4 General Check Procedure ............................................................................................................... 30
9. WARRANTY ........................................................................................................................................ 31
Page 4

PSM Training User Guide
Page 4 of 31
Ph: 1 (443) 569-3603 Fax: 1(443) 926-9402 Web: www.zephyranywhere.com
9700.0142 © Zephyr™ Technology 2014 2014-FEB-11
Glossary of Terms
AT
Anaerobic Threshold – closely associated with 2nd ventilatory threshold
BPM
Beats per minute (Heart rate) or Breaths per minute (Breathing rate)
BR
Breathing Rate
BT
Bluetooth®
ECG /EKG
Electro Cardio Gram
ECHO
2.4 GHz 802.15.4 Radio Network type used by this system
Gateway
Receiver device connected to PC
HR
Heart Rate
HR max
Maximum heart rate of an individual subject
LED
Light Emitting Diode
KML
Keyhole Markup Language – Google Earth File Format
PC
Personal Computer
PSM
Physiological Status Monitoring [system]
RH
Relative Humidity
RID
Zephyr™ Radio Interface Device
ROG
Red / Orange / Green[ subject physiological status indication]
USB
Universal Serial Bus – PC hardware connection
VMU
Velocity Magnitude Unit – a measure of activity level (in g) over a fixed time interval
Page 5

PSM Training User Guide
Page 5 of 31
Ph: 1 (443) 569-3603 Fax: 1(443) 926-9402 Web: www.zephyranywhere.com
9700.0142 © Zephyr™ Technology 2014 2014-FEB-11
1. Introduction
This document contains information required to operate the Zephyr™ PSM Training system incorporating
OmniSense Application software, using Zephyr components which support the ECHO radio network type.
1.1 System Description
The PSM Training System is a remote physiological monitoring system that utilizes Zephyr’s patented
BioHarness™ product. The BioHarness™ allows the measurement of:
Heart Rate
Breathing Rate
Activity level
Subject orientation (posture)
Estimated Core Temperature
A variety of physiological parameters using automated fitness tests – details are in the
OmniSense Analysis Help file
Data from the BioHarness™ is used to generate a color-coded Subject Status indication (ROG):
Green
Orange
Red
Data is relayed over a radio network. This configuration will support a maximum of 50 subjects.
Individual subject data is updated every 2.5 seconds.
Specific BioHarness 3.0 hardware is required for a PSM Training system. This hardware is dual
Bluetooth/ECHO.
The ECHO system does not support Bluetooth-only BioHarness modules.
1
Page 6

PSM Training User Guide
Page 6 of 31
Ph: 1 (443) 569-3603 Fax: 1(443) 926-9402 Web: www.zephyranywhere.com
9700.0142 © Zephyr™ Technology 2014 2014-FEB-11
1.2 System Diagrams
1. BioHarnessTM chest strap (up to 50)
2. BioHarnessTM 3.0 ECHO module (up to 50)
3. ECHO gateway – additional repeaters can be
used in the field to extend the network.
4. USB connector
5. PC platform
6. OmniSense Application software
7. Heart Rate (ECG) sensor locations
8. Breathing sensor location
9. Accelerometer in device
7 9 8
ECHO
1 2 5 6 3
4
1
Page 7

PSM Training User Guide
Page 7 of 31
Ph: 1 (443) 569-3603 Fax: 1(443) 926-9402 Web: www.zephyranywhere.com
9700.0142 © Zephyr™ Technology 2014 2014-FEB-11
1.3 Hardware Component Options
Multi Device Charge Cradle
Optional component
Micro-USB connectivity for device configuration & log download
Requires connection to PC and power outlet simultaneously for
use
Single Device Charge Cradle
Mini-USB connectivity for device configuration & log download
Connect to USB wall/car charger for charge only
ZEPHYR ECHO GATEWAY
Up to 300 yard range
USB or battery powered
Auxilliary field units can be added to
extend network coverage (no
additional configuration necessary)
ZEPHYR Training SYSTEM CASE
Main power supply or internal Li-on rechargeable
batteries
Charging / Configuration / Log Download of
BioHarness modules
1
Page 8

PSM Training User Guide
Page 8 of 31
Ph: 1 (443) 569-3603 Fax: 1(443) 926-9402 Web: www.zephyranywhere.com
9700.0142 © Zephyr™ Technology 2014 2014-FEB-11
Field Repeater
Integrated rechargeable battery power supply
24 hr battery life (5200mAh)
3 hr charging
Increase range or offer more effective coverage of an area
1
Page 9

PSM Training User Guide
Page 9 of 31
Ph: 1 (443) 569-3603 Fax: 1(443) 926-9402 Web: www.zephyranywhere.com
9700.0142 © Zephyr™ Technology 2014 2014-FEB-11
1.4 Software Installation
Follow the instructions in the OmniSense Software Installation Guide to:
Install OmniSense Live & Analysis modules including
o Zephyr Cfg Tool
o BioHarness Log Downloader
Install drivers for all BioHarness devices
1
Page 10

PSM Training User Guide
Page 10 of 31
Ph: 1 (443) 569-3603 Fax: 1(443) 926-9402 Web: www.zephyranywhere.com
9700.0142 © Zephyr™ Technology 2014 2014-FEB-11
2. Live Operations
For detailed information on how to set up and operate the OmniSense application to display data, refer to
the PSM Training OmniSense Live Help accessed from the application toolbar.
2.1 Radio Network Setup
Before adding any hardware components to the system database, radio network type must be set up or
confirmed in the OmniSense Live module.
The Radio Network Type must be set to ECHO.
2.2 Database Setup
The system must be set up prior to going live. Details are in the PSM Training OmniSense Live Help:
1. All BioHarness modules added to system
2. All subject details added to system
3. BioHarness modules assigned to subjects
4. Subjects added to a Team
5. Team deployed to Live
1. Start the Application
2. Select Preferences in toolbar
3. Set the Network Type
2
Page 11

PSM Training User Guide
Page 11 of 31
Ph: 1 (443) 569-3603 Fax: 1(443) 926-9402 Web: www.zephyranywhere.com
9700.0142 © Zephyr™ Technology 2014 2014-FEB-11
Confirm hardware allocation in
OmniSense Setup > Hardware tab
2
Check components match those that are
assigned to the subject
24
3
Power on components, check LEDs
[To power OFF BioModule, detach from strap,
press & hold center button]
4
Fit to Strap
5
Fasten at front, adjust tension for a snug
fit, and rotate into position
Moisten grey
sensor pads with
water
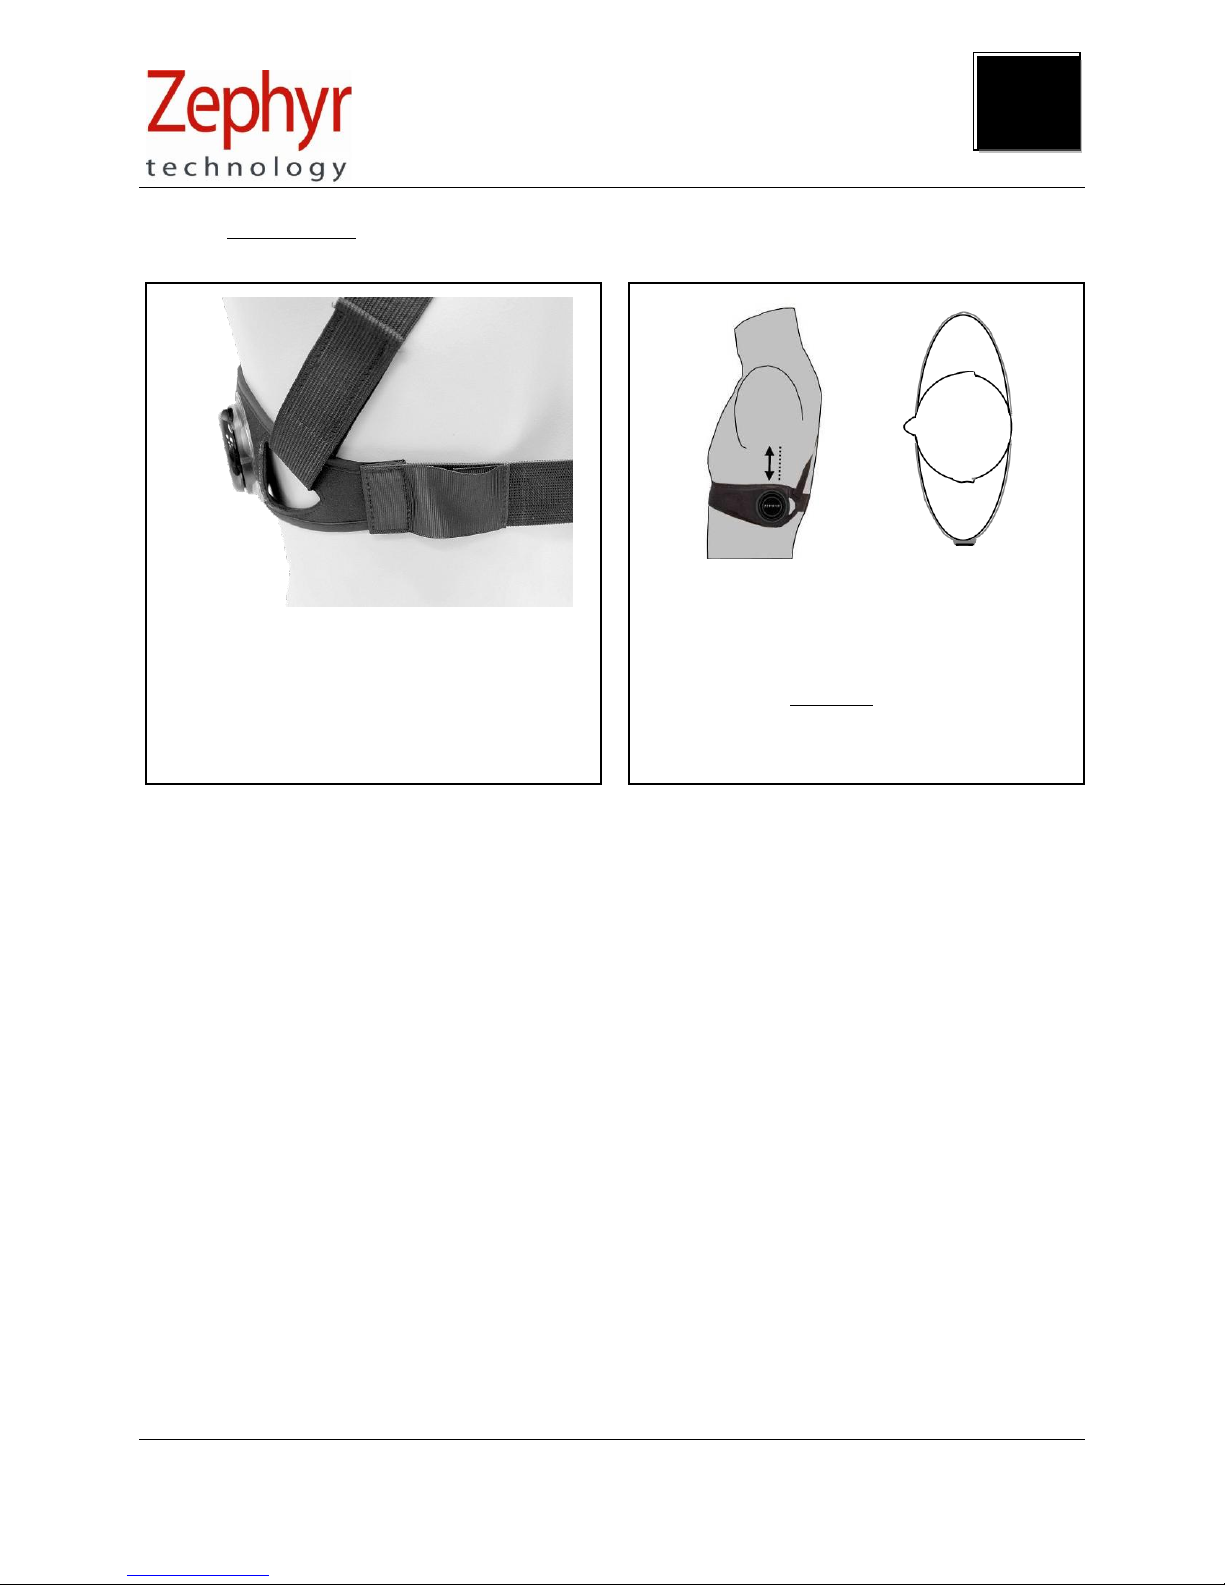
2.3 Issue BioHarness
2
2
Page 12
PSM Training User Guide
Page 12 of 31
Ph: 1 (443) 569-3603 Fax: 1(443) 926-9402 Web: www.zephyranywhere.com
9700.0142 © Zephyr™ Technology 2014 2014-FEB-11
1
Tension indication loop at rear should be
flush with strap (shown un-tensioned here)
when subject inhales and chest is fully
expanded
2
Centre line of the device should be directly
under the armpit – for optimum breathing
detection device should be at apex of rib
curvature. The device can be moved slightly
(~1”) to the rear only (dotted line) if the
optimum location is uncomfortable.
2.3.1 Strap Fitting
2
Page 13
PSM Training User Guide
Page 13 of 31
Ph: 1 (443) 569-3603 Fax: 1(443) 926-9402 Web: www.zephyranywhere.com
9700.0142 © Zephyr™ Technology 2014 2014-FEB-11
2.3.2 BioHarness LED Behaviour
If power cycling a BioHarness module does not cancel a Bluetooth or Logging error, then a hardware fault
is likely – replace the device in the interim.
Bluetooth/ECHO
Logging
Battery
HR Detect
Downloading
DEVICE STATE IN CRADLE
Connected
Error
Always off
Charging
Charged
No power
No records/Finished
Error
Disabled
Bluetooth/ECHO
Logging
Battery
HR Detect
Connected
Disabled
Enabled
Disabled
> 30% charge
< 30% charge
HR Locked
Not worn
DEVICE STATE WHEN WORN
Error
Error
< 10% charge
Strap worn, HR not locked
2
Page 14

PSM Training User Guide
Page 14 of 31
Ph: 1 (443) 569-3603 Fax: 1(443) 926-9402 Web: www.zephyranywhere.com
9700.0142 © Zephyr™ Technology 2014 2014-FEB-11
‘BH3 SIDE’
‘BH3 SIDE’
BH3 FRONT
2.3.3 Garment Type
It is necessary to set the garment type in OmniSense, as the orientation of the device varies, and
accelerometer data must be interpreted correctly in order to display posture data.
There are three variations of garment type:
The garment/device type can be selected from a pull down in the Hardware tab of the Setup screen in the
OmniSense Live Module.
Refer to the OmniSense Live help file on how to set garment type in the software. If the wrong type is set
here, then posture data from the device will be invalid.
2
Page 15

PSM Training User Guide
Page 15 of 31
Ph: 1 (443) 569-3603 Fax: 1(443) 926-9402 Web: www.zephyranywhere.com
9700.0142 © Zephyr™ Technology 2014 2014-FEB-11
1
Set up at preferred location
ACTIVITY AREA
See also suggestions on
optional field repeater units
2
Connect Gateway to PC
4
Start OmniSense
3
Power on BioHarness
modules
2.4 Operational Startup
2
Page 16

PSM Training User Guide
Page 16 of 31
Ph: 1 (443) 569-3603 Fax: 1(443) 926-9402 Web: www.zephyranywhere.com
9700.0142 © Zephyr™ Technology 2014 2014-FEB-11
1
START APPLICATION
START APPLICATION
2
SELECT LIVE MODE
6
FORWARD LEAN
POSTURE CHECK
4
DATA STABILISATION TIMES
FROM DEVICE POWER-ON
Heart Rate:
5 seconds
Breathing Rate:
30 – 45
seconds
Core Temperature;
1 second
Activity/Posture:
1 second
3
WAIT 1-2 minutes
It takes the Gateway 1-2 minutes for all
network connections to establish and
stabilize. During this time BioGauges may
switch from black to blue to ROG colours
intermittently
2.5 Live Screen Operation Checks
5
STATUS INDICATION ON START UP
SENDING ESTABLISHING DEVICE NOT DATA DATA
REQUEST CONNECTION WORN (CHECK) STABILIZING STABILIZING
2
Page 17

PSM Training User Guide
Page 17 of 31
Ph: 1 (443) 569-3603 Fax: 1(443) 926-9402 Web: www.zephyranywhere.com
9700.0142 © Zephyr™ Technology 2014 2014-FEB-11
2.6 Field Repeater Units
Optional field repeater units, powered by an integrated rechargeable battery source, can be used to
extend absolute range of the system, or provide better coverage of an area.
Field repeaters transmit directly to the base ECHO gateway, but NOT to each other. They cannot be used
to extend the system range indefinitely.
Suggestions for repeater location are displayed on the label on the rear of the unit.
ECHO
GATEWAY
REPEATER
GATEWAY
RANGE
300 YDS
MAXIMUM
RANGE
600 YDS
BEST
COVERAGE
RECHARGEABLE
POWER SOURCE
USB CONNECTOR
FOR BATTERY CHARGE
USB POWER
CONNECTOR TO
REPEATER
2
Page 18

PSM Training User Guide
Page 18 of 31
Ph: 1 (443) 569-3603 Fax: 1(443) 926-9402 Web: www.zephyranywhere.com
9700.0142 © Zephyr™ Technology 2014 2014-FEB-11
ECHO
Bluetooth
GPS data is currently ONLY logged in the
BioHarness, and must be downloaded into
the Analysis module. Summary data can
be displayed, and kml files generated for
display in Google Earth
QStarz 818XT
2.7 GPS Support
OmniSense Live and Analysis now support GPS data.
Some criteria apply:
A supported Bluetooth GPS unit must be used. This is currently a QStarz 818XT
The BioHarness module must be configured using the Zephyr Cfg Tool – see the next section
LIVE MODULE
No GPS data can currently be displayed in the Live module. This function is supported by PSM
Responder and some PSM Defense systems only.
ANALYSIS MODULE
GPS data, if it exists, will be imported into the OmniSense database using the Import Toolbar button and
Zephyr Downloader tool.
GOOGLE EARTH
An external kml file of GPS data – for use in Google Earth – can be generated from Analysis by rightclicking the session in the Select Session Tree, and selecting the Export KML option for that session. This
.kml file also contains summary physiological data:
Minimum/Maximum/Average for
Heart Rate
Peak Acceleration
Breathing Rate
Activity
Estimated Core Temperature
See Analysis Help for details
2
Page 19

PSM Training User Guide
Page 19 of 31
Ph: 1 (443) 569-3603 Fax: 1(443) 926-9402 Web: www.zephyranywhere.com
9700.0142 © Zephyr™ Technology 2014 2014-FEB-11
2.7.1 Configuring a BioHarness for use with a GPS
A BioModule can be configured to log GPS data for later download into OmniSense Analysis. Analysis can
display summary speed and distance data, though not location.
However a kml file can be exported from a session containing GPS data, for import into Google Earth.
Streaming GPS data cannot be displayed on a BioGauge in OmniSense live using ECHO – this can only
be done when using a PSM Responder System (Motorola digital radio network), or some PSM Defense
variants.
First, determine the Bluetooth MAC address of the GPS. This can be done using a PC with Bluetooth
capability.
1. Power on your GPS device – this can be done indoors – no satellite fix is needed for this task.
Go to Windows > Start > Devices and Printers
Select the Add A Device button
2
Page 20

PSM Training User Guide
Page 20 of 31
Ph: 1 (443) 569-3603 Fax: 1(443) 926-9402 Web: www.zephyranywhere.com
9700.0142 © Zephyr™ Technology 2014 2014-FEB-11
2. Windows will scan for any Bluetooth devices
It may take several attempts. When the Qstarz has been detected, right-click on the icon and select
Properties from the context menu.
3. The Device MAC address is the unique ID indicated
Note the value in XX:XX:XX:XX:XX:XX format.
2
Page 21

PSM Training User Guide
Page 21 of 31
Ph: 1 (443) 569-3603 Fax: 1(443) 926-9402 Web: www.zephyranywhere.com
9700.0142 © Zephyr™ Technology 2014 2014-FEB-11
4. Now we must program the GPS MAC address into the BioModule using the Zephyr Config Tool
located at C:\Program Files (x86)\Zephyr\OmniSense\Tools
Enter the GPS Mac address in the GPS Device field and click the Set BT Dev 9 button.
5. In the User Cfg tab, confirm that the Log Format is set to Summary (the default) or Summary and
Waveform
6. In operation, simply power on the GPS, then power on the configured BioHarness. The BioHarness
will communicate with the GPS and add GPS data to the summary log format. Download the data
directly into OmniSense Analysis when the session is finished. Instructions can be found in the
OmniSense Analysis Help file.
2
Page 22

PSM Training User Guide
Page 22 of 31
Ph: 1 (443) 569-3603 Fax: 1(443) 926-9402 Web: www.zephyranywhere.com
9700.0142 © Zephyr™ Technology 2014 2014-FEB-11
3. Logging
The default configuration of the BioHarness is to log and transmit simultaneously. Either of these modes
can be turned on or off as required, using the Zephyr Cfg Tool located at
C:\Program Files(x86)\Zephyr\OmniSense\Tools.
Two utilities are provided for downloading logs from the device:
Zephyr Downloader – accessed from the Analysis application toolbar download button
o Download from a single device, or multiple devices simultaneously
o Import data into OmniSense database and/or generate external csv files
BioHarness Log Downloader – installed with OmniSense, found in location C:\Program
Files(x86)\Zephyr\OmniSense\Tools
o Legacy tool
o Generate external csv file only
For both of the above utilities, the external csv files contain more detailed data than is imported to the
OmniSense database. If the BioHarness module is configured appropriately, ECG and accelerometer
waveform csv files, amongst others can be generated.
3.1 Download Device Logs
3.1.1 Download to OmniSense Database
A button on the OmniSense Analysis toolbar will allow direct downloading from a single device or
devices into the OmniSense database. This process is described in detail in the Analysis Help File at
the Data Import & Export > Import Log Data from a BioHarness node .
3.1.2 Download to External Files
This process is described in detail in the Live Help File at the Software Utilities > BioHarness Log
Downloader node .
3.2 Logging Formats
The BioHarness can be configured to a number of different log formats. These are set using the Zephyr
Cfg Tool. Briefly, the modes are:
General:
1 Hz general parameters + 18Hz breathing waveform & heart rate RR
General + ECG::
General + 250Hz raw ECG waveform
General + Acceleration
General + 100Hz Activity level (accelerometer magnitude)
BioHarness 3.0 only:
Summary:
An extended General log containing additional parameters (Default)
Summary + Waveform:
Summary + 250Hz ECG + 100Hz accelerometer
Summary + Development
Summary + 1KHz ECG + 100Hz accelerometer
3
Page 23

PSM Training User Guide
Page 23 of 31
Ph: 1 (443) 569-3603 Fax: 1(443) 926-9402 Web: www.zephyranywhere.com
9700.0142 © Zephyr™ Technology 2014 2014-FEB-11
4. Maintenance
4.1 BioHarness™ Module
Clean with a damp cloth when needed
Avoid prolonged immersion in water deeper than 1 meter. Do not use for swimming or related
water-based activities.
Avoid leaving the device in direct sunlight for prolonged periods
BATTERY
Recharge each time after use - shallow charge cycles prolong battery life (see next section)
Avoid storing in an uncharged state for prolonged periods
A top-up charge of the battery is recommended once a month if the devices are not used
regularly, to maintain optimum battery condition
The device is sealed against moisture ingress; the internal lithium ion battery is not end-user
replaceable. The device should be returned to an authorized agent for this procedure
REPLACEMENT
A replacement device must be added to the system — see the OmniSense Live Help — and re-assigned
to the appropriate subject.
Erase all existing logs in a replacement device when assigning to a new subject, or they will be added to
the subject’s data in the database at the next download session.
4
Page 24

PSM Training User Guide
Page 24 of 31
Ph: 1 (443) 569-3603 Fax: 1(443) 926-9402 Web: www.zephyranywhere.com
9700.0142 © Zephyr™ Technology 2014 2014-FEB-11
4.2 Charging BioHarness Modules
CHARGING TIMES: BioHarness
Fully discharged to 90% capacity: 1 hour
Fully discharged to 100% capacity: 3 hours
CHARGE NOTES
Devices can be left in chargers. Protection circuitry in the device will prevent the BioHarness from
being damaged.
It is recommended that the BioHarness modules are charged after every use – shallow
charge/discharge cycles prolong battery life
Avoid storing the devices fully discharged for prolonged periods – it may damage/reduce battery life
A top up charge is recommended once per month if the devices are not used regularly
LONG TERM STORAGE
Charge the device to full capacity, then use the Zephyr Cfg Tool to switch the device off completely.
Turning off the device using the central button leaves the internal clock running.
The device clock will need to be reset using the Cfg Tool when it is next used. Full instructions can be
found in the OmniSense Live Help File at the Software Utilities > Zephyr Config Tool node.
5-device cradle
Connect to PC + Wall
50-device case
4
Page 25

PSM Training User Guide
Page 25 of 31
Ph: 1 (443) 569-3603 Fax: 1(443) 926-9402 Web: www.zephyranywhere.com
9700.0142 © Zephyr™ Technology 2014 2014-FEB-11
4.3 Strap
WASH INSTRUCTIONS
Detach the BioHarness™ module
Rinse strap in fresh water after use to prevent salt buildup from perspiration
Hand Wash, or
Machine-wash on a Cold, Delicate setting after 30 days of use.
o Firmly attach the Velcro® fastenings together and do not wash with other garments which
may be damaged by these fastenings.
o Use a washing pouch if possible.
o Use soap or mild detergent, but NOT sterilizing tablets, as this may affect the conductive
fibers on the sensor surfaces
o Do Not spin or tumble dry
o Hang to dry
o Do not bleach.
o Do not iron as the strap contains conductive fibers which may be adversely affected by
excessive heat.
REPLACEMENT
BioHarness™ Straps have no unique characteristics or calibration procedures, and can be replaced at
will.
4
Page 26

PSM Training User Guide
Page 26 of 31
Ph: 1 (443) 569-3603 Fax: 1(443) 926-9402 Web: www.zephyranywhere.com
9700.0142 © Zephyr™ Technology 2014 2014-FEB-11
5. BioHarness Configuration
A large number of parameters can be configured within the BioHarness device, to tailor its function. The
Zephyr Cfg Tool, located at C:/Program Files (x86)/Zephyr/OmniSense/Tools can be used to control
settings.
Care should be taken when changing any parameters in the device. Record any settings
before you change them, and seek advice from Zephyr if you are in doubt about a setting
1. Connect your BioHarness Module a single cradle or system case to a PC.
2. Double-click the Zephyr Cfg Tool.exe executable file at C:\Program
Files(x86)\Zephyr\OmniSense\Tools.
3. A full description of the configurable settings can be found in the OmniSense Live Help File at
the Software Utilities > Zephyr Config Tool node.
Cradle
Training system case
USB
USB
5
Page 27

PSM Training User Guide
Page 27 of 31
Ph: 1 (443) 569-3603 Fax: 1(443) 926-9402 Web: www.zephyranywhere.com
9700.0142 © Zephyr™ Technology 2014 2014-FEB-11
6. Firmware Upgrades
Firmware upgrades for BioHarness devices become available as new functionality is added to the device.
You must use the utility ZUSBUpdater.exe, in conjunction with a suitable .img firmware image file.
Hardware compatibility is checked, so you should not be able to update a device with firmware intended
for another type. Both are located in a BioHarness Firmware Upgrade directory on the software CD.
A full description of the update procedure can be found in the OmniSense Live Help File at the
Software Utilities > Firmware Upgrades node.
6
6
Page 28

PSM Training User Guide
Page 28 of 31
Ph: 1 (443) 569-3603 Fax: 1(443) 926-9402 Web: www.zephyranywhere.com
9700.0142 © Zephyr™ Technology 2014 2014-FEB-11
7. Specifications
7.1 BioHarness Module
Parameter
Specification
Heart Rate:
25 – 240 Beats per Minute ± 1 BPM
Breathing Rate:
3 – 70 Breaths per Minute
Device Temperature:
10 – 60 °C ± 0.2°C in range 30 40°C
Battery Duration:
24 hrs Logging
16 hrs transmit
Charge Time:
3 hours to 100%, 1 hour to 90%
Battery Life:
Capacity 80% after 300 deep discharge cycles (4500hrs of use)
Storage Life:
6 months between charges (for optimal – recharge monthly)
Strap Sizes:
Small (XS – M; 27½ - 38 inches) Large (M- XL; 33½ - 43 inches)
Wash durability:
Typically 80 washes with BioHarness Module removed
Environmental – Operating:
Humidity:
5 90 %RH
Temperature:
-10 50°C
Environmental – Storage:
Humidity:
5 90 %RH
Temperature (< 1 month):
(Power off) -20°C 45°C
Temperature (< 6 months):
(Power off) -20°C 35°C
Water Resistance (Device):
IPX7 (immersion for up to 30minutes in 1 m of water)
Bluetooth Compliance:
Version 2.0 + EDR
Operating Frequency:
2.4 2.835 GHz Bluetooth
2.405 – 2.480 GHz ECHO
Output Power:
2 mW Bluetooth
100 mW ECHO
7
Page 29

PSM Training User Guide
Page 29 of 31
Ph: 1 (443) 569-3603 Fax: 1(443) 926-9402 Web: www.zephyranywhere.com
9700.0142 © Zephyr™ Technology 2014 2014-FEB-11
8. Troubleshooting
Zephyr strives to develop products which are user-friendly and problem free. However, human, external
system or environmental factors may result in issues which can be organised into the following types:
Software Installation problems: Refer to the OmniSense Software Installation Guide
Operational Errors in Live Mode: Refer to the OmniSense Live User Guide
Physiological Data Anomalies: Section 8.2
Hardware: Section 8.3
General Issues: Section 8.4
See also the Troubleshooting Section in the OmniSense Live Help file.
8.1 Device Clock Synchronization
The default device configuration is that it both transmits and logs data internally, and can record up to 24
hours of data in a single session. All logged data is time-stamped using an internal clock in the
BioHarness Module. The internal clock is not used to timestamp transmitted data.
This clock will reset to 1/1/2000 12:00:00 a.m. in two cases:
The Firmware has been upgraded
The device has been left unused for a number of months
If either of these scenarios has happened, or there is any doubt that the device internal clock does not
show current time, then the device clock should be re-synchronised, otherwise data sessions will be
created, time stamped at the above date..
In addition, when the system is delivered to a customer, device clocks are likely to be synchronised to time
zone at the point of manufacture, and should be resynchronised to local time.
Automatic BioHarness Clock/PC Synchronization
OmniSense Live:
When the device is added
into the system at Setup
OmniSense Analysis:
Whenever data is imported
from the device
6
8
Page 30

PSM Training User Guide
Page 30 of 31
Ph: 1 (443) 569-3603 Fax: 1(443) 926-9402 Web: www.zephyranywhere.com
9700.0142 © Zephyr™ Technology 2014 2014-FEB-11
8.2 Physiological Data Anomalies
Parameter
Indication
Possible Cause
Check / Remedy
Heart Rate
Excessively
high or
erratic
Movement of
sensor surface
against skin
Check strap tension – has it loosened?
Is skin excessively dry
Heart Rate
Consistently
200+ bpm
Damaged strap
Replace strap to check
Breathing
Rate
Abnormally
low value
Constant
compression of
breathing sensor
by external force
Check for / remove external agent
Check device at apex of rib curvature
8.3 General Issues
Parameter
Indication
Possible Cause
Check / Remedy
Communications
No data in
BioGauges
Radio network
error
Exit OmniSense, disconnect the
Gateway receiver, wait & restart
OmniSense
Check antenna connections
Confirm no duplication of device
Short Addresses, especially if a new
device has been added to the system.
Use Zephyr Config Tool
Logged data
time stamp
Dated
1/1/2000
Device internal
clock not
resynchronized
Connect device to PC and start log
import utility in OmniSense Analysis
to reset internal clock
Use Zephyr Cfg Tool to resync time
8.4 General Check Procedure
Carry out the following checks when in Live mode
Component
Indication
Check / Remedy
BioHarness
Module
Constant LED
Check LED behavior Section 2.3.2
8
8
Page 31

PSM Training User Guide
Page 31 of 31
Ph: 1 (443) 569-3603 Fax: 1(443) 926-9402 Web: www.zephyranywhere.com
9700.0142 © Zephyr™ Technology 2014 2014-FEB-11
9. Warranty
Limited Warranty for the Zephyr PSM Training physiological monitoring system
Zephyr Technology Corporation warrants to the original end purchaser that
the PSM TRAINING hardware shall be free from material defects in material and workmanship for a period of
one (1) year from the original date of purchase (the "Hardware Warranty Period")
the BioHarness Chest Strap shall be free from material defects in material and workmanship for a period of
three (3) months or 50 hand washes, whichever comes first, from the date of purchase (the “Chest Strap
Warranty Period”)
the software shall be free from material defects or errors for a period of one (1) year from the original date of
purchase (the “Software warranty period”).
If the product is determined to be materially defective during the Warranty Period, your sole remedy and Zephyr’s sole
and exclusive liability shall be limited to the repair or replacement of this product with a new or refurbished product at
Zephyr’s or its licensed distributor’s option. For purpose of this Limited Hardware Warranty and Liability, "refurbished"
means a product that has been returned to its original specifications. Visit www.zephyr-technology.com for instructions
on how to deliver the product to an authorized service facility.
This warranty shall not apply if this product
a) is used with products that are not compatible with this product
b) is modified, or tampered with
c) is damaged by acts of God, misuse, abuse, negligence, accident, wear and tear, unreasonable use, or by other
causes unrelated to defective materials or workmanship
d) has had the serial number altered, defaced or removed
e) has, in the reasonable opinion of Zephyr or its licensed distributors, been opened, altered, or defaced. This
warranty shall also be voidable by zephyr or its licensed distributors
If (1) Zephyr reasonably believes that the PSM TRAINING system has been used in a manner that would violate the
terms and conditions of a separate end user license agreement for system software; or (2) the product is used with
products not sold or licensed by Zephyr. You assume all risks and liabilities associated with use of third party
products.
This warranty is provided to you in lieu of all other express or implied warranties including warranties of
merchantability and fitness for a particular purpose for the PSM TRAINING system, which are disclaimed hereunder.
However, if such warranties are required as a matter of law, then they are limited in duration to the warranty period.
Our sole and exclusive recourse in the event of any dissatisfaction with or damage arising from the use of the PSM
TRAINING system and Zephyr's maximum liability shall be limited to repair or replacement of the PSM TRAINING
system. Except as expressly stated above, Zephyr excludes all liability for any loss of data, loss of profit, or any other
loss or damage suffered by you or any third party, whether such damages are direct, indirect, consequential, special,
or incidental and however arising under any theory of law, as a result of using your PSM TRAINING system. Some
countries, states or provinces do not allow limitation on how long an implied warranty lasts and some countries, states
and provinces do not allow the exclusion or limitations of consequential or incidental damages, so the limitations or
exclusions may not apply to you.
This warranty gives you specific legal rights, and you may also have other rights which vary from country to country,
state to state or province to province. This warranty is in all countries where Zephyr has an office or a licensed
distributor. The warranty offered by Zephyr Technology Corporation on your PSM TRAINING hardware is the same
whether or not you register your product.
Failure to register within one (1) week of receipt voids the warranty for the BioHarness Strap.
9
 Loading...