

Page 1
Return the
Product
Registration
Card and your
TV could be
._ ®
THE QUALITY GOFS IN BEFORETHE NAME GOES ON
FREE/
nuestros
,pana:
que
manual!
Page 2
SAFETY WARNINGS
WARNING
A
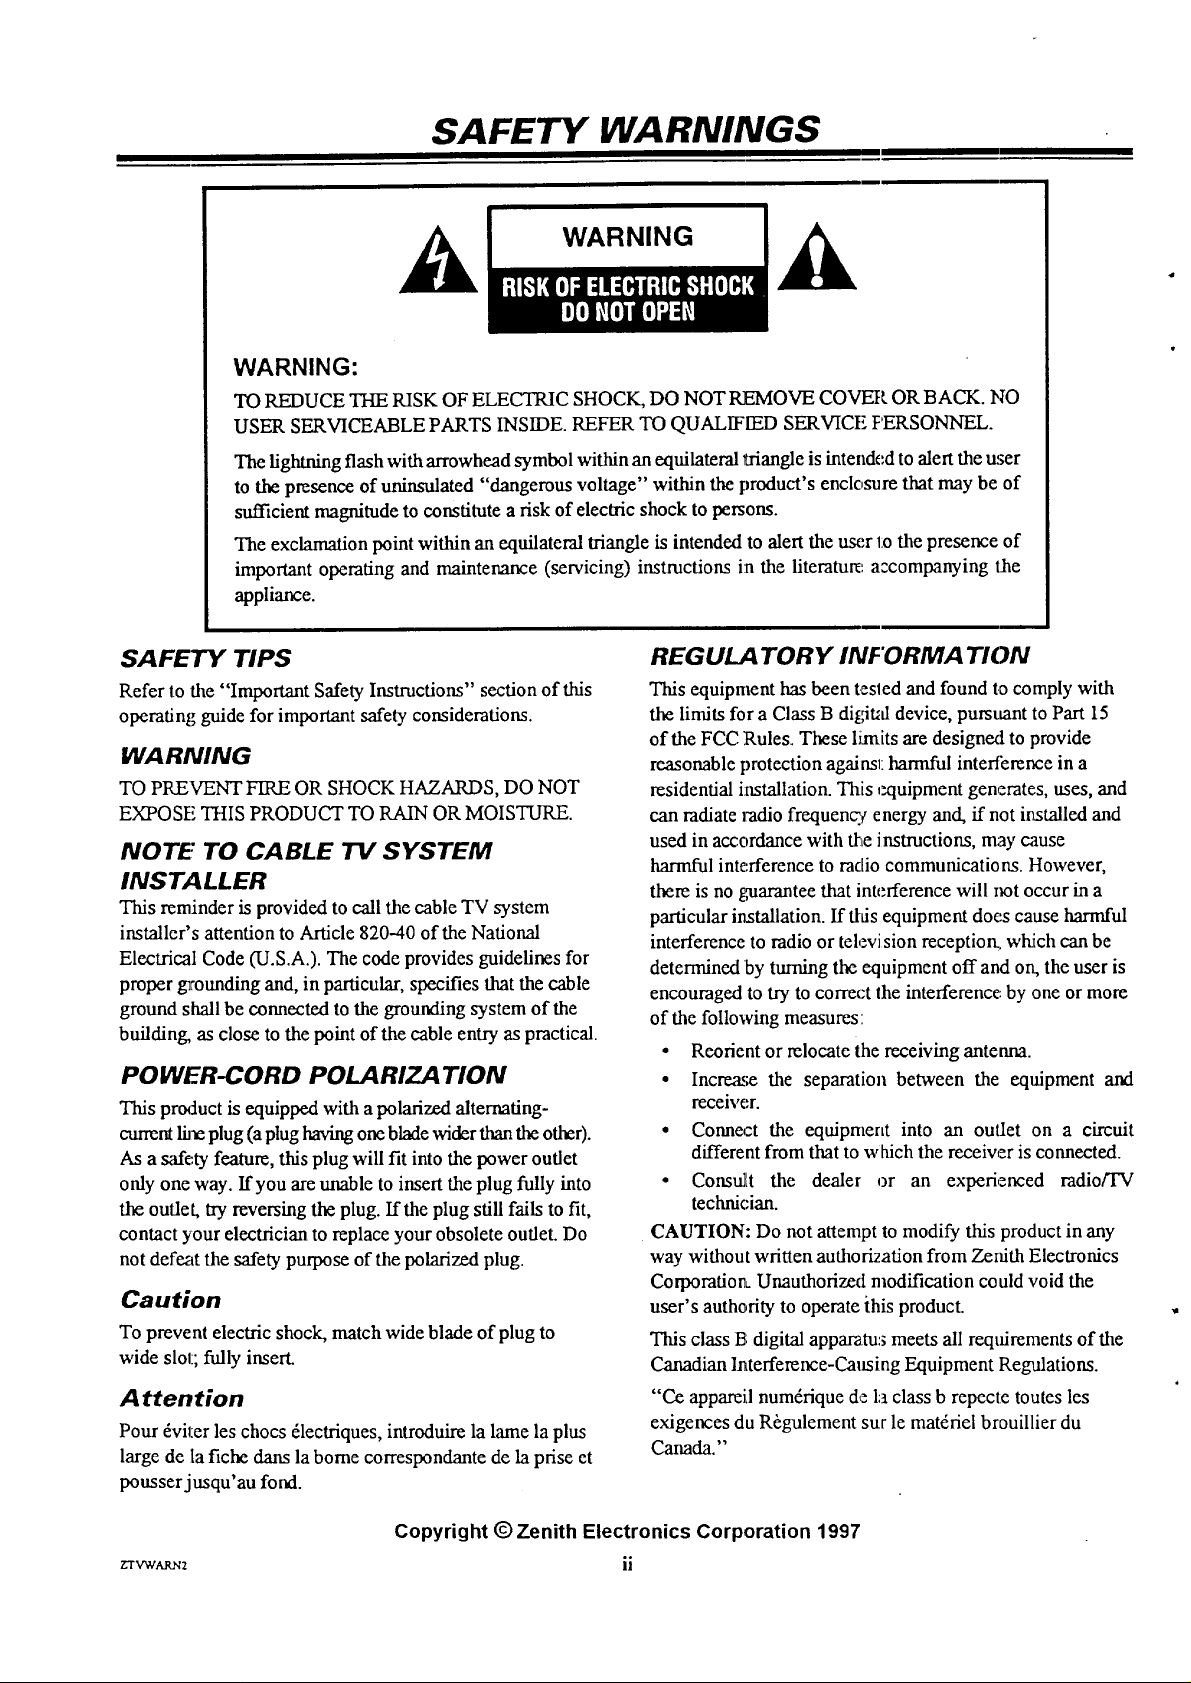
WARNING:
TO REDUCE THE RISK OF ELECTRIC SHOCK, DO NOT REMOVE COVER OR BACK. NO
USER SERVICEABLE PARTS INSIDE. REFER TO QUALIFIED SERVICE PERSONNEL.
The lightning flash with arrowhead symbol within an equilateral triangle is intended to alert the user
to the presence of uninsulated "dangerous voltage" within the product's enclosure that may be of
sufficient magnitude to constitute a risk of eleclric shock to persons.
The exclamation point within an equilateral triangle is intended to alert the user 1.othe presence of
important operating and maintenance (servicing) instructions i:nthe literature a:companying the
appliance.
A
SAFETY TIPS
Refer to the "Important Safety Instructions" section of this
operating guide for important safety considerations.
WARNING
TO PREVENT FIRE OR SHOCK HAZARDS, DO NOT
EXPOSE THIS PRODUCT TO RAIN OR MOISTURE.
NOTE TO CABLE TV SYSTEM
INSTALLER
This reminder is provided to call the cable TV system
installer's attention to Article 820-40 of the National
Electrical Code (U.S.A.). The code provides guidelines for
proper grounding and, in particular, specifies that the cable
ground shall be connected to the grounding system of the
building, as close to the point of the cable entry as practical.
POWER-CORD POLARIZATION
This product is equipped with a polarized alternating-
current lhle plug (a plug having one blade wider than the other).
As a safety feature, this plug will fit into the power outlet
only one way. If you are unable to insert the plug fully into
the outlet, try reversing the plug. If the plug still fails to fit,
contact your electrician to replace your obsolete outlet. Do
not defeat the safety purpose of the polarized plug.
Caution
To prevent electric shock, match wide blade of plug to
wide slot; fully insert.
Attention
Pour _viter les chocs 61ectriques, introduire la lame la plus
large de la fiche dans la borne correspondante de la prise et
pousserjusqu'au fond.
REGULA TORY INFORMATION
This equipment has been tesled and found to comply with
the limits for a Class B digdUddevice, pursuant to Part 15
of the FCC Rules_ These limits are designed to provide
reasonable protection againsl: harmful interference in a
residential installation. This ezluipment generates, uses, and
can radiate radio frequenq¢ energy and, ff not installed and
used in accordance with the instructions, may cause
harmful interference to radio communications. However,
there is no guarantee that interference will not occur in a
particular installation. If ttds equipment does cause harmful
interference to radio or television reception., which can be
determined by turning the equipment off and on, the user is
encouraged to try to correx:t the interference: by one or more
of the following measures:
• Reorient or relocate the receiving antenna.
° Increase the separation between the equipment and
receiver.
• Connect the equipment into an outlet on a circuit
different from that to which the receiver is connected.
• Consult the dealer or an experienced mdio/TV
technk:ian.
CAUTION: Do not attempt to modify this product in any
way without written authoriaation from Zenith Electronics
Corporation- Unauthorized modification could void the
user's authority to operate ihis product.
This class 13;digital appara.tu:; meets all requirements of the
Canadian lnterference-Caltsing Equipment Regulations.
"Ce appareil num&ique de la class b repecte toutes les
exigences du R_gulement sur le mat&iel brouillier du
Canada."
ZTVWARN2
Copyright © Zenith Electronics Corporation 1997
ii
Page 3
IMPORTANT SAFETY INSTRUC'i'IONS
Your product has been manufactured and tested with your safety in mind. However, improper use can result in potential electrical
shock or f'tre hazards. To avoid defeating the safeguards that have been built into your new pmducl; please read _tndobserve the
following safety points when installing and using your new product, and save them for future reference.
Observing the simple precautions discussed in this section of the operating guide ,:anhelp you get many years of enjoyment and
safe operation from your new product.
1. Read Instructions
Read all the safety and operating instructions
before operating the product.
2. Follow Instructions
Follow all operating and use instructions.
3. Retain Instructions
Keep tile safety and operating instructions for
future reference.
4. Heed Warnings
Follow all warnings on the product and in the
operating instructions.
5. Cleaning
Unplug: this product from the wall outlet before
cleaning. Do not use liquid cleaners or aerosol
cleaners. Use a damp cloth for cleaning.
6. Water and Moisture
Do not use this product near water D for example,
near a bath tub, washbowl, kitchen sink, laundry
tub, in a wet basement, or near a swimming pool.
7. Accessories
Do not place this product on an unstable cart,
stand, tripod, bracket, or table. The product may
fail, causing serious injury to a child or adult, and
serious damage to the product. Use only with a
cart, stand, tripod, bracket, or table recommended
by the manufacturer or sold with the product. Any
mounting of the product should follow the manufac-
turer's instructions, and should use a mounting
accessory recommended by the manufacturer.
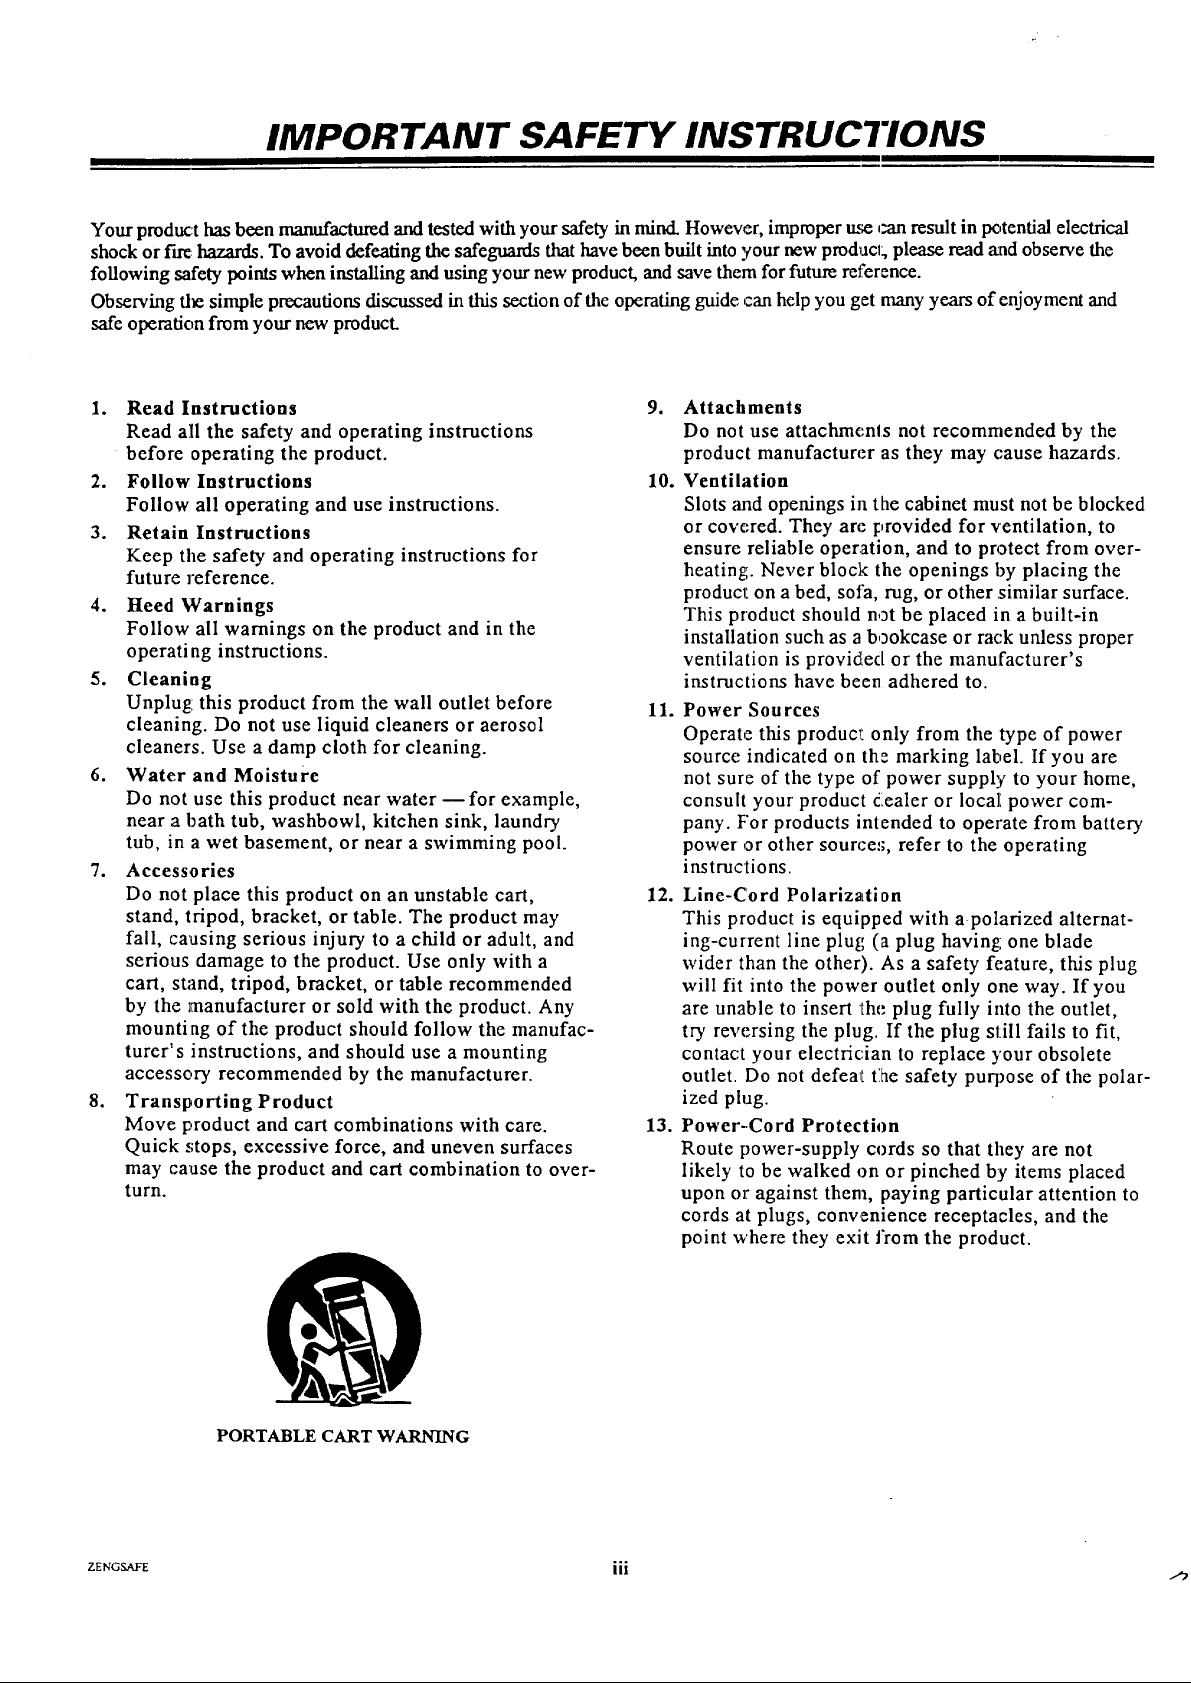
8. Transporting Product
Move product and cart combinations with care.
Quick .,;tops, excessive force, and uneven surfaces
may cause the product and cart combination to over-
turn.
,
Attachments
Do not use attachments not recommended by the
product manufacturer as they may cause hazards.
10.
Ventilation
Slots and openings in the cabinet must not be blocked
or cow:red. They are provided for ventilation, to
ensure reliable operation, and to protect from over-
heating. Never block the openings by placing the
product, on a bed, sofa, rug, or other similar surface.
This product should not be placed in a built-in
installation such as a bookcase or rack unless proper
ventilation is provided or the manufacturer's
instructions have been adhered to.
11.
Power Sou rces
Operate this product, only from the type of power
source indicated on th: marking label. If you are
not sure of the type of power supply to your home,
consult your product dlealer or loca][ power com-
pany. F'or products intended to operate from battery
power or other source:;, refer to the operating
instructions.
12. Line-Cord Polarization
This product is equipped with a polarized alternat-
ing-current line plug (a plug having: one blade
wider than the other). As a safety feature, this plug
will fit into the power outlet only one way. If you
are unable to insert the plug fully into the outlet,
try reversing the plug. If the plug still fails to fit,
contact your electrician to replace )'our obsolete
outlet. Do not defea_I ti_e safety purpose of the polar-
ized plug.
13. Power-Cord Protection
Route power-supply cords so that they are not
likely to be walked on or pinched by items placed
upon or against them, paying particular attention to
cords at plugs, convenience receptacles, and the
point where they exit from the product.
PORTABLE CART WARNING
ZENGSAFE iii
Page 4
IMPORTANT SAFETY INSTRUCTIONS
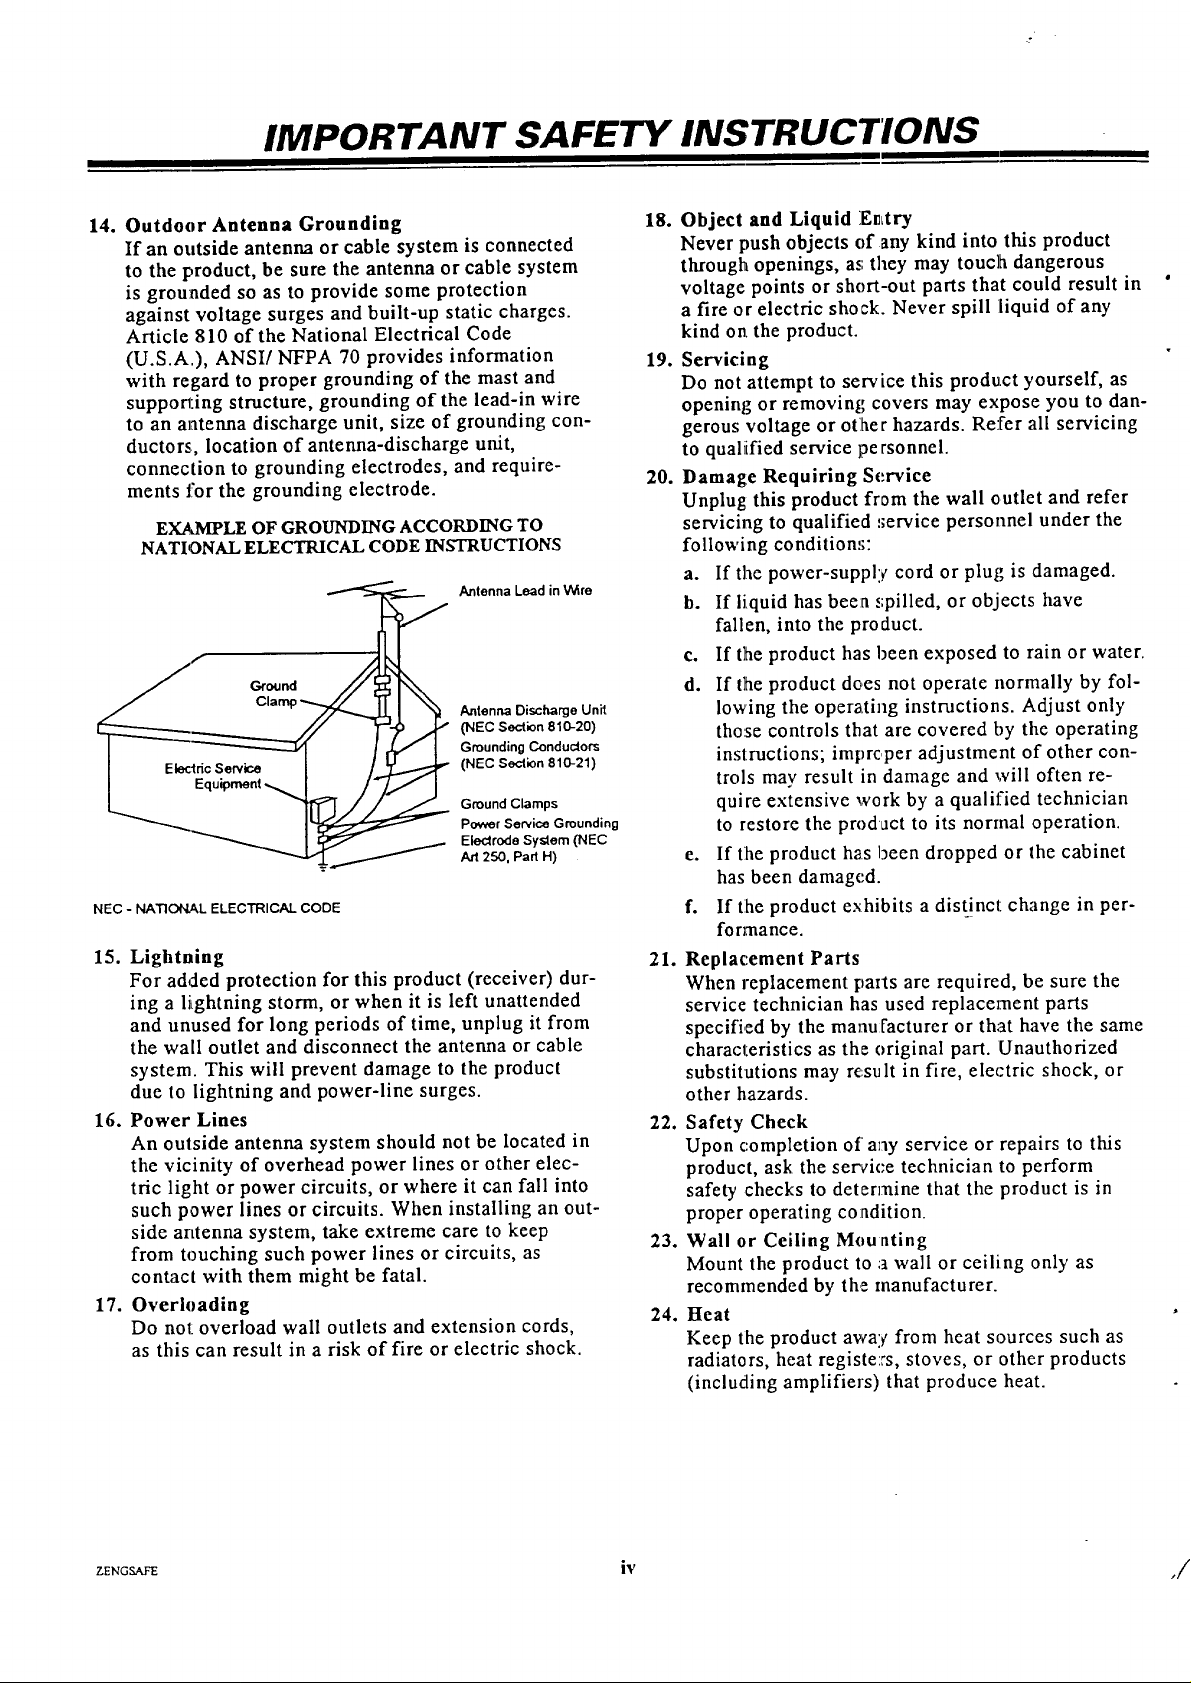
14. Outdoor Antenna Grounding 18.
If an outside antenna or cable system is connected
to the product, be sure the antenna or cable system
is grounded so as to provide some protection
against voltage surges and built-up static charges.
Article 810 of the National Electrical Code
(U.S.A.), ANSI/NFPA 70 provides information 19.
with regard to proper grounding of the mast and
supporting structure, grounding of the lead-in wire
to an antenna discharge unit, size of grounding con-
ductors, location of antenna-discharge unit,
connection to grounding electrodes, and require-
ments for the grounding electrode. 20.
EXAMPLE OF GROUNDING ACCORDING TO
NATIONAL ELECTRICAL CODE INSTRUCTIONS
Ground
__ Antenna Lead in Wire
i El_'ldc Sewice I / _ (NEC Section 810-21)
I (NEC Section 810-20)
_'_'-..__ i_ Power Service Grounding
NEC - NATIONAL ELECTRICAL CODE
15. Lightning
Cla Antenna Discharge Unit
Grounding Conductors
Electrode System (NEC
Art 250, Pad H)
21,
For added protection for this product (receiver) dur-
ing a l_ghtning storm, or when it is left unattended
and unused for long periods of time, unplug it from
the wall outlet and disconnect the antenna or cable
system. This will prevent damage to the product
due to lightning and power-line surges.
16. Power Lines
22. Safety Check
An outside antenna system should not be located in
the vicinity of overhead power lines or other elec-
tric light or power circuits, or where it can fall into
such power lines or circuits. When installing an out-
side antenna system, take extreme care to keep
from touching such power lines or circuits, as
23. Wall or Ceiling Mounting
contact with them might be fatal.
17. Overloading
Do not overload wall outlets and extension cords,
24. Heat
as this can result in a risk of fire or electric shock.
Object and Liquid E_Ltry
Never push objects of any kind into this product
through openings, as they may touclh dangerous
voltage points or short-out parts that could result in
a fire or electric shock. Never spill liquid of any
kind on, the product.
Servicing
Do not attempt to service this product yourself, as
opening or removing covers may expose you to dan-
gerous voltage or otlher hazards. Refer all servicing
to qualiified service personnel.
Damage Requiring Service
Unplug this product from the wall outlet and refer
servicing to qualified :;ervice personnel under the
following conditions:
a. If the power-supply cord or plug is damaged.
b. If liquid has been ::pilled, or objects have
fallen, into the product.
c. If the product has been exposed to rain or water.
d. If the product does not operate normally by fol-
lowing the oper_Lting instructions. Adjust only
those controls that are covered by the operating
instructions; imprcper adjustment of other con-
trols may result in damage and will often re-
quire extensive work by a qualified technician
to restore the prod act to its normal operation.
e. If tlhe product has been dropped or the cabinet
has been damaged.
f. If [he product exhibits a distinct change in per-
formance.
Replacement Parts
When replacement parts are required, be sure the
service technician has used replacement parts
specified by the manufacturer or that have the same
characteristics as the original part. Unauthorized
substitutions may result in fire, electric shock, or
other hazards.
Upon completion of any service or repairs to this
product, ask the service technician to perform
safety checks to determine that the product is in
proper operating condition.
Mount the product to a wall or ceiling only as
recommended by the manufacturer.
Keep the product away from heat sources such as
radiators, heat registe:rs, stoves, or other products
(including amplifiers) that produce heat.
ZE_GS._:E iv
,/
Page 5
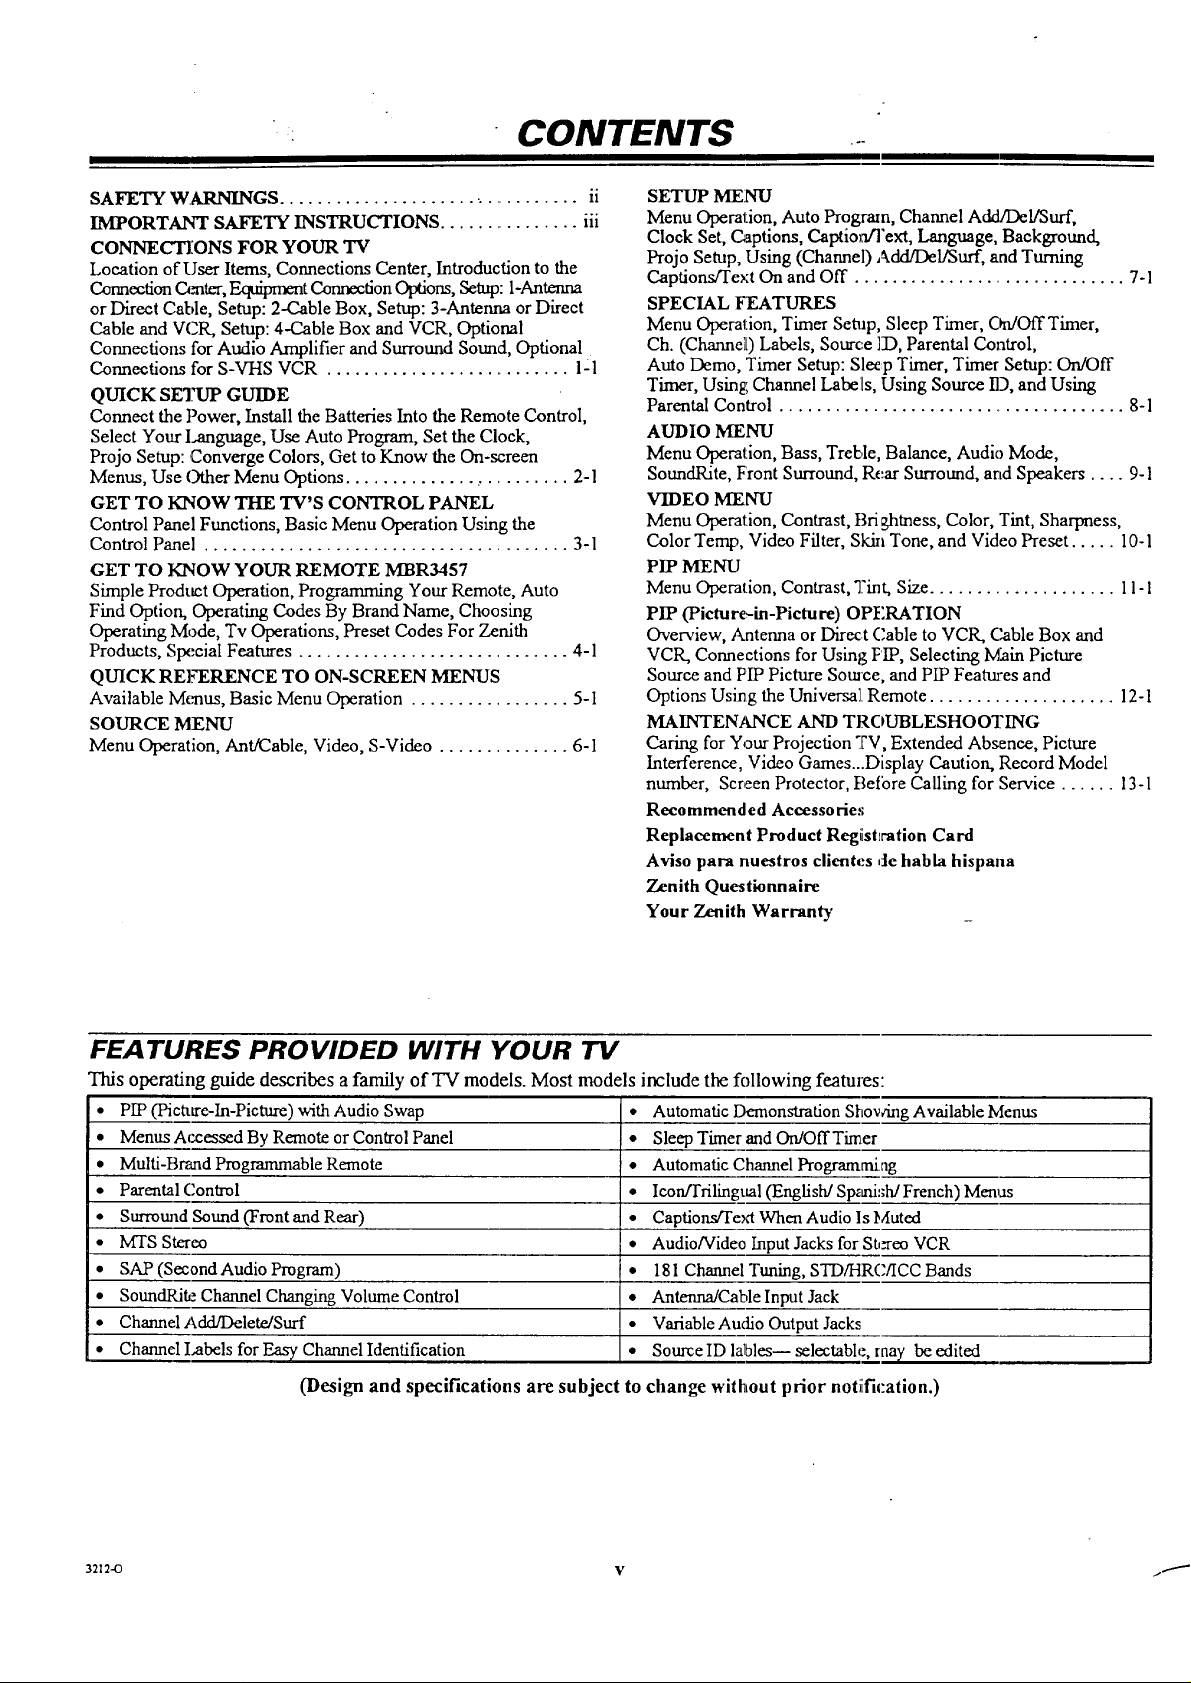
• CONTENTS
SAFETY WARNINGS ................................ ii
IMPORTANT SAFETY INSTRUCTIONS ............... iii
CONNECTIONS FOR YOUR TV
Location of User Items, Connections Center, Introduction to the
Connection C,mter, Equiprr_t ConnectionOptions,Setup: 1-Antenna
or Direct Cable, Setup: 2-C.able Box, Setup: 3-Antenna or Direct
Cable and VCR, Setup: 4-Cable Box and VCR, Optional
Connections for Audio Amplifier and Surround Sound, Optional
Connections for S-VHS VCR .......................... 1-1
QUICK SETUP GUIDE
Connect the Power, Install the Batteries Into the Remote Control,
Select Your I.,anguage, Use Auto Program, Set the Clock,
Projo Setup: Converge Colors, Get to Know the On-screen
Menus, Use Other Menu Options ......................... 2-1
GET TO KNOW THE TV'S CONTROL PANEL
Control Panel Functions, Basic Menu Operation Using the
Control Panel ....................................... 3-1
GET TO KNOW YOUR REMOTE MBR3457
Simple Product _tion, Programming Your Remote, Auto
Find Option, Operating Codes By Brand Name, Choosing
Operating Mode, Tv Operations, Preset Codes For Zenith
Products, Sl_;cial Features ............................. 4-1
QUICK REFERENCE TO ON-SCREEN MENUS
Available Menus, Basic Menu Operation ................. 5-I
SOURCE MENU
Menu Operation, Ant/Cable, Video, S-Video .............. 6-1
SETUP MENU
Menu Operation, Auto Program, Channel Add/Del/Surf,
Clock Set, Captions, Caption/Text, Language, Background,
Projo Setup, Using (Channel) Add/Del/Surf, and Turning
Captions/Text On and Off ............................. 7-1
SPECIAL FEATURES
Menu Operation, Timer Setup, Sleep Timer, C_a/Off Timer,
Ch. (Char, nelL)Labels, Source [D, Parental Control,
Auto Demo, Timer Setup: Sleep Timer, Timer Setup: On/Off
Timer, Using Channel Labels, Using Source ID, and Using
Parental Control ..................................... 8-1
AUDIO MENU
Menu Operation, Bass, Treble, Balance, Audio Mode,
SoundRite, Front Surround, Rear Surround, and Speakers .... 9-1
VIDEO MENU
Menu Operation, Contrast, Brightness, Color, Tint, Sharpness,
Color Temp, Video Filter, Skin Tone, and Video Preset ..... 10-1
PIP MENU
Menu Operation, Contrast, Tint, Size .................... 11-1
PIP (Pictu re_in-Pictu re) OPERATION
Overview, Antenna or Direct (;able to VCR, Cable Box and
VCR, Connections for Using PIP, Selecting Main Picture
Source and PIP Picture Souace, and PIP Fea_:es and
Options Using the Universal. Remote .................... 12-1
MAINTENANCE AND TROUBLESHOOTING
Caring for Your Projection TV, Extended Absence, Picture
Interference, Video Games_Display Caution, Record Model
number, Screen Protector, 13efbre Calling for Service ...... 13-1
Recommended Accessories
Replacement Product Registlration Card
Aviso para nuestros clientes de habla hispana
Zenith Questionnaire
Your Zenith Warranty
FEATURES PROVIDED WITH YOUR TV
This operating guide describes a family of TV models. Most models include the following features:
PIP (Picture-In-Picture) with Audio Swap *
Menus Accessed By Remote or Con_-ol Panel •
Multi-Brand Prograrmnable Remote •
Parental Control •
Surround Sound (Front and Rear) •
MTS Stereo •
SAP (Second Audio Program) •
SoundRite Channel Changing Volume Control •
Channel Add/Delete/Surf •
Channel Labels for Easy Channel Identification •
(Design and specifications are subject to
3212-O V ._
Automatic Demonstration Showing Available Menus
Sleep Timer and On/OffTimer
Automatic Channel Programming
Icon[l'rilingual (English/Sp_afi:;h/French) Menus
Captions/Text When Audio Is Muted
Audio/Video Input Jacks for StJ_eo VCR
181 Channel Tuning, STD/HRC/ICC Bands
Antenna/Cable Input Jack
Variable Audio Output Jacks
Source ID lables-- selectable, tna), be edited
change without prior notiification.)
Page 6

CONNECTIONS FOR YOUR TV
LOCATION OF USER ITEMS
The items t;hownbelow are important to the operation of your TV. Get to know them, because they will be referenced throughout
this operating guide.
Point remote
control toward
center of screen
to operate TV.
Control Panel
Built-in
speakers
Connection
Center
Place VCR
Shelf Here
Front View of Typical TV Rear View of Typical TV
CONNECTIONS CENTER
Locate the Connection Center on the back of the TV.
power cord before making any
Turn off power or unplug 'IV
connections.
ANTENNA/CABLE
75-ohm antenna or cable-TV
connection to your TV. Attach
your antenna, cable-TV line, or
VCR to this jack.
s_-_Ro_ S_R s
SURROUND SPEAKER
Connection_ for output to optional
Surmnnd Sound speakers.
TERMINALS /
s v_oEo _
VIDEO IN
Jacks for audio and video input
from a stereo VCR or other A/V
component. (Connect to these jacks
to hear stereo sound when playing a
stereo tape.)
S-VIDEO IN
Jacks for audio and video input
from a SuperoVHS component.
VARIABLE AUDIO OUTPUT
Standard phono jack connectors for
output to an optional stereo
amplifier or to external speakers.
3212-0 1 --1 /
Page 7

CONNECTIONS FOR YOUR 71/
INTRODUCTION TO THE CONNECTION CENTER
Shown below are examples of the type of "Source" equipment you can connect to your TV. Your antenna or cab]ieservice line
should be connected to Antenna/C_le. If you have a cable box, connect it to Anterma/Cable. Use the Audio/Video connections for
accessory equipment like a VCR. To hear stereo audio from your stereo VCR during tape playback, use theAudio/Video connections.
See the recommended setup options listed on the following pages.
EQUIPMENT CONNECTION OPTIONS
Over-the-Air Antenna
or Cable Service
Camcorder
Connection Center
OR
OR
OR
Input Sourt:e Jacks on Connection Center
Antenna/Cable In Jack
Video In Jacks
S-Video In Jacks
Output Jacks on Connection Center
Variable Audio Out Jacks
Surround Speakers Out Jacks
Page 8
CONNECTIONS FOR YOUR
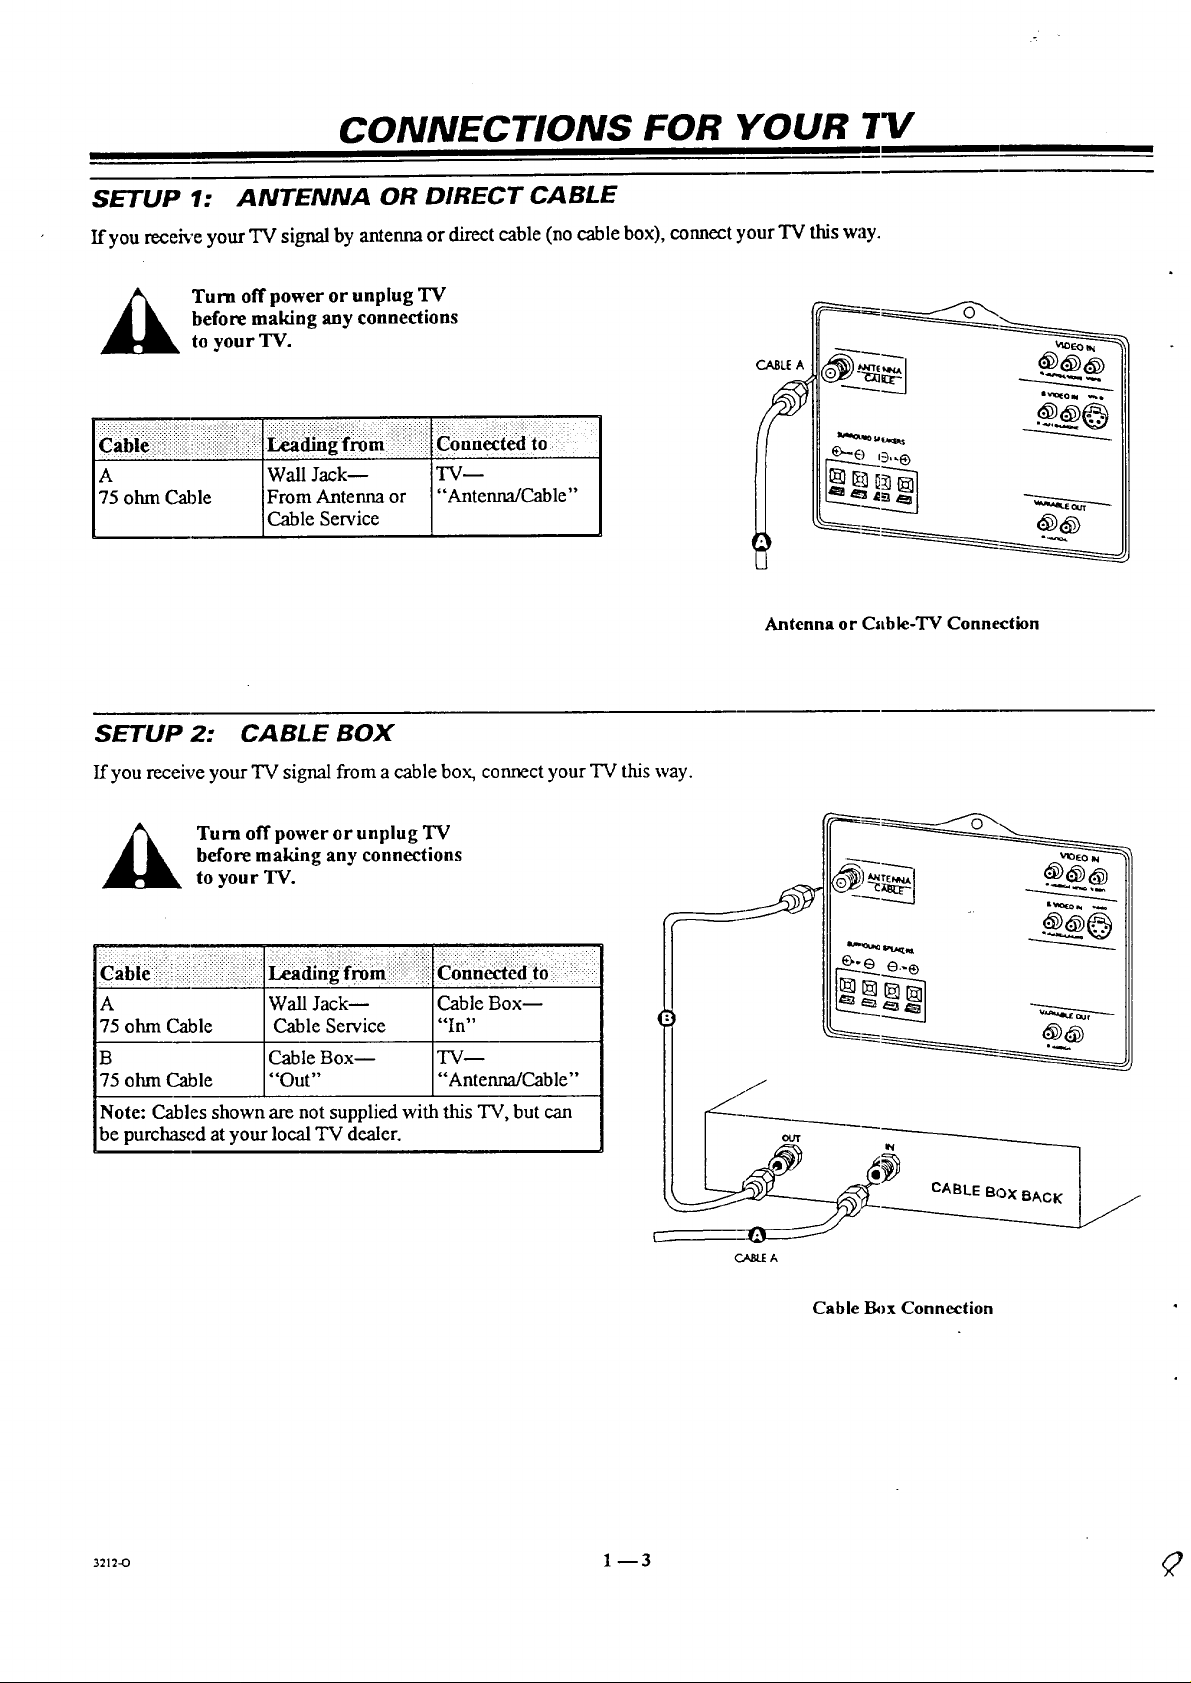
SETUP 1: ANTENNA OR DIRECT CABLE
ffyou receh'e your TV signal by antenna or direct cable (no cable box), connect your TV this way.
j_ Turn off power or unplug TV
before making any connections
to your TV.
;.;-; ::;; : :;;: :;. , , ,-,, ,.,, , , , ,.-,.,. ,, . ,,
A Wall Jack-- TV--
75 ohm Cable From Antenna or "Antenna/Cable"
Cable Service
SETUP ,2: CABLE BOX
If you receive your TV signal from a cable box, connect your TV this way.
before making any connections
Turn off power or unplug TV
to your TV.
CABLE A
I___ _---_
_-._1 -_----_
An tenna or Cab le-TV Connection
A Wall Jack-- Cable Box--
75 ohm Cable Cable Service "In"
B Cable Box-- TV--
75 ohm Cable "Out .... Antenna/Cable"
Note: Cables shown are not supplied with this TV, but can
be purchased at your local TV dealer.
3212-O 1 --3
_ _-_--__1
OUT IN
ABLE BOX BACK
_A
Cable Box Connection
Page 9
CONNECTIONS FOR YOUR .TV
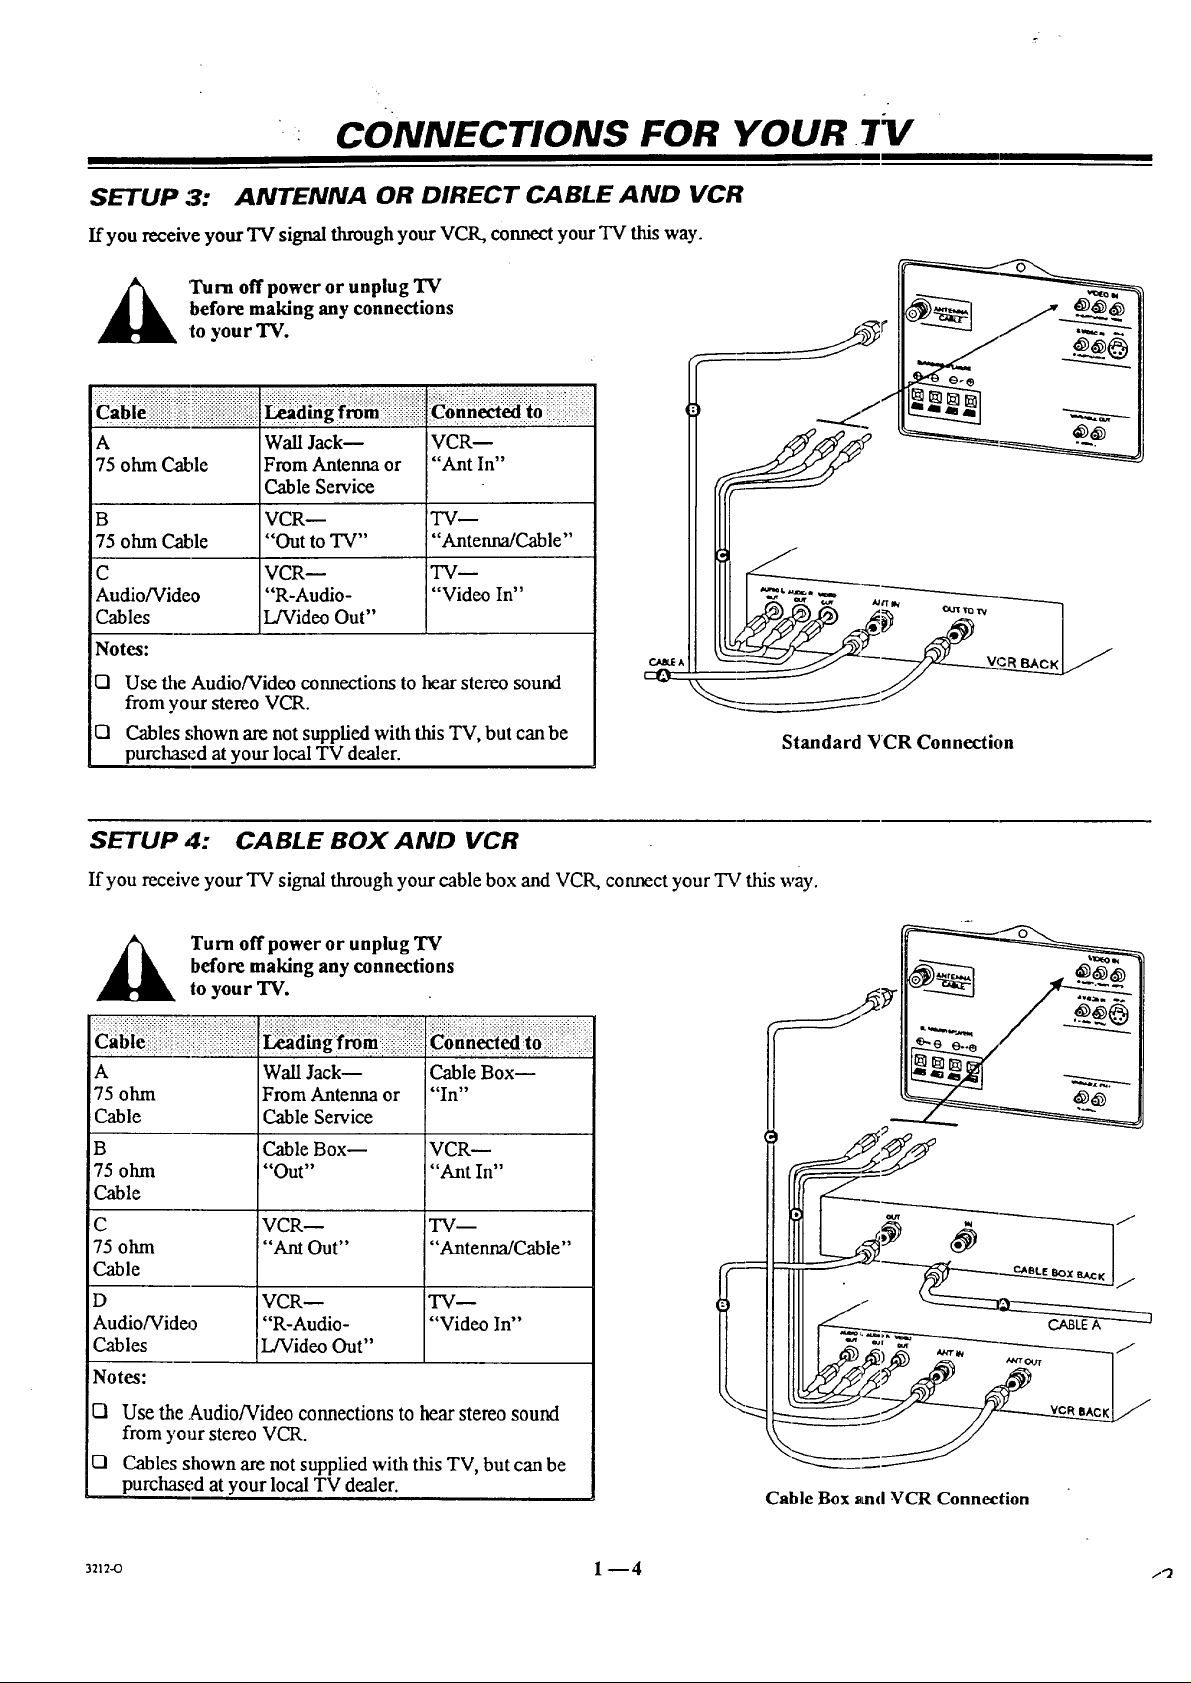
SETUP 3: ANTENNA OR DIRECT CABLE AND VCR
If you receive your'IV signal through your VCR, connect your TV this way.
before making any connections
Tum off power or unplug TV
to you r TV.
c i i iiiPiiiiiiiiiiiiiii iiii!!iiiiiii!iiii iiiiiiiiiiiiiiiii iiiii a ! fzzi iiiii i:iiiiiiiiiiiiiiili
A Wall Jack-- VCR--
75 ohm Cable From Antenna or "Ant In"
Cable Service
B VCR-- TV--
75 ohm Cable "Out to TV .... Antenna/Cable"
C VCR-- TV--
Audio/Video "R-Audio- "Video In"
Cables L/Video Out"
Notes:
F-I Use the Audio/Video connections to hear stereo sound
from your stereo VCR.
UI Cables .,;hown are not supplied with this TV, but can be
purcha_:d at your local TV dealer.
Standard VCR Connection
SETUP 4: CABLE BOX AND VCR
If you receive your TV signal throughyour cable box and VCR, connect your TV this way.
A urn offpoweror unplug TV
A Wall Jack-- Cable Box--
75 ohm From Antenna or "In"
Cable Cable Service
B Cable Box-- VCR--
75 ohm "Out .... Ant In"
Cable
C VCR-- TV--
75 ohm "Ant Out .... Antenna/Cable"
Cable
D VCR _ TV--
Audio/Vid_3 "R-Audio- "Video In"
Cables _L/Video Out"
!Notes:
1-1 Use the Audio/Video connections to hear stereo sound
from your stereo VCR.
CI Cables shown are not supplied with this TV, but can be
purchased at your local TV dealer.
before making any connections
to your TV.
Cable Box _md VCR Connection
/
CABLE A
/
32_2_ 1 -- 4 /_
Page 10
CONNECTIONS FOR YOUR "FV
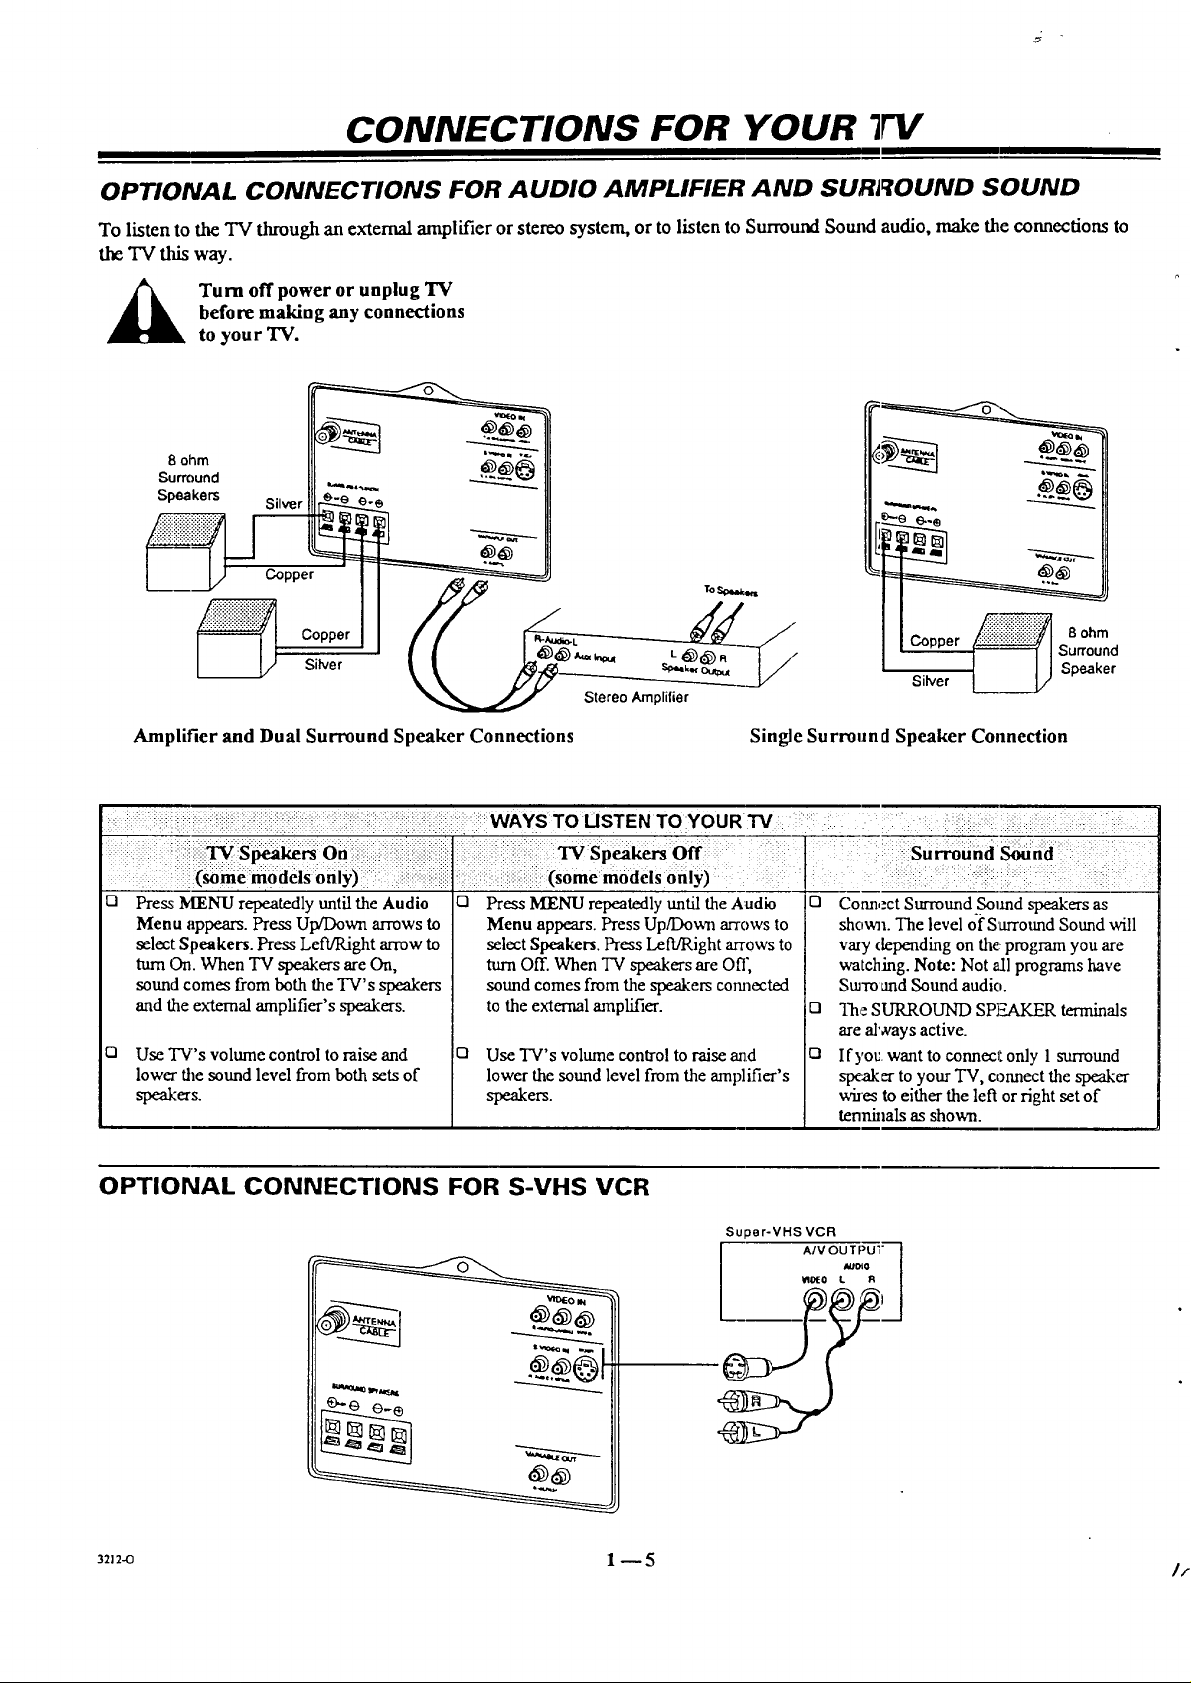
OPTIONAL CONNECTIONS FOR AUDIO AMPLIFIER AND SURROUND SOUND
To listen to the TV through an external amplifier or stereo system, or to listen to Surround Sotmd audio, make the connections to
the TV this way.
before making any connections
Turn off power or unplug "IV
to your TV.
8 ohm
Surround
Speakers
Silver _-e _._
Copper _-
Copper
Sider
t....e.= t_.,.__ -_
pe,ke,
Amplifier and Dual Surround Speaker Connections Single Surround Speaker Connection
i i i : _WAYS TOUSTEN TO YOUR 3'4 : i!: ::.: i. _::
i (_me:m6ddSOiilY): ; iiiiii(somemodeisonly) [ :
Q o n
Press MENU repeatedly until the Audio
Menu appears. Press Up/Down arrows to
select Speakers. Press Left/Right arrow to
turn On. When TV speakers are On,
sound comes from both the TV's speakers
and the external amplifier's speakers.
0 Use TV's volume control to raise and
lower the sound level from both sets of
spewers.
Press MENU repeatedly until the Audio
Menu appears. Press Up/Down arrows to
select Speakers. Press Left/Right arrows to
turn Off. When "IV speakers are Off,
sound comes from the speakers comlected
to the external amplifier.
El
Use TV's volume conlrol to raise and
lower the sound level from the amplifier's
speakers.
Connect Surround .sound speakers as
shown. The level ofSarround Sound will
vary depending on the:program you are
watching. Note: Not all programs have
Stu'm and Sound audio.
El
Th,: SURROUND SPF_AKER terminals
are always active.
El
If you. want to connect only 1 surround
speaker to your "IV, connect the speaker
whes to either the left or right set of
tennhmls as shown.
OPTIONAL CONNECTIONS FOR S-VHS VCR
Super-VHS VCR
A/V OUTPU'" ]
° I
32_2-o 1 _5
Page 11
QUICK SETUP GUIDE
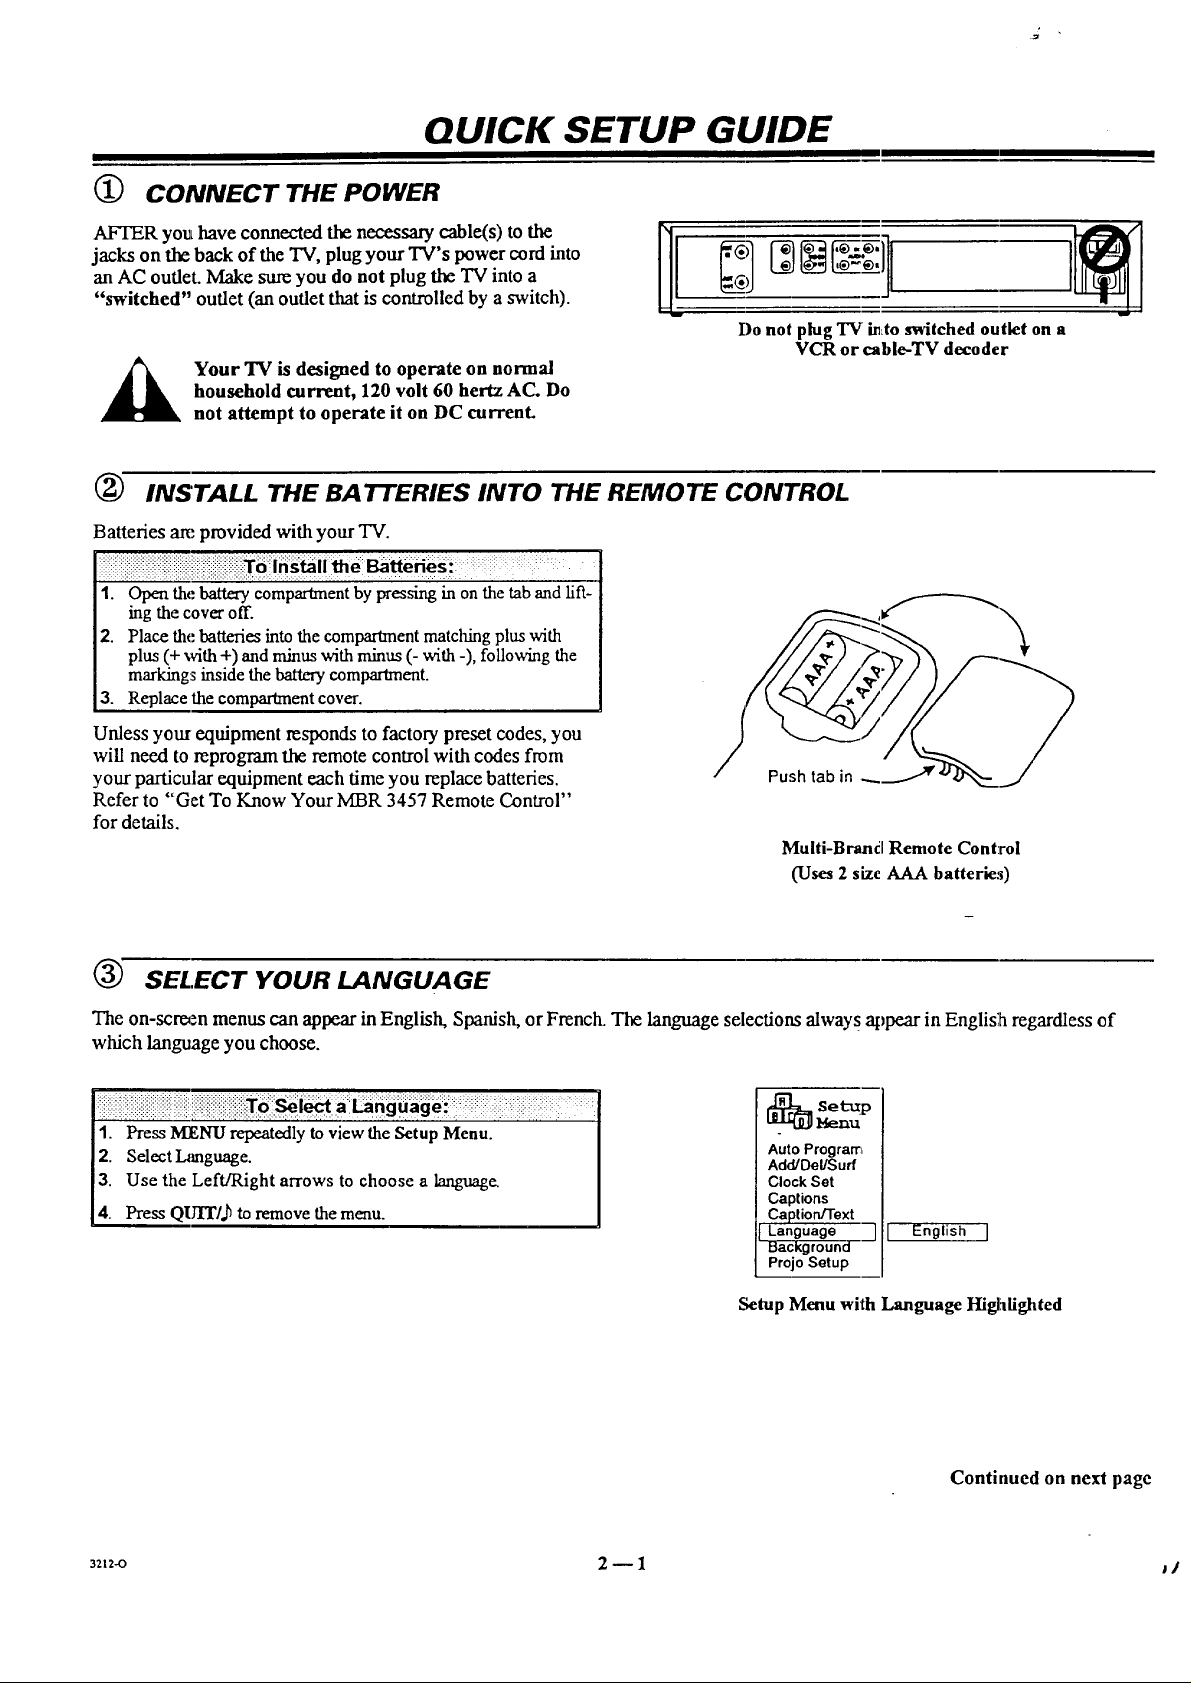
(_ CONNECT THE POWER
AFTER you have connected the necessary cable(s) to the
jacks on the back of the TV, plug your TV's power cord into
an AC outlet. Make sure you do not plug the TV into a
"switched" outlet (an outlet that is controlled by a switch).
Do not plug TV i_to switched outlet on a
VCR or cable-TV decoder
household current, 120 volt 60 hertz AC. Do
Your TV is designed to operate on normal
not attempt to operate it on DC current.
(_ INSTALL THE BATTERIES INTO THE REMOTE CONTROL
Batteries are provided with your TV.
?i!ii!',: •
1. Open the batt_ compartment by pressing in on the tab and lift-
ing the cover off.
2. Place the batteries into the compartment matching plus with
plus (+ with +) and minus with minus (- with -), following the
markings inside the battery compartment.
3. Replace the compartment cover.
Unless your equipment responds to factory preset codes, you
will need to reprogram the remote control with codes from
your particular equipment each time you replace batteries.
Push tab in
Refer to "Get To Know Your MBR 3457 Remote Control"
for details.
Multi-Brand Remote Control
(Uses 2 size AAA batteries)
(_ SELECT YOUR LANGUAGE
The on-scro,_n menus can appear in English, Spanish, or French. The language selections alway s appear in Englis;h regardless of
which language you choose.
li: ! ! 'l
!1. Press MENU repeatedly to view the Setup Menu. I
12. Select L_mguage. I
13. Use the Left/Right arrows to choose a language. I
J4. Press QUIT/,b to remove the menu. !
Auto Program
Add/Del/Surf
Clock Set
Captions
Caption/Text
Language --]
Background
Projo Setup
Setup Menu with Language Higltdighted
I English
Continued on next page
32t2_ 2 -- 1 j /
Page 12

QUICK SETUP GUIDE
(_ USE AUTO PROGRAM
Auto Program finds all available channels and stores them in
the TV's memory. The first time you turn on your TV, Auto
Program will be selected in the Setup Menu.
iii i!ii!i!iiii i iilii!!i!i!iiXos Ia!A 'P !iiiiiiiiiiiiii i: ii iiiiiiiiiiiii!iiiiii!iii iiiiiii i iiiiiiiii i iiiill
1. Press MENU repeatedlyto view the Setup Menu.
2. SelectAuto Program.
3. Use the Left/Right arrows to advance to the next menu.
4. Selecteither OFF AIR ANTENNA or CABLE TV.
5. Use the Left/Right arrows to begin the channel search.
(_ SET THE CLOCK
You must set the clock if you are going to use features like the
on/off timer.
Aulo Pro(dlramJ
Add/Dol/$urf
ClockGet
Caplions
Caption/Text
Language
Background
ProjoGetup
Setup Menu with Auto Program FIighlighted
_ etup
Auto Program
Add!Del/Su d
cFC__:Set ]
Captions
Caption/Text
Language
Background
Projo Selup
Menu
,1_ Set Clock
Setup Menu with Clock Set Highlighted
1. Press MENU repeatedly on your multi-brand remote until the Setup Menu is dis-
played, press the Up or Down arrow key to select Clock Set, then press a Left
or Right arrow key to see the Clock Menu.
2. Select (.'lock Mode, and press the Left or Right arrow key to select
Auto or Manual.
AUTO: TV sets the time automatically (while TV is turned OFF).
MANUAL: Use the universal remote to set the time.
..... . .::: .+: . :: ;: : • .: ::
4. Use Up/Down arrows to select Time
Zone, then press a Left/Right arrow
to select Auto or a specific time zone.
5. Use the Up/Down arrows to select
Daylight Saving then press a Left/
4. Use Up/Down arrows to
select Time Set and use the
number keys to set the time.
5. Press TIMER to select A!_[
or PM.
Right arrow to select Auto, On or
Off.
6. Press QUIT to remove the menu.
6. Press QUIT to remove the
menu.
Tip: In the Auto mode the time could be displaced by an hour if your TV receives a
time-set signal from a station which is not in your time zone or if their is a discrepancy
with daylight savings time.
Menu
[ Clock Mode
Time Set
j Menu
Clock Mode
Time Zone
Day. Saving
[ [ Manual
I [ Auto
321:-o 2 -- 2
Page 13
QUICK SETUP GUIDE _
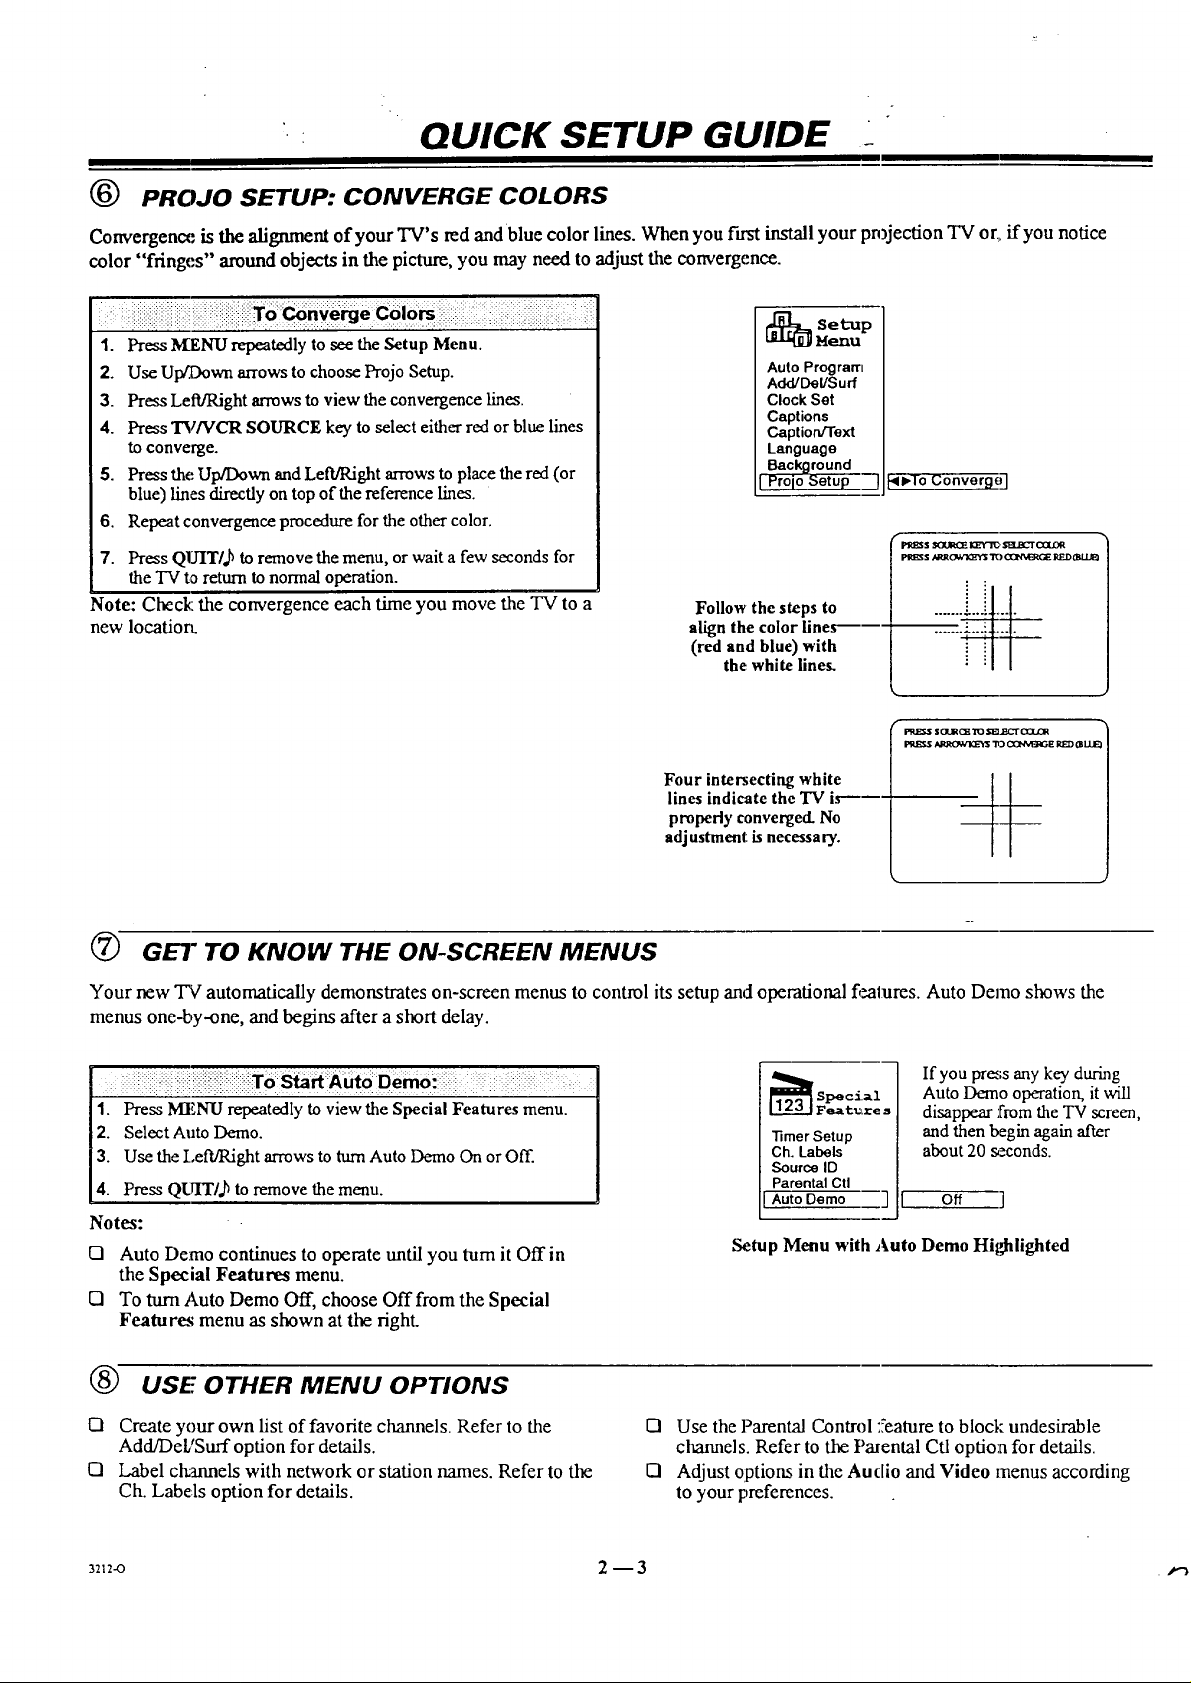
(_ PROJO SETUP: CONVERGE COLORS
Convergence is the alignment of your TV's red and blue color lines. When you fust install your pn)jection TV or_,if you notice
color "fringes'" around objects in the picture, you may need to adjust the convergence.
ii iii!iiiiii ii!iiiili i iiiiiiiiiiiiiiii!iiiiiiiiii,iiiiilX ii . i elc 'oi iiiiii ii!iiii iiiiiiii!iiiiiiii !ii iii!iiiiiiiiiiiiii! ilili ii!!il
1. Press M_ENU repeatedly to see the Setup Menu.
2. Use Up/Down arrows to choose Projo Setup.
3. Press LetVRight arrows to view the convergence lines.
4. Press 'I3//VCR SOURCE key to select either red or blue lines
to converge.
5. Press the Up/Down and Left/Right arrows to place the red (or
blue) lines directly on top of the reference lines.
6. Repeat convergence procedure for the other color.
7. Press Q1TITI, bto remove the menu, or wait a few seconds for
the TV to return to normal operation.
Note: Check: the convergence each time you move the TV to a
new locatiorL
Follow the steps to
align the color fines------
(red and blue) with
Auto Program
Add/Del/S urf
Clock Set
Captions
Caption/Text
Language
Background
I Pro[o Setup --]
the white lines.
<),To Converg_
PI_BSSSOURQE KZY'I_SB.ECTOQLOR
_ S&_JROWIQ_ "r_)(X]N%43_CERED0SI.U_
PPJ[I_ ARROk')_ "113C(3NM_E RED 0l UJE)
Four intersecting white
lines indicate the "IV ix-'---
properly converged. No
adjustment is necessa ry.
7(7(7_GEl" TO KNOW THE ON-SCREEN MENUS
Your new TV automatically demonstrates on-screen menus to control its setup and operational features. Auto Demo shows the
menus one-by-one, and begins after a short delay.
If you pr_;s any key during
Auto Demo operation, it will
1. Press MENU repeatedly to view the Special Features menu. I
2. Select Auto Demo. [
3. Use the I,eft/Pdght arrows to turn Auto Demo On or Off. [
4. Press QUIT/,h to remove the menu. ]
Notes:
[] Auto Demo continues to operate until you turnit Off in
the Special Features menu.
[] To turn Auto Demo Off, choose Off from the Special
Features menu as shown at the right.
-timer Setup
Ch. Labels
Source ID
Parental Ctl
Auto Demo ]
Setup Menu with Auto Demo Hil_lighted
disappear from the TV screen,
and then begin again after
about 20 seconds.
o. ]
(_ USE OTHER MENU OPTIONS
[] Create your own list of favorite channels. Refer to the
Add/DeL'Surf option for details.
[] Label cl_annels with network or station names. Refer to the
Ch. Labels option for details.
3212-0 2 --3
El Use the Parental Control :Yeatureto block undesirable
channels. Refer to the Parental Ctl option for details.
13 Adjust options in the Audio and Video menus according
to your preferences.
Page 14
GET TO KNOW THE TV'S CONTROl. PANEL
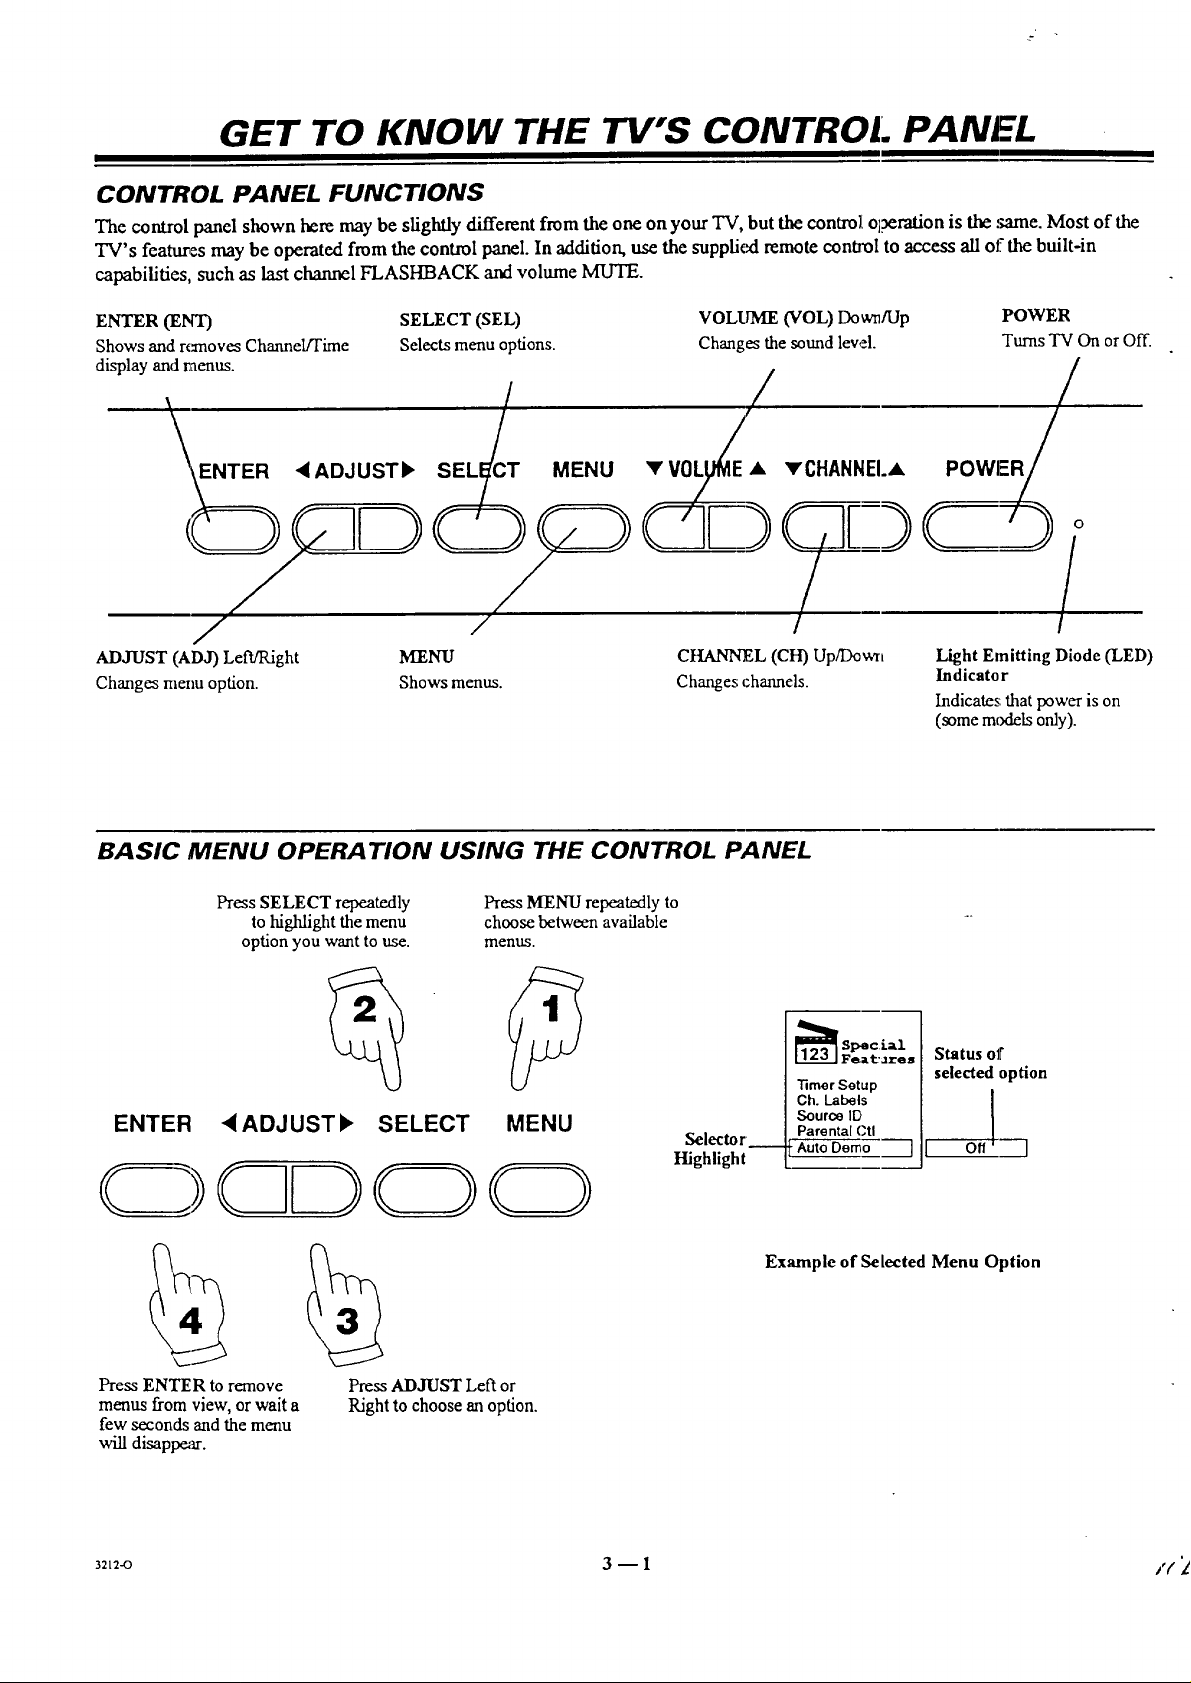
CONTROL PANEL FUNCTIONS
The control panel shown here may be slightly different from the one on your TV, but the contro]Ltitration is the :mine. Most of the
TV's features may be operated from the control panel. In addition, use the supplkxi remote control to access all of the built-in
capabilities, such as last channel FLASHBACK and volume MU'IE.
ENTER (ENT) SELECT (SEL)
Shows and rc_noves Channel/Time Selects menu options.
display and raenus.
E_/ , ADJUSTF SELiT MENU
VOLUME (VOL) Down/Up POWER
Changes the sound level. Turas "IN On or Off.
• VOLI
• vCHANNEI.• POWER/
/ /
ADJUST (AD3) LefVILight MENU
Changes menu option. Shows menus.
BASIC MENU OPERA TION USING THE CONTROL PANEL
CHANNEL (CH) Up/Down
Changes channels.
Light Emitting Diode (LED)
Indicator
Indicates that power is on
(some mcxieLsonly).
Press SELECT repeatedly
to highlight the menu
optionyou wantto use.
Press MENU repeatedly to
choose between available
menus.
ENTER •ADJUST• SELECT MENU
Press ENTER to remove
menus from view, or wait a
few seconds and the menu
will disappear.
Press ADJUST Left or
Right to choose an option.
Selector
Highlight
Status of
"timer Setup
Ch. Labels
Source113
Parental Ctl
•Auto Dome 1
Example of Selected Menu Option
selected option
J
3212-O 3 -- 1 /(
Page 15

I
GET TO KNOW YOUR REMOTE (MBR3457)
SIMPLE PRODUCT OPERATION
VCR
Cable Box
TV
2nd VCR (AUX)
For "IV Operation
1. Press TV.
2. Aim remote at TV.
3. Press POWER to turn on TV.
4. Press other buttons to operate
your TV's features.
For Cable Box Operation
1. Press CABLE.
2. Aim remote at cable box.
3. Press POWER to turn on your
cable box..
4. Press other buttons to operate
your cable box's features.
POWER On/Off
Product Buttons
For VCR Operation
1. Press VCR.
2. Aim remote at VCR.
3. Press POWER to turn on VCR.
4. Press other buttons to operate your
VCR' s teatures.
For 2nd VCR Operation
1. Press AUX.
2. Aim remote at 2nd VCR.
3. Press POWER to turn on VCR.
4. Press ot:aer buttons to operate your
VCR' s features.
Your remote can operate up to seven different products. Turn to the following pages for programming instructions. You can pro-
gram the AUX button to operate a second TV or VCR, if desired.
3212-O 4- 1 , J,/i)
Page 16

m i
GET TO KNOW YOUR REMOTE (MBR3457)
PROGRAMMING YOUR REMOTE
If you're using Zenith products, the remote is already programmed for the most common codes: TV --: 101, VCR = 201, CABLE =
353, and AUX = 401. For other brands, or if your remote fails to control your Zenith products, you'll have to program the remote.
Step-By-Step Instructions Response On Remote
1. Install the batteries if you have not already done so.
2. Press and hold O using a blunt object. Indicator light stays on to shcw you're in the programming
Release PRG after the indicator light turns on. mode.
3. Press then release the Indicator light flashes to show remote is ready to accept
button for the product (_@ @@ a code.
being programmed.
Enter3-digit (_) (_) (_)
4. Indicator light flashes for each digit you enter.
product code @ @ @
from the chart @ (_ @
which follows. (_) @
5o
Press then release @ to save the code.
Indicator light on remote flashes and turns off to show your
code was accepted.
°
Point remote at product and press (_ to test the
product's operation. If it does not turn on, reprogram the
remote using a different code listed for your product.
7. Repeat the above steps to program the remote for another product.
Product turns On.
If none of the codes listed for your product operates it,
use Auto Find as described below.
Page 17

GET:TO KNOW YOUR REMOTE (MBR3457)
AUTO FIND OPTION (ALTERNATE PROGRAMMING METHOD)
If'you've tried all the codes for your product and none operates it, you can use Auto Find to search for the code you need. Follow
the steps below for each product you want to program. Please be patient while using this method; the remote may have to search all
cf the codes shown in the chart on the next page.
To Auto Find a Code
1. Turn On the product you want to operate.
2. Press and hold PRG using a blunt object. Release PRG after the
indicator light turns on.
3. Press the key to be programmed: CATV, VCR, AUX, or TV.
4. Enter"0-0-0," then press ENTER within two seconds. Auto
Find is active when the indicator light flashes and remains lit.
5. Point the remote at the product.
6. Press and release POWER repeatedly, about once a second,
until your product turns Off. The indicator light turns Off when
you press POWER and On when you release it.
7. Press ENTER immediately to save the code. The indicator light
flashes :o indicate the code has been saved.
8. Press POWER to turn On your product.
9. Test your product. If the remote fails to operate the functions
you use most often, use Auto Find again to search for a better
code. (Auto Find resumes its search after the last code that was en-
tered and saved in step 7.)
Notes:
121If the indicator light stay,'; on as you press POWER, Auto
Find has tried all of the codes. If the product you want to
control has not turned off, your remote carmot work with
it, in which case you must ttse the product's own remote
control.
[] To cancel .Auto Find, press PRG at any time during Auto
Find.
Equipment to be
_:_ntrolled
"lypical Remote
Control
2212-0 4 -- 3
Page 18

GET TO KNOW YOUR REMOTE (MBR3457)
OPERATING CODES BY BRAND NAME
TVS
Adm i_
AdvenoJa'aTV/VCR
AkaJ
Amark
AOC
Bell & Howell
Broksonic
Candle
Centurion
[ Citizen
Contec
Coronado
Crown
Curtis Mathes
Daewoo
Daewoo TV/VCR
Dayuon
Elektra
Emerson
Emerson TV/VCR
Rsher
Fun-',; TV/VCR
General
Electrc
Golds(at
GoldstarTVNCR I 153
Hitachi 102.
J.C. Penney I(_.,
JVC 125.
KMC 1(13
KTV 1(13,
Kurazai 121
Lodgenet 121
Logik 121
LXI 133.
Magnavox 1(13.
Magna,a3x "rv/vcR 173
Majesoc 121
Marantz I(M,
Megatron
Memorex
MGA/
Mitsubishi
Monlgomery
Ward
NEC
Panasonic
Panasonic TVN(._.
Philco
Philips
Pioneer
Portland
ProScan
iOu_.sar
116, 121, 13(1, 133
154
1(14
103, 146
I(}4
121
131,136
139
119
121. 139
141
103
103
116. 119, 121
149. 159
148
119
121
1(!3.104,123.124.
131. 136. 145
158
109. 118
15.4
11)6,1(17. 114,
] 16, 117. 161
103, 104, 119, 147
103, 129, 163
110. 114,
117.
119
132, 164
104, 138
137
112, 113,
117.
119, 127.
128,
139.165
121).155
146
121
1(M, 119,120.
130,140,155
II)3,11M, 105.
II3,114.119.
121.130.133
11_.119
106, liP, L61).I06
174
I03. l(M. 112.
113. 139
112.113
135
I(13
116.157.162,167
I(16.1(17
RCA
Realistic
Sampo
Samsung
Sanyo
Scott
Sears
Sharp
Signature 2000
Sony
Soundesign
Sylvania
Symplr_cTVNCR
Tamng
Teknika
Tolerant
Toshiba
X R 1I1011
Yorx
_nith
Zenith TV/VCR
_.dmiral
Adventura
Aiwa
Akai
Audio
Dynamics
3ell & Howell
Broksonic
Canon
Citizen
Craig
Curtis Mathcs
Daewoo
Day,on
DBX
Emel_on
Fisher
Furl_i
General
Electric
Goldstar
Go Video
Hitachi
Instant Replay
J.C. Penney
JVC
Kenwood
Logik
LXI
104.116,126.157.
161.162,167,168
105, 123, 124
119
103, 119. 134, 141
1118,109.118
119. 124
103, 108, 109,110,
111,118, 134
103,105,122,133.
137.156, 169
103, 104. 105.
113, 114.119,
121, 130, 133
115, 143, 151. 170
1139
112, 113. 117. 119,
127. 128. 139
154
1(16
1(13. 112, 121.
124. 139
1(13. 121
110, 111, 134. 171
121
119
101. 149. 175
153. 154, 172
VCRS
208,261
231
231
223.238.241
2112.218
21)6.247
221.226,250.255
214
2(19
212
214,259
244, 246. 248,254
236.246
2(12.218
203.2(19.221.
223.226.233.
235,243.25(I
211.212.213,247
231
214.216.220
2(19
256.262.263
215,257
214.227
214.215, 218,227
2(12.224, 225.258
_12
239
2(_.231
Magnavox
Marantz
Mar=
Memorex
Mitsubishi
Montgomery
Ward
Multi Tech
NEC
Orion
Panasonic
Pentax
Phik:o
Philips
Pioneer
Portland
Pro Scan
Quasar
RCA
Realistic
Samsung
Sans,,;
Sanyo
Scott
Scars
Sharp
Shin(ore
Signamre 2(XXl
Sony
ISylvania
Symphonic
Ta.shiko
Tatung
Teac
Teknika
Toshiba
XRIOG0
Vector Research
Yamaha
Zenith
207.214.231
207,218
209
206,212.214,231
204,222,252. 264
208,214.216,
219,231,249
239
202.218
214,251.259
215
207.214
207.214. 227
210.215
246
216,260
214.259
215.216,22(k227.
240.242.249.26(}
21_.208.212.
214.231
220.230.238
239
206, 212.247
204.2115,233,243
206,209,211.
212.215
208.261
239
208.214.216.
219.231.249
217.232.237
_17.214.227
231
209
2(12
2(12.231
209.234
205.215
239
204.218
202.218
201.224.225.
229.237
CABLE/SATELLITE
A!legm
Allegro A/B Swilch
Gemini
Genera Electric
General
Instrument
Hamlin
Jerrold
Kale Vision
Macom
Magnavox
358.362
361
305.331. 338
367
304.305.30d,
307.308.309,
310.318
302, 303. 345,
365, 366
304, 30"/. 308. 309,
310.318.360.363
335
314,321
334
NSC
Oak
[:_asonic
P;uagon
i_nilips
Pioneer
RCA DSS
Regency
S=msung
Scientific Atlanta
Sprucer
Sumdard Comp
Stargate
Texscan
"rc,_om
Unikz
United Satellite
Universal
Vid Tech
Video Way
Viewstu.r
Zenith
Z_nith Satellite
335.339. 368,
369. 370
31 I."132.342
313.2_20
333
347.350.352.
354.355
315.343
i 373
329
335
316.323,336. 364
313
335
379
339.356.371
317.318.346
348,362
344
358. :!62
34O
349
354. 355.372
3111.353.374
312. 328.33(I.
35 I,:178
VIDEO DISC
PLAYERS
Sanyo 4111
_',ny 41M
.....7
Zcnith
AUDIO C:D
PLAYERS
Akai
;=own
)enon
Rsher
Goldstar
Hamaan/Kardo_
,WC
Kenwood
Magnavox
Mitsubishi
qAD
Nakamichi
NEC
Onk'yo
I_.masonic
R_ilips
Pmneer
Quasar
Radio Shack
RCA
Sanyo
4(19.4:!4
410
411
412,438
4641
413
415
412.4 6.,d 17.4.41
421,42!2, ._33. 434
423. 424
425.4:!6._47
427. 428
429
43_
43 I, 432
421.433._.M
431.4_5
432
431.4 _6._39.4411.
:441
437
438, 4 }9
44(I
Sharp 441,442
Sony 4.43, 4.44,445
Soundesign 461. 498,501. 502
Sylvania 433
Teac 446
Technics 432.459
Toshiba 447
Yamaha 448
Zenith 46(I. 461. 498.501.
5O2
AUDIO TAPE
DECKS
Denon 4.55
Harman/Kardon 456
/VC 457
Kenwood 450
Onkyo 458
PhilipsIX'C 454
Pioneer 45 I. 478
Sony 452
Technics 454.497
Yamaha 453
AUDIO TUNERS
AN[) AMPLIFIERS
Denon 462. 463
qsher 464
Goldstnr 460
Hanna,a/ 465
Kardon
JVC 466
Kenwood 468. 469
Maran,_ 472.5(13
Onkyo 473
Philips 475.476
Pior_er 477. 478,479
Radio Shack 487. 488
Realistic 4811
Sanyo 481
Scott 482
Sharp 483
S_rwood 487,488
Sony 489.490, 491. 492
Soundesifn 461. 498, 5(11.5(12
Tcac 494,495
Tochnit_ 497
Y;a'naha 496
Zenith 46(). 461,498.5()1.
5(12
Ref: ]24-212-37 and
gP 221-952-02A
3212-O 4_4
Page 19

GET TO KNOW YOUR REMOTE (MBR3457)
7"1/OPERATIONS
Fress TV on tile remote to select TV operation.
Point Remote at TV
Programs your remote to operate other
PRG (Program)
product.,;. See "Programming Your
Remote" in this chapter for details.
FLASHBK (Flashback)
Returns to the
previous channel.
SURF
Activates the TVs channel
"Surf" feature.
,CHANNEL (Up or Down)
Selects the next
channel.
When the "Surf" option is
On, you receive only channels
set as "SurF' channels.
ENTER
Shows the Channel/Time display.
Press after channel numbers for
fast selection.
MENU
Displays on-screen menus
for TV mode.
PIP, SWAP, and FREEZ KEYS
See "PIP Operation"
section for more details.
TIMER
Displays the Sleep Timer Menu. Press
repeatedly to set TV shut-off time.
Specifies AM or PM when
you set the clock or use a timer
feature. See "Getting to Know Your
TV" section for more details.
POWER
Turn., TV On or Off.
TV
Selects "['Voperation.
MLrIE
Makes sound level Soft or turns it off
(while picture remains).
VOLUME Left/Right
Change,: the TV's sound level.
NUMBERS
Selects channels directly and enters
numeric values for some options.
Up/Down and Left/Right Arrows
The Up/Down arrows select options.
The I.ef'JRight arrows adjust options.
QUIT/J_
Removes on-screen display from view.
If no display is on, switches front speaker
surro.md sound On and Off for some TVs.
CC (Closed Captioning)
Display:; the closed caption menu.
TV/VCR - SOURCE
Switches between watching TV via the
available sources, that is
ANTEI_NAJCABLE, VI[DEO IN, etc.
MBR3457 Remote
Note: Keys dedicated to VCR functions will still operate your VCR while the remote is in TV mode.
3z,2-o 4--5 ] (_
Page 20

GET TO KNOW YOUR REMOTE (MBR3457)
PRESET CODES FOR ZENITH PRODUCTS
Key
Name
POWER
CABLE
VCR
AUX
TV
SURF
FLASHBK
MUTE
CHANNEL UP TV
CHANNEL DN TV
VOLUME (Right) TV
VOLUME (Left) TV
1 TV
2 TV
3 TV
4 TV
5 "IV
6 TV
7 "IV
8 TV
9 TV
0 TV
TV Power On/Off
Selects Cable Mode
Selects VCR Mode
Selects AUX Mode
Selects TV Mode
Surf On/Off
TV Flashback
TV Mute
TV Mode
Zenith Code 101
Channel Up
Channel Dn
Volume Up
Volume Dn
Digit I
Digit 2
Digit 3
Digit 4
Digit 5
Digit 6
Digit 7
Digit 8
Digit 9
Digit 0
VCR Mode
Zenith Code 201
VCR Power On/Off
Selects Cable Mode
Selects VCR Mode
Selects AUX Mode
Selects TV Mode
VCR AM/PM
VCR Flashback
TV Mute
VCR Channel Up
VCR Channel Dn
TV Volume Up
TV Volume Dn
VCR Digit I
VCR Digit 2
VCR Digit 3
VCR Digit 4
VCR Digit 5
VCR Digit 6
VCR Digit 7
VCR Digit 8
VCR Digit 9
VCR Digit 0
Zenith Code 353
Cable Power On/Off
Selects Cable Mode
Selects VCR Mode
Selects AUX Mode
Selects TV Mode
CABLE FC/Fav Ch
CABLE Flashback
TV Mute (See Note)
CABLE Channel Up
CABLE Channel Dn
TV Volume Up (See No
TV Volt, me Dn (See No
CABLE Digit 1 AUX Digit 1
CABLE Digit 2 AUX
CABLE Digit 3 AUX
CABLE Digit 4 AUX
CABLE Digit 5 AUX
CABLE
CABLE
CABLE
CABLE
CABLE
ENTER TV Enter VCR Enter CABLE
MENU TV Menu VCR Menu CABLE
UP ARROW TV Select Up VCR Select Up CABLE
DOWN ARROW TV Select Dn VCR Select Dn CABLE
LEFT ARROW TV Adjust Left VCR Adjust Left CABLE
RIGHT ARROW TV Adjust Right VCR Adjust Right CABLE
QUIT/b TV SEQ Sound VCR Quit CABLE
PIP TV PIP VCR VCR+ CABLE
SWAP TV PIP Swap VCR Channel Map CABLE
FREEZ TV PIP Freeze VCR Search CABLE
CC
TIMER
TV/VCR/SOURCE
RECORD
PAUSE
REWIND
PLAY
STOP
FFWD
TV Closed Captions VCR Memory CABLE
TV Timer VCR Timer CABLE
TV Sources TV Tuner or VCR Tuner CABLE
VCR Record VCR Record CABLE
VCR Pause
VCR Rewind
VCR Play
VCR Stop
VCR Fast Forward
VCR Pause
VCR Rewind
VCR Play
VCR Stop
VCR Fast Forward
CABLE Guide
VCR Rewind
VCR Play
VCR Stop
VCR F'ast Forward
Cable Mode
Digit 6 AUX
Digit 7 AUX
Digit 8 AUX
Digit 9 AUX
Digit 0 AUX
Enter
Menu
Up Arrow
Down Arrow
Left Arrow
Right Arrow
Quit
Day Up
Day Down
Pg Up/-k
Pg Down/#
Timer
Info
Buy
AUX Mode
Zenith Code 401
AUX TV/r)isc
Selects Cable Mode
Selects VCR Mode
Selects AUX Mode
Selects TV Mode
AUX Audio
AUX Frame/Time
TV Mute
AUX Skip >>
AUX Skip <<
TV Volume Up
TV Volum_ Dn
Digit 2
Digit 3
Digit 4
Digit 5
Digit 6
Digit 7
Digit 8
Digit 9
Digit 0
AUX DispZiay
AUX Program
AUX Part
AUX Random
AUX x3 FAST <
AUX x3 FAST >
AUX Clear
AUX Repeat-Side
AUX Repeat-A-B
AUX Repeat-Chap
AUX Memory
AUX Still
AUX TWr)isc
AUX Edit
AUX Pause
AUX Scan <<
AUX Play
AUX StopJEject
AUX Scan >>
Reference: 124-212-37 and
I.tP 221-952-02A
Note: You can change TV Volume Up/Down to Cable Vol/Mute when you progrm'n special code 399 into the remate.
3212-o 4--6 /
Page 21

GET TO KNOW YOUR REMOTE (MBR3457)
SPECIAl, FEATURES
AUX+I, AUX+2, AUX+3
Your remote ('ancontrol up to seven products. If you've
programmed the remote for four products using the TV, VCR,
,CABLE, and AUX keys, you can program it for up to three more
by using AUX+ 1,+2, +3.
To Program AUX+I, AUX+2, and AUX+3
1. Locate the three-digit code for your product in the code table.
9. Press and hold PRG until the indicator lights.
3. Press AUX and "1" simultaneously to select AUX+I.
4. Enter the three-digit code, then press ENTER. The indicator light
should flash, then turn off to indicate the code was accepted. If the
light stays on, repeat steps 3 and 4 or try a different code.
5. Repeat steps 2 - 4 for AUX+2 and AUX+3.
6. Write your codes on the label inside the battery
compartment for future reference.
Hold down ALIX and press 1, 2, or 3 to access AUX +1, +2, or +3
mode.
CABLE BOX VOLUME
Your remote can control cable box volume and muting, if
available on your cable box.
Program your cable box code into the CABLE or the AUX key.
Repeat the: programming steps, using the same CABLE or AUX
121 1"oProgram the Cable Box Volume
key as above, but enter special code 3-9-9, followed by ENTER.
AMPLIFIER VOLUME OVERRIDE
Your remote can override your "IV, VCR, or video disc player's
volume functionswith your amplifier's volume and muting.
To Program the Amplifier Volume Override
1. Program your amplifier code into the CABLE orAUX key.
2. Select the key on your remote (TV, VCR, etc.'_where you
want the amplifier volume control function to appear. For
example, pJressTV if you want to operate your amplifier's vol-
ume and mute while the reraole is in TV mode.
3. Enter special code 4-9-9, fall awed by ENTER.
The amplifier volume and mute features are now available in the TV
mode.
Notes:
1:1 To restore normal volume and muting control to your re-
mote, reprogram the remote for the product into each key
(TV, VCR, etc.) to be restoxed.
CD and tape players will automatically select amplifier
volume and mute, if an amplifier code is p:ogrammed into
the remote.
Note: To restore "IV volume/mute control to the CABLE or
AUX key, reprogram your cable code into that key.
3:,1:-o 4 -- 7
4"7 /
Page 22

QUICK REFERENCE TO ON-SCREEN MENUS
AVAILABLE MENUS
The features of your TV are controlled through menus. Each menu has an Icon and a list of options.
"['hemenus illustrated are typical though some may vary, like the Source menu which has listings that a user can change.
--Men______uIcon
7 PZp_r-Menu Tide
.J Menu I
ntrast ,,,,_ ] I
si;:e_ Options
Video
S-Video
Source
Menl:t
_ etup
Menu
I Auto Program I
Add/DeVSud
Clock Set
Captions
Caption/Text
Language
Background
Projo Setup
Special
Features
[Timer Setup -7
Ch. Labels
Source ID
Parental Ctl
Auto Demo
_€ udio
Menu
1Bass I
Treble
Balance
Audio Mode
SoundRite
Front Surf
Rear Surr
Speakers
I_ll MenuVide°
-C_ntrast ]
Brightness
Color
Tint
Sharpness
Color Ternp
Video Filter
Skin Tone
Video Preset
BASIC MENU OPERATION
Press MENU repeatedly
to choose between
]_, available menus.
Press the Up or Down
arrows repeatedly
until the desired
option is highlighted.
Pressthe Left or
Right arrows to adjust
o, change a selected
option.
P;'ess QUIT/J3 to .
remove menus or wa,t 'C" 4 I I
a few seconds for the
TV to return to nor-
n:al operation.
Typical Remote Control
Press TV button to place the remote in TV mode.
3212-o 5 -- 1 /') )
Page 23

SOURCE MENU
withAnt/Cable
MENU OPERA TION
Direct Access
Press TV/VCR SOURCE to enter
the Source Menu.
Use the Left/Right arrows to select
_/3"."Y
either Main or PIP.
Main Source
highl_htecL
-_SeOUrce
nu
Main <_ PIP
[ AnffCable I
Video
S-Video
SOUECe
enu
Malrl <_ PiP
Ant/Cable
Dual-Function Menu. Provides access to Main
and PIP Sources. Use Left/Right arrows to
switch between Main and PIP source menus.
Use TVNCR SOURCE to select s9urce.
, @ Press"IW,'VCRSOURCE repeatedly until
PIP Source
with Video
highlighted.
the des a'ed option is selected.
Press
QUIT/,b orwait a fewseconds for the
TV to return to normal operation.
Indirect Access
Press MENU repeatedly until the
Source Menu is selected.
--_'_-- Use the Lef_ght arrows to select
P x@/&\ Press Up/Down an:ows to choose the
"_/@_,_) desired option.
PressQU1T/.bor wait a fewseconds
fo::theTV to return tonormal operation.
:::_i::i_i ! i::i_i:::::iriiil i:iiii:!:i i_:: i Funct[onLi: : -:
Ant/Cable Selects the antenna or cable-TV source for viewing. You see program material from the source
equipment connected to the ANT/CABLE jack. If your source equipment is a VCR or a cable box, put
the TV on either channel 3 or 4.
Video Selects the audio and video from an A/V source (such as a VCR or a video disc playe0 for viewing.
You see program material from the source equipment connected to the VIDEO IN jacks.
S-Video Selects the audio and video from a Super-VHS video source (such as an S-VHS VCR or a video disc
[ . .
iplayer) for viewing. You see program material from thesource equipmenl comx_ed to the ,q-VIDEO INjacks.
Notes: Refer to the "Connections for Your TV" section to make the proper equipment connections to the TV. For information about PIP
sources, refer to the "PIP Operation" section.
3212_ 6--1
Page 24

Auto Program
Add/Del/Surf
Clock Set
Captions
Caption/Text
Language
Background
Projo Setup
MENU OPERATION
Setup
Menu
SETUP MENU
} [<l_ To Program 1
[ Clock Set
] [<_. SetCIock
Captions
Caption/Text
Language
Background
This is the menu you see when
Video or S-Video source is chosen.
@ Press MENU repeatedly until the
_(_._ Press the Up/Down arrows to choose
(SELEC'O the desired option. _ O
Menu Option Function
Auto Program
Setup Menu appears.
Finds all active channels and stores them in the TV's memory for use by ,CHANNEL Up/Down.
Available channels are: Broadcast Band -- VHF 2 to 13, UHF 14 to 69 a:ad Cable-TV Eand -- 1to 125.
See "QUICK SETUP GUIDE" section for information.
(Channel)
Add/Del/Surf
Creates a list of favorite channels selected by using CI-UkNNEL Up/Down. ADD (or DE,LETE)
channels as desired. Creates "Surf" channels of specia! interest, such as aI1sports channels. See the
information following this chart.
Clock Set
Captions
Sets the clock in the TV to the correct time. See "QUICK SETUP GUIDE" section for information.
Turns Caption/Text On or Off. Options are: On, Off, or Captions When Muted. See the information
following this chart.
Caption/Text
Select from the options available when Captions (above) is turned On. Displays closed captioning or
informational text when available on the selected channel. Options are: Caption 1,Caption 2, Caption 3,
Caption 4, Text 1, Text 2, Text 3, or Text 4. Few TV programs or video tapes offer text captioning for
any option other than Caption 1.Therefore, Caption 1 is the only recommended choice, unless you know
that a specific program is providing captioning using one of the other selez:tions.
Language
Selects English, Spanish, or French for on-screen menus. See "QUICK SETUP GUIDE"' section for
information.
Background
Projo Setup
Adds (ON) or removes (OFF) a background behind the on-screen menus.
Converges (aligns) the blue and red CRT beams. See "QUICK SETUP (3UIDE" section for information.
F're,';sthe Left/Right arrows to
adjust the selected option.
F're:;sQUIT/.b or wait a few seconds
fi_rthe TV to return to normal operation.
3212-o 7 -- 1
continued on next page
Page 25

USING (CHANNEL) ADD/DEL/SURF
SETUP MENU
Add/Delete and "Surf" Channels to Scan
1. Use the Lip/Down arrows to highlight Add/Del/Surf
in the Setup Menu.
2. Press Left/Right arrows to view the
Add/Del/Surf display.
3. Use the Left/Right/Up/Down arrows to move chan-
nel selector to the channel being added/deleted or in-
cluded in Surf Channel Scan.
4. Press TIMER repeatedly to select Add, Delete, or
Surf:
Add = Adds channel to scan when Channel
Up/Down arrow is pressed.
Delete = Channel will not be included in scan when
Channel Up/Down arrow is pressed.
Surf = Channel will be added to Surf Channel scan
when Surf is active and Channel Up/Down arrow is
pressed.
Repeat Steps 3 -- 4 to add, delete, or include
additional channels to Surf Channel Scan.
Press QUIT/,h to remove the menu or wait a few sec-
onds for the TV to return to normal operation.
Available Channels
_ -------_
:5 7
_:: 17 19 _ I _._ \ I
3_,_.--.eT----3r--_ --( _h 2
+_ _: _;: : <- C',BS
:;7 47 48 "_ 60 Added
i- _r !i< s9 6o l +
,!::. _,:; 63 _' • Pret
[ MoreChannels 4,
...... )) !
Selector Highlighted with Surf Icon
Live view of
_- selected channel
_- Added Channel
- Deleted Channel
--- Surf Channel
Channel
--- Status
.._..._ Instructions
- Use Down arrow
to move selector
to additional
numbers if present
Notes:
[] Add/Del/Surfcan only be t:sed with ANT/CABLE Source.
[] Surf Scan channel numbers are shown with the Surf Icon
on the Add/Del/Surf menu.
13 The audio of deleted channels is muted.
[] Added/deleted or Surf cl-tarnel status can be changed at
any time.
TURNING CAPTIONS ON AND OFF
']?urns Caption/Text Feature On and Off
l.. In the Setup Menu, use the Up/Down arrows to
highlight Captions.
2.
Use the Left/Right arrows to select: Off, On, or
Captions When Muted.
3.
Press QUIT/.b to remove the menu or wait a few sec-
onds for the TV to return to normal operation.
",['urnsCaption/Text Feature On and Off with CC Key
l.. Press TV, then press CC key on remote.
2.
Press CC repeatedly to cycle through the
options: Off, On, or Captions When Muted.
3.
Press QUIT/.b to remove the menu or wait a few sec-
onds for the TV to return to normal operation.
Notes: If you select Captions When Muted, closed captions
will appear when the audio is muted.
Captions will not appear with programs which do not transmit
a captions signal.
_ et:up
Menu
Auto Program
Add/Del/S urf
Clock Set
I Captions ]
Captionfl-e:(t
Language
Background
Projo Setup
Off [_ When Muted
Calations 1
Off ]
Page 26

SPECIAL FEATURES
_ Special
Features
I "lqmer Setup I
Ch. Labels
Source ID
Parental Ctl
Auto Demo
Note: All adjustments on the Audio Menu are optional. You do not have to adjust these features in order to use your TV.
MENU OPERATION
,1_ To Set Timers I
@ PressMENU repeatedly until the (_]_/[_)
_@_[_) Press the Up/Down arrows to choose (_
_:_ (SELECTj the desired option.
Special Features menu is shown.
Menu Option
rimer Setup
Ch (Channel) Labels
Sets the TV's Sleep Timer and On/Off Timer features. See the information following this chart.
Assigns a network/station label, name, or call letters to specified channels. For example, if you choose
the label "ABC" for channel 7, then "ABC" will appear in the Channel/q'ime display whenever
channel 7 is selected. More information follows.
Source ID
Assigns a descriptive "name" to the input sources. For example, if the Video source is named VCR,
"VCR" will now appear in the Source Menu as a reminder that your VCP is connected to the VIDEO IN
jacks. You may also edit your own custom source ID label.
Parental Ctl (Control)
Controls the programming in your broadcast area. You can use Parental Control to block out particular
channels or the program from a VCR. More information follows.
Auto Demo
Demonstrates on-screen menus and features available on this TV. Refer to the section "QUICK SETUP
GUIDE."
Use the Left/Right arrows to
adjust the selected option.
(ADJUST)
Press QUIT/) or wait a few
.,ec3nds for the TV to return to
normal operation.
Function
continued on next page
3212-O 8 _ 1 e/
Page 27

SPECIAL FEATURES
TIMER SETUP: Sleep Timer
The Sleep Timer programs the "IV to turnoffafter a period from 15 minutes up to 4 hours. The time on the TV's clock must be
set before you can use the Sleep Timer.
From Special Features Menu
1. Use the Up/Down arrows to highlight Timer Setup.
2. Press LeftlRight arrows to view the Timer Menu.
3. Use the Up/Down arrows to highlight Sleep Timer.
4. Press the Left/Right arrows repeatedly to set the
period of time the TV will remain On.
5. Press QUIT/,,h to remove the menu or wait a few sec-
onds for the TV to return to normal operation.
Direct Access
1. With no menus showing on the TV, press TIMER
on your remote to directly access the Sleep Timer.
2. Press TIMER repeatedly to set the period of time
the TV 'will remain on.
You can cancel the Sleep Timer by:
Turning off Ihe TV or pressing TIMER repeatedly until Off is
showing.
_ imer
Menu
[ Sleep Timer
][ 0:15
On Time
Off Time
On/Off Timer
Sleep Timer Set to Turn TV Offin 1,5Minutes
I :._[.. Good Night 0:58
• .';8 Seconds
"Good Night" Display Appears
60 Secortds;Before Shut-Off
TIMER SETUP: On/Off Timer
The On/Off Timer pmglmns the TV to mm on at a specific time, then mm offat :anothertime. 3%e time on the "UV'sclock must
be set before you can use the On/Off Timer.
Set On/Off "rimer
1. Use the Up/Down arrows to highlight Timer Setup.
2. Press Left/Right arrows to access the Timer Menu.
3. Use the Up/Down arrows to highlight On Time and
use the numbers on your remote to enter a time for
the TV r_oturn On. Press TIMER on the remote to se-
lect AM or PM. (You can also use the Left/Right ar-
rows to advance the time.)
4. Use the Up/Down arrows to highlight Off Time and
use the numbered buttons on your remote to enter a
time for the TV to turn Off. Press TIMER on the re-
mote to select AM or PM. (You can also use the
Left/Right arrows to advance the time.)
5.
Use the Up/Down arrows to highlight On/Off Timer
and use the Left/Right arrows to turn timer On (or Off).
6.
Press QUIT/.b to remove the menu or wait a few sec-
Note: To us(: the On/OffTimer, you must specify an Offtime.
_ imer
Me n_L
Sleep Timer
On Time ----J
I 11:00 AM _I
Off Time
On/Off Timer
On/OffTimer Set tto'rum TV On at 11:00 AM
onds for the TV to return to normal operation.
Page 28

SPECIAL FEATURES
USING CHANNEL LABELS
This feature is not practical if the input source
is from a cable box, because the only channel
you would receive is the cable box output
channel (usually Ch. 3 or Ch. 4).
Assign Labels to Channels
1. From the Special Features menu, press the Up/Down
arrows to highlight Ch. (Channel) Labels.
2. Press the Left/Right arrows to view the channel
label display.
3. Select a channel by using CHANNEL Up/Down ar-
rows or enter channel number with numbered keys.
4. Use the Left/Right/Up/Down arrows to select
appropriate label to add to the channel number.
5. To create a custom label, press TIMER to access
the custom labels display. Follow on-screen instruc-
tions. Use Up/Down!Left/Right arrows to select
each character, followed by ENTER to place that
character in the customized channel label. Press
TIMER to exit and return to Ch. Labels display.
.
Repeat steps 3 through 5 for each channel.
7.
Press QUIT/.b to remove the menu or wait a few sec-
onds for the TV to return to normal operation.
Notes:
121 CtL Labels can only be used with ANT/CABLE 1or 2
Source. Select .... (dashes) for no label.
Q Choose"NONE" if you want to block the labels that some
TV stations provide.
Q A channel label that you select will override a label pro-
vided by"some TV stations.
Live view of selected channel
.... NONE A&E ABC ACTS
ADC AMC BCC BET BP,A'V
CA CBC CBN CBS CMTV
CNBC CNH COM CSPN CSP2
CTN CTV DIS DISC E!
ENC ESPN ESPN2 ET EWTPI
FAM FNN FOX F&V F)'.
GALA HB0 HN HSE H:;N
IC INSP JCN LIFE MAX
ME/U MMT M'IV NBC NICK
NOS PBS PLAY PTL OVC
RDS REQ SC SCFI SI40W
SIN TBS TBN TELE TLC
TMC INN TNT TRAV TWC
UPN 'ISA VC VCR VH-1
VISN WB _ WTBS WWOR
,. _ _N
_ Label Selector
Ch9 ----
WGN _--
Press r:r_--_,]--
to edit
C3-
A B C D E F G H I J K L M N O
P QR S 1" U VWXY Z 0 1 2 3 4
5 6 7 8 () 0 - / & # . I ? * lq I_
U.._Arrows to Select Characler
PressENTERToAdd Cl-aracler
Pre.ssTIMER To _e_u'n
Channel Number
Channel Label
Appears after
a label is chosen
USING SOURCE ID
Assign Identifying Names To Your Sources
1. From the Special Features menu, press the
Up/Down arrows to highlight Source ID.
2. Press the Left/Right arrows to view the Source ID
screen.
3. Press the Up/Down arrows to highlight a Source.
4. Press the Left/Right arrows repeatedly to choose a
label for the chosen Source.
5.
Press QUITLb to remove the menu or wait a few
second.,; for the TV to return to normal operation.
UI To edit and make a custom label, (1) Highlight any label
(except "Disabled" or "--(') from the display, (2) Press
TIMER, (3) Use arrows to select a character and then
press ENTER to add it (repeat for more characters), (4)
Press TIMER. for previous menu, press QUIT to clear
screen.
Note: If you select "Disabled," the source for which you select
it will not appear in the Source Menu.
Press _ To Edit
Source
[Ant/Cable J
Video
S-Video
"N
Live view of high-
lighted Source
Label
[ Cable I
VCR
Page 29

I
USING PARENTAL CONTROL
Pa_ent.al
Control
"iimer Setup
Ch. Labels
Source ID
Parental Ctl ]
Auto Demo
I BlockCh. I
y
Block Video
Set Hours
Set Password
Lock On/Off
_r
Parental
Control
BlockCh.
Block Video I
Set Hours
Sel Password
Lock On/Off
SPECIAL FEATURES
1 2 3 4_ 5
6 7 [] 9 10
11 12 13 14 15_
16 17 18_19 20_
21 22 23 24 25
26 27_28 29 30
31 32 33 34 35_
36 37 38 39 40
41 42 43 44 45
46 47 48 49 50
__+
51 52 53 54 55
56 57 58 59 60
Block Channels Display
Select channels to be blocked using Left/Ri_ihLq3p/Down
arrows. Press TIMER to block the selected ,'l_mnel. A pad-
lock symbol appears next to the channel number. Repeat as
necessary before returning to Parental Control menu.
_--I [ Blocked I OR [ Unblocked ] [
C1'1I_1
C8S
Unblocked
Press ENTER to
return to the
Parental Control
menu
P_ent_
Con_ol
Block Ch.
Block Video
Set Hours J
Set Password
Lock On/Off
Parental
Control
Block Ch.
Block Video
Set Hours
I Set Password ]
Lock On/Off
j_Parental
[ Lock On!Oft I
Steps Required to Use
Block Ch. (Channel)
Blocks video and audio for selected channels. A padlock
symbol appears next to the blocked channel numbers. The
grayed numbers are channels not included in your favorite
channels list. The solid numbers are channel numbers included
in your favorite channels.
Block Video
Blocks the inaage for all A/V (Audio/Video) and S-Video
sources.
Set Hou rs
Specifies the number of hours Parental Control will be in
effect.
Control
Block Ch.
Block Video
Set Hours
Set Password
Parental Control
Set Password
Sets your Parental Control l:,assword. A pa:_swordcan be any
four digits you choose.
Note: Remember your password or you will have to wait until
the specified time has elapsed before you can see the channels
and/or videx) sources you lmv(: blocked.
Lock On/Off
Turns the Parental Control f_ature On or Off. When On, the
blocked channels or video sotLrces cannot be viewed unless
you use the password to un_Iockthe TV or the Set Hours time
period elapses.
3212-o 8 --4 -"9 0
Page 30

AUDIO MENU
Menu Operation
@ Press MENU repeatedly until the
Menu Option
Bass
Treble
Balance
Audio Mode
(SAP is not an opdon for
the Video or S-Video
sources.)
SoundRite
Front Surr
Rear Surr
Speakers
_ udio
Bass
Treble
Balance
Audio Mode
SoundRite
Front Surf .h
Rear Surf
Speakers
Audio Menu is shown.
Press the Up/Down arrows until the
desired option is highlighted.
Menu
I'1 I I_}
All adjustments on the Audio
Menu are optional. You do not
have to adjust these features in or-
der to use your TV.
Pres,; the Left/Right arrows to adjust the
selected option.
Press QUIT/J_ or wait a few seconds for
the qV to return to normal operation.
Function
Adjusts the low-frequency sound level.
Adjusts the high-frequency sound level.
Adjusts sound between the two speakers.
Selects STEREO, MONO, or 2ND AUDIO/SAP operation.
Stereo: Directs sound to the Left and Right speakers. Stereo is the recommended choice: The "IV
switches automatically between the STEREO and MONO modes depending on the type of
signal received.
Mono: Directs the same sound to both Left and Right speakers, ev,*.nif the program received is in
stereo.
2nd Directs the sound for the Second Audio Program (usually a second language) to both the
Audio/SAP: Left and Right speakers. SAP sound is always monaural. When the SAP broadcast ends,
the TV changes automatically to the type of signal received, STEREO or MONO. The TV
changes back to 2ND AUDIO/SAP when :theSAP broadzast resumes.
Adjusts sound to the same volume as the previously selected[ channel.
Turns the Front Surround effect On and Off. Front Surround is only available while receiving a surround-
encoded program. With no menus on-screen, press Quit/,b to turn Surround Sound On and Off.
Adjusts the Surround Sound provided to the optional speakers.
Turns internal speakers On and Off. (Off indicated by "EXT Volume" on Vclume bar.)
3212-O
9--1
Page 31

MENU OPERATION
VIDEO MENU
li ,lVideo
"El" Menu
Contrast
Brightness
Color
Tint
Sharpness
Color Temp
Video Filter
Skin Tone
Video Preset
• ' "1
All adjustments on the Video Menu
are optional. You do not have to ad-
just thc_e features in order to use
your TV.
@ Pri_lSeSo]VMEnN_uit:sP_atend!y until the (_f_,-
_ _""$_ Press the Up/Down arrows until the @
(SELECT) desired option is selected.
Press the Left/Right arrows to
adjust the selected option.
Menu Option Function
Contrast Adjusts the picture's overall contrast and color level.
Brightness Adjusts the picture's brightness level of black areas.
Color Adjusts the picture's color intensity.
Tint Adjusts the flesh tones to more green or red.
Sharpness Adjusts the object edge definition for best picture quality.
Color Temp Changes the "color temperature" or picture white balance between cooler whites and warmer reds.
(Temperature)
Video Filter Reduces video "noise" or interference in dark picture areas.
Skin Tone Maintains natural skin tones under changing scene and video source conditions.
Video Preset Adjusts the picture to various viewing conditions. Options are:
Custom = Saves personal preference changes made to the Video Menu and stores them
as your Custom setting.
Preset
Movie
Video Game
Sports
Daylight
Weak Signal
= Restores the video characteristics set at the factory.
= Delivers clear, cinema-like effects in a home theater setting with dim lighting.
= Tones down bright video game color intensities and graphics for prolonged
close-range viewing conditions.
= Provides a bright, sharp picture with vivid color and crisp detail
= Enhances picture contrast in brightly-lit condkions.
= Reduces "noise" (snow) from poor quality signz:l transmission or video tapes.
nl2-o 10 -- 1 _/9
Page 32

PIP MENU
Selecting the PIP Menu does not
"activate" PIP. However, a PIP window
appears during menu operation to show
the effect of any adjustments.
Co_s_
Tint=
S z(.
------------ __]'< I
All adju2;tments on the PIP Menu
are optic nal. You do not have to
adjust these features in order to
use your TV.
MENU OPERATION
Press MENU repeatedly until the f_____(_
PIP Menu appears. _'
(aDJOin)
_(_ Press the Up/Down arrows undl the 4_' _
desired option is either highlighted
or selected.
(sm.zcr_
Menu Option Function
Contrast Adjusts the color intensity in the PIP picture.
Tint IAdjuststhe flesh tones in the PIP picture to more green or red.
Size Adjusts the size of the PIP inset between small or large:. -
Press the Left/Right arrows to adjust
the selected option.
Press QUIT/.h or wzdt a few seconds for
the TV to return to normal operation.
3m-o 11 -- 1 "2 )
Page 33

PIP (PICTURE-IN-PICTURE) OPERuq TION
OVERVIEW
The PIP (Picture-in-Picture) feature lets you watch two programs at the same time on the same screen. The pictures visible on the
TV screen a_e determined by the equipment sources connected to the connection center on the back of the TV. You must have two
equipment sources (one of which is a VCR or video disc player) to get two different pictures for PIP operation.
Picture from
VCR
Picture #1
PIP Picture
Main Picture
Picture from
Cable Service
Picture #2
ANTENNA OR DIRECT CABLE TO VCR
With your equipment setup in this manner, your TV can:
O Simultancously show two different channels: one selected
with the TV's tuner and the other with the VCR's tuner.
CABLE BOX AND VCR
With your equipment setup in this manner, your TV can:
_-3 Simultaneously show two different channels: one selected
with the (Lable Box tuner and the other with the VCR's
tuner.
O Simultancously show a video tape playing in the VCR and
a channel selected with the TV's tuner.
O Swap the Main Picture und the PIP Picture.
D Simultaneously show a video tape playing in the VCR and
a cable channel selected with the Cable Box tuner.
El Swap the Main Picture ;rod the PIP Picture.
Page 34

PIP (PICTURE-IN-PICTURE) OPERA "lION
CONNECTIONS FOR USING PIP
!ii ii!PiPIOPTi0NS iusi NG A_EN _1RECT CAB
1. Set VCR'sTV/VCR* switch
toTV.
2. Press"£VNCR SOURCE
repea_Jly to choose
Ant/Cable for the Main pic-
lure in the Source Menu.
3. Press Left/Right arrows
to select Source Menu for
the PIP picture.
4. Select Video in the Source
Menu ibr the PIP inset;
press ENTER to exit the
Source Menu.
5. Select a channel with the
TV's channel selector.
6. Press PIP key to activate PIP.
7. Press VCR key on the remote
to access the VCR mode_
8. Select a PIP channel using
the VCR's channel selector.
* May be labeled TV/Video.
PIPOPTI 0NSUSI NGCABLE:AN DVC R :!i
1. Make sure VCR's TV/VCR*
switch is set to TV.
2. Press TVNCR SOURCE
repeatedly to select
Ant/Cable for the Main
picture in the Source Menu.
3. Press LeR/Right arrows to
select Source Menu for the
PIP picture.
4. Select Video for the PIP inset
in the Source Menu; press
ENTER to exit the Source
Menu.
5. Select a channel with the
TV's channel selector.
6. Press PIP key to activate PIP.
7. Press VCR key on the remote
to access the VCR mode.
8. Play a tape in the VCR and
view it in the PIP inset_
Required Antenna Connection For Use With PIP
1. Press TVNCR SOURCE
key to access the
Source Menu.
2. Press TV/VCR SOURCE
repea_fly to choose
Ant/Cable for the Main
picture in the Source Menu.
3. Press Left/Right arrows to
select Source Menu for the
PIP picl,'ttre.
4. Select Video for the PIP
inset in the Source Menu;
press ENTER to exit the
Source Menu.
5. Select a channel with the
TV's channel selector.
6. Press PIP key to
activate PIP.
7. PressCABLE key on remote
to access Cable mode.
8. Select a PIP channel using
the cable box.
1. Press TVNCR SOURCE
key to access the
Source Menu.
2. Press TV/VCR SOURCE
repeatedly tochoose
Ant/Cable for the Main
picture in the Source Menu.
3. Press LefffRight arrowsto
select Source Menu for the
PIP picture.
4. Select Video for the PIP
inset in the Source Menu;
press ENTER to exit the
Source Menu.
5. Select a channel with the
TV's channel selector.
6. Press PIP keyto
activate PIP.
7. Press VCR key to access
VCR mode; set VCR's
TV/VCR switch to VCR.
8. Play a tape in the VCR and
view it in the PIP inset_
STEREO VCR %
/.N t_pta
Required Cable-TV Connection For Use With PIP
32,2-o 12--2 ,_ _;
Page 35

PIP (PICTURE-IN-PICTURE) OPERA TiON
SELECTING MAIN PICTURE SOURCE AND PIP PICTURE SOURCE
PIP Picture
Main Picture I
::: iii_iliTOTU_ PIP On UsingU,iversal Remote
1. Point the remote at the "IV.
2. Press TV key on remote to select TV MODE.
3. Press PIP key to see PIP picture.
I....../Audio fi_m
_-------- Source of PIP Picture
Main Picture
I Source of Main Picture
.--- Audio Mode of
Main Picture
PIP mode is active
1 Press SOURCE on your remote to view the Source Menu.
2. Press the Left/Right arrows to select Main Source.
3. Press UpS)own arrows repeatedly to select the source
equipmc_at you want for the Main picture.
4. Press QFIT/,h to remove the menu.
Available
Main
Picture
Sources
Sour ce
enu
Main <t_ PIP
Ant/Cable ]
Video
S-Video
You can choose any source listed for the Main Picture and
for PIP Picture, as long as you have equipment connected to
the corresponding jacks on the connection center of the TV.
1 Press SOURCE on remote to view the Source Menu.
2 Press the Left/Right arrows to select PIP source column.
3. Press Up/Down arrows repeatedly to select the source
equipment you want for the PIP picture.
4. Press QU-IT/,b to remove the menu.
SOurce
eIlU
Msdn <_ PIP
Ant/Cable
IWdoo q
S-Video
Available
PIP
Picttt re
So urces
3z12-o 12 -- 3 ")/.L
Page 36

PIP (PICTURE-IN-PICTURE) OPERA "lION
,PIP FEATURES AND OPTIONS USING THE UNIVERSAL REMOTE
Up/Down/Left/Right Arrow_
PIP (On/Off)
]PIP(On/Off?
Press PIP to turn the Picture-In-Picture feature On and Off.
PIP Freeze
Use to stop action (freeze) the image in the PIP picture. Press
FREEZ again to return to live action.
Note: If PIP is not turned on, this key freezes the Main Picture
in the PIP inset and turns PIP on.
%urce
Press to select sources.
Audio Swap
Press QUIT/J_ to switch audio from the Main Picture source to
the PIP source, when no other menus are showing.
Note: Audio is being
heard from the source
that has the musical note\
appearing next to it, in \
this case PIP X
Ch 2- CBS
3:56
Surround
QuiU_
(Audio Swap)
FREEZ
SOURCE
PIP Active Arrow Keypad
When you press PIP on the reraote, a help menu appears. This
is an on-screen reference detining which arrows perform
which function.
PIP Move
Press the LefffRight arrows rel:eatedly to move the PIP Inset
to any of the four corners of the TV screen.
Swap
Move J
PIP Swap
Press the Up/Down arrows to swap the picture in the Main Pic-
ture screen with the picture from the PIP inset window. Press
again to restore.
PIP Move
PIP
Ch 5- NBC
PIP channel display appears when PIP is turned On.
PIP Menu
"]7hePIP Menu changes the settings for the PIP picture. Press
MENU repeat,_ly until the PIP Menu appears. Press the
Up/Down arrows to choose an option. Press the Left/Right arrows
t_ adjust that option. See "PIP Menu" section for information.
!Contrast I [* !
15nt
Size
The PIP Menu customizes settings for the PIP picture.
3212-O
Swap l
Move T PIP Swap
12-- 4
Page 37

MAINTENANCE AND TROUBLESHOOTING
CARING FOR YOUR PROJECTION "IV
Your TV will look better, have a longer life, and perform
better if you care for it properly.
_ irst, check to see that the TV is off. For added
Cabinet Care
Non-Wood Cabinet or Cabinet Components
Moisten a soft cloth with a mild soap solution. Wipe the surface
with a damp cloth. Then rinse the cloth in clean wamr and wipe
the surface :again.Allow the TV to air-dry before turning it on.
Wood Cabinets or Cabinet Components
Use any good furniture cleaner and polish. Regular care will
help preserve the finish.
Screen Protector And
Projection Screen Cleaning
Use a soft cloth moistened with warm water and rub lightly in
the soiled areas of the screen. DO NOT USE A TISSUE OR
PAPER TOWEL, AS THESE MAY DAMAGE SURFACE.
Wipe only in the vertical (up/down) direction (along the
grooves). If there is a dirt buildup, a mild soap solution may
be used. Use dry soft cloth to dry the screen. Avoid scratching
or damaging: the screen surface.
_ NOTE: The TV screen is easily damaged. Avoidaccidental contact with the screen.
safety, unplug the TV from the power outlet.
Note: If you unplug your TV, you may have to re-
set the clock to the current time.
EXTENDED ABSENCE
Before an extended absence (such as a vacation) you may want
to unplug tl_: power cord from the electrical wall outlet. This
will protect the "IV from poss_le damage from lightning or
power line sqtrges. If you have an outdoor antenna, you may
also want to disconnect the antenna lead-in wires on the back
of the TV.
Note: If you unplug your TV, you may have to reset the clock
to the current time.
TV PICTURE INTERFERENCE
Your'IV picture may be _Tected by interference such as:
Speckled or Streaked Piety:re
Can be caus_t by nearby aulomobile ignition, electrical appli-
ances, etc. Most noticeable ia weak signal areas.
Snow in Picture
Caused by insufficient signal. Usually cau_ by the TV being
located too far from the TV ,_;tationorby improper antenna
installation.
Ghosts or Reflections
Caused by signals being reflected from surrounding buildings,
water tanks, or other high structures.
Radio Signal
Causedby police, amateur,or CB radiotransmitters.
These interference probletas can often be corrected by using a
better antenna, signal amplifiers, or various fdter devices. See
your TV de_der for additiotml information and available TV
accessories.
VIDEO GAMES AND OTHER FIXED
PATTERN DISPLA Y CA UTK)N
If you use your TV for video games or other fixed displays,
avoid setting the Brightness control for an excessively bright
picture. A fixed display is any image that doesn't change fre-
quently, such as a channel/network identifi_ition or other sym-
bol that remains in the same location for long periods of time. A
bright, fixed pattern, if left ort for long periods of time, can re-
sult in a permanent imprin! on the TV pictme tube. You can re-
duce this possibility by alternating the use of the fixed pattern
display with normal TV picture viewing, by turning down the
Contrast control for sustained fixed pattern use, and by turning off
the fixed pattern display when not in use.
RECORD MODEL NUMBER OF YOUR TV
The model ar_l serial numbers of your new TV are located on the
back of the TV cabinet. For yoar future convenience and protec-
tion, we suggest that you recont these numben; here:
Model No.
Serial No.
ZPROCAR 13 _ 1 _ /
Page 38

MAINTENANCE AND TROUBLESHOOTIIVG
SCREEN PROTECTOR
Some projection TVs are equipped with a screen protector. If it is necessary to remove or adjust the protector, "peel" the moldings
away from uheTV to separate them from the tabs groove and carefully lift out the, screen protector. Be careful not to damage the
moldings.
Snap-in
Moldings
Screen
Protector
Step 1. Install one of the long snap-in moldings into the
groove at the bottom of the TV and push the molding tabs into
the groove as shown at the right. Place screen protector into
the slot between the molding and the TV screen with the label
on the screen protector facing you. Have someone hold the
screen protector in position over the TV screen.
Step 2. Carefully shift the screen protector up, down, left, or
right as needed.
the TV screen or the screen protector
Be extra careful not to scratch either
surfaces during installation.
Step 3. Place the remaining three snap-in moldings in position
on the top (remaining long piece), left, and right sides of the
"IV (shorter pieces). Press firmly enough on each snap-in
molding to force the retainer tabs into the groove as shown
above; each tab must be fully inserted. After installation, remove
the label from the front of the screen protector, if desired.
Molding
Tabs G_'oove
/ /
/ /
/ /
/ /
/ /
/ /
.,- /
Push molding tabs into
groove on front of "IV,
- Retainiing
Tab
Groove on
front of TV
Clean screen protector asdescribed on previous page.
Page 39

MAINTENANCE AND TROUBLESHOOTIlVG
BEFORE CALLING FOR SERVICE
Check these items and see if you can correct the trouble by changing the adjustment of a control or _tmenu setting. By making these
simple checks before calling for service, you may save time and money.
Problem
Picture OK. Poor sound.
Sound OK. Poor picture. Re-orient antenna. Try another channel m possible st_ttion trouble.
No picture or sound. Is TV on? Is there power in wall outlet'.,' Is TV plugged in? Is antenna
Picture blurted or distorted. Ghost in picture. Check antenna or cable hook up for broken wires. Try another channel
No color, or poor color. Is it a color program? Check antenna or cable hook up for broken wires.
No sound or sound is low. VOLUME (VOL) setting may be too low. Check MUTE key operation
Cannot select certain channels or other channels. Channels may be skipl:_l in CH. ADD/DEL/SURF option of SETUP
No closed captions Are captions available'.,' Is CAPTION 1, CAPTION 2, CAPTION 3 or
Black or blue box covers half of screen. Is text information available? Is TEX7I"1, TEXT 2, TEXT 3 or TEXT 4
No picture or sound when VIDEO or Is audio/video source hooked up properly? Are all Wires connected to
S-VIDEO source is selected. VIDEO IN or S-VIDEO IN jacks on "l%'/Source connection center?
No stereo sound or weak stereo sound Check AUDIO mode. Was stereo sound present before selecting VIDEO
when using _stereo VCR. or S-VIDEO source?
PIP inset frame is black or lacks contrast Adjust PIP COLOR AMD CONTRAST settings in PIP MENU. Are all
when selecting VIDEO for PIP inset, wires connected to VIDEO INjacks _n 'IV/Source connection center?.
PIP inset frame is "snowy" when using ANT/ Is TV/VCR switch on the VCR (or remote) in the "IV l:osition'_
CABLE for PIP and S-VIDEO for main picture.
No picture when using VIDEO for PIP Is TV/VCR switch on the VCR (or remc te) in the TV position?
inset source _mdANT/CABLE for main picture.
Remote control does not work. Are batteries okay? Does Indicator light turn On? Is TV turned On7 Is
Notes:
Try This
Re-orient antenna. Try another channel --possible station trouble. Adjust
AUDIO MENU options. Check Mute feature? Check for local interference.
Is antenna/cable connection loose?
Adjust VIDEO MENU options. Trouble with cable-TV system? Is
antenna/cable connection loose?
hooked up? Is cable hooked up? Trouble with cable-TV system? Check
auxiliary audioNideo extuipment. Check channel selection. Is the
channel blocked by PARENTAL CONTROL?
poss_le station trouble. Check for local interference.
Adjust VIDEO MENU options.
on remote control. Are Speakers set to Off?
MENU. Use AUTO PROGRAM a second time. Is TV in Surf Channel
Scan mode with only one channel speci_.qedas a Surf channel?
CAPTION 4 selected u_iingthe CAVEIONS option on Me SETUP MENU?
selected in the CAPTIONS opfionofthe SETUP MENU.
remote in "IV mode?
El If your TV fails to respond to the VIDEO PRESET selection, or to any other menu selection, you must reset the TV. Simply dis-
connect the AC power cord from the power outlet. Wait a few minutes, then plug the TV back into the power outlet. You may
have to re,set the clock to the current time.
[] Unplugging the TV does not deactivate the Parental Control.
3212-o 13 -- 3 0
Page 40

Zen Ad Revise isi
2/17/97 1:20 PM Page 1
i
..._ .,'
Broken or lost remote?
For an exact replacement
remote control for your
new Zenith television, see
your local Zenith dealer
or order direct by calling
1.800.255.6790. To assure
the correct remote for
your new Zenith TV,
please have your televi-
sion's model number
ready when you call.
ONLY
$39.95
plus S4.50
Shipping & handling
CA 7.75%, GA 6.0%, IL 7.75%, KS 4.9%. KY 6%, ME 6%, NJ 6%, PA 7%, RI 7%, TX 7,75%, VA 4.5%, WA 8.2;%
TV wall mounts
• Easy to install
• Safe and strong
• 5-year warranty
• Made in the U.S.A.
• Space-saving
• UL listed
• 10-degree tilt
13" ALGW-13
ONLY
$69.95
19/20" ALGW-20
ONLY
$89.95
25/27" ALGW-27
ONLY
$109.95
VCR Bracket ALGVCR
ONLY
$49.95
plus S4.50
Shipping & handling
Residents add sales tax--
These completely cordless,
lightweigi_t headphones
allow you to enjoy a
private listening experi-
ence without disturbing
others. The infrared
technology delivers a
virtually interference free
signal up 1:o30 feet!
Works with most TVs,
VCRs or audio devices -
with a fixed audio output
jack. Comes with micro-
phone hookup option
for universal compatibility.
Soft cushioned ear pads
for comfortable use.
ZEN 91 1
ONLY
59.95
plus $4.50
Shipping & handling
Use Your Visa or
t
f
MasterCard to Order __-_lr__r/_
Call Toll-Free _r,,_- _,.-f ®
1.800.255.6790
PLEASE ALLOW 2-3 WEEKS FOR r)ELIVERY
59670 Zenith
Zen_Ad. Iu+Zen_gd_ I _,-t
I
7 ,_-, • "7_-o
,B__12=EE_--I 4: 4 r,1.....r ,_,
Page 41

REPLACEMENT PRODUCT REGISTRATION CARD
You could win a full refund on your new Zenith product!
Look for the Product Registration Card on your new video
product.
Each month Zenith holds a drawing from the completed
Product Registration Cards received during the preceding
month. Zenith will reimburse the winner for the full purchase
price of the product.
To participate, simply complete and return the Product
Registration Card today.
The odds of winning the free drawing described above
depend on the number of participants. Free drawing offer
is void in Canada and other places where restricted or
prohibited by law. Offer is void for Hotel/Motel and
Institutional models. Rental models are not eligible.
Use the replacement Product Registration Card below
only if the original card has been misplaced or lost.
Product Card lost or misplaced?
The Product Registration Card furnished with your video
product is pre-printed with its Model and Serial numbers.
Please fill out the card and raa_l it at your earliest convenience.
It is imperative that Zenith know how to reaclh you promptly if
we discover a safe .t.t.typroblem that would affo=t you. If the
original card lhas been lost or misplaced, use the replacement
card below. F,ithercard will qt:alify you for the free drawing,
but you are limited to only one entry in the drawing. Complete
the card, place it in an envelope, and mail it to:
Zenith Electronics Corporation
P. O. Box 173257
Denver, CO 80217-3257
Zenith Product Registration Card
H5Z01-01
(_) Please Print Clearly or Type (_) Area Code Telephone
1.I--]Mr. 2. E]Mrs. 3.[-]Ms. 4.[_Miss I [ [ JI [ I J'-I
IIIJ
First Name Initial Last Name
I...............i Iq ,:,, ',Ji!l!i!iiiiiiiiiiii', liiiiiiilq',iiiiiiiil ';':l,:;',',iiii[iiiii ':t_1
City ......_i_i_iii_!iiii_iiiiiiiii!i!iiii!iiiiiii!i!ii_iiiiiiiiiiiiiiiii_;_._;iii_i_i_iiii!iiiiiiiiiiii_i_i_i;i_;ii_?._ili!ii_iii!iiii;_iiiiiiii_::_iiiiiiiiii_iiiiii_iiiiiiiiiiii}_:i:i,_iiiiiiii_iii_iii!i!iii_i_:.,_i_;_!_iiii;iiii}_ii{:_:i_i_iiiiiii_iiiiiiii_ .::_iiii::iiiiiiiiiiiiiiii:_::
State ......ZIi_i}}i__i'._i_i}i::i::__::iiii}iii',}',iii_;;_ii!ii'jiii'_i:,iiii{iiiiiiiiiii}iiii!iiii;_iiii_!}};_',iii!}',iiiiiiiil!}iiiiii',ii:,i',i',',}!ii:,iiiiiiiiiiiii_ii_,_,_,,,,,,,,:,_!_.;::;i;_;_=i_i_;_;_=,_==,_,','........................
Mo. Day Yr.
III 111 IIJ
.....;::!iiii!iiiMODEL
........................I I
.............NUMBER
Copy Numbers Here
From Label on Set
NUMBER
L_
PHOTOCOPY AND CUT ALONG DASHED LINE
Pleaserecord the model number
and serial number from the sticker
on the backof your set.
Page 42

A VISO PARA NUESTROS CLIENTES DE HABLA HISPANA
Zenith publica muchos de sus manuales de instrucciones en
idioma espafiol. Si le interesa pedir la versi6n en espafiol de este
manual, lle_ el formulario provisto a continuaci6n, fotoc6pielo y
envfelo a ia direcci6n indicada.
No todos los manuales de instrucciones est_ disponibles en
espafiol. Sin embargo, podemos proporcionarle el manual que
corresponde a un modelo similar a este, en el cual se describen
casi todas _; caracterfsticas del producto que usted uliliza.
El manual en espafiol es gratis.
Formulario de pedido de su manual de instrucciones
(Este forlnulario de pedido es solo vfilido parael producto descrito en es!_emanual
Nfimero de modelo:
Nfimero de serial:
Dia de Compra:
Instrucdones:
1. Llene el formulario prolx)rcionado a continuaci6n con la
informaci6n solicitada,
2. Haga una fotocopia dell formulario de ix_ido y enviela a:
Service Literature Deparlment
Zenith Video Tech Corporation
1000 Milwaukee Avenue
Glen view, IL 60025-2493
( 206322,
UZ-GZ PROJ
(lo encontrar_l en la parte posterior del aparato)
(1o encontrarti en la parte posterior del aparato)
Nombre
Direcci6n
Ciudad
Pals
Apartamento
Estado C6digo postM
ZTVCOUPS
Page 43

ZENITH QUESTIONNAIRE
HELP US HELP YOU
We want you to get the most out of your new Zenith product Thanks for taking a few momenls to complete the following question-
naire; we value your input!
Agree Disagree
1. The operating guide is well-organized. []
D D [ZI ID
4
S 3 2 1
2. I can find the information I want. l"7 [[[]
6 4
3. The text is clearly written, l-"] []
$ .4
4. This operating guide is written in language that r-]
i understand, s ,,
5. The examples are clear and useful. 1"7
6 ,!
6. Diagrams and illustrations are easy to follow. D D
8 ,I
7. The quality of this operating guide would influ- El _-_
ence whether I'd buy a Zenith product again, s .,
8. I would recommend this product based on the ['7
quality of the operating guide. 5 ,,
9. Instructions are clear and helpful. V-] __
o
10. This operating guide meets my expectations.
s 4
D D D [--1 D
S ,11 3 2 1
D [ZI D
3 2 1
ID [_S D
3 2 1
D [D D
3 2 1
D [-q D
3 2 1
D [-q D
3 2 1
D [D D
3 2 1
D [D D
3 2 1
D [-1 rn
3 2 1
Z-GZLEVI
206-3212-O
COMMENTS
Your comments help us determine if we should give greater emphasis to certain topics in the operating guide.
Page 44

Fold Alonl_ This Line Second.
BUSINESS REPLY MAIL
I
FIRST-CLASS MAIL PERMIT NO. 203 GLENVIEW, IL
POSTAGE WILL BE PAID BY ADDRESSEE
NO POSTAGE
NECESSARY
IF MAILED
IENTHE
UNITED STATES
ZENITH ELECTRONICS CORPORATION
ATTN: TECHNICAL PUBLICATIONS
1000 MILWAUKEE AVE.
GLENVIEW, IL 60025-9852
Name
Street
City
State Zip Code
First
I
I
I,II,,ll,,,ll,,,,,I,l,l,l,l,l,,I,,ll,,I,l,,,I,l,,ll,I
Fold Alon z This Line First.
L_sl:
Daytime Telephone
Date Questionnaire Completed
Page 45

YOUR ZENITH TV WARRANTY
PROJECTION COLOR TV
Welcome into the Zenith family! We believe that you will be pleased with your new Zenith Projec:tion TV. Please read this
warranty carefully. It is a "ONE YEAR FULL WARRANTY," plus a limited second year pictTaretube warranty, as defined under
federal law. This warranty gives you specific legal rights, and you may also have other rights that vary from state to state within the
U.S.A.
Zenith's Responsibility
Service Labor and Parts -- During a period of one year from
effective warranty date, Zenith will supply new or
remanufactured replacement picture tubes or other parts, and will
pay for service laborby a Zenith authorized service center, when
such parts or service labor are needed to repair the product as a
result of manufacturing defects. Further, Zenith will supply a
new or remanufactured replacement for any picture tube which
fails during the second year after effective warranty date because
of a manufacturing defect. Replacement parts are warranted for
the remainhlg portion of the original warranty period. The above
service labor warranty applies only in the U.S.A.
On-Site Service m Warranty service is provided where the
Projection TV is installed.
Not Covered m This warranty covers manufacturing defects
and does not cover installation, adjustment of customer controls
in the home, installation or repair of home antenna systems, cable
converters or cable company-supplied equipment; it also does
not cover clarnage due to misuse, abuse, negligence, acts of God
or other causes beyond the control of Zenith. Any alteration of
the product after manufacture voids this warranty in its entirety.
Before you ask for Warranty service, check the
operating guide section entitled, "Maintenance
And Troubleshooting." You might avoid a
service call.
Owner's Responsibility
Effective Warranty Date --- Warranty begins on the date of
original consumer installation. For your convenience, keep the
dealers datcxl bill of sale or delivery ticket as evidence of the
purchase date.
Operating Guide m Read your Operating Guide carefully so
that you will understand the operation of your set and how to
adjust the customer controls.
Antenna .-- Reception problems caused by inadequate home
antennas or faulty antenna connections are the owner's
responsibility.
Important: Product Registration -- Please fill out and mail
your Owner Registration (Laid. It is imperative that Zenith know
how to reach you promptly if we should discover a safety
problem that could affect you.
Warranty Service m For warranty service information, contact
any Zenith authorized service center. Parts and service labor that
are Zenith's responsibility (s,_eabove) will !beprovided without
charge. Other service is at the owner's expense. If you have any
problem in obtaining satisl:'actory warranty :;ervice, call or write
the Customer Response Center. You must provide the model
number, serial number and date of purchase or date of original
installation.
Zenith EIo:tronics Corporation
Customer Sc:rvice Department
1000 Mihvaukee Avenue
Glenview, IL 60025-2493
Telephone: (708) 391-8752
Mon-Fri, 7:00 a.m. - 8_00 p.m. Central Time
ZW'P-.PRO
ADDITIONAL ZENITH PROTECTION PLAN AVAILABLE
Zenith offers you the opportunity to obtain additional long-term protection against failure of
the picture tube inyour new television. Our Picture Tube Protection Plan enablc:s you to avoid
any unexpected picture tube repair expenses and keep your television in top condition. It
guarantees you a genuine Zenith replacement picture tube and service from a Zenith
authorized service center.
Be sure to send in the Product Registration Card. We will send you an application for the
Protection Plan near the expiration of the two year manufacturer's warranty on the picture
tube. For additional information, call (847) 391-8757.
 Loading...