

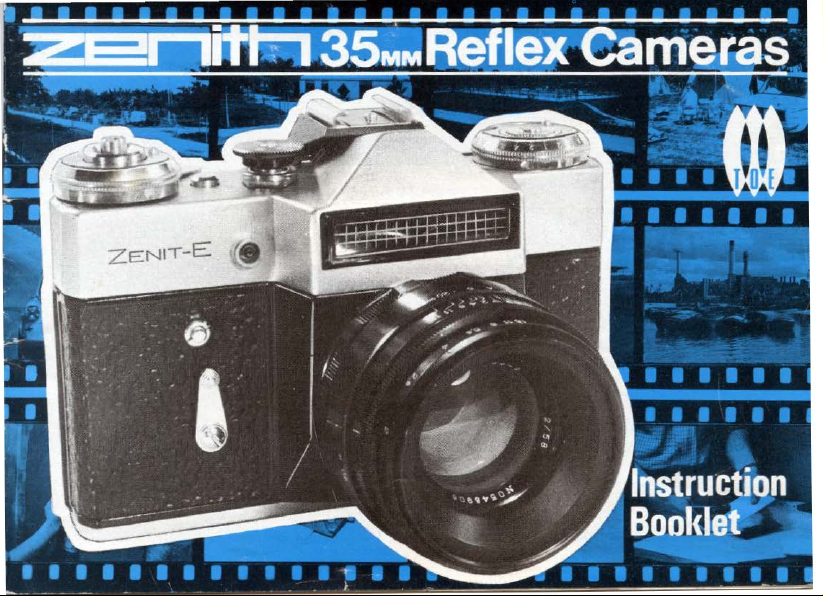
Page 1

Page 2
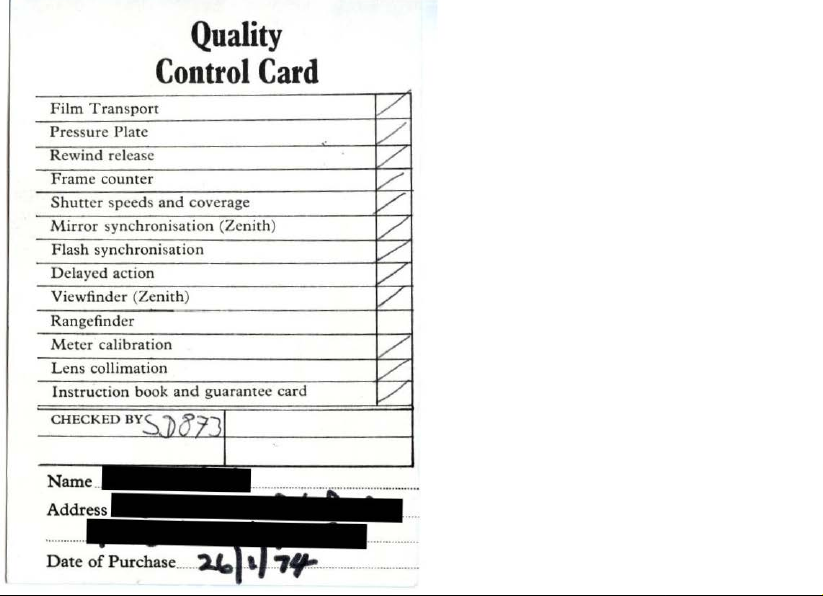
Quality
Control
Film
Transport
Pre
ssure
Plat
e
Rewind
release
Fr
ame
counte
r
Sh
utt
er speeds
Mirror
Flash sync
Delayed action
nd
Viewfi
Rang
e find
Meter calibration
Lens
collimation
Instru
ction book
and
synchroni sation (
hronisation
er (Zenith
er
cove
)
and
guarantee ca
rage
Zenit
Card
h)
rd
Page 3
Page 4

2
Page 5
WARNING
FOR
ALL
TIME
LOCK RELEASE
ZENITH
CAMERAS
The
type
of
pany
he film to
t
cassette used by
will cause jamming and
tea r.
this
may
Com-
cause
When checking
that
the
release
button
wind lever
tion
pression
Please
1 All
th
made fr
During the manufac
bubbles
the gla
fect whats
the com
2
The Zenith camera wi
of
the
is
not
. Failure
at
to
release
that
the
Note
modern
fitted
mon
exce
high
to your Zenith camera)
om
special grades of
almost inevitab ly o
ss, but these have no adverse ef-
oever on
posite phot
ochro
me and colour films, wit h
pti
on of any Fu
your
camera please see
in
the
centre
in
the
locked
down
this
will give
wind mechanism
qua
lity Lenses (such as
opt
tur
ing process small
ccur
the fun
ctio ning
ograph
ic
len
ll
accept
ji
35mm
of
the
posi-
the
im-
is
faulty.
are
ical glass.
within
of
s.
all
types
. Cassette.
3 Zenith cameras have a built
gin when viewing
Finder. This enables the whole viewing
area
to
be used when
ture
without
matter
whic h may be
edges
of
the
fear
finder.
thro
of
losing
in
ugh the Reflex
comp
on the
safety mar-
osing
any
subject
extreme
:zenith
F2
Helios
Specification
f2
Helios but, additionally, features a
built-in selenium
meter.
See pages 14
lating
Zeni
th
for
unloading
is
similar
to
the Zenith B
photo
-electric exposure
and
15
for
instructions re-
to
the controls and
E exposure metering system and
of
camera.
operation
the
of
pic-
E
the
3
Page 6

:Z:E:!I
1ith
BF2
This instruction manual contains the basic characteristics and essent ial operating principles
Zenith B Camera. Read very carefully and
use. Soon you
have
to
creative
6 I
MPORTANT
VI/hen
2
Do
optical
3
Do
fingertip
4
Do
5
Always
6
Always
will
think
possibilities
become familiar
about the 'mechanism'
with
RULES
removing
not
efficiency,
not
not
or
touch
the
optical
and
rotate
the
to
rotate
advance
ensure pre-set
shutter-re/ease
avoid
engaging
the
shutter
the
this fine instrument.
TO
OBSERVE
fitting
the
lens,
surfaces
may
damage
'r
lock.
speed
selector
film-
transport
ring
is
closed
with
the
of
the camera-
grip
it
of
lenses
coated
button.
crank
after
follow
the
or
the
return-mirror.
surfaces.
only
short
its
fullest
instructions in
but
enjoy concentrating on
avoiding
direct
distance
extent.
and
before
camera's controls, and handling, until you
as a whole
Apply
the
to
focussing
the
undue
pressure
Fingerprints
'push-button'
between
"8"
This
avoids
exposure.
first
few
action
and
blank
on
"500".
4
days
of
the
more
any
one
diminish
with
exposures.
do
not
ring.
your
of
the
Page 7

SPECIFICATION
Lens
: 58mm Helios f/ 2 interchangeable
18
inches; apertures: f/2
scale.
...
ndustarf3
viewfinder
io
ngl
e stroke crank: advances film, sets shutter, counts exposure, primes
tt
er speed dial. ·
x 3
i"
x 4 • (approx.)
grammes.
Vi
Film
Transport
Other
Dimensions
distance
OR
50mm l
apertures f3 .5
Shutt
er : Focal plane; Instant return mirror; speeds: 1 /
delay timer. 'M' and 'X' synchro.
ewfinde
Features
Weight
r:
Reflex
magnificat
: Si
shu
: Film type reminder; Fil
: 5
i"
:
920
su
to f/16
.5 interchangeable; minimum focus : 24 inch es;
to
f16; aperture-setting ring ; depth
with grou
n: 5X.
ndglass
m-rewind
per-fast 6 element;
; pre-set diaphragm; depth
of
field and distance scales.
30
sec
to
focusi
ng screen; Eyepiece
button.
minimum
of
1 /
500
focus:
field index;
sec;
Band
5
Page 8

1 2 3
1
Rash unit connector
2
3
Rashgun bracket
4
Self-timer setting lever
Lens
I
4
6
5
Page 9

Cassette spool
Viewfinder eyepiece 7
Opening catch
Cassette chamber
Film channel runners
Take-
Take-
up
Film pressure plate
guide
Sprocket 8
Film aperture
up
spool
spool spring
Back cover
•
•
10
11
12
13
14
11
11
6 7
8 9
10
11
12
1314
15
16
7
Page 10

1---
-----
In
dex
of
the diaphragm setting ring
Diaphragm
Pre-set diaphragm ring
Depth
of
setting
fie
ld
scale
ring
with
with
index
index
~----
---
Distance scale
Focusing ring
Diaphragm setting ring
Focus
ing
ring with dia
Distance scale
Depth
of
field scale
with
ind
ex
phragm scale
8
Page 11
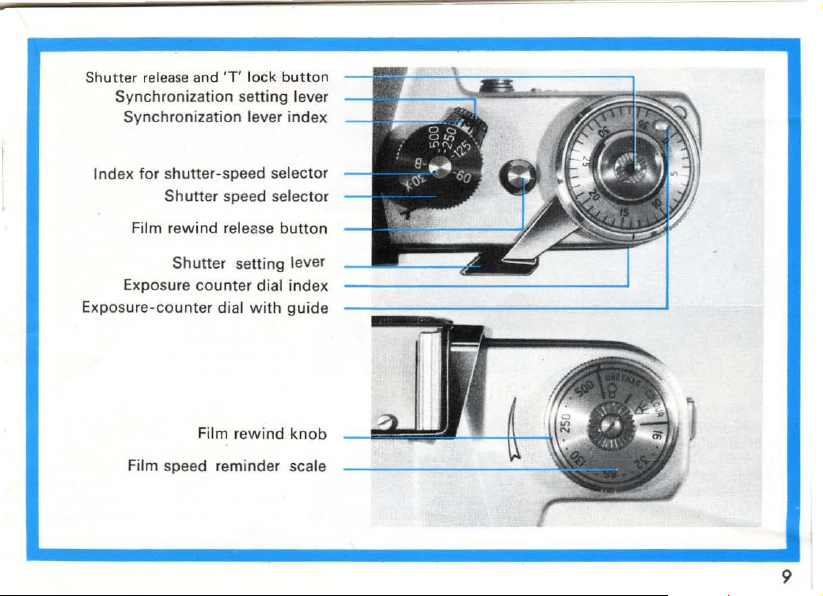
Shutter
release and
Synchronization setting lever
Synchronization lever index
Index
for
Film rewind release
Exposure counter
Exposure-counter
Film speed reminder scale
'T'
lock
shutter-speed select
Shutter speed selector
Shutter setting lever
dial
Film r
ewind
butt
on
or
button
dial ind ex
with guide
knob
9
Page 12

INSTRUCTIONS
FOR
LOADING
(see
p.
14
for
The camera can be loaded in
normal
lighting
the back
pulling
pull
Next,
upward
cassette .
conditions.
cover of the
the
lock-catch
the
film-rewind
s and inseri
10
Zenith
camera
upwa
the
Open
rds.
wheel
film
E)
by
Now
fix
film
spring and engage
t
t
over
Replace
seat. Return
its
back
lock-catch. Advance
setting lever
then
the
advanced
shot. To transport
f
ilm
the shutt
release
Note. Whi
check whet
wheel
whether
loaded
the exposure-cou
he
t
in
exposur
is
the leading edge
und
er the
ooth and film
hat
the
film
the
film -channe
the
original position.
fig ure ·o·
dex
coc
the
cover by pressing
to
press
the
lever turns.
by
to
the
film
er
twice : pr
button
le
cocking
her the fi
rotat
es.
the camera is
with
dot
on the rin g. Set the
e c
ount
ked.
take-up
sprocket. Ensure
is
guided correc
casse
rewind
the stop position:
release
the spa ce
aperture :
after each
If
film. Finally, turn
nter dial and set
to
align
er when
of
spoo
on
the
spool-
l runners.
tte
into
wheel
Close
down
the s
hutter-
button.
the
film
of
non-exposed
cock
essing
cocking:
the shu
lm rewin
not.
chec
correctly
with
the
shutter
the
tly
its
to
the
the
As
one
the
tter.
the
l
is
d
k
Page 13
EXPOSURE
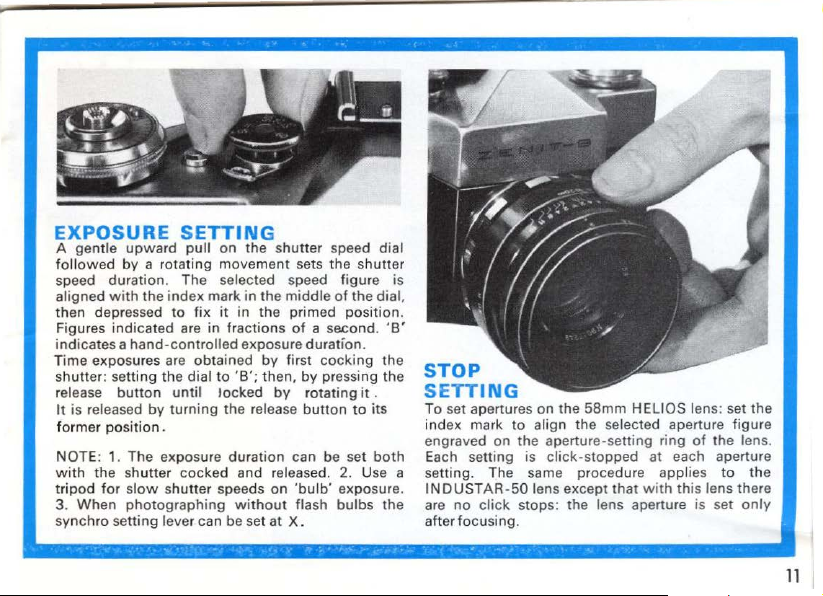
A gentle
followed
speed duration. The selected speed figure is
aligned
with
then depressed
Figures
indicated
indicates a hand-controlled
T
ime
exposures are
shutter: setting the
release
It
fo
NOTE: 1. The exposure
with
tripod
3.
synchro
button
is released
rmer
position.
the shutter
for slow shutter
When
setting lever can be set
SETTING
upward
by
photographing
pull on the shutter speed dial
a rotating movement sets
the
index
mark
in
it
in
in
fractions
exposure
'B'; then.
locked
the release
duration
and
speeds
without
the
the
by
by
to
fix
are
obtained
dial to
until
turning
cocked
the
shutter
middle
of
the
cocking
ng
it
to
be
set
exposure.
bulbs
dial,
ion.
the
the
.
its
both
the
primed posit
of
a second.
duration.
first
by pressi
by
rotating
button
can
released. 2. Use a
on
'bulb'
flash
at
X.
'B'
STOP
SETTING
To
set apertures on
index mark
engraved on
Each setting is
setting. The same procedure applies
INOUSTAR-50
no
click
are
after focusing.
the
58mm
to
align the selected aperture figure
the
aperture-setting ring
click-stopped
lens except
stops: the lens aperture is set
HELIOS lens: set
of
at
each aperture
that
with
thi
s lens there
the
to
the
lens.
the
only
11
Page 14

12
FLASH
SYNCHRONIZER
For
photographing
poor
illumination,
flash
gun.
Zenith
B camera is
a special device
flash
to
operaung
actinn
flash
tion
setting lever
When
operating
flash
gun, the
lever
should
Only
one
may
be used
camera:
either
flash
Hand
exposure "B"
mended
when
considerable
(after
flash)
over
resulting
in
you
For
this
which
coincide
time. To
exposure
when
with
switch
bulb
: set the
against
with
synchron
be
set against index " X
time
in
photographing
bulbs
or
using
amount
enters
the
exposure .
conditions
should
purpose
synchronizes
synchroniza-
an electronic
izati
of
the
electronic
1s
flash
of
camera
fitted
the
on
index
on
1 /
Zenith
not
stray
shutter
a si
setting
30th
recom
bulbs
with
use
with
ngle
"M
with
flash
light
wit
the
sec.
: a
a
-
".
".
B
.
-
h
Page 15

When shooting
procedure :
by turning the
go
. Set exposure; choose the frame; focus the lens
Clo
se the lens opening
timer release button. The shutter operates in
9 sec. after pressing
IM
PORTANT
The camera should
scrupulously
a closed carrying case.
Never remove the
Clean the optical coated lens surfaces
device, any repair and adjustment should
BULB
When using
uncocked. The shutter must always be cocked
with
the self
-tim
er,
cock
the shutter:
self
-ti
mer setting lever
to
th
e button.
TIPS
be
clean and protected from excessive
FLASH
bulb
handled
Fo
Jens from the camera unnecessarily.
WARNING
type flashguns. do not insert a n
observe the foll
wind
the self · timer mechanism
down
the f stop and press t
gently
and carefully avoiding undue force
r storage
pur
only
be
THE
SELF
-
TIMER
owing
as far as
it
will
...
he
self
no
less than
vib
rations.
poses the cap sho
with
performed
a camera
ew
befor
This
only
flashbulb
e t
he flashbulb
UNLOADING
THE
CAMERA
1see p.
14
fo
r
Zenith
E)
•••
lllllliiiiiiiiiiiiiiiiiia'
When the exposure counter
means that the exposed
cassette. The procedure is the
tt
er mechanism
shu
button
and,
knob in the direction
until
has left the spring
cover
and remove the fi lm cassette
mois
ture and sharp temperature fluctuations.
uld
be
placed on the lens and the shutter and self- timer released.
prevents
blower-brush.
by a highly
into
the
is connected .
holding
you feel, by the relaxed
of the
camera. 3
to
controls and dials.
dust
and
dirt
from reaching the surfaces
As
the camera is a complex
qualified specialist.
gun
while
it
is
dial
shows
film
should be rewound into the
following
by
pressing the
it
in this position. rotate the film rewind
shown
of
the take-up spool. 2 Open the back
Pull
connected
film
by
the indicating pointer
for
ce, that the end
the
film
rewind
out
of
the camera.
Always
optical
to
the camera
figure
(36
or
20)
: 1 Disengage the
-rewind release
of
the
film
knob
upwards
keep the camera
Keep
the camera in
of
optical parts.
and mechanical
with
the sh
utt
it
er
13
Page 16

:zenith
58mm
F2
HELIOS
LENS
E
LOADING & UNLOADING
Proceed
spring-loaded
exposure
brought
slightly
(Illustr
position, for
the
p
ation shows
cassette
osition).
as
previously
rewind
meter
into
operati
and turning
loading
pull
the
instructed
knob
controls
ng
position
it
anti-clockwise.
the
and
knob
is recessed
it
has
knob
final
upwards
but
first
by
depressing
in
the
removal
from
as
the
within
to
rewind
this
be
of
Specifications as Zenith B but, additionally, featur
built-in
aperture settings and
and
EXPOSURE
The principal
concentric
Dial
speed control and
the
illustration).
brated
Except
instructions
selenium
for
exposure,
for
photo-electric
film
speeds.
and
unloading
the
Zenith B apply
CONTROLS
contro
to
(calibrated from 1
small 'zero' index in the curved
with
ASA
ls comprise
the
rewind knob (see illustration). The Outer
/30th
this,
when
The
Inner
Dial
and DIN speed ratings and aperture
exposure meter calibrated for
the
camera,
all
equally
two
circular dials and each is
to
1 / 500th sec ) is
operations
to
the
rotated, is constantly
is
the
film-speed
meter-w
ind
control
14
the
es
a
Zenith
shutcer-
linked
ow,
fig
E
to
(see
(cali-
ures).
R
ewind Knob
Inner
Dial
(film-speed
aperture in
---
dex)
and
--1'1
Page 17

EXPOSURE
To obtain accurate exposure: fir
Inner Dial)
speed rating
fingers
do
position
Dial until the small 'zero' index is bisected
speed)
(located in the curved
of
reading
the selected apertur
image-resolution is obtained, turn the pre-set diaphragm ring
extent-
OPERATION
st
align
the
to
coincide
(ASA
not
obscure
at
which
aperture and shutter speed. Finally, align the red
depress the release
with
or
the needle comes to rest.
e:
the small
DIN ). Next,
the
window)
point
point
photo
-electric
. The meter is
the camera at subject, rotate the focusing ring
button
film-speed setting line (engraved
black
dot
the camera lens
to obtain perfect exposure.
engraved beneath the selected
window
(mounted
Now,
rotate the knurled Outer (shutter
now
primed
to
the
by the stationary meter-needle
for
dot
on
of
coincident
until
to
its
film
that
with
sharp
fullest
subject and ensure
above the lens). Note the
any seiection
on
the
Helios lens
clockwise
the
-
15
Page 18

 Loading...