

Page 1
machine numbers I B13AOIL B13AO2D I B13AO3D I BlgAO2D B19A21D
_inedthat this
for energy
gtossary
of _merica
the ENERGY
operating guide / warranty
Page 2
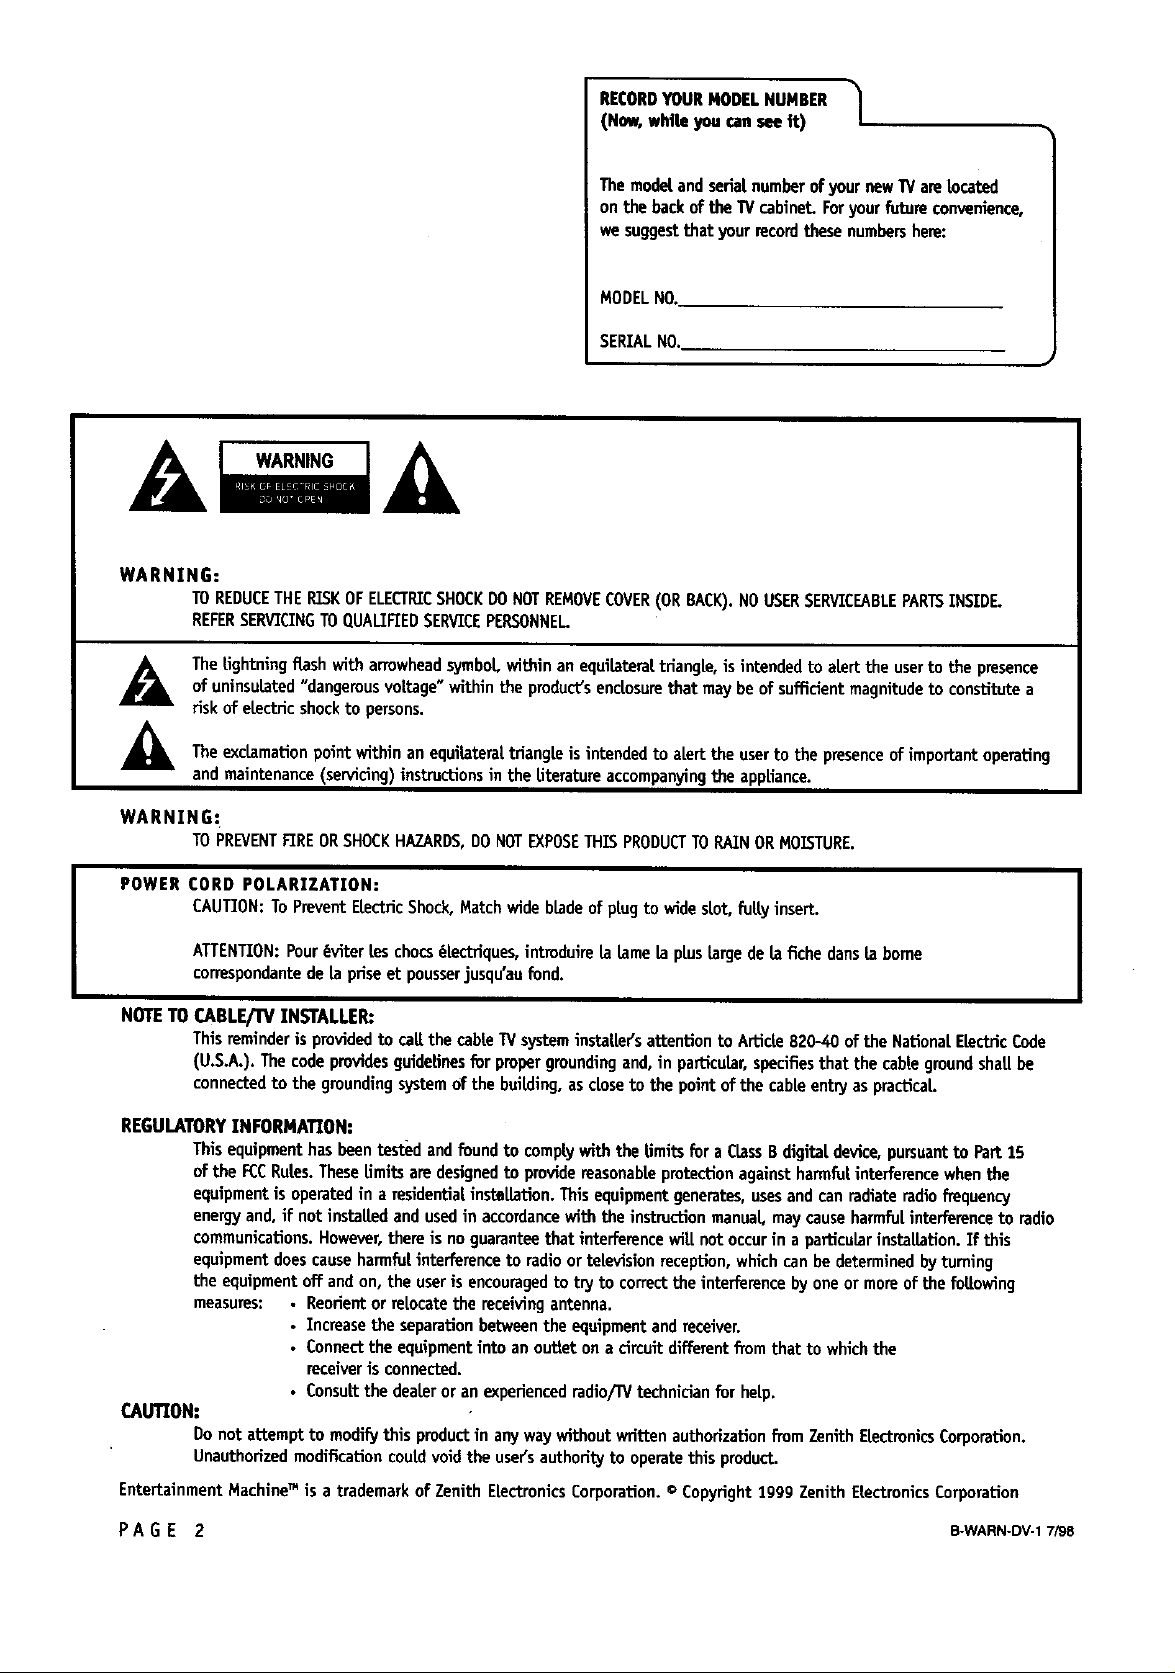
WARNING:
RECORDYOURMODELNUMBER J
(Now, while you cansee R)
The mode[andserialnumber ofyournewIV areLocated
onthe backof the TV cabinet.Foryourfutureconvenience,
wesuggestthat your recordthesenumbershere:
MODEL NO.
SERIALNO.
TOREDUCETHERISKOFELECTRICSHOCKDONOTREMOVECOVER(ORBACK).NO USERSERVICEABLEPARTSINSIDE.
REFERSERVICINGTOQUALIFIEDSERVICEPERSONNEL.
Thelightningflashwitharrowheadsymbol withinan equiLateraLtriangle,isintendedtoalerttheusertothepresence
ofuninsuLated"dangerousvoltage"withintheproduct'senclosurethatmay be ofsufficientmagnitudetoconstitutea
riskofelectricshocktopersons.
[
Theexclamationpoint within an equibteral triangleis intendedto alert the user to the presenceof importantoperating
and maintenance(servicing)instructions in the literatureaccompanyingthe appliance.
WARNING:
TOPREVENTFIREORSHOCKHAZARDS,DO NOTEXPOSETHISPRODUCTTORAINOR MOISTURE.
POWER CORD POLARIZATION:
CAUTION:ToPreventELectricShock,Matchwide bladeof plug to wide slot,fully insert.
ATTENTION:Pour_viter les chocs_iectriques, introddireta Lamela plus LargedeLafiche dansLaborne
correspondantede la priseet pousserjusqu'au fund.
NOTETO CABLF./I_ INSTALLER:
Thisreminderis providedto call thecable IV systeminstailer's attention to Article820-40 of the National ELectricCode
(U.S.A.). Thecode providesguidelinesfur propergroundingand,in particuLar,specifiesthat the cablegroundshaUbe
connectedto the groundingsystemofthe building,ascloseto the point of the cableentry as practical
REGULATORYINFORMATION:
This equipmenthasbeentested andfoundto complywith the Limitsfur a CLassBdigitaldevice,pursuantto Part 15
of the FCCRules.TheseLimitsare designedto providereasonableprotectionagainstharmfulinterferencewhenthe
equipment is operatedin a residentia| instaEation.Thisequipmentgenerates,usesandcanradiate radiofrequency
energyand, if not installed and usedin accordancewith the instructionmanual may causeharmfulinterference to radio
communications.However,thereis no guaranteethat interference wil.I not occurin aparticularinstallation.If this
equipment doescauseharmfulinterference to radio or television reception,which can be determinedbyturning
the equipmentoft andon, the useris encouragedto try to correctthe interference byone or more of the fullowing
measures: • Reorientor ra|ocate the receivingantenna.
• Increasethe separation betweenthe equipment andreceiver.
• Connectthe equipmentinto an outi_eton a circuit differentfTomthat to whichthe
receiveris connected.
CAUTION:
Donot attempt to modify this product in any waywithout writtenauthorization from Zenith ELectronicsCorporation.
Unauthorizedmodification could void the user'sauthority to operatethis product.
EntertainmentMachineTM isa trademarkofZenithElectronicsCorporation.© Copyright1999ZenithEiectronicsCorporation
• Consu|tthe dealeror anexperiencedradio/iv technician fur help.
PA GE 2 B-WARN-DV-17/98
Page 3
Important safeguards for you and your new product
Your product has been manufactured and tested with your safety in mind. However, improper use can resuLtin potential
electrical shock or fire hazards. To avoid defeating the safeguards that have been built into your new product, please read
and observe the fottow!_ngsafety points when installing and using your new product, and save them for future reference.
Observlng the simple p_ecautioris discussed in this operating guide can help you get many years of enjoyment and safe
operation that are built into your new product.
This product complies with at[ applicable U.S. Federal safety requirements, and those of the Canadian Standards Association.
1. Read Instructions
ALLthe safetyand operatinginstructions shouldbe read
beforethe productis operated.
2. Follow Instructions
At[operatingand useinstructions shouldbe followed.
3. Retain Instructions
The safetyand operatinginstructions shouldbe retained
for future reference.
4. Heed Warnings
A[twarningsonthe productandin the operatinginstruc-
tions shouldbe adheredto.
5. CLeaning
Unplugthis productfrom the watt outlet beforecleaning.
Donot useLiquidcleanersoraerosolcleaners.Usea damp
clothfor cleaning.
6. Water and Moisture
Do not usethis productnearwater for example,near a
bath tub, washbow[, kitchen sink, or Laundrytub, in a
wet basement,or near a swimmingpool
7. Accessories
Do notplacethisproducton an unstablecart,stand,tri-
pod,bracket,or table.The productmay fall,causingseri-
ousinjuryto a childoradult,and seriousdamage tothe
product.Useonlywitha cart,stand,tripod,bracket,or
tablerecommendedbythemanufacturer,orsoldwiththe
product.Any mountingoftheproductshouldfollowthe
manufacturer'sinstructions,and shouldusea mounting
accessoryrecommendedbythemanufacturer.
8.TransportingProduct
A productandcartcombinationshouldbe moved with
care.Quickstops,excessiveforce,and unevensurfaces
may causetheproductand cartcombinationto overturn.
9. Attachments
Do notuseattachmentsnotrecommendedby theproduct
manufacturerastheymay causehazards.
10. VenUtation
SLotsand openingsin the cabinetare provided for ventila-
tion and to ensurereliableoperationof the productand to
protectit from overheating, and these openingsmustnot
be blockedor covered.The openingsshouldnever be
blocked by placingthe producton a bed,sofa,rug, or
othersimilar surface.This productshouldnot be placedin
a built-in installation suchasa bookcaseorrackunless
properventilation is providedorthe manufacturer's
instructions have been adheredto.
11. Power Sources
Thisproduct shouldbe operated onlyfrom the type of
power sourceindicated on the marking[abet.If you are
not sureof the type of powersupplyto yourhome, con-
suit your productdealer or Local powercompany,for prod-
uctsintended to operatefrom battery power,or other
sources,referto the operatinginstructions.
12. Line-Cord Pol.arization
This product is equipped with a polarized alternating-cur-
rent Lineplug (a plug havingone bLadewider than the
other). This plug will fit into the poweroutlet onlyone
way.Thisis a safety feature. If youare unableto insert
the plug fully into the outlet, try reversingthe plug. If
the plugshouldstilt fail to fit, contactyour electricianto
replaceyourobsolete outlet. Donot defeat the safety pur-
poseof the polarized plug.
13. Power-Cord Protection
Power-supplycordsshould be routed sothat they are not
Eke[yto be walkedon or pinchedby items placeduponor
against them, paying particularattention to cordsat
plugs, conveniencereceptacles,andthe point wherethey
exitfromtheproduct.
PORTABLE CART WARNING
(ConUnued on next page)
PAGE 3
Page 4

(Continuedfrompreviouspage)
14. Outdoor Antenna Grounding
If an outsideantenna or cable systemis connectedto the
product,be surethe antenna or cablesystemis grounded
so asto providesomeprotectionagainst voltagesurges
and built-up static charges.A_cie 810 of the National
Etectrlca[Code(U.S.A.), ANSI/NFPA 70 providesinforma-
tion with regardto propergroundingof the mastandsup-
porting structure,groundingof the lead-in wire to an
antennadischargeunit, size of groundingconductors,Loca-
tion of antenna=dischargeunit, connectionto grounding
electrodes,and requirementsfor the groundingelectrode.
Examp|eof Grounding Accordingto National Electrical
CodeInstructions
• Antenna Discharge Unit
(NEC Section 810-20)
Gto=J_!dingConductor
(NEC Section 810-21)
GroundClamps
Power Service Grounding
Electrode System (NEC
NEC- NationalELectricaLCode
15. Lightning
Foradded protectionfor this product(receiver) duringa
lightning storm, or whenit is [eft unattended and unused
for longperiodsof time, unplugit from the wait outlet and
disconnectthe antenna or cable system. Thiswit[ prevent
damageto the productdueto lightningand power-Line
surges.
16. Power Lines
An outside antenna system should not be located in the
vicinity of overhead power lines or other electric tight or
power circuits, or where it can fair into such power lines or
circuits. When instaiting an outside antenna system,
extreme care shoutd be taken to keepfrom touching such
power lines or circuits as contact with them might be
fatal
17. OverLoading
Donot overload watt outlets and extensioncords asthis
can resutt in a risk of fire or electric shock.
A_ 250, Part H)
18. Object and Liquid Entry
Neverpushobjectsof any kind into this productthrough
openingsasthey maytouch dangerousvoltagepointsor
short-outpartsthat couldresultin a fire or electricshock.
Neverspilt llquid of anykind on the product.
19. Servicing
Do not attempt to servicethis productyourselfasopening
or removingcoversmayexpose you to dangerousvoltage
or other hazards. Referatl servicing to qualified service
personnel
20. Damage Requiring Service
Unplugthis product from the waitoutlet and refer servic-
ing to quatified service personne[underthe followingcon-
ditions:
a. If the power-supplycordor plugis damaged.
b. If liquid hasbeen spiited, or objectshave fatten into
the product.
c. If the product hasbeenexposedto rain or water.
d. If the product doesnot operatenormaLLyby foLlowing
the operatinginstructions.Adjustonly those controLsthat
arecoveredby the operatinginstructionsas animproper
adjustmentof other controLsmayresultin damageand wii[
often requireextensivework by a qualified technician to
restore the productto its normaloperation.
e. If the producthas beendroppedor the cabinethas
beendamaged.
f. If the productexhibitsa distinct changein perform-
ance.
21. RepLacement Parts
Whenreplacementpartsare required,be sure the service
technician has usedreptacementparts specified bythe
manufactureror havethe samecharacteristicsas the origi-
nal part. Unauthorizedsubstitutionsmay resultin fire,
electricshock, or other hazards.
22. Safety Check
Upon compietlonof any service or repairs to this product,
askthe service technician to performsafety checksto
determine that the product is in proper operating condi-
tion.
23. WaLLor CeiLing Mounting
The product shoutd be mountedto a wail or ceiling ontyas
recommendedby the manufacturer.
24. Heat
The product should be situated awayfrom heatsources
such as radiators, heat registers,stoves, or other products
(inctuding amptifiers) that produce heat.
PAGE 4
Page 5
Note: This operating guide describesfeatures for a family of TV models, as a result, not all features are
available on all models!
See the feature by mode[ chart below to identify which features are on your W.
Turnto the nextpage to beginyour TV setup.
SafetyWarnings 2
ImportantSafetyInstructions 3
Tableof ContentsandModelby FeaturesChart 5
Step 1. Hook Up W
Hookup Directory 6
TV and other Equipment Hookups
Antenna, accessoryDi-poLeantenna 7
Cable service 8
Antenna with VCR g
Cableservicewith VCR 10
Step 3. Customize Your W's Features
Setup Menu (Start with page 11, Auto Program)
Language 17
Ch Add/Det 18
CLockSet Menu
Set Time 19
Timer Setup, On and Off Time, On/Off Timer 20
SLeepTimer 21
Video Menu 22
Special FeaturesMenu
Caption/Text 23
CCWhenMute (CLosedCaptions) 24
Step 2. Reception Set Up and Channel Search
Signal Setup/Auto Program 11
(Select Antenna, or cable service and perform
channelsearch)
RemoteControlKeyFunctions 12
On-ScreenMenuOperationUsingRemote 13
On-ScreenMenu OperationUsingIV FrontPanel 14
Gtossary 28
Maintenance 29
TroubLeShooting 30
Recommended Accessories InsideBackCover
Warranty BackCover
ParentalControl 25
Audio 27
BasicTV Operation 15
On-ScreenMenus FeaturesOverview 16
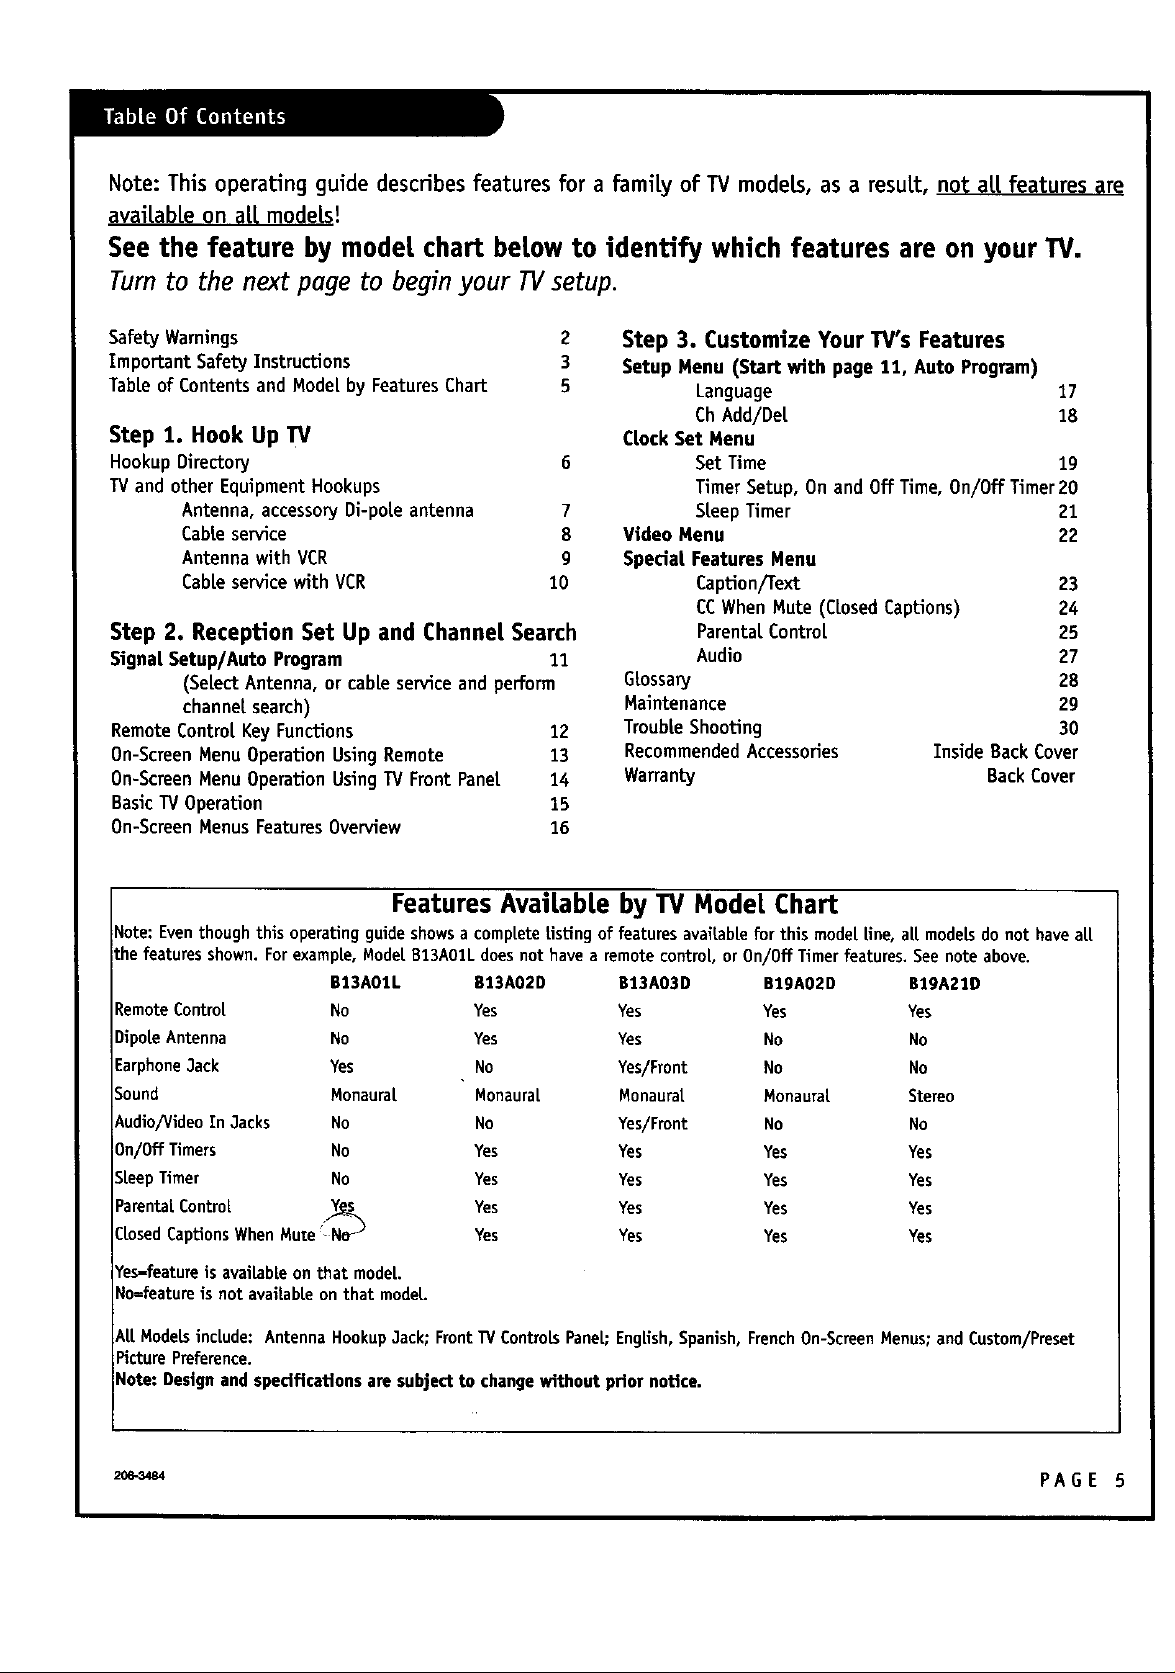
Features AvaiLable by TV Mode[ Chart
Note: Eventhough this operatingguide showsa completelisting of features avail.abLefor this model [ine, aLLmodels do not have aLL
the features shown. ForexampLe,Model B13AOIL does not havea remotecontroL,or On/Off Timer features. See note above.
B13AOIL 813A02D B13AO3D BlgAO2D BlgAZID
RemoteControl No Yes Yes Yes Yes
DipoLeAntenna No Yes Yes No No
Earphone3ack Yes No Yes/Front No No
Sound Monaural Monaural Monaural Monaural Stereo
Audio/VideoIn 3acks No No Yes/Front No No
On/Off Timers No Yes Yes Yes Yes
SLeepTimer No Yes Yes Yes Yes
ParentalControl Y_ Yes Yes Yes Yes
CLosedCaptionsWhen Mute'-NoJ Yes Yes Yes Yes
Yes-featureisavailableon thatmodel.
No=featureisnotavailableon thatmodel.
ALLModelsincLude: Antenna Hookup3ack; FrontTVControls Pane[;EngLish,Spanish, French On-ScreenMenus;andCustom/Preset
Picture Preference.
Note: Design and spedflcations are subject to change without prior notice.
PAGE 5
Page 6
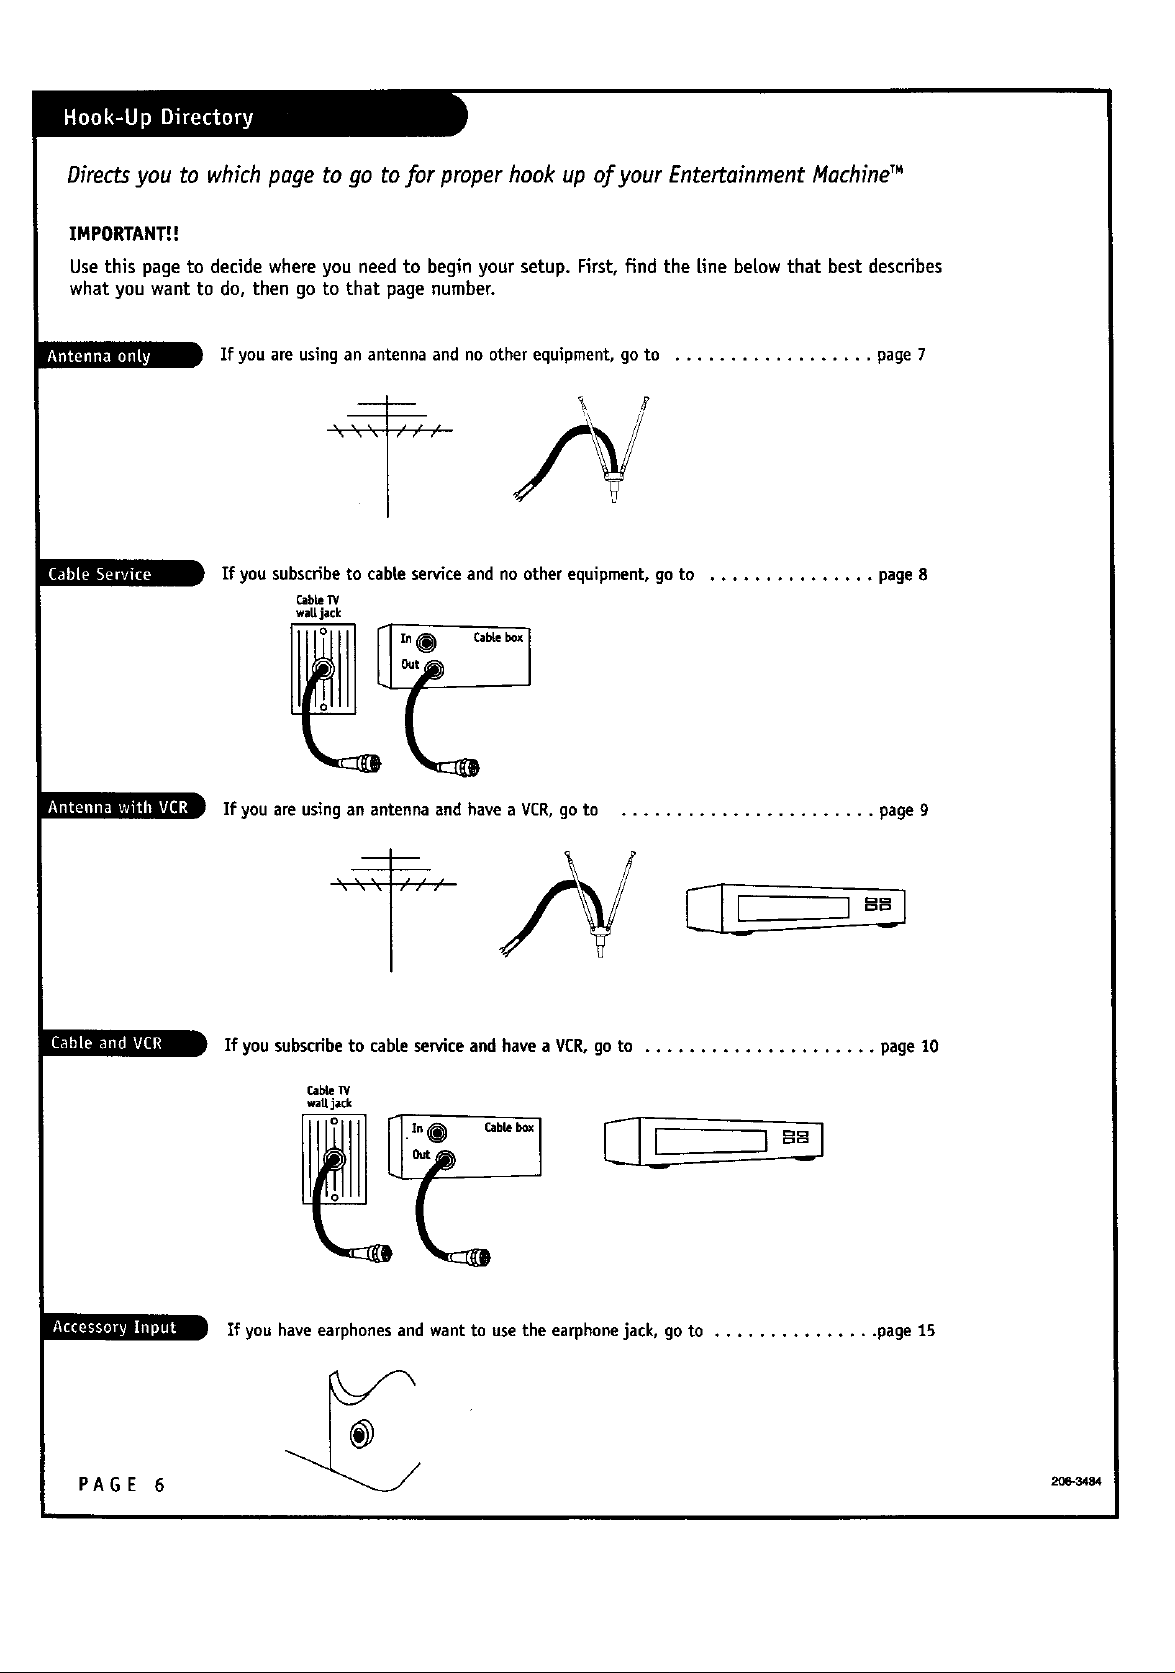
Directs you to which page to go to for proper hook up oj:your Entertainment MachineTM
IMPORTANT!!
Usethis page to decide whereyou need to begin your setup. First, find the tine betow that best describes
what you want to do, then go to that page number.
If youare using an antenna and no other equipment,go to .................. page 7
If subscribe
you to cabteserviceand no other equipment,go to ............... page 8
Cable P/
waU jack
If you are usingan antennaand havea VCR,go to ....................... page9
If yousubscribeto cable service and have aVCR,goto ..................... page10
r.ablelV
waajad<
Ifyou haveearphonesandwantto usethe earphonejack,goto ............... page15
PAGE 6
2O6"3484
Page 7

Connecting an antenna to your Entertainment MachineTM
Hookupyour EntertainmentMachineTM, see
diagramsat right.
Removethe backof the remoteand put in
two AAAbatteries.
PI.ugin your TV. Do not ptug it into a
switchedoutLet.
Goto page11 to Auto Programyour
EntertainmentMachineTM.
[]
[]
If you haveo 75 ohm RFcable,
thenyou don't need any adapters!
Remember,whenscrewingRF
cablesontojacks,dock_se tight-
ens,and counterclockwiseloosens.
Over-the-Air
Antennas
Antenna
ohm)
Antenna
_ J 300/75 ohm
Adapter
V Feoa aL
Antenna
75 OHM RFCabte
300-75 OHH Adapter
2o_s4 PAGE 7
The wire that comesfToman off-air antennaor cabLeserviceprovider.Eachend rookstike a hex shapednut
with a wire stickingthroughthe middle, and it screwsonto the threadedjack on the backof yourW.
A smalldevicethat connectsa two-wire300 ohmantennato a 75 ohm RFjack. Theyare usuat|yaboutan
inch longwith two screwsononeend anda roundopeningwith a wire stickingout on the other end.
Page 8

Connecting Cableservice to your Entertainment MachineTM
Hookup your EntertainmentHachineTM, see
diagramsat right.
Removethe backof the remote and put in
two AAAbatteries.
PLugin your W. Do not p!.ugit into a
switchedoutl.et.
Go to page 11 to Auto Programyour
EntertainmentHachineTM.
If you'reusing a cable box, leaveyour 1Van
channel 3 or 4 and useyour cable box to
change channels.
Without CabLeBox
CabLeW
waltjack
With CabLeBox
CabLeTV
waUjack
Antenna
l
i
Remember,whenscrewingRFcablesonto
jacks, clockwise tightens,and counterclock-
wiseloosens.
[]
_ ....................................................................................... _
' CABLESERVICE Thewire that supp[ies a[[ your cab[eTV (CAW)stations. |
PAGE 8
If you're usinga cable box,Auto Program
(page I1) might onlyfind the channelyour
cable serviceis on (usually channel3 or4).
Don't worry,that's o[lyou need!
/
J
Page 9

Connecting your oj_-air antenna and VCR
to your Entertainment Machine TM
(VCRwith Fiat Wire Antenna Adapter)
Hookup your EntertainmentMachineTM, seedia-
gramsat right.
Removethe backof the remote and put in two
AAAbatteries.
P[ugin your TV. Do not p[ug it into a switched
outtet.
Goto page11 to Auto Programyour
EntertainmentMachineTM.
nna_
z fiat wire
300/75 ohm
Adapter
(VCRwith Round Antenna Wire)
[] Remember,whenscrewingRFcablesontojocks,
clockwisetightens, and counterclockwiseloosens.
Antenna
Over-the-Air
I
Coblesnotindudedv_thTV
PAGE 9
Page 10

Connecting Cable service and a VCR
to your Entertainment MachineTM
Hookupyour Entertainment MachineTM, see
diagramsat right.
Cable"rv
waU.tadc
RFcoaxialwire (75ohm)
Without CabLeBox
m
[]
Removethe back ofthe remoteand put in
two AAAbatteries.
Ptugin your W. Donot plug it into a
switchedouttet.
VottA120C_
Go to page 11 to Auto Program your
Entertainment MachineTM.
Leaveyour VCRandyour televisiontuned to
channel three and usethe cableboxto
changeehanneb.
CabteW
waLLjack
With Cabte Box
Remember,whenscrewingin RFwiresonto"
jacks, clockwiseb'ghtens,andcounterclock-
wiseloosens.
[]
NoA/V cablesare included with your Zenith
Entertuinment MachineTM.
Zfyou're usinga cable box, Auto Program
(page 1I) might onlyfind the chonnelyour
cable serviceison (usuallychannel 3 or 4).
Don't worry,that's oll you need!
PAGE 10
)In Output
switch 3 4
Out Video Audio
©
Page 11

Signal sets the TVup to receive either over-the-air antenna signaLs (Air) or the cable signal_Tomyour
cable service provider (Cable). UseAuto Program to outomaticoUyfind and store in the TV'smemory, all
the stations available in your area.
kid
kD
Set-Up Im _ _ _1
Language English
• Signal Cable
Auto Program
ChAdd/Delete
Select ,9_ Adjust • Menu
With the remotecontrol in hand,pressPOWERto turn on
your EntertainmentHachineTM,
PressHENUsothe Setup menuappears.
Usethe UPor DOWNarrowto selectSignaL.
With Signalhighlighted, usethe RIGHTor LEFTarrow on the
remote controlto selecteither:
Air - for over-the-afr antennareception.
CabLe- for receptionfrom your cableserviceprovider.
Usethe UPor DOWNarrowto selectAuto Program.
- Air
Set-Up [] 0 G _[
Language English
Signal Cable
• AutoProgram
ChAdd/Delete
Select <:,- Adjust • Menu
Q
O
Pressa RIGHTor LEFTarrowto begin AutoProgram,follow
on-screeninstructions.Whenthe channelsearchis complete,
you are readyto watch TV.
AutoProgromfinds chonnetsbeingreceivedbythe TVtuner,See
informotiononpage15_orusingthe CableBoxorV£Rtuners.
[] Cablewill not work unle_ you subscribeto ceblesemite.
OFF-AIR-ANTENNA
CABLE
2O6-3484
The devicereceivingthe programsignalbroadcastoverthe air.
YourAuto Programselection,if yousubscribeto a cane service.
® ® ®
® ® ®
sourcesleep cc
C2 Q _
PAGE 11
Page 12

A quick list of all the keys on your remote and what they do
Note: At! the features |isted below may not be available on your W, see page 5 for a complete
listing of the features available by model number on each TV in this family.
CH (CHANNEL UP) --
Goes to next higher channel number.
VOLUME (LEFT) --
Decreases the sound level.
UP/DOWN-LEFT/RIGHT ARROWS
The Up/Down arrowsselect menu
optionsand the LeFt/Rightarrows
adjust menuoptions.
DISPLAY
Showsthe channeL/time display.
PICTURE
Selects videomenuoptions.
LEFT,and RIGHTarrowsadjust
settings.
NOT USED
Turns ]V On or Off.
_ POWER
Displays on-screen menus.
__ MENU
S
VOLUME (RIGHT)
Increases the sound level.
,,dvoi
4; leou,:p.)i
CH (CHANNEL DOWN)
Goes to next lower channel number.
s MUTE
,:4:, !S>
" flashback
source sleep cc
TurnssoundOffand On
while the picture remains.
Pressonceto mutesound,press
again to restoresound.
NUMBER KEYPAD
Selects channels directly.
FLASHBK (FLASHBACK)
Return to the Last channel viewed.
SOURCE
Switches between currentlyselected
TVchannel, Channel3, and Channel4
on someTVs.
On modelB13AO3Donly, switches
between watching TV,Aux
(Audio/Video jack input), Channel3,
and Channel4.
PAGE 12
CC
Choosesdosed captions andtext
options:C1, C2, T1, T2.
SLEEP
Setsthe time the TV will turn off
automatically.
remote contTotmodetnumbers
SC3482
SC3484 w/Glow Keys
Page 13

How touse theremotecontroltoaccesstheon-screenmenus; selectthemenu options,
and adjusttheoptions
................. x
PressMENUrepeatedty to scroi[ through the availabte
F
menus.
Presseither the Up or Downchan arrow key repeatedly
to move the menuarrow up or down the avai[abte menu
options and setectone.
Usethe Right or Left vat arrow keyto adjustthe seLect-
ed menu option.
@
Set-Up Set-Up []
- ib Language English
P
i--
-1, Signal Cable
i- -
-• AutoProgram
I_ _
- _ Ch Add/Delete
Select <_ Adjust • Menu
Language English
• Signal Cable .... Air
AutoProgram
Ch Add/Delete
Select "=_" Adjust • Menu
power
i," x_I
_x_han
Youcan usethe TVfront panel controlsto operatethe on-screen
menusalso, see nextpage.
Cablewill not workunlessyousubscribeto cableservice,
display i mute
,r:_ picture,_,
._ flashback
sourcesleep cc
! !
PAGE 13
Page 14

How to useyour _ont panel controls to operate the on-screenmenus
Note: Whenusingthe buttonson the front panetto
seLectand adjust optionson the on-screenmenus:
CHANNEL- Select Up/Down
VOLUME= Adjust Left/Right
To accessthe Setup menu, pressthe MENU
button once;to getthe other menus,keep
pressingthe MENUbutton.
Choosethe on-screenmenuoptionyou wish
to changeusing either SELECTbutton.
TheADJUSTbuttons act as an "adjustment_"
(Left/Right) function - - usethem to change
the menuoption.
power • channe| • • vo|ume • menu
0
.- 000000 °
I ©
Menusdisappearafter twentyseconds.Toget them
back,push the MENUbutton again.
[]
PAGE 14
If you'velost your remote,you conget o new
replacementbycoUing1-800-255-5790 topurchase
a replocemenL
Note:Remotesare not availablefor Mode! BI3AO1L.
Page 15

Introducing you to the basics of your Entertainment MachineTM
1 - PressingDISPLAYwilt showthe ChanneL/Timedisplay;the currently
selectedchanneL.,andthe currenttime (if the cLockis set).
2 - CHANNELUP/DOWNarrows:Usethese arrowsto changechannels. Auto
Programfinds aLLchannelsavaiLabLeto you.
2 - NUMBERKeypad:Toskipto any channeL,enter the numberof the
channel usingthe NUMBERkeypad. Press"0" first for channelnumbersunder
10.
2 - FLASHBACK:To instantLyreturn to the Lastchannelviewed, pressFLASH-
BACK(PreviousChanneD.
20
12:35 AM
power
3 - VOLUME RIGHT/LEFT: To adjust the sound LeveL, use the VOLUME
R/GBT/LEFT arrows.
3 - Tosilenceyour TVinstantly, pressMUTE.To get the soundback, press
MUTEagain.
Iil1_
Usethe IV tuner, (or if you have other sources)the VCRtuner, orthe CabLe
Boxtuner to tune channelsand providethe pictureand soundto your TV.See
pages8, 9, and 10 for Happy/Sad notesregardingVCRand CabLeBoxes.Set
your VCRand/or CabLeBox output switchesto either _ or 4, then tune the TV
to channel3 or 4 to receivethe VCRor CabLeBoxtuner image.See your VCR
and/or your CabLeBoxowners manuaL(s)for further operating information.
I...'!_'.]n_'_mLI
Anearphonejack is provide on somemodels.Connectyour earphone(s)and
fot[owthe instructionsprovided with yourearphone(s).
cha_
disj_lay . mute
,_._: picture ;._(___
flashback
sourcesleep cc
-IIv !
2_3,_4 PAGE 15
Page 16

Descriptionso/ themenus and submenus onyour EntertainmentMachineTM
Menu Name
SETUP
Language
Stgna|
Auto Program
Ch. Add/Del,
CLOCK
Time Set
On Time
Off Time
On/Off Timer
Sl,eepTimer
Desedption and page number
Setsup thebasic/eatureso/yourEntertainmentMachine
Pickthe languageyouwant your on-screenmenusto appearin. 17
ChooseAir, or Cable service. 11
AutomaticaLLyfinds and storesactive channelsto flip through using ChannelUp/Down. 11
YoumanuaLLypick and choosewhichactive channels wiLLappearwhen flipping through using 18
Channel Up/Down.
Sets the clock, programs the Sleep Timer, and on/oj_ timer optYons
lg
Setthe TV dock's time.
Setthe time that the 13/wiLLautomaticaLLyturn on. 20
Setthe time that the 13/wiLLautomaticaUyturn off.
Pickwhetherthe on/off timers wiLLbe workingor not.
Pick a presettime that the TVwiLLautomaticallyturn off, 15 minutes - two hours. 21
PAGE 16
VIDEO Personalizesthe picture image
Youroptionsare: Picture Pref., Contrast,Brightness,Sharpness,CoLor,andTint.
SPECIAL Goes beyond basics and customizesyour Entertainment Machine"
Caption/Text Choosethe captioningor text options for yourEntertainmentMachineTM.
Optionsare: Off, Caption1, Caption2, Text1, orText2.
CCWhen Mute CLosedCaptionsappearan-screen when mute is selected (sound is turned off).
ParentaLControl. Restrictviewer programmingbasedon selectedratings.
Audio SeLectsStereo, Monaural or SAP(SecondAudioProgram)on Ws with Stereoaudio.
2Z
23
24
25
Page 17

®®
Use to choosea different language for the
on-screenmenus to appear in
PressMENUto place the Setup menu on
the TV.
Use the Up or Down SeLectarrow to
hightight the Language option.
Use the Left or Right adjust arrow to
choose either: Eng|ish, Spanish, or
French as the language the on-screen
menus wilt appear in.
Set-Up 0
l, Language English
Signal Cable
AutoProgram
ChAdd/Delete
Select <_ Adjust • Menu
\ )
(D
.,, I_hanf ",,
F \ / %
•--,,o .... ,,oJ_
• m- \ , ;
rnenu_,lll_,_
- - - Spanish, French
r
[]
Evenif the 711isturnedonand o.f_,thesetectedlon-
guegeremainsfor theon-screenmenus.
If the TVisdisconnected.frompower,it revertsbackto
the offginalpreset conditionwithEnglishon-screen
menus.
display mute
_picture
, flashback
.... O" :
L ] _ .
source sleep cc
2oe-34s4 PAGE 17
Page 18

Followthe instructionsbelowto includeor
removechannelsfrom the channelscan
F
Language English
Signal Cable
AutoProgram
• ChAcid/Delete
®
®
Note: Use the remote control
to add or delete channels.
As shownin the Setup menu, with Ch Add/DeL selected:
To add or de[ete a channel, use the number keypad to
tune to the channel..
Usethe l.eft or right arrow to adjust, either: add the cur-
rentl.y tuned channe[ or delete it.
To sel.ect another channel,to add or del.ete,use the num-
ber keypad or Ch Up/Down and repeat above instructions.
ForModel No. B1301Lonly: Sincethere isno remotecontrol for this model
you mustuse the ch up/down arrowsto select channels. T.fyou delete chan-
netsfTomthe 7Y'smemory,simply rerunAuto Programto restoreol[avail-
able chonnets.
Select 4_.- Adjust • Menu
_r
•, i ¸¸-"
g %
crldrlJ _i
/, _Ii
Char_ /
display . mute
,_ picture :_
"7 8). _.9_
_- S.6i flas_l_.,k•
source sleep so
i
=
CHANNELSCAN
ADDED
DELETED
PAGE 18
Thechannels found and put into the TV's memorywhen AutoProgram'sChannelSearchwasperformed. Channelsthat
aretuned asthe user presseseither the ChUp or Down keys on the remoteor front controL pane[•
ChannetwiUbe included when pressing ChUp/Down.
Channe[wiLtnot be included when pressingChUp/Down.
20_-8484
Page 19

Use to set the time on the TV'sdock
PressMENU repeatedly to place the CLock
menu on the TV screen.
Usethe Up or Down SeLectarrow to
p,
highlight the Time Set option.
IL
Press and herd down the Left or Right
Iv
Adjust arrow and set the current time,
making sure AM or PH is set correctty.
Clock EL]
• TimeSet: 12:00AM
OnTime: 12:21AM
OffTime: 12:09AM
On/OffTimer On
SleepTimer 30Min
y Select <- Adjust • Menu
power
// :cha_
, / - ,
= menu i
@
[]
rfyou setthedock,the timeappea_automaticaUy
whenyoupressD.P3PLAY.
If youdisconnect powerto the TVyou wiUhaveto res-
set the internalclock.
display mute
_,_: p!_u_e
flashback
source sleep cc
i ,
PAGE 19
Page 20

Use to set the clock: On Time/Of:f Time/On-Off TimerJ:eature
Clock _ _ € _ ]
TimeSet: 12:00AM
• On'rime: 12:21AM
Off_me: 12:09AM
On/OffTimer On
SleepTimer 30Min
Select 4_- Adjust • Menu
Clock _ _ I__1
TimeSet: 12:00AM
OnTime: 12:21AM
• Off'nine: 12:09AM
On/OffTimer On
SleepTimer 30Min
Select "q="Adjust • Menu
In the Clock menu with the On Time option
highlighted, pressand hold down the Left or
Right arrow until the time you want the TV
to turn on appears.
With the Off Time option highlighted, press
and hold down the Left or Right arrow until
the time you want the TVto turn off
appears.
With the On/Off Timer option highlighted,
use the Left or Right arrow to set:
"On" - the TVwilt turn On and Off.
"Off' - the 13/wit[ not turn On and Off.
Clock L_ _ _ _1
TimeSet: 12:00AM
OnTime: 12:21AM
OffTime: 12:09AM
• On/Off11mer On
SleepTimer 30Min
• Select <=.-Adjust • Menu
power
chan,'
i .
dspay mute
: picture
/
•2.: (g)
,4;, ,.g) :Bh
[]
ON TIMER
OFFTIMER
ON/OFFTIMER
TheOn/Oj_Timer dock settings conbe left the some
but thefeature conbe set to beGOb'reor ino_'ve.
Youmustset on off timefor the On/Off Timerfeature
to work.
Timesetting that automatlcal.tyturns your13/on at the preset time.
Time settingthat automatica[tyturns your "IVoff at the presettime.
Option that enablesor disablesthe On/OffTimersettings.
flashback
source sleep cc
• =
/
PAGE 20 _Te
Page 21

Automatically turns the TV off after the select-
ed preset time period has elapsed
Press MENUrepeatedly to place the Clock
menu on the TV screen.
Use the Up or Down SeLect arrow to
highlight the SLeepTimer option.
Use the Left and Right arrows to select the
time that you want the TV to turn itself
off in.
Another way to set the Sleep Timer is to
press SLEEPon the remote to access the
preset time options. Then pressSLEEP
repeatedty to choose one of the preset
settings.
Todisablethe SleepTimer,simplyselectOf] in the Sleep
Timeroptionsmenu orpressPOWERto turn the TVoff.
Clock
Time Set: 12:00AM
On Time: 12:21AM
OffTime: 12:09AM
On/OffTimer On
• Sleep Timer 30 Min• Select <_" Adjust • Menu
• J
power
chan
'vOl_ ; • ' ivo'
I _ i menu
display . mute
_,_:_picture _,
Sl 'B
_: _:
_J (0 i :
source sleep cc
w
flashback
Off
15Min
30Min
45 Min
60Min
90Min
120 Min
;LEEPTIMER Feature whichturns the TVoff after the presetectedUme has expired.Featurecan be presetto turn the TVoff in
a preset time period from !5 minutes upto :Zhours.
2ce-3,m4 PAGE 21
Page 22

Use to .fine-tune the picture's appearance to
your personal preferences
Press MENU repeatedly to place the Video
menu on the TV screen.
Use the Up or Down select arrow to
highlight the menu feature.
® ®
Video []
PicturePref Preset
Contrast E !
Brightness
Sharpness I I i
Color
Tint
• Select "q_ Adjust • Menu
Custom
Use the Left or Right adjust arrow to change
the menu options:
PicturePreference- - Custom,or Preset.
Contrast- - Changesthe amountof difference
between blackand white levels in the picture.
Brightness- - Increases or decreasesthe amountof
white in your picture.
Sharpness- - Raisesor lowers the definlton of the
picture. The lower the level,the softerthe image wit[
appear.
Color - - Adjustslevelsof at[ colors.
Tint - - Adjuststhe relative amountsof redand green
in your picture.
Anotherway to adjust the Videooptions is to press
PICTURErepeatedlyto select a video option,then use
the Left or Rightarrowto chartgethe setting.
power
,chart, ,,
\ ,/
., .,
i_.voI • _vol,!
="11J ,menu, jl_'/"_r
\ J ",. \ . / 1,
dsplay mule
picture _,
L,, /: - ! 7
flashback
i I
--q!Tb
CUSTOM
PRESET
PAGE 22
Userspecifiedsettingsforvideomenu options.As yo_ make changesinthevideomenu,the_areconsideredcus-
tom preferences.
Changesall.customsettingsbackto their originalvalues.
Page 23

cc
®
Use to turn on and select on-screen closed
captions or text, instead of sound
PressMENUrepeatedly to pLacethe Special
(features) menu on the TV screen.
Usethe Up or Down select arrow to
highUght the Caption/Text option.
Use the Left or Right adjust arrow to
choose:
Off, C1, C2, T1, T2.
Another method of choosing captions, or
text is to pressCCon the remote to access
the CapUon/Text menu. Press repeated_ to
choose one of the options.
Special []
• Caption/Text: Off-
CCWhenMute:
Parental Control
Audio:
T Select <J" Adjust • Menu
.' chan '
dispay . mute
picture ;,
C1C2T1T2
J
power
\ •
T_fa dosed caption optionis available on the broad-
cost,it wilt probably beCaption 1.
[]
C1,C2,T1, T2
CAPTIONS
TEXT
Becertainthat the programyou ere watchinghas
closedcaptions or text available,Checkthe local
listingsto determine _ dosed captionsor text are
availableon the broadcast.
flashback
source sleep cc
/
C1 - Closed Captions 1, C2 - Closed Captions 2, T1 - Text 1, T2 - Text 2.
Words that appear on the TV screen as a substitute for the audio track (instead of sound), for the hearing
impaffed. Today, many TV programs include closed captions in addition to the audio track.
Words that sorer| across the TV screen in a box, instead of sound.
PAGE 23
Page 24

® ®
Displays closed captions when the audio
(sound) is muted
Feature works when sound is muted.
Press MENUrepeatedly to place the Special
(features) menu on the TVscreen.
Use the Up or Down select arrow to
highUght the CCWhen Mute option.
Use the Left or Right adjust arrow to choose:
Off, or On.
Off, feature not active.
On, if available, captions will appear until
mute is turned off.
Press MUTEto activate CCWhen Mute.
Press MUTEagain to turn feature off.
Special []
Caption/Text:
b, CCWhen Mute: Off --
Parental Control
Audio:
T Select <_ Adjust • Menu
power
cha_
dispay mu_
...... picture :_
•_. "_) "31
-- On
Thisfeature worksgroatif you get a phonecall and do
not wont to missthe audio porbbn of theprogramyou
ore watching.
Not all programshaveclosedcaptions.
CCWHENMUTE
PAGE 24 _-_e,_
This feature a|lowsyouto have dosed captionsappearonthe rv screenwheneverthe mute mode
(nosound)is setected.
L-i 6) i J
source sleep cc
flashback
Page 25

Optional feature can be used to "block" undesirable programming from appearing on your TVscreen
ParentalControloffersthe user a widevariety of opUonsand settings in menu form that restrictor "bLock" the programmingwhichcan
appearto the generalaudienceand children. ParentalControlallowsthe userthe capabilityof defining whichprogramrating they con-
sideracceptable,to the youngeror moresensitiveviewer. It can be presetandturned either on or off bythe userwho specifiesa
secret4-number code,the password.The numberof hoursmust be specifiedand general audience and childrenviewer blocksshould
both be programmedinto the TV's memory. Viewerratingsare specifiedfor both the TV (TV GuideUnesmenu), and motion picture
industry (Movie Ratingsmenu); bothrating systemsshouldbe usedto assurecompletecoveragefor programsappearingon yourTV. The
ratings are directedat the agesof children, and mature audiences.
Overview
To insure complete coverage for aLLTV programs, (movies and regular TV shows) choose a rating for MPAA, from the seLec-
tions below AND choose ratings from the %/Parental GuideLines Rating System on the next page for General Audiences,
and for Children. In addition to those, you may wish to add additional restrictions from the Content BLockmenu and for
the No Rating option to be blocked. See menu example on next page.
Things to Consider before Setting Up Parental Control
• Specify which rating you consider acceptable to the viewer. (For example, if you choose %/-PG, all more restrictive rat-
ings wiLLbe automaticaLLyblocked; the viewer will not be able to see: TV-PG, %/-14, or %/-MA rated programming.)
• BLockprogram"Content_' basedon individual parameters suchas: StrongDiaLog(D), BadLanguage(L), SexScenes(S),
ViolenceScenes(V), or FantasyVioLenceScenes(FV);in the TV GuideLinesoption.
• How many hours do you want Parental Control to be active? Set the number of Hours option from Off, 1, up to 99.
• SeLecta secret password;in the Set Passwordoption. Usethe numberkeys on the remote. Don'tforgetthe password,it
is the onlyway you can accessthe ParentalControlmenu and changerating selections,or turn ParentalControl off.
• Doyou want ParentalControl to beactive aLLthe time? If not, you canturn it on or off; with the LockOn/Off option.
[] Simply spedj_'ng one content block such as SexScenes,
will not outomaticoUyblock another content in the pro-
grams from appearing.
[] Don'tforget your passwordoryou will have to wait until
the blocktimeyou spedfled expires,be_re you can
accessany restrictedprogramming.
MOTION
G GeneralAudiences
PG ParentalGuidance
Suggested
PG-13 ParentalGuidance
Suggested
R Restrictedviewing
NC-17 RestrictedViewing
X HardCore Films
PICTUREASSOCIATIONOF AMERICA(MPAA) RATINGSYSTEM
Content not offensiveto mostviewers.
Contentis suchthat parentsmay not want their children to viewthe program.
Programis inappropriatefor preteens, with a greater degree of offensive material
than a PGrated program.
Not for children underage 17. Strongelementsof sexand/or violence.
Not for children underage 17 under any circumstances.Strongsexual content.
Sameas NC-17 rating.
Youshouldset PorentalControl restrictions_or both general
audiencesand for childrenclessificotionsin the TVGuideLines
menuto be active at thesametime to insure completepro-
grammingcoverage.
Note:ZenithElectronicsCorporationis
cretionis advised.
notliablefor anyprogramcontentthat appearswhen usingthis ratingsystem;as always, userdis-
2o_._e4 PAGE 2
Page 26

A_er reading the preceding page,follow the instructions below to set up and activate Parental Control
Parental Control
Cap_o_Text
CCWhenMute:
I_ ParentalControl
Audio:
T SeLect4_ Ad)ust • Menu
Note: Use the remote control
to set up Parental Control.
- - I1_ Movie Ratings
,- -II_ TV Guidelines
- -_1,- No Rating: Unblock
- -_1_ Set Hours: Off
- -_" Set Password
i _ __. Lock On/Off: Off
€ Select _Adjust
MPAA Ratings
G _/
PG _/
PG-13 _/
R _"
NC-17 _/
X _/
• Me
€ Select _Adjust • Men
[] Blocked
Z Unblocked
Rating All FV V S L D
(Childrens)
TV-y _'
TV-Y7 _' v'
(General Audiences)
TV-PG _/ _'_/ _/\
TV-MA _'
Select o Adjust I Met
Enter the Password
O-9:Press • Exit I
I
B
B
m
B
As shown above in the Special menu with the Parental Control option highlight-
ed, press the Left or Right arrow to got to Parental ControL.
Usethe Up or Down arrow to select a restriction option, like TMGuideLines.
Use Up/Down, to select, the restriction; use Left/Right, to set the checkmark
(BLock) for the options. "Al!.," for TV-G for example. (See the Mini Glossary,
Ratings Charts on this and the previous page for rating meanings.)
Pressing t4ENU returns to the previous menu.
After you have selected and adjusted (BLocked/Unbtocked) the options:
• Set the hours you want Parental Control active.
• Set a 4-number password using the number keypad.
• 4-number password must be from OOO0to 7999.
• Finally, set the Parental Control Lock option to either on or off. :
[n theTVGuidelinesmenu,pressthe UporDownarrowandrepeattogoframtheAll columnto the
IV,,V,L,andD columns.(DownOtTOWwillmovethehightightframtopto bottom, thento thenext
columnontheright,topto bottom,thento thenextcolumnon theright, toptobottometc.)
"AU" blockseveryrestriction;for examplefor guidelinerating TV-PG,"All" will blockprogramswith
V=Violence,S=SexScenes,L=BadLanguage,and D-SuggestiveDialogfrom appearing.
NoRating meansthat the programdoesnot contolnany rating information.
Use these keys
to select and
adjust the
Parental Control
menu options.
Use the number
keypad to set
the password.
W-G GeneralAudience
W-PG ParentalGuidanceSuggested
TV-14 ParentsStrongLyCautioned
W-HA Mature AudienceOnLy
CHILDREN'S CLASSIFICATIONS
TV-Y ChiLdren
W-Y7 ChiLdren7 and over
PAGE 26
W PARENTALGUIDELINERAI"INGSYSTEM
Consideredsuitablefor aGaudiences;chiLdrenmaywatch unattended.
UnsuitabLefor younger children,may containSuggestiveDiaLog,BadLanguage,Sex,and VioLenceScenes.
UnsuitabLefor childrenunder14, maycontain StrongDiaLog,Bad Language,Sex,and VioLenceScenes.
AduLtsonly,may containStrongDiaLog,BadLanguage,Sex, and Violence Scenes.
Consideredsuitablefor all childrenunder7 yearsold.
Consideredsuitablefor childrenover7, may containFantasyVioLenceScenes.
Page 27

Adjuststhesound on yourEntertainmentMachineTM
® ®
Special
Caption/Text:
CC WhenMute:
Parental Control
• Audio: Stereo -- -- --
y Select <_" Adjust • Menu
Mona, SAP
B
PressMENUrepeatedty to ptace the Specia[
(features) menu on the TV screen.
L
power
Use the Up or Down setectarrowto
hightightthe Audiooption.
Use the Left or Right adjust arrow to choose:
Stereo, Mona, or SAP.
display mute
Audio optionswill onlyappear on TVsequipped withstereo.See
page5for the_eoturespmvidodon the modelof TVyou hove.
._,flashback
sourcesleep so
STEREO
MONO
SAP
2os-a,m4 PAGE 27
Stereosoundisheardand dividedbetweenthetef_and rightspeakers.
Monaural.soundisheardfloraartspeakers.
SecondAudiosoundisheard,ifavaitabteon program.
Page 28

_J
Description of the terms used in this guide
A/V CABLES
A/V DEVICE
ACC_SORIES
ADD
ANTENNA
AUDIO
CAPT]ON/TEXT
DELETE
BVD
ICON
INPUT
JACK
Useto connectAudio/Videoequipment
suchasa VCR,usuaLLyto achievehigher
quaEtypictureand sound.
Anydevice that producesvideo or sound
(VCR,DVD,cablebox, or television).
Optionalequipmentusable with your
Enter_inment machineTM.
Thisfeature Letsyou add new channelsto
the channel,scanlist that you'LLscroll
through whenusingyour remote.
Thephysicalreceiverof television signals
sent overthe air.A large metal pieceof
equipmentdoesnot alwayshaveto be vis-
ible for yourhometo beusingan anten-
na.
Soundportionof a program.
A form ofsubtitlingthat writes out the
dialogfor your program.
Thisfunction Letsyouremove channels
that you don'twantto watchfromthe
channelscanllst you'lLscroll,through.
Digitalvideo disk player.
A smallpictureonyour screenthat repre-
senting a feature or menu.
Refersto the jack that receives a signal
into the IV, VCRor otherA/V device.
A connectoron the backof a W, VCR,or
anyotherA/V device.This inctud_'sthe RE
jack that is threaded with a placefor a
smaLLwire in the center,and the
Audio/videojacks that havea smatter
openingand are color-coded.
MONO SOUND
OUTPUT
RF CABLE
SIGNAL
SOURCE
SPECIAL
STEREOSOUND
TUNER
VCR
VIDEO
Hono (monaural) sound is one channel of
sound. On more than one speaker, at[ the
speakers play the same audio.
Refersto the jack that sendsa signalout
of a VCR,DVD,orother A/V device.
Thewire that comesfrom an off-air
antenna or cableserviceprovider.Each
end lookslike a hex shapednutwith a
wire sticking through the middle,and it
screwsontothe threadedjack onthe
backof yourW.
Pictureandsoundtravelingthrough
cable,or on the air, to yourtelevision
screen.
Theterm for the equipmentprovidingpic-
ture andsoundsignalstoyour
EntertainmentNachineTM. VCR,DVDplay-
ers,or CableBoxesareexamplesof
sources.
Featuresthat arenotordinarilyincluded
in a TV - - enhancingyourentertainment
experience.
Stereo(Stereophonic)soundrefersto
audiothat's dividedinto right andLeft
sides.
Any device that picks up broadcast sig-
nals and turns them into picture and
sound.
Videocassette recorder.Usedfor record-
ing and playbackofvideotape cassettes.
Picture portionof a program.
MENU
On-screenaid providedforyou to useto
control,and programyour TV'sfeatures.
PAGE 28 2o_
Page 29

Caring for your Entertainment MachineTM
Ear[tymalfunctionscanbeprevented.Carefo[and regutarcleaningcanextend the amountof timeyou wilt[havewith your
newEntertainmentMachineTM. Be sureto turnthe poweroff and puttout the plugbeforeyoubeginanycl.eaning.
1. Here'sagreat wayto keepthe dustoff your screenfor a while. Wet a softc[tothin a mixtureof [tukewarmwater and a tittle fabric
softenerordishwashingdetergent.Wringthe clothunti!,it's a[tmostdry,and then useit to wipethe screen.
2. Makesurethe excesswater is off the screen,andthen let it air-dry beforeyouturn on your EntertainmentMachineTM.
1. Useasoft c[tnthwith a mi[tdsoapsol.utionto wipe the cabinet.
2. Rinsethe cloth andwipe the cabinetagain.
3. Let the cabinetair-dry beforeturning the EntertainmentMachineTM on.
_lk f you leaveyour EntertainmentMachineTM dormantfor a [tongtime (such as avacation), it's a goodidea to unplugthe power
[] If you unplug Zenith Entertainment MachineTM, have to resetthe clockusing the ClockSetmenu described
2O6-3484
to protectagainstpossibledamagefrom tightning orpowersurges.If you useanoff-air antenna, you may aLsowantto dis-
connectit from the backof yourTV beforeleaving.
your you may
eer/ier. Seepage 19.
PAGE 29
Copyrlght-l-g99Zenith ElectronicsCorporation " _,_'_T
Page 30

 Loading...