

Page 1

machine numbers A27B41 A32B41 A32B84 A36B41
operating guide / warranty
Thanks for
choosing Zenith!
hookup directory
index
your on-screen menus
page
47
page
16
page
3
Page 2
WARNING:
TO REDUCE THE RISK OF ELECTRIC SHOCK DO NOT REMOVE COVER (OR BACK). NO USER SERVICEABLE PARTS INSIDE.
REFER SERVICING TO QUALIFIED SERVICE PERSONNEL.
The lightning flash with arrowhead symbol, within an equilateral triangle, is intended to alert the user to the presence
of uninsulated “dangerous voltage” within the product’s enclosure that may be of sufficient magnitude to constitute a
risk of electric shock to persons.
The exclamation point within an equilateral triangle is intended to alert the user to the presence of important operating
and maintenance (servicing) instructions in the literature accompanying the appliance.
WARNING:
TO PREVENT FIRE OR SHOCK HAZARDS, DO NOT EXPOSE THIS PRODUCT TO RAIN OR MOISTURE.
POWER CORD POLARIZATION:
CAUTION: To Prevent Electric Shock, Match wide blade of plug to wide slot, fully insert.
ATTENTION: Pour éviter les chocs électriques, introduire la lame la plus large de la fiche dans la borne
correspondante de la prise et pousser jusqu’au fond.
NOTE TO CABLE/TV INSTALLER:
This reminder is provided to call the cable TV system installer’s attention to Article 820-40 of the National Electric Code
(U.S.A.). The code provides guidelines for proper grounding and, in particular, specifies that the cable ground shall be
connected to the grounding system of the building, as close to the point of the cable entry as practical.
REGULATORY INFORMATION:
This equipment has been tested and found to comply with the limits for a Class B digital device, pursuant to Part 15
of the FCC Rules. These limits are designed to provide reasonable protection against harmful interference when the
equipment is operated in a residential installation. This equipment generates, uses and can radiate radio frequency
energy and, if not installed and used in accordance with the instruction manual, may cause harmful interference to radio
communications. However, there is no guarantee that interference will not occur in a particular installation. If this
equipment does cause harmful interference to radio or television reception, which can be determined by turning
the equipment off and on, the user is encouraged to try to correct the interference by one or more of the following
measures:
• Reorient or relocate the receiving antenna.
• Increase the separation between the equipment and receiver.
• Connect the equipment into an outlet on a circuit different from that to which the
receiver is connected.
• Consult the dealer or an experienced radio/TV technician for help.
CAUTION:
Do not attempt to modify this product in any way without written authorization from Zenith Electronics Corporation.
Unauthorized modification could void the user’s authority to operate this product.
RECORD YOUR MODEL NUMBER
(Now, while you can see it)
The model and serial number of your new TV are located
on the back of the TV cabinet. For your future convenience,
we suggest that your record these numbers here:
MODEL NO.____________________________________
SERIAL NO.____________________________________
WARNING
RISK OF ELECTRIC SHOCK
DO NOT OPEN
Page 3
3374-O
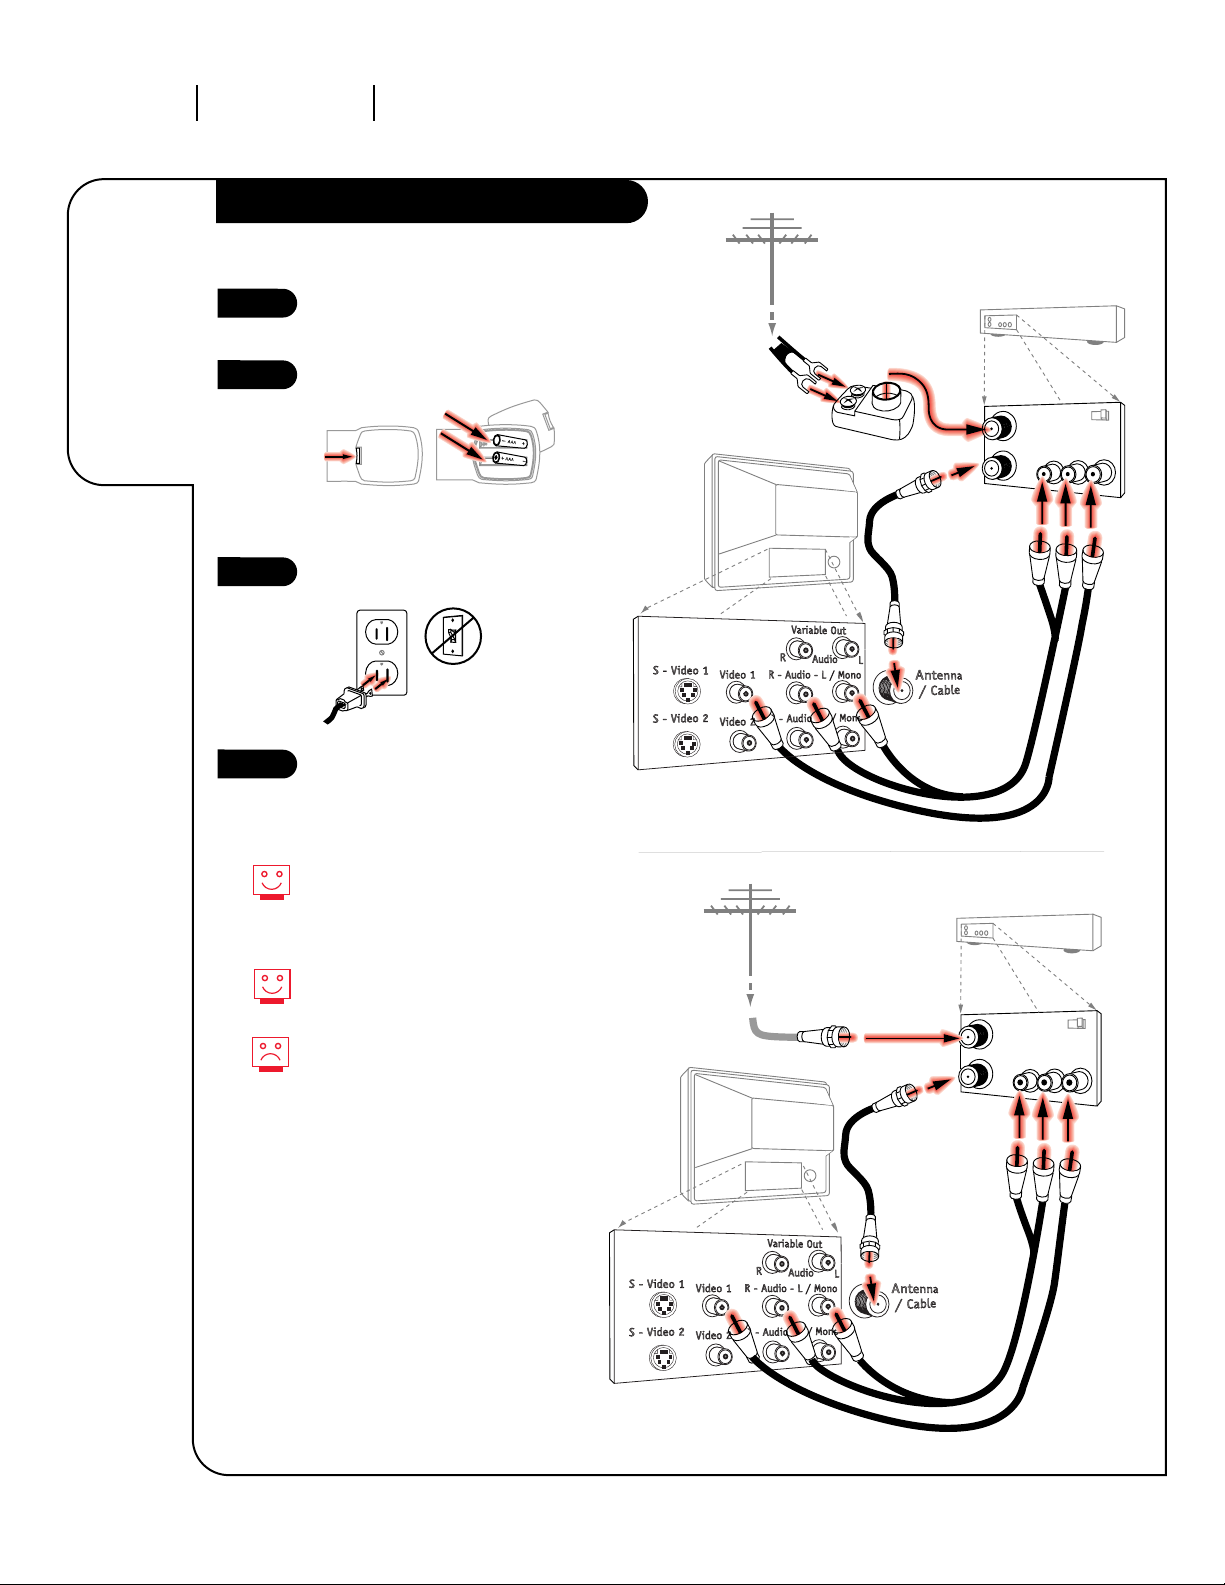
INSTALLATION GETTING STARTED PAGE 3
This page will
direct you to
which page
to go to for
proper hookup of your
Entertainment
Machine.
Hook-Up Directory
IMPORTANT!!
Use this page to decide where you need to begin your setup. First, find the line
below that best describes what you want to do, then go to that page number.
Note: Design and specifications are subject to change without prior notification.
Cable TV
wall jack
Cable box
In
Out
Cable TV
wall jack
Cable box
In
Out
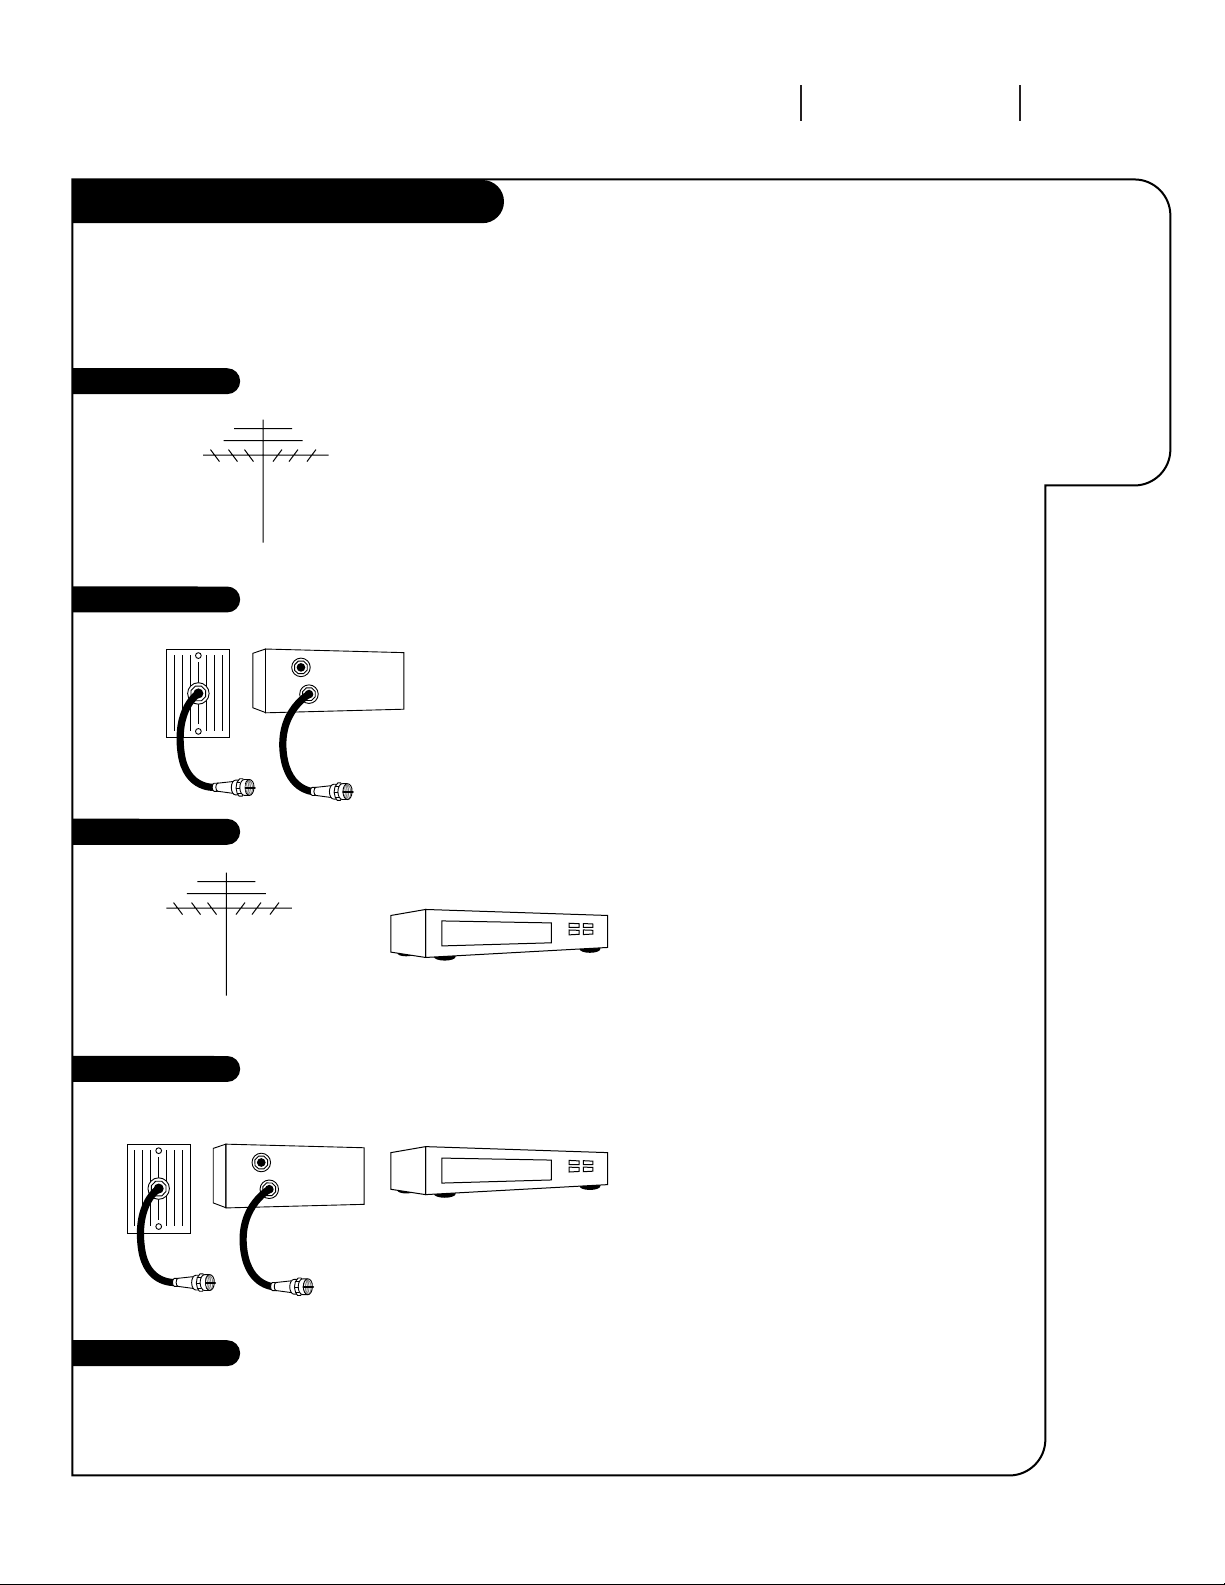
If you are using an antenna and no other equipment, go to . . . . . . . . . . . . . . . . . . page 4
If you have cable and no other equipment, go to . . . . . . . . . . . . . . . . . . . . . . . . . page 5
If you are using an antenna and have a VCR, go to . . . . . . . . . . . . . . . . . . . . . . . page 6
If you have cable and a VCR, go to . . . . . . . . . . . . . . . . . . . . . . . . . . . . . . . . . . page 7
Antenna only
Cable only
Antenna with VCR
Cable and VCR
Other
If you have a Super VHS VCR, a DVD Player, or Audio equipment, go to . . . . . . . . . . .pages 8-9
Page 4
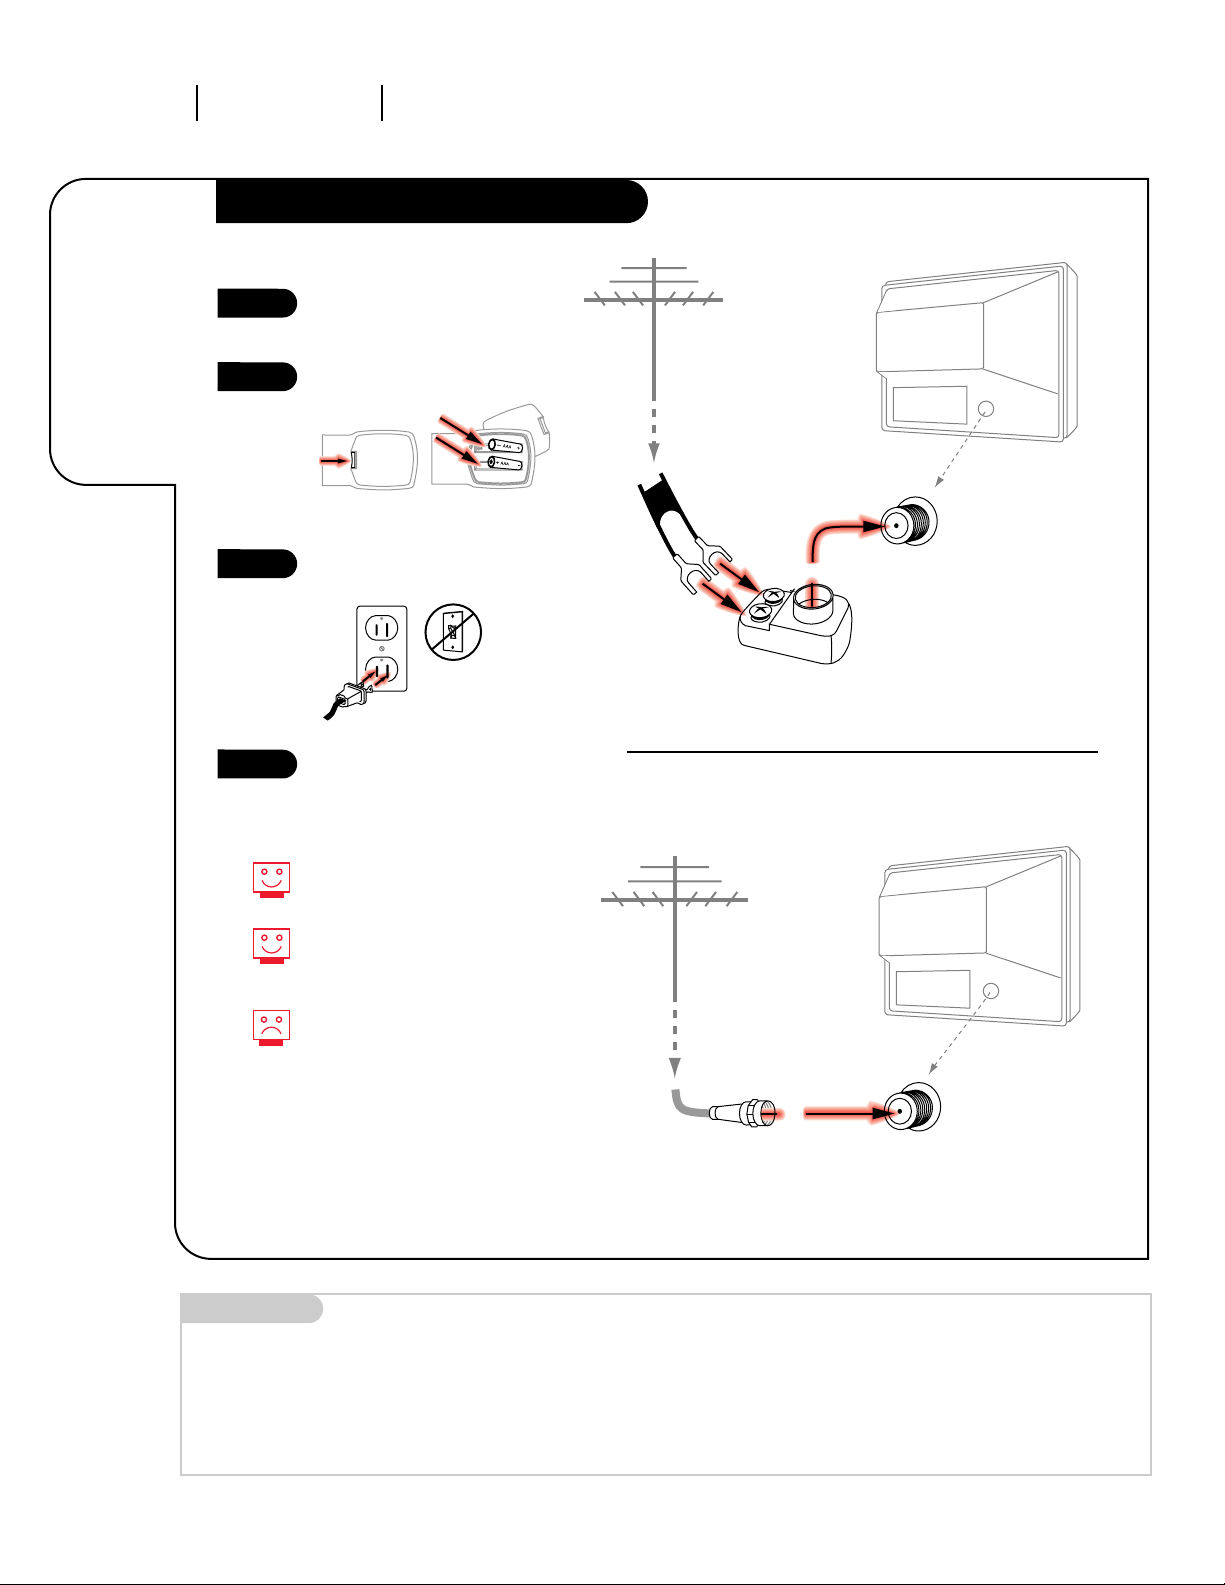
Hook up your Entertainment
Machine, see diagrams at right.
Remove the back of the remote
and put in two AAA batteries.
Plug in your TV. Do not plug it
into a switched outlet.
Go to page 10 to Auto Program
your Entertainment Machine.
3374-O
INSTALLATION STANDARDPAGE 4
Connect an
antenna
to your
Entertainment
Machine.
Hook Up Your Antenna to the TV
Mini glossary
75 OHM RF CABLE The wire that comes from an off-air antenna or cable service provider. Each end looks like a hex shaped nut with a wire
sticking through the middle, and it screws onto the threaded jack on the back of your TV.
300 TO 75 OHM ADAPTER A small device that connects a two-wire 300 ohm antenna to a 75 ohm RF jack. They are usually about an
inch long with two screws on one end and a round opening with a wire sticking out on the other end.
RF coaxial wire
(75ohm)
Antenna
TV back
TV back panel
(expanded view)
Antenna
/ Cable
TV back
Flat wire
(300 ohm)
Antenna
300/75 ohm
Adapter
TV back panel
(expanded view)
Antenna
/ Cable
If you have a 75 ohm RF cable,
then you don’t need any adapters!
Remember, when screwing RF
cables onto jacks, clockwise tightens, and counterclockwise loosens.
A 300 to 75 ohm adapter is not
included with your Zenith
Entertainment Machine.
back of
remote
1
2
3
4
Page 5
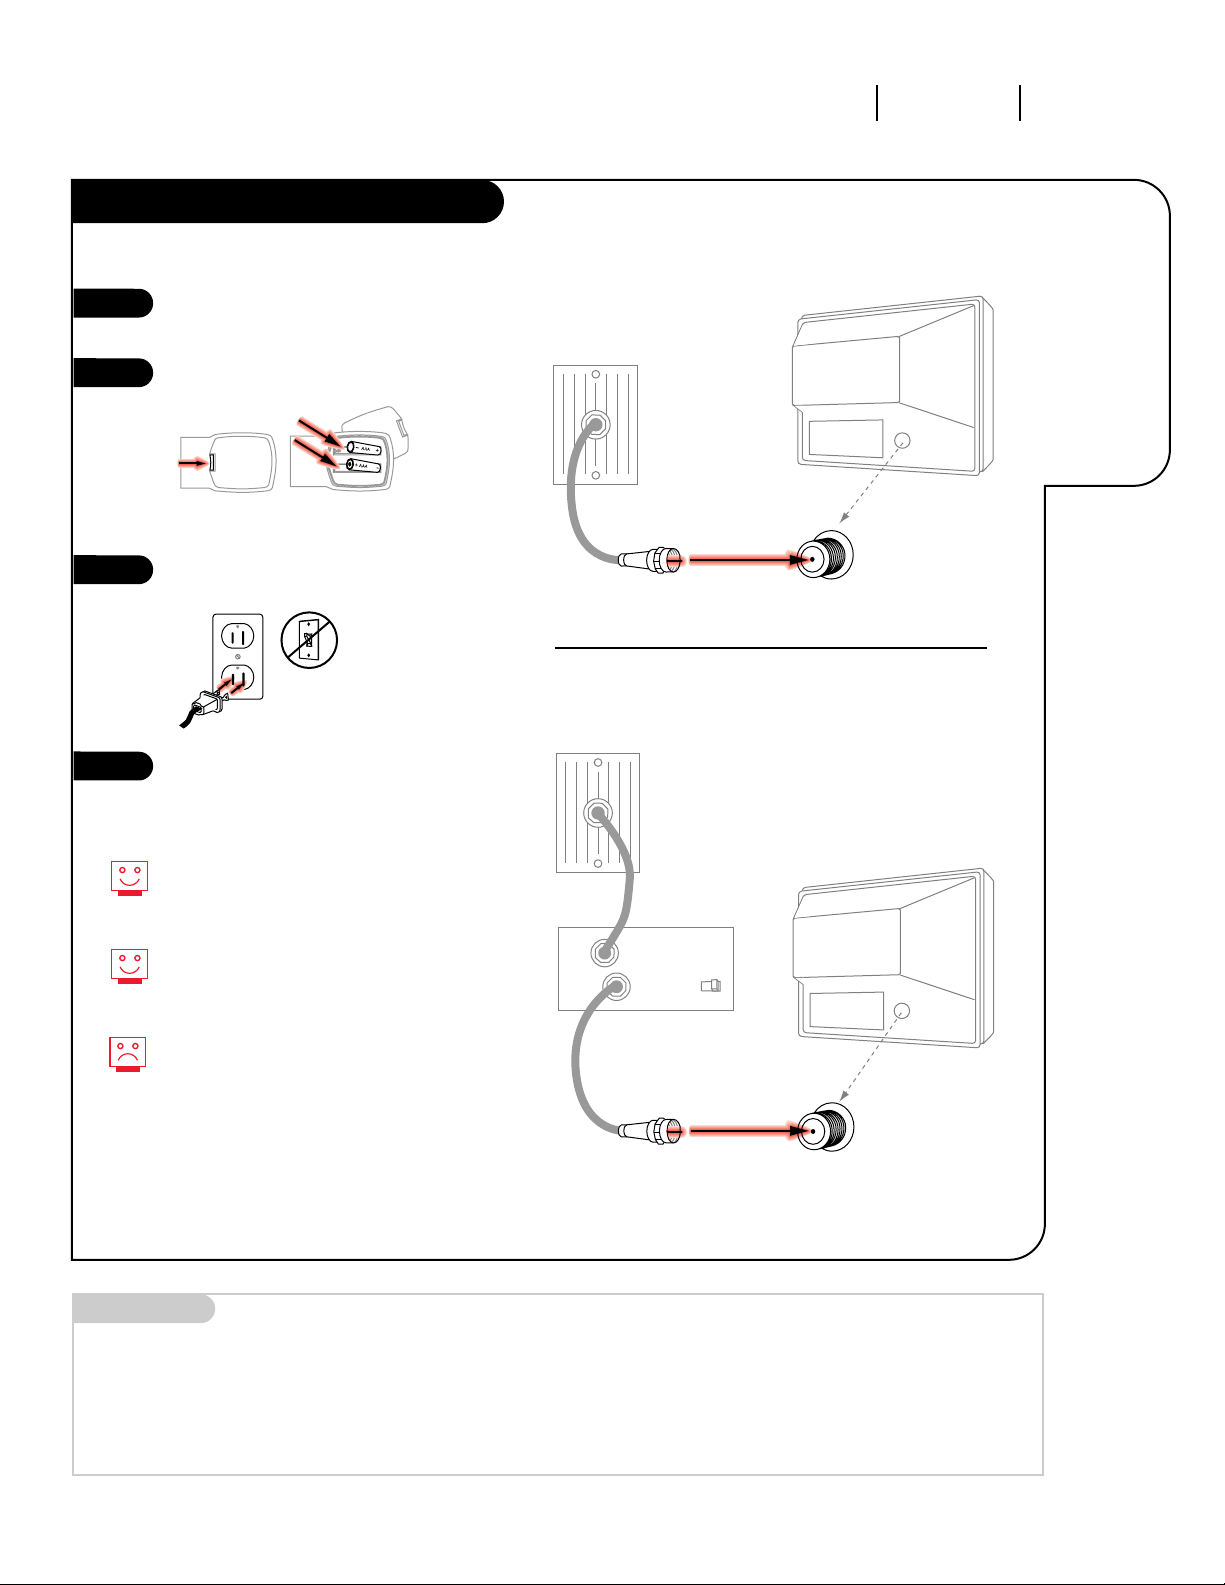
Hook up your Entertainment
Machine, see diagrams at right.
Remove the back of the remote
and put in two AAA batteries.
Plug in your TV. Do not plug it
into a switched outlet.
Go to page 10 to Auto Program
your Entertainment Machine.
3374-O
INSTALLATION STANDARD PAGE 5
Connect
cable to your
Entertainment
Machine.
Mini glossary
CABLE SERVICE The wire that supplies all your cable TV (CATV) stations.
Hook Up Your Cable (CATV) to the TV
Cable TV
wall jack
Cable TV
wall jack
Cable box
In
Out
RF coaxial wire (75ohm)
RF coaxial wire (75ohm)
3 4
output
switch
TV back panel
(expanded view)
Antenna
/ Cable
TV back
TV back panel
(expanded view)
Antenna
/ Cable
TV back
If you’re using a cable box, leave your
TV on channel 3 or 4 and use your
cable box to change channels.
Remember, when screwing RF cables
onto jacks, clockwise tightens, and
counterclockwise loosens.
If you’re using a cable box, AutoProgram (page 10) might only find the
channel your cable service is on
(usually channel 3 or 4). Don’t worry,
that’s all you need!
back of
remote
1
2
3
4
Without Cable Box
With Cable Box
Page 6
3374-O
INSTALLATION STANDARDPAGE 6
Connect your
off-air
antenna and
VCR to your
Entertainment
Machine.
Hook Up Antenna and VCR to the TV
TV back panel
(expanded view)
TV back
RF coaxial wire
(75ohm)
not included
with TV
In
Out
Audio
R-L Out
Video
Out
3 4
VCR back
VCR back AV panel
In
Out
3 4
VCR back
VCR back AV panel
Flat wire
(300 ohm)
Antenna
300/75 ohm
Adapter
Round wire (75ohm)
Antenna
output
switch
output
switch
A/V cables
not included
with TV
A/V cables
not included
with TV
TV back panel
(expanded view)
TV back
RF coaxial wire
(75ohm)
not included
with TV
Audio
R-L Out
Video
Out
back of
remote
Remember, when screwing
RF cables onto jacks, clockwise
tightens, and counterclockwise
loosens.
Use Video sources for better
picture and sound.
Without A/V cables, VCRs will not
play videocassettes in stereo
sound.
Hook up your Entertainment
Machine, see diagrams at right.
Remove the back of the remote
and put in two AAA batteries.
Plug in your TV. Do not plug it
into a switched outlet.
Go to page 10 to Auto Program
your Entertainment Machine.
1
2
3
4
(VCR with Round Antenna Wire)
(VCR with Flat Wire Antenna Adapter)
Page 7
3374-O
INSTALLATION STANDARD PAGE 7
Connect
your VCR and
Cable to your
Entertainment
Machine.
Hook Up Your Cable (CATV) and VCR
Leave your VCR and your television
tuned to channel three and use
the cable box to change channels.
Remember, when screwing in RF
cables onto jacks, clockwise tightens, and counterclockwise loosens.
Use Video sources for better
picture and sound.
No A/V cables are included with
your Zenith Entertainment
Machine. Without A/V cables, VCRs
will not play videocassettes in
stereo sound.
TV back panel
(expanded view)
TV back
RF coaxial wire
(75ohm)
not included
with TV
TV back panel
(expanded view)
TV back
RF coaxial wire
(75ohm)
not included
with TV
Cable TV
wall jack
Cable TV
wall jack
Round wire (75ohm)
Round wire (75ohm)
Cable box
In
Out
In
Out
3 4
VCR back
VCR back AV panel
In
Out
3 4
VCR back
VCR back AV panel
A/V cables
not included
with TV
output
switch
output
switch
3 4
output
switch
A/V cables
not included
with TV
Audio
R-L Out
Video
Out
Audio
R-L Out
Video
Out
back of
remote
Hook up your Entertainment
Machine, see diagrams at right.
Remove the back of the remote
and put in two AAA batteries.
Plug in your TV. Do not plug it
into a switched outlet.
Go to page 10 to Auto Program
your Entertainment Machine.
1
2
3
4
With Cable Box
Without Cable Box
Page 8
3375-O
INSTALLATION S-VHS VCR/DVD PLAYERPAGE 8
Connecting a
S-VHS VCR
or DVD Player
to your
Entertainment
Machine.
Super VHS VCR/DVD Player
3374-O
Locate the Ant In jack on the
back of your S-VHS VCR.
Connect the cable line coming
from your wall directly to
this jack.
Now locate the Out to TV
jack. Connect a cable from
the Out to TV jack to the
Antenna/Cable jack on
the back of your TV.
Find the audio and S-Video
jacks on the back of your
S-VHS VCR, and connect them
following the instructions provided with your equipment.
1
2
3
Use Video sources for better
picture and sound.
To use with PIP: go to the
Source Menu (page 30) and
choose the jack you’ve connected
your S-VHS (S-VHS 1,-2) as the
Main or PIP source.
TV back
In
Out
3 4
Super VHS VCR
Back AV panel
Cables
not included
with TV
Audio
R-L Out
S-Video
Out
Attach to
cable wall jack,
cable box, or
antenna
Super VHS VCR
DVD* Player
Simply connect the S-Video/Audio out on
the DVD to the S-VHS 1, R-L Audio or
S-VHS 2, R-L Audio In on the TV.
DVD Player
Jacks
* Digital Video Disk Player
Page 9
3375-O
INSTALLATION STEREO SYSTEM PAGE 9
Get the
best sound
possible
from your
Entertainment
Machine.
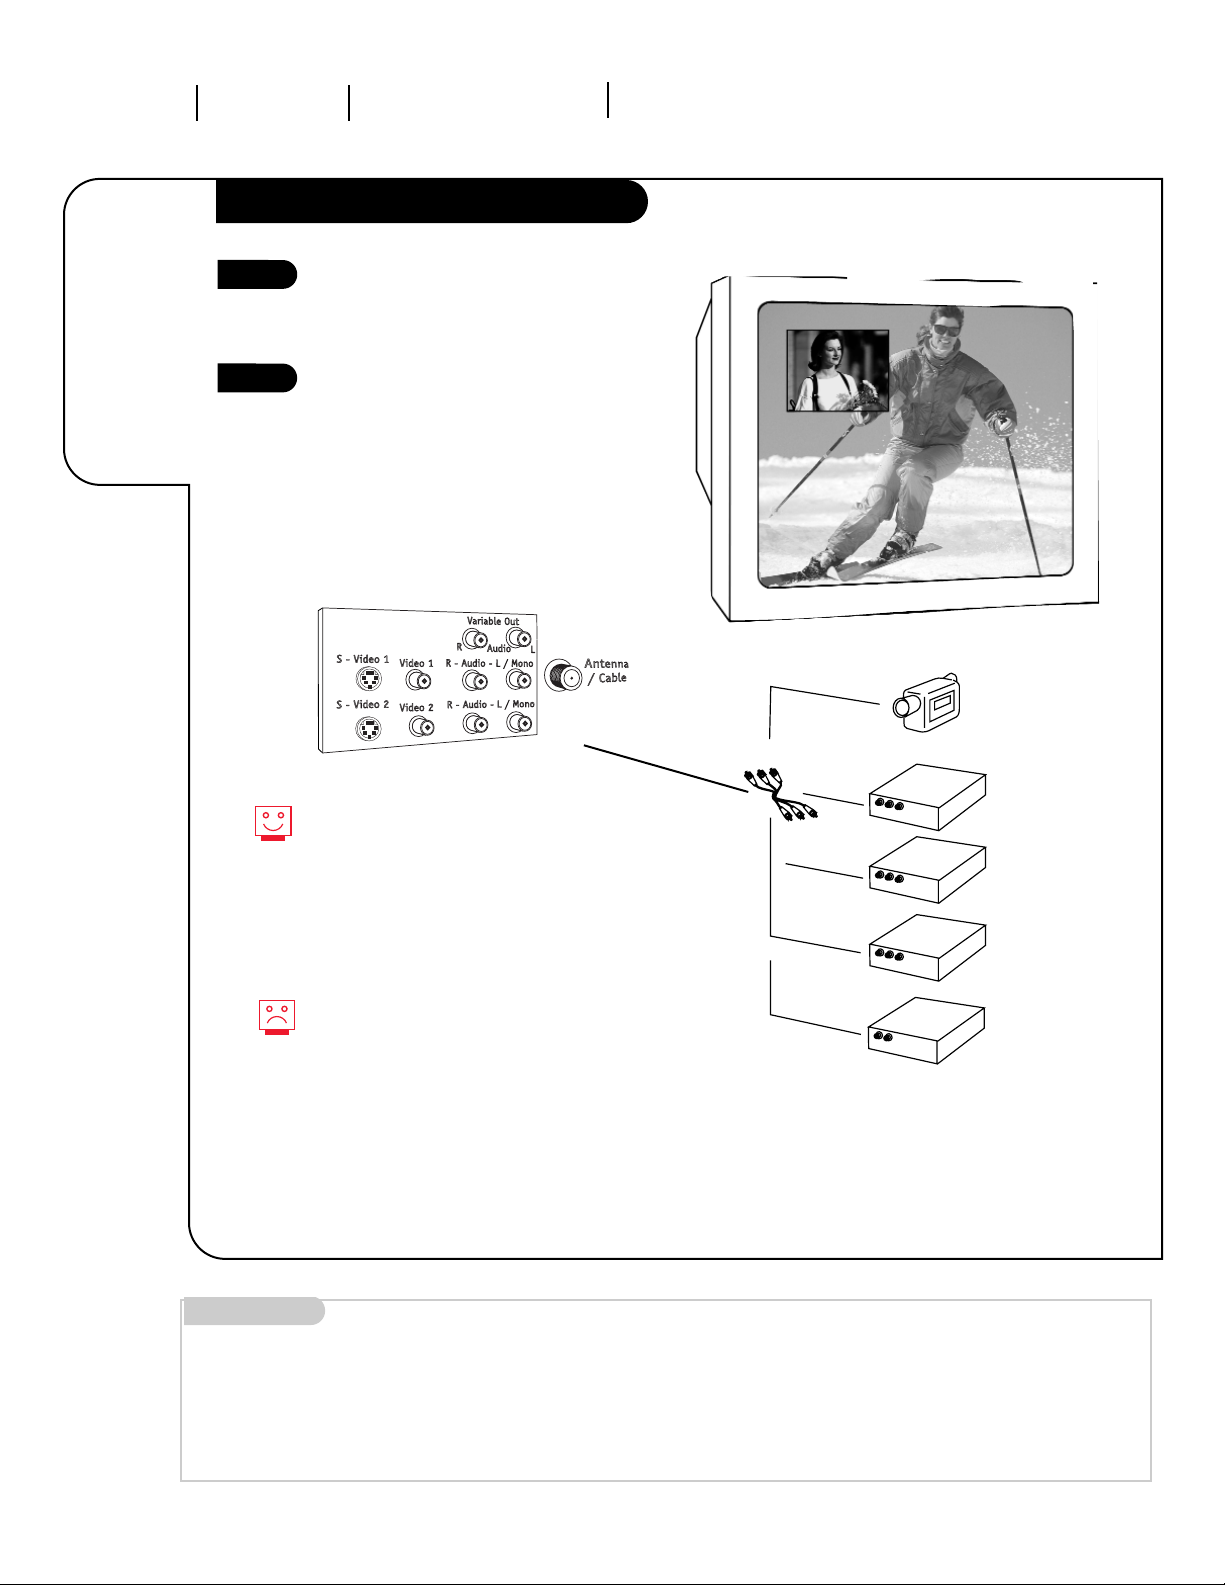
Audio Hook-ups
A/V cables
not included
with TV
TV back
R-L Audio
Input
Stereo
System
Locate the jacks marked
Variable Out. These are for the
stereo system. Connect the
stereo system’s cables, according to their color (red is the
right channel, white the left)
to these jacks.
1
These wires should be included
with your stereo system.
Before you begin plugging in your stereo system, it’s a good idea to put it in its
approximate place first. That way you know
how much wire you have or will need.
Page 10
INSTALLATION AUTO PROGRAM
PAGE 10
3375-O
Mini glossary
AUTO PROGRAM Auto Program is how your Entertainment Machine finds all the channels available in your area and stores them in memory.
Use Auto
Program to
automatically
find and
store all of
the stations
available in
your area in
the TV’s
memory.
Auto Program
With the remote control in hand,
press the POWER key to turn on
your Entertainment Machine.
Press the MENU key so the Setup
menu appears.
Using the UP/DOWN arrows on
the remote control, select Auto
Program on your screen.
Press a RIGHT or LEFT arrow to
reach the Auto Program screen.
Using the UP/DOWN arrows,
choose either Cable TV or Off-Air
Antenna on your screen.
Note: The option that is blinking
and appears in white is selected.
Press a RIGHT or LEFT arrow to
begin Auto Program.
Press ENTER or QUIT to return to
TV viewing.
1
2
3
4
5
6
7
PRG
CABLE
VCR
AUX TV
ENTER
FLASHBK
CHANNEL
CHANNEL
123
456
7
0
89
MENU
REWIND
RECORD
PIP
PIP ch
FREEZ
PAUSE TIMER
PLAY
STOP
SURF
MUTE
POWER
VOLUME VOLUME
QUIT
CC
FFWD
TV/VCR
SOURCE
7
4/6
2
3/5
1
Note: Auto Program finds channels
being received by the TV Tuner. See
information on page 14 for using
the Cable Box or VCR Tuners.
To customize your channel
selection, see page 18.
Page 11
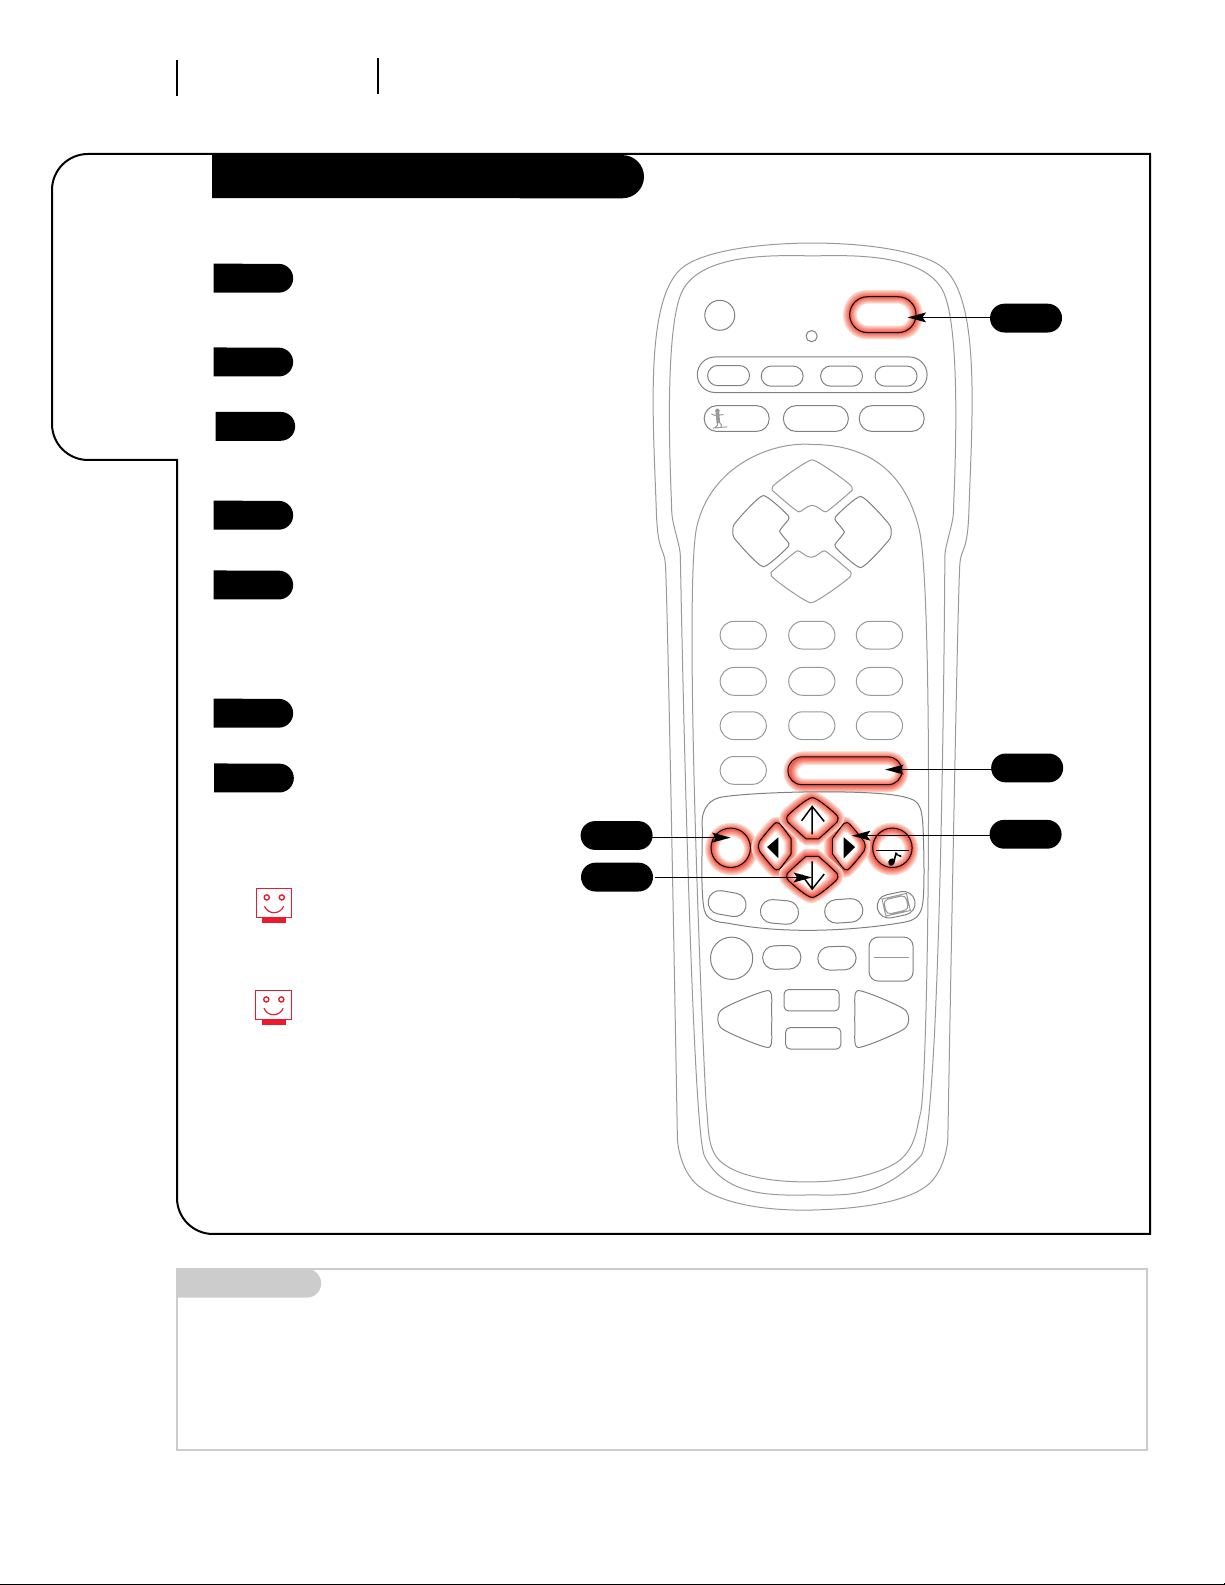
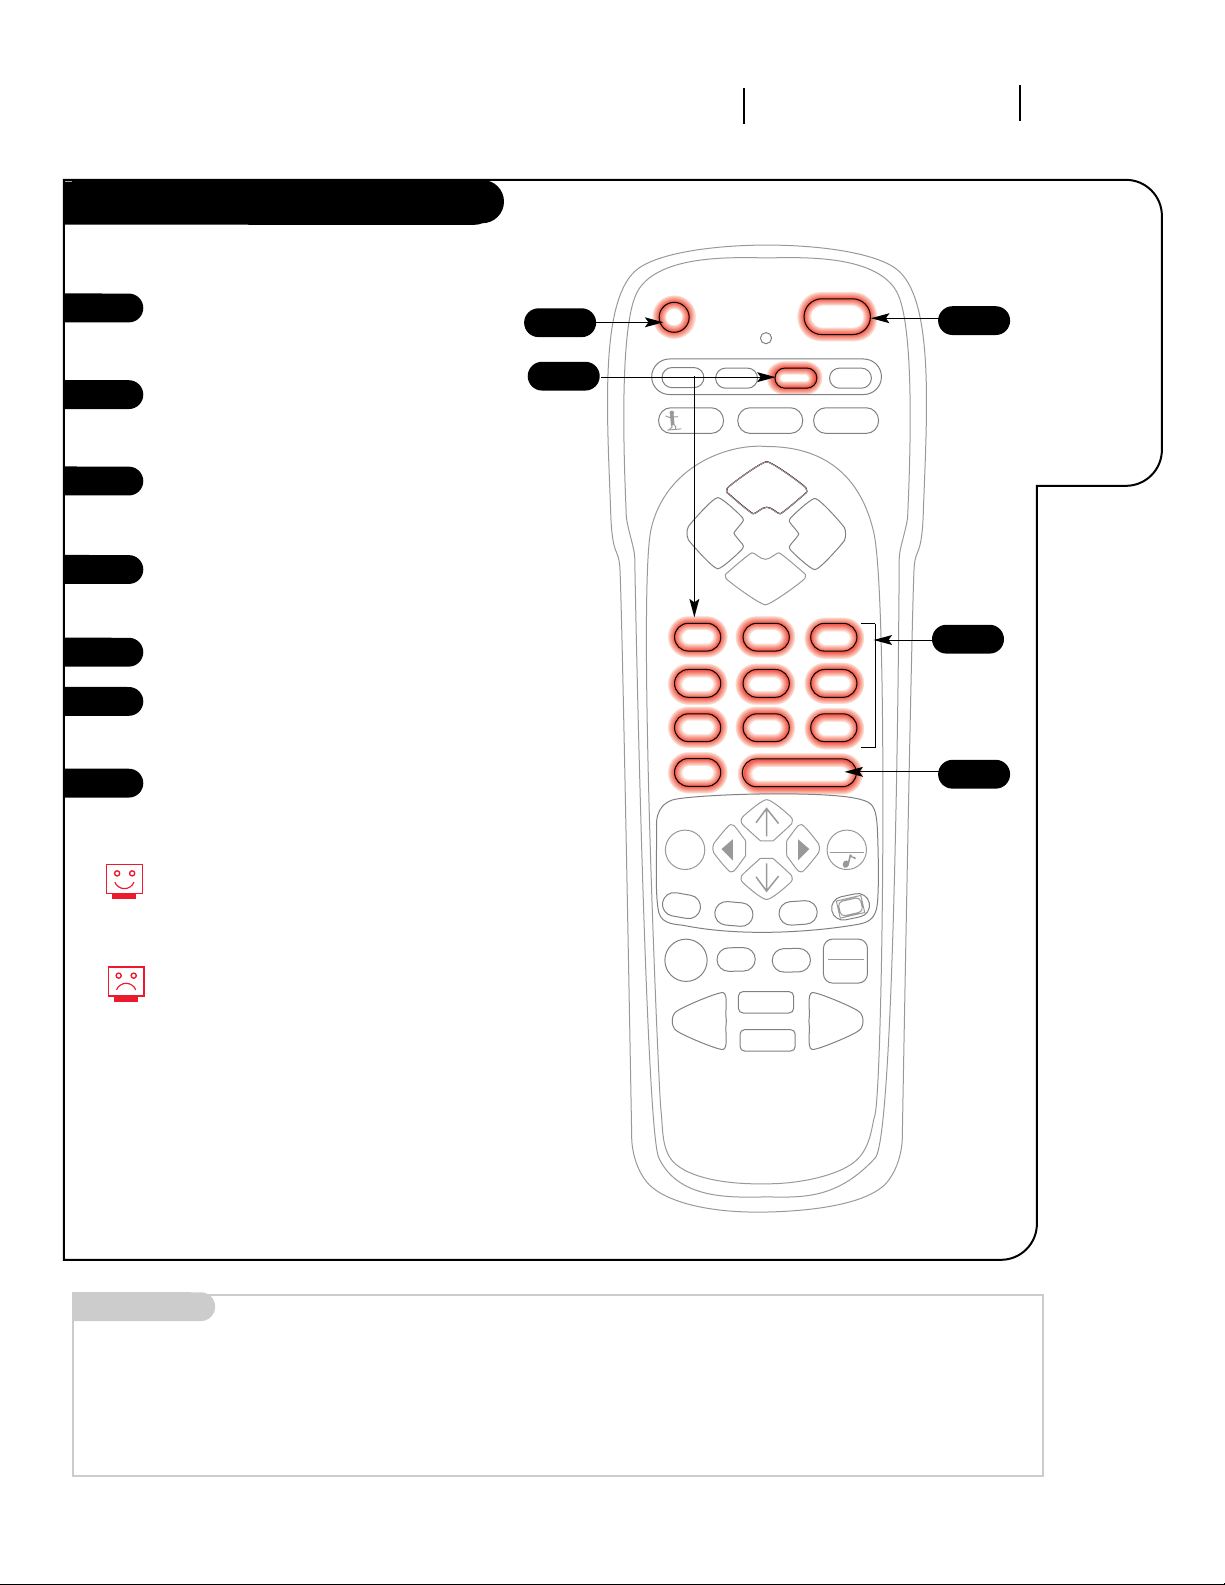
OPERATION REMOTE KEY FUNCTIONS TV MODE
PAGE 11
3375-O
A quick list
of all the
keys on your
remote and
what they do.
TV Mode Remote Key Functions
PRG
POWER
CABLE
VCR
AUX TV
SURF
ENTER
FLASHBK MUTE
CHANNEL
CHANNEL
VOLUME VOLUME
123
456
7
0
89
MENU
REWIND FFWD
RECORD
QUIT
PIP
PIP ch
FREEZ
CC
TV/VCR
SOURCE
PAUSE TIMER
PLAY
STOP
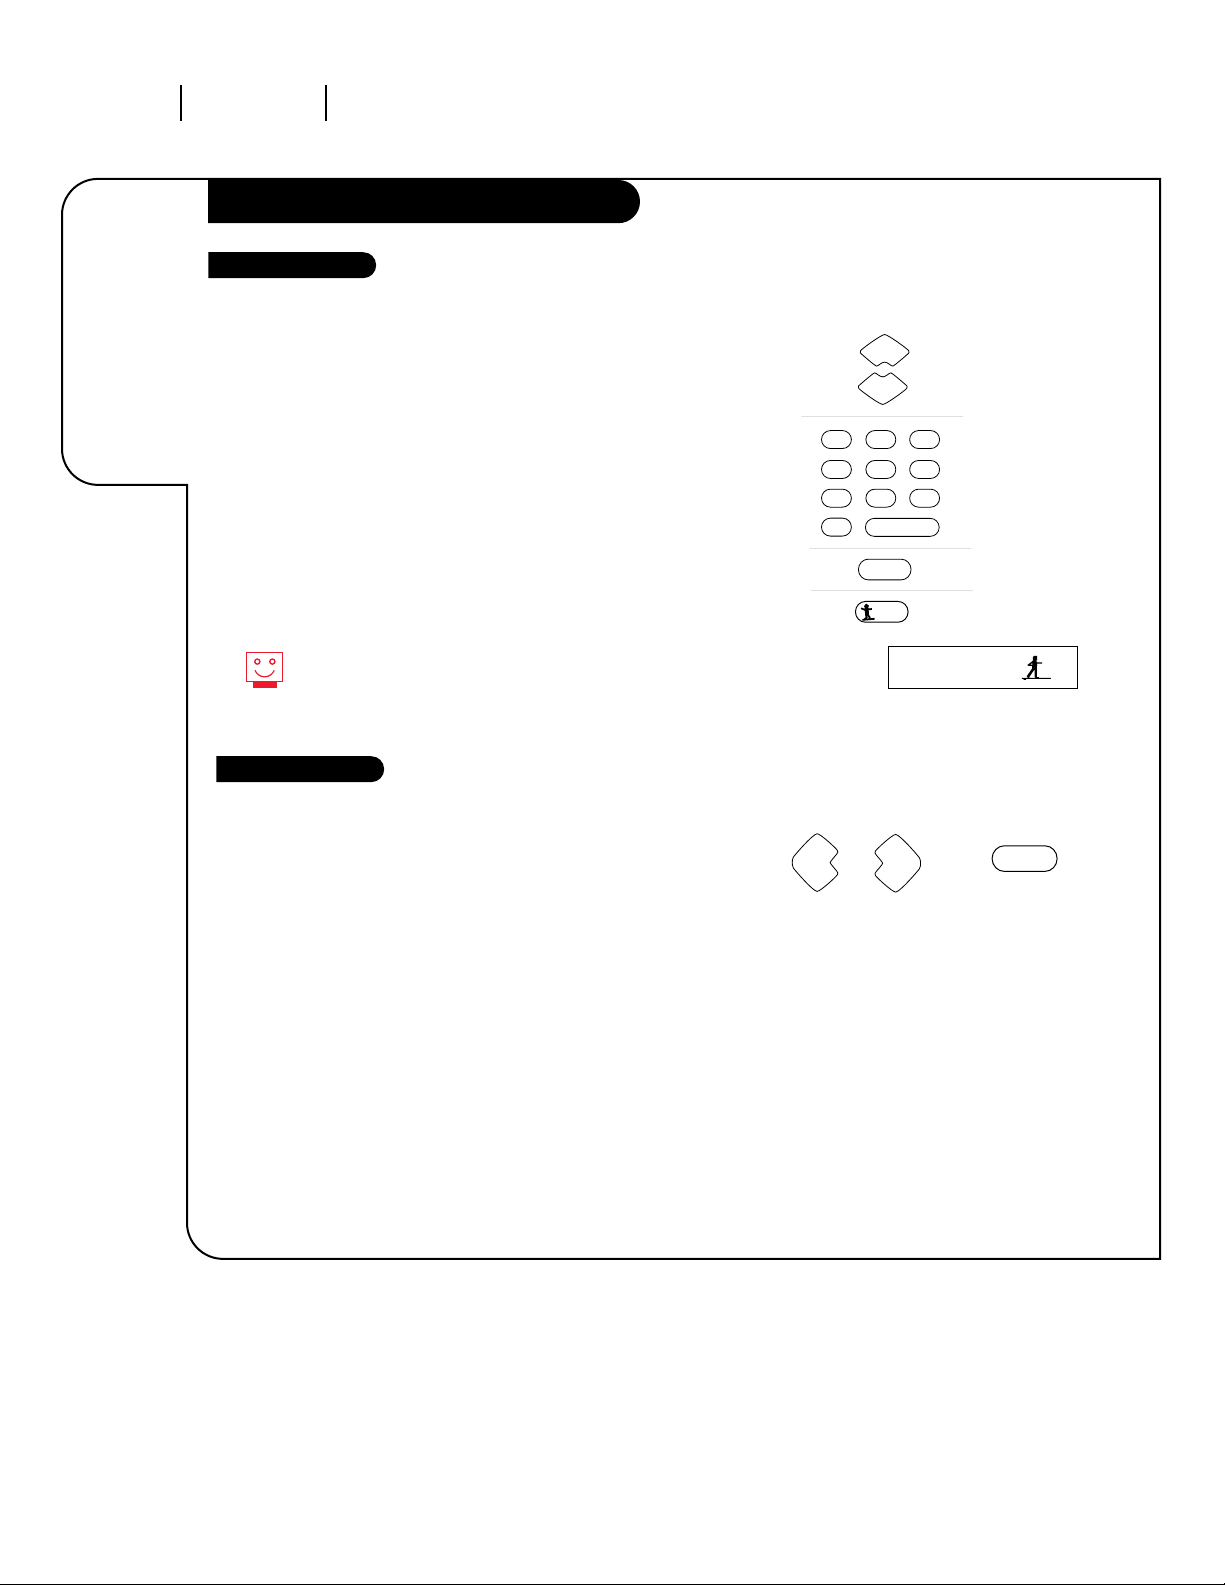
PRG (PROGRAM)
Programs your remote to
operate other products.
See page 35.
FLASHBK (FLASHBACK)
Return to the
last channel viewed.
POWER
Turns TV On or Off.
CABLE/VCR/AUX/TV
Selects remote operating mode.
CHANNEL (UP/DOWN)
Flip through
available channels.
MUTE
Turns sound Off and On
while the picture remains.
Press once to quiet sound, press
again to mute, press again to
restore sound.
ENTER
Shows the Channel/Time
display. Press after channel
numbers for instant selection.
NUMBER KEY PAD
Selects channels directly and
enters numeric values for
some options
.
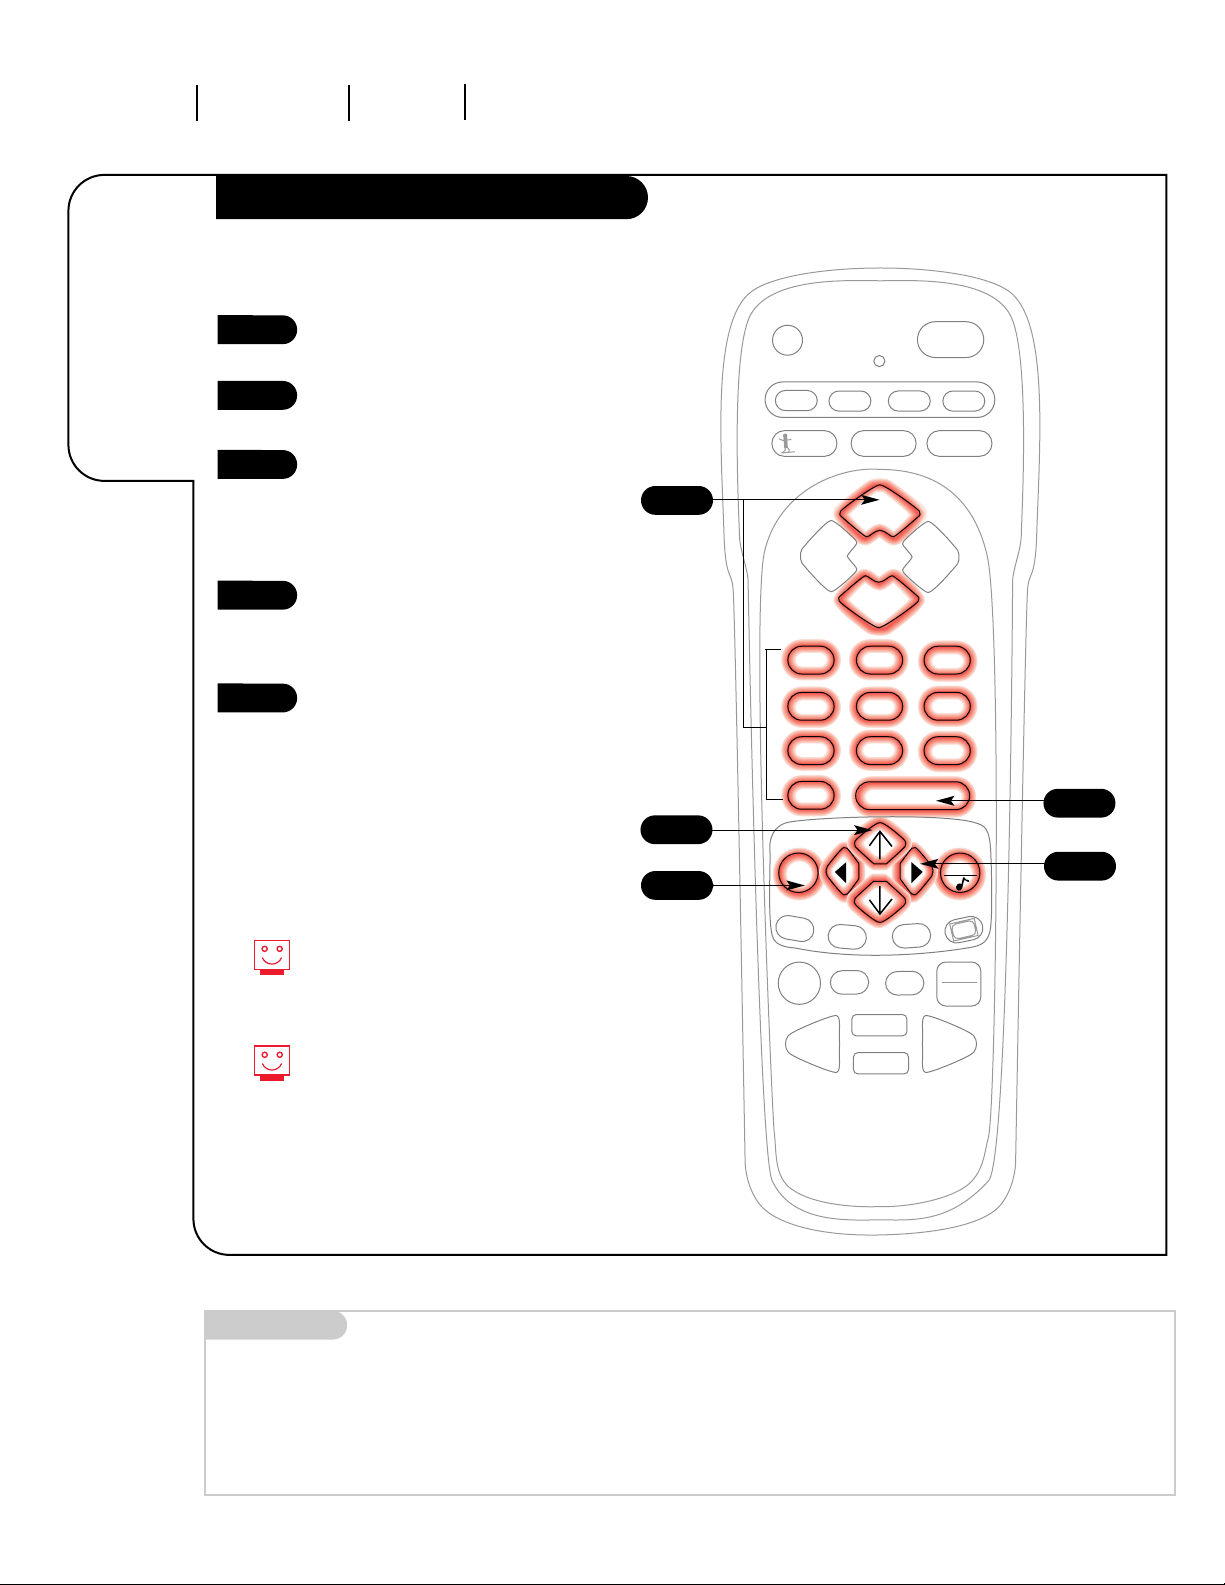
MENU
Displays on-screen
menus for TV mode. See page 16
UP/DOWN ARROWS
The Up/Down arrows select options.
remote control part number
MBR3458
(124-212-51)
TIMER
Displays the Sleep Timer
Menu. See “Timer Setup”
on page 24 for
more information.
VOLUME LEFT/RIGHT
Adjusts the sound levels on
your Entertainment Machine.
QUIT
Removes on-screen display from
view. If no display is on, switches
SEQ sound feature On and Off on
some TVs.
TV/VCR-SOURCE
Switches between watching TV
through your antenna/cable, or
through your VCR.
Keys dedicated to VCR
functions will still operate
your VCR while the remote
is in TV mode.
CC(CLOSED CAPTIONING)
Displays the closed caption menu.
LEFT/RIGHT ARROWS
The Left/Right arrows
adjust options.
LED INDICATOR LIGHT
Lights when keys are pressed.
PIP FEATURES
For PIP (Picture-in-Picture)
operation. See page 32
SURF
Activates custom channel select
mode on your
Entertainment Machine.
When Surf mode is active, CHANNEL
UP/DOWN keys “Surf” through the
channels you’ve selected.
Page 12
MENU
POWER
VOLUME
CHANNEL
3375-O
OPERATION BUTTON FUNCTIONSPAGE 12
How to use
your front
control
panel to
operate
the menus.
Front Panel Diagram
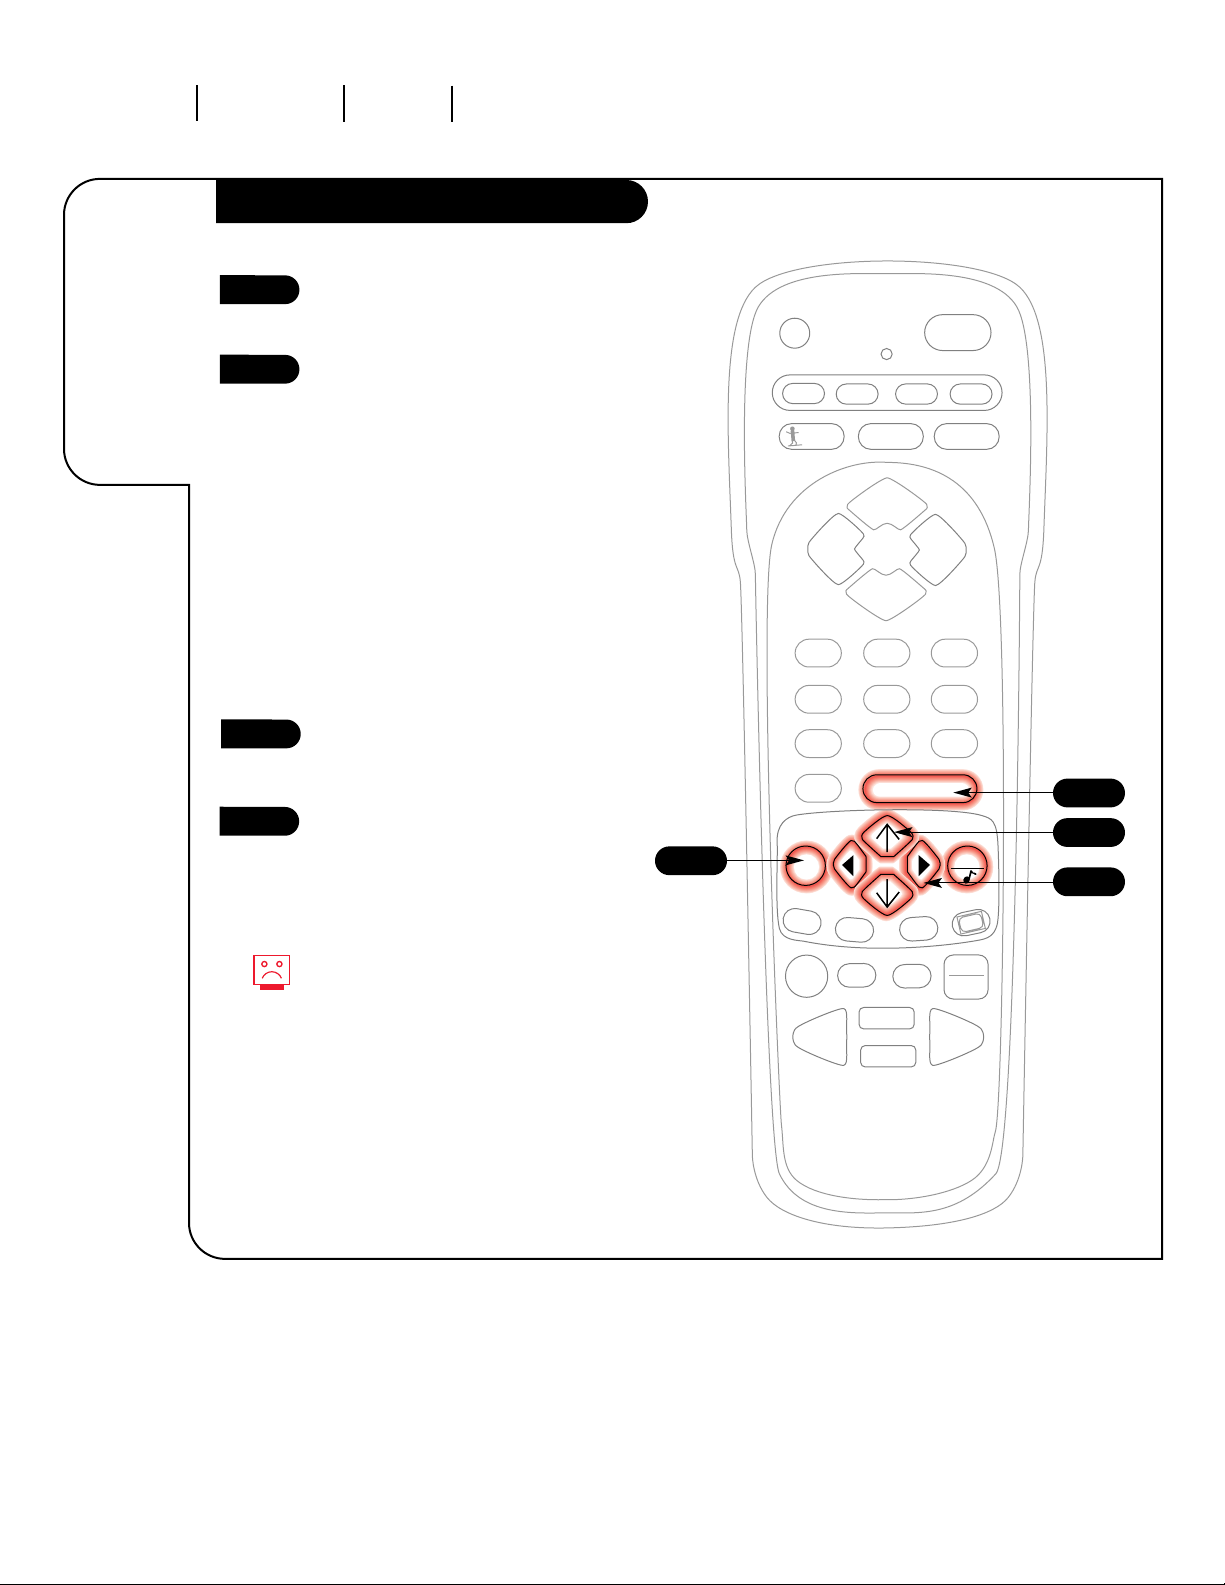
ENTER ADJUST SELECT MENU VOLUME CHANNEL POWER
To access the Setup menu, press
the MENU button once; to get the
other menus, keep pressing the
MENU button.
Choose the function you wish to
change using the SELECT button.
The ADJUST buttons act as an
“adjustment” (Left/Right) function.
Menus disappear after five seconds.
To get them back, push the MENU
button again.
If you’ve lost your remote, you can
get a new replacement by calling
1-800-255-6790 to purchase a
replacement.
1
2
3
Note: For model A27B41, when using the onscreen menus, the buttons on the front panel
correspond to the remote control buttons as
follows:
VOLUME = Adjust Left/Right
CHANNEL = Select Up/Down
Typical 10-Button TV Front Panel
Typical 6-Button TV Front Panel
1
32
Page 13
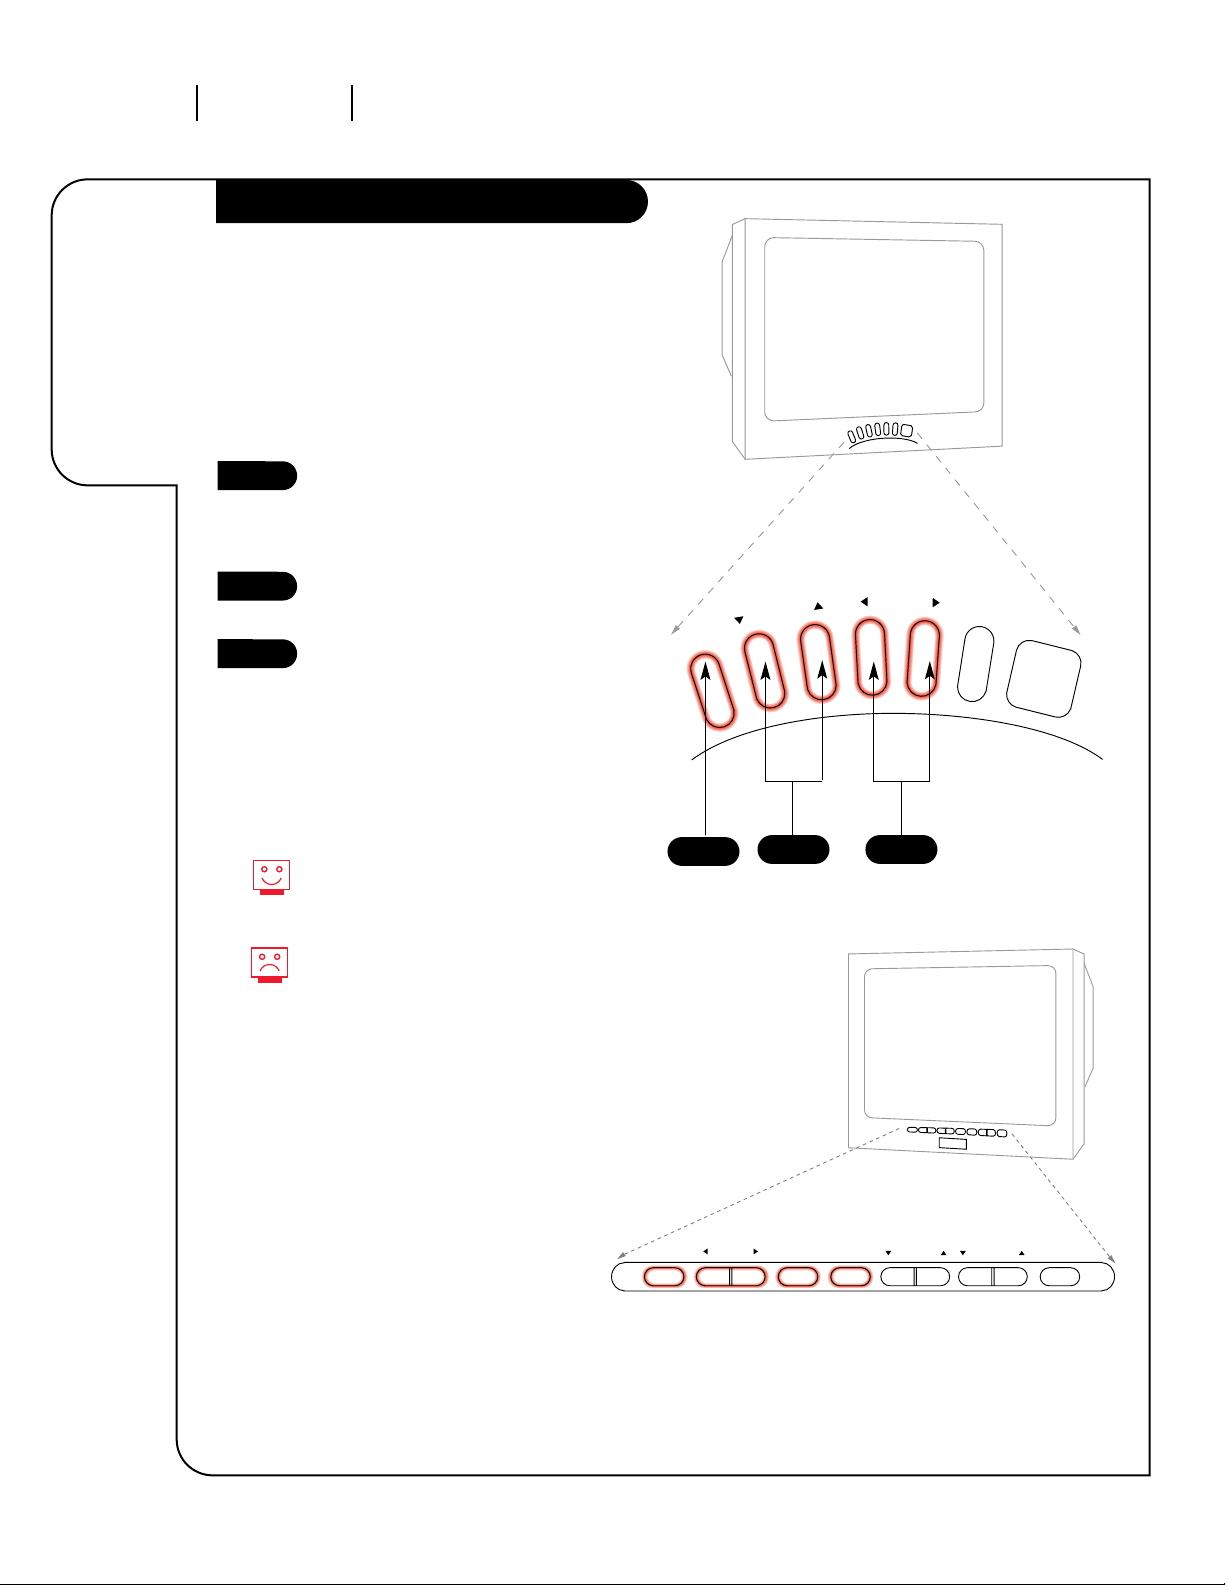
3375-O
OPERATION TV FUNDAMENTALS PAGE 13
Introducing
you to the
basics of your
Entertainment
Machine
Basic Television Operation
The source button (TV/VCR/Source) on the remote switches between
Video input and Cable/Antenna input. The Time/Channel display will
read “Video” in place of a channel number if A/V inputs are selected as
the picture source.
Cable/Antenna Input: This setting allows you to change cable or
antenna channels and to view videocassettes on channel 3 (or 4)
in mono s o und.
Video Input: This setting allows stereo playback of videocassettes. The
television cannot change channels in the Video mode, but the VCR can.
To view the current input source, press ENTER on your remote.
The Time/Channel display should appear in the upper right
hand corner of the screen. If the display reads ‘Video,’ then the
source is an A/V input. If the display reads a channel number,
then the source is your Cable or Antenna.
Source
XDS Data Feature
Channel/Label or Video (Indicates Source)
Time
Audio Mode
PIP Channel & Label
(Note Shows Source of sound)
Ch 12-MTV
10:55
Stereo
PIP Ch 30-ABC
XDS = Extended Data Service
Some broadcasters are including on the signal they provide
additional information (data) about the program. This data (see
example) appears on your TV screen when you press ENTER; if
the channel has XDS.
Date
Channel/Time/Audio Display
(shown with PIP display, if PIP is on)
Title of Program
Length of Program (in hours and minutes)
Time Remaining (in hours and minutes)
Showing XDS Data
Select a channel. Press ENTER to display XDS data; if available.
XDS Channel Labels
XDS can provide a channel label automatically. For the programs to display an XDS channel label, select the dashes
(- - - -) for that channel from the Channel ID option in the
Setup Menu.
Example of an XDS Data Display
Jan/30/98
Ch 25-MTV
7:55
Stereo
PIP Ch 30-ABC
NOVA
Length 00:44 Time Left 00:37
At this printing, XDS data is only being provided
by some public broadcasting stations; and as a
result, it is only available on some channels.
You must set the Clock in the Setup Menu
before the time will appear on the
Channel/Time Display or on the XDS display.
Page 14
3374-O
PAGE 14
OPERATION TV FUNDAMENTALS
Basic Television Operation (cont’d)
Surfing
VOLUME VOLUME
CHANNEL UP/DOWN arrows: Use these arrows to change the channels.
Autoprogram will have found all channels available to you.
NUMBER Key Pad: To skip to any channel, enter the number of the
channel using the NUMBER key pad, then press ENTER.
FLASHBACK: To instantly return to the last channel viewed,
press FLASHBACK.
SURF: Switches between the primary channel selection and your customized surf channel selections. The surf mode icon will appear in the
lower right corner of the screen when you change channels. Press SURF
to turn surf On, press again to turn surf mode Off.
This is while the source is set to Antenna/Cable. For any other
source, such as a VCR, the Main Picture channel changing will
be controlled by that equipment.
Volume Right/Left: To adjust the volume level, use the volume
Right/Left arrows. To silence your TV instantly, press MUTE once to
soften the volume, press again to turn sound off. To get the sound
back, press MUTE again.
FLASHBK
CHANNEL
CHANNEL
ENTER
123
456
7089
SURF
Audio
Changing Channels
MUTE
Introducing
you to the
basics of your
Entertainment
Machine
Page 15

Mini glossary
TUNER The television, VCR, or cable box that you choose to change channels with.
OPERATION TV FUNDAMENTALS
3374-O
PAGE 15
Basic Television Operation (cont’d)
Help on
combining
your
Entertainment
Machine
with more
equipment.
There are a number of ways you can choose to integrate your Entertainment Machine with the rest of your equipment. Channels can be changed using the television, the VCR, or the cable box, with advantages to each.
USING THE TELEVISION AS THE TUNER preserves all your channel labels (not available on some models). It also
reduces the number of keys on the remote control you need to worry about. (One device, one remote to learn.)
USING THE VCR AS THE TUNER has the advantage of simplifying the recording process. If the VCR is tuned to
channel seven, then the VCR will record channel seven.
USING THE CABLE BOX (if you have one) to change the stations sometimes has an advantage, too, especially if
your cable provider requires you to use their cable box to descramble their stations.
Setting Up a Tuner
1
2
3
4
5
Based on the advantages listed above, decide what
device you want to use as the tuner.
Connect the antenna or cable source to the input
of your tuner. (If you chose your television as the
tuner, then you’re done. Go watch your
Entertainment Machine.)
Connect the output of your tuner to the input of the
next device.
If you used A/V cables for step 3, set the “next
device” to Video input. If you used an RF coaxial
cable in step 3, then tune the “next device” to
match the output channel of your tuner (usually
channel 3 or 4).
Repeat steps 3 and 4 until you reach your
Entertainment Machine. Then enjoy!
Page 16

OPERATION MENUS
Mini glossary
ADD The add function adds channels to the list that will be scrolled through when using your remote.
DELETE The delete function removes channels from the list that will be scrolled through when using your remote.
SURF The surf function creates a special list of your favorite channels. You can access this group of channels by
pushing the surf button on the remote.
PAGE 16
On-Screen Menus
3374-O
SETUP MENU Adjusts the basic characteristics of your Entertainment Machine.
Auto Program Automatically finds and stores active channels to flip through using
Channel Up/Down.
Add/Del/Surf Manually picks and chooses which active channels will appear when flip-
ping through using Channel Up/Down
Clock Set Sets the time.
Captions Turns closed captioning on, off, or set it to come on automatically when
the television is muted.
Caption/Text Chooses the captioning or text method for your Entertainment Machine.
Language Picks the language you want your on-screen menus to appear in.
Background Turns the background for on-screen menus transparent or opaque.
SPECIAL Goes beyond basics and customizes your Entertainment
FEATURES Machine’s functions.
Timer Setup Programs a time for your Entertainment Machine to turn itself on or off,
or to turn itself off after a certain amount of time.
Channel Labels Labels your channels with their network names (ABC, CBS, HBO, etc.).
Parental Control Allows parents to block any channel or A/V source for up to 99 hours,
with the use of a password.
Auto Demo Demonstrates the on-screen menus that control TV setup and operational
features.
Continued on next page.
Descriptions
of all the
menus on your
Entertainment
Machine.
Using the Menu button on your remote you can access
all the menus below.
Menu Name Go to page
10
18
19
20
21
22
23
24
25
26
27
Page 17

OPERATION MENUS PAGE 17
On-Screen Menus Overview, cont’d
3374-O
AUDIO MENU Customizes the sound to suit your room and your taste. Your options are:
Bass, Treble, Balance, Audio Mode, Front Surround, SoundRite, Speakers.
VIDEO MENU Adjusts your picture for any viewing situation. Your options are:
Contrast, Brightness, Color, Tint, Sharpness, Color Temp, Picture Pref.
PIP MENU Controls the size and appearance of the PIP inset. Your options are:
Color, Tint, Size.
SOURCE MENU Chooses from the available sources for both the main picture and PIP.
Channel/Time/ Shows the current time, channel, video and audio source, and the
Audio Display Surf status.
PIP/Channel If present, indicates PIP is on.
Audio Source Shows (with PIP on), the source sound is coming from, main or
PIP.
Volume Display Shows the current sound level.
XDS Display If available on currently selected channel, gives program name, length of
program and time left in program in hours and minutes. Also shows
Channel/Time/Audio display. If the clock has been set, displays the time
also.
Descriptions
of all the
menus on your
Entertainment
Machine.
Using the Menu button on your remote, you can access
all the menus below.
Menu Name Go to page
28
29
30
31
13
13
14
13
Page 18
OPERATION MENUS SETUP MENU
3374-O
PAGE 18
Setting Add/Del/Surf
Customize
your channel
selection.
PRG
CABLE
VCR
AUX TV
ENTER
FLASHBK
CHANNEL
CHANNEL
123
456
7
0
89
MENU
REWIND
RECORD
PIP
PIP ch
FREEZ
PAUSE TIMER
PLAY
STOP
SURF
MUTE
POWER
VOLUME VOLUME
QUIT
CC
FFWD
TV/VCR
SOURCE
Press the MENU key on the remote
so the Setup menu appears.
Select Add/Delete/Surf menu
using the UP/DOWN arrows.
Using either the NUMBER key pad
or the CHANNEL UP/DOWN arrows
on the remote, select a channel.
(If adding a deleted channel, you
will need to use the number pad.)
Using the RIGHT/LEFT arrows,
pick whether that channel is
Added, Deleted, or a Surf channel.
To continue, select another
channel and repeat step 4. If you
are finished, press ENTER or QUIT
to return to TV viewing.
1
2
3
4
5
4
3
5
1
If you delete a channel, it isn’t
gone for good. Just select it
using the NUMBER key pad on
the remote, or add it later.
Press SURF, with Surf active, you
can use channel up/down to scroll
the Surf channel list. Press SURF
again to return to normal channel
scan.
2
Mini glossary
ADD This function lets you add new channels to the list that you'll scroll through when using your remote.
DELETE This function lets you remove channels that you don't watch from the list you'll scroll through.
SURF This function lets you add your favorite channels to the Surf list.
Page 19

OPERATION MENUS SETUP MENU
3375-O
PAGE 19
PRG
CABLE
VCR
AUX TV
ENTER
FLASHBK
CHANNEL
CHANNEL
123
456
7
0
89
MENU
REWIND
RECORD
PIP
PIP ch
FREEZ
PAUSE TIMER
PLAY
STOP
SURF
MUTE
POWER
VOLUME VOLUME
QUIT
CC
FFWD
TV/VCR
SOURCE
1
2
3
4
5
Clock Set
Press the MENU key on the remote
control so the Setup menu appears.
Using the UP/DOWN arrows on
the remote control, select Clock
Set on your screen.
Press a RIGHT or LEFT arrow to
access the Clock Menu.
Using the UP/DOWN arrows,
select Date Set.
Using the LEFT or RIGHT arrows,
SELECT the Month, Date, or Year.
Use the UP/DOWN arrows to
change the Month, Date, or Year.
Once you have set the correct
year, press the RIGHT arrow, then
use an UP/DOWN arrow key to
select Clock Set.
Press a RIGHT or LEFT arrow key
to adjust the time.
Press the TIMER key to select AM
or PM.
Press ENTER or QUIT to return to
TV viewing.
1
10
9
2/4/6/7
You can use the NUMBER key
pad to simply type in the time
and date (AM and PM are still
selected with the Timer key).
Set the clock
and date on
your Zenith
Entertainment
Machine.
7
8
9
10
6
3/5/7/8
Page 20

OPERATION MENUS SETUP MENU
3375-O
PAGE 20
Captions
Press the MENU key on the
remote control so the Setup
menu appears.
Using the UP/DOWN arrows
on the remote control, select
Captions.
Press a RIGHT/LEFT arrow to
choose any of the following
options: On, Off, or Captions
When Muted.
Press ENTER or QUIT to return to
TV viewing.
Captions come in handy when the
television is on mute.
Not all programming has closed
captioning or text available.
1
2
3
4
PRG
CABLE
VCR
AUX TV
ENTER
FLASHBK
CHANNEL
CHANNEL
123
456
7
0
89
MENU
REWIND
RECORD
PIP
PIP ch
FREEZ
PAUSE TIMER
PLAY
STOP
SURF
MUTE
POWER
VOLUME VOLUME
QUIT
CC
FFWD
TV/VCR
SOURCE
3
1
4
2
Turn on closed
captioning or
Captions When
Muted.
Press “CC” to turns captions On,
Off, or select Captions When
Muted.
Page 21

OPERATION MENUS SETUP MENU
3375-O
PAGE 21
Turn on closed
captioning or
text that
appears at the
bottom of
your screen.
Caption/Text
Press the MENU key on the
remote control so the Setup
menu appears.
Using the UP/DOWN arrows
on the remote control. Select
Caption/Text o n your screen.
Press a RIGHT/LEFT arrow to
choose any of the following
options: Caption 1, Caption 2,
Caption 3, Caption 4, Text 1,
Text 2, Text 3, or Text 4.
Press ENTER or QUIT to return to
TV viewing.
Captions come in handy when the
television is on mute.
Standard closed captioning is
available using the Caption 1
option.
Not all programming has closed
captioning or text available; even
though Captions 1, 2, 3, 4, and
Text 1, 2, 3, and 4 are available
for use to the broadcaster.
1
2
3
4
PRG
CABLE
VCR
AUX TV
ENTER
FLASHBK
CHANNEL
CHANNEL
123
456
7
0
89
MENU
REWIND
RECORD
PIP
PIP ch
FREEZ
PAUSE TIMER
PLAY
STOP
SURF
MUTE
POWER
VOLUME VOLUME
QUIT
CC
FFWD
TV/VCR
SOURCE
3
1
4
2
Caption/Text is a feature which allows your
Entertainment Machine to receive various closed caption and text options provided by your broadcaster.
A
vailability and fuctionality of Caption/Text feature is
d
etermined only by your broadcaster and may not be
available in our area.
Mini glossary
CAPTIONS The term for the words that scroll across the bottom of your TV screen; usually the audio portion of the program provided for the hearing
impaired.
TEXT The term for the words that appear in a large black frame and almost cover the entire screen; usually messages provided by the broad-
caster.
Page 22

OPERATION MENUS SETUP MENU
3375-O
PAGE 22
Language Options
Press the MENU key on the
remote control so the Setup
menu appears.
Using the UP/DOWN arrows on
the remote control, select
Language on your screen.
Press a RIGHT/LEFT arrow to
choose any of the following
options: English, Spanish or
French.
Press ENTER or QUIT to return to
TV viewing.
1
2
3
4
Choose the
language you
want the
menus to
appear in.
PRG
CABLE
VCR
AUX TV
ENTER
FLASHBK
CHANNEL
CHANNEL
123
456
7
0
89
MENU
REWIND
RECORD
PIP
PIP ch
FREEZ
PAUSE TIMER
PLAY
STOP
SURF
MUTE
POWER
VOLUME VOLUME
QUIT
CC
FFWD
TV/VCR
SOURCE
3
1
4
2
Page 23

OPERATION MENUS SETUP MENU
3375-O
PAGE 23
Background
Press the MENU key on the
remote control so the Setup menu
appears.
Using the UP/DOWN arrows on
the remote control, select
Background on your screen.
Press a RIGHT/LEFT arrow to
choose On or Off.
Press ENTER or QUIT to return to
regular TV viewing.
1
2
3
4
PRG
CABLE
VCR
AUX TV
ENTER
FLASHBK
CHANNEL
CHANNEL
123
456
7
0
89
MENU
REWIND
RECORD
PIP
PIP ch
FREEZ
PAUSE TIMER
PLAY
STOP
SURF
MUTE
POWER
VOLUME VOLUME
QUIT
CC
FFWD
TV/VCR
SOURCE
3
1
4
2
Add a
background
to the
on-screen
menus.
Page 24

OPERATION MENUS SPECIAL FEATURESPAGE 24
3375-O
PRG
CABLE
VCR
AUX TV
ENTER
FLASHBK
CHANNEL
CHANNEL
123
456
7
0
89
MENU
REWIND
RECORD
PIP
PIP ch
FREEZ
PAUSE TIMER
PLAY
STOP
SURF
MUTE
POWER
VOLUME VOLUME
QUIT
CC
FFWD
TV/VCR
SOURCE
Timer Setup
Use the number keypad to type in
time settings.
The On/Off timer will not work
until the Clock on your television
has been set.
Automatically
turns your
Entertainment
Machine on
or off.
Press the MENU key on the remote
control so the Special Features
menu appears.
Using the UP/DOWN arrows on
the remote control, select Timer
Setup on your screen.
Press a RIGHT/LEFT arrow. The Timer
Setup screen will appear.
Sleep Timer: Use the RIGHT/LEFT
arrows to adjust the length of time
until the TV shuts down (select a
countdown from ten minutes to
four hours).
At this point, continue to step
five to set the On Time, or press
ENTER or QUIT to return to
TV viewing.
On Time: Using the UP/DOWN
arrows on the remote control, select
On Time on your screen.
Press a RIGHT or LEFT arrow or use
the NUMBER key pad to enter the
time your TV will automatically
turn on.
Press the TIMER button to select
AM or PM.
Press the UP/DOWN arrows to
select On/Off Timer.
Press the LEFT or RIGHT arrow to
turn on the On/Off Timer.
Press ENTER or QUIT to return to
TV viewing or continue programming by repeating the above steps
for Off Time.
1
2
3
4
6
2
10
3/4/9
5
6
7
8
7
5/8
Note:
9
10
1
Page 25

OPERATION MENUS SPECIAL FEATURES PAGE 25
3375-O
Channel Labels
With the CHANNEL UP/DOWN key, set
your Entertainment Machine to the
channel you want to label.
Press the MENU key repeatedly until the
Special Features menu appears.
Using the UP/DOWN keys, select
Ch. Labels in the menu.
Use a RIGHT/LEFT arrow to select a
channel label. (Each press will bring up
a different label.)
Press ENTER to accept the label and
return to regular TV viewing.
NOTE: The (----) label indicates that
your TV will accept the original, broadcast label, and (None) will block all
labeling.
1
2
3
4
5
PRG
CABLE
VCR
AUX TV
ENTER
FLASHBK
CHANNEL
CHANNEL
123
456
7
0
89
MENU
REWIND
RECORD
PIP
PIP ch
FREEZ
PAUSE TIMER
PLAY
STOP
SURF
MUTE
POWER
VOLUME VOLUME
QUIT
CC
FFWD
TV/VCR
SOURCE
4
1
5
2
3
1
Label the
channels
for the
Channel/Time
Display.
Page 26

OPERATION MENUS SPECIAL FEATURESPAGE 26
Make sure
you know
what your
kids aren’t
watching.
Parental Control
3375-O
Use the NUMBERS key pad to
choose channel numbers.
The On/Off timer will not work
until the Clock has been set.
PRG
CABLE
VCR
AUX TV
ENTER
FLASHBK
CHANNEL
CHANNEL
123
456
7
0
89
MENU
REWIND
RECORD
PIP
PIP ch
FREEZ
PAUSE
TIMER
PLAY
STOP
SURF
MUTE
POWER
VOLUME VOLUME
QUIT
CC
FFWD
TV/VCR
SOURCE
1
2
3
4
2
3
1
5
7
4
Press MENU repeatedly until the Special
Features menu appears.
Using the UP/DOWN arrows, select
Parental Ctl. in the menu.
Press a RIGHT/LEFT arrow to enter the
Parental Control menu.
With the UP/DOWN arrows, select
Block Ch.
Choose a channel number. Press a
RIGHT/LEFT arrow to choose Blocked or
Unblocked. Choose another channel number and continue Blocking/Unblocking
channels.
Use UP/DOWN and RIGHT/LEFT arrows for
the following:
Choose Block Video, Use the RIGHT/LEFT
arrows to Block or Unblock the A/V
inputs.
Choose Set Hours. Use the RIGHT/LEFT
arrows to increase/decrease the hours
parental Control will be active.
Choose Set Password. A display will
appear on the screen, prompting you to
enter a code. Use the Number Keypad,
enter a four-number code. You will be
asked to reenter the same code.
Choose Lock On Off. Use a RIGHT/LEFT
arrow key to choose whether Parental
Control will be On or Off, for the hours
you specified.
8
2/3
9
10
Page 27

OPERATION MENUS SPECIAL FEATURES PAGE 27
3375-O
Your
entertainment
machine will
show you
all your
menu options.
Press the MENU key repeatedly on
the remote control so the Special
Features menu appears.
Using the UP/DOWN arrows on
the remote control, select
Auto Demo on your screen.
Press a RIGHT/LEFT arrow to
choose On or Off.
Press ENTER or QUIT to return to
regular TV viewing.
1
2
3
4
PRG
CABLE
VCR
AUX TV
ENTER
FLASHBK
CHANNEL
CHANNEL
123
456
7
0
89
MENU
REWIND
RECORD
PIP
PIP ch
FREEZ
PAUSE TIMER
PLAY
STOP
SURF
MUTE
POWER
VOLUME VOLUME
QUIT
CC
FFWD
TV/VCR
SOURCE
3
1
4
2
Auto Demo
Auto Demo will continue to
operate until it is turned Off in
the Special Features menu.
Page 28
OPERATION MENUS AUDIO MENUPAGE 28
3375-O
Customize
the sound
on your
Entertainment
Machine.
Audio Menu
Press the MENU key repeatedly on the
remote control until the Audio menu
appears.
Using the UP/DOWN arrows on the
remote control, select the setting you
want to change. Choose from:
Press a RIGHT/LEFT arrow to change the
option you have selected or adjust the
sound setting to whatever you prefer.
Press ENTER or QUIT to return to
TV viewing, or press the UP arrow to
return to the Audio Menu to adjust
another option.
Not all programming is broadcast in
stereo sound, or has Second Audio
Programming/SAP.
1
2
3
4
PRG
CABLE
VCR
AUX TV
ENTER
FLASHBK
CHANNEL
CHANNEL
123
456
7
0
89
MENU
REWIND
RECORD
PIP
PIP ch
FREEZ
PAUSE TIMER
PLAY
STOP
SURF
MUTE
POWER
VOLUME VOLUME
QUIT
CC
FFWD
TV/VCR
SOURCE
• Bass: Increase/decrease lower-end sounds.
• Treble: Increase/decrease higher-end sounds.
• Balance: Allows you to put the sound more to
the left or right channel.
• Audio Mode: Choose from stereo sound,
mono, SEQ, or SAP.
• Front Surr: Turn the front surround sound
speakers on or off.
• SoundRite: Scans for changes in sound level
during commercials, then adjusts the sound
to match your current level.
• Speakers: Turn the regular speakers on or off.
3
1
4
2
Page 29

Press the MENU key repeatedly so the Video
menu appears.
Using the UP/DOWN arrows, select the menu
option that you want to change.
Your options are:
Press a RIGHT/LEFT arrow to adjust the option
you have selected.
Press ENTER to return to regular TV viewing.
Someone left the picture looking terrible?
Just choose Preset under Picture Pref (preference) to get the regular picture back quickly.
OPERATION MENUS VIDEO MENU PAGE 29
3375-O
Customize the
picture quality
on your
Entertainment
Machine.
Video Menu
1
2
3
4
PRG
CABLE
VCR
AUX TV
ENTER
FLASHBK
CHANNEL
CHANNEL
123
456
7
0
89
MENU
REWIND
RECORD
PIP
PIP ch
FREEZ
PAUSE TIMER
PLAY
STOP
SURF
MUTE
POWER
VOLUME VOLUME
QUIT
CC
FFWD
TV/VCR
SOURCE
3
1
4
2
• Contrast: Changes the amount of difference
between black levels and white levels in
your picture.
• Brightness: Increases or decreases the
amount of white in your picture.
• Color: Adjust levels of all colors.
• Tint: Adjust the relative amounts of the
color red and green in your picture.
• Sharpness: Raise or lower the definition
of the picture. The lower the level, the
softer the image will appear.
• Color Temp: Adjust the color qualities of
the entire picture at once: warm, medium,
and cool.
• Picture Pref: Choose either Custom or
Preset. Custom allows you to set the
picture the way you want. Preset moves all
the above options back to their original,
factory-set levels.
Page 30

OPERATION MENUS PIP MENUPAGE 30
Header
3374-O
PIP Menu
PRG
CABLE
VCR
AUX TV
ENTER
FLASHBK
CHANNEL
CHANNEL
123
456
7
0
89
MENU
REWIND
RECORD
PIP
PIP ch
FREEZ
PAUSE TIMER
PLAY
STOP
SURF
MUTE
POWER
VOLUME VOLUME
QUIT
CC
FFWD
TV/VCR
SOURCE
3
1
4
2
Control
the picture
qualities
of your
PIP inset.
Press the MENU key repeatedly until the
PIP Menu appears.
Using the UP/DOWN arrows, select the
PIP option you want to change; Color,
Size, or Tint.
Use a RIGHT/LEFT arrow to change the
option.
Press ENTER to return to regular
TV viewing.
1
2
3
4
Mini glossary
PIP This is the most common way to refer to the Picture-In-Picture (PIP) option.
Page 31

OPERATION MENUS SOURCE MENU PAGE 31
Header
3375-O
Choose
the sources
for your main
picture
and PIP.
1
2
3
4
You can watch home movies and
still scan for the big game.
This menu shows your viewing source options.
Mini glossary
SOURCE The term for the equipment that provides audio and video information to your Entertainment Machine. VCRs, Laser Disk players, or
Cable Boxes are examples of sources.
Source Menu
PRG
CABLE
VCR
AUX TV
ENTER
FLASHBK
CHANNEL
CHANNEL
123
456
7
0
89
MENU
REWIND
RECORD
PIP
PIP ch
FREEZ
PAUSE TIMER
PLAY
STOP
SURF
MUTE
POWER
VOLUME VOLUME
QUIT
CC
FFWD
TV/VCR
SOURCE
3
1
4
2
Push the MENU key repeatedly until the
Source Menu appears on your screen.
Using the UP/DOWN arrows, choose the
source for Main picture or PIP inset.
Using the LEFT/RIGHT arrows, choose the
source for Main picture or PIP inset. The
names will correspond to the jacks on the
back of your TV. If you connected a VCR to
the Video 1 jacks, then select Video 1 to
watch that VCR.
Press ENTER to return to regular TV viewing.
Page 32

OPERATION PICTURE-IN-PICTURE OVERVIEWPAGE 32
3375-O
Picture-in-
picture
explained.
PIP Overview
YOUR PICTURE-IN-PICTURE FEATURE
The Picture-In-Picture (PIP) function allows you to put a smaller
picture, called the “inset,” on the bigger screen, or the “main”
picture.
Normally you would need some other piece of equipment, like a
VCR, to act as a tuner to receive and display a second channel at
the same time. Your Entertainment Machine eliminates that need
by giving you two tuners on one TV. PIP is always available, no
matter what equipment you have.
Don’t want to miss any of the big game, but hate
commercials? Just put the game in the PIP inset, and surf your
favorite channels using the main picture.
WORKING WITH PIP
Just like your Entertainment Machine’s main screen, PIP will need
a source to take its image from. Set the main screen source to
Antenna/Cable, then set the PIP source to Antenna/Cable, as an
example. This can be adjusted under the Source menu (see page
31).
PIP can be used in any picture mode. Put Antenna/Cable in the
inset while you watch a tape. Attached to Video 1, have a DVD
disc going in the PIP inset while you watch a tape on the main
screen.
POSSIBLE REASONS FOR ADJUSTING PIP SOURCE
1. You want to watch a video tape, but keep scanning for another
movie or game. Set the PIP source to VIDEO 1, or 2 and you
can watch the VCR and TV, swapping between the two.
2. You want to watch your favorite live program on Antenna/Cable
on the main picture and when a commercial break appears,
swap to the PIP inset which has a videotape in the VCR ready
to play, or choose a different channel on Antenna/Cable.
Picture-in-Picture Main Picture
Mini glossary
TUNER Any device that picks up broadcast signals and turns them into picture and sound.
SOURCE Other equipment connected to the TV source inputs on the TV back connections panel; Video 1, or Video 2 for example.
Page 33

OPERATION PICTURE-IN-PICTURE PIP OPERATION PAGE 33
3375-O
Header
Learn to
use the PIP
features on
your
entertainment
machine.
PIP Operation
Press PIP to place the PIP inset on the
main screen. Press PIP again to remove
inset.
With PIP inset on, press PIP ch to switch
to PIP inset channel scan, press PIP ch
to return channel scan to the main
screen.
With PIP inset on, press FREEZ to freeze
the image in the PIP inset, press FREEZ
again to resume motion.
PIP On Operations
Audio Swap
With no other on-screen menus active,
use the QUIT key to switch sound
between main picture and the PIP inset;
the musical note shows which audio is
being heard.
PIP Swap
Use Up/Down arrows to flip PIP image
with main picture.
Channels
Press CHANNEL Up/Down to change
channels in the PIP inset - - if the
source for the PIP inset is
Antenna/Cable.
If the source is other equipment connected to the Vldeo 1, or Video 2 jacks,
tune channels on that equipment.
PIP Inset Video Source
Press TV/VCR SOURCE to switch video
sources for the PIP inset between,
Antenna/Cable, Video 1, or Video 2.
Move PIP Inset around Screen
Use the left/right arrows to move the
PIP inset to a different location on the
main screen.
1
2
3
Mini glossary
PIP This is the most common way to refer to the Picture-In-Picture (PIP) option.
PRG
CABLE
VCR
AUX TV
ENTER
FLASHBK
CHANNEL
CHANNEL
123
456
7
0
89
MENU
REWIND
RECORD
PIP
PAUSE TIMER
PLAY
STOP
SURF
MUTE
POWER
VOLUME VOLUME
QUIT
CC
FFWD
TV/VCR
SOURCE
PIP ch
FREEZ
3
1
2
Page 34
Mini glossary
SOURCE Equipment connected to the back connections panel jacks on the TV.
MAIN SOURCE Connection or equipment providing the picture and sound for the main picture.
PIP SOURCE Equipment providing the picture for the PIP inset.
Press PIP to place the PIP inset on the
main screen. Press TV/VCR Source to
switch input source for the PIP inset.
Or, go to the Source menu, highlight PIP
Source and use RIGHT/LEFT arrows to
select PIP inset source. Highlight Main
Source and use RIGHT/LEFT arrows to
select main picture source.
Main Screen or PIP Inset Sources
You can use:
Antenna/Cable
Video 1/S-Video 1
Video 2/S-Video 2
Where sources are connected
You can use any input source for the PIP
inset that is connected to the TV connections panel. (Antenna/Cable, Video 1, or
Video 2.)
Note: If you used the S-Video 1, or the
S-Video 2 input, S-VHS 1, or S-VHS 2 will
appear as available sources instead of
Video 1, or Video 2.
If no equipment is connected to a source
you select for the PIP inset, or if it is
turned Off, the PIP inset will be black.
OPERATION PICTURE-IN-PICTURE SELECTING VIEWING SOURCESPAGE 34
Choosing
which source
to watch for
main screen
and PIP inset.
PIP-Selecting Viewing Sources
3374-O
1
2
AUDIO/VIDEO OUT
VIDEO
R -AUDIO-L
AUDIO/VIDEO OUT
VIDEO
R -AUDIO-L
AUDIO IN
R -AUDIO-L
AUDIO/VIDEO OUT
VIDEO
R -AUDIO-L
Examples of the types of
equipment you can connect
to your TV
Camcorder
VCR
S-Video VCR
DVD Player
Other
Page 35

REMOTE PROGRAMMING REMOTE PAGE 35
3375-O
Programming the Remote
Program your
remote to
work with a
vast range of
brand name
devices.
The device you want to program should
be on.
On the chart on page 39/40, find
the type of device you’re
programming, and then find the brand
name. Make a note of the three-digit
code, you’ll need it soon.
Press and hold the PRG key. It’s recessed
so it doesn’t get pushed accidentally.
Use a small object. When the indicator
light turns on, you can release the key.
Push the key name with the type of
device you’re programming (VCR, CABLE,
AUX, TV).
Using the number pad, enter the three
digit code you found on page 39/40.
Press ENTER to save the code. (The indicator light will flash 3 times, then turn
off to indicate the code is valid.)
Aim the remote at the device and push
the POWER key. It should turn off. If
not, try the other codes listed and continue from step three.
Note: To reset remote to factory settings, enter 9-1-1, in step 5.
Programming your Zenith remote
will allow you to use one remote
to work up to 7 different devices.
Not all devices will work with your
Zenith remote control.
1
2
3
4
5
6
7
PRG
CABLE
VCR
AUX TV
ENTER
FLASHBK
CHANNEL
CHANNEL
123
456
7
0
89
MENU
REWIND
RECORD
PIP
PIP ch
FREEZ
PAUSE TIMER
PLAY
STOP
SURF
MUTE
POWER
VOLUME VOLUME
QUIT
CC
FFWD
TV/VCR
SOURCE
6
7
3
5
4
Mini glossary
PROGRAMMING Procedure to set up remote to operate other equipment.
PRG Programming key.
DEVICE Infra-red remote controllable electronic accessory.
Page 36

REMOTE REMOTE PROGRAMMINGPAGE 36
3375-O
Control the
volume on
your home
audio system
without
changing
modes.
Amplifier Volume Override
Find the code that operates your
amplifier. Test it to make sure it’s the
correct one by following the procedure in “Programming Your Remote”
on the previous page.
Program your audio system into the
CABLE or one of the available AUX
modes.
Select the mode you want amplifier
volume to appear (e.g. TV).
Press and hold PRG on your remote
until the indicator light stays lit,
then release.
Press 4-9-9; then ENTER on the
remote. The indicator light will flash
three times if code is accepted.
Audio system volume/mute now
appears in the mode selected.
Note: You can also program Cable
Box Volume and Mute control (if
available) into your cable box mode
(CABLE or AUX mode) by repeating
the steps for programming on the
previous page but entering 3-9-9,
instead of a brand code, then pressing ENTER.
1
2
3
4
To put everything back to normal,
reprogram the mode from step 3
with the original brand code.
If you can’t find the code for your
amplifier, use the Auto Find
feature on page 38.
5
6
PRG
CABLE
VCR
AUX TV
ENTER
FLASHBK
CHANNEL
CHANNEL
123
456
7
0
89
MENU
REWIND
RECORD
PIP
FREEZ
PAUSE TIMER
PLAY
STOP
SURF
MUTE
POWER
VOLUME VOLUME
QUIT
CC
FFWD
TV/VCR
SOURCE
PIP ch
2
5
3
4
Indicator Light
Mini glossary
AMPLIFIER Audio device which sends sound to speakers, like as Audio Tuner, Receiver, or Amplifier.
See Audio Tuners/Amp list on page 40.
CABLE BOX VOLUME/MUTE Some cable boxes have volume controls.
Page 37
REMOTE REMOTE PROGRAMMING PAGE 37
Mini glossary
AUX Auxiliary equipment. Can be any equipment which does not have a dedicated key on the remote like cable or VCR.
Typically a second VCR, stereo system, audio tape deck, etc.
3375-O
AUX+1, AUX+2, AUX+3
Control up
to seven
different
devices with
your remote!
Refer to the chart on page 39/40
to find the type and brand name
of the device you're programming.
Press and hold the PRG key until
the indicator light turns on, then
release the PRG key.
Press the AUX key and the 1 on
the NUMBER key pad at the same
time (for AUX +1).
Using the NUMBER key pad, enter
the three-digit code for the
device you've selected.
Press ENTER to save the code.
With the device turned on, point
the remote at it and press
POWER. It should turn off.
Repeat the steps for AUX+2, and
AUX+3.
1
2
3
4
5
6
7
PRG
CABLE
VCR
AUX TV
ENTER
FLASHBK
CHANNEL
CHANNEL
123
456
7
0
89
MENU
REWIND
RECORD
PIP
FREEZ
PAUSE TIMER
PLAY
STOP
SURF
MUTE
POWER
VOLUME VOLUME
QUIT
CC
FFWD
TV/VCR
SOURCE
PIP ch
5
7
2
4
3
Programming your Zenith remote
will allow you to use one remote
to work up to 7 different products
or devices.
Some devices may not work with
your Zenith remote control.
Page 38

REMOTE REMOTE PROGRAMMING AUTO-FINDPAGE 38
3375-O
Use the
remote
control to
search all
possible
codes.
Remote Control Auto-Find
PRG
CABLE
VCR
AUX TV
ENTER
FLASHBK
CHANNEL
CHANNEL
123
456
7
0
89
MENU
REWIND
RECORD
PIP
FREEZ
PAUSE TIMER
PLAY
STOP
SURF
MUTE
POWER
VOLUME VOLUME
QUIT
CC
FFWD
TV/VCR
SOURCE
PIP ch
1
2
3
4
5
6
7
5/7
3
6
2
You can quickly get out of Auto
Find by pressing PRG.
If the indicator light stays on
while you push Power instead of
turning off, all the codes have
been tried and your device can’t
be programmed.
4
Indicator Light
Turn on the device you want the
remote to control.
Press and hold the PRG key until
the indicator light turns on, then
release the PRG key.
Press the key for the device you
are trying to program (CABLE,
VCR, AUX, TV).
Press 0-0-0 (zero-zero-zero), then
press the ENTER key right away.
Aim the remote at the correct
device and push the POWER
key (The indicator light will turn
off while the POWER key is
pressed). Allow a second to pass,
then push the POWER key again.
Repeat until the device turns off.
Push ENTER to save the code (The
indicator light will flash 3 times
and then turn off).
Press POWER to turn the device
back on.
Page 39

REFERENCE PROGRAMMING CODES PAGE 39
3369-o
Admiral . . . . . . . 208 261
Adventura . . . . . . 231
Aiwa . . . . . . . . . 231
Akai . . . . . . . . . . 223 238 241
Audio Dynamics . . 202 218
Bell & Howell. . . . 206 247
Broksonic . . . . . . 221 226 250
255
Canon . . . . . . . . 214
Citizen . . . . . . . . 209
Craig . . . . . . . . . 212
Curtis Mathes . . . 214 259
Daewoo . . . . . . . 244 246 248
254
Daytron . . . . . . . 236 246
DBX . . . . . . . . . . 202 218
Emerson . . . . . . . 203 209 221
223 226 233
235 243 250
Fisher . . . . . . . . . 211 212 213
247
Funai . . . . . . . . . 231
General Electric . . 214 216 220
Goldstar . . . . . . . 209
Go Video . . . . . . . 256 262 263
Hitachi . . . . . . . . 215 257
Instant Replay . . . 214 227
J.C. Penny . . . . . . 214 215 218
227
JVC . . . . . . . . . . 202 224 225
258
Kenwood . . . . . . . 202
Logik . . . . . . . . . 239
LXI . . . . . . . . . . 209 231
Magnavox . . . . . . 207 214 231
Marantz . . . . . . . 207 218
Marta . . . . . . . . . 209
Memorex . . . . . . . 206 212 214
231
Mitsubishi . . . . . . 204 222 252
264
Montgomery Ward 208 214 216
219 231 249
Multi Tech . . . . . . 239
NEC . . . . . . . . . . 202 218
Orion . . . . . . . . . 250
Panasonic . . . . . . 214 251 259
Pentax . . . . . . . . 215
Philco. . . . . . . . . 207 214
Philips . . . . . . . . 207 214 227
Pioneer . . . . . . . 210 215
Portland . . . . . . . 246
ProScan . . . . . . . 216 260
Quasar . . . . . . . . 214 259
RCA . . . . . . . . . . 215 216 220
227 240 242
249 260
Realistic . . . . . . . 206 208 212
214 231
Samsung . . . . . . . 220 230 238
Sansui . . . . . . . . 239
Sanyo . . . . . . . . 206 212 247
Scott . . . . . . . . . 204 205 233
243
Sears . . . . . . . . . 206 209 211
212 215
Sharp . . . . . . . . . 208 261
Shintom . . . . . . . 239
Signature 2000. . . 208 214 216
219 231 249
Sony . . . . . . . . . 217 232 237
Sylvania . . . . . . . 207 214 227
Symphonic . . . . . 231
Tashiko. . . . . . . . 209
Tatung . . . . . . . . 202
Teac. . . . . . . . . . 202 231
Teknika. . . . . . . . 209 234
Toshiba. . . . . . . . 205 215
XR 1000 . . . . . . . 239
Vector Research . . 204 218
Yamaha. . . . . . . . 202 218
Zenith . . . . . . . . 201 224 225
229 237
Admiral . . . . . . . 116 121 130
133
Adventura TV/VCR 154
Akai . . . . . . . . . . 104
Amark . . . . . . . . 103 146
AOC . . . . . . . . . . 104
Bell & Howell . . . 121
Broksonic . . . . . . 131 136
Candle . . . . . . . . 139
Centurion . . . . . . 119
Citizen . . . . . . . . 121 139
Contec . . . . . . . . 141
Coronado . . . . . . 103
Crown . . . . . . . . 103
Curtis Mathes . . . . 116 119 121
Daewoo . . . . . . . 149 159
Daewoo TV/VCR . . 148
Daytron . . . . . . . 119
Elektra . . . . . . . . 121
Emerson . . . . . . . 103 104 123
124 131 136
145
Emerson TV/VCR . . 158
Fisher . . . . . . . . . 109 118
Funai TV/VCR . . . . 154
General Electric . . 106 107 114
116 117 161
Goldstar . . . . . . . 103 104 119
147
Goldstar TV/VCR . . 153
Hitachi . . . . . . . . 102 103 129
163
J.C. Penney . . . . . 104 110 114
117 119
JVC . . . . . . . . . . 125 132 164
KMC . . . . . . . . . . 103
KTV . . . . . . . . . . 103 104 138
Kurazai . . . . . . . . 121
Lodgenet. . . . . . . 121
Logik . . . . . . . . . 121
LXI . . . . . . . . . . 133 137
Magnavox . . . . . . 103 112 113
117 119 127
128 139 165
Magnavox TV/VCR 173
Majestic . . . . . . . 121
Marantz . . . . . . . 104 120 155
Megatron. . . . . . . 146
Memorex . . . . . . . 121
MGA/Mitsubishi. . . 104 119 120
130 140 155
Montgomery Ward 103 104 105
113 114 119
121 130 133
NEC . . . . . . . . . . 104 119
Panasonic . . . . . . 106 107 160
166
Panasonic TV/VCR 174
Philco. . . . . . . . . 103 104 112
113 139
Philips . . . . . . . . 112 113
Pioneer. . . . . . . . 135
Portland . . . . . . . 103
ProScan . . . . . . . 116 157 162
167
Quasar . . . . . . . . 106 107
RCA . . . . . . . . . . 104 116 126
157 161 162
167 168
Realistic . . . . . . . 105 123 124
Sampo . . . . . . . . 119
Samsung . . . . . . . 103 119 134
141
Sanyo . . . . . . . . . 108 109 118
Scott . . . . . . . . . 119 124
Sears . . . . . . . . . 103 108 109
110 111 118
134
Sharp . . . . . . . . . 103 105 122
133 137 156
169
Signature 2000. . . 103 104 105
113 114 119
121 130 133
Sony . . . . . . . . . 115 143 151
170
Soundesign . . . . . 139
Sylvania . . . . . . . 112 113 117
119 127 128
139
Symphonic TV/VCR 154
Tatung . . . . . . . . 106
Teknika. . . . . . . . 103 112 121
124 139
Telerent . . . . . . . 103 121
Toshiba . . . . . . . 110 111 134
171
XR 1000 . . . . . . . 121
Yorx . . . . . . . . . . 119
Zenith . . . . . . . . 101 149 175
Zenith TV/VCR . . . 153 154 172
Find the codes
you need to
program your
remote. On
this page: TVs
and VCRs.
Programming Codes
TVs
VCRs
Page 40

REMOTE REMOTE PROGRAMMING PROGRAMMING CODESPAGE 40
3369-o
Allegro . . . . . . . . 358 362
Allegro A/B Switch 361
Gemini . . . . . . . . 305 331 338
General Electric. . . 367
General Instrument 304 305 306
307 308 309
310 318
Hamlin . . . . . . . . 302 303 345
365 366
Jerrold . . . . . . . . 304 307 308
309 310 318
360 363
Kale Vision . . . . . 335
Macom . . . . . . . . 314 321
Magnavox . . . . . . 334
NSC . . . . . . . . . . 335 339 368
369 370
Oak . . . . . . . . . . 311 332 342
Panasonic . . . . . . 313 320
Paragon . . . . . . . 333
Philips . . . . . . . . 347 350 352
354 355
Pioneer. . . . . . . . 315 343
RCA DSS . . . . . . . 373
Regency . . . . . . . 329
Samsung . . . . . . . 335
Scientific Atlanta 316 323 336
364
Sprucer . . . . . . . . 313
Standard Comp . . . 335
Stargate . . . . . . . 379
Texscan . . . . . . . 339 356 371
Tocom . . . . . . . . 317 318 346
Unika . . . . . . . . . 348 362
United Satellite . . 344
Universal . . . . . . 358 362
Vid Tech . . . . . . . 340
Video Way . . . . . . 349
Viewstar . . . . . . . 354 355 372
Zenith . . . . . . . . 301 353 374
Zenith Satellite . . 312 328 330
351 378
Pioneer . . . . . . . 402 403
Sanyo . . . . . . . . . 401
Sony . . . . . . . . . 404
Zenith . . . . . . . . 401
Akai . . . . . . . . . . 409 424
Crown. . . . . . . . . 410
Denon . . . . . . . . 411
Fisher . . . . . . . . . 412 438
Goldstar . . . . . . . 460
Harman/Kardon . . 413
JVC . . . . . . . . . . 415
Kenwood . . . . . . 412 416 417
441
Magnavox . . . . . . 421 422 433
434
Mitsubishi . . . . . . 423 424
NAD . . . . . . . . . . 425 426 447
Nakamichi . . . . . . 427 428
NEC . . . . . . . . . . 429
Onkyo . . . . . . . . 430
Panasonic . . . . . . 431 432
Philips . . . . . . . . 421 433 434
Pioneer. . . . . . . . 431 435
Quasar . . . . . . . . 432
Radio Shack. . . . . 431 436 439
440 441
RCA . . . . . . . . . . 437
Sanyo . . . . . . . . . 438 439
Scott . . . . . . . . . 440
Sharp . . . . . . . . . 441 442
Sony. . . . . . . . . . 443 444 445
Soundesign . . . . . 461 498 501
502
Sylvania . . . . . . . 433
Teac . . . . . . . . . 446
Technics . . . . . . . 432 459
Toshiba. . . . . . . . 447
Yamaha . . . . . . . 448
Zenith . . . . . . . . 460 461 498
501 502
Find the codes
you need to pro-
gram your
remote.
On this page:
Cable,Satellite,
CD Players, Tape
Decks and Audio
Tuners and
Amplifiers.
Programming Codes
Video Disc Players
Audio CD Players
Audio Tape Decks
Cable Satellite
Denon. . . . . . . . . 462 463
Fisher . . . . . . . . . 464
Goldstar . . . . . . . 460
Harman/Kardon . . 465
JVC . . . . . . . . . . 466
Kenwood . . . . . . 468 469
Marantz. . . . . . . . 472 503
Onkyo . . . . . . . . 473
Philips . . . . . . . . 475 476
Pioneer. . . . . . . . 477 478 479
Radio Shack. . . . . 487 488
Realistic . . . . . . . 480
Sanyo . . . . . . . . . 481
Scott . . . . . . . . . 482
Sharp . . . . . . . . . 483
Sony. . . . . . . . . . 489 490 491
492
Soundesign . . . . . 461 498 501
502
Teac . . . . . . . . . 494 495
Technics . . . . . . . 497
Yamaha . . . . . . . 496
Zenith . . . . . . . . 460 461 498
501 502
Audio Tuners/Amps
Denon. . . . . . . . . 455
Harman/Kardon. . . 456
JVC . . . . . . . . . . 457
Kenwood . . . . . . . 450
Onkyo. . . . . . . . . 458
Philips DCC . . . . . 454
Pioneer. . . . . . . . 451 478
Sony. . . . . . . . . . 452
Page 41

REMOTE REMOTE PROGRAMMING PROGRAMMING CODES PAGE 41
3375-O
A complete
list of key
functions for
your remote
control.
Some of the functions shown above may not be available on your equipment.
Remote Key Functions by Mode
Remote Control Part No. 124-212-51 and µP 221-952-02A
Preset or default key functions by mode for Zenith products
TV Mode VCR Mode Cable Mode AUX Mode
KEY NAME Zenith Code 101 Zenith Code 201 Zenith Code 353 Zenith Code 401
POWER TV On/Off VCR On/Off Cable Box On/Off AUX TV/DISC
CABLE Selects Cable Selects Cable Selects Cable Selects Cable
VCR Selects VCR Selects VCR Selects VCR Selects VCR
AUX Selects Aux Selects AUX Selects Aux Selects AUX
TV Selects TV Selects TV Selects TV Selects TV
SURF Surf On/Off VCR AM/PM CABLE FC Fav Ch AUX Audio
FLASHBK TV Flashback VCR Flashback Cable Flashback AUX Frame/Time
MUTE TV Mute TV Mute TV Mute TV Mute
CHANNEL UP TV Channel Up VCR Channel Up Cable Channel Up AUX Skip >>
CHANNEL DN TV Channel Dn VCR Channel Dn Cable Channel Dn AUX Skip <<
VOLUME (RIGHT) TV Volume Up TV Volume Up TV Volume Up TV Volume Up
VOLUME (LEFT) TV Volume Dn TV Volume Dn TV Volume Dn TV Volume Dn
1 TV Digit 1 VCR Digit 1 Cable Digit 1 AUX Digit 1
2 TV Digit 2 VCR Digit 2 Cable Digit 2 AUX Digit 2
3 TV Digit 3 VCR Digit 3 Cable Digit 3 AUX Digit 3
4 TV Digit 4 VCR Digit 4 Cable Digit 4 AUX Digit 4
5 TV Digit 5 VCR Digit 5 Cable Digit 5 AUX Digit 5
6 TV Digit 6 VCR Digit 6 Cable Digit 6 AUX Digit 6
7 TV Digit 7 VCR Digit 7 Cable Digit 7 AUX Digit 7
8 TV Digit 8 VCR Digit 8 Cable Digit 8 AUX Digit 8
9 TV Digit 9 VCR Digit 9 Cable Digit 9 AUX Digit 9
0 TV Digit 0 VCR Digit 0 Cable Digit 0 AUX Digit 0
ENTER TV Enter VCR Enter Cable Enter Aux Display
MENU TV Menu VCR Menu Cable Menu AUX Program
UP ARROW TV Select Up VCR Select Up Cable Up Arrow AUX Part
DOWN ARROW TV Select Dn VCR Select Dn Cable Dn Arrow AUX Random
LEFT ARROW TV Adjust Left VCR Adjust Left Cable Left Arrow AUX x3 FAST <
RIGHT ARROW TV Adjust Right VCR Adjust Right Cable Right Arrow AUX x3 FAST >
QUIT/ TV Seq Sound VCR Quit Cable Quit AUX Clear
PIP TV PIP VCR+ Day Up AUX Repeat-Side
SWAP TV PIP Swap VCR Channel Map Day Down AUX Repeat-A-B
FREEZ TV PIP Freeze VCR Search Cable Pg Up AUX Repeat-Chap
CC TV Closed Captions VCR Memory Cable Pg Down AUX Memory
TIMER TV Timer VCR Timer Cable Timer AUX Still
TV/VCR/SOURCE TV Sources TV Tuner or VCR Tuner Cable Info AUX TV/Disc
RECORD VCR Record VCR Record Cable Buy AUX Edit
PAUSE VCR Pause VCR Pause Cable Guide AUX Pause
REWIND VCR Rewind VCR Rewind VCR Rewind AUX Scan <<
PLAY VCR Play VCR Play VCR Play AUX Play
STOP VCR Stop VCR Stop VCR Stop AUX Stop/Eject
FFWD VCR Fast Forward VCR Fast Forward VCR Fast Forward AUX Scan >>
Page 42

REFERENCE MAINTENANCEPAGE 42
3374-O
Caring for
your
Entertainment
Machine.
Maintenance
1. Here’s a great way to keep the dust off your screen for a while. Wet a soft cloth in a mixture of lukewarm water and a little fabric softener or dish washing detergent. Wring the cloth until it’s almost dry,
and then use it to wipe the screen.
2. Make sure the excess water is off the screen, and then let it air-dry before you turn on your
Entertainment Machine.
1. Use a soft cloth with a mild soap solution to wipe the cabinet (avoid using any cleaner that says
”industrial strength“ or ”will wash the white off of rice“ on the label).
2. Rinse the cloth and wipe the cabinet again.
3. Let the cabinet air-dry before turning the Entertainment Machine on.
Use a quality wood cleaner and polish. This will protect the Entertainment Machine from dirt and dust, as
well as keep the cabinet looking new.
If you leave your Entertainment Machine dormant for a long time (such as a vacation), it’s a good idea to
unplug the power to protect against possible damage from lightning or power surges. If you use an offair antenna, you may also want to disconnect it from the back of your TV before leaving.
Screen Cleaning
Extended Absence
If you unplug your Zenith Entertainment Machine, you may have to reset the clock using the Clock Set
menu described earlier. See page 19.
Cabinet Cleaning
Wood Cabinet
Early malfunctions can be prevented. Careful and regular cleaning can extend the amount of time you will have with
your new Entertainment Machine. Be sure to turn the power off and pull out the plug before you begin any cleaning.
Maintenance
Page 43

REFERENCE MAINTENANCE
SYMPTOMS
Snowy picture and lousy sound.
Multiple images or ‘ghost shadows.’
Interference: Sharp lines across
the screen and lousy sound.
Normal picture but no sound.
No picture and lousy sound.
No picture and no sound —
The thing is just DEAD!
No color, but the sound is O.K.
Picture has a big black box
on it, but the sound is O.K.
Picture has two horizontal
black bars, one on top and
one on bottom.
Remote control doesn’t work.
PAGE 43
3374-O
SOLUTIONS
• Check your antenna connection or location.
• Check your antenna direction and/or location.
• Make sure the wire from your antenna to your Entertainment Machine is
properly connected.
The following may cause image problems or distortion:
Electrical appliances, powerful lights, cars, trucks; computers or
portable phones; medical equipment
• If possible increase the distance between your Entertainment Machine and
the offending appliance. Or shut one of them off.
• Check volume levels.
• Make sure the TV is not Muted.
• Try another channel. The problem may be the broadcast, not your
Entertainment Machine.
• Are the Audio A/V cables properly installed?
• Are you in TV or cable tuning mode, and should be in the other?
• Make sure output channels on all A/V equipment are on the same channel (3 or 4).
• Check that all connections are tight.
• Is the AC power plugged in?
• Check that your AC power outlet works. (Test it by plugging in something
else or try another plug.)
• Make sure your brightness and audio controls are set properly.
• Try another channel. The problem may be with the broadcast.
• Check the color control in the Video menu.
• Try another channel. The problem may be with the broadcast.
• The CC (closed caption) option may be in Text mode. Select OFF in the
Captions menu (see page 20).
• Your program is in letterbox. This means that the shape of your TV is a
square, but the program is a rectangle. Think of the bars as empty space the
program doesn’t fill; not picture that’s blocked out. Because this format is a
direct representation of film as you see it in the movies, you are actually seeing
MORE of the program when you see those bars. Trust us.
• Make sure the batteries are fresh and installed properly. Does indicator light
work?
• Is remote in TV mode? Press TV for TV mode.
Some quick
and easy
tips to fixing
problems
yourself.
Troubleshooting
Page 44

Menu options can’t be
changed or selected.
No picture or sound
when any non-cable source
is selected.
Weak or no Stereo Sound
when using a stereo VCR.
The PIP inset is black or
lacks contrast when VIDEO 1
is the PIP source.
The PIP inset is “snow” when
the source is Antenna/Cable,
Video 1, or Video 2.
There is no picture in the
PIP inset when using VIDEO 1
for the PIP and Antenna/Cable
for the main picture.
If all else fails, try unplugging your entertainment machine for about 5 minutes, then plugging it back in.
(Don’t forget to reset the clock.) If that doesn’t work, call 1-847-391-8752, extension 5, between 8:30 am
and 4:30 pm Central Standard Time.
• Try unplugging your Entertainment Machine for a few minutes,
then plug it back in. (Don’t forget to reset the clock.)
• Check to see if the source equipment has been turned on.
• Make sure that the connections are secure on the back of your TV and on
the source equipment.
• Check to see if all the connections are secure.
• Look in the Audio mode menu to see if all the settings are correct.
• You might want to adjust the PIP picture settings under the PIP menu.
• Check that all the wires are connected properly.
• PIP source turned on?
• Look to see if the TV/VCR button on your VCR has the TV selected.
• Look to see if the TV/VCR button on your VCR has the TV selected.
REFERENCE MAINTENANCEPAGE 44
Troubleshooting cont’d
3375-O
Some quick
and easy
tips to fixing
problems
yourself.
Page 45

REFERENCE GLOSSARY PAGE 45
Glossary
3374-O
A/V CABLES Audio/Video cables. Three cables bunched together—Right audio (red),
Left audio (white), and Video (yellow). A/V cables are used for stereo
playback of videocassettes and for higher quality picture and sound
from other A/V devices.
A/V DEVICE Any device that produces video or sound (VCR, DVD, cable box,
or television).
ADD This function lets you add new channels to list that you’ll scroll
through when using your remote.
AMPLIFIER An external machine that amplifies sound from a television, CD player,
VCR, DVD or other A/V device.
ANTENNA The physical receiver of television signals sent over the air. A large
metal piece of equipment does not always have to be visible for your
home to be using an antenna.
CAPTIONS/TEXT A form of subtitling that writes out the dialog for your program.
DATA SOURCE A jack for hooking up optional equipment that gives you access to the
Internet through your TV.
DELETE This function lets you remove channels that you don’t watch from the
list you’ll scroll through.
ICON A small picture on your screen that represents a function or menu
item.
INPUT Refers to the jack that receives a signal into the TV, VCR or other
A/V device.
JACK A connection on the back of a TV, VCR, or any other A/V device.
This includes the RF jack that is threaded with a place for a small wire
in the center, and the Audio/Video jacks that have a bigger opening
and are color-coded.
MODE The device that the remote control is currently controlling
(TV, VCR, Cable, etc.) is its “mode.”
MONO SOUND Mono (monaural) sound is one channel of sound. On more than one
speaker all the speakers play the same audio.
OHM RF CABLE The wire that comes from an off-air antenna or cable service provider.
Each end looks like a hex shaped nut with a wire sticking through the
middle, and it screws onto the threaded jack on the back of your TV.
OUTPUT Refers to the jack that sends a signal out of a VCR, DVD, or other A/V
device.
A complete
list of
definitions
for words
found in
this guide.
Page 46

REFERENCE GLOSSARY PAGE 46
3369-o
3357-o
PIP This is the most common way to refer to the Picture-In-Picture
(PIP) option.
SECOND AUDIO Second Audio Programming (SAP) is another, separate, audio channel
PROGRAMMING/SAP available with some programming. Choosing SAP often refers to
listening to audio in another language, such as Spanish or French.
SIGNAL Picture and sound traveling through cable, or on the air, to your
television screen.
SOURCE The term for the equipment that provides audio and video information
to your Entertainment Machine. VCR, DVD players, or
Cable Boxes are examples of sources.
STEREO SOUND Stereo (Stereophonic) sound refers to audio that’s divided into right
and left sides.
SURF The surf function creates a special list of your favorite channels.
You can access this group of channels by pushing the surf button on
the remote.
TUNER Any device that picks up broadcast signals and turns them into
picture and sound.
Glossary (cont’d)
A complete
list of
definitions
for words
found in
this guide.
Page 47

REFERENCE INDEX PAGE 47
Header
3374-O
Index
FEATURE PAGE
Add/Del/Surf . . . . . . . . . . . . . . . . . . . . . . . . . . . . .18
Amplifier Volume Override. . . . . . . . . . . . . . . . . . . . . 36
Audio Hook-ups . . . . . . . . . . . . . . . . . . . . . . . . . . . . 9
Audio Menu . . . . . . . . . . . . . . . . . . . . . . . . . . . . . . 28
Auto Demo. . . . . . . . . . . . . . . . . . . . . . . . . . . . . . . 27
Auto Find . . . . . . . . . . . . . . . . . . . . . . . . . . . . . . . 38
Auto Program. . . . . . . . . . . . . . . . . . . . . . . . . . . . . 10
Background Menu . . . . . . . . . . . . . . . . . . . . . . . . . . 23
Basic Television Operation. . . . . . . . . . . . . . . . . . . . . 13
Batteries. . . . . . . . . . . . . . . . . . . . . . . . . . . . . . . . . 4
Button Functions. . . . . . . . . . . . . . . . . . . . . . . . . . . 11
Cable . . . . . . . . . . . . . . . . . . . . . . . . . . . . . . . . . 5, 7
Captions/Text Menu . . . . . . . . . . . . . . . . . . . . . . 20, 21
Channel Labels . . . . . . . . . . . . . . . . . . . . . . . . . . . . 25
Channel Search (Auto Program) . . . . . . . . . . . . . . . . . 10
Clock Set. . . . . . . . . . . . . . . . . . . . . . . . . . . . . . . . 19
DVD Player . . . . . . . . . . . . . . . . . . . . . . . . . . . . . . . 8
External Stereo. . . . . . . . . . . . . . . . . . . . . . . . . . . . . 9
Front Panel Diagram. . . . . . . . . . . . . . . . . . . . . . . . . 12
Glossary. . . . . . . . . . . . . . . . . . . . . . . . . . . . . . 45, 46
Hook-Up Directory. . . . . . . . . . . . . . . . . . . . . . . . . . . 3
Find what you
want quickly.
Jack Pack . . . . . . . . . . . . . . . . . . . . . . . . . . . . . . . . 6
Language Menu. . . . . . . . . . . . . . . . . . . . . . . . . . . . 22
Maintenance . . . . . . . . . . . . . . . . . . . . . . . . . . . 43, 44
On-Screen Menus. . . . . . . . . . . . . . . . . . . . . . . . . . . 16
Picture-in-Picture . . . . . . . . . . . . . . . . . . . . . . . . 32-34
PIP . . . . . . . . . . . . . . . . . . . . . . . . . . . . . . . . .33-34
PIP Menu . . . . . . . . . . . . . . . . . . . . . . . . . . . . . . . .30
Programming Codes . . . . . . . . . . . . . . . . . . . . . . .39-40
Remote Control Diagram . . . . . . . . . . . . . . . . . . . . . .11
Safety Information . . . . . . . . . . . . . . . . . . . . . . . . . .2
Serial Number . . . . . . . . . . . . . . . . . . . . . . . . . . . . . .2
Super VHS VCR . . . . . . . . . . . . . . . . . . . . . . . . . . . . .8
Surf . . . . . . . . . . . . . . . . . . . . . . . . . . . . . . . . . . .18
Timer . . . . . . . . . . . . . . . . . . . . . . . . . . . . . . . . . .24
Troubleshooting . . . . . . . . . . . . . . . . . . . . . . . . .43-44
VCR . . . . . . . . . . . . . . . . . . . . . . . . . . . . . . . . . .6, 7
Video Menu . . . . . . . . . . . . . . . . . . . . . . . . . . . . . .29
Warranty . . . . . . . . . . . . . . . . . . . . . . . . . . . . . . . .48
XDS . . . . . . . . . . . . . . . . . . . . . . . . . . . . . . . . . . .13
FEATURE PAGE
Page 48

Direct-View Color TV Welcome to the Zenith family! We believe that you will be pleased with your new Zenith Entertainment Machine. Please read this
warranty carefully, it is a “LIMITED WARRANTY” as defined under Federal Law. This warranty gives you specific legal rights,
and you may also have other rights that vary from state to state within the U.S.A.
ZENITH RESPONSIBILITY
Service Labor During a period of 90 days from effective warranty date, Zenith will provide service labor by a Zenith authorized service center
when needed, as determined by the Zenith service center, as a result of manufacturing defects.
Parts New or remanufactured replacements for factory-defective parts will be supplied by a Zenith authorized service center for one year
from effective warranty date (color picture tube — two years). Such replacement parts are
warranted for the remaining portion of the original warranty period.
Home Service Warranty service for 21” diagonal (U.S.A.) or larger screen size models is provided in the home in most cases. (Some
repairs may require the unit to be taken by the servicer to the repair facility and returned, at no additional charge.)
Not Covered This warranty covers manufacturing defects and does not cover installation, adjustment of customer controls in the home,
installation or repair of home antenna systems, cable converters or cable company-supplied equipment; it also does
not cover damage due to misuse, abuse, negligence, acts of God or other causes beyond the control of Zenith. Any
alteration of the product after manufacture voids this warranty in its entirety.
THIS WARRANTY IS IN LIEU OF ANY OTHER WARRANTY, EXPRESSED OR IMPLIED, INCLUDING WITHOUT LIMITATION, ANY WARRANTY OF
MERCHANTABILITY OR FITNESS FOR A PARTICULAR PURPOSE, AND ZENITH SHALL NOT BE LIABLE FOR ANY CONSEQUENTIAL, INDIRECT,
OR INCIDENTAL DAMAGES OF ANY KIND, INCLUDING LOST REVENUES OR PROFITS IN CONNECTION WITH THIS PRODUCT.
OWNER’S RESPONSIBILITY
Effective Warranty Date Warranty begins on the date of original consumer purchase. For your convenience, keep the dealer’s dated bill of sale or
delivery ticket as evidence of the purchase date.
Operating Guide Read your Operating Guide carefully so that you will understand the operation of your set and how to adjust the customer controls.
Carry-In Service Models under 21” diagonal (U.S.A.) screen size must be taken to a Zenith authorized service center for warranty service
and must be picked up by the owner.
Antenna Reception problems caused by inadequate home antenna or faulty antenna connections are the owner’s responsibility.
Important Product Registration—Please fill out and mail your Product Registration Card. It is imperative that Zenith know how to reach
you promptly if we should discover a safety problem that could affect you.
Warranty Service For warranty service information, contact any Zenith authorized service center. Parts and service labor that are Zenith’s
responsibility (see above) will be provided without charge. Other service is at the owner’s expense. If you have any problem
in obtaining satisfactory warranty service, call or write the Zenith Response Center. You must provide the model number,
serial number and date of purchase or date of original installation. Before you ask for warranty service, read “Maintenance
And Troubleshooting” in your operating guide. You might avoid a service call.
ZENITH CONSUMER SERVICES
Factory Owned Service Center
Home & Carry-in Service
Television/VCR
Parts and Accessories
PTV/Computer
Service Contracts Hours:
M-F 8-6, Sat 9-2
801 E. Roosevelt Rd
Lombard, IL 630-705-2830
Be sure to send in the Product Registration Card. We will send you an application for the Protection Plan near the expiration of the
two-year manufacturer’s warranty on the picture tube. For additional information call (847) 391-8757.
206-3375-O
Issue*
Your Zenith Warranty
ZENITH ELECTRONICS CORPORATION
Zenith Response Center
1000 Milwaukee Avenue
Glenview, IL 60025-2493
Telephone (847)391-8752
Mon-Fri, 7:00 a.m.-8:00 p.m. CST
IN CANADA, WRITE OR CALL US AT:
LG Electronics
235 Superior Blvd.
Mississauga, Ontario, Canada LST-2L6
tel: (905)795-6240,
fax:(905) 670-2379
IN MEXICO, WRITE OR CALL US
LG Electronics
Av. San Andres Atoto, No 8
Col. San Andres Atoto, Naucalpan
Estado de Mexico,
C.P. 53500
tel; 01 (800) 50 481
y en el D.F. 359 43 55
fax 01 (800) 50 733
y en el D.F. 357 17 56
Additional Zenith Picture Tube Protection Plan Available
Zenith offers you the opportunity to obtain additional long-term protection against failure of the picture tube in your new television. Our Picture Tube
Protection Plan enables you to avoid any unexpected picture tube repair expenses and keep your television in top condition. It guarantees you a genuine
Zenith replacement picture tube and service from a Zenith authorized service center.
Page 49
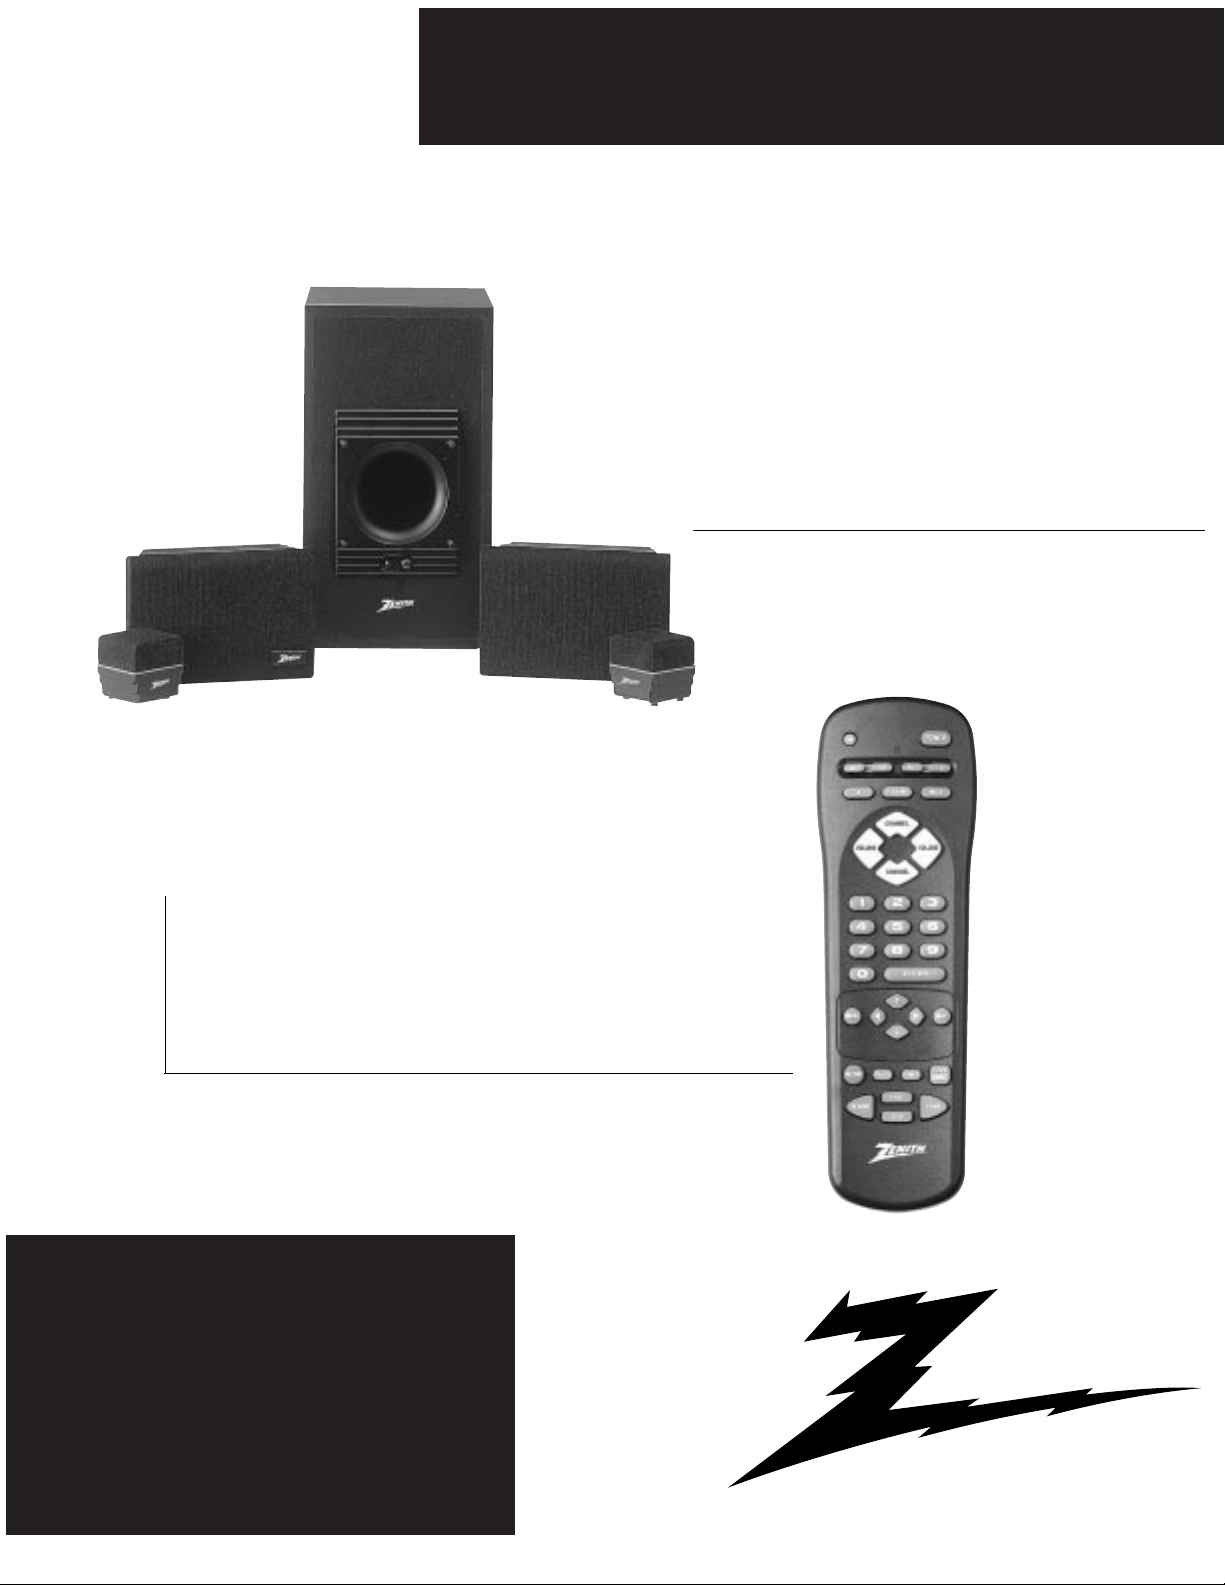
Recommended Audio/Video Accessories
Broken or lost remote? Perhaps you would just like the
convenience of having a second remote on hand. Order
your replacement remote control direct from Zenith! To
ensure that you receive the correct remote, have your
television's model number ready when you call.
For use with any Surround Sound compatible TV. These
speakers create a sound so real, it’s as if you were part
of the action. The convenient, space-saving shelf design
make these speakers an ideal addition to any Home
Theater System. The contemporary black finish complements any room.
ONLY $39.95
CV5000
ONLY $224.95
PLUS $4.95
SHIPPING & HANDLING
PLUS
$17.95
SHIPPING & HANDLING
STEREO SURROUND SOUND SPEAKERS
REPLACEMENT REMOTE
ORDER TODAY!
CALL TOLL-FREE
1.800.255.6790
Use Your Visa or MasterCard to Order
PLEASE ALLOW 3- 4 WEEKS FOR DELIVERY
zenith
 Loading...