

Page 1

machine numbers I A27A76R I A27A74R
C
operating guide / warranty
Page 2
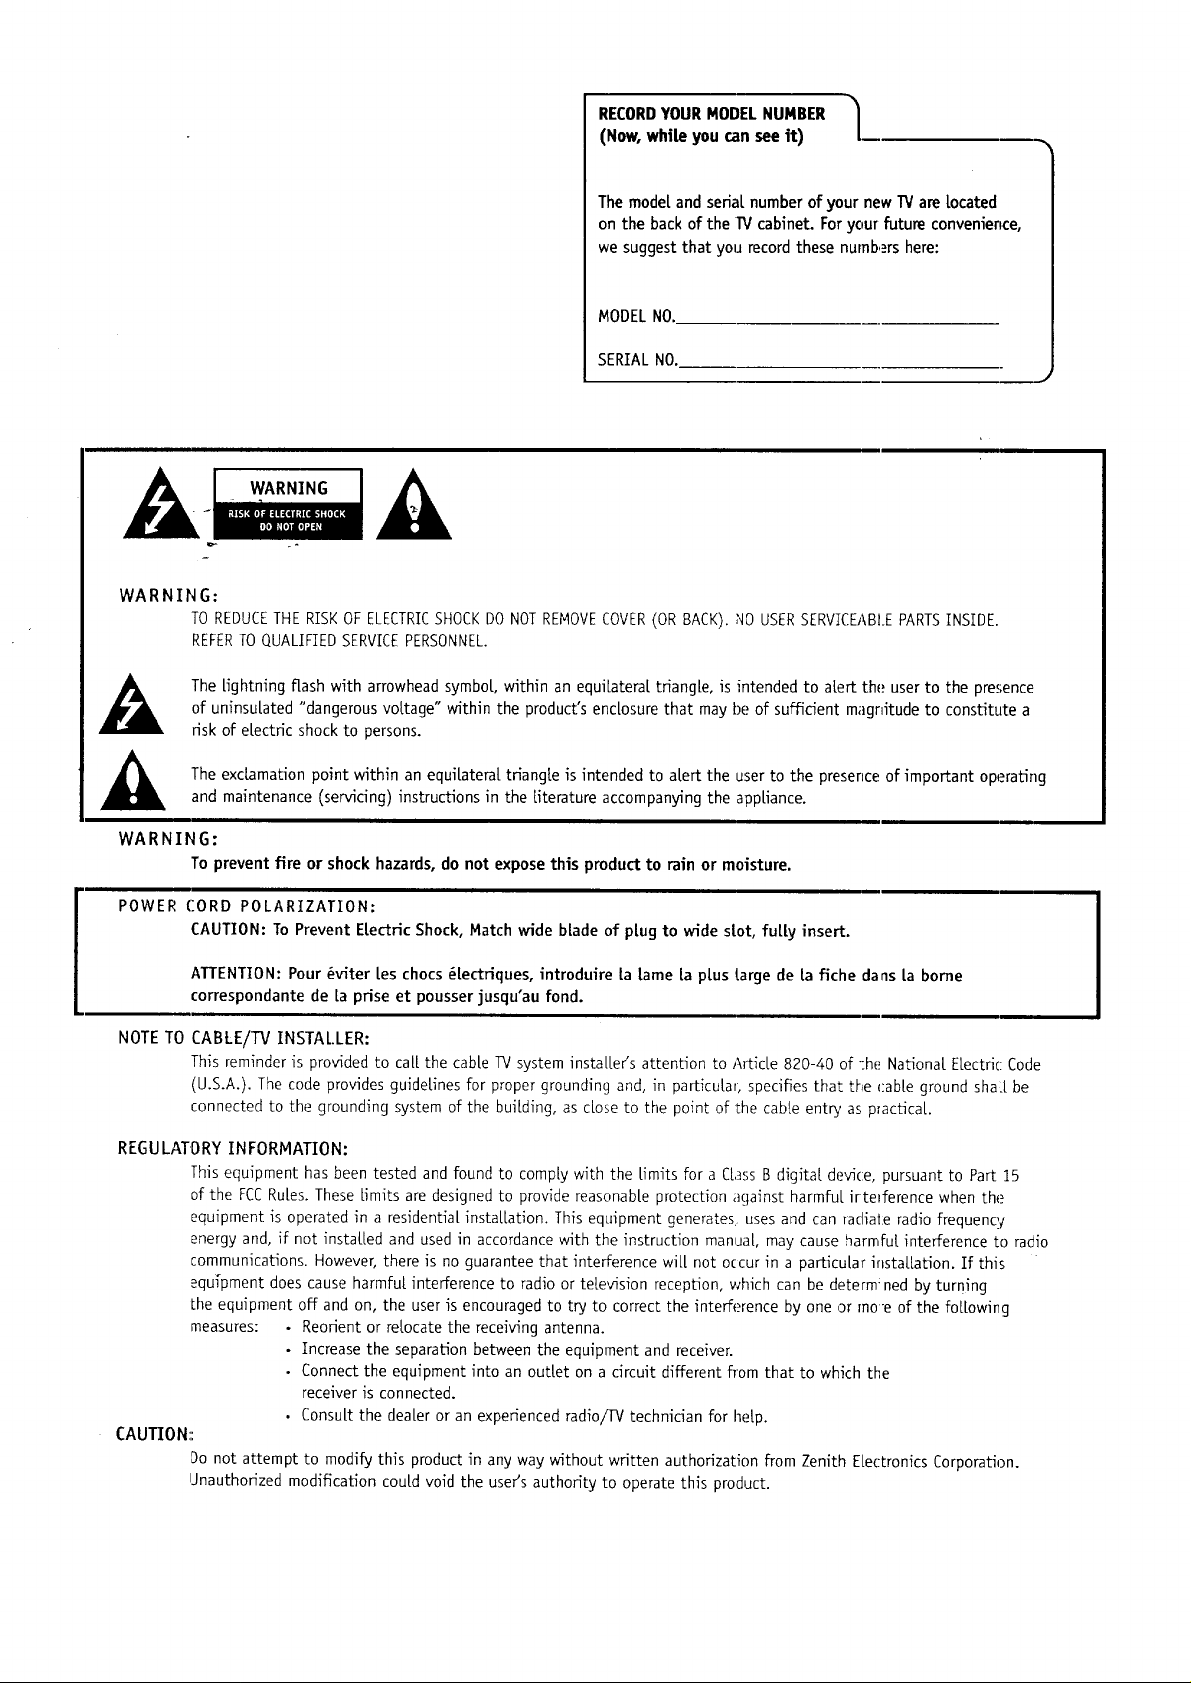
WARNING:
RECORDYOUR MODEL NUMBER |
(Now, while you can see it)
/
The mode[and serial number of yournew TVarelocated
onthe backof the 1_/cabinet. Foryourfuture convenience,
wesuggestthat yourecordthese numbershere:
MODEL NO.
SERIAL NO.
WARNING
TO REDUCETHE RISK OF ELECTRICSHOCKDO NOTREMOVECOVER(OR BACK). NO USERSERVICEABI_EPARTSINSIDE.
REFERTO QUALIFIED SERVICEPERSONNEL.
The lightning flash with arrowhead symbol, within an equilateral triangle, is intended to alert the user to the presence
of uninsulated "dangerous voltage" within the product's enclosure that may be of sufficient magnitude to constitute a
risk of electric shock to persons.
The exclamation point within an equilateral triangle is intended to alert the user to the preserlce of important operating
and maintenance (servicing) instructions in the literature accompanying the appliance.
WARNING:
To preventfire or shockhazards,do not expose this product to rain or moisture•
POWER CORD POLARIZATION:
CAUTION: To Prevent Electric Shock, Match wide blade of plug to wide slot, fully insert.
ATTENTION: Pour _viter [es chocs _[ectriques, introduire la lame [a plus Large de la fiche dans [a borne
correspondante de [a prise et pousser jusqu'au fond.
NOTETO
REGULATORY INFORMATION:
CAUTION::
CABLE/TV INSTALLER:
This reminder is provided to ca[[ the cable TV system installers attention to Article 820-40 of :he National Electric Code
(U.S.A.). The code provides guidelines for proper grounding and, in particu[al, specifies that the cable ground sha_l be
connected to the grounding system of the building, as close to the point of the cable entry as practical.
This equipment has been tested and found to comply with the Umits for a C[,_ssB digital device, pursuant to Part 15
of the FCCRuLes.These limits are designed to provide reasonable protection against harmful irtefference when the
equipment is operated in a residential installation. This equipment generates uses and can radiate radio frequency
energy and, if not installed and used in accordance with the instruction manuaL, may cause harrnfu[ interference to radio
communications. However, there is no guarantee that interference wiLLnot occur in a particular instaLLation. If this
equTpment does cause harmful interference to radio or television reception, which can be determ _ned by turning
the equipment off and on, the user is encouraged to try to correct the interference by one or moe of the following
measures: . Reorient or relocate the receiving antenna.
• Increase the separation between the equipment and receiver.
• Connect the equipment into an outlet on a circuit different from that to which the
receiver is connected.
• ConsuLt the dealer or an experienced radio/TV technician for help.
Do not attempt to modify this product in any way without written authorization from Zenith Electronics Corporation.
Unauthorized modification could void the users authority to operate this product.
Page 3
,.STAL'.T,ONI O.T,N°ST.,TEOIPAGE3
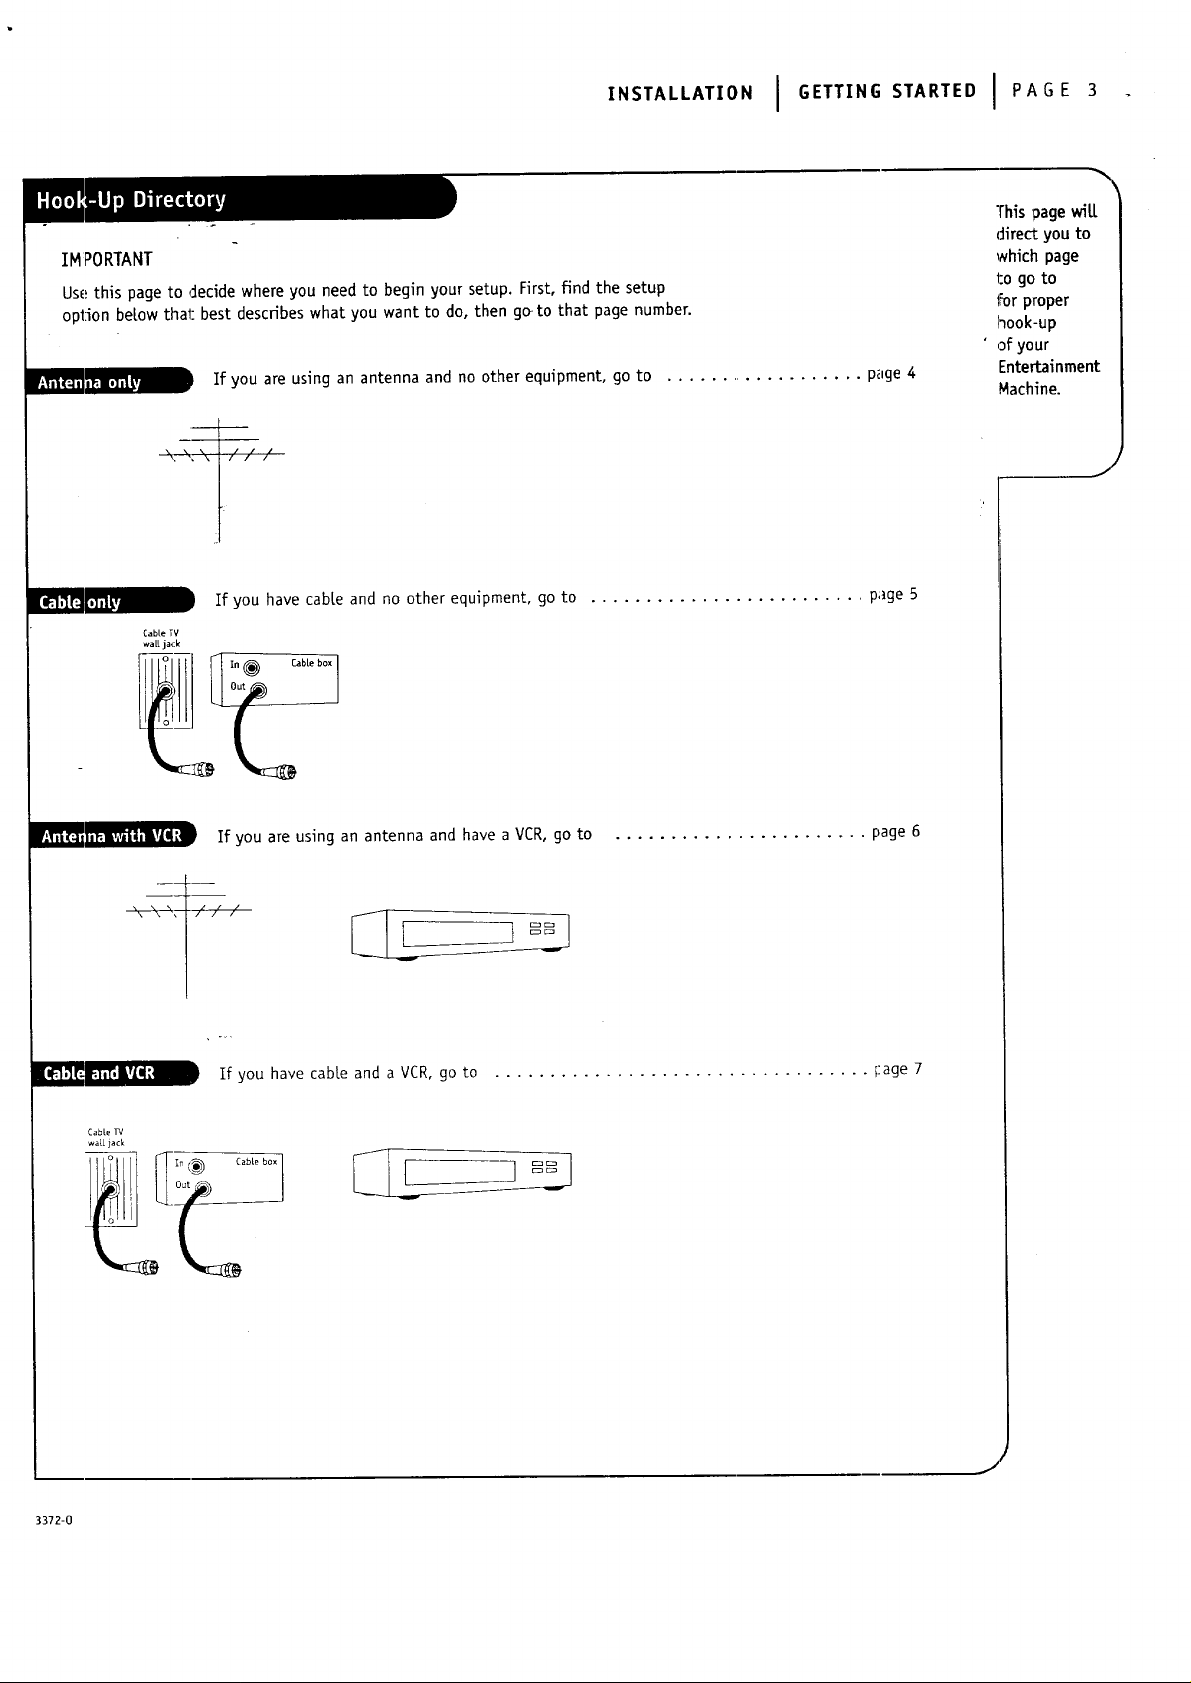
IMPORTANT
Usethis pageto decide whereyou need to begin your setup. First, find the setup
option be!ow thai: best describes what you want to do, then ge to that page number.
If you are using an antenna and no other equipment, go to ................... page 4
,, \ \ t / / /
,, ,, \ i x / /
t
Ifyou have cable and no otherequipment, go to ......................... page 5
Cable TV
wall jack
This page wit[
direct you to
which page
to go to
for proper
hook-up
• of your
Entertainment
Machine.
J
CabLe TV
wall jack
Ifyou are usingan antenna and have a VCR, go to ....................... page 6
If you have cable and a VCR, go to .................................. Fage 7
3372-0
J
Page 4
PAOE4I,NS*A,<A*,ONI S*AN°A.°
f
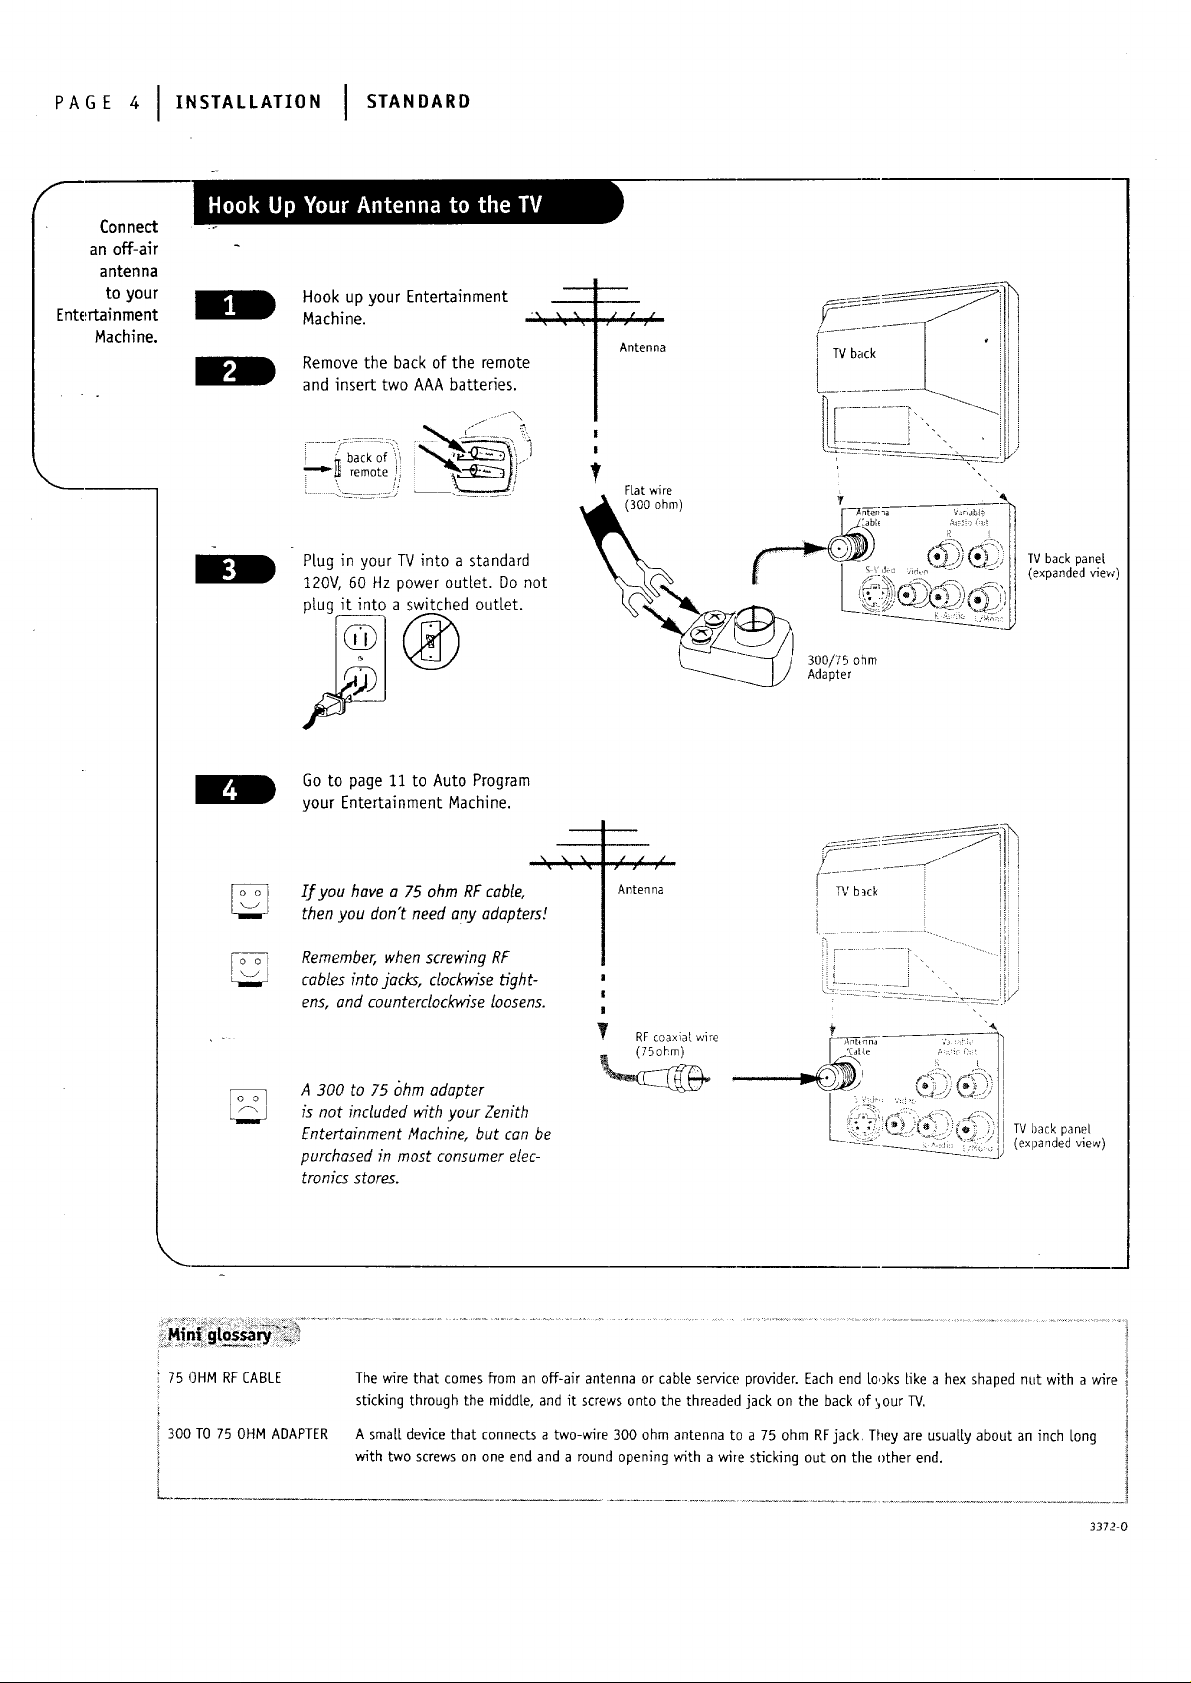
Connect
an off-air
antenna
to your
Entertainment
Machine.
Hook up your Entertainment
Machine. '" " "
Remove the back of the remote
and insert two AAA batteries.
back of _'_
_ remote i
." # /
• . z
Antenna
T;C-
[..........i
T
FLatwire
_, (300ohm) i_i[,? _,:r_
PLug in your TV into a standard
120V, 60 Hz power outlet. Do not
plug it into a switched outlet.
Go to page 11 to Auto Program
your Entertainment Machine.
IJ=you have a 75 ohm RF cable,
then you don't need any adapters[
Remember, when screwing RF
cables into jacks, clockwise b'ght-
ens, and counterdock_'se loosens.
A 300 to 75 [_hm adopter
is not included with your Zenith
Entertainment Machine, but can be
purchased in most consumer elec-
tronics stores.
\ \ \
/ d ,/
Antenna
T RFcoaxial wire
f--;
!
I
i f........... i. '
4 i "' ii _
'Cat Le ;,:;i _}:r
............ii
4k
TV back pane[
(expanded view)
TV back panel
(expanded view)
75 OHM RF CABLE
300 TO 75 OHM ADAPTER
The wire that comes from an off-air antenna or cane service provider. Each end Looks Like a hex shaped nut with a wire
sticking through the middle, and it screws onto the threaded jack on the back of '._ourTV.
A smaLLdevice that connects a two-wire 300 ohm antenna to a 75 ohm RF jack. They are usuaLLy about an inch Long
with two screws on one end and a round opening with a wire sticking out on the other end.
3372÷0
Page 5
il_lw
Elll
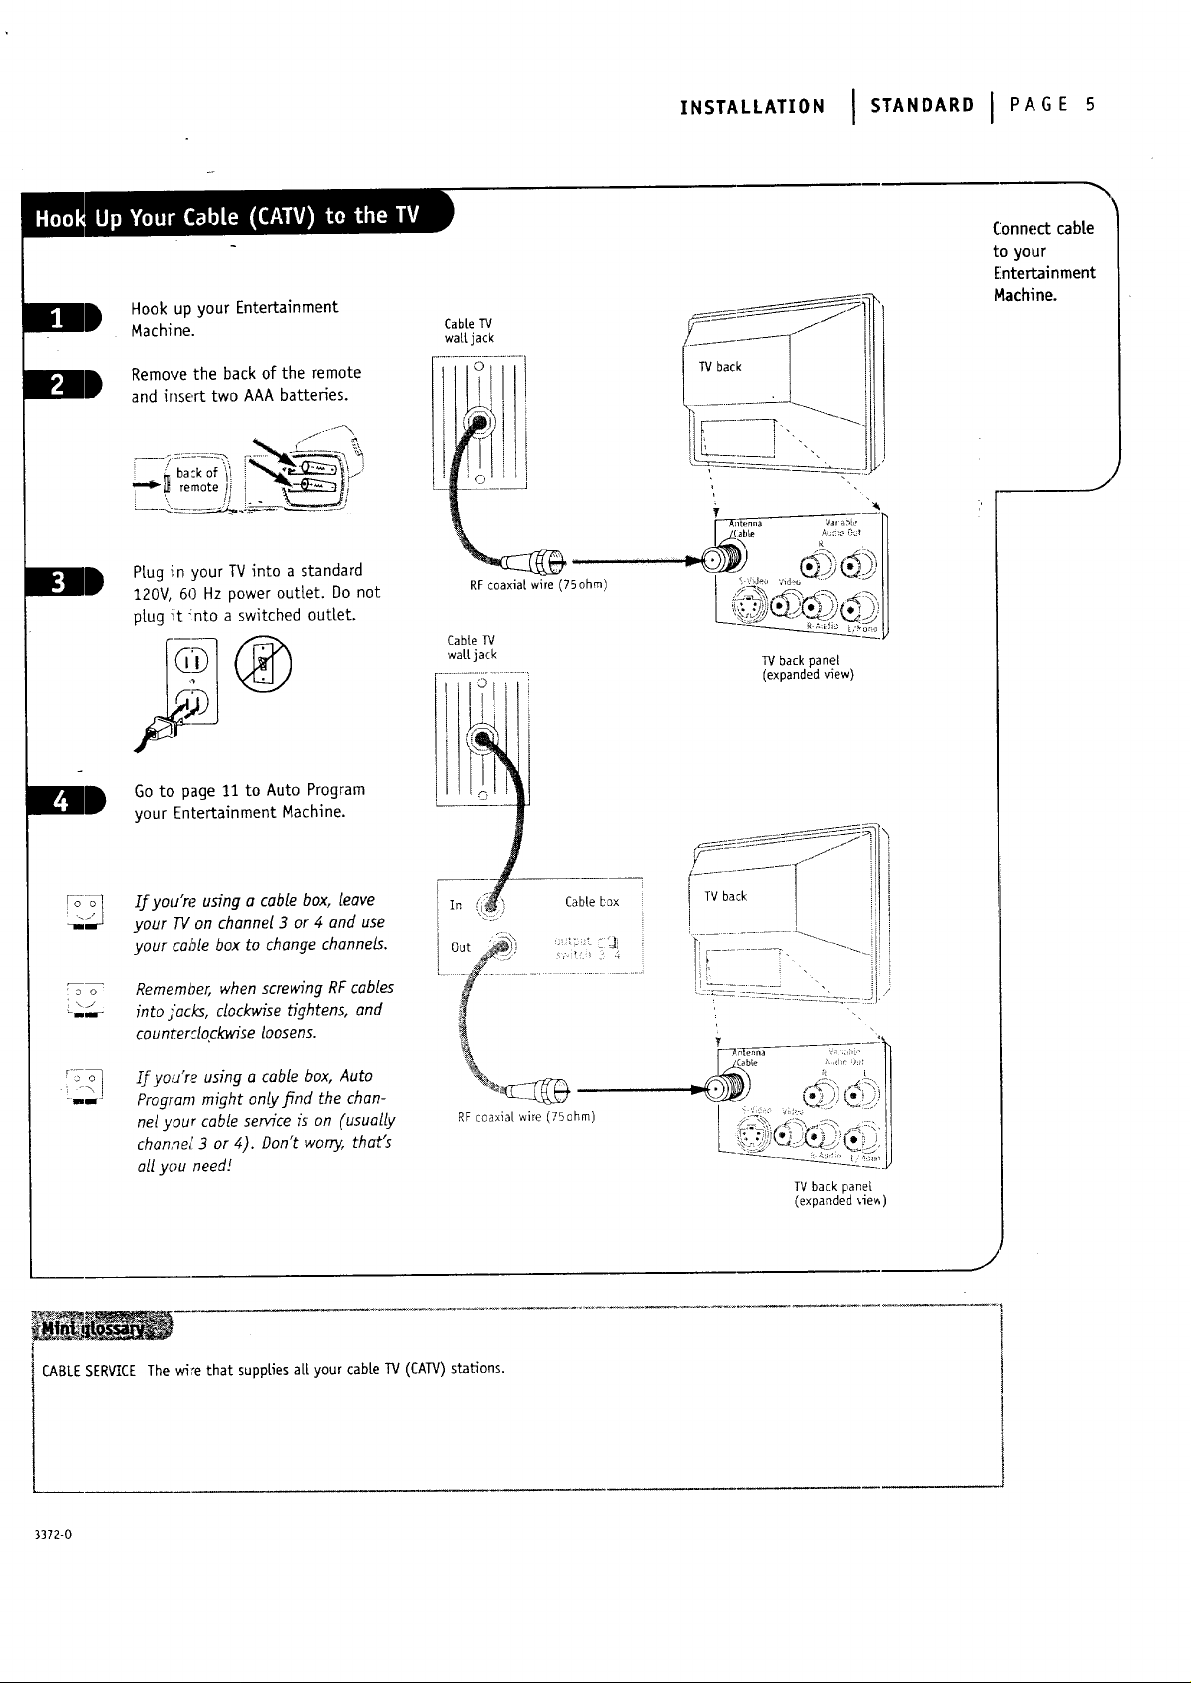
Hook up your Entertainment
Machine.
Remove the back of the remote
and insert two AAA batteries.
CaMe TV
walljack
,.STAL'AT,O.ISTA.OA.OI PAGE
Connect cable
to your
Entertainment
Machine.
ZZ H'
""_ remote iii "_"'_,--Z_J _r
Plug in your TV into a standard
120V, 60 Hz power outlet. Do not
plug :it :nto a switched outlet.
Go to page 11 to Auto Program
your Entertainment Machine.
_, If you're using a cable box, leave
your TV on channel 3 or 4 and use
your cable box to change channels.
o_ RememOer, when screwing RF cables
-..r into j'ack3, clockwise tightens, and
counr.er_.lockwise toosens.
RF coaxial wire (75ohm) i(_ t!2))i_._::(i_i :'_ "i)ll
Cable IV
wall. jack
In (i_'_}) Cablebox
j TV back
TV back pane[
(expanded 'dew)
!
t
J
If you're, using a cable box, Auto
Program might only find the chan-
nel your cable service is on (usually
channel! 3 or 4). Don't worry, that's
all you need!
CABLESERWCEThe wPe that supplies all your cable IV (CAIV) stations.
3372-0
RF coaxial wire (75ohm)
IV back panet
(expanded vie_)
I
Page 6
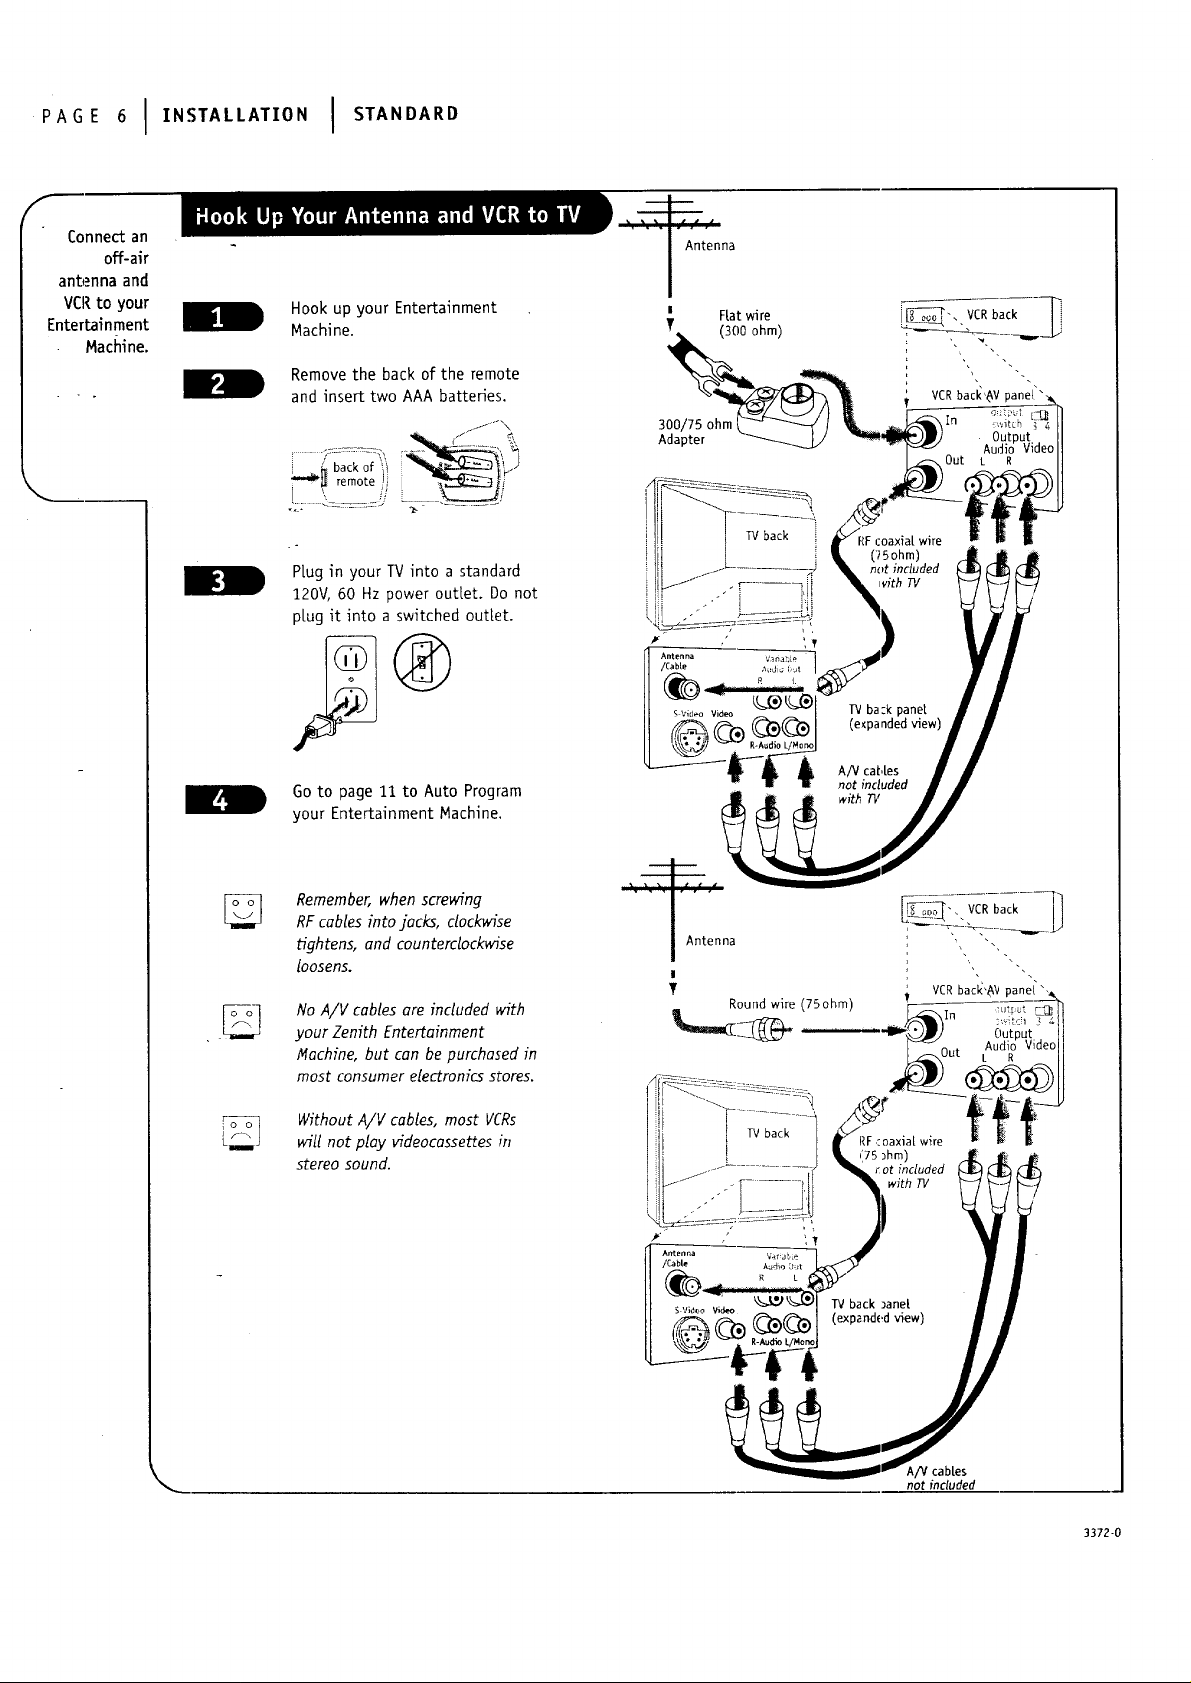
PAGE°I,NS,A''A"O"IS'ANOA"O
f
Connectan
off-air
antennaand
VCRto your
Entertainment
Machine.
Hook up yourEntertainment
Machine.
Remove the back of the remote
and insert two AAA batteries.
--___romoteyli_ _j
Hug in your TV into a standard
120V, 60 Hz power outlet. Do not
plug it into a switched outlet.
L
Go to page 11 to Auto Program
F
your Entertainment Machine,
Antenna
J ,:,,-t,\
Remember,when screwing
RFcablesintojacks,clockwise
tightens,and counterclockwise
loosens.
No A/V cables are included with
your Zenith Entertainment
Machine, but can be purchased in
most consumer electronics stores.
Without A/V cables, most VCRs
will not play videocassettes in
stereo sound.
not included
3372-0
Page 7
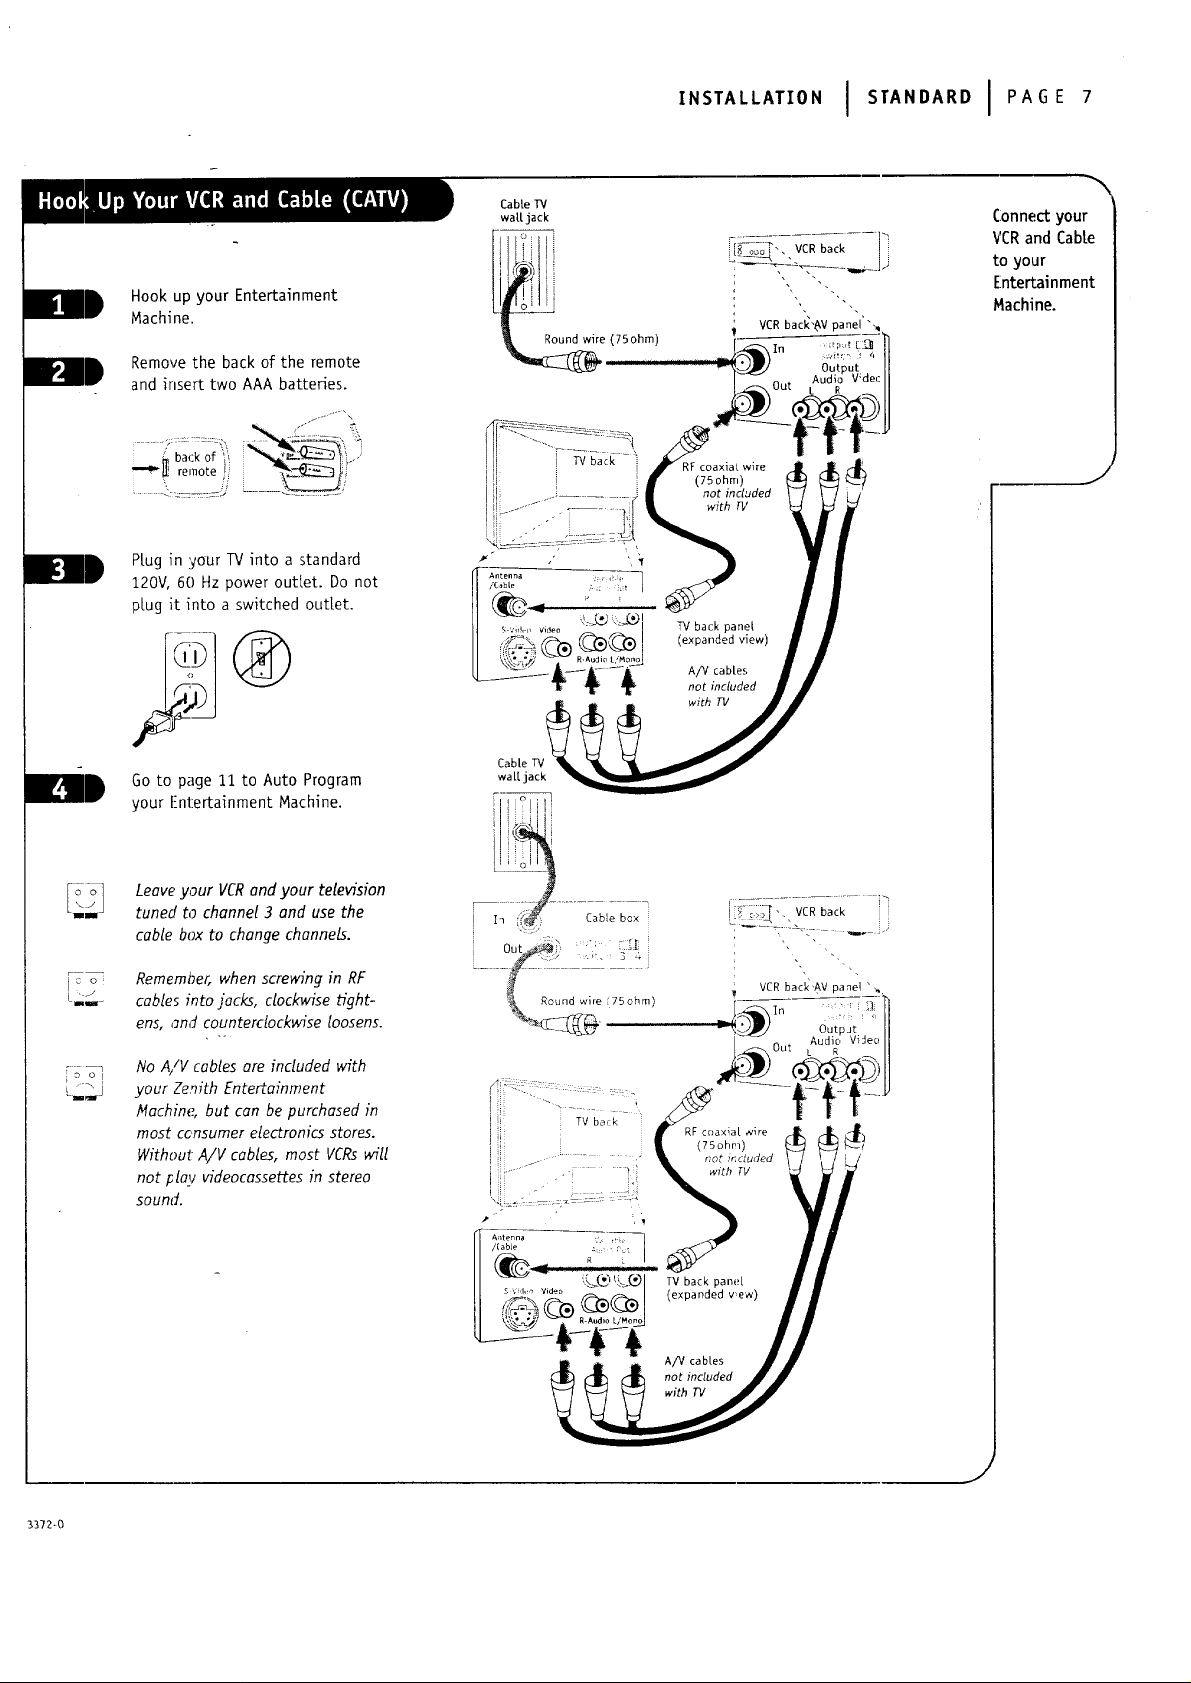
Hook up your Entertainment
Machine.
Remove the back of the remote
and insert two AAA batteries.
,,. ....... \
'_ back of ",_
""_ remote F
Mug in :¢our TV into a standard
120V, 60 Hz power out[et. Do not
plug it into a switched outlet.
,.STA''AT,ONI S'A"OA"OIPAGE'
Connectyour
VCRand Cable
to your
Entertainment
Machine.
J
Ill
_ Leaveyour VCRandyour teWvision
Go to page 11 to Auto Program
your l-_ntertainment Machine.
.. tuned to channel 3 and use the
cable box to changechannels.
i : o_ Remember, when screwing in RF
L.:__ cables into jacks, clockwise tight-
ens, and counterclockwise loosens.
r --q
No A/V cables ore included with
your Zenith Entertainment
Machine, but can be purchased in
most consumer electronics stores.
Without A/V cables, most VCRswill
not _l_l videocassettes in stereo
sound.
with TV
3372-0
J
Page 8
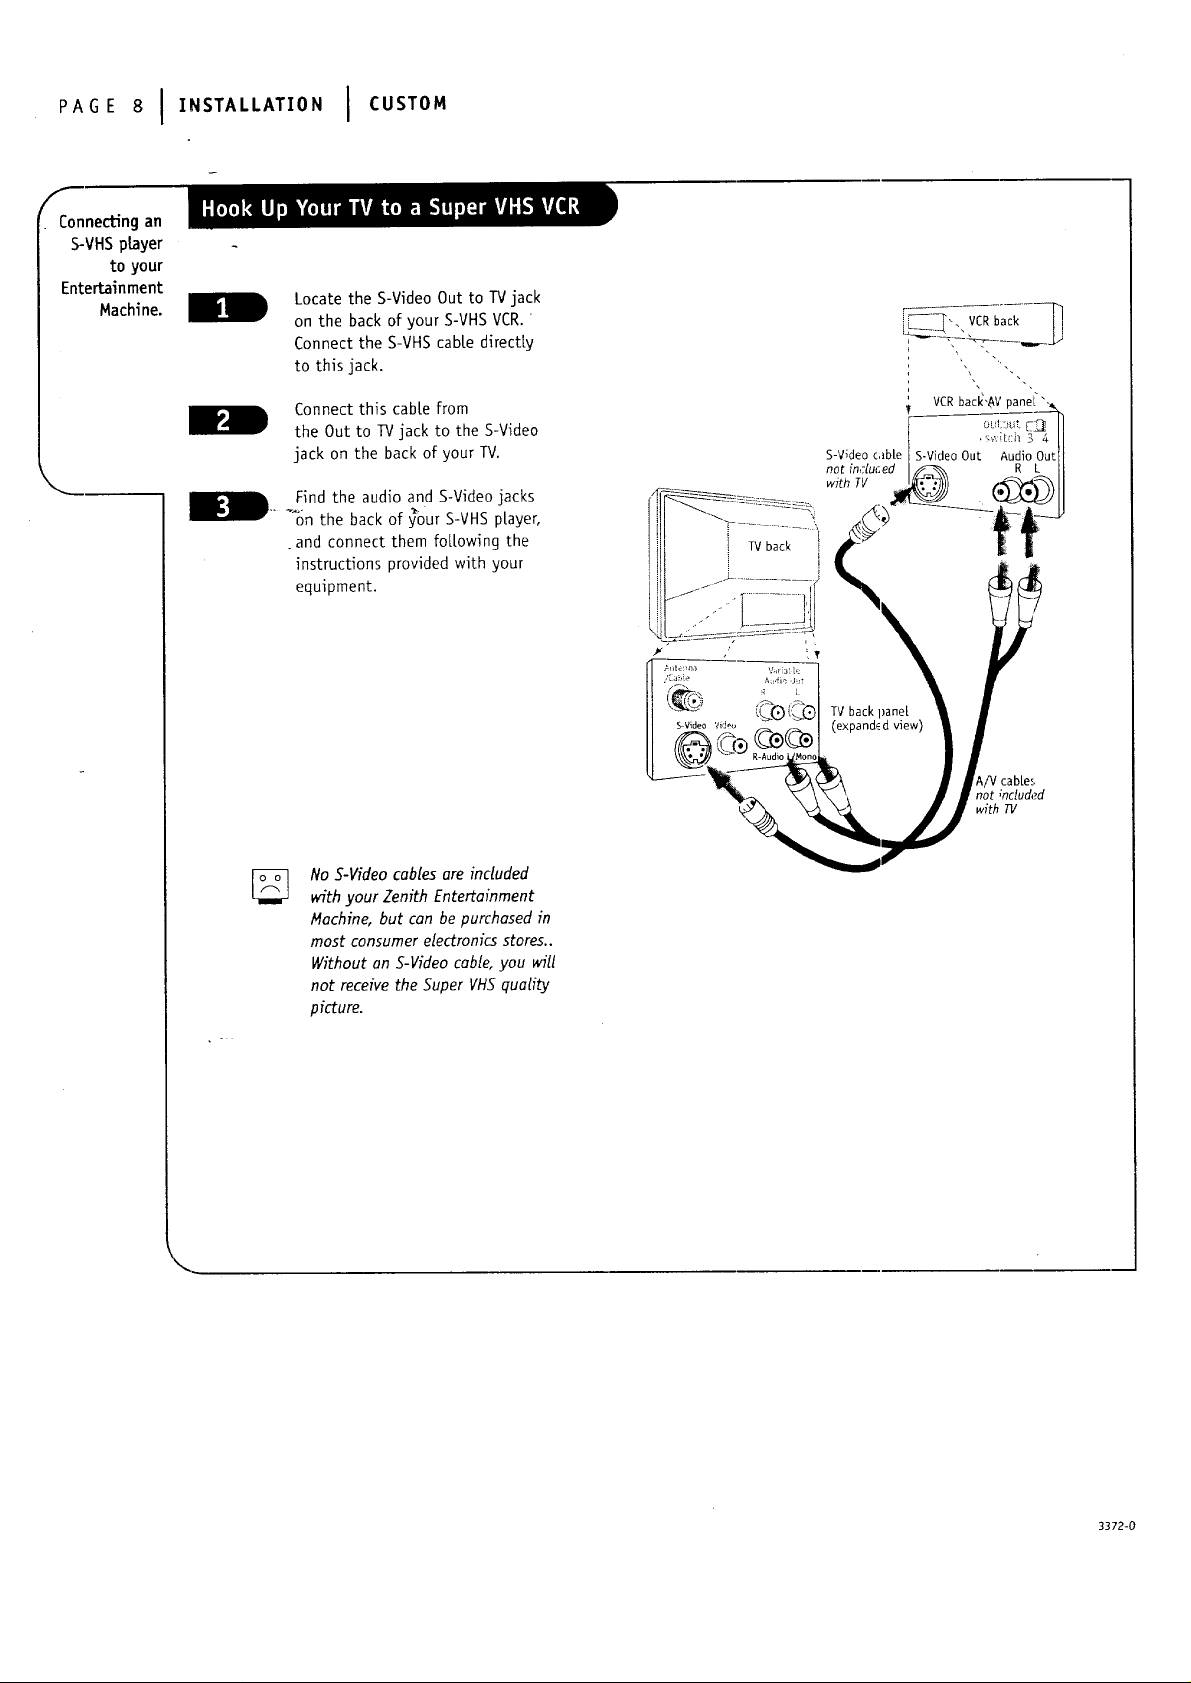
PAGE8I,NSTAL'AT'ONI CUSTO"
f
Connecting an
S-VHS player
to your
Entertainment
Machine.
Locate the S-Video Out to TV jack
on the back of your S-VHS VCR.
Connect the S-VHS cabte directty
to this jack.
)_'. VCRback
Connect this cable from
the Out to W jack to the S-Video
jack on the back of your TV.
m_ Find the audio and S-Video jacks
_on the back of your S-VHS player,
oand connect them for[owing the
instructions provided with your
equipment.
No S-Video cables are included
with your Zenith Entertainment
Hochine, but con be purchased in
most consumer electronics stores..
Without on S-Video coble, you will
not receive the Super VHS quatity
picture.
VCR bac_'6V pane[_ h
S-V_deocable_S-VideoOut AudioOutll
AiV cabLe!;
not ;ndud,?d
with TV
3372-0
Page 9
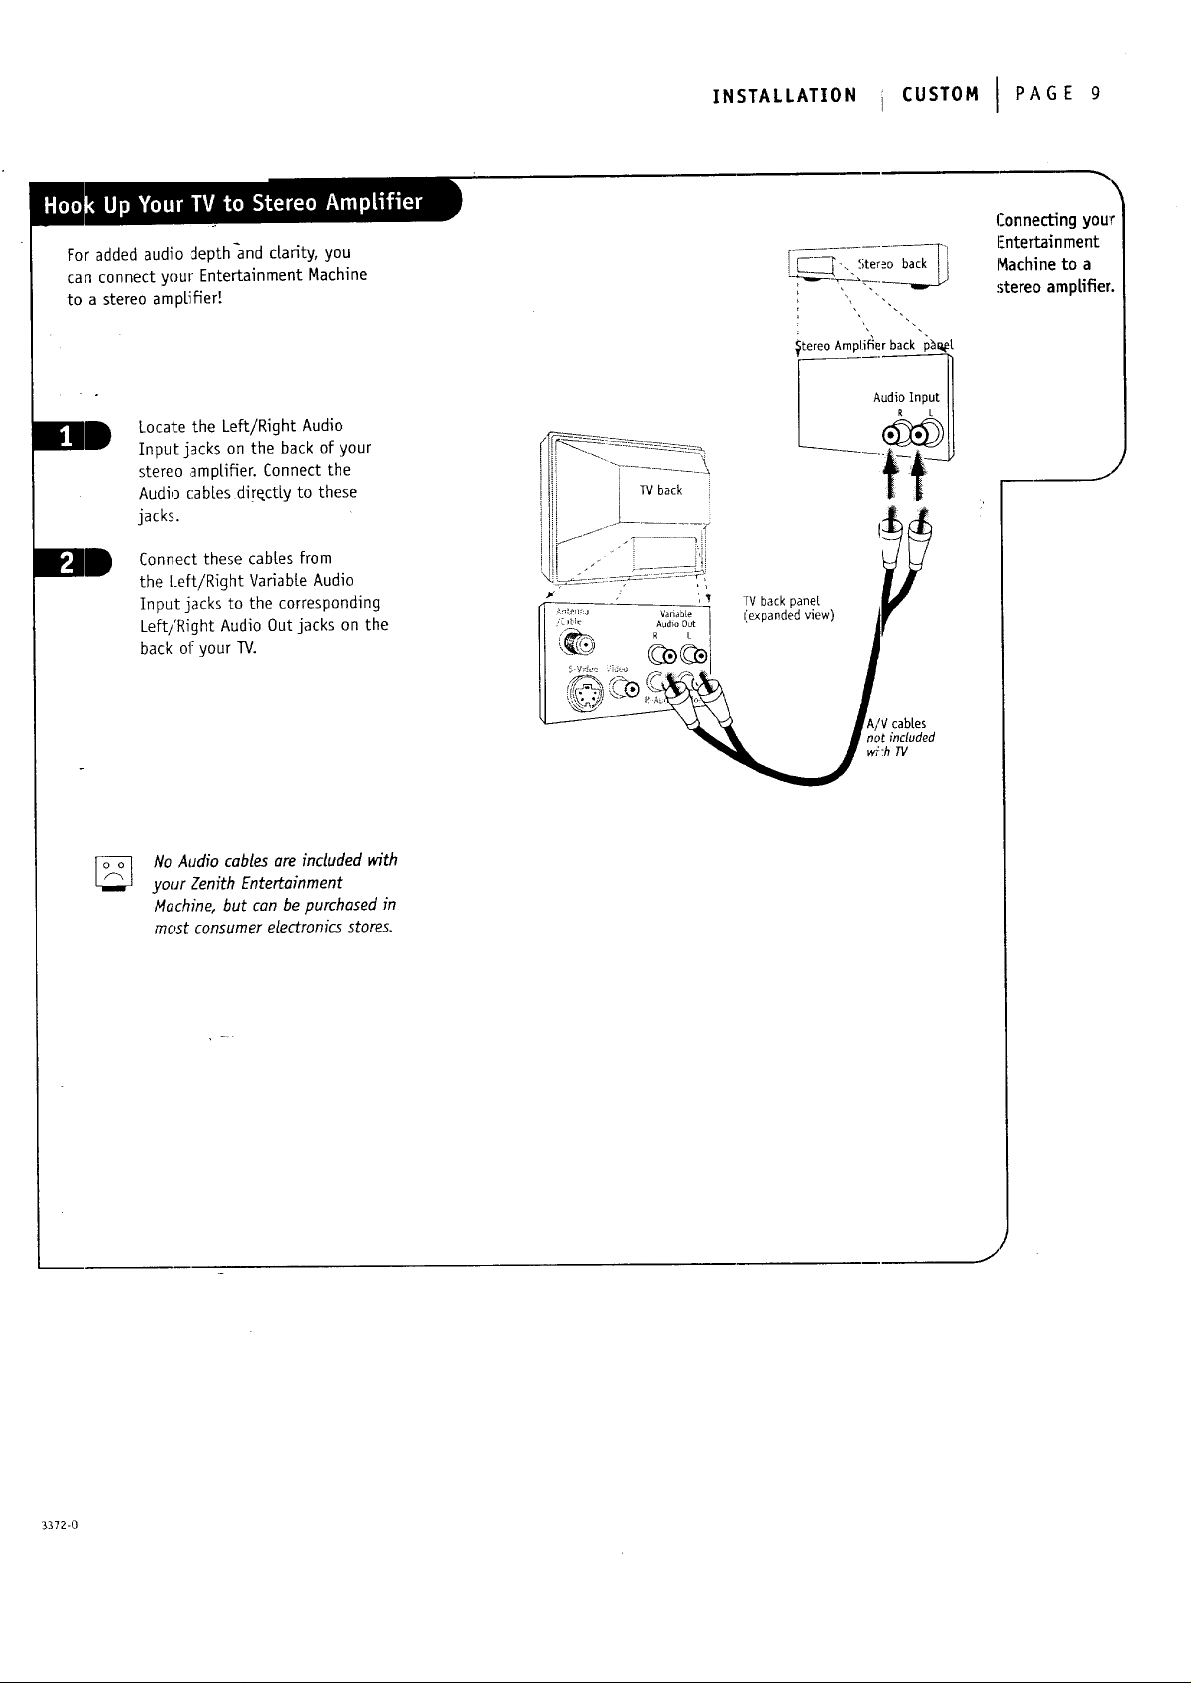
For added audio _epth-and clarity, you
can connect your Entertainment Machine
to a stereo amplifier!
Locate the Left/Right Audio
Input j_cks on the back of your
stereo amplifier. Connect the
Audio cables diFect[y to these
jacks.
Connect these cables from
the Left/Right Variable Audio
Input jacks to the corresponding
Left/Right Audio Out jacks on the
back oi: your TV.
INSTALLATION CUSTOM I PAGE 9
Connectingyou_
l-'ntertainment
Machine to a
stereo amplifier.
J
)
No Audio cablesare includedwith
your ZenithEntertainment
Mochine,but can be purchased in
most consumer electronicsstores.
J
3372-0
Page 10
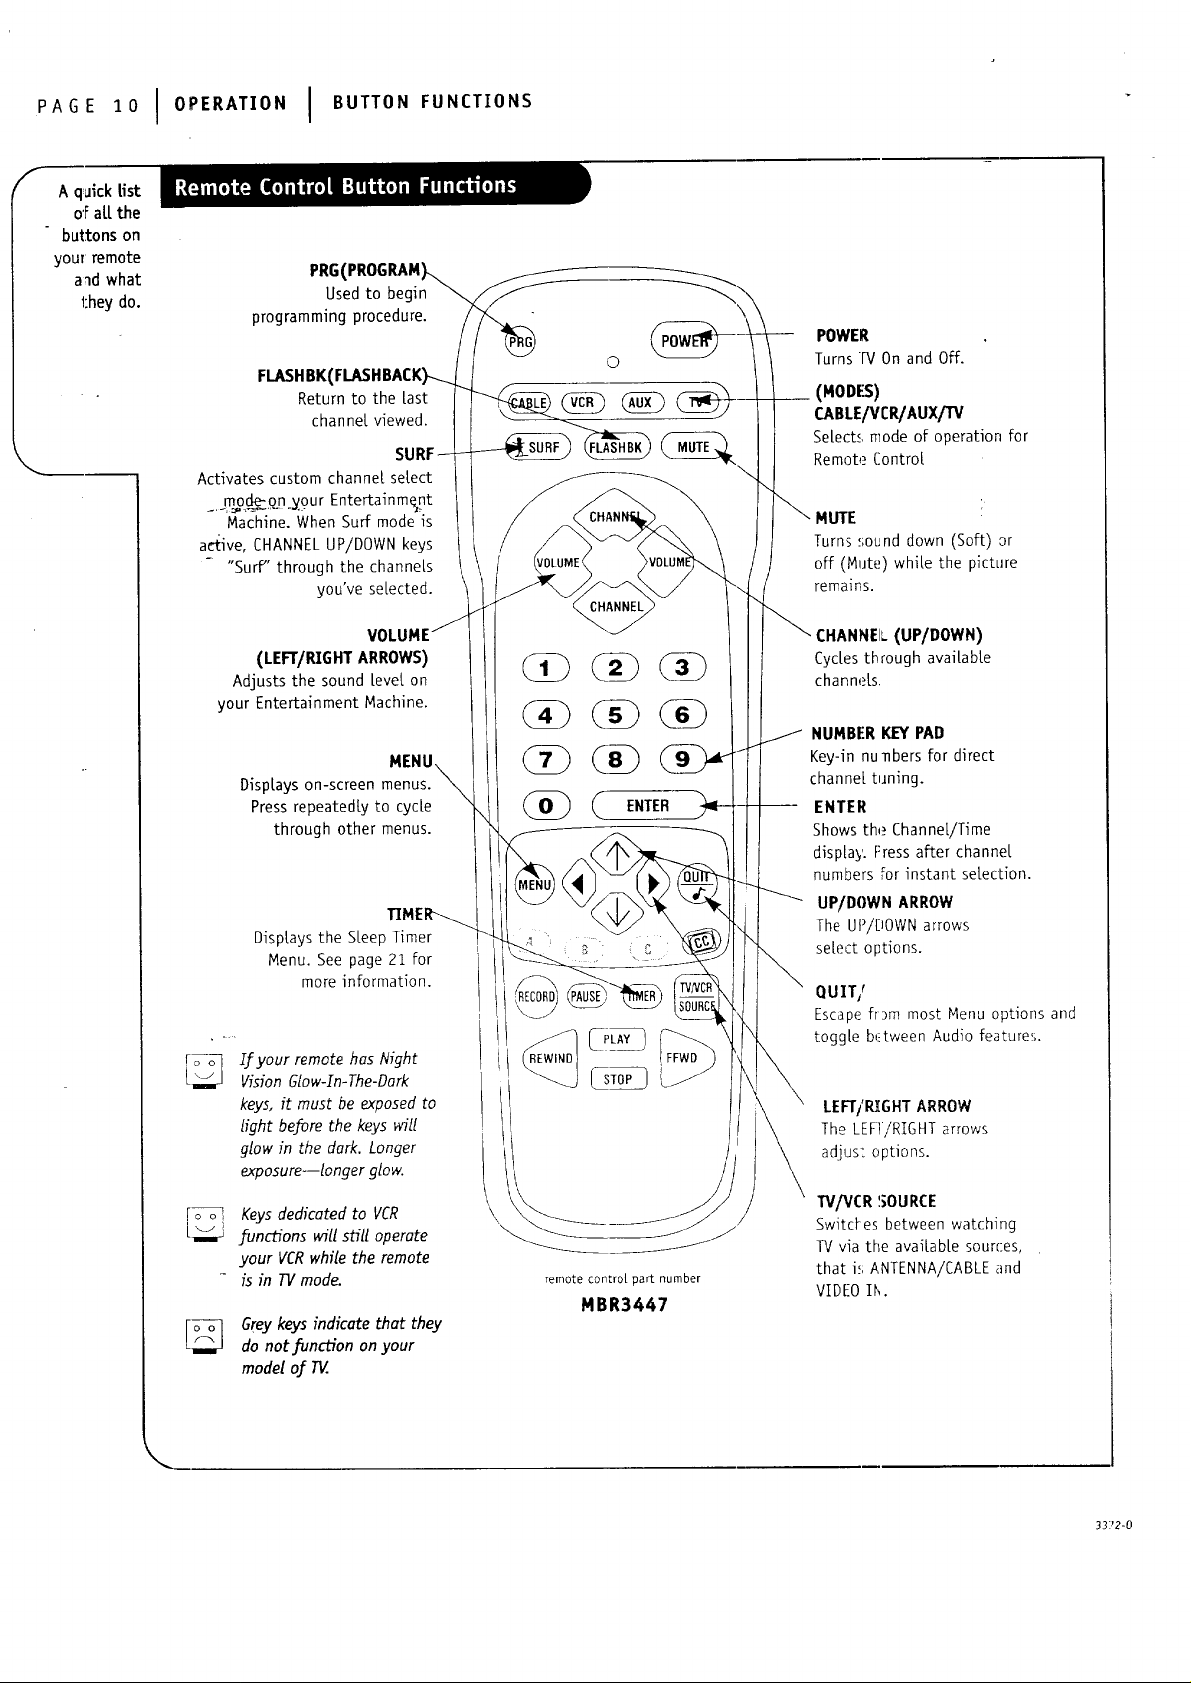
pAGEi010pERAT,ONIBU,TON,UNC,,O.S
A quickUst
ofaLLthe
buttonson
your remote
a_d what
they do.
Activates custom channel select
_._.mo._9.n y.9ur Entertainment
Machine. When Surfmode is
a_ive, CHANNEL UP/DOWN keys
"Surf"through the channels
PR6(
Used to begin
programming procedure.
©
FLASHBK(
Return to the [ast
channel viewed.
you'veselected.
POWER
Turns rV On and Off.
__ (MODES)
CABLE/VrR/AUX/TV
SeLectsmode of operationfor
Remote Contro[
MUTE
Turns sot, nd down (Soft) or
off (Mute) while the picture
remains.
VC
(LEFT/RIGHT ARROWS)
Adjusts the sound Level on
your Entertainment Machine.
MENU.
DispLays on-screen menus.
Press repeatedly to cycle
through other menus.
DispLays the SLeep Timer
Menu. See page 21 for
more information.
Fo-_ d your remote has Night
VisionGlow-In-The-Dark
keys,itmust be exposedto
lightbeforethekeys Mll
glow in the dark.Longer
exposure--longerglow.
F_ Keysdedicatedto VCR
L_,._ functionsMU stilloperate
your VCR whilethe remote
isin TV mode.
CHANNEL (UP/DOWN)
CycLesthrough avaiLabLe
channels.
NUMBER KEY PAD
J
%
%
ENTER
Key-innu _bers fordirect
channel tuning.
ENTER
Shows the ChanneL/Time
display. Fress after channel
numbers for instant selection.
UP/DOWN ARROW
The UP/DOWN arrows
select options.
QUIT/
Escape from most Menu options and
toggle b,_tween Audio feature!;.
LEFTiPJ[GHT ARROW
The LEFI/RIGHT arrows
adjus:options.
\
I"Vi_/CR :_,OURCE
_J
remote control part number
MBR3447
SwitcLes between watching
lV via the avaiLabLe sources,
that i_,;ANTENNA!CABLE and
VIDEO IN.
[o_ Greykeysindicatethatthey
do not_unctiononyour
modelofIlL.
\
3372-0
Page 11
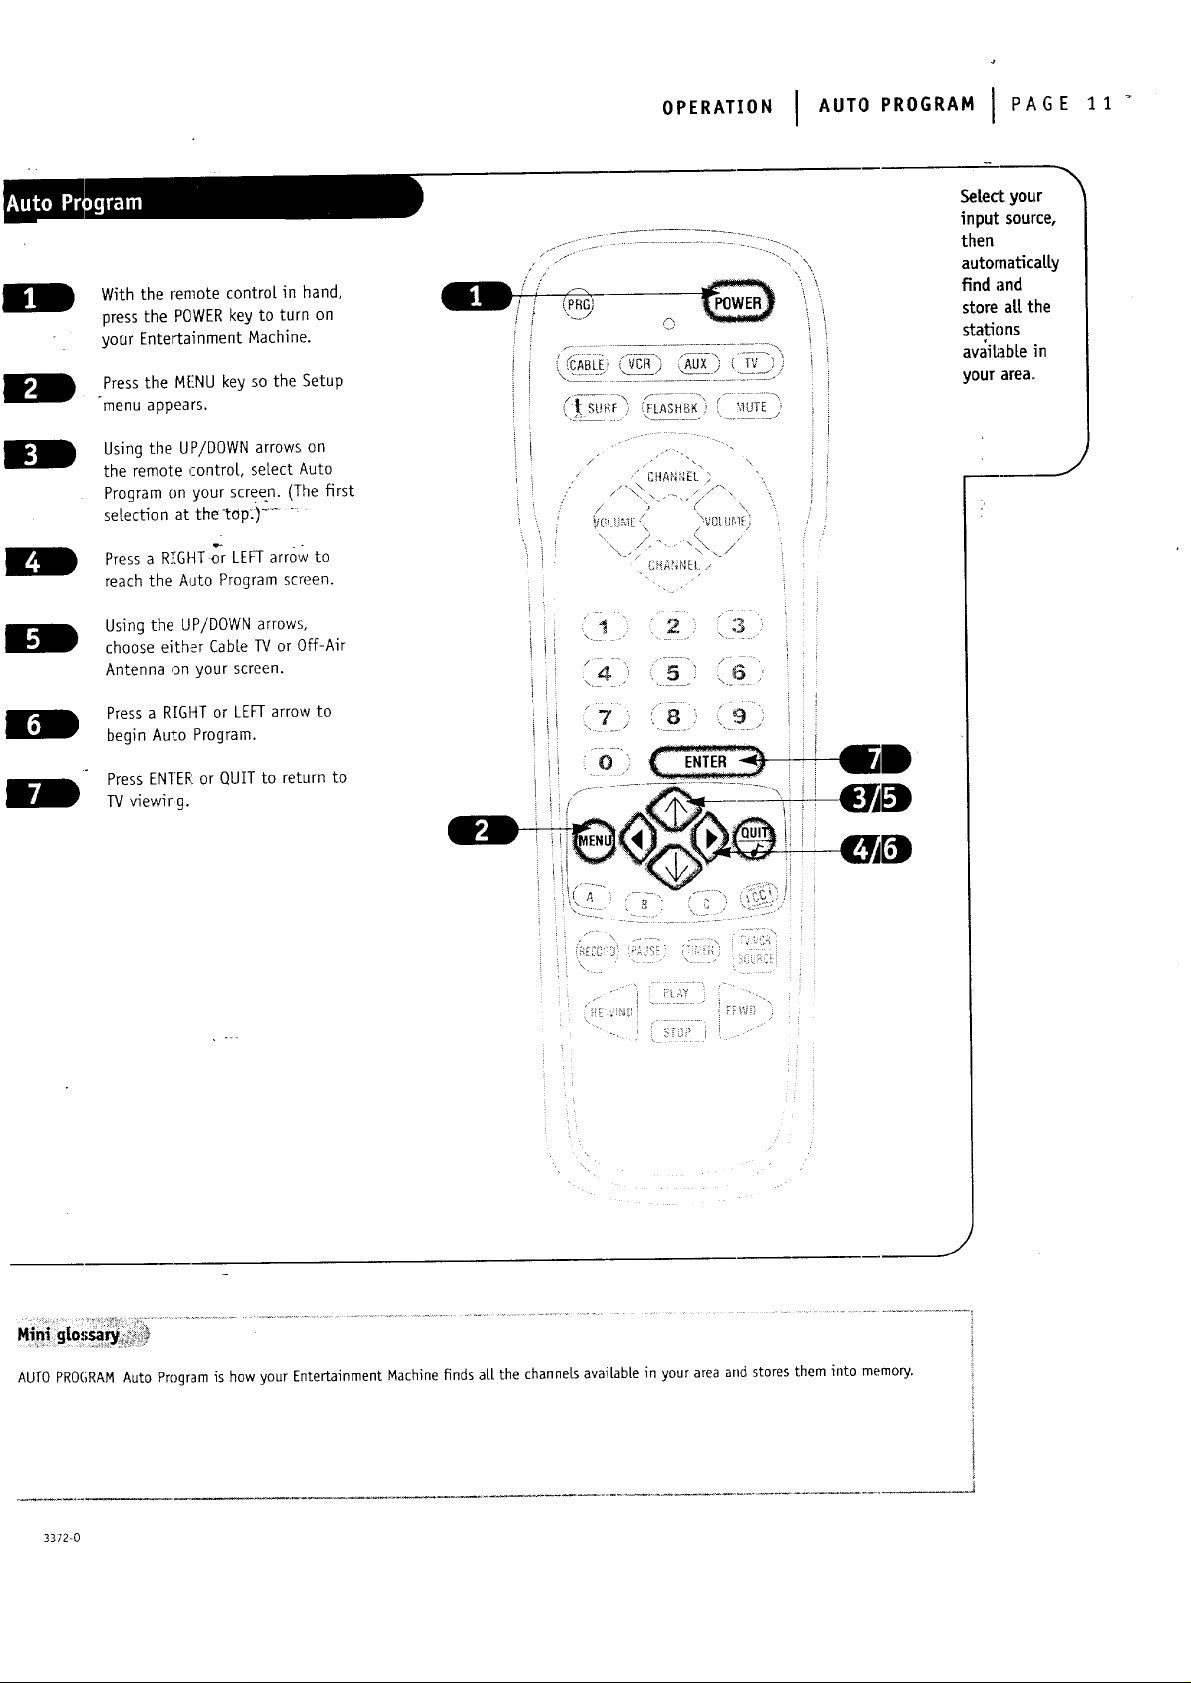
Select your
input source,
then
automaticat[y
I
I
With the remote contro[ in hand,
press the POWER key to turn on
yoar Entertainment Machine.
Press the MENU key so the Setup
-menu appears.
Using the UP/DOWN arrows on
the remote contro[, setect Auto
Program on your screen. (The first
selection at the-top:) .......
Press a R!GHT o'-rLEFTarrow to
reach the Auto Program screen.
f ........................................
/ ....... • ...........................
--\_ j\
/ .
k\
CHA_fI_LL
find and
store at!.the
stations
avaib_ble in
your area°
II
Using the UP/DOWN arrows,
choose either Cable 11/or Off-Aft
Antenna on your screen.
I
Press a RIGHT or LEFT arrow to
begin Au=o Program.
2 3
PressENTEEor QUITto return to
TVv4ewirg.
AUTOPROGRAMAuto Programis how your Entertainment Machine finds a[[ the channeLsavailable in your area and stores them into memo_J.
3372-0
J
Page 12
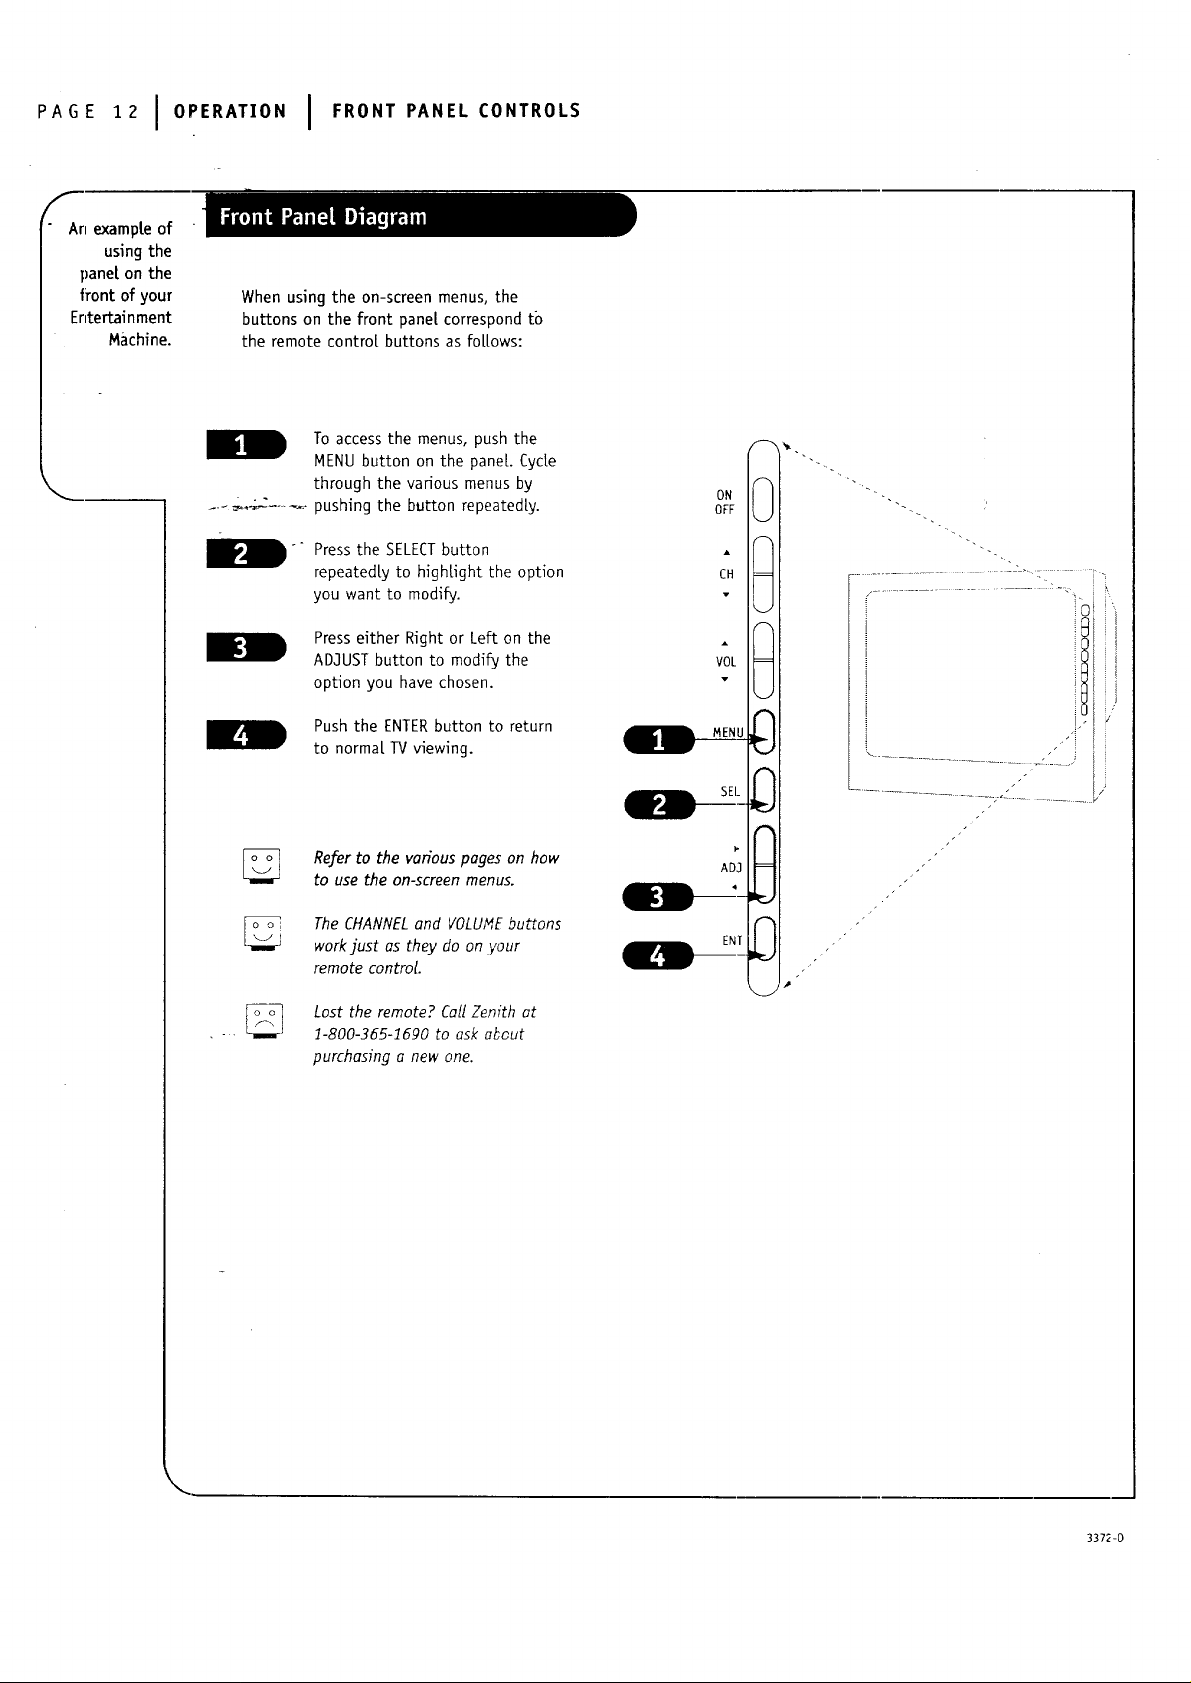
PAGE121OPERATIONI F.ONTPANELCONT.O'S
fAn exampte of
using the
pane[ on the
front of your
Entertainment
Machine.
When using the on-screen menus, the
buttons on the front panel correspond to
the remote contro[ buttons as follows:
To access the menus, push the
MENU button on the pane[. Cycte
through the various menus by
pushing the button repeatedly.
ON
OFF
Press the SELECTbutton
repeatedly to highlight the option
you want to modify.
Press either Right or Left on the
ADJUST button to modify the
option you have chosen.
Push the ENTER button to return
to normat TV viewing.
Referto the variouspages on how
to use the on-screenmenus.
The CHANNEL and VOLUMEbu_ons
work just as they do on your
remote control.
Lost the remote? Call Zenith ot
1-800-365-1690 to ask about
purchasing a new one.
CH
VOL
A
A
ADJ
,J
IP-
F
i "
3372-0
Page 13
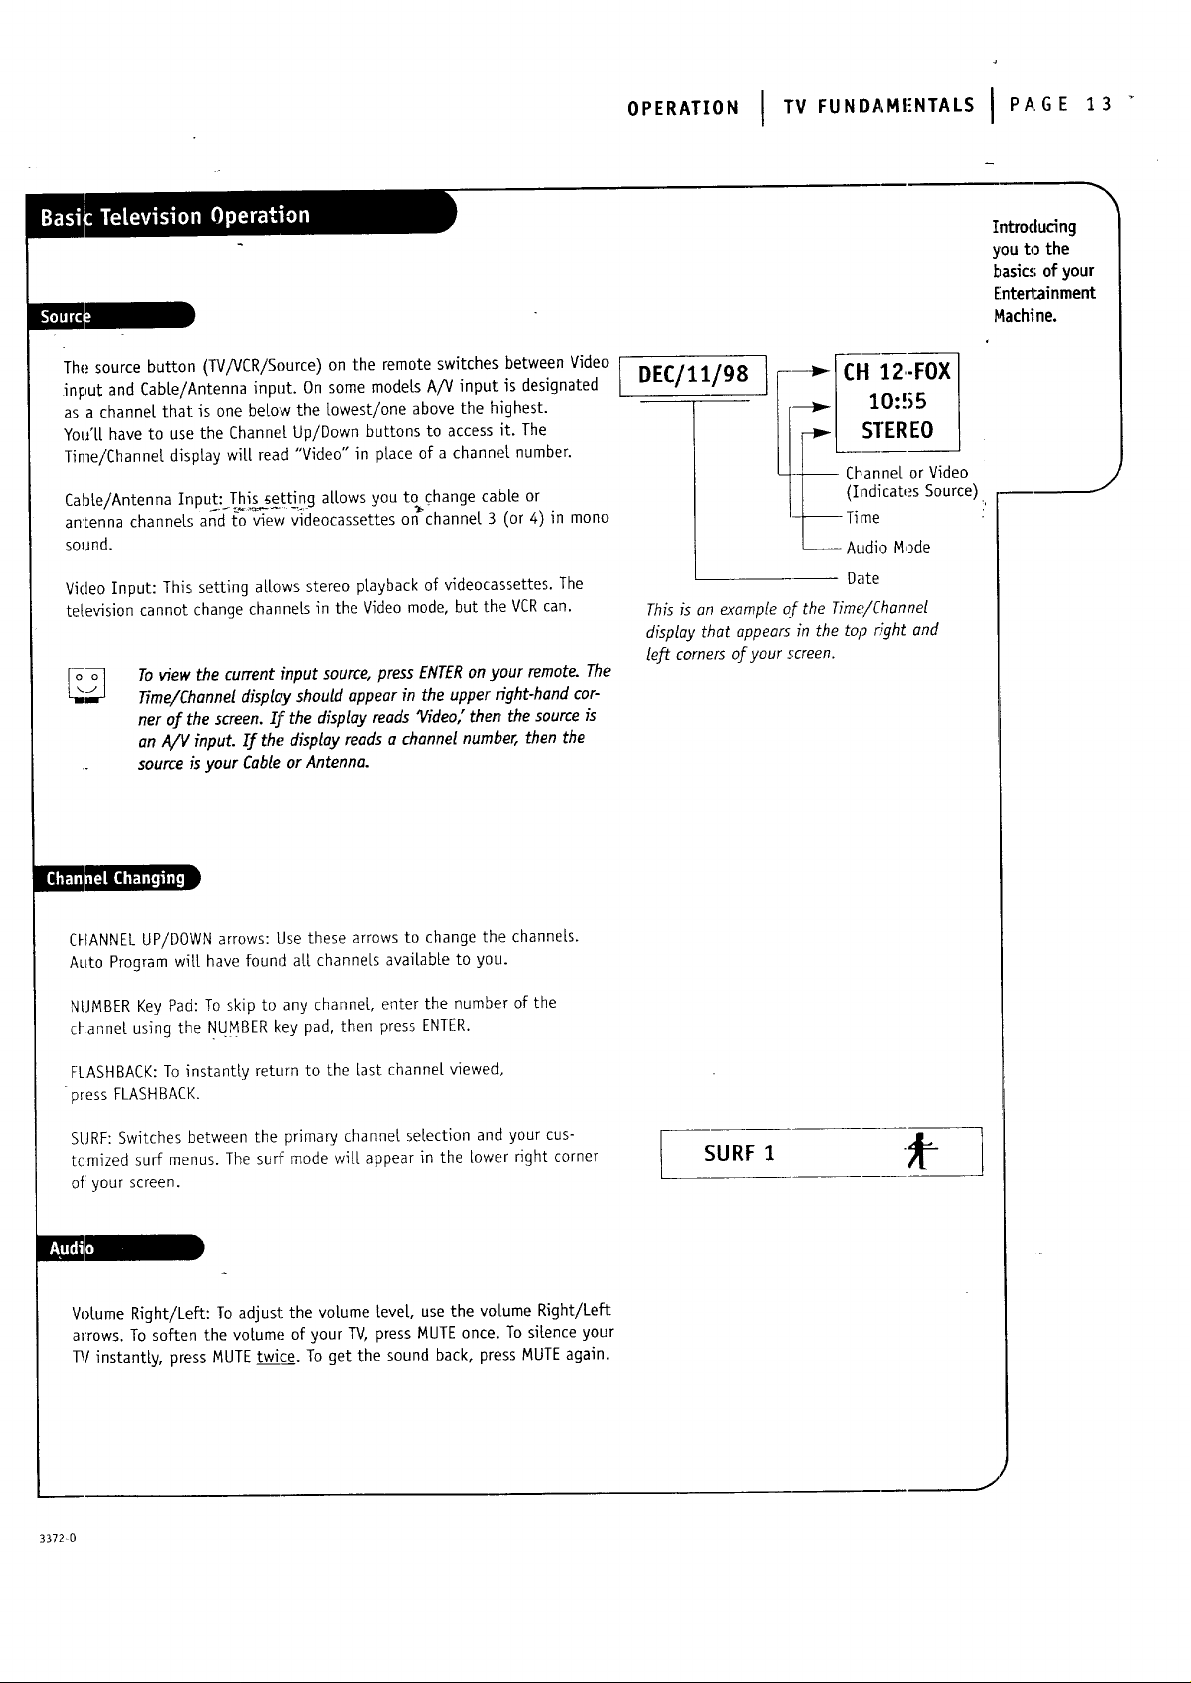
OPE.,,,O.I 'VFU"O'"'"T''SIP GE13
Introducing
you to the
basic_ of your
Entertainment
Machine.
The source button (TV/VCR/Source) on the remote switches between Video [
input and Cable/Antenna input. On some models A/V input is designated
as a channel that is one below the Lowest/one above the highest.
You'[[ have to use the Channel Up/Down buttons to access it. The
Time/Channel display will read "Video" in place of a channel number.
CabLe/Antenna Input" This_ett_ng a[[ows you to change cab[e or
antenna channels and to view videocassettes on'channeL 3 (or 4) in mono
sound.
Video Input: This setting a[[ows stereo playback of videocassettes. The
television cannot change channels in the Video mode, but the VCRcan.
To view the current input source, press ENTER on your remote. The
Time/Channel displc'y should appear in the upper right-hand cor-
ner of the screen. IJ" the display reads 'Video" then the source is
an A/q/ input. If the display reads a channel number, then the
source is your Cable or Antenna.
|I i]_ilff=.] i# i_-1i[, _,1_IP
CHANNEL UP!DOWN arrows: Use these arrows to change the channels.
Auto Program wit[ have found aLLchannels avai[abLe to you.
DEC11 198 --_ [CH 12,-FOX
[
---_l 10:55
-_ CI-anne[ or Video
/ (Indicates Source)
Time _'
_ Audio Mode
Date
This is an example of the Time/Channel
display that appears in the top Hght and
left corners of your screen.
J
NUMBER Key Pad: To skip to any channel enter the number of the
cFanne[ using the NUMBER key pad, then press ENTER.
FLASHBACK: To instantly return to the last channe[ viewed,
press FLASHBACK.
SURF: Switches between the primary channel selection and your cus-
tcm]zed surf menus. The surf mode wi[[ appear in the [ower right corner
of:your screen.
Volume Right/Left: To adjust: the votume [eve[, use the volume Right/Left
arrows. To soften the votume of your W, press MUTE once. To silence your
TV instantly, press MUTE twice. To get the sound back, press MUTEagain.
3372_0
SURF :1 _=-
Page 14
PAGEIO E.ATIONI TVFONOA.ENTA'S
f
Help on
combining
Entertainment
your
Machine
with-more
equipment.
There are a number of ways you can choose to integrateyour EntertainmentMachine with the restofyour equipment.
ChanneLs can be changed using thetelevision,the VCR, orthe cablebox, with advantages to each.
USING THE TELEVISION AS THE TUNER preservesa[[yourchannel[abeLs(notavai[abl.eon some models).Italso
reducesthenumber of keyson the remote controlyou need to worryabout.(One device,one remote to [earn.)
USING THE VCR AS THE TUNER has the advantage of simplifyingthe recordingproce.';s.Ifthe VCR istuned to
channel seven,then the VCR willrecordchannel seven.
USI.NG_TH_CABLE BOX (i_you have one) to change the stations sometimes has an advartage, too, especiaLLy if
your cable provider requires you to use their cable box to descramb[e their stations.
Based on the advantages Listed above, decide what
device you want to use as the tuner for your
Entertainment Machine.
Connect the antenna or cable source to the input
of your tuner. If you chose your te{evision as the
tuner, then you're done. Go watch your
Entertainment Machine.
Connect the output ofyour tunerto the input of the
nextdevice.
If you used A/V cab[es for step 3, set the "next
device" to Video input. If you used an RF coaxia[
cab[e in step 3, then tune the "next device" to
match the output channe[ of your tuner (usually
channel 3 or 4).
Repeat steps 3 and 4 until you reach your
Entertainment Machine. _hen enjoy!
TUNER Thetelevision, VCR,or cable box that you useto changechanneLson your Entertainment Machine.
A/V CABLES Audio/Video cables. Threecables bunched together--right audio (red), [eft.audio (white), and vi_eo (yeUow).
A/V DEVICE Any device that producesvideo or sound (VCR,cab[e box, or te[evision).
3372-O
Page 15

Using the Menu button on your remote you can access
aU the menus below.
Menu Name
SETUP MENU Adjust the basic characteristics of your Entertainment Machine.
OP RAT,ONISETUP.ENUIPAOE
Descriptions
of at[ the
menuson your
Entertainment
Machine.
Go to page
Auto Program Automatically finds and stores active channels to flip through using
CHANNEL UP/DOWN.
Add/De[/Surf ManuaUy pick and choose which, active channels will appear when
-f[_pG'g':ch_'ough using Cha_ne[ Up/Down.
m,_ _.
Clock Set -Set the time and date yourself, or program your clock to automati-
cally detect the time, and to adjust to Daylight Savings when you
program in your time zone.
Caption Turn closed captioning on, off, or set it to come on automatically
when the television is muted.
Caption/Text Choose the captioning or text method for your Entertainment
Machine.
Language Selects language for on-screen menus. Your options are English,
Spanish, or French.
FEATURES Customize your Entertainment Machine's functions.
Timer Setup Program a time for your Entertainment Machine to turn itself on or
off, or to turn itself off after a certain amount of time.
Channel Labels Label your channels ,with their network names (ABC, CBS, HBO, etc.).
Parental Controls Allows parents to block any channel with the use of a password.
11
J
16
17
18
19
20
21
22
23
Auto Demo 'Your Entertainment Machine will show you what it's capable of by
running through all of its options and menus automatically.
AUDIO MENU Customize the sound to suit your room and your taste. Your options
are: Bass, Treble, Balance, Audio Mode. Front Surround, SoundRite,
Speakers.
VI DE 0 M EN IJ Adjust your picture for any viewing situation. Your options are:
Contrast, BHghtness, Color, Tint, Sharpness, Color Temp, Picture
Preference.
SOURCE MENU Choose from the available sources for the main picture.
3372-0
24
25
26
27
J
Page 16

PAG:161SETUPIMEN°S
f
Customize
your charmer
selection.
Press the menu button.
Select the Add/De[/Surf menu
(on your TV screen) using the
Up/Down select arrows.
Using either the number pad or
the CHANNEL UP/DOWN arrows on
the remote, select a channel.
Using the RIGHT/LEFT select
arrows, pick whether that
channel is Added, Deleted, or
on the Surf list.
To continue, select another
channel. If you are finished,
press ENTERor QUIT to return
to TV viewing.
i •
" " '
i i
;i
i •
, i
i :
The menu will disappear a_ter _ve
seconds if no buttons are pressed. To
get it back, press menu again.
Ifyou deletea channel itisn'tgone
for good. Justselectthe channel
again usingthe number keypad on
the remote,or add itlater.
Once Auto Program has been activat-
ed,CHANNEL UP/DOWN willonlycycle
throughselectedchannels.
ADD This function [ets you add new channels to the [ist that you'l[ scrol[through when using your remote.
DEL=-I-E This function [ets you remove channels that you don't watch from the fist you'U scroll through.
SURF Thesurf function creates a special [ist of your favorite channels. You can accessthis group of channels by
pushing the surf button on the remote.
3372-0
Page 17

Press the MENU key on the remote
control so the Setup menu appears.
Using the UP/DOWN arrows on
the remote controL, select CLock
Set on your screen.
Press a RIGHT or LEFT arrow to
access the CLockMenu.
SETUP IMENUS I PAGE 17"
Setthe dock
and dateon
yourZenith
Entertainment
Machine.
J
II
Using theUP/DOWN arrows,
setec': Time Set. --
Press a RIGHT or LEFT arrow key
to adjust the time.
Press the TIMER button to select
AM or PM.
Once you have set the correct
time,press ENTER exitthe Time
Set mode.
Now press an UP/DOWN arrow key
to select Date Set.
Usincl the LEFTor RIGHT arrows,
SEI_ECTthe Month, Date or Year.
Use the UP/DOWN arrow keys to
SETeither Month, Date, or Year.
Press ENTER or QUIT to return to
TV viewi.ng.
/
i7i r ",
............... \8 2
3372-C
You can use the NUMBER key
"°iiv
pad to simply _pe in the time
and date (AM and PM are still
se(ected with the Timer key).
j#
Page 18

PAGe!18I S 'UPI"E"US
f
Turnon dosed
captioning
that appears
at the bottom
of your
screen.
Press the MENU key on the remote
contro[ so the Setup
menu appears.
Using the UP/DOWN arrows on the
remote control, se[ect Caption on
your screen.
.._t- ...............................................___?_...._
/// z'" "\\ ,
/1 / " '\
//
'_5: iPOWE--j"_
(__
( MUTE )
Pressa RIGHT/LEFTarrow to
.choose any of the.foLlowing
options: On, Caption When Muted,
or Off.
I
PressENTERor QUITto return to
TVviewing.
/ , CHANNI!L_/_
/
" \ \
\ / '---_', /
.i.... 3z]: <$3
0
_8) ".....
._ \9,
C
S_O? --
Captions come in handy when the
television is on Mute or Soft.
._7_/
3372-0
Page 19

Caption/Text is a feature which arrows your
Entertainment Machine to receive various closed cap-
tion and text options provided by your broadcaster.
Availability and functiona{ity of Caption/Text feature is
cletermined on_4 by your broadcaster and may not be
_vai{abte in your area.
SETUPI .E.USI PAGE19>
,,- .iiLL:LT-Z TT 771: :L-W::_;:,;.--._..,.
",P_ t POWER
Turnon closed
captioningor
textthat
appearson
yourscreen.
o o
Press the MENU key on the remote
corltro[ so the Setup
menu appears.
Using the-UPiD'OWN.arrows on the
remote contro[, setect Caption/Text
on your-screen.
Press a RIGHT/LEFT arrow to
choose any of the fo[towing
options: Caption 1, Caption 2,
Caption 3, Caption 4, Text 1,
Text 2, Text 3 or Text 4.
PressENTERor QUITto return to
IV viewing.
Standardclosedcaptioningisavail-
ableusingthe CaptionI option.
:'_--_ (_F:.L --i> /- ....... x
/ " CIIANNFI_
.I \_-\ :-_
\
]NAN _ZL
(:_7 :.5; 6)
T 8 9
3372-{)
ic o
Not a,!l programming has closed cap-
Honing or text available.
t
t
/
Page 20

PAG 20ISETUPI"ENUS
f
Choose the
"language you
want at[ the
menus to
appear in.
Press the MENU key on the
remote controt so the Setup
menu appears.
Using the UP/DOWN arrows on
the remote control se[ect
Language on your screen.
............. i__-L-ICIL-_-..Z.........
" / \,\
/ .f"x f-_ \ "
/ (.PR_GJ ( POWER) _
.° -_ ,i i
i "_ _} (_0_-'_"-t-_-_,, '
\.__ -- _.-:J x-I-J J
i
...... i i
lll!I
Press a RIGHT/LEFT arrow to
choose any of the fo[[owing
options: English, S_anish, or
French.
Press ENTER or QUIT to return to
regular TV viewing.
/ _""CI_AI'IIIE i i
\
(VI_LUI?iE\ 'VOLUf'_) _ ' .:
\ , ("
{7 ",,
/ x_ ,\
ii
tl ' {"2_J .......... i
' "..........' (" 3 '_ i i i
i ; . /
ii! ]II
C-4-'i c5_"........._ c.6;"........' {!
('_EOOSO;(PAUSE,_
\ /
i i _
: !
J-< _..... ,.....
f"" ?LA( i "_.
......._, 7-_7o7-'it..............
--::> "TV,_vC_i l
I
!i:
I,
i i
\
3372-0
Page 21

,EA,o. sI .ENUSIPAGE,,
Automaticat[y
........... _.i.__ _ ----_ ..............
/ / h ",.
Press the MENU key on the remote
I
controL repeatedly so the Speciat
Features Menu appears.
Using the LIP/DOWN arrows on the
remote controL, select Timer Setup
on your screen.
/
;; 'POWEV 't
• __...............
SUhr FLASHBK ) { MU'fE
D
)
turn your
Zenith
Entertainment
Machine on
or off.
Press a RIGHT/LEFT arrow. The Timer
Menu screen will appear.
Sleep Timer: lJse the RIGHT/LEFT
arrows to adjust the Length of time
until the TV shuts down (seLect a
countdown from ten minutes to
four hours).
Note:
At this point, continue to step
five to set the On Time, or press
ENTERor (]UIT to return to
TV viewing.
On Time: Using the UP/DOWN
arrows oq the remote controL, select
On Time on your screen.
Press a RIGHT or LEFT arrow or use
the NUMBER key pad to enter the
time your TV wi{[ automatica[[y
turn on.
Press the TIMER button to se{ect
AM or PM.
Press the UP/DOWN arrow keys to
se{ect On/Off Timer.
J
\ /,"-.---'.\ ,
3372-0
Press the LEFT or RIGHT arrow to
turn on the On/Off Timer
Press ENTERor QUIT to return to
TV _ewfng or continue program-
ming by repeating the above steps
for Off Time.
The On/O_: Hmer will not work
unb7 the Cf.ockon your television
has been set.
J
Page 22

.AGE,, I,E.,SIS,E<,,.,_,TO,ES
l.abetyour
television
channel.
Using the NUMBER key pad or the
CHANNEL UP/DOWN arrows, select
the channel you wish to [abe[.
Press the MENU key on the
remote control repeatedly so the
Specia{ Features menu appears.
k.
Using the UP/DOWN se[ect arrows
.on the remote control select
Ch._iL'abe[son your screen.
Using the RIGHT/LEFT adjust
arrows, choose the channel label
that best describes that channel.
Choose another channel to [abe[
using the process described in
steps I and 4, or press ENTERor
QUIT to mturn to W_ewing.
/ \\
POWER) ''
! l !
f "7............. ..... .'.. i" !
'4'....... I" "_--"_ ""....... l,
i I
i
t,
,-!-
i i
t ,
'i i!/
i I
i :
t_
JJ
/:i
!
f
I
3372-0
Page 23

Hi
Hi
Press the MENU key on the remote
control repeatedly so the Special
Features menu appears.
Using the UP/DOWN arrows, select
Parent:at Ct[.
Press the RIGHT/LEFT arrows and the
Parental CtL screen will appear.
BLock Ch.: Use the NUMBER key pad
or the CHANNEL"UP/DOWN arrows to
choose a c_anne[. Press the
RIGHT/LEFT arrows to block or
unb[ock the channel
Set Houls: Using the UP/DOWN
arrows on the remote control, select
Set Hours. Press a RIGHT/LEFT select
arrow to adjust Length of time your
TMwin automaticaLLy block a channeL.
Password: Press the DOWN arrow to
seLect Password. Enter a four digit
code 4sing the NUMBER key pad on
your lemote. Enter it again to confirm
password.
.E.usI sPEci,,.FEATu, sI PAGE
Keepcontrol
ofthekids"
vieMng
habits,even
when you're
notaround.
J
i
i
HDHI
After your password is confirmed,
'Lock On/Off' will be selected.
Use the RIGHT/LEFT arrows to turn
parental control on or off.
Press Enter or Quit to return to
TV viewi ng.
Return t:o the Parental Control menu
to unb[ock a channel.
Parental control will still work even if
the W has been unplugged.
The Lockout time will always reset
itselfwhen-the TV ispluggedin.
Remember your password! You can't
enter the Parental Control menu
without: it until a#er the lockout time
has passed.
3372-0
J
Page 24

PAGE 24 I MENUS I SPECIAL FEATURES
f
Your
Entertainment
Machinewill
show you aLL
the menu
options.
Press the MENU key on the
remote control so the Special
Features menu appears.
Using the UP/DOWN select arrows
on the remote control, select
Auto Demo on your screen.
Turn Auto Demo on or off using
the RIGHT/LEFT adjust arrows.
PressENTER to returnto
TV viewing.
Auto Demo willcontinuallyshow
you everymenu and displaythat
your ZenithEntertainment
Machine has.It willeven attempt
to show you what itdoes.
To turnAuto Demo off,selectitin
the Set Up menu and shut itoff
withthe RIGHT/LEFT adjust
OTTOWS.
\
3372-9
Page 25

Press the MENU key on the remote con-
tro[ so the Audio menu appears.
Using the UP/DOWN arrows on the
remote controL, select the setting you
w_nL to change. Choose from:
[Z.:ZZTZZ[. ii i_ii.i i_Z ZZZ£Z;L._._.."
/
/
,i
C"
!
t".:_: (T_"_ (;_i]$i) ,:qT-'_)
i
.E.usI , uo.o. .us I PAGE2
Choose
between
stereo sound,
\ \
',, ,
\ ..... " ! i
1
mono sound,
or SAP.
ii
"x
I|
I|
• Bass: Increases/decreasestower-end
sounds.
• TrebLe: Lncreases/decreases mgner-eno
sour_ds. _.
• Balance: ALLowsyou to put the sound
more to the Left or right channeL.
• Audio Mode: Choose from Stereo
sound, Mono, or 2nd Audio/SAP.
• Front Surr: Turn the front surround
sound speakerson or off.
Sound Rite: Scans for changes in
sound [eve[ during commercials, then
adjusts the sound to match your cur-
rent [eve[.
• Speakers: Turn the regular speakers
on or off.
Press a RIGHT/LEFT arrow to change the
option you have selected.
Use the RIGHT/LEFT arrows to adjust the
souqd setting to whatever you prefer.
[ :
J
I|
-o_ Not all programming is broadcast in
[,,_ stereo sound, or Second Audio
STI-REOSOUND Stereo (Stereophonic) sound refers to audio that's dMded into right and [eft sides.
NCNOSOUND Mono (monauraD sound is one channel of sound. Onmore than one speakeraLLthe speakersplay the sa_e audio.
2NDAUDiO/SAP SecondAudio Programming (SAP)is another, separate, audio channel avaiLabLewith some programming. I'hoosing SAP often
3372-0
Press EN:[ERor QU[T to return to TV
viewing, or press the UP arrow and
retLrn to the Audio Menu to adjust
another option.
, X' .
Programming/SAP. " "iilJii__il ._i iii
(3U]T toggles between Audio features.
refers to Listening to audio in another Language,such as Spanish or French.
Page 26

PAG,201.E.OSI V'OEO. .US
f
Use the Video
menu to
customize
how your
pictureLooks.
Press the MENU key repeatedly and the
Video menu wit[ appear. Your options
are:
• Contrast: Adjusts the level of
difference between white and black
in the TV picture. The more contrast,
the brighter the picture appears.
• Brightness: Increases or decreases
the amount of white in the W picture.
• Color: Adjusts levels of all colors in
the 11/picture.
Tint: Balances between amounts of
red and green in the TV picture.
Sharpness: Raises or lowers the
definition of the TV picture. The
lower the level, the softer the images
wil[ appear.
Color Temp: Adjust the color quali-
ties of the entire picture at once:
Coot or Warm.
Picture Preference: Choose either
Custom or Preset. Custom allows you
to set the picture the way you want.
Preset moves all the above options
back to their original Levels.
Using the UP/DOWN arrows on the
remote control, select Contrast on your
screen.
Using the RIGHT/LEFT arrows, adjust
the contrast level to your preference.
Press ENTER, QUIT or MENU one more
time to return to TV viewing, or
repeat from step four to set the other
menu options.
Using the UP/DOWN arrows, select
Picture Preference on your screen.
Using the RIGHT/LEFT arrows, choose
either the original settings with Preset,
or use your own settings with Custom.
JustchoosethePresetoptioninPicture
Preferencetoquicklyresetthelevels.
33720
Page 27

Press the MENU key on the
remote contro{ repeated[y so the
Source menu appears.
Using the UP/DOWN arrows on
the remote control, select Main
Source on your screen.
.E.usI sou,<EME.USIPAGE2,
SeLectthe signal[
source for your
Entertainment
Machine.
Press a RIGHT or LEFTarrow to
choose one of the following
optio ns-."j_t_n na!Ca b[e" or
"Video or S-VHS':
Press ENTER or QUIT to return to
TV viewing.
J
3372-0
.... . .... °._
°
Page 28

pAG,28IOPE.AT,O.I "E"OTE'U"<T'O"S
f
_Programyour
remote to
work with a
vast range of
A/V devices.
The device you want to program
shoutd be ON.
On the chart in this manual find
the type of device you're program-
ming and then find the brand
name. Make a note of the three-
digit code--you'll need iL soon.
accidenta[[y. When the indicator
tight turns on, you can release
the button.
Push the button with the name of
the device you're programming
(VCR, CABLE, AUX, TV).
! I
i
I ! //
i \ i
, i !
i
k..
Using the number pad, enter the
three digit code found on the
chart in the Reference section.
Press ENTERto save the code The
indicator tight witL flash three
times and turn off if the code was
accepted..
Aim the remote at the device and
push the POWERbutton. It should
turn off. If not, try the other
codes [isted and continue from
step three.
Programming your Zenith remote
will allow you to use one remote
to work up to 7 different devices/
Not all devices will work with your
Zenith remote control.
3372-0
Page 29

Program the code that operates
your amplifier into the CABLE or
AUX mode, as described on the
"Programming Your Remote" page.
OPE.A,,O.I .E"O'EFO"C"ONSIPAGE
Control the
w)lume on
f"_7- _.................................. -_'-. your sound
/ _\, amplifier
"_ '' without
i POWER
,._q '_ J ' LeavingTV
i mode.
SeLeEtthe modein which you
wan: volume to appear (e.g. TV).
Press and hold PRG on your
remote untiL-the indicator tight
stays l_f
Press 4-9-9; then ENTER on the
remote. The indicator Light wiLL
flash three times if code is
accepted.
Audio system voLume/mute now
appears in the mode selected.
oo!
Your volume and mute keys now con-
trol your ampl_er, while all the other
keys mU operate the Entertainment
M_'chine. Toput everything back to
norma_ reprogram all buttons with
their original codes (see the
"Programming Your Remote" section).
u
J
BHAN_JEL
i f .-_-
.4 ! ...... -"
,..- _._ " s " ( c :_.£.vJ))'
- - ..... kz:._" ....... [ &. - ---
" "" ......... : TVV_P,
R:rngn'_ %US[" [i#,1_R -
\ ........... SOb_C[
_,--J"-: " PcilY - .....
R_WIN L __WD
-- Si[_f J"
[].you can't jffnd the codefor your
amplifier, use the Auto Findfeature
...... . ........... -.-- -
.J
Mi !ii i ' i i:iiiii !i iiiiii ii.............................................................................................................................................................................................,
LIFIER An external machinethat amplifies sound from a television, CDplayer, VCR,or other A/V device.
3372-0
Page 30

AGI 3OI OPE.ATIONI .E.OT FUNCT,O.S
tf.ConL-ro[ up to
sevendifferent
de_ces with
your remote!
Refer to the chart in this manual
to find the type and brand name
of the device you're programming.
Press and hold the PRG key until
the indicator light turns on.
Press the AUX key and the 1 on
the number pad at the same time
(forAUX+I).
Using the number pad, enter the
three-digit code for the device
you've selected.
Press Enter to save the code.
Aim the remote at the device and
press POWER. It should turn on.
Repeat the steps for AUX+2, and
AUX+3.
Programming your Zenith remote
will allow you to use one remote
to work up to 7 different devices!
Not all de_ces will work with your
Zenith remote controL.
-_ ....... _: ........ -.Tr _ ..........
REWIND _r ._
\
• ._.._..................... oo
3372-0
Page 31

If Programming the Remote did not find your
code, try this procedure to automatically find
the code for your device. If your remote
becomes inoperable, go back to "Programming
your Remote" and enter the Zenith TV code for
step five.
Turn on the device you're
programming for the
remote control.
Press and hoFd-t_PRG k_y unti{
the indicator,light turns on.
Press the key for the device you're
trying to program (CABLE, VCR,
AUX, TV).
Enter the code 0-0-0 (zero-zero-
zero), then press the ENTER key
fight away.
O,E.A,,O.I .E.O,E,O.<,,O.SIPAGE3,
Usethe
remote
controlto
searchat[
possible
codes.
Aim the remote at the correct
device and press the POWER
button. A[{ow a second to pass,
then push the POWER button
again. Repeat until the device
turns off. (This is a trial and error
process, so it may be necessary to
repeat these steps unt]{ the
remote finds your code.)
Push ENrER to save the code.
Press POWERto turn the device
back on. "
Youcon quickly get out of Auto
Find by pressing the Quit button.
If the indicator light stays on
while .you push Power, instead
of turning off, all the codes have
been tried and your device can't
be programmed.
3372-0
J
Page 32

PAo,3210PE.AT.o.I . .us
Receive cletailed
prograr_infor-
marion on most
Public
Broadcasting
stations.
XDS ,, Extended Data Service
Some broadcasters are including on the signal they provide
additional information (data) about the program. This addition-
at information appears on your "IV screen when you press
ENTER;if the channel has XDS.
Date
Channel/Time/Audio Display
f
- Jan!30198
Ch 25-MTV
7:55
Stereo
Title of Program
_Lengfh'of Program (in hours_and minutes)
Time Remaining (in hours and minutes)
Showing XDS Data
Select a channel. Press ENTERto display XDS data; if available.
XDS Channel Labels
XDS can provide a channel [abe[ automatically. For the pro-
grams to display an XDS channel [abe[, select the dashes
(.... ) for that channel from the Channel ID option in the
Setup Menu.
NOVA
Length 00 44 Time Left 00:37
Example of an XDS Data Display
At this time, XDS data is only being provided by
some broadcasters; it is only available on some
channels.
You must set the Clock in the Setup Menu
before the time will appear on the
Channel/Time l_'splay or on the XDS display.
BROADCASTER Channelor network providing the television program.
3372-0
Page 33

Admiral. ....... 116 121 130
Ad_entura TV/VCR. 154
Akai .......... 104
Amarl_ ........ 103 146
AO(: .......... 104
BEE.& Howell .., 121
Broksonic ...... 131 136
[andre ........ 139
Centurion ...... 1:.9
Citizen ........ 121 _39
Cortec ....... I_+I
[or)nado ..... 103
CroNn ........ 103
Curtis Mathes .... 116 119 121
Daewoo ....... 149 159
Daewoo W/VCR . 148
Oa_tron ....... 119
E[e,<tra ........ 1;!I
E_._rson ....... 103 104 123
Emerson W/VCR . . 158
Fisher ......... 11)9 118
1_'43
124 131 136
I,$5
Funai W/VCR .... 154
Genera[ Electric .. 105 107 114
Gotdstar ....... 103 104 119
Go[dstar WiVCR . . 153
Hitachi ........ 102 103 129
J.C. Penney ..... 104 110 134
JVC .......... 1_25 132 164
KMC .......... 103
KTV .......... 103 104 138
Kurazai ........ 121
Lodgenet ....... 121
Logik ......... 121
LXI .......... 133 137
Magnavox ...... 103 112 113
Magnavox W/VCR . 173
Majestic ....... 121
Marantz ....... 104 120 155
Megatron ....... 146
Memorex ....... 121
116 117 161
147
153
117 119
117 11g 127
128 139 165
REFERENCE I PROGRAMM:[NG CODES I PAG E 3 3
MGA/Mi_ubishi... 104 119 120 11C 111 118
Montgomery Ward . !03 104 105 Sharp ......... 103 105 122
NE[ .......... 104 119 Signatum 2000 .... i0_ 104 105
Panasonic ...... 106 107 160 121 130 133
PanasonicTV/VCR . 174 17C
Phi[co ......... 103 104 112 Soundesign ..... 13_
Phi[ips ........ 112 113 11f 127 128
Pioneer ........ 135
Po_[and ....... 103 Symphonic TV/VCR 15z
ProScan ....... 116 157 162 Iatung ........ 10[
Quasar ........ 106 107
RCA .......... 104 116 126
ReaSstic ....... 105 123 124 XR I000 ....... 12:
Sampo ........ 11g Yo_ .......... 119
Samsung ....... 103 119 134 Zenith ........ 10:149 175
Sanyo ......... 108 109 118
Scott ......... 119 124
Sears ......... 103 108 109
130 140 155 134
1!3 114 119 13_ 137 156
121 130 133 165
11_ 114 119
166
113 139
167 leknika ........ 10_ 112 121
157 161 162 Toshiba ....... 110 111 134
167 168 17:
141
Sony ......... 11£ 143 151
SyLvania ....... 11_ 113 1!7
13[
12l. 139
Te[erent ....... 103 121
ZenithTViVCR ... 153 154 172
Findthecodes
you need to
programyour
remote.On
thispage:Ws
and VC_.
J
mm
Admiral ....... 21)8 261
Ad_entura ...... 2H
Aiwa ......... 231
Akai .......... 2__3 238 241
Audio Dynamics . . 202
Bell & Howell .... 2,)6 247
_rcksonic ...... 2>_1 226 250
Canon ........ 214
Cit zen ........ 2 )9
Craig ......... 212
CultisMathes . .. 214 259
Daewoo ....... 244 246 248
Daytron ....... 236 246
DBK .......... 202 218
Emerson ....... 203 209 221
Fisher ......... 211 212 213
Funai ......... 231
255
254
223 226 233
235 243 250
247
Genera[Electric . . 214 216 220
Go[dstar ....... 209
Go Video ....... 256 262 263
Hitachi ........ 215 257
)la
Instant Replay . . . 214 227
J.C. Penny ...... 214 215 218
3VC .......... 202 224 225
Kenwood ....... 202
Logik ......... 239
LXI .......... 209 231
Magnavox ...... 207 214 231
Marantz ....... 207 218
Marta ......... 209
Memorex ....... 206 212 214
Mitsubishi ...... 204 222 252
Montgomery Ward . 208 214 216
Multi Tech ...... 239
227
258
231
264
219 231 24g
NEC .......... 202 218 Sharp ......... 208 261
Orion ......... 250 Shintom ....... 239
Panasonic ...... 214 251 259 Signature 2000... 208 214 216
Pentax ........ 215
PhiLco ......... 207 214
PhHips ........ 207 214 227
Pioneer ....... 210 215
Po_Land ....... 246
ProScan ....... 216 260
Quasar ........ 214 259
RCA .......... 215 216 220
Rea[istk ....... 206 208 212
Samsung ....... 220 230 238 Yamaha ........ 20_ 218
Sansui ........ 239 Zenith ........ 20[ 224 225
Sanyo ........ 206 212 247
Scott ......... 204 205 233
Sears ......... 206 209 211
227 240 242 Toshiba ........ 205 215
249 260
214 231 Vector Research .. 204 218
243
212 215
Sony ......... 21_ 232 237
Sylvania ....... 20_ 214 227
Symphonic ..... 23 L
Tashiko ........ 20q
7atung ........ 202
Teac .......... 202 231
Teknika ........ 20') 234
XR 1000 ....... 239
21g 231 249
22] 237
J
3372-0
Page 34

PAG=_I.EFE. NC I ,.O0.AM.,NOCOOES
Find the codes
you need to
program your
remote.
On this page:
Cable, _iteUite,
Video Disc
PLayers,CD
Pl_ayersand
Tape Decks
A[tegro ........ 358 362 Kale Vision ..... 335
A[[egro A/B Switch 361 Macom ........ 314 321
Gemini ........ 305 331 338 Magnavox ...... 334
General E[ectric... 367 NSC .......... 335 339 368
Genera[ Instrument 304 305 306
Ham{in ........ 302 303 345
derro[o ........ 304 307 308 ........
__" -" 360 363 Pioneer ........ 315 343
307 308 309 Oak .......... 311 332 342
310 318
365 366 Paragon ....... 333
30g 310 318 354 355
Panasonic ...... 313 320
Phi[ips 347 350 352
369 370
iv_ [:-[,]m6_'a_.Irl:4J-1
Pioneer ....... 402 403
Sanyo ......... 401
Sony ......... 404
Zenith ........ 401
RCA DSS ....... 373
Regency ....... 329
Samsung ....... 335
Scientific Atlanta . 316 323 335
Sprucer ........ 313
Standard Comp ... 335
Stargate ....... 379
Texscan ....... 339 356 371
Tocom ........ 317 318 346
364
Unika ......... 3(+8 362
United Satellite . : 344
Universal ...... 358 362
Vid Tech ....... 340
Video Way ...... 349
View'star ....... 354 355 372
._Zenith ........ 301 353 374
_Tenith Sate[{ite . . 312 328 330
' 251 378
Akai .......... 409 424 Mi_ubishi ...... 423 424
C_wn ......... 410 NAD .......... 425 426 447
Denon ........ 411 Nakamichi ...... 427 428
Fisher ......... 412 438 NEC .......... 429
Go[dstar ....... 460 Onkyo ........ 430
HarmaniKardon ..413 Panasonic ...... 431 432
3VC .......... 415 Phi[ips ........ _21 433 434
Kenwood ...... 412 416 417 Pioneer ........ 431 435
Magnavox ...... 421 422 433
Denon ......... 455
Harman/Kardon... 456
3VC .......... 457
Kenwood ....... 450
DeDon ......... 462 463
Fisher ......... 464
Go[dstar ....... 460
Harman/Kardon ..465
3V[ .......... 466
Kenwood ...... 468 469
441
434 Radio Shack ..... 431 436 439
Quasar ........ 432
440 441
Onkyo ......... 458
Phili_s DCC ..... 454
Pioneer ........ 451 a78
Sony .......... 452
Marantz ........ 472 503
Onkyo ........ 473
Phi[ips ........ 475 476
Pioneer ........ 477 478 479
Radio Shack ..... 487 488
Realistic ....... 480
RCA .......... 437
Sanyo ......... 438 439
Scott ......... 440
Sharp ......... 441 442
Sony .......... 443 444 445
Soundesign ..... 461 498 501
Sylvania ....... 433
Teac ......... 446
Technics ....... 432 459
Toshiba ........ 447
Sanyo ......... 481
Scott ......... 482
Sharp ......... 483
Sony .......... 489 490 491
Soundesign ..... 461 498 501
502
492
502
Yamaha ....... $48
Zenith ........ _6D 46_ 498
Teac ......... 494 495
Technics ....... 497
Yamaha ....... 496
Zenith ........ 460 461 498
501 502
501 502
3172-0
Page 35

RE,E.ENCEIPROORA""'NOCOOESIPAG
TV Mode VCR Mode CaMe Mode AUX Mode
KEY NAME Zenith Code 101 Zenith Code 201 Zenith Code 353 Zenith Code 401
POWER TV On!Off VCR On/Off Cable Box On/Off AUX W/Disc
CABLE Selects Cable Selects Cable Selects Cable Selects Cable
VCR Selects VCR Selects VCR Selects VCR Selects VC?
AUX Selects Aux Selects AUX Selects Aux Selects AUX
TV Selects TV Selects TV Selects TV Selects TV
SURF Surf On/Off VCR AM/PM Cable FC!Fav Ch AUX Audio
FLASHBK TV FLashback VCR FLashback Cable FLashback AUX Frame/Time
MUTE - _rv Mute TV Mute TV Mute TV Mute
CHANNEL UP TV Channel Up VCR Channel Up Cable Channel Up AUX Skk) --,>
CHANNEL DN TV Channel Dn VCRChannel Dn Cable Channel Dn AUX Skip <<
VOLUME (RIGI'iT) TV Volume Up TV Volume Up TV Volume Up TV Volume Up
VOLUME (LEFT) TV Volume Dn TV Volume Dn TV Volume Dn TV Volume Dr
I TV Digit I VCR Digit i CabLe Digit I AUX Digit I
2 TV Digit 2 VCR Digit 2 CabLe Digit 2 AUX Digit 2
3 TV Digit 3 VCR Digit :3 Cable Digit 3 AUX Digit 3
4 TV Digit 4 VCR Digit 4 Cable Digit 4 AUX Digit 4
5 TV Digit 5 VCR Digit 5 Cable Digit 5 AUX Digit 5
6 TV Digit 6 VCR Digit 6 Cable Digit 6 AUX Digit 6
7 TV Digit 7 VCR Digit 7 Cable Digit 7 AUX Digit 7
8 TV Digit 8 VCR Digit 8 Cable Digit 8 AUX Digit 8
9 IV Digit 9 VCR Digit 9 Cable Digit 9 AUX Digit 9
0 TV Digit O VCR Digit 0 Cable Digit 0 AUX Digit O
ENTER TV Enter VCR Enter CabLe Enter Aux DispLay
MENU TV Menu VCR Menu Cable Menu AUX Program
UP ARROW TV Select Up VCR Select Up CabLe Up Arrow AUX Part
DOWN ARROW TV Select Dn VCR Select Dn Cable Dn Arrow AUX Random
LEFT ARROW TV Adjust Left VCR Adjust Left Cable Left Arrow AUX x3 F#ST <
RIGHT ARROW IV Adjust Right VCR Adjust Right CabLe Right Arro_ AUX x3 F_ST >
QUIT/ TV Seq Sound VCR Quit CabLeQuit AUX Clear
A TV PIP VCR+ Day Up AUX Repeat-_fiide
B TV PIP Swap VCR Channel Map Day Down AUX Repeat-A-B
C TV PIP Freeze VCR Search CabLe Pg Up AUX Repeat-Chap
£C TV CLosed Captions VCR Memory CabLe Pg Down AUX Memory
TIMER TV Timer VCR Timer Cable Timer AUX Still
TV/VCR/SOLIRCE TV Sources TV Tuner or VCRTuner Cable Info AUX W/Disc
RECORD VCR Record VCR Recorcl Cable Buy AUX Edit
PAUSE VCR Pause VCR Pause CabLe Guide AUX Pause
REWIND VCR Rewfnd VCR Re_'ind VCR Rewind AUX Scan <<
PLAY VCR PLay VCR PLay VCR PLay AUX Play
STOP VCR Stop VCR Stop VCR Stop AUX Stop/Eject
FFWD VCR Fast Forward VCR Fast Forward VCR Fast Forward AUX Scan >>
A complete
Ustof the
button
functions on
your remote
control
J
3372-0
References: 124-212-37 and pP 22!-952-02A
Some of the [unctions shown above may not be available on your TV (such as PIP).
Page 36

PAGE301RE R NC I "A'NTENANC
f
Cadng for
Entertainment
your
Machine.
Early malfunctions can be prevented. Careful and regular cleaning can extend the amount of time you will have with
your new Entertainment Machine. Be sure to turn the power off and pull out the plug before you begin any cleaning.
__j
I. Here's a gre_ way to keep the dust off your screen for a wlliLe. Wet a soft cloth in a mixturei'oF Luke-
warm water and a Little fabric softener or dish washing detergent. Wring the cloth until it's almost dry,
and then use it to wipe the screen.
2. Make sure the excess water is off the screen, and then Let it air-dry before vo_ turn on your
Entertainment Machine.
[I_ _ I i[:-i,l[l_l[:,_. I II I I|! I
l_l_,_r,[_
1. Use a soft cloth with a mild soap solution to wipe the cabinet (avoid using any cleaner that says
"industffa[ strength" or "will wash the white off of rice" on the Label).
2. Rinse the cloth and wipe the cabinet again.
3. Let the cabinet air-dry before turning the Entertainment Machine on.
Use a quality wood cleaner and polish. This wilt protect the Entertainment Machne from dirt and dust, as
well as keep the cabinet Looking new.
If you Leaveyour Entertainment Machine dormant for a Long time (such as a vacation), it's a good idea
to unplug the power to protect against possible damage from Lightning or po_e" surges. If you use an
off-air antenna, you may also want to disconnect it from the back of your TV before Leaving.
Ifyou unplugyour Zenith EntertainmentMachine,you may have to resetthe clockusingthe ClockSet
menu described earlier.
3372-0
Page 37

SYMPTOMS SOLUTIONS
Snowy picture and Lousy sound. • Check your antenna connection or Location.
.EFE.ENCEI "A ENTENANCEIPAGE
Some quick
and easy
tips to fixing
problems
yourself.
Multiple images or "ghost shadows: • Check your antenna direction and/or location.
interference: Sharp Lines across
the screen and Lousy sound.
Normal picture but no sound.
No picture and Lousy sound.
No picture and no sound --
The thing is just DEAD!
• Make sure the wire from your antenna to your Entertainment Machine is
properly connected.
Thefollowing may cause image problems or distortion:
Electrical appliances, powerful lights, cars, trucks; computers or portable phones;
Medical equipment
• If possible increase the distance between your Entertainment Machine and
the offending appliance. Or shut one of them off.
• Check volume control.
• Make sure the W is not Muted.
• Try another channel. The problem may be the broadcast, not your
Entertainment Machine.
• Are the Audio A./V cables properly installed?
• Are the wires for external speakers (if you have external speakers)
properly installed?
• Are you in TV or Cable tuning mode (See Auto Program on page 12), and should
be in the other?
• Make sure output channels on all A/V equipment are on the same channel (3 or 4).
• Check that all connections are tight.
• Is the AC power plugged in?
• Check that your AC power outlet works. (Test it b!l plugging in something else
or try another plug.)
• Make sure your brightness and audio controls are set properly.
• Try another channel. The problem may be with the broadcast, not your
Entertainment Machine.
.J
No color, but the sound is O.K. • Check the color control in the Video menu.
• Try another channel The problem may be with the broadcast.
Picture has a big Dlack box • The CC (closed caption) option may be in Text m_de. Select OFFin the
on it, but the sound is O.K. Captions/Text menu. See page 16.
Picture has two horizontal • Your program is in tetterbox. This means that the shape of your IV is
black bars, one on top and square, but the program is a rectangle. Think of t3e bars as emptv space the
one on bottorn, program doesn't fill; not picture that's blocked out. Because this format is a
direct representation of film as you see it in the movies, you are acI:uatLy seeing
MOREof the program when you see those bars. Trust us.
Remote control doesn't work. • Make sure the batteries are fresh and installed properly.
• Check to see that the MBR (Multi Brand Remote available on some models) is in
the right mode for your equipment.
Menu options won't change. • Try unplugging the TV, waiting about five minute!;, and then plugging it back in
and trying again.
If all else fails, call 1 (847) 391-8752, extension 5, between 8:30 a.m. and 4:30 p.m. Central Stand(ird Time.
3372-0
jl
Page 38

PAGE 38 ] REFERENCE
/
A complete
list of
definitions for
words found
in this guide.
75 OHM RF CABLE
The wire that comes from an off-aft antenna or cable sendce provider.
Each end looks like a hex shaped nut with a wire sticking through the
middle. It screws onto the threaded jack on the back of your TV.
k.
300 TO 75 OHM
ADAPTER
A/V CABLES
A/V DEVICE
ADD
AMPLIFIER
ANTENNA
AUTO PROGRAM
BLOCK
A small device that connects a two-wire 300 ohm antenna to a
75 ohm RFjack. They are usually about an inch long with tw3 screws on
one end and a round opening with a wire sticking out on the other end.
Audio/Video cables. Three cables bunched together--right audio(red),
left audio (white), and video (yellow). A/V cables are used for stereo
playback of videocassettes and for higher quality picture and sound :
from other A/V devices.
Any device that produces video or sound (VCR, cable box,
or television).
This function lets you add new channels to list that you'll scroll through
when using your remote.
An external machine that amplifies sound from a television, CD player,
VCR, or other A/V device.
The physical receiver of television signals sent over the air. A large
metal piece of equipment does not always have to be visible for your
home to be using an antenna.
Auto Program enables your Entertainrnent Machine to auto_atical[y find
all the channels available in your area.
Restrict or censor a channel for a set length of time.
DELETE
INPUT
This function lets you remove channels that. you don't watch from the
list you'll scroll through using your remote.
Refers to the jack that receives a signal from a TV, VCRor other
A/V device.
3372-0
Page 39

,lACK
A connection on the back of a TV, VCR, or any other A/V device.
REFERENCE I PAGE 39
A complete
fist of
definiUons for
words found
in this guide.
MONO SOUND
OUTPUT
SECOND AUDIO
PROGRAMM.ING/SAP
_
SIGNAL
STEREO SOUND
TUNER
Mono (monaura[) sound is one channel of sound. On more than one
speaker, at[ the speakers p[ay the same audio.
Refers to the jack that sends a signat out of a VCR, or other A/V device.
Second Audio Programming (SAP) isanother separate, audio channel
avai[ab[e with some programming. Choosing SAP often refers to listening
to audio in another [anguage, such as Spanish or French.
Picture and sound traveling through cable, or on the air, to your
television screen.
Stereo (stereophonic) sound refers to audio that's divided into right and
[eft sides.
Devicethatpicksup the signaland turnsthem into
pictureand sound.
J
3372-0
J
Page 40

-PA6 E 40 I REFERENCE
qd what you
want quick|y.
x.._
FEATURE PAGE
AmpLifier VoLume Override ................................ 29
Antenna .......................................... 4, 6
Audio Menu ......................................... 25
Auto Demo ......................................... 24
Auto Find .......................................... 31
Auto Progrm .......................................... 11
AUX+I, AUX+2, AUX+3 .................................. 30
Basic TeLevision Operation ............................. 13, 14
Batteries ........................................... 4-7
Button Functions ..................................... 10
Cable ............................................ 5, 7
Caption Menu ........................................ 18
CATV............................................. 5,7
Channel LabeLs ....................................... 22
Add/De[/Surf ........................................ 16
CLock Set ........................................... 17
Front Panel ......................................... 12
GLossary ......................................... 38, 39
Hook-Up Directory ..................................... 3
Language Menu ....................................... 20
Maintenance ........................................ 36
On-Screen Menus ...................................... ?5
Parental ControL ....................................... 23
Programming the Remote ................................ 28
Remote Control Auto-Find ................................ 31
S-VHS Hookup ........................................ 8
Safety Information ..................................... 2
Serial Number ........................................ 2
Surf .............................................. 13
Timer ............................................. 21
Troubleshooting ....................................... 37
VCR ............................................. 6, 7
Video Menu ......................................... 26
Warranty ........................................... 42
3372-0
Page 41

STEREOSURROUND SOUND SPEAKERS
For use with any Surround Sound compat_ibte TV. These
speakers create .a sound so real it s as it you were part
ot .the action. The convenient, sp.ace-saving she[f design
make these speakers an ideal additicn to any Home
Theater System. The contemporary black finish comp[e-
merits any room.
cv5oooONLY _$;!24.95 ,_us_,_
REPLACEMENT REMOTE
SHIPPING & HANDLING
Broken or lostremote? Perhapsyou woutd justLikethe
convenienceof having a second remote on hand. Order
your rep.[acementremotecontroldirectfrom.Zenith!To
ensurethat you receivethe correctremote,have your
tetevision s mode[ number ready when you cart.
ONLY_$39.95 ,_o_s
SHIPPING & HANDLING
zenith
3372-0
Use Your Visa or MasterCard to Order
PLEASEALLOW 3-4 WEEKS FOR DELIVERY
Page 42

Oirect-ViewColorW WelcomeintotheZenith_amily!We be[Uevethatyou willbe pleasedwithyournew ZenithEntertainmentMachine.Plea_-ereadthis
warrantycarefuLLy,itisa "LIMITEDWARRANTY" as definedunderFederalLaw.Thiswarrantygivesyou specific!.egalrights,
and you may aLsohaveotherrightsthatvaryfromstatetostatewithintheU.S.A.
ZENITH-RESPONSI
ServiceLabor
BILITY
Duringa periodof90 daysfromeffectivewarrantydate,Zenithwiltprovideservicelaborby a ZenitJrauthorizedservicecenter
when neededas determined by Zenith, asa result of manufacturing defects.
. °
Parts
Newor remanufactured replacements for Factory-defective parts wi[[[[be supplied by a Zenith authori;:ed
service center for one year from effective warranty date (color picture tube -- two years). Such _pL]cement parts are
warranted for the remaining portion of the original warranty period.
Home Service
Warranty service for 21" diagonal (U.S,A.) or larger screensize models is provided in the home in most cases. (Some
repairs may requirethe unit to betaken by the servicer to the repair facility and returned, at no additional charge.)
Not Covered
This warranty covers manufacturing defects and does not cover installation, adjustment of customer controLs in the home,
installation or repair of home antenna systems, cable converters or cable company-supplied equipment; it aLso does
not cover dama_le due to misuse, abuse, negligence, acts of God or other causes beyond the control of Zenith. Any )
alteration of the product after manufacture voids this warranty in its entire_.
OWNER'S RESPONSIBILITY
Effective Warranty Date
Operating Guide
Carry-lnService ModeLsunder21"diagonal[(U.S.A.)screensizemustbe takentoa Zenithauthorizedservicecenterforwarrantyservice
Antenna Reception problems caused by inadequate home antenna or faultyantenna connections arethe owrlefs responsibility.
Important Product Registration--Please fill. out and mail. your Product Registration Card. It is imperative that Zenith know how to reach
Warranty begins on the date of odginat consumerpurchase, Foryour convenience, keep the deale(s dated bill[ of sale or
delivery ticket as evidence of the purchasedate.
Readyour Operating Guide carefiJUyso that you will understand the open_tion of yourset and how to adjust the customer controls.
and must be pickedup bytheowner.
you promptly if we should discover a safety problem that could affect you.
WarrantyService Forwarrantyself'iceinformation,contactany ZenithauthorizedservicecentenPartsand servicelaborthatareZenith's
responsibiUty(seeabove)wiltbe providedwithoutcharge.Otherserviceisatthe ownedsexpense.Ifyouhaveany prob,em
inobtainingsatisfactorywarrantyservice,ca[lor writetheZenithResponseCenter.You must plovidethe mode[[number,
serialnumberand dateof purchaseor dateoforiginalinstat[ation.Beforeyouask [orwarrantysenHce,read"Maintenance
And Troubleshooting" in your operating guide.You might avoida senrice c_[L
TIlls WARRANTYIS IN LIEU OF ANY OTHERWARRANTY,EXPRESSOR IMPLIED, INCLUDING WITHOUT LIMITATION, ANY WARRAN-
13' OFMERCHANTABILITY OR FITNESSFORA PARTICULARPURPOSE,AND ZENITH SHALL NOTBE LIABLE FORANY CONSEQUEN-
TIAL, INDIRECT, ORINCIDENTAL DAMAGESOFANY KIND, INCLUDING LOSTREVENUESOR PROFI_ IFl CONNECTIONW]ITHTHE
PRODUCT.
ZENITH CONSUMER SERVICES
F]ctory Owned Service Center
Fame & Carry-in Service
T__levision/VCR
Farts and Accessories
FTV!Com purer
Service Hours:
M-F 8-6, Sat 9-2
WiLl accept UPS Shipments
ZENITH ELECTRONICS CORPORATION
Zenith Resaonse Center
1000 Ni_wnukee Avenue
Gtenvi_w, IL 60025-2493
Telephone (847)391--8752
Non-Fri, 7 O0 a.m.-8:00 p.m. C_T
www.z_ nitl.com
201 James Record Rd.
801 E.RooseveLt Rd
Lombard, IL 60148
(630) 705-2830
Building4
Huntsville,AL 35824
(205) 461-8583
AdditionalZenith PictureTube ProtectionPlan AvailabLe
Zenithoffersyou the opportunityto obtainadditionalLong-termprotectionagainstfailureof the picturetube in your new
EntertainmentMachine.Our PictureTube ProtectionPLan enablesyou to avoidany unexpected picturetube repairexpenses
and keep your EntertainmentMachine in top condition•Itguaranteesyou a genuineZenith rep[acementpicturetubeand seF
vicefrom a Zenithauthorizedservicecenter•
_mmm_ Be sure to send in the Product Regl3trotion Card. We witt send you _nd application .for the Pto_ection Hon near t#e exp ration of the
two year manufacturer's warranty on the m'cture tub_ For odditionoi in_rmon'on coil (847) 39]-8757.
3372-0
Page 43

Page 44

206-3372-0
 Loading...