

Page 1
ZEBRA PERFORMANCE-LINE
R-140
User's Guide
TM
TM
R-140
Page 2

Zebra R-140
User's Guide
TM
Customer order # 48040L
Manufacturer part # 48040LB Rev. 1
Page 3

Proprietary Statement
This manual contains proprietary information of Zebra Technologies Corporation. It is intended solely for the
information and use of parties operating and maintaining the equipment described herein. Such proprietary
information may not be used, reproduced, or disclosed to any other parties for any other purpose without the
expressed written permission of Zebra Technologies Corporation.
Product Improvements
Continuous improvement of products is a policy of Zebra Technologies Corporation. All specifications and signs are
subject to change without notice.
FCC Compliance Statement
NOTE: This equipment has been tested and found to comply with the limits for a Class A digital Device, pursuant to
Part 15 of the FCC Rules. These limits are designed to provide reasonable protection against harmful interference when
the equipment is operated in a commercial environment. This equipment generates, uses and can radiate radio
frequency energy and, if not installed and used in accordance with the instructions manual, may cause harmful
interference to radio communications. Operation of this equipment in a residential area is likely to cause harmful
interference in which case the user will be required to correct the interference at his own expense.
In order to insure compliance, this printer must be used with a Shielded Power Cord and Shielded Communication
Cables.
"The user is cautioned that any changes or modifications not expressly approved by Zebra Technologies Corporation
could void the user's authority to operate the equipment."
Canadian DOC Compliance Statement
This digital apparatus does not exceed the Class A limits for radio noise emissions from digital apparatus as set out in
the radio interference regulations of the Canadian Department of Communications.
CE Compliance
If the accompanying printer displays the CE mark, it also meets EMC directive 89/336/EEC, with amendments
effective at the time of manufacture.
Liability Disclaimer
Zebra Technologies Corporation takes steps to assure that its published Engineering Specifications and Manuals are
correct; however, errors do occur. Zebra Technologies Corporation reserves the right to correct any such errors and
disclaims liability resulting therefrom.
No Liability for Consequential Damage
In no event shall Zebra Technologies Corporation or anyone else involved in the creation, production, or delivery of
the accompanying product (including hardware and software) be liable for any damages whatsoever (including,
without limitation, damages for loss of business profits, business interruption, loss of business information, or other
pecuniary loss) arising out of the use of or the results of use of or inability to use such product, even if Zebra
Technologies Corporation has been advised of the possibility of such damages. Because some states do not allow the
exclusion or limitation of liability for consequential or incidental damages, the above limitation may not apply to
you.
Copyrights
This copyrighted manual and the label printer described herein are owned by Zebra Technologies Corporation. All
rights are reserved. Unauthorized reproduction of this manual or the software in the label printer may result in
imprisonment of up to one year and fines of up to $10,000 (17 U.S.C.506). Copyright violators may be subject to
civil liability.
All products and brand names are trademarks of their respective companies. All rights reserved.
2000 Zebra Technologies Corporation. All rights reserved.
ii Zebra R-140 User’s Guide
Page 4
Zebra R-140 User’s Guide iii
Page 5

iv Zebra R-140 User’s Guide
Page 6

TableofContents
Introduction
Hello!........................................1
PrintMechanismCapabilities............................2
RFIDCapabilities..................................2
MediaTransportMechanismCapabilities......................2
SystemRequirements................................2
UnpackingandInspection.............................3
ReportingDamage ...............................3
Storage......................................3
MediaandRibbonRequirements .........................4
PowerCord.....................................4
PrinterAnatomy101................................5
RFIDOverview...................................6
SupportedTags..................................6
Tag-itTags....................................7
I•CodeTags...................................8
CalibratingthePrinter
Purpose.......................................9
TypesofMedia..................................10
Non-ContinuousWebMedia..........................10
Non-ContinuousBlackMarkMedia .....................11
ContinuousMedia...............................11
ChoosingthePrintMode.............................12
LoadingtheMedia.................................13
PositioningtheMediaSensors ..........................14
TransmissiveSensor..............................14
BlackMarkSensor ..............................16
ZebraR-140User’sGuide v
Page 7

LoadingtheRibbon................................17
OperatorControls.................................18
POWERSwitch.................................18
FrontPanel...................................18
ConfiguringthePrinter..............................19
ConfiguringtheSoftwareorPrinterDriver....................20
MediaandRibbonCalibration ..........................21
PrintingaTestLabel................................23
EstablishingCommunication
SystemConsiderations ..............................25
Interfaces....................................25
DataSpecifications...............................25
CablingRequirements ..............................26
PrinterBasics
OperatorControls.................................27
POWERSwitch................................27
FrontPanelDisplay..............................28
FrontPanelKeys ...............................29
FrontPanelLights...............................30
RollMediaLoading ...............................31
Tear-OffMode.................................31
Peel-OffMode.................................32
RewindMode(forPrintersWithouttheCutterOption).............34
CutterMode..................................36
RewindMode(forPrintersWiththeCutterOption)..............38
FanfoldMediaLoading..............................40
RemovingtheLabelBackingMaterial......................42
RibbonLoading .................................43
RibbonRemoval .................................45
vi ZebraR-140User’sGuide
Page 8

Configuration
EnteringtheSetupMode.............................47
ChangingPassword-ProtectedParameters ...................48
LeavingtheSetupMode..............................49
ConfigurationandCalibrationSequence.....................50
RoutineCareandAdjustment
Cleaning......................................69
CleaningtheExterior..............................70
CleaningtheInterior..............................70
CleaningthePrintheadandPlatenRoller...................70
CleaningtheSensors..............................71
CleaningtheSnapPlate............................72
CleaningtheCutterModule..........................74
Lubrication.....................................74
FuseReplacement.................................74
Adjustments....................................76
TogglePositioning...............................76
PrintheadPressureAdjustment ........................77
MediaSensorPositionAdjustment......................77
Troubleshooting
LEDErrorConditionsandWarnings ......................79
PrintQualityProblems..............................82
WrinkledRibbon.................................83
Communications..................................83
RFIDSymptoms..................................85
PrinterDiagnostics ................................87
Power-OnSelfTest..............................87
AdditionalPrinterSelfTests..........................87
ZebraR-140User’sGuide vii
Page 9

Specifications
MediaHandling..................................93
Options ......................................93
®
ZebraProgrammingLanguage(ZPLII
BarCodes.....................................94
GeneralSpecifications ..............................95
PrintingSpecifications ..............................96
RibbonSpecification...............................96
MediaSpecifications...............................97
PowerLineCordSpecifications .........................98
).....................94
Appendix
PrinterInterfaceTechnicalInformation......................99
RS-232/RS-422/RS-485SerialDataPort...................99
ParallelDataPort...............................103
ZPLIICommandsforRFID...........................104
^WT–WriteTag...............................104
^RT–ReadTag................................105
^RS–RFIDSetup...............................107
^RI-RFIDGetTagUniqueID........................107
SampleZPLIILabelFormats..........................109
Format1:SimpleTextandaBarcode.....................110
Format2:SavingaLabelFormatAsaGraphicImage............110
Format3:UsingaSerializedDataField...................111
Format4:RFIDSample............................111
Index
viii ZebraR-140User’sGuide
Page 10

Hello!
Introduction
Congratulations! You have just purchased the highest quality thermal
demand printer with RFID capability in the industry. Manufactured by
Zebra Technologies Corporation, the industry leader in quality, service, and
value. For over 30 years, Zebra Technologies Corporation has provided
customers with the highest caliber of products and support
n
This manual provides all of the information you will need to operate
your printer.
n
The ZPL IIProgramming Reference Volumes I and II
(part # 45540L) show you how to create the perfect label format for your
application. These books also explain how, through ZBI
extend the power of ZPL II by allowing custom programs to be written
that operate within the printer, directly interfacing with, for example, bar
code scanners and keyboard display devices. In addition, the books
contain information about the enhanced operating system features of
your printer. There are three ways to obtain these books: on the
accessory CD-ROM (supplied with the printer), on our web site
(www.zebra.com), and printed manuals can be ordered from your
distributor.
, you can
n
The ZebraNetâNetworking: PrintServer IIäInstallation and User’s
Guide (part # 45537L) explains how you can quickly set up your printer
on an IP network (optional ZebraNet PrintServer II required).
The Zebra R-140 printer, when connected to a host computer, functions as a
complete system for printing and encoding “Smart” labels, tickets, and tags.
The printer receives instructions from the host computer. Microprocessors
continuously monitor these signals along with the inputs received from the
control panel and various sensors. The microprocessors interpret this
information and control the Zebra R-140 printer’s mechanical drive,
printhead, RFID Subsystem, command interpretation, label formatting, and
media and ribbon movement.
Zebra R-140 User’s Guide 1
Page 11

Print Mechanism Capabilities
The Zebra R-140 print mechanism has been designed to print information
on labels, tickets, and tags. It uses a square or rectangular dot thermal
printhead that heats a ribbon as it passes beneath the print elements, melting
its ink onto the media (direct thermal print mode involves using
heat-sensitive media instead of an inked ribbon). Print speeds are selected
via software control.
RFID Capabilities
Transponders used with the R-140 work on the 13.56 MHZ international
frequency for RFID. Currently, smart labels based on chip/antenna inlays
using Texas Instruments’ Tag-It
RFID transponder chips are fully supported. Transponder data may be read,
written and write-verified through RFID enhancements to Zebra’s ZPL II
programming language. Encoding and verifying data through ZPL II is as
easy as printing a bar code.
, and Philips Semiconductors’ I•Code
Media Transport Mechanism Capabilities
The media transport mechanism of the Zebra R-140 printer has been
designed to accommodate various types of media including die-cut labels,
ticket and tag stock, continuous roll media, fanfold media, and black-mark
media.
System Requirements
In addition to the Zebra R-140 printer, you will need the following items to
form a complete label preparation system:
n
Label-, ticket-, tag-, or “Smart” RFID label-stock
n
Thermal transfer ribbon (if printing in Thermal Transfer mode).
2 Zebra R-140 User’s Guide
Page 12

n
A device, such as a personal computer (PC), for data entry and output of
label formats to the printer.
n
A data communication cable to connect the controlling device to the
Zebra R-140 printer. (Remote installations may require additional cables
and communication devices such as modems and/or protocol
converters.)
Unpacking and Inspection
Inspect the printer for possible damage incurred during shipment.
n
Check all exterior surfaces.
n
Raise the media access door and inspect the media compartment.
In case shipping is required, save the carton and all packing material.
Contact your authorized Zebra reseller for instructions.
Reporting Damage
If you discover shipping damage:
n
Immediately notify and file a damage report with the shipping company.
Zebra Technologies Corporation is not responsible for any damage
incurred during shipment of the equipment and will not repair this
damage under warranty.
n
Keep the carton and all packing material for inspection.
n
Notify your authorized Zebra reseller.
Storage
If you are not placing the printer into operation immediately, repackage it
using the original packing materials. The printer may be stored under the
following conditions:
n
Temperature: -4° to +140° F (-20° to +60° C)
n
Relative humidity: 5 to 85% non-condensing
Zebra R-140 User’s Guide 3
Page 13

MediaandRibbonRequirements
Sinceprintqualityisaffectedbymediaandribbon,printingspeeds,and
printeroperatingmodes,itisveryimportanttoruntestsforyour
applications.
HighqualityRFIDLabelsarerecommendedtoensureagainstpremature
printheadwear.
Fornon-RFIDapplications,weSTRONGLYRECOMMENDtheuseof
ZebraTechnologiesCorporation-brandsuppliesforcontinuoushigh-quality
printing.Awiderangeofpaper,polypropylene,polyester,andvinylstock
hasbeenspecificallyengineeredtoenhancetheprintingcapabilitiesofthe
printerandtoensureagainstprematureprintheadwear.
n
Continuousrollmedia,fanfoldmedia,orcardstockwithoptional
perforationsandregistrationholesmaybeused.
n
Printheadlifemaybereducedbytheabrasionofexposedpaperfibers
whenusingperforatedmedia.
n
TheribbonMUSTbeaswideasorwiderthanthemediabeingused.If
theribbonisnarrowerthanthemedia,areasoftheprintheadwillbe
unprotectedandsubjecttoprematurewear.(Whenprintingindirect
thermalmode,ribbonisnotusedandshouldnotbeloadedinthe
printer.)
PowerCord
WARNING!Forpersonnelandequipmentsafety,alwaysusea
three-prongplugwithaground(earth)connection.
NOTE:Dependingonhowyourprinterwasordered,apowercordmayor
maynotbeincluded.Ifoneisnotincluded,oriftheoneincluded
isnotsuitableforyourrequirements,referto“PowerLineCord
Specifications”onpage98.
Thepowercordconnectormustbepluggedintothematingconnectoron
therearoftheprinter.
4 ZebraR-140User’sGuide
Page 14
Make sure that the POWER on/off switch (located at the back of the printer)
is in the off position before connecting the power cable to an electrical
outlet.
Printer Anatomy 101
Tear-off/
peel-off
bar
Printhead
lever
Platen
roller
Snap
plate
Lower
roller
Spindle
hook
Ribbon take-up
spindle
Ribbon supply
spindle
Dancer
roller
assembly
Media
guide
Rewind
spindle
(optional)
Only on select models
Media
supply
guide
Media
supply
hanger
Figure 1
Depending on the options you have selected, your printer may look slightly
different.
Zebra R-140 User’s Guide 5
Page 15

RFID Overview
The R140 printer contains special hardware necessary to program RFID
tags. To use the RFID capabilities of this printer, you will need the
appropriate RFID media. Currently the Tag-It and I•Code tag types are
supported. This media is collectively known as an RFID tag, and includes
the label, backing, and an RFID transponder inlay encased by the label
material.
The RFID capabilities of the printer allow you to program, read, and obtain
certain information regarding the status of the RFID subsystem. The RFID
printers incorporate an antenna to program the RFID tags. RFID tags have
coils built into them. When these tags line-up over the antenna, you are
able to communicate to the tag to obtain information and program the tag.
Before printing on the label, the RFID commands are executed. This is
done through newly added ZPL commands. After the RFID tag is
programmed and verified, the printer will format and print the remaining
ZPL commands.
Each tag has memory blocks that are programmed and read through ZPL
commands. The ZPL commands allow the user to adjust the number of
retries to get a successful execution of the command. If a block can not be
programmed within the number of retries, then the formatted label is fed out
with the word VOID overlaid.
After the failed tag is fed, an attempt will be made to program the tag again
with the corresponding format. The reprogramming of the tag will follow
the same series of commands to the tag, and the same number of retries for
each block. If this tag fails to program, then this label will be fed out
overlaid with a the word VOID. One final attempt will be made to
reprogram the tag. If unsuccessful, a third VOID tag will be printed.
After three VOID tags, the customer format will be removed from the print
queue, and will proceed with the next format (if one exists in the buffer).
Supported Tags
The R-140 currently supports two transponder types: Tag-it and I•Code.
6 Zebra R-140 User’s Guide
Page 16
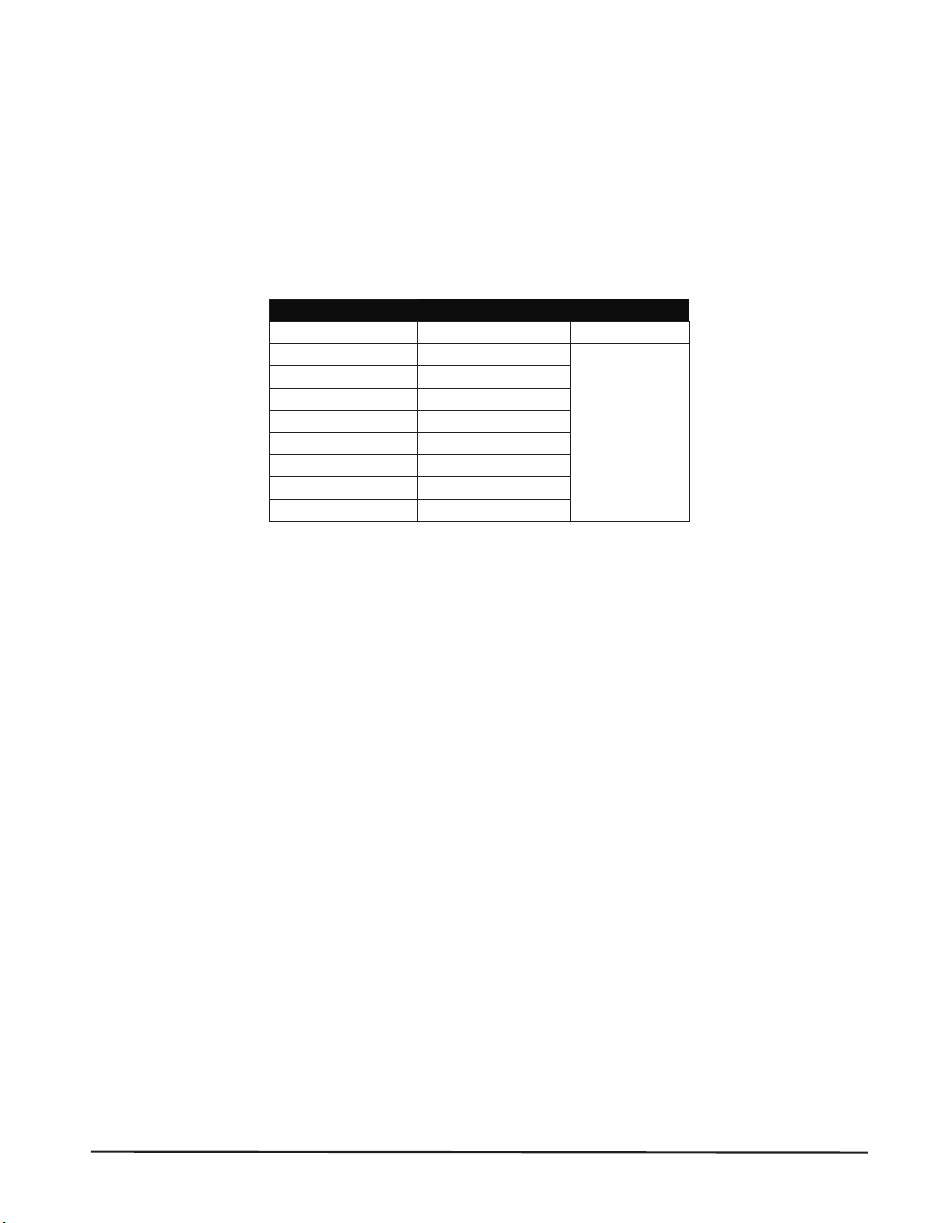
Tag-it Tags
Tag-it labels are high frequency (13.56MHz) devices. Tag-it is a read/write
RFID tag with 256 bits of storage capacity for user data. Data is addressed
in eight blocks of 32 bits, each block containing four bytes.
Tag-it Blocks
Block # Description Bytes
0 User Data
1 User Data
2 User Data
3 User Data
4 User Data
5 User Data
6 User Data
7 User Data
32 User
Zebra R-140 User’s Guide 7
Page 17
I·Code Tags
I•Code labels are also high frequency (13.56MHz) devices but have 512
bits of storage capacity. Data is addressed in sixteen blocks of 32 bits, each
block containing four bytes. The first two blocks of data (block 0 and 1) are
used for storage of a unique 64 bit serial number. The next two blocks
(blocks 2 and 3) are used for storage of configuration information; block 4
is used for family or application identification and blocks 5 to 15 are free
for user application use.
If you are using I•Code tags for your own use, and don’t require universal
special function or family codes, then you can program blocks 3 through 15.
I•Code Blocks
Block # Description Bytes
0 Serial Number (write protected)
1 Serial Number (write protected)
2 Write Protect Block (Caution!)
3 Special Function Block
4 Family Code
5 User Data
6 User Data
7 User Data
8 User Data
9 User Data
10 User Data
11 User Data
12 User Data
13 User Data
14 User Data
15 User Data
8 Optional
40 User
8 Zebra R-140 User’s Guide
Page 18

This chapter of the user’s guide is so important that we’ve printed it on a
different color paper! That way, it will be easy for you to find when you
must calibrate (set up) the printer for your particular application.
Purpose
n
n
NOTE: This procedure must be performed when the printer is first
To calibrate the printer, you must do the following (all of the instructions
are contained in this chapter):
Calibrating the Printer
To calibrate the printer.
To verify that the printer is properly set up by printing a test label.
installed or when it cannot properly detect the top of the label.
n
Determine the type of media (labels) being used.
n
Choose the print method.
n
Position the media sensors (if necessary).
n
Configure the printer and software or driver based on the label being
used.
n
Perform a media and ribbon calibration.
n
Print a test label.
Zebra R-140 User’s Guide 9
Page 19
Types of Media
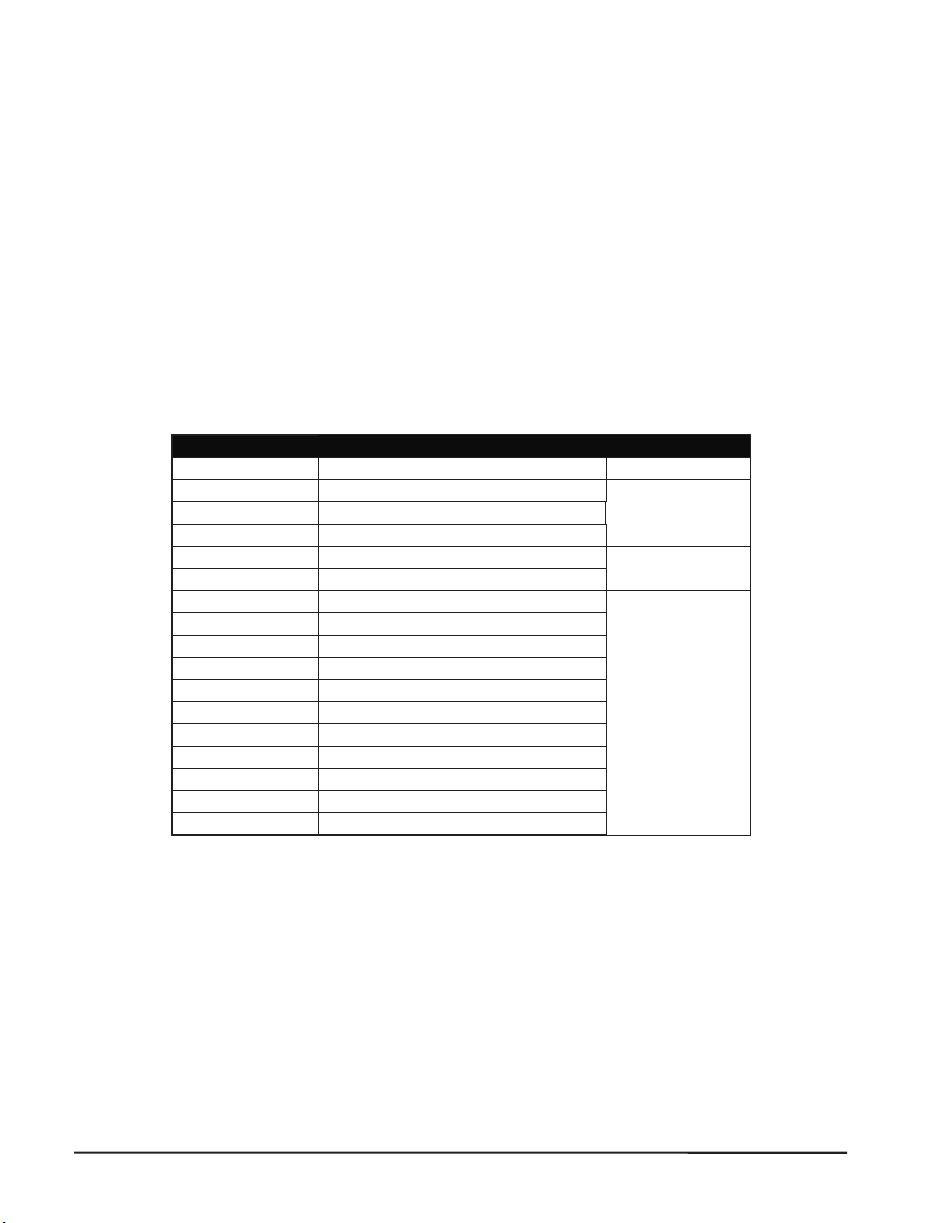
Non-Continuous Web Media
Non-continuous web media (refer to Figure 2) refers to individual labels
that are separated by a gap, notch, or hole. When you look at the media,
you can tell where one label ends and the next one begins.
Hole
Label gap (2-4 mm)
Notch
Non-continuous media with a hole or notch
Label gap (2-4 mm)
Non-continuous media with gaps between the labels
(individual labels on a continuous liner)
Figure 2
10 Zebra R-140 User’s Guide
Page 20
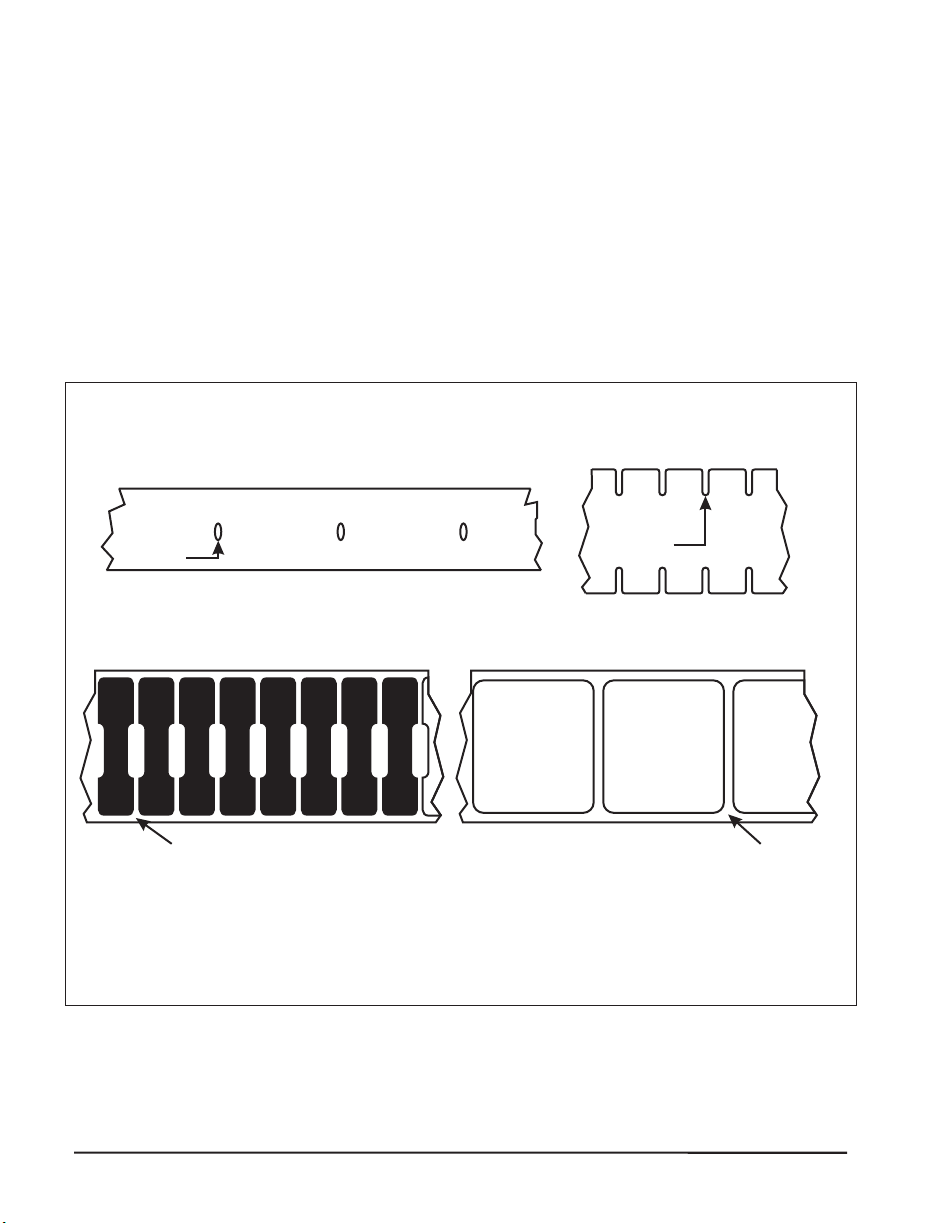
Non-Continuous Black Mark Media
Non-continuous black mark media has black marks printed on the back that
indicate the start and end of each label (refer to Figure 3).
Black mark
Non-continuous media for black mark sensing
Figure 3
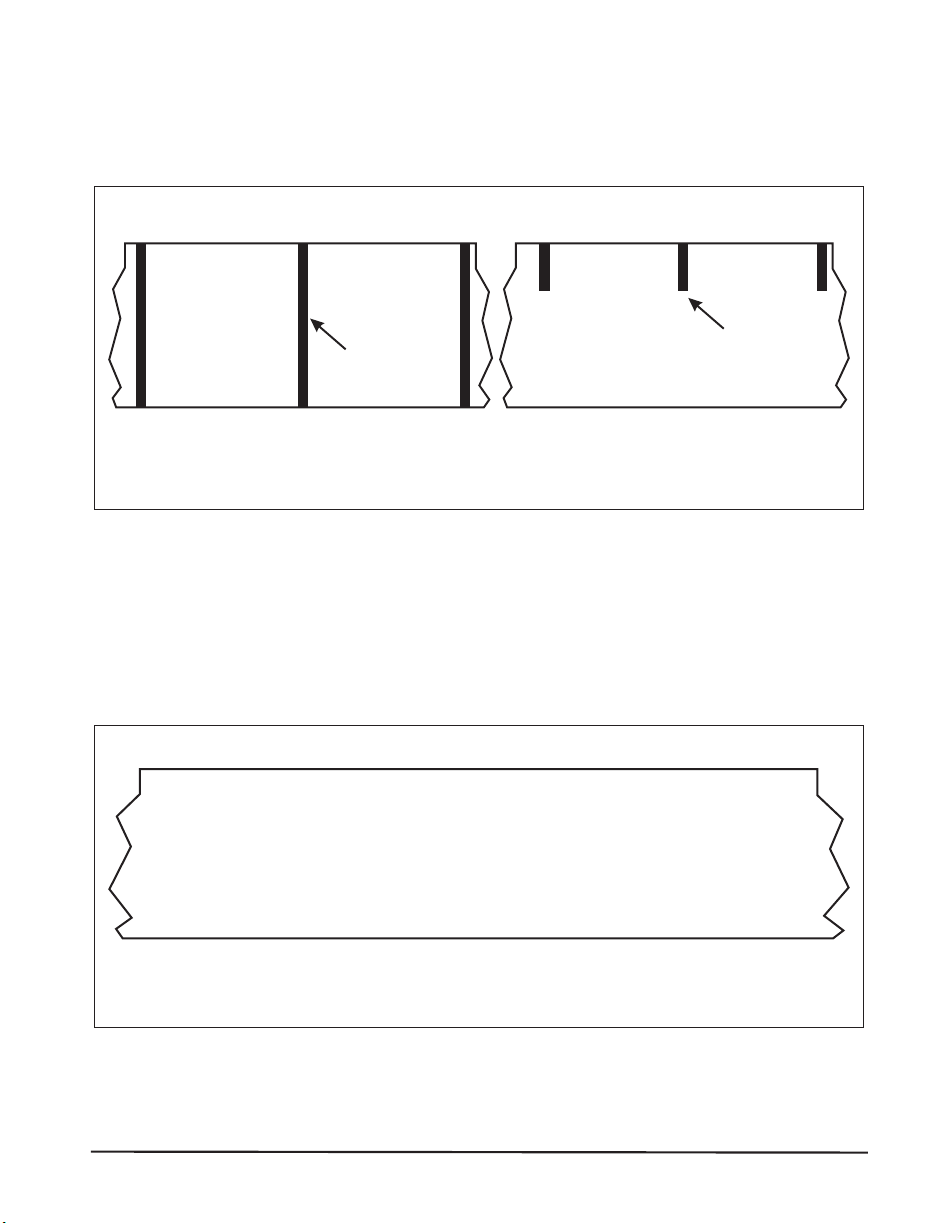
Continuous Media
Black mark
Continuous media (refer to Figure 4) is one uninterrupted roll of material
that allows the image to be printed anywhere on the label.
Continuous media (no gaps, holes, notches, or black marks)
Figure 4
Zebra R-140 User’s Guide 11
Page 21

Choosing the Print Mode
n
Tear-off mode allows you to tear off each label, or a strip of labels, after
it is printed.
n
In Peel-off mode, backing material is peeled away from the label as it is
printed. After this label is removed from the printer, the next one is
printed.
n
When in cutter mode, the printer automatically cuts the label after it is
printed.
n
In rewind mode, the media and backing are rewound onto a core as the
labels are printed.
NOTE: Peel-off and Rewind mode may not be suitable for all RFID media
types.
12 Zebra R-140 User’s Guide
Page 22
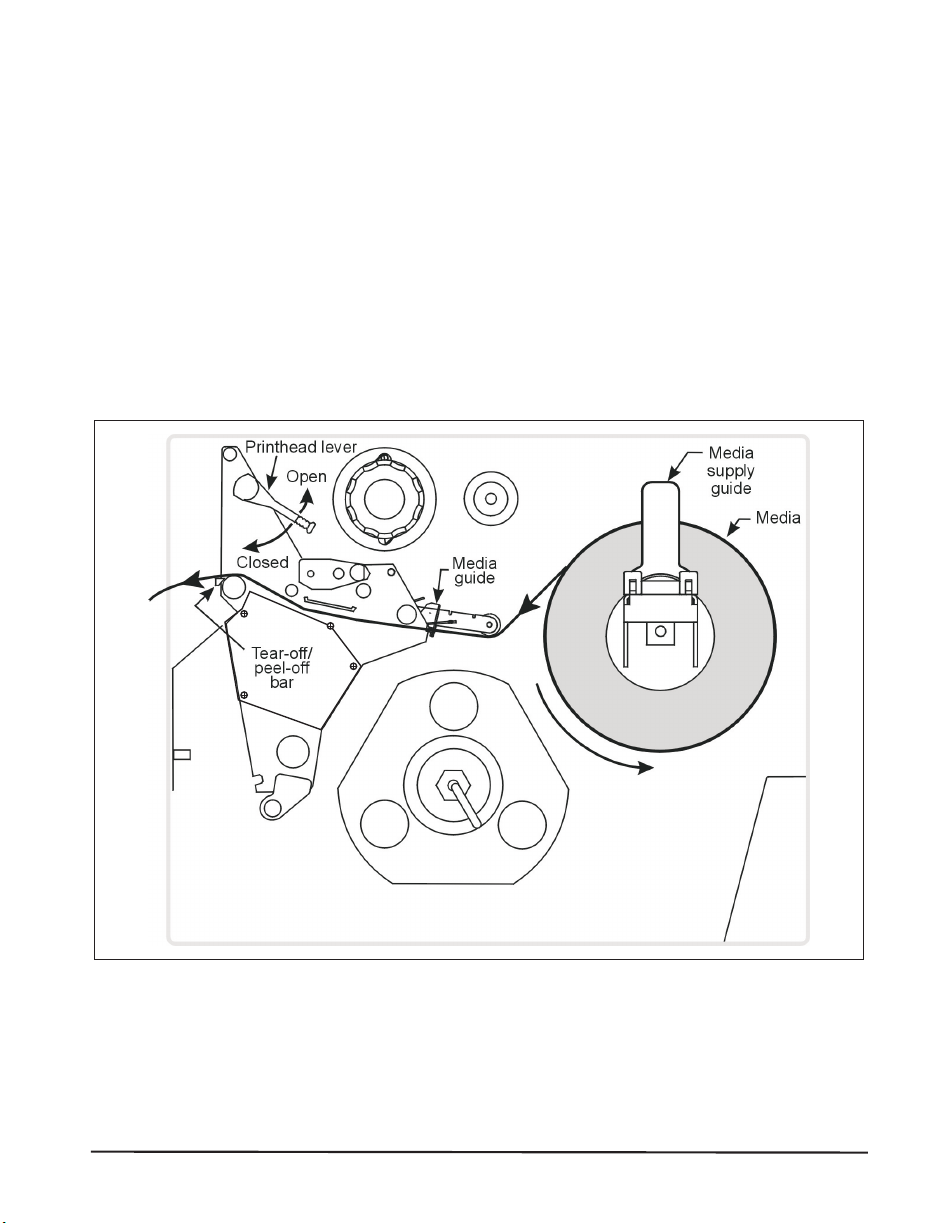
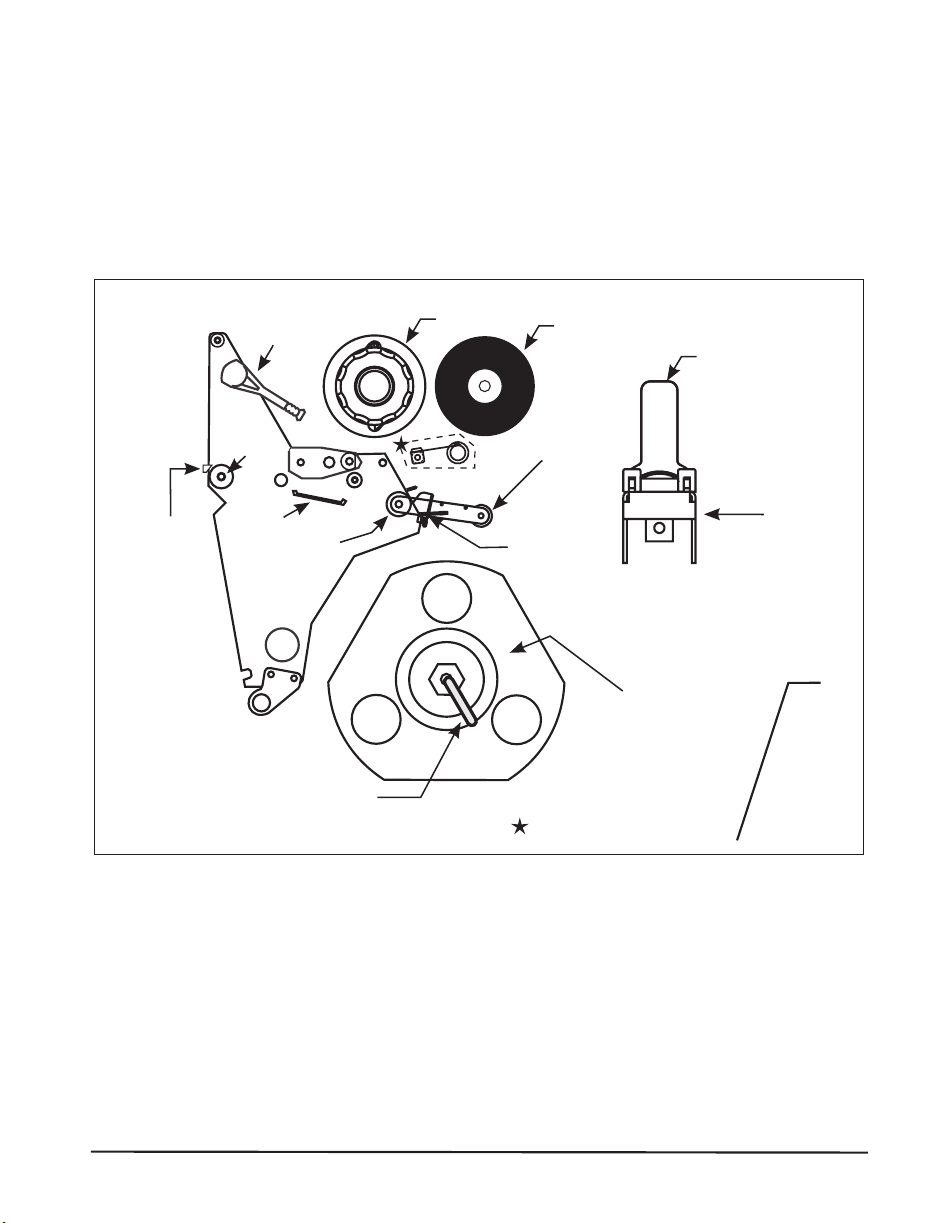
LoadingtheMedia
Figure5illustratesonemethodofmedialoading.Formoredetailed
instructions,aswellasinformationabouthowtoloadthedifferenttypesof
mediaandthevariousprintingmodes,refertotheinstructionsthatbeginon
page31.
Figure5
ZebraR-140User’sGuide 13
Page 23

Positioning the Media Sensors
The correct positioning of the media sensors is important. It can make the
difference between a perfect label and a call to Technical Support!
Transmissive Sensor
The web or gap sensor, better known as the “transmissive sensor,” detects
the gap between labels.
The transmissive sensor actually consists of two sections: a light source
(the lower media sensor) and a light sensor (the upper media sensor). The
media passes between the two.
The upper media sensor must be positioned:
n
Directly over the hole or notch, or
n
Anywhere along the width of the media if there is a gap between labels.
NOTE: If you are using continuous media, position the upper media sensor
over the media so that the printer can detect an out-of-paper
condition.
14 Zebra R-140 User’s Guide
Page 24
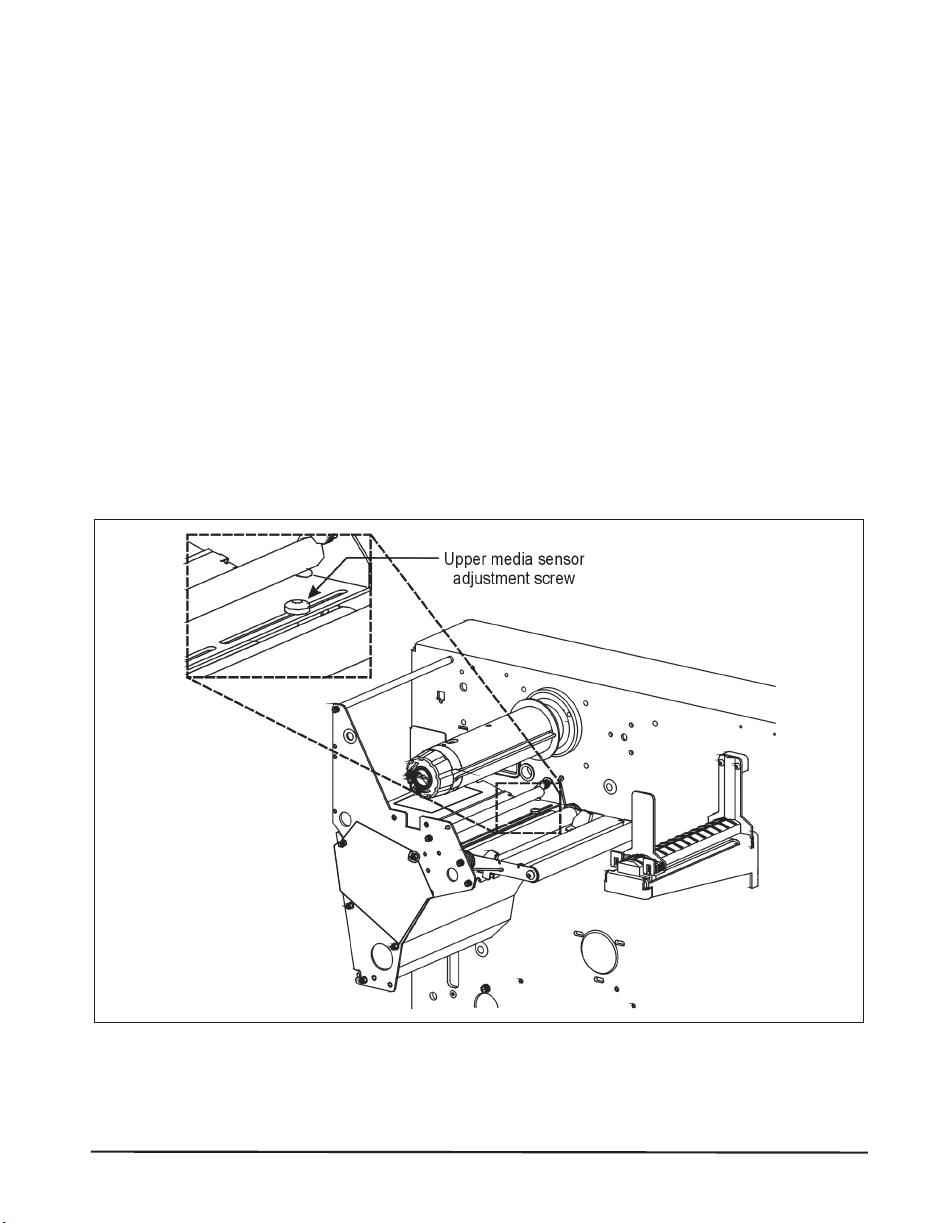
Adjusting the Upper Media Sensor
Refer to Figure 6. (For clarity, not all printer parts are shown.)
1. Remove the ribbon (if it is installed).
2. Locate the upper media sensor. The upper media sensor “eye” is
directly below the adjustment screw head.
3. Slightly loosen the upper media sensor adjustment screw (Phillips
head).
4. Using the tip of the screwdriver, slide the upper sensor along the slot to
the desired position.
5. Secure the upper media sensor adjustment screw.
Figure 6
Zebra R-140 User’s Guide 15
Page 25
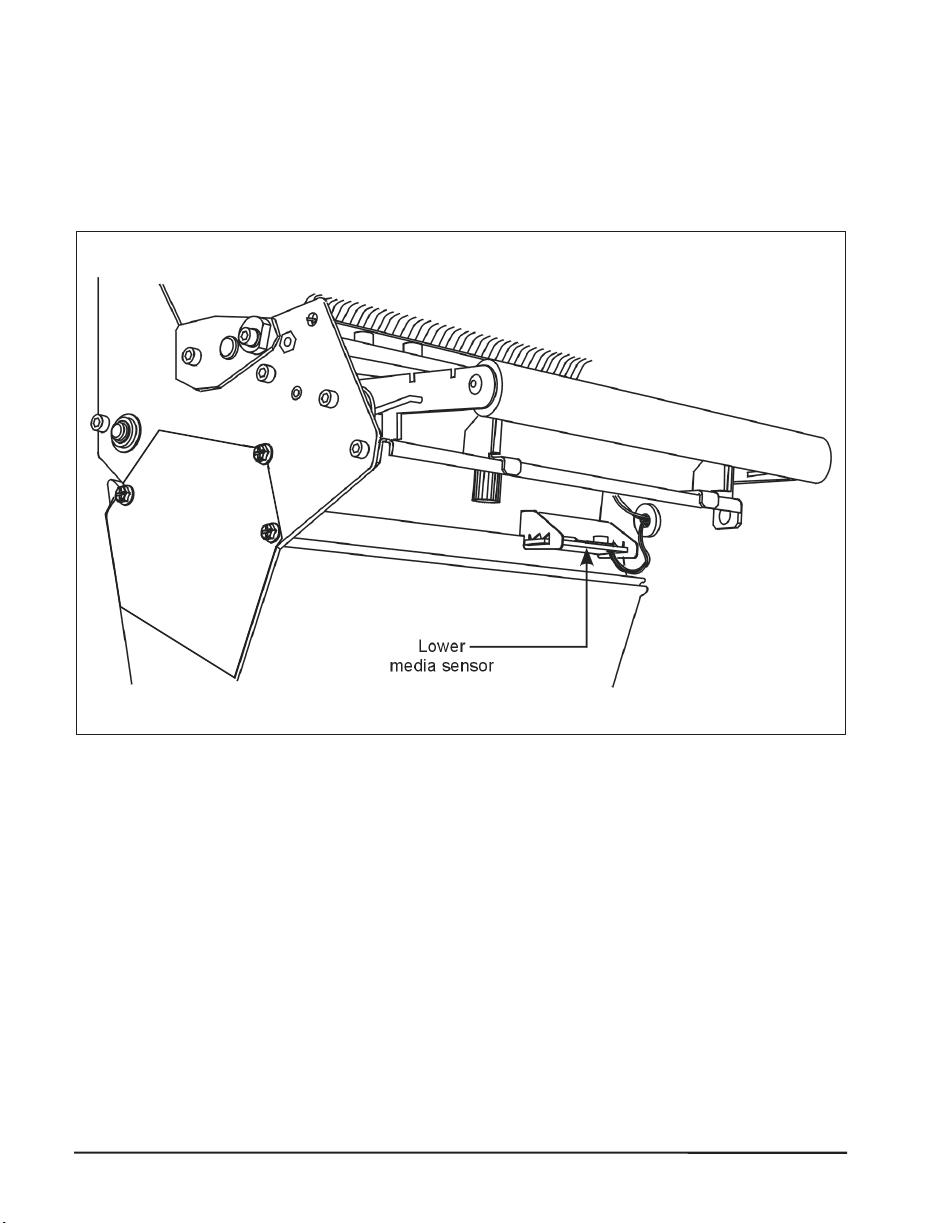
AdjustingtheLowerMediaSensor
Positionthelowermediasensor(refertoFigure7)byslidingitinitsslot
untilitispositionedundertheuppermediasensor.
Figure7
BlackMarkSensor
Theblackmarksensorisinafixedpositionandenabledviathefrontpanel
(detailsin“ConfiguringthePrinter”onpage19).
16 ZebraR-140User’sGuide
Page 26

LoadingtheRibbon
Toloadribbon,refertoFigure8.Formoredetailedinformation,referto
theinstructionsthatbeginonpage43.
Figure8
ZebraR-140User’sGuide 17
Page 27

OperatorControls
POWERSwitch
ThePOWERswitchislocatedatthebackoftheprinterabovethepower
cordandfuse.Turnontheprinter.
FrontPanel
Thestep-by-stepinstructionsinthis
sectiontellyouwhichkeystopress
andwhatappearsontheliquidcrystal
display(LCD)duringthecalibration
procedure.
Foramoredetailedexplanationofthe
frontpanelkeysandlights(asshown
inFigure9),refertotheinstructions
thatbeginonpage28.
Figure9
18 ZebraR-140User’sGuide
Page 28

ConfiguringthePrinter
Theconfigurationprocedureinthenexttablecontainstheinformationyou
needtogetyourprinterupandrunning,butitisnotcomprehensive.Refer
topage47formoreinformation.
n
EntertheconfigurationmodebypressingtheSETUP/EXITkeyatthe
“PRINTERREADY”display.
NOTE:YouwillneedtopresstheNEXT/SAVEkeymorethanonceto
advancetosomeofthedisplays.
n
Toincreasethevalue,answer“yes,”indicate“on,”ormovetothenext
selection,usetheRIGHTBLACKOVALkey.
n
Todecreasethevalue,answer“no,”indicate“off,”orreturntothe
previousselection,usetheLEFTBLACKOVALkey.
NOTE:Whenchangingparameters,anasterisk(*)intheupperleft-hand
cornerofthedisplayindicatesthatyouhavechangedthissetting
fromwhatiscurrentlystoredinmemory.
ZebraR-140User’sGuide 19
Page 29

Press Display Shows Action/Explanation
- PRINTER READY Normal printer operation.
DARKNESS
PRINT MODE
MEDIA TYPE
SENSOR TYPE
PRINT METHOD
MAXIMUM
LENGTH
SAVE SETTINGS
Press the BLACK OVAL keys to increase or decrease the print
darkness setting. (You may need to change this setting when
you print your label.)
Press the BLACK OVAL keys to select tear-off, peel-off, cutter,
or rewind mode.
Press the BLACK OVAL keys to select continuous or
non-continuous media type. (If you choose continuous
media, you must also include a label length instruction in
your label format.)
Press the BLACK OVAL keys to select transmissive or black
mark sensing mode. Unless your media has black marks on
the back, leave your printer at the default setting (web).
Press the BLACK OVAL keys to select thermal transfer (if you
are using ribbon) or direct thermal (no ribbon).
Press the BLACK OVAL keys to set the value that is closest to,
but not less than, the length of the label you are using.
Press the BLACK OVAL keys to select:
PERMANENT -- saves the changes when the power is turned
off.
Press NEXT/SAVE to accept the selection.
- PRINTER READY
You have exited the configuration mode and are now ready
to calibrate the printer.
Configuring the Software or Printer Driver
Many printer settings may also be controlled by your printer’s driver or
label preparation software. Refer to the driver or software documentation
for more information.
20 Zebra R-140 User’s Guide
Page 30
Media and Ribbon Calibration
NOTE: All steps must be performed in the following procedure, even if
only one sensor needs to be adjusted.
6. Press the SETUP/EXIT key.
7. Press the NEXT/SAVE key until “MEDIA AND RIBBON
CALIBRATE” displays.
8. To start the calibration procedure, press the RIGHT BLACK OVAL
key. “LOAD BACKING CANCEL CONTINUE” displays.
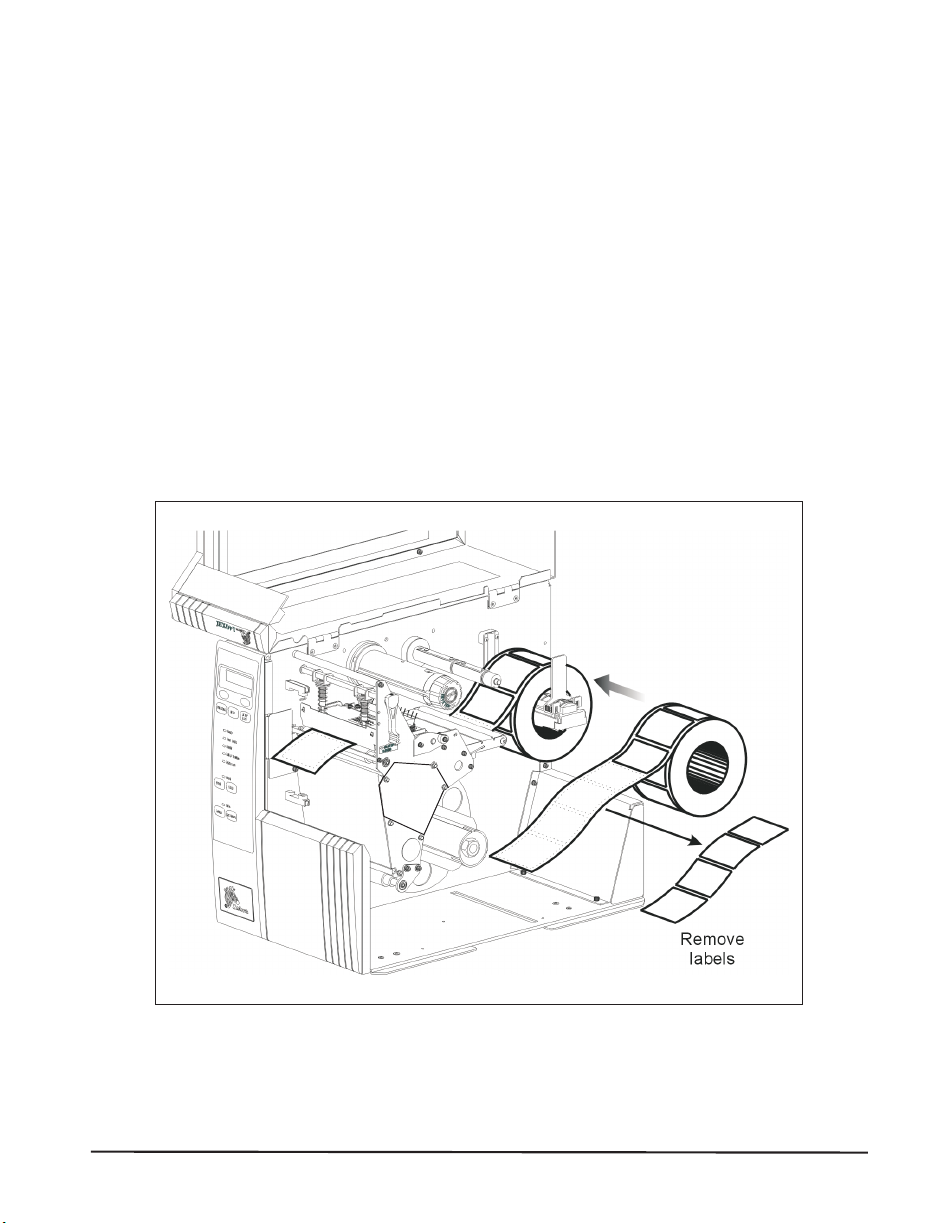
9. Open the printhead. Remove approximately 8” (203 mm) of labels
from the media roll, enough so that only the backing material is
threaded between the media sensors when the media is loaded
(refer to Figure 10).
Figure 10
Zebra R-140 User’s Guide 21
Page 31

10. Press the RIGHT BLACK OVAL key. The front panel display will
show “REMOVE RIBBON CANCEL CONTINUE.”
11. Either remove the ribbon or slide it as far from the printer frame as
possible.
12. Close the printhead, trapping the ribbon in this position.
13. Press the RIGHT BLACK OVAL key. The front panel will show
“CALIBRATING PLEASE WAIT.”
14. When this part of the calibration process is completed, the display will
read “RELOAD ALL CONTINUE.”
15. Open the printhead. Pull the backing material until a label is positioned
between the media sensors.
16. Either load the ribbon or return the ribbon to its proper position.
17. Close the printhead. Press the RIGHT BLACK OVAL key to perform
the next part of the calibration sequence. “MEDIA AND RIBBON
CALIBRATE” displays. The printer is calibrated when the media stops
feeding.
18. Press the SETUP/EXIT key to leave the programming mode. Choose
“permanent” when SAVE CHANGES displays.
22 Zebra R-140 User’s Guide
Page 32

PrintingaTestLabel
Toprintatestlabel:
19.Turnofftheprinter.
20.PressandholdtheCANCELkey
whileturningontheprinter.
Aconfigurationlabel,whichshowsthe
printer’scurrentlystoredparameters,
willprint(similartotheoneshownin
Figure11).
PULSEMODE STARTPRINTSIG
PULSEMODE
FEEDMODE
FEEDMODE
ENABLED
ENABLED
DISABLED
DISABLED
1P1
1P1
4096
4096
NONE
NONE
1536
1536
STARTPRINTSIG
RESYNCHMODE
RESYNCHMODE
RIBBONLOWMODE
RIBBONLOWMODE
REPRINTMODE
REPRINTMODE
hfDep:Version1
hfDep:Version1
2000-05-1712:27:15
2000-05-1712:27:15
RFIDVERSION
RFIDVERSION
TIMESTAMP
TIMESTAMP
Figure11
Ifyouencounteranyproblemswhileyouareconfiguringorcalibratingthe
printerorprintingatestlabel,refertoTroubleshooting,whichstartson
page79.Otherwise,refertoEstablishingCommunicationonpage25toset
upthecommunicationparameters.
ZebraR-140User’sGuide 23
Page 33

24 Zebra R-140 User’s Guide
Page 34

Establishing Communication
System Considerations
Interfaces
The method of interfacing this printer to a data source depends on the
communication options installed in the printer. The standard interfaces are
an RS-232/RS-422/RS-485 serial data port and a bi-directional parallel port.
The optional ZebraNet PrintServer II enables printers to be connected to 10
BaseT Ethernet networks. In addition, the IBM
option is available for those applications that require them.
Data Specifications
®
Twinax or IBM Coax
When communicating via an
asynchronous serial data port (refer
to Figure 12), the baud rate, number
of data and stop bits, parity, and
handshaking are user selectable.
Parity only applies to data
transmitted by the printer since the
parity of received data is ignored.
Printer
25
Male
25
Null modem adapter
(if using a standard
modem cable)
50’ maximum
Figure 12
Male
Computer
25
Female
9
Zebra R-140 User’s Guide 25
Page 35

Whencommunicatingviatheparallel
port(refertoFigure13),the
previouslymentionedparametersare
notconsidered.Refertopage57to
configurethecommunication
parametersfortheprinter.The
valuesselectedmustbethesameas
thoseusedbythehostequipment
connectedtotheprinter.
Forserialandparallelpinoutand
technicalinformation,refertothe
Appendixonpage99.
ComputerPrinter
36-pin
male
PC
25-pin
female
25-pin
male
10’maximum
CablingRequirements
Datacablesmustbefullyshieldedandfittedwithmetalormetalized
connectorshells.Shieldedcablesandconnectorsarerequiredtoprevent
radiationandreceptionofelectricalnoise.
Tominimizeelectricalnoisepickupinthecable:
n
Keepdatacablesasshortaspossible.
n
Donotbundlethedatacablestightlywiththepowercords.
n
Donottiethedatacablestopowerwireconduits.
NOTES:ZebraprinterscomplywithFCC“RulesandRegulations”,
Part15,forClassBEquipment,usingfullyshieldeddata
cables.Useofunshieldedcablesmayincreaseradiated
emissionsabovetheClassBlimits.
RS-422andRS-485applicationsshouldusetwistedshielded
pairsasrecommendedintheAppendixoftheTA/EA.-485
Specification.
Figure13
26 ZebraR-140User’sGuide
Page 36

Operator Controls
This section discusses the functions of the various controls and indicators
on the printer. The operator should become familiar with each of these
functions.
POWER Switch
This switch is located at the back of the printer above the power cord and
fuse. The POWER switch should be turned off before connecting or
disconnecting any cables.
External influences, such as lightning storms or noise on the power or data
cables, may cause erratic printer behavior. Turning the printer’s power off
and back on may re-establish proper printer operation.
Printer Basics
Zebra R-140 User’s Guide 27
Page 37

Front Panel Display
The front panel display communicates operational status and programming
modes and parameters.
Figure 14
28 Zebra R-140 User’s Guide
Page 38

FrontPanelKeys
Key Function
Startsandstopstheprintingprocess.
•Iftheprinterisnotprinting:noprintingcanoccur.
•Iftheprinterisprinting:printingstopsoncethecurrentlabeliscomplete.
Presstoremoveerrormessagesfromthedisplay.
NOTE:PausemodecanalsobeactivatedviaZPLII(~PP,^PP).
Forcestheprintertofeedoneblanklabeleachtimethekeyispressed.
•Printernotprinting:oneblanklabelimmediatelyfeeds.
•Printing:oneblanklabelfeedsafterthecurrentbatchoflabelsiscomplete.
NOTE:EquivalenttotheSlewtoHomePosition(~PH,^PH)ZPLIIinstruction.
Wheninthepausemode,thiskeywillcancelprintjobs.
•Printjobinqueue:pressonceforeachprintjobtobedeleted.
•Pressandholdforseveralsecondstocancelallprintjobsintheprinter’s
memory.TheDATAlightwillturnoff.
WheninPausemode,thiskeywillcalibratetheprinterfor:
•Medialength.
•Mediatype(continuousornon-continuous).
•Printmode(directthermalorthermaltransfer).
•Sensorvalues.
NOTE:Thekeysbelowareusedonlywhenconfiguringtheprinter.Specificusesofthesekeys
areexplainedinConfiguration,startingonpage47.
•Scrollsbacktothepreviousparameter.
•Pressandholdtoquicklygobackwardthroughparametersets.
•Scrollsforwardtothenextparameter.(Savesanychangesyou’vemadeinthe
configurationandcalibrationsequence.)
•Pressandholdtoquicklyadvancethroughparametersets.
Entersandexitstheconfigurationmode.
Thesekeyschangetheparametervalues.Theyareusedindifferentways
dependingontheparameterdisplayed.Commonusesare:toincrease/decrease
avalue,answer“yes”or“no,”indicate“on”or“off,”scrollthroughseveral
choices,inputthepassword,orsetuptheprinterforafirmwaredownload.
ZebraR-140User’sGuide 29
Page 39

Front Panel Lights
NOTE: If two operating conditions occur simultaneously (for example,
one that causes a light to be on constantly and one that causes the
same light to flash), the light will flash.
Light Status Indication
POWER
TAKE LABEL
ERROR
CHECK
RIBBON
PAPER OUT
PAUSE
DATA
Off The printer is off or power is not applied.
On The printer is on.
Off Normal operation.
Flashing
Off Normal operation — no printer errors.
Flashing
Off Normal operation — ribbon (if used) is properly loaded.
On
Off Normal operation — media is properly loaded.
On
Off Normal operation.
On
Off Normal operation. No data being received or processed.
On
Flashing
(Peel-off mode only.) The label is available. Printing is paused until
the label is removed.
A printer error exists. Check the display screen for more
information.
Printing is paused, the front panel displays a warning message, and
the PAUSE light is on.
• If the printer is in direct thermal mode: Ribbon is loaded.
• If the printer is in thermal transfer mode: No ribbon is loaded.
No media is under the media sensor. Printing is paused, the display
shows an error message, and the PAUSE light is on.
The printer has stopped all printing operations. Either the PAUSE
key was pressed, a pause command was included in the label
format, the on-line verifier detected an error, or a printer error was
detected. Refer to the display screen for more information.
Data processing or printing is taking place. No data is being
received.
The printer is receiving data from or sending status information to
the host computer. Flashing slows when the printer cannot accept
more data, but returns to normal once data is again being received.
30 Zebra R-140 User’s Guide
Page 40

Roll Media Loading
NOTE: A calibration must be performed when media and ribbon (if used)
are first installed in the printer, or when a different type of media
or ribbon is being used.
Tear-Off Mode
Refer to Figure 15.
1. Open the printhead.
2. Slide the media guide and media supply guide as far from the printer
frame as possible. Flip down the media supply guide.
3. Load media as shown.
4. Flip up the media supply guide. Slide in the media guide and media
supply guide so they just touch, but not restrict, the edge of the roll.
5. Close the printhead.
Figure 15
Zebra R-140 User’s Guide 31
Page 41

Peel-OffMode
NOTE:Rewindoptionrequired.
NOTE:ThePeel-OffModemaynotbesuitableforsomeRFIDmedia
RefertoFigure16.
1.Removetherewindplatefromthefrontoftheprinter(ifinstalled).
Storeitonthetwomountingscrewsontheinsideofthefrontpanel.
2.Opentheprinthead.
3.Slidethemediaguideandmediasupplyguideasfarfromtheprinter
frameaspossible.Flipdownthemediasupplyguide.
4.Loadmediaasshown.
5.Whenloadingmedia,allowapproximately36”(914mm)ofmediato
extendpastthetear-off/peel-offbar.Removealllabelsfromthis
portiontocreatealeader.
6.Removethehookfromtherewindspindle.Ifyouareusingacore,
slideitontotherewindspindleuntilitisflushagainsttheguideplate.
types.Theusershouldtestforeachapplication
7.Windthelabelbackingaroundeitherthe3”(76mm)coreortherewind
spindleandreinstallthehook.
8.Flipupthemediasupplyguide.Slideinthemediaguideandmedia
supplyguidesotheyjusttouch,butnotrestrict,theedgeoftheroll.
Beforeclosingtheprinthead,makesure:
n
Themediaispositionedagainsttheinsideguides.
n
Themediaistautandparallelwithitselfandthepathwaywhenwound
ontotherewindspindle/core.
9.Closetheprinthead.
10.Todiscardthelabelbackingfromtherewindspindle,referto
“RemovingtheLabelBackingMaterial”onpage42.
32 ZebraR-140User’sGuide
Page 42

Figure 16
Zebra R-140 User’s Guide 33
Page 43

RewindMode(forPrintersWithouttheCutterOption)
NOTE:Rewindoptionrequired.
NOTE:RewindmodemaynotbesuitableforRFIDapplications.
RefertoFigure17.
1.Removetherewindplatefromitsstoragelocationinfrontoftheprint
mechanisminsidethemediacompartment.
2.Inverttherewindplatesothatthelipontheattachedhookplatepoints
down.
3.Insertthehookplatelipashortdistance(½"/13mm)intothelower
openinginthesideplate.
4.Aligntheupperendoftherewindplatewiththecorrespondingopening
inthesideplate.Slideintherewindplatesothatitstopsagainstthe
printer’smainframe.
5.Opentheprinthead.
6.Slidethemediaguideandmediasupplyguideasfarfromtheprinter
frameaspossible.Flipdownthemediasupplyguide.
7.Loadmediaasshown.
8.Whenloadingmedia,allowapproximately36”(914mm)ofmediato
extendpasttheprinthead.Removealllabelsfromthisportiontocreate
aleader.
9.Removethehookfromtherewindspindle.Ifyouareusingacore,
slideitontotherewindspindleuntilitisflushagainsttheguideplate.
10.Windthelabelbackingaroundeitherthe3”(76mm)coreortherewind
spindleandreinstallthehook.
11.Flipupthemediasupplyguide.Slideinthemediaguideandmedia
supplyguidesotheyjusttouch,butnotrestrict,theedgeoftheroll.
34 ZebraR-140User’sGuide
Page 44

Before closing the printhead, make sure:
n
The media is positioned against the inside guides.
n
The media is taut and parallel with itself and the pathway when wound
onto the rewind spindle/core.
12. Close the printhead.
Figure 17
Zebra R-140 User’s Guide 35
Page 45

CutterMode
NOTE:Cutteroptionrequired.
RefertoFigure18.
1.Opentheprinthead.
2.Slidethemediaguideandmediasupplyguideasfarfromtheprinter
3.Loadmediaasshown.
4.Flipupthemediasupplyguide.Slideinthemediaguideandmedia
5.Closetheprinthead.
6.Theprinterwillautomaticallyfeedoutandcutonelabelwhenthe
frameaspossible.Flipdownthemediasupplyguide.
supplyguidesotheyjusttouch,butnotrestrict,theedgeoftheroll.
printeristurnedon.
36 ZebraR-140User’sGuide
Page 46

Figure 18
Zebra R-140 User’s Guide 37
Page 47

RewindMode(forPrintersWiththeCutterOption)
NOTE:Cutterandrewindoptionsrequired.
NOTE:RewindmodemaynotbesuitableforRFIDapplications.
RefertoFigure19.
1.Removetherewindplatefromitsstoragelocationinfrontoftheprint
mechanisminsidethemediacompartment.
2.Inverttherewindplatesothatthelipontheattachedhookplatepoints
down.
3.Insertthehookplatelipashortdistance(½"/13mm)intothelower
openinginthesideplate.Slideintherewindplatesothatitstops
againsttheprinter’smainframe.
4.Insertthetwosmalltabsontherewindplateintothecorresponding
slotsinthecuttersupportbracket.(Therewindplateshouldspringinto
theproperposition.)
5.Opentheprinthead.
6.Slidethemediaguideandmediasupplyguideasfarfromtheprinter
frameaspossible.Flipdownthemediasupplyguide.
7.Loadmediaasshown.
8.Whenloadingmedia,allowapproximately36”(914mm)ofmediato
extendpasttheprinthead.Removealllabelsfromthisportiontocreate
aleader.
9.Removethehookfromtherewindspindle.Ifyouareusingacore,
slideitontotherewindspindleuntilitisflushagainsttheguideplate.
10.Windthelabelbackingaroundeitherthe3”(76mm)coreortherewind
spindleandreinstallthehook.
11.Flipupthemediasupplyguide.Slideinthemediaguideandmedia
supplyguidesotheyjusttouch,butnotrestrict,theedgeoftheroll.
38 ZebraR-140User’sGuide
Page 48

Before closing the printhead, make sure:
n
The media is positioned against the inside guides.
n
The media is taut and parallel with itself and the pathway when wound
onto the rewind spindle/core.
12. Close the printhead.
Figure 19
Zebra R-140 User’s Guide 39
Page 49

FanfoldMediaLoading
NOTE:Acalibrationmustbeperformedwhenmediaandribbon(ifused)
arefirstinstalledintheprinter,orwhenadifferenttypeofmedia
orribbonisbeingused.
Fanfoldmediafeedsthrougheitherthebottomorrearaccessslotfrom
outsidetheprinter.
RefertoFigures20and21.
1.Opentheprinthead.
2.Slidethemediaguideasfarfromtheprinterframeaspossible.
3.Loadmediaasshown.Ifincuttermode,routemediathroughthe
cutter.
4.Slideinthemediaguidesoitjusttouches,butnotrestricts,theedgeof
theroll.
5.Closetheprinthead.
40 ZebraR-140User’sGuide
Page 50

Figure 20
Figure 21
Zebra R-140 User’s Guide 41
Page 51

Removing the Label Backing Material
Since the rewind spindle holds the backing from a standard-size media roll,
we recommend that you perform this procedure whenever you change the
media.
To remove the backing material from the rewind spindle, follow these steps
(you don’t need to turn off the printer for this procedure).
1. Unwind approximately 36” (914 mm) of backing from the rewind
spindle. Cut it off at the spindle.
2. Pull out the hook. Slide the backing material off of the rewind spindle
and discard.
3. Wind the media around the rewind spindle once or twice and reinstall
the hook. Continue winding to remove any slack in the media.
42 Zebra R-140 User’s Guide
Page 52

RibbonLoading
Toloadribbon,refertoFigure22andfollowtheprocedurebelow.
NOTE:Useribbonthatisatleastaswideasthemedia.Thesmooth
backingoftheribbonprotectstheprintheadfromwearand
prematurefailureduetoexcessiveabrasion.(Fordirectthermal
printmode,ribbonisnotusedandshouldnotbeloadedinthe
printer.)
1.Alignthesegmentsoftheribbonsupplyspindle.
2.Placetheribbonrollontheribbonsupplyspindle.
NOTE:Makesurethatthecoreispushedupagainst
thestopontheribbonsupplyspindleand
thattheribbonisalignedsquarelywithitscore.Ifthisisnotdone,
theribbonmaynotcovertheprintheadentirelyontheinside,
exposingprintelementstopotentiallydamagingcontactwiththe
media.
3.Opentheprinthead.
4.(Optional)Tomakeribbonloadingand
unloadingeasier,makealeaderforyour
ribbonrollifitdoesn’talreadyhaveone.
5.Tearoffastripofmedia(labelsand
backing)about6-12”(152-305mm)long
fromtheroll.Peeloffalabelfromthis
strip.Applyhalfofthislabeltotheend
ofthestripandtheotherhalftotheend
oftheribbon.Thisactsasaribbon
leader.
Ribbon
Label
Stripofmedia
6-12”long
6.Threadtheribbon(withleader,ifused)asshownwithoutcreasingor
wrinklingit.
ZebraR-140User’sGuide 43
Page 53

7. Before wrapping the ribbon around the ribbon take-up spindle, ensure that
the arrow on the knob aligns with the indented notch (see Figure 23
inset).
8. Place the ribbon (with leader, if used) around the ribbon take-up spindle
and wind counterclockwise for several turns.
9. Close the printhead.
Figure 22
44 Zebra R-140 User’s Guide
Page 54

RibbonRemoval
s
1.Breaktheribbonasclosetotheribbontake-upspindleaspossible.
2.RefertoFigure23.Whileholdingtheribbontake-upspindle,turnthe
knob(1)clockwiseuntilitstops.Thiswillcausetheribbonreleasebars
topivotdown(2),easingthespindle’s“grip”onthewoundribbon.
3.Slidetheribbonoffoftheribbontake-upspindle.Oncethespent
ribbonhasbeenremoved,ensurethatthearrowontheknobalignswith
theindentednotchintheribbontake-upspindle(seeFigure23inset).
4.Removetheemptycorefromtheribbonsupplyspindle.
5.Followtheribbonloadingprocedureonpage43toloadthenewribbon.
2
1
Figure23
ZebraR-140User’sGuide 45
Page 55

46 Zebra R-140 User’s Guide
Page 56

Configuration
Afteryouhaveinstalledthemediaandribbonandthepower-onselftest
(POST)iscomplete,thefrontpaneldisplaywillshow“PRINTERREADY.”
(IftheprinterfailsitsPOST,refertopage87.)Youmaynowsetprinter
parametersforyourapplicationusingthefrontpaneldisplayandthefivekeys
directlybelowit.
NOTE:PrintersthatareoperatingonanIPnetworkcanbequickly
configuredviaZebraNet
PrintServerIIrequired).Forinformation,refertoZebraNet
Networking:PrintServerIIInstallationandUser’sGuide.
Ifitbecomesnecessarytorestoretheinitialprinterdefaults,see“FEED
KeyandPAUSEKeySelfTest”onpage91.
NOTE:Unlessotherwisenoted,allparametersarelistedintheorderthey
aredisplayed,startingwith“DARKNESS.”
EnteringtheSetupMode
Toentertheprogrammingmode,presstheSETUP/EXITkey.Presseither
theNEXT/SAVEkeyorPREVIOUSkeytoscrolltotheparameteryou
wishtoset.
NOTE:YoumayalsopressandholdtheNEXT/SAVEandPREVIOUS
keystoquicklyadvancethroughtheconfigurationparameters.
Parametersinthissectionareshownintheorderdisplayedwhenpressing
theNEXT/SAVEkey.Throughoutthisprocess,presstheNEXT/SAVE
keytocontinuetothenextparameter,orpressthePREVIOUSkeytoreturn
tothepreviousparameterinthecycle.
WebView(optionalZebraNet
Anasterisk(*)intheupperleft-handcornerofthedisplayindicatesthatthe
valuedisplayedisdifferentthanthecurrentlystoredvalue.
ZebraR-140User’sGuide 47
Page 57

Changing Password-Protected Parameters
Certain parameters are password-protected by factory default.
CAUTION: Do not change password-protected parameters unless
you are sure you know what you are doing! If they are
set incorrectly, these parameters could cause the
printer to function in an unpredictable way.
The first attempt to change one of these parameters (pressing one of the
BLACK OVAL keys) will require you to enter a four-digit password. This
is done via the “ENTER PASSWORD” display. The LEFT BLACK
OVAL key changes the selected digit position. The RIGHT BLACK
OVAL key increases the selected digit value. After entering the password,
press the NEXT/SAVE key. The parameter you wish to change will be
displayed. If the password was entered correctly, you can now change the
value.
The default password value is 1234. The password can be changed using
the ^KP (Define Password) ZPL II instruction or through ZebraNet
WebView (optional ZebraNet PrintServer II required).
NOTE: Once the password has been entered correctly, it will not have to
be entered again unless you leave and re-enter the programming
mode using the SETUP/EXIT key.
NOTE: You can disable the password protection feature so that it no
longer prompts you for a password by setting the password to
ØØØØ via the ^KPØ ZPL/ZPL II command. To re-enable the
password-protection feature, send the ZPL/ZPL II command ^KPx,
where “x” can be any number, one to four digits in length,
except Ø.
48 Zebra R-140 User’s Guide
Page 58

Leaving the Setup Mode
You can leave the program mode at any time by pressing the SETUP/EXIT
key. The “SAVE CHANGES” display will appear. There are five choices,
described below. Pressing the LEFT or RIGHT BLACK OVAL key
displays other choices and pressing the NEXT/SAVE key selects the
displayed choice.
n
PERMANENT - Permanently saves the changes. Values are stored in
the printer even when power is turned off.
n
TEMPORARY - Saves the changes until changed again or until power is
turned off.
n
CANCEL - Cancels all changes since pressing the SETUP/EXIT key
except the darkness and tear-off settings (if they were changed).
n
LOAD DEFAULTS - Loads factory defaults. The factory defaults are
shown on the following pages.
NOTE: Loading factory defaults will require printer calibration.
n
LOAD LAST SAVE - Loads values from the last permanent save.
Zebra R-140 User’s Guide 49
Page 59

ConfigurationandCalibrationSequence
Press DisplayShows Action/Explanation
---- PRINTERREADY Normalprinteroperation.
SettingPrintParameters
AdjustingPrintDarknessPresstheRIGHTBLACKOVALkeyto
increasedarkness.PresstheLEFTBLACKOVALkeytodecrease
darkness.
Default:+10
Range:0to+30
Darknesssettingsaredependentuponavarietyoffactors
includingribbontype,media,andtheconditionoftheprinthead.
Youmayadjustthedarknessforconsistenthigh-qualityprinting.
Ifprintingistoolight,oriftherearevoidsinprintedareas,you
DARKNESS
TEAROFF
PRINTMODE
shouldincreasethedarkness.Ifprintingistoodark,orifthereis
spreadingorbleedingofprintedareas,youshoulddecreasethe
darkness.
TheFEEDkeyselftestonpage90canalsobeusedtodetermine
thebestdarknesssetting.Sincethedarknesssettingtakeseffect
immediately,youcanseetheresultsonlabelsthatarecurrently
printing.
CAUTION:Setthedarknesstothelowestsettingthatprovides
goodprintquality.Darknesssettoohighmaycause
inksmearingand/oritmayburnthroughtheribbon.
Darknesssettingsalsomaybechangedbythedriverorsoftware
settings.
AdjustingtheTear-OffPositionPresstheRIGHTBLACKOVAL
keytoincreasethevalue,presstheLEFTBLACKOVALkeyto
decreasethevalue.Eachpressofthekeyadjuststhetear-off
positionbyfourdotrows.
Default:+0
Range:-120to+120
Thisparameterestablishesthepositionofthemediaoverthe
tear-off/peel-offbarafterprinting.Thelabelandbackingcanbe
tornofforcutbetweenlabels.
SelectingPrintModePresstheRIGHTorLEFTBLACKOVALkey
todisplayotherchoices.
Default:Tear-off
Selections:Tear-off,peel-off,cutter,rewind,applicator*
Printmodesettingstelltheprinterthemethodofmediadelivery
thatyouwishtouse.Besuretoselectaprintmodethatyour
hardwareconfigurationsupportssincesomeselectionsdisplayed
areforoptionalprinterfeatures.
*Optionrequired
50 ZebraR-140User’sGuide
Page 60

Press Display Shows Action/Explanation
Setting Media Type Press the RIGHT or LEFT BLACK OVAL key
to display other choices.
Default: Continuous
Selections: Continuous, non-continuous
MEDIA TYPE
SENSOR TYPE
PRINT METHOD
This parameter tells the printer the type of media you are using.
Selecting continuous media requires that you include a label
length instruction in your label format (^LLxxxx if you are using
ZPL or ZPL II).
When non-continuous media is selected, the printer feeds media
to calculate label length (the distance between two detections of
the inter-label gap, webbing, or alignment notch or hole).
Setting the Sensor Type Press the RIGHT or LEFT BLACK OVAL
key to display other choices.
Default: Web
Selections: Web, mark
This parameter tells the printer whether you are using media with
a web (gap/space between labels, notch, or hole) to indicate the
separations between labels or if you are using media with a black
mark printed on the back. If your media does not have black
marks on the back, leave your printer at the default (web).
Selecting Print Method Press the RIGHT BLACK OVAL key for
the next value; press the LEFT BLACK OVAL key for the previous
value.
Default: Thermal transfer
Selections: Thermal transfer, direct thermal
The print method parameter tells the printer the method of
printing you wish to use: direct thermal (no ribbon) or thermal
transfer (using thermal transfer media and ribbon).
NOTE: Selecting direct thermal when using thermal transfer
media and ribbon creates a warning condition, but
printing will continue.
Zebra R-140 User’s Guide 51
Page 61

Press DisplayShows Action/Explanation
SettingPrintWidthPresstheRIGHTBLACKOVALkeyto
increasethevalue,presstheLEFTBLACKOVALkeytodecrease
thevalue.Tochangetheunitofmeasurement,presstheLEFT
BLACKOVALkeyuntiltheunitofmeasurementisactive,then
presstheRIGHTBLACKOVALkeytotoggletoadifferentunitof
PRINTWIDTH
MAXIMUM
LENGTH
measure(inches,mm,ordots).
Default:,Range:Thedefaultandrangeofacceptablevaluesvary
dependingonwhatprinteryouhave.Referto“Printing
Specifications”onpage96forfurtherinformationaboutthe
rangesavailableforyourmodel.
Printwidthdeterminestheprintableareaacrossthewidthofthe
label.
SettingMaximumLengthPresstheLEFTBLACKOVALkeyto
decreasethevalue,presstheRIGHTBLACKOVALkeyto
increasethevalue.
Default:,Range:Thedefaultandrangeofacceptablevaluesvary
dependingonyourprinter’sconfiguration.Valuesareadjustable
in1”(25.4mm)increments.
Maximumlengthisusedinconjunctionwiththecalibration
procedure.Thevalueofthissettingdeterminesthemaximum
labellengththatwillbeusedduringthemediaportionofthe
calibrationprocess.Onlyafewlabelsarerequiredtosetmedia
sensors.Alwayssetthevaluethatisclosestto,butnotlower
than,thelengthofthelabelyouareusing.Forexample,ifthe
lengthofthelabelis14.5inches(368mm),settheparameterfor
15.0inches(381mm).
52 ZebraR-140User’sGuide
Page 62

Listing Printer Information
Press Display Shows Action/Explanation
List Fonts Press the RIGHT BLACK OVAL key to print a label
listing all of the available fonts.
LIST FONTS
LIST BAR CODES
LIST IMAGES
LIST FORMATS
LIST SETUP
LIST ALL
This selection is used to print a label that lists all of the fonts
currently available in the printer, including standard printer fonts
plus any optional fonts. Fonts may be stored in RAM, FLASH
memory, font EPROMs, or font cards.
List Bar Codes Press the RIGHT BLACK OVAL key to print a label
listing all of the available bar codes.
This selection is used to print a label that lists all of the bar codes
currently available in the printer.
List Images Press the RIGHT BLACK OVAL key to print a label
listing all of the available images.
This selection is used to print a label that lists all of the images
currently stored in the printer’s RAM, FLASH memory, optional
EPROM, or optional memory card.
List Formats Press the RIGHT BLACK OVAL key to print a label
listing all of the available formats.
This selection is used to print a label that lists all of the formats
currently stored in the printer’s RAM, FLASH memory, optional
EPROM, or optional memory card.
List Setup Press the RIGHT BLACK OVAL key to print a label
listing the current printer configuration.
This selection is used to print a label that lists the current printer
configuration information. (Same as CANCEL key self test.)
List All Press the RIGHT BLACK OVAL key to print a label listing
all of the available fonts, bar codes, images, formats, and the
current printer configuration.
This selection is used to print a label that lists the five previous
selections, as described.
Zebra R-140 User’s Guide 53
Page 63

Press Display Shows Action/Explanation
Initialize Memory Card
CAUTION: Perform this operation only when it is necessary to
erase all previously stored information from the optional memory
card. Press the NEXT//SAVE key to bypass this function.
1. Press the RIGHT BLACK OVAL key to select “YES.”
If your printer is set to require a password, you will
now be prompted to enter the password. Enter the
password and then press the NEXT/SAVE key.
2. The display will ask “INITIALIZE CARD?”. Press the RIGHT
BLACK OVAL key “YES.”
3. The front panel LCD will ask “ARE YOU SURE?”.
INITIALIZE CARD
INIT FLASH MEM
4. Press the RIGHT BLACK OVAL key “YES” to begin initialization.
or
Press the LEFT BLACK OVAL key “NO” to cancel the request
and return to the “INITIALIZE CARD” prompt.
5. Press the SETUP/EXIT key followed by the NEXT/SAVE key.
If initialization is still in process, the front panel display
will flash back and forth between the two phrases
“CHECKING B: MEMORY” and “PRINTER IDLE.”
When initialization is complete, the printer will
automatically exit the configuration mode and the
front panel will display “PRINTER READY.”
NOTE: Depending on the amount of memory in the memory
card, initialization may take up to five minutes to
complete.
Initialize Flash Memory
CAUTION: Perform this operation only when it is necessary to
erase all previously stored information from the FLASH memory.
Press the NEXT//SAVE key to bypass this function.
1. Press the RIGHT BLACK OVAL key to select “YES.”
If your printer is set to require a password, you will
now be prompted to enter the password. Enter the
password and then press the NEXT/SAVE key.
2. The display will ask “INITIALIZE FLASH?”. Press the RIGHT
BLACK OVAL key “YES.”
3. The front panel LCD will ask “ARE YOU SURE?”.
4. Press the RIGHT BLACK OVAL key “YES” to begin initialization.
or
Press the LEFT BLACK OVAL key “NO” to cancel the request
and return to the “INITIALIZE FLASH” prompt.
5. Press the SETUP/EXIT key followed by the NEXT/SAVE key.
If initialization is still in process, the front panel display
will flash back and forth between the two phrases
“CHECKING E: MEMORY” and “PRINTER IDLE.”
When initialization is complete, the printer will
automatically exit the configuration mode and the
front panel will display “PRINTER READY.”
NOTE: Depending on the amount of free FLASH memory,
initialization may take up to one minute to complete.
54 Zebra R-140 User’s Guide
Page 64

MediaandRibbonSensorCalibration
NOTE:Beforeyoubeginthisprocedure,makesurethatthemaximumlengthissettoavalue
equaltoorgreaterthanthelengthofthelabelsyouareusing.Ifthemaximumlengthissettoa
lowervalue,thecalibrationprocesswillassumethatcontinuousmediaisintheprinter.See
page52formoreinformation.
Therearetwodifferenttypesofcalibrationthatcanbeperformedbytheprinter:
1)StandardCalibration.PressingtheCALIBRATEkeyontheprinter’sfrontpanelcausesthe
printertofeedmediaandribbonandsetthevaluesitdetectsformedia,mediabackingmaterial
(thespacesbetweenlabels),mediaout,andribbonornoribbon(whichdeterminestheprint
mode—thermaltransferordirectthermal).Thistypeofcalibrationalsooccursaspartofthe
sensorprofileandmediaandribboncalibrationprocedures.
2)MediaandRibbonSensorSensitivityCalibration.Performingthemediaandribbon
calibrationprocedurefirstresetsthesensitivityofthesensorstobetterdetectthemediaand
ribbonyouareusing.Withthesensorsattheirnewsensitivity,theprinterthenperformsthe
standardcalibrationdescribedabove.Changingthetypeofribbonand/ormediamayrequire
resettingthesensitivityofthemediaandribbonsensors.Indicationsthatthesensitivitymay
needtoberesetwouldbeaCHECKRIBBONlightonwiththeribbonproperlyinstalledor
non-continuousmediabeingtreatedascontinuousmedia.
Press DisplayShows Action/Explanation
SensorProfilePressNEXT/SAVEtoskipthisstandardcalibration
procedureandcontinuewiththemediaandribboncalibration
parameterwhichfollows.PresstheRIGHTBLACKOVALkeyto
initiatethisstandardcalibrationprocedureandprintamedia
sensorprofile.
SENSORPROFILE
SeeFigure24.Themediasensorprofilemaybeusedto
troubleshootregistrationproblemsthatmaybecausedwhenthe
mediasensordetectspreprintedareasonthemediaor
experiencesdifficultyindeterminingweblocation.Ifthe
sensitivityofthemediaand/orribbonsensorsMUSTbeadjusted,
usethemediaandribbonsensorsensitivityprocedure.
Figure24
ZebraR-140User’sGuide 55
Page 65

Press Display Shows Action/Explanation
Media and Ribbon Sensor Sensitivity Press NEXT/SAVE to skip
the calibration procedure and continue with the host port
selection parameters that follow. Press the RIGHT BLACK OVAL
MEDIA AND
RIBBON
CALIBRATE
Media and Ribbon Calibration Procedure
LOAD BACKING
REMOVE RIBBON
CALIBRATING
PLEASE WAIT
---- RELOAD ALL
MEDIA AND
RIBBON
CALIBRATE
key to start the calibration procedure.
This procedure is used to adjust the sensitivity of the media and
ribbon sensors.
NOTE: The procedure must be followed exactly as presented.
All steps must be performed even if only one of the
sensors requires adjustment.
Press the LEFT BLACK OVAL key to cancel the operation, or do
the following:
1) Open the printhead.
2) Remove approximately 8” (203 mm) of labels from the media
roll, enough so that only the backing material is threaded
between the media sensors when the media is loaded.
Press the LEFT BLACK OVAL key to cancel the operation or do
the following:
1) Remove the ribbon (sliding it as far to the right as possible will
have the same effect as removing it).
2) Close the printhead.
The printer automatically adjusts the scale (gain) of the signals it
receives from the media and ribbon sensors based on the
specific media and ribbon combination you are using. On the
sensor profile, this essentially corresponds to moving the graph
up or down to optimize the readings for your application.
When “RELOAD ALL” is displayed:
1) Open the printhead and pull the media forward until a label is
positioned under the media sensor.
2) Move the ribbon back to its proper position.
3) Close the printhead.
Now that the scale has changed, the printer performs a
calibration equivalent to pressing the CALIBRATE key. During
this process, the printer checks the readings for the media and
ribbon based on the new scale you have established, determines
the label length, and determines whether you are in direct
thermal or thermal transfer print mode. The process is now
complete! To see the new readings on the new scale, print a
sensor profile.
56 Zebra R-140 User’s Guide
Page 66

Setting Communication Parameters
Communication parameters must be set correctly for the printer to communicate with the host.
These parameters make sure that the printer and host are “speaking the same language.” All
communications parameters are password protected.
Press Display Shows Action/Explanation
Setting Parallel Communications Press the RIGHT or LEFT
BLACK OVAL key to display other choices.
PARALLEL
COMM
SERIAL COMM
BAUD
DATA BITS
Default: Parallel
Selections: Parallel, twinax/coax
Select the communications port that matches the one being used
by the host computer.
Setting Serial Communications Press the RIGHT or LEFT
BLACK OVAL key to display other choices.
Default: RS232
Selections: RS232, RS422/485, RS485 multidrop
Select the communications port that matches the one being used
by the host computer.
Setting Baud Press the RIGHT or LEFT BLACK OVAL key to
display other choices.
Default: 9600
Selections: 110, 300, 600, 1200, 2400, 4800, 9600, 14400, 19200,
28800, 38400, 57600
The baud setting of the printer must match the baud setting of
the host for accurate communications to take place. Select the
value that matches the one being used by the host.
Setting Data Bits Press the RIGHT or LEFT BLACK OVAL key
to display other choices.
Default: 7-bits
Selections: 7-bits, 8-bits
The data bits of the printer must match the data bits of the host
for accurate communications to take place. Set the data bits to
match the setting being used by the host.
NOTE: Must be set to 8 data bits to use Code Page 850.
Zebra R-140 User’s Guide 57
Page 67

Press Display Shows Action/Explanation
Setting Parity Press the RIGHT or LEFT BLACK OVAL key to
display other choices.
Default: Even
PARITY
STOP BITS
HOST
HANDSHAKE
PROTOCOL
Selections: Even, odd, none
The parity of the printer must match the parity of the host for
accurate communications to take place. Select the parity that
matches the one being used by the host.
Setting Stop Bits Press the RIGHT or LEFT BLACK OVAL key
to display other choices.
Default: 1 stop bit
Selections: 1 stop bit, 2 stop bits
The stop bits of the printer must match the stop bits of the host
for accurate communications to take place. Select the stop bits
that match the one being used by the host.
Setting Host Handshake Press the RIGHT or LEFT BLACK
OVAL key to display other choices.
Default: XON/XOFF
Selections: XON/XOFF, DTR/DSR
The handshake protocol of the printer must match the handshake
protocol of the host for communications to take place. Select the
handshake protocol that matches the one being used by the host.
Setting Protocol Press the RIGHT or LEFT BLACK OVAL key
to display other choices.
Default: None
Selections: None, Zebra, ACK/NACK
Protocol is a type of error checking system. Depending on the
selection, an indicator may be sent from the printer to the host
signifying that data has been received. Select the protocol that is
requested by the host. Further details on protocol can be found
in the ZPL II Programming Reference Volumes I and II.
NOTE: Zebra is the same as ACK/NACK except that with Zebra
the response messages are sequenced.
NOTE: If Zebra is selected, printer must use “DTR/DSR” host
handshake protocol.
58 Zebra R-140 User’s Guide
Page 68

Press DisplayShows Action/Explanation
SettingNetworkID PresstheLEFTBLACKOVALkeyto
movetothenextdigitposition,presstheRIGHTBLACKOVAL
keytoincreasethevalueofthedigit.
Default:000
NETWORKID
COMMUNICATIONS
Range:000-999
NetworkIDisusedtoassignauniquenumbertoaprinterusedin
anRS-422/RS-485network.Thisgivesthehostthemeansto
addressaspecificprinter.Iftheprinterisusedinanetwork,you
mustselectanetworkIDnumber.ThisdoesnotaffectTCP/IPor
IPXnetworks.
SettingCommunicationsMode PresstheRIGHTorLEFT
BLACKOVALkeytodisplayotherchoices.
Default:Normalmode
Selections:Normalmode,diagnostics
Thecommunicationdiagnosticsmodeisatroubleshootingtool
forcheckingtheinterconnectionbetweentheprinterandthe
host.When“diagnostics”isselected,alldatasentfromthehost
totheprinterwillbeprintedasstraightASCIIhexcharacters.The
printerprintsallcharactersreceivedincludingcontrolcodes,like
CR(carriagereturn).AsampleprintoutisshowninFigure34on
page91.
NOTESondiagnosticprintouts:
•AnFEindicatesaframingerror.
•AnOEindicatesanoverrunerror.
•APEindicatesaparityerror.
•AnNEindicatesnoise.
Foranyerrors,checkthatyourcommunicationparametersare
correct.Settheprintwidthequaltoorlessthanthelabelwidth
usedforthetest.Seepage52formoreinformation.
ZebraR-140User’sGuide 59
Page 69

Selecting Prefix and Delimiter Characters
Prefix and delimiter characters are 2-digit hex values used within the ZPL/ZPL II formats sent to
the printer. The printer uses the last prefix and delimiter characters sent to it, whether from a
ZPL II instruction or from the front panel.
NOTE: DO NOT use the same hex value for the control, format, and delimiter character. The
printer needs to see different characters to function properly.
Press Display Shows Action/Explanation
Control Prefix Character Press the LEFT BLACK OVAL key to
move to the next digit position, press the RIGHT BLACK OVAL
key to increase the value of the digit.
CONTROL PREFIX
FORMAT
PREFIX
DELIMITER CHAR
Default: 7E (tilde - displayed as a black square)
Range: 00-FF
The printer looks for this 2-digit hex character to indicate the start
of a ZPL/ZPL II control instruction.
Format Prefix Character Press the LEFT BLACK OVAL key to
move to the next digit position, press the RIGHT BLACK OVAL
key to increase the value of the digit.
Default: 5E (caret)
Range: 00-FF
The printer looks for this 2-digit hex character to indicate the start
of a ZPL/ZPL II format instruction.
Delimiter Character Press the LEFT BLACK OVAL key to
move to the next digit position, press the RIGHT BLACK OVAL
key to increase the value of the digit.
Default: 2C (comma)
Range: 00-FF
The delimiter character is a 2-digit hex value used as a parameter
place marker in ZPL/ZPL II format instructions. Refer to the ZPL II
Programming Reference Volumes I and II for more information.
60 Zebra R-140 User’s Guide
Page 70

Selecting ZPL Mode
Press Display Shows Action/Explanation
Selecting ZPL Mode Press the RIGHT or LEFT BLACK OVAL
key to display other choices.
Default: ZPL II
Selections: ZPL II, ZPL
ZPL MODE
Power-Up and Head Close Parameters
MEDIA POWER
UP
HEAD CLOSE
The printer will remain in the selected mode until it is changed by
this front panel instruction or by using a ZPL/ZPL II command. The
printer accepts label formats written in either ZPL or ZPL II. This
eliminates the need to rewrite any ZPL formats you already have.
Refer to the ZPL II Programming Reference Volumes I and II for
more information on the differences between ZPL and ZPL II .
Media Power-Up Press the RIGHT or LEFT BLACK OVAL key
to display other choices.
Default: Feed
Selections: Feed, calibration, length, and no motion
This parameter establishes the action of the media when the
printer is turned on.
• Calibration: Recalibrates the media and ribbon sensors.
• Feed: Feeds the label to the first web.
• Length: Determines the length of the label.
• No Motion: Media does not move.
Head Close Press the RIGHT or LEFT BLACK OVAL key to
display other choices.
Default: Feed
Selections: Feed, calibration, length, no motion
Determines the action of the media after the printhead has been
opened and then closed.
• Calibration: Recalibrates the media and ribbon sensors.
• Feed: Feeds the label to the first web.
• Length: Determines the length of the label.
• No Motion: Media does not move.
Zebra R-140 User’s Guide 61
Page 71

Label Positioning Parameters
Press Display Shows Action/Explanation
Backfeed Sequence Press the RIGHT or LEFT BLACK OVAL
key to display other choices.
Default: Default (90%)
BACKFEED
LABEL TOP
LEFT POSITION
Selections: Default, after, before, 10%, 20%, 30%, 40%, 50%,
This parameter establishes when and how much label backfeed
occurs after a label is removed or cut in the peel-off, cutter, and
applicator modes. It has no effect in rewind or tear-off modes.
This parameter setting can be superseded by the ~JS instruction
when received as part of a label format (refer to the ZPL II
Programming Reference Volumes I and II).
NOTE: The difference between the value entered and 100%
Adjusting Label Top Position Press the RIGHT BLACK OVAL key
to increase the value, press the LEFT BLACK OVAL key to
decrease the value. The displayed value represents dots.
Default: +0
Range: -120 to +120 dot rows
The label top position adjusts the print position vertically on the
label. Positive numbers adjust the label top position further down
the label (away from the printhead), negative numbers adjust the
position up the label (toward the printhead).
Adjusting Left Position Press the LEFT BLACK OVAL key to
move to the next position, press the RIGHT BLACK OVAL key to
change between + and - and to increase the value of the digit.
The displayed value represents dots.
Default: 0000
Range: -9999 to +9999
NOTE: For a negative value, enter the value before changing to
This parameter establishes how far from the left edge of a label
the format will begin to print by adjusting horizontal positioning
on the label. Positive numbers adjust the printing to the left by
the number of dots selected, negative numbers shift printing to
the right.
60%, 70%, 80%, off
establishes how much backfeed occurs before the next
label is printed. For example, a value of 40 means that
40% of the backfeed takes place after the label is
removed or cut. The remaining 60% takes place before
the next label is printed. A value of “before” means that
all backfeed will take place before the next label is
printed.
the minus sign.
62 Zebra R-140 User’s Guide
Page 72

Press Display Shows Action/Explanation
Setting the Head Test Count Press the LEFT BLACK OVAL
key to move to the next digit position, press the RIGHT BLACK
OVAL key to change the value of the digit.
HEAD TEST
COUNT
HEAD RESISTOR
VERIFIER PORT
Default: 0000 (disables the test)
Range: 0000 to 9999
The printer periodically performs a test of the printhead
functionality, called a “printhead test” or “head test.” This
parameter establishes how many labels are printed between
these internal tests.
Setting the Head Resistor Value Press the LEFT BLACK
OVAL key to move to the next digit position, press the RIGHT
BLACK OVAL key to increase the value of the digit.
CAUTION: This parameter should only be changed by qualified
personnel!
Initial Value: Factory-set to match the printhead shipped with
your printer.
Default Value: 0500
Range: 0500 to 1175
This value has been pre-set at the factory to match the resistance
value of the printhead. It will not need to be changed unless the
printhead is replaced.
CAUTION: DO NOT set the value higher than that shown on the
printhead. Setting a higher value may damage the
printhead!
Before replacing a printhead, look on the bottom of the printhead
element for the label that shows the resistance value (ohm value).
Setting the Verifier Port Press the RIGHT or LEFT BLACK
OVAL key to display other choices.
Default: Off
Selections: Off, 1 VER-RPRNT, 2 VER-THRUPUT
The auxiliary port is used to determine how the printer will react
to the Zebra on-line verifier. There are currently three operating
conditions for this port:
• Off: The verifier port is off.
• 1 VER-RPRNT ERR: Label reprinted if verifier detects an error.
If a bar code is near the upper edge of the label, the label will be
fed out far enough to be verified and then backfed to allow the
next label to be printed and verified.
• 2 VER-THRUPUT: Allows greatest throughput but may not
indicate a verification error immediately upon detection. May
print from one to three labels before an error is recognized and
printing stops.
For more information on the operation of the optional verifier,
refer to the documentation provided with that option.
Zebra R-140 User’s Guide 63
Page 73

Press Display Shows Action/Explanation
Setting the Applicator Port Press the RIGHT or LEFT BLACK
OVAL key to display other choices.
Default: Off
Selections: Off, mode 1, mode 2, mode 3, mode 4
Determines the action of the verifier port.
• Off: The applicator port is off.
APPLICATOR
PORT
WEB S.
MEDIA S.
RIBBON S.
• Mode 1: Asserts the ~END_PRINT signal low while the printer
is moving the label forward.
• Mode 2: Asserts the ~END_PRINT signal high while the printer
is moving the label forward.
• Mode 3: Asserts the ~END_PRINT signal low for 20
milliseconds when a label has been completed and positioned.
Not asserted during continuous printing modes.
• Mode 4: Asserts the ~END_PRINT signal high for 20
milliseconds when a label has been completed and positioned.
Not asserted during continuous printing modes.
MARK S.
MARK MED S.
MEDIA LED
RIBBON LED
MARK LED
These parameters are automatically set during the calibration
procedure. They should only be changed by a qualified service
technician. Refer to the maintenance manual for more
information on these parameters.
Press the NEXT/SAVE key repeatedly to skip these parameters.
64 Zebra R-140 User’s Guide
Page 74

Press Display Shows Action/Explanation
LCD Display Adjustment Press the LEFT BLACK OVAL key to
decrease the value (reduce brightness), press the RIGHT BLACK
LCD ADJUST
FORMAT
CONVERT
IDLE DISPLAY*
RTC DATE*
RTC TIME*
OVAL key to increase the value (increase brightness).
Range: 00 to 19
This parameter allows you to adjust the brightness of your
display if your display is difficult to read.
Format Convert Press the RIGHT or LEFT BLACK OVAL key to
display other choices.
Default: None
Selections: None, 150 → 300, 150 → 600, 200 → 600, 300 → 600
Selects the bitmap scaling factor. The first number is the original
dots per inch (d.p.i.) value; the second, the d.p.i. to which you
would like to scale.
Idle Display Press the RIGHT or LEFT BLACK OVAL key to
display other choices.
Default: Firmware version
Selections: mm/dd/yy (24 hour), mm/dd/yy (12 hour),
dd/mm/yy (24 hour), dd/mm/yy (12 hour)
This parameter selects the LCD display options for the real time
clock (if installed).
NOTE: If the default value is not selected, pressing either BLACK
OVAL key will briefly display the firmware version of the
printer.
RTC Date Press the LEFT BLACK OVAL key to move to the
next digit position, press the RIGHT BLACK OVAL key to increase
the value of the digit.
This parameter allows you to set the date following the
convention selected in “IDLE DISPLAY.”
RTC Time Press the LEFT BLACK OVAL key to move to the
next digit position, press the RIGHT BLACK OVAL key to increase
the value of the digit.
This parameter allows you to set the time following the
convention selected in “IDLE DISPLAY.”
* Option required
Zebra R-140 User’s Guide 65
Page 75

Press Display Shows Action/Explanation
IP Resolution Press the RIGHT or LEFT BLACK OVAL key to
display other choices.
Default: Dynamic
IP RESOLUTION*
IP PROTOCOLS*
IP ADDRESS*
SUBNET MASK*
DEFAULT
GATEWAY*
Selections: Dynamic, permanent
Depending on the selection, allows either the user (”permanent”)
or the server (”dynamic”) to select the IP address. For more
information, refer to ZebraNet Networking: PrintServer II
Installation and User’s Guide.
IP Protocols Press the RIGHT or LEFT BLACK OVAL key to
display other choices.
Default: All
Selections: All, gleaning only, RARP, BOOTP, DHCP,
DHCP/BOOTP
If “dynamic” was chosen in the previous parameter, this selection
determines the method(s) by which the PrinterServer will receive
the IP address from the server. For more information, refer to
ZebraNet Networking: PrintServer II Installation and User’s
Guide.
IP Address Press the LEFT BLACK OVAL key to move to the
next digit position, press the RIGHT BLACK OVAL key to increase
the value of the digit.
This parameter allows you to select the IP address if “permanent”
was chosen in “IP RESOLUTION.” (If “dynamic” was chosen, the
user cannot select the address.) For more information, refer to
ZebraNet Networking: PrintServer II Installation and User’s
Guide.
Subnet Mask Press the RIGHT or LEFT BLACK OVAL key to
display other choices.
Default: Permanent (user must set)
Selections: Dynamic (user may set, but server can assign),
permanent
This parameter selects the part of the IP address that is
considered to be part of the local network It can be reached
without going through the default gateway.
Default Gateway Press the LEFT BLACK OVAL key to move
to the next digit position, press the RIGHT BLACK OVAL key to
increase the value of the digit.
This parameter allows you to select the IP address that the
network traffic is routed through if the destination address is not
part of the local network.
* Option required
66 Zebra R-140 User’s Guide
Page 76

Press Display Shows Action/Explanation
Selecting the Display Language Press the RIGHT or LEFT BLACK
OVAL key to display other choices.
Default: English
LANGUAGE
Selections: English, Spanish, French, German, Italian,
Norwegian, Portuguese, Swedish, Danish,
Spanish 2, Dutch, Finnish, Custom
This parameter allows you to change the language used on the
front panel display.
RFID Test Press the left oval key to select the QUICK test or the
right oval key to select the SLOW test.
NOTE: RFID media must be loaded and the appropriate tag type
selected (or choose Autodetect) in order to run this test. Only the
Texas Instruments’ Tag-It
and Philips I•Code
supported.
RFID tags are
RFID TEST
QUICK - Perfoms the RFID Test and displays either a PASSED! or
FAILED! result for the entire test. The user is then prompted to
CONTINUE.
SLOW - Performs the same RFID Test but displays the status of
each function tested. There is a one second pause between the
displaying of the result of the current functions test and the
beginning of the next function test. If a particular functions
passes, the user will see an OK! for that function. If a particular
fuction fails, the user will see a FAILED! for that function and then
is prompted to CONTINUE.
Selecting the RFID Tag Type Press the right or left oval key to
display other choices.
and Philips
RFID TAG TYPE
NOTE: Only the Texas Instruments’ Tag-It
Semiconductors’ I•Code
RFID tags are supported.
Default: None Choices: Autodetect, None, Tag-It, ICODE
This parameter allows you to change the type of RFID tag being
used. If the user is unsure of the type of tag being used, select
Autodetect.
RFID ERR STATUS Displays the last RFID error status message received.
You have now completed the entire configuration and calibration sequence. You may either
press the NEXT/SAVE key or the SETUP/EXIT key.
Zebra R-140 User’s Guide 67
Page 77

Press Display Shows Action/Explanation
You are now back at the first parameter in the configuration
sequence.
DARKNESS
SAVE SETTINGS
PRINTER READY
NOTE: If you pressed the NEXT/SAVE key but are through
programming the printer configuration, you may press
the SETUP/EXIT key and continue with the “SAVE
SETTINGS” function.
Save Settings Press the RIGHT or LEFT BLACK OVAL key to
display other choices.
Default: Permanent
Selections: Permanent, temporary, cancel, load defaults,
load last save.
This display appears when you attempt to exit the configuration
mode.
• Permanent: Permanently saves the changes, even when printer
power is turned off.
• Temporary: Saves the changes until changed again or until
power is turned off.
• Cancel: Cancels all changes since you entered the
configuration mode except for darkness and tear-off position (if
they were changed).
• Load defaults: Loads factory defaults.
NOTE: Loading factory defaults will require calibration.
• Load last save: Loads the values from the last permanent save.
Press the NEXT/SAVE key to activate the displayed choice.
You have exited the configuration and calibration sequence and
are now ready for normal printer operation
68 Zebra R-140 User’s Guide
Page 78

Routine Care and Adjustment
Cleaning
The following table provides a brief cleaning schedule. Specific cleaning
procedures are provided on the following pages.
Area Method Interval
Printhead Solvent*
Platen roller Solvent*
Transmissive sensor Air blow
Black mark sensor Air blow
Media path Solvent*
Ribbon sensor Air blow
Label available sensors Air blow Monthly
Tear-off/peel-off bar Solvent*
Cutter Solvent*
* Zebra recommends using a solvent containing 90% isopropyl alcohol.
Direct thermal print mode:
After every roll of media (or
500’/152 m of fanfold media).
Thermal transfer print mode:
After every roll of ribbon.
As neededSnap plate Solvent*
CAUTION: Use only the cleaning agents indicated. Zebra
Technologies Corporation will not be responsible for
any other fluids being used on this printer.
Zebra R-140 User’s Guide 69
Page 79

CleaningtheExterior
Theexteriorsurfacesoftheprintermaybecleanedwithalint-freecloth.
Donotuseharshorabrasivecleaningagentsorsolvents.Ifnecessary,a
milddetergentsolutionordesktopcleanermaybeusedsparingly.
CleaningtheInterior
Inspectthisareaaftereveryfourrollsofmedia.Removeanydirtandlint
fromtheinterioroftheprinterusingasoftbristlebrushand/orvacuum
cleaner.
CleaningthePrintheadandPlatenRoller
Inconsistentprintquality,suchasvoidsinthebarcodeorgraphics,may
indicateadirtyprinthead.Forbestresults,performthefollowingcleaning
procedureaftereveryrollofribbon.
NOTE:Youdonotneedtoturnofftheprinterbeforecleaningthe
printhead.Ifpoweristurnedoff,alllabelformatsandimages,as
wellasanytemporarilysavedparametersettingsstoredinthe
printer’sinternalmemory,willbelost.Whenpoweristurnedback
on,youwillneedtoreloadtheseitems.
Tocleantheprinthead,refertoFigure25andfollowthesesteps:
1.Opentheprinthead.
2.Removethemediaandribbon(ifloaded).
3.MoistenanapplicatortipwithZebra-recommendedsolventandwipe
alongtheprintelementsfromendtoend.(Theprintelementsareon
thebrownstripjustbehindthechromestripontheprinthead.)Allowa
fewsecondsforthesolventtoevaporate.
70 ZebraR-140User’sGuide
Page 80

4.Rotatetheplatenrollerandcleanthoroughlywithsolventandan
applicator.
5.Brush/vacuumanyaccumulatedpaperlintanddustawayfromthe
rollers.
6.Reloadribbonand/ormedia,andcloseandtheprinthead.
Figure25
CleaningtheSensors
Themedia,ribbon,andlabelavailablesensorsshouldbecleanedona
regularbasistoensureproperoperationoftheprinter.Tolocatethese
sensors,refertoFigure25,Figure6onpage15,andFigure7onpage16.
Brush/vacuumanyaccumulatedpaperlintanddustoffofthesesensors.
ZebraR-140User’sGuide 71
Page 81

CleaningtheSnapPlate
Cleanthesnapplatetoremovelabeladhesiveoralabelthathasadheredto
theundersideofthesnapplate.
RefertoFigure26.
1.Carefullypushthetabsonthesnapplatetowardstherearoftheprinter
andgentlyliftuponthesnapplate.
CAUTION:Usecaretonotbend,twist,orotherwisedeformthe
tabs!
2.Removethesnapplatefromtheprinter.
3.Cleanthesnapplatewithcleaningsolventandasoftcloth.
RefertoFigure27.
4.Toreinstallthesnapplate,insertthethebottomofthesnapplate(with
thenotches)intothetwoslotsofthemediapathway.
5.Pressdownontherightandleftendofthesnapplate(nearthetabs)
andlockintoplace.
72 ZebraR-140User’sGuide
Page 82

Figure 26
Figure 27
Zebra R-140 User’s Guide 73
Page 83

CleaningtheCutterModule
(Forprintersequippedwiththeoptionalcutter.)
Iflabelsarenotbeingcutproperlyorifthecutterjamswithlabels,turnoff
theprinterpowerandunplugtheprinter.Then,cleanthestationarycutter
bladewithcleaningsolvent.Thiswillremovelabeladhesiveand/orpaper
debris.Iffurthercuttercleaningisnecessary,orifthecuttercontinuesto
performunsatisfactorily,contactanauthorizedservicetechnician.
Lubrication
CAUTION!Nolubricatingagentsofanykindshouldbeusedon
thisprinter!Somecommerciallyavailablelubricants
willdamagethefinishandthemechanicalpartsif
used.
FuseReplacement
Theprinterusesametric-stylefuse(5X20mmIEC)ratedatF5A,250V.
Theendcapsofthefusemustbearthecertificationmarkofaknown
internationalsafetyorganization(seeFigure36onpage98).Theprinter
comeswithtwoapprovedfuses:oneinthecircuitandoneinthe“spare
fuse”holder.
1.Turnofftheprinterpowerandunplugthepowercordfromthebackof
theprinter.SeeFigure28.
2.Usingasmall-bladescrewdriverorsimilartool,removethefuseholder
fromtheprinter.
3.Removethefaultyfuseandinstallanewfuseofthecorrecttype.Refer
toFigure29.Thefusethatgoesintotheprinterfirstistheonethatis
“in-circuit.”Ifyouusethesparefuse,besuretoorderareplacement
fuse(fusescanbeorderedfromyourZebradistributor).
74 ZebraR-140User’sGuide
Page 84

4. Snap the fuse holder back into position.
5. Reconnect the power cord.
If the new fuse fails right away, the printer has an internal component
failure and must be repaired.
Small blade
screwdriver
Spare
fuse
Fuse
holder
Fuse
holder
AC power
entry
module
Figure 28
In-circuit
fuse
Figure 29
Zebra R-140 User’s Guide 75
Page 85

Adjustments
Toggle Positioning
Both toggles should be positioned so that they provide even pressure on the
media. The toggles are positioned by sliding them to the desired location.
On media too narrow to accommodate both toggles, position one toggle
over the center of the media and decrease the pressure on the unused toggle.
NOTE: Make sure that the toggle pressure is even across the width of the
media. Otherwise, the media and/or ribbon may “drift.”
Figure 30
76 Zebra R-140 User’s Guide
Page 86

PrintheadPressureAdjustment
Thisadjustmentmaybenecessaryifprintingistoolightononesideorif
thickmediaisused.RefertoFigure30.
1.Performthetogglepositioningprocedure.Iftheproblemissolved,you
maystophere;otherwise,continuewiththerestofthisprocedure.
2.Printsomelabelsat2.4"/61mmpersecondbyrunningthePAUSEkey
selftest(seepage89).
3.Whileprintinglabels,lowerthedarknesssettinguntilagraylevelof
printingisseen.
4.Loosentheknurled(upper)lockingnutsatthetopofthetoggle
assembly/assemblies.
5.Increaseordecreasespringpressureusingtheknurled(lower)adjusting
nutsontheshaftsofthetoggle(s)untiltheleftandrightedgesof
printedareaareequallydark.
NOTE:Printheadlifecanbemaximizedbyusingthelowestpressurethat
producesthedesiredprintquality.
6.Increasedarknesstotheoptimumlevelforthemediabeingused.
7.Retightenlockingnuts.
MediaSensorPositionAdjustment
See“PositioningtheMediaSensors”onpage14.
ZebraR-140User’sGuide 77
Page 87

78 Zebra R-140 User’s Guide
Page 88

Troubleshooting
LEDErrorConditionsandWarnings
ErrorConditionRibbonOut
Problem Solution
Inthermaltransfermode,theribbonis
notloadedorloadedincorrectly.
Inthermaltransfermode,theribbon
sensorisnotsensingcorrectlyloaded
ribbon.
Indirectthermalmode,whenribbonis
notused:
ErrorConditionPaperOut
Problem Solution
Themediaisnotloadedorloaded
incorrectly.
Themediasensorisnotadjusted
properly.
Theprinterissetfornon-continuous
media,butcontinuousmediaisloaded.
Theincorrectmediasensorisbeing
used.
Loadtheribboncorrectly.See“RibbonLoading”on
page43.
Performthemediaandribbonsensorcalibration(see
page21).
Puttheprinterindirectthermalmodeviathefront
panelandremoveribbon(ifloaded).
Ensurethattheprinterdriverorsoftwaresettingsare
correctlyset(ifapplicable).
Reloadthemedia.Referto“RollMediaLoading”on
page31.
Checkthepositionoftheupperandlowermedia
sensors.See“PositioningtheMediaSensors”on
page14.
Eitherloadthecorrectmediaorsettheprinterforthe
correctmediatypeviathefrontpanel.
Ensurethattheprinterdriverorsoftwaresettingsare
correctlyset(ifapplicable).
Calibratetheprinter(seepage21).
Viathefrontpanel,checkthesensortypetoensure
thatthecorrectoneisusedforthemedialoaded.See
page20.Calibratetheprinter(seepage21).
ZebraR-140User’sGuide 79
Page 89

ErrorConditionHeadOpen
Problem Solution
Theprintheadisnotfullyclosed. Closetheprinthead.
ErrorConditionHeadElementBad
Problem Solution
Ifthefailedelementsimpactyourprintingapplication,
Oneormoreoftheprintheadelements
havefailedtheprintheadelementtest.
replacetheprinthead.Tooverridethiserror,disable
theheadtestcountfeatureonthefrontpanelby
defaultingthevalueto“0000.”Seepage63.
WarningRibbonIn
Problem Solution
Removetheribbonandsettheprintertodirectthermal
Theribbonisloaded.
mode.
Ensurethattheprinterdriverand/orsoftwaresettings
arecorrectlyset(ifapplicable).
WarningHeadTooHot
Problem Solution
Theprintheadisovertemperature.
80 ZebraR-140User’sGuide
Allowtheprintertocool.Printingautomatically
resumeswhentheprintheadelementscooltoan
acceptableoperatingtemperature.
Page 90

WarningHeadCold
Problem Solution
Theprintheadisundertemperature.
WarningCutterJammed
Problem Solution
Cutterbladeisinthemediapath.
OutofMemory*
Problem Solution
*Thereisnotenoughmemoryto
performthefunctionshownonthe
secondlineoftheerrormessage.
Continueprintingwhiletheprintheadreachesthe
correctoperatingtemperature.Iftheerrorremains,
theenvironmentmaybetoocoldforproperprinting.
Relocatetheprintertoawarmerarea.
Turnofftheprinterpowerandunplugtheprinter.
Inspectthecuttermodulefordebrisandcleanas
neededfollowingthecleaninginstructionsonpage74.
InsufficientDRAMforthelabellength,downloaded
fonts/graphics,andimages.
Ensurethatthedevice,suchasFLASHmemoryor
PCMCIAcard,isinstalledandnotwriteprotectedor
full.
Ensurethatthedataisnotdirectedtoadevicethatis
notinstalledoravailable.
ZebraR-140User’sGuide 81
Page 91

PrintQualityProblems
GeneralPrintQualityIssues
Problem Solution
Youareusinganincorrectmediaand
ribboncombinationforyourapplication.
Theprinterissetattheincorrectprint
speed.
Theprinterissetattheincorrect
darknesslevel.
Theprintheadisdirty.
Thereislightprinting(ornoprinting)on
theleftorrightsideofthelabelorthe
printedimageisnotsharp.
Graylinesonblanklabelswithnoconsistentpattern
Problem Solution
Theprintheadisdirty.
ConsultyourauthorizedZebrareseller/distributorfor
informationandadvice.
Foroptimalprintquality,settheprintspeedtothe
lowestpossiblesettingviaZPLII,thedriver,orthe
software.
Foroptimalprintquality,setthedarknesstothelowest
possiblesettingviathefrontpanel,thedriver,orthe
software.
Cleantheprintheadaccordingtotheinstructionson
page70.
Thetogglepressureneedstobeadjusted.Followthe
printheadpressureadjustmentinstructionson
page77.
Cleantheprintheadaccordingtotheinstructionson
page70.
Light,consistentverticallinesrunningthroughallofthelabels
Problem Solution
Theprintheadorplatenrollerisdirty.
Cleantheprinthead,platenroller,orbothaccordingto
theinstructionsonpage70.
Intermittentcreasesontheleftandrightedgesofthelabels
Problem Solution
Thereistoomuchtogglepressureon
theprinthead.
82 ZebraR-140User’sGuide
Reducethetogglepressure.Refertotheprinthead
pressureadjustmentonpage77.
Page 92

WrinkledRibbon
Problem Solution
Theribbonisnotloadedcorrectly.
Thedarknesssettingisincorrect.
Incorrectprintheadpressureorbalance.
Themediaisnotfeedingcorrectly.Itis
“walking”fromsidetoside.
Loadtheribboncorrectly.See“RibbonLoading”on
page43.
Setthedarknesstothelowestpossiblesettingfor
goodprintquality.See“Darkness”onpage50.
Setthepressuretotheminimumrequiredforgood
printquality.See“PrintheadPressureAdjustment”on
page77.
Makesurethatthemediaguideandmediasupply
guidetouchtheedgeofthemedia.
Communications
Alabelformatwassenttotheprinterbutnotrecognized.The
DATAlightdoesnotflash.
Problem Solution
Checktheprinterdriverorsoftwarecommunications
settings(ifapplicable).
Checktheprinterhostportsettingviathefrontpanel
(seepage57).Selecttheportthatmatchestheone
beingusedbythehost.
Thecommunicationparametersare
incorrect.
Areyouusingthecorrectcommunicationcable?See
page26fortherequirements.
Viathefrontpanel,checktheprotocolsetting.It
shouldbesetto“none.”Seepage58.
Ensurethatthecorrectdriverisbeingused,if
applicable.
ZebraR-140User’sGuide 83
Page 93

Alabelformatwassenttotheprinter.Severallabelsprint,thenthe
printerskips,misplaces,misses,ordistortstheimageonthelabel.
Problem Solution
ThehostissettoEPPparallel
communications.
Theserialcommunicationsettingsare
incorrect.
Changethesettingsonthecomputerhosttostandard
parallelcommunications.
Ensurethattheflowcontrolsettingsmatch.
Checkthecommunicationcablelength.Seepage26
forrequirements.
Checktheprinterdriverorsoftwarecommunications
settings(ifapplicable).
Alabelformatwassenttotheprinterbutnotrecognized.The
DATAlightflashesbutnoprintingoccurs.
Problem Solution
Theprefixanddelimetercharactersset
intheprinterdonotmatchtheonesin
thelabelformat.
Incorrectdataisbeingsenttothe
printer.
Verifytheprefixanddelimetercharacters.See
page60.
EnsurethatZPLisbeingused.
Checkthecommunicationsettingsonthecomputer.
Ensurethattheymatchtheprintersettings.
84 ZebraR-140User’sGuide
Page 94

RFID Symptoms
Problem Diagnosis Solution
RFID tags not programming
(general).
RFID VOID label is printed.
Bad RFID Labels - No VOID
NO TAG Error Message
Printer not set-up properly
Check if supported RFID
media is loaded properly.
Verify tag type is properly
selected in ZPLII and/or
through front panel.
ZPL II is attempting to write
to a non-existent block.
Verify voided tag on external
reader.
Error Message appears on
Front Panel
Verify ZPL II for RFID
commands.
Read/Program labels
externally.
Tag is out of reach of the
antenna or too close.
Wrong type of tag was
selected.
Block is write protected
Print a Configuration label
(Cancel Key Self Test) to verify
RFID version.
Run an RFID Self Test (through
the Front Panel). Make note of
Error Messages and refer to that
symptom in this table.
Reload media.
Use RFID media with supported
tag type.
Edit ZPLII to select proper tag
type or set through control
panel.
Edit ZPL II to increase retries.
Some tag’s (e.g. Tag-It) blocks
are identified as0-7. IfZPLII
attempts to write to block “8”, it
will fail. Check the ZPL II
commands and make the
appropriate corrections.
Discard bad tag (media problem)
Refer to that symptom in this
table.
Add proper RFID commands to
ZPL II.
Bad tag if it fails external verify.
Call service technician if it
passes external verify.
Verify tag alignment
Verify tag type is properly
selected in ZPLII and/or through
front panel.
Verify that the label has a
transponder in it.
Ensure that the tag is not write
protected .
Zebra R-140 User’s Guide 85
Page 95

Problem Diagnosis Solution
NO TAG Error Message
(Continued)
PK TIMEOUT Error Message
Other Error Messages
Confirm that the tags meet
Tags have metal/aluminum
in them.
ZPL II giving insufficient
amount of retries.
Tag is bad. Load new tags.
An attempt was made to
communicate to the internal
hardware, but timed out.
Problem not correctable by
User.
requirements (i.e. no metal/
aluminum in them)
Reload with proper tags.
Increase the number of retries in
the ZPL II commands.
Retry printing label.
Cycle power and try printing
label again.
Verify internal cabling
connections
Call service technician.
Call service technician.
86 Zebra R-140 User’s Guide
Page 96

PrinterDiagnostics
Power-OnSelfTest
Apower-onselftest(POST)isperformedautomaticallyeachtimethe
printeristurnedon.Duringthistestsequence,thefrontpanellightsand
liquidcrystaldisplaymonitortheprogressofthePOST.Iftheprinterfails
anyofthesetests,theword“FAILED”willbeaddedtothedisplay.Ifthis
occurs,notifyanauthorizedZebrareseller.
AdditionalPrinterSelfTests
Theseselftestsproducesampleprintoutsandprovidespecificinformation
thathelpdeterminetheoperatingconditionsfortheprinter.
Eachselftestisenabledbypressingaspecificfrontpanelkeyor
combinationofkeyswhileturningthePOWERswitchon.Keepthekey(s)
depresseduntiltheDATAlightturnsoff.Whenthepower-onselftestis
complete,theselectedselfteststartsautomatically.
NOTES:Whenperformingselftests,avoidsendingalabelformattothe
printer.Inthecaseofaremotehost,disconnectalldatainterface
cablesfromtheprinter.
Whencancelingaselftestpriortoitsactualcompletion,always
turntheprinterpoweroffandthenbackontoresettheprinter.
Whenperformingtheseselftestswhileinthepeel-offmode,
youmustremovethelabelsastheybecomeavailable.
Ifyourmediaisnotwideenoughorlongenough,unexpected
and/orundesiredresultsmayoccur.Makesurethatyourprint
widthissetcorrectlyforthemediayouareusingbeforeyou
runanyselftests,otherwisethetestmayprintoutontheplaten
roller.Seepage52forinformationonsettingtheprintwidth.
ZebraR-140User’sGuide 87
Page 97

CANCELKeySelfTest
Thisselftestprintsalistingofthe
configurationparameterscurrently
storedintheprinter’smemory.See
Figure31(dependingontheoptions
ordered,yourlabelmaylook
different).
1.Turntheprinteroff.
2.PressandholdtheCANCELkey
whileturningonthepower.
Theconfigurationmaybechanged
eithertemporarily(forspecificlabel
formatsorribbonandlabelstock)or
permanently(bysavingthenew
parametersinmemory).Savingnew
parametersoccurswhenevera
calibrationprocedureisperformed.
Refertopage19forfurther
informationabouttheconfiguration
procedure.
PULSEMODE STARTPRINTSIG
PULSEMODE
FEEDMODE
FEEDMODE
ENABLED
ENABLED
DISABLED
DISABLED
1P1
1P1
4096
4096
NONE
NONE
1536
1536
STARTPRINTSIG
RESYNCHMODE
RESYNCHMODE
RIBBONLOWMODE
RIBBONLOWMODE
REPRINTMODE
REPRINTMODE
hfDep:Version1
hfDep:Version1
2000-05-1712:27:15
2000-05-1712:27:15
RFIDVERSION
RFIDVERSION
TIMESTAMP
TIMESTAMP
Figure31
88 ZebraR-140User’sGuide
Page 98

PAUSE Key Self Test
This self test can be used to provide the test labels required when making
adjustments to the printer’s mechanical assemblies. See the sample printout
in Figure 32.
1. Turn off the printer.
2. Press and hold the PAUSE key while turning on the power.
n
The initial self test prints 15 labels at 2.4"/61 mm per second
per second, then automatically pauses the printer. Each time the PAUSE
key is pressed, an additional 15 labels print.
n
While the printer is paused, pressing the CANCEL key alters the self
test. Now each time the PAUSE key is pressed the printer prints 15
labels at 6"/152 mm per second.
n
While the printer is paused, pressing the CANCEL key again alters the
self test again. Each time the PAUSE key is pressed the printer prints 50
labels at 2.4”/61 mm per second.
n
While the printer is paused, pressing the CANCEL key again alters the
self test a third time. Now each time the PAUSE key is pressed the
printer prints 50 labels at 6”/152 mm per second.
n
While the printer is paused, pressing the CANCEL key again alters the
self test a fourth time. Each time the PAUSE key is pressed the printer
prints 15 labels at the printer’s maximum speed.
n
To exit this self test at any time, press and hold the CANCEL key.
Figure 32
Zebra R-140 User’s Guide 89
Page 99

FEEDKeySelfTest
SeeFigure33.
1.Turnofftheprinter.
2.Pressandholdthe
FEEDkeywhile
turningonthepower.
TheFEEDkeyselftest
printsoutatvarious
darknesssettingsabove
andbelowthatofthe
darknessvalueshownon
theconfigurationlabel.
Lookattheselabelsand
determinewhichonehas
thebestdarknesssetting
foryourapplication.This
valuecanbeenteredinto
theprinterbysettingthe
darknessduringthe
configurationprocedure.
Refertopage50formore
information.
Figure33
Thevalueprintedonthatlabelisaddedto(plus)orsubtractedfrom(minus)
thedarknessvaluespecifiedontheconfigurationlabel.Theresulting
numericvalue(0to30)isthebestdarknessvalueforthatspecific
media/ribboncombination.
90 ZebraR-140User’sGuide
Page 100

FEEDKeyandPAUSEKeySelfTest
1.Turnofftheprinter.
2.PressandholdtheFEEDandPAUSEkeyswhileturningonthepower.
Performingthisselftesttemporarilyresetstheprinterconfigurationtothe
factorydefaultvalues.Thesevalueswillbeactiveonlyuntilpoweris
turnedoffunlessyousavethempermanentlyinmemory.
CommunicationsDiagnosticsTest
Thistestiscontrolledfromthefrontpaneldisplay.Refertopage59.A
typicalprintoutfromthistestisshowninFigure34.Turnoffthepowerto
exitthisselftest.
NOTE:Thislabelwillbeinvertedwhenprinted.
Figure34
AdditionalPrinterDiagnostics
Additionaldiagnostictestsareavailableforthisprinter,howevertheyare
beyondthescopeofthisuser’sguide.Refertothemaintenancemanualfor
informationabouttheseadditionaltests.
ZebraR-140User’sGuide 91
 Loading...