

Page 1

P1058563-003
Zebra
AirWatch™ Connector
User Guide
Page 2

© 2013 ZIH Corp. The copyrights in this manual and the software and/or firmware in the print engin e described
therein are owned by ZIH Corp. and Zebra’s licensors. Unauthorized reproduction of this manual or the software
and/or firmware in the print engine may result in imprisonment of up to one year and fines of up to $10,000
(17 U.S.C.506). Copyright violators may be subject to civil liability.
This product may contain ZPL
®
, ZPL II®, and Link-OS™ programs; Element Energy Equalizer® Circuit; E3®; and
Monotype Imaging fonts. Software © ZIH Corp. All rights reserved worldwide.
Link-OS™ and all product names and numbers are trademarks, and Zebra, the Zebra logo, ZPL, ZPL II, Element
Energy Equalizer Circuit, and E
3
Circuit are registered trademarks of ZIH Corp. All rights reserved worldwide.
All other brand names, product names, or trademarks belong to their respective holders. For additional trademark
information, please see “Trademarks” on the product CD.
Proprietary Statement This manual contains proprietary information of Zebra Technologies Corporation and its
subsidiaries (“Zebra Technologies”). It is intended solely for the information and use of parties operating and
maintaining the equipment described herein. Such proprietary information may not be used, reproduced, or disclosed
to any other parties for any other purpose without the express, written permission of Zebra Technologies.
Product Improvements Continuous improvement of products is a policy of Zebra Technologies. All
specifications and designs are subject to change without notice.
Liability Disclaimer Zebra Technologies takes steps to ensure that its published Engineering specifications and
manuals are correct; however, errors do occur. Zebra Technologies reserves the right to correct any such errors and
disclaims liability resulting therefrom.
Limitation of Liability In no event shall Zebra Technologies or anyone else involved in the creation, production,
or delivery of the accompanying product (including hardware and software) be liable for any damages whatsoever
(including, without limitation, consequential damages including loss of business profits, business interruption, or loss
of business information) arising out of the use of, the results of use of, or inability to use such product, even if Zebra
Technologies has been advised of the possibility of such damages. Some jurisdictions do not allow the exclusion or
limitation of incidental or consequential damages, so the above limitation or exclusion may not apply to you.
rapidJson Library Copyright © 2011 Milo Yip
Permission is hereby granted, free of charge, to any person obtaining a copy of this software and associated documentation files
(the "Software"), to deal in the Software without restriction, including without limitation the rights to use, copy, modify, merge,
publish, distribute, sublicense, and/or sell copies of the Software, and to permit persons to whom the Software is furnished to do
so, subject to the following conditions:
The above copyright notice and this permission notice shall be included in all copies or substantial portions of the Software.
THE SOFTWARE IS PROVIDED "AS IS", WITHOUT WARRANTY OF ANY KIND, EXPRESS OR IMPLIED, INCLUDING
BUT NOT LIMITED TO THE WARRANTIES OF MERCHANTABILITY, FITNESS FOR A PARTICULAR PURPOSE AND
NONINFRINGEMENT. IN NO EVENT SHALL THE AUTHORS OR COPYRIGHT HOLDERS BE LIABLE FOR ANY
CLAIM, DAMAGES OR OTHER LIABILITY, WHETHER IN AN ACTION OF CONTRACT, TORT OR OTHERWISE,
ARISING FROM, OUT OF OR IN CONNECTION WITH THE SOFTWARE OR THE USE OR OTHER DEALINGS IN THE
SOFTWARE.
libCurl Library COPYRIGHT AND PERMISSION NOTICE Copyright © 1996 - 2012, Daniel Stenberg, <daniel@haxx.se>.
All rights reserved. Permission to use, copy, modify, and distribute this software for any purpose with or without fee is hereby
granted, provided that the above copyright notice and this permission notice appear in all copies. THE SOFTWARE IS
PROVIDED "AS IS", WITHOUT WARRANTY OF ANY KIND, EXPRESS OR IMPLIED, INCLUDING BUT NOT LIMITED
TO THE WARRANTIES OF MERCHANTABILITY, FITNESS FOR A P AR TICULAR PURPOSE AND NONINFRINGEMENT
OF THIRD PARTY RIGHTS. IN NO EVENT SHALL THE AUTHORS OR COPYRIGHT HOLDERS BE LIABLE FOR ANY
CLAIM, DAMAGES OR OTHER LIABILITY, WHETHER IN AN ACTION OF CONTRACT, TORT OR OTHERWISE,
ARISING FROM, OUT OF OR IN CONNECTION WITH THE SOFTWARE OR THE USE OR OTHER DEALINGS IN THE
SOFTWARE. Except as contained in this notice, the name of a copyright holder shall not be used in advertising or otherwise to
promote the sale, use or other dealings in this Software without prior written authorization of the copyright holder.
Page 3

Apache Tomcat Copyright © 1999-2013, The Apache Software Foundation
Sun, Sun Microsystems, Solaris, Java and JavaServer Pages are trademarks or registered trademarks of Oracle Corporation. UNIX
is a registered trademark in the United States and other countries, exclusively licensed through 'The Open Group'. Microsoft,
Windows, WindowsNT, and Win32 are registered trademarks of Microsoft Corporation. Linux is a registered trademark of Linus
Torvalds. All other product names mentioned herein and throughout the entire web site are trademarks of their respective owners.
"Apache Tomcat" and "Tomcat" are trademarks of the Apache Soft ware Foundation. Use of these trademarks is subject to the
terms of section 6 of Apache License, Version 2.0 (current)
.
3
10/31/13 P1058563-003
Page 4

4
Notes • ____________________________________________________________________
__________________________________________________________________________
__________________________________________________________________________
__________________________________________________________________________
__________________________________________________________________________
__________________________________________________________________________
__________________________________________________________________________
__________________________________________________________________________
__________________________________________________________________________
__________________________________________________________________________
P1058563-003 10/31/13
Page 5

Contents
About This Document . . . . . . . . . . . . . . . . . . . . . . . . . . . . . . . . . . . . . . . . . . . . . . . 7
Who Should Use This Document . . . . . . . . . . . . . . . . . . . . . . . . . . . . . . . . . . . . . . . . . . 8
How This Document Is Organized . . . . . . . . . . . . . . . . . . . . . . . . . . . . . . . . . . . . . . . . . . 8
Document Conventions . . . . . . . . . . . . . . . . . . . . . . . . . . . . . . . . . . . . . . . . . . . . . . . . . . 9
Introduction . . . . . . . . . . . . . . . . . . . . . . . . . . . . . . . . . . . . . . . . . . . . . . . . . . . . . . 11
Overview . . . . . . . . . . . . . . . . . . . . . . . . . . . . . . . . . . . . . . . . . . . . . . . . . . . . . . . . . . . . 12
What the AirWatch Connector Does . . . . . . . . . . . . . . . . . . . . . . . . . . . . . . . . . . . . . . . 12
Supported Printers . . . . . . . . . . . . . . . . . . . . . . . . . . . . . . . . . . . . . . . . . . . . . . . . . . . . . 12
Supported Operating Systems . . . . . . . . . . . . . . . . . . . . . . . . . . . . . . . . . . . . . . . . . . . 12
Installation . . . . . . . . . . . . . . . . . . . . . . . . . . . . . . . . . . . . . . . . . . . . . . . . . . . . . . . 13
Installing in a Windows Operating System . . . . . . . . . . . . . . . . . . . . . . . . . . . . . . . . . . 14
Installation Steps . . . . . . . . . . . . . . . . . . . . . . . . . . . . . . . . . . . . . . . . . . . . . . . . . . . . . . 15
Configuring Printers with WebLink . . . . . . . . . . . . . . . . . . . . . . . . . . . . . . . . . . . 37
Configuring Weblink . . . . . . . . . . . . . . . . . . . . . . . . . . . . . . . . . . . . . . . . . . . . . . . . . . . 38
Using AirWatch Connector . . . . . . . . . . . . . . . . . . . . . . . . . . . . . . . . . . . . . . . . . 43
Printer Discovery . . . . . . . . . . . . . . . . . . . . . . . . . . . . . . . . . . . . . . . . . . . . . . . . . . . . . . 44
Organizing Printers . . . . . . . . . . . . . . . . . . . . . . . . . . . . . . . . . . . . . . . . . . . . . . . . . . . . 45
Profiles . . . . . . . . . . . . . . . . . . . . . . . . . . . . . . . . . . . . . . . . . . . . . . . . . . . . . . . . . . . . . . 49
Updating Printer Firmware and Files . . . . . . . . . . . . . . . . . . . . . . . . . . . . . . . . . . . . . . . 52
Checking Printer Status . . . . . . . . . . . . . . . . . . . . . . . . . . . . . . . . . . . . . . . . . . . . . . . . . 55
10/31/13 P1058563-003
Page 6

Contents
6
T roubleshooting . . . . . . . . . . . . . . . . . . . . . . . . . . . . . . . . . . . . . . . . . . . . . . . . . . 57
Troubleshooting . . . . . . . . . . . . . . . . . . . . . . . . . . . . . . . . . . . . . . . . . . . . . . . . . . . . . . . 58
SSL/TLS Certificate Errors . . . . . . . . . . . . . . . . . . . . . . . . . . . . . . . . . . . . . . . . . . . . . . 60
Other Typical Errors . . . . . . . . . . . . . . . . . . . . . . . . . . . . . . . . . . . . . . . . . . . . . . . . . . . . 62
Troubleshooting . . . . . . . . . . . . . . . . . . . . . . . . . . . . . . . . . . . . . . . . . . . . . . . . . . . . . . . 63
HTTP Messages . . . . . . . . . . . . . . . . . . . . . . . . . . . . . . . . . . . . . . . . . . . . . . . . . . . . . . 64
WebLink Set/Get/Do Commands . . . . . . . . . . . . . . . . . . . . . . . . . . . . . . . . . . . . . 65
Introduction to SGD Commands . . . . . . . . . . . . . . . . . . . . . . . . . . . . . . . . . . . . . . . . . . 66
weblink.enable . . . . . . . . . . . . . . . . . . . . . . . . . . . . . . . . . . . . . . . . . . . . . . . . . . . . . . . 67
weblink.ip.conn[1|2].authentication.add . . . . . . . . . . . . . . . . . . . . . . . . . . . . . . . . . . . . 68
weblink.ip.conn[1|2].authentication.entries . . . . . . . . . . . . . . . . . . . . . . . . . . . . . . . . . 70
weblink.ip.conn[1|2].authentication.remove . . . . . . . . . . . . . . . . . . . . . . . . . . . . . . . . . . 71
weblink.ip.conn[1|2].enable . . . . . . . . . . . . . . . . . . . . . . . . . . . . . . . . . . . . . . . . . . . . 72
weblink.ip.conn[1|2].location . . . . . . . . . . . . . . . . . . . . . . . . . . . . . . . . . . . . . . . . . . . 73
weblink.ip.conn[1|2].maximum_simultaneous_connections . . . . . . . . . . . . . . . . . . . . 74
weblink.ip.conn[1|2].proxy . . . . . . . . . . . . . . . . . . . . . . . . . . . . . . . . . . . . . . . . . . . . . 75
weblink.ip.conn[1|2].retry_interval . . . . . . . . . . . . . . . . . . . . . . . . . . . . . . . . . . . . . . . . 77
weblink.ip.conn[1|2].test.location . . . . . . . . . . . . . . . . . . . . . . . . . . . . . . . . . . . . . . . . . 78
weblink.ip.conn[1|2].test.retry_interval . . . . . . . . . . . . . . . . . . . . . . . . . . . . . . . . . . . . 80
weblink.ip.conn[1|2].test.test_on . . . . . . . . . . . . . . . . . . . . . . . . . . . . . . . . . . . . . . . . . 81
weblink.logging.clear . . . . . . . . . . . . . . . . . . . . . . . . . . . . . . . . . . . . . . . . . . . . . . . . . . 83
weblink.logging.entries . . . . . . . . . . . . . . . . . . . . . . . . . . . . . . . . . . . . . . . . . . . . . . . . . 84
weblink.logging.max_entries . . . . . . . . . . . . . . . . . . . . . . . . . . . . . . . . . . . . . . . . . . . . 85
weblink.printer_reset_required . . . . . . . . . . . . . . . . . . . . . . . . . . . . . . . . . . . . . . . . . . . 87
weblink.restore_defaults . . . . . . . . . . . . . . . . . . . . . . . . . . . . . . . . . . . . . . . . . . . . . . . . 88
P1058563-003 10/31/13
Page 7

About This Document
This section provides you with contact information, documen t struc ture and organization, and
additional reference documents.
Contents
Who Should Use This Document. . . . . . . . . . . . . . . . . . . . . . . . . . . . . . . . . . . . . . . . . . . . 8
How This Document Is Organized . . . . . . . . . . . . . . . . . . . . . . . . . . . . . . . . . . . . . . . . . . . 8
Document Conventions . . . . . . . . . . . . . . . . . . . . . . . . . . . . . . . . . . . . . . . . . . . . . . . . . . . 9
10/31/13 P1058563-003
Page 8

About This Document
8
Who Should Use This Document
Who Should Use This Document
This User Guide is intended for use by any person who needs to install, perform routine
maintenance, upgrade, or troubleshoot proble ms with the Zebra Airwatch Connector software.
How This Document Is Organized
The User Guide is set up as follows:
Section Description
Introduction This section provides general information about
Installation This section outlines the system requirements for
Configuring Printers with WebLink This section describes basic, network, and firewall
the Zebra AirWatch Connector.
installation and provides specific details for the
installation of Zebra AirWatch Connector.
configurations for printers connected to Zebra
AirWatch Connector.
Using AirWatch Connector This section provides specific information about
organizing and managing printers via Zebra
AirWatch Connector.
Troubleshooting This section provides troubleshooting information
about the Zebra AirWatch Connector.
WebLink Set/Get/Do Commands This section describes the Set/Get/Do commands,
parameters, and values that are available with
Zebra AirWatch Connector.
P1058563-003 10/31/13
Page 9

Document Conventions
The following conventions are used throughout this document to convey certain information.
Alternate Color (online only) Cross-references contain hot links to other sections in this
guide. If you are viewing this guide online in .p df format, you can click the cross-reference
(blue text) to jump directly to its location.
Command Line Examples Command line examples appear in Courier New font. For
example, type
Files and Directories File names and directories appear in Courier New font. For
example, the
Icons Used
Important • Advises you of informatio n that is essential to complete a task.
ZTools to get to the Post-Install scripts in the bin directory.
Zebra<version number>.tar file and the /root directory.
About This Document
Document Conventions
9
Note • Indicates neutral or positive information that emphasizes or supplements important
points of the main text.
Example • Provides an example, often a scenario, to better clarify a section of text.
10/31/13 P1058563-003
Page 10

About This Document
Notes • ___________________________________________________________________
__________________________________________________________________________
__________________________________________________________________________
__________________________________________________________________________
__________________________________________________________________________
__________________________________________________________________________
__________________________________________________________________________
__________________________________________________________________________
__________________________________________________________________________
__________________________________________________________________________
10
Document Conventions
P1058563-003 10/31/13
Page 11

Introduction
This section provides general information about the Zebra AirWatch Connector.
Contents
Overview . . . . . . . . . . . . . . . . . . . . . . . . . . . . . . . . . . . . . . . . . . . . . . . . . . . . . . . . . . . . . 12
What the AirWatch Connector Does . . . . . . . . . . . . . . . . . . . . . . . . . . . . . . . . . . . . . . . . 12
Supported Printers. . . . . . . . . . . . . . . . . . . . . . . . . . . . . . . . . . . . . . . . . . . . . . . . . . . . . . 12
Supported Operating Systems. . . . . . . . . . . . . . . . . . . . . . . . . . . . . . . . . . . . . . . . . . . . . 12
10/31/13 P1058563-003
Page 12

Introduction
12
Overview
Overview
The Zebra AirWatch Connector partners with the AirWatch server to manage your Zebra
Link-OS
Zebra AirWatch Connector will:
™ printers.
• Monitor printers and report issues to the AirWatch system
• Monitor printer alerts
• Enable administrators to send files and operating system updates to the printer via the
AirWatch server console
What the AirWatch Connector Does
Zebra AirW atch Connector sends alert s to AirWatch, watches printers coming online, monitors
the status of the printers, and sends files and set tings to the printers.
Supported Printers
•QLn320™ Ethernet and Wi-Fi
•QLn220™ Ethernet and Wi-Fi
•QLn420
•iMZ320™ Wi-Fi
•iMZ220™ Wi-Fi
• ZT200
•ZD500R™ Ethernet and Wi-Fi
™
Ethernet and Wi-Fi
™
Series Ethernet and Wi-Fi
Supported Operating Systems
The Zebra AirWatch Connector supports the 32-bit or 64-bit versions of the following:
•Windows
• Windows Server 2008 R2 (also known as Windows 7 Server)
®
Server 2008
P1058563-003 10/31/13
Page 13

Installation
This section outlines the system requirements for installation and provides specific details for
the installation of Zebra AirWatch Connector.
Contents
Installing in a Windows Operating System . . . . . . . . . . . . . . . . . . . . . . . . . . . . . . . . . . . 14
Minimum System Requirements . . . . . . . . . . . . . . . . . . . . . . . . . . . . . . . . . . . . . . . . . 14
Installation Steps . . . . . . . . . . . . . . . . . . . . . . . . . . . . . . . . . . . . . . . . . . . . . . . . . . . . . . . 15
Step 1: Install an AirWatch Server . . . . . . . . . . . . . . . . . . . . . . . . . . . . . . . . . . . . . . . 15
Step 2: Install Software . . . . . . . . . . . . . . . . . . . . . . . . . . . . . . . . . . . . . . . . . . . . . . . . 15
Step 3: Set Up Zebra AirWatch Connector . . . . . . . . . . . . . . . . . . . . . . . . . . . . . . . . . 26
Step 4: Create a Certificate . . . . . . . . . . . . . . . . . . . . . . . . . . . . . . . . . . . . . . . . . . . . . 29
Step 5: Set Up Printers . . . . . . . . . . . . . . . . . . . . . . . . . . . . . . . . . . . . . . . . . . . . . . . . 32
Step 6: Test a Printer . . . . . . . . . . . . . . . . . . . . . . . . . . . . . . . . . . . . . . . . . . . . . . . . . . 33
10/31/13 P1058563-003
Page 14

Installation
14
Installing in a Windows Operating System
Installing in a Windows Operating System
Minimum System Requirements
The Zebra AirWatch Connector supports the 32-bit or 64-bit versions of the following:
• Windows Server 2008
• Windows Server 2008 R2 (also known as Windows 7 Server)
Note • This system should be installed on a “clean” Windows Server. A clean system is one
that does not already include Apache Tomcat
Tomcat will be installed as part of this installation procedure and must be the only Tomcat
version resident on this system. Multiple versions of Tomcat will encounter conflicts.
™
or any other server software installation.
P1058563-003 10/31/13
Page 15

Installation Steps
Step 1: Install an AirWatch Server
1. Contact AirWatch.
a. Contact AirWatch Customer Support to obtain an AirWatch version 6.3 or later
installation.
b. Obtain the AirWatch Endpoint URL from your AirWatch support representative.
Note • The URL you will be searching for usually starts with the deviceservices
server. Ask for the Zebra printer management URL.
Example • https://airwatchportals.com/deviceservices/peripheralservice/v1/register
Step 2: Install Software
1. Install Zebra AirWatch Connector software.
a. Open a web browser.
b. Download and install Java Runtime version 7 or greater:
http://www.java.com/en/download/index.jsp
c. Download and install the Java Cryptography Extension:
http://www.oracle.com/technetwork/java/javase/downloads/jce-7-download-
432124.html
d. Download and install the latest version of Open SSL:
http://slproweb.com/products/Win32OpenSSL.html
Installation
Installation Steps
15
10/31/13 P1058563-003
Page 16
Installation
16
Installation Steps
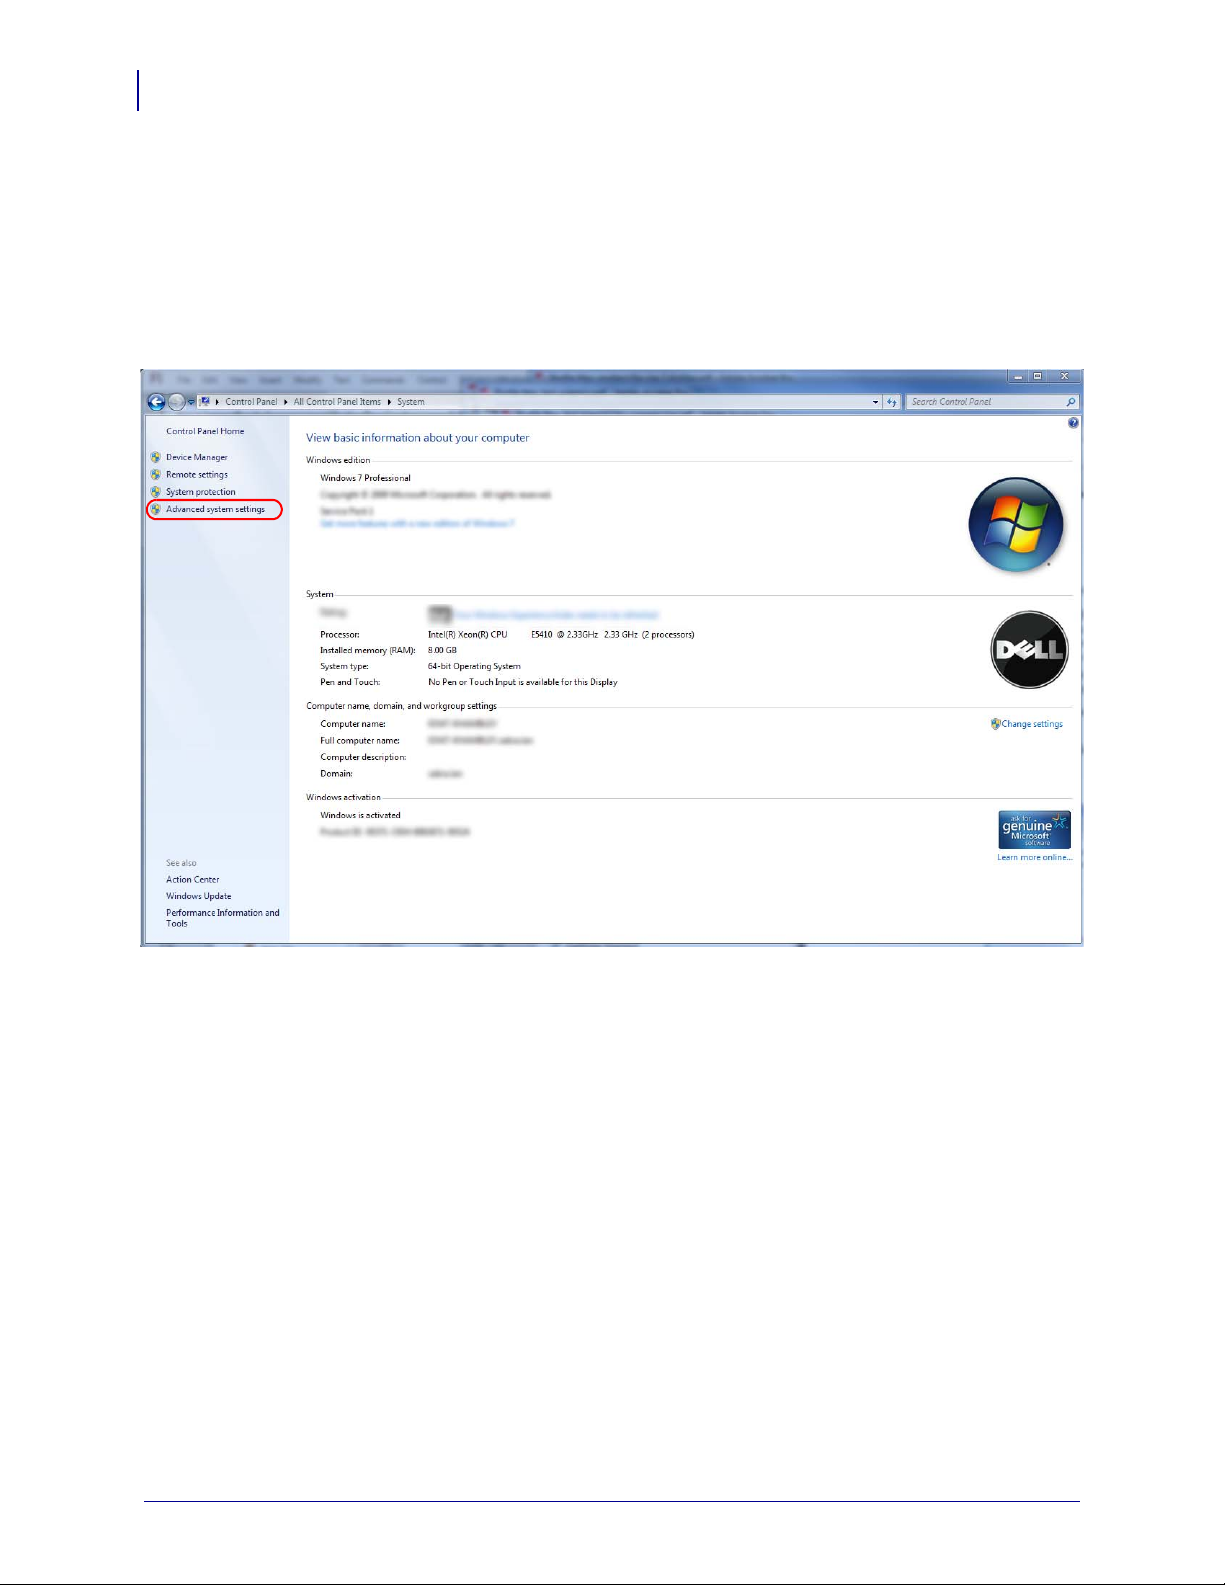
2. Once Java is installed, the JAVA_HOME environment variable needs to be set.
a. Open the Control Panel.
b. Select System.
c. See Figure 1. Click on Advanced system settings.
Figure 1 • Control Panel > System
P1058563-003 10/31/13
Page 17

d. See Figure 2. Click on the Advanced tab.
e. Click on Environment Variables.
Figure 2 • Advanced Tab
Installation
Installation Steps
17
10/31/13 P1058563-003
Page 18
Installation
18
Installation Steps
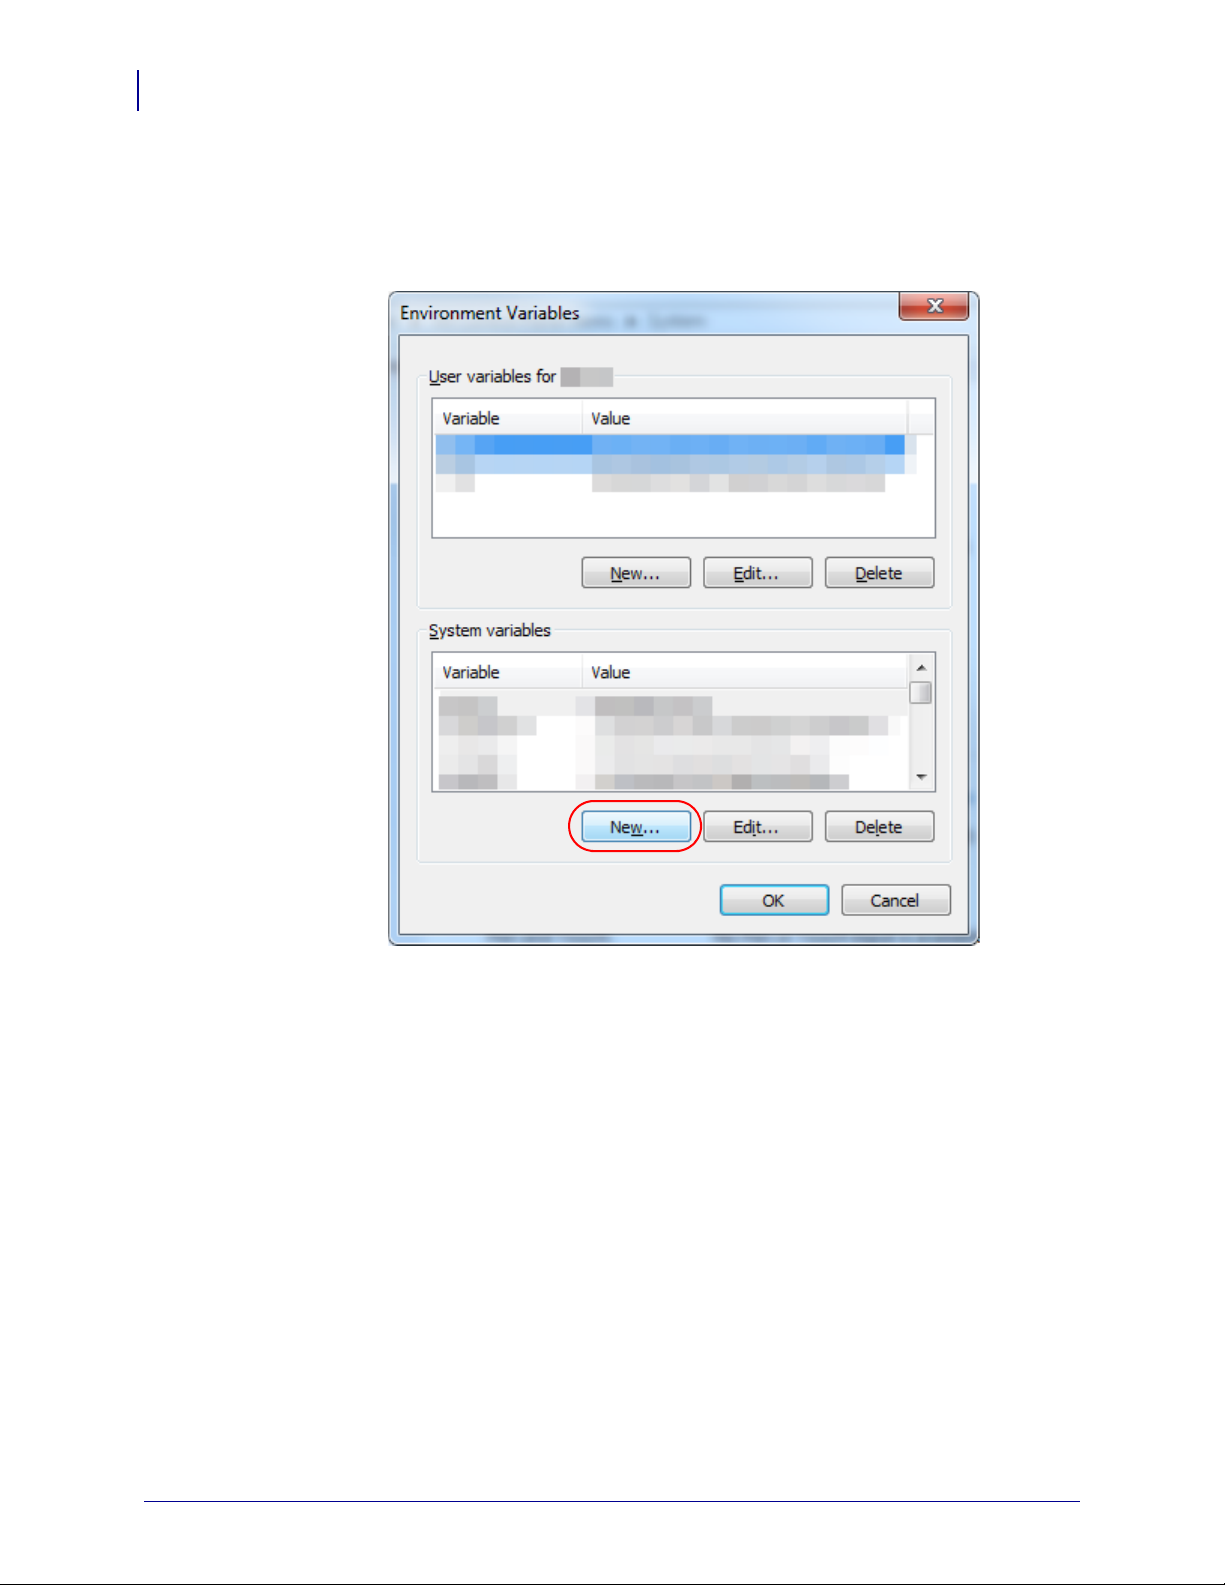
f. See Figure 3. To create a new environment variable under System variables, click on
New....
Figure 3 • Environment Variables Dialog
P1058563-003 10/31/13
Page 19
Installation
Installation Steps
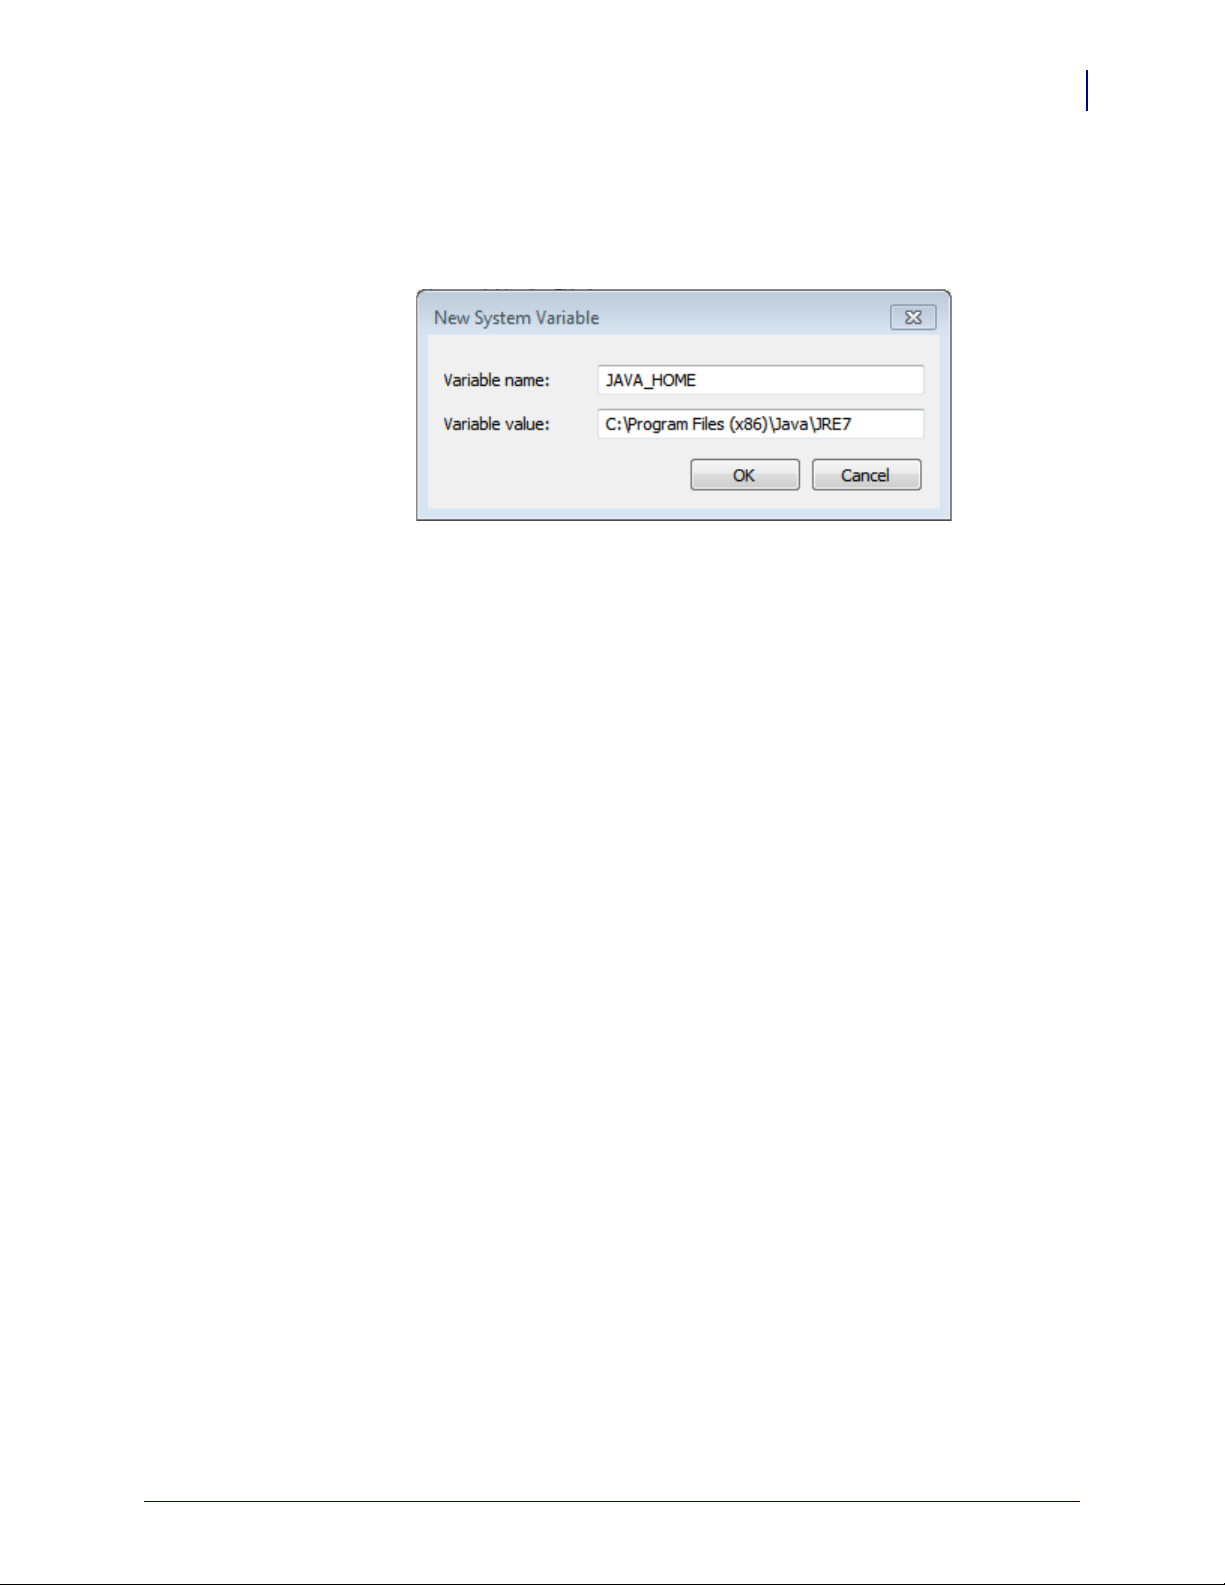
g. See Figure 4. Enter the Variable name and Variable value shown below in the
appropriate boxes.
Figure 4 • New System Variable
h. Click OK to save the new system variable and value.
19
10/31/13 P1058563-003
Page 20
Installation
20
Installation Steps
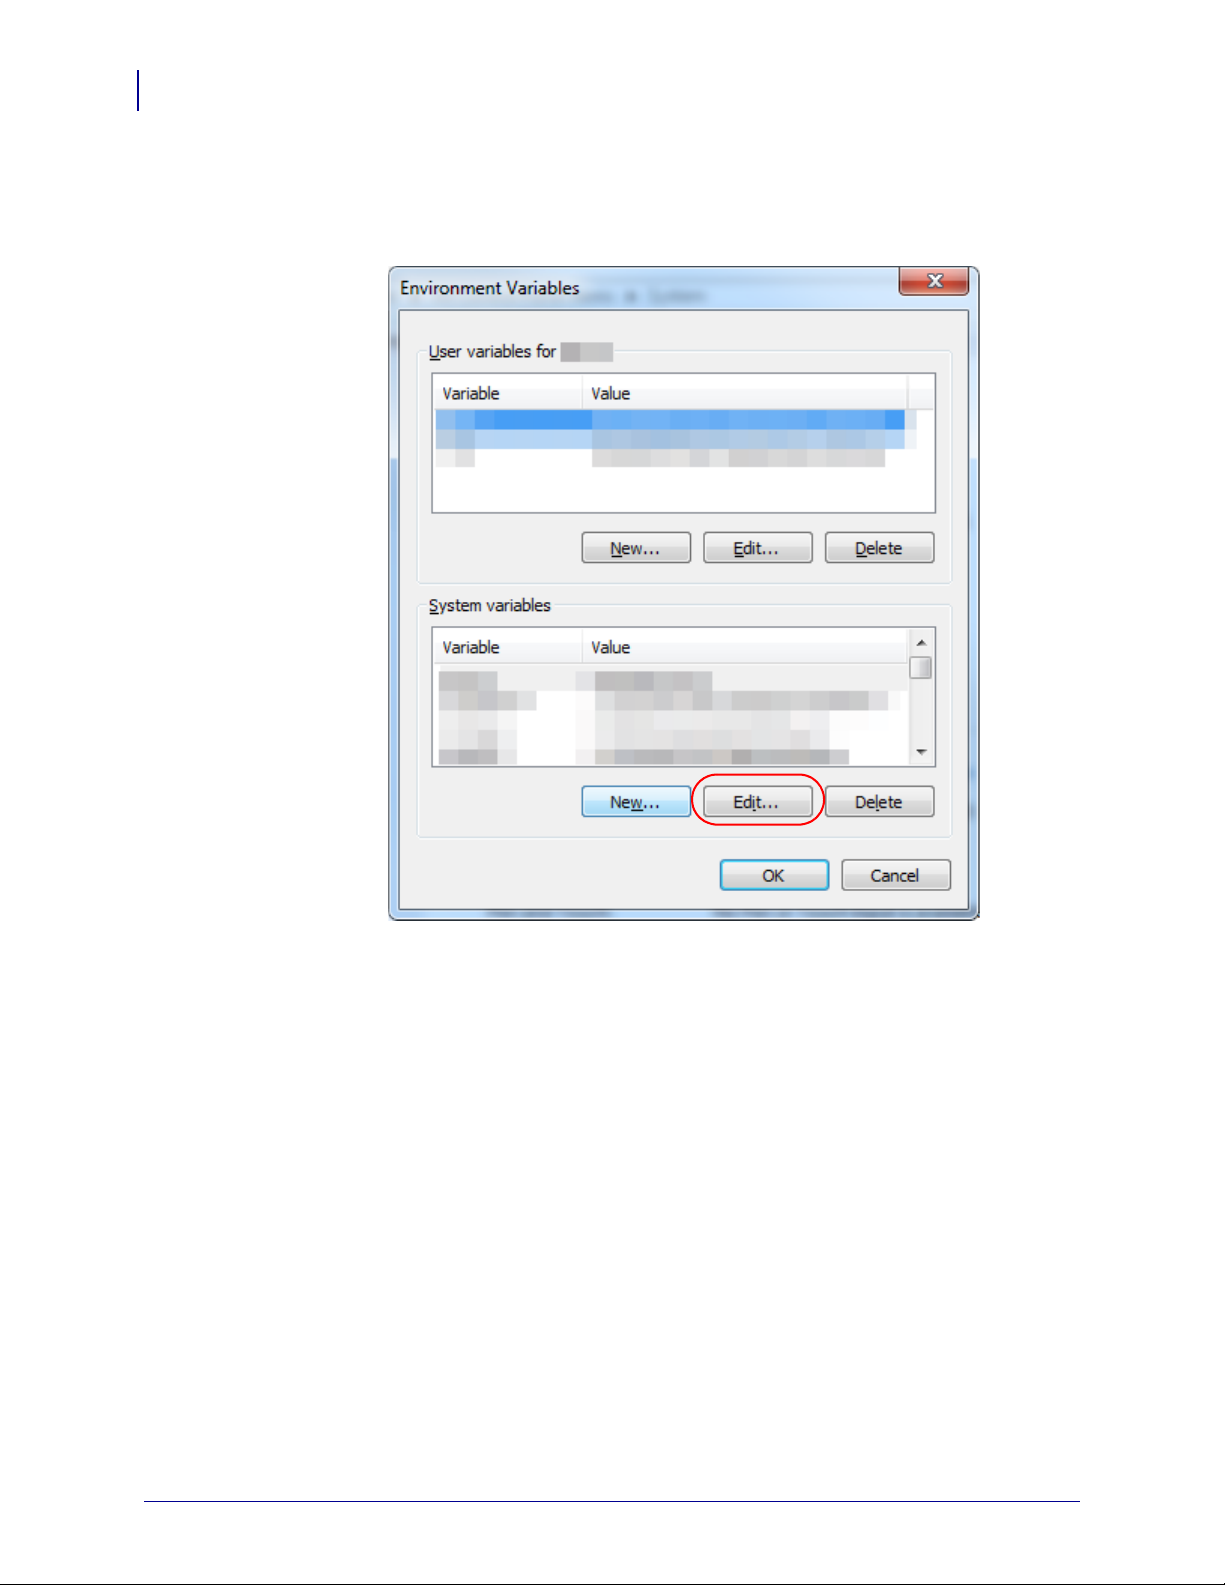
i. See Figure 5. To edit the path variable under System variables, click on Edit....
Figure 5 • Environment Variables Dialog
P1058563-003 10/31/13
Page 21

Installation
Installation Steps
j. See Figure 6. Add the following lines to the end of the Variable value:
C:\Program Files (x86)\Java\jre7\bin; C:\openssl\bin;
Figure 6 • New System Variable
k. Click OK to save the system variable and value.
l. Navigate to www.zebra.com/linkos and download the Zebra AirWatch Connector.
21
3. Run install.exe.
a. You must accept the terms of the License Agreement to continue.
b. Click Next.
10/31/13 P1058563-003
Page 22
Installation
22
Installation Steps
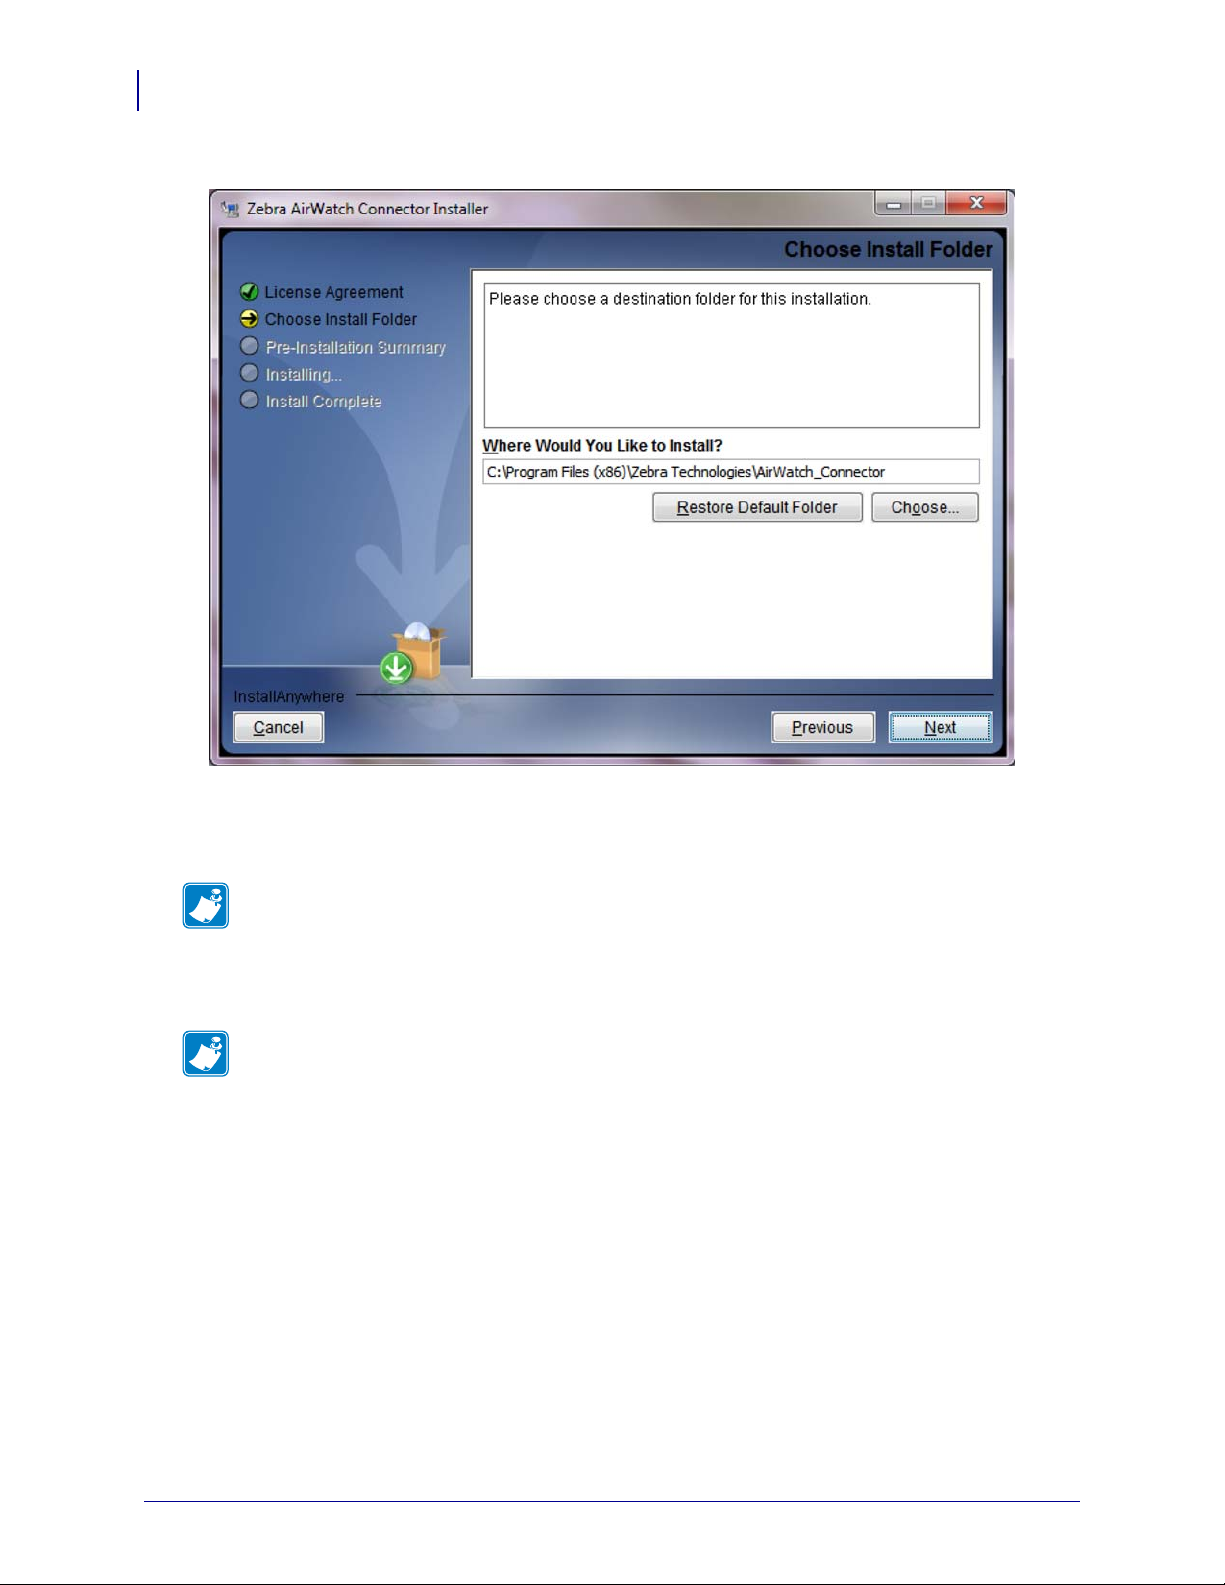
4. Determine the location to install the Zebra AirWatch Connector.
5. Click Next.
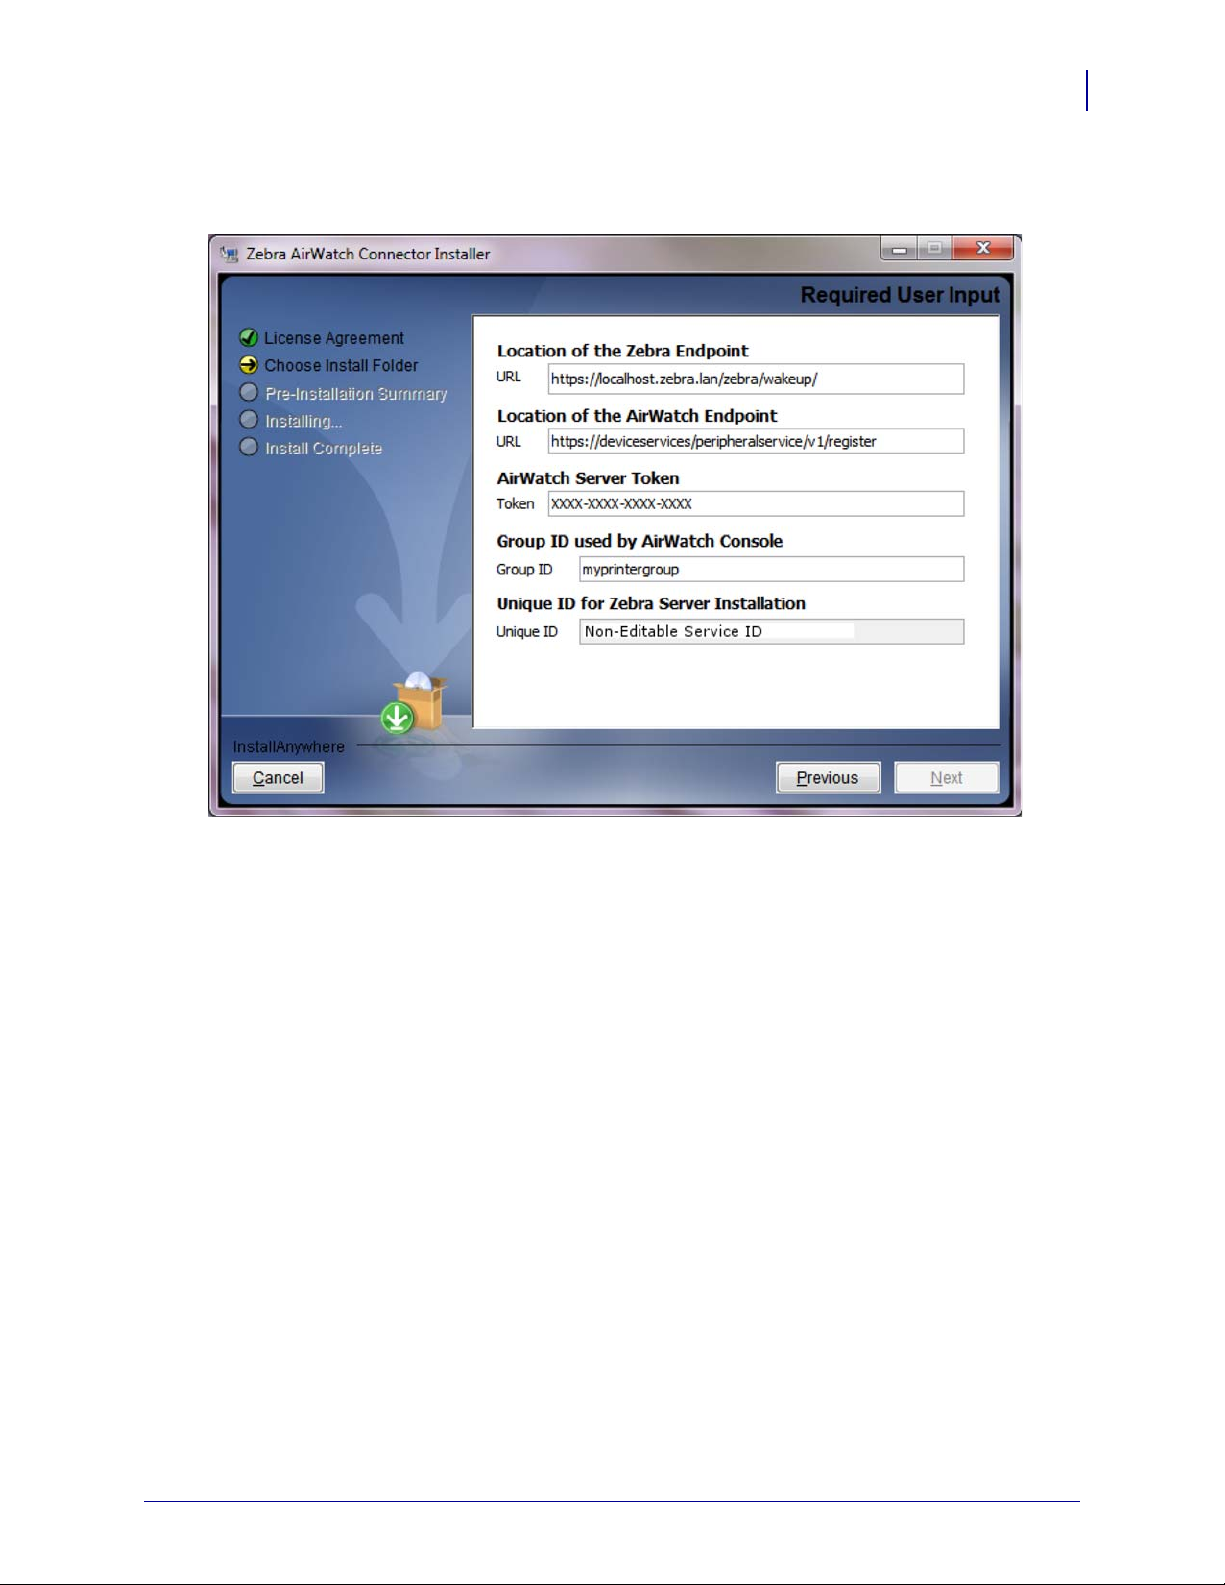
6. The installer will fill in the Zebra Endpoint URL.
Note • If the URL does not match your DNS server name, change the DNS name to your
server name.
Example • http://zserver.abccompanyinc.com/zebra_airwatch_connector/zebra/wakeup
7. Enter the AirWatch Endpoint URL (obtained during the AirWatch server installation).
Note • The URL starts with the deviceservices server. Ask for the Zebra printer
management URL.
Example • https://airwatchportals.com/deviceservices/peripheralservice/v1/register
P1058563-003 10/31/13
Page 23
Installation Steps
8. Enter the string XXXX-XXXX-XXXX-XXXX for the AirWatch Server token.
9. Enter the base Group ID for your company from your AirWatch installation.
Installation
23
10. Click Next.
10/31/13 P1058563-003
Page 24
Installation
24
Installation Steps
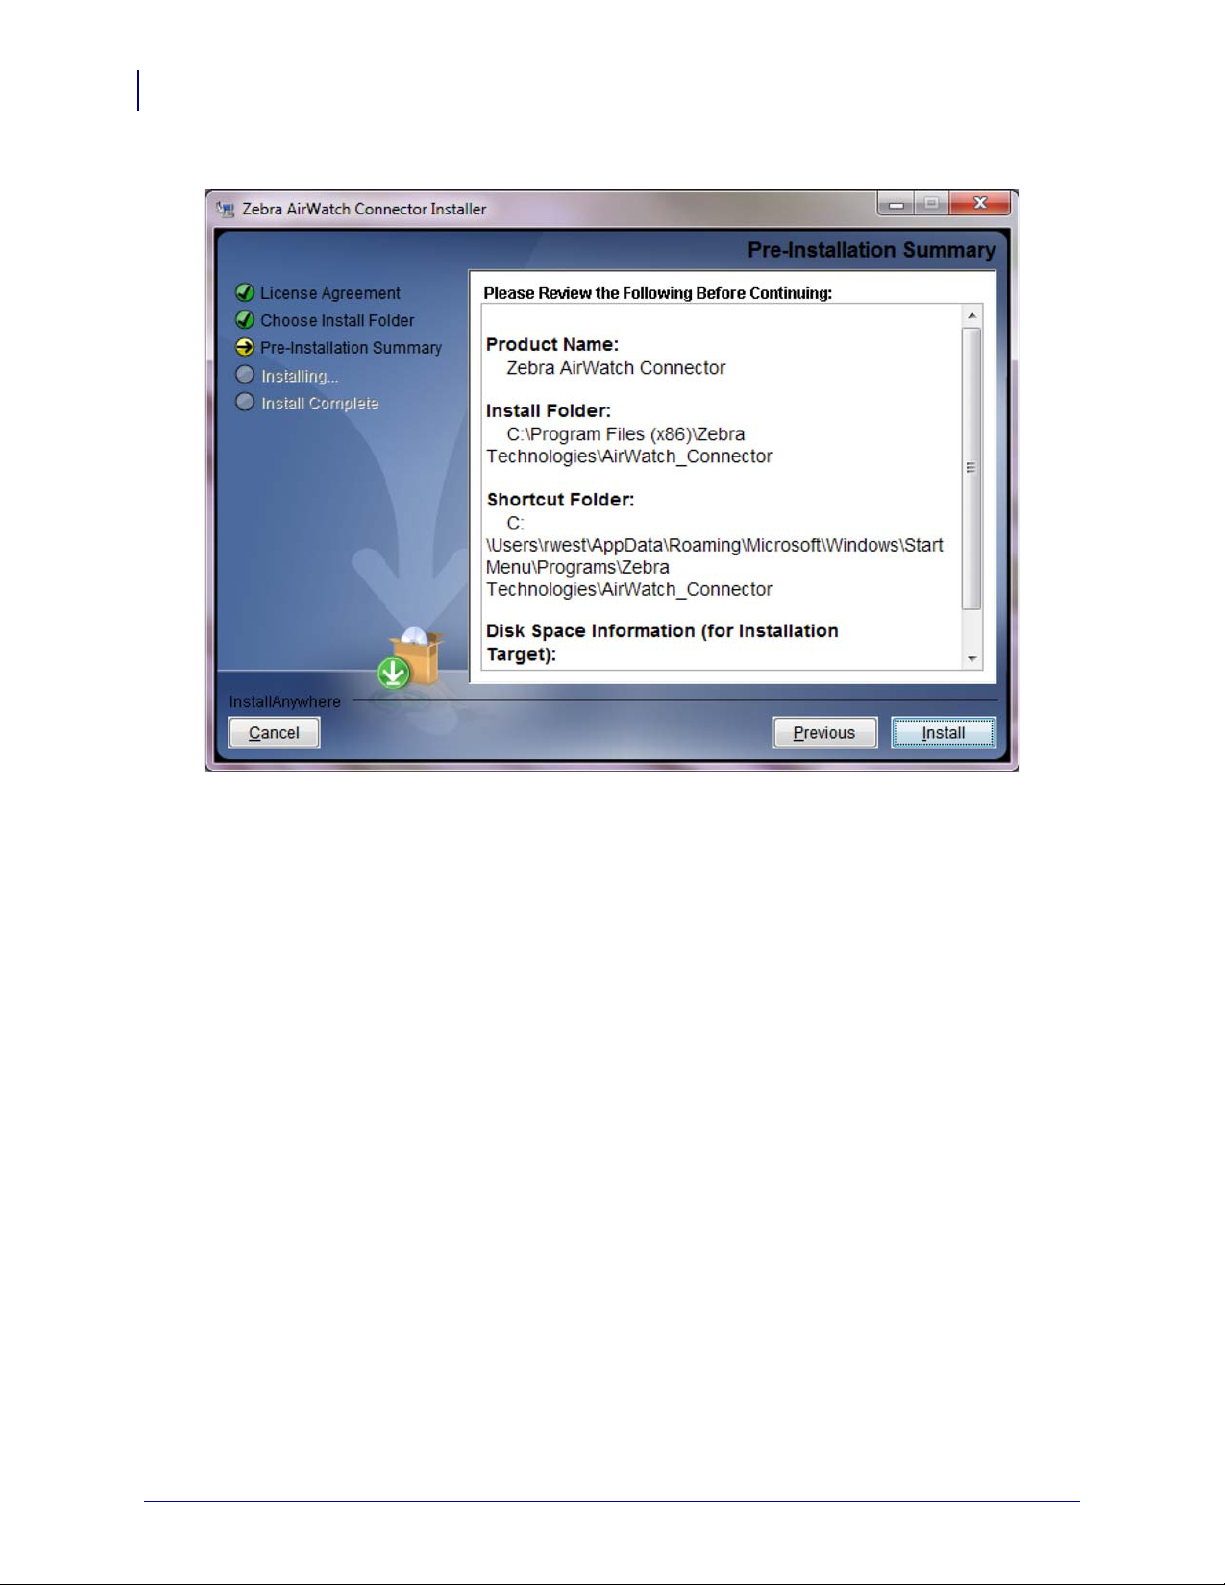
11. Verify that the wizard summary file locations are correct as shown.
P1058563-003 10/31/13
Page 25

12. Click Install.
Installation
Installation Steps
25
13. Click Done.
10/31/13 P1058563-003
Page 26

Installation
26
Installation Steps
Step 3: Set Up Zebra AirWatch Connector
1. Set up the Zebra AirWatch Connector within the AirWatch console.
a. Open a web browser.
b. Log into the AirWatch console.
2. Under Menu, select Peripherals > Printer Management (shown in red).
P1058563-003 10/31/13
Page 27
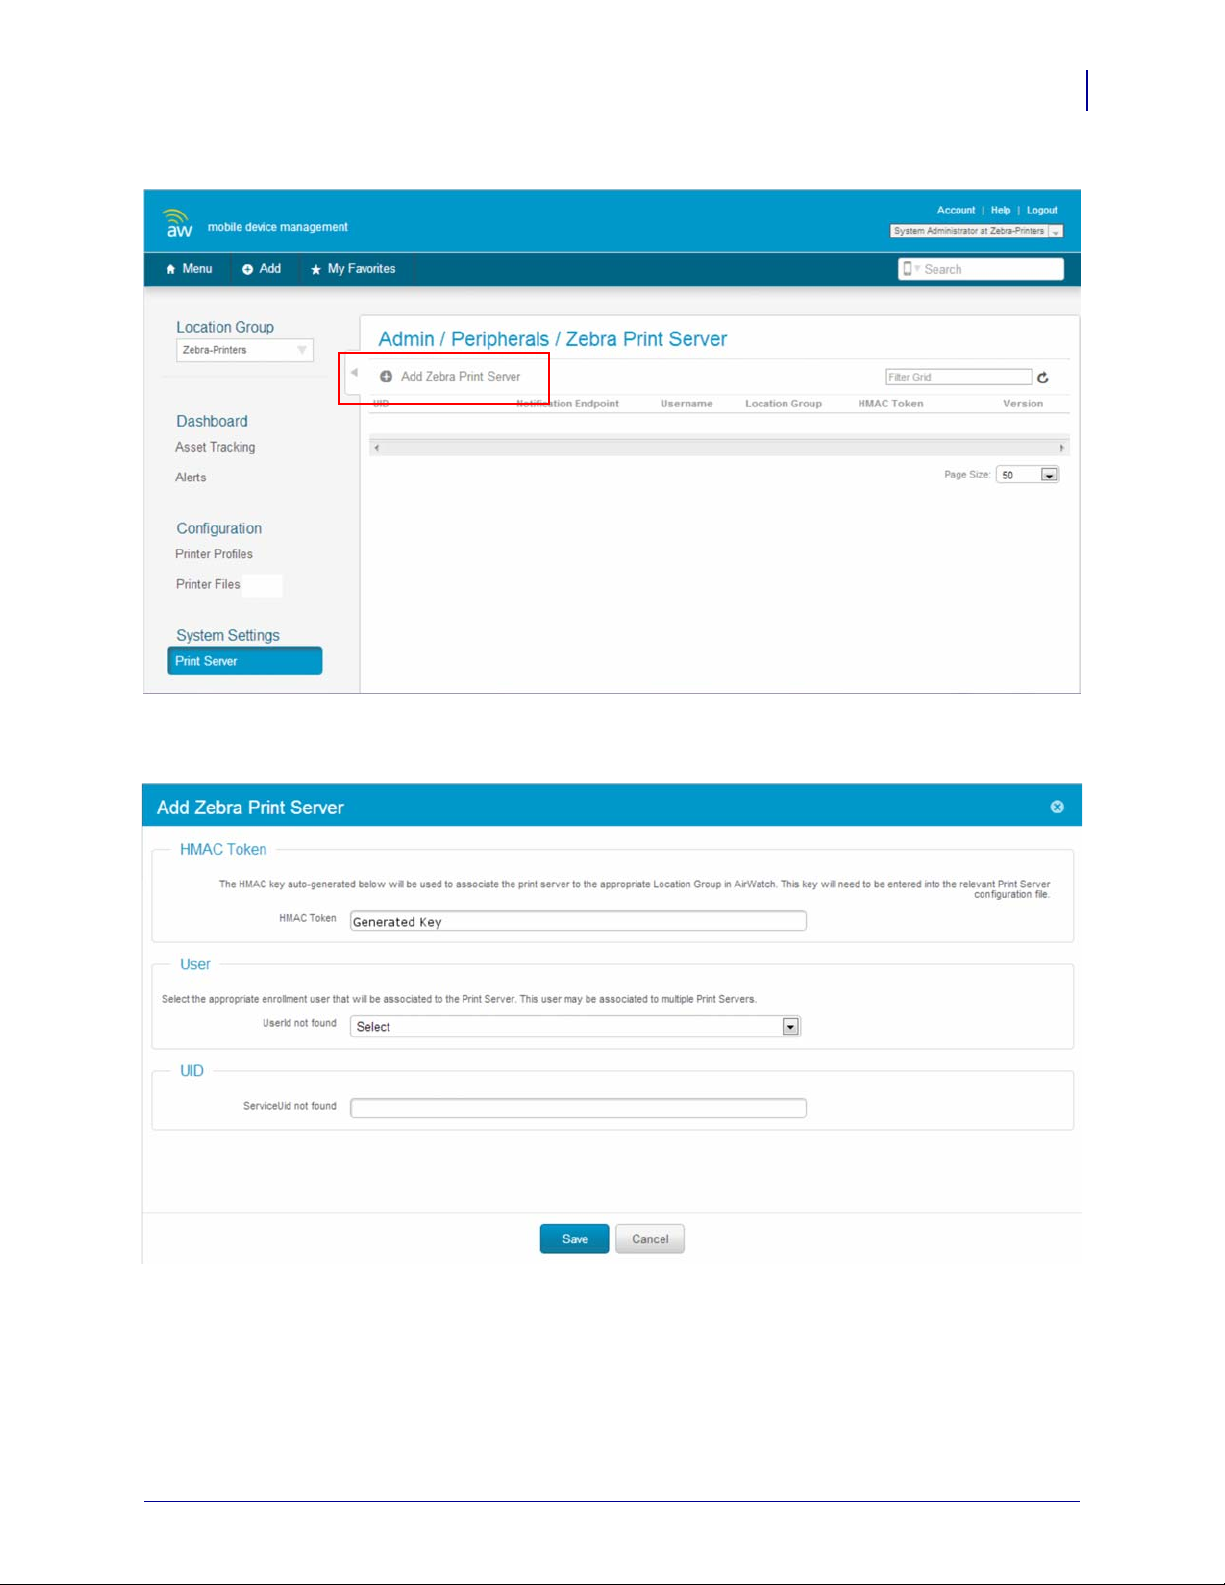
3. Under System Settings, select Print Server.
Installation
Installation Steps
27
4. Select Add Zebra Print Server (see the preceding graphic and area in red).
Note the HMAC token. (You will need the token later in this procedure.)
5. Enter your user information.
6. Enter the Zebra ServiceUID in the UID section.
10/31/13 P1058563-003
Page 28

Installation
28
Installation Steps
7. Click Save.
The Zebra server will be shown as Pending Registration.
8. On your server, navigate to the install location for Zebra AirWatch Connector (default is
C:\Program Files\Zebra Technologies\AirWatch_Connector).
9. Go to the resources folder:
.\apache-tomcat-7.0.33\webapps\zebra_airwatch_connector\resources
10. Open the zebraAirwatch.options file with any text editor.
11. Change the XXXX-XXXX-XXXX-XXXX string (key value is "AirWatchToken")to the
AirW atch HMA C token you just go t from the Add Zebra Print Server dial og box (in step 4
on page 27).
12. Save the file.
P1058563-003 10/31/13
Page 29

Step 4: Create a Certificate
1. Create a directory named zebra_certs.
This directory may reside anywhere you choose (desktop, etc.).
2. From the Start menu, run cmd.exe as the administrator.
Opens a DOS prompt.
3. Navigate to your zebra_certs directory.
Run the following commands from this directory:
a. Type: set RANDFILE=.rnd
b. On the command line, type openssl, and then press Enter.
4. Enter the following command and fill in the fields based on the information provided
below:
a. Type: genrsa -out zserver.abccompanyinc.com.key 2048, and then
Enter.
press
where zserver.abccompanyinc.com = full DNS name of the server
Installation
Installation Steps
29
Note • This command generates the key and is part of the security for the server
communications. DO NOT give this information out to anyone.
b. Enter th e foll owin g co mmand and fill in the fields based on the information pro vi de d
below:
req -new -subj
"/C=xx/ST=yyyyy/L=aaaaa/O=jjjjj/OU=rrrrrr/emailAddress=ss
sss/CN=uuuuu" -key uuuuu.key -out uuuuu.csr
•where xx: two digit Country Code
•where yyyyy: State name where the server (or company) resides
•where aaaaa: C ity or town name
•where jjjjj: Organization or company name
•where rrrrrr: Organizational unit name
•where sssss: the contact email address for the certificate creator
•where uuuuu: full DNS name of the server
Note • The DNS name must match the DNS name supplied to the printer as the
location URL as the Zebra AirWatch Connector.
Example • Listed below is an example of a complete certificate creation request.
req -new -subj "/C=US/ST=Illinois/L=Anytown/O=ABC
Company Inc/OU=IT
Team/emailAddress=John@abccompanyinc.com/CN=zserver.abcc
ompanyinc.com" -key zserver.abccompanyinc.com.key -out
zserver.abccompanyinc.com.csr
10/31/13 P1058563-003
Page 30

Installation
30
Installation Steps
5. Email the certificate file (.csr file) to softpm@zebra.com.
This certificate will be signed and sent back to you. Once you receive a signed copy,
proceed to the next step.
6. Copy the zip file containing the signed certificate files to the zebra_certs directory.
7. Extract the signed certificate files into the same directo r y.
Note • You should receive four certificate files: one that matches the one you sent and
three with the names ZebraCAChain.
8. This step will convert the certificate and ask you to set a passkey. Enter the following
command and fill in the fields based on the information provided below:
pkcs12 -export -in zserver.abccompanyinc.com.cer -inkey
zserver.abccompanyinc.com.key -out
zserver.abccompanyinc.com.p12 -name tomcat -CAfile
ZebraCAChain.cer -caname root -chain
•where zserver.abccompanyinc.com: full DNS name of the server
• This command will ask you to set a passkey.
9. Enter a standard alphanumeric passkey, but do not include any special characters (for
example, do not use characters such as $, %, &, or @). The passkey should be something
easy to remember, but should not be distributed to anyone.
10. Copy this file zserver.abccompanyinc.com.p12 to:
%TOMCAT_INSTALL_LOCATION%\tomcat7.0.33\conf directory
P1058563-003 10/31/13
Page 31

Installation
Installation Steps
11. Configure the Tomcat server to use the passkey (created in step 8) and the certificate file.
a. From the %TOMCAT_INSTALL_LOCATION%\tomcat7.0.33\conf directory,
edit the Tomcat server.xml file as follows:
•where %TOMCAT_INSTALL_LOCATION%: your installation directory location
b. Include the following text within the <Service> XML block:
<Service name=”Catalina”>
…
<Connector SSLEnabled="true" acceptorThreadCount="5"
clientAuth="want" keyAlias="tomcat"
keystoreFile="conf/zserver.abccompanyinc.com.p12"
keystorePass="YourPasskey" keystoreType="pkcs12"
maxConnections="-1" maxThreads="2500" port="443"
protocol="org.apache.coyote.http11.Http11NioProtocol"
scheme="https" secure="true" sessionTimeout="0"
socket.soKeepAlive="true" sslProtocol="TLS"/>
…
</Service>
31
•where zserver.abccompanyinc.com: full DNS name of the server
•where YourPasskey = passkey from step 8.
12. Run the following command from the zebra_certs directory:
a. %> keytool -importcert -file ZebraCAChain.cer -keystore
"%JRE_HOME%\lib\security\cacerts" -alias "ZebraCAChain"
•where %JRE_HOME%: local installation of the Java Runtime Environment (JRE)
• JRE default locations: C:\Program Files\Java\jre7 or
for a 32-bit version: C:\Program Files (x86)\Java\jre7
Note • The default password for the Java cacert keystore is changeit.
13. Verify the certificates were correctly installed by entering the following command:
keytool -keystore "%JRE_HOME%\lib\security\cacerts" ^
-alias "ZebraCAChain" -list
a. Enter keystore password (default password is changeit).
The console will show the following:
ZebraCAChain, Feb 18, 2013, trustedCertEntry,
Certificate fingerprint (MD5):
ED:D2:75:F3:84:5E:32:E7:82:5A:3C:4D:1A:B4:73:2C
14. From the Zebra Technologies AirWatch Connector directory, navigate to the tomcat/bin
directory.
10/31/13 P1058563-003
Page 32

Installation
32
Installation Steps
15. Open catalina.bat in a text editor.
a. Find the line that sets the JAVA_OPTS:
set JAVA_OPTS=%JAVA_OPTS% %LOGGING_MANAGER%
b. Edit the JAVA_OPTS line (above) to read as shown below:
set JAVA_OPTS=%JAVA_OPTS% %LOGGING_MANAGER% Djava.rmi.server.useCodebaseOnly=false
c. Find the next line that sets the JAVA_OPTS:
set JAVA_OPTS=%JAVA_OPTS% %LOGGING_CONFIG% -
d. Edit the JAVA_OPTS line (above) to read as shown below:
set JAVA_OPTS=%JAVA_OPTS% %LOGGING_CONFIG% Djava.rmi.server.useCodebaseOnly=false
e. Save this file.
16. Restart the Tomcat server by navigating to the Tomcat install directory and running the
bin/startup.bat file.
Step 5: Set Up Printers
1. Set up your printers to communicate with AirWatch:
a. Download the latest operating system for your printers from http://www.zebra.com
b. Using the ZDownloader Utility, install the firmware on your Zebra printers.
(To obtain a copy of the ZDownloader Utility, go to www.zebra.com/utilities.)
c. Using the Zebra Setup Utilities, configure your printer on your network.
d. Set up the printers based on the Configuring Printers with WebLink on page 37.
P1058563-003 10/31/13
Page 33

Step 6: Test a Printer
Request Settings from a Printer
In this section, you will test a printer to verify that the AirWatch console is able to request the
current settings from the printer.
1. Turn on the printer.
2. Log into the AirWatch console, if necessary.
Note • Once you are logged in, the printer appears on your console after approximately 60
seconds. (See figure below.)
Installation
Installation Steps
33
3. To see specific details about this printer, click on the Friendly Name of the printer.
The printer summary appears. If the printer settings appear on the screen, AirWatch is
receiving settings from the printer.
10/31/13 P1058563-003
Page 34

Installation
34
Installation Steps
P1058563-003 10/31/13
Page 35

Receiving Alerts from a Printer
In this section, you will test that the AirWatch console receives alerts from the printer.
1. Click the Alerts tab.
2. Open the media door on the printer.
3. Wait 10 seconds, and then refresh the AirWatch console display.
You should see the Head Open alert with the orange exclamation mark in the Status
column.
Installation
Installation Steps
35
4. Close the media door on the printer.
5. Wait 10 seconds, and then refresh the AirWatch console display.
You should see the Head Open alert with the blue check mark in the Status column. If the
alerts appear on the screen, you have verified that the printer is able to send alerts to the
AirWatch console.
Note • Both the Status icon and the Sample Time change on the Alerts screen.
10/31/13 P1058563-003
Page 36

Installation
Notes • ___________________________________________________________________
__________________________________________________________________________
__________________________________________________________________________
__________________________________________________________________________
__________________________________________________________________________
__________________________________________________________________________
__________________________________________________________________________
__________________________________________________________________________
__________________________________________________________________________
__________________________________________________________________________
36
Installation Steps
P1058563-003 10/31/13
Page 37

Configuring Printers
with WebLink
This section describes basic, network, and firewall configurations for printers connected to
Zebra AirWatch Connector.
Contents
Configuring Weblink. . . . . . . . . . . . . . . . . . . . . . . . . . . . . . . . . . . . . . . . . . . . . . . . . . . . . 38
Basic Configuration . . . . . . . . . . . . . . . . . . . . . . . . . . . . . . . . . . . . . . . . . . . . . . . . . . . 38
When a Proxy Server is Part of the Network Configuration. . . . . . . . . . . . . . . . . . . . . 38
When HTTP Authentication is Necessary . . . . . . . . . . . . . . . . . . . . . . . . . . . . . . . . . . 39
Additional Firewall Configuration . . . . . . . . . . . . . . . . . . . . . . . . . . . . . . . . . . . . . . . . . 40
Difference Between Conn1 and Conn2 . . . . . . . . . . . . . . . . . . . . . . . . . . . . . . . . . . . . 40
Enable Logging . . . . . . . . . . . . . . . . . . . . . . . . . . . . . . . . . . . . . . . . . . . . . . . . . . . . . . 40
Navigating the Log Output. . . . . . . . . . . . . . . . . . . . . . . . . . . . . . . . . . . . . . . . . . . . . . 41
10/31/13 P1058563-003
Page 38

Configuring Printers with WebLink
38
Configuring Weblink
Configuring Weblink
When any WebLink setting (with the exception of the logging settings) is adjusted either via
SNMP, SGD, or JSON it is required that the printer be reset before the new value takes effect.
weblink.printer_reset_required setting will be set to "yes" if there are any settings
The
that have been modified that require a printer reset.
Basic Configuration
To determine how much configuration is necessary, consider the following
questions:
• Is the remote server that the printer is attempting to connect to outside of the corporate
firewall?
• Does the firewall require a username and password to access the remote server?
• Does the printer require a proxy server to access the remote server?
• Does the firewall permit HTTPS connections initially, or does the printer need to connect
via HTTP first?
If the answer to any of these questions is ‘yes’, then more than the basic configuration may be
necessary. Depending upon the network environment that the printer is in, accessing the
remote server may only require that a few settings be set.
The minimum requirement is that the URL for the remo te server be set. For simplicity, assume
that only
conn1 is being used (this is the typical scenario). See also Difference Bet ween Conn1
and Conn2 on page 40.
To configure the printer to connect to the remote server:
1. Set weblink.ip.conn1.location to the URL of the remote server.
The URL must conform to the standards described in RFC3986
(http://www.ietf.org/rfc/rfc3986.txt). For example, if the remote servlet’s full URL is
https://www.examplecorpinc.com/zebra/weblink/
Configure the location setting as follows:
!U1setvar"weblink.ip.conn1.location"
"https://www.examplecorpinc.com/zebra/weblink/"
2. Reset the printer.
When the printer has an IP address, it will attempt to connect to the remote server. In the
event that the remote server does not indicate that the printer has connected, logging may
need to be enabled in order to determine the failure.
When a Proxy Server is Part of the Network Configuration
If a proxy server must be used to access the remote server, the printer’s proxy setting must be
set to connect to the server. There are typically four properties associated with a proxy server:
• The proxy server scheme:
• The proxy server address
P1058563-003 10/31/13
HTTP or HTTPS
Page 39

Configuring Printers with WebLink
Configuring Weblink
• The proxy server port (optional)
• The username and password for the proxy (optional)
To supply the address of the proxy server (assuming a default port and no
username/password), configure the proxy setting as follows:
!U1setvar"weblink.ip.conn1.proxy""https://my.internal.proxy/"
In this scenario, the proxy address is my.internal.proxyand the scheme is HTTPS. The default
port (1080) will be used. No username or passwo rd will b e used to a uthenticat e with t he proxy.
To specify an alternate port, configure the proxy as follows:
!U1setvar"weblink.ip.conn1.proxy""https://my.internal.proxy:3128/"
To specify a username and password configure the proxy as follows:
!U1setvar"weblink.ip.conn1.proxy""https://user:pass@my.internal.proxy/"
The proxy username, password, and the rest of the URL must follow the rules specified in
RFC3986 (
http://www.ietf.org/rfc/rfc3986.txt).
39
When HTTP Authentication is Necessary
Use this configuration when, for example, a firewall requires a username and/or password.
It may be necessary to specify a username and password to various routers and servers along
the path to the remote server. Typically, when using a browser to access the server, the
authentication request will be presented in the form of a dialog window that asks for the
username and password.
Because the printer’s connection to the remote server is headless and non-interactive, the
Weblink configuration allows a user to enter in a server name/username/password triplet. The
triplet will be used in the event that the printer is p resen ted with an au thentication request (for
example, this typically is requested via the
To specify authentication credentials, issue the following:
!U1setvar"weblink.ip.conn1.authentication.add""servername.comusername
password"
In this scenario, the server requesting authenticati on is servername.c om. The username and
password to be supplied are ‘username’ and ‘password’. The server name can be either a DNS
name or an IP address. The username and password cannot be retrieved from SGD, SNMP, or
JSON once added. Only the server name will be returned.
More than one set of authentication triplets can be added. The printer will only use the
credentials as they are needed. In other words, the printer will only use the credentials for
servername.com if it receives a
HTTP/1.1401Unauthorized request from servername.com.
HTTP/1.1401Unauthorized request).
To see what authentication triplets are specified issue:
!U1getvar"weblink.ip.conn1.authentication.entries"
To remove authentication credentials issue the following:
!U1setvar"weblink.ip.conn1.authentication.remove""servername.com"
10/31/13 P1058563-003
Page 40

Configuring Printers with WebLink
40
Configuring Weblink
Additional Firewall Configuration
Some firewalls do not allow the first con nection attempt for a device to be HTTPS, or they
require newconnections to be mad e p e rio dic all y i n order to keep the initial connections intact.
The weblink test branch was provided to address issues that typic ally arise because the prin ter
is an unattended device.
To configure the printer to attempt an
HTTP connection anytim e that the HTTPS connection
drops, issue the following commands:
!U1setvar"weblink.ip.conn1.test.location"
"http://www.zebra.com/apps/linktest"
!U1setvar"weblink.ip.conn1.test.test_on""failure"
The weblink.ip.conn1.test.location can be an y valid HTTP address. The default uses a
link provided by Zebra that exists for no other purpose than to help developers test their
connections to the internet. Setting
weblink.ip.conn1.test.test_on to interval or both will
force the printer to attempt a connection to the URL in location every
weblink.ip.conn1.test.retry_interval seconds (default is 900 seconds/15 minutes).
To configure the printer to try an HTTP connection periodically, independent of the HTTPS
success, issue the following commands:
!U1setvar"weblink.ip.conn1.test.location"
"http://www.zebra.com/apps/linktest"
!U1setvar"weblink.ip.conn1.test.test_on""interval"
!U1setvar"weblink.ip.conn1.test.retry_interval""900"
Difference Between Conn1 and Conn2
The printer has the ability to connect to two different servers. Connection 1 (conn1) and
Connection 2 (conn2) are identical in every way in terms of their configuration. It is expected
that conn2 will typically be left unmodified unless a user has an alternate server that they wish
to use to configure the printer.
A typical scenario in which both connections would be used is if a user wishes to have the
printer connect to both a configuration server and a data source.
Enable Logging
If your printer has trouble connecting, you may wish to enable logging. By default, loggi ng is
not enabled in order to reduce the amount of memory consumed when the Weblink feature is
enabled. It is recommended that, once the Weblink feature is configured properly and is
performing as expected, the lo gging be disabl ed o r that a very small (less t han 100) number of
logging entries be permitted.
To enable logging,
to zero (0), which indicates that no messages are logged. When attempting to troubleshoot
connection issues, it is recommended that
max_entries to 100 means that the 100 newest logging entries will be present in
weblink.logging.entries. Older entries are discarded when the maximum number of entries
is reached.
!U1setvar"weblink.logging.max_entries""100"
P1058563-003 10/31/13
weblink.logging.max_entriesneeds to be modified. By default, it is set
max_entries be set to at least 100 entries. Setting
Page 41

The logging settings are atypical to t he Weblink settings as they do not require the printer to be
reset before taking effect. This does not mean that previous lo gging messages tha t would have
been logged will appear when the
value. It means that any new logging messages will be logged from that point forward.
Issue the following command to clear any log entries currently in the
weblink.logging.entries buffer.
!U1do"weblink.logging.clear"""
Navigating the Log Output
The log will contain useful information, even in the scenario where the printer successfully
connects to the remote server. This section explains how to read the log and highlights some o f
the key entries that will help to determine if the connection was successful.
A typical log entry looks as follows:
[12‐04‐201214:57:10.625][conn1.1]Attemptingconnectionto
https://www.examplecorpinc.com/zebra/weblink/
The first column is the date and time that the event occurred. The format of the date and time
matches the format of
milliseconds to aid in troubleshooting network latency concerns.
rtc.date and rtc.time. The time, however, also includes the
Configuring Printers with WebLink
Configuring Weblink
max_entriessetting is changed from zero (0) to a greater
41
Note • For printers that do not have a battery to store the Real Time Clock (RTC) value, the
date will be restored to the default value upon a power cycle. The default value depends upon
how the rtc.date Set/Get/Do (SGD) is managed. If it has never been set, the n it will default to
the firmware build date (the value in appl.date). Otherwise, the value in rtc.date will default
to the value that it was last set to. This does not mean the value of the rtc.date when it was
power cycled – it means that when a user sets
value. If the printer has a battery, then the
rtc.date, that value becomes the new default
rtc.date never defaults and continues to track the
date as expected.
The second column indicates the connection name and channel that the entries are associated
with. The connection name will match the weblink branch that was configured with the
respective URL (for example, conn1 or conn2). The channel number indicates which channel
on the respective connection that the entries corresponds to.
Note • Channels are additional connections that are requested by the server when the server
needs to perform a specific operation that cannot be done on the channel(s) currently open.
Typically only the RAW channel is open, which operates similar to the RAW TCP port. It is
typical to see two channels opened—the main channel and the RAW channel.
The third column is the actual message, which contains information a bout what occurred in the
printer at the corresponding time in column one. In the above example, the printer was
initiating the connection to the URL specified in
weblink.ip.conn1.location.
Review the section titled SSL/TLS Certificate Errors on page 60 to understand what it means
when certain logging messages/errors appear in the log.
10/31/13 P1058563-003
Page 42

Configuring Printers with WebLink
Notes • ____________________________________________________________________
__________________________________________________________________________
__________________________________________________________________________
__________________________________________________________________________
__________________________________________________________________________
__________________________________________________________________________
__________________________________________________________________________
__________________________________________________________________________
__________________________________________________________________________
__________________________________________________________________________
42
Configuring Weblink
P1058563-003 10/31/13
Page 43

Using AirWatch Connector
This section provides specific information about organizing and managing printers via Zebra
AirWatch Connector.
Contents
Printer Discovery . . . . . . . . . . . . . . . . . . . . . . . . . . . . . . . . . . . . . . . . . . . . . . . . . . . . . . . 44
Organizing Printers . . . . . . . . . . . . . . . . . . . . . . . . . . . . . . . . . . . . . . . . . . . . . . . . . . . . . 45
Create a Group . . . . . . . . . . . . . . . . . . . . . . . . . . . . . . . . . . . . . . . . . . . . . . . . . . . . . . 45
Add Printers to the Group . . . . . . . . . . . . . . . . . . . . . . . . . . . . . . . . . . . . . . . . . . . . . . 47
View the Location Group Dashboard. . . . . . . . . . . . . . . . . . . . . . . . . . . . . . . . . . . . . . 48
Profiles. . . . . . . . . . . . . . . . . . . . . . . . . . . . . . . . . . . . . . . . . . . . . . . . . . . . . . . . . . . . . . . 49
Create a Profile . . . . . . . . . . . . . . . . . . . . . . . . . . . . . . . . . . . . . . . . . . . . . . . . . . . . . . 49
Manage a Profile . . . . . . . . . . . . . . . . . . . . . . . . . . . . . . . . . . . . . . . . . . . . . . . . . . . . . 51
Updating Printer Firmware and Files . . . . . . . . . . . . . . . . . . . . . . . . . . . . . . . . . . . . . . . . 52
Upload a File . . . . . . . . . . . . . . . . . . . . . . . . . . . . . . . . . . . . . . . . . . . . . . . . . . . . . . . . 52
Manage a File . . . . . . . . . . . . . . . . . . . . . . . . . . . . . . . . . . . . . . . . . . . . . . . . . . . . . . . 54
Checking Printer Status . . . . . . . . . . . . . . . . . . . . . . . . . . . . . . . . . . . . . . . . . . . . . . . . . . 55
10/31/13 P1058563-003
Page 44

Using AirWatch Connector
44
Printer Discovery
Printer Discovery
When a new printer is powered on, it will auto matically noti fy Zebra AirWatch Connector that
it is operational. There are several methods to validate that the printer is operational, settings
are available, and communication is active.
• To determine if the settings are available, see Request Settings from a Printer on page 33.
• To refresh the printer settings, click
• To remotely power on and power off the printer, click
Important • Do not click Factory Reset unless directed to do so by Technical Support.
Factory Reset will change settings and lose the Location Group.
Device Query on the Printer Summary page.
Soft Reset.
P1058563-003 10/31/13
Page 45

Organizing Printers
After you see the printers on the AirWatch console, you may wish to organize or arrange
groups of printers. These groups may be established based on location, role, or region.
Create a Group
1. On the AirWatch console, select the Main Menu at the top left of the screen.
2. In the Configuration section, select Location & Groups.
Using AirWatch Connector
Organizing Printers
45
3. Click on the Main Group link (on the left side of the screen).
10/31/13 P1058563-003
Page 46

Using AirWatch Connector
46
Organizing Printers
4. Click Add Child Location Group.
5. Name the Location Group.
6. Enter the Group ID.
Important • Even though the Location Gr oup ID is n ot identified as required, you must fil l
in this field in order to group the Ze bra printers.
7. Fill in the next three fields:
a. Location Group Type
b. Country
c. Locale
Y
Note • You may change the fields: Internal Name and Display Name even though these
and the other fields below them are auto-populated.
8. Click Save.
P1058563-003 10/31/13
Page 47

Add Printers to the Group
1. Navigate to the Printer Asset Management screen.
2. To add a printer to your new group, click on the Printer Friendly Name.
3. In the Device Details, select Admin > Change Location Group.
4. Click the Location dropdown menu, and select your new group.
Using AirWatch Connector
Organizing Printers
47
5. Click Save.
6. Repeat step 1 through step 5 for all printers that you wish to include in the group.
10/31/13 P1058563-003
Page 48

Using AirWatch Connector
48
Organizing Printers
View the Location Group Dashboard
1. Navigate back to your Asset Tracking screen.
2. Click on the name of your new Location Group.
P1058563-003 10/31/13
Page 49

Profiles
Using profiles is the preferred method to manage and ensure that printer settings within a
group are the same.
Create a Profile
1. From the Main Dashboard screen, click Printer Profiles.
Using AirWatch Connector
Profiles
49
2. From the Printer Profiles screen, click Add a New Profile.
10/31/13 P1058563-003
Page 50

Using AirWatch Connector
50
Profiles
3. Fill in the name and description of the profile.
4. Select the Assignment Type from the dropdown menu.
Note • Profiles consist of three Assignment Types:
• Auto: the profile will be sent automatically to the printers within the Assigned
Location Group.
• Optional: the profile will be assigned to the Assigned Location Group, but it must
be manually sent to the group.
• Interactive: the profile will not be assigned to any group, and it can be sent to any
printer in any group.
5. Fill in the printer Model and the Assigned Location Groups.
6. Choose one of the following categories:
Note • Do not attempt to include any Custom Settings. This category is not operational at
this time.
7. Fill in all of the settings associated with your category.
P1058563-003 10/31/13
Page 51

8. Click Save.
9. Repeat step 6 through step 8 for all categories you wish to include in the profile.
10. Click Save & Publish.
Note • The Save & Publish button will immediately send (“publ ish”) th e setti ngs to those
groups with an Assignment Type of “Auto”.
Manage a Profile
1. Navigate to the Asset Tracking Dashboard.
2. Click on the Printer Friendly Name.
3. Click on the Profiles tab.
You will see all of the profiles that are available to be downloaded.
4. Click on Actions (see red box) to load the profile immedi ately to the selected printer.
Using AirWatch Connector
Profiles
51
5. Validate that the Auto Assignment Type profile has been sent to the printer by checking
Status Indicator.
the
10/31/13 P1058563-003
Page 52

Using AirWatch Connector
52
Updating Printer Firmware and Files
Updating Printer Firmware and Files
You can use AirWatch to update printer’s operating system and object files. The steps are
similar to managing a profile.
Upload a File
1. From the Main Dashboard screen, click Printer Files.
2. From the Printer Files screen, click Add New File.
P1058563-003 10/31/13
Page 53

Using AirWatch Connector
Updating Printer Firmware and Files
3. Fill in the name of the file.
4. Select the Assignment Type from the dropdown menu.
Note • Profiles consist of three Assignment Types:
• Auto: the file will be sent automatically to the printers within the Assigned
Location Group.
• Optional: the file will be assigned to the Assigned Location Group, but it must be
manually sent to the group.
• Interactive: the file will not be assigned to any group, and it can be sent to any
printer in any group.
53
5. Fill in the printer Model and the Assigned Location Groups.
6. Choose File (left-hand menu).
7. Click Upload.
8. Select the file you wish to upload from the dialog box.
9. Click Save.
10. Click Save & Publish.
Note • The Save & Publish button will immediately send (“publ ish”) th e setti ngs to those
groups with an Assignment Type of “Auto”.
10/31/13 P1058563-003
Page 54

Using AirWatch Connector
54
Updating Printer Firmware and Files
Manage a File
1. Navigate to the Asset Tracking Dashboard.
2. Click on the Printer Friendly Name.
3. Click on the Files tab.
4. Click on Actions (see red box) to load the file immedi ately to the selected printer.
5. Validate that the Auto Assignment Type file has been sent to the printer by checking the
You will see all of the files that are available to be downloaded.
Status Indicator.
P1058563-003 10/31/13
Page 55

Checking Printer Status
Printer status is communicated to AirWatch via alerts. The following table identifies the
current alerts managed by AirWatch Connector.
Alert Description
PAPER OUT
RIBBON OUT
HEAD TOO HOT
HEAD COLD
HEAD OPEN
SUPPLY TOO HOT
RIBBON IN
REWIND
CUTTER JAMMED
HEAD ELEMENT BAD
POWER ON
CLEAN PRINTHEAD
MEDIA LOW
RIBBON LOW
REPLACE HEAD
BATTERY LOW
RFID ERROR
COLD START
Using AirWatch Connector
Checking Printer Status
Paper is out.
Ribbon is out.
The printhead is too hot to print.
The printhead is too cold to print.
The printhead/media door is open.
The power supply is too hot.
The ribbon has been loaded in the printer.
The rewind unit is full (for tabletop printers with a rewind unit).
The cutter is jammed.
A printhead element has burned out.
The printer has powered on.
This alert is sent when the printing odometer has reached the
number of meters printed.
Note • This alert is set using the Set/Get/Do command
“device.cph_interval”. The airwatch console shows the
setting as “Clean Printhead Interval”.
The paper/media is low.
The ribbon is low.
The printhead needs to be replaced.
The battery charge is low.
The RFID encoding has encount ered an error.
The printer has been powered on.
55
For more specific information on viewing alerts from AirWatch console, see Receiving Alerts
from a Printer on page 35.
10/31/13 P1058563-003
Page 56

Using AirWatch Connector
Notes • ___________________________________________________________________
__________________________________________________________________________
__________________________________________________________________________
__________________________________________________________________________
__________________________________________________________________________
__________________________________________________________________________
__________________________________________________________________________
__________________________________________________________________________
__________________________________________________________________________
__________________________________________________________________________
56
Checking Printer Status
P1058563-003 10/31/13
Page 57

Troubleshooting
This section provides troubleshooting information about the Zebra AirWatch Connector.
Contents
Troubleshooting . . . . . . . . . . . . . . . . . . . . . . . . . . . . . . . . . . . . . . . . . . . . . . . . . . . . . . . . 58
Installation . . . . . . . . . . . . . . . . . . . . . . . . . . . . . . . . . . . . . . . . . . . . . . . . . . . . . . . . . . 58
Using AirWatch . . . . . . . . . . . . . . . . . . . . . . . . . . . . . . . . . . . . . . . . . . . . . . . . . . . . . . 59
SSL/TLS Certificate Errors. . . . . . . . . . . . . . . . . . . . . . . . . . . . . . . . . . . . . . . . . . . . . . . . 60
Other Typical Errors. . . . . . . . . . . . . . . . . . . . . . . . . . . . . . . . . . . . . . . . . . . . . . . . . . . . . 62
Troubleshooting . . . . . . . . . . . . . . . . . . . . . . . . . . . . . . . . . . . . . . . . . . . . . . . . . . . . . . . . 63
HTTP Messages . . . . . . . . . . . . . . . . . . . . . . . . . . . . . . . . . . . . . . . . . . . . . . . . . . . . . . . 64
10/31/13 P1058563-003
Page 58

Troubleshooting
58
Troubleshooting
Troubleshooting
Installation
Issue Reason Solution
Error when starting Tomcat Various reasons can cause this
error.
Tomcat Port conflict error There is another server trying to
use the same port as Zebra
AirWatch Connector on the
computer. The default port is 443.
See Apache Tomcat website —
http://tomcat.apache.org/tomcat-
7.0-doc/index.html
Choose one of the following:
• Stop the other servers using
Windows services.
• Change the port in Tomcat.
Important • If you chang e
the port, you must change
the “weblink.location” on
the printer. From the
Control Panel, open
Windows Firewall,
Advanced settings, and
manually add the Port to
the allowed
Inbound/Outbound list.
P1058563-003 10/31/13
Page 59

Using AirWatch
Issue Reason Solution
Troubleshooting
Troubleshooting
59
I add a printer to a Location
Group. Once the printer is
powered off and on, it is no longer
associated with the original
location group.
I add a printer to a Location
Group. I click Soft Reset on the
AirWatch console and it is no
longer associated with the original
location group.
Some settings are not stored until a
profile is published to that prin ter.
Some settings are not stored until a
profile is published to that prin ter.
a. Create a generic profile for the
Location Group.
b. Set the option to Auto install
and click Publish.
(All settings are saved and sent
to all of the printers within the
group.)
a. Create a generic profile for the
Location Group.
b. Set the option to Auto install
and click Publish.
(All settings are saved and sent
to all of the printers within the
group.)
10/31/13 P1058563-003
Page 60

Troubleshooting
60
SSL/TLS Certificate Errors
SSL/TLS Certificate Errors
Secure connections to the remote server present the opportunity for several errors when
attempting to connect. The errors typically involve the certificates used when connecting via
SSL or TLS. This section highlights some of the most common issues involving the
certificates.
Error Cause / Solution
"SSLcertificateproblem:self
signedcertificateincertificate
chain"
"SSLcertificateproblem:unableto
getlocalissuercertificate"
"SSLcertificateproblem:
certificatehasexpired"
One of the situations that prevent a successful connection is not
having the correct Certificate Authority certificates installed on
the remote server. Zebra requires that the Zebra Root Ce rtificate
Authority and the Zebra Subordinate Certificate Authority be
installed on the remote server. This error typically indicates that
only one of the Zebra Certificate Authority certificates is
installed on the remote server.
One of the situations that prevent a successful connection is not
having the correct Certificate Authority certificates installed on
the remote server. Zebra requires that the Zebra Root Ce rtificate
Authority and the Zebra Subordinate Certificate Authority be
installed on the remote server. This error typically indicates that
neither of the Zebra Certificate Authority certificates are
installed on the remote server.
This error indicates that the remote server’s certificate has
expired. This is typically an indication that the printer’s date
and/or time are incorrect as the Zebra certificates are typically
issued for long durations. Check that
rtc.date and rtc.time
are set correctly.
Note • For printers that do not have a battery to store the
Real Time Clock (RTC) value, the date will be restored
to the default value upon a power cycle. The default
value depends upon how the
rtc.date SGD is managed.
If it has never been set then it will default to the
firmware build date (the value in
Otherwise, the value in
rtc.datewill default to the
appl.date).
value that it was last set to. This does not mean the va lue
rtc.date when it was power cycled. It means that
of the
when a user sets
rtc.date that becomes the new default
value.
If the printer has a battery, then the
rtc.date is never
default and continues to track the date as expected.
P1058563-003 10/31/13
Page 61

Error Cause / Solution
Troubleshooting
SSL/TLS Certificate Errors
61
"SSLcertificateproblem:
certificateisnotyetvalid"
"subjectAltNamedoesnotmatch
1.2.3.4"
"SSLcertificatesubjectname
'examplecorpinc.com'doesnotmatch
targethostname'1.2.3.4'"
This error indicates that the remote server’s certificate was
incorrectly issued or that the printer’s date and/or time are
incorrect. Check that the printer’s date and time (
rtc.time) are set correctly and that the certificate’s start and
rtc.date and
expiration date are valid.
Note • For printers that do not have a battery to store the
Real Time Clock (RTC) value, the date will be restored
to the default value upon a power cycle. The default
value depends upon how the
rtc.date SGD is managed.
If it has never been set then it will default to the
firmware build date (the value in
Otherwise, the value in
rtc.datewill default to the
appl.date).
value that it was last set to. This does not mean the va lue
rtc.date when it was power cycled. It means that
of the
when a user sets
rtc.date that becomes the new default
value.
If the printer has a battery then the
rtc.date is never
default and continues to track the date as expected.
Part of the certificate validation process involves making sure
that the remote server is who it claims to be. A certifica te can be
created to validate against several aliases/DNS na mes. T ypically
the certificate will not contain the IP address of the server as IP
addresses are subject to change. When specifying the remote
server’s URL via
weblink.ip.conn1.location be sure to
specify one of the DNS aliases listed in the certifica te. The valid
names will be listed either under the Common Name (CN) field
and/or the subjectAltName (SAN or Subject Alternate Name)
field within the certificate. For example, the certificat e may
have the CN set to
'examplecorpinc.com' or 'alias.for.examplecorpinc.com'.
'examplecorpinc' and the SAN set to
Any of the CN or SAN names can be used, but, as the IP address
is not listed in the CN or SAN it cannot. It is not recommended
that the IP address be part of the SAN if a DNS name is
available to avoid connection issues that may arise due to subnet
change or DHCP lease expirations, etc.
"UnknownSSLprotocolerrorin
connectionto...”
When this message is seen it means that the remote server’s
SSL/TLS configuration is incorrect. Refer to Troubleshooting
on page 63 to ensure the server and printer are both configured
correctly.
I do not see any of these errors, but the
printer still does not connect.
10/31/13 P1058563-003
Refer to Troubleshooting on page 63 to ensure the server and
printer are both configured correctly.
Page 62

Troubleshooting
62
Other Typical Errors
Other Typical Errors
While SSL/TLS connection errors are the most common, there are issues that can arise that
prevent a successful connection. This section highlights the most common issues.
Error Cause / Solution
"Readfailedwithanunexpected
error"
"Failedtoconnect(SP=#,CI=#,
UW=#,AC=#,PC=#)"
This message typically indicates that connection to the remote
server was lost. The connection can either be lost due to the
server powering off or resetting, the firewall or proxy server
shutting down the connection, or because the remote server
gracefully requests that the connection be discontinued.
Note • After 60 seconds of inactivity on the connection
the printer will attempt to contact the server via a TCP
Keepalive. If the connection is still present the server
will respond and the connection will remain open. After
10 successive failed attempts to contact the remote the
printer will assume the connection is severed and close
the connection. The printer will resume it's attempt to
connect to the remote server so that when the server
comes back online the printer will re-establish
communication.
If this error is seen one or more of the ‘#’ values will be set to 0.
This is an indication of an incorrect config urat io n o f th e re mo te
server. Ensure that the remote server is setup according to the
Servlet configuration in the Zebra Link-OS SDK
documentation.
This typically indicates an incorrect version of the remote
Application Server (for example, Apache/Tomcat version may
be incorrect). If this issue persists contact Zebra Technical
Support.
P1058563-003 10/31/13
Page 63

Troubleshooting
Whenever troubleshooting a connection issue, the following questions should be answered to
ensure the configuration is correct.
1. Is the printer connected correctly via Wireless or Ethernet?
2. Does the printer have a valid IP address?
3. Can I ping the printer’s IP address from a device on the same network as the printer?
4. Is the remote server URL in weblink.ip.conn1.location correct and does it point to the
remote server that is configured for weblink functionality?
5. Can you connect to the location defined in the weblink.ip.conn1.location setting via a
browser?
6. Is the remote server I am attempting to connect to outside the corporate firewall?
7. Can the URL specified in weblink.ip.conn1.test.location be accessed?
If this is the case, talk with your administrator about altering restrictions for accessing
HTTPS connections.
Troubleshooting
Troubleshooting
63
8. Does the firewall require a username and password to access the remote server?
9. Do I require a proxy server to access the remote server?
10. Is the proxy server port the default (1080) or another port (for e xample, 3128 for the Linux
Squid proxy)?
Note • If using the Linux Proxy Server Squid, and you are having trou ble conn ecting, note
that it may be configured to:
a. disallow POST messages
b. only operate in HTTP/1.0 mode 3
c. disallow SSL connections.
Refer to your Linux Squid documentation for complete details.
11. Does the firewall permit HTTPS connections initially or do I need to connect via HTTP
first?
12. Is the remote server configured to use SSL v3.0 or TLS 1.0?
TLS1.0 is recommended, but SSL v3.0 is also supported. Versions prior to SSL v3.0 and
later than TLS v1.0 are not currently supported.
13. Are the Zebra Certificate Authority Certificates correctly installed on the remote server?
14. Was the server’s certificate issued by Zebra and is it signed by the Zebra Certificate
Authority?
15. Has the server’s certificate expired?
16. Is the printer’s date and time within the issue and exp ired period of the server’s certificate?
10/31/13 P1058563-003
Page 64

Troubleshooting
64
HTTP Messages
17. Does the value in weblink.ip.conn1.location match either the Common Name or one of
the names listed in the Subject Alternate Name of the remote server’s certificate?
18. Is the proxy server configured correctly and does the respective proxy server allow
HTTPS connections via the HTTP CONNECT method?
19. Are there any HTTP authentication attempts when trying to connect that fail?
20. Are there any HTTP/1.1 4xx messages in the log?
If your connection issues persist and the solution s in th is d oc umen t d o not he lp , co ntact Zebra
Tech Support and provide the output of the following command. Ensure that logging is
enabled and that the error(s) appear within the entries)
!U1getvar"weblink"
HTTP Messages
Message Cause / Solution
HTTP/1.1100Continue This indicates that the server and printer have begun
communicating and is often seen in place of
HTTP/1.1101SwitchingProtocols This indicates that the basic connection to the server worked
HTTP/1.1200OK.
and the protocol is being switched to a more efficient protocol
for data transfer.
HTTP/1.1200OK This indicates that an HTTPGET or HTTPPOST was successful.
HTTP/1.130xMoved/Redirect/etc This indicates that the URL specified has moved or that the
firewall redirected the printer to another location (typically this
is done to authenticate a user in a transparent proxy
configuration).
HTTP/1.1401Unauthorized This indicates that the printer either needs to authenticate with
the server or failed to authenticate with the remote server (or
server/router along the route to the server).
HTTP/1.1403Forbidden This typically means that the authentication was provided and
valid, however, the user does not have access to the requested
resource.
HTTP/1.1404NotFound This indicates that the remote UR L provided points to an invalid
location on the server. This does indicate, however, that the
server name is valid. Just the path after the domain name is
invalid.
P1058563-003 10/31/13
Page 65

WebLink Set/Get/Do
Commands
This section describes the Set/Get/Do commands, parameters, and values that are available
with Zebra AirWatch Connector.
Contents
Introduction to SGD Commands . . . . . . . . . . . . . . . . . . . . . . . . . . . . . . . . . . . . . . . . . . . 66
weblink.enable. . . . . . . . . . . . . . . . . . . . . . . . . . . . . . . . . . . . . . . . . . . . . . . . . . . . . . . 67
weblink.ip.conn[1|2].authentication.add. . . . . . . . . . . . . . . . . . . . . . . . . . . . . . . . . . . . 68
weblink.ip.conn[1|2].authentication.entries . . . . . . . . . . . . . . . . . . . . . . . . . . . . . . . . . 70
weblink.ip.conn[1|2].authentication.remove. . . . . . . . . . . . . . . . . . . . . . . . . . . . . . . . . 71
weblink.ip.conn[1|2].enable . . . . . . . . . . . . . . . . . . . . . . . . . . . . . . . . . . . . . . . . . . . . . 72
weblink.ip.conn[1|2].location . . . . . . . . . . . . . . . . . . . . . . . . . . . . . . . . . . . . . . . . . . . . 73
weblink.ip.conn[1|2].maximum_ simultaneous_connections . . . . . . . . . . . . . . . . . . . . 74
weblink.ip.conn[1|2].proxy . . . . . . . . . . . . . . . . . . . . . . . . . . . . . . . . . . . . . . . . . . . . . . 75
weblink.ip.conn[1|2].retry_interval . . . . . . . . . . . . . . . . . . . . . . . . . . . . . . . . . . . . . . . . 77
weblink.ip.conn[1|2].test.location . . . . . . . . . . . . . . . . . . . . . . . . . . . . . . . . . . . . . . . . . 78
weblink.ip.conn[1|2].test.retry_interval. . . . . . . . . . . . . . . . . . . . . . . . . . . . . . . . . . . . . 80
weblink.ip.conn[1|2].test.test_on . . . . . . . . . . . . . . . . . . . . . . . . . . . . . . . . . . . . . . . . . 81
weblink.logging.clear . . . . . . . . . . . . . . . . . . . . . . . . . . . . . . . . . . . . . . . . . . . . . . . . . . 83
weblink.logging.entries. . . . . . . . . . . . . . . . . . . . . . . . . . . . . . . . . . . . . . . . . . . . . . . . . 84
weblink.logging.max_entries . . . . . . . . . . . . . . . . . . . . . . . . . . . . . . . . . . . . . . . . . . . . 85
weblink.printer_reset_required. . . . . . . . . . . . . . . . . . . . . . . . . . . . . . . . . . . . . . . . . . . 87
weblink.restore_defaults . . . . . . . . . . . . . . . . . . . . . . . . . . . . . . . . . . . . . . . . . . . . . . . 88
10/31/13 P1058563-003
Page 66

WebLink Set/Get/Do Commands
66
Introduction to SGD Commands
Introduction to SGD Commands
For more specific information about SGD syntax and structure, see the Zebra Programming
Guide section on Set/Get/Do Command Structure.
To send SGD commands to a printer, use the Zebra Setup Utilities.
P1058563-003 10/31/13
Page 67

weblink.enable
Description This command indicates if one or more of the weblink connections are active.
If there is more than one connection under the weblink branch (for example,
weblink.ip.conn1) and if any of the .location values are set, then this SGD will be set to
"on". If all connections are disabled (all connection .location values set to ""), then this
value will be set to
^JUF,^JUS,^JUN,^JUA, and device.restore_defaults do not have any affect on this
setting.
• iMZ 220™, iMZ 320™
• QLn220™, QLn320™, QLn420™
• ZT210™, ZT220™, ZT230™
"off".
WebLink Set/Get/Do Commands
weblink.enable
67
Type
Commands Details
getvar
This command indicates if one or more of the weblink connections are active.
Format:
Result:
• "yes" if any of the .location values are set
• "off" if all connections are disabled
getvar
!U1getvar"weblink.enable"
10/31/13 P1058563-003
Page 68

WebLink Set/Get/Do Commands
68
weblink.ip.conn[1|2].authentication.add
weblink.ip.conn[1|2].authentication.add
Description This command allows the user to add a single server/username/password
triplet into the list of au thentication entries.
When the printer attempts to connect to the server (url specified in
weblink.ip.conn[1|2].location) the server may require HTTP authentication (e.g. digest,
basic, DNS, etc.). There may be multiple authentication requests along the route to the
destination (e.g. a local server first requires HTTP authentication as well as on the remote
server).
For each HTTP authentication request received while attempting to connect, the printer will
enumerate the authentication entries and attempt to sati sfy the request with the
username/password pair provided for the respective server. The server name in the entry is
what determines which username/password pair should be used for which authentication
request. Both DNS names and IP addresses are acceptable. The server, username, and
password are separated by a single space (not a tab or other white space character). The server
name is the only required field. If no username is supplied, but a password is, there must be
two spaces between the server and the password fields. If there is a username but no password,
or simply just the servername, no space is required at the end of the entry.
If the command is changed when the connection is enabled (
), it will not take effect until the connection is disabled and then re-enabled.
"on"
Important •
^JUF,^JUS,^JUN,^JUA, and device.restore_defaults do not have any affect on this
This setting only be changed when weblink.enable is set to "off".
weblink.enableissetto
setting.
Supported Devices
• iMZ 220™, iMZ 320™
• QLn220™, QLn320™, QLn420™
• ZT210™, ZT220™, ZT230™
Type
setvar
P1058563-003 10/31/13
Page 69

Commands Details
WebLink Set/Get/Do Commands
weblink.ip.conn[1|2].authentication.add
69
setvar
This command adds a single server/username/password triplet to the list of authentication
entries.
Format:
• !U1setvar"weblink.ip.conn1.authentication.add""servername[username][
password]"
• !U1setvar"weblink.ip.conn2.authentication.add""servername[username][
password]"
Values: servername[username][password]hasamaximumlengthofstringis2048
characters
Default: NA
Example 1 • In this example, a username and a password is supplied:
!U1setvar"weblink.ip.conn1.authentication.add""my.server.lanjohndoe
password"
Example 2 • In this example, no password is supplied
!U1setvar"weblink.ip.conn1.authentication.add""my.server.lanjohndoe"
Example 3 • In this example, no username is supplied (note the double space)
!U1setvar"weblink.ip.conn1.authentication.add""my.server.lan password"
Example 4 • In this example, no username or password is supplied
!U1setvar"weblink.ip.conn1.authentication.add""my.server.lan"
10/31/13 P1058563-003
Page 70

WebLink Set/Get/Do Commands
70
weblink.ip.conn[1|2].authentication.entries
weblink.ip.conn[1|2].authentication.entries
Description This command lists the server names added to the authentication entries list.
Only the server names will be shown. The username and passwords will not be shown.The
server names are separated by a
^JUF,^JUS,^JUN,^JUA, and device.restore_defaults do not have any affect on this
setting.
Supported Devices
• iMZ 220™, iMZ 320™
• QLn220™, QLn320™, QLn420™
• ZT210™, ZT220™, ZT230™
Type getvar
\r\n so that each shows up on its own line.
Commands Details
getvar
This command lists the server names for the specified connection.
Format:
• !U1getvar"weblink.ip.conn1.authentication.entries"
• !U1getvar"weblink.ip.conn2.authentication.entries"
P1058563-003 10/31/13
Page 71

WebLink Set/Get/Do Commands
weblink.ip.conn[1|2].authentication.remove
weblink.ip.conn[1|2].authentication.remove
Description This command allows the user to remove a single server/username/password
triplet from the list of authentication entries.
T o remove an entry only the server name is supplied. If an invalid entry is supplied no action is
taken. If the SGD is changed when the connection is enabled
weblink.ip.conn[1|2].enable), it will not take effect until the connection is disabled and
(
then re-enabled. It is therefore recommended that this setting only be changed when
weblink.ip.conn[1|2].enable is set to "off".
^JUF,^JUS,^JUN,^JUA, and device.restore_defaults do not have any affect on this
setting.
Supported Devices
• iMZ 220™, iMZ 320™
• QLn220™, QLn320™, QLn420™
• ZT210™, ZT220™, ZT230™
71
Type
Commands Details
setvar
This command removes a single server/username/password triplet from the list of
authenticaiton entries.
Format:
• !U1setvar"weblink.ip.conn1.authentication.remove""servername"
• !U1setvar"weblink.ip.conn2.authentication.remove""servername"
Values: servernamehasamaximumlengthofstringis2048characters.
Default: NA
Example • In this example, a username and a password is supplied
!U1setvar"weblink.ip.conn1.authentication.remove""my.server.lan"
setvar
10/31/13 P1058563-003
Page 72

WebLink Set/Get/Do Commands
72
weblink.ip.conn[1|2].enable
weblink.ip.conn[1|2].enable
Description This command enables or disables the weblink IP connection #1.
A side effect of setting this SGD to "on", the weblink.enable will also be set to "on".
When this setting is set to "off", if the weblink.ip.conn2.enable is also "off", the
weblink.enable will be set to "off".
Supported Devices
• iMZ 220™, iMZ 320™
• QLn220™, QLn320™, QLn420™
• ZT210™, ZT220™, ZT230™
Type
Commands Details
setvar
This command enables/disables the weblink IP connection.
Format:
• !U1setvar"weblink.ip.conn1.enable""value"
• !U1setvar"weblink.ip.conn2.enable""value"
Values: "on","off"
Default: "off"
getvar
This command retrieves the current setting.
Format:
• !U1setvar"weblink.ip.conn1.enable"
• !U1setvar"weblink.ip.conn2.enable"
Result:
• "on"iftheconnectionisenabled
• "off"iftheconnectionisdisabled
setvar,getvar
P1058563-003 10/31/13
Page 73

WebLink Set/Get/Do Commands
weblink.ip.conn[1|2].location
weblink.ip.conn[1|2].location
Description This command assigns the URL of the server for this connection. The URL
must follow the URL rules for the HTTP[S] protocol outlined in RFC23 96
(http://www.ietf.org/rfc/rfc2396.txt).
The setting will not take effect until the printer is reset. Changing this setting will set
weblink.printer_reset_required to
^JUF, ^JUS, ^JUN, ^JUA, and device.restore_defaults do not have any affect on this setting.
Supported Devices
•iMz™ series
•QLn™ series
• ZT200™ series
•ZD500R™ series
"yes".
73
Type
Commands Details
setvar
This command sets the server URL for the specified connection.
Format:
• !U1setvar"weblink.ip.conn1.location""value"
• !U1setvar"weblink.ip.conn2.location""value
Values: anyHTTPSURLupto2048characters
Default: ""
getvar
This command returns the server URL currently assigned to the connection.
Format:
• !U1getvar"weblink.ip.conn1.location"
• !U1getvar"weblink.ip.conn2.location"
Example •
!U1setvar"weblink.ip.conn2.location"
"https://my.linkos.server.com:8080/link/os"
setvar,getvar
10/31/13 P1058563-003
Page 74

WebLink Set/Get/Do Commands
74
weblink.ip.conn[1|2].maximum_ simultaneous_connections
weblink.ip.conn[1|2].maximum_
simultaneous_connections
Description This command indicates the maximum number of simultaneous connections
that can be initiated by the printer.
Vi a th e main connection (the original connection initiated by the printer to the remote server),
the remote server can request that additional connetions from the printer be initated (e.g. a
connection that supports only JSON SGDs, one that behaves similar to the RAW TCP port.
The server is free to request as many as it thinks it needs, but the printer will p revent more than
N number of connections, where N is the value of this command.
^JUF,^JUS,^JUN,^JUA, and device.restore_defaults do not have any affect on this
setting.
Supported Devices
• iMZ 220™, iMZ 320™
• QLn220™, QLn320™, QLn420™
• ZT210™, ZT220™, ZT230™
Type
Commands Details
setvar
This command sets the maximum number of connections.
Format:
• !U1setvar"weblink.ip.conn1.maximum_simultaneous_connections""value"
• !U1setvar"weblink.ip.conn2.maximum_simultaneous_connections""value"
Values: Anyintegerfrom1‐100
Default: "10"
getvar
This command retrieves the maximum set number of connections.
Format:
• !U1getvar"weblink.ip.conn1.maximum_simultaneous_connections"
• !U1getvar"weblink.ip.conn2.maximum_simultaneous_connections"
Example • This example sets the conn1 maximum connections to 3.
!U1setvar"weblink.ip.conn1.maximum_simultaneous_connections""3"
setvar,getvar
P1058563-003 10/31/13
Page 75

WebLink Set/Get/Do Commands
weblink.ip.conn[1|2].proxy
Description This command assigns the URL of the proxy for the connection.
The proxy server protocol, port, domain, username, and password are all encoded into the
URL via the format outlined in RFC2396 (http://www.ietf.org/rfc/rfc2396.txt).
The username and password must avoid the invalid characters listed in RFC2396 (e.g. ':', '@',
'/', etc). If an invalid character must be used it needs to be escaped using '%' as described in
RFC2396.
^JUF,^JUS,^JUN,^JUA, and device.restore_defaults do not have any affect on this
setting.
Supported Devices
• iMZ 220™, iMZ 320™
• QLn220™, QLn320™, QLn420™
• ZT210™, ZT220™, ZT230™
weblink.ip.conn[1|2].proxy
75
Type
Commands Details
setvar
This command assigns the URL of the connection proxy.
Format:
• !U1setvar"weblink.ip.conn1.proxy""url"
• !U1setvar"weblink.ip.conn2.proxy""url"
Values:
• Any valid URL up to 2048 characters
• Expected URL format: [http|https]://[user:pass@]domain[:port]/[path]
• The URL will need to be built according to the server/proxy environment the printer is
running within.
Default:
• The user:pass, port, and path are all optional.
• The default scheme must be either HTTPS or HTTP. The default is HTTP.
• The default port is 1080.
• The default is to omit the username and password.
getvar
This command retrieves the URL of the connection proxy.
Format:
• !U1getvar"weblink.ip.conn1.proxy"
• !U1getvar"weblink.ip.conn2.proxy"
setvar,getvar,do
""
10/31/13 P1058563-003
Page 76

WebLink Set/Get/Do Commands
76
weblink.ip.conn[1|2].proxy
Commands Details
do
This command assigns the URL of the connection proxy.
Format:
• !U1do"weblink.ip.conn1.proxy""url"
• !U1do"weblink.ip.conn2.proxy""url"
Values:
• Any valid URL up to 2048 characters
• Expected URL format: [scheme://][user:pass@]domain[:port]/[path]
• The URL will need to be built according to the server/proxy environment the printer is
running within.
Default:
• The scheme, user:pass, port, and path are all optional.
• The default scheme is http.
• The default port is 1080.
• The default is to omit the username and password.
Example • Examples of how to connect to various proxy servers:
""
http://username:password@mydomain.com:3128/
http://mydomain.com/
P1058563-003 10/31/13
Page 77

WebLink Set/Get/Do Commands
weblink.ip.conn[1|2].retry_interval
weblink.ip.conn[1|2].retry_interval
Description This command sets the number of seconds between attempts to connect to the
server URL provided in
connection is lost, the printer will wait
connect again.
^JUF,^JUS,^JUN,^JUA, and device.restore_defaults do not have any affect on this
setting.
Supported Devices
• iMZ 220™, iMZ 320™
• QLn220™, QLn320™, QLn420™
• ZT210™, ZT220™, ZT230™
weblink.ip.conn1.location. If an attempt is unsuccessful or the
'retry_interval' seconds before attempting to
77
Type
Commands Details
setvar
This command sets the number of seconds to wait before attempting to reconnect to the
server.
Format:
• !U1setvar"weblink.ip.conn1.retry_interval""value"
• !U1setvar"weblink.ip.conn2.retry_interval""value"
Values: 1‐600
Default: "10"
getvar
This command returns the number of seconds to wait between connection attempts.
Format:
• !U1getvar"weblink.ip.conn1.retry_interval"
• !U1getvar"weblink.ip.conn2.retry_interval"
do
This command sets the number of seconds to wait before attempting to reconnect to the
server.
Format:
• !U1do"weblink.ip.conn1.retry_interval""value"
• !U1do"weblink.ip.conn2.retry_interval""value"
setvar,getvar,do
Values: 1‐600
Default: "10"
10/31/13 P1058563-003
Page 78

WebLink Set/Get/Do Commands
78
weblink.ip.conn[1|2].test.location
weblink.ip.conn[1|2].test.location
Description This command holds the URL for testing a connection to the internet. This is
meant to assist users in debugging their printer's connection to remote servers when there are
issues with the main weblink connection (conn1 or conn2).
The URL must follow the URL rules for the HTTP[S] protocol outlined in RFC2396
(http://www.ietf.org/rfc/rfc2396.txt).
^JUF,^JUS,^JUN,^JUA, and device.restore_defaults do not have any affect on this
setting.
Supported Devices
• iMZ 220™, iMZ 320™
• QLn220™, QLn320™, QLn420™
• ZT210™, ZT220™, ZT230™
Type
Commands Details
setvar
This command sets the URL to hold for testing a connection.
Format:
• !U1setvar"weblink.ip.conn1.test.location""url"
• !U1setvar"weblink.ip.conn2.test.location""url"
Values: AnyHTTPSURLupto2048characters
Default: "http://www.zebra.com/apps/linktest"
getvar
This command retrieves the printer's test connection URL.
Format:
• !U1getvar"weblink.ip.conn1.test.location"
• !U1getvar"weblink.ip.conn2.test.location"
do
This command sets the URL to hold for testing a connection.
Format:
• !U1do"weblink.ip.conn1.test.location""url"
• !U1do"weblink.ip.conn2.test.location""url"
Values: AnyHTTPSURLupto2048characters
setvar,getvar,do
Default: "http://www.zebra.com/apps/linktest"
P1058563-003 10/31/13
Page 79

WebLink Set/Get/Do Commands
weblink.ip.conn[1|2].test.location
Example • The test connection can assist the user in several ways/scenarios:
1. If the test.test_on value is set to "failure", any time the main weblink
conn[1|2].location) connection fails to connect then the test.location URL will be
(
used. In this situation, an attempt will be made to contact the remote URL in
test.location, using authentication and proxy configuration that is specified by the main
connection.
2. If the test.test_on value is set to "interval" an attempt will be made to contact the
remote URL in
test.location every test.retry_interval seconds, using authentication
and proxy configuration that is specified by the main connection.
3. If the test.test_on value is set to "both", then scenario 1 and 2 will both occur. This is
useful for users who will use an HTTP connection to move through their firewall - and
thereafter frequently refresh the connection to indicate to their firewall that there is still
activity for the purpose of keeping the connection alive.
79
10/31/13 P1058563-003
Page 80

WebLink Set/Get/Do Commands
80
weblink.ip.conn[1|2].test.retry_interval
weblink.ip.conn[1|2].test.retry_interval
Description This command determines how often, in seconds, a connection to the
test.location URL should be attempted. Th is setting is only applicable when the
SGD is set to
^JUF,^JUS,^JUN,^JUA, and device.restore_defaults do not have any affect on this
setting.
Supported Devices
• iMZ 220™, iMZ 320™
• QLn220™, QLn320™, QLn420™
• ZT210™, ZT220™, ZT230™
Type setevar,getvar,do
Commands Details
"interval" or "both".
test.test_on
setvar
getvar
do
This command sets the interval for how often a connection to the test.location URL should
be attempted.
Format:
• !U1setvar"weblink.ip.conn1.test.retry_interval""value"
• !U1setvar"weblink.ip.conn2.test.retry_interval""value"
Values: 0‐1800(inseconds,providing0second‐30minuteinterval)
Default: "900"
This command retrieves the retry interval.
Format:
• !U1getvar"weblink.ip.conn1.test.retry_interval"
• !U1getvar"weblink.ip.conn2.test.retry_interval"
This command sets the interval for how often a connection to the test.location URL should
be attempted.
Format:
• !U1do"weblink.ip.conn1.test.retry_interval""value"
• !U1do"weblink.ip.conn2.test.retry_interval""value"
Values: 0‐1800
Default: "900"
P1058563-003 10/31/13
Page 81

WebLink Set/Get/Do Commands
weblink.ip.conn[1|2].test.test_on
weblink.ip.conn[1|2].test.test_on
Description This command determines when the test conne ction sho uld be attemp ted. This
assists in debugging the printer's connection to remo te servers when there are issues with t he
main weblink connection (conn1 or conn2).
^JUF,^JUS,^JUN,^JUA, and device.restore_defaults do not have any affect on this
setting.
Supported Devices
• iMZ 220™, iMZ 320™
• QLn220™, QLn320™, QLn420™
• ZT210™, ZT220™, ZT230™
Type setvar,getvar,do
Commands Details
81
setvar
getvar
do
This command indicate when the test connection should be attempted.
Format:
• !U1setvar"weblink.ip.conn1.test.test_on""value"
• !U1setvar"weblink.ip.conn2.test.test_on""value"
Values: off,failure,interval,both
Default: "failure"
This command retrieves the test connection setting.
Format:
• !U1getvar"weblink.ip.conn1.test.test_on"
• !U1getvar"weblink.ip.conn2.test.test_on"
This command sets when the test connection should be attempted.
Format:
• !U1do"weblink.ip.conn1.test.test_on""value"
• !U1do"weblink.ip.conn2.test.test_on""value"
Values: off,failure,interval,both
Default: "failure"
10/31/13 P1058563-003
Page 82

WebLink Set/Get/Do Commands
82
weblink.ip.conn[1|2].test.test_on
Example • The test connection can assist the user is several ways/scenarios:
1. If the test.test_on value is set to "failure", any time the main weblink
(
used. An attempt will be made to contact the remote URL in
authentication and proxy configuration that is specified by the main connection.
2. If the test.test_on value is set to "interval" an attempt will be made to contact the
remote URL in
and proxy configuration that is specified by the main connection.
3. If the test.test_on value is set to "both", then scenario 1 and 2 will both occur. This is
useful for users who will use an HTTP connection to move through their firewall - and
thereafter frequently refresh the connection to indicate to their firewall that there is still
activity for the purpose of keeping the connection alive.
conn[1|2].location) connection fails to connect then the test.location URL will be
test.location, using
test.location every test.retry_interval seconds, using authentication
P1058563-003 10/31/13
Page 83

weblink.logging.clear
Description This command clears the weblink log. Setting this value to any thi ng will clear
it, including an empty string.
^JUF,^JUS,^JUN,^JUA, and device.restore_defaults do not have any affect on this
setting.
Supported Devices
• iMZ 220™, iMZ 320™
• QLn220™, QLn320™, QLn420™
• ZT210™, ZT220™, ZT230™
WebLink Set/Get/Do Commands
weblink.logging.clear
83
Type
Commands Details
setvar
This command clears the weblink log entires.
Format:
Values: Anystringvalue,includinganemptystring.
Default: NA
do
This command clears the weblink log entires.
Format:
Values: Anystringvalue,includinganemptystring.
Default: NA
Example • This example clears the weblink log entries with an empty string value.
!U1setvar"weblink.logging.clear"""
setvar,do
!U1setvar"weblink.logging.clear""value"
!U1do"weblink.logging.clear""value"
10/31/13 P1058563-003
Page 84

WebLink Set/Get/Do Commands
84
weblink.logging.entries
weblink.logging.entries
Description This command returns the N number of entries in t he weblink log, wh ere N has
a maximum value that is set by
The weblink log is a collection of events related to connecting to a remote Link-OS™ server.
The log entries range anywhere from general status to errors that prevented a successful
connection. The log contains entries from all connections and are labeled so that it is clear
which log entries are for which connection. Each log entry also c ontains a timestamp for when
it was logged by the system. The newest events will appear at the bottom of the list.
^JUF,^JUS,^JUN,^JUA, and device.restore_defaults do not have any affect on this
setting.
Supported Devices
• iMZ 220™, iMZ 320™
• QLn220™, QLn320™, QLn420™
• ZT210™, ZT220™, ZT230™
weblink.logging.max_entries.
Type getvar
Commands Details
getvar
This command returns a lists of entries in the weblink log.
Format:
Values: NA
Default: ""
Example • This example shows the result from weblink.logging.entries:
[01‐04‐201308:40:45.655][conn1.1]HTTP/1.1404NotFound
[01‐04‐201308:40:45.659][conn1.1]ReceivedHTTPcode404fromproxyafter
CONNECT
[01‐04‐201308:40:45.660][conn1.1]Closingconnection
[01‐04‐201308:40:45.662][conn1.1]Failedtoconnect(SP=0,CU=0,UW=0,AC
=0,PC=0)
!U1getvar"weblink.logging.entries"
P1058563-003 10/31/13
Page 85

WebLink Set/Get/Do Commands
weblink.logging.max_entries
Description This command specifies the maximum number of individual log entries that
will be stored in the
weblink.logging.entries command.
weblink.logging.max_entries
85
Important •
lost. If there are N log entries currently in the log, the user sets the max_entires to M, where
M is less than N, the oldest (N-M) log entries will be removed.
^JUF,^JUS,^JUN,^JUA, and device.restore_defaults do not have any affect on this
setting.
Supported Devices
• iMZ 220™, iMZ 320™
• QLn220™, QLn320™, QLn420™
• ZT210™, ZT220™, ZT230™
Type
Commands Details
setvar
This command sets the maximum number of log entires that will be stored.
Format:
Values: 0‐10000
Note •
Default:
getvar
This command returns the setting for the ma ximum numbe r of log entries that will be stored .
Changes to this command are immediate and ma y result in some log entries bei ng
setvar,getvar,do
!U1setvar"weblink.logging.max_entries""value"
Setting the value to 0 disables logging.
"0"
do
Format:
This command sets the maximum number of log entires that will be stored.
Format:
!U1getvar"weblink.logging.max_entries"
!U1do"weblink.logging.max_entries""value"
Values: 0‐10000
Setting the value to 0 disables logging.
Note •
Default:
10/31/13 P1058563-003
"0"
Page 86

WebLink Set/Get/Do Commands
86
weblink.logging.max_entries
Example 1 • In this example, weblink.logging.max_entries is set to 3:
[01‐04‐201308:40:45.659][conn1.1]ReceivedHTTPcode404fromproxyafter
CONNECT
[01‐04‐201308:40:45.660][conn1.1]Closingconnection
[01‐04‐201308:40:45.662][conn1.1]Failedtoconnect(SP=0,CU=0,UW=0,AC
=0,PC=0)
Example 2 •
In this example, weblink.logging.max_entries is set to 2:
weblink.logging.entries becomes:
[01‐04‐201308:40:45.660][conn1.1]Closingconnection
[01‐04‐201308:40:45.662][conn1.1]Failedtoconnect(SP=0,CU=0,UW=0,AC
=0,PC=0)
P1058563-003 10/31/13
Page 87

WebLink Set/Get/Do Commands
weblink.printer_reset_required
weblink.printer_reset_required
Description This command retrives a "yes" or "no"value indicating whether any of the
weblink settings have been modified.
^JUF,^JUS,^JUN,^JUA, and device.restore_defaults do not have any affect on this
setting.
Supported Devices
• iMZ 220™, iMZ 320™
• QLn220™, QLn320™, QLn420™
• ZT210™, ZT220™, ZT230™
87
Type
Commands Details
getvar
This command retrieves whether any of the weblink settings are modified.
Format:
Values: "yes"or"no"
Default: "no"
getvar
!U1getvar"weblink.printer_reset_required"
10/31/13 P1058563-003
Page 88

WebLink Set/Get/Do Commands
88
weblink.restore_defaults
weblink.restore_defaults
Description This command defaults, and saves, the weblink branch settings. Any value,
including an empty string, will default the weblink branch settings.
The entire weblink branch of settings will be defaulted and the settings are saved;
Note •
however, the weblink connections will not use the new settings until the printer is restarted
(e.g. the
^JUF,^JUS,^JUN,^JUA, and device.restore_defaults do not have any affect on this
setting.
Supported Devices
weblink.printer_reset_required SGD will be "yes" after a default).
• iMZ 220™, iMZ 320™
• QLn220™, QLn320™, QLn420™
• ZT210™, ZT220™, ZT230™
Type
Commands Details
setvar
This command defaults the weblink branch settings.
Format:
Values: Anyvalue,includinganemptystring,willdefaultthebranch
Default: NA
do
This command defaults the weblink branch settings.
Format:
Values: Anyvalue,includinganemptystring,willdefaultthebranch
Default: NA
Example • These all default the branch:
!U1setvar"weblink.restore_defaults"""
!U1setvar"weblink.restore_defaults""foo"
!U1do"weblink.restore_defaults"""
!U1do"weblink.restore_defaults""foo"
setvar,do
!U1setvar"weblink.restore_defaults""value"
!U1do"weblink.restore_defaults""value"
P1058563-003 10/31/13
Page 89

89
10/31/13 P1058563-003
Page 90

Zebra Technologies Corporation
Zebra Technologies Corporation
475 Half Day Road, Suite 500
Lincolnshire, IL 60069 USA
T: +1 847 634 6700
Toll-free +1 866 230 9494
F: +1 847 913 8766
Zebra Technologies Europe Limited
Dukes Meadow
Millboard Road
Bourne End
Buckinghamshire, SL8 5XF, UK
T: +44 (0)1 62 8 55 60 00
F: +44 (0)1628 556001
Zebra Technologies Asia Pacific, LLC
120 Robinson Road
#06-01 Parakou Building
Singapore 068913
T: +65 685 8 07 22
F: +65 6885 0838
http://www.zebra.com
© 2013 ZIH Corp.
P1058563-003
 Loading...