

Page 1

Mobile Printer
User’s Manual
MP Series, RP Series
Encore Series,
Cameo Series,
QL Series
Chargers
Document: Chargers_F.pdf
Rev. F, July, 2002
Page 2

Proprietary Statement
This manual contains proprietary information of Zebra Technologies Corporation. It is
intended solely for the information and use of parties operating and maintaining the
equipment described herein. Such proprietary information may not be used,
reproduced, or disclosed to any other parties for any other purpose without the
expressed written permission of Zebra Technologies Corporation.
Product Improvements
Since continuous product improvement is a policy of Zebra Technologies Corporation,
all specifications and signs are subject to change without notice.
FCC Compliance Statement
NOTE: Applicable equipment described in this manual has been tested and found to
comply with the limits for a Class A digital device, pursuant to Part 15 of FCC Rules.
These limits are designed to provided reasonable protection against harmful
interference when the equipment is operated in a commercial environment. This
equipment generates, uses, and can radiate radio frequency energy and, if not
installed and used in accordance with the instruction manual, may cause harmful
interference to radio communications. Operation of this equipment in a residential
area is likely to cause harmful interference in which case the user will be required to
correct the interference at his own expense.
NOTE: Equipment described in this manual were tested with shielded cables on the
peripheral devices. Shielded cables must be used with equipment described in this
manual to insure compliance.
Changes or modifications to equipment described in this manual not expressly
approved by Zebra Technologies Corporation could void the user’s authority to operate
this equipment.
Liability Disclaimer
Inasmuch as every effort has been made to supply accurate information in this
manual, Zebra Technologies Corporation is not liable for any erroneous information or
omissions. Zebra Technologies Corporation reserves the right to correct any such
errors and disclaims liability resulting therefrom.
No Liability for Consequential Damage
In no event shall Zebra Technologies Corporation or anyone else involved in the
creation, production, or delivery of the accompanying product (including hardware and
software) be liable for any damages whatsoever (including, without limitation,
damages for loss of business profits, business interruption, loss of business
information, or other pecuniary loss) arising out of the use of or the results of use of or
inability to use such product, even if Zebra Technologies Corporation has been
advised of the possibility of such damages. Because some states do not allow the
exclusion of liability for consequential or incidental damages, the above limitation may
not apply to you.
Copyrights
The copyrights in this manual and the system described therein are owned by Zebra
Technologies Corporation. All rights are reserved. Unauthorized reproduction of this
manual or the software in any of the system modules may result in imprisonment of up
to one year and fines of up to $10,000 (17 U.S.C.506). Copyright violators may be
subject to civil liability.
All products and brand names are trademarks of their respective companies. All
rights reserved.
©
2002 Zebra Technologies Corporation
Page 3

Contents
Introduction ................................................................................... 4
MP and RP Series Printers ............................................................................4
Cameo and Encore Series ............................................................................. 4
QL Series ....................................................................................................... 4
Safety Warnings.............................................................................................4
UCLI72-4 Quad Charger ............................................................... 5
Description .....................................................................................................5
Setting up the Charger ................................................................................... 5
Charging Batteries .........................................................................................5
Charging Times..............................................................................................8
Safety Precautions ......................................................................................... 8
Battery Safety ................................................................................................ 8
Charger Safety ............................................................................................... 8
UCN72-4 Quad Charger ............................................................... 9
Description .....................................................................................................9
Charging Batteries .........................................................................................9
UCN72-4 Part Numbers ............................................................................... 10
NCxx04 Series Quad Charger/Conditioners ............................... 11
Description ................................................................................................... 11
Charging Batteries ....................................................................................... 11
Conditioning Battery Packs .......................................................................... 12
Communications Port ..................................................................................12
NCxx04 Part Numbers .................................................................................13
LI72 Wall Charger ....................................................................... 14
Description ...................................................................................................14
Charging Battery Packs ...............................................................................14
LI72 Models ................................................................................................. 15
UCN72 Wall Charger .................................................................. 16
Description ...................................................................................................16
Charging Battery Packs ...............................................................................16
UCN72 Models.............................................................................................17
UC Series Charger/Conditioner .................................................. 18
Description .................................................................................. 18
Charging Battery Packs ...............................................................................18
Conditioning Battery Packs .......................................................................... 18
UC Series Charger Models ..........................................................................19
Trickle Chargers.......................................................................... 20
Description ...................................................................................................20
Charging Batteries .......................................................................................20
Trickle Charger Models ................................................................................ 20
Product Support .......................................................................... 21
Page 4

Introduction
This manual covers the use of all chargers currently offered by Zebra for use with MP, RP, Encore, Cameo and QL
series mobile printers.
MP and RP Series Printers
The MP series (MP5022, MP5030, MP5033 and MP5044)
and the RP3 use NiCad batteries, which require periodic
“conditioning” to maintain their maximum capacity. The UC
and NCxx04 series chargers designed for these batteries are
equipped with a "Condition" cycle, which first discharges
then charges the battery. It is recommended NiCad battery
packs be conditioned once a week.
Cameo and Encore Series
The Encore and Cameo series printers use NiMH (NickelMetal Hydride) battery technology. NiMH batteries must be
initially “cycled” several times before maximum capacity is
realized.
A NiMH battery is” cycled” by fully charging it, then fully
discharging it through normal use. This process should be
done when the batteries are new.
QL Series
QL series printers use Lithium Ion (LIon) batteries to
achieve maximum power output in a minimum volume. LIon
batteries don’t need to be conditioned or cycled, however
they can only be safely charged in a charger designed for
this battery type. Use of an unauthorized charger with a
LIon battery could damage a battery beyond use.
Safety Warnings
Avoid accidental short circuiting of any battery. Allowing
battery terminals to contact conductive material will create
a short circuit which could cause burns and other injuries or
could start a fire.
Use of any charger not approved specifically by Zebra for
use with its batteries could cause damage to the battery
pack or the printer and will void the warranty.
UMAN-Charge 4
Page 5
l
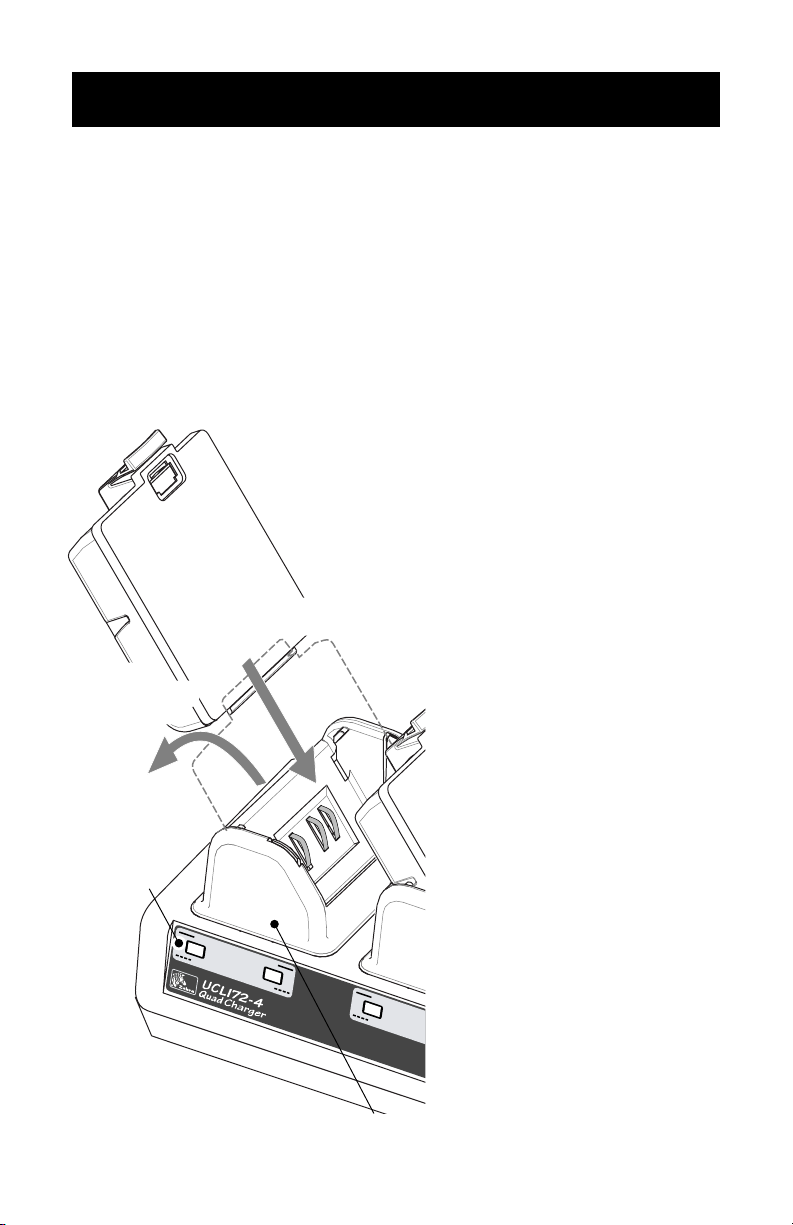
UCLI72-4 Quad Charger
Description
The UCLI72-4 Quad Charger is designed to charge up to
four Lithium-Ion (LIon) QL series Mobile Printer battery
packs simultaneously. The unit is supplied with an external
110/220 VAC power supply and a line cord compatible with
its country of use.
Setting up the Charger
Place the Quad Charger on a surface near an A.C. outlet.
There are four mounting holes in the bottom of the charger
which allow it to be secured to a table or
shelf to help ensure the charging process
will not be interrupted by someone
inadvertently moving or unplugging
either the charger or the battery
packs under charge.
1. Slide
Battery Pack
into Charger
bay
1. Rock
Battery Pack
into place
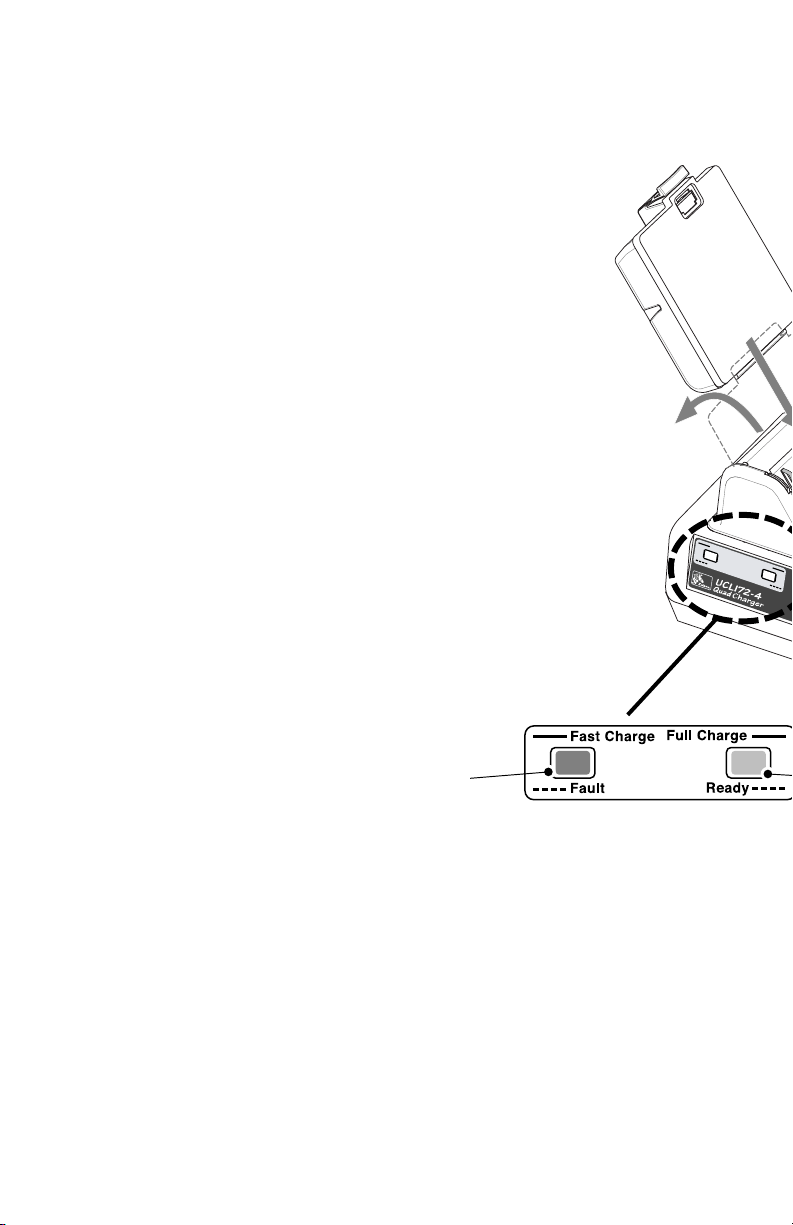
Fast Charge
Indicator
F
a
s
t C
h
arg
F
a
u
lt
FIGURE 1: INSERTING THE
BATTERY PACK
e
F
u
ll C
h
a
rg
e
R
e
a
d
y
Charger Bay
Plug the circular four pin plug
from the power supply into the
back of the charger. Plug
one end of the AC cord
into the Power Supply
and the other into the
A.C. power source. The
power indicator on the
front panel should come
on, indicating the Quad
Charger is ready for use.
Please refer to Figure 2.
Charging Batteries
Ensure that the power
F
a
st C
h
a
rg
indicator on the front
e
F
u
F
a
u
lt
panel is on.
Plug a battery pack into
any one of the four
5 UMAN-Charge
charging bays as shown.
continued on next page
Page 6
Note the orientation of the battery pack. Slide the
battery pack into the charging bay until it stops.
Then rock the battery pack back until it snaps
into place. The amber indicator directly under the
battery being charged will turn on if the battery is
properly inserted.
The charger will perform an automatic charging
cycle on inserted battery packs. First it will
perform a “Fast Charge” to bring the batteries up
to a usable voltage as quickly as possible. Once
80% of the charge voltage has been reached,
the charger switches over to a slower rate to
finish charging the battery.
The Amber indicator reports the status of the
battery under charge. It can either be on
steadily, indicating the battery is undergoing a
“Fast Charge”; or be off, indicating that the
battery is fully charged. If the Amber and Green
indicators are both flashing, there is a problem
with the battery pack and it will not be charged.
The Green indicator reports the charging
status. If it is flashing, and
the Amber indicator is lit
steadily, it reports that the
charger has completed the
Amber
Indicator
fast charge part of the charging cycle and is now “topping off” the battery at a slower
charge rate. The battery pack is usable at this point although it would be more desirable to wait until the battery is
full charged.
If the green indicator is lit steadily, and the Amber indicator
is off, the battery pack is fully charged.
F
a
s
t
C
h
a
r
g
e
F
u
l
l
C
h
a
F
r
a
g
u
e
l
t
R
e
a
d
y
UMAN-Charge 6
Page 7
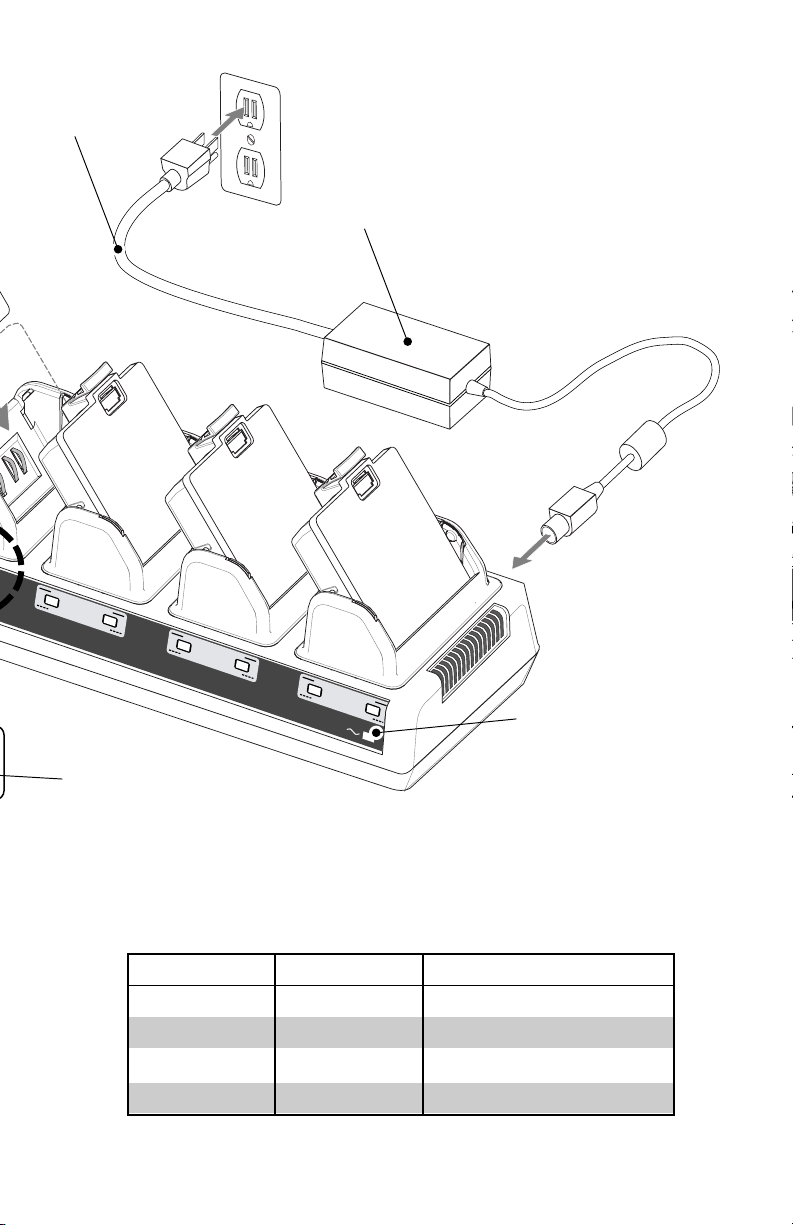
A.C. Cord
F
a
s
t
C
h
a
r
g
e
F
u
l
l
C
h
F
a
u
l
t
R
e
Power Supply
a
r
g
e
a
d
y
F
a
s
t
C
h
a
r
g
e
F
u
l
l
C
h
a
F
r
a
g
u
e
l
t
R
e
a
d
y
F
a
s
t
C
h
a
r
g
e
F
u
l
l
C
h
a
F
r
g
a
u
e
l
t
R
e
a
d
y
P
o
w
e
r
Power
Indicator
Green
Indicator
FIGURE 2: THE UCLI72-4
QUAD CHARGER SYSTEM
Refer to the chart below for a quick reference:
Amber Green Battery Status
On Off Charging
On Flashing O.K. (80% charged)
Off On Completely Charged
Flashing Flashing Faulty Battery
7 UMAN-Charge
continued on next page
Page 8

Charging Times
QL220/320 QL 420
(AT16004-1) (AT16293-1)
80% charge 1.25 hrs 2.5 Hrs.
Full Charge 2.5 hrs 5 hrs.
These times are for completely discharged batteries. Battery packs which are still partially charged will take less time.
The Quad Charger has a safety feature which stops charging a battery after six hours regardless of its charge state.
Safety Precautions
Battery Safety
Avoid accidental short circuiting of any battery. Allowing
battery terminals to contact conductive material will create a
short circuit which could cause burns and other injuries or
could start a fire.
Use of any charger not approved specifically by Zebra for
use with its batteries could cause damage to the battery
pack or the printer and will void the warranty.
Charger Safety
Use care in locating the Quad Charger. Do not place it in
locations where liquids or metallic objects may be dropped
into the charging bays. Do not block the ventilating slots on
the top and bottom covers. Insure that the Charger is
plugged into a power source which won’t accidently be
turned off if you will be charging batteries overnight.
Use of any batteries not approved specifically by Zebra for
use with this charger could cause damage to the battery or
the charger and will void the warranty.
UMAN-Charge 8
Page 9

UCN72-4 Quad Charger
Description
The UCN72-4 Quad Charger is designed to charge up to
four NiMH Encore and/or Cameo series batteries simultaneously. Battery packs may be charged externally or while
plugged into the printer. The unit has switch selectable 110/
220 V.A.C. input voltage and is supplied with a line cord
compatible with its country of use.
Charge
Cable
Power Indicator
UCN72-4
Charge Indicator
Charging Batteries
Set the voltage selection switch on the unit’s rear panel to
agree with the supplied A.C. voltage. Refer to diagram below
and to table.
To charge batteries: Plug the
line cord into the charger and
then into the A.C. supply recep-
tacle. The power
indicator on the
Voltage set to
115 V.A.C.
front panel will
light.
Voltage set to
220 V.A.C.
Plug a charge
cable into the
charger jack on
SETTING THE VOLTAGE SWITCH
9 UMAN-Charge
continued on next page
Page 10

the battery pack to be charged. The charge indicator near
the cable will either light steadily, or start to blink. On a fully
charged battery, the indicator will go out after a few minutes,
indicating a fully charged condition.
On batteries in need of charging, the indicator will stop
blinking after a period of time determined by the charge level
of the battery and then stay lit continuously. This indicates
that the charger is now operating in fast charge mode. When
the light goes out, the battery has been completely charged.
Maximum charge time for a battery is 180 minutes. Four
batteries may be charged at the same time with the UCN724 charger.
UCN72-4 Part Numbers
Part Number (Country) Line cord p/n V.A.C. Setting
AC15482-1(U.S.) TLCMXX03 110
AC15482-2 (U.K.) TLCEBS1310 220
AC15482-3 (Euro) TLCE12013 220
AC15482-4 (Aust.) TLCE15012 220
Do not charge batteries while printing. Attempting to print while
charging batteries with the UCN72-4 Charger can result in unreliable charging.
UMAN-Charge 10
Page 11

NCxx04 Series Quad Charger/Conditioners
Description
NC series Quad Chargers sequentially charge and/or
condition up to 4 batteries. Charge time is approximately
one hour per battery depending on battery’s state of charge.
Condition cycle times vary with both the battery’s state of
charge and with each model.
Charging Batteries
Plug the A.C. line of the charger into an A.C. receptacle.
For MP series printers, connect batteries by sliding them
downward onto battery contact plate as though mounting
them on a printer. (See illustration below.)
Other printer series use individual cables to charge the
battery packs. Plug the cables into either the charge jack on
the battery pack, or, in the case of the RP3 printer, the
printer’s charging jack.
Once the batteries are installed
Slide Batteries on plates as
though mounting on a printer.
or plugged in the charge cycle
will automatically begin, start-
ing with the first battery con-
nected. It will sequence left
to right through each in-
stalled battery in turn. The
“Charge” indicator above
the battery under charge
will light steadily during
charging.
A.C. Power Connector
Communications (COM) Port
LOADING BATTERIES (MP SERIES ONLY)
11 UMAN-Charge
Note location of
Charger Jack on
Battery.
continued on next page
Page 12

Conditioning Battery Packs
In order to extend battery life, battery packs should be
conditioned periodically. The NC series Quad Chargers are
equipped with a "Condition" mode, which fully discharges a
battery pack followed by a full charge cycle. Conditioning
NiCad battery packs once a week is recommended for
optimum performance of batteries.
Condition Light:
FLASHING light indicates pending operation.
When the battery is next in the charger’s
sequence, it will be conditioned.
STEADY light indicates conditioning is in
progress. Only one condition light will be on
continuously at any time.
Charge Light:
FLASHING light indicates
pending operation. When the
battery is next in the
charger’s sequence, it will be
charged.
STEADY light indicates battery
is being charged. Only one
charge light will be on
continuously at any time.
Condition Button
Pressing this switch will start the Condition
cycle for the battery directly below it. The
Condition Light will turn on.
Ready Light
Charging/Conditioning cycle is
completed for this battery.
Power Light:
STEADY light indicates
normal operation.
FLASHING light indicates
a problem with the
charger.
NCXX04 QUAD CHARGER CONTROL PANEL
Start the condition cycle by pressing the condition button
above the battery just connected . Refer to illustration above
for details on the NCxx04 control panel
Communications Port
The NCxx04 Quad chargers are equipped with a COM port
which allows communication between the charger and a P.C.
UMAN-Charge 12
Page 13

The communications port should only be used by factory
authorized personnel.
NCxx04 Part Numbers
Part Number* Used On Charge Method
DC12127-1x MP5020/22 Battery Drop-In
DC12255-1x MP5030/33 Battery Drop-In
DC12363-1x MP5030,RP3 Cable
DC12248-1x MP5044 Battery Drop-In
DC12464-2x RP3 Battery Drop-In
DC12363-5x Encore 4
DC12363-6x Encore 2,3
* Last digit in part number Indicates model:
-X0 = North American model
-X1 = U.K. model
-X2 = Continental European model
-X3 = Australian model
†
These models use NiMH type battery packs. Conditioning is not
necessary once batteries have been cycled several times. A NiMH battery
is” cycled” by fully charging it, then fully discharging it through normal use.
The “Condition” cycle on NCxx04 series chargers can also be used for
this purpose.
†
†
Cable
Cable
13 UMAN-Charge
Page 14

LI72 Wall Charger
Description
The LI72 is a wall mounted fast charger with universal 110
to 230, 50-60 Hz. VAC input. Multiple A.C. plug configurations comply with most international standards. This charger is
used with the QL series printers
(QL 220, QL 320, QL 420)
equipped with Lithium Ion (LiIon)
batteries. The LI72 will charge a
battery pack as fast as its charge
level will allow, and then switch
over to a maintenance charge to
keep the charge at its maximum.
Refer to the table below for part
numbers.
Charging Battery Packs
Plug the LI72 into the appropriate
A.C. wall receptacle, then insert
the charge cable into the battery
Charge indicator
pack charger jack.
The charger LED will indicate the status of the
charger as follows:
• A steady light indicates the battery pack is
undergoing a fast charge.
• A slow blinking light indicates the charger is
in maintenance mode. The battery pack is
ready for use.
• A rapidly blinking light indicates a problem
with the battery pack. The battery may have an
internal short, or its charge monitoring circuitry
may be malfunctioning. The battery pack
should not be used any further.
Charging
Tri ckle
Charging
Fault
Condition
UMAN-Charge 14
Page 15

Do not attempt to charge batteries with the LI72 while
printing. Attempting to print while charging can result in improperly charged batteries.
LI72 Models
Model number Country of use V .A.C.
AT15759-1 U.S. & Japan 110
AT15759-2 U.K. 220
AT15759-3 Euro 220
AT15759-4 Aust 220
AT15759-6* (varies w/line varies
cord supplied)
*This model is suppled with an IEC socket to allow use as an inline charger. Connection to A.C. supply is via a line cord
configured with an A.C. plug for the country of intended use.
15 UMAN-Charge
Page 16

UCN72 Wall Charger
Description
The UCN72 is a wall mounted fast charger with universal
110 to 230, 50-60 Hz. VAC input. Multiple A.C. plug configurations comply with most international standards. This charger is
used with the Encore and Cameo
series printers equipped with
NiMH batteries. The UCN72 will
charge a battery pack as fast as its
charge level will allow, and then
switch over to a trickle mode to
maintain the charge at its maximum. Refer to the table below for
part numbers.
Charging Battery Packs
Plug the UCN72 into the appropriate A.C. wall receptacle, then
insert the charge cable into the
battery pack charger jack.
Charge indicator
The charger LED will indicate the status of the
charger as follows:
• A steady light indicates the battery pack is
undergoing a fast charge.
• A slow blinking light indicates the charger is
in trickle mode. The battery pack is ready for
use.
• A rapidly blinking light indicates a problem
with the battery pack. The battery may have an
internal short, or its charge monitoring circuitry
may be malfunctioning. The battery pack
should not be used any further.
Do not attempt to charge batteries with the UCN72
while printing. Attempting to print while charging can result in
improperly charged batteries.
Charging
Tri ckle
Charging
Temperature
too high/low
UMAN-Charge 16
Page 17

UCN72 Models
Model number Country of use V .A.C.
AT15244-1 U.S. & Japan 110
AT15244-2 U.K. 220
AT15244-3 Euro 220
AT15244-4 Aust 220
AT15244-6* (varies w/line varies
cord supplied)
*This model is suppled with an IEC socket to allow use as an inline charger. Connection to A.C. supply is via a line cord
configured with an A.C. plug for the country of intended use.
17 UMAN-Charge
Page 18

UC Series Charger/Conditioner
IMPORTANT: Never charge or condition battery packs while
attempting to run the printer.
Description
The UC series of Charger/Conditioners is designed to
charge and condition individual battery packs used on the
MP, RP, Encore and Cameo series of portable printers.
Battery packs may be charged off-unit or while connected
to the printer. Typical charge time is 60 to 90 minutes.
Charging Battery Packs
Plug the A.C. line cord into an A.C. receptacle, then plug
the charge cable into the battery pack’s charger jack. The
“Power” light will come on, followed by the “Charge” light.
When the Battery Pack has been fully charged, the “Charge
OK” indicator will light.
Conditioning Battery Packs
NiCad type battery packs used on a daily basis should be
“conditioned” once a week to insure they keep their maximum charge life. This is especially important with batteries
that are usually recharged with the Trickle Charger.
1. Connect the Charger to an A.C. power
source.
2. Plug the charger into the
battery pack’s charger jack.
Wait 5 seconds.
3. Press and hold
the “Condition”
button for
1 second
until the
red
“Conditioning”
indicator
lights .
“Power” Light
“Charge” Light
“Charge OK” Light
“Condition” Button
“Conditioning ” Light
UMAN-Charge 18
Page 19

The condition cycle for a fully charged battery is approximately 90 minutes.
If the “Charge OK” indicator blinks, disconnect the battery
pack and wait until all the lights except the “Power “ light go
out. Reconnect the battery and repeat step 3.
UC Series Charger Models
Base Part Number* Used on Charge Method
CC12708-1x MP5020/22 Cable
CC12708-2x MP5030 Cable
CC12708-3x MP5044 Cable
CC12708-5x RP3 Cable to Printer
CC12891-1x RP3 Battery Drop-In
CC12708-7x Encore 2,3, Cameo
CC12708-8x Encore 4
* Last digit in part number Indicates model:
†
-X0 = North American model
-X1 = U.K. model
-X2 = Continental European model
-X3 = Australian model
† These models use NiMH type battery packs. Conditioning is not necessary
once batteries have been cycled several times. A NiMH battery is” cycled” by
fully charging it, then fully discharging it through normal use. The “Condition”
cycle on UC series chargers can also be used for this purpose.
†
Cable
Cable
19 UMAN-Charge
Page 20

Trickle Chargers
Description
These compact, cost effective chargers are designed to
charge individual battery packs. Typical charge time is 12 to
16 hours.
Charging Batteries
Plug the charge cable into the battery pack charger jack,
and the Charger body into the appropriate A.C. wall receptacle. Trickle Chargers will charge the battery overnight,
typically in 12 to 16 hours. While they can be used when the
printer is running, charging time will be lengthened.
Trickle Charger Models
Part No V .A.C./Hz (Country) Batt. Voltage/Model
AT852 110/60 (U.S.) 7.2 V/ MP503x Series
AT855 110/60 (U.S.) 6.0 V/ MP502x Series
AT856 110/60 (U.S.) 12 V/ MP5044
AT12478-1 220/50 (Euro)
AT12479-1 220/50 (Euro) 6/7.2V/Encore, Cameo
AT12699-1 220/50 (U.K.) 6-7.2V/MP Series
AT12700-1 220/50 (U.K.) 12V/MP5044
AT13797-1 110/60 (U.S.) 7.2V/Encore, Cameo
6/7.2V/MP502x/3x Series
Series
Trickle Chargers do not condition batteries, and
thus should not be used as the principal
charger for NiCad battery packs such as
Charger Body
A.C. Receptacle
Charger Jack
UMAN-Charge 20
used on the MP and RP
series.
Page 21

Product Support
Contact the Product Support Help Desk at:
Zebra Technologies Corporation
30 Plan Way
Warwick, Rhode Island 02886.1012 USA
Telephone: +1 401.739.5800
Fax: +1 401.732.7808
e-mail: risupport@zebra.com
Ask for the Help Desk
In Europe:
Zebra Technologies Europe, Ltd.
Zebra House
The Valley Centre, Gordon Road
High Wycombe
Buckinghamshire HP13 6EQ, United Kingdom
Telephone: +44 1494 768298
Fax: +44 1494 768210
e-mail: tseurope@zebra.com
Ask for Customer Support
21 UMAN-Charge
Page 22

Visit our Website at
www.zebra.com
 Loading...