

Page 1
ZEBRA PERSONAL PRINTER LINE
Zebra
DIRECT THERMAL PRINTER
A300
User's Guide
Page 2

Zebra® A300
User’s Guide
Customer order # 55530L
Manufacturer part # 55530LB Rev. 4
Page 3
ZebraA300 Users Guide
Proprietary Statement
This manual contains proprietary i nfor mati on of Zebra Technologies Corpor ation. It is intended solely for the information and
use of parties operating and maintaining the e quipment described herein. Such proprietary information may not be used, reproduced, or disclosed to any other parties for any other purpose without the expressed written permission of Zebra Technologies
Corporation.
Product Improvements
Continuous improvement of products is a policy of Zebra Technologies Corporation. All specifications and signs are subject to
change without notice.
FCC Compliance Statement
Note: This equipment has been tested and found to comply with the limits for a Class A digital Device, pursuant to Part 15 of
the FCC Rules. These limi ts are designed to provide reasonable protection against harmful interference when the equipment is
operated in a commercial environment. Thi s equipm e nt generates, uses and can radiate radio frequency energy and, if not
installed and used in accordance with the instructions manual, may cause harmful interference to radio communications. Operation of this equipment in a residential area is likely to cause harmful interference in which case the user will be required to correct the interference at his own expense.
In order to insure compliance, this printer must be used with Shielded Commu n ication Cables.
“The user is cautioned that any changes or modifications not expressly approved by Zebra Technologies Corp oration could void
the user’s authority to operate the equipment.”
Canadian DOC Compliance Statement
This digital apparatus does not exceed the Class A limits for radio noise emissio ns from dig i tal apparatus as set out in the radio
interference regulations of the Canadian Department of Communications.
CE Compliance
If the accompanying printer displays the CE mark, it also meets EMC directive 89/336/EEC, with ammendments effective at the
time of manufacture.
Liability Disclaimer
Zebra Technologies Corporation takes steps to assure that its published Engineering specificati on s a nd Manuals are correct;
however, errors do occur. Zebra Technologies Corporation has been advised of the possibility of such damages. Because some
states do not allow the exclusion or limitation of liability for consequential or incidental damages, the above limitation may not
apply to you.
Copyrights
This copyrighted manual and the label printer described herein are owned by Zebra Technologies Corporation. All rights are
reserved. Unauthorized reproduction of this manual or the software in the la bel printer may result in imprisonment of up to one
year and fines of up to $10,000 (17 U.S.C.506). Copyright violators may be subject to civil liability.
All trademarks are the property of their respective owners. Zebra, ZPL, and ZPL II are registered trademarks and ZebraNet is a
trademark of Zebra Technolo gies Corpo rat ion. Cen t ronics is a registered trademark of Centronics Data Computer Corporation.
Windows is a trademark of Microsoft Corporation. IBM is a registered trademark of International Business Machines Corp.
© Zebra Technologies Corporation. All rights reserved.
Page 4

ZebraA300 Users Guide
Contents
Introduction. . . . . . . . . . . . . . . . . . . . . . . . . . . . . . . . . . . . . . . . . . . . . . . . . . 1
Unpacking and Inspection . . . . . . . . . . . . . . . . . . . . . . . . . . . . . . . . . . . . . . . 1
Additional Requirements. . . . . . . . . . . . . . . . . . . . . . . . . . . . . . . . . . . . . . . . 1
Setting Up the Zebra A300 Printer . . . . . . . . . . . . . . . . . . . . . . . . . . . . . . . . 2
Setting Up the Software . . . . . . . . . . . . . . . . . . . . . . . . . . . . . . . . . . . . . . . 12
Operating the System . . . . . . . . . . . . . . . . . . . . . . . . . . . . . . . . . . . . . . . . . 13
ZebraNet Option . . . . . . . . . . . . . . . . . . . . . . . . . . . . . . . . . . . . . . . . . . . . . 17
Preventive Maint ena nce . . . . . . . . . . . . . . . . . . . . . . . . . . . . . . . . . . . . . . . 18
Troubleshooting. . . . . . . . . . . . . . . . . . . . . . . . . . . . . . . . . . . . . . . . . . . . . . 19
Specifications . . . . . . . . . . . . . . . . . . . . . . . . . . . . . . . . . . . . . . . . . . . . . . . 22
Software License Agreement . . . . . . . . . . . . . . . . . . . . . . . . . . . . . . . . . . . 25
Warranty . . . . . . . . . . . . . . . . . . . . . . . . . . . . . . . . . . . . . . . . . . . . . . . . . . . 26
i
Page 5
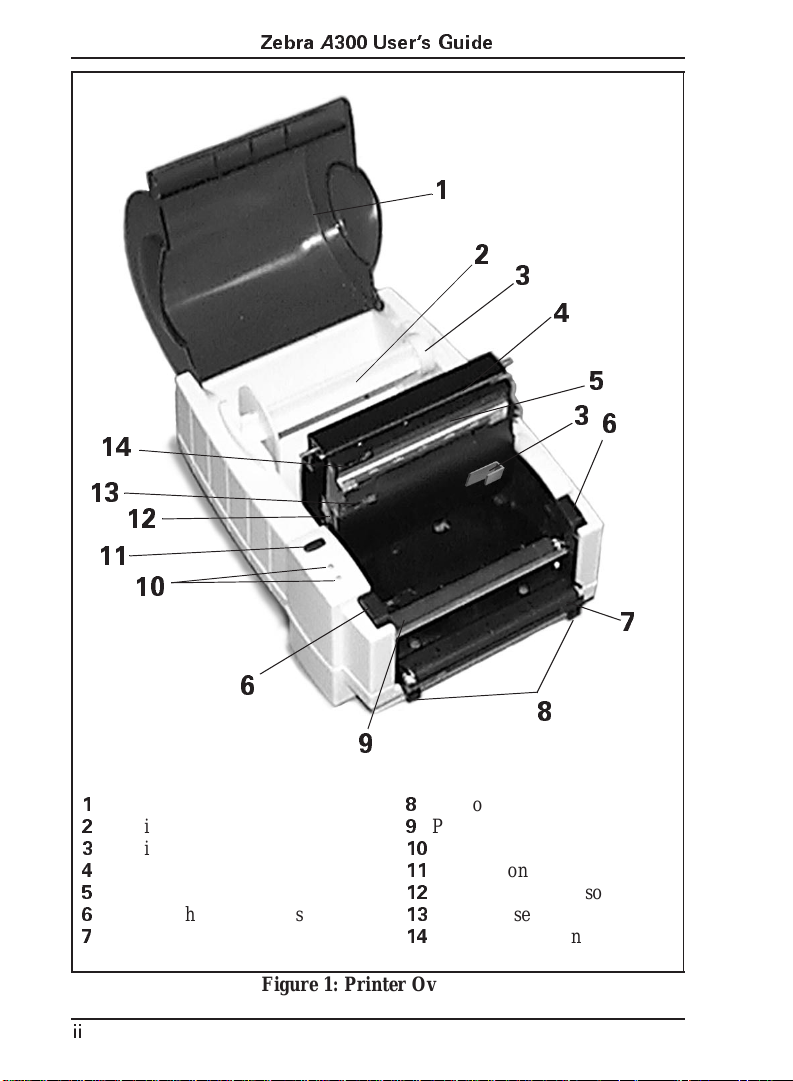
14
13
11
12
10
ZebraA300 Users Guide
1
2
3
4
5
3
6
6
1
Media cover
2
Media holder
3
Media guides
4
Tear bar
5
Printhead
6
Print mechanism latches
7
Peel-off roller
ii
9
8
Peel-off door latches
9
Platen roller
10
Power/fault lights
11
Feed button
12
Printhead open sensor
13
Paper out sensor
14
Label presentation sensor
Figure 1: Printer Overview
7
8
Page 6
ZebraA300 Users Guide
Introduction
This manual provides all of the information you will need to operate your
printer on a daily basis. To print labels, tags, or tickets with the A300 printer,
ref e r to th e ZPL II Programming Guide (part # 46469L) or to the o n -li ne
instructions with the BAR-ONE software. To obtain a copy of the ZPL II
Programming Guide, mail or fax in the card at the back of this book.
Unpacking and Inspecti on
Save the carton and all packin g materia ls in case shippi ng is eve r require d.
Inspect the printer for possible damage incurred during shipment. If you discover shipping damag e upon inspec tio n:
• Immediately notify the shippi n g compan y of the damage .
• Retain all packaging materi al for shippin g compan y inspec tio n.
• File a damage report wit h the shippin g compan y and no tif y your local
distributor and Zebra Technologies Corporat ion of the damag e.
Zebra Technologies Corpora ti on is not respon sibl e for any damage incurred
dur in g shipment of the equipment and will not repair th is damage under warranty. Immediate notification of damage to the shipping company or its
insuring agency will generally result in ensuring any damage claim validity
and ult im ate monet ary compens a tion.
Additional Requirements
• Shielded data cable—serial or parallel, depending on which method you
prefer to use.
• Power cord—for 230 VAC operation only (120 VAC units come with a
power cord)
• ZPL II Programming Guide, if you are going to use ZPL II to design
label formats for the A300 printer. To obtain a copy, m ail or f ax in the
card at the back of thi s boo k .
1
Page 7
ZebraA300 Users Guide
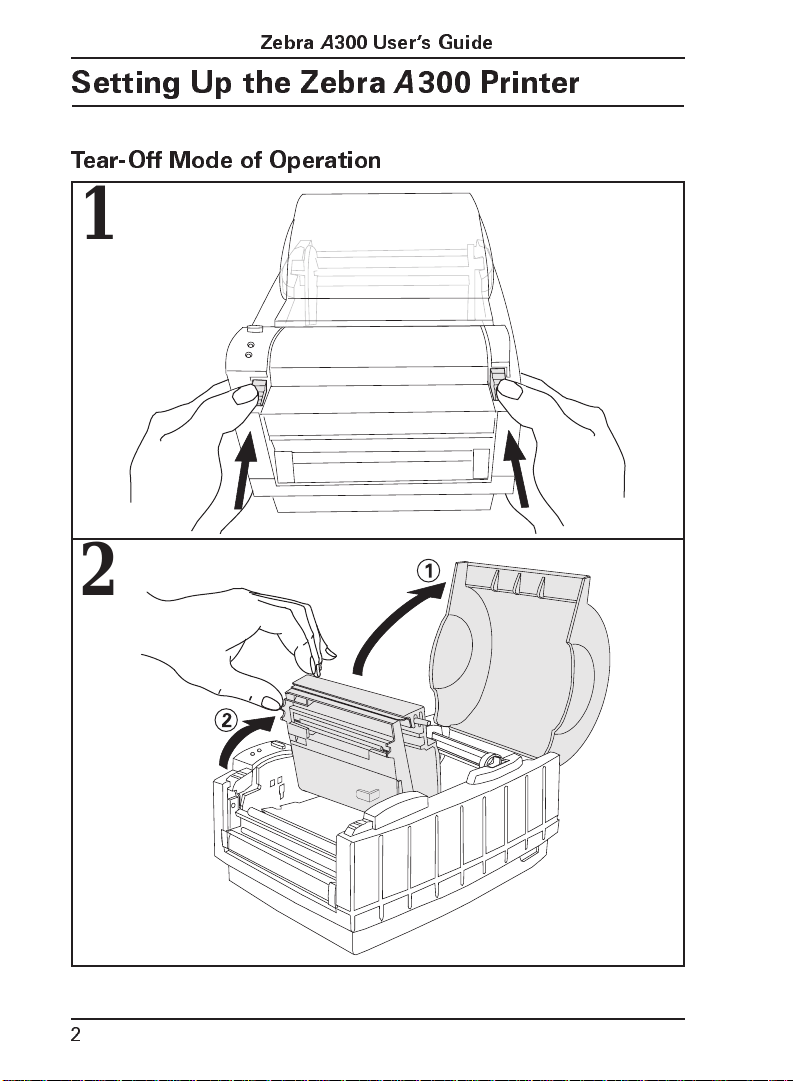
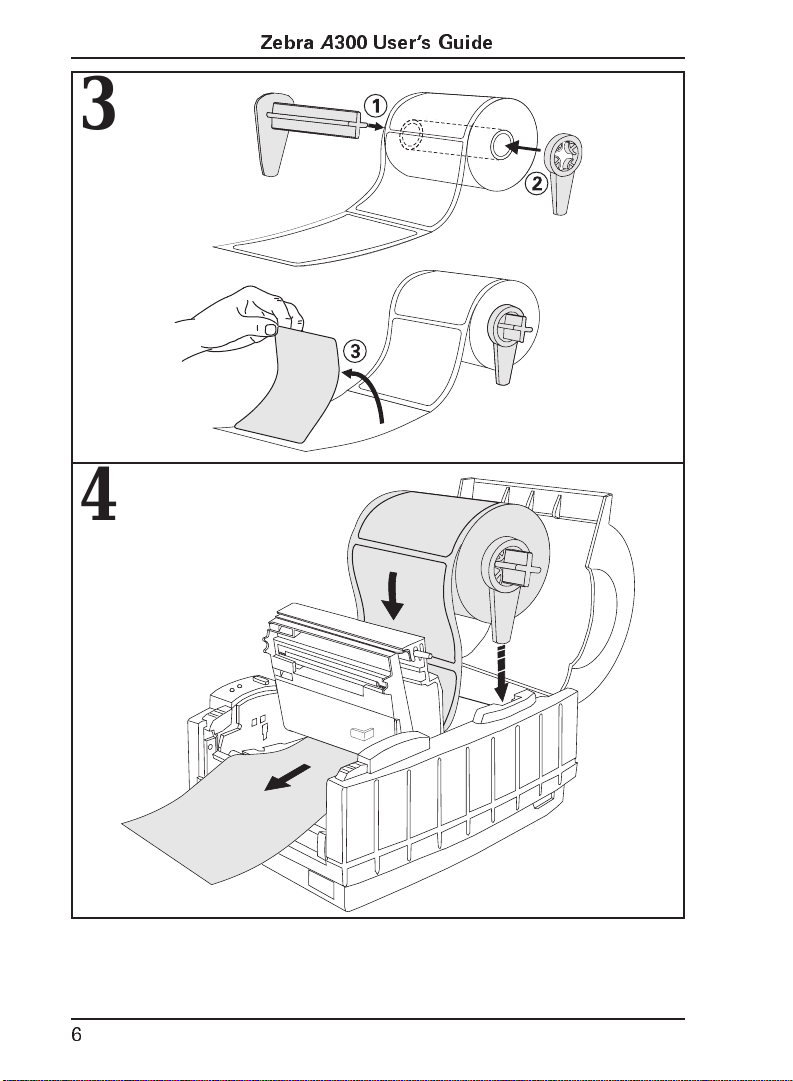
Setting Up the ZebraA300 Printer
Tear-Off Mode of Operation
1
2
2
Page 8
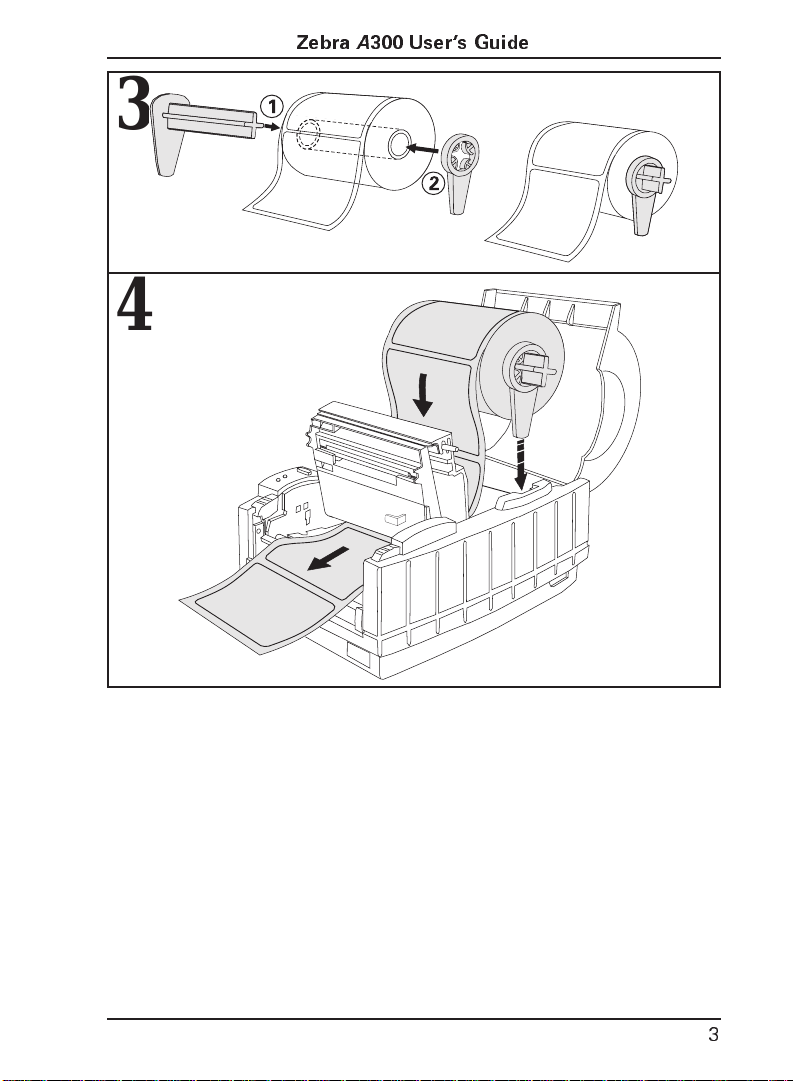
3
4
ZebraA300 Users Guide
3
Page 9
ZebraA300 Users Guide
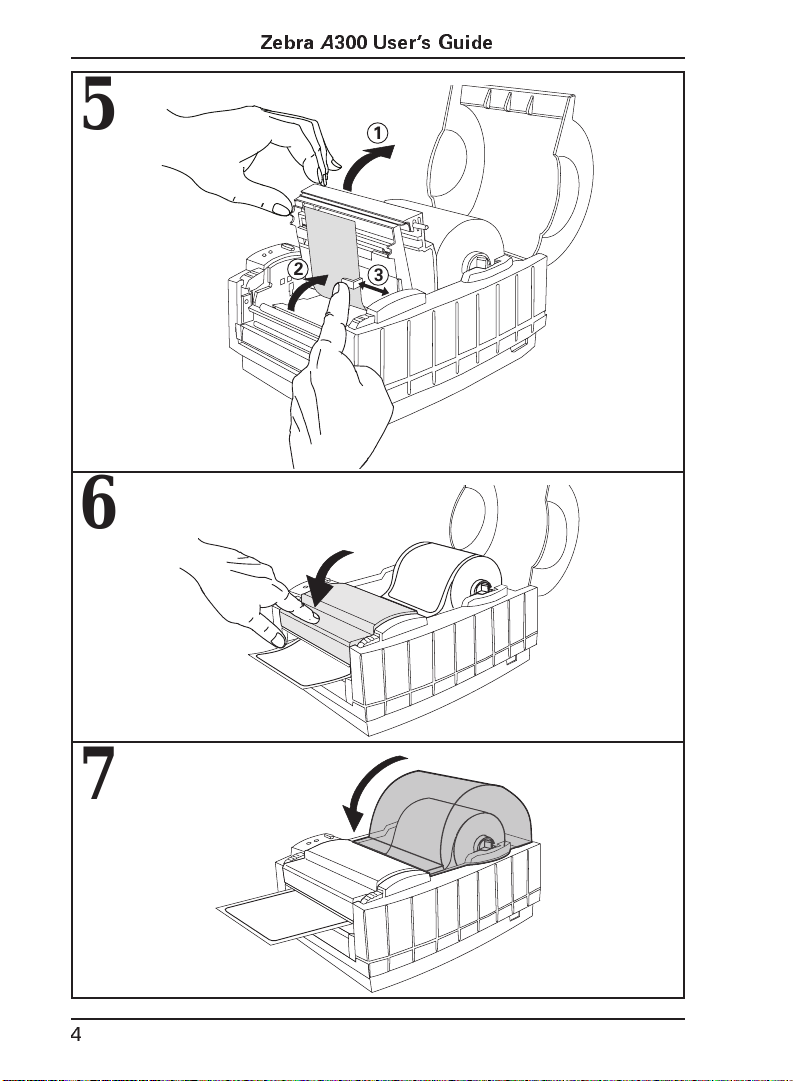
5
6
1
2
3
7
4
Page 10
ZebraA300 Users Guide
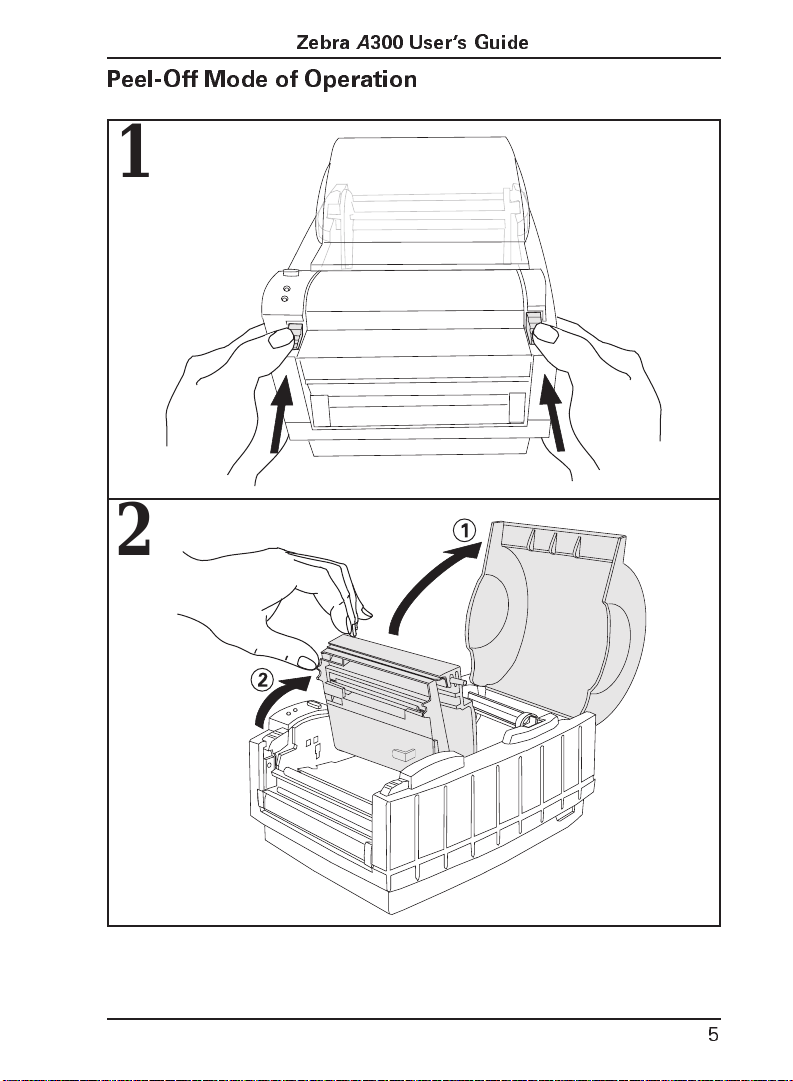
Peel-Off Mode of Operation
1
2
5
Page 11
3
4
ZebraA300 Users Guide
6
Page 12

ZebraA300 Users Guide
5
6
1
2
3
7
Page 13

7
8
ZebraA300 Users Guide
8
Page 14

ZebraA300 Users Guide
Fanfold Media Loading
1
2
9
Page 15

10
Connecting the Zebra
Figure 2: Parallel Connection
A
300 Printer to the Computer
Zebra
A
300 Users Guide
Page 16

11
Figure 3: Serial Connection
Zebra
A
300 Users Guide
Page 17

ZebraA300 Users Guide
Setting Up the Software
Note: If you plan to use BAR-ONE software to create your labels, you will
need to install the software on your comput er before you can operate your
printer.
You will not need to use BAR-ONE software if you are printing label formats created in ZPL II. To print ZPL II, you may use virtually any text program on any comp ut er— inc luding Apple
text to the printer via either the serial or parallel port. For more information,
ref e r to th e ZPL II Programming Guide (available by sending in the mail-in/
fax-in post card at the back of this book).
BAR-ONE System Requirements
BAR-ONE software works with most IBM®-compatible personal computers
available today. The software may be installed and up-and-running within a
few minutes. Refer to the on-line help system and to the Read-Me file for
further information and/or last-minute updates. The BAR-ONE software
may be installed on any computer that mee ts the follo w ing sy ste m requ ire ments:
®
computers—that will send ASCII
12
System
Require ments
Processor
Hard disk
Memory
Interface
Display
Floppy drive
Operating system
Mouse
BAR-ONE
Minimum
486SX 486SX
3 MB 10 MB
4 MB RAM 8 MB RAM
RS-232 Parallel
VGA SVGA
Windows™ 3.1 or higher, NT, 95; OS/2
RS-232 or PS/2
Recom-
mended
3½”
Page 18

ZebraA300 Users Guide
BAR-ONE Installation
The A300 printer uses BAR-ONE software or ZPL II Program ming Language sent from any Windows™ or DOS applicat ion.
1. Start Windows.
2. In ser t d is k 1 of the BAR-ONE softwar e in your fl op p y disk d r ive (A: or
B:).
3. In Program Manager, cli ck on the File menu. Select Run. (Windows 95
users: select Run from the Start menu.)
4. Type A:\SETUP (or B:\SETUP) and then press OK.
5. Follow the on-screen instructions to complete the installation.
Operating the System
T o create a label for the A300, you ma y either use the BAR-ONE software to
create the label format or write one in ZPL I I , which is Zebra’s programming
language for creating labels. If you are using BAR-ONE software, refer to
the on-line BAR-ONE instructions. If you are using, or plan to use, the
ZPL II programming language to format your labels, make sure y ou have a
copy of the ZPL II Programming Guide. Ref er to the m a il -in / fa x -in card
included with the A300 printer to obtain a copy, if desired.
Printer Operating Modes
Tear-O ff M ode.
it is printed.
Peel-Off Mod e .
is p rin t ed , the printer wa it s u ntil the oper ato r r emo ve s the label, t he n th e ne xt
label prints.
The operato r tears off each label (o r a strip of labels) as
The backing material is peeled away from the label as it
13
Page 19

Operator Controls
ZebraA300 Users Guide
Power Switch.
Located on the right-hand side of the printer near the
back. The power switch should be turned off before connecting or di sconnecting any cables.
Feed Key.
In normal use, pressing the Feed Key once when the printer is
idle (not print ing ) will cause the p rinte r to fee d a blank label. The Feed Ke y
also activates a number of specialized functions which are described in
T able 1.
Table 1: Feed Key Troubleshooting Modes
Power Off Mode (Communications Diagnostics Mode)
With the printer power off, press and hold the Feed key while you turn the power on. The
printer prints out a listing of its current configuration (configuration label). See Figure 5 on
page 20. For best results, use media that is at least 4” wide by 4” long. After printing the
label, the printer will automatically enter a diagn ostic mode in which the printer prints out a
literal representation of all data subsequently received (hex dump mode). To exit this mode,
turn the printer power off.
Power On Modes
With the printer power on, printhead closed, and Fault light off, press and hold the Feed key
for several seconds and the Fault Light will flash the following numer of times in sequence.
The explanation at the right shows what happens when you release the key after the specific
number of flashes.
*
**
***
****
If the feed key is held down past 4 flashes, the printer will ignore the key when it is released.
The label showing the current configuration of the printer prints. For best results, use
media that is at least 4” wide by 4” long. See F igure 5 on page 20.
The media sensor calibration process is entered. See “Calibration” on page 15.
The serial communication parameters are reset to 9600 baud, 8 bit word length, no
parity, and 1 stop bit.
Reset factory defaults. Once this mode is entered, the Fault light will flash rapidly. If
the Feed key is pressed and released at this time, the factory default settings will be
saved into memory.
14
Page 20

Zebra A300 & T300
User's Guide
Addendum
Page 21

Scope
This addendum contains information about the new Calibration features
added to the Zebra A300 and Zebra T300 printers when upgraded with the
25.8.1 and 23.8.1 versions of firmware respectively.
Calibration
Auto-Calibration
The printer only auto-calibrates when using non-continuous media (a
gap, notch, or black mark separates each label). During this process, the
printer sets the sensor levels for, and determines the length of, the labels
being used. (To calibrate the printer for media with pre-printed labels or
pre-printed backing, see “Manual Calibration.”)
The first time the printer is turned ON, auto-calibration senses if continuous media is loaded. If this media is used, the label length must be set
through the label preparation software being used.
NOTE: If continuous media is sensed, non-continuous media can
not be used until you either (a) reset the factory defaults (see
“Feed Key Troubleshooting Modes” in the "Operating the System" section of the printer user's guide), or (b) refer to your label
preparation software user’s manual.
To auto-calibrate:
1. Load the media according to the instructions in “Setting Up
the Zebra Printer” in the printer user's guide.
2. Turn the printer power ON.
3. Some blank labels will feed, completing the auto-calibration
process.
4. If the Fault LED (A300) or Power LED (T300) begins flashing,
refer to the “Manual Calibration” process.
Remember:
n
Auto-calibration is performed when the printer is turned ON
and whenever an error condition is cleared.
n
Single flashing of the A300 Fault LED indicates a
PRINTHEAD OPEN condition. Single flashing of the T300
Power LED indicates an Error condition.
n
Double flashing of the LED (A300 Fault LED - T300 Power
LED) indicates a printer PAUSED mode. Press the FEED
Button and the printer will auto-calibrate.
Page 22

Manual Calibration
Manual calibration should be performed whenever you are using preprinted labels or preprinted label backing, or if the printer will not auto
calibrate.
NOTE: Before performing a manual calibration, refer to your
label preparation software user’s manual and set the printer for
the media type (web or black mark).
To manually calibrate:
1. Turn the printer power ON.
2. Remove several labels from a section of backing material. Load
the media so that only the backing material is threaded through
the printer and under the printhead, then close the printhead.
3. Press and hold the FEED button until the LED (A300 Fault LED
- T300 Power LED) flashes once, then twice; then release the
button.
4. The printer sets the media sensor for the label backing you are
using. (Once this process is completed, the media automatically
feeds forward until a label is positioned at the printhead.)
5. A profile of the media sensor settings is printed on the label.
(See the examples in Figures 1 and 2). The printer then saves
the new settings in memory and is ready for normal operation.
6. Press the Feed button. One entire blank label should feed. If this
does not happen, try resetting the factory defaults for the printer
(see “Feed Key Troubleshooting Modes” in the "Operating the
System" section of the printer user's guide).
NOTE: Performing a manual calibration disables the auto-calibration function. To return to auto-calibration, either default the
printer (see “Feed Key Troubleshooting Modes” in the "Operating the System" section of the printer user's guide) or refer to your
label preparation software user’s manual.
Page 23

Figure 1. A300 Sample Media Sensor Profile
Figure 2. T300 Sample Media Sensor Profile
© Zebra Technologies Corporation Part # 55560L Rev. 1
Page 24

ZebraA300 Users Guide
Printer Indicator Lights.
Table 2: Printer Indicator Lights
Power
Light
Printer Con dition
Power is off or printer not receiving power • •
Power is on • •
Paper out or not sensed or
Printhead is open
Printhead is over temperature • •
••
OnO
Fault Light
f
f
OnF
g
n
i
h
s
f
a
f
l
O
Initial Printer Power-Up
Turn the printer on by pre ssi ng th e Pow e r Sw i tch on the rig ht s ide o f the
printer. The Power and Fault lights will tu rn on. The prin ter per for ms a set of
internal diagnostics, and after the diagnostics have been completed (within
1 - 10 seconds) the Fau lt light will tu rn off. If y ou are using non-continuous
media, the printer will then advance the media to position the gap over the
tear bar so that it is ready for use.
If loading the printe r with medi a for the first time, or chan ging the type of
media, perform the Calibration below.
Calibration
This calibrati on p roced ure sh oul d be perf o rm ed the first time you use the
printer and any time you change the type of m edia in the printer.
1. Remove several labels from a section of backing material so that only
the backing materi al is under the print head mech ani sm.
2. Turn the print er pow e r on if it is not alre ad y on .
3. Press and hold the Feed Key until the Fault light flas hes twice in a row.
(First it will flash once, then twice in a row at which point you release
the key.)
4. The printer will adjust the media sensor level for the media backing you
are using. After it is done making this adjustment, the Fault light will
flash rapidly.
5. Reload the media so that a label is under the printhead.
15
Page 25

ZebraA300 Users Guide
6. Press and release the Feed Key. A profile of the media sensor settings
will print. Wh en comple te , the printer w ill save the new setting s in
memory and the printe r is ready f or normal operation.
Figure 4: Sample Media Sensor Profile
Setting the Communication Parameters
If you are using the printe r’s serial port to transfer da ta , you wil l need to
make sure that the printer and the computer have identical communication
parameter set tin gs. To initialize the commu nic atio n parameters for the
printer:
• Press and hold the Feed key until the Fault light blinks three (3) times in
a row. Release the key. The baud rate for the printer will be reset to
9600 baud, 8 bit word length, no parity, and 1 stop bit. Then, set the
communication s param eters on your co mpu ter to match this.
• If you need to use different settings than t he defaults (for example, if
you are usin g a mode m with cert ain req uire ments) you have two opt ions
for setting the communicati on s parame te rs. Sen d the ^SC “Se t Com mu nications” ZPL command (describe d below) at 9600 baud via the serial
port set up as shown above , then rese t the com puter to the new valu e s.
Or, send the ^SC command via the parallel port, then reco nn ect for
serial port ope rat ion as need ed .
16
Page 26

ZebraA300 Users Guide
Here is the command description for the Set Communications command
(refer to your ZPL II Programming Guide for additional prog ra mmi n g
inform ation):
^SCa,b,c,d,e,f
where
a = baud rate (110 - 19200 baud)
b = word length (7 or 8 data bits)
c = parity (N = none, E = even, O = odd)
d = stop bits (1 or 2 )
e = hand s hake (X = XON/XOFF, D = DTR/DSR)
f = Zebra protocol (Y = yes, N = no)
If you do not specify a new setting for a parameter, it remains
unchanged (it does not change to the default value).
Adjusting the Darkness of the Printing
If you are using BAR-ONE or other software, adjust the relative darkness
setting as indicated in that software. Or, if you are using ZPL II , send the
^MD (Media Darkness) ZPL II command.
ZebraNet Op tion
You ma y choo se to net work you r Zebra A300 printer. Contact your distributor for information abo ut Zebra Net ™ micro print serv er— eth ern et con nectivity for your Zebra A300 printer.
17
Page 27

ZebraA300 Users Guide
Preventive Maintenance
Cleaning
CAUTION: Use only the cleanin g agents indi ca ted in the following tabl e.
Zebra Technologies Corporation will not be responsible for any other fluids
being used on th is print er.
Inconsis tent print qua li ty, such as voids in the bar code or graphics, may
indicate a dirty printhe ad. For best resul ts, perfo rm the cleani n g proced ures
in Table 4. For the location of these printer parts, refer to Figure 1 on page ii.
Table 3. Cleaning Schedule
Area Method Interval
Printhead Note: You do n ot need to turn the printer off
before cleaning the printhead. Use solvent* on a
cotton swab to clean the print elements from end
to end. (The print elements are the thin gray line
on the printhead.)
Platen Roller Rotate the platen roller and clean it thoroughly
with solvent* and a cotton swab.
Peel-Off Roller Rotate the peel-off roller and clean it thoroughly
with solvent* and a cotton swab.
Transmissive Media Sensor Ai r blow
Media Path Solvent*
Peel/Tear Bar Solvent* As needed.
Label Available Sensor Air blow Monthly.
Printhead Open Sensor Air blow As needed.
Exterior Mild detergent or desktop cleaner. As needed.
Interior Brush/vacuum cleaner As needed.
* Zebra recommends using solvent containing 70% isopropyl alcohol.
After every
roll of
media (or
500 ft of
fanfold
media)
Lubrication
CAUTION! No lubricatin g agents of any kind sho uld be used on this
printer! If used, some commercially available lubricants will damage the finish and mechanic al parts.
18
Page 28

ZebraA300 Users Guide
Troubleshooting
Table 4. Troubleshooting
Symptom Diagnosis Action
Power light does not
turn on when Power
switch is turned on.
When printer is first
powered on, the Fault
light remains on.
Fault light is flashing. Printhead is open. Close printhead.
Printer is not receiving
power.
Printer failed an internal diagnostic test.
Make sure that the power supply is plugged
into the printer and into a wall outlet, power
strip, or other source of power.
Turn the printer power off and then back on.
If the symptom persists, call a service technician.
Long tracks of missing
print (blank vertical
lines) on several labels.
Misregistration (printing does not start at the
top of the label) and
misprint of 1 to 3
labels.
A label format was sent
to the printer but not
recognized.
Printer appears to operate, but nothing prints.
Out of media or media
incorrectly loaded.
Printhead is overheated.
Printhead is dirty. Clean the printhead. See Table 3 on page 18.
Print element is dam-
aged.
Printer needs to be
calibrated.
Communications
parameters are incorrect.
Data cable not correct
or not co nnected correctly.
Non-thermally sensitive material.
Load media correctly. Make sure that the
media is placed on the inside edge of the
platen roller and that it feeds straight
through the printhead otherwise it may not
be detected by the media sensor.
Allow printer to cool. Printing resumes
automatically when the printhead element
cools to operating temperature.
Call a service technician to replace the printhead.
Recalibrate the printer. See “Calibration” on
page 15.
For serial communication, make sure that
the baud rates of the printer and t he computer match. Also, make sure that the correct com ports on the PC are selected.
Make sure the data cable is installed correctly if serially connected. For serial operation, make sure you are using a “null
modem” cable.
Make sure that you are using direct thermal
label, ticket, or tag stock. Zebra recommends using genuine Zebra media in your
printer for best results.
19
Page 29

ZebraA300 Users Guide
Troubleshooting Modes
Printing a Configuration Label.
current configuration (configuration label), refer to Table 1, “Feed Key
Troubleshooting Modes,” on page 14.
Figure 5: Configuration Label (Sample)
Calibration.
ping a label, you may nee d to rec alibrat e the print er. See “Calibrat ion” on
page 15.
If the printer is exh ibi tin g unus ua l sympt om s, such as skip-
T o print out a listing of the p r inter’s
Resetting to Factor y Default Values.
factory defaults might solve some problems. For instructions, ref er to
Table 1, “Feed Key Troubleshooting Modes,” on page 14.
Communications Diagnostics.
ring data betw een the compu te r and p rinter, you may want to put the print er
in the Communicat i ons Dia gn osti cs mode. In this mode, the prin ter print s
the ASCII characters and their corresponding hexadecimal values for any
data received from the host computer. For instructions, refer to Table 1,
“Feed Key Troublesh ooti ng Modes, ” on p age 14. A typical p rin tout i s sh own
in Figure 6.
20
If y ou suspect problems in transfer-
Resetti ng the print er to th e
Page 30

ZebraA300 Users Guide
Figure 6: Communicati on s Dia gnostic s Printo ut (Sample)
21
Page 31

ZebraA300 Users Guide
Specific a t i o n s
Table 5: Specifications
Print density 203 dots/inch 8 dots/mm
Print width 1² to 4.125
Print speed 2²/sec 51 mm/sec
Label width (including backing
material, if any)
Label length 0.5² to 18
Interlabel gap 0.08² to 0.16
Label thickness (including backing
material, if any)
Label roll size Maximum outer
Registration tolerance
First dot location (from outer media
edge)
Fonts available •CG Triumvirate Bold Condensed (6, 8, 10, 12, 14,
Bar codes available • 2-digit and 5-digit supplemental code
diameter
Minimum inner
core diameter
Horizontal ± 0.059
Vertical ± 0.0393
1² to 4.25
0.003² to 0.010
5.0
1.0
0.125² to 0.140
18 pt. )
•Z ebr a fonts A, B, C, D, E, H, GS, IBM Code Page850
International Characters, Graphics symbols
•Codabar (Supports ratios of 2:1 to 3:1)
•Code 11
•Co de 128 (Supports serialization in all subsets and
UCC Case Codes)
•Code 39 (Supports ratios of 2:1 to 3:1)
•Code 93
•EAN Versions 8 and 13, EAN Extensions
•Industrial 2 of 5, Standard 2 of 5
•Interleaved 2 of 5 (Supports ratios of 2:1 to 3:1, Modulus 10 Check Digit)
•LOGMARS
•MaxiCode
•MSI
•PDF 417
•Plessey
•POSTNET
•UPC Versions A a nd E, UPC Extensions
²
²
²
²
²
²
²
²
²
²
25.6 to 105.0 mm
25 to 108 mm
12.7 to 457 mm
2 to 4 mm
0.076 to 0.254 mm
127 mm
25.4 mm
± 1.5 mm
± 1.0 mm
3.17 t o 3.56 m m
22
Page 32

ZebraA300 Users Guide
Table 5: Specifications (Continu ed)
Media requirements Zebra recommends use of Zebra brand media. All media
Physical size (L ´ W ´ H) 9.7² ´ 7.0² ´ 6.0
Weight (without media) 3.35 lb 1.52 kg
Temperature
range
Relative humidity, operation and
storage
Electrical External 120 or 230 VAC power supply, depending on
Communications
Agency approvals •UL 544 Medical Equipment Standard Part 42.5
Processor/memory 32-bit microcontroller, 512 kB DRAM
Power line cord • The overall length must be less than 12.5 ft (3.8 meters)
Parallel data cable For maximum reliability, use a parallel data cable no
Operating 50° to 104° F 10° to 40° C
Storage -4° to 140° F -20° to 60° C
must be direct thermal media. Media may be continuous,
die-cut, or notched. Notched media must have a notch
which is 1/4² wide ´3/
of the label as it feeds through the printer.
10 to 90% R.H.
which model you ordered. Additional custom line cords
may also be available.
36-pin Centronics
serial port; contact your distributor for information about
ZebraNet™—ethernet connectivity for the A300.
•CSA 22.2 No. 950 Canadian Safety Standard
•Carries the CE mark of compliance.
•IEC 950/EN 60950 International Safety Standard
•FCC Part 15 Subpart B level A Electromagnetic Radiation Standard
•AAME 4.3.2 Medical Standard
•UL 1950 Domestic Safety Standard
•SOR/88-475 Canadian Electromagnetic Radiation
Standard
•EN50082-1 International Immunity Standard
•C.I.S.P.R.-22 Class B European Electromagnetic Radiation Standard
•It must be rated for at least 3 A, 250 V.
•Th e chassis ground (earth) MUST be connected to
assure safety and reduce electromagnetic interference.
The ground connection is handled by the third wire
(earth) in the power line cord. See Figure 7.
The AC power plug and IEC 320 connector must bear
the certification mark of at least one international safety
organization (some examples are shown in Figure 2.)
longer than 6 ft (1.8 m).
32²
long located on the left side
²
®
-compatible parallel port and RS-232
249 mm ´ 179 mm ´
154 mm
23
Page 33

ZebraA300 Users Guide
Figure 7. 2 30 VA C Powe r Line Cord
Figure 8. Examples of International Safety Organizations
Table 6. Parallel Pinouts
Pin No. Description
1 Strobe
2-9 Data Bits 0-7
10 Acknowledge
11 Busy
12 Paper end
13 Select
14-17 Not used
18 +5 V @ 0.75 A
19-30 Ground
31 Not used
32 Error/fault
33 Ground
34 Not used
35 +5 V through 3.3 K
36 Select
24
Page 34

ZebraA300 Users Guide
Table 7. RS-232 Pinouts
Pin No. Description
1 Unused
2 RXD (receive data) input to printer
3 TXD (transmit data) output from printer
4 DTR (data terminal ready) output from printer
5 Ground
6 DSR (data set ready) input to printer
7 RTS (request to send) output from printer
8 Unused
9 Unused
To connect your serial port to a 9 -pin connector on your P C, use a 9-pin to
9-pin null modem (crossover) cable. If your PC has a 25-pin connector,
use a standard (straight-through) 9-pin to 25-pin cable.
Software Licen se Agreement
The enclosed software and documentation are protected by the United States copyright law and international treaty, and therefore you must treat them like a book, with the exception that you may make copies to protect yourself agains t los s of the origi nal.
Your right to use the enclosed software and documentation as described below is non-exclusive and non-transferable. Zebra
retains ownership in the software and documentation and all other right, title and interest. The enclosed software and documentation may b e used by any number of people and may be freely moved from one c omputer to ano ther as long as t here is no possibility of their being used by more than one person on more than one computer at the same time.
Machine readable files representing graphics or fonts which you have created independently may be converted to ZPL format
files using the enclosed software and such files may be used, copied onto diskettes or font cards, given away, or sold without
paying license fees to Zebra.
Pictorial or graphic images and machine readable files representing them may be protected by United States copyright law and
international treaty provisions which prohibits y ou from transcribing or scanning such images or using copying, or converting
such files without permission of the copyright owner. You may not use this software in violation of U.S. copyright law or international treaty. By using this software, you agree to be bound by these terms.
Zebra Technologies Corporation (“Zebra”) warrants the enclosed diskette to be free of defects in material and workmanship for
a period of 60 days from the date of purchase. In the event of notification within the warranty period of defects in material and
workmanship, Zebra will replace the defective diskette or documentation. Zebra specifically disclaims all other warranties,
expressed or implied , including but not limited to implied warranties of merchantability and fitness for a particular purpose. IN
NO EVENT WILL ZEBRA TECHNOLOGIES BE LIABLE F OR LOST PROFITS, LOST DATA, OR ANY OTHER INCIDENTAL OR CONSEQUENTIAL DAMAGES CAUSED BY ABUSE OR MISAPPLICATION OF THE SOFTW ARE OR B Y
ITS USE IN VIOLATION OF THE U.S. COPYRIGHT LAW OR INTERNATIONAL TREATY.
25
Page 35

ZebraA300 Users Guide
Warranty
1. Printer Warranty
ZEBRA printers, excluding thermal printheads which are warranted separately below, are warranted against defects in material
or workmanship for twelve (12) months from the date of purchase by the end user. This warranty does not cover normal wear
and tear and shall be null and void if the equipment is modified, improperly ins talled or used , dama ged by accident or neglect, or
in the event any parts are improperly installed or replaced by the user. Proof of purchase or product registration is required. If
proof of purchas e or prod uct reg istration cannot be established, shipment date to the original buyer (dealer or distributor) will be
used to establish the warranty period.
Since printhead wear is part of normal operations, the original printhead and replacement printheads are covered by a limited
warranty of six (6) months/180 days from t he date of purchase by the end user. To qualify for this warranty, the printer must be
returned to the factory or other authorized service center. Although the user is not required to purchase ZEBRA brand supplies
(media), to the extent it is determined that the use of other supplies (media) shall have caused any defect to the th ermal pr inthead
for which a warranty claim is made, the user shall be responsible for ZEBRA Technologies’ customary charges for labor and
materials to repair such defect. To the exten t that it is determined that failure to follow the preventive maintenance schedule and
procedures listed in the User’s Guide shall have caused any defect to the thermal printhead for which a warranty c laim is made ,
this limited warranty shall be void.
ZEBRA TECHNOLOGIES’ SOLE OBLIGATION UNDER THIS WARRANTY SHALL BE TO FURNISH PARTS AND
LABOR FOR THE REPAIR OR REPLACEMENT OF PRODU CT S FOUND TO BE DEFECTIVE IN MATERIAL OR
WORKMANSHIP DURING THE WARRANTY PERIOD.
As a condition of this warranty, the user must: (a) obtain a ZEBRA Return Authorization for the printer, or subassembly(s); (b)
ship the printer or subassembly(s), transportation prepaid to the authorized service location; and (c) include with the Product or
subassembly(s ) a w ritten description of the claimed defect. Unless ZEBRA Technologies authorizes return of the entire Product, the user shall return only the subassembly(s). Products returned shall be packaged in the original packing and shipping container or comparable container. In the event equipment is not so packaged or if shipping damage is evident, it will not be
accepted for service under warranty. Surface transportation charges for the return of the printer to the customer shall be paid by
ZEBRA Technologies within the 48 contiguous states and the District of Columbia. Customer shall pay shipping costs, customs
clearance, and other related charges outside the designated area. If ZEBRA Technologies determines that the Product returned to
it for warranty service or replace me n t is not defective as herein defin e d, BUYE R shall pa y all costs of handling and transportation.
2. Supplies Warranty
ZEBRA supplies are warranted to be free from defects in materials or workmanship for a period of either the stated material
shelf life or six (6) months/180 days from date of shipment, whichever occurs first, provided that the BUYER has complied with
ZEBRA Technologies’ guidelines on storage, handling, and usage of the labeling supplies in ZEBRA printers. ZEBRA Technologies does not warrant the performance of ZEBRA labeling supplies on non-ZEBRA printers.
Any supplies product shown to the satisfa ction of ZEBRA Technologies, within the time provided, to be so defective shall be
replaced without charge, or ZEBRA Technologies may issue a credit in such an amount as it deems reasonable.
3. Warranty Exclusions and Conditions
The above warranties are in lieu of all other warranties, expressed or implied, oral or written, statutory or otherwise, including
any implied warranty of merchant-ability or fitness for a particular purpose.
ZEBRA Technologies shall not be respo nsible f or the specific a ppl icati on to which any Products are applied, including but not
limited to compatibility with other equipment.
All statements, technical information and recommendations relating to ZEBRA Products are based upon tests believed to be
reliable but do not constitute a guarantee or warranty.
ZEBRA TECHNOLOGIES SHALL NOT, UNDER ANY CIRCUMSTANCES WHATSOEVER, BE LIABLE TO BUYER OR
ANY OTHER PARTY FOR LOST PROFITS, DIMINUTION OF GOOD WILL OR ANY OTHER SPECIAL OR CONSEQUENTIAL DAMAGES WHATSOEVER WITH RESPECT TO ANY CLAIM HEREUNDER. IN ADDITION, ZEBRA
TECHNOLOGIES’ LIABILITY FOR WARRANTY CLAIMS SHALL NOT, IN ANY EVENT, EXCEED THE INVOICE
PRICE OF THE PRODUCT CLAIMED DEFECTIVE, NOR SHALL ZEBRA TECHNOLOGIES BE LIABLE FOR DELAYS
IN REPLACEMENT OR REPAIR OF PRODUCTS.
No salesperson, representative or agent of ZE BRA Technologies is authorized to make any guarantee, warranty, or representation in addition to the foregoing warranty.
NO WAIVER, ALTERATI ON, ADDITION, OR MODIFICATION OF THE FOREGOING WARRANTIES SHALL BE
V ALID UNLESS MADE IN WRITING AND SIGNED BY AN EXECUTIVE OFFICER OF ZEBRA TECHNOLOGIES.
26
Page 36

333 Corporate Woods Parkway
Vernon Hills, Illinois 60061.3109 USA
Telephone +1 847.634.6700
Facsimile +1 847.913.8766
Zebra Technologies Europe Limited
Zebra House
The Valley Centre, Gordon Road
High Wycombe
Buckinghamshire HP13 6EQ, UK
Telephone +44 (0)1494 472872
Facsimile +44 (0)1494 450103
Customer order #55530L
Manufacturer part #55530LB
© Zebra Technologies Corporation
 Loading...