


FS/VS Smart Camera
License Upgrade
User Guide
MN-004305-02EN

ZEBRA and the stylized Zebra head are trademarks of Zebra Technologies Corporation, registered in
many jurisdictions worldwide. All other trademarks are the property of their respective owners.
© 2022 Zebra Technologies Corporation and/or its affiliates. All rights reserved.
Information in this document is subject to change without notice. The software described in this document
is furnished under a license agreement or nondisclosure agreement. The software may be used or copied
only in accordance with the terms of those agreements.
For further information regarding legal and proprietary statements, please go to:
SOFTWARE:zebra.com/linkoslegal
COPYRIGHTS:zebra.com/copyright
WARRANTY:zebra.com/warranty
END USER LICENSE AGREEMENT: zebra.com/eula
Terms of Use
Proprietary Statement
This manual contains proprietary information of Zebra Technologies Corporation and its subsidiaries
(“Zebra Technologies”). It is intended solely for the information and use of parties operating and
maintaining the equipment described herein. Such proprietary information may not be used, reproduced,
or disclosed to any other parties for any other purpose without the express, written permission of Zebra
Technologies.
Product Improvements
Continuous improvement of products is a policy of Zebra Technologies. All specifications and designs are
subject to change without notice.
Liability Disclaimer
Zebra Technologies takes steps to ensure that its published Engineering specifications and manuals are
correct; however, errors do occur. Zebra Technologies reserves the right to correct any such errors and
disclaims liability resulting therefrom.
Limitation of Liability
In no event shall Zebra Technologies or anyone else involved in the creation, production, or delivery of the
accompanying product (including hardware and software) be liable for any damages whatsoever
(including, without limitation, consequential damages including loss of business profits, business
interruption, or loss of business information) arising out of the use of, the results of use of, or inability to
use such product, even if Zebra Technologies has been advised of the possibility of such damages. Some
jurisdictions do not allow the exclusion or limitation of incidental or consequential damages, so the above
limitation or exclusion may not apply to you.
2

About This Guide
This guide provides details license acquisition methods for utilizing specific toolsets in Zebra Aurora.
IMPORTANT: If you have a problem with your equipment, contact Zebra Global Customer Support for your
region. Contact information is available at: zebra.com/support
Service Information
If you have a problem with your equipment, contact Zebra Global Customer Support for your region.
Contact information is available at: zebra.com/support
When contacting support, please have the following information available:
• Serial number of the unit
• Model number or product name
• Software type and version number.
Zebra responds to calls by email, telephone or fax within the time limits set forth in support agreements.
.
If your problem cannot be solved by Zebra Customer Support, you may need to return your equipment for
servicing and will be given specific directions. Zebra is not responsible for any damages incurred during
shipment if the approved shipping container is not used. Shipping the units improperly can possibly void
the warranty.
If you purchased your Zebra business product from a Zebra business partner, contact that business
partner for support.
Revision History
Changes to the original guide are listed below:
Change Date Description
-02 Rev A 7/22 Feature updates in this version include:
-01 Rev A 7/21 Initial Release
• Offline License Acquisition
• Instructions for Obtaining Activation and Device ID
• License Types
3

Contents
About This Guide
Service Information ............................................................................................................... 3
Revision History .................................................................................................................... 3
FS/VS License Upgrade 2
Acquiring a License ............................................................................................................... 2
License Acquisition Modes .................................................................................................... 2
Acquiring an Activation ID ..................................................................................................... 2
Acquiring License from the Licensing Server (Online) .......................................................... 2
Acquiring License by Downloading Bin File (Offline) ............................................................ 5
Downloading an Offline License from the Licensing Server ............................................... 5
Downloading the Capability Response ................................................................................. 7
Time Tampering .................................................................................................................. 13
Returning a License ......................................................................................................................... 14
License Types ..................................................................................................................... 15
1

FS/VS License Upgrade
FS Decode and VS Machine Vision Toolsets require a valid license to be installed on the
can be activated using the Web HMI. This guide includes instructions on expanding the toolset of Zebra
Aurora by upgrading the license. For more information on using the FS/VS Smart Camera, refer to the
Product Reference Guide.
Acquiring a License
For the customers, partners, and distributors that require a FS/VS Industrial Scanner product license for FS
Decode and VS Machine Vision Tools through your Account Manager.
A p
erpetual license is a permanent license that is available for the lifespan of the device.
License Acquisition Modes
A license for the device may be acquired in an online or offline mode.
•
Licensing Server (Online mode)
• Bin File (Offline Mode)
NOTE:
network with an active Internet connection. The device cannot utilize a computer’s Internet connection (over
USB-C or direct Ethernet connection to the computer) to perform the upgrade.
This upgrade and deactivation process for a license requires the device to be connected to an Ethernet
device. Licenses
Acquiring an Activation ID
The Activation ID is the unique 32-bit alpha-numeric number provided when the license is procured. This
number acts as the key to enable the device to activate the license. An example of the Activation ID is
4a69-7ed6-ffec-4448-8874-d155-2fcd-a2cd.
NOTE:
Acquiring License from
This is the default license acquisition
acquire a license from the licensing server. The license server is hosted on the cloud and the
contacts the cloud-based license server to acquire licenses.
Refer to the link shared via e-mail when the license is procured for credentials.
the
Licensing Server (Online)
in online mode.
2
The device must have an Internet connection to
device

Open the web Human-Machine Interface (HMI) by entering the device’s IP address into a web browser
1.
or clicking the IP address link under View Devices in Zebra Aurora.
Figure 1 Zebra Aurora - View Devices
2. Log into the HMI using the default credentials for an administrator account:
a. Username: admin
b. Password: admin
3. Select the gear icon to access the settings menu.
Figure 2 Web HMI
Select the Licensing tab.
To acquire licenses from the Licensing Server:
1.
Select the Online option from the ACQUIRE LICENSE METHOD as shown in
2. Enter the following
Licensing Server
URL in the LICENSING SERVER URL form field:
• zebra-licensing.flexnetoperations.com/flexnet/deviceservices
3
Figure 3
.
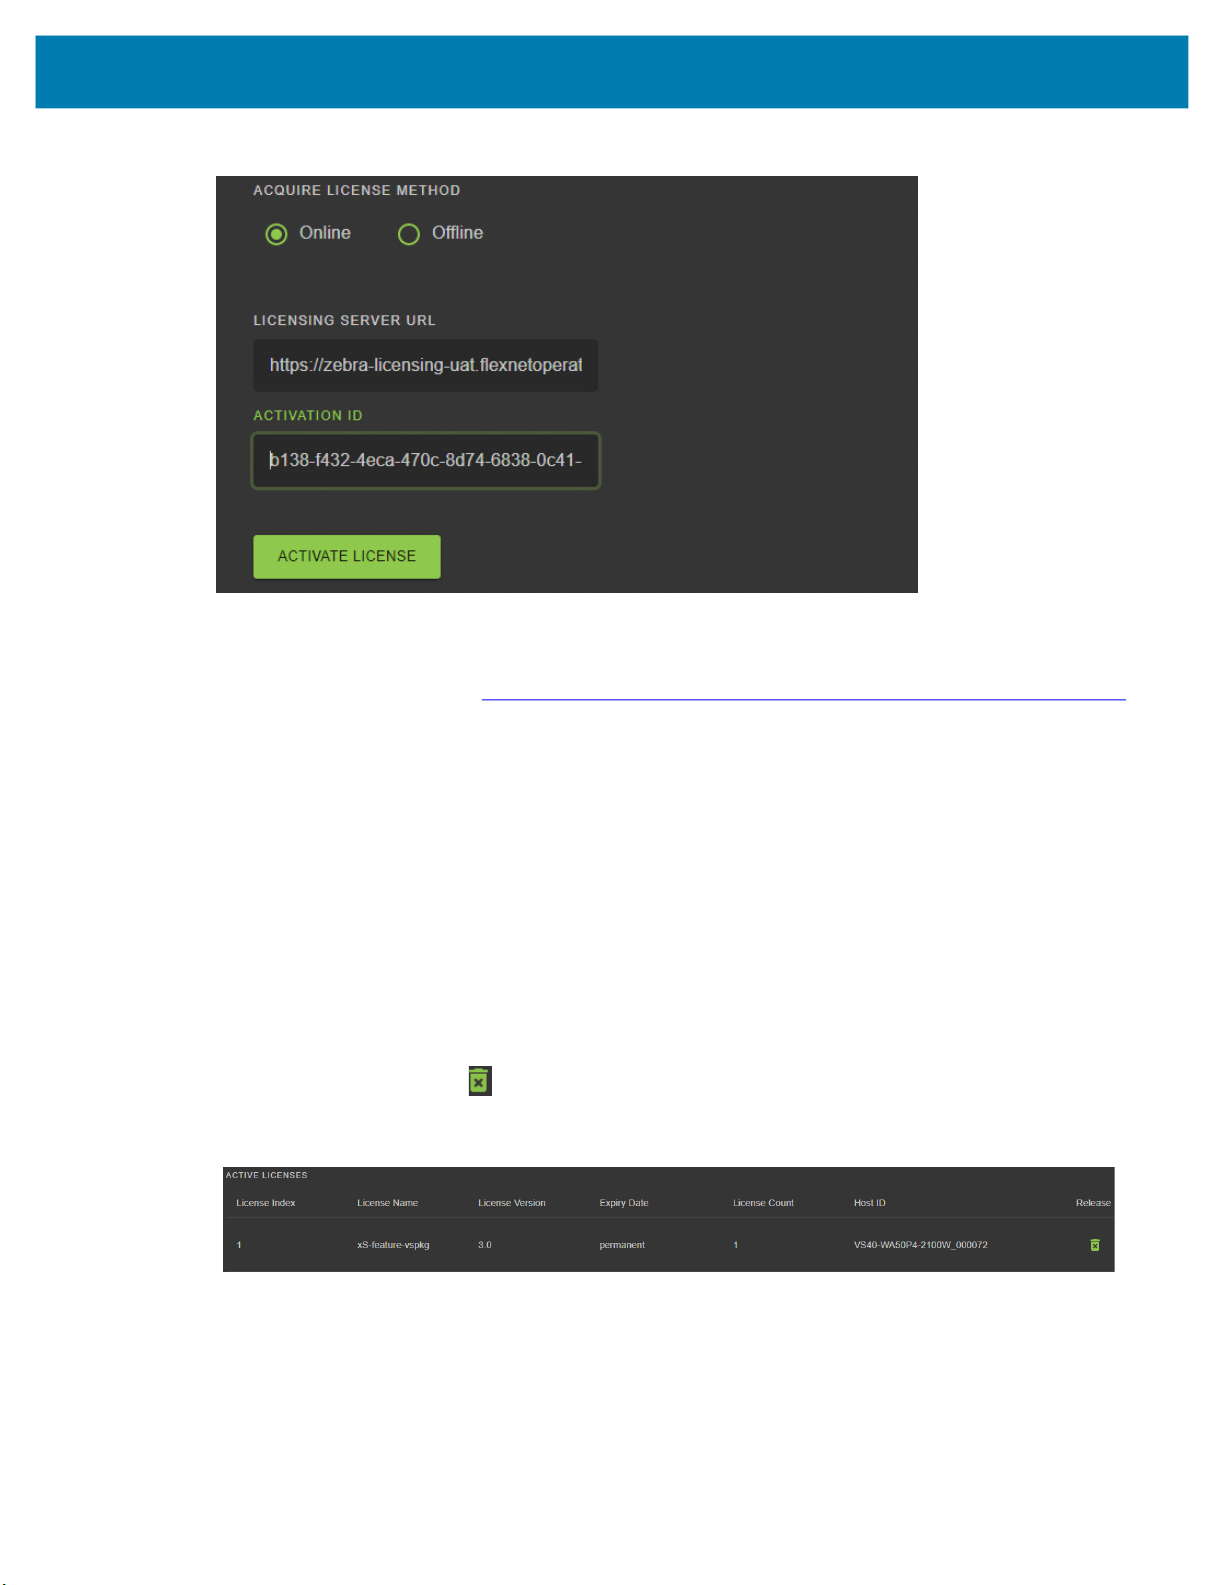
Figure 3
Manage License
Enter the 32-byte
Acquiring an Activation ID
that is provided via e-mail when the license is procured.
To circumvent a firewall while contacting the cloud-based license server, set up a proxy server.
For detailed instructions, visit: supportcommunity.zebra.com/s/article/ZSL-Licensing-Server-Connectivity
Click ACTIVATE LICENSE to acquire the license. An Available License(s) list displays (see
Figure 4)
and
includes the following information:
•
License Index: Lists the license number.
•
License Name: This is the feature name of license, such as “xS-feature-vspkg”.
•
License Version: Lists the license version number.
•
Expiration Date: Expiration date for the trial license. For the Perpetual license, this field shows
permanent.
•
License Count: Lists the number of licenses allocated to the device.
•
Host ID: A unique number for the license server to identify the device. This number has both Part
Number and Serial number of devices. The example shown below is
VS40-WA50P4-2100W_12345678901234.
•
Release:
Figure 4
Click
button to release the license back to license server from device.
ACTIVE LICENSES
4

Acquiring License by Downloading Bin File (Offline)
Use the offline method of license acquisition when Internet connection is not available. The Capability
Response must be downloaded from the server to acquire
Capability Response
To acquire the license in the offline mode:
1.
Download the Capability Response (see
2.
On the Licensing screen, select the
Figure 5
Manage License - Offline Mode
for more details.
Downloading the Capability Response).
offline
option from the ACQUIRE LICENSE METHOD option.
a
license with this method. See
Downloading the
3.
Click CHOOOSE FILE and locate the bin file downloaded in
4.
Click ACTIVATE LICENSE button to activate the license. An Available License(s) list displays.
Figure 6
5. Start a new job in Zebra Aurora to utilize the upgraded toolset.
a. Close any current jobs if they are still open in the application.
b. Starting a new job shows the newly enabled tools available with the upgraded license.
NOTE: The device name, model name, and part number remain unchanged after a license upgrade. The
changes based on the newly upgraded license are implemented upon the creation of a new Job.
Available License - Offline
Downloading the Capability Response
Downloading an Offline License from the Licensing Server
Ensure that you have the Device ID and the Activation ID information prior to downloading the capability
response. For additional information, refer to Obtaining the Device ID and Acquiring an Activation ID.
.
5

Obtaining the Device ID
The Device ID is the unique identification number of the device on the Zebra Licensing Server. The Device
ID must be in the format <Part Number>_<Serial_Number>.
For example, FS40-WA50F4-2C000W_
•
The Part Number is xS10, xS20, xS40 or xS70.
•
The Serial Number is a 14-digit number.
Look for the Part Number and the Serial Number from Zebra Aurora, Web HMI, or on the label of device.
Figure 7 Device Label
12345678901234,
where
12345678901234
Figure 8 Device Part Number (from Web HMI)
Figure 9 Device Part Number and Serial Number (from Aurora)
12345678901234
6

Downloading the Capability Response
To download the Capability Response from the licensing server:
1.
Log in before entering the Zebra Licensing Server at zebra-licensing.flexnetoperations.com/ .
2.
Enter the Username and Password.
Figure 10
3.
The Home screen displays
Figure 11
Zebra Licensing Server Login Window
Software Licenses Portal Home Screen
:
7
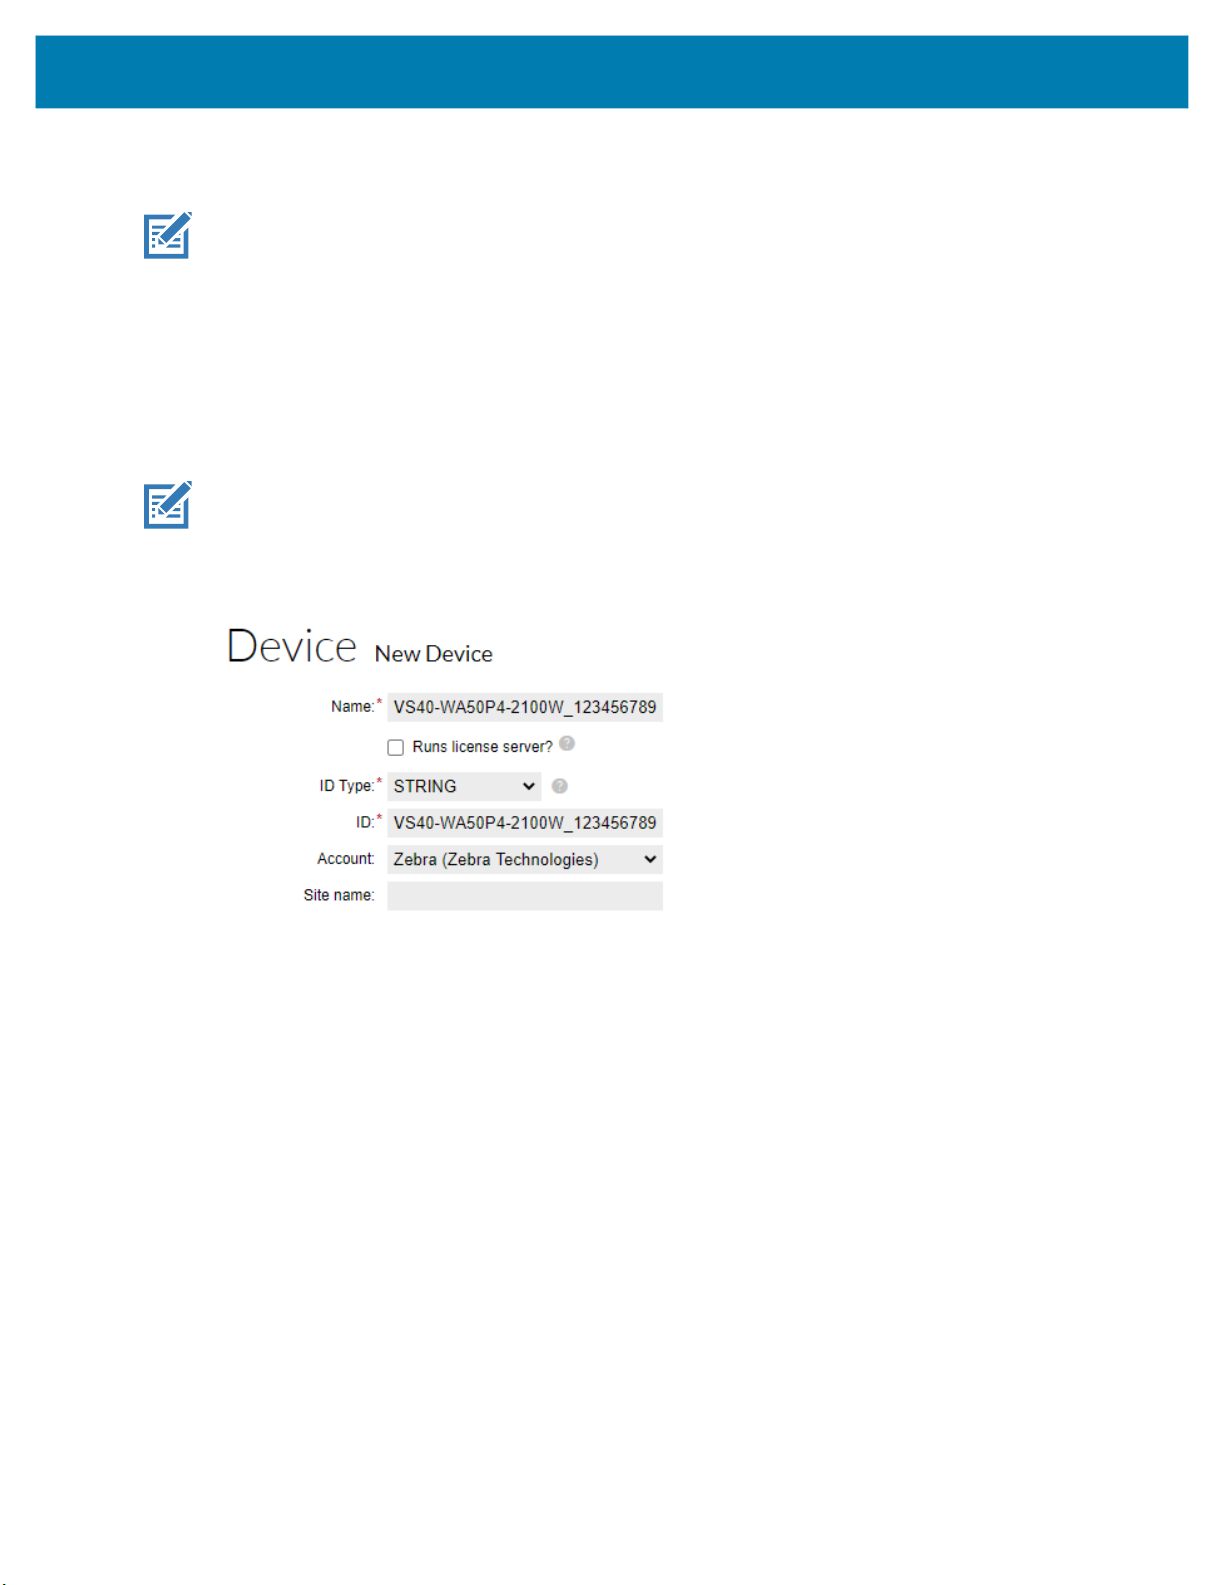
Select the Devices tab drop-down arrow to select Create Device. A New Device screen displays (see
4.
Figure 12
).
NOTE:
5.
VS40-WA50P4-2100W_12345678901234
On the New Device screen:
•
Enter the ID in the format <Part_Number>_<Serial_Number> (see
is used as
an example.
Obtaining the Device ID
more details).
•
Enter the Name which is same as the ID. Do not select the Runs license server checkbox and leave
Site Name empty.
•
Pick your Account from drop down list.
NOTE: Zebra (Zebra Technologies) used as
Figure 12
Create New Device Screen
an example.
for
6.
Click Save. The Device created successfully message
registered.
8
displays
when the device is successfully

Figure 13
View Device Screen
7.
Select Action to expand the drop-down list.
8.
Next, select Map By Activation ID.
Figure 14
View Device Action Drop-Down Menus
9

In the Map by Activations IDs screen, enter the Activation ID. If you have multiple IDs, ensure that
9.
each ID is entered on a new line.
Figure 15
10.
Click Validate. The Validation successful message displays when the Activation ID is successfully
Map by Activation IDs Screen
validated.
11.
Edit the Qty to add for all of the licenses that are mapped to a single device.
NOTE:
12.
Figure 16
13.
For a standalone license, the value is 1.
Click Save.
Activation ID Validation Successful
The page displays a Entitlement successfully mapped message.
10

Figure 17
14.
Click Action to expand the drop-down list. Next, select Download Capability Response. The bin file is
Device Entitlement Successfully Mapped
available in the Download folder.
Figure 18
View Device Action Drop-Down Menus
After the download is complete, verify that the device is accessible in the directory.
1.
Click the Devices tab to enter Device Screen.
2.
On the Devices screen:
a.
Click the drop-down arrow next to the Filter icon to select Device ID.
b.
Enter the Device ID VS40-WA50P4-2100W_ 12345678901234 next to Search.
c.
Click Search and the entitled devices are listed.
11

Figure 19
Device Screen
12
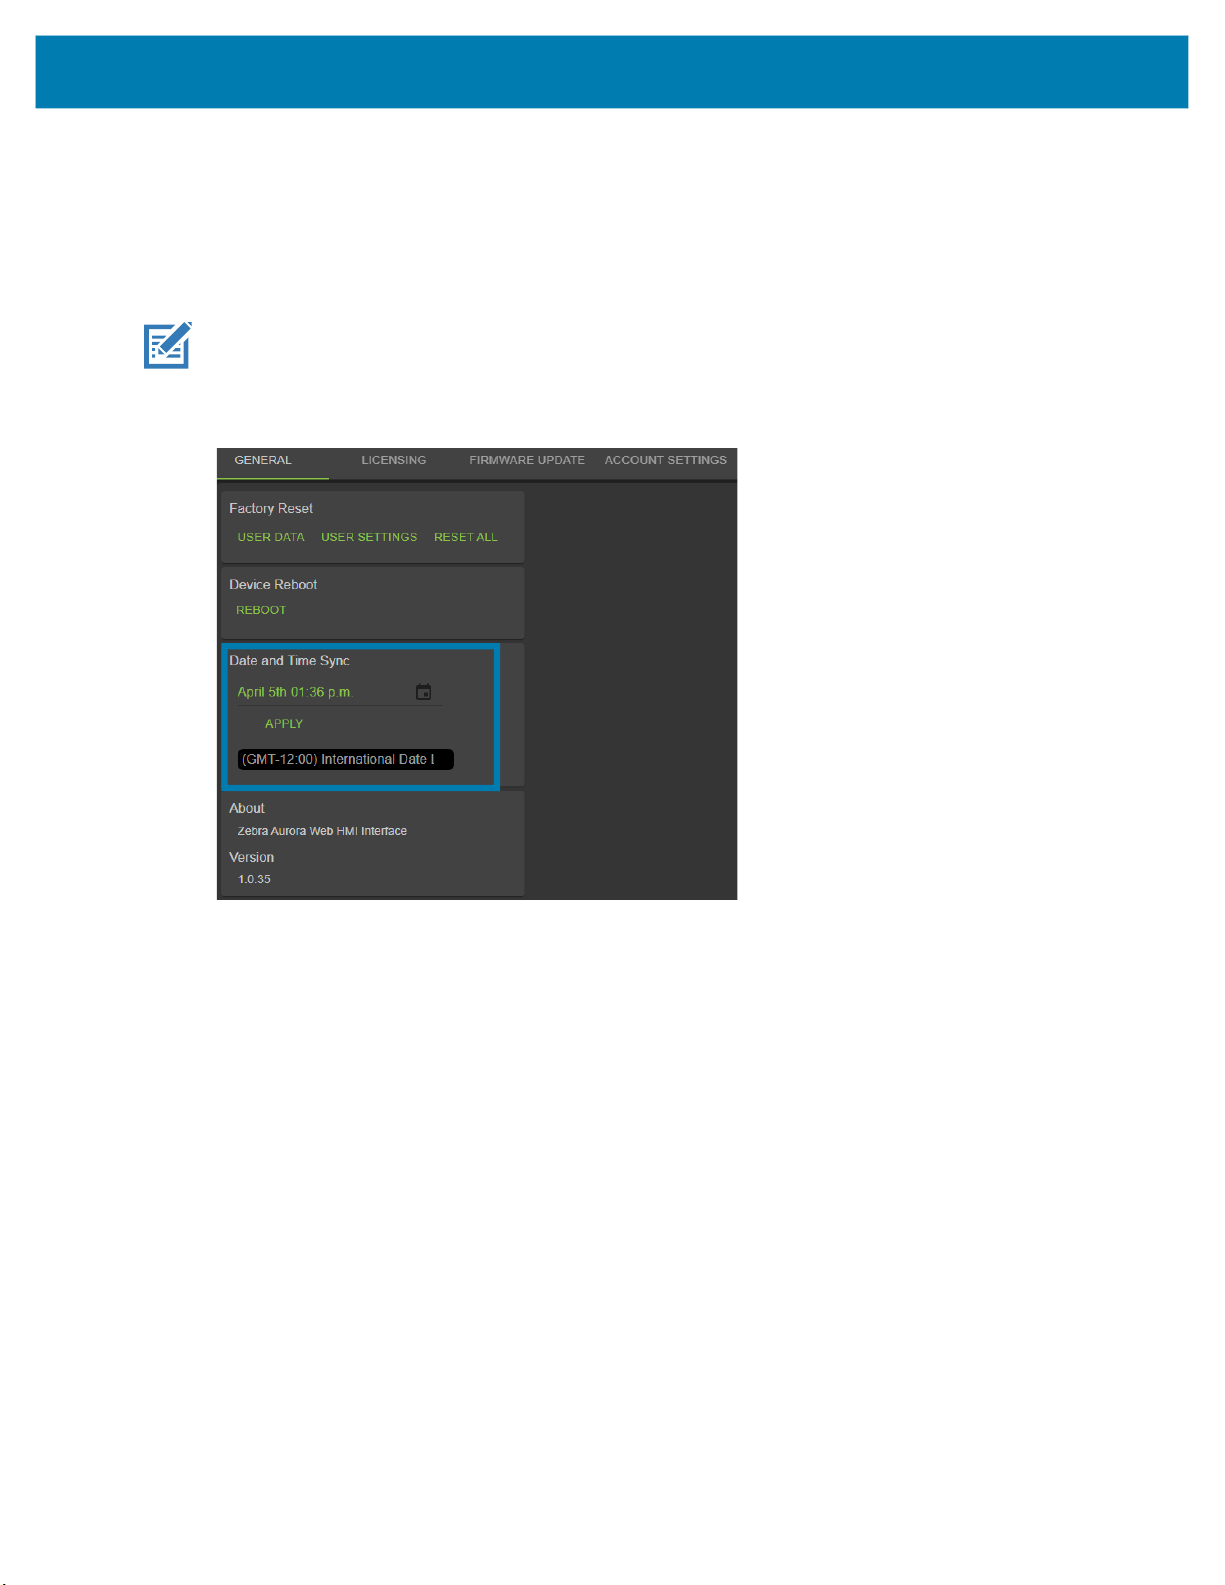
Time Tampering
License operations such as acquiring and returning licenses are time dependent operations. The device
must be configured with the current date and time. Failing to do so results in error when acquiring and
releasing licenses. The device time can be set automatically via the NTP server or configured manually in
the Date and Time Sync window.
NOTE:
error.
Figure 20 Time Setting
Clock Wind Back detection is enabled in the firmware. Any back tracking of date or time results in a license
13
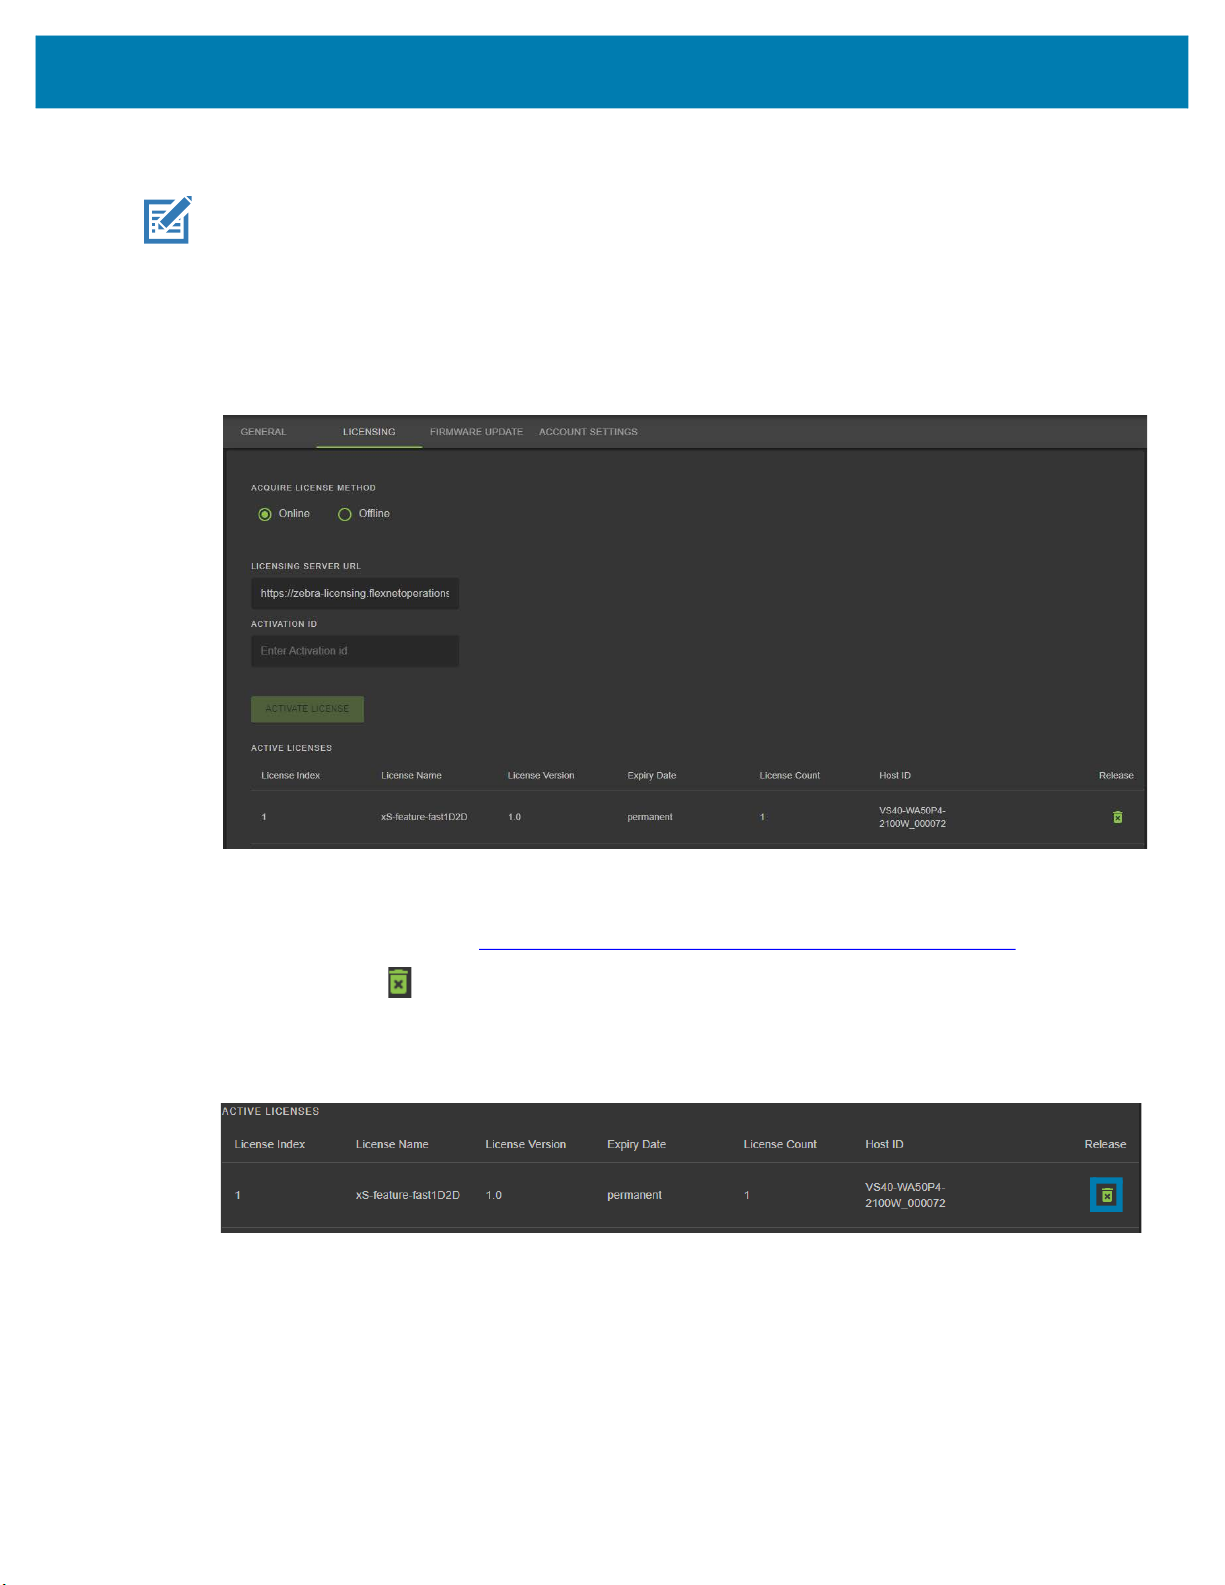
Returning a License
NOTE:
Users can return the license back to the cloud server regardless of the method used to initially acquire the
license (offline or online).
1.
Figure 21
The device must be connected to the Internet to return a license.
On the LICENSING screen, select the Online option in the ACQUIRE LICENSE METHOD section.
Manage License - Return License
2.
In the LICENSING SERVER URL field,
acquired.
enter
the
licensing
server
URL
from which the license is
• Licensing Server URL: zebra-licensing.flexnetoperations.com/flexnet/deviceservices
3. Click the button to
4. After removing the
Figure 22 Return License Back to Server
Release the license back to license server.
licenses, the empty ACTIVE LICENSES
list
window displays.
14
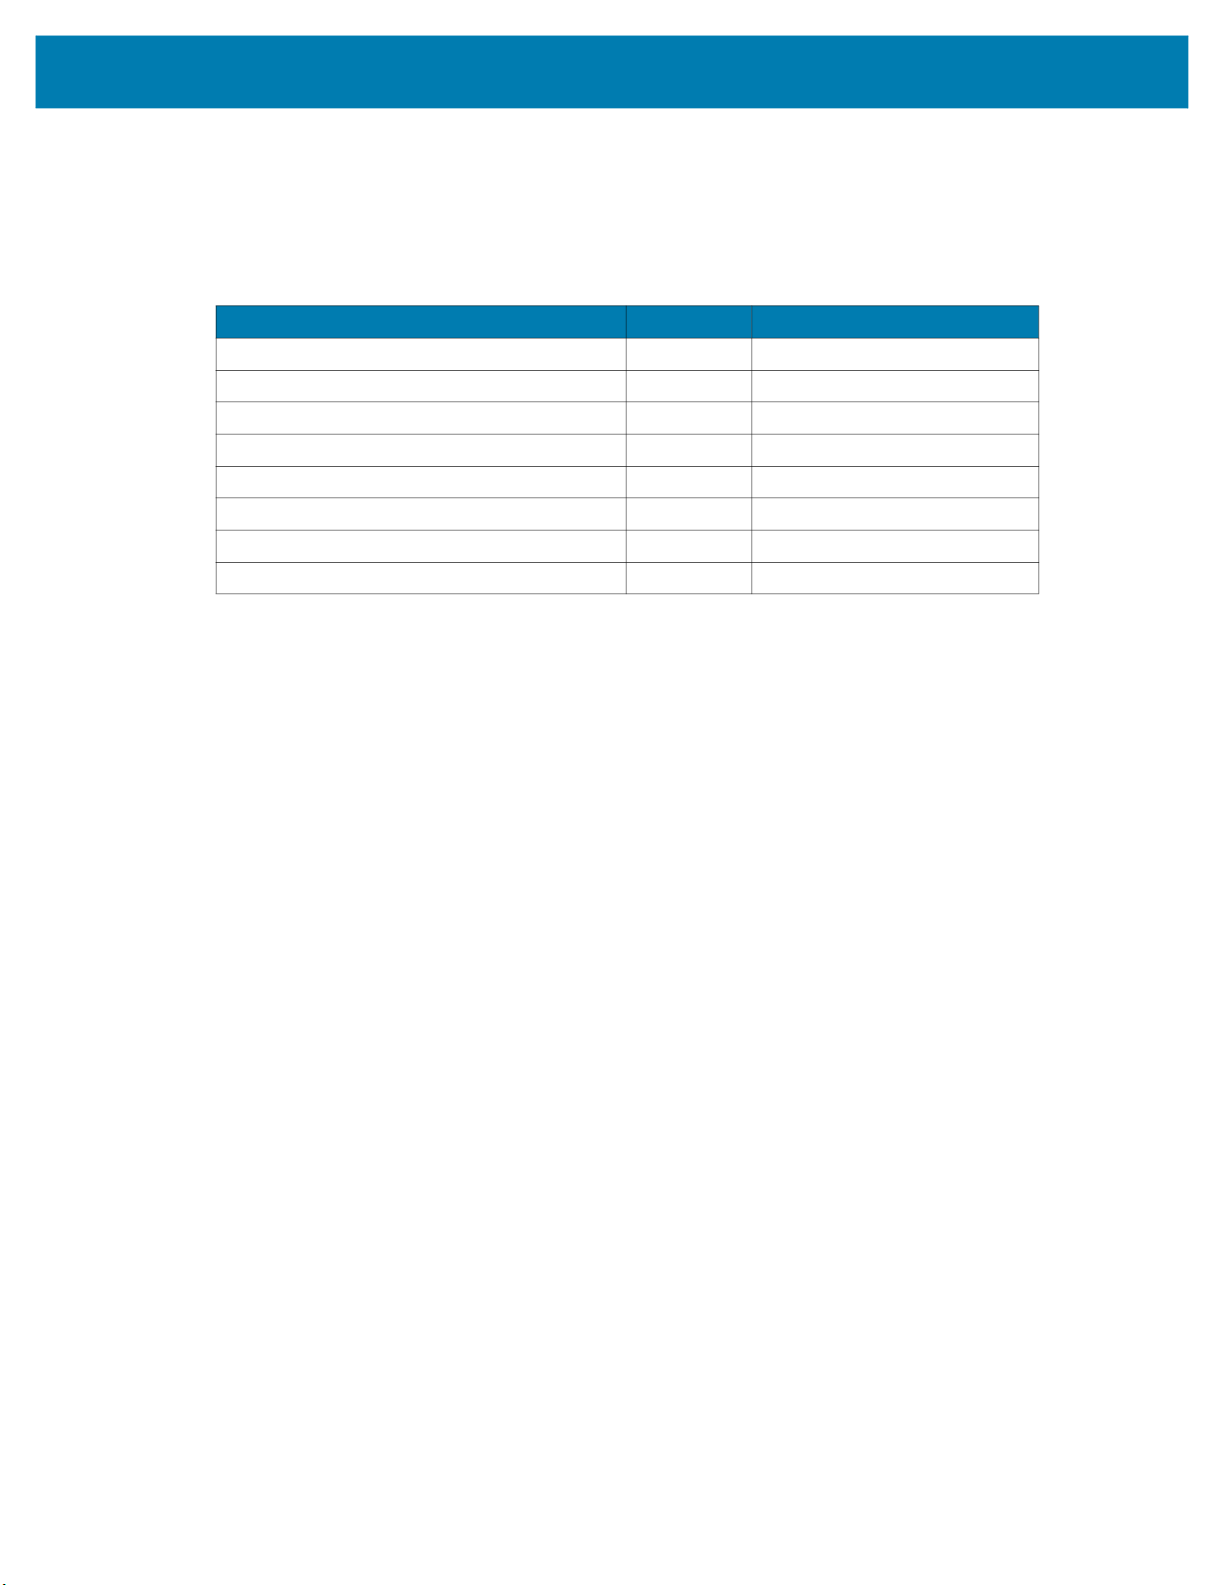
License Types
The Web HMI refers to License Name when describing license types. The table below outlines the various
licenses available and their corresponding License Name as referenced in the Web HMI.
Table 1 Licenses
VS Sensor Package License 1.0 xs-feature-vspkg
VS Standard Package License 2.0 xs-feature-vspkg
VS Advanced Package License 3.0 xs-feature-vspkg
FS DPM Full Package License 3.0 xs-feature-fspkg
VS Trainable OCR License 1.0 xs-feature-trainOCR
FS Fast 1D/2D License 1.0 xs-feature-fast1D2D
FS DPM Lite License 1.0 xs-feature-DPMLite
Aurora Desktop Emulator License EVAL 1.0 aurora-feature-emulnodelock
License Type Version License Name (Web HMI)
15

zebra.com
 Loading...