

Page 1

Virtual Device-PX
®
Link-OS
User Guide
P1100296-001
Page 2

© 2018 ZIH Corp. All rights reserved. ZEBRA and the stylized Zebra head are
trademarks of ZIH Corp., registered in many jurisdictions worldwide. All other trademarks
are the property of their respective owners.
Information in this document is subject to change without notice.
For further information regarding legal and proprietary statements, please go to:
COPYRIGHTS: www.zebra.com/copyright
WARRANTY: www.zebra.com/warranty
END USER LICENSE AGREEMENT: www.zebra.com/eula
SOFTWARE: www.zebra.com/linkoslegal
Terms of Use
Proprietary Statement
Technologies Corporation and its subsidiaries (“Zebra Technologies”). It is intended solely
for the information and use of parties operating and maintaining the equipment described
herein. Such proprietary information may not be used, reproduced, or disclosed to any
other parties for any other purpose without the express, written permission of Zebra
Technologies.
This manual contains proprietary information of Zebra
Product Improvements Continuous improvement of products is a policy of Zebra
Technologies. All specifications and designs are subject to change without notice.
Liability Disclaimer Zebra Technologies takes steps to ensure that its published
Engineering specifications and manuals are correct; however, errors do occur. Zebra
Technologies reserves the right to correct any such errors and disclaims liability resulting
therefrom.
Limitation of Liability In no event shall Zebra Technologies or anyone else involved in
the creation, production, or delivery of the accompanying product (including hardware and
software) be liable for any damages whatsoever (including, without limitation,
consequential damages including loss of business profits, business interruption, or loss of
business information) arising out of the use of, the results of use of, or inability to use such
product, even if Zebra Technologies has been advised of the possibility of such damages.
Some jurisdictions do not allow the exclusion or limitation of incidental or consequential
damages, so the above limitation or exclusion may not apply to you.
Part Number: P1100296-001 Rev. A
Page 3

Contents
Introduction . . . . . . . . . . . . . . . . . . . . . . . . . . . . . . . . . . . . . . . . . . . . . . . . . . . . . . . 5
Supported Printers . . . . . . . . . . . . . . . . . . . . . . . . . . . . . . . . . . . . . . . . . . . . . . . . . . . . . . . 6
Virtual Device-PX Features . . . . . . . . . . . . . . . . . . . . . . . . . . . . . . . . . . . . . . . . . . . . . . . . 6
Configuring Network Connectivity . . . . . . . . . . . . . . . . . . . . . . . . . . . . . . . . . . . . . . . . . . . 7
Notes . . . . . . . . . . . . . . . . . . . . . . . . . . . . . . . . . . . . . . . . . . . . . . . . . . . . . . . . . . . . . . . . . 7
Install, Register, and Enable Virtual Device-PX . . . . . . . . . . . . . . . . . . . . . . . . . . 9
Acquiring the Virtual Device Application . . . . . . . . . . . . . . . . . . . . . . . . . . . . . . . . . . . . . 10
Downloading the Virtual Device-PX Application . . . . . . . . . . . . . . . . . . . . . . . . . . . . . . . . .11
Adding Printers to the ZDownloader List . . . . . . . . . . . . . . . . . . . . . . . . . . . . . . . . . . .11
Modifying Printers in the List . . . . . . . . . . . . . . . . . . . . . . . . . . . . . . . . . . . . . . . . . . . 16
Deleting Printers from the List . . . . . . . . . . . . . . . . . . . . . . . . . . . . . . . . . . . . . . . . . . 17
Downloading the Virtual Device App to Selected Printers . . . . . . . . . . . . . . . . . . . . . 18
Canceling a Download in Progress . . . . . . . . . . . . . . . . . . . . . . . . . . . . . . . . . . . . . . 20
Registering the Virtual Device . . . . . . . . . . . . . . . . . . . . . . . . . . . . . . . . . . . . . . . . . . . . . 21
ZDownloader Log File . . . . . . . . . . . . . . . . . . . . . . . . . . . . . . . . . . . . . . . . . . . . . . . . 21
Enabling the Virtual Device . . . . . . . . . . . . . . . . . . . . . . . . . . . . . . . . . . . . . . . . . . . . . . . 22
Using an SGD Command . . . . . . . . . . . . . . . . . . . . . . . . . . . . . . . . . . . . . . . . . . . . . 22
Using the User Menus . . . . . . . . . . . . . . . . . . . . . . . . . . . . . . . . . . . . . . . . . . . . . . . . 22
Commands . . . . . . . . . . . . . . . . . . . . . . . . . . . . . . . . . . . . . . . . . . . . . . . . . . . . . . 33
Tables of Supported Commands . . . . . . . . . . . . . . . . . . . . . . . . . . . . . . . . . . . . . . . . . . . 34
Set/Get/Do (SGD) Commands . . . . . . . . . . . . . . . . . . . . . . . . . . . . . . . . . . . . . . . . . . . . . 37
apl.enable . . . . . . . . . . . . . . . . . . . . . . . . . . . . . . . . . . . . . . . . . . . . . . . . . . . . . . . . . 37
apl.version . . . . . . . . . . . . . . . . . . . . . . . . . . . . . . . . . . . . . . . . . . . . . . . . . . . . . . . . . 37
apl.framework_version . . . . . . . . . . . . . . . . . . . . . . . . . . . . . . . . . . . . . . . . . . . . . . . . 38
Supported Fonts and Barcodes . . . . . . . . . . . . . . . . . . . . . . . . . . . . . . . . . . . . . 39
Thermal Printer Fonts . . . . . . . . . . . . . . . . . . . . . . . . . . . . . . . . . . . . . . . . . . . . . . . . . . . 40
02/15/2018 Virtual Device-PX User Guide P1100296-001
Page 4

Contents
4
Barcode Fonts . . . . . . . . . . . . . . . . . . . . . . . . . . . . . . . . . . . . . . . . . . . . . . . . . . . . . . . . . 42
ZDownloader Utility . . . . . . . . . . . . . . . . . . . . . . . . . . . . . . . . . . . . . . . . . . . . . . . 43
Downloading the ZDownloader Utility . . . . . . . . . . . . . . . . . . . . . . . . . . . . . . . . . . . . . . . 44
Installing the ZDownloader Utility . . . . . . . . . . . . . . . . . . . . . . . . . . . . . . . . . . . . . . . . . . . 45
Index . . . . . . . . . . . . . . . . . . . . . . . . . . . . . . . . . . . . . . . . . . . . . . . . . . . . . . . . . . . . 49
P1100296-001 Virtual Device-PX User Guide 02/15/2018
Page 5

Introduction
This section describes the features and functions of a Zebra printer that is running the
Virtual Device-PX application. The Virtual Device-PX application enables Zebra mobile
and tabletop printers to work with many host systems that are using PRINTRONIX
printers. In most cases, no changes will be required to the host application. This
feature can help customers to make a smooth transition to Zebra printers and save
them the time and expense of having to rewrite their host software.
Contents
Supported Printers . . . . . . . . . . . . . . . . . . . . . . . . . . . . . . . . . . . . . . . . . . . . . . . . . . . . . . . 6
Virtual Device-PX Features . . . . . . . . . . . . . . . . . . . . . . . . . . . . . . . . . . . . . . . . . . . . . . . . 6
Configuring Network Connectivity . . . . . . . . . . . . . . . . . . . . . . . . . . . . . . . . . . . . . . . . . . . 7
Notes . . . . . . . . . . . . . . . . . . . . . . . . . . . . . . . . . . . . . . . . . . . . . . . . . . . . . . . . . . . . . . . . . 7
®
02/15/2018 Virtual Device-PX User Guide P1100296-001
Page 6

Introduction
6
Supported Printers
Supported Printers
This manual describes the Virtual Device-PX language for Zebra mobile and tabletop printers
and should be used by any person who needs to support that language on one of the following
Zebra printers:
Printer Firmware
iMZ Series V73.19.6Z and later
QLn Series V68.19.6Z and later
ZT200 Series V72.19.6Z and later
ZT400 Series V75.19.7Z and later
ZT510 V80.20.02Z and later
ZT600 Series V80.20.02Z and later
ZD400 Series V77.19.14Z or V84.20.05Z and later
ZD500 Series V74.19.6Z and later
ZD600 Series V84.20.05Z and later
ZQ300 Series V81.20.06Z and later
ZQ500 Series V76.19.10Z and later
Note • The Virtual Device-PX language is supported only on 203 dpi printers.
For complete printer operation, use this manual in combination with the User Guide for your
printer.
Virtual Device-PX Features
The Virtual Device-PX application:
• Uses existing features of Zebra printers, when available.
• Supports the Bluetooth
• Offers many fonts, barcodes, and specific commands and features of target printer models
(see Supported Fonts and Barcodes on page 39).
• Provides support of PRINTRONIX
®
, Serial, Ethernet, WLAN, and USB interfaces.
®
commands (see Commands on page 33).
P1100296-001 Virtual Device-PX User Guide 02/15/2018
Page 7

Configuring Network Connectivity
Your printer may be equipped with one or more of the following interfaces:
• Bluetooth—For detailed information to connect a Bluetooth device, refer to the Bluetooth
User Guide.
• Wired print server—For detailed information, refer to the ZebraNet Wired and Wireless
Print Servers User Guide.
• Wireless print server (a/b/g/n)—For detailed information, refer to the ZebraNet Wir ed and
Wireless Print Servers User Guide.
For other connectivity options, refer to the User Guide for your printer. Copies of these
manuals are available at http://www.zebra.com/manuals.
Notes
• Other command languages are disabled when running Virtual Device-PX. However,
Set/Get/Do (SGD) commands and file download all operate properly with
PX
enabled.
Introduction
Configuring Network Connectivity
Virtual Device-
7
•
Virtual Device-PX fonts can only be used with Virtual Device-PX commands. They cannot
be used with other languages.
Virtual Device-PX mode application will not respond to CPCL, ZPL, or EPL
•The
commands. Instead, commands will be processed by the
Virtual Device-PX application.
02/15/2018 Virtual Device-PX User Guide P1100296-001
Page 8

Introduction
Notes • ___________________________________________________________________
__________________________________________________________________________
__________________________________________________________________________
__________________________________________________________________________
__________________________________________________________________________
__________________________________________________________________________
__________________________________________________________________________
__________________________________________________________________________
__________________________________________________________________________
__________________________________________________________________________
8
Notes
P1100296-001 Virtual Device-PX User Guide 02/15/2018
Page 9

Install, Register, and
Enable Virtual Device-PX
This section provides you with instructions on how to install and enable the Virtual Device-PX
application on one or more Zebra printers.
Contents
Acquiring the Virtual Device Application. . . . . . . . . . . . . . . . . . . . . . . . . . . . . . . . . . . . . . 10
Downloading the Virtual Device-PX Application. . . . . . . . . . . . . . . . . . . . . . . . . . . . . . . . 11
Using ZDownloader . . . . . . . . . . . . . . . . . . . . . . . . . . . . . . . . . . . . . . . . . . . . . . . . . . . 11
Adding Printers to the ZDownloader List . . . . . . . . . . . . . . . . . . . . . . . . . . . . . . . . . 11
Auto-Detect Printers. . . . . . . . . . . . . . . . . . . . . . . . . . . . . . . . . . . . . . . . . . . . . . . . . 12
Manually Add Printers . . . . . . . . . . . . . . . . . . . . . . . . . . . . . . . . . . . . . . . . . . . . . . . 13
Modifying Printers in the List . . . . . . . . . . . . . . . . . . . . . . . . . . . . . . . . . . . . . . . . . . 16
Deleting Printers from the List . . . . . . . . . . . . . . . . . . . . . . . . . . . . . . . . . . . . . . . . . 17
Downloading the Virtual Device App to Selected Printers . . . . . . . . . . . . . . . . . . . . 18
Registering the Virtual Device . . . . . . . . . . . . . . . . . . . . . . . . . . . . . . . . . . . . . . . . . . . . . 21
Enabling the Virtual Device . . . . . . . . . . . . . . . . . . . . . . . . . . . . . . . . . . . . . . . . . . . . . . . 22
Using an SGD Command . . . . . . . . . . . . . . . . . . . . . . . . . . . . . . . . . . . . . . . . . . . . . . 22
Using the User Menus . . . . . . . . . . . . . . . . . . . . . . . . . . . . . . . . . . . . . . . . . . . . . . . . . 22
QLn420 Printers. . . . . . . . . . . . . . . . . . . . . . . . . . . . . . . . . . . . . . . . . . . . . . . . . . . . 23
QLn320 and QLn220 Printers . . . . . . . . . . . . . . . . . . . . . . . . . . . . . . . . . . . . . . . . . 26
ZT230, ZT400 Series, ZT510, ZT600 Series, ZD500 Series, and ZD600 Series
Printers . . . . . . . . . . . . . . . . . . . . . . . . . . . . . . . . . . . . . . . . . . . . . . . . . . . . . . . . 29
02/15/2018 Virtual Device-PX User Guide P1100296-001
Page 10

Getting Started
10
Acquiring the Virtual Device Application
Acquiring the Virtual Device Application
To get the Virtual Device app, perform the following from your computer:
1. Open a web browser and navigate to http://www.zebra.com/virtualdevices.
2. Locate your printer type in the list of printers, and then click Download Now.
3. Fill out the information on the Virtual Device Download Request form.
4. Click Submit.
5. Read the End User License Agreement.
6. Click Accept and Begin Download Now.
Your browser prompts you to open or save the archive containing the Virtual Device app.
7. Save and store the Virtual Device app archive file to your computer.
The archive file contains the following:
• The Virtual Device .NRD file to be downloaded to a Zebra printer.
•A .txt file that contains the SGD command for immediately activating the Virtual
Device app.
8. Extract the files from the archive to your computer.
P1100296-001 Virtual Device-PX User Guide 02/15/2018
Page 11
Downloading the Virtual Device-PX Application
Downloading the Virtual Device-PX Application
Zebra provides two options to download the Virtual Device-PX app to the printer.
• On a computer with the ZDownloader Utility
The ZDownloader Utility is the only method shown in this manual. For instructions on
how to download and install the ZDownloader Utility, see ZDownloader Utility
on page 43.
• On an Android device with the Zebra Printer Setup Utility for Android Devices (available
for free on Google Play™)
For information on using the Zebra Printer Setup Utility for Android Devices and to
download the user guide, navigate to www.zebra.com/setup.
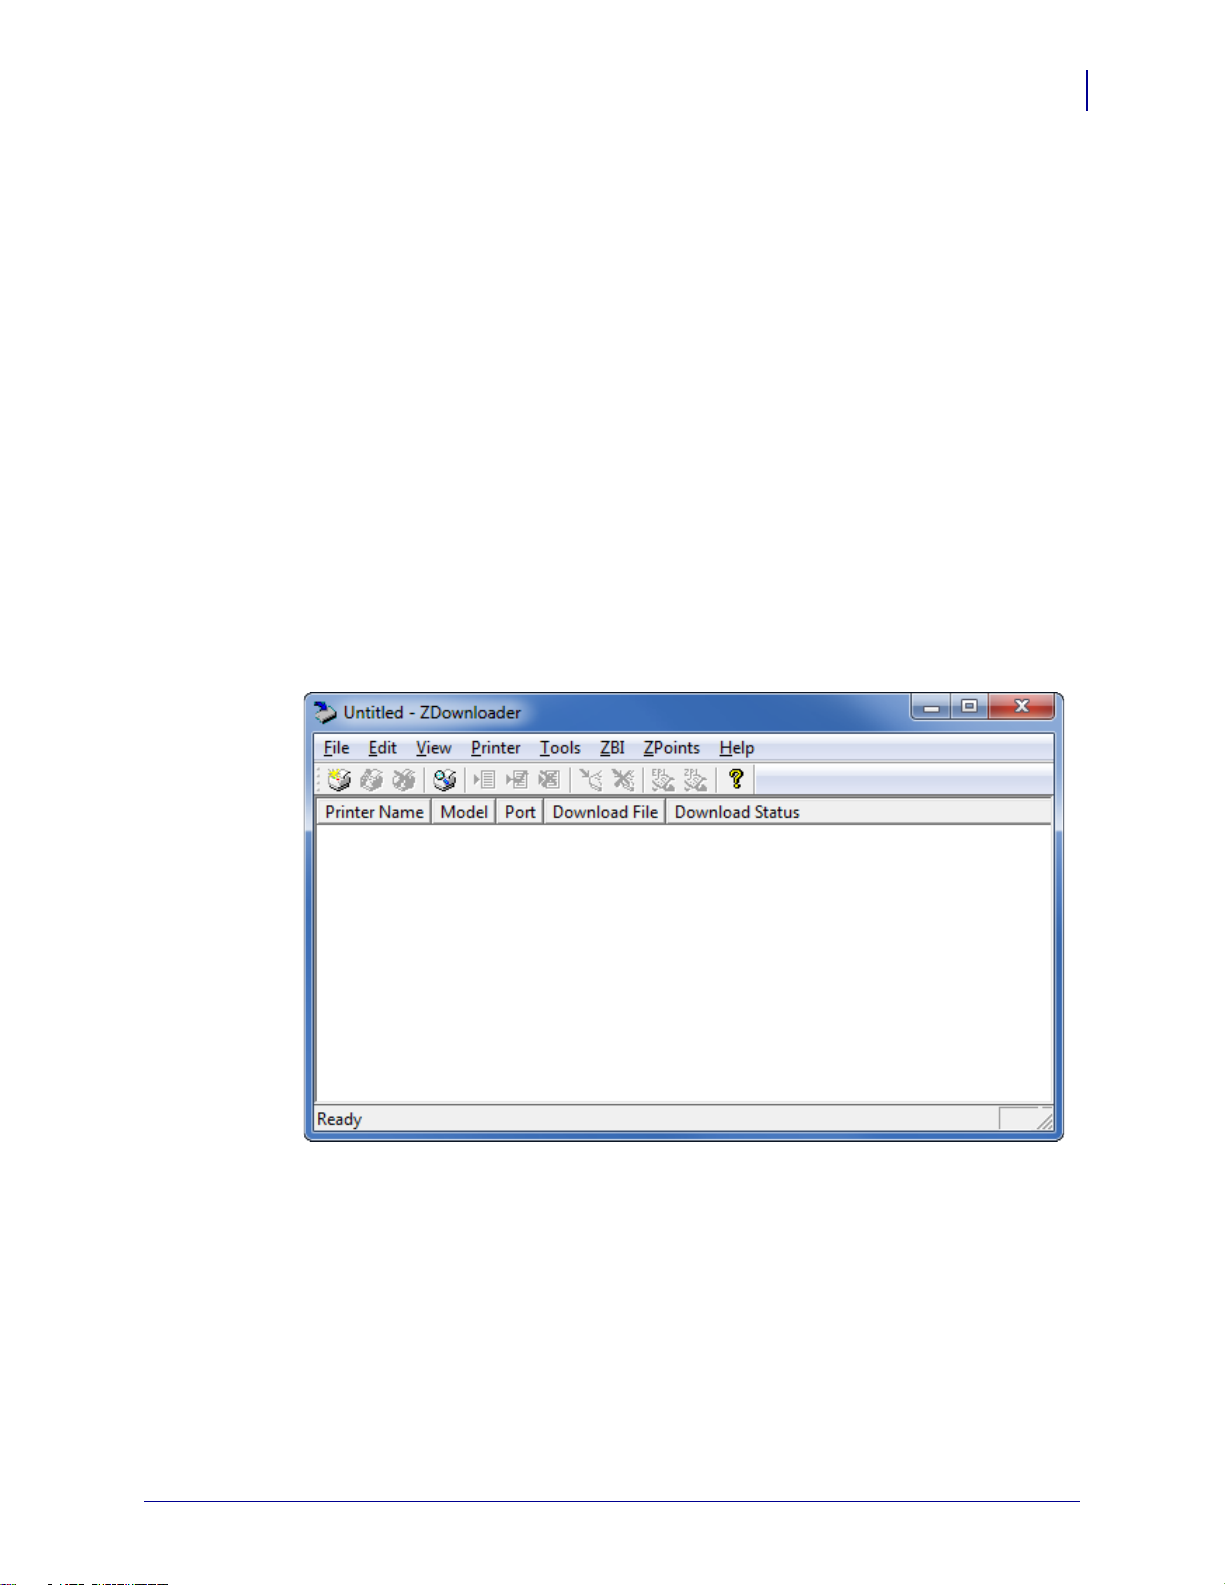
Using ZDownloader
The ZDownloader application can update Virtual Device-PX files in Zebra printers connected
by Serial, Parallel, USB, and IP Ethernet networks.
Getting Started
11
Figure 1 • Initial ZDownloader Screen
Adding Printers to the ZDownloader List
There are two ways to add printers to the list:
• Auto-Detect (use for USB or IP Ethernet interfaces)
• Manual add (use for Serial, Parallel, or IP Ethernet interfaces)
If your printer is connecting via the serial or parallel interfaces, or is not detected by using the
Auto-Detect method, use the Manual Add method.
02/15/2018 Virtual Device-PX User Guide P1100296-001
Page 12

Getting Started
12
Downloading the Virtual Device-PX Application
Auto-Detect Printers
Use Auto-Detect for USB or IP Ethernet interfaces.
Note • Ethernet connected printers are detected by the application broadcasting a UDP
packet out onto the network. UDP port number 4201 is used for the discovery process.
Some networks filter out UDP packets. This means that the ZDownloader utility may not
be able to detect all of the printers on your network. See your network administrator for
more information. If you are not able to Auto-Detect your network printers, follow
instructions for manually adding a printer.
USB printers can only be added by using Auto-Detect. The ZDownloader utility can support
as many USB printers as your computer can support (most computers typically can support up
to 255).
P1100296-001 Virtual Device-PX User Guide 02/15/2018
Page 13

Getting Started
Downloading the Virtual Device-PX Application
To Auto-Detect printers connected via the USB or IP Ethernet interfaces,
perform the following steps:
1. In the ZDownloader toolbar, select Printer > Auto-Detect.
OR
Right-click in the ZDownloader window and select Auto-Detect Printers.
The printers detected are added to the printer list.
13
Manually Add Printers
To manually add printers connected via the Serial, Parallel, or Network
interfaces, perform the following steps:
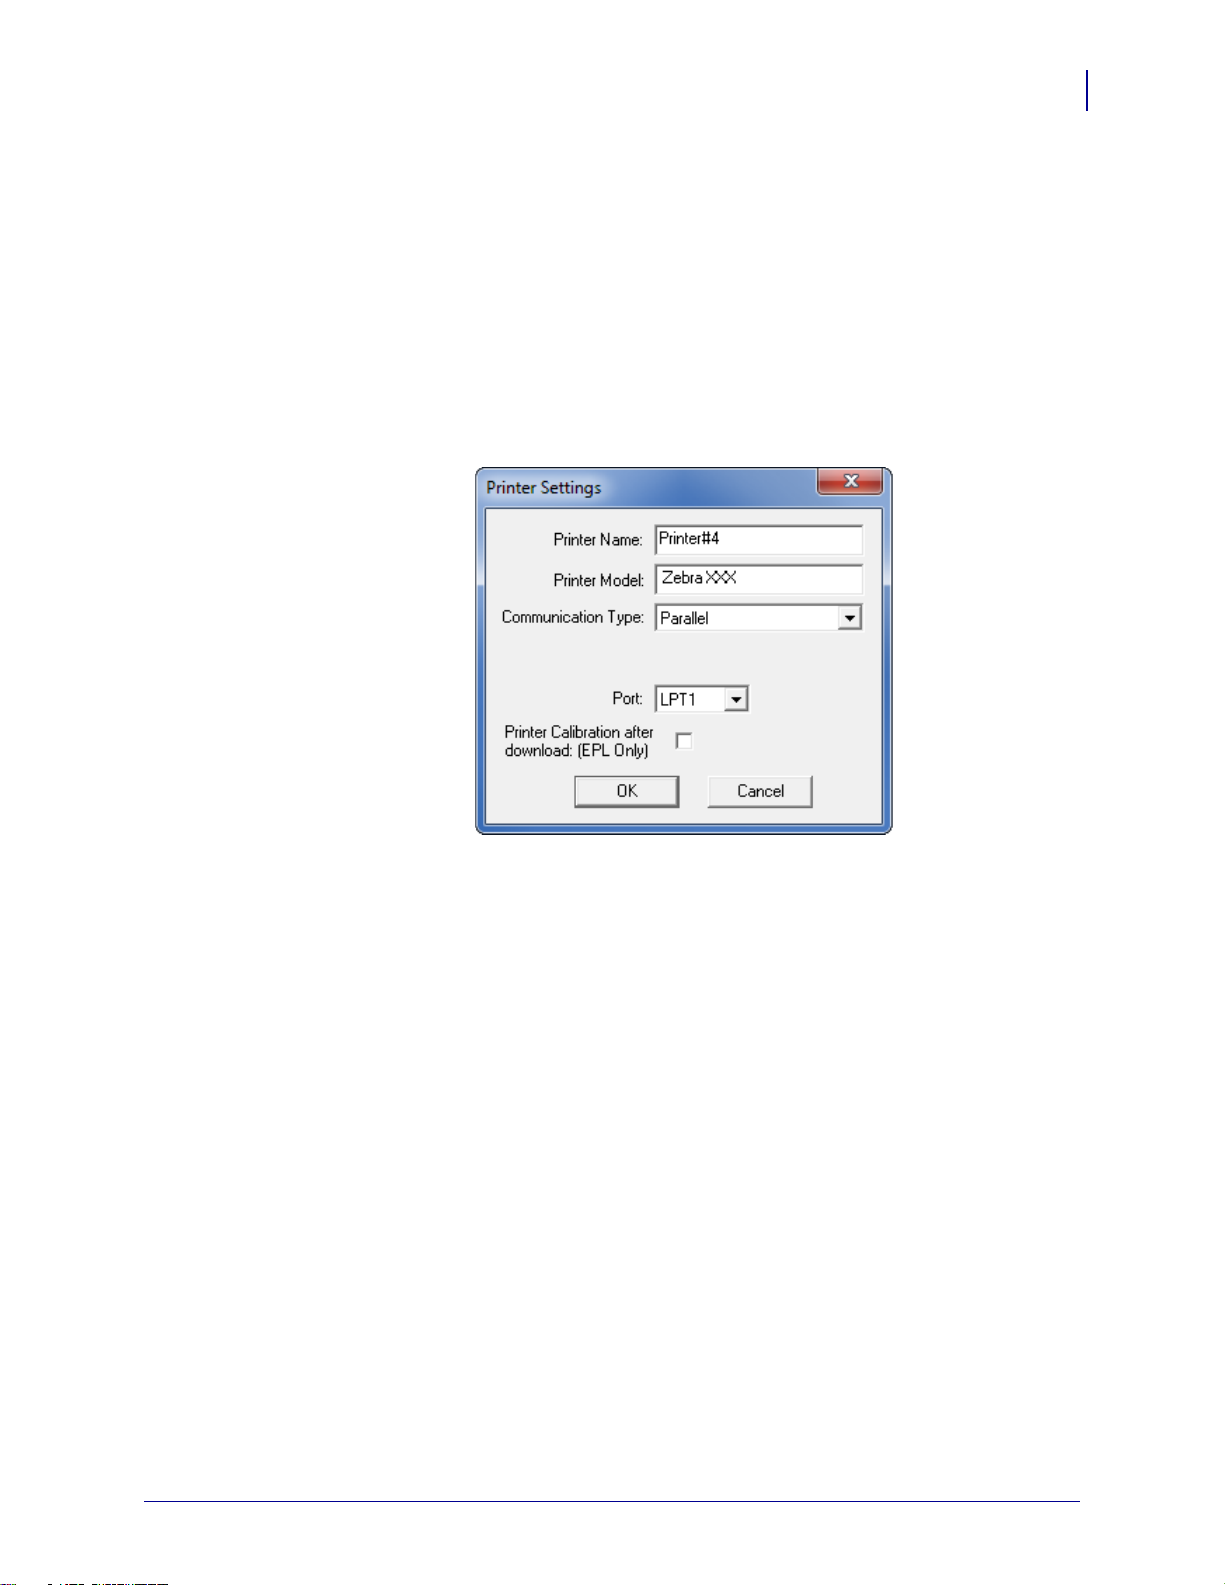
1. In the ZDownloader toolbar, select Printer > Add….
OR
Right-click in the ZDownloader window and select Add Printer….
The following window appears.
2. Add a printer name and your printer model in the appropriate fields.
02/15/2018 Virtual Device-PX User Guide P1100296-001
Page 14

Getting Started
14
Downloading the Virtual Device-PX Application
If you are adding a… Then…
Serial Printer Go to Adding a Serial Printer
Parallel Printer Go to Adding a Parallel Printer on page 15
Network Printer Go to Adding a Network Printer on page 16
Adding a Serial Printer
3. Select the serial port to which the printer is connected.
4. Click Port Settings.
The following window appears.
P1100296-001 Virtual Device-PX User Guide 02/15/2018
Page 15
Downloading the Virtual Device-PX Application
5. Adjust the settings as necessary. The printer’s serial port settings must match the
computer’s serial port settings. For more information about the settings, refer to the User
Guide for your printer.
6. Click OK to save the port settings.
7. Click OK to add the printer.
Adding a Parallel Printer
8. Set Communication Type to Parallel.
The available parallel ports will be shown in the Port drop-down box.
Getting Started
15
9. Select the port to which the printer is connected. No additional configuration is necessary.
10. Click OK to add the printer.
02/15/2018 Virtual Device-PX User Guide P1100296-001
Page 16

Getting Started
16
Downloading the Virtual Device-PX Application
Adding a Network Printer
11. Set Communication Type to Network.
The following window appears.
12. Enter the printer’s IP address.
13. Click OK to save the network settings.
14. Click OK to add the printer.
Modifying Printers in the List
To change printer settings for a printer in the list, perform the following steps:
1. Select the printer to modify.
P1100296-001 Virtual Device-PX User Guide 02/15/2018
Page 17

Downloading the Virtual Device-PX Application
2. In the toolbar, select Printer > Modify Printer….
OR
Right-click on the printer and select Modify Printer….
The printer settings for the selected printer are displayed.
Getting Started
17
3. Modify the settings as desired.
4. Click OK to save the settings.
Deleting Printers from the List
To delete printers from the list, perform the following steps:
1. Select one or more printers to delete.
02/15/2018 Virtual Device-PX User Guide P1100296-001
Page 18
Getting Started
18
Downloading the Virtual Device-PX Application
2. In the toolbar, select Printer > Delete.
OR
Right-click on one of the selected printers and select Delete Printer(s).
The printer is removed from the list.
Downloading the Virtual Device App to Selected Printers
To download the Virtual Device-PX app to your printer(s), you must select the file to send to
each printer. ZDownloader, by default, downloads files to one printer at a time. If you have
multiple printers to update and want to speed up the process, you can increase the number of
simultaneous downloads.
Note • More simultaneous downloads require more of your computer resources. Some
computers may slow down with simultaneous downloads or as more printers are added for
simultaneous downloading.
To allow simultaneous downloads, perform the following step:
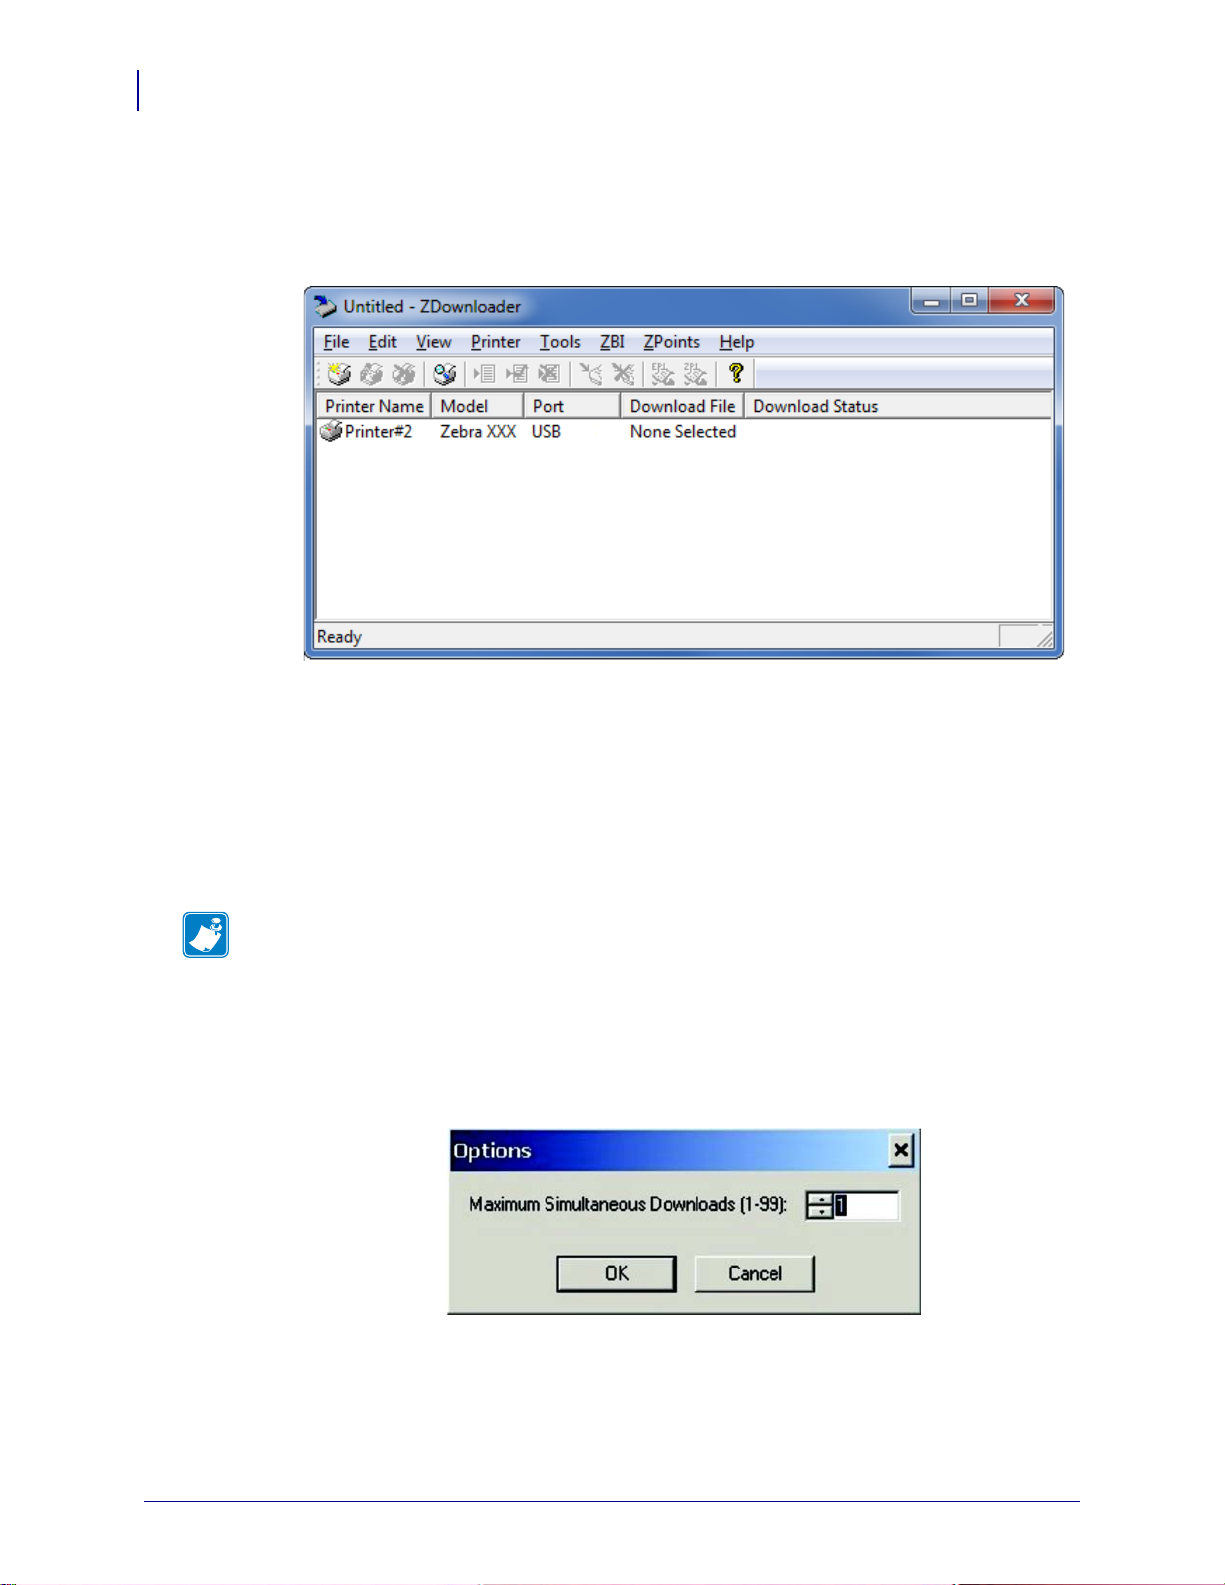
1. Click Tools > Options….
The following prompt appears.
2. Raise the number shown to allow multiple simultaneous downloads.
3. Click OK.
P1100296-001 Virtual Device-PX User Guide 02/15/2018
Page 19

Getting Started
Downloading the Virtual Device-PX Application
To download the Virtual Device app file to one or more printers, perform the
following steps:
1. Select the printers to which you want to download the Virtual Device-PX app file. To
select multiple printers, hold down the Ctrl or Shift key, and then click on the desired
printers.
19
2. In the toolbar, select File > Select Firmware File….
OR
Right-click on one of the selected printers and select Select Firmware File….
3. Navigate to the Virtual Device app file that you acquired previously.
4. Click Open.
The file that you selected appears under Download File for the selected printers.
Printers that are present in the list but that do not have a file selected will be ignored when
Downloading starts.
5. Start the download process by doing one of the following:
• Select Printer > Download to Selected.
02/15/2018 Virtual Device-PX User Guide P1100296-001
Page 20

Getting Started
20
Downloading the Virtual Device-PX Application
• Select the printer(s) of interest and select the Printer and then select Download To
Selected.
6. In the toolbar, select Printer > Download All.
OR
Right-click in the ZDownloader window and select Download All.
After downloading has begun, the progress of each printer will be shown in the Download
Status column.
Canceling a Download in Progress
The Cancel Download toolbar button and the Printer > Cancel Download menu options
become active when the files are downloading.
To cancel downloading to ALL printers in the list, perform the following step:
1. Click Printer > Cancel Download.
OR
Right-click in the ZDownloader window and select Cancel Download.
To cancel downloading to SPECIFIC printers in the list, perform the following step:
1. Select one or more printers with a download in progress.
2. Click Printer > Cancel Download.
OR
Right-click on a selected printer and select Cancel Download.
P1100296-001 Virtual Device-PX User Guide 02/15/2018
Page 21

Registering the Virtual Device
ZDownloader maintains a log file of all items downloaded to a Zebra printer along with the
printer serial number. You can register your Virtual Device installation with Zebra Repair and
Tech Support to ensure that a printer sent in for repair is returned with the Virtual Device
installed, and when engaging Zebra Tech Support, they will have records of the item being
loaded. To register your Virtual Device installation, you must send the log file created by
ZDownloader to the Zebra log file management group.
ZDownloader Log File
To send the log file, complete these steps:
1. Based on your operating system, navigate to the appropriate folder:
• Microsoft® Windows® XP
C:\Program Files\Common Files\FirmwareDownloader
• Microsoft Windows 7,Windows 8, and Windows 10
C:\ProgramData\Zebra Technologies\Firmware Downloader and ZBI
Key Manager
Getting Started
Registering the Virtual Device
21
2. Copy the log file (DownloadLog.txt), and email to Zdownloader@zebra.com.
If you are downloading from several computers, you need to send the log file from each
computer. If you download files to printers on one day and do not send the file the same
day, please note this in your email so that the log file management group picks up the
previous load detail. Otherwise, they only pick up the load data for the day that the log file
is sent.
02/15/2018 Virtual Device-PX User Guide P1100296-001
Page 22

Getting Started
22
Enabling the Virtual Device
Enabling the Virtual Device
You can enable Virtual Device-PX by sending a Set/Get/Do (SGD) command to the printer or
by selecting the option through the printer’s menus.
Note • ZPL and CPCL will not function normally when a Virtual Device is enabled.
Using an SGD Command
To en able Virtual Device-PX on your printer, send the following command:
! U1 setvar "apl.enable" "apl-px"
To disable Virtual Devices on your printer and return to normal function, send the following
command:
! U1 setvar "apl.enable" "none"
You must restart the printer after changing the value of apl.enable. For more information
about this SGD command, see apl.enable on page 41.
Using the User Menus
This section includes instructions for the following printers:
• QLn420 Printers on page 23
• QLn320 and QLn220 Printers on page 26
• ZT230, ZT400 Series, ZT510, ZT600 Series, ZD500 Series, and ZD600 Series Printers
on page 29
If necessary, refer to the User Guide for your printer for additional information about your
printer’s control panel.
P1100296-001 Virtual Device-PX User Guide 02/15/2018
Page 23

QLn420 Printers
PRINTER READY
VXXXXXXX
SETTINGS
LANGUAGE
1. From the printer’s idle display screen, press the LEFT SOFT KEY to select the Home
icon.
Getting Started
Enabling the Virtual Device
23
The printer displays the Home Menu.
2. Use the ARROWS to navigate to the LANGUAGE menu.
02/15/2018 Virtual Device-PX User Guide P1100296-001
Page 24

Getting Started
LANGUAGE
▼ ENGLISH ▲
VIRTUAL DEVICE
▼ NONE ▲
24
Enabling the Virtual Device
3. Press the OK button.
The printer displays the LANGUAGE selection screen.
4. Use the LEFT or RIGHT ARROW to navigate to the VIRTUAL DEVICE selection
screen.
P1100296-001 Virtual Device-PX User Guide 02/15/2018
Page 25

5. Use the UP or DOWN ARROW to scroll to the APL-PX option.
VIRTUAL DEVICE
▼ APL-PX ▲
USE
6. Press the RIGHT SOFT KEY to select USE.
Getting Started
Enabling the Virtual Device
25
The printer restarts and uses the Virtual Device that you selected.
02/15/2018 Virtual Device-PX User Guide P1100296-001
Page 26
Getting Started
Zebra QLn320
FW ver: XXXXXXXXXX
Baud Rate: 115200
Battery ok
IP Addr: 10.14.205.138
Menu
Communication Back
Settings Back
26
Enabling the Virtual Device
QLn320 and QLn220 Printers
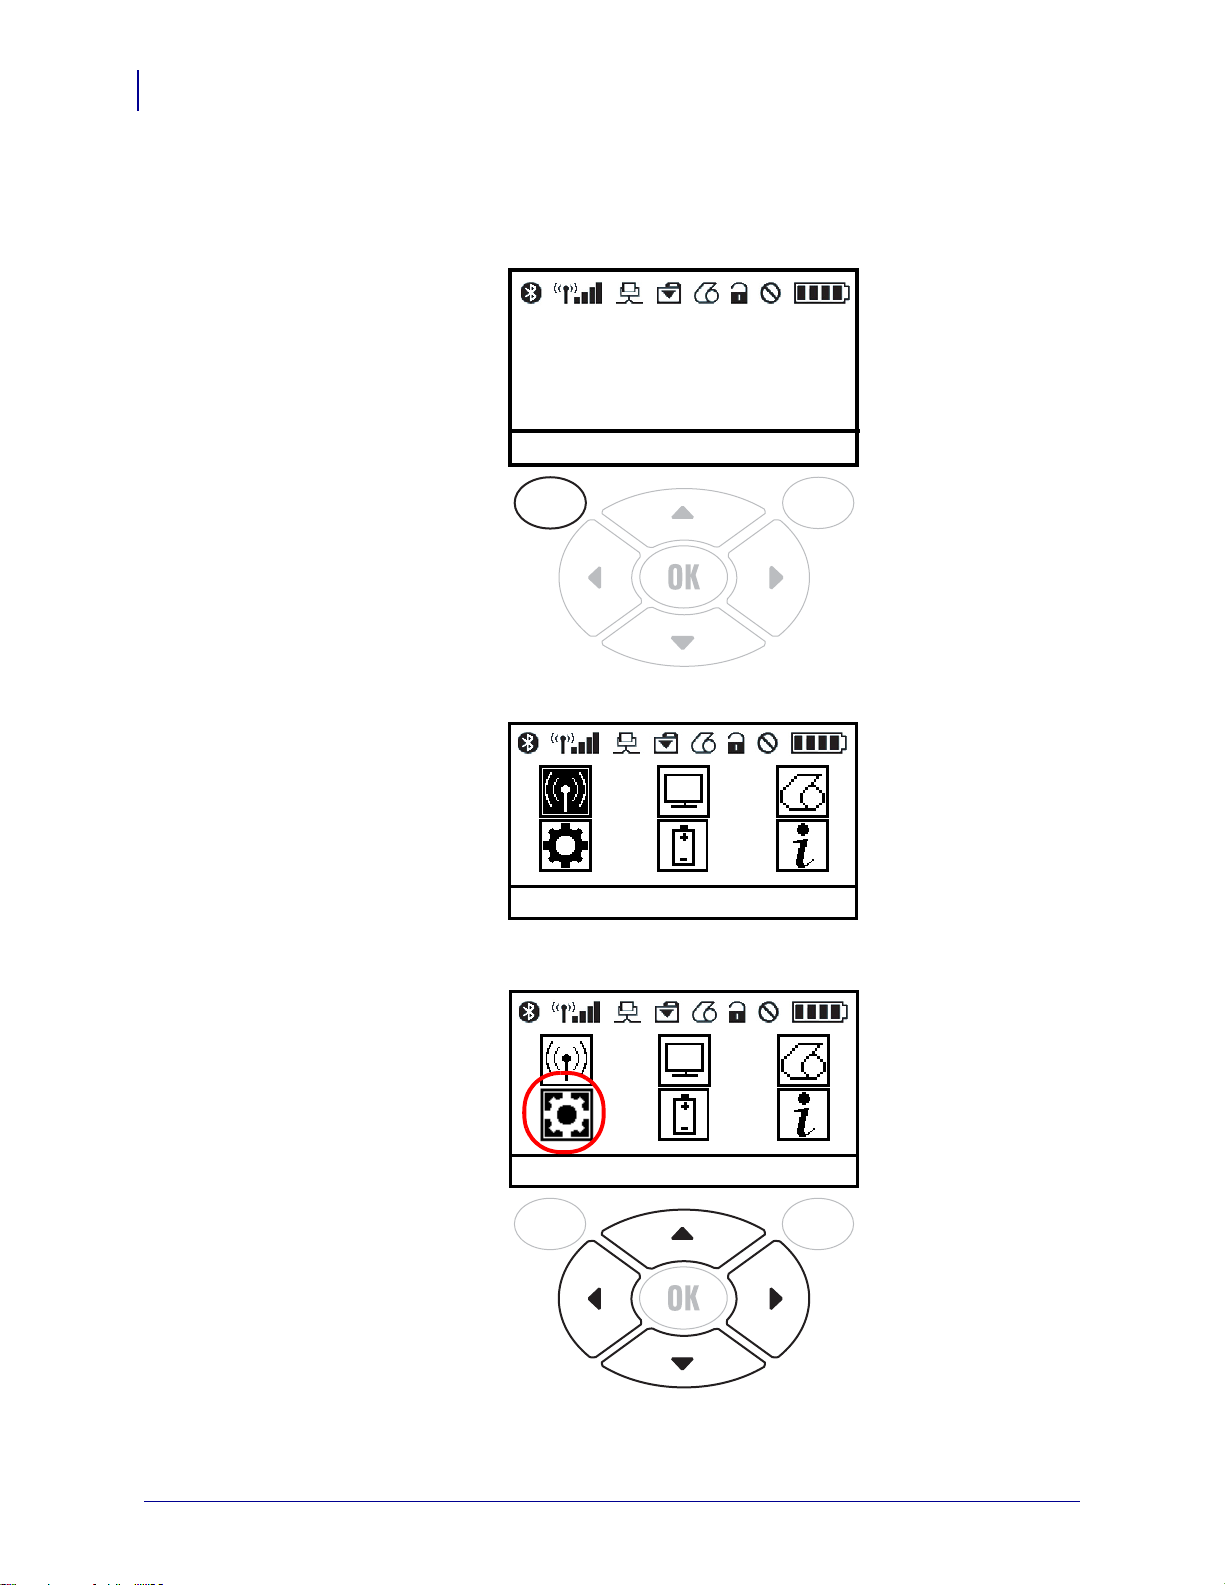
1. From the printer’s idle display screen, press the LEFT SOFT KEY to select the Home
icon.
The printer displays the Home Menu.
2. Use the ARROWS to navigate to the SETTINGS menu.
P1100296-001 Virtual Device-PX User Guide 02/15/2018
Page 27
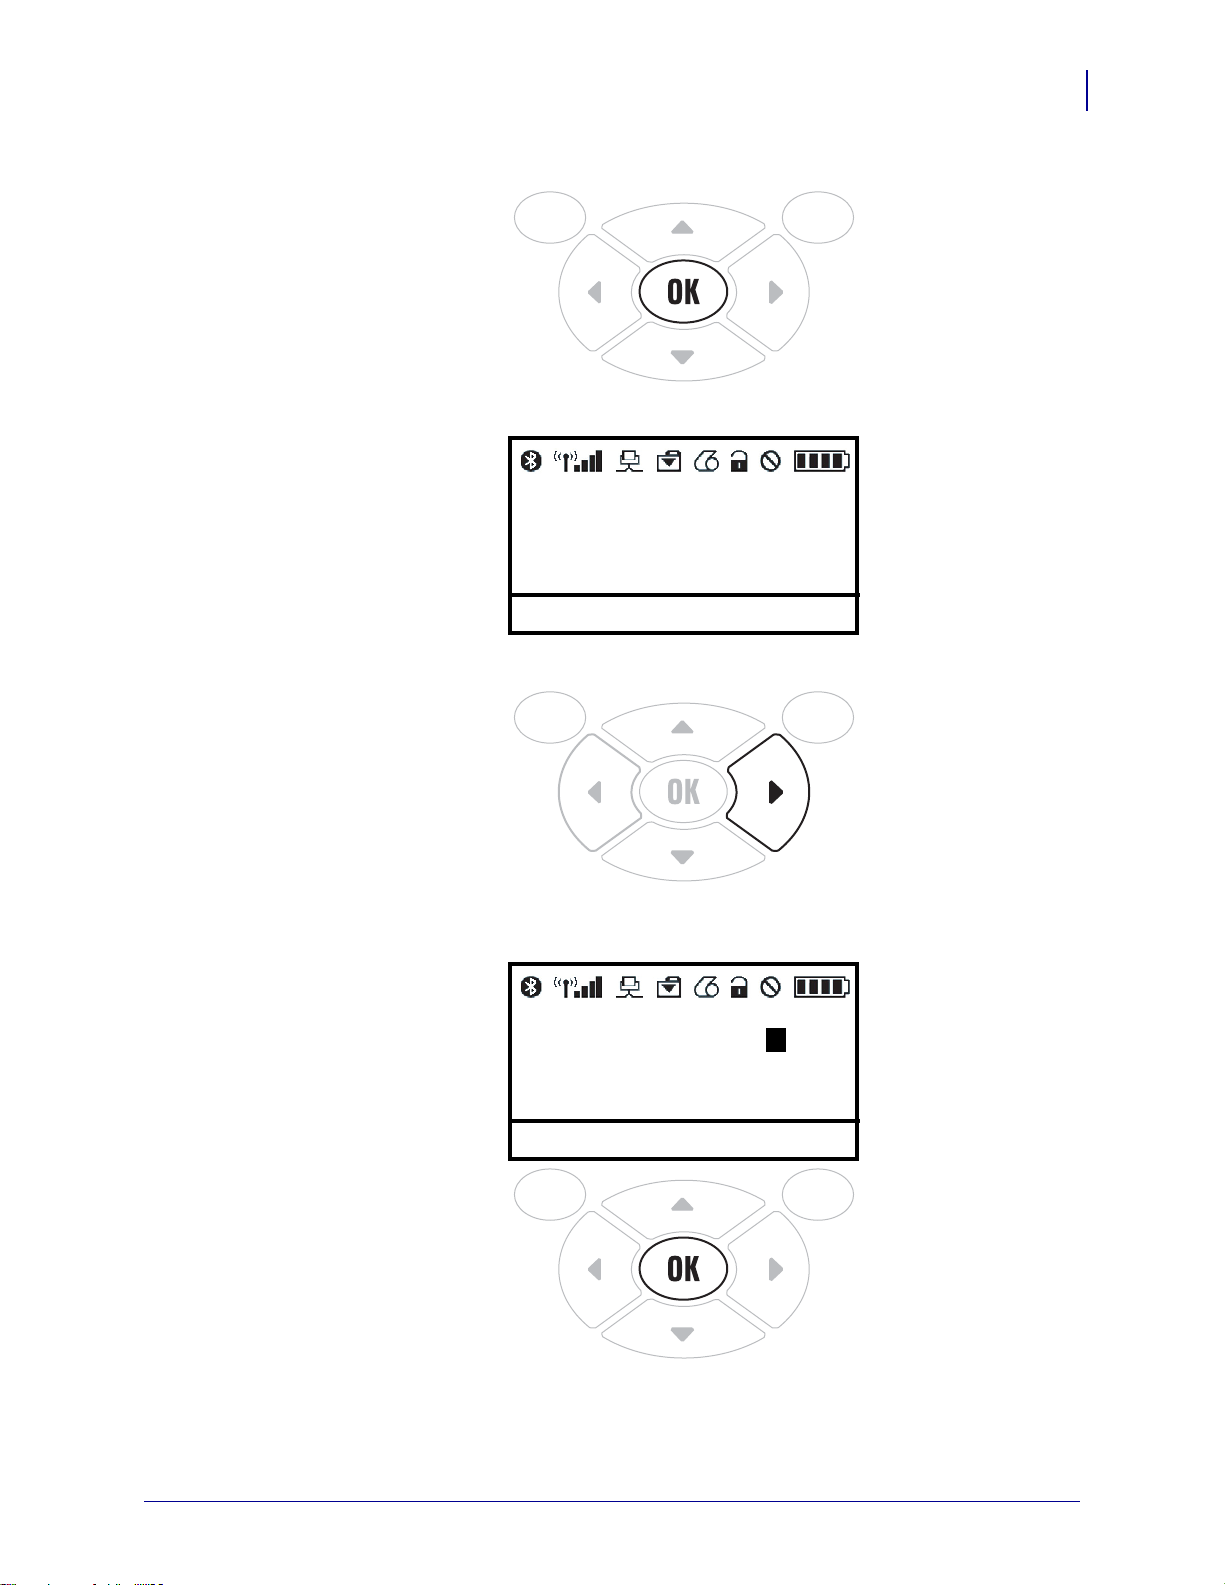
3. Press the OK button.
Virtual Dev: none ▲▼
Menu Use Back
Virtual Dev: apl-px ▲? ▼
Menu Use Back
The printer displays the VIRTUAL DEVICE selection screen.
Getting Started
Enabling the Virtual Device
27
4. Press the RIGHT ARROW to highlight the up arrow on the display.
5. With the up arrow highlighted, press the OK button until you scroll to the APL-PX
option.
02/15/2018 Virtual Device-PX User Guide P1100296-001
Page 28

Getting Started
28
Enabling the Virtual Device
6. Press the LEFT ARROW to highlight APL-PX
7. Press OK to select USE.
The printer restarts and uses the Virtual Device that you selected.
P1100296-001 Virtual Device-PX User Guide 02/15/2018
Page 29
Getting Started
PRINTER READY
VXXXXXXX
HOME MENU
SETTINGS
Enabling the Virtual Device
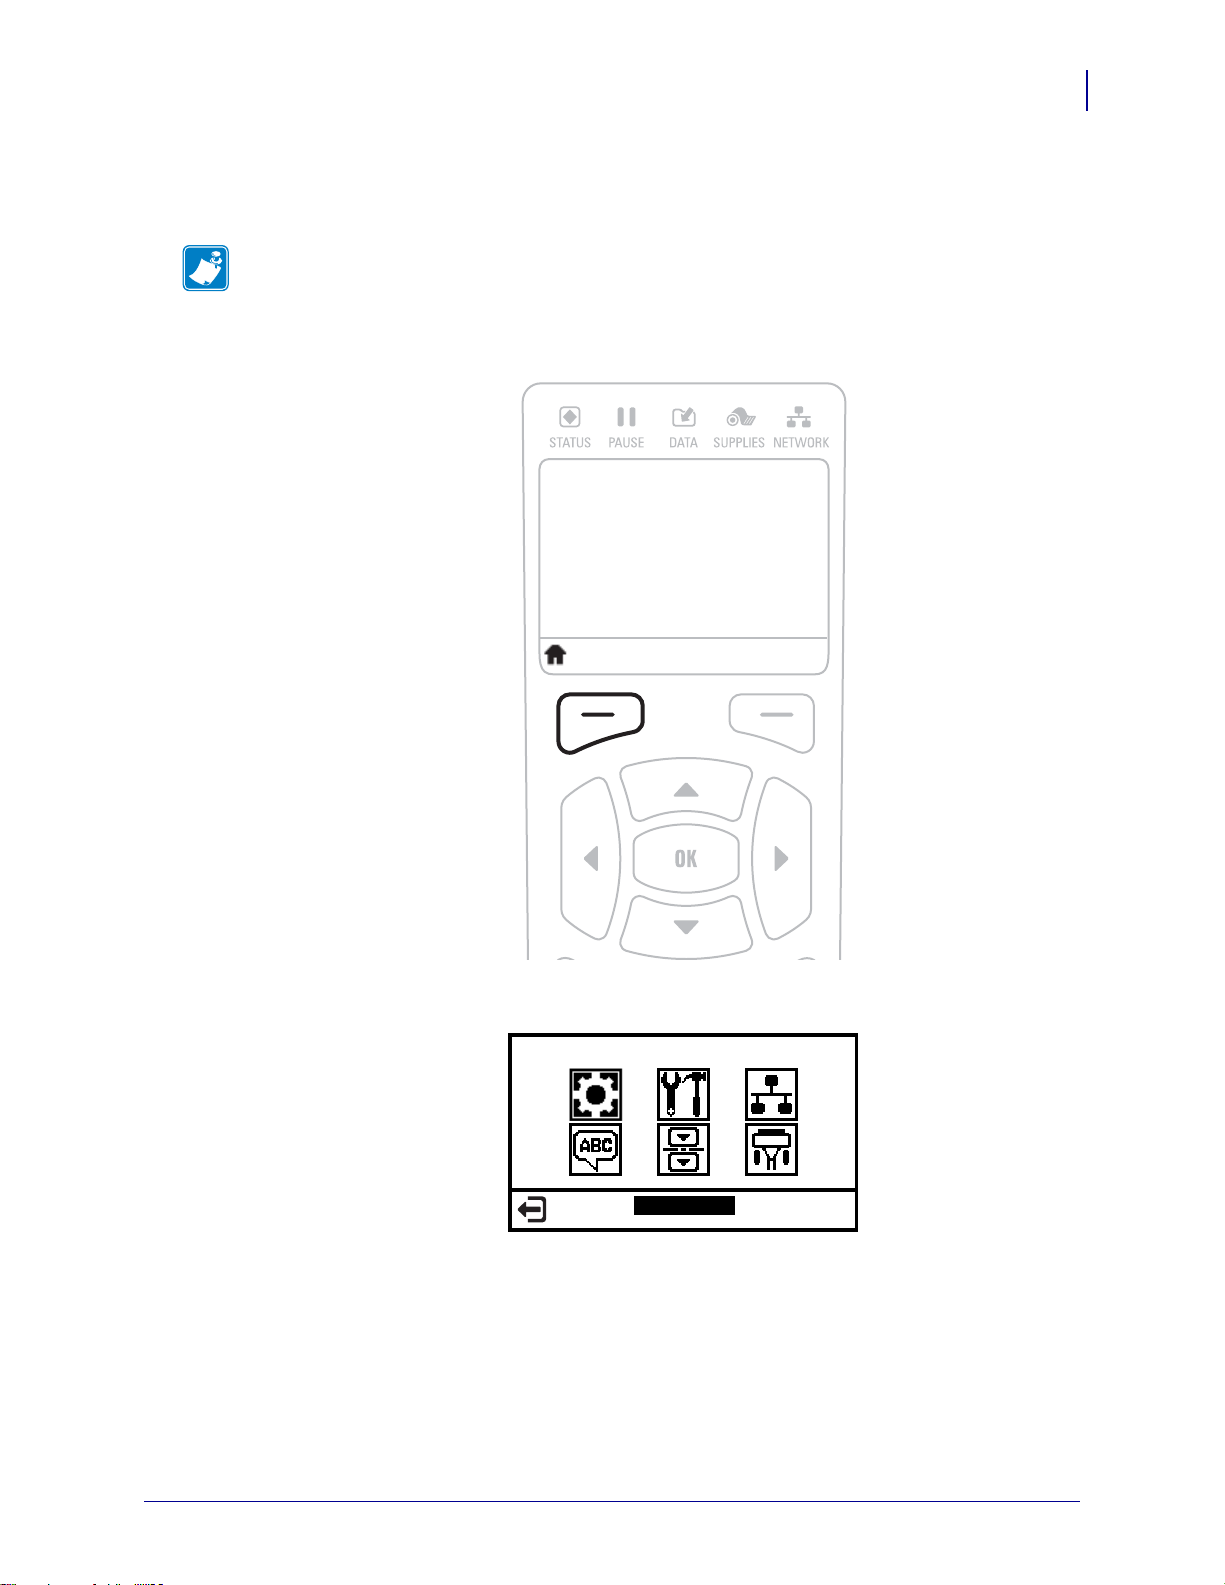
ZT230, ZT400 Series, ZT510, ZT600 Series, ZD500 Series, and ZD600 Series
Printers
Note • The ZT230 control panel is shown in this procedure. The control panel for the other
printers is similar.
1. From the printer’s idle display screen, press the LEFT SELECT KEY to select the Home
icon.
29
The printer displays the Home Menu.
02/15/2018 Virtual Device-PX User Guide P1100296-001
Page 30

Getting Started
HOME MENU
SETTINGS
▼
LANGUAGE
ENGLISH
▲
30
Enabling the Virtual Device
2. Use the ARROWS to navigate to the LANGUAGE menu.
3. Press the OK button.
The printer displays the LANGUAGE selection screen.
P1100296-001 Virtual Device-PX User Guide 02/15/2018
Page 31

Getting Started
▼
VIRTUAL DEVICE
NONE
▲
▼
VIRTUAL DEVICE
APL-PX
▲
USE
Enabling the Virtual Device
4. Use the LEFT or RIGHT ARROW to navigate to the VIRTUAL DEVICE selection
screen.
31
5. Use the UP or DOWN ARROW to scroll to the APL-PX option.
02/15/2018 Virtual Device-PX User Guide P1100296-001
Page 32

Getting Started
▼
VIRTUAL DEVICE
APL-PX
▲
USE
32
Enabling the Virtual Device
6. Press the RIGHT SOFT KEY or OK to select USE.
The printer restarts and uses the Virtual Device that you selected.
P1100296-001 Virtual Device-PX User Guide 02/15/2018
Page 33

Commands
This section provides a detailed listing of commands for use on your Zebra printer with the
Virtual Device-PX app.
Contents
Tables of Supported Commands . . . . . . . . . . . . . . . . . . . . . . . . . . . . . . . . . . . . . . . . . . . 34
Normal Mode Commands . . . . . . . . . . . . . . . . . . . . . . . . . . . . . . . . . . . . . . . . . . . . . . 34
Create Form Mode Commands . . . . . . . . . . . . . . . . . . . . . . . . . . . . . . . . . . . . . . . . . . 35
Execute Form Commands . . . . . . . . . . . . . . . . . . . . . . . . . . . . . . . . . . . . . . . . . . . . . . 35
Set/Get/Do (SGD) Commands. . . . . . . . . . . . . . . . . . . . . . . . . . . . . . . . . . . . . . . . . . . . . 37
02/15/2018 Virtual Device-PX User Guide P1100296-001
Page 34

Commands
34
Tables of Supported Commands
Tables of Supported Commands
For more information about the supported commands, refer to Printronix® Programmer's
Reference Manual, “IGP®/PGL® Emulation for Line Matrix Printers.”
Table 1 • Normal Mode Commands
Normal Mode Commands
Command Mnemonic Description Parameters Supported
Change SFCC SFCC Changes the Special Function Control
All Parameters Supported
Code character
Configuration CONFIG Reconfigures IGP/PGL parameters IGNORE CHAR
Create CREATE Places the IGP/PGL in the Create Form
formname, FL, DISK
mode where all the Create Form mode
commands are available to design form
elements
Directory DIRECTORY Provides a list of all defined forms and
DISK
logos, logo assignments to forms, and
memory usage and availability
Emulation
Switch
EMULATION Switch emulation from IGP/PGL to
IGP/VGL (if VGL is present)
emulation option P
Execute EXECUTE Executes a previously created form formname, FC,
(cc)AFn;(D)ASCII
text(D),
(cc)BFn;(D)data(D),
(cc)NORMAL
Font FONT Selects a specific typeface, bold, slant
FACE #, NAME #
(italic) factor, and symbol set
Normal Mode NORMAL Places the IGP/PGL in the Normal
All Parameters Supported
mode, where it does not change the data
stream but awaits the SFCC followed
by an IGP/PGL command
Paper PAPER Controls printer paper options, such as
EJECT
page orientation, intensity, and ribbon
use
Reset RESET Deletes all forms and logos from the
All Parameters Supported
IGP/PGL memory or the printer flash
memory
Select Format
On/Off
Reset RESET Deletes all forms and logos from the
SFON Ignores all host-generated paper
SFOFF
movement commands
All Parameters Supported
All Parameters Supported
IGP/PGL memory or the printer flash
memory
Select Format
On/Off
P1100296-001 Virtual Device-PX User Guide 02/15/2018
SFON Ignores all host-generated paper
SFOFF
movement commands
All Parameters Supported
Page 35

Commands
Tables of Supported Commands
Table 2 • Create Form Mode Commands
Create Form Mode Commands
Command Mnemonic Description Parameters Supported
35
Alphanumerics ALPHA Defines size, location, and content of
alphanumeric characters and dynamic
alphanumeric data fields
Bar Codes BARCODE Each bar code type has its own
command to define size, location,
R, Cn, AFn;L, POINT, SR,
SC, VE, HE, (D), text,
STOP
See Barcode Fonts
on page 42
orientation, and data
End END Terminates the Create Form mode All Parameters Supported
Form Length LFORM Specifies form length by total number
All Parameters Supported
of lines at 6 or 8 lpi
Lines, Horizontal HORZ Defines the location, size, and thickness
All Parameters Supported
of horizontal lines
Lines, Vertical VERT Defines the location, size, and thickness
All Parameters Supported
of vertical lines
Reset RESET Deletes all forms and logos from the
All Parameters Supported
IGP/PGL memory or the printer flash
memory
Scale SCALE Defines the vertical spacing and
All Parameters Supported
horizontal pitch for data positioning in
character or dot columns and rows
Select Format
On/Off
SFON Ignores all host-generated paper
SFOFF
movement commands
All Parameters Supported
Paper PAPER Controls printer paper options, such as
EJECT
page orientation, intensity and ribbon
use
Table 3 • Execute Form Commands
Execute Form Commands
Command Mnemonic Description Parameters Supported
Dynamic
Alphanumeric
Data
Dynamic Bar
Code Data
AFn Executes the dynamic alphanumeric
data provided after the (cc) EXECUTE
command
BFn Executes the dynamic bar code data
provided after the (cc) EXECUTE
All Parameters Supported
All Parameters Supported
command
Font FONT Selects a specific typeface, bold, slant
FACE #, NAME #
(italic) factor, and symbol set
02/15/2018 Virtual Device-PX User Guide P1100296-001
Page 36

Commands
36
Tables of Supported Commands
Execute Form Commands
Command Mnemonic Description Parameters Supported
Table 3 • Execute Form Commands (Continued)
Normal Mode NORMAL Places the IGP/PGL in the Normal
mode, where it does not change the data
stream but awaits the SFCC followed
by an IGP/PGL command
Paper PAPER Controls printer paper options, such as
page orientation, intensity and ribbon
use
Reset RESET Deletes all forms and logos from the
IGP/PGL memory or the printer flash
memory
Select Format
On/Off
SFON Ignores all host-generated paper
SFOFF
movement commands
All Parameters Supported
EJECT
All Parameters Supported
All Parameters Supported
P1100296-001 Virtual Device-PX User Guide 02/15/2018
Page 37

Set/Get/Do (SGD) Commands
Commands
Set/Get/Do (SGD) Commands
37
The following SGD commands were added for use with your Virtual Device app. For more
detailed information on SGD commands, see the Programming Guide for ZPL II
Set/Get/Do, Mirror, and WML (formerly the ZPL II Programming Guide).
apl.enable
Description This command enables or disables a Virtual Device app.
Note •
• ZPL and CPCL will not function normally when a Virtual Device app is enabled.
• You must restart the printer after changing the value of apl.enable.
Type setvar
Commands Details
setvar
This command instructs the printer to enable a virtual device.
Format: ! U1 setvar "apl.enable" "value"
Values:
"apl-px" = enable
"none" = disable any Virtual Device app (ZPL and CPCL function normally)
Virtual Device-PX
®
, ZBI 2,
Example 1 • This example shows how to enable the Virtual Device-PX app:
! U1 setvar "apl.enable" "apl-px"
Example 2 • This example shows how to disable the Virtual Device-PX app:
! U1 setvar "apl.enable" "none"
apl.version
Description This command returns the version of the currently running Virtual Device app.
Type getvar
Commands Details
getvar Format: ! U1 getvar "apl.version"
02/15/2018 Virtual Device-PX User Guide P1100296-001
Page 38

Commands
38
Set/Get/Do (SGD) Commands
apl.framework_version
Description This command returns the level of support for Virtual Devices in the printer
operating system.
Type getvar
Commands Details
getvar Format: ! U1 getvar "apl.framework_version"
P1100296-001 Virtual Device-PX User Guide 02/15/2018
Page 39

Supported Fonts
and Barcodes
This section provides you with examples of the fonts, barcodes, and two-dimensional
codes available on the Zebra printers with
Contents
Thermal Printer Fonts . . . . . . . . . . . . . . . . . . . . . . . . . . . . . . . . . . . . . . . . . . . . . . . . . . . 40
Barcode Fonts . . . . . . . . . . . . . . . . . . . . . . . . . . . . . . . . . . . . . . . . . . . . . . . . . . . . . . . . . 42
Virtual Device-PX.
02/15/2018 Virtual Device-PX User Guide P1100296-001
Page 40

Supported Fonts
40
Thermal Printer Fonts
Thermal Printer Fonts
Table 4 • Supported Thermal Printer Fonts
Font Face Number Description Example
92250 CG Triumvirate Bold
Condensed
P1100296-001 Virtual Device-PX User Guide 02/15/2018
Page 41
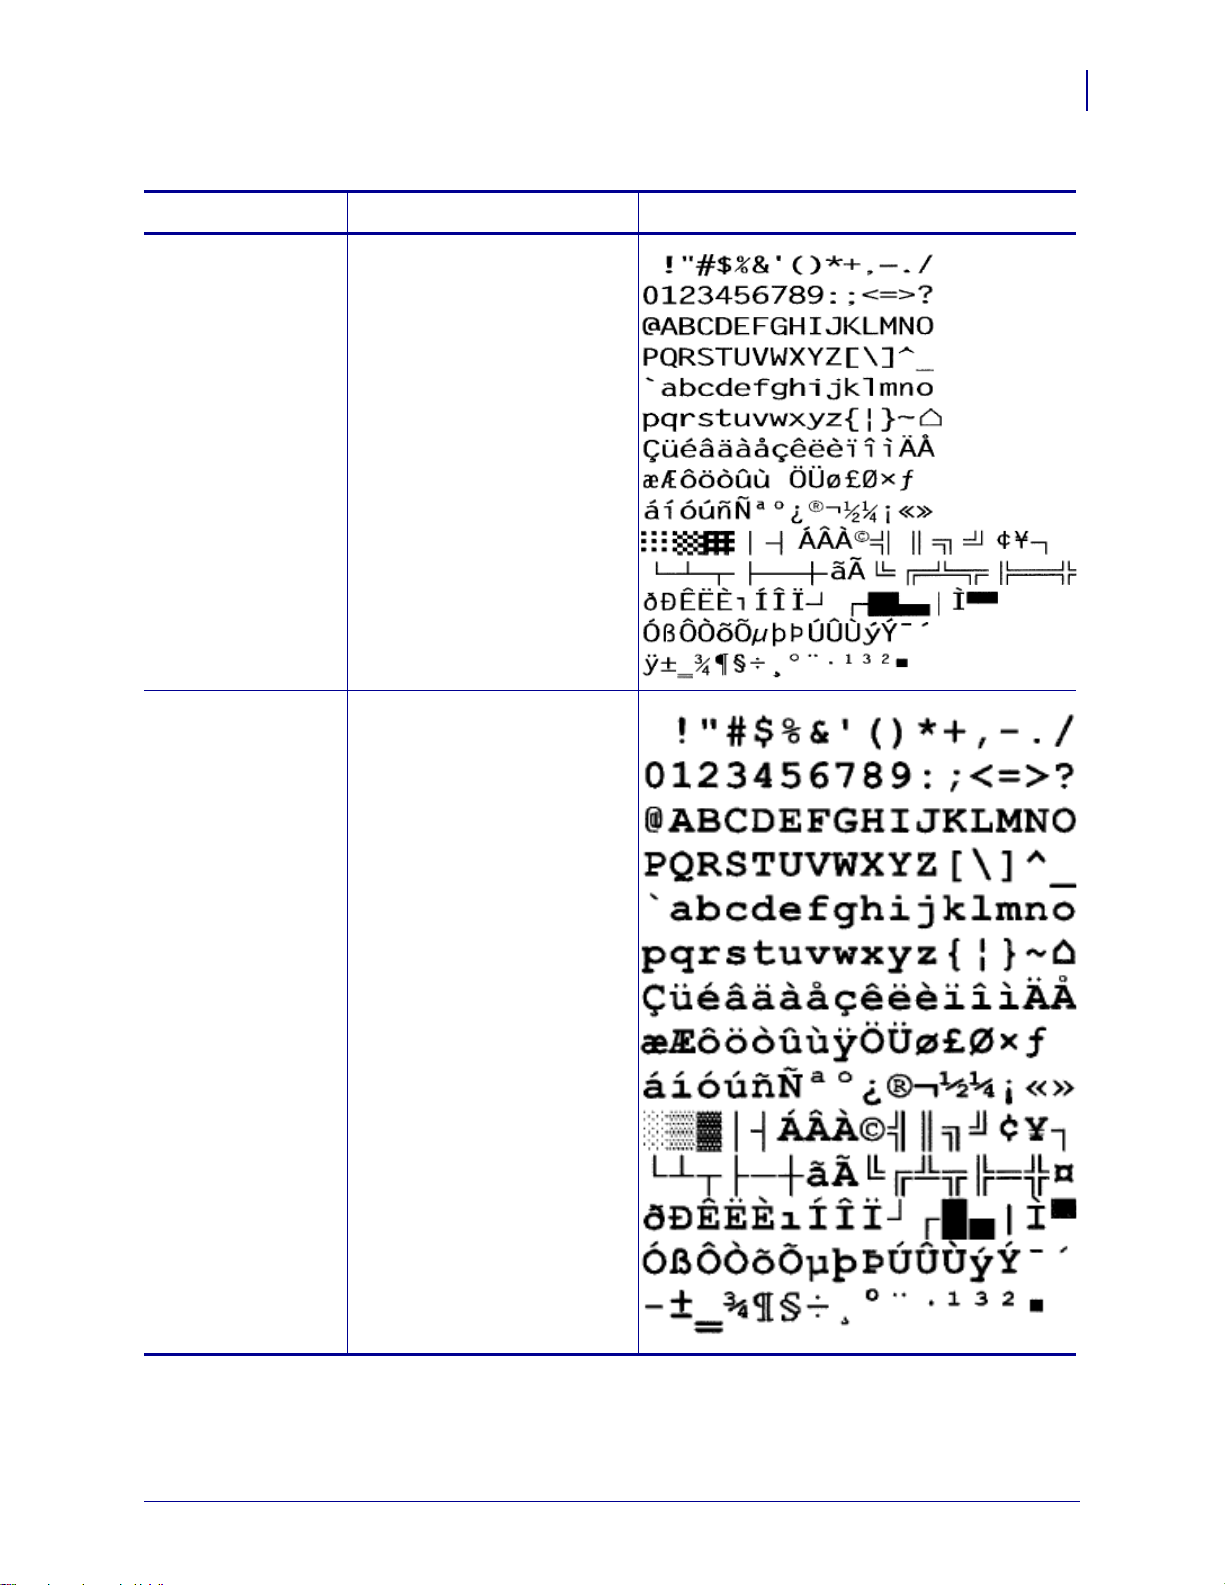
Table 4 • Supported Thermal Printer Fonts (Continued)
Font Face Number Description Example
93779 Letter Gothic Bold
Supported Fonts
Thermal Printer Fonts
41
93952 Courier New Bold
02/15/2018 Virtual Device-PX User Guide P1100296-001
Page 42

Supported Fonts
42
Barcode Fonts
Barcode Fonts
Table 5 • Supported Barcode Fonts
Barcode Mnemonic
Code 39 C3/9 Variable Alphanumeric [DIR;] [MAG;] [Hn[.m];], [BFn;L;], SR;SC
C128A
Code 128
C128B
C128C
Symbol
Length
Variable Alphanumeric
Code Set Parameters Supported
[(D)[data field] (D)[PDF [;LOC]
[DIR;] [MAG;] [Hn[.m];] [BFn;L;] SR, SC,
(D) [data field] (D) [PDF [;LOC]
P1100296-001 Virtual Device-PX User Guide 02/15/2018
Page 43

ZDownloader Utility
This section provides you with the instructions for downloading and installing the
ZDownloader Utility.
Contents
Downloading the ZDownloader Utility . . . . . . . . . . . . . . . . . . . . . . . . . . . . . . . . . . . . . . . 44
Installing the ZDownloader Utility. . . . . . . . . . . . . . . . . . . . . . . . . . . . . . . . . . . . . . . . . . . 45
02/15/2018 Virtual Device-PX User Guide P1100296-001
Page 44

ZDownloader Utility
44
Downloading the ZDownloader Utility
Downloading the ZDownloader Utility
To download the ZDownloader Utility, perform the following from your computer:
1. Open a web browser and navigate to www.zebra.com.
2. Click on the Support & Downloads header on the webpage.
3. Select a printer.
4. When the printer page opens, locate and select the Software Utilities tab.
5. Scroll down to the ZDownloader Utility and select the Download link.
Note • You will be prompted to create a user profile or login to www.zebra.com with an
existing profile to download the ZDownloader Utility.
6. Click on the Accept and Begin Download Now button.
The installation file download will begin.
P1100296-001 Virtual Device-PX User Guide 02/15/2018
Page 45

Installing the ZDownloader Utility
To install the ZDownloader Utility, perform the following from your computer:
1. Run the installation file after the download is complete.
2. If you are prompted to allow the application to make changes to your computer, click Ye s.
The utility installs on your computer. When installation is complete, the Firmware
Downloader and ZBI Key Manager installation wizard appears.
ZDownloader Utility
Installing the ZDownloader Utility
45
3. Click Next.
The End User License Agreement appears.
02/15/2018 Virtual Device-PX User Guide P1100296-001
Page 46

ZDownloader Utility
46
Installing the ZDownloader Utility
4. Read the terms of the agreement.
5. Click the checkbox to accept the terms.
6. Click Next.
7. Click Next.
The installation wizard displays information about the installation.
P1100296-001 Virtual Device-PX User Guide 02/15/2018
Page 47

8. Click Next.
The installation wizard installs the application.
ZDownloader Utility
Installing the ZDownloader Utility
47
9. Click Finish to close the wizard.
02/15/2018 Virtual Device-PX User Guide P1100296-001
Page 48

ZDownloader Utility
Notes • ___________________________________________________________________
__________________________________________________________________________
__________________________________________________________________________
__________________________________________________________________________
__________________________________________________________________________
__________________________________________________________________________
__________________________________________________________________________
__________________________________________________________________________
__________________________________________________________________________
__________________________________________________________________________
48
Installing the ZDownloader Utility
P1100296-001 Virtual Device-PX User Guide 02/15/2018
Page 49

Index
A
application installation
acquiring the app, 10
canceling a download in progress, 20
downloading the app to printers, 18
auto-detect printers, 12
B
barcodes
supported barcodes, 42
C
connectivity options, 7
D
disabling the Virtual Device
by apl.enable SGD command, 37
through the control panel
QLn320 and QLn220 printers, 26
QLn420 printers, 23
ZT230, ZD510, and ZD600 series printers,
29
ways to enable/disable, 22
29
ways to enable/disable, 22
F
features, 6
fonts, 40
I
IP Ethernet printers
auto-detect, 12
manually add, 13
L
liability, 2
M
manually add printers, 13
modifying printer communication settings through
ZDownloader, 16
P
parallel printers, 13
print servers, 7
E
enabling the Virtual Device
by apl.enable SGD command, 37
through the control panel
QLn320 and QLn220 printers, 26
QLn420 printers, 23
ZT230, ZD510, and ZD600 series printers,
02/15/2018 Virtual Device-PX User Guide P1100296-001
S
serial interface
add printers, 13
Set/Get/Do (SGD) commands, 37
Page 50

50
Index
T
tables of supported commands, 34
types of commands
create form mode, 35
execute form, 35
normal mode, 34
U
USB printers, 12
V
version
level of support for Virtual Devices, 38
of Virtual Device, 37
Virtual Device version, 37
W
wired print server
auto detect, 12
for more information, 7
manually add, 13
wireless print server
auto detect, 12
for more information, 7
manually add, 13
Z
ZDownloader
adding printers, 11
canceling a download in progress, 20
deleting printers, 17
downloading the Virtual Device app to printers, 18
downloading ZDownloader, 44
installing ZDownloader, 45
modifying printer settings, 16
zebra printer setup utility for android devices, 11
P1100296-001 Virtual Device-PX User Guide 02/15/2018
Page 51

Corporate Headquarters
Zebra Technologies Corporation
3 Overlook Point
Lincolnshire, IL 60069 USA
T: +1 847 634 6700
Toll-free +1 866 230 9494
F: +1 847 913 8766
http://www.zebra.com
P1100296-001
 Loading...