

Page 1

Virtual Device-O
User Guide
‘fgP1059537-003
Page 2

© 2018 ZIH Corp. All rights reserved. ZEBRA and the stylized Zebra head are trademarks of ZIH Corp.,
registered in many jurisdictions worldwide. All other trademarks are the property of their respective
owners.
Information in this document is subject to change without notice.
For further information regarding legal and proprietary statements, please go to:
COPYRIGHTS: http://www.zebra.com/copyright
WARRANTY: http://www.zebra.com/warranty
END USER LICENSE AGREEMENT: http://www.zebra.com/eula
SOFTWARE: http://www.zebra.com/linkoslegal
Terms of Use
Proprietary Statement
and its subsidiaries (“Zebra Technologies”). It is intended solely for the information and use of parties
operating and maintaining the equipment described herein. Such proprietary information may not be used,
reproduced, or disclosed to any other parties for any other purpose without the express, written permission
of Zebra Technologies.
This manual contains proprietary information of Zebra Technologies Corporation
Product Improvements Continuous improvement of products is a policy of Zebra Technologies. All
specifications and designs are subject to change without notice.
Liability Disclaimer Zebra Technologies takes steps to ensure that its published Engineering
specifications and manuals are correct; however, errors do occur. Zebra Technologies reserves the right to
correct any such errors and disclaims liability resulting therefrom.
Limitation of Liability In no event shall Zebra Technologies or anyone else involved in the creation,
production, or delivery of the accompanying product (including hardware and software) be liable for any
damages whatsoever (including, without limitation, consequential damages including loss of business
profits, business interruption, or loss of business information) arising out of the use of, the results of use of,
or inability to use such product, even if Zebra Technologies has been advised of the possibility of such
damages. Some jurisdictions do not allow the exclusion or limitation of incidental or consequential
damages, so the above limitation or exclusion may not apply to you.
Part Number: P1059537-003 Rev. A
Page 3

Contents
2 • Contents . . . . . . . . . . . . . . . . . . . . . . . . . . . . . . . . . . . . . . . . . . . . . . . . . . . . . . . 3
1 • Introduction . . . . . . . . . . . . . . . . . . . . . . . . . . . . . . . . . . . . . . . . . . . . . . . . . . . . 6
Overview . . . . . . . . . . . . . . . . . . . . . . . . . . . . . . . . . . . . . . . . . . . . . . . . . . . . . . . . . . . . . . 7
Virtual Device-O Features . . . . . . . . . . . . . . . . . . . . . . . . . . . . . . . . . . . . . . . . . . . . . . . . . 7
Supported Printers . . . . . . . . . . . . . . . . . . . . . . . . . . . . . . . . . . . . . . . . . . . . . . . . . . . . . . . 8
Configuring Network Connectivity . . . . . . . . . . . . . . . . . . . . . . . . . . . . . . . . . . . . . . . . . . . 8
Notes . . . . . . . . . . . . . . . . . . . . . . . . . . . . . . . . . . . . . . . . . . . . . . . . . . . . . . . . . . . . . . . . . 9
2 • Install, Register, and Enable Virtual Device-O . . . . . . . . . . . . . . . . . . . . . . . 10
Acquiring the Virtual Device Application . . . . . . . . . . . . . . . . . . . . . . . . . . . . . . . . . . . . . 11
Downloading the Virtual Device-O Application . . . . . . . . . . . . . . . . . . . . . . . . . . . . . . . . 12
Adding Printers to the ZDownloader List . . . . . . . . . . . . . . . . . . . . . . . . . . . . . . . . . . 12
Modifying Printers in the List . . . . . . . . . . . . . . . . . . . . . . . . . . . . . . . . . . . . . . . . . . . 18
Deleting Printers from the List . . . . . . . . . . . . . . . . . . . . . . . . . . . . . . . . . . . . . . . . . . 19
Downloading the Virtual Device App to Selected Printers . . . . . . . . . . . . . . . . . . . . . 20
Canceling a Download in Progress . . . . . . . . . . . . . . . . . . . . . . . . . . . . . . . . . . . . . . 22
Registering the Virtual Device . . . . . . . . . . . . . . . . . . . . . . . . . . . . . . . . . . . . . . . . . . . . . 23
ZDownloader Log File . . . . . . . . . . . . . . . . . . . . . . . . . . . . . . . . . . . . . . . . . . . . . . . . 23
Enabling the Virtual Device . . . . . . . . . . . . . . . . . . . . . . . . . . . . . . . . . . . . . . . . . . . . . . . 24
Using an SGD Command . . . . . . . . . . . . . . . . . . . . . . . . . . . . . . . . . . . . . . . . . . . . . 24
Using the User Menus . . . . . . . . . . . . . . . . . . . . . . . . . . . . . . . . . . . . . . . . . . . . . . . . 24
8/28/18 Virtual Device-O User Guide P1059537-003
Page 4

Contents
4
3 • Commands . . . . . . . . . . . . . . . . . . . . . . . . . . . . . . . . . . . . . . . . . . . . . . . . . . . . 35
Supported Commands . . . . . . . . . . . . . . . . . . . . . . . . . . . . . . . . . . . . . . . . . . . . . . . . . . . 37
Line Print Commands . . . . . . . . . . . . . . . . . . . . . . . . . . . . . . . . . . . . . . . . . . . . . . . . 37
Easy Print Commands . . . . . . . . . . . . . . . . . . . . . . . . . . . . . . . . . . . . . . . . . . . . . . . . 38
Query Commands . . . . . . . . . . . . . . . . . . . . . . . . . . . . . . . . . . . . . . . . . . . . . . . . . . . 38
PK80 Commands . . . . . . . . . . . . . . . . . . . . . . . . . . . . . . . . . . . . . . . . . . . . . . . . . . . . 39
MF8i Commands . . . . . . . . . . . . . . . . . . . . . . . . . . . . . . . . . . . . . . . . . . . . . . . . . . . . 39
Line Print Commands . . . . . . . . . . . . . . . . . . . . . . . . . . . . . . . . . . . . . . . . . . . . . . . . . . . 40
CR . . . . . . . . . . . . . . . . . . . . . . . . . . . . . . . . . . . . . . . . . . . . . . . . . . . . . . . . . . . . . . . 40
ESC ! n . . . . . . . . . . . . . . . . . . . . . . . . . . . . . . . . . . . . . . . . . . . . . . . . . . . . . . . . . . . 40
ESC @ . . . . . . . . . . . . . . . . . . . . . . . . . . . . . . . . . . . . . . . . . . . . . . . . . . . . . . . . . . . . 41
ESC A n . . . . . . . . . . . . . . . . . . . . . . . . . . . . . . . . . . . . . . . . . . . . . . . . . . . . . . . . . . . 41
ESC B, ESC E . . . . . . . . . . . . . . . . . . . . . . . . . . . . . . . . . . . . . . . . . . . . . . . . . . . . . . 42
ESC EZ . . . . . . . . . . . . . . . . . . . . . . . . . . . . . . . . . . . . . . . . . . . . . . . . . . . . . . . . . . . 43
ESC Hn . . . . . . . . . . . . . . . . . . . . . . . . . . . . . . . . . . . . . . . . . . . . . . . . . . . . . . . . . . . 43
ESC Q n1n2 . . . . . . . . . . . . . . . . . . . . . . . . . . . . . . . . . . . . . . . . . . . . . . . . . . . . . . . . 43
ESC R n . . . . . . . . . . . . . . . . . . . . . . . . . . . . . . . . . . . . . . . . . . . . . . . . . . . . . . . . . . . 44
ESC V n1 n2 . . . . . . . . . . . . . . . . . . . . . . . . . . . . . . . . . . . . . . . . . . . . . . . . . . . . . . . 45
ESC w n . . . . . . . . . . . . . . . . . . . . . . . . . . . . . . . . . . . . . . . . . . . . . . . . . . . . . . . . . . . 46
FF . . . . . . . . . . . . . . . . . . . . . . . . . . . . . . . . . . . . . . . . . . . . . . . . . . . . . . . . . . . . . . . 47
LF . . . . . . . . . . . . . . . . . . . . . . . . . . . . . . . . . . . . . . . . . . . . . . . . . . . . . . . . . . . . . . . . 47
SI . . . . . . . . . . . . . . . . . . . . . . . . . . . . . . . . . . . . . . . . . . . . . . . . . . . . . . . . . . . . . . . . 47
SO . . . . . . . . . . . . . . . . . . . . . . . . . . . . . . . . . . . . . . . . . . . . . . . . . . . . . . . . . . . . . . . 48
Easy Print Commands . . . . . . . . . . . . . . . . . . . . . . . . . . . . . . . . . . . . . . . . . . . . . . . . . . . 49
Ahead Command {AHEAD:nnn} . . . . . . . . . . . . . . . . . . . . . . . . . . . . . . . . . . . . . . . . 49
Back Command {BACK:nnn} . . . . . . . . . . . . . . . . . . . . . . . . . . . . . . . . . . . . . . . . . . . 49
Line Printer Mode {LP} . . . . . . . . . . . . . . . . . . . . . . . . . . . . . . . . . . . . . . . . . . . . . . . . 49
Print {Print...} . . . . . . . . . . . . . . . . . . . . . . . . . . . . . . . . . . . . . . . . . . . . . . . . . . . . . . . 50
Print {Print...} (continued) . . . . . . . . . . . . . . . . . . . . . . . . . . . . . . . . . . . . . . . . . . . . . . 51
Print {Print...} (continued) . . . . . . . . . . . . . . . . . . . . . . . . . . . . . . . . . . . . . . . . . . . . . . 52
Print {Print...} (continued) . . . . . . . . . . . . . . . . . . . . . . . . . . . . . . . . . . . . . . . . . . . . . . 53
Status {S} . . . . . . . . . . . . . . . . . . . . . . . . . . . . . . . . . . . . . . . . . . . . . . . . . . . . . . . . . . 54
Self Test Printout {TP} . . . . . . . . . . . . . . . . . . . . . . . . . . . . . . . . . . . . . . . . . . . . . . . . 54
Limited Self Test Printout {TP1} . . . . . . . . . . . . . . . . . . . . . . . . . . . . . . . . . . . . . . . . . 54
P1059537-003 Virtual Device-O User Guide 8/28/18
Page 5

Contents
Query Commands . . . . . . . . . . . . . . . . . . . . . . . . . . . . . . . . . . . . . . . . . . . . . . . . . . . . . . 55
ESC {BT?} . . . . . . . . . . . . . . . . . . . . . . . . . . . . . . . . . . . . . . . . . . . . . . . . . . . . . . . . . 55
ESC {CF?} . . . . . . . . . . . . . . . . . . . . . . . . . . . . . . . . . . . . . . . . . . . . . . . . . . . . . . . . . 56
ESC {FM?} . . . . . . . . . . . . . . . . . . . . . . . . . . . . . . . . . . . . . . . . . . . . . . . . . . . . . . . . . 58
ESC {FN?} . . . . . . . . . . . . . . . . . . . . . . . . . . . . . . . . . . . . . . . . . . . . . . . . . . . . . . . . . 59
ESC {GR?} . . . . . . . . . . . . . . . . . . . . . . . . . . . . . . . . . . . . . . . . . . . . . . . . . . . . . . . . . 60
ESC {MY?} . . . . . . . . . . . . . . . . . . . . . . . . . . . . . . . . . . . . . . . . . . . . . . . . . . . . . . . . . 61
ESC {PH?} . . . . . . . . . . . . . . . . . . . . . . . . . . . . . . . . . . . . . . . . . . . . . . . . . . . . . . . . . 62
ESC {RE!} . . . . . . . . . . . . . . . . . . . . . . . . . . . . . . . . . . . . . . . . . . . . . . . . . . . . . . . . . 62
ESC {ST?} . . . . . . . . . . . . . . . . . . . . . . . . . . . . . . . . . . . . . . . . . . . . . . . . . . . . . . . . . 63
ESC {VR?} . . . . . . . . . . . . . . . . . . . . . . . . . . . . . . . . . . . . . . . . . . . . . . . . . . . . . . . . . 65
Query Command Override . . . . . . . . . . . . . . . . . . . . . . . . . . . . . . . . . . . . . . . . . . . . . 66
Set/Get/Do (SGD) Commands . . . . . . . . . . . . . . . . . . . . . . . . . . . . . . . . . . . . . . . . . . . . . 67
apl.enable . . . . . . . . . . . . . . . . . . . . . . . . . . . . . . . . . . . . . . . . . . . . . . . . . . . . . . . . . 67
apl.version . . . . . . . . . . . . . . . . . . . . . . . . . . . . . . . . . . . . . . . . . . . . . . . . . . . . . . . . . 67
apl.framework_version . . . . . . . . . . . . . . . . . . . . . . . . . . . . . . . . . . . . . . . . . . . . . . . . 68
apl.o.graphics_byte_width . . . . . . . . . . . . . . . . . . . . . . . . . . . . . . . . . . . . . . . . . . . . . 68
5
4 • Supported Fonts . . . . . . . . . . . . . . . . . . . . . . . . . . . . . . . . . . . . . . . . . . . . . . . 69
Supported Fonts . . . . . . . . . . . . . . . . . . . . . . . . . . . . . . . . . . . . . . . . . . . . . . . . . . . . . . . 70
5 • ZDownloader Utility . . . . . . . . . . . . . . . . . . . . . . . . . . . . . . . . . . . . . . . . . . . . . 74
Downloading the ZDownloader Utility . . . . . . . . . . . . . . . . . . . . . . . . . . . . . . . . . . . . . . . 75
Installing the ZDownloader Utility . . . . . . . . . . . . . . . . . . . . . . . . . . . . . . . . . . . . . . . . . . . 76
1 • Index . . . . . . . . . . . . . . . . . . . . . . . . . . . . . . . . . . . . . . . . . . . . . . . . . . . . . . . . . 79
8/28/18 Virtual Device-O User Guide P1059537-003
Page 6

Introduction
This section describes the features and functions of a Zebra printer that is running the
Virtual Device-O application.
Contents
Overview . . . . . . . . . . . . . . . . . . . . . . . . . . . . . . . . . . . . . . . . . . . . . . . . . . . . . . . . . . . . . . 7
Virtual Device-O Features . . . . . . . . . . . . . . . . . . . . . . . . . . . . . . . . . . . . . . . . . . . . . . . . . 7
Virtual Device-O Features . . . . . . . . . . . . . . . . . . . . . . . . . . . . . . . . . . . . . . . . . . . . . . . . . 7
Configuring Network Connectivity . . . . . . . . . . . . . . . . . . . . . . . . . . . . . . . . . . . . . . . . . . . 8
Notes . . . . . . . . . . . . . . . . . . . . . . . . . . . . . . . . . . . . . . . . . . . . . . . . . . . . . . . . . . . . . . . . . 9
8/28/18 Virtual Device-O User Guide P1059537-003
Page 7

Overview
Introduction
Overview
7
The Virtual Device-O application enables Zebra Link-OS printers to work with many
host systems that are using Datamax-O’Neil
be required to the host application. This feature can help customers to make a smooth
transition to Zebra printers and save them the time and expense of having to rewrite
their host software.
Virtual Device-O Features
The Virtual Device-O application:
• Uses existing features of Zebra printers, when available.
• Offers fonts similar to the original device. These fonts will use 120 KB or more of
memory space.
• Supports the Bluetooth
• Offers many outline fonts, barcodes, and specific commands and features of
target printer models (see Supported Fonts on page 69).
• Provides support of Datamax-O’Neil commands (see Commands on page 35).
®
printers. In most cases, no changes will
®
, Serial, Ethernet, WLAN, and USB interfaces.
8/28/18 Virtual Device-O User Guide P1059537-003
Page 8

Introduction
8
Supported Printers
Supported Printers
This manual describes the Virtual Device-O language for Zebra Link-OS printers and
should be used by any person who needs to support that language on one of the
following Zebra printers:
Printer Firmware
iMZ Series V73.19.6Z and later
QLn Series V68.19.6Z and later
ZT200 Series V72.19.6Z and later
ZT400 Series V75.19.7Z and later
ZT510 V80.20.02Z and later
ZT600 Series V80.20.02Z and later
ZD400 Series V77.19.14Z or V84.20.05Z and later
ZD500 Series V74.19.6Z and later
ZD600 Series V84.20.05Z and later
ZQ300 Series V81.20.06Z and later
ZQ500 Series V76.19.10Z and later
Note • The Virtual Device-O language is supported only on 203 dpi printers.
For complete printer operation, use this manual in combination with the User Guide
for your printer.
Configuring Network Connectivity
Your printer may be equipped with one or more of the following interfaces:
• Bluetooth—For detailed information to connect a Bluetooth device, refer to the
Bluetooth User Guide.
• Wired print server—For detailed information, refer to the ZebraNet Wired and
Wireless Print Servers User Guide.
• Wireless print server—For detailed information, refer to the ZebraNet Wired and
Wireless Print Servers User Guide.
For other connectivity options, refer to the User Guide for your printer. Copies of these
manuals are available at http://www.zebra.com/manuals.
P1059537-003 Virtual Device-O User Guide 8/28/18
Page 9

Notes
Introduction
Notes
• Other command languages are disabled when running Virtual Device-O.
However, Set/Get/Do (SGD) commands and file download all operate properly
with Virtual Device-O enabled.
• Virtual Device-O fonts can only be used with Virtual Device-O commands. They
cannot be used with other languages.
• The Virtual Device-O mode application will not respond to CPCL, ZPL, or EPL
commands. Instead, commands will be processed by the Virtual Device-O
application.
9
8/28/18 Virtual Device-O User Guide P1059537-003
Page 10

Install, Register, and
Enable Virtual Device-O
This section provides you with instructions on how to install and enable the
Virtual Device-O application on one or more Zebra printers.
Contents
Acquiring the Virtual Device Application . . . . . . . . . . . . . . . . . . . . . . . . . . . . . . . . . . . . . 11
Downloading the Virtual Device-O Application. . . . . . . . . . . . . . . . . . . . . . . . . . . . . . . . . 12
Using ZDownloader . . . . . . . . . . . . . . . . . . . . . . . . . . . . . . . . . . . . . . . . . . . . . . . . . . . 12
Adding Printers to the ZDownloader List . . . . . . . . . . . . . . . . . . . . . . . . . . . . . . . . . 12
Auto-Detect Printers. . . . . . . . . . . . . . . . . . . . . . . . . . . . . . . . . . . . . . . . . . . . . . . . . 13
Manually Add Printers . . . . . . . . . . . . . . . . . . . . . . . . . . . . . . . . . . . . . . . . . . . . . . . 14
Modifying Printers in the List . . . . . . . . . . . . . . . . . . . . . . . . . . . . . . . . . . . . . . . . . . 18
Deleting Printers from the List . . . . . . . . . . . . . . . . . . . . . . . . . . . . . . . . . . . . . . . . . 19
Downloading the Virtual Device App to Selected Printers . . . . . . . . . . . . . . . . . . . . 20
Registering the Virtual Device . . . . . . . . . . . . . . . . . . . . . . . . . . . . . . . . . . . . . . . . . . . . . 23
Enabling the Virtual Device . . . . . . . . . . . . . . . . . . . . . . . . . . . . . . . . . . . . . . . . . . . . . . . 24
Using an SGD Command . . . . . . . . . . . . . . . . . . . . . . . . . . . . . . . . . . . . . . . . . . . . . . 24
Using the User Menus . . . . . . . . . . . . . . . . . . . . . . . . . . . . . . . . . . . . . . . . . . . . . . . . . 24
QLn420 Printers. . . . . . . . . . . . . . . . . . . . . . . . . . . . . . . . . . . . . . . . . . . . . . . . . . . . 25
QLn320 and QLn220 Printers . . . . . . . . . . . . . . . . . . . . . . . . . . . . . . . . . . . . . . . . . 28
Supported ZTxxx and ZDxxx PRINTERS with a Display . . . . . . . . . . . . . . . . . . . . . 31
8/28/18 Virtual Device-O User Guide P1059537-003
Page 11

Acquiring the Virtual Device Application
To get the Virtual Device app, perform the following from your computer:
1. Open a web browser and navigate to http://www.zebra.com/virtualdevices.
2. Locate your printer type in the list of printers, and then click Download Now.
3. Fill out the information on the Virtual Device Download Request form.
4. Click Submit.
5. Read the End User License Agreement.
6. Click Accept and Begin Download Now.
Your browser prompts you to open or save the archive containing the Virtual
Device app.
7. Save and store the Virtual Device app archive file to your computer.
The archive file contains the following:
Getting Started
Acquiring the Virtual Device Application
11
• The Virtual Device .NRD file to be downloaded to a Zebra printer.
•A .txt file that contains the SGD command for immediately activating the
Virtual Device app.
8. Extract the files from the archive to your computer.
8/28/18 Virtual Device-O User Guide P1059537-003
Page 12

Getting Started
12
Downloading the Virtual Device-O Application
Downloading the Virtual Device-O Application
Zebra provides two options to download the Virtual Device-O app to the printer.
• On a computer with the ZDownloader Utility
The ZDownloader Utility is the only method shown in this manual. For instructions
on how to download and install the ZDownloader Utility, see ZDownloader Utility
on page 74.
• On an Android device with the Zebra Printer Setup Utility for Android Devices
(available for free on Google Play™)
For information on using the Zebra Printer Setup Utility for Android Devices and to
download the user guide, navigate to http://www.zebra.com/setup.
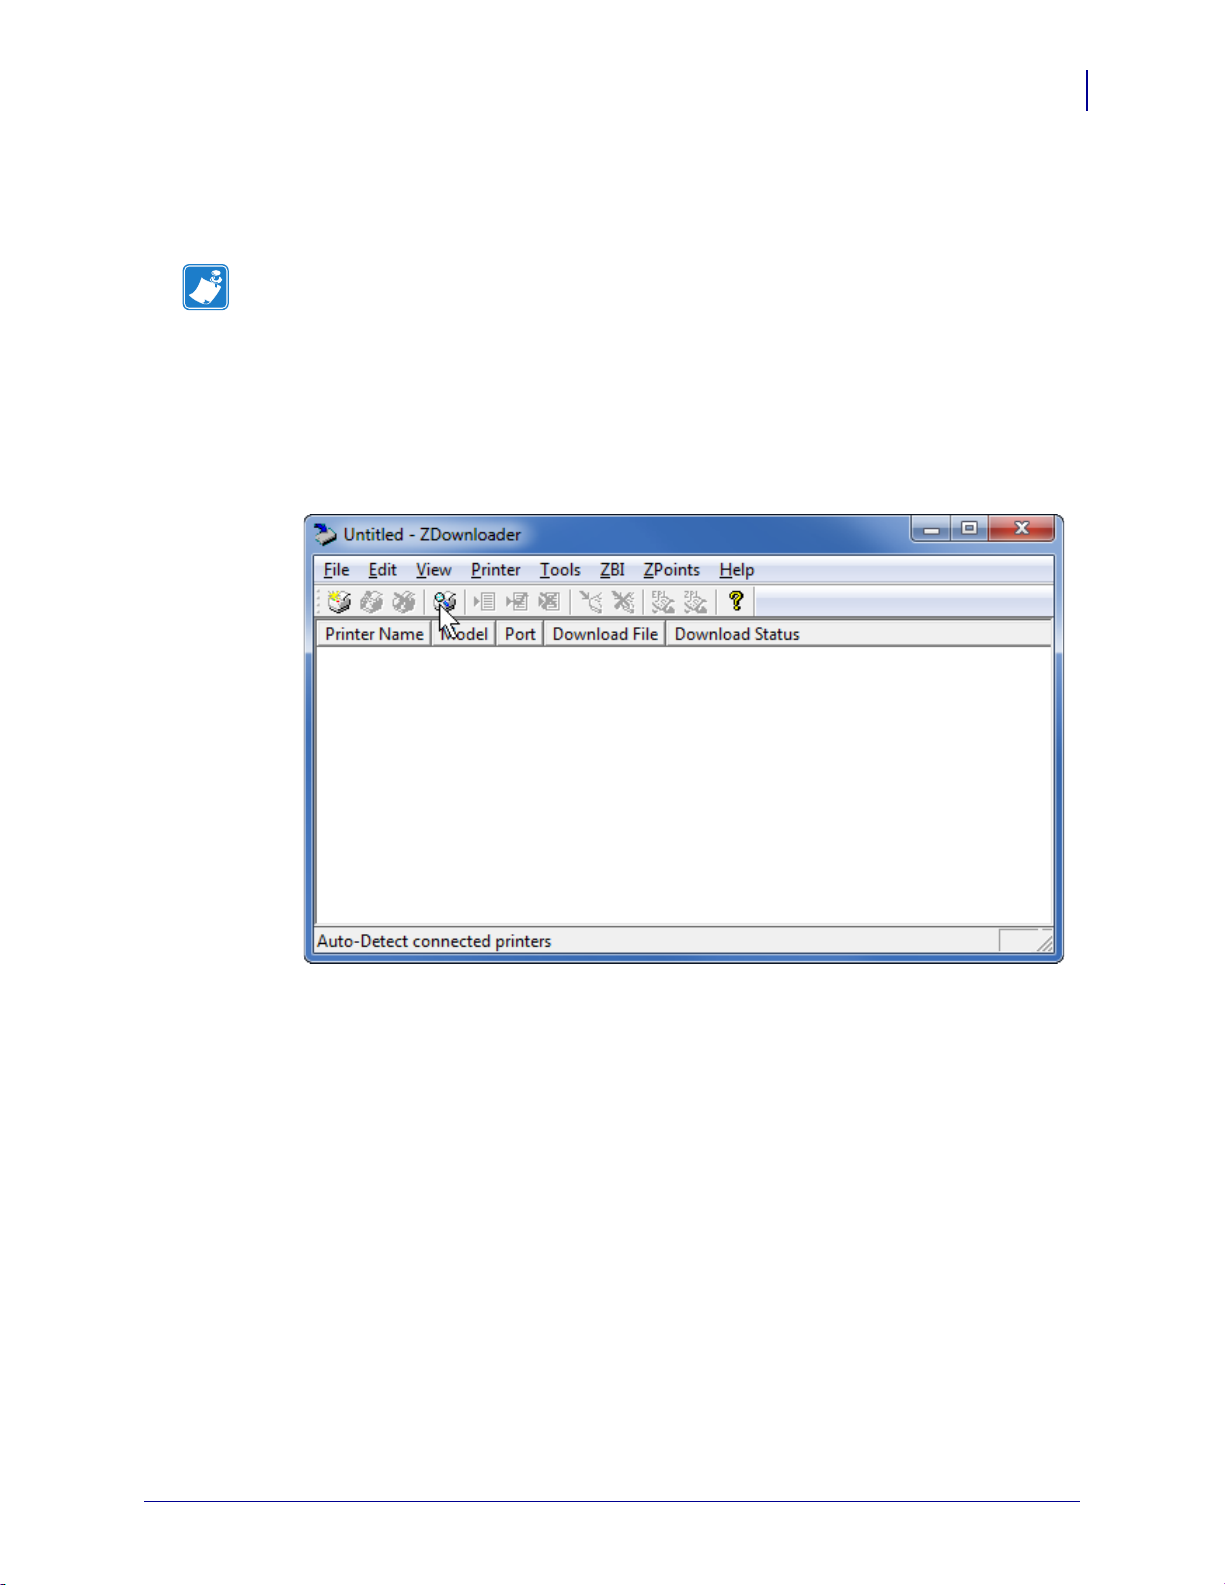
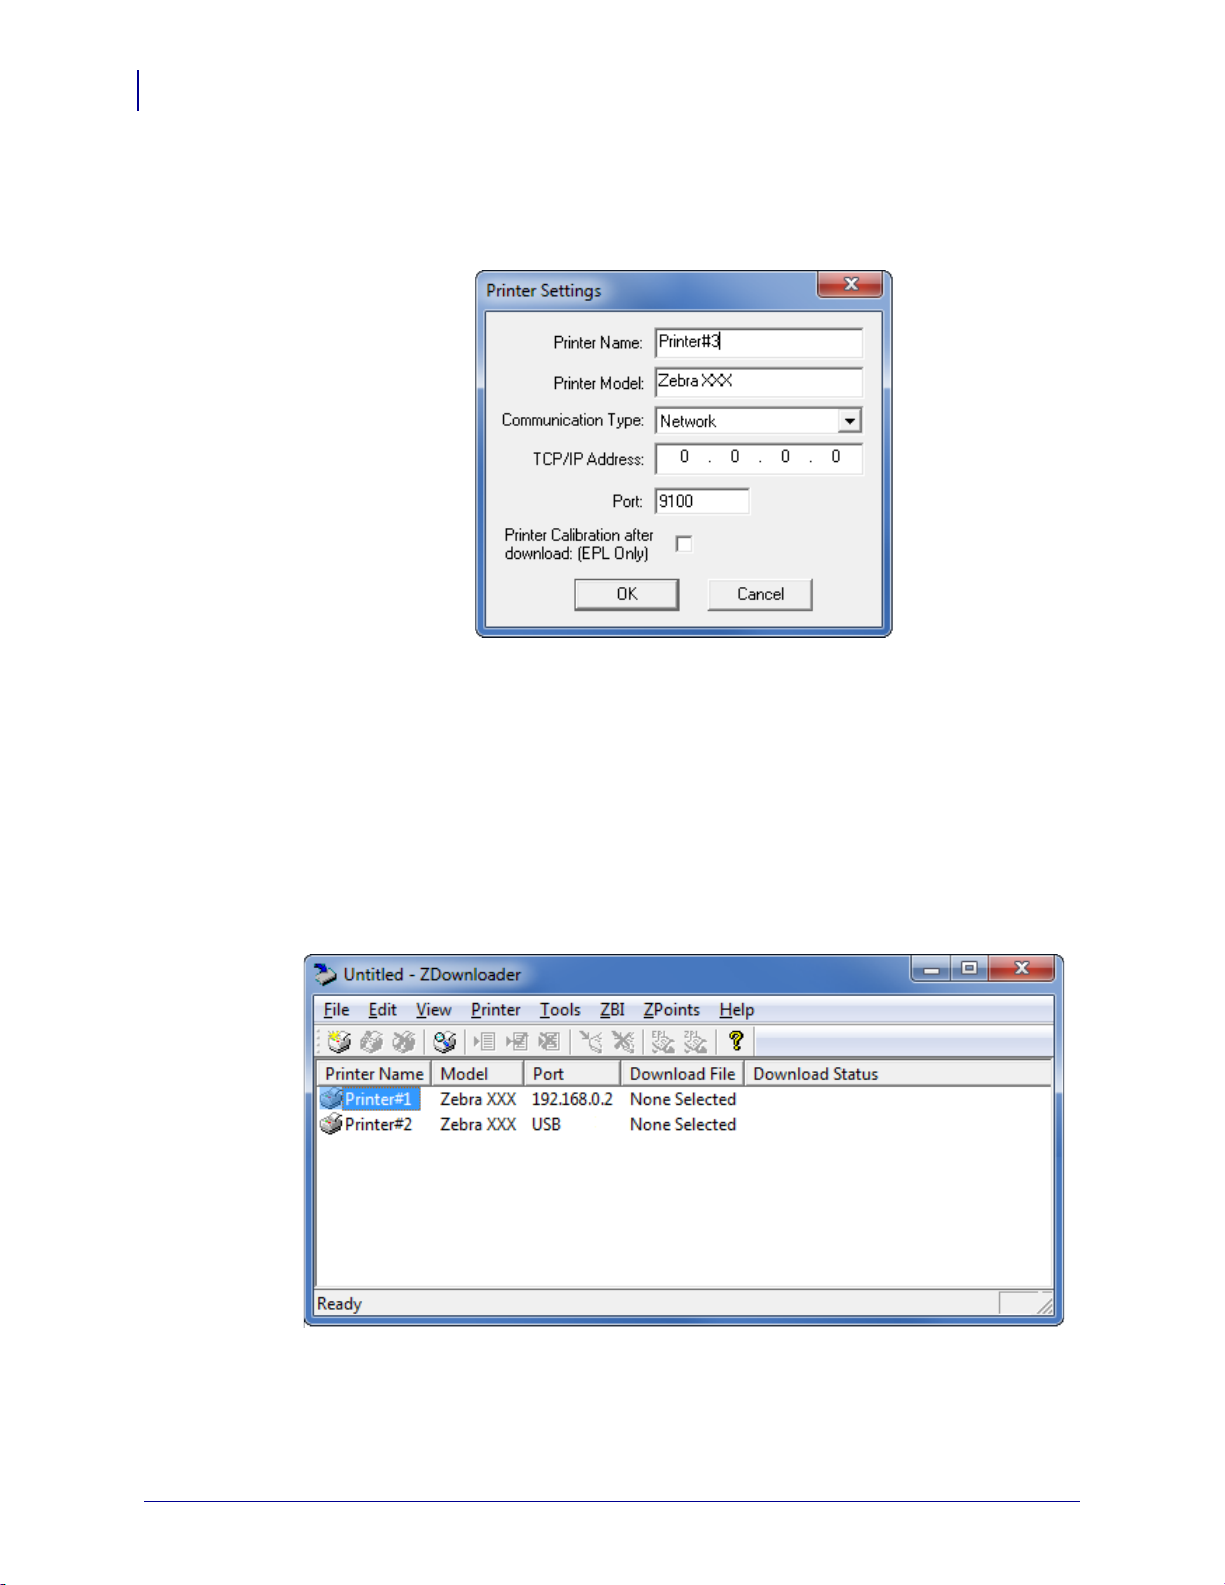
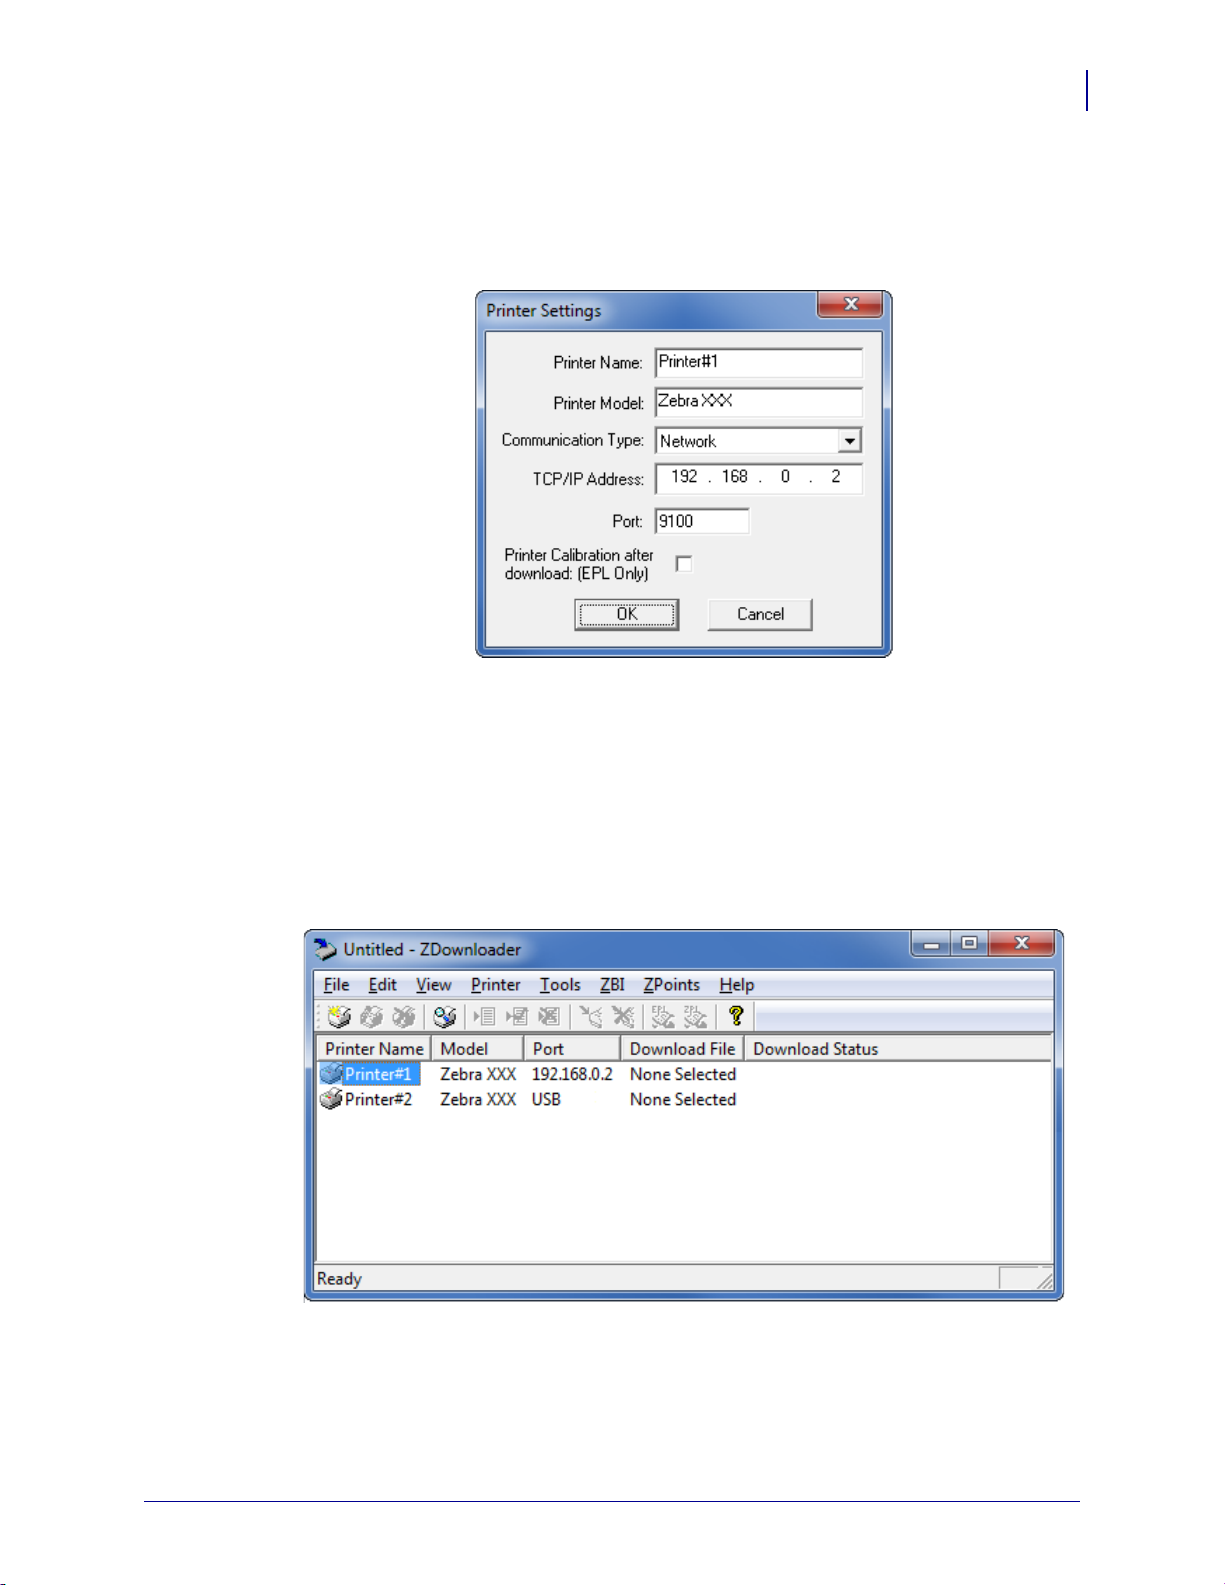
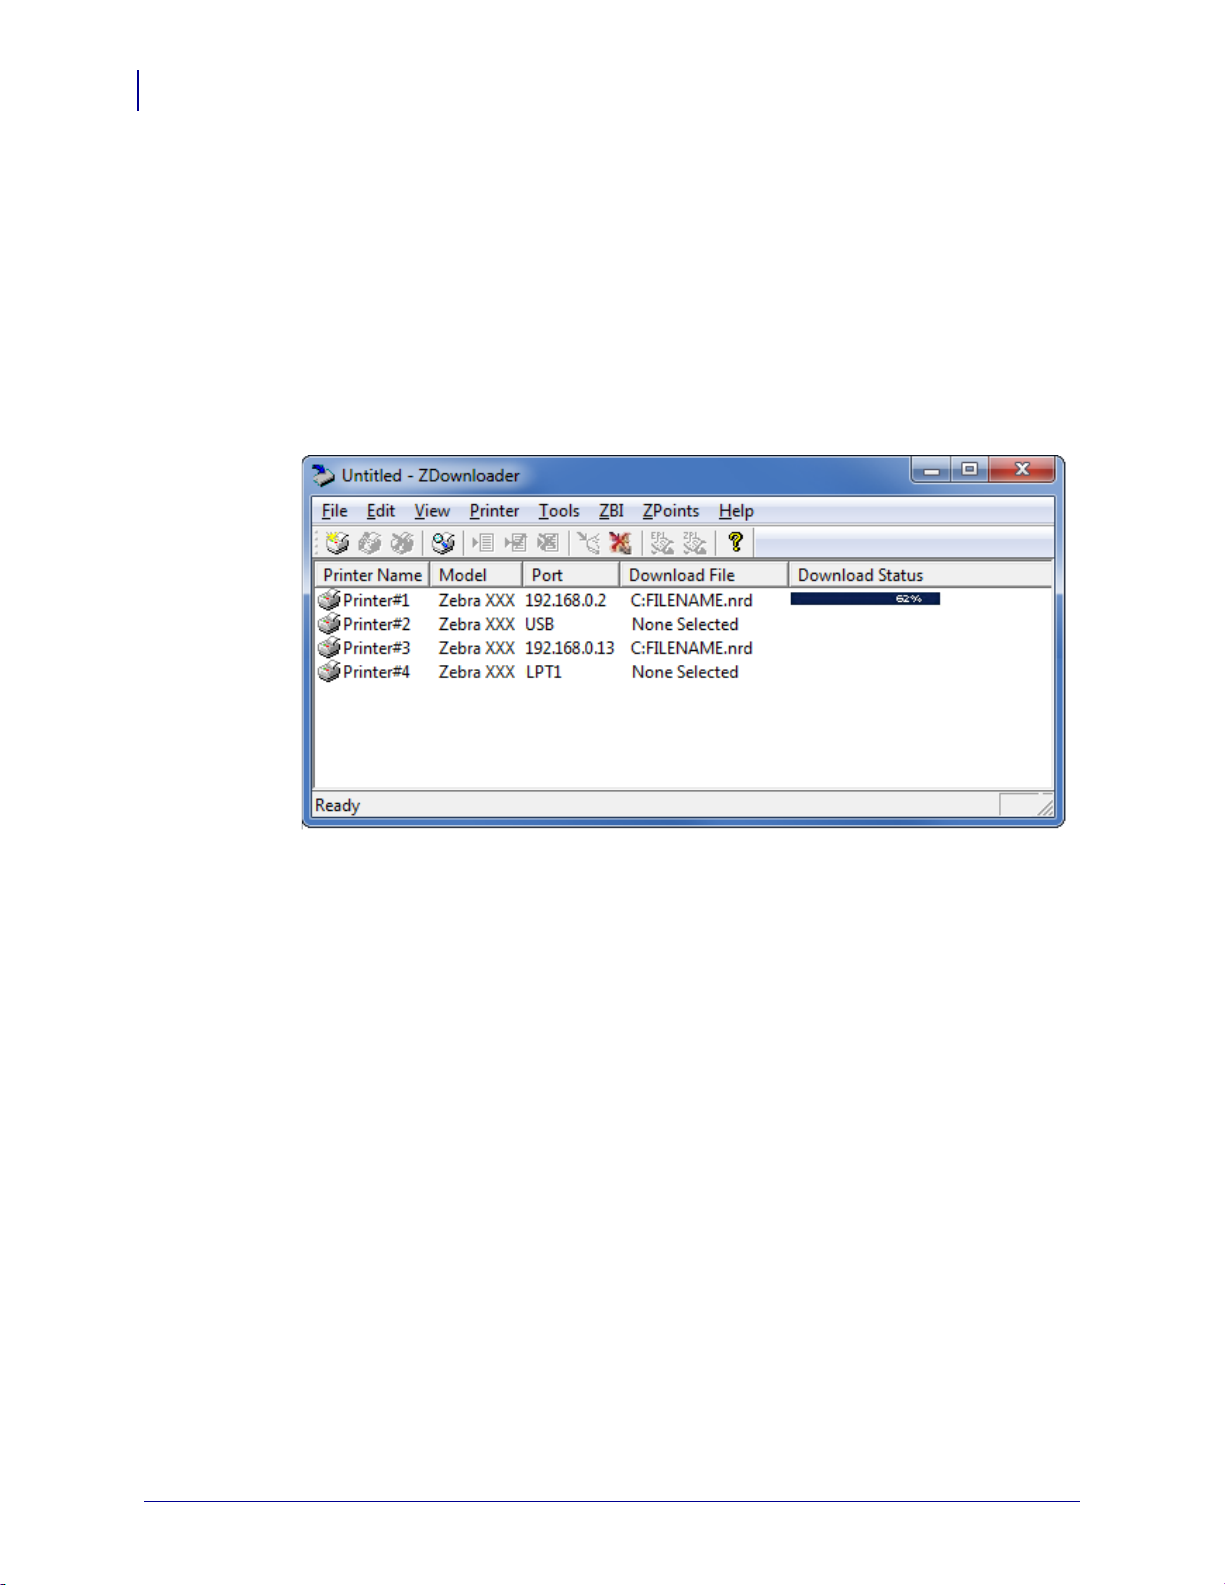
Using ZDownloader
The ZDownloader application can update Virtual Device-O files in Zebra printers
connected by Serial, Parallel, USB, and IP Ethernet networks.
Figure 1 • Initial ZDownloader Screen
Adding Printers to the ZDownloader List
There are two ways to add printers to the list:
• Auto-Detect (use for USB or IP Ethernet interfaces)
• Manual add (use for Serial, Parallel, or IP Ethernet interfaces)
If your printer is connecting via the serial or parallel interfaces, or is not detected by
using the Auto-Detect method, use the Manual Add method.
P1059537-003 Virtual Device-O User Guide 8/28/18
Page 13
Auto-Detect Printers
Use Auto-Detect for USB or IP Ethernet interfaces.
Note • Ethernet connected printers are detected by the application broadcasting a
UDP packet out onto the network. UDP port number 4201 is used for the
discovery process. Some networks filter out UDP packets. This means that the
ZDownloader utility may not be able to detect all of the printers on your network.
See your network administrator for more information. If you are not able to AutoDetect your network printers, follow instructions for manually adding a printer.
USB printers can only be added by using Auto-Detect. The ZDownloader utility can
support as many USB printers as your computer can support (most computers
typically can support up to 255).
Getting Started
Downloading the Virtual Device-O Application
13
8/28/18 Virtual Device-O User Guide P1059537-003
Page 14
Getting Started
14
Downloading the Virtual Device-O Application
To Auto-Detect printers connected via the USB or IP Ethernet interfaces,
perform the following steps:
1. In the ZDownloader toolbar, select Printer > Auto-Detect.
OR
Right-click in the ZDownloader window and select Auto-Detect Printers.
The printers detected are added to the printer list.
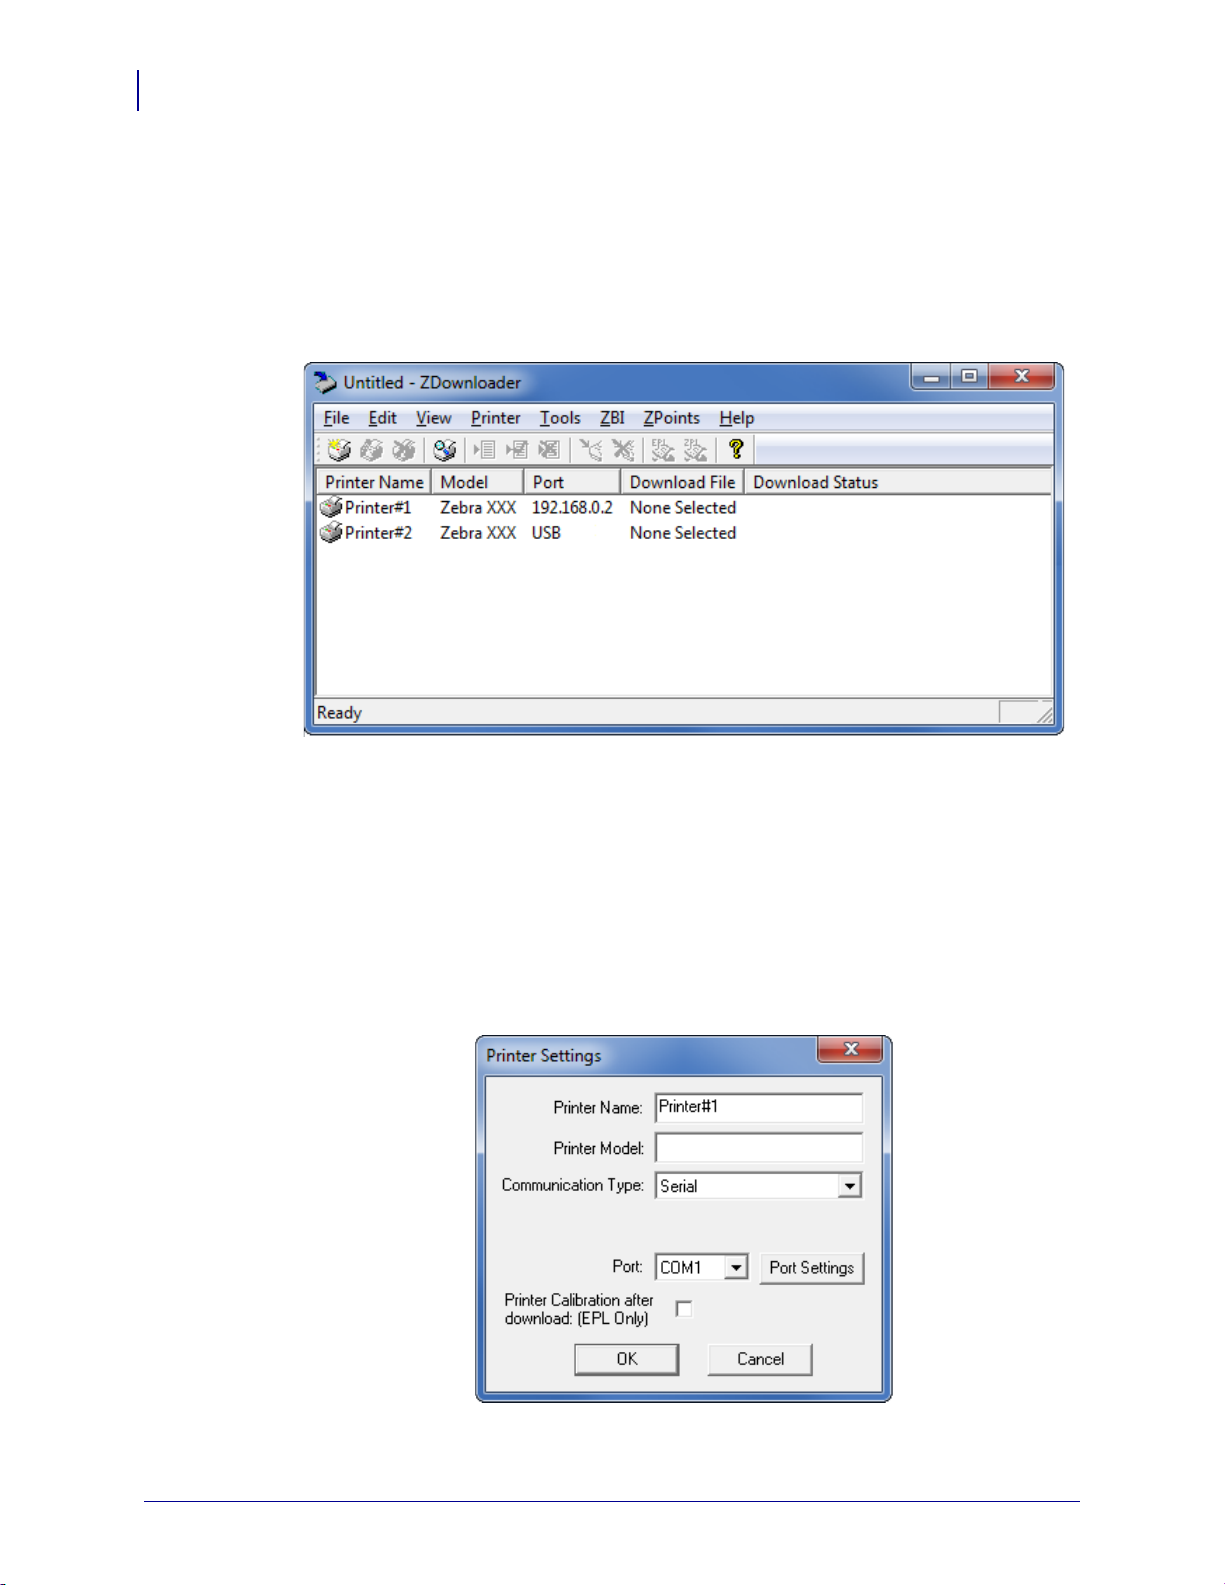
Manually Add Printers
To manually add printers connected via the Serial, Parallel, or Network
interfaces, perform the following steps:
1. In the ZDownloader toolbar, select Printer > Add….
OR
Right-click in the ZDownloader window and select Add Printer….
The following window appears.
P1059537-003 Virtual Device-O User Guide 8/28/18
Page 15
Downloading the Virtual Device-O Application
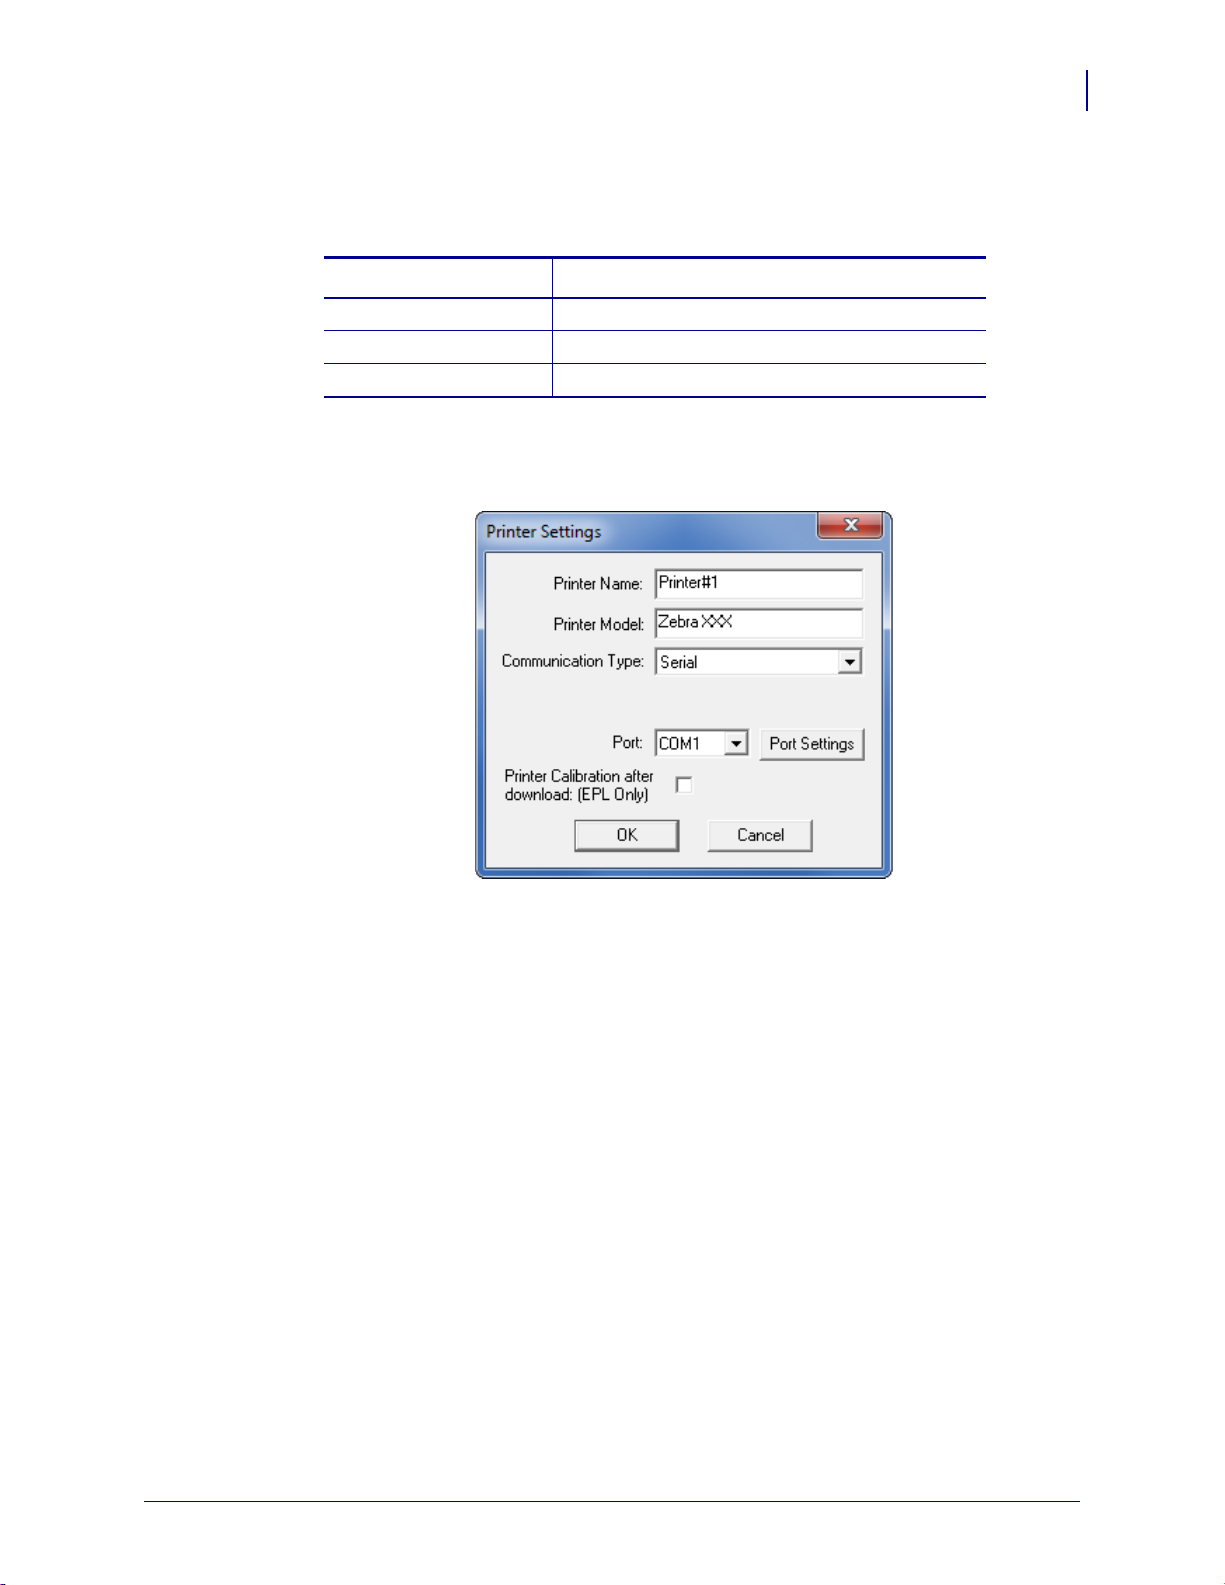
2. Add a printer name and your printer model in the appropriate fields.
3. What type of printer are you adding?
-
If you are adding a… Then…
Serial Printer Go to Adding a Serial Printer.
Parallel Printer Go to Adding a Parallel Printer on page 17.
Network Printer Go to Adding a Network Printer on page 18.
Adding a Serial Printer
4. Select the serial port to which the printer is connected.
Getting Started
15
8/28/18 Virtual Device-O User Guide P1059537-003
Page 16
Getting Started
16
Downloading the Virtual Device-O Application
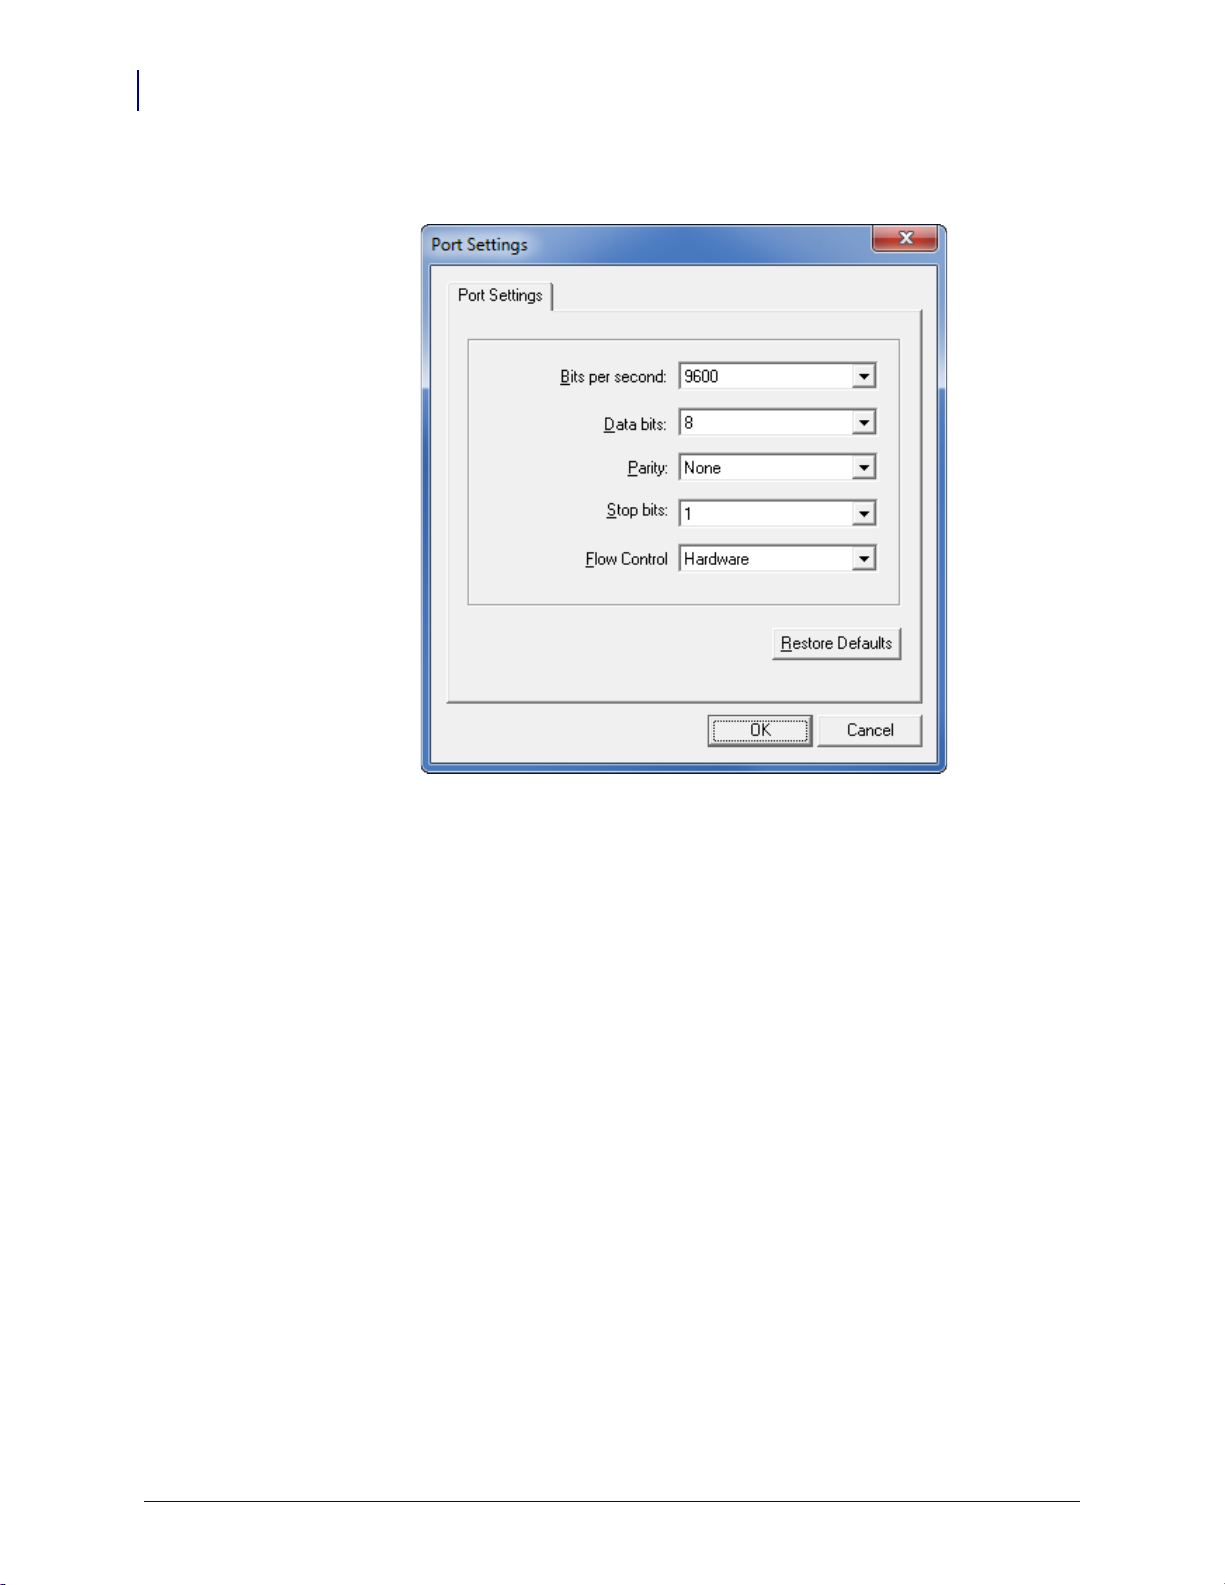
5. Click Port Settings.
The following window appears.
6. Adjust the settings as necessary. The printer’s serial port settings must match the
computer’s serial port settings. For more information about the settings, refer to
the User Guide for your printer.
7. Click OK to save the port settings.
8. Click OK to add the printer.
P1059537-003 Virtual Device-O User Guide 8/28/18
Page 17
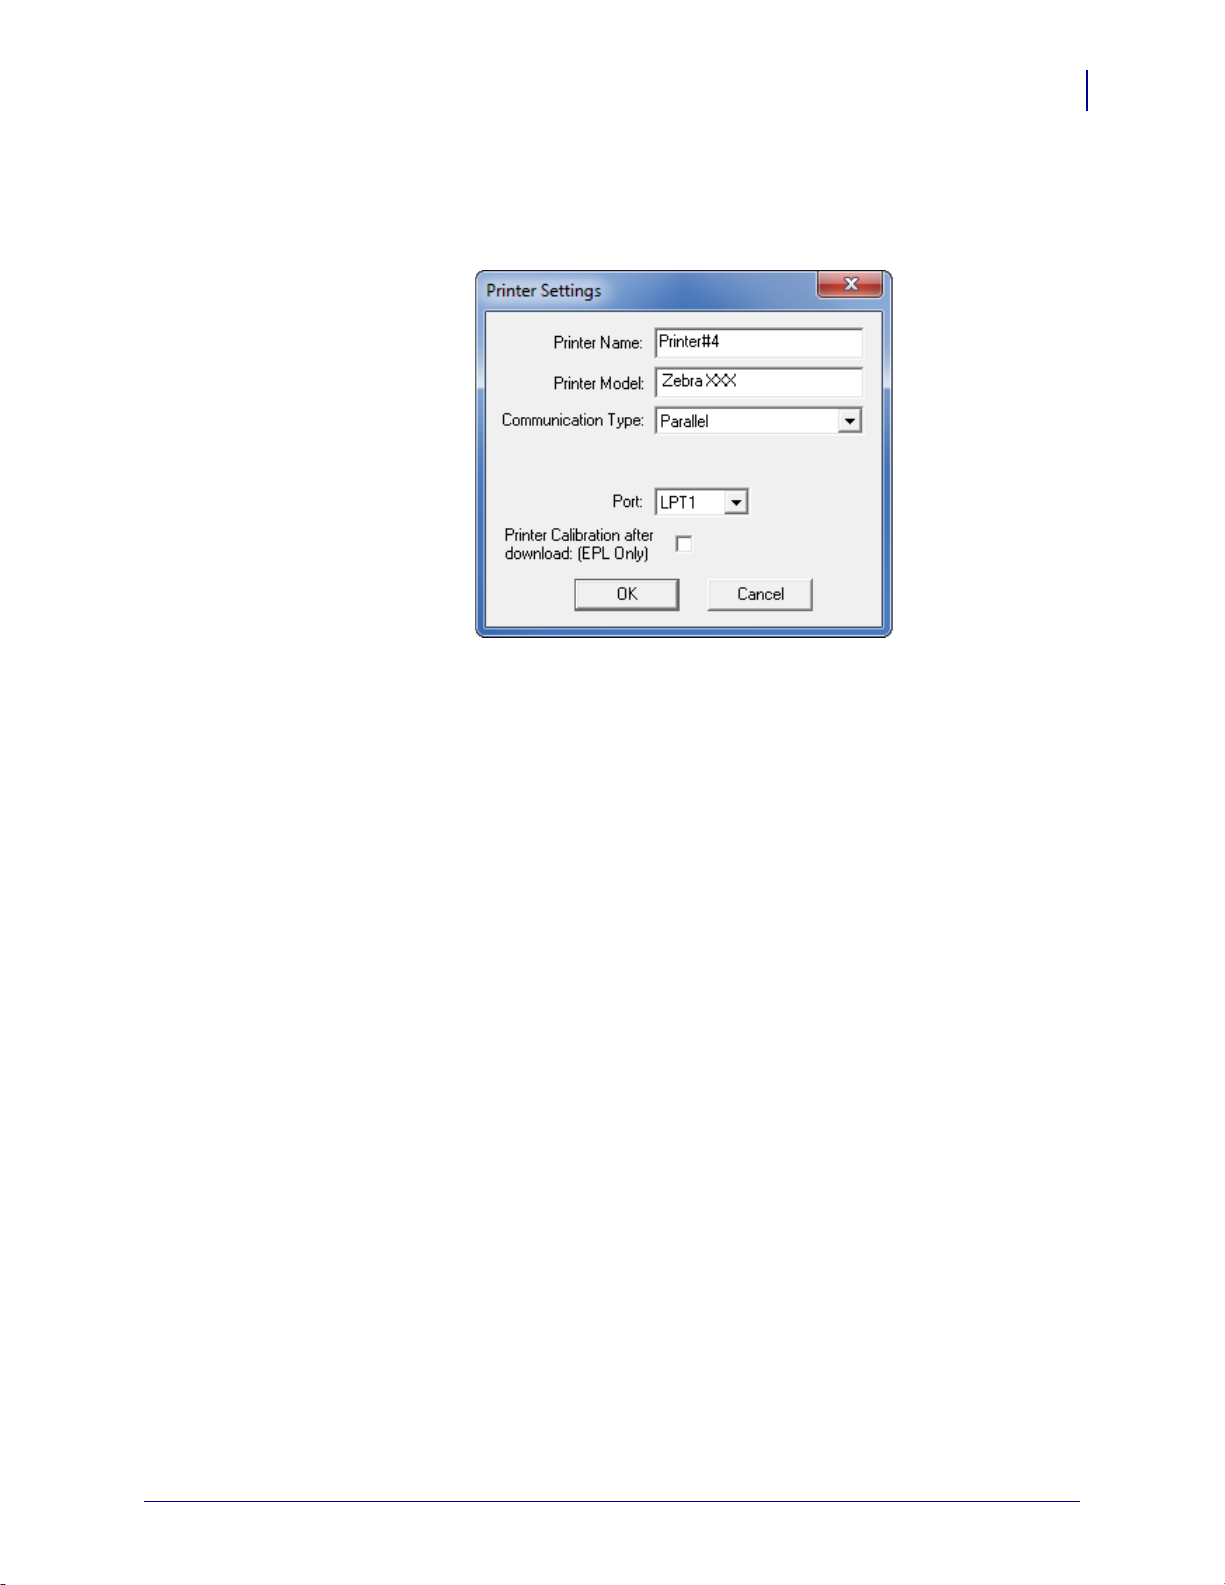
Adding a Parallel Printer
9. Set Communication Type to Parallel.
The available parallel ports will be shown in the Port drop-down box.
Getting Started
Downloading the Virtual Device-O Application
17
10. Select the port to which the printer is connected. No additional configuration is
necessary.
11. Click OK to add the printer.
8/28/18 Virtual Device-O User Guide P1059537-003
Page 18
Getting Started
18
Downloading the Virtual Device-O Application
Adding a Network Printer
12. Set Communication Type to Network.
The following window appears.
13. Enter the printer’s IP address.
14. Click OK to save the network settings.
15. Click OK to add the printer.
Modifying Printers in the List
To change printer settings for a printer in the list, perform the following steps:
1. Select the printer to modify.
P1059537-003 Virtual Device-O User Guide 8/28/18
Page 19
Downloading the Virtual Device-O Application
2. In the toolbar, select Printer > Modify Printer….
OR
Right-click on the printer and select Modify Printer….
The printer settings for the selected printer are displayed.
Getting Started
19
3. Modify the settings as desired.
4. Click OK to save the settings.
Deleting Printers from the List
To delete printers from the list, perform the following steps:
1. Select one or more printers to delete.
8/28/18 Virtual Device-O User Guide P1059537-003
Page 20
Getting Started
20
Downloading the Virtual Device-O Application
2. In the toolbar, select Printer > Delete.
OR
Right-click on one of the selected printers and select Delete Printer(s).
The printer is removed from the list.
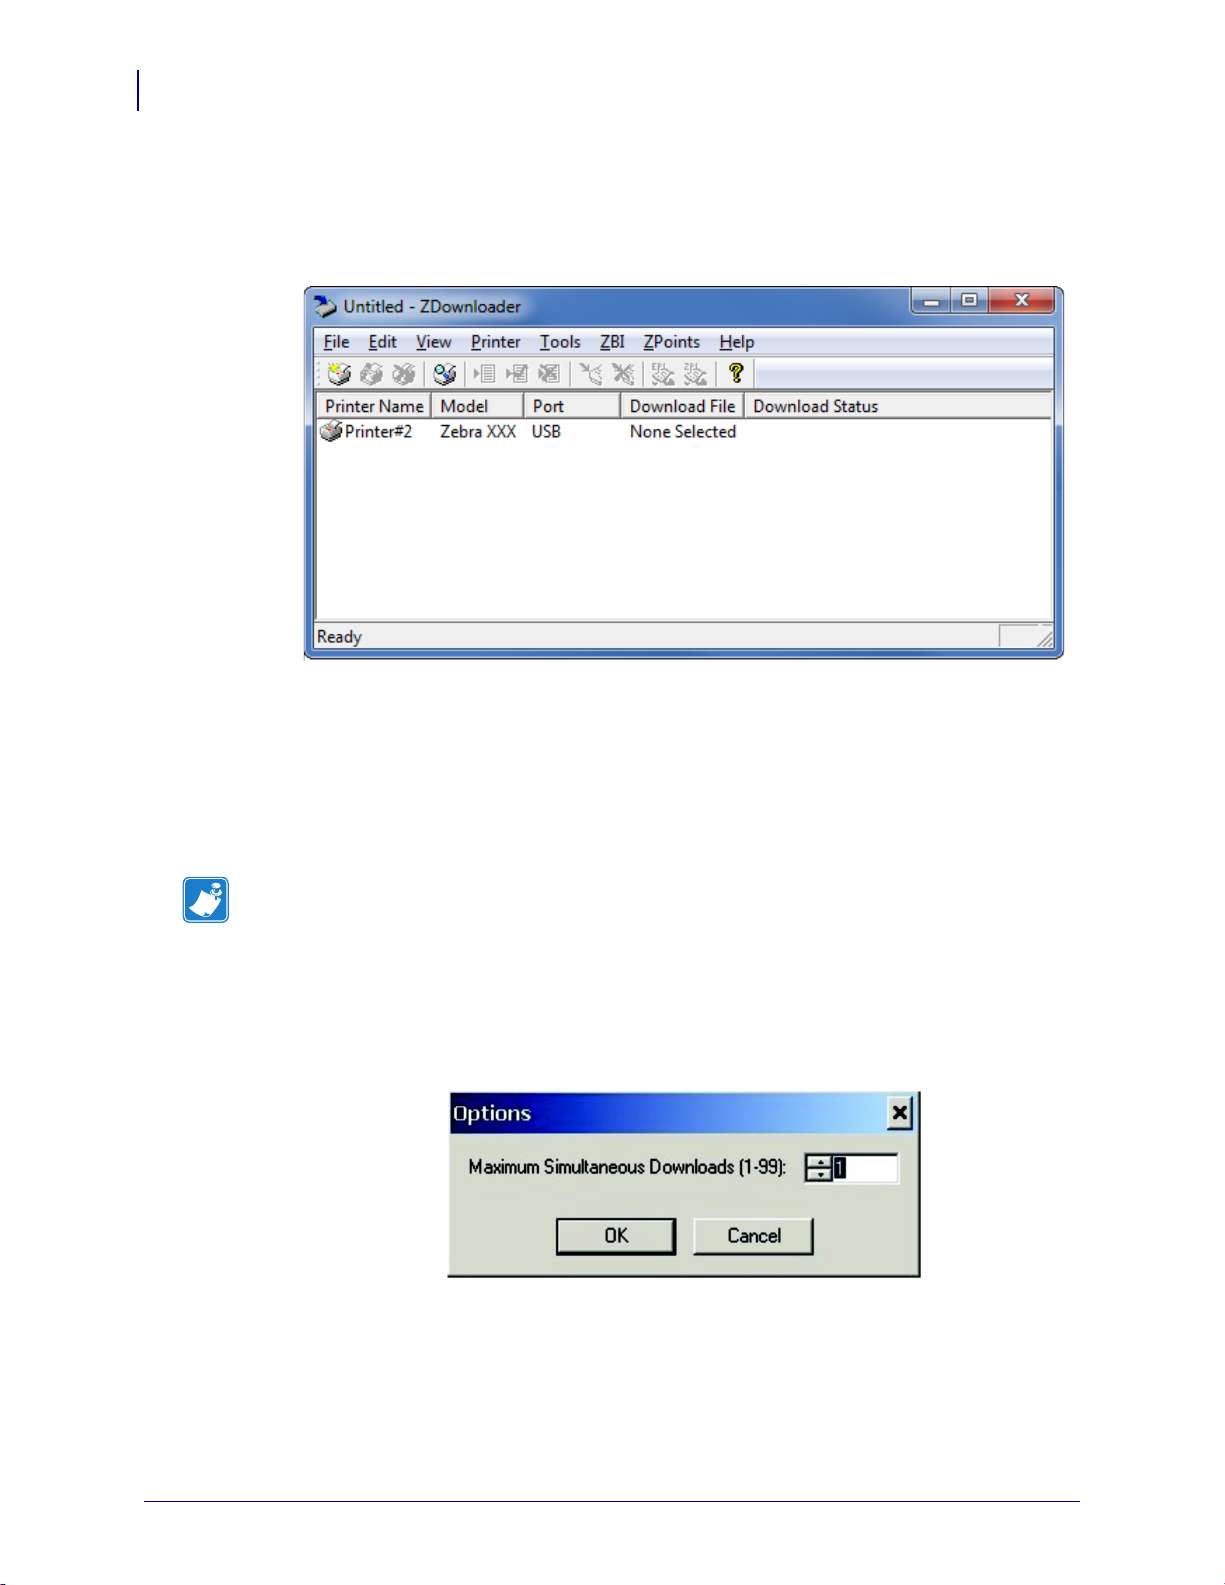
Downloading the Virtual Device App to Selected Printers
To download the Virtual Device-O app to your printer(s), you must select the file to
send to each printer. ZDownloader, by default, downloads files to one printer at a time.
If you have multiple printers to update and want to speed up the process, you can
increase the number of simultaneous downloads.
Note • More simultaneous downloads require more of your computer resources.
Some computers may slow down with simultaneous downloads or as more printers
are added for simultaneous downloading.
To allow simultaneous downloads, perform the following step:
1. Click Tools > Options….
The following prompt appears.
2. Raise the number shown to allow multiple simultaneous downloads.
3. Click OK.
P1059537-003 Virtual Device-O User Guide 8/28/18
Page 21

Getting Started
Downloading the Virtual Device-O Application
To download the Virtual Device app file to one or more printers, perform the
following steps:
1. Select the printers to which you want to download the Virtual Device-O app file. To
select multiple printers, hold down the Ctrl or Shift key, and then click on the
desired printers.
21
2. In the toolbar, select File > Select Firmware File….
OR
Right-click on one of the selected printers and select Select Firmware File….
3. Navigate to the Virtual Device app file that you acquired previously.
4. Click Open.
The file that you selected appears under Download File for the selected printers.
Printers that are present in the list but that do not have a file selected will be
ignored when Downloading starts.
8/28/18 Virtual Device-O User Guide P1059537-003
Page 22
Getting Started
22
Downloading the Virtual Device-O Application
5. Start the download process by doing one of the following:
• Select Printer > Download to Selected.
• Select the printer(s) of interest and select the Printer and then select
Download To Selected.
6. In the toolbar, select Printer > Download All.
OR
Right-click in the ZDownloader window and select Download All.
After downloading has begun, the progress of each printer will be shown in the
Download Status column.
Canceling a Download in Progress
The Cancel Download toolbar button and the Printer > Cancel Download menu
options become active when the files are downloading.
To cancel downloading to ALL printers in the list, perform the following step:
1. Click Printer > Cancel Download.
OR
Right-click in the ZDownloader window and select Cancel Download.
To cancel downloading to SPECIFIC printers in the list, perform the following step:
1. Select one or more printers with a download in progress.
2. Click Printer > Cancel Download.
OR
Right-click on a selected printer and select Cancel Download.
P1059537-003 Virtual Device-O User Guide 8/28/18
Page 23

Registering the Virtual Device
ZDownloader maintains a log file of all items downloaded to a Zebra printer along with
the printer serial number. You can register your Virtual Device installation with Zebra
Repair and Tech Support to ensure that a printer sent in for repair is returned with the
Virtual Device installed, and when engaging Zebra Tech Support, they will have
records of the item being loaded. To register your Virtual Device installation, you must
send the log file created by ZDownloader to the Zebra log file management group.
ZDownloader Log File
To send the log file, complete these steps:
1. Based on your operating system, navigate to the appropriate folder:
•Microsoft® Windows® XP
C:\Program Files\Common Files\FirmwareDownloader
• Microsoft Windows 7, Windows 8, and Windows 10
C:\ProgramData\Zebra Technologies\Firmware Downloader and
ZBI Key Manager
Getting Started
Registering the Virtual Device
23
2. Copy the log file (DownloadLog.txt), and email to Zdownloader@zebra.com.
If you are downloading from several computers, you need to send the log file from
each computer. If you download files to printers on one day and do not send the
file the same day, please note this in your email so that the log file management
group picks up the previous load detail. Otherwise, they only pick up the load data
for the day that the log file is sent.
8/28/18 Virtual Device-O User Guide P1059537-003
Page 24

Getting Started
24
Enabling the Virtual Device
Enabling the Virtual Device
You can enable Virtual Device-O by sending a Set/Get/Do (SGD) command to the
printer or by selecting the option through the printer’s menus.
Using an SGD Command
To enable Virtual Device-O on your printer, send the following command:
! U1 setvar "apl.enable" "apl-d"
To disable Virtual Devices on your printer and return to normal function, send the
following command:
! U1 setvar "apl.enable" "none"
You must restart the printer after changing the value of apl.enable. For more
information about this SGD command, see apl.enable on page 67.
Using the User Menus
This section includes instructions for the following printers:
• QLn420 Printers on page 25
• QLn320 and QLn220 Printers on page 28
• Supported ZTxxx and ZDxxx PRINTERS with a Display on page 31
If necessary, refer to the User Guide for your printer for additional information about
your printer’s control panel.
P1059537-003 Virtual Device-O User Guide 8/28/18
Page 25
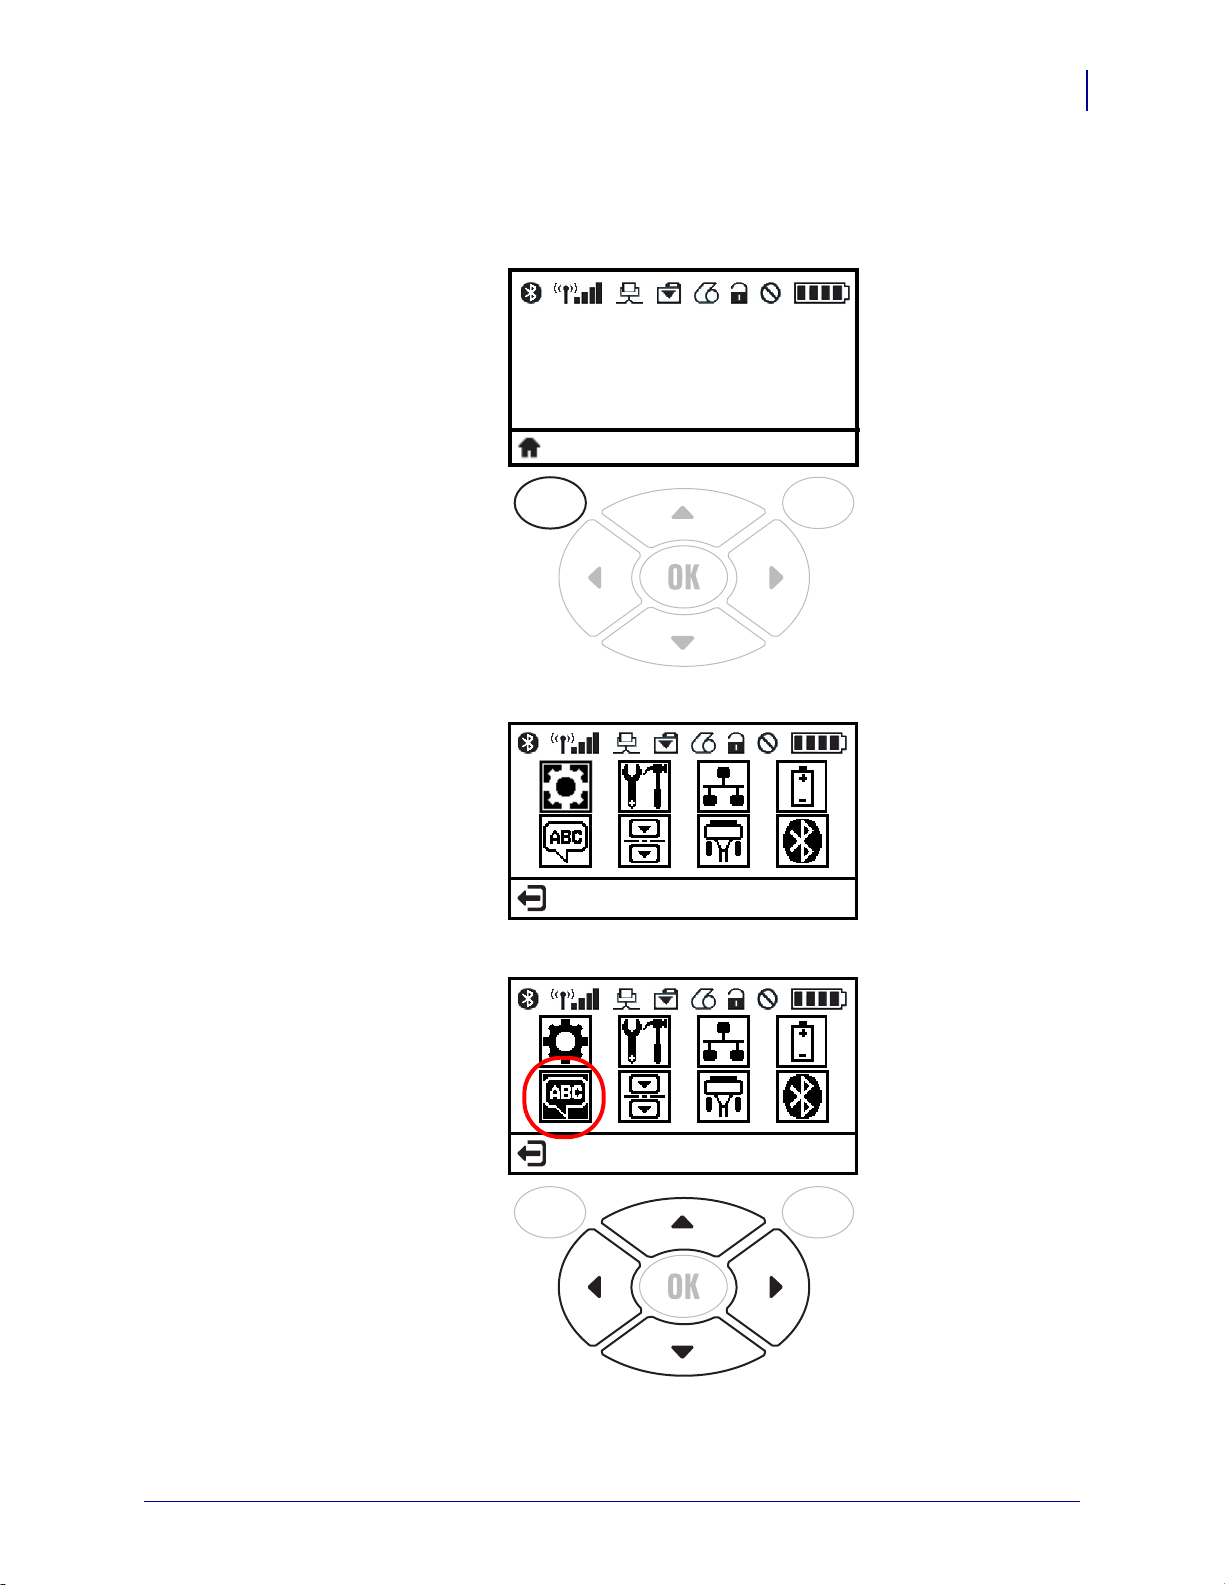
QLn420 Printers
PRINTER READY
VXXXXXXX
SETTINGS
LANGUAGE
1. From the printer’s idle display screen, press the LEFT SOFT KEY to select the
Home icon.
Getting Started
Enabling the Virtual Device
25
The printer displays the Home Menu.
2. Use the ARROWS to navigate to the LANGUAGE menu.
8/28/18 Virtual Device-O User Guide P1059537-003
Page 26

Getting Started
LANGUAGE
▼ ENGLISH ▲
VIRTUAL DEVICE
▼ NONE ▲
26
Enabling the Virtual Device
3. Press OK.
The printer displays the LANGUAGE selection screen.
4. Use the LEFT or RIGHT ARROW to navigate to the VIRTUAL DEVICE selection
screen.
P1059537-003 Virtual Device-O User Guide 8/28/18
Page 27

Enabling the Virtual Device
VIRTUAL DEVICE
▼ APL-D ▲
USE
5. Use the UP or DOWN ARROW to scroll to the APL-D option.
6. Press the RIGHT SOFT KEY to select USE.
Getting Started
27
The printer restarts and uses the Virtual Device that you selected.
8/28/18 Virtual Device-O User Guide P1059537-003
Page 28

Getting Started
Zebra QLn320
FW ver: XXXXXXXXXX
Baud Rate: 115200
Battery ok
IP Addr: 10.14.205.138
Menu
Communication Back
Settings Back
28
Enabling the Virtual Device
QLn320 and QLn220 Printers
1. From the printer’s idle display screen, press the LEFT SOFT KEY to select the
Home icon.
The printer displays the Home Menu.
2. Use the ARROWS to navigate to the SETTINGS menu.
P1059537-003 Virtual Device-O User Guide 8/28/18
Page 29

3. Press OK.
Virtual Dev: none ▲▼
Menu Use Back
Virtual Dev: apl‐d ▲? ▼
Menu Use Back
The printer displays the VIRTUAL DEVICE selection screen.
Getting Started
Enabling the Virtual Device
29
4. Press the RIGHT ARROW to highlight the up arrow on the display.
5. With the up arrow highlighted, press the OK button until you scroll to the APL-D
option.
8/28/18 Virtual Device-O User Guide P1059537-003
Page 30

Getting Started
30
Enabling the Virtual Device
6. Press the LEFT ARROW to highlight APL-D
7. Press OK to select USE.
The printer restarts and uses the Virtual Device that you selected.
P1059537-003 Virtual Device-O User Guide 8/28/18
Page 31

Supported ZTxxx and ZDxxx PRINTERS with a Display
PRINTER READY
VXXXXXXX
HOME MENU
SETTINGS
Note • The ZT230 control panel is shown in this procedure. The control panel for the
other printers is similar.
1. From the printer’s idle display screen, press the LEFT SELECT KEY to select the
Home icon.
Getting Started
Enabling the Virtual Device
31
The printer displays the Home Menu.
8/28/18 Virtual Device-O User Guide P1059537-003
Page 32

Getting Started
HOME MENU
SETTINGS
▼
LANGUAGE
ENGLISH
▲
32
Enabling the Virtual Device
2. Use the ARROWS to navigate to the LANGUAGE menu.
3. Press OK.
The printer displays the LANGUAGE selection screen.
P1059537-003 Virtual Device-O User Guide 8/28/18
Page 33

Getting Started
▼
VIRTUAL DEVICE
NONE
▲
▼
VIRTUAL DEVICE
APL-D
▲
USE
Enabling the Virtual Device
4. Use the LEFT or RIGHT ARROW to navigate to the VIRTUAL DEVICE selection
screen.
33
5. Use the UP or DOWN ARROW to scroll to the APL-D option.
8/28/18 Virtual Device-O User Guide P1059537-003
Page 34

Getting Started
▼
VIRTUAL DEVICE
APL-D
▲
USE
34
Enabling the Virtual Device
6. Press the RIGHT SOFT KEY or OK to select USE.
The printer restarts and uses the Virtual Device that you selected.
P1059537-003 Virtual Device-O User Guide 8/28/18
Page 35

Commands
This section provides a detailed listing of commands for use on your Zebra printer
with Virtual Device-O app.
Contents
Supported Commands . . . . . . . . . . . . . . . . . . . . . . . . . . . . . . . . . . . . . . . . . . . . . . . . . . . 37
Line Print Commands . . . . . . . . . . . . . . . . . . . . . . . . . . . . . . . . . . . . . . . . . . . . . . . . . 37
Easy Print Commands . . . . . . . . . . . . . . . . . . . . . . . . . . . . . . . . . . . . . . . . . . . . . . . . . 38
Query Commands . . . . . . . . . . . . . . . . . . . . . . . . . . . . . . . . . . . . . . . . . . . . . . . . . . . . 38
PK80 Commands. . . . . . . . . . . . . . . . . . . . . . . . . . . . . . . . . . . . . . . . . . . . . . . . . . . . . 39
MF8i Commands . . . . . . . . . . . . . . . . . . . . . . . . . . . . . . . . . . . . . . . . . . . . . . . . . . . . . 39
Line Print Commands. . . . . . . . . . . . . . . . . . . . . . . . . . . . . . . . . . . . . . . . . . . . . . . . . . . . 40
CR . . . . . . . . . . . . . . . . . . . . . . . . . . . . . . . . . . . . . . . . . . . . . . . . . . . . . . . . . . . . . . . . 40
ESC ! n. . . . . . . . . . . . . . . . . . . . . . . . . . . . . . . . . . . . . . . . . . . . . . . . . . . . . . . . . . . . . 40
ESC @ . . . . . . . . . . . . . . . . . . . . . . . . . . . . . . . . . . . . . . . . . . . . . . . . . . . . . . . . . . . . . 41
ESC A n . . . . . . . . . . . . . . . . . . . . . . . . . . . . . . . . . . . . . . . . . . . . . . . . . . . . . . . . . . . . 41
ESC B, ESC E . . . . . . . . . . . . . . . . . . . . . . . . . . . . . . . . . . . . . . . . . . . . . . . . . . . . . . . 42
ESC EZ . . . . . . . . . . . . . . . . . . . . . . . . . . . . . . . . . . . . . . . . . . . . . . . . . . . . . . . . . . . . 43
ESC Hn . . . . . . . . . . . . . . . . . . . . . . . . . . . . . . . . . . . . . . . . . . . . . . . . . . . . . . . . . . . . 43
ESC Q n1n2. . . . . . . . . . . . . . . . . . . . . . . . . . . . . . . . . . . . . . . . . . . . . . . . . . . . . . . . . 43
ESC R n . . . . . . . . . . . . . . . . . . . . . . . . . . . . . . . . . . . . . . . . . . . . . . . . . . . . . . . . . . . . 44
ESC V n1 n2 . . . . . . . . . . . . . . . . . . . . . . . . . . . . . . . . . . . . . . . . . . . . . . . . . . . . . . . . 45
ESC w n . . . . . . . . . . . . . . . . . . . . . . . . . . . . . . . . . . . . . . . . . . . . . . . . . . . . . . . . . . . . 46
FF. . . . . . . . . . . . . . . . . . . . . . . . . . . . . . . . . . . . . . . . . . . . . . . . . . . . . . . . . . . . . . . . . 47
LF. . . . . . . . . . . . . . . . . . . . . . . . . . . . . . . . . . . . . . . . . . . . . . . . . . . . . . . . . . . . . . . . . 47
SI . . . . . . . . . . . . . . . . . . . . . . . . . . . . . . . . . . . . . . . . . . . . . . . . . . . . . . . . . . . . . . . . . 47
SO . . . . . . . . . . . . . . . . . . . . . . . . . . . . . . . . . . . . . . . . . . . . . . . . . . . . . . . . . . . . . . . . 48
Easy Print Commands . . . . . . . . . . . . . . . . . . . . . . . . . . . . . . . . . . . . . . . . . . . . . . . . . . . 49
Ahead Command {AHEAD:nnn} . . . . . . . . . . . . . . . . . . . . . . . . . . . . . . . . . . . . . . . . . 49
Back Command {BACK:nnn} . . . . . . . . . . . . . . . . . . . . . . . . . . . . . . . . . . . . . . . . . . . . 49
Line Printer Mode {LP}. . . . . . . . . . . . . . . . . . . . . . . . . . . . . . . . . . . . . . . . . . . . . . . . . 49
8/28/18 Virtual Device-O User Guide P1059537-003
Page 36

36
Commands
Contents (Continued)
Print {Print...} . . . . . . . . . . . . . . . . . . . . . . . . . . . . . . . . . . . . . . . . . . . . . . . . . . . . . . . . 50
Status {S} . . . . . . . . . . . . . . . . . . . . . . . . . . . . . . . . . . . . . . . . . . . . . . . . . . . . . . . . . . . 54
Self Test Printout {TP} . . . . . . . . . . . . . . . . . . . . . . . . . . . . . . . . . . . . . . . . . . . . . . . . . 54
Limited Self Test Printout {TP1}. . . . . . . . . . . . . . . . . . . . . . . . . . . . . . . . . . . . . . . . . . 54
Query Commands . . . . . . . . . . . . . . . . . . . . . . . . . . . . . . . . . . . . . . . . . . . . . . . . . . . . . . 55
ESC {BT?} . . . . . . . . . . . . . . . . . . . . . . . . . . . . . . . . . . . . . . . . . . . . . . . . . . . . . . . . . . 55
ESC {CF?} . . . . . . . . . . . . . . . . . . . . . . . . . . . . . . . . . . . . . . . . . . . . . . . . . . . . . . . . . . 56
ESC {FM?} . . . . . . . . . . . . . . . . . . . . . . . . . . . . . . . . . . . . . . . . . . . . . . . . . . . . . . . . . . 58
ESC {FN?} . . . . . . . . . . . . . . . . . . . . . . . . . . . . . . . . . . . . . . . . . . . . . . . . . . . . . . . . . . 59
ESC {GR?}. . . . . . . . . . . . . . . . . . . . . . . . . . . . . . . . . . . . . . . . . . . . . . . . . . . . . . . . . . 60
ESC {MY?}. . . . . . . . . . . . . . . . . . . . . . . . . . . . . . . . . . . . . . . . . . . . . . . . . . . . . . . . . . 61
ESC {PH?} . . . . . . . . . . . . . . . . . . . . . . . . . . . . . . . . . . . . . . . . . . . . . . . . . . . . . . . . . . 62
ESC {RE!} . . . . . . . . . . . . . . . . . . . . . . . . . . . . . . . . . . . . . . . . . . . . . . . . . . . . . . . . . . 62
ESC {ST?} . . . . . . . . . . . . . . . . . . . . . . . . . . . . . . . . . . . . . . . . . . . . . . . . . . . . . . . . . . 63
ESC {VR?} . . . . . . . . . . . . . . . . . . . . . . . . . . . . . . . . . . . . . . . . . . . . . . . . . . . . . . . . . . 65
Query Command Override. . . . . . . . . . . . . . . . . . . . . . . . . . . . . . . . . . . . . . . . . . . . . . . . 66
Set/Get/Do (SGD) Commands. . . . . . . . . . . . . . . . . . . . . . . . . . . . . . . . . . . . . . . . . . . . . 67
P1059537-003 Virtual Device-O User Guide 8/28/18
Page 37

Commands
Supported Commands
Supported Commands
Line Print Commands
Table 1 • Supported Line Print Commands
Command Description Supported Comments/See Also
CAN Cancels a buffer line No N/A
CR Enters a carriage return Yes CR on page 40
37
ESC ! n Sets double-high or double-wide print
mode for one line
ESC @ Resets the printer Yes ESC @ on page 41
ESC A n Sets interline spacing Yes ESC A n on page 41
ESC B Begins acceptance of compressed
graphics
ESC C n Sets form length Yes Consumes, but does not
ESC E Ends acceptance of compressed
graphics
®
ESC EZ Goes to Easy Print
ESC Hn Increases the height of the font n times. Yes ESC Hn on page 43
ESC Q n1n2 Advances the specified distance from
the black mark
ESC R n Selects an international character set Yes ESC R n on page 44
ESC V n1 n2 Enters bitmapped graphics mode Yes ESC V n1 n2
ESC w n Selects a font Yes ESC w n on page 46
FF Form feed (goes to top of form) Yes FF on page 47
mode Yes ESC EZ on page 43
Yes ESC ! n on page 40
Yes ESC B, ESC E
on page 42
process
Yes ESC B, ESC E
on page 42
Yes ESC Q n1n2 on page 43
on page 45
LF Line feed (advances paper) Yes LF on page 47
SI Sets single-wide print mode Yes SI on page 47
SO Sets double-wide print mode Yes SO on page 48
8/28/18 Virtual Device-O User Guide P1059537-003
Page 38

Commands
38
Supported Commands
Easy Print Commands
Table 2 • Supported Easy Print Commands
Command Description Supported Comments/See Also
{AHEAD:nnn} Advances the paper Yes Ahead Command
{AHEAD:nnn}
on page 49
{BACK:nnn} Moves the paper back Yes Back Command
{BACK:nnn} on page 49
{IPL:0xAA55} Initial program load No Consumes, but does not
process
{LP} Line printer mode Yes Line Printer Mode {LP}
on page 49
{Print ...} Print Yes Print {Print...}
on page 50
{S} Status Yes Status {S} on page 54
{TP} Prints self-test results Yes Self Test Printout {TP}
on page 54
{TP1} Prints limited self-test results Yes Limited Self Test
Printout {TP1}
on page 54
Query Commands
Table 3 • Supported Query Commands
Command Description Supported Comments/See Also
ESC {BT?} Returns battery voltage and temperature Yes ESC {BT?} on page 55
ESC {CF?} Returns information about configurable
options
ESC {CN!} Cancels demand printing No Consumes, but does not
ESC {DQ?} Returns remaining quantity of images No Consumes, but does not
Yes ESC {CF?} on page 56
process
process
ESC {FM?} Returns a list of all formats currently
saved to the printer
ESC {FN?} Returns a list of all available fonts Yes ESC {FN?} on page 59
ESC {GR?} Returns a list of all graphics currently
saved to the printer
ESC {MR?} Returns the magnetic card reader
configuration
P1059537-003 Virtual Device-O User Guide 8/28/18
Yes ESC {FM?} on page 58
Yes ESC {GR?} on page 60
No Consumes, but does not
process
Page 39

Commands
Supported Commands
Table 3 • Supported Query Commands (Continued)
Command Description Supported Comments/See Also
39
ESC {MY?} Returns the amount of memory
available, used, and remaining
ESC {PH?} Returns information about the printhead Yes ESC {PH?} on page 62
ESC {RE!} Resets the printer Yes ESC {RE!} on page 62
ESC {RS?} Returns data read for a swiped magnetic
card
ESC {ST?} Returns information about the printer’s
status
ESC {VR?} Returns the version number of the
firmware, boot block, and downloaded
files
Yes ESC {MY?} on page 61
No Consumes, but does not
process
Yes ESC {ST?} on page 63
Yes ESC {VR?} on page 65
PK80 Commands
Table 4 • Supported PK80 Commands
Command Description
DC2 (0x12) Sets the pica pitch mode and cancels the double-wide, emphasized, and
condensed modes.
DC4 (0x14)
SO (0x0E)
SI (0x0F)
Cancels the double-wide mode set by SO.
Sets double-wide mode (if not in condensed mode) for one line only and cancels
the condensed mode (if not in condensed mode).
Sets condensed mode (if not in double-wide mode) and cancels the double-wide
mode (if in double-wide mode).
Esc! (0x00) Enables 10 cpi
Esc! (0x01) Enables 12 cpi
MF8i Commands
Table 5 • Supported MF8i Commands
Command Description
Esc W1 Double-wide printing on
Esc W0
Esc e
Esc :
8/28/18 Virtual Device-O User Guide P1059537-003
Double-wide printing off
End print job status report
Set Elite pitch (12 cpi)
Page 40

Commands
40
Line Print Commands
Line Print Commands
CR
Description Carriage Return
ESC ! n
Syntax
Notes
command prints the line and advances the paper. Both commands are available for
the convenience of programmers who may be used to using one or the other. To print
and advance a number of lines, use that number of CR commands, LF commands, or
a combination of the two.
Description Sets double-high and double-wide print mode for one line.
Syntax
CR
ASCII equivalent CR
Decimal equivalent 13
Hex equivalent 0D
Like the Line Feed command (see LF on page 47), the Carriage Return
<ESC>!n
ASCII equivalent ESC ! n
Decimal equivalent 27 33 n
Hex equivalent 1B 21 n
Range Set the value for n as described below:
n =
10h 16d Double High
20h 32d Double Wide
30h 48d Double High and Double
Description
Wide
Notes Changes the font height, font width, or both to double the size for one line.
This command applies to the entire line.
P1059537-003 Virtual Device-O User Guide 8/28/18
Page 41

ESC @
Description Resets the printer
Commands
Line Print Commands
41
ESC A n
Syntax
Default 20.4 cpi font (n = 33 decimal, 21 hexadecimal)
Range 21–26 hex
<ESC>@
ASCII equivalent ESC @
Decimal equivalent 27 64
Hex equivalent 1B 40
Notes Resets the printer to defaults.
Description Sets the interline spacing
Syntax
<ESC>An
ASCII equivalent ESC A n
Decimal equivalent 27 65 n
Hex equivalent 1B 41 n
Default n = 0
Range 1–155
Notes In the command syntax, n (an 8-bit binary number) represents the number of
blank dot lines fed between character lines. After the completion of the current line,
the n blank lines are added before the next line begins printing.
8/28/18 Virtual Device-O User Guide P1059537-003
Page 42

Commands
42
Line Print Commands
ESC B, ESC E
Description Accepts (ESC B) or ends acceptance of (ESC E) compressed graphics
Syntax
<ESC>B
ASCII equivalent ESC B
Decimal equivalent 27 66
Hex equivalent 1B 42
Syntax <ESC>E
ASCII equivalent ESC E
Decimal equivalent 27 69
Hex equivalent 1B 45
Notes
The printer accepts compressed graphics data, which is then uncompressed
and printed.
After you send the command to accept graphics data (ESC B), each dotline must
begin with one of the following letters:
U = uncompressed dotline
G = compressed dotline (using a run-length encoding scheme)
Compressed graphics mode requires a graphic image the same width as the
printhead in use.
A = advance the specified number of dotlines
An A followed by a single byte count indicates the number of dotlines to
advance.
When all data has been sent, the final bytes must be ESC E to end acceptance of
compressed graphics data.
This command uses the SGD “apl.o.graphics_byte_width” to specify the byte width of
the graphic. The default value for this setting is the width of the printhead.
Printhead Width Dots Across Bytes Across Dots Per Inch
2 in. 384 48 203
3 in. 576 72 203
4 in. 832 104 203
P1059537-003 Virtual Device-O User Guide 8/28/18
Page 43

ESC EZ
Description Goes to Easy Print mode.
Commands
Line Print Commands
43
ESC Hn
Syntax
Notes
Description Increases the height of the font n times.
Syntax
Notes
applies to the entire line.
<ESC>EZ
ASCII equivalent ESC E Z
Decimal equivalent 27 69 90
Hex equivalent 1B 45 5A
Places the printer in Easy Print mode. (You must use uppercase letters.)
<ESC>Hn
ASCII equivalent ESC H n
Decimal equivalent 27 72 n
Hex equivalent 1B 48 n
Multiply the height of the font by the number specified by n. This command
ESC Q n1n2
Description Advances the specified distance from the black mark
Syntax
Notes Advance the paper n1n2 dot lines from the black mark (Q mark).
<ESC>Q n1 n2
ASCII equivalent ESC H n1n2
Decimal equivalent 27 81 n1n2
Hex equivalent 1B 51 n1n2
8/28/18 Virtual Device-O User Guide P1059537-003
Page 44

Commands
44
Line Print Commands
ESC R n
Description Selects an International character set.
Syntax
<ESC>Rn
ASCII equivalent ESC R n
Decimal equivalent 27 82 n
Hex equivalent 1B 52 n
Notes
Set the value for n as described below:
n
Country
0 USA
1 France
2 Germany
3 UK
4 Denmark
5 Sweden
6 Italy
7 Spain
P1059537-003 Virtual Device-O User Guide 8/28/18
Page 45

ESC V n1 n2
Description Enters bitmapped graphics mode.
Commands
Line Print Commands
45
Syntax
<ESC>V n1n2
ASCII equivalent ESC V n1n2
Decimal equivalent 24 86 n1n2
Hex equivalent 1B 56 n1n2
Notes
In the command syntax, the next (n1 * 254 + n2) dot lines are printed as
bitmapped graphics. The command is used to print user-generated bitmaps across
the width of the printhead. After receipt of this command, the printer dumps the binary
data supplied directly to the printhead. A bit set to 1 means the dot is on, and a bit set
to 0 means the dot is off.
Graphics printed using this command must be the exact width of the printhead in bits.
Bit 7 of the first byte of data received prints at the left-most dot on the printhead as you
view the printhead with the paper feeding away from you. The printer remains in
bitmapped graphics mode until the number of bytes necessary to fill the specified
number of lines of print have been received by the printer.
This command uses the SGD command apl.o.graphics_byte_width to specify
the byte width of the graphic. The default value for this setting is the width of the
printhead.
Printhead Width Dots Across Bytes Across Dots Per Inch
2 in. 384 48 203
3 in. 576 72 203
4 in. 832 104 203
8/28/18 Virtual Device-O User Guide P1059537-003
Page 46

Commands
46
Line Print Commands
ESC w n
Description Selects a font
Syntax
<ESC>wn
ASCII equivalent ESC w n
Decimal equivalent 27 119 n
Hex equivalent 1B 77 n
Default MF204, a 20.4 cpi font (n = 33 decimal or 21 hexadecimal)
Notes Selects a font (see Table 6), given n, a binary eight-bit number. The first three
fonts in the table are permanent fonts. The next four may be removed.
Table 6 • Line Printer Mode Fonts
Name
Font
Characters/
Inch
ASCII Dec Hex
Dots
Wide
Dots
High
Description
MF055 5.5 # 3523373996 chars large block
MF072 7.2 ” 3422283196 chars large block
MF102 10.2 (space
)
32 20 20 26 223 chars medium block
bold
charac
ter
MF107 10.7 & 38 26 19 26 96 chars large block bold
MF185 18.5 $ 36 24 11 24 96 chars large block
MF204 20.4 ! 33 21 10 24 224 chars block normal
MF226 22.6 % 37 25 9 24 97 chars small block
IM5X7 22.1 ? 63 3F 5 7 96 chars impact 5×7
IM5X8 22.1 @ 64 40 5 8 96 chars impact 5×8
Note: For more specific information about fonts, see Table 7, Supported Fonts on page 70.
P1059537-003 Virtual Device-O User Guide 8/28/18
Page 47

FF
Description Form feed (goes to top of form)
Commands
Line Print Commands
47
LF
Syntax
Notes
Description Line feed (advances paper)
Syntax
Notes
command prints the line and advances the paper. Both commands are available for
the convenience of programmers who may be used to using one or the other. To print
and advance a number of lines, use that number of CR commands, LF commands, or
a combination of the two.
FF
ASCII equivalent FF
Decimal equivalent 12
Hex equivalent 0C
Prints the line and advances the paper to top of the next form.
LF
ASCII equivalent FF
Decimal equivalent 10
Hex equivalent 0A
Like the Carriage Return command (see CR on page 40), the Line feed
SI
Description Sets single-wide print mode
Syntax
Notes
printing) command.
8/28/18 Virtual Device-O User Guide P1059537-003
SI
ASCII equivalent SI
Decimal equivalent 15
Hex equivalent OF
Prints the current font in single width. Effectively cancels an SO (double-wide
Page 48

Commands
48
Line Print Commands
SO
Description Sets double-wide print mode
Syntax
Notes
command or a Carriage Return (CR) is received to cancel it.
SO
ASCII equivalent SO
Decimal equivalent 14
Hex equivalent OE
Prints the current font in double width until an SI (single-wide printing mode)
P1059537-003 Virtual Device-O User Guide 8/28/18
Page 49

Easy Print Commands
Easy Print commands have a unique syntax. The left bracket begins the command
set, followed by the command. The right bracket ends the command set.
Example • For the Easy Print command {Ahead:nnn}, enter the following:
{
AHEAD:nnn
}
Ahead Command {AHEAD:nnn}
Description AHEAD:nnn or Ahead:nnn or A:nnn advances the paper by nnn
dotlines. The Ahead command is an alternative to manually advancing the paper.
Commands
Easy Print Commands
49
Syntax
Range 1–65,000
{AHEAD:nnn}
Notes The command must be enclosed in left and right brackets.
Back Command {BACK:nnn}
Description BACK:nnn or Back:nnn or B:nnn backs up the paper by nnn dotlines.
The Back command repositions the edge of the paper for minimum paper waste.
Syntax
Range 1–200
{BACK:nnn}
Notes The command must be enclosed in left and right brackets.
Line Printer Mode {LP}
Description LP places the printer in Line Printer mode.
Syntax
{LP}
Notes
8/28/18 Virtual Device-O User Guide P1059537-003
The command must be enclosed in left and right brackets. {LP} is not a Line
Printer Mode command. Execute this command only from the Easy Print Mode. If
you execute this command from within Line Printer Mode by mistake, your label or
receipt will include “{LP}” on it.
Page 50

Commands
50
Easy Print Commands
Print {Print...}
Description “Print...” initiates a limited self-test printout that includes all possible
printer actions to stop the paper or rotate an image, all possible print images, and all
possible options used to alter those images.
Syntax
{Print,Global Options:@row,column:Name,Field
Options|data|}
Parameter Definition
{ A left bracket begins the command set.
Print, Include a comma after the Print command if there are one or
more global options. If there are no global options, follow the
Print command with a colon.
Global
Options:
@row,column: @row,column: specifies the row and column where the text or
Name, Include the name of the text, barcode, line, or graphic to be
See Names on page 52. If more than one global option is
used, separate them with commas. Follow the last global
option with a colon.
graphic image will appear. Separate the row and column
numbers with a comma (no spaces after the @ symbol or
around the comma).
The range for the rows is 1-65,000. In a typical print request,
there may be five or more @row,column parameters for a
single word Print.
printed. The name must always be five characters (no spaces),
including graphics that you name yourself. See Names
on page 52 for more information.
Field Options See Field Options on page 53. Specify the field options that will
be used to increase the size of fonts, barcodes, graphics, or
lines. If more than one field option is used, separate them with
commas.
|Data| Specify the data to be printed or turned into a barcode.
Surround the data with vertical bars.
} A right bracket ends the command set.
Notes
• The command must be enclosed in left and right brackets.
• You can use a single print command for multiple print lines (called a print
request). This means that you do not have to repeat the word “Print” every
time you want to print another line of text.
P1059537-003 Virtual Device-O User Guide 8/28/18
Page 51

Print {Print...} (continued)
Global Options
AHEADnnn
nnn = 1–65,000
Advances the paper the specified number of dotlines before printing.
BACKnnn
nnn = 1–200
Backs up the paper the specified number of dotlines before printing.
QSTOPnnn
nnn = a number from 1–65,000
Stops printing nnn dotlines after sensing a black mark. The printer stops even if it
has not completed the label or receipt image that it was printing.
ROTn
n = 0, 90, 180, 270
Rotates the printed image in 90-degree increments.
Commands
Easy Print Commands
51
STOPnnn
nnn = a number from 1–65,000
Stops printing nnn dotlines after beginning printing a label or receipt image.
8/28/18 Virtual Device-O User Guide P1059537-003
Page 52

Commands
52
Easy Print Commands
Print {Print...} (continued)
Names
Fonts Fonts and their 5-character names are listed in Table 7 on page 70.
Barcodes
Barcode 5-Character Name
Codabar COBAR
Code 39 (2:1 ratio) BC39N
Code 39 (3:1 ratio) BC39W
Code 93 BC093
Code 128 BC128
EAN-8 EAN08
EAN-13 EAN13
Interleaved 2 of 5 (ratio 2.5 to 1) BC125
Interleaved 2 of 5 (ratio 2 to 1) I2OF5
MSI/Plessey PLESY
UCC/EAN-128 EN128
UPC-A UPC-A
UPC-E UPC-E
PDF417 PD417
Aztec AZTEC
QR QR_BC
Lines To draw a line, specify the type of line, the line length, and the line thickness
using the parameters below. Follow the line specifications with a single vertical bar,
such as
{PRINT: @50,20:HLINE,length 250,thick 2|}
HLINE or H
Draws a horizontal line.
VLINE or V
Draws a vertical line.
lengthnnn or Lnnn
Sets the line length to nnn dots
thickn or Tn
Sets the line thickness to n dots.
P1059537-003 Virtual Device-O User Guide 8/28/18
Page 53

Print {Print...} (continued)
Field Options
HMULTn or HMn
n = 1–255
Enlarges text or graphics n times horizontally.
VMULTn or Vn
n = 1–255
Enlarges text or graphics n times vertically.
HIGHn or Hn
n = 1–255
Changes the height of a barcode in 5 dot intervals. Default is 5 dots.
WIDEn or Wn
n = 1–255
Multiplies the width of a barcode by n. Default is 1.
Commands
Easy Print Commands
53
8/28/18 Virtual Device-O User Guide P1059537-003
Page 54

Commands
54
Easy Print Commands
Status {S}
Description S returns a fixed status string, which includes paper status, head latch
status, and power status.
Syntax
Reply Syntax {U:1234;x;y;z;RDY}
{S}
where x = paper status (P for paper, N for no paper)
y = head latch (D for closed, U for open)
z = power status (O for Ok, V for voltage error)
Notes The command must be enclosed in left and right brackets.
Self Test Printout {TP}
Description TP initiates a self-test printout.
Syntax
Notes
{TP}
The command must be enclosed in left and right brackets.
Limited Self Test Printout {TP1}
Description TP1 initiates a limited self-test printout. (Prints the same output as the
{TP}, which is a two-key report.)
Syntax
Notes
{TP1}
The command must be enclosed in left and right brackets.
P1059537-003 Virtual Device-O User Guide 8/28/18
Page 55

Query Commands
Query commands take the format ESC {Query?} where Query is replaced with a
specific command.
ESC {BT?}
Description A BATTERY query returns the current battery voltage and temperature.
Commands
Query Commands
55
Query Syntax
Reply Syntax {BT!V:x;T:x,CH:x}
Example •
{BT!V:6.8;T:+25.8C,CH:C}
BT! This reply is to a BATTERY query.
V:6.8 The current battery voltage is 6.8 Volts.
T:+26.0C Battery temperature is 26.0 C.
CH:C Complete charge.
Parameter
V = voltage n.n Volts
T =
temperature
CH = charge C Complete
ESC{BT?}
Reply
±nn.nC Current temperature of the battery.
F Fast Charge
I Initialization
N No Charge
Definition
T Trickle Charge
W Wait to restart
SB00...SBnn
= Reserved
8/28/18 Virtual Device-O User Guide P1059537-003
TBD Future option
Page 56

Commands
56
Query Commands
ESC {CF?}
Description A CONFIGURATION query returns information about configurable
options.
Query Syntax
ESC{CF?}
Reply Syntax {CF!L:x;B:x;P:x;N:x;H:x;D:x;Y:x;S:x;T:x}
Example •
{CF!L:LP;B:096;P:N;N:8;H:B;D:+10%;Y:1;S:Y;T:0060}
CF! This reply is to a CONFIGURATION query.
L:LP Default mode = Line Printer mode.
B:096 Baud rate = 9600.
P:N No parity.
N:8 8 data bits.
H:B Hardware and software handshaking are enabled.
D:+10% Darkness (burn time) = +10%
Y:1 Paper = single ply
S:Y Sound = on
T:0060 Timeout = 60 seconds
Parameter
L = default
mode
Reply
LP Line Printer
EZ Easy Print (EZ)
Definition
B = baud rate 012, 024,
1200, 2400, 4800, 9600, 19200, or 38400
048, 096,
192,384
P = parity N None
E Even
O Odd
N = number of
7, 8 7 or 8 data bits
data bits
H =
handshaking
N None
H Hardware
S Software
B Both
D = darkness –25% to
+35%
–25%, –20%, –15%, –10%, –05%, 0%, +5%,
+10%, +15%, 20%, +25%, +30%, +35%
D Down
Y = ply of
paper
1 Single ply
2 Double ply
P1059537-003 Virtual Device-O User Guide 8/28/18
Page 57

Commands
Query Commands
57
Parameter
S = beeper
(sound)
T = timeout
value in
seconds
Reply
Definition
Y Yes
N No
nnnn 9999 = no timeout/always on
8/28/18 Virtual Device-O User Guide P1059537-003
Page 58

Commands
58
Query Commands
ESC {FM?}
Description A FORMAT query returns a list of the formats currently saved to the
printer. Within a complete format definition, the query parameters are separated from
each other by commas. Different formats are separated by a semicolon, carriage
return, and line feed (; <CR> <LF>).
Query Syntax
ESC{FM?}
Reply Syntax {FM!N5:x,L:x,UV:x,UD:x,US:x}
Example •
{FM!N5:LABEL,L:D,UV:1,UD:06/19/06,US:SHIPPING LABEL1}
FM! This reply is to a FORMAT query.
N5:LABEL The format’s five-character name is LABEL.
L:D This is a downloaded format.
UV:1 The user version is 1.
UD:06/19/06 The user date is 06/19/06.
US:SHIPPING
The user descriptive summary is SHIPPING LABEL1.
LABEL1
Parameter Reply Definition
N5 xxxxx Five-character format name
L R =
Location
Resident
D =
Downloaded
UV x User version number
UD mm/dd/yy User date (month/day/year)
US x...x
User description of format
(20 chars)
P1059537-003 Virtual Device-O User Guide 8/28/18
Page 59

ESC {FN?}
Description A FONT query returns a list of the available fonts (permanent and
downloaded). Within a complete font definition, the query parameters are separated
from each other by commas. Different fonts are separated by a semicolon, carriage
return, and line feed (; <CR> <LF>).
Commands
Query Commands
59
Query Syntax
ESC{FN?}
Reply Syntax {FN!N5:x,N1:x,L:x,UV:x,UD:x,US:x,CPI:x}
Example •
{FN!N5:MF107,N1:&(26),L:R,UV:1,UD:04/02/06,
US:96CHARS BLOCKBOLD,CPI:10.7;
N5:MF204,N1:!(21),L:D,UV:1,UD:04/02/06,
US:224 CHR BLOCK NORMAL,CPI:20.4}
FN! This reply is to a FONT query.
N5:MF107 The first font has the name MF107.
N1:&(26) The one-character name is &, which is 26 in hexadecimal.
L:R The first font is a resident font.
UV:1 The user version is 1.
UD:04/02/06 The user date is 04/02/06.
US:96CHARS
The font is a 96-character block bold font.
BLOCKBOLD
CPI:10.7 The font has 10.7 characters per inch.
N5:MF204 The next font begins and is read similarly.
Parameter
Reply
Definition
N5 xxxxx Five-character font name
N1 x(nn) One-character name followed by the
hexadecimal value.
L R =
Location
Resident
D =
Downloaded
UV x User version number
UD mm/dd/yy User date (month/day/year)
US x...x
User description of font
(20 chars)
CPI nn.n Number of font characters per inch
8/28/18 Virtual Device-O User Guide P1059537-003
Page 60

Commands
60
Query Commands
ESC {GR?}
Description A GRAPHICS query returns a list of the graphics that are currently
downloaded to the printer. Within a complete graphic definition, the query parameters
are separated from each other by commas. Different graphics are separated by a
semicolon, carriage return, and line feed (; <CR> <LF>).
Query Syntax
ESC{GR?}
Reply Syntax {GR!N5:x;N1:x,L:x,UV:x,UD:x,US:x}
Example •
{GR!N5:LOGO1,N1:z(7A),L:D,UV:1,UD:06/19/96,US:LOGO}
GR! This reply is to a GRAPHICS query.
N5:LOGO1 The graphic has the five-character name, LOGO1.
N1:z(7A) The one-character name is z, which is 7A in hexadecimal.
L:D This graphic was downloaded.
UV:1 The user version is 1.
UD:06/19/06 The user date is 06/19/06.
US:LOGO The user descriptive summary is LOGO.
Parameter
Reply
Definition
N5 xxxxx Five-character graphic name
N1 x(nn) One-character name followed by the
hexadecimal value.
L R =
Location
Resident
D =
Downloaded
UV x User version number
UD mm/dd/yy User date (month/day/year)
US x...x
User description of graphic
(20 chars)
P1059537-003 Virtual Device-O User Guide 8/28/18
Page 61

ESC {MY?}
Description A MEMORY query returns the size of all memory available in the printer,
including the amount used and the amount remaining for the application.
Commands
Query Commands
61
Query Syntax
ESC{MY?}
Reply Syntax {MY!FS:x;FM:x;RS:x;DT:x;DR:x}
Example •
{MY!FS:64M;FM:AMD;RS:8M;DT:065536;DR:063952}
MY! This reply is to a MEMORY query.
FS:64M The printer contains a 64 MB Flash memory.
FM:AMD Flash manufacturer: response is always AMD.
RS:8M RAM Size = 8M
DT:065536 Total Flash area available for download is 65,536 kilobytes.
DR:063952 Download Flash memory remaining.
Parameter Reply Definition
FS nM Flash size: n = size of the flash memory in
megabytes
FM AMD Flash manufacturer
RS nM Ram size: n = size of the RAM in megabytes
DT nnnnnn Download total area: nnnnnn = size of Flash
memory in kilobytes
DR nnnnnn Download Flash remaining: nnnnnn = size of
the Flash memory that is free in kilobytes
8/28/18 Virtual Device-O User Guide P1059537-003
Page 62

Commands
62
Query Commands
ESC {PH?}
Description A PRINTHEAD query returns information about the printhead used in
the printer.
Query Syntax
Reply Syntax {PH!TD:x;DD:x;M:x;T:x}
Example •
{PH!TD:0384;DD:203;M:LPT3245;T:+31.0C}
PH! This is a reply to a PRINTHEAD query.
TD:0384 The print distance across the printhead is 384 dots.
DD:203 The dot density of the printhead is 203 dots per inch.
M:LPT3245 Response is always LPT3245.
T:+31.0C The current printhead temperature is +31.0 C.
Parameter
TD nnnn Total number of dots across the printhead.
DD nnn Density of the printhead (dots per inch).
M x...x
T +nn.nC Current temperature of the printhead.
ESC{PH?}
Reply
(variable
width)
Definition
Response is always LPT3245.
ESC {RE!}
Description This command resets the printer.
Syntax
Reply Syntax ESC{RE!}
P1059537-003 Virtual Device-O User Guide 8/28/18
ESC{RE!}
Page 63

ESC {ST?}
Description A STATUS query shows whether the next print request can be done or
returns information about errors from the previous print request.
Commands
Query Commands
63
Query Syntax
ESC{ST?}
Reply Syntax {ST!E:x;L:x;P:x;R:x;B:x;H:x}
Example •
{ST!E:N;L:D;P:P;R:62;B:O;H:O}
ST! This reply is to a STATUS query.
E:N No errors were found.
L: The printhead is latched, ready to print.
P:P Media is present.
R:58 58K remains in the input buffer.
B:O Battery voltage and temperature are acceptable.
H:O The printhead temperature is acceptable.
Parameter
Reply
Definition
E = Error N No error *
c Command error (invalid command)
d Data error (such as a letter in a numeric-only
barcode)
f Font not available
g Global parameter error
o Overrun of buffer *
p Field parameter error
q Black mark not found *
r Row/column error
s Syntax error
L = Lever U Up
D Down
P = Paper P Present
N Not present
R = RAM nn Buffer size remaining in kilobytes
B = Battery
condition
O Okay
T Out of temperature range
V Out of voltage range
* Rows marked with an asterisk apply to both Easy Print and Line Printer modes.
Rows without an asterisk apply only to Easy Print mode.
8/28/18 Virtual Device-O User Guide P1059537-003
Page 64

Commands
64
Query Commands
Parameter
H = Printhead
temperature
* Rows marked with an asterisk apply to both Easy Print and Line Printer modes.
Rows without an asterisk apply only to Easy Print mode.
Reply
O Okay
T Out of range
Definition
P1059537-003 Virtual Device-O User Guide 8/28/18
Page 65

ESC {VR?}
Description A VERSION query returns the firmware, boot code, and download file
versions.
Commands
Query Commands
65
Query Syntax
ESC{VR?}
Reply Syntax {VR!F:x;C:x;B:x;D:x;H:x}
Example • {VR!F:6.65;C:5.40:B:5.10;D:1.3;H:5.08}
VR! This reply is to a VERSION query.
F:6.65 Firmware version: response is always 6.65.
C:5.40 Communication controller version: response is always
5.40
B:5.10 Boot code version: response is always 5.10.
D:1.3 Download file version: response is always 1.3.
H:5.08 Response is always 5.08.
Parameter
Reply
Definition
F n.nn Firmware version
C n.nn Communication controller version
B n.nn Boot code version
D n.n Download (fonts, graphics, formats) version
H n.nn Response is always 5.08
8/28/18 Virtual Device-O User Guide P1059537-003
Page 66

Commands
66
Query Commands
Query Command Override
The query override command can be used to change the printer’s response to an
existing query or to have the printer respond to a new query. Note that, while the
definition of the new response is arbitrary, the same value is sent each time the
command is received. It is possible, though unlikely, that an application may require a
variable response to a query command in order to function properly. If so, a
modification to the printer firmware would be needed in that case.
Format:
Where:
Example • Paragraph tag x1_Example brings up the singular word.
Esc {ZQO?} “{command?}” “{response}”
Esc = 1B hex
{ZQO?} = Command to create a new query/response
“{command}” = the command to be overridden, such as QST, {QST}
“{response}” = the response to send in response to the above query, such as
{QST:JB:1234}
Esc {ZQO?} “{MD}” “{01/15/2008}”
Instructs the printer to respond as follows to the MD query: {01/15/2008}.
Query override commands can be saved in an autoexec.bat or config.sys file.
P1059537-003 Virtual Device-O User Guide 8/28/18
Page 67

Set/Get/Do (SGD) Commands
The following SGD commands were added for use with your Virtual Device app. For
more detailed information on SGD commands, see the Programming Guide for
®
ZPL II
Guide).
apl.enable
Description This command enables or disables a Virtual Device app.
Note •
• ZPL and CPCL may not function normally when a Virtual Device app is enabled.
• You must restart the printer after changing the value of apl.enable.
Type setvar
Commands Details
, ZBI 2, Set/Get/Do, Mirror, and WML (formerly the ZPL II Programming
Commands
Set/Get/Do (SGD) Commands
67
setvar
apl.version
This command instructs the printer to set the RFID valid counter to zero.
Format: ! U1 setvar "apl.enable" "value"
Values:
"apl-o" = enable Virtual Device O
"none" = disable any Virtual Device app (ZPL and CPCL function normally)
Example 1 • This example shows how to enable the Virtual Device-O app:
! U1 setvar "apl.enable" "apl-o"
Example 2 • This example shows how to disable the Virtual Device-O app:
! U1 setvar "apl.enable" "none"
Description This command returns the version of the currently running Virtual
Device app.
Type getvar
Commands Details
getvar Format: ! U1 getvar "apl.version"
8/28/18 Virtual Device-O User Guide P1059537-003
Page 68

Commands
68
Set/Get/Do (SGD) Commands
apl.framework_version
Description This command returns the level of support for Virtual Devices in the
printer operating system.
Type getvar
Commands Details
getvar Format: ! U1 getvar "apl.framework_version"
apl.o.graphics_byte_width
Description This command specifies the byte width of a graphic. The default value
for this setting is the width of the printhead.
Printhead Width Dots Across Bytes Across Dots Per Inch
2 in. 384 48 203
3 in. 576 72 203
4 in. 832 104 203
Type setvar
Commands Details
setvar Format: ! U1 setvar "apl.o.graphics_byte_width" "value"
Accepted Values: 0 to the width of the printhead
Default Value: the width of the printhead
Example • This example shows a byte width for a graphic being set at 35 bytes:
! U1 setvar "apl.o.graphics_byte_width" "35"
P1059537-003 Virtual Device-O User Guide 8/28/18
Page 69

Supported Fonts
This section provides you with available fonts on the Zebra printers with Virtual Device-D.
Contents
Supported Fonts. . . . . . . . . . . . . . . . . . . . . . . . . . . . . . . . . . . . . . . . . . . . . . . . . . . . . . . . 70
8/28/18 Virtual Device-O User Guide P1059537-003
Page 70

Supported Fonts
70
Supported Fonts
Supported Fonts
Table 7 shows the standard fonts and associated character sets that are provided with Virtual Device-
O.
Table 7 • Supported Fonts
5-Char
Name
1-Char
Name
MF055 #
(0×23)
CPI
†
Height
‡
Width
‡
Character Set
5.5 39 37 96 ASCII chars
(0×20-0×7E)
MF072 "
(0×22)
Notes
†
CPI: Characters per inch
‡
Height and Width: specified in dots (or pixels)
P1059537-003 Virtual Device-O User Guide 8/28/18
7.2 31 28 96 ASCII chars
(0×20-0×7E)
Page 71

Table 7 • Supported Fonts (Continued)
Supported Fonts
Supported Fonts
71
5-Char
Name
1-Char
Name
MF102 Space
(0×20)
CPI
†
Height
‡
Width
‡
Character Set
10.2 26 20 223 CP437chars
(0×20-0×7E)
MF107 &
10.7 26 19 96 ASCII chars
(0×26)
MF185 $
18.5 24 11 96 ASCII chars
(0×24)
Notes
†
CPI: Characters per inch
‡
Height and Width: specified in dots (or pixels)
(0×20-0×7E)
(0×20-0×7E)
8/28/18 Virtual Device-O User Guide P1059537-003
Page 72

Supported Fonts
72
Supported Fonts
Table 7 • Supported Fonts (Continued)
5-Char
Name
MF204 !
MF226 %
OCA1R O
1-Char
Name
(0×21)
(0×25)
CPI
†
Height
‡
Width
‡
Character Set
20.4 24 10 224 CP437chars
(0×20-0×7E)
22.6 24 9 96 ASCII chars
(0×20-0×7E)
8.5 24 14 ASCII digits only, rotated
(0×4F)
PT05H N/A 34 9 6 96 ASCII chars
(0×20-0×7E)
This font can be
referenced only by
the 5-char name.
PT05T B
34 24 6 96 ASCII chars
(0×42)
Notes
†
CPI: Characters per inch
‡
Height and Width: specified in dots (or pixels)
(Shown at twice its size for clarity.)
(0×20-0×7E)
(Shown at twice its size for clarity.)
P1059537-003 Virtual Device-O User Guide 8/28/18
Page 73

Table 7 • Supported Fonts (Continued)
Supported Fonts
Supported Fonts
73
5-Char
Name
1-Char
Name
PT06H C
(0×43)
PX004 a
(0×61)
PX005 c
(0×63)
CPI
†
Height
‡
Width
‡
Character Set
25 12 8 96 ASCII chars
(0×20-0×7E)
50 24 4 96 ASCII chars
(0×20-0×7E)
(Shown at twice its size for clarity.)
40 24 5 96 ASCII chars
(0×20-0×7E)
PX007 d
34 24 6 96 ASCII chars
(0×64)
Notes
†
CPI: Characters per inch
‡
Height and Width: specified in dots (or pixels)
(Shown at twice its size for clarity.)
(0×20-0×7E)
(Shown at twice its size for clarity.)
8/28/18 Virtual Device-O User Guide P1059537-003
Page 74

ZDownloader Utility
This section provides you with the instructions for downloading and installing the
ZDownloader Utility.
Contents
Downloading the ZDownloader Utility . . . . . . . . . . . . . . . . . . . . . . . . . . . . . . . . . . . . . . . 75
Installing the ZDownloader Utility. . . . . . . . . . . . . . . . . . . . . . . . . . . . . . . . . . . . . . . . . . . 76
8/28/18 Virtual Device-O User Guide P1059537-003
Page 75

Downloading the ZDownloader Utility
To download the ZDownloader Utility, perform the following from your
computer:
1. Open a web browser and navigate to http://www.zebra.com.
2. Click on the Support & Downloads header on the web page.
3. Select a printer.
4. When the printer page opens, locate and select the Software Utilities tab.
5. Scroll down to the ZDownloader Utility and select the Download link.
Note • You will be prompted to create a user profile or login to
http://www.zebra.com with an existing profile to download the ZDownloader Utility.
6. Click on the Accept and Begin Download Now button.
The installation file download will begin.
ZDownloader Utility
Downloading the ZDownloader Utility
75
8/28/18 Virtual Device-O User Guide P1059537-003
Page 76

ZDownloader Utility
76
Installing the ZDownloader Utility
Installing the ZDownloader Utility
To install the ZDownloader Utility, perform the following from your computer:
1. Run the installation file after the download is complete.
2. If you are prompted to allow the application to make changes to your computer,
click Yes.
The utility installs on your computer. When installation is complete, the Firmware
Downloader and ZBI Key Manager installation wizard appears.
3. Click Next.
The End User License Agreement appears.
P1059537-003 Virtual Device-O User Guide 8/28/18
Page 77

4. Read the terms of the agreement.
ZDownloader Utility
Installing the ZDownloader Utility
77
5. Click the checkbox to accept the terms.
6. Click Next.
The installation wizard displays information about the installation.
8/28/18 Virtual Device-O User Guide P1059537-003
Page 78

ZDownloader Utility
78
Installing the ZDownloader Utility
7. Click Next.
The installation wizard installs the application.
8. Click Finish to close the wizard.
P1059537-003 Virtual Device-O User Guide 8/28/18
Page 79

Index
A
advance paper from black mark (Q mark), 43
ahead command, 49
application installation
acquiring the app, 11
canceling a download in progress, 22
downloading the app to printers, 20
auto-detect printers, 13
B
back command, 49
barcodes
names, 52
battery voltage and temperature command, 55
bitmapped graphics, 45
black mark, 43
byte width, 68
C
carriage return, 40
compressed graphics, 42
configurable options command, 56
connectivity options, 8
D
disabling the Virtual Device
by apl.enable SGD command, 67
through the control panel
QLn320 and QLn220 printers, 28
QLn420 printers, 25
Supported ZTxxx And ZDxxx Printers With
A Display, 31
ways to enable/disable, 24
double-high print, 40
double-wide print
set as print mode, 48
set for one line, 40
E
Easy Print
go to from Line Print, 43
supported commands, 38
enabling the Virtual Device
by apl.enable SGD command, 67
Supported ZTxxx And ZDxxx Printers With A
Display, 31
through the control panel
QLn320 and QLn220 printers, 28
QLn420 printers, 25
ways to enable/disable, 24
F
features, 7
fonts
character sets and specifications, 70
double-wide print, 48
enlarge height, 43
query command, 59
select, 46
single-wide print, 47
form feed, 47
formats command, 58
8/28/18 Virtual Device-O User Guide P1059537-003
Page 80

80
Index
G
generate Easy Print print request, 50
graphics
bitmapped, 45
compressed, 42
query command, 60
specify byte width of a graphic, 68
H
heighten font, 43
I
interline spacing, 41
IP Ethernet printers
auto-detect, 13
manually add, 14
L
liability, 2
line feed, 47
Line Print
go to from Easy Print, 49
supported commands, 37
M
manually add printers, 14
memory query command, 61
MF8i supported commands, 39
modifying printer communication settings
through ZDownloader, 18
O
override query command, 66
P
parallel printers, 14
PK80 supported commands, 39
print requests, 50
print servers, 8
print width
double-wide font mode, 48
single-wide font, 47
printhead query command, 62
Q
Q mark, 43
query
query command override, 66
supported commands, 38
R
reset printer
Line Print command, 41
query command, 62
S
select an international character set, 44
select font, 46
self-test printout
{TP}, 54
{TP1}, 54
serial interface
add printers, 14
Set/Get/Do (SGD) commands, 67
single-wide print, 47
status command
Easy Print mode, 54
query mode, 63
U
USB printers, 13
V
version
level of support for Virtual Devices, 68
of Virtual Device, 67
query command, 65
Virtual Device version, 67
W
wired print server
auto detect, 13
for more information, 8
manually add, 14
wireless print server
auto detect, 13
for more information, 8
manually add, 14
Z
ZDownloader
adding printers, 12
canceling a download in progress, 22
deleting printers, 19
downloading the Virtual Device app to printers,
P1059537-003 Virtual Device-O User Guide 8/28/18
Page 81

Index
81
20
downloading ZDownloader, 75
installing ZDownloader, 76
modifying printer settings, 18
zebra printer setup utility for android devices, 12
8/28/18 Virtual Device-O User Guide P1059537-003
Page 82

Corporate Headquarters
Zebra Technologies Corporation
3 Overlook Point
Lincolnshire, IL 60069 USA
T: +1 847 634 6700
Toll-free +1 866 230 9494
F: +1 847 913 8766
http://www.zebra.com
P1059537-003
 Loading...