

Page 1

VCD7X00-P Vehicle Cradle
Quick Reference Guide
Page 2

2 VCD7X00-P Vehicle Cradle
Zebra reserves the right to make changes to any product to improve reliability,
function, or design.
Zebra does not assume any product liability arising out of, or in connection with,
the application or use of any product, circuit, or application described herein.
No license is granted, either expressly or by implication, estoppel, or otherwise
under any patent right or patent, covering or relating to any combination, system,
apparatus, machine, material, method, or process in which Zebra products might
be used. An implied license exists only for equipment, circuits, and subsystems
contained in Zebra products.
Warranty
For the complete Zebra hardware product warranty statement, go to:
http://www.zebra.com/warranty.
Page 3

Quick Reference Guide 3
Introduction
This guide describes how to install and use a VCD7X00-P vehicle cradle with a
Zebra MC7X Enterprise Digital Assistant.
Install the VCD7X00-P into your vehicle. Once installed, the cradle:
• holds the MC7X securely in place
• provides power for operating the MC7X
• provides a serial port for data communication between an MC7X and an
external device (e.g., a printer)
• re-charges the battery in the MC7X
• re-charges a standard capacity or extended capacity spare battery.
The cradle is powered by the vehicle’s 12V or 24V electrical system. The
operating voltage range is 9V to 32V and requires a maximum current of 4A.
About This Guide
Specific topics in this guide include:
• Requirements on page 4
• Parts on page 5
• Mounting the Cradle on page 7
• Power Connection on page 8
• Serial Device Connection on page 10
• MC7X Insertion and Removal on page 11
• MC7X Battery Charging on page 12
• Spare Battery Insertion and Removal on page 12
• Spare Battery Charging on page 13
• LED Indicators on page 14
• Care and Cleaning on page 14
• Troubleshooting on page 15
• Regulatory Information on page 17
• Service Information on backcover.
For detailed information about the series of MC70 EDA, refer to the MC70 Quick
Start Guide (p/n 72-71770-xx), MC70 User Guide (p/n 72E-71769-xx), and the
MC70 Integrator Guide (p/n 72E-71768-xx) or the MC75 Quick Start Guide (p/n
72-103079-xx), MC75 User Guide (p/n 72E-103077-xx), and the MC75 Integrator
Guide (p/n 72E-103078-xx).
Page 4

4 VCD7X00-P Vehicle Cradle
Requirements
For mounting:
• four #8-32 self-locking nuts (included)
• four #8 washers (included)
• a drill with a #6 drill bit (.204”).
For power connection:
• power input cable (included), p/n 25-61987-01R
• UL Listed in-line fuse rated 250V, 5A (included), must be used if not connecting
to vehicle’s fuse panel
• in-line fuse holder (included), must be used if not connecting to vehicle’s fuse
panel.
For serial connection:
• DB9 female serial cable (some devices may require null modem).
For communication:
• an MC7X
• host computer setup and MC7X setup (as determined by the application you
are using).
Page 5

Quick Reference Guide 5
FRONT VIEW
Serial Port
Release Lever
MC7X Slot
Power Port
Spare Battery
Charging LED
Spare Battery
Battery Release
Lever
BOTTOM VIEW
REAR VIEW
Mounting Screws
Parts
Page 6

6 VCD7X00-P Vehicle Cradle
1
Connector on Power Cable
Connector on Serial Cable
There are two connection ports on the bottom of the cradle:
Ports Function
Serial Standard RS 232 port used for direct connection to the serial
Power Used for connecting to vehicle power using the power input cable.
device using a serial cable.
Connector Pin-Outs
Power Input Cable
Pin Signal
1 Chassis ground (Bare Wire)
2 Chassis ground (Bare Wire)
3 V+ (Red Wire)
4 V+ (Red Wire)
Serial Cable
Pin Signal Pin Signal
1DCD5GND
2RxD6DSR
3TxD7RTS
4 DTR 8 CTS
5GND9*+5V_OUT @
*Active only when serial communication is
enabled in the EDA.
200 mA max.
Page 7

Quick Reference Guide 7
1.5”
1.2”
CAUTION
Park the vehicle first. Always ensure the
ROAD SAFETY - Do not use the MC7X while driving.
MC7X is fully inserted into
the cradle. Do not place it on the seat or where it can break loose in
a collision or sudden stop. Lack of proper insertion may result in
property damage or personal injury. Zebra is not responsible for any
loss resulting from the use of the products while driving. Remember:
Safety comes first.
Mounting the Cradle
CAUTION Only mount the Vehicle Cradle in a vertical position with the
release level at the top or in a horizontal position with the
mobile computer display facing up. Never mount the vehicle
cradle on the side or upside down or on a wall that can be
subject to impact or collision of greater than 40Gs, in
accordance with SAE J1455 Section 4.10.3.5
1. Select a mounting location for the cradle. It should be flat, and must provide
adequate support for the cradle.
2. Prepare the mounting surface to accept four #8-32 studs, using the mounting
template below. Drill four holes with a #6 drill bit.
3. Position the cradle on the mounting surface.
Page 8

8 VCD7X00-P Vehicle Cradle
4. Fasten it using four #8 washers and four #8-32 self-locking nuts.
CAUTION Do not install a VCD7X00-P Vehicle Cradle on or near an air
bag cover plate or within an aerobic zone. Also, do not install
it in a location that affects vehicle safety or driveability.
Power Connection
Please read all of these instructions before beginning.
WARNING
To connect the cradle to power:
CAUTION When setting up connection for this cradle, only use the
1. Locate the vehicle power source.
NOTE The ideal location for connecting the vehicle cradle power input
! A properly trained technician must perform the power
connection. Improper connection can damage your vehicle,
cradle or mobile computer. Refer to the vehicle’s Owner’s
Manual for instructions for removing power.
power input cable provided with this cradle.
cable would be an accessory output in your vehicle’s fuse panel.
The vehicle cradle should be added to a circuit with a maximum
load capacity for the cradle and the original circuit. Refer to the
vehicle’s Owner’s Manual for identification of the circuit.
If a fused output is not available, the vehicle cradle must be
installed with the provided in-line fuse holder and UL Listed 5A
fuse. The fuse protects the vehicle from an electrical short on
the power line to the cradle.
To use the cradle to charge the MC7X and spare battery, when
the vehicle’s ignition is off, connect the cradle to unswitched
power.
2. Route the power input cable from the cradle’s power port to the connection
point for the vehicle’s power source.
Page 9
Quick Reference Guide 9
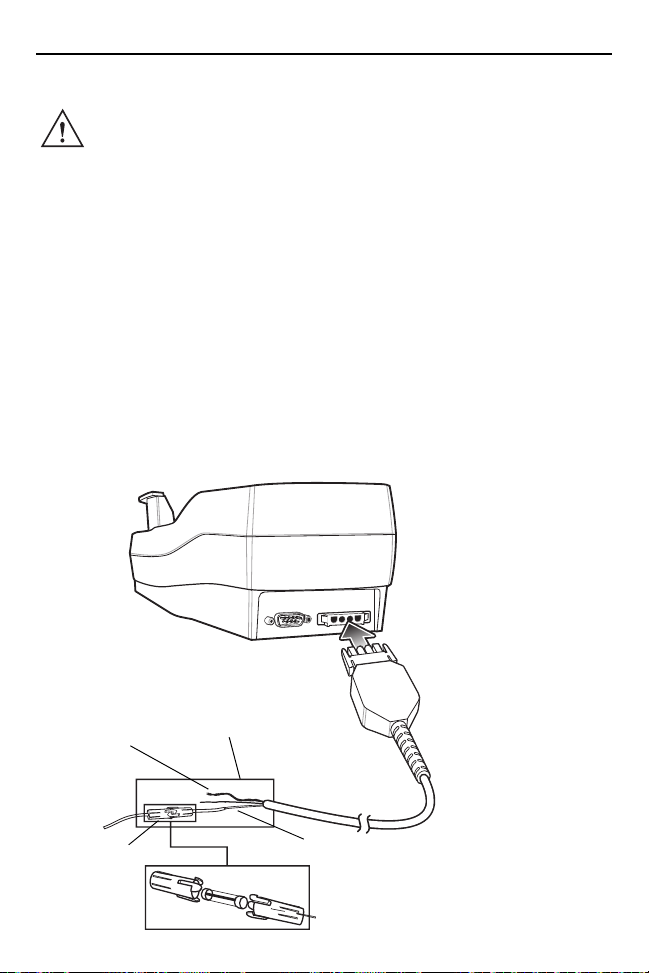
Shield Wire
(bare wire)
Ground Wire
(black)
V+ Power (red)
5A Fuse and
Fuse Holder
NOTE The means of routing and securing the power input cable from
the cradle through to the vehicle power source is extremely
important. Hazards associated with improper wiring can be
severe. To avoid unintentional contact between the wire and any
sharp edges, provide the cable with proper bushings and
clamping where it passes through openings. If the wire is
subjected to sharp surfaces and excess engine vibration, the
wiring harness insulation can wear away, causing a short
between the bare wire and chassis. This can start a fire. To avoid
any mishaps, all wiring should be routed away from moving
parts, high temperature areas and any contaminants.
3. When using the supplied in-line fuse holder (which must be used if not
connecting to vehicle’s fuse panel):
a. Ensure the fuse holder contains a 5A UL Listed slow-blow fuse.
b. Splice the fuse holder to the end of the red V+ wire, as shown above. Make
the distance from the fuse to the power connection point as short as
possible.
Page 10

10 VCD7X00-P Vehicle Cradle
To Serial Port of
Serial Device
4. Prepare the cable termination.
a. Red wire: connect to a +12/24 V vehicle power source.
b. Black wire and Shield wire: connect to vehicle ground wire or chassis
ground.
NOTE How the cable terminates depends on the vehicle. If the vehicle
has a power output connector, then you must attach a mating
connector to the end of the power cable. You may be able to
connect to a fuse panel with a simple blade terminal or
commercially available connector. Consult the vehicle Owner’s
Manual for information on how to access the power supply in the
vehicle.
5. Connect the power input cable into the power port on the cradle.
To see if the cradle has power, insert the MC7X. The Charging LED on the MC7X
blinks slowly to indicate charging and turns solid amber when the battery is
completely charged. See LED Indicators on page 14 for other indications.
Serial Device Connection
The MC7X has a serial port on the bottom.
When the MC7X is inserted into the cradle,
it connects to the cradle’s serial port. The
MC7X can then use the cradle’s serial port
to communicate with an external device.
To provide serial communications between
an MC7X and a serial device, connect one
end of the 9-pin serial cable into the serial
port on the cradle, and the other end into
the serial port on the serial device.
NOTE Some devices may require a null modem serial cable.
To begin communication:
1. Insert the MC7X into the cradle.
Page 11

Quick Reference Guide 11
MC7X
Release
Lever
2. To initiate communication, make appropriate selections on the MC7X, as
determined by the application you are using.
CAUTION Removing the MC7X during data communication disrupts
communication between the MC7X and the attached device.
MC7X Insertion and Removal
NOTE The vehicle cradle supports the insertion and charging of an
MC7X with a standard capacity or extended capacity battery and
a standard capacity or extended capacity battery in the spare
battery slot.
To ensure the MC7X was inserted correctly, listen for the audible click that
signifies that the MC7X button release locking mechanism was enabled and the
MC7X was locked into place.
CAUTION Ensure that the MC7X is fully inserted into the cradle. Lack of
proper insertion may result in property damage or personal
injury. Zebra is not responsible for any loss resulting from the
use of the products while driving.
Page 12

12 VCD7X00-P Vehicle Cradle
MC7X Release Lever
MC7X Battery Charging
1. Ensure the cradle is connected to a power source. See Power Connection on
page 8.
2. Insert the MC7X into the cradle. See MC7X Insertion and Removal on page 11.
The MC7X starts to charge through the cradle as soon as it is inserted. This does
not deplete the vehicle battery significantly. The 1900 mAh battery charges in
approximately four hours. The 3800 mAh battery charges in approximately eight
hours. See LED Indicators on page 14 for all charging indications.
Spare Battery Insertion and Removal
NOTE The vehicle cradle supports the insertion and charging of both
the standard capacity battery and the larger capacity battery in
the spare battery slot.
To insert a spare battery:
1. Lift the battery release lever.
Page 13

Quick Reference Guide 13
Extended Capacity
Battery Shown
Battery Release Lever
Extended Capacity
Battery Shown
2. Position the spare battery in the spare battery charging slot in the cradle with
the charging contacts facing up and to the rear of the cradle.
3. Place the battery into the spare battery slot.
4. Release the battery release lever. Ensure that the spare battery is inserted
correctly. The battery release lever should lock the spare battery into place.
To remove a spare battery, while holding the battery release lever back, lift and
remove the battery from the spare battery slot.
Spare Battery Charging
1. Ensure the cradle is connected to a power source. See Power Connection on
page 8.
2. Insert the spare battery into the cradle. See Spare Battery Insertion and
Removal on page 12.
Page 14

14 VCD7X00-P Vehicle Cradle
The spare battery starts to charge through the cradle as soon as it is inserted.
This does not deplete the vehicle battery significantly. The 1900 mAh battery
charges in approximately four hours. The 3800 mAh battery charges in
approximately eight hours. See LED Indicators on page 14 for charging
indications.
LED Indicators
LED Indication
MC7X Battery Charging (LED is on MC7X)
Off MC7X is not in cradle, MC7X is not placed correctly,
Fast Blinking Amber
(twice a second)
Slow Blinking Amber
(once every two seconds)
Solid Amber Charging is complete.
Spare Battery Charging (LED is on cradle)
Off No spare battery in slot; spare battery not placed
Fast Blinking Amber
(twice a second)
Slow Blinking Amber
(once every two seconds)
Solid Amber Charging is complete.
or cradle is not powered.
Error in charging (not within battery charging
temperature or charging for too long without
completion). Check placement of MC7X.
MC7X is charging.
correctly; cradle is not powered.
Error in charging (not within battery charging
temperature or charging for too long without
completion). Check placement of spare battery.
Spare battery is charging.
Care and Cleaning
Avoid getting oils, grease or gasoline on the cradle, and do not let debris gather in
the bottom of the cradle slot. When necessary, clean the cradle with a mild
cleaner. If you are not sure whether or not to use a particular cleaner, contact
Zebra for advice.
Page 15

Quick Reference Guide 15
Troubleshooting
Symptom Possible Cause Action
MC7X battery
charging LED
does not light
up.
MC7X battery is
not recharging.
No data was
transmitted, or
transmitted
data was
incomplete.
Cradle is not
receiving power.
MC7X was
removed from the
cradle too soon.
Battery is faulty. Replace the battery.
MC7X was not
placed correctly in
the cradle.
MC7X removed
from cradle during
communications.
No null modem
cable was used.
Incorrect cable
configuration.
Cable missing or
disconnected.
Ensure the Power Input cable is
securely connected to the cradle’s
Power Port.
Replace the MC7X in the cradle; you
may have removed it before it was
recharged. If a MC7X battery pack is
fully depleted, it can take four hours to
fully recharge a standard capacity
battery and eight hours for a larger
capacity battery.
Remove the MC7X from the cradle,
and re-insert correctly. If the battery still
does not charge, contact Customer
Support.
The MC7X battery charging LED
slowly blinks amber when the MC7X is
correctly inserted and charging.
Replace MC7X in cradle and
retransmit.
Some external devices require a null
modem cable. Retransmit using a null
modem cable.
See your system administrator.
Re-connect cable.
Page 16

16 VCD7X00-P Vehicle Cradle
Health and Safety Recommendations
Vehicle Installation
RF signals may affect improperly installed or inadequately shielded electronic
systems in motor vehicles (including safety systems). Check with the
manufacturer or its representative regarding your vehicle. You should also consult
the manufacturer of any equipment that has been added to your vehicle.
An air bag inflates with great force. DO NOT place objects, including either
installed or portable wireless equipment, in the area over the air bag or in the air
bag deployment area. If in-vehicle wireless equipment is improperly installed and
the air bag inflates, serious injury could result.
Position your device within easy reach. Be able to access your device without
removing your eyes from the road.
Note: Connection to an alert device that will cause a vehicle horn to sound or
lights to flash, on receipt of a call on public roads, is not permitted.
Safety on the Road
Do not take notes or use the device while driving. Jotting down a “to do” list or
flipping through your address book takes attention away from your primary
responsibility, driving safely.
When driving a car, driving is your first responsibility - Give full attention to driving.
Check the laws and regulations on the use of wireless devices in the areas where
you drive. Always obey them.
When using a wireless device behind the wheel of a car, practice good common
sense and remember the following tips:
• Get to know your wireless device and any features such as speed dial and
redial. If available, these features help you to place your call without taking
your attention off the road.
• When available, use a hands free device.
• Let the person you are speaking with know you are driving; if necessary,
suspend the call in heavy traffic or hazardous weather conditions. Rain, sleet,
snow, ice, and even heavy traffic can be hazardous.
• Dial sensibly and assess the traffic; if possible, place calls when you are not
moving or before pulling into traffic. Try to plan calls when your car will be
stationary. If you need to make a call while moving, dial only a few numbers,
check the road and your mirrors, then continue.
Page 17

Quick Reference Guide 17
• Do not engage in stressful or emotional conversations that may be distracting.
Make people you are talking with aware you are driving and suspend
conversations that have the potential to divert your attention from the road.
• Use your wireless phone to call for help. Dial the Emergency services, (9-1-1 in
the US, and 1-1-2 in Europe) or other local emergency number in the case of
fire, traffic accident or medical emergencies. Remember, it is a free call on your
wireless phone! The call can be made regardless of any security codes and
depending on a network, with or without a SIM card inserted.
• Use your wireless phone to help others in emergencies. If you see an auto
accident, crime in progress or other serious emergency where lives are in
danger, call the Emergency Services, (9-1-1 in the US, and 1-1-2 in Europe) or
other local emergency number, as you would want others to do for you.
• Call roadside assistance or a special non-emergency wireless assistance
number when necessary. If you see a broken-down vehicle posing no serious
hazard, a broken traffic signal, a minor traffic accident where no one appears
injured, or a vehicle you know to be stolen, call roadside assistance or other
special non-emergency wireless number.
“The wireless industry reminds you to use your device / phone safely when
driving”.
Regulatory Information
This guide applies to model number: VCD7000-P.
All Zebra devices are designed to be compliant with rules and regulations in
locations they are sold and will be labeled as required.
Any changes or modifications to Zebra equipment, not expressly approved by
Zebra, could void the user's authority to operate the equipment.
For use only with Zebra approved and UL Listed mobile computers. Zebra
approved and UL Listed accessories and/or Zebra approved and UL
Listed/Recognized battery packs.
CAUTION Only use Zebra approved and UL listed accessories, battery
packs and battery chargers.
Do NOT attempt to charge damp/wet mobile computers or
batteries. All components must be dry before connecting to an
external power source.
Declared maximum operating temperature 50ºC.
Page 18

18 VCD7X00-P Vehicle Cradle
Local language translations are available at the following web site:
http://www.zebra.com/support.
Radio Frequency Interference Requirements-FCC
Note: This equipment has been tested and found to comply with
the limits for a Class B digital device, pursuant to Part 15 of the
protection against harmful interference in a residential installation. This equipment
generates, uses and can radiate radio frequency energy and, if not installed and
used in accordance with the instructions, may cause harmful interference to radio
communications. However there is no guarantee that interference will not occur in
a particular installation. If this equipment does cause harmful interference to radio
or television reception, which can be determined by turning the equipment off and
on, the user is encouraged to try to correct the interference by one or more of the
following measures:
• Reorient or relocate the receiving antenna
• Increase the separation between the equipment and receiver
• Connect the equipment into an outlet on a circuit different from that to which
the receiver is connected
• Consult the dealer or an experienced radio/TV technician for help.
Radio Frequency Interference Requirements - Canada
This Class B digital apparatus complies with Canadian ICES-003.
Cet appareil numérique de la classe B est conforme à la norme NMB-003 du
Canada.
FCC rules. These limits are designed to provide reasonable
Marking and European Economic Area (EEA)
Statement of Compliance
Zebra hereby declares that this device is in compliance with all the applicable
Directives, 2004/108/EC, 2006/95/EC and 2011/65/EU. A Declaration of
Conformity may be obtained from http://www.zebra.com/doc.
Page 19

Quick Reference Guide 19
Batteries
Taiwan - Recycling
EPA (Environmental Protection Administration) requires dry
battery producing or importing firms in accordance with Article
15 of the Waste Disposal Act are required to indicate the
recycling marks on the batteries used in sales, giveaway or
promotion. Contact a qualified Taiwanese recycler for proper battery disposal.
Battery Information
Zebra rechargeable battery packs are designed and constructed to the highest
standards within the industry.
However, there are limitations to how long a battery can operate or be stored
before needing replacement. Many factors affect the actual life cycle of a battery
pack, such as heat, cold, harsh environmental conditions and severe drops.
When batteries are stored over six (6) months, some irreversible deterioration in
overall battery quality may occur. Store batteries at half of full charge in a dry, cool
place, removed from the equipment to prevent loss of capacity, rusting of metallic
parts and electrolyte leakage. When storing batteries for one year or longer, the
charge level should be verified at least once a year and charged to half of full
charge.
Replace the battery when a significant loss of run time is detected.
Standard warranty period for all Zebra batteries is one year, regardless if the
battery was purchased separately or included as part of the mobile computer. For
more information on Zebra batteries, please visit:
http://www.zebra.com/batterybasics
CAUTION Risk of explosion if battery is replaced by an incorrect type.
Dispose of batteries according to instructions.
Battery Safety Guidelines
• The area in which the units are charged should be clear of debris and
combustible materials or chemicals. Particular care should be taken where the
device is charged in a non commercial environment.
• Follow battery usage, storage, and charging guidelines found in the user's
guide.
• Improper battery use may result in a fire, explosion, or other hazard.
• To charge the mobile device battery, the battery and charger temperatures
must be between +32°F and +104°F (0°C and +40°C).
Page 20

20 VCD7X00-P Vehicle Cradle
• Do not use incompatible batteries and chargers. Use of an incompatible
battery or charger may present a risk of fire, explosion, leakage, or other
hazard. If you have any questions about the compatibility of a battery or a
charger, contact Zebra support.
• To enable authentication of approved batteries, as required by IEEE1725
clause 10.2.1, the 3600 mAh battery (p/n 82-71364-05) and the 4800 mAh
battery (p/n 82-71364-06) contain a Zebra hologram. Do not install any battery
without checking it has the Zebra authentication hologram.
• Do not disassemble or open, crush, bend or deform, puncture, or shred.
• Severe impact from dropping any battery-operated device on a hard surface
could cause the battery to overheat.
• Do not short circuit a battery or allow metallic or conductive objects to contact
the battery terminals.
• Do not modify or remanufacture, attempt to insert foreign objects into the
battery, immerse or expose to water or other liquids, or expose to fire,
explosion, or other hazard.
• Do not leave or store the equipment in or near areas that might get very hot,
such as in a parked vehicle or near a radiator or other heat source. Do not
place battery into a microwave oven or dryer.
• Battery usage by children should be supervised.
• Please follow local regulations to promptly dispose of used re-chargeable
batteries.
• Do not dispose of batteries in fire.
• Seek medical advice immediately if a battery has been swallowed.
• In the event of a battery leak, do not allow the liquid to come in contact with the
skin or eyes. If contact has been made, wash the affected area with large
amounts of water and seek medical advice.
• If you suspect damage to your equipment or battery, contact Zebra support to
arrange for inspection.
Japan (VCCI) - Voluntary Control Council for Interference
Class B ITE
この装置は、情報処理装置等電波障害自主規制協議会 (VCCI)の基準に基づくクラス
B 情報技術装置です。この装置は、家庭環境で使用することを目的としていますが、この装
置がラジオやテレビジョン受信機に近接して使用されると、受信障害を引き起こすことがあ
ります。 取扱説明書に従って正しい取り扱いをして下さい。
Page 21

Quick Reference Guide 21
This is a Class B product based on the standard of the Voluntary Control Council
for Interference from Information Technology Equipment (VCCI). If this is used
near a radio or television receiver in a domestic environment, it may cause radio
interference. Install and use the equipment according to the instruction manual.
Waste Electrical and Electronic Equipment (WEEE)
English: For EU Customers: All products at the end of their life must be returned
to Zebra for recycling. For information on how to return product, please go to:
http://www.zebra.com/weee.
Français: Clients de l'Union Européenne: Tous les produits en fin de cycle de vie
doivent être retournés à Zebra pour recyclage. Pour de plus amples informations
sur le retour de produits, consultez : http://www.zebra.com/weee.
Español: Para clientes en la Unión Europea: todos los productos deberán
entregarse a Zebra al final de su ciclo de vida para que sean reciclados. Si desea
más información sobre cómo devolver un producto, visite:
http://www.zebra.com/weee.
Bulgarish: За клиенти от ЕС: След края на полезния им живот всички
продукти трябва да се връщат на Zebra за рециклиране. За информация
относно връщането на продукти, моля отидете на адрес:
http://www.zebra.com/weee.
Deutsch: Für Kunden innerhalb der EU: Alle Produkte müssen am Ende ihrer
Lebensdauer zum Recycling an Zebra zurückgesandt werden. Informationen zur
Rücksendung von Produkten finden Sie unter http://www.zebra.com/weee.
Italiano: per i clienti dell'UE: tutti i prodotti che sono giunti al termine del rispettivo
ciclo di vita devono essere restituiti a Zebra al fine di consentirne il riciclaggio. Per
informazioni sulle modalità di restituzione, visitare il seguente sito Web:
http://www.zebra.com/weee.
Português: Para clientes da UE: todos os produtos no fim de vida devem ser
devolvidos à Zebra para reciclagem. Para obter informações sobre como
devolver o produto, visite: http://www.zebra.com/weee.
Nederlands:
levensduur naar Zebra te worden teruggezonden voor recycling. Raadpleeg
http://www.zebra.com/weee voor meer informatie over het terugzenden van
producten.
Polski: Klienci z obszaru Unii Europejskiej: Produkty wycofane z eksploatacji
nale¿y zwróciæ do firmy Zebra w celu ich utylizacji. Informacje na temat zwrotu
produktów znajduj¹ siê na stronie internetowej http://www.zebra.com/weee.
Voor klanten in de EU: alle producten dienen aan het einde van hun
Page 22

22 VCD7X00-P Vehicle Cradle
Čeština: Pro zákazníky z EU: Všechny produkty je nutné po skonèení jejich
životnosti vrátit spoleènosti Zebra k recyklaci. Informace o zpùsobu vrácení
produktu najdete na webové stránce: http://www.zebra.com/weee.
Eesti: EL klientidele: kõik tooted tuleb nende eluea lõppedes tagastada
taaskasutamise eesmärgil Zebra'ile. Lisainformatsiooni saamiseks toote
tagastamise kohta külastage palun aadressi: http://www.zebra.com/weee.
Magyar: Az EU-ban vásárlóknak: Minden tönkrement terméket a Zebra
vállalathoz kell eljuttatni újrahasznosítás céljából. A termék visszajuttatásának
módjával kapcsolatos tudnivalókért látogasson el a http://www.zebra.com/weee
weboldalra.
Slovenski: Za kupce v EU: vsi izdelki se morajo po poteku življenjske dobe vrniti
podjetju Zebra za reciklažo. Za informacije o vraèilu izdelka obišèite:
http://www.zebra.com/weee.
Svenska: För kunder inom EU: Alla produkter som uppnått sin livslängd måste
returneras till Zebra för återvinning. Information om hur du returnerar produkten
finns på http://www.zebra.com/weee.
Suomi: Asiakkaat Euroopan unionin alueella: Kaikki tuotteet on palautettava
kierrätettäväksi Zebra-yhtiöön, kun tuotetta ei enää käytetä. Lisätietoja tuotteen
palauttamisesta on osoitteessa http://www.zebra.com/weee.
Dansk: Til kunder i EU: Alle produkter skal returneres til Zebra til recirkulering, når
de er udtjent. Læs oplysningerne om returnering af produkter på:
http://www.zebra.com/weee.
Ελληνικά: Για πελάτες στην Ε.Ε.: Όλα τα προϊόντα, στο τέλος της διάρκειας ζωής
τους, πρέπει να επιστρέφονται στην Zebra για ανακύκλωση. Για περισσότερες
πληροφορίες σχετικά με την επιστροφή ενός προϊόντος
διεύθυνση http://www.zebra.com/weee στο ∆ιαδίκτυο.
Malti: Għal klijenti fl-UE: il-prodotti kollha li jkunu waslu fl-aħħar tal-ħajja ta' l-użu
tagħhom, iridu jiġu rritornati għand Zebra għar-riċiklaġġ. Għal aktar tagħrif dwar kif
għandek tirritorna l-prodott, jekk jogħġbok żur: http://www.zebra.com/weee.
Românesc: Pentru clienţii din UE: Toate produsele, la sfârşitul duratei lor de
funcţionare, trebuie returnate la Zebra pentru reciclare. Pentru informaţii despre
returnarea produsului, accesaţi: http://www.zebra.com/weee.
Slovenski: Za kupce v EU: vsi izdelki se morajo po poteku življenjske dobe vrniti
podjetju Zebra za reciklažo. Za informacije o vračilu izdelka obiščite:
http://www.zebra.com/weee.
Slovenčina: Pre zákazníkov z krajín EU: Všetky výrobky musia byť po uplynutí
doby ich životnosti vrátené spoločnosti Zebra na recykláciu. Bližšie informácie o
vrátení výrobkov nájdete na: http://www.zebra.com/weee.
Lietuvių: ES vartotojams: visi gaminiai, pasibaigus jų eksploatacijos laikui, turi
būti grąžinti utilizuoti į kompaniją „Zebra“. Daugiau informacijos, kaip grąžinti
gaminį, rasite: http://www.zebra.com/weee.
, επισκεφθείτε τη
Page 23

Quick Reference Guide 23
Latviešu: ES klientiem: visi produkti pēc to kalpošanas mūža beigām ir jānogādā
atpakaļ Zebra otrreizējai pārstrādei. Lai iegūtu informāciju par produktu
nogādāšanu Zebra, lūdzu, skatiet: http://www.zebra.com/weee.
Türkçe: AB Müşterileri için: Kullanım süresi dolan tüm ürünler geri dönüştürme
için Zebra'ya iade edilmelidir. Ürünlerin nasıl iade edileceği hakkında bilgi için
lütfen şu adresi ziyaret edin: http://www.zebra.com/weee.
Page 24

Zebra Technologies Corporation
Lincolnshire, IL, USA
http://www.zebra.com
Zebra and the Zebra head graphic are registered trademarks of ZIH Corp. The Symbol logo is a
registered trademark of Symbol Technologies, Inc., a Zebra Technologies company.
© 2015 Symbol Technologies, Inc.
72-109083-02 Revision A - March 2015
Service Information
If you have a problem using the equipment, contact your facility’s Technical or
Systems Support. If there is a problem with the equipment, they will contact the
Zebra Support at: http://www.zebra.com/support.
For the latest version of this guide go to: http://www.zebra.com/support.
 Loading...