

Zebra VC8300 Vehicle-Mounted Computer VC8300-10 Vehicle Computer Quick Reference Guide (en)

VC8300-10
Vehicle Computer
Quick Reference
Guide

2 VC8300-10 Vehicle Computer
Introduction
The VC8300-10 is a rugged vehicle-mount computer that is designed to maximize
productivity in harsh environments. The device is intended for use in commercial
and industrial applications with a focus on real time wireless data transactions
which options suit materials handling applications in warehouses, manufacturing
facilities, ports, yards, and freezers.
The device’s compact design improves visibility and reduces safety concerns
while retaining a large screen size (10.4”). Its 802.11 a/b/g/n/ac WLAN provides
real-time information that improves decision making, reduces errors, and
enhances productivity.
Unpacking
The following items are contained in the box:
• VC8300-10 Vehicle Computer
• VC8300-10 Quick Reference Guide
Carefully remove all protective material from around the device and save the
shipping container for later storage and shipping.
Inspect the equipment for damage. If you are missing any equipment or if you find
any damaged equipment, contact the Zebra Support Center immediately. See
Service Information on page 24 for contact information.
Removing Protective Film from Display
The front display of the device is protected during transport by a transparent film.
This film should remain on the front display during assembly to avoid damage to
the front display surface. Only remove the film once all of the assembly work has
been completed.
Related Documents
The following document provides more information about the VC8300 vehicle
computer.
• VC8300 Product Reference Guide for Android ™ Version 11, p/n
MN-004179-xx - provides detailed information for VC8300 set up, operation,
specifications and accessories.
For the latest version of this guide and all guides, go to: zebra.com/support
.
Quick Reference Guide 3
Device Features
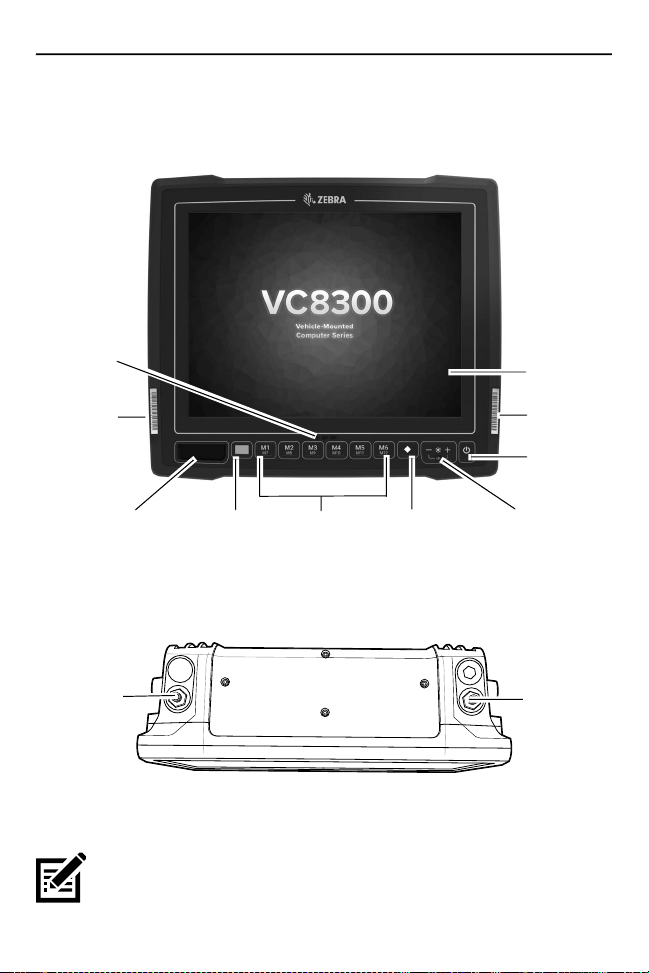
Front View
Captive or
resistive
LED
Unpairing
barcode
Speaker
Blue
modifier key
Programmable
keys
(6 + 6)
Activates
on-screen
keyboard
Top View of External Wi-Fi Antenna
802.11 a/b/g/n/ac Radio External Antenna Connectors
(Freezer
Model) touch
screen
Pairing
barcode
Power
button
Speaker
volume\Display
brightness
ANT 2
ANT 1 - Reverse Polarity Jack (WLAN + Bluetooth) External Main antenna
ANT 2 - Reverse Polarity Jack (WLAN) External Aux Antenna
NOTE: Wi-Fi antennas are not shipped with the device and must be
ordered as a separate accessory. The device can be switched between
internal and external antenna.
ANT 1
4 VC8300-10 Vehicle Computer
For a complete list of configurations, refer to the VC8300 Product Reference
Guide for Android Version 11 at zebra.com/support
.
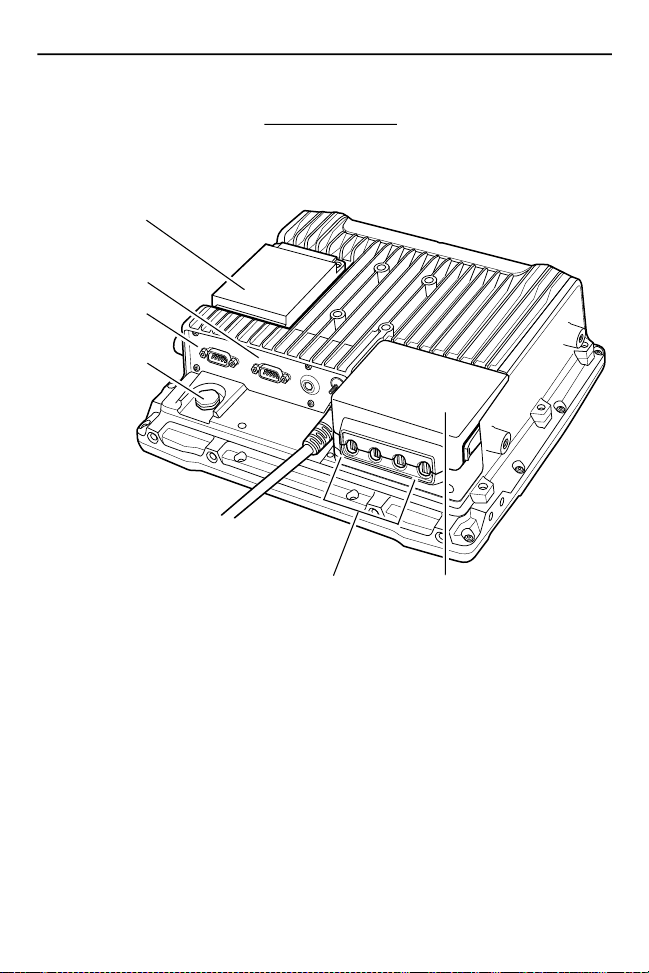
Back View
Back View with Dust Cover
UPS battery
COM 1
COM 2
Vent
Strain relief
(four)
Dust
cover
Quick Reference Guide 5
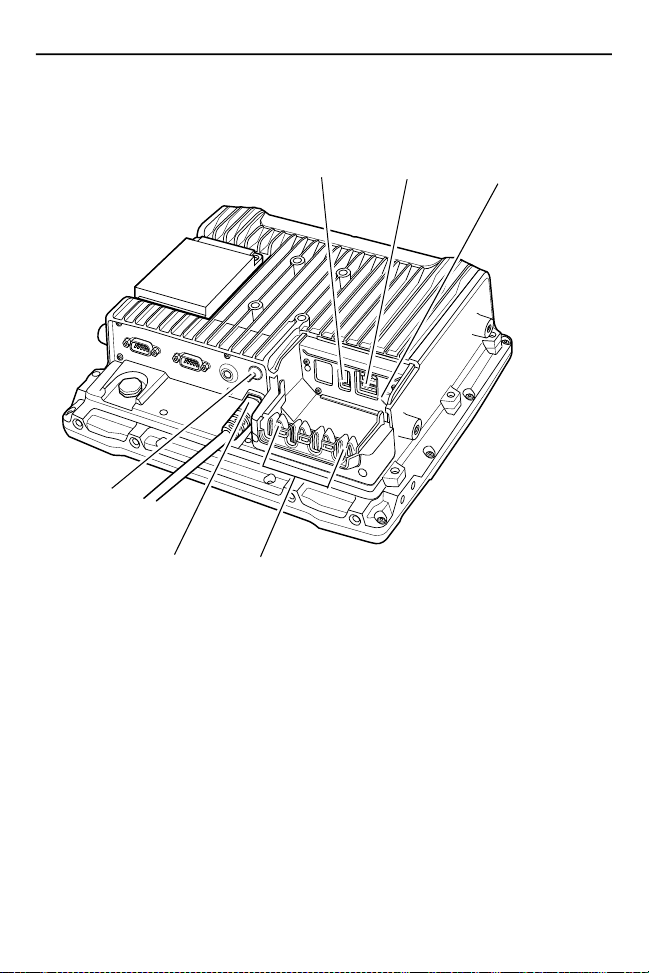
Back View without Dust Cover
Powered
USB
Speaker/
Mic
Ground
lug
Power
Standard
Strain relief
(four)
USB
Setting up the Software
To set up the device software:
1.
Connect the device to an external power source.
2. Press and hold the Power button to turn on the device (see Front View on
page 3).
3. On a VC8300 with GMS software, follow the Google Setup Wizard to set up a
Google account.
4. If required, manually set the date and time.
a. Touch Settings > Date & Time.
b. Touch Automatic date & time switch to disable automatic date and time
configuration.

6 VC8300-10 Vehicle Computer
c. Touch Set Date to set the current date.
d. Touch Set Time to set the current time.
e. Touch Select time zone to set the location time zone.
f. Touch Home.
5. Connect the device to a WLAN.
6. Select language settings:
a. Touch Settings > Languages & input > Languages.
b. Touch Add Language and select a language.
c. Drag the desired language to the top of the language list. The system
language changes.
d. Touch Home.
For detailed information, refer to the VC8300 Product Reference Guide for
Android Version 11 at zebra.com/support
.
Wireless Network Configuration
To connect to the WLAN:
1. Touch Settings > Wi-Fi.
2. Scroll through the list and select the desired WLAN network.
3. For open networks, touch the profile once or touch and hold and then select
Connect to network or for secure networks enter the required password or
other credentials then touch Connect. See the system administrator for more
information.
4. The device obtains a network address and other required information from the
network using the Dynamic Host Configuration Protocol (DHCP). To configure
the device with a fixed internet protocol (IP) address, Refer to the VC8300
Product Reference Guide for Android Version 11 at zebra.com/support
5. In the Wi-Fi setting field, Connected appears indicating that the device is
connected to the WLAN.
For detailed information, such as applying advanced settings, refer to the VC8300
Product Reference Guide for Android Version 11 at zebra.com/support
.
.

Quick Reference Guide 7
Bluetooth
The device is equipped with Bluetooth radios for communication with a variety of
Bluetooth peripherals. Use the Bluetooth settings to configure Bluetooth
peripherals.
For detailed information, refer to the VC8300 Product Reference Guide for
Android Version 11 at zebra.com/support
.
Programmable Keys
There are six programmable keys on the VC8300-10 front bezel. When used with
the Blue Modifier Key, six additional programmable keys are available. To map
keys, use the Key Programmer settings.
For detailed information, refer to the VC8300 Product Reference Guide for
Android Version 11 at zebra.com/support
.
Power
Use the 100/240 VAC power supply (p/n PS1400) and AC line cord to power the
device from an AC source. For detailed information, refer to the VC8300 Product
Reference Guide for Android Version 11 at zebra.com/support
IMPORTANT: The AC/DC power supply is only intended for use at room
temperature condition such as an office environment.
.
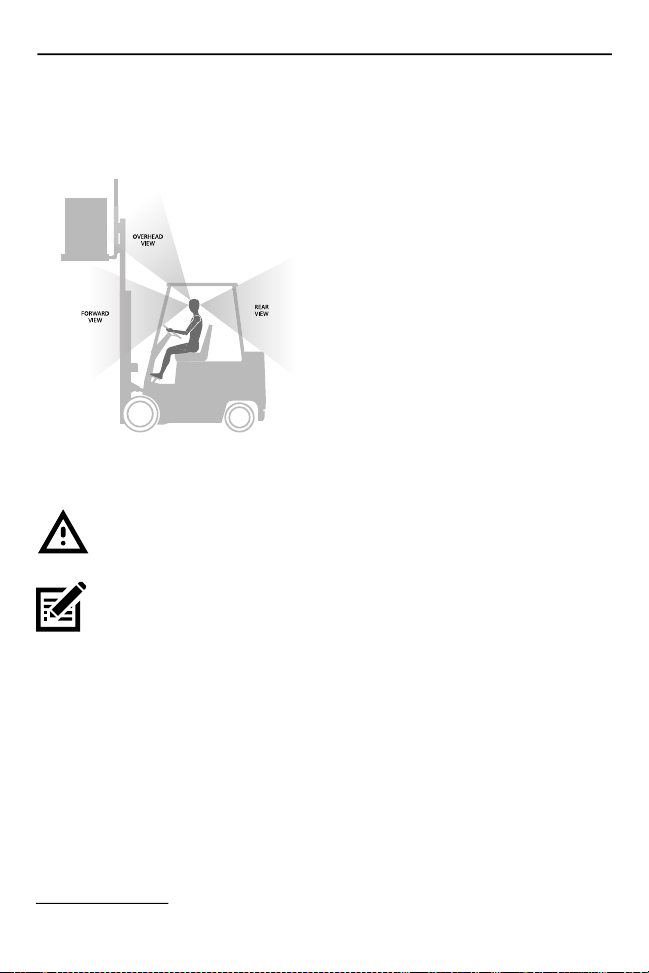
Installation
CAUTION: Do not install the vehicle computer in a location that affects
vehicle safety, visibility, or ability to drive.
If mounted above head height, it is recommended to also use a safety
strap with the mount bracket.
Installing the VC8300 on a Forklift
IMPORTANT: The vehicle front end connected fuse must meet
UL 275.
At
tach the desired mount to the device. Refer to the VC8300 Product Reference
Guide for Android Version 11 at zebra.com/support
and instructions.
for detailed mounting options
8 VC8300-10 Vehicle Computer
1. Attach the mounted device to the vehicle and position in a location that does
not obstruct the operator’s view.
View Obstruction Considerations
2. If using an external antenna, connect antenna in a vertical position to the
device.
CAUTION: Tighten peripherals with thumbscrews by hand only. Do not
use tools for tightening thumbscrews.
NOTE: If installing peripherals, allow enough space when selecting a
mounting location.
3. Connect peripherals to the device. Place the cables in the strain relief
brackets inside the dust cover and replace the dust cover (see Back View on
page 4).
4. Connect the device to the vehicle DC supply.
5. Press Power to turn the device On or Off (see Front View on page 3).
Connect Optional Parts and Accessories
Use the device connection ports to connect optional parts and accessories (see
Back View on page 4).
Refer to the VC8300 Product Reference Guide for Android Version 11 at
zebra.com/support
numbers.
for a complete list of optional parts, accessories, and part
 Loading...