


TC15
Computadora táctil
Guía de inicio rápido
MN-004494-01ESMX Rev. A

ZEBRA y la cabeza de cebra estilizada son marcas comerciales de ZebraTechnologiesCorporation
registradas en muchas jurisdicciones en todo el mundo. Todas las demás marcas comerciales pertenecen
a sus respectivos dueños. ©2022 Zebra Technologies Corporation o sus filiales. Todos los derechos
reservados.
La información incluida en este documento está sujeta a cambios sin previo aviso. El software descrito
en este documento se proporciona según lo dispuesto en el acuerdo de licencia o en el acuerdo de
confidencialidad. Se puede utilizar o copiar este software solo en conformidad con los términos de tales
acuerdos.
Para obtener más información relacionada con las declaraciones legales y de propiedad, visite:
SOFTWARE:zebra.com/linkoslegal.
DERECHOS DE AUTOR Y MARCAS COMERCIALES: zebra.com/copyright.
GARANTÍA: zebra.com/warranty.
ACUERDO DE LICENCIA PARA EL USUARIO FINAL: zebra.com/eula.
Términos de uso
Declaración de propiedad
Este manual contiene información de propiedad de ZebraTechnologiesCorporation y sus subsidiarias
(“ZebraTechnologies”). Está destinado exclusivamente a la información y el uso de las partes que operan
y mantienen el equipo aquí descrito. Dicha información de propiedad no puede utilizarse ni reproducirse,
ni tampoco divulgarse a ninguna otra parte, para ningún otro propósito sin el permiso expreso y por escrito
de ZebraTechnologies.
Derechos de autor
Mejoras del producto
El perfeccionamiento continuo de los productos es una política de ZebraTechnologies. Todos los diseños
y especificaciones están sujetos a cambios sin previo aviso.
Exención de responsabilidad
ZebraTechnologies toma medidas para garantizar que sus especificaciones y manuales de ingeniería
publicados sean correctos. Sin embargo, a veces se producen errores. ZebraTechnologies se reserva el
derecho de corregir dichos errores y renuncia a la responsabilidad resultante de esta acción.
Limitación de responsabilidad
En ningún caso, ZebraTechnologies o cualquier otra persona involucrada en la creación, producción o
entrega del producto (incluidos hardware y software) será responsable de cualquier daño (lo que incluye,
sin limitaciones, daños resultantes, como los siguientes: pérdidas de ganancias comerciales, interrupción
del negocio o pérdida de información comercial) que surja del uso, los resultados del uso o la incapacidad
de utilizar tal producto, incluso si ZebraTechnologies está al tanto de la posibilidad de tales daños.
Algunas jurisdicciones no permiten la exclusión o la limitación de daños incidentales o resultantes, por lo
que es posible que las limitaciones o exclusiones mencionadas no sean aplicables en su caso.

Unpacking
Features
TC15 Guía de inicio rápido
Unpacking the device from the box.
1. Carefully remove all protective material from the device and save the shipping container for later
storage and shipping.
2. Verify the following items are in the box:
• Touch computer
• Lithium-ion battery
• Regulatory Guide
3. Inspect the equipment for damage. If any equipment is missing or damaged, contact the
GlobalCustomer Support Center immediately.
4. Before using the device for the first time, remove the protective shipping film that covers the display.
This section lists the features of the TC15 touch computer.
Figura 1Front View
Number Item Description
1 Front Camera Takes photos and videos (available on some models).
2 Receiver/Sub
Microphone
3 Proximity/Light
Sensor
4 Data Capture LED Indicates data capture status.
5 Charging/
Notification LED
Use for audio playback in Handset mode / Located on the front top of the
device.
Determines proximity for turning off display when in handset mode.
Determines ambient light for controlling display backlight intensity.
Indicates battery charging status while charging and application generated
notifications.
6 Touch Screen Displays all information needed to operate the device.
7 Microphone Use for communications in Handset mode. Located on the front bottom of
the device.
8 Speaker Provides audio output for video and music playback. Provides audio in
speakerphone mode.
3

TC15 Guía de inicio rápido
Number Item Description
9 Cradle Charging
Contacts
10 USB-C Connector Provides USB host and client communications, and device charging via
11 Programmable
Button
12 Scan Button Initiates data capture (programmable).
Figura 2Rear View
Provides device charging via cradles and accessories.
cables and accessories.
This button is configurable for use with other applications.
Tabla 1Rear View
Number Item Description
13 NFC Antenna Provides communication with other NFC-enabled devices.
14 Basic Hand
Strap Mount
15 Battery Release
Latch
16 Battery Cover Removable cover that encloses the 5,000 mAh (typical) Lithium-ion Battery.
17 Volume Up/
Down Button
18 Scan Button Initiates data capture (programmable).
19 Camera Flash Provides illumination for the camera.
20 Rear Camera Takes photos and videos.
21 Power Button Turns the display on and off. Press and hold to reset the device or power off.
22 Exit Window Provides data capture using the imager.
Setting Up the Device
To start using the device for the first time, you must set it up.
Provides mounting point for Basic Hand Strap accessory.
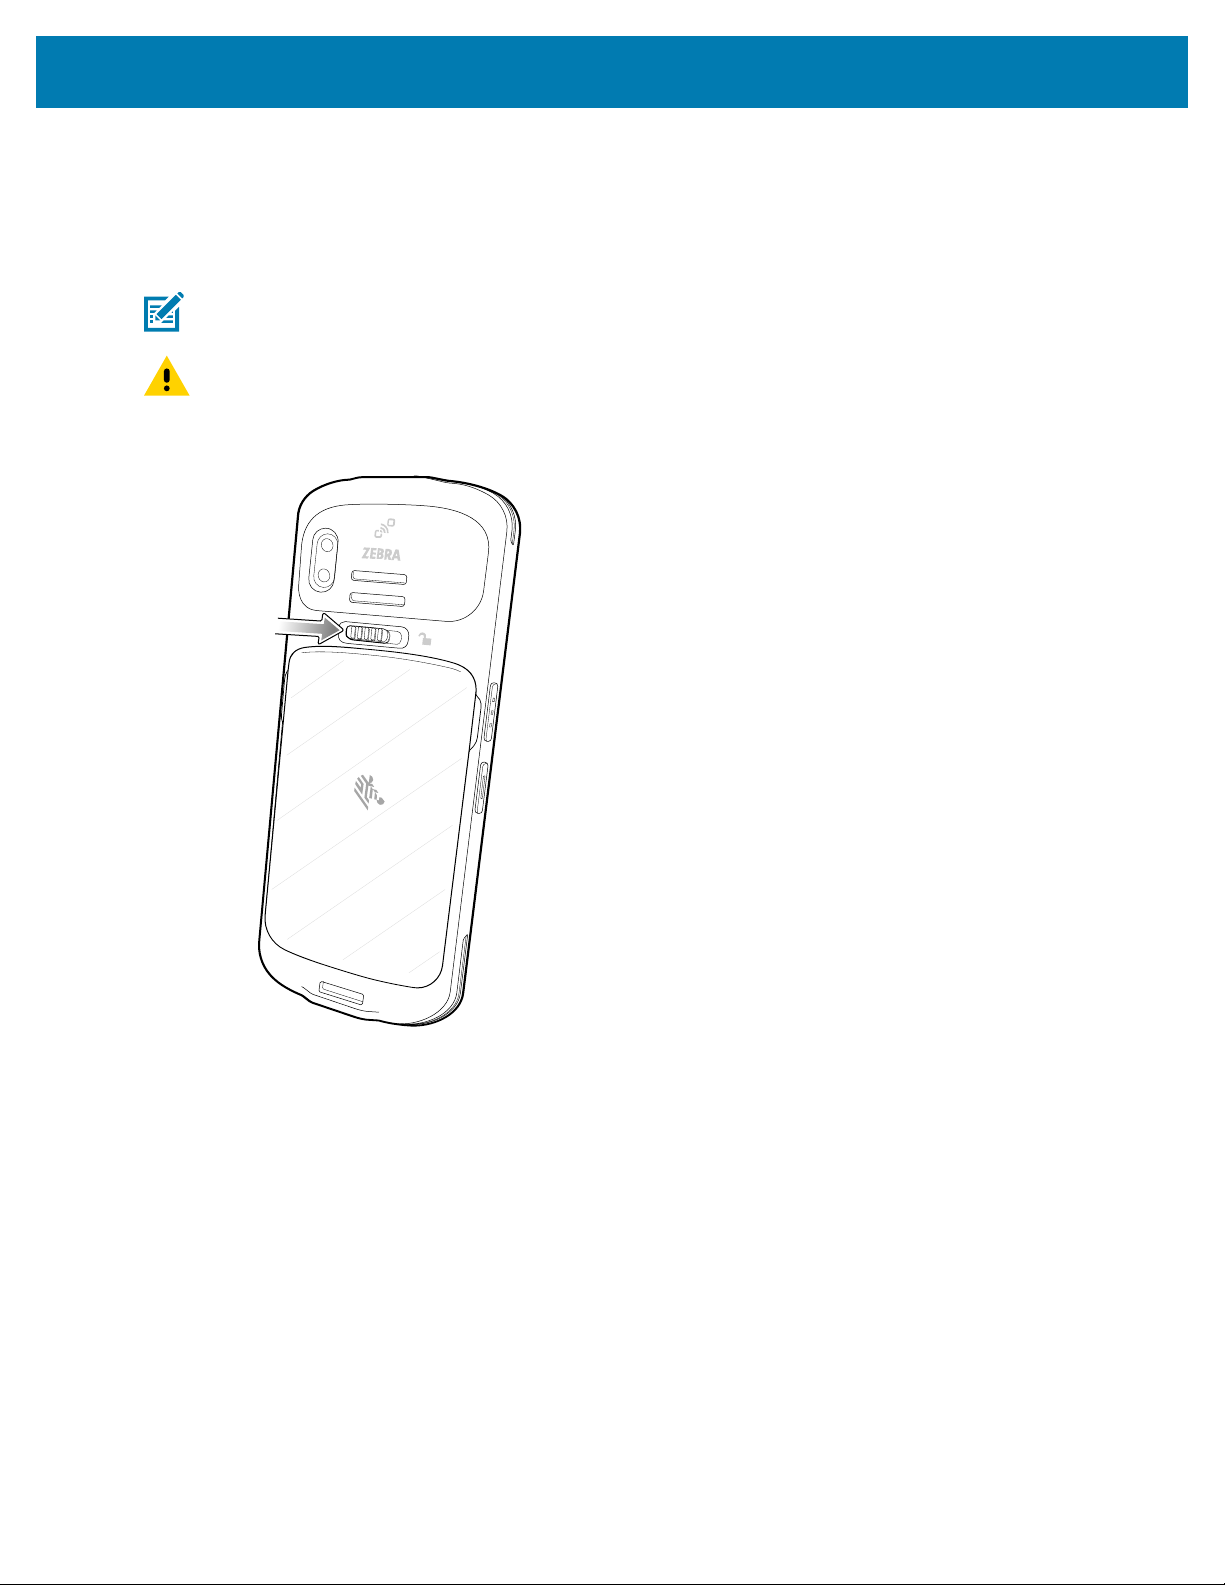
Slide to remove the battery cover.
Increase and decrease audio volume (programmable).
4

TC15 Guía de inicio rápido
1. Install a microSD card (optional)
2. Install a nano SIM card (optional)
3. Install the battery
4. Install hand strap (optional)
5. Charge the device
6. Power on the device.
Installing or Replacing a microSD Card
The microSD card slot provides secondary non-volatile storage. The slot is located within the battery
compartment and is found after removing the battery. Refer to the documentation provided with the card
for more information, and follow the manufacturer's recommendations for use.
PRECAUCIÓN: Follow proper electrostatic discharge (ESD) precautions to avoid damaging the
microSD card. Proper ESD precautions include, but are not limited to, working on an ESD mat and
ensuring that the operator is properly grounded.
1. Slide the battery latch to the unlock position.
5

2. Remove the battery cover.
TC15 Guía de inicio rápido
6

3. Remove the battery.
TC15 Guía de inicio rápido
7

TC15 Guía de inicio rápido
4. Using your fingernail or a plastic tool, pull out the SD/SIM card drawer.
5. Remove the SD/SIM card drawer from the device.
8

TC15 Guía de inicio rápido
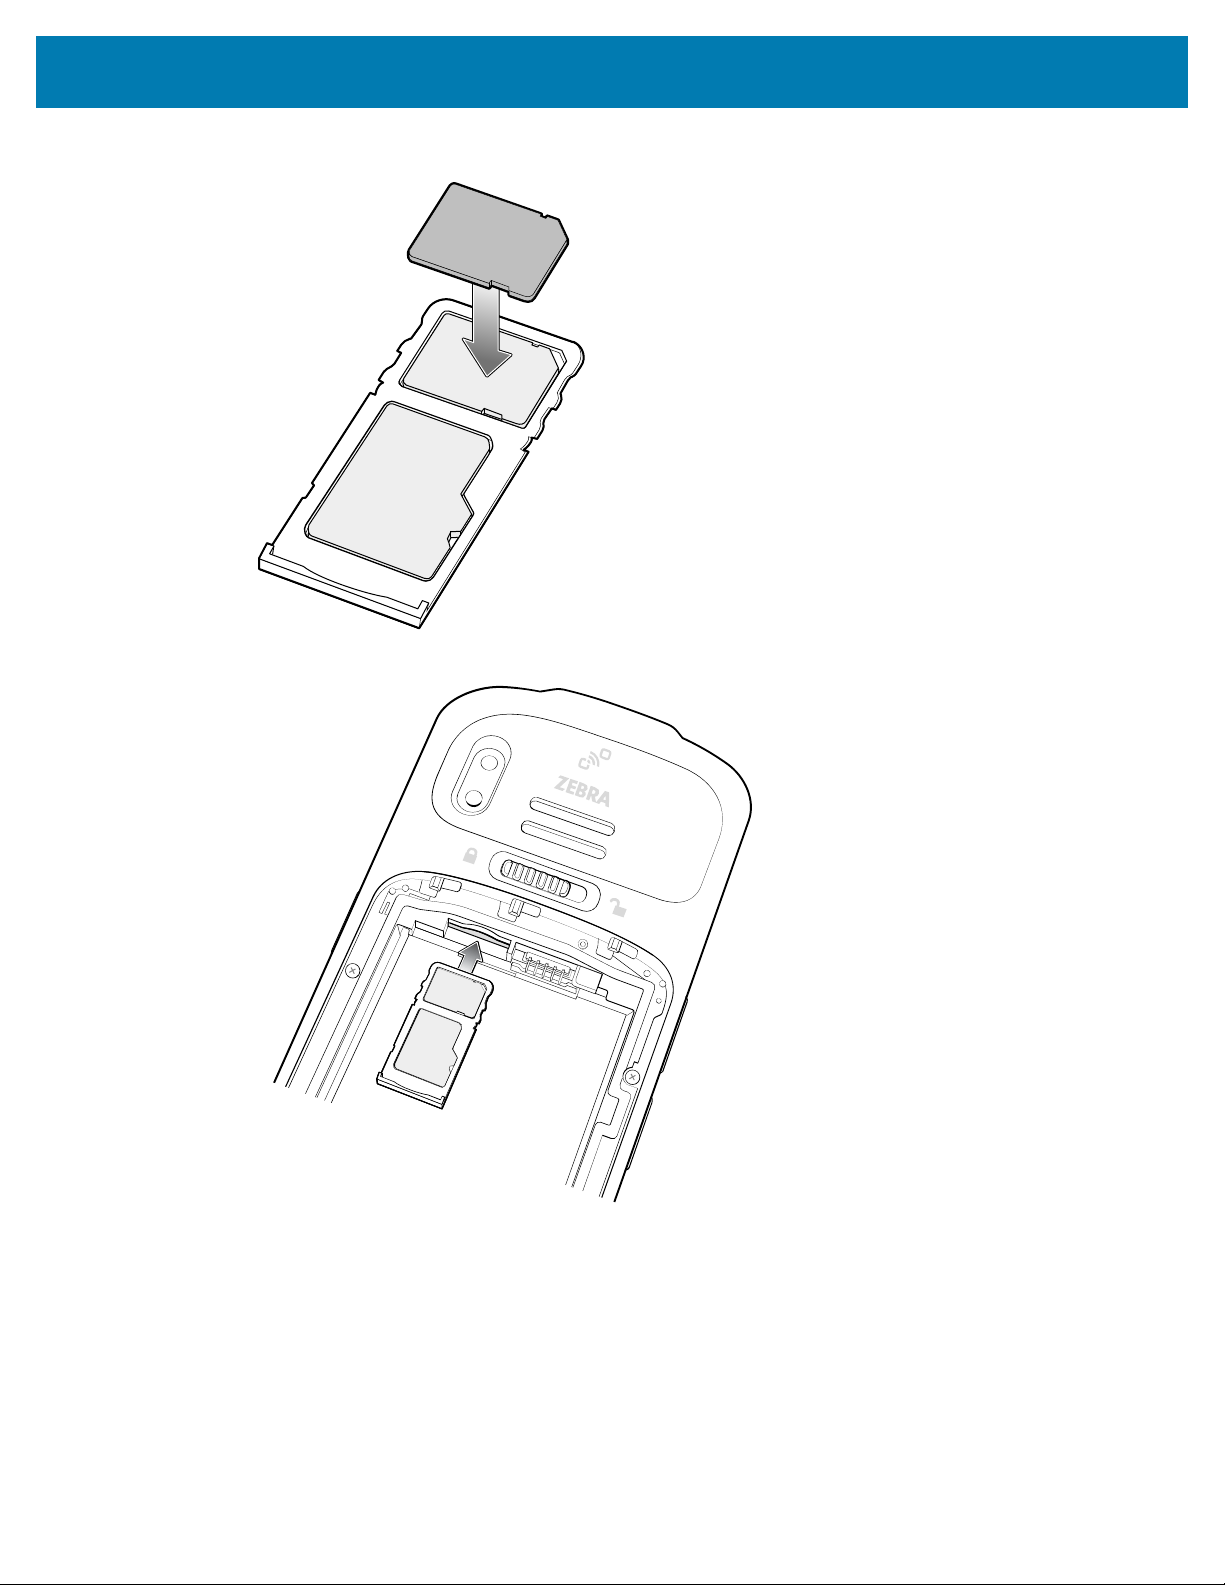
6. Insert or replace the microSD card into the SD/SIM card drawer.
7. Insert the SD/SIM card drawer into the device.
8. Press the SD/SIM card drawer into the device to ensure it is in securely.
9

9. Insert the battery.
TC15 Guía de inicio rápido
10. Replacethe battery cover.
10
TC15 Guía de inicio rápido
Installing or Replacing the SIM Card
The slot is located within the battery compartment and is found after removing the battery.Refer
to the documentation provided with the card for more information, and follow the manufacturer's
recommendations for use.
NOTA: Only use a nan SIM card.
PRECAUCIÓN: Follow proper electrostatic discharge (ESD) precautions to avoid damaging the
SIM card. Proper ESD precautions include, but are not limited to, working on an ESD mat and
ensuring that the operator is properly grounded.
1. Slide the battery latch to the unlock position.
11

2. Remove the battery cover.
TC15 Guía de inicio rápido
12

3. Remove the battery.
TC15 Guía de inicio rápido
13

TC15 Guía de inicio rápido
4. Using your fingernail or a plastic tool, pull out the SD/SIM card drawer.
5. Remove the SD/SIM card drawer from the device.
14
TC15 Guía de inicio rápido
6. Insert or replace the SIM card into the SD/SIM card drawer.
7. Insert the SD/SIM card drawer into the device.
8. Press the SD/SIM card drawer into the device to ensure it is in securely.
15

9. Insert the battery.
TC15 Guía de inicio rápido
10. Replacethe battery cover.
16

TC15 Guía de inicio rápido
Installing or Replacing the Battery
This section describes how to install the battery into the device.
NOTA: User modification of the device, particularly in the battery well, such as labels, asset
tags, engravings, stickers, etc., may compromise the intended performance of the device or
accessories. Performance levels such as sealing (Ingress Protection (IP)), impact performance
(drop and tumble), functionality, temperature resistance, etc. could be effected. DO NOT put any
labels, asset tags, engravings, stickers, etc. in the battery well.
1. Slide the switch to the unlock position.
17

2. Pull the battery cover off.
TC15 Guía de inicio rápido
3. Align the contacts, slide the battery in position on an angle, and insert the battery, top first, into the
battery compartment in the back of the device.
18

TC15 Guía de inicio rápido
4. Press the bottom of the battery down into the battery compartment.
5. Insert and align the cover into the bottom latches.
19

TC15 Guía de inicio rápido
6. Push the cover down into the top latches, until it snaps into place.
20

TC15 Guía de inicio rápido
7. To remove the battery, lift the battery up from the bottom of the battery.
21

Charging
TC15 Guía de inicio rápido
PRECAUCIÓN: Ensure that you follow the guidelines for battery safety described in the device
Product Reference Guide.
Use one of the following accessories to charge the device and/or spare battery.
Accessory Part Number Description
1-Slot Charge Only
Cradle with Spare Battery
Charger
TC15 USB-C2A Cable CBL-TC5X-USBC2A-01 Provides UBC-A to USB-C power to the
Charging the Device
1. Insert the device into a cradle charging slot to begin charging.
• If the device includes a rubber boot, then it is not necessary to use a shimin the cradle. If the shim is
in the cradle, you must remove it first, before inserting the device in the charging slot.
• If the device does not include a rubber boot, then it is necessary to use a shim in the cradle. If the
shim is not in the cradle, it must be inserted first, before inserting the device in the charging slot.
2. Ensure the device is seated properly.
The device’s Charging/Notification LED indicates the status of the battery charging in the device. The
battery charges from fully depleted to 100% in less than 3.5 hours and charges from fully depleted to
80% in less than 2 hours.
NOTA: In many cases the 80% charge provides plenty of charge for daily use.
CRD-TC1XTN28-2SC-01 Provides device charging only. Requires
DC Cable (CBL-DC-388A1-01), AC Cord
(23844-00R) and power supply (PWRBGA12V50W0WW)..
device.
To achieve the best fast charging results use only Zebra charging accessories and batteries.
Charge batteries at room temperature with the device in sleep mode.
22

Charging Indicators
The Charge LED Indicator indicates the charge status.
Tabla 2LED Charge Indicators
Status Indications
TC15 Guía de inicio rápido
Off
Slow Blinking Amber (1
blink every 4 seconds)
Slow Blinking Red (1
blink every 4 seconds)
Solid Green
Solid Red
Fast Blinking Amber (2
blinks/second)
Fast Blinking Red (2
blinks/second)
• Device is not charging.
• Device is not inserted correctly in the cradle or connected to a power
source.
• Charger/cradle is not powered.
• Device is charging.
• Device is charging but the battery is at end of useful life.
• Charging complete.
• Charging complete but the battery is at end of useful life.
Charging error. For example:
• Temperature is too low or too high.
• Charging has gone on too long without completion (typically eight hours).
Charging error but the battery is at end of useful life., for example:
• Temperature is too low or too high.
• Charging has gone on too long without completion (typically eight hours).
Charging the Spare Battery
1. Align the contacts, slide the battery in position on an angle, and insert the battery, top first,into a
battery charging well.
2. Gently press down on the battery to ensure proper contact.
The Spare Battery Charging LED on the cup indicates the status of the spare battery charging. The
battery charges from fully depleted to 80% in approximately 3.5 hours @ 5°C to10°C(41°F to 50°F)and
45°C to50°C(113°F to 122°F).The battery charges from fully depleted to 80% in approximately 2 hours
@ 10°C to45°C(50°F to 113°F).
NOTA: In many cases the 80% charge provides plenty of charge for daily use.
To achieve the best fast charging results use only Zebra charging accessories and batteries.
Charge batteries at room temperature with the device in sleep mode.
23

TC15 Guía de inicio rápido
Spare Battery LED Charging Indicators
The Charge LED Indicator indicates the charge status.
Tabla 3LED Charge Indicators
Status Indications
Solid Amber
Solid Green
Fast Blinking Red (2
blinks/second)
Off
• Spare battery is charging.
• Spare battery charging is complete.
Charging error. For example:
• Check placement of spare battery and battery is at the end of useful life.
• No spare battery in slot.
• Spare battery not placed in slot correctly.
• Cradle is not powered.
Charging Temperature
Charge batteries in temperatures from 5°C to 50°C (41°F to 122°F). The device or accessory always
performs battery charging in a safe and intelligent manner. At higher temperatures, for example, at
approximately 37°C (98°F), the device or accessory may for brief periods of time alternately enable and
disable battery charging to keep the battery at acceptable temperatures. The device or accessory indicates
when charging is disabled due to abnormal temperatures via its LED and a notification appears on the
display.
1-Slot Charge Only Cradle with Spare Battery Charger
NOTA:
• If the device includes a rubber boot, then it is not necessary to use a shimin the cradle. If the
shim is in the cradle, you must remove it first, before inserting the device in the charging slot.
• If the device does not include a rubber boot, then it is necessary to use a shim in the cradle.
If the shim is not in the cradle, it must be inserted first, before inserting the device in the
charging slot.
24

TC15 Guía de inicio rápido
25

TC15 Guía de inicio rápido
1 Device chargingslot
2 Spare battery charging slot
3 Shim
USB-C Cable and Wall Charger
Scanning with Internal Imager
To read a barcode, a scan-enabled application is required. The device contains the DataWedge application
that allows the user to enable the imager, decode the barcode data and display the barcode content.
1. Ensure that an application is open on the device and a text field is in focus (text cursor in text field).
26

TC15 Guía de inicio rápido
2. Point the exit window on the top of the device at a barcode.
3. Press and hold the scan button.
The red laser aiming pattern turns on to assist in aiming.
NOTA: When the device is in Picklist mode, the imager does not decode the barcode until the
crosshair or aiming dot touches the barcode.
27
TC15 Guía de inicio rápido
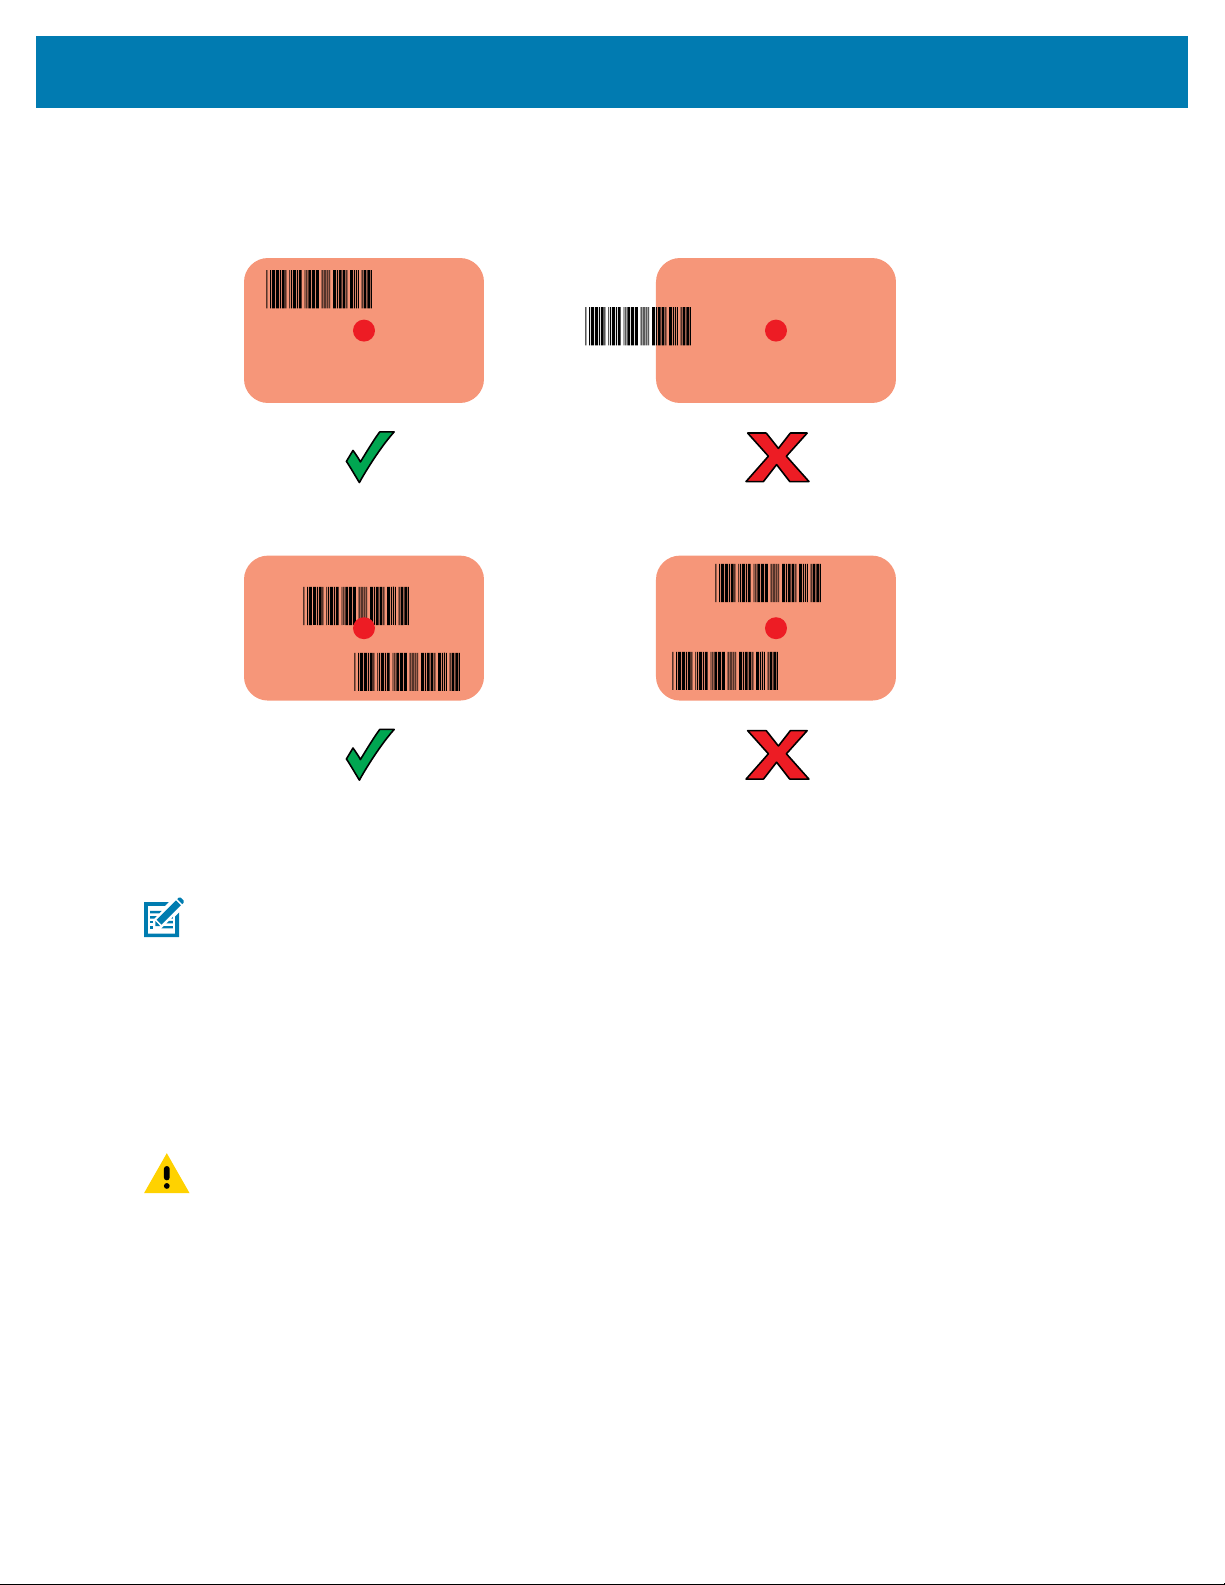
4. Ensure the barcode is within the area formed by the crosshairs in the aiming pattern. The aiming dot is
used for increased visibility in bright lighting conditions.
Figura 3Aiming Pattern
Figura 4Pick List Mode with Multiple Barcodes in Aiming Pattern
5. The Data Capture LED lights red (SE4710), green (SE4100), or ??? (SE4770) and a beep sounds, by
default, to indicate the barcode was decoded successfully.
6. Release the scan button.
NOTA: Imager decoding usually occurs instantaneously. The device repeats the steps required
to take a digital picture (image) of a poor or difficult barcode as long as the scan button remains
pressed.
7. The barcode content data displays in the text field.
Ergonomic Considerations
Taking breaks and task rotation are recommended.
PRECAUCIÓN: Avoid extreme wrist angles.
28

TC15 Guía de inicio rápido
29

www.zebra.com
 Loading...