


ZEBRA MOBILE PRINTERS
Wireless Configuration Guide
CONTENTS
INFORMATION NEEDED FOR NETWORK CONFIGURATION ........................................... 4
USING LABEL VISTA TO CONFIGURE YOUR WIRELESS PRINTER ..................................... 5
INTRODUCTION TO LABEL VISTA ......................................................................................... 5
RUNNING LABEL VISTA ................................................................................................... 5
CONNECTING YOUR PRINTER ............................................................................................ 6
WIRELESS NETWORK PRINTER SETUP WITH WLAN 802.11B RADIO ........................................... 8
NETWORK SETUP USING LABEL VISTA ................................................................................... 8
QUICK NETWORK SETUP ........................................................................................ 8
NETWORK SETUP WITH ENCRYPTION ....................................................................11
AUTHENTICATION SETTINGS .............................................................................................12
POP 3 (POST OFFICE PROTOCOL 3) SETUP ....................................................................13
FTP MIRROR .............................................................................................................14
BLUETOOTH™ SETUP WITH LABEL VISTA ...............................................................................16
AUTHENTICATION ..................................................................................................16
PIN .......................................................................................................................17
DISCOVERABLE .....................................................................................................17
FRIENDLY NAME ....................................................................................................17
USING PARAMETER COMMANDS TO CONFIGURE A NETWORK PRINTER ....................18
PARAMETER COMMAND FORMAT ......................................................................................18
CONFIGURATION PARAMETERS .........................................................................................19
NETWORKING PARAMETERS ............................................................................................19
VIRTUAL PRIVATE NETWORK (VPN) COMMANDS ...................................................................22
Zebra Mobile Printers • Wireless Configuration Guide • rev. H 1
continued

CONTENTS (Continued)
VPN SETTINGS USING LABEL VISTA ...................................................................................22
VPN MODE. ..............................................................................................................22
USER NAME: .............................................................................................................22
PASSWORD: ...............................................................................................................22
DOMAIN: .................................................................................................................22
VPN IP ADDRESS: ......................................................................................................22
CPCL VPN COMMANDS ............................................................................................22
USING CPCL TO CONFIGURE A NETWORK PRINTER ................................................... 24
LAN COMMAND ....................................................................................................... 24
LAN COMMAND: SETTING THE IP ADDRESS FOR NETWORK PRINTERS ..........................................26
NETWORK PRINTER TROUBLESHOOTING ................................................................................27
CONFIGURING WIRELESS PRINTERS USING HTTP & TELNET ..........................................28
WAVELINK AVALANCHE™ NETWORK MANAGEMENT IMPLEMENTATION ..................... 30
INSTALLING THE WAVELINK AVALANCHE AGENT AND CONSOLE MANAGER ......................................31
AVALANCHE PRINTER CONFIGURATION WITH LABEL VISTA .........................................................31
SETTING AVALANCHE PARAMETERS WITH THE PRINTER CONFIGURATION UTILITY ...............................32
SETTING AVALANCHE PARAMETERS WITH CPCL ...................................................................33
TROUBLESHOOTING PROBLEMS WITH AVALANCHE ....................................................................33
SYMBOL™ MSP NETWORK MANAGEMENT IMPLEMENTATION .....................................35
MSP AGENT CONFIGURATION ........................................................................................35
SETTING MSP PARAMETERS WITH CPCL ..........................................................................36
CPCL LANGUAGE CONFIGURATION PARAMETERS ..................................................................36
continued
Zebra Mobile Printers • Wireless Configuration Guide • rev. H 2
CONTENTS (Continued)
WIRELESS SECURITY- EAP-FAST AND WPA EAP-FAST ....................................................38
INTRODUCTION ............................................................................................................38
CONFIGURING THE NETWORK FOR EAP-FAST AUTHENTICATION .................................................38
CONFIGURING THE PRINTER FOR EAP-FAST AUTHENTICATION ...................................................39
C
ONFIGURING FOR WPA EAP-FAST AUTHENTICATION ..........................................................41
WIRELESS SECURITY- EAP-TLS AND WPA EAP-TLS ....................................................... 42
INTRODUCTION ........................................................................................................... 42
CONFIGURING THE NETWORK FOR EAP-TLS AUTHENTICATION .................................................. 42
CONFIGURING THE PRINTER FOR EAP-TLS AUTHENTICATION ..................................................... 43
C
ONFIGURING THE ACCESS POINT FOR WPA EAP-TLS AUTHENTICATION .................................... 45
CONFIGURING THE PRINTER FOR WPA EAP-TLS AUTHENTICATION ............................................ 46
WIRELESS SECURITY- EAP-TTLS AND WPA EAP-TTLS .....................................................47
INTRODUCTION ............................................................................................................47
CONFIGURING THE NETWORK FOR EAP-TTLS AUTHENTICATION ..................................................47
C
ONFIGURING THE PRINTER FOR EAP-TTLS AUTHENTICATION ................................................... 48
CONFIGURING THE ACCESS POINT FOR WPA EAP-TTLS AUTHENTICATION ....................................51
CONFIGURING THE PRINTER FOR WPA EAP-TTLS AUTHENTICATION ...........................................51
WIRELESS SECURITY- PEAP AND WPA PEAP .................................................................52
INTRODUCTION ............................................................................................................52
C
ONFIGURING THE NETWORK FOR PEAP AUTHENTICATION .......................................................52
CONFIGURING THE PRINTER FOR PEAP AUTHENTICATION ......................................................... 53
Zebra Mobile Printers • Wireless Configuration Guide • rev. H 3

Information Needed for Network Configuration
Before you start to configure your printer for use on a Local Area
Network (LAN), you will need some basic information which will enable you to establish the network configuration for your printer.
Use Table 1 opposite as a guide to obtain information on important
networking settings. If you don’t know this information, you should
obtain it from the network administrator.
Table 1: Network Information Needed For Printer Set-up
1. What is your wireless LAN’s ESSID (Extended Service Set
Identifier)?: ____________________________________
2. Does the network supports DHCP (Dynamic Host Configuration
Protocol)?
• YES _______ (If “yes”, proceed to question 3)
• NO______ (If “no”, fill out information below)
1. IP address____:_____:_____:____
2. Subnet Mask:__:_____:____:____
3. Gateway:____:_____:_____:______
3. If the Wireless network has WEP (Wired Equivalent Privacy)
enabled then you need to know if it uses 40 bit or 128 bit WEP
encryption and the encryption keys:
• 40 bit key: __________ ____________
• 128 bit key:
____________________ _________ ___________
• Which encryption key index is your network using (circle
one): 1, 2, 3, 4
4. Authentication Information (not available with Frequency
Hopping [FHSS] radios)
If you are using Cisco’s LEAP authentication scheme you will
need:
• User Name: __________ Password: __________
If you are using the Kerberos authentication scheme you will
need:
• User Name: __________ Realm: __________
• Password: __________ KDC: __________
5. Zebra Mobile Network Printers support POP3 (Post Office
Protocol 3) The information you will need to set up POP3 is:
• The IP address of the POP3 server: ____:____:____:_____
• The user name of the POP3 account: _________________
•. The password of the POP3 account: _________________
• You will also need to decide how frequently you want the
printer to check for new e-mail. This is called the poll
frequency.
Poll Frequency: ____________________
Zebra Mobile Printers • Wireless Configuration Guide • rev. H 4

Using Label Vista to Configure Your Wireless Printer
INTRODUCTION TO LABEL VISTA
Label Vista™ is a program that allows users with little or
no programming background to design labels which can be
printed on the full range of Zebra Technologies Corporation’s
mobile printers. It combines an intuitive graphically based user
environment along with powerful, but easily mastered, editing
tools.
In addition, Label Vista provides utilities making it easy to configure your printer for a variety of purposes, including setting
them up for wireless communications either on a Local Area
Network (LAN) or using the international Bluetooth™ communications standard.
Label Vista utilizes a subset of Zebra’s Portable Printer Control
Language (CPCL). Label files created in Label Vista are fully
compatible with other labels created using the complete set of
CPCL commands.
System Requirements For Label Vista
1) An IBM-compatible PC with a CD-ROM drive and the minimum
configuration to run Windows 95/98/NT/2000/XP will have
sufficient memory to run Label Vista. You will need a serial
(RS232-C) data port and approximately 10 MB of disk space
for the full Label Vista installation.
2) Serial communications cable (Zebra P/N BL11757-000) to
connect your Zebra Mobile Printer to the 9 pin serial port of
your PC.
You may need to supply adapter cables between the serial
communications cable and your computer if (1) your serial port
has 25 pins or (2) the connector gender of your computer does
not agree with the communications cable. Zebra’s standard
communication cable has a 9-pin female connector.
3) Label Vista™ Label Creation Utility Software, Revision 2.17 or
higher. Label Vista can be installed from the Accessories CD
which was packaged with your printer or can be downloaded
directly from Zebra’s Web site at: http://www.zebra.com
Label Vista Installation
Important: Please close all applications including Microsoft™
Office and Microsoft Outlook before proceeding.
Place the Label Vista CD-ROM in your CD drive, and double
click on the “Setup.exe” icon to start the installation. You will
be prompted for the location of the Label Vista installation.
NOTE: the Label Vista installation procedure will automatically
load TrueType™ fonts included in the software package. You
should insure that these fonts will not conflict with any of your
system’s existing fonts, and that this installation will not exceed
your system’s maximum number of installed fonts.
RUNNING LABEL VISTA
After Label Vista has been installed, the program can be started by navigating through the Start button on the bottom of the
screen to the Programs section, and selecting Label Vista.
Contextual help
Label Vista has extensive contextual help support. To use the
help utility, select the
icon and click on a feature of Label
Vista you need information about (a menu item, an icon ,etc.).
continued
Zebra Mobile Printers • Wireless Configuration Guide • rev. H 5
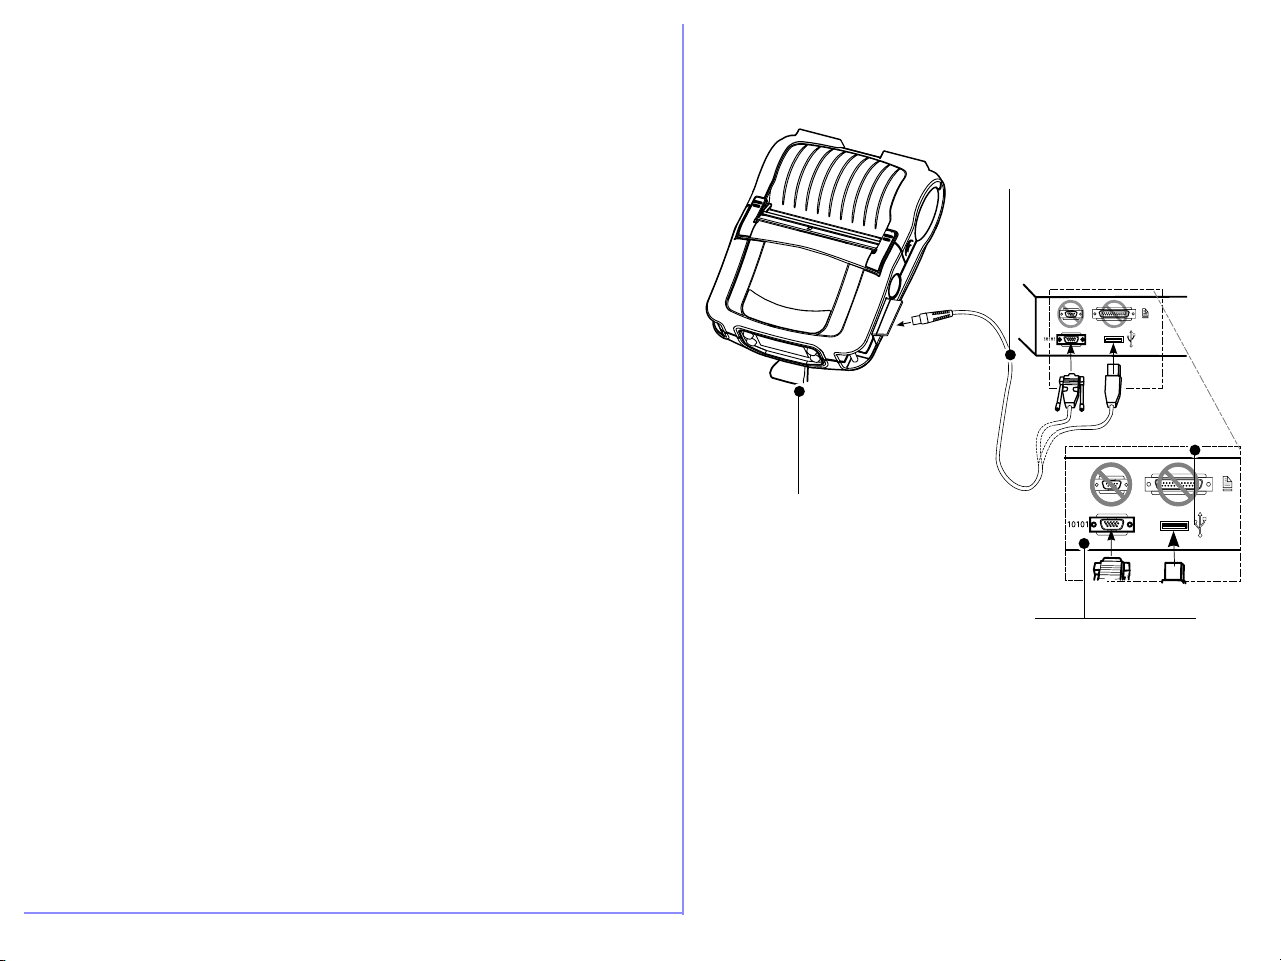
CONNECTING YOUR PRINTER
Label Vista installs drivers to allow you to communicate with Zebra
portable printers.
Connect the printer’s communication cable from either your com
puter’s COM1 or COM2 (Serial I/O) connector or its USB port to the
mobile printer’s I/O connector as shown opposite. Note that only
QL Plus and RW series printers support USB connections. (Refer to
the section of this manual on the Printer menu for more information
on setting up communications parameters from your computer to
your printer.)
Communication Cables
-
Mobile Printer
(QL420 shown)
Communication ports
continued
Zebra Mobile Printers • Wireless Configuration Guide • rev. H 6

Using the Printer Menu Com Port Setup
Once you have Label Vista running, and your printer connected to
your P.C., click on the Printer selection on the menu bar, then the
Com Port Setup selection.
Communications Port sets up the communications port via the
ComPort dialog box. The mobile printer user may select the communications port and the rate at which data is transferred.. The
Com1 or Com2 selections allow bi-directional serial communications with the printer; the other options do not apply.
Two network protocols are available to communicate to Zebra mobile printers equipped with network capabilities: NETWORK TCPIP
and NETWORK LPD. In order to communicate with the printer,
choose the protocol that the printer is configured for. If you are
unsure as to which protocol the printer is using, turn the printer off
and while holding the feed key down turn the printer back on. This
will print the printer’s 2-key report. The protocol that the printer is
configured to use is listed under the RF-LAN section. If the printer
is using a Symbol MOM card choose the NETWORK SYMBOL
MOM CARD option. This is a TCP protocol that does not close the
network connection.
In order to talk to a network printer the IP address and port must
also be entered. The printer’s current IP address and port are also
listed on the 2-key report. Configuring Baudrate allows selection
of the rate at which data is sent over either COM port. Baud rates
range from 2400 to 115200 b.p.s.
Checking the Set Printer Baud Rate box allows Label Vista to auto
matically set the Baud rate for the program and the printer.
-
Zebra Mobile Printers • Wireless Configuration Guide • rev. H 7
Wireless Network Printer Setup With WLAN 802.11b Radio
You will need information for the Network you will connect to. It
will be useful if you get this information before you start the setup
procedure. Refer to the information you compiled in Table 1 when
completing the set-up process.
NETWORK SETUP USING LABEL VISTA
Label Vista has Network setup wizards to help the user to configure his/her wireless network printer quickly and easily.
The three types of setup are:
• Quick Network Setup (no Encryption)
• Network Setup with Encryption
• POP3 Setup
Label Vista will also allow you to set the Authentication settings.
QUICK NETWORK SETUP
Use this option if you do not need to use data encryption on your
wireless network.
Once your printer is connected via cable to your PC, open Label
Vista. Ensure that communications to the printer is set per the
preceding section. To verify communication between your PC and
the printer click on Printer/ Read files. If there is communication, a
window showing the files in the printer memory will be displayed
after a few seconds.
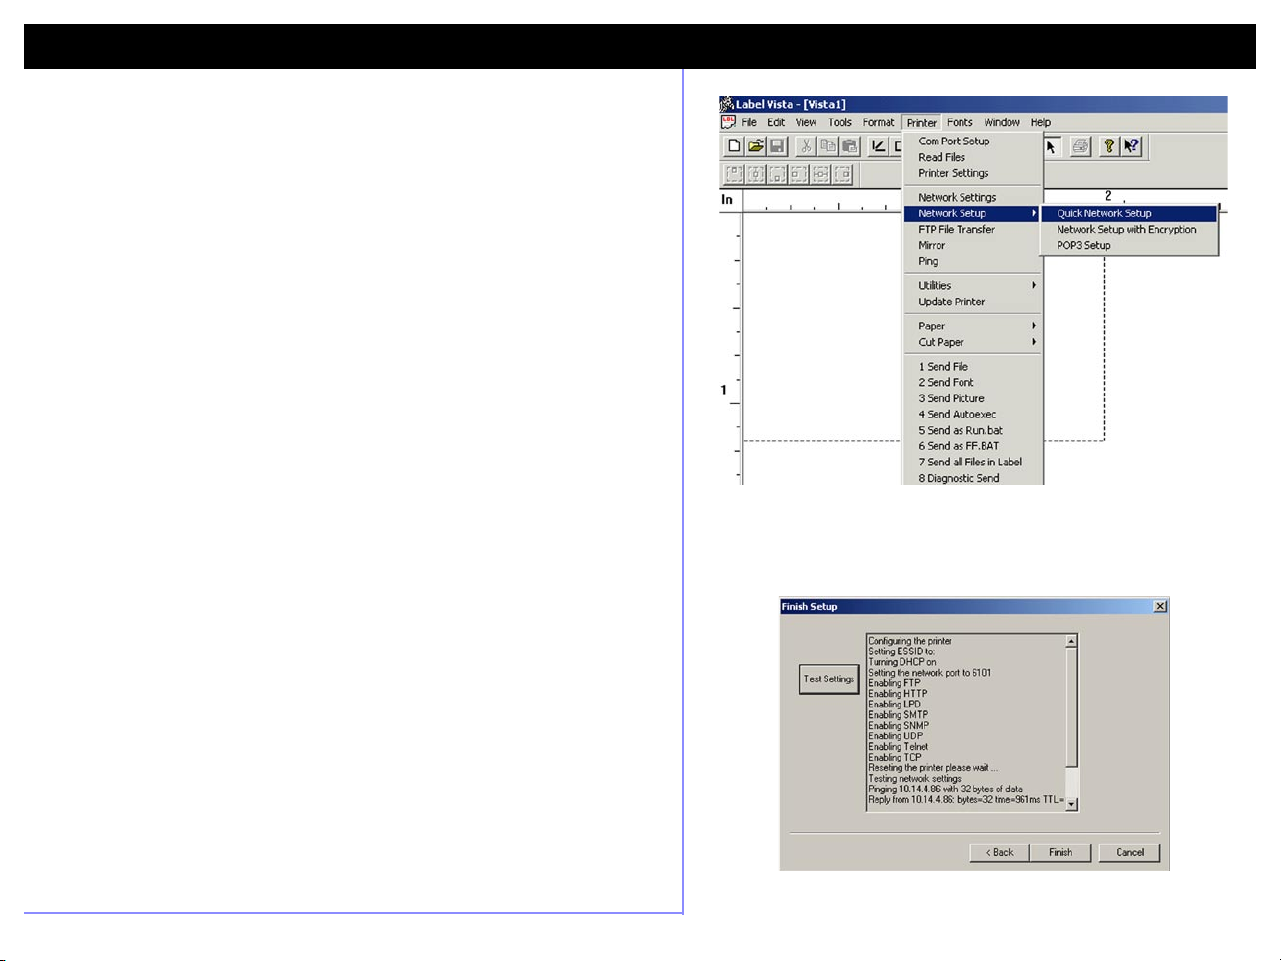
• Open Label Vista and select “Printer” on the top bar menu. On
the drop down menu, go to Network Setup. Then select: Quick
Network Setup.
• Follow the prompts provided by the set up Wizard, using the in
formation filled in on Table 1.
• At the end of the setup process you will be prompted to click on
“Test Settings” to make sure the connection and settings have
been established. After selecting “Test Settings” you will see
actual communication between the printer and Access Point tak-
Zebra Mobile Printers • Wireless Configuration Guide • rev. H 8
-
continued

ing place. You may then exit the wizard by clicking on the “Finish”
button.
Verifying Communications
If your printer is equipped with a display, you can verify that the
printer has established communication with the Access Point. The
antenna symbol on the upper left hand side corner of the LCD will
be shown.
You can scroll the screens of the printer LCD until you get to the
WLAN TCP-IP screen. The IP address and the ESSID of the Access
Point will be shown. If the printer is not associated with a network
radio access point, the antenna icon will be missing and the ESSID
field will be blank.
If your printer does not have an LCD the “Power” LED will blink if
the printer is not associated with an access point.
Power Button
Feed Button
Antenna Icon Scroll Button
A blinking power LED indicates that the
printer is not linked to an access point on
the network, or the printer’s battery needs
re-charging
A rapidly blinking
indicator means radio
communications with a host
is taking place
Feed Button
QL Series Keypad
QL320 WLANTCP
IP: 10.14.86
ESSID: ZEBRA_MKTG
PORT: 6101 MORE BACK
QL and RW Series Keypad with LCD
Power Button
Select Button
continued
Zebra Mobile Printers • Wireless Configuration Guide • rev. H 9
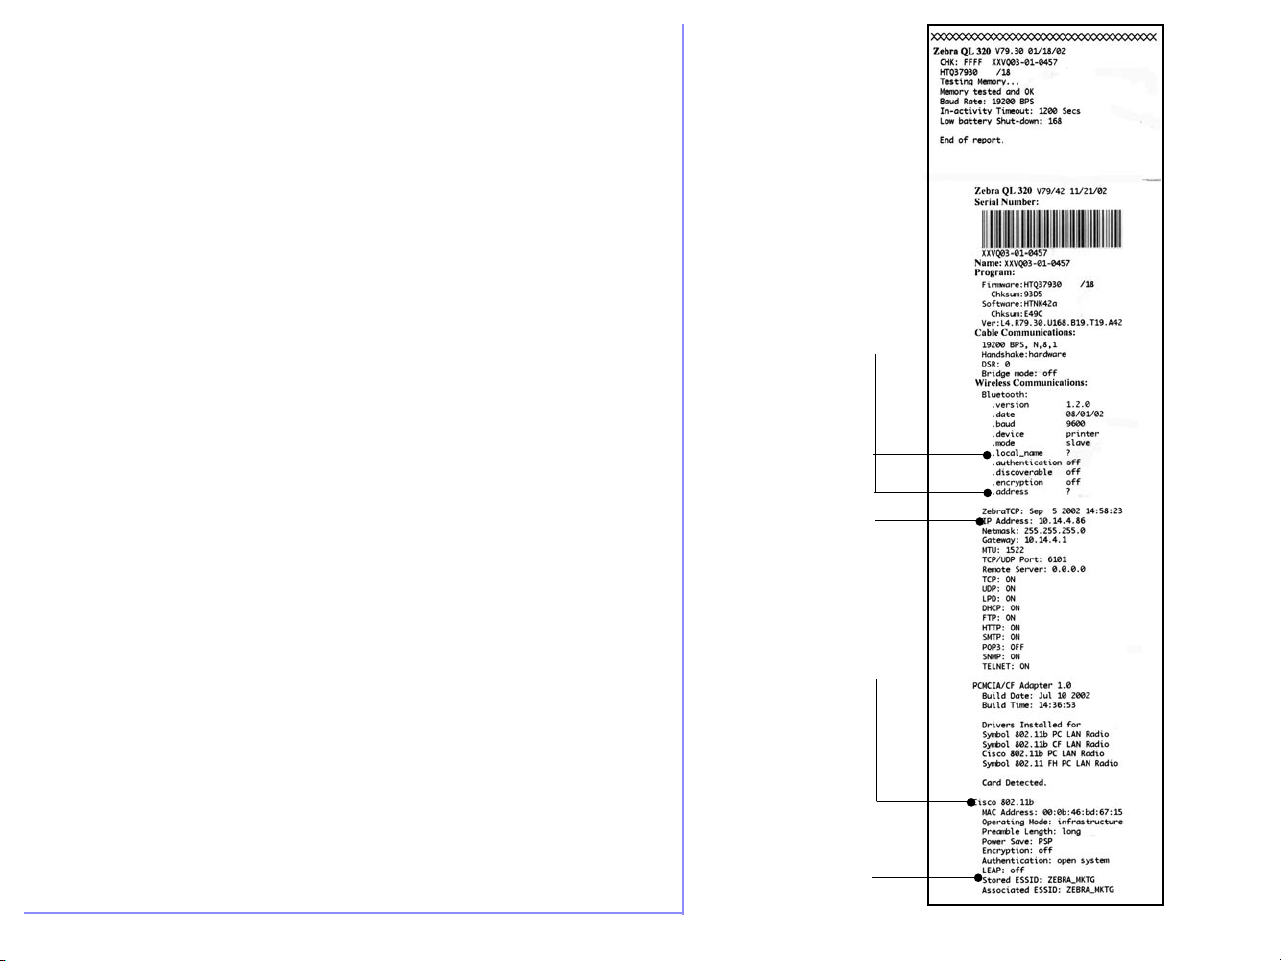
Printing a Configuration Label
If your printer does not have an LCD you can print a Configuration
Label (2-key report) and verify the network settings in the printer.
To print out a Configuration Label follow these steps:
1. Turn the printer off. Load the media compartment with journal
media (media with no black bars printed on the back)
2. Press and hold the Feed Button.
3. Press and release the Power button and keep the Feed button
pressed. When printing starts, release the Feed button.
The printer will generate a configuration label as shown opposite.
A “? “ value for the
Bluetooth .local _
name and .address
parameters indicates
no Bluetooth radio is
installed.
The IP Address was
automatically as
signed by DHCP
This printer has a
Cisco 802.11b radio
ESSID setup was
successful and this
printer is associated
to the Access Point
Zebra Mobile Printers • Wireless Configuration Guide • rev. H 10
-
continued

NETWORK SETUP WITH ENCRYPTION
• As was described in Quick Network Setup, open Label Vista and
click on “Printer” on the top menu. From the drop down menu go to
Network Setup and select Network Setup with Encryption. Follow
the wizard steps by clicking Next and by entering the information
from Table 1 as it was done in the Quick Network Setup.
If you don’t know some of the requested information, contact your
network administrator.
• Continue the setup by following the wizard windows. Just as in
the Quick Network Setup you must:
• Enter the network port
• Enable the applicable network protocols. Consult with your net
work administrator to find out which protocols you want to enable.
Note that if your printer has a Frequency Hopping (FHSS) radio
installed you can only use 40 bit encryption.
• Test the settings and click “Finish” to end the wizard and finish
the setup procedure.
-
continued
Zebra Mobile Printers • Wireless Configuration Guide • rev. H 11
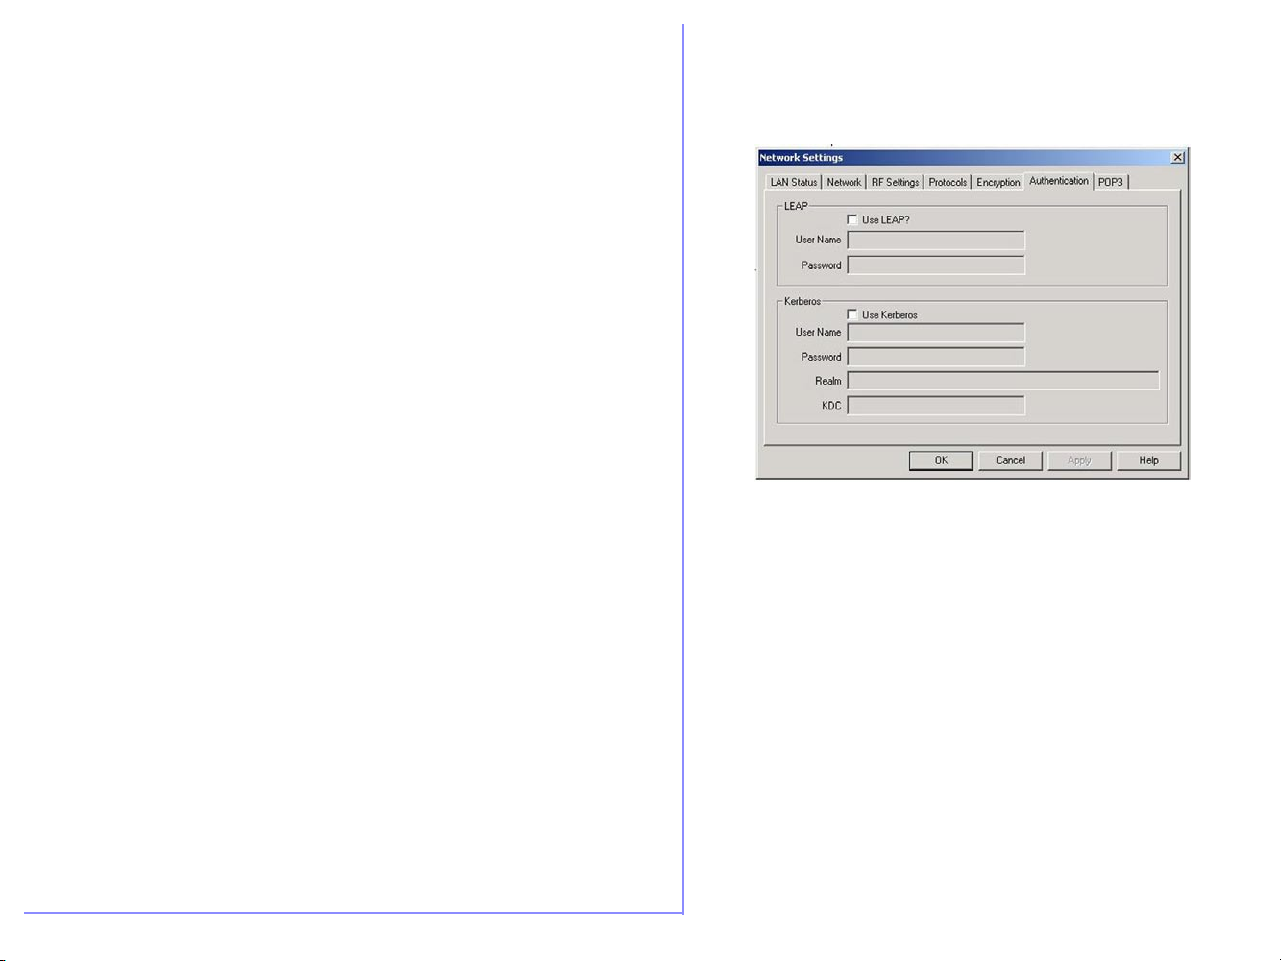
AUTHENTICATION SETTINGS
If you have a printer with a Cisco 802.11b/Symbol 802.11b radio
and your network supports either the LEAP or Kerberos security,
you can set authentication with Label Vista by doing the following:
In Label Vista’s top menu click on Printer and select Network Set
tings from the drop down menu. Click on the “Authentication” tab
and then check the box next to either LEAP or Kerberos depending
on your authentication system. Enter the appropriate authentication information you recorded in Table 1. (See picture opposite).
Contact your network administrator if you don’t know the required
authentication information.
NOTE: If you have an 802.11 FH (Frequency Hopping) radio installed,
LEAP and Kerberos authentication are not available.
-
continued
Zebra Mobile Printers • Wireless Configuration Guide • rev. H 12
POP 3 (POST OFFICE PROTOCOL 3) SETUP
POP 3 (Post Office Protocol 3) is usually used to retrieve e-mail
from a mail server, but it can also be used for sending print jobs to
a wireless mobile network printer. The printer should already be
configured for wireless operation and associated with an access
point before running the POP3 setup wizard. (See the previous two
sections).
• Open Label Vista. In the top menu bar select Printer / Network
Setup / POP3 Setup.
• The POP3 window will come up, and present a list of informa
tion you will need to continue. Remember that the printer should
already be associated with an access point in order to proceed.
Contact your network administrator if you don’t know the informa-
tion requested.
• Enter the POP3 Server IP address and click “next”. (Contact
your network administrator to obtain this address).
• Next, you will need to enter the User Name and Password for
the e-mail account being used. Click “Next”.
• You must now enter the frequency (in seconds) the printer will
check the POP3 account for new mail. Note that the recommended
frequency should be set to greater than thirty seconds to avoid
printer unresponsiveness. Click on “Next”.
• Select the POP3 desired options as shown in the last window.
If the “Print Body of E-Mails” option is selected, the printer will
print messages as they are received. E-mail messages sent to the
printer should be in ASCII text.
If you send an e-mail message to the printer that can be inter-
preted as a CPCL command, the printer will attempt to execute
that command.
Select POP3 networking option & enter
the POP3 Server IP
address
-
Enter the POP3 User
name and password
Enter how often the
printer will query the
POP3 server.
continued
Zebra Mobile Printers • Wireless Configuration Guide • rev. H 13
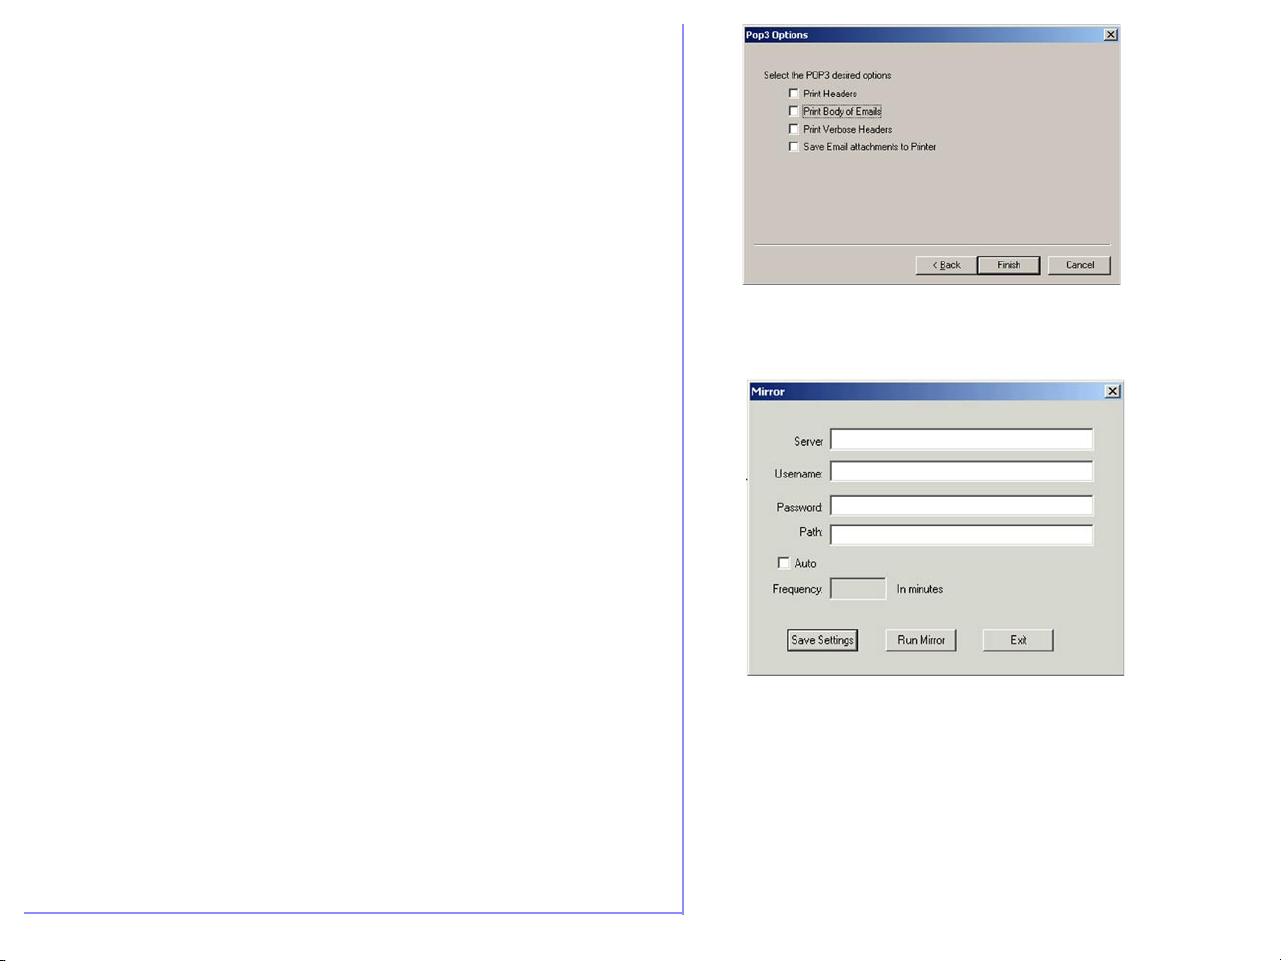
If you select the “Save E-Mail attachments to Printer” option,
e-mail attachments will be saved in the printer’s flash memory.
The size of the attachments that can be saved is limited to the
memory remaining. Attachment file names will be truncated to
11 characters (8 character file name and a three character extension.)
Click “Finish” when you have finished selecting the POP3 optoins.
Once you have finished setting up your printer it will become
recognized as a unique device on your network with its own IP address.
FTP MIRROR
Zebra QL series printers support a file mirroring process that
allows the printer to synchronize files with those stored on an
FTP server. Since the process relies solely on the FTP standard,
no other special utilities are required. The files on the FTP server
can be printer firmware files, fonts, or lists of printer configuration
commands (such as commands to change the printer’s WEP key).
In order for this file synchronization process to work properly, it is
only required that the FTP server support “Unix style” directory
listings and that the modification time stamps of the files stored on
the FTP server are accurate.
Setting Up Mirror In Label Vista
Select the options for displaying your POP3 messages.
The Mirror dialog box is a selection under the Printer menu in
Label Vista. You must fill out the FTP server information and your
user name and password as requested. Clicking on the “Auto”
Select the options for seting up the file mirroring process
check box will instruct the printer to synchronize its files per the
number of minutes you enter in the Frequency box.
continued
Zebra Mobile Printers • Wireless Configuration Guide • rev. H 14

Setting Up Mirror With Parameter Commands
NOTE: Refer to pg. 18 for more general information on parameter commands.
The following set/get variables are available to enable FTP
mirroring:
ip.mirror.auto: on/off
getvar example: !U1 getvar “ip.mirror.auto”
setvar example: ! U1 setvar “ip.mirror.auto” “on”
If “on”, the printer will automatically synchronize files upon
power-up, and then per the frequency setting. (see ip.mirror.
freq, below)
ip.mirror.username: 20 bytes (string)
getvar example: !U1 getvar “ip.mirror.username”
setvar example: ! U1 setvar “ip.mirror.username” “test”
Username to use for FTP login
ip.mirror.password: 20 bytes (string)
getvar example: !U1 getvar “ip.mirror.password”
setvar example: ! U1 setvar “ip.mirror.password” “secret”
Password for FTP account
ip.mirror.server: 40 bytes (string)
getvar example: !U1 getvar “ip.mirror.server”
setvar example:
! U1 setvar “ip.mirror.server” “192.168.1.1”
Server ip address or name (if DNS server information is pro-
vided via DHCP).
ip.mirror.path: 50 bytes (string)
getvar example: !U1 getvar “ip.mirror.path”
setvar example: ! U1 setvar “ip.mirror.path” “/zebra/ql”
Path on the FTP server where the mirror directory is located.
Defaults to “companyname/model”.
NOTE: this must be an absolute path (i.e. it must start with / or ~)
ip.mirror.freq: 0-99 minutes
getvar example: !U1 getvar “ip.mirror.freq”
setvar example: ! U1 setvar “ip.mirror.freq” “25”
Number of minutes to wait before performing another file
synchronization. If this value is “0”, the mirror process will be
performed only once when the printer powers-up. Setting
a low value will cause the printer to spend most of its time
performing the mirror process. This parameter only applies
if ip.mirror.auto is “on”.
ip.mirror.fetch
do example: ! U1 do “ip.mirror.fetch” “yes”
Forces the mirror process to be run immediately. The printer
will immediately contact the FTP server defined by “ip.mirror.
server”, log on with the defined username and password and
look for mirror file updates.
Refer to Section 14 of the CPCL Programming Manual for more
information on configuring FTP mirror with parameter com
mands.
-
Zebra Mobile Printers • Wireless Configuration Guide • rev. H 15

Bluetooth™ Setup with Label Vista
Bluetooth settings that are configurable by Label Vista:
• Authentication
• Discoverable Mode
• Friendly Name
• PIN
By default, a Zebra Bluetooth printer comes with Authentication
turned OFF, Discoverable turned ON, and the “Friendly Name” of
the printer set as the printer’s serial number.
The printer will always be a “slave device” in Bluetooth parlance.
It will not look for other Bluetooth devices to connect to, and will
never initiate the communication link itself.
In order to change the Bluetooth settings the printer needs to be
connected to a PC through a serial cable as detailed in the first section.
• To change the Bluetooth parameters in the printer, open Label Vista
from the top main menu and select Printer / Utilities / Bluetooth
settings.
• Once in the Bluetooth window (see opposite) you can change any
parameters that are not grayed out.
AUTHENTICATION
Authentication offers three choices: OFF, SET PIN and
GENERATED.
OFF: Authentication and encryption are turned off in the printer.
SETPIN: When setting a PIN value, authentication will be enabled
and the PIN will be the value set by the user in the PIN field.
Select this option and enter your selected PIN in the box (see
picture). When authentication is enabled and a master device
attempts to communicate with the printer, the printer will require
this PIN before it accepts the connection.
continued
Zebra Mobile Printers • Wireless Configuration Guide • rev. H 16

GENERATED: Selecting this option will also enable authentication.
This option is available for backwards compatibility only and may
not be supported in future editions of the Bluetooth library.
To enable authentication make sure you are using Bluetooth library
version 1.2.3 or higher and select the SETPIN option.
PIN
Enter your desired PIN in this box. You can use between 4 and
10 characters and any combination of letters and numbers (ASCII
characters) is allowed. (See SETPIN option above.) NOTE: This
feature is available only when application software is at revision
“44u” or higher.
DISCOVERABLE
Discoverable is set ON or OFF. If Discoverable is turned OFF, the
printer will not be discovered by any other device but can still
can be connected if the application developer knows the printer’s
Bluetooth address. The printer’s Bluetooth address can be found
by printing a Configuration Label (2-key report), or by scrolling
through the LCD if available. (Refer to pg. 9 of this manual or the
printer’s User’s Guide for instructions on printing a Configuration
Label.)
FRIENDLY NAME
The “Friendly Name” is the name that a master device will see
when the printer is discovered. By default, the friendly name is
the printer’s serial number. It can be changed to whatever name
the end user desires.
Printer serial number.
Used as Bluetooth
default “friendly
name”.
Last 3 digits of the
Software number are its
revision
Bluetooth version:
Discoverable and
Authentication
parameters can be
turned “off.”
Encryption is turned on
when Authentication
parameter is “On.”
Bluetooth Address.
Barcode representing
the address is printed
above. The Bluetooth
address cannot be
changed.
The picture opposite shows a Configuration Label (2-key report)
with the Bluetooth configurable settings highlighted.
Typical 2-Key Reset Report
Zebra Mobile Printers • Wireless Configuration Guide • rev. H 17
 Loading...