

Installation Instruction
Mississauga, Ontario
Canada
DESCRIPTION: DOCUMENT SCANNER MNT INSTALL
NOTE - FOR SUPPLIER/VENDOR:
• THIS DOCUMENT HAS A TOTAL OF 5 PAGES, INCLUDING COVER SHEET
• ALL PAGES, EXCLUDING COVER SHEET, ARE REQUIRED FOR CUSTOMER
INSTRUCTION
• DO NOT INCLUDE FIRST PAGE IN ASSEMBLY PACKAGE
ITEM GROUP
PRODUCT TYPE
EDR/O STATUS
OBSOLETE PROD. / PROJ. ENG.: SA JAN 25/07
ENGINEERING ONLY MECH. ENG.: KT JAN 25/07
PRE-PILOT ELEC. ENG.:
BETA OTHER:
RELEASED
X
EDR/EDO NO.: 7796
A00DOC
VN0
APPROVALS DATE
DRAWN BY: KEN TAYLOR JAN-12-07
CHKD. BY:
TG
U:\engdata\RELEASE\MISSISSAUGA PRODUCTS\DO
DATE:
JAN 25/07
INSTALLATION INSTRUCTION FORM:
Blank_Forms\installation instruction_portrait.doc
APPROV'D. BY:
PB
JAN 25/07
Mississauga, Ontario
TITLE:
DOCUMENT SCANNER MNT
INSTALL
A
DRAWING NO.
1616310
SHEET 1 OF 5
SIZE
REV.
A
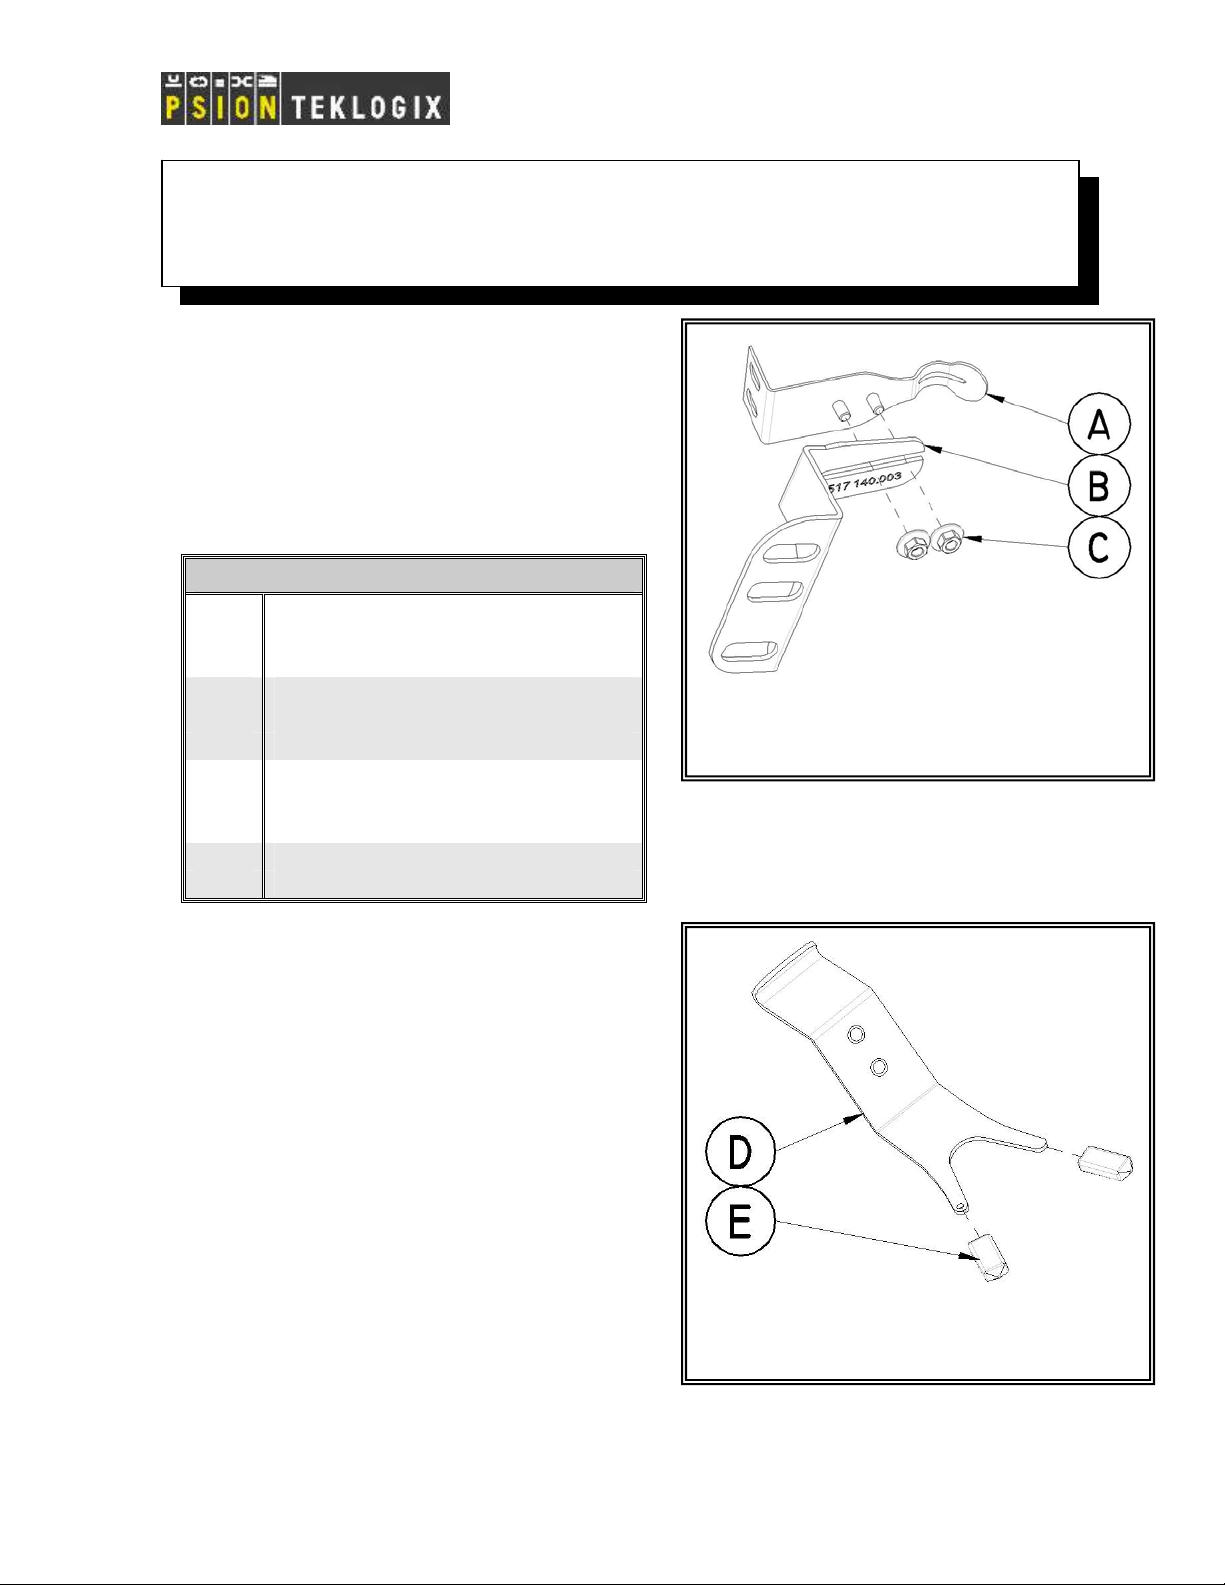
Installation Instruction for MT3601-10/12 Scanner Right Side
Installation
Step 1: Place the threaded bolts on the Spring
Bracket (A) through the long slot on the Angle
Bracket (B) and fasten using two M4 hexagon Nuts
(C) as shown in Figure 1. Torque to 18 lbf-in.
Legend:
A Spring Bracket with bolts
B Angle Bracket
C 4x Nut Hexagon M4 with washer
D Connecting Plate
E 2x Protective Caps
F Spring Bracket without bolts
G 8580/90 Vehicle Mount Terminal
H 2x Flat Washer
I 2x Screws M8 x 12 Hexagon
J Standard Mount Bracket
K 2x Screws M8 x 16 Hexagon
Step 2: Slide the accompanying protective
caps (E) over the ends of the Connecting Plate
(D) to avoid damage to the scanner or injury to
the user. See Figure 2.
Figure 1
Figure 2
Part No. 1616310 Revision A
Sheet
1 of 4

Step 3: Place the threaded bolts
on the Connecting Plate (D) into
the elongated holes on the Spring
Brackets (A) and (F) in position
shown. Secure the holder loosely
using two M4 hexagon Nuts (C)
as shown in Figure 3.
Step 4: Adjust the Spring
Brackets (A) and (F) suitably
before using the scanner.
Temporally place the hand-held
scanner into the mounted holder
and fasten the two M4 hexagon
Nut (C). Torque to 18 lbf-in.
Remove the hand-held scanner
from the holder.
Step 5
Washer (H), through the Angle Bracket (B) into Vehicle Mount Terminal (G). Torque to 26 lbf-in.
* For assembly with RAM mount use M8 x 12 mm Screw (I), see Figure 4-1.
* For assembly with Standard Mount (J) use M8 x 16 mm Screw (K), see Figure 4-2.
: Next attach the holder to the 8580/90 terminal (G) as shown in Figure 4-1 or 4-2 * and Flat
Figure 4-1
Figure 3
Figure 4-2
Part No. 1616310 Revision A
Sheet
2 of 4

Step 6: Connect the hand-held scanner cable to the 8580 / 8590 Vehicle Mount
Terminal.
Note: When connecting the hand-hand scanner interface cables
to the 8580/90 Vehicle Mount Terminal. The cable cover must be
removed and reinstalled correctly. Please ensure you attach the
cable cover as per 8580/90 Vehicle Mount User Manual, see
section 4.1 complying with Protection Standards IP65. The IP65
protection class can no longer be guaranteed if the cable cover is
installed incorrectly.
Appendix A: Support Services and World Wide Offices
Support Services
Psion Teklogix provides a complete range of product support services to its customers
worldwide. These services include post-installation technical support and product
repairs.
Canada and USA: Technical Support and Repair Services
In Canada and the U.S.A. these services can be accessed through the Psion Teklogix
Helpdesk. The Helpdesk coordinates repairs, helps you troubleshoot problems over the
phone, and arranges for technicians or engineers to come to your site. Canadian and
U.S. customers may receive access to technical support services, ranging from phone
support to emergency on-site system support, by calling the toll-free number below, or
via our secure web site.
Note: Customers calling the toll-free number should have their Psion Teklogix customer
number or trouble ticket number available.
Voice: 1 800 387-8898
Fax: 1 905 812-6304
Web Site: http://service.psionteklogix.com
WORLD WIDE WEB
www.psionteklogix.com
International Support
For technical support outside of Canada or the U.S.A., please contact your local Psion
Teklogix office.
Part No. 1616310 Revision A
Sheet
3 of 4

Psion Teklogix Worldwide Offices and *Service Centers
North America
Canada (corporate office)
*Psion Teklo gix I nc.
2100 Meadowvale Blvd.
Mississauga, O n t ario L 5N 7J9
Canada
Tel: +1 905 813 9900
amer icas.marketing@psionteklogix.com
Psion T ek log ix I nc.
Int egr ation Servi ce s Gr ou p
Sui te 410-132 51 Delf Place
Richmond, BC .V6V 2A2
Canada
Tel: 1 604 2 14 7400
amer icas.marketing@psionteklogix.com
Psion T ek log ix Syst ems
3026 Solandt Road
Kanat a, Ontario K2K 2A5
Canada
Tel: 613- 592- 2592
Fax : 613- 592- 6778
U.S.A.
*Psion Teklo gix Co r p.
1810 A i rpo rt Exchange Blvd
Su ite 500 Erlanger
Kentuck y 41018
United States
Tel: +1 859 371 6006
amer icas.marketing@psionteklogix.com
Mexico
Psion T ek log ix S.A. de C . V.
Si erra Moj ada 626-2
Col. Lomas Barrilaco
D.F. 11010
Mexico
Tel: + 52 55 5202 6802
amer icas.marketing@psionteklogix.com
Europe
Belgium
Psion Teklogix Benelux
Nieuwe Weg 1
2070 Zw i jn drecht
Belgium
Tel: + 32 3 250 22 00
info@psionteklogix.b
Denmark
Psion Teklogix AB (Denmark)
Branch of Psion Teklogix A.B.
Vest er ballev ej 4- 6
D K -7000 Freder icia
Denmark
Tel: + 45 76240133
info@psionteklogix.dk
France
*Psion Teklo gix S.A. [ A ix En Pr o vence]
Parc de la Duranne
135, rue René D escartes
BP 421 000
13591 Aix En Pr ovence
Cedex 3
France
Tel: + 33 4 42908809
contact@psionteklogix.fr
e
Germany
Psion Teklogix Gmbh
Jak o b - K ai ser - St r . 3
47877 Will ich Münchheide
Germany
Tel: +49 2154 92820
info@psionteklogix.de
Italy
Psion Teklogix Srl
Piazza Don Mapelli 75
20099 Sesto S. Giovanni (MI)
ITALY
Tel + 39 02 2412471
Fax + 39 02 24124701
Email: tkxitalia@psionteklogix.com
Spain
Psion Tekl o gix S.L. Espana
WTC A lmeda Park-Poligo no Almeda
Placa de la Pau s/n
Ed if i ci o no 3, 2 Pla nt a
08940 Cor n ella de Llobr egat
Barcelona
Spain
Tel: +34 93 475 02 20
teklogix@psionteklogix.com
Sweden
Psion Te kl o gix AB
St or a Badh usgatan 1 8-2 0
11 21 G othenburg
Sweden
Tel: +46 31 339 30 90
info@psionteklogix.se
Switzerland
1A Chemin de la D ent D Oche
Ecublens,VD 1024
Sw it zer l an d
Tel: +41 21 694 80 10
christophe.francois@psionteklogix.c
om
United Kingdom
Psion Te kl o gix ( U K ) L imi t ed
Bourne End Business C ent re
Cores End Road
Bourne End
Buckinghamshire SL8 5AR
United Kingdom
Tel: +44 1628 648800
enquiries@psionteklogix.com
Asia
China
Psion Tek l o gix (Shanghai)
Wireless Techno logies Co ., Ltd.
Uni t 1507- 08
Mingshen Building
No .3131 Kai X uan Rd
Shanghai 200 030
China
Tel: +86 21 5407 1 991
ptchina@psiont eklogix.com
India
Psion T eklogix Syst e m s I ndia Pvt . Lt d.
V-11, 2nd Floor, Green Par k Extn
New Delh i -Ind i a, 110016,
phone: + 91- 11- 5107 4500/ 5107
6500 /5107 8500 / 5107 9500
Fax : +91 -11 - 510 7 05 00
tekind@psionteklogix.com
Japan
Psion Teklogix Japan
Ark Mo ri Buildi ng 12F
1-12- 32 , Akasaka, Minato - ku,
Tokyo 107- 6012
Tel: 813 4360 -82 72
Fax : 813 4360- 8201
Emai l: kazuo.aoki@psionteklogix.com
Singapore
Psion Teklogix Asia Pacific Pte Ltd
152 Beac h Road
# 22 -0 3/04 G at eway East
Si ngapore 189721
Tel: + 65 6296 2232
Fax: +65 6296 2322
teksing@ psionteklogix.com
Korea
Psion T ek log ix Ko r ea
904 Cresyn Tower
8-24 Jamwo n-do ng
Seocho-kn, Seoul
Korea
Tel: + 82 2 344 51256
Calvin.cho@ psionteklogix.com
Middle East
Dubai
Psion Teklogix D ubai
P.O . Box 2616 59 JAFZ
Shei k h Z ayed
Emaar Building #2, U n it 615
Dubai
UAE
Tel: +971 4 368 94 12
Joe.iarocci@psionteklogix.com
Israel
Psion T ek log ix I s r ael
14 Z e’elon St. Unit 47
Or-Yehuda
Israel 60407
Tel: +972 3 634 80 01
guy.perry@psionteklogix.com
Africa
South A frica
Psion T eklo gix So uth Africa
Pr opr iet ar y Limit ed
Grd Flr East,W ate r fal l Ed ge
Phase 2,W at er fall Pa r k
Bekker Rd.
Midrand 1685
South A frica
Tel: + 27 11 8057440
sales@psionteklogix.co.za
8\05
*
Auth o rize d S er vice C e n ter
Part No. 1616310 Revision A
Sheet
4 of 4
 Loading...