


 Loading...
Zaxwerks ProAnimator / ProModeler - User Guide V. 4 |
|

Zaxwerks Inc. 5724 Camellia Ave.
Temple City, CA 91780 (626) 309-9102 phone (626) 309-9142 fax http://www.zaxwerks.com
Sales: sales@zaxwerks.com
Tech Support: support@zaxwerks.com
© 1996 - 2006 Zaxwerks Inc. All rights reserved.
This manual, as well as the software described in it, is furnished under license and may only be used or copied in accordance with the terms of such license. The information in this manual is furnished for informational use only, is subject to change without notice, and does not represent product specifications or commitment on the part of Zaxwerks. Zaxwerks assumes no responsibility or liability for any error or inaccuracies that may appear in this document.
The Zaxwerks 3D Invigorator, ProAnimator, and ProModeler are a trademarks of Zaxwerks Inc. After Effects, Illustrator and Photoshop are trademarks of Adobe Systems Inc. FreeHand is a trademark of Macromedia Inc. Apple and Macintosh are registered trademarks of Apple Computer, Inc. Windows 2000 and Windows XP are registered trademarks of Microsoft, Inc. OpenGL is a trademark of Silicon Graphics Inc. All other product names or trademarks are the property of their respective owners.
|
Zaxwerks ProAnimator / ProModeler - User Guide V. 4 |

Table of Contents
INTRODUCTION . . . . . . . . . . . . . . . . . . . . . . . . . . . . . . 16
INSTALLATION INSTRUCTIONS . . . . . . . . . . . . . . . 17
WHAT’S NEW IN VERSION 4? . . . . . . . . . . . . . . . . . |
23 |
BASIC CONCEPTS |
|
Modeling . . . . . . . . . . . . . . . . . . . . . . . . . . . . . . . . . . . . |
27 |
Surface Set-Up . . . . . . . . . . . . . . . . . . . . . . . . . . . . . . . |
27 |
Scene Set-Up & Lighting . . . . . . . . . . . . . . . . . . . . . . . |
28 |
Animation . . . . . . . . . . . . . . . . . . . . . . . . . . . . . . . . . . . |
28 |
Rendering . . . . . . . . . . . . . . . . . . . . . . . . . . . . . . . . . . . |
28 |
ANIMATION TUTORIALS
ProAnimator Introduction . . . . . . . . . . . . . . . . . . . . . . 31
Creating An Animation in Five Clicks . . . . . . . . . . . . 32
Changing The Text In An Animation . . . . . . . . . . 34
Changing The Speed Of An Animation . . . . . . . . 35
Changing The Camera’s View
Of The Animation . . . . . . . . . . . . . . . . . . . . . . . 36
Rendering An Animation . . . . . . . . . . . . . . . . . . . . . . . 38
Rendering A Single Frame . . . . . . . . . . . . . . . . . . 38
Saving A Single Frame Rendering . . . . . . . . . . . . 39
Rendering The Movie . . . . . . . . . . . . . . . . . . . . . . 40
Rendering Options . . . . . . . . . . . . . . . . . . . . . . . . 41
Changing The Timing And Speed
Of An Animation . . . . . . . . . . . . . . . . . . . . . . . . . . . . 42
What is A Pose? What Is A Transition? . . . . . . . 42
Creating A New Scene . . . . . . . . . . . . . . . . . . . . . 43
Creating The 3D Text . . . . . . . . . . . . . . . . . . . . . . 44
Adding An Animation Preset . . . . . . . . . . . . . . . . 44
Changing The Track Name . . . . . . . . . . . . . . . . . . 45
Moving Splice Points . . . . . . . . . . . . . . . . . . . . . . 45
Adding More Hold Time To
The Beginning Pose . . . . . . . . . . . . . . . . . . . . . . 46
Changing The Position Of A Segment
Without Changing Its Length . . . . . . . . . . . . . . 46
Slowing Down The Motion Of A Transition . . . . 47
Resetting An Animation Back
To A Saved Preset . . . . . . . . . . . . . . . . . . . . . . . 48
Increasing The Length Of
An Entire Animation . . . . . . . . . . . . . . . . . . . . 48
Setting The Loop Points For
The Work Area . . . . . . . . . . . . . . . . . . . . . . . . . 50
Shortening The Length Of
An Entire Animation . . . . . . . . . . . . . . . . . . . . 51
Selecting Segments That Are
Difficult To Click On . . . . . . . . . . . . . . . . . . . . 52
Changing Object Motion During Transitions . . . . . . 53
Changing The Curve Of A Motion Path . . . . . . . 53
Changing The Direction Of
The Arch In The Path . . . . . . . . . . . . . . . . . . . . 55
Zaxwerks ProAnimator / ProModeler - User Guide V. 4

Controlling When Objects Start To Move . . . . . . 56
Controlling The Order Of Objects
As They Cascade . . . . . . . . . . . . . . . . . . . . . . . 57
Adding Start Ease And End Ease
For A Professional Touch . . . . . . . . . . . . . . . . 60
Changing The Positions Of Objects . . . . . . . . . . . . . . 62
Moving Objects To New Positions . . . . . . . . . . . 63
Spreading Objects Apart . . . . . . . . . . . . . . . . . . . 65
Bunching Objects To A Point . . . . . . . . . . . . . . . . 66
Making Objects Spin As They Move . . . . . . . . . . 67
Randomizing Object Positions . . . . . . . . . . . . . . 68
Shuffling Objects . . . . . . . . . . . . . . . . . . . . . . . . . . 69
ANIMATION CONTROLS REFERENCE |
|
Easy/Advanced Controls . . . . . . . . . . . . . . . . . . . . . . . |
73 |
Track Segment Labels . . . . . . . . . . . . . . . . . . . . . . . . . |
73 |
Selecting All Objects On A Track . . . . . . . . . . . . . . . . |
74 |
Track Commands . . . . . . . . . . . . . . . . . . . . . . . . . . . . . |
74 |
Add Camera Track . . . . . . . . . . . . . . . . . . . . . . . . |
75 |
Duplicate Selected Tracks . . . . . . . . . . . . . . . . . . |
75 |
Move Selected Objects To Track.... . . . . . . . . . . . . |
76 |
Reset Selected Tracks . . . . . . . . . . . . . . . . . . . . . . |
76 |
Delete Selected Tracks . . . . . . . . . . . . . . . . . . . . . |
77 |
Select All Segments . . . . . . . . . . . . . . . . . . . . . . . . |
77 |
Flip Selected Segments . . . . . . . . . . . . . . . . . . . . |
77 |
Object Animations Menu . . . . . . . . . . . . . . . . . . . . . . . |
78 |
Add Object Pose . . . . . . . . . . . . . . . . . . . . . . . . . . |
78 |
Set As Starting Position . . . . . . . . . . . . . . . . . . . . |
78 |
Save Preset . . . . . . . . . . . . . . . . . . . . . . |
. . . . . . . . . 79 |
Rename Preset . . . . . . . . . . . . . . . . . . . |
. . . . . . . . . 80 |
Delete Preset . . . . . . . . . . . . . . . . . . . . |
. . . . . . . . . 80 |
Append Preset . . . . . . . . . . . . . . . . . . . |
. . . . . . . . . 80 |
Last Applied Preset . . . . . . . . . . . . . . . |
. . . . . . . . . 81 |
Object Animations Preset List . . . . . . |
. . . . . . . . . 81 |
Object Animation TRY Button . . . . . . . . . |
. . . . . . . . . 82 |
Camera Animations Menu . . . . . . . . . . . . . |
. . . . . . . . . 82 |
Add Camera Pose . . . . . . . . . . . . . . . . |
. . . . . . . . . 83 |
Save Preset.... . . . . . . . . . . . . . . . . . . . . . |
. . . . . . . . . 83 |
Rename Preset.... . . . . . . . . . . . . . . . . . . |
. . . . . . . . . 84 |
Delete Preset.... . . . . . . . . . . . . . . . . . . . . |
. . . . . . . . . 84 |
Append Preset.... . . . . . . . . . . . . . . . . . . |
. . . . . . . . . 84 |
Last Applied Preset . . . . . . . . . . . . . . . |
. . . . . . . . . 84 |
Camera Animations Preset List . . . . . |
. . . . . . . . . 85 |
Camera Animation TRY Button . . . . . . . . |
. . . . . . . . . 85 |
Animation Timeline . . . . . . . . . . . . . . . . . . |
. . . . . . . . . 86 |
Current Time Marker . . . . . . . . . . . . . . . . . |
. . . . . . . . . 86 |
Current Time Readout (The GOTO Field) |
. . . . . . . . . 86 |
Project Start Time . . . . . . . . . . . . . . . . . . . |
. . . . . . . . . 87 |
Project Duration . . . . . . . . . . . . . . . . . . . . . |
. . . . . . . . . 87 |
Frame Rate Popup . . . . . . . . . . . . . . . . . . . |
. . . . . . . . . 88 |
Motion Blur . . . . . . . . . . . . . . . . . . . . . . . . . |
. . . . . . . . . 88 |
Shutter Angle . . . . . . . . . . . . . . . . . . . . . . . |
. . . . . . . . . 89 |
Time Line Track Controls . . . . . . . . . . . . . |
. . . . . . . . . 89 |
Visibility . . . . . . . . . . . . . . . . . . . . . . . . |
. . . . . . . . . 89 |
Solo / Ghost . . . . . . . . . . . . . . . . . . . . . |
. . . . . . . . . 90 |
Lock . . . . . . . . . . . . . . . . . . . . . . . . . . . |
. . . . . . . . . 91 |
Zaxwerks ProAnimator / ProModeler - User Guide V. 4

Animation Playback . . . . . . . . . . . . . . . . . . . . . . . . . . |
. 91 |
Play Work Area . . . . . . . . . . . . . . . . . . . . . . . . . . |
. 91 |
Work Area Start And End Markers . . . . . . . . . . |
. 92 |
Jump To Beginning . . . . . . . . . . . . . . . . . . . . . . . |
. 92 |
Back One Frame . . . . . . . . . . . . . . . . . . . . . . . . . |
. 92 |
Play Project . . . . . . . . . . . . . . . . . . . . . . . . . . . . . |
. 92 |
Stop . . . . . . . . . . . . . . . . . . . . . . . . . . . . . . . . . . . . |
. 93 |
Forward One Frame . . . . . . . . . . . . . . . . . . . . . . |
. 93 |
Jump To End Of Project . . . . . . . . . . . . . . . . . . . |
. 93 |
Loop . . . . . . . . . . . . . . . . . . . . . . . . . . . . . . . . . . . |
. 93 |
Loop With Hold . . . . . . . . . . . . . . . . . . . . . . . . . . |
. 94 |
Show/Hide Paths . . . . . . . . . . . . . . . . . . . . . . . . . |
. 94 |
Animation Tracks . . . . . . . . . . . . . . . . . . . . . . . . . . . . |
. 95 |
Animation Poses . . . . . . . . . . . . . . . . . . . . . . . . . . . . . |
. 96 |
Pose Actions . . . . . . . . . . . . . . . . . . . . . . . . . . . . . . . . |
. 97 |
Animation Transitions . . . . . . . . . . . . . . . . . . . . . . . . |
. 98 |
Path Actions . . . . . . . . . . . . . . . . . . . . . . . . . . . . . . . . |
. 99 |
Primary vs.. Secondary Selections . . . . . . . . . . . . . . |
. 99 |
Pose Positioning Controls For Objects . . . . . . . . . . |
100 |
Advantages Of Using The Pose Controls . . . . . . . . . |
101 |
Easy Controls For Poses . . . . . . . . . . . . . . . . . . . . . . |
102 |
Bunch/Spread . . . . . . . . . . . . . . . . . . . . . . . . . . . . . . . |
103 |
Randomize . . . . . . . . . . . . . . . . . . . . . . . . . . . . . . . . . . |
103 |
Shuffle . . . . . . . . . . . . . . . . . . . . . . . . . . . . . . . . . . . . |
103 |
Local Center Rotation . . . . . . . . . . . . . . . . . . . . . . . . |
104 |
Move . . . . . . . . . . . . . . . . . . . . . . . . . . . . . . . . . . . . |
105 |
Advanced Controls For Poses . . . . . . . . . . . . . . . . . . . . . |
106 |
Start At Center . . . . . . . . . . . . . . . . . . . . . . . . . . . . . . |
107 |
Advanced Move Controller . . . . . . . . . . . . . . . . . . . . |
108 |
Numeric Move Controller . . . . . . . . . . . . . . . . . . . . . |
108 |
Scale Controls . . . . . . . . . . . . . . . . . . . . . . . . . . . . . . . |
109 |
Local Center Rotation . . . . . . . . . . . . . . . . . . . . . . . . |
110 |
Common Center Rotation . . . . . . . . . . . . . . . . . . . . . |
111 |
Distribute . . . . . . . . . . . . . . . . . . . . . . . . . . . . . . . . . . . |
112 |
Range Control for Circle |
|
& Square Distributions . . . . . . . . . . . . . . . . |
112 |
Distribute Types . . . . . . . . . . . . . . . . . . . . . . . . . |
113 |
Pose Actions . . . . . . . . . . . . . . . . . . . . . . . . . . . . . . . . |
118 |
Timing . . . . . . . . . . . . . . . . . . . . . . . . . . . . . . . . . . |
118 |
Pose Action Type . . . . . . . . . . . . . . . . . . . . . . . . . |
119 |
Use Common Center . . . . . . . . . . . . . . . . . . . . . . |
123 |
Making Adjustments For Smoothness . . . . . . . |
125 |
Visibility Actions For Poses . . . . . . . . . . . . . . . . |
126 |
Visibility Action Types . . . . . . . . . . . . . . . . . |
126 |
Timing . . . . . . . . . . . . . . . . . . . . . . . . . . . . . |
127 |
Using Visibility Actions . . . . . . . . . . . . . . . . |
127 |
Pose Action Presets . . . . . . . . . . . . . . . . . . . . . . . . . . |
127 |
Pose Start / End Time . . . . . . . . . . . . . . . . . . . . . . . . |
128 |
What Is A Tweak? . . . . . . . . . . . . . . . . . . . . . . . . . . . . |
128 |
Reset Tweaks . . . . . . . . . . . . . . . . . . . . . . . . . . . . . . . |
129 |
Reset Pose . . . . . . . . . . . . . . . . . . . . . . . . . . . . . . . . . . |
130 |
Reset All . . . . . . . . . . . . . . . . . . . . . . . . . . . . . . . . . . . . |
130 |
Transition Controls For Objects . . . . . . . . . . . . . . . . . . . |
131 |
Easy Controls . . . . . . . . . . . . . . . . . . . . . . . . . . . . . . . |
132 |
Zaxwerks ProAnimator / ProModeler - User Guide V. 4

Ease - Start & End . . . . . |
. . . . . . . . . . . . . . . . . . . . . . |
133 |
|
Cascade |
. . . . . . . . . . . . . . |
. . . . . . . . . . . . . . . . . . . . . . |
134 |
Cascade Order . . . . . . . . |
. . . . . . . . . . . . . . . . . . . . . . |
135 |
|
Arch .. .. .. |
. . . . . . . . . . . . . . |
. . . . . . . . . . . . . . . . . . . . . . |
139 |
Arch Direction . . . . . . . . |
. . . . . . . . . . . . . . . . . . . . . . |
140 |
|
Advanced Controls . . . . . |
. . . . . . . . . . . . . . . . . . . . . . |
140 |
|
Timing .. . . . . . . . . . . . . . . |
. . . . . . . . . . . . . . . . . . . . . . 141 |
||
Cascade |
. . . . . . . . . . . . . . |
. . . . . . . . . . . . . . . . . . . . . . |
141 |
Cascade Order . . . . . . . . |
. . . . . . . . . . . . . . . . . . . . . . |
141 |
|
Ease .. .. .. |
. . . . . . . . . . . . . . |
. . . . . . . . . . . . . . . . . . . . . . |
141 |
Ease Amount . . . . . . . . . . |
. . . . . . . . . . . . . . . . . . . . . . |
141 |
|
Start Gaps & End Gaps . |
. . . . . . . . . . . . . . . . . . . . . . |
141 |
|
Clump Size . . . . . . . . . . . . |
. . . . . . . . . . . . . . . . . . . . . . |
142 |
|
Transition Presets . . . . . . |
. . . . . . . . . . . . . . . . . . . . . . |
142 |
|
Paths .. .. |
. . . . . . . . . . . . . . |
. . . . . . . . . . . . . . . . . . . . . . 142 |
|
Keyframe-Based vs.. Generated Paths . . . . . . . . . . . |
143 |
||
Start/End Smoothing . . . |
. . . . . . . . . . . . . . . . . . . . . . |
145 |
|
Advanced Arch Amount . |
. . . . . . . . . . . . . . . . . . . . . . |
145 |
|
Arch Styles . . . . . . . . . . . |
. . . . . . . . . . . . . . . . . . . . . . |
146 |
|
Advanced Arch Direction |
. . . . . . . . . . . . . . . . . . . . . |
149 |
|
Direction Styles . . . . . . . |
. . . . . . . . . . . . . . . . . . . . . . |
149 |
|
Arch Center . . . . . . . . . . . |
. . . . . . . . . . . . . . . . . . . . . . |
152 |
|
Overshoot Start/End . . . |
. . . . . . . . . . . . . . . . . . . . . . |
152 |
|
Flatten Start/End . . . . . . |
. . . . . . . . . . . . . . . . . . . . . . |
153 |
|
Twist .. .. |
. . . . . . . . . . . . . . |
. . . . . . . . . . . . . . . . . . . . . . 154 |
|
Path Actions . . . . . . . . . . . . . . . . . . . . . . . . . . . . . . . . 154
Timing . . . . . . . . . . . . . . . . . . . . . . . . . . . . . . . . . . 154
Path Action Type . . . . . . . . . . . . . . . . . . . . . . . . . 155
Making Adjustments For Smoothness . . . . . . . 163
Visibility Actions For Transitions . . . . . . . . . . . 164
Visibility Action Types . . . . . . . . . . . . . . . . . 164
Timing . . . . . . . . . . . . . . . . . . . . . . . . . . . . . 165
Using Visibility Actions . . . . . . . . . . . . . . . . 165
Grouping . . . . . . . . . . . . . . . . . . . . . . . . . . . . . . . . . . . 166
Pose Grouping And Transition Grouping . . . . . 166
The Effect Of Grouping On Timing . . . . . . . . . . 167
Groups And Hard Groups . . . . . . . . . . . . . . . . . . 167
When To Use A Hard Group . . . . . . . . . . . . . . . . 169
Group Text By (Para/Line/Word/Char) . . . . . . 170
Make Independent.. . . . . . . . . . . . . . . . . . . . . . . . 171
Animation On/Off . . . . . . . . . . . . . . . . . . . . . . . . 171
Add To Group . . . . . . . . . . . . . . . . . . . . . . . . . . . . 172
Rename Group . . . . . . . . . . . . . . . . . . . . . . . . . . . 172
Select/Structure . . . . . . . . . . . . . . . . . . . . . . . . . . 172
Select All . . . . . . . . . . . . . . . . . . . . . . . . . . . . . . . . 174
Pose Controls For Cameras . . . . . . . . . . . . . . . . . . . 174
Transition Controls For Cameras . . . . . . . . . . . . . . . 175
Camera Timing. . . . . . . . . . . . . . . . . . . . . . . . . . . 175
Start Ease / End Ease . . . . . . . . . . . . . . . . . . . . . 175
Ease Amount . . . . . . . . . . . . . . . . . . . . . . . . . . . . 176
Camera Paths . . . . . . . . . . . . . . . . . . . . . . . . . . . . 177
Start Smoothing / End Smoothing . . . . . . . . . . . 177
Zaxwerks ProAnimator / ProModeler - User Guide V. 4

MODELING, SURFACING, & LIGHTING
Basic Tutorials . . . . . . . . . . . . . . . . . . . . . . . . . . . . . . . 181
Creating And Working With 3D Text . . . . . . . . . . . . 181
Applying Object Styles . . . . . . . . . . . . . . . . . . . . . . . . 183
Changing The Depth Of An Object . . . . . . . . . . . . . . 187
Coloring Objects . . . . . . . . . . . . . . . . . . . . . . . . . . . . . 188
Coloring Objects: Method 1 . . . . . . . . . . . . . . . . 189
Coloring Objects: Method 2 . . . . . . . . . . . . . . . . 190
Coloring Objects: Method 3 . . . . . . . . . . . . . . . . 191
Editing 3D Text . . . . . . . . . . . . . . . . . . . . . . . . . . . . . . 193
How To Set The Lighting . . . . . . . . . . . . . . . . . . . . . . 195
Using Lighting Styles . . . . . . . . . . . . . . . . . . . . . 196
How To Set The Camera . . . . . . . . . . . . . . . . . . . . . . 197
Saving A View .. .. .. .. .. .. .. .. .. .. .. .. .. .. .. .. .. .. .. .. .. .. .. .. .. .. .. .. .. .. .. 199
Think Like A Photographer . . . . . . . . . . . . . . . . . . . . 201
How To Render An Image .. .. .. .. .. .. .. .. .. .. .. .. .. .. .. .. .. .. .. .. .. 202
How To Get The Background To Drop Out . . . . . . . 203
Advanced Tutorials
How To Create a 3D Logo . . . . . . . . . . . . . . . . . . . . . 204
How To Make Objects Invisible . . . . . . . . . . . . . . . . 206
Moving 3D Objects - Part 1 . . . . . . . . . . . . . . . . . . . . 208
How To Reset 3D Objects . . . . . . . . . . . . . . . . . . . . . 210
Moving 3D Objects - Part 2 . . . . . . . . . . . . . . . . . . . . 211
Camera Shortcuts . . . . . . . . . . . . . . . . . . . . . . . . . . . . 214
Camera Shortcuts Exercise . . . . . . . . . . . . . . . . . . . . 216
Adjusting The Thickness of Objects . . . . . . . . . . . . 217
How To Apply An Edge Profile . . . . . . . . . . . . . . . . . 220
How To Apply A Single Material To An Object . . . . 223 How To Add A Second Material To An Object . . . . 225 How To Split A Profile To Fine Tune
Material Placement . . . . . . . . . . . . . . . . . . . . . . . 227 How To Create An Object Style . . . . . . . . . . . . . . . . 229 Coloring The Other Objects . . . . . . . . . . . . . . . . . . . 230 How To Make Lights Cast Shadows . . . . . . . . . . . . . 232 How To Move Lights . . . . . . . . . . . . . . . . . . . . . . . . . . 234 How To Save A Project . . . . . . . . . . . . . . . . . . . . . . . 236
Additional Types When Working With
Illustrator Files . . . . . . . . . . . . . . . . . . . . . . . . . . 237
MODELING, SURFACING, & LIGHTING
Reference . . . . . . . . . . . . . . . . . . . . . . . . . . . . . . . . . . . 239
The Start Window . . . . . . . . . . . . . . . . . . . . . . . . . . . . 240
Create Text Objects . . . . . . . . . . . . . . . . . . . . . . . . . . 241
Text Entry Area . . . . . . . . . . . . . . . . . . . . . . . . . . 241
Setting The Block Size . . . . . . . . . . . . . . . . . . . . 241
Font Popup . . . . . . . . . . . . . . . . . . . . . . . . . . . . . . 242
Size . . . . . . . . . . . . . . . . . . . . . . . . . . . . . . . . . . . . 242
Leading . . . . . . . . . . . . . . . . . . . . . . . . . . . . . . . . . 243
Spacing . . . . . . . . . . . . . . . . . . . . . . . . . . . . . . . . . 243
Kerning . . . . . . . . . . . . . . . . . . . . . . . . . . . . . . . . . 243
Width Scale. . . . . . . . . . . . . . . . . . . . . . . . . . . . . . 243
Height Scale . . . . . . . . . . . . . . . . . . . . . . . . . . . . . 244
Baseline Shift . . . . . . . . . . . . . . . . . . . . . . . . . . . . 244
Justification . . . . . . . . . . . . . . . . . . . . . . . . . . . . . 244
Zaxwerks ProAnimator / ProModeler - User Guide V. 4

Create Whitespace Objects . . . . . . . . . . . . . . . . 245
Center Text Block . . . . . . . . . . . . . . . . . . . . . . . . 246
Text Window Shortcuts . . . . . . . . . . . . . . . . . . . 247
Cleaning Up Problems With Font Models . . . . 248
Open Illustrator Artwork . . . . . . . . . . . . . . . . . . . . . . |
249 |
Show All Files . . . . . . . . . . . . . . . . . . . . . . . . . . . |
250 |
Open By Layers . . . . . . . . . . . . . . . . . . . . . . . . . . |
250 |
Open As Layer Cycling Object . . . . . . . . . . . . . . |
251 |
Use Illustrator Colors . . . . . . . . . . . . . . . . . . . . . |
251 |
Dismantle Incoming Groups . . . . . . . . . . . . . . . |
252 |
Move Objects To Center . . . . . . . . . . . . . . . . . . . |
253 |
3D Primitives . . . . . . . . . . . . . . . . . . . . . . . . . . . . . . . |
255 |
The PROJECT WINDOW . . . . . . . . . . . . . . . . . . . . . |
259 |
Project Window . . . . . . . . . . . . . . . . . . . . . . . . . . . . . |
261 |
Scene Preview Window . . . . . . . . . . . . . . . . . . . . . . . |
262 |
Toolbar . . . . . . . . . . . . . . . . . . . . . . . . . . . . . . . . . . . . |
262 |
The CAMERA CONTROLS |
|
Camera Mode Button . . . . . . . . . . . . . . . . . . . . . . . . . |
263 |
Camera Manipulation . . . . . . . . . . . . . . . . . . . . . . . . . |
264 |
Camera Tumble . . . . . . . . . . . . . . . . . . . . . . . . . . |
264 |
Camera Roll . . . . . . . . . . . . . . . . . . . . . . . . . . . . . |
265 |
Camera Track . . . . . . . . . . . . . . . . . . . . . . . . . . . . |
266 |
Camera Dolly . . . . . . . . . . . . . . . . . . . . . . . . . . . . |
266 |
Camera Manipulation Shortcut Keys . . . . . . . . |
267 |
Zoom Tool . . . . . . . . . . . . . . . . . . . . . . . . . . . . . . |
268 |
Small Camera Tab Area
Views Popup . . . . . . . . . . . . . . . . . . . . . . . . . . . . 269
Lens Popup . . . . . . . . . . . . . . . . . . . . . . . . . . . . . . 270
Antialiasing Popup . . . . . . . . . . . . . . . . . . . . . . . 271
Super Fast Final Rendering . . . . . . . . . . . . . . . . 272
Resolution Settings . . . . . . . . . . . . . . . . . . . . . . . 273
Pixel Aspect . . . . . . . . . . . . . . . . . . . . . . . . . . . . . 274
Alpha Channel . . . . . . . . . . . . . . . . . . . . . . . . . . . 274
Background Color . . . . . . . . . . . . . . . . . . . . . . . . 275
Backgrounds Images And Movies . . . . . . . . . . . 275
Onscreen Grids . . . . . . . . . . . . . . . . . . . . . . . . . . 276
The LIGHTING CONTROLS |
|
Light Mode Button . . . . . . . . . . . . . . . . . . . . . . . . . . . |
277 |
Light Manipulation In The Scene Preview . . . . . . . |
277 |
Lighting Manipulator Ball . . . . . . . . . . . . . . . . . . . . . |
278 |
The Lights List . . . . . . . . . . . . . . . . . . . . . . . . . . . . . . |
279 |
Turn On This Light . . . . . . . . . . . . . . . . . . . . . . . . . . . |
279 |
Disable All Shadows . . . . . . . . . . . . . . . . . . . . . . . . . . |
280 |
Light Editor Area . . . . . . . . . . . . . . . . . . . . . . . . . . . . . . . . |
280 |
Light Name Field . . . . . . . . . . . . . . . . . . . . . . . . . . . . |
281 |
Light Color Picker . . . . . . . . . . . . . . . . . . . . . . . . . . . |
281 |
Light Color Eyedropper . . . . . . . . . . . . . . . . . . . . . . . |
282 |
Light Intensity . . . . . . . . . . . . . . . . . . . . . . . . . . . . . . . |
282 |
Shadow Casting . . . . . . . . . . . . . . . . . . . . . . . . . . . . . |
283 |
Shadow Darkness . . . . . . . . . . . . . . . . . . . . . . . . . . . . |
284 |
Shadow Softness . . . . . . . . . . . . . . . . . . . . . . . . . . . . |
284 |
Light Preview . . . . . . . . . . . . . . . . . . . . . . . . . . . . . . . . . . . |
284 |
Zaxwerks ProAnimator / ProModeler - User Guide V. 4

Light Commands . . . . . . . . . . . . . . . . . . . . . . . . . . . . . . . . |
285 |
Save Light To Bin . . . . . . . . . . . . . . . . . . . . . . . . . . . . |
285 |
Lights Bin . . . . . . . . . . . . . . . . . . . . . . . . . . . . . . . . . . . . |
286 |
Lights Swatch Commands . . . . . . . . . . . . . . . . . . . . . . . . |
287 |
Apply Swatch To Light . . . . . . . . . . . . . . . . . . . . . . . . |
287 |
Duplicate Light Swatch . . . . . . . . . . . . . . . . . . . . . . . |
287 |
Delete Selected Swatches . . . . . . . . . . . . . . . . . . . . . |
288 |
Clear Bin . . . . . . . . . . . . . . . . . . . . . . . . . . . . . . . . . . . |
288 |
Lighting Styles Bin . . . . . . . . . . . . . . . . . . . . . . . . . . . . . . . |
289 |
Lighting Styles Swatch Commands . . . . . . . . . . . . . . . . . |
290 |
Save Lighting Style . . . . . . . . . . . . . . . . . . . . . . . . . . . |
290 |
Apply Lighting Style . . . . . . . . . . . . . . . . . . . . . . |
290 |
Duplicate Lighting Style . . . . . . . . . . . . . . . . . . . |
291 |
Delete Selected Lighting Styles . . . . . . . . . . . . . |
291 |
Clear Bin . . . . . . . . . . . . . . . . . . . . . . . . . . . . . . . . |
291 |
The OBJECT CONTROLS |
|
Object Mode Button . . . . . . . . . . . . . . . . . . . . . . . . . . . . . |
292 |
Object Manipulation . . . . . . . . . . . . . . . . . . . . . . . . . . . . . |
292 |
Object Nudging . . . . . . . . . . . . . . . . . . . . . . . . . . . . . . |
293 |
Object Tumble . . . . . . . . . . . . . . . . . . . . . . . . . . . . . . . |
294 |
Object Roll . . . . . . . . . . . . . . . . . . . . . . . . . . . . . . . . . . |
295 |
Object Track . . . . . . . . . . . . . . . . . . . . . . . . . . . . . . . . |
296 |
Object Dolly . . . . . . . . . . . . . . . . . . . . . . . . . . . . . . . . |
297 |
Drag Using Object’s Axes . . . . . . . . . . . . . . . . . . . . . |
298 |
Object Scale . . . . . . . . . . . . . . . . . . . . . . . . . . . . . . . . |
301 |
Selecting Objects . . . . . . . . . . . . . . . . . . . . . . . . . . . . . . . . |
302 |
Selection Tool . . . . . . . . . . . . . . . . . . . . . . . . . . . . . . . |
302 |
Primary And Secondary Selections . . . . . . . . . . . . . |
302 |
Adding To And Removing From Selections . . . . . . |
303 |
Drag Selecting . . . . . . . . . . . . . . . . . . . . . . . . . . . . . . . |
304 |
Select All . . . . . . . . . . . . . . . . . . . . . . . . . . . . . . . . . . . |
304 |
Deselect All . . . . . . . . . . . . . . . . . . . . . . . . . . . . . . . . . |
304 |
Using Manipulation Tools For Selecting . . . . . . . . . |
305 |
Small Object Tab Area . . . . . . . . . . . . . . . . . . . . . . . . . . . . |
305 |
Object List . . . . . . . . . . . . . . . . . . . . . . . . . . . . . . . . . . |
306 |
Bold Object Names . . . . . . . . . . . . . . . . . . . . . . . |
306 |
Italic Object Names . . . . . . . . . . . . . . . . . . . . . . . |
307 |
Bullets In The Object List . . . . . . . . . . . . . . . . . . |
307 |
Reset Object . . . . . . . . . . . . . . . . . . . . . . . . . . . . . . . . |
308 |
Make Invisible . . . . . . . . . . . . . . . . . . . . . . . . . . . . . . . |
308 |
Delete Object . . . . . . . . . . . . . . . . . . . . . . . . . . . . . . . |
309 |
Duplicate Object . . . . . . . . . . . . . . . . . . . . . . . . . . . . . |
309 |
The Object Menu . . . . . . . . . . . . . . . . . . . . . . . . . . . . |
310 |
User Prefs . . . . . . . . . . . . . . . . . . . . . . . . . . . . . . . . . . |
311 |
Clear Objects . . . . . . . . . . . . . . . . . . . . . . . . . . . . . . . . |
311 |
Clear Scene . . . . . . . . . . . . . . . . . . . . . . . . . . . . . . . . . |
311 |
Large Object Tab . . . . . . . . . . . . . . . . . . . . . . . . . . . . . . . . |
312 |
Object Name Field . . . . . . . . . . . . . . . . . . . . . . . . . . . |
313 |
Reload Layer . . . . . . . . . . . . . . . . . . . . . . . . . . . . . . . . |
314 |
Replace . . . . . . . . . . . . . . . . . . . . . . . . . . . . . . . . . . . . |
316 |
File Name Field . . . . . . . . . . . . . . . . . . . . . . . . . . . . . . |
318 |
Object Faceting . . . . . . . . . . . . . . . . . . . . . . . . . . . . . . . . . |
318 |
Draft Quality vs.. Best Quality . . . . . . . . . . . . . . |
319 |
Zaxwerks ProAnimator / ProModeler - User Guide V. 4

Generate Model Parts . . . . . . . . . . . . . . . . . . . . . . . . 320 Depth . . . . . . . . . . . . . . . . . . . . . . . . . . . . . . . . . . . . 321 Spike Buster . . . . . . . . . . . . . . . . . . . . . . . . . . . . . . . . . . . . 322 New Looks . . . . . . . . . . . . . . . . . . . . . . . . . . . . . . . . . . 323 Spike Buster And Edge Offsets . . . . . . . . . . . . . . . . . 323 Unbustable Spikes . . . . . . . . . . . . . . . . . . . . . . . . . . . 324 Edge Controls . . . . . . . . . . . . . . . . . . . . . . . . . . . . . . . . . . . 325 Outside Edges vs.. Hole Edges . . . . . . . . . . . . . . . . . 325 Edge Profile Popup . . . . . . . . . . . . . . . . . . . . . . . . . . . 326
Edge Scale . . . . . . . . . . . . . . . . . . . . . . . . . . . . . . . . . . 328 Edge Offset . . . . . . . . . . . . . . . . . . . . . . . . . . . . . . . . . 329 Use Same Profile for Hole Edges . . . . . . . . . . . . . . . 330 Use Same Material for Hole Edges . . . . . . . . . . . . . . 331 Use Same Scale for Hole Edges . . . . . . . . . . . . . . . . 331
CUSTOM EDGES . . . . . . . . . . . . . . . . . . . . . . . . . . . . . 332 How To Create A Custom Edge . . . . . . . . . . . . . . . . 332 Each Layer Becomes A Single Edge . . . . . . . . . . . . 333 Where Do Custom Edges Appear In The Menu? . . 333 Setting The Scale Of A Custom Edge . . . . . . . . . . . . 334 What Types Of Paths Can Edges Be? . . . . . . . . . . . . 335 Crossing The Y Axis . . . . . . . . . . . . . . . . . . . . . . . . . . 336 Crossing The X Axis . . . . . . . . . . . . . . . . . . . . . . . . . . 337 Editing A Profile While The Project Is Open . . . . . . 337
Importance Of The Starting Point For Mapping . . . 338 How To Tell Where The Seam Will Be . . . . . . . . . . . 340 Edge Profile Examples . . . . . . . . . . . . . . . . . . . . . . . . 341
The OBJECT STATS DIALOGUE . . . . . . . . . . . . . . 344
MESHING . . . . . . . . . . . . . . . . . . . . . . . . . . . . . . . . . . . . 345
IMPORTING 3D MODELS . . . . . . . . . . . . . . . . . . . . 347
Scale .. .. .. .. . . . . . . . . . . . . . . . . . . . . . . . . . . . . . . . . . . . 347
Move Objects To Center . . . . . . . . . . . . . . . . . . . . . . 348
EXPORTING 3D MODELS . . . . . . . . . . . . . . . . . . . |
349 |
Exporting All, Selected, Or Visible Objects. . . . . . . |
350 |
Baking Transformations . . . . . . . . . . . . . . . . . . . . . . |
350 |
LAYER CYCLING OBJECTS
What Is A Layer Cycling Object? . . . . . . . . . . . . . . . 351
Understanding Layer Cycling . . . . . . . . . . . . . . . . . . 352
Example Uses For This Technique . . . . . . . . . . . . . . 352
How To Prep The Vector File . . . . . . . . . . . . . . . . . . 356
How To Make A Layer Cycling Object . . . . . . . . . . . 357
The Layer Cycling Controls . . . . . . . . . . . . . . . . . . . . 358
The Frame Controls . . . . . . . . . . . . . . . . . . . . . . . . . . 358
Total Frames Field . . . . . . . . . . . . . . . . . . . . . . . 359
Frame Counter . . . . . . . . . . . . . . . . . . . . . . . . . . . 359
The Playback Controls . . . . . . . . . . . . . . . . . . . . . . . . 360
Start Frame . . . . . . . . . . . . . . . . . . . . . . . . . . . . . 360
Show Before Start Frame . . . . . . . . . . . . . . . . . . 360
Change Every . . . . . . . . . . . . . . . . . . . . . . . . . . . . 361
10 |
Zaxwerks ProAnimator / ProModeler - User Guide V. 4 |
Sequence . . . . . . . . . . . . . . . . . . . . . . . . . . . . . . . |
362 |
Random Seed . . . . . . . . . . . . . . . . . . . . . . . . . . . . |
363 |
Exporting Layer Cycling Objects . . . . . . . . . . . . . . . |
364 |
Combining Sequences . . . . . . . . . . . . . . . . . . . . . . . . |
365 |
Using Cycling Objects Inside ElectricImage . . . . . . |
365 |
Using Cycling Objects Inside Other Programs . . . . |
368 |
MATERIALS |
|
Materials Tab . . . . . . . . . . . . . . . . . . . . . . . . . . . . . . . . |
371 |
Materials Bin . . . . . . . . . . . . . . . . . . . . . . . . . . . . . . . . . . . |
372 |
Moving And Rearranging Swatches . . . . . . . . . . . . . |
373 |
Selecting Swatches . . . . . . . . . . . . . . . . . . . . . . . . . . |
373 |
Materials Tab Swatch Commands |
|
Duplicate Selected Materials . . . . . . . . . . . . . . . . . . |
373 |
Select All Unused . . . . . . . . . . . . . . . . . . . . . . . . . . . . |
374 |
Delete Selected Materials . . . . . . . . . . . . . . . . . . . . . |
374 |
Clear Bin . . . . . . . . . . . . . . . . . . . . . . . . . . . . . . . . . . . |
374 |
Material Editor Area . . . . . . . . . . . . . . . . . . . . . . . . . . . . . |
375 |
Loading A Material Into The Editor . . . . . . . . . . . . . . . . . |
376 |
Loading By Drag and Drop . . . . . . . . . . . . . . . . . . . . |
377 |
Loading By Double Clicking . . . . . . . . . . . . . . . . . . . |
377 |
Material Name Field . . . . . . . . . . . . . . . . . . . . . . . . . . . . . |
377 |
Material Color . . . . . . . . . . . . . . . . . . . . . . . . . . . . . . . . . . |
378 |
Eyedropper . . . . . . . . . . . . . . . . . . . . . . . . . . . . . . . . . . . . |
379 |
New Material Types . . . . . . . . . . . . . . . . . . . . . . . . . . |
379 |
Wireframe And Hidden Line Rendering . . . . . 380 How To Give Objects A Wireframe or
Hidden Line Look . . . . . . . . . . . . . . . . . . . . . 381 Making The Lines Thicker Or Thinner . . . . . . . . . . . 382 Setting The Color Between The Lines . . . . . . . . . . . 383 Making The Lines React To Lights . . . . . . . . . . . . . . 384 Making Lines Shine With Reflections . . . . . . . . . . . . 384 Applying Grid Lines Across Object Faces . . . . . . . . 385
Cartoon Coloring . . . . . . . . . . . . . . . . . . . . . . . . . . . . 387
How To Give Objects Cartoon Coloring . . . . . . . . . 387
Absolute Coloring . . . . . . . . . . . . . . . . . . . . . . . . . . . . 389
How To Give Objects Absolute Coloring . . . . . . . . . 389
2D Graphics In A 3D World . . . . . . . . . . . . . . . . . . . . 390
Absolute Coloring For Pop Art Looks . . . . . . . . . . . 391
The Stroked Pop Art Look . . . . . . . . . . . . . . . . . . . . . 392
The Modified Pop Art Look . . . . . . . . . . . . . . . . . . . . 393
Making TV Screens . . . . . . . . . . . . . . . . . . . . . . . . . . . 394
Making 3D Environments . . . . . . . . . . . . . . . . . . . . . 394
The Matte Color Material . . . . . . . . . . . . . . . . . . . . 395
Masking Out Unwanted Objects . . . . . . . . . . . . . . . . 395
Using Matte Objects To Create Wipes . . . . . . . . . . . 396
Using 3D Mattes For Object Replacement . . . . . . . 397
Making 3D Objects Circle Around
2D Elements . . . . . . . . . . . . . . . . . . . . . . . . . . . . . 398
Zaxwerks ProAnimator / ProModeler - User Guide V. 4 |
11 |

The Shadow Catcher Material . . . . . . . . . . . . . |
399 |
Setting Up The Camera For A |
|
Shadow-Catching Project . . . . . . . . . . . . . . . . . . |
401 |
TEXTURE MAPPING . . . . . . . . . . . . . . . . . . . . . . . . . . |
402 |
Picking A Texture . . . . . . . . . . . . . . . . . . . . . . . . . . . . |
403 |
Sizing and Positioning The Maps . . . . . . . . . . . . . . . |
403 |
Map Enabler Checkbox . . . . . . . . . . . . . . . . . . . . . . . |
406 |
Image Maps . . . . . . . . . . . . . . . . . . . . . . . . . . . . . . . . . . . . |
407 |
Decal Maps . . . . . . . . . . . . . . . . . . . . . . . . . . . . . . . . . . . . |
407 |
Highlight Sharpness . . . . . . . . . . . . . . . . . . . . . . . . . . . . . . |
409 |
Highlight Brightness . . . . . . . . . . . . . . . . . . . . . . . . . . . . . |
410 |
Highlight Mapping . . . . . . . . . . . . . . . . . . . . . . . . . . . . . . . |
411 |
How To Make A Highlight Map . . . . . . . . . . . . . . . . . |
411 |
How To Give A Material A Highlight Map . . . . . . . . |
412 |
Creative Uses For Highlight Mapping . . . . . . . . . . . |
413 |
Bumpiness . . . . . . . . . . . . . . . . . . . . . . . . . . . . . . . . . . . . |
415 |
Making Better Bump Maps . . . . . . . . . . . . . . . . . . . . . . . . |
416 |
Transparency . . . . . . . . . . . . . . . . . . . . . . . . . . . . . . . . . . . |
417 |
Transparency Maps . . . . . . . . . . . . . . . . . . . . . . . . . . . . . . |
417 |
Reflectivity . . . . . . . . . . . . . . . . . . . . . . . . . . . . . . . . . . . . |
419 |
Reflection Maps . . . . . . . . . . . . . . . . . . . . . . . . . . . . . . . . . |
420 |
Highlights And Reflections By Surface Type . . . . . . . . . |
421 |
How The Color Channels In A Map Are Used . . . . . . . . |
424 |
Channel Usage by Map Type . . . . . . . . . . . . . . . . . . . . . . |
425 |
Material Commands . . . . . . . . . . . . . . . . . . . . . . . . . . . . . |
426 |
New Material . . . . . . . . . . . . . . . . . . . . . . . . . . . . . . . . |
426 |
Duplicate Material . . . . . . . . . . . . . . . . . . . . . . . . . . . |
426 |
Save Material To Bin . . . . . . . . . . . . . . . . . . . . . . . . . |
427 |
Clear Map . . . . . . . . . . . . . . . . . . . . . . . . . . . . . . . . . . |
427 |
OBJECT STYLES
Object Styles Tab . . . . . . . . . . . . . . . . . . . . . . . . . . . . . . . . 428
Applying Object Styles . . . . . . . . . . . . . . . . . . . . . . . . 429
Linking Objects To Object Styles .. .. .. .. .. .. .. .. .. .. .. .. .. .. .. 429
Renaming Object Styles . . . . . . . . . . . . . . . . . . . . . . . 430
Adding Notes To An Object Style . . . . . . . . . . . . . . . 430
Object Styles Swatch Popup . . . . . . . . . . . . . . . . . . . . . . 430
Save Object Style . . . . . . . . . . . . . . . . . . . . . . . . . . . . 431
Unlink Object Style . . . . . . . . . . . . . . . . . . . . . . . . . . 431
Remove Object Style . . . . . . . . . . . . . . . . . . . . . . . . . 432
Duplicate Object Style . . . . . . . . . . . . . . . . . . . . . . . . 432
Select All Unused . . . . . . . . . . . . . . . . . . . . . . . . . . . . 433
Delete Selected Object Styles . . . . . . . . . . . . . . . . . . 433
Clear Bin . . . . . . . . . . . . . . . . . . . . . . . . . . . . . . . . . . . 434
Moving Object Style Swatches . . . . . . . . . . . . . . . . . . . . . 434
Regenerating Object Style Swatches
That Have Been Deleted . . . . . . . . . . . . . . . . . . . 435
MATERIAL SET-UP & ASSIGNMENT
Material Set-Up . . . . . . . . . . . . . . . . . . . . . . . . . . . . . . 436
Material Assignment window . . . . . . . . . . . . . . . . . . . . . . 436 Material Set-Up Toolbar . . . . . . . . . . . . . . . . . . . . . . . . . . 438 Display splits . . . . . . . . . . . . . . . . . . . . . . . . . . . . . . . . 438
12 |
Zaxwerks ProAnimator / ProModeler - User Guide V. 4 |

Split tool . . . . . . . . . . . . . . . . . . . . . . . . . . . . . . . . . . . |
438 |
Grabber hand . . . . . . . . . . . . . . . . . . . . . . . . . . . . . . . |
440 |
Dolly tool . . . . . . . . . . . . . . . . . . . . . . . . . . . . . . . . . . . |
441 |
Zoom tool . . . . . . . . . . . . . . . . . . . . . . . . . . . . . . . . . . |
441 |
Palette Commands Popup . . . . . . . . . . . . . . . . . . . . . . . . |
441 |
Clear All Splits . . . . . . . . . . . . . . . . . . . . . . . . . . . . . . |
442 |
Fit All .. .. . . . . . . . . . . . . . . . . . . . . . . . . . . . . . . . . . . . . |
442 |
Swap Materials . . . . . . . . . . . . . . . . . . . . . . . . . . . . . . |
442 |
Delete Selected Materials . . . . . . . . . . . . . . . . . . . . . |
443 |
Material Palette . . . . . . . . . . . . . . . . . . . . . . . . . . . . . . . . . |
444 |
Palette Checkbox . . . . . . . . . . . . . . . . . . . . . . . . . . . . . . . . |
445 |
USER PREFERENCES
Shadow Quality . . . . . . . . . . . . . . . . . . . . . . . . . . . . . . 446
Duplication Offset . . . . . . . . . . . . . . . . . . . . . . . . . . . 447
Hard Shading Angle . . . . . . . . . . . . . . . . . . . . . . . . . . 448
Save Project Data As . . . . . . . . . . . . . . . . . . . . . . . . . 449
Show Floor Grid In Preview Windows . . . . . . . . . . 450
Floor Grid Y Offset . . . . . . . . . . . . . . . . . . . . . . . . . . . 450
OpenGL Texture Previews . . . . . . . . . . . . . . . . . . . . 451
Real Time Slider Interactions . . . . . . . . . . . . . . . . . . 452
Restore To Factory Settings . . . . . . . . . . . . . . . . . . . 453
ProAnimator Plug-in . . . . . . . . . . . . . . . . . . . . . . . . . 456
Differences Between The Invigorator PRO
And ProAnimator Plug-ins . . . . . . . . . . . . . . . . . 457
ProAnimator Plug-in Quick Start . . . . . . . . . . . . . 459
How To Enter ProAnimator’s World . . . . . . . . . . . . 461
How To Close ProAnimator . . . . . . . . . . . . . . . . . . . 462
How To Make A ProAnimator Animation Match
With Your After Effects Animation . . . . . . . . . . 462
Synchronizing The After Effects And The
ProAnimator Cameras . . . . . . . . . . . . . . . . . . . . 463
Making The ProAnimator Camera Follow
The After Effects Camera . . . . . . . . . . . . . . . . . . 464
Important Note About Merging 3D Images
From Two Cameras . . . . . . . . . . . . . . . . . . . . . . . 465
Making The After Effects Camera Follow
The ProAnimator Camera . . . . . . . . . . . . . . . . . 466
Applying ProAnimator Object Motion To
After Effects Planes . . . . . . . . . . . . . . . . . . . . . . 469
Speeding Up The Import Process . . . . . . . . . . . . . . . 470
Using After Effects Layers As Texture Maps . . . . . 470
Layer Map Offsets . . . . . . . . . . . . . . . . . . . . . . . . . . . . 473
Exchanging Files Between Plug-in And
Standalone . . . . . . . . . . . . . . . . . . . . . . . . . . . . . . 474
SPECIAL TOPICS
Opening Version 3 Projects in Version 4 . . . . . . . . . 476
To Convert Or Not To Convert. . . . . . . . . . . . . . 477
Merging Scenes . . . . . . . . . . . . . . . . . . . . . . . . . . . . . . 478
Changes To Swatch Handling . . . . . . . . . . . . . . . . . . 478
How Swatch Handling Now Works . . . . . . . . . . 479
Zaxwerks ProAnimator / ProModeler - User Guide V. 4 |
13 |

Benefits Of The New Swatch
Handling System . . . . . . . . . . . . . . . . . . . . . 480 Range Dragging For Double Arrow Sliders . . . . . . . 481 Offline Camera . . . . . . . . . . . . . . . . . . . . . . . . . . . . . . 482 How Do Materials Work? . . . . . . . . . . . . . . . . . . . . . . 483 Understanding Vector Objects . . . . . . . . . . . . . . . . . 487 Creating Basic Shapes . . . . . . . . . . . . . . . . . . . . . . . . 491 Creating Grids . . . . . . . . . . . . . . . . . . . . . . . . . . . . . . . 493 Preparing Your Vector Files . . . . . . . . . . . . . . . . . . . 495
How To Edit An Illustrator File And Get The
3D Model To Use The Changes . . . . . . . . . . . . . 500 Using Clip Art . . . . . . . . . . . . . . . . . . . . . . . . . . . . . . . 503 Overlapping Objects . . . . . . . . . . . . . . . . . . . . . . . . . . 504 The Holes In Objects Are Filling In . . . . . . . . . . . . . 505 Spikes On Smooth Curves . . . . . . . . . . . . . . . . . . . . . 506 Spike On Points . . . . . . . . . . . . . . . . . . . . . . . . . . . . . 507 Using Scanned Artwork to Create Models . . . . . . . 508 Working With Objects Outside The View
Of The Camera . . . . . . . . . . . . . . . . . . . . . . . . . . . 510 Making Projects Render Faster . . . . . . . . . . . . . . . . 511
TROUBLE SHOOTING . . . . . . . . . . . . . . . . . . . . . . . 513
KEYBOARD SHORTCUTS . . . . . . . . . . . . . . . . . . . . 516
APPENDIX: The Edge Profiles . . . . . . . . . . . . . . . 520
Zaxwerks ProAnimator / ProModeler - User Guide V. 4 |
14 |

Zaxwerks ProAnimator / ProModeler - User Guide V. 4 |
15 |

Introduction
This user guide covers the ProAnimator and the ProModeler software..
The ProModeler is used for creating 3D models and rendering still (single) images.. The ProAnimator is used for creating 3D models, animating them and rendering movies.. The two programs are very similar.. If you took the ProModeler and added an animation window you would have the ProAnimator..
This user guide is divided into four major sections.. The first section is a series of tutorials on how to create animations with the ProAnimator..
The second section breaks down and explains the animation capabilities, feature by feature..
The third section is a series of tutorials on text creation, logo creation, surface coloring, manipulating the objects, moving the camera, setting up lights and finally rendering.. These features are the same in both the ProModeler and the ProAnimator.. Since these features are nearly identical in both programs, the word ProAnimator is used to talk about the software..
However if you have the ProModeler just understand that we are talking about your program too.. When there are differences in the way the two programs work, these differences will be noted in the text..
The fourth section breaks down and explains each feature for modeling, surface coloring, object and camera manipulation, and lighting..
For further assistance we have additional resources on our Web site: www..Zaxwerks..com.. These include a User Forum, Troubleshooting page, a list of Frequently Asked Questions, and demonstration movies..
Have loads of fun with your new program! ProAnimator and ProModeler ROCK!
16 |
Zaxwerks ProAnimator / ProModeler - User Guide V. 4 |

Installation Instructions
Zaxwerks ProAnimator / ProModeler - User Guide V. 4 |
17 |

System Requirements
System Requirements - MACINTOSH |
System Requirements - WINDOWS |
- G4 Power Mac (G5 recommended) |
- Intel Pentium III or 4 processor |
- Mac OS X 10..2..8, 10..3..9, 10..4..6 |
- Windows 2000 or Windows XP Pro or Home Edition |
- Apple’s OpenGL system extension |
- OpenGL system ..dll file |
- QuickTime 5 or above |
- QuickTime 5 or above |
- Color monitor capable of displaying at least |
- Color monitor capable of displaying at least |
1024 x 768 in Millions of colors |
1024 x 768 in True color |
- 128 MB RAM, (256 MB recommended) |
- 128 MB RAM (256 MB recommended) |
- 100MB unused hard-disk space |
- 100MB unused hard-disk space |
- CD ROM drive |
- CD ROM drive |
Software specifications subject to change without notice.. Software used under license.. ALL RIGHTS RESERVED.. Refer to the Zaxwerks End User License for more information..
18 |
Zaxwerks ProAnimator / ProModeler - User Guide V. 4 |
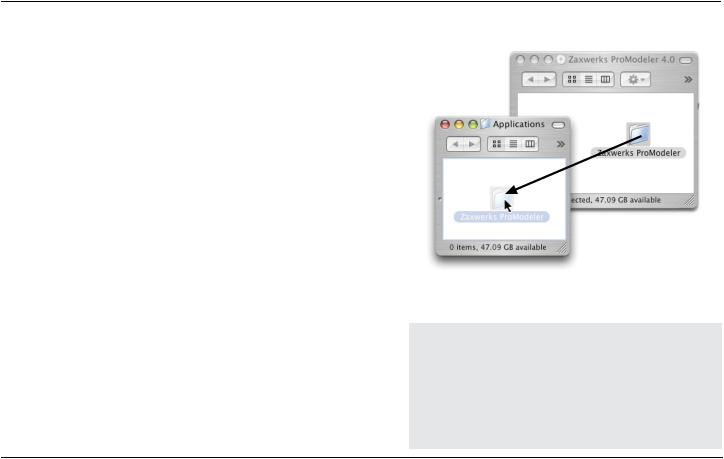
Installing ProModeler
The ProModeler does not use an automatic installer. There is only one step to install the software .
If you are installing from a CD . . .
1- Find the ProModeler folder on the CD and drag it into the Applications folder (Mac) or Program Files Folder (PC) .
If you are installing from a downloaded file . . .
1- Unstuff or Unzip the download, then drag the ProModeler folder into the Applications folder (Mac) or Program Files Folder (PC) .
To launch the ProModeler, open the ProModeler folder and double click on the ProModeler application .
Installing ProAnimator
The ProAnimator can run as either a standalone or a plug-in . If you only want to run it as a standalone follow the directions for installing the ProModeler. If you want to run it as a plug-in do the following:
If you are installing from a CD . . .
1- Find the ProAnimator folder on the CD and drag it into the Applications/Adobe After Effects/Plug-ins folder.
TROUBLESHOOTING TIP!
The ProAnimator/ProModeler folders contain many fii les and folders. DO NOT touch the contents of the main folder. During installation, drag ONLY the top level ProAnimator/ProModeler folder and all these other fii les and folders will be moved to the Applications folder too.
Zaxwerks ProAnimator / ProModeler - User Guide V. 4 |
9 |
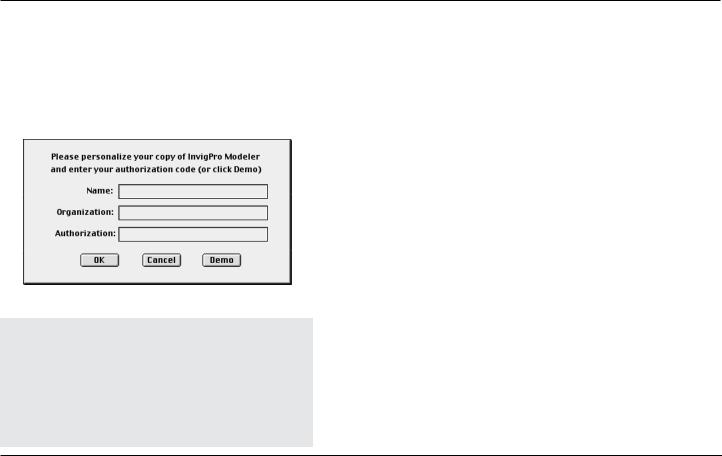
Fill in all fields then click the OK button.
TROUBLESHOOTING TIP !
On some Windows systems you may have trouble typing into the Authorization Window. If this is the case, open a program such as NotePad and type the information there. Then copy and paste the information, one line at a time, into the Authorization window.
If you are installing from a downloaded file .... .
1- Unstuff or Unzip the download, then drag the ProAnimator folder into the Applications/Adobe After Effects/Plug-ins folder..
We recommend that once the ProAnimator is installed, you open the ProAnimator folder, make a Shortcut (Alias) for the standalone version and put it on your desktop..
To launch the ProAnimator standalone double click on the Shortcut (Alias)..
To use the ProAnimator plug-in, launch After Effects, create a new comp, create a new Solid that is comp sized, then from the Effect menu choose Effect > Zaxwerks > ProAnimator..
Entering An Authorization Code For The First Time
The first time you launch the software it will ask you to enter some information.. Type your Name and Organization, and type the Authorization Code exactly as it was given to you.. Then press the OK button..
A Temporary Code looks like this: A1234-B1234. A Permanent Code looks like this: IPMS40-A1234-B1234-C1234 A Temporary Code lasts for 30 days to give you time to contact Zaxwerks and register the software.. Once registered, Zaxwerks will give you a permanent authorization code.. (See the next section for information on how to enter a permanent code.)
20 |
Zaxwerks ProAnimator / ProModeler - User Guide V. 4 |

If you already have a Permanent Code there is no need to enter the Temporary Code first.. Type the Permanent Code when you see the Authorization window and you’ll be ready to go..
Demo Mode
If you don’t have either a Temporary or a Permanent Authorization Code you can run the program in Demo Mode by clicking the DEMO button at the bottom of the authorization window.. Demo mode adds a watermark to the renderings and also limits the program in some ways, but other than that most everything works.. Demo mode lets you get an idea of how the program runs so you can see how fast and easy it is..
Entering A Permanent Authorization Code
(If this is the first time you have run the software see the previous section titled: Entering An Authorization Code For The First Time.)
If you have been running the software using a Temporary Authorization Code, double click on the program icon to launch it.. You will see a message window saying how many days you have left to run the program.. At the bottom of this message window there will be a “Register” button.. Click the “Register” button then enter your Permanent Authorization Code..
A Permanent Code looks like this: IPAS40-A1234-B1234-C1234
Zaxwerks ProAnimator / ProModeler - User Guide V. 4 |
21 |

Click this link on the Zaxwerks Home page to get to the registration page.
How To Get A Permanent Authorization Code
A Permanent Authorization code is sent to you directly from Zaxwerks.. Contact Zaxwerks in one of the following ways:
Register by email: register@zaxwerks..com
Register online: |
www..zaxwerks..com/Register_English..html |
Register by phone: |
1-800-549-0250 |
You will be asked for your Temporary Authorization Code and your contact information so you can receive notices about bug fixes and updates..
If you bought the program directly from Zaxwerks you will have received a green Invoice/Receipt with the Permanent codes printed on stickers at the bottom..
22 |
Zaxwerks ProAnimator / ProModeler - User Guide V. 4 |

What’s New In Version 4?
Welcome to version 4 of the ProAnimator and ProModeler.. This is a huge upgrade from version 3.. We have improved the programs so you can work faster, create prettier images, and build more interesting animations..
1 - Workflow Enhancements
New features that help you work faster and keep more organized.. This includes new features such as an Offline camera, real time slider interactions, merging scenes, a new central file system for swatches and the ability to use movies as texture maps or backgrounds..
2 - Animation Enhancements
New features that enable you to do previously impossible animations.. Highlights include duplicating tracks, flipping tracks, path actions for creating new types of motion, new scaling controls, new types of object distribution, locking and soloing of tracks and a feature to animate cascading visibility..
3 - Modeling Enhancements
Now you can make spheres, cube, cones and other shapes, reuse your text and logo models in new projects, and handle foreign language fonts (not double-byte).. If you are a ProModeler user you get the whole text engine as a new feature too..
Zaxwerks ProAnimator / ProModeler - User Guide V. 4 |
23 |

4 - Surfacing Enhancements
New kinds of material controls elevate the look of your images to new levels.. Highlights here include Wireframe, Shaded Wireframe, Reflective Wireframe, Hiddlenline, Filled Hiddenline, Cartoon Coloring, Absolute Coloring and Highlight mapping.. Materials can be mixed and matched for outstanding new looks.. There are also two special purpose materials, one for catching 3D shadows and applying them to 2D background images, and the other for turning any 3D object into a mask.. These surfacing enhancements are included in both the ProAnimator and the ProModeler..
5 - The Plug-in version.
ProAnimator now works as a plug-in too.. This means you never have to leave your compositor in order to create amazing ProAnimator 3D elements.. As a plug-in all elements are “live” so you can make changes to any part at any time of the production process..
24 |
Zaxwerks ProAnimator / ProModeler - User Guide V. 4 |

Basic Concepts
Zaxwerks ProAnimator / ProModeler - User Guide V. 4 |
25 |

26 |
Zaxwerks ProAnimator / ProModeler - User Guide V. 4 |

BASIC CONCEPTS
The ProAnimator creates its own models and images.. It does not process existing footage to give it a “3D effect”.. You create models that have depth and size, arrange them in space, and then take pictures of them..
The ProAnimator is a true 3D program, but it has differences that make it unique from any other 3D program.. There is a tremendous amount of technology and workflow design packed into this program, in order to make it easier to learn and faster to use..
If you are new to creating 3D graphics here is a short overview of the steps involved:
Modeling
The ProAnimator creates models out of Adobe Illustrator files and fonts installed on your computer.. Models can be modified using the controls in the Object Tab.. A selection of over 100 preset edge profiles come built into the program or you can make your own.. You can also import models created in other 3D programs..
Surface Set-Up
The ProAnimator has a completely unique way of handling surfaces.. Up to six different materials can be applied to each object and those materials can be used in a variety of ways.. Once you
DEFINITIONS
Modeling
The creation of the objects and adjustment of their shape.
Surface Set-Up
The paint job that is applied to the surface of the objects. Often called “Surfacing”.
Scene Set-Up
The positioning of the objects and lights within the 3D scene and the positioning of the camera which views the scene and takes the picture.
Animation
Moving the objects or camera over time.
Rendering
Creation of the final 3D image or movie. “Taking the picture”.
Zaxwerks ProAnimator / ProModeler - User Guide V. 4 |
27 |

try it you will see how the ProAnimator has finally given artists the tools to create a new generation of 3D title and logo graphics.. Graphics like you have never seen before..
Scene Set-Up And Lighting
Setting up a 3D scene has been streamlined to make it easier for 2D graphic artists to make the jump to 3D.. A scene can have as many objects as you need and objects or groups of objects can be rotated and positioned independently.. Up to six lights can be used, and once you get your lights perfect they can be saved and reused in future projects..
Object manipulation within the 3D scene is done in a way that’s completely new.. Single and multiple objects can be manipulated with speed and fluidity.. There are a full compliment of short cut keys.. Even nudge keys are supported..
Animation
Animation is created in a new way that is visual rather than technical.. Feedback is continuous so you can watch the animation as you edit it.. There is no need to stop and render a preview..
Rendering
The rendering engine is designed for the rigors of professional production.. It creates beautiful images of any resolution with excellent antialiasing, image mapping, soft shadows, transparencies for glass and chrome effects.. Images and movies come with alpha channels for compositing without the need to key the source footage..
28 |
Zaxwerks ProAnimator / ProModeler - User Guide V. 4 |

Animation
Tutorials
Zaxwerks ProAnimator / ProModeler - User Guide V. 4 |
29 |

30 |
Zaxwerks ProAnimator / ProModeler - User Guide V. 4 |
Loading...