

Page 1
Zaxwerks 3D Invigorator - ProAnimator - Tutorials 1
Page 2

Zaxwerks Inc.
5724 Camellia Ave.
Temple City, CA 91780
(626) 309-9102 phone
(626) 309-9142 fax
http://www.zaxwerks.com
Sales: sales@zaxwerks.com
Tech Support: support@zaxwerks.com
© 1996 - 2003 Zaxwerks Inc. All rights reserved.
This manual, as well as the software described in it, is furnished under license and may only be used or copied
in accordance with the terms of such license. The information in this manual is furnished for informational use
only, is subject to change without notice, and does not represent product specifications or commitment on the
part of Zaxwerks. Zaxwerks assumes no responsibility or liability for any error or inaccuracies that may appear
in this document.
The Zaxwerks 3D Invigorator is a trademark of Zaxwerks Inc. After Effects, Illustrator and Photoshop are trademarks of Adobe Systems Inc. FreeHand is a trademark of Macromedia Inc. Apple and Macintosh are registered trademarks of Apple Computer, Inc. Windows 2000 and Windows XP are registered trademarks of
Microsoft, Inc. OpenGL is a trademark of Silicon Graphics Inc. All other product names or trademarks are the
property of their respective owners.
Zaxwerks 3D Invigorator - ProAnimator - Tutorials2
Page 3

Table of Contents
INSTALLATION INSTRUCTIONS . . . . . . . . . . . . . . . 5
BASIC CONCEPTS
Modeling . . . . . . . . . . . . . . . . . . . . . . . . . . . . . . . . . . . . 13
Surface Set-Up . . . . . . . . . . . . . . . . . . . . . . . . . . . . . . . 14
Scene Set-Up & Lighting . . . . . . . . . . . . . . . . . . . . . . . 14
Animation . . . . . . . . . . . . . . . . . . . . . . . . . . . . . . . . . . . 14
Rendering . . . . . . . . . . . . . . . . . . . . . . . . . . . . . . . . . . . 14
ANIMATION TUTORIALS
ProAnimator Introduction . . . . . . . . . . . . . . . . . . . . . 17
Creating An Animation in Five Clicks . . . . . . . . . . . 18
Changing The Text In An Animation . . . . . . . . . 20
Changing The Speed Of An Animation . . . . . . . 21
Changing The Camera’s View
Of The Animation . . . . . . . . . . . . . . . . . . . . . . . 22
Rendering An Animation . . . . . . . . . . . . . . . . . . . . . . 24
Rendering A Single Frame . . . . . . . . . . . . . . . . .24
Saving A Single Frame Rendering . . . . . . . . . . . 25
Rendering The Movie . . . . . . . . . . . . . . . . . . . . . 26
Rendering Options . . . . . . . . . . . . . . . . . . . . . . . . 27
Changing The Timing And Speed
Of An Animation . . . . . . . . . . . . . . . . . . . . . . . . . . . 28
What is A Pose? What Is A Transition? . . . . . . 28
Creating A New Scene . . . . . . . . . . . . . . . . . . . . . 29
Creating The 3D Text . . . . . . . . . . . . . . . . . . . . . . 30
Zaxwerks 3D Invigorator - ProAnimator - Tutorials 3
Adding An Animation Preset . . . . . . . . . . . . . . . 30
Changing The Track Name . . . . . . . . . . . . . . . . . 31
Moving Splice Points . . . . . . . . . . . . . . . . . . . . . . 31
Adding More Hold Time To
The Beginning Pose . . . . . . . . . . . . . . . . . . . . . 32
Changing The Position Of A Segment
Without Changing Its Length . . . . . . . . . . . . . 32
Slowing Down The Motion Of A Transition . . . 33
Resetting An Animation Back
To A Saved Preset . . . . . . . . . . . . . . . . . . . . . . 34
Increasing The Length Of
An Entire Animation . . . . . . . . . . . . . . . . . . . . 34
Setting The Loop Points For
The Work Area . . . . . . . . . . . . . . . . . . . . . . . . 36
Shortening The Length Of
An Entire Animation . . . . . . . . . . . . . . . . . . . . 37
Selecting Segments That Are
Difficult To Click On . . . . . . . . . . . . . . . . . . . . 38
Changing Object Motion During Transitions . . . . . . 39
Changing The Curve Of A Motion Path . . . . . . . 40
Changing The Direction Of
The Arch In The Path . . . . . . . . . . . . . . . . . . . 41
Controlling When Objects Start To Move . . . . . 42
Controlling The Order Of Objects
As They Cascade . . . . . . . . . . . . . . . . . . . . . . . 43
Adding Start Ease And End Ease
For A Professional Touch . . . . . . . . . . . . . . . 46
Page 4

Changing The Positions Of Objects . . . . . . . . . . . . . 48
Moving Objects To New Positions . . . . . . . . . . . 49
Spreading Objects Apart . . . . . . . . . . . . . . . . . . . 51
Bunching Objects To A Point . . . . . . . . . . . . . . . 52
Making Objects Spin As They Move . . . . . . . . . 53
Randomizing Object Positions . . . . . . . . . . . . . . 54
Shuffling Objects . . . . . . . . . . . . . . . . . . . . . . . . . 55
MODELING, SURFACING, & LIGHTING
Basic Tutorials . . . . . . . . . . . . . . . . . . . . . . . . . . . . . . . . 59
Creating And Working With 3D Text . . . . . . . . . . . . . 59
Applying Object Styles . . . . . . . . . . . . . . . . . . . . . . . . 61
Changing The Depth Of An Object . . . . . . . . . . . . . . 65
Coloring Objects . . . . . . . . . . . . . . . . . . . . . . . . . . . . . 66
Coloring Objects: Method 1 . . . . . . . . . . . . . . . . 67
Coloring Objects: Method 2 . . . . . . . . . . . . . . . . 68
Coloring Objects: Method 3 . . . . . . . . . . . . . . . . 69
Editing 3D Text . . . . . . . . . . . . . . . . . . . . . . . . . . . . . . 71
How To Set The Lighting . . . . . . . . . . . . . . . . . . . . . . 73
Using Lighting Styles . . . . . . . . . . . . . . . . . . . . . . 74
How To Set The Camera . . . . . . . . . . . . . . . . . . . . . . . 75
Saving A View . . . . . . . . . . . . . . . . . . . . . . . . . . . . . . . 77
Think Like A Photographer . . . . . . . . . . . . . . . . . . . . 79
How To Render An Image . . . . . . . . . . . . . . . . . . . . . 80
How To Get The Background To Drop Out . . . . . . . 81
Advanced Tutorials
How To Create a 3D Logo . . . . . . . . . . . . . . . . . . . . . 82
How To Make Objects Invisible . . . . . . . . . . . . . . . . . 84
Moving 3D Objects - Part 1 . . . . . . . . . . . . . . . . . . . . 86
How To Reset 3D Objects . . . . . . . . . . . . . . . . . . . . . 88
Moving 3D Objects - Part 2 . . . . . . . . . . . . . . . . . . . . 89
Camera Shortcuts . . . . . . . . . . . . . . . . . . . . . . . . . . . . 92
Camera Shortcuts Exercise . . . . . . . . . . . . . . . . . . . . 94
Adjusting The Thickness of Objects . . . . . . . . . . . . . 95
How To Apply An Edge Profile . . . . . . . . . . . . . . . . . 98
How To Apply A Single Material To An Object . . . 101
How To Add A Second Material To An Object . . . 103
How To Split A Profile To Fine Tune
Material Placement . . . . . . . . . . . . . . . . . . . . . . 105
How To Create An Object Style . . . . . . . . . . . . . . . . 107
Coloring The Other Objects . . . . . . . . . . . . . . . . . . . 108
How To Make Lights Cast Shadows . . . . . . . . . . . . 110
How To Move Lights . . . . . . . . . . . . . . . . . . . . . . . . . 112
How To Save A Project . . . . . . . . . . . . . . . . . . . . . . . 114
Additional Tipes When Working With
Illustrator Files . . . . . . . . . . . . . . . . . . . . . . . . . . 115
Zaxwerks 3D Invigorator - ProAnimator - Tutorials4
Page 5

Installation Instructions
Zaxwerks 3D Invigorator - ProAnimator - Tutorials
5
Page 6

System Requirements
System Requirements - MACINTOSH
- G3 Power Mac (G4 recommended)
- Mac OS 9.1, 10.1 or 10.2.6.
- Apple’s OpenGL system extension
- QuickTime 5 or 6.1
- Color monitor capable of displaying at least
1024 x 768 in Millions of colors
- 128 MB RAM, (256 MB recommended)
- 100MB unused hard-disk space
- CD ROM drive
Software specifications subject to change without notice. Software used under license.
ALL RIGHTS RESERVED. Refer to the Zaxwerks End User License for more information.
System Requirements - WINDOWS
- Intel Pentium III or 4 processor
- Windows 2000 or Windows XP Pro or Home Edition
- OpenGL system .dll file
- QuickTime 5 or 6.1
- Color monitor capable of displaying at least
1024 x 768 in True color
- 128 MB RAM (256 MB recommended)
- 100MB unused hard-disk space
- CD ROM drive
Zaxwerks 3D Invigorator - ProAnimator - Tutorials6
Page 7

Installing the Software
The Invigorator does not use an automatic installer. You only
need to do one step to install the software.
If you are installing from a CD...
1- Find the ProAnimator (or ProModeler) folder on the CD and
drag it into the Applications folder on your main hard drive.
If you are installing from a downloaded file...
1- Unstuff or Unzip the download, then drag the ProAnimator
(or ProModeler) folder into the Applications folder on your
main hard drive.
TROUBLESHOOTING TIP!
The ProAnimator/ProModeler folder contains many files
and folders. DO NOT touch the contents of the main folder.
Drag ONLY the ProAnimator/ProModeler folder to the
Applications folder and all these other files and folders will
be moved to the Applications folder too.
You are now ready to launch the program and create your first
Invigorator project. Open the Applications folder, then open the
ProAnimator or ProModeler folder, and double click on the
program icon.
Zaxwerks 3D Invigorator - ProAnimator - Tutorials
7
Page 8
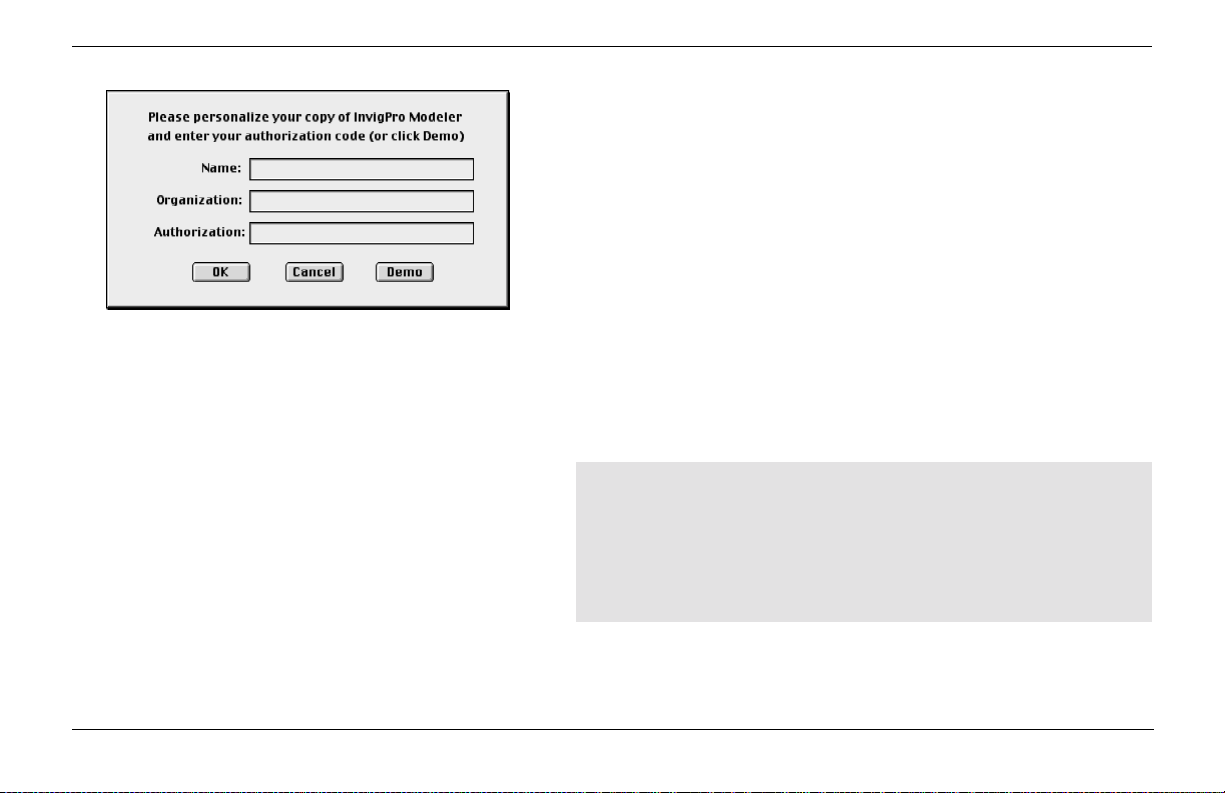
Fill in all fields then click the OK button.
Entering An Authorization Code For The First Time
The first time you launch the software it will ask you to enter
some information. Type your Name and Organization, and type
the Authorization Code exactly as it was given to you. Then press
the OK button.
A Temporary Code looks like this: A1234-B1234. A Permanent
Code looks like this: IPMS30-A1234-B1234-C1234 A Temporary
Code lasts for 30 days to give you time to contact Zaxwerks and
register the software. Once registered, Zaxwerks will give you a
permanent authorization code. (See the next section for infor-
mation on how to enter a permanent code.)
If you already have a Permanent Code there is no need to enter
the Temporary Code first. Type the Permanent Code when you
see the Authorization window and you’ll be ready to go.
TROUBLESHOOTING TIP !
On some Windows systems you may have trouble typing
into the Authorization Window. If this is the case, open a
program such as NotePad and type the information there.
Then copy and paste the information, one line at a time,
into the Authorization window.
Zaxwerks 3D Invigorator - ProAnimator - Tutorials8
Page 9

Demo Mode
If you don’t have either a Temporary or a Permanent Authorization Code you can run the program in Demo Mode by clicking the
DEMO button at the bottom of the authorization window. Demo
mode adds a watermark to the renderings and also limits the
program in some ways, but other than that most everything
works. Demo mode lets you get an idea of how the program runs
so you can see how fast and easy it is.
Entering A Permanent Authorization Code
(If this is the first time you have run the software see the
previous section titled: Entering An Authorization Code For
The First Time.)
If you have been running the software using a Temporary Authorization Code, double click on the program icon to launch it. You
will see a message window saying how many days you have left
to run the program. At the bottom of this message window will
be a “Register” button. Click the “Register” button then enter
your Permanent Authorization Code.
A Permanent Code looks like this: IPAS30-A1234-B1234-C1234
Zaxwerks 3D Invigorator - ProAnimator - Tutorials
9
Page 10
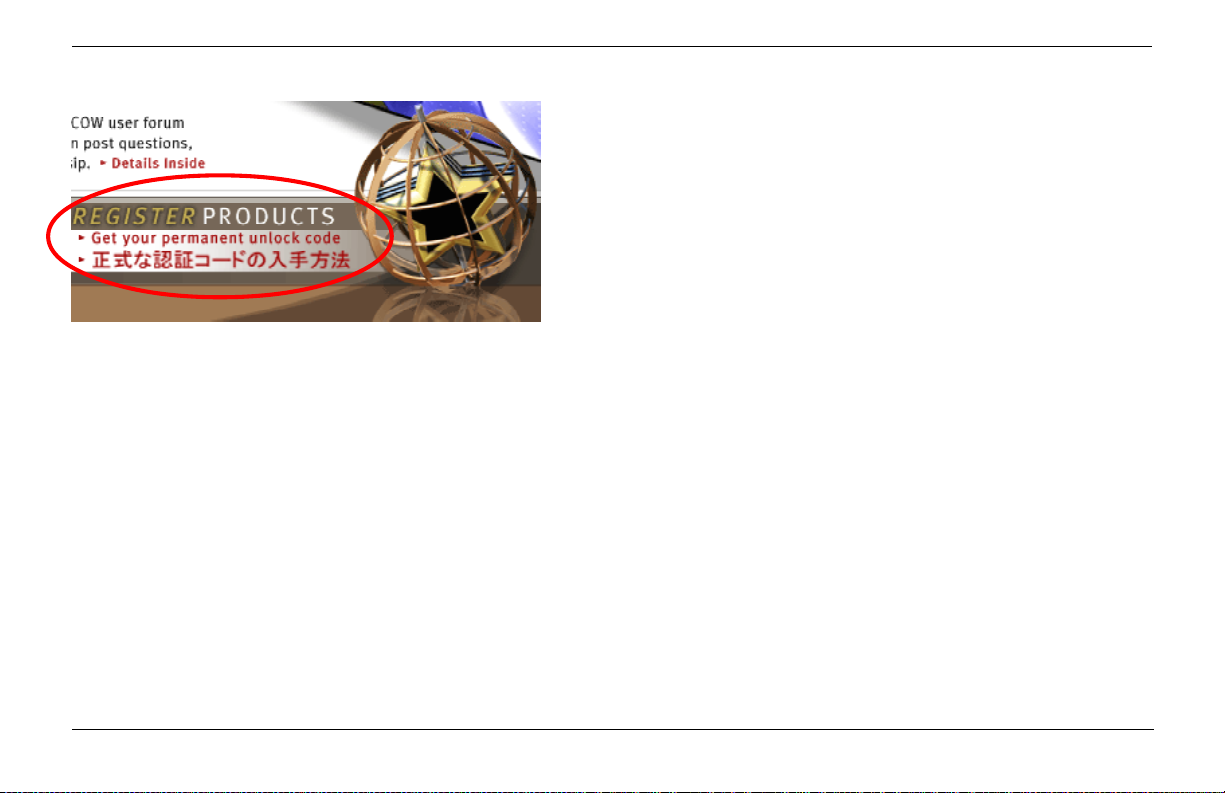
How To Get A Permanent Authorization Code
A Permanent Authorization code is sent to you directly from
Zaxwerks. Contact Zaxwerks in one of the following ways:
Register by email: register@zaxwerks.com
Register online: www.zaxwerks.com/Register_English.html
Register by phone: 1-800-549-0250
You will be asked for your Temporary Authorization Code and
your contact information so you can receive notices about bug
fixes and updates.
Click this link on the Zaxwerks Home page to
get to the registration page.
If you bought the program directly from Zaxwerks you will have
received a green Invoice/Receipt with the Permanent codes
printed on stickers at the bottom.
Zaxwerks 3D Invigorator - ProAnimator - Tutorials10
Page 11

Basic Concepts
Zaxwerks 3D Invigorator - ProAnimator - Tutorials
11
Page 12

Zaxwerks 3D Invigorator - ProAnimator - Tutorials12
Page 13

BASIC CONCEPTS
The Invigorator creates its own models and images. It does not
process existing footage to give it a “3D effect”. You create
models that have depth and size, arrange them in space, and then
take pictures of them.
The Invigorator is a true 3D program, but it has differences that
make it unique from any other 3D program. There is a tremendous amount of technology and workflow design packed into this
program, in order to make it easier to learn and faster to use.
If you are new to creating 3D graphics here is a short overview of
the steps involved:
Modeling
The Invigorator creates models out of Adobe Illustrator files and
fonts installed on your computer. Models can be modified using
the controls in the Object Tab. A selection of over 100 preset
edge profiles come built into the program or you can make your
own. You can also import models created in other programs.
DEFINITIONS
Modeling
The creation of the objects and adjustment of
their shape.
Surface Set-Up
The paint job that is applied to the surface of
the objects. Often called “Surfacing”.
Scene Set-Up
The positioning of the objects and lights within
the 3D scene and the positioning of the
camera which views the scene and takes the
picture.
Animation
Moving the objects or camera over time.
Rendering
Creation of the final 3D image or movie.
“Taking the picture”.
Zaxwerks 3D Invigorator - ProAnimator - Tutorials
13
Page 14

Surface Set-Up
Animation
The Invigorator has a completely unique way of handling
surfaces. Up to six different materials can be applied to
each object and those materials can be used in a variety of
ways. Once you try it you will see how the Invigorator has
finally given artists the tools to create a new generation of
3D title and logo graphics. Graphics like you have never
seen before.
Scene Set-Up And Lighting
Setting up a 3D scene has been streamlined to make it
easier for 2D graphic artists to make the jump to 3D. A
scene can have as many objects as you need and objects or
groups of objects can be rotated and positioned independently. Up to six lights can be used, and once you get your
lights perfect they can be saved and reused in future
projects.
Object manipulation within the 3D scene is done in a way
that’s completely new. Single and multiple objects can be
manipulated with speed and fluidity. There are a full
compliment of short cut keys. Even nudge keys are
supported.
Animation is created in a new way that is visual rather than
technical. Feedback is continuous so you can watch the
animation as you edit it. There is no need to stop and
render a preview.
Rendering
The rendering engine is designed for the rigors of professional production. It creates beautiful images of any
resolution with excellent antialiasing, image mapping, soft
shadows, transparencies for glass and chrome effects.
Images and movies come with alpha channels for compositing without the need to key the source footage.
Zaxwerks 3D Invigorator - ProAnimator - Tutorials14
Page 15

Animation
Tutorials
Zaxwerks 3D Invigorator - ProAnimator - Tutorials
15
Page 16

Zaxwerks 3D Invigorator - ProAnimator - Tutorials16
Page 17

ProAnimator Introduction
Hello and welcome to the world of the Invigorator ProAnimator!
The ProAnimator is different than any other animation program.
Other animation programs make you fiddle with things like
keyframes and velocity curves. The more objects you are animating the more keyframes you have to fiddle with. Projects can get
very complicated very quickly.
The ProAnimator, on the other hand creates animations in a new
and unique way. The creation of an animation is more like
directing a movie. The user is freed to create and design rather
than be forced into the roll as technician. Start to finish is only a
few steps and animating one object or 50 is the same amount of
work.
There are several ways to create your animation. The first we’ll
look at is how to use a preset to make the entire animation in just
a few clicks.
Zaxwerks 3D Invigorator - ProAnimator - Tutorials
17
Page 18
Beginning Tutorials
Creating An Animation In Five Clicks
Our first project will show you how fast it is to create an animation from start to finish using the presets supplied with the
software.
TROUBLESHOOTING TIP: You must have installed the
program properly for the factory presets to be present. If
the TRY button doesn’t do anything or you don’t see any
presets in the menus when doing the following project, you
must quit and reinstall the program following the installation instructions.
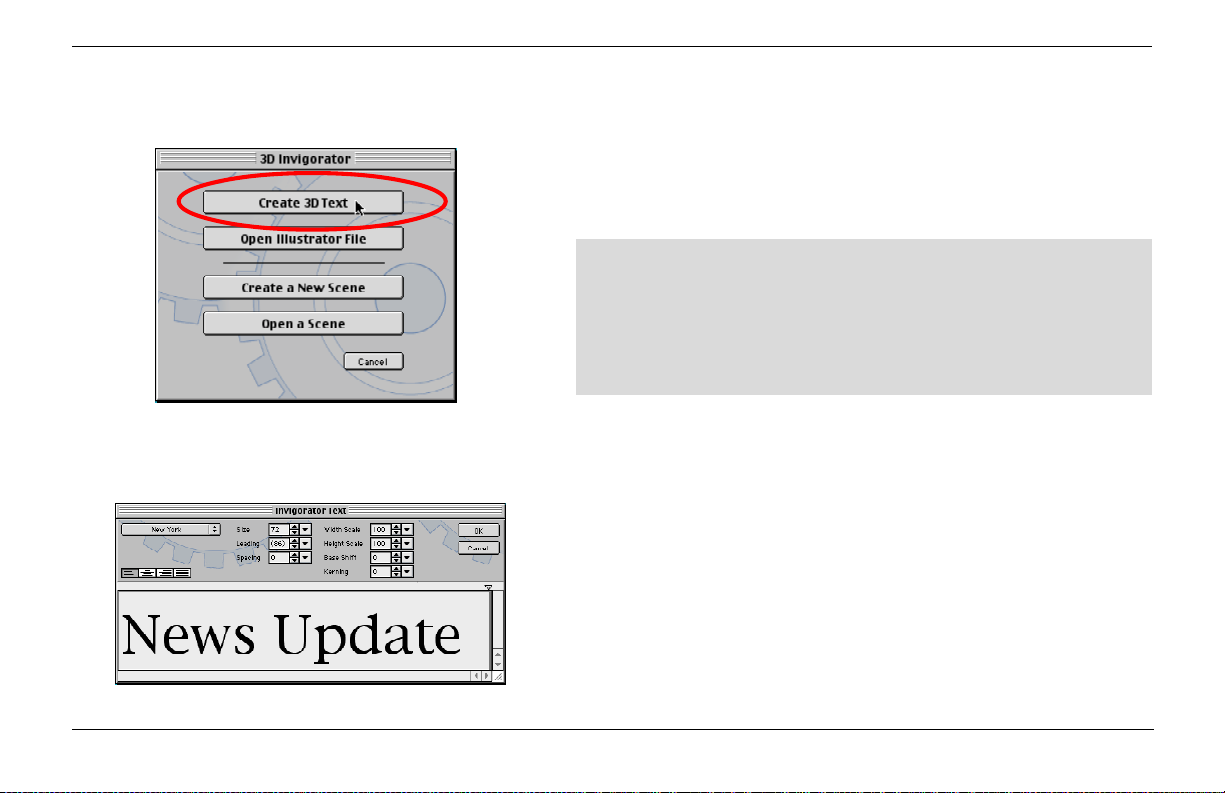
1- Double click the ProAnimator icon to launch the program.
2- When you see four large buttons click the “Create 3D Text”
button.
3- Type the words News Update. Then click the OK button.
The flat text will be turned into 3D models automatically. You
will now see many pictures of Object Styles on the right side of
the main window. An Object Style is a snapshot of all the settings
for creating an object’s “Look”.
Type the words that will become 3D.
Zaxwerks 3D Invigorator - ProAnimator - Tutorials18
Page 19
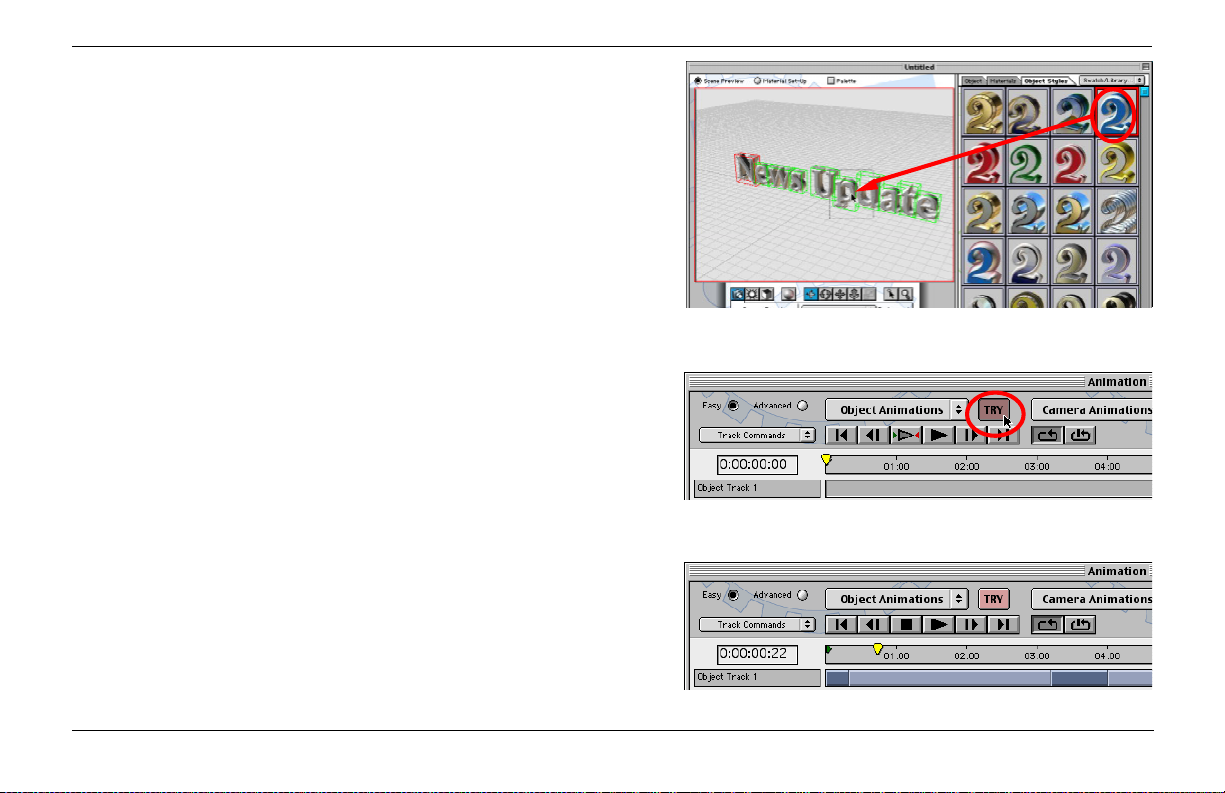
4- Click on the top right Object Style (the blue and white one).
Hold your mouse button down and then drag to the left. As you
drag you will see a dotted rectangle moving along with the mouse
cursor. When the tip of the mouse is over one of the text letters
let up on the mouse button.
You will see that all of your letters have turned blue and white.
This “click down - hold - drag to position - and let up” procedure
is called “Drag and Drop”. Drag and Drop can be done with many
things inside the ProAnimator.
Below the main window is another window which may be
partially hidden if your monitor isn’t big enough to hold them
both. Click once on the lower window to bring it to the front.
This window is called the Animation window.
5- At the top of the Animation window find the first red button
labled “TRY”. It is next to the button labled “Object Animations”.
Click it once.
Watch as an animation is constructed before your eyes. The
timeline will get several colored bars in “Object Track 1”, the
objects will jump to new positions, and the animation will play
back over and over.
That’s it. You’ve just created a complete 3D animation, and did
the whole thing in five mouse clicks!
Zaxwerks 3D Invigorator - ProAnimator - Tutorials
Drag and Drop an Object Style to color the letters.
Click TRY to auto-create an animation.
The colored bars represent the animation.
19
Page 20
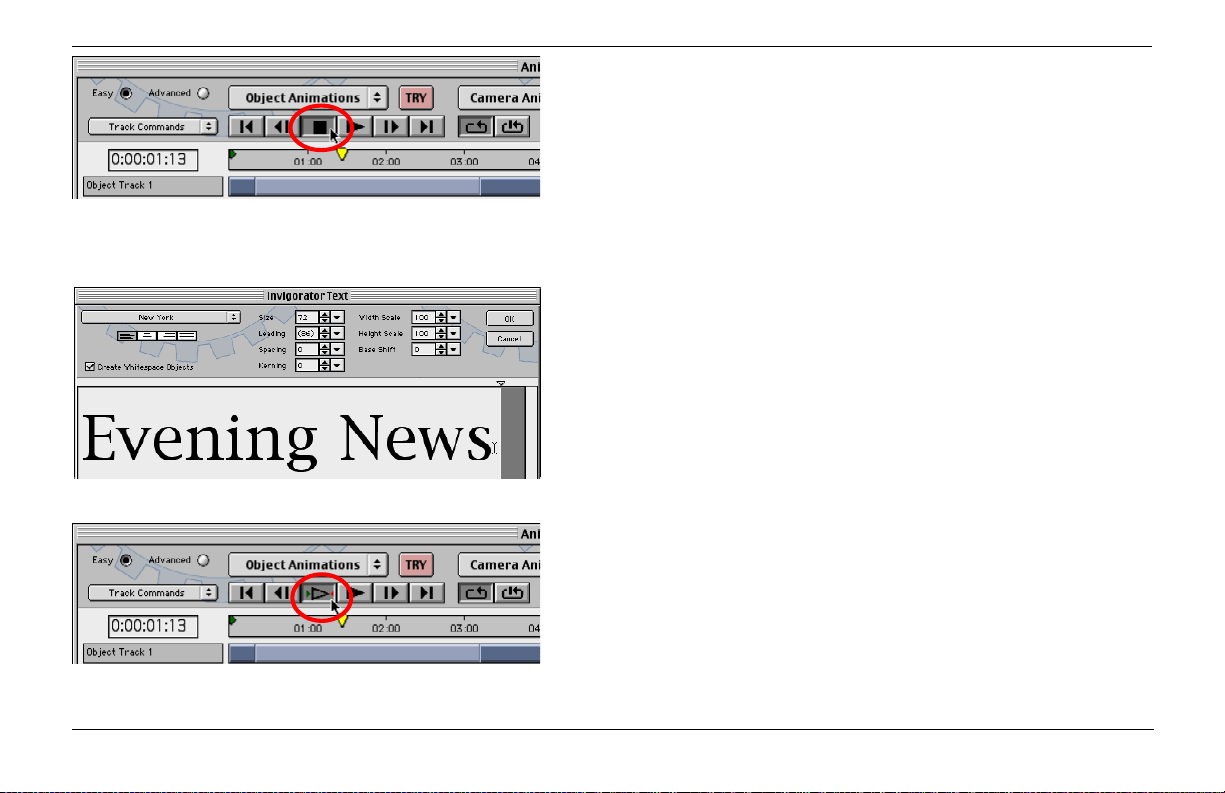
Click the Stop button to halt playback of the animation.
To experiment with other animations click the “TRY” button
again. Each time you click TRY a new animation will be constructed using the text you typed.
Stop the playback of your animation by clicking the Stop button
and continue on to the next exercise.
Changing The Text In An Animation
Once you have created an animation you can change the text
without having to redo any other work.
1- Stop the animation if you haven’t already done so.
2- Click on the main Set-Up window (the large top window) to
bring it to the front, then double click on one of the letters. This
will open the same text window where you first typed the words,
News Update.
3- Erase the words “News Update.” In their place type “Evening
News”. Then click the OK button. If you get a message asking if
you want to modify the objects, click “Modify”. In the 3D window
you will see the letters change.
The gray Play button only plays the area
between the green and red markers.
4- In the Animation window click the gray Play button to play the
new animation. Notice that the animation is the same even
though the text is different.
Zaxwerks 3D Invigorator - ProAnimator - Tutorials20
Page 21

Changing The Speed Of An Animation
Changing the speed of an animation makes it run faster or slower.
As a general rule the faster an animation, the more punch it has.
While the slower an animation, the more grand it appears.
PREPARATION: Look at the blue bars in the Time Line. If there
is only one light blue bar then you can go to the next step. If not,
click the TRY button again and see if this new animation has only
one light blue bar. If not, click the TRY button again and again
until the program picks an animation with only one light blue bar.
Note that there will be three blue bars total. One light bar
between two dark blue bars.
To make an animation move faster all you need to do is shorten
the length of the Transition segment. A shorter segment means
less time, a longer segment means more time.
1- Position the mouse cursor over the right end of the Transition
segment (the light blue bar). When you do this you will see the
cursor turn into a left-right slider. Click down and drag the end of
the Transition to the left, making it shorter. Release the mouse
button when the Transition segment is half the length it was. Play
back the animation and you’ll see your objects are now moving
faster.
Start with an animation having two dark blue bars and a
light one in the middle.
Drag the end of the Transition segment to the left to
speed things up.
Zaxwerks 3D Invigorator - ProAnimator - Tutorials
21
Page 22
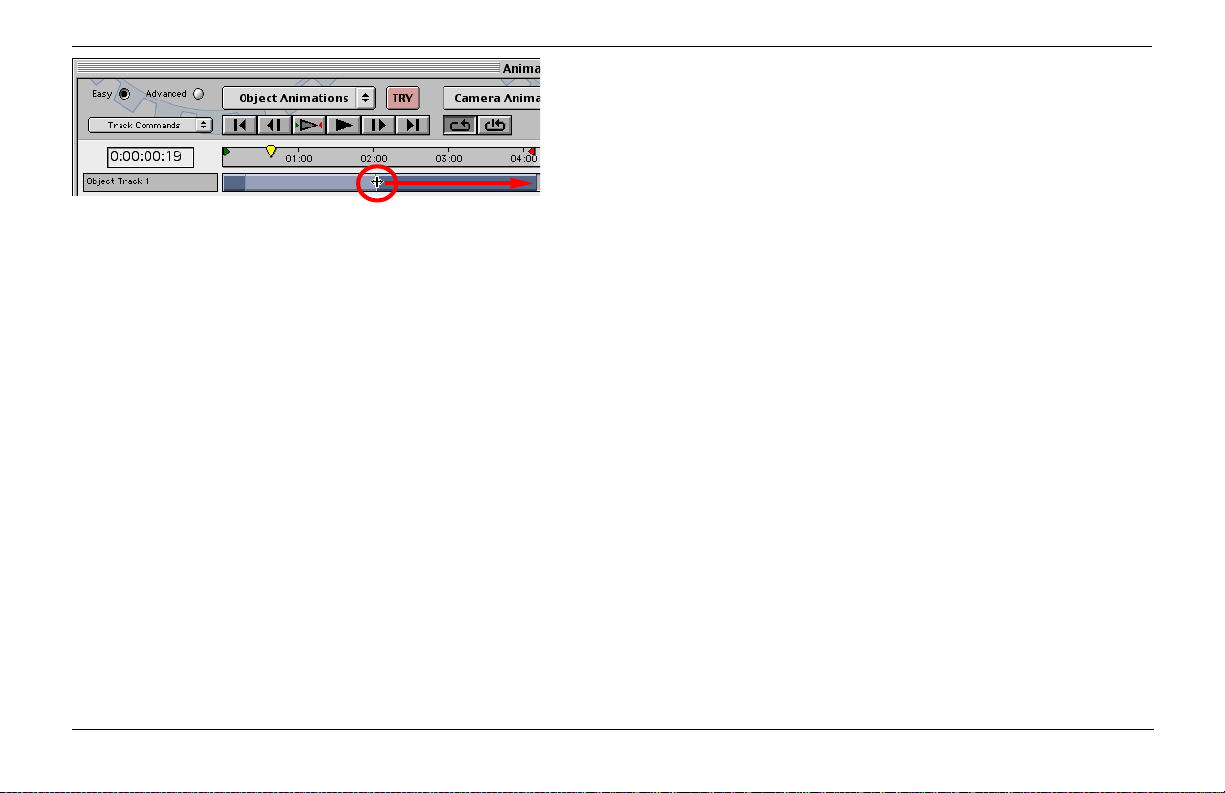
Drag the end of the Transition segment to the right to
slow things down.
2- Next, drag the right end of the segment to make it shorter by
half and you’ll see the objects moving even faster. You can also
drag the right end of the segment all the way to the right and you
will see the objects moving slower.
See how easy it is to adjust the timing of an animation? The 3D
window will give you real time feedback so you can adjust the
timing while watching the animation play. And notice that you
are doing this for eleven letters without touching a single keyframe!
Changing The Camera’s View Of The Animation
The motion of the objects and the viewpoint of the camera are
independent from each other. Once an animation is created you
can move the camera to any position and view the animation
from that new position.
1- Keep the animation playing. Click on the SetUp window, the
window at the top, to bring it to the front. Find the row of tools
below the 3D preview window. These are the tools that let you
change the position of the camera, lights and objects.
Zaxwerks 3D Invigorator - ProAnimator - Tutorials22
Page 23
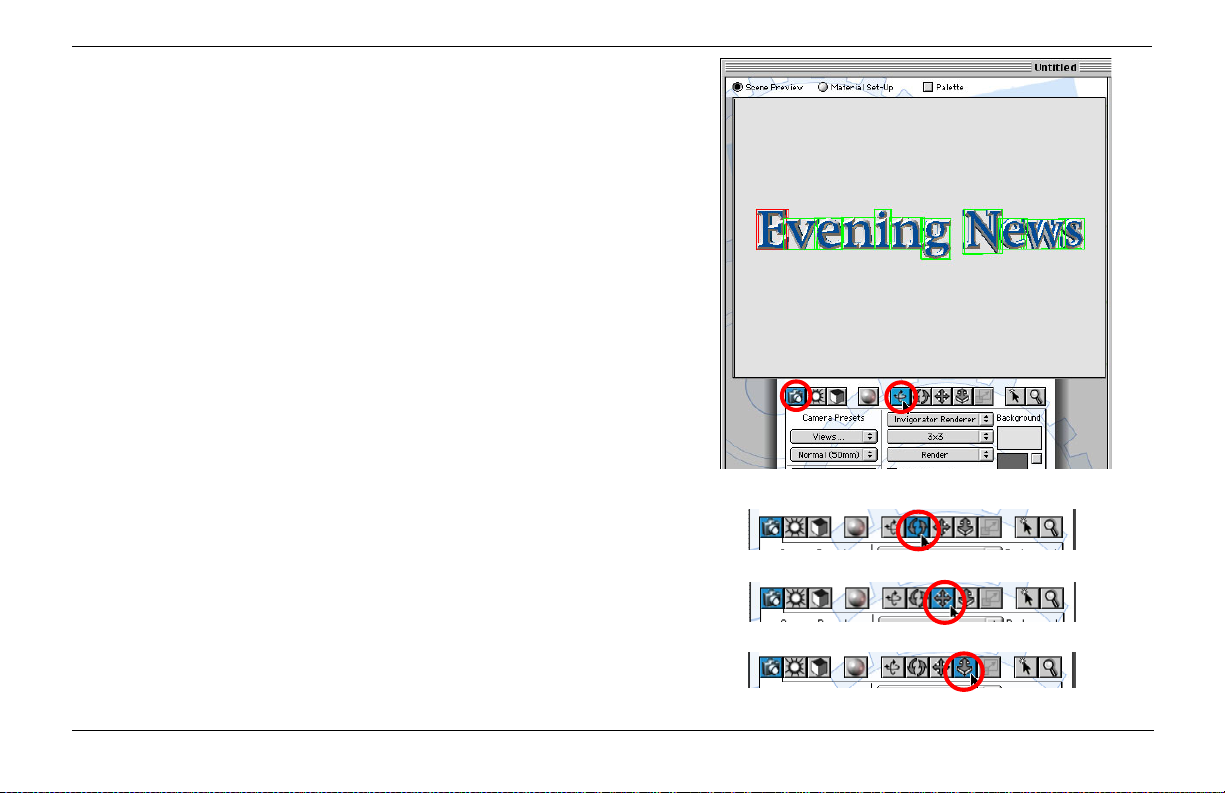
2- Click on the Camera button to make it blue (it may already be
blue).
3- Next click on the Tumble tool (first tool in the group of five
tool buttons).
4- Now you can click the mouse in the 3D preview window and
drag left/right or up/down. As you drag, the camera will change
position. You can tell that it is the camera moving because the
floor and all of the objects move together. You won’t see the
camera itself because it is what you are looking through.
Let up on your mouse button to watch the animation play back
from a different viewpoint.
The other three tools move the camera in different ways. Take a
moment to experiment with them to see what they do.
Tumble -Makes the camera orbit around the objects
Roll -Makes the camera tilt side to side
Track -Moves the camera left/right and up/down
Dolly -Pushes the camera closer to the objects or pulls
it further away.
Select the camera and the Tumble tool.
The Roll tool.
The Track tool.
Zaxwerks 3D Invigorator - ProAnimator - Tutorials
The Dolly tool.
23
Page 24
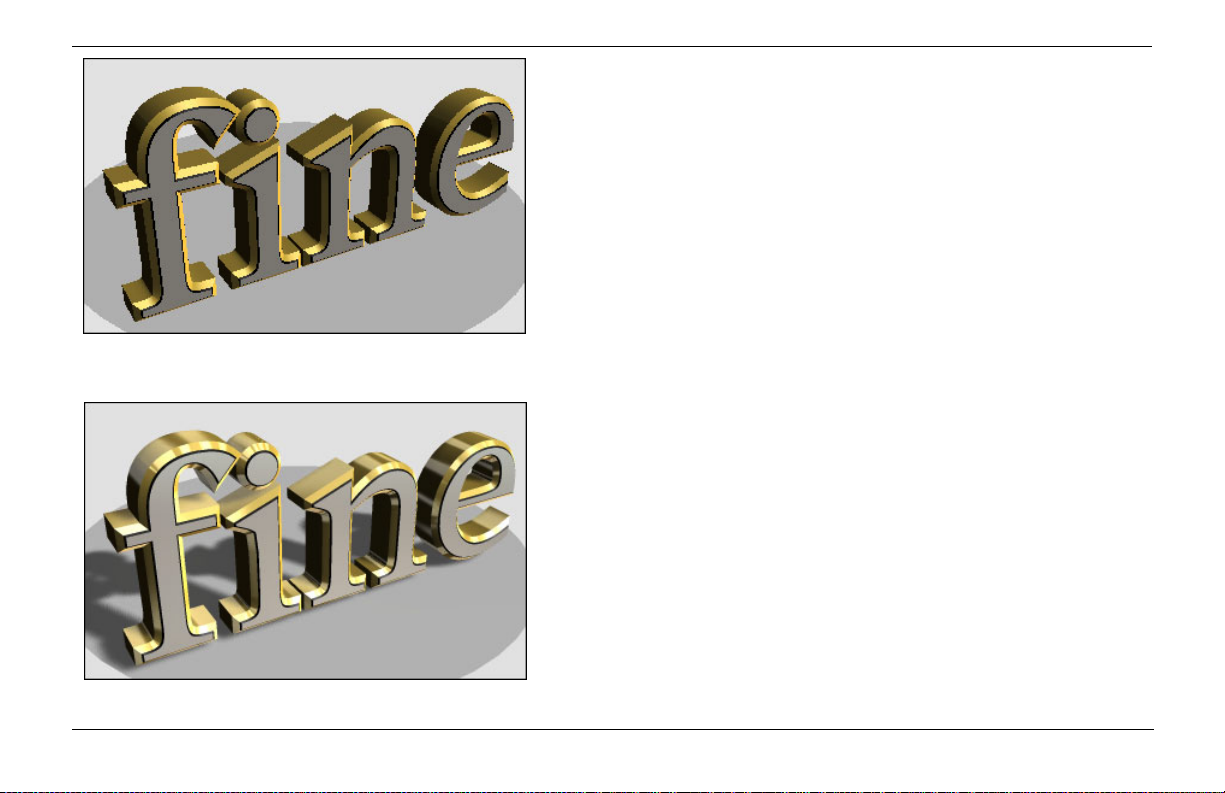
A draft quality rendering.
Chapter 2
Rendering an Animation
Now that you have an animation it’s time to render it and save the
movie as a file which you can bring into your video editor,
compositor or other program.
The 3D window that the animation is created in only shows you a
draft mode view. Draft mode has no antialiasing, no motion blur,
no shadows, and no reflectivity. Only solid surface colors. That’s
because all of these things take extra time to render and the 3D
window tries to do things in real time.
There are two ways of seeing what the final image will look like:
rendering a single frame of the animation; or rendering the entire
animation.
Rendering A Single Frame
Single frame rendering is done to check what the final movie will
look like without having to render the entire movie. When you
render a single frame all of the rendering features are turned on,
so you will see the antialiasing, motion blur, textures and reflections that are usually turned off when doing previews.
A final quality rendering.
Zaxwerks 3D Invigorator - ProAnimator - Tutorials24
Page 25
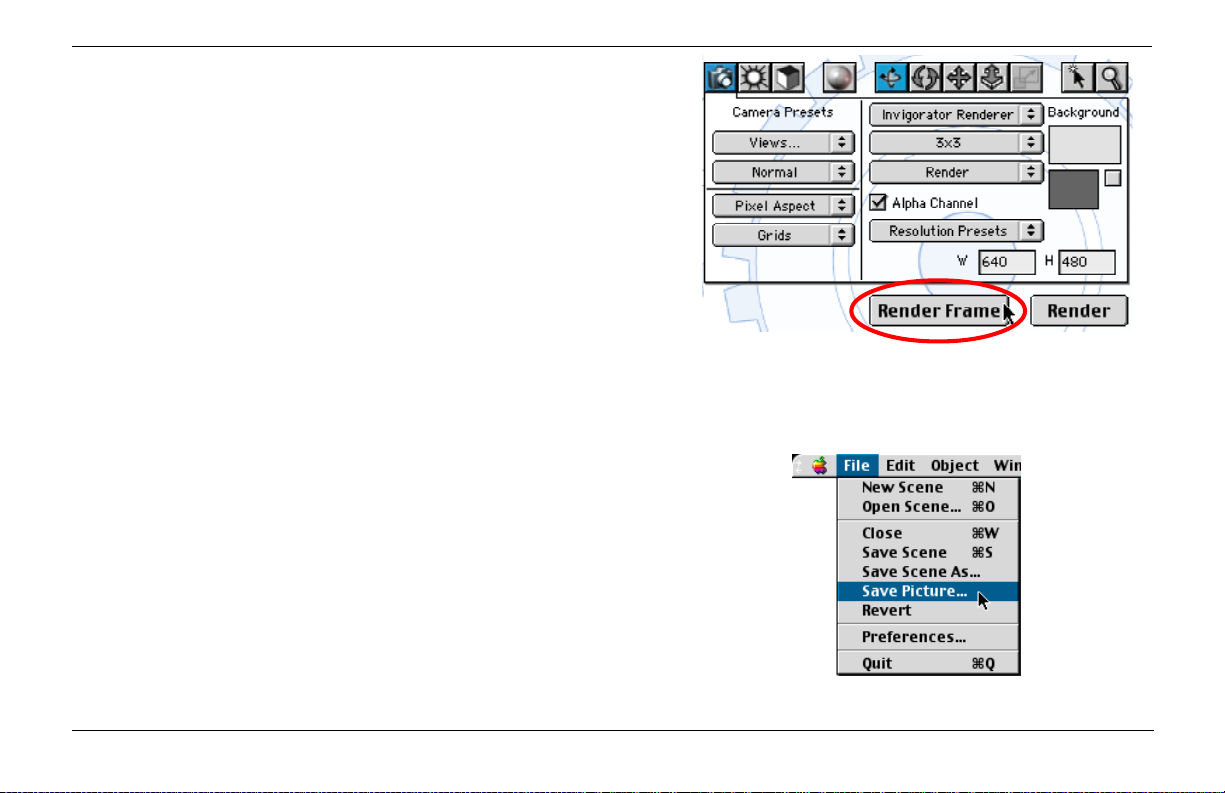
1- To render a single frame click the Render Frame button. The
current frame is rendered and will appear in a window. You can
leave this window open and do another rendering. You can also
save the image in this window to a file if you want to keep it. (See
Saving A Single Frame Rendering.)
By moving the Time Marker to different places in the animation
and rendering single frames you can do spot checks to see how
the animation is going to look. Once all of these spot checks look
good move on to rendering the whole movie.
Saving A Single Frame Rendering
After a single frame rendering is done is will appear in its own
window. When you close this window, the rendering will be
erased from memory. To save one of these pictures do the
following:
- Click on the image to bring it in front of all the other windows.
- Use the File> Save Picture... command.
You will be given a file dialogue where you can name the image
and choose the format to save it in.
If the Alpha channel checkbox was turned ON during the rendering, you will be saving the Alpha channel into the same file as the
RGB image. This enables you to open the file in Photoshop or
other image editing programs that accept Alpha channels and get
perfect antialiasing by loading the Alpha channel as a selection.
Click the Render Frame button to render a final quality
image at the current time.
Zaxwerks 3D Invigorator - ProAnimator - Tutorials
25
Page 26
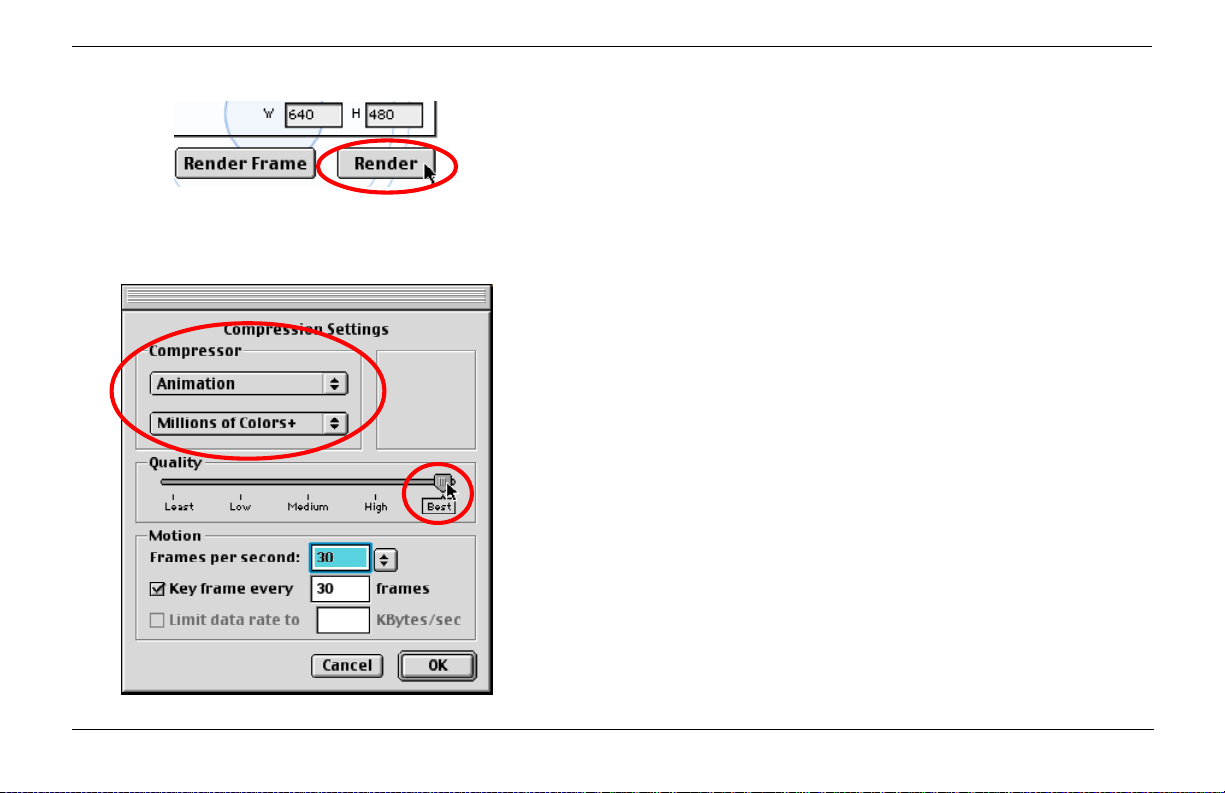
Click the Render button to render the whole movie or part
of the move, depending on how the render options are set.
Rendering The Movie
To render the final movie click the Render button. This will
render the movie based on the options set on the camera tab.
After clicking the Render button you will see a file dialogue
where you can name the movie and choose where to save it.
After clicking the Save button you will then see the QuickTime
Compression Settings window. Choose the compressor that gives
you the best results for the editing or compositing system you will
be taking the movie to.
In most cases you will want to save your ProAnimator movie with
as little compression as possible. That way you will be able to
mix it with other footage in your editor or compositor. You will
probably also want to keep the alpha channel so the background
of the movie will be removed without you having to “key it out”.
There are two compressors you can use that fullfill both of these
requirements. One is the Animation compressor, the other is the
TGA compressor. Both of these compressors are standard
QuickTime options. There may be others that will work with
your specific editing hardware. Once you have selected either
one of these compressors you should put the Quality slider at
“Best”, and set the color depth menu to “Millions of Colors +”.
The “+” sign means you get the Alpha channel as part of the
movie file.
Zaxwerks 3D Invigorator - ProAnimator - Tutorials26
Page 27

Rendering Options
The rendering options are seen on the camera tab. These options
tell the program what part of the animation you are going to
render, what size you will be rendering it at and what the quality
of the rendering should be.
(See the section on Rendering Options later in this User Guide
for explanations of these options.)
Zaxwerks 3D Invigorator - ProAnimator - Tutorials
Render with or
without an Alpha
Channel.
The camera tab contains the rendering options.
Render the whole
movie or part of
the movie.
Choose the size
for the final
rendering.
27
Page 28
Chapter 3
Changing The Timing And Speed Of
Parts Of An Animation
Oftentimes the preset animations will get close to what
you want but you may still need to make some adjustments to the timing in order for it to be perfect. Next we
will look at how to change the timing of an animation to
better fit the requirements of a project.
What Is A Pose? What Is A Transition?
The first step in knowing how to change an animation is
to understand a little about how an animation is put
together. Animation is the movement of objects over
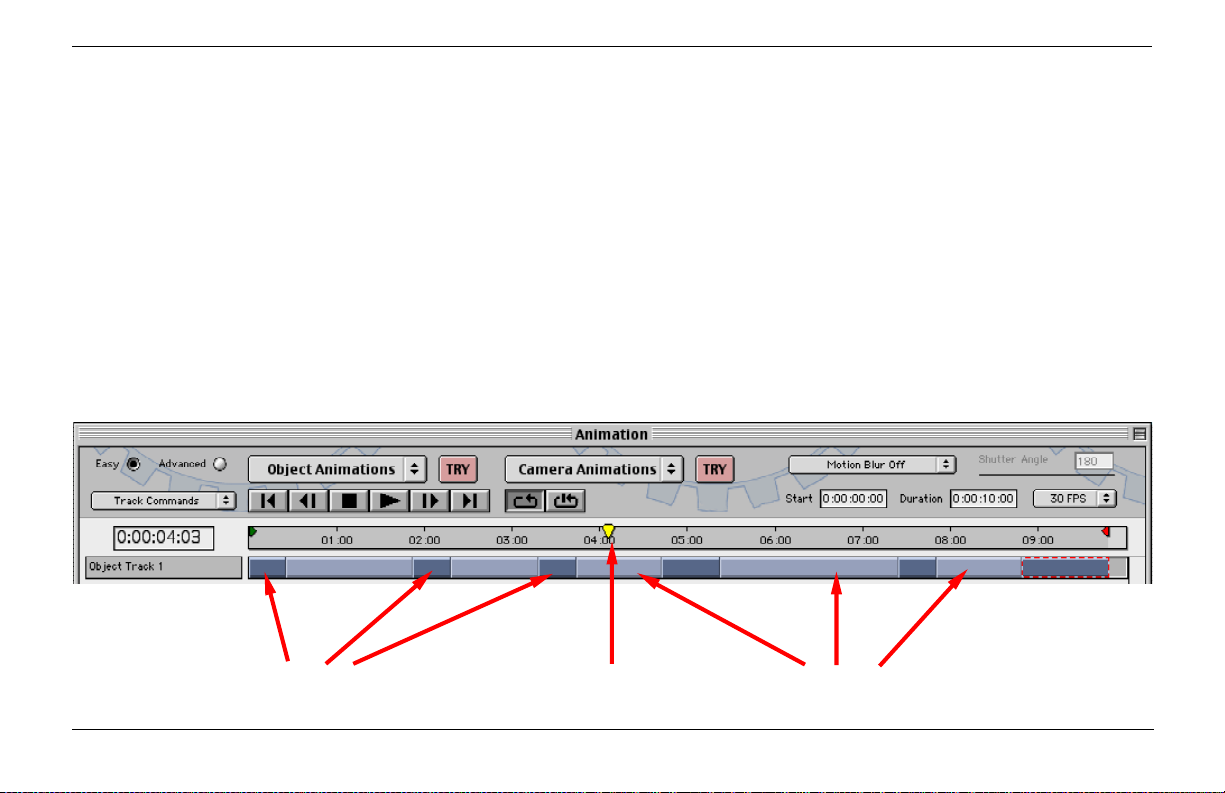
time. To show time the ProAnimator has a Time Line.
When you look at the Time Line you can see that time
runs from left to right. It starts at Time = 0 and goes to
Time = 10 seconds.
An animation is shown on the Time Line as a series of
light blue and dark blue rectangles. The dark blue rectangles are called Pose segments and the light blue rectangles are called Transition segments.
Pose Segments
The Time Line
Transition Segments
Zaxwerks 3D Invigorator - ProAnimator - Tutorials28
Page 29
A Pose is a snapshot of the position of your objects in space. A
pose is very similar to a keyframe, but a single pose cound
contain hundreds of keyframes. A Transition is the movement of
objects from one Pose to the next. A Transition segment must
always have a Pose segment on either side of it. The simplest
animation would be three segments: Pose-Transition-Pose. There
is no limit to how long an animation can be. You can add segment
after segment for a very long and elaborate series of movements.
The length of each segment shows you how long it lasts. The
length of a Pose shows you how long the objects will sit at that
one position. The length of a Transition shows you how long it
will take for the objects to move between two Poses.
If you did the first tutorial you were introduced to changing the
length of a Transition segment. There is more than one way to do
it so let’s look at this in more detail.
Creating A New Scene
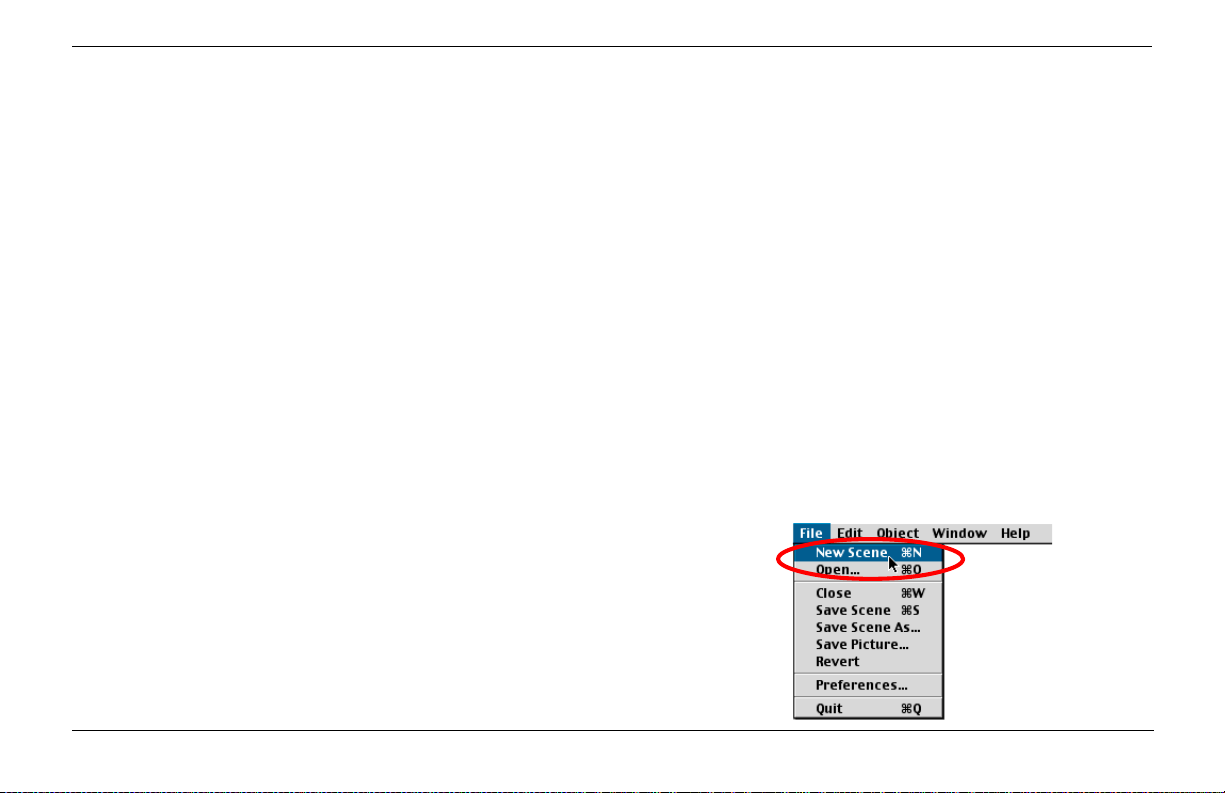
If you are continuing from the last tutorial look under the File
menu and pick the New Scene command. When it asks if you’d
like to save the current scene click No.
If you are just starting, launch the program and click the New
Scene button.
Zaxwerks 3D Invigorator - ProAnimator - Tutorials
29
Page 30
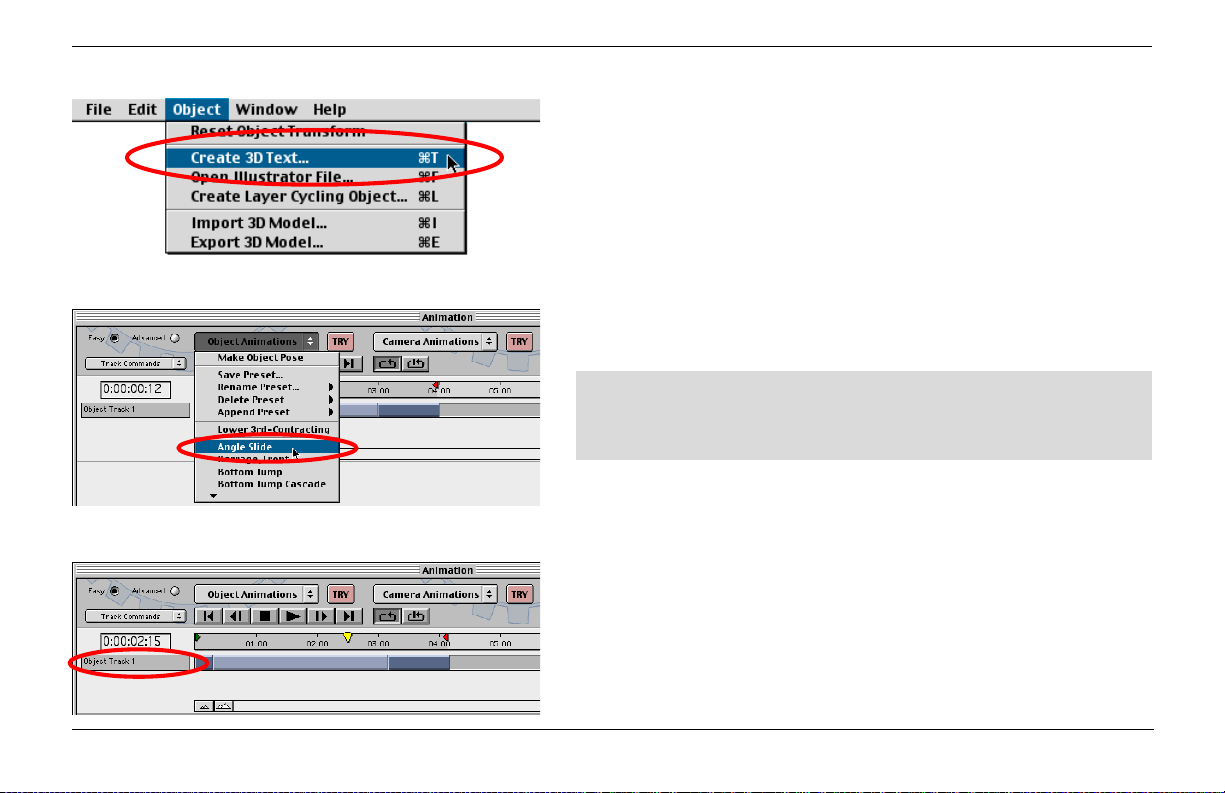
Creating The 3D Text
Look under the Object menu and choose the “Create 3D Text”
command.
When you see the text window, type “Moving along” then click
the OK button.
Adding An Animation Preset
1- Go to the Animation window and click on the Object Animations popup menu. Find the preset called “Angle Slide”. Choose
it. You will see the animation start to play.
During the next series of instructions do NOT stop the
playback of the animation. The ProAnimator let’s you keep
the animation playing while you make changes.
Look at the Time Line. You can see that a single animation track
has been created. This track contains a starting pose, then a
transition segment, then an ending pose. To the left of the
segments are the words “Object Track 1” this is a name to
identify this track.
Zaxwerks 3D Invigorator - ProAnimator - Tutorials30
Page 31

Changing The Track Name
1- Double click on the track name. You will see that it becomes
highlighted. Type the words “Moving along” to rename the track.
After typing click the Return or Enter key on your keyboard, this
turns off the editing of the name so you won’t accidentally change
it.
(NOTE: if you accidentally clicked and removed the highlight
from the name, click and drag over the words to select them
again, then type “Moving along.”)
Moving Splice Points
As the animation plays watch the yellow time marker. When the
time marker is at the beginning of the animation the 3D objects
are positioned below the lower left corner of the preview window. Notice that they stay there for a bit before the letters begin
to move. The movement of the letters happens when the time
marker is over the light blue Transition segment. Once the time
marker gets over the end pose, the letters stop moving and they
hold until the end of the final pose is reached.
Move the mouse cursor so it is over the place where the first pose
and the transition touch each other. This is called a “Splice
Point”. When the cursor is over a splice point you will see that it
changes to the Splice Point Editor. Once the cursor changes it
means you will be able to change the position of the splice point
without moving the other end of the segment.
Double click the name to change it.
When positioned over a Splice Point the cursor will
change and you can then drag the Splice Point.
Zaxwerks 3D Invigorator - ProAnimator - Tutorials
31
Page 32

Drag on a Splice Point to change the length of the segments.
Adding More Hold Time To The Beginning Pose
1- With the cursor over the first splice point click down and drag
the splice point until it lines up with the 2 second mark on the
Time Line. Then release the mouse button.
The animation will now hold for 2 seconds at the beginning, then
all the letters will quickly move into position before holding again
at the end.
Why do the letters now move so quickly? It’s because moving the
splice point made the transition segment become much shorter,
meaning the letters have less time to move the same distance, so
they have to move faster.
Changing The Position Of A Segment Without Changing Its Length
In the previous step you changed the length of a segment by
moving its splice point. If you drag on the center of a segment,
instead of its splice point, you can change where the pose or
transition happens on the Time Line.
1- Click on the center of the transition segment, hold your mouse
button down, and drag to the left. You will see that the transition
segment sticks to your mouse cursor and moves left as you drag.
Zaxwerks 3D Invigorator - ProAnimator - Tutorials32
Page 33

2- Drag left until the segment stops at the left end of the Time
Line, then release your mouse button.
You will now see that there is no pause at the beginning. As soon
as the time marker gets to time “zero” the letters immediately
begin to move. Once they reach their final position they hold
there until the time marker reaches the end of the final pose.
What happened to the starting pose? If you look closely
you will see that it is still there, but it’s only one frame long.
Remember, a transition always has to have a pose on
either side, even if the pose is just one frame long.
Slowing Down The Motion Of A Transition
The speed that the letters move is related to the length of the
transition segment. The longer the transition, the slower the
movement.
1- Do this: Drag the splice point at the right end of the transition
all the way to the right. Make sure the cursor changes before you
click and drag, otherwise you may not get the desired result.
What happened to the speed of the letters? The transition
segment is now 4 seconds long so it takes the letters 4 seconds to
move from their starting pose to their ending pose. This makes
the letters all move much more slowly than before.
Zaxwerks 3D Invigorator - ProAnimator - Tutorials
Drag on the center of a segment to change
the position without changing its length.
Drag the right end of the Transition all the way to the right.
33
Page 34

Reselect a preset from the popup menu to erase your changes.
Resetting An Animation Back To A Saved Preset
If you change an animation and want to restore it back to the
saved version all you have to do is to select the animation preset
from the menu again.
Click on the Object Animations popup menu. Find the preset
called “Angle Slide”. Choose it. This will erase the existing
animation and reapply the preset animation to the objects.
TROUBLESHOOTING TIP: If nothing happens, click on the
Track’s name so it becomes dark. This tells the program
which track you want to apply the preset to.
Increasing The Length Of An Entire Animation
Sometimes you have an animation that you need to make shorter.
Other times you have an animation that needs to take up more
time. In both of these cases you must scale the duration of the
whole animation. Not just change a single segment, but affect all
of the pose and transition segments at one time. Here’s how you
do it...
1- If the animation is playing, click the Stop button.
Zaxwerks 3D Invigorator - ProAnimator - Tutorials34
Page 35

2- Click once on the starting pose to select it. You will see a red
dotted line surrounding the pose segment.
3- Next, hold down the Shift key on your keyboard. Keep holding
it down.
4- Now click your mouse once on the end pose. Let up on the
Shift key after having clicked on the end pose.
You will now see that there are dotted lines surrounding all of the
segments on this track. This means that all segments have been
selected. Shift-clicking is a very fast way to select all segments
that lie between two points. To scale the length of all the selected
segments do the following...
5- Hold down the Option (Alt) key on your keyboard. Position
the mouse cursor over the end of the last segment. This should
be at the 4 second mark. Click and hold down on your mouse
button, then drag to the right. You will see the segments grow
longer as you drag. Drag until the right end of the last segment is
under the 8 second mark. Release the mouse button.
6- Click the gray play button. You will see that the objects now
move much more slowly than before. You should also see that
the animation doesn’t play all the way through to the end. Once
the time marker gets to 4 seconds it jumps back to the beginning
and starts over. To make it play all the way through you will need
to adjust the end loop point for the work area. (See next step.)
Zaxwerks 3D Invigorator - ProAnimator - Tutorials
1
Shift Click between two points to select multiple segments.
Hold the Option (Alt) key and drag the end to the
8 second mark.
2
35
Page 36

Work Area
Start Marker
Drag the end marker to set the end of the loop.
Play Work
Area Button
Loop
Button
Work Area
End Marker
Setting The Loop Points For The Work Area
The Work Area is the portion of the animation that is played when
the gray “Play Work Area” arrow is pushed. If the black Play
arrow is pushed the animation plays all the way through from the
beginning to very end. But if the Play Work Area arrow is pushed
the animation starts playing at the green arrow and stops when it
gets to the red arrow. Additionally, if the Loop button is turned
on, the animation will play over and over until you click the
square Stop button.
The little green and red arrows in the Time Line set the beginning
and ending of the Work Area. Between the green and red arrows
the timeline is dark gray. This is to let you easily see the work
area. Playing only the work area lets you see part of your animation without having to watch other parts that you may not be
interested in.
In the last step you made the animation 8 seconds long but only
the first 4 seconds is playing back. This is because the red arrow
that marks the end of the work area loop is still sitting at 4
seconds. To set the end marker to be able to see the entire
animation, position the mouse cursor over the end marker, (the
red marker) click down and drag to the right until the marker is
at the 8 second mark. Now you can click the Play Work Area
button and watch the animation all the way through.
Zaxwerks 3D Invigorator - ProAnimator - Tutorials36
Page 37

Shortening The Length Of An Entire Animation
You can shorten an entire animation the same way that you
made it longer.
1- Shift-click to select all segments. (Click on the beginning pose,
hold down the shift key then click on the end pose.) You will
see dotted lines surrounding all of the segments indicating that
the whole animation is selected.
2- Next, hold down the Option (Alt) key on your keyboard.
Position the mouse cursor over the end of the last segment.
When the mouse is in the correct position you will see the cursor
change from an arrow to the splice point editor.
3- Click and hold down on your mouse button, then drag to the
left. You will see all of the segments grow shorter as you drag.
Drag until the right end of the last segment is under the 2 second
mark. Release the mouse button and the Option (Alt) key.
Click the Play Work Area button. You will now see the objects
moving much more quickly.
You will also see that after the objects stop moving, the animation sits still for quite a while. This is because the the time
marker must reach the red end marker before it can loop back to
the beginning. To remove the pause, drag the red end marker to
the 2 second mark. Now the animation will loop the first two
seconds over and over.
Zaxwerks 3D Invigorator - ProAnimator - Tutorials
With all segments selected, hold down the Option
(Alt) key and drag the end to the left.
Drag the end marker to the 2 second mark
to play back only the first two seconds.
37
Page 38

1
Click the left arrow key on your keyboard to
move the selection from Position 3 to 2 to 1.
Hold down the Shift key as you click the
arrow keys to add to a selection.
2
3
Selecting Segments That Are Difficult To Click On
When segments are made very short it is sometimes difficult to
click on them. The ProAnimator has a way to select segments
without clicking on them.
1- Don’t hold down any other key. Click on the last segment to
the right. This segment is large so it will be easy to click on.
With one segment selected you can use the arrow keys on your
keyboard to move the selection to the right or left.
2- On your keyboard, click the left arrow key once. You will see
the red selection dots move to the transition. Click the left arrow
key again and you will see the dots surrounding the thin segment
that is the first pose.
If you hold down the Shift key while arrowing left and right you
can extend the selection. For instance, now that the start
segment is selected, hold down the Shift key and click the right
arrow two times. You should now see the dotted selection lines
surrounding the entire animation.
Zaxwerks 3D Invigorator - ProAnimator - Tutorials38
Page 39

Chapter 4
Changing Object Motion During Transitions
There are a great many ways you can change the motion of your
objects during an animation. When a Transition segment is
selected, and the animation is not playing, the paths that the
objects move along are shown as red lines in the 3D window, and
the controls for the selected transition are shown at the bottom of
the animation window.
IMPORTANT! Before you continue with this next section you
should
1- Create a New Scene,
2- Create 3D text of the word “Transitions”, and then
3- Add the object animation called Angle Slide.
If you don’t know how to do these things please follow the
instructions at the beginning of Chapter 2.
Zaxwerks 3D Invigorator - ProAnimator - Tutorials
The motion paths of the Angle Slide animation.
When you select a transition in the Time Line the
motion paths will be displayed in the 3D window.
39
Page 40

The Arch Slider.
An Arch of 10 gives the paths a slight curve.
Changing The Curve Of A Motion Path
1- When you play the Angle Slide animation you can see that the
letters are moving along a straight path. Stop the playback and
click on the transition segment to select it. When a transition is
selected you can see the paths that objects move along as red
lines with red dots on them.
At the bottom right end of the animation window you will see a
slider titled “Arch”. When this slider is set to 0 there is no arch or
curve in the path. The objects move from their starting pose to
their ending pose in a straight line. The Arch slider enables you
to curve the path making it look more interesting.
2- Drag the Arch slider to 10 then release the mouse. The paths
will now curve upward a little. Drag the Arch slider to 25. See
how the paths are now curved quite a bit. Click the gray play
arrow to start the animation playing and see how the letters now
look like they are dropping into their final position instead of
sliding up into position.
3- Drag the Arch slider to 50. Now the letters look like they are
dropping into place from the top of the screen. Most likely you
can see the letters lifting up before they fall down, but the lifting
is happening offscreen. Only the light colored area in the middle
of the preview window will be rendered in the final movie.
Anything that is happening in the dark gray area won’t be seen.
An Arch of 50 gives the paths an extreme curve.
4- Set the Arch slider to 20, before you go to the next tutorial.
Zaxwerks 3D Invigorator - ProAnimator - Tutorials40
Page 41

Changing The Direction Of The Arch In The Path
Up to this point the Arch of the path has been up and over, as if
the letters are riding over the top of a hill. We can change this
direction. Find the Arch Direction knob located to the right of
the Arch slider. See how the arrow on the knob is pointing up.
1- Drag the Arch Direction knob so it is pointing down. Play the
animation if it has stopped. See how the letters now swoop up
from the bottom of the screen. This has quite a different look
than the when the animation was dropping in from the top.
2- Drag the Arch Direction knob so it is pointing to the right, then
increase the Arch slider to 50. Now the letters are moving off in
the distance before turning and traveling right toward the camera.
This is a very cool multi-overlapping look and is very difficult to
get with any other software.
3- Often a little change can make a lot of difference. Instead of
setting the Arch Direction arrow to the right, which would be the
3 o’clock position on the face of a clock, try setting it to the 2
o’clock or 4 o’clock positions. Experiment with different positions and see the effect.
4- When you are done experimenting stop the animation and pick
the Angle Slide preset from the Object Animations popup menu.
This will reset the animation to its original form.
The Arch Direction control will make
objects swoop down, or to the side.
Zaxwerks 3D Invigorator - ProAnimator - Tutorials
41
Page 42

Controlling When Objects Start To Move
In the Angle Slide animation notice how each letter flies on
screen a little bit later than the one next to it. The secret is the
“Cascade” slider. The Cascade slider controls the timing of
objects as they move along their motion path.
1- Stop the animation. Select the transition segment if it’s not
already selected. For the Angle Slide animation you’ll see that
Cascade is set to 9. Drag the slider so that Cascade reads 0. Play
the animation and you will see that now all the objects are
moving together. When Cascade is at 0 all objects start moving at
exactly the same time.
2- Set the Cascade slider to 20. Now you will see that there is
space between each letter. Each letter waits a little bit before it
starts to move. This creates a spread-out cascade of letters.
3- Set the Cascade slider to 50 . Now you will see that there is
quite a bit of space between the letters. You still get the cascading effect but the spacing is so large that each letter now looks
like it is moving on its own.
4- Set the Cascade slider to 100. This is the top end of the range
and it means that each letter completely finishes its move before
the next letter starts to move. In other words the first letter
moves to its end position before the second letter starts to move.
Zaxwerks 3D Invigorator - ProAnimator - Tutorials42
Page 43

Then the second letter goes to its final position before the third
letter begins to move. This pattern continues until all the letters
reach their final position.
One thing to notice is that as you increase the amount of
Cascade, the letters move faster . This is because part of
the time a letter has to complete its move, is being spent
waiting for its turn to go. So once the letter starts moving it
has to move faster to get to the final position.
5- Set the Cascade slider back to 9, and start playing the animation if it has stopped.
Controlling The Order Of Objects As They Cascade
If you look at the Angle Slide animation as it plays you will see
that the last letter of the word comes on screen first, then the
next to last letter, and so on. The final letter to appear on screen
is the first letter of the word. The feature that controls the order
of the letters as they begin to move is called the Cascade Order.
1- The Cascade Order popup menu is located to the right of the
Cascade slider. It is currently set to “Right to Left”. Click on it
and choose “Birth Order”. Let the animation continue to play
while you make this change The animation will now play with
the “T” first followed by the “r” and then the rest of the letters in
sequence. Birth Order means the order that the letters were
created in.
Zaxwerks 3D Invigorator - ProAnimator - Tutorials
43
Page 44

The “Selection Order” option lets you choose the exact order
that objects will fly onto the screen.
2- From the Cascade Order popup, choose the Random option.
Now the letters build on in random order. This is a very cool
look. You can change the order of the random sequence by
picking the Random option again. In other words if you don’t like
the cascade order that the Random option picked for you, you
can choose the Random option again and again until the cascade
order is more to your liking. For instance, if you wanted the T in
the word Transitions to be the very first letter that flies on, you
can pick the Random option over and over until T happens to be
picked as the first letter in the order.
The other options fit various other purposes. Top to Bottom, Left
to Right, and the others tell you what they do. There is one other
Cascade Order option that is very useful. This is the option called
Selection Order. What the Selection Order option does is it lets
you pick the letters one by one in the order that you want them to
move. Let’s do this so you can see what this can be used for.
3- Stop the animation. Click on the Transition segment to select
it, then click on the yellow Time Marker and drag it left or right
until you can see all the letters on the screen.
4- The selecting must be done in the 3D Scene preview window.
Click once on this window. Select the Selection Tool icon. (This
is the icon next to the Magnifying glass icon.) Click somewhere
in the 3D window but don’t click on an object. This will deselect
everything. You should not see any red or green selection boxes
surrounding letters.
Zaxwerks 3D Invigorator - ProAnimator - Tutorials44
Page 45

5- Now let’s decide which letters we want to fly on first. Say that
you want the word to build on from the ends towards the middle.
Select the T by clicking once on the letter. If you select it you will
see a red wire box around the letter. If you don’t see the wire box
try clicking on the letter again.
6- Next hold down the Shift key on your keyboard and click once
on the “s” at the end of the word Transitions. If you selected it
you will see a green wire box around the “s”. If there is a red wire
box around the “s” then you forgot to hold the Shift key down.
Go to the top of this page and start over.
7- Next select the “r” then the “n” and so on back and forth
working toward the middle. Be sure to pay attention as you are
selecting. You might not click on a letter. If you don’t the wire
box does not appear. Or you may accidentally click on a letter
that was already selected. If you do this the wire box will disappear so you will have to select that letter again.
8- Once you have all of the letters selected go to the Animation
window and choose “Selection Order” from the Cascade Order
popup menu. This locks the selection order into the program’s
memory. Now play the animation. You will see the letters cascade onto the screen in the order that you selected them!
Hold down the Shift key then select the objects
in the order you want them to move.
Zaxwerks 3D Invigorator - ProAnimator - Tutorials
45
Page 46

By the way you don’t need to select every letter. Sometimes you
just want a few main letters to come on first and the order really
doesn’t matter for the rest of the letters. If this is the case just
select the main letters and leave the rest unselected. The letters
that were selected will appear at the beginning and the letters
that were unselected will follow in birth order.
Adding Start Ease And End Ease For A Professional Touch
Real life objects accelerate when they start to move and decelerate when they slow to a stop. Think of a car. When a car begins
to move it speeds up over a few seconds until it gets to full speed.
It doesn’t just go from sitting still to full speed in an instant. It
takes several seconds for it to get going.
The same thing happens when you stop a car. If you are going 40
and you step on the brake the car does not stop instantly. It takes
it a few seconds to slow down first and then it stops.
Start Ease and End Ease are both applied using this slider.
Start Ease and End Ease are animation terms that mean the
speeding up at the beginning of a movement and the slowing
down at the end of a movement. Start Ease and End Ease are one
of the little things that makes your work look really good. Without this feature letters tend to bang into place. With this feature
the letters will settle into place. As a general rule the more Ease
you use, the heavier the objects will appear.
Zaxwerks 3D Invigorator - ProAnimator - Tutorials46
Page 47

Find the Ease slider next to the Cascade control. Notice that it
has two slider arrows. The light arrow on the left controls Start
Ease, the acceleration of objects as they begin to move. The dark
arrow on the right controls End Ease, the slowing down of
objects as they near their final pose.
1- Drag the End Ease (dark) arrow to the left so it reads 60. Play
the animation and you will see that the letters now settle into
position very nicely. By setting this control to 60 you told the
program to keep the letters at a constant speed for the first 60% of
the transition, and then slow down over the last 40%.
Since the letters begin offscreen there is no need to add Start
Ease. You only need to add Ease when you see the letters start or
stop while on screen, in the live area that will be rendered.
Dragging the End Ease arrow to 60 makes the objects
slow down over the last 40% of the animation.
Zaxwerks 3D Invigorator - ProAnimator - Tutorials
47
Page 48

Chapter 5
Changing The Positions Of Objects
Poses are the positions of your objects. An animation is created
by placing objects in different positions at different times, and
then having the program move the objects from one Pose to the
next. We saw in the last section how to change the way that
objects move between two poses. Now we will learn how to put
the objects into those poses.
IMPORTANT! Before you continue with this next section you
should:
1- Create a New Scene,
2- Create 3D text of the word “Positions”, and then
3- Add the object animation preset called CrashZoom.
If you don’t know how to do these things read the instructions at
the beginning of Chapter 3.
If you followed the IMPORTANT step above you will now be
looking at an animation of the word Positions. Notice how the
starting Pose has the letters positioned behind the camera so that
the first you see of them is when they appear to crash through the
screen from behind. The middle Pose has the words come to a
rest in the center of the screen, and the final Pose is once again
behind the camera as the word flies past the camera and out of
view.
Zaxwerks 3D Invigorator - ProAnimator - Tutorials48
Page 49

Moving Objects To New Positions
The Move control is one of the tools you will use the most. When
you are setting up an animation and placing objects into their
positions the tendency is to want to drag the objects in the 3D
window. This is the old way of doing it. In fact, in most 3D
programs this is the only way you have of positioning objects, but
in the ProAnimator we call this Tweaking.
Tweaking is the very last method you should use to position
objects. It is the technique you use when you can’t get the Pose
controls to do exactly what you want. One advantage of using
the Pose controls is that you will be able to save your animations
as presets and apply them to any other group of objects, so you
should get used to using these controls as quickly as possible.
(For more information about Tweaks see the section called
“What is a Tweak?” later in this guide.)
We will use the Move controls to make the objects fly to a different place on the screen. As you play the animation you can see
that the second Pose is responsible for the position of the objects
at the center of the screen.
Stop the animation playback (by clicking your spacebar), and
click on the second Pose to select it. You will see the controls for
this Pose appear at the bottom of the Animation window. There
are two parts to the Move controller; a set of direction clickpoints, and a slider to set the amount of distance to move.
Zaxwerks 3D Invigorator - ProAnimator - Tutorials
The Move controls.
Dragging objects in the 3D window is called Tweaking- you
should NOT tweak objects if you can avoid it.
The Distance slider.
Direction Buttons.
49
Page 50

1st Pose
By default objects move
forward.
2nd Pose 3rd Pose
Click the UP arrow to move
objects up.
Currently the slider is set to 0 meaning that the objects aren’t
being moved anywhere. They are all sitting at their Home position.
Instead of having the letters fly to the center of the screen let’s
have them fly to the top third of the screen. Here’s how you do it.
1- First make sure that the second Pose is selected.
2- Hold down the Shift key on your keyboard and drag the Move
slider back and forth a few times between 0 and 500. Notice how
the letters come closer to you. This is because the center button
on the direction indicator is dark. Click on the UP arrow, and
drag the slider until the letters are positioned about a third of the
way down from the top of the screen. This should be at about
150.
3- Now play the animation. (Tap your spacebar.) You will see the
letters flying to this higher position instead of the center of the
screen.
4- Leave the animation playing and double click the center
button. Now you will see the letters flying to a far away position.
A single click on this button moves the objects forward, and a
double click move the objects away.
Double click the center
button to move ojects back.
Click the DOWN arrow to
move objects down.
5- Leave the animation playing and click the DOWN arrow. Now
you will see the letters flying to a lower third position.
Zaxwerks 3D Invigorator - ProAnimator - Tutorials50
Page 51
Pretty amazing how a single click could reposition all of those
letters, changing all of those animation paths, and you never even
had to stop the animation to do it! This is something you could
never do with the Tweak method, and shows you the second main
benefit of using the Pose controls: you can make extremely fast
changes.
Spreading Objects Apart
With the word now flying to the lower third of the screen, let’s
add some spacing between the letters to give it a different look.
The Bunch/Spread slider enables you to quickly spread objects
horizontally.
1- Tap your spacebar to stop the playback of the animation. The
second Pose should still be selected. If it isn’t, click it so you see
the red dotted lines around this Pose segment.
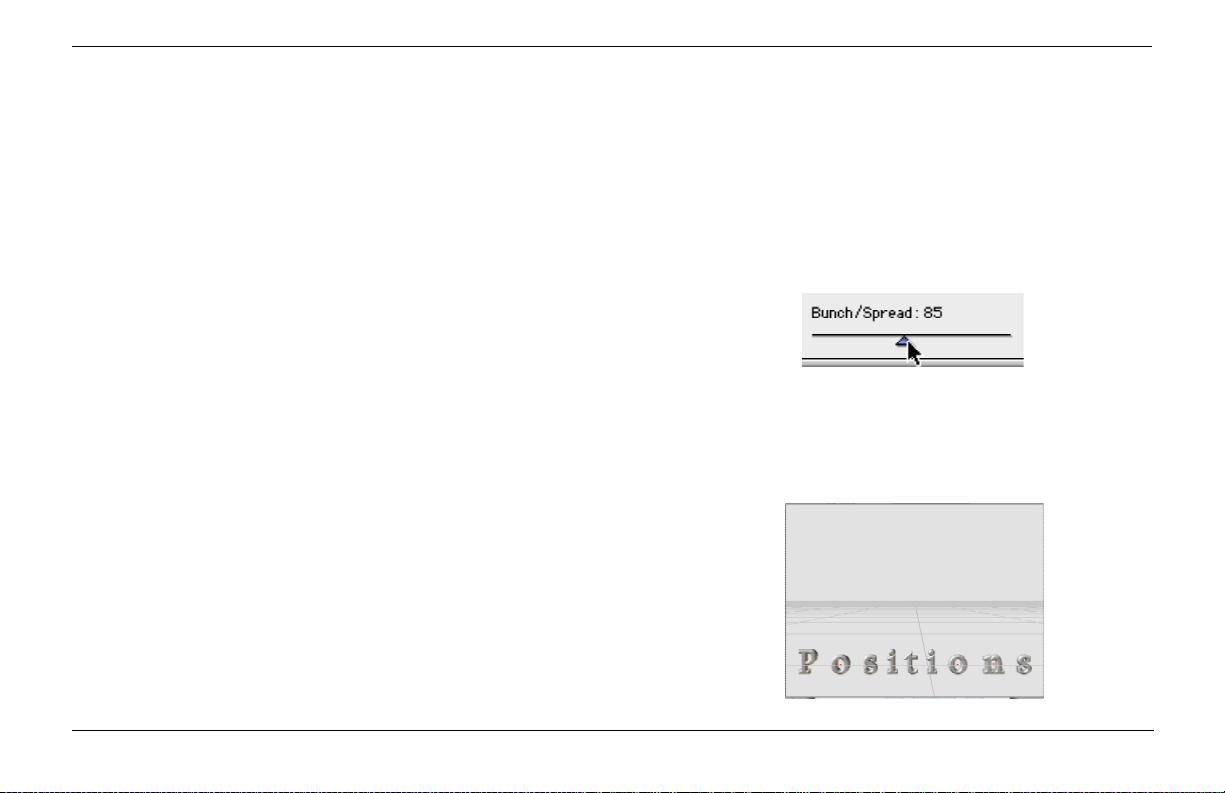
2- Hold down the Shift key and drag the Bunch/Spread slider back
and forth a few times. See how the letters bunch together as you
drag to the left and spread apart as you drag to the right.
Stop dragging when the letters just about fit the width of the
screen. This should be around 85.
Drag to the left to bunch objects together.
Drag to the right to spread them apart.
3- Start the animation playing to see the word flying to this spread
position.
Zaxwerks 3D Invigorator - ProAnimator - Tutorials
51
Page 52

Select the first Pose.
1st Pose
Setting Bunch/Spread to -100 puts all the objects on top of
each other, as you can see in the picture below...
2nd Pose 3rd Pose
Bunching Objects To A Point
The Bunch/Spread slider also enables you to quickly bunch the
letters into a clump. This is useful when you want the objects to
all fly from a single point. Let’s bunch the letters at the first Pose.
1- Stop the animation. Select the first Pose segment.
The controls will update to show you the settings used by the
selected Pose.
At the beginning of the animation the objects are off screen
which makes it hard to see the adjustments we make to the Pose.
2- Hold down the Shift key and drag the Move slider from its
current position of 1000 to a valueof 500. This will bring the
objects into view so we can see the effect of the Bunch/Spread
slider. When we are done with the Bunching we’ll return the
Move slider to its original value.
3- Hold the Shift key down and drag the Bunch/Spread slider to
the left until it reads -100. This puts all the letters on top of each
other.
4- Set the Move slider back to 1000.
5- Play the animation. Now the letters spread out as they move.
Zaxwerks 3D Invigorator - ProAnimator - Tutorials52
Page 53

Making Objects Spin As They Move
You can also make objects spin as they move. There are two
ways of doing this. One way is to set the rotations as part of the
Poses. The second method is to use something called a Path
Action which adds a rotation to the objects during the Transition.
We’ll show you how to do the first method here. The second
method is discussed in the section on Path Actions.
1- Stop the animation. Select the first Pose segment if it’s not
already selected.
2- Drag the Move slider to 500 so you can see what you are doing.
(By the way, you can also move the camera to see what you are
doing, but then you have to worry about getting the camera back
to the same position. It’s much easier to drag the Move slider
instead.)
3- Hold down the Shift key and drag the green oval on the Rotation control. Watch the letters and stop dragging when they have
rotated once around. It may take you a couple of drags to get all
the way around. You don’t have to be perfect.
4- Set the Move slider back to 1000.
Drag the green oval to rotate
the letters around the Y axis.
5- Play the animation. Now the letters both spin and spread as
they fly into position.
Zaxwerks 3D Invigorator - ProAnimator - Tutorials
Watch the letters in the 3D window as you drag the
green oval on the rotation tool.
53
Page 54

1st Pose
Select the 3rd Pose.
2nd Pose 3rd Pose
Randomizing Object Positions
The Randomize slider gives you a quick way to jiggle object
positions. The larger the value the more distance the objects are
moved away from their original positions. Each time you click on
the slider a new random direction is picked so you can click over
and over until you get the pattern you want. For instance sometimes random positioning places two letters on top of each other.
If this happens just click on the slider and a new set of random
positions will be calculated.
Let’s randomize the positions of the letters in the final Pose.
1- Stop the animation. Select the last Pose segment. Pose
number three. The Pose controls will update to show you the
settings used by this Pose.
2- Drag the Move slider from its current value (should be 950) to a
value of about 500.
3- Hold the Shift key down and slowly drag the Randomize slider.
As you drag you will see the letters jumping further and further
away from their original positions. Values around 10 leave the
word still read-able, but just a little jumbled. As the values
increase the letters get more and more jumbled until you can’t
read the word anymore. Set the Randomize slider to 40.
4- Set the Move slider back to 950.
Zaxwerks 3D Invigorator - ProAnimator - Tutorials54
Page 55

You may see bits of a letter poking into the screen. If you do, it is
because the Randomize feature has accidentally moved an object
down in front of the camera. Each time you click on the Randomize slider arrow a new set of random directions will be picked, so
all you have to do is to click on the arrow and you will see the
letters jump to new positions. Click on the arrow over and over
until you can’t see any letters on screen.
5- Play the animation. Now as the letters fly from their lower
third position past the camera they jumble up a bit making the
animation more interesting to look at.
Shuffling Objects
Another type of randomizing can be done by shuffling the objects.
Shuffling is the process of substituting one object for another
object. The Shuffle control does a variety of different types of
shuffling. For instance if you choose the Mix 2 option every two
letters may or may not get switched for each other. This will
produce a word that is almost the same as the original word. As
you mix more and more letters together the word becomes more
and more unreadable.
A bit of one letter that has been moved in front of the camera.
Click the Randomize arrow until it goes away.
Zaxwerks 3D Invigorator - ProAnimator - Tutorials
55
Page 56

1- Select the last Pose segment if it’s not already selected.
2- Click on the Shuffle popup menu and choose the Mix It Up
option. This causes all of the letters to get shuffled together with
no regard to where the objects started. It creates the maximum
amount of shuffling.
Choose “Mix It Up” for the maximum amount of shuffling.
Objects that have been both Randomized and Shuffled.
Now as the animation plays you will see that as the letters fly off
screen they go to even more random positions giving each letter a
life of its own.
Zaxwerks 3D Invigorator - ProAnimator - Tutorials56
Page 57

Modeling, Surfacing and Lighting
Tutorials
Zaxwerks 3D Invigorator - ProAnimator - Tutorials
57
Page 58

Zaxwerks 3D Invigorator - ProAnimator - Tutorials58
Page 59

In this series of tutorials you will learn how to create and edit 3D
text models, apply basic attributes, set up a 3D scene and render
the final image.
TROUBLESHOOTING TIP !
You must have installed the program properly for the
factory presets to be present. Be sure to read and follow
the Installation Instructions at the beginning of this User
Guide.
Creating And Working With 3D Text
Start off with the program closed. If it is already running, Quit or
Exit the program.
1- Double click on the application icon to launch the program.
2- When you see the window with four large buttons click the
“Create 3D Text” button.
3- Type the words “Coming Up Next...”
4- Change the justification to Centered.
5- Use the Command+A (Control+A on Windows) keyboard
shortcut to select all the letters, then change the font to Arial
Plain. (If you don’t have Arial on your computer then use
Helvetica or some other font.)
Font List
Justification Buttons
Zaxwerks 3D Invigorator - ProAnimator - Tutorials
59
Page 60

Change fonts by choosing them from the fonts list.
Click the little arrows to step the values up or down.
6- Double click on the word “Next...” to select the whole word,
then change the font to Arial Black. (If you don’t have Arial
Black on your computer then use Helvetica Bold or some other
font.)
Once you have selected a font you can use your keyboard’s up
and down arrow keys to step through all the fonts in the list.
7- Click the up or down arrows a few times to change the font on
the word “Next...” Change the font several times so you can see
how easy it is to experiment and find the right font for the job.
TROUBLESHOOTING TIP !
If clicking the keyboard arrow keys doesn’t change the
font, use your mouse to click on the font list, pick a font,
then release the mouse. Don’t click on anything else. If
you click on something after picking a font, the up and
down arrow keys won’t work.
Once you are done experimenting select Arial Black from the font
list again. Leave the word “Next...” selected.
8- Make the word “Next...” larger by clicking the up/down arrow
buttons next to the Size field. If you hold down the Shift key
when you click, each click increases the size by 4 points per click.
Stop when you get to 96.
Zaxwerks 3D Invigorator - ProAnimator - Tutorials60
Page 61

9- Click the cursor between the t and the first dot. Increase the
Kerning by picking the 100 option from the Kerning values popup.
This will add a little space between the characters.
10- Drag the Block Size arrow to the left so there is a minimum of
white space on either side of the letters. If you drag too far to the
left you will see the word “Up” wrap down to the second line.
Don’t go this far. “Up” should stay on the first line.
11- Click the OK button. This will close the Text Window and
create 3D models of the title you just made.
Applying Object Styles
(continuing from the last tutorial)
When you OK out of the text window each character is turned
into an independent 3D model. You can see in the Scene Preview
window that each character has a red or green wire bounding box
around it.
1- Move the cursor to where there are no characters and click
once. This will deselect all of the objects and the wire boxes will
disappear.
The right half of the interface shows a bin full of little pictures.
Each picture represents an Object Style. An Object Style is a
group of settings for such things as the Depth, Bevel, and Colors.
Zaxwerks 3D Invigorator - ProAnimator - Tutorials
Drag the Block Size arrow to remove excess white space.
Click where there are no objects to deselect everything.
61
Page 62

Drop Object Styles onto letters to make them
look like the Object Styles.
Shift-click on each letter you want to add to the selection.
2- Click down on the Object Style in the top right corner. It
should be blue with a white bevel. Keep your mouse button
down and drag toward the 3D window. You will see an outline of
the picture following your cursor. Continue to drag until the
point of your cursor is over the “p”. Once in position let up on
your mouse button to “drop” the Object Style onto the 3D model.
You will see it change to blue with a white edge.
TROUBLESHOOTING TIP !
If you do not see any Object Styles in the right half of the
window, then you do not have the program properly installed. Quit the program and install it properly, following
the Installation Instructions at the beginning of this guide.
3- Repeat the drag and drop sequence again. Drag the blue Object
Style from the bin and drop it onto the U. Notice again that
nothing is selected. When nothing is selected dropping Object
Styles only affects the single object that is below the point of the
cursor.
4- Click on the Selection Tool in the toolbar. Select all of the
characters in the word “Coming” by holding down the Shift key
and clicking on each letter one at a time. As each object is
selected you will see a red or green bounding box appear around
it.
Zaxwerks 3D Invigorator - ProAnimator - Tutorials62
Page 63

5- Now drag and drop the red and white object style. It should be
the first picture in the second row. When you drop it onto one of
the selected letters, all selected letters will receive the same
Object Style.
Click on an empty part of the Scene Preview window (where
there are no 3D objects). This will deselect the 3D models.
6- With the Selection tool still active, position the cursor at the
lower right corner of the 3D window and drag up and left. As you
drag you will see a red box being drawn from the point of the
cursor. Drag the box so that the red box touches a little bit of
each letter of the word “Next...”. Don’t let the red box touch any
of the letters on the top line. When the cursor is properly positioned let up on your mouse button. This will select all 3D
models that the box either surrounded or touched.
(NOTE: Some versions of OSX will not show the red box. However the selection process will still work. Just imagine there is a
red box there... think different ;-)
Apply an Object Style to many objects by dragging it from the
bin and dropping it onto one of the selected objects.
7- Now double click on the first Object Style in the third row.
Double clicking an Object Style is another way to apply it to the
selected objects.
The picture of the Object Style you just applied in step 7 looks
very reflective but the objects in the 3D window don’t look
reflective at all. This is because reflections are turned off when
you start the program.
Zaxwerks 3D Invigorator - ProAnimator - Tutorials
2.
1.
Click down at point 1 and drag to point 2 to select
all objects the rectangle touches.
63
Page 64

Click this button to change the display levels.
Solid with Draft Textures and Reflections
There are two rendering levels: Draft quality and Best quality.
Normally the 3D window shows you Draft quality which disables
things such as textures, reflections, shadows, transparency and
antialiasing. All of these add to the look of the final image, but
they take extra rendering time and are not usually needed when
creating objects and positioning the camera.
Solid
Wireframe
Putting the Camera into Tumble mode.
8- To see draft versions of the textures and reflections click on
the sphere icon on the toolbar. This changes the display level
from Wireframe, to Solid, to Solid with Draft Textures and
Reflections.
If you click too many times you will see the display level return to
wireframe. Once on wireframe click two more times to get to
Texture and Reflection mode, and see the reflections on the
bottom word.
9- Click on the Camera button in the toolbar, (it may already be
selected), then click on the Tumble Tool.
10- Now position the cursor over the center of the 3D window.
Click and hold the mouse button down. Drag slowly, left, right,
up and down. You will see that you are Tumbling the camera
around the objects. You can tell that you are moving the camera
because the floor grid is moving too. If you were rotating the
objects, the floor would not move. As you drag you can see the
reflections moving across the faces of the bottom word.
Zaxwerks 3D Invigorator - ProAnimator - Tutorials64
Page 65

Reflections are nice to look at but they can slow down the
interaction speed.
11- Click the sphere icon once to change the display level to
wireframe, and then click once more to change the level to Solid
but without reflections.
12- From the Views menu, pick the High Left view.
Changing The Depth Of An Object
(continuing from the last tutorial)
Object Styles apply all the settings needed to create a model.
However sometimes you need to refine those settings to customize your look.
1- Select all of the characters in the top line, (“Coming Up”).
2- At the top right of the window is a tab that says Object. Click
on the Object tab to make it active. The Object tab contains all
the settings for adjusting the shape of an object.
Choosing a view from the Views menu.
The Object Tab.
In the lower right corner of the Object tab you will see the Depth
slider.
Zaxwerks 3D Invigorator - ProAnimator - Tutorials
The Depth Slider.
65
Page 66

3- Drag the Depth slider arrow to a value of 40. If you watch the
numbers in the box just above this slider you will see when you
get to 40. Release your mouse button and the models will suddenly get bigger.
To watch the models get bigger or smaller without having to
release the mouse button, hold down the Shift key as you drag.
4- Hold down the Shift key on your keyboard, then drag the Depth
arrow left and right. You will see the model changing as you drag.
This is a very useful feature! All sliders in the Invigorator
work this way. By holding the Shift key down as you drag a
slider, you will see the models change as you drag.
5- Stop dragging when the Depth value is at 10.
Now the top text is thin and elegant while the bottom text is
heavier with more punch.
Set the depth of the top line of letters to 10.
Coloring Objects
(continuing from the last tutorial)
It is often necessary to change the color from what is built into an
Object Style. Here are three ways to do it.
Zaxwerks 3D Invigorator - ProAnimator - Tutorials66
Page 67

Coloring Objects: Method 1
When objects have all had the same Object Style applied to them
they share the same materials. When you need to change the
color of all objects using the same Object Style all you have to do
is to change the color of the base material.
1- Select the letter “C” in the word “Coming”.
2- Click the Palette checkbox to display the active material
palette used on this letter.
3- Show the Materials Tab by clicking on the tab titled “Materials”
which is located at the top right corner of the Set-Up window.
4- Drag the swatch in dock 1 of the palette, (the Red Material),
and drop it into the Material Editor dock on the Materials tab.
This will load the material and make it ready for editing.
5- Click on the color rectangle to open the color picker, and
change the red to a medium pink. OK out of the color picker.
You will see that the swatch ball is now colored pink, and so are
the objects in the 3D window. All of these objects use the same
material, so by changing the color of the material, all of these
objects receive the change.
Zaxwerks 3D Invigorator - ProAnimator - Tutorials
Drag the swatch from dock 1 and drop it into the
dock in the Materials Editor.
Click here to open the color picker.
By changing the color of the material, the
objects receive the change too.
67
Page 68

Coloring Objects: Method 2
(continuing from the Method 1 tutorial)
Instead of showing the Materials Palette, you can drop new
materials directly onto the 3D objects.
1- Make sure that no objects are selected by clicking on a blank
part of the 3D window.
2- Show the Materials Tab.
3- Find the black swatch in the top row and find the letter “U” in
the word “Up”. Drag the material to the left and drop it when the
cursor is positioned over the blue part of the letter “U”. You will
see the front and side of the word “Up” turn black.
TROUBLESHOOTING TIP!
When you release the mouse, the position of the arrow is
significant. If you miss the colored part, and instead drop
the material onto the white bevel, Undo and try again. If you
miss the object entirely nothing will happen, so just try again.
NOTE: If you would like to know how to make the front and
side different colors, do the Advanced Tutorials.
After completing step 3 you may have noticed that although you
dropped the black material onto the “U”, the “p” received the new
color too. This is for the same reason that the whole word in
Method 1 received the new color. All of these letters share the
same Object Style. For individual letter control, read on...
Zaxwerks 3D Invigorator - ProAnimator - Tutorials68
Page 69

Coloring Objects: Method 3
(continuing from the Method 2 tutorial)
When you want to change the color of a single object without
affecting any other objects, you need to unlink the Object Style
first, then apply the new color.
IMPORTANT: For this next exercise you must have the pink
material sitting in the Material Editor dock. (see Method 1) If
it is not, you must do the following before you go on:
- Click on a pink object in the 3D window.
- You will see a pink swatch appear below the 3D window.
- Drag the pink swatch to the editing area, and drop it in
the Material Editor dock.
1- Make sure that no objects are selected by clicking on a blank
part of the 3D window. Then select the “p” by clicking once on it.
2- Show the Object Styles Tab by clicking on the tab titled “Object
Styles” which is located at the top right corner of the Set-Up
window.
3- Find the Swatch/Library... menu in the top right corner and
choose the “Unlink Object Style” command from it. This will not
change the appearance of the “p” but it unlinks the object so you
can change its color without affecting any other objects.
Zaxwerks 3D Invigorator - ProAnimator - Tutorials
69
Page 70

4- Show the Materials tab, and drag the pink material from the
Material Editor dock and drop it onto the black part of the “p”.
The “p” will now be colored pink.
Now let’s color the “C” black.
1- Click on the “C” to select it. Make sure it is the only object
selected.
2- Show the Object Styles Tab.
3- Choose the “Unlink Object Style” command from the Swatch/
Library... menu.
4- Show the Materials tab, and drag the black material from the
first row of the bin, and drop it onto the pink part of the letter
“C”. The “C” will now be colored black.
Zaxwerks 3D Invigorator - ProAnimator - Tutorials70
Page 71

Editing 3D Text
(continuing from the last tutorial)
You can change text at any time and the new text will take on all
the colors and shape settings of the existing letters. Usually this
is a simple matter of just typing new text. However when there is
more than one Object Style being used in the same text block,
you need to know the way the Invigorator applies Object Styles to
new objects.
Say we want to change the words “Coming Up Next...” to “Appearing Tuesday...” And we want the look of the new title to
match the look of the old title; meaning we want the first “A” to
be black, the rest of the word pink, and the word “Tuesday” to be
gold and silver.
If we open the Text Window and erase all the letters, when we
type in the new ones they will all be colored the same as the “C”
because the “C” was the first letter in the text block.
When only some of the letters are selected at a time, the Invigorator uses the first letter in the selection as the “Master” and all
the new text is made to match the master. So by selecting the
letters in three groups, it will keep all three of the Object Styles
used in this title. Here’s how to do it...
Double click on a letter to open the Text window,
1- In the 3D window, double click on one of the letters. This will
open the Text Window.
Zaxwerks 3D Invigorator - ProAnimator - Tutorials
71
Page 72

2- Select only the letter “C” in the word “Coming”.
3- Type an “A”, which is the first letter in the word “Appearing”.
4- Select the letters, “oming Up”, which are the rest of the letters
on the top line.
5- Type “ppearing”, which are the rest of the letters in the word
“Appearing”.
TROUBLESHOOTING TIP!
If you make a selection then hit the delete or backspace
key before typing the new text, the attribute matching won’t
work as described in this section. All you have to do is to
make a selection and start typing.
6- Select the whole bottom line. (“Next...”)
7- Type “Tuesday...”
8- Set the justification to Left Justification.
Do not drag the Block Size arrow. If you change the position of
the block size arrow, it will change where the text is inserted into
the scene. This may push the text off the screen.
9- Click OK. You will see the new title in the 3D window with the
same “look” as the old title.
Zaxwerks 3D Invigorator - ProAnimator - Tutorials72
Page 73

How To Set The Lighting
(continuing from the last tutorial)
Lighting is set from the Lighting tab.
- Click on the Light mode button to reveal the lighting controls.
The Invigorator’s lights have parallel rays, they are not cones like
you would find on a spotlight. Parallel lighting is much easier to
use. You can’t accidentally put a light behind an object, or point it
in the wrong direction.
Adjusting the direction lights are pointing is very easy. Find the
lighting manipulator below the 3D window. The arrow with the
red box around it is the light that will be manipulated.
- Click and drag on the lighting arrow. You will see it move as you
drag. Once you stop dragging, the lighting in the 3D window will
update to show you the effect.
You can also manipulate the lights by dragging in the 3D window.
- Select the Lighting Tumble tool if it’s not already selected, then
drag in the 3D window. You will see the lighting change as you
drag. Note that you don’t see the light itself, you see the effect of
the light on the objects in the scene.
To move one of the other lights select it from the Lights list.
Zaxwerks 3D Invigorator - ProAnimator - Tutorials
Click this button to reveal
the lighting controls.
Click and drag in
this window to move
the selected light.
The Light Tumble tool.
Select other lights
from the Lights list.
73
Page 74

Turn on
shadows here.
Set light
color here.
Set the
brightness here.
This swatch
previews
what the light
will look like.
When you do this you will see the red box switch to a different
arrow. Then you can drag to move this other light.
Each light can have its own color. Each light can also cast
shadows. Turn on these features in the Lighting tab.
Using Lighting Styles
(continuing from the last tutorial)
Just as objects can have Object Styles, lights can have Lighting
Styles. Lighting Styles contain the settings for all the lights in a
scene.
The Lighting Editor.
The Lighting Styles Tab.
1 - Click on the Lighting Styles tab.
Here you will see presets for many different lighting setups. You
can apply a Lighting Style by either dragging and dropping the
icon into the 3D window, or by simply double clicking on the
icon.
2 - Start at the top icon and work your way down the list. Double
click on each icon, then take a look at the effect it has on the
objects in the 3D window.
Especially look at the difference between the Lighting Styles
called: Side Lights, High Key, and Footlights. Each of these has
the main light coming from a different direction. See how
changes in lighting can change the mood of the image.
Zaxwerks 3D Invigorator - ProAnimator - Tutorials74
Page 75

3 - Scroll down to the bottom of the list. These Lighting Styles
have variations in color, not just in intensity. Apply each Lighting
Style and see the effect. Notice how lights with strong colors
tend to override the colors applied to the objects. For instance,
with Melrose and Sunset you pretty much loose any sense that
the front faces are pink.
4 - End by applying the Red Light District Lighting Style. This one
doesn’t affect the faces too much but it applies a nice red glow to
some of the edges.
How To Set The Camera
(continuing from the last tutorial)
Camera manipulation is just as easy as moving the lights. You
click the Camera Mode button, to tell the program you want to
move the camera, then you select one of the manipulator tools
and drag in the 3D window.
Say for instance that you want to look at the title from below
instead of above.
1 - Select the Camera Mode button.
2 - Select the Tumble Tool.
Zaxwerks 3D Invigorator - ProAnimator - Tutorials
The Melrose Style.
The Red Light District Style.
75
Page 76

Viewing the scene from a low angle,
with the Floor Grid turned ON.
3 - Click in the 3D window and drag directly up. You will see the
objects rotating to a different position. Actually it is the camera
that is rotating around the objects. You can tell this because the
Floor Grid is moving along with the objects. If the objects were
rotating the floor would be still.
4 - Stop dragging when the bottom of the word “Tuesday...” is
parallel to the bottom of the 3D window.
At this point the Floor Grid is getting in the way. The Floor Grid
doesn’t render in the final images and we can turn it off any time
we want.
5 - Find the Grids popup menu. Choose the Floor Grid menu item
to toggle it OFF. Notice that there are other types of grids here
too. A Title Safe grid, a Lower Third grid, even a special grid
called “4:3 Inside 16:9”. When you are using an HD resolution
(16:9) format, this grid shows you what will appear within a
standard TV (4:3) screen if you cropped off the sides.
With the Floor Grid turned off you can see the image much better.
You can also see the effect of the red lights much more strongly
from this lower angle. That’s an important point to remember.
The effect of the lighting will change as you view a scene from
different directions.
The Floor Grid Turned OFF.
Zaxwerks 3D Invigorator - ProAnimator - Tutorials76
Page 77

Saving A View
(continuing from the last tutorial)
Sometimes you need to save a camera view. For instance if you
had to move the camera to check positioning and then wanted to
return to that previous view, a saved view will get you back with a
single click.
If you did the last tutorial, the camera should still be looking at
the title from a low angle. To save a view do the following...
1 - Click on the Camera Mode button, (if it isn’t already blue.)
2 - Find the “Views...” popup menu.
3 - Choose the “Save View...” command from the Views popup.
4 - You will see a window to name the view. Type in a name and
click the Save button.
The preset you just saved will now appear in the “Views...” menu.
To return to this view at any time just select this preset.
Use the “Save View...” command to save a camera view.
Zaxwerks 3D Invigorator - ProAnimator - Tutorials
Naming the saved view.
77
Page 78

Take a little time right now and experiment with the rest of the camera manipulation tools. See what each does. For
practice here are some other views of this title. See if you can match them. You will need to use all four camera manipulation tools to do it, but you won’t have to move the objects themselves.
Zaxwerks 3D Invigorator - ProAnimator - Tutorials78
Page 79

Think Like A Photographer
It’s important to remember that when you work with the 3D
Invigorator you are using a real 3D program. 3D programs
simulate a photographer’s studio. You can move objects, set
lights, and reposition the camera.
You are always looking at the scene through the lens of the
camera. The Scene Preview window shows you what the camera
sees. What you see through the Camera lens is what you will get
in the final rendering.
Thinking like a Photographer helps you figure out what to do.
For instance, moving one object closer to the camera will make
only that object bigger. However, moving the camera closer to
some objects will make all objects bigger.
If you are taking a picture of a group of people and you can’t see
them all in the camera’s viewfinder, what do you do? Have
everyone move back? Or move the camera back? Both would
work, but one is easier.
Once you start to think like a person shooting a picture with a
camera, things make more sense.
Zaxwerks 3D Invigorator - ProAnimator - Tutorials
79
Page 80

How To Render An Image
(continuing from the last tutorial)
Once the objects have been created, colored and lit, and the
camera and lights are ready to go, it’s time to render the final
image.
1 - Click the Render Frame button to render a final quality image
at full resolution with all features turned on.
If you are using the ProModeler the Render button does the same
thing as Render Frame. It will render a single frame and put it
into a display window. If you like the image you can save it to
disk by using the File> Save Picture... command.
A Best Quality rendering is shown in a display
window when the rendering is completed. However,
it has not yet been saved to disk.
To save a rendering to disk use the “Save Picture...” command.
If you are using the ProAnimator, there are two Render buttons.
Render Frame will render a single image. If you like the image
you must save it to keep it. The other Render button will render a
movie. (See the section called Rendering the Movie in the
Animation Tutorials section.)
Zaxwerks 3D Invigorator - ProAnimator - Tutorials80
Page 81

How To Get The Background To Drop Out
(continuing from the last tutorial)
Usually when you get done creating a picture the next step is to
take it into some other program to combine (composite) it with
other images. Having a good alpha channel is key to the compositing process.
To create an alpha channel do the following:
1 - Turn on the Alpha channel checkbox.
This checkbox is turned on by default so it may already have a
checkmark in the box.
The main problem comes when you save the image or the movie.
If you don’t save the image in a format that supports alpha
channels, the alpha channel won’t be there when you take it into
Photoshop or your compositing or editing program.
Fortunately the ProModeler only saves renderings to PICT or
TARGA file formats and both of these support alpha channels.
However if you have the ProAnimator, you have to make sure that
you choose a file format that has “Millions+” in the Compressor
Options. The “+” sign means alpha channel. So saving a movie in
Millions+ means you will have the RGB image as well as the
Alpha channel in the same movie file.
The RGB Channels. The Alpha Channel.
The alpha channel makes the background
drop out so all you see are the 3D objects.
The Invigorator creates perfect alpha channels
so there is no need to render the objects over a
green or blue background, then try to key out
the background. All you need to do is turn on
the creation of the alpha channel then save to
the correct format when the rendering is done.
Zaxwerks 3D Invigorator - ProAnimator - Tutorials
81
Page 82

The Advanced Tutorials assume that you know
all of the skills covered in the Beginning
Tutorials. If you find yourself lost, or things are
moving too quickly, stop and do the Beginning
Tutorials first. Then do the Advanced Tutorials.
Advanced Tutorials
Let’s create a 3D logo and work through some of the problems
you may run across. Logos are oftentimes more difficult than
straight text because they usually have overlapping elements and
there is a need to preserve the integrity of the original design.
The “look” of the logo is often the point about which a client gets
the most picky. So the great challenge with doing 3D work is how
to give the logo a 3D look while still preserving the look of the
logo. Sounds like a paradox, but it’s not too hard to overcome.
Let’s start with creating the logo as a 3D model and we’ll discuss
the design challenges as we go.
TROUBLESHOOTING TIP !
You must have installed the program properly for the
factory presets to be present. Be sure to read and follow
the Installation Instructions at the beginning of this User
Guide.
How To Create A 3D Logo
Start off with the program closed. If it is already running, Quit or
Exit the program.
1- Double click on the application icon to launch the program.
2- When you see the window with four large buttons click the
“Open Illustrator File” button.
Zaxwerks 3D Invigorator - ProAnimator - Tutorials82
Page 83

3- Go to the Tutorials folder and find the “Kings Crest Logo.ai”
file. Do NOT double-click on the file or click the Select button.
4- Before you open the Illustrator file put checkmarks in front of
the following options:
Turn ON:
- Open By Layers
- Use Illustrator Colors
- Move Objects to Center
Do not turn ON:
-Dismantle Incoming Groups
-As Layer Cycling Object
5- Now click the Select button.
This will open the main Set-Up window and create 3D models out
of the paths in the Illustrator file.
6- Turn off the Floor Grid, then select the Dolly tool and drag your
mouse up to move closer to the models.
What happened? The 3D logo looks terrible! This is because
there are many overlapping pieces in this logo. When the logo
was in its 2D form, the “stacking order” of the pieces kept it all
readable. (Look at the picture to see what the logo looks like in
its 2D form.)
Zaxwerks 3D Invigorator - ProAnimator - Tutorials
The 2D logo.
First look at the 3D version.
83
Page 84

When you are in a 3D program there is no such thing as stacking
order. The only thing that matters is whether an object is closer
to the camera than some other object. Since an Illustrator file
doesn’t have any Z information, all of the models start off with the
same Z position, so all the overlapping parts are equally close to
the camera.
This confuses the camera so it shows part of one object and part
of another creating a visual mess. What’s worse is that as the
viewpoint of the camera changes different parts of the models
will flash into view because the camera can’t figure out which of
these overlapping objects to show. To get rid of the mess all we
need to do is to move the objects so some parts will be closer to
the camera than others.
Object Mode Button
Object List
How To Make Objects Invisible
(continuing from the last tutorial)
Let’s turn off the visibility of the text objects so we can concentrate on the center part of the logo.
1- Click on the Object Mode button to reveal the small tabbed
area below the tool bar.
2- Click on the Object List and choose the Deselect All item. You
will see all the green and red selection boxes disappear.
Zaxwerks 3D Invigorator - ProAnimator - Tutorials84
Page 85

TROUBLESHOOTING TIP!
Click on the Object List again and look at it. If it contains
names such as Shield, King Text, Face, Eyes, etc. then you
can proceed with the rest of the tutorial. If it says things
like Object 1, Object 2, Object 3, Group 1, Group 2, etc.
then you did not properly do Step 4 of the previous tutorial
on “How To Create A 3D Logo”. Quit the program and start
the Advanced Tutorial again.
3- In the Object List choose the “King Text” item.
You will see a red wire bounding box appear around the word
“King” indicating that it is selected.
4- Hold down the Shift key on your keyboard, and from the
Object List choose the “Entertainment Text” item.
You will see a green bounding box appear around the word
“Entertainment”. Click down on the Object List and look at the
menu items for the two objects you have just selected. Notice
that they are written in BOLD. This is to let you know that these
two items are selected.
Click off the Object List making sure that you don’t accidentally
deselect the objects, by clicking on a menu item.
5- Make the objects invisible by turning on the “Make Invisible”
checkbox. Find this checkbox just below the Object List.
Zaxwerks 3D Invigorator - ProAnimator - Tutorials
When items in the Object List are selected,
their names will be written in bold.
Tu rn ON “Make Invisible” to make all selected objects invisible.
85
Page 86

Drag up to push the Shield away and
move it behind the other objects.
Moving 3D Objects - Part 1
(continuing from the last tutorial)
So far you have only moved the camera. You can move individual
objects by using the manipulation tools while in Object Mode.
You should still have the Object Mode button selected from Step 1
of the last tutorial, and you should still have the Dolly tool
selected. (If these two buttons are not blue, select them now.)
1- Click once on the Shield to select it.
A single click with any manipulator tool will select objects
as long as you don’t drag, just click. This keeps you from
having to use the Selection Tool each time you want to
make a selection.
2- Click down in the 3D window and drag up until the blue of the
Shield is no longer visible on the front of the yellow Face object.
What you are doing is moving the Shield backwards.
TROUBLESHOOTING TIP!
If you have the ProAnimator you will see a message saying
that you are about to Tweak something. Read the section
called “What Is A Tweak” in the Animation section for
important information about tweaking objects. For the
purpose of this tutorial however, just click the OK button
and repeat Step 2 again.
Zaxwerks 3D Invigorator - ProAnimator - Tutorials86
Page 87

3- Click once on the Face object to select it, then click down in
the 3D window and drag down to pull the Face forward. Stop
when you can see the face clearly.
4- Click on the Crown to select it, then drag down to pull it
forward until it is in front of the Face object.
Next we need to select the Eyes, but this object is partially
hidden by other objects. The best way to select the Eyes is to do
it from the Object List.
5- In the Object List select the Eyes object, then drag in the 3D
window to pull the eyes forward until they are in front of the
Face.
At this point the logo is looking fairly good. However there is one
big problem which the next step will show to you.
6- Switch to Camera mode by clicking on the Camera button,
then choose the Front View from the Views... menu.
What happened? All the objects have been shifted sideways!
When you were dragging the objects forward and backward you
were pulling them straight toward the camera, and since the
camera was looking at the objects from an angle the objects were
being pulled out of alignment.
Zaxwerks 3D Invigorator - ProAnimator - Tutorials
Drag down to pull the Face forward.
Drag down to pull the Crown and Eyes forward.
87
Page 88

Double click the Selection Tool as a
shortcut for the Select All command.
Click the Reset button to return objects
to their original positions.
How To Reset The 3D Objects
(continuing from the last tutorial)
We need to reset the objects back to their starting positions so
you can learn a different way to move them. But first let’s return
the camera to the previous view.
1- From the camera Views... menu choose the High Right view.
2- Switch back to Object Mode.
3- Double click on the Selection Tool. This is a shortcut for the
Select All command which selects all visible objects.
4- Click the Reset button, located below the Object List.
What happened? The objects jumped to the top corner of your
screen! The reason why is that the Reset button moves the
objects back to their original positions where they were created
in the Adobe Illustrator program. When you first opened the file
you had the “Move To Center” option turned on. Move To Center
repositions all of the objects to the center of the world so they
are easier to work with. When you clicked Reset it removed the
dragging you did in the last tutorial but also removed the centering process. However, to get the objects back to center is easy.
Use Move To Center to bring all selected
objects to the center of the world.
5- Click the Move To Center button, located next to the Reset
button. Now the objects will be back where you expect them to
be.
Zaxwerks 3D Invigorator - ProAnimator - Tutorials88
Page 89

Moving 3D Objects - Part 2
(continuing from the last tutorial)
Now let’s learn how to move objects forward and back without
pulling them off to the side. Pay attention because this technique
will be very useful in your future projects.
1- Click on the background to deselect all objects, then click once
on the Shield to select it. You should see only one bounding box
and it should be around the Shield.
2- Select the Dolly tool, then click and drag down in the 3D
window. As you drag you will see that the Shield is being pulled
straight toward you. You are looking “through” the camera’s lens
so the Shield is being pulled straight toward the camera. This is
why the parts were pulled out of alignment.
What we need is a way to move objects forward or back, but
without pulling them off to the side.
3- Release the mouse button and use the Undo command from
the Edit menu. This will return the Shield to its previous position.
If it only gets part way there you may have let go of your mouse
before the dragging was completed so just select Undo again, and
again until the Shield is back to where it started.
Click on the shield to select it.
If you Undo too many times you can the use the Redo
command to step forward again.
Zaxwerks 3D Invigorator - ProAnimator - Tutorials
Dragging down pulls the shield directly toward the camera.
89
Page 90

4- Turn on the “Drag Using Object’s Axes” checkbox, located
directly above the Object List. Remember where this checkbox
is. It is the key to keeping your objects in alignment.
The Shield should still be selected.
5- Click and drag down in the 3D window.
Notice that the Shield is now moving toward the left side of the
screen instead of coming straight at you. What’s happening is
that the Shield is moving forward and back along its own axis
instead of the camera’s axis. This means that it will stay aligned
with all the other pieces. With the “Drag Using Object’s Axes”
checkbox turned on you are able to move objects forward and
back directly along their Z axis. If you drag up you will see the
object go behind the other objects and off into the distance.
6- Drag the Shield until it is just behind the other pieces.
7- Select the Face and drag down to pull it forward just a bit.
8- Select the Crown and drag down until it is just in front of the
Face.
Dragging up and down will now make the shield
move back and forth along its own Z axis.
Zaxwerks 3D Invigorator - ProAnimator - Tutorials90
Page 91

9- In the Object List select the Eyes, then drag in the 3D window
to pull the eyes forward until they are even with the front of the
Face.
Getting objects to align can sometimes be hard to do. There is a
technique for doing this that can be helpful. As you drag, look for
the red wire box surrounding the eyes. Pull the eyes forward
until you can easily see the red wires, then push the eyes back
until the lowest of the red wires just disappears behind the yellow
of the Face.
10- Select the “Crown Insignia” from the Object List and pull it
forward until you can see it in front of the Crown.
Pull the eyes forward until you see the red wire box, ...
Now let’s check how the logo looks from the front.
11- Switch to Camera mode, and pick the Front view from the
Views... menu.
As you can see the logo pieces are still aligned and readable. In
the next sections we will fine tune the look and turn the logo into
a finished piece.
Zaxwerks 3D Invigorator - ProAnimator - Tutorials
...then slowly push them back until the red wires just disappear.
91
Page 92

The shortcut for Camera Tumble.
The shortcut for Camera Dolly.
Camera Shortcuts
(continuing from the last tutorial)
As you are working on a logo you will find that it is useful to be
able to move the camera to look at the objects from different
angles. Up to this point we have been moving the camera by
switching to camera mode, selecting a manipulation tool, and
then dragging in the 3D window. That’s three steps. However the
camera has shortcut keys that will let you move it around in one
step. Here’s how....
1- Hold down the Spacebar and the Command key on your
keyboard, (Alt key on Windows). Then drag left/right in the 3D
window.
This is the shortcut for Camera Tumble. It’s easy to remember
because it is the spacebar and the key right next to the spacebar.
You can drag left/right/up and down with this tool to look at every
side of the object. You will find that this one shortcut is used all
the time so take a second and memorize it.
2- Select the Front view from the Views... menu.
3- Hold down the Spacebar and the Control key on your keyboard, (same keys for Mac and Windows). Then drag up/down in
the 3D window.
Zaxwerks 3D Invigorator - ProAnimator - Tutorials92
Page 93

This is the shortcut for Camera Dolly. It’s easy to remember
because it is the spacebar and the key furthest away from the
spacebar. Drag up while holding these keys down to dolly up
closer to the object, and drag down to pull back away from the
object. You are moving the camera remember, so up pushes the
camera closer to the object and down pulls the camera away
from the objects. You will find that this is the second most-used
shortcut and it is worth memorizing too.
4- Select the Front view from the Views... menu.
5- Hold down the Spacebar all by itself. Then drag left/right in the
3D window.
This is the shortcut for Camera Tracking. It’s the most easy to
remember because it works just like the spacebar in Photoshop.
Holding down the spacebar and dragging is like moving the view
of your Photoshop canvas.
Notice that all of the Camera shortcuts use the spacebar.
For the rest of the tutorials instead of telling you to switch modes
and select this or that tool, we’ll just say “Tumble the camera to
look at the sides of your objects,” or “Dolly-in to get a closer look
at how the two parts interact.”
The shortcut for Camera Track.
Let’s take a second and do an exercise to get you more familiar
with these shortcut keys.
Zaxwerks 3D Invigorator - ProAnimator - Tutorials
Tracking the Camera acts like the grabber hand in Photoshop.
93
Page 94

1 & 7
3
Camera Shortcut Exercise
(continuing from the last tutorial)
1- Select the Front view from the Views... menu.
2- Using only the shortcut keys, Dolly-in close on the Eyes.
3- Track so the K is centered.
2
4- Tumble so you are looking at the objects from the left.
5- Dolly out until you can see all objects.
6- Tumble so you are looking from the front.
7- Track so the objects are centered and you are back where you
started.
4
Got it? Great. Then let’s move on.
5
6
Zaxwerks 3D Invigorator - ProAnimator - Tutorials94
Page 95

Adjusting the Thickness of Objects
(continuing from the last tutorial)
When objects are first created each object is made the same
thickness. The next step toward completing our logo is to make
each object the proper thickness.
1- Tumble the Camera so you are looking at the objects from the
right.
You can see from this view how far apart the objects are spaced.
You can also see that parts of objects are too thick and stick out
where they shouldn’t. Usually the thicker an object is the more
solid it appears. The thinner it is the more delicate it feels. The
thickness of an object is controlled by the Depth slider. Find the
Depth slider at the bottom right corner of the Object Tab.
2- Select the Shield. Drag the Depth slider to 0. Release your
mouse button.
As soon as you release the mouse the Shield gets completely thin.
A Depth of 0 creates a plane. However, notice that the Shield
didn’t change shape until you released the mouse button. If you
hold down on your keyboard’s Shift key while you are dragging
the slider, you will see the object change depth as you drag.
3- Hold down the Shift key and drag the Depth slider to 30.
Zaxwerks 3D Invigorator - ProAnimator - Tutorials
Look at the logo from the right...
A Depth of 0 creates a plane.
95
Page 96

While you are dragging notice that the front face of the Shield is
staying in the same place. As the Depth gets larger the object
grows toward the back. It does not get bigger around its center.
That’s because Depth doesn’t scale the object, it rebuilds the
object with new dimensions. If you use the Scale tool the object
will expand or contract about its center.
4- Tumble the Camera to a 3/4 view. (Use the Shortcut keys!)
Use the Select Invisible command to select the invisible objects.
The White Holes object is sticking out behind the Face.
5- Select the Face object, and set its Depth to 12.
6- Select the Eyes object, and set its Depth to 2.
7- Switch to Object Mode and use the Object List to select the
Crown Insignia object. Then set its Depth to 4.
8- Pick the Select Invisible command from the Object List. This
will select the invisible text objects. Next uncheck the “Make
Invisible” checkbox. This will make the text objects reappear.
9- Give the King Text object a Depth of 12, and the Entertainment
Text object a Depth of 4.
We’ll leave the Crown the same Depth that it already is. That
leaves us with the White Holes object. If you Tumble the camera
to the side you will see that this object sticks out behind the Face
object. All it is supposed to be is a background color to prevent
Zaxwerks 3D Invigorator - ProAnimator - Tutorials96
Page 97

you from seeing through the mouth and eye sockets of the Face.
The White Holes object is needed or else you’d see the blue of the
shield and that would spoil the look of the logo.
In order to put the White Holes object in the correct place we will
need to use all of the techniques that we’ve learned so far.
1- Select the White Holes object, then set its Depth to 2.
2- Pick the Dolly tool and turn on “Drag Using Object’s Axes”
mode.
3- Drag up and down and watch the object pass through the other
objects. Watch the lower corner of the red bounding box and
position the object so that it is near the back of the Face object
but not behind it.
4- Tumble and Track the Camera to look at the logo from the
front.
Pretty good! We’re almost done.
Zaxwerks 3D Invigorator - ProAnimator - Tutorials
Watch the red lines. As you drag
they will move through the Face.
97
Page 98

The Material Set-Up window shows you a cross-section type of
view so you can see which Edge Profile is applied to the object.
How To Apply An Edge Profile
(continuing from the last tutorial)
Edge Profiles are the bevels used to dress up the object. There
are over 100 profiles built into the program and you can make
your own too. Think of an Edge Profile as fancy molding that
goes around the perimeter of your objects.
1- Select the Shield object.
2- Click on the Material Set-Up button, located above the 3D
window.
The 3D window will be replaced by a window showing you the
Edge Profile being used by the Shield. Imagine that you are
above the Shield, looking down at it, and you take a slice through
its center. You would have the front of the Shield at the bottom of
the slice, and the back of the Shield would be at the top of the
slice. Look at the Material Set-Up window and see that this is
what it is showing. We’ve labeled the Front and Back in the
window so you can remember what you are looking at.
This cross-section view also shows you the Edge Profile applied
to the outside edges of the Shield on the left, and on the right
would be the Edge Profile applied to the holes in the Shield, if it
had any.
Zaxwerks 3D Invigorator - ProAnimator - Tutorials98
Page 99

The Edge Profile being used by the Shield is called the Medium
Bevel. If you look at the top right corner of the Object Tab you
will see the name “Bevel, Medium” in the first menu. This menu
is where you select the profiles. Let’s change the Edge Profile to
something that you might see on a wooden plaque.
3- Click on the Edge Profile menu, find the Stacks submenu and
then find the “Tiers, Rounded” item. Select it.
The Material Set-Up window now shows a three-level bevel.
4- Click on the Scene Preview button, located above the 3D
window, to go back to the 3D image of the logo.
The Shield now has a triple-level bevel on it.
Next, let’s apply the Edge Profile called Power Groove Bevels, to
the “King Text” object.
1- Select the King Text object.
2- Display the Material Set-Up window.
3- Click on the Edge Profile menu, find the Inset Face submenu
and then find the “Bevel, Power Grooves” item. Select it.
The Rounded Tiers Edge Profile as it appears
in the Material Set-Up window.
Zaxwerks 3D Invigorator - ProAnimator - Tutorials
99
Page 100

The Power Grooves Edge Profile as it appears
in the Material Set-Up window.
You can see that this Edge Profile has lots of angles on it. These
angles catch highlights very nicely.
4- Switch back to the 3D Scene Preview window.
Unfortunately the King Text object doesn’t look much different
than it did before because it’s colored black. When you open up
Illustrator files with the “Use Illustrator Colors” option turned
ON, any objects that are colored black in Illustrator will end up
black in the Invigorator. Black looks fine on the printed page but
3D models that are painted black don’t look very good at all.
To help out the logo we need to choose a few new colors that will
enhance the look.
Zaxwerks 3D Invigorator - ProAnimator - Tutorials100
 Loading...