

Page 1

Photoshop Plug-in
Tutorial Guide
Page 2

Zaxwerks Inc.
5724 Camellia Ave.
Temple City, CA 91780
(626) 309-9102 phone
(626) 309-9142 fax
http://www.zaxwerks.com
http://www.digitalanarchy.com
Sales: sales@digitalanarchy.com
Tech Support: sales@digitalanarchy.com
You can also ll out a help request form at:
http://www.digitalanarchy.com/support/form.php
© 1996 - 2009 Zaxwerks Inc. All rights reserved.
This manual, as well as the software described in it, is furnished
under license and may only be used or copied in accordance with the
terms of such license. The information in this manual is furnished for
informational use only, is subject to change without notice, and does
not represent product specications or commitment on the part of
Zaxwerks. Zaxwerks assumes no responsibility or liability for any
error or inaccuracies that may appear in this document.
The Zaxwerks Invigorator for Photoshop is a trademark of Zaxwerks
Inc. Illustrator and Photoshop are trademarks of Adobe Systems Inc.
Windows, Windows Vista, and Windows XP are registered trademarks
of Microsoft, Inc. Tiger and Leopard are registered trademarks of
Apple Inc. All other product names or trademarks are the property of
their respective owners.
Page 3

Tutorial Project
Setting up a project from beginning to end.
In this tutorial, we’ll go over how to make a sales advertisement project within 3D Invigorator. This will cover working
with Illustrator les, materials, lighting, and more.
The completed project le rendered in Photoshop.
The sale_ad.psd le will allow you to see the whole layout of the completed
project. The sales_ad.zxp is the saved scene from 3D Invigorator. Use the
Open Scene command in 3D Invigorator to open up the scene. The starburst.
ai le is the Illustrator le we will work with when we start the project.
Tutorial Project 3
Page 4

Starting the setup
Create a new document in Photoshop with 500x500 pixel dimensions. Create a new layer, and convert the layer into a
Smart Filter. Then, we’ll apply 3D Invigorator to the Smart Filter layer, so that 3D Invigorator is re-editable.
Create a new document that is 500x500
pixels.
Create a new layer and convert the layer
into a Smart Filter.
Apply 3D Invigorator onto the smart lter layer. The 3D
Invigorator interface will launch.
Tutorial Project 4
Page 5

Importing the Illustrator File
Let’s start this project by creating the 50% OFF! starburst. When you apply the 3D Invigorator plug-in, a start up screen
will pop up. Select Open Illustrator File and choose the starburst.ai le.
Select Open Illustrator File.
Locate the starburst.ai le from the tutorial
folder.
Enable Move Objects to Center so the
Illustrator object is created in the center of
the scene.
Click the Select button to import the
Illustrator.
The starburst object will load up in the 3D
Invigorator interface.
Tutorial Project 5
Page 6

Applying an Object Style
Now that we have the starburst, let’s give it an Object Style. Object Styles are composed of bevels, materials, texture
maps, depth and more, all saved together. By applying an Object Style, the object inherits all the properties.
Go to the Object Styles panel and nd the
teal and pink Object Style.
To apply the Object Style to the starburst,
drag and drop the Object Style onto the
starburst
With the starburst selected, the Material
Editor tab shows the materials that are
applied on the object currently.
If there is a material swatch in an Object Style
that isn’t in the Material Bin, you can save the
material for future use.
Each number in the prole viewer
corresponds to a material swatch to show
where each material is applied.
Tutorial Project 6
Page 7

Creating New Materials
The Material Editor panel gives you full control to color your objects. We’ll create two red swatches and a white
swatch. Assign a material color with the Color box, select a rendering style, then save the material to bin. Use the New
Material command to create a new swatch.
After customizing a swatch, drag and drop
it into the Material Bin.
Create two red swatches, and one white
swatch. Use Standard Color for the rst
red swatch, and use Absolute Color for the
second red swatch and the white swatch.
Standard Color allows lighting to work on the
material, which will aect the tone. Absolute
Color negates lighting and can’t have
highlights, shadows, or reections.
Click on the Color box on the Material Editor
to open the Color Picker window. Use the
color wheel to pick the red or white color.
Click the OK button to conrm the color
choice. Save the swatch and create a new
swatch. Repeat the process to create all
three swatches.
The three new swatches. The Standard
Color swatch looks realistic with natural
lighting, while the Absolute Color swatches
are solid color tones.
Tutorial Project 7
Page 8

Assigning Materials
Now that we created the swatches, we can customize the colors on the starburst. If we’re replacing all the materials,
why choose that Object Style? When using an Object Style, we can use the proles and depth as a basis for how the
object looks.
Looking at the prole viewer, the rst
material controls the color on the front
and back face of the object. The second
material is the color for the outside face,
and the third material is the bevel color.
The starburst after the colors have been
applied.
Apply the absolute red material to the
rst material dock, the standard red to the
second dock, and the absolute white to the
third dock. This will give the front face a
solid, bright color while the outside faces
look dynamic with shadows. The white
color adds a highlight to the edges.
Tutorial Project 8
Page 9
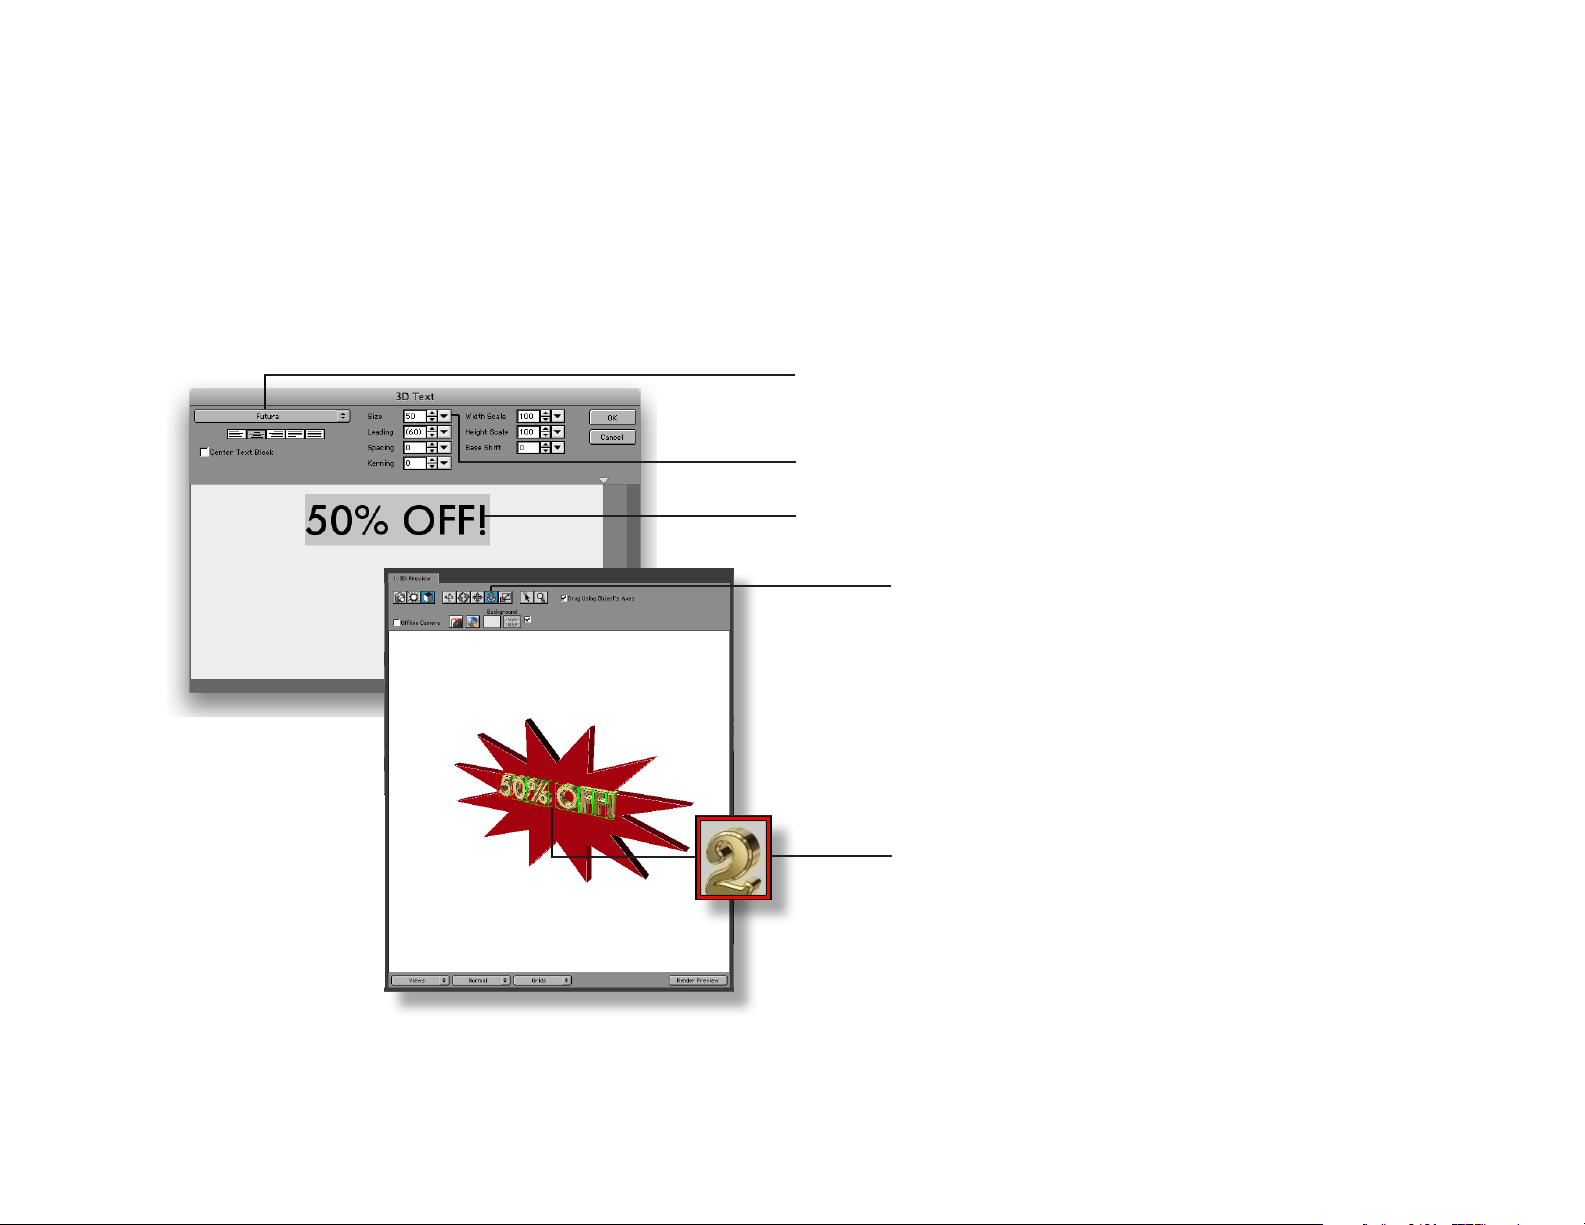
Creating 3D Text
Use the Create 3D Text command to generate the 50% OFF! text. We’ll adjust the font type, font sizes, and the text
position to align the text with the starburst. After that, we’ll apply an Object Style.
Select the font type Futura. If Futura is not
available, choose another san serif font.
Change the font size to 50.
Type “50% OFF!” in the input text box.
Select Object Mode and the Object Dolly
tool. Drag the mouse down to pull the text
outward.
New objects are created in the same
position. Separate the objects with the object
manipulation tools.
Drag and drop the gold Object Style onto
the 3D text.
Font types that are supported are Postscript and True Type fonts. Open Type fonts are not supported. To use Open
Type fonts or non-western language fonts, type the text in Adobe Illustrator, convert the text to outlines, and save
the Illustrator le without compression. Then you can import your Illustrator le into 3D Invigorator. Another option
is working with Photoshop and using the “Save Paths to Illustrator” command.
Tutorial Project 9
Page 10

Customizing the 3D Text
To change the prole settings, use the Prole Viewer and adjust splits. Splits lets you separate an edge into multiple
parts so you can apply dierent materials for each part. We’ll adjust dierent colors and split positions for the text.
Select the text, and assign the absolute white
swatch in the rst Material Palette dock, and the
default black swatch in the second dock.
The default Prole Viewer setup from the
gold object style.
The nished Prole Viewer setup. Follow
the steps below to complete the setup.
Remove this split. Pull the red arrow o the edge.
To add a split, use the split tool and click on any edge. A red arrow
and a green material chip will be created.
Replace the material. Drag and drop the black material swatch
from the Material Palette onto the green material chip.
Adjust the position of this split to the center of
the edge. This will separate the edge in half.
Reposition this split to to the end of the edge.
The text after all the changes are completed.
Tutorial Project 10
Page 11

Positioning the Camera and Objects
Use the Front view preset to position the camera directly infront of the objects. This will let us to position our objects
easily. After we set up the camera view, we can position the starburst into its nal location.
Change the view to “Front”.
Use the Object Dolly tool to push the
objects back. Then, use the Object Tumble
tool to rotate the starburst. Next, use
Object Tracking to move the objects to the
right.
To input the position and rotation values precisely,
go to the Object panel and reveal “Info”. Enter the
values presented here.
Tutorial Project 11
Page 12

Creating the Banners with 3D Primitives
To create the top and bottom separators, we will create two 3D Primitive Planes and apply a material swatch to them.
In the Object menu, select Create 3D
Primitive.
Use the Duplicate command to create
another 3D Primitive to work with.
Use the Primitive drop down menu to
change the Sphere into a Plane.
For the top Plane, use 530 width and 250
height. Then, move the Plane to the top
using Object Tracking.
For the bottom Plane, use 530 width and 75
height. Then, move the Plane to the bottom
using Object tracking.
Apply the standard red material swatch to
both Planes.
Tutorial Project 12
Page 13
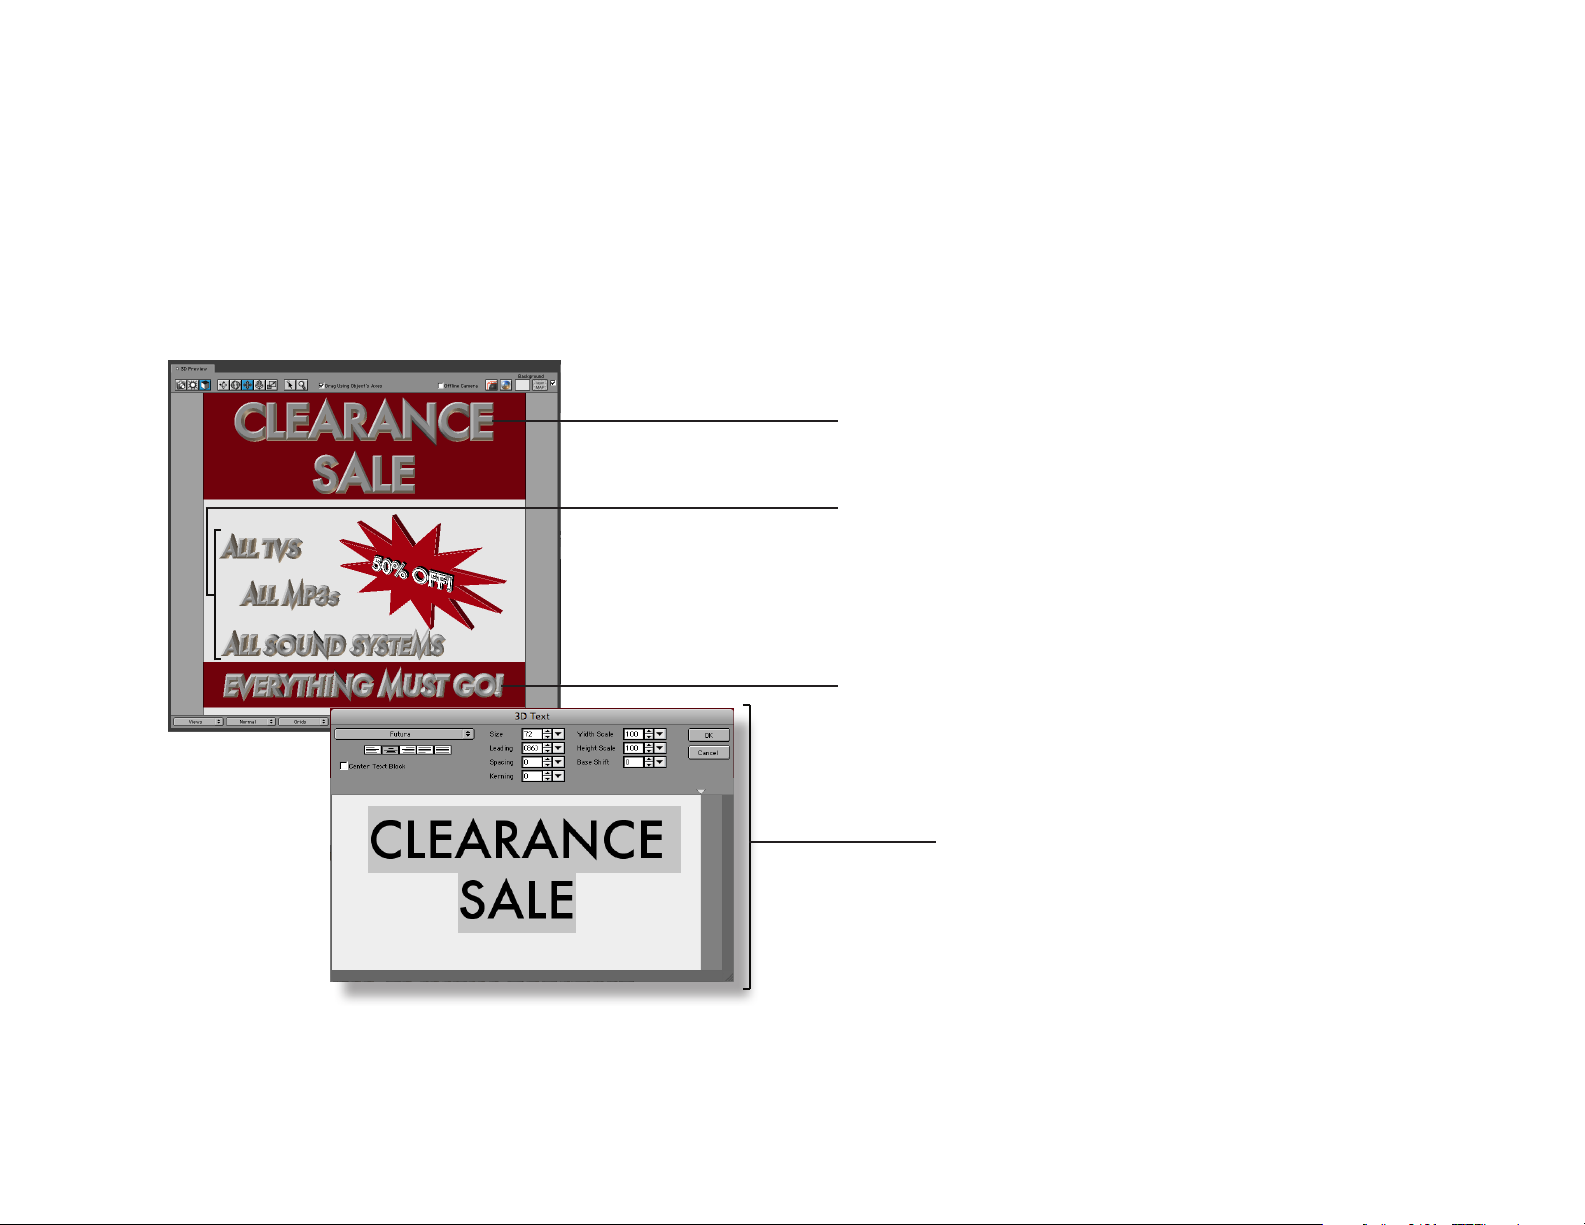
Create The Rest of the 3D Text
Add the title text, the body text, and the footer text. Use the Object Tracking tool to move all the text to their nal
positions.
Create the 3D Text “CLEARANCE SALE” using
72 font size. Move the text to the top.
Create the 3D Text “ALL TVs”, “ALL MP3s”,
and “ALL SOUND SYSTEMS” using Futura
Italic, 35 font size. Move the text to their
respective positions.
Create the 3D Text “EVERYTHING MUST GO!”
using Futura Italic 40 font size. Move the
text to the bottom.
If you need to re-edit the 3D text, double
click on the text in the 3D Preview window,
or click the Edit Text button in the Object
panel.
Tutorial Project 13
Page 14
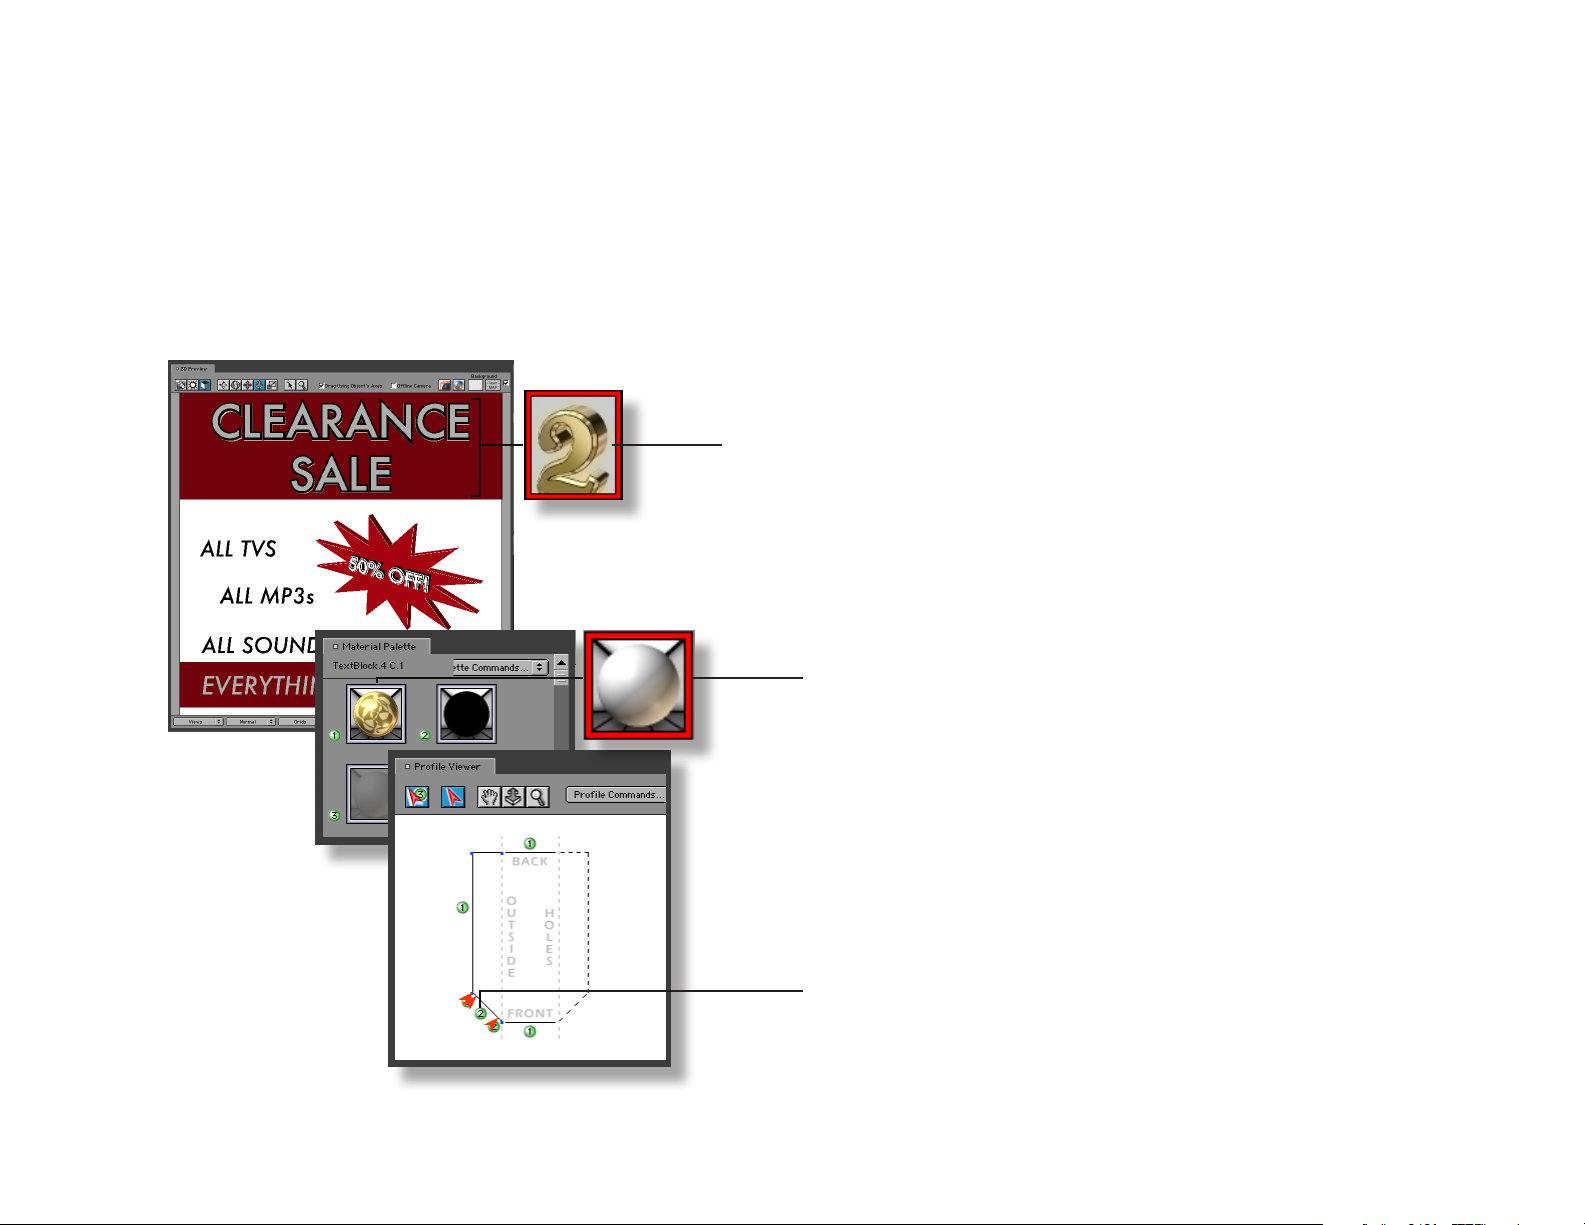
Styling the main text
Let’s apply an Object Style to the text and customize the colors. Similar to customizing the “50% OFF” text, we will
need to work with the Material Palette, and the Prole Viewer panel.
Apply the gold Object Style.
Apply the default white material swatch.
After you apply the white material swatch
to the rst material palette box, drag the
white material swatch from the Material
Palette to the green material chip.
Tutorial Project 14
Page 15

Styling the body text
To select a text group for editing, use the object drag down menu in the Objects panel. This allows you to nd all the
objects in the scene, and select the text group you want. Using this method, we can quickly edit all the text.
The Object pull down menu. Every object in the
scene is listed here. Highlighting a text block
shows the letters within the text group.
Apply the default black Object Style. This
Object Style makes the text appear at.
Apply the black Object Style, then
apply the white material swatch to
make the text white.
Tutorial Project 15
Page 16

Adjusting the lighting
We want the lighting in the scene to be bright, so let’s adjust the lighting to brighten up the scene. We’ll also use the
shadow casting option to create shadows and give the scene more depth.
Enable Shadow Casting.
Select Light 2 to make changes to the
second light.
Change the second light color to white.
Enable Shadow Casting for the second
light.
Drag the light position cursor, and move
the light to the top right position.
After enabling Shadow Casting, a drop
shadow eect will appear behind the
main text.
Tutorial Project 16
Page 17

Example Vector Files
The following are 3D objects created from the example vector les. You can apply object styles, colors, and texture
maps to t your project needs. The Illustrator les can be found in the Vector Examples folder.
arrow_curved_left.ai
arrow_curved_right.ai
arrow_futuristic.ai
arrow_rounded.ai
arrow_straight.ai
arrow_thick.ai
bells.ai
bicycle.ai
sh_hook.ai
Example Vector Files 17
Page 18

Example Vector Files
The Illustrator les can be found in the Vector Examples folder.
ower1.ai
ower2.ai
ower3.ai
shape_club.ai
shape_cross.ai
shape_diamond.ai
shape_heart.ai
shape_hexagon.ai
shape_octagon.ai
Example Vector Files 18
Page 19

Example Vector Files
The Illustrator les can be found in the Vector Examples folder.
shape_pentagon.ai
shape_spade.ai
shape_star1.ai
shape_star2.ai
sign_accessible.ai
sign_biohazard.ai
sign_eye_protection.ai
sign_fallout_shelter.ai
sign_freeway1.ai
Example Vector Files 19
Page 20

Example Vector Files
The Illustrator les can be found in the Vector Examples folder.
sign_freeway2.ai
sign_trac1.ai
sign_trac2.ai
sign_wrong.ai
snowake1.ai
snowake2.ai
snowman.ai
starburst1.ai
starburst2.ai
Example Vector Files 20
Page 21

Example Vector Files
The Illustrator les can be found in the Vector Examples folder.
starburst3.ai
starburst4.ai
starburst5.ai
starburst6.ai
starburst7.ai
starburst8.ai
Example Vector Files 21
 Loading...